Embed Size (px)
Citation preview

Last Updated: 10/22/2019
Cash Receipt Entry (Non-Account Receivable (AR) related receipts)
(ARBTCRUB)
1 | Page
TABLE OF CONTENTS OVERVIEW .................................................................................................................................................. 2
BASIC CASH RECEIPT ENTRY PROCESS ...................................................................................................... 2 ACCESSING THE ARBTCRUB SCREEN .................................................................................................. 3
USING THE SEARCH BAR ............................................................................................................................ 3 ................................................................................................................................................................. 3 USING A LINK ............................................................................................................................................. 3
CREATING A CASH RECEIPT SET – MANUAL ENTRY .......................................................................... 3 CASH RECEIPT SET HEADER ...................................................................................................................... 4 RECEIPT HEADER ....................................................................................................................................... 5 RECEIPT DETAILS ....................................................................................................................................... 7
BALANCING CASH RECEIPT SET – ACCESSING THE ARBTCRBP SCREEN .................................. 10 USING THE SCREEN LINKS ........................................................................................................................ 10 USING A LINK ........................................................................................................................................... 11 VIEW REPORT .......................................................................................................................................... 11
ATTACHMENTS ........................................................................................................................................ 13 TENDERED REPORT ................................................................................................................................. 14
SUBMITTING RECEIPTS FOR APPROVAL ............................................................................................ 15 CREATING A CASH RECEIPT SET – COPY TOOL ............................................................................... 17 CREATING A CASH RECEIPT SET – EXCEL UPLOAD (ARUTFI) ........................................................ 18
CREATING THE EXCEL FILE ....................................................................... ERROR! BOOKMARK NOT DEFINED. UPLOADING THE EXCEL FILE ..................................................................... ERROR! BOOKMARK NOT DEFINED.
2 | Page
Initiator
Create/Update I
Balance/ Run Proof
Bring deposit to Treasury
Treasury Approve
Yes
Department Approve
CRs Auto Post
Yes
No
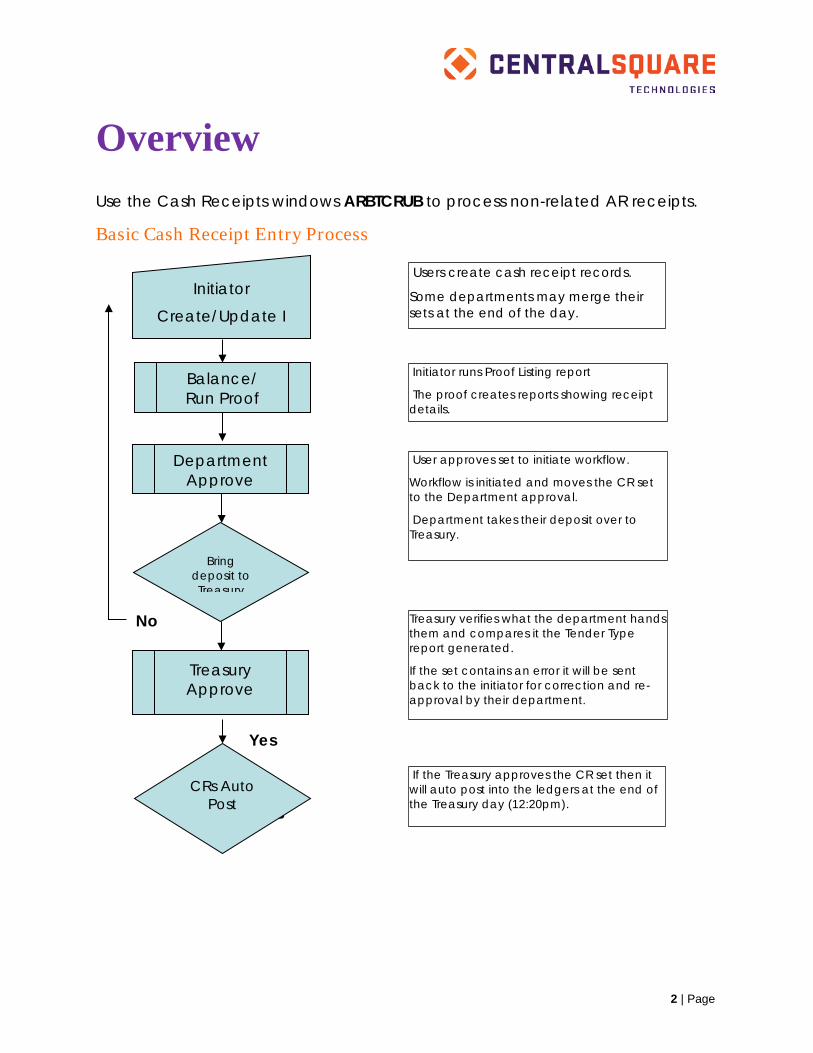
Overview Use the Cash Receipts windows ARBTCRUB to process non-related AR receipts. Basic Cash Receipt Entry Process
Users create cash receipt records.
Some departments may merge their sets at the end of the day.
Initiator runs Proof Listing report
The proof creates reports showing receipt details.
User approves set to initiate workflow.
Workflow is initiated and moves the CR set to the Department approval.
Department takes their deposit over to Treasury.
Treasury verifies what the department hands them and compares it the Tender Type report generated.
If the set contains an error it will be sent back to the initiator for correction and re-approval by their department.
If the Treasury approves the CR set then it will auto post into the ledgers at the end of the Treasury day (12:20pm).
3 | Page
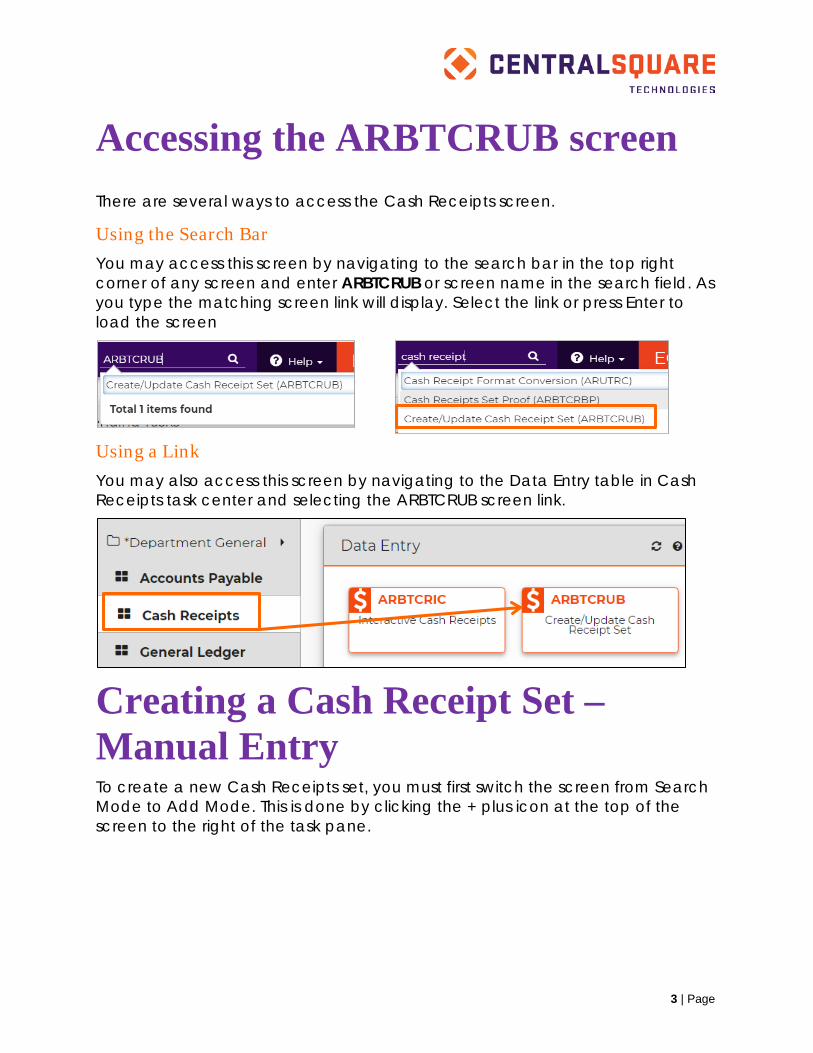
Accessing the ARBTCRUB screen There are several ways to access the Cash Receipts screen.
Using the Search Bar You may access this screen by navigating to the search bar in the top right corner of any screen and enter ARBTCRUB or screen name in the search field. As you type the matching screen link will display. Select the link or press Enter to load the screen
Using a Link You may also access this screen by navigating to the Data Entry table in Cash Receipts task center and selecting the ARBTCRUB screen link.
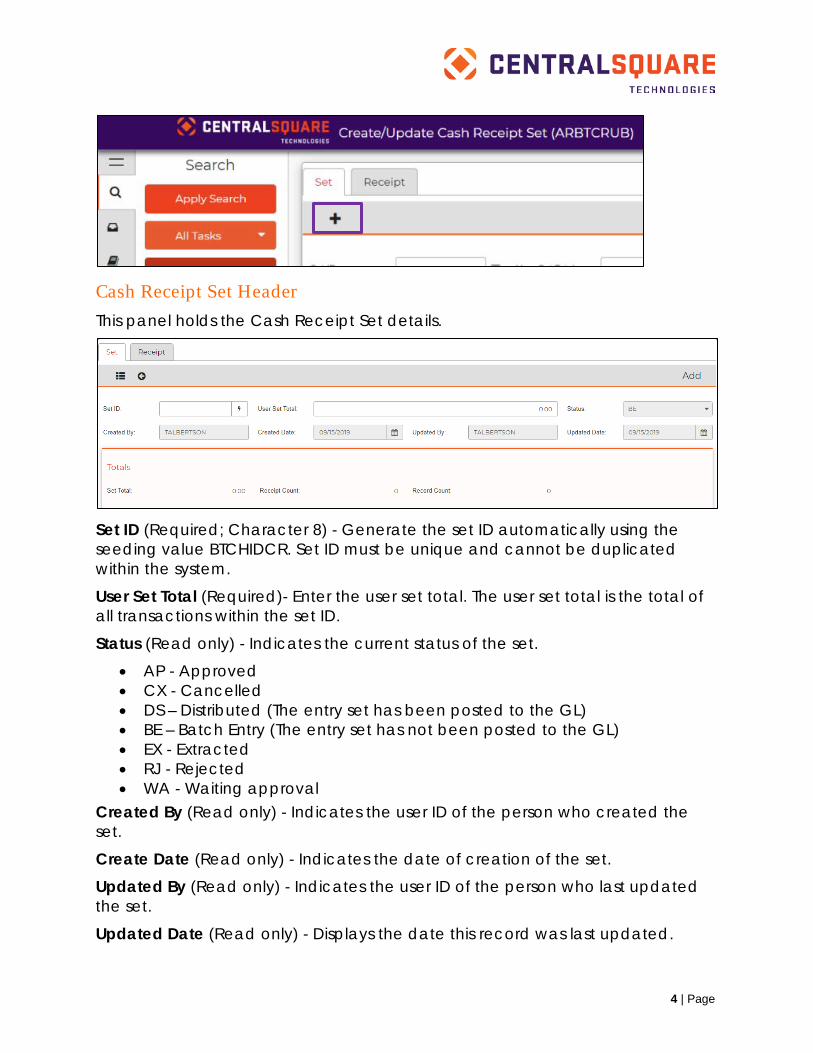
Creating a Cash Receipt Set – Manual Entry To create a new Cash Receipts set, you must first switch the screen from Search Mode to Add Mode. This is done by clicking the + plus icon at the top of the screen to the right of the task pane.
4 | Page
Cash Receipt Set Header This panel holds the Cash Receipt Set details.
Set ID (Required; Character 8) - Generate the set ID automatically using the seeding value BTCHIDCR. Set ID must be unique and cannot be duplicated within the system.
User Set Total (Required)- Enter the user set total. The user set total is the total of all transactions within the set ID.
Status (Read only) - Indicates the current status of the set.
• AP - Approved • CX - Cancelled • DS – Distributed (The entry set has been posted to the GL) • BE – Batch Entry (The entry set has not been posted to the GL) • EX - Extracted • RJ - Rejected • WA - Waiting approval
Created By (Read only) - Indicates the user ID of the person who created the set.
Create Date (Read only) - Indicates the date of creation of the set.
Updated By (Read only) - Indicates the user ID of the person who last updated the set.
Updated Date (Read only) - Displays the date this record was last updated.
5 | Page
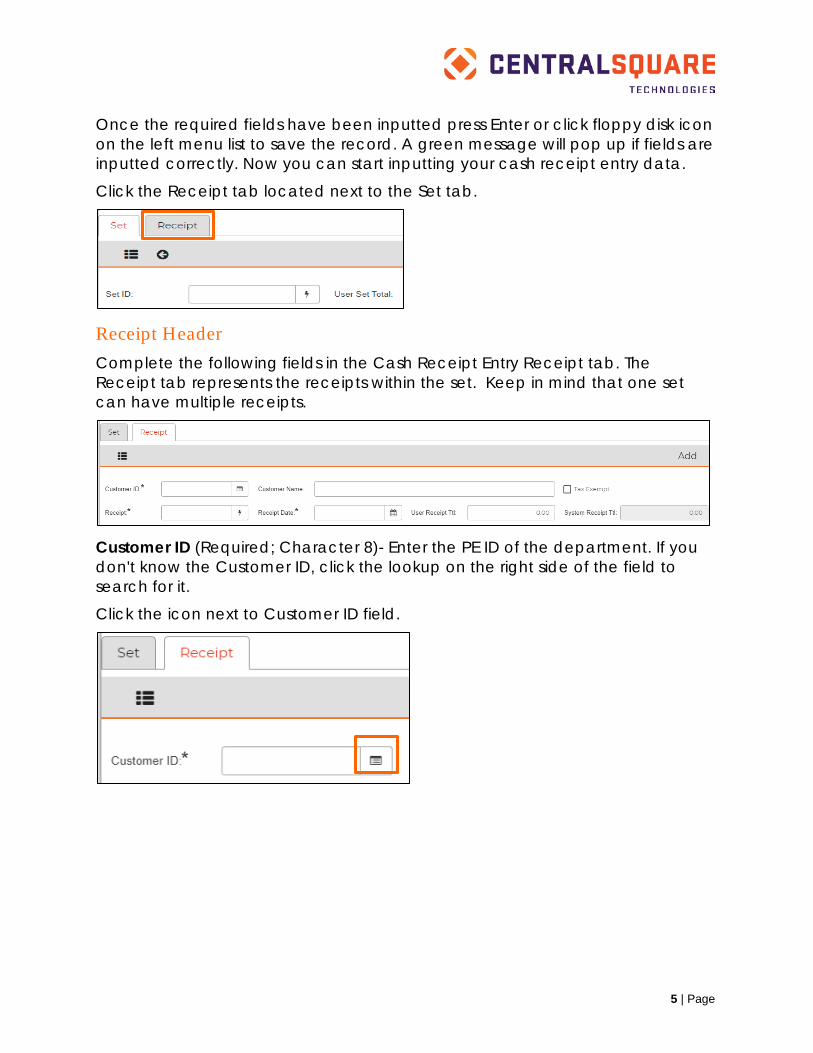
Once the required fields have been inputted press Enter or click floppy disk icon on the left menu list to save the record. A green message will pop up if fields are inputted correctly. Now you can start inputting your cash receipt entry data.
Click the Receipt tab located next to the Set tab.
Receipt Header Complete the following fields in the Cash Receipt Entry Receipt tab. The Receipt tab represents the receipts within the set. Keep in mind that one set can have multiple receipts.
Customer ID (Required; Character 8)- Enter the PE ID of the department. If you don't know the Customer ID, click the lookup on the right side of the field to search for it.
Click the icon next to Customer ID field.
6 | Page
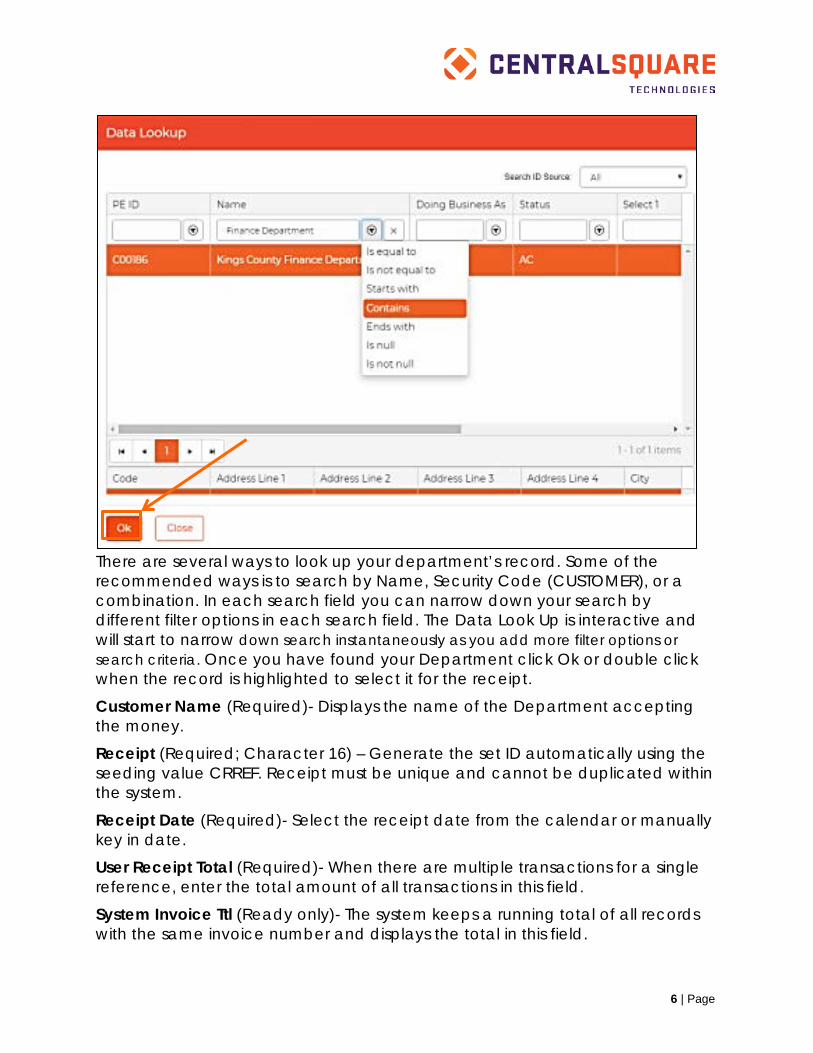
There are several ways to look up your department’s record. Some of the recommended ways is to search by Name, Security Code (CUSTOMER), or a combination. In each search field you can narrow down your search by different filter options in each search field. The Data Look Up is interactive and will start to narrow down search instantaneously as you add more filter options or search criteria. Once you have found your Department click Ok or double click when the record is highlighted to select it for the receipt.
Customer Name (Required)- Displays the name of the Department accepting the money.
Receipt (Required; Character 16) – Generate the set ID automatically using the seeding value CRREF. Receipt must be unique and cannot be duplicated within the system.
Receipt Date (Required)- Select the receipt date from the calendar or manually key in date.
User Receipt Total (Required)- When there are multiple transactions for a single reference, enter the total amount of all transactions in this field.
System Invoice Ttl (Ready only)- The system keeps a running total of all records with the same invoice number and displays the total in this field.
7 | Page
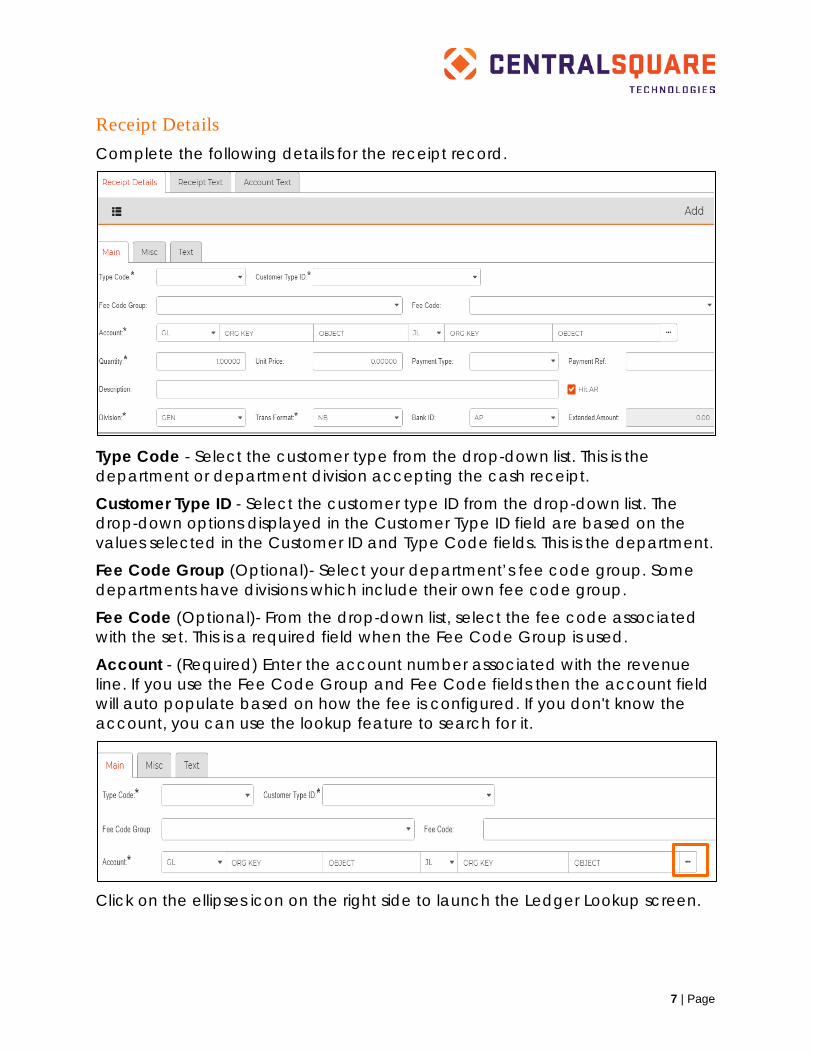
Receipt Details Complete the following details for the receipt record.
Type Code - Select the customer type from the drop-down list. This is the department or department division accepting the cash receipt.
Customer Type ID - Select the customer type ID from the drop-down list. The drop-down options displayed in the Customer Type ID field are based on the values selected in the Customer ID and Type Code fields. This is the department.
Fee Code Group (Optional)- Select your department’s fee code group. Some departments have divisions which include their own fee code group.
Fee Code (Optional)- From the drop-down list, select the fee code associated with the set. This is a required field when the Fee Code Group is used.
Account - (Required) Enter the account number associated with the revenue line. If you use the Fee Code Group and Fee Code fields then the account field will auto populate based on how the fee is configured. If you don't know the account, you can use the lookup feature to search for it.
Click on the ellipses icon on the right side to launch the Ledger Lookup screen.
8 | Page
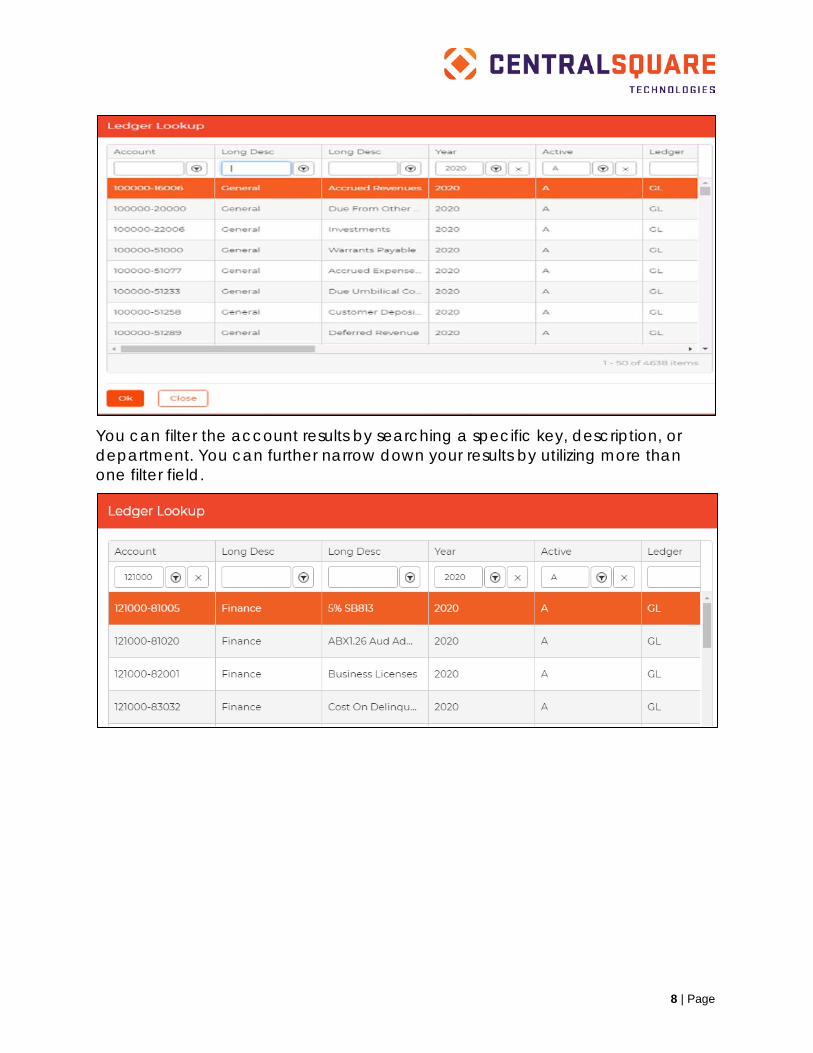
You can filter the account results by searching a specific key, description, or department. You can further narrow down your results by utilizing more than one filter field.

9 | Page
Once you have found your desired click on the desired record to select it and then click the OK button and the account information will populate into the proper fields. The look up feature can be used on both the GL and JL accounts.
Quantity (Required) – System auto populates to 1.
Unit Price - Enter the unit price of the receipt. If the receipt is being spilt into multiple tender types or accounts then input the unit price of this receipt line.
Payment Type (Required) - Select the method of payment made by the customer.
Payment Ref (Optional) - Enter any reference associated with the payment type. For instance, if the payment type is check, the payment reference could be the check number.
Description (Optional) - Enter a description of this receipt. If nothing is inputted then the description will default to the Object description.
Division (Required )- System auto populates data GEN in field. Do not change or delete.
Trans Format (Required) - System auto populates data NB in field. Do not change or delete.
Bank ID (Required) - System auto populates data AP in field. Do not change or delete.
Extended Amount (Read only)- This field indicates the total of the receipt line.
If you need to add another line to the receipt click on the plus icon in the Receipt Details header and a new record will populate.
10 | Page
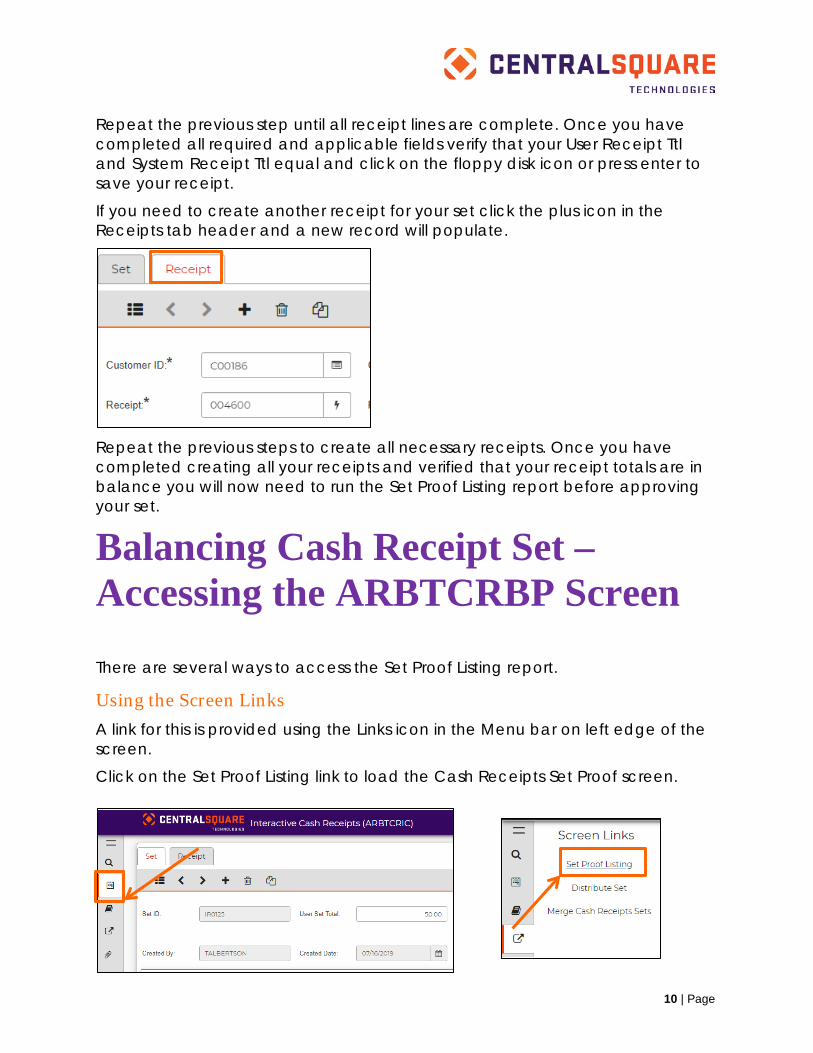
Repeat the previous step until all receipt lines are complete. Once you have completed all required and applicable fields verify that your User Receipt Ttl and System Receipt Ttl equal and click on the floppy disk icon or press enter to save your receipt.
If you need to create another receipt for your set click the plus icon in the Receipts tab header and a new record will populate.
Repeat the previous steps to create all necessary receipts. Once you have completed creating all your receipts and verified that your receipt totals are in balance you will now need to run the Set Proof Listing report before approving your set.
Balancing Cash Receipt Set – Accessing the ARBTCRBP Screen There are several ways to access the Set Proof Listing report.
Using the Screen Links A link for this is provided using the Links icon in the Menu bar on left edge of the screen.
Click on the Set Proof Listing link to load the Cash Receipts Set Proof screen.
11 | Page
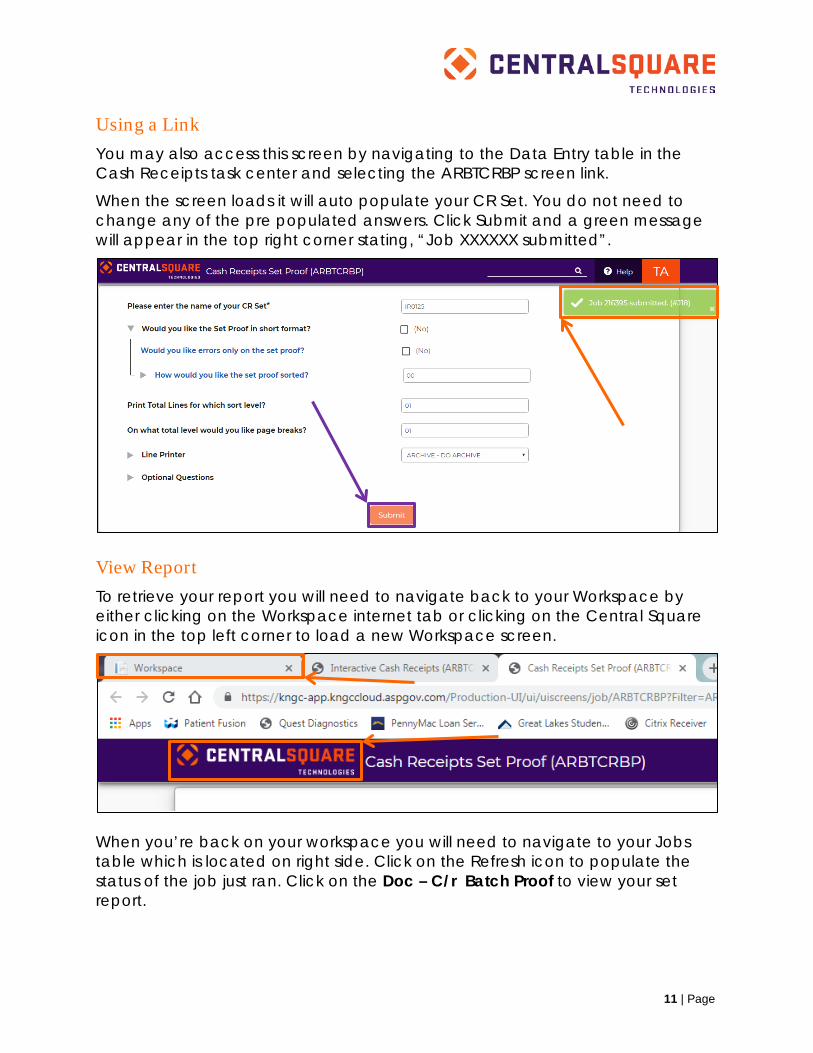
Using a Link You may also access this screen by navigating to the Data Entry table in the Cash Receipts task center and selecting the ARBTCRBP screen link.
When the screen loads it will auto populate your CR Set. You do not need to change any of the pre populated answers. Click Submit and a green message will appear in the top right corner stating, “Job XXXXXX submitted”.
View Report To retrieve your report you will need to navigate back to your Workspace by either clicking on the Workspace internet tab or clicking on the Central Square icon in the top left corner to load a new Workspace screen.
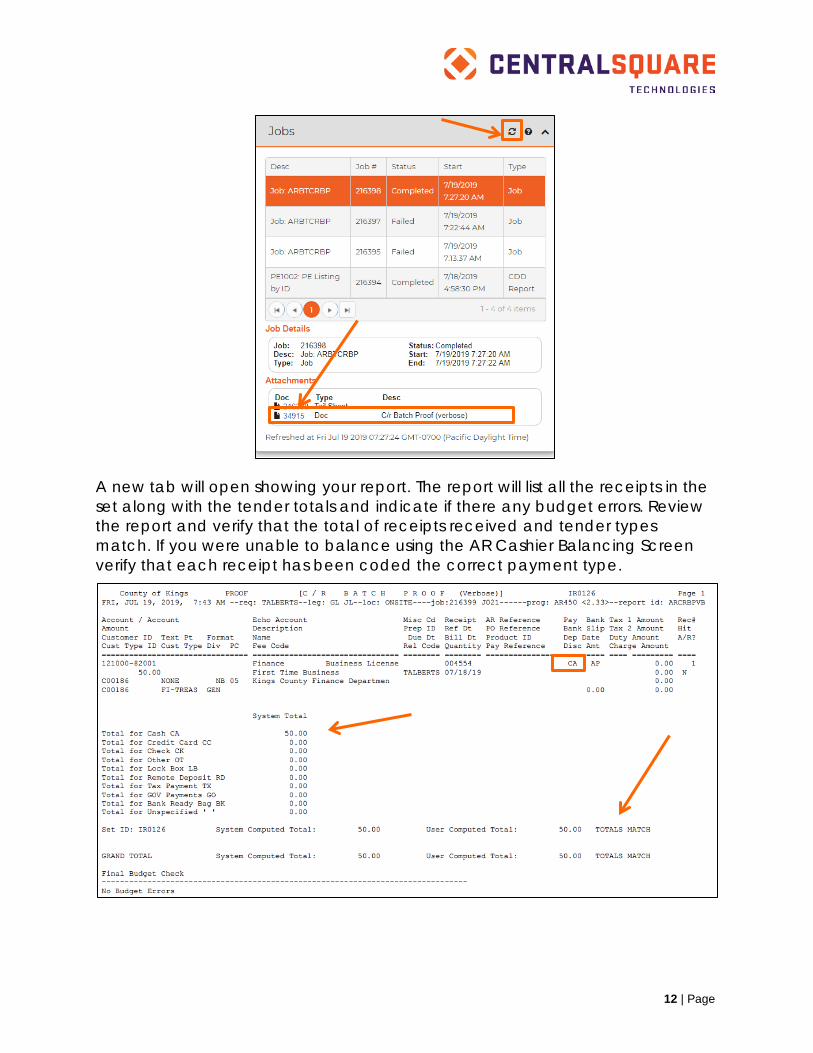
When you’re back on your workspace you will need to navigate to your Jobs table which is located on right side. Click on the Refresh icon to populate the status of the job just ran. Click on the Doc – C/r Batch Proof to view your set report.
12 | Page
A new tab will open showing your report. The report will list all the receipts in the set along with the tender totals and indicate if there any budget errors. Review the report and verify that the total of receipts received and tender types match. If you were unable to balance using the AR Cashier Balancing Screen verify that each receipt has been coded the correct payment type.
13 | Page
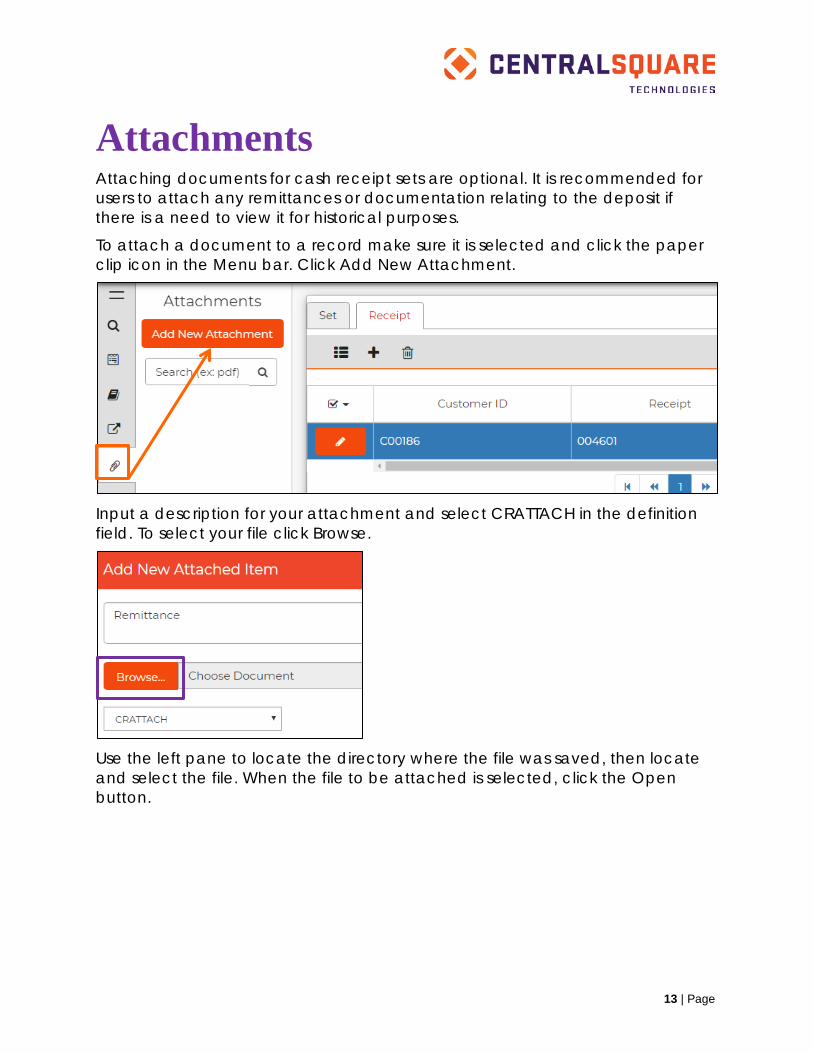
Attachments Attaching documents for cash receipt sets are optional. It is recommended for users to attach any remittances or documentation relating to the deposit if there is a need to view it for historical purposes.
To attach a document to a record make sure it is selected and click the paper clip icon in the Menu bar. Click Add New Attachment.
Input a description for your attachment and select CRATTACH in the definition field. To select your file click Browse.
Use the left pane to locate the directory where the file was saved, then locate and select the file. When the file to be attached is selected, click the Open button.
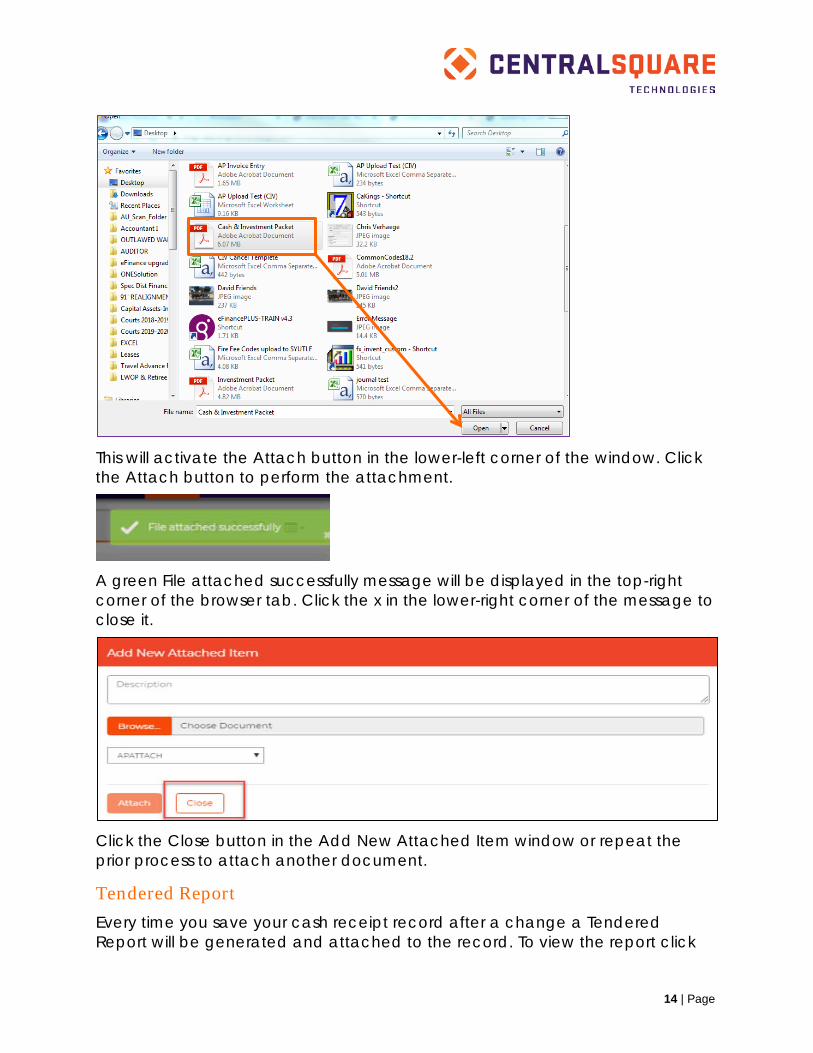
14 | Page
This will activate the Attach button in the lower-left corner of the window. Click the Attach button to perform the attachment.
A green File attached successfully message will be displayed in the top-right corner of the browser tab. Click the x in the lower-right corner of the message to close it.
Click the Close button in the Add New Attached Item window or repeat the prior process to attach another document.
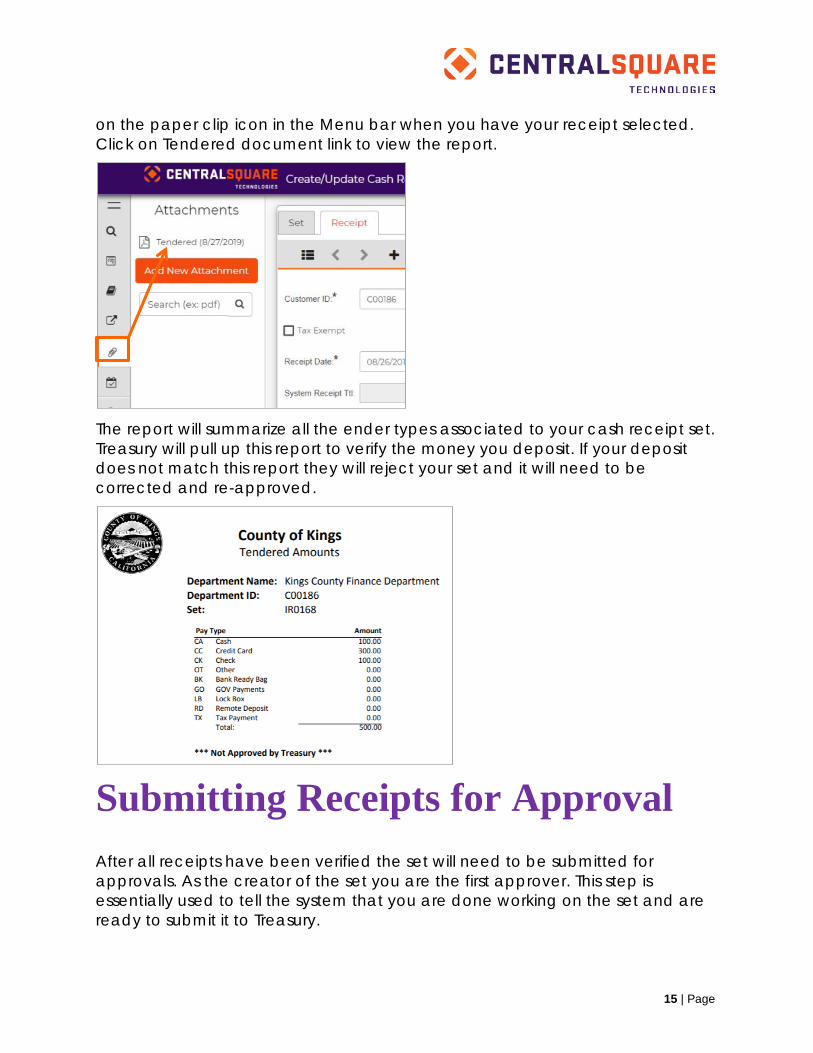
Tendered Report Every time you save your cash receipt record after a change a Tendered Report will be generated and attached to the record. To view the report click
15 | Page
on the paper clip icon in the Menu bar when you have your receipt selected. Click on Tendered document link to view the report.
The report will summarize all the ender types associated to your cash receipt set. Treasury will pull up this report to verify the money you deposit. If your deposit does not match this report they will reject your set and it will need to be corrected and re-approved.
Submitting Receipts for Approval After all receipts have been verified the set will need to be submitted for approvals. As the creator of the set you are the first approver. This step is essentially used to tell the system that you are done working on the set and are ready to submit it to Treasury.
16 | Page
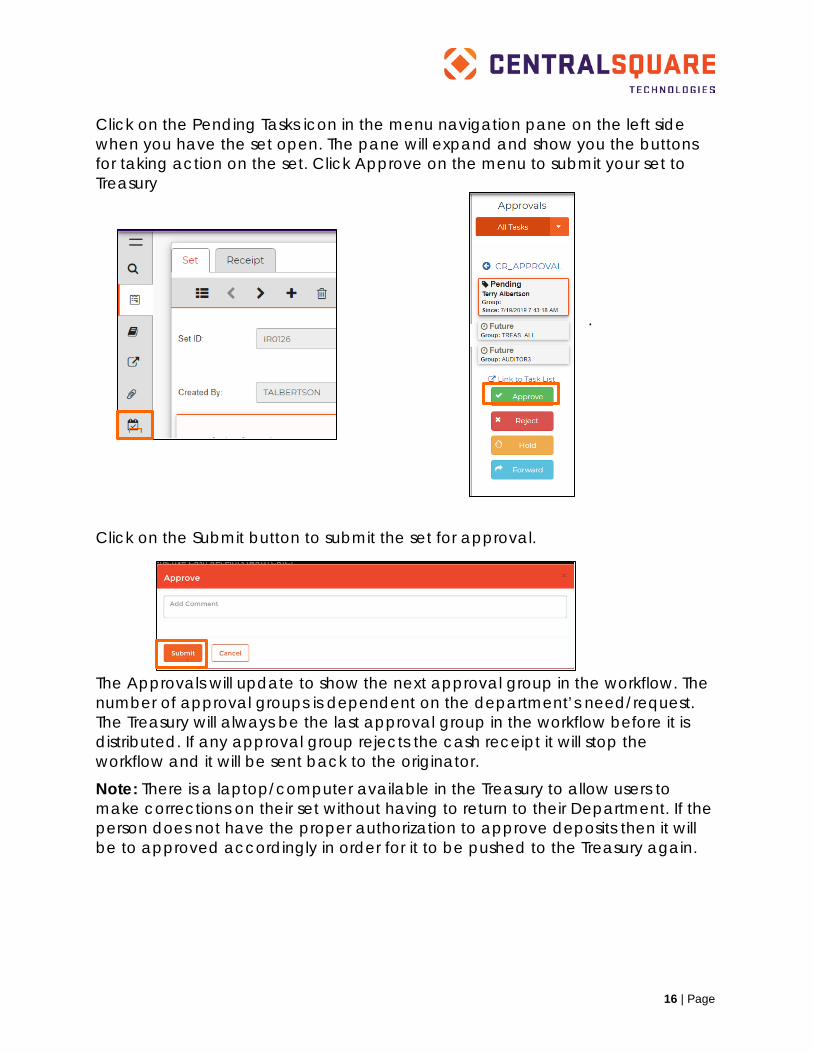
Click on the Pending Tasks icon in the menu navigation pane on the left side when you have the set open. The pane will expand and show you the buttons for taking action on the set. Click Approve on the menu to submit your set to Treasury
.
Click on the Submit button to submit the set for approval.
The Approvals will update to show the next approval group in the workflow. The number of approval groups is dependent on the department’s need/request. The Treasury will always be the last approval group in the workflow before it is distributed. If any approval group rejects the cash receipt it will stop the workflow and it will be sent back to the originator.
Note: There is a laptop/computer available in the Treasury to allow users to make corrections on their set without having to return to their Department. If the person does not have the proper authorization to approve deposits then it will be to approved accordingly in order for it to be pushed to the Treasury again.
17 | Page
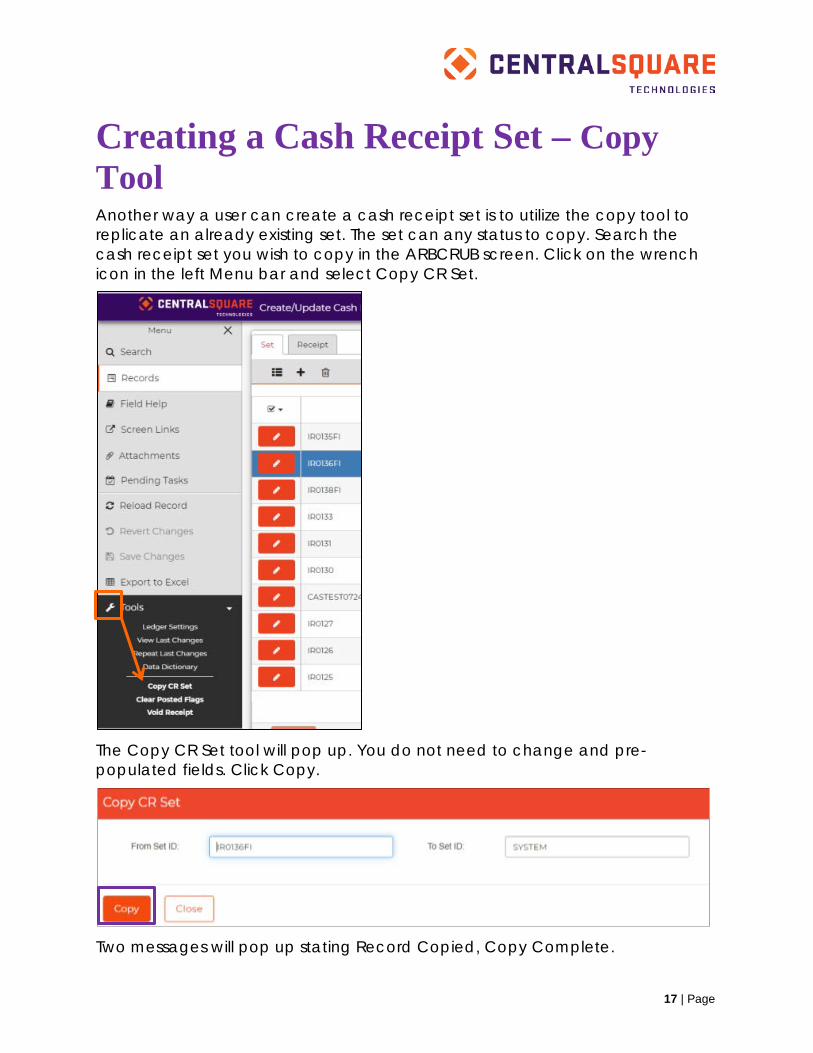
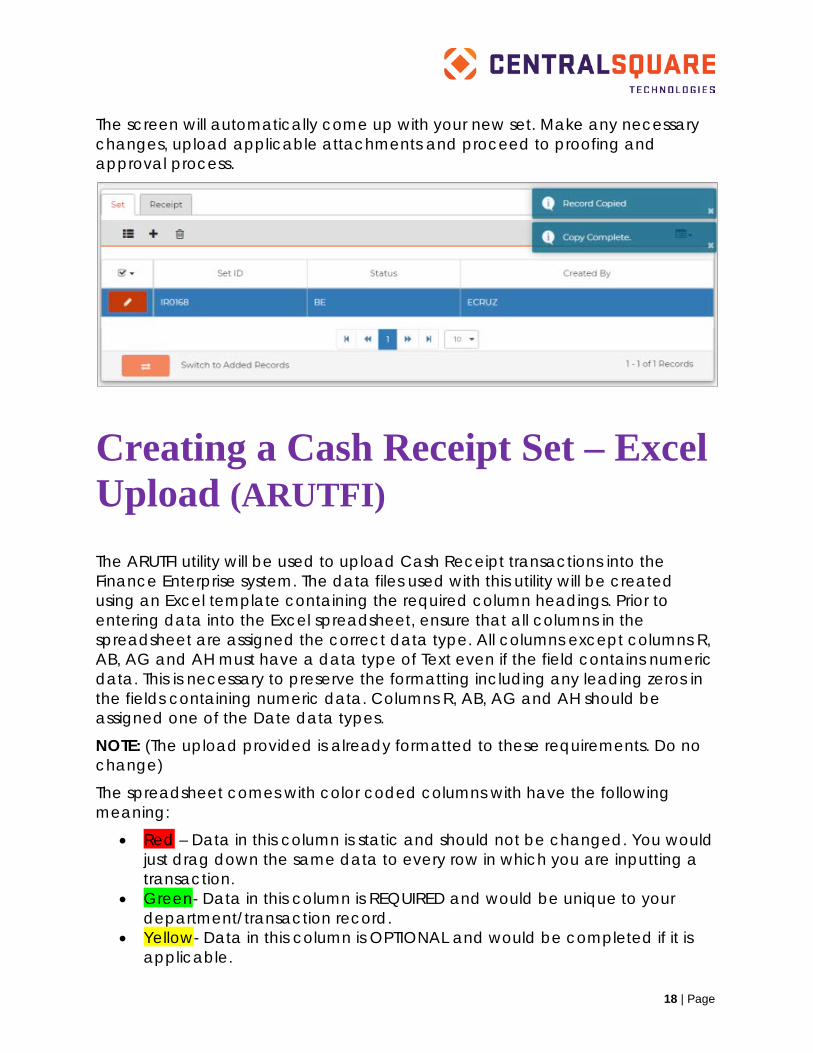
Creating a Cash Receipt Set – Copy Tool Another way a user can create a cash receipt set is to utilize the copy tool to replicate an already existing set. The set can any status to copy. Search the cash receipt set you wish to copy in the ARBCRUB screen. Click on the wrench icon in the left Menu bar and select Copy CR Set.
The Copy CR Set tool will pop up. You do not need to change and pre-populated fields. Click Copy.
Two messages will pop up stating Record Copied, Copy Complete.
18 | Page
The screen will automatically come up with your new set. Make any necessary changes, upload applicable attachments and proceed to proofing and approval process.
Creating a Cash Receipt Set – Excel Upload (ARUTFI)
The ARUTFI utility will be used to upload Cash Receipt transactions into the Finance Enterprise system. The data files used with this utility will be created using an Excel template containing the required column headings. Prior to entering data into the Excel spreadsheet, ensure that all columns in the spreadsheet are assigned the correct data type. All columns except columns R, AB, AG and AH must have a data type of Text even if the field contains numeric data. This is necessary to preserve the formatting including any leading zeros in the fields containing numeric data. Columns R, AB, AG and AH should be assigned one of the Date data types.
NOTE: (The upload provided is already formatted to these requirements. Do no change)
The spreadsheet comes with color coded columns with have the following meaning:
• Red – Data in this column is static and should not be changed. You would just drag down the same data to every row in which you are inputting a transaction.
• Green- Data in this column is REQUIRED and would be unique to your department/transaction record.
• Yellow- Data in this column is OPTIONAL and would be completed if it is applicable.
19 | Page
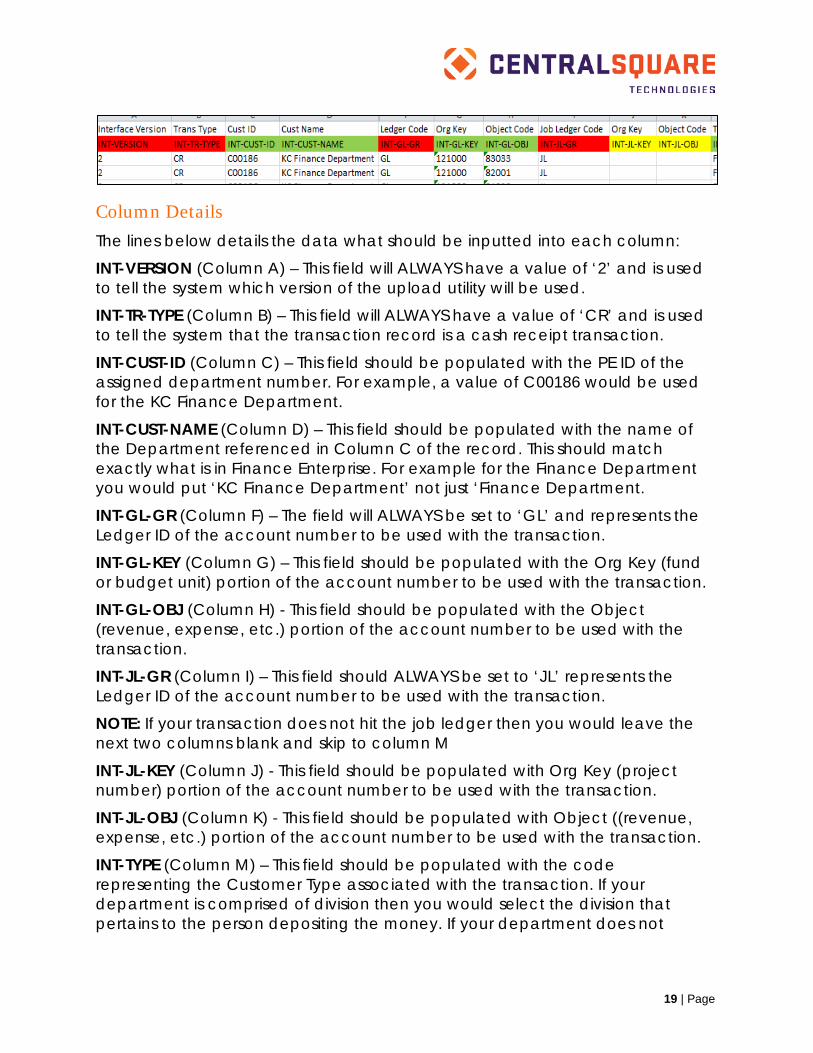
Column Details The lines below details the data what should be inputted into each column:
INT-VERSION (Column A) – This field will ALWAYS have a value of ‘2’ and is used to tell the system which version of the upload utility will be used.
INT-TR-TYPE (Column B) – This field will ALWAYS have a value of ‘CR’ and is used to tell the system that the transaction record is a cash receipt transaction.
INT-CUST-ID (Column C) – This field should be populated with the PE ID of the assigned department number. For example, a value of C00186 would be used for the KC Finance Department.
INT-CUST-NAME (Column D) – This field should be populated with the name of the Department referenced in Column C of the record. This should match exactly what is in Finance Enterprise. For example for the Finance Department you would put ‘KC Finance Department’ not just ‘Finance Department.
INT-GL-GR (Column F) – The field will ALWAYS be set to ‘GL’ and represents the Ledger ID of the account number to be used with the transaction.
INT-GL-KEY (Column G) – This field should be populated with the Org Key (fund or budget unit) portion of the account number to be used with the transaction.
INT-GL-OBJ (Column H) - This field should be populated with the Object (revenue, expense, etc.) portion of the account number to be used with the transaction.
INT-JL-GR (Column I) – This field should ALWAYS be set to ‘JL’ represents the Ledger ID of the account number to be used with the transaction.
NOTE: If your transaction does not hit the job ledger then you would leave the next two columns blank and skip to column M
INT-JL-KEY (Column J) - This field should be populated with Org Key (project number) portion of the account number to be used with the transaction.
INT-JL-OBJ (Column K) - This field should be populated with Object ((revenue, expense, etc.) portion of the account number to be used with the transaction.
INT-TYPE (Column M) – This field should be populated with the code representing the Customer Type associated with the transaction. If your department is comprised of division then you would select the division that pertains to the person depositing the money. If your department does not
20 | Page
include division then you would simple choose the only available Type Code (Department Initials). This information can be found in Finance Enterprise.
INT-DIV (Column N) – This field will ALWAYS have a value of ‘GEN’ and is used to tell the system that the transaction record uses the General Division. Kings County only uses a single division so this field will be the same for all records.
INT-REF2 (Column P) – This field should ALWAYS contain a value of ‘SYSTEM’. This value is used to tell the system to assign a receipt number to the transaction using a seed.
INT-DESC (Column Q) – This field is optional and for a description of the transaction. If no description is inputted then the system will default to the description of the Object.
INT-REF-DT (Column R) – This field should be populated with the date to be assigned as the receipt date for the transaction record.
INT-QTY (Column V) – This field should ALWAYS be populated with a number of ‘1’.
INT-UNIT-PRICE (Column W) – This field should be populated with the unit price of the transaction. This will be multiplied by the value in column V to calculate the transaction cost.
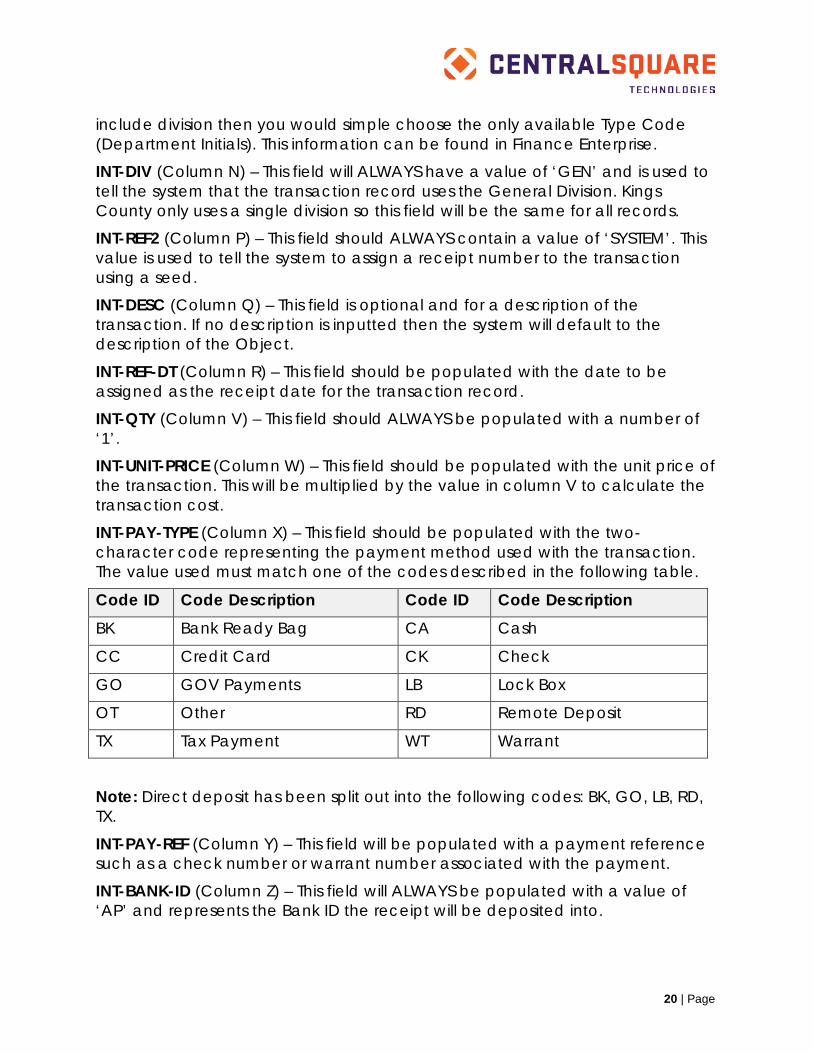
INT-PAY-TYPE (Column X) – This field should be populated with the two-character code representing the payment method used with the transaction. The value used must match one of the codes described in the following table.
Code ID Code Description Code ID Code Description BK Bank Ready Bag CA Cash
CC Credit Card CK Check
GO GOV Payments LB Lock Box
OT Other RD Remote Deposit
TX Tax Payment WT Warrant
Note: Direct deposit has been split out into the following codes: BK, GO, LB, RD, TX.
INT-PAY-REF (Column Y) – This field will be populated with a payment reference such as a check number or warrant number associated with the payment.
INT-BANK-ID (Column Z) – This field will ALWAYS be populated with a value of ‘AP’ and represents the Bank ID the receipt will be deposited into.
21 | Page
INT-TRN-FMT (Column AE) – This field should ALWAYS contain a value of ‘NB’ and is used to tell the system how to format the description as it appears in GL when created by the system. The NB format tells the system to use the PE name, a blank, and a description.
INT-HIT-AR (Column AF) – This field should contain a value of ‘Y’.
After all of the records have been entered into the spreadsheet, the spreadsheet should be first saved as an Excel spreadsheet. This is recommended in case any corrections will need to be made to the file.
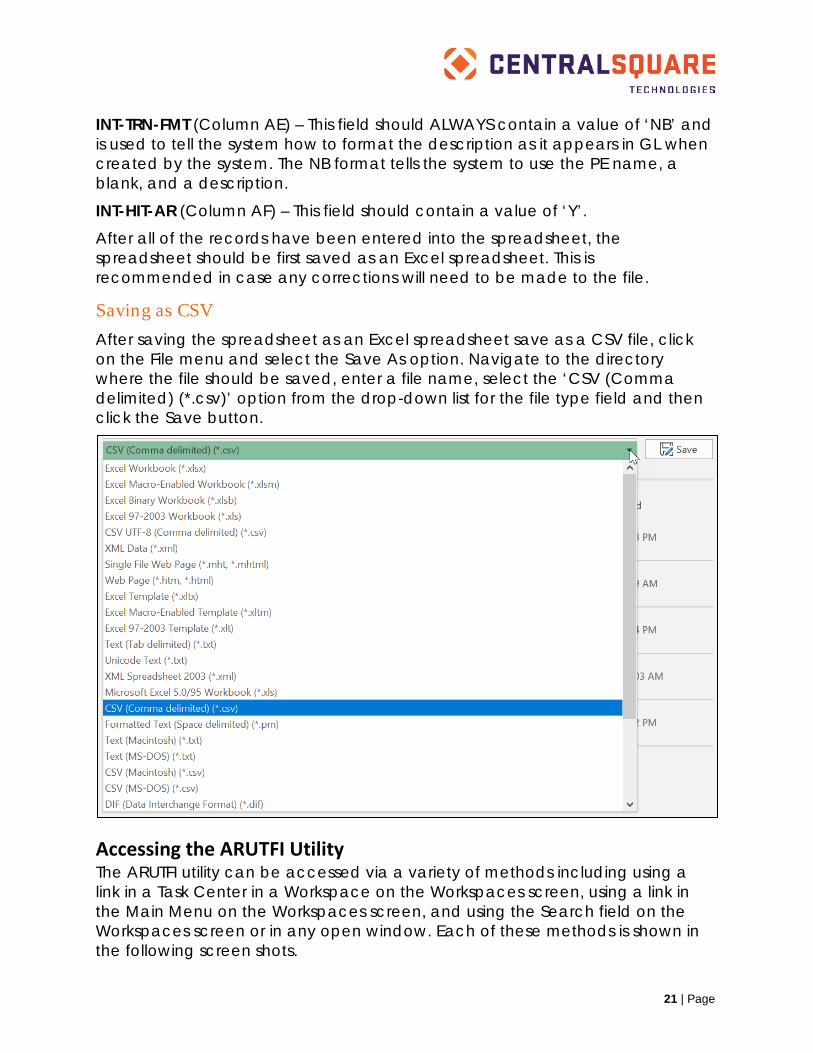
Saving as CSV After saving the spreadsheet as an Excel spreadsheet save as a CSV file, click on the File menu and select the Save As option. Navigate to the directory where the file should be saved, enter a file name, select the ‘CSV (Comma delimited) (*.csv)’ option from the drop-down list for the file type field and then click the Save button.
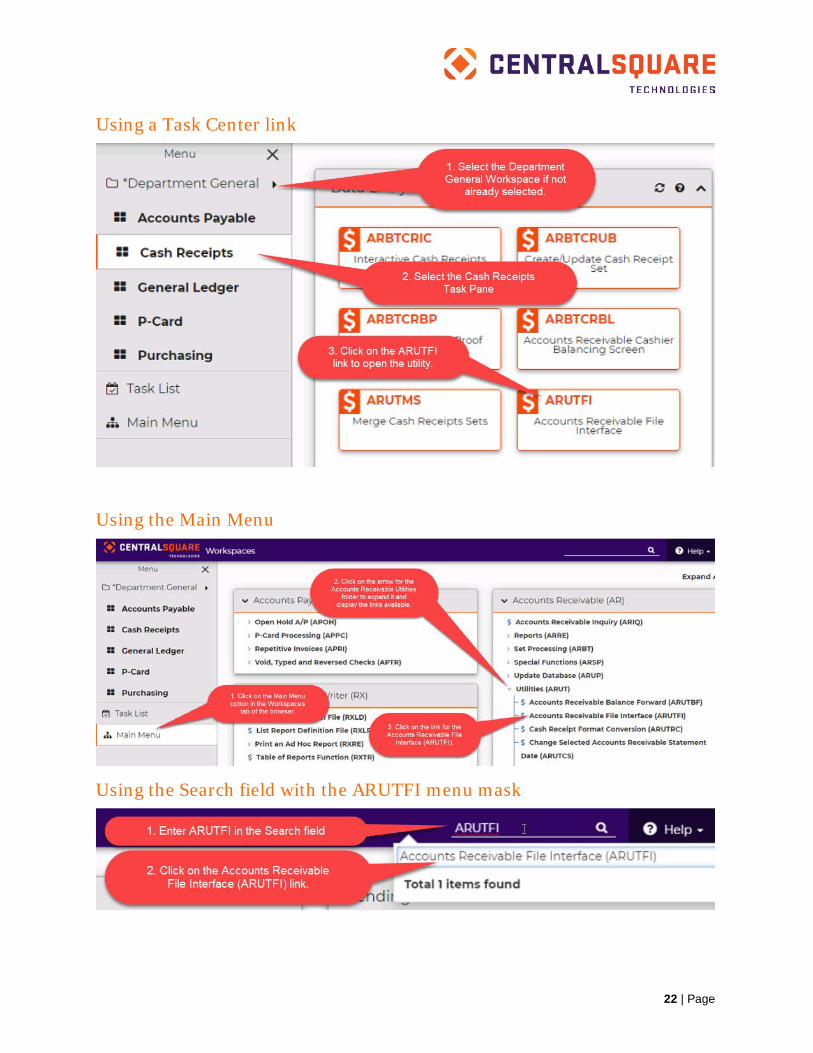
Accessing the ARUTFI Utility The ARUTFI utility can be accessed via a variety of methods including using a link in a Task Center in a Workspace on the Workspaces screen, using a link in the Main Menu on the Workspaces screen, and using the Search field on the Workspaces screen or in any open window. Each of these methods is shown in the following screen shots.
22 | Page
Using a Task Center link
Using the Main Menu
Using the Search field with the ARUTFI menu mask
23 | Page
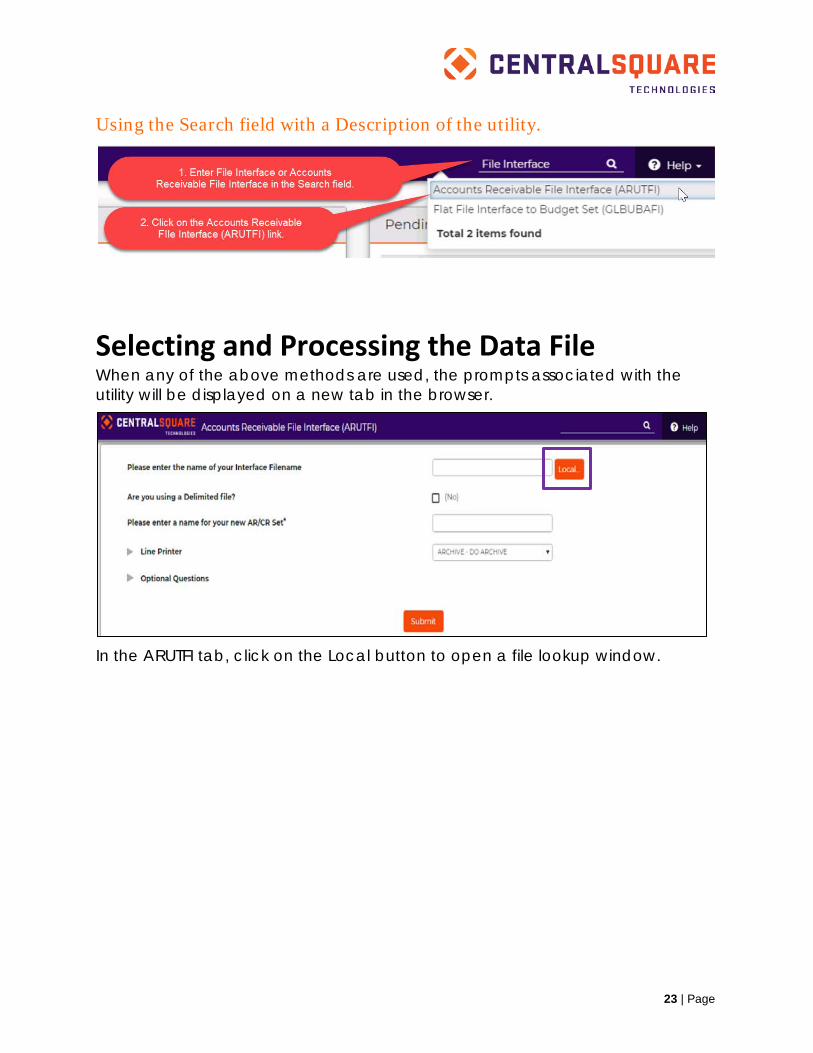
Using the Search field with a Description of the utility.
Selecting and Processing the Data File When any of the above methods are used, the prompts associated with the utility will be displayed on a new tab in the browser.
In the ARUTFI tab, click on the Local button to open a file lookup window.
24 | Page
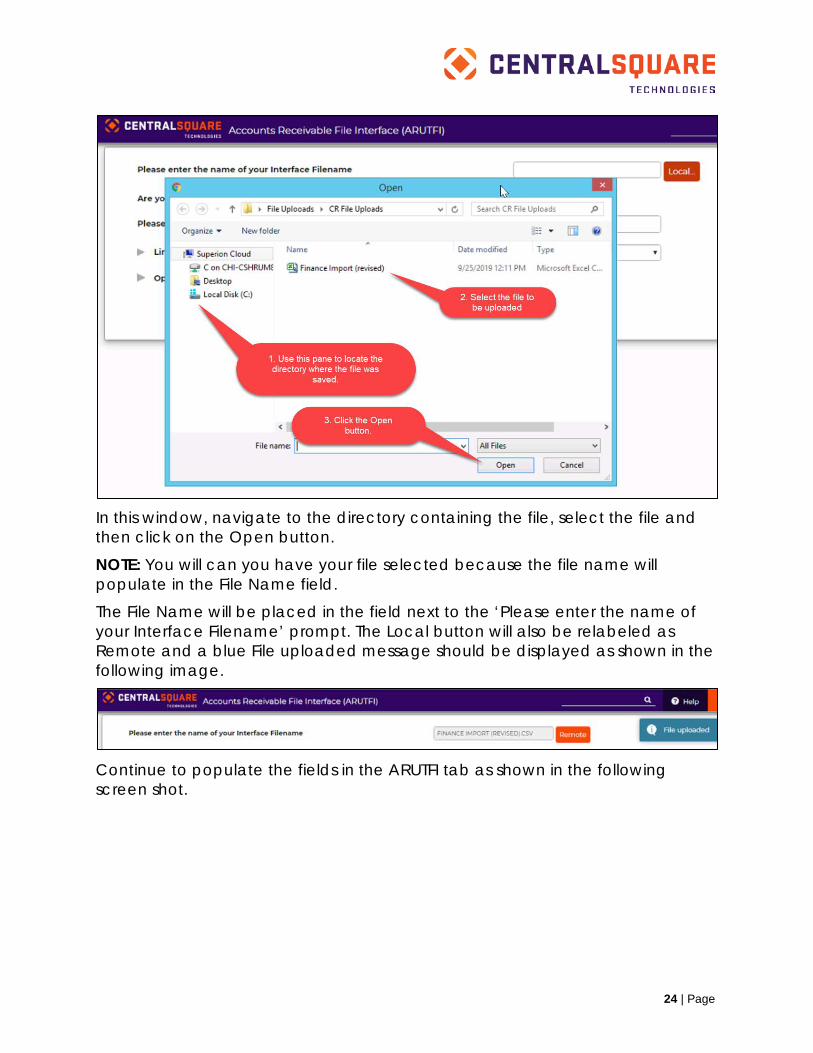
In this window, navigate to the directory containing the file, select the file and then click on the Open button.
NOTE: You will can you have your file selected because the file name will populate in the File Name field.
The File Name will be placed in the field next to the ‘Please enter the name of your Interface Filename’ prompt. The Local button will also be relabeled as Remote and a blue File uploaded message should be displayed as shown in the following image.
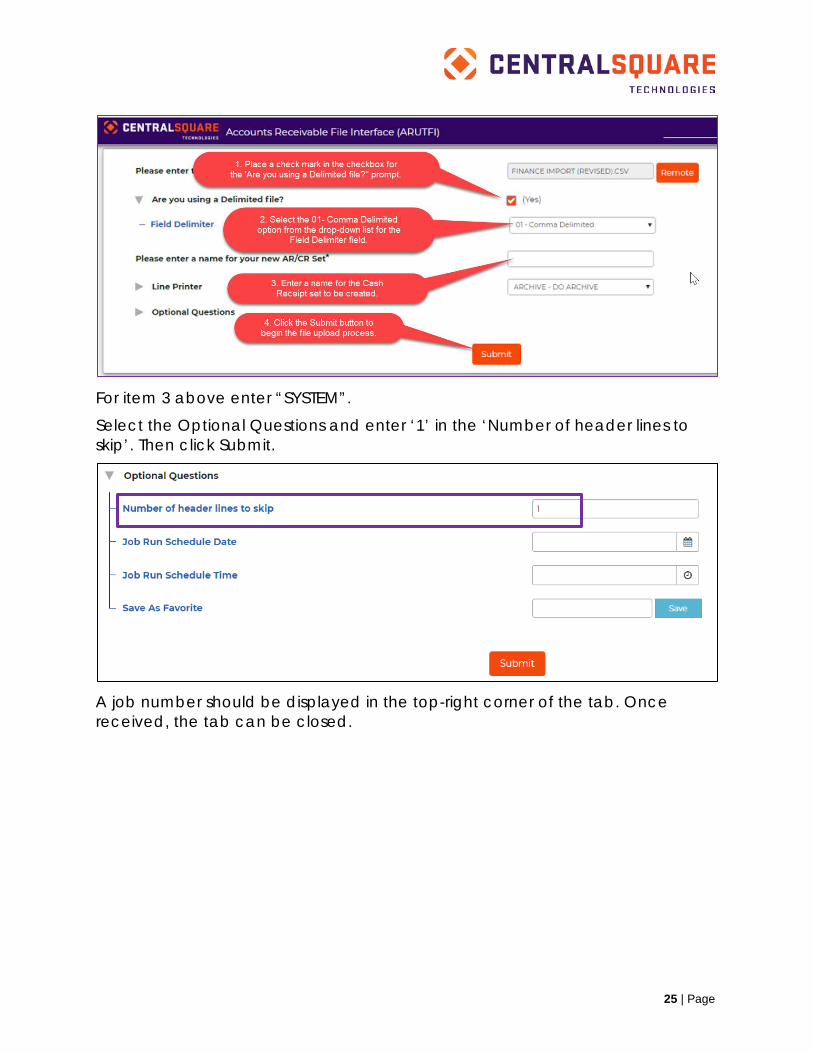
Continue to populate the fields in the ARUTFI tab as shown in the following screen shot.
25 | Page
For item 3 above enter “SYSTEM”.
Select the Optional Questions and enter ‘1’ in the ‘Number of header lines to skip’. Then click Submit.
A job number should be displayed in the top-right corner of the tab. Once received, the tab can be closed.
26 | Page
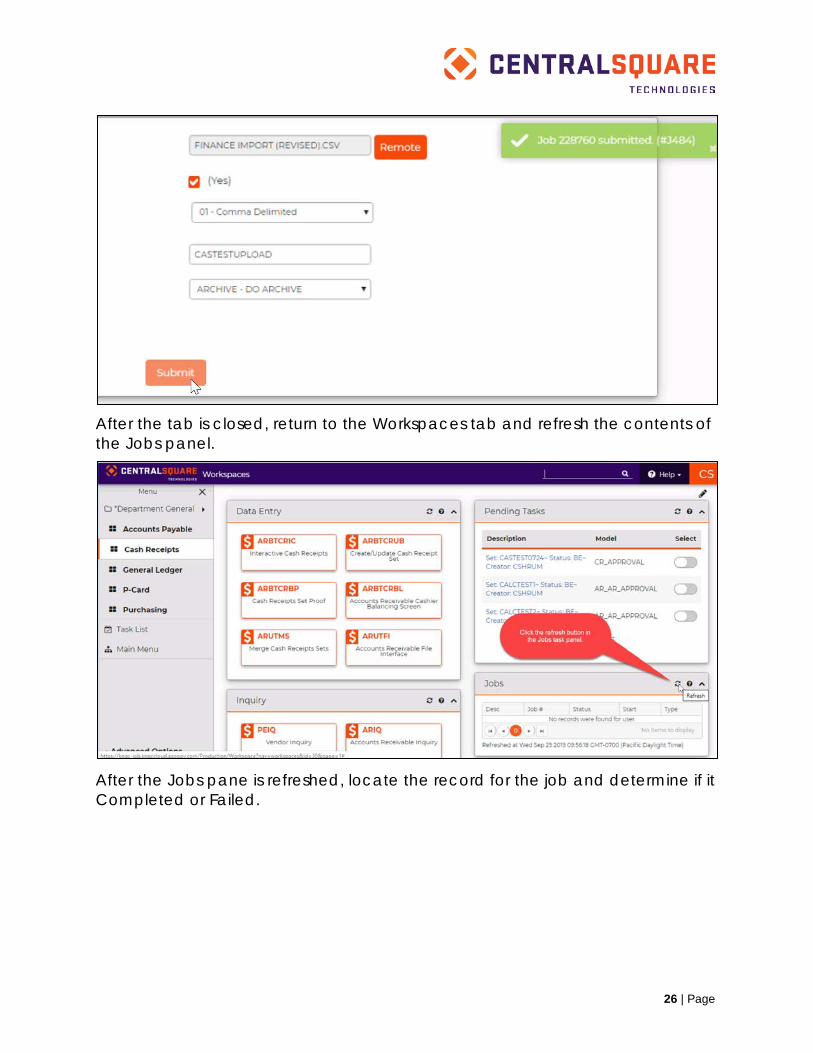
After the tab is closed, return to the Workspaces tab and refresh the contents of the Jobs panel.
After the Jobs pane is refreshed, locate the record for the job and determine if it Completed or Failed.
27 | Page
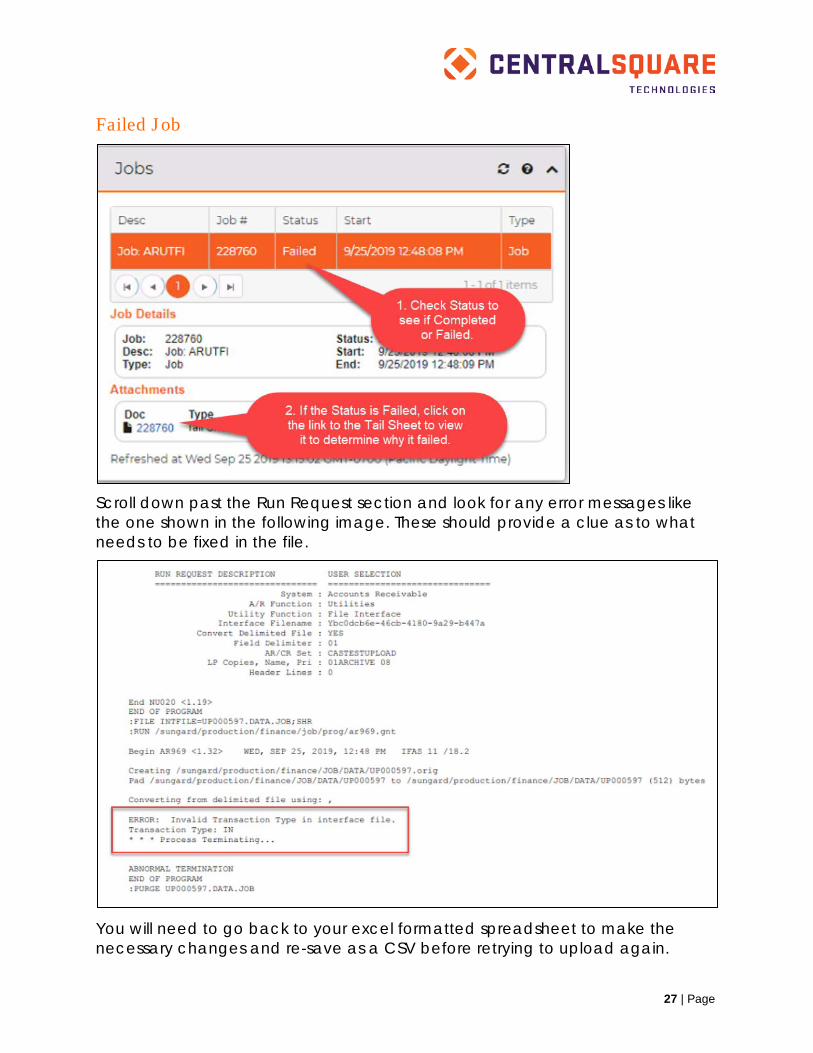
Failed Job
Scroll down past the Run Request section and look for any error messages like the one shown in the following image. These should provide a clue as to what needs to be fixed in the file.
You will need to go back to your excel formatted spreadsheet to make the necessary changes and re-save as a CSV before retrying to upload again.
28 | Page
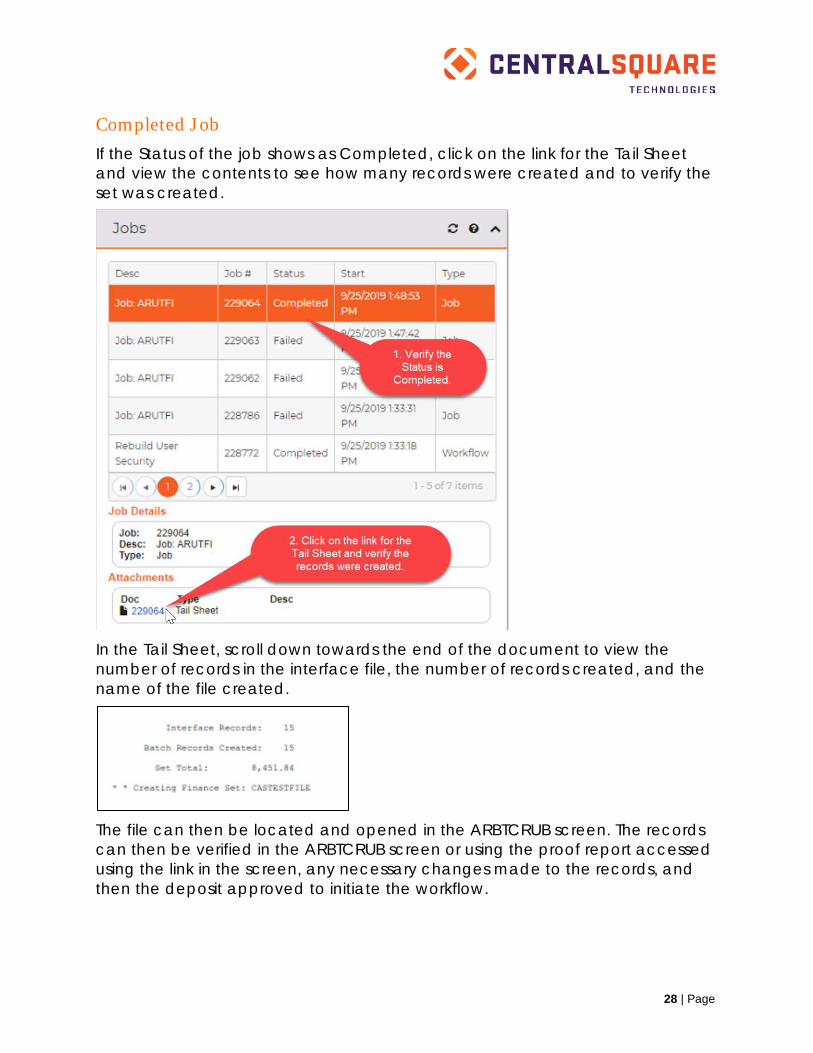
Completed Job If the Status of the job shows as Completed, click on the link for the Tail Sheet and view the contents to see how many records were created and to verify the set was created.
In the Tail Sheet, scroll down towards the end of the document to view the number of records in the interface file, the number of records created, and the name of the file created.
The file can then be located and opened in the ARBTCRUB screen. The records can then be verified in the ARBTCRUB screen or using the proof report accessed using the link in the screen, any necessary changes made to the records, and then the deposit approved to initiate the workflow.