Embed Size (px)
Citation preview
Avaya Solution & Interoperability Test Lab
Application Notes for Configuring VPN Tunnels between Avaya IP Office and WatchGuard Firebox X and SOHO Products – Issue 1.0
Abstract
These Application Notes cover the configuration of site-to-site VPN tunnels between Avaya IP Office and WatchGuard Firebox X and SOHO products. Client VPN tunnels to IP Office are also covered. Information in these Application Notes has been obtained through compliance testing and additional technical discussions. Testing was conducted via the DeveloperConnection Program at the Avaya Solution and Interoperability Test Lab.
SH; Reviewed: SPOC 12/30/2004
Solution & Interoperability Test Lab Application Notes ©2004 Avaya Inc. All Rights Reserved.
1 of 41 IPO-watchguard.doc
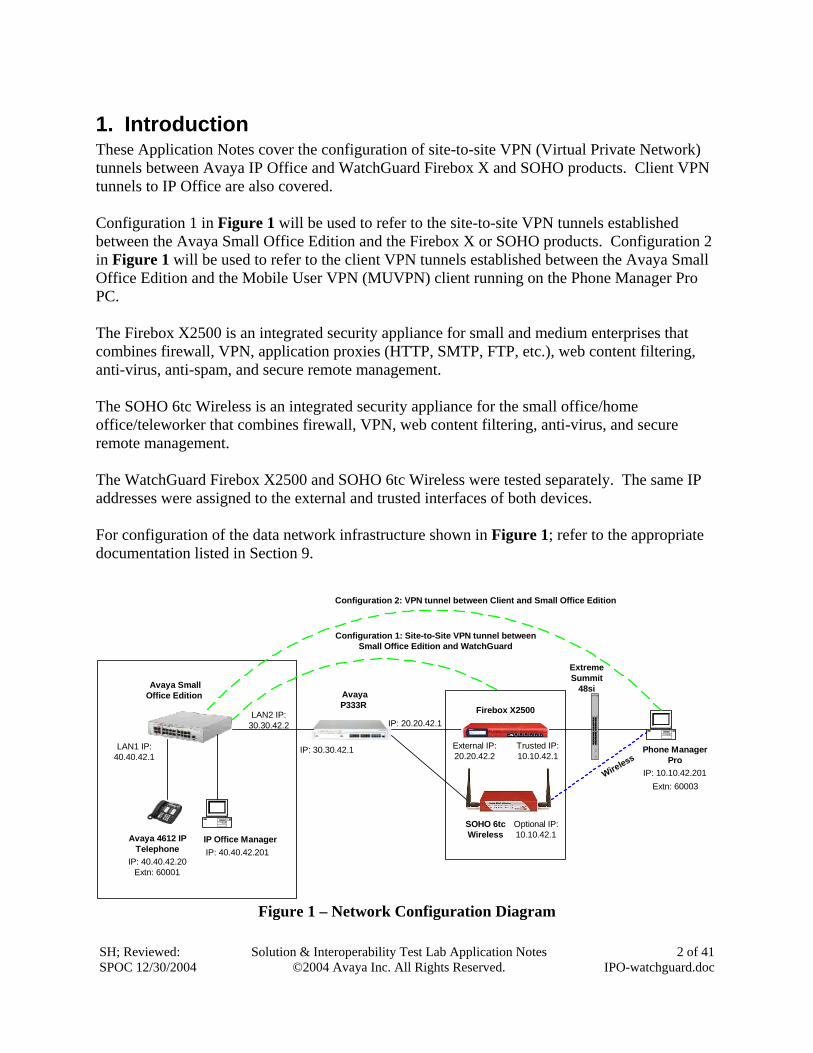
1. Introduction These Application Notes cover the configuration of site-to-site VPN (Virtual Private Network) tunnels between Avaya IP Office and WatchGuard Firebox X and SOHO products. Client VPN tunnels to IP Office are also covered. Configuration 1 in Figure 1 will be used to refer to the site-to-site VPN tunnels established between the Avaya Small Office Edition and the Firebox X or SOHO products. Configuration 2 in Figure 1 will be used to refer to the client VPN tunnels established between the Avaya Small Office Edition and the Mobile User VPN (MUVPN) client running on the Phone Manager Pro PC. The Firebox X2500 is an integrated security appliance for small and medium enterprises that combines firewall, VPN, application proxies (HTTP, SMTP, FTP, etc.), web content filtering, anti-virus, anti-spam, and secure remote management. The SOHO 6tc Wireless is an integrated security appliance for the small office/home office/teleworker that combines firewall, VPN, web content filtering, anti-virus, and secure remote management. The WatchGuard Firebox X2500 and SOHO 6tc Wireless were tested separately. The same IP addresses were assigned to the external and trusted interfaces of both devices. For configuration of the data network infrastructure shown in Figure 1; refer to the appropriate documentation listed in Section 9.
Avaya 4612 IPTelephone
IP Office Manager
AvayaP333R
Avaya SmallOffice Edition
IP: 40.40.42.201IP: 40.40.42.20
Extn: 60001
Phone ManagerPro
IP: 10.10.42.201Extn: 60003
SOHO 6tcWireless
Wireless
Configuration 1: Site-to-Site VPN tunnel betweenSmall Office Edition and WatchGuard
Configuration 2: VPN tunnel between Client and Small Office Edition
Firebox X2500
ExtremeSummit
48si
LAN1 IP:40.40.42.1
LAN2 IP:30.30.42.2
IP: 30.30.42.1
IP: 20.20.42.1
External IP:20.20.42.2
Trusted IP:10.10.42.1
Optional IP:10.10.42.1
Figure 1 – Network Configuration Diagram
SH; Reviewed: SPOC 12/30/2004
Solution & Interoperability Test Lab Application Notes ©2004 Avaya Inc. All Rights Reserved.
2 of 41 IPO-watchguard.doc
SH; Reviewed: SPOC 12/30/2004
Solution & Interoperability Test Lab Application Notes ©2004 Avaya Inc. All Rights Reserved.
3 of 41 IPO-watchguard.doc
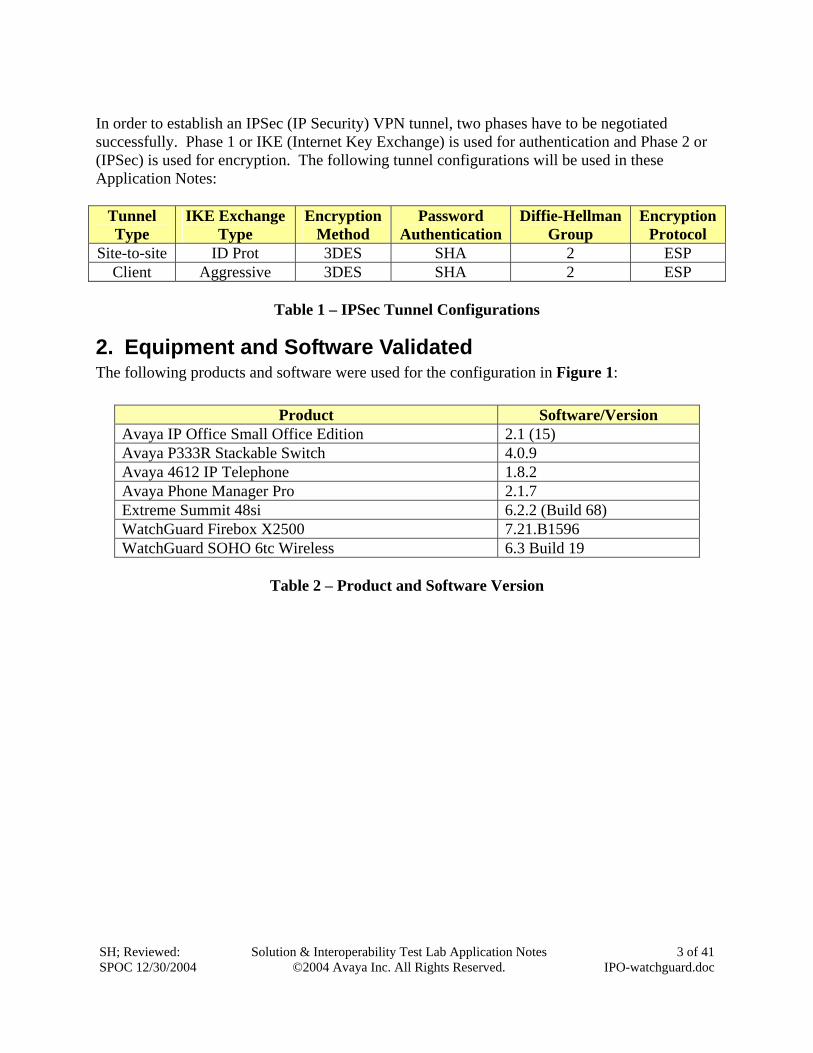
In order to establish an IPSec (IP Security) VPN tunnel, two phases have to be negotiated successfully. Phase 1 or IKE (Internet Key Exchange) is used for authentication and Phase 2 or (IPSec) is used for encryption. The following tunnel configurations will be used in these Application Notes:
Tunnel Type
IKE Exchange Type
Encryption Method
Password Authentication
Diffie-Hellman Group
Encryption Protocol
Site-to-site ID Prot 3DES SHA 2 ESP Client Aggressive 3DES SHA 2 ESP
Table 1 – IPSec Tunnel Configurations
2. Equipment and Software Validated The following products and software were used for the configuration in Figure 1:
Product Software/Version Avaya IP Office Small Office Edition 2.1 (15) Avaya P333R Stackable Switch 4.0.9 Avaya 4612 IP Telephone 1.8.2 Avaya Phone Manager Pro 2.1.7 Extreme Summit 48si 6.2.2 (Build 68) WatchGuard Firebox X2500 7.21.B1596 WatchGuard SOHO 6tc Wireless 6.3 Build 19
Table 2 – Product and Software Version
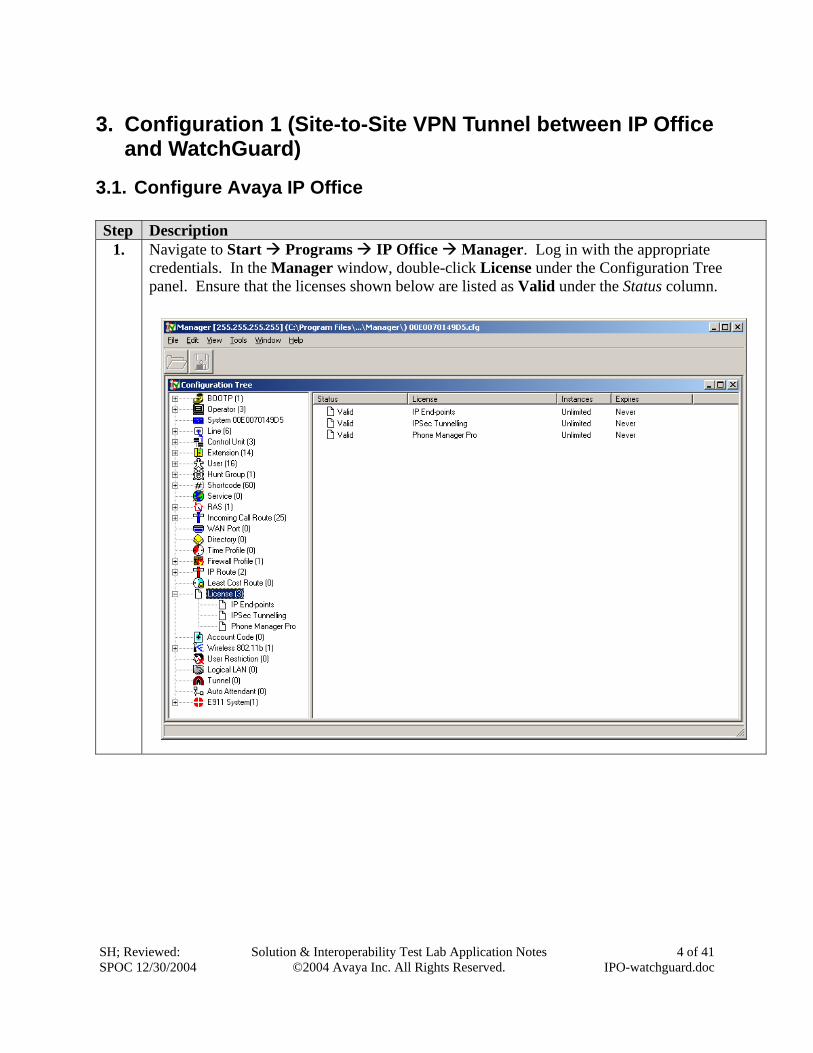
3. Configuration 1 (Site-to-Site VPN Tunnel between IP Office and WatchGuard)
3.1. Configure Avaya IP Office Step Description
1. Navigate to Start Programs IP Office Manager. Log in with the appropriate credentials. In the Manager window, double-click License under the Configuration Tree panel. Ensure that the licenses shown below are listed as Valid under the Status column.
SH; Reviewed: SPOC 12/30/2004
Solution & Interoperability Test Lab Application Notes ©2004 Avaya Inc. All Rights Reserved.
4 of 41 IPO-watchguard.doc
SH; Reviewed: SPOC 12/30/2004
Solution & Interoperability Test Lab Application Notes ©2004 Avaya Inc. All Rights Reserved.
5 of 41 IPO-watchguard.doc
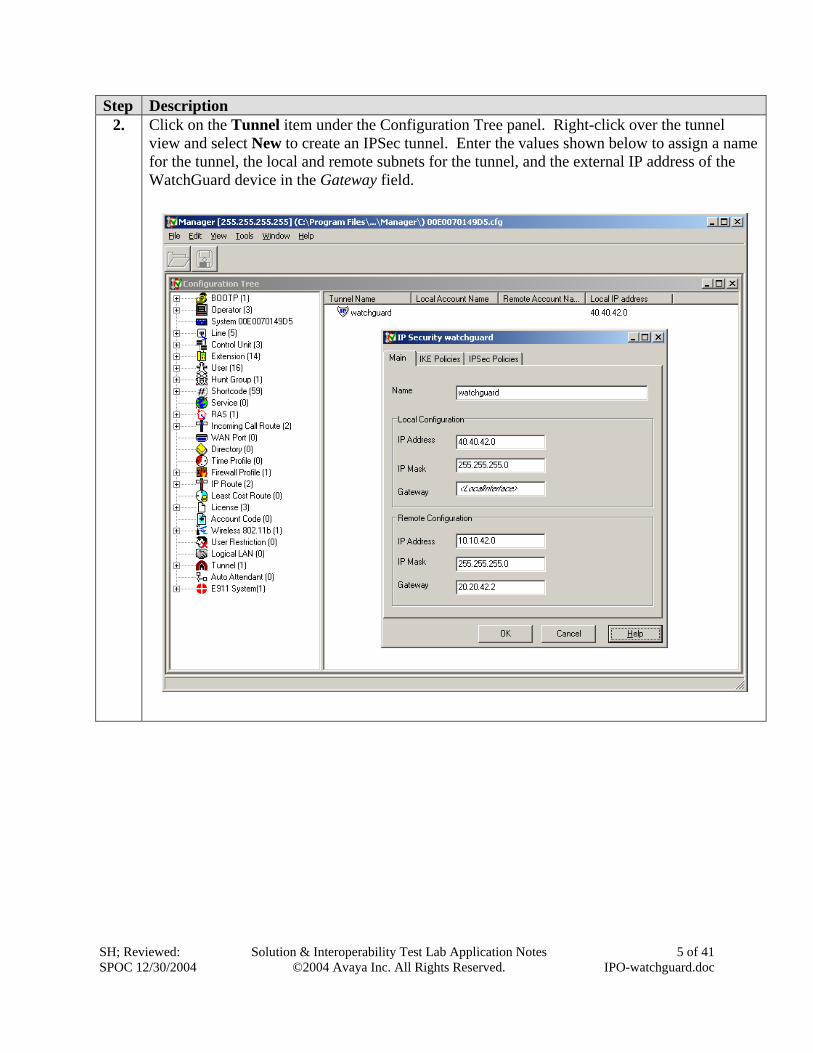
Step Description 2. Click on the Tunnel item under the Configuration Tree panel. Right-click over the tunnel
view and select New to create an IPSec tunnel. Enter the values shown below to assign a name for the tunnel, the local and remote subnets for the tunnel, and the external IP address of the WatchGuard device in the Gateway field.
SH; Reviewed: SPOC 12/30/2004
Solution & Interoperability Test Lab Application Notes ©2004 Avaya Inc. All Rights Reserved.
6 of 41 IPO-watchguard.doc
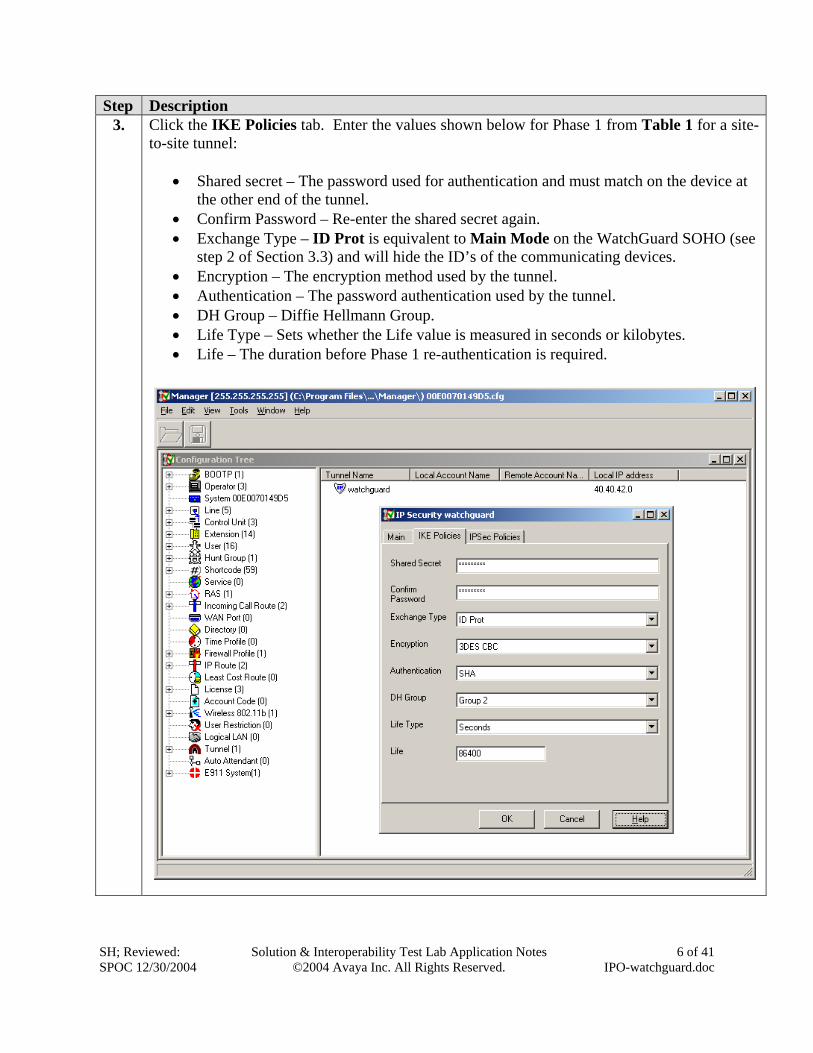
Step Description 3. Click the IKE Policies tab. Enter the values shown below for Phase 1 from Table 1 for a site-
to-site tunnel:
• Shared secret – The password used for authentication and must match on the device at the other end of the tunnel.
• Confirm Password – Re-enter the shared secret again. • Exchange Type – ID Prot is equivalent to Main Mode on the WatchGuard SOHO (see
step 2 of Section 3.3) and will hide the ID’s of the communicating devices. • Encryption – The encryption method used by the tunnel. • Authentication – The password authentication used by the tunnel. • DH Group – Diffie Hellmann Group. • Life Type – Sets whether the Life value is measured in seconds or kilobytes. • Life – The duration before Phase 1 re-authentication is required.
SH; Reviewed: SPOC 12/30/2004
Solution & Interoperability Test Lab Application Notes ©2004 Avaya Inc. All Rights Reserved.
7 of 41 IPO-watchguard.doc
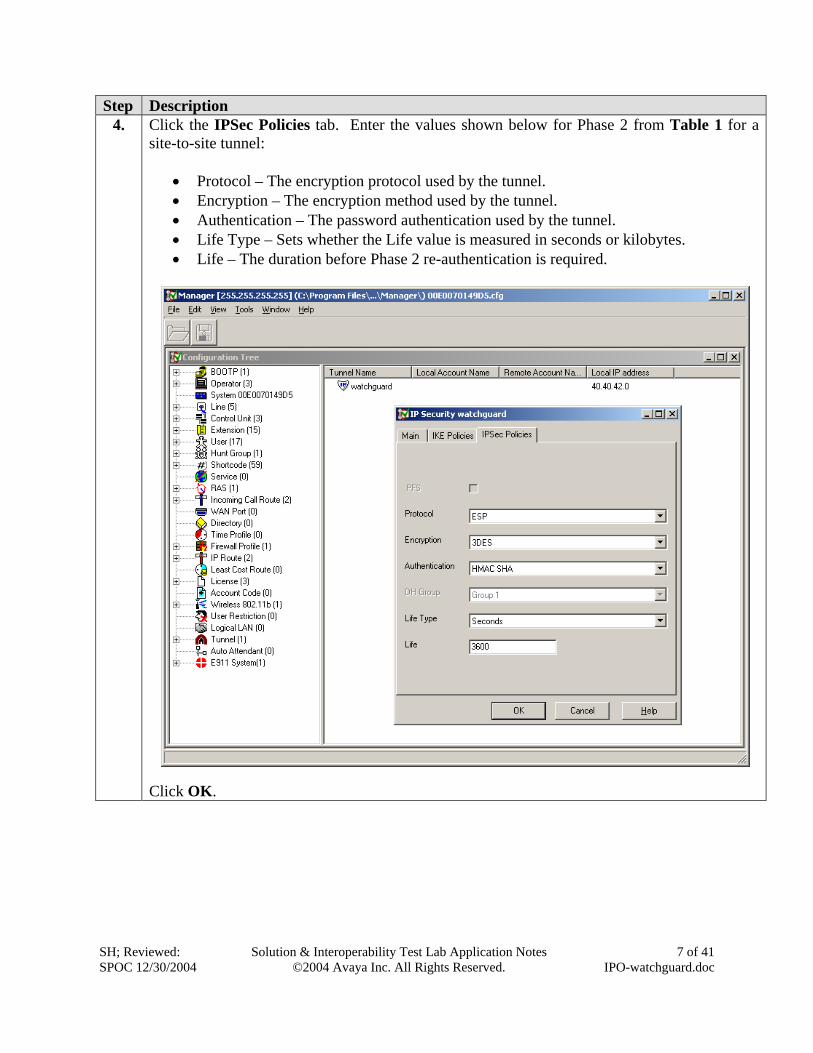
Step Description 4. Click the IPSec Policies tab. Enter the values shown below for Phase 2 from Table 1 for a
site-to-site tunnel:
• Protocol – The encryption protocol used by the tunnel. • Encryption – The encryption method used by the tunnel. • Authentication – The password authentication used by the tunnel. • Life Type – Sets whether the Life value is measured in seconds or kilobytes. • Life – The duration before Phase 2 re-authentication is required.
Click OK.

3.2. Configure WatchGuard Firebox X Step Description
1.
Log into the Firebox X by navigating to Start Programs WatchGuard Firebox System Manager. Select Tools Policy Manager or click on the taskbar icon.
2. Click on Network Branch Office VPN Manual IPSec… to add a new branch office tunnel with manual security.
SH; Reviewed: SPOC 12/30/2004
Solution & Interoperability Test Lab Application Notes ©2004 Avaya Inc. All Rights Reserved.
8 of 41 IPO-watchguard.doc
SH; ReviSPOC 12
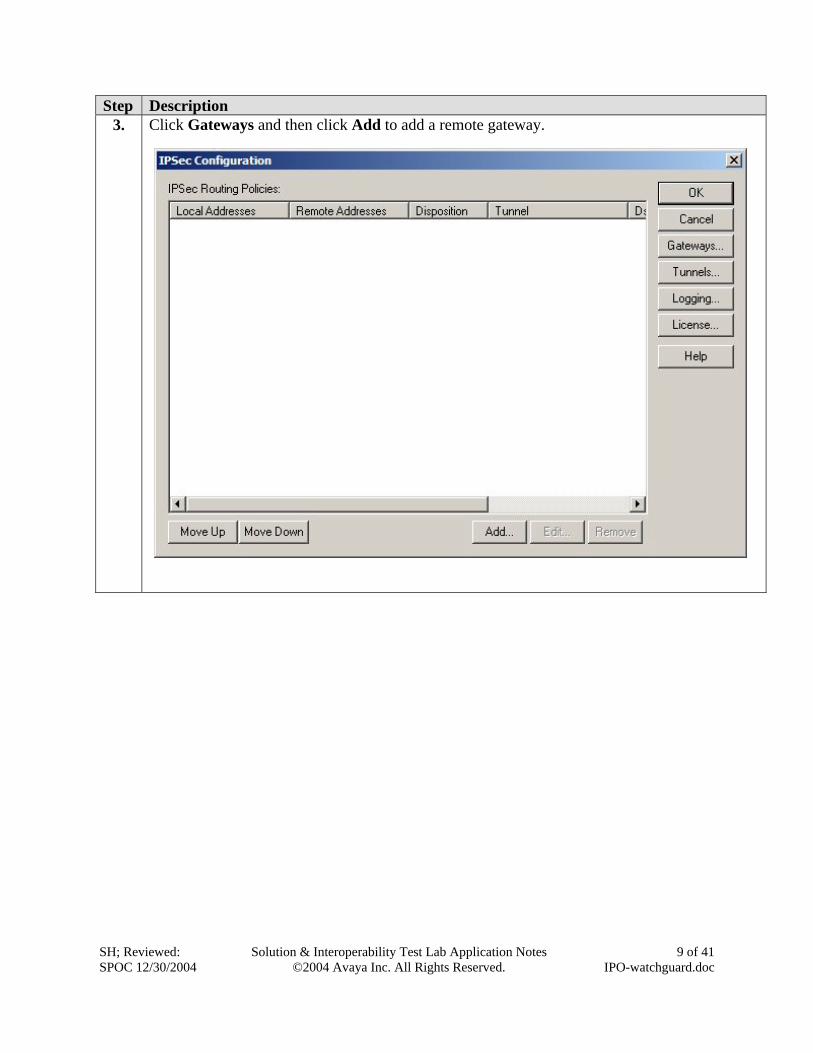
Step Description 3. Click Gateways and then click Add to add a remote gateway.
ewed: /30/2004
Solution & Interoperability Test Lab Application Notes ©2004 Avaya Inc. All Rights Reserved.
9 of 41 IPO-watchguard.doc
SH; Reviewed: SPOC 12/30/2004
Solution & Interoperability Test Lab Application Notes ©2004 Avaya Inc. All Rights Reserved.
10 of 41 IPO-watchguard.doc
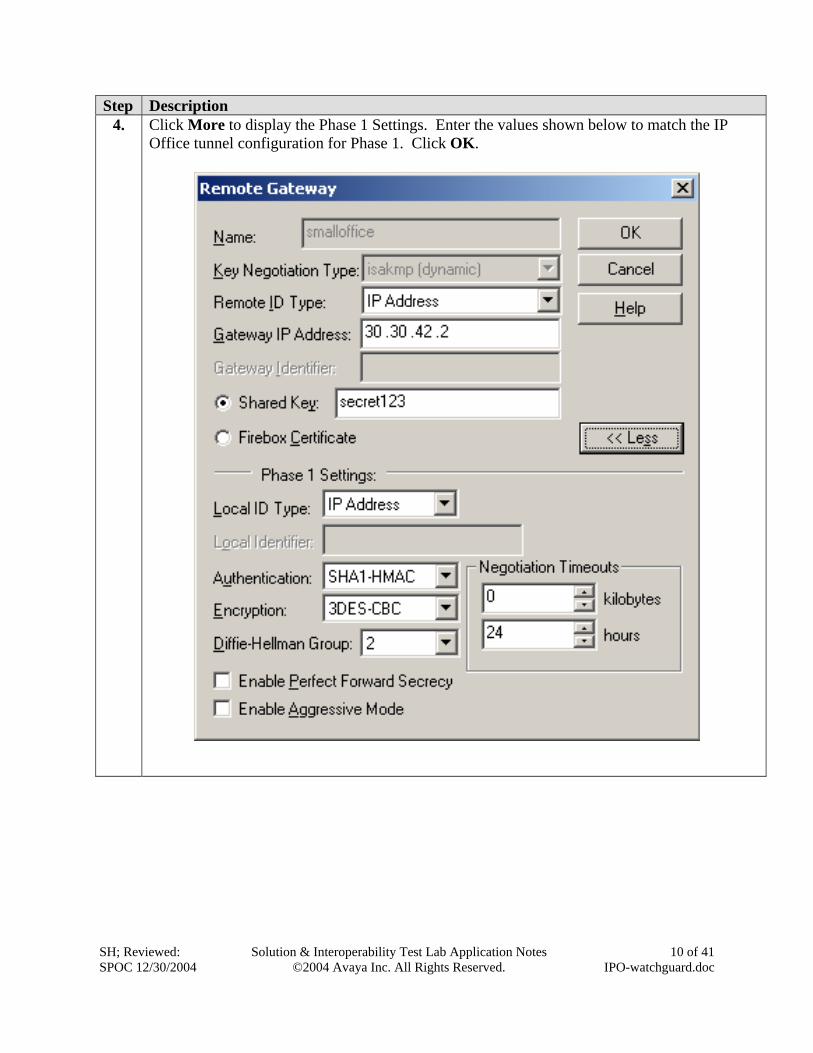
Step Description 4. Click More to display the Phase 1 Settings. Enter the values shown below to match the IP
Office tunnel configuration for Phase 1. Click OK.
SH; Reviewed: SPOC 12/30/2004
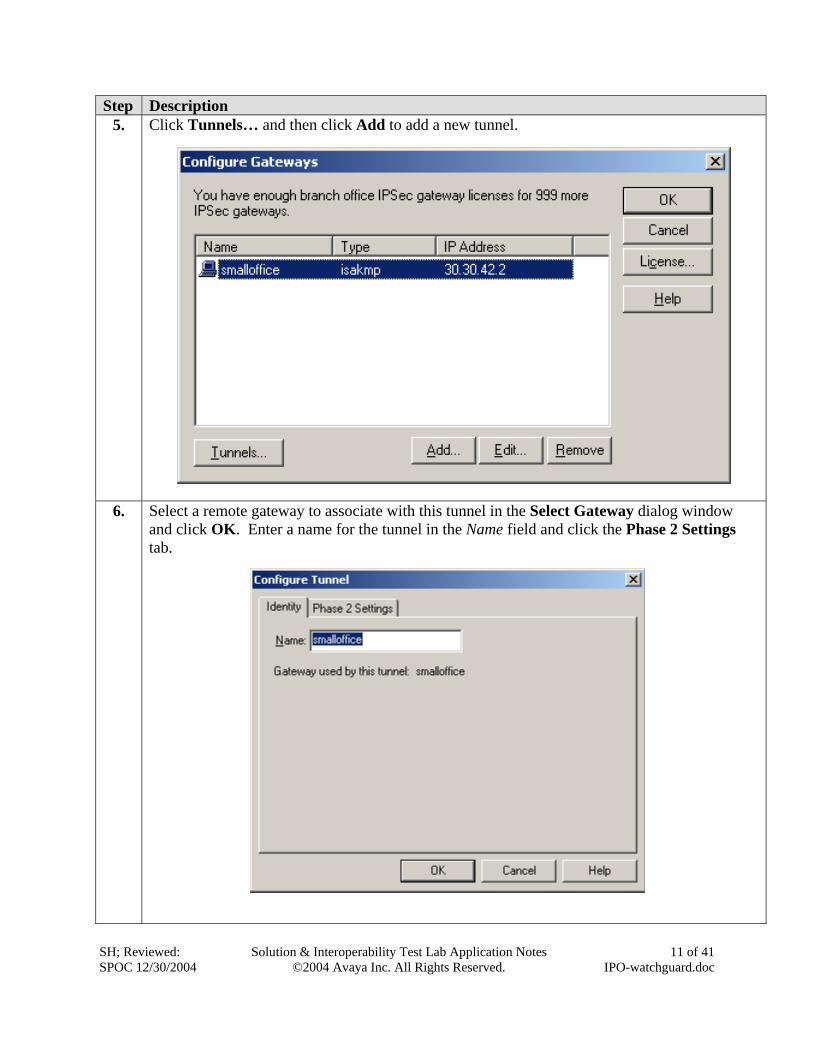
Step Description 5. Click Tunnels… and then click Add to add a new tunnel.
6. Select a remote gateway to associate with this tunnel in the Select Gateway dialog window and click OK. Enter a name for the tunnel in the Name field and click the Phase 2 Settings tab.
Solution & Interoperability Test Lab Application Notes
©2004 Avaya Inc. All Rights Reserved. 11 of 41
IPO-watchguard.doc
SH; Reviewed: SPOC 12/30/2004
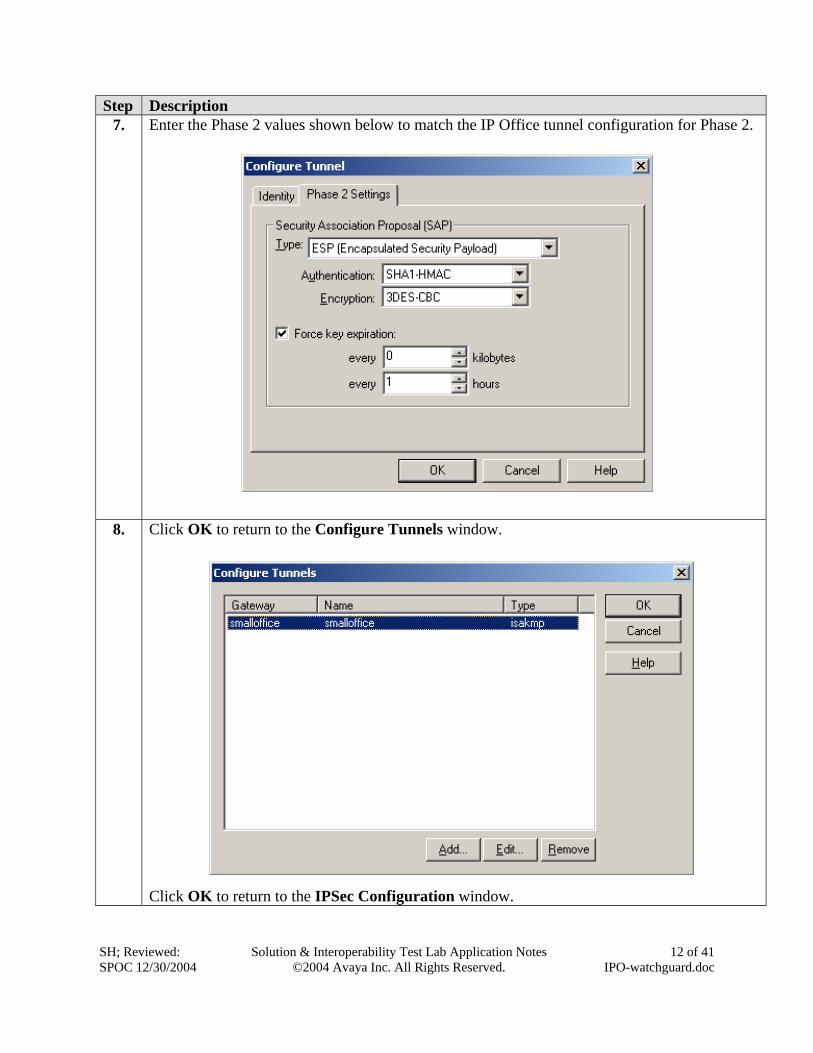
Step Description 7. Enter the Phase 2 values shown below to match the IP Office tunnel configuration for Phase 2.
8. Click OK to Click OK to
return to the Configure Tunnels window.
Solution & Interoperability Test Lab Application Notes
©2004 Avaya Inc. All Rights Reserved. 12 of 41
IPO-watchguard.doc
return to the IPSec Configuration window.
SH; Reviewed: SPOC 12/30/2004
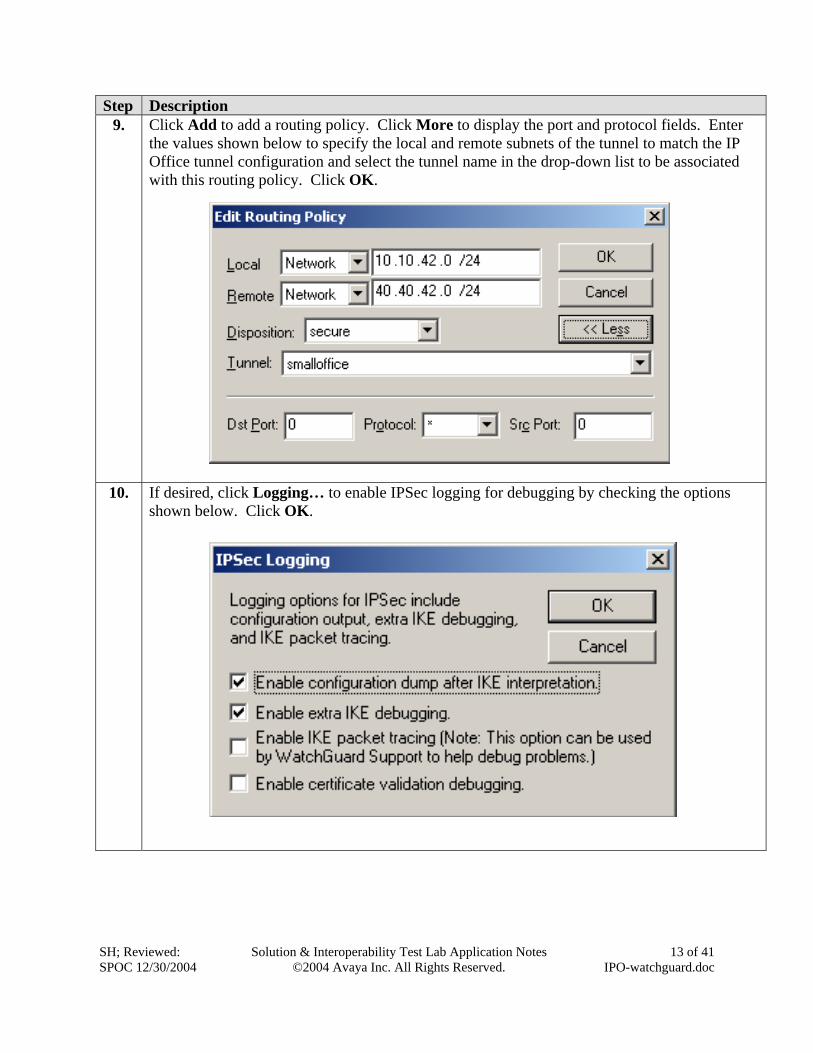
Step Description 9. Click Add to add a routing policy. Click More to display the port and protocol fields. Enter
the values shown below to specify the local and remote subnets of the tunnel to match the IP Office tunnel configuration and select the tunnel name in the drop-down list to be associated with this routing policy. Click OK.
10. If desired, click Logging… to enable IPSec logging for debugging by checking the options shown below. Click OK.
Solution & Interoperability Test Lab Application Notes
©2004 Avaya Inc. All Rights Reserved. 13 of 41
IPO-watchguard.doc

SH; Reviewed: SPOC 12/30/2004
Step Description 11. Add a service to allow any access between the network behind Small Office Edition and the
trusted network of the Firebox X. In the Policy Manager, select Edit Add Service, expand the Packet Filters and select the Any service and click Add.
Solution & Interoperability Test Lab Application Notes
©2004 Avaya Inc. All Rights Reserved. 14 of 41
IPO-watchguard.doc
SH; Reviewed: SPOC 12/30/2004
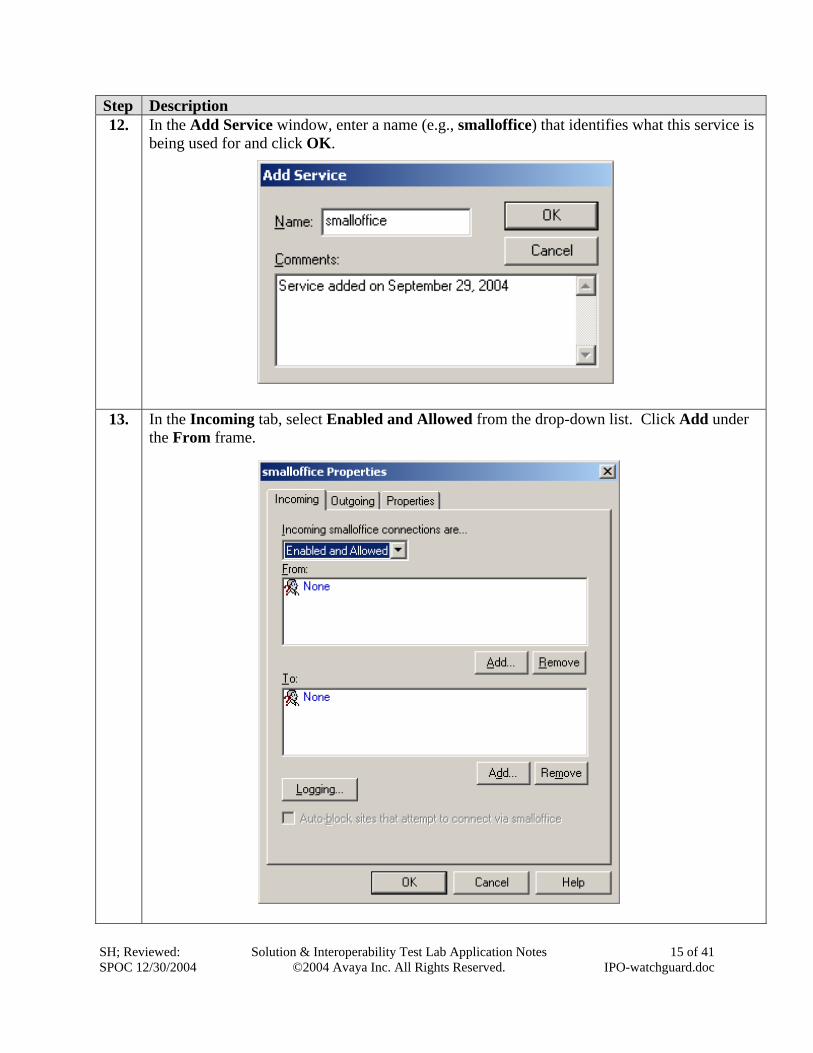
Step Description 12. In the Add Service window, enter a name (e.g., smalloffice) that identifies what this service is
being used for and click OK.
13. In the Incomingthe From frame
tab, select Enabled and Allowed from the drop-down list. Click Add under .
Solution & Interoperability Test Lab Application Notes
©2004 Avaya Inc. All Rights Reserved. 15 of 41
IPO-watchguard.doc
SH; Reviewed: SPOC 12/30/2004
Solution & Interoperability Test Lab Application Notes ©2004 Avaya Inc. All Rights Reserved.
16 of 41 IPO-watchguard.doc
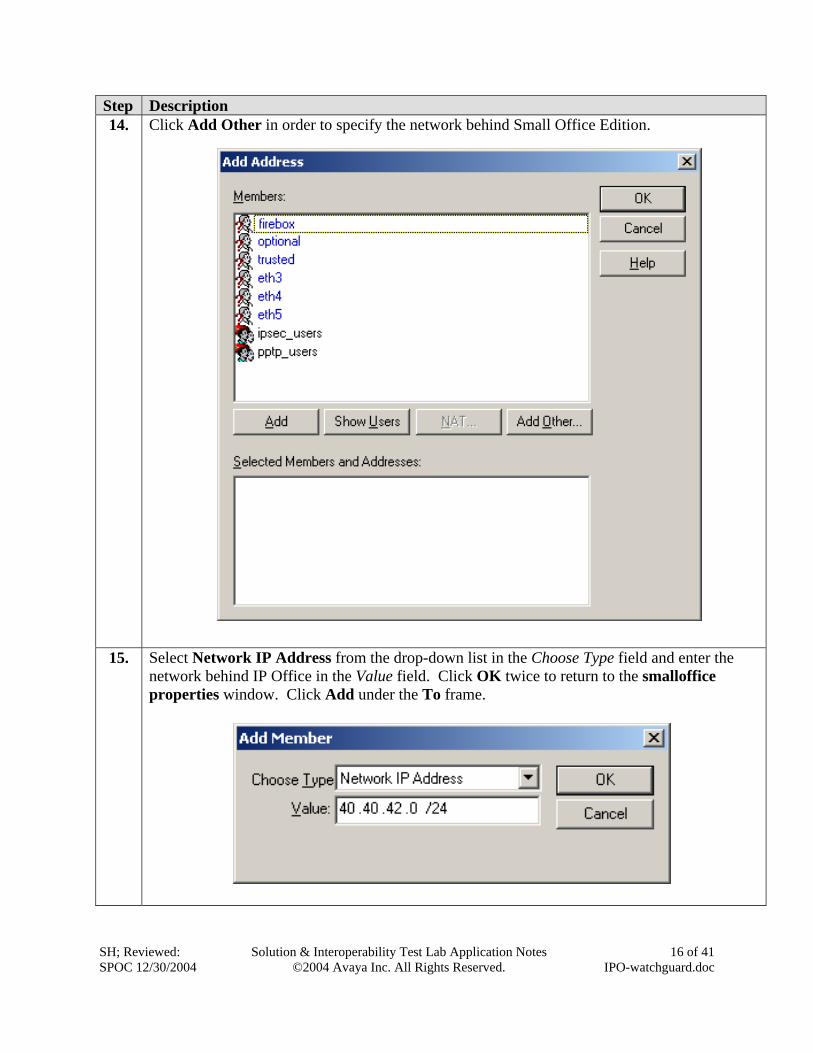
Step Description 14. Click Add Other in order to specify the network behind Small Office Edition.
15. Select Network IP Address from the drop-down list in the Choose Type field and enter the network behind IP Office in the Value field. Click OK twice to return to the smalloffice properties window. Click Add under the To frame.
SH; Reviewed: SPOC 12/30/2004
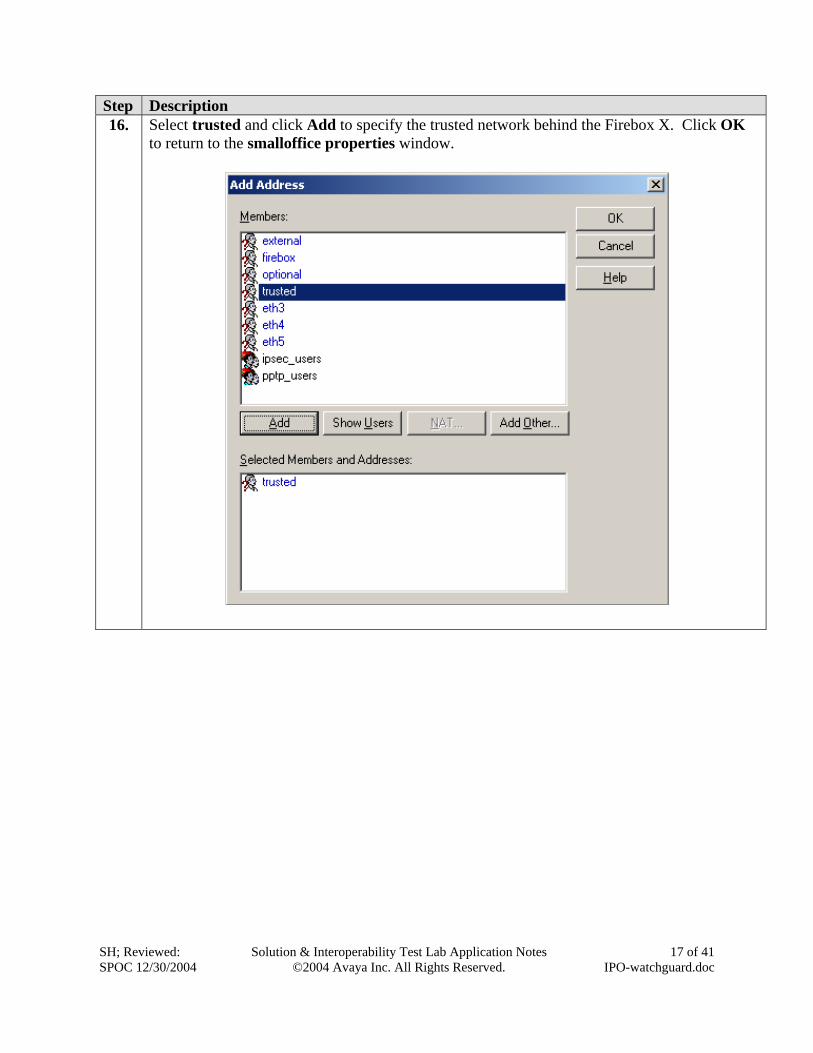
Step Description 16. Select trusted and click Add to specify the trusted network behind the Firebox X. Click OK
to return to the smalloffice properties window.
Solution & Interoperability Test Lab Application Notes
©2004 Avaya Inc. All Rights Reserved. 17 of 41
IPO-watchguard.doc
SH; Reviewed: SPOC 12/30/2004
Solution & Interoperability Test Lab Application Notes ©2004 Avaya Inc. All Rights Reserved.
18 of 41 IPO-watchguard.doc
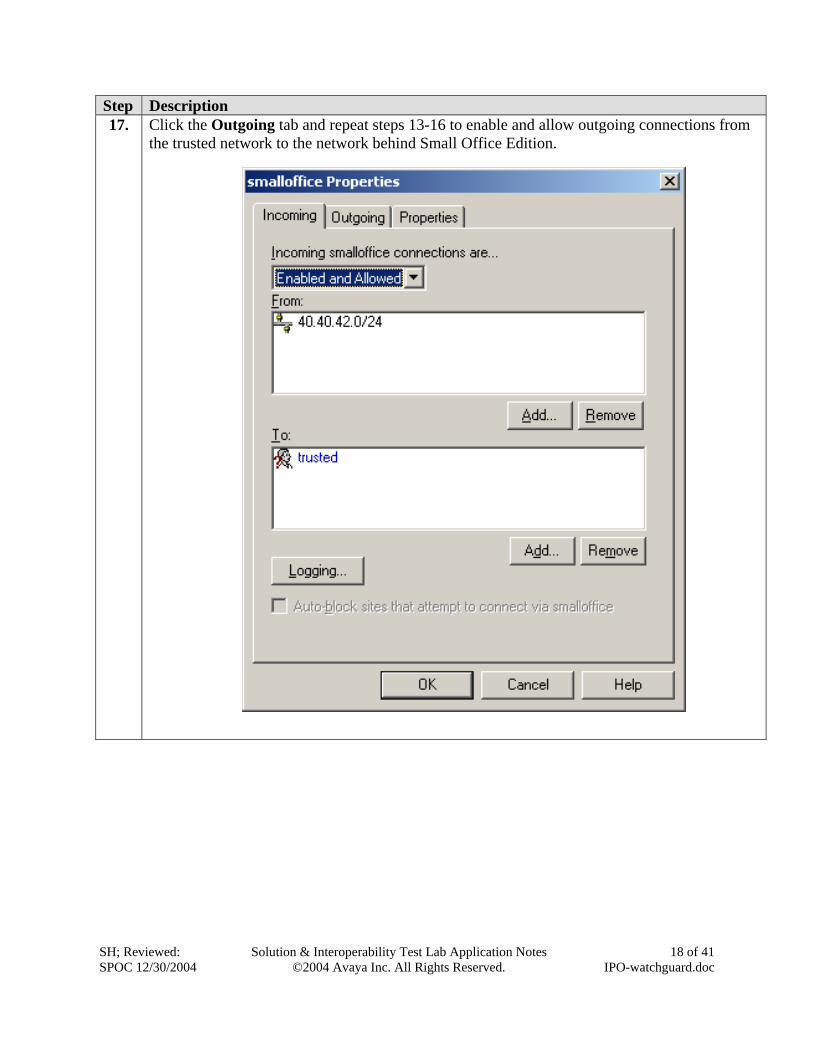
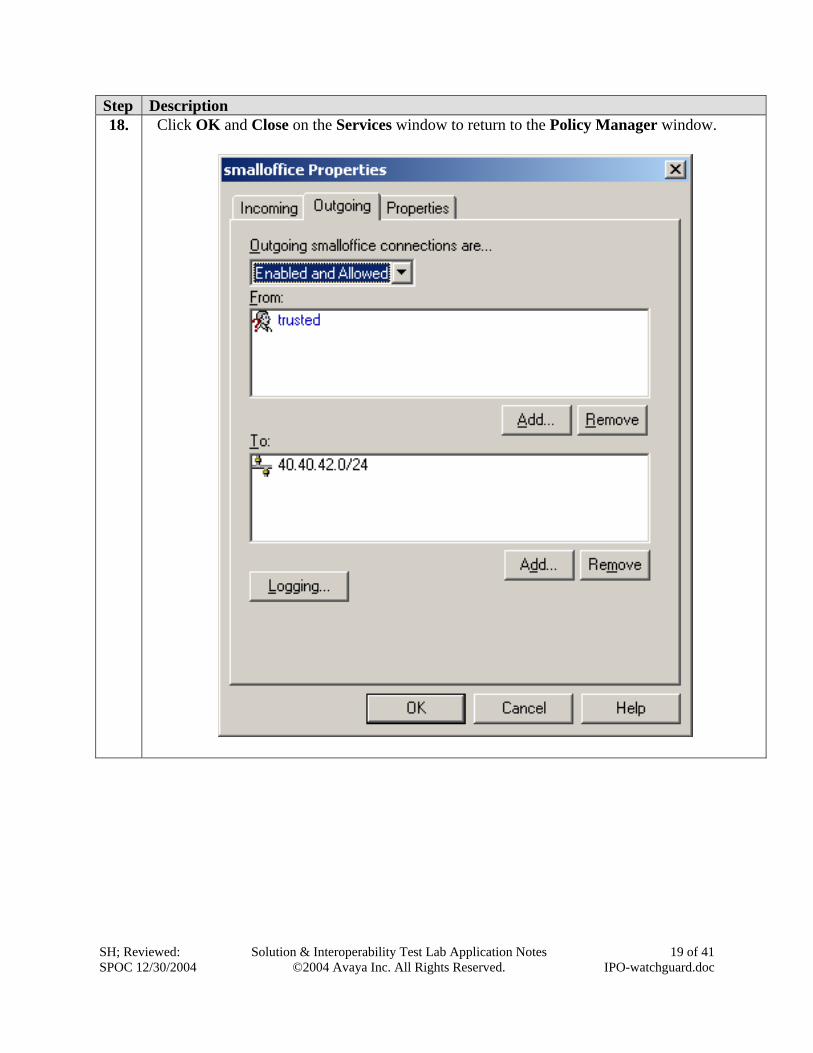
Step Description 17. Click the Outgoing tab and repeat steps 13-16 to enable and allow outgoing connections from
the trusted network to the network behind Small Office Edition.
SH; Reviewed: SPOC 12/30/2004
Solution & Interoperability Test Lab Application Notes ©2004 Avaya Inc. All Rights Reserved.
19 of 41 IPO-watchguard.doc
Step Description 18. Click OK and Close on the Services window to return to the Policy Manager window.

3.3. Configure the WatchGuard SOHO Step Description
1. Open the SOHO 6 Configuration screen by specifying the IP address of private interface of the SOHO 6tc Wireless in a browser window. Click the Manual VPN option on the left pane and click Add to create a VPN tunnel to the IP Office.
SH; Reviewed: SPOC 12/30/2004
Solution & Interoperability Test Lab Application Notes ©2004 Avaya Inc. All Rights Reserved.
20 of 41 IPO-watchguard.doc
e/3
SH; ReviSPOC 12
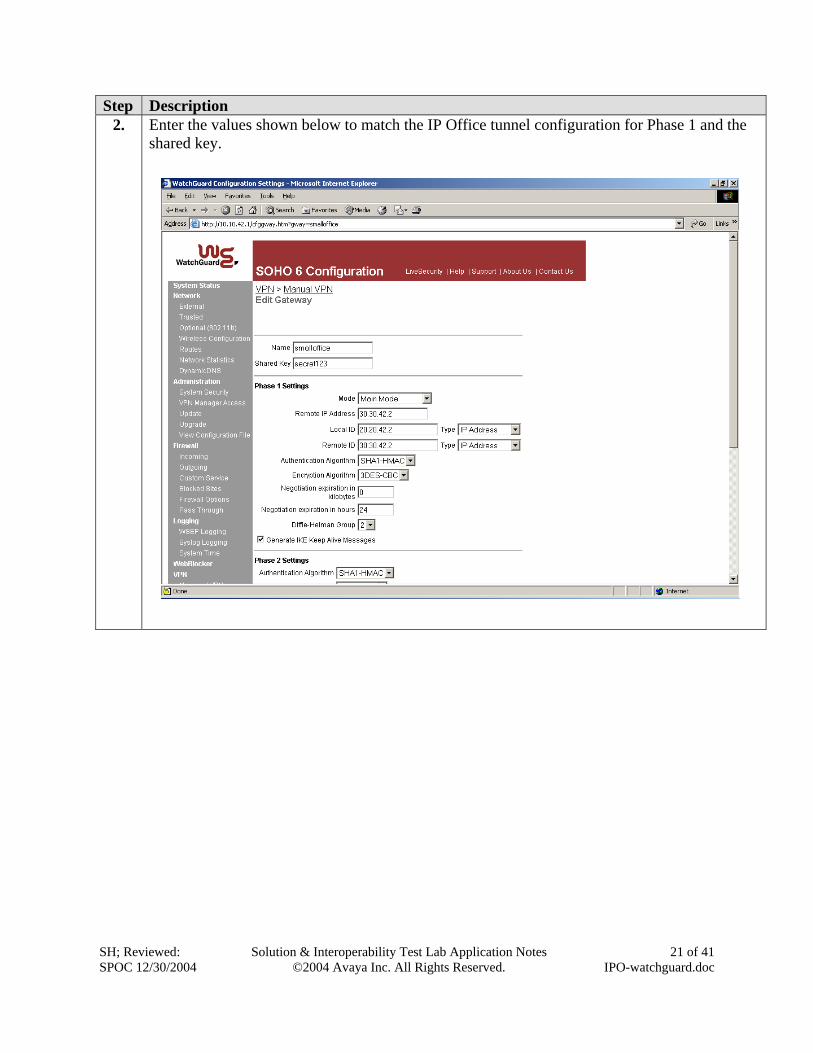
Step Description 2. Enter the values shown below to match the IP Office tunnel configuration for Phase 1 and the
shared key.
wed: 0/2004
Solution & Interoperability Test Lab Application Notes ©2004 Avaya Inc. All Rights Reserved.
21 of 41 IPO-watchguard.doc
SH; Reviewed: SPOC 12/30/2004
Solution & Interoperability Test Lab Application Notes ©2004 Avaya Inc. All Rights Reserved.
22 of 41 IPO-watchguard.doc
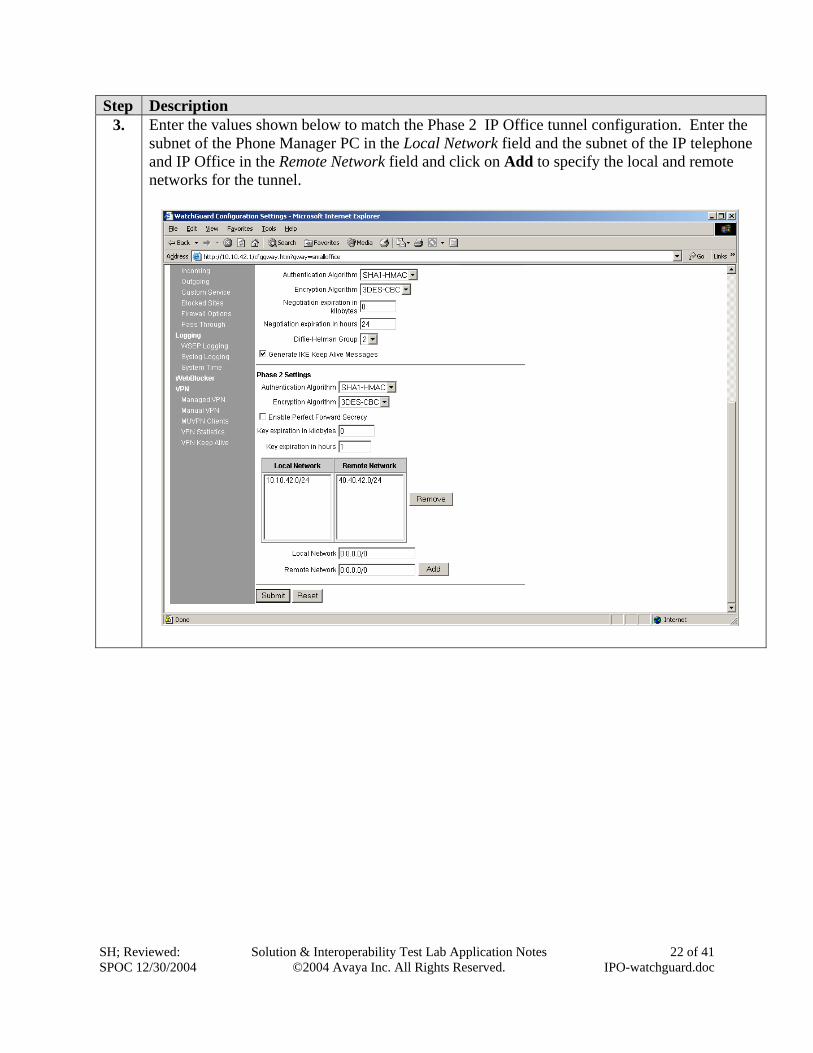
Step Description 3. Enter the values shown below to match the Phase 2 IP Office tunnel configuration. Enter the
subnet of the Phone Manager PC in the Local Network field and the subnet of the IP telephone and IP Office in the Remote Network field and click on Add to specify the local and remote networks for the tunnel.
4. Configuration 2 (VPN tunnel between client and IP Office)
4.1. Configuring Avaya IP Office Step Description
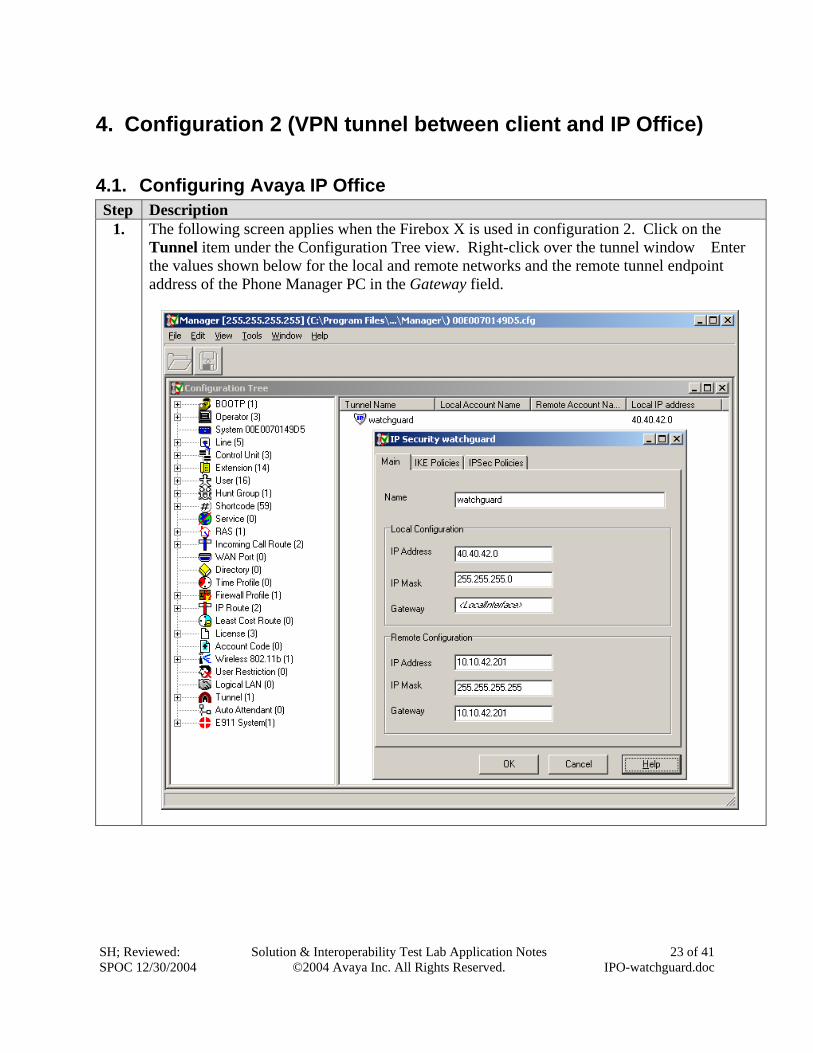
1. The following screen applies when the Firebox X is used in configuration 2. Click on the Tunnel item under the Configuration Tree view. Right-click over the tunnel window Enter the values shown below for the local and remote networks and the remote tunnel endpoint address of the Phone Manager PC in the Gateway field.
SH; Reviewed: SPOC 12/30/2004
Solution & Interoperability Test Lab Application Notes ©2004 Avaya Inc. All Rights Reserved.
23 of 41 IPO-watchguard.doc
SH; Reviewed: SPOC 12/30/2004
Solution & Interoperability Test Lab Application Notes ©2004 Avaya Inc. All Rights Reserved.
24 of 41 IPO-watchguard.doc
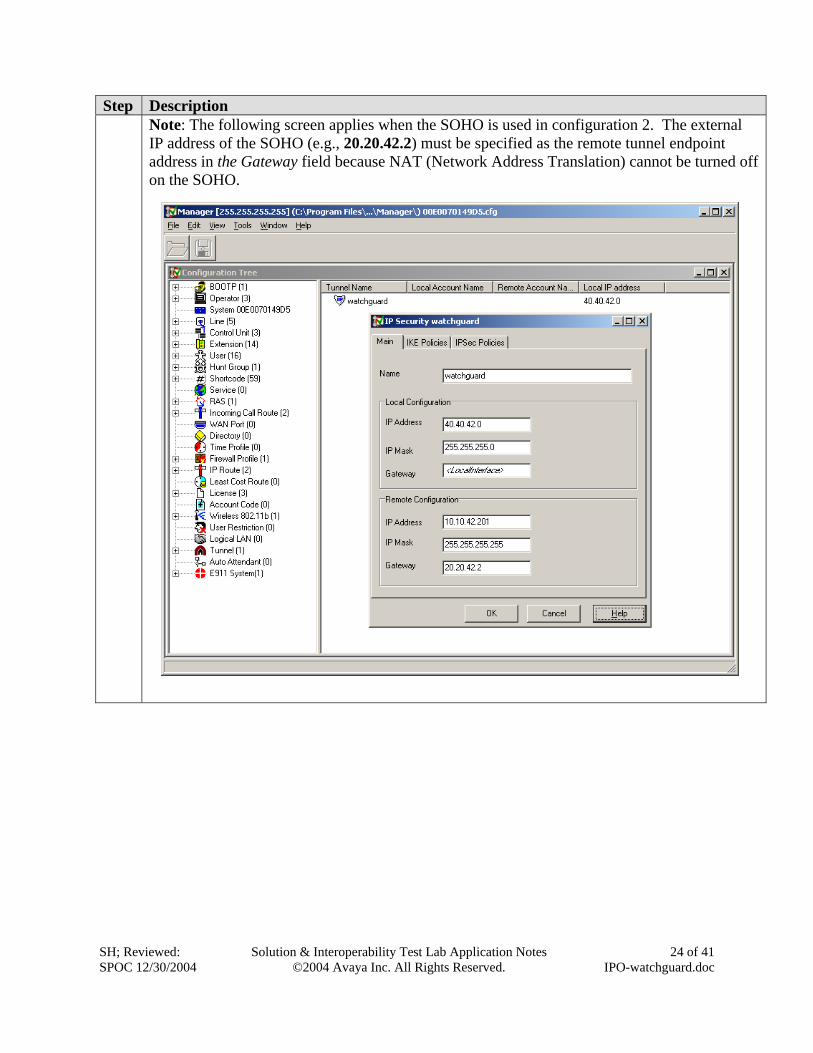
Step Description Note: The following screen applies when the SOHO is used in configuration 2. The external
IP address of the SOHO (e.g., 20.20.42.2) must be specified as the remote tunnel endpoint address in the Gateway field because NAT (Network Address Translation) cannot be turned off on the SOHO.
SH; Reviewed: SPOC 12/30/2004
Solution & Interoperability Test Lab Application Notes ©2004 Avaya Inc. All Rights Reserved.
25 of 41 IPO-watchguard.doc
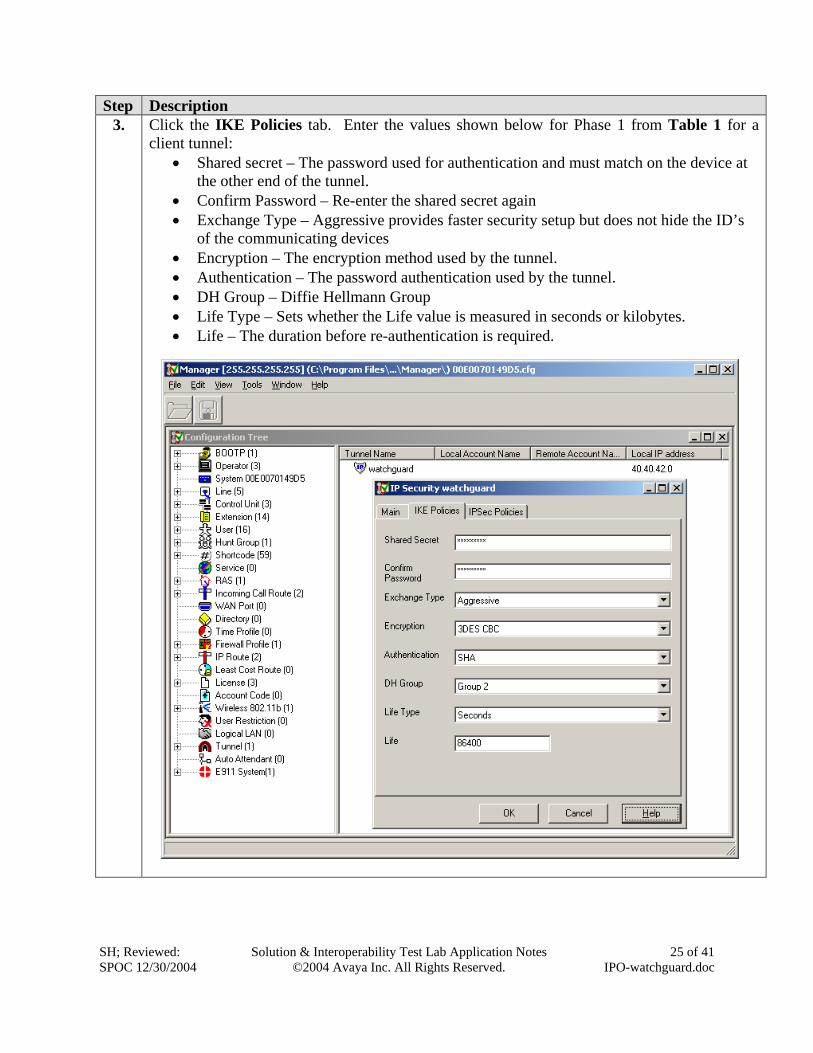
Step Description 3. Click the IKE Policies tab. Enter the values shown below for Phase 1 from Table 1 for a
client tunnel: • Shared secret – The password used for authentication and must match on the device at
the other end of the tunnel. • Confirm Password – Re-enter the shared secret again • Exchange Type – Aggressive provides faster security setup but does not hide the ID’s
of the communicating devices • Encryption – The encryption method used by the tunnel. • Authentication – The password authentication used by the tunnel. • DH Group – Diffie Hellmann Group • Life Type – Sets whether the Life value is measured in seconds or kilobytes. • Life – The duration before re-authentication is required.
SH; Reviewed: SPOC 12/30/2004
Solution & Interoperability Test Lab Application Notes ©2004 Avaya Inc. All Rights Reserved.
26 of 41 IPO-watchguard.doc
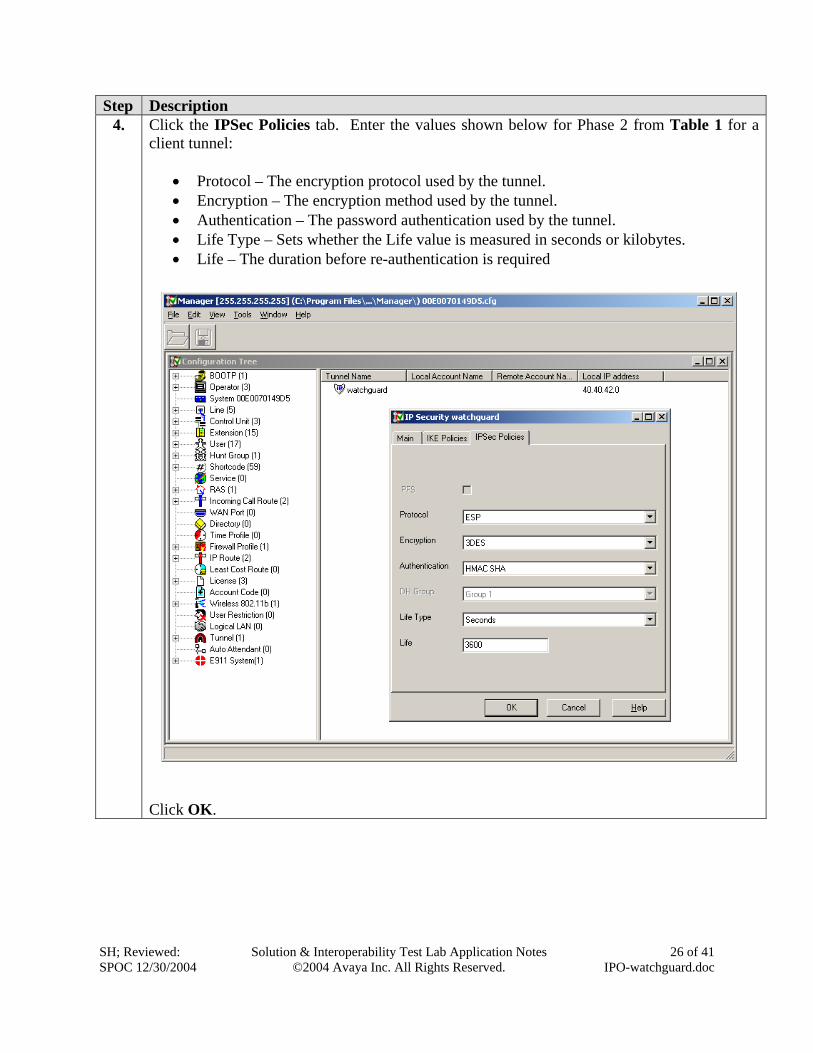
Step Description 4. Click the IPSec Policies tab. Enter the values shown below for Phase 2 from Table 1 for a
client tunnel:
• Protocol – The encryption protocol used by the tunnel. • Encryption – The encryption method used by the tunnel. • Authentication – The password authentication used by the tunnel. • Life Type – Sets whether the Life value is measured in seconds or kilobytes. • Life – The duration before re-authentication is required
Click OK.
4.2. Configure MUVPN Client Step Description
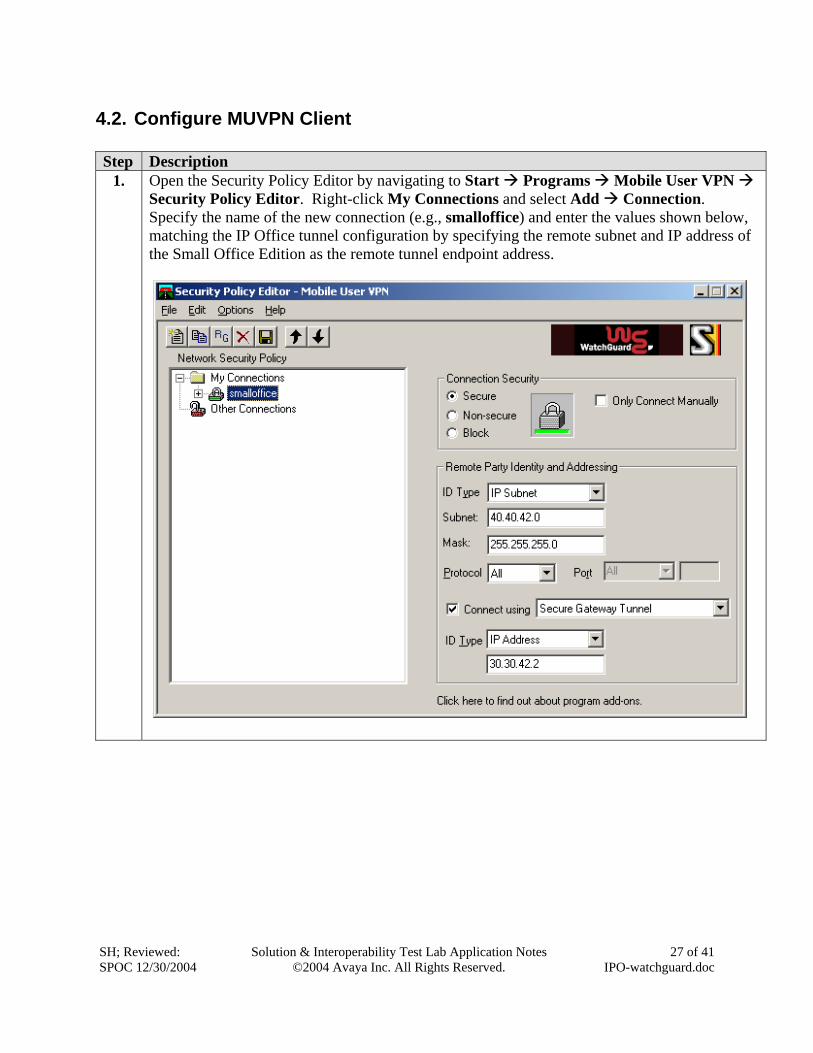
1. Open the Security Policy Editor by navigating to Start Programs Mobile User VPN Security Policy Editor. Right-click My Connections and select Add Connection. Specify the name of the new connection (e.g., smalloffice) and enter the values shown below, matching the IP Office tunnel configuration by specifying the remote subnet and IP address of the Small Office Edition as the remote tunnel endpoint address.
SH; Reviewed: SPOC 12/30/2004
Solution & Interoperability Test Lab Application Notes ©2004 Avaya Inc. All Rights Reserved.
27 of 41 IPO-watchguard.doc
SH; Reviewed: SPOC 12/30/2004
Solution & Interoperability Test Lab Application Notes ©2004 Avaya Inc. All Rights Reserved.
28 of 41 IPO-watchguard.doc
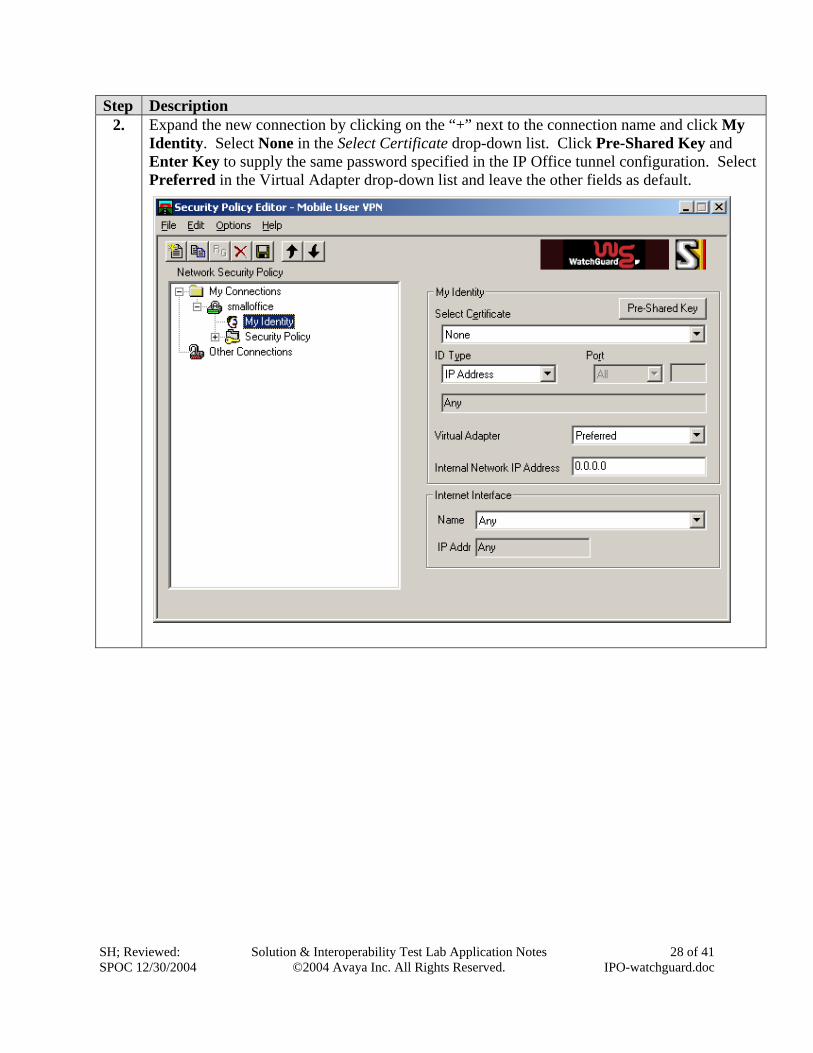
Step Description 2. Expand the new connection by clicking on the “+” next to the connection name and click My
Identity. Select None in the Select Certificate drop-down list. Click Pre-Shared Key and Enter Key to supply the same password specified in the IP Office tunnel configuration. Select Preferred in the Virtual Adapter drop-down list and leave the other fields as default.
SH; Reviewed: SPOC 12/30/2004
Solution & Interoperability Test Lab Application Notes ©2004 Avaya Inc. All Rights Reserved.
29 of 41 IPO-watchguard.doc
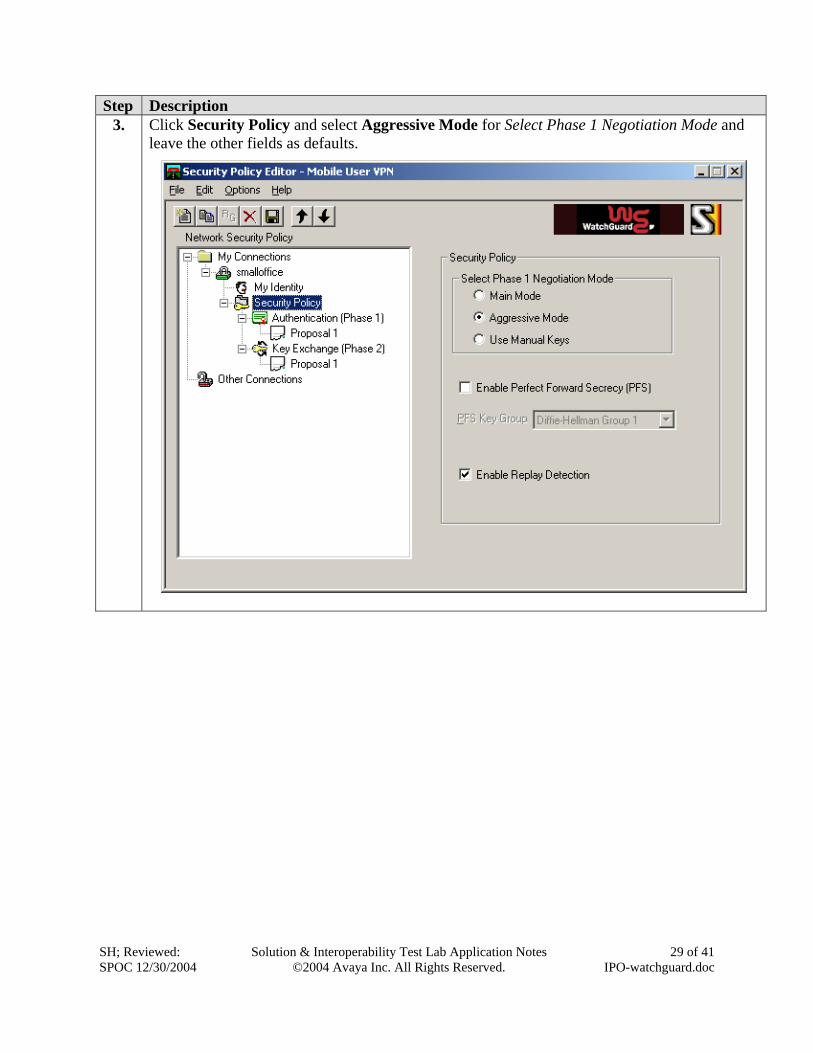
Step Description 3. Click Security Policy and select Aggressive Mode for Select Phase 1 Negotiation Mode and
leave the other fields as defaults.
SH; Reviewed: SPOC 12/30/2004
Solution & Interoperability Test Lab Application Notes ©2004 Avaya Inc. All Rights Reserved.
30 of 41 IPO-watchguard.doc
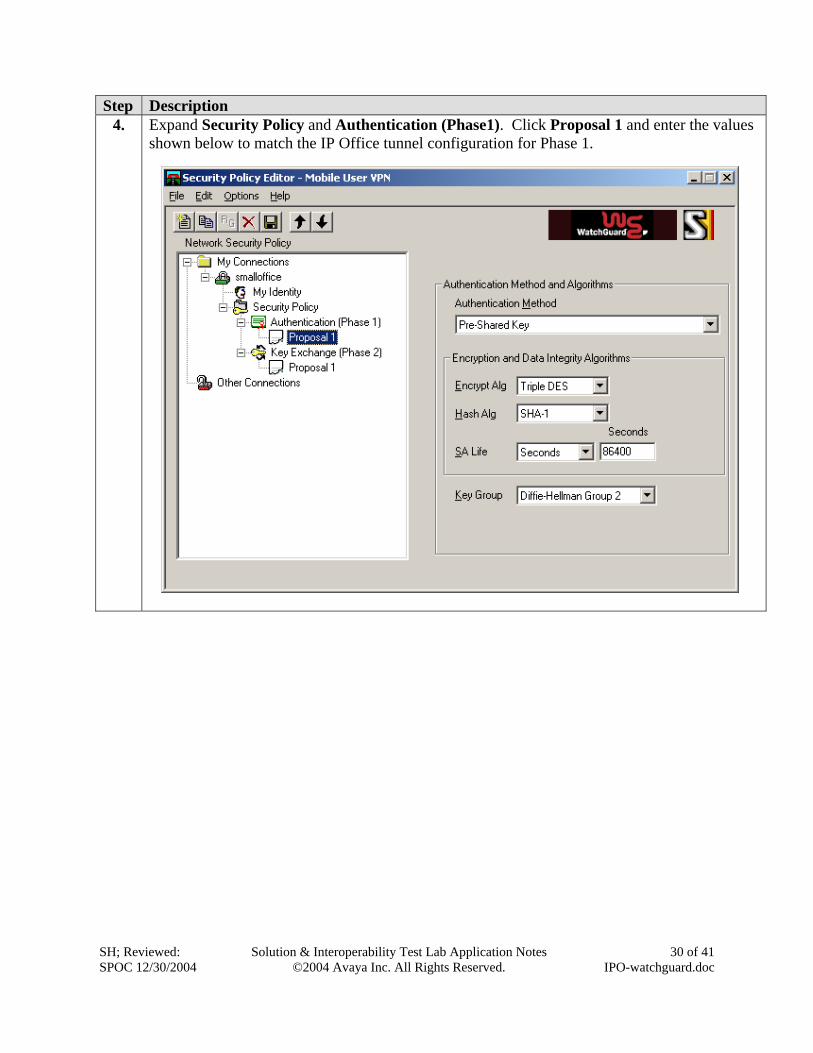
Step Description 4. Expand Security Policy and Authentication (Phase1). Click Proposal 1 and enter the values
shown below to match the IP Office tunnel configuration for Phase 1.
SH; ReviSPOC 12
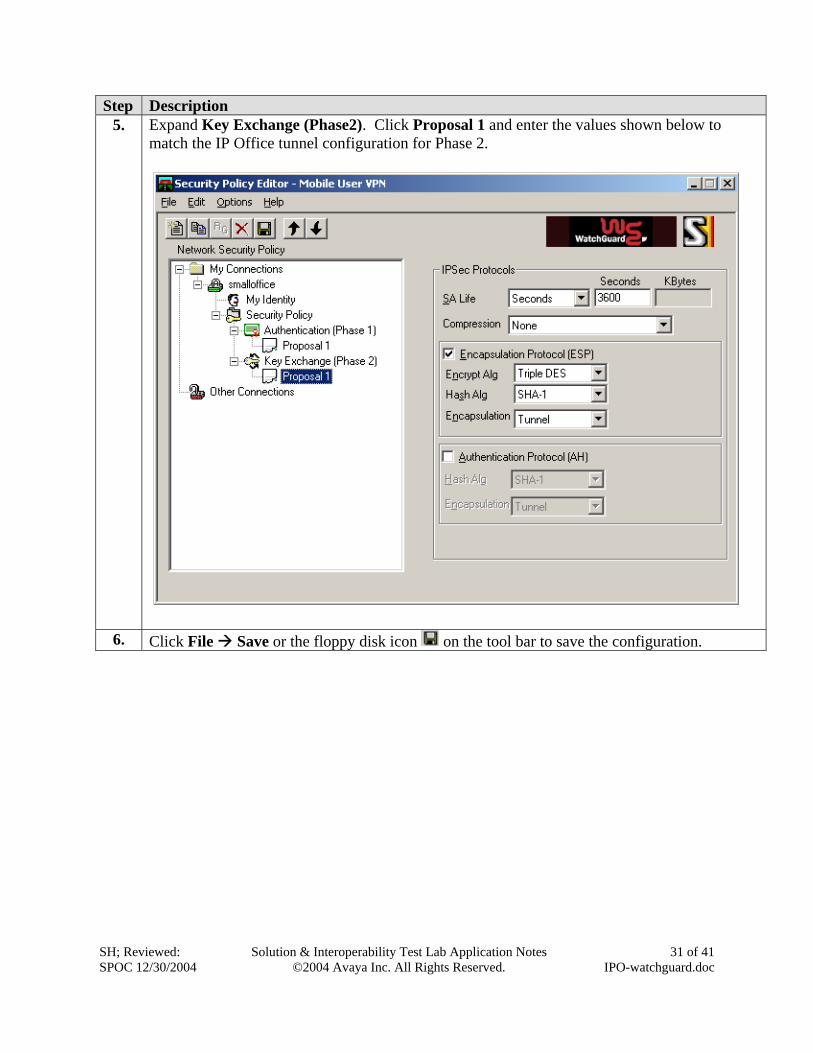
Step Description 5. Expand Key Exchange (Phase2). Click Proposal 1 and enter the values shown below to
match the IP Office tunnel configuration for Phase 2.
6.
ewed: /30/2004
Solution & Interoperability Test Lab Application Notes ©2004 Avaya Inc. All Rights Reserved.
31 of 41 IPO-watchguard.doc
Click File Save or the floppy disk icon on the tool bar to save the configuration.
SH; Reviewed: SPOC 12/30/2004
Solution & Interoperability Test Lab Application Notes ©2004 Avaya Inc. All Rights Reserved.
32 of 41 IPO-watchguard.doc
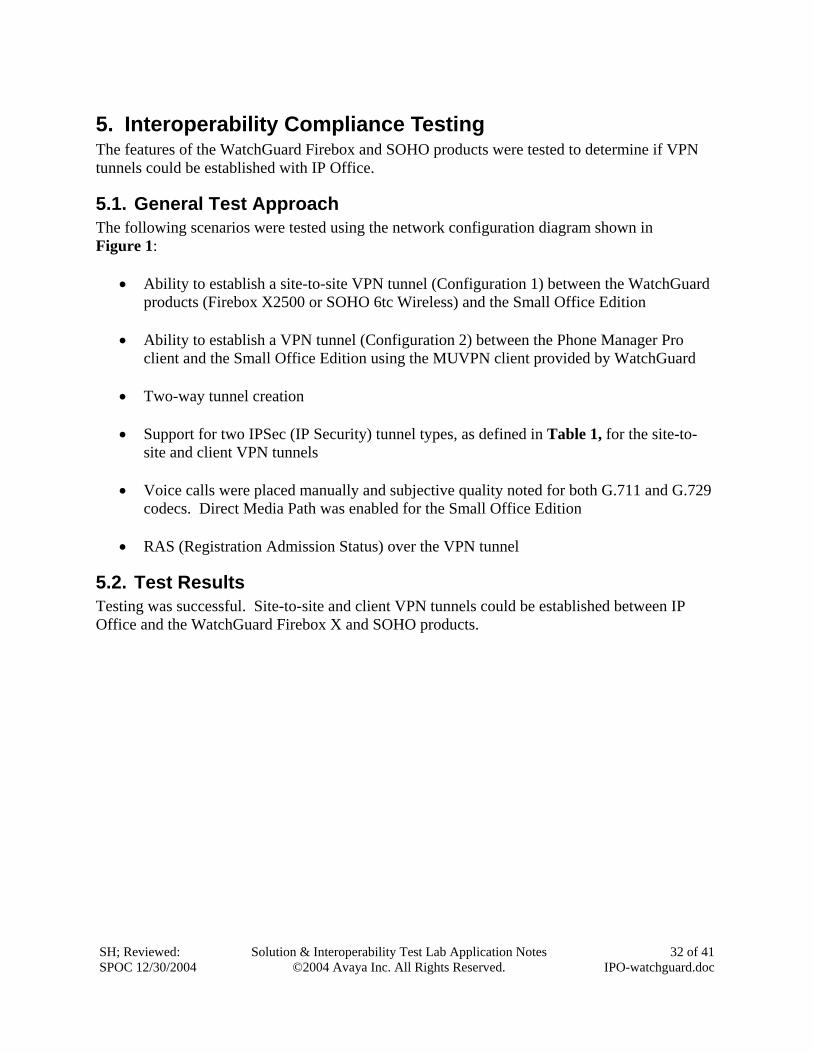
5. Interoperability Compliance Testing The features of the WatchGuard Firebox and SOHO products were tested to determine if VPN tunnels could be established with IP Office.
5.1. General Test Approach The following scenarios were tested using the network configuration diagram shown in Figure 1:
• Ability to establish a site-to-site VPN tunnel (Configuration 1) between the WatchGuard products (Firebox X2500 or SOHO 6tc Wireless) and the Small Office Edition
• Ability to establish a VPN tunnel (Configuration 2) between the Phone Manager Pro
client and the Small Office Edition using the MUVPN client provided by WatchGuard
• Two-way tunnel creation • Support for two IPSec (IP Security) tunnel types, as defined in Table 1, for the site-to-
site and client VPN tunnels
• Voice calls were placed manually and subjective quality noted for both G.711 and G.729 codecs. Direct Media Path was enabled for the Small Office Edition
• RAS (Registration Admission Status) over the VPN tunnel
5.2. Test Results Testing was successful. Site-to-site and client VPN tunnels could be established between IP Office and the WatchGuard Firebox X and SOHO products.
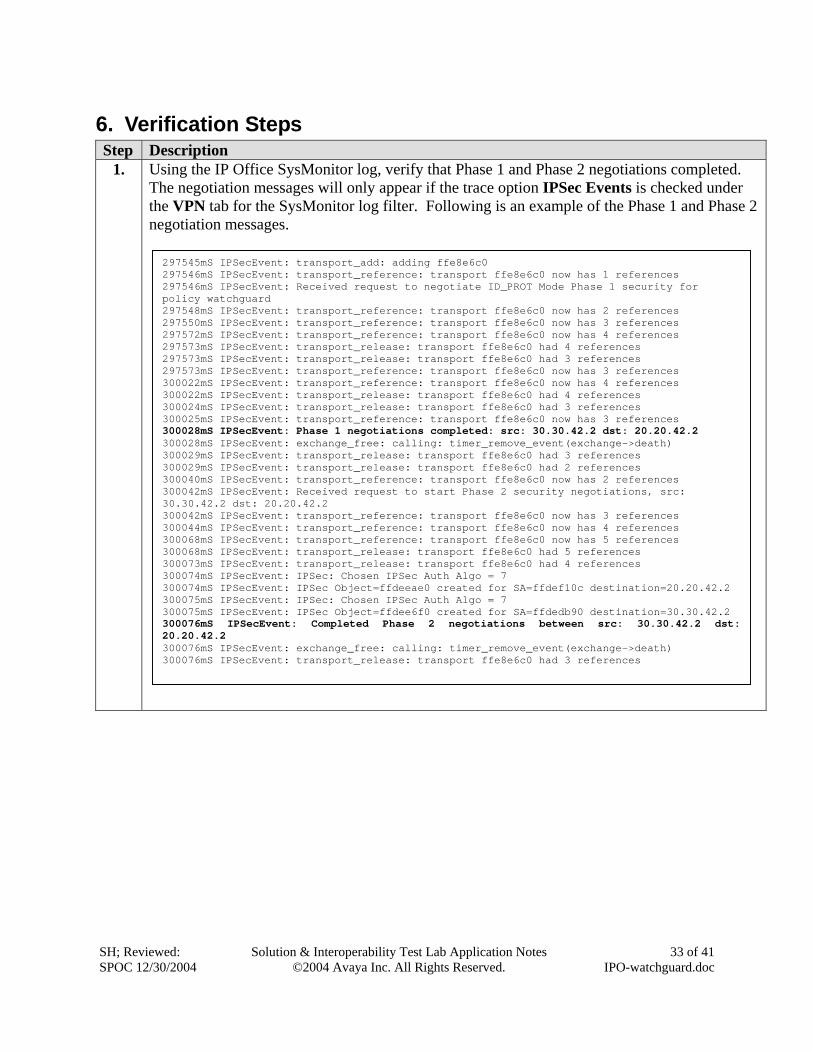
6. Verification Steps Step Description
1. Using the IP Office SysMonitor log, verify that Phase 1 and Phase 2 negotiations completed. The negotiation messages will only appear if the trace option IPSec Events is checked under the VPN tab for the SysMonitor log filter. Following is an example of the Phase 1 and Phase 2 negotiation messages.
SH; RevieSPOC 12/3
297545mS IPSecEvent: transport_add: adding ffe8e6c0 297546mS IPSecEvent: transport_reference: transport ffe8e6c0 now has 1 references 297546mS IPSecEvent: Received request to negotiate ID_PROT Mode Phase 1 security for policy watchguard 297548mS IPSecEvent: transport_reference: transport ffe8e6c0 now has 2 references 297550mS IPSecEvent: transport_reference: transport ffe8e6c0 now has 3 references 297572mS IPSecEvent: transport_reference: transport ffe8e6c0 now has 4 references 297573mS IPSecEvent: transport_release: transport ffe8e6c0 had 4 references 297573mS IPSecEvent: transport_release: transport ffe8e6c0 had 3 references 297573mS IPSecEvent: transport_reference: transport ffe8e6c0 now has 3 references 300022mS IPSecEvent: transport_reference: transport ffe8e6c0 now has 4 references 300022mS IPSecEvent: transport_release: transport ffe8e6c0 had 4 references 300024mS IPSecEvent: transport_release: transport ffe8e6c0 had 3 references 300025mS IPSecEvent: transport_reference: transport ffe8e6c0 now has 3 references 300028mS IPSecEvent: Phase 1 negotiations completed: src: 30.30.42.2 dst: 20.20.42.2 300028mS IPSecEvent: exchange_free: calling: timer_remove_event(exchange->death) 300029mS IPSecEvent: transport_release: transport ffe8e6c0 had 3 references 300029mS IPSecEvent: transport_release: transport ffe8e6c0 had 2 references 300040mS IPSecEvent: transport_reference: transport ffe8e6c0 now has 2 references 300042mS IPSecEvent: Received request to start Phase 2 security negotiations, src: 30.30.42.2 dst: 20.20.42.2 300042mS IPSecEvent: transport_reference: transport ffe8e6c0 now has 3 references 300044mS IPSecEvent: transport_reference: transport ffe8e6c0 now has 4 references 300068mS IPSecEvent: transport_reference: transport ffe8e6c0 now has 5 references 300068mS IPSecEvent: transport_release: transport ffe8e6c0 had 5 references 300073mS IPSecEvent: transport_release: transport ffe8e6c0 had 4 references 300074mS IPSecEvent: IPSec: Chosen IPSec Auth Algo = 7 300074mS IPSecEvent: IPSec Object=ffdeeae0 created for SA=ffdef10c destination=20.20.42.2 300075mS IPSecEvent: IPSec: Chosen IPSec Auth Algo = 7 300075mS IPSecEvent: IPSec Object=ffdee6f0 created for SA=ffdedb90 destination=30.30.42.2 300076mS IPSecEvent: Completed Phase 2 negotiations between src: 30.30.42.2 dst:20.20.42.2 300076mS IPSecEvent: exchange_free: calling: timer_remove_event(exchange->death) 300076mS IPSecEvent: transport_release: transport ffe8e6c0 had 3 references
wed: 0/2004
Solution & Interoperability Test Lab Application Notes ©2004 Avaya Inc. All Rights Reserved.
33 of 41 IPO-watchguard.doc
SH; Reviewed: SPOC 12/30/2004
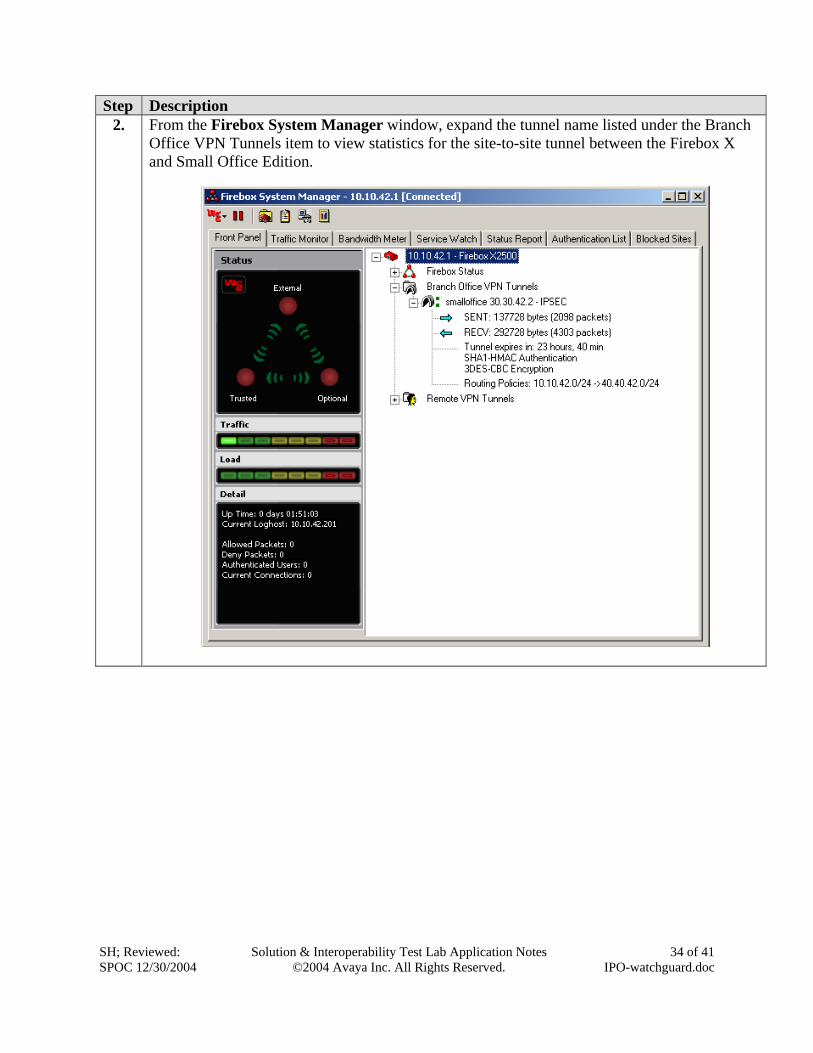
Step Description 2. From the Firebox System Manager window, expand the tunnel name listed under the Branch
Office VPN Tunnels item to view statistics for the site-to-site tunnel between the Firebox X and Small Office Edition.
Solution & Interoperability Test Lab Application Notes
©2004 Avaya Inc. All Rights Reserved. 34 of 41
IPO-watchguard.doc
SH; Reviewed: SPOC 12/30/2004
Solution & Interoperability Test Lab Application Notes ©2004 Avaya Inc. All Rights Reserved.
35 of 41 IPO-watchguard.doc
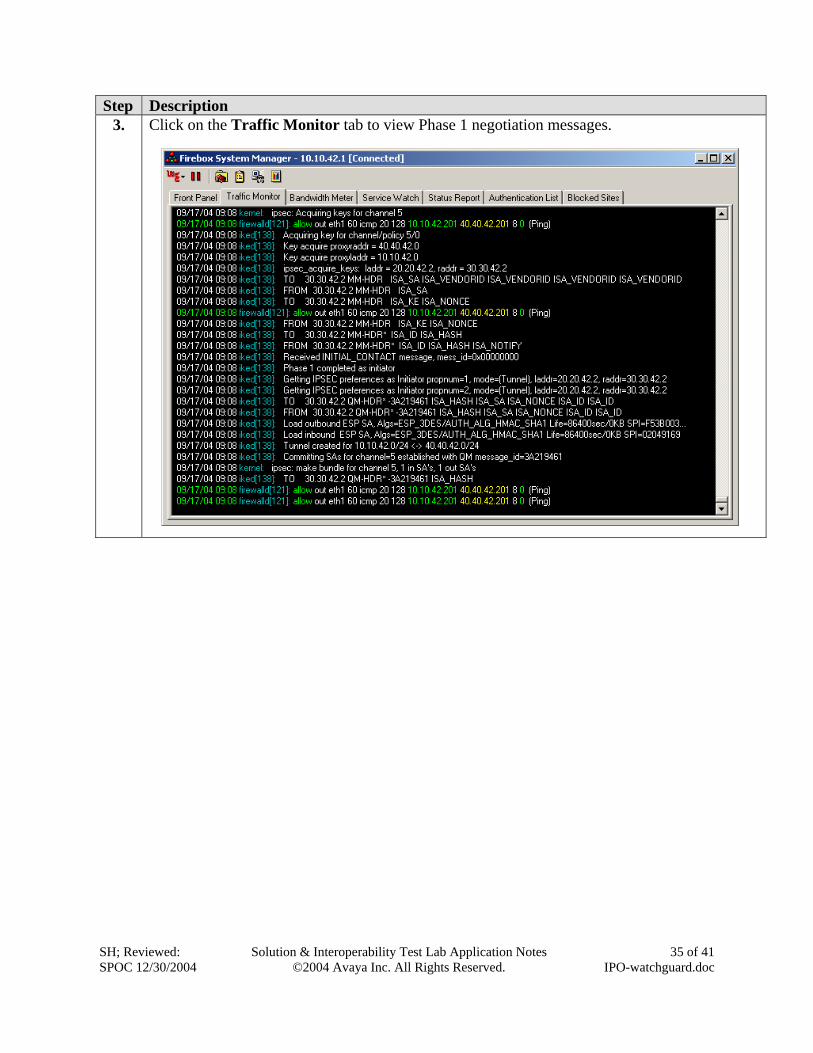
Step Description 3. Click on the Traffic Monitor tab to view Phase 1 negotiation messages.

SH; Reviewed: SPOC 12/30/2004
Solution & Interoperability Test Lab Application Notes ©2004 Avaya Inc. All Rights Reserved.
36 of 41 IPO-watchguard.doc
Step Description 4. From the Firebox System Manager, select Tools Log Viewer or click on the taskbar icon
to view the Phase 1 negotiation message history.
SH; Reviewed: SPOC 12/30/2004
Solution & Interoperability Test Lab Application Notes ©2004 Avaya Inc. All Rights Reserved.
37 of 41 IPO-watchguard.doc
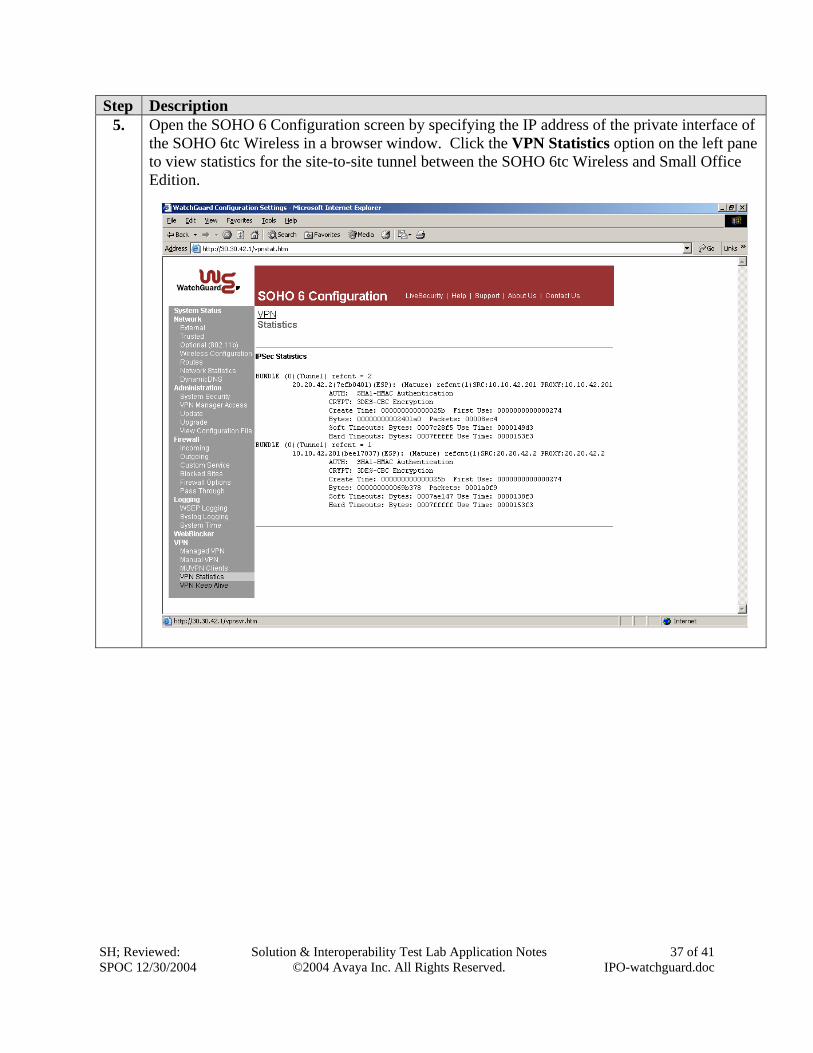
Step Description 5. Open the SOHO 6 Configuration screen by specifying the IP address of the private interface of
the SOHO 6tc Wireless in a browser window. Click the VPN Statistics option on the left pane to view statistics for the site-to-site tunnel between the SOHO 6tc Wireless and Small Office Edition.
SH; Reviewed: SPOC 12/30/2004
Solution & Interoperability Test Lab Application Notes ©2004 Avaya Inc. All Rights Reserved.
38 of 41 IPO-watchguard.doc
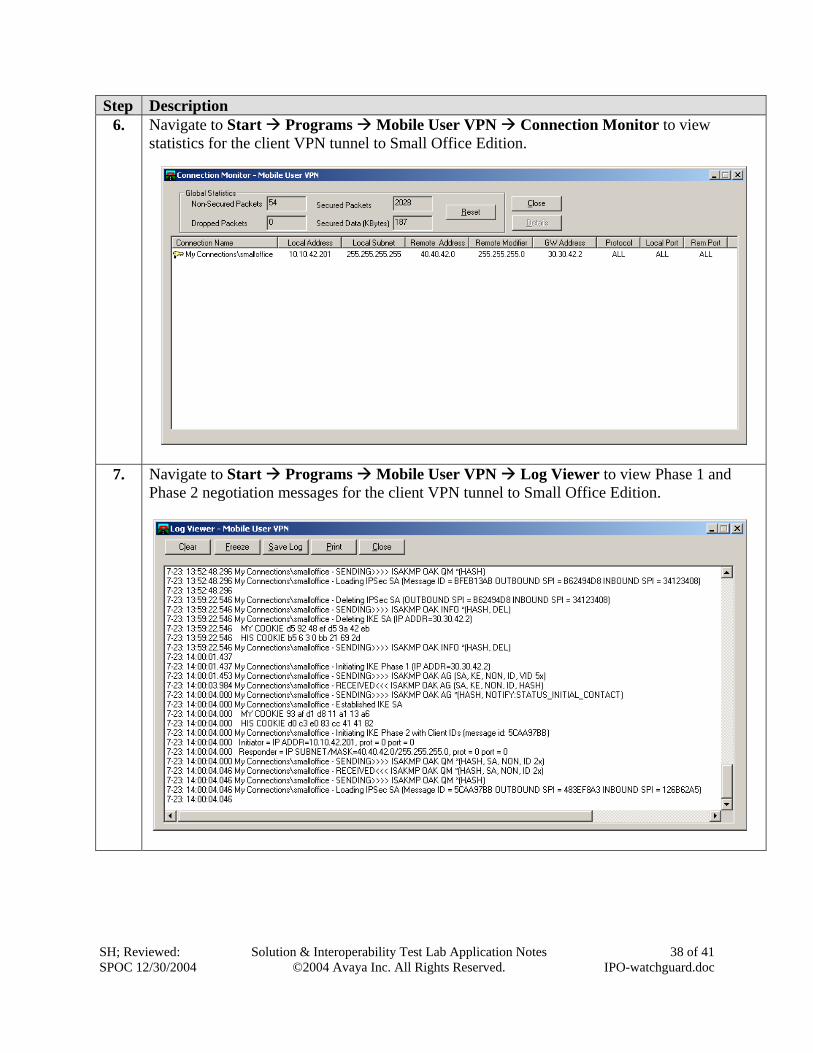
Step Description 6. Navigate to Start Programs Mobile User VPN Connection Monitor to view
statistics for the client VPN tunnel to Small Office Edition.
7. Navigate to Start Programs Mobile User VPN Log Viewer to view Phase 1 and Phase 2 negotiation messages for the client VPN tunnel to Small Office Edition.
SH; Reviewed: SPOC 12/30/2004
Solution & Interoperability Test Lab Application Notes ©2004 Avaya Inc. All Rights Reserved.
39 of 41 IPO-watchguard.doc
7. Support For technical support on WatchGuard, visit http://www.watchguard.com/support.
8. Conclusion The configuration of site-to-site VPN tunnels between the Avaya IP Office and WatchGuard Firebox X and SOHO products as well as client VPN tunnels to IP Office has been successfully compliance tested.
SH; Reviewed: SPOC 12/30/2004
Solution & Interoperability Test Lab Application Notes ©2004 Avaya Inc. All Rights Reserved.
40 of 41 IPO-watchguard.doc
9. References [1] WatchGuard Firebox X Reviewer’s Guide, April 2004 [2] WatchGuard System Manager User Guide, 2004. [3] WatchGuard Firebox SOHO 6 Wireless User Guide, Firmware Version 6.3, 2003 [4] ExtremeWare Software User Guide, Software Version 6.2.1, April 2002; Document Number:
100049-00 Rev.05 [5] Avaya IP Office 2.1 Manager Application, Issue 15c, 6th May 2004; Document Number:
40DHB0002USAU [6] Avaya P333R Installation and Configuration Guide, Software Version 4.0, April 2003
SH; Reviewed: SPOC 12/30/2004
Solution & Interoperability Test Lab Application Notes ©2004 Avaya Inc. All Rights Reserved.
41 of 41 IPO-watchguard.doc
©2004 Avaya Inc. All Rights Reserved. Avaya and the Avaya Logo are trademarks of Avaya Inc. All trademarks identified by ® and ™ are registered trademarks or trademarks, respectively, of Avaya Inc. All other trademarks are the property of their respective owners. The information provided in these Application Notes is subject to change without notice. The configurations, technical data, and recommendations provided in these Application Notes are believed to be accurate and dependable, but are presented without express or implied warranty. Users are responsible for their application of any products specified in these Application Notes. Please e-mail any questions or comments pertaining to these Application Notes along with the full title name and filename, located in the lower right corner, directly to the Avaya DeveloperConnection Program at [email protected].


