Embed Size (px)
Citation preview
Cisco IOS Software C
C H A P T E R 16
Configuring FiltersThis chapter describes how to configure and manage MAC address, IP, and EtherType filters on the access point using the web-browser interface.
16-1onfiguration Guide for Cisco Aironet Access Points
Chapter 16 Configuring FiltersUnderstanding Filters
Understanding FiltersProtocol filters (IP protocol, IP port, and EtherType) prevent or allow the use of specific protocols through the access point’s Ethernet and radio ports. You can set up individual protocol filters or sets of filters. You can filter protocols for wireless client devices, users on the wired LAN, or both. For example, an SNMP filter on the access point’s radio port prevents wireless client devices from using SNMP with or through the access point but does not block SNMP access from the wired LAN.
IP address and MAC address filters allow or disallow the forwarding of unicast and multicast packets either sent from or addressed to specific IP or MAC addresses. You can create a filter that passes traffic to all addresses except those you specify, or you can create a filter that blocks traffic to all addresses except those you specify.
You can configure filters using the web-browser interface or by entering commands in the CLI.
Tip You can include filters in the access point’s QoS policies. Refer to Chapter 15, “Configuring QoS,”for detailed instructions on setting up QoS policies.
Note Using the CLI, you can configure up to 2,048 MAC addresses for filtering. Using the web-browser interface, however, you can configure only up to 43 MAC addresses for filtering.
Configuring Filters Using the CLITo configure filters using CLI commands, you use access control lists (ACLs) and bridge groups.
• For more information on bridge groups, see the Configuring Transparent Bridging chapter in the Bridging and IBM Networking Configuration Guide, at the following URL:http://www.cisco.com/c/en/us/td/docs/ios/bridging/configuration/guide/15-s/br-15-s-book/br_transprnt_brdg.html
• For more information on access control lists (ACLs), see the IP Access List Overview chapter, in the Security Configuration Guide, at the following URL:http://www.cisco.com/c/en/us/td/docs/ios-xml/ios/sec_data_acl/configuration/12-4t/sec-data-acl-12-4t-book/sec-access-list-ov.html
Note Avoid using both the CLI and the web-browser interfaces to configure the wireless device. If you configure the wireless device using the CLI, the web-browser interface might display an inaccurate interpretation of the configuration. However, the inaccuracy does not necessarily mean that the wireless device is misconfigured. For example, if you configure ACLs using the CLI, the web-browser interface might display this message: “Filter 700 was configured on interface Dot11Radio0 using CLI. It must be cleared via CLI to ensure proper operation of the web interface.” If you see this message you should use the CLI to delete the ACLs and use the web-browser interface to reconfigure them.
16-2Cisco IOS Software Configuration Guide for Cisco Aironet Access Points
Chapter 16 Configuring FiltersConfiguring Filters Using the Web-Browser Interface
Configuring Filters Using the Web-Browser InterfaceThis section describes how to configure and enable filters using the web-browser interface. You complete two steps to configure and enable a filter:
1. Name and configure the filter using the filter setup pages.
2. Enable the filter using the Apply Filters page.
Configuring and Enabling MAC Address FiltersMAC address filters allow or disallow the forwarding of unicast and multicast packets either sent from or addressed to specific MAC addresses. You can create a filter that passes traffic to all MAC addresses except those you specify, or you can create a filter that blocks traffic to all MAC addresses except those you specify. You can apply the filters you create to either or both the Ethernet and radio ports and to either or both incoming and outgoing packets.
Note Using the CLI, you can configure MAC addresses for filtering, but because of a NVRAM limitation, you need FTP or TFTP for more than 600 MAC filters. Using the web-browser interface, however, you can configure only up to 43 MAC addresses for filtering.
Note MAC address filters are powerful, and if you make a mistake setting up the filters, you can lock yourself out of the access point while connecting to the AP using Telnet. If you accidentally lock yourself out of your access point, use the CLI from the console interface to disable the filters.
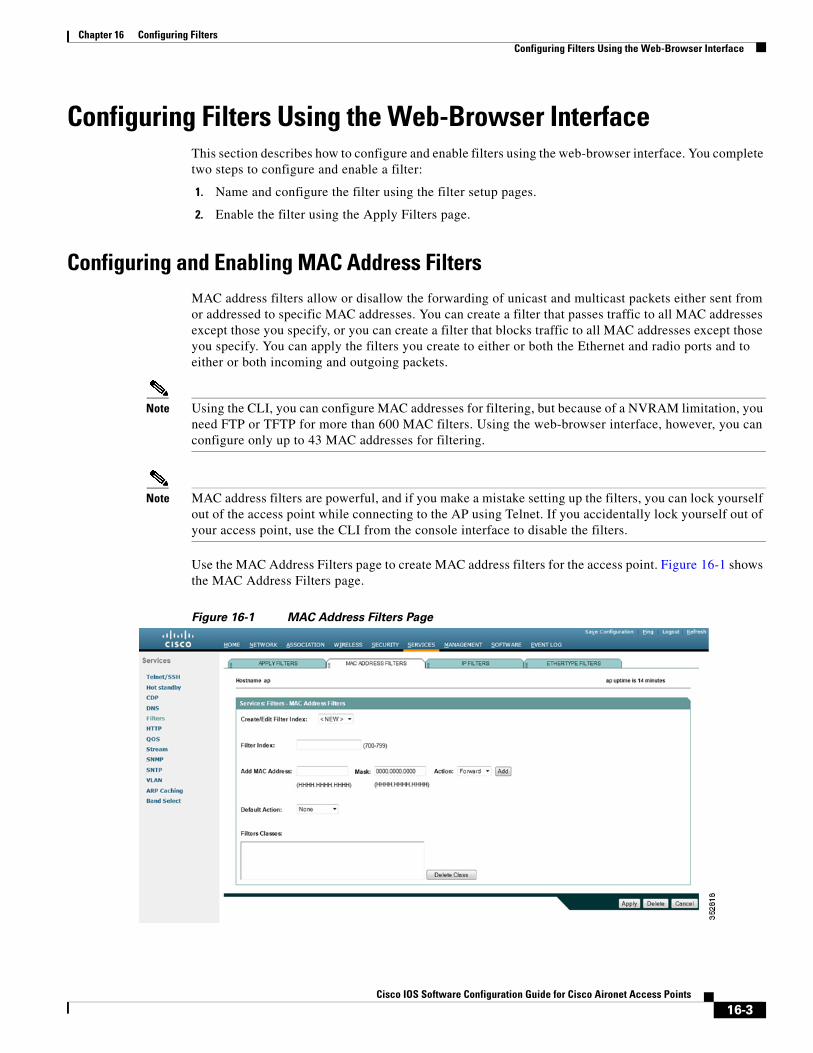
Use the MAC Address Filters page to create MAC address filters for the access point. Figure 16-1 shows the MAC Address Filters page.
Figure 16-1 MAC Address Filters Page
16-3Cisco IOS Software Configuration Guide for Cisco Aironet Access Points
Chapter 16 Configuring FiltersConfiguring Filters Using the Web-Browser Interface
Follow this link path to reach the Address Filters page:
1. Click Services in the page navigation bar.
2. In the Services page list, click Filters.
3. On the Apply Filters page, click the MAC Address Filters tab at the top of the page.
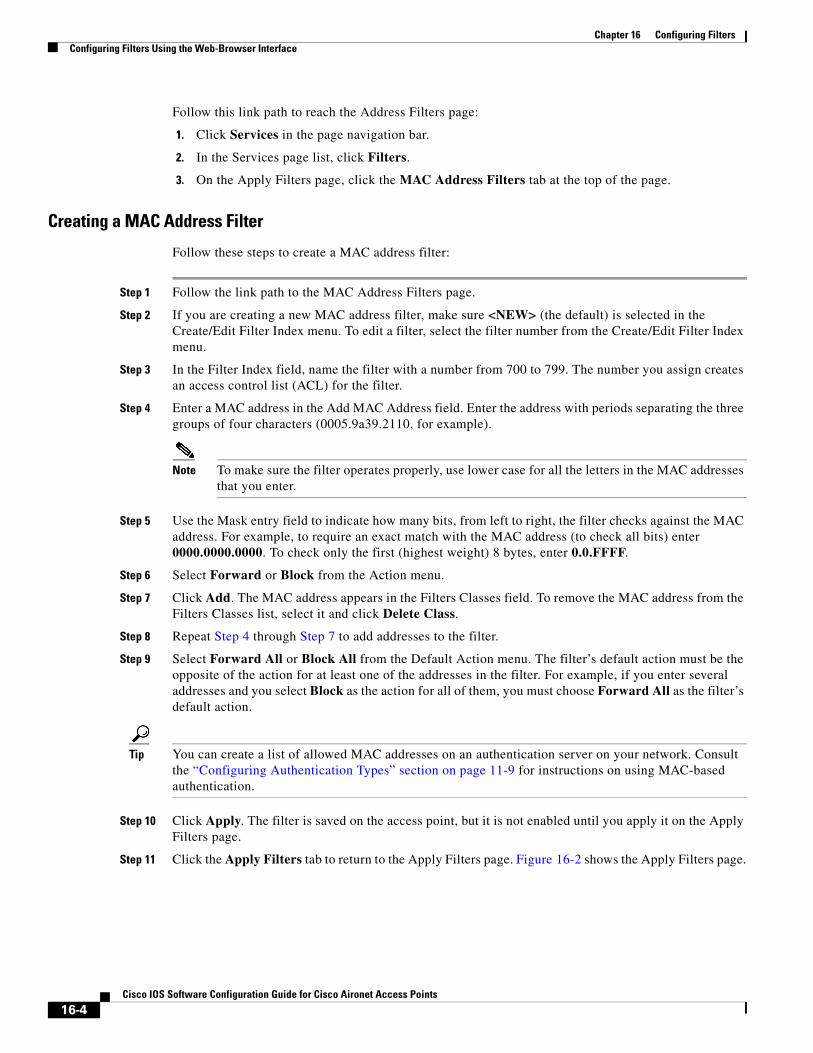
Creating a MAC Address Filter
Follow these steps to create a MAC address filter:
Step 1 Follow the link path to the MAC Address Filters page.
Step 2 If you are creating a new MAC address filter, make sure <NEW> (the default) is selected in the Create/Edit Filter Index menu. To edit a filter, select the filter number from the Create/Edit Filter Index menu.
Step 3 In the Filter Index field, name the filter with a number from 700 to 799. The number you assign creates an access control list (ACL) for the filter.
Step 4 Enter a MAC address in the Add MAC Address field. Enter the address with periods separating the three groups of four characters (0005.9a39.2110, for example).
Note To make sure the filter operates properly, use lower case for all the letters in the MAC addresses that you enter.
Step 5 Use the Mask entry field to indicate how many bits, from left to right, the filter checks against the MAC address. For example, to require an exact match with the MAC address (to check all bits) enter 0000.0000.0000. To check only the first (highest weight) 8 bytes, enter 0.0.FFFF.
Step 6 Select Forward or Block from the Action menu.
Step 7 Click Add. The MAC address appears in the Filters Classes field. To remove the MAC address from the Filters Classes list, select it and click Delete Class.
Step 8 Repeat Step 4 through Step 7 to add addresses to the filter.
Step 9 Select Forward All or Block All from the Default Action menu. The filter’s default action must be the opposite of the action for at least one of the addresses in the filter. For example, if you enter several addresses and you select Block as the action for all of them, you must choose Forward All as the filter’s default action.
Tip You can create a list of allowed MAC addresses on an authentication server on your network. Consult the “Configuring Authentication Types” section on page 11-9 for instructions on using MAC-based authentication.
Step 10 Click Apply. The filter is saved on the access point, but it is not enabled until you apply it on the Apply Filters page.
Step 11 Click the Apply Filters tab to return to the Apply Filters page. Figure 16-2 shows the Apply Filters page.
16-4Cisco IOS Software Configuration Guide for Cisco Aironet Access Points
Chapter 16 Configuring FiltersConfiguring Filters Using the Web-Browser Interface
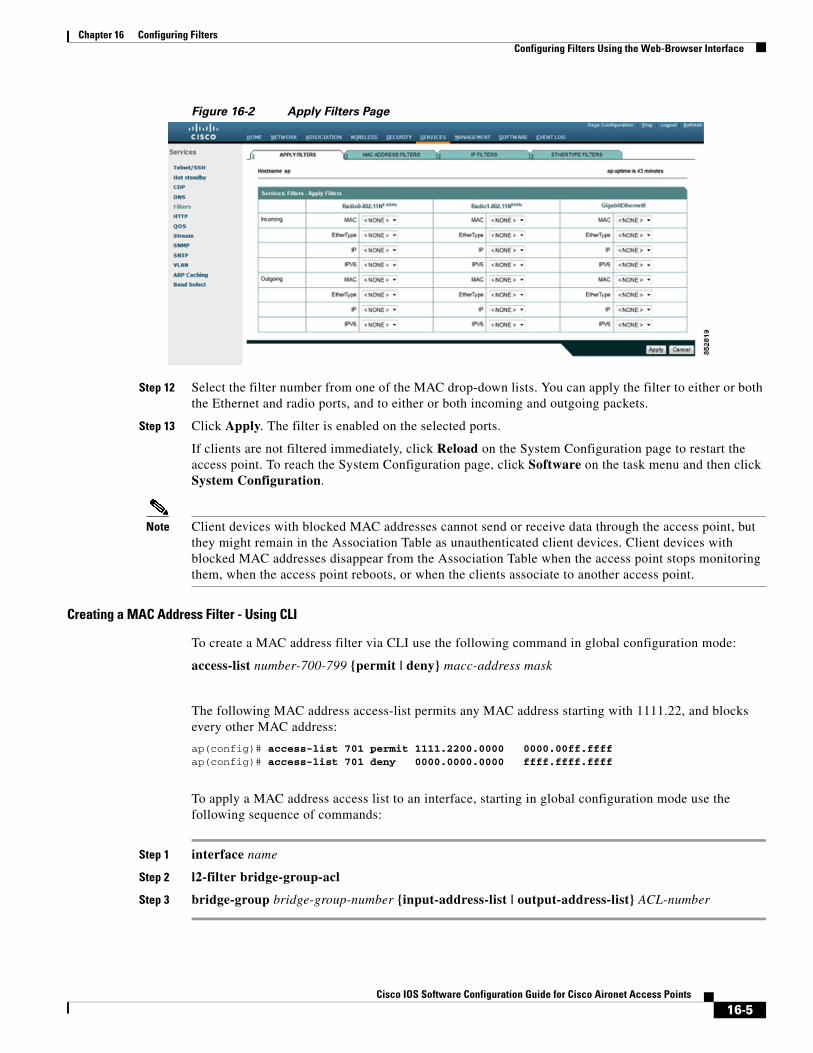
Figure 16-2 Apply Filters Page
Step 12 Select the filter number from one of the MAC drop-down lists. You can apply the filter to either or both the Ethernet and radio ports, and to either or both incoming and outgoing packets.
Step 13 Click Apply. The filter is enabled on the selected ports.
If clients are not filtered immediately, click Reload on the System Configuration page to restart the access point. To reach the System Configuration page, click Software on the task menu and then click System Configuration.
Note Client devices with blocked MAC addresses cannot send or receive data through the access point, but they might remain in the Association Table as unauthenticated client devices. Client devices with blocked MAC addresses disappear from the Association Table when the access point stops monitoring them, when the access point reboots, or when the clients associate to another access point.
Creating a MAC Address Filter - Using CLI
To create a MAC address filter via CLI use the following command in global configuration mode:
access-list number-700-799 {permit | deny} macc-address mask
The following MAC address access-list permits any MAC address starting with 1111.22, and blocks every other MAC address:
ap(config)# access-list 701 permit 1111.2200.0000 0000.00ff.ffffap(config)# access-list 701 deny 0000.0000.0000 ffff.ffff.ffff
To apply a MAC address access list to an interface, starting in global configuration mode use the following sequence of commands:
Step 1 interface name
Step 2 l2-filter bridge-group-acl
Step 3 bridge-group bridge-group-number {input-address-list | output-address-list} ACL-number
16-5Cisco IOS Software Configuration Guide for Cisco Aironet Access Points
Chapter 16 Configuring FiltersConfiguring Filters Using the Web-Browser Interface
The following example applies the MAC address access list 701 created above to the Radio 0 interface, in the inbound direction. However, no VLAN was created on the interface, and so the ACL is applied to the default bridge group 1:
ap(config)# interface dot11Radio 0ap(config-if)# l2-filter bridge-group-aclap(config-if)# bridge-group 1 input-address-list 701
In the following example, a VLAN 33 was created and associated to Radio 1. The matching bridge group 33 was created between the radio 1 subinterface 33 and the Ethernet subinterface 33. The MAC address filter is applied to the outgoing direction on radio 1 subinterface 33:
ap(config)# interface Dot11Radio1ap(config-if)# l2-filter bridge-group-aclap(config-if)# exitap(config)# interface Dot11Radio1.33ap(config-if)# bridge-group 33 output-address-list 701
Using MAC Address ACLs to Block or Allow Client Association to the Access Point
You can use MAC address ACLs to block or allow association to the access point. Instead of filtering traffic across an interface, you use the ACL to filter associations to the access point radio.
Follow these steps to use an ACL to filter associations to the access point radio:
Step 1 Follow Steps 1 through 10 in the “Creating a MAC Address Filter” section on page 16-4 to create an ACL. For MAC addresses that you want to allow to associate, select Forward from the Action menu. Select Block for addresses that you want to prevent from associating. Select Block All from the Default Action menu.
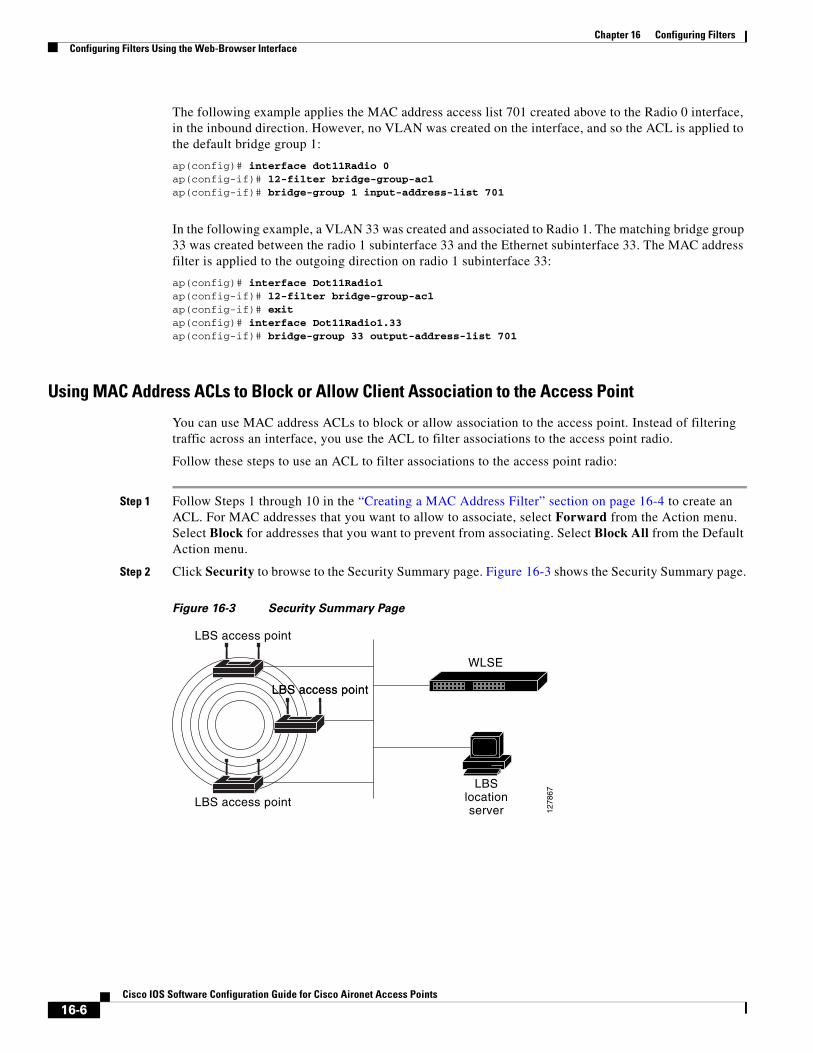
Step 2 Click Security to browse to the Security Summary page. Figure 16-3 shows the Security Summary page.
Figure 16-3 Security Summary Page
LBS access point
LBS access point
WLSE
LBSlocationserver 12
7867
LBS access pointLBS access point
16-6Cisco IOS Software Configuration Guide for Cisco Aironet Access Points
Chapter 16 Configuring FiltersConfiguring Filters Using the Web-Browser Interface
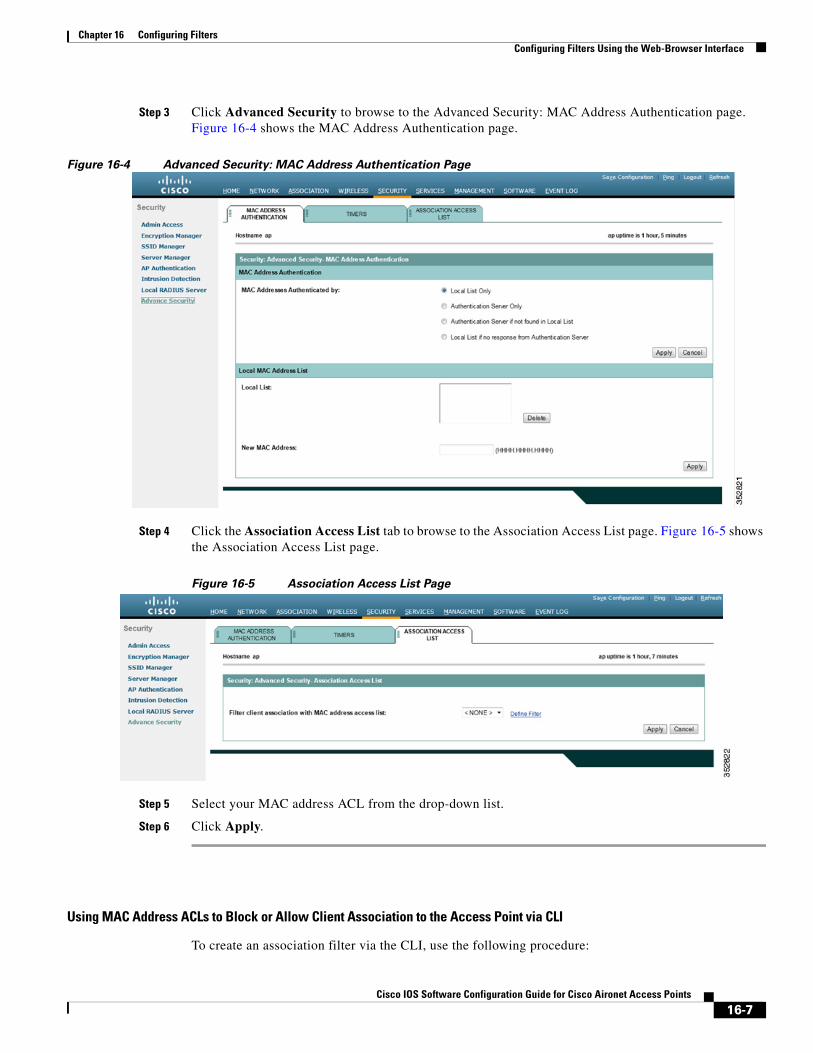
Step 3 Click Advanced Security to browse to the Advanced Security: MAC Address Authentication page. Figure 16-4 shows the MAC Address Authentication page.
Figure 16-4 Advanced Security: MAC Address Authentication Page
Step 4 Click the Association Access List tab to browse to the Association Access List page. Figure 16-5 shows the Association Access List page.
Figure 16-5 Association Access List Page
Step 5 Select your MAC address ACL from the drop-down list.
Step 6 Click Apply.
Using MAC Address ACLs to Block or Allow Client Association to the Access Point via CLI
To create an association filter via the CLI, use the following procedure:
16-7Cisco IOS Software Configuration Guide for Cisco Aironet Access Points
Chapter 16 Configuring FiltersConfiguring Filters Using the Web-Browser Interface
Step 1 Creating a MAC address access-list using the command access-list number-700-799.
Step 2 Use the global configuration command dott11 association mac-list list-number to apply the use the MAC address access list as a filter for all wireless client associations, on all radios. Clients not listed in the MAC address access-list will not be allowed to associate to any of the AP SSIDs, on any of the AP radios.
The following example uses MAC address access-list 702 as a global MAC address association filter:
ap(config)# dot11 association mac-list 702ap(config)# end
Configuring MAC Address AuthenticationA MAC address filter applied to an interface filters the MAC addresses which are sending traffic through that interface, regardless of the SSID in use. A MAC address filter applied at global association level filters those MAC addresses that are allowed to associate to one of the access point SSIDs, regardless of the SSID in use or regardless of the VLAN or interface associated to the SSID.
You can also use MAC addresses to filter the MAC addresses that are allowed to associate to a target SSID. This process is called MAC address authentication. The following table compares the three MAC address filtering methods available on Cisco IOS access points:
You can check MAC addresses used for authentication on the access point local list, or on an authentication server. The authentication server can be an external RADIUS server or the AP internal RADIUS server.
To configure your AP to use MAC address authentication on the SSID, you need to go through the following steps:
Step 1 Determine the source of MAC address authentication (local list, local AP RADIUS server, external RADIUS server)If you use the AP local list of local RADIUS server, create the MAC addresses on the AP (in the AP local list of the RADIUS server, respectively)
Step 2 Configure the SSID to use the method you defined.
Method Target Notes
Interface MAC address filter
Specific interface or VLAN
Applies to all SSIDs mapped to the target interface or VLAN
Association MAC address
AP, globally Applies to all SSIDs and all VLANs, for all wireless clients associating to the AP
SSID MAC address authentication
Specific SSID Applies to a specific SSID, regardless of the radio, interface or VLAN to which the SSID is mapped
16-8Cisco IOS Software Configuration Guide for Cisco Aironet Access Points
Chapter 16 Configuring FiltersConfiguring Filters Using the Web-Browser Interface
Determining the source of MAC Authentication
To define the source of MAC address verification for SSID MAC authentication, go to Security > Advanced Security > MAC Address Authentication.
In the MAC Address Authentication tab:
• To exclusively use the list of MAC addresses defined in the local page to authenticate client MAC addresses on target SSIDs, click the Local List Only option.
• To use the local MAC address list as the primary MAC address authentication method for SSID MAC-address authentication, when a list created on an external RADIUS server for MAC addresses not found in the local list, click the Authentication Server if not found in the local list option.
• To use primarily an external RADIUS server (or the access point internal RADIUS server), and to revert back to a local list on the same page only if the external server is not responding, click the Local list if no response from Authentication server option.
• To only use an external RADIUS server or the AP internal RADIUS server, and to never use the MAC addresses defined on the local page, click the Authentication Server Only option.
Click Apply to validate your choice.
Using the CLI, you can determine the source of MAC address verification using the global command aaa authentication login mac_methods.
The following example configures the AP to use the local list, and only revert to a group of RADIUS servers called rad_mac if the MAC address is not found in the local list:
ap(config)# aaa authentication login mac_methods local group rad_mac
For more details on how to create groups of RADIUS servers, see Chapter 11, “Configuring Authentication Types.”
Using a local MAC address list
If you want to use a list of MAC addresses defined on the MAC Address authentication page for SSID MAC address authentication, enter at the bottom of the page the MAC addresses (one at a time) that are authorized for authentication on the target SSIDs.
Note The list is global. A MAC address defined in the list will be authorized to join any SSID where MAC address authentication is enabled. If you want to use different lists of MAC addresses for different SSIDs on the AP, you must use an external RADIUS server.
From the CLI, a MAC address used for MAC address authentication is entered as a user, with the mac-address as the password. The user is then assigned an exit autocommand to prevent the user from accessing the AP interface. The following example creates the MAC address 1111.2222.3333 in the global list:
ap(config)# username 111122223333 password 0 111122223333ap(config)# username 111122223333 autocommand exitap(config)# end
16-9Cisco IOS Software Configuration Guide for Cisco Aironet Access Points
Chapter 16 Configuring FiltersConfiguring Filters Using the Web-Browser Interface
Using the AP internal RADIUS server for MAC address authentication
If you want to use a list of MAC addresses defined in the AP internal RADIUS server page, go to Security > Local RADIUS Server > General Setup.
In the General Setup page, enable the server for MAC authentication by checking the MAC check box in the Enable Authentication Protocols section. Then, click Apply to validate.
When using the AP internal RADIUS server, you need to define the AP as a RADIUS client. For this:
Step 1 In the Network Access Server (AAA Clients) section, enter the AP’s IP address in the Network Access Server field.
Step 2 Enter a Shared Secret, which is a password used to authenticate the queries sourced from the AP IP address. You will need to define the same shared secret when configuring the AP as a RADIUS server in the Server Manager page.
Step 3 Click Apply to validate.
For more details on how to configure the AP local RADIUS server, including CLI commands, see Chapter 11, “Configuring Authentication Types.”.
To create individual MAC addresses to be used for MAC authentication on target SSIDs, in the Individual Users section:
Step 1 Enter the target MAC address, without any separator in both the Username and Password fields.
Step 2 Check the MAC authentication only.
Step 3 Click Apply to validate.
Note The MAC addresses defined in the AP internal RADIUS server are global.If you configure the AP to use an authentication server for MAC address verification, all SSIDs configured to use MAC authentication and the local AP RADIUS server will check the local list.A major difference between using the AP global MAC address list and using the AP internal Authentication server as a source for SSID MAC authentication is that the global list applies to all SSIDs configured to use MAC address authentication. When choosing to use an authentication server for MAC authentication, some SSIDs can use the AP internal server list, while other SSIDs can use an external RADIUS server list.
From the CLI, you can add MAC address users by entering the local RADIUS server configuration submode, and then creating users. The username and password are the MAC address, without the separator. Add the keyword mac-only to specify that the user is used for MAC authentication.
The following example creates the MAC address user 333344445555:
ap(config)# radius-server localap(config-radsrv)# user 333344445555 password 0 333344445555 mac-auth-onlyap(config-radsrv)# end
When using the AP internal RADIUS server, you need to define the AP as a RADIUS server in the Security > Server Manager page.
16-10Cisco IOS Software Configuration Guide for Cisco Aironet Access Points
Chapter 16 Configuring FiltersConfiguring Filters Using the Web-Browser Interface
In the Corporate Servers section, you can add a new server for your AP. For this:
Step 1 Enter the AP’s IP address in the Server field
Step 2 Enter the same Shared Secret you entered when defining the AP as a RADIUS client in the previous page.
Step 3 Enter the Authentication Port as 1812.
Step 4 Enter the Accounting Port as 1813.
Step 5 Click Apply to validate.
Step 6 In the Default Server Priorities section, select the AP in the Priority 1 field of the MAC Authentication priority list.
Step 7 Click Apply to validate.
Using an external RADIUS server for MAC address authentication
When using an external RADIUS server for MAC authentication, enter the external RADIUS server details in the Security > Server Manager > Corporate Servers section. Also select at least one server in the Default Server Priorities > MAC Authentication list.
Configuring the SSID for MAC Authentication
Once you have defined a source of MAC addresses and defined the MAC addresses (when using the local list or the AP internal RADIUS server), you need to configure the target SSIDs to use MAC authentication. For this:
Step 1 Go to the Security > SSID Manager page.
Step 2 Select or create a new SSID.
Step 3 In the Client Authentication Settings section, select the check boxes for each accepted authentication method. Then from the corresponding drop-down list, select With MAC Authentication.
Step 4 To use the default method defined in the Security > Advanced Security page and the default servers defined in Security > Server Manager page (if applicable), click the Use Defaults option in the MAC Authentication Servers section.To use servers different from those defined in the Security > Server Manager page, click the Customize option and then select the servers to use.The Customize option does not override the configuration from the Security > Advanced Security page that defines if the local list or the servers should be used. If you configured the AP to use only the internal list, choosing the Customize option in the SSID page will have no effect. The Customize option is only targeted at selecting what MAC server to choose, when MAC servers are selected in the Security > Advanced Security page.
Step 5 Click Apply to validate.
16-11Cisco IOS Software Configuration Guide for Cisco Aironet Access Points
Chapter 16 Configuring FiltersConfiguring Filters Using the Web-Browser Interface
Creating a Time-Based ACLTime-based ACLs are ACLs that can be enabled or disabled for a specific period of time. This capability provides robustness and the flexibility to define access control policies that either permit or deny certain kinds of traffic.
This example illustrates how to configure a time-based ACL through the CLI, where Telnet connection is permitted from the inside to the outside network on weekdays during business hours:
Note A time-based ACL can be defined either on the gigabit Ethernet port or on the Radio port of the Aironet AP, based on your requirements. It is never applied on the Bridge Group Virtual Interface (BVI).
Follow these steps to create a time-based ACL.
Step 1 Log in to the AP through the CLI.
Step 2 Use the console port or Telnet in order to access the ACL through the Ethernet interface or the wireless interface.
Step 3 Enter global configuration mode.
Step 4 Create a Time Range. For this example, Test:
ap(config-time-range)# time-range Test
Step 5 Create a time-range:
ap(config-time-range)# time-range periodic weekdays 7:00 to 19:00
Note Allows access to users during weekdays from 7:00 to 19:00 hrs.
Step 6 Create an ACL. For this example, 101:
ap(config)# ip access-list extended 101
ap(config-ext-nacl)# permit tcp 10.1.1.0 0.0.0.255 172.16.1.0 0.0.0.255 eq telnet time-range Test
Note This ACL permits Telnet traffic to and from the network for the specified time-range Test. It also permits a Telnet session to the AP on weekdays, if the AP IP address is in the 172.16.1.0 subnet.
Step 7 Apply the time-based ACL to the Ethernet interface:
ap(config)# interface gigabitEthernet 0
ap(config-if)# ip address 172.16.1.10 255.255.255.0
ap(config-if)# ip access-group 101 in
16-12Cisco IOS Software Configuration Guide for Cisco Aironet Access Points
Chapter 16 Configuring FiltersConfiguring Filters Using the Web-Browser Interface
ACL Logging
ACL logging is not supported on the bridging interfaces of AP platforms. When applied on bridging interface, it will work as if configured without “log” option and logging would not take effect. However, ACL logging will work well for the BVI interfaces as long as a separate ACL is used for the BVI interface.
Configuring and Enabling IP FiltersIP filters (IP address, IP protocol, and IP port) prevent or allow the use of specific protocols through the access point’s Ethernet and radio ports, and IP address filters allow or prevent the forwarding of unicast and multicast packets either sent from or addressed to specific IP addresses. You can create a filter that passes traffic to all addresses except those you specify, or you can create a filter that blocks traffic to all addresses except those you specify. You can create filters that contain elements of one, two, or all three IP filtering methods. You can apply the filters you create to either or both the Ethernet and radio ports and to either or both incoming and outgoing packets.
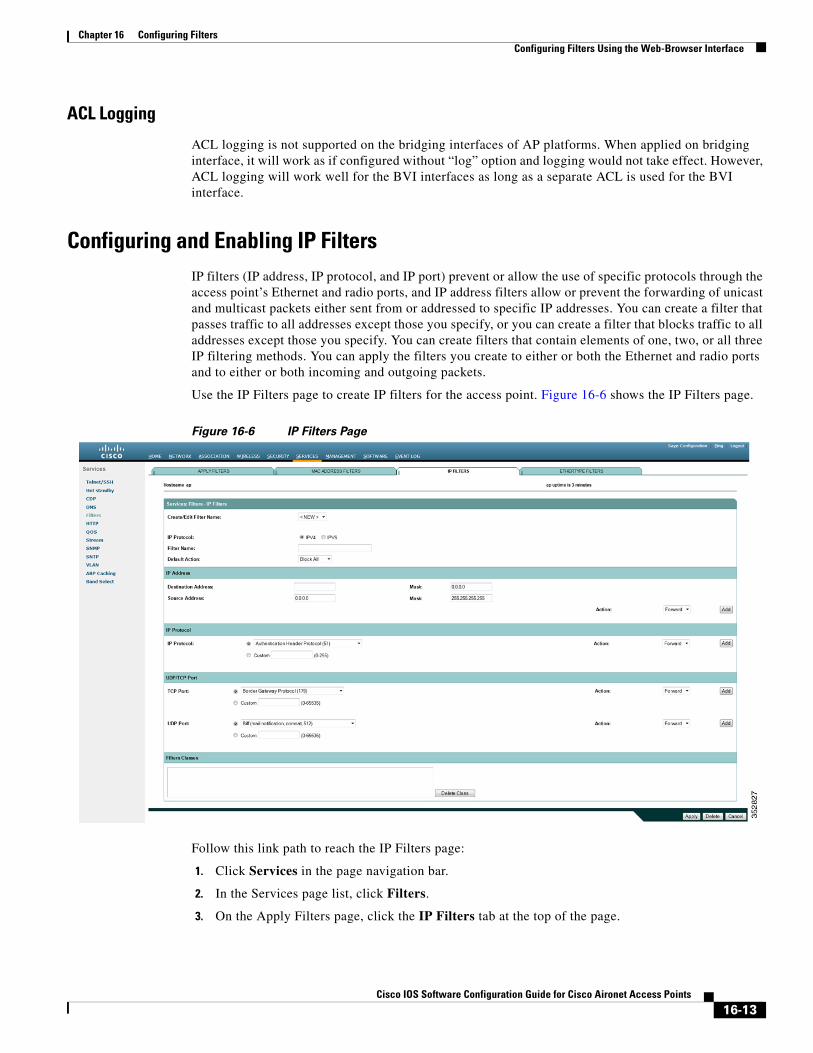
Use the IP Filters page to create IP filters for the access point. Figure 16-6 shows the IP Filters page.
Figure 16-6 IP Filters Page
Follow this link path to reach the IP Filters page:
1. Click Services in the page navigation bar.
2. In the Services page list, click Filters.
3. On the Apply Filters page, click the IP Filters tab at the top of the page.
16-13Cisco IOS Software Configuration Guide for Cisco Aironet Access Points
Chapter 16 Configuring FiltersConfiguring Filters Using the Web-Browser Interface
Creating an IP Filter
Follow these steps to create an IP filter:
Step 1 Follow the link path to the IP Filters page.
Step 2 If you are creating a new filter, make sure <NEW> (the default) is selected in the Create/Edit Filter Index menu. To edit an existing filter, select the filter name from the Create/Edit Filter Index menu.
Step 3 Enter a descriptive name for the new filter in the Filter Name field.
Step 4 Select Forward all or Block all as the filter’s default action from the Default Action menu. The filter’s default action must be the opposite of the action for at least one of the addresses in the filter. For example, if you create a filter containing an IP address, an IP protocol, and an IP port and you select Block as the action for all of them, you must choose Forward All as the filter’s default action.
Step 5 To filter an IP address, enter an address in the IP Address field.
Note If you plan to block traffic to all IP addresses except those you specify as allowed, put the address of your own PC in the list of allowed addresses to avoid losing connectivity to the access point.
Step 6 Type the mask for the IP address in the Mask field. Enter the mask with periods separating the groups of characters (172.31.24.10, for example). If you enter 255.255.255.255 as the mask, the access point accepts any IP address. If you enter 0.0.0.0, the access point looks for an exact match with the IP address you entered in the IP Address field. The mask you enter in this field behaves the same way that a mask behaves when you enter it in the CLI.
Step 7 Select Forward or Block from the Action menu.
Step 8 Click Add. The address appears in the Filters Classes field. To remove the address from the Filters Classes list, select it and click Delete Class. Repeat Step 5 through Step 8 to add addresses to the filter.
If you do not need to add IP protocol or IP port elements to the filter, skip to Step 15 to save the filter on the access point.
Step 9 To filter an IP protocol, select one of the common protocols from the IP Protocol drop-down list, or select the Custom radio button and enter the number of an existing ACL in the Custom field. Enter an ACL number from 0 to 255. See Appendix A, “Protocol Filters,” for a list of IP protocols and their numeric designators.
Step 10 Select Forward or Block from the Action menu.
Step 11 Click Add. The protocol appears in the Filters Classes field. To remove the protocol from the Filters Classes list, select it and click Delete Class. Repeat Step 9 to Step 11 to add protocols to the filter.
If you do not need to add IP port elements to the filter, skip to Step 15 to save the filter on the access point.
Step 12 To filter a TCP or UDP port protocol, select one of the common port protocols from the TCP Port or UDP Port drop-down lists, or select the Custom radio button and enter the number of an existing protocol in one of the Custom fields. Enter a protocol number from 0 to 65535. See Appendix A, “Protocol Filters,” for a list of IP port protocols and their numeric designators.
Step 13 Select Forward or Block from the Action menu.
Step 14 Click Add. The protocol appears in the Filters Classes field. To remove the protocol from the Filters Classes list, select it and click Delete Class. Repeat Step 12 to Step 14 to add protocols to the filter.
16-14Cisco IOS Software Configuration Guide for Cisco Aironet Access Points
Chapter 16 Configuring FiltersConfiguring Filters Using the Web-Browser Interface
Step 15 When the filter is complete, click Apply. The filter is saved on the access point, but it is not enabled until you apply it on the Apply Filters page.
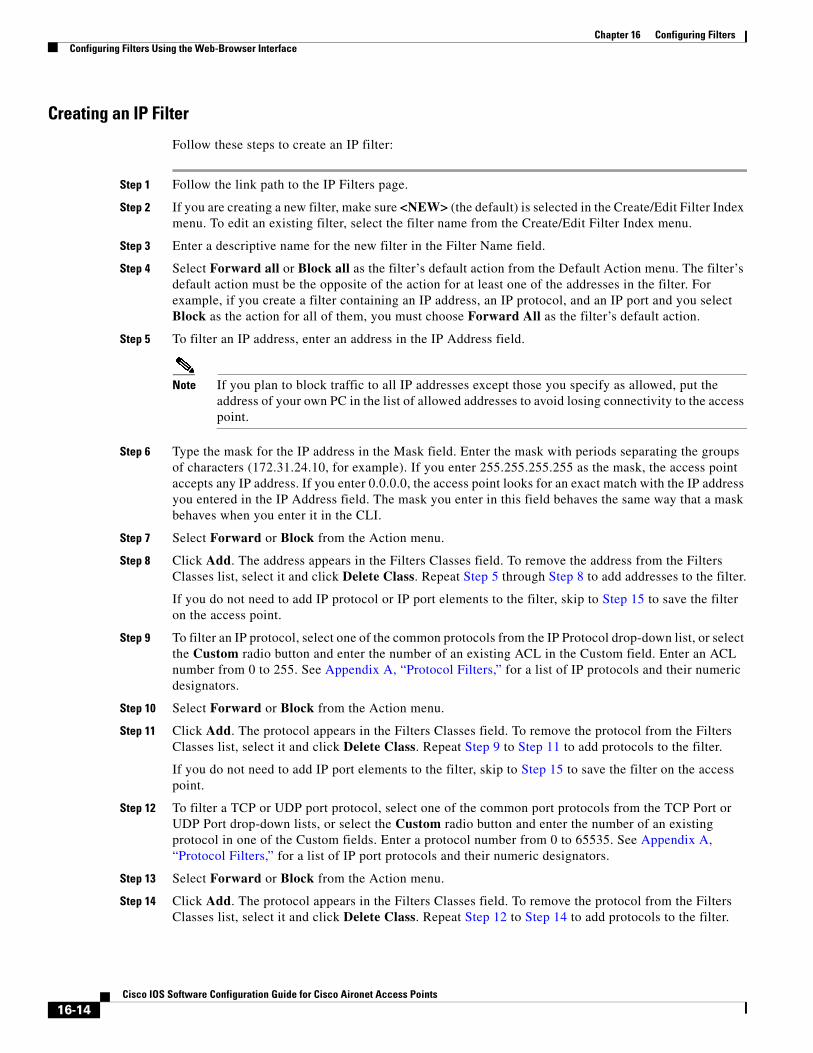
Step 16 Click the Apply Filters tab to return to the Apply Filters page. Figure 16-7 shows the Apply Filters page.
Figure 16-7 Apply Filters Page
Step 17 Select the filter name from one of the IP drop-down lists. You can apply the filter to either or both the Ethernet and radio ports, and to either or both incoming and outgoing packets.
Step 18 Click Apply. The filter is enabled on the selected ports.
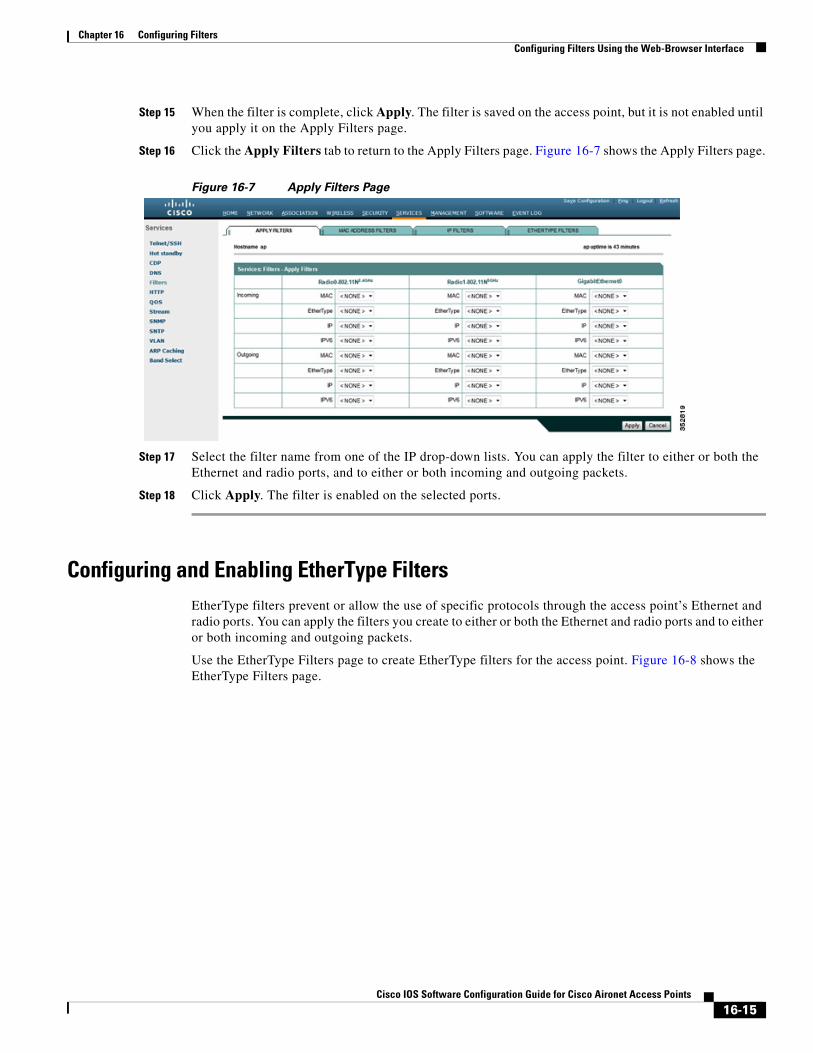
Configuring and Enabling EtherType FiltersEtherType filters prevent or allow the use of specific protocols through the access point’s Ethernet and radio ports. You can apply the filters you create to either or both the Ethernet and radio ports and to either or both incoming and outgoing packets.
Use the EtherType Filters page to create EtherType filters for the access point. Figure 16-8 shows the EtherType Filters page.
16-15Cisco IOS Software Configuration Guide for Cisco Aironet Access Points
Chapter 16 Configuring FiltersConfiguring Filters Using the Web-Browser Interface
Figure 16-8 EtherType Filters Page
Follow this link path to reach the EtherType Filters page:
1. Click Services in the page navigation bar.
2. In the Services page list, click Filters.
3. On the Apply Filters page, click the EtherType Filters tab at the top of the page.
Creating an EtherType Filter
Follow these steps to create an EtherType filter:
Step 1 Follow the link path to the EtherType Filters page.
Step 2 If you are creating a new filter, make sure <NEW> (the default) is selected in the Create/Edit Filter Index menu. To edit an existing filter, select the filter number from the Create/Edit Filter Index menu.
Step 3 In the Filter Index field, name the filter with a number from 200 to 299. The number you assign creates an access control list (ACL) for the filter.
Step 4 Enter an EtherType number in the Add EtherType field. See Appendix A, “Protocol Filters,” for a list of protocols and their numeric designators.
Step 5 Enter the mask for the EtherType in the Mask field. If you enter 0, the mask requires an exact match of the EtherType.
Step 6 Select Forward or Block from the Action menu.
Step 7 Click Add. The EtherType appears in the Filters Classes field. To remove the EtherType from the Filters Classes list, select it and click Delete Class. Repeat Step 4 through Step 7 to add Ethertypes to the filter.
16-16Cisco IOS Software Configuration Guide for Cisco Aironet Access Points
Chapter 16 Configuring FiltersConfiguring Filters Using the Web-Browser Interface
Step 8 Select Forward All or Block All from the Default Action menu. The filter’s default action must be the opposite of the action for at least one of the Ethertypes in the filter. For example, if you enter several Ethertypes and you select Block as the action for all of them, you must choose Forward All as the filter’s default action.
Step 9 Click Apply. The filter is saved on the access point, but it is not enabled until you apply it on the Apply Filters page.
Step 10 Click the Apply Filters tab to return to the Apply Filters page.
Step 11 Select the filter number from one of the EtherType drop-down lists. You can apply the filter to either or both the Ethernet and radio ports, and to either or both incoming and outgoing packets.
Step 12 Click Apply. The filter is enabled on the selected ports.
16-17Cisco IOS Software Configuration Guide for Cisco Aironet Access Points
Chapter 16 Configuring FiltersConfiguring Filters Using the Web-Browser Interface
16-18Cisco IOS Software Configuration Guide for Cisco Aironet Access Points


