Embed Size (px)
Citation preview
2020
Denver Engineer
Examination
StudyMaterialforWrittenTest
527Pages
(ExcludingCover and Separation Sheets)
Section A
Local 858 2019-2021 Fire Fighters Agreement
1
TABLE OF CONTENTS
ARTICLE/TITLE PAGE
SUBORDINATION ............................................................................................................. 1
II RECOGNITION .................................................................................................................. 2
Ill UNION SECURITY ............................................................................................................ 3
IV UNION ACTIVITY ............................................................................................................. 5
V NON-DISCRIMINATION .................................................................................................. 7
VI RIGHTS OF MANAGEMENT ........................................................................................... 8
VII PRODUCTIVITY .............................................................................................................. 10
VIII CALL BACK COMPENSATION, FIRE FIGHTER OBLIGATION AND
OVERTIME ....................................................................................................................... 11
IX UNIFORM ALLOW AN CEA ND REGULATIONS ......................................................... 13
X INSURANCE, HEAL TH AND SAFETY ......................................................................... 14
XI STRIKES AND OTHER DISRUPTIONS OF NORMAL WORK ROUTINE ................. 16
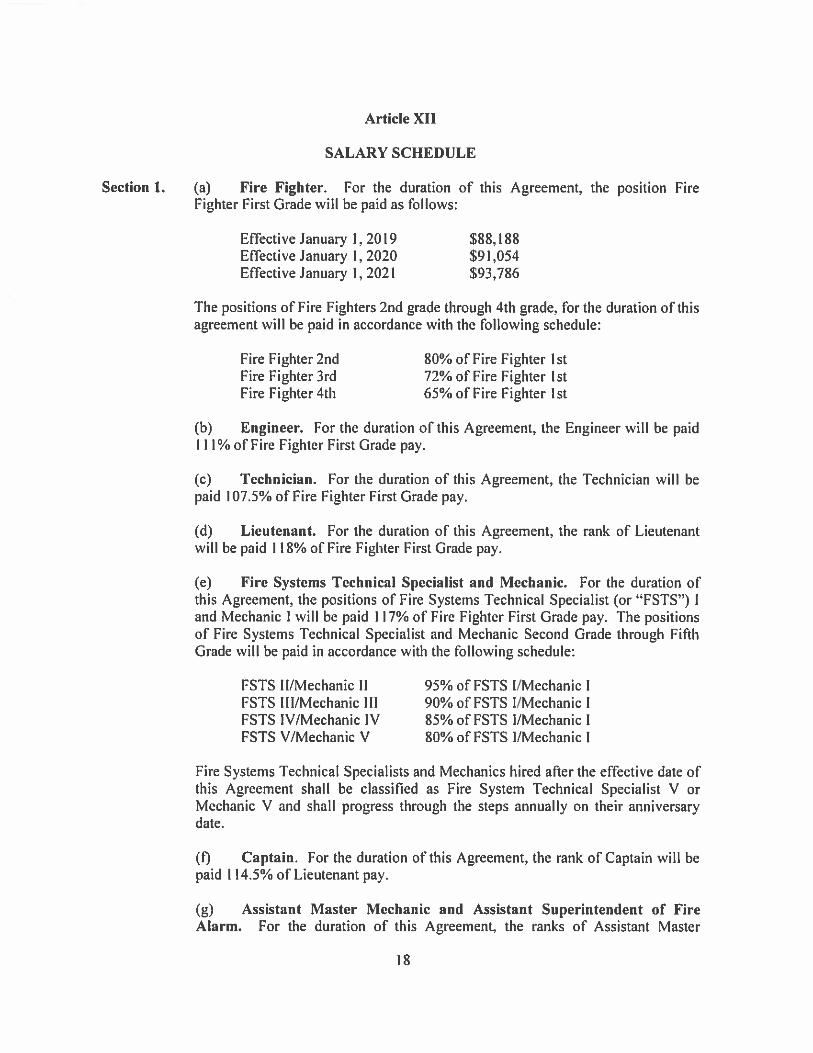
XII SALARY SCHEDULE ...................................................................................................... 17
XIII HOLIDAYS ....................................................................................................................... 19
XIV VACATION ....................................................................................................................... 21
XV GRIEVANCE PROCEDURE ............................................................................................ 24
XVI TEMPORARY ASSIGNMENT TO HIGHER RANK OR POSITION ............................ 26
XVII WORKDAY AND WORK WEEK .................................................................................. 27
XVIII SICK LEAVE .................................................................................................................... 29
XIX MILEAGE ALLOWANCE ............................................................................................... 35
XX RETIREE HEAL TH .......................................................................................................... 36
XXI DEATH AND DISABILITY CONTRIBUTION .............................................................. 37
XXII WAIVER AND NOTICE .................................................................................................. 38
XXIII ENTIRE AGREEMENT .................................................................................................... 39
XXIV EFFECTIVE DA TE, RATIFICATION AND TERMINATION ..................................... .40
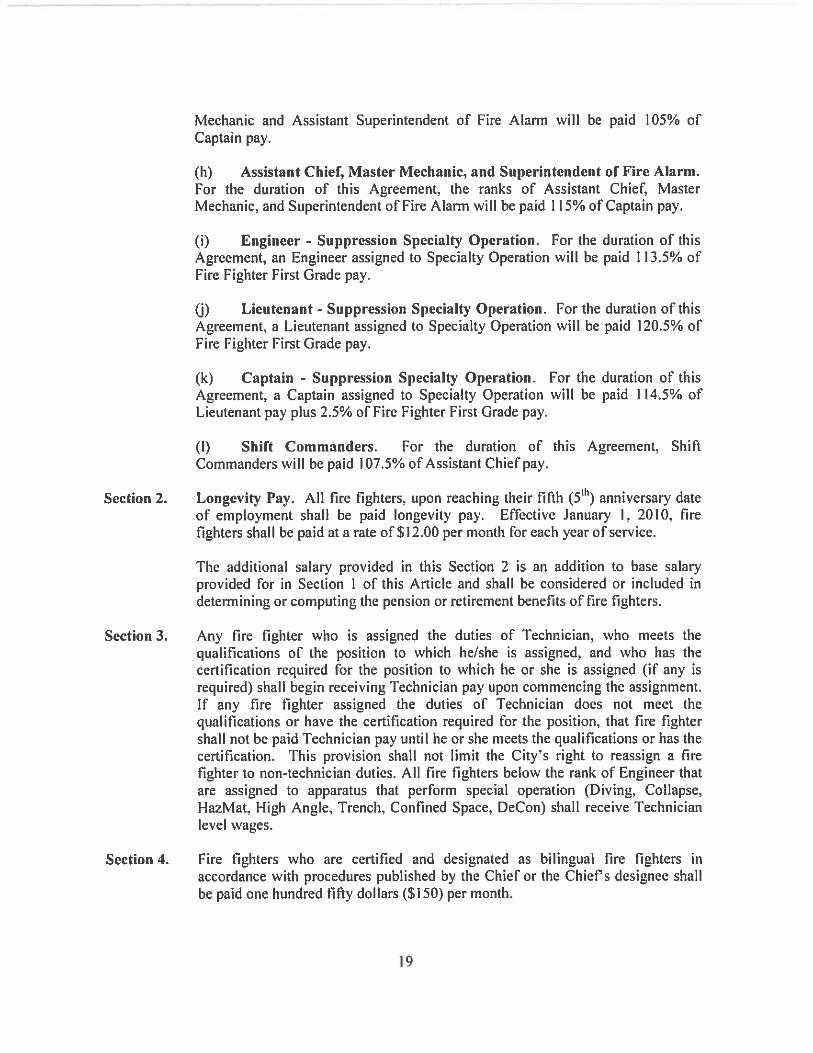
Section 1.
Section 2.
Article I
SUBORDINATION
This Agreement shall in all respects, wherever the same may be applicable herein, be subject and subordinate to the provisions of the Charter of the City and County of Denver, the Directives and Guidelines of the Denver Fire Department and the Rules and Regulations of the Civil Service Commission of the City and County of Denver as promulgated and adopted by the Civil Service Commission, and is further subject and subordinate to all applicable City Ordinances, Statutes, Constitutional provisions and any revisions, amendments or newly adopted provisions to any said Ordinance, Charter, Statute or Constitutional provision which may hereinafter be enacted.
It is expressly intended that the duties, responsibilities and functions of the City in the operation of its Fire Department shall in no manner be impaired, subordinated or negated by a provision of this Agreement.
Section 1.
Article II
RECOGNITION
The City recognizes Denver Fire Fighters, Local 858, IAFF, AFL-CIO (hereinafter referred to as "the Union") as sole and exclusive bargaining agent for all fire fighters pursuant to Section 9.7.1, et seq., of the Charter of the City and County of Denver. As used in this Agreement, the tenn "fire fighter" shall mean the members of the Classified Service of the Fire Department of the City and County of Denver, except any person holding the rank of Chief of the Fire Department, or any person assigned the duties of Deputy Fire Chief or Division Chief.
2
Section l.
Section 2.
Section 3.
Section 4.
Section 5.
Article III
UNION SECURITY
No fire fighter shall be required to become a member of the Union as a condition of his/her employment or continued employment by the City, and there shall be no discrimination against any fire fighter on account of his/her membership or non-membership in the Union.
It is recognized that all fire fighters may or may not join the Union, at the individual's discretion.
It is further recognized that the Union, as the exclusive bargaining representative of all fire fighters owes the same duties to all fire fighters, whether Union members or not, and provides benefits and services to all fire fighters whether Union members or not. Therefore, all fire fighters shall as a condition of continued employment, within thirty (30) days of the effective date of this provision or within thirty (30) days of the date of hire, whichever is later, either be a member of the Union and pay Union dues or pay an agency fee to the Union in an amount equal to the actual cost of representation which shall not exceed the uniform Union dues, assessed uniformly against all Union members. The Union shall notify non-members who pay an agency fee of their rights, duties, and responsibilities.
Any fire fighter who is a member of and adheres to established tenets or teachings of a bona fide religion, body or sect which has historically held conscientious objections to joining or financially supporting labor organizations shall not be required to financially support the Union as a condition of employment; except that as a condition of employment, such employee shall be required to pay, in lieu of "fair share" payment, sums equal to such "fair share" payment to one of the following non-religious, non-labor organizations all of which are exempt from taxation under 26 U.S.C. § 501 (c)(3): Denver Fire Fighters Burn Foundation, the Salvation Anny, Muscular Dystrophy Association, or the Denver Fire Fighters Protective Association Relief Fund.
The City shall deduct on a regular basis from the pay of all fire fighters who hereafter voluntarily authorize such deductions in writing on a form provided for this purpose by the Union or the City: (1) the amount of Union dues uniformly assessed all fire fighters who are Union members, (2) the amount of agency fee, equal to the actual cost of representation which shall not exceed the uniform Union dues, uniformly assessed against fire fighters who are not Union members, and (3) initiation fees uniformly assessed against all Union members. Each authorization given under this Section shall state that it is irrevocable for a period of one ( 1) year or until the termination date of this Agreement, whichever occurs sooner, and is automatically renewable for another year unless written revocation
3
Section 1.
Section 2.
Section 3.
Section 4.
Section 5.
Article IV
UNION ACTIVITY
Neither the Union, nor its officers, agents, representatives, or members will intimidate, interfere with, or coerce fire fighters. No Union activity or Union business of any kind will be carried on during working hours without express written permission in advance from the Fire Chief or his/her designated representative. Violation of this Section 1 of this Article IV by any fire fighter shall be just cause for disciplinary action pursuant to the City Charter. Failure of the City to enforce any of the provisions of this Section 1 of this Article IV in any one (I) or more instances shall not be considered a waiver of any of the provisions of this Section I of this Article IV.
No fire fighter shall be discharged, disciplined or discriminated against because of activity on behalf of the Union that does not interfere with the discharge of his/her duties or any assignments, or violate any of the provisions of the Agreement.
The Union shall have the right to post on the bulletin board designated by the Fire Chief or his/her designated representative, within all respective fire houses and support services, notices of Union meetings, Union recreational and social affairs, notices of Union elections, and appointments and results of Union elections, all of which pertain to the Denver Fire Department, provided that such notices are first approved by the Fire Chief or his/her designated representative. Any postings of an inflammatory nature are expressly prohibited. There shall be no postings regarding any political candidate or candidates nor of any political matter.
When approved by the Fire Chief or his/her designated representative in writing, the two principal officers of the Union shall be granted leave from duty with full pay for conducting necessary Union business. When approved by the Fire Chief or his/her designated representative in writing, during the term of the deliberations of the Union Bargaining Committee, as constituted pursuant to the Union bylaws, members of the Committee, (not to exceed three) shall be granted leave from duty with full pay for conducting necessary Union business. When approved by the Chief or his/her designated representative in writing, members of the Union Executive Board (not to exceed four) shall be granted leave from duty with full pay for attending Executive Board and general membership meetings. The Union shall endeavor to conduct all necessary Union business during the nonworking time of the greatest number of fire fighters required for such business, to the greatest extent possible. Said approval shall be granted by the Chief or his/her designated representative in writing when said leave would not disrupt or interfere with the service of the department.
Such fire fighters (not to exceed four) as may be selected by the Union and approved by the Fire Chief or his/her designated representative shall be granted
5
Section 6.
leave from duty without pay for Union activities such as attending educational conferences, seminars and training courses for the improvement of fire service and the Fire Department. Members of the union's Executive Board shall be permitted to address each Department recruit class at a mutually agreeable time within the first week of the academy.
6
Article V
NON-DISCRIMINATION
Neither the City nor the Union shall discriminate against any fire fighter on the basis of actual or perceived age, race, creed, color, gender, sexual orientation, politics, religion, national origin, marital status, physical or mental disability, military status, genetic information, or membership or non-membership in a labor organization.
Nothing in this section, however, shall be construed to prohibit actions taken because of a bona fide occupational qualification.
7
Section 1.
Article VI
RIGHTS OF MANAGEMENT
Except as otherwise specifically provided in this Agreement, the City has the sole and exclusive right to exercise all the rights or functions of management, and the exercise of any such rights or functions shall not be subject to any grievance procedure, except as to resolution of whether or not a specific matter is a management right. Without limiting the generality of the foregoing, as used herein, the term "Rights of Management" includes:
(a) The determination of Fire Department policy including the right to manage the affairs of the Fire Department in all respects;
(b) the right to assign working hours including overtime;
(c) the right to establish, modify or change work schedules, staffing of apparatus, amount of apparatus in the main or reserve fleet, etc.;
(d) the right to assign tire fighters to other duties within the Fire Department when their apparatus is out of service;
(e) the right to direct the members of the Fire Department, including the right to hire, promote or transfer any fire tighter;
(t) the table of organization of the Fire Department, including the right to organize and reorganize the Fire Department in any manner it chooses, including the size of the Fire Department and the determination of job classifications and ranks based upon duties assigned;
(g) the determination of the safety, health and property protection measures for the Fire Department;
(h) the selection, promotion or transfer of fire fighters to supervisory or other managerial or technician positions or to positions outside the Classified Service of the Fire Department;
(i) the allocation and assignment of work to fire fighters within the Fire Department;
U) the determination of policy affecting the selection or training of tire fighters;
(k) the scheduling of operations and the determination of the number and duration of hours of assigned duty per week;
8
Section l.
Section 2.
Section 3.
Article VII
PRODUCTIVITY
The Union and the City recognize that increased productivity will require the continuation of improvements and technological progress through new methods, techniques and equipment which will contribute to improved quality and efficiency of fire protection for the citizens of Denver. The Union and the City will act in good faith and with a cooperative attitude to achieve these ends.
There shall be established a Labor/Management Committee comprised of six (6) members, three (3) of whom shall be appointed by the President of Local 858 and three (3) of whom shall be appointed by the Chief of the Fire Department. The Committee shall address any matter of mutual concern. The Committee shall meet at the request of the President of Local 858 or the Chief of the Fire Department within ten ( I 0) days of a request for a meeting.
The Department shall provide the union with copies of and will email to the President and Secretary Treasurer all new or revised:
(a) department orders;(b) directives;(c) guidelines;(d) Fire Chief and Division Memoranda (currently those denominated FCM,
OPS, TRN, FPB, TEC and ADM); and,(e) a quarterly listing of fire fighters in alpha and assignment sequence.
l l
Article VIII
CALL BACK COMPENSATION, FIRE FIGHTER OBLIGATION, AND OVERTIME
Section 1.
(a)
(b)
Section 2.
If, in the sole opinion of the Fire Chief or his/her designees, it is necessary to call fire fighters back to work during their normal time off, such recalled fire fighters must report for duty. Failure to report for duty, if personally contacted, shall subject such fire fighter to disciplinary action pursuant to the Charter of the City unless reporting is excused by the Chief or his/her immediate designee.
A recalled fire fighter of the following ranks or assignments:
Fire Fighter Fourth Grade Fire Fighter Third Grade Fire Fighter Second Grade Fire Fighter First Grade Technician Engineer Fire Systems Technical Specialist Mechanic Lieutenant Captain Assistant Chief (Suppression) (Effective January 1, 2021)
shall be compensated at the rate of time and one-half ()-1/2) of his/her regular rate of compensation for the time worked, in I 5-minute increments or a minimum of three (3) hours if required to respond to a station, work location or incident, in cash if the money is available, otherwise in the form of compensatory time off. Such time off shall be taken within one ( 1) year of the time in which it is earned, provided that the time to be taken off is approved by the Fire Chief or his/her designee in writing. If the call back is contiguous to the beginning or end of the scheduled shift, the three (3) hour minimum shall not apply.
A recalled fire fighter holding the rank of Assistant Master Mechanic, Assistant Superintendent of Fire Alann, Master Mechanic, Superintendent of Fire Alarm, or Assistant Chief (Non-Suppression) shall be compensated in cash or in the fonn of compensatory time off, at the rate of their regular rate of compensation, computed on an hourly basis, for time actually worked, when called back to duty during nonnal time off. Such time off shall be taken within one (I) year of the time at which it is earned, provided that the time to be taken off is approved by the Fire Chief or his/her designee in writing.
In the event that a fire fighter other than a person holding the rank of Assistant Master Mechanic, Assistant Superintendent of Fire Alann, Master Mechanic, Superintendent of Fire Alann, or Assistant Chief (Non-Suppression) is called upon to work overtime in excess of fifteen ( I 5) minutes after his/her regular shift has ended, the fire fighter shall be compensated at the rate of time and one-half ( 1-1 /2) of his/her regular rate of compensation for all overtime worked after
12
Section 1.
Section 2.
Section 3.
Section 4.
Section 5.
Section 6.
Section 7.
rate as provided in Section 2 of this Article. Article IX
UNIFORM ALLOWANCE AND REGULATIONS
The City shall pay the total cost of procurement and replacement, including replacement for line of duty mishaps, of all uniforms, including replacement of Department issued blue T-shirts, except socks, ties, belts, briefs, panties, and brassieres, that are required to be worn by fire fighters. The style, quality, design, components and the quantity of uniforms shall be specified by the Manager of Safety for the individual fire fighter in an economical, equitable manner in the best interests of the City.
Turnout gear required by the Fire Department is not considered to be part of the uniform for purposes of Section 1 above. All fire fighters shall have turnout gear and required personal protective equipment (PPE) provided by the City. If, in the sole opinion of the Fire Chief or his/her designated representative, any item of a fire fighter's turnout gear or required PPE becomes unserviceable, such article of turnout gear or PPE shall be replaced by the City. Whenever feasible, at the time of purchase, turnout gear and required PPE shall meet or exceed current National Fire Protection Agency safety standards and specifications.
All fire fighters will maintain complete uniforms and turnout gear in good condition. Periodic inspections will be made by the Fire Chief or his/her designees to ensure the service-ability of each fire fighter's uniforms and turnout gear.
If a non-uniformed fire fighter sustains line-of-duty damage to his/her clothing, the cost of such damaged article of clothing will be reimbursed by the City upon the submission of a claim accompanied by proof of loss and approved by the Fire Chief or his/her designated representative.
Fire fighters assigned to the Fire Investigation Division and who are required to wear firearms, shall receive from the City a $400.00 per year firearm allowance pro-rated for the time a firearm was required. Proration will be based on monthly increments only. Eligibility for a given month will be credited if said assignment is effective on or before the 15th day or transfer from the Fire Investigation Division is after the 15th day of the month. This payment shall be made at the end of each calendar year or upon termination or retirement from the Fire Department of each member entitled to such allowance.
The practice of providing those fire fighters assigned to the repair shop with work uniforms and garments shall be pursuant to Executive Order No. 110, and the amendments thereto, for the term of this Agreement.
Effective January I, 20 I 6, each fire fighter shall be paid an annual cleaning and maintenance allowance of $550.00, payable with the last paycheck in November.
14
Section 1.
Section 2.
Section 3.
Article XI
STRIKES AND OTHER DISRUPTIONS
OF NORMAL WORK ROUTINE
The protection of the public health, safety and welfare demands that neither the Union, nor the fire fighters, or any person acting in concert with them, will cause, sanction, or take part in any strike, walkout, sitdown, slowdown, stoppage of work, picketing, retarding of work, abnormal absenteeism, withholding of services or any other interference with the normal work routine.
Violation of any provision of this Article by the Union shall be cause for the City terminating this Agreement upon the giving of written notice to this effect to the President of Denver Fire Fighters Local No. 858, in addition to whatever other remedies may be available to the City at law or in equity.
Violation of any of the provisions of this Article by any fire fighter shall be just cause for the immediate discharge of that fire fighter, in addition to whatever other remedies may be available to the City at law or in equity. No fire fighter shall receive any portion of his/her salary while engaging in activity in violation of this Article.
17
Section 1.
Section 2.
Section 3.
Article XIII
HOLIDAYS
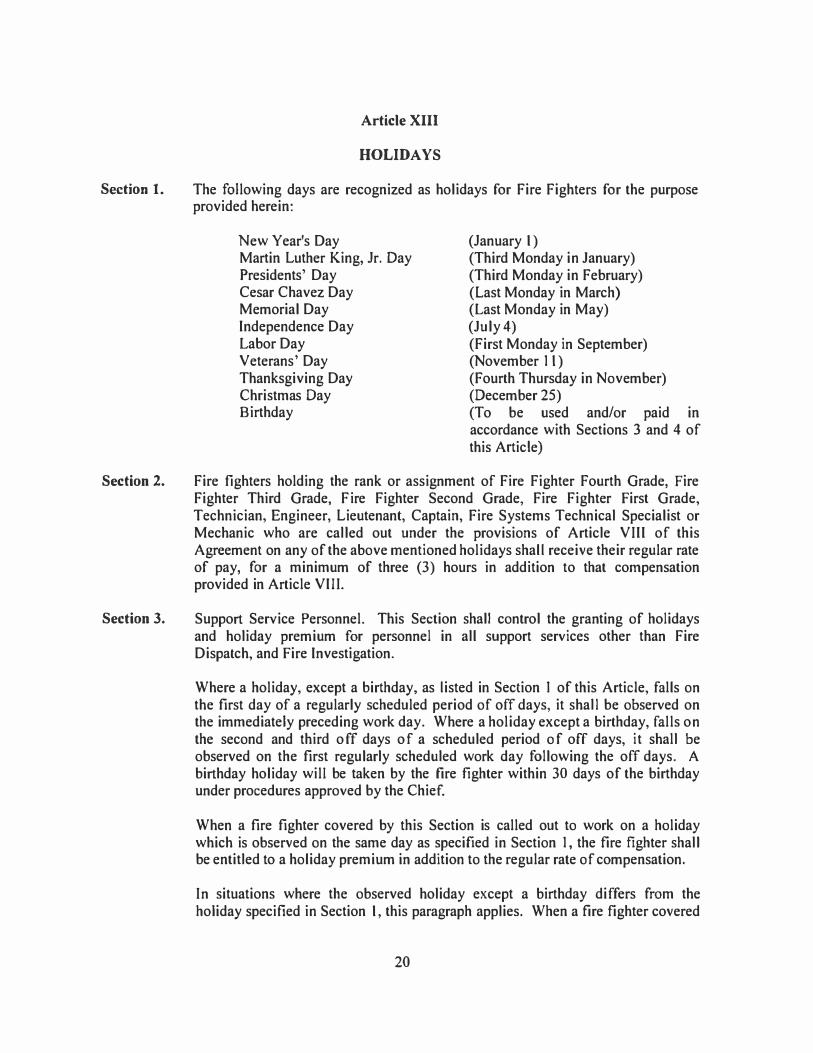
The following days are recognized as holidays for Fire Fighters for the purpose provided herein:
New Year's Day Martin Luther King, Jr. Day Presidents' Day Cesar Chavez Day Memorial Day Independence Day Labor Day Veterans' Day Thanksgiving Day Christmas Day Birthday
(January I) (Third Monday in January) (Third Monday in February) (Last Monday in March) (Last Monday in May) (July 4) (First Monday in September) (November 11) (Fourth Thursday in November) (December 25) (To be used and/or paid in accordance with Sections 3 and 4 of this Article)
Fire fighters holding the rank or assignment of Fire Fighter Fourth Grade, Fire Fighter Third Grade, Fire Fighter Second Grade, Fire Fighter First Grade, Technician, Engineer, Lieutenant, Captain, Fire Systems Technical Specialist or Mechanic who are called out under the provisions of Article VIII of this Agreement on any of the above mentioned holidays shall receive their regular rate of pay, for a minimum of three (3) hours in addition to that compensation provided in Article VIII.
Support Service Personnel. This Section shall control the granting of holidays and holiday premium for personnel in all support services other than Fire Dispatch, and Fire Investigation.
Where a holiday, except a birthday, as listed in Section I of this Article, falls on the first day of a regularly scheduled period of off days, it shall be observed on the immediately preceding work day. Where a holiday except a birthday, falls on the second and third off days of a scheduled period of off days, it shall be observed on the first regularly scheduled work day following the off days. A birthday holiday will be taken by the fire fighter within 30 days of the birthday under procedures approved by the Chief.
When a fire fighter covered by this Section is called out to work on a holiday which is observed on the same day as specified in Section 1, the fire fighter shall be entitled to a holiday premium in addition to the regular rate of compensation.
In situations where the observed holiday except a birthday differs from the holiday specified in Section I, this paragraph applies. When a fire fighter covered
20
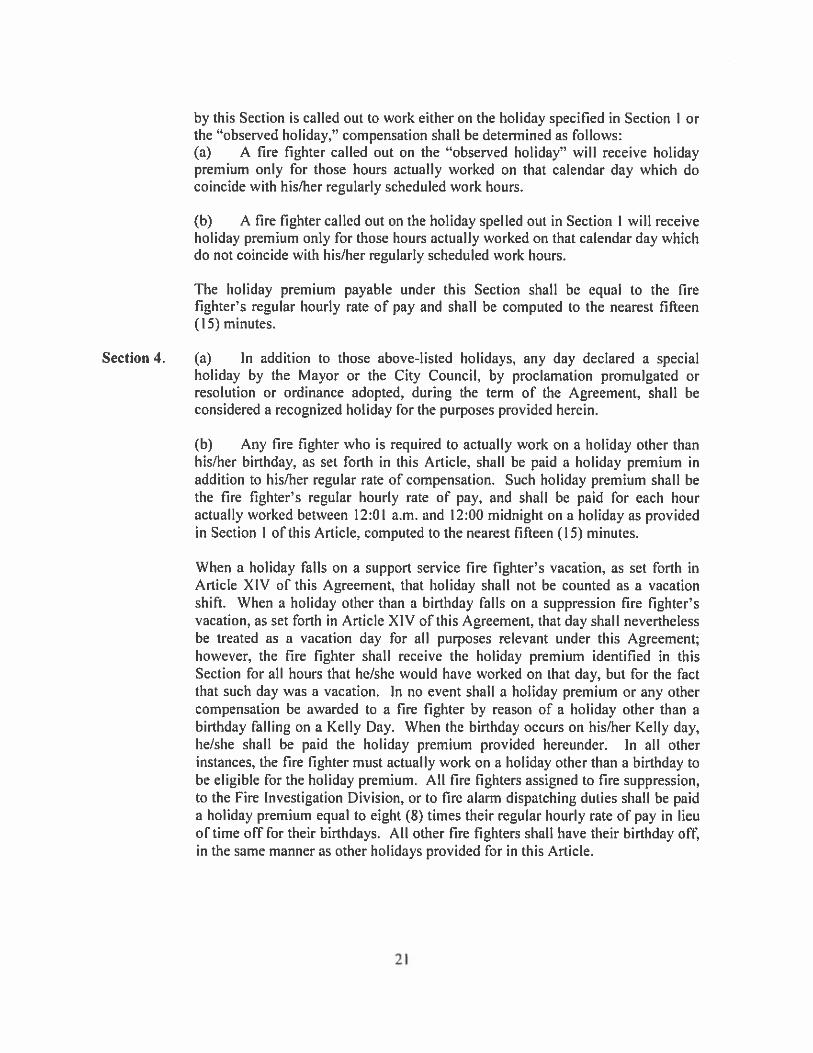
Section 1.
Section 2.
Section 3.
Section 4.
Article XIV
VACATION
Each fire fighter shall accrue vacation leave at his/her regular rate of pay in accordance with the following:
(a) Those fire fighters who have less than three (3) years of service shall accrue one hundred twenty ( 120) hours vacation annually at the rate of ten (I 0) hours for each month.
(b) Those fire fighters who have three (3) or more years of service shall accrue one hundred forty-four ( 144) hours of vacation leave annually at the rate of twelve (12) hours per month.
(c) Those fire fighters who have ten ( 10) or more years of service shall accrue one hundred sixty-eight ( 168) hours of vacation leave annually at the rate of fourteen (14) hours per month.
( d) Those fire fighters who have fifteen ( 15) or more years of service shall accrue one hundred ninety-two ( 192) hours of vacation leave annually at a rate of sixteen (16) hours per month.
(e) Effective January I, 2020, those fire fighters who have twenty-five (25) or more years of service shall accrue two hundred sixteen (216) hours of vacation annually at a rate of eighteen ( 18) hours per month.
If a fire fighter is employed only part of a month, he/she will earn vacation leave for the month only if he/she started on or before or tenninated after the 15th day of the month.
If the fire fighter's third (3rd), tenth (10th) or fifteenth (15 th) anniversary of
his/her hiring date occurs on a day other than the first day of the month, he/she will earn vacation leave for that month at the rates described in Section I of this Article only if the anniversary date is on or before the fifteenth (15th). If the third (3rd) or tenth ( I 0th) anniversary date of hire falls on a day after the fifteenth ( 15th) day of the month, he/she will earn at the higher rate beginning the first day of the following month.
(a) Vacation hours accrued under the provisions of this Agreement may not be used until the calendar year after they are accrued. In no case may a fire fighter use more hours of vacation than the sum of what he/she accrued in the previous calendar year, credited monthly. Any unused vacation leave left over from the previous year that the fire fighter is unable to use, in the sole opinion of the Fire Chief or his/her designee, shall be paid in cash at the fire fighter's regular rate of pay in effect at the time of payment, and such payment shall be made within the first quarter of the succeeding year.
22
Article XV
GRIEVANCE PROCEDURE
Section 1. A grievance is a claim that the City has violated an express provision of this Agreement, and does not include any disciplinary matters. Any fire fighter or group of fire fighters may discuss any matter with their Division Chief, Deputy Chief or the Fire Chief, without invoking the formal grievance procedure provided for in this Article. Neither the City nor the Union shall threaten, restrain, or coerce any fire fighter for asserting said fire fighter's rights pursuant to this Agreement.
Section 2. A grievance must be initiated only by an aggrieved fire fighter. The aggrieved fire fighter must reduce his/her entire grievance and all the reasons therefor, and the provisions of this Agreement which the aggrieved fire fighter feels have been violated, to writing and present the written grievance, signed and dated by the fire fighter, to his/her Division Chief within ten (10) calendar days after the fire fighter knew or should have known the facts which gave rise to the grievance. If not submitted within ten ( 10) calendar days, the grievance shall not be entitled to consideration.
Section 3. All grievances shall be settled in the following manner:
Step 1. The grievance shall be submitted to the grievant's Division Chief within ten (10) calendar days after the fire fighter knew or should have known the facts which gave rise to the grievance. Within ten ( I 0) calendar days after receipt of the grievance the Fire Chief or his/her designated representative shall discuss the grievance with the aggrieved fire fighter and two (2) members of the Grievance Committee of the Union. The Fire Chief or his/her designated representative will give the aggrieved fire fighter, through the Union Grievance Committee, his/her answer in writing within ten ( I 0) calendar days after holding such meeting. If the grievance is not answered within said ten ( I 0) days it will be considered denied.
Step 2. If the Union Grievance Committee is not satisfied with the answer obtained at "Step I," a Union officer must give written notice of intent to arbitrate to the corporate authorities of the City within fourteen ( 14) calendar days. The Grievance Arbitration Board shall consist of:
(a) Appointee of the City;
(b) Appointee of the Union;
(c) The representatives of each party shall select the third member of the Grievance Arbitration Board, who shall be the Chair;
(d) If within twenty-one (21) calendar days, the representatives of the City and the Union fail to select a third member, either party or its
25
Section 1.
Article XVI
TEMPORARY ASSIGNMENT TO
HIGHER RANK OR POSITION
When a fire fighter is designated to perfonn the duties of a higher pay classification or rank due to a vacancy in such higher position, such fire fighter shall receive the existing base rate of compensation paid the classification or rank to which the fire fighter is so designated provided:
(a) Fire fighters assigned to suppression divisions work at least eight (8) hours of the shift; or
(b) Fire fighters assigned to support services work at least 50% of the shift.
This Article shall apply to a Fire Fighter 4th Grade through Technician acting as an Engineer or Lieutenant; a Mechanic acting as Assistant Master Mechanic or Master Mechanic; a Fire Systems Technical Specialist acting as Assistant Superintendent of Fire Alarm or Superintendent of Fire Alarm; an Engineer acting as a Lieutenant; a Lieutenant acting as a Captain; and a Captain acting as an Assistant Chief in all support services. However, except that, whenever possible, an Engineer shall remain in that position and shall perform the duties and functions of an Engineer.
28


Section 1.
Section 2.
Section 3.
ARTICLE XXIII
ENTIRE AGREEMENT
The City and the Union shall not be bound by any requirement which is not specifically stated in this Agreement. Specifically, but not exclusively, the City and the Union are not bound by any past practices of the City or the Union, or understandings with any labor organizations, unless such past practices or understandings are specifically stated in this Agreement.
The Union and the City agree that this Agreement is intended to cover matters affecting wages, rates of pay, grievance procedure, working conditions and other terms and conditions of employment and similar or related subjects, and that during the term of this Agreement, neither the City nor the Union will be required to negotiate on any further matters affecting these or any other subjects not specifically set forth in this Agreement.
Notwithstanding any other provisions of this Agreement to the contrary, in the event that any Article, or Subsection(s) thereof, of this Agreement shall be declared invalid by any court of competent jurisdiction, or by any applicable State or Federal law or regulation, or should a decision by any court of competent jurisdiction or any applicable State or Federal law or regulation diminish the benefits provided by this Agreement, or impose additional obligations on the City, the parties shall negotiate on the Article or Subsection(s) thereof affected. All other provisions of this Agreement not affected shall continue in full force and effect.
41
Section 1.
Section 2.
Article XXIV
EFFECTIVE DATE, RATIFICATION AND TERMINATION
This Agreement shall be effective January I, 2019 and shall continue to and include December 31, 2021.
This Agreement is subject to ratification by the fire fighters of Denver Fire Fighters Local 858, lAFF, AFL-CIO, and the approval of an adopting ordinance by the City before the Union or the City is bound by the terms of this Agreement.
42
Section B
Denver Fire Department Directives
46

Revised 12-03-19
TABLE OF CONTENTS DEPARTMENT DIRECTIVES
1004.00 Attendance at Incidents 08-03-10
1008.00 Request for Reassignment and Drafting Process 03-13-18 (was “Transfer Procedure”)
1009.01 Non-Line of Duty (NLOD) Sick Leave 02-23-18
1010.02 ALL DFD Related Accidents and Driver Review 12-03-19 (was “Accidents Involving DFD Vehicles or Apparatus”)
1011.00 Uniforms and Personal Appearance 08-29-19
1012.00 Member Contact with Law Enforcement - Reporting of Charges (Internal Affairs required reporting) 04-30-19
1012.00a Form – Member Law Enforcement Contact – Reporting of Charges Form 04-30-19
1019.00 Mission Statement 12-28-17
1020.00 Code of Conduct 01-03-12
1021.00 Sexual Harassment Policy 07-18-19
1022.00 Exec. Order 94 – C & C of Denver Employees’ Alcohol & Drug Policy 01-03-12
1023.00 Use of Dept. Psych. by FD Personnel - Problems Drug/Alcohol Abuse 01-06-17
1024.00 Grooming Standards 06-15-16
1037.00 DFD Hazing, Harassment, Retribution Policy 07-10-15
1046.00 Administrative Grievance Procedures 06-13-16
1056.00 Corrective Action Procedures (w/attached Discipline Flow Chart) eff. 07-23-19
1057.00 Discipline Handbook (w/Attachments a, b, and c) eff. 07-23-19
1058.00 Performance Evaluation 11-21-19 (w/attachments a and b)
1058.00a Crew Integrity Vitals Assessment Form
1058.00b Performance Evaluation Physician Clearance Form
1069.00 Contract Grievance Procedure 08-18-17
1081.00 Denver Fire Department HIPAA Guidelines (w/Attachment a)(10-01-19)
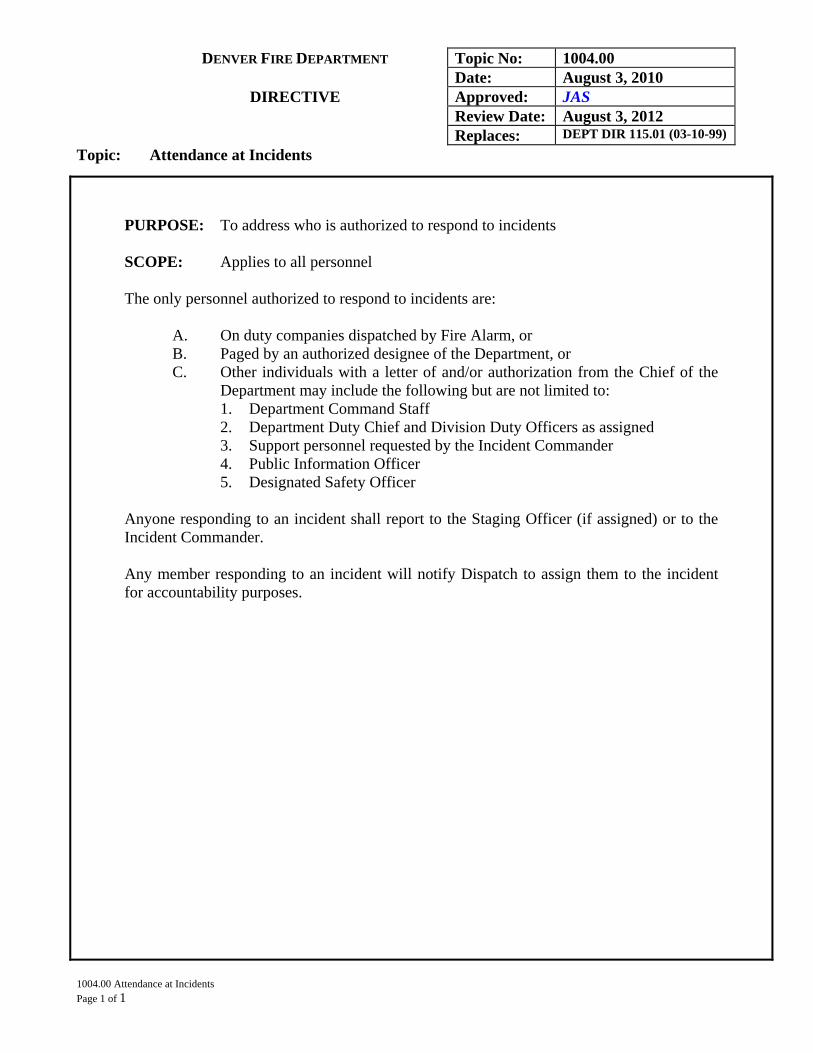
DENVER FIRE DEPARTMENT Topic No: 1004.00Date: August 3, 2010
DIRECTIVE Approved: JAS Review Date: August 3, 2012 Replaces: DEPT DIR 115.01 (03-10-99)
Topic: Attendance at Incidents
1004.00 Attendance at Incidents
Page 1 of 1
PURPOSE: To address who is authorized to respond to incidents
SCOPE: Applies to all personnel
The only personnel authorized to respond to incidents are:
A. On duty companies dispatched by Fire Alarm, orB. Paged by an authorized designee of the Department, orC. Other individuals with a letter of and/or authorization from the Chief of the
Department may include the following but are not limited to:1. Department Command Staff2. Department Duty Chief and Division Duty Officers as assigned3. Support personnel requested by the Incident Commander4. Public Information Officer5. Designated Safety Officer
Anyone responding to an incident shall report to the Staging Officer (if assigned) or to the Incident Commander.
Any member responding to an incident will notify Dispatch to assign them to the incident for accountability purposes.
DENVER FIRE DEPARTMENT Topic No: 1008.00
Date: 03-13-18
DIRECTIVE Approved: TAB
Review Date: 03-13-19
Replaces: Same (Titled “Transfer
Procedure”) dated 06-29-16
Topic: Request for Reassignment and Drafting
Process
1008.00 Request for Reassignment and Drafting Process
Page 1 of 8
PURPOSE: To explain the procedure and associated requirements, conditions, and
stipulations regarding the transfer of personnel from one assignment to
another.
SCOPE: Applies to all uniformed members within the Denver Fire Department,
including Command Officers (Captains and Assistant Chiefs), as specified in
the Procedure below. The transfer of Command Officers shall be at the
discretion and/or approval of the Chief of the Department or designee.
DEFINITIONS:
Technical Support Assignment: Operations, Fire Prevention, Technical Services,
Administration, Safety and Training, and Airport Division staff positions
Operations Technical Suppression Assignment: Operations technical suppression
assignments shall be company-specific, as opposed to discipline-specific (i.e., hazmat,
dive, high-angle, confined space, etc.) Operational technical assignments shall include all
positions on E-01, E-06, E-09, TR-01, TR-09, R-01, and R-02.
Airport Division Assignment: Airport Division assignments are Aircraft Rescue and Fire
Fighting (ARFF) assignments and technical suppression assignments at Denver
International Airport (DEN). Assignments include all members assigned to DFD Stations
31, 32, 33, 34, 35, and ARFF Training.
Requested Transfer (Previously referred to as Convenience Transfer): Shall refer to any
transfer granted as a result of a member’s transfer request that was submitted via “My
DFD.”
Time Commitments for Requested Assignments (see II. L):
One year for non-technical suppression assignments;
Two years for technical suppression, technical support, and Airport Division assignments.,
(unless otherwise specified in job announcement at the time of posting).
Time Commitments for Drafted Vacancies (see II. M):
One year for non-technical suppression assignments;
Two years for technical suppression, technical support, and Airport Division assignments.
DENVER FIRE DEPARTMENT Topic No: 1008.00
Date: 03-13-18
DIRECTIVE Approved: TAB
Review Date: 03-13-19
Replaces: Same (Titled “Transfer
Procedure”) dated 06-29-16
Topic: Request for Reassignment and Drafting
Process
1008.00 Request for Reassignment and Drafting Process
Page 2 of 8
I. RIGHTS OF MANAGEMENT
Pursuant in part to Article VI, Section 1, of the Collective Bargaining Agreement
between Denver Firefighters – Local 858 IAFF, AFL-CIO and the City and County of
Denver, “… the City has the sole and exclusive right to exercise all the rights or
functions of management, and the exercise of any such rights or functions shall not be
subject to any grievance procedure, except as to resolution of whether or not a specific
matter is a management right.”
Pursuant in part to Article VI, Section 2, of the Collective Bargaining Agreement
between Denver Firefighters – Local 858 IAFF, AFL-CIO and the City and County of
Denver, “All discretionary power vested in the City and the Fire Chief shall not be
exercised in an arbitrary or capricious manner.”
The Administration Division Chief or designee administers the Request for
Reassignment and Drafting Process Directive and will consult with the appropriate
Division Chief or designee before making the final decision on all transfers.
The Department will follow this Directive to the best of its ability and reserves the
right to correct errors that were made in good faith in the least disruptive manner
possible.
The Division Chiefs of Operations and Airport Divisions, or designee(s), shall have
full discretion and authority, within their respective Divisions, to leave positions
vacant as deemed necessary for use by Probationary Firefighters, and/or to balance
staffing between apparatus, shifts, and districts.
II. GENERAL TRANSFER PROCEDURES
A. All eligible Firefighters shall have the right to request a transfer within the
provisions of this Procedure. To be eligible, members shall complete their
assignment obligation commitments as outlined in Section II.K. Fourth Grade,
Third Grade, and Second Grade Firefighters are not eligible to submit transfer
requests. A member must hold the rank of Firefighter First Grade to be eligible
to submit a transfer request.
B. All transfer requests shall be submitted using the “My DFD” webpage link.
Responsibility for verifying the accuracy of each transfer request and that each
transfer request has been posted to the Department website lies with the
requesting member. The transfer of Command Officers shall be at the
DENVER FIRE DEPARTMENT Topic No: 1008.00
Date: 03-13-18
DIRECTIVE Approved: TAB
Review Date: 03-13-19
Replaces: Same (Titled “Transfer
Procedure”) dated 06-29-16
Topic: Request for Reassignment and Drafting
Process
1008.00 Request for Reassignment and Drafting Process
Page 3 of 8
discretion and/or approval of the Chief of the Department or designee.
Members are responsible for reviewing the accuracy of any transfer requests
they have on file. Members can withdraw any transfer at any time unless
specified in this Procedure. To withdraw a transfer, the member must log in to
“My DFD” and select “My Transfers”. The transfer will remain active until
removed by the Administration Division on the next recognized business day.
C. A member may have a maximum of three transfer requests on file (with the
exception of Right of First Refusal – see II. P & Q). Transfers to Operations
Division suppression assignments must be for a specific company and/or shift.
Transfers to the Administration Division shall be for either administrative
support, Internal Affairs Unit (IAU), or Fire Investigation Unit (FIU) positions,
and those assignments shall be determined by the Administration Division
Chief. All other requests will be to a specific division, and assignments within
those divisions shall be determined by the appropriate Division Chief or
designee.
D. An effective vacancy date is created as a result of a transfer, promotion,
demotion, separation of service, or a positional change due to the needs of the
Department and shall be considered official as of the date of transfer,
promotion, demotion, separation of service, or positional change due to the
needs of the Department. All transfer requests shall be honored in order of
seniority, unless otherwise stipulated in Section III., with the following
exception: The needs of a vacant position may require a member to possess an
EMT, driver, and/or other certifications, as determined by the Division Chief
or designee.
E. All transfer requests must be on file 21 days prior to the next effective transfer
date (A-shift Sunday) following the effective vacancy date to be considered
(i.e., for 2017, members who want to be considered or excluded for a vacancy
to be filled on August 20th, 2017 A-shift Sunday would need to have their
requested transfer submitted or removed before midnight on July 30th, 2017).
Transfer requests to or within Airport Division assignments must be on file 42
days prior to the effective A-shift Sunday transfer date (i.e. for the
aforementioned example, members who want to be considered or excluded for
a vacancy at DEN to be filled on August 20th, 2017 A-shift Sunday would need
or have their requested transfer submitted or removed before midnight one July
9th, 2017). Note that any member who has attended paid badging, training, etc.
for a DEN position will not be allowed to withdraw their transfer request.
DENVER FIRE DEPARTMENT Topic No: 1008.00
Date: 03-13-18
DIRECTIVE Approved: TAB
Review Date: 03-13-19
Replaces: Same (Titled “Transfer
Procedure”) dated 06-29-16
Topic: Request for Reassignment and Drafting
Process
1008.00 Request for Reassignment and Drafting Process
Page 4 of 8
F. For a position identified by the appropriate Division Chief, if no transfer
requests are received 21 days prior to the upcoming effective transfer date, or
42 days in the case of Airport Division assignments, all eligible members will
have an opportunity to submit a transfer request and the drafting process will
be initiated. Recruiting and drafting processes will run concurrently. From
the date of notification, members have the opportunity to submit their transfer
requests for 7 calendar days. Effective 0000 hours on the 8th calendar day, the
senior eligible submitted request of transfer, in accordance with this Directive,
shall be granted, unless the provisions of Section III of this Directive apply. If
no transfer requests have been received by 2359 hours on the 7th calendar day,
the vacancy shall be filled by the drafting process, and notices of transfers will
be generated. Any promotion, retirement, or transfer that occurs after 0000
hours on the 8th calendar day within the current 21-day cycle will not be
considered for the current effective transfer date.
G. If the vacancy is for a permanently assigned Officer or Engineer position
and no transfer requests have been received 21 days prior to the upcoming
effective transfer date, or 42 days in the case of Airport Division assignments,
all eligible promoted members will have an opportunity to submit a transfer
request. From the date of known vacancy, members have the opportunity to
submit their transfer requests for 7 calendar days. Effective 0000 hours on the
8th calendar day, the senior eligible submitted request of transfer, in accordance
with this Directive, will be considered, unless the provisions of Section III of
this Directive apply. If no transfer requests have been received by 2359 hours
on the 7th calendar day, the senior roving Officer or newest promoted Engineer
will be administratively assigned to the vacant position. Any promotion,
retirement, or transfer that occurs after 0000 hours on the 8th calendar day
within the current 21-day cycle will not be considered for the current effective
transfer date.
For a vacancy that occurred due to the submittal of a request within this allotted
time frame as stated above, the effective date of this vacancy will be 21
calendar days from the effective transfer date (or the following A shift
Sunday).
H. Members may only submit transfer requests for assignments in the rank that
they presently hold.
I. Roving Lieutenants may only submit a transfer request(s) for roving or support
assignments.
DENVER FIRE DEPARTMENT Topic No: 1008.00
Date: 03-13-18
DIRECTIVE Approved: TAB
Review Date: 03-13-19
Replaces: Same (Titled “Transfer
Procedure”) dated 06-29-16
Topic: Request for Reassignment and Drafting
Process
1008.00 Request for Reassignment and Drafting Process
Page 5 of 8
J. To be considered, all Airport Division transfer requests must be on file 42 days
prior to the effective transfer date (as stated in E., above) or the start of the
next 40-hour ARFF academy, whichever is earlier. Transfer cancellations shall
not be accepted within 42 days of the effective transfer date. Once a member
has accepted a transfer to the Airport Division and attended any paid training,
badging, or other preparation, certification procedures must be maintained and
the transfer to the Airport Division may not be withdrawn.
K. The effective transfer date for members transferring from one Operations or
Airport Division suppression assignment to another Operations or Airport
Division suppression assignment will be on an A-shift Sunday. The effective
transfer date for all other transfers (i.e., suppression to support, support to
suppression, or support to support) can be on any Sunday.
L. Once a requested transfer has been granted to any assignment, all other
requests by that member shall be purged, including Right of First Refusal.
Specific obligations for requested assignments are as follows: one year for
non-technical suppression assignments; two years for technical suppression,
technical support, and Airport Division assignments, (unless otherwise
specified in job announcement at the time of posting). The obligation may be
modified by the Chief of the Department or designee, according to Department
needs.
M. If a member has been drafted, the specific time obligations for assignments
are as follows: one year for non-technical suppression assignments; two years
for technical suppression, technical support, and Airport Division assignments.
The obligation may be modified by the Chief of the Department or designee,
according to Department needs.
N. If a Division Chief or designee denies a transfer, justification for that denial
must be submitted in writing through the chain of command to the Deputy
Chief of Department for approval. If the denial is upheld, a copy of the denial
shall be provided to the requesting member via Department email. The
member’s transfer request shall remain on file and will be given future
consideration.
O. The number of positions to be staffed or filled within each division shall be
determined by the Division Chief and submitted to the Office of the Deputy
DENVER FIRE DEPARTMENT Topic No: 1008.00
Date: 03-13-18
DIRECTIVE Approved: TAB
Review Date: 03-13-19
Replaces: Same (Titled “Transfer
Procedure”) dated 06-29-16
Topic: Request for Reassignment and Drafting
Process
1008.00 Request for Reassignment and Drafting Process
Page 6 of 8
Chief for approval. The determination of the number of staffed positions shall
not be exercised in an arbitrary or capricious manner.
P. When it is necessary to draft a Firefighter to fill a vacancy, all members of the
last class to turn First Grade Firefighter at the time of the effective transfer
date shall be eligible (see III.B). Once it is determined that there are no more
eligible members to be drafted from the last class to turn First Grade
Firefighter, then the next most junior class to be First Grade Firefighter will be
eligible to be drafted. The Division Chief or designee may conduct interviews.
When it is necessary to draft an Engineer to fill a vacancy, only the twenty-
five least senior Engineers at the time of the effective transfer date shall be
eligible (see III.B). The Division Chief or designee may conduct interviews.
When it is necessary to draft a Lieutenant to fill a vacancy, all Lieutenants who
have not fulfilled a minimum of eighteen (18) consecutive months in a support
position at the time of the effective transfer date shall be eligible. Previous
support service does not count towards the required new two (2) year
commitment. The Division Chief or designee may conduct interviews.
Q. All requested transfers shall be considered during the annual Department
Reorganization and shall occur once a year, on the first A-shift Sunday in
January, prior to Kelly Day and vacation selections for that given year. This
date shall be determined by the Administration Division Chief. The District
Administrative Chief and the Division Chief of Operations (or the Division
Chief of the Airport Division as it applies to the Airport) may transfer a
member between shifts within their company, district or city-wide to balance
seniority or to accommodate special needs within a specific company(ies) (i.e.,
EMT, certified drivers, etc.) All requested transfers shall be considered for
the April/May and August/September transfers that will take place on an
A-shift Sunday, as determined by the Administration Division Chief.
R. Division Chiefs will have the authority to temporarily transfer members, within
their Division, to help manage the operational needs of both the Division and
the Department. As an example; when, as determined by the District
Administrative Chief, a temporary transfer is deemed to be necessary, the
District Administrative Chief shall forward the request through the Shift
Commander to the Division Chief for review. Upon the Division Chief’s
approval of the request, the member being transferred shall have the Right of
First Refusal back to the assignment they held prior to the temporary transfer.
DENVER FIRE DEPARTMENT Topic No: 1008.00
Date: 03-13-18
DIRECTIVE Approved: TAB
Review Date: 03-13-19
Replaces: Same (Titled “Transfer
Procedure”) dated 06-29-16
Topic: Request for Reassignment and Drafting
Process
1008.00 Request for Reassignment and Drafting Process
Page 7 of 8
S. If a member has been administratively transferred as part of a Department
Reorganization (see P.) to another assignment, or temporarily transferred to
facilitate operational and/or Departmental needs, said member shall have an
opportunity to submit a written request for transfer back to their original
assignment with a one-time Right of First Refusal. An email request for
transfer must be submitted through the chain of command using Department
email to the Administration Division Chief within nine calendar days of the
effective date of administrative transfer. If said member declines the
opportunity to return to their original assignment, the transfer request shall be
purged.
III. TECHNICAL SUPPRESSION, TECHNICAL SUPPORT, AND AIRPORT DIVISION
ASSIGNMENTS
General Transfer Procedures, as stated in Section II., shall apply with the following
exceptions:
A. Firefighters 1st grade and above will be considered for a technical suppression,
technical support, or Airport Division assignment. In the event that there is no
1st grade Firefighter transfer request on file, 2nd and 3rd grade Firefighters may
be considered for assignment during the recruiting and drafting process. These
members shall acquire training and applicable certifications and develop
proficiencies relative to the specific technical assignment, as predetermined by
the Division Chief of that assignment. All technical suppression, technical
support, and Airport Division assignments will be based on training and/or
certifications, as determined by the applicable Division Chief. Each Division
Chief requiring certifications will submit the standards and justifications to the
office of the Deputy Chief for approval and the approved certifications shall
be distributed via Fire Chief Memorandum / Standard Operating Guideline
(SOG) and be posted on the Department’s website, with notice via email to all
DFD members. Any future changes in certification requirements shall be
resubmitted for approval and distribution, as outlined above. The approved
applicable certifications for these transfers override seniority. If all members
being considered for the position(s) have equal certification(s), then seniority
will determine the member(s) being transferred. Prior to being considered for
the transfer, applicants will be required to participate in a meeting to fully
discuss the requirements and expectations of the position. Those requirements
and expectations shall be acknowledged by the requesting member in writing
prior to the transfer becoming effective. Failure to meet those requirements
DENVER FIRE DEPARTMENT Topic No: 1008.00
Date: 03-13-18
DIRECTIVE Approved: TAB
Review Date: 03-13-19
Replaces: Same (Titled “Transfer
Procedure”) dated 06-29-16
Topic: Request for Reassignment and Drafting
Process
1008.00 Request for Reassignment and Drafting Process
Page 8 of 8
and expectations within a predetermined time frame, with adequate training
opportunities, may result in a member’s reassignment. The appropriate
Division Chief or designee shall submit their meeting agenda for approval to
the Deputy Chief. The positions of Public Information Officer, Department
Recruiter(s) and Fire (Arson) Investigators shall be at the discretion of the
Chief of Department. The selection of the Public Information Officer,
Department Recruitment Officer(s) and Fire (Arson) Investigators will not be
based on seniority and may include an interview process. The minimum time
commitment for the position of Fire (Arson) Investigator will be 36 months (if
requested), and 24 months if drafted.
B. Lieutenants, Engineers, and Firefighters in Support who have previously
completed the full assignment obligations (greater than eighteen months)
in the rank they currently hold shall not be considered for drafting.
IV. APPEALS PROCESS
Transfers may be appealed using the Administrative Grievance Procedure in effect at
the time of the grievance. All attempts shall be made to transfer members based on
this Request for Reassignment and Drafting Process Directive. Deviation from this
Directive may be considered, without setting precedent for future transfers, if it is in
the best interest of the Department.
NOTE: This Directive shall be reviewed annually, or as needed, and revisions made as
necessary.
DENVER FIRE DEPARTMENT Topic No: 1009.01
Date: 02-23-18
DIRECTIVE Approved: TAB
Review Date: 02-23-20
Replaces: Same, dated 11-09-17
Topic: Non-Line of Duty (NLOD) Sick Leave
1009.01 Non-Line of Duty (NLOD) Sick Leave
Page 1 of 1
PURPOSE: To outline procedures for members with NLOD injuries or illness
SCOPE: Applies to all uniformed members
SICK LEAVE (Non-Line of Duty Illness or Injury)
It is the responsibility of each member to notify their respective officer of any absences and/or
injuries.
It is the responsibility of Company Officers and Support Service Heads to monitor the use of
sick leave of members assigned to them. They shall contact the members at their place of
confinement for verification whenever there is a reasonable doubt as to compliance by any
member.
Any time a member cannot be contacted by the above procedure, the immediate supervisor
shall contact the Administration Division for further action. The Administration Division is
authorized to perform “welfare checks.”
All members are reminded that current information must be on record with the
Administration Division concerning their home address and telephone number.
Violation of the above-listed procedures may subject the member to disciplinary action.
RETURN TO WORK
If a member assigned to a 48-hour work week has missed three (3) consecutive shifts (72
hours); not including a Kelly Day, or if a member assigned to a 40-hour work week has missed
40 hours consecutively; not including a Kelly Day, the member must have a doctor’s note
releasing the member to full duty with no restrictions based on the member’s job description.
Before the member can return to work, this doctor’s release must be given to the member’s
officer, who will immediately forward it to the Administration Division. In addition, the
member’s officer shall notify the Administration Division of the sick leave usage within 72
hours of the member’s absence. Based upon FMLA law, paperwork will be sent to the
member explaining the employee rights under the Family and Medical Leave Act.
DENVER FIRE DEPARTMENT Topic No: 1010.02 Date: 12-03-19 DEPARTMENT DIRECTIVE Approved: TAB Review Date: 12-03-21 Topic:
ALL DFD Related Accidents and Driver Review
Replaces: Same, dated 11-07-14 (was named Accidents Involving DFD Vehicles or Apparatus); and 1010.00, 1010.03, and 1010.04
1010.02 ALL DFD Related Accidents and Driver Review Page 1 of 9
PROCEDURES FOR DFD VEHICLE AND APPARATUS ACCIDENTS Whenever any vehicle or apparatus assigned to the Denver Fire Department is involved in a traffic accident, the incident will be classified by dispatchers as an “Accident-Fire Dept. Vehicle” or “Accident-Fire Dept. Apparatus.” All accidents involving DFD vehicles or apparatus shall be reported and investigated and the accident packet shall be fully completed. All accidents occurring off Department property will require a police response. The following procedures shall be followed in the event a Department vehicle or apparatus is involved in an accident. All Fire Department vehicles and apparatus shall carry a complete Accident Packet. It shall be the responsibility of the officer in charge and/or the driver/operator to complete all required actions and forms and to make sure forms are available in the vehicle. Forms are available online in Target Solutions .
DO NOT MAKE STATEMENTS REGARDING THE ACCIDENT TO ANYONE EXCEPT POLICE OR DEPARTMENT INVESTIGATORS.
I. PROCEDURES FOR ACCIDENTS INVOLVING ALL FIRE DEPARTMENT VEHICLES, INCLUDING FIRE APPARATUS, WITH ANOTHER PERSON OR AGENCY INVOLVED
A. All vehicles and apparatus involved in an accident, including
apparatus responding on emergency responses, must stop immediately, render aid as needed, and begin the reporting procedure.
B. Notify the dispatcher immediately of the following:
1. Dept. vehicle or apparatus involved 2. Location 3. Need for a cover-in company (for responding apparatus)
C. Request the following:
1. DFD Fire Company (if additional DFD resources are needed)
2. Ambulance for injured parties (include details of injuries and the number of injured parties)
DENVER FIRE DEPARTMENT Topic No: 1010.02 Date: 12-03-19 DEPARTMENT DIRECTIVE Approved: TAB Review Date: 12-03-21 Topic:
ALL DFD Related Accidents and Driver Review
Replaces: Same, dated 11-07-14 (was named Accidents Involving DFD Vehicles or Apparatus); and 1010.00, 1010.03, and 1010.04
1010.02 ALL DFD Related Accidents and Driver Review Page 2 of 9
3. Police (if determined by the investigating Chief that damage was NOT limited to Department vehicle)
4. Activation of Accident Call List 5. Opening of an Incident for the accident 6. Notification of District Chief, or if a Support Division
vehicle, the Division Assistant Chief (during business hours) for investigation
D. Document the following:
1. Name, age, and date of birth of all injured parties 2. Address and phone numbers of all involved parties
(work/cell if possible) 3. Ambulance company name/s, number/s, and attendant
name/s 4. Hospital destination of all injured parties
E. Obtain and document:
1. Name, address, and phone numbers for all involved drivers 2. Driver’s license number for all involved drivers (copy the
number from the license) 3. License plate and VIN number from all vehicles involved 4. Insurance company, policy number, agent, and agent
telephone numbers - note expiration dates 5. Name, address phone number, and statement for each
witness
F. The investigating Assistant Chief or other Denver Fire Department investigator shall make certain that comprehensive photographs are taken of involved vehicles and the accident scene. (See photo guidelines in accident packet)
G. Include only known facts in written or verbal reports. Obtain statements from all parties and crew members present. DO NOT MAKE CONCLUSIONS OR ASSUME LIABILITY FOR THE ACCIDENT.
DENVER FIRE DEPARTMENT Topic No: 1010.02 Date: 12-03-19 DEPARTMENT DIRECTIVE Approved: TAB Review Date: 12-03-21 Topic:
ALL DFD Related Accidents and Driver Review
Replaces: Same, dated 11-07-14 (was named Accidents Involving DFD Vehicles or Apparatus); and 1010.00, 1010.03, and 1010.04
1010.02 ALL DFD Related Accidents and Driver Review Page 3 of 9
H. Refer to Executive Order 94 for guidance in completing post
incident testing.
I. All items in the Accident Packet shall be completed and returned to the Administration Division, through the District Chief, Shift Commander and/or appropriate Division Chief within 72 hours after an accident. Completed packets may be submitted electronically through the chain of command via the Administration Division email address at: [email protected]. The completed packet should contain: 1. Completed Accident Packet checklist 2. Copy of the letter from the Company Officer (apparatus) or
driver/operator (DFD vehicle) explaining the details of the accident, through the chain of command to the Chief of the Department
3. Accident Information Exchange Form(s) 4. Driver/Operator Vehicle Accident Report 5. Letter from the Fire Department officer investigating the
accident. All supervisory letters on accident investigations shall include whether or not Executive Order 94 was invoked, with reasons why or why not.
6. Photographs (may be emailed to the Master Mechanic, Driving Coordinator and [email protected])
7. Witness statements and crew statements
J. The Administration Division will notify the Deputy Chief and the appropriate Division Chief of all accidents involving their Division in a weekly report. After review of the accident documentation, the Administration Division will forward copies to the Chief of Department through the chain of command and initiate the review committee process as appropriate.
K. Complete NFIRS reports.
DENVER FIRE DEPARTMENT Topic No: 1010.02 Date: 12-03-19 DEPARTMENT DIRECTIVE Approved: TAB Review Date: 12-03-21 Topic:
ALL DFD Related Accidents and Driver Review
Replaces: Same, dated 11-07-14 (was named Accidents Involving DFD Vehicles or Apparatus); and 1010.00, 1010.03, and 1010.04
1010.02 ALL DFD Related Accidents and Driver Review Page 4 of 9
L. Accidents Outside of the City of Denver:
DFD Vehicle or Apparatus accidents occurring outside the City of Denver shall be handled as above. The Company Officer (apparatus) or driver/operator (DFD vehicle) is still responsible for completing an accident packet and for completing the exchange of information with the other driver(s) and for ensuring a police report is filed. Company Officers or driver/operators should get information as to how to obtain a copy of the official report of the accident from the Police Officer of the jurisdiction in which the accident occurred.
II. PROCEDURES FOR ACCIDENTS INVOLVING ALL FIRE DEPARTMENT VEHICLES, INCLUDING FIRE APPARATUS, ON DEPARTMENT PROPERTY WITH NO OTHER PERSON OR AGENCY INVOLVED AND WITH NO INJURIES: A. Notify Dispatcher if the accident has put you out of service and
request an incident number. (Stay In Service if the above conditions exist and you are able to respond to an incident).
B. Request that the Dispatcher initiate the Accident Call List and to send the District Chief/Supervisor/Department Driving Coordinator or other investigator from Safety and Training.
C. Make certain that pictures are taken at accident scene by the
District Chief or Fire Department investigator. *Refer to Accident Packet for Guidelines for Taking Photos
D. Completed packets may be submitted electronically through the
chain of command via the Administration Division email address at: [email protected]. The completed packet should contain:
DENVER FIRE DEPARTMENT Topic No: 1010.02 Date: 12-03-19 DEPARTMENT DIRECTIVE Approved: TAB Review Date: 12-03-21 Topic:
ALL DFD Related Accidents and Driver Review
Replaces: Same, dated 11-07-14 (was named Accidents Involving DFD Vehicles or Apparatus); and 1010.00, 1010.03, and 1010.04
1010.02 ALL DFD Related Accidents and Driver Review Page 5 of 9
1. Completed Accident Packet checklist 2. Copy of the letter from the Company Officer (apparatus) or
driver/operator (DFD vehicle) explaining the details of the accident, through the chain of command to the Chief of the Department
3. Accident Information Exchange Form(s) 4. Driver/Operator Vehicle Accident Report 5. Letter from the Fire Department officer investigating the accident.
All supervisory letters on accident investigations shall include whether Executive Order 94 was invoked, with reasons why or why not.
6. Photographs (may be emailed to the Master Mechanic, Driving Coordinator and [email protected]).
7. Witness statements and crew statements.
III. REVIEW OF ACCIDENTS INVOLVING FIRE DEPARTMENT
VEHICLES / APPARATUS AND PERSONNEL All accidents involving fire apparatus shall be reported, investigated, and have a completed accident packet submitted. No member shall investigate their own accident. A. The Assistant Chief of the involved Division and the on-duty
member of the Administration Division staff shall be notified of ALL Fire Department vehicle accidents.
A member of the Administration Division and/or a member of the Safety and Training Division staff shall respond to ALL accidents where injury or death has occurred.
Include all forms. If a form is not applicable, mark with a large “N/A.”
B. The Administration Division will be responsible for notifying the Deputy Chief of the Department of all accidents.

DENVER FIRE DEPARTMENT Topic No: 1010.02 Date: 12-03-19 DEPARTMENT DIRECTIVE Approved: TAB Review Date: 12-03-21 Topic:
ALL DFD Related Accidents and Driver Review
Replaces: Same, dated 11-07-14 (was named Accidents Involving DFD Vehicles or Apparatus); and 1010.00, 1010.03, and 1010.04
1010.02 ALL DFD Related Accidents and Driver Review Page 6 of 9
C. The Department Driving Coordinator will request a quarterly
meeting for the Department Driver/Operator Safety Review Board to the appropriate Divisions. It shall be the duty of the Department Driver/Operator Safety Review Board to review all Department vehicle accidents. The Driver/Operator Safety Review Board shall, upon review of the incident, determine whether an accident was preventable or non-preventable and determine a primary cause when necessary.
1. Preventable: Accident was principally caused by driving
actions in violation of traffic laws and/or Department policy.
2. Non-preventable: Unavoidable accident; proper defensive techniques were practiced.
3. The DFD Driver/Operator Safety Review Board will present its recommendations to the Division Chief of Safety and Training for determination of points and/or any recommendations of remedial training. Any disciplinary recommendations from the Review Board will be presented to the Division Chief of Administration.
4. When the consideration of the accident is complete, the Department Driving Coordinator shall record the findings. Point values are determined as follows:
IV. FIRE DEPARTMENT VEHICLE / APPARATUS ACCIDENT CLASSIFICATION
Non-preventable – 0 points, accidents determined to be unavoidable with
reasonable preventive measures and actions consistent with Department driver training.
Preventable – 0 to 12 points, taking into consideration the circumstances
surrounding the accident and report information from the Police Department. Traffic violations will be assessed that number of points similar with the penalty point schedule in state statutes and used by the State of Colorado Motor Vehicle Division.
DENVER FIRE DEPARTMENT Topic No: 1010.02 Date: 12-03-19 DEPARTMENT DIRECTIVE Approved: TAB Review Date: 12-03-21 Topic:
ALL DFD Related Accidents and Driver Review
Replaces: Same, dated 11-07-14 (was named Accidents Involving DFD Vehicles or Apparatus); and 1010.00, 1010.03, and 1010.04
1010.02 ALL DFD Related Accidents and Driver Review Page 7 of 9
To maintain a valid DFD driver/operator license, a member shall not accrue more than 12 points within any twelve consecutive months or more than 18 points within any twenty-four consecutive months. Primary Cause: Additional point assessment where there is a violation of any Department driving policy. If the accident is found to be non-preventable, the Safety and Training Division will file a document in the Department Driving Records, with a copy to the operator’s Division Chief. No points will be assessed. If the accident is found to be preventable, the total of preventable points plus primary cause points (if applicable) will be applied to the driver’s record and a determination of discipline (if applicable) will be initiated by the operator’s supervisor according to the Department disciplinary process (see NOTE below). Accrued points for only one accident could subject the driver/operator to disciplinary procedure without regard to any time limits. NOTE: Discipline given for driving matters is subject to the same rules for representation and appeal as discipline levied for any other reason.
Points assessed for the current accident will be added to the points
assessed during the past twenty-four consecutive months.
Drivers who have been involved in either preventable or non-preventable accidents may be required to complete assigned JPRs if the Department Driving Coordinator believes that a driver/operator would benefit from such training and one of the following situations exists:
1. Three non-preventable accidents within an 18-month period 2. Any accident resulting in death or serious injury 3. Any vehicle accident that includes circumstances that indicate
there would be a benefit to the member or the Department
DENVER FIRE DEPARTMENT Topic No: 1010.02 Date: 12-03-19 DEPARTMENT DIRECTIVE Approved: TAB Review Date: 12-03-21 Topic:
ALL DFD Related Accidents and Driver Review
Replaces: Same, dated 11-07-14 (was named Accidents Involving DFD Vehicles or Apparatus); and 1010.00, 1010.03, and 1010.04
1010.02 ALL DFD Related Accidents and Driver Review Page 8 of 9
Flagrant Violations: Violations that contradict other Department standards
or result in extreme damage and/or injuries may result in severe disciplinary recommendations.
Driver training shall be provided by the Department and may include
defensive driving or emergency driving and maneuvering. Questions concerning this policy may be directed to the Administration
Division. Point assessment values will correlate with the following corrective
actions: 0 – 4 points: Company Level Training
5 - 8 points: Verbal Reprimand and Company Level Training
9 – 11 points: Written Reprimand
12 or more points: Suspension of Denver Fire Department
driver’s license, possible reassignment, and appropriate disciplinary action which may include suspension, demotion, or termination
Drivers or Company/Chief Officers shall report vehicle accidents they are NOT involved in by:
1. Contacting the Dispatcher and reporting the accident. The driver
or officer should state that his/her vehicle is not involved.
2. Giving the accident location and requesting Police. Where applicable, ask for an ambulance response – giving as many details about number of injured parties and type of injuries as possible.
DENVER FIRE DEPARTMENT Topic No: 1010.02 Date: 12-03-19 DEPARTMENT DIRECTIVE Approved: TAB Review Date: 12-03-21 Topic:
ALL DFD Related Accidents and Driver Review
Replaces: Same, dated 11-07-14 (was named Accidents Involving DFD Vehicles or Apparatus); and 1010.00, 1010.03, and 1010.04
1010.02 ALL DFD Related Accidents and Driver Review Page 9 of 9
3. Informing the Dispatcher if the driver or crew is giving assistance
at the scene. Request additional apparatus as needed – giving details about what type of assistance is required - i.e. fire, extrication, hazard removal, sand, hazardous materials, etc.
DENVER FIRE DEPARTMENT
DIRECTIVE
1011.00 Uniforms and Personal Appearance Page 1 of 10
Topic No: 1011.00 Date: 08-29-2019 Approved: TAB Review Date: 08-29-2021 Replaces: Same, dated 08-09-19
Topic: Uniforms and Personal Appearance
PURPOSE: To outline an approved, standardized Departmental guideline for uniforms, which serve to identify members of the organization and promote professionalism throughout the agency.
SCOPE: Applies to all uniformed members of the Department
Only the regulation uniform approved by the Department shall be worn while on-duty. It is the member’s responsibility to obtain and maintain the uniform items required for their assignment, in accordance with this document and Article IX of the Collective Bargaining Agreement. All personnel are expected to project a professional appearance while on-duty and should take pride in their personal appearance.
I. Regulation Uniforms - General:
A. Department-issued “Class A” uniform is to be worn at designated formal functions or at the discretion of the company officer, district chief, or department administrators.
B. Department-issued “Class B” uniform shall be the standard uniform for all non-
formal public appearances. Class B uniforms shall be worn at all times the members are in official contact with the public (exception: Class C may be worn on emergency responses).
C. With the exception of public appearances requiring the wear of other uniform
classifications, “Class C” uniform items should be considered the station work uniform.
D. Badge, name plate, flag, and rank insignia shall be worn with Class A and Class B
uniforms. “Polo” style shirts excepted, which will be issued with embroidered Maltese on left chest, name and rank on right chest.
E. From the hours of 0730 to 1700, all members shall wear the appropriate regulation
uniform while on-duty. Fitness attire shall be worn only while involved in physical fitness activity, or from 1700 until 0730 the next day, as nighttime/turn-out wear.
F. Company officers will be held accountable for maintaining a consistent company
appearance and shall ensure all members are appropriately dressed for a given activity.
DENVER FIRE DEPARTMENT
DIRECTIVE
1011.00 Uniforms and Personal Appearance Page 2 of 10
Topic No: 1011.00 Date: 08-29-2019 Approved: TAB Review Date: 08-29-2021 Replaces: Same, dated 08-09-19
Topic: Uniforms and Personal Appearance
II. “Class A” Regulation Uniform (Formal):
A. Department-issued navy blue, long-sleeved shirt with black tie (white shirts for chief officers).
B. Department-issued navy blue trousers (black trousers for chief officers).
C. Department-issued navy blue dress suit coat with silver-plated buttons and badge
holder over left upper pocket (black coat with gold-plated buttons for chief officers). Maltese Cross insignia will be displayed on the left sleeve, above the rank stripes, one cross for every five years of completed service; gold for chief officers, silver for all other members. Striping for ranks will be placed above the cuff of the left sleeve as follows:
1. Chief of Department – Five ½-inch gold stripes on sleeves
2. Deputy Chief of Department – Four ½-inch stripes and one ¼-inch gold stripe
on sleeves
3. Division Chiefs – Four ½-inch gold stripes on sleeves
4. Shift Commanders – Three ½ inch gold stripes and one ¼ inch gold stripe on sleeves.
5. Assistant Chiefs – Three ½-inch gold stripes on sleeves
6. Master Mechanic and Superintendent of Fire Alarm – Three ½-inch gold
stripes on sleeves
7. Assistant Master Mechanic and Assistant Superintendent of Fire Alarm – Two ½-inch gold stripes on sleeves
8. Captains – Two ½-inch silver stripes on sleeves
9. Lieutenants – One ½-inch silver strip on sleeves
10. Engineers – One ¼-inch silver stripe on sleeves
DENVER FIRE DEPARTMENT
DIRECTIVE
1011.00 Uniforms and Personal Appearance Page 3 of 10
Topic No: 1011.00 Date: 08-29-2019 Approved: TAB Review Date: 08-29-2021 Replaces: Same, dated 08-09-19
Topic: Uniforms and Personal Appearance
D. Black belt with plain buckle (gold for chief officers, silver for all other members).
E. Black leather dress shoes that will take polish or simulated leather shoes (style optional). Station work shoes are not acceptable with Class A attire.
F. Badge shall be worn on suit jacket. The LODD “Never Forget” pin shall be worn on the right lapel of the suit jacket. Name plate, flag pin, rank insignia, commendation ribbons, and department-approved pins shall be worn on the dress shirt.
G. Department-issued, navy blue uniform hat (white for chief officers).
H. Navy blue or black socks to match trousers
III. “Class B” Regulation Uniform (Standard – worn for non-formal public
appearances): Non-formal public appearances will be defined as fire safety inspections, community service events, or department sponsored appearances.
A. Standard issue long- or short-sleeved navy blue uniform shirt with badge, rank
insignia, flag pin, name tag, LODD “Never Forget” pin, service pin, and other department-approved pins will be considered the standard shirt for non-formal public appearances. 1. Chief officers may wear white or navy
B. Members may wear a department-issued “polo” style shirt, however:
1. Members assigned to a suppression assignment are required to have “FIRE” or “Denver Fire” on the back of these shirts.
2. Chief officers may wear white or navy.
C. Long-sleeved t-shirts shall not be worn with the short-sleeved uniform shirt or the polo style shirt.
D. Department-issued navy blue trousers or 6 pocket pants (black trousers/6 pocket
pants may be worn by chief officers when wearing white shirts). E. Black belt with plain buckle (gold for chief officers, silver for all other
members).
DENVER FIRE DEPARTMENT
DIRECTIVE
1011.00 Uniforms and Personal Appearance Page 4 of 10
Topic No: 1011.00 Date: 08-29-2019 Approved: TAB Review Date: 08-29-2021 Replaces: Same, dated 08-09-19
Topic: Uniforms and Personal Appearance
F. Approved station work shoes or boots must meet established department of safety
requirements (protected toe and shank; please contact warehouse for specific details), must be fully enclosed (back, toes, sides), must be all black in color, and shall be kept clean and in good condition.
G. Navy blue or black socks to match trousers
H. Uniform cap (authorized dark-blue, baseball-style cap), optional. Baseball-style
caps shall only be worn with logo and brim facing forward, they shall not be worn backwards or sideways. Caps shall be in good condition, with minimal fading or discoloration. No caps may be worn with unapproved or non-department related logos, insignias, stickers, or designs.
IV. “Class C” Regulation Uniform (Work):
A. Department-issued short or long-sleeved t-shirt in good condition. T-shirts shall be tucked into trousers at all times.
B. Department-issued sweatshirt (job-shirt, unaltered).
C. Department-issued navy blue trousers.
D. Navy blue knit cap or authorized dark-blue, baseball-style cap. Baseball-style caps
shall only be worn with logo and brim facing forward. No caps may be worn with unapproved or non-department related logos, stickers, insignias, or designs.
V. Station Wear for Physical Fitness, Overnight, and Other Activities Approved by
Company or Chief Officers:
A. Navy blue sweatpants or shorts and department-issued t-shirts
B. Department-issued job-shirt
C. Appropriate training shoes
VI. Fire Investigation:
Fire Investigators’ Class B and Class C work uniforms shall be determined by the Division Chief of Administration, with the approval of the Chief of the Department.
DENVER FIRE DEPARTMENT
DIRECTIVE
1011.00 Uniforms and Personal Appearance Page 5 of 10
Topic No: 1011.00 Date: 08-29-2019 Approved: TAB Review Date: 08-29-21 Replaces: Same, dated 08-09-19
Topic: Uniforms and Personal Appearance Investigators shall comply with all other portions of this Directive, including maintaining a Class A uniform for official Department functions.
VII. Uniform Restrictions:
A. Any item not specified above that has been issued from the DFD Quartermaster shall be considered approved apparel. R&D items may initially be worn for the
approved testing period only. If the item is selected for inclusion into the official uniform, it may continue to be worn with the approval of the DFD Quartermaster and appropriate Division Chief. If an item is not selected for inclusion, it is no longer considered as approved for on-duty use.
B. With the exception of baseball-style caps, no portion of the department-issued
uniform, of which material or article has been purchased by the City, shall be worn except when on duty.
C. No authorized uniform item shall be distributed or given to unauthorized
personnel.
D. Members promoting shall update their uniforms by anticipating these needs during the annual uniform replacement and/or by utilizing the annual maintenance allowance.
E. Uniforms shall be maintained in good condition and, with the exception of sizing
adjustments, shall be unaltered. They shall be clean, neatly pressed, and free of tears, stains, or holes; faded, worn, or damaged clothing is not acceptable. Badges and name plates shall be polished.
F. Shirts shall be tucked into trousers at all times.
G. No buttons, emblems, or insignia of any kind shall be worn on or about the uniform, except as specified or authorized by the Chief or designee.
VIII. Considered Exceptions:
A. Members may request, through the chain of command to the Deputy Chief, or designee, approval of apparel that is not issued by the DFD Quartermaster. Submissions for consideration are to be made at the member’s expense. If the
DENVER FIRE DEPARTMENT
DIRECTIVE
1011.00 Uniforms and Personal Appearance Page 6 of 10
Topic No: 1011.00 Date: 08-29-2019 Approved: TAB Review Date: 08-29-21 Replaces: Same, dated 08-09-19
Topic: Uniforms and Personal Appearance
apparel is approved, all costs associated with providing the apparel shall be at the member’s expense. Any artwork or representation of submissions must be of a file type that can be opened and accessed by DFD computers. The following points apply to all apparel submitted for approval:
1. Apparel must be navy blue or black in color.
2. All company/firehouse logos, emblems, or artwork shall be submitted for
approval prior to being displayed while on duty. A company-specific Maltese Cross, DFD badge, or DFD scramble will be the only items considered for placement on the left front chest of t-shirts, job-shirts, sweat shirts, jackets, and/or on the front of baseball/knit style caps. Alternate placement may be considered on a case-by-case basis.
3. T-shirts, job-shirts, sweat shirts, etc., intended for wear in a suppression
assignment must have “Denver Fire” or “FIRE” on the back consistent with department-issued apparel.
4. Baseball-style caps must be of the same color and similar material as those
issued by the DFD Quartermaster. Caps with a snapback closure or caps with mesh backs may be submitted for approval as long as the closure and mesh are navy blue in color and the front is constructed of fabric and color similar to the standard issue cap.
5. Following the approval process, all non-department issued items approved for
wear in the Operations Division, will be listed in Target Solutions / File Center / Division 1 Operations / Approved/Unapproved Uniforms.
Approved items are listed as general items approved for the Division and items approved by District. Approved items are shown as photographs. Officers will be able to determine if an item has been approved by locating the article of clothing in the general items approved for either the Division or District. Non- approved items are also shown as photographs.
DENVER FIRE DEPARTMENT
DIRECTIVE
1011.00 Uniforms and Personal Appearance Page 7 of 10
Topic No: 1011.00 Date: 08-29-2019 Approved: TAB Review Date: 08-29-21 Replaces: Same, dated 08-09-19
Topic: Uniforms and Personal Appearance
IX. Accessories and Insignia Description and Placement:
A. Shoulder Patches Shoulder patches shall be worn on the left shoulder of Class A and B uniform shirts (polo shirts excluded) and dress suit coats (stitched in gold for chief officers, red or silver for all other members.)
B. Name Plates
Name plates, furnished by the Department, shall be worn over the right shirt pocket of Class A and B uniforms, centered above the flap as close as possible to the top of flap. Current winter/summer jackets have names sewn onto the right side; however, on older jackets, name plates may be worn over the left coat pocket, below the badge and centered above the flap as close as possible to the top of the flap. If desired, the name plate may contain the EMT emblem.
C. Collar Insignia
The placement of collar insignia is approximately ¾-inch from the front edge of the collar lapel and centered on the collar. Lieutenant and Captain bars are to be parallel to the front collar edge. Tops of bugles shall face the neck on chiefs’ insignia. Department Officers will wear the following collar insignia on uniform shirt:
1. Chief of Department – Gold-plated five bugle insignia
2. Deputy and Division Chiefs – Gold-plated four bugle insignia
3. Shift Commanders and Assistant Chiefs – Gold-plated three bugle insignia
4. Superintendent of Fire Alarm and Assistant Superintendent of Fire Alarm
– Gold-plated lightning bolt insignia
5. Master Mechanic and Assistant Master Mechanic – Gold-plated fire engine insignia
6. Captains – Silver double bars
7. Lieutenants – Silver single bar
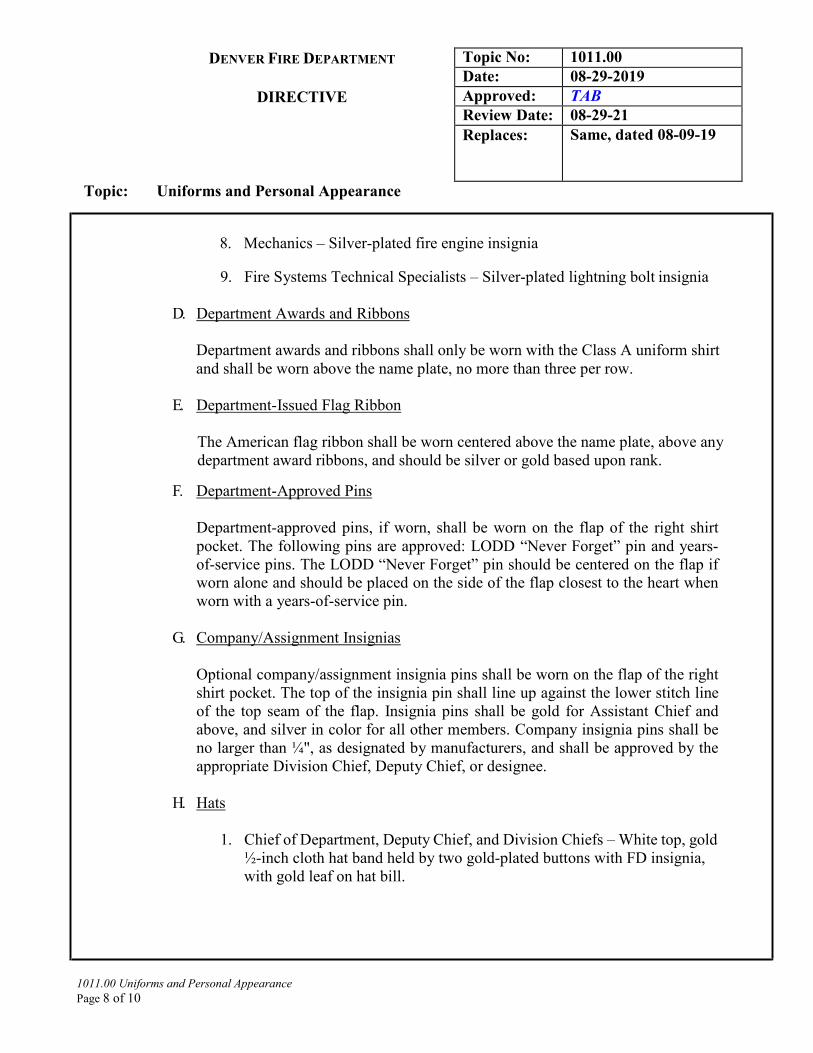
DENVER FIRE DEPARTMENT
DIRECTIVE
1011.00 Uniforms and Personal Appearance Page 8 of 10
Topic No: 1011.00 Date: 08-29-2019 Approved: TAB Review Date: 08-29-21 Replaces: Same, dated 08-09-19
Topic: Uniforms and Personal Appearance
8. Mechanics – Silver-plated fire engine insignia
9. Fire Systems Technical Specialists – Silver-plated lightning bolt insignia
D. Department Awards and Ribbons
Department awards and ribbons shall only be worn with the Class A uniform shirt and shall be worn above the name plate, no more than three per row.
E. Department-Issued Flag Ribbon
The American flag ribbon shall be worn centered above the name plate, above any department award ribbons, and should be silver or gold based upon rank.
F. Department-Approved Pins
Department-approved pins, if worn, shall be worn on the flap of the right shirt pocket. The following pins are approved: LODD “Never Forget” pin and years- of-service pins. The LODD “Never Forget” pin should be centered on the flap if worn alone and should be placed on the side of the flap closest to the heart when worn with a years-of-service pin.
G. Company/Assignment Insignias
Optional company/assignment insignia pins shall be worn on the flap of the right shirt pocket. The top of the insignia pin shall line up against the lower stitch line of the top seam of the flap. Insignia pins shall be gold for Assistant Chief and above, and silver in color for all other members. Company insignia pins shall be no larger than ¼", as designated by manufacturers, and shall be approved by the appropriate Division Chief, Deputy Chief, or designee.
H. Hats
1. Chief of Department, Deputy Chief, and Division Chiefs – White top, gold ½-inch cloth hat band held by two gold-plated buttons with FD insignia, with gold leaf on hat bill.
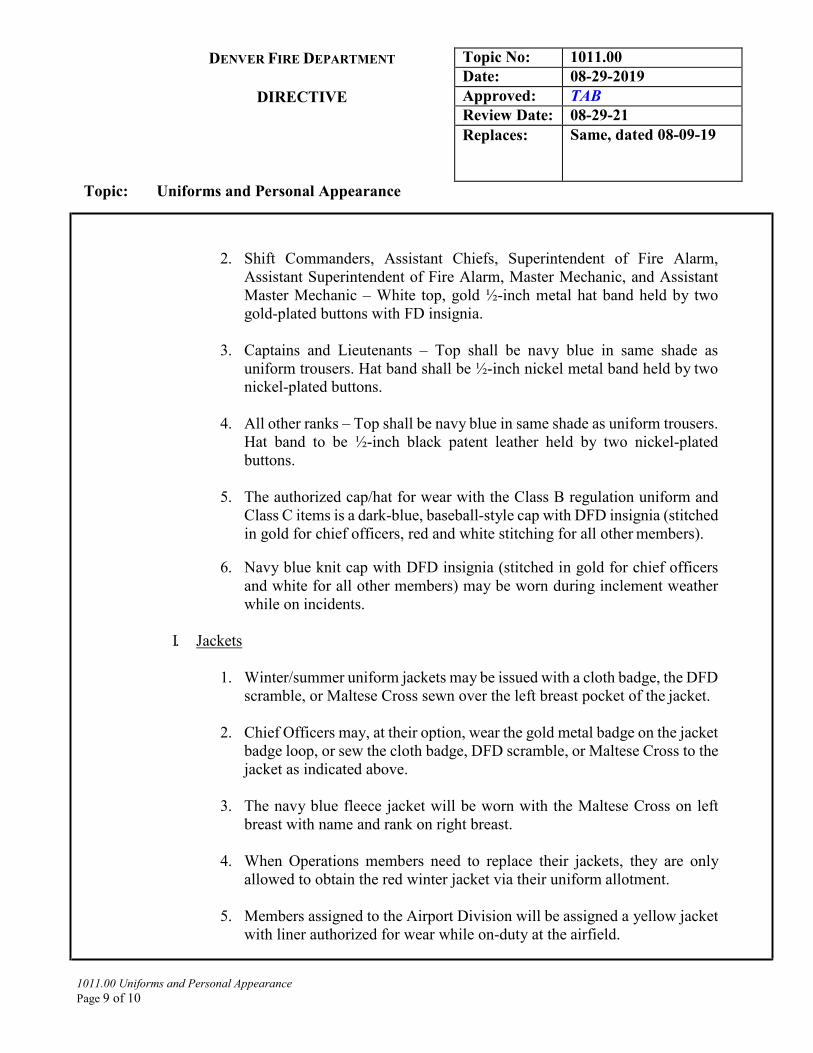
DENVER FIRE DEPARTMENT
DIRECTIVE
1011.00 Uniforms and Personal Appearance Page 9 of 10
Topic No: 1011.00 Date: 08-29-2019 Approved: TAB Review Date: 08-29-21 Replaces: Same, dated 08-09-19
Topic: Uniforms and Personal Appearance
2. Shift Commanders, Assistant Chiefs, Superintendent of Fire Alarm, Assistant Superintendent of Fire Alarm, Master Mechanic, and Assistant Master Mechanic – White top, gold ½-inch metal hat band held by two gold-plated buttons with FD insignia.
3. Captains and Lieutenants – Top shall be navy blue in same shade as
uniform trousers. Hat band shall be ½-inch nickel metal band held by two nickel-plated buttons.
4. All other ranks – Top shall be navy blue in same shade as uniform trousers.
Hat band to be ½-inch black patent leather held by two nickel-plated buttons.
5. The authorized cap/hat for wear with the Class B regulation uniform and
Class C items is a dark-blue, baseball-style cap with DFD insignia (stitched in gold for chief officers, red and white stitching for all other members).
6. Navy blue knit cap with DFD insignia (stitched in gold for chief officers and white for all other members) may be worn during inclement weather while on incidents.
I. Jackets
1. Winter/summer uniform jackets may be issued with a cloth badge, the DFD scramble, or Maltese Cross sewn over the left breast pocket of the jacket.
2. Chief Officers may, at their option, wear the gold metal badge on the jacket
badge loop, or sew the cloth badge, DFD scramble, or Maltese Cross to the jacket as indicated above.
3. The navy blue fleece jacket will be worn with the Maltese Cross on left
breast with name and rank on right breast.
4. When Operations members need to replace their jackets, they are only allowed to obtain the red winter jacket via their uniform allotment.
5. Members assigned to the Airport Division will be assigned a yellow jacket
with liner authorized for wear while on-duty at the airfield.
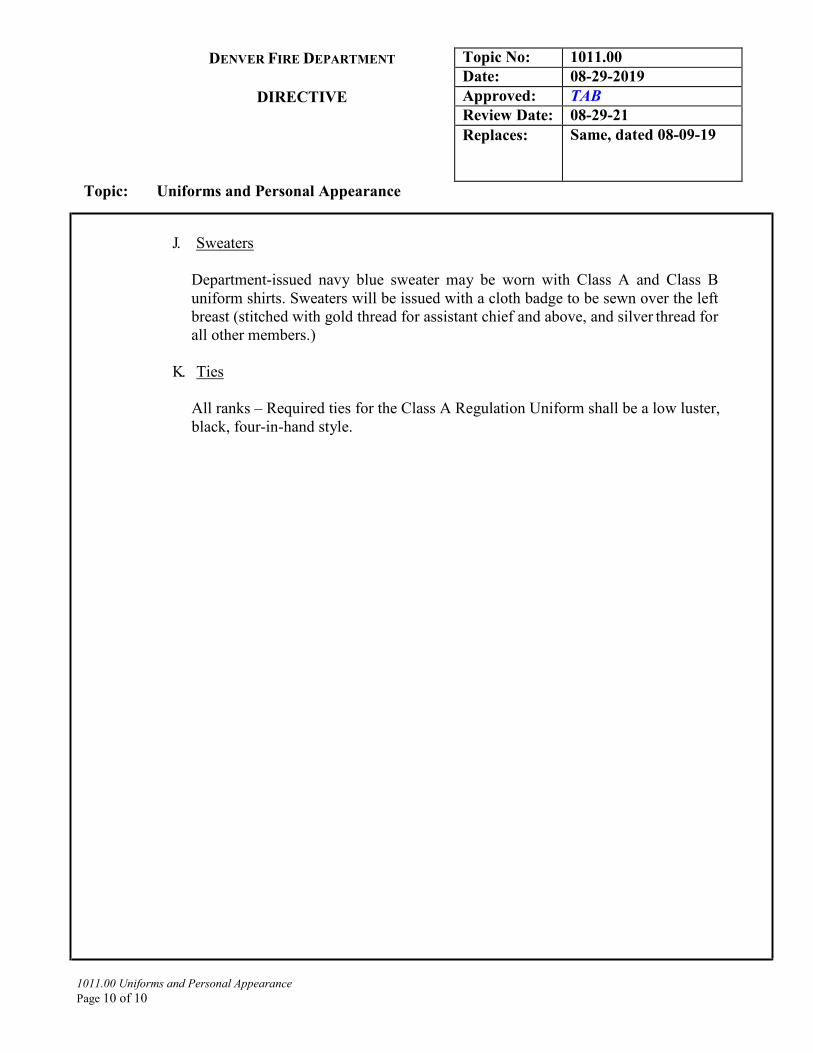
DENVER FIRE DEPARTMENT
DIRECTIVE
1011.00 Uniforms and Personal Appearance Page 10 of 10
Topic No: 1011.00 Date: 08-29-2019 Approved: TAB Review Date: 08-29-21 Replaces: Same, dated 08-09-19
Topic: Uniforms and Personal Appearance
J. Sweaters
Department-issued navy blue sweater may be worn with Class A and Class B uniform shirts. Sweaters will be issued with a cloth badge to be sewn over the left breast (stitched with gold thread for assistant chief and above, and silver thread for all other members.)
K. Ties
All ranks – Required ties for the Class A Regulation Uniform shall be a low luster, black, four-in-hand style.
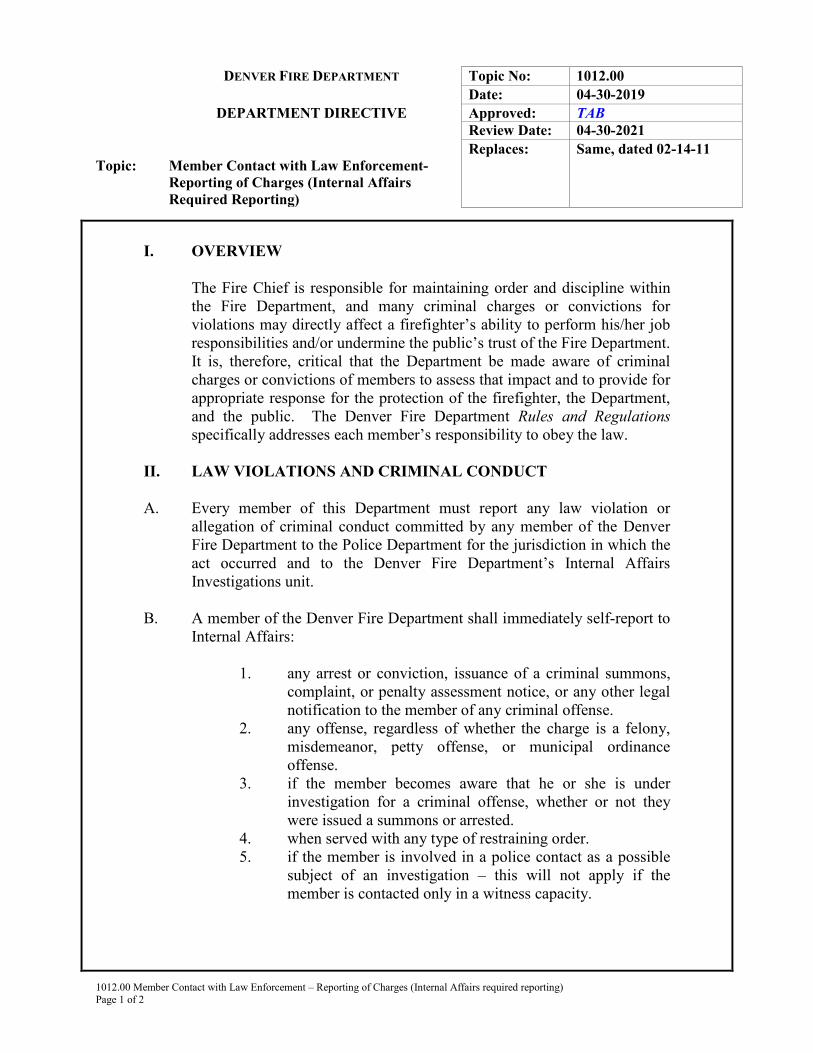
DENVER FIRE DEPARTMENT Topic No: 1012.00 Date: 04-30-2019 DEPARTMENT DIRECTIVE Approved: TAB Review Date: 04-30-2021 Topic:
Member Contact with Law Enforcement- Reporting of Charges (Internal Affairs Required Reporting)
Replaces: Same, dated 02-14-11
1012.00 Member Contact with Law Enforcement – Reporting of Charges (Internal Affairs required reporting) Page 1 of 2
I. OVERVIEW
The Fire Chief is responsible for maintaining order and discipline within the Fire Department, and many criminal charges or convictions for violations may directly affect a firefighter’s ability to perform his/her job responsibilities and/or undermine the public’s trust of the Fire Department. It is, therefore, critical that the Department be made aware of criminal charges or convictions of members to assess that impact and to provide for appropriate response for the protection of the firefighter, the Department, and the public. The Denver Fire Department Rules and Regulations specifically addresses each member’s responsibility to obey the law.
II. LAW VIOLATIONS AND CRIMINAL CONDUCT A. Every member of this Department must report any law violation or
allegation of criminal conduct committed by any member of the Denver Fire Department to the Police Department for the jurisdiction in which the act occurred and to the Denver Fire Department’s Internal Affairs Investigations unit.
B. A member of the Denver Fire Department shall immediately self-report to Internal Affairs:
1. any arrest or conviction, issuance of a criminal summons,
complaint, or penalty assessment notice, or any other legal notification to the member of any criminal offense.
2. any offense, regardless of whether the charge is a felony, misdemeanor, petty offense, or municipal ordinance offense.
3. if the member becomes aware that he or she is under investigation for a criminal offense, whether or not they were issued a summons or arrested.
4. when served with any type of restraining order. 5. if the member is involved in a police contact as a possible
subject of an investigation – this will not apply if the member is contacted only in a witness capacity.
DENVER FIRE DEPARTMENT Topic No: 1012.00 Date: 04-30-2019 DEPARTMENT DIRECTIVE Approved: TAB Review Date: 04-30-2021 Topic:
Member Contact with Law Enforcement- Reporting of Charges (Internal Affairs Required Reporting)
Replaces: Same, dated 02-14-11
1012.00 Member Contact with Law Enforcement – Reporting of Charges (Internal Affairs required reporting) Page 2 of 2
Exception: Parking tickets or traffic infractions in which the original charge incurs no points. Driving violations will be handled in accordance with DFD Directive 1010.05. DFD Driver’s License Policy.
C. A failure to report any of the above will result in discipline. D. Any supervisor who becomes aware that a member is under
investigation for, arrested for, charged with, or convicted of any law violation or allegation of criminal conduct other than a traffic infraction, or that a member has been served with a restraining order and who fails to report that violation as set forth above should expect to receive significant discipline.
E All law violations committed by a member, all allegations of criminal conduct other than a traffic infraction by a member, and all allegations that a member has been issued a restraining order as the result of allegations of domestic violence or criminal activity must be investigated by Internal Affairs regardless of the outcome of the criminal proceedings or whether the restraining order has later been vacated.
III. REQUIRED DOCUMENTATION
A. Members shall notify their direct supervisor. They will complete and
submit the Member Law Enforcement Contact- Reporting of Charges form, located in Target Solutions by the shift immediately following the incident.
B. The completed form is to be immediately forwarded to the members supervisor and Internal Affairs.
C. To retain necessary confidentiality, Internal Affairs/Administration will disseminate information to the member’s chain of command as appropriate.
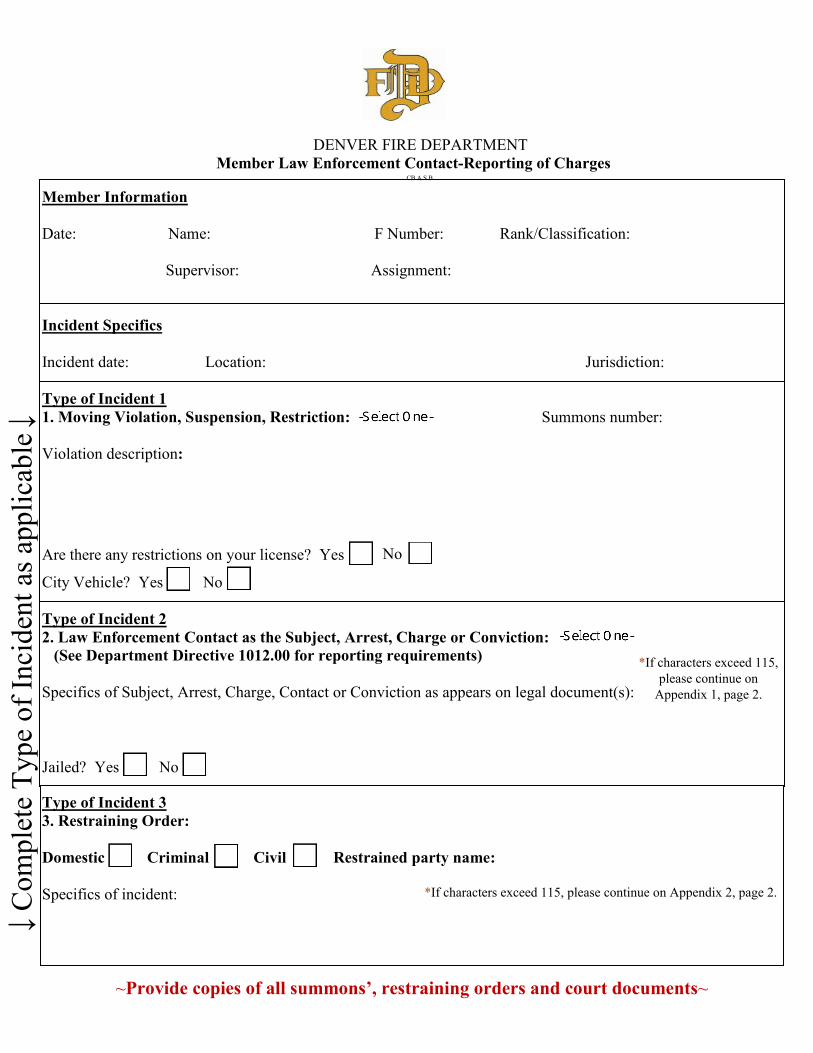
Member Information
Date: Name: F Number: Rank/Classification:
Supervisor: Assignment:
Incident Specifics
Incident date: Location: Jurisdiction:
Type of Incident 1 Summons number: 1. Moving Violation, Suspension, Restriction:
Violation description:
Are there any restrictions on your license? Yes
City Vehicle? Yes No
Type of Incident 2 2. Law Enforcement Contact as the Subject, Arrest, Charge or Conviction:
(See Department Directive 1012.00 for reporting requirements)
Specifics of Subject, Arrest, Charge, Contact or Conviction as appears on legal document(s):
Jailed? Yes No
Type of Incident 3 3. Restraining Order:
Domestic Criminal Civil Restrained party name:
Specifics of incident:
~Provide copies of all summons’, restraining orders and court documents~
No
Com
plet
e Ty
pe o
f Inc
iden
t as a
pplic
able
*If characters exceed 115,please continue on
Appendix 1, page 2.
*If characters exceed 115, please continue on Appendix 2, page 2.
→
→
DENVER FIRE DEPARTMENT Member Law Enforcement Contact-Reporting of Charges
CB A.S.B.
Appendix 1 – Type of Incident 2 – Law Enforcement Contact Continued
Appendix 2 – Type of Incident 3 – Restraining Order Continued
Acknowledgment and confirmation of information provided
By signing this form, you confirm that the information in this document is correct.
Employee Signature:________________________________________Date:_____________________________
Employee Responsibility: Complete form and forward to the Denver Fire Department’s Internal Investigations Unit immediately upon reporting to work for the next duty shift following the occurrence of the reported action.
~Provide copies of all summons’, restraining orders and court documents~
Send form and all related documents to Internal Affairs.
DENVER FIRE DEPARTMENT Topic No: 1019.00
Date: 12-28-17
DEPARTMENT DIRECTIVE Approved: TAB
Review Date: 12-28-19
Topic:
Mission Statement
Replaces: Same, dated 08-10-12
1019.00 Mission Statement
Page 1 of 1
The Denver Fire Department is dedicated to:
• Our Desire to Serve; committing to those we serve with integrity,
accountability, and inclusivity
• Our Courage to Act; providing quality, timely, and professional emergency
services to protect life and property
• Our Ability to Perform; working together to maintain the highest standards of
mitigation, preparedness, prevention, and community engagement
DENVER FIRE DEPARTMENT Topic No: 1020.00 Date: 01-03-12 DEPARTMENT DIRECTIVE Approved: TAB Review Date: 01-03-14 Topic:
Code of Conduct
Replaces: DEPT. DIR. 103.01 (02-19-09)
1020.00 Code of Conduct Page 1 of 2
The following list of guidelines represents the conduct standards for members of the Denver Fire Department. Every member of the Denver Fire Department is expected to conduct themselves in a self-disciplined and professional manner and is responsible for that conduct and should project a positive, productive, and mature demeanor. EVERY MEMBER SHALL: 1. Comply with the Guidelines of their respective Divisions and written Directives of
both the Denver Fire Department and the City of Denver.
2. Use their training and capabilities to protect the public at all times.
3. Work to the level of expertise in their position so as to enable all Department programs and functions to operate effectively.
4. Always conduct themselves to reflect credit on the Department and the City of
Denver.
5. Supervisors will manage in an effective, considerate, and fair manner. Subordinates will follow instructions in a positive, cooperative manner.
6. Always conduct themselves in a manner that creates good order inside the
Department.
7. Keep themselves informed to enhance their awareness and efficiency concerning their positions.
8. Be concerned and protective of each member’s welfare.
9. Operate safely.
10. Use good judgment.
11. Keep themselves physically fit.
12. Observe the work hours of their position.
DENVER FIRE DEPARTMENT Topic No: 1020.00 Date: 01-03-12 DEPARTMENT DIRECTIVE Approved: TAB Review Date: 01-03-14 Topic:
DFD Policy Code of Conduct
Replaces: DEPT. DIR. 103.01 (02-19-09)
1020.00 DFD Policy Code of Conduct Page 2 of 2
13. Obey the law.
14. Be responsible and maintain any/all Department equipment and property at an
efficient and usable level.
MEMBERS SHALL NOT: 15. Engage in activity that is detrimental to the Department. 16. Engage in a conflict of interest to the department or use their position with the
Department for personal gain or influence.
17. Use alcoholic beverages, debilitating drugs, or any substance which impairs their physical or mental capacities while on duty, or when susceptible to emergency recall.*
18. Engage in intimidating, threatening, or hostile behaviors, physical assault, or
other acts of this nature.
19. Engage in any sexual activity while on duty.*
20. Abuse their Sick Leave.
21. Steal.
22. Depart from the truth.*
*Members found to be in violation of these sections may be terminated.
DENVER FIRE DEPARTMENT Topic No: 1021.00 Date: 07-18-19 DEPARTMENT DIRECTIVE Approved: TAB Review Date: 07-18-21 Topic:
Sexual Harassment Policy
Replaces: Same, dated 03-22-18
1021.00 Sexual Harassment Policy Page 1 of 3
It is the policy of the Denver Fire Department that sexual harassment is not acceptable and will not be tolerated. All employees are expected to avoid any participation in unwelcome behavior or conduct toward any other employee, which could be interpreted as sexual harassment under the following guidelines: Sexual harassment is defined as follows: Unwelcome sexual advances, requests for sexual favors, or other verbal or physical conduct of a physical nature, when: 1. Submission to such conduct is made either explicitly or implicitly a term or
condition of an individual’s employment; or 2. Submission to or rejection of such conduct by an individual is used as the basis for
employment decisions affecting such individuals; or
3. Such conduct has the purpose or effect of unreasonably interfering with an individual’s work performance or creating an intimidating, hostile, or offensive environment.
Examples of sexual harassment include, but are not limited to: 1. Sex-oriented verbal “kidding” / “ jobbing.” 2. “Teasing” or joking that takes on a sexual tone.
3. Subtle pressure for sexual activity.
4. Physical contact such as patting, pinching, or constant brushing against another’s
body.
5. Demands for sexual favors.
6. Printed material that is construed to be sexually offensive.
7. Television broadcasts or video (including but not limited to tapes, disks, digital media, downloads, and streaming) of a sexual nature.*
DENVER FIRE DEPARTMENT Topic No: 1021.00 Date: 07-18-19 DEPARTMENT DIRECTIVE Approved: TAB Review Date: 07-18-21 Topic:
Sexual Harassment Policy
Replaces: Same, dated 03-22-18
1021.00 Sexual Harassment Policy Page 2 of 3
A supervisor or any other person is engaging in sexual harassment if they use, offer, or threaten to use the power of their office or position to control, influence, or affect the career, salary, or job of another employee or prospective employee in exchange for unwelcome sexual favors. Any employee is engaging in sexual harassment if they participate in deliberate or repeated unsolicited verbal comments, gestures, or physical contact of a sexual nature which are unwelcome or interfere with the work environment. The following procedures shall be followed when sexual harassment occurs: 1. The affected individual should, if they are comfortable doing so, make it clear to
all involved persons that such behavior is offensive to them.
2. The affected individual shall bring the matter to the appropriate supervisor’s attention. **
3. The supervisor shall investigate the complaint of sexual harassment promptly or
shall forward the complaint to the Internal Affairs Bureau for investigation. The determination of whether or not a particular action constitutes sexual harassment shall be made from the facts on a case-by-case basis. In determining harassment, the supervisor or other appropriate official shall look at the totality of the circumstances, such as the nature of the sexual conduct and the context in which the alleged incidents occurred.
4. If sexual harassment is found to exist, appropriate management and supervisory
personnel shall take prompt corrective action. Please refer to Department Directive #1057.00, DFD Discipline Handbook, to ensure that correct procedures are followed.
• Sexual harassment, which has the effect of unreasonably interfering with an
employee’s work performance or which creates an intimidating, hostile or offensive environment shall constitute a violation of the Department’s Conduct Standards, and may result in discipline up to and including dismissal on the first offense.
• Sexual harassment, which affects a term or condition of employment or which is the basis of an employment decision affecting the employee or prospective employee, shall constitute a violation of the Department’s Conduct Standards, and may result in discipline up to and including dismissal on the first offense.
DENVER FIRE DEPARTMENT Topic No: 1021.00 Date: 07-18-19 DEPARTMENT DIRECTIVE Approved: TAB Review Date: 07-18-21 Topic:
Sexual Harassment Policy
Replaces: Same, dated 03-22-18
1021.00 Sexual Harassment Policy Page 3 of 3
5. If the actions of the immediate supervisors do not effectively stop the sexual
harassment, the affected individual should contact the Employee Relations Specialist at Safety HR. The complaint will then be further investigated and dealt with by the Specialist.
If an employee reporting harassment, discrimination, or retaliation pursuant to this policy does not wish to be identified as a complainant, the Chief may be listed as the complainant in any subsequent investigations of that report. In cases where the Chief is alleged to be engaging in conduct in violation of this policy, the Executive Director of Safety may be named as the complainant in any subsequent investigations of that report. Refer to Department policy when using cable television or video in the fire house. The displaying of sexually explicit material in a public building and in the work environment is prohibited. Company Officers and District Chiefs will be held responsible for ensuring compliance of this policy. Those who are found in violation of this policy will be dealt with in accordance with the sexual harassment policy of the Denver Fire Department. *The broadcasting of sexual explicit material in any Fire Department facility is hereby prohibited. **Appropriate supervisor can include immediate supervisor or anyone in the chain of command, Administrative Division Chief, Division 4, HR Business Partner, or the Employee Relations Specialist for Department of Safety. It is the responsibility of the “appropriate supervisor” to report the allegation immediately to the administration at the Denver Fire Department Headquarters. Employees may also report their concerns to Safety HR, or the Executive Director of Safety’s Office.
DENVER FIRE DEPARTMENT Topic No: 1022.00 Date: 01-03-12 DEPARTMENT DIRECTIVE Approved: TAB Review Date: 01-03-14 Topic:
Executive Order 94 – City and County of Denver Employees’ Alcohol and Drug Policy
Replaces: DEPT. DIR. 106.02 (03-15-01)
1022.00 Executive Order 94 – City and County of Denver Employees’ Alcohol and Drug Policy Page 1 of 24
Pursuant to City Attorney Memorandum: DATE: February 23, 2001 TO: Cathy A. Donohue, Public Works Manager
Alan Ochsenbein, Denver International Airport
THROUGH: Xavier S. L. DuRan, Assistant City Attorney, Supervisor SUBEJCT: EXECUTIVE ORDER 94
"Per your request, I am providing further explanation as to the reason for the rewrite to Executive Order 94, the City and County of Denver Employees’ Alcohol and Drug Policy. As a reminder, the purpose of the rewrite was to: (a) ensure compliance with recent state and federal law and the new Department of Transportation regulations passed in December 2000; and (b) make the executive order more user friendly.”
I. COMPLIANCE WITH STATE AND FEDERAL LAW
A. Section IB, Legal Drugs, 2: This section was rewritten in order to require
return to work determinations while an employee is under the influence of prescription medication be made by the department’s Human Resource Specialist or Safety Officer only after consulting with medical personnel. This brings this section into compliance with state law and the Denver Health and Hospital Authority (“DHHA”) regulations. Additionally, this section was rewritten to require our medical providers acquire medical releases from employees prior to having conversations with the employees’ personal physicians, in accordance with DHHA regulations.
B. Section IB, Legal Drugs, 3: This language was rewritten in compliance with the new Department of Transportation regulations, which specifically prohibit employees with Commercial Drivers’ Licenses (“CDL”) from using marijuana, even though marijuana may have been approved for medical use under state law.
C. Section IIC, Post-Accident Testing, 1: This language was also rewritten in
compliance with recent federal law. Specifically, it was altered to require that before any post-driving or workplace accident alcohol and drug tests are conducted, the department determine the employee involved in the accident may have been at fault and the accident involved a fatality, or any individual was injured enough to receive medical attention immediately away from the scene of the accident, or the accident resulted in disabling

DENVER FIRE DEPARTMENT Topic No: 1022.00 Date: 01-03-12 DEPARTMENT DIRECTIVE Approved: TAB Review Date: 01-03-14 Topic:
Executive Order 94 – City and County of Denver Employees’ Alcohol and Drug Policy
Replaces: DEPT. DIR. 106.02 (03-15-01)
1022.00 Executive Order 94 – City and County of Denver Employees’ Alcohol and Drug Policy Page 2 of 24
damage to vehicle. Additionally, we added to this section the current definition of disabling damage.
II. USER FRIENDLY
The individuals who use this Order on a regular basis have continually
complained to the Drug and Alcohol Committee about how difficult it is to follow the Executive Order. Therefore, in an attempt to make the Order more user friendly, we reorganized the paragraphs. Specifically, we moved all paragraphs concerning CDL testing into one section and all of the paragraphs discussing non-CDL testing into another section.
We also listed the supervisors’ duties from supplemental manuals in this Order, so
the Order will now stand-alone. For example, under reasonable suspicion testing, section II. DRUG AND ALCOHOL TESTING, B1.a.i-viii, we listed each step that a supervisor must take when ordering this type of test.
Additionally, we included a section to allow for classified members of the Police
and Fire Departments and Deputy Sheriffs to be tested in the future. As you may be well aware, the Manager of Safety, Aristedes Zavaras, in concert with my office, is currently developing Department of Safety regulations to provide for this testing. See Section II.F.
In the training section of the Order, we expanded the explanation as to the employees’ and supervisors’ responsibilities. Again, this rewrite was made to include information from supplemental manuals so the Order will now stand-alone. Additionally, in this section, we changed the expression “probation period” to “first year of employment” since Career Service Authority is eliminating the expression “probation period” from its personnel rules. Throughout the regulation, we also changed the expression “Office of Employee Assistance” to the correct name of that agency, which is “Mayor’s Office of Employee Assistance.” In Section B of the miscellaneous provision of the Order, we added the search language approved by the City Attorney to be used on posted notices. Finally in the addendum, we grouped the paragraphs referring to alcohol under the first section and grouped the provisions dealing with illegal drugs under the second section.
DENVER FIRE DEPARTMENT Topic No: 1022.00 Date: 01-03-12 DEPARTMENT DIRECTIVE Approved: TAB Review Date: 01-03-14 Topic:
Executive Order 94 – City and County of Denver Employees’ Alcohol and Drug Policy
Replaces: DEPT. DIR. 106.02 (03-15-01)
1022.00 Executive Order 94 – City and County of Denver Employees’ Alcohol and Drug Policy Page 3 of 24
III. CONCLUSION
The Drug and Alcohol Committee made these revisions to comply with state and federal law and the Department of Transportation regulations. Additionally, we revised the Order to make it easier for anyone to follow, since we have received numerous complaints over the years that the Order was confusing. Hopefully, this memorandum has adequately explained the revisions. However, if you should have any further questions regarding this Order or would like the drafters of the Order to attend any meetings, in anticipation of any questions that may arise, please contact me at 720-913-3107. Thank you. RCH/mv G:EmploymentLaw/HESSC\CDL File\Donahue and Ochsenbein.memo.doc
DENVER FIRE DEPARTMENT Topic No: 1022.00 Date: 01-03-12 DEPARTMENT DIRECTIVE Approved: TAB Review Date: 01-03-14 Topic:
Executive Order 94 – City and County of Denver Employees’ Alcohol and Drug Policy
Replaces: DEPT. DIR. 106.02 (03-15-01)
1022.00 Executive Order 94 – City and County of Denver Employees’ Alcohol and Drug Policy Page 4 of 24
Pursuant to EXECUTIVE ORDER NO. 94 Memorandum: DATE: March 15, 2001 TO: All City Agencies FROM: Wellington E. Webb M A Y O R SUBJECT: CITY AND COUNTY OF DENVER EMPLOYEES' ALCOHOL
AND DRUG POLICY PURPOSE: As an employer, the City and County of Denver (City) is required to adhere to various federal, state, local laws and regulations regarding alcohol and drug use. The City also has a vital interest in maintaining a safe, healthy and efficient environment for their employees and the public. Being under the influence of, subject to the effects of or impaired by alcohol or a drug on the job may pose serious safety and health risks to the user, the user’s co-workers and the public. Additionally, the possession, use or sale of an illegal drug in the workplace may pose an unacceptable risk to the safe, healthy and efficient operation of the City. The City maintains the Mayor’s Office of Employee Assistant and provides Department of Safety psychologists who offer help to employees who seek assistance for alcohol or drug use and other personal or emotional problems. RESPONSIBLE AUTHORITY (S): City Attorney This executive order, effective on the above date, establishes and confirms the policy of the City concerning the problem of drug and alcohol use in the workplace. On the date it becomes effective, this executive order supersedes all previous enacted alcohol and drug executive orders.
ALCOHOL AND DRUG POLIY FOR
CITY AND COUNTY OF DENVER EMPLOYEES:
I. PROHIBITIONS FOR ALL CITY EMPLOYEES INCLUDING
CLASSIFIED MEMBERS OF THE POLICE AND FIRE DEPARTMENTS.
DENVER FIRE DEPARTMENT Topic No: 1022.00 Date: 01-03-12 DEPARTMENT DIRECTIVE Approved: TAB Review Date: 01-03-14 Topic:
Executive Order 94 – City and County of Denver Employees’ Alcohol and Drug Policy
Replaces: DEPT. DIR. 106.02 (03-15-01)
1022.00 Executive Order 94 – City and County of Denver Employees’ Alcohol and Drug Policy Page 5 of 24
A. Alcohol Employees are prohibited from consuming, being under the influence of, subject to the effects of the impaired by alcohol while performing City business, while driving a City vehicle or while on City property, unless the employee is not on duty and attending an officially sanctioned private function, e.g., and invitation only library reception. The alcohol levels defined by the state legislature that may be amended from time to time for defining “under the influence of alcohol” and “impaired by alcohol” are adopted here for purposes of this executive order. Employees holding Commercial Driver’s licenses (CDL) are subject to the alcohol levels defined by the Department of Transportation (DOT) regulations that may be amended from time to time for “under the influence” which are adopted here for purposes of this executive order. Current alcohol level definitions are contained in the Addendum to this Order. If there is a conflict between the state legislature or the DOT regulation alcohol level definitions and the ones contained in the Addendum to this Order, the state legislature and DOT regulation definitions will take precedence.
B. Legal Drugs
1. It is the responsibility of the employees who work in positions operating vehicles or dangerous equipment or affecting the health or safety of co-workers or the public to advise their supervisors that they are taking prescription medication that may affect their performance.
2. Employees who work in positions operating vehicles or dangerous
equipment or affecting the health or safety of co-workers or the public are prohibited from consuming, being under the influence of, subject to the effects of or impaired by legally obtained prescription drugs while performing City business, unless the following two determinations have been made:
DENVER FIRE DEPARTMENT Topic No: 1022.00 Date: 01-03-12 DEPARTMENT DIRECTIVE Approved: TAB Review Date: 01-03-14 Topic:
Executive Order 94 – City and County of Denver Employees’ Alcohol and Drug Policy
Replaces: DEPT. DIR. 106.02 (03-15-01)
1022.00 Executive Order 94 – City and County of Denver Employees’ Alcohol and Drug Policy Page 6 of 24
a. It is determined by both the employee’s supervisor and either the employee’s Human Resource Specialist or Safety Officer after consulting with the Occupational Health and Safety Clinic (OHSC) personnel that the employee’s job performance will not be affected and that the employee does not pose a threat to their own safety.
b. It is determined by both the employee’s supervisor and
either the employee’s Human Resource Specialist or Safety Officer after consulting with the OHSC personnel that the employee will not pose a threat to the safety of co-workers or the public, and the employee will not disrupt the efficient operation of the agency.
If appropriate, the OHSC personnel may contact the employee’s personal physician. Prior to making contact with the employee’s personal physician, the OHSC personnel should try to obtain a medical release from the employee. Employees may be required to use sick leave, take a leave of absence or comply with other appropriate non-disciplinary actions determined by the appointing authority until the above determinations can be made. The OHSC shall keep the medical records that disclose the identity of the legal drug confidential in accordance with state and federal laws. Release of this information should only occur after a determination has been made that the employee is using the drug illegally.
3. The DOT regulations prohibit employees with CDLs from using
marijuana, even for approved medical reasons. If the federal and Colorado laws are in conflict on this issue, the federal law will take precedence. Therefore, a positive marijuana drug test will be treated as an illegal drug use for employees with CDLs, subjecting them to all rules contained herein for illegal drug use even if the marijuana has been prescribed for the employee by a physician for medical reasons.
DENVER FIRE DEPARTMENT Topic No: 1022.00 Date: 01-03-12 DEPARTMENT DIRECTIVE Approved: TAB Review Date: 01-03-14 Topic:
Executive Order 94 – City and County of Denver Employees’ Alcohol and Drug Policy
Replaces: DEPT. DIR. 106.02 (03-15-01)
1022.00 Executive Order 94 – City and County of Denver Employees’ Alcohol and Drug Policy Page 7 of 24
C. Illegal Drugs
1. Employees are prohibited from consuming, being under the influence of, subject to the effects of or impaired by illegal drugs while performing City business, while driving a City vehicle or while on City property.
2. Employees are also prohibited from selling, purchasing,
transferring or possessing an illegal drug.
As a part of official duties, illegal drugs may be handled, controlled and disposed of according to established department contraband procedures by classified members of the Police and Fire Departments or Denver Sheriff employees. However, it is grounds for immediate dismissal if classified members of the Police and Fire Departments or Denver Sheriff employees sell, purchase, transfer or possess illegal drugs at any time other than as a part of their official duties. The illegal drug cut-off levels established by the DOT regulations, that may be amended from time to time, are adopted here for purposes of this executive order. Current illegal drug levels are contained in the Addendum to this Order. If there is a conflict between the DOT regulation, illegal drug levels and the ones contained in the Addendum to this Orders, the DOT regulation definition will take precedence.
II. DRUG AND ALCOHOL TESTING
A. Pre-Employment Testing
1. City may implement, with the City Attorney’s approval, pre-employment screening practices designed to prevent hiring individuals for job positions:
a. whose use of illegal drugs may affect the public health or
safety and
b. whose use of alcohol or legal drugs indicates a potential for impaired or unsafe job performance where the public health or safety may be affected.
DENVER FIRE DEPARTMENT Topic No: 1022.00 Date: 01-03-12 DEPARTMENT DIRECTIVE Approved: TAB Review Date: 01-03-14 Topic:
Executive Order 94 – City and County of Denver Employees’ Alcohol and Drug Policy
Replaces: DEPT. DIR. 106.02 (03-15-01)
1022.00 Executive Order 94 – City and County of Denver Employees’ Alcohol and Drug Policy Page 8 of 24
The Civil Service Commission, Career Service Authority, OHSC or interviewing agency shall inform a job applicant of these pre-employment screening practices prior to such screening.
2. Employees with CDLs, prior to the first time the employee
performs a safety-sensitive function, shall be tested for controlled substances, pursuant to applicable DOT regulations as may be amended from time to time.
3. Refusal by an applicant to submit to a pre-employment test shall
result in denial of employment.
4. Pre-employment test results:
a. Alcohol
Where alcohol use is detected and it is determined to be a potential safety risk, employment shall be denied.
b. Legal Drugs
i. Where use of a prescription drug is detected,
applicants may be required to offer proof that the drug has been prescribed by a physician for the applicant. If the applicant is unable to provide such proof, employment may be denied.
ii. Where the applicant’s future or continued use of the
drug poses a potential safety risk or would impair job performance, employment may be denied in accordance with the applicable state and federal laws.
c. Illegal Drugs
i. Employment shall be denied when the presence of
an illegal drug is detected.
ii. Employment shall be denied when the presence of a known masking agent is detected.

DENVER FIRE DEPARTMENT Topic No: 1022.00 Date: 01-03-12 DEPARTMENT DIRECTIVE Approved: TAB Review Date: 01-03-14 Topic:
Executive Order 94 – City and County of Denver Employees’ Alcohol and Drug Policy
Replaces: DEPT. DIR. 106.02 (03-15-01)
1022.00 Executive Order 94 – City and County of Denver Employees’ Alcohol and Drug Policy Page 9 of 24
iii. A second direct observation urinalysis test may be required prior to offering employment to an applicant whose drug test evidences the urine sample has been diluted.
B. Reasonable Suspicion Testing
1. When a supervisor has reasonable suspicion that any employee is
in violation of this policy, after taking appropriate safety measures, i.e., removing the employee from any situation which may pose a safety risk to the employee, co-workers or the public, the supervisor shall immediately consult with his/her Human Resources Specialist, Safety Officer or the City Attorney’s Office to determine further actions. However, if immediate consultation is not possible, it is the responsibility of the supervisor to initiate alcohol and drug testing. The supervisor shall initiate testing as follows:
a. Alcohol
i. Document in writing the specific reasons for the
decision to initiate testing based on specific, contemporaneous, articulable observations of the employee’s appearance, behavior, speech or body odors.
ii. Have a second supervisor confirm the specific,
contemporaneous, articulable observations of the employee’s appearance, behavior, speech or body odors.
iii. Confront the employee and articulate that the
supervisor is ordering the employee to go to the testing site for testing.
iv. Escort the employee to the testing site as soon as
possible. However, if the supervisor is unable to escort the employee, the supervisor should have another individual escort the employee for testing. The individual selected to escort the employee shall
DENVER FIRE DEPARTMENT Topic No: 1022.00 Date: 01-03-12 DEPARTMENT DIRECTIVE Approved: TAB Review Date: 01-03-14 Topic:
Executive Order 94 – City and County of Denver Employees’ Alcohol and Drug Policy
Replaces: DEPT. DIR. 106.02 (03-15-01)
1022.00 Executive Order 94 – City and County of Denver Employees’ Alcohol and Drug Policy Page 10 of 24
be of a higher grade/rank than the employee being tested.
v. Require the employee to bring a picture identification card and proof of the employee’s social security number to the testing site.
vi. If the employee refuses to go to the testing site or
refuses to participate in the testing process, the supervisor or the escort should tell the employee that refusal to comply with a direct order of an authorized supervisor might subject the employee to discipline, up to and including dismissal.
vii. After the initial test results are known, the
supervisor shall contact the appointing authority for further guidance. If the appointing authority is unavailable and the supervisor has a reasonable doubt about the employee’s ability to satisfactorily and safely meet job requirements, the supervisor shall place the employee on investigatory leave pending results of testing or other administrative determination.
viii. No supervisor or escort should allow an employee
to drive to or away from the testing or the work site. However, if the employee does drive off, notify the Police Department immediately and provide them pertinent information, i.e., employee’s car make; model and color; license plate number, direction of travel and reason for ordering the alcohol and/or drug testing.
During regular OHSC hours, the testing shall be conducted at one of the OHSC testing site. After regular hours, the supervisor shall page the OHSC alcohol and drug testing personnel to arrange for immediate testing. Testing should be administered within two (2) hours of making a reasonable suspicion determination. If this two (2) hour time frame is exceeded, the supervisor should document the reasons the test was not promptly administered. Supervisors who do not test employees within this established time frame may be subject to discipline, up to and including dismissal.
DENVER FIRE DEPARTMENT Topic No: 1022.00 Date: 01-03-12 DEPARTMENT DIRECTIVE Approved: TAB Review Date: 01-03-14 Topic:
Executive Order 94 – City and County of Denver Employees’ Alcohol and Drug Policy
Replaces: DEPT. DIR. 106.02 (03-15-01)
1022.00 Executive Order 94 – City and County of Denver Employees’ Alcohol and Drug Policy Page 11 of 24
Supervisors and escorts shall keep the employee’s name and identifying information restricted to persons who “need to know.”
b. Legal drugs
i. Document in writing the specific, contemporaneous, articulable
observations of the employee’s appearance, behavior, speech or body odors that provides reasonable suspicion that the employee’s use of or being under the influence of, subject to the effects of or impaired by a legal drug poses a potential safety risk or would impair job performance.
ii. Have a second supervisor confirm the specific, contemporaneous,
articulable observations of the employee’s appearance, behavior, speech or body odors.
iii. Confront the employee and articulate that the supervisor is ordering the
employee to go to the OHSC for evaluation.
iv. Escort the employee to the evaluation site as soon as possible. However, if the supervisor is unable to escort the employee, the supervisor should have another individual escort the employee for evaluation.
v. If the employee refuses to go to the evaluation site, the supervisor or the
escort should tell the employee that refusal to comply with a direct order of an authorized supervisor might subject the employee to discipline, up to and including dismissal.
vi. If the clinic personnel determine that the employee’s use of, being under
the influence of, subject to the effects of or impaired by a legal drug poses a potential safety risk or would impair job performance; the supervisor shall contact the appointing authority for further guidance.
vii. If the appointing authority is unavailable and the supervisor has a
reasonable doubt about the employee’s ability to satisfactorily and safely meet job requirements, the supervisor shall place the employee on investigatory leave pending such consultation. However, no supervisor or escort should allow an employee to drive to or away from the evaluation site. If the employee does drive off, the supervisor or escort shall notify the Police Department immediately and provide them pertinent
DENVER FIRE DEPARTMENT Topic No: 1022.00 Date: 01-03-12 DEPARTMENT DIRECTIVE Approved: TAB Review Date: 01-03-14 Topic:
Executive Order 94 – City and County of Denver Employees’ Alcohol and Drug Policy
Replaces: DEPT. DIR. 106.02 (03-15-01)
1022.00 Executive Order 94 – City and County of Denver Employees’ Alcohol and Drug Policy Page 12 of 24
information, i.e., employee’s car make; model and color; license plate number, direction of travel; and reason for ordering the evaluation.
viii. If the clinic personnel determine that the employee’s use of, being under
the influence of, subject to the effects of or impaired by a legal drug does not pose a potential safety risk and does not impair job performance, have the employee return to work.
b. Illegal drugs
Follow the steps listed above in Section B.l.a.
However, testing for illegal drugs should be administered within eight (8) hours of making a reasonable suspicion determination. If this eight-hour (8) time frame is exceeded, the supervisor must document the reasons the test was not promptly administered. Supervisors who do not test employees within the established time frame may be subject to discipline, up to and including dismissal.
The police are to be contacted when a supervisor has reasonable suspicion that an employee appears to be in possession of, selling or transferring illegal drugs.
C. Post-Accident Testing
1. As soon as practicable following a driving or other workplace accident,
the supervisor shall ensure that driver-employee is tested for alcohol and drugs when the accident:
a. may have been the fault of the employee and the accident involves
a fatality;
b. may have been the fault of the employee and any individual was injured severely enough to receive medical treatment immediately away from the scene of the accident;
c. may have been the fault of the employee and the accident resulted
in disabling damage to any vehicle or any equipment; or,
d. there is reasonable suspicion to test the employee.
DENVER FIRE DEPARTMENT Topic No: 1022.00 Date: 01-03-12 DEPARTMENT DIRECTIVE Approved: TAB Review Date: 01-03-14 Topic:
Executive Order 94 – City and County of Denver Employees’ Alcohol and Drug Policy
Replaces: DEPT. DIR. 106.02 (03-15-01)
1022.00 Executive Order 94 – City and County of Denver Employees’ Alcohol and Drug Policy Page 13 of 24
2. Post-accident alcohol and drug testing should be administered within two (2) hours following the accident. Supervisors who do not test employees within the established time frames may be subject to discipline, up to and including dismissal.
3. “Disabling damage” for a vehicle accident is defined as precluding the
departure of the vehicle from the scene of an accident in its usual manner. Vehicle damage that can be remedied temporarily at the scene without special tools or parts, i.e., replacing a tire with the spare, taping over a headlight or tying down the hood of a car, are not considered disabling.
4. “Disabling damage” for a workplace accident is defined as precluding the
use of the equipment from its usual operation. Equipment that can be remedied temporarily at the scene without special tools or parts is not considered disabling.
D. Return to Duty Testing
1. If an employee has violated the prohibited conduct listed in Sections I(A)
or I(C) of this Order, the employee shall not return to work unless the employee has completed a successful return to duty alcohol test.
E. Commercial Driver’s License Testing
For those positions requiring a CDL, the City shall implement drug testing pursuant to applicable DOT regulations, as may be amended from time to time in addition to the testing described in Sections I(B), I(C) and I(D) of this Order. 1. Pre-Employment Testing
Prior to the first time a driver performs safety-sensitive functions for the City or any of its agencies, the driver shall be tested for illegal drugs usage in compliance with the DOT and state regulations, as may be amended from time to time.
2. Reasonable Suspicion Testing
a. Alcohol
DENVER FIRE DEPARTMENT Topic No: 1022.00 Date: 01-03-12 DEPARTMENT DIRECTIVE Approved: TAB Review Date: 01-03-14 Topic:
Executive Order 94 – City and County of Denver Employees’ Alcohol and Drug Policy
Replaces: DEPT. DIR. 106.02 (03-15-01)
1022.00 Executive Order 94 – City and County of Denver Employees’ Alcohol and Drug Policy Page 14 of 24
The procedures described in Section II(B)(1)(a) of this Order shall be followed.
b. Legal Drugs
The procedures described in Section II(B)(1)(b) of this Order shall be followed.
b. Illegal Drugs
The procedures described in Section II(B)(1)(c) of this Order shall be followed.
3. Post-Accident Testing
a. As soon as practicable following an accident, the supervisor shall ensure that driver-employee is tested for alcohol and drugs when:
i. the accident occurred while the vehicle driver was
performing safety-sensitive functions with respect to the vehicle and the accident involved the loss of human life;
ii. the vehicle driver was cited under the state or local law for
a moving violation arising from the accident and an individual was injured severely enough to receive medical treatment immediately away from the scene;
iii. the vehicle driver was cited under the state or local law for
a moving violation arising from the accident and one or more of the vehicles involved in the accident sustained disabling damage. “Disabling damage” is defined in Section II (C)(2) and (3) in this Order;
iv. there is reasonable suspicion to test the employee.
b. If the supervisor does not initiate alcohol testing with eight (8)
hours of the accident or drug testing within thirty-two (32) hours of the accident, the supervisor shall cease attempts to administer the tests and shall state in writing for the record the reasons for not administering the tests. Supervisors who do not test employees
DENVER FIRE DEPARTMENT Topic No: 1022.00 Date: 01-03-12 DEPARTMENT DIRECTIVE Approved: TAB Review Date: 01-03-14 Topic:
Executive Order 94 – City and County of Denver Employees’ Alcohol and Drug Policy
Replaces: DEPT. DIR. 106.02 (03-15-01)
1022.00 Executive Order 94 – City and County of Denver Employees’ Alcohol and Drug Policy Page 15 of 24
within the established time frames may be subject to discipline, up to and including dismissal.
4. Random Testing
a. Alcohol
Pursuant to the DOT regulations, random alcohol testing shall be conducted annually on 25% of the average number of City commercial driver’s license positions in existence. This percentage may be amended from time to time by the DOT. Alcohol testing shall be conducted on a random, unannounced basis just before, during or just after the employee performed safety-sensitive funciton.
b. Illegal Drugs
Pursuant to the DOT regulations, random drug testing shall be conducted annually on 50% of the average number of City commercial driver’s license positions in existence. This percentage may be amended from time to time by the DOT. Drug testing shall be conducted on a random, unannounced basis. There is no requirement that this testing be conducted in immediate time proximity to performing safety-sensitive functions.
5. Return to Duty Testing
a. Alcohol
If an employee has violated the prohibited conduct listed in Sections 1(A) or I(C) of this Order, the employee shall not return to perform safety-sensitive duties unless the employee has completed a successful return to duty alcohol test.
6. Follow-Up Testing a. Alcohol
i. The number and frequency of the follow-up alcohol tests shall be directed by the substance abuse professional and shall consist of at least six (6) tests in the first twelve (12) months following the employee’s return to work.
DENVER FIRE DEPARTMENT Topic No: 1022.00 Date: 01-03-12 DEPARTMENT DIRECTIVE Approved: TAB Review Date: 01-03-14 Topic:
Executive Order 94 – City and County of Denver Employees’ Alcohol and Drug Policy
Replaces: DEPT. DIR. 106.02 (03-15-01)
1022.00 Executive Order 94 – City and County of Denver Employees’ Alcohol and Drug Policy Page 16 of 24
ii. Follow-up testing testing shall be unannounced and shall be conducted just before, during or just after the employee performed safety-sensitive functions.
b. Illegal Drugs
i. The number and frequency of the follow-up drug tests shall be
directed by the Substance Abuse Professional and shall consist of at least six (6) tests in the first (12) twelve months following the employee’s return to work.
ii. Follow-up testing shall be unannounced. There is no requirement
that this testing be conducted in immediate time proximity to performing safety-sensitive functions.
F. Classified Members of the Police and Fire Departments and Deputy Sheriffs
Testing
For those employees who are classified members of the Police and Fire Departments or Deputy Sheriffs, the City may implement drug testing pursuant to their respective department procedures, as may be amended from time to time in addition to the testing described in Section II (A), II (B), II(C) and II (D) of this Order.
III. EXECUTIVE ORDER 94 TRAINING
A. All City Employees
All new City employees should be trained on this Order during their first year of employment, Training, at a minimum, should include study of Order and instruction on the recognition of drug and alcohol impairment and use. Additionally, a copy of this Order should be given to each employee with employee acknowledging, in writing, receipt of the policy and the training.
B. All Employees with Supervisory Duties
1. All employees with supervisory duties should be trained on this Order
during the first six months following their promotion. This training at a minimum should include study of the Order, instruction on the recognition of drug and alcohol impairment and use, the proper documentation of the
DENVER FIRE DEPARTMENT Topic No: 1022.00 Date: 01-03-12 DEPARTMENT DIRECTIVE Approved: TAB Review Date: 01-03-14 Topic:
Executive Order 94 – City and County of Denver Employees’ Alcohol and Drug Policy
Replaces: DEPT. DIR. 106.02 (03-15-01)
1022.00 Executive Order 94 – City and County of Denver Employees’ Alcohol and Drug Policy Page 17 of 24
supervisor’s reasonable suspicion, and the supervisor’s responsibility for escorting employees to the testing sites and the drug testing process.
2. Supervisors shall ensure that all drug and alcohol tests are accomplished
immediately after the justification for testing is established. Timeliness for testing is outlined in this Order and its Addendum. Further, once a supervisor has reasonable suspicion that an employee appears to be under the influence of alcohol or drugs, the agency cannot condone the employee’s driving of a motor vehicle. If the employee drives off in his/her own or a City vehicle, the Police Department must be notified immediately. Supervisors whom elicit the use on another individual to escort an employee to testing or evaluation sites shall educate the individual to escort an employee to testing or evaluation sites shall educate the individual on the duties of the escort as provided herein prior to allowing that individual to escort the employee.
3. Supervisors are subject to discipline for failing to fulfill the responsibilities
set forth for supervisors in this Order. However, although a supervisor’s failure to fulfill his/her responsibility may result in disciplinary action being taken against the supervisor, up to and including dismissal, such failure does not, in any way, excuse the employee’s violation of this Order or negate the agency’s disciplinary action against the employee.
CAUTION: No physical force may be used against an employee to enforce any order under this policy. The employee must be advised that noncompliance with a supervisor’s order will be viewed as refusal to obey the order of a supervisor and subject to discipline, up to and including dismissal.
CAUTION: Supervisors are to restrict communications concerning possible violations of this policy to those persons who are participating in the evaluation, investigation or disciplinary action and who have a “need to know” about the details of the drug/alcohol evaluation, investigation and disciplinary action. This restriction includes not mentioning the names of employees who are suspected of or disciplined for violating this policy.
DENVER FIRE DEPARTMENT Topic No: 1022.00 Date: 01-03-12 DEPARTMENT DIRECTIVE Approved: TAB Review Date: 01-03-14 Topic:
Executive Order 94 – City and County of Denver Employees’ Alcohol and Drug Policy
Replaces: DEPT. DIR. 106.02 (03-15-01)
1022.00 Executive Order 94 – City and County of Denver Employees’ Alcohol and Drug Policy Page 18 of 24
IV. DISCIPLINARY ACTIONS A. If it is determined after the appropriate pre-disciplinary meeting that any
of the following situations apply, the employee shall be dismissed even for the first offense for the following conduct.
1. Classified members of the Police and Fire Departments or Deputy
Sheriffs violate their respective departments’ prohibitions regarding illegal use of controlled substances;
2. The employee has endangered the lives of others, or foreseeably could have endangered the lives of others;
3. The employee’s disciplinary history compels dismissal as a matter
of progressive discipline;
4. The employee has refused to enter into a Stipulation and Agreement;
5. The employee has violated the Stipulation and Agreement;
6. The employee refuses to submit to testing under this Order;
7. The employee uses, or attempts to use, a masking agent to alter the sample and/or drug and/or alcohol test results.
B. A first time violation of this policy, which does not result in a dismissal
pursuant to Section (A) of this Order, shall result in a lesser disciplinary action in conjunction with a Stipulation and Agreement for treatment.
1. Substance Abuse Professionals of the Mayor’s Office of Employee
Assistance, or such other substance abuse professional(s) as may be designated, shall conduct an assessment of the employee and create a treatment plan.
2. Each such agreement shall be in writing and approved by the City Attorney’s Office. The City shall offer no employee more than one such agreement during his or her employment with the City.
3. Employees who participate in a supervisor-approved inpatient
treatment plan shall be allowed to take one (1) day per month sick leave or vacation leave, or allowed to work one (1) day per month, to assure continued health coverage.
DENVER FIRE DEPARTMENT Topic No: 1022.00 Date: 01-03-12 DEPARTMENT DIRECTIVE Approved: TAB Review Date: 01-03-14 Topic:
Executive Order 94 – City and County of Denver Employees’ Alcohol and Drug Policy
Replaces: DEPT. DIR. 106.02 (03-15-01)
1022.00 Executive Order 94 – City and County of Denver Employees’ Alcohol and Drug Policy Page 19 of 24
V. MISSCELLANEOUS PROVISIONS
A. Driver’s License
It is the responsibility of employees required to drive as part of their assigned duties or job specifications to report to their appointing authority any loss of a driver’s license or the restriction of driving privileges, no later than the beginning of the employee’s next scheduled shift. Every employee who is required to drive, as part of their assigned duties or job specifications, shall certify that they have a current valid drivers license in accordance with Executive Order 25 as may be amended from time to time
B. Searches
1. Before any search is conducted, supervisors shall contact the City
Attorney’s Office for guidance.
2. Management has the right to search City-owned property, e.g., a desk, storage cabinet or City vehicle, when the search is necessary for a non-investigatory work-related purpose such as retrieving a needed file. Additionally, management may search City-owned property, e.g., a desk, file cabinet, locker, or City vehicle, when predicated by reasonable suspicion that evidence of misconduct will be found. Finally, management may search an employee’s personal property, e.g., their personal vehicle parked on City property, lunch boxes, briefcases, purses, tool kits, and backpacks, upon consent of the employee.
3. Clearly posted notices explaining the City’s right to carry out
search activities should be displayed in appropriate locations throughout the work area. The posted notices should contain the language listed above in paragraph V (B)(2) of this Order. Any deviation from this language must be approved by the City Attorney’s Office prior to posting.
C. Contracts
1. This Executive Order is applicable to contract personnel. Violation
of these provisions or refusal to cooperate with implementation of
DENVER FIRE DEPARTMENT Topic No: 1022.00 Date: 01-03-12 DEPARTMENT DIRECTIVE Approved: TAB Review Date: 01-03-14 Topic:
Executive Order 94 – City and County of Denver Employees’ Alcohol and Drug Policy
Replaces: DEPT. DIR. 106.02 (03-15-01)
1022.00 Executive Order 94 – City and County of Denver Employees’ Alcohol and Drug Policy Page 20 of 24
the policy can result in the City; barring contract personnel from City facilities or from participating in City operations.
2. All City contracts shall inform contractors doing work for the City
about this Executive Order.
D. Mayor’s Office of Employee Assistance and Department of Safety Psychologists
The City maintains the Mayor’s Office of Employee Assistance (MOEA) and provides Department of Safety psychologists who offer help to employees who suffer from alcohol or drug use of other personal issues. It is the responsibility of each employee to seek help from the MOEA, Department of Safety psychologist or other appropriate health care professionals before alcohol and drug use leads to disciplinary actions.
E. Memorandum to this Order
The City Attorney shall have the authority to amend definitions and drug testing cut-off levels contained in the Order’s Memorandum, from time to time, consistent with Colorado statues and the DOT regulations, without obtaining signatures of the Mayor or City Council. For purposes of this Executive Order, all references to Agency head, Department head or appointing authority will also include the designee of the Agency head, Department head or appointing authority.
DENVER FIRE DEPARTMENT Topic No: 1022.00 Date: 01-03-12 DEPARTMENT DIRECTIVE Approved: TAB Review Date: 01-03-14 Topic:
Executive Order 94 – City and County of Denver Employees’ Alcohol and Drug Policy
Replaces: DEPT. DIR. 106.02 (03-15-01)
1022.00 Executive Order 94 – City and County of Denver Employees’ Alcohol and Drug Policy Page 21 of 24
Approved for Legality: Approved: _____________________ ___________________________ J. Wallace Wortham, Jr. Wellington E. Webb City Attorney MAYOR ___________________________ Bruce Baumgartner Manager of Aviation ___________________________ Theresa M. Donahue Manager of Environmental Health ___________________________ Thomas J. Migaki Manager of General Services ___________________________ Betty Jean Brooks Manager of Parks & Recreation ___________________________ Stephanie Foote Manager of Public Works ___________________________ Cheryl D. Cohen Manager of Revenue ___________________________ Aristedes W. Zavaras Manager of Safety ___________________________ Dr. Chris Veasey Manager of Human Services
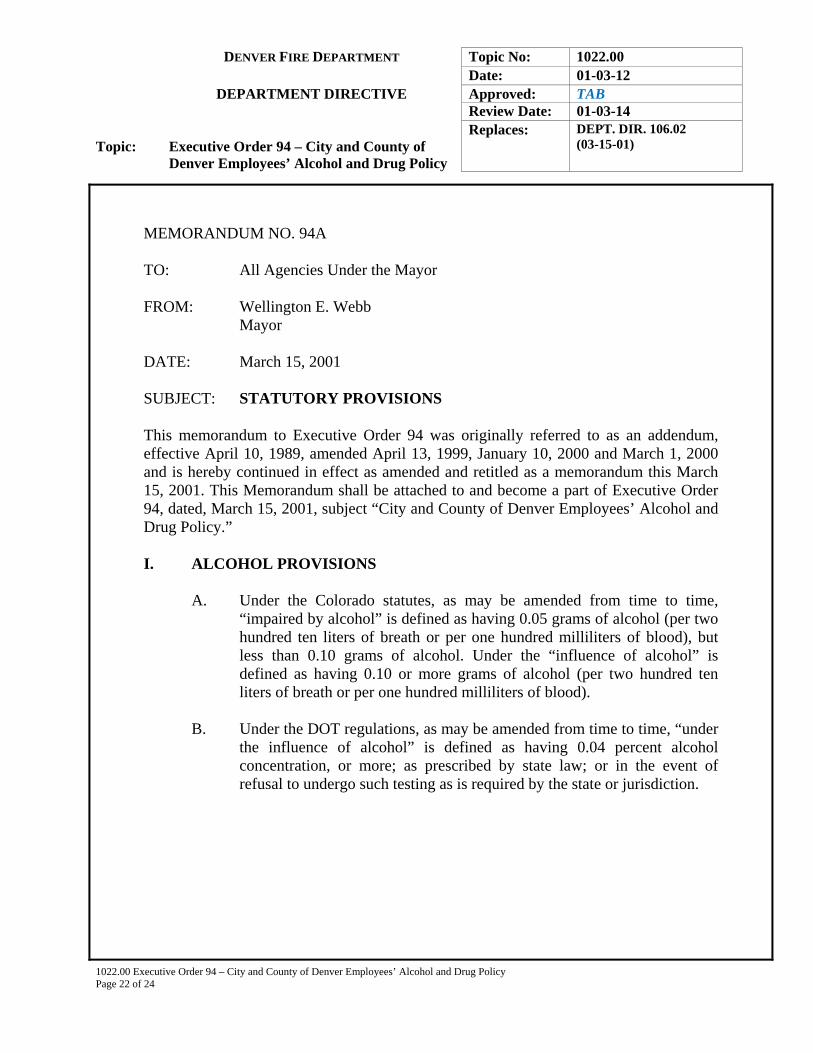
DENVER FIRE DEPARTMENT Topic No: 1022.00 Date: 01-03-12 DEPARTMENT DIRECTIVE Approved: TAB Review Date: 01-03-14 Topic:
Executive Order 94 – City and County of Denver Employees’ Alcohol and Drug Policy
Replaces: DEPT. DIR. 106.02 (03-15-01)
1022.00 Executive Order 94 – City and County of Denver Employees’ Alcohol and Drug Policy Page 22 of 24
MEMORANDUM NO. 94A TO: All Agencies Under the Mayor FROM: Wellington E. Webb Mayor DATE: March 15, 2001 SUBJECT: STATUTORY PROVISIONS This memorandum to Executive Order 94 was originally referred to as an addendum, effective April 10, 1989, amended April 13, 1999, January 10, 2000 and March 1, 2000 and is hereby continued in effect as amended and retitled as a memorandum this March 15, 2001. This Memorandum shall be attached to and become a part of Executive Order 94, dated, March 15, 2001, subject “City and County of Denver Employees’ Alcohol and Drug Policy.” I. ALCOHOL PROVISIONS
A. Under the Colorado statutes, as may be amended from time to time, “impaired by alcohol” is defined as having 0.05 grams of alcohol (per two hundred ten liters of breath or per one hundred milliliters of blood), but less than 0.10 grams of alcohol. Under the “influence of alcohol” is defined as having 0.10 or more grams of alcohol (per two hundred ten liters of breath or per one hundred milliliters of blood).
B. Under the DOT regulations, as may be amended from time to time, “under
the influence of alcohol” is defined as having 0.04 percent alcohol concentration, or more; as prescribed by state law; or in the event of refusal to undergo such testing as is required by the state or jurisdiction.
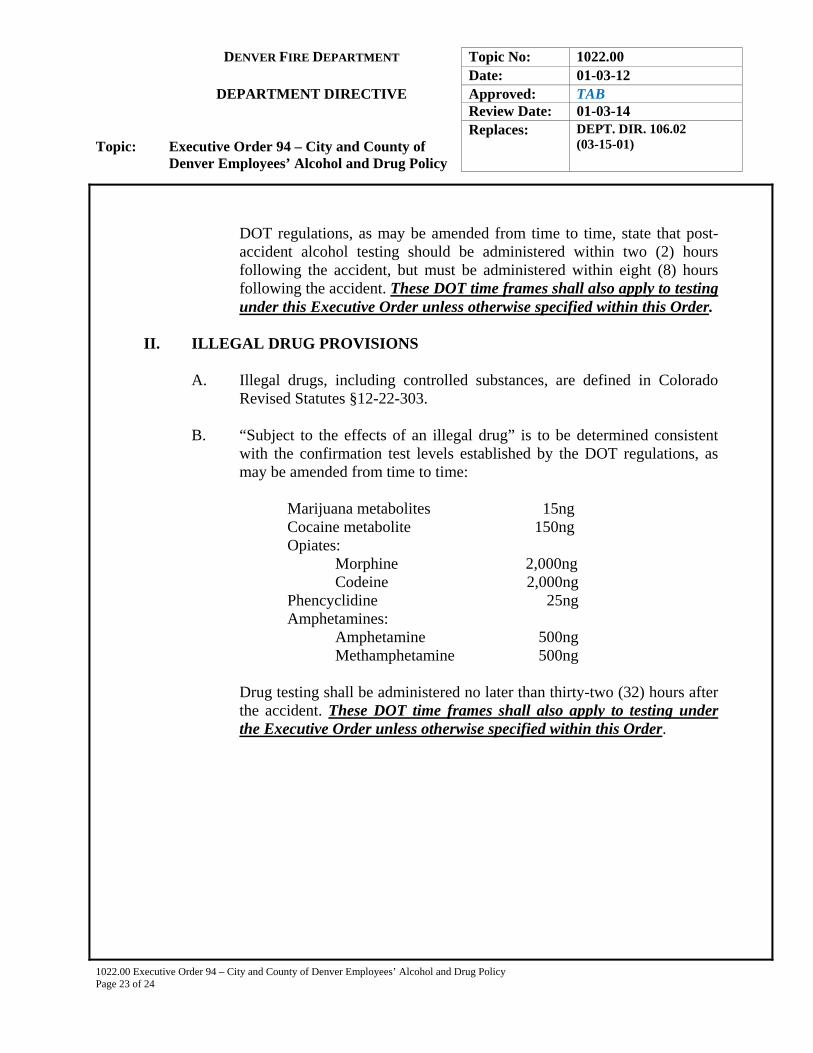
DENVER FIRE DEPARTMENT Topic No: 1022.00 Date: 01-03-12 DEPARTMENT DIRECTIVE Approved: TAB Review Date: 01-03-14 Topic:
Executive Order 94 – City and County of Denver Employees’ Alcohol and Drug Policy
Replaces: DEPT. DIR. 106.02 (03-15-01)
1022.00 Executive Order 94 – City and County of Denver Employees’ Alcohol and Drug Policy Page 23 of 24
DOT regulations, as may be amended from time to time, state that post-accident alcohol testing should be administered within two (2) hours following the accident, but must be administered within eight (8) hours following the accident. These DOT time frames shall also apply to testing under this Executive Order unless otherwise specified within this Order.
II. ILLEGAL DRUG PROVISIONS
A. Illegal drugs, including controlled substances, are defined in Colorado
Revised Statutes §12-22-303.
B. “Subject to the effects of an illegal drug” is to be determined consistent with the confirmation test levels established by the DOT regulations, as may be amended from time to time:
Marijuana metabolites 15ng Cocaine metabolite 150ng Opiates: Morphine 2,000ng Codeine 2,000ng Phencyclidine 25ng Amphetamines: Amphetamine 500ng Methamphetamine 500ng
Drug testing shall be administered no later than thirty-two (32) hours after the accident. These DOT time frames shall also apply to testing under the Executive Order unless otherwise specified within this Order.
DENVER FIRE DEPARTMENT Topic No: 1022.00 Date: 01-03-12 DEPARTMENT DIRECTIVE Approved: TAB Review Date: 01-03-14 Topic:
Executive Order 94 - City and County of Denver Employees’ Alcohol and Drug Policy
Replaces: DEPT. DIR. 106.02 (03-15-01)
1022.00 Executive Order 94 – City and County of Denver Employees’ Alcohol and Drug Policy Page 24 of 24
EXECUTIVE SUMMARY OF CHANGES
Executive Order No. 94
TITLE: City and County of Denver Employees’ Alcohol and Drug Policy
CURRENT DATE: March 1, 2000
PROPOSED REVISION: March 15, 2001
REASON FOR CHANGES: The existing Executive Order that established policy and procedures regarding alcohol and drugs was last revised in March 1, 2000. Several federal law and court cases necessitated the re-write. MAJOR CHANGES: See Memorandum from City Attorney R. Craig Hess for specific changes.
DENVER FIRE DEPARTMENT Topic No: 1023.00
Date: 01-06-17
DEPARTMENT DIRECTIVE Approved: TAB
Review Date: 01-06-19
Topic:
Use of Department Psychologist by Fire
Department Personnel for Problems of Drug
and/or Alcohol Abuse
Replaces: Same, dated 01-03-12
1023.00 Use of Department Psychologist by Fire Department Personnel for Problems of Drug and/or Alcohol Abuse
Page 1 of 8
When a Fire Department member voluntarily seeks aid for a drug or alcohol problem
from the Fire Department Psychologist, that transaction shall be deemed confidential. If
the department member voluntarily enters appropriate treatment for drug/alcohol
problems as recommended by the Department Psychologist or other appropriate
professional health service provide, there shall be no action taken detrimental to the
member’s job by department management on that occasion.
This policy is intended to apply only to those situations where a member’s conduct, due
to drug or alcohol abuse, has not already become a problem for the Department. When
the member’s conduct has already become a problem, the Chief of Department must have
his usual discretionary powers. Subsequent problems with drug/alcohol abuse by the
same member shall be dealt with in the usual manner, namely, on a case-by-case basis at
the discretion of the Chief of Department.
------------------------------------------------------------------------------------------------------------
Policy Overview
As an employer, the City is required to adhere to various federal, state, and local laws and
regulations regarding alcohol or drug abuse. These laws are contained in the attached
appendix.
The City also has a vital interest in maintaining safe, healthy, and efficient working
conditions for its employees. Being under the influence of a drug or alcohol on the job
may pose serious safety and health risks not only to the user buy to all those who work
with the user. The possession, use or sale of an illegal drug or use of alcohol in the
workplace may also pose unacceptable risks for safe, healthful, and efficient operations.
The City also maintains an Office of Employee Assistance and provides Department of
Safety psychologists that offer help to employees who seek assistance for alcohol or drug
abuse and other personal or emotional problems.
Within the legal framework and with these basic objectives in mind, the City has
established the following policy with regard to use, possession or sale of alcohol or drugs.
DENVER FIRE DEPARTMENT Topic No: 1023.00
Date: 01-06-17
DEPARTMENT DIRECTIVE Approved: TAB
Review Date: 01-06-19
Topic:
Use of Department Psychologist by Fire
Department Personnel for Problems of Drug
and/or Alcohol Abuse
Replaces: Same, dated 01-03-12
1023.00 Use of Department Psychologist by Fire Department Personnel for Problems of Drug and/or Alcohol Abuse
Page 2 of 8
I. ON-THE-JOB USE, POSSESSION OR SALE OF DRUGS OR ALCOHOL
A. Alcohol
Being under the influence or impaired by alcohol by any employee while performing City
business or while in a City facility is prohibited. Consumption of alcohol in a City
facility, in a City vehicle or on City premises is prohibited unless consumed at an
officially sanctioned private function, e.g., an invitation only library reception.
B. Legal Drugs
It is the responsibility of the employee who works in a position operating a vehicle or
dangerous equipment or affecting the public health or safety to advise management that
he or she is taking a prescription drug which may affect performance. The use or being
under the influence of any legally obtained drug by any employee while performing City
business or while in a City facility may be prohibited if such use or influence may affect
the safety of co-workers or members of the public, the employee’s job performance, or
the safe or efficient operation of the City facility. An employee may continue to work,
even though under the influence of a legal drug, if the appointing authority or a designee
has determined, after consulting with the Occupational Health and Safety Center that the
employee does not pose a threat to his or her own safety or the safety of co-workers and
that the employee’s job performance is not significantly affected by the legal drug.
Otherwise, the employee may be required to use sick leave or take a leave of absence or
comply with other appropriate non-disciplinary action determined by the appointing
authority or a designee.
C. Illegal Drugs
The use, sale, purchase, transfer or possession of an illegal drug by any employee while
in a City facility or while performing City business is prohibited. For the classified
service employees and the deputy sheriffs of the Department of Safety, the presence in
any detectable amount of any illegal drug in an employee at any time is prohibited.
DENVER FIRE DEPARTMENT Topic No: 1023.00
Date: 01-06-17
DEPARTMENT DIRECTIVE Approved: TAB
Review Date: 01-06-19
Topic:
Use of Department Psychologist by Fire
Department Personnel for Problems of Drug
and/or Alcohol Abuse
Replaces: Same, dated 01-03-12
1023.00 Use of Department Psychologist by Fire Department Personnel for Problems of Drug and/or Alcohol Abuse
Page 3 of 8
Policy Implementation
II. PROCEDURES FOR MANAGEMENT AND SUPERVISORS
When a supervisor has reasonable suspicion that an employee is in violation of this policy
the supervisor should immediately consult with an appropriate member of the in-house
personnel staff or with the City Attorney’s Office to determine further actions. However,
if it is recognized that the employee appears to be under the influence of drugs or alcohol,
or alcohol or drugs are in his or her possession, immediate action may be required.
Where this is the situation, the supervisor should do the following:
A. Under the Influence of Alcohol
The supervisor should confront the employee with the suspicion and order the employee
to the Occupational Health and Safety Center (during work day hours). If the clinic is
closed, refer to Denver General Psychiatric and Substance Abuse Emergency Room
Service or the Denver Police Department DUI facilities for an evaluation. Arrangements
are to be made by the supervisor to provide transportation for the employee to the
evaluation site. If the employee refuses to be evaluated, arrangements should be made
for the employee to be transported home.
*Caution: Once a supervisor has reasonable suspicion that an employee appears to be
under the influence of alcohol and should the employee refuse an order to be evaluated
and drives off in their own or a City vehicle, the police must be notified immediately.
B. Use, Possession, or Sale of Illicit Drugs
When a supervisor has reasonable suspicion that an employee appears to be using illicit
drugs while on duty, the same procedure applies as when a supervisor has reasonable
suspicion that an employee appears under the influence of alcohol.
When a supervisor has reasonable suspicion that an employee appears to be in possession
of or selling or transferring illicit drugs, the police are to be contacted. It is the policy of
the Department of Safety for all classified service employees and deputy sheriffs that
improper use or possession of controlled substances is grounds for immediate dismissal.
Management and supervisors are to restrict conversations concerning possible violations
of this policy to those persons who are participating in the evaluation, investigation or
disciplinary action and who have a need to know about the details of the drug/alcohol
DENVER FIRE DEPARTMENT Topic No: 1023.00
Date: 01-06-17
DEPARTMENT DIRECTIVE Approved: TAB
Review Date: 01-06-19
Topic:
Use of Department Psychologist by Fire
Department Personnel for Problems of Drug
and/or Alcohol Abuse
Replaces: Same, dated 01-03-12
1023.00 Use of Department Psychologist by Fire Department Personnel for Problems of Drug and/or Alcohol Abuse
Page 4 of 8
investigation. This includes not mentioning the name of the employee or employees
suspected of violating this policy.
C. Drug and Alcohol Screening
Employees may be required to submit to blood, or urine, or other alcohol or drug
screening where there is reasonable suspicion of illicit use or the employee is under the
influence of or impaired by alcohol or drug. Drug and alcohol screening may also be
justified where, even though the employee does not exhibit any observable symptoms of
being under the influence, a workplace accident may have been caused by human error
which could be drug or alcohol related. If any specimen obtained in a drug screening
remains after supervisor authorized testing, the remaining specimen is to be retained until
adjudication of disciplinary action is concluded. The Occupational Health and Safety
Center shall ensure that appropriate chain of custody is maintained for all specimens.
D. Investigatory Leave
The supervisor is then to contact management for further guidance. In the absence of
such consultation and if the supervisor has a reasonable doubt about the employee’s
ability to satisfactorily and safety meet job requirements, the supervisor shall place the
employee on investigatory leave pending results of testing or other administrative
determination.
III. DUI/DWAI ON OR OFF THE JOB
It is the responsibility of any employee who is required to drive as part of his or her
assigned duties or job specification to report to his or her appointing authority any DUI or
DWAI charge which results in the loss of a driver’s license or the restriction of driving
privileges. Every employee who is required to drive as part of his or her assigned duties
or job specification shall annually certify that he or she has a currently valid driver’s
license.
IV. NON-COMPLIANCE BY EMPLOYEE
(Missing)
V. DISCIPLINARY ACTION
Violation of this policy can result in a disciplinary action, up to and including dismissal,
even for a first offense. The appointing authority or designee, in lieu of disciplinary
action, may enter into an agreement with the employee after consultation with the city
DENVER FIRE DEPARTMENT Topic No: 1023.00
Date: 01-06-17
DEPARTMENT DIRECTIVE Approved: TAB
Review Date: 01-06-19
Topic:
Use of Department Psychologist by Fire
Department Personnel for Problems of Drug
and/or Alcohol Abuse
Replaces: Same, dated 01-03-12
1023.00 Use of Department Psychologist by Fire Department Personnel for Problems of Drug and/or Alcohol Abuse
Page 5 of 8
attorney’s office, for assessment of the employee’s alcohol or drug abuse problem and for
any treatment suggested by the treatment plan developer. For Career Service Authority
employees, the treatment plan developer is the Office of Employee Assistance and for
classified service employees, the treatment plan developer is the department psychologist.
VI. FACILITY WORK RULES
Nothing in this policy precludes the appointment authority of any City agency from
establishing work rules, which cannot be less stringent than this policy, subject to
approval of the City Attorney.
VII. SEARCHES
Searches of employees to investigate work-related misconduct may be conducted when
there is reasonable suspicion to believe that the employees are in violation of this policy,
and where the scope of the search is reasonably related to the objectives of the search and
not excessively intrusive in light of the nature of the misconduct. Supervisors shall
contact the City Attorney’s office for guidance.
VIII. CONTRACT PERSONNEL
These policy provisions are applicable to contract personnel. Violation of these
provisions or refusal to cooperate with implementation of the policy can result in the
City’s barring contract personnel from City facilities or participating in City operations.
IX. POSTING NOTICES
Clearly posted notices explaining the City’s right to carry out search activities should be
displayed in appropriate locations throughout the work area. Such postings should
emphasize the City’s intention to maintain a safe and healthful working environment. In
addition, a copy of the City’s Drug and Alcohol policy may be given to each employee
with each employee acknowledging in writing receipt of the policy.
At a minimum, facility management is to inform all contractors doing work in the facility
about the applicable policy provisions and provide a copy of this policy to such
contractors. Certain other enforcement actions may be necessary.
X. DRUG AND ALCOHOL USE RELATIONSHIP TO THE OFFICE OF EMPLOYEE
ASSISTANCE AND DEPARTMENT OF SAFETY PSYCHOLOGISTS
DENVER FIRE DEPARTMENT Topic No: 1023.00
Date: 01-06-17
DEPARTMENT DIRECTIVE Approved: TAB
Review Date: 01-06-19
Topic:
Use of Department Psychologist by Fire
Department Personnel for Problems of Drug
and/or Alcohol Abuse
Replaces: Same, dated 01-03-12
1023.00 Use of Department Psychologist by Fire Department Personnel for Problems of Drug and/or Alcohol Abuse
Page 6 of 8
The City and County of Denver maintains an Office of Employee Assistance and
provides Department of Safety psychologists that offer help to employees who suffer
from alcohol or drug abuse and other personal emotional problems. It is the
responsibility of each employee to seek help from the Office of Employee Assistance or
Department of Safety psychologist before alcohol and drug abuse problems lead to
disciplinary problems. Once a violation of this policy occurs, subsequent use of the
Office of Employee Assistance or Department of Safety psychologist may be part of a
condition of continued employment.
APPENDIX
Federal Rehabilitation Act of 1973
For the purposes of the Rehabilitation Act of 1973, 29 U.S.C. $700, et seq.
“Individual with handicaps” means any person who has a physical or mental
impairment which substantially limits one or more of such person’s major life activities,
(ii) has a record of such impairment, or (iii) is regarded as having such an impairment.
For purposes of sections 503 and 504 as such sections relate to employment, such term
does not include any individual who is an alcoholic or drug abuser whose current use of
alcohol or drugs prevents such individual from performing the duties of the job in
question or whose employment, by reason of such current alcohol or drug abuse, would
constitute a direct threat to property or the safety of others.”
Colorado Revised Statutes
Under the Colorado Statutes, it is a discriminatory or unfair employment practice:
(a) For an employer to refuse to hire, to discharge, to promote or demote, or to
discriminate in matters of compensation against any person otherwise qualified because
of handicap, but, with regard to a handicap, it is not a discriminatory or unfair
employment practice for an employer to act as provided in this paragraph (a) if there is no
reasonable accommodation that the employer can make with regard to the handicap, the
handicap actually disqualifies the person from the job, and the handicap has a significant
impact on the job;
Career Service Authority

DENVER FIRE DEPARTMENT Topic No: 1023.00
Date: 01-06-17
DEPARTMENT DIRECTIVE Approved: TAB
Review Date: 01-06-19
Topic:
Use of Department Psychologist by Fire
Department Personnel for Problems of Drug
and/or Alcohol Abuse
Replaces: Same, dated 01-03-12
1023.00 Use of Department Psychologist by Fire Department Personnel for Problems of Drug and/or Alcohol Abuse
Page 7 of 8
Under Career Service Authority regulations, it is a ground for immediate dismissal for an
employee to:
(b) Be under the influence of alcohol while on duty (CSA 16-22(3)) or illegally
(use) habit forming drugs or narcotics, or marijuana on City and County premises or
while on duty; or illegally (introduce) or (possess) such substances on City and County
premises while on duty. (CSA 16-22(1) or refuse to comply with orders of an authorized
supervisor.)
Denver Fire Department
Under Denver Fire Department policy, using or being under the influence of alcohol
while on duty, or use, possession or illegal activity involving drugs and controlled
substances are major violations. Use or being under the influence of alcohol on duty is a
major offense because the nature of the fire service requires quick, accurate, efficient
judgments to be made. Alcohol may impair a member’s ability to perform effectively,
thereby endangering other members and the public. Any offense may result in discipline,
up to and including dismissal
The Department’s drug policy states that:
Members shall not use or possess any prescription drug, on or off duty, except as
prescribed by and under the supervision of a licensed doctor or dentist. The use of any
illegal drug, controlled substance, or other substance; the possession of any illegal drug
or substance, or any participating activity involving illegal drugs or substances on or off
duty, may subject member to discipline, up to and including dismissal.
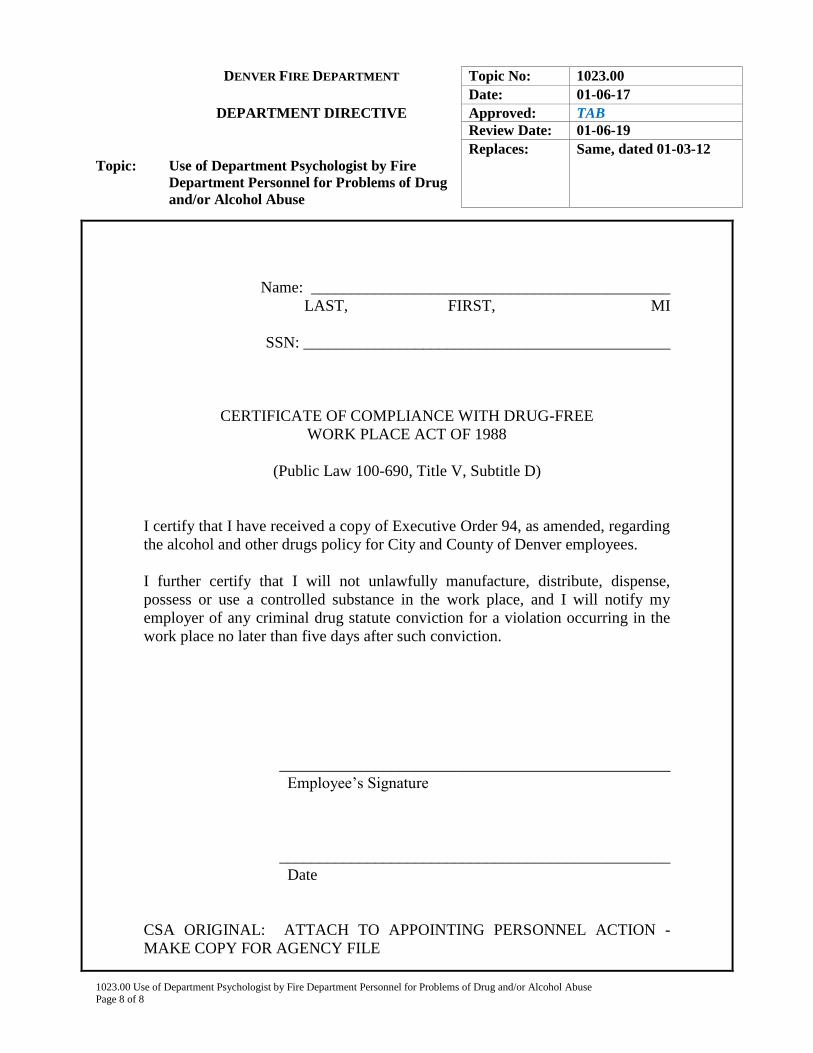
DENVER FIRE DEPARTMENT Topic No: 1023.00
Date: 01-06-17
DEPARTMENT DIRECTIVE Approved: TAB
Review Date: 01-06-19
Topic:
Use of Department Psychologist by Fire
Department Personnel for Problems of Drug
and/or Alcohol Abuse
Replaces: Same, dated 01-03-12
1023.00 Use of Department Psychologist by Fire Department Personnel for Problems of Drug and/or Alcohol Abuse Page 8 of 8
Name: _____________________________________________
LAST, FIRST, MI
SSN: ______________________________________________
CERTIFICATE OF COMPLIANCE WITH DRUG-FREE
WORK PLACE ACT OF 1988
(Public Law 100-690, Title V, Subtitle D)
I certify that I have received a copy of Executive Order 94, as amended, regarding
the alcohol and other drugs policy for City and County of Denver employees.
I further certify that I will not unlawfully manufacture, distribute, dispense,
possess or use a controlled substance in the work place, and I will notify my
employer of any criminal drug statute conviction for a violation occurring in the
work place no later than five days after such conviction.
_________________________________________________
Employee’s Signature
_________________________________________________
Date
CSA ORIGINAL: ATTACH TO APPOINTING PERSONNEL ACTION -
MAKE COPY FOR AGENCY FILE
DENVER FIRE DEPARTMENT Topic No: 1024.00
Date: 06-15-16
DEPARTMENT DIRECTIVE Approved: TAB
Review Date: 06-15-18
Topic:
Grooming Standards
Replaces: Same, Dated 05-15-12
1024.00 Grooming Standards
Page 1 of 4
The following hair, appearance, and grooming standards shall be adhered to by all
members of the classified service in all Divisions of the Denver Fire Department. Each
of these standards has been adopted for one or both of the following reasons:
SAFETY: These are necessary to provide a safe work environment for all
employees and are based upon current national and local standards. They are
applicable to all employees equally.
APPEARANCE: These standards are adopted to provide a uniform and
professional work force. They are based upon what a cross-section of typical
Denver citizens would reasonably expect members to look like. These
standards are gender-specific; that is, a different standard may be adopted for
male and female members of the Department, depending upon the item at
issue. Society in general accepts different standards for male and female
appearance, and recent court rulings have upheld the adoption of such
standards.
All members shall abide by the grooming standard outlined in this policy at all times
while in uniform.
Supervisors will advise those within their command of the grooming standards and will
assure conformity.
Any member not conforming to the grooming standards outlined in this Directive may
be subject to discipline up to and including being relieved of duty pending the outcome
of an investigation.
The Denver Fire Department will consider, and may approve, individual adjustments to
these standards on a case-by-case basis. Requests shall be made in writing through the
chain of command to the Fire Chief. Members must conform to regular Department
grooming standards unless they are granted a waiver. Medical waivers may be
temporary, depending on the circumstances.
GENERAL GROOMING STANDARDS
All uniforms shall be clean and pressed and in good repair. Items that have holes, tears,
or are faded shall not be permitted. Uniforms and other equipment shall be used as
outlined in other Department Directives and shall be worn for the proper comfort,
protection, and appearance of the member.
DENVER FIRE DEPARTMENT Topic No: 1024.00
Date: 06-15-16
DEPARTMENT DIRECTIVE Approved: TAB
Review Date: 06-15-18
Topic:
Grooming Standards
Replaces: Same, Dated 05-15-12
1024.00 Grooming Standards
Page 2 of 4
All bunking and safety equipment shall be clean and in good repair. Reflective surfaces
shall be completely attached and retain their reflective properties. Contaminated items
shall not be permitted.
Hair shall be professional in appearance and shall not create an unsafe condition during
performance of emergency and non-emergency operations. Hair shall not impede nor
interfere with the proper wearing and/or use of all personal protective equipment. Hair
shall be clean, well groomed, and shall not obstruct one’s vision. Mohawks, shaved
geometric patterns or letters, and faddish or unusual hair styles as determined by the
Chief, Deputy Chief, or the member’s respective Division Chief are not authorized.
Accepted hair colors are those that are naturally occurring. Additionally acceptable are
those colors found to be in a traditional hair color spectrum chart. Colors that are not
allowed are those considered to be extreme in nature; examples include but are not
limited to: blue, purple, gold, green, yellow, synthetic white (other than naturally
occurring), orange, and neon red. A full spectrum color chart is housed in the
Administration Division and should be utilized if questions arise. Final determination on
acceptable hair colors will be made by the Chief or Deputy Chief of the Department.
Cosmetics: Cosmetics shall be conservative, professional, and blend with natural skin
tone.
Fingernails: Fingernails shall be kept clean and allow for the safe and proper use of
medical and firefighting gloves as determined by the District Chief or his/her designee.
Jewelry:
Rings - Two rings per hand are permitted as long as they do not interfere with the
quick donning of gloves or turnout coat. However, the wearing of rings is not
recommended when responding to emergencies due to the potential for injury (e.g.,
electrical burns, crushing, entanglement). Rings with projections that compromise
the integrity of EMS gloves are not permitted.
Body Piercing - With the exception of earrings for women as outlined below, no
other visible body piercing jewelry shall be worn while on duty. This includes, but
is not limited to: nose rings, tongue studs, eyebrow piercings, etc.
Necklace – Only one is authorized and shall not be visible while in uniform.
Watch/Bracelet – One close-fitting watch/ bracelet is permitted per arm.
Sunglasses: Sunglasses shall be conservative in design and limited to black, brown, or
navy. Frames should be of a simple design.
DENVER FIRE DEPARTMENT Topic No: 1024.00
Date: 06-15-16
DEPARTMENT DIRECTIVE Approved: TAB
Review Date: 06-15-18
Topic:
Grooming Standards
Replaces: Same, Dated 05-15-12
1024.00 Grooming Standards
Page 3 of 4
Tattoos: Tattoos which must be covered while on duty include:
Tattoos which are racist, sexist, offensive, or obscene.
Sexually explicit tattoos, or tattoos with offensive/vulgar language and/or
illustrations
Symbols used by known militant, racist, or hate groups
Tattoos promoting, depicting, identifying, or supporting any gang, gang affiliation,
or gang activity
Tattoos which are visible on the face, neck, head, or hands (with the exception of
tattoo rings on fingers, still limited to a total of two rings per hand).
Intentional body modification, including but not limited to: Split or forked tongue,
foreign objects inserted under the skin to create an unnatural shape, design, or pattern,
enlarged or stretched holes in earlobes are prohibited.
Dental veneers: Dental veneers for the purpose of ornamentation, and dental
adornments such as jewels, initials, designs, etc., are prohibited.
MALE GROOMING STANDARDS
Hair: Hair shall not extend below the bottom of the uniform shirt collar or cover more
than the upper half of the ear. Braided hair, ponytails, or hair accessories are not
authorized while in uniform.
Sideburns: Shall be neatly trimmed and shall not interfere with the seal of the SCBA
face piece
Facial Hair: At the start of the work shift, all areas of the skin that are involved with
the seal of the face piece shall be clean shaven. The sealing area of the face piece shall
be defined as: all areas of the skin which contact the face or neck seal and the nose cup
seal (NIOSH). Authorized facial hair shall be clean and neatly trimmed and in no case
shall it extend beyond the bottom of the jaw bone.
FEMALE GROOMING STANDARDS
Hair: Hair shall be worn in a fashion so that the length does not exceed the bottom of
the shoulder blades or more than 4 inches in bulk while standing in formation. Hair
shall not extend beyond the outside corners of the eyes so as not to obstruct vision, and
hair that falls below the clavicle shall be drawn back and secured in a bun, braid, or
ponytail for safety. Hair accessories shall be a solid color of navy, black, brown, or
plain gold or silver to match the appropriate rank insignia. Hair must not interfere with
any safety equipment or PPE.
DENVER FIRE DEPARTMENT Topic No: 1024.00
Date: 06-15-16
DEPARTMENT DIRECTIVE Approved: TAB
Review Date: 06-15-18
Topic:
Grooming Standards
Replaces: Same, Dated 05-15-12
1024.00 Grooming Standards
Page 4 of 4
Female members in Class A uniforms: Hair that falls below the bottom edge
of the back of the shirt/coat collar shall be drawn back and secured in a bun,
braid, or ponytail. Hair shall not extend beyond the outside corners of the eyes
so as not to obstruct vision. Hair accessories shall be a solid color of navy,
black, brown, or plain gold or silver to match the appropriate rank insignia.
Earrings: Two ear posts are allowed per ear. The decorative front of the ear post shall
not exceed ¼ inch in diameter. The ear post may be silver or gold in color, or may have
a clear gemstone as the decorative front. Hoop or ring shapes are not allowed.
Nail Polish: Colored polish is authorized except for the color black and neon colors.
With the exception of a natural-colored French manicure, fingernails shall be solid in
color and shall not be airbrushed or adorned. Patterns, chips, or sparkles are not
authorized. If there is a question in regard to color, the member shall be referred to the
color charts kept on file in the Administrative Division. Final determination on
acceptable nail colors will be made by the Chief or Deputy Chief of the Department.
DENVER FIRE DEPARTMENT Topic No: 1037.00
Date: 07-10-15
DEPARTMENT DIRECTIVE Approved: ECT
Review Date: 07-10-17
Topic:
DFD Hazing, Harassment, Retribution Policy
Replaces: Old Dept. Dir. 105.04
(dated 11-22-99)
1037.00 DFD Hazing, Harassment, Retribution Policy Page 1 of 3
For purposes of this policy definitions are as follows:
Appropriate Supervisor can include immediate supervisor, anyone in the chain of
command, or Administrative Division Chief. It is the responsibility of the “appropriate
supervisor: to report the allegation immediately to the administration at the Denver Fire
Department Headquarters.
Harassment 1) To irritate or torment persistently, 2) To wear out; exhaust. 3) To
impede and exhaust (an enemy) by repeated attacks or raids. Synonyms: harass, harry,
hound, pester, bait. These verbs mean to trouble persistently or incessantly. Harass and
harry imply systematic persecution by besieging with repeated annoyances, threats, or
demands. Hound suggests unrelenting pursuit to gain a desired end. Badger to nag or
tease persistently. Pester is to inflict a succession of petty annoyances. Bait to torment
by or as if by taunting, insulting, or ridiculing.
Hazing 1) To persecute or harass with meaningless, difficult or humiliating tasks. 2)
To initiate, as into a college fraternity, by exacting humiliating performances from, or
playing rough practical jokes upon.
Retribution Something given or demanded in repayment, especially punishment.
Hazing, harassment, or retribution has no place in any of the Denver Fire
Department’s work locations. It is the goal of the Denver Fire Department to rid work
sites of destructive behavior or the threat of such behavior. It is the shared obligation of
all employees and employee organizations to individually and jointly act to prevent or
defuse actual or implied destructive behavior at work. The Denver Fire Department is
committed to maintain a safe work environment free from all forms of hazing,
harassment, and retribution.
To ensure and affirm a safe, hazing-, harassment-, retribution-free workplace,
the following will not be tolerated, and may subject any perpetrator to disciplinary action.
a. Hazing, harassment, or retribution by or against any employee of the Denver
Fire Department.
b. Intimidating, threatening, or hostile behaviors, physical assault, vandalism, arson,
sabotage, unauthorized use of weapons, bringing unauthorized weapons onto
Denver Fire Department property or other acts of this type are clearly
inappropriate to the workplace.
DENVER FIRE DEPARTMENT Topic No: 1037.00
Date: 07-10-15
DEPARTMENT DIRECTIVE Approved: ECT
Review Date: 07-10-17
Topic:
DFD Hazing, Harassment, Retribution Policy
Replaces: Old Dept. Dir. 105.04
(dated 11-22-99)
1037.00 DFD Hazing, Harassment, Retribution Policy Page 2 of 3
c. Jokes or comments that imply destructive acts, which are reasonably perceived to
be a threat of eminent harm.
d. Encouraging others to engage in the negative behaviors outlined in this policy.
No employee acting in good faith who reports real or implied destructive behavior
will be subject to retaliation or harassment based upon his or her report.
When an employee has a complaint or observes an act of hazing, harassment, or
retribution at work, the employee shall bring the matter to the appropriate supervisor’s
attention. The supervisor shall investigate the complaint and make a determination of
appropriate action on a case-by-case basis. In making the determination, the supervisor
or other appropriate official shall look at the totality of the circumstances, such as the
nature of the actions and the context in which the alleged incidents occurred. If hazing,
harassment, or retribution are found to exist, appropriate management and supervisory
personnel shall take prompt corrective action. Please refer to Topic #106.01
(Disciplinary Guidebook), to ensure that the correct procedures are followed.
If the actions of the immediate supervisors do not effectively stop the hazing,
harassment, or retribution, the affected individual shall contact the Denver Fire
Department Administration. The complaint will then be further investigated.
MANAGEMENT ‘S RESPONSIBILITY
The Manager’s foremost obligation is to ensure the safety of any employee who
has been threatened or harmed. Managers are responsible for ensuring a prompt and
adequate response to any incident of workplace hazing, harassment, or retribution.
Immediate supervisors shall investigate any and all complaints and/or incidents of
workplace hazing, harassment, or retribution and take appropriate action. The
investigation shall include, at a minimum, an interview of all persons involved, including
any witnesses in order to obtain an accurate account of the incident. The statements of
witnesses and others interviewed shall be documented in writing. Advice and assistance
in this process will be provided by the Administration Division.
DENVER FIRE DEPARTMENT Topic No: 1037.00
Date: 07-10-15
DEPARTMENT DIRECTIVE Approved: ECT
Review Date: 07-10-17
Topic:
DFD Hazing, Harassment, Retribution Policy
Replaces: Old Dept. Dir. 105.04
(dated 11-22-99)
1037.00 DFD Hazing, Harassment, Retribution Policy Page 3 of 3
EMPLOYEE RESPONSIBILITY
Employees who feel they have been subjected to any of the behaviors listed above
or have observed or have knowledge of any violation of this policy should report the
incident to the Denver Fire Department Administration. However, if a situation presents
an immediate life threat to the employee or others, the employee is advised to call the
Denver Fire Department Dispatcher or the Denver Police Department officials for
assistance, if it is practical and safe to do so at the time.
DISCIPLINARY ACTION
Any violation of this policy by employees, including a first offense, may result in
disciplinary action, up to and including demotion or dismissal. Willful failure of a
supervisory employee to enforce this policy may result in disciplinary action against
the supervisor, up to and including demotion or dismissal.
Any deliberate, unwarranted allegations of violation of this policy will be viewed
as an attempt to disrupt Department operations and may result in disciplinary action.
DENVER FIRE DEPARTMENT Topic No: 1046.00
Date: 06-13-16
DEPARTMENT DIRECTIVE Approved: TAB
Review Date: 06-13-18
Topic:
Administrative Grievance Procedures
Replaces: Old Dept. Dir. 104.03
(02-01-07)
1046.00 Administrative Grievance Procedures
Page 1 of 2
SCOPE: Applies to all Denver Fire Department Personnel
OVERVIEW
Only an aggrieved member may initiate an Administrative Grievance.
The aggrieved employee must enter the grievance and all supporting information
in writing, and present the written, signed, and dated grievance to his/her
immediate supervisor within ten (10) calendar days after the member knew, or
should have known, the facts which gave rise to the Administrative Grievance.
An Administrative Grievance shall be addressed within the employee’s chain of
command UNLESS the grievance involves sexual harassment, Equal
Employment Opportunity issues, workplace violence, hostile work environment,
or issues involving illegal acts. In such situations, the grievance shall be
immediately brought to the attention of the Division Chief of Administration
and/or the Deputy Chief of the Department.
RESOLUTION OF GRIEVANCES
It is desirable that Administrative Grievances be resolved at the lowest level of
supervision.
1. Any officer of the Department who receives a properly submitted
grievance from a subordinate should reply in writing within ten (10)
calendar days after receiving the grievance.
2. If an employee receives an unsatisfactory reply from the immediate
supervisor, s/he may forward the grievance to the next level in the chain of
command. An Administrative Grievance may be carried as far as the
office of the Executive Director of Safety, provided that each succeeding
level of command has had the opportunity to resolve the grievance. If a
grievance is not answered in writing within ten (10) calendar days, at any
level, it is to be considered ‘denied’ and the employee may move to the
next level.
3. An Administrative Grievance shall not be directed to any office outside of
the Department of Safety without written permission of the Department
Chief and the Executive Director of Safety.
4. No part of the procedure listed above is to be used for Contract Grievances
(issues directly related to the Fire Fighters Agreement between Local 858
DENVER FIRE DEPARTMENT Topic No: 1046.00
Date: 06-13-16
DEPARTMENT DIRECTIVE Approved: TAB
Review Date: 06-13-18
Topic: Administrative Grievance Procedures
Replaces: Old Dept. Dir. 104.03
(02-01-07)
1046.00 Administrative Grievance Procedures
Page 2 of 2
and the City and County of Denver). The procedure for filing a Contract
Grievance is found in Article XV of the Agreement.
DENVER FIRE DEPARTMENT Topic No: 1056.00 Date: 07-23-19, eff. 07-23-19 DIRECTIVE Approved: TAB Review Date: 07-23-21 Replaces: Same, dated 01-12-17 Topic: Corrective Action Procedures
1056.00 Corrective Action Procedures Page 1 of 14
PURPOSE: The purpose of the DFD Corrective Actions Procedures is to establish a recognized method for handling allegations of misconduct, violations of standards, and/or issues involving substandard performance based upon the expectations, directives, guidelines, and policies of the Denver Fire Department, the Department of Safety, and the City and County of Denver. SCOPE: All Uniformed Members I. Non-Disciplinary Modification Process The intent of the non-disciplinary modification process is to provide a method of corrective action for issues of substandard performance or questionable behavior that have not yet risen to a level requiring formal discipline, yet still require official attention and documentation. These processes allow the development of an action plan aimed towards improving performance and/or mitigating questionable behaviors through clearly defined expectations. There are two-official non-disciplinary processes utilized on the DFD: the first is a documented Coaching and Counseling session, and the second is a formalized Performance Improvement Plan (PIP). It is extremely important for supervisors to understand that these processes are not meant as a substitute for normal supervisory interactions. Supervisors are expected to meet their managerial obligations by conducting regular interactions with their personnel to address minor issues, outline general expectations, conduct training, etc. These daily management activities are not the primary concern of the Administration Division and are appropriately handled at the lowest supervisory level with no documentation relevant to this policy1. However, as a condition or concern escalates and is not being resolved by such lower level interactions, the supervisor will reach a point where formal documentation of the issue may be required. When this occurs, it is crucial that the Administration Division become involved; while the corrective process will be carried out at the supervisory level, the issue will now require different handling where assistance from the Administration Division is required to ensure consistency across the Department; correct handling, proper format and content, and the appropriate procedures necessary to meet Administrative and legal guidelines. All such documentation will be maintained by the Administration Division in a central area of the Department.
1 While documentation relevant to this policy may not be required at this level, supervisors are encouraged to keep notes (or have the supervisor send a confirming email to the member regarding the supervisor and member interaction for confirmation) on any performance or conduct related coaching given to personnel.
DENVER FIRE DEPARTMENT Topic No: 1056.00 Date: 07-23-19, eff. 07-23-19 DIRECTIVE Approved: TAB Review Date: 07-23-21 Replaces: Same, dated 01-12-17 Topic: Corrective Action Procedures
1056.00 Corrective Action Procedures Page 2 of 14
A. Coaching and Counseling A formal Coaching and Counseling process may be one of the first steps utilized to improve a member’s performance. Coaching and Counseling is intended to bring issues to a member’s attention when they are minor, and to correct the problem(s) before disciplinary action is required. Coaching and Counseling is a straightforward process during which a supervisor meets with a member regarding a substandard performance issue and/or inappropriate workplace behavior(s). The goal will be to determine an action plan which will assist in correcting the questionable behavior/performance. Whatever the cause of the behavioral/performance issue(s), the supervisor shall clarify the expectations placed upon the member by the Department and shall provide follow-up oversight for the issues and plans discussed. It must be stressed that the Coaching and Counseling process is not punitive; rather, it is a non-disciplinary method used to correct substandard performance and/or behaviors that are not meeting standards/expectation of the Denver Fire Department, Department of Safety, and/or the City and County of Denver. Disciplinary action might result should the member be unable or unwilling to change their unacceptable behaviors and/or improve their performance. Documentation of a Coaching and Counseling session is mandatory and may be accomplished via designated form. Such documentation will be confidentially maintained by the Administration Division’s Internal Affairs Bureau (IAB) and the information shall not be authorized to be kept in any other location.
B. Performance Improvement Plan (PIP)
A Performance Improvement Plan (PIP) is a formal process used to: 1) identify performance deficiencies and/or certain behavioral issues that need to be corrected, and 2) create an action plan to facilitate the necessary changes. A PIP may be implemented when it becomes necessary to help a member improve his or her performance and/or behaviors/issues. Performance deficiencies are typically associated with a lack of the proper knowledge or skill set necessary to effectively perform the member’s job responsibilities (i.e. failure to complete assignments/tasks, low quality of work product, etc.) or lack of continued skill retention. Behavioral issues generally relate to a member’s conduct, including but not limited to, violations of standards based upon the expectations, directives, guidelines, and policies of the Denver Fire Department, the Department of Safety, and the City and County of Denver. Behavioral issues of a serious nature are best handled within the formal disciplinary frame work; only certain behavioral issues of a less serious nature will be appropriately addressed within a PIP, as
DENVER FIRE DEPARTMENT Topic No: 1056.00 Date: 07-23-19, eff. 07-23-19 DIRECTIVE Approved: TAB Review Date: 07-23-21 Replaces: Same, dated 01-12-17 Topic: Corrective Action Procedures
1056.00 Corrective Action Procedures Page 3 of 14
determined by the Command Staff, IAB, and the representative(s) of the City Attorney’s Office (CAO). Once it has been determined that a PIP would be an appropriate adjunct for managing a member, the supervisor will develop the PIP under the direct guidance of IAB. IAB’s guidance helps to ensure consistency in investigations and documentation across all areas of the Department. PIPs must be specific and measurable, with definitive time frames for compliance.
1. Specific: The supervisor must specifically identify the performance to be improved or the behavior to be corrected, including but not limited to:
a. Which skills need improvement b. Which behaviors need modification
2. Measurable:
a. Identify the standards, directives, policies, procedures, etc. against which the performance will be measured and provide clear expectations about the items that must change.
b. State the expected level of performance and timeline for improvements.
c. Compare actual performance against the standards and note if expectations were met or were not met.
3. Time:
a. Establish periodic review dates to assess the member’s progress and to provide continued feedback for the duration of the PIP (i.e. every week/month/etc.).
b. Establish a timeline for the length of time the PIP will be in place (i.e. 60/90/120/365 days).
c. Document all meetings with the member reviewing progress under the PIP.
4. Other:
a. Where possible and appropriate, identify any additional resources available to assist the member in achieving the desired improvements (i.e. Directives, Guidelines, City resources, etc.).
b. Acknowledge potential consequences should the action plan outlined in the PIP not be satisfactorily completed (i.e. change in work assignment, discipline, etc.).
DENVER FIRE DEPARTMENT Topic No: 1056.00 Date: 07-23-19, eff. 07-23-19 DIRECTIVE Approved: TAB Review Date: 07-23-21 Replaces: Same, dated 01-12-17 Topic: Corrective Action Procedures
1056.00 Corrective Action Procedures Page 4 of 14
All PIPs shall be submitted to IAB for guidance, review, and consultation with the City Attorney’s Office prior to approval for implementation.
II. Discipline Process The discipline process may be initiated at any supervisory level. In the case of possible misconduct by a member’s supervisor, the alleged misconduct should be reported to the next level of supervision and the Administration Division Chief, or designee, notified through the chain of command. Once an officer/acting officer has reason to believe that departmental directives, guidelines, policies, or other conduct standards have been violated, the officer/acting officer shall contact IAB for 1) guidance, 2) to determine if disciplinary action is warranted, and/or 3) to determine an appropriate fact-finding process. If, in the officers’ opinion, the concern may be of a disciplinary nature, he/she shall inform their chain of command and contact the IAB for advice, guidance, and disciplinary history before initiating a more in-depth investigation into the facts and circumstances surrounding the conduct at issue2. The length and depth of any investigation will depend upon the facts of each case, taking into consideration the nature and severity of the alleged infraction, the number of potential rule violations, the complexity of the factual situation, the number of potential witnesses, the level of contemplated disciplinary options, and any other circumstances unique to the alleged misconduct or performance problems as determined by the Administrative Division Chief, or designee, along with IAB.
Truthfulness and cooperation are vital to the investigatory process; they are expected and demanded of all members involved in an investigatory process or those who have information pertaining to an investigation of misconduct. No member shall knowingly engage in conduct interfering with an investigation or have contact (direct or indirect) with any witness, complainant, or investigator which is intended to, or results in, the obstruction, compromise, or interference with an Internal Investigation. Following any investigation, the Chief of the Department, or designee, will determine whether the recommended disciplinary action is appropriate. Should the recommended discipline be found inappropriate, an amended recommendation will be made for the level of discipline that is believed more suitable. If it is determined that the facts of the case might warrant a discipline greater than a Written Reprimand, an intake meeting with the Conduct Review Board (CRB) will be scheduled. At intake, the CRB group will be comprised of the Deputy Director of Safety/designee, the Administration Division Chief/designee, the Division Chief/designee of the involved member, a member of the
2 As discussed more fully below, IAB may take over the investigation at this point.
DENVER FIRE DEPARTMENT Topic No: 1056.00 Date: 07-23-19, eff. 07-23-19 DIRECTIVE Approved: TAB Review Date: 07-23-21 Replaces: Same, dated 01-12-17 Topic: Corrective Action Procedures
1056.00 Corrective Action Procedures Page 5 of 14
same rank, and a member of one rank above. This group will determine whether or not the IA Case will move forward to a Contemplation of Disciplinary Action (CODA) and Pre-Disciplinary meeting with the Chief of the Department/designee. All discipline greater than a written reprimand will be forwarded to the Executive Director of Safety’s Office for final discipline determination.
After consultation with IAB, any discipline that is issued will include notification of the appropriate chain of command. All documentation shall be sent to IAB for final review, approval, and placement in the members’ discipline file. The member and their supervisor will be notified of the final approval. Confidentiality shall be maintained regarding information within the file including written and verbal statements, videos and other documents. Information contained in the file may be released on a need to know basis as determined by the Chief of the Department or the Deputy Director of Safety. Conduct Review Board members shall maintain confidentiality of any discussions related to discipline cases.
A. Contacting the Internal Affairs Bureau (IAB)
The Internal Affairs Bureau is a resource to guide officers through the investigation and disciplinary process. Officers shall contact IAB for guidance and assistance in all disciplinary matters prior to any action being taken. IAB will provide information on procedures, the appropriate level of investigation, potential discipline, similar cases, prior discipline, and commendations. It is the intent of the Department that disciplinary actions be handled at the lowest appropriate level, with input and guidance from IA personnel; however, investigations involving allegations of a continuing pattern of misconduct, that involve misconduct of a serious nature, or that involve possible law violations shall be conducted by the IAB. Officers of the IAB shall have full authority, pursuant to the command of the Chief of the Department, to conduct an investigation without interference from any officer.
B. Disciplinary Considerations The purposes to be achieved by the imposition of discipline in a particular case are dependent on all the facts and circumstances of that case. Those purposes may vary based upon a consideration of numerous factors including, but not limited to, the nature and seriousness of the misconduct, the circumstances under which the misconduct was committed, the harm or prejudice arising from the
DENVER FIRE DEPARTMENT Topic No: 1056.00 Date: 07-23-19, eff. 07-23-19 DIRECTIVE Approved: TAB Review Date: 07-23-21 Replaces: Same, dated 01-12-17 Topic: Corrective Action Procedures
1056.00 Corrective Action Procedures Page 6 of 14
misconduct, and the existence of any relevant mitigating or aggravating circumstances.
1. Among the primary purposes of disciplinary sanctions are the following:
• To modify/correct conduct. • To impose an appropriate penalty. • To address/reflect the harm or risk of harm arising from the
misconduct and the effects of the misconduct both inside and outside of the Department.
• To provide notice of the consequences of misconduct to all members of the Department and to deter future misconduct by all members.
• Ensuring the orderly functioning and operation of the Department and adherence to its established standards of conduct.
• Reinforcing Department values. • Reinforcing training. • Effectively managing risk and potential civil liability for
members, the Department, and the City. • Establishing trust in and respect for the discipline system and
the Department, both internally and in the community.
2. It is important for all members of the Department to understand that the goals and purposes of the discipline system are different from those of the criminal justice and civil law systems. While some of the factors taken into consideration in the civil and criminal systems may overlap with factors considered in the discipline system, it must be remembered that the purposes of disciplinary sanctions are different from the purposes of civil and criminal law sanctions. Additionally, it is not the function of the prosecutor’s office, through the criminal justice system, to enforce the rules, regulations, and policies of the Department. Nor is it necessary that a member be criminally convicted in order for the Department to discipline the member for misconduct which is prohibited by law.
DENVER FIRE DEPARTMENT Topic No: 1056.00 Date: 07-23-19, eff. 07-23-19 DIRECTIVE Approved: TAB Review Date: 07-23-21 Replaces: Same, dated 01-12-17 Topic: Corrective Action Procedures
1056.00 Corrective Action Procedures Page 7 of 14
3. Any measure or level of discipline may be used in any given situation
as deemed appropriate by the officer, or acting officer, and with concurrence from IAB. Under certain circumstances, immediate dismissal may be warranted. Failure to correct behavior, or the commission of additional violations after discipline has been taken, may subject the member to further disciplinary action, up to and including dismissal. Prior disciplinary actions may be taken into consideration for current disciplinary purposes, regardless of when they occurred. The member’s past discipline record along with the nature and severity of the offense will be weighed when determining the appropriate level of discipline. Where possible, the determination of the appropriate level of discipline will be consistent with discipline given to other members who engaged in similar conduct under similar circumstances. This comparative discipline does not preclude the implementation of more severe discipline for repeat behavior. Reference the Denver Fire Department Discipline Handbook for any needed clarification or answers to specific questions.
C. Disciplinary Options
Potential types of discipline will be explained in detail later in this document. Such discipline may include, but is not limited to, the following:
1. Verbal Reprimand 2. Written Reprimand 3. Fines 4. Suspension 5. Involuntary Demotion 6. Dismissal
D. Review of Discipline
All recommendations for discipline shall be reviewed by the Chief of the Department, or designee. The Chief of the Department reserves the right to change the recommended discipline as believed appropriate, even if the disciplined member has agreed to a level of discipline recommended by the disciplining officer. No discipline will be final until reviewed by the Chief of the Department or designee; no disciplinary action greater than a Written Reprimand will be final until reviewed by both the Chief of the Department and the Executive Director of Safety, or their designees. Disciplinary actions greater than
DENVER FIRE DEPARTMENT Topic No: 1056.00 Date: 07-23-19, eff. 07-23-19 DIRECTIVE Approved: TAB Review Date: 07-23-21 Replaces: Same, dated 01-12-17 Topic: Corrective Action Procedures
1056.00 Corrective Action Procedures Page 8 of 14
a Written Reprimand will be imposed by the Executive Director of Safety as required by Denver City Charter § 9.4.14.
E. Disciplinary Actions which may be Appealed
A Verbal Reprimand and a Written Reprimand may be appealed to the next level of supervision only; reference Discipline Flowchart. All discipline greater than written reprimands may be appealed to the Civil Service Commission pursuant to Denver City Charter § 9.4.15 and Civil Service Commission Rule 12.
F. Disciplinary Actions
1. Verbal Reprimand
The Verbal Reprimand is often an effective tool for use by a supervising officer in correcting behavior that involves minor misconduct. Minor misconduct is viewed as a violation of policy or procedure that has a minimal adverse impact on the operation or integrity of the Department. Through the use of this tool, the problem issue is clearly identified and expected changes should be clearly stated. When an incident occurs in which the officer determines from the relevant facts that a Verbal Reprimand is appropriate, the officer shall notify their appropriate chain of command and contact the IAB for assistance. The “Summary of Events” section of the Verbal Reprimand form must be reviewed and approved by IAB, and it must be completed with sufficient detail to give notice and allow the member to correct the misconduct or performance issue. The sections of the form entitled, “Previous Discipline” and “Commendations” shall be verified through IAB. Because a Verbal Reprimand is a formal disciplinary action, it must be documented. Once presented to the member, the officer will have the member sign the designated form confirming that the Verbal Reprimand has been given. The member shall sign the form. The member’s signature is not a statement of agreement or disagreement, it signifies only that the member is in receipt of the document. If the member is in agreement with the reprimand and recommended action, the member will check and initial the box marked, “Agree” on the form. The Verbal Reprimand will then be sent through the
DENVER FIRE DEPARTMENT Topic No: 1056.00 Date: 07-23-19, eff. 07-23-19 DIRECTIVE Approved: TAB Review Date: 07-23-21 Replaces: Same, dated 01-12-17 Topic: Corrective Action Procedures
1056.00 Corrective Action Procedures Page 9 of 14
appropriate chain of command to IAB for review by the Deputy Chief of the Department or designee. If the Verbal Reprimand is finalized by the Deputy Chief’s review, the original Verbal Reprimand document will be filed in the Department discipline files. A copy will be sent to the member through the chain of command.
a. Appealing a Verbal Reprimand
If the member does not agree with the Verbal Reprimand, the member will check and initial the box marked “Disagree” on the form. The documentation shall then be forwarded to the next level of supervision. The officer at the next level of supervision shall review the case and may interview the member and the original disciplining officer and make a recommendation to uphold or change the Verbal Reprimand. If the Verbal Reprimand is upheld or reduced, no further appeal is permitted. The discipline will then be sent through the appropriate chain of command to IAB to be reviewed by the Deputy Chief of the Department, or designee. If the recommended discipline is increased one step, a Written Reprimand will be initiated. If the recommendation of discipline is greater than a Written Reprimand, a Pre-Disciplinary meeting will be scheduled with the Chief of the Department. A written command by the Chief of the Department for discipline greater than a Written Reprimand will be sent to the Executive Director of Safety, or designee, for final review. If the Verbal Reprimand is finalized after the Deputy Chief’s review, the original Verbal Reprimand will be filed in the Department discipline files and the member will receive a copy through the chain of command.
DENVER FIRE DEPARTMENT Topic No: 1056.00 Date: 07-23-19, eff. 07-23-19 DIRECTIVE Approved: TAB Review Date: 07-23-21 Replaces: Same, dated 01-12-17 Topic: Corrective Action Procedures
1056.00 Corrective Action Procedures Page 10 of 14
2. Written Reprimand
When the disciplining officer believes, due to the nature and severity of the infraction and/or the member’s past disciplinary history, that correcting the behavior under investigation requires more than a Verbal Reprimand, a Written Reprimand may be issued. The officer shall inform their appropriate chain of command and contact the IAB for assistance. The “Summary of Events” section of the Written Reprimand form must be reviewed and approved by IAB, and it must be completed with sufficient detail to allow the member to correct the misconduct and/or provide a defense for the allegations against him/her. The sections of the form entitled “Previous Discipline” and “Commendations” shall be verified through IAB. Following approval of the Written Reprimand, the disciplining officer will meet with the member. This meeting will permit the member to provide an answer to the charge(s) and tell his/her side of the events. If the officer determines that a Written Reprimand is still justified, the officer will issue the approved document. During the meeting, the officer will also instruct the member as to how his/her behavior or performance can be improved.
At the conclusion of the meeting the member shall sign the form. If the member is in agreement with the reprimand and recommended action, the member will check and initial the box marked, “Agree” on the form. The Written Reprimand will then be sent through the appropriate chain of command to IAB for review by the Deputy Chief of the Department or designee. If the Written Reprimand is finalized by the Deputy Chief’s review, the original Written Reprimand document will be filed in the Department discipline files. A copy will be sent to the member through the chain of command. If the Written Reprimand is not approved by the Deputy Chief/designee, a Pre-Disciplinary meeting with the Chief of the Department will be set.
a. Appealing a Written Reprimand
If the member does not agree with the Written Reprimand, the member will check and initial the box marked “Disagree” on the form. The documentation shall then be forwarded to the next level of supervision.

DENVER FIRE DEPARTMENT Topic No: 1056.00 Date: 07-23-19, eff. 07-23-19 DIRECTIVE Approved: TAB Review Date: 07-23-21 Replaces: Same, dated 01-12-17 Topic: Corrective Action Procedures
1056.00 Corrective Action Procedures Page 11 of 14
The officer at the next level of supervision shall review the case, and may interview the member and the original disciplining officer, and make a recommendation to uphold or change the Written Reprimand. If the Written Reprimand is upheld or reduced, no further appeal is permitted. The discipline will then be sent through the appropriate chain of command to IAB to be reviewed by the Deputy Chief of the Department, or designee. If the recommended discipline is increased, a Pre-Disciplinary meeting will be scheduled with the Chief of the Department. A written command by the Chief of the Department for discipline greater than a Written Reprimand will be sent to the Executive Director of Safety or designee for final review. If the reprimand is finalized after the Chief’s review, the original Written Reprimand will be filed in the Department discipline files and the member will receive a copy through the chain of command.
3. Conduct Review Board (CRB)
If it is determined that the facts of the case might warrant a discipline greater than a Written Reprimand, an intake meeting with the Conduct Review Board (CRB) will be scheduled. At intake, the CRB group will be comprised of the Deputy Director of Safety/designee, the Administration Division Chief/designee, the Division Chief/designee of the involved member, a member of the same rank, and a member of one rank above. This group will determine whether or not the IA Case will move forward to a CODA and Pre-Disciplinary meeting with the Chief of the Department/designee. All discipline greater than a written reprimand will be forwarded to the Executive Director of Safety’s Office for final discipline determination.
4. Notice of Contemplation of Disciplinary Action and Pre-Disciplinary Meeting
A Contemplation of Disciplinary Action form must be used whenever a disciplinary action greater than a Written Reprimand is being
DENVER FIRE DEPARTMENT Topic No: 1056.00 Date: 07-23-19, eff. 07-23-19 DIRECTIVE Approved: TAB Review Date: 07-23-21 Replaces: Same, dated 01-12-17 Topic: Corrective Action Procedures
1056.00 Corrective Action Procedures Page 12 of 14
considered (e.g., suspension, involuntary demotion, fines, or dismissal). The “Summary of Events” section of the form will contain sufficient detail regarding the allegation of misconduct so as to allow the member to provide a defense of any allegations. IAB will conduct all investigations in which discipline greater than a Written Reprimand is considered. After the investigation is completed and the CRB has made the recommendation to move forward with a Pre-Disciplinary Meeting, the Contemplation of Disciplinary Action form will be sent to the City Attorney’s Office for review. The subject member will be served with a copy of the “Contemplation of Disciplinary Action” form, which will detail the time and place of the Pre-Disciplinary meeting with the Chief of the Department or designee. The Chief will make a written command regarding discipline. Any written command by the Chief greater than a written reprimand will be sent to the Executive Director of Safety, or designee, for final review. Any discipline imposed by the Executive Director of Safety will be issued by Departmental Order.
The Departmental Order of Disciplinary Action will be served upon the member in person with a certificate of hand delivery or by certified mail. The original will be filed in the Department disciplinary file.
5. Suspension, Involuntary Demotion, Fines, or Dismissal
Before a member is suspended, involuntarily demoted, subjected to fines, or dismissed, the Chief of the Department, or designee, shall hold a Pre-Disciplinary meeting. A Pre-Disciplinary meeting is not required for Verbal and Written Reprimands.
The purpose of the Pre-Disciplinary meeting includes the following:
a. To allow the member to correct any errors in the Department’s information or facts upon which the Department proposes to take disciplinary action.
b. To allow the member, in a non-adversarial setting, to tell his or her side of the story and present any mitigating information as to why the disciplinary action should not be taken.
DENVER FIRE DEPARTMENT Topic No: 1056.00 Date: 07-23-19, eff. 07-23-19 DIRECTIVE Approved: TAB Review Date: 07-23-21 Replaces: Same, dated 01-12-17 Topic: Corrective Action Procedures
1056.00 Corrective Action Procedures Page 13 of 14
A member is allowed to have an attorney or union representative present during the meeting. The member is not compelled to make a statement and their participation in the meeting is voluntary.
III. Appealing Suspension, Involuntary Demotion, Fines, or Dismissal
The member, or the member’s designated representative, may file an appeal for hearing with the Civil Service Commission in all disciplinary matters, except those involving reprimands, within ten (10) calendar days from the date of service of a Departmental Order of Disciplinary Action. Members should review the requirements of Civil Service Commission Rule 12 to ensure compliance with appeal procedures.
IV. Possible Causes for Dismissal
Some actions may be cause for dismissal; however, a lesser discipline may be imposed where circumstances warrant. It is impossible to identify all conduct which may be cause for dismissal. Therefore, the rules and regulations found in the Denver Fire Department Discipline Handbook and Matrix should not be deemed an exclusive list. For a list of rules and regulations, as well as presumptive disciplinary outcomes, the Denver Fire Department Discipline Handbook and Matrix should be consulted.
DFD DISCIPLINE FLOW CHART ATTACHED TO THIS DOCUMENT
PLEASE CONTACT IAB FOR CORRECTIVE ACTION TEMPLATES TO INCLUDE: COACHING & COUNSELING, PIPs, VERBAL REPRIMANDS, OR WRITTEN REPRIMANDS.
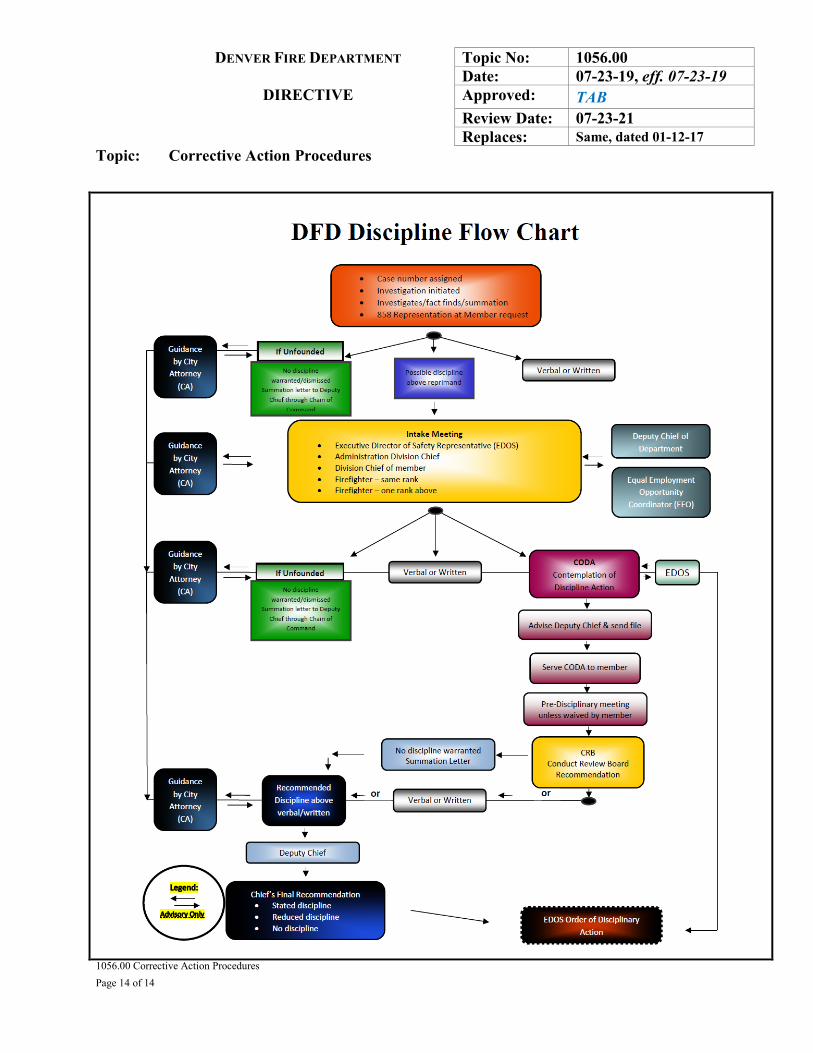
DENVER FIRE DEPARTMENT Topic No: 1056.00 Date: 07-23-19, eff. 07-23-19 DIRECTIVE Approved: TAB Review Date: 07-23-21 Replaces: Same, dated 01-12-17 Topic: Corrective Action Procedures
1056.00 Corrective Action Procedures Page 14 of 14

DFD Discipline Flow Chart
or
Intake Meeting • Executive Director of Safety Representative (EDOS) • Administration Division Chief • Division Chief of member • Firefighter – same rank • Firefighter – one rank above
Guidance by City
Attorney (CA)
CODA Contemplation of Discipline Action
Advise Deputy Chief & send file
Serve CODA to member
Pre-Disciplinary meeting unless waived by member
No discipline warranted Summation Letter
Verbal or Written Recommended Discipline above verbal/written
Chief’s Final Recommendation • Stated discipline • Reduced discipline • No discipline
EDOS Order of Disciplinary Action
If Unfounded
No discipline warranted/dismissed
Summation letter to Deputy Chief through Chain of
Command
If Unfounded Verbal or Written
Equal Employment Opportunity
Coordinator (EEO)
or
• Case number assigned • Investigation initiated • Investigates/fact finds/summation • 858 Representation at Member request
1056.00 Corrective Action Procedure, Page 14
DFD Discipline Flow Chart
Guidance by City
Attorney (CA)
Guidance by City
Attorney (CA)
Guidance by City
Attorney (CA)
CRB Conduct Review Board
Recommendation
EDOS
Possible discipline above reprimand
Verbal or Written
No discipline warranted/dismissed
Summation letter to Deputy Chief through Chain of
Command
Deputy Chief
Deputy Chief of Department
DENVER FIRE DEPARTMENT Topic No: 1057.00 Date: 07-23-19, eff. 07-23-19 DIRECTIVE Approved: TAB Review Date: 07-23-21 Replaces: Same, dated 01-12-17 Topic: DFD Discipline Handbook
1057.00 DFD Discipline Handbook Page 1 of 15
By order of the Chief of the Denver Fire Department and approval of the Executive Director of
Safety, this handbook shall apply to all violations occurring on or after July 23, 2019. PURPOSE: An effective discipline system is one that is fair, rational, efficient, consistent, transparent and which reflects the mission, vision, and guiding principles of the Denver Fire Department. It must foster respect, trust, and confidence among all Department personnel as well as between the Department and the community it serves. SCOPE: Applies to all Denver Fire Department uniformed personnel
The purpose of this Discipline Handbook is to provide sworn members of the Denver Fire Department with notice of the principles and guidelines which shall be employed by the Department in making disciplinary decisions. This Handbook should be reviewed and considered in conjunction with revisions to Department Rules and Regulations, all other Department policies and procedures related to discipline, and all Civil Service Commission rules regarding appeals. This Handbook does not create any contractual rights between or among the City and County of Denver, the Civil Service Commission, the Denver Fire Department, the Department of Safety, and any employee or applicant for employment with the Department of Safety. The Denver Fire Department is dedicated to providing quality, timely, and professional emergency services to those who live in, work in, and visit the City and County of Denver and the communities we serve. All members of the Denver Fire Department are expected to conduct themselves in a self-disciplined and professional manner. They should project a positive, productive, and mature demeanor, while performing their duties with honesty, integrity, and pride. The following list of guidelines represents the conduct standards for members of the Denver Fire Department. EVERY MEMBER SHALL:
1. Comply with the Guidelines of their respective Divisions and written Directives of both the Denver Fire Department and the City of Denver.
2. Use their training and capabilities to protect the public at all times. 3. Work to the level of expertise in their position so as to enable all Department programs and
functions to operate effectively. 4. Always conduct themselves to reflect credit on the Department and the City of Denver. 5. Supervisors will manage in an effective, considerate, and fair manner. Subordinates will follow
instructions in a positive, cooperative manner. 6. Always conduct themselves in a manner that creates good order inside the Department. 7. Keep themselves informed to enhance their awareness and efficiency concerning their positions. 8. Be concerned and protective of each member’s welfare. 9. Operate safely.
DENVER FIRE DEPARTMENT Topic No: 1057.00 Date: 07-23-19, eff. 07-23-19 DIRECTIVE Approved: TAB Review Date: 07-23-21 Replaces: Same, dated 01-12-17 Topic: DFD Discipline Handbook
1057.00 DFD Discipline Handbook Page 2 of 15
10. Use good judgment. 11. Keep themselves physically fit. 12. Observe the work hours of their position. 13. Obey the law. 14. Be responsible and maintain any/all Department equipment and property at an efficient and
usable level.
MEMBERS SHALL NOT:
15. Engage in activity that is detrimental to the Department. 16. Engage in a conflict of interest to the Department or use their position with the Department for
personal gain or influence. 17. Use alcoholic beverages, debilitating drugs, or any substance which impairs their physical or
mental capacities while on duty, or when susceptible to emergency recall. 18. Engage in intimidating, threatening, or hostile behaviors, physical assault, or other acts of this
nature. 19. Engage in any sexual activity while on duty. 20. Abuse their Sick Leave. 21. Steal. 22. Depart from the truth.
Sec. 1 General Principles 1.1 The discipline system must be fairly, efficiently, and consistently administered so as to promote and
maintain a culture of public accountability, individual responsibility, and maintenance of the highest standards of professionalism.
1.2 Discipline should be based upon reasonable notice of the standards by which conduct will be judged and the likely consequences of the failure to adhere to Department rules and policies.
1.3 The investigation of allegations of misconduct must be fair, thorough, conducted with full regard for the
rights of members, and designed to develop all relevant facts necessary for the fair determination of the issue in question.
1.4 Truthfulness is vital to the investigation and review process and shall be expected and demanded of all
subject members, witnesses, complainants, and all persons involved in the investigation and review of allegations of misconduct.
1.5 The determination of whether an allegation of misconduct should be sustained must be based upon the
application of Department-wide standards and the fair consideration of only those facts relevant to that determination.
DENVER FIRE DEPARTMENT Topic No: 1057.00 Date: 07-23-19, eff. 07-23-19 DIRECTIVE Approved: TAB Review Date: 07-23-21 Replaces: Same, dated 01-12-17 Topic: DFD Discipline Handbook
1057.00 DFD Discipline Handbook Page 3 of 15
1.6 The administration of the discipline process shall not discriminate against anyone on the actual or
perceived basis of race, color, creed, national origin, ancestry, gender, sexual orientation, age, religion, political affiliation, physical or mental disability, military status, marital status, or other basis protected by Federal, State, or local law or regulation.
1.7 No rule or policy shall be created, interpreted, or applied so as to lead to a result which is unjust,
unreasonable, or unconscionable, and contrary to the goals and purposes of these Disciplinary Guidelines.
Sec. 2 Practices in Support of the Disciplinary System 2.1 Practices such as mediation, early intervention, remedial training, mentoring, and the like are means to
affect the performance and conduct of members apart from the imposition of disciplinary sanctions and to improve the efficiency and effectiveness of the disciplinary system. However, none of these practices are intended to relieve members of responsibility for their misconduct. The failure of the Department to provide any of the above or the failure to apply any of the programs or practices to a particular member or case does not create a defense to misconduct or constitute a mitigating circumstance.
Sec. 3 Ancillary Consequences of the Disciplinary System 3.1 The disciplinary penalties that may be imposed on Department members are reprimand, dismissal, fined
days, suspension without pay, and involuntary demotion with a reduction in pay. The Executive Director of Safety or her/his designee is responsible for imposing all disciplinary penalties, except for reprimands, which may be issued by the Chief.
3.2 The Chief may establish practices, make decisions, and enter orders with regard to matters not directly
related but ancillary to the imposition of discipline. These can include, but are not limited to, no-contact orders, temporary or permanent re-assignments, regulating on-duty work hours and responsibilities, regulating secondary employment privileges, ordering psychological or other work-related examinations, determining necessary remedial training or entering any other order, restriction, or condition deemed appropriate under the circumstances. These practices do not constitute the imposition of discipline and are not regarded as a part of any disciplinary sanction. The imposition of any of the above orders, conditions, or restrictions may not be considered in determining whether a violation should be sustained and, if so, what the appropriate penalty should be.
3.3 The imposition of disciplinary sanctions may have an impact on future status and benefits including, but
not limited to, assignments, promotions or appointments. The Executive Director of Safety, the Chief, or the Denver Civil Service Commission may establish policies and practices with regard to any of these. These practices do not constitute the imposition of discipline and should not be regarded as a part of any disciplinary sanction. The future impact of the imposition of disciplinary sanctions may not be
DENVER FIRE DEPARTMENT Topic No: 1057.00 Date: 07-23-19, eff. 07-23-19 DIRECTIVE Approved: TAB Review Date: 07-23-21 Replaces: Same, dated 01-12-17 Topic: DFD Discipline Handbook
1057.00 DFD Discipline Handbook Page 4 of 15
considered in determining whether or not a violation should be sustained and, if so, what the appropriate penalty should be.
3.4 The imposition of disciplinary sanctions will no doubt have a personal and financial impact on the
member who is disciplined. Understandably, that impact will vary from member to member based upon his/her personal circumstances. It should not be expected that a system of consistent discipline should reasonably take these kinds of differences into account. Therefore, these types of variables may not be considered in determining whether a violation should be sustained and, if so, what the appropriate penalty should be.
Sec. 4 Determining the Facts: Internal Investigations 4.1 The integrity of the internal investigation process is essential to the fair administration of discipline. No
system of discipline can be effective without investigations that can be considered unbiased and trustworthy by members of the Department as well as the general public.
4.2 Investigations must be fair, thorough, timely and in accordance with accepted Department policies and
procedures. Investigations must be conducted with full regard for the member’s rights and the rights and respect due to fellow members, non-sworn members of the Department, complainants, witnesses, and other members of the public. Investigations shall not discriminate against anyone on the basis of actual or perceived race, color, creed, national origin, ancestry, gender, sexual orientation, age, religion, political affiliation, physical or mental disability, military status, marital status, or other basis protected by Federal, State, or local law or regulation.
4.3 Truthfulness is vital in an internal investigation. It must be expected and demanded. Department
personnel are required to cooperate and be completely truthful or face disciplinary sanctions. Non-Departmental personnel must also be truthful.
4.4 Any attempt to improperly dissuade, discourage, prevent, or interfere with any internal affairs
investigation is subject to discipline.
4.5 Any member who knowingly, intentionally, or willfully makes a false report, intentionally omits a material fact, or otherwise departs from the truth in any investigation, including any internal affairs investigation, administrative or judicial proceeding, is subject to discipline.
4.6 It is important to note that the primary role of Internal Affairs (IA) is that of investigation and fact-
finding. IA conducts the investigation1 and prepares the investigative file for review by the Conduct
1 This section is not intended to limit who can investigate any given matter. At times, it may be appropriate to have police, outside investigators, house Captains, or another person not affiliated with IAB to conduct an investigation. While generally IAB will conduct investigations, the Director and Chief have the discretion to assign investigations to a party outside of IAB.
DENVER FIRE DEPARTMENT Topic No: 1057.00 Date: 07-23-19, eff. 07-23-19 DIRECTIVE Approved: TAB Review Date: 07-23-21 Replaces: Same, dated 01-12-17 Topic: DFD Discipline Handbook
1057.00 DFD Discipline Handbook Page 5 of 15
Review Board. IA does not make disciplinary recommendations or determine disciplinary sanctions above the level of a Written Reprimand.
Sec. 5 Determining Whether a Violation Has Been Proven 5.1 In determining whether a violation of any Departmental rule, regulation, policy, procedure, or Directive
has been proven, the reviewer (including, but not limited to, the Director or designee, the Chief, and members of the Conduct Review Board) must act as a finder of fact. This process is separate and distinct from any consideration of what disciplinary sanction, if any, is appropriate if it is decided that a violation has been proven.
5.2 As a finder of fact, the reviewer must rely only upon the evidence in the case, which must be thoroughly
reviewed. The reviewer must consider only the evidence that is contained in the investigative file and any reasonable inferences to be drawn from that evidence. The reviewer is expected to use common sense and life experiences when acting as a finder of fact. However, he/she is not to base any conclusions on information known to him/her regarding the matter or the persons involved in the matter if that information is not part of the investigative file.
5.3 As the finder of fact, the reviewer must judge the credibility of witnesses and the weight to be given their
statements. In doing so, he/she should take into consideration the witnesses’ means of knowledge, strength of memory, and opportunities for observation; the reasonableness or unreasonableness of their statements; the consistency or lack of consistency in their statements; motives; whether their statement has been contradicted or supported by other evidence; any bias, prejudice, or interest; their manner or demeanor while making statements; and all other facts and circumstances shown by the evidence which affect the credibility of the witnesses. Based on all of these stated considerations and all the facts, circumstances, and evidence in the case, the reviewer may believe all, part, or none of any witnesses’ statements. He/she may also determine what weight, if any, to give to any witnesses’ statements.
5.4 The reviewer must thoroughly review the policy, procedure, rule, regulation, or Directive alleged to be
violated and apply it to the facts as he/she determines them. The reviewer must do so without regard for whether he/she personally agrees with the particular policy, procedure, rule, regulation, or Directive or whether he/she believes it should be amended or repealed.
5.5 In determining whether there is sufficient evidence to establish that a violation has occurred, the reviewer
must apply the standard of proof known as the “preponderance of the evidence.” To prove something by a “preponderance of the evidence” means to prove that it is more likely than not. In determining whether the burden of proof of “preponderance of the evidence” has been met, reasonable care and caution should be used to consider all the evidence in the case and the weight that evidence should be afforded. The quantum of evidence that constitutes a preponderance must be sufficient to lead to the reasonable conclusion that the accused member committed the violation which is being considered. A suspicion, belief, or opinion not supported by the weight of the evidence is not sufficient.
DENVER FIRE DEPARTMENT Topic No: 1057.00 Date: 07-23-19, eff. 07-23-19 DIRECTIVE Approved: TAB Review Date: 07-23-21 Replaces: Same, dated 01-12-17 Topic: DFD Discipline Handbook
1057.00 DFD Discipline Handbook Page 6 of 15
5.6 After thoroughly reviewing all the evidence and after determining formal findings are necessary, the
reviewer must make one of the following findings for each of the specifications considered:
5.6.1 Unfounded: The investigation indicates that the subject's alleged actions relating to the Department policy, procedure, rule, regulation, or Directive in question did not occur.
5.6.2 Exonerated: The investigation indicates that the alleged actions of the subject were within the policies, procedures, rules, regulations, and Directives of the Department.
5.6.3 Not Sustained: There was insufficient evidence to either prove or disprove the allegation.
5.6.4 Sustained: The subject's actions were found by a preponderance of the evidence to have been in
violation of the Department policy, procedure, rule, regulation, or Directive in question. 5.7 Each specification of an alleged violation should be considered separately, and a separate decision
reached as to whether there is a preponderance of evidence establishing that the alleged violation occurred. The sustaining of any one specification does not compel the sustaining of other specifications.
5.8 As a finder of fact, the reviewer may be participating in an official disciplinary proceeding such as a Conduct Review Board (CRB) or Pre-Disciplinary meeting where information in addition to the investigative file, such as a statement by the subject member, is presented for consideration. The reviewer may properly consider that additional information, assess its credibility, and afford it whatever weight he/she deems appropriate.
Sec. 6 Determining Appropriate Discipline 6.1 The purposes to be achieved by the imposition of discipline in a particular case are dependent on all the
facts and circumstances of that case. Those purposes may vary based upon a consideration of numerous factors including, but not limited to, the nature and seriousness of the misconduct, the circumstances under which the misconduct was committed, the harm or prejudice arising from the misconduct, and the existence of any relevant mitigating or aggravating circumstances.
6.2 Among the primary purposes of disciplinary sanctions are the following:
• To modify/correct conduct. • To impose an appropriate penalty. • To address/reflect the harm or risk of harm arising from the misconduct and the effects of the
misconduct both inside and outside of the Department. • To provide notice of the consequences of misconduct to all members of the Department and to deter
future misconduct by all members. Ensuring the orderly functioning and operation of the Department and adherence to its established standards of conduct.
• Reinforcing Department values.
DENVER FIRE DEPARTMENT Topic No: 1057.00 Date: 07-23-19, eff. 07-23-19 DIRECTIVE Approved: TAB Review Date: 07-23-21 Replaces: Same, dated 01-12-17 Topic: DFD Discipline Handbook
1057.00 DFD Discipline Handbook Page 7 of 15
• Reinforcing training. • Effectively managing risk and potential civil liability for members, the Department, and the City. • Establishing trust in and respect for the discipline system and the Department, both internally and in
the community. 6.3 It is important for all members of the Department to understand that the goals and purposes of the
discipline system are different from those of the criminal justice and civil law systems. While some of the factors taken into consideration in the civil and criminal systems may overlap with factors considered in the discipline system, it must be remembered that the purposes of disciplinary sanctions are different from the purposes of civil and criminal law sanctions. Additionally, it is not the function of the prosecutor’s office, through the criminal justice system, to enforce the rules, regulations, and policies of the Department. Nor is it necessary that a member be criminally convicted in order for the Department to discipline the member for misconduct which is prohibited by law.
Sec. 7 Categories of Conduct 7.1 There are six categories of conduct in the matrix. Categories range from the least serious to most serious
with regard to the nature of the conduct and its harm/impact on the Department and community. While the language of the conduct categories may seem similar, each category is intended to reflect the increased seriousness of the misconduct. Reasonable reviewers may disagree on the appropriate conduct category for a violation. Such disagreement does not necessarily mean that the reviewer, or the final decision maker, is wrong.
Sec. 8 Assigning Conduct Categories to Specific Rules and Regulations 8.1 Although the pre-determined categories contained in the matrix will likely cover the vast majority of
disciplinary violations, several issues of importance are noted:
8.1.1 The individual rules and regulations have been placed into particular conduct categories based upon the nature and type of misconduct. However, the unique factual circumstances of a given case may justify the application of a different conduct category than that previously assigned to the particular violation in the matrix. As such, command officers, the Chief (or designee), the Executive Director of Safety (or designee), the Hearing Officers, and the Civil Service Commission can and may determine that a previously assigned conduct category is not appropriate under the unique factual circumstances of the case. In this situation, a deviation from the matrix is allowed. Any such deviation must be reasonable under the circumstances and be justified by the facts of the case.
8.1.2 A limited number of rules and regulations could fit into any or all of the conduct categories based upon the nature of the conduct being addressed. Anyone reviewing such a case should consider the factors outlined in Section 9 below as well as the various facts presented in order to determine
DENVER FIRE DEPARTMENT Topic No: 1057.00 Date: 07-23-19, eff. 07-23-19 DIRECTIVE Approved: TAB Review Date: 07-23-21 Replaces: Same, dated 01-12-17 Topic: DFD Discipline Handbook
1057.00 DFD Discipline Handbook Page 8 of 15
the most appropriate conduct category.
8.1.3 Certain rules and regulations could fit more than one but not all conduct categories. Anyone
reviewing such a case should consider the various factors outlined in Section 9 below in order to determine the appropriate conduct category.
8.1.4 No attempt has been made to categorize all sources of rules which may apply to alleged
misconduct by fire fighters. Clearly, the Department rules and regulations govern fire fighter conduct but there are other rules and orders that might apply to misconduct. These include such things as Mayor’s Executive Orders, other policies and procedures, Directives, special orders, training bulletins, or the like. Anyone reviewing misconduct based upon any of these types of violations should consider the factors outlined below in order to determine the appropriate conduct category.
Sec. 9 Determining Appropriate Conduct Categories - Analysis 9.1 Situations will arise where personnel charged with the responsibility of recommending or ordering
disciplinary sanctions will have to determine the appropriate conduct category into which the misconduct falls and whether the alleged misconduct satisfies the definition of a particular category. This is a necessary first step in determining the appropriate sanction. In analyzing the misconduct, the following questions, among others, should be considered:
9.1.1 What is the general nature of the misconduct?
9.1.2 How does the misconduct relate to the stated mission, vision, and guiding principles of the
Department?
9.1.3 How does the misconduct impact the operations and image of the Department and its relationship with other agencies or the community?
9.1.4 What is the actual and demonstrable harm or risk of harm involved?
9.1.5 Does the misconduct involve an actual and demonstrable impact on fire fighter, employee, or
public safety, or a demonstrable serious risk to fire fighter, employee, or public safety?
9.1.6 Did the violation result in actual injury to a fire fighter, employee, or a member of the public? If so, what is the extent of the injury?
9.1.7 Does the misconduct involve unethical behavior or a serious abuse or misuse of authority?
9.1.8 Did the misconduct foreseeably result in death or serious bodily injury?
DENVER FIRE DEPARTMENT Topic No: 1057.00 Date: 07-23-19, eff. 07-23-19 DIRECTIVE Approved: TAB Review Date: 07-23-21 Replaces: Same, dated 01-12-17 Topic: DFD Discipline Handbook
1057.00 DFD Discipline Handbook Page 9 of 15
9.1.9 Does the misconduct constitute a failure to adhere to any condition of employment required by
contract or mandated by law? 9.2 In determining the conduct category, the definition of the category and the analysis described in this
section should control the determination of what category applies to the violation in question. Sec. 10 Brief Description of Matrix Tables 10.1 The disciplinary matrix has two primary tables: The Categories, Violations and Discipline Level
Assignments Table and the Penalty Table. 10.2 The Categories, Violations and Discipline Level Assignments Table identifies:
10.2.1 The definitions of each Conduct Category (A through F); 10.2.2 Example violations in the form of Rules and Regulations (RRs) that are found within each of these
conduct categories; and 10.2.3 The discipline level assigned to each conduct category based, in part, on the number of offenses
of an equal or greater conduct category that have occurred during the specific time periods assigned to that conduct category. This table also shows how the discipline level (levels 1 through 8) increases by one level for each repeated violation of an RR of an equal or greater conduct category during the specified time period.
10.3 The Penalty Table identifies: Eight discipline levels (1 through 8) ranging from least serious to most
serious; and the penalties associated with that discipline level with specification of the presumptive penalty and the mitigated and aggravated penalty ranges.
Sec. 11 Establishing Presumptive Penalties 11.1 The Penalty Table identifies a “presumptive penalty” for each conduct violation. 11.2 To achieve consistency, presumptive penalties are presumed to be the reasonable and appropriate
penalties that should be given. However, when mitigating or aggravating factors are established, a departure from the presumptive penalty may be justified. Even then, the penalty will remain within the penalty ranges established for that particular discipline level unless “special circumstances,” as explained below (Section 12), exist.
11.3 The “presumptive penalty” may also increase if a member has prior sustained violations of the same or
higher conduct category.
DENVER FIRE DEPARTMENT Topic No: 1057.00 Date: 07-23-19, eff. 07-23-19 DIRECTIVE Approved: TAB Review Date: 07-23-21 Replaces: Same, dated 01-12-17 Topic: DFD Discipline Handbook
1057.00 DFD Discipline Handbook Page 10 of 15
11.4 The factors or circumstances relied upon to find mitigation, aggravation, or “special circumstances,” must be articulated and justified in writing.
Sec. 12 Special Circumstances 12.1 It should be recognized that any discipline system can only be designed for the large majority of cases
and that on limited occasions, there will be extraordinary circumstances which would justify a penalty less than or greater than that allowed under the matrix. This is what is generally referred to as “going outside the matrix.” The authority to do so is within the sound discretion of the Chief and the Executive Director of Safety or his/her designee and is reasonable and necessary to avoid injustice. A properly functioning matrix system cannot be so rigidly applied as to mandate a certain sanction or limit a certain sanction where doing so would lead to an unjust result or fail to reflect the totality of the particular circumstances.
12.2 These issues will generally arise when there is extraordinary mitigation, extraordinary aggravation,
questions of reduction in rank or grade, extended suspensions, or cases involving termination where termination is not the presumptive or aggravated penalty indicated by the matrix.
12.3 The reasons2 for departing upward or downward from the maximum or minimum penalty called for in
the matrix as well as the basis for determining the particular penalty must be documented and explained. Sec. 13 Disciplinary Recommendations made to the Executive Director of Safety or his/her Designee 13.1 The Executive Director of Safety or his/her designee is charged with the responsibility of ordering all
discipline issued to uniformed members of the Denver Fire Department greater than a reprimand. All input into the issue of whether or not a member has violated a Departmental rule or policy and, if so, what the appropriate sanction should be are in the form of recommendations to the Executive Director of Safety or his/her designee.
2 Factors to consider in determining whether extraordinary aggravation exists include, but are not limited to: Commission of acts which demonstrate a continued inability or unwillingness to conform to expected standards of conduct; Commission of an act which causes a continuing, disruptive effect on the efficient and/or safe operations of the Department or clearly constitute a substantial risk to public safety; Commission of an act which calls into serious question the member's trustworthiness and/or integrity so as to interfere with the continued performance of his/her assigned duties and responsibilities, or which demonstrate a serious lack of the ethics, character or judgment necessary to hold the position of firefighter; Commission of an act which has had or may be reasonably demonstrated to have, an appreciable negative effect on the general public’s confidence and/or trust in the operations of the Department; or Creation of a serious legal or financial risk for the Department or the City arising from the misconduct of a member or the retention of that member.
DENVER FIRE DEPARTMENT Topic No: 1057.00 Date: 07-23-19, eff. 07-23-19 DIRECTIVE Approved: TAB Review Date: 07-23-21 Replaces: Same, dated 01-12-17 Topic: DFD Discipline Handbook
1057.00 DFD Discipline Handbook Page 11 of 15
13.2 The Executive Director of Safety or his/her designee considers recommendations but is not bound by
them. The Director may approve, modify, or disapprove any recommendation made to him/her. No provision of the City Charter or Civil Service Rules requires the Director to follow the recommendations.
13.3 Disciplinary recommendations and their underlying rationale are considered part of the Executive
Director of Safety’s deliberative process. Therefore, the Department may develop policies and procedures to limit access to, keep confidential, or otherwise protect recommendations / rationales from public disclosure except as required by law or to the extent necessary to facilitate decision-making at various stages of the disciplinary process.
Sec. 14 Role of the Chief in the Disciplinary Process 14.1 It is the responsibility of the Chief or his/her designee to initiate disciplinary action against members of
the Fire Department by a written order submitted to the Executive Director of Safety for approval. 14.2 Prior to submitting that order, the Chief must provide written notice to the subject member advising
him/her of the charges, an explanation of the evidence supporting those charges (generally in the form of a CODA) and an opportunity to respond to the charges at a pre-disciplinary meeting.
14.3 In reviewing disciplinary recommendations made to him/her and in making any recommendation to the
Director of Safety or his/her designee, the Chief is guided by the provisions of the Charter, the Civil Service Rules, the Rules and Regulations and policies and procedures of the Department, and all other laws relevant to the imposition of discipline.
14.4 The Chief shall make findings as to each allegation considered and shall determine the discipline he/she
believes to be appropriate by applying the principles, guidelines and procedures detailed herein. The recommendation shall contain a written summary of his/her findings, the basis for any disciplinary sanction recommended, and an explanation of how the sanction was determined. This summary shall also include the findings as to each allegation, relevant commendatory and/or disciplinary history, any mitigating or aggravating circumstances considered, and any factors which justify the decision to impose a penalty other than the presumptive or a penalty “outside the matrix” as a result of special circumstances.
Sec. 15 Role of the Executive Director of Safety in Imposing Discipline 15.1 The Executive Director of Safety or his/her designee is responsible for ordering all discipline, with the
exception of reprimands, in the Denver Fire Department. In doing so, the Director of Safety is guided by the provisions of the Charter, the Civil Service Rules, the Rules and Regulations and policies and procedures of the Denver Fire Department, applicable policies of the City and County of Denver and all other laws relevant to the imposition of discipline.

DENVER FIRE DEPARTMENT Topic No: 1057.00 Date: 07-23-19, eff. 07-23-19 DIRECTIVE Approved: TAB Review Date: 07-23-21 Replaces: Same, dated 01-12-17 Topic: DFD Discipline Handbook
1057.00 DFD Discipline Handbook Page 12 of 15
15.2 The Director of Safety is also empowered with reasonable discretion in exercising his/her authority to administer the Department of Safety.
15.3 The Director of Safety or his/her designee shall review the entire investigative file, the pre-disciplinary
letter containing a summary of the facts, the disciplinary and commendation history, the audio recording of the pre-disciplinary hearing held by the Chief, and a listing of the violations considered. The recommended finding as to each violation is listed along with the recommended penalty as to each. The Director or his/her designee shall consider the recommendation of the Chief but is not bound by it.
15.4 If the Director of Safety or his/her designee finds that there are insufficient facts or information to make
a final determination of appropriate discipline, the Director of Safety or his/her designee may return the case for further investigation or otherwise order that the facts or information be provided.
15.5 In sustaining any violations or determining the appropriate discipline, the Director of Safety or his/her
designee must follow the same rules, principles and guidelines, including the matrix, followed by other reviewers. The Director or his/her designee must determine the conduct category, the discipline level and the presumptive penalty for each violation. He/she must consider whether any relevant disciplinary history justifies an increase in the discipline level and the corresponding presumptive penalty; whether there are any mitigating or aggravating circumstances that justify the imposition of a penalty in the mitigated or aggravated ranges for the appropriate discipline level; and whether there are any special circumstances such as extraordinary mitigation or extraordinary aggravation that would justify a lesser or greater penalty than that allowed by the matrix. He/she shall also consider whether there are any special circumstances that justify reduction in rank or termination, where termination is not the presumptive or aggravated penalty listed by the matrix.
15.6 The Executive Director of Safety or his/her designee may impose a penalty greater or less than that
provided for in the matrix when the conduct taken as a whole justifies a finding of special circumstances. If special circumstances are found, the Director of Safety or his/her designee may impose a penalty less than that provided for by the matrix, a reduction in rank, or termination.
Sec. 16 Negotiated Settlement of Disciplinary Actions 16.1 The Department and the Executive Director of Safety recognize that, notwithstanding the consistency
which is to be achieved by the application of the disciplinary matrix, circumstances may arise which necessitate meaningful settlement discussions between the member, the Department, and the Director of Safety. Therefore, the Director of Safety or his/her designee or the Chief or his/her designee with the approval of the Director of Safety or his/her designee, may engage in settlement discussions with the subject member. These discussions may focus either on the specific violation(s) to be charged and/or the discipline to be imposed. Nonetheless, members should understand that settlement negotiations are not a matter of right and refusal by the Department or the Director of Safety or his/her designee to enter into settlement discussions or to reach a settlement agreement cannot be a basis of any claim of inconsistent treatment.
DENVER FIRE DEPARTMENT Topic No: 1057.00 Date: 07-23-19, eff. 07-23-19 DIRECTIVE Approved: TAB Review Date: 07-23-21 Replaces: Same, dated 01-12-17 Topic: DFD Discipline Handbook
1057.00 DFD Discipline Handbook Page 13 of 15
16.2 Settlement, while encouraged in appropriate cases, should occur only for legitimate purposes and not in
an effort to circumvent the application of the matrix or the purposes and goals of these Conduct Principles and Disciplinary Guidelines. All settlement agreements must be approved by the Director of Safety or his/her designee.
Sec. 17 Confidentiality in the Discipline Process 17.1 All persons who are involved in the investigation and the review of misconduct, recommend disciplinary
findings or sanctions, make decisions at any stage in the disciplinary process, or otherwise participate in the administration of the disciplinary process, as well as their legal or Department representatives, are obligated to keep disciplinary deliberations, recommendations, and rationales confidential except where:
1.) Disclosure is necessary for the administration of the disciplinary process; 2.) Approved by the Chief or the Executive Director of Safety; 3.) In accordance with established Department policy and procedure; or 4.) Required by the rules of the Civil Service Commission, the ordinances of the City and
County of Denver, or any applicable state or federal laws. Sec. 18 Conduct Prohibited by Law Involving Driving under the Influence and Driving While Ability Impaired As first responders, the Department recognizes the serious public safety issues involved when persons who have consumed alcohol and/or drugs operate motor vehicles. The Department has a significant interest in deterring such misconduct by its members. Therefore, a violation of any rule related to off duty, misdemeanor violations of law involving driving while under the influence or impaired should generally be presumed to merit a suspension equal to three (3) 24-hour shifts (72 hours) or more. While the penalty of 3 shifts is considered presumptive for any off duty, misdemeanor offense, driving while under the influence or impaired is considered a greater safety violation, especially for first responders. As such, higher discipline may be warranted. Other factors may be considered which can also increase the disciplinary penalty. These factors include, but are not limited to:
(a) Driving resulting in death or physical injury; (b) Driving resulting in property damage; (c) Reckless driving or excessive speeding (20 mph or more over the speed limit); (d) Threatening, discourteous, abusive, disrespectful, or unprofessional conduct toward investigating
law enforcement officers; (e) Attempts to elude apprehension; (f) Resisting detention or arrest; (g) Carrying a firearm on your person or displaying a firearm;
DENVER FIRE DEPARTMENT Topic No: 1057.00 Date: 07-23-19, eff. 07-23-19 DIRECTIVE Approved: TAB Review Date: 07-23-21 Replaces: Same, dated 01-12-17 Topic: DFD Discipline Handbook
1057.00 DFD Discipline Handbook Page 14 of 15
(h) Attempting to improperly influence the investigation by use of the member’s position in the
Department; (i) Leaving the scene, tampering with or altering evidence, making false statements to investigators,
or other attempts to avoid detection or responsibility; (j) Prior alcohol related law violations or Department violations; (k) The loss of or restrictions to driving privileges; and (l) A blood alcohol level of .15 or greater.
Sec. 19 Soliciting Preferential Treatment (i.e., Badging) Rule & Regulation 13 is the Department’s rules, prohibiting members from “using official position or authority for personal profit or advantage, including kickbacks.” While this can encompass a range of potential misconduct, this rule is most often seen when members attempt to use their position as Department members (i.e., displaying a badge or identifying themselves as fire fighters) to solicit preferential treatment not extended to the general public, such as during a traffic stop. All members of the Department should understand that the inappropriate use of their position as a member of the Department to solicit any preferential treatment or benefit to which they would not otherwise be entitled is considered highly objectionable and, if proven, will be disciplined accordingly. It is vital to the reputation of the Department that all members conduct themselves in a manner that does not create the perception that members have an expectation of being treated differently, believe they are entitled to benefits others would not be entitled to, or should not be held as accountable for their actions as others would be. Factors which should be considered by the reviewer include, but are not limited to, the intent of the offending member, the type of preferential treatment or benefit being solicited, the person or entity being solicited, and the manner in which the solicitation is carried out or attempted. One factual situation of note is the circumstance of a member interacting with law enforcement, i.e., in a domestic dispute, or when stopped for a traffic violation. While no member should have the expectation that he/she is entitled to be treated differently from the general public; nor should the member attempt to dissuade the officer from carrying out his/her duties based upon the fact that he/she is a fellow civil servant, nonetheless, there are times when identifying oneself as a firefighter may be necessary for safety reasons. For example, if an arson investigator who is carrying a concealed weapon is contacted by law enforcement, safety considerations may mandate that the member immediately inform the contacting officer that he or she is in possession of a weapon. Reviewers should carefully consider the circumstances when a member identifies themselves as a fire fighter for safety reasons, in response to a legitimate law enforcement inquiry, or for any other reason that is not in furtherance of seeking personal advantage. Violations of RR – 13 should only be sustained when the member is seeking preferential treatment or some other personal advantage.
DENVER FIRE DEPARTMENT Topic No: 1057.00 Date: 07-23-19, eff. 07-23-19 DIRECTIVE Approved: TAB Review Date: 07-23-21 Replaces: Same, dated 01-12-17 Topic: DFD Discipline Handbook
1057.00 DFD Discipline Handbook Page 15 of 15
However, under no circumstances should a member attempt to obtain preferential treatment based on his or her employment status. ATTACHMENTS TO THIS DIRECTIVE: DFD – Discipline Matrix (Categories – Violations and Discipline Level Assignments Table) DFD - Rules and Regulations DFD – Penalty Table and Discipline Matrix
DENVER FIRE DEPARTMENT Topic No: 1058.00 Date: 11-21-19 DEPARTMENT DIRECTIVE Approved: TAB Review Date: 11-21-21 Replaces: Same, dated 01-13-17 Topic: Performance Evaluation
1058.00 Performance Evaluation Page 1 of 9
PURPOSE: The Performance Evaluation (PE) is a measure of an individual’s ability to
physically perform essential functions required in the occupation of firefighting. The Denver Fire Department has established a minimum level of acceptable performance that protects the safety of the firefighter and provides for the appropriate delivery of fire suppression and rescue services for the citizens and visitors of the City and County of Denver. This Department Directive shall serve as a guideline for the administration of the PE and corrective procedures for members failing to meet acceptable performance levels.
SCOPE: Annually, the following personnel shall be required to perform a Performance
Evaluation:
A. All members assigned to fire suppression duties, Operations, and Denver International Airport (DIA).
B. Any members transferring from a Subdivision to Operations who have not completed the PE within the last calendar year.
C. Members returning to duty from any absence that exceeds 180 days.
Only members in the final year of the DROP are excused from participating. All other individuals contemplating retirement are still required to participate in the evaluation.
Performance Evaluation (PE)
The Performance Evaluation (PE) is a test of an individual’s ability to physically perform essential functions of firefighting. After Year 3, the Department has established a minimum acceptable time performance level. This level of performance protects the safety of the firefighter and will provide for the appropriate delivery of fire suppression and rescue services. The established minimum acceptable time performance is 10:47. For continuity, legitimacy, and impartiality, all PE’s will be administered by a member of the Peer Fitness Team. Prior to beginning any portion of the PE, resting vitals will be taken for each firefighter. The measurement of resting vitals can be obtained in one of three ways. They may be taken on-site by a Peer Fitness Trainer. They may be assessed by a member of the testing member’s crew at the station the same day as the Performance Evaluation prior to your arrival. Or, the member may receive clearance from their Primary Care Physician prior to their scheduled PE. Members wishing to have vitals assessed by a crew member or clearance from their doctor shall utilize the appropriate forms which are attached, i.e., Crew Integrity Vitals Assessment Form or Performance Evaluation Physician Clearance Form.

DENVER FIRE DEPARTMENT Topic No: 1058.00 Date: 11-21-19 DEPARTMENT DIRECTIVE Approved: TAB Review Date: 11-21-21 Replaces: Same, dated 01-13-17 Topic: Performance Evaluation
1058.00 Performance Evaluation Page 2 of 9
Vitals will no longer be documented as specific to each member but noted instead as a pass/fail based on the Department’s physician approved standard. Prior to beginning any portion of the PE, resting vitals will be taken for each firefighter. In order to proceed with the PE, the participants must have a blood pressure lower than 160/100 and a pulse of less than 110 beats per minute. The diastolic number must be under /100 no matter the systolic number in order to proceed with testing. All personnel are required to be dressed in a complete NFPA approved personal protective clothing ensemble to participate in the PE. This ensemble includes helmet with ear flaps, Nomex hood, coat, bunker pants, boots, fire gloves, SCBA and face piece. Event 1 is timed separately from the rest of the PE and does not count in the final time. PE evaluation time will begin once the firefighter begins Event #2 and will not stop until Event #10 is completed. During the course of this test, individuals WILL BE ALLOWED TO RUN ONLY DURING EVENT 5.
The 10 events of the PE are:
Event 1: Timed Protective Equipment Donning
This event allows the firefighter to safely don his/her complete set of personal protective equipment in a timely manner. Firefighter is given 2 minutes to don full personal protective equipment (boots, pants, coat, hood, helmet, gloves, SCBA and face piece) and demonstrate the ability to properly ‘go on air.’ Firefighters will begin this evolution in either their Class B, C, or workout apparel. Participants have the option of starting with or without their footwear on. Time will begin when the firefighter first touches their PPE and will end when they clap their gloved hands together. Failure to completely don in under 2 minutes will be something for the individual’s company officer to address and follow up on as this is a CMCB standard.
NOTE: FIREFIGHTER WILL BE ON AIR FOR THE REST OF THE PE AND THEIR EVALUATION TIME WILL BEGIN WHEN THE FIREFIGHTER TOUCHES THE LADDER.
DENVER FIRE DEPARTMENT Topic No: 1058.00 Date: 11-21-19 DEPARTMENT DIRECTIVE Approved: TAB Review Date: 11-21-21 Replaces: Same, dated 01-13-17 Topic: Performance Evaluation
1058.00 Performance Evaluation Page 3 of 9
Event 2: Ladder Lift, Carry, Raise and Extension
This event simulates the firefighter’s ability to place a ladder in service. Firefighter is to move to a position that places them at the proper lifting point of the 24’ ladder, perform a one-person lift; carry the ladder 75 feet to a “marked” raising area, raise the ladder, properly brace the ladder against the wall, extend the ladder three rungs, then position the ladder for the proper climbing angle. Firefighters do not need to secure the halyard during this evolution. MOVE TO THE NEXT EVENT.
Event 3: Forcible Entry
This event simulates the firefighter’s ability to gain entry into a locked structure. Firefighter is to walk 75 feet to the forcible entry machine, position to either side of the machine, pick up the sledgehammer and repeatedly strike until the buzzer sounds. For this evolution, the forcible entry machine will be set for 850 lb of force. MOVE TO THE NEXT EVENT.
Event 4: High Rise Pack
This event simulates the firefighter’s ability to carry a high-rise pack to an upper story location. Firefighter is to walk 75 feet to the high rise pack, the high rise pack will be placed onto the firefighters shoulder or their SCBA bottle, carry the high rise pack 30 feet to the simulated stair platform; simulate climbing 3 floors (completely stepping up and down = 1 step) for a total of 30 steps, carry the high rise pack 30 feet back to the marked area, the high-rise pack will be removed from their shoulder or SCBA bottle. For this evolution, the high-rise pack will be comprised of a 50ft section of 2 in hose and nozzle. MOVE TO THE NEXT EVENT.
Event 5 and 6: Hand Line Advancement and Pull
These events simulate the firefighter’s ability to advance and re-position a charged hand line. Firefighter is to walk 75 feet to the 1 ¾” hose line. Move to a position that places them at the proper lifting point of the charged hand line, pick up hand line, advance hand line 75 feet, get into kneeling position; crawl back 50 feet on hands and knees, keeping one hand in constant touch with the hose line until you
DENVER FIRE DEPARTMENT Topic No: 1058.00 Date: 11-21-19 DEPARTMENT DIRECTIVE Approved: TAB Review Date: 11-21-21 Replaces: Same, dated 01-13-17 Topic: Performance Evaluation
1058.00 Performance Evaluation Page 4 of 9
reach the first coupling. In a kneeling or sitting position, pull back 50 feet of hose until you reach the nozzle; lower nozzle to ground. MOVE TO NEXT EVENT.
Event 7: Overhaul
This event simulates the firefighter’s ability to pull ceilings and/or remove debris from above the shoulder level. Firefighter is to walk 75 feet to a position that places them at the proper lifting point of the pike pole, pick up manufactured weighted pike pole and then raise the pike pole 30 times, fully extending and dropping the head of the pole. Both hands must be below the mark on the pike pole. After 30 complete repetitions with arms fully extended, place the pike pole into the marked area. MOVE TO THE NEXT EVENT.
Event 8: Equipment Carry
This event simulates the firefighter’s ability to carry equipment from point to point. Firefighter is to walk 75 feet to a position that places them at the proper lifting point of the equipment to be moved, pick up item(s), carry item(s) 75 feet to the marked area, set equipment in marked area, lift and carry the second item(s) 75 feet back to the first marked starting area, set equipment in marked area. For this evolution, the first carry will involve a dual item carry involving both a medical kit and an O2 kit at the same time, weighted at 15 lb each. The second carry involves a single item carry of a humat hydrant adaptor. MOVE TO NEXT EVENT.
Event 9: Ventilation
This event simulates the firefighter’s ability to create an opening for ventilation. Firefighter is to walk 75 feet to a position that places them at the proper lifting point of the equipment hammer, pick up the equipment hammer, walk and position himself/herself on the Keiser Sled, repeatedly strike the I-beam (striking point) of the Keiser Sled until it moves a distance of 3 feet (repositioning feet when necessary), dismount the Keiser Sled. MOVE TO NEXT EVENT.
DENVER FIRE DEPARTMENT Topic No: 1058.00 Date: 11-21-19 DEPARTMENT DIRECTIVE Approved: TAB Review Date: 11-21-21 Replaces: Same, dated 01-13-17 Topic: Performance Evaluation
1058.00 Performance Evaluation Page 5 of 9
Event 10: Victim Rescue
This event simulates the firefighter’s ability to perform a victim rescue. Firefighter is to walk 75 feet to a position that places them at the proper lifting point of the 165 lb rescue mannequin, lift and move the rescue mannequin a distance of 75 feet total (traveling 37.5 feet going around the cone and returning 37.5 feet) and return to the starting point. Once the mannequin’s feet cross the line, time is stopped, and the firefighter goes off air.
At the conclusion of the test, firefighters will be sent to a rehab station to rehydrate. EVALUATION OUTCOMES
There are 5 possible outcomes for members taking the PE. They are:
1. Successful completion of the PE in the allotted time frame. Concluding the test at or under the prescribed time will demonstrate that the firefighter is physically prepared to perform the essential functions of firefighting. As such, no further action will be needed.
2. Inability to complete the PE within the allotted time. A. Notification of Shift Commander and/or District Chief, Wellness Coordinator,
and Immediate Supervisor. B. Within 7 days, member will receive mentoring for improvement and programs
that the Denver Fire Department has in place to assist them with successfully improving their time. This meeting will be attended by the Wellness Coordinator, the individual, and the individual’s immediate supervisor. Following this meeting, members will be required to sign a form acknowledging their mentoring session and acknowledging whether they plan to take advantage of department resources to improve their time. If the member wants to utilize a Peer Fitness Trainer, one will be assigned to contact them; the member is not required to use Department resources at this time. The member will remain on active duty and retest within 14 days.
C. If member successfully completes the PE retest in the allotted time, no further action will be taken.
D. If a member fails to complete the PE retest in the allotted time, they will have another meeting. Attending will be their Shift Commander and/or District Chief, the Wellness Coordinator, and Immediate Supervisor. The expectations of the Department will be reiterated and the programs in place to assist the
DENVER FIRE DEPARTMENT Topic No: 1058.00 Date: 11-21-19 DEPARTMENT DIRECTIVE Approved: TAB Review Date: 11-21-21 Replaces: Same, dated 01-13-17 Topic: Performance Evaluation
1058.00 Performance Evaluation Page 6 of 9
individual will be offered again. At this time, PARTICIPATION IN DEPARTMENT PROGRAMS WILL BE MANDATORY UNTIL SUCH TIME THAT THE FIREFIGHTER SHOWS SIGNIFICANT SIGNS OF IMPROVEMENT. Member will remain on active duty and be retested in 30 days.
E. If a member fails to complete the second PE retest in the allotted time, they will be placed on modified duty and assigned to the Safety and Training Division for 30 days. Their focus will be preparing for successful completion of the PE.
F. If a member has not shown signs of significant improvement after their 3rd retest, member will be deemed unable to safely work in Operations or at DIA and will be reassigned to the Administration Division. Requests for accommodation to a non-suppression assignment may be considered. The member will still have the availability of department programs but will not be able to return to work in Operations or at DIA until they have successfully completed the PE in the allotted time.
3. Failure to complete the PE due to injury or illness. A. Notification of Shift Commander and/or District Chief, Wellness Coordinator,
and Immediate Supervisor. B. Refusal to perform PE secondary to illness or injury constitutes
acknowledgment of inability to perform basic job functions and should be considered a failure. Member will be offered department resources. Members will be required to sign a form acknowledging they have been offered department resources to improve their performance. If the member wants to utilize a Peer Fitness Trainer, one will be assigned to contact them. Member will remain on active duty if appropriate and retest within 14 days.
C. If injury/illness is work-related and not yet reported, the Ouch Line shall be contacted, and the situation must be reported. If required, the member will be transported for treatment at COSH or Concentra. At that point, the Department’s modified duty procedure will be followed. Members are expected to adhere to any work restrictions placed upon them.
D. As their restrictions allow, individuals are expected to work with the Department’s Physical Therapist and Peer Fitness Trainers to prepare for the PE.
E. As a condition of returning to full duty, the firefighter must take/retake the PE. If they successfully complete the evaluation in under 10:47, no further action will be necessary, and they will return to the fire house.
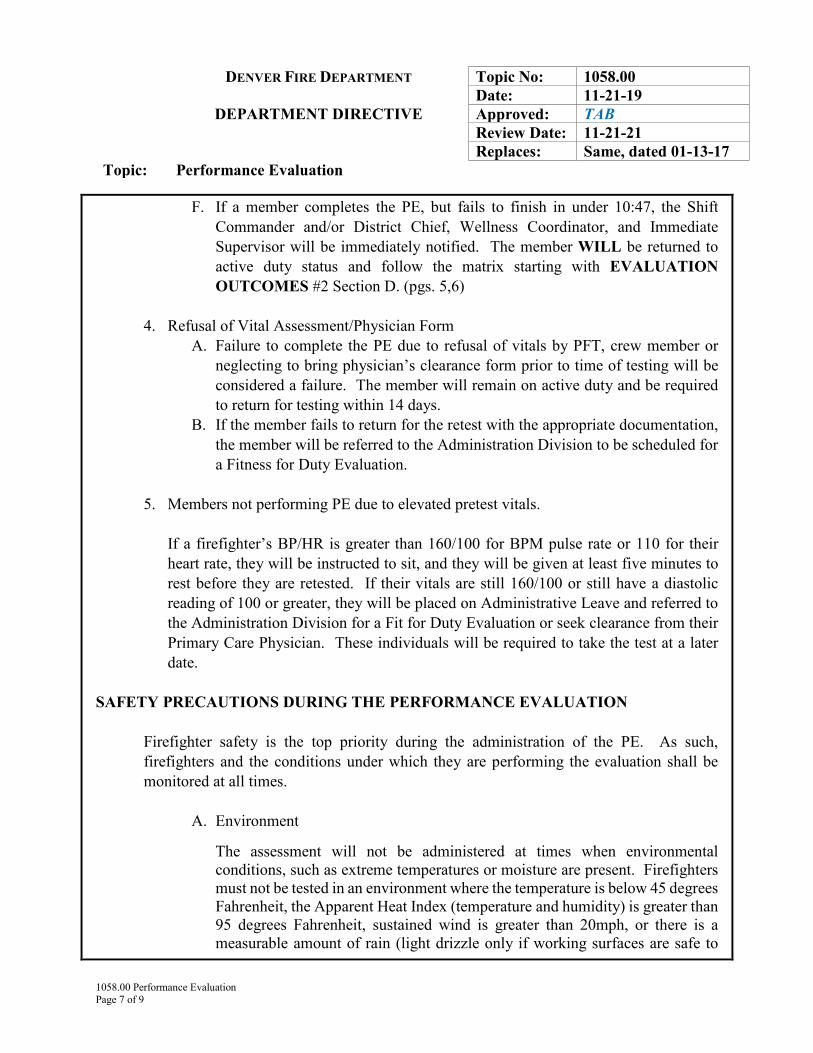
DENVER FIRE DEPARTMENT Topic No: 1058.00 Date: 11-21-19 DEPARTMENT DIRECTIVE Approved: TAB Review Date: 11-21-21 Replaces: Same, dated 01-13-17 Topic: Performance Evaluation
1058.00 Performance Evaluation Page 7 of 9
F. If a member completes the PE, but fails to finish in under 10:47, the Shift Commander and/or District Chief, Wellness Coordinator, and Immediate Supervisor will be immediately notified. The member WILL be returned to active duty status and follow the matrix starting with EVALUATION OUTCOMES #2 Section D. (pgs. 5,6)
4. Refusal of Vital Assessment/Physician Form
A. Failure to complete the PE due to refusal of vitals by PFT, crew member or neglecting to bring physician’s clearance form prior to time of testing will be considered a failure. The member will remain on active duty and be required to return for testing within 14 days.
B. If the member fails to return for the retest with the appropriate documentation, the member will be referred to the Administration Division to be scheduled for a Fitness for Duty Evaluation.
5. Members not performing PE due to elevated pretest vitals. If a firefighter’s BP/HR is greater than 160/100 for BPM pulse rate or 110 for their heart rate, they will be instructed to sit, and they will be given at least five minutes to rest before they are retested. If their vitals are still 160/100 or still have a diastolic reading of 100 or greater, they will be placed on Administrative Leave and referred to the Administration Division for a Fit for Duty Evaluation or seek clearance from their Primary Care Physician. These individuals will be required to take the test at a later date.
SAFETY PRECAUTIONS DURING THE PERFORMANCE EVALUATION Firefighter safety is the top priority during the administration of the PE. As such, firefighters and the conditions under which they are performing the evaluation shall be monitored at all times.
A. Environment
The assessment will not be administered at times when environmental conditions, such as extreme temperatures or moisture are present. Firefighters must not be tested in an environment where the temperature is below 45 degrees Fahrenheit, the Apparent Heat Index (temperature and humidity) is greater than 95 degrees Fahrenheit, sustained wind is greater than 20mph, or there is a measurable amount of rain (light drizzle only if working surfaces are safe to
DENVER FIRE DEPARTMENT Topic No: 1058.00 Date: 11-21-19 DEPARTMENT DIRECTIVE Approved: TAB Review Date: 11-21-21 Replaces: Same, dated 01-13-17 Topic: Performance Evaluation
1058.00 Performance Evaluation Page 8 of 9
walk on and props, tools, and test equipment can be kept dry). Standing water on the course must also be dried before beginning the test.
B. Personnel
Due to the strenuous nature of the assessment, personnel performing the evaluation shall be monitored at all times. This monitoring shall begin upon the arrival of the testing member and end after the firefighter is released from the rehab station. If an evaluator observes that a participant is physically struggling to complete the assessment, the PE will be terminated, and the individual will be checked to ensure they can return to work. This will be counted as a failure to complete the test and the participant will be subject to the procedure for a participant that fails to complete the PE due to an injury/illness. If an unsafe act is observed at any time, the PE will be stopped, the participant will be counseled on the safety concern and the evaluation will be restarted (from the beginning) at a later time. Unsafe acts include but are not limited to: improper lifting and carrying techniques and improper striking techniques.
C. Equipment
All equipment shall be maintained in proper working order to ensure that each firefighter is tested under the same general conditions. However, in some instances, it will be necessary to use props. All props shall be periodically checked throughout the course of a test day to ensure they are properly calibrated. The required equipment for the PE shall include:
1. 24 ft Extension Ladder 2. 165 lb Rescue Mannequin 3. Forcible Entry Machine/Prop w/ Sledgehammer 4. Keiser Sled w/ Special Hammer 5. 50 ft of 2” Hose Assembled as a High Rise Pack 6. Weighted 6’ Pike Pole 7. O2 Bag (with an O2 cylinder inside) 8. 1 Medical Bag (approximately 15 lb of weight inside) 9. Humat 10. 100’ 1 ¾ “simulated” Charged Hand Line with Nozzle 11. 4 Cones 12. 8” Step Box for high-rise pack evolution
DENVER FIRE DEPARTMENT Topic No: 1058.00 Date: 11-21-19 DEPARTMENT DIRECTIVE Approved: TAB Review Date: 11-21-21 Replaces: Same, dated 01-13-17 Topic: Performance Evaluation
1058.00 Performance Evaluation Page 9 of 9
PREPARATION FOR PERFORMANCE EVALUATION
Prior to taking the Work Performance Evaluation, personnel are advised to view the Department video demonstrating each station of the PE. As part of the video, suggested exercises will be demonstrated to assist firefighters in preparing for the assessment. Members are reminded that while these tasks may not be difficult by themselves, the cumulative assessment can be strenuous. Personnel are advised to engage in a physical fitness program to help prepare for the evaluation. The Denver Fire Department has Peer Fitness Trainers and Physical Therapists that can assist with developing plans or addressing any physical issues that may result from preparing for the PE. On the day of the Performance Evaluation (PE), it is strongly recommended that personnel refrain from drinking energy drinks and/or consuming large amounts of caffeine (coffee, sodas, etc.). Consuming these drinks can affect your vitals and potentially affect your evaluation. It is important to fully hydrate 24 hours before the test and up to the actual performance of the evaluation.
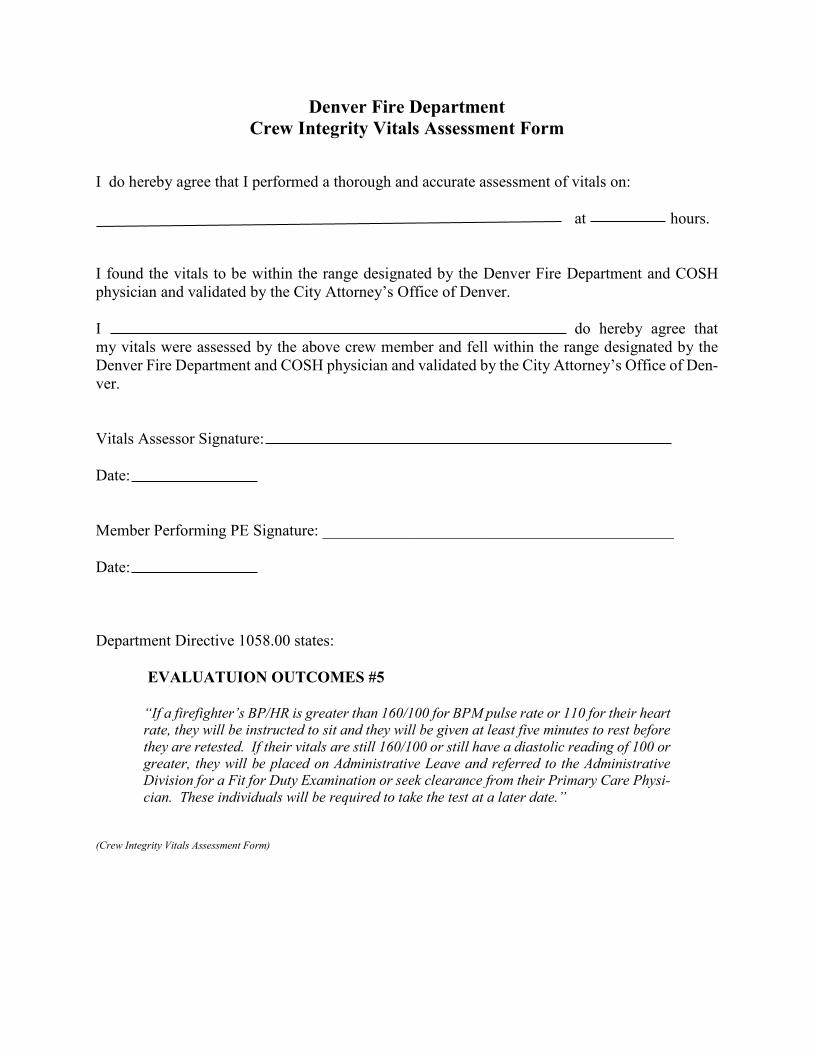
Denver Fire Department Crew Integrity Vitals Assessment Form
I do hereby agree that I performed a thorough and accurate assessment of vitals on: at hours. I found the vitals to be within the range designated by the Denver Fire Department and COSH physician and validated by the City Attorney’s Office of Denver. I do hereby agree that my vitals were assessed by the above crew member and fell within the range designated by the Denver Fire Department and COSH physician and validated by the City Attorney’s Office of Den-ver. Vitals Assessor Signature: Date: Member Performing PE Signature: ____________________________________________ Date: Department Directive 1058.00 states:
EVALUATUION OUTCOMES #5 “If a firefighter’s BP/HR is greater than 160/100 for BPM pulse rate or 110 for their heart rate, they will be instructed to sit and they will be given at least five minutes to rest before they are retested. If their vitals are still 160/100 or still have a diastolic reading of 100 or greater, they will be placed on Administrative Leave and referred to the Administrative Division for a Fit for Duty Examination or seek clearance from their Primary Care Physi-cian. These individuals will be required to take the test at a later date.”
(Crew Integrity Vitals Assessment Form)
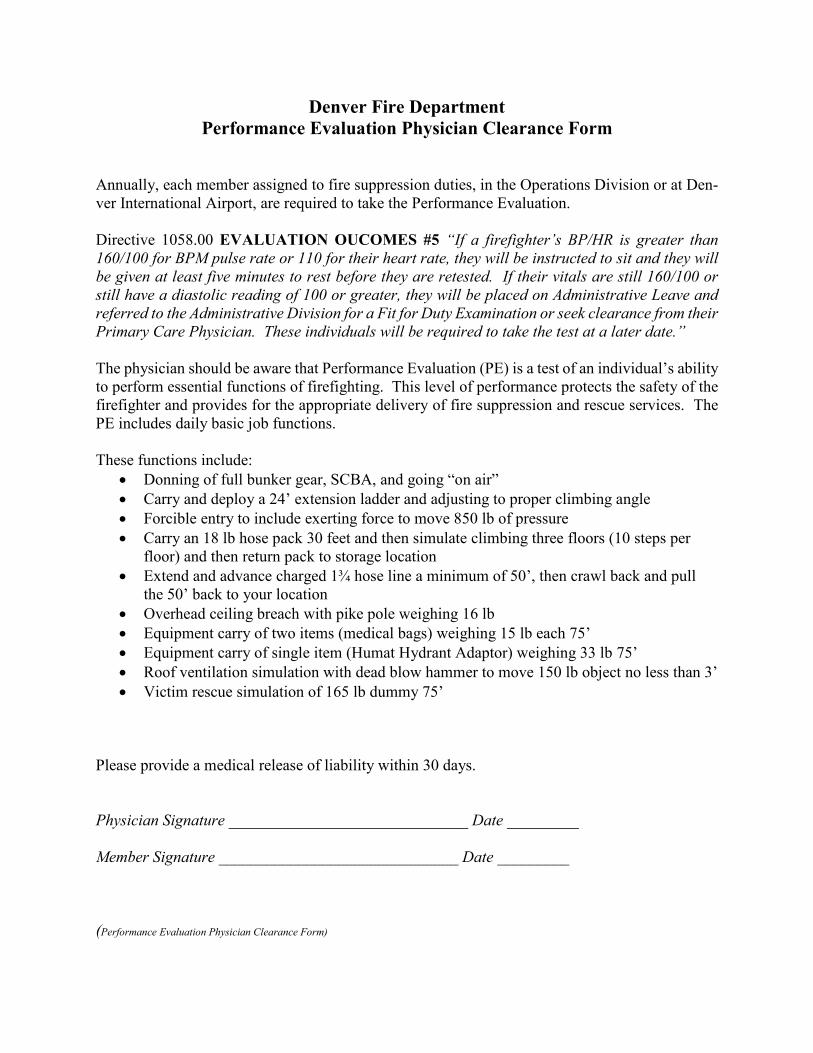
Denver Fire Department Performance Evaluation Physician Clearance Form
Annually, each member assigned to fire suppression duties, in the Operations Division or at Den-ver International Airport, are required to take the Performance Evaluation. Directive 1058.00 EVALUATION OUCOMES #5 “If a firefighter’s BP/HR is greater than 160/100 for BPM pulse rate or 110 for their heart rate, they will be instructed to sit and they will be given at least five minutes to rest before they are retested. If their vitals are still 160/100 or still have a diastolic reading of 100 or greater, they will be placed on Administrative Leave and referred to the Administrative Division for a Fit for Duty Examination or seek clearance from their Primary Care Physician. These individuals will be required to take the test at a later date.” The physician should be aware that Performance Evaluation (PE) is a test of an individual’s ability to perform essential functions of firefighting. This level of performance protects the safety of the firefighter and provides for the appropriate delivery of fire suppression and rescue services. The PE includes daily basic job functions. These functions include:
• Donning of full bunker gear, SCBA, and going “on air” • Carry and deploy a 24’ extension ladder and adjusting to proper climbing angle • Forcible entry to include exerting force to move 850 lb of pressure • Carry an 18 lb hose pack 30 feet and then simulate climbing three floors (10 steps per
floor) and then return pack to storage location • Extend and advance charged 1¾ hose line a minimum of 50’, then crawl back and pull
the 50’ back to your location • Overhead ceiling breach with pike pole weighing 16 lb • Equipment carry of two items (medical bags) weighing 15 lb each 75’ • Equipment carry of single item (Humat Hydrant Adaptor) weighing 33 lb 75’ • Roof ventilation simulation with dead blow hammer to move 150 lb object no less than 3’ • Victim rescue simulation of 165 lb dummy 75’
Please provide a medical release of liability within 30 days. Physician Signature ______________________________ Date _________ Member Signature ______________________________ Date _________ (Performance Evaluation Physician Clearance Form)
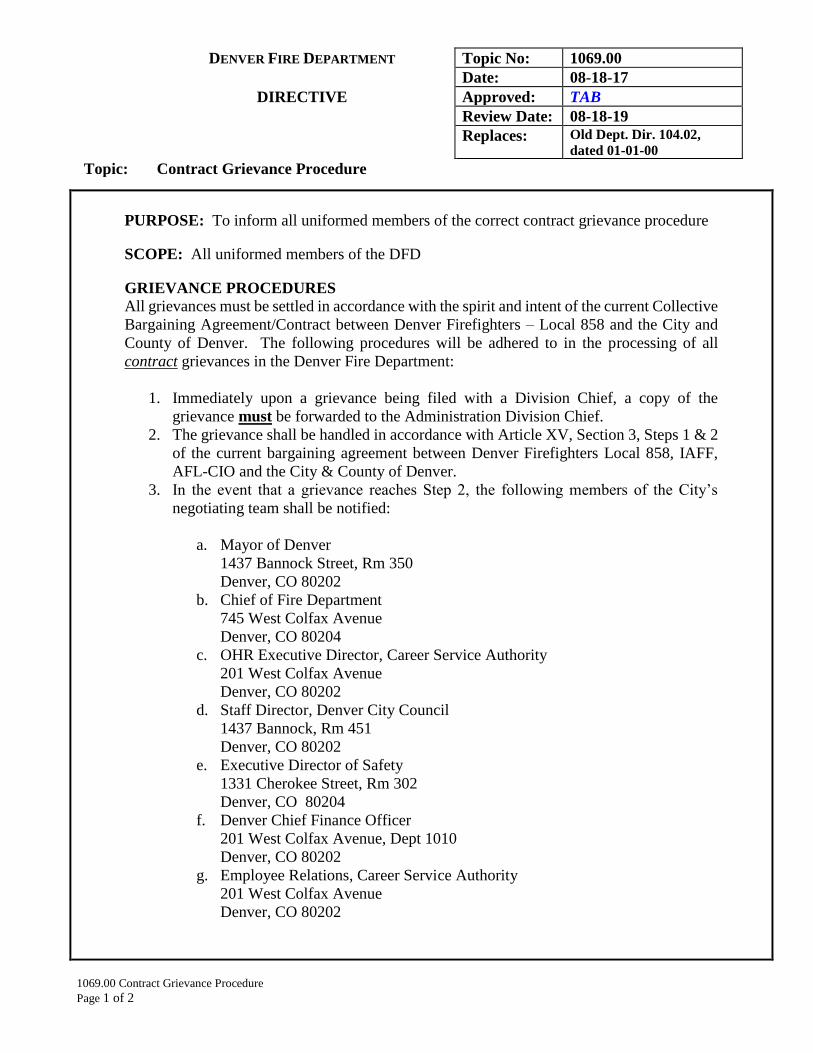
DENVER FIRE DEPARTMENT Topic No: 1069.00
Date: 08-18-17
DIRECTIVE Approved: TAB
Review Date: 08-18-19
Replaces: Old Dept. Dir. 104.02,
dated 01-01-00
Topic: Contract Grievance Procedure
1069.00 Contract Grievance Procedure
Page 1 of 2
PURPOSE: To inform all uniformed members of the correct contract grievance procedure
SCOPE: All uniformed members of the DFD
GRIEVANCE PROCEDURES
All grievances must be settled in accordance with the spirit and intent of the current Collective
Bargaining Agreement/Contract between Denver Firefighters – Local 858 and the City and
County of Denver. The following procedures will be adhered to in the processing of all
contract grievances in the Denver Fire Department:
1. Immediately upon a grievance being filed with a Division Chief, a copy of the
grievance must be forwarded to the Administration Division Chief.
2. The grievance shall be handled in accordance with Article XV, Section 3, Steps 1 & 2
of the current bargaining agreement between Denver Firefighters Local 858, IAFF,
AFL-CIO and the City & County of Denver.
3. In the event that a grievance reaches Step 2, the following members of the City’s
negotiating team shall be notified:
a. Mayor of Denver
1437 Bannock Street, Rm 350
Denver, CO 80202
b. Chief of Fire Department
745 West Colfax Avenue
Denver, CO 80204
c. OHR Executive Director, Career Service Authority
201 West Colfax Avenue
Denver, CO 80202
d. Staff Director, Denver City Council
1437 Bannock, Rm 451
Denver, CO 80202
e. Executive Director of Safety
1331 Cherokee Street, Rm 302
Denver, CO 80204
f. Denver Chief Finance Officer
201 West Colfax Avenue, Dept 1010
Denver, CO 80202
g. Employee Relations, Career Service Authority
201 West Colfax Avenue
Denver, CO 80202
DENVER FIRE DEPARTMENT Topic No: 1069.00
Date: 08-18-17
DIRECTIVE Approved: TAB
Review Date: 08-18-19
Replaces: Old Dept. Dir. 104.02,
dated 01-01-00
Topic: Contract Grievance Procedure
1069.00 Contract Grievance Procedure
Page 2 of 2
h. City Attorney
201 West Colfax Avenue, Dept 1207
Denver, CO 80202
REFERENCES:
DENVER FIREFIGHTERS COLLECTIVE BARGAINING AGREEMENT - LOCAL 858 and CITY &
COUNTY OF DENVER

DENVER FIRE DEPARTMENT Topic No: 1081.00 Date: 10-01-2019 DIRECTIVE Approved: TAB Review Date: 10-01-2021 Replaces: Same, dated 11-09-17
(Patient Privacy and Confidentiality)
Topic: Denver Fire Department HIPAA Guidelines
(1081.00 Denver Fire Department HIPAA Guidelines) Page 1 of 1
PURPOSE: To establish Health Insurance Portability and Accountability Act (HIPAA)
Guidelines for the Denver Fire Department. The Denver Fire Department is a HIPAA hybrid entity that has adopted HIPAA guidelines to best fit the specific business operations of the Department.
SCOPE: Applies to all DFD personnel Attachment: 1081.00a Denver Fire Department HIPAA Guidelines
Section C
Denver Fire Department Standard Operating Guidelines
258
DENVER FIRE DEPARTMENT Topic No: 2102.01
Date: 11-29-18
STANDARD OPERATING GUIDELINE Approved: CDIII
Review Date: 11-29-20
Section:
Topic:
OPERATIONS: DIVISION RESOURCE MGMT.
Response Assignment Policy
Replaces: Same, dated 05-06-16
2102.01 Response Assignment Policy
Page 1 of 2
PURPOSE: To define levels of incident response, provide overall safety, maintain
adequate city coverage, and more effectively utilize the firefighter
dispatcher’s experience and knowledge.
SCOPE: Applies to all Operations Division personnel
The core of the assignment of response level policy shall be:
Private Fire Alarm Systems: Denver Fire will respond to all Class II alarm
systems where a responsible party is not on scene or is unable to deliver the proper
alarm code for a reset. DFD will not respond to or continue to respond to alarms
generated by Class 2 Systems, where the monitoring agency has contacted or been
contacted by a responsible party at the address of alarm and determined that the
system malfunctioned. If the monitoring agency is unable to contact a responsible
party, the response assignment will default to the response assignment policy.
The response to all alarms generated by Class 1 Systems, where the monitoring
agency or a responsible party at the address of alarm has contacted DFD Dispatch
to report that the system malfunctioned, will be a Single Resource as outlined in
the Response Matrix. If DFD Dispatch does not receive this information from the
monitoring agency or a responsible party at the address, the response assignment
will default to the response matrix. The Code 9 response will be activated if the
current system user P.I.N. is given and positive identification is made by the
dispatcher.
Group Response: The minimum response assignment for a group response will
be in accordance with Response Matrix. Based upon information, DFD Dispatch
may upgrade or downgrade the response at any time and the Incident Commander
may upgrade or downgrade the response at any time. These increased and/or
decreased responses will be in conjunction with relevant information received and
not initiated arbitrarily.
Target Properties: All District Chiefs will provide a list of target properties and
recommended response to these properties.
RIT Company: DFD Dispatch shall assign a RIT Company at the time of the
initial dispatch to all nature codes indicated in the Response Matrix. The RIT
Company is to be utilized solely as a rescue and rapid intervention team for on-
scene fire companies for the duration of the incident assigned.
DENVER FIRE DEPARTMENT Topic No: 2102.01
Date: 11-29-18
STANDARD OPERATING GUIDELINE Approved: CDIII
Review Date: 11-29-20
Section:
Topic:
OPERATIONS: DIVISION RESOURCE MGMT.
Response Assignment Policy
Replaces: Same, dated 05-06-16
2102.01 Response Assignment Policy
Page 2 of 2
Calls for Non-Emergency Service: The response to all calls for non-emergency
service will be 1 fire company, the type to be determined by DFD Dispatch based
upon apparatus available and service request, Code 9.
DFD Dispatch: DFD firefighter dispatchers will interview the caller to secure
comprehensive information regarding each call for service. At any time in the
process of dispatching or during the response, DFD Dispatch may upgrade or
downgrade the response based upon information received. At any time during the
response, the Incident Commander may upgrade or downgrade the response based
upon information received or conditions observed.
DENVER FIRE DEPARTMENT Topic No: 2102.09
Date: 11-25-16
STANDARD OPERATING GUIDELINE Approved: CDIII
Review Date: 11-25-18
Section: OPERATIONS: DIVISION RESOURCE MGMT. Replaces: Same, dated 03-22-11
Topic: Change of Location
2102.09 Change of Location Page 1 of 1
PURPOSE: To standardize procedures when units are directed to temporarily change
where their apparatus is stationed (Quarters)
SCOPE: Applies to all Operations Division members
DEFINITIONS: None
Companies may be directed via the Shift Commander or in cases where the Shift Commander is
on an incident, Dispatch, to change locations for reasons such as training, station maintenance,
multi-alarm coverage, rigs OOS, etc.
When directed to change locations, companies should immediately respond to the new location
“Code 9” and maintain radio silence.
Upon reaching the new quarters, the company officer shall notify Dispatch via telephone. Radio
traffic should be kept to a minimum.
The company changing locations shall maintain their own identity on the radio and VocAlarm.
Upon returning to the company’s regular quarters, the company officer shall again notify Dispatch.
The District Chiefs should be notified of any rig changes in status affecting their District.
The Shift Commander should be notified of changes in rig status throughout the City.
REFERENCES: None
DENVER FIRE DEPARTMENT Topic No: 2105.01
Date: 03-23-18
STANDARD OPERATING GUIDELINE Approved: CDIII
Review Date: 03-23-20
Section: OPERATIONS: APPARATUS Replaces: Same, dated 03-08-17
Topic: Operating Apparatus in Reverse
2105.01 Operating Apparatus in Reverse
Page 1 of 2
PURPOSE: To ensure Department apparatus is safely operated while in reverse
SCOPE: Applies to all members operating or riding on Department apparatus
Before operating apparatus in reverse, the Driver/Operator shall remove any
hearing protection worn and lower the driver-side window at least ¼ of the way
down. Two firefighters shall position themselves near the rear of the vehicle. The
two spotters should be safely positioned so that the Engineer can see the spotter
positioned on the Engineer’s side of the apparatus, or the primary spotter, at all
times. If at any time the Engineer loses sight of the primary spotter, the Engineer
shall stop immediately until the spotter makes him/herself visible again. In case
the apparatus does not have a minimum of four persons on board, the Company
Officer will be required to act as one of the spotters located near the rear of the
apparatus.
While operating in reverse, the Officer, Firefighters, and Engineer shall work
together to maintain a safe environment for the members, apparatus, and
surrounding property.
Communications between the Engineer and spotters shall include the use of hand
signals. Standard signals include:
A. Straight Back: One hand above the head with palm toward face, waving
back. Other hand at your side (left or right hand optional).
B. Turn: Both arms pointing the same direction with index fingers extended
(driver will advise the spotter which way the turn will be made). The spotter
then assists the Engineer in backing apparatus.
C. Stop: Forearms crossed to form an X.
NIGHT BACKING
Signals will be the same. The spotter will assure that the rear scene lights or the
spotlights on rear of apparatus are turned on before allowing apparatus to be
backed. A flashlight may be carried, but at no time will it be directed toward
the mirror.
DENVER FIRE DEPARTMENT Topic No: 2105.01
Date: 03-23-18
STANDARD OPERATING GUIDELINE Approved: CDIII
Review Date: 03-23-20
Section: OPERATIONS: APPARATUS Replaces: Same, dated 03-08-17
Topic: Operating Apparatus in Reverse
2105.01 Operating Apparatus in Reverse
Page 2 of 2
ACCOUNTABILITY:
All personnel will be held accountable for using backers. Non-compliance may result
in disciplinary action. Officers and Acting Officers are responsible for ensuring that
all Department members comply with this Standard Operating Guideline, and backers
are utilized when the apparatus is operated in reverse.

DENVER FIRE DEPARTMENT Topic No: 2105.02 Date: 01-23-19 STANDARD OPERATING GUIDELINE Approved: CDIII Review Date: 01-23-21 Section:
OPERATIONS: APPARATUS Replaces: Same, dated 09-01-17
Topic: Ready Reserve Apparatus
2105.02, Ready Reserve Apparatus Page 1 of 3
PURPOSE: To establish policy and procedures for the use and maintenance of all Ready Reserve
Apparatus for Denver Fire Department Personnel. SCOPE: Applies to all Denver Fire Department Operations Division Personnel. POLICY:
Ready Reserve Apparatus are to be used in the following cases:
1. To be used by all companies for emergency response due to short term repairs to Front Line apparatus that exceeds two hours in duration. This includes holidays and weekends when repair shop personnel are not available for immediate repair.
2. To be used as a First Line unit in the case of emergency call back situations when companies are being used at multiple alarms and resources have been depleted.
3. Additional staffing is required for exceptional circumstances due to unanticipated events. This includes funerals, mutual aid, parades, conventions, extreme weather conditions, etc.
Ready Reserve Apparatus should not be used for:
1. Long term repairs to front line apparatus. 2. A resource to supply front line apparatus with equipment in the case of damaged tools,
appliances, hose, air packs, etc. This includes items under repair. Under no circumstances should equipment be removed from this apparatus for use unless needed for an emergency incident.
ASSIGNMENT:
The Operations Division, in coordination with the Fire Repair Shop, will determine where reserve apparatus is stationed. Stations housing Ready Reserve apparatus are selected due to geographic areas within the City to allow for quick access by companies in need. Authorization for the use of Ready Reserve apparatus is to be pre-approved by the Shift Commander. The location of Ready Reserve equipment can be found in Denver Fire Department Standard Operating Guideline 2106.09. Ready Reserve apparatus may change locations periodically based on the needs of the Operations Division. Companies that need to use a Ready Reserve apparatus should use the rig that is designated for use in their District, except for District 2, in which they will utilize the closest. If not available, the next closest Ready Reserve apparatus should be selected. The Ready Reserve at the Fire Academy is designated for District 5 companies and shall only be used as a last resort for the other Districts.
DENVER FIRE DEPARTMENT Topic No: 2105.02 Date: 01-23-19 STANDARD OPERATING GUIDELINE Approved: CDIII Review Date: 01-23-21 Section:
OPERATIONS: APPARATUS Replaces: Same, dated 09-01-17
Topic: Ready Reserve Apparatus
2105.02, Ready Reserve Apparatus Page 2 of 3
PROCEDURES:
• Equipment needed for the Ready Reserve shall be ordered by the House Captain of the station housing the apparatus and maintained by station personnel. The most up-to-date equipment shall be ordered to stay compliant with Department SOGs. The Ready Reserve should have equivalent equipment to our front-line apparatus (Standard Inventory Requirement).
• A comprehensive inventory must be kept with the Ready Reserve and an inventory shall be completed daily.
• A check in/check out inventory form shall be filled out each time there is a transfer of the Ready Reserve. This form will be maintained by the House Captain. This includes a process to inventory the Ready Reserve by the Officer taking possession of the Ready Reserve prior to leaving the station. This form shall be signed by the Officer taking possession of the Ready Reserve rig and the Officer housing the Ready Reserve rig. This process shall also be completed by the Officers on duty when the Ready Reserve is returned. This ensures that all equipment is returned with the Ready Reserve, thus making sure it is “ready” for the next assignment. If there are any items missing from the rig when it is returned to the station, the Officer returning the rig is responsible for seeing that the equipment is replaced in a timely manner. This includes a written statement sent through the chain of command explaining in detail why the equipment is missing.
• There is a sign in/sign out log that stays with the station housing the Ready Reserve and is filled out every time the Ready Reserve is transferred to another Officer.
• All equipment must stay with the Ready Reserve when it leaves the station. This includes any equipment that may not be used when placed in service. The Ready Reserve leaves as a unit and must be returned as a unit.
• All Ready Reserve apparatus shall be cleaned and maintained by the housing station. A regular cleaning schedule shall be established by the House Captain. This should include a schedule for doing a regular 56-point check on the rig.
• Hose on all Ready Reserve apparatus shall be maintained and tested by the company housing the unit. Testing shall follow the same procedures and dates as the company housing the Ready Reserve.
• Although the Ready Reserve is to be maintained by the company housing the unit, it is the responsibility of the Officer taking possession to ensure that his/her Engineer and Firefighters train and become familiar with the pump panel and its capabilities. It is strongly encouraged that the company taking possession train on the Ready Reserve immediately after receiving the apparatus.
• Anytime a ready reserve is transferred from one firehouse to another, and not going back to its designated firehouse, the company officer shall insure the inventory is completed and the checkout form is filled out and then emailed to the original firehouse.
DENVER FIRE DEPARTMENT Topic No: 2105.02 Date: 01-23-19 STANDARD OPERATING GUIDELINE Approved: CDIII Review Date: 01-23-21 Section:
OPERATIONS: APPARATUS Replaces: Same, dated 09-01-17
Topic: Ready Reserve Apparatus
2105.02, Ready Reserve Apparatus Page 3 of 3
• Radio designation for all Ready Reserve apparatus when used in emergency situations shall be
“Ready Reserve,” then the location in which it is being used. Example: “Ready Reserve Engine 6,” “Ready Reserve Parade One,” “Ready Reserve Convention Two,” “Ready Reserve Denver Fire,” etc. Otherwise, when used for emergency repairs on a short-term basis, the designation shall be maintained by the regular call sign of the company using the unit.
RETURN USE PROCEDURES
• Ready Reserve apparatus shall be cleaned both inside and out prior to returning to the housing station.
• Check all fluids and complete a 56-point check. This should include a “walk around” to note any new damage to the apparatus.
• Ready Reserve apparatus shall be returned with a full tank of fuel per Department guidelines. • A comprehensive inventory shall be completed by both Officers upon return. All items on the
Ready Reserve shall be returned to the location indicated on the inventory list. • All maintenance necessary for the Ready Reserve shall be coordinated through the Repair
Shop or Lineshop. • Notify the Shift Commander that the Ready Reserve Apparatus is back in service.
Equipment that will need to be removed from front-line apparatus to the ready reserve.
• Radios • MDT • Knox Box Keys • PAR Ring • Cell Phone • Maps and Complex Books • Personal PPE with Voice Amp • EMS bag & AED • ESO Tablet • Ice Rescue Bag
Any other equipment the company officer wishes to switch shall be done at their own firehouse. All equipment and hose loads shall be return to its original location prior to returning.
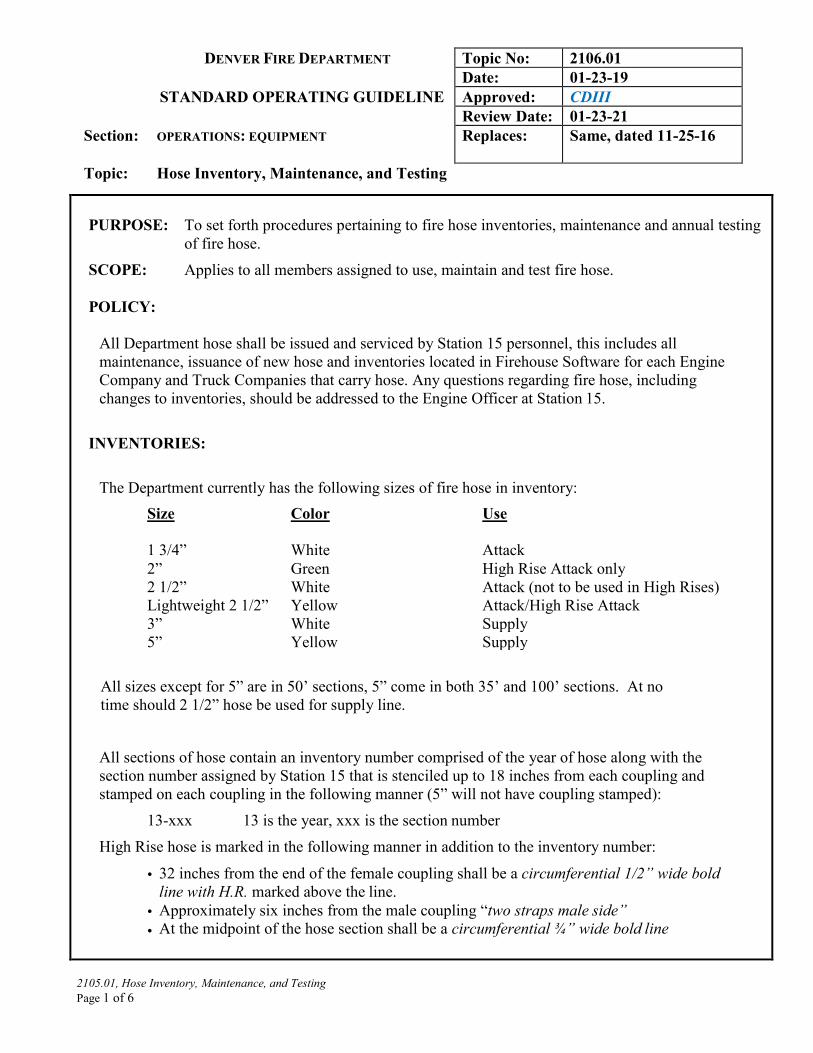
DENVER FIRE DEPARTMENT Topic No: 2106.01 Date: 01-23-19 STANDARD OPERATING GUIDELINE Approved: CDIII Review Date: 01-23-21 Section:
OPERATIONS: EQUIPMENT Replaces: Same, dated 11-25-16
Topic: Hose Inventory, Maintenance, and Testing
2105.01, Hose Inventory, Maintenance, and Testing Page 1 of 6
PURPOSE: To set forth procedures pertaining to fire hose inventories, maintenance and annual testing
of fire hose. SCOPE: Applies to all members assigned to use, maintain and test fire hose.
POLICY:
All Department hose shall be issued and serviced by Station 15 personnel, this includes all maintenance, issuance of new hose and inventories located in Firehouse Software for each Engine Company and Truck Companies that carry hose. Any questions regarding fire hose, including changes to inventories, should be addressed to the Engine Officer at Station 15.
INVENTORIES:
The Department currently has the following sizes of fire hose in inventory:
Size Color Use
1 3/4” White Attack 2” Green High Rise Attack only 2 1/2” White Attack (not to be used in High Rises) Lightweight 2 1/2” Yellow Attack/High Rise Attack 3” White Supply 5” Yellow Supply
All sizes except for 5” are in 50’ sections, 5” come in both 35’ and 100’ sections. At no time should 2 1/2” hose be used for supply line. All sections of hose contain an inventory number comprised of the year of hose along with the section number assigned by Station 15 that is stenciled up to 18 inches from each coupling and stamped on each coupling in the following manner (5” will not have coupling stamped):
13-xxx 13 is the year, xxx is the section number High Rise hose is marked in the following manner in addition to the inventory number:
• 32 inches from the end of the female coupling shall be a circumferential 1/2” wide bold line with H.R. marked above the line.
• Approximately six inches from the male coupling “two straps male side” • At the midpoint of the hose section shall be a circumferential ¾” wide bold line
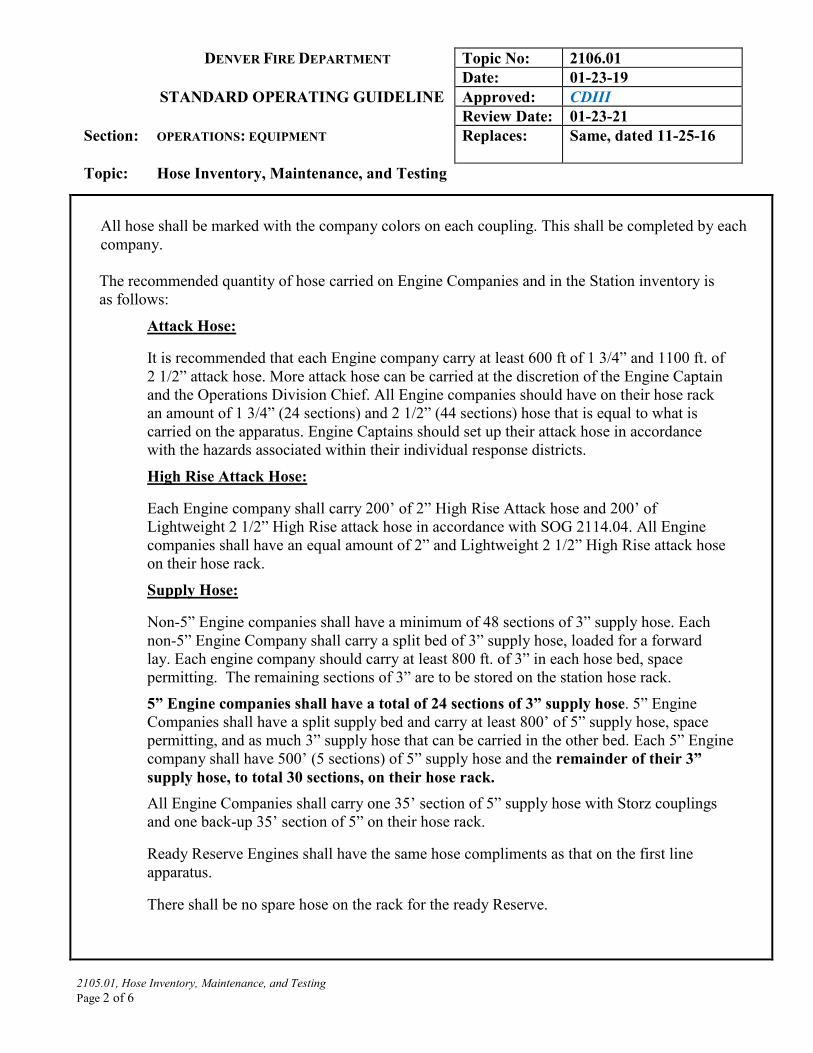
DENVER FIRE DEPARTMENT Topic No: 2106.01 Date: 01-23-19 STANDARD OPERATING GUIDELINE Approved: CDIII Review Date: 01-23-21 Section:
OPERATIONS: EQUIPMENT Replaces: Same, dated 11-25-16
Topic: Hose Inventory, Maintenance, and Testing
2105.01, Hose Inventory, Maintenance, and Testing Page 2 of 6
All hose shall be marked with the company colors on each coupling. This shall be completed by each company.
The recommended quantity of hose carried on Engine Companies and in the Station inventory is as follows:
Attack Hose:
It is recommended that each Engine company carry at least 600 ft of 1 3/4” and 1100 ft. of 2 1/2” attack hose. More attack hose can be carried at the discretion of the Engine Captain and the Operations Division Chief. All Engine companies should have on their hose rack an amount of 1 3/4” (24 sections) and 2 1/2” (44 sections) hose that is equal to what is carried on the apparatus. Engine Captains should set up their attack hose in accordance with the hazards associated within their individual response districts.
High Rise Attack Hose:
Each Engine company shall carry 200’ of 2” High Rise Attack hose and 200’ of Lightweight 2 1/2” High Rise attack hose in accordance with SOG 2114.04. All Engine companies shall have an equal amount of 2” and Lightweight 2 1/2” High Rise attack hose on their hose rack.
Supply Hose:
Non-5” Engine companies shall have a minimum of 48 sections of 3” supply hose. Each non-5” Engine Company shall carry a split bed of 3” supply hose, loaded for a forward lay. Each engine company should carry at least 800 ft. of 3” in each hose bed, space permitting. The remaining sections of 3” are to be stored on the station hose rack. 5” Engine companies shall have a total of 24 sections of 3” supply hose. 5” Engine Companies shall have a split supply bed and carry at least 800’ of 5” supply hose, space permitting, and as much 3” supply hose that can be carried in the other bed. Each 5” Engine company shall have 500’ (5 sections) of 5” supply hose and the remainder of their 3” supply hose, to total 30 sections, on their hose rack. All Engine Companies shall carry one 35’ section of 5” supply hose with Storz couplings and one back-up 35’ section of 5” on their hose rack.
Ready Reserve Engines shall have the same hose compliments as that on the first line apparatus.
There shall be no spare hose on the rack for the ready Reserve.
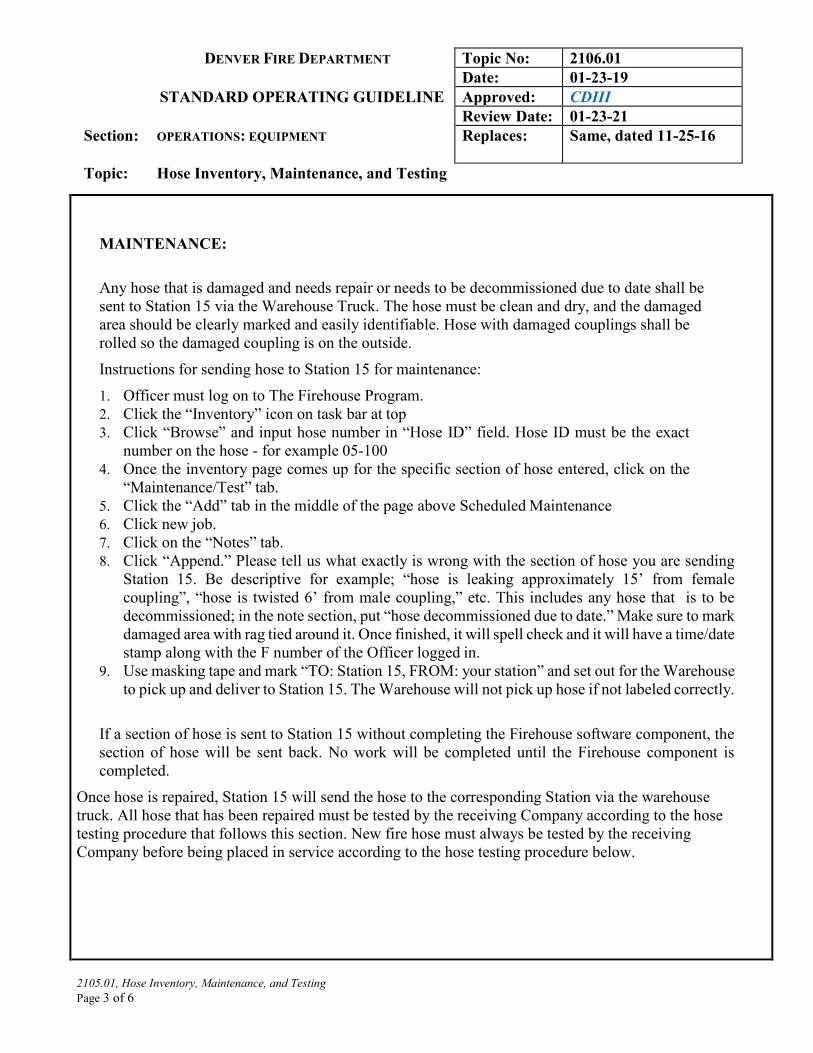
DENVER FIRE DEPARTMENT Topic No: 2106.01 Date: 01-23-19 STANDARD OPERATING GUIDELINE Approved: CDIII Review Date: 01-23-21 Section:
OPERATIONS: EQUIPMENT Replaces: Same, dated 11-25-16
Topic: Hose Inventory, Maintenance, and Testing
2105.01, Hose Inventory, Maintenance, and Testing Page 3 of 6
MAINTENANCE:
Any hose that is damaged and needs repair or needs to be decommissioned due to date shall be sent to Station 15 via the Warehouse Truck. The hose must be clean and dry, and the damaged area should be clearly marked and easily identifiable. Hose with damaged couplings shall be rolled so the damaged coupling is on the outside. Instructions for sending hose to Station 15 for maintenance: 1. Officer must log on to The Firehouse Program. 2. Click the “Inventory” icon on task bar at top 3. Click “Browse” and input hose number in “Hose ID” field. Hose ID must be the exact
number on the hose - for example 05-100 4. Once the inventory page comes up for the specific section of hose entered, click on the
“Maintenance/Test” tab. 5. Click the “Add” tab in the middle of the page above Scheduled Maintenance 6. Click new job. 7. Click on the “Notes” tab. 8. Click “Append.” Please tell us what exactly is wrong with the section of hose you are sending
Station 15. Be descriptive for example; “hose is leaking approximately 15’ from female coupling”, “hose is twisted 6’ from male coupling,” etc. This includes any hose that is to be decommissioned; in the note section, put “hose decommissioned due to date.” Make sure to mark damaged area with rag tied around it. Once finished, it will spell check and it will have a time/date stamp along with the F number of the Officer logged in.
9. Use masking tape and mark “TO: Station 15, FROM: your station” and set out for the Warehouse to pick up and deliver to Station 15. The Warehouse will not pick up hose if not labeled correctly.
If a section of hose is sent to Station 15 without completing the Firehouse software component, the section of hose will be sent back. No work will be completed until the Firehouse component is completed.
Once hose is repaired, Station 15 will send the hose to the corresponding Station via the warehouse truck. All hose that has been repaired must be tested by the receiving Company according to the hose testing procedure that follows this section. New fire hose must always be tested by the receiving Company before being placed in service according to the hose testing procedure below.
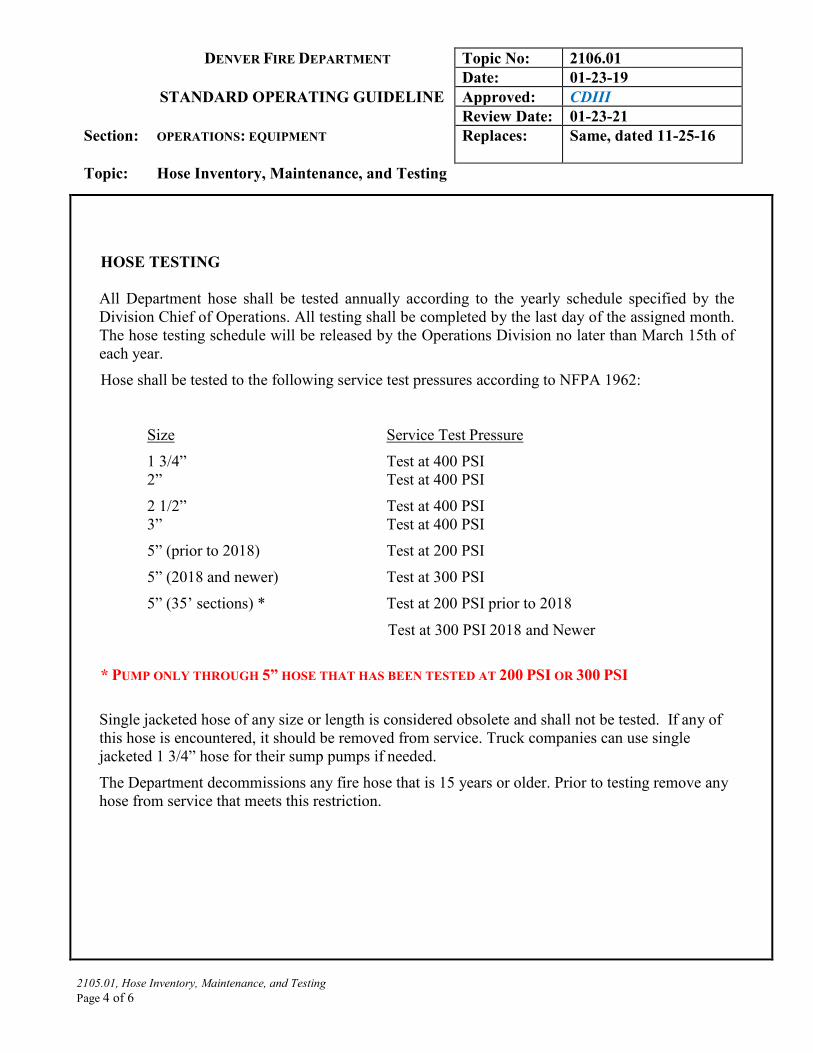
DENVER FIRE DEPARTMENT Topic No: 2106.01 Date: 01-23-19 STANDARD OPERATING GUIDELINE Approved: CDIII Review Date: 01-23-21 Section:
OPERATIONS: EQUIPMENT Replaces: Same, dated 11-25-16
Topic: Hose Inventory, Maintenance, and Testing
2105.01, Hose Inventory, Maintenance, and Testing Page 4 of 6
HOSE TESTING
All Department hose shall be tested annually according to the yearly schedule specified by the Division Chief of Operations. All testing shall be completed by the last day of the assigned month. The hose testing schedule will be released by the Operations Division no later than March 15th of each year. Hose shall be tested to the following service test pressures according to NFPA 1962:
Size Service Test Pressure 1 3/4” Test at 400 PSI 2” Test at 400 PSI 2 1/2” Test at 400 PSI 3” Test at 400 PSI 5” (prior to 2018) Test at 200 PSI 5” (2018 and newer) Test at 300 PSI 5” (35’ sections) * Test at 200 PSI prior to 2018
Test at 300 PSI 2018 and Newer
* PUMP ONLY THROUGH 5” HOSE THAT HAS BEEN TESTED AT 200 PSI OR 300 PSI Single jacketed hose of any size or length is considered obsolete and shall not be tested. If any of this hose is encountered, it should be removed from service. Truck companies can use single jacketed 1 3/4” hose for their sump pumps if needed. The Department decommissions any fire hose that is 15 years or older. Prior to testing remove any hose from service that meets this restriction.
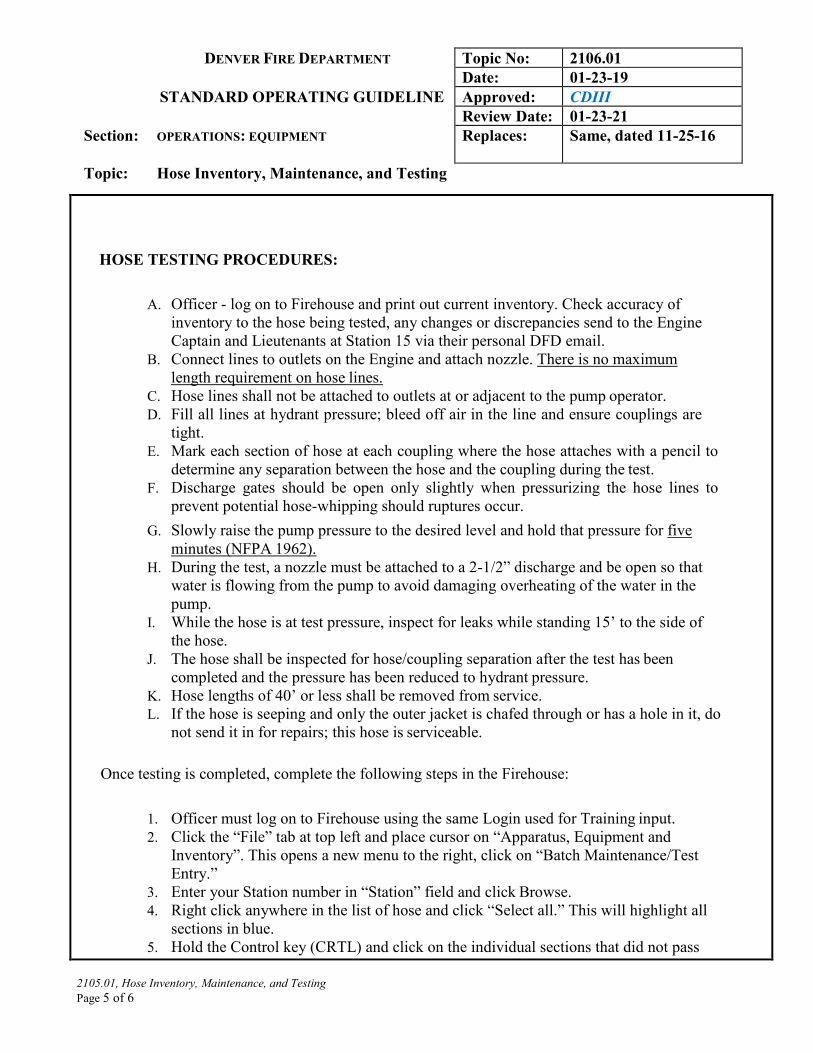
DENVER FIRE DEPARTMENT Topic No: 2106.01 Date: 01-23-19 STANDARD OPERATING GUIDELINE Approved: CDIII Review Date: 01-23-21 Section:
OPERATIONS: EQUIPMENT Replaces: Same, dated 11-25-16
Topic: Hose Inventory, Maintenance, and Testing
2105.01, Hose Inventory, Maintenance, and Testing Page 5 of 6
HOSE TESTING PROCEDURES:
A. Officer - log on to Firehouse and print out current inventory. Check accuracy of
inventory to the hose being tested, any changes or discrepancies send to the Engine Captain and Lieutenants at Station 15 via their personal DFD email.
B. Connect lines to outlets on the Engine and attach nozzle. There is no maximum length requirement on hose lines.
C. Hose lines shall not be attached to outlets at or adjacent to the pump operator. D. Fill all lines at hydrant pressure; bleed off air in the line and ensure couplings are
tight. E. Mark each section of hose at each coupling where the hose attaches with a pencil to
determine any separation between the hose and the coupling during the test. F. Discharge gates should be open only slightly when pressurizing the hose lines to
prevent potential hose-whipping should ruptures occur. G. Slowly raise the pump pressure to the desired level and hold that pressure for five
minutes (NFPA 1962). H. During the test, a nozzle must be attached to a 2-1/2” discharge and be open so that
water is flowing from the pump to avoid damaging overheating of the water in the pump.
I. While the hose is at test pressure, inspect for leaks while standing 15’ to the side of the hose.
J. The hose shall be inspected for hose/coupling separation after the test has been completed and the pressure has been reduced to hydrant pressure.
K. Hose lengths of 40’ or less shall be removed from service. L. If the hose is seeping and only the outer jacket is chafed through or has a hole in it, do
not send it in for repairs; this hose is serviceable.
Once testing is completed, complete the following steps in the Firehouse:
1. Officer must log on to Firehouse using the same Login used for Training input. 2. Click the “File” tab at top left and place cursor on “Apparatus, Equipment and
Inventory”. This opens a new menu to the right, click on “Batch Maintenance/Test Entry.”
3. Enter your Station number in “Station” field and click Browse. 4. Right click anywhere in the list of hose and click “Select all.” This will highlight all
sections in blue. 5. Hold the Control key (CRTL) and click on the individual sections that did not pass
DENVER FIRE DEPARTMENT Topic No: 2106.01 Date: 01-23-19 STANDARD OPERATING GUIDELINE Approved: CDIII Review Date: 01-23-21 Section:
OPERATIONS: EQUIPMENT Replaces: Same, dated 11-25-16
Topic: Hose Inventory, Maintenance, and Testing
2105.01, Hose Inventory, Maintenance, and Testing Page 6 of 6
the test, this includes all sections that are out of date. These sections will need to be entered individually according to the “Maintenance” instructions. Once all sections that did not pass are not highlighted, click “Ok.”
6. The “Maintenance/Test” page will be on the screen. Click on box next to yellow “Job” window. Double Click "Hose Test."
7. Click on "Details" and complete checklist. This checklist will apply to all hose that passed the hose test.
8. Click on the “Notes” tab. 9. Click “Append" and enter "Annual Hose Test." 10. Click "Save." 11. Complete the instructions for "Maintenance" for each individual section of hose that
did not pass the test.
REFERENCES: NFPA 1962
DENVER FIRE DEPARTMENT Topic No: 2106.08
Date: 12-12-18
STANDARD OPERATING GUIDELINE Approved: CDIII
Review Date: 12-12-20
Section:
Topic:
OPERATIONS: EQUIPMENT
Cleaning and Inspection of PPE -
Firefighting Protective Ensemble
Replaces: Same, dated 05-04-18
2106.08 Cleaning and Inspection of PPE – Firefighting Protective Ensemble
Page 1 of 5
PURPOSE: To give an operational overview for the safe handling, policies, and procedures
associated with sending PPE in for cleaning and inspection.
SCOPE: Applies to all Denver Fire Department personnel who utilize bunking gear.
PRIORITY CLEANING
Sending PPE to the laundry for a Priority Cleaning (routine) includes washing the PPE and
a visual inspection to check for obvious damage. If any minor repairs are necessary, they will
be completed at this time. PPE worn during Fires, Decon, or Asbestos exposure that require
cleaning will be designated as Priority Cleaning. If a member’s PPE is not just dirty, but
contaminated, special procedures will be taken in the washing process based on the type of
contaminant to ensure the PPE is both safe and sanitary. The special procedures will vary
based on the type of contamination.
Any component of your PPE can be sent in for a Priority Cleaning at any time.
Members should expect their PPE to be returned to them within one (1) week. If your PPE
requires advanced repairs as required by NFPA 1851, the timeline should be increased to
about 7-10 days. Returned PPE should be removed from its packaging as soon as possible
and inspected to be sure that repairs have been made and the material is dry.
Please Note: Priority Cleaning does not include an Annual Inspection.
ANNUAL INSPECTION
Structural firefighting protective clothing, including gloves, bunking gear, hoods, shrouds,
helmets, and structure boots shall be cleaned and inspected according to the manufacturer’s
instructions as needed, and at least once every 12 months per NFPA standards. This is known
as the Annual Inspection. If the PPE has not been sent in to be inspected within the calendar
year, members will send them in according to the Annual PPE Pick Up Schedule (attached).
When the washing process is completed, an advanced inspection will be performed on the
entire ensemble. The advanced inspection includes:
• A hydrostatic test of the vapor barrier in six locations
• A light test to verify that there has not been any migration of the batting in the thermal
layer
• An inspection of the outer shell
DENVER FIRE DEPARTMENT Topic No: 2106.08
Date: 12-12-18
STANDARD OPERATING GUIDELINE Approved: CDIII
Review Date: 12-12-20
Section:
Topic:
OPERATIONS: EQUIPMENT
Cleaning and Inspection of PPE -
Firefighting Protective Ensemble
Replaces: Same, dated 05-04-18
2106.08 Cleaning and Inspection of PPE – Firefighting Protective Ensemble
Page 2 of 5
• A light test to ensure that the reflective material is in good condition. Reflective
material can appear to be in good condition and have lost a large portion of its
reflective properties.
• Major repairs will also be conducted at this time. These repairs may affect the return
of the PPE by 7-10 days.
• A tag will be placed on your PPE indicating when the Annual Inspection was
completed.
The entire cleaning and inspection process is a safety and wellness issue that is focused on
ensuring the health and safety of the firefighter, both in the short and long term.
PREPARING BUNKING COATS AND PANTS FOR SHIPMENT
Members should the take the following steps to send their PPE (structural firefighting coats
and pants) in for Priority Cleaning or Annual Inspection:
1. Obtain and complete a copy of the DFD Bunking Gear Cleaning Form. The most
recent version of this form can be obtained from the DFD intranet under Warehouse
Forms. All fields on this form must be completed. Proper completion of this form
facilitates handling and tracking of your PPE. The most current version of the form
should be used because it provides all the necessary information. This form also
contains two (2) check boxes that indicate Priority Cleaning (routine) or Annual
Inspection (yearly). Please check the one that applies to the gear you are sending in.
2. If the PPE is contaminated, indicate that fact on the Bunker Gear Cleaning Form.
Clearly indicate the name of the suspected contaminant. Examples of
contaminants include asbestos, body fluids, gasoline, diesel, and other hazardous
materials. Bagging PPE after a fire does not require a yellow bag unless it has been
contaminated from the above list. Documentation of the type of contaminant is
important for two reasons: First, the personnel who are responsible for transporting,
cleaning, and inspecting the PPE will be alerted to take appropriate safety precautions.
Second, the cleaning staff will follow cleaning procedures that are specific to the type
of contamination that is in the garment. 3. Gather the complete set of PPE that requires the Annual Cleaning and
Inspection. Gathering a complete set of PPE is important because while one part of
the ensemble might appear clean, the laundry process includes an inspection during
the Annual Inspection (as defined by NFPA 1851). Every attempt should be made to
send in bunker gear with corresponding serial numbers. The first two numbers in the
serial number indicate the year of manufacture (12XXXXX). The first two numbers
must match on the coat and pant. You can also reference the date of manufacture
(DOM) to confirm the set was made on the same date. This will confirm the PPE is
inspected as an issued set. Often problems that are not apparent are uncovered during
DENVER FIRE DEPARTMENT Topic No: 2106.08
Date: 12-12-18
STANDARD OPERATING GUIDELINE Approved: CDIII
Review Date: 12-12-20
Section:
Topic:
OPERATIONS: EQUIPMENT
Cleaning and Inspection of PPE -
Firefighting Protective Ensemble
Replaces: Same, dated 05-04-18
2106.08 Cleaning and Inspection of PPE – Firefighting Protective Ensemble
Page 3 of 5
this inspection. Based on the findings of this advanced inspection, repairs can be made
or the PPE can be decommissioned. The equipment that should be gathered includes
gloves, structure boots, and hoods that are contaminated with asbestos (hoods are on
an exchange program; no one will have their own hood anymore). When a set of PPE
is sent in due to asbestos contamination, the hoods, shrouds, structure boots, and
gloves shall also be sent for cleaning. 4. Gather the proper shipping materials. The shipping materials include shipping
envelopes and laundry bags. Laundry bags come in blue and yellow. PPE that is not
contaminated should be shipped in a blue laundry bag. Contaminated gear must be
placed in a yellow laundry bag. The contaminated gear MUST be double bagged.
The purpose of using colored bags is twofold: First, using yellow and blue bags
reduces the chance that the PPE will be confused with trash or biohazard and disposed
of in error. Second, using different colored bags allows everyone to easily identify
contaminated PPE. 5. Remove all tools, equipment, and personal effects from the pockets of the
ensemble. This includes all equipment except the DRD (drag rescue device). 6. Package the coat and pant together in a laundry bag. Neatly fold the PPE and try
to remove any excess air from the inside of the laundry bag. Removing the air
facilitates shipping to the laundry facility. Once the air is removed, tie a knot in the
laundry bag to close the bag. Do not use tape to seal the bag. Tape can cause the
laundry bag to tear, exposing people who handle the bag to any possible
contamination. 7. Attach the DFD Bunker Gear Cleaning Form to the laundry bag(s). The form
should be in a shipping envelope. Shipping envelopes are available from the
Warehouse. Do not attach the paperwork or shipping envelope with tape. Tape can
cause the laundry bag to tear. 8. Send the completed package to the District Chief’s House. In the event of a large
number of members that require PPE cleaning and inspection, the company officer or
District Chief can contact the DFD Warehouse to arrange a priority pickup. Sending
the PPE to the District Chief’s station for pickup is considered the normal method of
delivery. 9. Clearly mark any accessory items that you need laundered with your name and
FD ID number. This includes bunking gear, firefighting gloves, structure boots,
suspenders, and helmets. Cleaning of all the items listed above are included in the
laundry vendor’s current contract with the DFD.
REFUSAL OF PPE SHIPMENTS
The Vendor can refuse any shipments that:
• Are contaminated, but the contaminant (or suspected contaminant) is not identified.
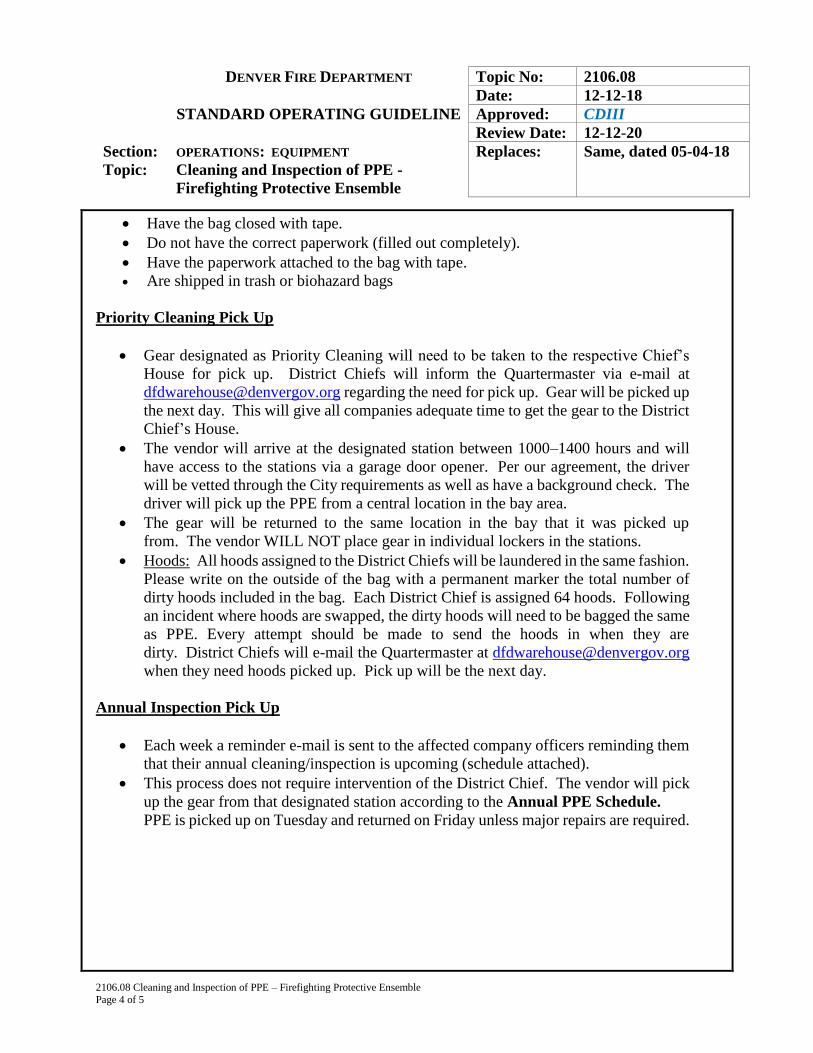
DENVER FIRE DEPARTMENT Topic No: 2106.08
Date: 12-12-18
STANDARD OPERATING GUIDELINE Approved: CDIII
Review Date: 12-12-20
Section:
Topic:
OPERATIONS: EQUIPMENT
Cleaning and Inspection of PPE -
Firefighting Protective Ensemble
Replaces: Same, dated 05-04-18
2106.08 Cleaning and Inspection of PPE – Firefighting Protective Ensemble
Page 4 of 5
• Have the bag closed with tape.
• Do not have the correct paperwork (filled out completely).
• Have the paperwork attached to the bag with tape.
• Are shipped in trash or biohazard bags
Priority Cleaning Pick Up
• Gear designated as Priority Cleaning will need to be taken to the respective Chief’s
House for pick up. District Chiefs will inform the Quartermaster via e-mail at
[email protected] regarding the need for pick up. Gear will be picked up
the next day. This will give all companies adequate time to get the gear to the District
Chief’s House.
• The vendor will arrive at the designated station between 1000–1400 hours and will
have access to the stations via a garage door opener. Per our agreement, the driver
will be vetted through the City requirements as well as have a background check. The
driver will pick up the PPE from a central location in the bay area.
• The gear will be returned to the same location in the bay that it was picked up
from. The vendor WILL NOT place gear in individual lockers in the stations.
• Hoods: All hoods assigned to the District Chiefs will be laundered in the same fashion.
Please write on the outside of the bag with a permanent marker the total number of
dirty hoods included in the bag. Each District Chief is assigned 64 hoods. Following
an incident where hoods are swapped, the dirty hoods will need to be bagged the same
as PPE. Every attempt should be made to send the hoods in when they are
dirty. District Chiefs will e-mail the Quartermaster at [email protected]
when they need hoods picked up. Pick up will be the next day.
Annual Inspection Pick Up
• Each week a reminder e-mail is sent to the affected company officers reminding them
that their annual cleaning/inspection is upcoming (schedule attached).
• This process does not require intervention of the District Chief. The vendor will pick
up the gear from that designated station according to the Annual PPE Schedule.
PPE is picked up on Tuesday and returned on Friday unless major repairs are required.
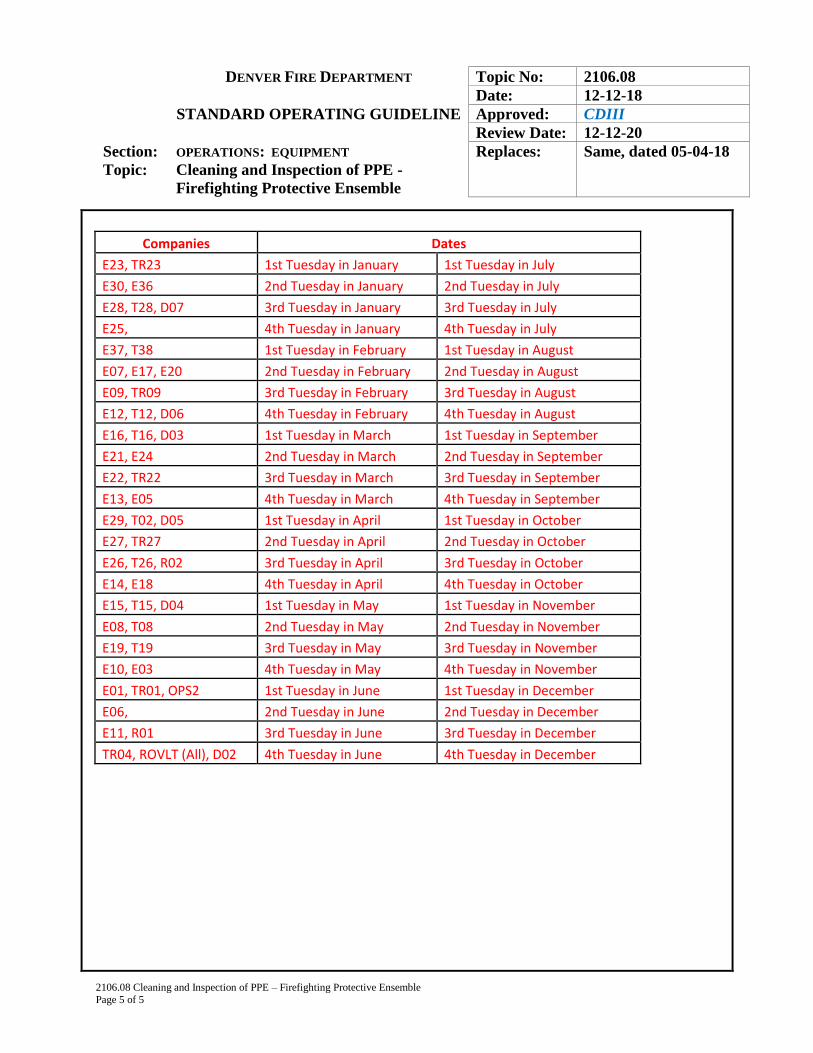
DENVER FIRE DEPARTMENT Topic No: 2106.08
Date: 12-12-18
STANDARD OPERATING GUIDELINE Approved: CDIII
Review Date: 12-12-20
Section:
Topic:
OPERATIONS: EQUIPMENT
Cleaning and Inspection of PPE -
Firefighting Protective Ensemble
Replaces: Same, dated 05-04-18
2106.08 Cleaning and Inspection of PPE – Firefighting Protective Ensemble
Page 5 of 5
Companies Dates
E23, TR23 1st Tuesday in January 1st Tuesday in July
E30, E36 2nd Tuesday in January 2nd Tuesday in July
E28, T28, D07 3rd Tuesday in January 3rd Tuesday in July
E25, 4th Tuesday in January 4th Tuesday in July
E37, T38 1st Tuesday in February 1st Tuesday in August
E07, E17, E20 2nd Tuesday in February 2nd Tuesday in August
E09, TR09 3rd Tuesday in February 3rd Tuesday in August
E12, T12, D06 4th Tuesday in February 4th Tuesday in August
E16, T16, D03 1st Tuesday in March 1st Tuesday in September
E21, E24 2nd Tuesday in March 2nd Tuesday in September
E22, TR22 3rd Tuesday in March 3rd Tuesday in September
E13, E05 4th Tuesday in March 4th Tuesday in September
E29, T02, D05 1st Tuesday in April 1st Tuesday in October
E27, TR27 2nd Tuesday in April 2nd Tuesday in October
E26, T26, R02 3rd Tuesday in April 3rd Tuesday in October
E14, E18 4th Tuesday in April 4th Tuesday in October
E15, T15, D04 1st Tuesday in May 1st Tuesday in November
E08, T08 2nd Tuesday in May 2nd Tuesday in November
E19, T19 3rd Tuesday in May 3rd Tuesday in November
E10, E03 4th Tuesday in May 4th Tuesday in November
E01, TR01, OPS2 1st Tuesday in June 1st Tuesday in December
E06, 2nd Tuesday in June 2nd Tuesday in December
E11, R01 3rd Tuesday in June 3rd Tuesday in December
TR04, ROVLT (All), D02 4th Tuesday in June 4th Tuesday in December
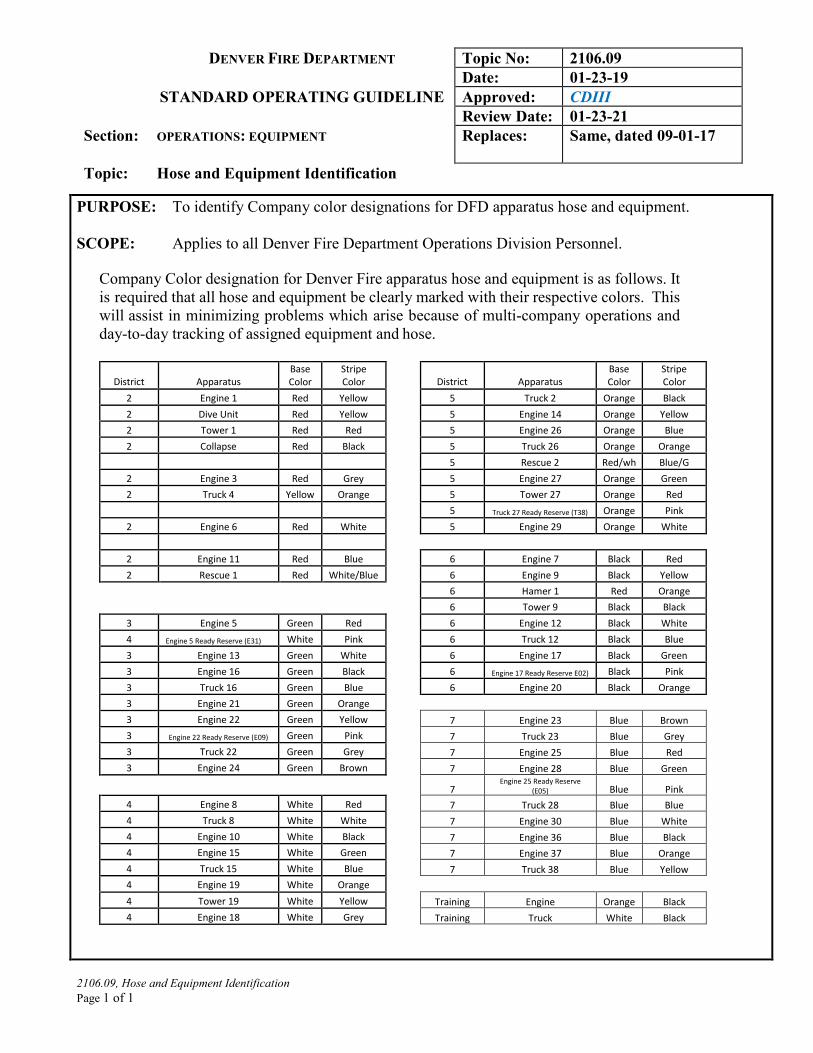
DENVER FIRE DEPARTMENT Topic No: 2106.09 Date: 01-23-19 STANDARD OPERATING GUIDELINE Approved: CDIII Review Date: 01-23-21 Section:
OPERATIONS: EQUIPMENT Replaces: Same, dated 09-01-17
Topic: Hose and Equipment Identification
2106.09, Hose and Equipment Identification Page 1 of 1
PURPOSE: To identify Company color designations for DFD apparatus hose and equipment. SCOPE: Applies to all Denver Fire Department Operations Division Personnel.
Company Color designation for Denver Fire apparatus hose and equipment is as follows. It is required that all hose and equipment be clearly marked with their respective colors. This will assist in minimizing problems which arise because of multi-company operations and day-to-day tracking of assigned equipment and hose.
District
Apparatus Base Color
Stripe Color
District
Apparatus
Base Color
Stripe Color
2 Engine 1 Red Yellow 5 Truck 2 Orange Black 2 Dive Unit Red Yellow 5 Engine 14 Orange Yellow 2 Tower 1 Red Red 5 Engine 26 Orange Blue 2 Collapse Red Black 5 Truck 26 Orange Orange 5 Rescue 2 Red/wh
Blue/G
2 Engine 3 Red Grey 5 Engine 27 Orange Green 2 Truck 4 Yellow Orange 5 Tower 27 Orange Red
5 Truck 27 Ready Reserve (T38) Orange Pink 2 Engine 6 Red White 5 Engine 29 Orange White
2 Engine 11 Red Blue 6 Engine 7 Black Red 2 Rescue 1 Red White/Blue 6 Engine 9 Black Yellow 6 Hamer 1 Red Orange
6 Tower 9 Black Black 3 Engine 5 Green Red 6 Engine 12 Black White 4 Engine 5 Ready Reserve (E31) White Pink 6 Truck 12 Black Blue 3 Engine 13 Green White 6 Engine 17 Black Green 3 Engine 16 Green Black 6 Engine 17 Ready Reserve E02) Black Pink 3 Truck 16 Green Blue 6 Engine 20 Black Orange 3 Engine 21 Green Orange 3 Engine 22 Green Yellow 7 Engine 23 Blue Brown 3 Engine 22 Ready Reserve (E09) Green Pink 7 Truck 23 Blue Grey 3 Truck 22 Green Grey 7 Engine 25 Blue Red 3 Engine 24 Green Brown 7 Engine 28 Blue Green
7 Engine 25 Ready Reserve
(E05) Blue Pink 4 Engine 8 White Red 7 Truck 28 Blue Blue 4 Truck 8 White White 7 Engine 30 Blue White 4 Engine 10 White Black 7 Engine 36 Blue Black 4 Engine 15 White Green 7 Engine 37 Blue Orange 4 Truck 15 White Blue 7 Truck 38 Blue Yellow 4 Engine 19 White Orange 4 Tower 19 White Yellow Training Engine Orange Black 4 Engine 18 White Grey Training Truck White Black

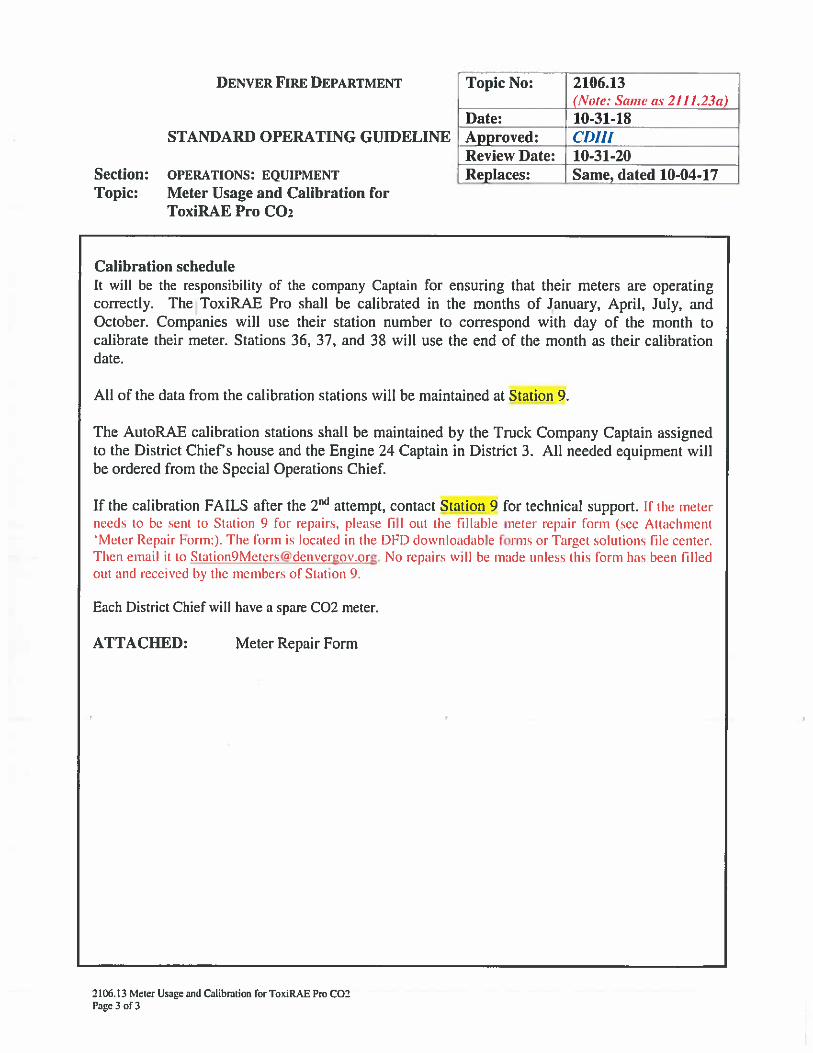
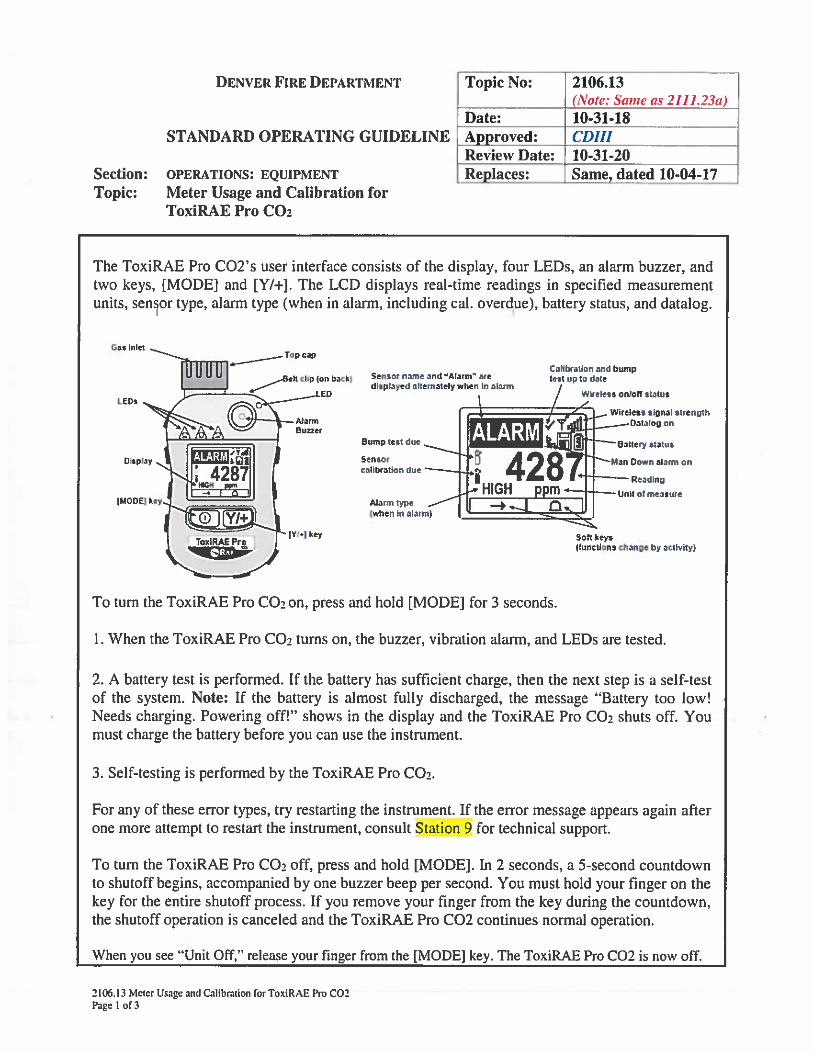
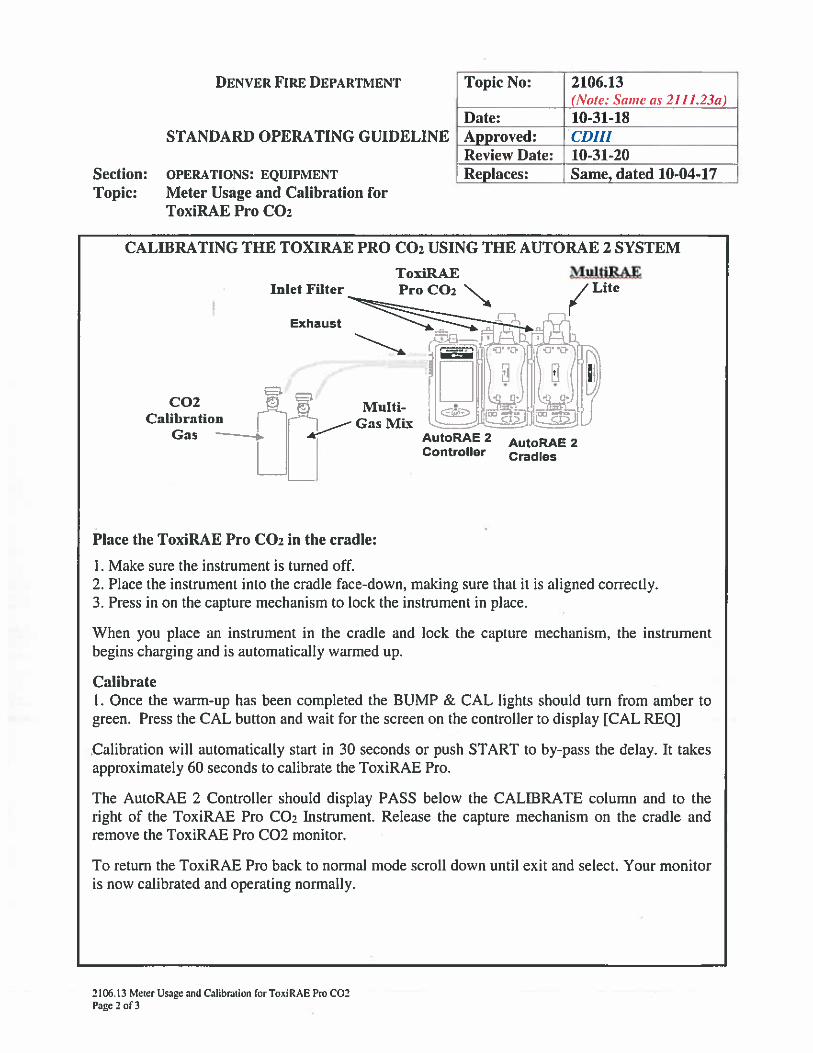
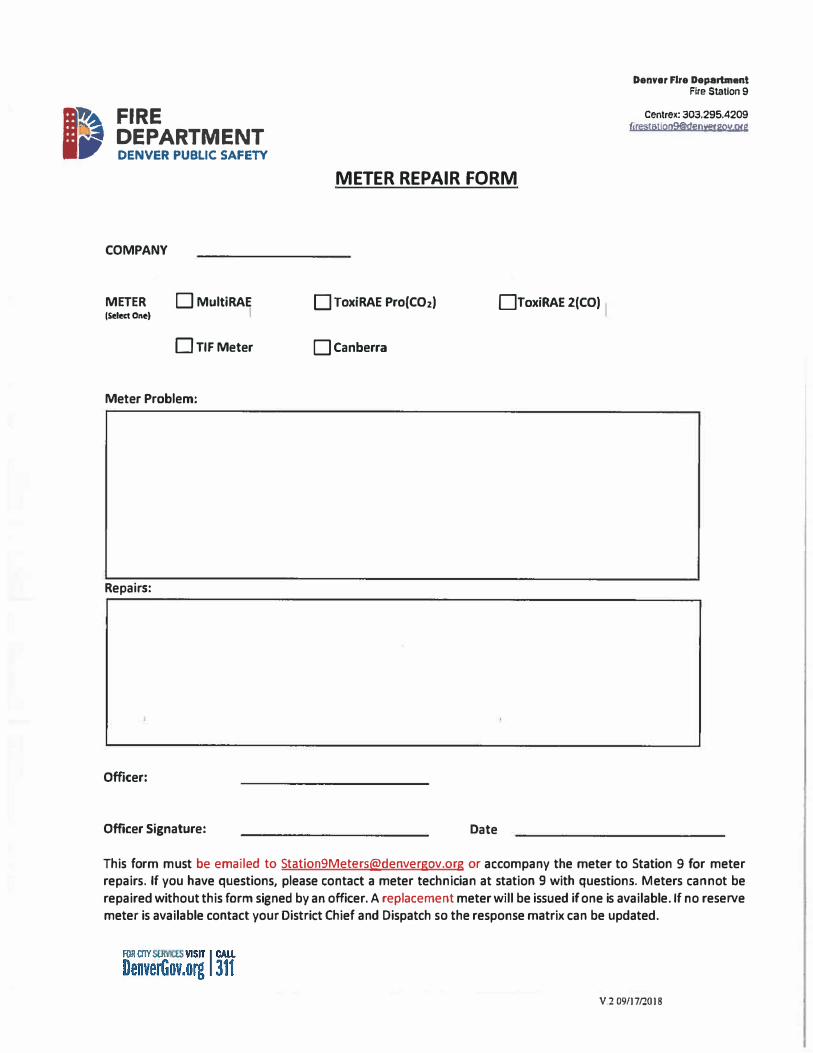
Ii',� FIRE
;t DEPARTMENT 111 DENVER PUBLIC SAFETY
COMPANY
METER (Select Onel
OMultiRAE I
OTIFMeter
Meter Problem:
Repairs:
Officer:
Officer Signature:
METER REPAIR FORM
0 ToxiRAE Pro(C0z) OroxiRAE 2(C0)
Ocanberra
Date
Denver Fire Department Fire Station 9
Centrex: 303.295.4209 tm:ststlg�nmm'jJl(e
This form must be emailed to [email protected] or accompany the meter to Station 9 for meter repairs. If you have questions, please contact a meter technician at station 9 with questions. Meters cannot be repaired without this form signed by an officer. A replacement meter will be issued if one is available. If no reserve meter is available contact your District Chief and Dispatch so the response matrix can be updated.
V.2 09/17/2018
DENVER FIRE DEPARTMENT Topic No: 2107.01Date: 04-20-11
STANDARD OPERATING GUIDELINE Approved: TAB Review Date: 04-20-13
Section: OPERATIONS: COMMUNICATION Replaces: Ops Dir 116.09 (01-01-99)
Topic: Incident Communications
2107.01 Incident Communications Page 1 of 2
PURPOSE: To ensure safe and consistent incident communications
SCOPE: Applies to All DFD Personnel when operating at incidents or training
I. RADIO COMMUNICATIONS
A. Initial tactical channels are assigned by DFD Dispatch.
B. The tactical channel can only be changed by the Incident Commander.
C. In the event that a tactical channel change is made after incidentoperations have been initiated, consideration should be given toconducting a PAR.
D. Radio communications shall follow the model identified in NIMS.
E. Communications shall be professional in nature at all times.
F. Apparatus Identification1. The “radio name” used in Department radio communications is
according to the particular apparatus or apparatus type rather thanthe position filled.a. Examples: Engine 22 relocated to Station 13 is to respond
as “Engine 22” rather than as “Engine 13.”b. If Tower 4 changes to a standard aerial, it then becomes
Truck 4.2. The Denver Fire Department will use the term “Engine” rather
than “Pumper.”3. Units shall answer a call from Fire Dispatch with their current
location. Even with GPS capabilities, the dispatcher map can becrowded, not zoomed in, or the GPS unit has not updated since thelast status change.
G. Echoing1. Echoing is essential for relaying critical information and for
confirming that assignments are received and understood.2. The “echo” should be the last segment of the complete radio
message.
DENVER FIRE DEPARTMENT Topic No: 2107.01Date: 04-20-11
STANDARD OPERATING GUIDELINE Approved: TAB Review Date: 04-20-13
Section: OPERATIONS: COMMUNICATION Replaces: Ops Dir 116.09 (01-01-99)
Topic: Incident Communications
2107.01 Incident Communications Page 2 of 2
a. Example: “Truck 8, Broadway Command, take your crewto the roof of the fire building to open a ventilation hole.”
b. The “echoed” response would be as follows: “BroadwayCommand, Truck 8, copy, proceeding to the roof of the firebuilding to open a ventilation hole.”
II. FACE-TO-FACE COMMUNICATIONS
Face-to-face communication is recommended between members of a group ordivision whenever possible.
III. ADDITIONAL COMMUNICATION TECHNOLOGIES
Incident dynamics may dictate the need for the use of additional communicationtechnologies, especially when relaying sensitive, lengthy, detailed information, orspecial operations. These include but are not limited to:
A. Telephones, both hardwired and wirelessB. HandsetsC. InternetD. Voice AmplifiersE. Building radios
REFERENCES: None
DENVER FIRE DEPARTMENT Topic No: 2107.06
Date: 03-08-17
STANDARD OPERATING GUIDELINE Approved: CD
Review Date: 03-08-19
Section:
Topic:
OPERATIONS: COMMUNICATIONS
Radio Communication with Denver
Police
Replaces: Part of Same, dated
08-02-13 (other part
moved to new 2111.24)
2107.06 Radio Communication with Denver Police
Page 1 of 2
PURPOSE: To expedite service to the public, protect responders on scene, and enhance
communication between agencies
SCOPE: Applies to all Operations Division personnel requesting assistance from the Denver
Police Department
I. DENVER FIRE DEPARTMENT PERSONNEL NEEDING POLICE
ASSISTANCE
A. Need for Denver Police cover but not Code 10 – When the need for Police cover
exists but the situation does not require a police response involving use of lights and
siren
1. The Incident Commander will select the appropriate Police Dispatch channel and
request to speak with the DPD dispatcher.
2. The Incident Commander will relay a brief description of their circumstance and
their request for Police cover. Example: “Engine 3 is at 24th and Welton with a
visibly agitated party. Engine 3 needs a police officer to this location for cover.”
3. The Incident Commander will then communicate to Fire Dispatch that the request
for police cover has been made on the police channel.
B. Need for Denver Police Code 10 – A threat to the safety of a civilian or to that of DFD
members is imminent. DPD will consider this High Priority and send police cover
immediately.
The Incident Commander will communicate this need through Fire Dispatch.
II. INCIDENTS REQUIRING DENVER FIRE DEPARTMENT STAGING WHILE
DENVER POLICE OFFICERS SECURE THE SCENE
The following radio procedures are recommended when members of the Denver Fire
Department are dispatched to an incident where the conditions deem it necessary to
stage apparatus and crew in a safe location remote from the incident until police have
secured the scene:
1. Contact Fire Dispatch with arrival and staging location.
2. Using a separate radio, contact Denver Police officers on the appropriate channel
to relay information on arrival, staging location, and apparatus designation.
3. Police will relay information when the scene is safe for entry by fire personnel.
DENVER FIRE DEPARTMENT Topic No: 2107.06
Date: 03-08-17
STANDARD OPERATING GUIDELINE Approved: CD
Review Date: 03-08-19
Section:
Topic:
OPERATIONS: COMMUNICATIONS
Radio Communication with Denver
Police
Replaces: Part of Same, dated
08-02-13 (other part
moved to new 2111.24)
2107.06 Radio Communication with Denver Police
Page 2 of 2
4. If, after a reasonable amount of time, “Scene-Safe” contact from Denver Police is
not received, the fire officer may contact the Police Department Incident
Commander on the appropriate police channel to receive confirmation of the scene
status.
5. Once “Scene-Safe” contact has been received from Denver Police, Fire will relay
information to Fire Dispatch.
DENVER FIRE DEPARTMENT Topic No: 2110.01
Date: 08-30-17
STANDARD OPERATING GUIDELINE Approved: CDIII
Review Date: 08-30-19
Section: OPERATIONS: SAFETY Replaces: Same, dated 08-21-14
Topic: Rapid Intervention Team
2110.01 Rapid Intervention Team
Page 1 of 4
PURPOSE: To identify the composition, response, and duties of the Rapid Intervention
Team and/or RIT Group / Branch
SCOPE: Applies to all Operations, Dispatch, and Support Service members involved
in or assisting with an incident where a RIT has been assigned
Section A: Composition
1. At the onset of the incident, the dispatcher shall assign a company the
designation of RIT.
2. Any company assigned to the RIT function shall be staffed with a minimum
of four firefighters. If the company has less than four firefighters, Dispatch
and the first due Chief shall be notified immediately by the responding
Company Officer.
3. Depending on the size and scope of the incident, additional companies may
be assigned Level I RIT duties.
Section B: Response
1. A RIT shall be dispatched Code 10 to all structure fires and to any incident
where firefighters could potentially enter an IDLH atmosphere.
2. Any company assigned as RIT will generally not assume a firefighting or
emergency operations role unless activated or otherwise directed by the IC.
RIT should only be reassigned after a new RIT has been established.
However, should the RIT have to take immediate action to affect a
firefighter rescue and/or address some other immediate safety-related issue,
they shall notify the IC immediately.
3. At the termination of the incident, a PAR should be called to assure
accountability of all on-scene companies prior to releasing the RIT from the
scene.
Section C: Pre-Activation Duties
1. Upon arrival, the RIT shall report to the Incident Commander with all
members, full PPE, forcible entry/exit tools, Thermal Imaging Camera
(TIC), and RIT pack. The RIT officer should receive an update on situation
status and accountability from the IC.
2. Prior to activation, the RIT should remain outside of the IDLH atmosphere
and be fully prepared to deploy immediately to assist troubled firefighters.
3. The RIT shall constantly monitor the designated tactical channel and
maintain a continual working knowledge of the location of all companies
operating in and around the incident.

DENVER FIRE DEPARTMENT Topic No: 2110.01
Date: 08-30-17
STANDARD OPERATING GUIDELINE Approved: CDIII
Review Date: 08-30-19
Section: OPERATIONS: SAFETY Replaces: Same, dated 08-21-14
Topic: Rapid Intervention Team
2110.01 Rapid Intervention Team
Page 2 of 4
4. The RIT team should perform a 360-degree survey, if possible, utilizing the
RIT RECON acronym as a size up tool, and report any pertinent information
to the Incident Commander immediately. The RIT RECON acronym stands
for: R – Rescue Plan; E – Egress/Access; C – Construction; O – Outside
Survey; N – Nasty Hazards.
Section D: Equipment
1. The following equipment shall be the minimum that a RIT should report to
the command post with:
a. Thermal Imaging Camera
b. RIT Pack:
1 300’ rope bag with 3 - 25’ Group Search Kits
1 Five ring harness with 1 large carabiner
1 Pair of tin snips
1 75 min. air cylinder, face piece and regulator
c. Hand tools (forcible entry/exit)
d. Portable radios
2. All truck companies are equipped with a RIT pack. The location of the pack
shall be clearly marked with a gold firefighter sticker that indicates the
location of a RIT pack within that compartment. If the gold sticker is not
present, the compartment with the RIT pack should be clearly marked to
alert members to its location. Members shall become very familiar with
the contents and operation of the RIT pack and its location on the truck
companies with which they normally respond.
Section E: Activation
Incident Commander Responsibilities:
Upon report of a “Mayday” (lost, downed, trapped, or missing firefighter), the IC
should:
1. Acknowledge Mayday
2. Deploy RIT
3. Notify Dispatch of RIT activation
4. Start PAR to verify ID of crew and firefighter(s) to help determine last
location of member(s)
The IC should consider the following:

DENVER FIRE DEPARTMENT Topic No: 2110.01
Date: 08-30-17
STANDARD OPERATING GUIDELINE Approved: CDIII
Review Date: 08-30-19
Section: OPERATIONS: SAFETY Replaces: Same, dated 08-21-14
Topic: Rapid Intervention Team
2110.01 Rapid Intervention Team
Page 3 of 4
1. Establishing a RIT Group / Branch to coordinate resolution of the Mayday
situation;
2. Leaving the RIT Group / Branch companies and the firefighter(s) in distress
on the initial tactical channel during the rescue operation; all uninvolved
units may move to a separate tactical channel as designated by the IC;
3. Calling a PAR in the case of a radio channel change for units already
operating at the emergency scene, to ensure all companies have tuned to the
correct channel;
4. The need for additional resources based on the scope and complexity of the
incident, including but not limited to the following:
a. Rescue One
b. Tower One
c. Collapse Unit
d. Hamer One
e. Additional alarms
f. DFD Structural Engineer
g. DFD USAR personnel
h. Air Shovel
i. Mutual Aid;
5. Assigning a Chief Officer to the RIT operation; and
6. Withdrawing unnecessary companies from affected areas based on a
risk/benefit analysis of continuing operations that are not directly associated
with rescue efforts.
Dispatch Responsibilities:
Upon notification of a RIT activation, the dispatcher shall do the following:
1. Notify the Dispatch Officer of the Mayday call as soon as possible;
2. Acknowledge the Mayday call and simulcast the alert tone calling for radio
silence, and
3. Activate Level II RIT Group / Branch, which shall consist of not less than
the following:
a. One Engine
b. One Truck
c. One Assistant Chief
RIT Group / Branch Responsibilities:
1. The primary mission of the Level I RIT is to locate and stabilize the
victim(s) and report the location, the victim(s)’ condition, and extrication
resource needs to the RIT Group Supervisor / Branch Director. Professional
DENVER FIRE DEPARTMENT Topic No: 2110.01
Date: 08-30-17
STANDARD OPERATING GUIDELINE Approved: CDIII
Review Date: 08-30-19
Section: OPERATIONS: SAFETY Replaces: Same, dated 08-21-14
Topic: Rapid Intervention Team
2110.01 Rapid Intervention Team
Page 4 of 4
knowledge and experience should dictate actions. If a rescue can be made
with the immediate resources available, the rescue should be completed.
2. The mission of the Level II RIT Group / Branch is to first complete any
Level I RIT duties that were unable to be performed by the initial RIT team
such as locating the downed firefighter, then progress toward extrication
and rescue. The RIT Group Supervisor / Branch Director should consider
the following:
a. Assigning the Level II RIT Engine to secure an additional water
supply and deploy a protective hose line for protection of firefighter
rescue
b. Assigning the Level II RIT Truck/Tower to perform rescue and
extrication
3. Consider the need for additional equipment such as:
a. Power saws
b. Extrication tools
c. Air bags
d. Protective hose lines
e. Five gas meter
f. Lights
g. Additional Ropes
h. Ladders
i. Hose lines
4. Based on the size and complexity of the incident, the RIT Group Supervisor
/ Branch Director should consider the need for additional RIT resources.
5. The RIT Group Supervisor / Branch Director should keep the IC updated
on the progress of the rescue and needed resources.
REFERENCES: Firescue Interactive, Rapid Intervention Team Recon, FDTN Volume 6,
Issue 12, December 2002, David McGrail
Final Report, Southwest Supermarket Fire, NIOSH,
http://phoenix.gov/FIRE/report.pdf, March 12, 2002
Fire Engineering, Engine Company Support of RIT/FAST Operations,
Andrew Fredericks
Intervention for Rescue of Members SOG – Aurora Fire Department,
Colorado
Rapid Intervention Crew SOP – West Metro Fire Rescue, Colorado
DFD Training Manual
DENVER FIRE DEPARTMENT Topic No: 2110.02
Date: 06-12-17
STANDARD OPERATING GUIDELINE Approved: CD
Review Date: 06-12-19
Section: OPERATIONS: SAFETY Replaces: Same, dated 08-21-14
Topic: Mayday Guidelines for Emergency
Incidents
2110.02 Mayday Guidelines for Emergency Incidents
Page 1 of 3
1
PURPOSE: To identify the roles and responsibilities of any individual who initiates a
Mayday and of all members involved at an incident where a Mayday has
been declared
SCOPE: Applies to all Operations, Dispatch, and Support Service members
I. MAYDAY PARAMETERS
A Mayday radio transmission is to be used to initiate aid in situations which are life
threatening to firefighters. Anyone on the emergency incident may declare a
Mayday as conditions warrant.
A Mayday shall be used in the following situations:
A. By personnel who are lost, trapped, or in trouble
B. By the IC, company officer, group supervisor, branch director, or other
member who cannot account for an assigned company or firefighter.
C. By a member who witnesses or has confirmed that a firefighter is in trouble.
The term “Mayday” shall be reserved only to report lost or trapped firefighters. The
term “Urgent Message” shall be used to report other emergencies or high risk
hazards.
II. MAYDAY FIREFIGHTER RESPONSIBILITIES
A. Members may declare a Mayday in one of two ways:
1. Activating the red emergency button on the member’s portable radio
followed by “Mayday Mayday Mayday.” This creates an
‘emergency auto key timeout’ that gives the user up to 15 seconds
of uninterrupted air time for transmitting emergent information
without having to hold the push to talk. The red emergency button
must be depressed initially for 2 seconds to activate the ‘emergency
auto key timeout.’
2. Transmitting a verbal radio message starting with “Mayday Mayday
Mayday.” If no acknowledgement is received by the I.C. on the
tactical channel that the incident is operating on, the firefighter can
switch the channel selector on the portable radio to either the number
1 or 16 position (DFD Channel 1) and repeat the Mayday. DFD
DENVER FIRE DEPARTMENT Topic No: 2110.02
Date: 06-12-17
STANDARD OPERATING GUIDELINE Approved: CD
Review Date: 06-12-19
Section: OPERATIONS: SAFETY Replaces: Same, dated 08-21-14
Topic: Mayday Guidelines for Emergency
Incidents
2110.02 Mayday Guidelines for Emergency Incidents
Page 2 of 3
2
Dispatchers should receive this Mayday and inform the IC
immediately.
B. After declaring the Mayday, if possible, the member should transmit the
following additional information:
1. WHO: Unit designation and riding position of declaring member,
including the number of involved crew members affected by life
threatening situation
2. WHERE: Your current or last known location
3. WHAT: What resources you need to resolve the situation
4. WHY: Why you are declaring a Mayday
The member should transmit this information in a calm and clear voice.
Examples of full Mayday declaration:
“Mayday, Mayday, Mayday. Engine One Alpha, two members, second
floor alpha side, we need a ladder to the window, there has been a floor
collapse and we are trapped.”
“Mayday, Mayday, Mayday. Tower One Charlie, one member; my
assignment was primary search on the third floor. Activate the RIT team.
I’m disoriented and low on air.”
C. Activate PASS device after transmitting Mayday information.
D. Maintain crew integrity.
E. Evaluate the situation and then balance your efforts of performing a breach,
evading, entrenching, or easy breathing based on your remaining air supply,
any injuries, and your personal capabilities.
II. IC RESPONSIBILITIES
The IC shall:
A. Acknowledge Mayday from firefighter.
B. Deploy the Rapid Intervention Team to assist with the Mayday situation.
C. Depending on the severity of the situation and the circumstances
surrounding the incident, the IC should consider requesting a Level II RIT
assignment or an additional alarm assignment to affect rescue of the trapped
or lost member.
DENVER FIRE DEPARTMENT Topic No: 2110.02
Date: 06-12-17
STANDARD OPERATING GUIDELINE Approved: CD
Review Date: 06-12-19
Section: OPERATIONS: SAFETY Replaces: Same, dated 08-21-14
Topic: Mayday Guidelines for Emergency
Incidents
2110.02 Mayday Guidelines for Emergency Incidents
Page 3 of 3
3
III. DISPATCH RESPONSIBILITIES
A. Acknowledge Mayday, if not done so by the IC, in a timely fashion.
B. Confirm the radio LID with the unit designation of the Mayday firefighter.
C. Clear the air with alert tone indicating radio silence and then echo the radio
transmission from the firefighter declaring the Mayday.
IV. ON-SCENE COMPANIES’ RESPONSIBILITIES
A. Acknowledge Mayday if Dispatch or IC do not acknowledge in a timely
fashion. Relay information to IC or Dispatch.
B. Upon activation of Mayday, all companies shall maintain radio silence until
notified by Command. Companies shall monitor the radios for any changes
in tactical radio channels.
C. Companies already operating at the emergency incident must continue to
carry out their assignments unless:
1. They are able to immediately assist with the Mayday situation, and
2. Doing so will not adversely affect emergency incident operations,
and 3. They have received specific authorization from the Incident
Commander
REFERENCES: Elgin Fire Department Safety – Lost/Trapped Firefighters
Operations Policy #2023.04 issued 10/21/05
DENVER FIRE DEPARTMENT Topic No: 2110.03
Date: 08-30-17
STANDARD OPERATING GUIDELINE Approved: CDIII
Review Date: 08-30-19
Section: OPERATIONS: SAFETY Replaces: Same, dated 03-22-11
Topic: Personnel Accountability System
2110.03 Personnel Accountability System
Page 1 of 4
PURPOSE: To assist in tracking members assigned to an emergency incident
SCOPE: Applies to all operations and support service members involved in or
assisting at an emergency incident
I. I.D. TAGS
A. Members shall place ID tag on the Company Identification Ring (CIR) at
the beginning of the shift and remove ID tag of the member being
relieved.
B. Company officers are responsible for ensuring that the ID tags on the CIR
are consistent with staffing assignment for the shift.
C. Members shall remove ID tag from rig any time they are individually out
of service during the shift (i.e. EMT recertification, training, court, etc.)
D. Company officers are responsible for ensuring ride-a-long participants are
represented on a generic ID tag on the CIR for the duration of the ride.
E. Support service members dispatched to an emergency scene are
responsible for having their Fire Department ID tags available. If assigned
to tasks inside of a hazard zone, they shall check in with the IC or
designated Accountability Officer and leave their Fire Department ID to
ensure accountability.
F. It is prohibited to alter or deface Fire Department ID tags in any way.
Company officers will ensure accurate and non-altered identification cards
are utilized. Members shall requisition to replace ID tags immediately if
lost or damaged.
II. ACCOUNTABILITY
A. Implementation of the IC system, managing span of control, implementing
unity of command (chain), and establishing clear communication help to
ensure accountability.
B. The IC is responsible for accountability for the duration of the emergency
incident unless an Accountability Officer has been designated.
DENVER FIRE DEPARTMENT Topic No: 2110.03
Date: 08-30-17
STANDARD OPERATING GUIDELINE Approved: CDIII
Review Date: 08-30-19
Section: OPERATIONS: SAFETY Replaces: Same, dated 03-22-11
Topic: Personnel Accountability System
2110.03 Personnel Accountability System
Page 2 of 4
C. The company officer shall be responsible for updating Command of any
changes in crew location, tactical function, or upon splitting the crew.
D. When operating in an IDLH atmosphere, the Incident Commander or
company officer shall be responsible for ensuring that assigned members
are operating in teams of two or more.
III. LEVEL I ACCOUNTABILITY
A. Companies arriving to any hazard area shall leave the CIR, with ID tags,
on the apparatus in the officer’s area of the cab.
B. All responding units and support personnel shall inform the IC or
designated staging officer when arriving on scene and shall stage until
assigned by the IC.
IV. LEVEL II ACCOUNTABILITY
A. Level II Accountability should be considered upon (but not limited to)
activation of a 2nd Alarm.
B. Level II Accountability shall be established (but not limited to) extended
operational periods, the creation of branches, working high-rise fires, or
when operating over large geographical areas.
C. When the IC mandates Level II Accountability, an Accountability Officer
shall be established and the CIRs shall be collected. The Accountability
Officer shall be responsible for tracking the location and assignment of
each company operating at the scene by the use of Tablet Command,
CIRs, and other tools as necessary.
D. The Accountability Operations shall be based at the command post.
V. COMMUNICATIONS
A. Upon completion of an assigned task, members shall utilize unity of
command (chain) to report status.
B. Radio traffic shall be preceded by unit designation, assignment, and crew
location.
DENVER FIRE DEPARTMENT Topic No: 2110.03
Date: 08-30-17
STANDARD OPERATING GUIDELINE Approved: CDIII
Review Date: 08-30-19
Section: OPERATIONS: SAFETY Replaces: Same, dated 03-22-11
Topic: Personnel Accountability System
2110.03 Personnel Accountability System
Page 3 of 4
VI. SITUATIONAL AWARENESS
All personnel are accountable for the safety of themselves and other members.
A. Crew members shall maintain a constant awareness of the location and
function of all members working with them.
B. All members shall maintain an awareness of each other’s physical
condition and shall use unity of command (chain) to request help, relief,
and reassignment of fatigued crew members.
C. When working in an IDLH atmosphere, team members must always be in
contact with each other through one of the following methods: voice (not
by radio), visual, or touch.
VII. PERSONNEL ACCOUNTABILITY REPORT (PAR)
A. A Personnel Accountability Report (PAR) involves a roll call of personnel
assigned to an incident to account for welfare and confirm location and
assignment.
B. For the branch director, division/group supervisor, or company
officer/single resource, a PAR is confirmation attesting to the safety and
welfare of all members of each company assigned.
C. Company officers shall include a report of their location and tactical
assignment when contacted for a PAR.
D. Reports of PAR should be conducted face-to-face within the
company/single resource, group, division, or branch whenever possible.
E. In the event of an evacuation, crews should report promptly to Command
to ensure the accountability of all members.
VIII. EVENTS REQUIRING A PAR
A. Report of firefighter(s) missing or transmission of a “Mayday”
B. Major change of conditions or catastrophic event (i.e. flashover, collapse,
explosion, etc.)
C. Change of mode or strategy
D. Change of tactical radio channel
E. Time intervals, as designated by the IC (accountability measure)
DENVER FIRE DEPARTMENT Topic No: 2110.03
Date: 08-30-17
STANDARD OPERATING GUIDELINE Approved: CDIII
Review Date: 08-30-19
Section: OPERATIONS: SAFETY Replaces: Same, dated 03-22-11
Topic: Personnel Accountability System
2110.03 Personnel Accountability System
Page 4 of 4
F. Prior to the release of the RIT from the emergency scene
REFERENCES: Golden Fire Department – SOG #501, Personnel Accountability System,
issued 10/27/00
Mt. Lebanon Fire Department – SOG #210.3, Accountability, issued 8/08
DENVER FIRE DEPARTMENT Topic No: 2111.01
Date: 06-12-17
STANDARD OPERATING GUIDELINE Approved: CD
Review Date: 06-12-19
Section: OPERATIONS: INCIDENT OPERATIONS Replaces: Same, dated 03-22-11
Topic: Tactical Considerations at Emergency
Incidents
2111.01 Tactical Considerations at Emergency Incidents
Page 1 of 3
PURPOSE: To provide direction when a crew is in doubt about a course of action at an
emergency scene
SCOPE: Applies to all members in a situation where a course of action must be
initiated at an emergency
When in Doubt:
1. Crew integrity must be maintained for safety and coordination of operations. Members
should work in teams of two or more at all incidents.
2. All safety and protective equipment shall be used at all incidents unless otherwise
authorized (i.e. SCBA at dumpster and car fires, eye protection at medical
emergencies, etc.)
3. Safety of Department members must come before speed or competition at any
incident.
4. Officers must maintain contact with all crew members and know their locations at
all times.
5. When in doubt at a natural gas emergency, turn off your radio.
6. First in Engine should lay a supply line to obvious working fires and attack the
fire as rapidly as possible.
7. When in doubt, utilize a 2-1/2” inch hand line (volume, pressure, staffing, etc.)
8. 1-3/4” hand lines should be limited to 300 feet.
9. At auto accidents with trapped victims, a minimum 1-3/4” line shall be used and a
supply line lay to the Engine, if possible.
10. Auto fires require a 1-3/4” line minimum to protect the crew and affect
extinguishment.
11. Reels or red lines should never be stretched into buildings for firefighting.
12. At auto accidents, members should not enter the vehicle until it is stabilized and a
protective line is laid.
DENVER FIRE DEPARTMENT Topic No: 2111.01
Date: 06-12-17
STANDARD OPERATING GUIDELINE Approved: CD
Review Date: 06-12-19
Section: OPERATIONS: INCIDENT OPERATIONS Replaces: Same, dated 03-22-11
Topic: Tactical Considerations at Emergency
Incidents
2111.01 Tactical Considerations at Emergency Incidents
Page 2 of 3
13. The Humat Valve shall be used for maximum effective use of an Engine. If a
situation dictates that the HUMAT valve cannot be used for the initial water
supply, this information shall be communicated over the tactical channel to all
responding units.
14. Engines should be used to their capacity before other hydrants are used.
15. 5” hose should be laid in such a manner as to not block intersections or streets, if
possible.
16. Crews and apparatus should not be committed to work where they are exposed to
falling high voltage power lines.
17. When it becomes apparent that opposing lines are operating, consideration should
be given to shutting one line down.
18. At all incidents, the first truck officer or second arriving engine officer at the
scene shall assume command of the incident.
19. Apparatus officers are in charge at still alarms and must make their own
decisions. Dispatchers can not make decisions for officers in the field.
20. When in doubt about the need for help at an incident, call for help.
21. At any fire incident where there are burned victims or fatalities, the call list must
be made and an arson investigator should respond.
22. When leaving a building where there is not a representative available, leave a note
that the Fire Department was present and of the actions taken (see 2111.08a,
Notice of Property Entrance for Investigation of Emergency Form, which is
obtained through Fire Prevention Division.). Make sure the building is secure and
the alarm system reset.
23. All officers and members should be aware of and work within the design
limitations of their apparatus and equipment.
24. Do not be in a hurry to pick up responding apparatus until the incident is
thoroughly investigated.
DENVER FIRE DEPARTMENT Topic No: 2111.01
Date: 06-12-17
STANDARD OPERATING GUIDELINE Approved: CD
Review Date: 06-12-19
Section: OPERATIONS: INCIDENT OPERATIONS Replaces: Same, dated 03-22-11
Topic: Tactical Considerations at Emergency
Incidents
2111.01 Tactical Considerations at Emergency Incidents
Page 3 of 3
25. If the situation does not feel right, it probably is not, so take the time to evaluate
your situation.
26. Firefighters should not use extinguishers or hose lines furnished in buildings,
except as a last resort.
27. At all incidents, Opticom should be turned off to aid visibility and release traffic
control devices.
28. At auto accidents, apparatus should be placed to protect firefighters and victims
from oncoming traffic.
29. Master streams should not be used when people are still inside the building,
except in extreme cases.
30. Firefighters entering buildings should bring all protective equipment and tools
with them to save time.
31. Any officer or firefighter given a task to accomplish should keep their superior
informed on progress or completion of given task.
32. Before forcing entry, look for a Knox Box and try the door.
33. When the fire is out, the next step is to determine its cause before disturbing the
scene and destroying evidence of a crime.
34. Never leave a crime scene until relieved by an authorized investigator so that
chain of evidence will be maintained. Secure the area immediately.
35. When calling for outside agencies, give the Dispatcher complete information as to
what you want them to do.
36. Truck, Engine, and Rescue companies each perform vital tasks at any incident.
Never perform another company’s job when your job is not completed. For
example: Engines performing extrication at an auto accident when protective
lines are not stretched; or Trucks operating hand lines when rescue and ventilation
are not complete.
REFERENCES: None
DENVER FIRE DEPARTMENT STANDARD OPERATING GUIDELINE
Section: OPERATIONS: INCIDENT OPERATIONS Topic: Elevator Rescue Response
2111.03 Elevator Rescue Response Page 1 of 4
Topic No: 2111.03 Date: 02-19-19 Approved: CDIII Review Date: 02-19-21 Replaces: Same, dated 08-31-17
PURPOSE:
To establish safe operating procedures for all Denver Fire Department personnel on elevator responses.
SCOPE: Applies to all DFD personnel training on or operating at an elevator incident and/or rescue. This guideline recognizes that building fires, smoke conditions, technical rescues, and medical emergencies may exist that dictate emergency actions other than those outlined here as the basic organizational structure for stalled elevators. This guideline shall be the only recognized elevator rescue guideline for all types of elevators, and it replaces all related district guidelines for elevator rescue.
GENERAL OPERATIONS:
Truck Officer:
• Assume command on established tactical channel. • Obtain set of building master keys. • Check status of building and elevator system; recall elevators as needed
Considerations should be given to recycling/recalling a stalled elevator when a blind shaft is involved.
• Relay location of car(s). • Once relieved of command by District Chief, join crew and oversee
operations. Engine Officer:
• Proceed to the machine room with one member of the engine crew,
communicate to IC that power has been shut-off to the affected elevator. • One member will remain on the assigned Tac channel, while the second
member switches to radio to radio. This ensures if communications fail on the assigned tactical channels, a second radio channel may be utilized. Tactical channel failure may occur inside structures (i.e. high rise, below grade and dead spots).
• Remains at the power shut off location for the duration of the incident.
DENVER FIRE DEPARTMENT STANDARD OPERATING GUIDELINE
Section: OPERATIONS: INCIDENT OPERATIONS Topic: Elevator Rescue Response
2111.03 Elevator Rescue Response Page 2 of 4
Topic No: 2111.03 Date: 02-19-19 Approved: CDIII Review Date: 02-19-21 Replaces: Same, dated 08-31-17
UNDER NO CIRCUMSTANCES SHALL THE HOISTWAY OR CAR DOORS BE OPENED BEFORE THE POWER IS SHUT OFF Truck Crew:
• Take the elevator keys and all other appropriate equipment needed to the proper floor.
• Determine number of trapped parties. • Determine condition of trapped parties and need for EMS. • Confirm the power to the stalled elevator has been turned off. • Confirm the location of car(s). If there are no keyways, consider poling
across first then down to open the affected car. • Open doors and determine if the victims can be removed safely, secure
shaft-way door. • If the victims cannot be removed safely, close the doors, re-start system
and attempt a reboot/recall.
Engine Crew:
• The remaining members of the Engine crew will bring EMS equipment to the floor of the stalled elevator.
• Work under the direction of the Truck Officer. • Assist Truck crew with extrication if multiple floors are involved in
removing the trapped parties. Chief Officer:
• Assume command. • The Command Post will be incident driven. • If the need for a technical rescue is determined, secure power to elevators.
adjacent to stalled car.
DENVER FIRE DEPARTMENT STANDARD OPERATING GUIDELINE
Section: OPERATIONS: INCIDENT OPERATIONS Topic: Elevator Rescue Response
2111.03 Elevator Rescue Response Page 3 of 4
Topic No: 2111.03 Date: 02-19-19 Approved: CDIII Review Date: 02-19-21 Replaces: Same, dated 08-31-17
Removal from hatchway (Operations level rescue), Safety Considerations:
• Turn on light on top of stalled elevator car with pike pole. • Shut down power on top of stalled car using a pike pole to press the
emergency stop button. • Secure outer doors with elevator chocks. • Ensure ladder rungs extend above destination, whether floor or top of car. • Have a Rescuer IN the stalled car, ON the stalled car and ON the floor to
ensure constant contact with the victim. • Rescuers must be able to safely access the top of the stalled car via shaft
way doors. • Stalled car must be within reach of telescoping ladder only. • There should be no fall hazard - meaning the fall potential, or clearance
between car and shaft should not be a concern, either due to a metal safety cage surrounding the stalled car or minimal void space between car and shaft way wall on all 3 sides.
• The car should be safe enough for rescuers to operate on top of. • There must be an operable hatch large enough to extricate a victim by
ladder. • Occupants must be able to assist in self-extrication, be ambulatory and
stable enough to climb a ladder out of the stalled car and off the top of the stalled car.
• Occupants shall not be transferred from car to car. Once removed from the car and onto the roof of the car, they shall be removed only via the shaft-way doors.
The incident may be determined to be a technical rescue which is defined as:
• The need to remove the occupants from the car using hatch-way without 3
sides of fall protection. • Taking control of car in a manner other than normal or firefighter
operation. • Car to car transfers. • Rope systems or breaching.
DENVER FIRE DEPARTMENT STANDARD OPERATING GUIDELINE
Section: OPERATIONS: INCIDENT OPERATIONS Topic: Elevator Rescue Response
2111.03 Elevator Rescue Response Page 4 of 4
Topic No: 2111.03 Date: 02-19-19 Approved: CDIII Review Date: 02-19-21 Replaces: Same, dated 08-31-17
In the event of a technical rescue:
• Notify Command, request appropriate High-Angle and Shift Commander
resources, and ensure that the elevator company is responding. • High-Angle response companies will report to IC for incident details. • Shift Commander will be on site Safety Officer.
THESE ACTIONS SHALL NOT BE ATTEMPTED WITHOUT THE ASSISTANCE OF THE HIGH ANGLE TEAM, AND/OR ELEVATOR SERVICE COMPANY. On all elevator rescue calls, proper PPE shall be worn. At a minimum, helmet and gloves should be worn. Consideration should be given to the possibility of smoke in the machine room. If a box alarm is also activated from the elevator machine room or shaft-way, treat it as a fire rescue call with full PPE and firefighting equipment. Technical PPE shall be worn if entry into the shaft way is warranted on a technical rescue incident. Consideration should be taken for fall protection on open elevator shaft ways. At the end of the incident, notify the building representatives of the actions taken and leave the power off to the affected car. Leave conveyance OTC with RP.
DENVER FIRE DEPARTMENT Topic No: 2111.05 Date: 08-30-17 STANDARD OPERATING GUIDELINE Approved: CDIII Review Date: 08-30-19 Section: OPERATIONS: INCIDENT OPERATIONS Replaces: Same, dated 03-22-11 Topic: Evacuation of a Structure or Area during
an Operating Incident
2111.05 Evacuation of a Structure or Area during an Operating Incident Page 1 of 2
PURPOSE: To facilitate the evacuation of DFD personnel from a life-threatening
situation at an operating incident SCOPE: Applies to all DFD members operating at an incident To evacuate Fire Department personnel from a life-threatening situation at an incident, the following procedures shall be followed:
A. The Incident Commander or any Fire Officer or member that perceives a life-threatening situation shall announce the evacuation order over the tactical channel immediately.
B. The Fire Dispatcher activates the oscillating Emergency Back-out Tone on the
tactical channel (keep in mind that the tone can not be transmitted on a non-repeated channel, i.e. radio-to-radio).
C. All fire apparatus operators on scene, upon hearing the Incident Commander’s
order and/or the evacuation alert tone, will sound their air horns for 30 seconds. The 30-second horn blasts can be repeated when the complexity of the structure and/or incident warrant. Pump operators who are managing active lines should not leave their pump panel to activate their air horns.
D. Fire Dispatch will transmit on the tactical channel that the oscillating Emergency
Back-out Tone has been sounded and the address of the incident. This message will be transmitted three times at 15-second intervals. When the tactical channel is a non-repeated channel (radio-to-radio), the Incident Commander shall repeat three times at 15-second intervals that DFD personnel are ordered to evacuate the structure or area.
E. All on-scene officers shall immediately order their subordinates to evacuate. F. All personnel shall retreat to a safe area, as designated by the Incident
Commander, Branch Director, Division/Group Supervisor, or Company Officer/Single Resource for a PAR (Personnel Accountability Report).
G. Immediately following the evacuation and PAR, the Branch Director or
Division/Group Supervisors shall report the status of their assigned crews to the Incident Commander.
DENVER FIRE DEPARTMENT Topic No: 2111.05 Date: 08-30-17 STANDARD OPERATING GUIDELINE Approved: CDIII Review Date: 08-30-19 Section: OPERATIONS: INCIDENT OPERATIONS Replaces: Same, dated 03-22-11 Topic: Evacuation of a Structure or Area during
an Operating Incident
2111.05 Evacuation of a Structure or Area during an Operating Incident Page 2 of 2
H. Company Officers shall include a report of their location and tactical assignment when contacted for a PAR.
REFERENCES: None
DENVER FIRE DEPARTMENT Topic No: 2111.06
Date: 08-30-17
STANDARD OPERATING GUIDELINE Approved: CDIII
Review Date: 08-30-19
Section: OPERATIONS: INCIDENT OPERATIONS Replaces: Same, dated 03-22-11
Topic: Level 1 and Level 2 Staging
2111.06 Level 1 and Level 2 Staging
Page 1 of 2
PURPOSE: To establish Level 1 and Level 2 staging on incidents and set parameters
when each may be appropriate
SCOPE: Applies to all Operations members and support staff when assigned to
both emergent and non-emergent scenes when multiple companies will be
responding
Unless otherwise assigned, all responding units and support personnel shall inform the IC or
designated Staging Officer when arriving on scene and shall stage until assigned by the IC.
Advantages of Staging
The Incident Commander or first arriving Officer on scene should use Level 1 or Level 2 staging
at tactical incidents. The effective use of staging:
A. Will prevent excessive apparatus congestion at the scene
B. Allows Command to evaluate the scene prior to assigning companies
C. Places apparatus in an uncommitted location close to the immediate scene
to facilitate more effective assignments by Command
D. Reduces radio traffic at larger incidents and ensures resources are
maintained by utilizing a Staging Officer
E. Allows Command to formulate and implement a plan with reduced
confusion and pressure from arriving units
I. LEVEL 1 STAGING
When Level 1 Staging is established, incoming companies shall position
themselves according to potential strategic objectives or tactical priorities with
regard to access, apparatus placement, water supply, etc. Companies shall try to
position their rigs to maintain open routes of travel to the scene for other
companies or equipment requested by the IC.
Companies shall report their staged position and stand by until receiving orders
from Command.
If staged companies observe critical tactical information, they should advise
Command of such conditions.
DENVER FIRE DEPARTMENT Topic No: 2111.06
Date: 08-30-17
STANDARD OPERATING GUIDELINE Approved: CDIII
Review Date: 08-30-19
Section: OPERATIONS: INCIDENT OPERATIONS Replaces: Same, dated 03-22-11
Topic: Level 1 and Level 2 Staging
2111.06 Level 1 and Level 2 Staging
Page 2 of 2
II. LEVEL 2 STAGING
Level 2 staging should be considered when additional companies and equipment
are required. The Staging Area will be designated by the Incident Commander
and should be located away from the Command Post and emergency scene to
allow adequate space for assembly and movement of equipment.
When Command announces Level 2 Staging and a location (i.e. Level 2 Staging
at Colfax and Broadway), all incoming units will report to and remain in staging
until assigned by the Staging Officer or Command.
The first arriving Officer to the Level 2 Staging Area will become the Staging
Officer and assume control of the Staging Area. If the Incident Commander
needs to utilize the Staging Officer’s company, the task and assignment of the
Staging Officer will be passed to the next arriving apparatus into staging. This
process will continue until a permanent Staging Officer is designated.
All responding companies will respond directly to the Staging Area and report in
person to the Staging Officer. They will standby their apparatus with their
company intact.
When requested by the Incident Commander, the Staging Officer will assign
companies, informing them where and to whom to report. He/She will then
advise the Incident Commander of the specific units assigned.
The Staging Officer should maintain a log of all companies and equipment
assigned to staging. It will also be the Staging Officer’s responsibility to maintain
base levels of personnel and equipment as required by the Incident Commander.
Staging Officers should consider the use of a different radio channel to request
resources from Dispatch to avoid unnecessary radio traffic on the tactical channel.
REFERENCES: None
DENVER FIRE DEPARTMENT
STANDARD OPERATING GUIDELINE
Section: Topic:
OPERATIONS: INCIDENT OPERATIONS Natural Gas
2111.07 Natural Gas Page 1 of 5
Topic No: 2111.07 Date: 08-02-19 Approved: CDIII Review Date: 08-02-21 Replaces: Same, dated 07-18-18
PURPOSE: To establish a guideline for operating at a natural gas emergency
SCOPE: Applies to all Denver Fire Department personnel responding to a natural gas
emergency
I. CONSIDERATIONS FOR INSIDE GAS LEAKS
Natural gas is much lighter than air and will usually dissipate rapidly in the outside environment. Inside buildings, however, it tends to pocket, particularly in attics and dead air spaces. The flammable limits are approximately 5% to 15% in air. These low explosive limits create the possibility of the air/gas mixture being too rich for an ignition to occur until after fire department intervention. Natural gas itself is non-toxic; however, it displaces oxygen and can result in asphyxiation if in a confined space. Carbon monoxide will not be found during a natural gas leak unless it is being burned. Flammable gas ranges can only be determined by a combustible gas instrument.
All firefighters that enter a potentially explosive atmosphere must wear all their personal protective equipment, including SCBA. All electrical switches shall be left in the position found. Doorbells and other sources of spark-producing mechanisms should be guarded against accidental activation.
Although the Motorola radios are intrinsically safe the potential for an ignition source is low, if the radio and battery are damaged its intrinsic ability may be compromised. With high concentrations of natural gas, it is best to minimize portable radio use when entering the structure and when possible transmitting outside of the area, or until the determination has been made that the leak is controlled, and the atmosphere is out of the explosive range.
It may be necessary to have the electricity to the structure shut off. Mercury switches in a thermostat create a spark when activated. This hazard can be eliminated by turning off the breaker switches that are generally located outside of the building; consider the possibility of gas permeation into the breaker box from the structure. In instances where it is impractical for fire crews to shut off the power supply, Xcel Energy shall be contacted.
Shutting off the gas at the meter is the quickest way to eliminate all the pilot lights as well as the leak.
DENVER FIRE DEPARTMENT
STANDARD OPERATING GUIDELINE
Section: Topic:
OPERATIONS: INCIDENT OPERATIONS Natural Gas
2111.07 Natural Gas Page 2 of 5
Topic No: 2111.07 Date: 08-02-19 Approved: CDIII Review Date: 08-02-21 Replaces: Same, dated 07-18-18
A. ENGINE COMPANY OPERATIONS
The first arriving engine company has the responsibility of securing a water supply and being prepared to have an attack line ready in the event of fire or explosion. The first-in engine officer has the option of:
1. Reverse lay, from the affected building to the hydrant. 2. Staging at the nearest hydrant. 3. Laying in short of the building. 4. Laying in well past the building. (This is preferable, as size-up can be
conducted on three sides of the building.)
If the engine company has laid a supply line, the engine shall not be spotted directly in front of the building.
1. In areas that have an immediate truck company response, the first-in engine
crew shall not enter the building. 2. When necessary, the first-in engine company shall lay a supply line; the
crew shall ready an attack line and remain outside of the building. 3. The crew shall not position themselves directly in front of the building. 4. All personnel shall have their full PPE on, including SCBA.
If the leak is large and ignition has not taken place, the first engine crew shall ready an attack line. If a structure fire is burning or an explosion has occurred in a structure, the initial attack shall be performed by the first-in engine. The minimum attack line shall be a 1-3/4” hand line.
If heavy concentrations of gas are detected, the members shall exit the building and shut down the gas from the meter outside.
In areas where the first-in truck company is several minutes away, the crew of the engine company shall secure a water supply and, if conditions warrant, ready an attack line. Two members of the crew may enter the building to locate and secure the gas leak. A truck company arriving after a company that has initiated an investigation shall not enter the area unless requested to do so by the incident commander.
DENVER FIRE DEPARTMENT
STANDARD OPERATING GUIDELINE
Section: Topic:
OPERATIONS: INCIDENT OPERATIONS Natural Gas
2111.07 Natural Gas Page 3 of 5
Topic No: 2111.07 Date: 08-02-19 Approved: CDIII Review Date: 08-02-21 Replaces: Same, dated 07-18-18
B. TRUCK COMPANY OPERATIONS
The first-in truck company shall spot the truck well beyond or short of the building. The truck shall not be spotted directly in front of the building.
The truck company officer shall establish incident command and build the command structure as the situation dictates and available resources allow. Two crew members shall be sent to locate and secure the gas leak. One member should be sent to locate the gas meter and be prepared to shut it down if necessary. Any additional staffing requirements or additional resources needed should be relayed to the incident commander immediately. All later arriving units shall stage away from the building and wait for orders from the incident commander. No Department member shall enter the building, other than the first-in crew, until ordered to do so by the incident commander.
All truck companies now carry the Multiple-Gas meter for leak detection, as well as TIF meters. The meters are programmable multiple-gas monitors designed to provide continuous exposure monitoring of toxic organic and inorganic gases, oxygen, and combustible gases. The TIF meter detects the presence of combustible and/or flammable gases, but it does not give numeric readings, and can not be used to determine the explosive limits of any atmosphere where a leak is detected.
Most natural gas emergencies occur when a pilot light has gone out on an appliance (generally a stove), and/or the thermo coupling has failed on a water heater or furnace and the gas continues to flow. Shutting off the gas to the affected appliance can easily mitigate these conditions. In residential gas emergencies, these appliances should be considered and investigated first.
Ventilation shall be performed by vertical or positive pressure after the leak has been controlled and ignition sources eliminated. Fans (use large fans when available) shall be connected to an outside power source (generators, if necessary) and at no time shall fans be used in such a manner as to draw natural gas- contaminated air through them. Fans should be turned on before moving them into position.
After ventilation has been completed, meters should be used in the building to make a final check to ensure that natural gas is not present, or limits are below 10% LEL, and that carbon monoxide levels are acceptable (less than 9ppm in residential, 35 ppm in commercial).

DENVER FIRE DEPARTMENT
STANDARD OPERATING GUIDELINE
Section: Topic:
OPERATIONS: INCIDENT OPERATIONS Natural Gas
2111.07 Natural Gas Page 4 of 5
Topic No: 2111.07 Date: 08-02-19 Approved: CDIII Review Date: 08-02-21 Replaces: Same, dated 07-18-18
II. CONSIDERATIONS FOR OUTSIDE GAS LEAKS
Below is the response and mitigation procedures for Xcel Energy to outside gas leaks. The Denver Fire Department will not mitigate an outside leak unless it has been determined by the Incident Commander that an immediate life hazard exists.
XCEL’S BLOWING GAS RESPONSE TO OUTSIDE GAS LEAKS
1. First arriving supervisor is referred to as the “First Responder “Their
duties are to access the leak, check surrounding buildings and areas for migration and formulate an action plan. The First Responder should be the point of contact for the first DFD assigned company or chief.
2. Second arriving vehicle is referred to as the “Trouble Truck” they will be responsible for the stoppage of the leak.
XCEL’S BLOWING GAS PROCEDURES TO OUTSIDE GAS LEAKS
1. Xcel’s blowing gas procedures will not allow their first responders to enter
and work in a gaseous atmosphere, trench and or excavations to mitigate leaks unless there is no alternative.
2. Their procedure utilizes the practice of “digging back” and remotely shutting off gas to mitigate the leak.
3. This increases the time frame in which the incident can be resolved.
A. DENVER FIRE PROCEDURES FOR OUTSIDE GAS LEAKS
Denver Fire companies will not plug or crimp lines on outside gas leaks unless it has been determined that an immediate life hazard exists and has been approved by the Incident Commander. Crimping or plugging gas lines shall be considered a last resort for outside gas leak mitigation.
Xcel Energy has requested that natural gas leaks not be plugged or crimped by DFD personnel for the following reasons.
1. Plugging or crimping a gas line may cause damage further down the line. 2. Companies will not be able to ascertain if the gas line is 2-way pressure fed. 3. The proper PPE for gas line work is a one-piece nomex suit, which protects
against pockets of gas being trapped between the layers of PPE.
DENVER FIRE DEPARTMENT
STANDARD OPERATING GUIDELINE
Section: Topic:
OPERATIONS: INCIDENT OPERATIONS Natural Gas
2111.07 Natural Gas Page 5 of 5
Topic No: 2111.07 Date: 08-02-19 Approved: CDIII Review Date: 08-02-21 Replaces: Same, dated 07-18-18
4. Creating a spark when there is a “joint” or “combined” trench, containing an electrical line and gas line in the same trench is another concern for our crews working in a trench that contains a severed gas line.
Companies should protect exposures, protect in place, or evacuate occupants. The area shall be secured, and nearby buildings should be evacuated and sealed by shutting windows and doors. HVAC system air intakes may also draw gas into a building and may need to be shut off as well. A perimeter must be established where the gas limits are below 10% LEL. Exposures shall be covered by hose lines while Xcel Energy repairs the rupture or shuts down the supply. .
1. I.C should contact the First Responder and establish a command post where assistance can be coordinated.
2. General assistance may be restriction, evacuation, assessment for gas concentrations of the surrounding area / buildings and protective hose lines.
3. I.C should request the assistance from Rescue 1, 2 or the if life hazard mitigation is an absolute and the gas line needs to be plugged. It is important to remember that high amounts of static electricity are developed during the normal flow of gas through plastic piping. Before making any attempt to crimp the pipe, wet rags must be wrapped around the leaking area to prevent a discharge of static electricity.
4. Larger lines, 6” to 10”, can not be plugged, and assistance from Xcel Energy is mandatory. No attempt shall be made to shut off the leak in a high pressure or large diameter supply line.
5. During longer incidents the I.C. with counsel of the First Responder shall decide on the need of Denver Fire Resources. The decision to terminate command will be based on life and property threat. The IC must ensure that threat monitoring will continue after vacating the incident.
If ignition has taken place, there shall be no attempt to extinguish the fire. Protect exposures from radiant heat by applying hose streams directly to the exposure building. Applying hose streams directly to a gas fire will not extinguish the leak and will only hamper the efforts of Xcel crews.
During a large diameter, high pressure leak, members operating in the immediate area of the leak shall wear full PPE, including SCBA.

DENVER FIRE DEPARTMENT Topic No: 2111.11
Date: 11-02-16
STANDARD OPERATING GUIDELINE Approved: CDIII
Review Date: 11-02-18
Section:
Topic:
OPERATIONS: INCIDENT OPERATIONS
Firefighter Rehabilitation during
Emergency Incidents
Replaces: Same, dated 10-12-11
(formerly named
“Incident Rehabilitation”)
PURPOSE: To establish a Standard Operating Guideline for Rehabilitation for
firefighters operating at an IDLH incident or training exercise. It is intended to
provide a framework to identify personnel that are suffering the effects of
metabolic heat build-up, dehydration, physical exertion and/or extreme weather.
SCOPE: All Operations Division Personnel operating at an IDLH emergency
scene or training evolution
Level 1 REHAB:
Level 1 Rehab shall be implemented when the following parameters are met:
Up to two 45 minute air cylinders or
Over 40 minutes of work at an incident
Temperature 85°F or greater or 20°F or less
At the discretion of the Incident Commander
Level 1 Rehabilitation shall be the responsibility of the Company officer. All
members of the Company shall be evaluated with the following parameters.
The Company officer shall have the authority to hold a member from
returning to work if any of the following parameters warrant a member to be
seen by ALS.
CO levels shall be evaluated utilizing the Rad 57’s when
members exit the IDLH and 10 minutes thereafter
If CO levels are less than 10% the member may be released
back to service
If CO levels are greater than 10% then the member shall be
evaluated by ALS
Heart Rate shall be assessed after 10 minutes of rest
If Heart Rate after ten minutes of rest is 120 bpm or greater,
then reassess after 20 minutes
If Heart Rate is still 120 bpm or greater after 20 minutes, the
member shall be evaluated by ALS
When at level 1 Rehab, members shall consume at a minimum
one 12-24 oz. of bottled water or sports drink
Company officers should be familiar with the signs and
symptoms of heat stress and cold stress
Notify the IC when stressed members require relief, rotation, or
reassignment according to conditions
DENVER FIRE DEPARTMENT Topic No: 2111.11
Date: 11-02-16
STANDARD OPERATING GUIDELINE Approved: CDIII
Review Date: 11-02-18
Section:
Topic:
OPERATIONS: INCIDENT OPERATIONS
Firefighter Rehabilitation during
Emergency Incidents
Replaces: Same, dated 10-12-11
(formerly named
“Incident Rehabilitation”)
If members are evaluated by ALS but not transported they must
call the Ouch line (see dept. directive 1014.00 line of duty
injuries, exposures and reporting)
Level II REHAB
Level II Rehab shall be implemented when the following parameters are met.
When the incident has exceeded a 1st Alarm
Over two 45 minute air cylinders
Over forty minutes of work at an incident
Members have consumed over two 45min SCBA cylinders
Responses that are categorized as an extended technical rescue
Responses that cover a large geographic area
Temperature 85°F or greater or 20°F or less
At the discretion of the Incident Commander
Level II Rehabilitation shall be a functional division under the Incident Command
System and is the responsibility of the Incident commander or his/her designee.
The Air/Light unit shall be utilized due to the resources it possesses. Denver
Health will assign another ALS transport unit to the incident that will work
under the Rehab Division.
All members shall be evaluated with the following parameters over a 30
minute period. The Rehab Division officer shall have the authority to hold a
member in Rehab if any of the following parameters warrant a member to be
seen by ALS.
CO levels shall be evaluated utilizing the Rad 57’s when
members exit the IDLH and 10 minutes thereafter.
If CO levels are less than 10% the member may be released
back to service after the REHAB period.
If CO levels are greater than 10% then the member shall be
evaluated by ALS.
Heart Rate shall be assessed after 10 minutes of rest.
If Heart Rate after 10 minutes of rest is 120 bpm or greater,
then reassess after an additional ten minutes.
If Heart Rate is still 120 bpm or greater after 20 minutes, the
member shall be evaluated by ALS.
When at level II Rehab, members shall consume at a minimum
two 12-24 oz. of bottled water or sports drink.
It shall be mandatory for members to doff their structural PPE.
DENVER FIRE DEPARTMENT Topic No: 2111.11
Date: 11-02-16
STANDARD OPERATING GUIDELINE Approved: CDIII
Review Date: 11-02-18
Section:
Topic:
OPERATIONS: INCIDENT OPERATIONS
Firefighter Rehabilitation during
Emergency Incidents
Replaces: Same, dated 10-12-11
(formerly named
“Incident Rehabilitation”)
If members are evaluated by ALS and advised to hold in rehab
due to a medical issue but not transported, members must call
the Ouch line (see dept. directive 1014.00 line of duty,
exposures and reporting)
Medical monitoring will be provided by ALS. ALS will work and advise the
Rehab Division officer whom has the ultimate authority to release, hold, or
transport a member from Rehab based on the guidance provided by the ALS crew.
Location of the REHAB area will be site dependent, however, the following
criteria can assist in site selection:
A location that will provide physical rest by allowing the body
to recuperate from the demands and hazards of the emergency
operation.
Located far enough away from the scene that members may
safely remove their PPE and be afforded mental rest from the
stress and pressure of the emergency operation
Provide suitable protection from the prevailing environmental
conditions as well as a place to sit and rest. During hot weather
it should be a cool and shaded area. During cold weather it
should be a warm and dry area. Tents and chairs from the
air/light can be utilized for hot weather operations. RTD buses
can be requested for cold weather operations.
Enable members to be free of exhaust fumes from apparatus.
Large enough to accommodate multiple crews.
Easily accessible by ALS units should transport/evaluation be
needed.
Allow prompt re-entry to emergency scene upon completion of
REHAB.
Consideration should be given to completing hood swap-out when members are
leaving rehab to return to scene/service.
DENVER FIRE DEPARTMENT Topic No: 2111.12
Date: 08-30-17
STANDARD OPERATING GUIDELINE Approved: CDIII
Review Date: 08-30-19
Section: OPERATIONS: INCIDENT OPERATIONS Replaces: Same, dated 05-03-11
Topic: Explosive Devices
2111.12 Explosive Devices
Page 1 of 2
PURPOSE: To ensure a consistent and safe response to all potential bombing and
suspicious incidents
SCOPE: Applies to all Denver Fire Department personnel
I. BOMB INCIDENTS
A. No Explosion
1. Department personnel respond Code 9 when requested by Denver
Police Department.
2. When police request assistance, the apparatus and personnel shall
remain at a safe distance on a standby basis only. Searches and
handling of possible explosive devices will be the responsibility of
DPD personnel.
B. Bomb Explosions
1. The Dispatcher will dispatch necessary equipment and personnel.
2. To diminish the possibility of destroying evidence at a bombing
and to protect firefighters, Department personnel shall not enter the
explosive area unless the detonation caused injury or fire. The
bomb area shall be secured until the arrival of DPD Bomb Squad.
3. In all cases where a bomb has been found or exploded, the first
arriving officer shall notify the Dispatcher, who will be responsible
for notifying the Denver Police Department, the appropriate
District Chief, and the Shift Commander.
4. All members at the scene of a bombing incident shall be aware of
the possibility of a second or delayed bomb detonation.
II. DISCOVERY OF SUSPICIOUS OBJECTS
A. Any object that is suspected of being a possible explosive, explosive in
nature, or which might contain an explosive shall not be touched or
moved.
DENVER FIRE DEPARTMENT Topic No: 2111.12
Date: 08-30-17
STANDARD OPERATING GUIDELINE Approved: CDIII
Review Date: 08-30-19
Section: OPERATIONS: INCIDENT OPERATIONS Replaces: Same, dated 05-03-11
Topic: Explosive Devices
2111.12 Explosive Devices
Page 2 of 2
B. Chemicals determined to be unstable and/or shock sensitive (i.e.,
crystallized dynamite, picric acid, etc.) shall be handled as an explosive
and only by the DPD Bomb Squad.
C. Upon awareness of a possible bomb or other material that is explosive in
nature, the following measures should be completed utilizing the “5 C’s
Rule”:
1. Confirm there is a device from a safe distance.
2. Clear the area.
3. Cordon off the location.
4. Control all entry and exit points
5. Check the immediate area for secondary devices.
REFERENCES: U.S. Military “5 C’s Rule”
DENVER FIRE DEPARTMENT Topic No: 2111.14
Date: 12-07-17
STANDARD OPERATING GUIDELINE Approved: CDIII
Review Date: 12-07-19
Section: OPERATIONS: INCIDENT OPERATIONS Replaces: Same, dated 11-03-11
Topic: Fire Investigation Unit
2111.14 Fire Investigation Unit
Page 1 of 3
PURPOSE: To provide an operational guideline for utilization of the Fire Investigation
Unit.
SCOPE: Applies to members involved at the scene of an incident that may require a
response by members of the Fire Investigation Unit.
DEFINITIONS:
Cause – The circumstances, conditions, or agencies that brought about or resulted in the
fire or explosion incident, damage to property resulting from the fire or explosion
incident, or bodily injury or loss of life resulting from the fire or explosion incident.
Origin/Point of Origin – A general geographical location with a fire scene in which the
“point of origin” of a fire is reasonably believed to be located; The exact physical
location within the area of origin where a heat source and the fuel interact, resulting in a
fire or explosion.
Serious Bodily Injury – An injury that involves a substantial risk of death, serious
permanent disfigurement, or protracted loss or impairment of the function of any part or
organ of the body; or breaks, fractures, or burns of the second or third degree.
The Fire Investigation Unit (FIU) investigates all explosions and fires of suspicious or unknown
origin. Investigators will attempt to determine the cause and origin of such events, and will
pursue criminal charges for all arson and related crimes. While this document defines the
majority of the incident types to which Investigators respond, it in no way precludes the Incident
Commander from contacting an Investigator for advice or direction on any incident.
Fire Investigators are responsible for enforcement of the Colorado Revised Statutes, the Denver
Fire Code, the International Fire Code, and sections of the Revised Municipal Code as they
pertain to fire related offenses. Fire Investigators are also responsible for collection of evidence,
interviewing witnesses and victims, interrogating suspects, preparing and serving search and/or
arrest warrants, preparing and presenting case filings to the prosecuting attorney, and testifying
in legal proceedings.
Fire Investigators shall be called to respond to:
A. All suspicious or known arson fires.
B. All fires causing property damage when the Incident Commander is unable to
determine the cause and origin.
DENVER FIRE DEPARTMENT Topic No: 2111.14
Date: 12-07-17
STANDARD OPERATING GUIDELINE Approved: CDIII
Review Date: 12-07-19
Section: OPERATIONS: INCIDENT OPERATIONS Replaces: Same, dated 11-03-11
Topic: Fire Investigation Unit
2111.14 Fire Investigation Unit
Page 2 of 3
C. All explosions involving property damage and/or life-threatening injuries
D. All multiple alarm fires.
E. All fires involving fatalities and/or serious bodily injuries, whether civilian or
firefighter.
F. All fires resulting in injuries deemed serious enough to warrant ambulance
transport, whether civilian or firefighter.
G. Any fire scene at which a firefighter is injured as a direct result of malfunctioning
personal protective equipment.
H. Malicious false alarms where information is available that might identify a
suspect.
I. All fires caused by juveniles. Children less than ten years of age will be referred
to the Youth Fire Stop Program by the Arson Investigator.
J. All auto accidents involving fire that result in the serious bodily injury or death of
a person.
K. All threats of arson.
L. All reports of incendiary devices and/or their components.
M. Any incident when requested by the Incident Commander.
N. Any incident when requested by the Denver Police Department.
O. Requests from the Fire Prevention Duty Officer or Shift Commander for
assistance in remedying reports of overcrowding and/or other occupancy
violations which create an immediate life safety hazard.
P. Fire Investigators will not respond to or enter any building where there is a bomb
threat unless specifically requested by the Incident Commander or the Police
Department. Investigators will respond to bombings when fire apparatus is
dispatched and will assist the Police Department upon request only. If an
Investigator is first on the scene, he/she shall secure the scene until arrival of the
Police Department.
DENVER FIRE DEPARTMENT Topic No: 2111.14
Date: 12-07-17
STANDARD OPERATING GUIDELINE Approved: CDIII
Review Date: 12-07-19
Section: OPERATIONS: INCIDENT OPERATIONS Replaces: Same, dated 11-03-11
Topic: Fire Investigation Unit
2111.14 Fire Investigation Unit
Page 3 of 3
REFERENCES:
• NFPA 921 Guide for Fire and Explosion Investigations, 2017 Edition
• Colorado Revised Statutes, 2016 Edition
DENVER FIRE DEPARTMENT Topic No: 2111.15
Date: 08-30-17
STANDARD OPERATING GUIDELINE Approved: CDIII
Review Date: 08-30-19
Section: OPERATIONS: INCIDENT OPERATIONS Replaces: Same, dated 05-18-11
Topic: Safety Vest Usage While In Traffic
2111.15 Safety Vest Usage While in Traffic
Page 1 of 2
PURPOSE: To describe the requirements of safety vest or other ANSI compliant
outerwear usage by Denver Fire Department members when working at an
incident that places the member in or near moving traffic or on a
highway/interstate. Structural turnout coats are not ANSI compliant.
SCOPE: Applies to all Operations Members operating at incidents on roadways
DEFINITION:
Hot Zone - The hazard area that includes the environment where an immediate danger
exists to firefighters operating in areas where fire, heat, chemicals, and other
contaminants and/or an entanglement hazard exists
I. BACKGROUND
For incidents where exposure to the hazards of moving traffic are present for Fire
Department personnel working on foot, safety vest or other ANSI compliant outerwear
usage is required except as explained below. Conforming to this policy places the
member in compliance with Federal law 23 CFR Part 634 and applicable provisions of
the Federal Highway Administration’s Manual on Uniform Traffic Devices (MUTCD).
II. PROCEDURE
Specifically, when the nature of the incident requires the member to work in or near
moving traffic or on a highway/interstate or any other roadway, the following personal
protective apparel shall be worn:
A. ANSI 107-compliant Class II vest, Class III Traffic Safety garment, or
ANSI 207 Public Safety vest
B. Other ANSI compliant outerwear
If firefighters are wearing structural turnout coats due to inclement weather (i.e. rain,
cold, etc,) or other reasons, the ANSI traffic safety vest needs to be donned over the
turnout coat unless the firefighter will be working in a hazardous area as described in
“Exceptions.”
III. EXCEPTIONS
Several unique incident types may be encountered where the donning of a highway safety
vest may actually increase risk of injury for the Fire Department member or where
wearing of a vest may in fact be otherwise impractical. Under these limited situations,
DENVER FIRE DEPARTMENT Topic No: 2111.15
Date: 08-30-17
STANDARD OPERATING GUIDELINE Approved: CDIII
Review Date: 08-30-19
Section: OPERATIONS: INCIDENT OPERATIONS Replaces: Same, dated 05-18-11
Topic: Safety Vest Usage While In Traffic
2111.15 Safety Vest Usage While in Traffic
Page 2 of 2
the requirement for donning ANSI-compliant vests by members directly involved in
hazard area “Hot Zone” activities is modified.
The exemptions for wearing a highway safety vest apply only to members directly
involved in activities within an established “Hot Zone.”
The required ANSI-compliant Highway Safety vest need not be worn when a member is
required to:
A. Don structural PPE and SCBA to work in close proximity to a source of
heat such as during suppression of a vehicle fire.
B. Don hazardous material personal protective equipment to avoid potential
exposure to chemicals or other contaminants.
C. Don technical rescue PPE and/or equipment for a technical rescue incident
such as extrication, high or low-angle rope rescue, swift water rescue, etc.
D. Don PPE to work in close proximity to operating machinery where
wearing the traffic vest may create a possible entanglement hazard.
All members on-scene performing duties or involved in activities other than those listed
above are required to don ANSI-compliant vests when working in or near moving traffic.
At any incident, immediate attention should be given to creating a safe working zone
through rig placement, using traffic cones, etc. to make the incident as safe as possible.
This becomes more imperative when personnel are working without the benefit of
wearing ANSI approved outerwear.
Members directly involved in source of heat, chemical, or technical rescue activities as
listed above and who complete their activities within the designated Hot Zone are
required to don ANSI-compliant vests or other ANSI approved outerwear once their
activities within the Hot Zone are completed or they leave the immediate Hot Zone area
of the incident scene. For example, safety vests shall be donned once members return to
the apparatus to return tools and equipment involved in Hot Zone activities, or to doff
Structural PPE, and expect to remain on scene after these activities are completed.
DENVER FIRE DEPARTMENT Topic No: 2111.16
Date: 08-30-17
STANDARD OPERATING GUIDELINE Approved: CDIII
Review Date: 08-30-19
Section:
Topic:
OPERATIONS: INCIDENT OPERATIONS
Mandatory SCBA Use
Replaces: Same, dated 12-17-12
2111.16 Mandatory SCBA Use
Page 1 of 2
I. SUBJECT, PURPOSE, AND SCOPE
SUBJECT: Mandatory use of Self Contained Breathing Apparatus
(SCBA) during pre and post control operations, during fire suppression
activities to include but not limited to: rubbish fires, vehicle fires, and
structure fires.
PURPOSE: To develop a “Best Practice” approach to increasing the
safety and health of members assigned to suppression.
SCOPE: This guideline applies to all Department members involved
in fire suppression activities, regardless of the nature.
II. INTRODUCTION
Exposure to Carbon Monoxide (CO), Hydrogen Cyanide (HCN), and other
by-products of combustion have been linked to increases in fire related
deaths and sickness, due to the fact of HCN and CO being an escape
inhibitor. CO and HCN are two of the most deadly gases present in a
structure fire. There are several other irritants, asphyxiates, and toxic gases
present at every fire that are not able to be consistently monitored that
include but are not limited to solids, particulates, and dusts. CO and HCN,
being the most prevalent, can cause impairment of a firefighter. The
affected member will not be able to think rationally or be able to avert an
unforeseen event during pre and post control fire operations.
III. SCOPE
The intent of the Mandatory SCBA Use Guideline is to avoid, or minimize,
any respiratory contact with products of combustion, super-heated gases,
toxic products, or other hazardous contaminants.
The use of breathing apparatus means that ALL personnel will have
facepieces in place, breathing air from the supply provided. Where
appropriate, Airline-Supplied Breathing Apparatus may be used in place of
SCBA.
The utilization of the SCBA shall be required for all personnel operating:
• In an active fire area, pre and post control.
• Directly above an active fire area, pre and post control.
• In a potential explosion or fire area, including gas leaks and fuel spills.
DENVER FIRE DEPARTMENT Topic No: 2111.16
Date: 08-30-17
STANDARD OPERATING GUIDELINE Approved: CDIII
Review Date: 08-30-19
Section:
Topic:
OPERATIONS: INCIDENT OPERATIONS
Mandatory SCBA Use
Replaces: Same, dated 12-17-12
2111.16 Mandatory SCBA Use
Page 2 of 2
• Where products of combustion are visible in the atmosphere (smoke),
including vehicle fires and dumpster fires -- where invisible
contaminants are suspected to be present (i.e. Carbon Monoxide
and Hydrogen Cyanide during overhaul).
• Where fire crews are operating within 10 feet of the affected
building.
• Where IDLH (Immediately Dangerous to Life and Health) atmospheres
are present, suspected to be present, or may be released without
warning.
• In any confined space which has not been tested to establish respiratory
safety.
Mandatory use of the SCBA must be adhered to at all times. This is
particularly significant during overhaul, when smoldering materials may
produce increased quantities of carbon monoxide, hydrogen cyanide, and
other toxic products including but not limited to solids, particulates, and
dusts.
DENVER FIRE DEPARTMENT Topic No: 2111.17
Date: 08-31-17
STANDARD OPERATING GUIDELINE Approved: CDIII
Review Date: 08-31-19
Section:
Topic:
OPERATIONS: INCIDENT OPERATIONS
Elevator Use during Fire Ground
Operations
Replaces: Same, dated 08-15-13
2111.17 Elevator Use during Fire Ground Operations Page 1 of 7
PURPOSE: To establish a Safe Operating Guideline when utilizing elevators during fire
ground Operations.
SCOPE: Applies to all Fire Department Personnel when using elevators during pre-
and post-control fire ground Operations.
There is considerable danger associated with the use of elevators during fire
ground operations. The elevator hoist way can act as a chimney, rapidly filling
with smoke and heat, making elevators unsafe for fire department operations.
Heat from the fire, and/or water from firefighting operations can quickly
damage elevator components, causing the elevator to fail and become
inoperable.
Although elevators can be a very valuable logistical tool, they can also quickly
become dangerous and deadly traps. Extreme caution should always be
exercised regarding the use of all elevators.
The following information is intended to provide more comprehensive knowledge
and considerations for the use of elevators in multi-storied buildings during fire
ground operations:
I. Important Operational Considerations and Recommendations
A. The Seven-up rule: As a rule, elevators should not be utilized in high rise
buildings on the 6th floor or below during the pre-control phase of fire ground
operations, including fire alarm investigations. Elevators should not be utilized
in low-rise buildings that are 6-stories or less in height; the time needed to
retrieve elevator keys, recall an elevator, periodically stop the elevator, and test
the elevator’s performance on the way up to the destination will take longer than
simply walking up this short distance to a proposed interior staging location two
floors below the reported fire floor, or floor of alarm. An added benefit of taking
the stairs is that the initial Single Resource/Fire Floor Division doesn’t lose one
of their members, who would have to be assigned to the position of elevator
operator.
B. Smoke or Fire in the Elevator Machine Room or Hoist Way: If the alarm
panel or other size-up information indicates that the source of the smoke or fire
may be inside an elevator machine room or at the top of an elevator hoist way,
do not utilize that bank of elevators. If that is the only bank of elevators in the
building, use the stairs.

DENVER FIRE DEPARTMENT Topic No: 2111.17
Date: 08-31-17
STANDARD OPERATING GUIDELINE Approved: CDIII
Review Date: 08-31-19
Section:
Topic:
OPERATIONS: INCIDENT OPERATIONS
Elevator Use during Fire Ground
Operations
Replaces: Same, dated 08-15-13
2111.17 Elevator Use during Fire Ground Operations Page 2 of 7
C. Beware of Elevator Shunt Trip Systems which are power control systems
involving building elevators that automatically shut power down to an elevator
when a heat detector activates in an elevator hoist way or elevator machine room.
Shunt trip systems are present when elevator machine rooms and hoist ways are
protected by automatic fire sprinklers. Shunt trips are designed to make sure that
electrical equipment is de-energized prior to the application of water from
sprinklers, so that erratic and unpredictable elevator behavior can be thwarted.
They are activated by heat detectors in machine rooms and hoist ways located
near sprinkler heads.
The vast majority of elevator systems in Denver that are equipped with
shunt trips provide no warning to firefighters that the systems are about
to shut down the power. Furthermore, these systems can activate at any
time, causing the car to stop between floors out of the “Floor Zone,”
trapping firefighters.
To address concerns that elevator shunt trip could function without warning,
newer buildings including high rises in Denver have a warning signal; this
signal is characterized by a “flashing fire helmet” in the elevator car. This
“flashing hat” will inform firefighters that the “fire alarm initiating device”
in the elevator machine room or hoist way has been activated and shunt trip
activation is soon to follow.
These Shunt Trip systems operate as follows:
1. Phase I recall is activated. Elevator car returns to the designated
level and the doors open.
2. If smoke is present in the elevator machine room or at the top of the
hoist way, an activated smoke detector head in either area will cause
the red fire helmet indicator light to flash inside the car. This is a
warning that the elevator may be compromised and should not be
operated; however, the elevator will still operational.
3. If enough heat is present in the machine room or at the top of the
hoist way to activate a heat detector, then the elevator circuitry will
cause the shunt trip to activate, at which point, the elevator should
return to the designated level, with the doors open and shut down.
D. Multiple Elevator Banks: If the building has multiple elevator banks, such as
low-rise, mid-rise, and high-rise, make every effort to utilize an elevator within
DENVER FIRE DEPARTMENT Topic No: 2111.17
Date: 08-31-17
STANDARD OPERATING GUIDELINE Approved: CDIII
Review Date: 08-31-19
Section:
Topic:
OPERATIONS: INCIDENT OPERATIONS
Elevator Use during Fire Ground
Operations
Replaces: Same, dated 08-15-13
2111.17 Elevator Use during Fire Ground Operations Page 3 of 7
a bank that does not directly service the suspected fire floor, or floor of alarm.
Avoid using any elevator that provides direct service to a suspected fire floor or
floor of alarm, including the freight elevator, especially if heavy fire conditions
are evident.
E. Fire Service Recall and Control: Elevators that are not equipped with “Fire
Service” recall and control features (Phase I and II) should not be utilized during
the pre-control phase of fire ground operations, including fire alarm
investigations.
F. Full PPE, SCBA, Irons, and Radio: Anytime fire department personnel are
utilizing an elevator for fire ground operations, including fire alarm
investigations, ALL personnel will be equipped with full Personal Protective
Equipment (PPE), Self-Contained Breathing Apparatus (SCBA), Portable
Radio(s), and the appropriate Forcible Entry / Exit Tools (set of irons), when
inside an elevator car.
G. Don’t overload the elevator: The Elevator Operator will be responsible for
considering the physical dimensions and rated capacity of the assigned elevator
to ensure that the elevator is not overloaded. As a rule of thumb, a Firefighter
with equipment weighs about 300 pounds and the maximum number of
personnel should be 7. Also, enough room should be left to allow for forcible
exit from the elevator car.
H. Designated Elevator Operator: Anytime an elevator is used for fire ground
operations, including fire alarm investigations, the First Arriving Truck Engineer
is normally designated as the Elevator Operator. The Elevator Operator will
remain in control of the elevator until relieved, or reassigned. The Elevator
Operator will also be equipped with the appropriate full PPE, SCBA, Portable
Radio, and Forcible Entry / Exit Tools (set of irons).
I. Visually inspect the Hoist-way for Water, Smoke, and Fire: Once an elevator
is chosen for use, and prior to leaving the starting location, generally at the lobby
level, have one member inspect the elevator hoist-way. Using a powerful hand-
light, direct the light up into the hoist-way through the gap located between the
elevator car and the hoist-way wall. Check for anything unusual, but particularly
any signs of water, smoke, or fire. This inspection practice should be repeated
during any stops made at designated locations on the way up as you test the
elevator’s performance. It is recommended to stop the elevator a minimum of
once for short distances (less than ten flights) and two or more times for distances
DENVER FIRE DEPARTMENT Topic No: 2111.17
Date: 08-31-17
STANDARD OPERATING GUIDELINE Approved: CDIII
Review Date: 08-31-19
Section:
Topic:
OPERATIONS: INCIDENT OPERATIONS
Elevator Use during Fire Ground
Operations
Replaces: Same, dated 08-15-13
2111.17 Elevator Use during Fire Ground Operations Page 4 of 7
greater than ten flights. Any sign of something unusual, but especially water,
smoke, or fire in the hoist-way, dictates that all members immediately evacuate
the elevator and use the stairs. The Incident Commander must also be notified
of the situation and actions. It is extremely important for all firefighters to stand
all the way inside the elevator car when completing this inspection. If a member
has one foot in and one foot out, they could sustain serious or fatal injuries if the
elevator car were to suddenly move in either direction.
J. Never take an elevator below grade: Elevators will not be utilized to access
areas below grade during fire ground operations, including fire alarm
investigations.
K. Never take an elevator directly to a reported fire floor or floor of alarm: Under NO conditions will an elevator be utilized to gain access directly to a
reported fire floor, floor of alarm, or to the location of any other potential fire
related emergency condition during fire ground operations, including fire alarm
investigations.
L. Stop two (2) floors below the reported fire floor or floor of alarm: Anytime
an elevator is utilized for fire ground operations, including fire alarm
investigations, fire companies will not take the elevator to a location any closer
than two (2) floors below the reported or suspected fire floor, or floor of alarm.
Fire companies will stop at least two (2) floors below and walk up the remaining
two flights. The company officer in charge will notify the incident commander
as to which stairway is being used to access the fire floor, and once a
determination has been made, whether that stairway will be designated as the
“Attack Stairway” or the “Evacuation Stairway.”
M. Test the elevator’s performance: When utilizing an elevator equipped with
“Fire Service” recall and control features, fire companies should stop the
elevator on the way up to the staging destination to evaluate the elevator’s
performance. Fire companies should stop the elevator a minimum of once for
short distances (less than ten flights) and two or more times for distances greater
than ten flights. The following items should be evaluated:
1. Does the elevator stop at the desired floor?
2. Do the elevator doors remain closed when the elevator stops?
3. Do the elevator doors open when the door open button is activated?
4. Do the elevator doors close when the door open button is released before
the doors are fully opened?

DENVER FIRE DEPARTMENT Topic No: 2111.17
Date: 08-31-17
STANDARD OPERATING GUIDELINE Approved: CDIII
Review Date: 08-31-19
Section:
Topic:
OPERATIONS: INCIDENT OPERATIONS
Elevator Use during Fire Ground
Operations
Replaces: Same, dated 08-15-13
2111.17 Elevator Use during Fire Ground Operations Page 5 of 7
5. Does the elevator car stop at a location where the elevator car floor is
level with the floor of the desired location?
6. Does the elevator perform normally and not in an erratic or potentially
dangerous manner?
A negative result to any of these performance evaluations is justification for
evacuation of the elevator by all fire department personnel and a switch to
the utilization of the stairs to gain access to the upper floors.
II. Engine Company Officer is in charge of Investigation / Single Resource/
Fire Floor Division: When an Engine Company and the crew members of a
Truck Company minus their Officer join together and respond to an upper floor,
the Engine Company Officer is in charge of that entire Single Resource/Fire
Floor Division. Truck Company personnel will operate under the direction of
the Engine Company Officer until joined by the Truck Company Officer. All
communication on the fire floor or location of the emergency should go through
the Engine Company Officer. The Engine Company Officer then
communicates with the Suppression Branch Director (if assigned) or the initial
Incident Commander.
These procedures are designed to maximize firefighter safety when utilizing
elevators for operations in multi-story and high-rise buildings. These
procedures must be strictly adhered to during the Pre-Control Phase of the fire
ground or emergency operation. However, keep in mind that once the incident
has been brought under control, the Incident Commander or his designee may
initiate a more liberal utilization of elevators as a logistical tool, if it is
determined safe to do so, if the elevator(s) are operating properly, and if it
would positively contribute to the efficiency and effectiveness of the overall
fire ground or emergency operations.
DENVER FIRE DEPARTMENT Topic No: 2111.17
Date: 08-31-17
STANDARD OPERATING GUIDELINE Approved: CDIII
Review Date: 08-31-19
Section:
Topic:
OPERATIONS: INCIDENT OPERATIONS
Elevator Use during Fire Ground
Operations
Replaces: Same, dated 08-15-13
2111.17 Elevator Use during Fire Ground Operations Page 6 of 7
III. Fire Service Access Elevators:
A. Buildings covered by the 2009 International Building Code
At one point, the City of Denver adopted the 2009 International Building Code which
requires the installation of a fire service access elevator in buildings with an occupied
floor more than 120 feet above the lowest level of Fire Department vehicle access.
In addition to the Shunt Trip system requirements listed above in section C regarding
these newer building elevators, the following requirements for fire service access
elevators are present:
1. There must be at least one such elevator in each building that meets the code
requirements.
2. The elevator must recall to a 1-hour fire-rated lobby. The lobby must be
enclosed above the ground floor and must connect directly to a stairwell with a
standpipe for firefighting operations.
3. Power and elevator control systems must be enclosed within 1-hour fire rated
construction.
4. Hoist ways must be enclosed and must be fire-rated.
5. The entire hoist way must be lighted to one foot candle when the elevator is in
Phase I or Phase II operation.
6. The fire command center must have a system that continually monitors the
elevator’s location and whether the car is occupied.
B. Buildings covered by 2015 International Building Code
The City of Denver recently adopted the 2016 Fire Code and the 2015 IBC . There
are significant alterations to the new code affecting traction and fire service access
elevators. The significant changes are as follows:
1. Shunt Trip systems are prohibited for fire service access elevators to address
the concern of firefighters becoming trapped in elevators with Shunt Trips.
2. For traction elevators, fire sprinklers are no longer required in elevator
hoistways and elevator machine rooms, if these spaces meet specific
requirements. (Most new machine rooms and hoistways meet these exemption
requirements). Sprinklers for these spaces are still required to be sprinklered if
the traction elevators use non-fire rated suspension means such as the black belt
technology.
3. Power and control system wiring and cabling protection has increased from a
1-hour fire rating to a 2-hour fire rating.
DENVER FIRE DEPARTMENT Topic No: 2111.17
Date: 08-31-17
STANDARD OPERATING GUIDELINE Approved: CDIII
Review Date: 08-31-19
Section:
Topic:
OPERATIONS: INCIDENT OPERATIONS
Elevator Use during Fire Ground
Operations
Replaces: Same, dated 08-15-13
2111.17 Elevator Use during Fire Ground Operations Page 7 of 7
4. 2015 IBC requirements will not apply retroactively to structures that were built
prior to the adoption of the new code.
DENVER FIRE DEPARTMENT Topic No: 2111.19
Date: 06-03-16
STANDARD OPERATING GUIDELINE Approved: CD
Review Date: 06-03-18
Section: OPERATIONS: INCIDENT OPERATIONS Replaces: N/A
Topic: Ballistic Gear Use, Storage, and
Maintenance
2111.19 Ballistic Gear Use, Storage, and Maintenance
Page 1 of 1 1
PURPOSE: To identify the process and procedures for use, storage, and maintenance
of DFD Ballistic Gear
SCOPE: Applies to all Operations Division Personnel
I. Storage of Ballistic Gear
A. Ballistic gear consists of a Ballistic Helmet and Soft Body Armor with a Plate
Carrier.
B. Each DFD apparatus is issued four sets of Ballistic gear. District Chief
Officers are issued one set of Ballistic gear.
C. Ballistic gear shall be stored in a dry and easily accessible area on each
apparatus.
II. Firefighter Use of Ballistic Gear
A. Ballistic gear shall be worn at any active shooter incident. Ballistic gear
maybe utilized at other incidents at officers’ discretion.
B. Gear is to be inspected and fitted at the start of each shift.
III. Maintenance and Replacement of Ballistic Gear
A. After each use, whether in training or on an actual call, gear is to be inspected
for serviceability and repair needs according to manufacturer guidelines.
B. If gear is in need of repair, members are to contact the Operations Division
Captain, noting the type and extent of damage. The gear shall then be
prepared and tagged for pickup by the Warehouse truck for transport to the
Department Quartermaster.
C. If after use the gear is determined to be serviceable, it should be cleaned and
placed back into service.
DENVER FIRE DEPARTMENT Topic No: 2111.22
Date: 01-26-17
STANDARD OPERATING GUIDELINE Approved: CDIII
Review Date: 01-26-19
Section: OPERATIONS: INCIDENT OPERATIONS Replaces: 2113.07, dated 08-14-14
Topic: Carbon Monoxide
2111.22 Carbon Monoxide Page 1 of 3
PURPOSE: To establish the guidelines for DFD personnel responding to incidents
involving the investigation of an accumulation of carbon monoxide
SCOPE: Applies to all Denver Fire Department personnel functioning in an
operational capacity at a carbon monoxide response
I. CONSIDERATIONS
Carbon monoxide is an odorless, tasteless, colorless gas that is deadly. It is a by-product
of a fuel burning process. Many appliances such as furnaces, kitchen stoves, hot water
heaters, automobiles, etc. can produce carbon monoxide. When a faulty device or unusual
conditions exist, carbon monoxide may be vented into areas where people are present.
Carbon monoxide poisoning may be difficult to diagnose. Its symptoms are similar to the
flu, which may include headache, nausea, fatigue, and dizzy spells.
The Occupational Safety and Health Administration (OSHA) has established a maximum
safe working level for carbon monoxide at 35 parts per million (PPM) over an eight-hour
period, in the general workplace. The U.S. Environmental Protection Agency has
established that residential levels are not to exceed 9 PPM over an eight-hour average.
Commercial buildings have many sources of CO not found in residences such as parking
garages, drive-through windows, auto repair bays, various “processes”, un-vented gas
burners in large confined spaces, forklifts, etc., recognizing the OSHA-established 35 PPM
as the acceptable level for commercial buildings. Denver Fire Department has
established 35 ppm as the threshold level where all members must use their SCBA.
Company officers are responsible for ensuring that their meters are operating
correctly.
II. TRUCK COMPANY RESPONSIBILITIES
The truck officer establishes incident command and builds the command structure
as the situation dictates and available resources allow. Two firefighters with SCBA
enter the structure with a multi gas meter. The meter should be zeroed and set up
inside a clean air environment (no vehicle fumes). Any additional resources needed
should be relayed to the incident commander immediately.
NOTE: AN ALARMING DETECTOR IS ASSUMED TO BE CORRECT
UNTIL DETERMINED OTHERWISE.
DENVER FIRE DEPARTMENT Topic No: 2111.22
Date: 01-26-17
STANDARD OPERATING GUIDELINE Approved: CDIII
Review Date: 01-26-19
Section: OPERATIONS: INCIDENT OPERATIONS Replaces: 2113.07, dated 08-14-14
Topic: Carbon Monoxide
2111.22 Carbon Monoxide Page 2 of 3
A. Be sure the structure is evacuated and start the investigation procedure with
2 – 3 firefighters only.
An initial air reading should be taken just inside the entry point to ascertain
initial conditions, keeping in mind that meters take a short period of time to
analyze the air sampled.
B. Determine if anyone exhibits any symptoms of carbon monoxide poisoning
(symptoms may include, but are not limited to, headache, nausea, fatigue,
dizzy spells, or impaired judgment).
If anyone is presenting with signs and symptoms of carbon monoxide
poisoning, command shall request Hamer 1 and an ambulance Code 10. If
the Hamer is not available, another truck company with meters shall be
dispatched to verify the initial meter readings.
C. If no one exhibits any symptoms of carbon monoxide poisoning, check the
interior to get a CO reading in PPM.
1. Keep windows and doors closed until house is checked completely
using the carbon monoxide meter.
2. Turn on any appliances that can create carbon monoxide and make
sure levels don’t increase while running (furnace, hot water heater).
3. Ventilation (electric fans) of the structure shall begin to bring levels
below 9 PPM unless it is a commercial structure, then 35 PPM is
acceptable.
4. Xcel Energy shall be notified if necessary (malfunctioning furnace,
etc.)
5. If Xcel has been notified, they should be enroute and the crew should
stand-by until the arrival of Xcel.
6. Inform the residents of findings and actions taken.
7. If CO levels are below threshold limits of 9 PPM (residential) or 35
PPM (commercial), then inform the resident to have their CO
detector checked as recommended by the manufacturer.
8. Advise the residents to call 911 if the alarm reactivates.

DENVER FIRE DEPARTMENT Topic No: 2111.22
Date: 01-26-17
STANDARD OPERATING GUIDELINE Approved: CDIII
Review Date: 01-26-19
Section: OPERATIONS: INCIDENT OPERATIONS Replaces: 2113.07, dated 08-14-14
Topic: Carbon Monoxide
2111.22 Carbon Monoxide Page 3 of 3
III. SINGLE GAS CO DETECTORS
1. A single gas CO meter will be issued and shall be permanently attached to the
in-service medical or oxygen bag on all companies
2. Once meter is turned on, leave it as is. The default mode when turned on will
measure the low limit of CO (35 PPM) and will go into alarm at or above this
level
3. The meter is designed to run in a continuous manner; therefore, once placed
in service there is no need to shut the meter off.
4. These meters are to operate as a safety buffer only, to alert fire crews of
inadvertently operating in a CO contaminated atmosphere. (I.e. medical calls,
etc…)
5. If the meter goes into alarm (35 ppm) the rescuers and victims shall retreat to
a safe area and the company officer shall contact Fire Dispatch to initiate the
appropriate CO response which will include a Truck Company/and or Hamer
6. Calibration is required every six months. Companies will not be assigned a
specific meter; Station 6 will maintain a calibrated and working inventory of
meters that will be distributed out when the districts send in their current
meters. Company officers and members will be responsible for the
inventory of the meter that they receive. The single gas meters shall be sent
to Station 6 for calibration as follows:
January/July: District 2
February/August: District 3
March/September: District 4
April/October: District 5
May/November: District 6
June/December: District 7

DENVER FIRE DEPARTMENT Topic No: 2111.23
Date: 1-26-17
STANDARD OPERATING GUIDELINE Approved: CDIII
Review Date: 1-26-19
Section: OPERATIONS: INCIDENT OPERATIONS Replaces: New
Topic: Carbon Dioxide
2111.23 Carbon Dioxide Page 1 of 3
PURPOSE: To establish the guideline for DFD personnel responding to incidents involving
the investigation of the accumulation of Carbon Dioxide.
SCOPE: Applies to all Denver Fire Department functioning in an operational capacity at a
carbon dioxide response.
I. CARBON DIOXIDE CONSIDERATIONS
Carbon Dioxide or CO2 is used in the following applications:
• Beverage industry including restaurants, bars, movie theatres and breweries.
• Concerts and night clubs
• Plant growing for enriching the plant growth
• pH treatment of swimming pools
• It is the second most widely delivered and used compressed gas after Oxygen
CO2 is either a compressed/liquefied gas which is most commonly used in industry or
it is a solid like dry ice. It is an odorless and colorless or in the solid form may be
white, it has a biting/sour/acidic taste that may be noticed at higher concentrations.
Vapor Density or how heavy it is compared to air is 1.53 or 1 ½ times heavier than
air.
CO2 is always present in our atmosphere, generally less than 600 parts per million (ppm).
In industry, it would not be uncommon to measure levels 1000ppm to 1800ppm. The
OSHA Standard (29 CFR 1915.1000) states these thresholds which the Operations
Division will use as a guide to determine of an IDLH atmosphere exists, and if a Level 2
response is required.
• Permissible Exposure Limit (PEL) - 5000ppm
• 8-hour work shift of a 40-hour workweek
• Short-term Exposure limit (STEL) – 30,000ppm
• Measured exposure over 15-minute average
• Immediately Dangerous to Life or Health (IDLH) - 40,000 ppm
• Based on the effects that might occur as a consequence of a 30-minute exposure.
EVERY EFFORT SHOULD BE MADE TO EXIT AND EVACUATE
IMMEDIATELY!
DENVER FIRE DEPARTMENT Topic No: 2111.23
Date: 1-26-17
STANDARD OPERATING GUIDELINE Approved: CDIII
Review Date: 1-26-19
Section: OPERATIONS: INCIDENT OPERATIONS Replaces: New
Topic: Carbon Dioxide
2111.23 Carbon Dioxide Page 2 of 3
II. FIRE PREVENTION CONSIDERATIONS
When CO2 is used in industry, large quantities are often required. Greater than 100
pounds in use requires continuous ventilation, or a CO2 detection system with the
following alarm set points:
1. Beverage or pH Systems are to follow these standards:
• 5,000ppm or 0.5% – Self re-setting (non-latching) alarm. Notification for employees
only in approved locations with instructional signage.
• 15,000ppm or 1.0% – Latching Alarm. Notification for employees only in approved
locations with instructional signage. Requires a service company or approved trained
employees to investigate, repair and reset.
• 30,000ppm or 1.5% – Latching Alarm. Initiate amber strobes and audible horns
provided in the vicinity of each interior storage container, cylinder or tank and at each
point of use. Additional amber strobes and audible horns shall be placed at the
entrances to below grade locations, confined spaces, and at walk-in coolers.
Activation of automatic system shutoff valve. Evacuate room/area and call 911. In
buildings with a monitored sprinkler or fire alarm/detection system, the carbon
dioxide (CO2) emergency alarm system shall be connected to the building fire alarm
control panel and WILL DISPATCH THE FIRE DEPARTMENT.
2. Plant growing occupancy’s are to follow these standards:
• 5,000ppm – latching alarm. Initiate amber strobes and audible horns provided in the
vicinity of each interior storage container, cylinder or tank and at each point of
release (grow room). Activation of automatic system shutoff valve. Evacuate the
room in alarm and contact a qualified service company to investigate and address the
condition. Reset of the emergency alarm to be conducted by qualified personnel.
FIRE DEPARTMENT IS NOT CALLED OR DISPATCHED ON THIS ALARM
SINCE THE LEVEL IS 5,000 PPM.
III. RECOMMENDED OPERATIONS FOR EMS CALLS
1. A single gas CO2 meter will be issued to all companies and shall be placed on
apparatus. The meter has 2 alarms levels:
LOW ALARM at 5000ppm
HIGH ALARM at 30000ppm
DENVER FIRE DEPARTMENT Topic No: 2111.23
Date: 1-26-17
STANDARD OPERATING GUIDELINE Approved: CDIII
Review Date: 1-26-19
Section: OPERATIONS: INCIDENT OPERATIONS Replaces: New
Topic: Carbon Dioxide
2111.23 Carbon Dioxide Page 3 of 3
These meters are to operate as a safety buffer only, to alert fire crews of inadvertently
operating in a CO2 contaminated atmosphere. (I.e. medical calls, etc.)
2. CO2 meter should be used when responding to the following occupancy’s:
• Beverage systems in restaurants, bars, movie theatres & breweries – Below grade
• Walk-in coolers at restaurants as a (confined space) similar to below grade
• Concerts and night clubs – Below grade
• Any plant growing facility – Any Occupancy
• Swimming pool pH treatment facility – Any Occupancy
3. When the LOW ALARM is activated it should alert the rescuers that CO2 is present
above the PEL (Permissible Exposure Limit) and the occupancy management needs
to contact their CO2 supplier to have the system serviced.
4. When the HIGH ALARM is activated the rescuers and victims shall retreat to a safe
area and the company officer shall contact Fire Dispatch to initiate the appropriate
CO2 response which will include a Chief, Engine, Truck and Hamer 1. Hamer 1 will
determine actual concentration and strength of CO2 in an effort to render the building
safe for occupancy. If 30000ppm or higher is measured, entry for any mission
specific purpose requires all structural firefighting gear including SCBA, on air.
IV. RECOMMENDED OPERATIONS FOR PFAS/BOX RESPONSE
NOTE: AN ALARMING DETECTOR IS ASSUMED TO BE
CORRECT UNTIL DETERMINED OTHERWISE
1. Evacuation of the occupancy should be the primary concern of any company
on scene of a CO2 alarm sounding. If entering the structure is required, then
all structural firefighting gear should be worn and all members entering the
CO2 enriched environment should be utilizing their SCBA on air.
a. Remember that CO2 is heavier than air. Be sure to check areas below
grade during your search for possible victims.
b. CO2 may tend to accumulate in enclosed areas and elevated readings
should be suspected in these areas.
c. The balance of the CO2 response will be dispatched to assist in the
mitigation of the incident.
SEE ATTACHMENT 2111.23a (Meter Usage and Calibration for ToxiRAE Pro CO2.)
DENVER FIRE DEPARTMENT Topic No: 2112.01
Date: 06-27-18
STANDARD OPERATING GUIDELINE Approved: CDIII
Review Date: 06-27-20
Section: OPERATIONS: ENGINE OPERATIONS Replaces: Same, dated 03-22-11
Topic: Engine Company Operations
Introduction
2112.01 Engine Company Operations Introduction
Page 1 of 3
PURPOSE: To provide an understanding and working knowledge of the fundamental
operations of the engine company and to serve as an introduction for the
following Engine Company guidelines.
SCOPE: Applies to all officers and firefighters assigned to or working as a member
of an Engine company.
The importance of a highly disciplined and well-trained Engine Company cannot be over
emphasized. Arguably, one of the most important tasks to be accomplished on the fireground is
the placement and effective operation of the initial hoseline. The Engine Company’s ability to
quickly and effectively stretch and operate a hoseline most often determines the number of lives
saved and subsequent fire damage prevented during fireground operations. Statistics show that
fireground injuries and death are drastically reduced after the fire has been extinguished. The
importance of placing the initial hoseline into operation and getting water to the seat of the fire
can not be overstated.
The Engine Company officer sets the stage for the successful Engine Company through
leadership and training with his/her crew. Upon arrival to the fire scene, the Engine Company
officer is faced with a myriad of considerations that will ultimately affect a positive outcome for
the incident at hand. For example, the officer must, in coordination with the Engineer, initiate
appropriate apparatus positioning with considerations for water supply, responding ladder
companies, attack line stretches, and potential fire spread. In addition, a proper size up of the
incident should provide information regarding rescue situations (location and number of parties
trapped), size and extent of fire, structural integrity, hoseline selection (length, diameter, nozzle),
and the type of hose stretch most suitable, i.e. straight into the fire building, up or down a
stairway, up a stairwell well hole, or potentially up the exterior of the building using a rope or
over a ladder. Not to be disregarded is the Engine Company officer’s understanding of the
abilities and limitations of the crew members present. The engine officer must recognize the
skills and abilities present and use them to their greatest potential as members of the engine
company team.
The engine company Engineer assumes the primary responsibility of the safe and efficient
delivery of all members of the engine company to the emergency to which they are responding.
In addition, the engine company Engineer must be proficient in their ability to provide the
needed water and correct pressure through the necessary hose-lines, as well as to ensure the
completed water supply to the engine. The Engineer must be well versed in the hydraulic
formulas and calculations necessary to provide the needed water flow to the various hoseline
members operating inside the fire building. The Engine Company Engineer must also consider
the appropriate positioning of the apparatus, remain out of the way for operating truck
companies, be cognizant of the potential needs for more water should the incident demand, and
DENVER FIRE DEPARTMENT Topic No: 2112.01
Date: 06-27-18
STANDARD OPERATING GUIDELINE Approved: CDIII
Review Date: 06-27-20
Section: OPERATIONS: ENGINE OPERATIONS Replaces: Same, dated 03-22-11
Topic: Engine Company Operations
Introduction
2112.01 Engine Company Operations Introduction
Page 2 of 3
must also monitor their radio to remain aware of the actions occurring within the fire building
itself.
The Firefighter/Officer assigned to the nozzle position must understand the impact and
importance of their task. The ability to recognize the appropriate time and location to apply the
correct stream into the fire environment is a skill that comes with time and experience. An
example of this would be the application of the stream into the overhead (and over-heated)
atmosphere to cool the unburned fuel (smoke) present to prevent rollover and flashover
situations. The nozzle Firefighter must be vigilant to changing fire conditions and be prepared to
act aggressively with the appropriate stream placement and hoseline positioning. The rest of the
attack team must also be cognizant of changing conditions such as fire spread or structural
weakness and be prepared to relay this information to the engine officer.
The back-up, or “Sampson” Firefighter, must be familiar with their respective engine to properly
assist the officer with the initial hoseline stretch. In addition, the Sampson must be applied to the
supply line to avoid flooding the hose-bed. This Firefighter is then charged with providing
assistance to the officer who will be initiating the stretch and placement of the attack line. It is
imperative that the utmost attention be paid to this initial stretch with regard to kinks and proper
Firefighter spacing on the hose-line for efficient hose advancement. The experienced Firefighter
will anticipate potential problems encountered at corners, doorways, and other obstacles during
this advancement. It is imperative that the engine company members operating on a hoseline
exercise discipline to not bunch up on the nozzle, but rather remain appropriately spaced out
along the line to allow for the proper advancement of the hoseline throughout the fire building.
The Firefighter assigned to water supply must ensure that this task is completed in a timely and
effective manner to quickly rejoin the rest of his/her company on the hoseline. If the water
supply can not be established due to a bad hydrant, for example, this must be communicated
immediately. In addition, the water supply Firefighter must be mindful of kinks in the supply
hose which could severely hinder proper water flow at the incident. Kinks may be found at the
hydrant due to the hydrant strap, under car tires or in the street on the way back to the engine.
This Firefighter must exercise diligence and discipline to ensure the water supply is not
compromised in any way. Once the water supply Firefighter has rejoined his/her crew, strict
discipline must be exercised on the hoseline, assuming the necessary position at a corner or
doorway for example, to help get the hoseline into place effectively and efficiently.
As mentioned, the Engine Company member holds a very challenging and dynamic position that
requires a thorough understanding of the capabilities of their specific engine, including the
different hose sizes and loads, nozzles, and all available tools found on that apparatus. A full and
complete knowledge of the characteristics of the hose stream and the associated hydraulic
theories are of prime importance in the study of the engine company member, as well as the
appropriate techniques required to successfully get the initial hoseline in place as quickly and
DENVER FIRE DEPARTMENT Topic No: 2112.01
Date: 06-27-18
STANDARD OPERATING GUIDELINE Approved: CDIII
Review Date: 06-27-20
Section: OPERATIONS: ENGINE OPERATIONS Replaces: Same, dated 03-22-11
Topic: Engine Company Operations
Introduction
2112.01 Engine Company Operations Introduction
Page 3 of 3
efficiently as possible. Pre-planning the different types of buildings found in their response area
regarding hose stretches and connections is the finishing touch to a well-rounded engine crew.
Each member of the engine company must understand the importance of their specific roles and
the contributions that they make to the entire team. These concepts are all accomplished through
strong leadership from the Engine Company officer that emphasizes the importance of a
thoroughly trained and disciplined engine company with highly skilled Firefighters.
Keep in mind the following are guidelines only. They do not replace good judgment, common
sense, or a good initial size-up upon arrival on scene. The Standard Operating Guidelines for
Engine Operations have been categorized into major fire incident types for the ease of reference.
However, as a company officer, do not allow yourself to fall into the routine of thinking that
each fire that you respond to falls neatly into one of these categories. Every house fire,
commercial building fire, car fire, or any of the myriad types of fires that you will respond to has
its own unique circumstances that you must recognize to make good, sound decisions. The
choices of water supply, hose size, hose length, nozzle selection, where you place your line, and
the placement purpose are all decisions that you are going to make and be responsible for. Those
decisions are often going to be dictated by what you see when you arrive. You will find that the
fire, its location, size, and potential to grow will dictate most of your actions. Pay attention!
These guidelines do not replace your good judgment!
DENVER FIRE DEPARTMENT
STANDARD OPERATING GUIDELINE
Section: OPERATIONS: ENGINE OPERATIONS
Topic: Engine Company Operations Definitions
2112.02 Engine Company Operations Definitions
Page 1 of 4
Topic No: 2112.02
Date: 06-27-18
Approved: CDIII
Review Date: 06-27-20
Replaces: Same, dated 03-22-11
PURPOSE: To provide definitions for the Engine Company Operations Standard Operating
Guidelines.
SCOPE: Applies to all members performing Engine company operations
Backup Line:
This is a line that is at least as long (or longer) as and has the capability of delivering the same
gallons per minute or more as the primary attack line. This line will be charged with water, staffed
by firefighters, and can be use in any number of ways:
• Providing additional water support (gpms) for the attack line – water delivery to seat of fire
• Providing support in the form of protecting egress for the attack or search teams – i.e.
positioning this line at the top of a stairwell to prevent the fire from coming from behind
crews operating there
• Providing water delivery in the form of exposure protection – this can be an inside or
outside exposure
Dual Reverse Lay:
Dual reverse lays can be accomplished with two 3” supply lines laid from the attack engine, or
multiverse or ladder/tower/truck back to the hydrant. The overall benefit is having the engine
‘going to work’ on the hydrant (this is imperative for adequate water supply for master stream
applications). This technique can be used as a water supply system for a ground level master
stream, ladder tower master stream, as well as water supply for a second engine involved in various
fire attack measures. This system is also imperative for high-rise water supply operations.
Forward Lay:
The engine company establishes a water supply by making a connection to the fire hydrant
utilizing the Humat valve. This Engine shall make connections using one or two 3” lines
(depending on the structure) and drive the apparatus to a location at or near the fire building,
being mindful not to obstruct truck operations.
Going to Work on a Hydrant:
This term applies to an engine working on a hydrant utilizing a 5” supply line. Some of the options
for this source engine are:
• Pumping to an in-line engine in a relay set-up
• Pumping to an attack engine in a tandem set-up

DENVER FIRE DEPARTMENT
STANDARD OPERATING GUIDELINE
Section: OPERATIONS: ENGINE OPERATIONS
Topic: Engine Company Operations Definitions
2112.02 Engine Company Operations Definitions
Page 2 of 4
Topic No: 2112.02
Date: 06-27-18
Approved: CDIII
Review Date: 06-27-20
Replaces: Same, dated 03-22-11
• Pumping through a supply line wyed-off to an attack line (reverse lay) Pumping to a
portable master stream device (monitor, blitzfire)
• When fire attack engine is near (35’) of the hydrant
Humat Valve:
A four-way hydrant valve that is designed to deliver an uninterrupted water supply via a forward
lay. A subsequent engine can then go to work on this same hydrant and boost the pressure in the
original 3” line laid by the attack engine or add another 3” supply line to the equation and increase
the water delivery twofold.
Master Stream Operations:
Master streams can be used in an offensive, transitional, or defensive operation, provided no crews
are operating in the interior of the structure where the master stream is directed. Any time a master
stream is needed, a water supply must be set up with a minimum of two 3” lines or one 5” line.
The engine supplying the master stream(s) must be set up to ‘go to work on the hydrant’ to
maximize water delivery to the master stream device(s).
Relay Pumping:
The process of using two or more engines to move water through hoselines over a long distance
by operating the engines in series.
Note: Pumping in relay is usually required any time the water source is located more than a few
hundred feet from the fire. Relay pumping is nothing more than inserting fire pumps (engines)
into supply lines at various intervals to counteract the effects of friction loss and/or an increase in
elevation. Hose size and hydrant pressure are key factors to consider when deciding if a relay
operation is needed.
Water discharged from the source engine is boosted and flows water through either two 3” lines
(or more) or one 5” line to the inlet(s) of the next engine (inline engine or attack engine). A
residual pressure of 20 – 80 psi is to be maintained between source engines and subsequent engines
thereafter.
Source Engine: Engine at work on the hydrant utilizing 5” hose for supply from
the hydrant and delivering water to the next engine via two (or more) 3” lines or
one 5” line. This engine will be pumping in volume (parallel) to maximize water
delivery to the next engine.
DENVER FIRE DEPARTMENT
STANDARD OPERATING GUIDELINE
Section: OPERATIONS: ENGINE OPERATIONS
Topic: Engine Company Operations Definitions
2112.02 Engine Company Operations Definitions Page 3 of 4
Topic No: 2112.02
Date: 06-27-18
Approved: CDIII
Review Date: 06-27-20
Replaces: Same, dated 03-22-11
In-Line Engine: Engine receiving water from the source engine and delivering
water to another source engine or the attack engine via two (or more) 3” lines or
one 5” line.
Attack Engine: Engine at or near the fire building receiving water from an in-line
engine or source engine. This engine will be responsible for delivering water to
multiple attack lines, a master steam device, or both. This engine will generally be
in the pressure (series) setting, depending on the amount of water being delivered.
Reverse Lay:
A reverse lay can be utilized for an interior attack, master stream operations, or for additional
supply needs. The engine will lay from the identified objective to the nearest hydrant to “go to
work” at the hydrant.
Safety Line:
The purpose of the safety line is to have a readily available attack line at the point of entry for
support, exposures, RIT operations, etc.
This line is pulled at a working fire and made ready to go at the same point of entry
as the attack team. It will be left dry at or near the door until needed by responding
crews. Generally, this line is pulled by the attack engine Engineer after the water
supply has been established. It can also be pulled by the RIT team or 2nd engine
crew.
Tandem Pumping:
A short relay operation in which the engine taking water from the supply source pumps into the
intake of the second engine. The second engine boosts the pressure of the water even higher. This
method is used when pressures higher than the capability of a single pump are required.
This method is commonly used when the attack pumper is located close enough to
a hydrant for a forward lay yet needs to overcome friction loss problems which
occur in either large sprinkler or standpipe systems or long hose lays.
DENVER FIRE DEPARTMENT
STANDARD OPERATING GUIDELINE
Section: OPERATIONS: ENGINE OPERATIONS
Topic: Engine Company Operations Definitions
2112.02 Engine Company Operations Definitions Page 4 of 4
Topic No: 2112.02
Date: 06-27-18
Approved: CDIII
Review Date: 06-27-20
Replaces: Same, dated 03-22-11
Tandem pumping is the method used by Denver Fire Department for all high-rise
operations that involve pumping into a Fire Department connection.
The engine at the hydrant will utilize 5” supply and pump to the attack engine in
volume ‘parallel.’ The attack engine will pump in either volume or pressure ‘series’
depending on the situation (high-rise, sprinklers, attack lines, master streams).
Standpipes/FDC – pressure
Sprinkler Connections – volume at 150 psi
Water Supply Hose:
Water supply hose shall be either 3” or 5”. This applies to all operations that include pumping to
an FDC. Engine companies should not use 2-1/2” hose as a source of supply for delivering water
via in-line pumping, to master streams, or to Fire Department connections.
DENVER FIRE DEPARTMENT Topic No: 2112.03
Date: 06-27-18
STANDARD OPERATING GUIDELINE Approved: CDIII
Review Date: 06-27-20
Section: OPERATIONS: ENGINE OPERATIONS Replaces: Same, dated 03-22-11
Topic: Engine Company Operations
Humat Valve Use
2112.03 Engine Company Operations Humat Valve Use
Page 1 of 2
USE OF THE HUMAT VALVE
Any time an engine company is dispatched to a reported structure fire or an odor investigation
with smoke and a forward or dual forward lay is performed, the Humat (hydrant) valve shall be
used.
The Humat valve can provide a key advantage to the overall water supply needs of the incident.
Humat valves are designed to assist within a forward lay scenario from the hydrant to the fire
area. The key advantage for the using a Humat valve is to provide additional GPM’s and to
assist with boosting pressure without having to interrupt the initial water supply to the attack
engine.
SAFETY STRAP
The safety strap shall be utilized to secure the hose line at the hydrant while the engine is laying
the supply line(s). The safety strap shall be inspected daily to ensure the structural components
are intact and that they have not been compromised by chemical erosion or normal wear.
POSSIBLE CONSIDERATIONS FOR THE USE OF THE HUMAT VALVE
A. First engine secures a water supply with a single 3” supply line and Humat valve. The
second engine goes to work on the same hydrant but does not engage the pumps. The
second engine simply allows the water to ‘pass through’ the pumps as it is delivered to
the first engine. This scenario may apply to a very strong hydrant at a fire that is not
demanding many gpms (there have been instances of the second engine, just by placing
the pumps in gear, to exceed what the first engine needs in terms of water – this scenario
works well for those situations.) A second supply line is not laid between the engines.
B. Same scenario as above, but now hand lines are operating off the first engine beyond
what a single 3” line can give with straight hydrant pressure (also increasing gpms) being
delivered to the first engine. The second engine engages the pumps and begins to
increase pressure to the attack engine’s supply. This increase is sufficient to handle the
water flow being asked for by the hand lines in service off the first engine. A second
supply line is not laid between the engines but can be considered due to the increase in
water demand and/or decreased hydrant capability.
C. The third scenario utilizes dual supply lines. The first in attack engine lays two lines to
the fire area. One line would be charged from the hydrant via the Humat valve while the
other lay dry for future use by the second or subsequent engine company. The second or
DENVER FIRE DEPARTMENT Topic No: 2112.03
Date: 06-27-18
STANDARD OPERATING GUIDELINE Approved: CDIII
Review Date: 06-27-20
Section: OPERATIONS: ENGINE OPERATIONS Replaces: Same, dated 03-22-11
Topic: Engine Company Operations
Humat Valve Use
2112.03 Engine Company Operations Humat Valve Use
Page 2 of 2
other subsequent engine company may conduct a reverse lay from the attack engine to the
Humat valve or a hand stretch may be needed to complete the additional supply lines.
D. Multiple supply lines can be laid between the attack engine and the supply engine, if a
Siamese or multiple Siamese appliances are used on the attack engine’s supply inlet.
Initially laying dual 3” supply lines in either a forward or reverse lay should be considered based
on the size of the fire and type of building construction and the possibility that other responding
apparatus may block future attempts for an engine to successfully lay additional lines. This
congestion may cause the needed additional supply lines to be hand stretched to the area, thus
delaying future water supply needs at a critical time in the incident.
These actions take much coordination from the engineers on the two engines involved. Both
engineers must be attentive to radio traffic regarding fire attack and water needs. In-district
training and a method of communication should be developed by all engine engineers to ensure a
safe and effective water supply evolution.
DENVER FIRE DEPARTMENT Topic No: 2112.04 Date: 04-15-19 STANDARD OPERATING GUIDELINE Approved: CDIII Review Date: 04-15-21 Section:
OPERATIONS: ENGINE OPERATIONS Replaces: Same, dated 06-27-18
Topic: Engine Company Operations at Grass, Weed Fires
2112.04 Engine Company Operations at Grass, Weed Fires Page 1 of 1
PURPOSE: To provide a guideline for Engine Company operations at grass/weed fires regarding
life safety, property conservation, and incident stabilization. SCOPE: Applies to all members performing Engine Company operations at grass/weed fires.
Although limited, history has demonstrated that the potential exists for rather devastating grass/weed fires within the City limits. The primary concern when confronting a grass/weed fire is the same as any fire – life safety and property conservation. Early recognition for the potential for fire spread, if any structures may be threatened, and whether the resources on scene can adequately mitigate the problem must be quickly determined by the first arriving officer. In addition, the request for additional resources, including DFD Wildland Engines and/or mutual aid, should be made early in the incident. One of the first things to be considered when attacking a grass/weed fire is the flame lengths. Generally, flame lengths of four feet or less can be attacked from the head of the fire. When attacking from the head, the officer must be aware of fuels and wind conditions. Prior to taking an engine off a hard surface, the engine officer, with coordination from the engineer, must ensure that the soil will support the weight of the apparatus. When applying water to the fire, consideration should be given to the use of a wetting agent that will help with penetration of dense fuels. This wetting agent can be applied in as low a concentration as 0.5%. A Pro Pak fire foam applicator with dish soap is a valuable tool in this scenario, if available. If flame lengths are greater than four feet, the officer should find an anchor point and work from the burned side toward the head of the fire. This tactic will require a pump and roll apparatus if the distance to the head of the fire is farther than the length of a hose lay. The officer must ensure that the fire is completely extinguished. This may entail using shovels to separate the burned from the unburned fuels. Self-contained breathing apparatus should not be worn unless conditions warrant. If wildland firefighting uniforms are available, they should be used. If structural bunkers are worn, the officer must closely monitor the crew for signs of heat injury.
DENVER FIRE DEPARTMENT Topic No: 2112.05
Date: 06-27-18
STANDARD OPERATING GUIDELINE Approved: CDIII
Review Date: 06-27-20
Section:
OPERATIONS: ENGINE OPERATIONS Replaces: Same, dated 03-22-11
Topic: Engine Company Operations – Parties
Trapped, Extrication Response
2112.05 Engine Company Operations – Parties Trapped, Extrication Response
Page 1 of 2
PURPOSE: To identify operational tactics for safe and efficient removal of parties trapped from a
motor vehicle. SCOPE: Applies to all Engine Company members operating at a parties trapped/extrication
response.
Parties Trapped / Extrication
A. Rig Placement
Engines should park to allow access for incoming truck/tower/rescue companies and
park in a manner that blocks the scene from oncoming traffic yet also allows close
access for a handline stretch.
B. Water Supply
A sustainable water supply from a hydrant should be considered if needed. If laying a
supply line, traffic considerations must be considered with regard to vehicles running
over the hose and causing a rupture.
C. Fire Attack
The minimum line suitable for parties trapped/extrication is a charged 1-3/4” handline
with a minimum 125 gpm fog nozzle – at the ready and staffed by a firefighter. This
line should be one that has foam capabilities if coming off a rig with an on-board foam
proportioner (pre-connected foam line). Due to unforeseen fuel leaks or other
flammable hazards, having a foam stream ‘at the ready’ is paramount for a foam blanket
and vapor suppression.
D. EMS
Members of the first due engine are responsible for initial triage and medical
assessment. Following the initial size-up and patient assessment, the IC shall contact
Dispatch and request additional resources, if needed.
E. Extrication
Physical extrication of patients should be well-coordinated between the engine and
truck/rescue crews. Denver Fire Department is responsible for and in charge of all
extrication activities. Once this has been completed, patient care is then turned over to
on-scene ALS units for transport to a hospital.
DENVER FIRE DEPARTMENT Topic No: 2112.05
Date: 06-27-18
STANDARD OPERATING GUIDELINE Approved: CDIII
Review Date: 06-27-20
Section:
OPERATIONS: ENGINE OPERATIONS Replaces: Same, dated 03-22-11
Topic: Engine Company Operations – Parties
Trapped, Extrication Response
2112.05 Engine Company Operations – Parties Trapped, Extrication Response
Page 2 of 2
If the extrication process will be lengthy, ALS members may be allowed access to the
patient(s) for I.V. therapy and a quick assessment, if necessary. This activity will take
place under the direct supervision of the on-scene IC.

DENVER FIRE DEPARTMENT Topic No: 2112.06
Date: 06-27-18
STANDARD OPERATING GUIDELINE Approved: CDIII
Review Date: 06-27-20
Section: OPERATIONS: ENGINE OPERATIONS Replaces: Same, dated 03-22-11
Topic: Engine Company Operations at Motor
Vehicle Fires
2112.06 Engine Company Operations at Motor Vehicle Fires
Page 1 of 3
PURPOSE: To identify operational tactics for safe and efficient extinguishment of
motor vehicle fires
SCOPE: Applies to all engine company members operating at a motor vehicle fire.
Also included are members of truck/tower/heavy rescue companies that
are dispatched to aid in the extinguishment, forcible entry, or search of
these vehicles.
Motor Vehicle Fires
A. Fire Control Operations
A motor vehicle fire should be treated as a ‘mini house’ fire in the scope
of duties to be performed by responding fire crews. Fire attack, forcible
entry, primary search, and ventilation are all tasks that need to be
performed by the arriving engine crew. Having members fully prepared to
handle these duties by wearing PPE and SCBA will ensure a successful
operation, with fire safety in mind.
The minimum level of protection for Firefighters is full protective clothing
(PPE) while breathing air from an SCBA. While engaged in pump
operations, the Engineer is not expected to wear full PPE. Officers have
discretion as whether to wear PPE with SCBA, but if they are engaged in
any firefighting efforts, PPE with SCBA shall be worn.
The minimum size hoseline for a working auto fire is the 1-3/4” handline
with a constant gallonage fog nozzle capable of flowing a minimum of
125 gallons per minute (gpm). If using an on-board foam proportioning
system (i.e. Pierce Engines), the previously recommended 95 gpm foam
nozzle should be avoided as it will not produce an adequate foam stream.
B. Apparatus Placement
Apparatus should be placed upwind and uphill of the incident, if
applicable, to afford protection from hazardous liquids and vapors, and to
reduce smoke exposure for the Engineer.
Consideration should also be given to using the apparatus as a barrier to
shield the incident from traffic hazards. Warning lights should be left
operating with the use of traffic cones, if necessary. The use of road flares
is discouraged due to the possibility of ignition of flammable vapors.
DENVER FIRE DEPARTMENT Topic No: 2112.06
Date: 06-27-18
STANDARD OPERATING GUIDELINE Approved: CDIII
Review Date: 06-27-20
Section: OPERATIONS: ENGINE OPERATIONS Replaces: Same, dated 03-22-11
Topic: Engine Company Operations at Motor
Vehicle Fires
2112.06 Engine Company Operations at Motor Vehicle Fires
Page 2 of 3
C. Water Supply
If the water carried on the engine will not be sufficient for extinguishment,
early consideration must be given to additional water supply sources.
Securing a water supply (hydrant) is a viable option, provided one is
available and traffic considerations coincide with a supply line being laid
out. Another consideration is calling for an additional engine company,
especially for auto fires on the highway/freeway, where hydrants are
limited, or if the size of vehicle will demand more water for fire attack.
There are highway/freeway standpipes and hydrants available for use, and
these should be pre-planned, noted, and trained with for use by companies
having them in their district.
D. Fire Attack
Where parties are trapped in the vehicle, water should be first applied to
protect the patients and permit an effective rescue.
Due to the possibility of a fuel system leak or rupture, or in the event of an
active fuel leak or fuel spill, the attack line of choice should be the 1-3/4”
handline with a minimum of a 125gpm fog nozzle having the capability of
immediately putting foam to work (pre-connected foam line).
If foam is used, the setting should be proportioned at the 6% foam
discharge setting. This is the recommended setting for E85 Ethanol-based
fuel and will work well for other types of vehicle fuel mixtures.
When rescue is not a factor, initial water should first be applied for several
seconds to extinguish fire or cool down the area around any fuel tanks or
fuel systems. This is especially important if the fuel tanks are Liquefied
Petroleum Gas (LPG) or Liquid Natural Gas (LNG).
One member of the attack team, in full PPE with SCBA, must have
forcible entry tools in his/her possession to provide prompt and safe entry
into the vehicle.
E. Firefighter Approach
The attack approach to a vehicle fire should be one that avoids direct
approach from the front of the vehicle and one that avoids close contact
with any tire that is directly affected by fire. Some vehicles today have
front bumpers that are attached by two shocks encases in a metal housing
– known as energy absorbing bumpers. When heated by fire, these shocks
will develop high pressures, heat up, and may explode, causing the front
DENVER FIRE DEPARTMENT Topic No: 2112.06
Date: 06-27-18
STANDARD OPERATING GUIDELINE Approved: CDIII
Review Date: 06-27-20
Section: OPERATIONS: ENGINE OPERATIONS Replaces: Same, dated 03-22-11
Topic: Engine Company Operations at Motor
Vehicle Fires
2112.06 Engine Company Operations at Motor Vehicle Fires
Page 3 of 3
bumper to become a projectile that may seriously injure a Firefighter.
Bumper assemblies have been known to travel 25 feet. A tire or split rim
that is in close contact to or being exposed to flame impingement may also
become a projectile if overheated.
Sufficient cooling of these two areas with water is needed prior to
engaging in any activity that may put Firefighters in their path (i.e. prying
open the hood of the vehicle for engine access).
Of special consideration are the gas-filled struts, springs, cylinders,
extending arms that hold the hood open and extend the rear hatch-back
doors open. If overheated, these struts will also explode and become
projectiles capable of serious bodily injury. Sufficiently cooling these
struts with water will minimize the danger of explosion and subsequent
release. To ensure personal safety, be sure to allow sufficient clearance
when releasing latches.
F. Hybrid Vehicles
Most recent publications recommend treating a gas hybrid car fire much
the same as a fuel-only-driven auto, with a few special considerations.
The tool of choice is copious amounts of water, which will both eliminate
the radiant heat and cool the hybrid’s metal battery box and the plastic
cells inside the battery pack.
Hybrid vehicles by nature are extremely quiet when stopped and may
appear to be off when, in fact, they are still running. Shutting the engine
off and disconnecting the vehicle’s 12-volt battery will minimize electrical
and fuel-related hazards.
Hybrid cars have orange cables that designate high voltage. Avoid cutting
or disconnecting these cables.
DENVER FIRE DEPARTMENT Topic No: 2112.07
Date: 06-27-18
STANDARD OPERATING GUIDELINE Approved: CDIII
Review Date: 06-27-20
Section: OPERATIONS: ENGINE OPERATIONS Replaces: Same, dated 03-22-11
Topic: Engine Company Operations at Single
Family Dwellings
2112.07 Engine Company Operations at Single Family Dwellings
Page 1 of 1
PURPOSE: To identify and safely Locate, Confine, and Extinguish (LCE) a fire in
a single-family dwelling
SCOPE: Applies to members performing engine company operations at a
single-family dwelling
Residential Fire Operations – Engine Company
The first arriving engine to a residential house fire will establish a water supply. If a
forward lay is performed, a Humat valve shall be utilized.
The second arriving engine to a residential house fire will establish a secondary water
supply or augment the first arriving engine by ‘going to work’ on their hydrant (Humat
valve). If gaining a second water supply, this supply line should be laid to the rear of the
residence. A Humat valve will also be used by this company.
It is strongly discouraged for the second engine to lay to the front of an address if
there is already an attack engine at or near the front of the fire building, due to
spotting considerations for the first and second due truck/tower companies. It would
be more appropriate for this engine to go to work on the hydrant/Humat valve of the
first attack engine.
If the second engine cannot lay to the rear (there is no alley), then this engine should
augment the water supply of the first attack engine at the Humat valve.
The third arriving engine (if not pre-assigned as the RIT company) should consider going to
the rear of the fire building or going to work on the attack engine’s Humat valve, if not
already done. Fire conditions and I.C. discretion will dictate the best placement for this
apparatus.
At a minimum, this third engine officer should be thinking of a second water supply
or augmenting the water supply of the attack engine.
DENVER FIRE DEPARTMENT Topic No: 2112.08
Date: 06-27-18
STANDARD OPERATING GUIDELINE Approved: CDIII
Review Date: 06-27-20
Section: OPERATIONS: ENGINE OPERATIONS Replaces: Same, dated 03-22-11
Topic: Engine Company Operations at Multi-
Family Dwellings
2112.08 Engine Company Operations at Multi-Family Dwellings
Page 1 of 3
PURPOSE: To efficiently and safely Locate, Confine, and Extinguish (LCE) a fire in
a multi-family dwelling
SCOPE: Applies to members performing engine company operations at fires in
multi-family dwellings
Fires in multi-family dwellings present a wide range of unique challenges to the engine
company. Multi-family dwellings cover an extremely wide range of buildings found within the
City and County of Denver, ranging from triplexes to lofts to expansive apartment complexes.
These may all be of different construction type, and all will certainly require different
approaches with regard to firefighting efforts. The Engine Company officer must consider the
need for water supply (including potential standpipe operations), potential rescue situations,
initial handline placement, and apparatus placement. In addition, the layout of the apartment
building or complex, the building construction type, and the time of day are considerations that
should occur during the size-up by the engine officer. It should be noted that many of today’s
newer multi-family dwellings are older commercial occupancies, and considerations must be
made for the differences in the approach to the diversity of these occupancies (see Engine
Company Operations at Commercial Buildings SOG).
The first arriving Engine Company to a fire in a multi-family dwelling will either establish a
water supply through a straight lay (utilizing the Humat valve), reverse lay, or make the
appropriate connections to the building’s FDC. A water supply should be established in such a
way to anticipate water needs, based on the size and construction of the occupancy and the
potential for fire spread. Based on size-up, this would include laying one or two 3” supply lines.
If a straight (forward) lay or dual forward lay is performed, a Humat valve shall be utilized.
The responsibility of second arriving Engine Company to a fire in a multi-family dwelling will
be to either establish a secondary water supply or augment the first arriving engine by ‘going to
work’ on their hydrant utilizing the Humat valve. If the occupancy is standpipe equipped and the
first arriving Engine Company has made the appropriate FDC connections, the second arriving
Engine Company will need to complete the water supply through tandem pumping. If the
occupancy is not standpipe equipped and the second arriving engine opts to establish a secondary
water supply, this engine company should lay to a different area of the building than the first
engine where their position will be advantageous to fire attack or support operations. Water
supply guidelines shall also be followed by this engine company.
The third due assigned engine company (if not pre-assigned as the RIT company) should be
proactively considering going to work at the hydrant of either the first or second arriving engine
company or, if applicable, securing a second water supply and providing the use of their engine
and handlines at a different location of the fire scene. Care must be exercised to avoid opposing
DENVER FIRE DEPARTMENT Topic No: 2112.08
Date: 06-27-18
STANDARD OPERATING GUIDELINE Approved: CDIII
Review Date: 06-27-20
Section: OPERATIONS: ENGINE OPERATIONS Replaces: Same, dated 03-22-11
Topic: Engine Company Operations at Multi-
Family Dwellings
2112.08 Engine Company Operations at Multi-Family Dwellings
Page 2 of 3
handlines. The best location for the third due engine should be coordinated through Command
upon arrival at the incident.
For obvious reasons, certain variances with unique apartment complexes and individual
buildings throughout the City may dictate a different approach to the initial engine company
operations. Variations from these guidelines must be communicated to incoming companies to
allow them to adapt appropriately, especially to second and third due engine companies for
subsequent water supply considerations.
Handline selection and placement is often a very dynamic decision-making process, based on the
size and type of occupancy and amount of fire involvement. Engine members getting the nozzle
to the seat of the fire for extinguishment may save more lives than effecting early time-
consuming. If rescues are in progress, the first handline may be deployed to protect egress of
potential fire victims. This would include interior stairways, hallways, and common doors that
may be used by civilians and firefighters for escape.
As previously mentioned, if the building is equipped with a standpipe, connections should be
made to the FDC. However, if the fire is on the first floor or a lower floor, or the standpipe has
proved itself inoperable, consideration should be given to an alternate method of getting a
handline in place. The best method for this may be for a handline to be stretched into the front,
side, or back entrance and directly to the fire room. Certain situations may dictate that the
handline be taken up stairs or up the exterior of the building. An example of this situation would
be a low-rise apartment building, where no standpipes are available or deemed unreliable by
previous experience or pre-planning. A fire on an upper floor may necessitate that the line be
brought up the exterior of the building, possibly into a neighboring apartment, over a balcony, or
through a window. This may be done via ladders or by dropping a utility rope and pulling the
uncharged handline up and into position. Interior stairwells may allow for a well-hole stretch. It
should be noted that whenever hose is stretched vertically, it should be secured so as not to stress
the coupling connections and to not allow the dry hoseline to fall back down once it is charged
with water. These situations are best executed when the engine company has preplanned and
made themselves familiar with unique characteristics found in their first in occupancies.
Apparatus Placement
Apparatus placement will set the stage for successful operations by allowing incoming truck and
tower companies access to the building for rescues and potential elevated master stream use.
Many apartment complexes in the City have limited access to the buildings, and preplanning and
forethought are required to allow for appropriate apparatus placement.
Throughout the City, one may find a varied collection of differing types of multi-family
dwellings. They can be composed of any of the five construction types, dictating potential
differences in the strategies and tactics implemented at the fire scene. Engine companies should
DENVER FIRE DEPARTMENT Topic No: 2112.08
Date: 06-27-18
STANDARD OPERATING GUIDELINE Approved: CDIII
Review Date: 06-27-20
Section: OPERATIONS: ENGINE OPERATIONS Replaces: Same, dated 03-22-11
Topic: Engine Company Operations at Multi-
Family Dwellings
2112.08 Engine Company Operations at Multi-Family Dwellings
Page 3 of 3
use every possible opportunity to familiarize themselves with the buildings in their areas, paying
close attention to FDCs, hydrant location, and the construction types.
DENVER FIRE DEPARTMENT Topic No: 2112.09
Date: 06-27-18
STANDARD OPERATING GUIDELINE Approved: CDIII
Review Date: 06-27-20
Section: OPERATIONS: ENGINE OPERATIONS Replaces: Same, dated 03-22-11
Topic: Engine Company Operations at
Commercial Buildings
2112.09 Engine Company Operations at Commercial Buildings
Page 1 of 5
PURPOSE: To efficiently and safely Locate, Confine, and Extinguish (LCE) a fire in
a commercial building
SCOPE: Applies to members performing Engine company operations at
commercial building fires
Commercial Fire Operations – Engine Company
It must be recognized that there are dramatic and significant differences in size, type, and
construction of commercial structures. Therefore, the water supply decisions of the first
second and third due engines will set the stage for a successful fire attack operation.
Engine companies must recognize the increased fire load (greater BTUs) presented by a
commercial building and make early water supply decisions that will be sufficient to
supply multiple handlines, tower/ladder monitors, or ground monitors, if necessary.
Laying a single 3” supply line to a large commercial structure will not be sufficient if
additional water is immediately needed. There will then be a delay in the fire-fight as
companies regroup to set up a larger water supply as the incident progresses. Be
cognizant of the potential fuel load these buildings have to offer and be ready for it!
The commercial structures that are typically found in the downtown area and central
portions of the City of Denver (the City) have much smaller areas and construction is
either ordinary or heavy timber. Newer commercial structures have extremely larger
areas and are of pre-stress slab construction. Other buildings discussed here are found
throughout the City and will pose water supply and fire attack issues due to their size and
layout.
If the building is equipped with a sprinkler system, immediate augmentation of
these systems will be required.
A. Apparatus Placement
Engine placement should be based on three agendas:
1. The engine must be out of the way for arriving truck/tower
companies. Good aerial ladder placement is a must at these
buildings, and every effort should be afforded the truck/tower to
spot as close to the building as possible. “I can stretch a line but I
can’t stretch a ladder” is a quote that directly applies to this
concept.
2. Rigs should be out of any collapse zone hazards.
3. The engine should be close enough to stretch attack lines into the
building.
DENVER FIRE DEPARTMENT Topic No: 2112.09
Date: 06-27-18
STANDARD OPERATING GUIDELINE Approved: CDIII
Review Date: 06-27-20
Section: OPERATIONS: ENGINE OPERATIONS Replaces: Same, dated 03-22-11
Topic: Engine Company Operations at
Commercial Buildings
2112.09 Engine Company Operations at Commercial Buildings
Page 2 of 5
B. Communication
Communication between engine officers with regard to water supply
activities is paramount to a successful operation at commercial buildings.
For example, stating where hydrants are, whether a reverse or dual reverse
is needed, and whether you have laid in or not are all things that need to be
expressed for a successful water supply evolution.
C. Water Supply
Every commercial building poses different water supply problems.
Engine officers will need to think ‘outside the box’ in terms of water
supply. A dual forward lay may not be appropriate in a massive
warehouse or school. Utilizing a Recon Group to locate the fire, then
communicating the need for a dual reverse lay from the second due engine
may be the appropriate tactic. Due to relatively longer lays and an
increased need for water because of building size, early care must be taken
with regard to an efficient water delivery system. Engines communicating
their needs and actions will make this operation successful.
D. Traditional Style Commercial Buildings
Every effort should be made to lay two 3” lines to a traditional style
commercial building by the first arriving engine company. If the building
has a sprinkler system, every attempt should be made to augment it while
the initial fire attack is started. Fire attack, due to materials involved and
size of structure, should be made with the appropriate handline unless a
large volume of fire dictates a ground master stream. Most traditional
style commercial buildings are conducive to reasonable handline stretches
(300’ or less).
It must be recognized by the first arriving engine officer that entry to the
fire area may not be through the so-called “front entrance” where the
office area is usually located. Typically, these buildings have office areas
in front, and making the stretch from this point cumbersome a slow and
could hinder the fire attack. Entry through the actual warehouse (man-
door or large roll-up door) may be more beneficial.
Special Consideration:
A truck/tower company using a tag-line system may have to do initial
reconnaissance to locate the fire prior to hose lines entering the structure.
This will save much needed time and energy by avoiding stretching an
attack line to the wrong location.
DENVER FIRE DEPARTMENT Topic No: 2112.09
Date: 06-27-18
STANDARD OPERATING GUIDELINE Approved: CDIII
Review Date: 06-27-20
Section: OPERATIONS: ENGINE OPERATIONS Replaces: Same, dated 03-22-11
Topic: Engine Company Operations at
Commercial Buildings
2112.09 Engine Company Operations at Commercial Buildings
Page 3 of 5
E. Buildings with Tilt Up Concrete Slab Walls and Lightweight Construction
Roofs
Once the fire area has been discovered, communication must be made with
the engine officer to get an exact location for access with the rig and an
attack line. Hydrant lays to certain points of these buildings may be in
excess of one thousand feet. These types of distances are not conducive to
a good water supply, especially when considering a single straight lay
without hydrant augmentation by a second engine. The closest possible
hydrant must be considered to establish a good water supply that may
eventually involve master streams or, at the very least, multiple 2-1/2”
handlines.
First arriving engine officers must consider how long it is going to be
before they will benefit from the added help (in pumping) from another
engine company. This is crucially important when considering a long
straight lay. Extended straight single lines will not give adequate water
supply for an initial fire attack; therefore, this engine must consider the
reverse lay or double reverse lay to get the engine to the hydrant and
maximize the water delivery. Working on a hydrant is the most efficient
place for an engine. The sprinkler system can also be augmented from this
engine using this method.
It has been noted that many tilt up concrete slab with lightweight truss
buildings have standpipe systems. This is incorrect; they are not standpipe
systems but are small hose connections (1-1/2 outlets piped into the
sprinkler system) that are only meant to be used for “clean up” or overhaul
lines. These small hose connections are not placed in a uniform manner
within structures and are not required in all occupancies. Also, these
connections are not required to be located near an exit as is required for
standpipe connections. Due to all these variables, small hose connections
shall not be used to supply an attack line.
Special Consideration:
Engine officers must recognize the need for immediate ground level
master streams versus handlines in the fire attack due to the volume of fire
present. This method can be most easily accomplished with the engine at
the hydrant.
To be Noted:
Engine officers should always consider varying methods of water delivery
to a commercial building. A straight lay with one 3” line is a risky venture
DENVER FIRE DEPARTMENT Topic No: 2112.09
Date: 06-27-18
STANDARD OPERATING GUIDELINE Approved: CDIII
Review Date: 06-27-20
Section: OPERATIONS: ENGINE OPERATIONS Replaces: Same, dated 03-22-11
Topic: Engine Company Operations at
Commercial Buildings
2112.09 Engine Company Operations at Commercial Buildings
Page 4 of 5
given the fuel load and excessive friction losses with potentially long
supply and attack line stretches. Ground level master streams are an
excellent tool for delivering large quantities of water to the upper areas of
most commercial buildings. This method can only be accomplished with
an engine at the hydrant delivering water to the master stream via two 3”
lines or one 5” supply line.
Radio traffic between engineers working at these incidents tend to be
heavy. Consideration be the IC should be given to putting the engineers on
the Engineer Tac Channel.
F. Schools/Churches
Coordination between engine officers is important at these buildings.
Many standpipe systems in schools may not work, as they may only
supply certain portions of the building or may only supply the sprinkler
system. Engine companies should consider investigating the fire to find
the best location for apparatus placement (this may not be at the front of
the building). A second engine may have to lay a dual reverse supply line
to the attack engine. The attack crew may then have to make its own
standpipe system utilizing 2-1/2” as a supply from the engine. The high-
rise backpacks are an excellent choice for an attack line here as they are
portable and can be carried to a location near the engine-made supply,
then stretched to the seat of the fire.
The high-rise hose packs can also be dropped from an upper floor to a
waiting supply line and be put to immediate use in a fire attack. If the
high-rise backpacks are not used, dropping a rope from an upper floor and
hoisting sufficient hose into play will work.
Consideration will have to be given to supplying the sprinkler system if
one is present. Understanding the building and its water systems through
pre-plans will help to address this issue.
G. Lightweight Constructed Buildings
Lightweight constructed buildings (i.e. strip malls, stand-alone fast food
restaurants) pose a serious hazard in their construction make-up.
Lightweight constructed supporting members can fail in less than four
minutes when exposed to fire and the HVAC systems are usually located
on the roofs of these structures. Early identification of a content fire verse
a structure fire is imperative. The engine company should be prepared in
DENVER FIRE DEPARTMENT Topic No: 2112.09
Date: 06-27-18
STANDARD OPERATING GUIDELINE Approved: CDIII
Review Date: 06-27-20
Section: OPERATIONS: ENGINE OPERATIONS Replaces: Same, dated 03-22-11
Topic: Engine Company Operations at
Commercial Buildings
2112.09 Engine Company Operations at Commercial Buildings
Page 5 of 5
the case of a content fire to mount an aggressive interior fire attack, with
the focus being water application on these supporting structural members.
Water supply is paramount and 2 – 3” lines should be considered as a
minimum for the attack engine, with the second engine augmenting the
attack engine by ‘going to work’ on the attack engine’s hydrant.
Line selection is paramount – heavy fuel load must be considered!
2-1/2” handlines and/or ground monitors should be considered based on
fuel load, fire conditions, and location of fire. Once inside the building,
opening up the ceiling with a solid/straight stream to cool the upper
supporting members and also to stop fire travel is an excellent tactic due to
relatively little roof compartmentation in these buildings.
If heavy fire is present upon arrival in one business, exposure protection to
the adjacent or connected businesses may be more important. Gaining
access to the exposure businesses and opening up the ceiling (truck crew)
with a hoseline at the ready to cool the ceiling members will stop fire
spread beyond the primary fire area.
DENVER FIRE DEPARTMENT Topic No: 2112.10
Date: 06-27-18
STANDARD OPERATING GUIDELINE Approved: CDIII
Review Date: 06-27-20
Section: OPERATIONS: ENGINE OPERATIONS Replaces: Same, dated 11-25-16
Topic: Engine Company Operations – 5-inch
Water Supply
2112.10 Engine Company Operations – 5-inch Water Supply
Page 1 of 2
PURPOSE: To provide, through the correct placement and operation of the 5-
inch engine, large amounts of water (in excess of 1,000 gpm) for
master stream application
SCOPE: Applies to all members working on a 5-inch engine company
performing large water operations through the use of 5-inch hose
I. MULTIPLE ALARM WATER SUPPLY OPERATIONS FOR 5-
INCH ENGINE COMPANIES
The Denver Fire Department Incident Response Matrix includes the
response of two 5-inch engines and one ladder tower to every multiple
alarm fire. When used effectively, 5-inch engine companies can provide
up to 2000 gallons per minute for water supply to master streams. Often,
they will use hydrants that will be more remote from the incident than
those hydrants being used by the first responding engines. The reason for
this is twofold. First, most of the close-in hydrants will likely have
already been secured by first alarm engine companies. Second, and most
importantly, the 5-inch engine company should attempt to locate and use a
hydrant that is on a large water main. The reason for this is to maximize
the amount of water that can be delivered from this large main, using 5-
inch hose, to the master streams that are operating on the fire scene. Radio
traffic is generally heavy at these incidents and engineers will add to this
traffic when coordinating water supply. Engineers should consider
utilizing the Engineer TAC channel as approved by the IC.
II. FIRST ARRIVING 5-INCH ENGINE
While responding to a multi-alarm fire, the officer and crew on the
responding 5-inch engine company should attempt to gain a mental picture
of the following important items:
A. Location of master stream(s) to be supplied
B. Hydrants already in use by first arriving engines
C. Location of closest large water main
Once the master stream location is determined, the 5-inch engine should
reverse lay their 5-inch hose from the master stream (ladder tower, ladder,
or engine supplying a particular master stream device) to the hydrant that
has been selected and ‘Go to Work at the Hydrant.’
DENVER FIRE DEPARTMENT Topic No: 2112.10
Date: 06-27-18
STANDARD OPERATING GUIDELINE Approved: CDIII
Review Date: 06-27-20
Section: OPERATIONS: ENGINE OPERATIONS Replaces: Same, dated 11-25-16
Topic: Engine Company Operations – 5-inch
Water Supply
2112.10 Engine Company Operations – 5-inch Water Supply
Page 2 of 2
Often it might be necessary to spot your engine at the hydrant and hand
drag the 5-inch hose to the master stream. This can be highly beneficial at
building complexes or incidents that have poor vehicle access.
III. SECOND ARRIVING 5-INCH ENGINE
If the master stream is a ladder tower, it should be noted that there is
approximately 100 pounds of friction loss in the water pipe alone.
Straight ladders with no tower have 60-plus pounds of friction loss. This,
added to the 80 pounds of nozzle pressure plus any head pressure, might
make it necessary to put the second arriving 5-inch company right next to
the ladder tower or ladder to receive the water from the 5-inch company at
the hydrant and then augment the pressure and relay pump into the master
stream.
The Incident Commander might prefer that the second arriving 5-inch
engine be used to supply another, more remote master stream. This engine
company should then simply follow the same operation outlined for the
first arriving 5-inch engine.
To be Noted:
For engines with electronic pressure governors: the engine working on the
hydrant should have their electronic governor set in the RPM mode, and engines
supplying the ladder tower should have their electronic governor set to PSI.
Only 5” hose that has been properly tested at pressure during annual hose testing
shall be utilized when supplying water.
All 5-inch engines should make every attempt to pay close attention to their radios and
firehouse monitors when large structure fires are in progress, this might give them a
better idea as to which hydrants are already in use and location of master streams.
Fire Dispatchers should also give 5-inch engines a “heads up” on the telephone when
they suspect that a structure fire is advancing toward a multiple alarm fire. 5-inch engine
companies can then start to ‘pre-plan’ a particular incident with regard to water supply.
This is especially beneficial at night.
DENVER FIRE DEPARTMENT Topic No: 2112.11 Date: 04-15-19 STANDARD OPERATING GUIDELINE Approved: CDIII Review Date: 04-15-21 Section:
OPERATIONS: ENGINE OPERATIONS Replaces: Same, dated 10-12-11 (was named AFFF/ATC Foam)
Topic: FOAM OPERATIONS
(2112.11 Foam Operations) Page 1 of 8
PURPOSE: This procedure will establish a standard guideline for the response to the report of a fuel spill or fire involving fuel spills on hydrocarbons & polar solvents. This procedure will also detail the use of wetting agents on class A type fires. Firefighters must be knowledgeable and demonstrate competence on the types of foam carried by the Denver Fire Department knowing when to use each type. SCOPE: Fire-fighting foam is an aggregate of air-filled bubbles formed from aqueous solutions and is lower in density than flammable liquids. It is used primarily to form a cohesive floating blanket on flammable and combustible liquids and prevents or extinguishes fire by suppressing formation of flammable vapors. It has the property of adhering to surfaces, which provides a degree of exposure protection from adjacent fires. Foam can be used as a fire prevention, control, or extinguishing agent for flammable liquid hazards. A wetting agent is a concentrate that when added to water reduces its surface tension and increases its ability to penetrate and spread. There is a significant difference between the uses of these two resources. DEFINITIONS: Alcohol-Resistant Foam Concentrate (AFFF) – The foam formed acts as a barrier both to exclude air or oxygen and to develop an aqueous film on the fuel surface that can suppress the evolution of fuel vapors. AFFF/ATC (AR-AFFF): A synthetic foam-forming liquid designed for protection of water-soluble polar solvents and water insoluble hydrocarbon flammable liquids. Class A Fire – A fire in ordinary combustible materials, such as wood, cloth, paper, rubber, and many plastics. Class B Fire – A fire in flammable liquids, combustible liquids, petroleum greases, tars, oils, oil-based paints, solvents, lacquers, alcohols, and flammable gases. Combustible Liquid - Any liquid that has a flash point at or above 37.8°C (100°F).
Concentration – The type of foam concentrate used determines the percentage of concentration required. For example, a 3 percent foam concentrate is mixed in the ratio of 97 parts water to 3 parts foam concentrate to make foam solution. Eductor – A device that uses the Venturi principle to introduce a proportionate quantity of foam concentrate into a water stream.
DENVER FIRE DEPARTMENT Topic No: 2112.11 Date: 04-15-19 STANDARD OPERATING GUIDELINE Approved: CDIII Review Date: 04-15-21 Section:
OPERATIONS: ENGINE OPERATIONS Replaces: Same, dated 10-12-11 (was named AFFF/ATC Foam)
Topic: FOAM OPERATIONS
(2112.11 Foam Operations) Page 2 of 8
Flammable Liquid – Any liquid that has a closed-cup flash point below 37.8°C (100°F). Foam Concentrate – A concentrated liquid foaming agent as received from the manufacturer. Foam Solution – a homogeneous mixture of water and foam concentrate in the correct proportions. Foam solution shall be considered to have the same hydraulic characteristics as water. Foam Concentrate Consumption Rate – The consumption rates shall be based on the percentage concentrate used in the calculation (e.g. 3% for hydrocarbon fuels or 6% for polar solvents). Foam Proportioner – this device consists of an eductor installed in a bypass line between the discharge and suction of a water pump. A small portion of the discharge of the pump flows through this eductor and draws the required quantity of air foam concentrate from a tank, delivering the mixture to the pump suction. Variable capacity can be secured using a manually controlled metering valve. Hydrocarbon – Flammable liquids, such as gasoline or fuel oil, which do not mix with water. In-Line Eductor – This eductor is used for installation in a hose line, usually at some distance from the nozzle, as a means of drafting air foam concentrate from a container.
Polar Solvent – A material that is soluble with water, such as ethanol, acetone, methyl ethyl ketone, etc. Wetting Agent –This type of agent is very similar to Class “A” Foam with regard to increasing wetting effectiveness of the water but does not have the foaming abilities. Quantity and Types of Foam used on the Denver Fire Department in the Operations Division:
• AR-AFFF – 3%-6% type of Class B fluorinated foam concentrate is designed to be used at the 3% application rate when used on a standard hydrocarbon fuel fire and 6% when used on a polar solvent/alcohol fuel.
• Training Foam – 1% non-fluorinated foam concentrate carried at the Denver Fire Academy to simulate training with Class B foam carried at the Denver Fire Academy as needed.
• Wetting Agent – Dish soap provided for use by the Denver Fire Department Warehouse for use in the firehouse for washing dishes will also be used as a Class A

DENVER FIRE DEPARTMENT Topic No: 2112.11 Date: 04-15-19 STANDARD OPERATING GUIDELINE Approved: CDIII Review Date: 04-15-21 Section:
OPERATIONS: ENGINE OPERATIONS Replaces: Same, dated 10-12-11 (was named AFFF/ATC Foam)
Topic: FOAM OPERATIONS
(2112.11 Foam Operations) Page 3 of 8
foam substitute for use as a wetting agent in the Pro-Pak and Fire Extinguisher (Light Water). This soap will not generate a foam blanket but will help penetrate class A fuels and non-water-soluble Class B combustibles to make extinguishment easier on dense materials.
The amount of Class B foam carried on Engines designated as foam rigs will be six (6) 5- gallon buckets (30 gallons) carried in the foam tank. No extra buckets of foam are necessary to be carried on the engine or in the firehouse. Any extra foam needed on an emergency incident can be brought in by adding another Engine to the incident or by calling Station 6 to respond to the incident to bring extra foam carried on a spare warehouse truck with call sign Foam 1. After any incident where Class B foam is used, Station 6 can be contacted to send replacement Class B foam to the firehouse or scene. Station 6 will also carry eductors and nozzles for use on large spills and/or fires. Foam Application Rates
• Hydrocarbon (Gasoline) – The application rate is 0.10 gpm/sqft at 3% foam concentration.
• Polar Solvents (Acetone, Ethanol) The application rate is 0.20 gpm/sqft at 6% foam concentration.
Foam Application Rates Calculated
1. Determine Area of Hazard (sqft) 2. Chooses appropriate Foam Application Rate 3. Foam Application Rate x Area = GPM of Foam Solution needed 4. Foam Solution GPM x % used = Concentrate GPM 5. Concentrate GPM x Time (minutes) = Total Concentrate needed
a. Storage Tanks – recommend 60 minutes of flow time b. Spills – recommend 15 minutes of flow time
Hydrocarbon Fuel Example
• Determine Area of Hazard = 3000 sqft • Foam Application Rate = 0.10 GPM • Foam Application Rate x Area = 300 GPM of Foam Solution needed • 300 GPM of Foam Solution x 3% Used = 9 GPM Concentrate • 9 x 15 minutes application time = 135 gals needed
DENVER FIRE DEPARTMENT Topic No: 2112.11 Date: 04-15-19 STANDARD OPERATING GUIDELINE Approved: CDIII Review Date: 04-15-21 Section:
OPERATIONS: ENGINE OPERATIONS Replaces: Same, dated 10-12-11 (was named AFFF/ATC Foam)
Topic: FOAM OPERATIONS
(2112.11 Foam Operations) Page 4 of 8
Polar Fuel Example – use 0.20 GPM as foam application rate and 270 gallons of foam would be needed.
These calculation examples are based on a spill area of 75’ x 40’
Based upon the 75’ x 40’spill footprint you would need 135 gallons of 3% foam concentrate would be needed. If we assume every gallon of 3% foam concentrate requires 97 gallons of water, we can see that we would also need 13,095 gallons of water (97 x 135) to maintain the recommended 15-minute application period on a hydrocarbon fuel spill. Safety Precaution when using foam:
• Use all protective clothing and equipment on all foam incidents including helmet, bunking coat and pants, boots, gloves, SBCA and hood. Always avoid breathing vapors and keep upwind, if possible.
• Environmental concerns are important to note, they include: o Contamination of surface water o Contamination of ground water.
Procedures for using Class B foam with on-board foam proportioner If the apparatus is provided with a foam proportioning system, the following procedures are to be used for foam operations: Foam Start Up Operations
1. Set metering dial to desired percentage. 2. Slowly open water valve. 3. Slowly open eductor valve. 4. Slowly open foam valve. 5. Set pump discharge pressure at 200 psi.
DENVER FIRE DEPARTMENT Topic No: 2112.11 Date: 04-15-19 STANDARD OPERATING GUIDELINE Approved: CDIII Review Date: 04-15-21 Section:
OPERATIONS: ENGINE OPERATIONS Replaces: Same, dated 10-12-11 (was named AFFF/ATC Foam)
Topic: FOAM OPERATIONS
(2112.11 Foam Operations) Page 5 of 8
Foam Shut down and system flush procedures 1. Close all foam supply valves. 2. Reduce pump discharge pressure to 100 psi (nozzle must be open to reduce pressure). 3. Slowly open flush valve. 4. Maintain 100 psi pump pressure and run flush until foam is no longer present. Rotate
metering dial while flushing. 5. Stop pump and close all valves.
The proper line suitable for foam operations coming off a rig with an on-board foam proportioner (pre-connected foam line) is a charged 1–3/4” handline with a minimum 125 gpm fog nozzle.
WARNINGS per Operating Manual.
1. Do not operate inlet to eductor over 250 psi 2. Do not throttle any valves in the eductor circuit. They must be fully opened and closed.
Procedures for using Class B foam with in-line eductor
1. Establish water supply line where possible and spot Engine at desired location for attack (up wind and uphill, if possible.)
2. Size up the incident to determine the quantity of foam and the type of foam needed by using the following rule of thumb:
a. Polar solvents (acetone, ethanol): 5-gallons of AR-AFFF set at 6% for polar solvents will cover 400 square feet. For oxygenated fuels, up to 30% additive or hydrocarbon 3% setting on meter valve will cover 800 square feet. The general rule of thumb for foam depth is ½ to 1 inch.
3. If the Incident Commander does not have the resources available to handle the incident, he or she should call for help and reevaluate the situation. If it is determined that the necessary resources are available to control the situation, this procedure should be continued.
4. Make hook up of eductor. The eductor can be mounted directly to pumper outlet or extended as needed with a 2-1/2” or 3” hose line from the pump panel to the eductor position.
5. Metering valve should be set at the correct percentage according to the type of fuel involved.
6. Pull the desired length of hose and make connections to the eductor. a. The length of attack line can be up to 300 feet of 1 ¾ inch hose from the eductor
to the incident scene. 7. Select the proper nozzle according to GPM flow. The nozzle and eductor must be rated
at the same flow for maximum performance. However, in all cases, the nozzle flow setting must not be less than the eductor. Currently, all in-line eductors flow at 95 GPM.
DENVER FIRE DEPARTMENT Topic No: 2112.11 Date: 04-15-19 STANDARD OPERATING GUIDELINE Approved: CDIII Review Date: 04-15-21 Section:
OPERATIONS: ENGINE OPERATIONS Replaces: Same, dated 10-12-11 (was named AFFF/ATC Foam)
Topic: FOAM OPERATIONS
(2112.11 Foam Operations) Page 6 of 8
8. Unload Class B buckets of AR-AFFF from the truck. 9. Put the pump into operation, 200 psi must be maintained at the eductor.
a. The eductors are designed to work at 200 psi inlet pressure for maximum effectiveness. At 200 psi, the mixture percentage will be as shown on the metering dial. The eductors can siphon foam concentrate at pressures between 50 and 200 psi, but at lower pressures the flow of water will be less with the same amount of foam concentrate. This means the percentage of concentrate will be higher than shown on the metering dial since the flow out of the eductor will be reduced at lower inlet pressures.
b. The eductor siphon tube is placed in the first can. All caps should be removed from other cans at the same time for quick transfer of the siphon tube as the contents of the foam cans are removed.
10. Makes sure no kinks are in the attack line and check to see that the nozzle bale is in the fully open position.
11. Direct the foam application, through one or more of the following methods: a. Indirect application: splashing foam off a vertical surface is an efficient means
of application. b. Bounce and roll the foam onto the fire from the front to control a spreading
surface fire. c. Raining the foam in on a high soft arch. The AR-AFFF should be continuously
applied even after extinguishment, until that entire fuel surface is covered by a visible foam blanket, especially when firefighters must enter the spill area.
12. General Instructions regarding the foam blanket: a. The foam blanket should be white in color. Reapply often to maintain the color. b. The foam blanket should be reapplied every five to ten minutes to assure vapor
suppression. Check the color of the foam blanket to make sure it is white. If the color turns brown, reapplication of foam to the area is necessary.
13. Before returning to service, thoroughly flush the entire foam piping system, appliances, and outlets until evidence of foam is no longer visible. The flushing process should be done to prevent clogging and associated problems with foam proportioning and discharge equipment to ensure residual foam concentrate has been eliminated.
Checklist for finding problems with using the in-line eductor to flow class B foam
The inability to properly proportion foam concentrate may be the result of one or more of the following:
1. Mismatched eductor/nozzle combination 2. Partially closed nozzle 3. Clogged nozzle
DENVER FIRE DEPARTMENT Topic No: 2112.11 Date: 04-15-19 STANDARD OPERATING GUIDELINE Approved: CDIII Review Date: 04-15-21 Section:
OPERATIONS: ENGINE OPERATIONS Replaces: Same, dated 10-12-11 (was named AFFF/ATC Foam)
Topic: FOAM OPERATIONS
(2112.11 Foam Operations) Page 7 of 8
4. Hose lay too long 5. Metering valve closed 6. Nozzle elevated too high above eductor 7. Equipment clogged with dried foam 8. Ball check valve stuck 9. Plugged screen 10. Kink in hose
Cold Weather Operations with Class B Foam
The AR-AFFF concentrate that the Denver Fire Department is using is good at temperatures of 25 degrees Fahrenheit to 120 degrees Fahrenheit. Below 25 degrees, the concentrate is too thick to siphon, and over 120 degrees the concentrate is too thin to siphon.
Possible Solution: If the temperature is below 25 degrees Fahrenheit, put one or more sections of hose on the ground near the exhaust pipe of the pumper using caution not to melt the plastic cans. Next put the five-gallon AR-AFFF container on the hose. The exhaust will help keep the AFFF warm and ready for use. Also, you might cover the AR-AFFF cans with a tarp to hold in the heat. Problems on your Eductor: There is a small brass ball check valve in the eductor. If any moisture is in this valve, it can freeze to the seat and cut off the AR-AFFF.
Solution: Try to keep the eductor warm until the last minute before using.
Foam Pro-Paks:
The Denver Fire Department carries (1) Pro-Pak on every Engine with a 2.5 gallon reservoir. This tool should only be used for small class A type fires. The Pro-Pak will only carry dish soap in the reservoir and not class B foam. Steps for using a Foam Pro-Pak: 1. Select the nozzle. 2. Connect the Hose & Nozzle 3. Fill the tank with pink soap 4. Set the foam concentration 5. Control the flow to get the proper foam quality
DENVER FIRE DEPARTMENT Topic No: 2112.11 Date: 04-15-19 STANDARD OPERATING GUIDELINE Approved: CDIII Review Date: 04-15-21 Section:
OPERATIONS: ENGINE OPERATIONS Replaces: Same, dated 10-12-11 (was named AFFF/ATC Foam)
Topic: FOAM OPERATIONS
(2112.11 Foam Operations) Page 8 of 8
“Light Water” Fire Extinguishers: Steps for filling the “Light Water” Fire Extinguisher: 1. Fill the extinguisher with up to 2.5 gallons of water. 2. Pour in 2-4 ounces of dish soap. Each capful is estimated to be around 2 ounces of soap.
“More soap does not guarantee you will see more suds when using extinguisher.” 3. Screw the top back on the extinguisher. 4. Fill with air up to 100 psi.
Training with Class B Foam is PROHIBITED
It is a violation of state and federal law to discharge pollutants into the gutter and storm drains. These pollutants flow directly to the South Platte River, Cherry Creek, or other surface waters without benefit of any treatment or containment, and thus can have both chronic and acute impacts to water quality, aquatic life, and human health. Training with Class B Fluorinated foam is strictly prohibited in the Denver Fire Department.
1. All training exercises will be conducted at the Denver Fire Academy with non-fluorinated training foam.
2. Any maintenance, testing or cleaning of equipment that uses Class B fluorinated foam must be done at the Repair Shop in the chemical containment area where runoff can be contained.
Documentation of Class B Foam usage:
Any time Class B foam is used on an incident the Incident Commander should send an email to the Assistant Chief of Special Operations with the following details with a copy to Station 6 to replenish the foam:
• Date • Location of Incident • Incident Number • Station/Rig that used the foam • Estimated number of gallons of Class B foam used on the emergency
REFERENCES:
NFPA Standard 10 – Standard for Portable Fire Extinguishers NFPA Standard 11 – Standard for Low, Medium, and High Expansion Foam NFPA Standard 18 – Standard on Wetting Agents NFPA Standard 1901 – Standards for Industrial Foam Trucks
DENVER FIRE DEPARTMENT Topic No: 2113.01 Date: 2-07-19 STANDARD OPERATING GUIDELINE Approved: CDIII Review Date: 2-07-21 Section: OPERATIONS: TRUCK OPERATIONS Replaces: Same, dated 4-20-11 Topic: Truck Company Operations at Single
Family Residential Fires
2113.01 Truck Company Operations at Single Family Residential Fires Page 1 of 4
PURPOSE: To provide a procedural overview for first and second arriving truck companies. SCOPE: Applies to all Denver Fire Department personnel functioning in an operational
capacity at a single-family residence fire. I. OPERATIONS
Arrival Report (if not already completed)- Initial report or size up from first arriving Truck company; paint a picture, keep it clear, concise and consistent.
1. Restate address if different from where dispatched. 2. Number of floors. 3. Building size and type. 4. Conditions and locations. 5. Strategy- offensive or defensive. 6. Command location.
Flow Path consideration is paramount prior to the commencement of any forcible entry, ventilation or fire suppression tactic. All ventilation tactics shall be coordinated and approved by the Incident Commander. Flow path is the movement of heat and smoke from the higher pressure within the fire area toward the lower-pressure areas accessible by doors, window openings, and roof structures. Controlling doors during forcible entry will restrict the amount of oxygen to the fire. Coordinated fire attack with ventilation tactics will decrease the risk of adverse flow
paths.
II. CONSIDERATIONS
1. Excessive and improper storage and debris. 2. Open stairways. 3. Combustible exterior. 4. Dangerous peak roof conditions. 5. The attached garage.
DENVER FIRE DEPARTMENT Topic No: 2113.01 Date: 2-07-19 STANDARD OPERATING GUIDELINE Approved: CDIII Review Date: 2-07-21 Section: OPERATIONS: TRUCK OPERATIONS Replaces: Same, dated 4-20-11 Topic: Truck Company Operations at Single
Family Residential Fires
2113.01 Truck Company Operations at Single Family Residential Fires Page 2 of 4
III. FIRST IN TRUCK COMPANY RESPONSIBILITIES
1. Size up. 2. Rig placement. 3. Establish Command. (if no Chief on scene) 4. Forcible entry for initial attack line placement. 5. Search and rescue. 6. Utility control. 7. Check for extension of fire. 8. Salvage and overhaul. 9. Ventilation.
IV. ROLES OF THE FIRST IN TRUCK
A. Officer
1. If no Assistant Chief is on scene, officer will establish Incident Command and build the command structure as the situation dictates and available resources allow.
a. Brief arrival report. b. First in tactical assignments.
i. Rig placement and assignment for second in truck and other responding apparatus.
ii. Assign back-up line to protect main areas of egress. iii. Assign exposure protection line. iv. Direct search efforts above fire floor. v. Ground ladder placement for 2nd means of egress. vi. Request additional resources and make other assignments as
necessary. vii. When relieved of command, rejoin the Engineer for interior
search and rescue or further fire ground operations. B. Engineer
1. Rig placement, spot for the building. 2. Check for presence of fire conditions in basement windows.
a. If fire conditions are present, notify command immediately. b. Determine if horizontal ventilation is appropriate and gain
permission from the IC prior to commencement.
DENVER FIRE DEPARTMENT Topic No: 2113.01 Date: 2-07-19 STANDARD OPERATING GUIDELINE Approved: CDIII Review Date: 2-07-21 Section: OPERATIONS: TRUCK OPERATIONS Replaces: Same, dated 4-20-11 Topic: Truck Company Operations at Single
Family Residential Fires
2113.01 Truck Company Operations at Single Family Residential Fires Page 3 of 4
3. Utility control. 4. Report to command on C-side conditions and actions taken. 5. Rejoin the officer for further fire ground operations. 6. Check for extension of fire. 7. Salvage and overhaul.
C. Firefighters
1. Force entry for primary attack line, (control the door). 2. Search for victims and the seat of the fire.
a. Concentrate efforts on exit passages and bedrooms. b. Relay the location of the fire to attack crew. c. Report the results of the primary search to command. d. Check for extension of fire.
All members must operate in the rescue mode until all secondary searches are completed.
V. SECOND IN TRUCK COMPANY RESPONSIBILITIES
Priority is dictated by the situation and needs to remain flexible, but may include:
1. Complete unfinished primary tactical responsibilities. 2. Vent Enter Search. (VES) 3. Primary search of the floor above the fire. 4. Roof operations. 5. Laddering for rescue, access/egress, and vertical ventilation. 6. Force barred windows. 7. Vent for life. 8. Vent for fire. 9. Check for extension of fire. 10. Check exposures. 11. Positive pressure ventilation. (post control) 12. Complete secondary search. 13. Salvage and overhaul.
DENVER FIRE DEPARTMENT Topic No: 2113.01 Date: 2-07-19 STANDARD OPERATING GUIDELINE Approved: CDIII Review Date: 2-07-21 Section: OPERATIONS: TRUCK OPERATIONS Replaces: Same, dated 4-20-11 Topic: Truck Company Operations at Single
Family Residential Fires
2113.01 Truck Company Operations at Single Family Residential Fires Page 4 of 4
IV. ROLES OF THE SECOND IN TRUCK COMPANY These are dictated by the situation and need to remain flexible to accomplish the tactical priorities set by the Incident Commander and the second in truck officer. REFERENCES: Fireground Strategies, third edition
DENVER FIRE DEPARTMENT Topic No: 2113.02 Date: 2-7-19 STANDARD OPERATING GUIDELINE Approved: CDIII Review Date: 2-7-21 Section: OPERATIONS: TRUCK OPERATIONS Replaces: Same, dated 4-20-11 Topic: Truck Company Operations at Multiple
Family Dwelling
2113.02 Truck Company Operations at Multiple Family Dwellings Page 1 of 5
PURPOSE: To provide a procedural overview for first and second arriving truck companies. SCOPE: Applies to all Denver Fire Department personnel functioning in an operational
capacity at multiple family dwellings. I. OPERATIONS
Multi Dwellings- Apartment/townhomes buildings, tenements, and large residential buildings that house four or more families.
Arrival Report- Initial report or size up from first arriving Truck company.
1. Paint a picture, keep it clear, concise and consistent. 2. Restate address if different from where dispatched. 3. Number of floors. 4. Building size and type. 5. Conditions and locations. 6. Strategy- offensive or defensive. 7. Command location.
All truck company duties are dictated by the situation and need to remain flexible to accomplish the tactical priorities set by the Incident Commander. Flow Path consideration is paramount prior to the commencement of any forcible entry, ventilation or fire suppression tactic. All ventilation tactics shall be coordinated and approved by the Incident Commander. Flow path is the movement of heat and smoke from the higher pressure within the fire area toward the lower-pressure areas accessible by doors, window openings, and roof structures. Controlling doors during forcible entry will restrict the amount of oxygen to the fire. Coordinated fire attack with ventilation tactics will decrease the risk of adverse flow
paths.
DENVER FIRE DEPARTMENT Topic No: 2113.02 Date: 2-7-19 STANDARD OPERATING GUIDELINE Approved: CDIII Review Date: 2-7-21 Section: OPERATIONS: TRUCK OPERATIONS Replaces: Same, dated 4-20-11 Topic: Truck Company Operations at Multiple
Family Dwelling
2113.02 Truck Company Operations at Multiple Family Dwellings Page 2 of 5
II. CONSIDERATIONS
These types of fires differ from others due to the high life hazard and the enclosed multiple exposures within a single structure.
1. High life hazard. 2. Limited apparatus and aerial access. 3. Delayed operation of initial hand lines. (reflex time) 4. Location of the fire. 5. Standpipe, sprinkler, Firefighter “B” service elevators, and centrally
monitored alarm systems may not be present. 6. Uncontrolled smoke exposure. 7. Protect occupants in place or evacuate. 8. Multiple exposures. 9. Stacked utility chases.
10. Large combustible attics or cocklofts. 11. Auto exposure.
Assume these structures are lightweight construction until confirmed otherwise. The presence of fire within the lightweight structural components and voids must be relayed to command. Depending on height, construction, and aerial access, these structures may be treated like high rise fires. Initial investigation must start at the lowest level to confirm that the fire did not originate on a lower level and vent up through open fire doors, stairways, and open apartment doors. First and second in truck placement is critical; Engineers may be required to stay with the apparatus and operate the aerial. Locating and rescuing the most endangered occupants and confining the fire must be a priority. Aggressive smoke control and ventilation of stairwells and hallways are critical for life safety. Roof operations are crucial to assist with smoke control and to prevent fire spread throughout the combustible voids. Incident Commanders should consider calling for additional resources early.
DENVER FIRE DEPARTMENT Topic No: 2113.02 Date: 2-7-19 STANDARD OPERATING GUIDELINE Approved: CDIII Review Date: 2-7-21 Section: OPERATIONS: TRUCK OPERATIONS Replaces: Same, dated 4-20-11 Topic: Truck Company Operations at Multiple
Family Dwelling
2113.02 Truck Company Operations at Multiple Family Dwellings Page 3 of 5
III. FIRST IN TRUCK COMPANY RESPONSIBILITIES
1. If no assistant Chief is on scene, establish command, and give a command statement.
2. Aerial placement a. Spot for rescue and roof operations b. Communicate placement for a second truck
3. Locate the Fire. 4. Forcible entry for initial attack line placement. 5. Search and rescue starting from the fire apartment working outward and
upward. 6. Utility control, initially within the affected apartment. 7. Check for extension of fire. 8. Salvage and overhaul.
IV. ROLES OF THE FIRST IN TRUCK
A. Officer
1. If no Assistant Chief is on scene, officer will establish Incident Command and build the command structure as the situation dictates and available resources allow.
a. Brief arrival report. b. First in tactical assignments-establish groups and/or divisions.
i. Rig placement and assignment for second in truck and other responding apparatus.
ii. Request additional resources and make other assignments as necessary.
iii. Identify and communicate critical construction features such as interior or exterior hallways or walkways, balconies, or other refuge areas.
iv. Ground ladder placement for 2nd means of egress. c. When relieved of command, rejoin the Engineer or crew for further
fire ground operations.
DENVER FIRE DEPARTMENT Topic No: 2113.02 Date: 2-7-19 STANDARD OPERATING GUIDELINE Approved: CDIII Review Date: 2-7-21 Section: OPERATIONS: TRUCK OPERATIONS Replaces: Same, dated 4-20-11 Topic: Truck Company Operations at Multiple
Family Dwelling
2113.02 Truck Company Operations at Multiple Family Dwellings Page 4 of 5
B. Engineer
1. Rig placement, spot for rescue and/or roof operations. 2. Aerial operations, if needed. 3. Rejoin the officer or crew as directed. 4. Utility control, either localized or general. 5. Check for extension of fire. 6. Salvage and overhaul.
C. Firefighters
1. Locate the fire, searching from the lowest level and working up. Report conditions, actions, and needs.
2. Force entry for primary attack line, (control door). 3. Search for victims and the seat of the fire.
a. Concentrate efforts on exit passages and bedrooms. b. Relay the location of the fire to the attack crew and Incident
Commander. c. Report the results of the primary search to command. d. Report the results of all searches.
4. Ventilate as appropriate. 5. Check for fire extension aggressively and early, concentrating on voids
and utility chases. 6. Salvage and overhaul.
All members must operate in the rescue mode until all secondary searches are completed.
V. SECOND IN TRUCK COMPANY RESPONSIBILITIES Priorities are search of the living unit(s) and floor above the fire or roof operations.
1. Spot aerial for rescue and roof operations, complementing the first in truck
position. 2. Complete unfinished primary tactical responsibilities. 3. Primary search of the living unit(s) and floor above the fire. 4. Vent Enter Search. (VES)
DENVER FIRE DEPARTMENT Topic No: 2113.02 Date: 2-7-19 STANDARD OPERATING GUIDELINE Approved: CDIII Review Date: 2-7-21 Section: OPERATIONS: TRUCK OPERATIONS Replaces: Same, dated 4-20-11 Topic: Truck Company Operations at Multiple
Family Dwelling
2113.02 Truck Company Operations at Multiple Family Dwellings Page 5 of 5
5. Roof operations. 6. Laddering for rescue, access/egress, and vertical ventilation. 7. Vent for life. 8. Vent for fire. 9. Utility control. 10. Check for fire extension aggressively and early, concentrating on voids
and utility chases. 11. Check exposures. 12. Positive pressure ventilation. 13. Complete secondary search. 14. Salvage and overhaul.
VI. ROLES OF THE SECOND IN TRUCK COMPANY These are dictated by the situation and need to remain flexible to accomplish the tactical priorities set by the Incident Commander. Emphasis on aerial or ladder placement for rescue, secondary egress, and roof operations. Ventilation must be addressed as soon as possible and only at the direction of the Incident Commander. REFERENCES: None
DENVER FIRE DEPARTMENT Topic No: 2113.03 Date: 2-7-19 STANDARD OPERATING GUIDELINE Approved: CDIII Review Date: 2-7-21 Section: OPERATIONS: TRUCK OPERATIONS Replaces: Same, dated 4-20-11 Topic: Truck Company Operations at Mixed-
Use Occupancy Fires
2113.03 Truck Company Operations at Mixed Use Occupancy Fires Page 1 of 4
PURPOSE: To provide a procedural overview for first and second arriving truck companies. SCOPE: Applies to all Denver Fire Department personnel functioning in an operational
capacity at a mixed-use occupancy fires.
I. OPERATIONS
Mixed- use occupancies house more than one occupancy in a single building. These will accommodate one or more stories of residential units located above a single story of commercial. Ordinary construction buildings are sometimes referred to as a Taxpayer.
Arrival Report- Initial report or size up from first arriving Truck company paint a picture, keep it clear, concise and consistent.
1. Restate address if different from where dispatched. 2. Number of floors. 3. Building size and type. 4. Conditions and locations. 5. Strategy- offensive or defensive. 6. Command location.
All truck company duties are dictated by the situation and need to remain flexible to accomplish the tactical priorities set by the Incident Commander. Flow Path consideration is paramount prior to the commencement of any forcible entry, ventilation or fire suppression tactic. All ventilation tactics shall be coordinated and approved by the Incident Commander. Flow path is the movement of heat and smoke from the higher pressure within the fire area toward the lower-pressure areas accessible by doors, window openings, and roof structures. Controlling doors during forcible entry will restrict the amount of oxygen to the fire. Coordinated fire attack with ventilation tactics will decrease the risk of adverse flow
paths.
DENVER FIRE DEPARTMENT Topic No: 2113.03 Date: 2-7-19 STANDARD OPERATING GUIDELINE Approved: CDIII Review Date: 2-7-21 Section: OPERATIONS: TRUCK OPERATIONS Replaces: Same, dated 4-20-11 Topic: Truck Company Operations at Mixed-
Use Occupancy Fires
2113.03 Truck Company Operations at Mixed Use Occupancy Fires Page 2 of 4
II. CONSIDERATIONS
Treat these incidents like a single-story residence with the following considerations:
1. Limited access for apparatus and aerial devices. 2. Forcible entry challenges. 3. Lightweight or Truss Joist I-beam construction. 4. Combustible building materials. 5. Large common attics or cocklofts. 6. Multiple void spaces. 7. Large open floor plans. 8. Multiple exposures. 9. Auto exposure. 10. Lack of fire protection equipment.
Assume these structures are light weight construction until confirmed otherwise. The presence of fire within the light weight structural components and voids must be relayed to command. Fire spread can be rapid. Aggressive void access and roof operations are crucial to prevent fire spread throughout the common voids. Incident Commanders should consider calling for additional resources early.
III. FIRST IN TRUCK COMPANY RESPONSIBILITIES
A. If no Assistant Chief is on scene, officer will establish incident command and
build the command structure as the situation dictates and available resources allow.
B. Aerial placement/Ground laddering for self-rescue. C. Consider spotting for the roof D. Forcible entry for initial attack line placement E. Search and rescue F. Utility control G. Check for extension H. Salvage and overhaul
DENVER FIRE DEPARTMENT Topic No: 2113.03 Date: 2-7-19 STANDARD OPERATING GUIDELINE Approved: CDIII Review Date: 2-7-21 Section: OPERATIONS: TRUCK OPERATIONS Replaces: Same, dated 4-20-11 Topic: Truck Company Operations at Mixed-
Use Occupancy Fires
2113.03 Truck Company Operations at Mixed Use Occupancy Fires Page 3 of 4
IV. ROLES OF THE FIRST IN TRUCK
A. Officer
1. Officer establishes Incident Command and builds the command structure
as the situation dictates and available resources allow (If a Chief Officer is not on scene).
a. Command statement-Establish groups and/or divisions as needed
b. First in tactical assignments i. Rig placement and assignment for second in truck and other
responding apparatus ii. Protection line to ensure safe means of egress iii. Request additional resources and make other assignments as
necessary. iv. Ground ladder placement for 2nd means of egress.
c. When relieved of command, rejoin the Engineer for interior search and rescue or further fire ground operations.
B. Engineer
1. Rig placement and aerial operation for rescue and/or ventilation. 2. Utility control, if possible. 3. Rejoin the officer for interior search and rescue or further fire ground
operations. 4. Check for extension of fire. 5. Salvage and overhaul.
C. Firefighters
1. Force entry for primary attack line, (control door). 2. Search for victims and the seat of the fire.
a. Concentrate efforts on exit passages and bedrooms. b. Relay the location of the fire to attack crew. c. Report the results of the primary search to command.
3. Ventilate as appropriate and only at the direction of the Incident Commander ensuring flow paths are considered.
4. Check for fire extension aggressively and early, concentrating on voids and utility chases.
DENVER FIRE DEPARTMENT Topic No: 2113.03 Date: 2-7-19 STANDARD OPERATING GUIDELINE Approved: CDIII Review Date: 2-7-21 Section: OPERATIONS: TRUCK OPERATIONS Replaces: Same, dated 4-20-11 Topic: Truck Company Operations at Mixed-
Use Occupancy Fires
2113.03 Truck Company Operations at Mixed Use Occupancy Fires Page 4 of 4
5. Salvage and overhaul. All members must operate in the rescue mode until all secondary searches are completed.
V. SECOND IN TRUCK COMPANY RESPONSIBILITIES
Priorities are search of the unit above or roof operations.
1. Complete unfinished primary tactical responsibilities. 2. Vent Enter Search. (VES) 3. Primary search of the floor above the fire. (should be conducted using
extreme caution) 4. Roof operations. 5. Laddering for rescue, access/egress. 6. Force barred windows. 7. Vent for life. 8. Vent for fire. 9. Check for extension aggressively and early, concentrating on voids and
utility chases. 10. Check exposures. 11. Positive pressure ventilation. 12. Salvage and overhaul.
IV. ROLES OF THE SECOND IN TRUCK COMPANY
These are dictated by the situation and need to remain flexible to accomplish the tactical priorities set by the Incident Commander. Emphasis on aerial or ladder placement to the rear for VES, secondary egress, and roof operations. REFERENCES: None
DENVER FIRE DEPARTMENT Topic No: 2113.04 Date: 2-7-19
STANDARD OPERATING GUIDELINE Approved: CDIII Review Date: 2-7-21
Section: OPERATIONS: TRUCK OPERATIONS Replaces: Same, dated 4-20-11 Topic: Truck Company Operations at Strip Mall
Fires, Including Stand Alone, Single Story, Single Occupancy Commercial Structures
2113.04 Truck Company Operations at Strip Mall Fires, Including Stand Alone, Single Story, Single Occupancy Commercial Structures Page 1 of 4
PURPOSE: To provide a procedural overview for first and second arriving truck companies.
SCOPE: Applies to all Denver Fire Department personnel functioning in an operational capacity at a strip mall or single story, single occupancy commercial structure fire.
I. OPERATIONS
Arrival Report- Initial report or size up from first arriving Truck company paint a picture, keep it clear, concise and consistent.
1. Restate address if different from where dispatched.2. Number of floors.3. Building size and type.4. Conditions and locations.5. Strategy- offensive or defensive.6. Command location.
All Truck company duties are dictated by the situation and need to remain flexible to accomplish the tactical priorities set by the Incident Commander.
Flow Path consideration is paramount prior to the commencement of any forcible entry, ventilation or fire suppression tactic. All ventilation tactics shall be coordinated and approved by the Incident Commander.
Flow path is the movement of heat and smoke from the higher pressure within the fire area toward the lower-pressure areas accessible by doors, window openings, and roof structures.
Controlling doors during forcible entry will restrict the amount of oxygen to the fire. Coordinated fire attack with ventilation tactics will decrease the risk of adverse flow
paths.
DENVER FIRE DEPARTMENT Topic No: 2113.04 Date: 2-7-19 STANDARD OPERATING GUIDELINE Approved: CDIII Review Date: 2-7-21 Section: OPERATIONS: TRUCK OPERATIONS Replaces: Same, dated 4-20-11 Topic: Truck Company Operations at Strip Mall
Fires, Including Stand Alone, Single Story, Single Occupancy Commercial Structures
2113.04 Truck Company Operations at Strip Mall Fires, Including Stand Alone, Single Story, Single Occupancy Commercial Structures Page 2 of 4
II. CONSIDERATIONS
1. Large open areas for fire spread. 2. Location and extent of fire. 3. Light weight construction. 4. Façade overhangs. 5. Roof loads. 6. Heavy fire loads. 7. High capacity utilities. 8. Rear access to building. (limited and well secured doors) 9. Drop ceilings or cocklofts. 10. Vertical ventilation using existing opening such as skylights and vents.
III. FIRST IN TRUCK COMPANY RESPONSIBILITIES
1. If no assistant Chief is on scene, establish command and give an arrival
report. 2. Rig placement. 3. Forcible entry for initial attack line placement. 4. Search and rescue. 5. Utility control. 6. Check for extension of fire. 7. Salvage and overhaul.
IV. ROLES OF THE FIRST IN TRUCK
A. Officer
1. If no Assistant Chief is on scene, officer will establish Incident Command
and build command structure as the situation dictates and available resources allow.
a. Command statement b. Establish groups and/or divisions as needed c. First in tactical assignments
i. Rig placement and assignment for second in truck and other responding apparatus
DENVER FIRE DEPARTMENT Topic No: 2113.04 Date: 2-7-19 STANDARD OPERATING GUIDELINE Approved: CDIII Review Date: 2-7-21 Section: OPERATIONS: TRUCK OPERATIONS Replaces: Same, dated 4-20-11 Topic: Truck Company Operations at Strip Mall
Fires, Including Stand Alone, Single Story, Single Occupancy Commercial Structures
2113.04 Truck Company Operations at Strip Mall Fires, Including Stand Alone, Single Story, Single Occupancy Commercial Structures Page 3 of 4
ii. Get a report from the rear of the building early iii. Request additional resources and make other assignments
as necessary. d. When relieved of command, rejoin the Engineer for interior search
and rescue or further fire ground operations.
B. Engineer
1. Rig placement, spot for the building. 2. Check for presence of fire conditions in basement windows.
a. If fire conditions are present, notify command immediately. 3. Utility control. 4. Rejoin the officer for further fire ground operations. 5. Check for extension. 6. Salvage and overhaul.
C. Firefighters
1. Force entry for primary attack line, (control door). 2. Pull ceiling above entryway to check for presence of fire and type of roof
construction. 3. Search for victims and the seat of the fire. Use tagline or hoseline as a
means for emergency egress. a. Concentrate efforts on exit passages and bedrooms. b. Relay the location of the fire to attack crew. c. Report the results of the primary search to command. d. Begin a secondary search. e. Report the results of the secondary search.
3. Ventilate as appropriate. 4. Check for fire extension. 5. Salvage and overhaul.
All members must operate in the rescue mode until all secondary searches are completed.
V. SECOND IN TRUCK COMPANY RESPONSIBILITIES
Priority is dictated by the situation and needs to remain flexible.
DENVER FIRE DEPARTMENT Topic No: 2113.04 Date: 2-7-19 STANDARD OPERATING GUIDELINE Approved: CDIII Review Date: 2-7-21 Section: OPERATIONS: TRUCK OPERATIONS Replaces: Same, dated 4-20-11 Topic: Truck Company Operations at Strip Mall
Fires, Including Stand Alone, Single Story, Single Occupancy Commercial Structures
2113.04 Truck Company Operations at Strip Mall Fires, Including Stand Alone, Single Story, Single Occupancy Commercial Structures Page 4 of 4
1. Complete unfinished primary tactical responsibilities. 2. Roof operations. 3. Force or remove barred windows. 4. Vent for life. 5. Vent for fire. 6. Check for extension. 7. Check exposures. 8. Positive pressure ventilation. 9. Salvage and overhaul.
IV. ROLES OF THE SECOND IN TRUCK COMPANY
These are dictated by the situation and need to remain flexible to accomplish the tactical priorities set by the Incident Commander and the second in truck officer.
REFERENCES: None
DENVER FIRE DEPARTMENT Topic No: 2113.05 Date: 2-7-19 STANDARD OPERATING GUIDELINE Approved: CDIII Review Date: 2-7-21 Section: OPERATIONS: TRUCK OPERATIONS Replaces: Same, dated 4-20-11 Topic: Truck Company Operations at
Warehouse Fires, Including “Big Box Store” Fires
2113.05 Truck Company Operations at Warehouse Fires Page 1 of 4
PURPOSE: To provide a procedural overview for first and second arriving truck companies. SCOPE: Applies to all Denver Fire Department personnel functioning in an operational
capacity at a warehouse fire. I. OPERATIONS
Arrival Report- Initial report or size up from first arriving Truck company paint a picture, keep it clear, concise and consistent.
1. Restate address if different from where dispatched. 2. Number of floors. 3. Building size and type. 4. Conditions and locations. 5. Strategy- offensive or defensive. 6. Command location.
Flow Path consideration is paramount prior to the commencement of any forcible entry, ventilation or fire suppression tactic. All ventilation tactics shall be coordinated and approved by the Incident Commander. Flow path is the movement of heat and smoke from the higher pressure within the fire area toward the lower-pressure areas accessible by doors, window openings, and roof structures. Controlling doors during forcible entry will restrict the amount of oxygen to the fire. Coordinated fire attack with ventilation tactics will decrease the risk of adverse flow
paths.
II. CONSIDERATIONS These fires present unique hazards. Due to large open areas, building construction, machinery, hazardous materials, and large capacity utilities, emphasis must be placed on team integrity and firefighter safety. Conditions on arrival and determining whether the building is occupied or not will determine the strategy and tactics employed:
1. Location and extent of fire. 2. Lightweight/special construction. 3. Determine the presence and location of fire walls/partition walls.
DENVER FIRE DEPARTMENT Topic No: 2113.05 Date: 2-7-19 STANDARD OPERATING GUIDELINE Approved: CDIII Review Date: 2-7-21 Section: OPERATIONS: TRUCK OPERATIONS Replaces: Same, dated 4-20-11 Topic: Truck Company Operations at
Warehouse Fires, Including “Big Box Store” Fires
2113.05 Truck Company Operations at Warehouse Fires Page 2 of 4
4. Roof loads. 5. Consider early vertical ventilation. 6. Large open floor space. 7. High capacity utilities. 8. Be aware of the presence of hazardous materials, machinery, and dangerous
manufacturing processes. It may be dangerous and create further hazard if the Fire Department shuts these down.
9. Presence of high piled storage. 10. Truck companies shall carry taglines and thermal imagers with them on all
warehouse calls. 11. If significant smoke or fire is present, personnel must deploy with a hose line
and/or tagline. 12. Be aware of changing conditions; if smoke is encountered, find the nearest exit,
open it, secure it, and deploy a tagline from a fixed point on the outside and continue your search.
13. If the location and extent of fire is not known, consider deploying a tagline parallel to the loading docks.
14. Be aware of the distance traveled in the structure relative to air available in your SCBA.
15. Consider additional resources and multiple alarms early. 16. Take the time to deploy rigs appropriately. Consider Level 2 staging from the
onset and know your best access before committing resources. 17. Due to the size of these structures, a primary survey of the entire building may be
warranted. Additional hazards/fires may be found. 18. Coordinate with interior crews and confirm with Incident Command before
ventilating and opening roll-up doors.
III. FIRST IN TRUCK COMPANY RESPONSIBILITIES
1. If no assistant chief is on scene, establish command and give an arrival report 2. Rig placement. 3. If the location of the fire is unknown, consideration shall be given to creating a
recon group with the first due Engine Company. This recon group shall be assigned to find the location and extent of fire, determine the best access for fire attack and communicate this with the Incident Commander.
4. If smoke and/or fire are present, deploy tagline(s) for emergency egress.
DENVER FIRE DEPARTMENT Topic No: 2113.05 Date: 2-7-19 STANDARD OPERATING GUIDELINE Approved: CDIII Review Date: 2-7-21 Section: OPERATIONS: TRUCK OPERATIONS Replaces: Same, dated 4-20-11 Topic: Truck Company Operations at
Warehouse Fires, Including “Big Box Store” Fires
2113.05 Truck Company Operations at Warehouse Fires Page 3 of 4
5. Search and rescue. Hasty search for victims and reconnaissance for fire location and its nearest access. Reconnaissance is critical for deployment of additional companies.
6. Utility/machinery control, if appropriate 7. Salvage and overhaul.
IV. ROLES OF THE FIRST IN TRUCK
A. Officer
1. If no Assistant Chief is on scene, officer will establish Incident Command and build the command structure as the situation dictates and available resource allow.
a. Command statement b. First in tactical assignments
i. Rig placement and assignment for second in engine, truck, and other responding apparatus based on reconnaissance information
ii. Get a report from C side early iii. Request additional resources and make other assignments as
necessary. c. When relieved of command, rejoin the Engineer for interior search and
rescue or further fireground operations.
B. Engineer
1. Rig placement. Should remain with the rig and be mobile to reposition based on the Interior Team’s report
2. Prepare aerial for operation 3. Logistical support for the Team 4. Forcible entry for the attack line(s) and/or secondary egress 5. Rejoin the officer for further fireground operations
DENVER FIRE DEPARTMENT Topic No: 2113.05 Date: 2-7-19 STANDARD OPERATING GUIDELINE Approved: CDIII Review Date: 2-7-21 Section: OPERATIONS: TRUCK OPERATIONS Replaces: Same, dated 4-20-11 Topic: Truck Company Operations at
Warehouse Fires, Including “Big Box Store” Fires
2113.05 Truck Company Operations at Warehouse Fires Page 4 of 4
C. Firefighters
1. Considering teaming up with the first in engine crew to form a recon group. Coordinate forcible entry, locate the fire, and conduct a hasty search.
2. Responsible for deploying taglines for their safety. 3. Utilize thermal imager and other appropriate tactics to locate any victims and fire.
a. Concentrate efforts on exits, area in front of dock doors, and main aisles. Use taglines and a thermal imager.
b. Relay the extent and location of the fire to attack crew and command. c. Locate and open the closest access to the fire. d. Report the results of the hasty search to command. e. Report any hazards to command as they are encountered. 3. Ventilate as appropriate while considering flow paths. 4. Check for fire extension. 5. Salvage and overhaul.
All members must operate with caution, keeping in mind air management, the potential for rapid fire spread, and collapse in these types of structures.
V. SECOND IN TRUCK COMPANY RESPONSIBILITIES
Priority is dictated by the situation and needs to remain flexible.
1. Spot apparatus per the Incident Commander. Don’t commit until there is a
clear understanding of the situation. 2. Be prepared for:
a. Forcible entry- roll-up doors. b. Interior operations. c. Roof operations, (use extreme caution and try to operate as near as
possible to aerial ladder. d. Utility management
IV. ROLES OF THE SECOND IN TRUCK COMPANY
These are dictated by the situation and need to remain flexible to accomplish the tactical priorities set by the Incident Commander and the second in truck officer.
REFERENCES: None
DENVER FIRE DEPARTMENT Topic No: 2119.02
Date: 12-07-17
STANDARD OPERATING GUIDELINE Approved: CDIII
Review Date: 12-07-19
Section:
Topic:
OPERATIONS: EMS
Base Station Contact
Replaces: Same, dated 10-12-11
2119.02 Base Station Contact
Page 1 of 4
PURPOSE: The following information should be used as a guideline for base
station determination.
SCOPE: Applies to all members making base station contact.
Base station contact is an essential part of the two-tier EMS system. Base station
contact allows direct contact with the attending emergency physician at Denver
Health Medical Center. Base station contact allows the liability issues of a patient's
refusal to be shared with the attending doctor at Denver Health Medical Center.
Emergency Medical Technicians of the Denver Fire Department have been granted
the latitude to make the determination for base station contact.
Once contact has been made with the patient, the patient can refuse treatment.
I. REFUSAL
A refusal can only be granted when:
A. The patient is mentally alert and oriented and has decision-making
capability.
B. The patient is not under the influence of drugs or alcohol.
C. The patient has not suffered a head injury.
D. The patient has been fully informed of the possible consequences of
refusing treatment, including further injury or possible death, and
continues to refuse treatment.
Base Station Contact is required at all times for: Any patient 5 years or younger
who is not being transported via ambulance regardless of the complaint
A. Any patient under 18 years of age who does not have a parent/legal
guardian present
B. Any patient considered to be high risk
C. You do not have to contact base for minors 6-18 that have a parent or
legal guardian present and are not deemed high risk
See the Denver Metro Protocols for further information: 0080 Patient Non
Transport or Refusal
http://www.dmemsmd.org/sites/default/files/Denver%20Metro%20Protocols%20J
uly%202017_1.pdf
II. AUTO ACCIDENTS
Base Station contact for citizens involved in auto accidents is required
when:
DENVER FIRE DEPARTMENT Topic No: 2119.02
Date: 12-07-17
STANDARD OPERATING GUIDELINE Approved: CDIII
Review Date: 12-07-19
Section:
Topic:
OPERATIONS: EMS
Base Station Contact
Replaces: Same, dated 10-12-11
2119.02 Base Station Contact
Page 2 of 4
A. The mechanism of the accident, as determined by Fire Department
members, is significant enough to cause injury, and the patient
verbally denies any injury or admits to minor injuries.
B. The patient, after being fully informed of the possible consequences
of refusing treatment, still verbally refuses to be seen by paramedics
or hospital personnel.
Base Station contact for citizens involved in auto accidents is not required
when:
A. The mechanism of the accident is determined, by Fire Department
members, to lack enough force to cause injury.
B. The Patient denies any injury.
C. The patient, after being fully informed of the possible consequences
of refusing treatment, still verbally refuses to be seen by paramedics
or hospital personnel.
III. LIFT ASSISTS
Base Station contact is not required for patients who have requested lifting
assistance due to a fall when:
A. The overall condition of the patient, as determined by Department
personnel, is not detrimental to leaving the patient under their own
care.
B. The mechanism of the accident, as determined by Fire Department
members, lacks enough force to cause injury.
C. The patient denies any injury.
D. The patient, after being fully informed of the possible consequences
of refusing treatment, still verbally refuses to be seen by paramedics
or hospital personnel.
IV. PARTY DOWN – INEBRIATED PATIENTS
Base station contact is required when a patient is found to be inebriated and
without need of ALS care. When ETOH is the only medical problem of the
patient, Denver Fire Department members shall cancel the responding ALS
ambulance. Denver Fire Department EMT’s shall make contact with the
Base Station physician and report patient condition and request to transfer
care to either the Denver Police or Denver Cares (Detox).
DENVER FIRE DEPARTMENT Topic No: 2119.02
Date: 12-07-17
STANDARD OPERATING GUIDELINE Approved: CDIII
Review Date: 12-07-19
Section:
Topic:
OPERATIONS: EMS
Base Station Contact
Replaces: Same, dated 10-12-11
2119.02 Base Station Contact
Page 3 of 4
Fire Department crews shall remain with the patient until care is transferred
to Denver Cares or, with permission from base station, to Denver Police.
V. DOA – PRONOUNCEMENT PROCEDURES
The Medical Director for the Denver Fire Department encourages
Department members to pronounce patients who are found in any of the
following conditions:
A. Decapitation
B. Decomposition
C. Dependent lividity or rigor mortis
D. Evidence of massive blunt head, chest, or abdominal trauma
E. Third degree burns over more than 90% of the total body surface
area
The procedure to pronounce a patient includes contacting the base station
physician and providing the patient’s condition, lack of vital signs, last
known time patient was seen alive, if known, and medical history, if known.
The doctor may ask for more information to confirm your findings. When
the doctor is satisfied with your assessment, he/she will pronounce the
patient’s time of death. Following the pronouncement, the responding
ambulance shall be cancelled and placed in service. Contact Dispatch and
request the police and medical examiner to respond. Department members
shall remain on scene until relieved by police or the medical examiner, and
the body released to their custody. After pronouncement, do not alter
condition in any way or remove equipment as the patient is now a potential
coroner’s case.
Outside the aforementioned signs, or unless a valid CPR directive is present
with the patient, all patients found pulseless and apneic shall be resuscitated.
See the Denver Metro Protocols for further information: 0050 General
Guidelines: Termination of Resuscitation and Field Pronouncement
Guidelines
http://www.dmemsmd.org/sites/default/files/Denver%20Metro%20Protoc
ols%20July%202017_1.pdf
VI. ADVANCED DIRECTIVES
All advanced directives require base station contact prior to withholding life
saving measures. If the medical directive is not readily available, begin
DENVER FIRE DEPARTMENT Topic No: 2119.02
Date: 12-07-17
STANDARD OPERATING GUIDELINE Approved: CDIII
Review Date: 12-07-19
Section:
Topic:
OPERATIONS: EMS
Base Station Contact
Replaces: Same, dated 10-12-11
2119.02 Base Station Contact
Page 4 of 4
resuscitation efforts and contact the base station doctor for guidance and/or
pronouncement. The pre-hospital provider should only accept verbal orders
to cease resuscitation from the base station physician.
See the Denver Metro Protocols for further information: 0060 Advanced
Medical Directives
http://www.dmemsmd.org/sites/default/files/Denver%20Metro%20Protocols%20July%2
02017_1.pdf
VII. MINORS
The State of Colorado considers any person under the age of 18 to be a
minor.
When the parent is not present to give consent or to refuse treatment for a minor:
A. If a minor has an injury or illness, but not a life-threatening medical
emergency, you may attempt to contact the parents/guardian. If this
cannot be done promptly, contact base station.
B. The consent of the parent is not necessary to authorize hospital or
emergency health care when an EMT, in good faith, relies on a
minor's consent, and the minor is at least 15 years of age and
emancipated or married.
C. If there is some reason to believe the child does not need transport
and can be left at the scene in the custody of a responsible adult (i.e.
teacher, social worker, grandparent), contact base station. Report
on condition of patient and scene situation. Only on very rare
circumstances should a child be left at the scene if the parent is not
present and only if base station grants permission.
D. If the minor had a life-threatening injury/illness, treat per protocols.
If a parent objects to treatment, contact base station immediately,
treat to the extent allowable, and notify police to respond and assist.
E. Neither a child nor a parent may refuse treatment on religious
grounds if the child is in imminent danger as a result of lack of
medical treatment, or when the child is in a life-threatening
situation, or when the condition will result in serious handicap or
disability.
When in doubt, your actions should be guided by what is in the minor’s
best interests and contact base station.
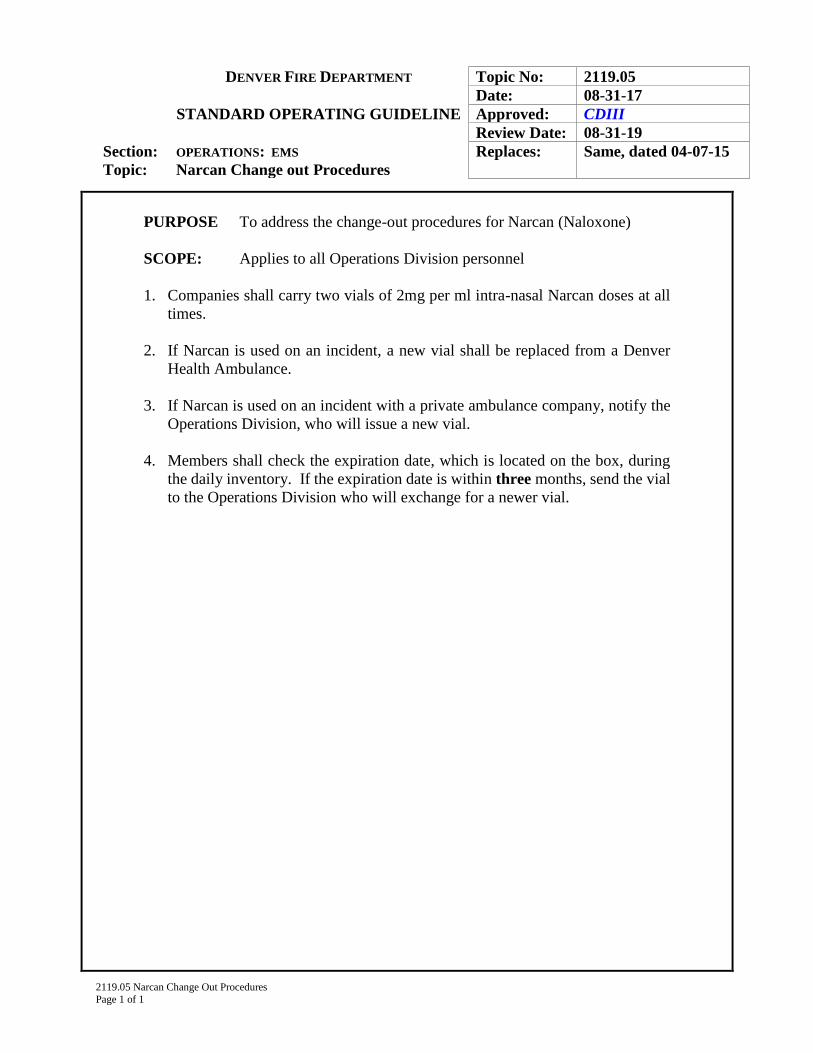
DENVER FIRE DEPARTMENT Topic No: 2119.05
Date: 08-31-17
STANDARD OPERATING GUIDELINE Approved: CDIII
Review Date: 08-31-19
Section:
Topic:
OPERATIONS: EMS
Narcan Change out Procedures
Replaces: Same, dated 04-07-15
2119.05 Narcan Change Out Procedures
Page 1 of 1
PURPOSE To address the change-out procedures for Narcan (Naloxone)
SCOPE: Applies to all Operations Division personnel
1. Companies shall carry two vials of 2mg per ml intra-nasal Narcan doses at all
times.
2. If Narcan is used on an incident, a new vial shall be replaced from a Denver
Health Ambulance.
3. If Narcan is used on an incident with a private ambulance company, notify the
Operations Division, who will issue a new vial.
4. Members shall check the expiration date, which is located on the box, during
the daily inventory. If the expiration date is within three months, send the vial
to the Operations Division who will exchange for a newer vial.
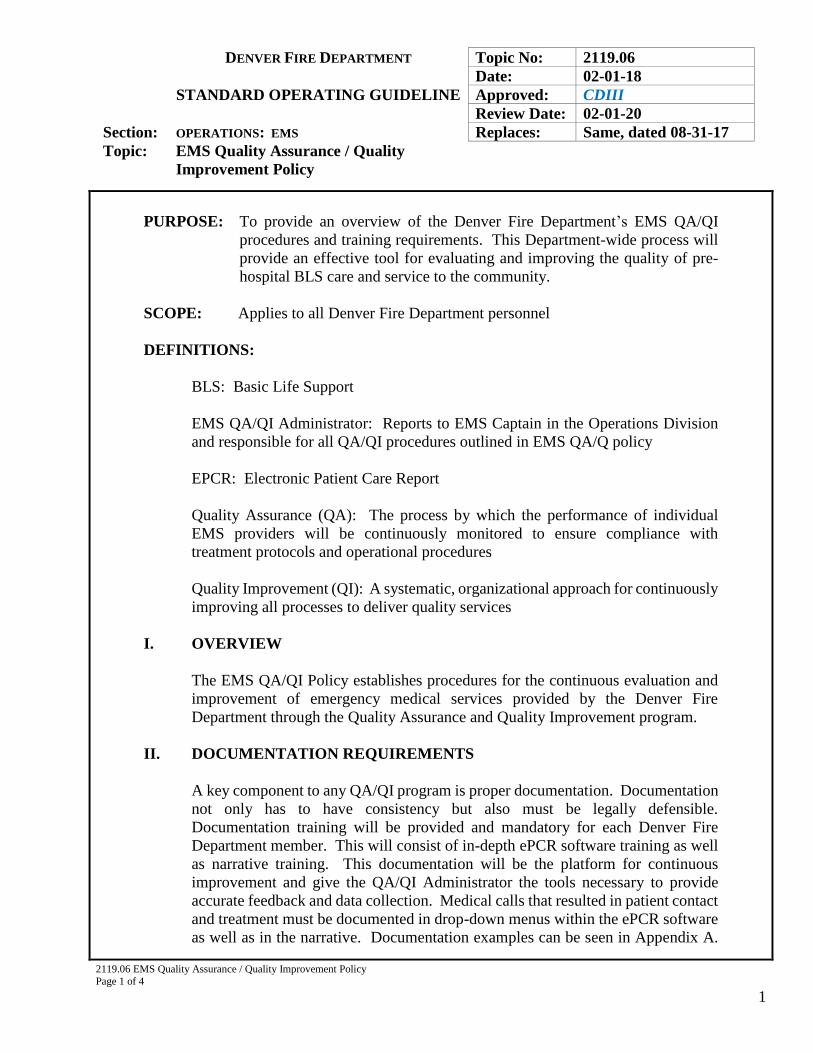
DENVER FIRE DEPARTMENT Topic No: 2119.06
Date: 02-01-18
STANDARD OPERATING GUIDELINE Approved: CDIII
Review Date: 02-01-20
Section: OPERATIONS: EMS Replaces: Same, dated 08-31-17
Topic: EMS Quality Assurance / Quality
Improvement Policy
2119.06 EMS Quality Assurance / Quality Improvement Policy
Page 1 of 4
1
PURPOSE: To provide an overview of the Denver Fire Department’s EMS QA/QI
procedures and training requirements. This Department-wide process will
provide an effective tool for evaluating and improving the quality of pre-
hospital BLS care and service to the community.
SCOPE: Applies to all Denver Fire Department personnel
DEFINITIONS:
BLS: Basic Life Support
EMS QA/QI Administrator: Reports to EMS Captain in the Operations Division
and responsible for all QA/QI procedures outlined in EMS QA/Q policy
EPCR: Electronic Patient Care Report
Quality Assurance (QA): The process by which the performance of individual
EMS providers will be continuously monitored to ensure compliance with
treatment protocols and operational procedures
Quality Improvement (QI): A systematic, organizational approach for continuously
improving all processes to deliver quality services
I. OVERVIEW
The EMS QA/QI Policy establishes procedures for the continuous evaluation and
improvement of emergency medical services provided by the Denver Fire
Department through the Quality Assurance and Quality Improvement program.
II. DOCUMENTATION REQUIREMENTS
A key component to any QA/QI program is proper documentation. Documentation
not only has to have consistency but also must be legally defensible.
Documentation training will be provided and mandatory for each Denver Fire
Department member. This will consist of in-depth ePCR software training as well
as narrative training. This documentation will be the platform for continuous
improvement and give the QA/QI Administrator the tools necessary to provide
accurate feedback and data collection. Medical calls that resulted in patient contact
and treatment must be documented in drop-down menus within the ePCR software
as well as in the narrative. Documentation examples can be seen in Appendix A.
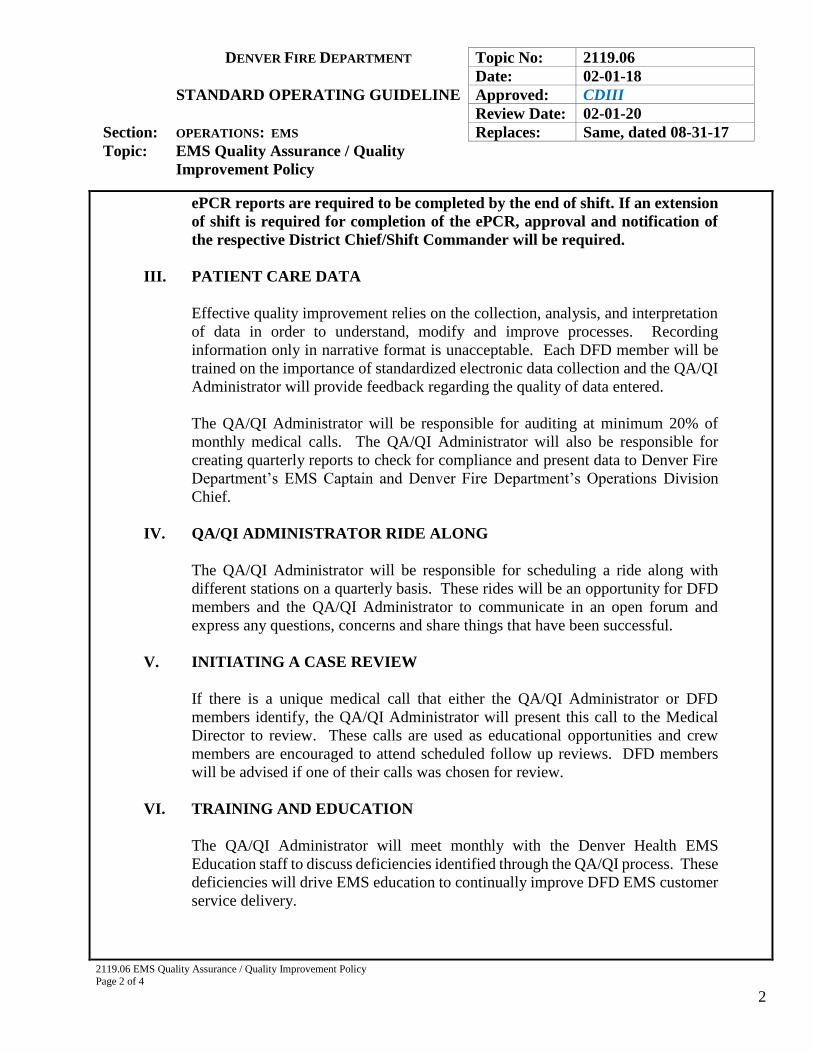
DENVER FIRE DEPARTMENT Topic No: 2119.06
Date: 02-01-18
STANDARD OPERATING GUIDELINE Approved: CDIII
Review Date: 02-01-20
Section: OPERATIONS: EMS Replaces: Same, dated 08-31-17
Topic: EMS Quality Assurance / Quality
Improvement Policy
2119.06 EMS Quality Assurance / Quality Improvement Policy
Page 2 of 4
2
ePCR reports are required to be completed by the end of shift. If an extension
of shift is required for completion of the ePCR, approval and notification of
the respective District Chief/Shift Commander will be required.
III. PATIENT CARE DATA
Effective quality improvement relies on the collection, analysis, and interpretation
of data in order to understand, modify and improve processes. Recording
information only in narrative format is unacceptable. Each DFD member will be
trained on the importance of standardized electronic data collection and the QA/QI
Administrator will provide feedback regarding the quality of data entered.
The QA/QI Administrator will be responsible for auditing at minimum 20% of
monthly medical calls. The QA/QI Administrator will also be responsible for
creating quarterly reports to check for compliance and present data to Denver Fire
Department’s EMS Captain and Denver Fire Department’s Operations Division
Chief.
IV. QA/QI ADMINISTRATOR RIDE ALONG
The QA/QI Administrator will be responsible for scheduling a ride along with
different stations on a quarterly basis. These rides will be an opportunity for DFD
members and the QA/QI Administrator to communicate in an open forum and
express any questions, concerns and share things that have been successful.
V. INITIATING A CASE REVIEW
If there is a unique medical call that either the QA/QI Administrator or DFD
members identify, the QA/QI Administrator will present this call to the Medical
Director to review. These calls are used as educational opportunities and crew
members are encouraged to attend scheduled follow up reviews. DFD members
will be advised if one of their calls was chosen for review.
VI. TRAINING AND EDUCATION
The QA/QI Administrator will meet monthly with the Denver Health EMS
Education staff to discuss deficiencies identified through the QA/QI process. These
deficiencies will drive EMS education to continually improve DFD EMS customer
service delivery.
DENVER FIRE DEPARTMENT Topic No: 2119.06
Date: 02-01-18
STANDARD OPERATING GUIDELINE Approved: CDIII
Review Date: 02-01-20
Section: OPERATIONS: EMS Replaces: Same, dated 08-31-17
Topic: EMS Quality Assurance / Quality
Improvement Policy
2119.06 EMS Quality Assurance / Quality Improvement Policy
Page 3 of 4
3
VII. REMEDIAL TRAINING AND EDUCATION
Any remedial training will be handled on a case by case basis. This will be openly
communicated to the DFD member and scheduled accordingly for one on one
remedial education.
VIII. EPCR ADMINISTRATOR AND CONTACT METHODS
DFD’s QA/QI Administrator will also serve as the ePCR Software Administrator.
If any questions, concerns, or ideas for improvement arise throughout the use of
this software, DFD members are instructed to contact the QA/QI Administrator
with these inquiries.
The QA/QI Administrator will also be available to all DFD members for questions
or guidance regarding proper patient documentation.
IX. TECHNICAL ISSUES WITH TABLET
When technical issues arise and a replacement tablet is needed, members are
instructed to contact the Shift Commander for a replacement. In the event that
there is a delay in delivery of a new tablet, members will be responsible for
completing Patient Care Reports and Fire Reports on their station desktop until a
replacement is available.
DENVER FIRE DEPARTMENT Topic No: 2119.06
Date: 02-01-18
STANDARD OPERATING GUIDELINE Approved: CDIII
Review Date: 02-01-20
Section: OPERATIONS: EMS Replaces: Same, dated 08-31-17
Topic: EMS Quality Assurance / Quality
Improvement Policy
2119.06 EMS Quality Assurance / Quality Improvement Policy
Page 4 of 4
4
APPENDIX A:
DOCUMENTATION EXAMPLES
I. PATIENT ASSESSMENT AND NARRATIVE METHODS
A. Recommended- CHART Method
Chief Complaint, History, Assessment, Treatments, Transport/Transfer of
Care
B. Also Acceptable- SOAP Method
Subjective, Objective, Assessment, Plan
II. SPECIAL CONSIDERATIONS
Special considerations, such as examples below, will be available as attachments
for members to review and be familiar with
C. Patient VS. Not a Patient
B. No Patient Contact
C. Assisted ALS
D. Refusals
E. DOA’s
F. Documenting more than one patient
G. Fire call resulting in a patient
DENVER FIRE DEPARTMENT Topic No: 2119.07
Date: 02-01-18
STANDARD OPERATING GUIDELINE Approved: CDIII
Review Date: 02-01-20
Section: OPERATIONS: EMS Replaces: New
Topic: EMS: Defining Quality Management
Standards
2119.07 EMS Defining Quality Management Standards
Page 1 of 5
1
PURPOSE: To provide an overview of the Denver Fire Department’s EMS Quality
Management Standards. This Department-wide process will provide an
effective tool for evaluating and improving patient care documentation and the
quality of pre-hospital patient care to the community.
SCOPE: Denver Fire Department Operations Personnel
DEFINITIONS:
EHR: Electronic Health Record
EMS QA/QI Administrator: Reports to EMS Captain in the Operations Division and
responsible for all QA/QI procedures outlined in EMS QA/Q policy
Quality Assurance (QA): The process by which the performance of individual EMS
providers will be continuously monitored to ensure compliance with treatment
protocols and operational procedures
Quality Improvement (QI): A systematic, organizational approach for continuously
improving all processes to deliver quality services
I. OVERVIEW
Defining EMS Quality Management standards establishes the process for
documentation review and sets expectations for the continuous evaluation and
improvement of emergency medical services provided by the Denver Fire Department
through the Quality Assurance and Quality Improvement program.
II. DEFINING QUALITY MANAGEMENT STANDARDS
Each report that is pulled for review will be evaluated for Documentation and Clinical
practice. Feedback within the Documentation Review and the Clinical Review varies
and each section requires a rating to be given of Poor, Fair, or Good. The following
sections are reviewed in each report when available:
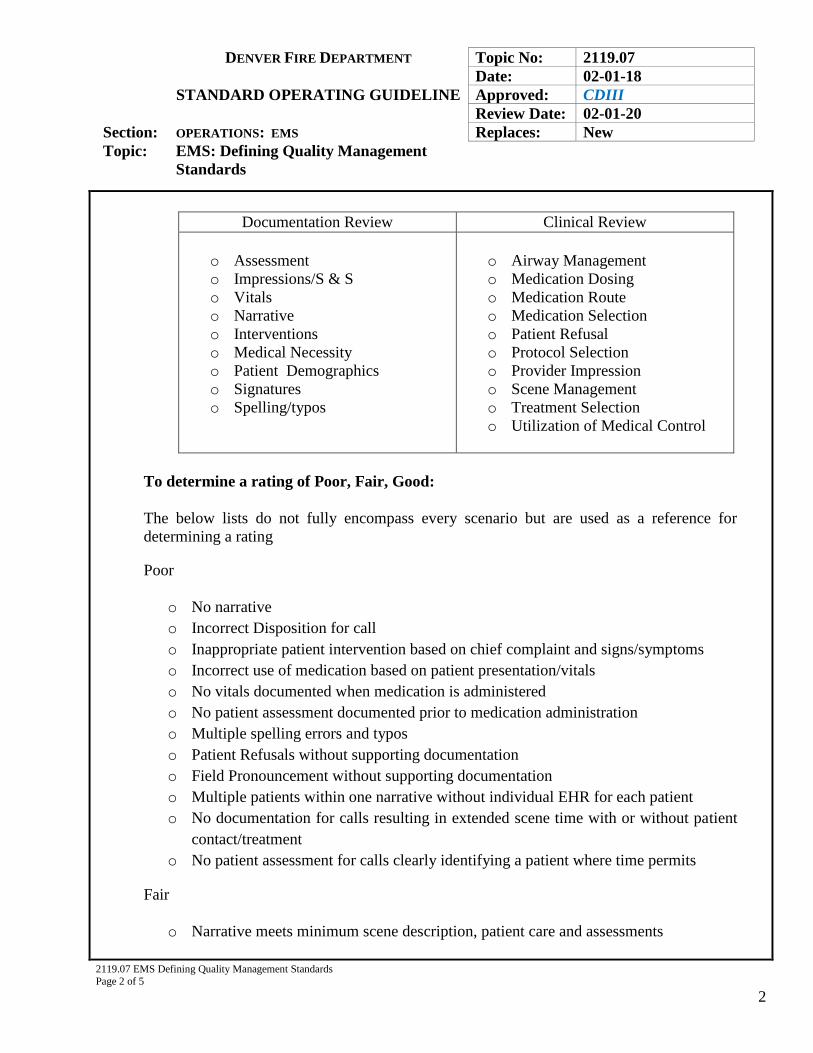
DENVER FIRE DEPARTMENT Topic No: 2119.07
Date: 02-01-18
STANDARD OPERATING GUIDELINE Approved: CDIII
Review Date: 02-01-20
Section: OPERATIONS: EMS Replaces: New
Topic: EMS: Defining Quality Management
Standards
2119.07 EMS Defining Quality Management Standards
Page 2 of 5
2
Documentation Review Clinical Review
o Assessment
o Impressions/S & S
o Vitals
o Narrative
o Interventions
o Medical Necessity
o Patient Demographics
o Signatures
o Spelling/typos
o Airway Management
o Medication Dosing
o Medication Route
o Medication Selection
o Patient Refusal
o Protocol Selection
o Provider Impression
o Scene Management
o Treatment Selection
o Utilization of Medical Control
To determine a rating of Poor, Fair, Good:
The below lists do not fully encompass every scenario but are used as a reference for
determining a rating
Poor
o No narrative
o Incorrect Disposition for call
o Inappropriate patient intervention based on chief complaint and signs/symptoms
o Incorrect use of medication based on patient presentation/vitals
o No vitals documented when medication is administered
o No patient assessment documented prior to medication administration
o Multiple spelling errors and typos
o Patient Refusals without supporting documentation
o Field Pronouncement without supporting documentation
o Multiple patients within one narrative without individual EHR for each patient
o No documentation for calls resulting in extended scene time with or without patient
contact/treatment
o No patient assessment for calls clearly identifying a patient where time permits
Fair
o Narrative meets minimum scene description, patient care and assessments
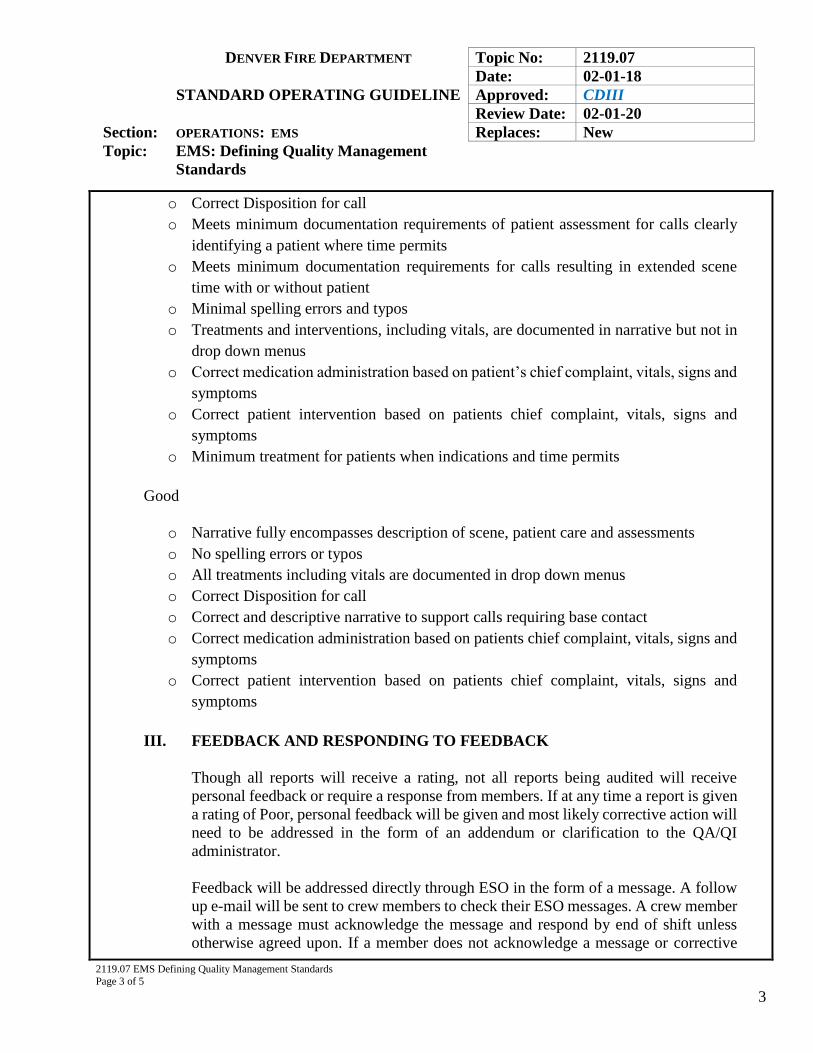
DENVER FIRE DEPARTMENT Topic No: 2119.07
Date: 02-01-18
STANDARD OPERATING GUIDELINE Approved: CDIII
Review Date: 02-01-20
Section: OPERATIONS: EMS Replaces: New
Topic: EMS: Defining Quality Management
Standards
2119.07 EMS Defining Quality Management Standards
Page 3 of 5
3
o Correct Disposition for call
o Meets minimum documentation requirements of patient assessment for calls clearly
identifying a patient where time permits
o Meets minimum documentation requirements for calls resulting in extended scene
time with or without patient
o Minimal spelling errors and typos
o Treatments and interventions, including vitals, are documented in narrative but not in
drop down menus
o Correct medication administration based on patient’s chief complaint, vitals, signs and
symptoms
o Correct patient intervention based on patients chief complaint, vitals, signs and
symptoms
o Minimum treatment for patients when indications and time permits
Good
o Narrative fully encompasses description of scene, patient care and assessments
o No spelling errors or typos
o All treatments including vitals are documented in drop down menus
o Correct Disposition for call
o Correct and descriptive narrative to support calls requiring base contact
o Correct medication administration based on patients chief complaint, vitals, signs and
symptoms
o Correct patient intervention based on patients chief complaint, vitals, signs and
symptoms
III. FEEDBACK AND RESPONDING TO FEEDBACK
Though all reports will receive a rating, not all reports being audited will receive
personal feedback or require a response from members. If at any time a report is given
a rating of Poor, personal feedback will be given and most likely corrective action will
need to be addressed in the form of an addendum or clarification to the QA/QI
administrator.
Feedback will be addressed directly through ESO in the form of a message. A follow
up e-mail will be sent to crew members to check their ESO messages. A crew member
with a message must acknowledge the message and respond by end of shift unless
otherwise agreed upon. If a member does not acknowledge a message or corrective
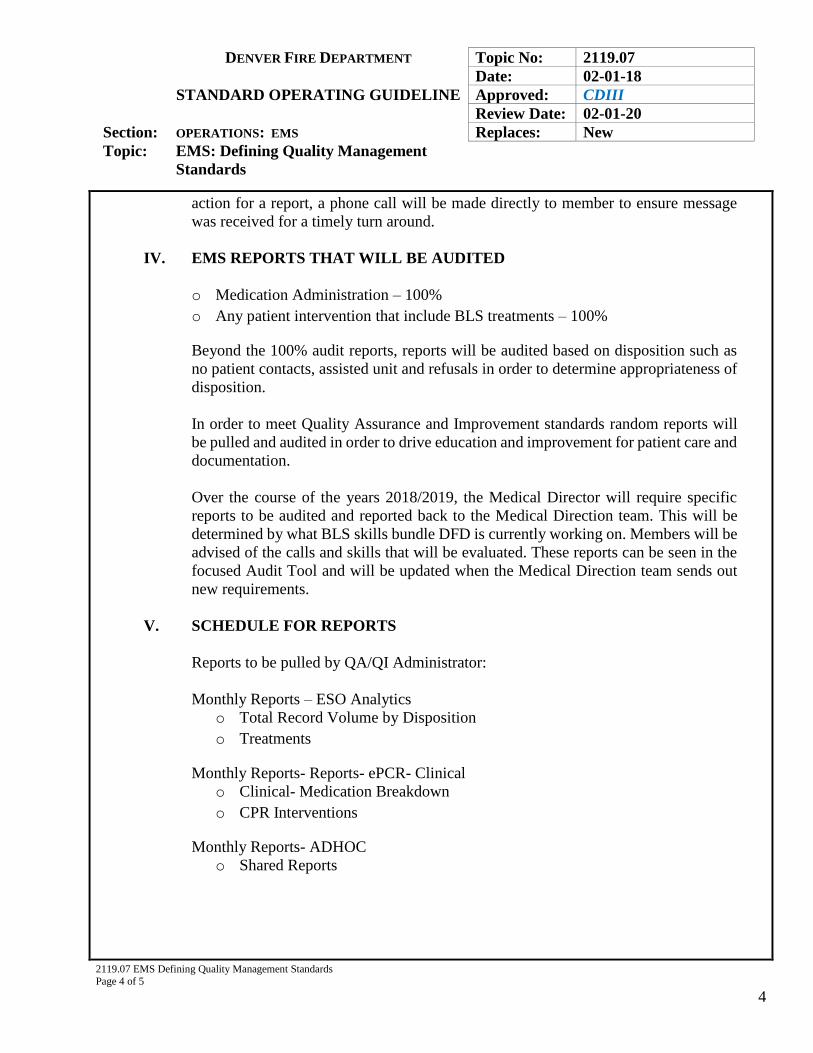
DENVER FIRE DEPARTMENT Topic No: 2119.07
Date: 02-01-18
STANDARD OPERATING GUIDELINE Approved: CDIII
Review Date: 02-01-20
Section: OPERATIONS: EMS Replaces: New
Topic: EMS: Defining Quality Management
Standards
2119.07 EMS Defining Quality Management Standards
Page 4 of 5
4
action for a report, a phone call will be made directly to member to ensure message
was received for a timely turn around.
IV. EMS REPORTS THAT WILL BE AUDITED
o Medication Administration – 100%
o Any patient intervention that include BLS treatments – 100%
Beyond the 100% audit reports, reports will be audited based on disposition such as
no patient contacts, assisted unit and refusals in order to determine appropriateness of
disposition.
In order to meet Quality Assurance and Improvement standards random reports will
be pulled and audited in order to drive education and improvement for patient care and
documentation.
Over the course of the years 2018/2019, the Medical Director will require specific
reports to be audited and reported back to the Medical Direction team. This will be
determined by what BLS skills bundle DFD is currently working on. Members will be
advised of the calls and skills that will be evaluated. These reports can be seen in the
focused Audit Tool and will be updated when the Medical Direction team sends out
new requirements.
V. SCHEDULE FOR REPORTS
Reports to be pulled by QA/QI Administrator:
Monthly Reports – ESO Analytics
o Total Record Volume by Disposition
o Treatments
Monthly Reports- Reports- ePCR- Clinical
o Clinical- Medication Breakdown
o CPR Interventions
Monthly Reports- ADHOC
o Shared Reports
DENVER FIRE DEPARTMENT Topic No: 2119.07
Date: 02-01-18
STANDARD OPERATING GUIDELINE Approved: CDIII
Review Date: 02-01-20
Section: OPERATIONS: EMS Replaces: New
Topic: EMS: Defining Quality Management
Standards
2119.07 EMS Defining Quality Management Standards
Page 5 of 5
5
VI. DFD FOCUSED AUDIT TOOL
o See attachments for Focused Audit tools. These will continuously be updated
throughout the BLS skills roll out.
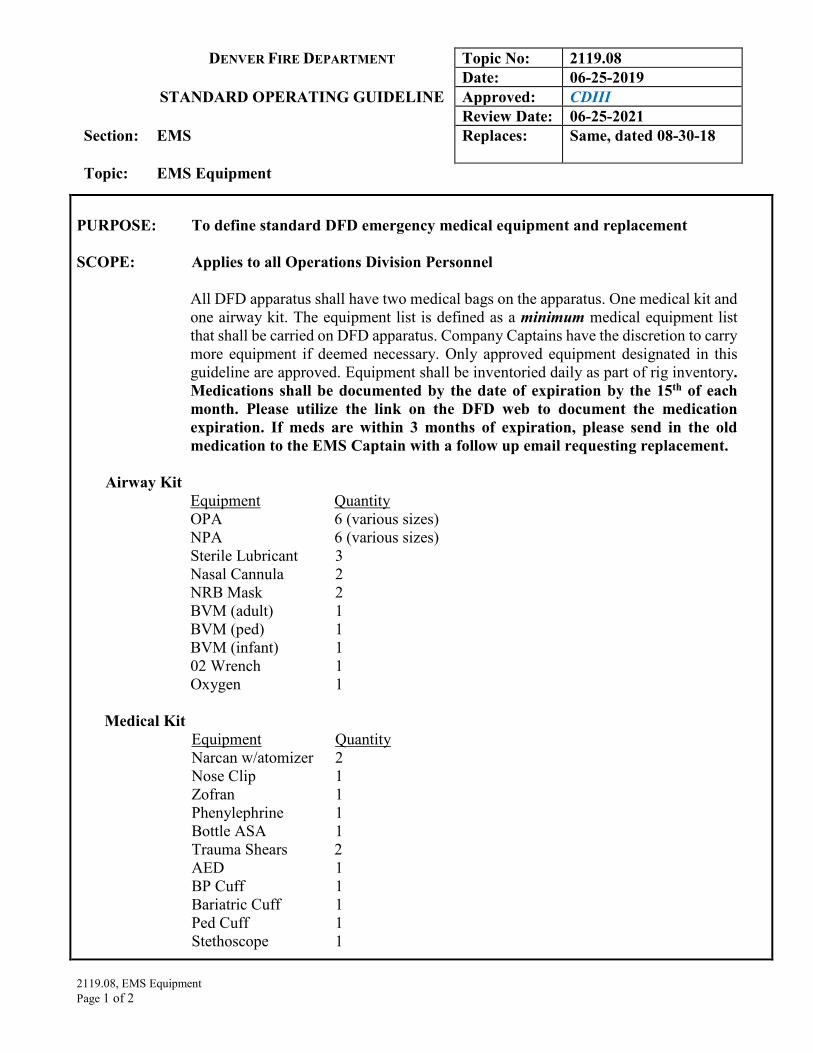
DENVER FIRE DEPARTMENT Topic No: 2119.08 Date: 06-25-2019 STANDARD OPERATING GUIDELINE Approved: CDIII Review Date: 06-25-2021 Section:
EMS Replaces: Same, dated 08-30-18
Topic: EMS Equipment
2119.08, EMS Equipment Page 1 of 2
PURPOSE: To define standard DFD emergency medical equipment and replacement SCOPE: Applies to all Operations Division Personnel
All DFD apparatus shall have two medical bags on the apparatus. One medical kit and one airway kit. The equipment list is defined as a minimum medical equipment list that shall be carried on DFD apparatus. Company Captains have the discretion to carry more equipment if deemed necessary. Only approved equipment designated in this guideline are approved. Equipment shall be inventoried daily as part of rig inventory. Medications shall be documented by the date of expiration by the 15th of each month. Please utilize the link on the DFD web to document the medication expiration. If meds are within 3 months of expiration, please send in the old medication to the EMS Captain with a follow up email requesting replacement.
Airway Kit
Equipment Quantity OPA 6 (various sizes) NPA 6 (various sizes) Sterile Lubricant 3 Nasal Cannula 2 NRB Mask 2 BVM (adult) 1 BVM (ped) 1 BVM (infant) 1 02 Wrench 1 Oxygen 1
Medical Kit Equipment Quantity Narcan w/atomizer 2 Nose Clip 1 Zofran 1 Phenylephrine 1 Bottle ASA 1 Trauma Shears 2 AED 1 BP Cuff 1 Bariatric Cuff 1 Ped Cuff 1 Stethoscope 1
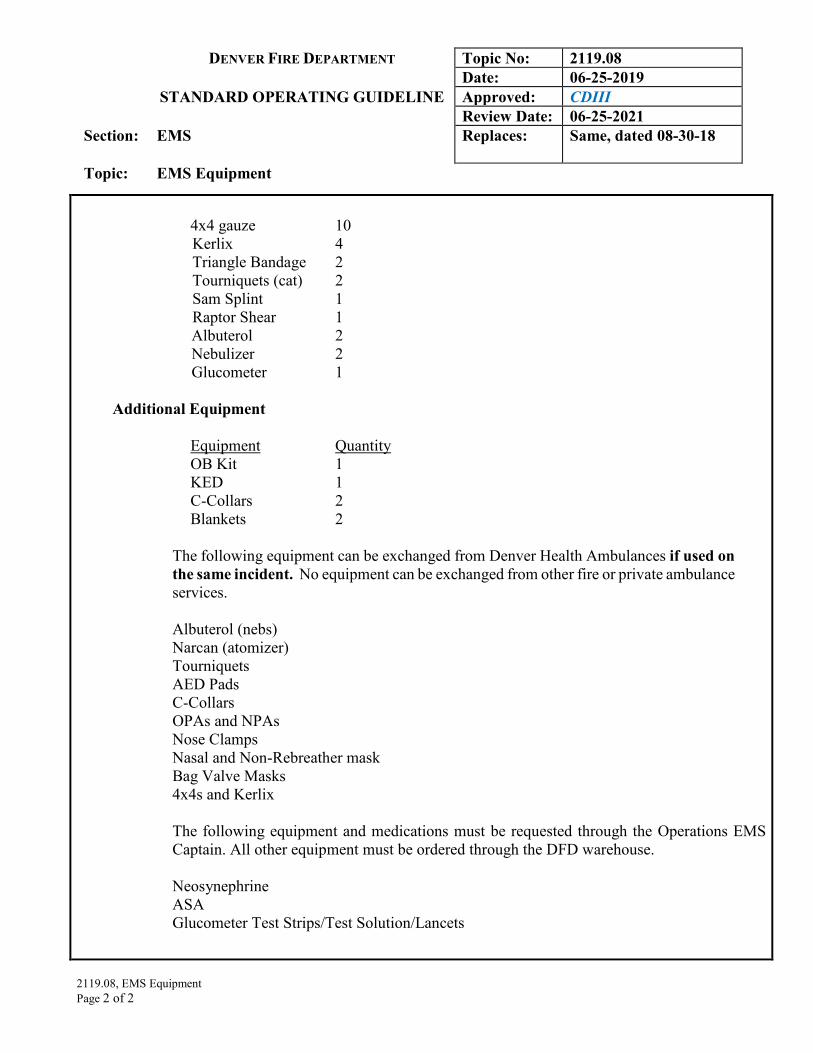
DENVER FIRE DEPARTMENT Topic No: 2119.08 Date: 06-25-2019 STANDARD OPERATING GUIDELINE Approved: CDIII Review Date: 06-25-2021 Section:
EMS Replaces: Same, dated 08-30-18
Topic: EMS Equipment
2119.08, EMS Equipment Page 2 of 2
4x4 gauze 10
Kerlix 4 Triangle Bandage 2 Tourniquets (cat) 2 Sam Splint 1 Raptor Shear 1 Albuterol 2 Nebulizer 2 Glucometer 1 Additional Equipment
Equipment Quantity OB Kit 1 KED 1 C-Collars 2 Blankets 2
The following equipment can be exchanged from Denver Health Ambulances if used on
the same incident. No equipment can be exchanged from other fire or private ambulance services.
Albuterol (nebs) Narcan (atomizer) Tourniquets AED Pads C-Collars OPAs and NPAs Nose Clamps Nasal and Non-Rebreather mask Bag Valve Masks 4x4s and Kerlix The following equipment and medications must be requested through the Operations EMS
Captain. All other equipment must be ordered through the DFD warehouse. Neosynephrine ASA Glucometer Test Strips/Test Solution/Lancets
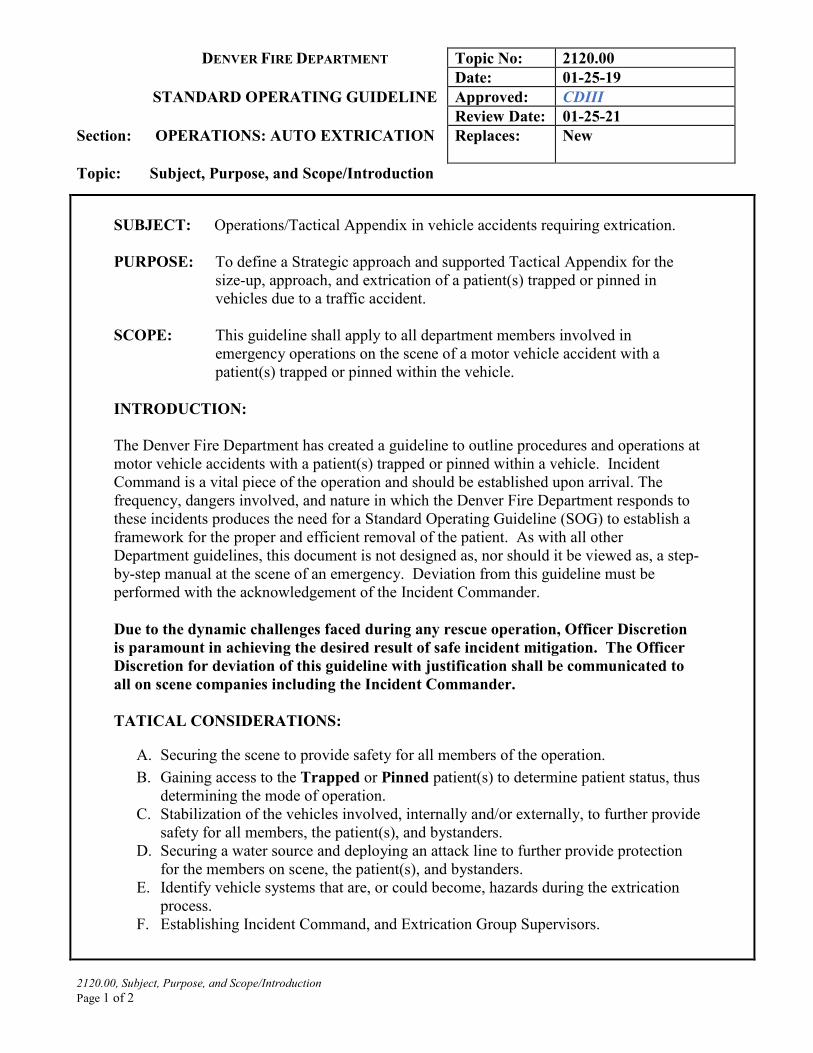
DENVER FIRE DEPARTMENT Topic No: 2120.00 Date: 01-25-19 STANDARD OPERATING GUIDELINE Approved: CDIII Review Date: 01-25-21 Section:
OPERATIONS: AUTO EXTRICATION Replaces: New
Topic: Subject, Purpose, and Scope/Introduction
2120.00, Subject, Purpose, and Scope/Introduction Page 1 of 2
SUBJECT: Operations/Tactical Appendix in vehicle accidents requiring extrication. PURPOSE: To define a Strategic approach and supported Tactical Appendix for the
size-up, approach, and extrication of a patient(s) trapped or pinned in vehicles due to a traffic accident.
SCOPE: This guideline shall apply to all department members involved in
emergency operations on the scene of a motor vehicle accident with a patient(s) trapped or pinned within the vehicle.
INTRODUCTION:
The Denver Fire Department has created a guideline to outline procedures and operations at motor vehicle accidents with a patient(s) trapped or pinned within a vehicle. Incident Command is a vital piece of the operation and should be established upon arrival. The frequency, dangers involved, and nature in which the Denver Fire Department responds to these incidents produces the need for a Standard Operating Guideline (SOG) to establish a framework for the proper and efficient removal of the patient. As with all other Department guidelines, this document is not designed as, nor should it be viewed as, a step-by-step manual at the scene of an emergency. Deviation from this guideline must be performed with the acknowledgement of the Incident Commander.
Due to the dynamic challenges faced during any rescue operation, Officer Discretion is paramount in achieving the desired result of safe incident mitigation. The Officer Discretion for deviation of this guideline with justification shall be communicated to all on scene companies including the Incident Commander.
TATICAL CONSIDERATIONS:
A. Securing the scene to provide safety for all members of the operation. B. Gaining access to the Trapped or Pinned patient(s) to determine patient status, thus
determining the mode of operation. C. Stabilization of the vehicles involved, internally and/or externally, to further provide
safety for all members, the patient(s), and bystanders. D. Securing a water source and deploying an attack line to further provide protection
for the members on scene, the patient(s), and bystanders. E. Identify vehicle systems that are, or could become, hazards during the extrication
process. F. Establishing Incident Command, and Extrication Group Supervisors.
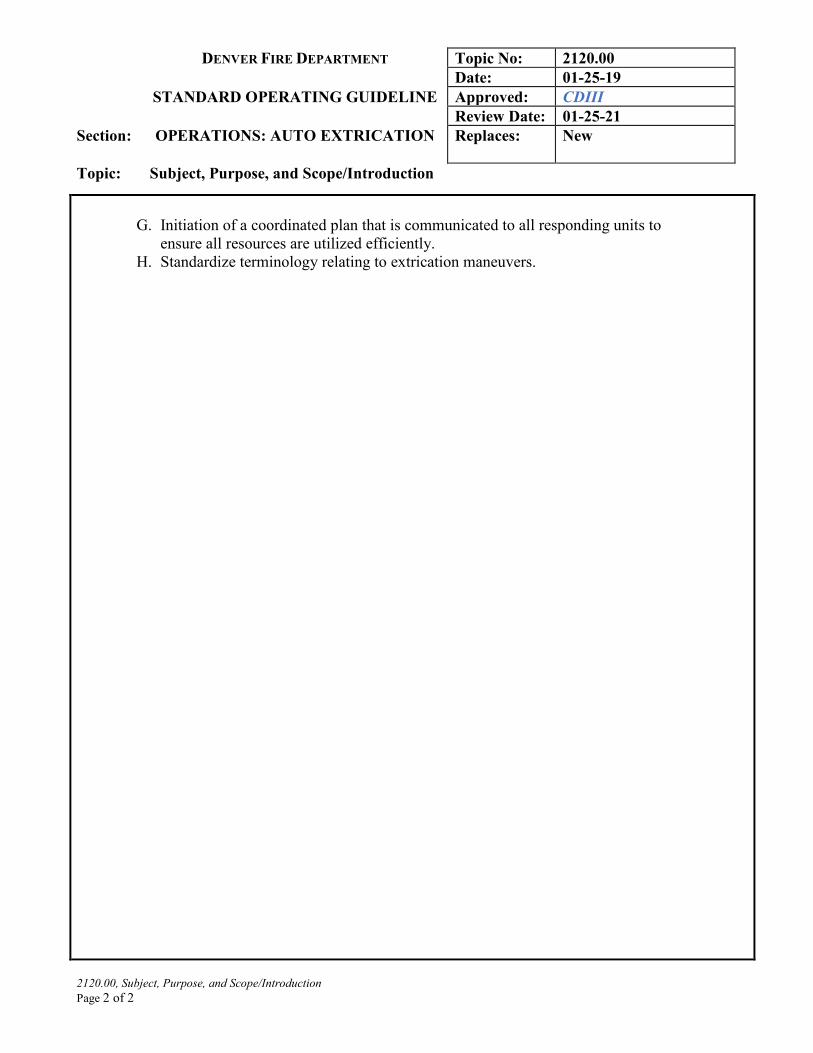
DENVER FIRE DEPARTMENT Topic No: 2120.00 Date: 01-25-19 STANDARD OPERATING GUIDELINE Approved: CDIII Review Date: 01-25-21 Section:
OPERATIONS: AUTO EXTRICATION Replaces: New
Topic: Subject, Purpose, and Scope/Introduction
2120.00, Subject, Purpose, and Scope/Introduction Page 2 of 2
G. Initiation of a coordinated plan that is communicated to all responding units to
ensure all resources are utilized efficiently. H. Standardize terminology relating to extrication maneuvers.
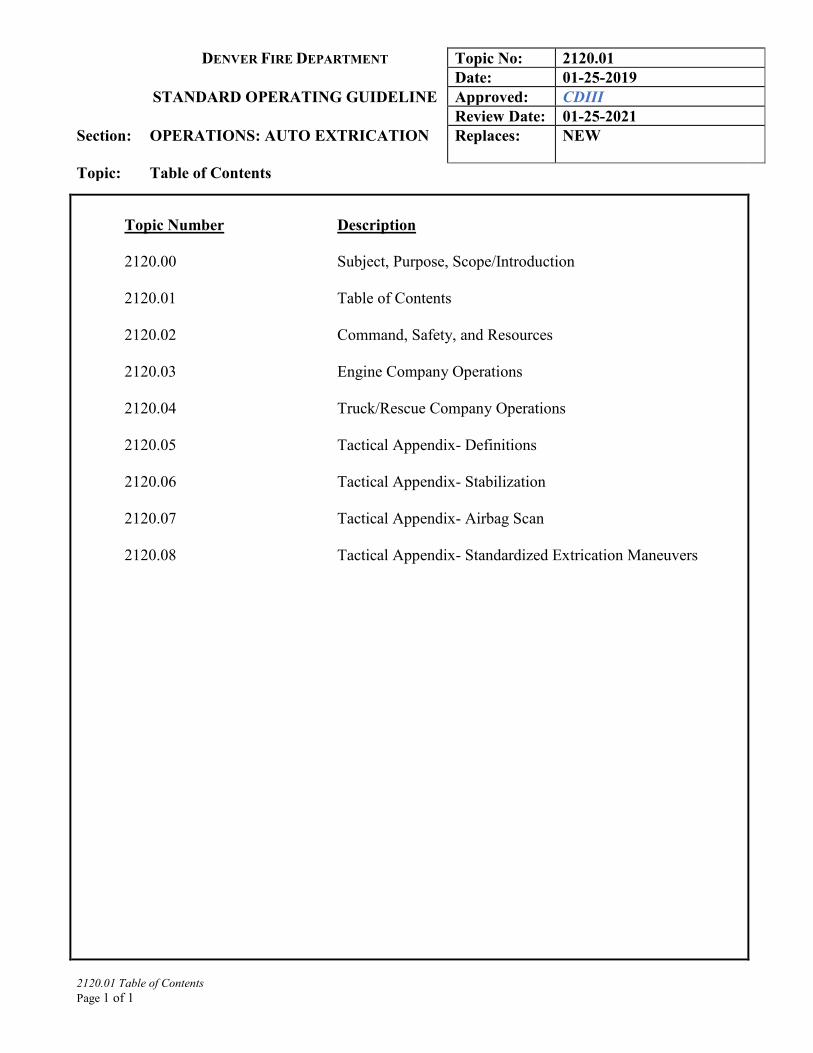
DENVER FIRE DEPARTMENT Topic No: 2120.01 Date: 01-25-2019 STANDARD OPERATING GUIDELINE Approved: CDIII Review Date: 01-25-2021 Section:
OPERATIONS: AUTO EXTRICATION Replaces: NEW
Topic: Table of Contents
2120.01 Table of Contents Page 1 of 1
Topic Number Description 2120.00 Subject, Purpose, Scope/Introduction 2120.01 Table of Contents 2120.02 Command, Safety, and Resources 2120.03 Engine Company Operations 2120.04 Truck/Rescue Company Operations 2120.05 Tactical Appendix- Definitions 2120.06 Tactical Appendix- Stabilization 2120.07 Tactical Appendix- Airbag Scan 2120.08 Tactical Appendix- Standardized Extrication Maneuvers
DENVER FIRE DEPARTMENT Topic No: 2120.02 Date: 01-25-19 STANDARD OPERATING GUIDELINE Approved: CDIII Review Date: 01-25-21 Section:
OPERATIONS: AUTO EXTRICATION Replaces: New
Topic: Command, Safety, and Resources
2120.02, Command, Safety, and Resources Page 1 of 2
Incident Command (IC) is a vital piece of the Extrication Process and should be established upon arrival of the first unit. Early IC direction will provide the best opportunity for the safe, efficient, and expedient completion of the incident. I. Incident Commander Roles and Responsibilities: The Incident Commander (IC) at an Auto Extrication is responsible for the overall control of the units operating at that incident. It is important that the IC communicate with incoming units to direct appropriate rig placement for scene safety and best access for the rigs outfitted with extrication equipment. Using standardized terminology, the IC will be able to coordinate and direct units to accomplish the overall Extrication Plan set forth by the Extrication Supervisor. The IC is responsible for the safe management of all members.
II. Extrication Supervisor: The Extrication Supervisor (ES) is responsible for developing and communicating the Extrication Plan to all members involved in the extrication process. Standardized terminology and extrication maneuvers will allow for crews to prepare for their assignment prior to arriving on scene. Areas of emphasis for the ES shall be patient evaluation for determination of mode of operation, vehicle/scene stabilization, and the Extrication Plan. III. Safety Officer:
While the IC is responsible for the safe management of all members, a Safety Officer shall operate at every Auto Extrication or “Parties Trapped”. The Shift Commander will be the Safety Officer and reports directly to the IC. Until a Safety Officer is assigned, the IC is the Safety Officer. While the safety of on scene members is the ultimate responsibility of the IC, the designation of a Safety Officer allows the IC to focus on the overall scene management. Safety Officers shall monitor and assess on-scene hazards and unsafe situations to ensure the highest degree of member safety. Please refer to Attachment B: Standard Operating Guideline- 2110.05- Safety Officer Rules and Responsibilities for additional information.
DENVER FIRE DEPARTMENT Topic No: 2120.02 Date: 01-25-19 STANDARD OPERATING GUIDELINE Approved: CDIII Review Date: 01-25-21 Section:
OPERATIONS: AUTO EXTRICATION Replaces: New
Topic: Command, Safety, and Resources
2120.02, Command, Safety, and Resources Page 2 of 2
Typical responses that lead to the use of the Auto Extrication guideline and the resources that accompany them:
Unknown Injury Accident:
Response- single resource *Shall be upgraded to a Parties Trapped Response once it has been determined that patient(s) is/are Trapped or Pinned
Accident with Injuries Response- single resource *Shall be upgraded to a Parties Trapped Response once it has been determined that patient(s) is/are Trapped or Pinned
Unknown Injury or Accident with Injuries Highway Response- two single resources *Shall be upgraded to a Parties Trapped Response once it has been determined that patient(s) is/are Trapped or Pinned
Rollover Response- Engine, Truck/Tower, Rescue, District Chief *Shall be upgraded to a Parties Trapped Response once it has been determined that patient(s) is/are Trapped or Pinned
Parties Trapped Response- Engine, two Trucks/Towers, Rescue, District Chief, Shift Commander
DENVER FIRE DEPARTMENT Topic No: 2120.03 Date: 01-25-19 STANDARD OPERATING GUIDELINE Approved: CDIII Review Date: 01-25-21 Section:
OPERATOINS: AUTO EXTRICATION Replaces: NEW
Topic: Engine Company Operations
2120.03, Engine Company Operations Page 1 of 2
All types of roadway collisions can lead to a Parties Trapped response. This, in addition to the number of Engine Companies in the city, creates a high likelihood that Engine Companies will arrive on scene first. The following details the actions to be performed by the Engine Company in the event extrication is necessary.
I. Arrival on Scene
Provide an arrival report to dispatch and remaining apparatus in the response. Information to be considered for this report and subsequent reports should include, but not be limited to, number of vehicles, current location(s) of vehicles, number of parties trapped and their location, stabilization needs, best access for incoming companies, additional resources (DFD, DPD, DHMC, DOT, Railway Systems Supervisor), and hazards in addition to the affected vehicles (fuel, down power lines, natural gas leak, Hazmat concerns, steep embankment, lighting issues). Anytime there is a party/patient trapped or pinned, the response shall be upgraded to a Parties Trapped Response.
II. Parties Trapped Confirmed: Golden Hour (Not Sick)
A. Establishment of Incident Command with an updated report to added/incoming units B. Initial scene stabilization:
• Set up and maintain traffic control using the rig(s) and/or cones to direct the flow of traffic away from the incident
• Perform hazard management/mitigation • Deploy, at minimum, a 1 3/4-inch hose line with an adjustable fog nozzle and attempt
to secure a water source C. Primary patient contact from the exterior of the vehicle to determine Sick or Not Sick D. Initial vehicle stabilization/immobilization with Step Chocks and/or Wheel Chocks E. Determine airbag locations by performing an Airbag Scan and announce to all members on
scene F. If possible, enter vehicle by avoiding airbag deployment zones (5-10-20 or 6-12-24 rules) G. Inside rescuer duties:
• Vehicle components control (ignition off, transmission in park, parking brake on, power locks unlocked, operate power windows/seats, manage seat belt)
• Assess and update patient status regularly • Relay entrapment issues to Extrication Supervisor • Peel and peek to identify airbag inflation device location and communicate
that information to the Extrication Supervisor • Provide protective covering for patient, BLS measures and, if necessary, call for ALS
measures/interventions
DENVER FIRE DEPARTMENT Topic No: 2120.03 Date: 01-25-19 STANDARD OPERATING GUIDELINE Approved: CDIII Review Date: 01-25-21 Section:
OPERATOINS: AUTO EXTRICATION Replaces: NEW
Topic: Engine Company Operations
2120.03, Engine Company Operations Page 2 of 2
• Monitor extrication activities to prevent intrusion onto patient • Ensure auxiliary devices are not connected to prevent back feed to airbags system.
H. Secure the 12V battery by a double cut on both cables, negative cable first I. Maintain Incident Command with necessary updates to incoming units and Dispatch until
transfer to District Chief J. Assist with patient transfer to a backboard (not a scoop) while ensuring
minimal twisting/turning and maintain C-spine precautions
III. Parties Trapped Confirmed: Platinum Ten (Sick)
When a patient is determined to be Sick, all the previous guidelines are applicable. The difference is in the haste with which the extrication is performed. The Sick patient requires immediate removal for life saving measures by paramedics and hospital staff and should be removed in the most efficient means available. Due to the limited time a Sick patient has, a rapid Risk versus benefit analysis is of utmost importance. This analysis will determine what steps are necessary and what steps can be omitted while taking additional risk for life. This mode of operation allows for “any means necessary” or “grab and go” removal of a patient.
IV. Post Extrication Patient Removal and Transfer to ALS
A. Assist Paramedics on scene and, if needed, in route to the hospital B. Maintain hose line for protection until all personnel and equipment are clear of the vehicle C. Apply absorbent to fluids on the ground
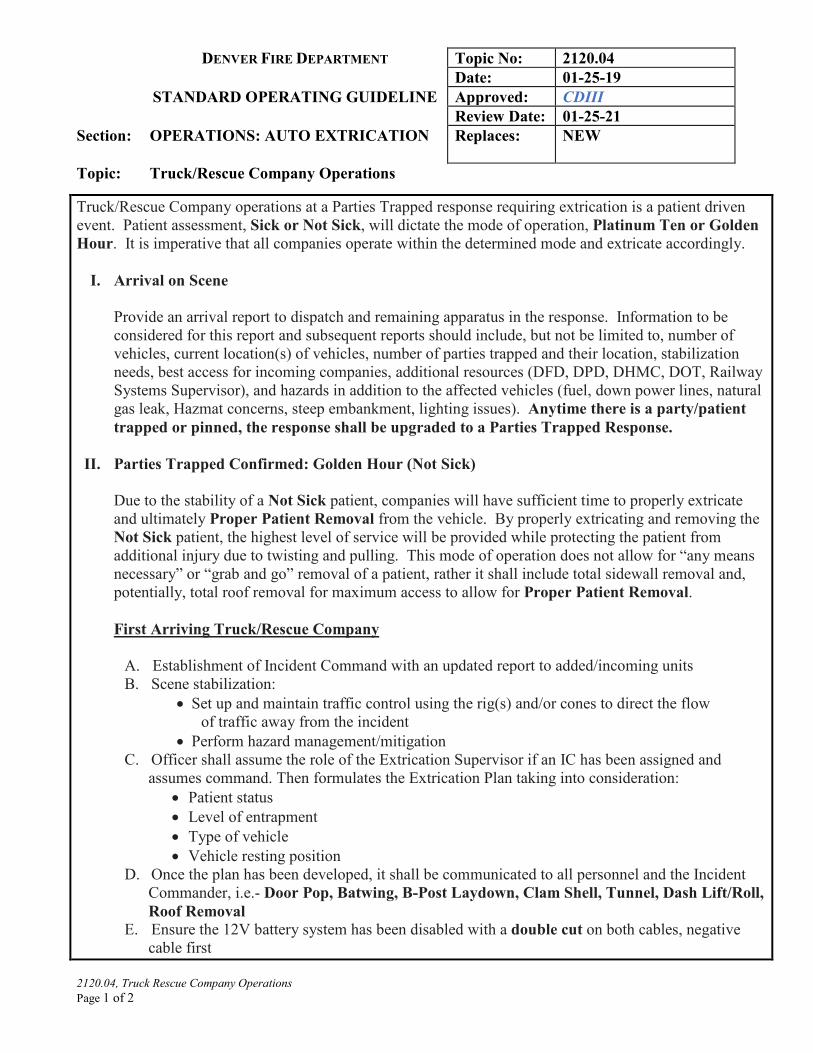
DENVER FIRE DEPARTMENT Topic No: 2120.04 Date: 01-25-19 STANDARD OPERATING GUIDELINE Approved: CDIII Review Date: 01-25-21 Section:
OPERATIONS: AUTO EXTRICATION Replaces: NEW
Topic: Truck/Rescue Company Operations
2120.04, Truck Rescue Company Operations Page 1 of 2
Truck/Rescue Company operations at a Parties Trapped response requiring extrication is a patient driven event. Patient assessment, Sick or Not Sick, will dictate the mode of operation, Platinum Ten or Golden Hour. It is imperative that all companies operate within the determined mode and extricate accordingly.
I. Arrival on Scene Provide an arrival report to dispatch and remaining apparatus in the response. Information to be considered for this report and subsequent reports should include, but not be limited to, number of vehicles, current location(s) of vehicles, number of parties trapped and their location, stabilization needs, best access for incoming companies, additional resources (DFD, DPD, DHMC, DOT, Railway Systems Supervisor), and hazards in addition to the affected vehicles (fuel, down power lines, natural gas leak, Hazmat concerns, steep embankment, lighting issues). Anytime there is a party/patient trapped or pinned, the response shall be upgraded to a Parties Trapped Response.
II. Parties Trapped Confirmed: Golden Hour (Not Sick)
Due to the stability of a Not Sick patient, companies will have sufficient time to properly extricate and ultimately Proper Patient Removal from the vehicle. By properly extricating and removing the Not Sick patient, the highest level of service will be provided while protecting the patient from additional injury due to twisting and pulling. This mode of operation does not allow for “any means necessary” or “grab and go” removal of a patient, rather it shall include total sidewall removal and, potentially, total roof removal for maximum access to allow for Proper Patient Removal.
First Arriving Truck/Rescue Company
A. Establishment of Incident Command with an updated report to added/incoming units B. Scene stabilization:
• Set up and maintain traffic control using the rig(s) and/or cones to direct the flow of traffic away from the incident
• Perform hazard management/mitigation C. Officer shall assume the role of the Extrication Supervisor if an IC has been assigned and
assumes command. Then formulates the Extrication Plan taking into consideration: • Patient status • Level of entrapment • Type of vehicle • Vehicle resting position
D. Once the plan has been developed, it shall be communicated to all personnel and the Incident Commander, i.e.- Door Pop, Batwing, B-Post Laydown, Clam Shell, Tunnel, Dash Lift/Roll, Roof Removal
E. Ensure the 12V battery system has been disabled with a double cut on both cables, negative cable first
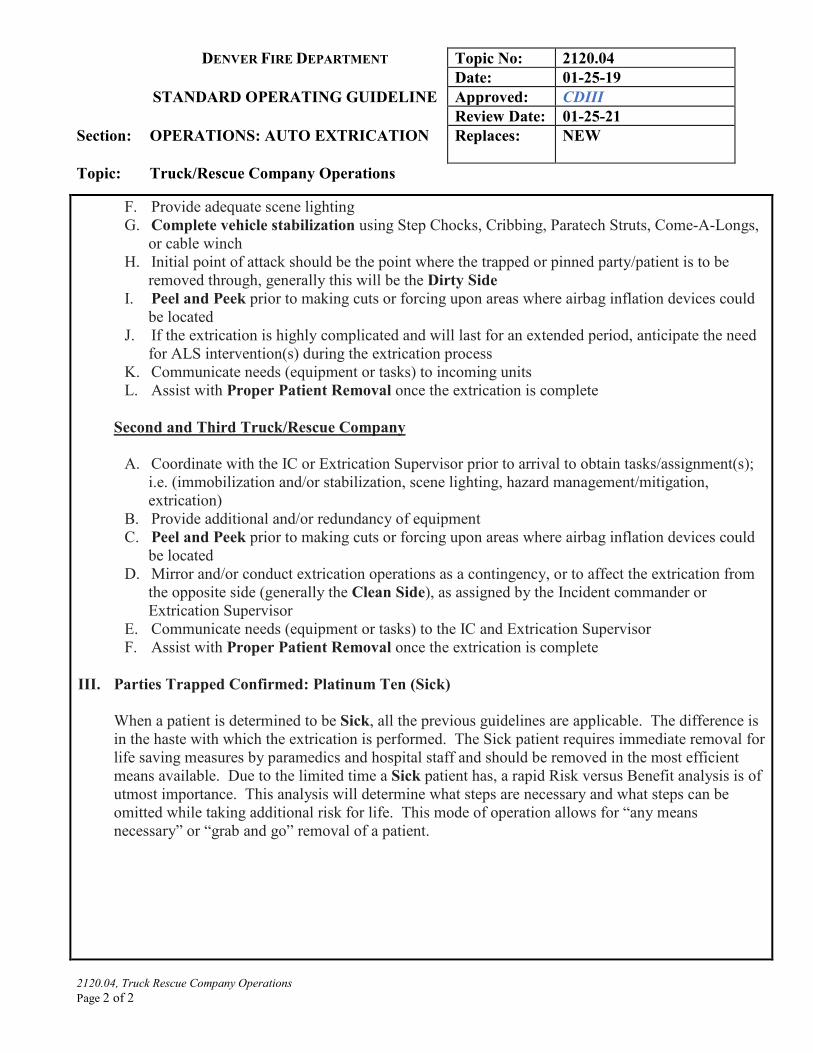
DENVER FIRE DEPARTMENT Topic No: 2120.04 Date: 01-25-19 STANDARD OPERATING GUIDELINE Approved: CDIII Review Date: 01-25-21 Section:
OPERATIONS: AUTO EXTRICATION Replaces: NEW
Topic: Truck/Rescue Company Operations
2120.04, Truck Rescue Company Operations Page 2 of 2
F. Provide adequate scene lighting G. Complete vehicle stabilization using Step Chocks, Cribbing, Paratech Struts, Come-A-Longs,
or cable winch H. Initial point of attack should be the point where the trapped or pinned party/patient is to be
removed through, generally this will be the Dirty Side I. Peel and Peek prior to making cuts or forcing upon areas where airbag inflation devices could
be located J. If the extrication is highly complicated and will last for an extended period, anticipate the need
for ALS intervention(s) during the extrication process K. Communicate needs (equipment or tasks) to incoming units L. Assist with Proper Patient Removal once the extrication is complete
Second and Third Truck/Rescue Company
A. Coordinate with the IC or Extrication Supervisor prior to arrival to obtain tasks/assignment(s); i.e. (immobilization and/or stabilization, scene lighting, hazard management/mitigation, extrication)
B. Provide additional and/or redundancy of equipment C. Peel and Peek prior to making cuts or forcing upon areas where airbag inflation devices could
be located D. Mirror and/or conduct extrication operations as a contingency, or to affect the extrication from
the opposite side (generally the Clean Side), as assigned by the Incident commander or Extrication Supervisor
E. Communicate needs (equipment or tasks) to the IC and Extrication Supervisor F. Assist with Proper Patient Removal once the extrication is complete
III. Parties Trapped Confirmed: Platinum Ten (Sick)
When a patient is determined to be Sick, all the previous guidelines are applicable. The difference is in the haste with which the extrication is performed. The Sick patient requires immediate removal for life saving measures by paramedics and hospital staff and should be removed in the most efficient means available. Due to the limited time a Sick patient has, a rapid Risk versus Benefit analysis is of utmost importance. This analysis will determine what steps are necessary and what steps can be omitted while taking additional risk for life. This mode of operation allows for “any means necessary” or “grab and go” removal of a patient.
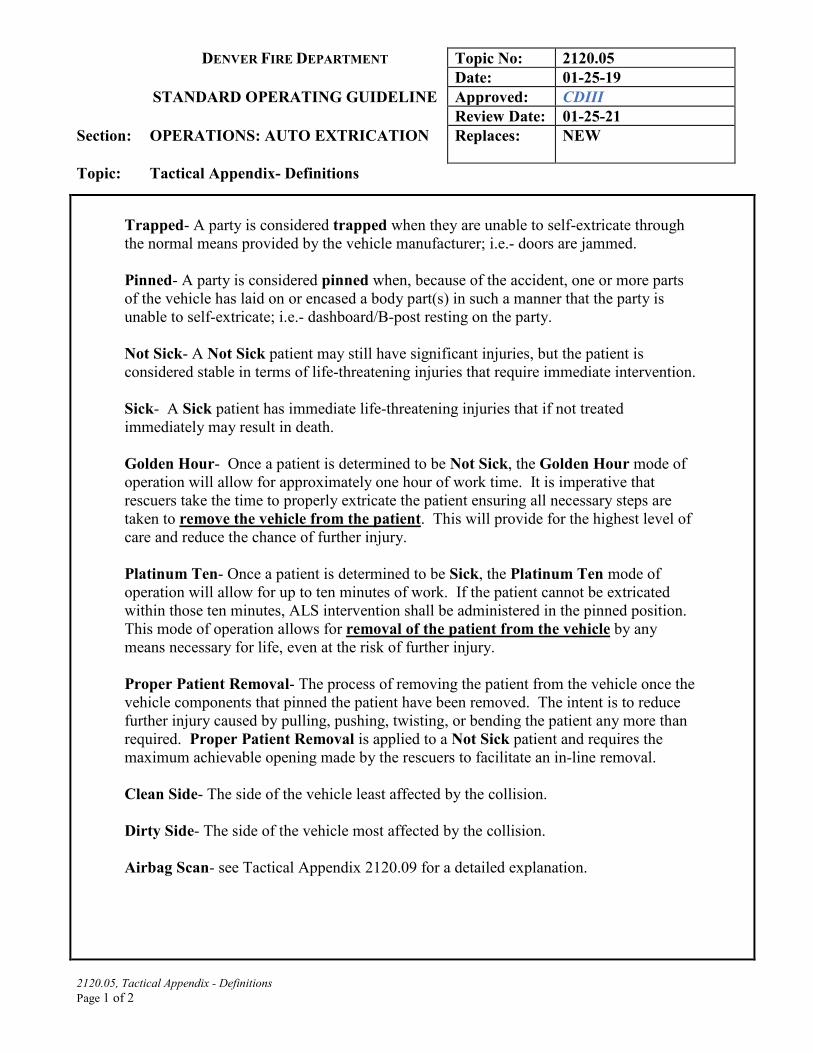
DENVER FIRE DEPARTMENT Topic No: 2120.05 Date: 01-25-19 STANDARD OPERATING GUIDELINE Approved: CDIII Review Date: 01-25-21 Section:
OPERATIONS: AUTO EXTRICATION Replaces: NEW
Topic: Tactical Appendix- Definitions
2120.05, Tactical Appendix - Definitions Page 1 of 2
Trapped- A party is considered trapped when they are unable to self-extricate through the normal means provided by the vehicle manufacturer; i.e.- doors are jammed. Pinned- A party is considered pinned when, because of the accident, one or more parts of the vehicle has laid on or encased a body part(s) in such a manner that the party is unable to self-extricate; i.e.- dashboard/B-post resting on the party. Not Sick- A Not Sick patient may still have significant injuries, but the patient is considered stable in terms of life-threatening injuries that require immediate intervention. Sick- A Sick patient has immediate life-threatening injuries that if not treated immediately may result in death. Golden Hour- Once a patient is determined to be Not Sick, the Golden Hour mode of operation will allow for approximately one hour of work time. It is imperative that rescuers take the time to properly extricate the patient ensuring all necessary steps are taken to remove the vehicle from the patient. This will provide for the highest level of care and reduce the chance of further injury. Platinum Ten- Once a patient is determined to be Sick, the Platinum Ten mode of operation will allow for up to ten minutes of work. If the patient cannot be extricated within those ten minutes, ALS intervention shall be administered in the pinned position. This mode of operation allows for removal of the patient from the vehicle by any means necessary for life, even at the risk of further injury. Proper Patient Removal- The process of removing the patient from the vehicle once the vehicle components that pinned the patient have been removed. The intent is to reduce further injury caused by pulling, pushing, twisting, or bending the patient any more than required. Proper Patient Removal is applied to a Not Sick patient and requires the maximum achievable opening made by the rescuers to facilitate an in-line removal. Clean Side- The side of the vehicle least affected by the collision. Dirty Side- The side of the vehicle most affected by the collision. Airbag Scan- see Tactical Appendix 2120.09 for a detailed explanation.
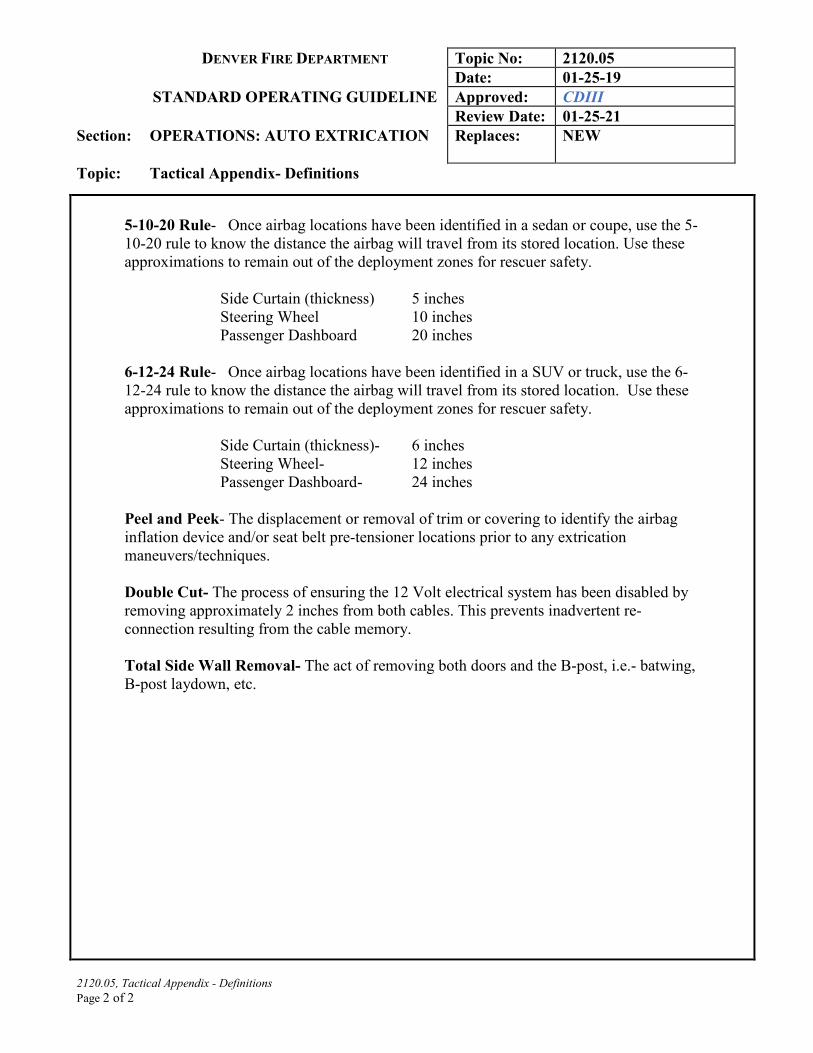
DENVER FIRE DEPARTMENT Topic No: 2120.05 Date: 01-25-19 STANDARD OPERATING GUIDELINE Approved: CDIII Review Date: 01-25-21 Section:
OPERATIONS: AUTO EXTRICATION Replaces: NEW
Topic: Tactical Appendix- Definitions
2120.05, Tactical Appendix - Definitions Page 2 of 2
5-10-20 Rule- Once airbag locations have been identified in a sedan or coupe, use the 5-10-20 rule to know the distance the airbag will travel from its stored location. Use these approximations to remain out of the deployment zones for rescuer safety. Side Curtain (thickness) 5 inches Steering Wheel 10 inches Passenger Dashboard 20 inches 6-12-24 Rule- Once airbag locations have been identified in a SUV or truck, use the 6-12-24 rule to know the distance the airbag will travel from its stored location. Use these approximations to remain out of the deployment zones for rescuer safety. Side Curtain (thickness)- 6 inches Steering Wheel- 12 inches Passenger Dashboard- 24 inches Peel and Peek- The displacement or removal of trim or covering to identify the airbag inflation device and/or seat belt pre-tensioner locations prior to any extrication maneuvers/techniques. Double Cut- The process of ensuring the 12 Volt electrical system has been disabled by removing approximately 2 inches from both cables. This prevents inadvertent re-connection resulting from the cable memory. Total Side Wall Removal- The act of removing both doors and the B-post, i.e.- batwing, B-post laydown, etc.
DENVER FIRE DEPARTMENT Topic No: 2120.06 Date: 01-25-19 STANDARD OPERATING GUIDELINE Approved: CDIII Review Date: 01-25-21 Section:
OPERATIONS: AUTO EXTRICATION Replaces: NEW
Topic: Tactical Appendix- Stabilization
2120.06, Tactical Appendix - Stabilization Page 1 of 1
I. Immobilization
Immobilize the vehicle on its wheels from rolling forward and backward. This can be accomplished with the vehicle components by placing the transmission in park and/or applying the parking brake. External immobilization is accomplished by placing wheel chocks or cribbing blocks in front of and behind one wheel in contact with the ground.
II. Initial Stabilization When instability exists, Initial Stabilization is accomplished by using step chocks and/or cribbing blocks to support major vehicle components (i.e.- posts, rails, frame). Initial Stabilization may, or may not completely resolve the instability, however it allows for the safety of the initial rescuer to access the patient(s) to determine Sick, Not Sick, or deceased. This shall be completed by the first arriving company prior to entry of the inside rescuer and prior to all extrication maneuvers.
III. Complete Stabilization When Initial Stabilization cannot fully restrict the movement of the vehicle, Complete Stabilization is required. Complete Stabilization is accomplished by using stop chocks, cribbing blocks, stabilization struts, come-a-longs, chain hoists, life safety ropes, and winches to restrict vehicle movement from its resting position. *All Stabilization shall be monitored by the assigned Safety Officer.
*All stabilization efforts shall consider the Extrication Plan so that the stabilization does not impede access for the Extrication Maneuvers.
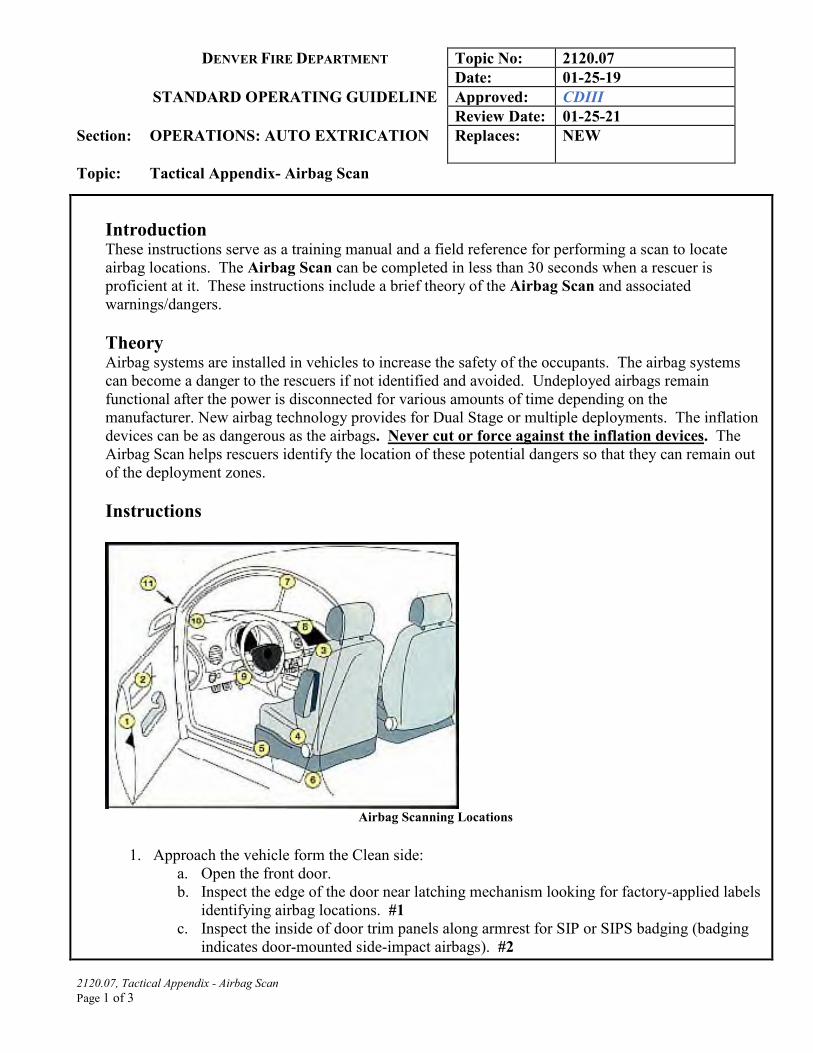
DENVER FIRE DEPARTMENT Topic No: 2120.07 Date: 01-25-19 STANDARD OPERATING GUIDELINE Approved: CDIII Review Date: 01-25-21 Section:
OPERATIONS: AUTO EXTRICATION Replaces: NEW
Topic: Tactical Appendix- Airbag Scan
2120.07, Tactical Appendix - Airbag Scan Page 1 of 3
Introduction These instructions serve as a training manual and a field reference for performing a scan to locate airbag locations. The Airbag Scan can be completed in less than 30 seconds when a rescuer is proficient at it. These instructions include a brief theory of the Airbag Scan and associated warnings/dangers. Theory Airbag systems are installed in vehicles to increase the safety of the occupants. The airbag systems can become a danger to the rescuers if not identified and avoided. Undeployed airbags remain functional after the power is disconnected for various amounts of time depending on the manufacturer. New airbag technology provides for Dual Stage or multiple deployments. The inflation devices can be as dangerous as the airbags. Never cut or force against the inflation devices. The Airbag Scan helps rescuers identify the location of these potential dangers so that they can remain out of the deployment zones. Instructions
Airbag Scanning Locations
1. Approach the vehicle form the Clean side:
a. Open the front door. b. Inspect the edge of the door near latching mechanism looking for factory-applied labels
identifying airbag locations. #1 c. Inspect the inside of door trim panels along armrest for SIP or SIPS badging (badging
indicates door-mounted side-impact airbags). #2
DENVER FIRE DEPARTMENT Topic No: 2120.07 Date: 01-25-19 STANDARD OPERATING GUIDELINE Approved: CDIII Review Date: 01-25-21 Section:
OPERATIONS: AUTO EXTRICATION Replaces: NEW
Topic: Tactical Appendix- Airbag Scan
2120.07, Tactical Appendix - Airbag Scan Page 2 of 3
d. Visually scan outside edge of seatback starting at the top of the headrest and move down to the seat hinge (badging indicates seat-mounted side-impact airbags). #3
e. Visually scan lower edge of seat cushion and seat trim material beginning at hinge and progressing to front edge of seat (badging indicates seat-mounted pelvic airbag). #4
f. Scan along rocker channel and seat-adjustment track from front of seat edge toward base of B-post. #5
g. Scan B-post from rocker channel to roof rail (badging indicates B-post mounted thoracic airbag); pay special attention near the Nader/U-bolt (common location for factory-applied labels). #6
h. Scan across vehicle to the opposite roof rail trim and follow it to the A-post. Scan down the A-post to dash level (badging indicates the presence of curtain airbags). #7
i. Scan from far side to near side across dashboard and steering column. Pay attention to passenger side dash (badging indicates dash mounted airbag) and the steering wheel/column (badging indicates steering wheel mounted airbag and/or knee bolster airbag) #8 and #9
j. From the exterior, look at driver’s side of dash near base of windshield and A-post to locate the VIN plate. #10
k. Scan VIN plate for airbag ID (SRS, SIP, SIPS, or Airbag ID) l. Near the VIN plate, scan the windshield for a factory mounted label (possibly listing
airbag locations). #11 m. The scan is complete for the front portion of the passenger compartment. n. Communicate the airbag locations to the Extrication Supervisor and all personnel.
2. When applicable, move to rear door on the clean side of the vehicle:
a. Open rear door. b. Inspect edge of door near latching mechanism (factory-applied label for airbags). c. Inspect inside of door trim panels along armrest for SIP or SIPS badging (badging
indicates door-mounted side-impact airbags). d. Scan outside edge of seatback, starting at top and scanning to bottom (badging indicates
seat-mounted side-impact airbags). e. Scan lower edge of seat cushion and seat trim material beginning at hinge and progress
to front edge. f. Scan along rocker channel from front of seat edge toward base of seat at the C-post. g. Scan C-post from the bottom up to the rear decking (badging indicates C-post mounted
thoracic airbag). h. Scan across the rear decking (badging indicates whiplash airbags mounted at the top
level of and behind the rear seats).
DENVER FIRE DEPARTMENT Topic No: 2120.07 Date: 01-25-19 STANDARD OPERATING GUIDELINE Approved: CDIII Review Date: 01-25-21 Section:
OPERATIONS: AUTO EXTRICATION Replaces: NEW
Topic: Tactical Appendix- Airbag Scan
2120.07, Tactical Appendix - Airbag Scan Page 3 of 3
i. Scan from the rear decking on the opposite side up the C-post to the roof rail (badging
indicates curtain airbags). j. Scan the roof rail from C-post to B-post (badging indicates curtain airbags). k. Scan down the B-post to the opposite rocker channel (badging indicates B-post mounted
thoracic airbag for the front passengers). l. Scan across the floor pan from the far B-post to the near B-post (badging indicates anti-
slide airbags for foot protection). m. Scanning is complete for the rear passenger compartment airbag systems. n. Communicate the airbag locations to the IC, Extrication Supervisor and all personnel.
Note Accessories can back feed the 12-volt system. Disconnect all connected accessories. i.e. phones, chargers, lights
etc. Warning! Completion of the airbag scanning technique should be conducted while remaining outside of vehicle. Danger! All airbags should be treated as loaded. The 12-Volt battery system shall be cut prior to extrication activities to allow for the capacitors to begin to bleed off the stored electricity. Once airbags are identified, keep clear of the deployment zones using the 5-10-20 and 6-12-24 Rules and avoid cutting or forcing on any inflation devices. Inflation or re-inflation can occur instantly causing harm to occupants and/or rescuers. Stay out of the deployment path when possible!
Dealing with Seatbelts Patient removal is challenging and may require additional personnel inside the vehicle, particularly when the patient is hanging from the seat belt. Be aware of seatbelts that are under tension. Sudden release of the belt may cause movement that further aggravate the injuries to the patient. To gradually release tension on the seatbelt try cutting the belt diagonally at midpoint along the cloth, between the catches and anchor points. Never cut the seat belt at the D-rings or anchor points. When total side wall removal is required, apply Vice Grips to the belt at the anchor to facilitate cutting the belt at the B-post. Pre-tension devices require the rescuer to circumnavigate the device. When exposed cut the connector plug wire to the discharge tube. The pre-tensioner/retractors can be difficult to cut without adverse effects.
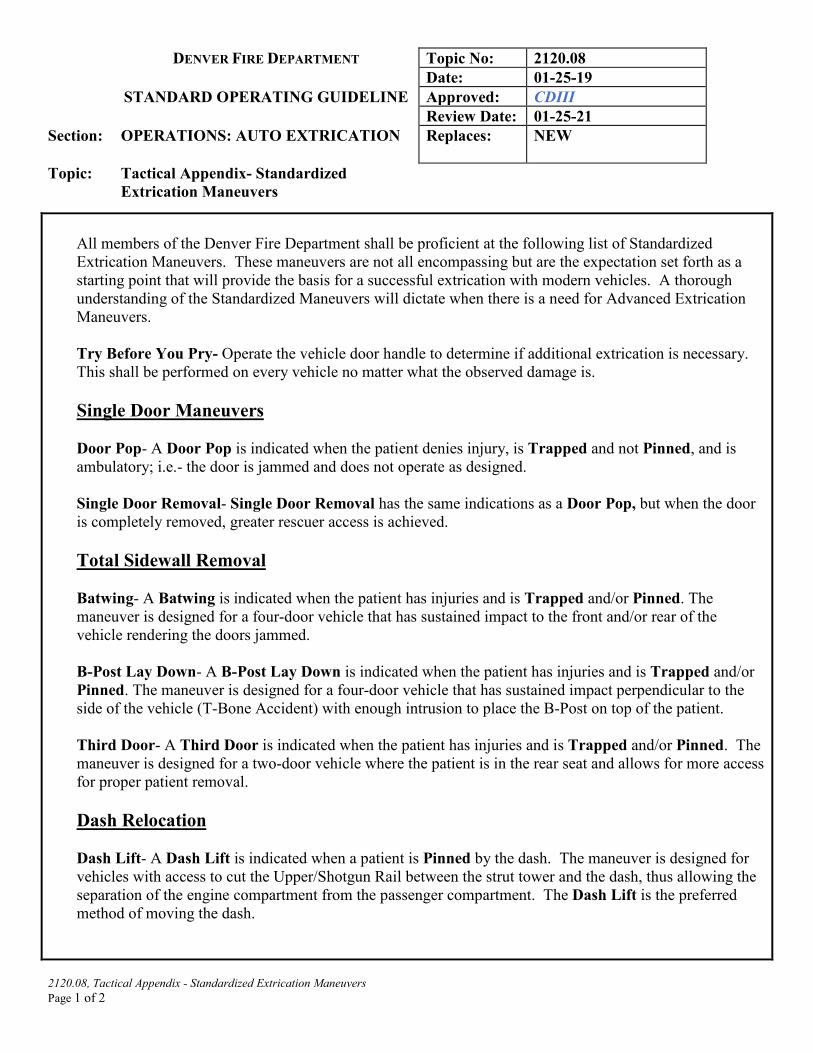
DENVER FIRE DEPARTMENT Topic No: 2120.08 Date: 01-25-19 STANDARD OPERATING GUIDELINE Approved: CDIII Review Date: 01-25-21 Section:
OPERATIONS: AUTO EXTRICATION Replaces: NEW
Topic: Tactical Appendix- Standardized Extrication Maneuvers
2120.08, Tactical Appendix - Standardized Extrication Maneuvers Page 1 of 2
All members of the Denver Fire Department shall be proficient at the following list of Standardized Extrication Maneuvers. These maneuvers are not all encompassing but are the expectation set forth as a starting point that will provide the basis for a successful extrication with modern vehicles. A thorough understanding of the Standardized Maneuvers will dictate when there is a need for Advanced Extrication Maneuvers.
Try Before You Pry- Operate the vehicle door handle to determine if additional extrication is necessary. This shall be performed on every vehicle no matter what the observed damage is. Single Door Maneuvers Door Pop- A Door Pop is indicated when the patient denies injury, is Trapped and not Pinned, and is ambulatory; i.e.- the door is jammed and does not operate as designed. Single Door Removal- Single Door Removal has the same indications as a Door Pop, but when the door is completely removed, greater rescuer access is achieved. Total Sidewall Removal Batwing- A Batwing is indicated when the patient has injuries and is Trapped and/or Pinned. The maneuver is designed for a four-door vehicle that has sustained impact to the front and/or rear of the vehicle rendering the doors jammed. B-Post Lay Down- A B-Post Lay Down is indicated when the patient has injuries and is Trapped and/or Pinned. The maneuver is designed for a four-door vehicle that has sustained impact perpendicular to the side of the vehicle (T-Bone Accident) with enough intrusion to place the B-Post on top of the patient. Third Door- A Third Door is indicated when the patient has injuries and is Trapped and/or Pinned. The maneuver is designed for a two-door vehicle where the patient is in the rear seat and allows for more access for proper patient removal. Dash Relocation Dash Lift- A Dash Lift is indicated when a patient is Pinned by the dash. The maneuver is designed for vehicles with access to cut the Upper/Shotgun Rail between the strut tower and the dash, thus allowing the separation of the engine compartment from the passenger compartment. The Dash Lift is the preferred method of moving the dash.
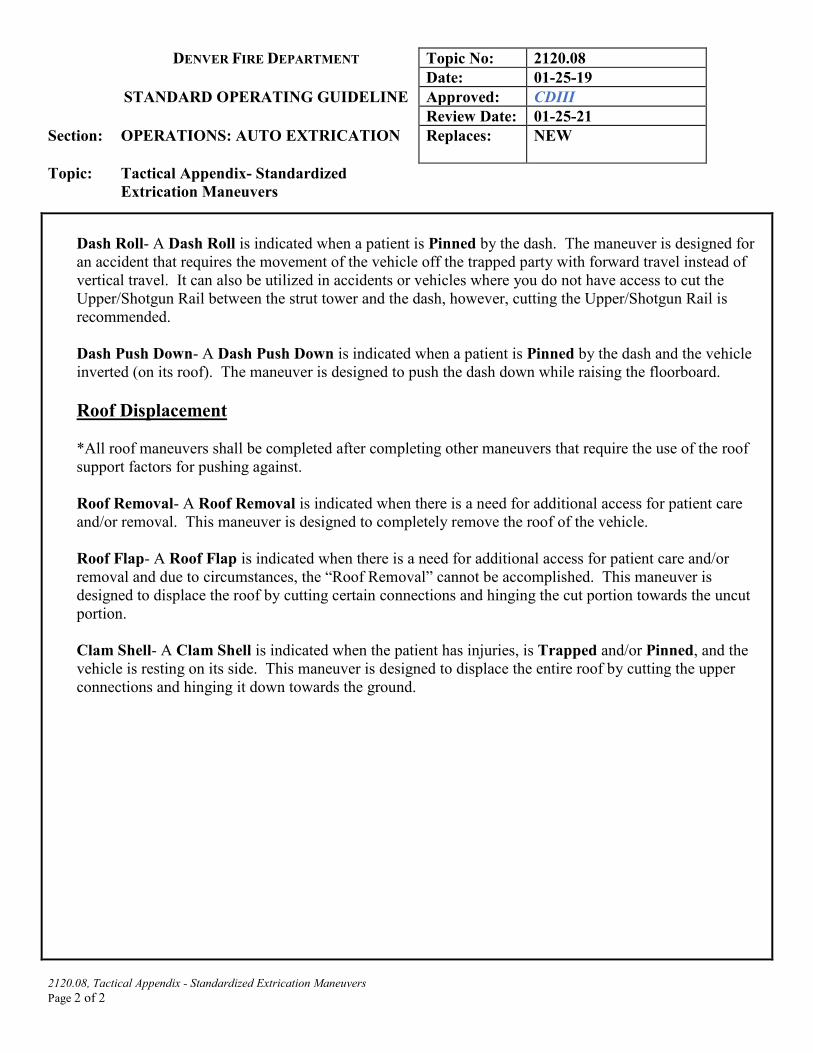
DENVER FIRE DEPARTMENT Topic No: 2120.08 Date: 01-25-19 STANDARD OPERATING GUIDELINE Approved: CDIII Review Date: 01-25-21 Section:
OPERATIONS: AUTO EXTRICATION Replaces: NEW
Topic: Tactical Appendix- Standardized Extrication Maneuvers
2120.08, Tactical Appendix - Standardized Extrication Maneuvers Page 2 of 2
Dash Roll- A Dash Roll is indicated when a patient is Pinned by the dash. The maneuver is designed for an accident that requires the movement of the vehicle off the trapped party with forward travel instead of vertical travel. It can also be utilized in accidents or vehicles where you do not have access to cut the Upper/Shotgun Rail between the strut tower and the dash, however, cutting the Upper/Shotgun Rail is recommended. Dash Push Down- A Dash Push Down is indicated when a patient is Pinned by the dash and the vehicle inverted (on its roof). The maneuver is designed to push the dash down while raising the floorboard. Roof Displacement *All roof maneuvers shall be completed after completing other maneuvers that require the use of the roof support factors for pushing against. Roof Removal- A Roof Removal is indicated when there is a need for additional access for patient care and/or removal. This maneuver is designed to completely remove the roof of the vehicle. Roof Flap- A Roof Flap is indicated when there is a need for additional access for patient care and/or removal and due to circumstances, the “Roof Removal” cannot be accomplished. This maneuver is designed to displace the roof by cutting certain connections and hinging the cut portion towards the uncut portion. Clam Shell- A Clam Shell is indicated when the patient has injuries, is Trapped and/or Pinned, and the vehicle is resting on its side. This maneuver is designed to displace the entire roof by cutting the upper connections and hinging it down towards the ground.
Section D
2019 COLORADO COMMERCIAL DRIVER LICENSE (CDL) MANUAL
Commercial Driver License Manual March 2019
CDL Driver’s Manual COPYRIGHT © 2015 AAMVA All Rights Reserved DR 2251 (03/08/19)
Commercial Driver’s License Manual - 2018 CDL Testing System
1-888-3737-888 (US)1-800-222-TIPS (Canada)01800-5533-000 (Mexico)
Make the Call, Save Lives.National Hotline:
1-888-3737-888truckersagainsttrafficking.org
Commercial Driver’s License Manual - 2018 CDL Testing System
In January 2015, an RV pulled into a truck stop in Virginia. Observant professional truck driver Kevin Kimmel recognized suspicious activity around that RV, which had pulled back by the truck line, and decided something was off. Instead of turning a blind eye, he made a call that brought law enforcement out to the scene within a few minutes. After interviewing the occupants of the vehicle, they discovered that a young woman, 20 years old, had been kidnapped from Iowa two weeks prior. She had been beaten, raped, her whole body burned by instruments heated on the RV stove, branded and starved. She was being sold by her traffickers, Laura Sorenson and Aldair Hodza, through sex ads on Craigslist, where men were purchasing her and then arriving at the RV to rape her. She was dying from malnutrition and the torture she was subjected to … had the call not been made that brought law enforcement out to that truck stop, doctors said she would have died within the next few days. Now a recovering survivor, this young woman calls Kimmel her guardian angel. He calls himself a Trucker Against Trafficking.
Truckers Against Trafficking is a non-profit organization that has been working with the trucking industry since 2009 to provide the needed training and tools to enable members of the industry to both recognize human trafficking when they see it happening and to know what actions to take to enable law enforcement to effectively fight this crime. Through this training and these tools, truckers are becoming Everyday Heroes like Kevin Kimmel, who was also named TAT’s 2015 Harriet Tubman Award winner.
One of the tools TAT provides is a wallet card with red flags to look for, questions to ask if you suspect someone is a victim and actionable information to report. This wallet card is available by App, from the appropriate App Store, on all smart phones, whether Android, iPhone or Windows format, as well as by emailing [email protected], for a version to carry in your wallet.
Additionally, TAT provides a powerful, 26-minute training video on its website (www.truckersagainsttrafficking.org), which, when watched along with taking and passing a short test, certifies drivers as TAT-Trained, a designation which can go on your resume. Because professional drivers often find themselves in locations frequented and exploited by human traffickers, they are in a unique position to recognize the signs of human trafficking and to make the call that can lead to victim recovery and perpetrator arrests. Get your wallet card today. Be an Everyday Hero! Make the call (1-888-3737-888); save lives!
1-888-3737-888 (US)1-800-222-TIPS (Canada)01800-5533-000 (Mexico)Text INFO or HELP to BeFree (233733)
Commercial Driver’s License Manual - 2018 CDL Testing System
This material is based upon work supported by the Federal Motor Carrier Safety Administration under Cooperative Agreement No. DTFH61-97-X-00017. Any opinions, findings, conclusions or recommendations expressed in this publication are those of the Author(s) and do not necessarily reflect the view of the Federal Motor Carrier Safety Administration.
COPYRIGHT © 2005 AAMVA. All rights reserved
This material has been created for and provided to State Driver License Agencies (SDLAs) by AAMVA for the purpose of educating Driver License applicants (Commercial or Non-Commercial). Permission to reproduce, use, distribute or sell this material has been granted to SDLAs only. No part of this book may be reproduced or transmitted in any form or by any means, electronic or mechanical, including photocopying, recording, or by any information storage and retrieval system without express written permission from the author / publisher. Any unauthorized reprint, use, distribution or sale of this material is prohibited.
Commercial Driver’s License Manual - 2018 CDL Testing System
TABLE OF CONTENTSSection 1INTRODUCTION ............................................................................................. 6
Section 2DRIVING SAFELY ......................................................................................... 16
Section 3TRANSPORTING CARGO SAFELY ............................................................. 56
Section 4TRANSPORTING PASSENGERS SAFELY .................................................. 59
Section 5AIR BRAKES ................................................................................................. 62
Section 6COMBINATION VEHICLES ........................................................................... 71
Section 7DOUBLES AND TRIPLES ............................................................................. 84
Section 8TANK VEHICLES .......................................................................................... 88
Section 9HAZARDOUS MATERIALS ........................................................................... 90
Section 10SCHOOL BUS ............................................................................................. 108
Section 11VEHICLE INSPECTION ...............................................................................119
Section 12BASIC VEHICLE CONTROL SKILLS TEST ................................................ 127
Section 13ON-ROAD DRIVING .................................................................................... 130
Commercial Driver’s License Manual - 2018 CDL Testing System
Page 6 Section 1 - Introduction (03/08/19)
Section 1
INTRODUCTIONThis Section Covers
● Commercial Driver License Tests ● Medical Requirements ● Driver Disqualifications ● Other Safety Rules ● International Registration Program ● Out of State CLP Holders
There is a federal requirement that each state have minimum standards for the licensing of commercial drivers. This manual provides driver license testing information for drivers who wish to have a commercial driver license (CDL). This manual does NOT provide information on all the federal and state requirements needed before you can drive a commercial motor vehicle (CMV). You may have to contact your state driver licensing authority for additional information. You must have a CDL to operate:Any single vehicle with a gross vehicle weight rating (GVWR) of 26,001 pounds or more. A combination vehicle with a gross combination weight rating (GCWR) of 26,001 or more pounds, provided the GVWR of the vehicle(s) being towed is in excess of 10,000 pounds. A vehicle designed to transport 16 or more passengers (including the driver). Any size vehicle which requires hazardous material placards or is carrying material listed as a select agent or toxin in 42 CFR part 73. Federal regulations through the Department of Homeland Security require a background check and fingerprinting for the Hazardous Materials endorsement. Contact your local department of driver licensing for more information. The following vehicles are exempt from the CDL requirements; Commercial Motor Vehicle does not include:CMV operated by military personnel for military purposes.Any farm vehicles:Controlled and operated by a farmer;Used to transport agriculture products, farm machinery, or farm supplies to or from a farm;Used within 150 miles of the person's farm; orNot used in the operation of a common or contract motor carrier.Firefighting Equipment. Vehicles necessary to the preservation of life and property or the execution of emergency governmental functions; emergency equipment
such as a fire truck, hook and ladder, foam or water transporter or other vehicles used only in response to emergencies are included in the exemption.Emergency Snow Plowing. During declared emergency snow removal operations, non-CDL holders may operate snowplow vehicles. The Colorado State Patrol (CSP) determines when an emergency snow conditions exist.Recreational Vehicles. When used for recreational purposes, a motor home with truck or motor home is used exclusively for pleasure, enjoyment, other recreational purposes, or family transportation of the owner, lessee, or occupant and is not used to transport cargo or passengers for profit, hire, or otherwise in any business or commercial enterprise."A state may administer its skills tests to a person who hastaken training in that state and is licensed in another UnitedStates jurisdiction" (FMCSR 383.79). Persons with out-of-state CLP's must have received training in Colorado.
CDL Classifications The CDL vehicle classification included in the federal standard, together with the type of cargo to be transported, determine what type of CDL license and endorsement an applicant must apply for. There are three basic vehicle classes or groups: Class A Combination Vehicles. Any combination of vehicles with gross combination weight rating (GCWR) of 26,001 or more pounds falls in Group A provided the GVWR of the vehicle(s) being towed is more than 10,000 pounds. Most Class A vehicles are trucks such as truck-tractor/semi-trailer or truck and trailer combinations. However, tractor-trailer buses may be found in a few communities. Driving a Class A vehicle requires considerably more skill and knowledge than driving vehicles in Classes B and C. Since these skills include those required to drive a B and C vehicle, a driver who has a Class A license also may drive vehicles in Classes B and C. Class B Heavy Straight Vehicles. Any single vehicle with a GVWR of 26,001 or more pounds falls in Group B, or any such vehicle towing another vehicle not in excess of 10,000 pounds GVWR. Class B includes straight trucks and large buses, including articulated buses. Safely driving these heavy vehicles requires considerably more knowledge and skill than driving the small trucks and buses found in Class C. Since they include the skills required to drive Class C vehicles, drivers who have qualified for a Class B license may also drive vehicles in Class C. Class C Small Vehicles. Any single vehicle with a GVWR less than 26,001 pounds falls in Group C, or any such vehicle towing another vehicle not in excess of 10,000 pounds GVWR. However, vehicles of this size are included in the CDL program only if they are: 1) Designed to carry 16 or more passengers including the driver, or (2) Used
Commercial Driver’s License Manual - 2018 CDL Testing System
Section 1 - Introduction Page 7 (03/08/19)
to transport hazardous materials in quantities requiring placarding under the Hazardous Materials Regulations (49 CFR Part 172, Subpart F) or is carrying material listed as a select agent or toxin in 42 CFR part 73. There are a great variety of vehicles in Class C. Some rather large Class C vehicles may require more skill and knowledge to operate than do the smaller ones. However, the licensing category is based principally on the type of cargo carried. Because of the seriousness of an accident involving hazardous material or human passengers, the safe operation of even the smaller vehicles in Class C requires special knowledge and the drivers of these vehicles must have a CDL. STATE OPTIONS: Some states may include more drivers and vehicles in their CDL programs. For example, in some states, a CDL may be required for buses designed to carry fewer than 16 passengers. Going beyond the federal standard is acceptable and the state will need to decide which battery of tests applies to these drivers, or develop a new battery.
CDL Endorsements & Restrictions Endorsements All commercial drivers who drive certain types of vehicles or haul certain types of cargo must add endorsements to their CDL license and/or Commercial Learner’s Permit (CLP) to show that they have the specialized knowledge required for these operations. There are six kinds of CDL endorsements that may be required, depending on the vehicle or type of cargo. NOTE: The only endorsements that may be added to a Commercial Learner’s Permit (CLP) are:
• Passenger (P);• School bus (S); and• Tank vehicle (N).
Double and Triple Trailers (T). Many drivers who are qualified to drive Class A vehicles may wish to pull double or triple trailers. Research shows that considerable additional knowledge and skill is necessary to safely pull double and triple trailers in various traffic conditions and driving environments. Consequently, adding the endorsement to the licenses of Class A drivers is necessary if they wish to pull double or triple trailers. A special knowledge examination on the problems associated with pulling multiple trailers must be passed. Tank Vehicle (N). Drivers of any commercial motor vehicle that is designed to transport any liquid or gaseous materials within a tank or tanks having an individual rated capacity of more than 119 gallons and an aggregate rated capacity of 1,000 gallons or more that is either permanently or temporarily attached to the vehicle or the chassis must obtain this endorsement. Applies
to Class A, B and C (only applicable to Class C if the vehicle is hauling hazardous materials) vehicles. Liquids in bulk cause driving control problems because the cargo is heavy, prone to shifting, and has a high center of gravity. These drivers must pass a special knowledge examination on the problems posed by large volume liquid cargos to add the endorsement to their CDL/CLP. Passengers (P). Drivers who wish to drive a vehicle having a design capacity to carry 16 or more people, including the driver, must add a passenger endorsement to their CDL/CLP. They must pass a special knowledge examination on safety considerations when transporting passengers and must pass skills tests in a passenger vehicle. The endorsement applies to applicants who wish to drive a bus in any class (A, B, or C). Hazardous Materials (H). Any driver, regardless of the vehicle Class/Group (A, B, or C) who wishes to haul any material that has been designated as hazardous under 49 U.S.C. 5103 and is required to be placarded under subpart F of 49 CFR part 172; or any quantity of a material listed as a select agent or toxin 42 CFR Part 73 must add a hazardous materials endorsement to their CDL. S/he must pass a special written examination on how to recognize, handle, and transport hazardous materials. The Transportation Security Administration (TSA) and the US Department of Transportation require background checks on commercial drivers who are certified to transport hazardous materials. The background checks include a review of criminal, immigration and FBI records. If the driver is found to represent a security threat, TSA will notify the person and the state will deny issuance of an endorsement. Combination Hazardous Materials and Tank Vehicle (X). Drivers of tank vehicles who haul hazardous materials or waste in amounts requiring placards must add an X endorsement to their CDL, showing that they have passed the special knowledge examinations for both tank vehicles and hazardous materials. School Buses (S). Drivers who wish to drive a school bus, must add a school bus endorsement to their CDL/CLP. They must pass a special knowledge examination on safety considerations when transporting passengers in a school bus and must pass skills tests in a school bus. The endorsement applies to applicants who wish to drive a school bus in any class (A, B, or C). In addition to these six required endorsements, states may add special endorsements of their own as they see fit.
Restrictions Restrictions may be added to Commercial Driver Licenses/Permits based upon the type of vehicle and equipment that the driver uses for the Skills Test. There are ten standardized restriction codes.
Commercial Driver’s License Manual - 2018 CDL Testing System
Page 8 Section 1 - Introduction (03/08/19)
NOTE: If a CLP is issued with a Passenger (P) or a School Bus (S) endorsement, it must also contain a (P) – No passengers in a CMV bus restriction.If a CLP is issued with a Tanker (N) endorsement, it must also contain a (X) – No cargo in a CMV tank vehicle. (E) - No manual transmission. If an applicant performsthe skills test in a vehicle equipped with an automatictransmission, the State must indicate on the CDL, if issued,that the person is restricted from operating a CMV equippedwith a manual transmission. For the purposes of the skillstest and the restriction, an automatic transmission includesany transmission not operating fully on the gear shift andclutch principle.(K) - Intrastate only: If an applicant certifies their statusas either Non-Excepted Intrastate or Excepted Intrastate,the state must indicate on the CDL, if issued, that personis restricted from operating a CMV in interstate commerce.States may impose this restriction for reasons other thanthose specified above. In Colorado, K restriction is alsoused to designate individuals between the ages of 18through 20, or individuals that do not meet the Departmentof Transportation (DOT) medical requirements but havebeen issued a waiver from the Colorado State Patrol (CSP)to operate a CDL vehicle.(L) - No Air brake equipped CMV: If an applicant does nottake or fails the air brake component of the knowledge test,or performs the skills test in a vehicle not equipped withair brakes, the State must indicate on the CLP or CDL, ifissued, that the person is restricted from operating a CMVequipped with any type of air brakes. For the purposesof the skills test and the restriction, air brakes include anybraking system operating fully or partially on the air brakeprinciple.(M) - No Class A passenger vehicle: If an applicantapplying for a passenger endorsement performs the skillstest in a passenger vehicle requiring a Group B CDL, theState must indicate on the CDL, if issued, that the personis restricted from operating a passenger vehicle requiring aGroup A CDL.Legal Age: 18You must be at least 18 years of age to apply for a CDL Instruction Permit, or to receive a CDL. Drivers 18 through 20 years of age will be issued the "K" restriction to operate a CDL vehicle within boundaries of Colorado.Medical ExaminationTo obtain the medical examination form you should contact your employer, physician, or download the form at: http://www.csp.state.co.us/mcsap.html and have a registered medical doctor certify the form.CDL Instruction PermitIf you have an out-of-state driver's license, you must be
issued a Colorado Regular Driver's License before applying for a Colorado CDL Instruction Permit. The CDL Instruction Permit is required before the CDL Driving Skill Tests are administered.To receive the CDL Instruction Permit you must:Have a Colorado regular driver's license;Show acceptable legal presence documentation;Show acceptable identification;Be at least 18 years of age;Show proof of your Social Security Number;Show evidence of a current DOT medical examination certification;Clear Commercial Driver License Information System (CDLIS) and National Driver Register (NDR) record's checks;Pass the required CDL Knowledge tests; and Pay the Instruction Permit fee.The CDL Instruction Permit allows you to operate the class of vehicle shown on the permit only when you are accompanied by a person who is at least 21 years of age and holds a valid CDL of the same class of license or higher, with the required endorsements for the vehicle being operated. The person must be in the seat closest to the driver.
Entry Level Driver Training (ELDT)The entry-level driver training Final Rule will go into compliance on February 2020.The standards established in this rule address the knowledge and skills necessary for the safe operation of commercial vehicles and also establish minimum qualifications for entities and individuals who provide entry-level training.Under the final rule, applicants seeking a CDL will be required to demonstrate proficiency in knowledge training and behind-the-wheel training on a driving range and on a public road, with training obtained from an instructional program that meets FMCSA standards (refer to Notes, page 133).(N) - No Class A and B passenger vehicle: If an applicantapplying for a passenger endorsement performs the skillstest in a passenger vehicle requiring a Group C CDL, theState must indicate on the CDL, if issued, that the personis restricted from operating a passenger vehicle requiring aGroup A or B CDL(O) - No tractor trailer CMV: If an applicant performs theskills test in a combination vehicle for a Group A CDL withthe power unit and towed unit connected with a pintle hookor other non-fifth wheel connection, the State must indicateon the CDL, if issued, that the person is restricted from
Commercial Driver’s License Manual - 2018 CDL Testing System
Section 1 - Introduction Page 9 (03/08/19)
operating a tractor-trailer combination connected by a fifth wheel that requires a Group A CDL.An applicant who passes a skills test using a combination vehicle that is NOT a Truck Tractor Semi-Trailer combination, but is otherwise equipped with a fifth wheel, will be issued a CDL with an “O” restriction.(P) - No passengers in CMV bus: A CLP holder witha P endorsement is prohibited from operating a CMVcarrying passengers, other than Federal/State auditors andinspectors, test examiners, other trainees, and the CDLholder accompanying the CLP holder as prescribed by §CFR 383.25(a)(1) of this part.A CLP holder with a S endorsement is prohibited from operating a school bus with passengers, other than Federal/State auditors and inspectors, test examiners, other trainees, and the CDL holder accompanying the CLP holder as prescribed by § CFR 383.25(a)(1) of this part. (V) - Medical Variance: If the State is notified accordingto § 383.73(o)(3) that the driver has been issued a medical variance, the State must indicate the existence of such a medical variance on the CDLIS driver record and the CDL document, if issued, using the restriction code ‘‘V’’ to indicate there is information about a medical variance on the CDLIS driver record.(X) - No cargo in CMV tank vehicle: A CLP holderwith an N endorsement may only operate an empty tank vehicle and is prohibited from operating any tank vehicle that previously contained hazardous materials that has not been purged of any residue.(Z) - No full air brake equipped CMV: If an applicantperforms the skills test in a vehicle equipped with air over hydraulic brakes, the State must indicate on the CDL, if issued, that the person is restricted from operating a CMV equipped with any braking system operating fully on the air brake principle. For the purposes of the skills test and the restriction, air over hydraulic brakes includes any braking system operating partially on the air brake and partially on the hydraulic brake principle.Any additional jurisdictional restrictions that apply to the CLP driving privilege.
To Get a CDL or CLP To get a CDL or CLP, you must pass knowledge and skills tests. This manual will help you pass the tests, however, it is not a substitute for a truck driver training class or program. Formal training is the most reliable way to learn the many special skills required for safely driving a large commercial vehicle and becoming a professional driver in the trucking industry. Figure 1.1 helps you determine if you need a CDL
Determining Class of CDL Required
NO
NO
NO
NO
NO
Is the GCWR 26,001 or
more pounds?
Is the GVWR of the trailer/towed unit 10,001 or
more pounds?
Class “A”
Class “B”
Class “C”
Class “C”
No CDL Required
Is the GVWR of the power
unit 26,001 or more pounds?
Is the vehicle transporting hazardous
materials in a placardable
quantity
Is the vehicle designed
to transport 16 or more passengers including the
driver?
YES YES
YES
YES
YES
Gross combination weight rating (GCWR)Means the value specified by the manufacturer of the power unit, if the value is displayed on the Federal Motor Vehicle Safety Standard (FMVSS) certification label; or the sum of the gross vehicle weight ratings (GVWRs) or the gross vehicle weights (GVWs) of the power unit and the towed unit(s), or any combination thereof, that produces the highest value.(The underlined and italicized text above is for use by roadside enforcement only for the purpose of determining whether the driver/vehicle is subject to CDL regulations. It is not used to determine whether a vehicle is representative for the purposes of Skills testing).Gross vehicle weight rating (GVWR) means the value specified by the manufacturer as the loaded weight of a single vehicle.NOTE: A bus may be Class A, B, or C depending on whether the GVWR is over 26,001 pounds or is a combination vehicle.
Figure 1.1
1.1 — Commercial Driver License Tests
1.1.1 — Knowledge TestsYou will have to take one or more knowledge tests, depending on what class of license and what endorsements you need. The CDL knowledge tests include: The general knowledge test, taken by all applicants.
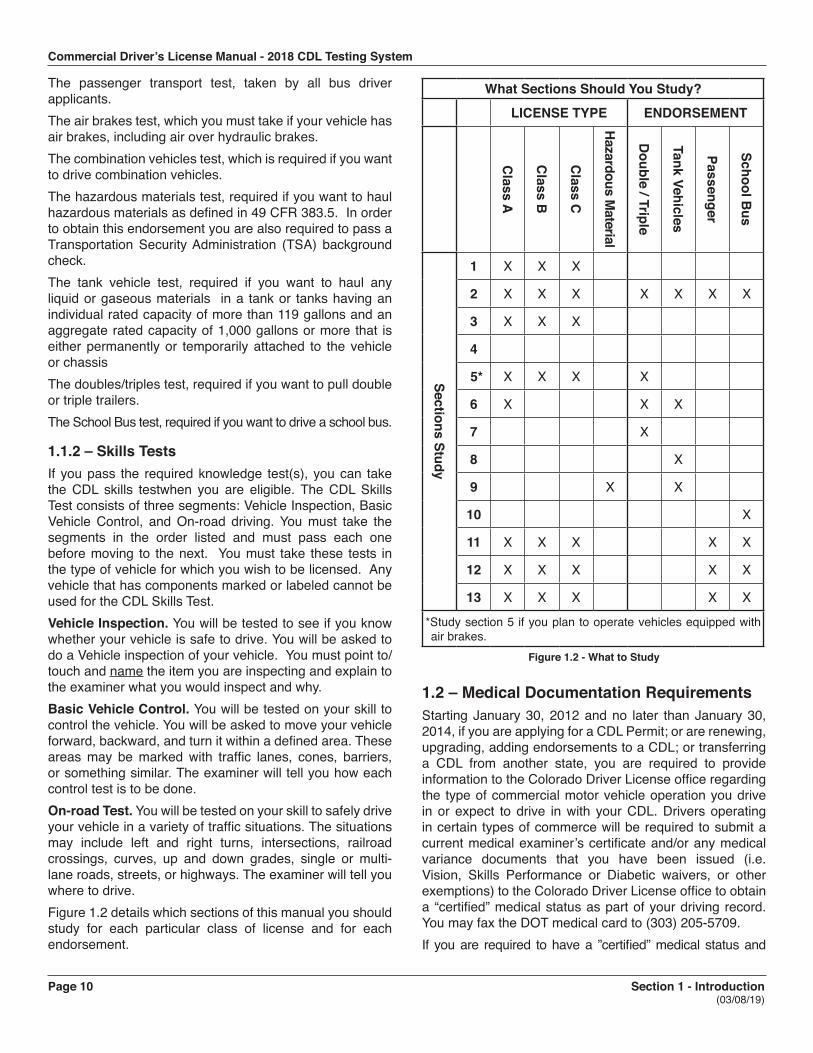
Commercial Driver’s License Manual - 2018 CDL Testing System
Page 10 Section 1 - Introduction (03/08/19)
The passenger transport test, taken by all bus driver applicants. The air brakes test, which you must take if your vehicle has air brakes, including air over hydraulic brakes. The combination vehicles test, which is required if you want to drive combination vehicles. The hazardous materials test, required if you want to haul hazardous materials as defined in 49 CFR 383.5. In order to obtain this endorsement you are also required to pass a Transportation Security Administration (TSA) background check. The tank vehicle test, required if you want to haul any liquid or gaseous materials in a tank or tanks having an individual rated capacity of more than 119 gallons and an aggregate rated capacity of 1,000 gallons or more that is either permanently or temporarily attached to the vehicle or chassis The doubles/triples test, required if you want to pull double or triple trailers. The School Bus test, required if you want to drive a school bus.
1.1.2 – Skills Tests If you pass the required knowledge test(s), you can take the CDL skills testwhen you are eligible. The CDL Skills Test consists of three segments: Vehicle Inspection, Basic Vehicle Control, and On-road driving. You must take the segments in the order listed and must pass each one before moving to the next. You must take these tests in the type of vehicle for which you wish to be licensed. Any vehicle that has components marked or labeled cannot be used for the CDL Skills Test. Vehicle Inspection. You will be tested to see if you know whether your vehicle is safe to drive. You will be asked to do a Vehicle inspection of your vehicle. You must point to/touch and name the item you are inspecting and explain to the examiner what you would inspect and why. Basic Vehicle Control. You will be tested on your skill to control the vehicle. You will be asked to move your vehicle forward, backward, and turn it within a defined area. These areas may be marked with traffic lanes, cones, barriers, or something similar. The examiner will tell you how each control test is to be done. On-road Test. You will be tested on your skill to safely drive your vehicle in a variety of traffic situations. The situations may include left and right turns, intersections, railroad crossings, curves, up and down grades, single or multi-lane roads, streets, or highways. The examiner will tell you where to drive. Figure 1.2 details which sections of this manual you should study for each particular class of license and for each endorsement.
What Sections Should You Study?
LICENSE TYPE ENDORSEMENT
Class A
Class B
Class C
Hazardous Material
Double / Triple
Tank Vehicles
Passenger
School Bus
Sections Study
1 X X X
2 X X X X X X X
3 X X X
4
5* X X X X
6 X X X
7 X
8 X
9 X X
10 X
11 X X X X X
12 X X X X X
13 X X X X X
*Study section 5 if you plan to operate vehicles equipped withair brakes.
Figure 1.2 - What to Study
1.2 – Medical Documentation Requirements Starting January 30, 2012 and no later than January 30, 2014, if you are applying for a CDL Permit; or are renewing, upgrading, adding endorsements to a CDL; or transferring a CDL from another state, you are required to provide information to the Colorado Driver License office regarding the type of commercial motor vehicle operation you drive in or expect to drive in with your CDL. Drivers operating in certain types of commerce will be required to submit a current medical examiner’s certificate and/or any medical variance documents that you have been issued (i.e. Vision, Skills Performance or Diabetic waivers, or other exemptions) to the Colorado Driver License office to obtain a “certified” medical status as part of your driving record. You may fax the DOT medical card to (303) 205-5709. If you are required to have a ”certified” medical status and
Commercial Driver’s License Manual - 2018 CDL Testing System
Section 1 - Introduction Page 11 (03/08/19)
fail to provide and keep up-to-date your medical examiner’s certificate you become ”not-certified” and may lose your CDL. For the purpose of complying with the new requirements for medical certification, it is important to know how you are using the CMV. The following information will help you decide how to self-certify:
1.2.1 – Interstate or Intrastate Commerce Do you, or will you, use a CDL to operate a CMV in interstate or intrastate commerce? Interstate commerce is when you drive a CMV: From one State to another State or a foreign country; Between two places within a State, but during part of the trip, the CMV crosses into another State or foreign country; or Between two places within a State, but the cargo or passengers are part of a trip that began or will end in another State or foreign country. Intrastate commerce is when you drive a CMV within a State and you do not meet any of the descriptions above for interstate commerce. If you operate in both intrastate commerce and interstate commerce, you must choose interstate commerce.
1.2.2 – Inter/Intrastate Commerce: Status Non-excepted or Excepted? Once you decide whether you will operate in interstate commerce or intrastate commerce, you must decide whether you will operate (or expect to operate) in a non-excepted or excepted status. This decision will tell you to which of the four types of commerce you must self-certify.
Interstate Commerce: You operate in excepted interstate commerce when you drive a CMV in interstate commerce only for the following excepted activities: To transport school children and/or school staff between home and school; As Federal, State or local government employees; To transport human corpses or sick or injured persons; Fire truck or rescue vehicle drivers during emergencies and other related activities; Primarily in the transportation of propane winter heating fuel when responding to an emergency condition requiring immediate response such as damage to a propane gas system after a storm or flooding; In Response to a pipeline emergency condition requiring immediate response such as a pipeline leak or rupture;
In custom harvesting on a farm or to transport farm machinery and supplies used in the custom harvesting operation to and from a farm or to transport custom harvested crops to storage or market; Beekeeper in the seasonal transportation of bees; Controlled and operated by a farmer, but is not a combination vehicle (power unit and towed unit), and is used to transport agricultural products, farm machinery or farm supplies (no placardable hazardous materials) to and from a farm and within 150 air-miles of the farm; As a private motor carrier of passengers for non-business purposes; or To transport migrant workers. If you answered yes to one or more of the above activities as the only operation in which you drive, you operate in excepted interstate commerce and do not need a Federal medical examiner’s certificate.If you answered no to all of the above activities, you operate in non-excepted interstate commerce and are required to provide a current medical examiner’s certificate (49 CFR 391.45),commonly referred to as a medical certificate or DOT card, to your State Driver Licensing Agency (SDLA). Most CDL holders who drive CMVs in interstate commerce are non-excepted interstate commerce drivers. If you operate in both excepted interstate commerce and non-excepted interstate commerce, you must choose non-excepted interstate commerce to be qualified to operate in both types of interstate commerce.
Intrastate Commerce: You operate in excepted Intrastate commerce when you drive a CMV only in intrastate commerce activities for which your State of licensure has determined do not require you to meet the State’s medical certification requirements. (contact your SDLA about their requirements). You operate in non-excepted intrastate commerce when you drive a CMV only in intrastate commerce and are required to meet your State of licensure’s medical certification requirements (contact your SDLA about their requirements). If you operate in both excepted intrastate commerce and non-excepted intrastate commerce, you must choose non-excepted intrastate commerce.
1.2.3 – Self-Certification Statements When completing an application for your CDL, you will be required to check the box next to the statement that describes your status. The actual statements on your application may vary from those shown below:
¨ INTERSTATE NON-EXCEPTED: I CERTIFYTHAT I OPERATE OR EXPECT TO OPERATE IN
Commercial Driver’s License Manual - 2018 CDL Testing System
Page 12 Section 1 - Introduction (03/08/19)
INTERSTATE COMMERCE, THAT I AM SUBJECT TO AND MEET THE FEDERAL DOT MEDICAL CARD REQUIREMENTS UNDER 49 CFR PART 391; AND THAT I AM REQUIRED TO OBTAIN A MEDICAL EXAMINER’S CERTIFICATE.
¨ INTERSTATE EXCEPTED: I CERTIFY THATI OPERATE OR EXPECT TO OPERATE ININTERSTATE COMMERCE, BUT ENGAGEEXCLUSIVELY IN TRANSPORTATION OROPERATIONS EXCEPTED UNDER 49 CFR§§390.3(F), 391.2, 391.68 OR 398.3 FROM ALL ORPARTS OF THE QUALIFICATION REQUIREMENTSOF 49 CFR PART 391; AND THAT I AM NOTREQUIRED TO OBTAIN A MEDICAL EXAMINER’SCERTIFICATE.
¨ INTRASTATE NON-EXCEPTED: I CERTIFY THAT IOPERATE OR EXPECT TO OPERATE ENTIRELY ININTRASTATE COMMERCE, THAT I AM SUBJECTTO AND MEET THE MEDICAL REQUIREMENTSFOR MY STATE; AND THAT I AM REQUIRED TOOBTAIN A MEDICAL EXAMINER’S CERTIFICATE.
¨ INTRASTATE EXCEPTED: I CERTIFY THAT IOPERATE OR EXPECT TO OPERATE ENTIRELYIN INTRASTATE COMMERCE, THAT I AM NOTSUBJECT TO THE MEDICAL REQUIREMENTS FORMY STATE; AND THAT I AM NOT REQUIRED TOOBTAIN A MEDICAL EXAMINER’S CERTIFICATE.
1.3 - CDL Disqualifications
1.3.1 – General You may not drive a commercial motor vehicle if you are disqualified for any reason.
1.3.2 – Alcohol, Leaving the Scene of an Accident, and Commission of a Felony It is illegal to operate a CMV if your blood alcohol concentration (BAC) is .04% or more. If you operate a CMV, you shall be deemed to have given your consent to alcohol testing. You will lose your CDL for at least one year for a first offense for: Driving a CMV if your blood alcohol concentration is .04% or higher. Driving a CMV under the influence of alcohol. Refusing to undergo blood alcohol testing. Driving a CMV while under the influence of a controlled substance. Leaving the scene of an accident involving a CMV. Committing a felony involving the use of a CMV. Driving a CMV when the CDL is suspended. Causing a fatality through negligent operation of a CMV, including but not limited to the crimes of motor vehicle manslaughter, homicide by motor vehicle, and negligent homicide.
Also, many of the major violations that occur in a non-CMV will result in a one-year CDL disqualification.. You will lose your CDL for at least three years if the offense occurs while you are operating a CMV that is placarded for hazardous materials. You will lose your CDL for life for a second offense. You will lose your CDL for life if you use a CMV to commit a felony involving controlled substances.You will be put out-of-service for 24 hours if you have any detectable amount of alcohol under .04%.
1.3.3 – Serious Traffic Violations Serious traffic violations includes excessive speeding (15 mph or more above the posted limit), reckless driving, improper or erratic lane changes, following a vehicle too closely, traffic offenses committed in a CMV in connection with fatal traffic accidents, driving a CMV without obtaining a CDL or having a CDL in the driver’s possession, and driving a CMV without the proper class of CDL and/or endorsements for the specific vehicle group being operated, or for the passengers or type of cargo being transported.You will lose your CDL: For at least 60 days if you have committed two serious traffic violations within a three-year period involving a CMV. For at least 120 days for three or more serious traffic violations within a three-year period involving a CMV.
1.3.4 – Violation of Out-of-Service Orders You will lose your CDL: For at least 90 days if you have committed your first violation of an out-of-service order. For at least one year if you have committed two violations of an out-of-service order in a ten-year period. For at least three years if you have committed three or more violations of an out-of-service order in a ten-year period.
1.3.5 – Railroad-highway Grade Crossing Violations You will lose your CDL: For at least 60 days for your first violation. For at least 120 days for your second violation within a three-year period. For at least one year for your third violation within a three-year period. These violations include violation of a federal, state or local law or regulation pertaining to one of the following six offenses at a railroad-highway grade crossing: For drivers who are not required to always stop, failing to stop before reaching the crossing if the tracks are not clear.
Commercial Driver’s License Manual - 2018 CDL Testing System
Section 1 - Introduction Page 13 (03/08/19)
For drivers who are not required to always stop, failing to slow down and check that the tracks are clear of an approaching train. For drivers who are always required to stop, failing to stop before driving onto the crossing. For all drivers failing to have sufficient space to drive completely through the crossing without stopping. For all drivers failing to obey a traffic control device or the directions of an enforcement official at the crossing. For all drivers failing to negotiate a crossing because of insufficient undercarriage clearance.
1.3.6 – Hazardous Materials Endorsement Background Check and Disqualifications If you require a hazardous materials endorsement you will be required to submit your fingerprints and be subject to a background check. You will be denied or you will lose your hazardous materials endorsement if you: Are not a lawful permanent resident of the United States. Renounce your United States citizenship. Are wanted or under indictment for certain felonies. Have a conviction in military or civilian court for certain felonies, or have a conviction in a military or civilian court for certain felonies. Have been adjudicated as lacking mental capacity or have been involuntarily committed to a mental health facility as specified in 49 CFR1572.109.Are considered to pose a security threat as determined by the Transportation Security Administration.The background check procedures vary from jurisdiction to jurisdiction. Your licensing agency will provide you with all the information you need to complete the required TSA background check procedures. To begin the background process contact TSA customer service at (877) 429-7746, or www.hazprints.com.
1.3.7 – Traffic Violations in Your Personal Vehicle The Motor Carrier Safety Improvement Act (MCSIA) of 1999 requires a CDL holder to be disqualified from operating a commercial motor vehicle if the CDL holder has been convicted of certain types of moving violations in their personal vehicle.If your privilege to operate your personal vehicle is revoked, cancelled, or suspended due to violations of traffic control laws (other than parking violations) you will also lose your CDL driving privileges. If your privilege to operate your personal vehicle is revoked, cancelled, or suspended due to alcohol, controlled
substance or felony violations, you will lose your CDL for 1 year. If you are convicted of a second violation in your personal vehicle or CMV you will lose your CDL for life. If your license to operate your personal vehicle is revoked, cancelled, or suspended you may not obtain a “hardship” license to operate a CMV.
1.4 – Other CDL Rules There are other federal and state rules that affect drivers operating CMVs in all states. Among them are: You cannot have more than one license. If you break this rule, a court may fine you up to $5,000 or put you in jail and keep your home state license and return any others. You must notify your employer within 30 days of conviction for any traffic violations (except parking). This is true no matter what type of vehicle you were driving. You must notify the Colorado Driver License office within 30 days if you are convicted in any other State or jurisdiction of any traffic violation (except parking). This is true no matter what type of vehicle you were driving. You must notify your employer within two business days if your license is suspended, revoked, or canceled, or if you are disqualified from driving. You must give your employer information on all driving jobs you have held for the past 10 years. You must do this when you apply for a commercial driving job. No one can drive a commercial motor vehicle without a CDL. A court may fine you up to $5,000 or put you in jail forbreaking this rule.If you have a hazardous materials endorsement you must notify and surrender your hazardous materials endorsement to the state that issued your CDL within 24 hours of any conviction or indictment in any jurisdiction, civilian or military, for, or found not guilty by reason of insanity of a disqualifying crime listed in 49 CFR 1572.103; who is adjudicated as lacking mental capacity or have been involuntarily committed to a health facility institution as specified in 49 CFR 1572.109; or who renounces his or her U. S. citizenship;Your employer may not let you drive a commercial motor vehicle if you have more than one license or if you’re CDL is suspended or revoked. A court may fine the employer up to $5,000 or put him/her in jail for breaking this rule. All states are connected to one computerized system to share information about CDL drivers. The states will check on drivers' accident records to be sure that drivers do not have more than one CDL. You are not allowed to hold a mobile telephone to conduct a voice communication or dial a mobile telephone by pressing more than a single button when driving. You are not allowed to send or read text messages while driving.
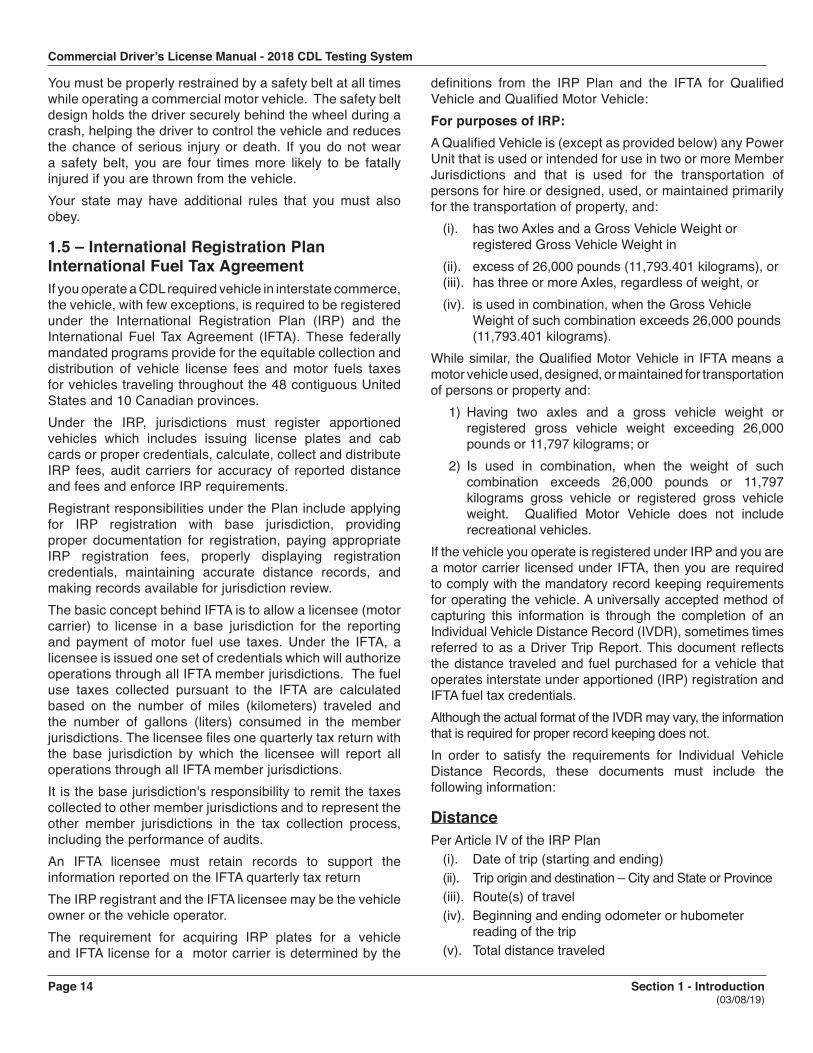
Commercial Driver’s License Manual - 2018 CDL Testing System
Page 14 Section 1 - Introduction (03/08/19)
You must be properly restrained by a safety belt at all times while operating a commercial motor vehicle. The safety belt design holds the driver securely behind the wheel during a crash, helping the driver to control the vehicle and reduces the chance of serious injury or death. If you do not wear a safety belt, you are four times more likely to be fatally injured if you are thrown from the vehicle. Your state may have additional rules that you must also obey.
1.5 – International Registration Plan International Fuel Tax AgreementIf you operate a CDL required vehicle in interstate commerce, the vehicle, with few exceptions, is required to be registered under the International Registration Plan (IRP) and the International Fuel Tax Agreement (IFTA). These federally mandated programs provide for the equitable collection and distribution of vehicle license fees and motor fuels taxes for vehicles traveling throughout the 48 contiguous United States and 10 Canadian provinces. Under the IRP, jurisdictions must register apportioned vehicles which includes issuing license plates and cab cards or proper credentials, calculate, collect and distribute IRP fees, audit carriers for accuracy of reported distance and fees and enforce IRP requirements.Registrant responsibilities under the Plan include applying for IRP registration with base jurisdiction, providing proper documentation for registration, paying appropriate IRP registration fees, properly displaying registration credentials, maintaining accurate distance records, and making records available for jurisdiction review. The basic concept behind IFTA is to allow a licensee (motor carrier) to license in a base jurisdiction for the reporting and payment of motor fuel use taxes. Under the IFTA, a licensee is issued one set of credentials which will authorize operations through all IFTA member jurisdictions. The fuel use taxes collected pursuant to the IFTA are calculated based on the number of miles (kilometers) traveled and the number of gallons (liters) consumed in the member jurisdictions. The licensee files one quarterly tax return with the base jurisdiction by which the licensee will report all operations through all IFTA member jurisdictions. It is the base jurisdiction's responsibility to remit the taxes collected to other member jurisdictions and to represent the other member jurisdictions in the tax collection process, including the performance of audits. An IFTA licensee must retain records to support the information reported on the IFTA quarterly tax return The IRP registrant and the IFTA licensee may be the vehicle owner or the vehicle operator. The requirement for acquiring IRP plates for a vehicle and IFTA license for a motor carrier is determined by the
definitions from the IRP Plan and the IFTA for Qualified Vehicle and Qualified Motor Vehicle: For purposes of IRP: A Qualified Vehicle is (except as provided below) any Power Unit that is used or intended for use in two or more Member Jurisdictions and that is used for the transportation of persons for hire or designed, used, or maintained primarily for the transportation of property, and:
(i). has two Axles and a Gross Vehicle Weight or registered Gross Vehicle Weight in
(ii). excess of 26,000 pounds (11,793.401 kilograms), or(iii). has three or more Axles, regardless of weight, or(iv). is used in combination, when the Gross Vehicle
Weight of such combination exceeds 26,000 pounds (11,793.401 kilograms).
While similar, the Qualified Motor Vehicle in IFTA means a motor vehicle used, designed, or maintained for transportation of persons or property and:
1) Having two axles and a gross vehicle weight orregistered gross vehicle weight exceeding 26,000pounds or 11,797 kilograms; or
2) Is used in combination, when the weight of suchcombination exceeds 26,000 pounds or 11,797kilograms gross vehicle or registered gross vehicleweight. Qualified Motor Vehicle does not includerecreational vehicles.
If the vehicle you operate is registered under IRP and you are a motor carrier licensed under IFTA, then you are required to comply with the mandatory record keeping requirements for operating the vehicle. A universally accepted method of capturing this information is through the completion of an Individual Vehicle Distance Record (IVDR), sometimes times referred to as a Driver Trip Report. This document reflects the distance traveled and fuel purchased for a vehicle that operates interstate under apportioned (IRP) registration and IFTA fuel tax credentials.Although the actual format of the IVDR may vary, the information that is required for proper record keeping does not. In order to satisfy the requirements for Individual Vehicle Distance Records, these documents must include the following information:
Distance Per Article IV of the IRP Plan
(i). Date of trip (starting and ending)(ii). Trip origin and destination – City and State or Province(iii). Route(s) of travel(iv). Beginning and ending odometer or hubometer
reading of the trip(v). Total distance traveled
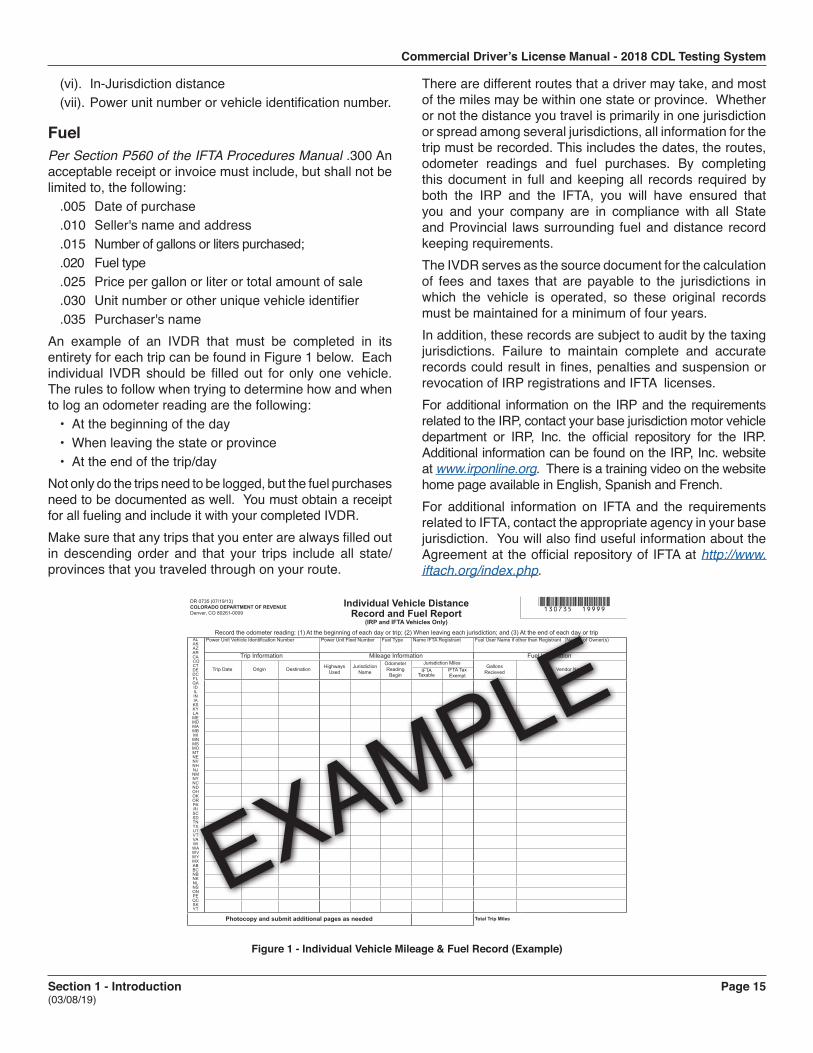
Commercial Driver’s License Manual - 2018 CDL Testing System
Section 1 - Introduction Page 15 (03/08/19)
(vi). In-Jurisdiction distance(vii). Power unit number or vehicle identification number.
FuelPer Section P560 of the IFTA Procedures Manual .300 An acceptable receipt or invoice must include, but shall not be limited to, the following:
.005 Date of purchase
.010 Seller's name and address
.015 Number of gallons or liters purchased;
.020 Fuel type
.025 Price per gallon or liter or total amount of sale
.030 Unit number or other unique vehicle identifier
.035 Purchaser's nameAn example of an IVDR that must be completed in its entirety for each trip can be found in Figure 1 below. Each individual IVDR should be filled out for only one vehicle. The rules to follow when trying to determine how and when to log an odometer reading are the following:
• At the beginning of the day• When leaving the state or province• At the end of the trip/day
Not only do the trips need to be logged, but the fuel purchases need to be documented as well. You must obtain a receipt for all fueling and include it with your completed IVDR. Make sure that any trips that you enter are always filled out in descending order and that your trips include all state/provinces that you traveled through on your route.
There are different routes that a driver may take, and most of the miles may be within one state or province. Whether or not the distance you travel is primarily in one jurisdiction or spread among several jurisdictions, all information for the trip must be recorded. This includes the dates, the routes, odometer readings and fuel purchases. By completing this document in full and keeping all records required by both the IRP and the IFTA, you will have ensured that you and your company are in compliance with all State and Provincial laws surrounding fuel and distance record keeping requirements. The IVDR serves as the source document for the calculation of fees and taxes that are payable to the jurisdictions in which the vehicle is operated, so these original records must be maintained for a minimum of four years. In addition, these records are subject to audit by the taxing jurisdictions. Failure to maintain complete and accurate records could result in fines, penalties and suspension or revocation of IRP registrations and IFTA licenses. For additional information on the IRP and the requirements related to the IRP, contact your base jurisdiction motor vehicle department or IRP, Inc. the official repository for the IRP. Additional information can be found on the IRP, Inc. website at www.irponline.org. There is a training video on the website home page available in English, Spanish and French.For additional information on IFTA and the requirements related to IFTA, contact the appropriate agency in your base jurisdiction. You will also find useful information about the Agreement at the official repository of IFTA at http://www.iftach.org/index.php.
DR 0735 (07/19/13)COLORADO DEPARTMENT OF REVENUEDenver, CO 80261-0009
Individual Vehicle Distance Record and Fuel Report
(IRP and IFTA Vehicles Only)Record the odometer reading: (1) At the beginning of each day or trip; (2) When leaving each jurisdiction; and (3) At the end of each day or trip
ALAKAZARCA COCTDEDCFLGAIDILINIAKSKYLAMEMDMAMBMIMNMSMOMTNENVNHNJNMNYNCNDOHOKORPARISCSDTNTXUTVTVAWIWAWVWYMXABBCNBNKNLNSONPEQCSKYT
Power Unit Vehicle Identification Number Power Unit Fleet Number Fuel Type Name IFTA Registrant Fuel User Name if other than Registrant Names of Owner(s)
Trip Information Mileage Information Fuel Information
Trip Date Origin Destination Highways Used
Jurisdiction Name
Odometer Reading
Begin
Jurisdiction MilesGallons
Recieved Vendor NameIFTA Taxable
IFTA Tax Exempt
Photocopy and submit additional pages as needed Total Trip Miles
*130735==19999*
EXAMPLE
Figure 1 - Individual Vehicle Mileage & Fuel Record (Example)
Commercial Driver’s License Manual - 2018 CDL Testing System
Page 16 Section 2 - Driving Safely (03/08/19)
Section 2
DRIVING SAFELYThis Section Covers● Vehicle Inspection● Basic Control of Your Vehicle● Shifting Gears● Seeing● Communicating● Space Management● Controlling Your Speed● Seeing Hazards● Distracted Driving● Aggressive Drivers/Road Rage● Night Driving & Driver Fatigue● Driving in Fog● Winter Driving● Hot Weather Driving● Railroad-highway Crossings● Mountain Driving● Driving Emergencies● Antilock Braking Systems● Skid Control and Recovery● Accident Procedures● Fires● Alcohol, Other Drugs, and Driving● Hazardous Materials Rules● School BusesThis section contains knowledge and safe driving information that all commercial drivers should know. You must pass a test on this information to get a CDL. This section does not have specific information on air brakes, combination vehicles, doubles, or passenger vehicles. When preparing for the Vehicle Inspection Test, you must review the material in Section 11 in addition to the information in this section. This section does have basic information on hazardous materials (HazMat) that all drivers should know. If you need a HazMat endorsement, you should study Section 9.
2.1 – Vehicle Inspection
2.1.1 – Why Inspect Safety is the most important reason you inspect your vehicle, safety for yourself and for other road users. A vehicle defect found during an inspection could save you problems later. You could have a breakdown on the
road that will cost time and dollars, or even worse, a crash caused by the defect. Federal and state laws require that drivers inspect their vehicles. Federal and state inspectors also may inspect your vehicles. If they judge the vehicle to be unsafe, they will put it "out of service" until it is fixed.
2.1.2 – Types of Vehicle Inspection Vehicle Inspection. A Vehicle inspection will help you find problems that could cause a crash or breakdown. During a Trip. For safety you should: Watch gauges for signs of trouble. Use your senses to check for problems (look, listen, smell, feel). Check critical items when you stop:Tires, wheels and rims. Brakes. Lights and reflectors. Brake and electrical connections to trailer. Trailer coupling devices. Cargo securement devices. After-trip Inspection and Report. You should do an after-trip inspection at the end of the trip, day, or tour of duty on each vehicle you operated. It may include filling out a vehicle condition report listing any problems you find. The inspection report helps a motor carrier know when the vehicle needs repairs.
2.1.3 – What to Look For
Tire Problems Too much or too little air pressure. Bad wear. You need at least 4/32-inch tread depth in every major groove on front tires. You need 2/32 inch on other tires. No fabric should show through the tread or sidewall. Cuts or other damage. Tread separation. Dual tires that come in contact with each other or parts of the vehicle. Mismatched sizes. Radial and bias-ply tires used together. Cut or cracked valve stems. Re-grooved, recapped, or retreaded tires on the front wheels of a bus are prohibited.
Wheel and Rim Problems Damaged rims.
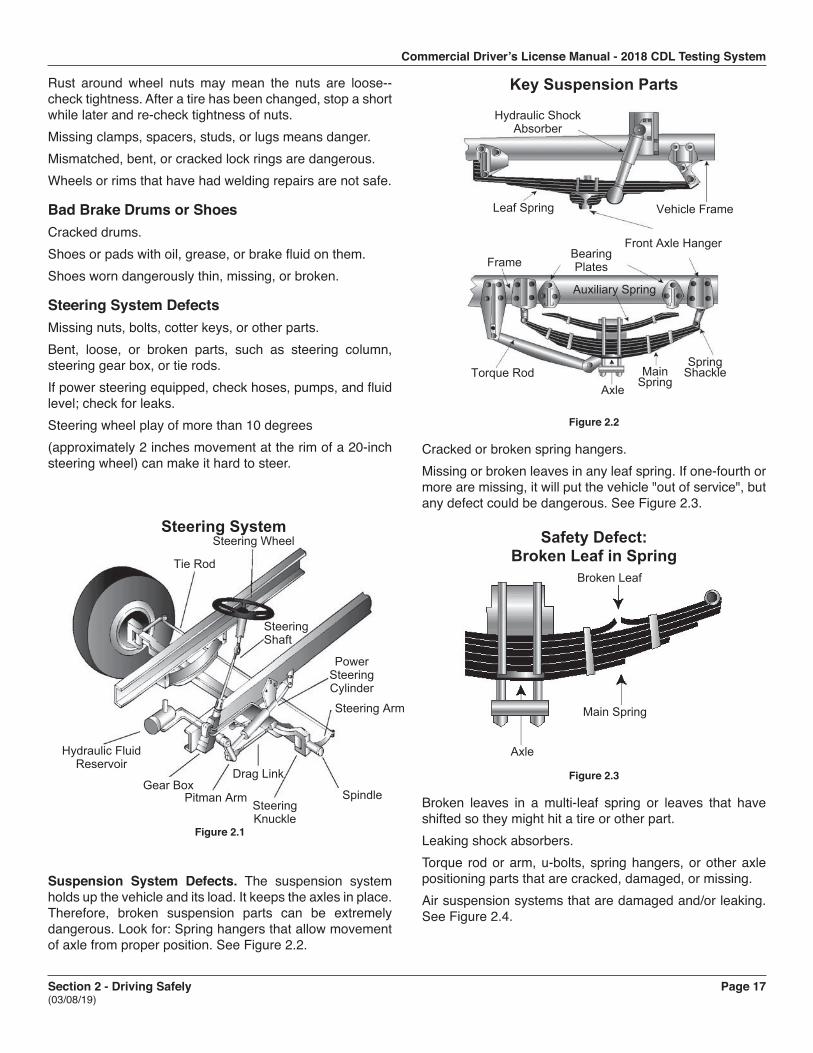
Commercial Driver’s License Manual - 2018 CDL Testing System
Section 2 - Driving Safely Page 17 (03/08/19)
Rust around wheel nuts may mean the nuts are loose--check tightness. After a tire has been changed, stop a short while later and re-check tightness of nuts. Missing clamps, spacers, studs, or lugs means danger. Mismatched, bent, or cracked lock rings are dangerous. Wheels or rims that have had welding repairs are not safe.
Bad Brake Drums or Shoes Cracked drums. Shoes or pads with oil, grease, or brake fluid on them. Shoes worn dangerously thin, missing, or broken.
Steering System Defects Missing nuts, bolts, cotter keys, or other parts. Bent, loose, or broken parts, such as steering column, steering gear box, or tie rods. If power steering equipped, check hoses, pumps, and fluid level; check for leaks. Steering wheel play of more than 10 degrees (approximately 2 inches movement at the rim of a 20-inch steering wheel) can make it hard to steer.
Steering SystemSteering Wheel
Steering Shaft
Tie Rod
Hydraulic Fluid Reservoir
Power Steering Cylinder
Pitman ArmSteering Knuckle
Spindle
Steering Arm
Drag LinkGear Box
Figure 2.1
Suspension System Defects. The suspension system holds up the vehicle and its load. It keeps the axles in place. Therefore, broken suspension parts can be extremely dangerous. Look for: Spring hangers that allow movement of axle from proper position. See Figure 2.2.
Hydraulic Shock Absorber
Vehicle Frame
Front Axle Hanger
Leaf Spring
Bearing Plates
Auxiliary Spring
Torque RodAxle
Main Spring
Spring Shackle
Frame
Key Suspension Parts
Figure 2.2
Cracked or broken spring hangers. Missing or broken leaves in any leaf spring. If one-fourth or more are missing, it will put the vehicle "out of service", but any defect could be dangerous. See Figure 2.3.
Safety Defect: Broken Leaf in Spring
Broken Leaf
Main Spring
Axle
Figure 2.3
Broken leaves in a multi-leaf spring or leaves that have shifted so they might hit a tire or other part. Leaking shock absorbers. Torque rod or arm, u-bolts, spring hangers, or other axle positioning parts that are cracked, damaged, or missing. Air suspension systems that are damaged and/or leaking. See Figure 2.4.
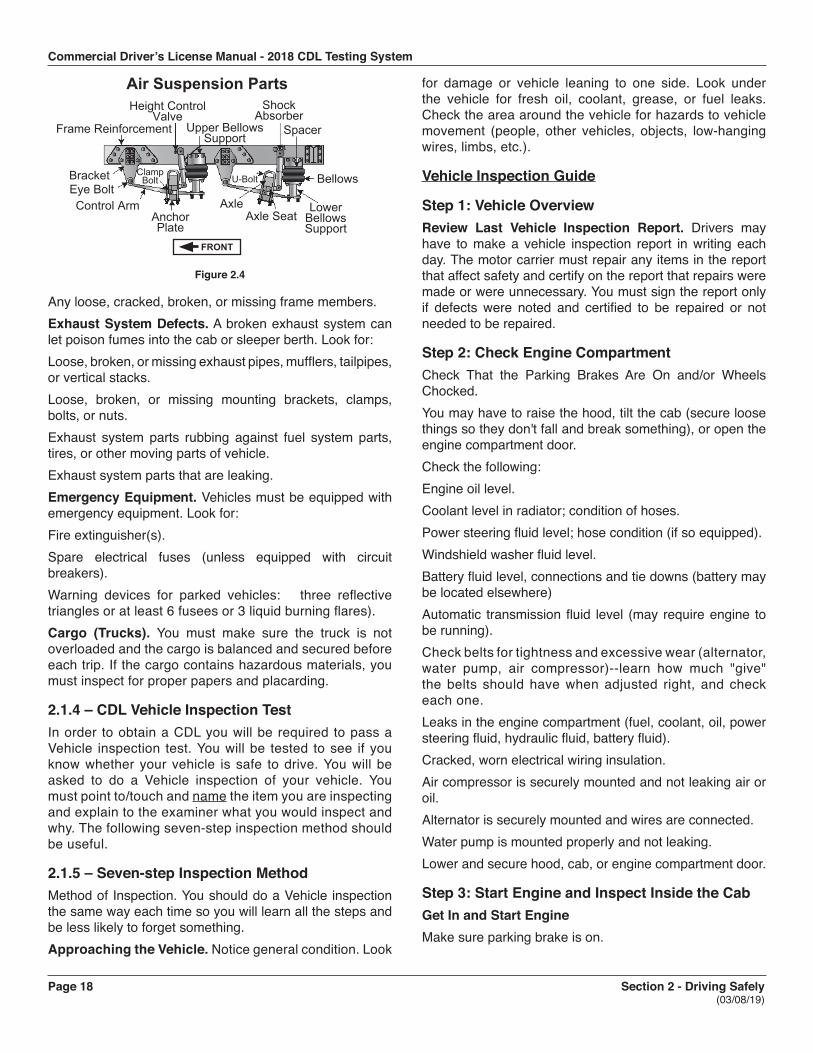
Commercial Driver’s License Manual - 2018 CDL Testing System
Page 18 Section 2 - Driving Safely (03/08/19)
Air Suspension PartsShock
AbsorberSpacerUpper Bellows
Support
Lower Bellows Support
Bellows
Height Control Valve
Frame Reinforcement
BracketEye BoltControl Arm
Anchor Plate
AxleAxle Seat
ClampBolt U-Bolt
FRONT
Figure 2.4
Any loose, cracked, broken, or missing frame members. Exhaust System Defects. A broken exhaust system can let poison fumes into the cab or sleeper berth. Look for: Loose, broken, or missing exhaust pipes, mufflers, tailpipes, or vertical stacks. Loose, broken, or missing mounting brackets, clamps, bolts, or nuts. Exhaust system parts rubbing against fuel system parts, tires, or other moving parts of vehicle. Exhaust system parts that are leaking. Emergency Equipment. Vehicles must be equipped with emergency equipment. Look for: Fire extinguisher(s). Spare electrical fuses (unless equipped with circuit breakers). Warning devices for parked vehicles: three reflective triangles or at least 6 fusees or 3 liquid burning flares). Cargo (Trucks). You must make sure the truck is not overloaded and the cargo is balanced and secured before each trip. If the cargo contains hazardous materials, you must inspect for proper papers and placarding.
2.1.4 – CDL Vehicle Inspection Test In order to obtain a CDL you will be required to pass a Vehicle inspection test. You will be tested to see if you know whether your vehicle is safe to drive. You will be asked to do a Vehicle inspection of your vehicle. You must point to/touch and name the item you are inspecting and explain to the examiner what you would inspect and why. The following seven-step inspection method should be useful.
2.1.5 – Seven-step Inspection Method Method of Inspection. You should do a Vehicle inspection the same way each time so you will learn all the steps and be less likely to forget something. Approaching the Vehicle. Notice general condition. Look
for damage or vehicle leaning to one side. Look under the vehicle for fresh oil, coolant, grease, or fuel leaks. Check the area around the vehicle for hazards to vehicle movement (people, other vehicles, objects, low-hanging wires, limbs, etc.).
Vehicle Inspection Guide
Step 1: Vehicle Overview Review Last Vehicle Inspection Report. Drivers may have to make a vehicle inspection report in writing each day. The motor carrier must repair any items in the report that affect safety and certify on the report that repairs were made or were unnecessary. You must sign the report only if defects were noted and certified to be repaired or not needed to be repaired.
Step 2: Check Engine Compartment Check That the Parking Brakes Are On and/or Wheels Chocked. You may have to raise the hood, tilt the cab (secure loose things so they don't fall and break something), or open the engine compartment door. Check the following: Engine oil level. Coolant level in radiator; condition of hoses. Power steering fluid level; hose condition (if so equipped). Windshield washer fluid level. Battery fluid level, connections and tie downs (battery may be located elsewhere) Automatic transmission fluid level (may require engine to be running). Check belts for tightness and excessive wear (alternator, water pump, air compressor)--learn how much "give" the belts should have when adjusted right, and check each one. Leaks in the engine compartment (fuel, coolant, oil, power steering fluid, hydraulic fluid, battery fluid). Cracked, worn electrical wiring insulation.Air compressor is securely mounted and not leaking air or oil.Alternator is securely mounted and wires are connected.Water pump is mounted properly and not leaking. Lower and secure hood, cab, or engine compartment door.
Step 3: Start Engine and Inspect Inside the Cab Get In and Start Engine Make sure parking brake is on.
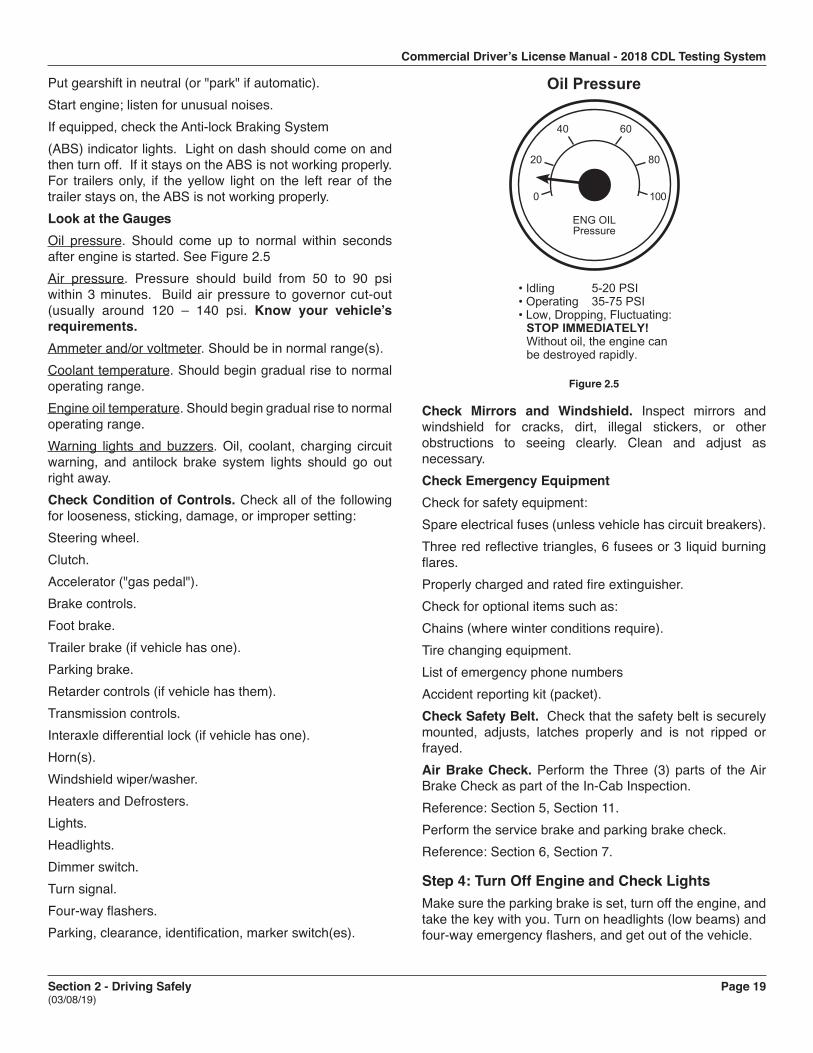
Commercial Driver’s License Manual - 2018 CDL Testing System
Section 2 - Driving Safely Page 19 (03/08/19)
Put gearshift in neutral (or "park" if automatic). Start engine; listen for unusual noises. If equipped, check the Anti-lock Braking System (ABS) indicator lights. Light on dash should come on and then turn off. If it stays on the ABS is not working properly. For trailers only, if the yellow light on the left rear of the trailer stays on, the ABS is not working properly. Look at the Gauges Oil pressure. Should come up to normal within seconds after engine is started. See Figure 2.5 Air pressure. Pressure should build from 50 to 90 psi within 3 minutes. Build air pressure to governor cut-out (usually around 120 – 140 psi. Know your vehicle’s requirements. Ammeter and/or voltmeter. Should be in normal range(s). Coolant temperature. Should begin gradual rise to normal operating range. Engine oil temperature. Should begin gradual rise to normal operating range. Warning lights and buzzers. Oil, coolant, charging circuit warning, and antilock brake system lights should go out right away. Check Condition of Controls. Check all of the following for looseness, sticking, damage, or improper setting: Steering wheel. Clutch. Accelerator ("gas pedal"). Brake controls. Foot brake. Trailer brake (if vehicle has one). Parking brake. Retarder controls (if vehicle has them). Transmission controls.Interaxle differential lock (if vehicle has one). Horn(s). Windshield wiper/washer.Heaters and Defrosters.Lights. Headlights. Dimmer switch. Turn signal. Four-way flashers.Parking, clearance, identification, marker switch(es).
Oil Pressure
• Idling 5-20 PSI• Operating 35-75 PSI• Low, Dropping, Fluctuating:
STOP IMMEDIATELY!Without oil, the engine canbe destroyed rapidly.
100
20 80
40 60
ENG OILPressure
0
Figure 2.5
Check Mirrors and Windshield. Inspect mirrors and windshield for cracks, dirt, illegal stickers, or other obstructions to seeing clearly. Clean and adjust as necessary. Check Emergency Equipment Check for safety equipment: Spare electrical fuses (unless vehicle has circuit breakers). Three red reflective triangles, 6 fusees or 3 liquid burning flares. Properly charged and rated fire extinguisher. Check for optional items such as: Chains (where winter conditions require). Tire changing equipment. List of emergency phone numbers Accident reporting kit (packet).Check Safety Belt. Check that the safety belt is securely mounted, adjusts, latches properly and is not ripped or frayed.Air Brake Check. Perform the Three (3) parts of the Air Brake Check as part of the In-Cab Inspection.Reference: Section 5, Section 11.Perform the service brake and parking brake check.Reference: Section 6, Section 7.
Step 4: Turn Off Engine and Check Lights Make sure the parking brake is set, turn off the engine, and take the key with you. Turn on headlights (low beams) and four-way emergency flashers, and get out of the vehicle.
Commercial Driver’s License Manual - 2018 CDL Testing System
Page 20 Section 2 - Driving Safely (03/08/19)
Step 5: Do Walk-around Inspection Go to front of vehicle and check that low beams are on and both of the four-way flashers are working. Push dimmer switch and check that high beams work. Turn off headlights and four-way emergency flashers. Turn on parking, clearance, side-marker, and identification lights.Turn on right turn signal. Turn on left turn signal.
General Walk around and inspect. Clean all lights, reflectors, and glass as you go along.
Left Front Side Driver's door glass should be clean.Mirrors are secure and clean.Door latches or locks should work properly. Left front wheel:Condition of wheel and rim--missing, bent, broken studs, clamps, lugs, or any signs of misalignment. Condition of tires--properly inflated, valve stem and cap OK, no serious cuts, bulges, or tread wear. Use wrench to test rust-streaked lug nuts, indicating looseness. Hub oil level OK, no leaks. Left front suspension:Condition of spring, spring hangers, shackles, u-bolts.Shock absorber condition. Left front brake:Condition of brake drum or disc.Condition of brake linings or pads.Condition of hoses.Condition of brake chamber.Condition of slack adjuster and push-rod.
Front Condition of front axle. Condition of steering system, steering box, hoses and linkage.No loose, worn, bent, damaged or missing parts. Must grab steering mechanism to test for looseness. Condition of windshield. Check for damage and clean if dirty. Check windshield wiper arms for proper spring tension. Check wiper blades for damage, "stiff" rubber, and securement. Lights and reflectors.
Parking, clearance, and identification lights clean, operating, and proper color (amber at front). Reflectors clean and proper color (amber at front). Right front turn signal light clean, operating, and proper color (amber or white on signals facing forward).
Right Side Right front: check all items as done on left front. Primary and secondary safety cab locks engaged (if cab-over-engine design). Right fuel tank(s). Securely mounted, not damaged, or leaking. Fuel crossover line secure. Tank(s) contain enough fuel. Cap(s) on and secure. Condition of visible parts. Rear of engine--not leaking. Transmission--not leaking.Drive Shaft--not bent/missing parts.Exhaust system--secure, not leaking, not touching wires, fuel, or air-lines. Frame and cross members--no bends or cracks.Air-lines and electrical wiring--secured against snagging, rubbing, wearing. Spare tire carrier or rack not damaged (if so equipped). Spare tire and/or wheel securely mounted in rack. Spare tire and wheel adequate (proper size, properly inflated). Cargo securement (trucks). Cargo properly blocked, braced, tied, chained, etc. Header board adequate, secure (if required). Side boards, stakes strong enough, free of damage, properly set in place (if so equipped).Canvas or tarp (if required) properly secured to prevent tearing, billowing, or blocking of mirrors. If oversize, all required signs (flags, lamps, and reflectors) safely and properly mounted and all required permits in driver's possession. Curbside cargo compartment doors in good condition, securely closed, latched/locked and required security seals in place.
Right Rear Condition of wheels and rims--no missing, bent, or broken spacers, studs, clamps, or lugs. Condition of tires--properly inflated, valve stems and caps OK, no serious cuts, bulges, tread wear, tires not rubbing each other, and nothing stuck between them. Tires same type, e.g., not mixed radial and bias types.
Commercial Driver’s License Manual - 2018 CDL Testing System
Section 2 - Driving Safely Page 21 (03/08/19)
Tires evenly matched (same sizes). Wheel bearing/seals not leaking.Condition of spacers.Tight lug nuts.Suspension:Condition of spring(s), spring hangers, shackles, and u-bolts. Axle secure. Powered axle(s) not leaking lube (gear oil). Condition of torque rod arms, bushings. Condition of shock absorber(s). If retractable axle equipped, check condition of lift mechanism. If air powered, check for leaks. Condition of air ride components. Brakes:Brake adjustment. Condition of brake drum(s) or discs.Condition of brake linings or pads.Condition of brake chamber.Condition of slack-adjuster and push-rod.Condition of hoses--look for any wear due to rubbing.Tie down.Lights and reflectors:Side-marker lights clean, operating, and proper color (red at rear, others amber). Side-marker reflectors clean and proper color (red at rear, others amber).
Rear Lights and reflectors. Rear clearance and identification lights clean, operating, and proper color (red at rear). Reflectors clean and proper color (red at rear). Taillights clean, operating, and proper color (red at rear).Right and Left rear turn signal operating, and proper color (red, yellow, or amber at rear). License plate(s) present, clean, and secured. Splash guards present, not damaged, properly fastened, not dragging on ground, or rubbing tires. Cargo secure (trucks). Cargo properly blocked, braced, tied, chained, etc. Tailboards up and properly secured. End gates free of damage, properly secured in stake sockets.
Canvas or tarp (if required) properly secured to prevent tearing, billowing, or blocking of either the rearview mirrors or rear lights. If over-length, or over-width, make sure all signs and/or additional lights/flags are safely and properly mounted and all required permits are in driver's possession. Rear doors securely closed, latched/locked.Trailer:Lights and Reflectors.Bulkhead.Air and Electric lines.Apron.5th wheel.Release leaver.Mounting bolts.Landing gear.Axles and Tires.Brake system.Door, ramps, and tie downs.
Left Side Check all items as done on right side, plus: Battery(ies) (if not mounted in engine compartment). Battery box(es) securely mounted to vehicle. Box has secure cover. Battery(ies) secured against movement. Battery(ies) not broken or leaking. Fluid in battery(ies) at proper level (except maintenance-free type). Cell caps present and securely tightened (except maintenance-free type). Vents in cell caps free of foreign material (except maintenance-free type).
Step 6: Check Signal Lights Get In and Turn Off all Lights Turn on stop lights (apply trailer hand brake or have a helper put on the brake pedal). Turn on left turn signal lights. Get Out and Check Lights Left front turn signal light clean, operating and proper color (amber or white on signals facing the front). Left rear turn signal light and both stop lights clean, operating, and proper color (red, yellow, or amber).Check all lights in the same manner.
Commercial Driver’s License Manual - 2018 CDL Testing System
Page 22 Section 2 - Driving Safely (03/08/19)
Get In Vehicle Turn off lights not needed for driving. Check for all required papers, trip manifests, permits, etc. Secure all loose articles in cab (they might interfere with operation of the controls or hit you in a crash). Start the engine.
Step 7: Start the Engine and Check Test for Hydraulic Leaks. If the vehicle has hydraulic brakes, pump the brake pedal three times. Then apply firm pressure to the pedal and hold for five seconds. The pedal should not move. If it does, there may be a leak or other problem. Get it fixed before driving. If the vehicle has air brakes, do the checks described in Sections 5 and 6 of this manual.
Brake System
Test Parking Brake(s) Fasten safety belt Set parking brake (power unit only). Release trailer parking brake (if applicable). Place vehicle into a low gear. Gently pull forward against parking brake to make sure the parking brake holds. Repeat the same steps for the trailer with trailer parking brake set and power unit parking brakes released (if applicable). If it doesn't hold vehicle, it is faulty; get it fixed.
Test Service Brake Stopping Action Go about five miles per hour. Push brake pedal firmly "Pulling" to one side or the other can mean brake trouble. Any unusual brake pedal "feel" or delayed stopping action can mean trouble. If you find anything unsafe during the Vehicle inspection, get it fixed. Federal and state laws forbid operating an unsafe vehicle.
2.1.6 – Inspection during a Trip Check Vehicle Operation Regularly You should check: Instruments. Air pressure gauge (if you have air brakes). Temperature gauges.Pressure gauges.
Ammeter/voltmeter. Mirrors. Tires. Cargo, cargo covers. Lights, etc If you see, hear, smell, or feel anything that might mean trouble, check it out. Safety Inspection. Drivers of trucks and truck tractors when transporting cargo must inspect the securement of the cargo within the first 50 miles of a trip and every 150 miles or every three hours (whichever comes first) after.
2.1.7 – After-trip Inspection and Report You may have to make a written report each day on the condition of the vehicle(s) you drove. Report anything affecting safety or possibly leading to mechanical breakdown.
Subsection 2.1 Test Your Knowledge
The vehicle inspection report tells the motor carrier about problems that may need fixing. Keep a copy of your report in the vehicle for one day. That way, the next driver can learn about any problems you have found.
1. What is the most important reason for doing a vehicle inspection?
2. What things should you check during a trip?3. Name some key steering system parts.4. Name some suspension system defects.5. What three kinds of emergency equipment must you have?6. What is the minimum tread depth for front tires?For
other tires?7. Name some things you should check on the front of
your vehicle during the walk around inspection.8. What should wheel bearing seals be checked for?9. How many red reflective triangles should you carry?10. How do you test hydraulic brakes for leaks?11. Why put the starter switch key in your pocket during
the Vehicle inspection?These questions may be on your test. If you can’t answer them all, re-read subsection 2.1.
2.2 – Basic Control of Your Vehicle
Commercial Driver’s License Manual - 2018 CDL Testing System
Section 2 - Driving Safely Page 23 (03/08/19)
To drive a vehicle safely, you must be able to control its speed and direction. Safe operation of a commercial vehicle requires skill in: Accelerating. Steering. Stopping. Backing safely. Fasten your seatbelt when on the road. Apply the parking brake when you leave your vehicle.
2.2.1 – Accelerating Don't roll back when you start. You may hit someone behind you. If you have a manual transmission vehicle, partly engage the clutch before you take your right foot off the brake. Put on the parking brake whenever necessary to keep from rolling back. Release the parking brake only when you have applied enough engine power to keep from rolling back. On a tractor-trailer equipped with a trailer brake hand valve, the hand valve can be applied to keep from rolling back. Speed up smoothly and gradually so the vehicle does not jerk. Rough acceleration can cause mechanical damage. When pulling a trailer, rough acceleration can damage the coupling. Speed up very gradually when traction is poor, as in rain or snow. If you use too much power, the drive wheels may spin. You could lose control. If the drive wheels begin to spin, take your foot off the accelerator.
2.2.2 – Steering Hold the steering wheel firmly with both hands. Your hands should be on opposite sides of the wheel. If you hit a curb or a pothole (chuckhole), the wheel could pull away from your hands unless you have a firm hold.
2.2.3 – Stopping Push the brake pedal down gradually. The amount of brake pressure you need to stop the vehicle will depend on the speed of the vehicle and how quickly you need to stop. Control the pressure so the vehicle comes to a smooth, safe stop. If you have a manual transmission, push the clutch in when the engine is close to idle.
2.2.4 – Backing Safely Because you cannot see everything behind your vehicle, backing is always dangerous. Avoid backing whenever you can. When you park, try to park so you will be able to pull forward when you leave. When you have to back, here are a few simple safety rules: Start in the proper position. Look at your path.
Use mirrors on both sides. Back slowly. Back and turn toward the driver's side whenever possible. Use a helper whenever possible. These rules are discussed in turn below. Start in the Proper Position. Put the vehicle in the best position to allow you to back safely. This position will depend on the type of backing to be done. Look at Your Path. Look at your line of travel before you begin. Get out and walk around the vehicle. Check your clearance to the sides and overhead, in and near the path your vehicle will take. Use Mirrors on Both Sides. Check the outside mirrors on both sides frequently. Get out of the vehicle and check your path if you are unsure. Back Slowly. Always back as slowly as possible. Use the lowest reverse gear. That way you can more easily correct any steering errors. You also can stop quickly if necessary. Back and Turn Toward the Driver's Side. Back to the driver's side so that you can see better. Backing toward the right side is very dangerous because you can't see as well. If you back and turn toward the driver's side, you can watch the rear of your vehicle by looking out the side window. Use driver-side backing--even if it means going around the block to put your vehicle in this position. The added safety is worth it. Use a Helper. Use a helper when you can. There are blind spots you can't see. That's why a helper is important. The helper should stand near the back of your vehicle where you can see the helper. Before you begin backing, work out a set of hand signals that you both understand. Agree on a signal for "stop."
2.3 – Shifting Gears Correct shifting of gears is important. If you can't get your vehicle into the right gear while driving, you will have less control.
2.3.1 – Manual Transmissions Basic Method for Shifting Up. Most heavy vehicles with unsynchronized manual transmissions require double clutching to change gears. If equipped with a synchronized manual transmission, double clutching is NOT required This is the basic method: Release accelerator, push in clutch and shift to neutral at the same time. Release clutch. Let engine and gears slow down to the rpm required for the next gear (this takes practice). Push in clutch and shift to the higher gear at the same time. Release clutch and press accelerator at the same time.
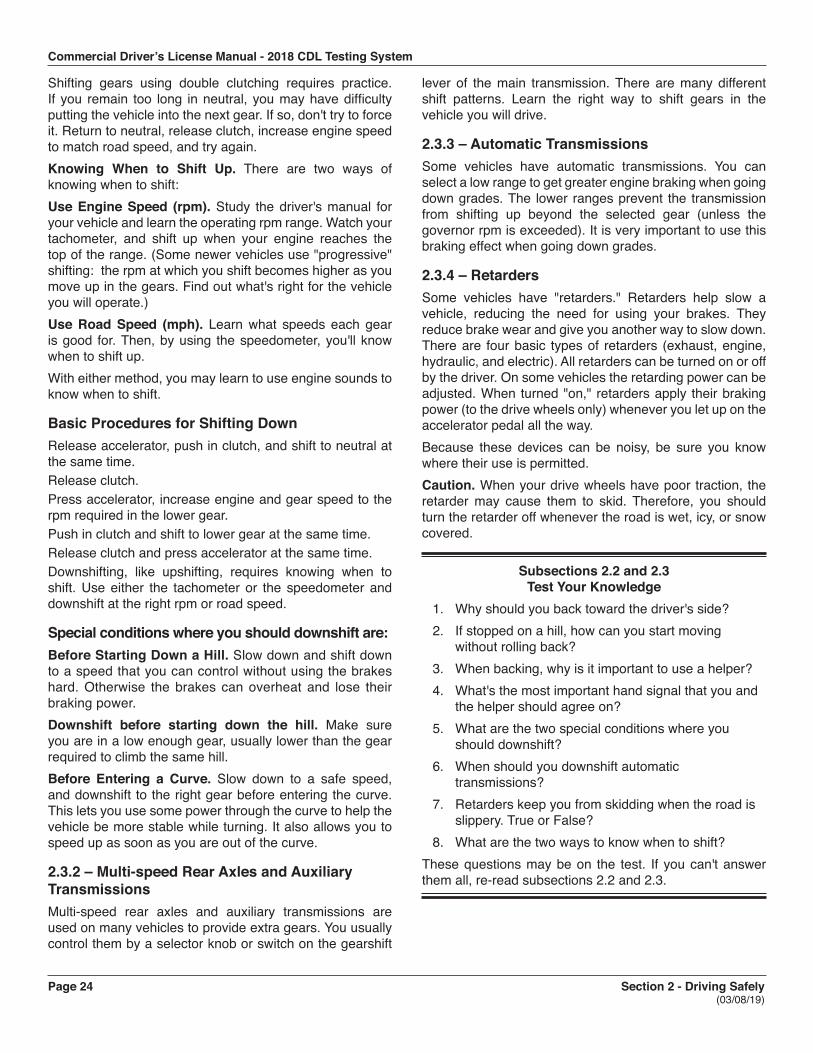
Commercial Driver’s License Manual - 2018 CDL Testing System
Page 24 Section 2 - Driving Safely (03/08/19)
Shifting gears using double clutching requires practice. If you remain too long in neutral, you may have difficulty putting the vehicle into the next gear. If so, don't try to force it. Return to neutral, release clutch, increase engine speed to match road speed, and try again. Knowing When to Shift Up. There are two ways of knowing when to shift: Use Engine Speed (rpm). Study the driver's manual for your vehicle and learn the operating rpm range. Watch your tachometer, and shift up when your engine reaches the top of the range. (Some newer vehicles use "progressive" shifting: the rpm at which you shift becomes higher as you move up in the gears. Find out what's right for the vehicle you will operate.) Use Road Speed (mph). Learn what speeds each gear is good for. Then, by using the speedometer, you'll know when to shift up. With either method, you may learn to use engine sounds to know when to shift.
Basic Procedures for Shifting Down Release accelerator, push in clutch, and shift to neutral at the same time. Release clutch. Press accelerator, increase engine and gear speed to the rpm required in the lower gear.Push in clutch and shift to lower gear at the same time. Release clutch and press accelerator at the same time. Downshifting, like upshifting, requires knowing when to shift. Use either the tachometer or the speedometer and downshift at the right rpm or road speed.
Special conditions where you should downshift are: Before Starting Down a Hill. Slow down and shift down to a speed that you can control without using the brakes hard. Otherwise the brakes can overheat and lose their braking power. Downshift before starting down the hill. Make sure you are in a low enough gear, usually lower than the gear required to climb the same hill. Before Entering a Curve. Slow down to a safe speed, and downshift to the right gear before entering the curve. This lets you use some power through the curve to help the vehicle be more stable while turning. It also allows you to speed up as soon as you are out of the curve.
2.3.2 – Multi-speed Rear Axles and Auxiliary Transmissions Multi-speed rear axles and auxiliary transmissions are used on many vehicles to provide extra gears. You usually control them by a selector knob or switch on the gearshift
lever of the main transmission. There are many different shift patterns. Learn the right way to shift gears in the vehicle you will drive.
2.3.3 – Automatic Transmissions Some vehicles have automatic transmissions. You can select a low range to get greater engine braking when going down grades. The lower ranges prevent the transmission from shifting up beyond the selected gear (unless the governor rpm is exceeded). It is very important to use this braking effect when going down grades.
2.3.4 – Retarders Some vehicles have "retarders." Retarders help slow a vehicle, reducing the need for using your brakes. They reduce brake wear and give you another way to slow down. There are four basic types of retarders (exhaust, engine, hydraulic, and electric). All retarders can be turned on or off by the driver. On some vehicles the retarding power can be adjusted. When turned "on," retarders apply their braking power (to the drive wheels only) whenever you let up on the accelerator pedal all the way.Because these devices can be noisy, be sure you know where their use is permitted. Caution. When your drive wheels have poor traction, the retarder may cause them to skid. Therefore, you should turn the retarder off whenever the road is wet, icy, or snow covered.
Subsections 2.2 and 2.3 Test Your Knowledge
1. Why should you back toward the driver's side?2. If stopped on a hill, how can you start moving
without rolling back?3. When backing, why is it important to use a helper?4. What's the most important hand signal that you and
the helper should agree on?5. What are the two special conditions where you
should downshift?6. When should you downshift automatic
transmissions?7. Retarders keep you from skidding when the road is
slippery. True or False?8. What are the two ways to know when to shift?
These questions may be on the test. If you can't answer them all, re-read subsections 2.2 and 2.3.
Commercial Driver’s License Manual - 2018 CDL Testing System
Section 2 - Driving Safely Page 25 (03/08/19)
2.4 – Seeing To be a safe driver you need to know what's going on all around your vehicle. Not looking properly is a major cause of accidents.
2.4.1 – Seeing Ahead All drivers look ahead; but many don't look far enough ahead. Importance of Looking Far Enough Ahead. Because stopping or changing lanes can take a lot of distance, knowing what the traffic is doing on all sides of you is very important. You need to look well ahead to make sure you have room to make these moves safely. How Far Ahead to Look. Most good drivers look at least 12 to 15 seconds ahead. That means looking ahead the distance you will travel in 12 to 15 seconds. At lower speeds, that's about one block. At highway speeds it's about a quarter of a mile. If you're not looking that far ahead, you may have to stop too quickly or make quick lane changes. Looking 12 to 15 seconds ahead doesn't mean not paying attention to things that are closer. Good drivers shift their attention back and forth, near and far. Figure 2.6 illustrates how far to look ahead.
City Driving12-15 Seconds is About One Block
Open Highway12-15 Seconds is About a Quarter-Mile
Figure 2.6
Look for Traffic. Look for vehicles coming onto the highway, into your lane, or turning. Watch for brake lights from slowing vehicles. By seeing these things far enough ahead, you can change your speed, or change lanes if necessary to avoid a problem. If a traffic light has been green for a long time it will probably change before you get there. Start slowing down and be ready to stop.
2.4.2 – Seeing to the Sides and Rear It's important to know what's going on behind and to the sides. Check your mirrors regularly. Check more often in special situations. Mirror Adjustment. Mirror adjustment should be checked
prior to the start of any trip and can only be checked accurately when the trailer(s) are straight. You should check and adjust each mirror to show some part of the vehicle. This will give you a reference point for judging the position of the other images. Regular Checks. You need to make regular checks of your mirrors to be aware of traffic and to check your vehicle. Traffic. Check your mirrors for vehicles on either side and in back of you. In an emergency, you may need to know whether you can make a quick lane change. Use your mirrors to spot overtaking vehicles. There are "blind spots" that your mirrors cannot show you. Check your mirrors regularly to know where other vehicles are around you, and to see if they move into your blind spots. Check Your Vehicle. Use the mirrors to keep an eye on your tires. It's one way to spot a tire fire. If you're carrying open cargo, you can use the mirrors to check it. Look for loose straps, ropes, or chains. Watch for a flapping or ballooning tarp.Special Situations. Special situations require more than regular mirror checks. These are lane changes, turns, merges, and tight maneuvers. Lane Changes. You need to check your mirrors to make sure no one is alongside you or about to pass you. Check your mirrors: Before you change lanes to make sure there is enough room. After you have signaled, to check that no one has moved into your blind spot. Right after you start the lane change, to double-check that your path is clear. After you complete the lane change. Turns. In turns, check your mirrors to make sure the rear of your vehicle will not hit anything. Merges. When merging, use your mirrors to make sure the gap in traffic is large enough for you to enter safely. Tight Maneuvers. Any time you are driving in close quarters, check your mirrors often. Make sure you have enough clearance. How to Use Mirrors. Use mirrors correctly by checking them quickly and understanding what you see. When you use your mirrors while driving on the road, check quickly. Look back and forth between the mirrors and the road ahead. Don't focus on the mirrors for too long. Otherwise, you will travel quite a distance without knowing what's happening ahead. Many large vehicles have curved (convex, "fisheye," "spot," "bug-eye") mirrors that show a wider area than flat mirrors. This is often helpful. But everything appears smaller in a convex mirror than it would if you were looking at it directly. Things also seem farther away than they really are. It's
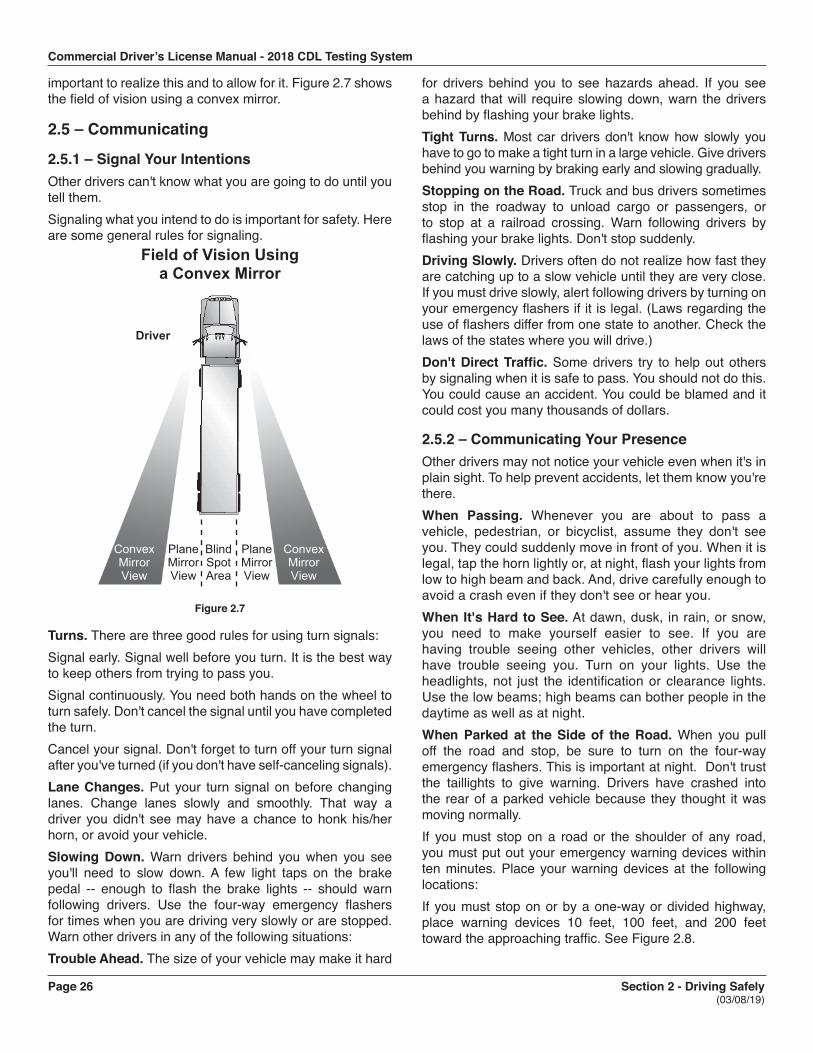
Commercial Driver’s License Manual - 2018 CDL Testing System
Page 26 Section 2 - Driving Safely (03/08/19)
important to realize this and to allow for it. Figure 2.7 shows the field of vision using a convex mirror.
2.5 – Communicating
2.5.1 – Signal Your Intentions Other drivers can't know what you are going to do until you tell them. Signaling what you intend to do is important for safety. Here are some general rules for signaling.
Field of Vision Using a Convex Mirror
Driver
Convex Mirror View
Convex Mirror View
Plane Mirror View
Plane Mirror View
Blind Spot Area
Figure 2.7
Turns. There are three good rules for using turn signals: Signal early. Signal well before you turn. It is the best way to keep others from trying to pass you. Signal continuously. You need both hands on the wheel to turn safely. Don't cancel the signal until you have completed the turn. Cancel your signal. Don't forget to turn off your turn signal after you've turned (if you don't have self-canceling signals). Lane Changes. Put your turn signal on before changing lanes. Change lanes slowly and smoothly. That way a driver you didn't see may have a chance to honk his/her horn, or avoid your vehicle. Slowing Down. Warn drivers behind you when you see you'll need to slow down. A few light taps on the brake pedal -- enough to flash the brake lights -- should warn following drivers. Use the four-way emergency flashers for times when you are driving very slowly or are stopped. Warn other drivers in any of the following situations: Trouble Ahead. The size of your vehicle may make it hard
for drivers behind you to see hazards ahead. If you see a hazard that will require slowing down, warn the drivers behind by flashing your brake lights.Tight Turns. Most car drivers don't know how slowly you have to go to make a tight turn in a large vehicle. Give drivers behind you warning by braking early and slowing gradually. Stopping on the Road. Truck and bus drivers sometimes stop in the roadway to unload cargo or passengers, or to stop at a railroad crossing. Warn following drivers by flashing your brake lights. Don't stop suddenly. Driving Slowly. Drivers often do not realize how fast they are catching up to a slow vehicle until they are very close. If you must drive slowly, alert following drivers by turning on your emergency flashers if it is legal. (Laws regarding the use of flashers differ from one state to another. Check the laws of the states where you will drive.) Don't Direct Traffic. Some drivers try to help out others by signaling when it is safe to pass. You should not do this. You could cause an accident. You could be blamed and it could cost you many thousands of dollars.
2.5.2 – Communicating Your Presence Other drivers may not notice your vehicle even when it's in plain sight. To help prevent accidents, let them know you're there. When Passing. Whenever you are about to pass a vehicle, pedestrian, or bicyclist, assume they don't see you. They could suddenly move in front of you. When it is legal, tap the horn lightly or, at night, flash your lights from low to high beam and back. And, drive carefully enough to avoid a crash even if they don't see or hear you. When It's Hard to See. At dawn, dusk, in rain, or snow, you need to make yourself easier to see. If you are having trouble seeing other vehicles, other drivers will have trouble seeing you. Turn on your lights. Use the headlights, not just the identification or clearance lights. Use the low beams; high beams can bother people in the daytime as well as at night. When Parked at the Side of the Road. When you pull off the road and stop, be sure to turn on the four-way emergency flashers. This is important at night. Don't trust the taillights to give warning. Drivers have crashed into the rear of a parked vehicle because they thought it was moving normally. If you must stop on a road or the shoulder of any road, you must put out your emergency warning devices within ten minutes. Place your warning devices at the following locations: If you must stop on or by a one-way or divided highway, place warning devices 10 feet, 100 feet, and 200 feet toward the approaching traffic. See Figure 2.8.
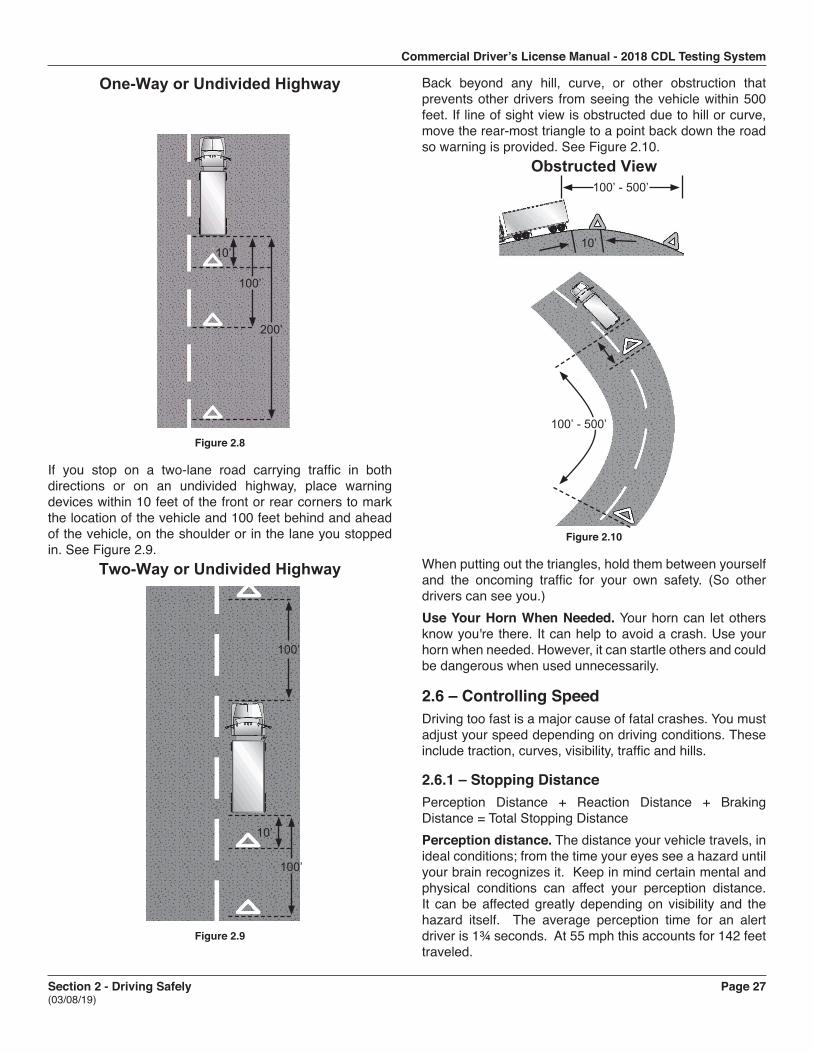
Commercial Driver’s License Manual - 2018 CDL Testing System
Section 2 - Driving Safely Page 27 (03/08/19)
One-Way or Undivided Highway
200’
100’
10’
Figure 2.8
If you stop on a two-lane road carrying traffic in both directions or on an undivided highway, place warning devices within 10 feet of the front or rear corners to mark the location of the vehicle and 100 feet behind and ahead of the vehicle, on the shoulder or in the lane you stopped in. See Figure 2.9.
Two-Way or Undivided Highway
100’
100’
10’
Figure 2.9
Back beyond any hill, curve, or other obstruction that prevents other drivers from seeing the vehicle within 500 feet. If line of sight view is obstructed due to hill or curve, move the rear-most triangle to a point back down the road so warning is provided. See Figure 2.10.
Obstructed View100’ - 500’
10’
100’ - 500’
Figure 2.10
When putting out the triangles, hold them between yourself and the oncoming traffic for your own safety. (So other drivers can see you.) Use Your Horn When Needed. Your horn can let others know you're there. It can help to avoid a crash. Use your horn when needed. However, it can startle others and could be dangerous when used unnecessarily.
2.6 – Controlling Speed Driving too fast is a major cause of fatal crashes. You must adjust your speed depending on driving conditions. These include traction, curves, visibility, traffic and hills.
2.6.1 – Stopping Distance Perception Distance + Reaction Distance + Braking Distance = Total Stopping Distance Perception distance. The distance your vehicle travels, in ideal conditions; from the time your eyes see a hazard until your brain recognizes it. Keep in mind certain mental and physical conditions can affect your perception distance. It can be affected greatly depending on visibility and the hazard itself. The average perception time for an alert driver is 1¾ seconds. At 55 mph this accounts for 142 feet traveled.
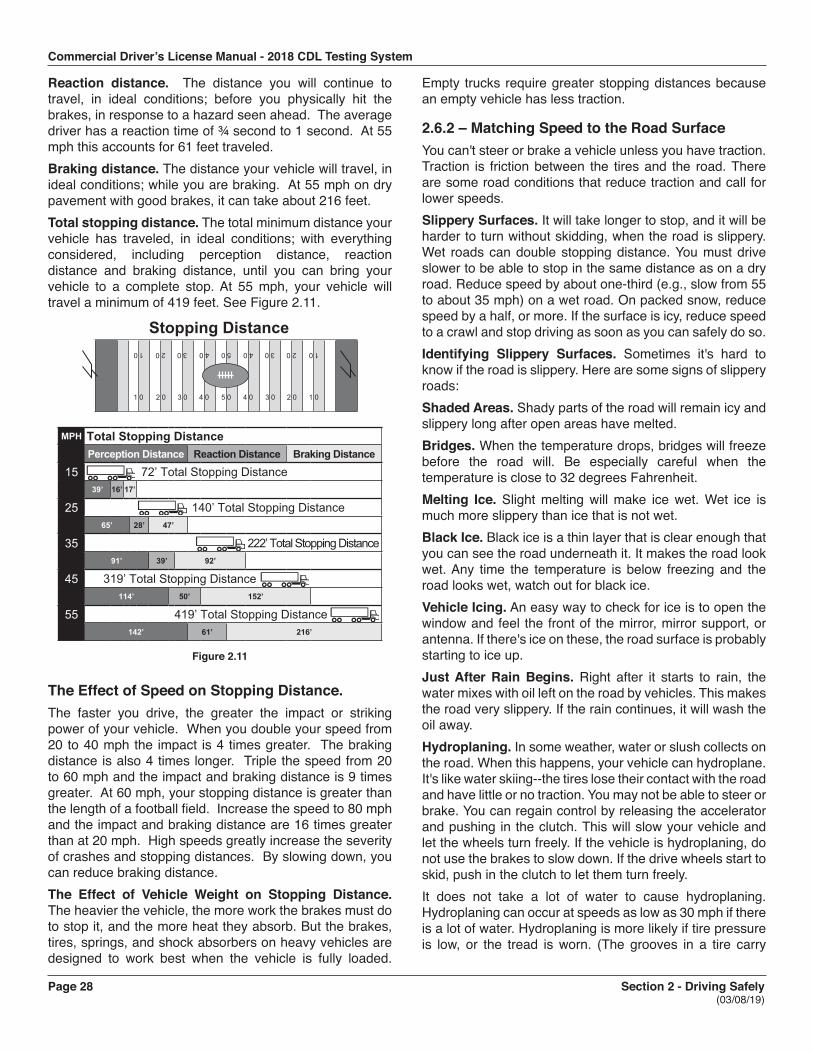
Commercial Driver’s License Manual - 2018 CDL Testing System
Page 28 Section 2 - Driving Safely (03/08/19)
Reaction distance. The distance you will continue to travel, in ideal conditions; before you physically hit the brakes, in response to a hazard seen ahead. The average driver has a reaction time of ¾ second to 1 second. At 55 mph this accounts for 61 feet traveled. Braking distance. The distance your vehicle will travel, in ideal conditions; while you are braking. At 55 mph on dry pavement with good brakes, it can take about 216 feet. Total stopping distance. The total minimum distance your vehicle has traveled, in ideal conditions; with everything considered, including perception distance, reaction distance and braking distance, until you can bring your vehicle to a complete stop. At 55 mph, your vehicle will travel a minimum of 419 feet. See Figure 2.11.
MPH Total Stopping Distance g DistancePerception Distance Reaction Distance Braking Distance
15 72’ Total Stopping Distance39’ 16’ 17’
25 140’ Total Stopping Distance65’ 28’ 47’
35 222’ Total Stopping Distance91’ 39’ 92’
45 319’ Total Stopping Distance114’ 50’ 152’
55 419’ Total Stopping Distance142’ 61’ 216’
1 0 2 0 3 0 4 0 5 0 4 0 3 0 2 0 1 0
102030405040302010
Stopping Distance
Figure 2.11
The Effect of Speed on Stopping Distance. The faster you drive, the greater the impact or striking power of your vehicle. When you double your speed from 20 to 40 mph the impact is 4 times greater. The braking distance is also 4 times longer. Triple the speed from 20 to 60 mph and the impact and braking distance is 9 times greater. At 60 mph, your stopping distance is greater than the length of a football field. Increase the speed to 80 mph and the impact and braking distance are 16 times greater than at 20 mph. High speeds greatly increase the severity of crashes and stopping distances. By slowing down, you can reduce braking distance.The Effect of Vehicle Weight on Stopping Distance. The heavier the vehicle, the more work the brakes must do to stop it, and the more heat they absorb. But the brakes, tires, springs, and shock absorbers on heavy vehicles are designed to work best when the vehicle is fully loaded.
Empty trucks require greater stopping distances because an empty vehicle has less traction.
2.6.2 – Matching Speed to the Road Surface You can't steer or brake a vehicle unless you have traction. Traction is friction between the tires and the road. There are some road conditions that reduce traction and call for lower speeds. Slippery Surfaces. It will take longer to stop, and it will be harder to turn without skidding, when the road is slippery. Wet roads can double stopping distance. You must drive slower to be able to stop in the same distance as on a dry road. Reduce speed by about one-third (e.g., slow from 55 to about 35 mph) on a wet road. On packed snow, reduce speed by a half, or more. If the surface is icy, reduce speed to a crawl and stop driving as soon as you can safely do so. Identifying Slippery Surfaces. Sometimes it's hard to know if the road is slippery. Here are some signs of slippery roads: Shaded Areas. Shady parts of the road will remain icy and slippery long after open areas have melted. Bridges. When the temperature drops, bridges will freeze before the road will. Be especially careful when the temperature is close to 32 degrees Fahrenheit. Melting Ice. Slight melting will make ice wet. Wet ice is much more slippery than ice that is not wet. Black Ice. Black ice is a thin layer that is clear enough that you can see the road underneath it. It makes the road look wet. Any time the temperature is below freezing and the road looks wet, watch out for black ice. Vehicle Icing. An easy way to check for ice is to open the window and feel the front of the mirror, mirror support, or antenna. If there's ice on these, the road surface is probably starting to ice up. Just After Rain Begins. Right after it starts to rain, the water mixes with oil left on the road by vehicles. This makes the road very slippery. If the rain continues, it will wash the oil away. Hydroplaning. In some weather, water or slush collects on the road. When this happens, your vehicle can hydroplane. It's like water skiing--the tires lose their contact with the road and have little or no traction. You may not be able to steer or brake. You can regain control by releasing the accelerator and pushing in the clutch. This will slow your vehicle and let the wheels turn freely. If the vehicle is hydroplaning, do not use the brakes to slow down. If the drive wheels start to skid, push in the clutch to let them turn freely. It does not take a lot of water to cause hydroplaning. Hydroplaning can occur at speeds as low as 30 mph if there is a lot of water. Hydroplaning is more likely if tire pressure is low, or the tread is worn. (The grooves in a tire carry
Commercial Driver’s License Manual - 2018 CDL Testing System
Section 2 - Driving Safely Page 29 (03/08/19)
away the water; if they aren't deep, they don't work well.) Road surfaces where water can collect can create conditions that cause a vehicle to hydroplane. Watch for clear reflections, tire splashes, and raindrops on the road. These are indications of standing water.
2.6.3 – Speed and Curves Drivers must adjust their speed for curves in the road. If you take a curve too fast, two things can happen. The tires can lose their traction and continue straight ahead, so you skid off the road. Or, the tires may keep their traction and the vehicle rolls over. Tests have shown that trucks with a high center of gravity can roll over at the posted speed limit for a curve. Slow to a safe speed before you enter a curve. Braking in a curve is dangerous because it is easier to lock the wheels and cause a skid. Slow down as needed. Don't ever exceed the posted speed limit for the curve. Be in a gear that will let you accelerate slightly in the curve. This will help you keep control.
2.6.4 – Speed and Distance Ahead You should always be able to stop within the distance you can see ahead. Fog, rain, or other conditions may require that you slowdown to be able to stop in the distance you can see. At night, you can't see as far with low beams as you can with high beams. When you must use low beams, slow down.
2.6.5 – Speed and Traffic Flow When you're driving in heavy traffic, the safest speed is the speed of other vehicles. Vehicles going the same direction at the same speed are not likely to run into one another. In many states, speed limits are lower for trucks and buses than for cars. It can vary as much as 15 mph. Use extra caution when you change lanes or pass on these roadways. Drive at the speed of the traffic, if you can without going at an illegal or unsafe speed. Keep a safe following distance.The main reason drivers exceed speed limits is to save time. But, anyone trying to drive faster than the speed of traffic will not be able to save much time. The risks involved are not worth it. If you go faster than the speed of other traffic, you'll have to keep passing other vehicles. This increases the chance of a crash, and it is more tiring. Fatigue increases the chance of a crash. Going with the flow of traffic is safer and easier.
2.6.6 – Speed on Downgrades Your vehicle's speed will increase on downgrades because of gravity. Your most important objective is to select and maintain a speed that is not too fast for the: Total weight of the vehicle and cargo. Length of the grade.
Steepness of the grade. Road conditions. Weather. If a speed limit is posted, or there is a sign indicating "Maximum Safe Speed," never exceed the speed shown. Also, look for and heed warning signs indicating the length and steepness of the grade. You must use the braking effect of the engine as the principal way of controlling your speed on downgrades. The braking effect of the engine is greatest when it is near the governed rpms and the transmission is in the lower gears. Save your brakes so you will be able to slow or stop as required by road and traffic conditions. Shift your transmission to a low gear before starting down the grade and use the proper braking techniques. Please read carefully the section on going down long, steep downgrades safely in "Mountain Driving."
2.6.7 – Roadway Work Zones Speeding traffic is the number one cause of injury and death in roadway work zones. Observe the posted speed limits at all times when approaching and driving through a work zone. Watch your speedometer, and don’t allow your speed to creep up as you drive through long sections of road construction. Decrease your speed for adverse weather or road conditions. Decrease your speed even further when a worker is close to the roadway.
Subsections 2.4, 2.5, and 2.6 Test Your Knowledge
1. How far ahead does the manual say you should look?
2. What are two main things to look for ahead?3. What's your most important way to see the sides
and rear of your vehicle?4. What does "communicating" mean in safe driving?5. Where should you place reflectors when stopped on
a divided highway?6. What three things add up to total stopping distance?7. If you go twice as fast, will your stopping distance
increase by two or four times?8. Empty trucks have the best braking. True or False?9. What is hydroplaning?10. What is "black ice”?
These questions may be on the test. If you can't answer them all, re-read subsections 2.4, 2.5, and 2.6.
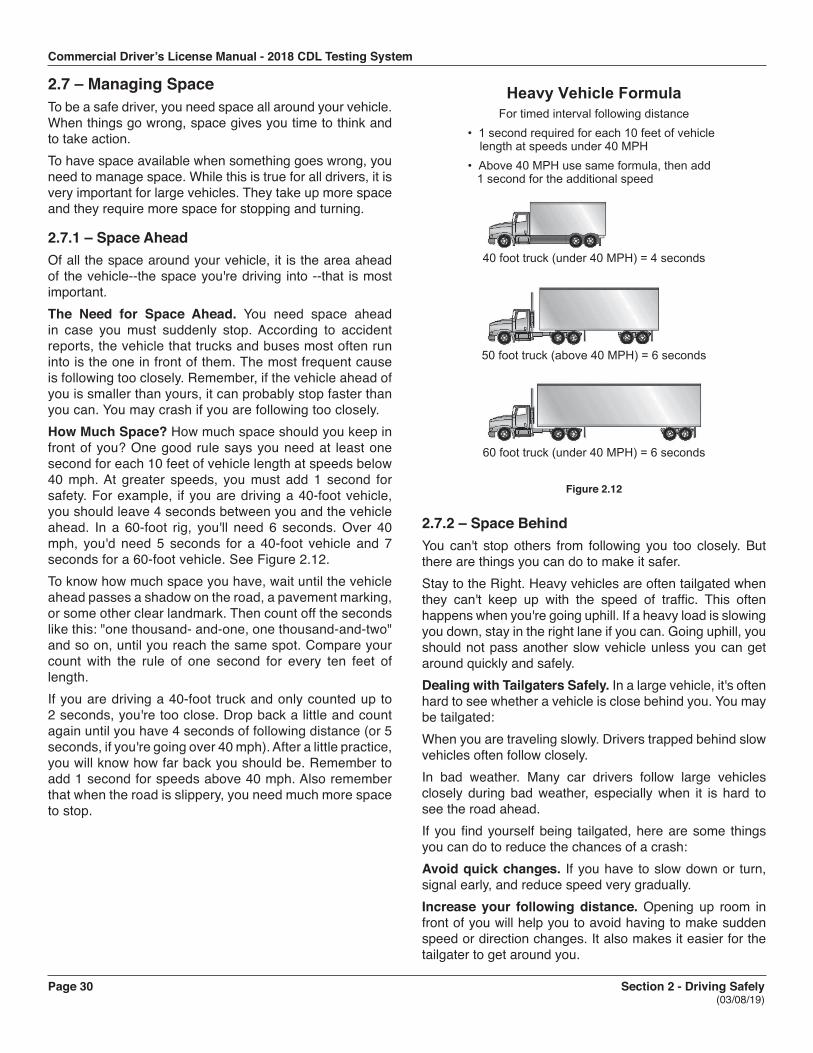
Commercial Driver’s License Manual - 2018 CDL Testing System
Page 30 Section 2 - Driving Safely (03/08/19)
2.7 – Managing Space To be a safe driver, you need space all around your vehicle. When things go wrong, space gives you time to think and to take action. To have space available when something goes wrong, you need to manage space. While this is true for all drivers, it is very important for large vehicles. They take up more space and they require more space for stopping and turning.
2.7.1 – Space Ahead Of all the space around your vehicle, it is the area ahead of the vehicle--the space you're driving into --that is most important. The Need for Space Ahead. You need space ahead in case you must suddenly stop. According to accident reports, the vehicle that trucks and buses most often run into is the one in front of them. The most frequent cause is following too closely. Remember, if the vehicle ahead of you is smaller than yours, it can probably stop faster than you can. You may crash if you are following too closely. How Much Space? How much space should you keep in front of you? One good rule says you need at least one second for each 10 feet of vehicle length at speeds below 40 mph. At greater speeds, you must add 1 second for safety. For example, if you are driving a 40-foot vehicle, you should leave 4 seconds between you and the vehicle ahead. In a 60-foot rig, you'll need 6 seconds. Over 40 mph, you'd need 5 seconds for a 40-foot vehicle and 7 seconds for a 60-foot vehicle. See Figure 2.12.To know how much space you have, wait until the vehicle ahead passes a shadow on the road, a pavement marking, or some other clear landmark. Then count off the seconds like this: "one thousand- and-one, one thousand-and-two" and so on, until you reach the same spot. Compare your count with the rule of one second for every ten feet of length. If you are driving a 40-foot truck and only counted up to 2 seconds, you're too close. Drop back a little and count again until you have 4 seconds of following distance (or 5 seconds, if you're going over 40 mph). After a little practice, you will know how far back you should be. Remember to add 1 second for speeds above 40 mph. Also remember that when the road is slippery, you need much more space to stop.
Heavy Vehicle FormulaFor timed interval following distance
• 1 second required for each 10 feet of vehicle length at speeds under 40 MPH• Above 40 MPH use same formula, then add 1 second for the additional speed
40 foot truck (under 40 MPH) = 4 seconds
60 foot truck (under 40 MPH) = 6 seconds
50 foot truck (above 40 MPH) = 6 seconds
Figure 2.12
2.7.2 – Space Behind You can't stop others from following you too closely. But there are things you can do to make it safer. Stay to the Right. Heavy vehicles are often tailgated when they can't keep up with the speed of traffic. This often happens when you're going uphill. If a heavy load is slowing you down, stay in the right lane if you can. Going uphill, you should not pass another slow vehicle unless you can get around quickly and safely. Dealing with Tailgaters Safely. In a large vehicle, it's often hard to see whether a vehicle is close behind you. You may be tailgated: When you are traveling slowly. Drivers trapped behind slow vehicles often follow closely. In bad weather. Many car drivers follow large vehicles closely during bad weather, especially when it is hard to see the road ahead. If you find yourself being tailgated, here are some things you can do to reduce the chances of a crash: Avoid quick changes. If you have to slow down or turn, signal early, and reduce speed very gradually. Increase your following distance. Opening up room in front of you will help you to avoid having to make sudden speed or direction changes. It also makes it easier for the tailgater to get around you.
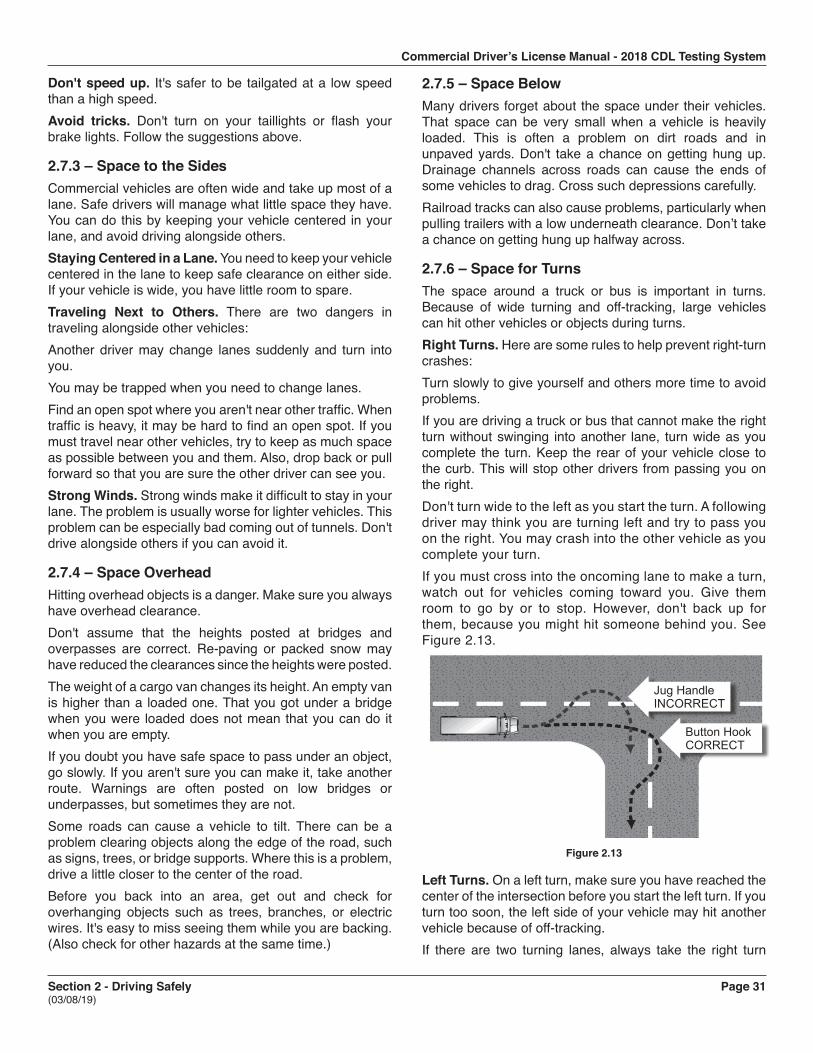
Commercial Driver’s License Manual - 2018 CDL Testing System
Section 2 - Driving Safely Page 31 (03/08/19)
Don't speed up. It's safer to be tailgated at a low speed than a high speed. Avoid tricks. Don't turn on your taillights or flash your brake lights. Follow the suggestions above.
2.7.3 – Space to the Sides Commercial vehicles are often wide and take up most of a lane. Safe drivers will manage what little space they have. You can do this by keeping your vehicle centered in your lane, and avoid driving alongside others. Staying Centered in a Lane. You need to keep your vehicle centered in the lane to keep safe clearance on either side. If your vehicle is wide, you have little room to spare. Traveling Next to Others. There are two dangers in traveling alongside other vehicles: Another driver may change lanes suddenly and turn into you. You may be trapped when you need to change lanes. Find an open spot where you aren't near other traffic. When traffic is heavy, it may be hard to find an open spot. If you must travel near other vehicles, try to keep as much space as possible between you and them. Also, drop back or pull forward so that you are sure the other driver can see you. Strong Winds. Strong winds make it difficult to stay in your lane. The problem is usually worse for lighter vehicles. This problem can be especially bad coming out of tunnels. Don't drive alongside others if you can avoid it.
2.7.4 – Space Overhead Hitting overhead objects is a danger. Make sure you always have overhead clearance. Don't assume that the heights posted at bridges and overpasses are correct. Re-paving or packed snow may have reduced the clearances since the heights were posted. The weight of a cargo van changes its height. An empty van is higher than a loaded one. That you got under a bridge when you were loaded does not mean that you can do it when you are empty. If you doubt you have safe space to pass under an object, go slowly. If you aren't sure you can make it, take another route. Warnings are often posted on low bridges or underpasses, but sometimes they are not. Some roads can cause a vehicle to tilt. There can be a problem clearing objects along the edge of the road, such as signs, trees, or bridge supports. Where this is a problem, drive a little closer to the center of the road. Before you back into an area, get out and check for overhanging objects such as trees, branches, or electric wires. It's easy to miss seeing them while you are backing. (Also check for other hazards at the same time.)
2.7.5 – Space Below Many drivers forget about the space under their vehicles. That space can be very small when a vehicle is heavily loaded. This is often a problem on dirt roads and in unpaved yards. Don't take a chance on getting hung up. Drainage channels across roads can cause the ends of some vehicles to drag. Cross such depressions carefully. Railroad tracks can also cause problems, particularly when pulling trailers with a low underneath clearance. Don’t take a chance on getting hung up halfway across.
2.7.6 – Space for Turns The space around a truck or bus is important in turns. Because of wide turning and off-tracking, large vehicles can hit other vehicles or objects during turns. Right Turns. Here are some rules to help prevent right-turn crashes: Turn slowly to give yourself and others more time to avoid problems.If you are driving a truck or bus that cannot make the right turn without swinging into another lane, turn wide as you complete the turn. Keep the rear of your vehicle close to the curb. This will stop other drivers from passing you on the right. Don't turn wide to the left as you start the turn. A following driver may think you are turning left and try to pass you on the right. You may crash into the other vehicle as you complete your turn. If you must cross into the oncoming lane to make a turn, watch out for vehicles coming toward you. Give them room to go by or to stop. However, don't back up for them, because you might hit someone behind you. See Figure 2.13.
Jug Handle INCORRECT
Button Hook CORRECT
Figure 2.13
Left Turns. On a left turn, make sure you have reached the center of the intersection before you start the left turn. If you turn too soon, the left side of your vehicle may hit another vehicle because of off-tracking. If there are two turning lanes, always take the right turn
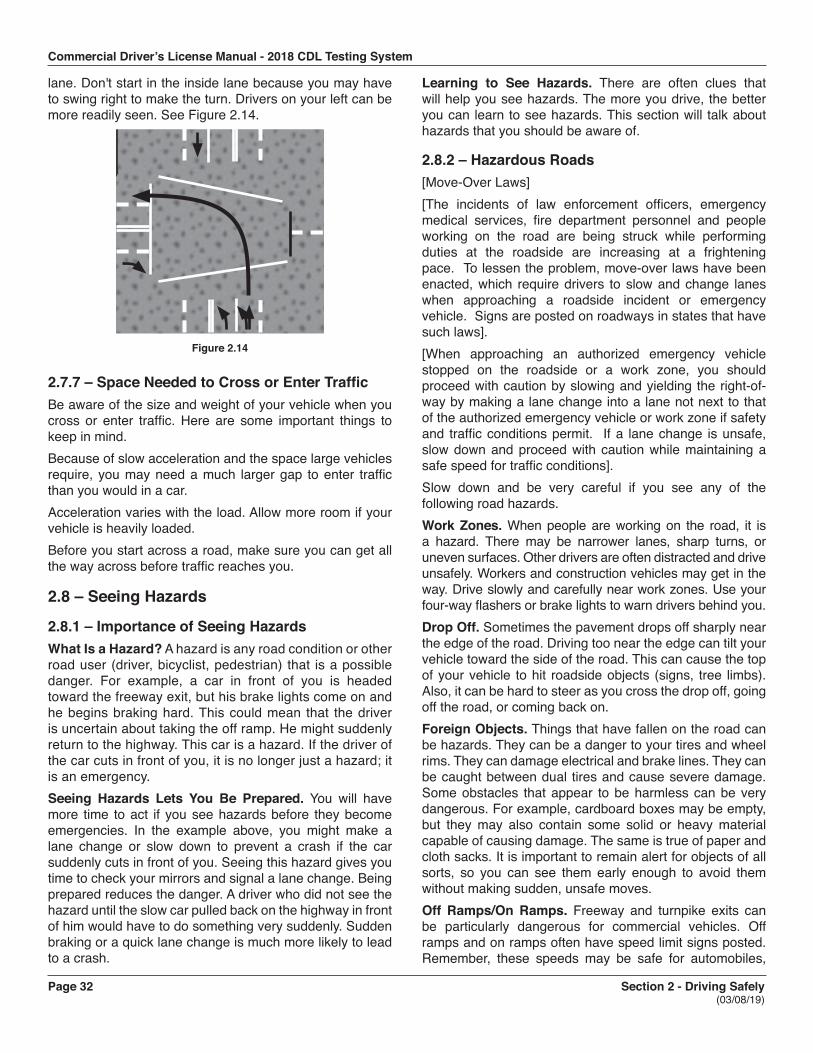
Commercial Driver’s License Manual - 2018 CDL Testing System
Page 32 Section 2 - Driving Safely (03/08/19)
lane. Don't start in the inside lane because you may have to swing right to make the turn. Drivers on your left can be more readily seen. See Figure 2.14.
Figure 2.14
2.7.7 – Space Needed to Cross or Enter Traffic Be aware of the size and weight of your vehicle when you cross or enter traffic. Here are some important things to keep in mind. Because of slow acceleration and the space large vehicles require, you may need a much larger gap to enter traffic than you would in a car. Acceleration varies with the load. Allow more room if your vehicle is heavily loaded. Before you start across a road, make sure you can get all the way across before traffic reaches you.
2.8 – Seeing Hazards
2.8.1 – Importance of Seeing Hazards What Is a Hazard? A hazard is any road condition or other road user (driver, bicyclist, pedestrian) that is a possible danger. For example, a car in front of you is headed toward the freeway exit, but his brake lights come on and he begins braking hard. This could mean that the driver is uncertain about taking the off ramp. He might suddenly return to the highway. This car is a hazard. If the driver of the car cuts in front of you, it is no longer just a hazard; it is an emergency. Seeing Hazards Lets You Be Prepared. You will have more time to act if you see hazards before they become emergencies. In the example above, you might make a lane change or slow down to prevent a crash if the car suddenly cuts in front of you. Seeing this hazard gives you time to check your mirrors and signal a lane change. Being prepared reduces the danger. A driver who did not see the hazard until the slow car pulled back on the highway in front of him would have to do something very suddenly. Sudden braking or a quick lane change is much more likely to lead to a crash.
Learning to See Hazards. There are often clues that will help you see hazards. The more you drive, the better you can learn to see hazards. This section will talk about hazards that you should be aware of.
2.8.2 – Hazardous Roads [Move-Over Laws] [The incidents of law enforcement officers, emergency medical services, fire department personnel and people working on the road are being struck while performing duties at the roadside are increasing at a frightening pace. To lessen the problem, move-over laws have been enacted, which require drivers to slow and change lanes when approaching a roadside incident or emergency vehicle. Signs are posted on roadways in states that have such laws].[When approaching an authorized emergency vehicle stopped on the roadside or a work zone, you should proceed with caution by slowing and yielding the right-of-way by making a lane change into a lane not next to that of the authorized emergency vehicle or work zone if safety and traffic conditions permit. If a lane change is unsafe, slow down and proceed with caution while maintaining a safe speed for traffic conditions]. Slow down and be very careful if you see any of the following road hazards. Work Zones. When people are working on the road, it is a hazard. There may be narrower lanes, sharp turns, or uneven surfaces. Other drivers are often distracted and drive unsafely. Workers and construction vehicles may get in the way. Drive slowly and carefully near work zones. Use your four-way flashers or brake lights to warn drivers behind you. Drop Off. Sometimes the pavement drops off sharply near the edge of the road. Driving too near the edge can tilt your vehicle toward the side of the road. This can cause the top of your vehicle to hit roadside objects (signs, tree limbs). Also, it can be hard to steer as you cross the drop off, going off the road, or coming back on. Foreign Objects. Things that have fallen on the road can be hazards. They can be a danger to your tires and wheel rims. They can damage electrical and brake lines. They can be caught between dual tires and cause severe damage. Some obstacles that appear to be harmless can be very dangerous. For example, cardboard boxes may be empty, but they may also contain some solid or heavy material capable of causing damage. The same is true of paper and cloth sacks. It is important to remain alert for objects of all sorts, so you can see them early enough to avoid them without making sudden, unsafe moves. Off Ramps/On Ramps. Freeway and turnpike exits can be particularly dangerous for commercial vehicles. Off ramps and on ramps often have speed limit signs posted. Remember, these speeds may be safe for automobiles,
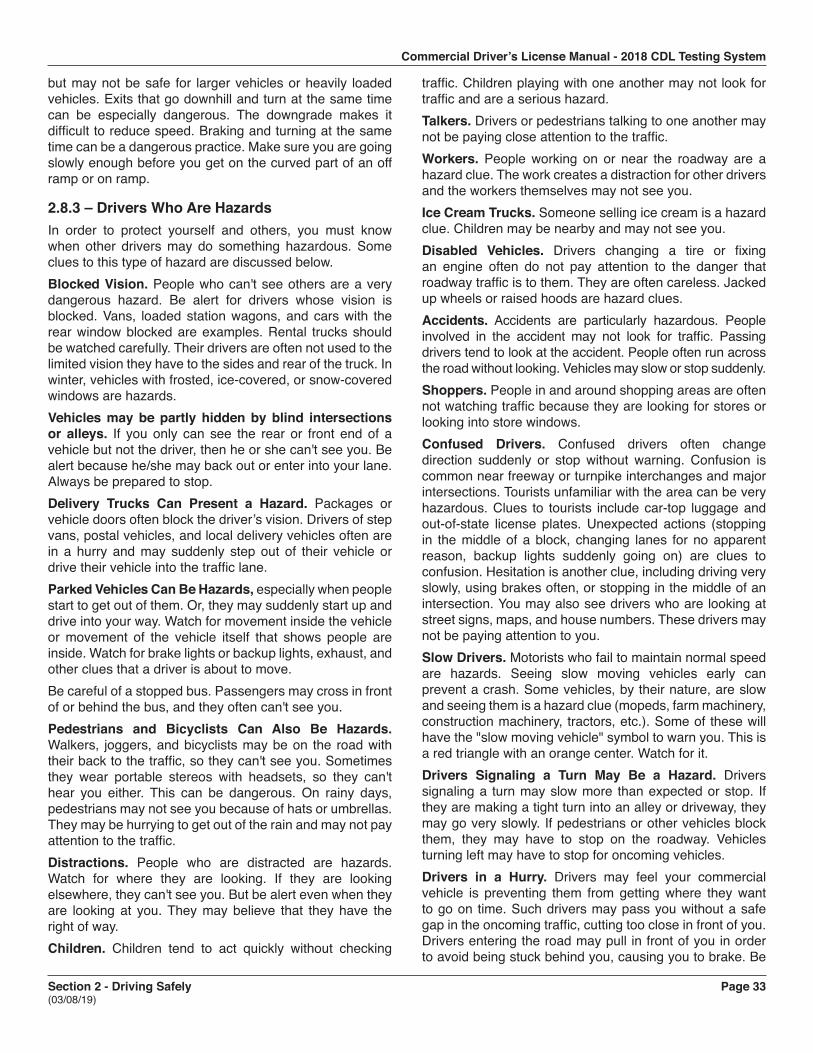
Commercial Driver’s License Manual - 2018 CDL Testing System
Section 2 - Driving Safely Page 33 (03/08/19)
but may not be safe for larger vehicles or heavily loaded vehicles. Exits that go downhill and turn at the same time can be especially dangerous. The downgrade makes it difficult to reduce speed. Braking and turning at the same time can be a dangerous practice. Make sure you are going slowly enough before you get on the curved part of an off ramp or on ramp.
2.8.3 – Drivers Who Are Hazards In order to protect yourself and others, you must know when other drivers may do something hazardous. Some clues to this type of hazard are discussed below. Blocked Vision. People who can't see others are a very dangerous hazard. Be alert for drivers whose vision is blocked. Vans, loaded station wagons, and cars with the rear window blocked are examples. Rental trucks should be watched carefully. Their drivers are often not used to the limited vision they have to the sides and rear of the truck. In winter, vehicles with frosted, ice-covered, or snow-covered windows are hazards. Vehicles may be partly hidden by blind intersections or alleys. If you only can see the rear or front end of a vehicle but not the driver, then he or she can't see you. Be alert because he/she may back out or enter into your lane. Always be prepared to stop. Delivery Trucks Can Present a Hazard. Packages or vehicle doors often block the driver’s vision. Drivers of step vans, postal vehicles, and local delivery vehicles often are in a hurry and may suddenly step out of their vehicle or drive their vehicle into the traffic lane. Parked Vehicles Can Be Hazards, especially when people start to get out of them. Or, they may suddenly start up and drive into your way. Watch for movement inside the vehicle or movement of the vehicle itself that shows people are inside. Watch for brake lights or backup lights, exhaust, and other clues that a driver is about to move. Be careful of a stopped bus. Passengers may cross in front of or behind the bus, and they often can't see you. Pedestrians and Bicyclists Can Also Be Hazards. Walkers, joggers, and bicyclists may be on the road with their back to the traffic, so they can't see you. Sometimes they wear portable stereos with headsets, so they can't hear you either. This can be dangerous. On rainy days, pedestrians may not see you because of hats or umbrellas. They may be hurrying to get out of the rain and may not pay attention to the traffic. Distractions. People who are distracted are hazards. Watch for where they are looking. If they are looking elsewhere, they can't see you. But be alert even when they are looking at you. They may believe that they have the right of way.Children. Children tend to act quickly without checking
traffic. Children playing with one another may not look for traffic and are a serious hazard. Talkers. Drivers or pedestrians talking to one another may not be paying close attention to the traffic. Workers. People working on or near the roadway are a hazard clue. The work creates a distraction for other drivers and the workers themselves may not see you. Ice Cream Trucks. Someone selling ice cream is a hazard clue. Children may be nearby and may not see you. Disabled Vehicles. Drivers changing a tire or fixing an engine often do not pay attention to the danger that roadway traffic is to them. They are often careless. Jacked up wheels or raised hoods are hazard clues. Accidents. Accidents are particularly hazardous. People involved in the accident may not look for traffic. Passing drivers tend to look at the accident. People often run across the road without looking. Vehicles may slow or stop suddenly. Shoppers. People in and around shopping areas are often not watching traffic because they are looking for stores or looking into store windows. Confused Drivers. Confused drivers often change direction suddenly or stop without warning. Confusion is common near freeway or turnpike interchanges and major intersections. Tourists unfamiliar with the area can be very hazardous. Clues to tourists include car-top luggage and out-of-state license plates. Unexpected actions (stopping in the middle of a block, changing lanes for no apparent reason, backup lights suddenly going on) are clues to confusion. Hesitation is another clue, including driving very slowly, using brakes often, or stopping in the middle of an intersection. You may also see drivers who are looking at street signs, maps, and house numbers. These drivers may not be paying attention to you. Slow Drivers. Motorists who fail to maintain normal speed are hazards. Seeing slow moving vehicles early can prevent a crash. Some vehicles, by their nature, are slow and seeing them is a hazard clue (mopeds, farm machinery, construction machinery, tractors, etc.). Some of these will have the "slow moving vehicle" symbol to warn you. This is a red triangle with an orange center. Watch for it.Drivers Signaling a Turn May Be a Hazard. Drivers signaling a turn may slow more than expected or stop. If they are making a tight turn into an alley or driveway, they may go very slowly. If pedestrians or other vehicles block them, they may have to stop on the roadway. Vehicles turning left may have to stop for oncoming vehicles. Drivers in a Hurry. Drivers may feel your commercial vehicle is preventing them from getting where they want to go on time. Such drivers may pass you without a safe gap in the oncoming traffic, cutting too close in front of you. Drivers entering the road may pull in front of you in order to avoid being stuck behind you, causing you to brake. Be
Commercial Driver’s License Manual - 2018 CDL Testing System
Page 34 Section 2 - Driving Safely (03/08/19)
aware of this and watch for drivers who are in a hurry. Impaired Drivers. Drivers who are sleepy, have had too much to drink, are on drugs, or who are ill are hazards. Some clues to these drivers are: Weaving across the road or drifting from one side to another. Leaving the road (dropping right wheels onto the shoulder, or bumping across a curb in a turn). Stopping at the wrong time (stopping at a green light, or waiting for too long at a stop). Open window in cold weather. Speeding up or slowing down suddenly, driving too fast or too slow. Be alert for drunk drivers and sleepy drivers late at night. Driver Body Movement as a Clue. Drivers look in the direction they are going to turn. You may sometimes get a clue from a driver's head and body movements that a driver may be going to make a turn, even though the turn signals aren't on. Drivers making over-the-shoulder checks may be going to change lanes. These clues are most easily seen in motorcyclists and bicyclists. Watch other road users and try to tell whether they might do something hazardous. Conflicts. You are in conflict when you have to change speed and/or direction to avoid hitting someone. Conflicts occur at intersections where vehicles meet, at merges (such as turnpike on ramps) and where there are needed lane changes (such as the end of a lane, forcing a move to another lane of traffic). Other situations include slow moving or stalled traffic in a traffic lane, and accident scenes. Watch for other drivers who are in conflict because they are a hazard to you. When they react to this conflict, they may do something that will put them in conflict with you.
2.8.4 – Always Have a Plan You should always be looking for hazards. Continue to learn to see hazards on the road. However, don't forget why you are looking for the hazards--they may turn into emergencies. You look for the hazards in order to have time to plan a way out of any emergency. When you see a hazard, think about the emergencies that could develop and figure out what you would do. Always be prepared to take action based on your plans. In this way, you will be a prepared, defensive driver who will improve your own safety as well as the safety of all road users.
Subsections 2.7 and 2.8 Test Your Knowledge
1. How do you find out how many seconds of followingdistance space you have?
2. If you are driving a 30-foot vehicle at 55 mph, howmany seconds of following distance should you allow?
3. You should decrease your following distance ifsomebody is following you too closely. True orFalse?
4. If you swing wide to the left before turning right,another driver may try to pass you on the right. Trueor False?
5. What is a hazard?6. Why make emergency plans when you see a
hazard?These questions may be on the test. If you can’t answer them all, re-read subsections 2.7 and 2.8
2.9 – Distracted Driving A driver distraction is anything that takes your attention away from driving. Whenever you are driving a vehicle and your full attention is not on the driving task, you are putting yourself, your passengers, other vehicles, and pedestrians in danger. Distracted driving can cause collisions, resulting in injury, death or property damage. Activities inside of the vehicle that can distract your attention include: talking to passengers; adjusting the radio, CD player or climate controls; eating, drinking or smoking; reading maps or other literature; picking up something that fell; talking on a cell phone or CB radio; reading or sending text messages; using any type of telematic or electronic devices (such as navigation systems, pagers, personal digital assistant, computers, etc.); daydreaming or being occupied with other mental distractions; and many others.Possible distractions that could occur outside a moving vehicle: outside traffic, vehicles or pedestrians; outside events such as police pulling someone over or a crash scene; sunlight/sunset; objects in roadway; road construction; reading billboards or other road advertisements; and many others.
2.9.1 – The Distracted Driving Crash Problem The Large Truck Crash Causation Study (LTCCS) reported that 8 percent of large-truck crashes occurred when Commercial Motor Vehicle (CMV) drivers were externally distracted and 2 percent of large truck crashes occurred when the driver was internally distracted. Approximately 5,500 people are killed each year on U.S. roadways and an estimated 448,000 are injured in motor vehicle crashes involving distracted driving (NHTSA Traffic Safety Facts: Distracted Driving). Research indicates that the burden of talking on a cell phone - even if it's hands-free - saps the brain of 39% of the energy it would ordinarily devote to safe driving. Drivers who use a hand-held device are more likely to get into a crash serious enough to cause injury. (NHTSA distracted driving website, www.distraction.gov).
Commercial Driver’s License Manual - 2018 CDL Testing System
Section 2 - Driving Safely Page 35 (03/08/19)
2.9.2 – Effects of Distracted Driving Effects of distracted driving include slowed perception, which may cause you to be delayed in perceiving or completely fail to perceive an important traffic event; delayed decision making and improper action, which can cause you to be delayed in taking the proper action or make incorrect inputs to the steering, accelerator or brakes.
2.9.3 – Types of Distractions There are many causes of distraction, all with the potential to increase risk. Physical distraction – one that causes you to take your hands off the wheel or eyes off the road, such as reaching for an object. Mental distraction – activities that take your mind away from the road, such as engaging in conversation with a passenger or thinking about something that happened during the day. Both physical and mental distraction – even greater chance a crash could happen, such as talking on a cell phone; or sending or reading text messages.
2.9.4 – Cell/Mobile Phones 49 CFR Part 383, 384, 390, 391 and 392 of the Federal Motor Carrier Safety Regulations (FMCSRs) and the Hazardous Materials Regulations (HMR) restricts the use of hand-held mobile telephones by drivers of commercial motor vehicles (CMVs); and implements new driver disqualification sanctions for drivers of CMVs who fail to comply with this Federal restriction; or who have multiple convictions for violating a State or local law or ordinance on motor vehicle traffic control that restricts the use of hand-held mobile telephones. Additionally, motor carriers are prohibited from requiring or allowing drivers of CMVs to use hand-held mobile telephones. The use of hand-held mobile telephones means, ‘‘using at least one hand to hold a mobile telephone to conduct a voice communication; “dialing a mobile telephone by pressing more than a single button”; or “moving from a seated driving position while restrained by a seat belt to reach for a mobile telephone”. If you choose to use a mobile phone while operating a CMV, you may only use a hands free mobile phone that is located close to you and that can be operated in compliance with the rule to conduct a voice communication. Your CDL will be disqualified after two or more convictions of any state law on hand-held mobile telephone use while operating a CMV. Disqualification is 60 days for the second offense within 3 years, and 120 days for three or more offenses within 3 years. In addition, the first and each subsequent violation of such a prohibition are subject to civil penalties imposed on such drivers, in an amount up to $2,750. Motor carriers must not allow nor require drivers to
use a hand-held mobile telephone while driving. Employers may also be subject to civil penalties in an amount up to $11,000. There is an emergency exception that allows you to use your hand-held mobile telephones if necessary to communicate with law enforcement officials or other emergency services. Research shows that the odds of being involved in a safety-critical event (e.g., crash, near-crash, unintentional lane deviation) is 6 times greater for CMV drivers who engage in dialing a mobile telephone while driving than for those who do not. Dialing drivers took their eyes off the forward roadway for an average of 3.8 seconds. At 55 mph (or 80.7 feet per second), this equates to a driver traveling 306 feet, the approximate length of a football field, without looking at the roadway. Your primary responsibility is to operate a motor vehicle safely. To do this, you must focus your full attention on the driving task.Note that hands-free devices are no less likely than hand-held cell phones to cause you to become distracted. Attention is diverted from the driving task while using either device.
2.9.5 –Texting 49 CFR Part 383, 384, 390, 391, 392, the Federal Motor Carrier Safety Regulations (FMCSR) prohibits texting by commercial motor vehicle (CMV) drivers while operating in interstate commerce; and implements new driver disqualification sanctions for drivers of CMVs who fail to comply with this Federal prohibition; or who have multiple convictions for violating a State or local law or ordinance on motor vehicle traffic control that prohibits texting while driving. Additionally, motor carriers are prohibited from requiring or allowing their drivers to engage in texting while driving.Texting means manually entering text into, or reading text from, an electronic device. This includes, but is not limited to, short message service, e-mailing, instant messaging, a command or request to access a World Wide Web page, or engaging in any other form of electronic text retrieval or entry, for present or future communication. Electronic device includes, but is not limited to, a cellular telephone; personal digital assistant; pager; computer; or any other device used to enter, write, send, receive, or read text. Your CDL will be disqualified after two or more convictions of any state law on texting while operating a CMV. Disqualification is 60 days for the second offense within 3 years, and 120 days for three or more offenses within 3 years. In addition, the first and each subsequent violation of such a prohibition are subject to civil penalties imposed on such drivers, in an amount up to $2,750. No motor carrier shall allow or require its drivers to engage in texting while
Commercial Driver’s License Manual - 2018 CDL Testing System
Page 36 Section 2 - Driving Safely (03/08/19)
driving. There is an emergency exception that allows you text if necessary to communicate with law enforcement officials or other emergency services. Evidence suggests that text messaging is even riskier than talking on a cell phone because it requires you to look at a small screen and manipulate the keypad with one’s hands. Texting is the most alarming distraction because it involves both physical and mental distraction simultaneously. Research shows that the odds of being involved in a safety-critical event (e.g., crash, near-crash, unintentional lane deviation) is 23.2 times greater for CMV drivers who engage in texting while driving than for those who do not. Sending or receiving text takes your eyes from the road for an average of 4.6 seconds. At 55 mph, you would travel 371 feet, or the length of an entire football field – without looking at the roadway.
2.9.6 – Don’t Drive Distracted Your goal should be to eliminate all in-vehicle distractions before driving begins. Accomplishing this goal can be done by: Assessing all potential in-vehicle distractions before driving Developing a preventative plan to reduce/eliminate possible distractions Expecting distractions to occur Discussing possible scenarios before getting behind the wheel Based on the assessment of potential distractions, you can formulate a preventative plan to reduce/eliminate possible distractions. If drivers react a half-second slower because of distractions, crashes double. Some tips to follow so you won’t become distracted: Turn off all communication devices. If you must use a mobile phone, make sure it is within close proximity, that it is operable while you are restrained, use an earpiece or the speaker phone function, use voice-activated dialing; or use the hands-free feature. Drivers are not in compliance if they unsafely reach for a mobile phone, even if they intend to use the hands-free function. Do not type or read a text message on a mobile device while driving. Familiarize yourself with your vehicle’s features and equipment, before you get behind the wheel. Adjust all vehicle controls and mirrors to your preferences prior to driving. Pre-program radio stations and pre-load your favorite CDs. Clear the vehicle of any unnecessary objects and secure cargo.
Review maps, program the GPS and plan your route before you begin driving. Don’t attempt to read or write while you drive. Avoid smoking, eating and drinking while you drive. Leave early to allow yourself time to stop to eat.Don’t engage in complex or emotionally intense conversations with other occupants. Secure commitment from other occupants to behave responsibly and to support the driver in reducing distractions.
2.9.7 – Watch Out for Other Distracted Drivers You need to be able to recognize other drivers who are engaged in any form of driving distraction. Not recognizing other distracted drivers can prevent you from perceiving or reacting correctly in time to prevent a crash. Watch for: Vehicles that may drift over the lane divider lines or within their own lane. Vehicles traveling at inconsistent speeds. Drivers who are preoccupied with maps, food, cigarettes, cell phones, or other objects. Drivers who appear to be involved in conversations with their passengers. Give a distracted driver plenty of room and maintain your safe following distance. Be very careful when passing a driver who seems to be distracted. The other driver may not be aware of your presence, and they may drift in front of you.
2.10 – Aggressive Drivers/Road Rage
2.10.1 – What Is It? Aggressive driving and road rage is not a new problem. However, in today’s world, where heavy and slow-moving traffic and tight schedules are the norm, more and more drivers are taking out their anger and frustration in their vehicles. Crowded roads leave little room for error, leading to suspicion and hostility among drivers and encouraging them to take personally the mistakes of other drivers. Aggressive driving is the act of operating a motor vehicle in a selfish, bold, or pushy manner, without regard for the rights or safety of others (i.e. changing lanes frequently and abruptly without notice). Road rage is operating a motor vehicle with the intent of doing harm to others or physically assaulting a driver or their vehicle.
2.10.2 – Don’t Be an Aggressive Driver How you feel before you even start your vehicle has a lot to do with how stress will affect you while driving.
Commercial Driver’s License Manual - 2018 CDL Testing System
Section 2 - Driving Safely Page 37 (03/08/19)
Reduce your stress before and while you drive. Listen to “easy listening” music. Give the drive your full attention. Don’t allow yourself to become distracted by talking on your cell phone, eating, etc. Be realistic about your travel time. Expect delays because of traffic, construction, or bad weather and make allowances. If you’re going to be later than you expected – deal with it. Take a deep breath and accept the delay. Give other drivers the benefit of the doubt. Try to imagine why he or she is driving that way. Whatever their reason, it has nothing to do with you. Slow down and keep your following distance reasonable. Don’t drive slowly in the left lane of traffic. Avoid gestures. Keep your hands on the wheel. Avoid making any gestures that might anger another driver, even seemingly harmless expressions of irritation like shaking your head. Be a cautious and courteous driver. If another driver seems eager to get in front of you, say, “Be my guest.” This response will soon become a habit and you won’t be as offended by other drivers’ actions.
2.10.3 – What You Should Do When Confronted by an Aggressive Driver First and foremost, make every attempt to get out of their way. Put your pride in the back seat. Do not challenge them by speeding up or attempting to hold-your-own in your travel lane. Avoid eye contact. Ignore gestures and refuse to react to them. Report aggressive drivers to the appropriate authorities by providing a vehicle description, license number, location and, if possible, direction of travel. If you have a cell phone, and can do it safely, call the police. If an aggressive driver is involved in a crash farther down the road, stop a safe distance from the crash scene, wait for the police to arrive, and report the driving behavior that you witnessed.
Subsections 2.9 and 2.10 Test Your Knowledge
1. What are some tips to follow so you won’t become adistracted driver?
2. How do you use in-vehicle communicationsequipment cautiously?
3. How do you recognize a distracted driver?
4. What is the difference between aggressive drivingand road rage?
5. What should you do when confronted with anaggressive driver?
6. What are some things you can do to reduce yourstress before and while you drive?
These questions may be on the test. If you can’t answer them all, re-read subsections 2.9 and 2.10.
2.11 – Driving at Night
2.11.1 – It's More Dangerous You are at greater risk when you drive at night. Drivers can't see hazards as quickly as in daylight, so they have less time to respond. Drivers caught by surprise are less able to avoid a crash. The problems of night driving involve the driver, the roadway, and the vehicle.
2.11.2 – Driver Factors Vision. Good vision is critical for safe driving. Your control of the brake, accelerator, and steering wheel is based on what you see. If you cannot see clearly, you will have trouble identifying traffic and roadway conditions, spotting potential trouble or responding to problems in a timely manner. Because seeing well is so critical to safe driving, you should have your eyes checked regularly by an eye specialist. You may never know you have poor vision unless your eyes are tested. If you need to wear glasses or contact lenses for driving, remember to: Always wear them when driving, even if driving short distances. If your driver license says corrective lenses are required, it is illegal to move a vehicle without using corrective lenses. Keep an extra set of corrective lenses in your vehicle. If your normal corrective lenses are broken or lost, you can use the spare lenses to drive safely.Avoid using dark or tinted corrective lenses at night, even if you think they help with glare. Tinted lenses cut down the light that you need to see clearly under night driving conditions. Glare. Drivers can be blinded for a short time by bright light. It can take several seconds to recover from glare. Even two seconds of glare blindness can be dangerous. A vehicle going 55 mph will travel more than half the distance of a football field during that time. Fatigue and Lack of Alertness. Fatigue is physical or mental tiredness that can be caused by physical or mental strain, repetitive tasks, illness or lack of sleep. Just like alcohol and drugs, it impairs your vision and judgment.
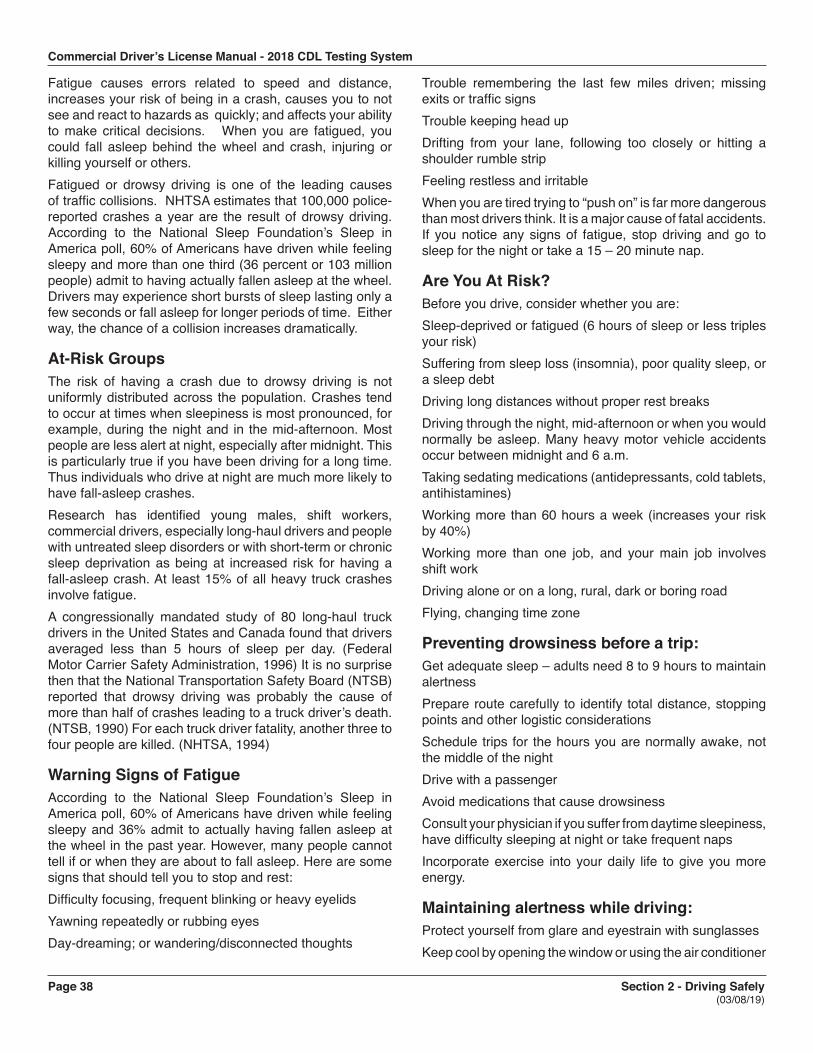
Commercial Driver’s License Manual - 2018 CDL Testing System
Page 38 Section 2 - Driving Safely (03/08/19)
Fatigue causes errors related to speed and distance, increases your risk of being in a crash, causes you to not see and react to hazards as quickly; and affects your ability to make critical decisions. When you are fatigued, you could fall asleep behind the wheel and crash, injuring or killing yourself or others. Fatigued or drowsy driving is one of the leading causes of traffic collisions. NHTSA estimates that 100,000 police-reported crashes a year are the result of drowsy driving. According to the National Sleep Foundation’s Sleep in America poll, 60% of Americans have driven while feeling sleepy and more than one third (36 percent or 103 million people) admit to having actually fallen asleep at the wheel. Drivers may experience short bursts of sleep lasting only a few seconds or fall asleep for longer periods of time. Either way, the chance of a collision increases dramatically.
At-Risk Groups The risk of having a crash due to drowsy driving is not uniformly distributed across the population. Crashes tend to occur at times when sleepiness is most pronounced, for example, during the night and in the mid-afternoon. Most people are less alert at night, especially after midnight. This is particularly true if you have been driving for a long time. Thus individuals who drive at night are much more likely to have fall-asleep crashes. Research has identified young males, shift workers, commercial drivers, especially long-haul drivers and people with untreated sleep disorders or with short-term or chronic sleep deprivation as being at increased risk for having a fall-asleep crash. At least 15% of all heavy truck crashes involve fatigue. A congressionally mandated study of 80 long-haul truck drivers in the United States and Canada found that drivers averaged less than 5 hours of sleep per day. (Federal Motor Carrier Safety Administration, 1996) It is no surprise then that the National Transportation Safety Board (NTSB) reported that drowsy driving was probably the cause of more than half of crashes leading to a truck driver’s death. (NTSB, 1990) For each truck driver fatality, another three to four people are killed. (NHTSA, 1994)
Warning Signs of Fatigue According to the National Sleep Foundation’s Sleep in America poll, 60% of Americans have driven while feeling sleepy and 36% admit to actually having fallen asleep at the wheel in the past year. However, many people cannot tell if or when they are about to fall asleep. Here are some signs that should tell you to stop and rest: Difficulty focusing, frequent blinking or heavy eyelids Yawning repeatedly or rubbing eyesDay-dreaming; or wandering/disconnected thoughts
Trouble remembering the last few miles driven; missing exits or traffic signs Trouble keeping head up Drifting from your lane, following too closely or hitting a shoulder rumble strip Feeling restless and irritable When you are tired trying to “push on” is far more dangerous than most drivers think. It is a major cause of fatal accidents. If you notice any signs of fatigue, stop driving and go to sleep for the night or take a 15 – 20 minute nap.
Are You At Risk? Before you drive, consider whether you are: Sleep-deprived or fatigued (6 hours of sleep or less triples your risk) Suffering from sleep loss (insomnia), poor quality sleep, or a sleep debt Driving long distances without proper rest breaks Driving through the night, mid-afternoon or when you would normally be asleep. Many heavy motor vehicle accidents occur between midnight and 6 a.m.Taking sedating medications (antidepressants, cold tablets, antihistamines) Working more than 60 hours a week (increases your risk by 40%) Working more than one job, and your main job involves shift work Driving alone or on a long, rural, dark or boring road Flying, changing time zone
Preventing drowsiness before a trip: Get adequate sleep – adults need 8 to 9 hours to maintain alertness Prepare route carefully to identify total distance, stopping points and other logistic considerations Schedule trips for the hours you are normally awake, not the middle of the night Drive with a passenger Avoid medications that cause drowsiness Consult your physician if you suffer from daytime sleepiness, have difficulty sleeping at night or take frequent naps Incorporate exercise into your daily life to give you more energy.
Maintaining alertness while driving: Protect yourself from glare and eyestrain with sunglasses Keep cool by opening the window or using the air conditioner
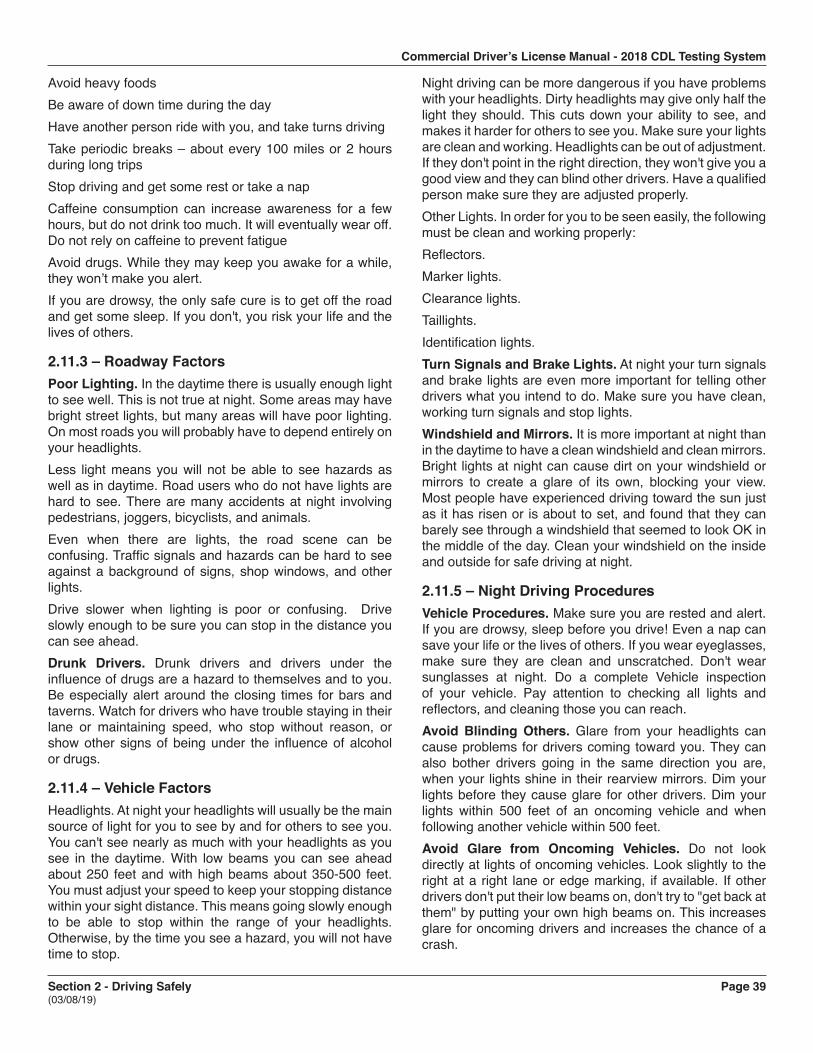
Commercial Driver’s License Manual - 2018 CDL Testing System
Section 2 - Driving Safely Page 39 (03/08/19)
Avoid heavy foods Be aware of down time during the day Have another person ride with you, and take turns driving Take periodic breaks – about every 100 miles or 2 hours during long trips Stop driving and get some rest or take a nap Caffeine consumption can increase awareness for a few hours, but do not drink too much. It will eventually wear off. Do not rely on caffeine to prevent fatigue Avoid drugs. While they may keep you awake for a while, they won’t make you alert. If you are drowsy, the only safe cure is to get off the road and get some sleep. If you don't, you risk your life and the lives of others.
2.11.3 – Roadway FactorsPoor Lighting. In the daytime there is usually enough light to see well. This is not true at night. Some areas may have bright street lights, but many areas will have poor lighting. On most roads you will probably have to depend entirely on your headlights. Less light means you will not be able to see hazards as well as in daytime. Road users who do not have lights are hard to see. There are many accidents at night involving pedestrians, joggers, bicyclists, and animals.Even when there are lights, the road scene can be confusing. Traffic signals and hazards can be hard to see against a background of signs, shop windows, and other lights. Drive slower when lighting is poor or confusing. Drive slowly enough to be sure you can stop in the distance you can see ahead. Drunk Drivers. Drunk drivers and drivers under the influence of drugs are a hazard to themselves and to you. Be especially alert around the closing times for bars and taverns. Watch for drivers who have trouble staying in their lane or maintaining speed, who stop without reason, or show other signs of being under the influence of alcohol or drugs.
2.11.4 – Vehicle Factors Headlights. At night your headlights will usually be the main source of light for you to see by and for others to see you. You can't see nearly as much with your headlights as you see in the daytime. With low beams you can see ahead about 250 feet and with high beams about 350-500 feet. You must adjust your speed to keep your stopping distance within your sight distance. This means going slowly enough to be able to stop within the range of your headlights. Otherwise, by the time you see a hazard, you will not have time to stop.
Night driving can be more dangerous if you have problems with your headlights. Dirty headlights may give only half the light they should. This cuts down your ability to see, and makes it harder for others to see you. Make sure your lights are clean and working. Headlights can be out of adjustment. If they don't point in the right direction, they won't give you a good view and they can blind other drivers. Have a qualified person make sure they are adjusted properly. Other Lights. In order for you to be seen easily, the following must be clean and working properly: Reflectors. Marker lights. Clearance lights. Taillights. Identification lights. Turn Signals and Brake Lights. At night your turn signals and brake lights are even more important for telling other drivers what you intend to do. Make sure you have clean, working turn signals and stop lights. Windshield and Mirrors. It is more important at night than in the daytime to have a clean windshield and clean mirrors. Bright lights at night can cause dirt on your windshield or mirrors to create a glare of its own, blocking your view. Most people have experienced driving toward the sun just as it has risen or is about to set, and found that they can barely see through a windshield that seemed to look OK in the middle of the day. Clean your windshield on the inside and outside for safe driving at night.
2.11.5 – Night Driving Procedures Vehicle Procedures. Make sure you are rested and alert. If you are drowsy, sleep before you drive! Even a nap can save your life or the lives of others. If you wear eyeglasses, make sure they are clean and unscratched. Don't wear sunglasses at night. Do a complete Vehicle inspection of your vehicle. Pay attention to checking all lights and reflectors, and cleaning those you can reach. Avoid Blinding Others. Glare from your headlights can cause problems for drivers coming toward you. They can also bother drivers going in the same direction you are, when your lights shine in their rearview mirrors. Dim your lights before they cause glare for other drivers. Dim your lights within 500 feet of an oncoming vehicle and when following another vehicle within 500 feet. Avoid Glare from Oncoming Vehicles. Do not look directly at lights of oncoming vehicles. Look slightly to the right at a right lane or edge marking, if available. If other drivers don't put their low beams on, don't try to "get back at them" by putting your own high beams on. This increases glare for oncoming drivers and increases the chance of a crash.
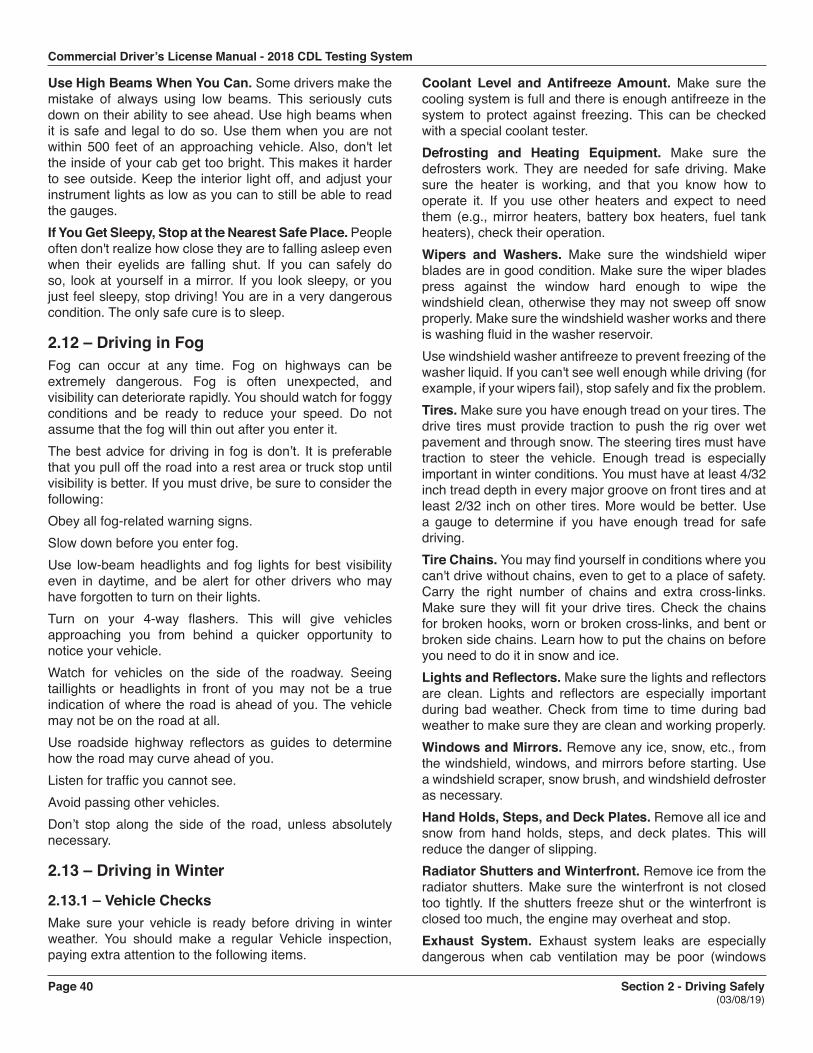
Commercial Driver’s License Manual - 2018 CDL Testing System
Page 40 Section 2 - Driving Safely (03/08/19)
Use High Beams When You Can. Some drivers make the mistake of always using low beams. This seriously cuts down on their ability to see ahead. Use high beams when it is safe and legal to do so. Use them when you are not within 500 feet of an approaching vehicle. Also, don't let the inside of your cab get too bright. This makes it harder to see outside. Keep the interior light off, and adjust your instrument lights as low as you can to still be able to read the gauges.If You Get Sleepy, Stop at the Nearest Safe Place. People often don't realize how close they are to falling asleep even when their eyelids are falling shut. If you can safely do so, look at yourself in a mirror. If you look sleepy, or you just feel sleepy, stop driving! You are in a very dangerous condition. The only safe cure is to sleep.
2.12 – Driving in Fog Fog can occur at any time. Fog on highways can be extremely dangerous. Fog is often unexpected, and visibility can deteriorate rapidly. You should watch for foggy conditions and be ready to reduce your speed. Do not assume that the fog will thin out after you enter it. The best advice for driving in fog is don’t. It is preferable that you pull off the road into a rest area or truck stop until visibility is better. If you must drive, be sure to consider the following: Obey all fog-related warning signs. Slow down before you enter fog. Use low-beam headlights and fog lights for best visibility even in daytime, and be alert for other drivers who may have forgotten to turn on their lights. Turn on your 4-way flashers. This will give vehicles approaching you from behind a quicker opportunity to notice your vehicle. Watch for vehicles on the side of the roadway. Seeing taillights or headlights in front of you may not be a true indication of where the road is ahead of you. The vehicle may not be on the road at all. Use roadside highway reflectors as guides to determine how the road may curve ahead of you. Listen for traffic you cannot see. Avoid passing other vehicles. Don’t stop along the side of the road, unless absolutely necessary.
2.13 – Driving in Winter
2.13.1 – Vehicle Checks Make sure your vehicle is ready before driving in winter weather. You should make a regular Vehicle inspection, paying extra attention to the following items.
Coolant Level and Antifreeze Amount. Make sure the cooling system is full and there is enough antifreeze in the system to protect against freezing. This can be checked with a special coolant tester. Defrosting and Heating Equipment. Make sure the defrosters work. They are needed for safe driving. Make sure the heater is working, and that you know how to operate it. If you use other heaters and expect to need them (e.g., mirror heaters, battery box heaters, fuel tank heaters), check their operation.Wipers and Washers. Make sure the windshield wiper blades are in good condition. Make sure the wiper blades press against the window hard enough to wipe the windshield clean, otherwise they may not sweep off snow properly. Make sure the windshield washer works and there is washing fluid in the washer reservoir. Use windshield washer antifreeze to prevent freezing of the washer liquid. If you can't see well enough while driving (for example, if your wipers fail), stop safely and fix the problem. Tires. Make sure you have enough tread on your tires. The drive tires must provide traction to push the rig over wet pavement and through snow. The steering tires must have traction to steer the vehicle. Enough tread is especially important in winter conditions. You must have at least 4/32 inch tread depth in every major groove on front tires and at least 2/32 inch on other tires. More would be better. Use a gauge to determine if you have enough tread for safe driving. Tire Chains. You may find yourself in conditions where you can't drive without chains, even to get to a place of safety. Carry the right number of chains and extra cross-links. Make sure they will fit your drive tires. Check the chains for broken hooks, worn or broken cross-links, and bent or broken side chains. Learn how to put the chains on before you need to do it in snow and ice. Lights and Reflectors. Make sure the lights and reflectors are clean. Lights and reflectors are especially important during bad weather. Check from time to time during bad weather to make sure they are clean and working properly. Windows and Mirrors. Remove any ice, snow, etc., from the windshield, windows, and mirrors before starting. Use a windshield scraper, snow brush, and windshield defroster as necessary. Hand Holds, Steps, and Deck Plates. Remove all ice and snow from hand holds, steps, and deck plates. This will reduce the danger of slipping. Radiator Shutters and Winterfront. Remove ice from the radiator shutters. Make sure the winterfront is not closed too tightly. If the shutters freeze shut or the winterfront is closed too much, the engine may overheat and stop. Exhaust System. Exhaust system leaks are especially dangerous when cab ventilation may be poor (windows
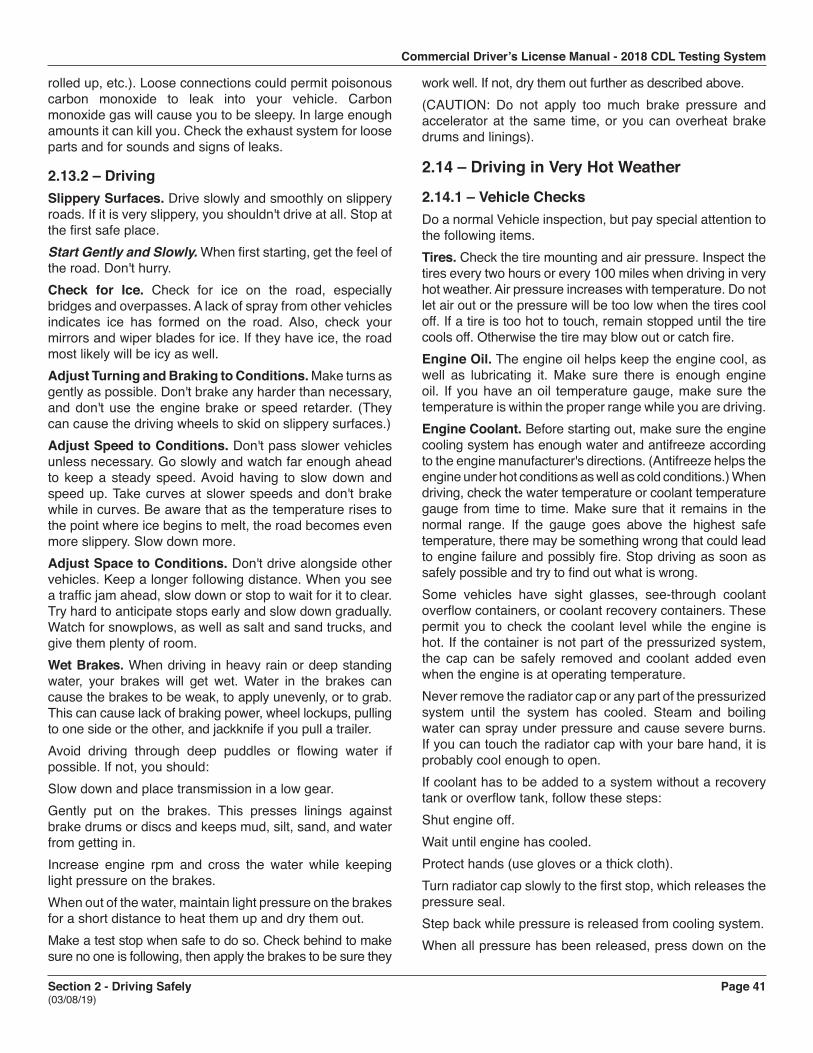
Commercial Driver’s License Manual - 2018 CDL Testing System
Section 2 - Driving Safely Page 41 (03/08/19)
rolled up, etc.). Loose connections could permit poisonous carbon monoxide to leak into your vehicle. Carbon monoxide gas will cause you to be sleepy. In large enough amounts it can kill you. Check the exhaust system for loose parts and for sounds and signs of leaks.
2.13.2 – Driving Slippery Surfaces. Drive slowly and smoothly on slippery roads. If it is very slippery, you shouldn't drive at all. Stop at the first safe place. Start Gently and Slowly. When first starting, get the feel of the road. Don't hurry. Check for Ice. Check for ice on the road, especially bridges and overpasses. A lack of spray from other vehicles indicates ice has formed on the road. Also, check your mirrors and wiper blades for ice. If they have ice, the road most likely will be icy as well. Adjust Turning and Braking to Conditions. Make turns as gently as possible. Don't brake any harder than necessary, and don't use the engine brake or speed retarder. (They can cause the driving wheels to skid on slippery surfaces.) Adjust Speed to Conditions. Don't pass slower vehicles unless necessary. Go slowly and watch far enough ahead to keep a steady speed. Avoid having to slow down and speed up. Take curves at slower speeds and don't brake while in curves. Be aware that as the temperature rises to the point where ice begins to melt, the road becomes even more slippery. Slow down more. Adjust Space to Conditions. Don't drive alongside other vehicles. Keep a longer following distance. When you see a traffic jam ahead, slow down or stop to wait for it to clear. Try hard to anticipate stops early and slow down gradually. Watch for snowplows, as well as salt and sand trucks, and give them plenty of room. Wet Brakes. When driving in heavy rain or deep standing water, your brakes will get wet. Water in the brakes can cause the brakes to be weak, to apply unevenly, or to grab. This can cause lack of braking power, wheel lockups, pulling to one side or the other, and jackknife if you pull a trailer. Avoid driving through deep puddles or flowing water if possible. If not, you should: Slow down and place transmission in a low gear. Gently put on the brakes. This presses linings against brake drums or discs and keeps mud, silt, sand, and water from getting in. Increase engine rpm and cross the water while keeping light pressure on the brakes.When out of the water, maintain light pressure on the brakes for a short distance to heat them up and dry them out. Make a test stop when safe to do so. Check behind to make sure no one is following, then apply the brakes to be sure they
work well. If not, dry them out further as described above. (CAUTION: Do not apply too much brake pressure and accelerator at the same time, or you can overheat brake drums and linings).
2.14 – Driving in Very Hot Weather
2.14.1 – Vehicle Checks Do a normal Vehicle inspection, but pay special attention to the following items. Tires. Check the tire mounting and air pressure. Inspect the tires every two hours or every 100 miles when driving in very hot weather. Air pressure increases with temperature. Do not let air out or the pressure will be too low when the tires cool off. If a tire is too hot to touch, remain stopped until the tire cools off. Otherwise the tire may blow out or catch fire. Engine Oil. The engine oil helps keep the engine cool, as well as lubricating it. Make sure there is enough engine oil. If you have an oil temperature gauge, make sure the temperature is within the proper range while you are driving. Engine Coolant. Before starting out, make sure the engine cooling system has enough water and antifreeze according to the engine manufacturer's directions. (Antifreeze helps the engine under hot conditions as well as cold conditions.) When driving, check the water temperature or coolant temperature gauge from time to time. Make sure that it remains in the normal range. If the gauge goes above the highest safe temperature, there may be something wrong that could lead to engine failure and possibly fire. Stop driving as soon as safely possible and try to find out what is wrong. Some vehicles have sight glasses, see-through coolant overflow containers, or coolant recovery containers. These permit you to check the coolant level while the engine is hot. If the container is not part of the pressurized system, the cap can be safely removed and coolant added even when the engine is at operating temperature. Never remove the radiator cap or any part of the pressurized system until the system has cooled. Steam and boiling water can spray under pressure and cause severe burns. If you can touch the radiator cap with your bare hand, it is probably cool enough to open.If coolant has to be added to a system without a recovery tank or overflow tank, follow these steps: Shut engine off. Wait until engine has cooled. Protect hands (use gloves or a thick cloth). Turn radiator cap slowly to the first stop, which releases the pressure seal. Step back while pressure is released from cooling system. When all pressure has been released, press down on the
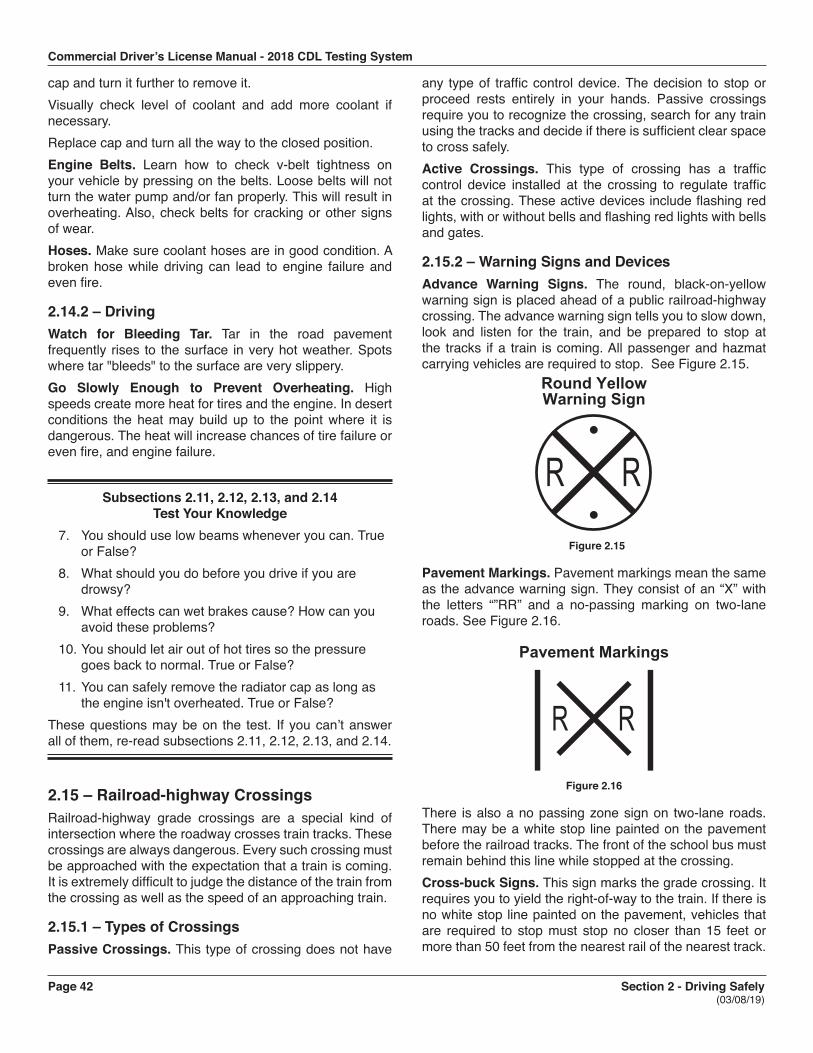
Commercial Driver’s License Manual - 2018 CDL Testing System
Page 42 Section 2 - Driving Safely (03/08/19)
cap and turn it further to remove it. Visually check level of coolant and add more coolant if necessary. Replace cap and turn all the way to the closed position. Engine Belts. Learn how to check v-belt tightness on your vehicle by pressing on the belts. Loose belts will not turn the water pump and/or fan properly. This will result in overheating. Also, check belts for cracking or other signs of wear. Hoses. Make sure coolant hoses are in good condition. A broken hose while driving can lead to engine failure and even fire.
2.14.2 – Driving Watch for Bleeding Tar. Tar in the road pavement frequently rises to the surface in very hot weather. Spots where tar "bleeds" to the surface are very slippery. Go Slowly Enough to Prevent Overheating. High speeds create more heat for tires and the engine. In desert conditions the heat may build up to the point where it is dangerous. The heat will increase chances of tire failure or even fire, and engine failure.
Subsections 2.11, 2.12, 2.13, and 2.14 Test Your Knowledge
7. You should use low beams whenever you can. True or False?
8. What should you do before you drive if you are drowsy?
9. What effects can wet brakes cause? How can you avoid these problems?
10. You should let air out of hot tires so the pressure goes back to normal. True or False?
11. You can safely remove the radiator cap as long as the engine isn't overheated. True or False?
These questions may be on the test. If you can’t answer all of them, re-read subsections 2.11, 2.12, 2.13, and 2.14.
2.15 – Railroad-highway Crossings Railroad-highway grade crossings are a special kind of intersection where the roadway crosses train tracks. These crossings are always dangerous. Every such crossing must be approached with the expectation that a train is coming. It is extremely difficult to judge the distance of the train from the crossing as well as the speed of an approaching train.
2.15.1 – Types of Crossings Passive Crossings. This type of crossing does not have
any type of traffic control device. The decision to stop or proceed rests entirely in your hands. Passive crossings require you to recognize the crossing, search for any train using the tracks and decide if there is sufficient clear space to cross safely. Active Crossings. This type of crossing has a traffic control device installed at the crossing to regulate traffic at the crossing. These active devices include flashing red lights, with or without bells and flashing red lights with bells and gates.
2.15.2 – Warning Signs and Devices Advance Warning Signs. The round, black-on-yellow warning sign is placed ahead of a public railroad-highway crossing. The advance warning sign tells you to slow down, look and listen for the train, and be prepared to stop at the tracks if a train is coming. All passenger and hazmat carrying vehicles are required to stop. See Figure 2.15.
Round Yellow Warning Sign
Figure 2.15
Pavement Markings. Pavement markings mean the same as the advance warning sign. They consist of an “X” with the letters “”RR” and a no-passing marking on two-lane roads. See Figure 2.16.
Pavement Markings
Figure 2.16
There is also a no passing zone sign on two-lane roads. There may be a white stop line painted on the pavement before the railroad tracks. The front of the school bus must remain behind this line while stopped at the crossing. Cross-buck Signs. This sign marks the grade crossing. It requires you to yield the right-of-way to the train. If there is no white stop line painted on the pavement, vehicles that are required to stop must stop no closer than 15 feet or more than 50 feet from the nearest rail of the nearest track.
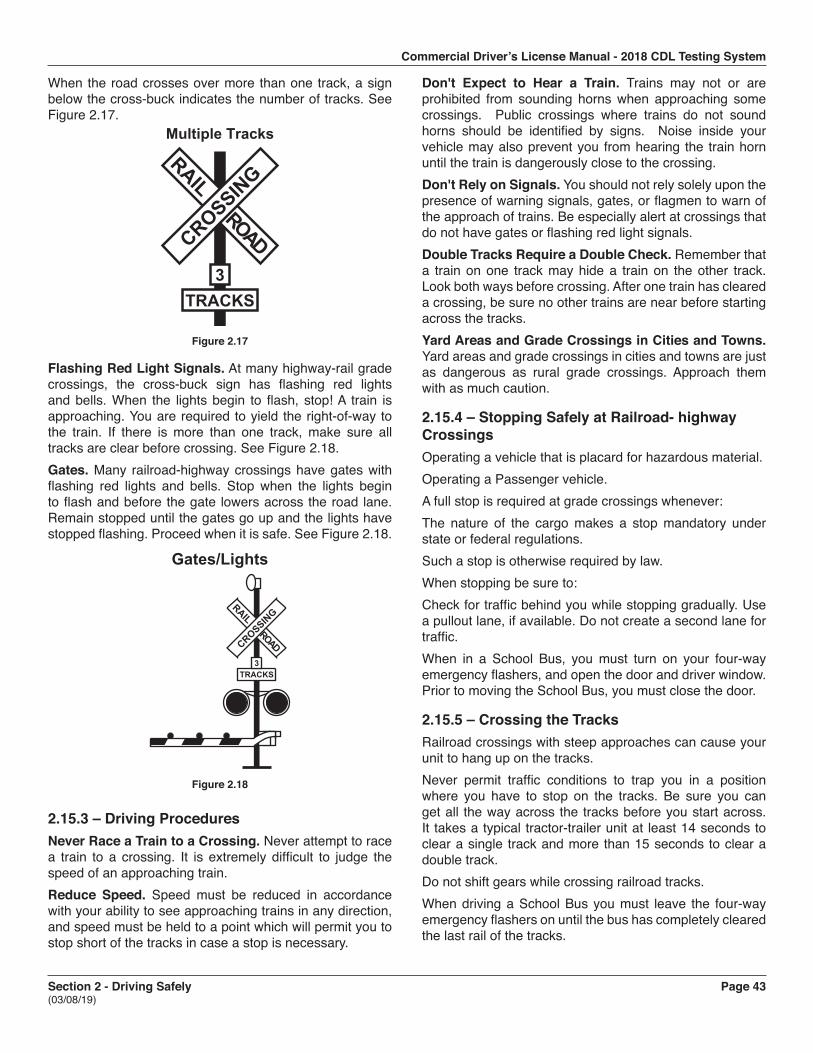
Commercial Driver’s License Manual - 2018 CDL Testing System
Section 2 - Driving Safely Page 43 (03/08/19)
When the road crosses over more than one track, a sign below the cross-buck indicates the number of tracks. See Figure 2.17.
RAIL ROADCROSSIN
G
TRACKS3
Multiple Tracks
Figure 2.17
Flashing Red Light Signals. At many highway-rail grade crossings, the cross-buck sign has flashing red lights and bells. When the lights begin to flash, stop! A train is approaching. You are required to yield the right-of-way to the train. If there is more than one track, make sure all tracks are clear before crossing. See Figure 2.18. Gates. Many railroad-highway crossings have gates with flashing red lights and bells. Stop when the lights begin to flash and before the gate lowers across the road lane. Remain stopped until the gates go up and the lights have stopped flashing. Proceed when it is safe. See Figure 2.18.
Gates/Lights
RAIL ROADCROSSIN
G
TRACKS3
Figure 2.18
2.15.3 – Driving Procedures Never Race a Train to a Crossing. Never attempt to race a train to a crossing. It is extremely difficult to judge the speed of an approaching train. Reduce Speed. Speed must be reduced in accordance with your ability to see approaching trains in any direction, and speed must be held to a point which will permit you to stop short of the tracks in case a stop is necessary.
Don't Expect to Hear a Train. Trains may not or are prohibited from sounding horns when approaching some crossings. Public crossings where trains do not sound horns should be identified by signs. Noise inside your vehicle may also prevent you from hearing the train horn until the train is dangerously close to the crossing. Don't Rely on Signals. You should not rely solely upon the presence of warning signals, gates, or flagmen to warn of the approach of trains. Be especially alert at crossings that do not have gates or flashing red light signals. Double Tracks Require a Double Check. Remember that a train on one track may hide a train on the other track. Look both ways before crossing. After one train has cleared a crossing, be sure no other trains are near before starting across the tracks. Yard Areas and Grade Crossings in Cities and Towns. Yard areas and grade crossings in cities and towns are just as dangerous as rural grade crossings. Approach them with as much caution.
2.15.4 – Stopping Safely at Railroad- highway Crossings Operating a vehicle that is placard for hazardous material.Operating a Passenger vehicle.A full stop is required at grade crossings whenever: The nature of the cargo makes a stop mandatory under state or federal regulations. Such a stop is otherwise required by law. When stopping be sure to: Check for traffic behind you while stopping gradually. Use a pullout lane, if available. Do not create a second lane for traffic.When in a School Bus, you must turn on your four-way emergency flashers, and open the door and driver window. Prior to moving the School Bus, you must close the door.
2.15.5 – Crossing the Tracks Railroad crossings with steep approaches can cause your unit to hang up on the tracks. Never permit traffic conditions to trap you in a position where you have to stop on the tracks. Be sure you can get all the way across the tracks before you start across. It takes a typical tractor-trailer unit at least 14 seconds to clear a single track and more than 15 seconds to clear a double track. Do not shift gears while crossing railroad tracks.When driving a School Bus you must leave the four-way emergency flashers on until the bus has completely cleared the last rail of the tracks.

Commercial Driver’s License Manual - 2018 CDL Testing System
Page 44 Section 2 - Driving Safely (03/08/19)
2.15.6 – Special Situations Be Aware! These trailers can get stuck on raised crossings: Low slung units (lowboy, car carrier, moving van, possum-belly livestock trailer). Single-axle tractor pulling a long trailer with its landing gear set to accommodate a tandem-axle tractor. If for any reason you get stuck on the tracks, get out of the vehicle and away from the tracks. Check signposts or signal housing at the crossing for emergency notification information. Call 911 or other emergency number. Give the location of the crossing using all identifiable landmarks, especially the DOT number, if posted.
2.16 – Mountain Driving In mountain driving, gravity plays a major role. On any upgrade, gravity slows you down. The steeper the grade, the longer the grade, and/or the heavier the load--the more you will have to use lower gears to climb hills or mountains. In coming down long, steep downgrades, gravity causes the speed of your vehicle to increase. You must select an appropriate safe speed, then use a low gear, and proper braking techniques. You should plan ahead and obtain information about any long, steep grades along your planned route of travel. If possible, talk to other drivers who are familiar with the grades to find out what speeds are safe. You must go slowly enough so your brakes can hold you back without getting too hot. If the brakes become too hot, they may start to "fade." This means you have to apply them harder and harder to get the same stopping power. If you continue to use the brakes hard, they can keep fading until you cannot slow down or stop at all.
2.16.1 – Select a "Safe" Speed Your most important consideration is to select a speed that is not too fast for the: Total weight of the vehicle and cargo. Length of the grade. Steepness of the grade. Road conditions. Weather. If a speed limit is posted, or there is a sign indicating "Maximum Safe Speed," never exceed the speed shown. Also, look for and heed warning signs indicating the length and steepness of the grade. You must use the braking effect of the engine as the principal way of controlling your speed. The braking effect of the engine is greatest when it is near the governed rpms and the transmission is in the lower gears. Save your brakes so you will be able to slow or stop as required by road and traffic conditions.
2.16.2 – Select the Right Gear before Starting Down the Grade Shift the transmission to a low gear before starting down the grade. Do not try to downshift after your speed has already built up. You will not be able to shift into a lower gear. You may not even be able to get back into any gear and all engine braking effect will be lost. Forcing an automatic transmission into a lower gear at high speed could damage the transmission and also lead to loss of all engine braking effect.With older trucks, a rule for choosing gears is to use the same gear going down a hill that you would need to climb the hill. However, new trucks have low friction parts and streamlined shapes for fuel economy. They may also have more powerful engines. This means they can go up hills in higher gears and have less friction and air drag to hold them back going down hills. For that reason, drivers of modern trucks may have to use lower gears going down a hill than would be required to go up the hill. You should know what is right for your vehicle.
2.16.3 – Brake Fading or Failure Brakes are designed so brake shoes or pads rub against the brake drum or disks to slow the vehicle. Braking creates heat, but brakes are designed to take a lot of heat. However, brakes can fade or fail from excessive heat caused by using them too much and not relying on the engine braking effect. Brake fade is also affected by adjustment. To safely control a vehicle, every brake must do its share of the work. Brakes out of adjustment will stop doing their share before those that are in adjustment. The other brakes can then overheat and fade, and there will not be enough braking available to control the vehicle. Brakes can get out of adjustment quickly, especially when they are used a lot; also, brake linings wear faster when they are hot. Therefore, brake adjustment must be checked frequently.
2.16.4 – Proper Braking Technique Remember. The use of brakes on a long and/or steep downgrade is only a supplement to the braking effect of the engine. Once the vehicle is in the proper low gear, the following are the proper braking techniques: Apply the brakes just hard enough to feel a definite slowdown. When your speed has been reduced to approximately five mph below your "safe" speed, release the brakes. (This brake application should last for about three seconds.) When your speed has increased to your "safe" speed, repeat steps 1 and 2. For example, if your "safe" speed is 40 mph, you would not apply the brakes until your speed reaches 40 mph. You now apply the brakes hard enough to gradually reduce your speed to 35 mph and then release the brakes. Repeat this

Commercial Driver’s License Manual - 2018 CDL Testing System
Section 2 - Driving Safely Page 45 (03/08/19)
as often as necessary until you have reached the end of the downgrade. Escape ramps have been built on many steep mountain downgrades. Escape ramps are made to stop runaway vehicles safely without injuring drivers and passengers. Escape ramps use a long bed of loose, soft material to slow a runaway vehicle, sometimes in combination with an upgrade. Know escape ramp locations on your route. Signs show drivers where ramp are located. Escape ramps save lives, equipment and cargo.
Subsections 2.15 and 2.16 Test Your Knowledge
1. What factors determine your selection of a "safe"speed when going down a long, steep downgrade?
2. Why should you be in the proper gear before startingdown a hill?
3. Describe the proper braking technique when goingdown a long, steep downgrade.
4. What type of vehicles can get stuck on a railroad-highway crossing?
5. How long does it take for a typical tractor-trailer unitto clear a double track?
These questions may be on the test. If you can’t answer them all, re-read subsections 2.15 and 2.16.
2.17 – Driving Emergencies Traffic emergencies occur when two vehicles are about to collide. Vehicle emergencies occur when tires, brakes, or other critical parts fail. Following the safety practices in this manual can help prevent emergencies. But if an emergency does happen, your chances of avoiding a crash depend upon how well you take action. Actions you can take are discussed below.
2.17.1 – Steering to Avoid a Crash Stopping is not always the safest thing to do in an emergency. When you don't have enough room to stop, you may have to steer away from what's ahead. Remember, you can almost always turn to miss an obstacle more quickly than you can stop. (However, top-heavy vehicles and tractors with multiple trailers may flip over.) Keep Both Hands on the Steering Wheel. In order to turn quickly, you must have a firm grip on the steering wheel with both hands. The best way to have both hands on the wheel, if there is an emergency, is to keep them there all the time. How to Turn Quickly and Safely. A quick turn can be made safely, if it's done the right way. Here are some points that safe drivers use:
Do not apply the brake while you are turning. It's very easy to lock your wheels while turning. If that happens, you may skid out of control. Do not turn any more than needed to clear whatever is in your way. The more sharply you turn, the greater the chances of a skid or rollover. Be prepared to "counter-steer," that is, to turn the wheel back in the other direction, once you've passed whatever was in your path. Unless you are prepared to counter-steer, you won't be able to do it quickly enough. You should think of emergency steering and counter-steering as two parts of one driving action. Where to Steer. If an oncoming driver has drifted into your lane, a move to your right is best. If that driver realizes what has happened, the natural response will be to return to his or her own lane. If something is blocking your path, the best direction to steer will depend on the situation. If you have been using your mirrors, you'll know which lane is empty and can be safely used. If the shoulder is clear, going right may be best. No one is likely to be driving on the shoulder but someone may be passing you on the left. You will know if you have been using your mirrors. If you are blocked on both sides, a move to the right may be best. At least you won't force anyone into an opposing traffic lane and a possible head-on collision. Leaving the Road. In some emergencies, you may have to drive off the road. It may be less risky than facing a collision with another vehicle. Most shoulders are strong enough to support the weight of a large vehicle and, therefore, offer an available escape route. Here are some guidelines, if you do leave the road. Avoid Braking. If possible, avoid using the brakes until your speed has dropped to about 20 mph. Then brake very gently to avoid skidding on a loose surface. Keep One Set of Wheels on the Pavement, if Possible. This helps to maintain control. Stay on the Shoulder. If the shoulder is clear, stay on it until your vehicle has come to a stop. Signal and check your mirrors before pulling back onto the road. Returning to the Road. If you are forced to return to the road before you can stop, use the following procedure:Hold the wheel tightly and turn sharply enough to get right back on the road safely. Don't try to edge gradually back on the road. If you do, your tires might grab unexpectedly and you could lose control. When both front tires are on the paved surface, counter-steer immediately. The two turns should be made as a single "steer-counter-steer" move.
Commercial Driver’s License Manual - 2018 CDL Testing System
Page 46 Section 2 - Driving Safely (03/08/19)
2.17.2 – How to Stop Quickly and Safely If somebody suddenly pulls out in front of you, your natural response is to hit the brakes. This is a good response if there's enough distance to stop, and you use the brakes correctly. You should brake in a way that will keep your vehicle in a straight line and allow you to turn if it becomes necessary. You can use the "controlled braking" method or the "stab braking" method. Controlled Braking. With this method, you apply the brakes as hard as you can without locking the wheels. Keep steering wheel movements very small while doing this. If you need to make a larger steering adjustment or if the wheels lock, release the brakes. Re-apply the brakes as soon as you can. Stab Braking. With this method, you apply your brakes all the way and release brakes when wheels lock up. As soon as the wheels start rolling, apply the brakes fully again. (It can take up to one second for the wheels to start rolling after you release the brakes. If you re-apply the brakes before the wheels start rolling, the vehicle won't straighten out.) Don't Jam on the Brakes. Emergency braking does not mean pushing down on the brake pedal as hard as you can. That will only keep the wheels locked up and cause a skid. If the wheels are skidding, you cannot control the vehicle.
2.17.3 – Brake Failure Brakes kept in good condition rarely fail. Most hydraulic brake failures occur for one of two reasons: (Air brakes are discussed in Section 5.) Loss of hydraulic pressure. Brake fade on long hills. Loss of Hydraulic Pressure. When the system won't build up pressure, the brake pedal will feel spongy or go to the floor. Here are some things you can do. Downshift. Putting the vehicle into a lower gear will help to slow the vehicle.Pump the Brakes. Sometimes pumping the brake pedal will generate enough hydraulic pressure to stop the vehicle. Use the Parking Brake. The parking or emergency brake is separate from the hydraulic brake system. Therefore, it can be used to slow the vehicle. However, be sure to press the release button or pull the release lever at the same time you use the emergency brake so you can adjust the brake pressure and keep the wheels from locking up. Find an Escape Route. While slowing the vehicle, look for an escape route--an open field, side-street, or escape ramp. Turning uphill is a good way to slow and stop the vehicle. Make sure the vehicle does not start rolling backward after you stop. Put it in low gear, apply the parking brake, and, if necessary, roll back into some obstacle that will stop the vehicle.
Brake Failure on Downgrades. Going slow enough and braking properly will almost always prevent brake failure on long downgrades. Once the brakes have failed, however, you are going to have to look outside your vehicle for something to stop it. Your best hope is an escape ramp. If there is one, there'll be signs telling you about it. Use it. Ramps are usually located a few miles from the top of the downgrade. Every year, hundreds of drivers avoid injury to themselves or damage to their vehicles by using escape ramps. Some escape ramps use soft gravel that resists the motion of the vehicle and brings it to a stop. Others turn uphill, using the hill to stop the vehicle and soft gravel to hold it in place. Any driver who loses brakes going downhill should use an escape ramp if it's available. If you don't use it, your chances of having a serious crash may be much greater. If no escape ramp is available, take the least hazardous escape route you can--such as an open field or a side road that flattens out or turns uphill. Make the move as soon as you know your brakes don't work. The longer you wait, the faster the vehicle will go, and the harder it will be to stop.
2.17.4 – Tire Failure Recognize Tire Failure. Quickly knowing you have a tire failure will let you have more time to react. Having just a few extra seconds to remember what it is you're supposed to do can help you. The major signs of tire failure are:Sound. The loud "bang" of a blowout is an easily recognized sign. Because it can take a few seconds for your vehicle to react, you might think it was some other vehicle. But any time you hear a tire blow, you'd be safest to assume it is yours. Vibration. If the vehicle thumps or vibrates heavily, it may be a sign that one of the tires has gone flat. With a rear tire, that may be the only sign you get. Feel. If the steering feels "heavy," it is probably a sign that one of the front tires has failed. Sometimes, failure of a rear tire will cause the vehicle to slide back and forth or "fishtail." However, dual rear tires usually prevent this. Respond to Tire Failure. When a tire fails, your vehicle is in danger. You must immediately: Hold the Steering Wheel Firmly. If a front tire fails, it can twist the steering wheel out of your hand. The only way to prevent this is to keep a firm grip on the steering wheel with both hands at all times. Stay off the Brake. It's natural to want to brake in an emergency. However, braking when a tire has failed could cause loss of control. Unless you're about to run into something, stay off the brake until the vehicle has slowed down. Then brake very gently, pull off the road, and stop. Check the Tires. After you've come to a stop, get out and check all the tires. Do this even if the vehicle seems to be
Commercial Driver’s License Manual - 2018 CDL Testing System
Section 2 - Driving Safely Page 47 (03/08/19)
handling all right. If one of your dual tires goes, the only way you may know it is by getting out and looking at it.
2.18 – Antilock Braking Systems (ABS) ABS is a computerized system that keeps your wheels from locking up during hard brake applications. ABS is an addition to your normal brakes. It does not decrease or increase your normal braking capability. ABS only activates when wheels are about to lock up. ABS does not necessarily shorten your stopping distance, but it does help you keep the vehicle under control during hard braking.
2.18.1 – How Antilock Braking Systems Work Sensors detect potential wheel lock up. An electronic control unit (ECU) will then decrease brake pressure to avoid wheel lockup. Brake pressure is adjusted to provide the maximum braking without danger of lockup.ABS works far faster than the driver can respond to potential wheel lockup. At all other times the brake system will operate normally.
2.18.2 – Vehicles Required to Have Antilock Braking Systems The Department of Transportation requires that ABS be on: Truck tractors with air brakes built on or after March 1, 1997. Other air brake vehicles, (trucks, buses, trailers, and converter dollies) built on or after March 1, 1998. Hydraulically braked trucks and buses with a gross vehicle weight rating of 10,000 lbs or more built on or after March 1, 1999. Many commercial vehicles built before these dates have been voluntarily equipped with ABS.
2.18.3 – How to Know If Your Vehicle Is Equipped with ABS Tractors, trucks, and buses will have yellow ABS malfunction lamps on the instrument panel. Trailers will have yellow ABS malfunction lamps on the left side, either on the front or rear corner. Dollies manufactured on or after March 1, 1998, are required to have a lamp on the left side. As a system check on newer vehicles, the malfunction lamp comes on at start-up for a bulb check, and then goes out quickly. On older systems, the lamp could stay on until you are driving over five mph. If the lamp stays on after the bulb check, or goes on once you are under way, you may have lost ABS control. In the case of towed units manufactured before it was
required by the Department of Transportation, it may be difficult to tell if the unit is equipped with ABS. Look under the vehicle for the ECU and wheel speed sensor wires coming from the back of the brakes.
2.18.4 – How ABS Helps You When you brake hard on slippery surfaces in a vehicle without ABS, your wheels may lock up. When your steering wheels lock up, you lose steering control. When your other wheels lock up, you may skid, jackknife, or even spin the vehicle.ABS helps you avoid wheel lock up and maintain control. You may or may not be able to stop faster with ABS, but you should be able to steer around an obstacle while braking, and avoid skids caused by over braking.
2.18.5 – ABS on the Tractor Only or Only on the Trailer Having ABS on only the tractor, only the trailer, or even on only one axle, still gives you more control over the vehicle during braking. Brake normally. When only the tractor has ABS, you should be able to maintain steering control, and there is less chance of jackknifing. But keep your eye on the trailer and let up on the brakes (if you can safely do so) if it begins to swing out. When only the trailer has ABS, the trailer is less likely to swing out, but if you lose steering control or start a tractor jackknife, let up on the brakes (if you can safely do so) until you regain control.
2.18.6 – Braking with ABS When you drive a vehicle with ABS, you should brake as you always have. In other words: Use only the braking force necessary to stop safely and stay in control. Brake the same way, regardless of whether you have ABS on the bus, tractor, the trailer, or both. As you slow down, monitor your tractor and trailer and back off the brakes (if it is safe to do so) to stay in control. There is only one exception to this procedure. If you drive a straight truck or combination with working ABS on all axles, in an emergency stop, you can fully apply the brakes.
2.18.7 – Braking If ABS Is Not Working Without ABS you still have normal brake functions. Drive and brake as you always have. Vehicles with ABS have yellow malfunction lamps to tell you if something isn’t working. As a system check on newer vehicles, the malfunction lamp comes on at start-up for a bulb check and then goes out quickly. On older systems, the lamp could stay on until you are driving over five mph.
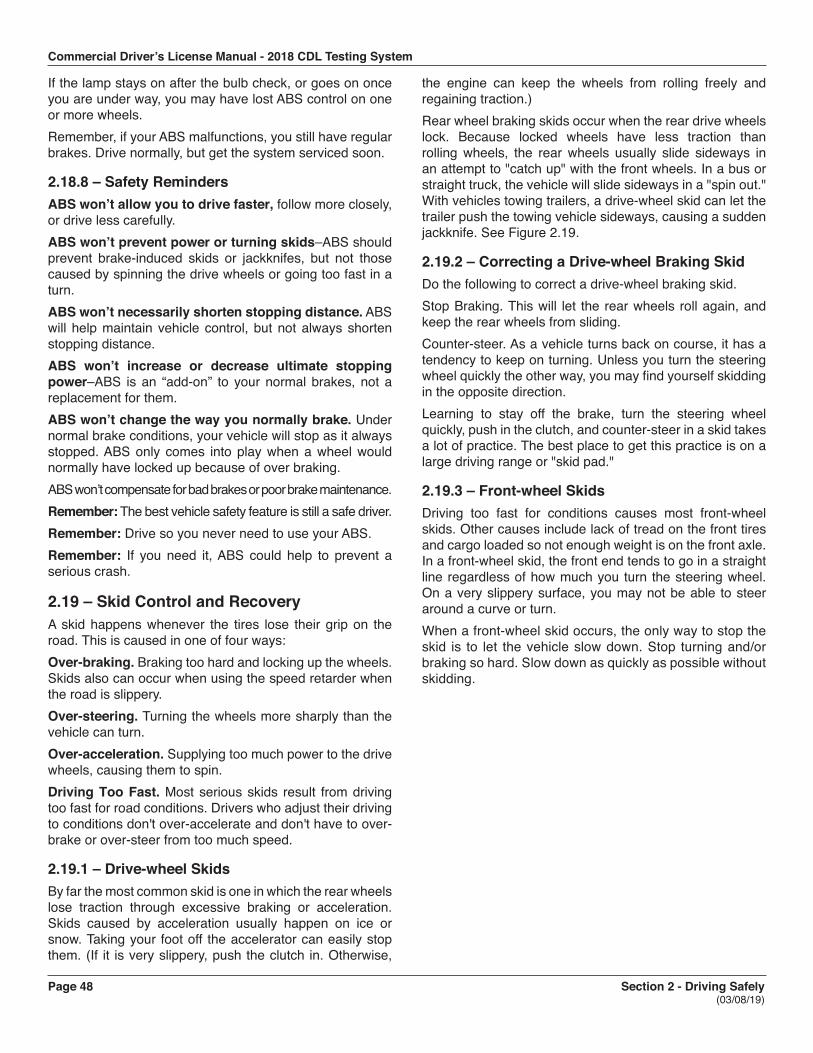
Commercial Driver’s License Manual - 2018 CDL Testing System
Page 48 Section 2 - Driving Safely (03/08/19)
If the lamp stays on after the bulb check, or goes on once you are under way, you may have lost ABS control on one or more wheels.Remember, if your ABS malfunctions, you still have regular brakes. Drive normally, but get the system serviced soon.
2.18.8 – Safety Reminders ABS won’t allow you to drive faster, follow more closely, or drive less carefully. ABS won’t prevent power or turning skids–ABS should prevent brake-induced skids or jackknifes, but not those caused by spinning the drive wheels or going too fast in a turn. ABS won’t necessarily shorten stopping distance. ABS will help maintain vehicle control, but not always shorten stopping distance. ABS won’t increase or decrease ultimate stopping power–ABS is an “add-on” to your normal brakes, not a replacement for them. ABS won’t change the way you normally brake. Under normal brake conditions, your vehicle will stop as it always stopped. ABS only comes into play when a wheel would normally have locked up because of over braking. ABS won’t compensate for bad brakes or poor brake maintenance. Remember: The best vehicle safety feature is still a safe driver. Remember: Drive so you never need to use your ABS. Remember: If you need it, ABS could help to prevent a serious crash.
2.19 – Skid Control and Recovery A skid happens whenever the tires lose their grip on the road. This is caused in one of four ways: Over-braking. Braking too hard and locking up the wheels. Skids also can occur when using the speed retarder when the road is slippery. Over-steering. Turning the wheels more sharply than the vehicle can turn. Over-acceleration. Supplying too much power to the drive wheels, causing them to spin. Driving Too Fast. Most serious skids result from driving too fast for road conditions. Drivers who adjust their driving to conditions don't over-accelerate and don't have to over-brake or over-steer from too much speed.
2.19.1 – Drive-wheel Skids By far the most common skid is one in which the rear wheels lose traction through excessive braking or acceleration. Skids caused by acceleration usually happen on ice or snow. Taking your foot off the accelerator can easily stop them. (If it is very slippery, push the clutch in. Otherwise,
the engine can keep the wheels from rolling freely and regaining traction.) Rear wheel braking skids occur when the rear drive wheels lock. Because locked wheels have less traction than rolling wheels, the rear wheels usually slide sideways in an attempt to "catch up" with the front wheels. In a bus or straight truck, the vehicle will slide sideways in a "spin out." With vehicles towing trailers, a drive-wheel skid can let the trailer push the towing vehicle sideways, causing a sudden jackknife. See Figure 2.19.
2.19.2 – Correcting a Drive-wheel Braking Skid Do the following to correct a drive-wheel braking skid. Stop Braking. This will let the rear wheels roll again, and keep the rear wheels from sliding. Counter-steer. As a vehicle turns back on course, it has a tendency to keep on turning. Unless you turn the steering wheel quickly the other way, you may find yourself skidding in the opposite direction. Learning to stay off the brake, turn the steering wheel quickly, push in the clutch, and counter-steer in a skid takes a lot of practice. The best place to get this practice is on a large driving range or "skid pad."
2.19.3 – Front-wheel Skids Driving too fast for conditions causes most front-wheel skids. Other causes include lack of tread on the front tires and cargo loaded so not enough weight is on the front axle. In a front-wheel skid, the front end tends to go in a straight line regardless of how much you turn the steering wheel. On a very slippery surface, you may not be able to steer around a curve or turn. When a front-wheel skid occurs, the only way to stop the skid is to let the vehicle slow down. Stop turning and/or braking so hard. Slow down as quickly as possible without skidding.
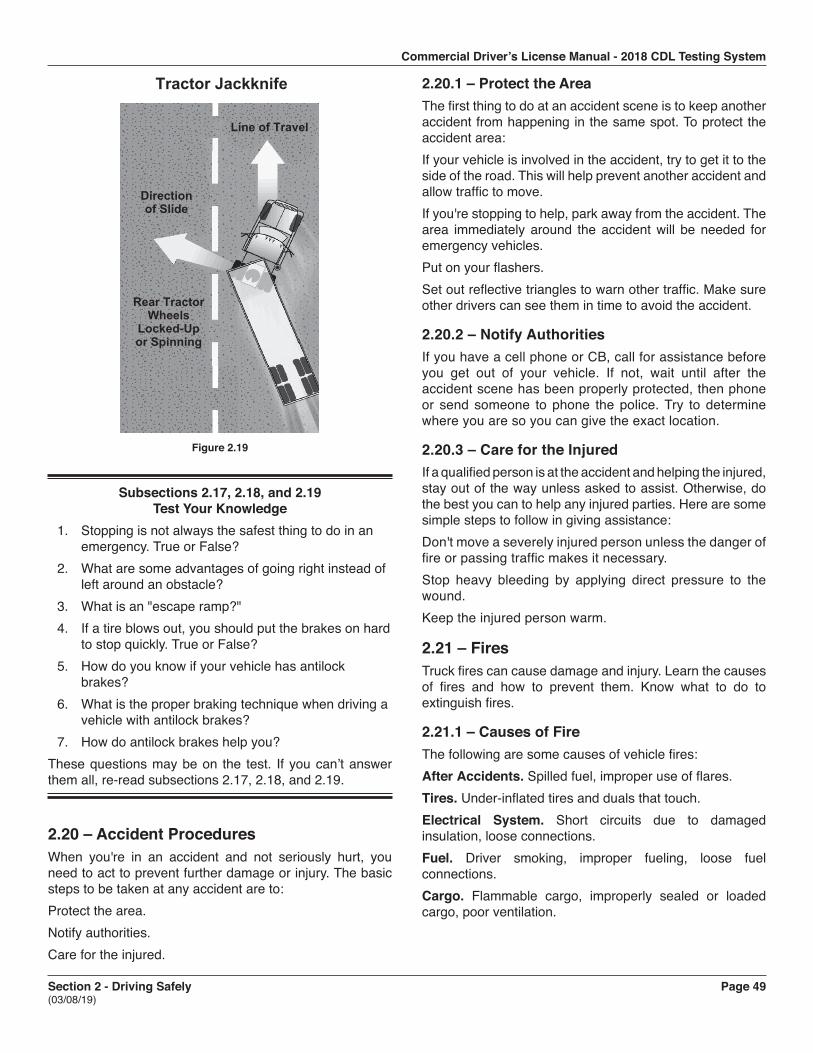
Commercial Driver’s License Manual - 2018 CDL Testing System
Section 2 - Driving Safely Page 49 (03/08/19)
Tractor Jackknife
Line of Travel
Direction of Slide
Rear Tractor Wheels
Locked-Up or Spinning
Figure 2.19
Subsections 2.17, 2.18, and 2.19 Test Your Knowledge
1. Stopping is not always the safest thing to do in an emergency. True or False?
2. What are some advantages of going right instead of left around an obstacle?
3. What is an "escape ramp?"4. If a tire blows out, you should put the brakes on hard
to stop quickly. True or False?5. How do you know if your vehicle has antilock
brakes?6. What is the proper braking technique when driving a
vehicle with antilock brakes?7. How do antilock brakes help you?
These questions may be on the test. If you can’t answer them all, re-read subsections 2.17, 2.18, and 2.19.
2.20 – Accident Procedures When you're in an accident and not seriously hurt, you need to act to prevent further damage or injury. The basic steps to be taken at any accident are to: Protect the area. Notify authorities. Care for the injured.
2.20.1 – Protect the Area The first thing to do at an accident scene is to keep another accident from happening in the same spot. To protect the accident area: If your vehicle is involved in the accident, try to get it to the side of the road. This will help prevent another accident and allow traffic to move. If you're stopping to help, park away from the accident. The area immediately around the accident will be needed for emergency vehicles. Put on your flashers. Set out reflective triangles to warn other traffic. Make sure other drivers can see them in time to avoid the accident.
2.20.2 – Notify Authorities If you have a cell phone or CB, call for assistance before you get out of your vehicle. If not, wait until after the accident scene has been properly protected, then phone or send someone to phone the police. Try to determine where you are so you can give the exact location.
2.20.3 – Care for the Injured If a qualified person is at the accident and helping the injured, stay out of the way unless asked to assist. Otherwise, do the best you can to help any injured parties. Here are some simple steps to follow in giving assistance: Don't move a severely injured person unless the danger of fire or passing traffic makes it necessary. Stop heavy bleeding by applying direct pressure to the wound. Keep the injured person warm.
2.21 – Fires Truck fires can cause damage and injury. Learn the causes of fires and how to prevent them. Know what to do to extinguish fires.
2.21.1 – Causes of Fire The following are some causes of vehicle fires:After Accidents. Spilled fuel, improper use of flares. Tires. Under-inflated tires and duals that touch. Electrical System. Short circuits due to damaged insulation, loose connections. Fuel. Driver smoking, improper fueling, loose fuel connections. Cargo. Flammable cargo, improperly sealed or loaded cargo, poor ventilation.
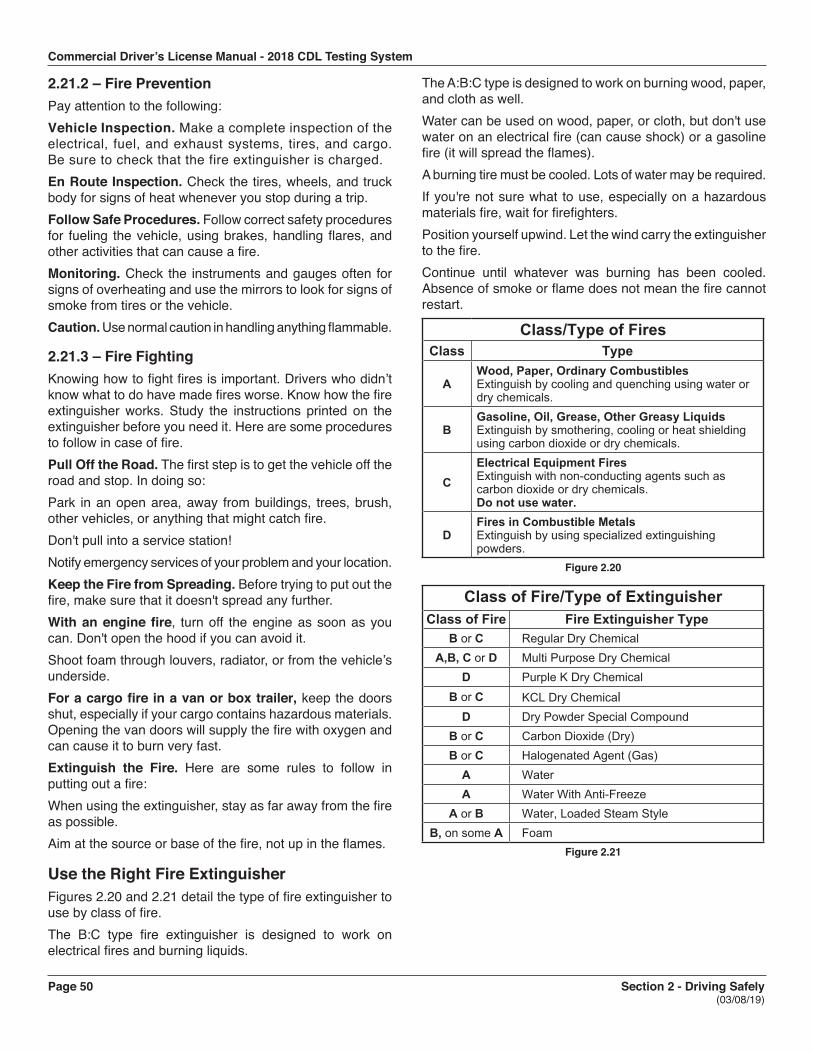
Commercial Driver’s License Manual - 2018 CDL Testing System
Page 50 Section 2 - Driving Safely (03/08/19)
2.21.2 – Fire Prevention Pay attention to the following: Vehicle Inspection. Make a complete inspection of the electrical, fuel, and exhaust systems, tires, and cargo. Be sure to check that the fire extinguisher is charged. En Route Inspection. Check the tires, wheels, and truck body for signs of heat whenever you stop during a trip. Follow Safe Procedures. Follow correct safety procedures for fueling the vehicle, using brakes, handling flares, and other activities that can cause a fire. Monitoring. Check the instruments and gauges often for signs of overheating and use the mirrors to look for signs of smoke from tires or the vehicle. Caution. Use normal caution in handling anything flammable.
2.21.3 – Fire Fighting Knowing how to fight fires is important. Drivers who didn’t know what to do have made fires worse. Know how the fire extinguisher works. Study the instructions printed on the extinguisher before you need it. Here are some procedures to follow in case of fire. Pull Off the Road. The first step is to get the vehicle off the road and stop. In doing so: Park in an open area, away from buildings, trees, brush, other vehicles, or anything that might catch fire. Don't pull into a service station! Notify emergency services of your problem and your location. Keep the Fire from Spreading. Before trying to put out the fire, make sure that it doesn't spread any further. With an engine fire, turn off the engine as soon as you can. Don't open the hood if you can avoid it.Shoot foam through louvers, radiator, or from the vehicle’s underside. For a cargo fire in a van or box trailer, keep the doors shut, especially if your cargo contains hazardous materials. Opening the van doors will supply the fire with oxygen and can cause it to burn very fast. Extinguish the Fire. Here are some rules to follow in putting out a fire: When using the extinguisher, stay as far away from the fire as possible. Aim at the source or base of the fire, not up in the flames.
Use the Right Fire Extinguisher Figures 2.20 and 2.21 detail the type of fire extinguisher to use by class of fire. The B:C type fire extinguisher is designed to work on electrical fires and burning liquids.
The A:B:C type is designed to work on burning wood, paper, and cloth as well. Water can be used on wood, paper, or cloth, but don't use water on an electrical fire (can cause shock) or a gasoline fire (it will spread the flames). A burning tire must be cooled. Lots of water may be required. If you're not sure what to use, especially on a hazardous materials fire, wait for firefighters. Position yourself upwind. Let the wind carry the extinguisher to the fire. Continue until whatever was burning has been cooled. Absence of smoke or flame does not mean the fire cannot restart.
Class/Type of FiresClass Type
AWood, Paper, Ordinary CombustiblesExtinguish by cooling and quenching using water or dry chemicals.
BGasoline, Oil, Grease, Other Greasy LiquidsExtinguish by smothering, cooling or heat shielding using carbon dioxide or dry chemicals.
CElectrical Equipment FiresExtinguish with non-conducting agents such as carbon dioxide or dry chemicals.Do not use water.
DFires in Combustible MetalsExtinguish by using specialized extinguishing powders.
Figure 2.20
Class of Fire/Type of ExtinguisherClass of Fire Fire Extinguisher Type
B or C Regular Dry ChemicalA,B, C or D Multi Purpose Dry Chemical
D Purple K Dry ChemicalB or C KCL Dry Chemical
D Dry Powder Special CompoundB or C Carbon Dioxide (Dry)B or C Halogenated Agent (Gas)
A WaterA Water With Anti-Freeze
A or B Water, Loaded Steam StyleB, on some A Foam
Figure 2.21
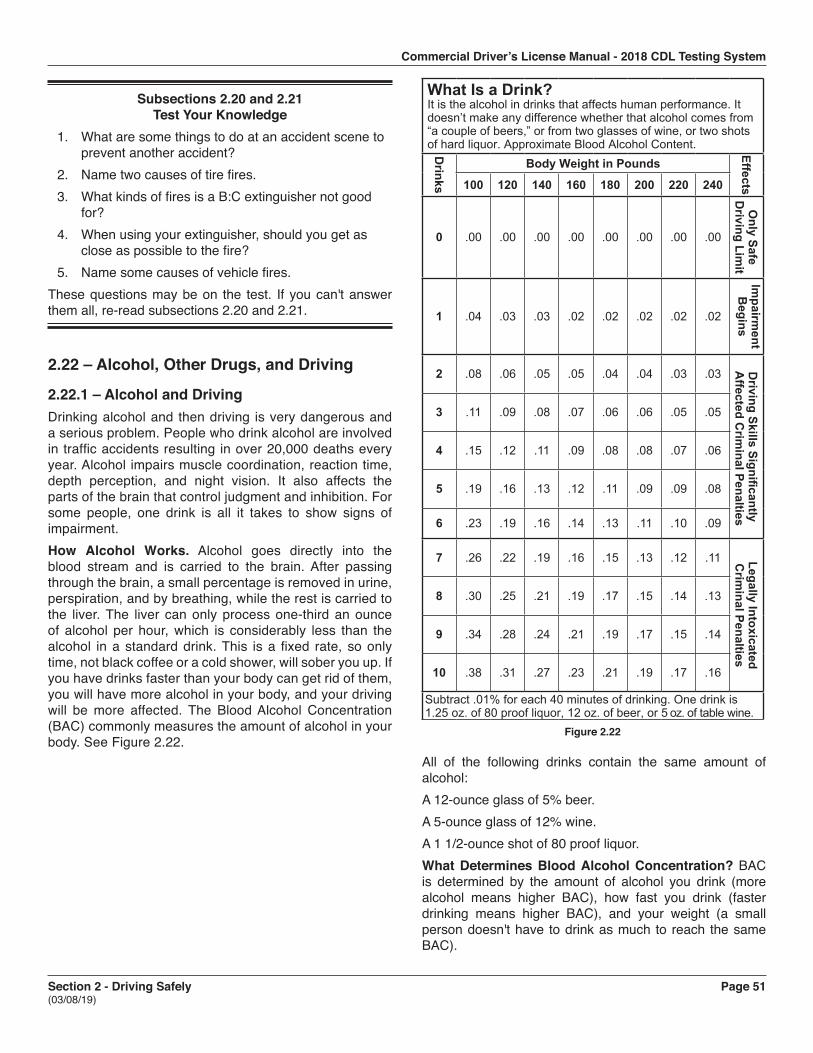
Commercial Driver’s License Manual - 2018 CDL Testing System
Section 2 - Driving Safely Page 51 (03/08/19)
Subsections 2.20 and 2.21 Test Your Knowledge
1. What are some things to do at an accident scene to prevent another accident?
2. Name two causes of tire fires.3. What kinds of fires is a B:C extinguisher not good
for?4. When using your extinguisher, should you get as
close as possible to the fire?5. Name some causes of vehicle fires.
These questions may be on the test. If you can't answer them all, re-read subsections 2.20 and 2.21.
2.22 – Alcohol, Other Drugs, and Driving
2.22.1 – Alcohol and Driving Drinking alcohol and then driving is very dangerous and a serious problem. People who drink alcohol are involved in traffic accidents resulting in over 20,000 deaths every year. Alcohol impairs muscle coordination, reaction time, depth perception, and night vision. It also affects the parts of the brain that control judgment and inhibition. For some people, one drink is all it takes to show signs of impairment. How Alcohol Works. Alcohol goes directly into the blood stream and is carried to the brain. After passing through the brain, a small percentage is removed in urine, perspiration, and by breathing, while the rest is carried to the liver. The liver can only process one-third an ounce of alcohol per hour, which is considerably less than the alcohol in a standard drink. This is a fixed rate, so only time, not black coffee or a cold shower, will sober you up. If you have drinks faster than your body can get rid of them, you will have more alcohol in your body, and your driving will be more affected. The Blood Alcohol Concentration (BAC) commonly measures the amount of alcohol in your body. See Figure 2.22.
What Is a Drink?It is the alcohol in drinks that affects human performance. It doesn’t make any difference whether that alcohol comes from “a couple of beers,” or from two glasses of wine, or two shots of hard liquor. Approximate Blood Alcohol Content.D
rinks
Body Weight in Pounds
Effects100 120 140 160 180 200 220 240
0 .00 .00 .00 .00 .00 .00 .00 .00
Only Safe
Driving Lim
it
1 .04 .03 .03 .02 .02 .02 .02 .02
Impairm
entB
egins
2 .08 .06 .05 .05 .04 .04 .03 .03 Driving Skills Significantly
Affected C
riminal Penalties
3 .11 .09 .08 .07 .06 .06 .05 .05
4 .15 .12 .11 .09 .08 .08 .07 .06
5 .19 .16 .13 .12 .11 .09 .09 .08
6 .23 .19 .16 .14 .13 .11 .10 .09
7 .26 .22 .19 .16 .15 .13 .12 .11 Legally IntoxicatedC
riminal Penalties
8 .30 .25 .21 .19 .17 .15 .14 .13
9 .34 .28 .24 .21 .19 .17 .15 .14
10 .38 .31 .27 .23 .21 .19 .17 .16
Subtract .01% for each 40 minutes of drinking. One drink is 1.25 oz. of 80 proof liquor, 12 oz. of beer, or 5 oz. of table wine.
Figure 2.22
All of the following drinks contain the same amount of alcohol: A 12-ounce glass of 5% beer. A 5-ounce glass of 12% wine. A 1 1/2-ounce shot of 80 proof liquor. What Determines Blood Alcohol Concentration? BAC is determined by the amount of alcohol you drink (more alcohol means higher BAC), how fast you drink (faster drinking means higher BAC), and your weight (a small person doesn't have to drink as much to reach the same BAC).
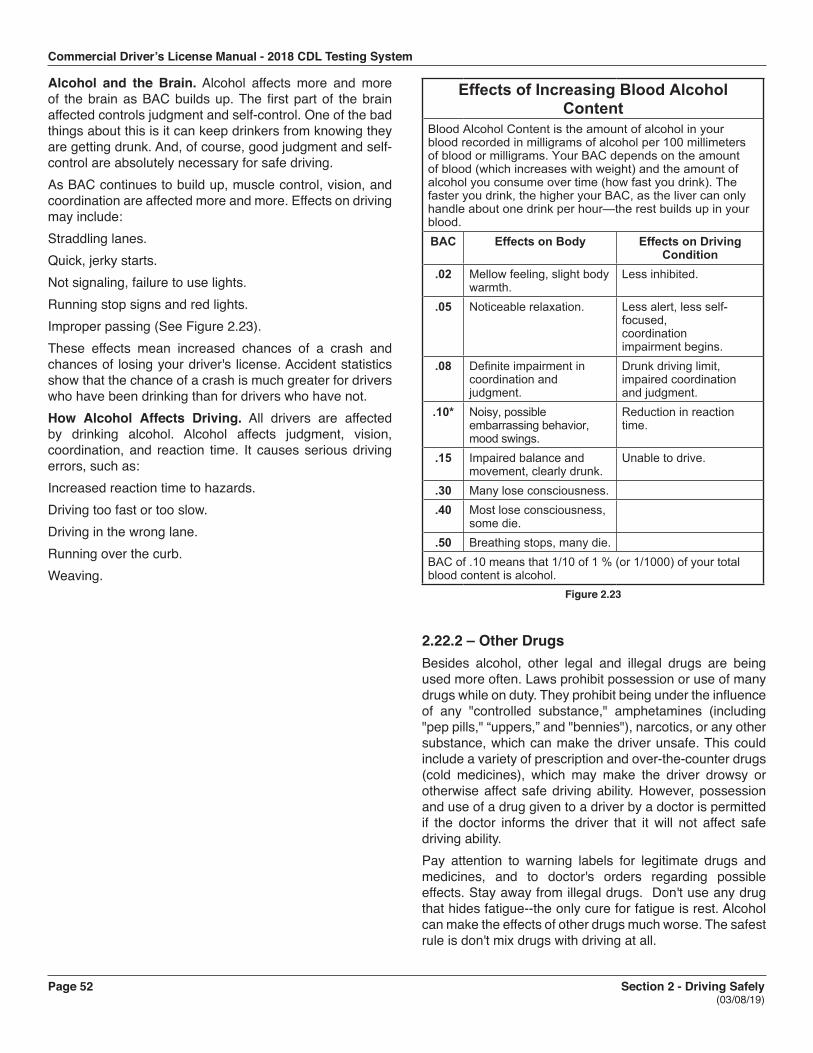
Commercial Driver’s License Manual - 2018 CDL Testing System
Page 52 Section 2 - Driving Safely (03/08/19)
Alcohol and the Brain. Alcohol affects more and more of the brain as BAC builds up. The first part of the brain affected controls judgment and self-control. One of the bad things about this is it can keep drinkers from knowing they are getting drunk. And, of course, good judgment and self-control are absolutely necessary for safe driving. As BAC continues to build up, muscle control, vision, and coordination are affected more and more. Effects on driving may include: Straddling lanes. Quick, jerky starts. Not signaling, failure to use lights. Running stop signs and red lights. Improper passing (See Figure 2.23). These effects mean increased chances of a crash and chances of losing your driver's license. Accident statistics show that the chance of a crash is much greater for drivers who have been drinking than for drivers who have not. How Alcohol Affects Driving. All drivers are affected by drinking alcohol. Alcohol affects judgment, vision, coordination, and reaction time. It causes serious driving errors, such as: Increased reaction time to hazards. Driving too fast or too slow. Driving in the wrong lane. Running over the curb. Weaving.
Effects of Increasing Blood Alcohol Content
Blood Alcohol Content is the amount of alcohol in your blood recorded in milligrams of alcohol per 100 millimeters of blood or milligrams. Your BAC depends on the amount of blood (which increases with weight) and the amount of alcohol you consume over time (how fast you drink). The faster you drink, the higher your BAC, as the liver can only handle about one drink per hour—the rest builds up in your blood.BAC Effects on Body Effects on Driving
Condition.02 Mellow feeling, slight body
warmth.Less inhibited.
.05 Noticeable relaxation. Less alert, less self-focused, coordination impairment begins.
.08 Definite impairment in coordination and judgment.
Drunk driving limit, impaired coordination and judgment.
.10* Noisy, possible embarrassing behavior, mood swings.
Reduction in reaction time.
.15 Impaired balance and movement, clearly drunk.
Unable to drive.
.30 Many lose consciousness.
.40 Most lose consciousness, some die.
.50 Breathing stops, many die.BAC of .10 means that 1/10 of 1 % (or 1/1000) of your total blood content is alcohol.
Figure 2.23
2.22.2 – Other Drugs Besides alcohol, other legal and illegal drugs are being used more often. Laws prohibit possession or use of many drugs while on duty. They prohibit being under the influence of any "controlled substance," amphetamines (including "pep pills," “uppers,” and "bennies"), narcotics, or any other substance, which can make the driver unsafe. This could include a variety of prescription and over-the-counter drugs (cold medicines), which may make the driver drowsy or otherwise affect safe driving ability. However, possession and use of a drug given to a driver by a doctor is permitted if the doctor informs the driver that it will not affect safe driving ability.Pay attention to warning labels for legitimate drugs and medicines, and to doctor's orders regarding possible effects. Stay away from illegal drugs. Don't use any drug that hides fatigue--the only cure for fatigue is rest. Alcohol can make the effects of other drugs much worse. The safest rule is don't mix drugs with driving at all.
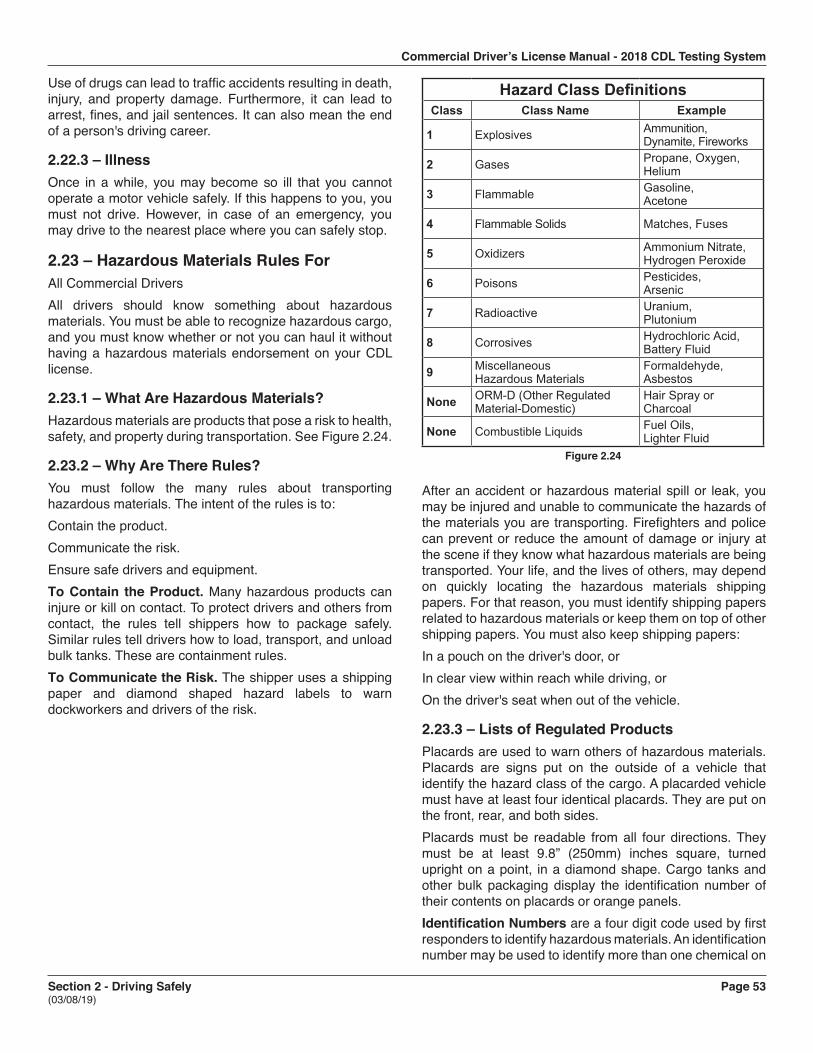
Commercial Driver’s License Manual - 2018 CDL Testing System
Section 2 - Driving Safely Page 53 (03/08/19)
Use of drugs can lead to traffic accidents resulting in death, injury, and property damage. Furthermore, it can lead to arrest, fines, and jail sentences. It can also mean the end of a person's driving career.
2.22.3 – Illness Once in a while, you may become so ill that you cannot operate a motor vehicle safely. If this happens to you, you must not drive. However, in case of an emergency, you may drive to the nearest place where you can safely stop.
2.23 – Hazardous Materials Rules For All Commercial Drivers All drivers should know something about hazardous materials. You must be able to recognize hazardous cargo, and you must know whether or not you can haul it without having a hazardous materials endorsement on your CDL license.
2.23.1 – What Are Hazardous Materials? Hazardous materials are products that pose a risk to health, safety, and property during transportation. See Figure 2.24.
2.23.2 – Why Are There Rules? You must follow the many rules about transporting hazardous materials. The intent of the rules is to: Contain the product. Communicate the risk. Ensure safe drivers and equipment. To Contain the Product. Many hazardous products can injure or kill on contact. To protect drivers and others from contact, the rules tell shippers how to package safely. Similar rules tell drivers how to load, transport, and unload bulk tanks. These are containment rules. To Communicate the Risk. The shipper uses a shipping paper and diamond shaped hazard labels to warn dockworkers and drivers of the risk.
Hazard Class DefinitionsClass Class Name Example
1 Explosives Ammunition, Dynamite, Fireworks
2 Gases Propane, Oxygen, Helium
3 Flammable Gasoline, Acetone
4 Flammable Solids Matches, Fuses
5 Oxidizers Ammonium Nitrate, Hydrogen Peroxide
6 Poisons Pesticides, Arsenic
7 Radioactive Uranium, Plutonium
8 Corrosives Hydrochloric Acid, Battery Fluid
9 Miscellaneous Hazardous Materials
Formaldehyde, Asbestos
None ORM-D (Other Regulated Material-Domestic)
Hair Spray or Charcoal
None Combustible Liquids Fuel Oils, Lighter Fluid
Figure 2.24
After an accident or hazardous material spill or leak, you may be injured and unable to communicate the hazards of the materials you are transporting. Firefighters and police can prevent or reduce the amount of damage or injury at the scene if they know what hazardous materials are being transported. Your life, and the lives of others, may depend on quickly locating the hazardous materials shipping papers. For that reason, you must identify shipping papers related to hazardous materials or keep them on top of other shipping papers. You must also keep shipping papers: In a pouch on the driver's door, or In clear view within reach while driving, or On the driver's seat when out of the vehicle.
2.23.3 – Lists of Regulated Products Placards are used to warn others of hazardous materials. Placards are signs put on the outside of a vehicle that identify the hazard class of the cargo. A placarded vehicle must have at least four identical placards. They are put on the front, rear, and both sides.Placards must be readable from all four directions. They must be at least 9.8” (250mm) inches square, turned upright on a point, in a diamond shape. Cargo tanks and other bulk packaging display the identification number of their contents on placards or orange panels. Identification Numbers are a four digit code used by first responders to identify hazardous materials. An identification number may be used to identify more than one chemical on
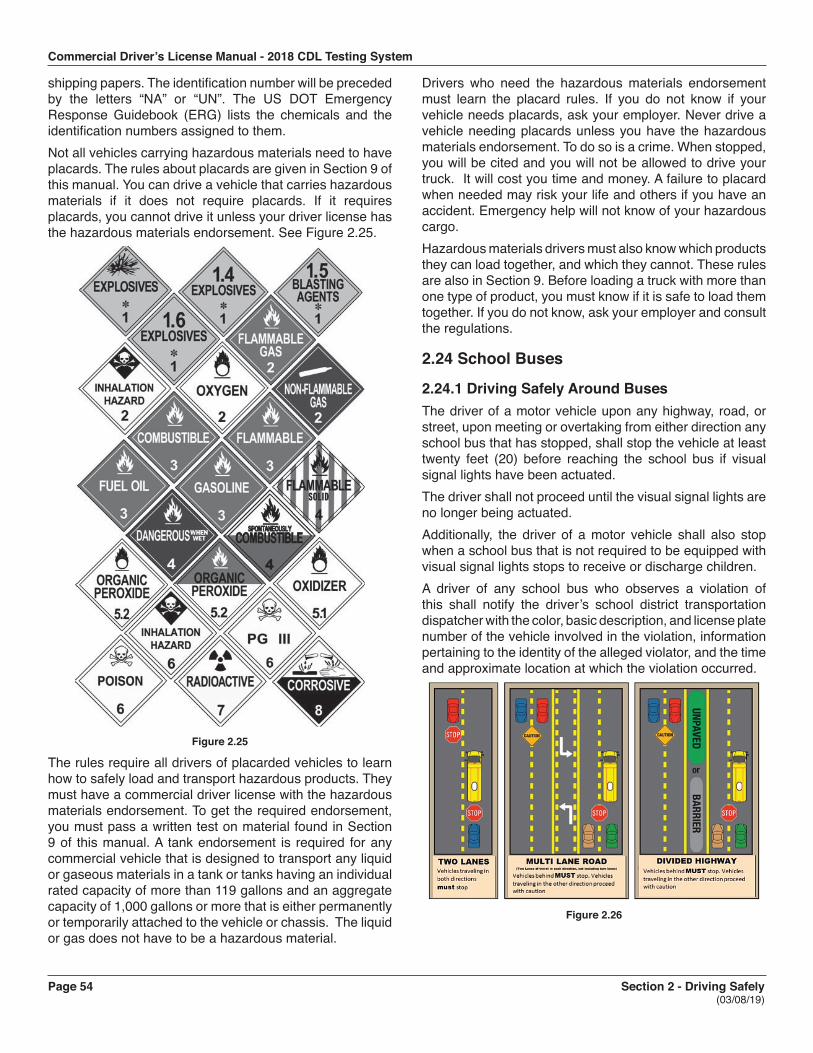
Commercial Driver’s License Manual - 2018 CDL Testing System
Page 54 Section 2 - Driving Safely (03/08/19)
shipping papers. The identification number will be preceded by the letters “NA” or “UN”. The US DOT Emergency Response Guidebook (ERG) lists the chemicals and the identification numbers assigned to them. Not all vehicles carrying hazardous materials need to have placards. The rules about placards are given in Section 9 of this manual. You can drive a vehicle that carries hazardous materials if it does not require placards. If it requires placards, you cannot drive it unless your driver license has the hazardous materials endorsement. See Figure 2.25.
Figure 2.25
The rules require all drivers of placarded vehicles to learn how to safely load and transport hazardous products. They must have a commercial driver license with the hazardous materials endorsement. To get the required endorsement, you must pass a written test on material found in Section 9 of this manual. A tank endorsement is required for any commercial vehicle that is designed to transport any liquid or gaseous materials in a tank or tanks having an individual rated capacity of more than 119 gallons and an aggregate capacity of 1,000 gallons or more that is either permanently or temporarily attached to the vehicle or chassis. The liquid or gas does not have to be a hazardous material.
Drivers who need the hazardous materials endorsement must learn the placard rules. If you do not know if your vehicle needs placards, ask your employer. Never drive a vehicle needing placards unless you have the hazardous materials endorsement. To do so is a crime. When stopped, you will be cited and you will not be allowed to drive your truck. It will cost you time and money. A failure to placard when needed may risk your life and others if you have an accident. Emergency help will not know of your hazardous cargo. Hazardous materials drivers must also know which products they can load together, and which they cannot. These rules are also in Section 9. Before loading a truck with more than one type of product, you must know if it is safe to load them together. If you do not know, ask your employer and consult the regulations.
2.24 School Buses
2.24.1 Driving Safely Around BusesThe driver of a motor vehicle upon any highway, road, or street, upon meeting or overtaking from either direction any school bus that has stopped, shall stop the vehicle at least twenty feet (20) before reaching the school bus if visual signal lights have been actuated. The driver shall not proceed until the visual signal lights are no longer being actuated. Additionally, the driver of a motor vehicle shall also stop when a school bus that is not required to be equipped with visual signal lights stops to receive or discharge children. A driver of any school bus who observes a violation of this shall notify the driver’s school district transportation dispatcher with the color, basic description, and license plate number of the vehicle involved in the violation, information pertaining to the identity of the alleged violator, and the time and approximate location at which the violation occurred.
Figure 2.26

Commercial Driver’s License Manual - 2018 CDL Testing System
Section 2 - Driving Safely Page 55 (03/08/19)
Subsections 2.22 and 2.24 Test Your Knowledge
1. Common medicines for colds can make you sleepy. True or False?
2. Coffee and a little fresh air will help a drinker sober up. True or False?
3. What is a hazardous materials placard?4. Why are placards used?5. On a divided highway, all vehicles must stop when
a school bus stops with visual signal lights? Ture or false?
These questions may be on the test. If you can't answer them all, re-read subsections 2.22 and 2.24.
Commercial Driver’s License Manual - 2018 CDL Testing System
Page 56 Section 3 - Transporting Cargo Safely (03/08/19)
Section 3
TRANSPORTING CARGO SAFELY
This Section Covers● Inspecting Cargo● Cargo Weight and Balance● Securing Cargo● Cargo Needing Special AttentionThis section tells you about hauling cargo safely. You must understand basic cargo safety rules to get a CDL.
If you load cargo wrong or do not secure it, it can be a danger to others and yourself. Loose cargo that falls off a vehicle can cause traffic problems and others could be hurt or killed. Loose cargo could hurt or kill you during a quick stop or crash. Your vehicle could be damaged by an overload. Steering could be affected by how a vehicle is loaded, making it more difficult to control the vehicle.
Whether or not you load and secure the cargo yourself, you are responsible for:Inspecting your cargo.Recognizing overloads and poorly balanced weight.Knowing your cargo is properly secured and does not obscure your view ahead or to the sides.Knowing your cargo does not restrict your access to emergency equipment.If you intend to carry hazardous material that requires placards on your vehicle, you will also need to have a hazardous materials endorsement. Section 9 of this manual has the information you need to pass the hazardous materials test.
3.1 – Inspecting CargoAs part of your Vehicle inspection, make sure the truck is not overloaded and the cargo is balanced and secured properly.After Starting. Inspect the cargo and its securing devices again within the first 50 miles after beginning a trip. Make any adjustments needed.Re-check. Re-check the cargo and securing devices as often as necessary during a trip to keep the load secure. You need to inspect again:After you have driven for 3 hours or 150 miles.
After every break you take during driving.Federal, state, and local regulations for commercial vehicle weight, securing cargo, covering loads, and where you can drive large vehicles vary from place to place. Know the rules where you will be driving.
3.2 – Weight and BalanceYou are responsible for not being overloaded. The following are some definitions of weight you should know.
3.2.1 – Definitions You Should KnowGross Vehicle Weight Rating (GVWR). The value specified by the manufacturer as the loaded weight of a single vehicle.Gross Combination Weight Rating (GCWR). The value specified by the manufacturer of the power unit, if the value is displayed on the Federal Motor Vehicle Safety Standard (FMVSS) certification label; or the sum of the gross vehicle weight ratings (GVWRs) or the gross vehicle weights (GVWs) of the power unit and the towed unit(s), or any combination thereof, that produces the highest value.(The underlined and italicized text above is for use by roadside enforcement only to determine whether the driver/vehicle is subject to CDL regulations. It is not used to determine whether a vehicle is representative for the purposes of Skills testing).Axle Weight. The weight transmitted to the ground by one axle or one set of axles.Tire Load. The maximum safe weight a tire can carry at a specified pressure. This rating is stated on the side of each tire.Suspension Systems. Suspension systems have a manufacturer's weight capacity rating.Coupling Device Capacity. Coupling devices are rated for the maximum weight they can pull and/or carry.
3.2.2 – Legal Weight LimitsYou must keep weights within legal limits. States have maximums for GVWRs, GCWRs, and axle weights. Often, maximum axle weights are set by a bridge formula. A bridge formula permits less maximum axle weight for axles that are closer together. This is to prevent overloading bridges and roadways.Overloading can have bad effects on steering, braking, and speed control. Overloaded trucks have to go very slowly on upgrades. Worse, they may gain too much speed on downgrades. Stopping distance increases. Brakes can fail when forced to work too hard.During bad weather or in mountains, it may not be safe to operate at legal maximum weights. Take this into account before driving.
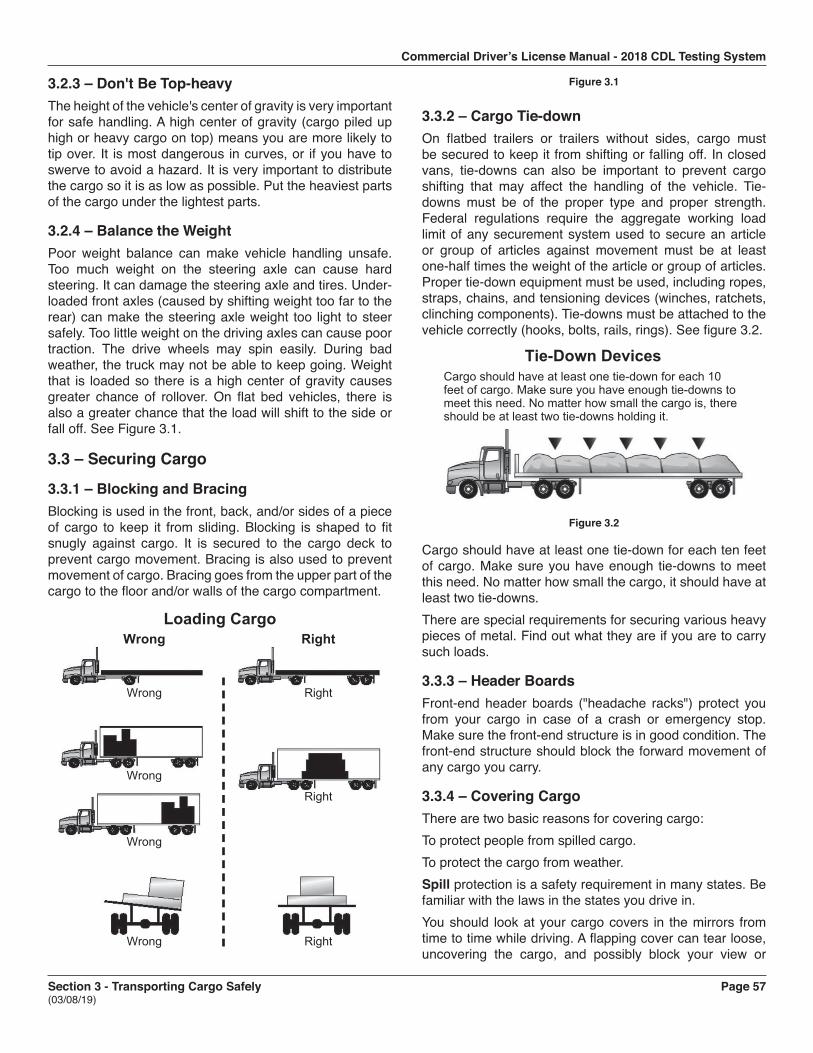
Commercial Driver’s License Manual - 2018 CDL Testing System
Section 3 - Transporting Cargo Safely Page 57 (03/08/19)
3.2.3 – Don't Be Top-heavyThe height of the vehicle's center of gravity is very important for safe handling. A high center of gravity (cargo piled up high or heavy cargo on top) means you are more likely to tip over. It is most dangerous in curves, or if you have to swerve to avoid a hazard. It is very important to distribute the cargo so it is as low as possible. Put the heaviest parts of the cargo under the lightest parts.
3.2.4 – Balance the WeightPoor weight balance can make vehicle handling unsafe. Too much weight on the steering axle can cause hard steering. It can damage the steering axle and tires. Under-loaded front axles (caused by shifting weight too far to the rear) can make the steering axle weight too light to steer safely. Too little weight on the driving axles can cause poor traction. The drive wheels may spin easily. During bad weather, the truck may not be able to keep going. Weight that is loaded so there is a high center of gravity causes greater chance of rollover. On flat bed vehicles, there is also a greater chance that the load will shift to the side or fall off. See Figure 3.1.
3.3 – Securing Cargo
3.3.1 – Blocking and BracingBlocking is used in the front, back, and/or sides of a piece of cargo to keep it from sliding. Blocking is shaped to fit snugly against cargo. It is secured to the cargo deck to prevent cargo movement. Bracing is also used to prevent movement of cargo. Bracing goes from the upper part of the cargo to the floor and/or walls of the cargo compartment.
Loading Cargo
Wrong
Wrong
Wrong
Wrong
Wrong Right
Right
Right
Right
Figure 3.1
3.3.2 – Cargo Tie-downOn flatbed trailers or trailers without sides, cargo must be secured to keep it from shifting or falling off. In closed vans, tie-downs can also be important to prevent cargo shifting that may affect the handling of the vehicle. Tie-downs must be of the proper type and proper strength. Federal regulations require the aggregate working load limit of any securement system used to secure an article or group of articles against movement must be at least one-half times the weight of the article or group of articles. Proper tie-down equipment must be used, including ropes, straps, chains, and tensioning devices (winches, ratchets, clinching components). Tie-downs must be attached to the vehicle correctly (hooks, bolts, rails, rings). See figure 3.2.
Tie-Down DevicesCargo should have at least one tie-down for each 10 feet of cargo. Make sure you have enough tie-downs to meet this need. No matter how small the cargo is, there should be at least two tie-downs holding it.
Figure 3.2
Cargo should have at least one tie-down for each ten feet of cargo. Make sure you have enough tie-downs to meet this need. No matter how small the cargo, it should have at least two tie-downs.There are special requirements for securing various heavy pieces of metal. Find out what they are if you are to carry such loads.
3.3.3 – Header BoardsFront-end header boards ("headache racks") protect you from your cargo in case of a crash or emergency stop. Make sure the front-end structure is in good condition. The front-end structure should block the forward movement of any cargo you carry.
3.3.4 – Covering CargoThere are two basic reasons for covering cargo:To protect people from spilled cargo.To protect the cargo from weather.Spill protection is a safety requirement in many states. Be familiar with the laws in the states you drive in.You should look at your cargo covers in the mirrors from time to time while driving. A flapping cover can tear loose, uncovering the cargo, and possibly block your view or
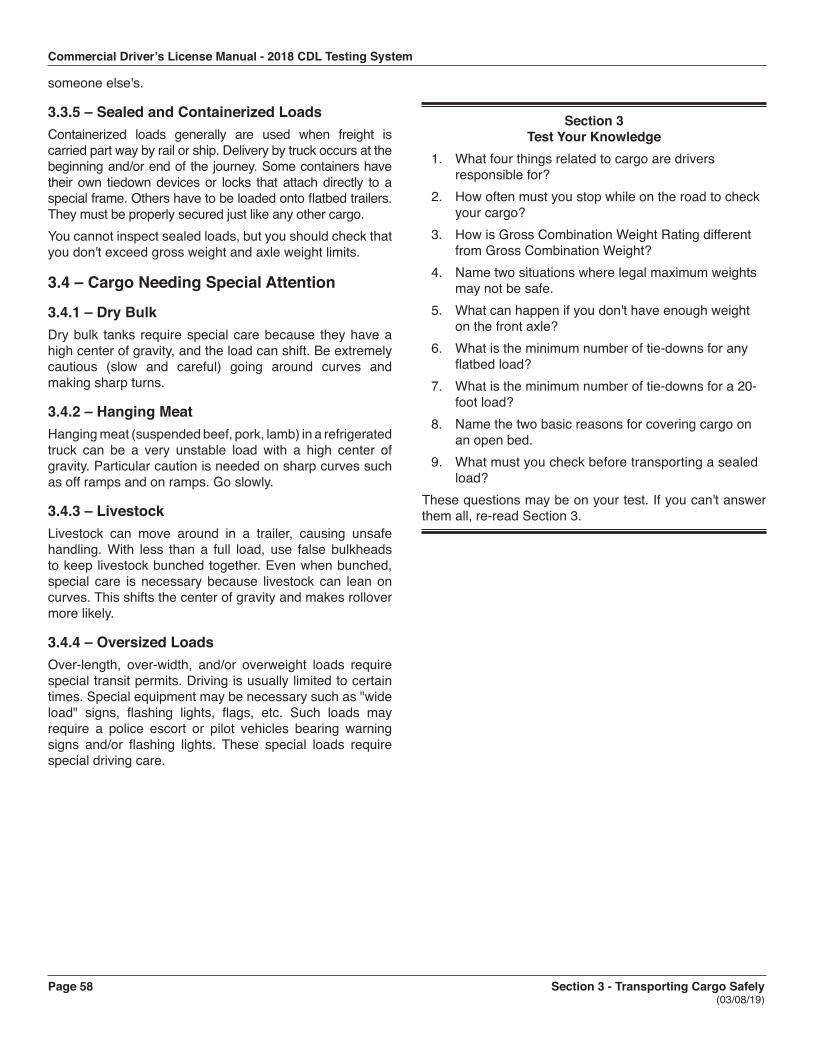
Commercial Driver’s License Manual - 2018 CDL Testing System
Page 58 Section 3 - Transporting Cargo Safely (03/08/19)
someone else's.
3.3.5 – Sealed and Containerized LoadsContainerized loads generally are used when freight is carried part way by rail or ship. Delivery by truck occurs at the beginning and/or end of the journey. Some containers have their own tiedown devices or locks that attach directly to a special frame. Others have to be loaded onto flatbed trailers. They must be properly secured just like any other cargo.You cannot inspect sealed loads, but you should check that you don't exceed gross weight and axle weight limits.
3.4 – Cargo Needing Special Attention
3.4.1 – Dry BulkDry bulk tanks require special care because they have a high center of gravity, and the load can shift. Be extremely cautious (slow and careful) going around curves and making sharp turns.
3.4.2 – Hanging MeatHanging meat (suspended beef, pork, lamb) in a refrigerated truck can be a very unstable load with a high center of gravity. Particular caution is needed on sharp curves such as off ramps and on ramps. Go slowly.
3.4.3 – LivestockLivestock can move around in a trailer, causing unsafe handling. With less than a full load, use false bulkheads to keep livestock bunched together. Even when bunched, special care is necessary because livestock can lean on curves. This shifts the center of gravity and makes rollover more likely.
3.4.4 – Oversized LoadsOver-length, over-width, and/or overweight loads require special transit permits. Driving is usually limited to certain times. Special equipment may be necessary such as "wide load" signs, flashing lights, flags, etc. Such loads may require a police escort or pilot vehicles bearing warning signs and/or flashing lights. These special loads require special driving care.
Section 3 Test Your Knowledge
1. What four things related to cargo are drivers responsible for?
2. How often must you stop while on the road to check your cargo?
3. How is Gross Combination Weight Rating different from Gross Combination Weight?
4. Name two situations where legal maximum weights may not be safe.
5. What can happen if you don't have enough weight on the front axle?
6. What is the minimum number of tie-downs for any flatbed load?
7. What is the minimum number of tie-downs for a 20-foot load?
8. Name the two basic reasons for covering cargo on an open bed.
9. What must you check before transporting a sealed load?
These questions may be on your test. If you can't answer them all, re-read Section 3.
Commercial Driver’s License Manual - 2018 CDL Testing System
Section 4 - Transporting Passengers Safely Page 59 (03/08/19)
Section 4
TRANSPORTING PASSENGERS SAFELY
This Section Covers ● Vehicle Inspection ● Loading ● On the Road ● After-trip Vehicle Inspection ● Prohibited Practices ● Use of Brake-door Interlocks
Bus drivers must have a commercial driver license if they drive a vehicle designed to seat more than 16 or more persons, including the driver.Bus drivers must have a passenger endorsement on their commercial driver license. To get the endorsement you must pass a knowledge test on Sections 2 and 4 of this manual. (If your bus has air brakes, you must also pass a knowledge test on Section 5.) You must also pass the skills tests required for the class of vehicle you drive.
4.1 – Vehicle InspectionBefore driving your bus, you must be sure it is safe. You must review the inspection report made by the previous driver. Only if defects reported earlier have been certified as repaired or not needed to be repaired, should you sign the previous driver's report. This is your certification that the defects reported earlier have been fixed.
4.1.1 – Vehicle SystemsMake sure these things are in good working order before driving:Service brakes, including air hose couplings (if your bus has a trailer or semitrailer).Parking brake.Steering mechanism.Lights and reflectors.Tires (front wheels must not have recapped or re-grooved tires).Horn.Windshield wiper or wipers.Rear-vision mirror or mirrors.Coupling devices (if present).Wheels and rims.
Emergency equipment.Make sure your bus has the fire extinguisher and emergency reflectors (3 reflective triangles or at least 6 fusees or 3 liquid burning flares) required by law. The bus must also have spare electrical fuses, unless equipped with circuit breakers.
4.1.2 – Access Doors and PanelsAs you check the outside of the bus, close any open emergency exits. Also, close any open access panels (for baggage, restroom service, engine, etc.) before driving.
4.1.3 – Bus InteriorPeople sometimes damage unattended buses. Always check the interior of the bus before driving to ensure rider safety. Aisles and stairwells should always be clear. The following parts of your bus must be in safe working condition:Each handhold and railing.Floor covering.Signaling devices, including the restroom emergency buzzer, if the bus has a restroom.Emergency exit handles.The seats must be safe for riders. All seats must be securely fastened to the bus.Never drive with an open emergency exit door or window. The "Emergency Exit" sign on an emergency door must be clearly visible. If there is a red emergency door light, it must work. Turn it on at night or any other time you use your outside lights.
4.1.4 – Roof HatchesYou may lock some emergency roof hatches in a partly open position for fresh air. Do not leave them open as a regular practice. Keep in mind the bus's higher clearance while driving with them open.
4.1.5 – Use Your Seatbelt!The driver's seat should have a seat belt. Always use it for safety.
4.2 – Loading and Trip StartDo not allow riders to leave carry-on baggage in a doorway or aisle. There should be nothing in the aisle that might trip other riders. Secure baggage and freight in ways that avoid damage and:Allow the driver to move freely and easily.Allow riders to exit by any window or door in an emergency.Protect riders from injury if carry-ons fall or shift.
4.2.1 – Hazardous Materials
Commercial Driver’s License Manual - 2018 CDL Testing System
Page 60 Section 4 - Transporting Passengers Safely (03/08/19)
Watch for cargo or baggage containing hazardous materials. Most hazardous materials cannot be carried on a bus.The Federal Hazardous Materials Table shows which materials are hazardous. They pose a risk to health, safety, and property during transportation. The rules require shippers to mark containers of hazardous material with the material's name, identification number, and hazard label. There are nine different four-inch, diamond-shaped hazard labels. See Figure 4.1. Watch for the diamond-shaped labels. Do not transport any hazardous material unless you are sure the rules allow it.
Hazard Class DefinitionsClass Class Name Example1 Explosives Ammunition, Dynamite, Fireworks
2 Gases Propane, Oxygen, Helium
3 Flammable Gasoline, Acetone
4 Flammable Solids Matches, Fuses
5 Oxidizers Ammonium Nitrate, Hydrogen Peroxide
6 Poisons Pesticides, Arsenic
7 Radioactive Uranium, Plutonium
8 Corrosives Hydrochloric Acid, Battery Fluid
9 Miscellaneous Hazardous Materials Formaldehyde, Asbestos
None ORM-D (Other Regulated Material - Domestic)
Hair Spray or Charcoal
None Combustible Liquids Fuel Oils, Lighter Fluid
Figure 4.1
4.2.2 – Forbidden Hazardous MaterialsBuses may carry small-arms ammunition labeled ORM-D, emergency hospital supplies, and drugs. You can carry small amounts of some other hazardous materials if the shipper cannot send them any other way. Buses must never carry:Division 2.3 poison gas, liquid Class 6 poison, tear gas, irritating material.More than 100 pounds of solid Class 6 poisons.Explosives in the space occupied by people, except small arms ammunition.Labeled radioactive materials in the space occupied by people.More than 500 pounds total of allowed hazardous materials, and no more than 100 pounds of any one class.Riders sometimes board a bus with an unlabeled hazardous material. Do not allow riders to carry on common hazards such as car batteries or gasoline.
4.2.3 – Standee LineNo rider may stand forward of the rear of the driver's seat. Buses designed to allow standing must have a two-inch line on the floor or some other means of showing riders where they cannot stand. This is called the standee line. All standing riders must stay behind it.
4.2.4 – At Your DestinationWhen arriving at the destination or intermediate stops announce:The location.Reason for stopping.Next departure time.Bus number.Remind riders to take carry-ons with them if they get off the bus. If the aisle is on a lower level than the seats, remind riders of the step-down. It is best to tell them before coming to a complete stop.Charter bus drivers should not allow riders on the bus until departure time. This will help prevent theft or vandalism of the bus.
4.3 – On the Road
4.3.1 – Passenger SupervisionMany charter and intercity carriers have passenger comfort and safety rules. Mention rules about smoking, drinking, or use of radio and tape players at the start of the trip. Explaining the rules at the start will help to avoid trouble later on.While driving, scan the interior of your bus as well as the road ahead, to the sides, and to the rear. You may have to remind riders about rules, or to keep arms and heads inside the bus.
4.3.2 – At StopsRiders can stumble when getting on or off, and when the bus starts or stops. Caution riders to watch their step when leaving the bus. Wait for them to sit down or brace themselves before starting. Starting and stopping should be as smooth as possible to avoid rider injury.Occasionally, you may have a drunk or disruptive rider. You must ensure this rider's safety as well as that of others. Don't discharge such riders where it would be unsafe for them. It may be safer at the next scheduled stop or a well-lighted area where there are other people. Many carriers have guidelines for handling disruptive riders.
4.3.3 – Common AccidentsThe Most Common Bus Accidents. Bus accidents often happen at intersections. Use caution, even if a signal or
Commercial Driver’s License Manual - 2018 CDL Testing System
Section 4 - Transporting Passengers Safely Page 61 (03/08/19)
stop sign controls other traffic. School and mass transit buses sometimes scrape off mirrors or hit passing vehicles when pulling out from a bus stop. Remember the clearance your bus needs, and watch for poles and tree limbs at stops. Know the size of the gap your bus needs to accelerate and merge with traffic. Wait for the gap to open before leaving the stop. Never assume other drivers will brake to give you room when you signal or start to pull out.4.3.4 – Speed on CurvesCrashes on curves that kill people and destroy buses result from excessive speed, often when rain or snow has made the road slippery. Every banked curve has a safe "design speed." In good weather, the posted speed is safe for cars but it may be too high for many buses. With good traction, the bus may roll over; with poor traction, it might slide off the curve. Reduce speed for curves! If your bus leans toward the outside on a banked curve, you are driving too fast.4.3.5 – Railroad-highway Crossing/ StopsStop at RR Crossings:Buses must stop at all unregulated railroad crossings.Stop your bus between 15 and 50 feet before railroad crossings.Listen and look in both directions for trains. You should open your forward door if it improves your ability to see or hear an approaching train.Before crossing, and after a train has passed, close your door, and make sure there isn't another train coming in the other direction on other tracks.If your bus has a manual transmission, never change gears while crossing the tracks.You do not have to stop, but must slow down and carefully check for other vehicles:At streetcar crossings.Where a policeman or flagman is directing traffic.If a traffic signal is green.At crossings marked as "exempt" or "abandoned."
4.3.6 – DrawbridgesStop at Drawbridges. Stop at drawbridges that do not have a signal light or traffic control attendant. Stop at least 50 feet before the draw of the bridge. Look to make sure the draw is completely closed before crossing. You do not need to stop, but must slow down and make sure it's safe, when:There is a traffic light showing green.The bridge has an attendant or traffic officer who controls traffic whenever the bridge opens.
4.4 – After-trip Vehicle InspectionInspect your bus at the end of each shift. If you work for an interstate carrier, you must complete a written inspection
report for each bus driven. The report must specify each bus and list any defect that would affect safety or result in a breakdown. If there are no defects, the report should say so.Riders sometimes damage safety-related parts such as handholds, seats, emergency exits, and windows. If you report this damage at the end of a shift, mechanics can make repairs before the bus goes out again. Mass transit drivers should also make sure passenger signaling devices and brake-door interlocks work properly.
4.5 – Prohibited PracticesAvoid fueling your bus with riders on board unless absolutely necessary. Never refuel in a closed building with riders on board.Don't talk with riders, or engage in any other distracting activity, while driving.Do not tow or push a disabled bus with riders aboard the vehicle, unless getting off would be unsafe. Only tow or push the bus to the nearest safe spot to discharge passengers. Follow your employer's guidelines on towing or pushing disabled buses.
4.6 – Use of Brake-door InterlocksUrban mass transit coaches may have a brake and accelerator interlock system. The interlock applies the brakes and holds the throttle in idle position when the rear door is open. The interlock releases when you close the rear door. Do not use this safety feature in place of the parking brake.
Section 4 Test Your Knowledge
1. Name some things to check in the interior of a bus during a Vehicle inspection.
2. What are some hazardous materials you can transport by bus?
3. What are some hazardous materials you can’t transport by bus?
4. What is a standee line?5. Does it matter where you make a disruptive
passenger get off the bus?6. How far from a railroad crossing should you stop?7. When must you stop before crossing a drawbridge?8. Describe from memory the “prohibited practices”
listed in the manual.9. The rear door of a transit bus has to be open to put
on the parking brake. True or False?These questions may be on your test. If you can’t answer them all, re-read Section 4.
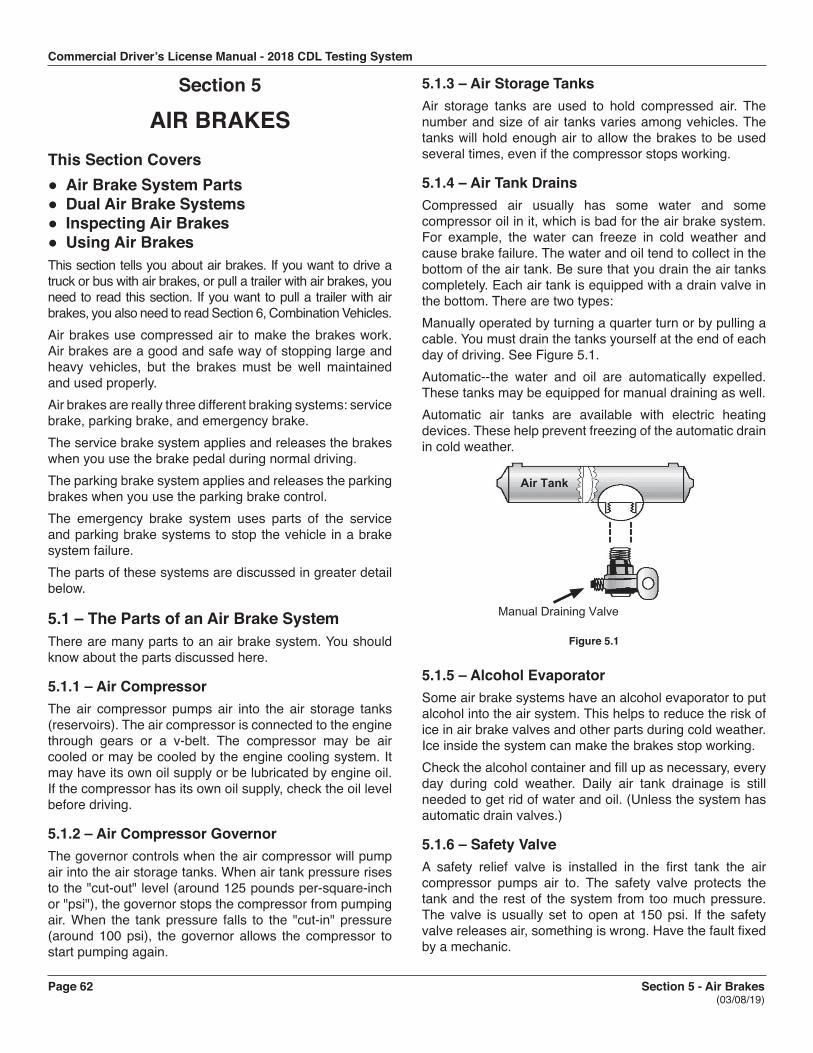
Commercial Driver’s License Manual - 2018 CDL Testing System
Page 62 Section 5 - Air Brakes (03/08/19)
Section 5
AIR BRAKESThis Section Covers● Air Brake System Parts● Dual Air Brake Systems● Inspecting Air Brakes● Using Air BrakesThis section tells you about air brakes. If you want to drive a truck or bus with air brakes, or pull a trailer with air brakes, you need to read this section. If you want to pull a trailer with air brakes, you also need to read Section 6, Combination Vehicles.Air brakes use compressed air to make the brakes work. Air brakes are a good and safe way of stopping large and heavy vehicles, but the brakes must be well maintained and used properly.Air brakes are really three different braking systems: service brake, parking brake, and emergency brake.The service brake system applies and releases the brakes when you use the brake pedal during normal driving.The parking brake system applies and releases the parking brakes when you use the parking brake control.The emergency brake system uses parts of the service and parking brake systems to stop the vehicle in a brake system failure.The parts of these systems are discussed in greater detail below.
5.1 – The Parts of an Air Brake SystemThere are many parts to an air brake system. You should know about the parts discussed here.
5.1.1 – Air CompressorThe air compressor pumps air into the air storage tanks (reservoirs). The air compressor is connected to the engine through gears or a v-belt. The compressor may be air cooled or may be cooled by the engine cooling system. It may have its own oil supply or be lubricated by engine oil. If the compressor has its own oil supply, check the oil level before driving.
5.1.2 – Air Compressor GovernorThe governor controls when the air compressor will pump air into the air storage tanks. When air tank pressure rises to the "cut-out" level (around 125 pounds per-square-inch or "psi"), the governor stops the compressor from pumping air. When the tank pressure falls to the "cut-in" pressure (around 100 psi), the governor allows the compressor to start pumping again.
5.1.3 – Air Storage TanksAir storage tanks are used to hold compressed air. The number and size of air tanks varies among vehicles. The tanks will hold enough air to allow the brakes to be used several times, even if the compressor stops working.
5.1.4 – Air Tank DrainsCompressed air usually has some water and some compressor oil in it, which is bad for the air brake system. For example, the water can freeze in cold weather and cause brake failure. The water and oil tend to collect in the bottom of the air tank. Be sure that you drain the air tanks completely. Each air tank is equipped with a drain valve in the bottom. There are two types:Manually operated by turning a quarter turn or by pulling a cable. You must drain the tanks yourself at the end of each day of driving. See Figure 5.1.Automatic--the water and oil are automatically expelled. These tanks may be equipped for manual draining as well.Automatic air tanks are available with electric heating devices. These help prevent freezing of the automatic drain in cold weather.
Manual Draining Valve
Air Tank
Figure 5.1
5.1.5 – Alcohol EvaporatorSome air brake systems have an alcohol evaporator to put alcohol into the air system. This helps to reduce the risk of ice in air brake valves and other parts during cold weather. Ice inside the system can make the brakes stop working.Check the alcohol container and fill up as necessary, every day during cold weather. Daily air tank drainage is still needed to get rid of water and oil. (Unless the system has automatic drain valves.)
5.1.6 – Safety ValveA safety relief valve is installed in the first tank the air compressor pumps air to. The safety valve protects the tank and the rest of the system from too much pressure. The valve is usually set to open at 150 psi. If the safety valve releases air, something is wrong. Have the fault fixed by a mechanic.
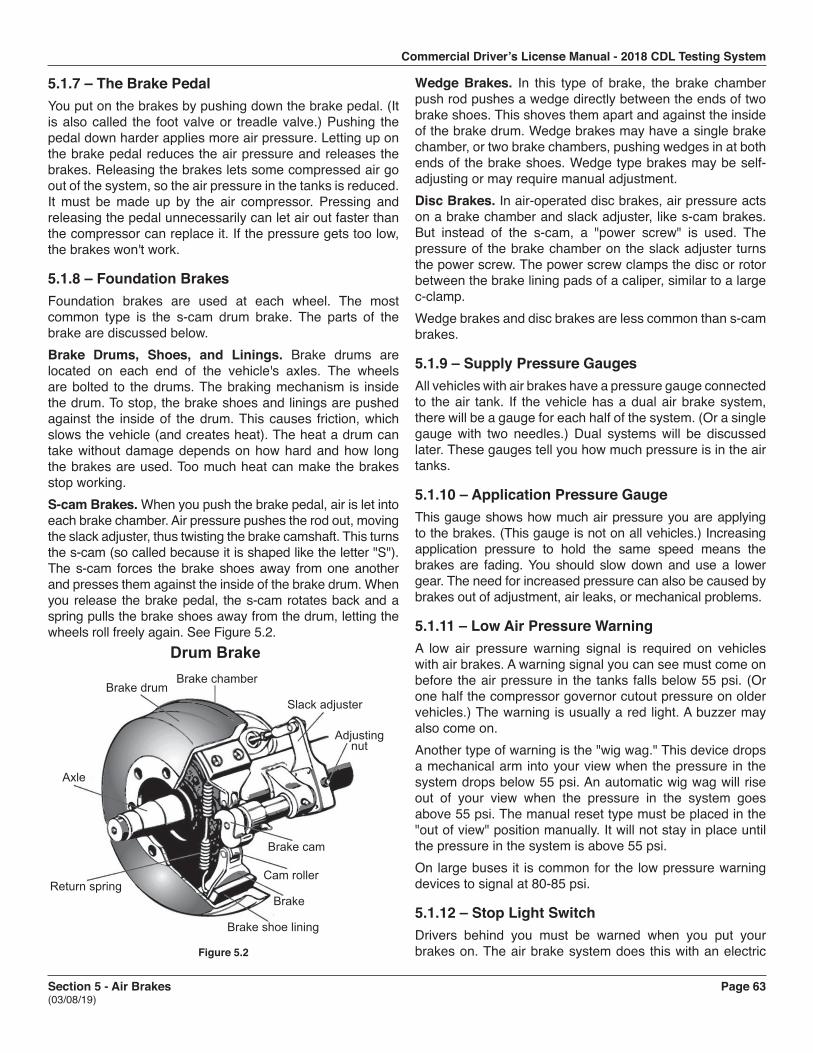
Commercial Driver’s License Manual - 2018 CDL Testing System
Section 5 - Air Brakes Page 63 (03/08/19)
5.1.7 – The Brake PedalYou put on the brakes by pushing down the brake pedal. (It is also called the foot valve or treadle valve.) Pushing the pedal down harder applies more air pressure. Letting up on the brake pedal reduces the air pressure and releases the brakes. Releasing the brakes lets some compressed air go out of the system, so the air pressure in the tanks is reduced. It must be made up by the air compressor. Pressing and releasing the pedal unnecessarily can let air out faster than the compressor can replace it. If the pressure gets too low, the brakes won't work.
5.1.8 – Foundation BrakesFoundation brakes are used at each wheel. The most common type is the s-cam drum brake. The parts of the brake are discussed below.Brake Drums, Shoes, and Linings. Brake drums are located on each end of the vehicle's axles. The wheels are bolted to the drums. The braking mechanism is inside the drum. To stop, the brake shoes and linings are pushed against the inside of the drum. This causes friction, which slows the vehicle (and creates heat). The heat a drum can take without damage depends on how hard and how long the brakes are used. Too much heat can make the brakes stop working.S-cam Brakes. When you push the brake pedal, air is let intoeach brake chamber. Air pressure pushes the rod out, movingthe slack adjuster, thus twisting the brake camshaft. This turnsthe s-cam (so called because it is shaped like the letter "S").The s-cam forces the brake shoes away from one anotherand presses them against the inside of the brake drum. Whenyou release the brake pedal, the s-cam rotates back and aspring pulls the brake shoes away from the drum, letting thewheels roll freely again. See Figure 5.2.
Drum BrakeBrake chamber
Slack adjuster
Adjusting nut
Brake drum
Brake shoe lining
Brake cam
Cam roller
BrakeReturn spring
Axle
Figure 5.2
Wedge Brakes. In this type of brake, the brake chamber push rod pushes a wedge directly between the ends of two brake shoes. This shoves them apart and against the inside of the brake drum. Wedge brakes may have a single brake chamber, or two brake chambers, pushing wedges in at both ends of the brake shoes. Wedge type brakes may be self-adjusting or may require manual adjustment.Disc Brakes. In air-operated disc brakes, air pressure acts on a brake chamber and slack adjuster, like s-cam brakes. But instead of the s-cam, a "power screw" is used. The pressure of the brake chamber on the slack adjuster turns the power screw. The power screw clamps the disc or rotor between the brake lining pads of a caliper, similar to a large c-clamp.Wedge brakes and disc brakes are less common than s-cam brakes.
5.1.9 – Supply Pressure GaugesAll vehicles with air brakes have a pressure gauge connected to the air tank. If the vehicle has a dual air brake system, there will be a gauge for each half of the system. (Or a single gauge with two needles.) Dual systems will be discussed later. These gauges tell you how much pressure is in the air tanks.
5.1.10 – Application Pressure GaugeThis gauge shows how much air pressure you are applying to the brakes. (This gauge is not on all vehicles.) Increasing application pressure to hold the same speed means the brakes are fading. You should slow down and use a lower gear. The need for increased pressure can also be caused by brakes out of adjustment, air leaks, or mechanical problems.
5.1.11 – Low Air Pressure WarningA low air pressure warning signal is required on vehicles with air brakes. A warning signal you can see must come on before the air pressure in the tanks falls below 55 psi. (Or one half the compressor governor cutout pressure on older vehicles.) The warning is usually a red light. A buzzer may also come on.Another type of warning is the "wig wag." This device drops a mechanical arm into your view when the pressure in the system drops below 55 psi. An automatic wig wag will rise out of your view when the pressure in the system goes above 55 psi. The manual reset type must be placed in the "out of view" position manually. It will not stay in place until the pressure in the system is above 55 psi.On large buses it is common for the low pressure warning devices to signal at 80-85 psi.
5.1.12 – Stop Light SwitchDrivers behind you must be warned when you put your brakes on. The air brake system does this with an electric
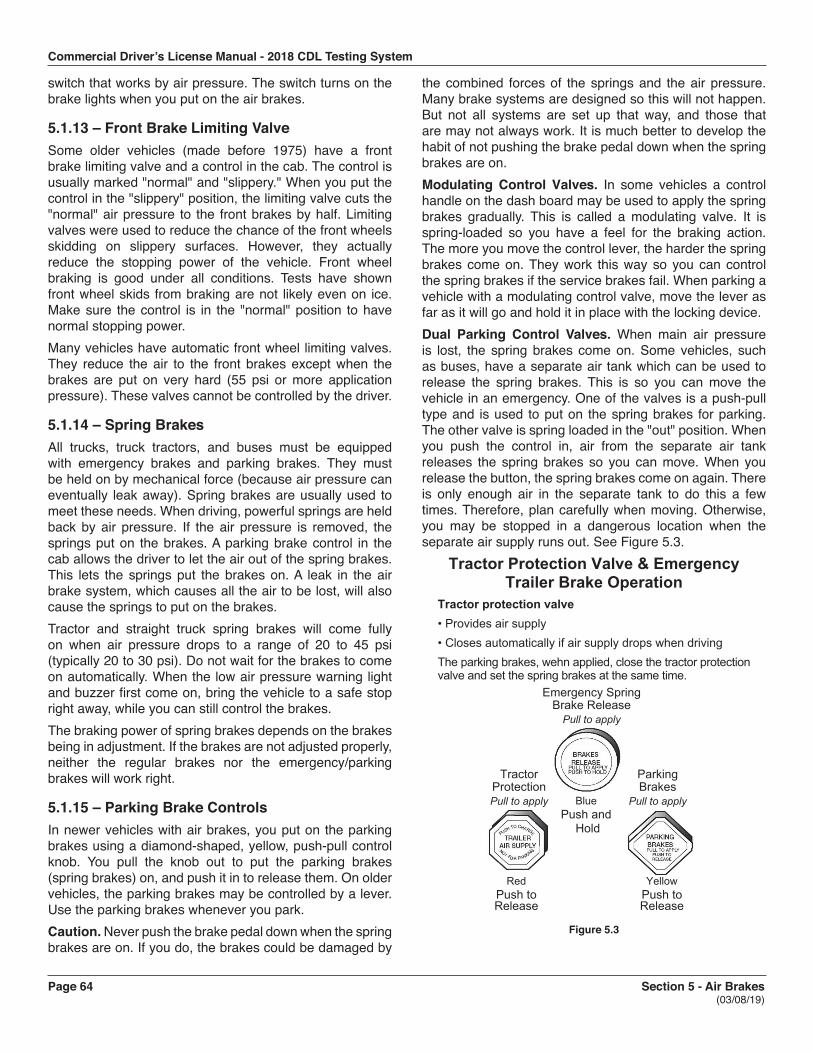
Commercial Driver’s License Manual - 2018 CDL Testing System
Page 64 Section 5 - Air Brakes (03/08/19)
switch that works by air pressure. The switch turns on the brake lights when you put on the air brakes.
5.1.13 – Front Brake Limiting ValveSome older vehicles (made before 1975) have a front brake limiting valve and a control in the cab. The control is usually marked "normal" and "slippery." When you put the control in the "slippery" position, the limiting valve cuts the "normal" air pressure to the front brakes by half. Limiting valves were used to reduce the chance of the front wheels skidding on slippery surfaces. However, they actually reduce the stopping power of the vehicle. Front wheel braking is good under all conditions. Tests have shown front wheel skids from braking are not likely even on ice. Make sure the control is in the "normal" position to have normal stopping power.Many vehicles have automatic front wheel limiting valves. They reduce the air to the front brakes except when the brakes are put on very hard (55 psi or more application pressure). These valves cannot be controlled by the driver.
5.1.14 – Spring BrakesAll trucks, truck tractors, and buses must be equipped with emergency brakes and parking brakes. They must be held on by mechanical force (because air pressure can eventually leak away). Spring brakes are usually used to meet these needs. When driving, powerful springs are held back by air pressure. If the air pressure is removed, the springs put on the brakes. A parking brake control in the cab allows the driver to let the air out of the spring brakes. This lets the springs put the brakes on. A leak in the air brake system, which causes all the air to be lost, will also cause the springs to put on the brakes.Tractor and straight truck spring brakes will come fully on when air pressure drops to a range of 20 to 45 psi (typically 20 to 30 psi). Do not wait for the brakes to come on automatically. When the low air pressure warning light and buzzer first come on, bring the vehicle to a safe stop right away, while you can still control the brakes.The braking power of spring brakes depends on the brakes being in adjustment. If the brakes are not adjusted properly, neither the regular brakes nor the emergency/parking brakes will work right.
5.1.15 – Parking Brake ControlsIn newer vehicles with air brakes, you put on the parking brakes using a diamond-shaped, yellow, push-pull control knob. You pull the knob out to put the parking brakes (spring brakes) on, and push it in to release them. On older vehicles, the parking brakes may be controlled by a lever. Use the parking brakes whenever you park.Caution. Never push the brake pedal down when the spring brakes are on. If you do, the brakes could be damaged by
the combined forces of the springs and the air pressure. Many brake systems are designed so this will not happen. But not all systems are set up that way, and those that are may not always work. It is much better to develop the habit of not pushing the brake pedal down when the spring brakes are on.Modulating Control Valves. In some vehicles a control handle on the dash board may be used to apply the spring brakes gradually. This is called a modulating valve. It is spring-loaded so you have a feel for the braking action. The more you move the control lever, the harder the spring brakes come on. They work this way so you can control the spring brakes if the service brakes fail. When parking a vehicle with a modulating control valve, move the lever as far as it will go and hold it in place with the locking device.Dual Parking Control Valves. When main air pressure is lost, the spring brakes come on. Some vehicles, such as buses, have a separate air tank which can be used to release the spring brakes. This is so you can move the vehicle in an emergency. One of the valves is a push-pull type and is used to put on the spring brakes for parking. The other valve is spring loaded in the "out" position. When you push the control in, air from the separate air tank releases the spring brakes so you can move. When you release the button, the spring brakes come on again. There is only enough air in the separate tank to do this a few times. Therefore, plan carefully when moving. Otherwise, you may be stopped in a dangerous location when the separate air supply runs out. See Figure 5.3.
Tractor Protection Valve & Emergency Trailer Brake Operation
Tractor protection valve• Provides air supply• Closes automatically if air supply drops when drivingThe parking brakes, wehn applied, close the tractor protection valve and set the spring brakes at the same time.
Emergency SpringBrake Release
Pull to apply
TractorProtectionPull to apply
ParkingBrakes
Pull to apply
YellowPush toRelease
RedPush toRelease
BluePush and
Hold
Figure 5.3
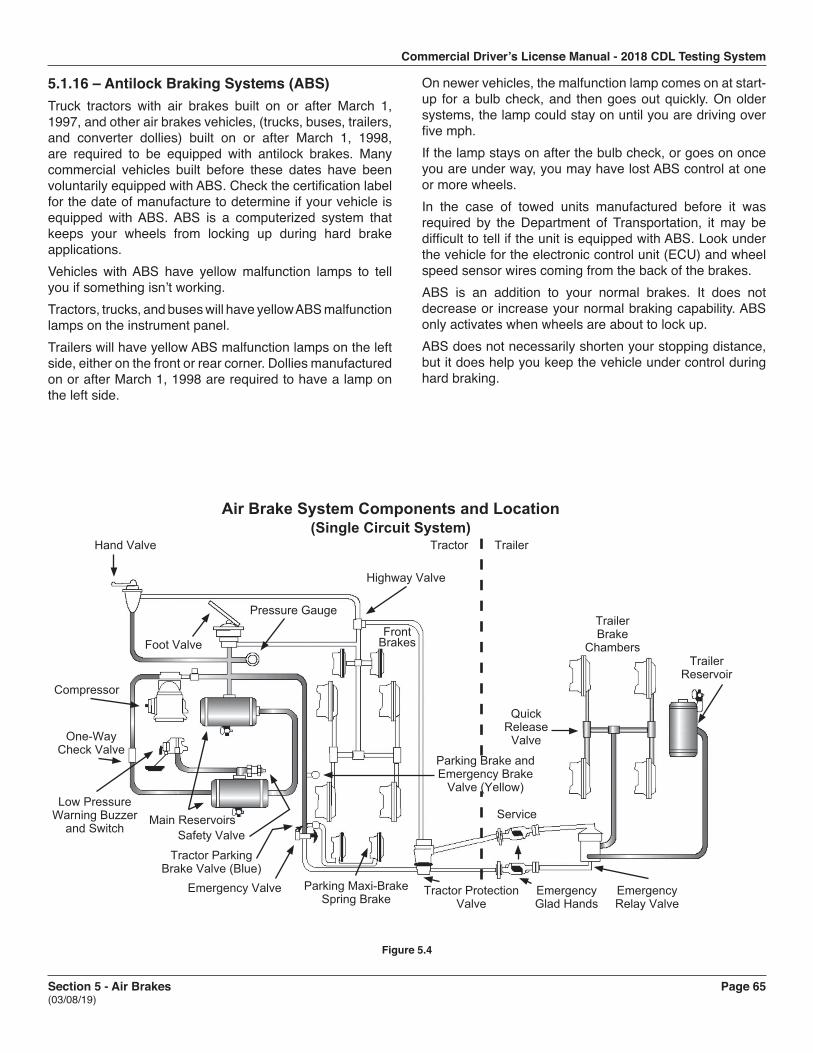
Commercial Driver’s License Manual - 2018 CDL Testing System
Section 5 - Air Brakes Page 65 (03/08/19)
5.1.16 – Antilock Braking Systems (ABS)Truck tractors with air brakes built on or after March 1, 1997, and other air brakes vehicles, (trucks, buses, trailers, and converter dollies) built on or after March 1, 1998, are required to be equipped with antilock brakes. Many commercial vehicles built before these dates have been voluntarily equipped with ABS. Check the certification label for the date of manufacture to determine if your vehicle is equipped with ABS. ABS is a computerized system that keeps your wheels from locking up during hard brake applications.Vehicles with ABS have yellow malfunction lamps to tell you if something isn’t working.Tractors, trucks, and buses will have yellow ABS malfunction lamps on the instrument panel.Trailers will have yellow ABS malfunction lamps on the left side, either on the front or rear corner. Dollies manufactured on or after March 1, 1998 are required to have a lamp on the left side.
On newer vehicles, the malfunction lamp comes on at start-up for a bulb check, and then goes out quickly. On older systems, the lamp could stay on until you are driving over five mph.If the lamp stays on after the bulb check, or goes on once you are under way, you may have lost ABS control at one or more wheels.In the case of towed units manufactured before it was required by the Department of Transportation, it may be difficult to tell if the unit is equipped with ABS. Look under the vehicle for the electronic control unit (ECU) and wheel speed sensor wires coming from the back of the brakes.ABS is an addition to your normal brakes. It does not decrease or increase your normal braking capability. ABS only activates when wheels are about to lock up.ABS does not necessarily shorten your stopping distance, but it does help you keep the vehicle under control during hard braking.
Air Brake System Components and Location(Single Circuit System)
Hand Valve
Safety Valve
Tractor Parking Brake Valve (Blue)
Parking Maxi-Brake Spring Brake
Tractor Protection Valve
Emergency Glad Hands
Emergency Relay Valve
Trailer Reservoir
Front Brakes
Trailer Brake
Chambers
Quick Release
Valve
Parking Brake and Emergency Brake
Valve (Yellow)
Compressor
One-Way Check Valve
Low Pressure Warning Buzzer
and SwitchMain Reservoirs
Foot Valve
Highway Valve
Emergency Valve
Pressure Gauge
Tractor Trailer
Service
Figure 5.4
Commercial Driver’s License Manual - 2018 CDL Testing System
Page 66 Section 5 - Air Brakes (03/08/19)
Subsection 5.1 Test Your Knowledge
1. Why must air tanks be drained?2. What is a supply pressure gauge used for?3. All vehicles with air brakes must have a low air
pressure warning signal. True or False?4. What are spring brakes?5. Front wheel brakes are good under all conditions.
True or False?6. How do you know if your vehicle is equipped with
antilock brakes?These questions may be on your test. If you can’t answer them all, re-read subsection 5.1.
5.2 – Dual Air BrakeMost heavy-duty vehicles use dual air brake systems for safety. A dual air brake system has two separate air brake systems, which use a single set of brake controls. Each system has its own air tanks, hoses, lines, etc. One system typically operates the regular brakes on the rear axle or axles. The other system operates the regular brakes on the front axle (and possibly one rear axle). Both systems supply air to the trailer (if there is one). The first system is called the "primary" system. The other is called the "secondary" system. See Figure 5.4.Before driving a vehicle with a dual air system, allow time for the air compressor to build up a minimum of 100 psi pressure in both the primary and secondary systems. Watch the primary and secondary air pressure gauges (or needles, if the system has two needles in one gauge). Pay attention to the low air pressure warning light and buzzer. The warning light and buzzer should shut off when air pressure in both systems rises to a value set by the manufacturer. This value must be greater than 55 psi.The warning light and buzzer should come on before the air pressure drops below 55 psi in either system. If this happens while driving, you should stop right away and safely park the vehicle. If one air system is very low on pressure, either the front or the rear brakes will not be operating fully. This means it will take you longer to stop. Bring the vehicle to a safe stop, and have the air brakes system fixed.
5.3 – Inspecting Air Brake SystemsYou should use the basic seven-step inspection procedure described in Section 2 to inspect your vehicle. There are more things to inspect on a vehicle with air brakes than one without them. These things are discussed below, in the order they fit into the seven-step method.
5.3.1 – During Step 2 Engine Compartment ChecksCheck Air Compressor Drive Belt (if compressor is belt-driven). If the air compressor is belt-driven, check the condition and tightness of the belt. It should be in good condition.
5.3.2 – During Step 5 Walk-around InspectionCheck Slack Adjusters on S-cam Brakes. Park on level ground and chock the wheels to prevent the vehicle from moving. Release the parking brakes so you can move the slack adjusters. Use gloves and pull hard on each slack adjuster that you can reach. If a slack adjuster moves more than about one inch where the push rod attaches to it, it probably needs adjustment. Adjust it or have it adjusted. Vehicles with too much brake slack can be very hard to stop. Out-of-adjustment brakes are the most common problem found in roadside inspections. Be safe. Check the slack adjusters.All vehicles built since 1994 have automatic slack adjustors. Even though automatic slack adjustors adjust themselves during full brake applications, they must be checked.Automatic adjusters should not have to be manually adjusted except when performing maintenance on the brakes and during installation of the slack adjusters. In a vehicle equipped with automatic adjusters, when the pushrod stroke exceeds the legal brake adjustment limit, it is an indication that a mechanical problem exists in the adjuster itself, a problem with the related foundation brake components, or that the adjuster was improperly installed.The manual adjustment of an automatic adjuster to bring a brake pushrod stroke within legal limits is generally masking a mechanical problem and is not fixing it. Further, routine adjustment of most automatic adjusters will likely result in premature wear of the adjuster itself. It is recommended that when brakes equipped with automatic adjusters are found to be out of adjustment, the driver take the vehicle to a repair facility as soon as possible to have the problem corrected. The manual adjustment of automatic slack adjusters is dangerous because it may give the driver a false sense of security regarding the effectiveness of the braking system.The manual adjustment of an automatic adjuster should only be used as a temporary measure to correct the adjustment in an emergency situation as it is likely the brake will soon be back out of adjustment since this procedure usually does not fix the underlying adjustment problem.(Note: Automatic slack adjusters are made by different manufacturers and do not all operate the same. Therefore, the specific manufacturer’s Service Manual should be consulted prior to troubleshooting a brake adjustment problem.)
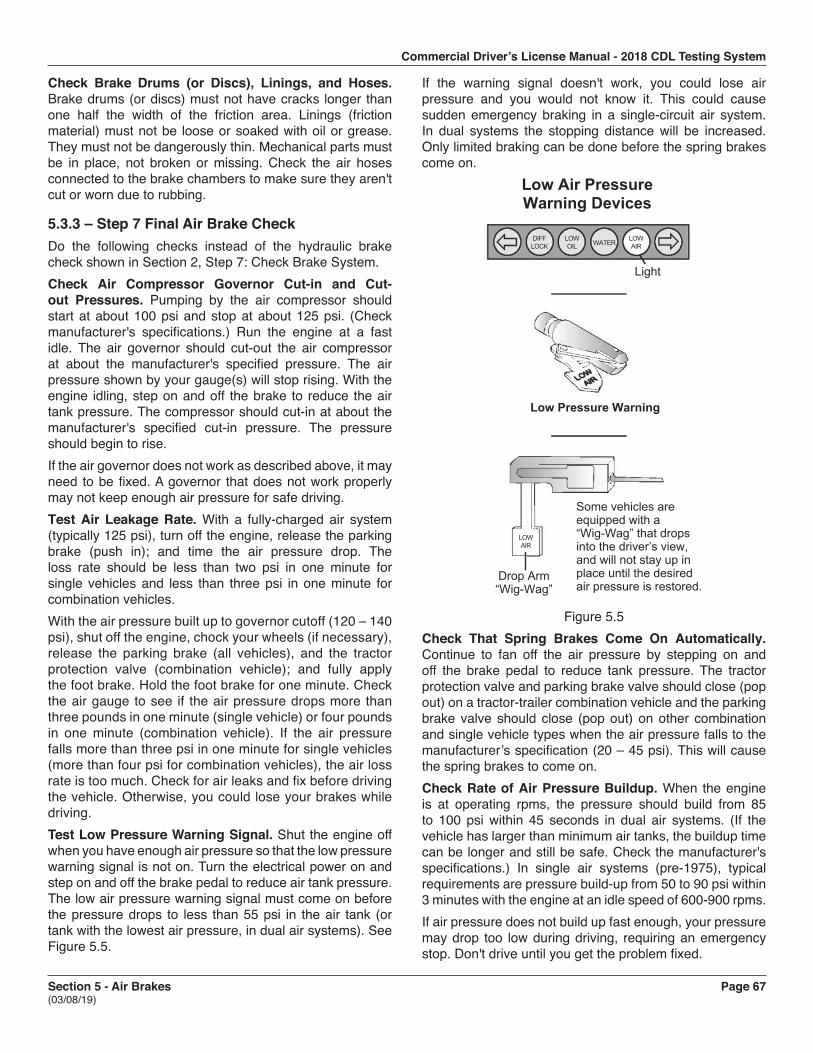
Commercial Driver’s License Manual - 2018 CDL Testing System
Section 5 - Air Brakes Page 67 (03/08/19)
Check Brake Drums (or Discs), Linings, and Hoses. Brake drums (or discs) must not have cracks longer than one half the width of the friction area. Linings (friction material) must not be loose or soaked with oil or grease. They must not be dangerously thin. Mechanical parts must be in place, not broken or missing. Check the air hoses connected to the brake chambers to make sure they aren't cut or worn due to rubbing.
5.3.3 – Step 7 Final Air Brake CheckDo the following checks instead of the hydraulic brake check shown in Section 2, Step 7: Check Brake System.Check Air Compressor Governor Cut-in and Cut-out Pressures. Pumping by the air compressor should start at about 100 psi and stop at about 125 psi. (Check manufacturer's specifications.) Run the engine at a fast idle. The air governor should cut-out the air compressor at about the manufacturer's specified pressure. The air pressure shown by your gauge(s) will stop rising. With the engine idling, step on and off the brake to reduce the air tank pressure. The compressor should cut-in at about the manufacturer's specified cut-in pressure. The pressure should begin to rise.If the air governor does not work as described above, it may need to be fixed. A governor that does not work properly may not keep enough air pressure for safe driving.Test Air Leakage Rate. With a fully-charged air system (typically 125 psi), turn off the engine, release the parking brake (push in); and time the air pressure drop. The loss rate should be less than two psi in one minute for single vehicles and less than three psi in one minute for combination vehicles.With the air pressure built up to governor cutoff (120 – 140 psi), shut off the engine, chock your wheels (if necessary), release the parking brake (all vehicles), and the tractor protection valve (combination vehicle); and fully apply the foot brake. Hold the foot brake for one minute. Check the air gauge to see if the air pressure drops more than three pounds in one minute (single vehicle) or four pounds in one minute (combination vehicle). If the air pressure falls more than three psi in one minute for single vehicles (more than four psi for combination vehicles), the air loss rate is too much. Check for air leaks and fix before driving the vehicle. Otherwise, you could lose your brakes while driving.Test Low Pressure Warning Signal. Shut the engine off when you have enough air pressure so that the low pressure warning signal is not on. Turn the electrical power on and step on and off the brake pedal to reduce air tank pressure. The low air pressure warning signal must come on before the pressure drops to less than 55 psi in the air tank (or tank with the lowest air pressure, in dual air systems). See Figure 5.5.
If the warning signal doesn't work, you could lose air pressure and you would not know it. This could cause sudden emergency braking in a single-circuit air system. In dual systems the stopping distance will be increased. Only limited braking can be done before the spring brakes come on.
Low Air Pressure Warning Devices
DIFF LOCK
LOW OIL
LOW AIR
LOW AIR
Light
Drop Arm “Wig-Wag”
Low Pressure Warning
Some vehicles are equipped with a “Wig-Wag” that drops into the driver’s view, and will not stay up in place until the desired air pressure is restored.
WATER
Figure 5.5Check That Spring Brakes Come On Automatically. Continue to fan off the air pressure by stepping on and off the brake pedal to reduce tank pressure. The tractor protection valve and parking brake valve should close (pop out) on a tractor-trailer combination vehicle and the parking brake valve should close (pop out) on other combination and single vehicle types when the air pressure falls to the manufacturer’s specification (20 – 45 psi). This will cause the spring brakes to come on.Check Rate of Air Pressure Buildup. When the engine is at operating rpms, the pressure should build from 85 to 100 psi within 45 seconds in dual air systems. (If the vehicle has larger than minimum air tanks, the buildup time can be longer and still be safe. Check the manufacturer's specifications.) In single air systems (pre-1975), typical requirements are pressure build-up from 50 to 90 psi within 3 minutes with the engine at an idle speed of 600-900 rpms.If air pressure does not build up fast enough, your pressure may drop too low during driving, requiring an emergency stop. Don't drive until you get the problem fixed.
Commercial Driver’s License Manual - 2018 CDL Testing System
Page 68 Section 5 - Air Brakes (03/08/19)
Test Parking Brake. Stop the vehicle, put the parking brake on, and gently pull against it in a low gear to test that the parking brake will hold.Test Service Brakes. Wait for normal air pressure, release the parking brake, move the vehicle forward slowly (about five mph), and apply the brakes firmly using the brake pedal. Note any vehicle "pulling" to one side, unusual feel, or delayed stopping action.This test may show you problems, which you otherwise wouldn't know about until you needed the brakes on the road.
Subsections 5.2 and 5.3 Test Your Knowledge
1. What is a dual air brake system?2. What are the slack adjusters?3. How can you check slack adjusters?4. How can you test the low pressure warning signal?5. How can you check that the spring brakes come on
automatically?6. What are the maximum leakage rates?
These questions may be on your test. If you can’t answer them all, re-read subsections 5.2 and 5.3.
5.4 – Using Air Brakes
5.4.1 – Normal StopsPush the brake pedal down. Control the pressure so the vehicle comes to a smooth, safe stop. If you have a manual transmission, don't push the clutch in until the engine rpm is down close to idle. When stopped, select a starting gear.
5.4.2 – Braking with Antilock BrakesWhen you brake hard on slippery surfaces in a vehicle without ABS, your wheels may lock up. When your steering wheels lock up, you lose steering control. When your other wheels lock up, you may skid, jackknife, or even spin the vehicle.ABS helps you avoid wheel lock up. The computer senses impending lockup, reduces the braking pressure to a safe level, and you maintain control.You may or may not be able to stop faster with ABS, but you should be able to steer around an obstacle while braking, and avoid skids caused by over braking.Having ABS on only the tractor, only the trailer, or even on only one axle, still gives you more control over the vehicle during braking. Brake normally.When only the tractor has ABS, you should be able to
maintain steering control, and there is less chance of jackknifing. But, keep your eye on the trailer and let up on the brakes (if you can safely do so) if it begins to swing out.When only the trailer has ABS, the trailer is less likely to swing out, but if you lose steering control or start a tractor jackknife, let up on the brakes (if you can safely do so) until you gain control.When you drive a tractor-trailer combination with ABS, you should brake as you always have. In other words:Use only the braking force necessary to stop safely and stay in control.Brake the same way, regardless of whether you have ABS on the tractor, the trailer, or both.As you slow down, monitor your tractor and trailer and back off the brakes (if it is safe to do so) to stay in control.There is only one exception to this procedure, if you always drive a straight truck or combination with working ABS on all axles, in an emergency stop, you can fully apply the brakes.Without ABS, you still have normal brake functions. Drive and brake as you always have.Remember, if your ABS malfunctions, you still have regular brakes. Drive normally, but get the system serviced soon.
5.4.3 – Emergency StopsIf somebody suddenly pulls out in front of you, your natural response is to hit the brakes. This is a good response if there's enough distance to stop, and you use the brakes correctly.You should brake in a way that will keep your vehicle in a straight line and allow you to turn if it becomes necessary. You can use the "controlled braking" method or the "stab braking" method.Controlled Braking. With this method, you apply the brakes as hard as you can without locking the wheels. Keep steering wheel movements very small while doing this. If you need to make a larger steering adjustment or if the wheels lock, release the brakes. Re-apply the brakes as soon as you can.Stab Braking. Apply your brakes all the way. Release brakes when wheels lock up. As soon as the wheels start rolling, apply the brakes fully again. (It can take up to one second for the wheels to start rolling after you release the brakes. If you re-apply the brakes before the wheels start rolling, the vehicle won't straighten out.)
5.4.4 – Stopping DistanceStopping distance was described in Section 2 under "Speed and Stopping Distance." With air brakes there is an added

Commercial Driver’s License Manual - 2018 CDL Testing System
Section 5 - Air Brakes Page 69 (03/08/19)
delay - “Brake Lag”. This is the time required for the brakes to work after the brake pedal is pushed. With hydraulic brakes (used on cars and light/medium trucks), the brakes work instantly. However, with air brakes, it takes a little time (one half second or more) for the air to flow through the lines to the brakes. Thus, the total stopping distance for vehicles with air brake systems is made up of four different factors.Perception Distance + Reaction Distance + Brake Lag Distance + Braking Distance = Total Stopping Distance.The air brake lag distance at 55 mph on dry pavement adds about 32 feet. So at 55 mph for an average driver under good traction and brake conditions, the total stopping distance is over 450 feet. See Figure 5.6.
MPH Total Stopping Distance g DistancePerception Distance Reaction Distance Braking Distance
15 72’ Total Stopping Distance39’ 16’ 17’
25 140’ Total Stopping Distance65’ 28’ 47’
35 222’ Total Stopping Distance91’ 39’ 92’
45 319’ Total Stopping Distance114’ 50’ 152’
55 419’ Total Stopping Distance142’ 61’ 216’
1 0 2 0 3 0 4 0 5 0 4 0 3 0 2 0 1 0
102030405040302010
Stopping Distance
Figure 5.6
5.4.5 – Brake Fading or FailureBrakes are designed so brake shoes or pads rub against the brake drum or disks to slow the vehicle. Braking creates heat, but brakes are designed to take a lot of heat. However, brakes can fade or fail from excessive heat caused by using them too much and not relying on the engine braking effect.Excessive use of the service brakes results in overheating and leads to brake fade. Brake fade results from excessive heat causing chemical changes in the brake lining, which reduce friction, and also causing expansion of the brake drums. As the overheated drums expand, the brake shoes and linings have to move farther to contact the drums, and the force of this contact is reduced. Continued overuse may increase brake fade until the vehicle cannot be slowed down or stopped.
Brake fade is also affected by adjustment. To safely control a vehicle, every brake must do its share of the work. Brakes out of adjustment will stop doing their share before those that are in adjustment. The other brakes can then overheat and fade, and there will not be enough braking available to control the vehicle(s). Brakes can get out of adjustment quickly, especially when they are hot. Therefore, check brake adjustment often.
5.4.6 – Proper Braking TechniqueRemember. The use of brakes on a long and/or steep downgrade is only a supplement to the braking effect of the engine. Once the vehicle is in the proper low gear, the following is the proper braking technique:Apply the brakes just hard enough to feel a definite slowdown.When your speed has been reduced to approximately five mph below your "safe" speed, release the brakes. (This application should last for about three seconds.)When your speed has increased to your "safe" speed, repeat steps 1 and 2.For example, if your "safe" speed is 40 mph, you would not apply the brakes until your speed reaches 40 mph. You now apply the brakes hard enough to gradually reduce your speed to 35 mph and then release the brakes. Repeat this as often as necessary until you have reached the end of the downgrade.
5.4.7 – Low Air PressureIf the low air pressure warning comes on, stop and safely park your vehicle as soon as possible. There might be an air leak in the system. Controlled braking is possible only while enough air remains in the air tanks. The spring brakes will come on when the air pressure drops into the range of 20 to 45 psi. A heavily loaded vehicle will take a long distance to stop because the spring brakes do not work on all axles. Lightly loaded vehicles or vehicles on slippery roads may skid out of control when the spring brakes come on. It is much safer to stop while there is enough air in the tanks to use the foot brakes.
5.4.8 – Parking BrakesAny time you park, use the parking brakes, except as noted below. Pull the parking brake control knob out to apply the parking brakes, push it in to release. The control will be a yellow, diamond-shaped knob labeled "parking brakes" on newer vehicles. On older vehicles, it may be a round blue knob or some other shape (including a lever that swings from side to side or up and down).Don't use the parking brakes if the brakes are very hot (from just having come down a steep grade), or if the brakes are very wet in freezing temperatures. If they are used while they are very hot, they can be damaged by the heat. If they are used in freezing temperatures when the brakes are very wet,
Commercial Driver’s License Manual - 2018 CDL Testing System
Page 70 Section 5 - Air Brakes (03/08/19)
they can freeze so the vehicle cannot move. Use wheel chocks on a level surface to hold the vehicle. Let hot brakes cool before using the parking brakes. If the brakes are wet, use the brakes lightly while driving in a low gear to heat and dry them.If your vehicle does not have automatic air tank drains, drain your air tanks at the end of each working day to remove moisture and oil. Otherwise, the brakes could fail.Never leave your vehicle unattended without applying the parking brakes or chocking the wheels. Your vehicle might roll away and cause injury and damage.
Subsection 5.4 Test Your Knowledge
1. Why should you be in the proper gear before starting down a hill?
2. What factors can cause brakes to fade or fail?3. The use of brakes on a long, steep downgrade
is only a supplement to the braking effect of the engine. True or False?
4. If you are away from your vehicle only a short time, you do not need to use the parking brake. True or False?
5. How often should you drain air tanks?6. How should you brake when you drive a tractor-
trailer combination with ABS?7. You still have normal brake functions if your ABS is
not working. True or False?These questions may be on your test. If you can’t answer them all, re-read subsection 5.4.
Commercial Driver’s License Manual - 2018 CDL Testing System
Section 6 - Combination Vehicles Page 71 (03/08/19)
Section 6
COMBINATION VEHICLESThis Section Covers
● Driving Combinations ● Combination Vehicle Air Brakes ● Antilock Brake Systems ● Coupling and Uncoupling ● Inspecting Combinations
This section provides information needed to pass the tests for combination vehicles (tractor-trailer, doubles, triples, straight truck with trailer). The information is only to give you the minimum knowledge needed for driving common combination vehicles. You should also study Section 7 if you need to pass the test for doubles and triples.
6.1 – Driving Combination Vehicles SafelyCombination vehicles are usually heavier, longer, and require more driving skill than single commercial vehicles. This means that drivers of combination vehicles need more knowledge and skill than drivers of single vehicles. In this section, we talk about some important safety factors that apply specifically to combination vehicles.
6.1.1 – Rollover RisksMore than half of truck driver deaths in crashes are the result of truck rollovers. When more cargo is piled up in a truck, the "center of gravity" moves higher up from the road. The truck becomes easier to turn over. Fully loaded rigs are ten times more likely to roll over in a crash than empty rigs.The following two things will help you prevent rollover--keep the cargo as close to the ground as possible, and drive slowly around turns. Keeping cargo low is even more important in combination vehicles than in straight trucks. Also, keep the load centered on your rig. If the load is to one side so it makes a trailer lean, a rollover is more likely. Make sure your cargo is centered and spread out as much as possible. (Cargo distribution is covered in Section 3 of this manual.)Rollovers happen when you turn too fast. Drive slowly around corners, on ramps, and off ramps.Avoid quick lane changes, especially when fully loaded.
6.1.2 – Steer GentlyTrucks with trailers have a dangerous "crack-the-whip" effect. When you make a quick lane change, the crack-the-whip effect can turn the trailer over. There are many accidents where only the trailer has overturned."Rearward amplification" causes the crack-the-whip effect.
Figure 6.1 shows eight types of combination vehicles and the rearward amplification each has in a quick lane change. Rigs with the least crack-the-whip effect are shown at the top and those with the most, at the bottom. Rearward amplification of 2.0 in the chart means that the rear trailer is twice as likely to turn over as the tractor. You can see that triples have a rearward amplification of 3.5. This means you can roll the last trailer of triples 3.5 times as easily as a five-axle tractor.Steer gently and smoothly when you are pulling trailers. If you make a sudden movement with your steering wheel, your trailer could tip over. Follow far enough behind other vehicles (at least 1 second for each 10 feet of your vehicle length, plus another second if going over 40 mph). Look far enough down the road to avoid being surprised and having to make a sudden lane change. At night, drive slowly enough to see obstacles with your headlights before it is too late to change lanes or stop gently. Slow down to a safe speed before going into a turn.
6.1.3 – Brake EarlyControl your speed whether fully loaded or empty. Large combination vehicles take longer to stop when they are empty than when they are fully loaded. When lightly loaded, the very stiff suspension springs and strong brakes give poor traction and make it very easy to lock up the wheels. Your trailer can swing out and strike other vehicles. Your tractor can jackknife very quickly. You also must be very careful about driving "bobtail" tractors (tractors without semitrailers). Tests have shown that bobtails can be very hard to stop smoothly. It takes them longer to stop than a tractor-semitrailer loaded to maximum gross weight.In any combination rig, allow lots of following distance and look far ahead, so you can brake early. Don't be caught by surprise and have to make a "panic" stop.
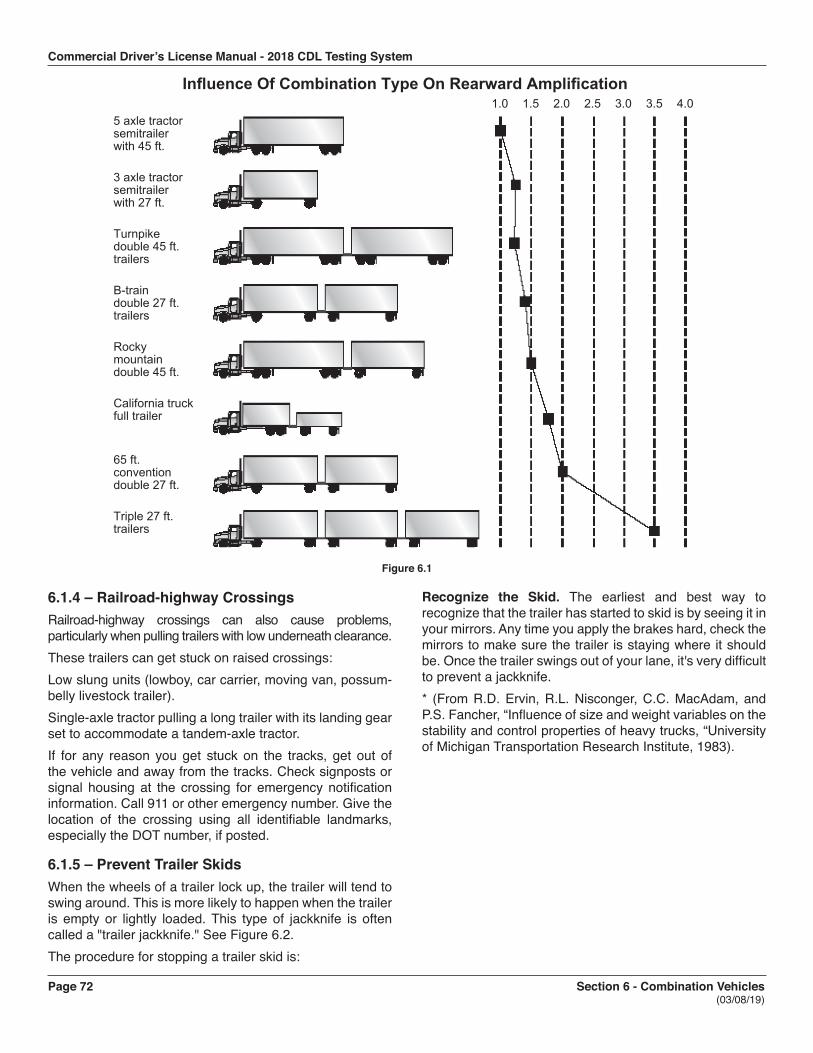
Commercial Driver’s License Manual - 2018 CDL Testing System
Page 72 Section 6 - Combination Vehicles (03/08/19)
6.1.4 – Railroad-highway CrossingsRailroad-highway crossings can also cause problems, particularly when pulling trailers with low underneath clearance.These trailers can get stuck on raised crossings:Low slung units (lowboy, car carrier, moving van, possum-belly livestock trailer).Single-axle tractor pulling a long trailer with its landing gear set to accommodate a tandem-axle tractor.If for any reason you get stuck on the tracks, get out of the vehicle and away from the tracks. Check signposts or signal housing at the crossing for emergency notification information. Call 911 or other emergency number. Give the location of the crossing using all identifiable landmarks, especially the DOT number, if posted.
6.1.5 – Prevent Trailer SkidsWhen the wheels of a trailer lock up, the trailer will tend to swing around. This is more likely to happen when the trailer is empty or lightly loaded. This type of jackknife is often called a "trailer jackknife." See Figure 6.2.The procedure for stopping a trailer skid is:
Recognize the Skid. The earliest and best way to recognize that the trailer has started to skid is by seeing it in your mirrors. Any time you apply the brakes hard, check the mirrors to make sure the trailer is staying where it should be. Once the trailer swings out of your lane, it's very difficult to prevent a jackknife.* (From R.D. Ervin, R.L. Nisconger, C.C. MacAdam, andP.S. Fancher, “Influence of size and weight variables on thestability and control properties of heavy trucks, “Universityof Michigan Transportation Research Institute, 1983).
5 axle tractorsemitrailerwith 45 ft.
3 axle tractorsemitrailerwith 27 ft.
Turnpikedouble 45 ft.trailers
B-traindouble 27 ft.trailers
Rockymountaindouble 45 ft.
California truckfull trailer
65 ft.conventiondouble 27 ft.
Triple 27 ft.trailers
1.0 1.5 2.0 2.5 3.0 3.5 4.0Influence Of Combination Type On Rearward Amplification
Figure 6.1
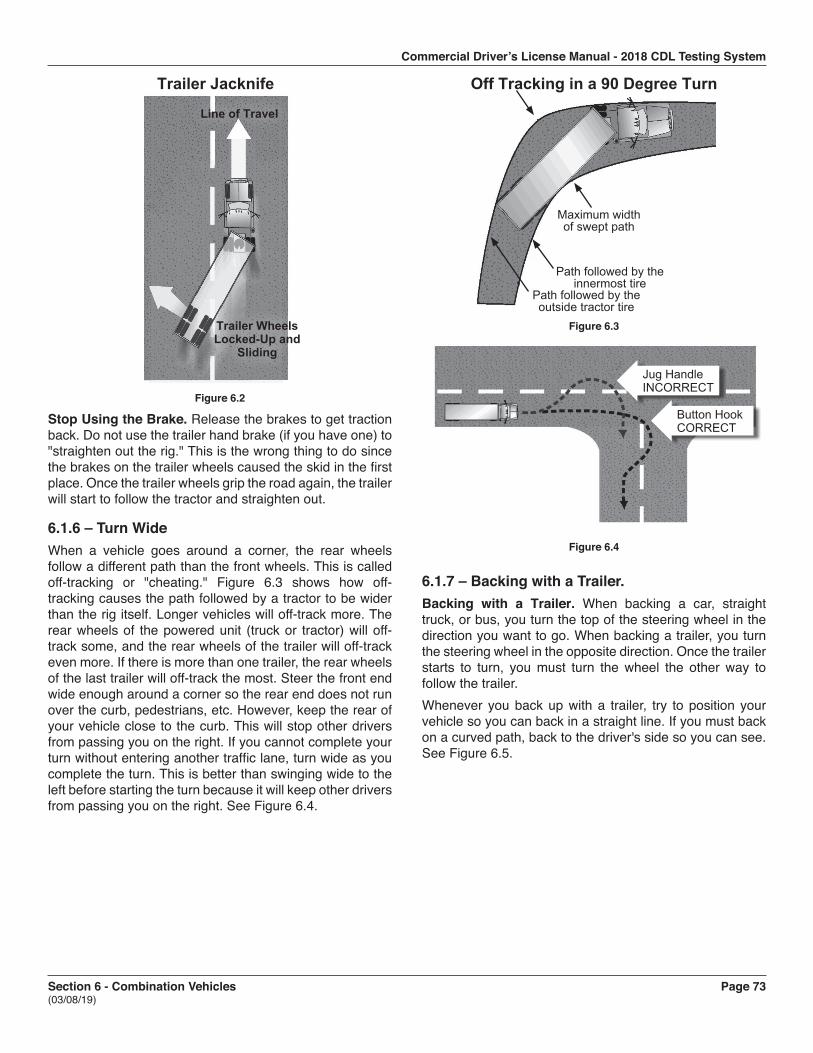
Commercial Driver’s License Manual - 2018 CDL Testing System
Section 6 - Combination Vehicles Page 73 (03/08/19)
Trailer Jacknife
Trailer Wheels Locked-Up and
Sliding
Line of Travel
Figure 6.2
Stop Using the Brake. Release the brakes to get traction back. Do not use the trailer hand brake (if you have one) to "straighten out the rig." This is the wrong thing to do since the brakes on the trailer wheels caused the skid in the first place. Once the trailer wheels grip the road again, the trailer will start to follow the tractor and straighten out.
6.1.6 – Turn WideWhen a vehicle goes around a corner, the rear wheels follow a different path than the front wheels. This is called off-tracking or "cheating." Figure 6.3 shows how off-tracking causes the path followed by a tractor to be wider than the rig itself. Longer vehicles will off-track more. The rear wheels of the powered unit (truck or tractor) will off-track some, and the rear wheels of the trailer will off-track even more. If there is more than one trailer, the rear wheels of the last trailer will off-track the most. Steer the front end wide enough around a corner so the rear end does not run over the curb, pedestrians, etc. However, keep the rear of your vehicle close to the curb. This will stop other drivers from passing you on the right. If you cannot complete your turn without entering another traffic lane, turn wide as you complete the turn. This is better than swinging wide to the left before starting the turn because it will keep other drivers from passing you on the right. See Figure 6.4.
Off Tracking in a 90 Degree Turn
Path followed by the innermost tire
Maximum width of swept path
Path followed by the outside tractor tire
Figure 6.3
Jug Handle INCORRECT
Button Hook CORRECT
Figure 6.4
6.1.7 – Backing with a Trailer.Backing with a Trailer. When backing a car, straight truck, or bus, you turn the top of the steering wheel in the direction you want to go. When backing a trailer, you turn the steering wheel in the opposite direction. Once the trailer starts to turn, you must turn the wheel the other way to follow the trailer.Whenever you back up with a trailer, try to position your vehicle so you can back in a straight line. If you must back on a curved path, back to the driver's side so you can see. See Figure 6.5.
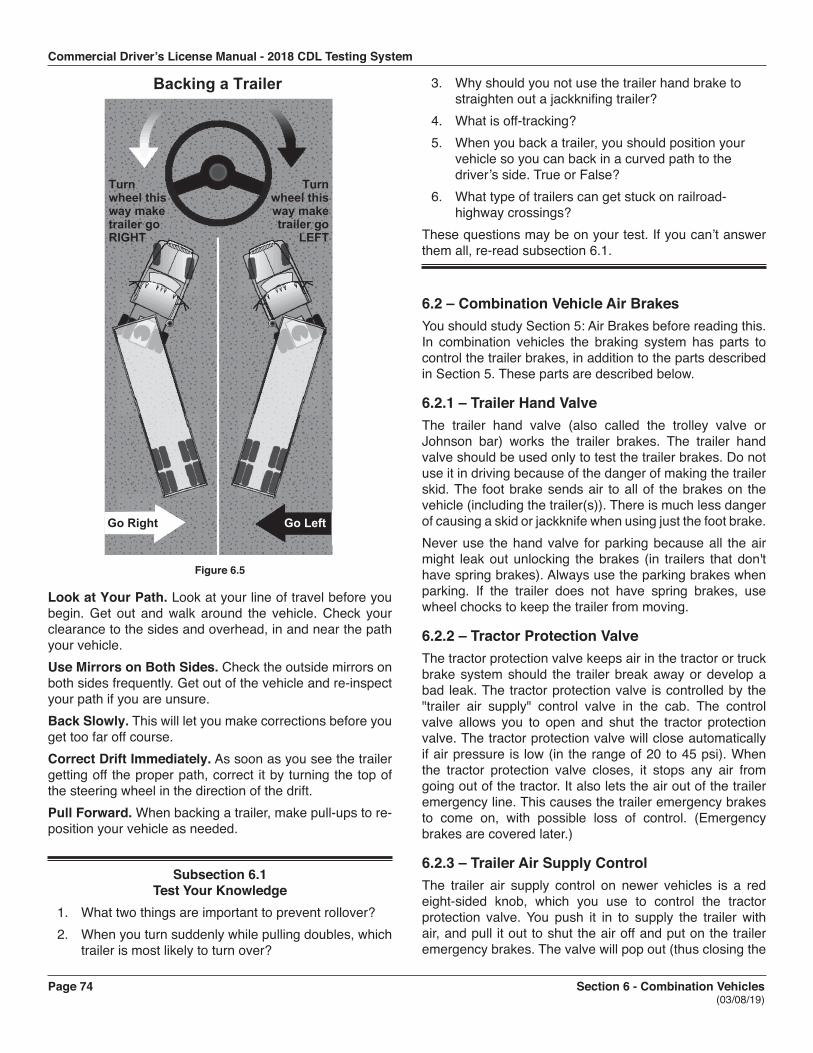
Commercial Driver’s License Manual - 2018 CDL Testing System
Page 74 Section 6 - Combination Vehicles (03/08/19)
Backing a Trailer
Turn wheel this way make trailer go RIGHT
Turn wheel this way make trailer go
LEFT
Go Right Go Left
Figure 6.5
Look at Your Path. Look at your line of travel before you begin. Get out and walk around the vehicle. Check your clearance to the sides and overhead, in and near the path your vehicle.Use Mirrors on Both Sides. Check the outside mirrors on both sides frequently. Get out of the vehicle and re-inspect your path if you are unsure.Back Slowly. This will let you make corrections before you get too far off course.Correct Drift Immediately. As soon as you see the trailer getting off the proper path, correct it by turning the top of the steering wheel in the direction of the drift.Pull Forward. When backing a trailer, make pull-ups to re-position your vehicle as needed.
Subsection 6.1 Test Your Knowledge
1. What two things are important to prevent rollover?2. When you turn suddenly while pulling doubles, which
trailer is most likely to turn over?
3. Why should you not use the trailer hand brake to straighten out a jackknifing trailer?
4. What is off-tracking?5. When you back a trailer, you should position your
vehicle so you can back in a curved path to the driver’s side. True or False?
6. What type of trailers can get stuck on railroad-highway crossings?
These questions may be on your test. If you can’t answer them all, re-read subsection 6.1.
6.2 – Combination Vehicle Air BrakesYou should study Section 5: Air Brakes before reading this. In combination vehicles the braking system has parts to control the trailer brakes, in addition to the parts described in Section 5. These parts are described below.
6.2.1 – Trailer Hand ValveThe trailer hand valve (also called the trolley valve or Johnson bar) works the trailer brakes. The trailer hand valve should be used only to test the trailer brakes. Do not use it in driving because of the danger of making the trailer skid. The foot brake sends air to all of the brakes on the vehicle (including the trailer(s)). There is much less danger of causing a skid or jackknife when using just the foot brake.Never use the hand valve for parking because all the air might leak out unlocking the brakes (in trailers that don't have spring brakes). Always use the parking brakes when parking. If the trailer does not have spring brakes, use wheel chocks to keep the trailer from moving.
6.2.2 – Tractor Protection ValveThe tractor protection valve keeps air in the tractor or truck brake system should the trailer break away or develop a bad leak. The tractor protection valve is controlled by the "trailer air supply" control valve in the cab. The control valve allows you to open and shut the tractor protection valve. The tractor protection valve will close automatically if air pressure is low (in the range of 20 to 45 psi). When the tractor protection valve closes, it stops any air from going out of the tractor. It also lets the air out of the trailer emergency line. This causes the trailer emergency brakes to come on, with possible loss of control. (Emergency brakes are covered later.)
6.2.3 – Trailer Air Supply ControlThe trailer air supply control on newer vehicles is a red eight-sided knob, which you use to control the tractor protection valve. You push it in to supply the trailer with air, and pull it out to shut the air off and put on the trailer emergency brakes. The valve will pop out (thus closing the
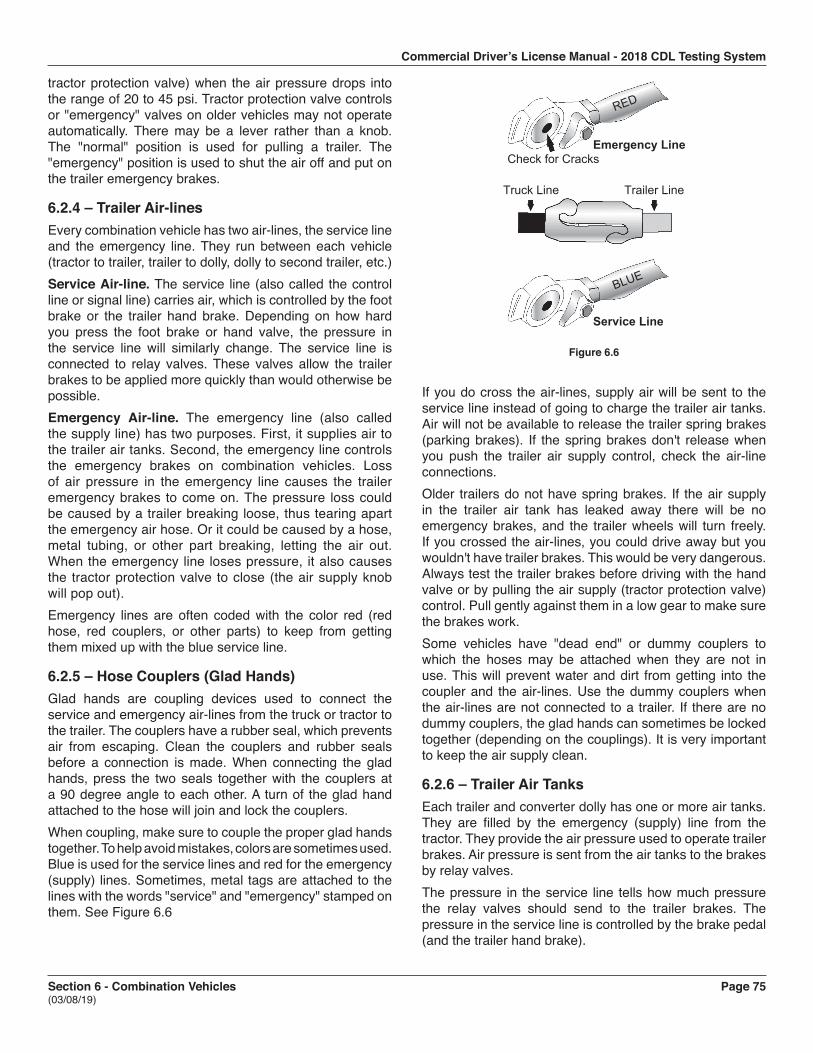
Commercial Driver’s License Manual - 2018 CDL Testing System
Section 6 - Combination Vehicles Page 75 (03/08/19)
tractor protection valve) when the air pressure drops into the range of 20 to 45 psi. Tractor protection valve controls or "emergency" valves on older vehicles may not operate automatically. There may be a lever rather than a knob. The "normal" position is used for pulling a trailer. The "emergency" position is used to shut the air off and put on the trailer emergency brakes.
6.2.4 – Trailer Air-linesEvery combination vehicle has two air-lines, the service line and the emergency line. They run between each vehicle (tractor to trailer, trailer to dolly, dolly to second trailer, etc.)Service Air-line. The service line (also called the control line or signal line) carries air, which is controlled by the foot brake or the trailer hand brake. Depending on how hard you press the foot brake or hand valve, the pressure in the service line will similarly change. The service line is connected to relay valves. These valves allow the trailer brakes to be applied more quickly than would otherwise be possible.Emergency Air-line. The emergency line (also called the supply line) has two purposes. First, it supplies air to the trailer air tanks. Second, the emergency line controls the emergency brakes on combination vehicles. Loss of air pressure in the emergency line causes the trailer emergency brakes to come on. The pressure loss could be caused by a trailer breaking loose, thus tearing apart the emergency air hose. Or it could be caused by a hose, metal tubing, or other part breaking, letting the air out. When the emergency line loses pressure, it also causes the tractor protection valve to close (the air supply knob will pop out).Emergency lines are often coded with the color red (red hose, red couplers, or other parts) to keep from getting them mixed up with the blue service line.
6.2.5 – Hose Couplers (Glad Hands)Glad hands are coupling devices used to connect the service and emergency air-lines from the truck or tractor to the trailer. The couplers have a rubber seal, which prevents air from escaping. Clean the couplers and rubber seals before a connection is made. When connecting the glad hands, press the two seals together with the couplers at a 90 degree angle to each other. A turn of the glad hand attached to the hose will join and lock the couplers.When coupling, make sure to couple the proper glad hands together. To help avoid mistakes, colors are sometimes used. Blue is used for the service lines and red for the emergency (supply) lines. Sometimes, metal tags are attached to the lines with the words "service" and "emergency" stamped on them. See Figure 6.6
Emergency Line
Service Line
Truck Line
Check for Cracks
Trailer Line
RED
BLUE
Figure 6.6
If you do cross the air-lines, supply air will be sent to the service line instead of going to charge the trailer air tanks. Air will not be available to release the trailer spring brakes (parking brakes). If the spring brakes don't release when you push the trailer air supply control, check the air-line connections.Older trailers do not have spring brakes. If the air supply in the trailer air tank has leaked away there will be no emergency brakes, and the trailer wheels will turn freely. If you crossed the air-lines, you could drive away but you wouldn't have trailer brakes. This would be very dangerous. Always test the trailer brakes before driving with the hand valve or by pulling the air supply (tractor protection valve) control. Pull gently against them in a low gear to make sure the brakes work.Some vehicles have "dead end" or dummy couplers to which the hoses may be attached when they are not in use. This will prevent water and dirt from getting into the coupler and the air-lines. Use the dummy couplers when the air-lines are not connected to a trailer. If there are no dummy couplers, the glad hands can sometimes be locked together (depending on the couplings). It is very important to keep the air supply clean.
6.2.6 – Trailer Air TanksEach trailer and converter dolly has one or more air tanks. They are filled by the emergency (supply) line from the tractor. They provide the air pressure used to operate trailer brakes. Air pressure is sent from the air tanks to the brakes by relay valves.The pressure in the service line tells how much pressure the relay valves should send to the trailer brakes. The pressure in the service line is controlled by the brake pedal (and the trailer hand brake).
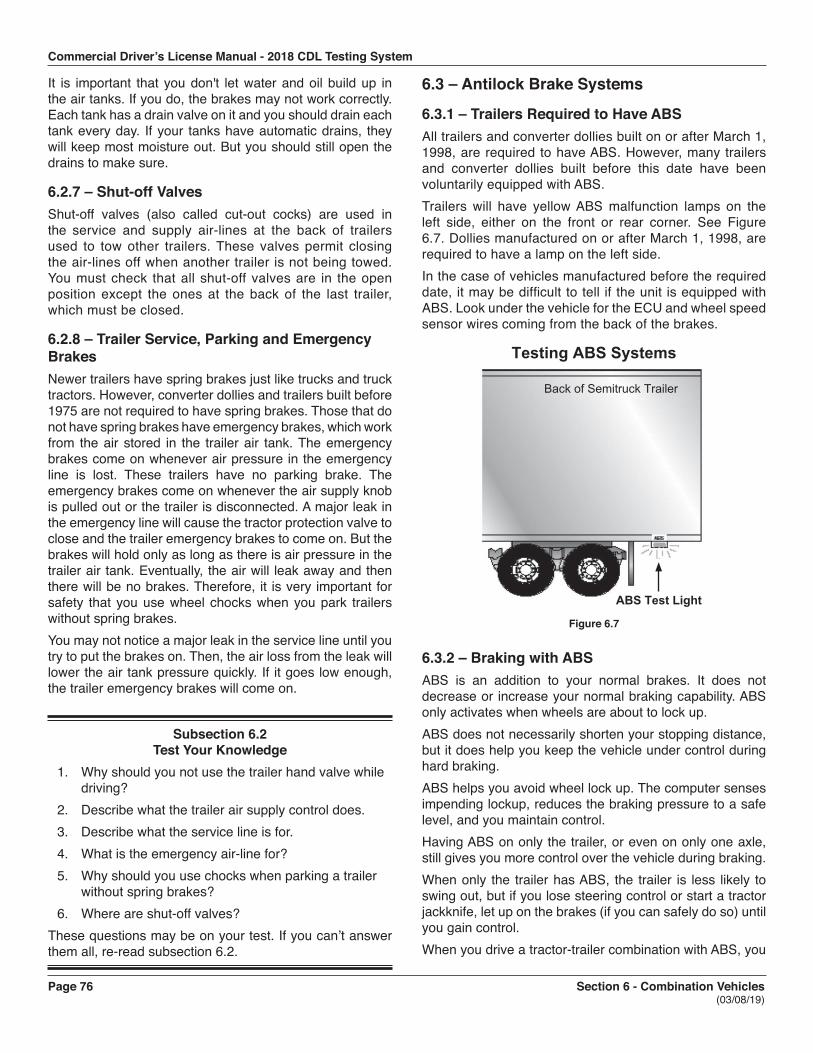
Commercial Driver’s License Manual - 2018 CDL Testing System
Page 76 Section 6 - Combination Vehicles (03/08/19)
It is important that you don't let water and oil build up in the air tanks. If you do, the brakes may not work correctly. Each tank has a drain valve on it and you should drain each tank every day. If your tanks have automatic drains, they will keep most moisture out. But you should still open the drains to make sure.
6.2.7 – Shut-off ValvesShut-off valves (also called cut-out cocks) are used in the service and supply air-lines at the back of trailers used to tow other trailers. These valves permit closing the air-lines off when another trailer is not being towed. You must check that all shut-off valves are in the open position except the ones at the back of the last trailer, which must be closed.
6.2.8 – Trailer Service, Parking and Emergency BrakesNewer trailers have spring brakes just like trucks and truck tractors. However, converter dollies and trailers built before 1975 are not required to have spring brakes. Those that do not have spring brakes have emergency brakes, which work from the air stored in the trailer air tank. The emergency brakes come on whenever air pressure in the emergency line is lost. These trailers have no parking brake. The emergency brakes come on whenever the air supply knob is pulled out or the trailer is disconnected. A major leak in the emergency line will cause the tractor protection valve to close and the trailer emergency brakes to come on. But the brakes will hold only as long as there is air pressure in the trailer air tank. Eventually, the air will leak away and then there will be no brakes. Therefore, it is very important for safety that you use wheel chocks when you park trailers without spring brakes.You may not notice a major leak in the service line until you try to put the brakes on. Then, the air loss from the leak will lower the air tank pressure quickly. If it goes low enough, the trailer emergency brakes will come on.
Subsection 6.2 Test Your Knowledge
1. Why should you not use the trailer hand valve while driving?
2. Describe what the trailer air supply control does.3. Describe what the service line is for.4. What is the emergency air-line for?5. Why should you use chocks when parking a trailer
without spring brakes?6. Where are shut-off valves?
These questions may be on your test. If you can’t answer them all, re-read subsection 6.2.
6.3 – Antilock Brake Systems
6.3.1 – Trailers Required to Have ABSAll trailers and converter dollies built on or after March 1, 1998, are required to have ABS. However, many trailers and converter dollies built before this date have been voluntarily equipped with ABS.Trailers will have yellow ABS malfunction lamps on the left side, either on the front or rear corner. See Figure 6.7. Dollies manufactured on or after March 1, 1998, are required to have a lamp on the left side.In the case of vehicles manufactured before the required date, it may be difficult to tell if the unit is equipped with ABS. Look under the vehicle for the ECU and wheel speed sensor wires coming from the back of the brakes.
Testing ABS Systems
Back of Semitruck Trailer
ABS Test Light
Figure 6.7
6.3.2 – Braking with ABSABS is an addition to your normal brakes. It does not decrease or increase your normal braking capability. ABS only activates when wheels are about to lock up.ABS does not necessarily shorten your stopping distance, but it does help you keep the vehicle under control during hard braking.ABS helps you avoid wheel lock up. The computer senses impending lockup, reduces the braking pressure to a safe level, and you maintain control.Having ABS on only the trailer, or even on only one axle, still gives you more control over the vehicle during braking.When only the trailer has ABS, the trailer is less likely to swing out, but if you lose steering control or start a tractor jackknife, let up on the brakes (if you can safely do so) until you gain control.When you drive a tractor-trailer combination with ABS, you
Commercial Driver’s License Manual - 2018 CDL Testing System
Section 6 - Combination Vehicles Page 77 (03/08/19)
should brake as you always have. In other words:Use only the braking force necessary to stop safely and stay in control.Brake the same way, regardless of whether you have ABS on the tractor, the trailer, or both.As you slow down, monitor your tractor and trailer and back off the brakes (if it is safe to do so) to stay in control.Remember, if your ABS malfunctions, you still have regular brakes. Drive normally, but get the system serviced soon.ABS won’t allow you to drive faster, follow more closely, or drive less carefully.
6.4 – Coupling and UncouplingKnowing how to couple and uncouple correctly is basic to safe operation of combination vehicles. Wrong coupling and uncoupling can be very dangerous. General coupling and uncoupling steps are listed below. There are differences between different rigs, so learn the details of coupling and uncoupling the truck(s) you will operate.
6.4.1 – Coupling Tractor-Semitrailers
Step 1. Inspect Fifth WheelCheck for damaged/missing parts.Check to see that mounting to tractor is secure, no cracks in frame, etc.Be sure that the fifth wheel plate is greased as required. Failure to keep the fifth wheel plate lubricated could cause steering problems because of friction between the tractor and trailer.Check if fifth wheel is in proper position for coupling:Wheel tilted down toward rear of tractor.Jaws open.Safety unlocking handle in the automatic lock position.If you have a sliding fifth wheel, make sure it is locked.Make sure the trailer kingpin is not bent or broken.
Step 2. Inspect Area and Chock WheelsMake sure area around the vehicle is clear.Be sure trailer wheels are chocked or spring brakes are on.Check that cargo (if any) is secured against movement due to tractor being coupled to the trailer.
Step 3. Position TractorPut the tractor directly in front of the trailer. (Never back under the trailer at an angle because you might push the trailer sideways and break the landing gear.)Check position, using outside mirrors, by looking down both sides of the trailer.
Step 4. Back SlowlyBack until fifth wheel just touches the trailer.Don't hit the trailer.
Step 5. Secure TractorPut on the parking brake.Put transmission in neutral.
Step 6. Check Trailer HeightThe trailer should be low enough that it is raised slightly by the tractor when the tractor is backed under it. Raise or lower the trailer as needed. (If the trailer is too low, the tractor may strike and damage the trailer nose; if the trailer is too high, it may not couple correctly.)Check that the kingpin and fifth wheel are aligned.
Step 7. Connect Air-lines to TrailerCheck glad hand seals and connect tractor emergency air-line to trailer emergency glad hand.Check glad hand seals and connect tractor service air-line to trailer service glad hand.Make sure air-lines are safely supported where they won't be crushed or caught while tractor is backing under the trailer.
Step 8. Supply Air to TrailerFrom cab, push in "air supply" knob or move tractor protection valve control from the "emergency" to the "normal" position to supply air to the trailer brake system.Wait until the air pressure is normal.Check brake system for crossed air-lines.Shut engine off so you can hear the brakes.Apply and release trailer brakes and listen for sound of trailer brakes being applied and released. You should hear the brakes move when applied and air escape when the brakes are released.Check air brake system pressure gauge for signs of major air loss.When you are sure trailer brakes are working, start engine.Make sure air pressure is up to normal.
Step 9. Lock Trailer BrakesPull out the "air supply" knob or move the tractor protection valve control from "normal" to "emergency."
Step 10. Back Under TrailerUse lowest reverse gear.Back tractor slowly under trailer to avoid hitting the kingpin too hard.
Commercial Driver’s License Manual - 2018 CDL Testing System
Page 78 Section 6 - Combination Vehicles (03/08/19)
Stop when the kingpin is locked into the fifth wheel.
Step 11. Check Connection for SecurityRaise trailer landing gear slightly off ground.Pull tractor gently forward while the trailer brakes are still locked to check that the trailer is locked onto the tractor.
Step 12. Secure VehiclePut transmission in neutral.Put parking brakes on.Shut off engine and take key with you so someone else won't move truck while you are under it.
Step 13. Inspect CouplingUse a flashlight, if necessary.Make sure there is no space between upper and lower fifth wheel. If there is space, something is wrong (kingpin may be on top of the closed fifth wheel jaws, and trailer would come loose very easily).Go under trailer and look into the back of the fifth wheel. Make sure the fifth wheel jaws have closed around the shank of the kingpin.Check that the locking lever is in the "lock" position.Check that the safety latch is in position over locking lever. (On some fifth wheels the catch must be put in place by hand.)If the coupling isn't right, don't drive the coupled unit; get it fixed.
Step 14. Connect the Electrical Cord and Check Air-linesPlug the electrical cord into the trailer and fasten the safety catch.Check both air-lines and electrical line for signs of damage.Make sure air and electrical lines will not hit any moving parts of vehicle.
Step 15. Raise Front Trailer Supports (Landing Gear)Use low gear range (if so equipped) to begin raising the landing gear. Once free of weight, switch to the high gear range.Raise the landing gear all the way up. (Never drive with landing gear only part way up as it may catch on railroad tracks or other things.)After raising landing gear, secure the crank handle safely.When full weight of trailer is resting on tractor:Check for enough clearance between rear of tractor frame and landing gear. (When tractor turns sharply, it must not hit landing gear.)
Check that there is enough clearance between the top of the tractor tires and the nose of the trailer.
Step 16. Remove Trailer Wheel ChocksRemove and store wheel chocks in a safe place.
6.4.2 – Uncoupling Tractor-SemitrailersThe following steps will help you to uncouple safely.
Step 1. Position RigMake sure surface of parking area can support weight of trailer.Have tractor lined up with the trailer. (Pulling out at an angle can damage landing gear.)
Step 2. Ease Pressure on Locking JawsShut off trailer air supply to lock trailer brakes.Ease pressure on fifth wheel locking jaws by backing up gently. (This will help you release the fifth wheel locking lever.)Put parking brakes on while tractor is pushing against the kingpin. (This will hold rig with pressure off the locking jaws.)
Step 3. Chock Trailer WheelsChock the trailer wheels if the trailer doesn't have spring brakes or if you're not sure. (The air could leak out of the trailer air tank, releasing its emergency brakes. Without chocks, the trailer could move.)
Step 4. Lower the Landing GearIf trailer is empty, lower the landing gear until it makes firm contact with the ground.If trailer is loaded, after the landing gear makes firm contact with the ground, turn crank in low gear a few extra turns. This will lift some weight off the tractor. (Do not lift trailer off the fifth wheel.) This will:Make it easier to unlatch fifth wheel.Make it easier to couple next time.
Step 5. Disconnect Air-lines and Electrical CableDisconnect air-lines from trailer. Connect air-line glad hands to dummy couplers at back of cab or couple them together.Hang electrical cable with plug down to prevent moisture from entering it.Make sure lines are supported so they won't be damaged while driving the tractor.
Step 6. Unlock Fifth WheelRaise the release handle lock.
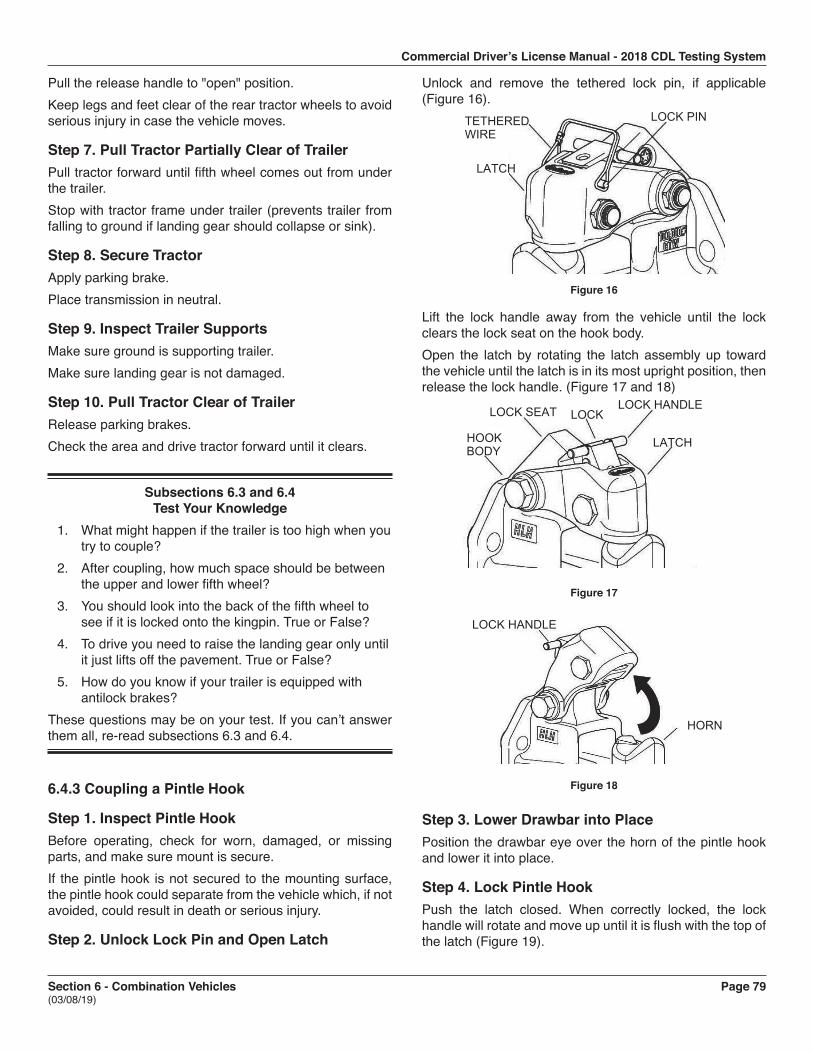
Commercial Driver’s License Manual - 2018 CDL Testing System
Section 6 - Combination Vehicles Page 79 (03/08/19)
Pull the release handle to "open" position.Keep legs and feet clear of the rear tractor wheels to avoid serious injury in case the vehicle moves.
Step 7. Pull Tractor Partially Clear of TrailerPull tractor forward until fifth wheel comes out from under the trailer.Stop with tractor frame under trailer (prevents trailer from falling to ground if landing gear should collapse or sink).
Step 8. Secure TractorApply parking brake.Place transmission in neutral.
Step 9. Inspect Trailer SupportsMake sure ground is supporting trailer.Make sure landing gear is not damaged.
Step 10. Pull Tractor Clear of TrailerRelease parking brakes.Check the area and drive tractor forward until it clears.
Subsections 6.3 and 6.4 Test Your Knowledge
1. What might happen if the trailer is too high when youtry to couple?
2. After coupling, how much space should be betweenthe upper and lower fifth wheel?
3. You should look into the back of the fifth wheel tosee if it is locked onto the kingpin. True or False?
4. To drive you need to raise the landing gear only untilit just lifts off the pavement. True or False?
5. How do you know if your trailer is equipped withantilock brakes?
These questions may be on your test. If you can’t answer them all, re-read subsections 6.3 and 6.4.
6.4.3 Coupling a Pintle Hook
Step 1. Inspect Pintle HookBefore operating, check for worn, damaged, or missing parts, and make sure mount is secure.If the pintle hook is not secured to the mounting surface, the pintle hook could separate from the vehicle which, if not avoided, could result in death or serious injury.
Step 2. Unlock Lock Pin and Open Latch
Unlock and remove the tethered lock pin, if applicable (Figure 16).
LATCH
LOCK PINTETHEREDWIRE
Figure 16
Lift the lock handle away from the vehicle until the lock clears the lock seat on the hook body.Open the latch by rotating the latch assembly up toward the vehicle until the latch is in its most upright position, then release the lock handle. (Figure 17 and 18)
LATCH
LOCK SEAT LOCK HANDLELOCK
HOOKBODY
Figure 17
LOCK HANDLE
HORN
Figure 18
Step 3. Lower Drawbar into PlacePosition the drawbar eye over the horn of the pintle hook and lower it into place.
Step 4. Lock Pintle HookPush the latch closed. When correctly locked, the lock handle will rotate and move up until it is flush with the top of the latch (Figure 19).
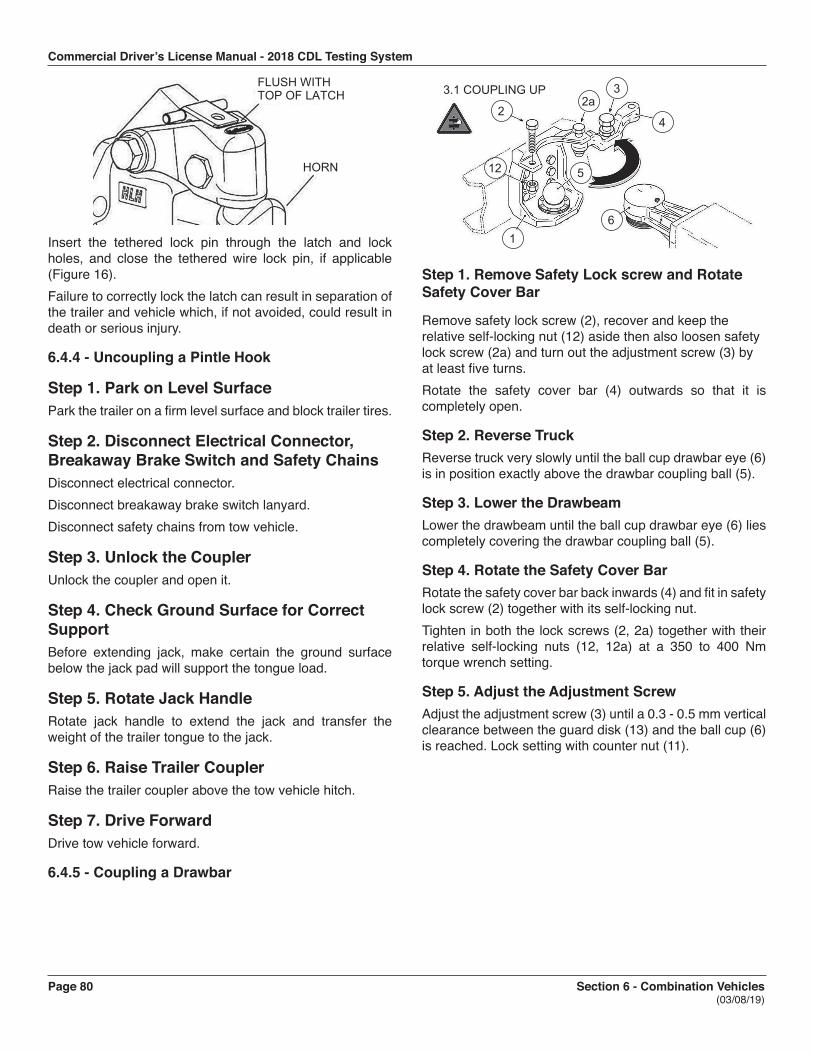
Commercial Driver’s License Manual - 2018 CDL Testing System
Page 80 Section 6 - Combination Vehicles (03/08/19)
FLUSH WITHTOP OF LATCH
HORN
Insert the tethered lock pin through the latch and lock holes, and close the tethered wire lock pin, if applicable (Figure 16).Failure to correctly lock the latch can result in separation of the trailer and vehicle which, if not avoided, could result in death or serious injury.
6.4.4 - Uncoupling a Pintle Hook
Step 1. Park on Level SurfacePark the trailer on a firm level surface and block trailer tires.
Step 2. Disconnect Electrical Connector, Breakaway Brake Switch and Safety ChainsDisconnect electrical connector.Disconnect breakaway brake switch lanyard.Disconnect safety chains from tow vehicle.
Step 3. Unlock the CouplerUnlock the coupler and open it.
Step 4. Check Ground Surface for Correct SupportBefore extending jack, make certain the ground surface below the jack pad will support the tongue load.
Step 5. Rotate Jack HandleRotate jack handle to extend the jack and transfer the weight of the trailer tongue to the jack.
Step 6. Raise Trailer CouplerRaise the trailer coupler above the tow vehicle hitch.
Step 7. Drive ForwardDrive tow vehicle forward.
6.4.5 - Coupling a Drawbar
3.1 COUPLING UP
5
22a
3
4
61
12
Step 1. Remove Safety Lock screw and Rotate Safety Cover Bar
Remove safety lock screw (2), recover and keep the relative self-locking nut (12) aside then also loosen safety lock screw (2a) and turn out the adjustment screw (3) by at least five turns.Rotate the safety cover bar (4) outwards so that it is completely open.
Step 2. Reverse TruckReverse truck very slowly until the ball cup drawbar eye (6) is in position exactly above the drawbar coupling ball (5).
Step 3. Lower the DrawbeamLower the drawbeam until the ball cup drawbar eye (6) lies completely covering the drawbar coupling ball (5).
Step 4. Rotate the Safety Cover BarRotate the safety cover bar back inwards (4) and fit in safety lock screw (2) together with its self-locking nut.Tighten in both the lock screws (2, 2a) together with their relative self-locking nuts (12, 12a) at a 350 to 400 Nm torque wrench setting.
Step 5. Adjust the Adjustment ScrewAdjust the adjustment screw (3) until a 0.3 - 0.5 mm vertical clearance between the guard disk (13) and the ball cup (6) is reached. Lock setting with counter nut (11).
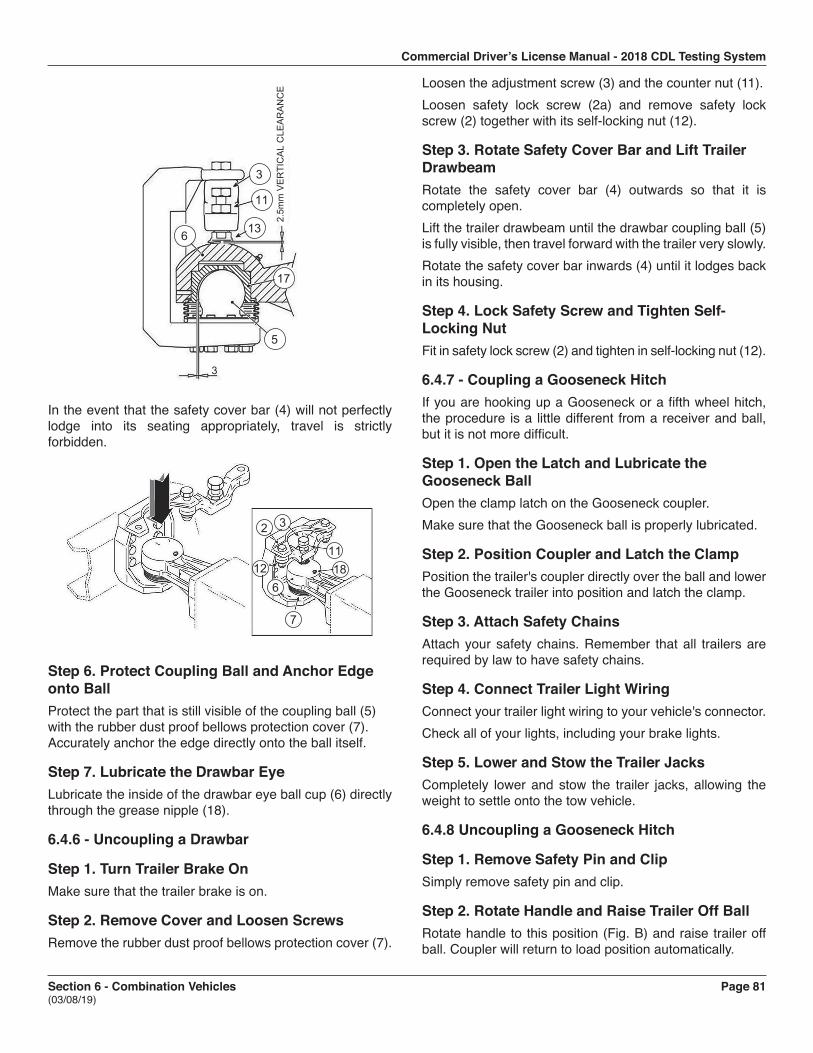
Commercial Driver’s License Manual - 2018 CDL Testing System
Section 6 - Combination Vehicles Page 81 (03/08/19)
17
5
3
11
6 13
3
2.5m
m V
ER
TIC
AL
CLE
AR
AN
CE
In the event that the safety cover bar (4) will not perfectly lodge into its seating appropriately, travel is strictly forbidden.
3
6
7
121118
2
Step 6. Protect Coupling Ball and Anchor Edge onto BallProtect the part that is still visible of the coupling ball (5)with the rubber dust proof bellows protection cover (7).Accurately anchor the edge directly onto the ball itself.
Step 7. Lubricate the Drawbar EyeLubricate the inside of the drawbar eye ball cup (6) directly through the grease nipple (18).
6.4.6 - Uncoupling a Drawbar
Step 1. Turn Trailer Brake OnMake sure that the trailer brake is on.
Step 2. Remove Cover and Loosen ScrewsRemove the rubber dust proof bellows protection cover (7).
Loosen the adjustment screw (3) and the counter nut (11).Loosen safety lock screw (2a) and remove safety lock screw (2) together with its self-locking nut (12).
Step 3. Rotate Safety Cover Bar and Lift Trailer DrawbeamRotate the safety cover bar (4) outwards so that it is completely open.Lift the trailer drawbeam until the drawbar coupling ball (5) is fully visible, then travel forward with the trailer very slowly.Rotate the safety cover bar inwards (4) until it lodges back in its housing.
Step 4. Lock Safety Screw and Tighten Self-Locking NutFit in safety lock screw (2) and tighten in self-locking nut (12).
6.4.7 - Coupling a Gooseneck HitchIf you are hooking up a Gooseneck or a fifth wheel hitch, the procedure is a little different from a receiver and ball, but it is not more difficult.
Step 1. Open the Latch and Lubricate the Gooseneck BallOpen the clamp latch on the Gooseneck coupler.Make sure that the Gooseneck ball is properly lubricated.
Step 2. Position Coupler and Latch the ClampPosition the trailer's coupler directly over the ball and lower the Gooseneck trailer into position and latch the clamp.
Step 3. Attach Safety ChainsAttach your safety chains. Remember that all trailers are required by law to have safety chains.
Step 4. Connect Trailer Light WiringConnect your trailer light wiring to your vehicle's connector.Check all of your lights, including your brake lights.
Step 5. Lower and Stow the Trailer JacksCompletely lower and stow the trailer jacks, allowing the weight to settle onto the tow vehicle.
6.4.8 Uncoupling a Gooseneck Hitch
Step 1. Remove Safety Pin and ClipSimply remove safety pin and clip.
Step 2. Rotate Handle and Raise Trailer Off BallRotate handle to this position (Fig. B) and raise trailer off ball. Coupler will return to load position automatically.
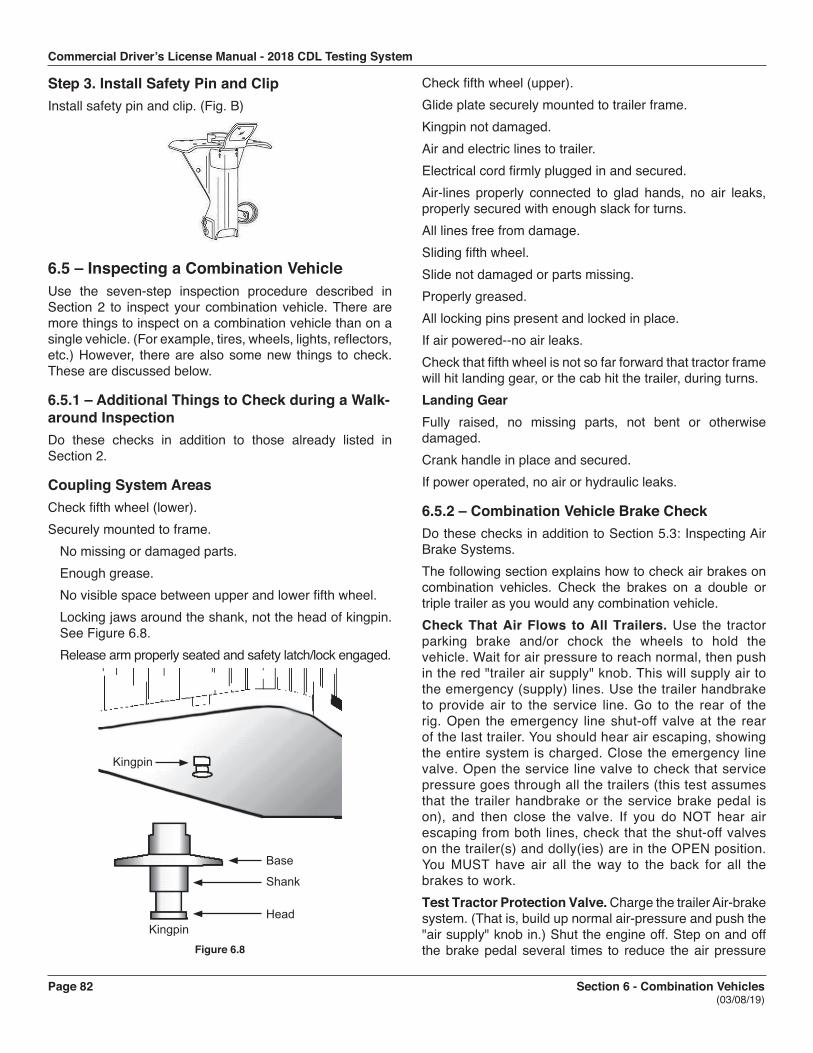
Commercial Driver’s License Manual - 2018 CDL Testing System
Page 82 Section 6 - Combination Vehicles (03/08/19)
Step 3. Install Safety Pin and ClipInstall safety pin and clip. (Fig. B)
6.5 – Inspecting a Combination VehicleUse the seven-step inspection procedure described in Section 2 to inspect your combination vehicle. There are more things to inspect on a combination vehicle than on a single vehicle. (For example, tires, wheels, lights, reflectors, etc.) However, there are also some new things to check. These are discussed below.
6.5.1 – Additional Things to Check during a Walk-around InspectionDo these checks in addition to those already listed in Section 2.
Coupling System AreasCheck fifth wheel (lower).Securely mounted to frame.
No missing or damaged parts.Enough grease.No visible space between upper and lower fifth wheel.Locking jaws around the shank, not the head of kingpin. See Figure 6.8.Release arm properly seated and safety latch/lock engaged.
Base
Shank
HeadKingpin
Kingpin
Figure 6.8
Check fifth wheel (upper).Glide plate securely mounted to trailer frame.Kingpin not damaged.Air and electric lines to trailer.Electrical cord firmly plugged in and secured.Air-lines properly connected to glad hands, no air leaks, properly secured with enough slack for turns.All lines free from damage.Sliding fifth wheel.Slide not damaged or parts missing.Properly greased.All locking pins present and locked in place.If air powered--no air leaks.Check that fifth wheel is not so far forward that tractor frame will hit landing gear, or the cab hit the trailer, during turns.Landing GearFully raised, no missing parts, not bent or otherwise damaged.Crank handle in place and secured.If power operated, no air or hydraulic leaks.
6.5.2 – Combination Vehicle Brake CheckDo these checks in addition to Section 5.3: Inspecting Air Brake Systems.The following section explains how to check air brakes on combination vehicles. Check the brakes on a double or triple trailer as you would any combination vehicle.Check That Air Flows to All Trailers. Use the tractor parking brake and/or chock the wheels to hold the vehicle. Wait for air pressure to reach normal, then push in the red "trailer air supply" knob. This will supply air to the emergency (supply) lines. Use the trailer handbrake to provide air to the service line. Go to the rear of the rig. Open the emergency line shut-off valve at the rear of the last trailer. You should hear air escaping, showing the entire system is charged. Close the emergency line valve. Open the service line valve to check that service pressure goes through all the trailers (this test assumes that the trailer handbrake or the service brake pedal is on), and then close the valve. If you do NOT hear air escaping from both lines, check that the shut-off valves on the trailer(s) and dolly(ies) are in the OPEN position. You MUST have air all the way to the back for all the brakes to work.Test Tractor Protection Valve. Charge the trailer Air-brake system. (That is, build up normal air-pressure and push the "air supply" knob in.) Shut the engine off. Step on and off the brake pedal several times to reduce the air pressure
Commercial Driver’s License Manual - 2018 CDL Testing System
Section 6 - Combination Vehicles Page 83 (03/08/19)
in the tanks. The trailer air supply control (also called the tractor protection valve control) should pop out (or go from "normal" to "emergency" position) when the air pressure falls into the pressure range specified by the manufacturer. (Usually within the range of 20 to 45 psi.)If the tractor protection valve doesn't work right, an air hose or trailer brake leak could drain all the air from the tractor. This would cause the emergency brakes to come on, with possible loss of control.Test Trailer Emergency Brakes. Charge the trailer air brake system and check that the trailer rolls freely. Then stop and pull out the trailer air supply control (also called tractor protection valve control or trailer emergency valve), or place it in the "emergency" position. Pull gently on the trailer with the tractor to check that the trailer emergency brakes are on.Test Trailer Service Brakes. Check for normal air pressure, release the parking brakes, move the vehicle forward slowly, and apply trailer brakes with the hand control (trolley valve), if so equipped. You should feel the brakes come on. This tells you the trailer brakes are connected and working. (The trailer brakes should be tested with the hand valve but controlled in normal operation with the foot pedal, which applies air to the service brakes at all wheels.)
Subsection 6.5 Test Your Knowledge
1. Which shut-off valves should be open and whichclosed?
2. How can you test that air flows to all trailers?3. How can you test the tractor protection valve?4. How can you test the trailer emergency brakes?5. How can you test the trailer service brakes?
These questions may be on your test. If you can’t answer all of them, re-read subsection 6.5.
Commercial Driver’s License Manual - 2018 CDL Testing System
Page 84 Section 7 - Doubles and Triples (03/08/19)
Section 7
DOUBLES AND TRIPLESThis Section Covers● Pulling Double/Triple Trailers● Coupling and Uncoupling● Inspecting Doubles and Triples● Checking Air BrakesThis section has information you need to pass the CDL knowledge test for driving safely with double and triple trailers. It tells about how important it is to be very careful when driving with more than one trailer, how to couple and uncouple correctly, and about inspecting doubles and triples carefully. (You should also study Sections 2, 5, and 6.)
7.1 – Pulling Double/Triple TrailersTake special care when pulling two and three trailers. There are more things that can go wrong, and doubles/triples are less stable than other commercial vehicles. Some areas of concern are discussed below.
7.1.1 – Prevent Trailer from Rolling OverTo prevent trailers from rolling over, you must steer gently and go slowly around corners, on ramps, off ramps, and curves. A safe speed on a curve for a straight truck or a single trailer combination vehicle may be too fast for a set of doubles or triples.
7.1.2 – Beware of the Crack-the-whip EffectDoubles and triples are more likely to turn over than other combination vehicles because of the "crack-the-whip" effect. You must steer gently when pulling trailers. The last trailer in a combination is most likely to turn over. If you don't understand the crack-the-whip effect, study subsection 6.1.2 of this manual.
7.1.3 – Inspect CompletelyThere are more critical parts to check when you have two or three trailers. Check them all. Follow the procedures described later in this section.
7.1.4 – Look Far AheadDoubles and triples must be driven very smoothly to avoid rollover or jackknife. Therefore, look far ahead so you can slow down or change lanes gradually when necessary.
7.1.5 – Manage SpaceDoubles and triples take up more space than other commercial vehicles. They are not only longer, but also need more space because they can't be turned or stopped suddenly. Allow more following distance. Make sure you
have large enough gaps before entering or crossing traffic. Be certain you are clear at the sides before changing lanes.
7.1.6 – Adverse ConditionsBe more careful in adverse conditions. In bad weather, slippery conditions, and mountain driving, you must be especially careful if you drive double and triple bottoms. You will have greater length and more dead axles to pull with your drive axles than other drivers. There is more chance for skids and loss of traction.
7.1.7 – Parking the VehicleMake sure you do not get in a spot you cannot pull straight through. You need to be aware of how parking lots are arranged in order to avoid a long and difficult escape.
7.1.8 – Antilock Braking Systems on Converter DolliesConverter dollies built on or after March 1, 1998, are required to have antilock brakes. These dollies will have a yellow lamp on the left side of the dolly.
7.2 – Coupling and UncouplingKnowing how to couple and uncouple correctly is basic to safe operation of doubles and triples. Wrong coupling and uncoupling can be very dangerous. Coupling and uncoupling steps for doubles and triples are listed below.
7.2.1 – Coupling Twin Trailers
Secure Second (Rear) TrailerIf the second trailer doesn't have spring brakes, drive the tractor close to the trailer, connect the emergency line, charge the trailer air tank, and disconnect the emergency line. This will set the trailer emergency brakes (if the slack adjusters are correctly adjusted). Chock the wheels if you have any doubt about the brakes.For the safest handling on the road, the more heavily loaded semitrailer should be in first position behind the tractor. The lighter trailer should be in the rear.A converter gear on a dolly is a coupling device of one or two axles and a fifth wheel by which a semitrailer can be coupled to the rear of a tractor-trailer combination forming a double bottom rig. See Figure 7.1.
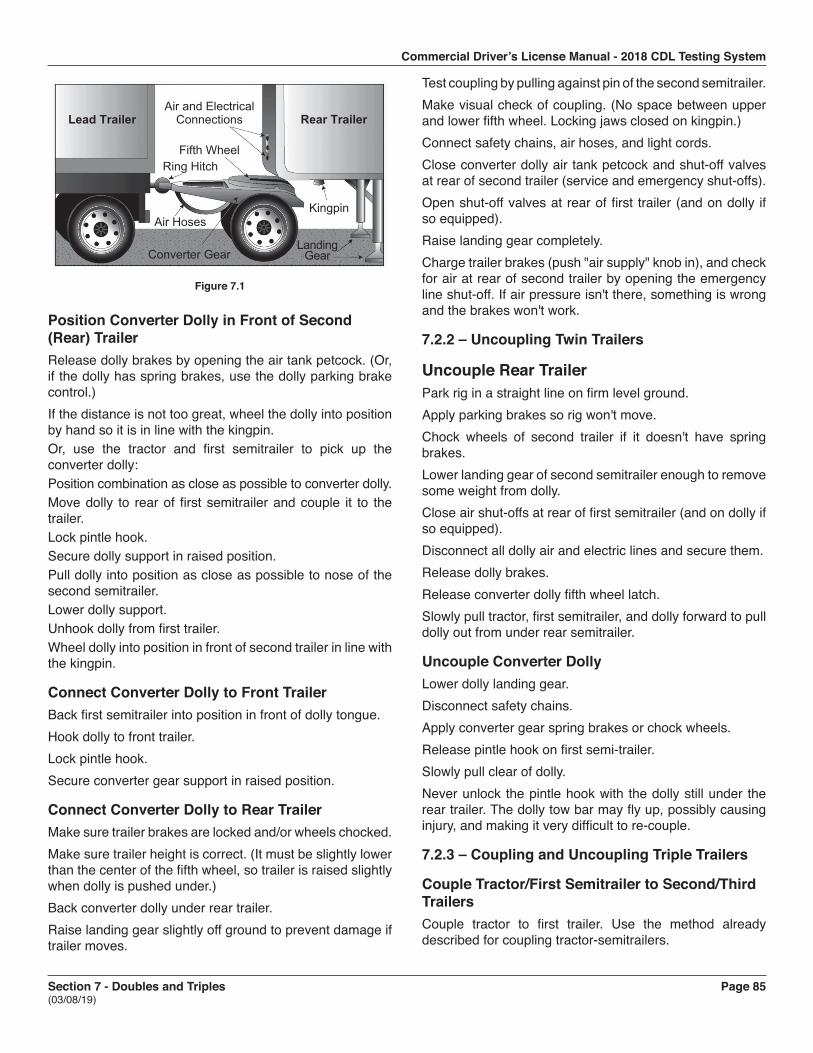
Commercial Driver’s License Manual - 2018 CDL Testing System
Section 7 - Doubles and Triples Page 85 (03/08/19)
Lead TrailerAir and Electrical
Connections
Fifth WheelRing Hitch
Air HosesKingpin
Converter GearLanding
Gear
Rear Trailer
Figure 7.1
Position Converter Dolly in Front of Second (Rear) TrailerRelease dolly brakes by opening the air tank petcock. (Or, if the dolly has spring brakes, use the dolly parking brake control.)If the distance is not too great, wheel the dolly into position by hand so it is in line with the kingpin.Or, use the tractor and first semitrailer to pick up the converter dolly:Position combination as close as possible to converter dolly.Move dolly to rear of first semitrailer and couple it to the trailer.Lock pintle hook.Secure dolly support in raised position.Pull dolly into position as close as possible to nose of the second semitrailer.Lower dolly support.Unhook dolly from first trailer.Wheel dolly into position in front of second trailer in line with the kingpin.
Connect Converter Dolly to Front TrailerBack first semitrailer into position in front of dolly tongue.Hook dolly to front trailer.Lock pintle hook.Secure converter gear support in raised position.
Connect Converter Dolly to Rear TrailerMake sure trailer brakes are locked and/or wheels chocked.Make sure trailer height is correct. (It must be slightly lower than the center of the fifth wheel, so trailer is raised slightly when dolly is pushed under.)Back converter dolly under rear trailer.Raise landing gear slightly off ground to prevent damage if trailer moves.
Test coupling by pulling against pin of the second semitrailer.Make visual check of coupling. (No space between upper and lower fifth wheel. Locking jaws closed on kingpin.)Connect safety chains, air hoses, and light cords.Close converter dolly air tank petcock and shut-off valves at rear of second trailer (service and emergency shut-offs).Open shut-off valves at rear of first trailer (and on dolly if so equipped).Raise landing gear completely.Charge trailer brakes (push "air supply" knob in), and check for air at rear of second trailer by opening the emergency line shut-off. If air pressure isn't there, something is wrong and the brakes won't work.
7.2.2 – Uncoupling Twin Trailers
Uncouple Rear TrailerPark rig in a straight line on firm level ground.Apply parking brakes so rig won't move.Chock wheels of second trailer if it doesn't have spring brakes.Lower landing gear of second semitrailer enough to remove some weight from dolly.Close air shut-offs at rear of first semitrailer (and on dolly if so equipped).Disconnect all dolly air and electric lines and secure them.Release dolly brakes.Release converter dolly fifth wheel latch.Slowly pull tractor, first semitrailer, and dolly forward to pull dolly out from under rear semitrailer.
Uncouple Converter DollyLower dolly landing gear.Disconnect safety chains.Apply converter gear spring brakes or chock wheels.Release pintle hook on first semi-trailer.Slowly pull clear of dolly.Never unlock the pintle hook with the dolly still under the rear trailer. The dolly tow bar may fly up, possibly causing injury, and making it very difficult to re-couple.
7.2.3 – Coupling and Uncoupling Triple Trailers
Couple Tractor/First Semitrailer to Second/Third TrailersCouple tractor to first trailer. Use the method already described for coupling tractor-semitrailers.
Commercial Driver’s License Manual - 2018 CDL Testing System
Page 86 Section 7 - Doubles and Triples (03/08/19)
Move converter dolly into position and couple first trailer to second trailer using the method for coupling doubles. Triples rig is now complete.
Uncouple Triple-trailer RigUncouple third trailer by pulling the dolly out, then unhitching the dolly using the method for uncoupling doubles.Uncouple remainder of rig as you would any double-bottom rig using the method already described.
7.2.4 – Coupling and Uncoupling Other CombinationsThe methods described so far apply to the more common tractor-trailer combinations. However, there are other ways of coupling and uncoupling the many types of truck-trailer and tractor-trailer combinations that are in use. There are too many to cover in this manual. You will need to learn the correct way to couple and uncouple the vehicle(s) you will drive according to the manufacturer and/or owner specifications.
7.3 – Inspecting Doubles and TriplesUse the seven-step inspection procedure described in Section 2 to inspect your combination vehicle. There are more things to inspect on a combination vehicle than on a single vehicle. Many of these items are simply more of what you would find on a single vehicle. (For example, tires, wheels, lights, reflectors, etc.) However, there are also some new things to check. These are discussed below.
7.3.1 – Additional ChecksDo these checks in addition to those already listed in Section 2, Step 5: Do a Walk-around Inspection.
Coupling System AreasCheck fifth wheel (lower).Securely mounted to frame.No missing or damaged parts.Enough grease.No visible space between upper and lower fifth wheel.Locking jaws around the shank, not the head of kingpin.Release arm properly seated and safety latch/lock engaged.Check fifth wheel (upper).Glide plate securely mounted to trailer frame.Kingpin not damaged.Air and electric lines to trailer.Electrical cord firmly plugged in and secured.Air-lines properly connected to glad hands, no air leaks, properly secured with enough slack for turns.
All lines free from damage.Sliding fifth wheel.Slide not damaged or parts missing.Properly greased.All locking pins present and locked in place.If air powered, no air leaks.Check that fifth wheel is not so far forward that the tractor frame will hit landing gear, or cab will hit the trailer, during turns.
Landing GearFully raised, no missing parts, not bent or otherwise damaged.Crank handle in place and secured.If power operated, no air or hydraulic leaks.
Double and Triple TrailersShut-off valves (at rear of trailers, in service and emergency lines).Rear of front trailers: OPEN.Rear of last trailer: CLOSED.Converter dolly air tank drain valve: CLOSED.Be sure air-lines are supported and glad hands are properly connected.If spare tire is carried on converter gear (dolly), make sure it's secured.Be sure pintle-eye of dolly is in place in pintle hook of trailer(s).Make sure pintle hook is latched.Safety chains should be secured to trailer(s).Be sure light cords are firmly in sockets on trailers.
7.3.2 – Additional Things to Check during a Walk-around InspectionDo these checks in addition to subsection 5.3, Inspecting Air Brake Systems.
7.4 – Doubles/Triples Air Brake CheckCheck the brakes on a double or triple trailer as you would any combination vehicle. Subsection 6.5.2 explains how to check air brakes on combination vehicles. You must also make the following checks on your double or triple trailers
7.4.1 – Additional Air Brake ChecksCheck That Air Flows to All Trailers (Double and Triple Trailers). Use the tractor parking brake and/or chock the wheels to hold the vehicle. Wait for air pressure to reach normal, then push in the red "trailer air supply" knob. This
Commercial Driver’s License Manual - 2018 CDL Testing System
Section 7 - Doubles and Triples Page 87 (03/08/19)
will supply air to the emergency (supply) lines. Use the trailer handbrake to provide air to the service line. Go to the rear of the rig. Open the emergency line shut-off valve at the rear of the last trailer. You should hear air escaping, showing the entire system is charged. Close the emergency line valve. Open the service line valve to check that service pressure goes through all the trailers (this test assumes that the trailer handbrake or the service brake pedal is on), and then close the valve. If you do NOT hear air escaping from both lines, check that the shut-off valves on the trailer(s) and dolly(ies) are in the OPEN position. You MUST have air all the way to the back for all the brakes to work.Test Tractor Protection Valve. Charge the trailer air brake system. (That is, build up normal air pressure and push the "air supply" knob in.) Shut the engine off. Step on and off the brake pedal several times to reduce the air pressure in the tanks. The trailer air supply control (also called the tractor protection valve control) should pop out (or go from "normal" to "emergency" position) when the air pressure falls into the pressure range specified by the manufacturer. (Usually within the range of 20 to 45 psi.)If the tractor protection valve doesn't work properly, an air hose or trailer brake leak could drain all the air from the tractor. This would cause the emergency brakes to come on, with possible loss of control.Test Trailer Emergency Brakes. Charge the trailer air brake system and check that the trailer rolls freely. Then stop and pull out the trailer air supply control (also called tractor protection valve control or trailer emergency valve) or place it in the "emergency" position. Pull gently on the trailer with the tractor to check that the trailer emergency brakes are on.Test Trailer Service Brakes. Check for normal air pressure, release the parking brakes, move the vehicle forward slowly, and apply trailer brakes with the hand control (trolley valve), if so equipped. You should feel the brakes come on. This tells you the trailer brakes are connected and working. (The trailer brakes should be tested with the hand valve, but controlled in normal operation with the foot pedal, which applies air to the service brakes at all wheels.)
Section 7 Test Your Knowledge
1. What is a converter dolly?2. Do converter dollies have spring brakes?3. What three methods can you use to secure a second
trailer before coupling?4. How do you check to make sure trailer height is
correct before coupling?5. What do you check when making a visual check of
coupling?6. Why should you pull a dolly out from under a trailer
before you disconnect it from the trailer in front?7. What should you check for when inspecting the
converter dolly? The pintle hook?8. Should the shut-off valves on the rear of the last
trailer be open or closed? On the first trailer in a setof doubles? On the middle trailer of a set of triples?
9. How can you test that air flows to all trailers?10. How do you know if your converter dolly is equipped
with antilock brakes?These questions may be on your test. If you can’t answer them all, re-read Section 7.
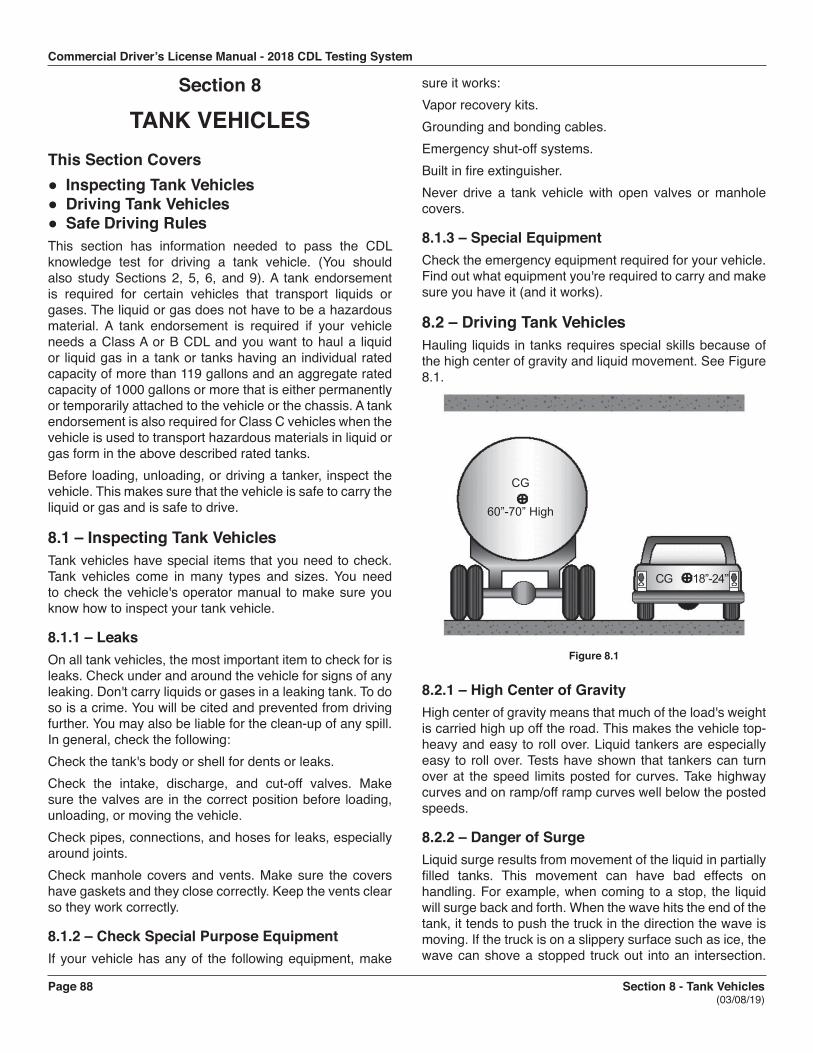
Commercial Driver’s License Manual - 2018 CDL Testing System
Page 88 Section 8 - Tank Vehicles (03/08/19)
Section 8
TANK VEHICLESThis Section Covers● Inspecting Tank Vehicles● Driving Tank Vehicles● Safe Driving RulesThis section has information needed to pass the CDL knowledge test for driving a tank vehicle. (You should also study Sections 2, 5, 6, and 9). A tank endorsement is required for certain vehicles that transport liquids or gases. The liquid or gas does not have to be a hazardous material. A tank endorsement is required if your vehicle needs a Class A or B CDL and you want to haul a liquid or liquid gas in a tank or tanks having an individual rated capacity of more than 119 gallons and an aggregate rated capacity of 1000 gallons or more that is either permanently or temporarily attached to the vehicle or the chassis. A tank endorsement is also required for Class C vehicles when the vehicle is used to transport hazardous materials in liquid or gas form in the above described rated tanks.Before loading, unloading, or driving a tanker, inspect the vehicle. This makes sure that the vehicle is safe to carry the liquid or gas and is safe to drive.
8.1 – Inspecting Tank VehiclesTank vehicles have special items that you need to check. Tank vehicles come in many types and sizes. You need to check the vehicle's operator manual to make sure you know how to inspect your tank vehicle.
8.1.1 – LeaksOn all tank vehicles, the most important item to check for is leaks. Check under and around the vehicle for signs of any leaking. Don't carry liquids or gases in a leaking tank. To do so is a crime. You will be cited and prevented from driving further. You may also be liable for the clean-up of any spill. In general, check the following:Check the tank's body or shell for dents or leaks.Check the intake, discharge, and cut-off valves. Make sure the valves are in the correct position before loading, unloading, or moving the vehicle.Check pipes, connections, and hoses for leaks, especially around joints.Check manhole covers and vents. Make sure the covers have gaskets and they close correctly. Keep the vents clear so they work correctly.
8.1.2 – Check Special Purpose EquipmentIf your vehicle has any of the following equipment, make
sure it works:Vapor recovery kits.Grounding and bonding cables.Emergency shut-off systems.Built in fire extinguisher.Never drive a tank vehicle with open valves or manhole covers.
8.1.3 – Special EquipmentCheck the emergency equipment required for your vehicle. Find out what equipment you're required to carry and make sure you have it (and it works).
8.2 – Driving Tank VehiclesHauling liquids in tanks requires special skills because of the high center of gravity and liquid movement. See Figure 8.1.
CG
60”-70” High
CG 18”-24”
Figure 8.1
8.2.1 – High Center of GravityHigh center of gravity means that much of the load's weight is carried high up off the road. This makes the vehicle top-heavy and easy to roll over. Liquid tankers are especially easy to roll over. Tests have shown that tankers can turn over at the speed limits posted for curves. Take highway curves and on ramp/off ramp curves well below the posted speeds.
8.2.2 – Danger of SurgeLiquid surge results from movement of the liquid in partially filled tanks. This movement can have bad effects on handling. For example, when coming to a stop, the liquid will surge back and forth. When the wave hits the end of the tank, it tends to push the truck in the direction the wave is moving. If the truck is on a slippery surface such as ice, the wave can shove a stopped truck out into an intersection.
Commercial Driver’s License Manual - 2018 CDL Testing System
Section 8 - Tank Vehicles Page 89 (03/08/19)
The driver of a liquid tanker must be very familiar with the handling of the vehicle.
8.2.3 – BulkheadsSome liquid tanks are divided into several smaller tanks by bulkheads. When loading and unloading the smaller tanks, the driver must pay attention to weight distribution. Don't put too much weight on the front or rear of the vehicle.
8.2.4 – Baffled TanksBaffled liquid tanks have bulkheads in them with holes that let the liquid flow through. The baffles help to control the forward and backward liquid surge. Side-to-side surge can still occur. This can cause a roll over.
8.2.5 – Un-baffled TanksUn-baffled liquid tankers (sometimes called "smooth bore" tanks) have nothing inside to slow down the flow of the liquid. Therefore, forward-and-back surge is very strong. Un-baffled tanks are usually those that transport food products (milk, for example). (Sanitation regulations forbid the use of baffles because of the difficulty in cleaning the inside of the tank.) Be extremely cautious (slow and careful) in driving smooth bore tanks, especially when starting and stopping.
8.2.6 – OutageNever load a cargo tank totally full. Liquids expand as they warm and you must leave room for the expanding liquid. This is called "outage." Since different liquids expand by different amounts, they require different amounts of outage. You must know the outage requirement when hauling liquids in bulk.
8.2.7 – How Much to Load?A full tank of dense liquid (such as some acids) may exceed legal weight limits. For that reason, you may often only partially fill tanks with heavy liquids. The amount of liquid to load into a tank depends on:The amount the liquid will expand in transit.The weight of the liquid.Legal weight limits.
8.3 – Safe Driving RulesIn order to drive tank vehicles safely, you must remember to follow all the safe driving rules. A few of these rules are:
8.3.1 – Drive SmoothlyBecause of the high center of gravity and the surge of the liquid, you must start, slow down, and stop very smoothly. Also, make smooth turns and lane changes.
8.3.2 – Controlling Surge
Keep a steady pressure on the brakes. Do not release too soon when coming to a stop.Brake far in advance of a stop and increase your following distance.If you must make a quick stop to avoid a crash, use controlled or stab braking. If you do not remember how to stop using these methods, review subsection 2.17.2. Also, remember that if you steer quickly while braking, your vehicle may roll over.
8.3.3 – CurvesSlow down before curves, then accelerate slightly through the curve. The posted speed for a curve may be too fast for a tank vehicle.
8.3.4 – Stopping DistanceKeep in mind how much space you need to stop your vehicle. Remember that wet roads double the normal stopping distance. Empty tank vehicles may take longer to stop than full ones.
8.3.5 – SkidsDon't over steer, over accelerate, or over brake. If you do, your vehicle may skid. On tank trailers, if your drive wheels or trailer wheels begin to skid, your vehicle may jackknife. When any vehicle starts to skid, you must take action to restore traction to the wheels.
Section 8 Test Your Knowledge
1. How are bulkheads different than baffles?2. Should a tank vehicle take curves, on ramps, or off
ramps at the posted speed limits?3. How are smooth bore tankers different to drive than
those with baffles?4. What three things determine how much liquid you
can load?5. What is outage?6. How can you help control surge?7. What two reasons make special care necessary
when driving tank vehicles?These questions may be on the test. If you can't answer them all, re-read Section 8.
Commercial Driver’s License Manual - 2018 CDL Testing System
Page 90 Section 9 - Hazardous Materials (03/08/19)
Section 9
HAZARDOUS MATERIALSThis Section Covers● The Intent of the Regulations● Bulk Tank Loading, Unloading, and
Marking● Driver Responsibilities● Driving and Parking Rules● Communications Rules● Emergencies● Loading and UnloadingHazardous materials are products that pose a risk to health, safety, and property during transportation. The term often is shortened to HAZMAT, which you may see on road signs, or to HM in government regulations. Hazardous materials include explosives, various types of gas, solids, flammable and combustible liquid, and other materials. Because of the risks involved and the potential consequences these risks impose, all levels of government regulate the handling of hazardous materials.The Hazardous Materials Regulations (HMR) is found in parts 171 - 180 of title 49 of the Code of Federal Regulations. The common reference for these regulations is 49 CFR 171 - 180The Hazardous Materials Table in the regulations contains a list of these items. However, this list is not all-inclusive. Whether or not a material is considered hazardous is based on its characteristics and the shipper's decision on whether or not the material meets a definition of a hazardous material in the regulations.The regulations require vehicles transporting certain types or quantities of hazardous materials to display diamond-shaped, square on point, warning signs called placards.This section is designed to assist you in understanding your role and responsibilities in hauling hazardous materials. Due to the constantly changing nature of government regulations, it is impossible to guarantee absolute accuracy of the materials in this section. An up-to-date copy of the complete regulations is essential for you to have. Included in these regulations is a complete glossary of terms.You must have a commercial driver license (CDL) with a hazardous materials endorsement before you drive any size vehicle that is used to transport hazardous material as defined in 49 CFR 383.5. You must pass a written test about the regulations and requirements to get this endorsement.Everything you need to know to pass the written test is
in this section. However, this is only a beginning. Most drivers need to know much more on the job. You can learn more by reading and understanding the federal and state rules applicable to hazardous materials, as well as, attending hazardous materials training courses. Your employer, colleges and universities, and various associations usually offer these courses. You can get copies of the Federal Regulations (49 CFR) through your local Government Printing Office bookstore and various industry publishers. Union or company offices often have copies of the rules for driver use. Find out where you can get your own copy to use on the job.The regulations require training and testing for all drivers involved in transporting hazardous materials. Your employer or a designated representative is required to provide this training and testing. Hazardous materials employers are required to keep a record of training for each employee as long as that employee is working with hazardous materials, and for 90 days thereafter. The regulations require that hazardous materials employees be trained and tested at least once every three years.All drivers must be trained in the security risks of hazardous materials transportation. This training must include how to recognize and respond to possible security threats.The regulations also require that drivers have special training before driving a vehicle transporting certain flammable gas materials or highway route controlled quantities of radioactive materials. In addition, drivers transporting cargo tanks and portable tanks must receive specialized training. Each driver’s employer or his or her designated representative must provide such training.Some locations require permits to transport certain explosives or bulk hazardous wastes. States and counties also may require drivers to follow special hazardous materials routes. The federal government may require permits or exemptions for special hazardous materials cargo such as rocket fuel. Find out about permits, exemptions, and special routes for the places you drive.
9.1 – The Intent of the Regulations
9.1.1 – Contain the MaterialTransporting hazardous materials can be risky. The regulations are intended to protect you, those around you, and the environment. They tell shippers how to package the materials safely and drivers how to load, transport, and unload the material. These are called "containment rules."
9.1.2 – Communicate the RiskTo communicate the risk, shippers must warn drivers and others about the material's hazards. The regulations require shippers to put hazard warning labels on packages,

Commercial Driver’s License Manual - 2018 CDL Testing System
Section 9 - Hazardous Materials Page 91 (03/08/19)
provide proper shipping papers, emergency response information, and placards. These steps communicate the hazard to the shipper, the carrier, and the driver.
9.1.3 – Assure Safe Drivers and EquipmentIn order to get a hazardous materials endorsement on a CDL, you must pass a written test about transporting hazardous materials. To pass the test, you must know how to:Identify what are hazardous materials.Safely load shipments.Properly placard your vehicle in accordance with the rules.Safely transport shipments.Learn the rules and follow them. Following the rules reduces the risk of injury from hazardous materials. Taking shortcuts by breaking rules is unsafe. Non-compliance with regulations can result in fines and jail.Inspect your vehicle before and during each trip. Law enforcement officers may stop and inspect your vehicle. When stopped, they may check your shipping papers, vehicle placards, and the hazardous materials endorsement on your driver license, and your knowledge of hazardous materials.
9.2 – Hazardous Materials Transportation—Who Does What
9.2.1 – The ShipperSends products from one place to another by truck, rail, vessel, or airplane.Uses the hazardous materials regulations to determine the product’s:Identification numberProper shipping name.Hazard class.Packing group.Correct packaging.Correct label and markings.Correct placards.Must package, mark, and label the materials; prepare shipping papers; provide emergency response information; and supply placards.Certify on the shipping paper that the shipment has been prepared according to the rules (unless you are pulling cargo tanks supplied by you or your employer).
9.2.2 – The CarrierTakes the shipment from the shipper to its destination.
Prior to transportation, checks that the shipper correctly described, marked, labeled, and otherwise prepared the shipment for transportation.Refuses improper shipments.
9.2.3 – The DriverMakes sure the shipper has identified, marked, and labeled the hazardous materials properly.Refuses leaking packages and shipments.Placards vehicle when loading, if required.Safely transports the shipment without delay.Follows all special rules about transporting hazardous materials.Keeps hazardous materials shipping papers and emergency response information in the proper place.Reports accidents and incidents involving hazardous materials to the proper government agency, when the accident/incident occurs while driver is in physical control of the shipment.
9.3 – Communication Rules
9.3.1 – DefinitionsSome words and phrases have special meanings when talking about hazardous materials. Some of these may differ from meanings you are used to. The words and phrases in this section may be on your test. The meanings of other important words are in the glossary at the end of Section 9.A material's hazard class reflects the risks associated with it. There are nine different hazard classes. The types of materials included in these nine classes are in Figure 9.1.
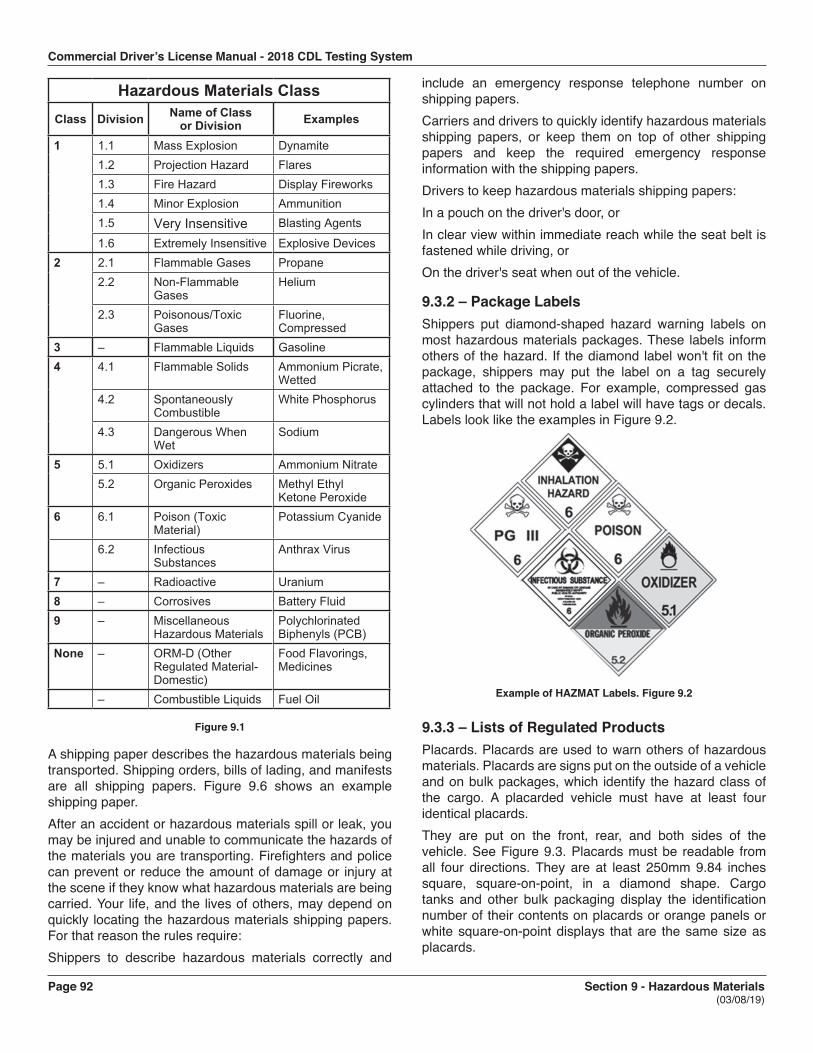
Commercial Driver’s License Manual - 2018 CDL Testing System
Page 92 Section 9 - Hazardous Materials (03/08/19)
Hazardous Materials ClassClass Division Name of Class
or Division Examples
1 1.1 Mass Explosion Dynamite1.2 Projection Hazard Flares1.3 Fire Hazard Display Fireworks 1.4 Minor Explosion Ammunition 1.5 Very Insensitive Blasting Agents
1.6 Extremely Insensitive Explosive Devices2 2.1 Flammable Gases Propane
2.2 Non-Flammable Gases
Helium
2.3 Poisonous/Toxic Gases
Fluorine, Compressed
3 – Flammable Liquids Gasoline4 4.1 Flammable Solids Ammonium Picrate,
Wetted4.2 Spontaneously
CombustibleWhite Phosphorus
4.3 Dangerous When Wet
Sodium
5 5.1 Oxidizers Ammonium Nitrate5.2 Organic Peroxides Methyl Ethyl
Ketone Peroxide6 6.1 Poison (Toxic
Material)Potassium Cyanide
6.2 Infectious Substances
Anthrax Virus
7 – Radioactive Uranium8 – Corrosives Battery Fluid9 – Miscellaneous
Hazardous MaterialsPolychlorinated Biphenyls (PCB)
None – ORM-D (Other Regulated Material- Domestic)
Food Flavorings, Medicines
– Combustible Liquids Fuel Oil
Figure 9.1
A shipping paper describes the hazardous materials being transported. Shipping orders, bills of lading, and manifests are all shipping papers. Figure 9.6 shows an example shipping paper.After an accident or hazardous materials spill or leak, you may be injured and unable to communicate the hazards of the materials you are transporting. Firefighters and police can prevent or reduce the amount of damage or injury at the scene if they know what hazardous materials are being carried. Your life, and the lives of others, may depend on quickly locating the hazardous materials shipping papers. For that reason the rules require:Shippers to describe hazardous materials correctly and
include an emergency response telephone number on shipping papers.Carriers and drivers to quickly identify hazardous materials shipping papers, or keep them on top of other shipping papers and keep the required emergency response information with the shipping papers.Drivers to keep hazardous materials shipping papers:In a pouch on the driver's door, orIn clear view within immediate reach while the seat belt is fastened while driving, orOn the driver's seat when out of the vehicle.
9.3.2 – Package LabelsShippers put diamond-shaped hazard warning labels on most hazardous materials packages. These labels inform others of the hazard. If the diamond label won't fit on the package, shippers may put the label on a tag securely attached to the package. For example, compressed gas cylinders that will not hold a label will have tags or decals. Labels look like the examples in Figure 9.2.
Example of HAZMAT Labels. Figure 9.2
9.3.3 – Lists of Regulated ProductsPlacards. Placards are used to warn others of hazardous materials. Placards are signs put on the outside of a vehicle and on bulk packages, which identify the hazard class of the cargo. A placarded vehicle must have at least four identical placards.They are put on the front, rear, and both sides of the vehicle. See Figure 9.3. Placards must be readable from all four directions. They are at least 250mm 9.84 inches square, square-on-point, in a diamond shape. Cargo tanks and other bulk packaging display the identification number of their contents on placards or orange panels or white square-on-point displays that are the same size as placards.
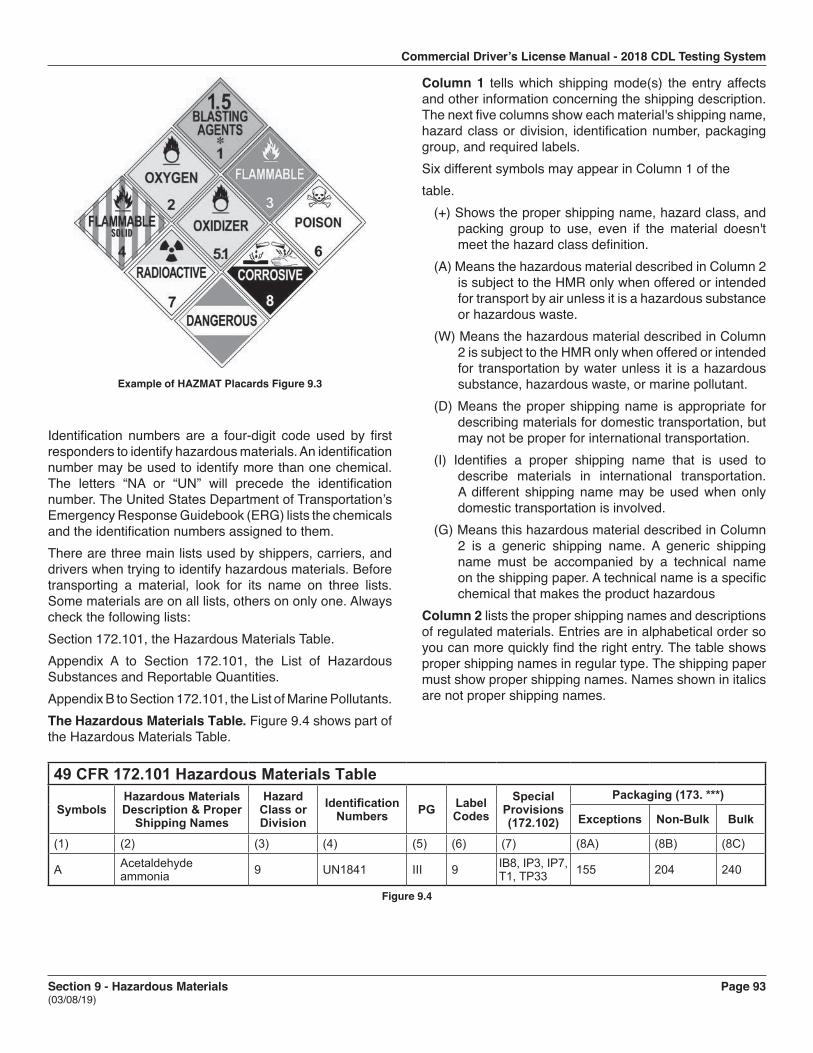
Commercial Driver’s License Manual - 2018 CDL Testing System
Section 9 - Hazardous Materials Page 93 (03/08/19)
Example of HAZMAT Placards Figure 9.3
Identification numbers are a four-digit code used by first responders to identify hazardous materials. An identification number may be used to identify more than one chemical. The letters “NA or “UN” will precede the identification number. The United States Department of Transportation’s Emergency Response Guidebook (ERG) lists the chemicals and the identification numbers assigned to them.There are three main lists used by shippers, carriers, and drivers when trying to identify hazardous materials. Before transporting a material, look for its name on three lists. Some materials are on all lists, others on only one. Always check the following lists:Section 172.101, the Hazardous Materials Table.Appendix A to Section 172.101, the List of Hazardous Substances and Reportable Quantities.Appendix B to Section 172.101, the List of Marine Pollutants.The Hazardous Materials Table. Figure 9.4 shows part of the Hazardous Materials Table.
Column 1 tells which shipping mode(s) the entry affects and other information concerning the shipping description. The next five columns show each material's shipping name, hazard class or division, identification number, packaging group, and required labels.Six different symbols may appear in Column 1 of thetable.
(+) Shows the proper shipping name, hazard class, and packing group to use, even if the material doesn't meet the hazard class definition.
(A) Means the hazardous material described in Column 2is subject to the HMR only when offered or intendedfor transport by air unless it is a hazardous substanceor hazardous waste.
(W) Means the hazardous material described in Column2 is subject to the HMR only when offered or intendedfor transportation by water unless it is a hazardoussubstance, hazardous waste, or marine pollutant.
(D) Means the proper shipping name is appropriate fordescribing materials for domestic transportation, butmay not be proper for international transportation.
(I) Identifies a proper shipping name that is used todescribe materials in international transportation.A different shipping name may be used when onlydomestic transportation is involved.
(G) Means this hazardous material described in Column2 is a generic shipping name. A generic shippingname must be accompanied by a technical nameon the shipping paper. A technical name is a specificchemical that makes the product hazardous
Column 2 lists the proper shipping names and descriptions of regulated materials. Entries are in alphabetical order so you can more quickly find the right entry. The table shows proper shipping names in regular type. The shipping paper must show proper shipping names. Names shown in italics are not proper shipping names.
49 CFR 172.101 Hazardous Materials Table
SymbolsHazardous Materials Description & Proper
Shipping Names
Hazard Class or Division
Identification Numbers PG Label
CodesSpecial
Provisions (172.102)
Packaging (173. ***)
Exceptions Non-Bulk Bulk
(1) (2) (3) (4) (5) (6) (7) (8A) (8B) (8C)
A Acetaldehyde ammonia 9 UN1841 III 9 IB8, IP3, IP7,
T1, TP33 155 204 240
Figure 9.4
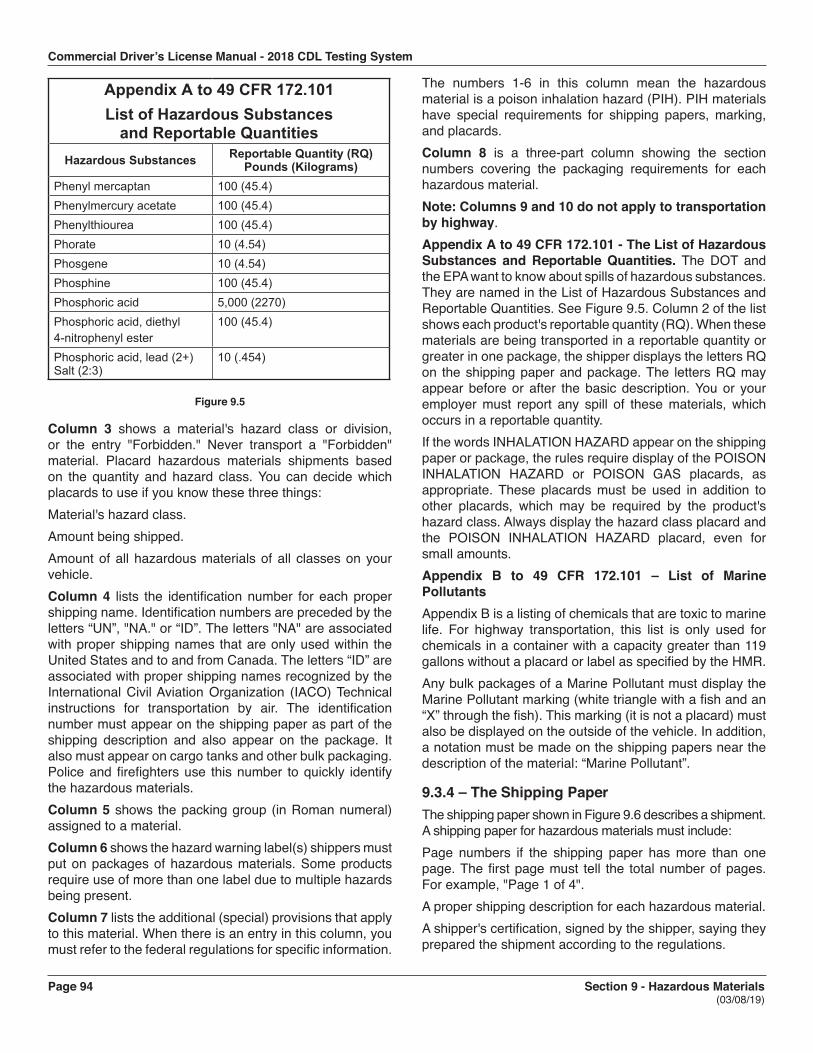
Commercial Driver’s License Manual - 2018 CDL Testing System
Page 94 Section 9 - Hazardous Materials (03/08/19)
Appendix A to 49 CFR 172.101List of Hazardous Substances
and Reportable QuantitiesHazardous Substances Reportable Quantity (RQ)
Pounds (Kilograms)Phenyl mercaptan 100 (45.4)Phenylmercury acetate 100 (45.4)Phenylthiourea 100 (45.4)Phorate 10 (4.54)Phosgene 10 (4.54)Phosphine 100 (45.4)Phosphoric acid 5,000 (2270)Phosphoric acid, diethyl4-nitrophenyl ester
100 (45.4)
Phosphoric acid, lead (2+) Salt (2:3)
10 (.454)
Figure 9.5
Column 3 shows a material's hazard class or division, or the entry "Forbidden." Never transport a "Forbidden" material. Placard hazardous materials shipments based on the quantity and hazard class. You can decide which placards to use if you know these three things:Material's hazard class.Amount being shipped.Amount of all hazardous materials of all classes on your vehicle.Column 4 lists the identification number for each proper shipping name. Identification numbers are preceded by the letters “UN”, "NA." or “ID”. The letters "NA" are associated with proper shipping names that are only used within the United States and to and from Canada. The letters “ID” are associated with proper shipping names recognized by the International Civil Aviation Organization (IACO) Technical instructions for transportation by air. The identification number must appear on the shipping paper as part of the shipping description and also appear on the package. It also must appear on cargo tanks and other bulk packaging. Police and firefighters use this number to quickly identify the hazardous materials.Column 5 shows the packing group (in Roman numeral) assigned to a material.Column 6 shows the hazard warning label(s) shippers must put on packages of hazardous materials. Some products require use of more than one label due to multiple hazards being present.Column 7 lists the additional (special) provisions that apply to this material. When there is an entry in this column, you must refer to the federal regulations for specific information.
The numbers 1-6 in this column mean the hazardous material is a poison inhalation hazard (PIH). PIH materials have special requirements for shipping papers, marking, and placards.Column 8 is a three-part column showing the section numbers covering the packaging requirements for each hazardous material.Note: Columns 9 and 10 do not apply to transportation by highway.Appendix A to 49 CFR 172.101 - The List of Hazardous Substances and Reportable Quantities. The DOT and the EPA want to know about spills of hazardous substances. They are named in the List of Hazardous Substances and Reportable Quantities. See Figure 9.5. Column 2 of the list shows each product's reportable quantity (RQ). When these materials are being transported in a reportable quantity or greater in one package, the shipper displays the letters RQ on the shipping paper and package. The letters RQ may appear before or after the basic description. You or your employer must report any spill of these materials, which occurs in a reportable quantity.If the words INHALATION HAZARD appear on the shipping paper or package, the rules require display of the POISON INHALATION HAZARD or POISON GAS placards, as appropriate. These placards must be used in addition to other placards, which may be required by the product's hazard class. Always display the hazard class placard and the POISON INHALATION HAZARD placard, even for small amounts.Appendix B to 49 CFR 172.101 – List of Marine PollutantsAppendix B is a listing of chemicals that are toxic to marine life. For highway transportation, this list is only used for chemicals in a container with a capacity greater than 119 gallons without a placard or label as specified by the HMR.Any bulk packages of a Marine Pollutant must display the Marine Pollutant marking (white triangle with a fish and an “X” through the fish). This marking (it is not a placard) must also be displayed on the outside of the vehicle. In addition, a notation must be made on the shipping papers near the description of the material: “Marine Pollutant”.
9.3.4 – The Shipping PaperThe shipping paper shown in Figure 9.6 describes a shipment. A shipping paper for hazardous materials must include:Page numbers if the shipping paper has more than one page. The first page must tell the total number of pages. For example, "Page 1 of 4".A proper shipping description for each hazardous material.A shipper's certification, signed by the shipper, saying they prepared the shipment according to the regulations.
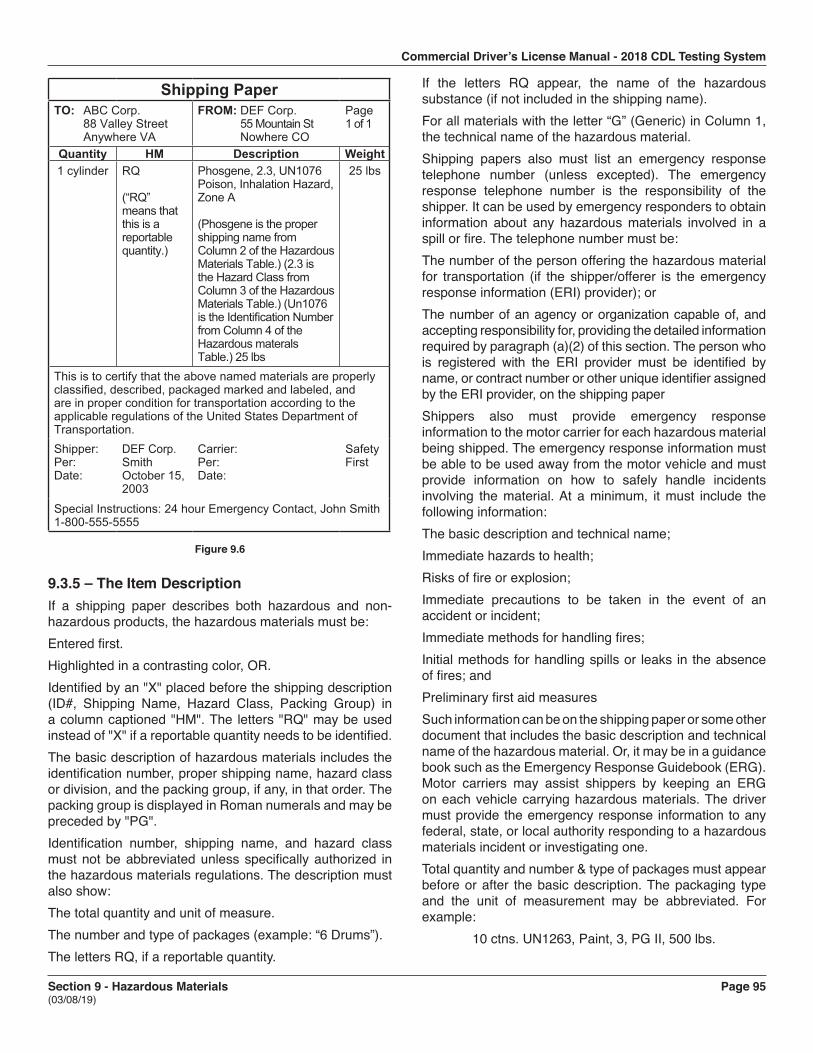
Commercial Driver’s License Manual - 2018 CDL Testing System
Section 9 - Hazardous Materials Page 95 (03/08/19)
Shipping PaperTO: ABC Corp.
88 Valley StreetAnywhere VA
FROM: DEF Corp. 55 Mountain StNowhere CO
Page1 of 1
Quantity HM Description Weight1 cylinder RQ
(“RQ” means that this is a reportable quantity.)
Phosgene, 2.3, UN1076Poison, Inhalation Hazard, Zone A
(Phosgene is the proper shipping name from Column 2 of the Hazardous Materials Table.) (2.3 is the Hazard Class from Column 3 of the Hazardous Materials Table.) (Un1076 is the Identification Number from Column 4 of the Hazardous materals Table.) 25 lbs
25 lbs
This is to certify that the above named materials are properly classified, described, packaged marked and labeled, and are in proper condition for transportation according to the applicable regulations of the United States Department of Transportation.Shipper:Per:Date:
DEF Corp.SmithOctober 15, 2003
Carrier:Per:Date:
Safety First
Special Instructions: 24 hour Emergency Contact, John Smith 1-800-555-5555
Figure 9.6
9.3.5 – The Item DescriptionIf a shipping paper describes both hazardous and non-hazardous products, the hazardous materials must be:Entered first.Highlighted in a contrasting color, OR.Identified by an "X" placed before the shipping description (ID#, Shipping Name, Hazard Class, Packing Group) in a column captioned "HM". The letters "RQ" may be used instead of "X" if a reportable quantity needs to be identified.The basic description of hazardous materials includes the identification number, proper shipping name, hazard class or division, and the packing group, if any, in that order. The packing group is displayed in Roman numerals and may be preceded by "PG".Identification number, shipping name, and hazard class must not be abbreviated unless specifically authorized in the hazardous materials regulations. The description must also show:The total quantity and unit of measure.The number and type of packages (example: “6 Drums”).The letters RQ, if a reportable quantity.
If the letters RQ appear, the name of the hazardous substance (if not included in the shipping name).For all materials with the letter “G” (Generic) in Column 1, the technical name of the hazardous material.Shipping papers also must list an emergency response telephone number (unless excepted). The emergency response telephone number is the responsibility of the shipper. It can be used by emergency responders to obtain information about any hazardous materials involved in a spill or fire. The telephone number must be:The number of the person offering the hazardous material for transportation (if the shipper/offerer is the emergency response information (ERI) provider); orThe number of an agency or organization capable of, and accepting responsibility for, providing the detailed information required by paragraph (a)(2) of this section. The person who is registered with the ERI provider must be identified by name, or contract number or other unique identifier assigned by the ERI provider, on the shipping paperShippers also must provide emergency response information to the motor carrier for each hazardous material being shipped. The emergency response information must be able to be used away from the motor vehicle and must provide information on how to safely handle incidents involving the material. At a minimum, it must include the following information:The basic description and technical name;Immediate hazards to health;Risks of fire or explosion;Immediate precautions to be taken in the event of an accident or incident;Immediate methods for handling fires;Initial methods for handling spills or leaks in the absence of fires; andPreliminary first aid measuresSuch information can be on the shipping paper or some other document that includes the basic description and technical name of the hazardous material. Or, it may be in a guidance book such as the Emergency Response Guidebook (ERG). Motor carriers may assist shippers by keeping an ERG on each vehicle carrying hazardous materials. The driver must provide the emergency response information to any federal, state, or local authority responding to a hazardous materials incident or investigating one.Total quantity and number & type of packages must appear before or after the basic description. The packaging type and the unit of measurement may be abbreviated. For example:
10 ctns. UN1263, Paint, 3, PG II, 500 lbs.

Commercial Driver’s License Manual - 2018 CDL Testing System
Page 96 Section 9 - Hazardous Materials (03/08/19)
The shipper of hazardous wastes must put the word WASTE before the proper shipping name of the material on the shipping paper (hazardous waste manifest). For example:
UN1090, Waste Acetone, 3, PG II.A non-hazardous material may not be described by using a hazard class or an identification number.Shippers must keep a copy of shipping papers (or an electronic image) for a period of 2 years (3 years for hazardous waste) after the material is accepted by the initial carrier.If one provides a carrier service only and is not the originator of the shipment, a carrier is required to keep a copy of the shipping paper (or an electronic image) for a period of 1 year.IMPORTANT NOTE: To view complete regulatory requirements for the transportation of hazardous materials one should refer to the Code of Federal Regulations, Title 49, Parts 171-180.
9.3.6 – Shipper's CertificationWhen the shipper packages hazardous materials, he/she certifies that the package has been prepared according to the rules. The signed shipper's certification appears on the original shipping paper. The only exceptions are when a shipper is a private carrier transporting their own product and when the package is provided by the carrier (for example, a cargo tank). Unless a package is clearly unsafe or does not comply with the HMR, you may accept the shipper's certification concerning proper packaging. Some carriers have additional rules about transporting hazardous materials. Follow your employer's rules when accepting shipments.
9.3.7 – Package Markings and LabelsShippers print required markings directly on the package, an attached label, or tag. An important package marking is the name of the hazardous material. It is the same name as the one on the shipping paper. The requirements for marking vary by package size and material being transported. When required, the shipper will put the following on the package:The name and address of shipper or consignee.The hazardous material's shipping name and identification number.The labels required.It is a good idea to compare the shipping paper to the markings and labels. Always make sure that the shipper shows the correct basic description on the shipping paper, and verifies that the proper labels are shown on the packages. If you are not familiar with the material, ask the shipper to contact your office.
If rules require it, the shipper will put RQ, MARINE POLLUTANT, BIOHAZARD, HOT, or INHALATION-HAZARD on the package. Packages with liquid containers inside will also have package orientation markings with the arrows pointing in the correct upright direction. The labels used always reflect the hazard class of the product. If a package needs more than one label, the labels must be close together, near the proper shipping name.
9.3.8 – Recognizing Hazardous MaterialsLearn to recognize shipments of hazardous materials. To find out if the shipment includes hazardous materials, look at the shipping paper. Does it have:An entry with a proper shipping name, hazard class, and identification number?A highlighted entry, or one with an X or RQ in the hazardous materials column?Other clues suggesting hazardous materials:What business is the shipper in? Paint dealer? Chemical supply? Scientific supply house? Pest control or agricultural supplier? Explosives, munitions, or fireworks dealer?Are there tanks with diamond labels or placards on the premises?What type of package is being shipped? Cylinders and drums are often used for hazardous materials shipments.Is a hazard class label, proper shipping name, or identification number on the package?Are there any handling precautions?
9.3.9 – Hazardous Waste ManifestWhen transporting hazardous wastes, you must sign by hand and carry a Uniform Hazardous Waste Manifest. The name and EPA registration number of the shippers, carriers, and destination must appear on the manifest. Shippers must prepare, date, and sign by hand the manifest. Treat the manifest as a shipping paper when transporting the waste. Only give the waste shipment to another registered carrier or disposal/treatment facility. Each carrier transporting the shipment must sign by hand the manifest. After you deliver the shipment, keep your copy of the manifest. Each copy must have all needed signatures and dates, including those of the person to whom you delivered the waste.
9.3.10 – PlacardingAttach the appropriate placards to the vehicle before you drive it. You are only allowed to move an improperly placarded vehicle during an emergency, in order to protect life or property.Placards must appear on both sides and both ends of the vehicle. Each placard must be:Easily seen from the direction it faces.
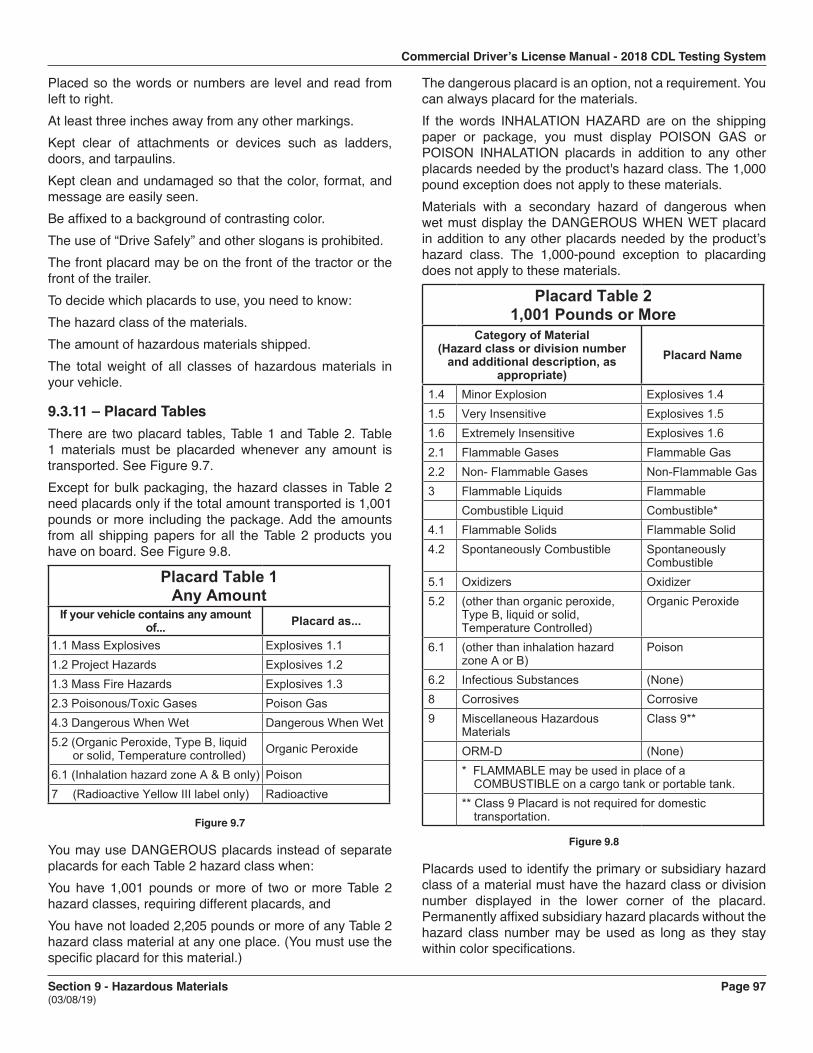
Commercial Driver’s License Manual - 2018 CDL Testing System
Section 9 - Hazardous Materials Page 97 (03/08/19)
Placed so the words or numbers are level and read from left to right.At least three inches away from any other markings.Kept clear of attachments or devices such as ladders, doors, and tarpaulins.Kept clean and undamaged so that the color, format, and message are easily seen.Be affixed to a background of contrasting color.The use of “Drive Safely” and other slogans is prohibited.The front placard may be on the front of the tractor or the front of the trailer.To decide which placards to use, you need to know:The hazard class of the materials.The amount of hazardous materials shipped.The total weight of all classes of hazardous materials in your vehicle.
9.3.11 – Placard TablesThere are two placard tables, Table 1 and Table 2. Table 1 materials must be placarded whenever any amount is transported. See Figure 9.7.Except for bulk packaging, the hazard classes in Table 2 need placards only if the total amount transported is 1,001 pounds or more including the package. Add the amounts from all shipping papers for all the Table 2 products you have on board. See Figure 9.8.
Placard Table 1Any Amount
If your vehicle contains any amount of... Placard as...
1.1 Mass Explosives Explosives 1.11.2 Project Hazards Explosives 1.21.3 Mass Fire Hazards Explosives 1.32.3 Poisonous/Toxic Gases Poison Gas4.3 Dangerous When Wet Dangerous When Wet5.2 (Organic Peroxide, Type B, liquid
or solid, Temperature controlled) Organic Peroxide
6.1 (Inhalation hazard zone A & B only) Poison7 (Radioactive Yellow III label only) Radioactive
Figure 9.7
You may use DANGEROUS placards instead of separate placards for each Table 2 hazard class when:You have 1,001 pounds or more of two or more Table 2 hazard classes, requiring different placards, andYou have not loaded 2,205 pounds or more of any Table 2 hazard class material at any one place. (You must use the specific placard for this material.)
The dangerous placard is an option, not a requirement. You can always placard for the materials.If the words INHALATION HAZARD are on the shipping paper or package, you must display POISON GAS or POISON INHALATION placards in addition to any other placards needed by the product's hazard class. The 1,000 pound exception does not apply to these materials.Materials with a secondary hazard of dangerous when wet must display the DANGEROUS WHEN WET placard in addition to any other placards needed by the product’s hazard class. The 1,000-pound exception to placarding does not apply to these materials.
Placard Table 21,001 Pounds or More
Category of Material (Hazard class or division number
and additional description, as appropriate)
Placard Name
1.4 Minor Explosion Explosives 1.41.5 Very Insensitive Explosives 1.51.6 Extremely Insensitive Explosives 1.62.1 Flammable Gases Flammable Gas2.2 Non- Flammable Gases Non-Flammable Gas3 Flammable Liquids Flammable
Combustible Liquid Combustible*4.1 Flammable Solids Flammable Solid4.2 Spontaneously Combustible Spontaneously
Combustible5.1 Oxidizers Oxidizer5.2 (other than organic peroxide,
Type B, liquid or solid, Temperature Controlled)
Organic Peroxide
6.1 (other than inhalation hazard zone A or B)
Poison
6.2 Infectious Substances (None)8 Corrosives Corrosive9 Miscellaneous Hazardous
MaterialsClass 9**
ORM-D (None)* FLAMMABLE may be used in place of a
COMBUSTIBLE on a cargo tank or portable tank.** Class 9 Placard is not required for domestic
transportation.
Figure 9.8
Placards used to identify the primary or subsidiary hazard class of a material must have the hazard class or division number displayed in the lower corner of the placard. Permanently affixed subsidiary hazard placards without the hazard class number may be used as long as they stay within color specifications.
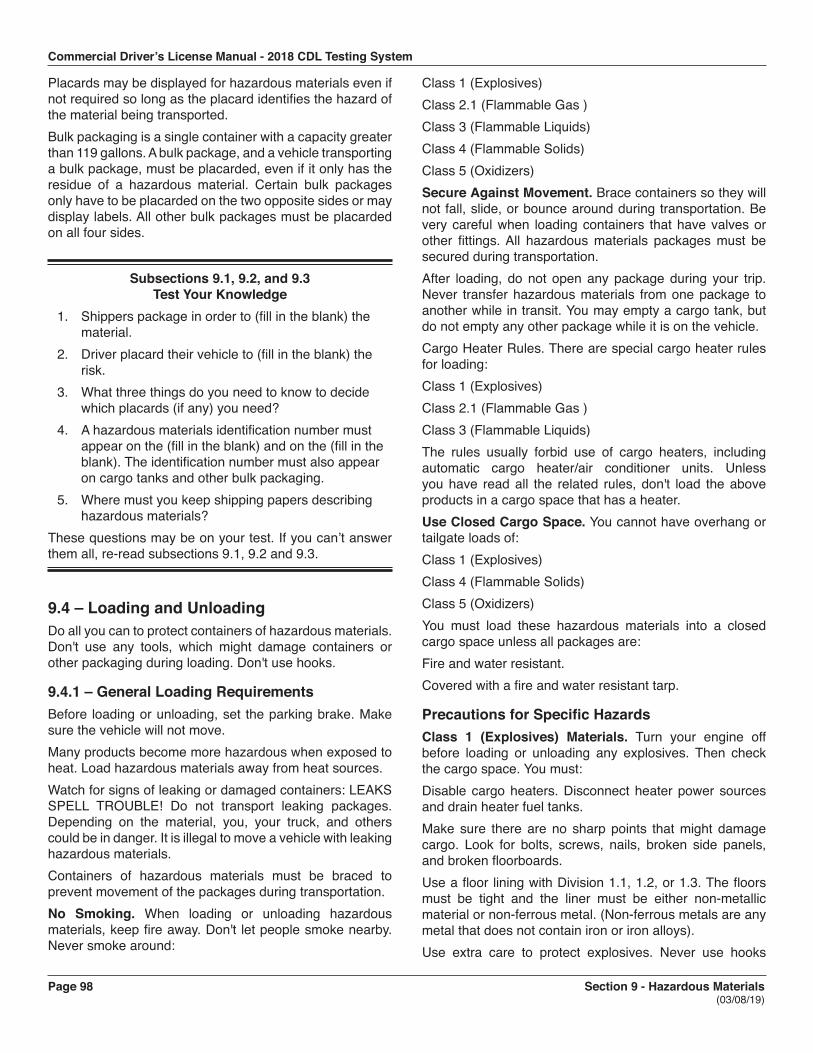
Commercial Driver’s License Manual - 2018 CDL Testing System
Page 98 Section 9 - Hazardous Materials (03/08/19)
Placards may be displayed for hazardous materials even if not required so long as the placard identifies the hazard of the material being transported.Bulk packaging is a single container with a capacity greater than 119 gallons. A bulk package, and a vehicle transporting a bulk package, must be placarded, even if it only has the residue of a hazardous material. Certain bulk packages only have to be placarded on the two opposite sides or may display labels. All other bulk packages must be placarded on all four sides.
Subsections 9.1, 9.2, and 9.3 Test Your Knowledge
1. Shippers package in order to (fill in the blank) thematerial.
2. Driver placard their vehicle to (fill in the blank) therisk.
3. What three things do you need to know to decidewhich placards (if any) you need?
4. A hazardous materials identification number mustappear on the (fill in the blank) and on the (fill in theblank). The identification number must also appearon cargo tanks and other bulk packaging.
5. Where must you keep shipping papers describinghazardous materials?
These questions may be on your test. If you can’t answer them all, re-read subsections 9.1, 9.2 and 9.3.
9.4 – Loading and UnloadingDo all you can to protect containers of hazardous materials. Don't use any tools, which might damage containers or other packaging during loading. Don't use hooks.
9.4.1 – General Loading RequirementsBefore loading or unloading, set the parking brake. Make sure the vehicle will not move.Many products become more hazardous when exposed to heat. Load hazardous materials away from heat sources.Watch for signs of leaking or damaged containers: LEAKS SPELL TROUBLE! Do not transport leaking packages. Depending on the material, you, your truck, and others could be in danger. It is illegal to move a vehicle with leaking hazardous materials.Containers of hazardous materials must be braced to prevent movement of the packages during transportation.No Smoking. When loading or unloading hazardous materials, keep fire away. Don't let people smoke nearby. Never smoke around:
Class 1 (Explosives)Class 2.1 (Flammable Gas )Class 3 (Flammable Liquids)Class 4 (Flammable Solids)Class 5 (Oxidizers)Secure Against Movement. Brace containers so they will not fall, slide, or bounce around during transportation. Be very careful when loading containers that have valves or other fittings. All hazardous materials packages must be secured during transportation.After loading, do not open any package during your trip. Never transfer hazardous materials from one package to another while in transit. You may empty a cargo tank, but do not empty any other package while it is on the vehicle.Cargo Heater Rules. There are special cargo heater rules for loading:Class 1 (Explosives)Class 2.1 (Flammable Gas )Class 3 (Flammable Liquids)The rules usually forbid use of cargo heaters, including automatic cargo heater/air conditioner units. Unless you have read all the related rules, don't load the above products in a cargo space that has a heater.Use Closed Cargo Space. You cannot have overhang or tailgate loads of:Class 1 (Explosives)Class 4 (Flammable Solids)Class 5 (Oxidizers)You must load these hazardous materials into a closed cargo space unless all packages are:Fire and water resistant.Covered with a fire and water resistant tarp.
Precautions for Specific HazardsClass 1 (Explosives) Materials. Turn your engine off before loading or unloading any explosives. Then check the cargo space. You must:Disable cargo heaters. Disconnect heater power sources and drain heater fuel tanks.Make sure there are no sharp points that might damage cargo. Look for bolts, screws, nails, broken side panels, and broken floorboards.Use a floor lining with Division 1.1, 1.2, or 1.3. The floors must be tight and the liner must be either non-metallic material or non-ferrous metal. (Non-ferrous metals are any metal that does not contain iron or iron alloys).Use extra care to protect explosives. Never use hooks

Commercial Driver’s License Manual - 2018 CDL Testing System
Section 9 - Hazardous Materials Page 99 (03/08/19)
or other metal tools. Never drop, throw, or roll packages. Protect explosive packages from other cargo that might cause damage.Do not transfer a Division 1.1, 1.2, or 1.3 from one vehicle to another on a public roadway except in an emergency. If safety requires an emergency transfer, set out red warning reflectors, flags, or electric lanterns. You must warn others on the road.Never transport damaged packages of explosives. Do not take a package that shows any dampness or oily stain.Do not transport Division 1.1 or 1.2 in vehicle combinations if:There is a marked or placarded cargo tank in the combination.The other vehicle in the combination contains:Division 1.1 A (Initiating Explosives).Packages of Class 7 (Radioactive) materials labeled "Yellow III."Division 2.3 (Poisonous Gas) Hazard zone A or B or Division 6.1 (Poisonous) materials Hazard zone A.Hazardous materials in a portable tank, on a DOT Spec 106A or 110A tank.Class 4 (Flammable Solids) and Class 5 (Oxidizers) Materials. Class 4 materials are solids that react (including fire and explosion) to water, heat, and air or even react spontaneously.Class 4 and 5 materials must be completely enclosed in a vehicle or covered securely. Class 4 and 5 materials, which become unstable and dangerous when wet, must be kept dry while in transit and during loading and unloading. Materials that are subject to spontaneous combustion or heating must be in vehicles with sufficient ventilation.Class 8 (Corrosive) Materials. If loading by hand, load breakable containers of corrosive liquid one by one. Keep them right side up. Do not drop or roll the containers. Load them onto an even floor surface. Stack carboys only if the lower tiers can bear the weight of the upper tiers safely.Do not load nitric acid above any other product.Load charged storage batteries so their liquid won't spill. Keep them right side up. Make sure other cargo won't fall against or short circuit them.Never load corrosive liquids next to or above:Division 1.4 (Explosives C).Division 4.1 (Flammable Solids).Division 4.3 (Dangerous When Wet).Class 5 (Oxidizers).Division 2.3, Zone B (Poisonous Gases).
Never load corrosive liquids with:Division 1.1 or 1.2Division 1.3Division 1.5 (Blasting Agents).Division 2.3, Zone A (Poisonous Gases).Division 4.2 (Spontaneously Combustible Materials).Division 6.1, PGI, Zone A (Poison Liquids).Class 2 (Compressed Gases) Including Cryogenic Liquids. If your vehicle doesn't have racks to hold cylinders, the cargo space floor must be flat. The cylinders must be:Held upright.In racks attached to the vehicle or in boxes that will keep them from turning over.Cylinders may be loaded in a horizontal position (lying down) if it is designed so the relief valve is in the vapor space.Division 2.3 (Poisonous Gas) or Division 6.1 (Poisonous) Materials. Never transport these materials in containers with interconnections. Never load a package labeled POISON or POISON INHALATION HAZARD in the driver's cab or sleeper or with food material for human or animal consumption. There are special rules for loading and unloading Class 2 materials in cargo tanks. You must have special training to do this.Class 7 (Radioactive) Materials. Some packages of Class 7 (Radioactive) materials bear a number called the "transport index." The shipper labels these packages Radioactive II or Radioactive III, and prints the package's transport index on the label. Radiation surrounds each package, passing through all nearby packages. To deal with this problem, the number of packages you can load together is controlled. Their closeness to people, animals, and unexposed film is also controlled. The transport index tells the degree of control needed during transportation. The total transport index of all packages in a single vehicle must not exceed 50.Table A to this section (49 CFR 177-842) shows rulesfor each transport index. It shows how close you can loadClass 7 (Radioactive) materials to people, animals, or film.For example, you can't leave a package with a transportindex of 1.1 within two feet of people or cargo space walls.
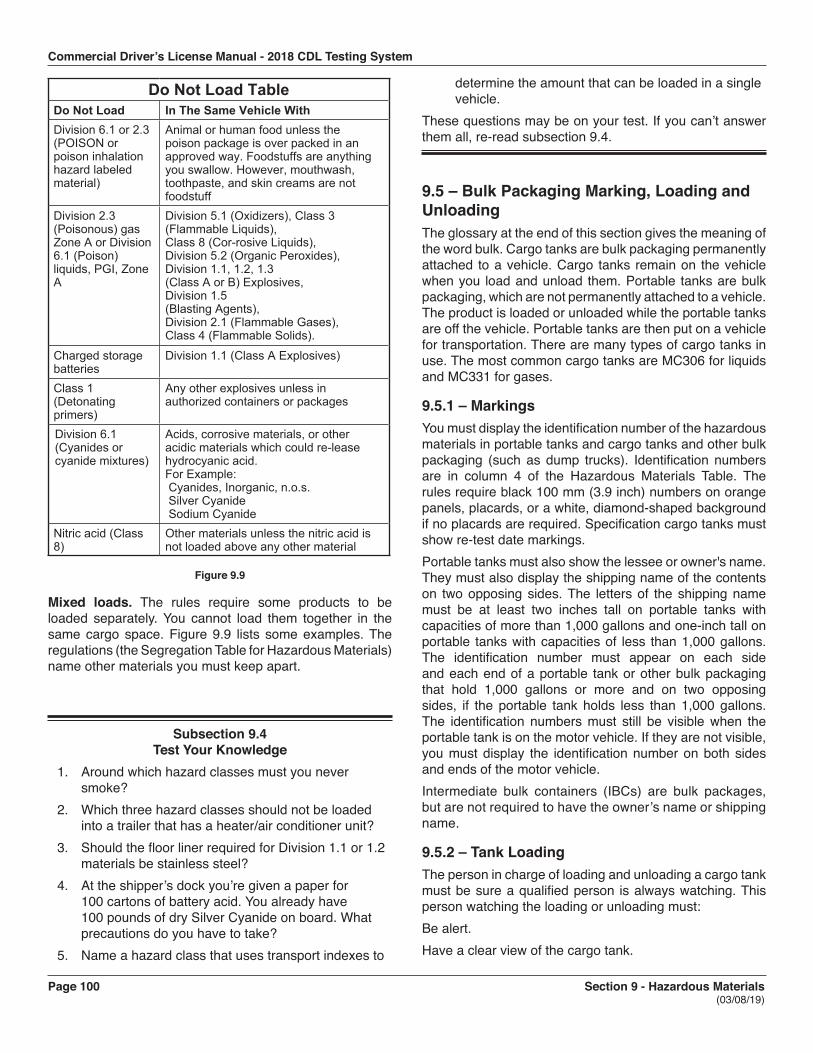
Commercial Driver’s License Manual - 2018 CDL Testing System
Page 100 Section 9 - Hazardous Materials (03/08/19)
Do Not Load TableDo Not Load In The Same Vehicle WithDivision 6.1 or 2.3 (POISON or poison inhalation hazard labeled material)
Animal or human food unless the poison package is over packed in an approved way. Foodstuffs are anything you swallow. However, mouthwash, toothpaste, and skin creams are not foodstuff
Division 2.3 (Poisonous) gas Zone A or Division 6.1 (Poison) liquids, PGI, Zone A
Division 5.1 (Oxidizers), Class 3 (Flammable Liquids), Class 8 (Cor-rosive Liquids), Division 5.2 (Organic Peroxides), Division 1.1, 1.2, 1.3 (Class A or B) Explosives,Division 1.5 (Blasting Agents), Division 2.1 (Flammable Gases), Class 4 (Flammable Solids).
Charged storage batteries
Division 1.1 (Class A Explosives)
Class 1 (Detonating primers)
Any other explosives unless in authorized containers or packages
Division 6.1 (Cyanides or cyanide mixtures)
Acids, corrosive materials, or other acidic materials which could re-lease hydrocyanic acid.For Example: Cyanides, Inorganic, n.o.s. Silver Cyanide Sodium Cyanide
Nitric acid (Class 8)
Other materials unless the nitric acid is not loaded above any other material
Figure 9.9
Mixed loads. The rules require some products to be loaded separately. You cannot load them together in the same cargo space. Figure 9.9 lists some examples. The regulations (the Segregation Table for Hazardous Materials) name other materials you must keep apart.
Subsection 9.4 Test Your Knowledge
1. Around which hazard classes must you neversmoke?
2. Which three hazard classes should not be loadedinto a trailer that has a heater/air conditioner unit?
3. Should the floor liner required for Division 1.1 or 1.2materials be stainless steel?
4. At the shipper’s dock you’re given a paper for100 cartons of battery acid. You already have100 pounds of dry Silver Cyanide on board. Whatprecautions do you have to take?
5. Name a hazard class that uses transport indexes to
determine the amount that can be loaded in a single vehicle.
These questions may be on your test. If you can’t answer them all, re-read subsection 9.4.
9.5 – Bulk Packaging Marking, Loading and UnloadingThe glossary at the end of this section gives the meaning of the word bulk. Cargo tanks are bulk packaging permanently attached to a vehicle. Cargo tanks remain on the vehicle when you load and unload them. Portable tanks are bulk packaging, which are not permanently attached to a vehicle. The product is loaded or unloaded while the portable tanks are off the vehicle. Portable tanks are then put on a vehicle for transportation. There are many types of cargo tanks in use. The most common cargo tanks are MC306 for liquids and MC331 for gases.
9.5.1 – MarkingsYou must display the identification number of the hazardous materials in portable tanks and cargo tanks and other bulk packaging (such as dump trucks). Identification numbers are in column 4 of the Hazardous Materials Table. The rules require black 100 mm (3.9 inch) numbers on orange panels, placards, or a white, diamond-shaped background if no placards are required. Specification cargo tanks must show re-test date markings.Portable tanks must also show the lessee or owner's name. They must also display the shipping name of the contents on two opposing sides. The letters of the shipping name must be at least two inches tall on portable tanks with capacities of more than 1,000 gallons and one-inch tall on portable tanks with capacities of less than 1,000 gallons. The identification number must appear on each side and each end of a portable tank or other bulk packaging that hold 1,000 gallons or more and on two opposing sides, if the portable tank holds less than 1,000 gallons. The identification numbers must still be visible when the portable tank is on the motor vehicle. If they are not visible, you must display the identification number on both sides and ends of the motor vehicle.Intermediate bulk containers (IBCs) are bulk packages, but are not required to have the owner’s name or shipping name.
9.5.2 – Tank LoadingThe person in charge of loading and unloading a cargo tank must be sure a qualified person is always watching. This person watching the loading or unloading must:Be alert.Have a clear view of the cargo tank.
Commercial Driver’s License Manual - 2018 CDL Testing System
Section 9 - Hazardous Materials Page 101 (03/08/19)
Be within 25 feet of the tank.Know of the hazards of the materials involved.Know the procedures to follow in an emergency.Be authorized to move the cargo tank and able to do so.There are special attendance rules for cargo tanks transporting propane and anhydrous ammonia.Close all manholes and valves before moving a tank of hazardous materials, no matter how small the amount in the tank or how short the distance. Manholes and valves must be closed to prevent leaks. It is illegal to move a cargo tank with open valves or covers unless it is empty according to 49 CFR 173.29.
9.5.3 – Flammable LiquidsTurn off your engine before loading or unloading any flammable liquids. Only run the engine if needed to operate a pump. Ground a cargo tank correctly before filling it through an open filling hole. Ground the tank before opening the filling hole, and maintain the ground until after closing the filling hole.
9.5.4 – Compressed GasKeep liquid discharge valves on a compressed gas tank closed except when loading and unloading. Unless your engine runs a pump for product transfer, turn it off when loading or unloading. If you use the engine, turn it off after product transfer, before you unhook the hose. Unhook all loading/unloading connections before coupling, uncoupling, or moving a cargo tank. Always chock trailers and semi-trailers to prevent motion when uncoupled from the power unit.
Subsection 9.5 Test Your Knowledge
1. What are cargo tanks?2. How is a portable tank different from a cargo tank?3. Your engine runs a pump used during delivery of
compressed gas. Should you turn off the enginebefore or after unhooking hoses after delivery?
These questions may be on your test. If you can’t answer them all, re-read subsection 9.5.
9.6 – Hazardous Materials -- Driving and Parking Rules
9.6.1 – Parking with Division 1.1, 1.2, or 1.3 ExplosivesNever park with Division 1.1, 1.2, or 1.3 explosives within five feet of the traveled part of the road. Except for short
periods of time needed for vehicle operation necessities (e.g., fueling), do not park within 300 feet of:A bridge, tunnel, or building.A place where people gather.An open fire.If you must park to do your job, do so only briefly.Don't park on private property unless the owner is aware of the danger. Someone must always watch the parked vehicle. You may let someone else watch it for you only if your vehicle is:On the shipper's property.On the carrier's property.On the consignee's property.You are allowed to leave your vehicle unattended in a safe haven. A safe haven is an approved place for parking unattended vehicles loaded with explosives. Designation of authorized safe havens is usually made by local authorities.
9.6.2 – Parking a Placarded Vehicle Not Transporting Division 1.1, 1.2, or 1.3) ExplosivesYou may park a placarded vehicle (not laden with explosives) within five feet of the traveled part of the road only if your work requires it. Do so only briefly. Someone must always watch the vehicle when parked on a public roadway or shoulder. Do not uncouple a trailer and leave it with hazardous materials on a public street. Do not park within 300 feet of an open fire.
9.6.3 – Attending Parked VehiclesThe person attending a placarded vehicle must:Be in the vehicle, awake, and not in the sleeper berth, or within 100 feet of the vehicle and have it within clear view.Be aware of the hazards of the materials being transported.Know what to do in emergencies.Be able to move the vehicle, if needed.
9.6.4 – No Flares!You might break down and have to use stopped vehicle signals. Use reflective triangles or red electric lights. Never use burning signals, such as flares or fuses, around a:Tank used for Class 3 (Flammable Liquids) or Division 2.1 (Flammable Gas) whether loaded or empty.Vehicle loaded with Division 1.1, 1.2, or 1.3 Explosives.
9.6.5 – Route RestrictionsSome states and counties require permits to transport hazardous materials or wastes. They may limit the routes you can use. Local rules about routes and permits change often. It is your job as driver to find out if you need permits
Commercial Driver’s License Manual - 2018 CDL Testing System
Page 102 Section 9 - Hazardous Materials (03/08/19)
or must use special routes. Make sure you have all needed papers before starting.If you work for a carrier, ask your dispatcher about route restrictions or permits. If you are an independent trucker and are planning a new route, check with state agencies where you plan to travel. Some localities prohibit transportation of hazardous materials through tunnels, over bridges, or other roadways. Always check before you start.Whenever placarded, avoid heavily populated areas, crowds, tunnels, narrow streets, and alleys. Take other routes, even if inconvenient, unless there is no other way. Never drive a placarded vehicle near open fires unless you can safely pass without stopping.If transporting Division 1.1, 1.2, or 1.3 explosives, you must have a written route plan and follow that plan. Carriers prepare the route plan in advance and give the driver a copy. You may plan the route yourself if you pick up the explosives at a location other than your employer's terminal. Write out the plan in advance. Keep a copy of it with you while transporting the explosives. Deliver shipments of explosives only to authorized persons or leave them in locked rooms designed for explosives storage.A carrier must choose the safest route to transport placarded radioactive materials. After choosing the route, the carrier must tell the driver about the radioactive materials, and show the route plan.
9.6.6 – No SmokingDo not smoke within 25 feet of a placarded cargo tank used for Class 3 (flammable liquids) or Division 2.1 (gases). Also, do not smoke or carry a lighted cigarette, cigar, or pipe within 25 feet of any vehicle, which contains:Class 1 (Explosives)Class 3 (Flammable Liquids)Class 4.1 (Flammable Solids)Class 4.2 (Spontaneously Combustible)Class 5 (Oxidizers)
9.6.7 – Refuel with Engine OffTurn off your engine before fueling a motor vehicle containing hazardous materials. Someone must always be at the nozzle, controlling fuel flow.
9.6.8 – 10 B C Fire ExtinguisherThe power unit of placarded vehicles must have a fire extinguisher with a UL rating of 10 B:C or more.
9.6.9 – Check TiresMake sure your tires are properly inflated.You must examine each tire on a motor vehicle at the beginning of each trip and each time the vehicle is parked.
The only acceptable way to check tire pressure is to use a tire pressure gauge.Do not drive with a tire that is leaking or flat except to the nearest safe place to fix it. Remove any overheated tire. Place it a safe distance from your vehicle. Don't drive until you correct the cause of the overheating. Remember to follow the rules about parking and attending placarded vehicles. They apply even when checking, repairing, or replacing tires.
9.6.10 – Where to Keep Shipping Papers and Emergency Response InformationDo not accept a hazardous materials shipment without a properly prepared shipping paper. A shipping paper for hazardous materials must always be easily recognized. Other people must be able to find it quickly after a crash.Clearly distinguish hazardous materials shipping papers from others by tabbing them or keeping them on top of the stack of papers.When you are behind the wheel, keep shipping papers within your reach (with your seat belt on), or in a pouch on the driver's door. They must be easily seen by someone entering the cab.When not behind the wheel, leave shipping papers in the driver's door pouch or on the driver's seat.Emergency response information must be kept in the same location as the shipping paper.Papers for Division 1.1, 1.2 or, 1.3 Explosives.A carrier must give each driver transporting Division 1.1, 1.2, or 1.3 explosives a copy of Federal Motor Carrier Safety Regulations (FMCSR), Part 397. The carrier must also give written instructions on what to do if delayed or in an accident. The written instructions must include:The names and telephone numbers of people to contact (including carrier agents or shippers).The nature of the explosives transported.The precautions to take in emergencies such as fires, accidents, or leaks.Drivers must sign a receipt for these documents.You must be familiar with, and have in your possession while driving, the:Shipping papers.Written emergency instructions.Written route plan.A copy of FMCSR, Part 397.
9.6.11 – Equipment for ChlorineA driver transporting chlorine in cargo tanks must have an approved gas mask in the vehicle. The driver must also
Commercial Driver’s License Manual - 2018 CDL Testing System
Section 9 - Hazardous Materials Page 103 (03/08/19)
have an emergency kit for controlling leaks in dome cover plate fittings on the cargo tank.
9.6.12 – Stop before Railroad CrossingsStop before a railroad crossing if your vehicle:Is placarded.Carries any amount of chlorine.Has cargo tanks, whether loaded or empty used for hazardous materials.You must stop 15 to 50 feet before the nearest rail. Proceed only when you are sure no train is coming and you can clear the tracks without stopping. Don't shift gears while crossing the tracks.
9.7 – Hazardous Materials -Emergencies
9.7.1 – Emergency Response Guidebook (ERG)The Department of Transportation has a guidebook for firefighters, police, and industry workers on how to protect themselves and the public from hazardous materials. The guide is indexed by proper shipping name and hazardous materials identification number. Emergency personnel look for these things on the shipping paper. That is why it is vital that the proper shipping name, identification number, label, and placards are correct.
9.7.2 – Crashes/IncidentsAs a professional driver, your job at the scene of a crash or an incident is to:Keep people away from the scene.Limit the spread of material, only if you can safely do so.Communicate the danger of the hazardous materials to emergency response personnel.Provide emergency responders with the shipping papers and emergency response information.Follow this checklist:Check to see that your driving partner is OK.Keep shipping papers with you.Keep people far away and upwind.Warn others of the danger.Call for help.Follow your employer's instructions.
9.7.3 – FiresYou might have to control minor truck fires on the road. However, unless you have the training and equipment to do so safely, don't fight hazardous materials fires. Dealing with hazardous materials fires requires special training and protective gear.
When you discover a fire, call for help. You may use the fire extinguisher to keep minor truck fires from spreading to cargo before firefighters arrive. Feel trailer doors to see if they are hot before opening them. If hot, you may have a cargo fire and should not open the doors. Opening doors lets air in and may make the fire flare up. Without air, many fires only smolder until firemen arrive, doing less damage. If your cargo is already on fire, it is not safe to fight the fire. Keep the shipping papers with you to give to emergency personnel as soon as they arrive. Warn other people of the danger and keep them away.If you discover a cargo leak, identify the hazardous materials leaking by using shipping papers, labels, or package location. Do not touch any leaking material--many people injure themselves by touching hazardous materials. Do not try to identify the material or find the source of a leak by smell. Toxic gases can destroy your sense of smell and can injure or kill you even if they don't smell. Never eat, drink, or smoke around a leak or spill.If hazardous materials are spilling from your vehicle, do not move it any more than safety requires. You may move off the road and away from places where people gather, if doing so serves safety. Only move your vehicle if you can do so without danger to yourself or others.Never continue driving with hazardous materials leaking from your vehicle in order to find a phone , truck stop, help, or similar reason. Remember, the carrier pays for the cleanup of contaminated parking lots, roadways, and drainage ditches. The costs are enormous, so don't leave a lengthy trail of contamination. If hazardous materials are spilling from your vehicle:Park it.Secure the area.Stay there.Call for help or send someone else for help.When sending someone for help, give that person:A description of the emergency.Your exact location and direction of travel.Your name, the carrier's name, and the name of the community or city where your terminal is located.The proper shipping name, hazard class, and identification number of the hazardous materials, if you know them.This is a lot for someone to remember. It is a good idea to write it all down for the person you send for help. The emergency response team must know these things to find you and to handle the emergency. They may have to travel miles to get to you. This information will help them to bring the right equipment the first time, without having to go back for it.Never move your vehicle, if doing so will cause contamination or damage the vehicle. Keep upwind and away from
Commercial Driver’s License Manual - 2018 CDL Testing System
Page 104 Section 9 - Hazardous Materials (03/08/19)
roadside rests, truck stops, cafes, and businesses. Never try to repack leaking containers. Unless you have the training and equipment to repair leaks safely, don't try it. Call your dispatcher or supervisor for instructions and, if needed, emergency personnel.
9.7.4 – Responses to Specific HazardsClass 1 (Explosives). If your vehicle has a breakdown or accident while carrying explosives, warn others of the danger. Keep bystanders away. Do not allow smoking or open fire near the vehicle. If there is a fire, warn every one of the danger of explosion.Remove all explosives before separating vehicles involved in a collision. Place the explosives at least 200 feet from the vehicles and occupied buildings. Stay a safe distance away.Class 2 (Compressed Gases). If compressed gas is leaking from your vehicle, warn others of the danger. Only permit those involved in removing the hazard or wreckage to get close. You must notify the shipper if compressed gas is involved in any accident.Unless you are fueling machinery used in road construction or maintenance, do not transfer a flammable compressed gas from one tank to another on any public roadway.Class 3 (Flammable Liquids). If you are transporting a flammable liquid and have an accident or your vehicle breaks down, prevent bystanders from gathering. Warn people of the danger. Keep them from smoking.Never transport a leaking cargo tank farther than needed to reach a safe place. Get off the roadway if you can do so safely. Don't transfer flammable liquid from one vehicle to another on a public roadway except in an emergency.Class 4 (Flammable Solids) and Class 5 (Oxidizing Materials). If a flammable solid or oxidizing material spills, warn others of the fire hazard. Do not open smoldering packages of flammable solids. Remove them from the vehicle if you can safely do so. Also, remove unbroken packages if it will decrease the fire hazard.Class 6 (Poisonous Materials and Infectious Substances). It is your job to protect yourself, other people, and property from harm. Remember that many products classed as poison are also flammable. If you think a Division 2.3 (Poison Gases) or Division 6.1 (Poison Materials) might be flammable, take the added precautions needed for flammable liquids or gases. Do not allow smoking, open flame, or welding. Warn others of the hazards of fire, of inhaling vapors, or coming in contact with the poison.A vehicle involved in a leak of Division 2.3 (Poison Gases) or Division 6.1 (Poisons) must be checked for stray poison before being used again.If a Division 6.2 (Infectious Substances) package is damaged in handling or transportation, you should
immediately contact your supervisor. Packages that appear to be damaged or show signs of leakage should not be accepted.Class 7 (Radioactive Materials). If radioactive material is involved in a leak or broken package, tell your dispatcher or supervisor as soon as possible. If there is a spill, or if an internal container might be damaged, do not touch or inhale the material. Do not use the vehicle until it is cleaned and checked with a survey meter.Class 8 (Corrosive Materials). If corrosives spill or leak during transportation, be careful to avoid further damage or injury when handling the containers. Parts of the vehicle exposed to a corrosive liquid must be thoroughly washed with water. After unloading, wash out the interior as soon as possible before reloading.If continuing to transport a leaking tank would be unsafe, get off the road. If safe to do so, contain any liquid leaking from the vehicle. Keep bystanders away from the liquid and its fumes. Do everything possible to prevent injury to yourself and to others.
9.7.5 – Required NotificationThe National Response Center helps coordinate emergency response to chemical hazards. It is a resource to the police and firefighters. It maintains a 24-hour toll-free line listed below. You or your employer must phone when any of the following occur as a direct result of a hazardous materials incident:A person is killed.An injured person requires hospitalization.Estimated property damage exceeds $50,000.The general public is evacuated for more than one hour.One or more major transportation arteries or facilities are closed for one hour or more.Fire, breakage, spillage, or suspected radioactive contamination occurs.Fire, breakage, spillage or suspected contamination occur involving shipment of infectious substance(s) (bacteria or toxins).The release of a marine pollutant in a quantity greater than 119 gallons for a liquid or 882 pounds for a solid; or a situation exists of such a nature (e.g., continuing danger to life exists at the scene of an incident) that, in the judgment of the carrier, should be reported.National Response Center (800) 424-8802Persons telephoning the National Response Center should be ready to give:Their name.Name and address of the carrier they work for.
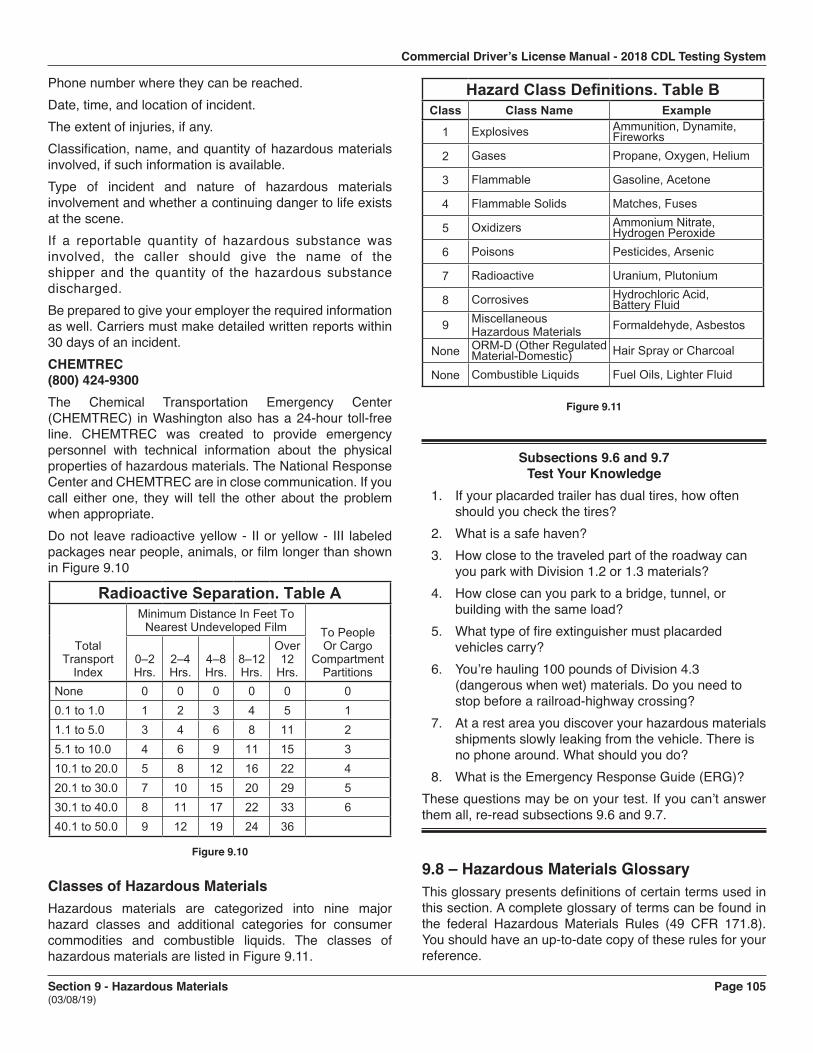
Commercial Driver’s License Manual - 2018 CDL Testing System
Section 9 - Hazardous Materials Page 105 (03/08/19)
Phone number where they can be reached.Date, time, and location of incident.The extent of injuries, if any.Classification, name, and quantity of hazardous materials involved, if such information is available.Type of incident and nature of hazardous materials involvement and whether a continuing danger to life exists at the scene.If a reportable quantity of hazardous substance was involved, the caller should give the name of the shipper and the quantity of the hazardous substance discharged.Be prepared to give your employer the required information as well. Carriers must make detailed written reports within 30 days of an incident.CHEMTREC (800) 424-9300The Chemical Transportation Emergency Center (CHEMTREC) in Washington also has a 24-hour toll-free line. CHEMTREC was created to provide emergency personnel with technical information about the physical properties of hazardous materials. The National Response Center and CHEMTREC are in close communication. If you call either one, they will tell the other about the problem when appropriate.Do not leave radioactive yellow - II or yellow - III labeled packages near people, animals, or film longer than shown in Figure 9.10
Radioactive Separation. Table A
Total Transport
Index
Minimum Distance In Feet To Nearest Undeveloped Film To People
Or Cargo Compartment
Partitions0–2 Hrs.
2–4 Hrs.
4–8 Hrs.
8–12 Hrs.
Over 12
Hrs.None 0 0 0 0 0 00.1 to 1.0 1 2 3 4 5 11.1 to 5.0 3 4 6 8 11 25.1 to 10.0 4 6 9 11 15 310.1 to 20.0 5 8 12 16 22 420.1 to 30.0 7 10 15 20 29 530.1 to 40.0 8 11 17 22 33 640.1 to 50.0 9 12 19 24 36
Figure 9.10
Classes of Hazardous MaterialsHazardous materials are categorized into nine major hazard classes and additional categories for consumer commodities and combustible liquids. The classes of hazardous materials are listed in Figure 9.11.
Hazard Class Definitions. Table BClass Class Name Example
1 Explosives Ammunition, Dynamite, Fireworks
2 Gases Propane, Oxygen, Helium
3 Flammable Gasoline, Acetone
4 Flammable Solids Matches, Fuses
5 Oxidizers Ammonium Nitrate, Hydrogen Peroxide
6 Poisons Pesticides, Arsenic
7 Radioactive Uranium, Plutonium
8 Corrosives Hydrochloric Acid, Battery Fluid
9 Miscellaneous Hazardous Materials Formaldehyde, Asbestos
None ORM-D (Other Regulated Material-Domestic) Hair Spray or Charcoal
None Combustible Liquids Fuel Oils, Lighter Fluid
Figure 9.11
Subsections 9.6 and 9.7 Test Your Knowledge
1. If your placarded trailer has dual tires, how oftenshould you check the tires?
2. What is a safe haven?3. How close to the traveled part of the roadway can
you park with Division 1.2 or 1.3 materials?4. How close can you park to a bridge, tunnel, or
building with the same load?5. What type of fire extinguisher must placarded
vehicles carry?6. You’re hauling 100 pounds of Division 4.3
(dangerous when wet) materials. Do you need tostop before a railroad-highway crossing?
7. At a rest area you discover your hazardous materialsshipments slowly leaking from the vehicle. There isno phone around. What should you do?
8. What is the Emergency Response Guide (ERG)?These questions may be on your test. If you can’t answer them all, re-read subsections 9.6 and 9.7.
9.8 – Hazardous Materials GlossaryThis glossary presents definitions of certain terms used in this section. A complete glossary of terms can be found in the federal Hazardous Materials Rules (49 CFR 171.8). You should have an up-to-date copy of these rules for your reference.
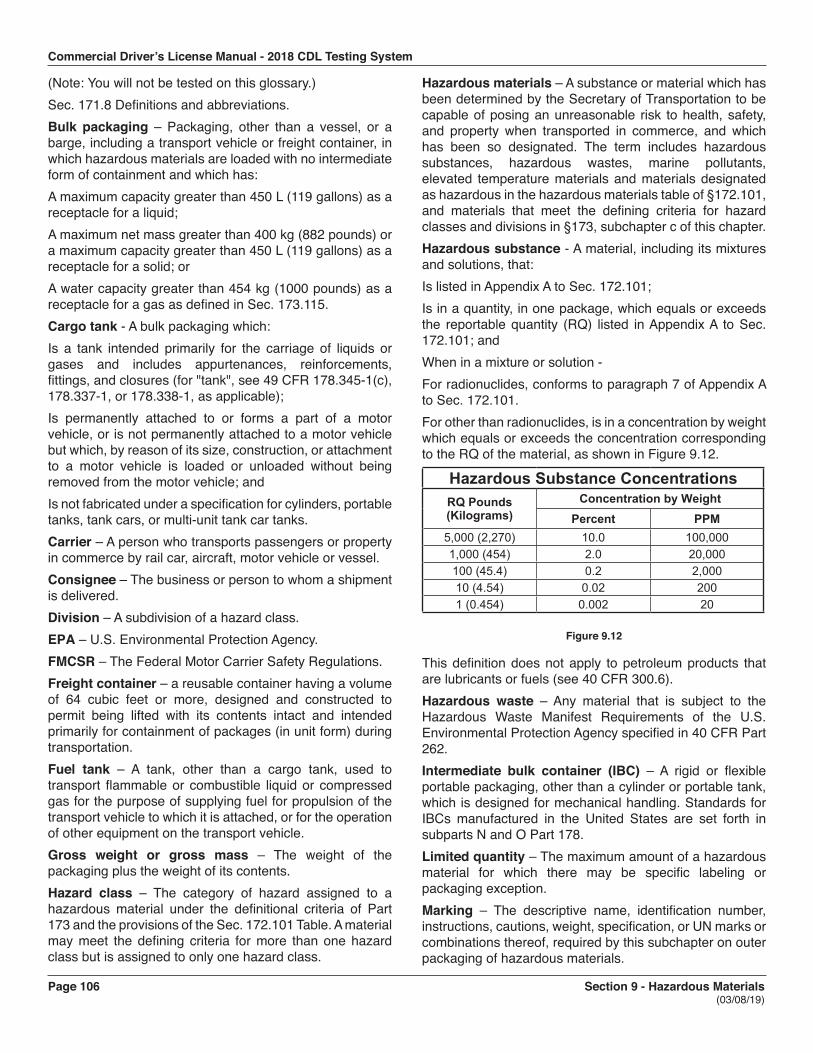
Commercial Driver’s License Manual - 2018 CDL Testing System
Page 106 Section 9 - Hazardous Materials (03/08/19)
(Note: You will not be tested on this glossary.)Sec. 171.8 Definitions and abbreviations.Bulk packaging – Packaging, other than a vessel, or a barge, including a transport vehicle or freight container, in which hazardous materials are loaded with no intermediate form of containment and which has:A maximum capacity greater than 450 L (119 gallons) as a receptacle for a liquid;A maximum net mass greater than 400 kg (882 pounds) or a maximum capacity greater than 450 L (119 gallons) as a receptacle for a solid; orA water capacity greater than 454 kg (1000 pounds) as a receptacle for a gas as defined in Sec. 173.115.Cargo tank - A bulk packaging which:Is a tank intended primarily for the carriage of liquids or gases and includes appurtenances, reinforcements, fittings, and closures (for "tank", see 49 CFR 178.345-1(c), 178.337-1, or 178.338-1, as applicable);Is permanently attached to or forms a part of a motor vehicle, or is not permanently attached to a motor vehicle but which, by reason of its size, construction, or attachment to a motor vehicle is loaded or unloaded without being removed from the motor vehicle; andIs not fabricated under a specification for cylinders, portable tanks, tank cars, or multi-unit tank car tanks.Carrier – A person who transports passengers or property in commerce by rail car, aircraft, motor vehicle or vessel.Consignee – The business or person to whom a shipment is delivered.Division – A subdivision of a hazard class.EPA – U.S. Environmental Protection Agency.FMCSR – The Federal Motor Carrier Safety Regulations.Freight container – a reusable container having a volume of 64 cubic feet or more, designed and constructed to permit being lifted with its contents intact and intended primarily for containment of packages (in unit form) during transportation.Fuel tank – A tank, other than a cargo tank, used to transport flammable or combustible liquid or compressed gas for the purpose of supplying fuel for propulsion of the transport vehicle to which it is attached, or for the operation of other equipment on the transport vehicle.Gross weight or gross mass – The weight of the packaging plus the weight of its contents.Hazard class – The category of hazard assigned to a hazardous material under the definitional criteria of Part 173 and the provisions of the Sec. 172.101 Table. A material may meet the defining criteria for more than one hazard class but is assigned to only one hazard class.
Hazardous materials – A substance or material which has been determined by the Secretary of Transportation to be capable of posing an unreasonable risk to health, safety, and property when transported in commerce, and which has been so designated. The term includes hazardous substances, hazardous wastes, marine pollutants, elevated temperature materials and materials designated as hazardous in the hazardous materials table of §172.101, and materials that meet the defining criteria for hazard classes and divisions in §173, subchapter c of this chapter.Hazardous substance - A material, including its mixtures and solutions, that:Is listed in Appendix A to Sec. 172.101;Is in a quantity, in one package, which equals or exceeds the reportable quantity (RQ) listed in Appendix A to Sec. 172.101; andWhen in a mixture or solution -For radionuclides, conforms to paragraph 7 of Appendix A to Sec. 172.101.For other than radionuclides, is in a concentration by weight which equals or exceeds the concentration corresponding to the RQ of the material, as shown in Figure 9.12.
Hazardous Substance ConcentrationsRQ Pounds(Kilograms)
Concentration by WeightPercent PPM
5,000 (2,270) 10.0 100,0001,000 (454) 2.0 20,000100 (45.4) 0.2 2,00010 (4.54) 0.02 2001 (0.454) 0.002 20
Figure 9.12
This definition does not apply to petroleum products that are lubricants or fuels (see 40 CFR 300.6).Hazardous waste – Any material that is subject to the Hazardous Waste Manifest Requirements of the U.S. Environmental Protection Agency specified in 40 CFR Part 262.Intermediate bulk container (IBC) – A rigid or flexible portable packaging, other than a cylinder or portable tank, which is designed for mechanical handling. Standards for IBCs manufactured in the United States are set forth in subparts N and O Part 178.Limited quantity – The maximum amount of a hazardous material for which there may be specific labeling or packaging exception.Marking – The descriptive name, identification number, instructions, cautions, weight, specification, or UN marks or combinations thereof, required by this subchapter on outer packaging of hazardous materials.
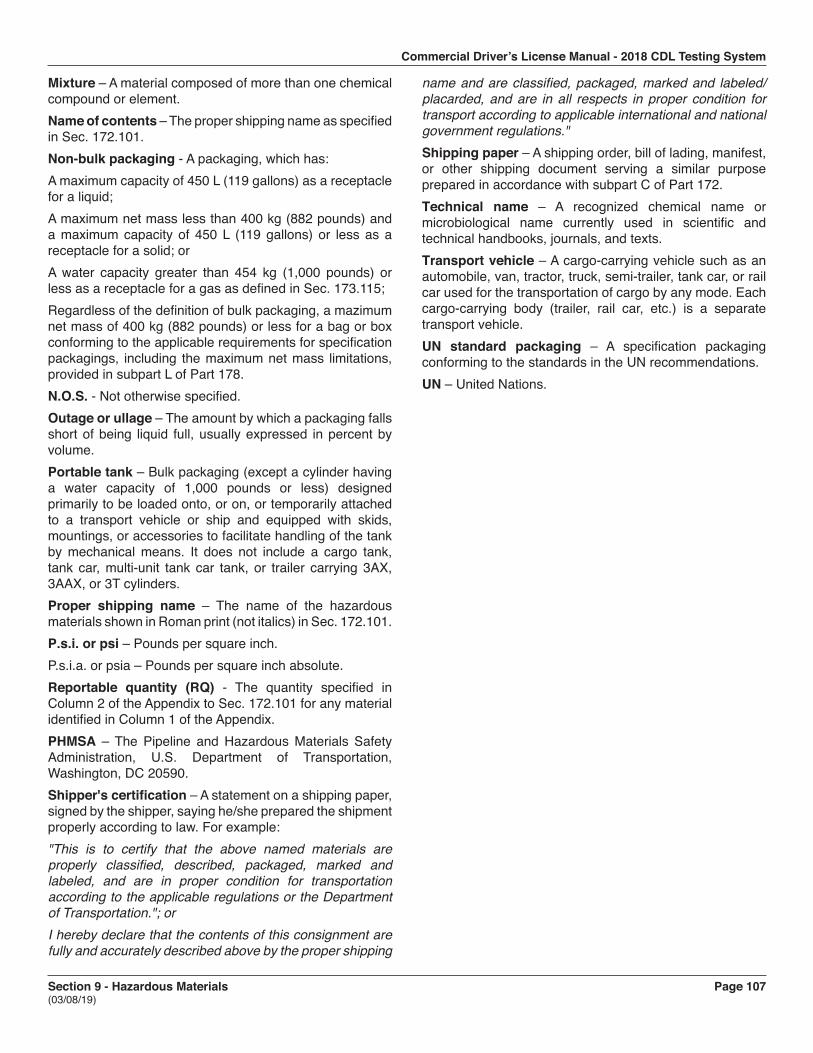
Commercial Driver’s License Manual - 2018 CDL Testing System
Section 9 - Hazardous Materials Page 107 (03/08/19)
Mixture – A material composed of more than one chemical compound or element.Name of contents – The proper shipping name as specified in Sec. 172.101.Non-bulk packaging - A packaging, which has:A maximum capacity of 450 L (119 gallons) as a receptacle for a liquid;A maximum net mass less than 400 kg (882 pounds) and a maximum capacity of 450 L (119 gallons) or less as a receptacle for a solid; orA water capacity greater than 454 kg (1,000 pounds) or less as a receptacle for a gas as defined in Sec. 173.115;Regardless of the definition of bulk packaging, a mazimum net mass of 400 kg (882 pounds) or less for a bag or box conforming to the applicable requirements for specification packagings, including the maximum net mass limitations, provided in subpart L of Part 178.N.O.S. - Not otherwise specified.Outage or ullage – The amount by which a packaging falls short of being liquid full, usually expressed in percent by volume.Portable tank – Bulk packaging (except a cylinder having a water capacity of 1,000 pounds or less) designed primarily to be loaded onto, or on, or temporarily attached to a transport vehicle or ship and equipped with skids, mountings, or accessories to facilitate handling of the tank by mechanical means. It does not include a cargo tank, tank car, multi-unit tank car tank, or trailer carrying 3AX, 3AAX, or 3T cylinders.Proper shipping name – The name of the hazardous materials shown in Roman print (not italics) in Sec. 172.101.P.s.i. or psi – Pounds per square inch.P.s.i.a. or psia – Pounds per square inch absolute.Reportable quantity (RQ) - The quantity specified in Column 2 of the Appendix to Sec. 172.101 for any material identified in Column 1 of the Appendix.PHMSA – The Pipeline and Hazardous Materials Safety Administration, U.S. Department of Transportation, Washington, DC 20590.Shipper's certification – A statement on a shipping paper, signed by the shipper, saying he/she prepared the shipment properly according to law. For example:"This is to certify that the above named materials are properly classified, described, packaged, marked and labeled, and are in proper condition for transportation according to the applicable regulations or the Department of Transportation."; orI hereby declare that the contents of this consignment are fully and accurately described above by the proper shipping
name and are classified, packaged, marked and labeled/placarded, and are in all respects in proper condition for transport according to applicable international and national government regulations."Shipping paper – A shipping order, bill of lading, manifest, or other shipping document serving a similar purpose prepared in accordance with subpart C of Part 172.Technical name – A recognized chemical name or microbiological name currently used in scientific and technical handbooks, journals, and texts.Transport vehicle – A cargo-carrying vehicle such as an automobile, van, tractor, truck, semi-trailer, tank car, or rail car used for the transportation of cargo by any mode. Each cargo-carrying body (trailer, rail car, etc.) is a separate transport vehicle.UN standard packaging – A specification packaging conforming to the standards in the UN recommendations.UN – United Nations.
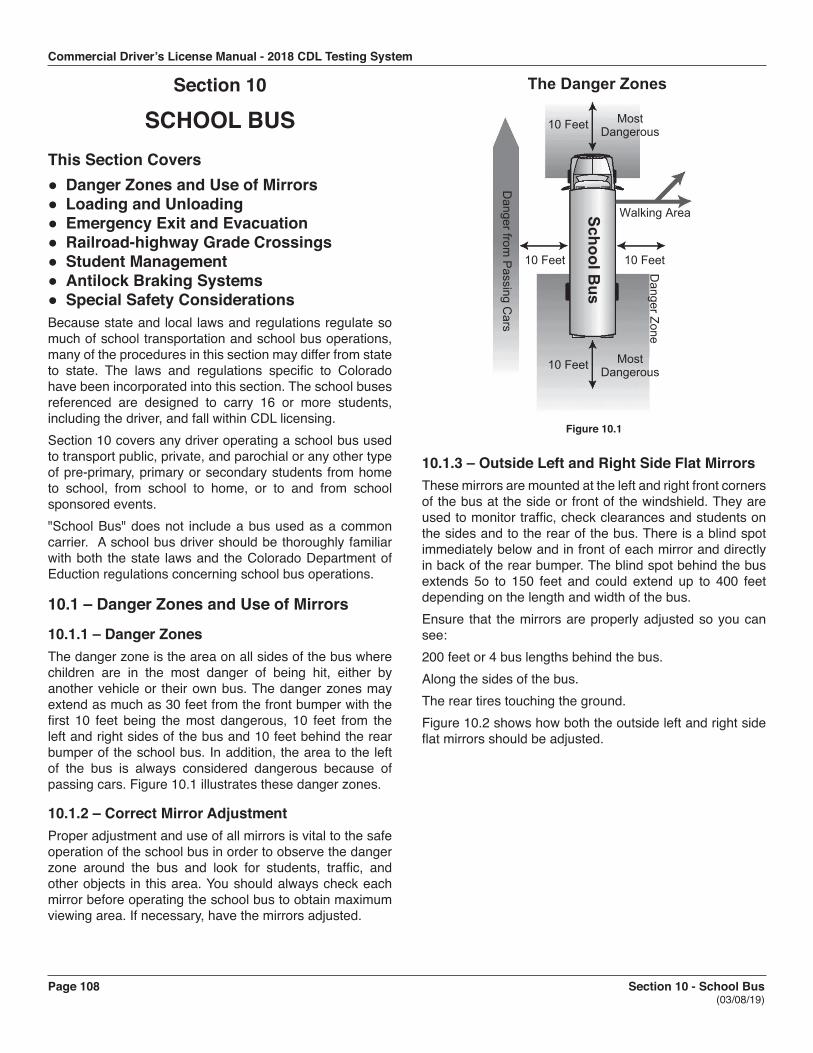
Commercial Driver’s License Manual - 2018 CDL Testing System
Page 108 Section 10 - School Bus (03/08/19)
Section 10
SCHOOL BUSThis Section Covers● Danger Zones and Use of Mirrors● Loading and Unloading● Emergency Exit and Evacuation● Railroad-highway Grade Crossings● Student Management● Antilock Braking Systems● Special Safety ConsiderationsBecause state and local laws and regulations regulate so much of school transportation and school bus operations, many of the procedures in this section may differ from state to state. The laws and regulations specific to Colorado have been incorporated into this section. The school buses referenced are designed to carry 16 or more students, including the driver, and fall within CDL licensing.Section 10 covers any driver operating a school bus used to transport public, private, and parochial or any other type of pre-primary, primary or secondary students from home to school, from school to home, or to and from school sponsored events."School Bus" does not include a bus used as a common carrier. A school bus driver should be thoroughly familiar with both the state laws and the Colorado Department of Eduction regulations concerning school bus operations.
10.1 – Danger Zones and Use of Mirrors
10.1.1 – Danger ZonesThe danger zone is the area on all sides of the bus where children are in the most danger of being hit, either by another vehicle or their own bus. The danger zones may extend as much as 30 feet from the front bumper with the first 10 feet being the most dangerous, 10 feet from the left and right sides of the bus and 10 feet behind the rear bumper of the school bus. In addition, the area to the left of the bus is always considered dangerous because of passing cars. Figure 10.1 illustrates these danger zones.
10.1.2 – Correct Mirror AdjustmentProper adjustment and use of all mirrors is vital to the safe operation of the school bus in order to observe the danger zone around the bus and look for students, traffic, and other objects in this area. You should always check each mirror before operating the school bus to obtain maximum viewing area. If necessary, have the mirrors adjusted.
The Danger Zones
MostDangerous10 Feet
Danger Zone
Danger from
Passing C
ars
10 Feet10 Feet
Walking AreaSchool Bus
MostDangerous10 Feet
Figure 10.1
10.1.3 – Outside Left and Right Side Flat MirrorsThese mirrors are mounted at the left and right front corners of the bus at the side or front of the windshield. They are used to monitor traffic, check clearances and students on the sides and to the rear of the bus. There is a blind spot immediately below and in front of each mirror and directly in back of the rear bumper. The blind spot behind the bus extends 5o to 150 feet and could extend up to 400 feet depending on the length and width of the bus.Ensure that the mirrors are properly adjusted so you can see:200 feet or 4 bus lengths behind the bus.Along the sides of the bus.The rear tires touching the ground.Figure 10.2 shows how both the outside left and right side flat mirrors should be adjusted.
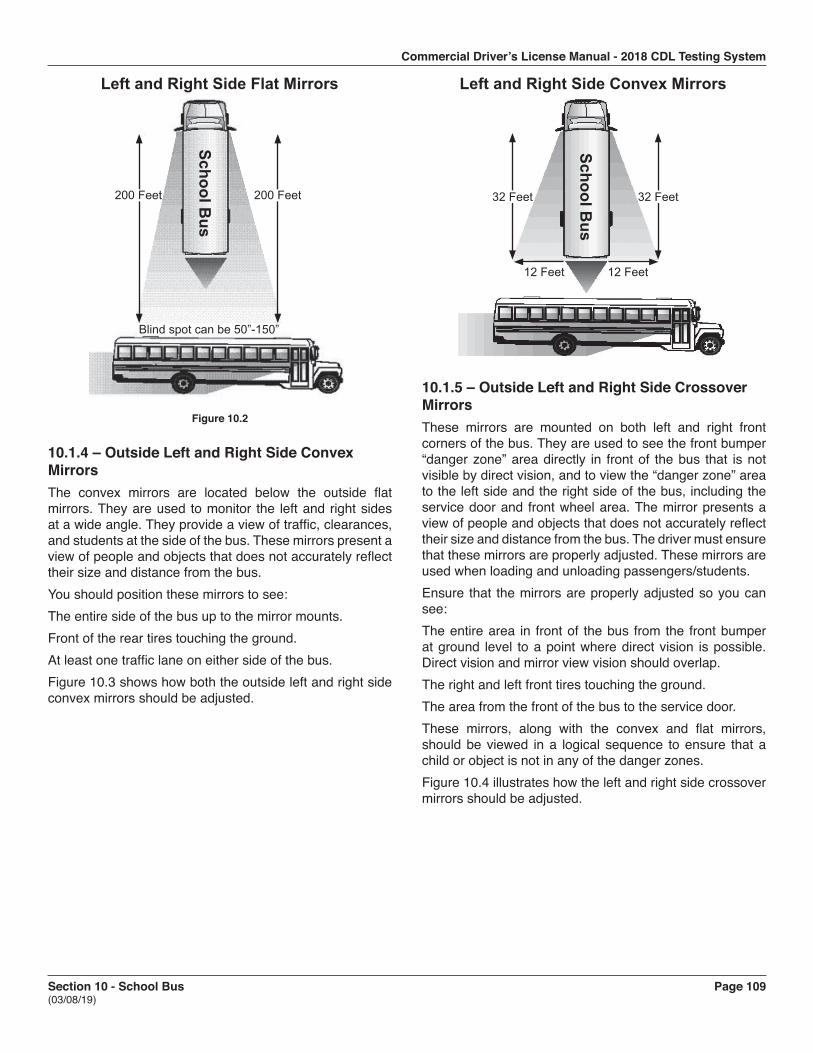
Commercial Driver’s License Manual - 2018 CDL Testing System
Section 10 - School Bus Page 109 (03/08/19)
Left and Right Side Flat Mirrors
School Bus
200 Feet 200 Feet
Blind spot can be 50”-150”
Figure 10.2
10.1.4 – Outside Left and Right Side Convex MirrorsThe convex mirrors are located below the outside flat mirrors. They are used to monitor the left and right sides at a wide angle. They provide a view of traffic, clearances, and students at the side of the bus. These mirrors present a view of people and objects that does not accurately reflect their size and distance from the bus.You should position these mirrors to see:The entire side of the bus up to the mirror mounts.Front of the rear tires touching the ground.At least one traffic lane on either side of the bus.Figure 10.3 shows how both the outside left and right side convex mirrors should be adjusted.
Left and Right Side Convex Mirrors
School Bus
32 Feet
12 Feet 12 Feet
32 Feet
10.1.5 – Outside Left and Right Side Crossover MirrorsThese mirrors are mounted on both left and right front corners of the bus. They are used to see the front bumper “danger zone” area directly in front of the bus that is not visible by direct vision, and to view the “danger zone” area to the left side and the right side of the bus, including the service door and front wheel area. The mirror presents a view of people and objects that does not accurately reflect their size and distance from the bus. The driver must ensure that these mirrors are properly adjusted. These mirrors are used when loading and unloading passengers/students.Ensure that the mirrors are properly adjusted so you can see:The entire area in front of the bus from the front bumper at ground level to a point where direct vision is possible. Direct vision and mirror view vision should overlap.The right and left front tires touching the ground.The area from the front of the bus to the service door.These mirrors, along with the convex and flat mirrors, should be viewed in a logical sequence to ensure that a child or object is not in any of the danger zones.Figure 10.4 illustrates how the left and right side crossover mirrors should be adjusted.
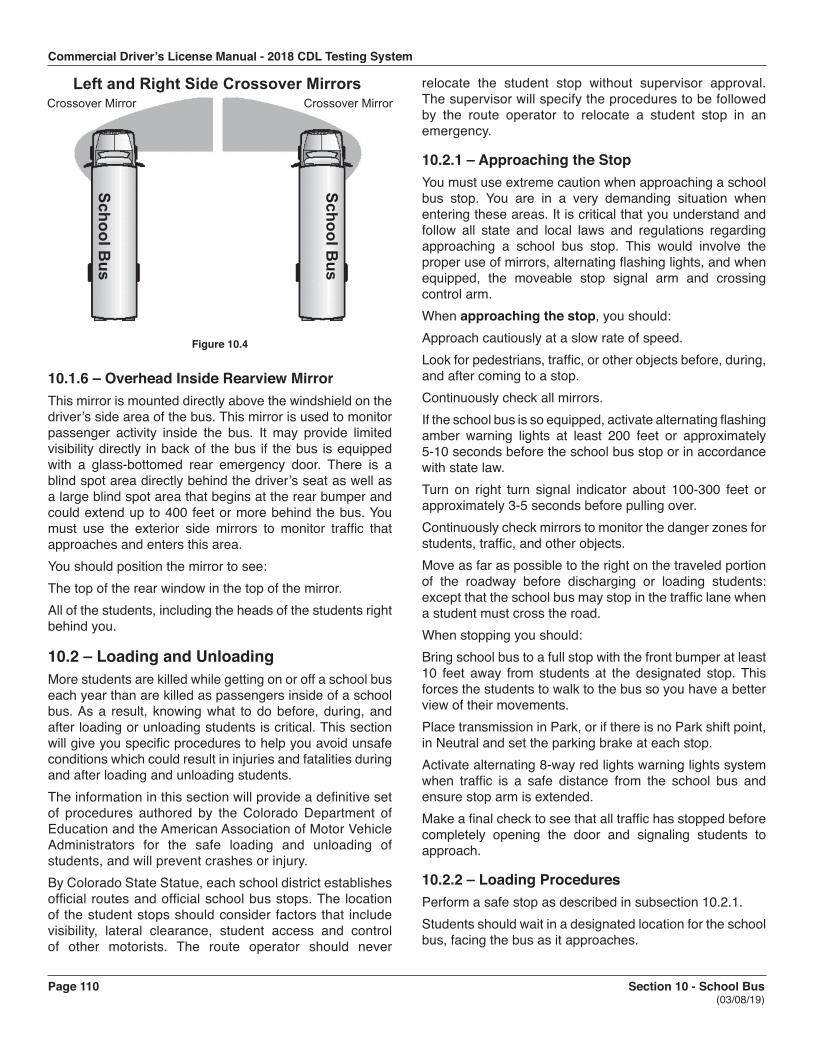
Commercial Driver’s License Manual - 2018 CDL Testing System
Page 110 Section 10 - School Bus (03/08/19)
Left and Right Side Crossover MirrorsCrossover Mirror Crossover Mirror
School Bus
School Bus
Figure 10.4
10.1.6 – Overhead Inside Rearview MirrorThis mirror is mounted directly above the windshield on the driver’s side area of the bus. This mirror is used to monitor passenger activity inside the bus. It may provide limited visibility directly in back of the bus if the bus is equipped with a glass-bottomed rear emergency door. There is a blind spot area directly behind the driver’s seat as well as a large blind spot area that begins at the rear bumper and could extend up to 400 feet or more behind the bus. You must use the exterior side mirrors to monitor traffic that approaches and enters this area.You should position the mirror to see:The top of the rear window in the top of the mirror.All of the students, including the heads of the students right behind you.
10.2 – Loading and UnloadingMore students are killed while getting on or off a school bus each year than are killed as passengers inside of a school bus. As a result, knowing what to do before, during, and after loading or unloading students is critical. This section will give you specific procedures to help you avoid unsafe conditions which could result in injuries and fatalities during and after loading and unloading students.The information in this section will provide a definitive set of procedures authored by the Colorado Department of Education and the American Association of Motor Vehicle Administrators for the safe loading and unloading of students, and will prevent crashes or injury.By Colorado State Statue, each school district establishes official routes and official school bus stops. The location of the student stops should consider factors that include visibility, lateral clearance, student access and control of other motorists. The route operator should never
relocate the student stop without supervisor approval. The supervisor will specify the procedures to be followed by the route operator to relocate a student stop in an emergency.
10.2.1 – Approaching the StopYou must use extreme caution when approaching a school bus stop. You are in a very demanding situation when entering these areas. It is critical that you understand and follow all state and local laws and regulations regarding approaching a school bus stop. This would involve the proper use of mirrors, alternating flashing lights, and when equipped, the moveable stop signal arm and crossing control arm.When approaching the stop, you should:Approach cautiously at a slow rate of speed.Look for pedestrians, traffic, or other objects before, during, and after coming to a stop.Continuously check all mirrors.If the school bus is so equipped, activate alternating flashing amber warning lights at least 200 feet or approximately 5-10 seconds before the school bus stop or in accordancewith state law.Turn on right turn signal indicator about 100-300 feet or approximately 3-5 seconds before pulling over.Continuously check mirrors to monitor the danger zones for students, traffic, and other objects.Move as far as possible to the right on the traveled portion of the roadway before discharging or loading students: except that the school bus may stop in the traffic lane when a student must cross the road.When stopping you should:Bring school bus to a full stop with the front bumper at least 10 feet away from students at the designated stop. This forces the students to walk to the bus so you have a better view of their movements.Place transmission in Park, or if there is no Park shift point, in Neutral and set the parking brake at each stop.Activate alternating 8-way red lights warning lights system when traffic is a safe distance from the school bus and ensure stop arm is extended.Make a final check to see that all traffic has stopped before completely opening the door and signaling students to approach.
10.2.2 – Loading ProceduresPerform a safe stop as described in subsection 10.2.1.Students should wait in a designated location for the school bus, facing the bus as it approaches.
Commercial Driver’s License Manual - 2018 CDL Testing System
Section 10 - School Bus Page 111 (03/08/19)
Students should board the bus only when signaled by the driver.Monitor all mirrors continuously.Count the number of students at the bus stop and be sure all board the bus. If possible, know names of students at each stop. If there is a student missing, ask the other students where the student is.Have the students board the school bus slowly, in single file, and use the handrail. The dome light should be on while loading in the dark.Wait until students are seated and facing forward before moving the bus.Check all mirrors. Make certain no one is running to catch the bus.If you cannot account for a student outside, secure the bus, take the key, and check around and underneath the bus.When all students are accounted for, prepare to leave by:Closing the door.Engaging the transmission.Releasing the parking brake.Turning off alternating flashing red lights.Turning on left turn signal.Checking all mirrors again.Allowing congested traffic to disperse.When it is safe, move the bus to enter traffic flow and continue the route.The loading procedure is essentially the same wherever you load students, but there are slight differences. When students are loading at the school campus, you should:Turn off the ignition switch.Remove key if leaving driver’s compartment.Position yourself to supervise loading as required or recommended by your state or local regulations.
10.2.3 – Unloading Procedures on the RoutePerform a safe stop at designated unloading areas as described in subsection 10.2.1.Have the students remain seated until told to exit.Check all mirrors.Count the number of students while unloading to confirm the location of all students before pulling away from the stop.Tell students to exit the bus and walk at least 10 feet away from the side of the bus to a position where the driver can plainly see all students.Check all mirrors again. Make sure no students are around or returning to the bus.
If you cannot account for a student outside the bus, secure the bus, and check around and underneath the bus.When all students are accounted for, prepare to leave by:Closing the door.Engaging transmission.Releasing parking brake.Turning off alternating flashing red lights.Turning on left turn signal.Checking all mirrors again.Allowing congested traffic to disperse.When it is safe, move the bus, enter the traffic flow and continue the route.Note. If you have missed a student’s unloading stop, do not back up. Be sure to follow local procedures.Additional Procedures for Students That Must Cross the Roadway. You should understand what students should do when exiting a school bus and crossing the street in front of the bus. In addition, the school bus driver should understand that students might not always do what they are supposed to do. If a student or students must cross the roadway, they should follow these procedures:Walk approximately 10 feet away from the side of the school bus to a position where you can see them.Walk to a location at least 10 feet in front of the right corner of the bumper, but still remaining away from the front of the school bus.Stop at the right edge of the roadway. You should be able to see the student’s feet.When students reach the edge of the roadway, they should:Stop and look in all directions, making sure the roadway is clear and is safe.Check to see if the red flashing lights on the bus are still flashing.Wait for your signal before crossing the roadway.Upon your signal, the students should:Cross far enough in front of the school bus to be in your view.Stop at the left edge of the school bus, stop, and look again for your signal to continue to cross the roadway.Look for traffic in both directions, making sure roadway is clear.Proceed across the roadway, continuing to look in all directions.Note: The school bus driver should enforce any state or local regulations or recommendations concerning student actions outside the school bus.
Commercial Driver’s License Manual - 2018 CDL Testing System
Page 112 Section 10 - School Bus (03/08/19)
10.2.4 – Unloading Procedures at SchoolWhen unloading at the school you should follow these procedures:Perform a safe stop at designated unloading areas as described in subsection 10.2.1.Secure the bus by:Turning off the ignition switch.Removing key if leaving driver’s compartment.Have the students remain seated until told to exit.Position yourself to supervise unloading as required or recommended by your state or local regulations.Have students exit in orderly fashion.Observe students as they step from bus to see that all move promptly away from the unloading area.Walk through the bus and check for hiding/sleeping students and items left by students.Check all mirrors. Make certain no students are returning to the bus.If you cannot account for a student outside the bus and the bus is secure, check around and underneath the bus.When all students are accounted for, prepare to leave by:Closing the door.Fastening safety belt.Starting engine.Engaging the transmission.Releasing the parking brake.Turning off alternating flashing red lights.Turning on left turn signal.Checking all mirrors again.Allowing congested traffic to disperse.When it is safe, pull away from the unloading area.
10.2.5 – Special Dangers of Loading and UnloadingDropped or Forgotten Objects. Always focus on students as they approach the bus and watch for any who disappear from sight.Students may drop an object near the bus during loading and unloading. Stopping to pick up the object, or returning to pick up the object may cause the student to disappear from the driver’s sight at a very dangerous moment.Students should be told to leave any dropped object and move to a point of safety out of the danger zones and attempt to get the driver’s attention to retrieve the object.Handrail Hang-ups. Students have been injured or killed
when clothing, accessories, or even parts of their body get caught in the handrail or door as they exited the bus. You should closely observe all students exiting the bus to confirm that they are in a safe location prior to moving the bus.
10.2.6 – Post-trip InspectionWhen your route or school activity trip is finished, you should conduct a post-trip inspection of the bus.You should walk through the bus and around the bus looking for the following:Articles left on the bus.Sleeping students.Open windows and doors.Mechanical/operational problems with the bus, with special attention to items that are unique to school buses – mirror systems, flashing warning lamps and stop signal arms.Damage or vandalism.Any problems or special situations should be reported immediately to your supervisor or school authorities.
10.3 – Emergency Exit and EvacuationAn emergency situation can happen to anyone, anytime, anywhere. It could be a crash, a stalled school bus on a railroad-highway crossing or in a high-speed intersection, an electrical fire in the engine compartment, a medical emergency to a student on the school bus, etc. Knowing what to do in an emergency–before, during and after an evacuation–can mean the difference between life and death.
10.3.1 – Planning for EmergenciesDetermine Need to Evacuate Bus. The first and most important consideration is for you to recognize the hazard. If time permits, school bus drivers should contact their dispatcher to explain the situation before making a decision to evacuate the school bus.As a general rule, student safety and control is best maintained by keeping students on the bus during an emergency and/or impending crisis situation, if so doing does not expose them to unnecessary risk or injury. Remember, the decision to evacuate the bus must be a timely one.A decision to evacuate should include consideration of the following conditions:Is there a fire or danger of fire?Is there a smell of raw or leaking fuel?Is there a chance the bus could be hit by other vehicles?Is the bus in the path of a sighted tornado or rising waters?
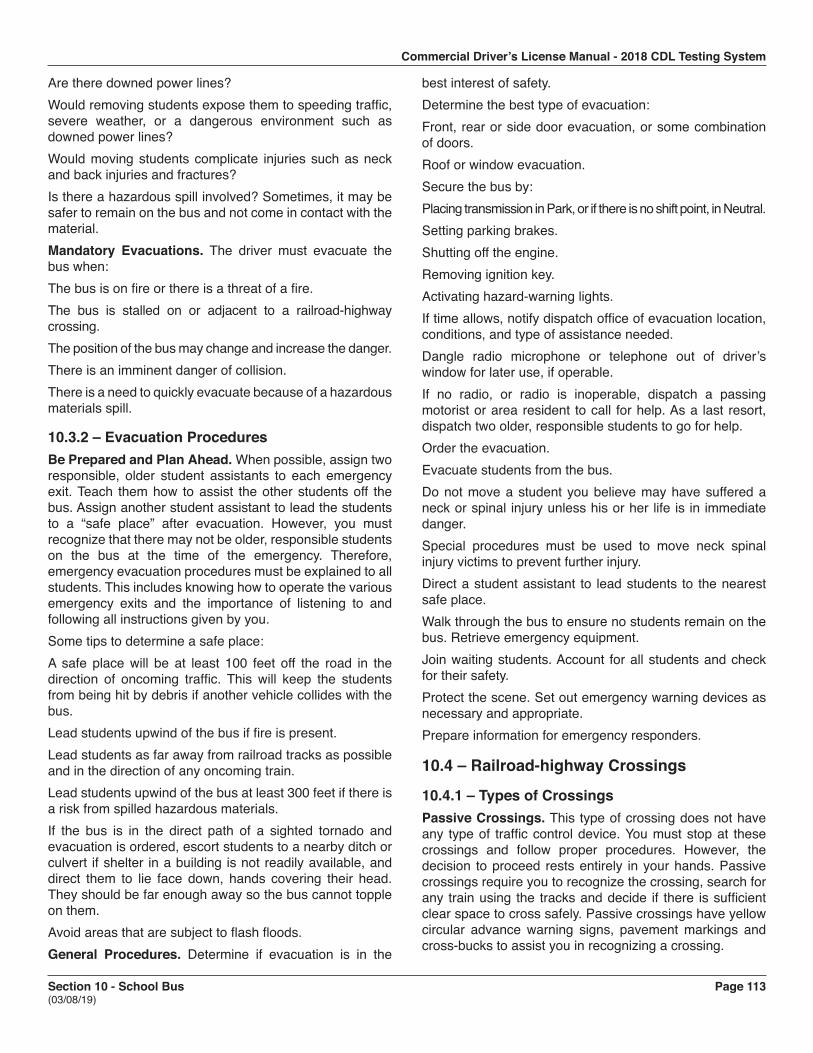
Commercial Driver’s License Manual - 2018 CDL Testing System
Section 10 - School Bus Page 113 (03/08/19)
Are there downed power lines?Would removing students expose them to speeding traffic, severe weather, or a dangerous environment such as downed power lines?Would moving students complicate injuries such as neck and back injuries and fractures?Is there a hazardous spill involved? Sometimes, it may be safer to remain on the bus and not come in contact with the material.Mandatory Evacuations. The driver must evacuate the bus when:The bus is on fire or there is a threat of a fire.The bus is stalled on or adjacent to a railroad-highway crossing.The position of the bus may change and increase the danger.There is an imminent danger of collision.There is a need to quickly evacuate because of a hazardous materials spill.
10.3.2 – Evacuation ProceduresBe Prepared and Plan Ahead. When possible, assign two responsible, older student assistants to each emergency exit. Teach them how to assist the other students off the bus. Assign another student assistant to lead the students to a “safe place” after evacuation. However, you must recognize that there may not be older, responsible students on the bus at the time of the emergency. Therefore, emergency evacuation procedures must be explained to all students. This includes knowing how to operate the various emergency exits and the importance of listening to and following all instructions given by you.Some tips to determine a safe place:A safe place will be at least 100 feet off the road in the direction of oncoming traffic. This will keep the students from being hit by debris if another vehicle collides with the bus.Lead students upwind of the bus if fire is present.Lead students as far away from railroad tracks as possible and in the direction of any oncoming train.Lead students upwind of the bus at least 300 feet if there is a risk from spilled hazardous materials.If the bus is in the direct path of a sighted tornado and evacuation is ordered, escort students to a nearby ditch or culvert if shelter in a building is not readily available, and direct them to lie face down, hands covering their head. They should be far enough away so the bus cannot topple on them.Avoid areas that are subject to flash floods.General Procedures. Determine if evacuation is in the
best interest of safety.Determine the best type of evacuation:Front, rear or side door evacuation, or some combination of doors.Roof or window evacuation.Secure the bus by:Placing transmission in Park, or if there is no shift point, in Neutral.Setting parking brakes.Shutting off the engine.Removing ignition key.Activating hazard-warning lights.If time allows, notify dispatch office of evacuation location, conditions, and type of assistance needed.Dangle radio microphone or telephone out of driver’s window for later use, if operable.If no radio, or radio is inoperable, dispatch a passing motorist or area resident to call for help. As a last resort, dispatch two older, responsible students to go for help.Order the evacuation.Evacuate students from the bus.Do not move a student you believe may have suffered a neck or spinal injury unless his or her life is in immediate danger.Special procedures must be used to move neck spinal injury victims to prevent further injury.Direct a student assistant to lead students to the nearest safe place.Walk through the bus to ensure no students remain on the bus. Retrieve emergency equipment.Join waiting students. Account for all students and check for their safety.Protect the scene. Set out emergency warning devices as necessary and appropriate.Prepare information for emergency responders.
10.4 – Railroad-highway Crossings
10.4.1 – Types of CrossingsPassive Crossings. This type of crossing does not have any type of traffic control device. You must stop at these crossings and follow proper procedures. However, the decision to proceed rests entirely in your hands. Passive crossings require you to recognize the crossing, search for any train using the tracks and decide if there is sufficient clear space to cross safely. Passive crossings have yellow circular advance warning signs, pavement markings and cross-bucks to assist you in recognizing a crossing.
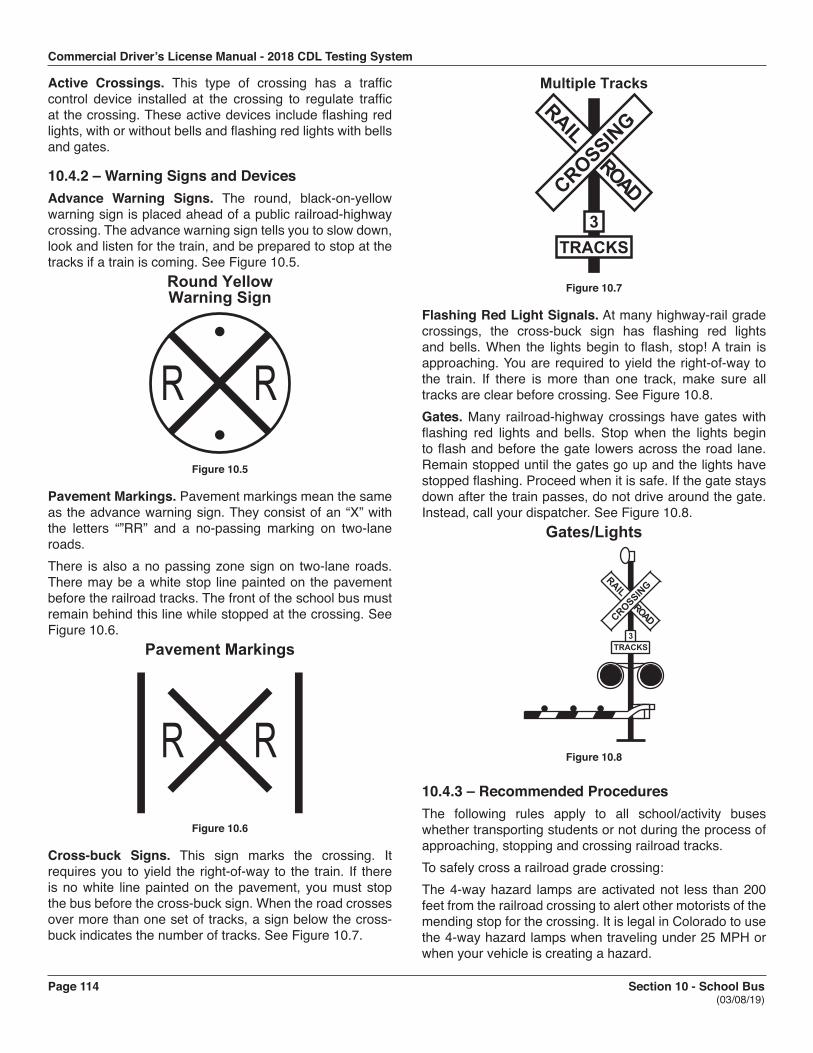
Commercial Driver’s License Manual - 2018 CDL Testing System
Page 114 Section 10 - School Bus (03/08/19)
Active Crossings. This type of crossing has a traffic control device installed at the crossing to regulate traffic at the crossing. These active devices include flashing red lights, with or without bells and flashing red lights with bells and gates.
10.4.2 – Warning Signs and DevicesAdvance Warning Signs. The round, black-on-yellow warning sign is placed ahead of a public railroad-highway crossing. The advance warning sign tells you to slow down, look and listen for the train, and be prepared to stop at the tracks if a train is coming. See Figure 10.5.
Round Yellow Warning Sign
Figure 10.5
Pavement Markings. Pavement markings mean the same as the advance warning sign. They consist of an “X” with the letters “”RR” and a no-passing marking on two-lane roads.There is also a no passing zone sign on two-lane roads. There may be a white stop line painted on the pavement before the railroad tracks. The front of the school bus must remain behind this line while stopped at the crossing. See Figure 10.6.
Pavement Markings
Figure 10.6
Cross-buck Signs. This sign marks the crossing. It requires you to yield the right-of-way to the train. If there is no white line painted on the pavement, you must stop the bus before the cross-buck sign. When the road crosses over more than one set of tracks, a sign below the cross-buck indicates the number of tracks. See Figure 10.7.
RAIL ROADCROSSIN
G
TRACKS3
Multiple Tracks
Figure 10.7
Flashing Red Light Signals. At many highway-rail grade crossings, the cross-buck sign has flashing red lights and bells. When the lights begin to flash, stop! A train is approaching. You are required to yield the right-of-way to the train. If there is more than one track, make sure all tracks are clear before crossing. See Figure 10.8.Gates. Many railroad-highway crossings have gates with flashing red lights and bells. Stop when the lights begin to flash and before the gate lowers across the road lane. Remain stopped until the gates go up and the lights have stopped flashing. Proceed when it is safe. If the gate stays down after the train passes, do not drive around the gate. Instead, call your dispatcher. See Figure 10.8.
Gates/Lights
RAIL ROADCROSSIN
G
TRACKS3
Figure 10.8
10.4.3 – Recommended ProceduresThe following rules apply to all school/activity buses whether transporting students or not during the process of approaching, stopping and crossing railroad tracks.To safely cross a railroad grade crossing:The 4-way hazard lamps are activated not less than 200 feet from the railroad crossing to alert other motorists of the mending stop for the crossing. It is legal in Colorado to use the 4-way hazard lamps when traveling under 25 MPH or when your vehicle is creating a hazard.
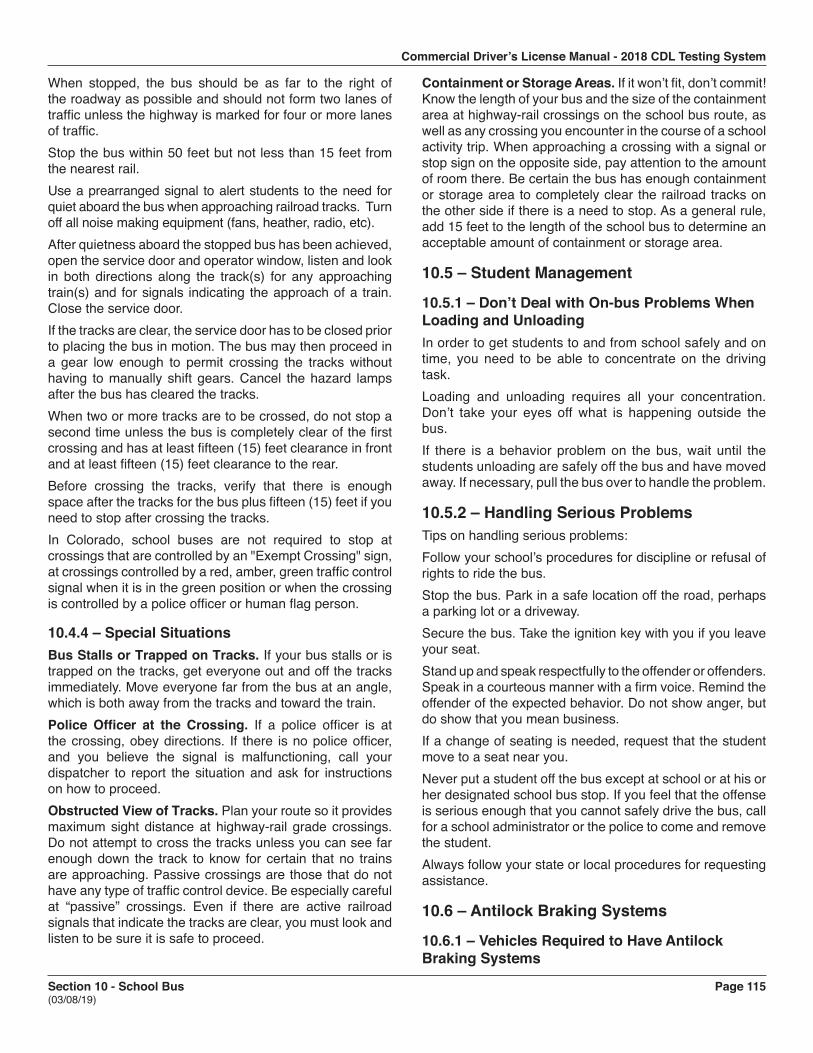
Commercial Driver’s License Manual - 2018 CDL Testing System
Section 10 - School Bus Page 115 (03/08/19)
When stopped, the bus should be as far to the right of the roadway as possible and should not form two lanes of traffic unless the highway is marked for four or more lanes of traffic.Stop the bus within 50 feet but not less than 15 feet from the nearest rail.Use a prearranged signal to alert students to the need for quiet aboard the bus when approaching railroad tracks. Turn off all noise making equipment (fans, heather, radio, etc).After quietness aboard the stopped bus has been achieved, open the service door and operator window, listen and look in both directions along the track(s) for any approaching train(s) and for signals indicating the approach of a train. Close the service door. If the tracks are clear, the service door has to be closed prior to placing the bus in motion. The bus may then proceed in a gear low enough to permit crossing the tracks without having to manually shift gears. Cancel the hazard lamps after the bus has cleared the tracks.When two or more tracks are to be crossed, do not stop a second time unless the bus is completely clear of the first crossing and has at least fifteen (15) feet clearance in front and at least fifteen (15) feet clearance to the rear.Before crossing the tracks, verify that there is enough space after the tracks for the bus plus fifteen (15) feet if you need to stop after crossing the tracks.In Colorado, school buses are not required to stop at crossings that are controlled by an "Exempt Crossing" sign, at crossings controlled by a red, amber, green traffic control signal when it is in the green position or when the crossing is controlled by a police officer or human flag person.
10.4.4 – Special SituationsBus Stalls or Trapped on Tracks. If your bus stalls or is trapped on the tracks, get everyone out and off the tracks immediately. Move everyone far from the bus at an angle, which is both away from the tracks and toward the train.Police Officer at the Crossing. If a police officer is at the crossing, obey directions. If there is no police officer, and you believe the signal is malfunctioning, call your dispatcher to report the situation and ask for instructions on how to proceed.Obstructed View of Tracks. Plan your route so it provides maximum sight distance at highway-rail grade crossings. Do not attempt to cross the tracks unless you can see far enough down the track to know for certain that no trains are approaching. Passive crossings are those that do not have any type of traffic control device. Be especially careful at “passive” crossings. Even if there are active railroad signals that indicate the tracks are clear, you must look and listen to be sure it is safe to proceed.
Containment or Storage Areas. If it won’t fit, don’t commit! Know the length of your bus and the size of the containment area at highway-rail crossings on the school bus route, as well as any crossing you encounter in the course of a school activity trip. When approaching a crossing with a signal or stop sign on the opposite side, pay attention to the amount of room there. Be certain the bus has enough containment or storage area to completely clear the railroad tracks on the other side if there is a need to stop. As a general rule, add 15 feet to the length of the school bus to determine an acceptable amount of containment or storage area.
10.5 – Student Management
10.5.1 – Don’t Deal with On-bus Problems When Loading and UnloadingIn order to get students to and from school safely and on time, you need to be able to concentrate on the driving task.Loading and unloading requires all your concentration. Don’t take your eyes off what is happening outside the bus.If there is a behavior problem on the bus, wait until the students unloading are safely off the bus and have moved away. If necessary, pull the bus over to handle the problem.
10.5.2 – Handling Serious ProblemsTips on handling serious problems:Follow your school’s procedures for discipline or refusal of rights to ride the bus.Stop the bus. Park in a safe location off the road, perhaps a parking lot or a driveway.Secure the bus. Take the ignition key with you if you leave your seat.Stand up and speak respectfully to the offender or offenders. Speak in a courteous manner with a firm voice. Remind the offender of the expected behavior. Do not show anger, but do show that you mean business.If a change of seating is needed, request that the student move to a seat near you.Never put a student off the bus except at school or at his or her designated school bus stop. If you feel that the offense is serious enough that you cannot safely drive the bus, call for a school administrator or the police to come and remove the student.Always follow your state or local procedures for requesting assistance.
10.6 – Antilock Braking Systems
10.6.1 – Vehicles Required to Have Antilock Braking Systems
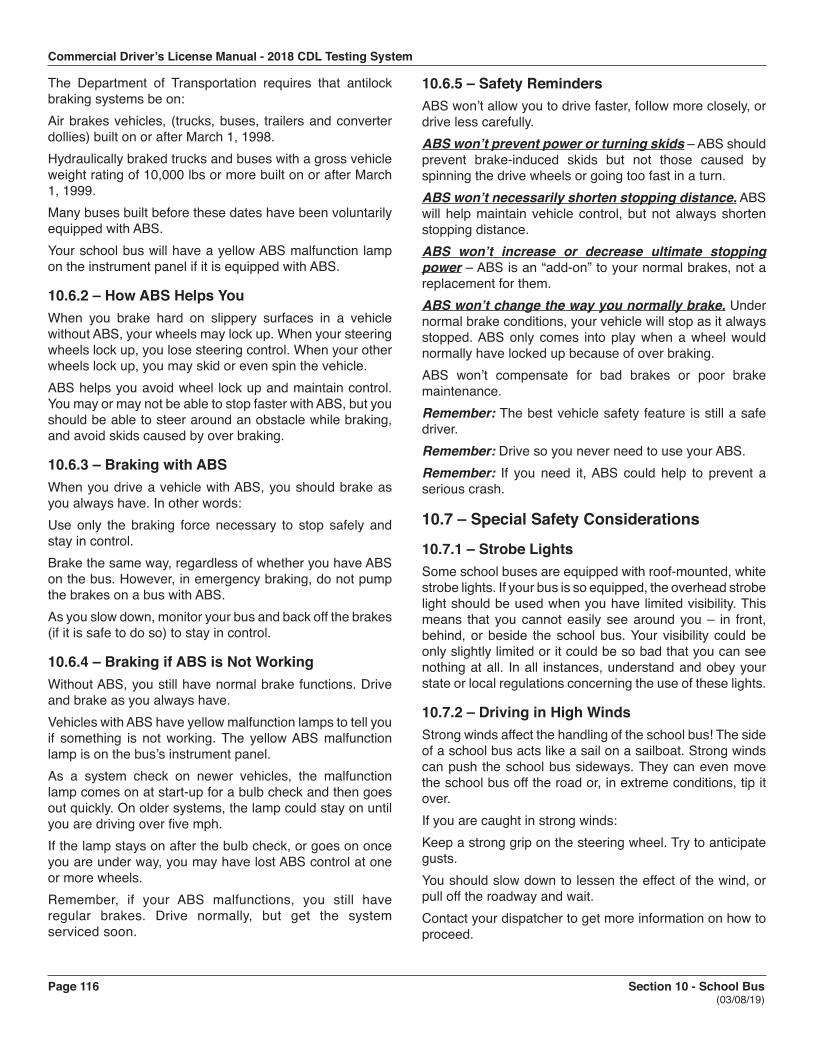
Commercial Driver’s License Manual - 2018 CDL Testing System
Page 116 Section 10 - School Bus (03/08/19)
The Department of Transportation requires that antilock braking systems be on:Air brakes vehicles, (trucks, buses, trailers and converter dollies) built on or after March 1, 1998.Hydraulically braked trucks and buses with a gross vehicle weight rating of 10,000 lbs or more built on or after March 1, 1999.Many buses built before these dates have been voluntarily equipped with ABS.Your school bus will have a yellow ABS malfunction lamp on the instrument panel if it is equipped with ABS.
10.6.2 – How ABS Helps YouWhen you brake hard on slippery surfaces in a vehicle without ABS, your wheels may lock up. When your steering wheels lock up, you lose steering control. When your other wheels lock up, you may skid or even spin the vehicle.ABS helps you avoid wheel lock up and maintain control. You may or may not be able to stop faster with ABS, but you should be able to steer around an obstacle while braking, and avoid skids caused by over braking.
10.6.3 – Braking with ABSWhen you drive a vehicle with ABS, you should brake as you always have. In other words:Use only the braking force necessary to stop safely and stay in control.Brake the same way, regardless of whether you have ABS on the bus. However, in emergency braking, do not pump the brakes on a bus with ABS.As you slow down, monitor your bus and back off the brakes (if it is safe to do so) to stay in control.
10.6.4 – Braking if ABS is Not WorkingWithout ABS, you still have normal brake functions. Drive and brake as you always have.Vehicles with ABS have yellow malfunction lamps to tell you if something is not working. The yellow ABS malfunction lamp is on the bus’s instrument panel.As a system check on newer vehicles, the malfunction lamp comes on at start-up for a bulb check and then goes out quickly. On older systems, the lamp could stay on until you are driving over five mph.If the lamp stays on after the bulb check, or goes on once you are under way, you may have lost ABS control at one or more wheels.Remember, if your ABS malfunctions, you still have regular brakes. Drive normally, but get the system serviced soon.
10.6.5 – Safety RemindersABS won’t allow you to drive faster, follow more closely, or drive less carefully.ABS won’t prevent power or turning skids – ABS should prevent brake-induced skids but not those caused by spinning the drive wheels or going too fast in a turn.ABS won’t necessarily shorten stopping distance. ABS will help maintain vehicle control, but not always shorten stopping distance.ABS won’t increase or decrease ultimate stopping power – ABS is an “add-on” to your normal brakes, not a replacement for them.ABS won’t change the way you normally brake. Under normal brake conditions, your vehicle will stop as it always stopped. ABS only comes into play when a wheel would normally have locked up because of over braking.ABS won’t compensate for bad brakes or poor brake maintenance.Remember: The best vehicle safety feature is still a safe driver.Remember: Drive so you never need to use your ABS.Remember: If you need it, ABS could help to prevent a serious crash.
10.7 – Special Safety Considerations
10.7.1 – Strobe LightsSome school buses are equipped with roof-mounted, white strobe lights. If your bus is so equipped, the overhead strobe light should be used when you have limited visibility. This means that you cannot easily see around you – in front, behind, or beside the school bus. Your visibility could be only slightly limited or it could be so bad that you can see nothing at all. In all instances, understand and obey your state or local regulations concerning the use of these lights.
10.7.2 – Driving in High WindsStrong winds affect the handling of the school bus! The side of a school bus acts like a sail on a sailboat. Strong winds can push the school bus sideways. They can even move the school bus off the road or, in extreme conditions, tip it over.If you are caught in strong winds:Keep a strong grip on the steering wheel. Try to anticipate gusts.You should slow down to lessen the effect of the wind, or pull off the roadway and wait.Contact your dispatcher to get more information on how to proceed.
Commercial Driver’s License Manual - 2018 CDL Testing System
Section 10 - School Bus Page 117 (03/08/19)
10.7.3 – BackingBacking a school bus is strongly discouraged. You should back your bus only when you have no other safe way to move the vehicle. You should never back a school bus when students are outside of the bus. Backing is dangerous and increases your risk of a collision. If you have no choice and you must back your bus, follow these procedures:Post a lookout. The purpose of the lookout is to warn you about obstacles, approaching persons, and other vehicles. The lookout should not give directions on how to back the bus.Signal for quiet on the bus.Constantly check all mirrors and rear windows.Back slowly and smoothly.If no lookout is available:Set the parking brake.Turn off the motor and take the keys with you.Walk to the rear of the bus to determine whether the way is clear.If you must back-up at a student pick-up point, be sure to pick up students before backing and watch for late comers at all times.Be sure that all students are in the bus before backing.If you must back-up at a student drop-off point, be sure to unload students after backing.
10.7.4 – Tail SwingA school bus can have up to a three-foot tail swing. You need to check your mirrors before and during any turning movements to monitor the tail swing.Light RailThe Regional Transportation District (RTD) has added Light Rail Transit to its bus fleet in the Denver Metropolitan area. The Light Rail Vehicles are six axle, articulated, bi-directional rail vehicles that are electrically powered using overhead wires. The light rail tracks in and around the Denver downtown area are points of extreme danger. School transportation vehicle operators must exercise the utmost care when approaching, traveling alongside, and crossing light rail tracks.The RTD light rail tracks are not a distance away from the road like most railroad tracks. They are, in most cases, a part of the same street motorists drive on. The light rail tracks run parallel to the traffic, traveling in the same direction as traffic or against traffic flow. There are several locations where the RTD light rail tracks cross major streets.Light Rail Vehicles (LRVs) may approach from either direction since they are bi-directional. Pay attention to all set of tracks. Even though a train may have left the crossing
on one track, another train may be approaching on another track. LRVs are very quiet and appear to be traveling slower than they actually are. Each car weights 40 tons and is equipped with a bell, an emergency siren, and three bright lights that can be seen two to three blocks away. Two of the lights are in the "normal"headlight positions, and the third is in the middle, at the top of the car. LRVs have turn signals to indicate which direction they are turning.In most cases, there are no physical barriers such as curbs or medians separating the vehicle traffic from the LRV rail. The rails are set in concrete, and are a lighter color than the asphalt on the road. Certain weather and light conditions will reduce the visibility of this subtle difference. In some areas the tracks are close to parking areas. Motorists can become confused as to where to park.Warning Signs - A yellow, diamond shaped warning sign with a black symbol of a streetcar indicates the location of the LRV tracks. At intersections, or by the tracks these signs have a black bi-directional arrow below the streetcar symbol. Before intersections these signs have the term "AHEAD" below the streetcar symbol.Procedures for Light Rail CrossingsTreat light rail crossings as a railroad crossing, except for the use of the hazard lights only when necessary as they are not recommended or required.Instruct students to be quiet when stopping at a LRV crossing.Turn down the radio.Flash the brake lights if required to stop.Stopping on the tracks is unsafe and unlawful. Always observe the "Stop Here on Red" sign and the white safety stripe (stop line) location.Traffic light controlled intersections govern both the motorist and the LRV. Treat these intersections like any other traffic controlled intersection. Look and listen in the appropriate directions for LRVs, motorists, and pedestrians before crossing the tracks.At stop sign controlled intersections, the Department of Education recommends that a school bus operator, when stopped, opens the driver's side window and service door. Look and listen in both directions for LRVs, motorists, and pedestrians. Close the service door before crossing the tracks.Never cross the light rail tracks until the entire vehicle's length can safely clear the tracks.Never back across the light rail tracks.The Department of Education recommends that school transportation operators do not park their vehicles near a light rail track or crossing. When parking, always consider the safest loading/unloading position for school students.
Commercial Driver’s License Manual - 2018 CDL Testing System
Page 118 Section 10 - School Bus (03/08/19)
Section 10 Test Your Knowledge
1. Define the danger zone. How far does the dangerzone extend around the bus?
2. What should you be able to see if the outside flatmirrors are adjusted properly? The outside convexmirrors? The crossover mirrors?
3. You are loading students along the route. Whenshould you activate your alternating flashing amberwarning lights?
4. You are unloading students along your route. Whereshould students walk to after exiting the bus?
5. After unloading at school, why should you walkthrough the bus?
6. What position should students be in front of the busbefore they cross the roadway?
7. Under what conditions must you evacuate the bus?8. How far from the nearest rail should you stop at a
highway-rail crossing?9. What is a passive highway-rail crossing? Why
should you be extra cautious at this type ofcrossing?
10. How should you use your brakes if your vehicle isequipped with antilock brakes (ABS)?
These questions may be on your test. If you can’t answer them all, re-read Section 10.
Commercial Driver’s License Manual - 2018 CDL Testing System
Section 11 - Vehicle Inspection Page 119 (03/08/19)
Section 11
VEHICLE INSPECTIONThis Section Covers
● Internal Inspection ● External Inspection
During the Vehicle inspection, you must show that the vehicle is safe to drive. You will have to walk around the vehicle, name and point to/ touch each item and explain to the examiner what you are checking and why.Any vehicle that has components marked or labeled cannot be used for the Vehicle Inspection test. All of the tests include an engine start, and an in-cab inspection. The in-cab inspection includes the air brake check if equipped.
11.1 All VehiclesStudy the following vehicle parts for the type of vehicle you will be using during the CDL skills tests. You should be able to identify each part and tell the examiner what you are looking for or inspecting.
11.1.1 Engine Compartment (Engine Off)
Leaks/HosesLook for puddles on the ground.Look for dripping fluids on underside of engine and transmission.Inspect hoses for condition and leaks.
Oil LevelCheck oil level when engine is off.Indicate where dipstick is located.Check that the oil level is within safe operating range. Level must be above refill mark.
Coolant LevelLooks at sight glass on radiator or coolant reservoir; adequate level will show in sight glass. If no sight glass is available, you must describe what s/he would look for after removing radiator cap.
Power Steering FluidChecks the dipstick and sees where the fluid level is relative to the refill mark or checks sight glass. Level must be above refill mark.
Engine Compartment BeltsCheck the following belts for snugness (1/2 to 3/4 inch play at center of belt), cracks, frays, loose fibers or signs of wear:
Power steering belt.Water pump belt.Alternator belt.Air compressor belt.Note: If any of the components listed above are not belt driven, you must:Tell the examiner which component(s) are not belt driven.
Engine Compartment ComponentsMake sure component(s) (air compressor, alternator, power steering, and water pump) are operating properly, are not damaged or leaking, and are mounted securely.
Hydraulic Brakes Master Cylinder & Brake FluidChecks that master cylinder is securely attached and not leakingChecks the level of brake fluid in the reservoir to ensure it is between the add and full marks
Safe StartPlace gearshift lever in neutral (or park, for automatic transmissions).Depress clutch before attempting to start the vehicleStart the vehicle and keep clutch depressed until engine reaches idling speed.Then release clutch slowly.
11.1.2 – Cab Check/Engine Start
Oil Pressure GaugeMake sure oil pressure gauge is working.Check that pressure gauge shows increasing or normal oil pressure or that the warning light goes off.If equipped, oil temperature gauge should begin a gradual rise to the normal operating range.
Temperature GaugeMake sure the temperature gauge is working.Temperature should begin to climb to the normal operating range or temperature light should be off.
Air GaugeCheck that the air gauge is working properly and that the air compressor builds the air pressure to governor cut-out at approximately 120-140 psi or as specified by manufacturer.
Ammeter/VoltmeterCheck that gauges show alternator and/or generator is charging or that warning light is off.
Commercial Driver’s License Manual - 2018 CDL Testing System
Page 120 Section 11 - Vehicle Inspection (03/08/19)
Mirrors and WindshieldMirrors should be clean and adjusted properly from the inside.Windshield should be clean with no illegal stickers, no obstructions, or damage to the glass.
Emergency EquipmentCheck for spare electrical fuses.Check for three red reflective triangles and 6 fusees or 3 liquid burning flares.Check that the fire extinguisher is properly charged and securely mounted.Note: If the vehicle is not equipped with electrical fuses, you must mention this to the examiner.
Wipers/WashersCheck that wiper arms and blades are secure, not damaged, and operate smoothly.If equipped, windshield washers must operate correctly.
Lights/Reflectors/Reflector Tape Condition (Sides & Rear)Test that dash indicators work when corresponding lights are turned on:Left turn signal.Right turn signal.Four-way emergency flashers.High beam headlight.Anti-lock Braking System (ABS) indicator.Check that all external lights and reflective equipment are clean and functional and none or broken or missing. Light and reflector checks include verification of correct color:Clearance lights (red on rear, amber elsewhere).Headlights (high and low beams).Taillights.Backing lights.Turn signals.Four-way flashers.Brake lights.Red reflectors (on rear) and amber reflectors (elsewhere).Reflector tape conditionNote: Checks of brake, turn signal and four-way flasher functions must be done separately.
HornCheck that air horn and/or electric horn work.
Heater/DefrosterTest that the heater and defroster work.
Parking Brake CheckWith air pressure built to governor cutout and the parking brake engaged (trailer brakes released on combination vehicles), check that the parking brake will hold vehicle by gently trying to pull forward with parking brake on.With air pressure built to governor cutout, the parking brake released and the trailer parking brake engaged (combination vehicles only), check that the trailer parking brake will hold vehicle by gently trying to pull forward with the trailer parking brake on.
Hydraulic Brake CheckFailure to perform both components of the hydraulic brake check will result in an automatic failure of the vehicle inspection test.1. Pump the brake pedal three times, then hold it down
for five seconds. The brake pedal should not move(depress) during the five seconds.
2. If equipped with a hydraulic brake reserve (back-up)system, with the key off, depress the brake pedal andlisten for the sound of the reserve system electric motor.
3. Check that the warning buzzer or light is off.
Air Brake Check (Air Brake Equipped Vehicles Only)Failure to perform all three components of the air brake check correctly will result in an automatic failure of the vehicle inspection test. Air brake safety devices vary. However, this procedure is designed to see that any safety device operates correctly as air pressure drops from normal to a low air condition. For safety purposes, in areas where an incline is present, you will use wheel chocks during the air brake check. The proper procedures for inspecting the air brake system are as follows:1. With the air pressure built up to governor cutoff (120
– 140 psi), shut off the engine leaving the key in the“on” or “battery charge” position, chock your wheels ifnecessary, release the parking brake (all vehicles), andthe tractor protection valve (combination vehicle) andfully apply the foot brake. Hold the foot brake for oneminute. Check the air gauge to see if the air pressuredrops more than three pounds in one minute (singlevehicle) or four pounds in one minute (combinationvehicle).
2. Begin fanning off the air pressure by rapidly applyingand releasing the foot brake. Low air warningdevices (buzzer, light, flag) should activate before airpressure drops below 55 psi or level specified by themanufacturer.
Commercial Driver’s License Manual - 2018 CDL Testing System
Section 11 - Vehicle Inspection Page 121 (03/08/19)
3. Continue to fan off the air pressure. At a range between20 – 45 psi on a tractor-trailer combination vehicle(or level specified by the manufacturer), the tractorprotection valve and parking brake valve should close(pop out). On other combination vehicle types andsingle vehicle types, the parking brake valve shouldclose (pop out).
Service Brake CheckYou will be required to check the application of air or hydraulic service brakes. This procedure is designed to determine that the brakes are working correctly and that the vehicle does not pull to one side or the other.Pull forward at 5 mph, apply the service brake and stop. Check to see that the vehicle does not pull to either side and that it stops when brake is applied.Safety BeltCheck that the safety belt is securely mounted, adjusts, latches properly and is not ripped or frayed.
11.2 – External Inspection (All Vehicles)
11.2.1– Steering
Steering Box/HosesCheck that the steering box is securely mounted and not leaking. Look for any missing nuts and/or bolts.Check for power steering fluid leaks or damage to power steering hoses.
Steering LinkageSee that connecting links, arms, and rods from the steering box to the wheel are not worn or cracked.Check that joints and sockets are not worn or loose and that there are no missing nuts or bolts.
11.2.2 – Suspension
Springs/Air/TorqueLook for missing, shifted, cracked, or broken leaf springs.Look for broken or distorted coil springs.If vehicle is equipped with torsion bars, torque arms, or other types of suspension components, check that they are not damaged and are mounted securely.Air ride suspension should be checked for damage and leaks.
MountsLook for cracked or broken spring hangers, missing or damaged bushings, and broken, loose, or missing bolts, u-bolts or other axle mounting parts. (The mounts shouldbe checked at each point where they are secured to thevehicle frame and axle[s]).
Shock AbsorbersSee that shock absorbers are secure and that there are no leaks.Note: Be prepared to perform the same suspension components inspection on every axle (power unit and trailer, if equipped).
11.2.3 – Brakes
Slack Adjustors and PushrodsLook for broken, loose, or missing parts.For manual slack adjustors, the brake pushrod should not move more than one inch (with the brakes released) when pulled by hand.
Brake ChambersSee that brake chambers are not leaking, cracked, or dented and are mounted securely. There are no loose or missing clamps.
Brake Hoses/LinesLook for cracked, worn, or leaking hoses, lines, and couplings.
Drum BrakeCheck for cracks, dents, or holes. Also check for loose or missing bolts.Check for contaminates such as debris or oil/grease.Brake linings (where visible) should not be worn dangerously thin.
Brake LiningsOn some brake drums, there are openings where the brake linings can be seen from outside the drum. For this type of drum, check that a visible amount of brake lining is showing.Note: Be prepared to perform the same brake components inspection on every axle (power unit and trailer, if equipped).
11.2.4 – Wheels
RimsCheck for damaged or bent rims. Rims cannot have welding repairs. Check rims for rust trails that may indicate the rim is loose on the wheel.
TiresThe following items must be inspected on every tire:Tread depth: Check for minimum tread depth (4/32 on steering axle tires, 2/32 on all other tires).Tire condition: Check that tread is evenly worn and look for cuts or other damage to tread or sidewalls. Also, make
Commercial Driver’s License Manual - 2018 CDL Testing System
Page 122 Section 11 - Vehicle Inspection (03/08/19)
sure that valve caps and stems are not missing, broken, or damaged.Tire inflation: Check for proper inflation by using a tire gauge. Note: You will not get credit if you simply kick the tires or use a mallet to check for proper inflation.
Hub Oil Seals/Axle SealsSee that hub oil/grease seals and axle seals are not leaking and, if wheel has a sight glass, oil level is adequate.
Lug NutsCheck that all lug nuts are present, free of cracks and distortions, and show no signs of looseness such as rust trails or shiny threads.Make sure all bolt holes are not cracked or distorted.
Spacers or Budd SpacingIf equipped, check that spacers are not bent, damaged, or rusted through; and are centered with dual wheels and tires evenly separated..Check the space between the tires for debris and/or foreign objects.Note: Be prepared to perform the same wheel inspection on every axle (power unit and trailer, if equipped).
11.2.5 – Side of Vehicle
Door(s)/Mirror(s)Check that door(s) are not damaged and that they open and close properly from the outside.Hinges should be secure with seals intact.Check that mirror(s) and mirror brackets are not damaged and are mounted securely with no loose fittings.
Fuel TankCheck that tank(s) are secure, cap(s) are tight, and that there are no leaks from tank(s) or lines.
Drive ShaftSee that drive shaft is not bent or cracked.Couplings should be secure and free of foreign objects.
Exhaust SystemCheck system for damage and signs of leaks such as rust or carbon soot. Exhaust system should not have cracks, holes or severe dentsSystem should be connected tightly and mounted securely.If equipped with emissions after-treatment equipment:Checks DEF tank to ensure the level of diesel exhaust fluid in the tank is adequate (more than 1/8th tank)
Checks that DEF indicator on the dash is working properly
FrameLook for cracks, broken welds, holes or other damage to the longitudinal frame members, cross members, box, and floor.
11.2.6 – Rear of VehicleSplash GuardsIf equipped, check that splash guards or mud flaps are not damaged and are mounted securely.
Doors/Ties/LiftsCheck that doors and hinges are not damaged and that they open, close, and latch properly from the outside, if equipped.Ties, straps, chains, and binders must also be secure.If equipped with a cargo lift, look for leaking, damaged or missing parts and explain how it should be checked for correct operation.Lift must be fully retracted and latched securely.
11.2.7 – Tractor/CouplingAir/Electric LinesListen for air leaks. Check that air hoses and electrical lines are not cut, chafed, spliced, or worn (steel braid should not show through).Make sure air and electrical lines are not tangled, pinched, or dragging against tractor parts.
Catwalk/StepsCheck that the catwalk is solid, clear of objects, and securely bolted to tractor frame.Check that steps leading to the cab entry and catwalk (if equipped) are solid, clear of objects, and securely bolted to tractor frame.
Mounting BoltsLook for loose or missing mounting brackets, clamps, bolts, or nuts. Both the fifth wheel and the slide mounting must be solidly attached.Check for loose or missing mounting bolts and for broken welds for pintle hook or other type of hitch mount, and tongue/draw-bar assembly to ensure that they are solidly attached in place.On other types of coupling systems (i.e., ball hitch, pintle hook, etc.), inspect all coupling components and mounting brackets for missing or broken parts.
Hitch Release LeverCheck to see that the hitch release lever is in place and is secure.
Commercial Driver’s License Manual - 2018 CDL Testing System
Section 11 - Vehicle Inspection Page 123 (03/08/19)
Locking JawsLook into fifth wheel gap and check that locking jaws are fully closed around the kingpin.On other types of coupling systems (i.e., ball hitch, pintle hook, etc.), inspect the locking mechanism for missing or broken parts and make sure it is locked securely. If present, safety cables or chains must be secure and free of kinks and excessive slack.
5th Wheel Skid PlateCheck for proper lubrication and that 5th wheel skid plate is securely mounted to the platform and that all bolts and pins are secure and not missing.
Platform (Fifth Wheel)Check for cracks or breaks in the platform structure which supports the fifth wheel skid plate.
Release Arm (Fifth Wheel)If equipped, make sure the release arm is in the engaged position and the safety latch is in place.
Kingpin/Apron/GapExplain that locking jaws holds kingpin in place and that the kingpin is not bent or damagedMake sure the visible part of the apron is not bent, cracked, or broken.Check that the trailer is lying flat on the fifth wheel skid plate (no gap).Check for kingpin lock.
Locking Pins (Fifth Wheel)If equipped, look for loose or missing pins in the slide mechanism of the sliding fifth wheel. If air powered, check for leaks.Make sure locking pins are fully engaged.Check that the fifth wheel is positioned properly so that the tractor frame will clear the landing gear during turns.
Sliding PintleCheck the sliding pintle hook for excessive wear and to ensure it is secure with no loose or missing nuts or bolts and cotter pin is in place.
Tongue or Draw-barCheck that the tongue/draw-bar is not bent or twisted and checks for broken welds and stress cracks.Check that the tongue/draw-bar eye is not worn excessively.
Tongue Storage AreaCheck that the storage area is solid and secured to the
tongue.Check that cargo in the storage area i.e. chains, binders, etc. are secure.
11.3 – School Bus Only
Emergency EquipmentIn addition to checking for spare electrical fuses (if equipped), three red reflective triangles, 6 fusees or 3 liquid burning flares and a properly charged and rated fire extinguisher, school bus drivers must also inspect the following emergency equipment:Emergency KitBody Fluid Cleanup Kit
Lighting IndicatorsIn addition to checking the lighting indicators listed in Section 10.2 of this manual, school bus drivers must also check the following lighting indicators (internal panel lights):Alternately flashing amber lights indicator, if equipped.Alternately flashing red lights indicator.Strobe light indicator, if equipped.
Lights/ReflectorsIn addition to checking the lights and reflective devices listed in Section 10.2 of this manual, school bus drivers must also check the following (external) lights and reflectors:Strobe light, if equipped is operational and is not broken.Stop arm light, if equipped.Alternately flashing amber lights, if equipped are operational and not broken.Alternately flashing red lights, on both the front and back of the vehicle are operational and not broken..
Student MirrorsIn addition to checking the external mirrors, school bus drivers must also check the internal and external mirrors used for observing students:Check for proper adjustment.Checks that all internal and external mirrors and mirror brackets are not damaged and are mounted securely with no loose fittings.Checks that visibility is not impaired due to dirty mirrors.
Stop Arm/Safety ArmIf equipped, check the stop arm to see that it is mounted securely to the frame of the vehicle. Also, check for loose fittings and damage. Checks that stop arm extends fully when operated
Commercial Driver’s License Manual - 2018 CDL Testing System
Page 124 Section 11 - Vehicle Inspection (03/08/19)
Passenger Entry/LiftCheck that the entry door is not damaged, operates smoothly, and closes securely from the inside.Hand rails are secure and the step light is working, if equipped.The entry steps must be clear with the treads not loose or worn excessively.If equipped with a handicap lift, look for leaking, damaged, or missing parts and explain how lift should be checked for correct operation. Lift must be fully retracted and latched securely.
Emergency ExitDemonstrate that at least one emergency exit is not damaged, operates smoothly, and closes securely from the inside.Check that release handle can be operated properly from both inside and outside the vehicle.Point out and describe how all other emergency exits operateCheck that any emergency exit warning devices are working properly.SeatingLook for broken seat frames and check that seat frames are firmly attached to the floor.Check that seat cushions are attached securely to the seat frames.
11.4 – Trailer
11.4.1 – Trailer Front
Air/Electrical ConnectionsCheck that trailer air connectors are sealed and in good condition.Make sure glad hands are locked in place, free of damage or air leaks.Make sure the trailer electrical plug is firmly seated and locked in place.
Header BoardIf equipped, check the header board to see that it is secure, free of damage, and strong enough to contain cargo.If equipped, the canvas or tarp carrier must be mounted and fastened securely.On enclosed trailers, check the front area for signs of damage such as cracks, bulges, or holes.
11.4.2 – Side of Trailer
Landing GearCheck that the landing gear is fully raised, has no missing parts, crank handle is secure, and the support frame and
landing pads are not damaged.If power operated, check for air or hydraulic leaks.
Doors/Ties/LiftsIf equipped, check that doors are not damaged. Check that doors open, close, and latch properly from the outside.Check that ties, straps, chains, and binders are secure.If equipped with a cargo lift, look for leaking, damaged or missing parts and explain how it should be checked for correct operation.Lift should be fully retracted and latched securely.
FrameLook for cracks, broken welds, holes or other damage to the frame, cross members, box, and floor.Tandem Release Arm/Locking PinsIf equipped, make sure the locking pins are locked in place and release arm is secured.
11.4.3 – Remainder of Trailer
Remainder of TrailerPlease refer to Section 11.2 of this manual for detailed inspection procedures regarding the following components:Wheels.Suspension system.Brakes.Doors/ties/lift.Splash guards.
11.5 – Coach/Transit Bus
11.5.1 – Passenger Items
Passenger Entry/LiftCheck that entry doors operate smoothly and close securely from the inside.Check that hand rails are secure and, if equipped, that the step light(s) are working.Check that the entry steps are clear, with the treads not loose or worn excessively.If equipped with a handicap lift, look for any leaking, damaged or missing part, and explain how it should be checked for correct operation.Lift should be fully retracted and latched securely.
Emergency ExitsMake sure that all emergency exits are not damaged, operate smoothly, and close securely from the inside.
Commercial Driver’s License Manual - 2018 CDL Testing System
Section 11 - Vehicle Inspection Page 125 (03/08/19)
Check that any emergency exit warning devices are working.Passenger SeatingLook for broken seat frames and check that seat frames are firmly attached to the floor.Check that seat cushions are attached securely to the seat frames.
11.5.2 – Entry/ ExitDoors/MirrorsCheck that entry/exit doors are not damaged and operate smoothly from the outside. Hinges should be secure with seals intact.Make sure that the passenger exit mirrors and all external mirrors and mirror brackets are not damaged and are mounted securely with no loose fittings.
11.5.3 – External Inspection of Coach/ Transit Bus
Level/Air LeaksSee that the vehicle is sitting level (front and rear), and if air-equipped, check for audible air leaks from the suspension system.
Fuel Tank(s)See that fuel tank(s) are secure with no leaks from tank(s) or lines.
Baggage CompartmentsCheck that baggage and all other exterior compartment doors are not damaged, operate properly, and latch securely.
Battery/BoxWherever located, see that battery(s) are secure, connections are tight, and cell caps are present.Battery connections should not show signs of excessive corrosion.Check that battery box and cover or door is not damaged and is secure.
11.5.4 – Remainder of Coach/ Transit BusRemainder of VehiclePlease refer to Section 11.2 of this manual for detailed inspection procedures for the remainder of the vehicle.Remember, the Vehicle Inspection must be passed before you can proceed to the Basic Control Skills test.
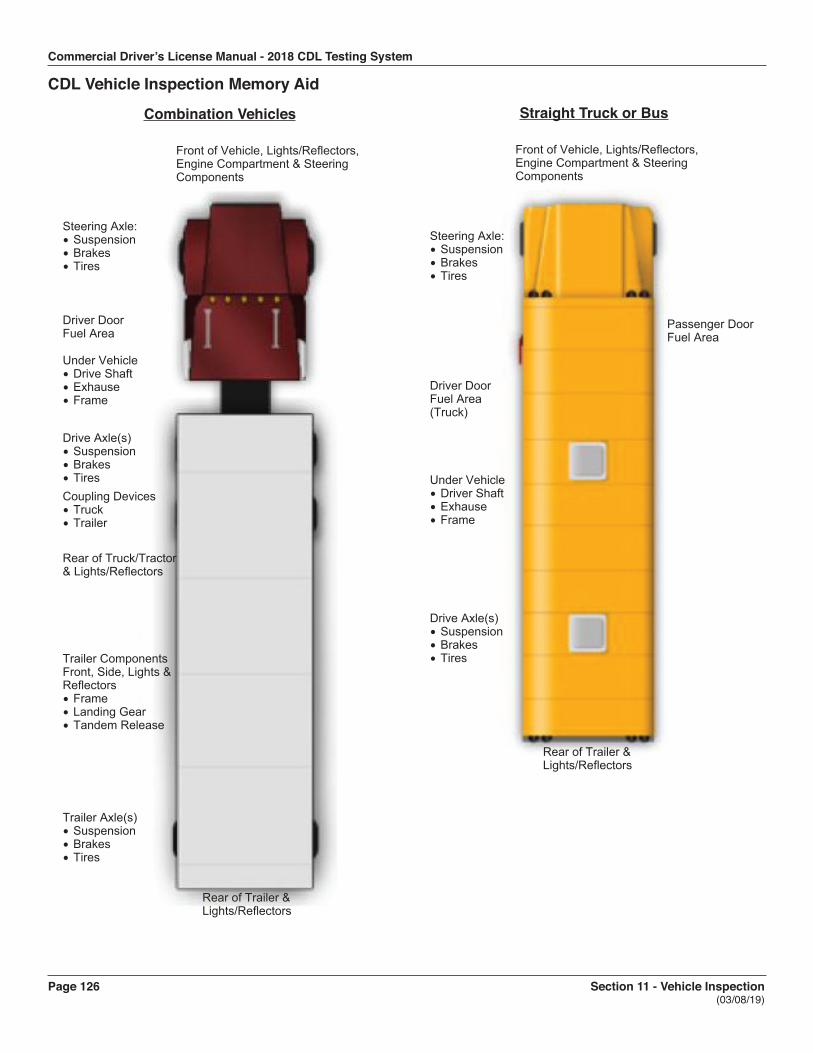
Commercial Driver’s License Manual - 2018 CDL Testing System
Page 126 Section 11 - Vehicle Inspection (03/08/19)
CDL Vehicle Inspection Memory Aid
Combination Vehicles
Front of Vehicle, Lights/Reflectors, Engine Compartment & Steering Components
Steering Axle:• Suspension• Brakes• Tires
Under Vehicle• Drive Shaft• Exhause• Frame
Drive Axle(s)• Suspension• Brakes• Tires
Trailer Components Front, Side, Lights & Reflectors• Frame• Landing Gear• Tandem Release
Trailer Axle(s)• Suspension• Brakes• Tires
Rear of Trailer & Lights/Reflectors
Coupling Devices• Truck• Trailer
Rear of Truck/Tractor& Lights/Reflectors
Driver DoorFuel Area
Straight Truck or Bus
Front of Vehicle, Lights/Reflectors, Engine Compartment & Steering Components
Steering Axle:• Suspension• Brakes• Tires
Passenger Door Fuel Area
Under Vehicle• Driver Shaft• Exhause• Frame
Drive Axle(s)• Suspension• Brakes• Tires
Rear of Trailer & Lights/Reflectors
Driver DoorFuel Area(Truck)
Commercial Driver’s License Manual - 2018 CDL Testing System
Section 12 - Basic Vehicle Control Skills Test Page 127 (03/08/19)
Section 12
BASIC VEHICLE CONTROL SKILLS TEST
This Section Covers● Skills Test Scoring● Skills Test ExercisesYour basic control skills could be tested using one or more of the following exercises off-road or somewhere on the street during the road test:Straight line backing.Offset back/rightOffset back/leftParallel park (driver side).Parallel park (conventional).Alley dock.These exercises are shown in Figures 12-1 through 12-6.
12.1 ScoringCrossing Boundaries (encroachments)Pull-upsOutside Vehicle Observations (looks)Final Position/Inside ParallelEncroachments – The examiner will score the number of times you touch or cross over an exercise boundary line or cone with any portion of your vehicle. Each encroachment will count as an error.Pull-ups – When a driver stops and pulls forward to clear an encroachment or to get a better position, it is scored as a “pull-up”. Stopping without changing direction does not count as a pull-up. You will not be penalized for initial pull-ups. However, an excessive number of pull-ups, will count as errors.Outside Vehicle Observations (Looks) – You may be permitted to safely stop and exit the vehicle to check the external position of the vehicle (look). When doing so, you must place the vehicle in neutral and set the parking brake(s). Then, when exiting the vehicle, you must do so safely by facing the vehicle and maintaining three points of contact with the vehicle at all times (when exiting a bus, maintain a firm grasp on the handrail at all times). If you do not safely secure the vehicle or safely exit the vehicle it may result in an automatic failure of the basic control skills test.The maximum number of times that you may look to check the position of you vehicle is two (2) except for the Straight
Line Backing exercise, which allows one look. Each time you open the door, move from a seated position where in physical control of the vehicle or on a bus walk to the back of a bus to get a better view, it is scored as a “look”.Final Position/Inside Parallel – It is important that you finish each exercise exactly as the examiner has instructed you. If you do not maneuver the vehicle into its final position as described by the examiner, you will be penalized and could fail the basic skills test.
12.2 Exercises
12.2.1 – Straight Line BackingYou may be asked to back your vehicle in a straight line between two rows of cones without touching or crossing over the exercise boundaries. (See Figure 12.1.)
12.2.2 – Offset Back/RightYou may be asked to back into a space that is to the right rear of your vehicle. You will drive straight forward the outer boundary. From that position you must back the vehicle into the opposite lane until the front of your vehicle has passed the first set of cones without striking boundary lines or cones. (See Figure 12.2)
12.2.3 – Offset Back/LeftYou may be asked to back into a space that is to the left rear of your vehicle. You will drive straight forward the outer boundary. From that position, you must back the vehicle into the opposite lane until the front of your vehicle has passed the first set of cones without striking boundary lines or cones. (See Figure 12.3)
12.2.4 – Parallel Park (Driver Side)You may be asked to park in a parallel parking space that is on your left. You are to drive past the entrance to the parallel parking space with your vehicle parallel to the parking area; and back into the space without crossing front, side or rear boundaries marked by cones. You are required to get your entire vehicle completely into the space. (See Figure 12.4)
12.2.5 – Parallel Park (Conventional)You may be asked to park in a parallel parking space that is on your right. You are to drive past the entrance to the parallel parking space with your vehicle parallel to the parking area; and back into the space without crossing front, side or rear boundaries marked by cones. You are required to get your entire vehicle completely into the space. (See Figure 12.5)
12.2.6 – Alley DockYou may be asked to sight-side back your vehicle into an alley. You will drive past the alley and position your vehicle parallel to the outer boundary. From that position, back into
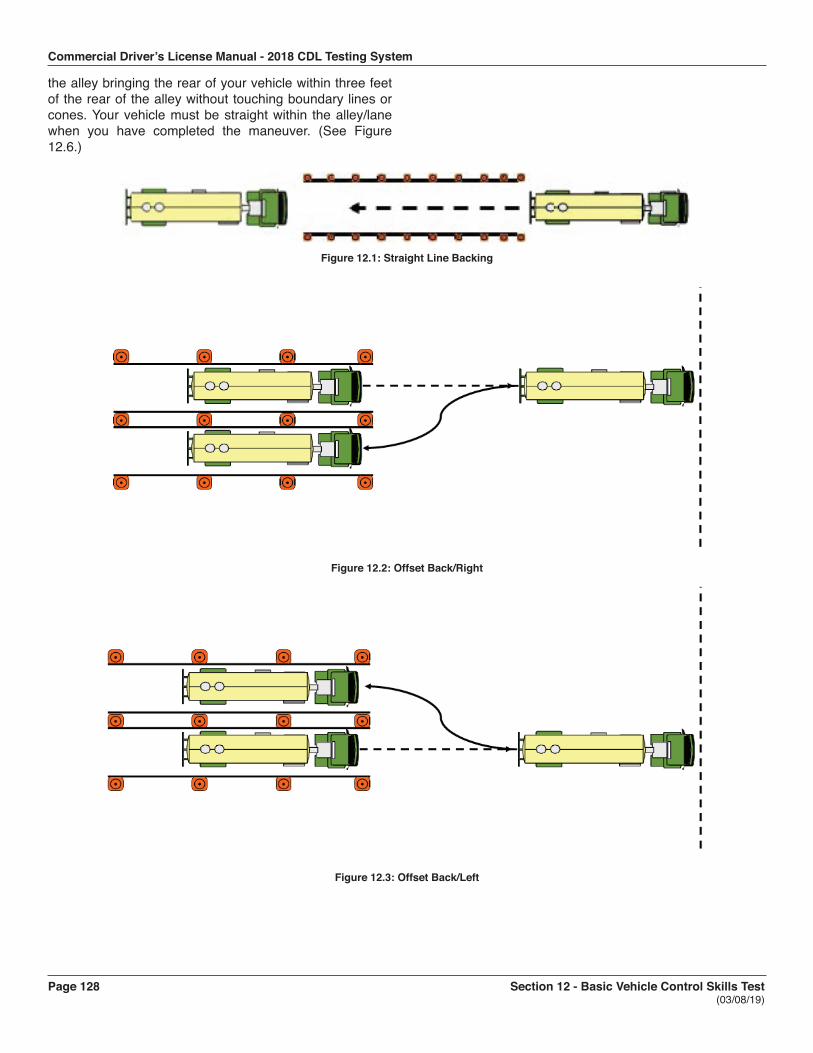
Commercial Driver’s License Manual - 2018 CDL Testing System
Page 128 Section 12 - Basic Vehicle Control Skills Test (03/08/19)
the alley bringing the rear of your vehicle within three feet of the rear of the alley without touching boundary lines or cones. Your vehicle must be straight within the alley/lane when you have completed the maneuver. (See Figure 12.6.)
Figure 12.1: Straight Line Backing
Figure 12.2: Offset Back/Right
Figure 12.3: Offset Back/Left
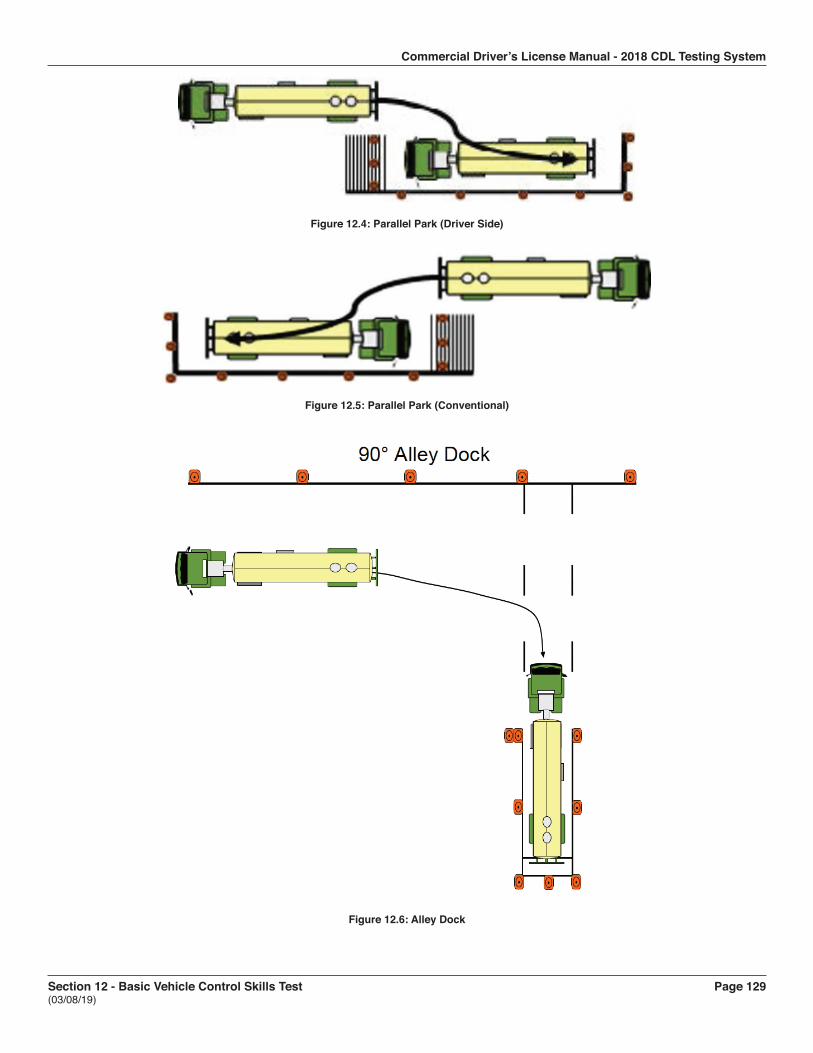
Commercial Driver’s License Manual - 2018 CDL Testing System
Section 12 - Basic Vehicle Control Skills Test Page 129 (03/08/19)
Figure 12.4: Parallel Park (Driver Side)
Figure 12.5: Parallel Park (Conventional)
Figure 12.6: Alley Dock
Commercial Driver’s License Manual - 2018 CDL Testing System
Page 130 Section 13 - On-Road Driving (03/08/19)
Section 13
ON-ROAD DRIVINGThis Section Covers● How You Will Be TestedYou will drive over a test route that has a variety of traffic situations. At all times during the test, you must drive in a safe and responsible manner; and you must:Wear your safety belt.Obey all traffic signs, signals, and laws.Complete the test without an accident or moving violation.During the driving test, the examiner will be scoring you on specific driving maneuvers as well as on your general driving behavior. You will follow the directions of the examiner. Directions will be given to you so you will have plenty of time to do what the examiner has asked. You will not be asked to drive in an unsafe manner.If your test route does not have certain traffic situations, you may be asked to simulate a traffic situation. You will do this by telling the examiner what you are or would be doing if you were in that traffic situation.
13.1 – How You Will Be Tested
13.1.1 – TurnsYou have been asked to make a turn:Check traffic in all directions.Use turn signals and safely get into the lane needed for the turn.As you approach the turn:Use turn signals to warn others of your turn.Slow down smoothly, change gears as needed to keep power, but do not coast unsafely. Unsafe coasting occurs when your vehicle is out of gear (clutch depressed or gearshift in neutral) for more than the length of your vehicle.If you must stop before making the turn:Come to a smooth stop without skidding.Come to a complete stop behind the stop line, crosswalk, or stop sign.If stopping behind another vehicle, stop where you can see the rear tires on the vehicle ahead of you (safe gap).Do not let your vehicle roll.Keep the front wheels aimed straight ahead.When ready to turn:Check traffic in all directions.
Keep both hands on the steering wheel during the turn.Keep checking your mirror to make sure the vehicle does not hit anything on the inside of the turn.Vehicle should not move into oncoming traffic.Vehicle should finish turn in correct lane.After turn:Make sure turn signal is off.Get up to speed of traffic, use turn signal, and move into right-most lane when safe to do so (if not already there).Check mirrors and traffic.
13.1.2 – IntersectionsAs you approach an intersection:Check traffic thoroughly in all directions.Decelerate gently.Brake smoothly and, if necessary, change gears.If necessary, come to a complete stop (no coasting) behind any stop signs, signals, sidewalks, or stop lines maintaining a safe gap behind any vehicle in front of you.Your vehicle must not roll forward or backward.When driving through an intersection:Check traffic thoroughly in all directions.Decelerate and yield to any pedestrians and traffic in the intersection.Do not change lanes while proceeding through the intersection.Keep your hands on the wheel.Once through the intersection:Continue checking mirrors and traffic.Accelerate smoothly and change gears as necessary.
13.1.3 – Urban BusinessDuring this part of the test, you are expected to make regular traffic checks and maintain a safe following distance. Your vehicle should be centered in the proper lane (right-most lane) and you should keep up with the flow of traffic but not exceed the posted speed limit.
13.1.4 –Lane ChangesDuring multiple lane portions of the test, you will be asked to change lanes to the left, and then back to the right. You should make the necessary traffic checks first, then use proper signals and smoothly change lanes when it is safe to do so.
13.1.5 – Expressway or Rural/Limited Access Highway
Commercial Driver’s License Manual - 2018 CDL Testing System
Section 13 - On-Road Driving Page 131 (03/08/19)
Before entering the expressway:Check traffic.Use proper signals.Merge smoothly into the proper lane of traffic.Once on the expressway:Maintain proper lane positioning, vehicle spacing, and vehicle speed.Continue to check traffic thoroughly in all directions.When exiting the expressway:Make necessary traffic checks.Use proper signals.Decelerate smoothly in the exit lane.Once on the exit ramp, you must continue to decelerate within the lane markings and maintain adequate spacing between your vehicle and other vehicles.
13.1.6 – Stop/StartFor this maneuver, you will be asked to pull your vehicle over to the side of the road and stop as if you were going to get out and check something on your vehicle. You must check traffic thoroughly in all directions and move to the right-most lane or shoulder of road.As you prepare for the stop:Check traffic.Activate your right turn signal.Decelerate smoothly, brake evenly, change gears as necessary.Bring your vehicle to a full stop without coasting.Once stopped:Vehicle must be parallel to the curb or shoulder of the road and safely out of the traffic flow.Vehicle should not be blocking driveways, fire hydrants, intersections, signs, etc.Cancel your turn signal.Activate your four-way emergency flashers.Apply the parking brake.Move the gear shift to neutral or park.Remove your feet from the brake and clutch pedals.When instructed to resume:Check traffic and your mirrors thoroughly in all directions.Turn off your four-way flashers.Activate the left turn signal.When traffic permits, you should release the parking brake and pull straight ahead.
Do not turn the wheel before your vehicle moves.Check traffic from all directions, especially to the left.Steer and accelerate smoothly into the proper lane when safe to do so.Once your vehicle is back into the flow of traffic, cancel your left turn signal.
13.1.7 – CurveWhen approaching a curve:Check traffic thoroughly in all directions.Before entering the curve, reduce speed so further braking or shifting is not required in the curve.Keep vehicle in the lane.Continue checking traffic in all directions.
13.1.8 – Railroad CrossingBefore reaching the crossing, all commercial drivers should:Decelerate, brake smoothly, and shift gears as necessary.Look and listen for the presence of trains.Check traffic in all directions.Do not stop, change gears, pass another vehicle, or change lanes while any part of your vehicle is in the crossing.If you are driving a bus, a school bus, or a vehicle displaying placards, you should be prepared to observe the following procedures at every railroad crossing (unless the crossing is exempt):As the vehicle approaches a railroad crossing, activate the four-way flashers.Stop the vehicle within 50 feet but not less than 15 feet from the nearest rail.Listen and look in both directions along the track for an approaching train and for signals indicating the approach of a train. If operating a bus, you may also be required to open the window and door prior to crossing tracks.Keep hands on the steering wheel as the vehicle crosses the tracks.Do not stop, change gears, or change lanes while any part of your vehicle is proceeding across the tracks.Four-way flashers should be deactivated after the vehicle crosses the tracks.Continue to check mirrors and traffic.Not all driving road test routes will have a railroad crossing. You may be asked to explain and demonstrate the proper railroad crossing procedures to the examiner at a simulated location.
13.1.9 – Bridge/Overpass/SignAfter driving under an overpass, you may be asked to tell
Commercial Driver’s License Manual - 2018 CDL Testing System
Page 132 Section 13 - On-Road Driving (03/08/19)
the examiner what the posted clearance or height was. After going over a bridge, you may be asked to tell the examiner what the posted weight limit was. If your test route does not have a bridge or overpass, you may be asked about another traffic sign. When asked, be prepared to identify and explain to the examiner any traffic sign which may appear on the route.
13.1.10 – Student Discharge (School Bus)If you are applying for a School Bus endorsement, you will be required to demonstrate a student discharge. Please refer to section 10 of this manual.As you approach the student pick up, you must:Decelerate and approach at a slow rate of speed while continuing to check traffic.Activate amber warning lights and right turn signals.Move as far as possible to the right on the traveled portion of the roadway.Recheck traffic.As you stop for the student discharge, you must:Bring school bus to a complete stop at least 10’ away from students at the stop.Place the transmission in neutral/park and set the parking brake.Activate the stop arm and red warning lights.When discharging students, you must:Communicate to students.Check traffic.Open the student door.Check for students.When students are crossing, you must:Check traffic.Communicate to students.Check for students.When resuming from the student discharge, you must:Check all mirrors.Turn off warning lights and stop arm.Close the doorCheck traffic.Accelerate away from the stop area.
13.1.11 – General Driving BehaviorsYou will be scored on your overall performance in the following general driving behavior categories:
13.1.11(a) – Clutch Usage (for Manual Transmission)Always use clutch to shift.
If equipped with an unsynchronized manual transmission, you must double-clutch when shifting. Do not rev or lug the engine.Do not ride clutch to control speed, coast with the clutch depressed, or "pop" the clutch.
13.1.12(b) – Gear Usage (for Manual Transmission)Do not grind or clash gears.Select gear that does not rev or lug engine.Do not shift in turns and intersections.
13.1.13(c) – Brake UsageDo not ride or pump brake.Do not brake harshly. Brake smoothly using steady pressure.
13.1.14(d) – Lane UsageDo not put vehicle over curbs, sidewalks, or lane markings.Stop behind stop lines, crosswalks, or stop signs.Complete a turn in the proper lane on a multiple lane road (vehicle should finish a left turn in the lane directly to the right of the center line).Finish a right turn in the right-most (curb) lane.Move to or remain in right-most lane unless lane is blocked.
13.1.15 – SteeringDo not over or under steer the vehicle.Keep both hands on the steering wheel at all times unless shifting. Once you have completed shift, return both hands to the steering wheel.
13.1.16 – Regular Traffic ChecksCheck traffic regularly.Check mirrors regularly.Check mirrors and traffic before, while in and after an intersection.Scan and check traffic in high volume areas and areas where pedestrians are expected to be present.
13.1.17 – Use of Turn SignalsUse turn signals properly.Activate turn signals when required.Activate turn signals at appropriate times.Cancel turn signals upon completion of a turn or lane change.

Commercial Driver’s License Manual - 2018 CDL Testing System
(03/08/19) Page 133
ENTRY LEVEL DRIVER TRAINING (ELDT)Mandatory, comprehensive training in all 50 states, the District of Columbia, and all U.S. territories would apply to the following individuals under the final rule.● First-time CDL applicants including:
● Class A CDLs● Class B CDLs
● Current CDL holders seeking a license upgrade (e.g.a Class B CDL holder seeking a Class A CDL) oran additional endorsement necessary to transporthazardous materials, or to operate a motor coach orschool bus.
FMCSA believes that many entities currently providing entry-level driver training, including motor carriers, school districts, independent training schools, and individuals will be eligible to provide training that complies with the new requirements.There are drivers that are not subject to this rule. For example, military drivers, farmers, and firefighters who are excepted from the Federal CDL requirements are not subject to this Final Rule.TRAINING REQUIREMENTS:This rule applies to all entry-level drivers who intend to drive CMVs in interstate or intrastate commerce, except:● Drivers excepted from the CDL requirements under
383.3 (c), (d), and (h).● Drivers applying for a restricted CDL under 393.3 (e)
through (g).● Veterans with military CMV experience who meet all
the requirements and conditions of 383.77; and● Drivers applying for a removal of a restriction in
accordance with 383.135 (b) (7).● Drivers who hold a valid Class A or Class B CDL, or a
passenger (P), school bus (S), or hazardous materials(H) endorsement, issued before February 7, 2020 arenot required to comply with this subpart pertaining tothat CDL endorsement.
● Individuals who obtain a CLP before February 7,2020 are not required to comply with this subpart ifthey obtain a CDL before their CLP or renewed CLPexpires.
● Individuals who obtain a CLP on or after February 7,2020 are required to comply with this subpart.
● Except for individuals seeking the H endorsement,individuals must complete the theory and BTW (range
and public road) portions of entry-level driver training within one year of completing the first portion.
Entry-level driver training means an entry-level driver receives training from an entity listed on FMCSA's Training Provider Registry prior to:● Taking the CDL skills test required to receive the Class
A or Class B CDL for the first time● Taking the CDL skills test required to upgrade to a
Class A or Class B CDL; or● Taking the CDL skills test required to obtain a
passenger and/or school bus endorsement for the firsttime and the CDL knowledge test required to obtain ahazardous materials endorsement for the first time
Notes

Commercial Driver’s License Manual - 2018 CDL Testing System
Page 134 (03/08/19)
Notes

Commercial Driver’s License Manual - 2018 CDL Testing System
(03/08/19) Page 135
Notes


Section E
Executive Orders
604
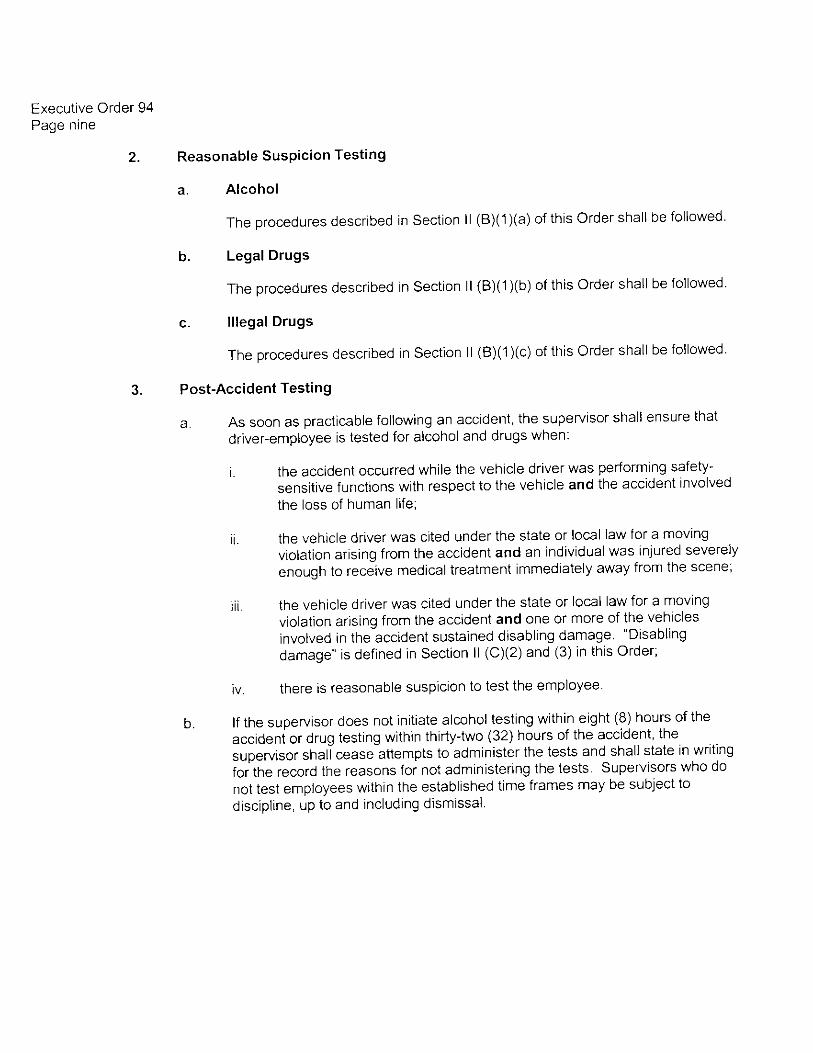
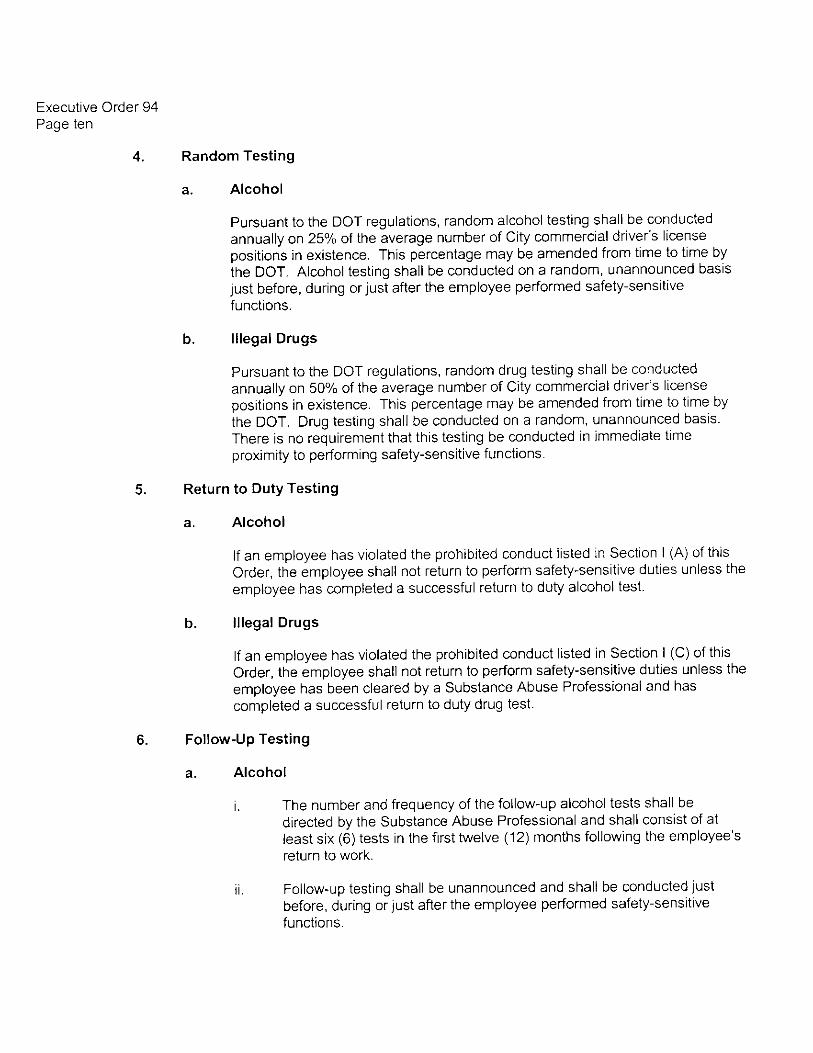
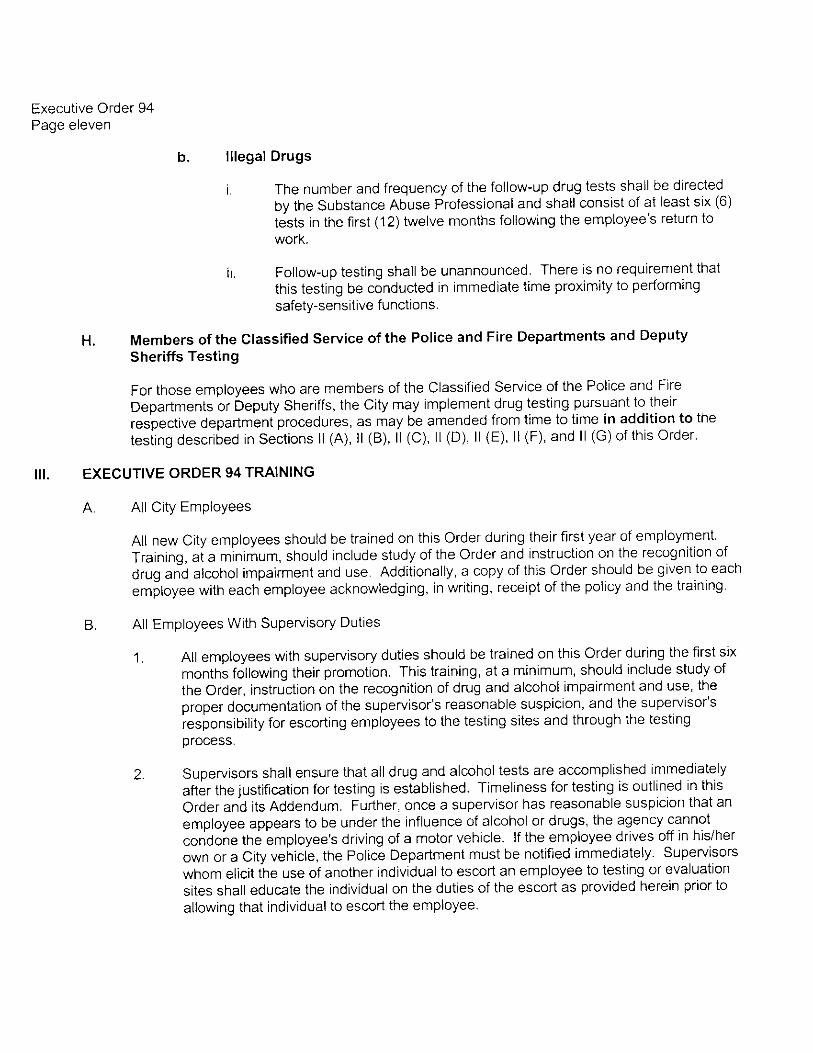
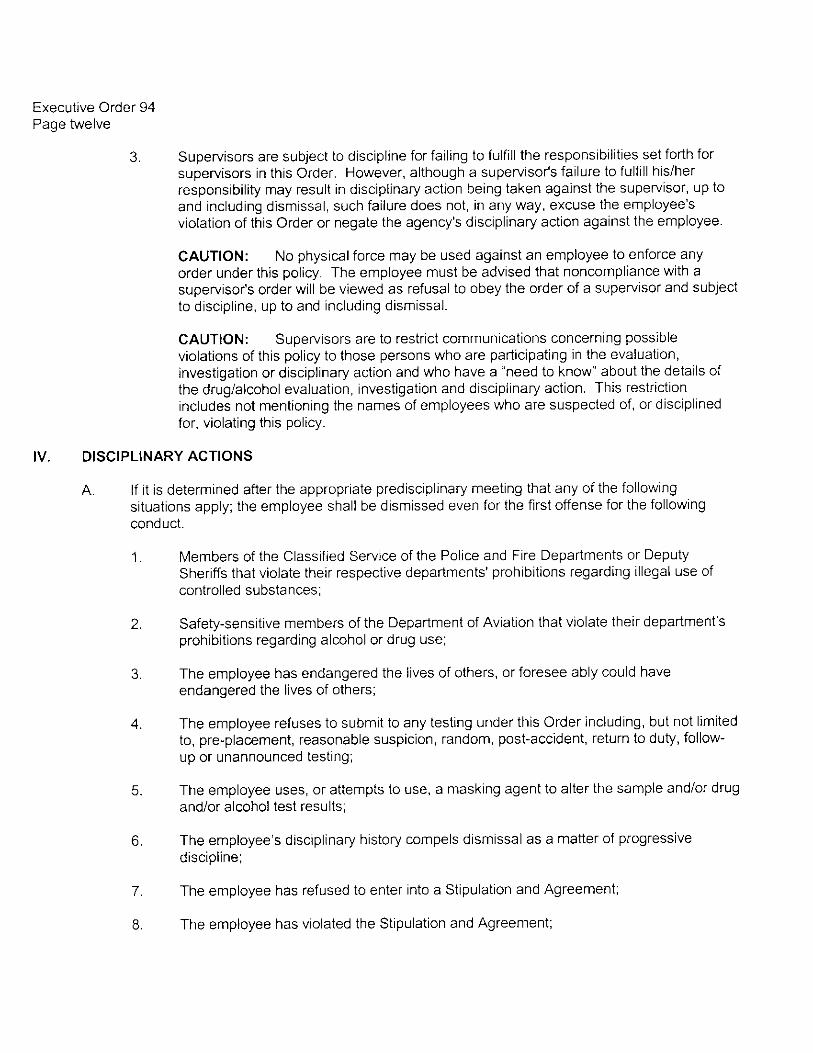
Department of Safety: Overview of XO 16
Acceptable Technology Use Policies
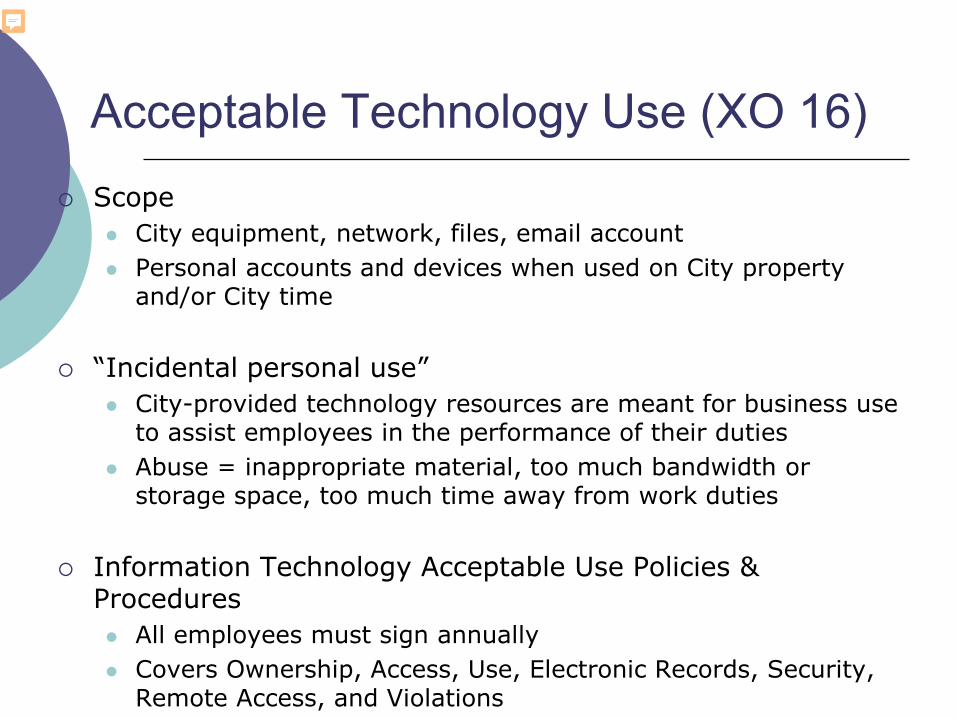
Acceptable Technology Use (XO 16) Scope
City equipment, network, files, email account Personal accounts and devices when used on City property
and/or City time
“Incidental personal use” City-provided technology resources are meant for business use
to assist employees in the performance of their duties Abuse = inappropriate material, too much bandwidth or
storage space, too much time away from work duties
Information Technology Acceptable Use Policies & Procedures All employees must sign annually Covers Ownership, Access, Use, Electronic Records, Security,
Remote Access, and Violations
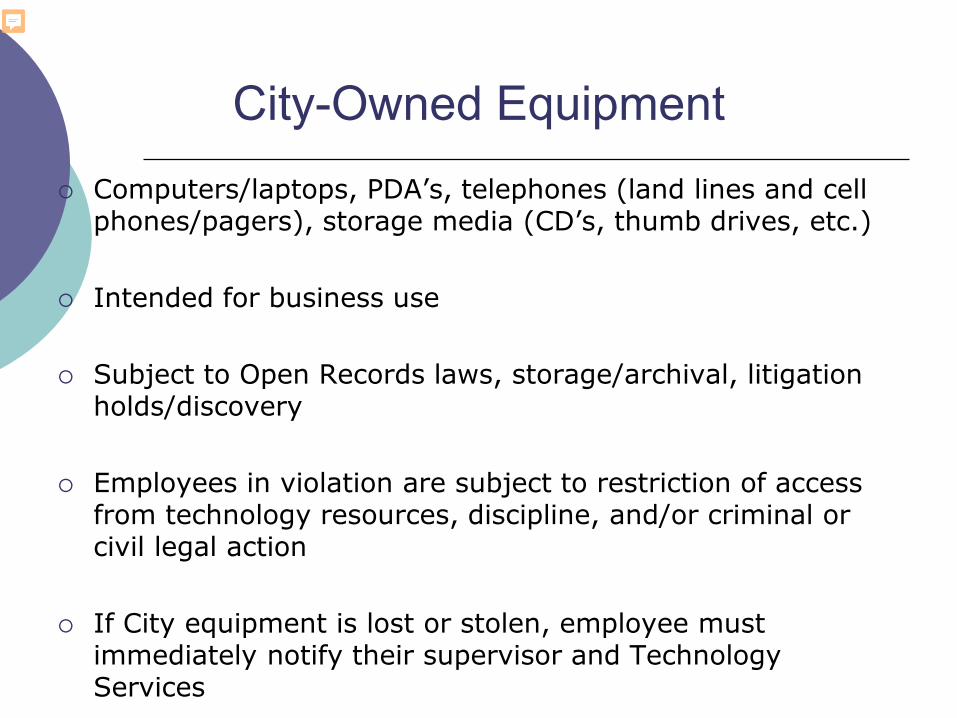
City-Owned Equipment Computers/laptops, PDA’s, telephones (land lines and cell
phones/pagers), storage media (CD’s, thumb drives, etc.)
Intended for business use
Subject to Open Records laws, storage/archival, litigation holds/discovery
Employees in violation are subject to restriction of access from technology resources, discipline, and/or criminal or civil legal action
If City equipment is lost or stolen, employee must immediately notify their supervisor and Technology Services
City Email and Internet Beware archives, filters, and flags
Do not put it into email unless you are prepared to defend why you wrote (or sent) it
Do not assume it is OK to access a site if it is not blocked
Do not download files, applications, patches, videos, images, links, or any other item which could “jeopardize City network security”
Beware the infamous email chain forward…..
Policies and Rules re: Technology Use
Executive Order No. 16
CSA Rule 16-2 (Code of Conduct)
TS Technology Acceptable Use Policy
Personal Time/Personal Media Code of Conduct: You are always on duty and
always represent your agency
Employee rights To engage in lawful off-duty conduct (Colorado
statute) To “engage in concerted activity” (National Labor
Relations Act) Freedom of speech (First Amendment)
Case law is mixed – some discipline upheld against employees who trash their agency on social media sites, blogs, etc.
You can never take back what you post Compromise personal and agency security Negative first impression “Friend” posts (and tags) are outside your control
Work Time/Work Media
Bottom Line: Employees have no expectation of privacy at work (internet use, email messages, created and stored files)
The DFD firehouses, PDP Districts, and DSD locations are public spaces – be mindful of what your co-workers/supervisors see and hear, as well as citizens, other first responders, and visitors.
Covers searches you do, files you download, movies you watch, images you post (viral or physical)
Work Time/Personal Media
Becomes a problem when it violates policies (eg – during calls) or impacts the job (eg – productivity, responsiveness)
Inappropriate content is still inappropriate content
Otherwise permissible off-duty conduct may be subject to discipline if done on duty (eg – blog commentary)
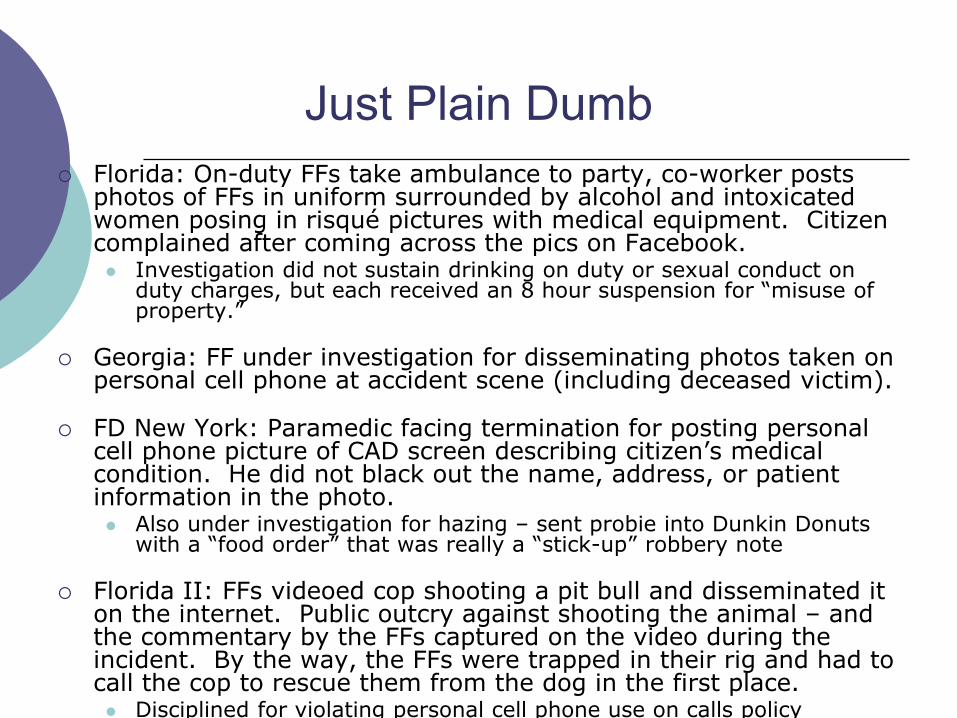
Just Plain Dumb Florida: On-duty FFs take ambulance to party, co-worker posts
photos of FFs in uniform surrounded by alcohol and intoxicated women posing in risqué pictures with medical equipment. Citizen complained after coming across the pics on Facebook. Investigation did not sustain drinking on duty or sexual conduct on
duty charges, but each received an 8 hour suspension for “misuse of property.”
Georgia: FF under investigation for disseminating photos taken on personal cell phone at accident scene (including deceased victim).
FD New York: Paramedic facing termination for posting personal cell phone picture of CAD screen describing citizen’s medical condition. He did not black out the name, address, or patient information in the photo. Also under investigation for hazing – sent probie into Dunkin Donuts
with a “food order” that was really a “stick-up” robbery note
Florida II: FFs videoed cop shooting a pit bull and disseminated it on the internet. Public outcry against shooting the animal – and the commentary by the FFs captured on the video during the incident. By the way, the FFs were trapped in their rig and had to call the cop to rescue them from the dog in the first place. Disciplined for violating personal cell phone use on calls policy
Section F
MAYOR'S OFFICE ANTI-FRATERNIZATION POLICY
MAYOR'S OFFICE DISCRIMINATION, HARASSMENT AND RETALIATION POLICY 2018
MAYOR’S OFFICE ANTI-FRATERNIZATION POLICY1
The Mayor’s Office of the City and County of Denver desires to foster a working environment marked by mutual respect and trust among co-workers. To this end, the Mayor’s Office seeks to avoid favoritism and the perception of favoritism, actual or potential conflicts of interest, claims of sexual harassment, and other problems that can result from romantic relationships between co-workers. As a result, the Mayor’s Office discourages, and in some instances prohibits, inter-office dating, romantic relationships and flirtatious behavior in the workplace. If employees and appointees of the Mayor’s Office develop dating and/or romantic relationships with work colleagues, they are strongly cautioned not to let such relationships affect their job performance or the workplace environment in any manner.
To ensure that romantic relationships do not adversely affect the workplace, employees and/or appointees who enter into such relationships must:
• Review the Mayor’s Office Discrimination, Harassment and Retaliation Policy;
• Behave professionally and avoid indiscreet behavior at all times in the workplace and while performing the functions of their jobs; and
• Refrain from public displays of affection, flirtation, sexual innuendo, sexually-oriented banter and joking, and suggestive comments, in the workplace and during the course of their job duties. This pertains to all forms of communication including, but not limited to, phone calls, emails, text messages, and social media.
Prohibited Relationships: No employee/appointee shall have a romantic relationship with an intern. No employee/appointee shall have a romantic relationship with a co-worker whom he or she directly supervises or whose terms or conditions of employment he or she may influence (examples of terms or conditions of employment include promotion, termination, discipline, and compensation). If a prohibited relationship develops, the Mayor’s Office must be notified immediately. This notification will enable the Mayor’s Office to consider potential options for resolving the conflict of interest. Employees and appointees found to be in violation of this policy may be subject to disciplinary action, up to and including termination. Failure to cooperate with the Mayor’s Office in resolving a conflict or problem caused by an inter-office romantic relationship may result in disciplinary action, up to and including termination. The Mayor’s Office reserves the right to make personnel decisions in the best interests of the Office, including termination, where a conflict of interest or the appearance of a conflict of interest exists by virtue of an inter-office relationship.
Effective Date: This policy takes effect July 30, 2018.
1 This policy supersedes the Anti-Fraternization Policy adopted in 2015.
1
MAYOR’S OFFICE DISCRIMINATION, HARASSMENT AND RETALIATION POLICY1
The Mayor’s Office is committed to maintaining a work environment free of discrimination, harassment and retaliation. Behavior may violate this policy even if it would not constitute a violation of federal, state and/or local law. This policy applies to all City employees as well as the Mayor, the Mayor’s staff, and Mayoral appointees. For purposes of this policy, “Mayoral appointees” are those persons appointed by the Mayor who hold full-time paid positions with the City and County of Denver.
A. Protected Characteristics All City employees, as well as Mayoral staff and appointees, have the right to work in an environment free of discrimination and harassment based on their race, color, religion, creed, national origin/ancestry, sex, sexual orientation, transgender status, gender identity and expression, disability, genetic information, military status, age, marital status, political affiliation, pregnancy or related condition, or any other status protected under federal, state and/or local law. These characteristics are referred to as "Protected Characteristics."
B. Discrimination
Discrimination occurs when an employee or appointee experiences an adverse employment action based on one or more Protected Characteristics of the employee or appointee. Adverse employment actions include, but are not limited to, termination, suspension, involuntary demotion, and failure to promote.
C. Harassment
Harassment based on one or more Protected Characteristics of an employee or appointee is a form of prohibited discrimination. There are two types of harassment:
1. Hostile Work Environment: This type of harassment exists when an employee or appointee is subjected to unwelcome and offensive conduct by someone with whom the employee or appointee interacts at work, at work-related functions, and/or when representing the City, when such conduct is based on a Protected Characteristic and is sufficiently severe or pervasive as to create an intimidating, hostile, or offensive work atmosphere. In order to constitute a hostile work environment, the conduct must meet all four of the following criteria:
● based on one or more Protected Characteristics; and
● subjectively offensive to the employee or appointee; and
● objectively offensive to a reasonable person; and
● severe or pervasive.
1 This policy supersedes the Mayoral Staff/Appointee Sexual Harassment Policy adopted in 2015.
2
Offensive conduct may be verbal, visual, or physical in nature, and may include derogatory comments, mocking, imitating, slurs, jokes, photographs, posters, cartoon drawings, social media content, gestures, unwanted touching and blocking normal movement, among other forms of conduct.
2. Quid Pro Quo (“This for that”): This type of harassment exists when a supervisor takes or threatens to take an adverse employment action or withholds or threatens to withhold an employment benefit based upon a subordinate engaging or refusing to engage in certain behaviors (typically sexual favors). The behavior must be based on, or related to, a Protected Characteristic.
Reporting Discrimination and Harassment An employee or appointee who experiences or witnesses discrimination or harassment by a career service employee or non-City employee/third party with whom the employee or appointee comes into contact as part of his or her job, is urged to promptly follow the steps outlined in Career Service Rule 16. An employee or appointee who experiences or witnesses harassment in violation of this policy by an appointee or the Mayor is encouraged to make it clear to that person that such behavior is offensive or uncomfortable and request that it stop. If the behavior does not stop, or if the employee or appointee is not comfortable speaking with the appointee or the Mayor about their behavior, the employee or appointee is urged to promptly report the behavior as follows:
A. For harassment by Mayoral appointees: An employee or appointee should report such conduct promptly to his or her supervisor, the Deputy Chief of Staff, the Chief of Staff, the Director of Administration, or the Office of Human Resources.
B. For harassment by the Mayor: An employee or appointee should report such conduct to
the Mayor’s Chief of Staff, the City Attorney, or the Executive Director of Human Resources.
An employee or appointee who experiences discrimination by an appointee or the Mayor should follow the procedure for reporting harassment set forth in paragraphs A and B above. Investigation of Discrimination and Harassment Complaints against career service employees and non-City employees will be promptly investigated pursuant to Career Service Rule 18. Complaints against Mayoral appointees will be promptly investigated, as appropriate, by the Office of Human Resources or a third-party investigator retained by the City Attorney’s Office. The City Attorney’s Office will coordinate the investigation. The outcome of the investigation will be communicated to the complaining employee or appointee as soon as practicable. Complaints against the Mayor will be promptly investigated, as appropriate, by a third-party
3
investigator retained by the City Attorney’s Office. The City Attorney’s Office will coordinate the investigation and make recommendations based on the results of the investigation. Retaliation is Prohibited No employee or appointee will be retaliated against for making a good-faith complaint or for participating in an investigation of an alleged act of discrimination or harassment. However, any employee or appointee making knowingly false accusations may be subject to appropriate disciplinary action. Retaliation should be reported according to the procedures set forth above. Effective Date This policy takes effect July 30, 2018.

Section G
Engineer Formula Reference
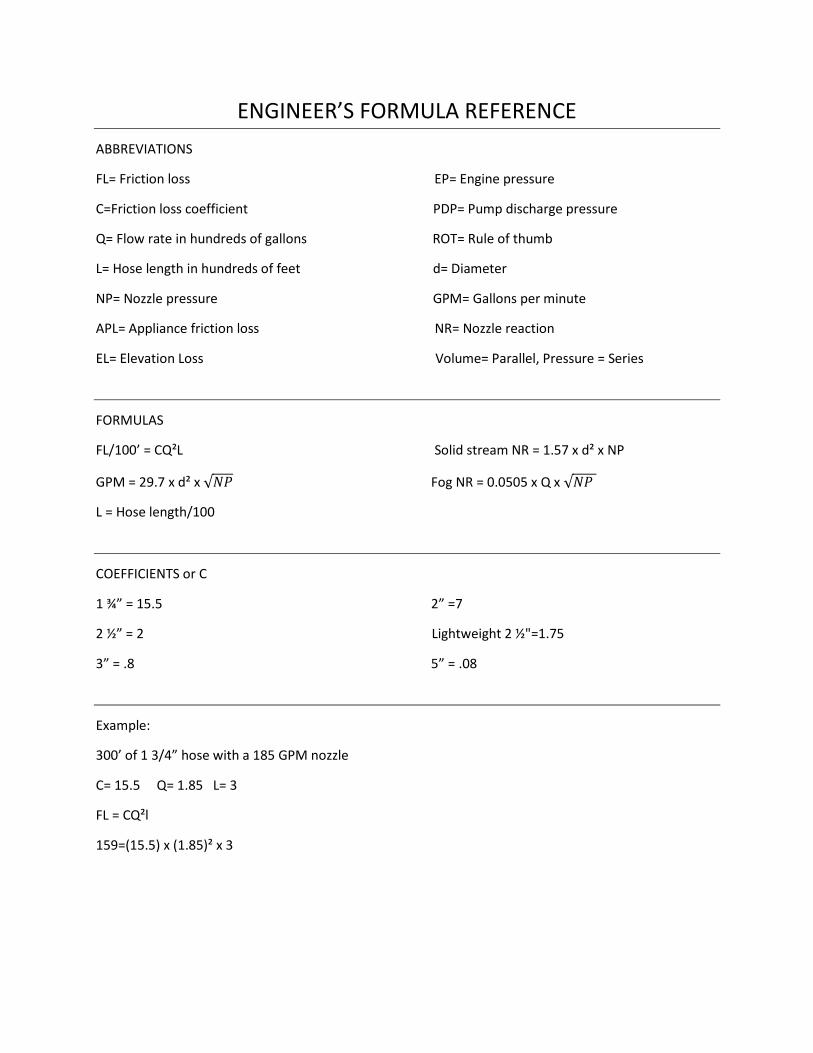
ENGINEER’S FORMULA REFERENCE
ABBREVIATIONS
FL= Friction loss EP= Engine pressure
C=Friction loss coefficient PDP= Pump discharge pressure
Q= Flow rate in hundreds of gallons ROT= Rule of thumb
L= Hose length in hundreds of feet d= Diameter
NP= Nozzle pressure GPM= Gallons per minute
APL= Appliance friction loss NR= Nozzle reaction
EL= Elevation Loss Volume= Parallel, Pressure = Series
FORMULAS
FL/100’ = CQ²L Solid stream NR = 1.57 x d² x NP
GPM = 29.7 x d² x √𝑁𝑃 Fog NR = 0.0505 x Q x √𝑁𝑃
L = Hose length/100
COEFFICIENTS or C
1 ¾” = 15.5 2” =7
2 ½” = 2 Lightweight 2 ½"=1.75
3” = .8 5” = .08
Example:
300’ of 1 3/4” hose with a 185 GPM nozzle
C= 15.5 Q= 1.85 L= 3
FL = CQ²l
159=(15.5) x (1.85)² x 3
Section H
Pump Chart Training Division 2019
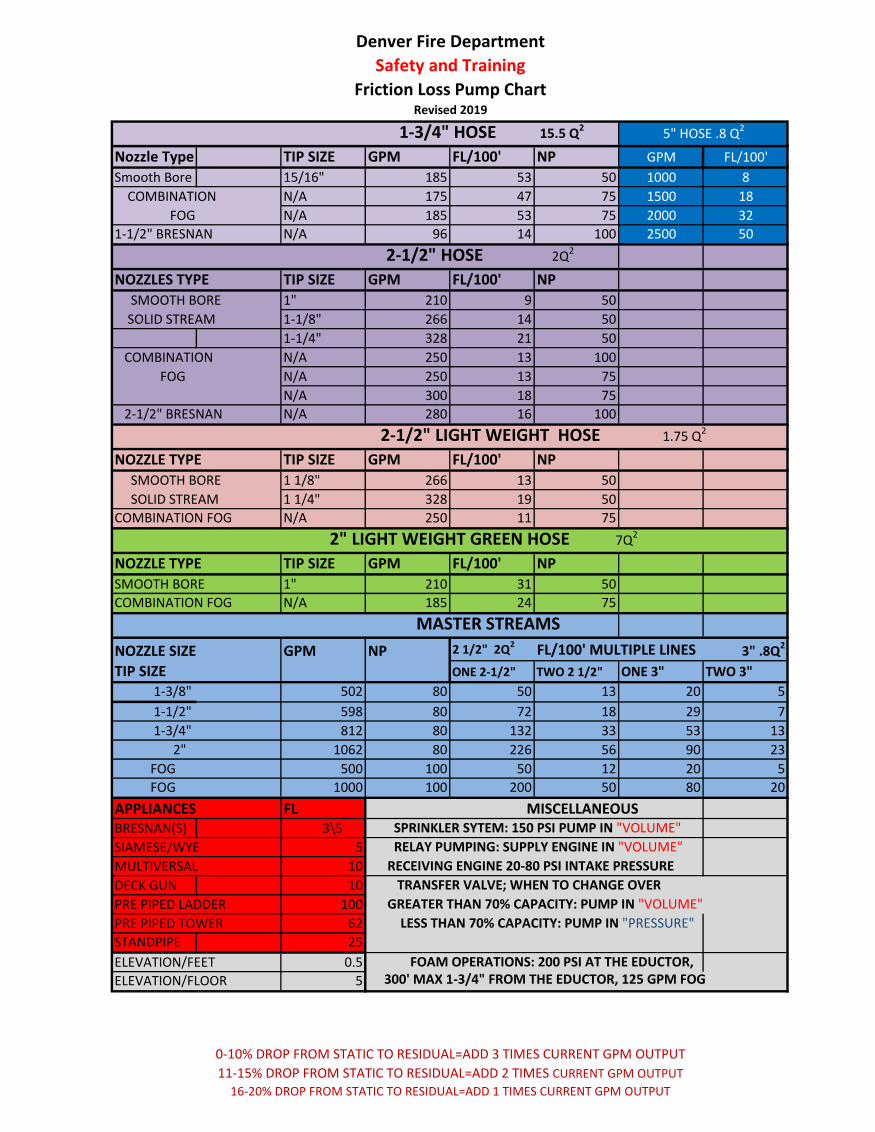
Denver Fire Department
Safety and Training
Friction Loss Pump ChartRevised 2019
1-3/4" HOSE 15.5 Q2
Nozzle Type TIP SIZE GPM FL/100' NP GPM FL/100'
Smooth Bore 15/16" 185 53 50 1000 8
COMBINATION N/A 175 47 75 1500 18
FOG N/A 185 53 75 2000 32
1-1/2" BRESNAN N/A 96 14 100 2500 50
2-1/2" HOSE 2Q2
NOZZLES TYPE TIP SIZE GPM FL/100' NP
SMOOTH BORE 1" 210 9 50
SOLID STREAM 1-1/8" 266 14 50
1-1/4" 328 21 50
COMBINATION N/A 250 13 100
FOG N/A 250 13 75
N/A 300 18 75
2-1/2" BRESNAN N/A 280 16 100
2-1/2" LIGHT WEIGHT HOSE 1.75 Q2
NOZZLE TYPE TIP SIZE GPM FL/100' NP
SMOOTH BORE 1 1/8" 266 13 50
SOLID STREAM 1 1/4" 328 19 50
COMBINATION FOG N/A 250 11 75
2" LIGHT WEIGHT GREEN HOSE 7Q2
NOZZLE TYPE TIP SIZE GPM FL/100' NP
SMOOTH BORE 1" 210 31 50
COMBINATION FOG N/A 185 24 75
MASTER STREAMS
NOZZLE SIZE GPM NP 2 1/2" 2Q2 FL/100' MULTIPLE LINES 3" .8Q2
TIP SIZE ONE 2-1/2" TWO 2 1/2" ONE 3" TWO 3"
1-3/8" 502 80 50 13 20 5
1-1/2" 598 80 72 18 29 7
1-3/4" 812 80 132 33 53 13
2" 1062 80 226 56 90 23
FOG 500 100 50 12 20 5
FOG 1000 100 200 50 80 20
APPLIANCES FL MISCELLANEOUS BRESNAN(S) 3\5 SPRINKLER SYTEM: 150 PSI PUMP IN "VOLUME"
SIAMESE/WYE 5 RELAY PUMPING: SUPPLY ENGINE IN "VOLUME"
MULTIVERSAL 10 RECEIVING ENGINE 20-80 PSI INTAKE PRESSURE
DECK GUN 10 TRANSFER VALVE; WHEN TO CHANGE OVER
PRE PIPED LADDER 100 GREATER THAN 70% CAPACITY: PUMP IN "VOLUME"
PRE PIPED TOWER 62 LESS THAN 70% CAPACITY: PUMP IN "PRESSURE"
STANDPIPE 25
ELEVATION/FEET 0.5 FOAM OPERATIONS: 200 PSI AT THE EDUCTOR,
ELEVATION/FLOOR 5 300' MAX 1-3/4" FROM THE EDUCTOR, 125 GPM FOG
5" HOSE .8 Q2
0-10% DROP FROM STATIC TO RESIDUAL=ADD 3 TIMES CURRENT GPM OUTPUT
11-15% DROP FROM STATIC TO RESIDUAL=ADD 2 TIMES CURRENT GPM OUTPUT
16-20% DROP FROM STATIC TO RESIDUAL=ADD 1 TIMES CURRENT GPM OUTPUT


