Embed Size (px)
Citation preview
ENGLISH
FRANÇAIS
KOREAN
ESPAÑOL
DIS NAVIGATION SYSTEM / OWNER’S MANUAL
P/N:MFL69919738
MAPM1771NDH.AUSAH MANUAL COVER (�� 30.5mm)_9738.INDD 1MAPM1771NDH.AUSAH MANUAL COVER (�� 30.5mm)_9738.INDD 1 2017-08-30 �� 12:28:432017-08-30 �� 12:28:43
2
Your Genesis Branded Vehicle may be equipped with technologies and services that use information collected, generated, recorded or stored by the vehicle. Genesis Branded Vehicle has created a Vehicle Owner Privacy Policy to explain how these technologies and services collect use and share this information.
You may read our Vehicle Owner Privacy Policy on the genesismotorsusa.com website at: https://www.genesismotorsusa.com/privacy-policy.htmlIf you would like to receive a hard copy of our Vehicle Owner Privacy Policy, please contact our Genesis Customer Care at:
Genesis Customer Care PO Box 20850 Fountain Valley, CA 92728 [email protected]
Genesis Customer Care representatives are available Monday through Friday, between the hours of 5:00 AM and 7:00 PM PST and Saturday and Sunday between 6:30 AM and 3:00 PM PST (English).For Genesis Customer Care assistance in Spanish or Korean, representatives are available Monday through Friday between 6:30 AM and 3:00 PM PST.
GENESIS BRANDED VEHICLE OWNER PRIVACY POLICY
3
Thank you for purchasing this DIS Navigation system.
This user’s manual explains how to use the GENESIS DIS Navigation system.Before using the product, read the contents of this user’s manual carefully and use this product safely.
• The screens shown in this manual may diff er with the actual screens of the product.• The design and specifi cation of this product may change without prior notifi cation for product improvement.• When transferring the vehicle to another individual, include this user’s manual so that the next driver can
continue its use.
All Map Database cannot be copied without permission.
Important Notice: This is protected by U.S. copyright laws. All rights not expressly granted are reserved.
You may not otherwise reproduce, modify, and distribute the content without Hyundai MnSoft, Inc’s prior written consent.
4
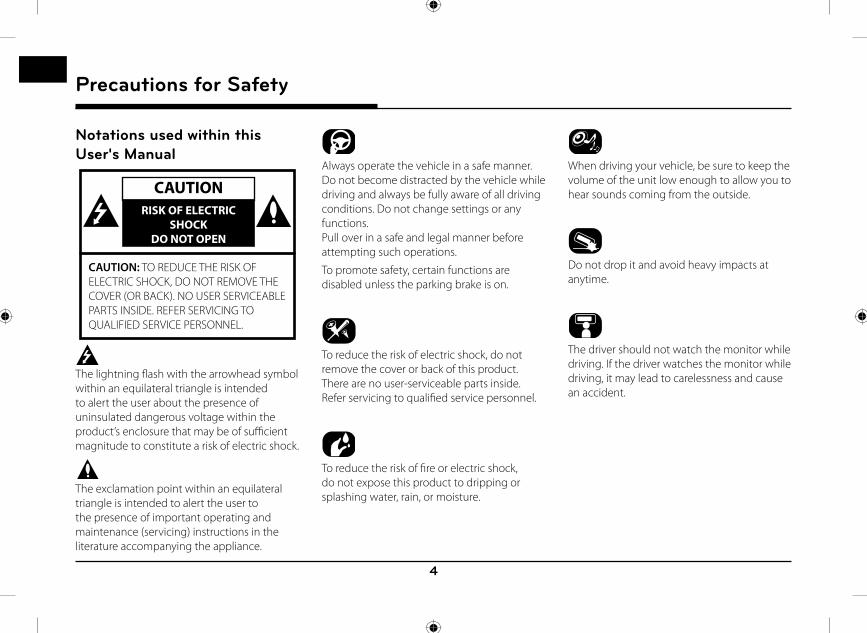
Notations used within this User's Manual
CAUTIONRISK OF ELECTRIC
SHOCK DO NOT OPEN
CAUTION: TO REDUCE THE RISK OF ELECTRIC SHOCK, DO NOT REMOVE THE COVER (OR BACK). NO USER SERVICEABLE PARTS INSIDE. REFER SERVICING TO QUALIFIED SERVICE PERSONNEL.
The lightning fl ash with the arrowhead symbol within an equilateral triangle is intended to alert the user about the presence of uninsulated dangerous voltage within the product’s enclosure that may be of suffi cient magnitude to constitute a risk of electric shock.
The exclamation point within an equilateral triangle is intended to alert the user to the presence of important operating and maintenance (servicing) instructions in the literature accompanying the appliance.
Always operate the vehicle in a safe manner. Do not become distracted by the vehicle while driving and always be fully aware of all driving conditions. Do not change settings or any functions.Pull over in a safe and legal manner before attempting such operations.
To promote safety, certain functions are disabled unless the parking brake is on.
To reduce the risk of electric shock, do not remove the cover or back of this product. There are no user-serviceable parts inside. Refer servicing to qualifi ed service personnel.
To reduce the risk of fi re or electric shock, do not expose this product to dripping or splashing water, rain, or moisture.
When driving your vehicle, be sure to keep the volume of the unit low enough to allow you to hear sounds coming from the outside.
Do not drop it and avoid heavy impacts at anytime.
The driver should not watch the monitor while driving. If the driver watches the monitor while driving, it may lead to carelessness and cause an accident.
Precautions for Safety
Precautions for Safety
5
Precautions for Safety
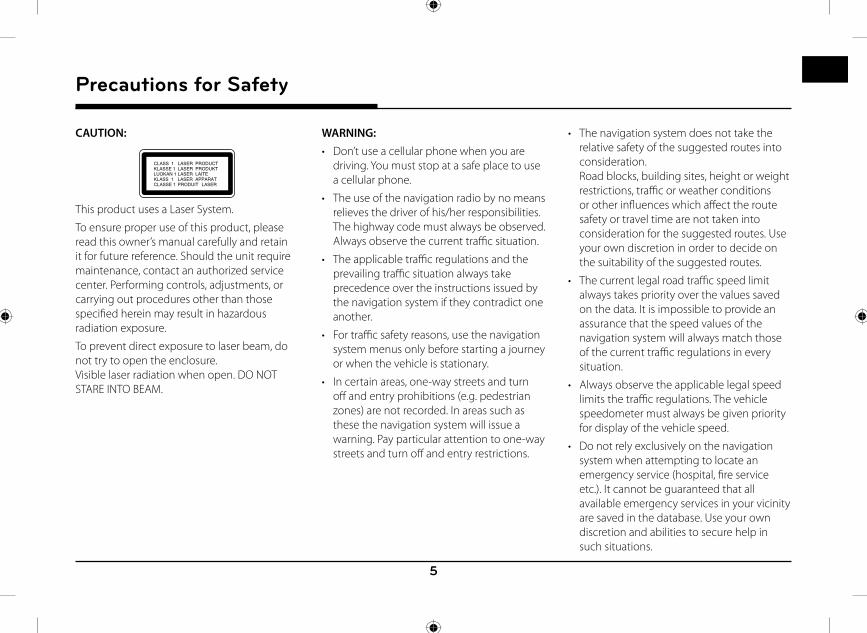
CAUTION:
This product uses a Laser System.
To ensure proper use of this product, please read this owner’s manual carefully and retain it for future reference. Should the unit require maintenance, contact an authorized service center. Performing controls, adjustments, or carrying out procedures other than those specifi ed herein may result in hazardous radiation exposure.
To prevent direct exposure to laser beam, do not try to open the enclosure. Visible laser radiation when open. DO NOT STARE INTO BEAM.
WARNING: • Don’t use a cellular phone when you are
driving. You must stop at a safe place to use a cellular phone.
• The use of the navigation radio by no means relieves the driver of his/her responsibilities. The highway code must always be observed. Always observe the current traffi c situation.
• The applicable traffi c regulations and the prevailing traffi c situation always take precedence over the instructions issued by the navigation system if they contradict one another.
• For traffi c safety reasons, use the navigation system menus only before starting a journey or when the vehicle is stationary.
• In certain areas, one-way streets and turn off and entry prohibitions (e.g. pedestrian zones) are not recorded. In areas such as these the navigation system will issue a warning. Pay particular attention to one-way streets and turn off and entry restrictions.
• The navigation system does not take the relative safety of the suggested routes into consideration.Road blocks, building sites, height or weight restrictions, traffi c or weather conditions or other infl uences which aff ect the route safety or travel time are not taken into consideration for the suggested routes. Use your own discretion in order to decide on the suitability of the suggested routes.
• The current legal road traffi c speed limit always takes priority over the values saved on the data. It is impossible to provide an assurance that the speed values of the navigation system will always match those of the current traffi c regulations in every situation.
• Always observe the applicable legal speed limits the traffi c regulations. The vehicle speedometer must always be given priority for display of the vehicle speed.
• Do not rely exclusively on the navigation system when attempting to locate an emergency service (hospital, fi re service etc.). It cannot be guaranteed that all available emergency services in your vicinity are saved in the database. Use your own discretion and abilities to secure help in such situations.
6
Precautions for Safety
CAUTION: • Do not keep the navigation system running
with the engine stopped. Doing so may discharge the vehicle battery. When you use the navigation system, always keep the engine running.
• When the driver wants to operate the navigation system, fi rst park the vehicle in a safe location and set the parking brake. Operating the system while driving can distract the driver and may result in a serious accident.
• Do not disassemble or modify this system. If you do, it may result in accidents, fi re, or electrical shock.
• Some states/provinces may have laws limiting the use of video screens while driving. Use the system only where it is legal to do so.
• Do not use your phone in private mode when you are driving. You must stop at a safe location to use it.
FCC WarningThis equipment has been tested and found to comply with the limits for a Class B digital device, pursuant to part 15 of the FCC Rules. These limits are designed to provide reasonable protection against harmful interference in a residential installation. This equipment generates, uses and can radiate radio frequency energy and, if not installed and used in accordance with the instructions, may cause harmful interference to radio communications. However, there is no guarantee that interference will not occur in a particular installation. If this equipment does cause harmful interference to radio or television reception, which can be determined by turning the equipment off and on, the user is encouraged to try to correct the interference by one or more of the following measures:
• Reorient or relocate the receiving antenna.
• Increase the separation between the equipment and receiver.
• Connect the equipment into an outlet on a circuit diff erent from that to which the receiver is connected.
• Consult the dealer or an experienced radio/TV technician for help.
Caution: Any changes or modifi cations to this device not explicitly approved by manufacturer could void your authority to operate this equipment.
This device complies with part 15 of the FCC Rules. Operation is subject to the following two conditions:
(1) This device may not cause harmful interference, and (2) this device must accept any interference received, including interference that may cause undesired operation.
IC Warning“This device complies with Industry Canada licence-exempt RSS standard(s).”
Operation is subject to the following conditions: (1) this device may not cause interference, and (2) this device must accept any interference, including interference that may cause undesired operation of the device.
7
Precautions for Safety 4Notations used within this User's Manual . . .4
FCC Warning . . . . . . . . . . . . . . . . . . . . . . . . . .6
IC Warning . . . . . . . . . . . . . . . . . . . . . . . . . . .6
Table of Contents 7
General Information 14About Disc . . . . . . . . . . . . . . . . . . . . . . . . . . 14
Recommended Practices for Handling
Discs .................................................................. 14
Types of Playable Discs ................................ 14
COPYRIGHTS ................................................. 15
DVD Region Code ......................................... 15
PBC: Playback Control (Video CD Only) . 15
If “ ” symbol appears ............................... 15
About USB . . . . . . . . . . . . . . . . . . . . . . . . . . 15
MP3 file Information. . . . . . . . . . . . . . . . . . . 16
Image file Information . . . . . . . . . . . . . . . . . 16
Video file Information . . . . . . . . . . . . . . . . . . 16
Using iPod® Devices . . . . . . . . . . . . . . . . . . . 17
Precautions upon using iPod® ................... 17
Supported iPod® devices ............................. 17
Using SD Cards. . . . . . . . . . . . . . . . . . . . . . . 17
Ejecting and Inserting SD Cards ............... 17
Usage of SD Cards ....................................... 17
Name of Each Component 18Head unit . . . . . . . . . . . . . . . . . . . . . . . . . . . . 18
Driver Information System (DIS) Control (USA
Only) . . . . . . . . . . . . . . . . . . . . . . . . . . . . . . 20
Driver Information System (DIS) Control
(CANADA Only) . . . . . . . . . . . . . . . . . . . . . . 21
Steering wheel remote control . . . . . . . . . . 22
Basic Operation 23Starting the system for the first time . . . . . 23
Turning the system off . . . . . . . . . . . . . . . . 23
AV OFF . . . . . . . . . . . . . . . . . . . . . . . . . . . . 23
AV ON . . . . . . . . . . . . . . . . . . . . . . . . . . . . . 23
Adjusting the volume . . . . . . . . . . . . . . . . . 23
Resetting the System . . . . . . . . . . . . . . . . . .24
Using the controller . . . . . . . . . . . . . . . . . . .24
Using the Touch screen . . . . . . . . . . . . . . . . .24
Radio Operation (FM/AM) 25Listening to FM/AM radio. . . . . . . . . . . . . . 25
Listening to HD Radio™ Stations (USA Only) . . 25
HD Radio screen ...........................................25
HD Radio™ Reception On/Off
(USA Only) ......................................................26
Tag (USA Only) .............................................26
Saving FM/AM preset . . . . . . . . . . . . . . . . . .27
Scanning FM/AM broadcast station . . . . . . .27
Scanning preset stations ............................ 27
Scanning all stations .................................... 27
Reordering FM/AM preset . . . . . . . . . . . . . 28
Autostore . . . . . . . . . . . . . . . . . . . . . . . . . . . 28
Radio Text On/Off . . . . . . . . . . . . . . . . . . . . 28
Sound Settings . . . . . . . . . . . . . . . . . . . . . . 28
Radio Operation (SiriusXM™) 29SiriusXM™ screen . . . . . . . . . . . . . . . . . . . . 29
Listening to SiriusXM™ radio . . . . . . . . . . . 30
Selecting SiriusXM™ broadcast channel . . 30
Selecting a channel through manual
search ...............................................................30
Selecting with channel up/down ..............30
Selecting a channel through preset ........30
Selecting channel through channel/category
list . . . . . . . . . . . . . . . . . . . . . . . . . . . . . . . . 30
Adding to Favorites . . . . . . . . . . . . . . . . . . . . 31
Program Guide . . . . . . . . . . . . . . . . . . . . . . . 31
Scanning SiriusXM™ broadcast channel . . 32
Direct Tune . . . . . . . . . . . . . . . . . . . . . . . . . 32
Sound Settings . . . . . . . . . . . . . . . . . . . . . . 32
Featured Favorites . . . . . . . . . . . . . . . . . . . . 32
Favorites . . . . . . . . . . . . . . . . . . . . . . . . . . . 33
Viewing Active Alert .....................................33
Deleting the song or artist saved in
[Favorites] menu ...........................................33
Favorites Alert On/Off . . . . . . . . . . . . . . . . 34
Table of Contents
Table of Contents

8
Storing SiriusXM™ preset . . . . . . . . . . . . . . 34
Reordering SiriusXM™ preset . . . . . . . . . . . 35
Game Zone . . . . . . . . . . . . . . . . . . . . . . . . . 35
Setting Team ..................................................35
Viewing Active Alert .....................................36
Alert On/Off ...................................................36
Subscription Status . . . . . . . . . . . . . . . . . . .37
Go to SiriusXM™ Data . . . . . . . . . . . . . . . . .37
Audio CD/MP3 CD Operation 38Playing an Audio CD/MP3 CD . . . . . . . . . . 38
Pause ...............................................................38
Skip ...................................................................38
Search ..............................................................38
Seek ..................................................................39
List ....................................................................39
Shuffle ..............................................................39
Repeat ..............................................................40
Scan ..................................................................40
Sound Settings ..............................................40
DVD/VCD Operation 41Playing a DVD/VCD . . . . . . . . . . . . . . . . . . . 41
Switching to Menu display or Full Screen
Display ............................................................... 41
Pause ................................................................ 41
Skip .................................................................... 41
Search ..............................................................42
Seek ..................................................................42
Title Menu/Disc Menu (DVD Only) ..........42
Caption Language (DVD Only) .................43
Voice Language (DVD Only) ......................43
Angle (DVD Only) .........................................43
DVD Settings (DVD Only) ...........................44
Repeat (VCD Only) .......................................44
Shortcut (VCD Only) ....................................44
PBC On/Off (VCD Only) .............................45
Display Settings .............................................45
Sound Settings ..............................................45
DVD language code .....................................46
Jukebox Operation 48Playing Jukebox Music . . . . . . . . . . . . . . . . 48
Pause ...............................................................48
Skip ...................................................................48
Search ..............................................................48
Seek ..................................................................48
Cover Flow View ............................................48
List ....................................................................49
Shuffle ..............................................................49
Scan ..................................................................49
Sound Settings ..............................................49
Repeat ..............................................................49
Playing Jukebox Video . . . . . . . . . . . . . . . . 50
Switching to Menu display or Full Screen
Display ..............................................................50
Pause ...............................................................50
Skip ...................................................................50
Search ..............................................................50
Seek ..................................................................50
List ....................................................................50
Shuffle ..............................................................50
Repeat ..............................................................50
Caption Settings ............................................51
Voice Settings .................................................51
Display Settings ..............................................51
Sound Settings ...............................................51
DivX® VOD ........................................................51
Viewing Jukebox Image . . . . . . . . . . . . . . . 52
Switching to Menu display or Full Screen
Display ..............................................................52
Skip ...................................................................52
Zoom in/out ...................................................52
Slideshow ........................................................53
List ....................................................................53
Slideshow Settings .......................................53
Display Settings .............................................53
Table of Contents
9
Table of Contents
USB Operation 54Playing USB Music . . . . . . . . . . . . . . . . . . . 54
Pause ...............................................................54
Skip ...................................................................54
Search ..............................................................54
Seek ..................................................................54
Cover Flow View ............................................54
List ....................................................................55
Shuffle ..............................................................55
Repeat ..............................................................55
Copying the USB music file to Jukebox 55
Hide Current File ...........................................55
Scan ..................................................................55
Sound Settings ..............................................55
Playing USB Video . . . . . . . . . . . . . . . . . . . 56
Switching to Menu display or Full Screen
Display ..............................................................56
Pause ...............................................................56
Skip ...................................................................56
Search ..............................................................56
Seek ..................................................................56
List .................................................................... 57
Shuffle .............................................................. 57
Repeat .............................................................. 57
Copying the USB video file to Jukebox . 57
Caption Settings ........................................... 57
Voice Settings ................................................ 57
DivX® VOD ....................................................... 57
Display Settings ............................................. 57
Sound Settings .............................................. 57
Viewing USB Image . . . . . . . . . . . . . . . . . . 58
Switching to Menu display or Full Screen
Display ..............................................................58
Skip ...................................................................58
Zoom in/out ...................................................58
Slideshow ........................................................58
List ....................................................................58
Slideshow Settings .......................................58
Copying the USB image file to Jukebox...58
Display Settings .............................................58
iPod® Operation 59Playing iPod® . . . . . . . . . . . . . . . . . . . . . . . . .59
Pause ...............................................................59
Skip ...................................................................59
Search ..............................................................59
Seek ..................................................................59
List ....................................................................59
Shuffle ..............................................................59
Repeat ..............................................................59
Scan ..................................................................59
Sound Settings ..............................................59
Auxiliary Device Operation 60Playing an AUX source . . . . . . . . . . . . . . . . 60
Sound Settings ..............................................60
Bluetooth® Audio 61Playing Bluetooth® Audio . . . . . . . . . . . . . . . 61
Before playing the Bluetooth® audio ........ 61
Starting the Bluetooth® audio .................... 61
Pause ................................................................ 61
Skip .................................................................... 61
Shuffle ............................................................... 61
Repeat ............................................................... 61
Connection Settings ..................................... 61
Sound Settings ............................................... 61
Getting Started with Navigation 62Navigation use restrictions . . . . . . . . . . . . . 62What is GPS? . . . . . . . . . . . . . . . . . . . . . . . 62About satellite signals . . . . . . . . . . . . . . . . . 62Acquiring satellite signals . . . . . . . . . . . . . . 62Operating Navigation Screen . . . . . . . . . . . 63
Map screen .....................................................63Zoom In / Zoom Out...................................66Map scale ........................................................66Changing the route conditions .................66Searching for POI ......................................... 67Adding the position to address book .....69Scrolling map ................................................. 70Traffic information list .................................. 70Navigation volume ........................................ 70Settings ............................................................ 71Making a call to POI ..................................... 71
Guidance to Previous Destinations ........... 71
10
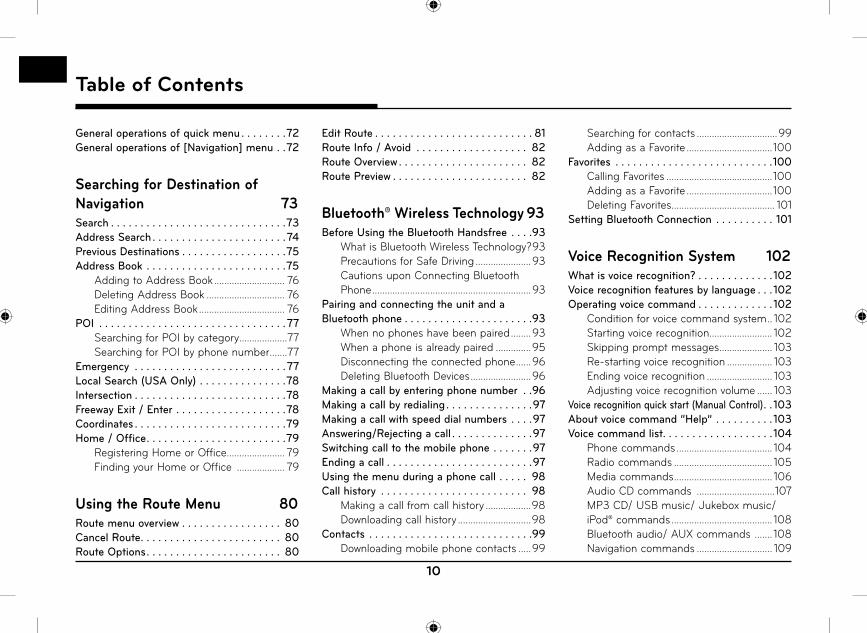
Table of Contents
General operations of quick menu . . . . . . . .72
General operations of [Navigation] menu . .72
Searching for Destination of Navigation 73Search . . . . . . . . . . . . . . . . . . . . . . . . . . . . . .73
Address Search . . . . . . . . . . . . . . . . . . . . . . .74
Previous Destinations . . . . . . . . . . . . . . . . . .75
Address Book . . . . . . . . . . . . . . . . . . . . . . . .75
Adding to Address Book ............................ 76
Deleting Address Book ............................... 76
Editing Address Book .................................. 76
POI . . . . . . . . . . . . . . . . . . . . . . . . . . . . . . . .77
Searching for POI by category ...................77
Searching for POI by phone number .......77
Emergency . . . . . . . . . . . . . . . . . . . . . . . . . .77
Local Search (USA Only) . . . . . . . . . . . . . . .78
Intersection . . . . . . . . . . . . . . . . . . . . . . . . . .78
Freeway Exit / Enter . . . . . . . . . . . . . . . . . . .78
Coordinates . . . . . . . . . . . . . . . . . . . . . . . . . .79
Home / Office . . . . . . . . . . . . . . . . . . . . . . . .79
Registering Home or Office ....................... 79
Finding your Home or Office ................... 79
Using the Route Menu 80Route menu overview . . . . . . . . . . . . . . . . . 80
Cancel Route . . . . . . . . . . . . . . . . . . . . . . . . 80
Route Options . . . . . . . . . . . . . . . . . . . . . . . 80
Edit Route . . . . . . . . . . . . . . . . . . . . . . . . . . . 81
Route Info / Avoid . . . . . . . . . . . . . . . . . . . 82
Route Overview . . . . . . . . . . . . . . . . . . . . . . 82
Route Preview . . . . . . . . . . . . . . . . . . . . . . . 82
Bluetooth® Wireless Technology 93Before Using the Bluetooth Handsfree . . . .93
What is Bluetooth Wireless Technology? 93
Precautions for Safe Driving ......................93
Cautions upon Connecting Bluetooth
Phone ...............................................................93
Pairing and connecting the unit and a
Bluetooth phone . . . . . . . . . . . . . . . . . . . . . .93
When no phones have been paired ........93
When a phone is already paired ..............95
Disconnecting the connected phone ......96
Deleting Bluetooth Devices ........................96
Making a call by entering phone number . .96
Making a call by redialing . . . . . . . . . . . . . . .97
Making a call with speed dial numbers . . . .97
Answering/Rejecting a call . . . . . . . . . . . . . .97
Switching call to the mobile phone . . . . . . .97
Ending a call . . . . . . . . . . . . . . . . . . . . . . . . .97
Using the menu during a phone call . . . . . 98
Call history . . . . . . . . . . . . . . . . . . . . . . . . . 98
Making a call from call history ..................98
Downloading call history .............................98
Contacts . . . . . . . . . . . . . . . . . . . . . . . . . . . .99
Downloading mobile phone contacts .....99
Searching for contacts ................................99
Adding as a Favorite ..................................100
Favorites . . . . . . . . . . . . . . . . . . . . . . . . . . .100
Calling Favorites ..........................................100
Adding as a Favorite ..................................100
Deleting Favorites ......................................... 101
Setting Bluetooth Connection . . . . . . . . . . 101
Voice Recognition System 102What is voice recognition? . . . . . . . . . . . . . 102
Voice recognition features by language . . .102
Operating voice command . . . . . . . . . . . . . 102
Condition for voice command system .. 102
Starting voice recognition......................... 102
Skipping prompt messages ..................... 103
Re-starting voice recognition .................. 103
Ending voice recognition .......................... 103
Adjusting voice recognition volume ...... 103
Voice recognition quick start (Manual Control) . . 103
About voice command “Help” . . . . . . . . . . 103
Voice command list . . . . . . . . . . . . . . . . . . .104
Phone commands ...................................... 104
Radio commands ....................................... 105
Media commands ....................................... 106
Audio CD commands ...............................107
MP3 CD/ USB music/ Jukebox music/
iPod® commands ........................................ 108
Bluetooth audio/ AUX commands ....... 108
Navigation commands .............................. 109
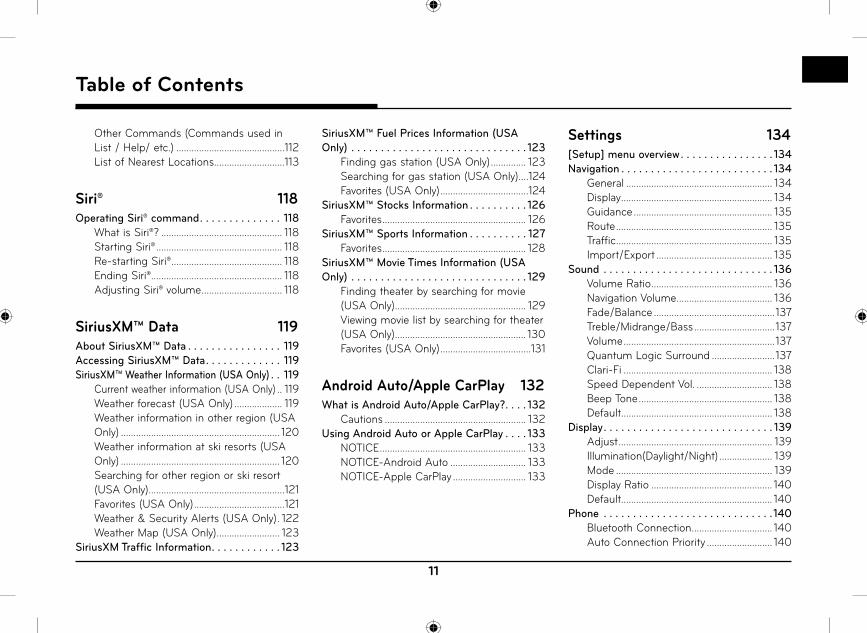
11
Table of Contents
Other Commands (Commands used in
List / Help/ etc.) ...........................................112
List of Nearest Locations ............................113
Siri® 118Operating Siri® command . . . . . . . . . . . . . . 118
What is Siri®? ................................................ 118
Starting Siri® .................................................. 118
Re-starting Siri® ............................................ 118
Ending Siri® .................................................... 118
Adjusting Siri® volume ................................ 118
SiriusXM™ Data 119About SiriusXM™ Data . . . . . . . . . . . . . . . . 119
Accessing SiriusXM™ Data . . . . . . . . . . . . . 119
SiriusXM™ Weather Information (USA Only) . . 119
Current weather information (USA Only) .. 119
Weather forecast (USA Only) ................... 119
Weather information in other region (USA
Only) ............................................................... 120
Weather information at ski resorts (USA
Only) ............................................................... 120
Searching for other region or ski resort
(USA Only) ......................................................121
Favorites (USA Only) ....................................121
Weather & Security Alerts (USA Only) . 122
Weather Map (USA Only) ......................... 123
SiriusXM Traffic Information . . . . . . . . . . . . 123
SiriusXM™ Fuel Prices Information (USA
Only) . . . . . . . . . . . . . . . . . . . . . . . . . . . . . . 123
Finding gas station (USA Only) .............. 123
Searching for gas station (USA Only)....124
Favorites (USA Only) ...................................124
SiriusXM™ Stocks Information . . . . . . . . . . 126
Favorites ......................................................... 126
SiriusXM™ Sports Information . . . . . . . . . . 127
Favorites ......................................................... 128
SiriusXM™ Movie Times Information (USA
Only) . . . . . . . . . . . . . . . . . . . . . . . . . . . . . . 129
Finding theater by searching for movie
(USA Only) .................................................... 129
Viewing movie list by searching for theater
(USA Only) .................................................... 130
Favorites (USA Only) ....................................131
Android Auto/Apple CarPlay 132What is Android Auto/Apple CarPlay? . . . . 132
Cautions ........................................................ 132
Using Android Auto or Apple CarPlay . . . . 133
NOTICE .......................................................... 133
NOTICE-Android Auto .............................. 133
NOTICE-Apple CarPlay ............................. 133
Settings 134[Setup] menu overview . . . . . . . . . . . . . . . . 134
Navigation . . . . . . . . . . . . . . . . . . . . . . . . . . 134
General .......................................................... 134
Display ............................................................ 134
Guidance ....................................................... 135
Route .............................................................. 135
Traffic .............................................................. 135
Import/Export .............................................. 135
Sound . . . . . . . . . . . . . . . . . . . . . . . . . . . . . 136
Volume Ratio ................................................ 136
Navigation Volume ...................................... 136
Fade/Balance ................................................137
Treble/Midrange/Bass ................................137
Volume ............................................................137
Quantum Logic Surround .........................137
Clari-Fi ........................................................... 138
Speed Dependent Vol. .............................. 138
Beep Tone ..................................................... 138
Default............................................................ 138
Display . . . . . . . . . . . . . . . . . . . . . . . . . . . . . 139
Adjust ............................................................. 139
Illumination(Daylight/Night) ..................... 139
Mode .............................................................. 139
Display Ratio ................................................ 140
Default............................................................ 140
Phone . . . . . . . . . . . . . . . . . . . . . . . . . . . . .140
Bluetooth Connection ................................ 140
Auto Connection Priority .......................... 140
12
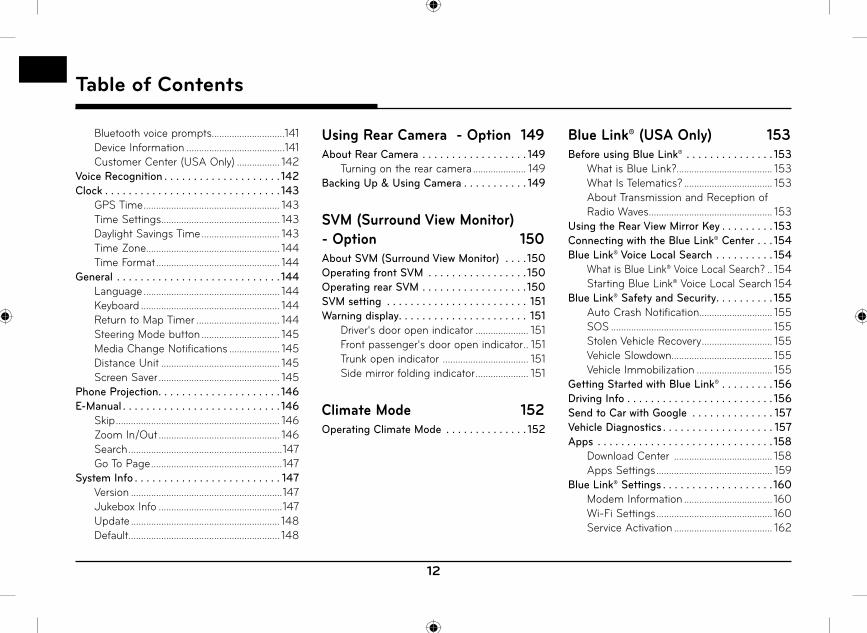
Table of Contents
Bluetooth voice prompts.............................141
Device Information .......................................141
Customer Center (USA Only) ................. 142
Voice Recognition . . . . . . . . . . . . . . . . . . . . 142
Clock . . . . . . . . . . . . . . . . . . . . . . . . . . . . . . 143
GPS Time ...................................................... 143
Time Settings ............................................... 143
Daylight Savings Time ............................... 143
Time Zone..................................................... 144
Time Format ................................................. 144
General . . . . . . . . . . . . . . . . . . . . . . . . . . . . 144
Language ...................................................... 144
Keyboard ....................................................... 144
Return to Map Timer ................................. 144
Steering Mode button ............................... 145
Media Change Notifications .................... 145
Distance Unit ............................................... 145
Screen Saver ................................................ 145
Phone Projection . . . . . . . . . . . . . . . . . . . . . 146
E-Manual . . . . . . . . . . . . . . . . . . . . . . . . . . . 146
Skip ................................................................. 146
Zoom In/Out ................................................ 146
Search .............................................................147
Go To Page ....................................................147
System Info . . . . . . . . . . . . . . . . . . . . . . . . . 147
Version ............................................................147
Jukebox Info .................................................147
Update ........................................................... 148
Default............................................................ 148
Using Rear Camera - Option 149About Rear Camera . . . . . . . . . . . . . . . . . . 149
Turning on the rear camera ..................... 149
Backing Up & Using Camera . . . . . . . . . . . 149
SVM (Surround View Monitor) - Option 150About SVM (Surround View Monitor) . . . .150
Operating front SVM . . . . . . . . . . . . . . . . .150
Operating rear SVM . . . . . . . . . . . . . . . . . .150
SVM setting . . . . . . . . . . . . . . . . . . . . . . . . 151
Warning display . . . . . . . . . . . . . . . . . . . . . . 151
Driver's door open indicator ..................... 151
Front passenger's door open indicator .. 151
Trunk open indicator .................................. 151
Side mirror folding indicator ..................... 151
Climate Mode 152Operating Climate Mode . . . . . . . . . . . . . . 152
Blue Link® (USA Only) 153Before using Blue Link® . . . . . . . . . . . . . . . 153
What is Blue Link?...................................... 153
What Is Telematics? ................................... 153
About Transmission and Reception of
Radio Waves ................................................. 153
Using the Rear View Mirror Key . . . . . . . . . 153
Connecting with the Blue Link® Center . . . 154
Blue Link® Voice Local Search . . . . . . . . . . 154
What is Blue Link® Voice Local Search? .. 154
Starting Blue Link® Voice Local Search 154
Blue Link® Safety and Security . . . . . . . . . . 155
Auto Crash Notification............................. 155
SOS ................................................................ 155
Stolen Vehicle Recovery ............................ 155
Vehicle Slowdown........................................ 155
Vehicle Immobilization .............................. 155
Getting Started with Blue Link® . . . . . . . . . 156
Driving Info . . . . . . . . . . . . . . . . . . . . . . . . . 156
Send to Car with Google . . . . . . . . . . . . . . 157
Vehicle Diagnostics . . . . . . . . . . . . . . . . . . . 157
Apps . . . . . . . . . . . . . . . . . . . . . . . . . . . . . . 158
Download Center ....................................... 158
Apps Settings .............................................. 159
Blue Link® Settings . . . . . . . . . . . . . . . . . . .160
Modem Information ................................... 160
Wi-Fi Settings .............................................. 160
Service Activation ....................................... 162
13
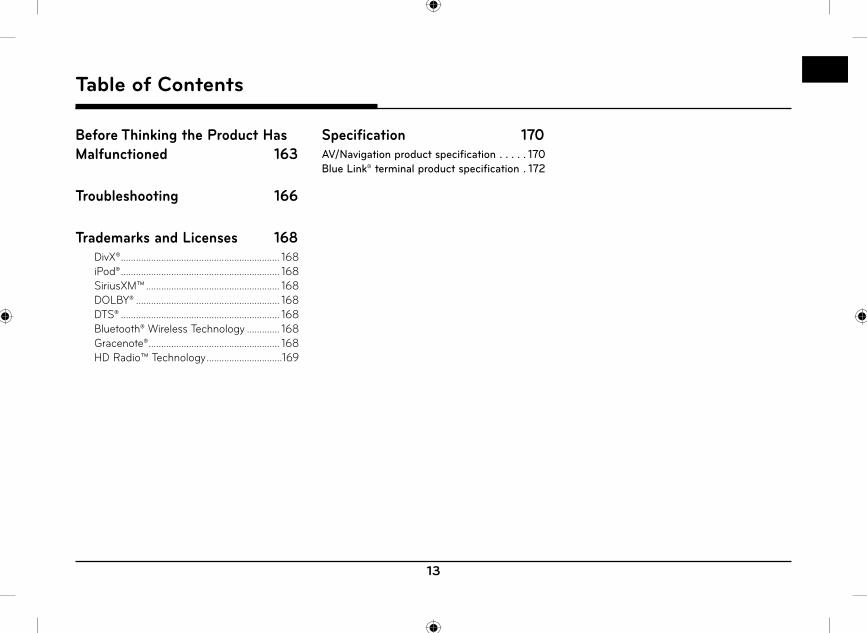
Before Thinking the Product Has Malfunctioned 163
Troubleshooting 166
Trademarks and Licenses 168DivX® ............................................................... 168
iPod® ............................................................... 168
SiriusXM™ ..................................................... 168
DOLBY® ......................................................... 168
DTS® ............................................................... 168
Bluetooth® Wireless Technology ............. 168
Gracenote® .................................................... 168
HD Radio™ Technology ..............................169
Specification 170AV/Navigation product specification . . . . . 170
Blue Link® terminal product specification . 172
Table of Contents

14
General Information
About Disc
Recommended Practices for Handling Discs• After using a disc, put the disc back in its original
case to prevent disc scratches.
• Do not use abnormally shaped discs (8cm, heart-shaped, octagon-shaped) as such discs could lead to malfunctions.
• Do not clean discs with chemical solutions, such as record sprays, antistatic sprays, antistatic liquids, benzene, or thinners.
• Do not expose the disc to direct sunlight or high temperatures for prolonged periods of time. Such exposure may lead to disc deformation.
• Upon playing a disc contaminated by dirt or other substances, the sound quality may deteriorate and result in skipping sounds. Writing on either side of the disc could result in damage to disc surfaces.
• Clean fi ngerprints and dust off the disc surface (coated side) with a soft cloth.
• Copy-protected CDs, such as S-type CDs, may not properly operate in the device. DATA CDs cannot be played. (However, such discs may still abnormally operate.)
• Skipping may occur when driving on bumpy roads for prolonged periods of time or upon severe shock, audio may not play properly.
• Do not attach sticker or label on the disc. Sticker or label may fall off and damage the system.
• Do not insert two or more discs into the disc slot simultaneously. It may damage the disc player.
• While disc is being inserted to the disc player by its self-loading mechanism, do not hold the disc or forcefully pull the disc. It may damage the disc player and the disc.
• Non-genuine discs may cause defective recognition or product disorder.
CAUTION : Servicing Compact Disc Player• Do not disassemble the device. Contact a
designated service center in case of malfunction. (Complete after service assistance will not be provided if the user disassembles the device.)
CAUTION : Cleaning Compact Disc Player• Do not use water to clean the device. Exposure
to water could lead to product malfunction.• Do not introduce foreign substances into
the disc insert/eject slot. Introducing foreign substances could damage the device interior.
• The device may fail to properly operate in extremely hot or cold temperatures.
• Steam can become condensed on the fi ber-optic lens due to rain, wet conditions, or upon operating the heating system. In such cases, discs may not be properly recognized. Remove the disc and wait until the moisture dries.
Types of Playable Discs
DVD-VIDEO (12 cm disc)
Video CD (12 cm disc)
VIDEO CD
Audio CD (12 cm disc)
CD-R/RW
ReWritable
In addition, this unit can play a DVD±R, DVD±RW, CD-R or CD-RW that contains audio titles, MP3 or WMA fi les.Depending on the conditions of the recording equipment or the CD-R/RW (or DVD-RW, DVD+RW) disc itself, some CD-R/RW (or DVD-RW, DVD+RW) discs may not be played on the unit.
General Information
15
General Information
COPYRIGHTSIt is forbidden by law to copy, broadcast, show, broadcast via cable, play in public, or rent copyrighted material without permission.
This product features the copy protection function developed by Macrovision. Copy protection signals are recorded on some discs. When playing the pictures of these discs on a unit, picture noise will appear. This product incorporates copyright protection technology that is protected by method claims of certain U.S. patents and other intellectual property rights owned by Macrovision Corporation and other rights owners. Use of this copyright protection technology must be authorized by Macrovision Corporation, and is intended for home and other limited viewing uses only unless otherwise authorized by Macrovision Corporation. Reverse engineering or disassembly is prohibited.
DVD Region CodeThis instrument is manufactured according to the region code number recorded in the DVD. If the DVD region code number does not match the region number of this instrument, DVD may not be played. Use the DVD corresponding to your region.
PBC: Playback Control (Video CD Only)Playback control is available for Video CD (VCD version 2.0 disc formats). PBC allows you to interact with the system via menus, search functions, or other typical computer-like operations. Moreover, still pictures of high resolution can be played if they are included in the disc. Video CDs not equipped with PBC (Version 1.1) operate in the same way as audio CDs.
If “ ” symbol appears
If “ ” symbol is displayed on the screen, the current screen will not be operated during the driving.
About USBConnect the USB device after turning on the engine. The USB device may become damaged if it is already connected when the ignition is turned on.
• Files that are not standard format fi les will not be played.
• For MP3/WMA fi les, only music fi les with compression rates between 8 Kbps ~ 320 Kbps can be played.
• Heed caution to static electricity when connecting/disconnecting external USB devices.
• Encoded MP3 Players will not be recognized when connected as an external device.
• When connecting an external USB device, the device may not properly recognize the USB is in some states.
• Only USB devices formatted as FAT 12/16/32 are supported, and NTFS fi le system is not supported.
• Some USB devices may not be supported due to compatibility issues.
• Avoid contact between the USB connector with bodily parts/foreign objects.
16
General Information
• Repeated connecting/disconnecting of USB devices within short periods of time may result in product malfunction.
• Insert USB device after starting the car. If the car is started while USB device is inserted, it may damage USB device.
• The amount of time required to recognize the external USB device may diff er depending on the type, size, or fi le formats stored on the USB. Such diff erences in required time are not indications of malfunction.
• The device may not recognize the USB device if separately purchased USB hubs and extension cables are being used. Connect the USB directly with the multimedia terminal of the vehicle.
• When application programs are installed to specifi c USBs, fi les may not properly play.
• The device may not operate normally if MP3 Players, cellular phones, digital cameras, or other electronic devices (USB devices not recognized as portable disk drives) are connected with the device.
• Charging through the USB may not work for some mobile devices.
• The device may not support normal operation when using a USB memory type besides Metal Cover Type USB Memory.
• The device may not support normal operation when using formats such as HDD Type, CF, or SD Memory.
• The device will not support fi les locked by DRM (Digital Rights Management).
• USB memory sticks used by connecting an Adaptor (SD Type or CF Type) may not be properly recognized.
MP3 file Information• Sampling frequency: 8 ~ 48 KHz (MP3), 22.5
~ 48 KHz (WMA), 8 ~ 192 KHz (FLAC)• Bit rate: 8 ~ 320 Kbps (MP3), 20 ~ 320 Kbps
(WMA), 8 Kbps ~ 1.6 Mbps (FLAC)• Version: v2, v7, v8, v9.• Playable fi le format: “.mp3”/ “.wma”/ “.fl ac”
Image file Information• Playable fi le format: “.bmp”, “.jpg”, “.gif”, “.png”,
“.tif” (Max 5MB).• It may not properly operate depending on
the storage type.
Video file Information• Video Resolution: 720 x 576 pixels (DivX),
1280 x 720 pixels (except DivX).• Playable fi le format: “.avi”, “.mpg”, “.mpeg”,
“.divx”, “.mp4”.• Subtitle format: “.smi”.• Video Codec:
“DIVX3.11”, “DIVX4”, “DIVX5”, “DIVX6”.• Audio Codec: “PCM”, “MP3”, “WMA”, “WAV”.• If video and caption fi le names are diff erent,
caption may not be displayed.• If DivX fi le format does not match main unit,
it may not be played properly.
17
General Information
Using iPod® Devices
Precautions upon using iPod®• Some iPods with unsupported
communication protocols may not properly operate with the system.
• If the iPod malfunctions due to an iPod device defect, reset the iPod and try again. (To learn more, refer to your iPod manual.)
• During ACC ON state, connecting the iPod through the iPod cable (The cable that is supplied when purchasing iPod/iPhone product.) will charge the iPod through the system.
• The use of genuine iPod cables supplied by Apple is recommended. (The use of other products may result in noise or abnormal operation.)
• Within iPhones, streaming audio and iPod control may occasionally confl ict. If problems persist, remove the iPhone and connect again.
• Use iPod with complete synchronization to iTunes. Unauthorized song addition may cause abnormal operation.
• If iPod and Bluetooth are connected simultaneously with the same iPhone, you cannot use Bluetooth audio function.
• If iPod touch or iPhone is used, iOS4.2 or greater is recommended.
Supported iPod® devicesiPhone 7, iPhone 7 Plus
iPhone 6, iPhone 6S , iPhone 6S Plus
iPhone SE
iPhone5, iPhone5S, iPhone5C
iPhone4, iPhone4S
iPhone 3GS
iPod Touch (1st through 5th generation)
iPod Nano
Using SD Cards
Ejecting and Inserting SD Cards• Ejecting and inserting SD cards while the
system is operating may result in SD Card or System errors. To eject or insert the SD card, fi rst turn off the system and the vehicle ignition.
• Eject/insert SD cards only to update the Map, Navi application and Navi S/W with a new version.
• When an SD Card with the new version is inserted, then the system will reboot automatically.
Usage of SD Cards• The SD Card is formatted to include only
Map and Navi S/W.
• The SD Card cannot be used to save and play Music.
• Do not add, delete, or format fi les within the SD Card.
18
Name of Each Component
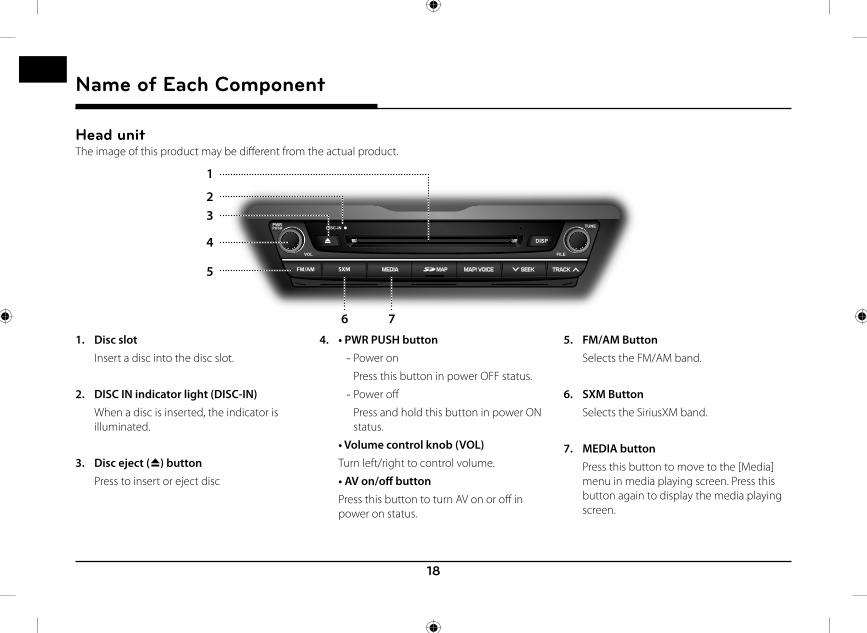
Head unitThe image of this product may be diff erent from the actual product.
/ SXM
1
4
6
2
5
7
3
1. Disc slot Insert a disc into the disc slot.
2. DISC IN indicator light (DISC-IN) When a disc is inserted, the indicator is
illuminated.
3. Disc eject (B) button Press to insert or eject disc
4. • PWR PUSH button - Power on
Press this button in power OFF status.
- Power off
Press and hold this button in power ON status.
• Volume control knob (VOL) Turn left/right to control volume.
• AV on/off button Press this button to turn AV on or off in
power on status.
5. FM/AM Button Selects the FM/AM band.
6. SXM Button Selects the SiriusXM band.
7. MEDIA button Press this button to move to the [Media]
menu in media playing screen. Press this button again to display the media playing screen.
Name of Each Component
19
/ SXM
10
11
13
12
8 9
Name of Each Component
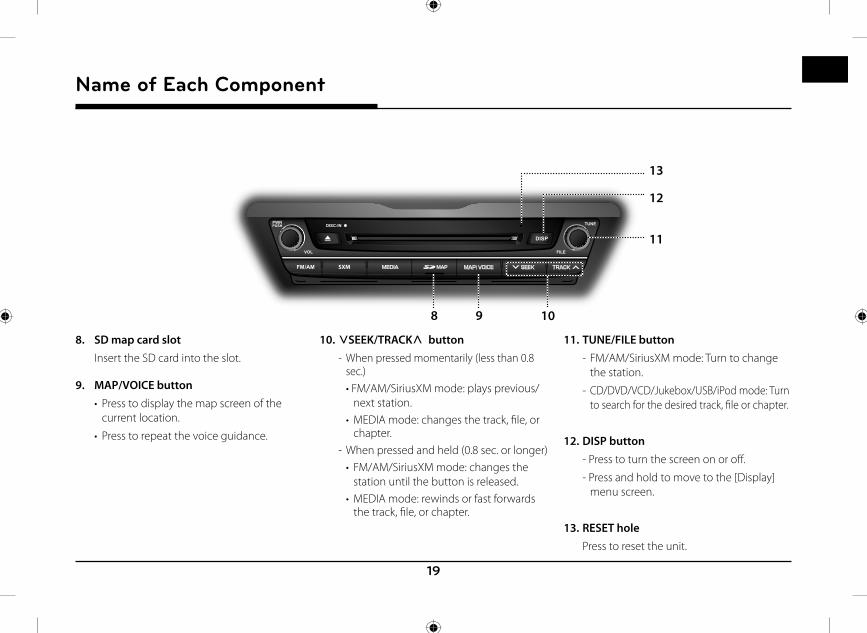
8. SD map card slot Insert the SD card into the slot.
9. MAP/VOICE button• Press to display the map screen of the
current location.
• Press to repeat the voice guidance.
10. SSEEK/TRACKW button- When pressed momentarily (less than 0.8
sec.) • FM/AM/SiriusXM mode: plays previous/
next station. • MEDIA mode: changes the track, fi le, or
chapter. - When pressed and held (0.8 sec. or longer)
• FM/AM/SiriusXM mode: changes the station until the button is released.
• MEDIA mode: rewinds or fast forwards the track, fi le, or chapter.
11. TUNE/FILE button- FM/AM/SiriusXM mode: Turn to change
the station.
- CD/DVD/VCD/Jukebox/USB/iPod mode: Turn to search for the desired track, fi le or chapter.
12. DISP button- Press to turn the screen on or off .
- Press and hold to move to the [Display] menu screen.
13. RESET hole Press to reset the unit.

20
Driver Information System (DIS) Control (USA Only)The image of this product may be diff erent from the actual product.
4 6
2 8
5
3 7
1
Name of Each Component
1. Controller Tap or rotate to navigate through the menu
screens. For more details, refer to “Using the controller” on page 24.
2. HOME button Press to move to the [HOME] menu screen.
3. PHONE button Press to move to the Phone menu screen.
4. BACK button Press to move to the previous screen.
5. button
Press to move to the [Blue Link] menu screen.
6. NAV button Press to move to the [Navigation] menu
screen.
7. MAP/VOICE button• Press to display the map screen of the
current location.
• Press to repeat the voice guidance.
8. MENU button Press to move to the pop-up menu in each
mode.
21
Driver Information System (DIS) Control (CANADA Only)The image of this product may be diff erent from the actual product.
4 6
2 8
5
3 7
1
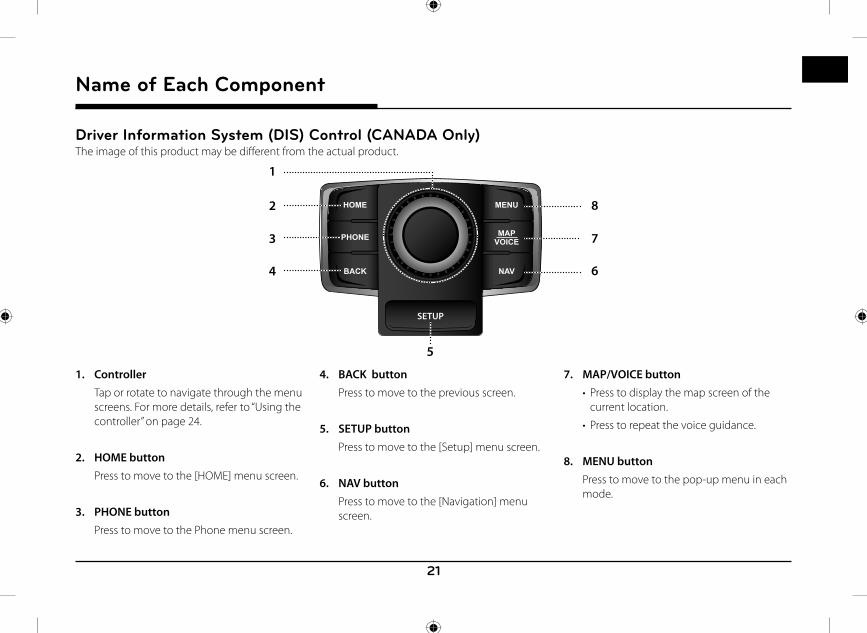
Name of Each Component
1. Controller Tap or rotate to navigate through the menu
screens. For more details, refer to “Using the controller” on page 24.
2. HOME button Press to move to the [HOME] menu screen.
3. PHONE button Press to move to the Phone menu screen.
4. BACK button Press to move to the previous screen.
5. SETUP button Press to move to the [Setup] menu screen.
6. NAV button Press to move to the [Navigation] menu
screen.
7. MAP/VOICE button• Press to display the map screen of the
current location.
• Press to repeat the voice guidance.
8. MENU button Press to move to the pop-up menu in each
mode.
22
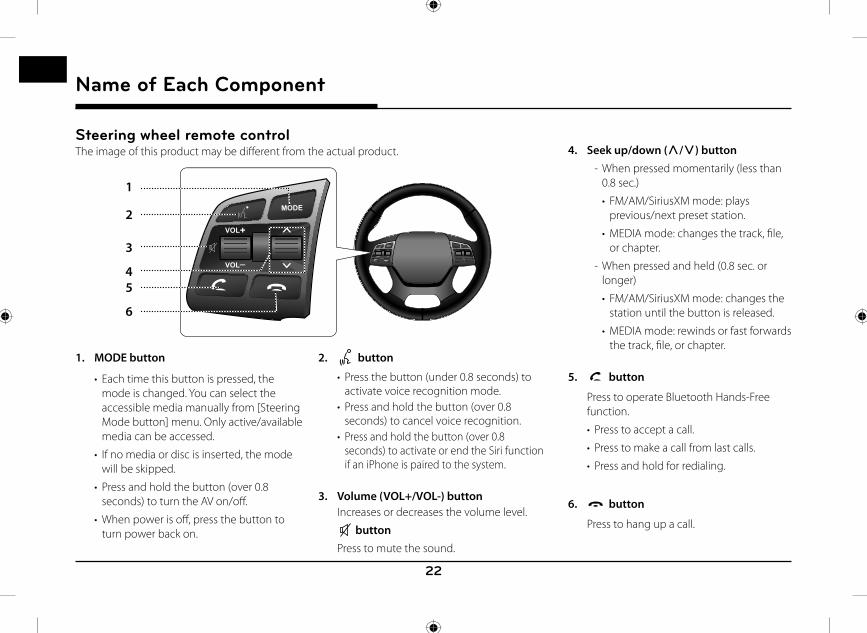
Steering wheel remote controlThe image of this product may be diff erent from the actual product.
1
5
6
2
3
4
Name of Each Component
1. MODE button
• Each time this button is pressed, the mode is changed. You can select the accessible media manually from [Steering Mode button] menu. Only active/available media can be accessed.
• If no media or disc is inserted, the mode will be skipped.
• Press and hold the button (over 0.8 seconds) to turn the AV on/off .
• When power is off , press the button to turn power back on.
2. button
• Press the button (under 0.8 seconds) to activate voice recognition mode.
• Press and hold the button (over 0.8 seconds) to cancel voice recognition.
• Press and hold the button (over 0.8 seconds) to activate or end the Siri function if an iPhone is paired to the system.
3. Volume (VOL+/VOL-) button Increases or decreases the volume level.
button Press to mute the sound.
4. Seek up/down (W/S) button- When pressed momentarily (less than
0.8 sec.)
• FM/AM/SiriusXM mode: plays previous/next preset station.
• MEDIA mode: changes the track, fi le, or chapter.
- When pressed and held (0.8 sec. or longer)
• FM/AM/SiriusXM mode: changes the station until the button is released.
• MEDIA mode: rewinds or fast forwards the track, fi le, or chapter.
5. button
Press to operate Bluetooth Hands-Free function.
• Press to accept a call.
• Press to make a call from last calls.
• Press and hold for redialing.
6. button
Press to hang up a call.

23
Basic Operation
Starting the system for the first time1. Press the engine start button.
Once the system is turned on, the booting process will start and the safety warning page is displayed.
2. Press [Confirm].
If you want to change the system language, press [Language]. For more details, refer to “Language” on page 144.
, Note
• You cannot operate the system while it is booting up. It may take some time for all of features of the system boot up.
• The safety warning page is displayed every time the ignition is turned on. The displayed warnings are related to safety, please closely read and comply with the safety warnings.
Turning the system offPress and hold “PWR PUSH” on the head unit.
To turn the system on again, press “PWR PUSH” on the head unit.
, Note
Check the volume when turning on the system. Before turning on the system, adjust the volume to a reasonable level.
AV OFFPress “PWR PUSH” on the head unit when the AV is ON.
AV ONPress “PWR PUSH” on the head unit when the AV is OFF.
Adjusting the volumeRotate the volume control knob (VOL) on the head unit.
, Note
When you turn the unit off , the current volume level is automatically memorized. Whenever you turn the system on, it operates at the memorized volume level.
Basic Operation

24
Basic Operation
Resetting the SystemThis feature is used to reset the system in the occurrence of an unforeseen error or problem. Press “RESET” button. (The use of a clip or pin is recommended when resetting the system.)
Using the controllerThis control is used to move and select menus.
Controller Description
Move in the menu by turning the controller left/right.
Push the controller up/down/left/right/diagonally to move in the menu.
Press the controller to select menu.
Using the Touch screenPress the desired menu on the screen to select a menu.
- USA Only
- CANADA Only
25
Radio Operation (FM/AM)
Listening to FM/AM radio1. Press ""FM/AM" on the head unit. Or press
[HOME] > [FM/AM].
2. Press [FM] or [AM] on the screen.
The FM/AM screen of the most recent listened station is displayed.
3. Auto tuning: Press "SSEEK/TRACKW" on the head unit.
- When a station is received, searching stops.
Manual tuning: Turn “TUNE/FILE” on the head unit in
clockwise or counter-clockwise direction.
- The stations move up and down step by step.
Preset tuning: From the 12 presets, select the station you
want to listen to.
Listening to HD Radio™ Stations (USA Only)The HD Radio function is not supported for vehicles purchased in Canada.
You can turn HD Radio reception on from the menu and listen to HD Radio Broadcasts.
The HD Radio screen is displayed only when a HD Radio broadcast is being received.
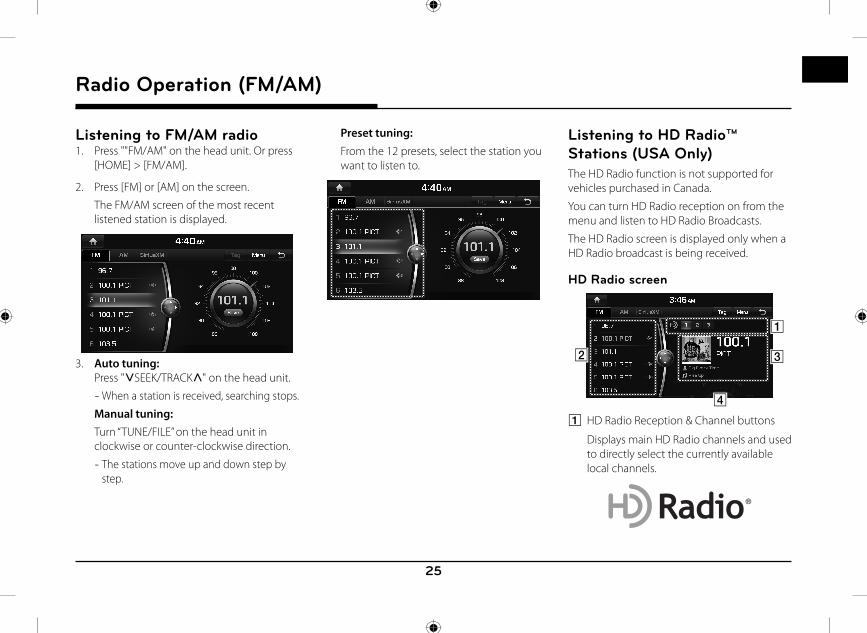
HD Radio screen
D
A
CB
A HD Radio Reception & Channel buttons
Displays main HD Radio channels and used to directly select the currently available local channels.
Radio Operation (FM/AM)
26
Radio Operation (FM/AM)
B HD Channel Number
• HD Channel number saved in preset.
• Preset tuning: From the 12 presets, select the HD Channel you want to listen to.
C Broadcast Information
Displays detailed information about the current broadcast. (Album Cover Art, Artist name, Song title, HD Radio channel, Frequency, PTY, etc...)
D Frequency controller
When controller is focused, it moves to center of screen. Turn the controller to search for frequency and move the red line.
, Note
HD Radio reception is included when the vehicle is in Radio mode. Methods used to reorder between channels, save preset stations, or other methods of searching frequencies used for standard radios are identical for HD Radio receivers. The HD Radio icon will be displayed when the vehicle is within regions where HD Radio signals can be received.
HD Radio™ Reception On/Off (USA Only)1. Select the band (FM, AM) you want.
If an HD Radio broadcast is received, the radio mode will switch from analog broadcast to HD Radio broadcast.
Press [Menu] > [HD Radio] on the screen.
The HD Radio receiver will be off and switch to analog broadcast.
, Note
• The default setting of [HD Radio] is set to on.
• HD Radio Technology is a digital radio technology used by FM and AM radio stations to transmit audio and data via a digital signal in conjunction with their analog signals.
• While listening to the radio, the HD Radio icon will become displayed if receiving an HD Radio broadcast.
Tag (USA Only)If the HD Radio broadcast includes Tag information, then the tag information is displayed on the screen.
1. Press [Tag] on the HD Radio screen.
, Note
When HD Radio reception is off , the [Tag] button is deactivated.
27
Radio Operation (FM/AM)
Saving FM/AM preset12 preset stations each for FM/AM mode can be saved manually.
1. Select the band (FM, AM) you want to store a station into.
2. Select the desired station.
3. Press [Menu] > [Save as Preset].
4. Press the desired preset number.
The station is saved.
, Note
When the station is saved on a number of which another station has already been saved, the previously saved station is erased.
Scanning FM/AM broadcast station
Scanning preset stationsThis function scans the 12 stations saved as preset numbers in the current band for 10 seconds each.
1. Select the band (FM, AM) you want.
2. Press [Menu] > [Preset Scan].
, Note
When the scan is operating, pressing the controller will stop the function and remain on the stopped station.
Scanning all stationsThis function scans all stations and plays only stations with superior reception for 5 seconds each.
1. Select the band (FM, AM) you want.
2. Press [Menu] > [Scan All Channels].
, Note
When the scan is operating, pressing the controller will stop the function and remain on the stopped station.
28
Radio Operation (FM/AM)
Reordering FM/AM presetThis function reorders the station saved to presets.
1. Select the band (FM, AM) you want.
2. Press [Menu] > [Reorder Presets].
3. Press the desired preset from the list with controller.
4. Move and press the selected preset up and down.
AutostoreA total of 24 stations with twelve preset stations each for FM/AM mode can be saved.
1. Select the band (FM, AM) you want.
2. Press [Menu] > [Autostore] to save automatically receivable stations to Preset list.
, Note
While Autostore is operating, pressing [Autostore] again will cancel the function and play the previous frequency.
Radio Text On/OffIf current broadcast includes Radio Text information, the text information is displayed on the screen.
1. Select the band (FM, AM) you want.
2. Press [Menu] > [Radio Text].
Pressing the [Radio Text] again will cancel the function.
Sound Settings1. Press [Menu] > [Sound Settings] in the
radio screen.
2. For more details, refer to “Sound” on page 136.
29
Radio Operation (SiriusXM™)
SiriusXM™ screen
8 10 129 11
3
4
5
67
21
Radio Operation (SiriusXM™)
1. Category Info Displays the category currently playing.
2. Channel Logo Displays the logo of the channel currently
playing.
3. Preset list Displays the channels saved in the Preset list.
Smart Favorites ( ) SXM supports 6 smart favorites. It is buffered 1 hour for the currently tuned channel (Instant Replay) and at least 1/2 hour for each of the 6 smart favorites.
4. Channel Info Displays the current channel number and
name.
5. Contents Info Displays the artist, title and other
information about the song currently playing.
6. (Category Lock)
If the Category Lock is Off, you can change or search all channels. If the Category Lock is On, you can change or search only the channels of the currently active category.
7. Live Changes to the Live Broadcast mode.
8. (Time difference) Displays the time difference between the
song playing and the Live broadcast.
9. c
Repeats the previously broadcasted program.• When it is pressed shortly (less than 0.8
sec.): Moves to the previous item.• When it is pressed and held (0.8 sec. or
longer): Searches backwards until the button is released.
10. d/M (Play/Pause) Plays/Pauses the currently broadcasting
program.
11. v• When it is pressed shortly (less than 0.8
sec.): Moves to the next item.• When it is pressed and held (0.8 sec.
or longer): Searches forward until the button is released.
12. / (Category Selection Buttons) This feature is used to select the Previous/
Next category.
30
Radio Operation (SiriusXM™)
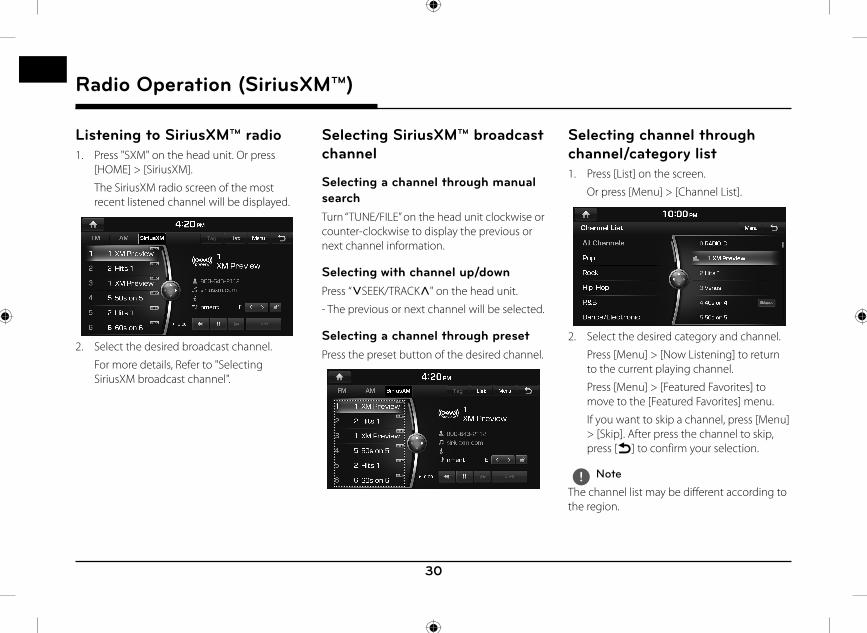
Listening to SiriusXM™ radio1. Press "SXM" on the head unit. Or press
[HOME] > [SiriusXM].
The SiriusXM radio screen of the most recent listened channel will be displayed.
2. Select the desired broadcast channel.
For more details, Refer to "Selecting SiriusXM broadcast channel".
Selecting SiriusXM™ broadcast channel
Selecting a channel through manual searchTurn “TUNE/FILE” on the head unit clockwise or counter-clockwise to display the previous or next channel information.
Selecting with channel up/downPress “SSEEK/TRACKW" on the head unit.
- The previous or next channel will be selected.
Selecting a channel through presetPress the preset button of the desired channel.
Selecting channel through channel/category list1. Press [List] on the screen.
Or press [Menu] > [Channel List].
2. Select the desired category and channel.
Press [Menu] > [Now Listening] to return to the current playing channel.
Press [Menu] > [Featured Favorites] to move to the [Featured Favorites] menu.
If you want to skip a channel, press [Menu] > [Skip]. After press the channel to skip, press [g] to confirm your selection.
, Note
The channel list may be diff erent according to the region.
31
Radio Operation (SiriusXM™)
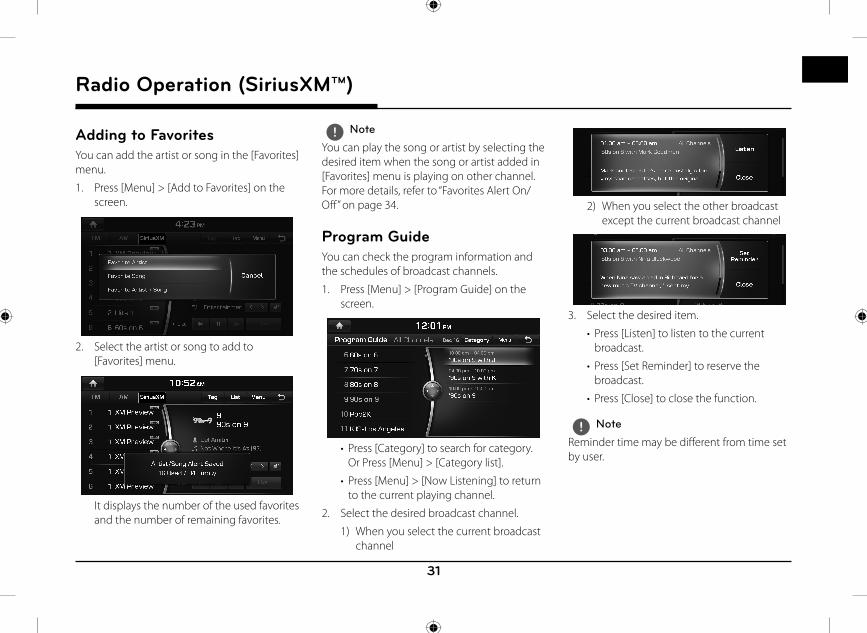
Adding to FavoritesYou can add the artist or song in the [Favorites] menu.
1. Press [Menu] > [Add to Favorites] on the screen.
2. Select the artist or song to add to [Favorites] menu.
It displays the number of the used favorites and the number of remaining favorites.
, Note
You can play the song or artist by selecting the desired item when the song or artist added in [Favorites] menu is playing on other channel. For more details, refer to “Favorites Alert On/Off ” on page 34.
Program GuideYou can check the program information and the schedules of broadcast channels.
1. Press [Menu] > [Program Guide] on the screen.
• Press [Category] to search for category. Or Press [Menu] > [Category list].
• Press [Menu] > [Now Listening] to return to the current playing channel.
2. Select the desired broadcast channel.
1) When you select the current broadcast channel
2) When you select the other broadcast except the current broadcast channel
3. Select the desired item.
• Press [Listen] to listen to the current broadcast.
• Press [Set Reminder] to reserve the broadcast.
• Press [Close] to close the function.
, Note
Reminder time may be diff erent from time set by user.
32
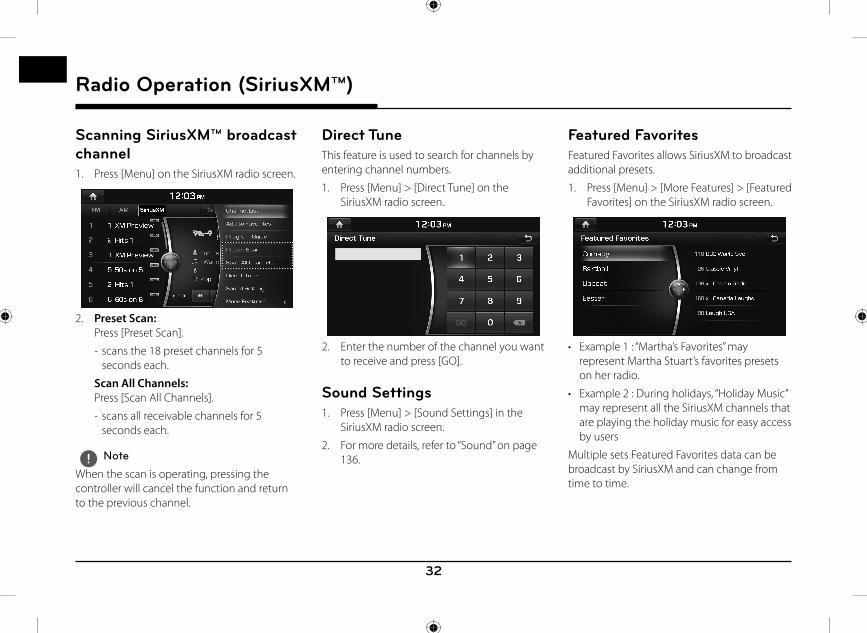
Scanning SiriusXM™ broadcast channel1. Press [Menu] on the SiriusXM radio screen.
2. Preset Scan: Press [Preset Scan].
- scans the 18 preset channels for 5 seconds each.
Scan All Channels: Press [Scan All Channels].
- scans all receivable channels for 5 seconds each.
, Note
When the scan is operating, pressing the controller will cancel the function and return to the previous channel.
Direct TuneThis feature is used to search for channels by entering channel numbers.
1. Press [Menu] > [Direct Tune] on the SiriusXM radio screen.
2. Enter the number of the channel you want to receive and press [GO].
Sound Settings1. Press [Menu] > [Sound Settings] in the
SiriusXM radio screen.
2. For more details, refer to “Sound” on page 136.
Featured FavoritesFeatured Favorites allows SiriusXM to broadcast additional presets.
1. Press [Menu] > [More Features] > [Featured Favorites] on the SiriusXM radio screen.
• Example 1 : “Martha’s Favorites” may represent Martha Stuart’s favorites presets on her radio.
• Example 2 : During holidays, “Holiday Music” may represent all the SiriusXM channels that are playing the holiday music for easy access by users
Multiple sets Featured Favorites data can be broadcast by SiriusXM and can change from time to time.
Radio Operation (SiriusXM™)
33
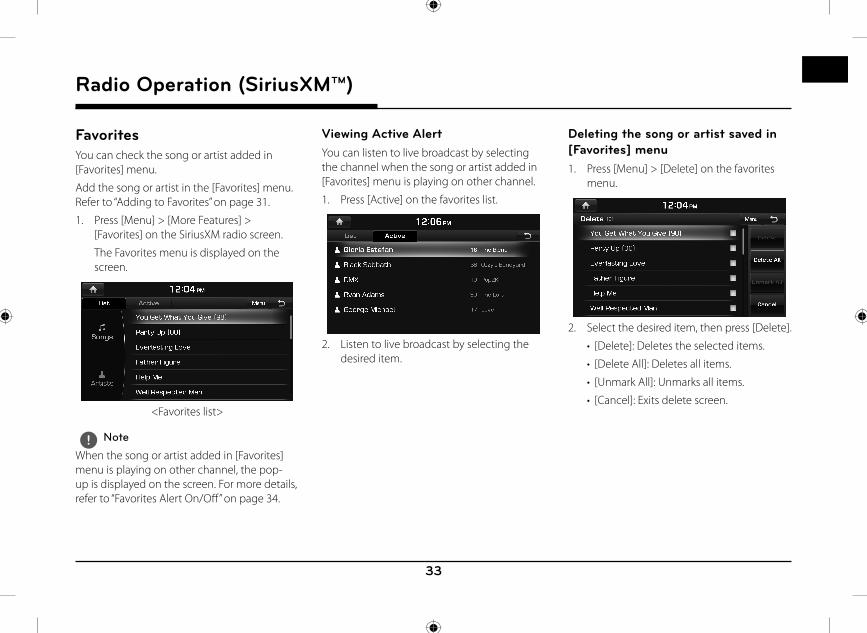
FavoritesYou can check the song or artist added in [Favorites] menu.
Add the song or artist in the [Favorites] menu. Refer to “Adding to Favorites” on page 31.
1. Press [Menu] > [More Features] > [Favorites] on the SiriusXM radio screen.
The Favorites menu is displayed on the screen.
<Favorites list>
, Note
When the song or artist added in [Favorites] menu is playing on other channel, the pop-up is displayed on the screen. For more details, refer to “Favorites Alert On/Off ” on page 34.
Viewing Active AlertYou can listen to live broadcast by selecting the channel when the song or artist added in [Favorites] menu is playing on other channel.
1. Press [Active] on the favorites list.
2. Listen to live broadcast by selecting the desired item.
Deleting the song or artist saved in [Favorites] menu1. Press [Menu] > [Delete] on the favorites
menu.
2. Select the desired item, then press [Delete].
• [Delete]: Deletes the selected items.
• [Delete All]: Deletes all items.
• [Unmark All]: Unmarks all items.
• [Cancel]: Exits delete screen.
Radio Operation (SiriusXM™)
34
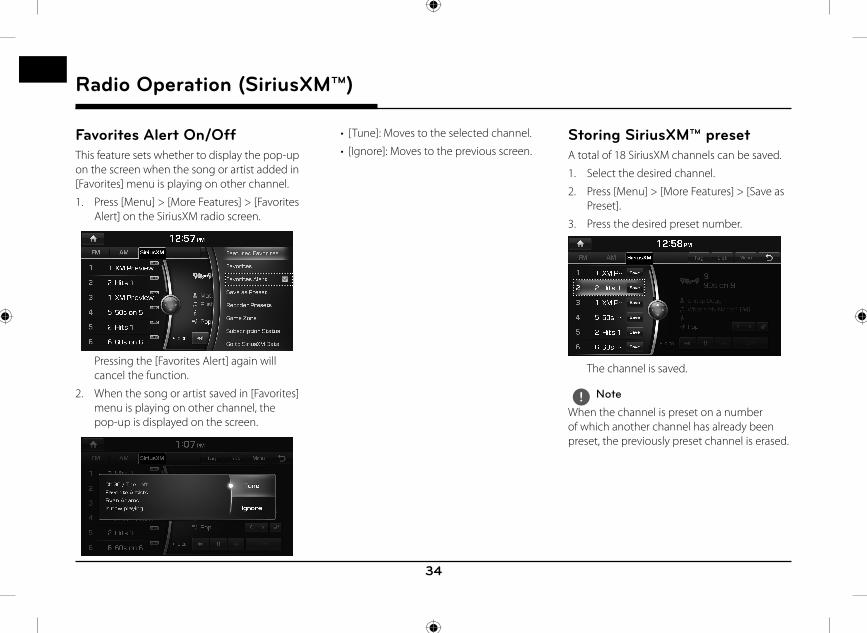
Favorites Alert On/OffThis feature sets whether to display the pop-up on the screen when the song or artist added in [Favorites] menu is playing on other channel.
1. Press [Menu] > [More Features] > [Favorites Alert] on the SiriusXM radio screen.
Pressing the [Favorites Alert] again will cancel the function.
2. When the song or artist saved in [Favorites] menu is playing on other channel, the pop-up is displayed on the screen.
• [Tune]: Moves to the selected channel.
• [Ignore]: Moves to the previous screen.Storing SiriusXM™ presetA total of 18 SiriusXM channels can be saved.
1. Select the desired channel.
2. Press [Menu] > [More Features] > [Save as Preset].
3. Press the desired preset number.
The channel is saved.
, Note
When the channel is preset on a number of which another channel has already been preset, the previously preset channel is erased.
Radio Operation (SiriusXM™)
35
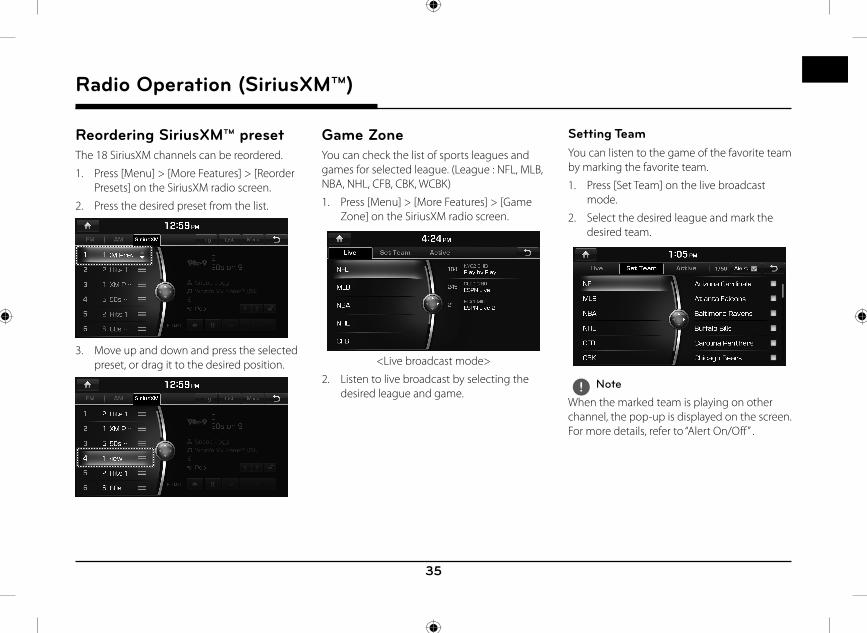
Reordering SiriusXM™ presetThe 18 SiriusXM channels can be reordered.
1. Press [Menu] > [More Features] > [Reorder Presets] on the SiriusXM radio screen.
2. Press the desired preset from the list.
3. Move up and down and press the selected preset, or drag it to the desired position.
Game ZoneYou can check the list of sports leagues and games for selected league. (League : NFL, MLB, NBA, NHL, CFB, CBK, WCBK)
1. Press [Menu] > [More Features] > [Game Zone] on the SiriusXM radio screen.
<Live broadcast mode>
2. Listen to live broadcast by selecting the desired league and game.
Setting TeamYou can listen to the game of the favorite team by marking the favorite team.
1. Press [Set Team] on the live broadcast mode.
2. Select the desired league and mark the desired team.
, Note
When the marked team is playing on other channel, the pop-up is displayed on the screen. For more details, refer to “Alert On/Off ” .
Radio Operation (SiriusXM™)
36
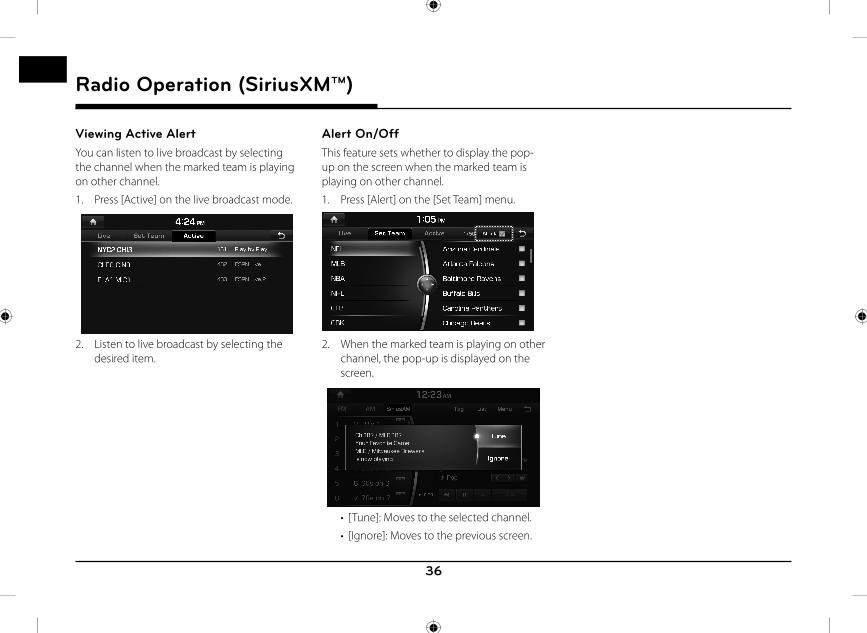
Viewing Active AlertYou can listen to live broadcast by selecting the channel when the marked team is playing on other channel.
1. Press [Active] on the live broadcast mode.
2. Listen to live broadcast by selecting the desired item.
Alert On/OffThis feature sets whether to display the pop-up on the screen when the marked team is playing on other channel.
1. Press [Alert] on the [Set Team] menu.
2. When the marked team is playing on other channel, the pop-up is displayed on the screen.
• [Tune]: Moves to the selected channel.
• [Ignore]: Moves to the previous screen.
Radio Operation (SiriusXM™)
37
Subscription Status This feature is used to check the Subscription status of SiriusXM.
1. Press [Menu] > [More Features] > [Subscription Status] on the SiriusXM radio screen.
2. If you have not subscribed to the SiriusXM service, press [Call] to enable Services.
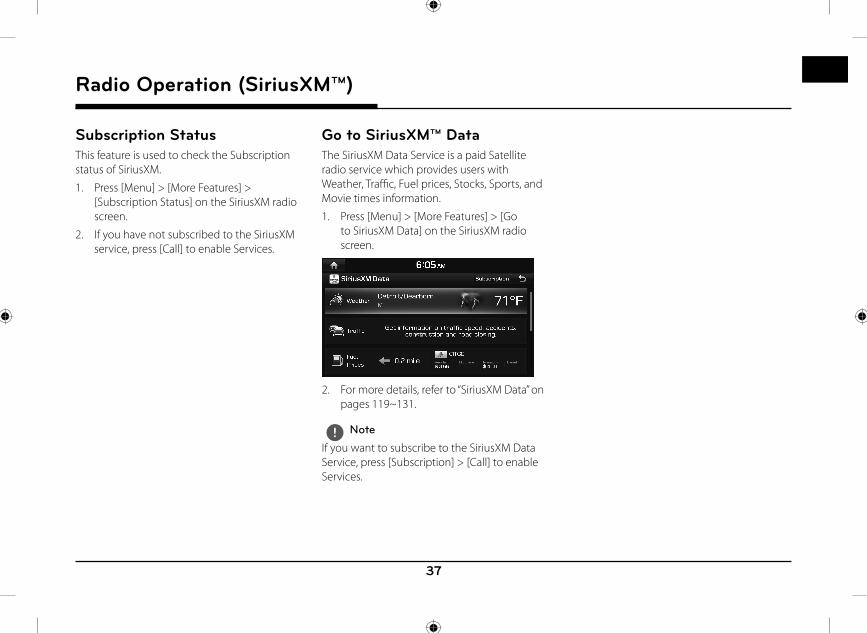
Go to SiriusXM™ DataThe SiriusXM Data Service is a paid Satellite radio service which provides users with Weather, Traffi c, Fuel prices, Stocks, Sports, and Movie times information.
1. Press [Menu] > [More Features] > [Go to SiriusXM Data] on the SiriusXM radio screen.
2. For more details, refer to “SiriusXM Data” on pages 119~131.
, Note
If you want to subscribe to the SiriusXM Data Service, press [Subscription] > [Call] to enable Services.
Radio Operation (SiriusXM™)
38
Audio CD/MP3 CD Operation
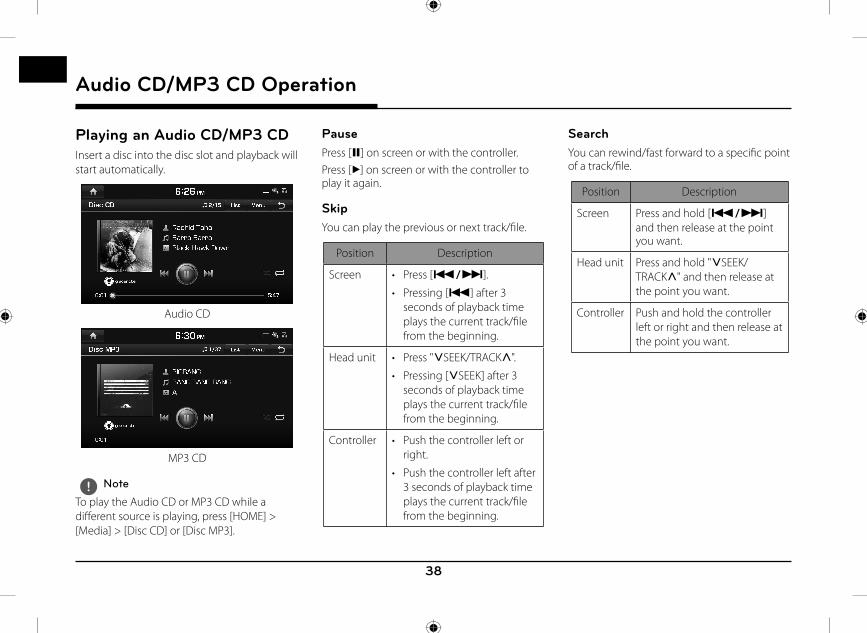
Playing an Audio CD/MP3 CDInsert a disc into the disc slot and playback will start automatically.
Audio CD
MP3 CD
, Note
To play the Audio CD or MP3 CD while a diff erent source is playing, press [HOME] > [Media] > [Disc CD] or [Disc MP3].
PausePress [M] on screen or with the controller.Press [d] on screen or with the controller to play it again.
SkipYou can play the previous or next track/fi le.
Position Description
Screen • Press [C/V].
• Pressing [C] after 3 seconds of playback time plays the current track/fi le from the beginning.
Head unit • Press "SSEEK/TRACKW".
• Pressing [SSEEK] after 3 seconds of playback time plays the current track/fi le from the beginning.
Controller • Push the controller left or right.
• Push the controller left after 3 seconds of playback time plays the current track/fi le from the beginning.
SearchYou can rewind/fast forward to a specifi c point of a track/fi le.
Position Description
Screen Press and hold [C/V] and then release at the point you want.
Head unit Press and hold "SSEEK/TRACKW" and then release at the point you want.
Controller Push and hold the controller left or right and then release at the point you want.
Audio CD/MP3 CD Operation
39
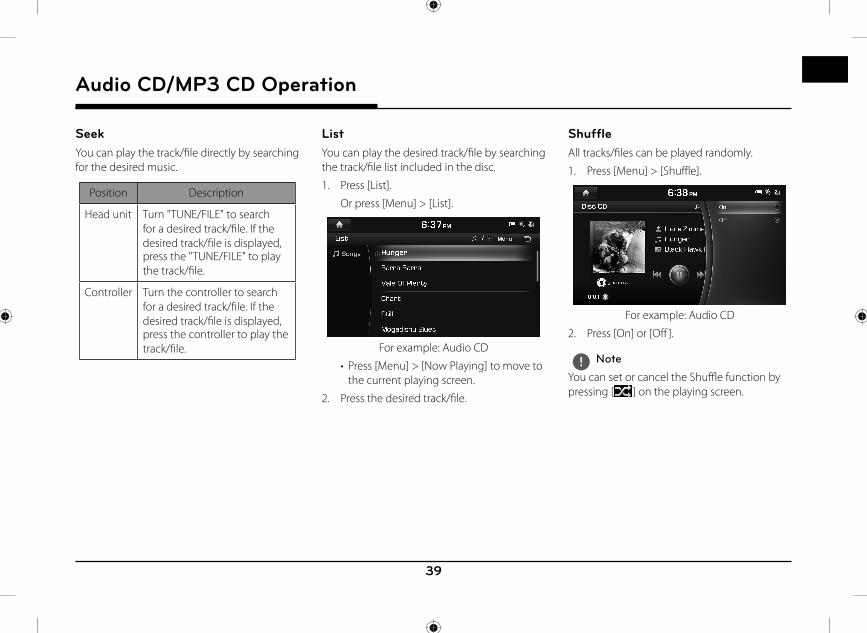
SeekYou can play the track/fi le directly by searching for the desired music.
Position Description
Head unit Turn "TUNE/FILE" to search for a desired track/fi le. If the desired track/fi le is displayed, press the "TUNE/FILE" to play the track/fi le.
Controller Turn the controller to search for a desired track/fi le. If the desired track/fi le is displayed, press the controller to play the track/fi le.
ListYou can play the desired track/fi le by searching the track/fi le list included in the disc.
1. Press [List].
Or press [Menu] > [List].
For example: Audio CD
• Press [Menu] > [Now Playing] to move to the current playing screen.
2. Press the desired track/fi le.
ShuffleAll tracks/fi les can be played randomly.
1. Press [Menu] > [Shuffle].
For example: Audio CD
2. Press [On] or [Off ].
, Note
You can set or cancel the Shuffl e function by pressing [ ] on the playing screen.
Audio CD/MP3 CD Operation
40
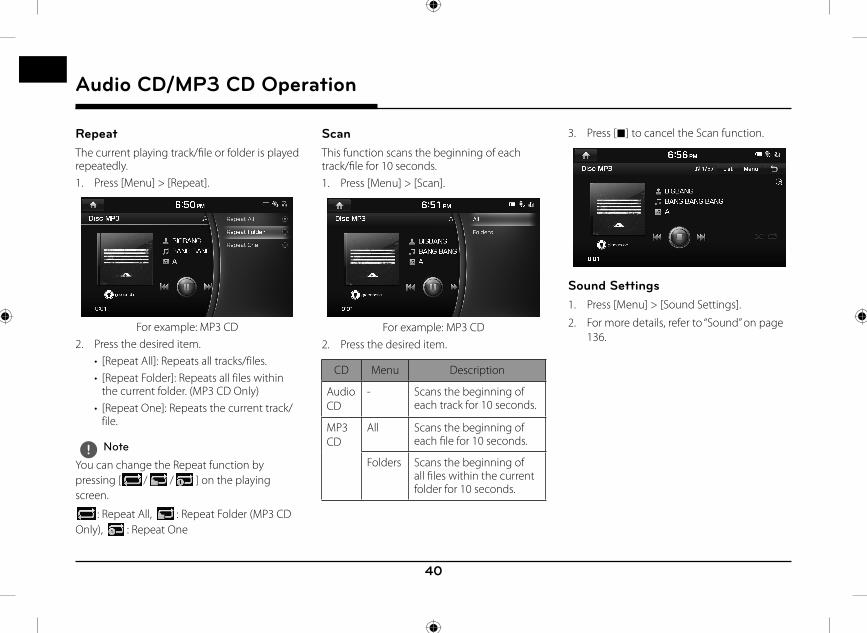
RepeatThe current playing track/fi le or folder is played repeatedly.1. Press [Menu] > [Repeat].
For example: MP3 CD2. Press the desired item.
• [Repeat All]: Repeats all tracks/files.• [Repeat Folder]: Repeats all files within
the current folder. (MP3 CD Only)• [Repeat One]: Repeats the current track/
file.
, Note
You can change the Repeat function by pressing [ / / ] on the playing screen.
: Repeat All, : Repeat Folder (MP3 CD Only), : Repeat One
ScanThis function scans the beginning of each track/fi le for 10 seconds.1. Press [Menu] > [Scan].
For example: MP3 CD2. Press the desired item.
CD Menu Description
Audio CD
- Scans the beginning of each track for 10 seconds.
MP3 CD
All Scans the beginning of each fi le for 10 seconds.
Folders Scans the beginning of all fi les within the current folder for 10 seconds.
3. Press [Z] to cancel the Scan function.
Sound Settings1. Press [Menu] > [Sound Settings].
2. For more details, refer to “Sound” on page 136.
Audio CD/MP3 CD Operation
4141
DVD/VCD Operation
Playing a DVD/VCDInsert a disc into the disc slot, with the label facing up.
Playback will start automatically. In some cases, the disc menu might appear.
, Note
• To play the DVD or VCD while a diff erent source is playing, press [HOME] > [Media] > [DVD] or [VCD].
• If a menu screen is displayed, select the desired option by using the controller.
• Video is not available while driving.(Because of traffi c regulations, video is only available while the vehicle is stopped.)
Switching to Menu display or Full Screen Display
Position Description
Screen Press the screen.
Controller Push the controller up or down on full screen display mode.
, Note
Press [Menu] > [Full Screen Display] or wait 5 seconds to display full screen mode.
PausePress [M] on screen or with the controller.Press [d] on screen or with the controller to play it again.
SkipYou can play the previous or next chapter/track.
Position Description
Screen • Press [C/V].
• Pressing [C] after 3 seconds of playback time plays the current chapter/track from the beginning.
Head unit • Press "SSEEK/TRACKW".
• Pressing [SSEEK] after 3 seconds of playback time plays the current chapter/track from the beginning.
Controller • Push the controller left or right.
• Push the controller left after 3 seconds of playback time plays the current chapter/track from the beginning.
DVD/VCD Operation
42
DVD/VCD Operation
SearchYou can rewind/fast forward to a specifi c point of a chapter/track.
Position Description
Screen Press and hold [C/V] and then release at the point you want.
Head unit Press and hold "SSEEK/TRACKW" and then release at the point you want.
Controller Push and hold the controller left or right and then release at the point you want.
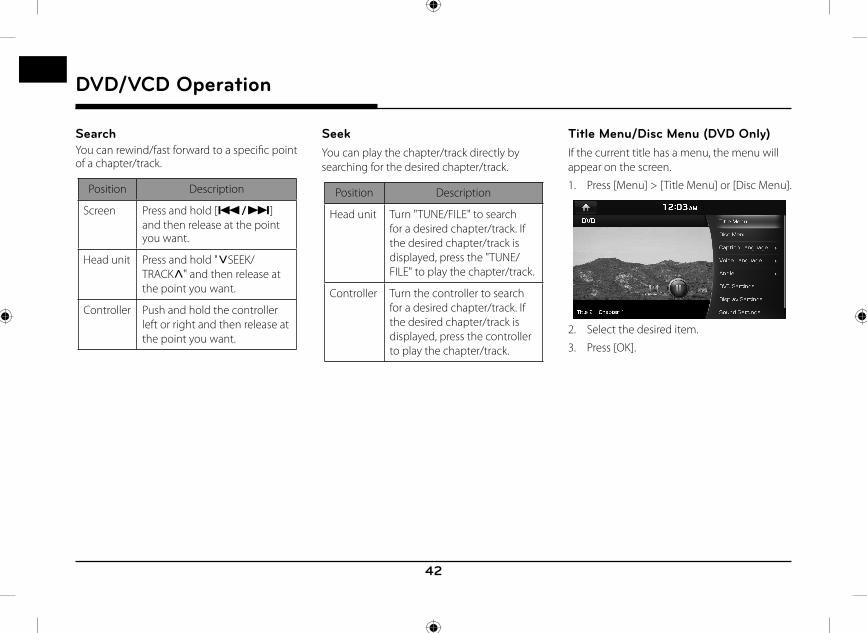
SeekYou can play the chapter/track directly by searching for the desired chapter/track.
Position Description
Head unit Turn "TUNE/FILE" to search for a desired chapter/track. If the desired chapter/track is displayed, press the "TUNE/FILE" to play the chapter/track.
Controller Turn the controller to search for a desired chapter/track. If the desired chapter/track is displayed, press the controller to play the chapter/track.
Title Menu/Disc Menu (DVD Only)If the current title has a menu, the menu will appear on the screen.
1. Press [Menu] > [Title Menu] or [Disc Menu].
2. Select the desired item.
3. Press [OK].
43
DVD/VCD Operation
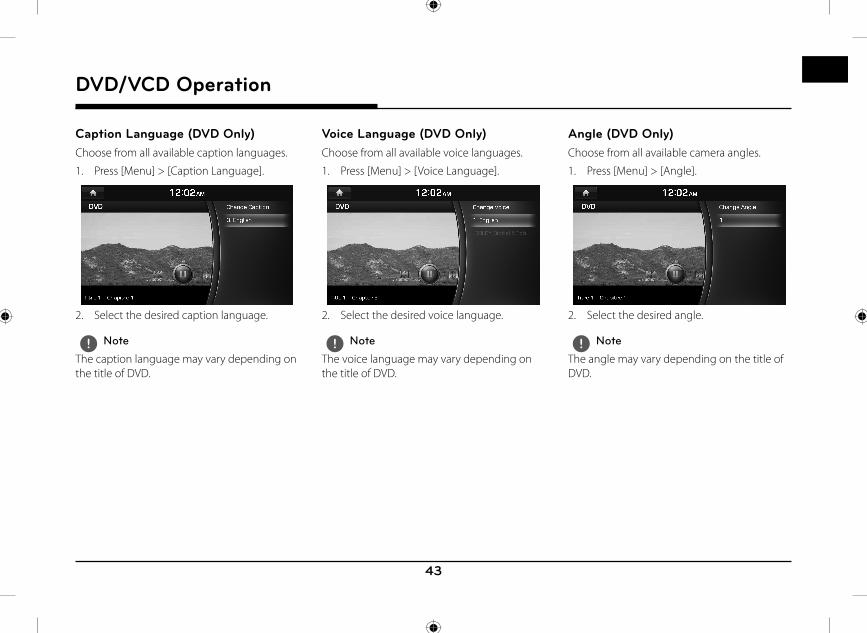
Caption Language (DVD Only)Choose from all available caption languages.
1. Press [Menu] > [Caption Language].
2. Select the desired caption language.
, Note
The caption language may vary depending on the title of DVD.
Voice Language (DVD Only)Choose from all available voice languages.
1. Press [Menu] > [Voice Language].
2. Select the desired voice language.
, Note
The voice language may vary depending on the title of DVD.
Angle (DVD Only)Choose from all available camera angles.
1. Press [Menu] > [Angle].
2. Select the desired angle.
, Note
The angle may vary depending on the title of DVD.
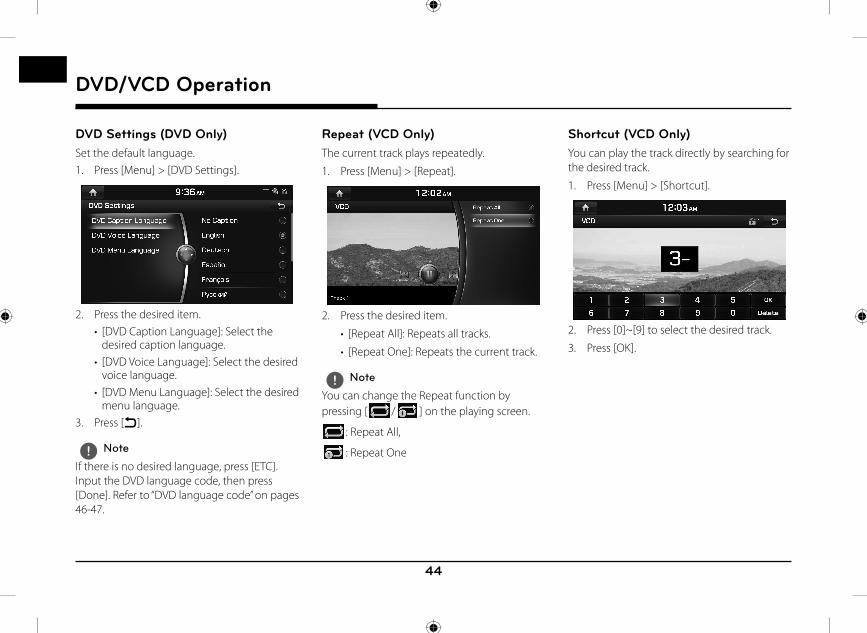
44
DVD/VCD Operation
DVD Settings (DVD Only)Set the default language.1. Press [Menu] > [DVD Settings].
2. Press the desired item.• [DVD Caption Language]: Select the
desired caption language.• [DVD Voice Language]: Select the desired
voice language.• [DVD Menu Language]: Select the desired
menu language.3. Press [1].
, Note
If there is no desired language, press [ETC]. Input the DVD language code, then press [Done]. Refer to “DVD language code” on pages 46-47.
Repeat (VCD Only)The current track plays repeatedly.
1. Press [Menu] > [Repeat].
2. Press the desired item.
• [Repeat All]: Repeats all tracks.
• [Repeat One]: Repeats the current track.
, Note
You can change the Repeat function by pressing [ / ] on the playing screen.
: Repeat All,
: Repeat One
Shortcut (VCD Only)You can play the track directly by searching for the desired track.
1. Press [Menu] > [Shortcut].
2. Press [0]~[9] to select the desired track.
3. Press [OK].
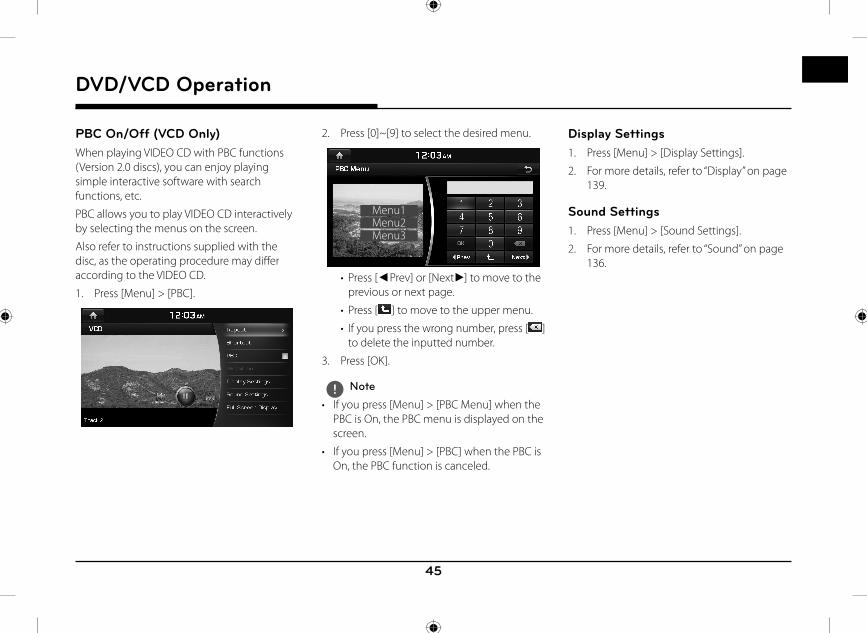
45
DVD/VCD Operation
PBC On/Off (VCD Only)When playing VIDEO CD with PBC functions (Version 2.0 discs), you can enjoy playing simple interactive software with search functions, etc.
PBC allows you to play VIDEO CD interactively by selecting the menus on the screen.
Also refer to instructions supplied with the disc, as the operating procedure may diff er according to the VIDEO CD.
1. Press [Menu] > [PBC].
2. Press [0]~[9] to select the desired menu.
Menu1Menu2Menu3
• Press [aPrev] or [Nextd] to move to the previous or next page.
• Press [ ] to move to the upper menu.
• If you press the wrong number, press [ ] to delete the inputted number.
3. Press [OK].
, Note
• If you press [Menu] > [PBC Menu] when the PBC is On, the PBC menu is displayed on the screen.
• If you press [Menu] > [PBC] when the PBC is On, the PBC function is canceled.
Display Settings1. Press [Menu] > [Display Settings].
2. For more details, refer to “Display” on page 139.
Sound Settings1. Press [Menu] > [Sound Settings].
2. For more details, refer to “Sound” on page 136.
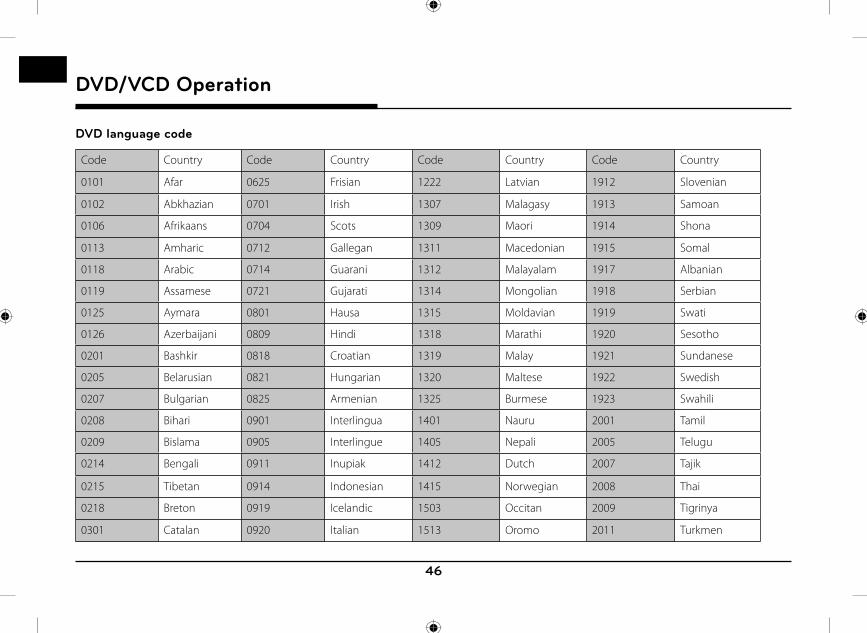
46
DVD/VCD Operation
DVD language code
Code Country Code Country Code Country Code Country
0101 Afar 0625 Frisian 1222 Latvian 1912 Slovenian
0102 Abkhazian 0701 Irish 1307 Malagasy 1913 Samoan
0106 Afrikaans 0704 Scots 1309 Maori 1914 Shona
0113 Amharic 0712 Gallegan 1311 Macedonian 1915 Somal
0118 Arabic 0714 Guarani 1312 Malayalam 1917 Albanian
0119 Assamese 0721 Gujarati 1314 Mongolian 1918 Serbian
0125 Aymara 0801 Hausa 1315 Moldavian 1919 Swati
0126 Azerbaijani 0809 Hindi 1318 Marathi 1920 Sesotho
0201 Bashkir 0818 Croatian 1319 Malay 1921 Sundanese
0205 Belarusian 0821 Hungarian 1320 Maltese 1922 Swedish
0207 Bulgarian 0825 Armenian 1325 Burmese 1923 Swahili
0208 Bihari 0901 Interlingua 1401 Nauru 2001 Tamil
0209 Bislama 0905 Interlingue 1405 Nepali 2005 Telugu
0214 Bengali 0911 Inupiak 1412 Dutch 2007 Tajik
0215 Tibetan 0914 Indonesian 1415 Norwegian 2008 Thai
0218 Breton 0919 Icelandic 1503 Occitan 2009 Tigrinya
0301 Catalan 0920 Italian 1513 Oromo 2011 Turkmen

47
DVD/VCD Operation
Code Country Code Country Code Country Code Country
0315 Corsican 0923 Hebrew 1518 Oriya 2012 Tagalog
0319 Czech 1009 Yiddish 1601 Punjabi 2014 Tswana
0325 Welsh 1001 Japanese 1612 Polish 2015 Tongo
0401 Danish 1022 Javanese 1619 Pushto 2018 Turkish
0405 Germany 1101 Georgian 1620 Portuguese 2019 Tsonga
0426 Bhutani 1111 Kazakh 1721 Quechua 2020 Tatar
0512 Greek 1112 Greenlandic 1813 Romance 2023 Twi
0514 English 1113 Cambodian 1814 Kirundi 2111 Ukrainian
0515 Esperanto 1114 Kannada 1815 Romanian 2118 Urdu
0519 Spanish 1115 Korean 1821 Russian 2126 Uzbek
0520 Estonian 1119 Kashmiri 1823 Kinyarwanda 2209 Vietnamese
0521 Basque 1121 Kurdish 1901 Sanskrit 2215 Volapuk
0601 Persian 1125 Kirghiz 1904 Sindhi 2315 Wolof
0609 Finnish 1201 Latin 1907 Sangho 2408 Xhosa
0610 Fijian 1214 Lingala 1908 Croatian 2515 Yoruba
0615 Faroese 1215 Laotian 1909 Sinhalese 2608 Chinese
0618 French 1220 Lithuanian 1911 Slovak 2621 Zulu
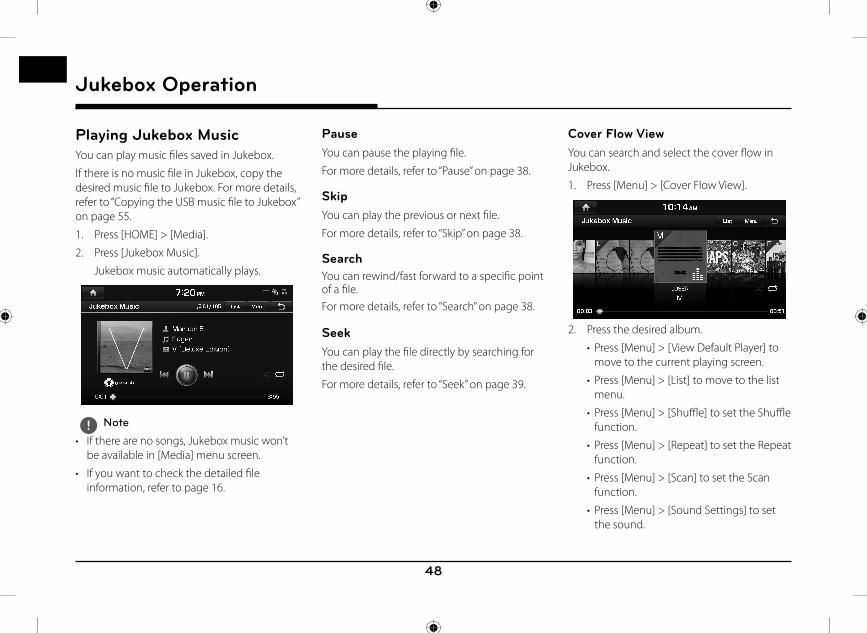
48
Jukebox Operation
Playing Jukebox MusicYou can play music fi les saved in Jukebox.
If there is no music fi le in Jukebox, copy the desired music fi le to Jukebox. For more details, refer to “Copying the USB music fi le to Jukebox” on page 55.
1. Press [HOME] > [Media].
2. Press [Jukebox Music].
Jukebox music automatically plays.
, Note
• If there are no songs, Jukebox music won’t be available in [Media] menu screen.
• If you want to check the detailed fi le information, refer to page 16.
PauseYou can pause the playing fi le.
For more details, refer to “Pause” on page 38.
SkipYou can play the previous or next fi le.
For more details, refer to “Skip” on page 38.
SearchYou can rewind/fast forward to a specifi c point of a fi le.For more details, refer to “Search” on page 38.
SeekYou can play the fi le directly by searching for the desired fi le.
For more details, refer to “Seek” on page 39.
Cover Flow ViewYou can search and select the cover fl ow in Jukebox.
1. Press [Menu] > [Cover Flow View].
2. Press the desired album.
• Press [Menu] > [View Default Player] to move to the current playing screen.
• Press [Menu] > [List] to move to the list menu.
• Press [Menu] > [Shuffl e] to set the Shuffl e function.
• Press [Menu] > [Repeat] to set the Repeat function.
• Press [Menu] > [Scan] to set the Scan function.
• Press [Menu] > [Sound Settings] to set the sound.
Jukebox Operation

49
Jukebox Operation
ListYou can play the desired fi le by searching the fi le list included in Jukebox.
1. Press [List].
Or press [Menu] > [List].
For example: Jukebox music screen
2. Select the desired fi le.
• Press [Menu] > [Now Playing] to move to the current playing screen.
• Press [Menu] > [Delete] to delete the desired fi le. For more details, refer to “Deleting Address Book” on page 76.
• Press [Menu] > [Clear Jukebox] to delete all fi les and playlists in Jukebox.
• Press [Menu] > [View Capacity] to check the storage capacity saved in Jukebox.
ShuffleAll fi les can be played randomly.
For more details, refer to “ Shuffl e” on page 39.
ScanThis function scans the beginning of each fi le for 10 seconds.
For more details, refer to MP3 CD operation of “ Scan” on page 40.
Sound Settings1. Press [Menu] > [Sound Settings].
2. For more details, refer to “Sound” on page 136.
RepeatThe current playing fi le is played repeatedly.
1. Press [Menu] > [Repeat].
2. Press the desired item.
• [Repeat All]: Repeats all files.
• [Repeat Folder]: Repeats all files within current folder.
• [Repeat One]: Repeats the current file.
, Note
You can change the Repeat function by pressing [ / / ] on the playing screen.
: Repeat All, : Repeat Folder,
: Repeat One
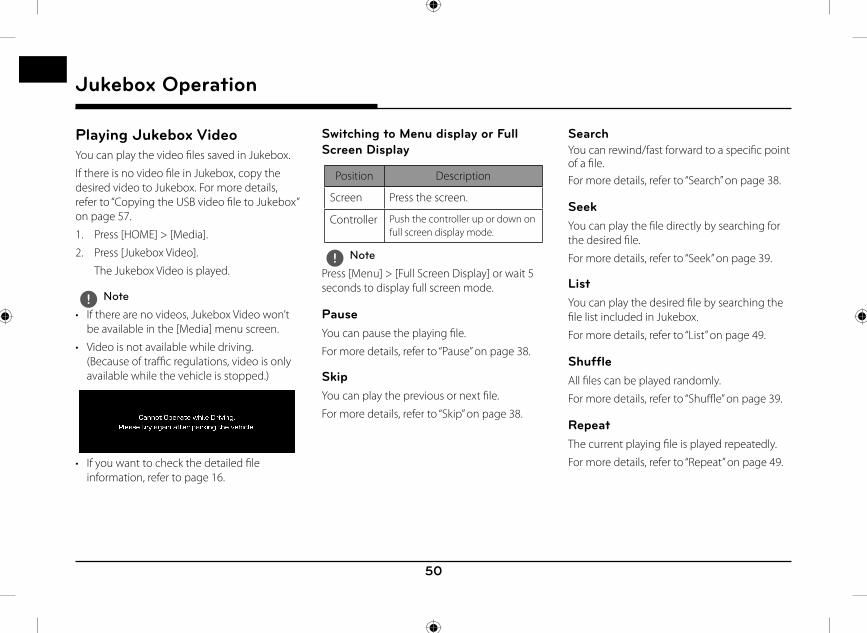
50
Jukebox Operation
Playing Jukebox VideoYou can play the video fi les saved in Jukebox.
If there is no video fi le in Jukebox, copy the desired video to Jukebox. For more details, refer to “Copying the USB video fi le to Jukebox” on page 57.
1. Press [HOME] > [Media].
2. Press [Jukebox Video].
The Jukebox Video is played.
, Note
• If there are no videos, Jukebox Video won’t be available in the [Media] menu screen.
• Video is not available while driving.(Because of traffi c regulations, video is only available while the vehicle is stopped.)
• If you want to check the detailed fi le information, refer to page 16.
Switching to Menu display or Full Screen Display
Position Description
Screen Press the screen.
Controller Push the controller up or down on full screen display mode.
, Note
Press [Menu] > [Full Screen Display] or wait 5 seconds to display full screen mode.
PauseYou can pause the playing fi le.
For more details, refer to “Pause” on page 38.
SkipYou can play the previous or next fi le.
For more details, refer to “Skip” on page 38.
SearchYou can rewind/fast forward to a specifi c point of a fi le.For more details, refer to “Search” on page 38.
SeekYou can play the fi le directly by searching for the desired fi le.
For more details, refer to “Seek” on page 39.
ListYou can play the desired fi le by searching the fi le list included in Jukebox.
For more details, refer to “List” on page 49.
ShuffleAll fi les can be played randomly.
For more details, refer to “ Shuffl e” on page 39.
RepeatThe current playing fi le is played repeatedly.
For more details, refer to “ Repeat” on page 49.
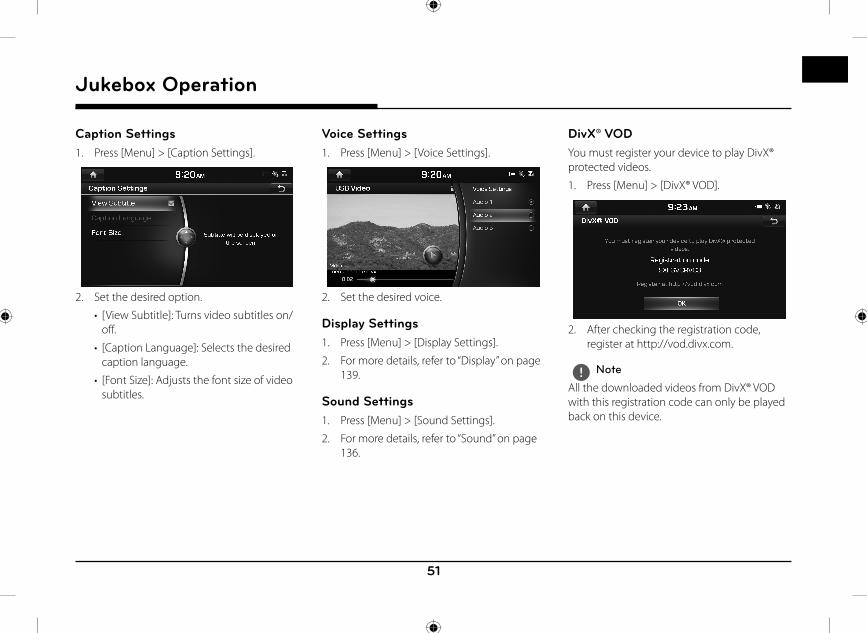
51
Jukebox Operation
Caption Settings1. Press [Menu] > [Caption Settings].
2. Set the desired option.
• [View Subtitle]: Turns video subtitles on/off.
• [Caption Language]: Selects the desired caption language.
• [Font Size]: Adjusts the font size of video subtitles.
Voice Settings1. Press [Menu] > [Voice Settings].
2. Set the desired voice.
Display Settings1. Press [Menu] > [Display Settings].
2. For more details, refer to “Display” on page 139.
Sound Settings1. Press [Menu] > [Sound Settings].
2. For more details, refer to “Sound” on page 136.
DivX® VODYou must register your device to play DivX® protected videos.
1. Press [Menu] > [DivX® VOD].
2. After checking the registration code, register at http://vod.divx.com.
, Note
All the downloaded videos from DivX® VOD with this registration code can only be played back on this device.
52
Jukebox Operation
Viewing Jukebox ImageYou can view the image fi les saved in Jukebox.
If there is no image fi le in Jukebox, copy the desired image to Jukebox. For more details, refer to “Copying the USB image fi le to Jukebox” on page 58.
1. Press [HOME] > [Media].
2. Press [Jukebox Image].
The Jukebox Image is viewed.
, Note
• If there are no images, Jukebox image won’t be available in the [Media] menu screen.
• If you want to check the detailed fi le information, refer to page 16.
• Image is not available while driving. (Based on the traffi c regulation, Image is only available whenever vehicle is in stop condition with parking gear.)
Switching to Menu display or Full Screen Display
Position Description
Screen Press the screen.
Controller Push the controller up or down on full screen display mode.
, Note
Press [Menu] > [Full Screen Display] or wait 5 seconds to display full screen mode.
SkipYou can view the previous or next image.
Position Description
Screen Press [C/V].
Controller Push the controller left or right.
Zoom in/out1. Turn the controller left or right.
2. Push the controller up, down, left or right to move the image.
53
Jukebox Operation
Slideshow1. Press [Menu] > [Slideshow].
The slideshow is played.
2. Press the controller to stop the slideshow.
ListYou can view the desired image by searching the image list included in Jukebox.
1. Press [List].
Or press [Menu] > [List].
2. Press the desired image.
• Press [Menu] > [Now Playing] to move to the current playing screen.
• Press [Menu] > [Delete] to delete the desired fi le. For more details, refer to “Deleting Address Book” on page 76.
• Press [Menu] > [Clear Jukebox] to delete all fi les and playlists in Jukebox.
• Press [Menu] > [View Capacity] to check the storage capacity saved in Jukebox.
Slideshow SettingsYou can set the slideshow interval. The slideshow is played according to the time interval.
1. Press [Menu] > [Slideshow Settings].
2. Press the desired slideshow interval.
Display Settings1. Press [Menu] > [Display Settings].
2. For more details, refer to “Display” on page 139.
54
USB Operation
Playing USB MusicYou can play music fi les saved in a USB memory device.
Connect a USB device to the USB port. Playback will start automatically.
, Note
To play USB music while a diff erent source is playing, press [HOME] > [Media] > [USB Music].
PauseYou can pause the playing fi le.
For more details, refer to “Pause” on page 38.
SkipYou can play the previous or next fi le.For more details, refer to “Skip” on page 38.
SearchYou can rewind/fast forward to a specifi c point of a fi le.For more details, refer to “Search” on page 38.
SeekYou can play the fi le directly by searching for the desired fi le.For more details, refer to “Seek” on page 39.
Cover Flow ViewYou can search and select the cover fl ow in USB.1. Press [Menu] > [Cover Flow View].
2. Press the desired album.
• Press [Menu] > [View Default Player] to move to the current playing screen.
• Press [Menu] > [List] to move to the list menu.
• Press [Menu] > [Shuffl e] to set the Shuffl e function.
• Press [Menu] > [Repeat] to set the Repeat function.
• Press [Menu] > [Copy to Jukebox] to copy the desired fi les to Jukebox. For more details, refer to “Copying the USB music fi le to Jukebox” on page 55.
• Press [Menu] > [Scan] to set the Scan function.
• Press [Menu] > [Sound Settings] to set the sound.
• Press [Menu] > [Hide Current File] to hide the current playing fi le.
USB Operation

55
USB Operation
ListYou can play the desired fi le by searching the fi le list included in USB.
1. Press [List].
Or press [Menu] > [List].
2. Press the desired fi le after searching for folder, songs, albums, artists, or genres.
• Press [Menu] > [Now Playing] to move to the current playing screen.
• Press [Menu] > [Copy to Jukebox] to copy the desired fi les to Jukebox.
ShuffleAll fi les can be played randomly.For more details, refer to “ Shuffl e” on page 39.
RepeatThe current playing fi le is played repeatedly.For more details, refer to “ Repeat” on page 49.
Copying the USB music file to JukeboxYou can copy the desired fi les to Jukebox.1. Press [Menu] > [Copy to Jukebox].
2. Select the desired file, then press [Copy].• [Copy]: Copies the selected file.• [Copy All]: Copies all the files.• [Unmark All]: Unmarks all the files.• [Cancel]: Cancels the copy function.
, Note
During fi le copy, the icon is displayed on the top right side of the screen. When the copy is completed, the icon disappears automatically.
Hide Current FileYou can hide the current playing fi le. Press [Menu] > [Hide Current File] from the playing screen.
ScanThis function scans the beginning of each fi le for 10 seconds.
For more details, refer to MP3 CD operation of “ Scan” on page 40.
Sound Settings1. Press [Menu] > [Sound Settings].
2. For more details, refer to “Sound” on page 136.
56
USB Operation
Playing USB VideoYou can play video fi les saved in a USB memory device.
Connect a USB device to the USB port and playback starts automatically.
, Note
• To play USB Video while a diff erent source is playing, press [HOME] > [Media] > [USB Video].
• Video is not available while driving.(Because of traffi c regulations, video is only available while the vehicle is stopped.)
Switching to Menu display or Full Screen Display
Position Description
Screen Press the screen.
Controller Push the controller up or down on full screen display mode.
, Note
Press [Menu] > [Full Screen Display] or wait 5 seconds to display full screen mode.
PauseYou can pause the playing fi le.
For more details, refer to “Pause” on page 38.
SkipYou can play the previous or next fi le.
For more details, refer to “Skip” on page 38.
SearchYou can rewind/fast forward to a specifi c point of a fi le.For more details, refer to “Search” on page 38.
SeekYou can play the fi le directly by searching for the desired fi le.
For more details, refer to “Seek” on page 39.
57
USB Operation
ListYou can play the desired fi le by searching the fi le list included in USB.
1. Press [List].
Or press [Menu] > [List].
2. Press the desired fi le.
• Press [Menu] > [Now Playing] to move to the current playing screen.
• Press [Menu] > [Copy to Jukebox] to copy the desired fi les to Jukebox.
ShuffleAll fi les can be played randomly.
For more details, refer to “ Shuffl e” on page 39.
RepeatThe current playing fi le is played repeatedly.
For more details, refer to “Repeat” on page 49.
Copying the USB video file to JukeboxYou can copy the desired fi les to Jukebox.
1. Press [Menu] > [Copy to Jukebox].
2. Select the desired file, then press [Copy].
• [Copy]: Copies the selected file.
• [Copy All]: Copies all the files.• [Unmark All]: Unmarks all the files.
• [Cancel]: Cancels the copy function.
, Note
During fi le copy, the icon is displayed on the top right side of the screen. When the copy is completed, the icon disappears automatically.
Caption SettingsYou can set the caption.
For more details, refer to “Caption Settings” on page 51.
Voice SettingsYou can set the voice.
For more details, refer to “Voice Settings” on page 51.
DivX® VODYou must register your device to play DivX® protected videos.
For more details, refer to “DivX® VOD” on page 51.
Display Settings1. Press [Menu] > [Display Settings].
2. For more details, refer to “Display” on page 139.
Sound Settings1. Press [Menu] > [Sound Settings].
2. For more details, refer to “Sound” on page 136.
58
USB Operation
Viewing USB ImageYou can play image fi les saved in a USB memory device.
1. Connect a USB device to the USB port.
2. Press [HOME] > [Media] > [USB Image].
, Note
Image is not available while driving. (Based on the traffi c regulation, Image is only available whenever vehicle is in stop condition with parking gear.)
Switching to Menu display or Full Screen Display
Position Description
Screen Press the screen.
Controller Push the controller up or down on full screen display mode.
, Note
Press [Menu] > [Full Screen Display] or wait 5 seconds to display full screen mode.
SkipYou can view the previous or next image.
For more details, refer to “Skip” on page 52.
Zoom in/outTurn the controller left or right.
For more details, refer to “Zoom in/out” on page 52.
SlideshowYou can set the slideshow.
For more details, refer to “Slideshow” on page 53.
ListYou can view the desired image by searching the image list included in USB.
For more details, refer to “List” on page 53.
Slideshow SettingsYou can set the slideshow interval. The slideshow is played according to the time interval.
For more details, refer to “Slideshow Settings” on page 53.
Copying the USB image file to JukeboxYou can copy the desired fi les to Jukebox.
1. Press [Menu] > [Copy to Jukebox].
2. Select the desired file, then press [Copy].
• [Copy]: Copies the selected file.
• [Copy All]: Copies all the files.
• [Unmark All]: Unmarks all the files.
• [Cancel]: Cancels the copy function.
, Note
During fi le copy, the icon is displayed on the top right side of the screen. When the copy is completed, the icon disappears automatically.
Display Settings1. Press [Menu] > [Display Settings].
2. For more details, refer to “Display” on page 139.
59
iPod® Operation
Playing iPod®1. Use iPod exclusive cable to connect iPod
to USB connector.
2. Press [HOME] > [Media] > [iPod].
It runs iPod mode.
PauseYou can pause the playing fi le. For more details, refer to “Pause” on page 38.
SkipYou can play the previous or next fi le. For more details, refer to “Skip” on page 38.
SearchYou can rewind/fast forward to a specifi c point of a fi le. For more details, refer to “Search” on page 38.
SeekYou can play the fi le directly by searching for the desired fi le. For more details, refer to “Seek” on page 39.
ListYou can play the desired fi le by searching the fi le list included in iPod.
1. Press [List].
Or press [Menu] > [List].
2. Press the desired fi le.
• Press [Menu] > [Now Playing] to move to the current playing screen.
• Press [Menu] > [Edit Category] to edit the category, then press the desired category. After moving to the desired category by turning the controller left or right, press the controller.
ShuffleAll fi les can be played randomly.
For more details, refer to “ Shuffl e” on page 39.
RepeatThe current playing fi le is played repeatedly.1. Press [Menu] > [Repeat].
2. Press the desired item.• [Repeat All]: Repeats all files.• [Repeat One]: Repeats the current file.
, Note
You can change the Repeat function by pressing [ / ] on the playing screen.
: Repeat All, : Repeat One
ScanThis function scans the beginning of each fi le for 10 seconds. For more details, refer to Audio CD operation of “ Scan” on page 40.
Sound Settings1. Press [Menu] > [Sound Settings].2. For more details, refer to “Sound” on page
136.
iPod® Operation
60
Auxiliary Device Operation
Playing an AUX source1. Connect an auxiliary device to the AUX
terminal.
2. Play the auxiliary device.
, Note
If you want to play the auxiliary device when playing other source, press [HOME] > [Media] > [AUX].
Sound Settings1. Press [Menu] > [Sound Settings].
2. For more details, refer to “Sound” on page 136.
Auxiliary Device Operation
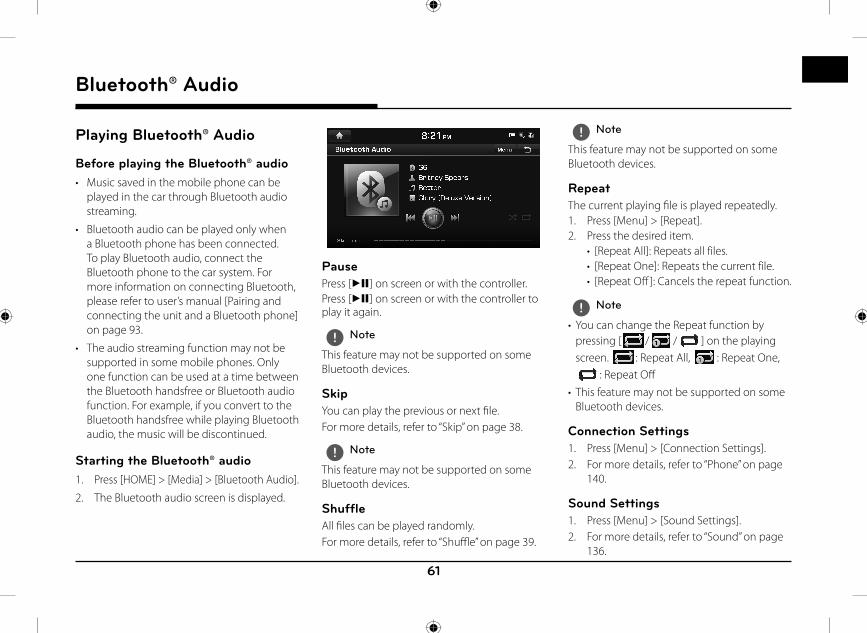
61
Bluetooth® Audio
Playing Bluetooth® Audio
Before playing the Bluetooth® audio• Music saved in the mobile phone can be
played in the car through Bluetooth audio streaming.
• Bluetooth audio can be played only when a Bluetooth phone has been connected. To play Bluetooth audio, connect the Bluetooth phone to the car system. For more information on connecting Bluetooth, please refer to user’s manual [Pairing and connecting the unit and a Bluetooth phone] on page 93.
• The audio streaming function may not be supported in some mobile phones. Only one function can be used at a time between the Bluetooth handsfree or Bluetooth audio function. For example, if you convert to the Bluetooth handsfree while playing Bluetooth audio, the music will be discontinued.
Starting the Bluetooth® audio1. Press [HOME] > [Media] > [Bluetooth Audio].
2. The Bluetooth audio screen is displayed.
PausePress [dM] on screen or with the controller.Press [dM] on screen or with the controller to play it again.
, Note
This feature may not be supported on some Bluetooth devices.
SkipYou can play the previous or next fi le.For more details, refer to “Skip” on page 38.
, Note
This feature may not be supported on some Bluetooth devices.
ShuffleAll fi les can be played randomly.For more details, refer to “ Shuffl e” on page 39.
, Note
This feature may not be supported on some Bluetooth devices.
RepeatThe current playing fi le is played repeatedly.1. Press [Menu] > [Repeat].2. Press the desired item.
• [Repeat All]: Repeats all files.• [Repeat One]: Repeats the current file.• [Repeat Off ]: Cancels the repeat function.
, Note
• You can change the Repeat function by pressing [ / // ] on the playing screen. : Repeat All, : Repeat One,
: Repeat Off • This feature may not be supported on some
Bluetooth devices.
Connection Settings1. Press [Menu] > [Connection Settings].2. For more details, refer to “Phone” on page
140.
Sound Settings1. Press [Menu] > [Sound Settings].2. For more details, refer to “Sound” on page
136.
Bluetooth® Audio
62
Getting Started with Navigation
Navigation use restrictionsPlease observe and comply with local traffi c rules and regulations.
• For your safety, some features cannot be operated while driving. Features that cannot be operated will be disabled.
• The route displayed for destination guidance is a reference and the route guidance will take you to the vicinity of your destination. The highlighted route is not always; the shortest distance, the least congested, and in some cases might, not be the fastest route.
• Road, name, and POI information may not always been completely updated. Some places may not include up to date information.
• The car position mark does not always indicate your exact location. This system uses GPS information, various sensors, and road map data to display the current position. However, errors in displaying your location may occur if the satellite is transmitting inaccurate signals or two or less satellite signals are being received. Errors that occur in such conditions cannot be corrected.
• The position of the vehicle within the navigation may diff er from your actual location depending on various reasons, including the satellite transmission state, vehicle state (driving location and conditions), etc. Additionally, the car position mark may diff er from the actual position if the map data is diff erent from the actual road landscape, such as changes due to the construction of new roads. If such diff erences occur, driving for a short period of time will automatically correct the position of the vehicle through map matching or GPS information.
What is GPS?The Global Positioning System (GPS) is a satellite-based navigation system made up of a network of 24 satellites placed into orbit by the U.S. Department of Defense.
GPS was originally intended for military applications, but in the 1980s, the government made the system available for civilian use.
GPS works in any weather conditions, anywhere in the world, 24 hours a day.
There are no subscription fees or setup charges to use GPS.
About satellite signalsYour unit must acquire satellite signals to operate. If you are indoors, near tall buildings or trees, or in a parking garage, the unit cannot acquire satellite signal.
Acquiring satellite signalsBefore the unit can determine your current position and navigate a route, you must do the following steps:
1. Go outside to an area free from tall obstructions.
2. Turn on the unit.
Acquiring satellite signals can take a few minutes.
Getting Started with Navigation
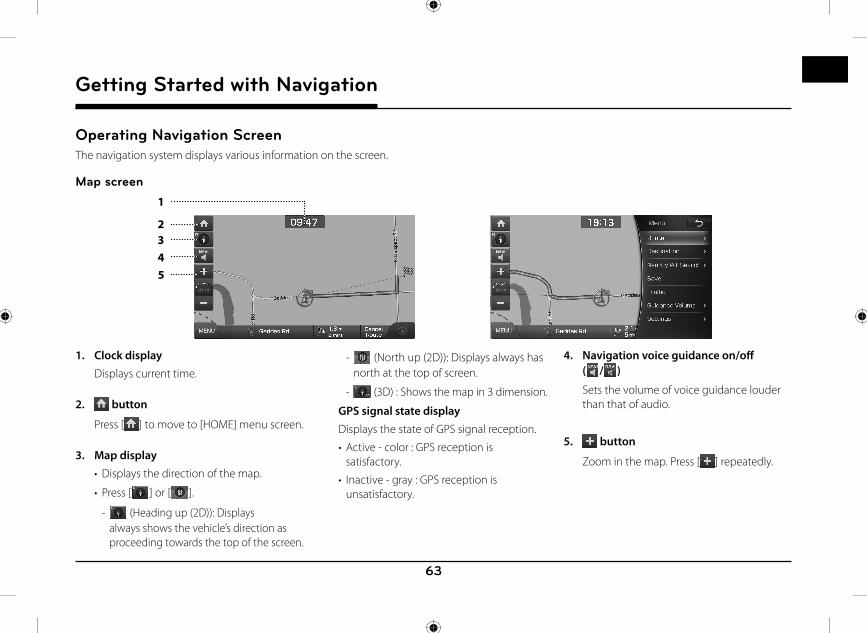
63
Getting Started with Navigation
Operating Navigation ScreenThe navigation system displays various information on the screen.
Map screen1
2345
1. Clock display Displays current time.
2. button
Press [ ] to move to [HOME] menu screen.
3. Map display• Displays the direction of the map.
• Press [ ] or [ ].
- (Heading up (2D)): Displays always shows the vehicle’s direction as proceeding towards the top of the screen.
- (North up (2D)): Displays always has north at the top of screen.
- (3D) : Shows the map in 3 dimension.
GPS signal state display Displays the state of GPS signal reception.
• Active - color : GPS reception is satisfactory.
• Inactive - gray : GPS reception is unsatisfactory.
4. Navigation voice guidance on/off ( / )
Sets the volume of voice guidance louder than that of audio.
5. button
Zoom in the map. Press [ ] repeatedly.

64
Getting Started with Navigation
14
11 1312
8
76
9
10
6. Map scale display• Displays the current map scale.
• Sets the zoom level automatically to the guidance. For more details, refer to "Map scale" on page 66.
7. button
Zoom out the map. Press [ ] repeatedly.
8. [MENU] button Moves to quick menu screen. For more
details, refer to "General operations of quick menu" on page 72.
9. Route guidance Displays the route guidance to the
destination when a route is set.
10. Vehicle position Displays current vehicle position and
direction.
11. Current position Displays the current position. Press to check
the destination information.
12. Remaining distance display/ Remaining time
Displays the distance and time of arrival to the destination or waypoint. Press and check the information on destination.
13. Cancel Route Cancels the route guidance to the
destination or waypoint.
14. [Route] button Changes the route conditions when a route
is set. For more details, refer to “Changing the route conditions” on page 66.
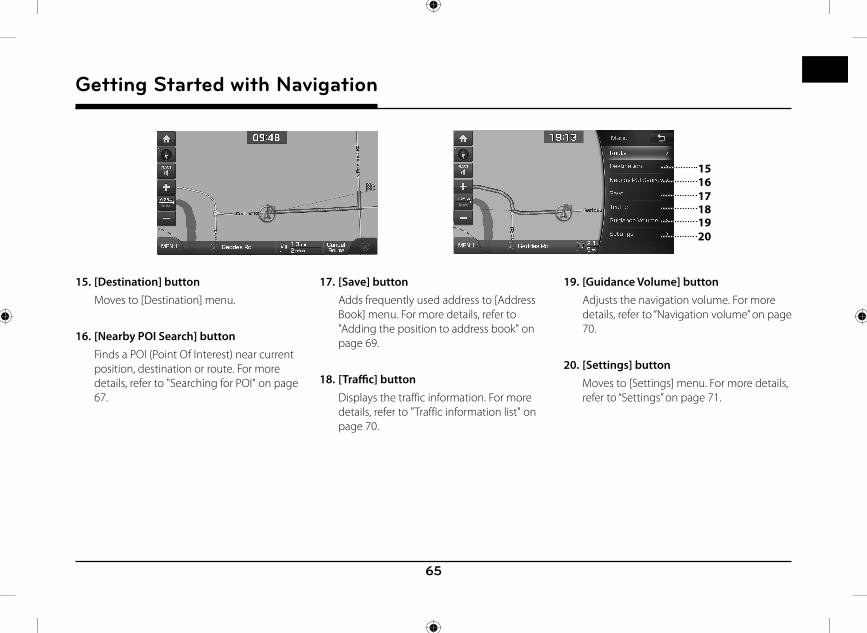
65
Getting Started with Navigation
1615
19
17
20
18
15. [Destination] button Moves to [Destination] menu.
16. [Nearby POI Search] button Finds a POI (Point Of Interest) near current
position, destination or route. For more details, refer to "Searching for POI" on page 67.
17. [Save] button Adds frequently used address to [Address
Book] menu. For more details, refer to "Adding the position to address book" on page 69.
18. [Traffi c] button Displays the traffic information. For more
details, refer to "Traffic information list" on page 70.
19. [Guidance Volume] button Adjusts the navigation volume. For more
details, refer to “Navigation volume” on page 70.
20. [Settings] button Moves to [Settings] menu. For more details,
refer to “Settings” on page 71.

66
Getting Started with Navigation
Zoom In / Zoom OutPress [ ] or [ ] to set the zoom level on the map screen.
Zoom bar
, Note
• You can set the zoom level by directly pressing the zoom bar on the screen.
• Press [ ] or [ ] for over 1 second. The zoom will continuously change.
• If the zoom range limit is reached, the [ ] /[ ] button will be disabled.
• If you want to set the auto zoom, press .
Map scaleThis function sets the zoom level automatically according to the road class.
Press [ ] on the map screen.
Name Description
Scale Fix (inactive - "Auto")
Fix the displayed scale.
Auto Scale (active - "Auto")
Change the map scale automatically depending on the road class.
Changing the route conditionsYou can set new route by searching for various route option when a route is set.
Cancel RouteYou can cancels the route guidance to the destination. For more details, refer to “ Cancel Route” on page 80.
Route OptionsYou can modify the route conditions or confi rm the route information. Set the appropriate route condition according to your purpose.For more details, refer to “ Route Options” on page 80.
Edit RouteThe Edit Route allows you to travel through the searched routes by editing the current route. For more details, refer to “Edit Route” on page 81.
Route OverviewYou can check the entire route between your current location and your destination. For more details, refer to “Route Overview” on page 82.
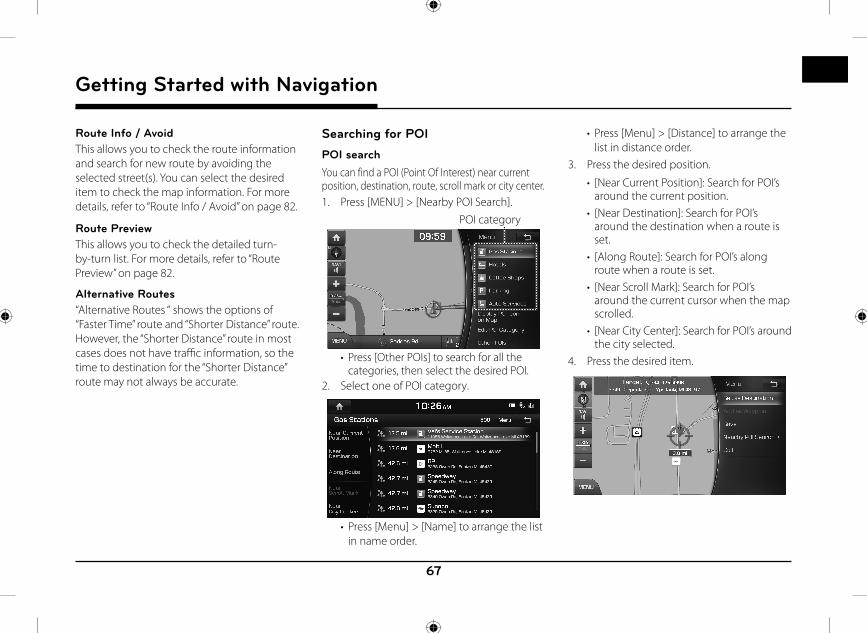
67
Getting Started with Navigation
Route Info / AvoidThis allows you to check the route information and search for new route by avoiding the selected street(s). You can select the desired item to check the map information. For more details, refer to “ Route Info / Avoid” on page 82.
Route PreviewThis allows you to check the detailed turn-by-turn list. For more details, refer to “Route Preview” on page 82.
Alternative Routes“Alternative Routes “ shows the options of “Faster Time” route and “Shorter Distance” route. However, the “Shorter Distance” route in most cases does not have traffi c information, so the time to destination for the “Shorter Distance” route may not always be accurate.
Searching for POIPOI searchYou can find a POI (Point Of Interest) near current position, destination, route, scroll mark or city center.1. Press [MENU] > [Nearby POI Search].
POI category
• Press [Other POIs] to search for all the categories, then select the desired POI.
2. Select one of POI category.
• Press [Menu] > [Name] to arrange the list in name order.
• Press [Menu] > [Distance] to arrange the list in distance order.
3. Press the desired position.
• [Near Current Position]: Search for POI’s around the current position.
• [Near Destination]: Search for POI’s around the destination when a route is set.
• [Along Route]: Search for POI’s along route when a route is set.
• [Near Scroll Mark]: Search for POI’s around the current cursor when the map scrolled.
• [Near City Center]: Search for POI’s around the city selected.
4. Press the desired item.
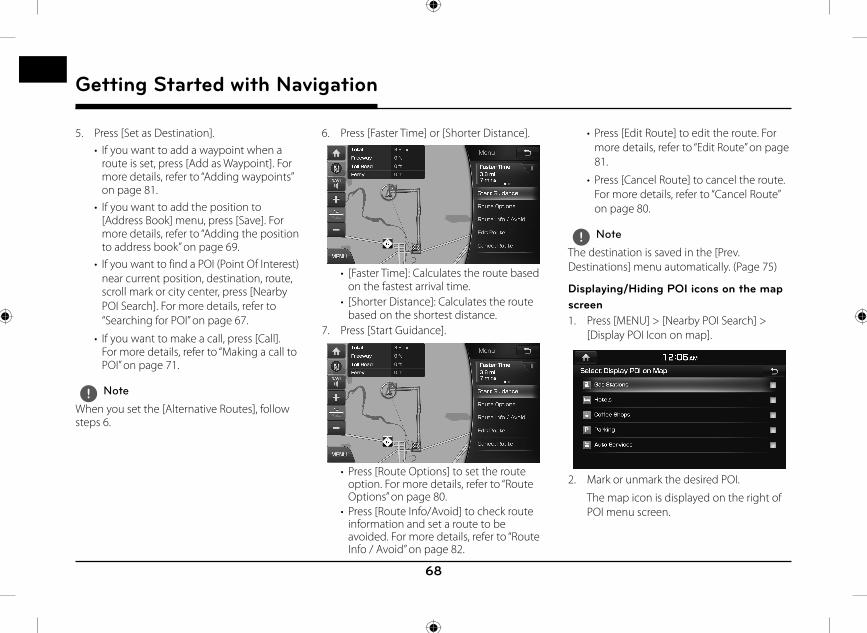
68
Getting Started with Navigation
5. Press [Set as Destination]. • If you want to add a waypoint when a
route is set, press [Add as Waypoint]. For more details, refer to “Adding waypoints” on page 81.
• If you want to add the position to [Address Book] menu, press [Save]. For more details, refer to “Adding the position to address book” on page 69.
• If you want to find a POI (Point Of Interest) near current position, destination, route, scroll mark or city center, press [Nearby POI Search]. For more details, refer to “Searching for POI” on page 67.
• If you want to make a call, press [Call]. For more details, refer to “Making a call to POI” on page 71.
, Note
When you set the [Alternative Routes], follow steps 6.
6. Press [Faster Time] or [Shorter Distance].
• [Faster Time]: Calculates the route based on the fastest arrival time.
• [Shorter Distance]: Calculates the route based on the shortest distance.
7. Press [Start Guidance].
• Press [Route Options] to set the route option. For more details, refer to “Route Options” on page 80.
• Press [Route Info/Avoid] to check route information and set a route to be avoided. For more details, refer to “Route Info / Avoid” on page 82.
• Press [Edit Route] to edit the route. For more details, refer to “Edit Route” on page 81.
• Press [Cancel Route] to cancel the route. For more details, refer to “Cancel Route” on page 80.
, Note
The destination is saved in the [Prev. Destinations] menu automatically. (Page 75)
Displaying/Hiding POI icons on the map screen1. Press [MENU] > [Nearby POI Search] >
[Display POI Icon on map].
2. Mark or unmark the desired POI.
The map icon is displayed on the right of POI menu screen.
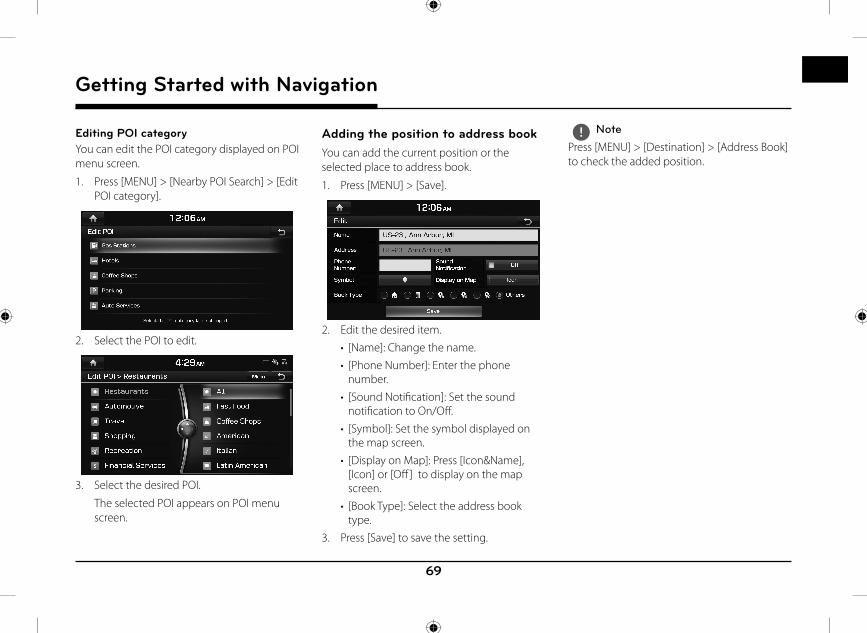
69
Getting Started with Navigation
Editing POI categoryYou can edit the POI category displayed on POI menu screen.
1. Press [MENU] > [Nearby POI Search] > [Edit POI category].
2. Select the POI to edit.
3. Select the desired POI.
The selected POI appears on POI menu screen.
Adding the position to address bookYou can add the current position or the selected place to address book.
1. Press [MENU] > [Save].
2. Edit the desired item.
• [Name]: Change the name.
• [Phone Number]: Enter the phone number.
• [Sound Notifi cation]: Set the sound notifi cation to On/Off .
• [Symbol]: Set the symbol displayed on the map screen.
• [Display on Map]: Press [Icon&Name], [Icon] or [Off ] to display on the map screen.
• [Book Type]: Select the address book type.
3. Press [Save] to save the setting.
, Note
Press [MENU] > [Destination] > [Address Book] to check the added position.

70
Getting Started with Navigation
Scrolling map1. Press and drag the map area on the screen.
The selected point will be centered on the screen and the scroll mark will be displayed.Information about the marked point and straight line distance from the current position will be displayed at the center of the screen.
2. Press [MENU].
3. Follow steps 5~7 of the “ POI search” on page 67.
, Note
If a map area on the map screen is pressed, the map will continuously scroll in the corresponding direction until the pressing is released.
Traffic information listThe current traffi c/road event information is basically displayed on the traffi c information list.
1. Press [MENU] > [Traffic].
• Press [Traffi c On Route] to display the traffi c information on route when the route is set.
2. Press the traffic list to display the detailed information.
3. Press [Menu].
You can check the related information by marking various information (Accidents, Road Construction, etc).
, Note
This feature may not be reflected depending on condition.
Navigation volumePress [MENU] > [ Guidance Volume] to adjust the volume.
• [ Navigation Volume]: Adjusts the navigation volume.
• [Mute]: Sets the sound to mute.
• [Volume Priority]: Sets the volume control to [Navigation Priority] or [Equal Volumes].
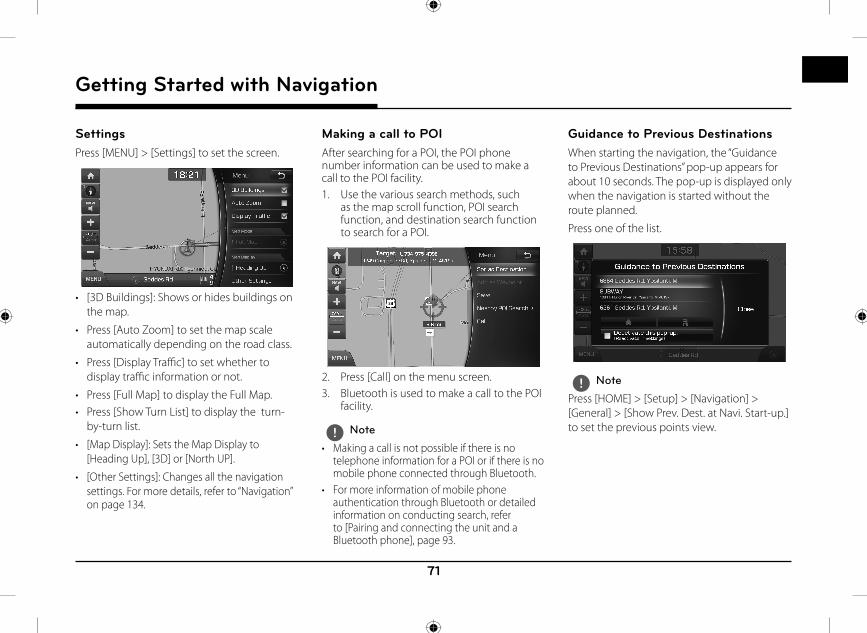
71
Getting Started with Navigation
SettingsPress [MENU] > [Settings] to set the screen.
• [3D Buildings]: Shows or hides buildings on the map.
• Press [Auto Zoom] to set the map scale automatically depending on the road class.
• Press [Display Traffi c] to set whether to display traffi c information or not.
• Press [Full Map] to display the Full Map.• Press [Show Turn List] to display the turn-
by-turn list.
• [Map Display]: Sets the Map Display to [Heading Up], [3D] or [North UP].
• [Other Settings]: Changes all the navigation settings. For more details, refer to “Navigation” on page 134.
Making a call to POIAfter searching for a POI, the POI phone number information can be used to make a call to the POI facility.1. Use the various search methods, such
as the map scroll function, POI search function, and destination search function to search for a POI.
2. Press [Call] on the menu screen.3. Bluetooth is used to make a call to the POI
facility.
, Note
• Making a call is not possible if there is no telephone information for a POI or if there is no mobile phone connected through Bluetooth.
• For more information of mobile phone authentication through Bluetooth or detailed information on conducting search, refer to [Pairing and connecting the unit and a Bluetooth phone], page 93.
Guidance to Previous DestinationsWhen starting the navigation, the “Guidance to Previous Destinations” pop-up appears for about 10 seconds. The pop-up is displayed only when the navigation is started without the route planned.
Press one of the list.
, Note
Press [HOME] > [Setup] > [Navigation] > [General] > [Show Prev. Dest. at Navi. Start-up.] to set the previous points view.
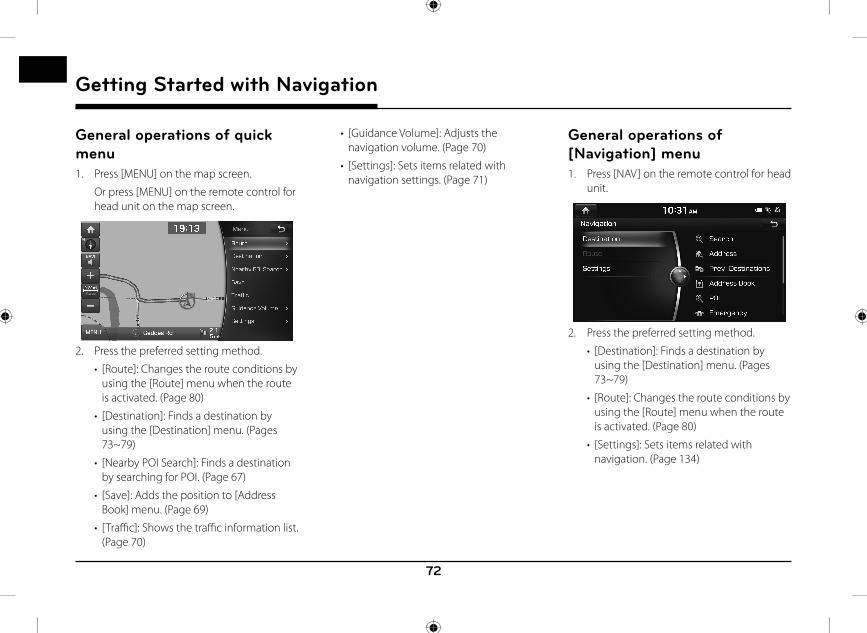
72
General operations of quick menu1. Press [MENU] on the map screen.
Or press [MENU] on the remote control for head unit on the map screen.
2. Press the preferred setting method.
• [Route]: Changes the route conditions by using the [Route] menu when the route is activated. (Page 80)
• [Destination]: Finds a destination by using the [Destination] menu. (Pages 73~79)
• [Nearby POI Search]: Finds a destination by searching for POI. (Page 67)
• [Save]: Adds the position to [Address Book] menu. (Page 69)
• [Traffi c]: Shows the traffi c information list. (Page 70)
• [Guidance Volume]: Adjusts the navigation volume. (Page 70)
• [Settings]: Sets items related with navigation settings. (Page 71)
General operations of [Navigation] menu1. Press [NAV] on the remote control for head
unit.
2. Press the preferred setting method.
• [Destination]: Finds a destination by using the [Destination] menu. (Pages 73~79)
• [Route]: Changes the route conditions by using the [Route] menu when the route is activated. (Page 80)
• [Settings]: Sets items related with navigation. (Page 134)
Getting Started with Navigation
Se
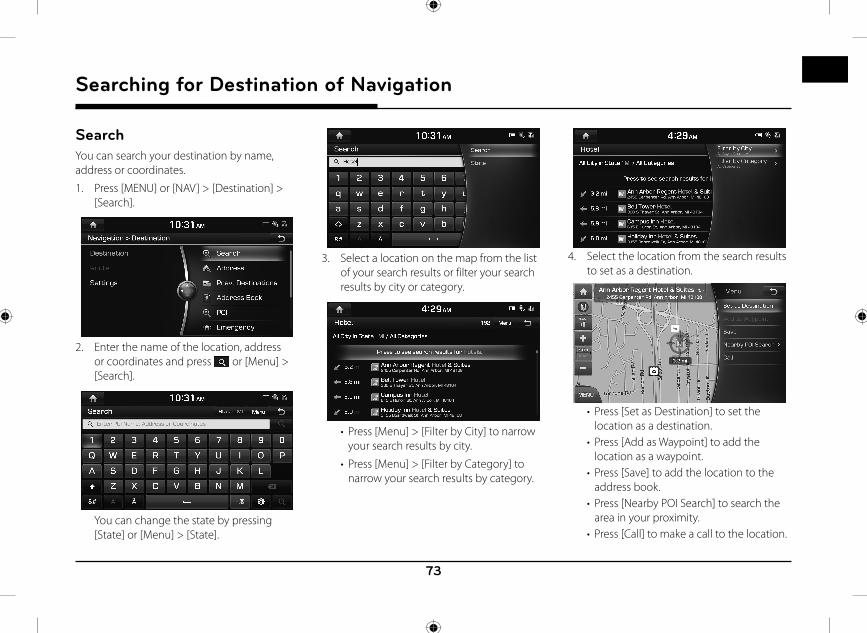
73
SearchYou can search your destination by name, address or coordinates.
1. Press [MENU] or [NAV] > [Destination] > [Search].
2. Enter the name of the location, address or coordinates and press or [Menu] > [Search].
You can change the state by pressing [State] or [Menu] > [State].
3. Select a location on the map from the list of your search results or filter your search results by city or category.
• Press [Menu] > [Filter by City] to narrow your search results by city.
• Press [Menu] > [Filter by Category] to narrow your search results by category.
4. Select the location from the search results to set as a destination.
• Press [Set as Destination] to set the location as a destination.
• Press [Add as Waypoint] to add the location as a waypoint.
• Press [Save] to add the location to the address book.
• Press [Nearby POI Search] to search the area in your proximity.
• Press [Call] to make a call to the location.
Searching for Destination of Navigation
Searching for Destination of Navigation
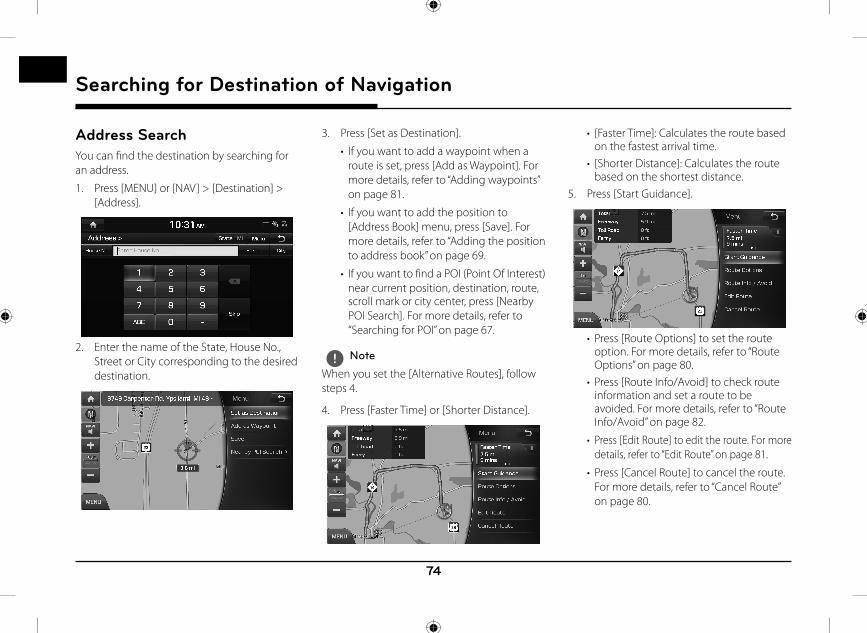
74
Searching for Destination of Navigation
Address SearchYou can fi nd the destination by searching for an address.
1. Press [MENU] or [NAV] > [Destination] > [Address].
2. Enter the name of the State, House No., Street or City corresponding to the desired destination.
3. Press [Set as Destination].
• If you want to add a waypoint when a route is set, press [Add as Waypoint]. For more details, refer to “Adding waypoints” on page 81.
• If you want to add the position to [Address Book] menu, press [Save]. For more details, refer to “Adding the position to address book” on page 69.
• If you want to find a POI (Point Of Interest) near current position, destination, route, scroll mark or city center, press [Nearby POI Search]. For more details, refer to “Searching for POI” on page 67.
, Note
When you set the [Alternative Routes], follow steps 4.
4. Press [Faster Time] or [Shorter Distance].
• [Faster Time]: Calculates the route based on the fastest arrival time.
• [Shorter Distance]: Calculates the route based on the shortest distance.
5. Press [Start Guidance].
• Press [Route Options] to set the route option. For more details, refer to “Route Options” on page 80.
• Press [Route Info/Avoid] to check route information and set a route to be avoided. For more details, refer to “Route Info/Avoid” on page 82.
• Press [Edit Route] to edit the route. For more details, refer to “Edit Route” on page 81.
• Press [Cancel Route] to cancel the route. For more details, refer to “Cancel Route” on page 80.
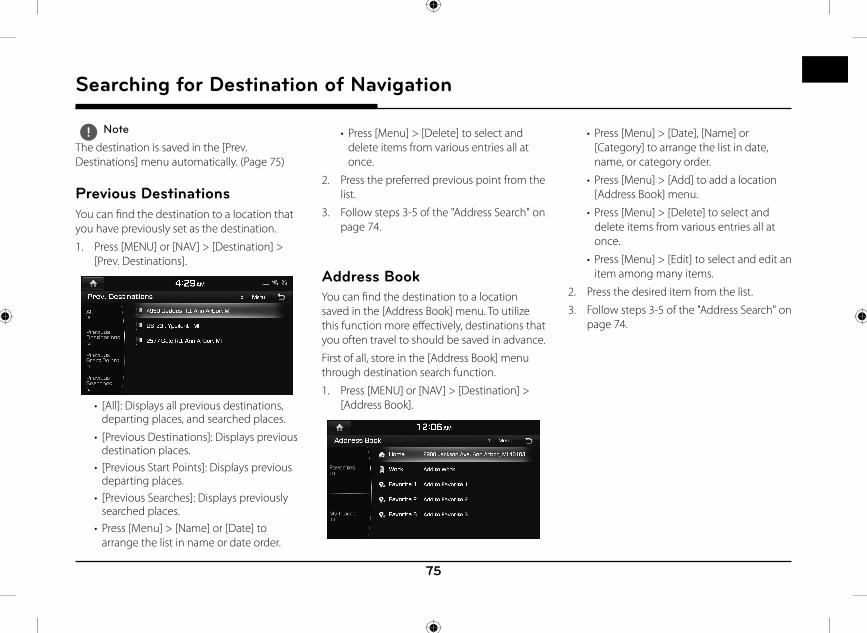
75
Searching for Destination of Navigation
, Note
The destination is saved in the [Prev. Destinations] menu automatically. (Page 75)
Previous DestinationsYou can fi nd the destination to a location that you have previously set as the destination.
1. Press [MENU] or [NAV] > [Destination] > [Prev. Destinations].
• [All]: Displays all previous destinations, departing places, and searched places.
• [Previous Destinations]: Displays previous destination places.
• [Previous Start Points]: Displays previous departing places.
• [Previous Searches]: Displays previously searched places.
• Press [Menu] > [Name] or [Date] to arrange the list in name or date order.
• Press [Menu] > [Delete] to select and delete items from various entries all at once.
2. Press the preferred previous point from the list.
3. Follow steps 3-5 of the " Address Search" on page 74.
Address BookYou can fi nd the destination to a location saved in the [Address Book] menu. To utilize this function more eff ectively, destinations that you often travel to should be saved in advance.
First of all, store in the [Address Book] menu through destination search function.
1. Press [MENU] or [NAV] > [Destination] > [Address Book].
• Press [Menu] > [Date], [Name] or [Category] to arrange the list in date, name, or category order.
• Press [Menu] > [Add] to add a location [Address Book] menu.
• Press [Menu] > [Delete] to select and delete items from various entries all at once.
• Press [Menu] > [Edit] to select and edit an item among many items.
2. Press the desired item from the list.
3. Follow steps 3-5 of the " Address Search" on page 74.
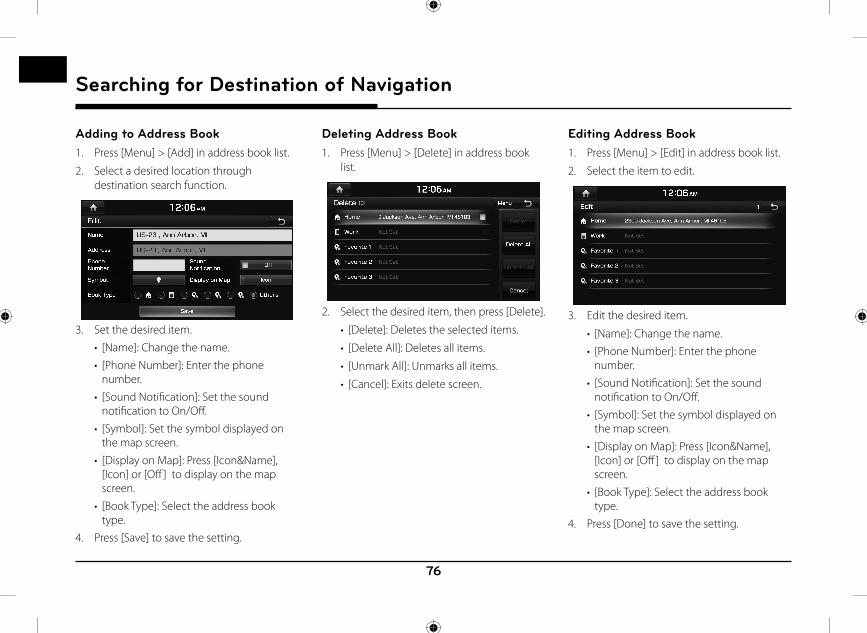
76
Searching for Destination of Navigation
Adding to Address Book1. Press [Menu] > [Add] in address book list.
2. Select a desired location through destination search function.
3. Set the desired item.
• [Name]: Change the name.
• [Phone Number]: Enter the phone number.
• [Sound Notifi cation]: Set the sound notifi cation to On/Off .
• [Symbol]: Set the symbol displayed on the map screen.
• [Display on Map]: Press [Icon&Name], [Icon] or [Off ] to display on the map screen.
• [Book Type]: Select the address book type.
4. Press [Save] to save the setting.
Deleting Address Book1. Press [Menu] > [Delete] in address book
list.
2. Select the desired item, then press [Delete].
• [Delete]: Deletes the selected items.
• [Delete All]: Deletes all items.
• [Unmark All]: Unmarks all items.
• [Cancel]: Exits delete screen.
Editing Address Book1. Press [Menu] > [Edit] in address book list.
2. Select the item to edit.
3. Edit the desired item.
• [Name]: Change the name.
• [Phone Number]: Enter the phone number.
• [Sound Notifi cation]: Set the sound notifi cation to On/Off .
• [Symbol]: Set the symbol displayed on the map screen.
• [Display on Map]: Press [Icon&Name], [Icon] or [Off ] to display on the map screen.
• [Book Type]: Select the address book type.
4. Press [Done] to save the setting.

77
Searching for Destination of Navigation
POIYou can fi nd a destination from various categories.
There are 2 ways to set the destination through POI search - by category, by phone number.
Searching for POI by category1. Press [NAV] > [Destination] > [POI] > [POI
Category].
If you want to search for the POI category by name, press [Menu] > [Category History] or [Category Search]. Input the name, then press [4] to finish.
2. Follow steps 2~7 of the "POI search" on page 67.
Searching for POI by phone numberIf you know the phone number of the destination, you may use this function to fi nd the destination.
1. Press [NAV] > [Destination] > [POI] > [Phone Number].
• Press [State] to change the state.
2. Input the desired phone number and press [4].
3. Press the desired POI.
4. Follow steps 3-5 of the " Address Search" on page 74.
EmergencyYou can fi nd a destination by searching for a Police Stations, Hospitals, Dealerships or Road Assistance in emergency situations.
1. Press [NAV] > [Destination] > [Emergency] > [Police Stations], [Hospitals], [Hyundai Dealerships] or [Road Assistance].
For example: Police Stations
• Press [Menu] > [Name] or [Distance] to arrange the list in name or distance order.
2. Press the preferred item from the list.
3. Follow steps 3-5 of the " Address Search" on page 74.
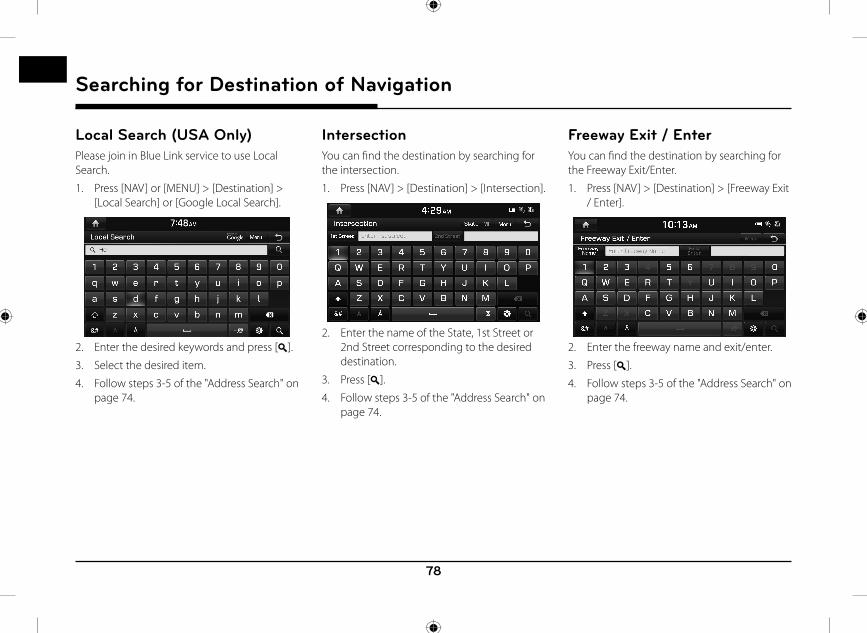
78
Searching for Destination of Navigation
Local Search (USA Only)Please join in Blue Link service to use Local Search.
1. Press [NAV] or [MENU] > [Destination] > [Local Search] or [Google Local Search].
2. Enter the desired keywords and press [4].
3. Select the desired item.
4. Follow steps 3-5 of the " Address Search" on page 74.
IntersectionYou can fi nd the destination by searching for the intersection.
1. Press [NAV] > [Destination] > [Intersection].
2. Enter the name of the State, 1st Street or 2nd Street corresponding to the desired destination.
3. Press [4].
4. Follow steps 3-5 of the " Address Search" on page 74.
Freeway Exit / EnterYou can fi nd the destination by searching for the Freeway Exit/Enter.
1. Press [NAV] > [Destination] > [Freeway Exit / Enter].
2. Enter the freeway name and exit/enter.
3. Press [4].
4. Follow steps 3-5 of the " Address Search" on page 74.
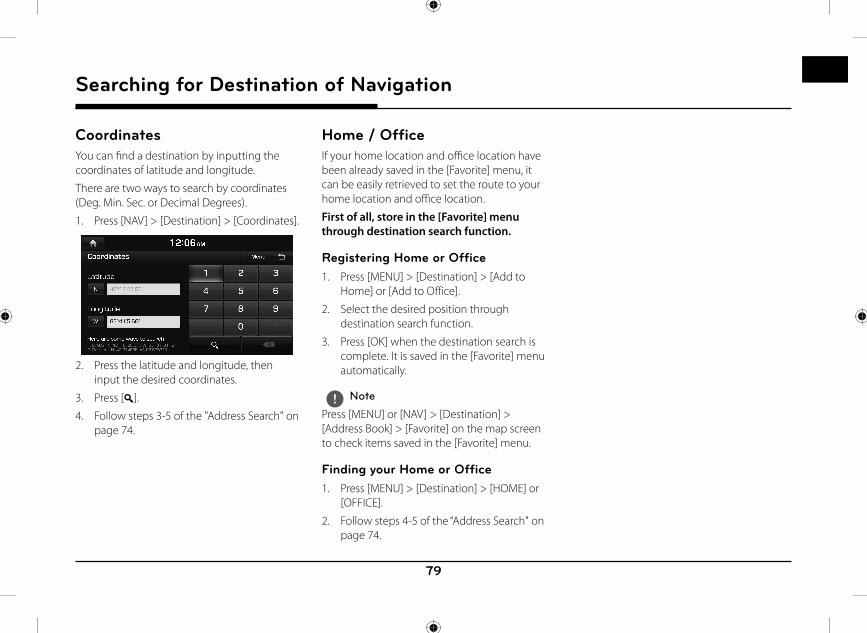
79
Searching for Destination of Navigation
CoordinatesYou can fi nd a destination by inputting the coordinates of latitude and longitude.
There are two ways to search by coordinates (Deg. Min. Sec. or Decimal Degrees).
1. Press [NAV] > [Destination] > [Coordinates].
2. Press the latitude and longitude, then input the desired coordinates.
3. Press [4].
4. Follow steps 3-5 of the " Address Search" on page 74.
Home / OfficeIf your home location and offi ce location have been already saved in the [Favorite] menu, it can be easily retrieved to set the route to your home location and offi ce location.
First of all, store in the [Favorite] menu through destination search function.
Registering Home or Office1. Press [MENU] > [Destination] > [Add to
Home] or [Add to Office].
2. Select the desired position through destination search function.
3. Press [OK] when the destination search is complete. It is saved in the [Favorite] menu automatically.
, Note
Press [MENU] or [NAV] > [Destination] > [Address Book] > [Favorite] on the map screen to check items saved in the [Favorite] menu.
Finding your Home or Office 1. Press [MENU] > [Destination] > [HOME] or
[OFFICE].
2. Follow steps 4-5 of the “ Address Search" on page 74.
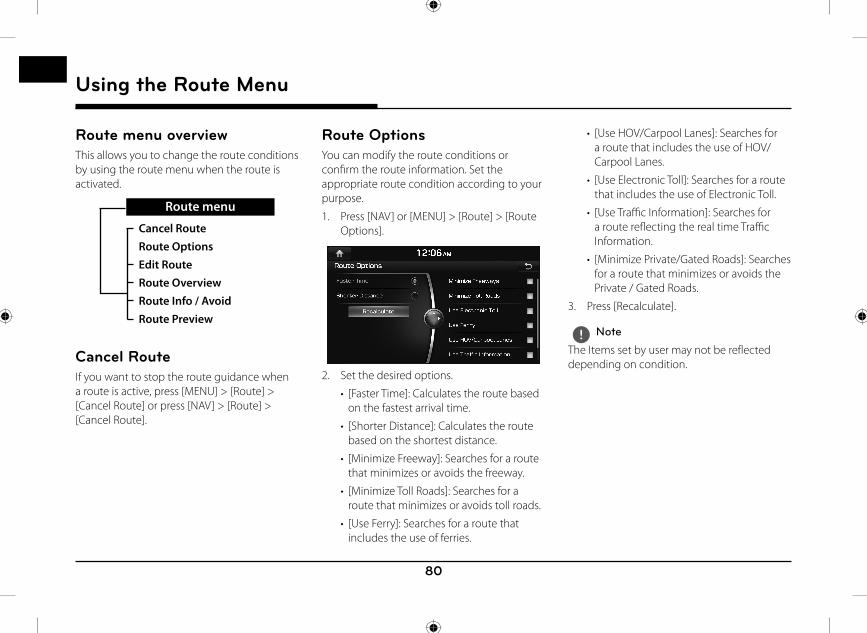
80
Using the Route Menu
Route menu overviewThis allows you to change the route conditions by using the route menu when the route is activated.
Route menu
Cancel RouteRoute OptionsEdit RouteRoute OverviewRoute Info / AvoidRoute Preview
Cancel RouteIf you want to stop the route guidance when a route is active, press [MENU] > [Route] > [Cancel Route] or press [NAV] > [Route] > [Cancel Route].
Route OptionsYou can modify the route conditions or confi rm the route information. Set the appropriate route condition according to your purpose.
1. Press [NAV] or [MENU] > [Route] > [Route Options].
2. Set the desired options.
• [Faster Time]: Calculates the route based on the fastest arrival time.
• [Shorter Distance]: Calculates the route based on the shortest distance.
• [Minimize Freeway]: Searches for a route that minimizes or avoids the freeway.
• [Minimize Toll Roads]: Searches for a route that minimizes or avoids toll roads.
• [Use Ferry]: Searches for a route that includes the use of ferries.
• [Use HOV/Carpool Lanes]: Searches for a route that includes the use of HOV/Carpool Lanes.
• [Use Electronic Toll]: Searches for a route that includes the use of Electronic Toll.
• [Use Traffi c Information]: Searches for a route refl ecting the real time Traffi c Information.
• [Minimize Private/Gated Roads]: Searches for a route that minimizes or avoids the Private / Gated Roads.
3. Press [Recalculate].
, Note
The Items set by user may not be reflected depending on condition.
Using the Route Menu
81
Using the Route Menu
Edit RouteThis feature allows you to travel through the searched routes by editing the current route. Waypoints can be added/deleted/edited and the order can be changed.
Adding waypoints1. Press [NAV] > [Route] > [Edit Route].
2. Press [Add as Waypoint (1/2/3)].
3. Add the waypoint through destination search function.
4. If you want to add an waypoint, follow steps 2~3.
5. Press [Done] > [Start Guidance].
Reordering Route1. Press [NAV] > [Route] > [Edit Route].
2. Press the desired item from the list.
3. Move the selected item up and down. Or Drag it to the desired position.
4. Press [Done] > [Start Guidance].
Deleting Route1. Press [NAV] > [Route] > [Edit Route].
2. Press [Menu] > [Delete].
3. Select the desired item, then press [Delete].
• [Delete]: Deletes the selected items.
• [Delete All]: Cancels the route.
• [Unmark All]: Unmarks all items.
• [Cancel]: Exits delete screen.
82
Using the Route Menu
Route Info / AvoidThis allows you to check the route information and search for new route by avoiding the selected street(s).
1. Press [NAV] > [Route] > [ Route Info / Avoid].
2. Press [Avoid] to select he street(s) that you want to avoid.
3. Press [Done] to plan new route.
Route OverviewYou can check the entire route between your current location and your destination.
1. Press [NAV] > [Route] > [Route Overview].
2. Press the desired item.
• [Start Guidance]: Starts the route guidance.
• Press [Route Options] to set the route option. For more details, refer to “Route Options” on page 80.
• Press [Route Info/Avoid] to check route information and set a route to be avoided. For more details, refer to “Route Info/Avoid” on page 82.
• Press [Edit Route] to edit the route. For more details, refer to “Edit Route” on page 81.
• Press [Cancel Route] to cancel the route. For more details, refer to “Cancel Route” on page 80.
Route PreviewThis allows you to check the detailed turn-by-turn list.
1. Press [NAV] > [Route] > [Route Preview].
2. Press the desired item.
• [ ]: Move to the departure location.
• [ ]: Move to the previous position.
• [ ]: Move to the next position.
• [ ]: Move to the destination location.
• [ ]: Quick move to the specifi c position.
• [ ]: Close the route scan.
83
END USER LICENSE AGREEMENT
PLEASE READ THIS END USER LICENSE AGREEMENT (“EULA”) CAREFULLY BEFORE USING THE NAVIGATION SYSTEM.
This is a license agreement between you and HYUNDAI MNSOFT, INC.. including its affi liates (“COMPANY”) regarding a copy of COMPANY navigable map database together with associated software, media and explanatory printed documentation published by COMPANY (jointly the “Product”). The Product is provided for your personal, internal use only and not for resale. It is protected by copyright and is subject to the following terms which are agreed to by you, on the one hand, and COMPANY and its licensors (and their licensors and suppliers) (collectively, “Licensors”) on the other hand.
By using the Product, you accept and agree to all terms and conditions in this End User License Agreement (“EULA”). IF YOU DO NOT AGREE TO THE TERMS OF THIS EULA, YOU MUST PROMPTLY EXIT THE PRODUCT OPERATION PROGRAM AND DO NOT USE OR ACCESS TO THE PRODUCT. You agree that your rights under this eula may be terminated automatically without notice if you fail to comply with any term(s) of this EULA.
84
Terms and ConditionsPersonal Use Only. You agree to use this Product together with COMPANY authorized application for the solely personal, non-commercial purposes for which you were licensed, and not for service bureau, time-sharing or other similar purposes. Accordingly, but subject to the restrictions set forth in the following paragraphs, you agree not to otherwise reproduce, copy, modify, decompile, disassemble, create any derivative works of, or reverse engineer any portion of this Data, and may not transfer or distribute it in any form, for any purpose, except to the extent permitted by mandatory laws. You may not assign this EULA or any of the rights or licenses granted under this EULA, except when installed in the system for which it was created.
Restrictions. Except where you have been specifi cally licensed to do so by COMPANY, and without limiting the preceding paragraph, you may not use the Product (i) with any products, systems, or applications installed or otherwise connected to or in communication with vehicles, capable of vehicle navigation, positioning, dispatch, real time route guidance, fl eet management or similar applications; or (ii) with or in communication with any positioning devices or any mobile or wireless-connected electronic or computer devices, including without limitation cellular phones, palmtop and handheld computers, pagers, and personal digital assistants or PDAs.
COPYING OR USE OF THE PRODUCT EXCEPT AS PERMITTED BY THIS EULA IS UNAUTHORIZED AND IS COPYRIGHT INFRINGEMENT UNDER THE LAWS OF YOUR COUNTRY. IF YOU COPY OR USE THE PRODUCT WITHOUT COMPANY PERMISSION, EXCEPT AS PERMITTED BY THIS EULA, YOU ARE VIOLATING THE LAW AND LIABLE TO COMPANY AND ITS LICENSORS FOR DAMAGES, AND YOU MAY BE SUBJECT TO CRIMINAL PENALTIES.
85
THE PRODUCT MAY INCLUDE ENFORCEMENT TECHNOLOGY DESIGNED TO PREVENT (i) UNAUTHORIZED COPYING OF THE PRODUCT ONTO PHYSICAL STORAGE MEDIA OR VIA TRANSFER OVER THE INTERNET OR OTHER ELECTRONIC COMMUNICATION MEANS AND/OR (ii) ILLEGAL USAGE OF THE PRODUCT OTHER THAN BY A SPECIFICALLY AUTHORIZED DEVICE. YOU AGREE THAT COMPANY MAY USE THESE MEASURES TO PROTECT COMPANY AND THE LICENSORS AGAINST COPYRIGHT INFRINGEMENT.
Uploads. The Product may provide functionality through which you are able to upload certain information about your use of the Product (collectively, “Uploads”) to COMPANY servers or receive other services from COMPANY (collectively, the “Services”). If you use such functionality, you authorize COMPANY to retain your Uploads on its servers. COMPANY will have no obligation to provide any Services, may change the form and nature of any Services at any time with or without notice to you, will have no liability whatsoever to you for any failure of the Product or Services to transmit your Uploads to or from COMPANY servers, may cease providing any Services at any time with or without notice to you, and will have no obligation to retain your Uploads (or any other materials you may provide to COMPANY) on its servers or return your Uploads (or any other materials you may provide to COMPANY) to you before deleting them from its servers.
Storage. The Product may provide functionality through which you are able to store information (such as images) on the device on which you are using the Product. COMPANY will have no liability whatsoever to you or any third party for any failure of the Product to store any such information on such device.
86
Personal Information. By using the Product, you agree to the collection, retention and processing of your personal data (including the location of your mobile device) by COMPANY and to the storage and processing of such personal information on computers located outside of the country in which you reside. Even though COMPANY has taken steps intended to protect your personal information from being intercepted, accessed, used, or disclosed by unauthorized persons, COMPANY cannot fully eliminate security risks associated with your personal information and cannot guarantee that its systems will not be breached. See [*] for additional information regarding COMPANY’s use of your personal information.
Warning. The Product refl ects reality as existing before you received the product and it comprises data and information from government other sources. accordingly, the product may contain inaccurate or incomplete information due to the passage of time, changing circumstances, sources used and the nature of collecting comprehensive geographic product, any of which may lead to incorrect results. THE PRODUCT AND SERVICES MAY NOT TO BE USED FOR SAFETY OF LIFE APPLICATIONS, OR FOR ANY OTHER APPLICATION IN WHICH THE ACCURACY OR RELIABILITY OF THE PRODUCT OR SERVICES COULD CREATE A SITUATION WHERE PERSONAL INJURY OR DEATH MAY OCCUR. DO NOT ATTEMPT TO CONFIGURE THE PRODUCT OR INPUT INFORMATION WHILE DRIVING. FAILURE TO PAY FULL ATTENTION TO THE OPERATION OF YOUR VEHICLE COULD RESULT IN DEATH, SERIOUS INJURY, OR PROPERTY DAMAGE. BY USING THE PRODUCT, YOU ASSUME ALL RESPONSIBILITY AND RISK.
87
Disclaimer of Warranty. The Product is provided to you “as is,” and you agree to use it at your own risk. SUBJECT TO THE APPLICABLE LAWS, COMPANY AND THE LICENSORS MAKE NO GUARANTEES, REPRESENTATIONS OR WARRANTIES OF ANY KIND, EXPRESS OR IMPLIED, ARISING BY LAW OR OTHERWISE, INCLUDING BUT NOT LIMITED TO, content, QUALITY, accuracy, completeness, eff ectiveness, reliability, PERFORMANCE, MERCHANTABILITY, FITNESS FOR A PARTICULAR PURPOSE, NON-INFRINGEMENT, usefulness, use or results to be obtained from the Product, or that the Product or server will be uninterrupted or error-free, OR THAT ERRORS IN THE PRODUCT OR NONCONFORMITY TO ITS DOCUMENTATION CAN OR WILL BE CORRECTED. YOU ACKNOWLEDGE THAT THE PROVISIONS OF THIS SECTION ARE A MATERIAL INDUCEMENT AND CONSIDERATION TO COMPANY AND THE LICENSORS TO GRANT THE LICENSE CONTAINED IN THIS EULA AND TO PROVIDE YOU WITH ACCESS TO THE SERVICES.
Limitation of Liability: TO THE MAXIMUM EXTENT PERMITTED UNDER THE APPLICABLE LAWS, COMPANY AND THE LICENSORS SHALL NOT BE LIABLE TO YOU: IN RESPECT OF ANY CLAIM, DEMAND OR ACTION, IRRESPECTIVE OF THE NATURE OF THE CAUSE OF THE CLAIM, DEMAND OR ACTION ALLEGING ANY LOSS, INJURY OR DAMAGES, DIRECT OR INDIRECT, INCURRED BY YOU OR ANY THIRD PARTY WHICH MAY ARISE IN CONNECTION WITH OR RESULT FROM THE USE OR POSSESSION OF THE PRODUCT; OR FOR ANY LOSS OF DATA, PROFIT, REVENUE, CONTRACTS OR SAVINGS, OR OTHER DIRECT, INDIRECT, INCIDENTAL, SPECIAL OR CONSEQUENTIAL DAMAGES ARISING OUT OF YOUR USE OF OR INABILITY TO USE THE PRODUCT, ANY DEFECT IN THE PRODUCT, OR THE BREACH OF THESE TERMS OR CONDITIONS, WHETHER IN AN ACTION IN CONTRACT OR TORT OR BASED ON A WARRANTY, EVEN IF COMPANY OR THE LICENSORS HAVE BEEN ADVISED OF THE POSSIBILITY OF SUCH DAMAGES AND NOTWITHSTANDING THE FAILURE OF ANY LIMITED REMEDY PROVIDED HEREIN.
88
Exclusions. Some jurisdictions do not allow certain warranty exclusions or the limitation or exclusion of liability, so to that extent the above exclusion may not apply to you. To the extent that COMPANY may not, as a matter of applicable law, disclaim any implied warranty or limit its liabilities, the scope and duration of such warranty and the extent of COMPANY’s liability shall be the minimum permitted under such applicable law. The disclaimer of warranty and limitation of liability set forth in this EULA does not aff ect or prejudice your statutory rights where you have acquired the Product otherwise than in the course of business.
Third-Party Copyright Notices. The third-party sourced data has been incorporated into or made a part of the Product and is being sublicensed to you subject to the terms and conditions of this EULA. In this regard, you shall not remove or tamper with any intellectual property rights notice attached or used in relation to data supplied by the Licensors.
Entire Agreement. This EULA is the entire agreement between COMPANY (and the Licensors) and you pertaining to the subject matter hereof, and supersedes in their entirety any and all previous written or oral communications or documents (including, if you are obtaining an update, any agreement that may have been included with an earlier version of the Product) with respect to such subject matter.
Governing Law. This EULA shall be governed by the laws of the jurisdiction in which you reside at the date of acquisition of the Product. Should you at that moment reside outside the European Union or Switzerland, the law of the jurisdiction within the European Union or Switzerland where you acquired the Product shall apply. In all other cases, or if the jurisdiction where you acquired the Product cannot be defi ned, the laws of the Republic of Korea shall apply. This EULA will not be governed by the U.N. Convention on Contracts for the International Sale of Goods. The courts competent at your place of residence at the time you acquired the Product shall have jurisdiction over any dispute arising out of, or relating to this EULA, without prejudice to COMPANY’s right to bring claims at your then current place of residence.
89
Export Control. You agree not to export or re-export from anywhere any part of the Product in any form except in compliance with applicable export laws, rules and regulations, including but not limited to the laws, rules and regulations administered by the Offi ce of Foreign Assets Control of the U.S. Department of Commerce and the Bureau of Industry and Security of the U.S. Department of Commerce.
Miscellaneous. If any provision of this EULA is found to be invalid or unenforceable, it will be enforced to the extent permissible and the remainder of this EULA will remain in full force and eff ect. Failure by COMPANY to prosecute any right with respect to a default hereunder will not constitute a waiver by COMPANY of the right to enforce rights with respect to the same or any other breach. No refunds or replacements will be permitted on damaged Product.
U.S. Government End Users. If the Product is being acquired by or on behalf of the United States Government or any other entity seeking or applying rights similar to those customarily claimed by the United States Government, this Product and related documentation are “Commercial Items” as that term is defi ned at 48 C.F.R. (“FAR”) 2.101. This Product and related documentation are licensed to the United States Government end users (a) only as “Commercial Items” and (b) with only those rights as are granted to all other end users in accordance with this EULA, and each copy of Product delivered or otherwise furnished shall be marked and embedded as appropriate with the following “Notice of Use,” and shall be treated in accordance with such Notice:
90
Notice of UseContractor (Manufacturer/ Supplier) Name: HYUNDAI MNSOFT, INC.
This Product and related documentation are commercial items as defi ned in FAR 2.101 and is subject to this EULA under which this Product is provided.
© 20XX HYUNDAI MNSOFT. All rights reserved.
If the Contracting Offi cer, federal government agency, or any federal offi cial refuses to use the legend provided herein, the Contracting Offi cer, federal government agency, or any federal offi cial must notify COMPANY prior to seeking additional or alternative rights in the Product.
End-User Terms Required by HERE. The Product utilizes map data that COMPANY licenses from HERE and the following copyright notices apply to such map data (the “HERE Data”): © 20XX HERE. All rights reserved.
The HERE Data for areas of Canada includes information taken with permission from Canadian authorities, including: © Her Majesty the Queen in Right of Canada, © Queen’s Printer for Ontario, © Canada Post Corporation, GeoBase.®, © Department of Natural Resources Canada. All rights reserved.
HERE holds a non-exclusive license from the United States Postal Service® to publish and sell ZIP+4® information.
©United States Postal Service® 20XX. Prices are not established, controlled or approved by the United States Postal Service®. The following trademarks and registrations are owned by the USPS: United States Postal Service, USPS, and ZIP+4.
91
Copyright for Brand Icon The marks of companies displayed by this product to indicate business locations are the marks of their respective owners. The use of such marks in this product does not imply any sponsorship, approval, or endorsement by such companies of this product.
Copyright for Junction ViewJunction View Data provided by ZENRIN USA, INC. Copyright(C) 20XX, All rights Reserved.
92
About Map UpdatesYou can contact your dealer or Call HYUNDAI MNSOFT at 1-888-757-0010.
Information• This product requires regular updates for new functions and map updates. Updating may require up to 1 hour depending on the data size.
• Turning off the power or ejecting the SD card during the update process may result in damage to the system. Make sure to keep the ignition on and wait until updating is complete.
CAUTION• Please use only the SD card that was included with the vehicle purchase.
• The use of an uncertifi ed SD card may result in damage to the system due to heat related deformation.
• Product malfunctions caused by the use of an uncertifi ed cards shall not be covered within the product warranty.
• Repeatedly connecting/disconnecting the SD card in a short period of time may cause damage to the device.
93
Bluetooth® Wireless Technology
Before Using the Bluetooth Handsfree
What is Bluetooth Wireless Technology?• Bluetooth Wireless Technology refers to a short-
distance wireless networking technology which uses a 2.45GHz frequency to connect various devices within a certain distance.
• Supported within PCs, external devices, Bluetooth phones, PDAs, various electronic devices, and automotive environments, Bluetooth Wireless Technology to be transmitted at high speeds without having to use a connector cable.
• Bluetooth Handsfree refers to a device which allows the user to conveniently make phone calls with Bluetooth mobile phones through the system.
• The Bluetooth Handsfree feature may not be supported in some mobile phones.
Precautions for Safe Driving• Bluetooth is a feature that enables drivers to
use handsfree while driving. Connecting the head unit with a Bluetooth phone allows the user to conveniently make calls, receive calls, and manage the phone book. Before using Bluetooth Wireless Technology, carefully read the contents of this user’s manual.
• Excessive use or operations while driving may lead to negligent driving practices and be the cause of accidents. Do not operate the device excessively while driving.
• Viewing the screen for prolonged periods of time is dangerous and may lead to accidents. When driving, view the screen only for short periods of time.
Cautions upon Connecting Bluetooth Phone• Before connecting the head unit with the
mobile phone, check to see that the mobile phone supports Bluetooth features.
• If you do not want automatic connection with your Bluetooth device, turn the Bluetooth feature off of the Bluetooth device.
• Park the vehicle when pairing the head unit with the mobile phone.
• Some Bluetooth features may occasionally not operate properly depending on the fi rmware version of your mobile phone. If such features can be operated after receiving a S/W upgrade from your mobile phone manufacturer, unpair all devices and pair again before use.
• When pairing and the head unit with the iPhone for the fi rst time while your iPhone is connected to the USB port with iPhone cable, error message may be displayed on your iPhone. But, this is intended operation. You may ignore it if your iPhone has been connected to the head unit.
Pairing and connecting the unit and a Bluetooth phoneTo use the Bluetooth feature, make sure the Bluetooth on your phone is turned on. Refer to your phone’s user guide.
When no phones have been paired1. Press "PHONE" on the remote control for
head unit or " " on the steering wheel remote control.
Bluetooth® Wireless Technology
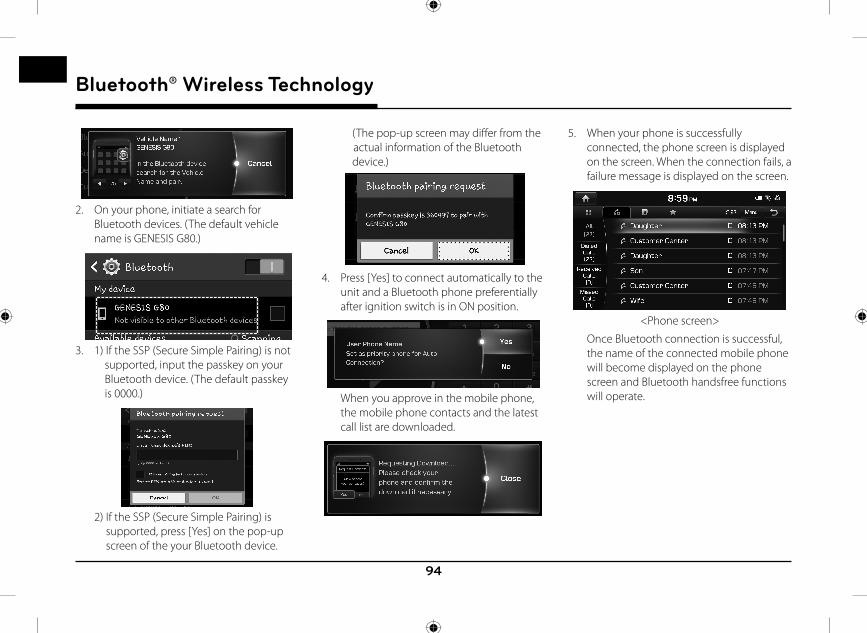
94
Bluetooth® Wireless Technology
2. On your phone, initiate a search for Bluetooth devices. (The default vehicle name is GENESIS G80.)
3. 1) If the SSP (Secure Simple Pairing) is not supported, input the passkey on your Bluetooth device. (The default passkey is 0000.)
2) If the SSP (Secure Simple Pairing) is supported, press [Yes] on the pop-up screen of the your Bluetooth device.
(The pop-up screen may diff er from the actual information of the Bluetooth device.)
4. Press [Yes] to connect automatically to the unit and a Bluetooth phone preferentially after ignition switch is in ON position.
When you approve in the mobile phone, the mobile phone contacts and the latest call list are downloaded.
5. When your phone is successfully connected, the phone screen is displayed on the screen. When the connection fails, a failure message is displayed on the screen.
<Phone screen>
Once Bluetooth connection is successful, the name of the connected mobile phone will become displayed on the phone screen and Bluetooth handsfree functions will operate.
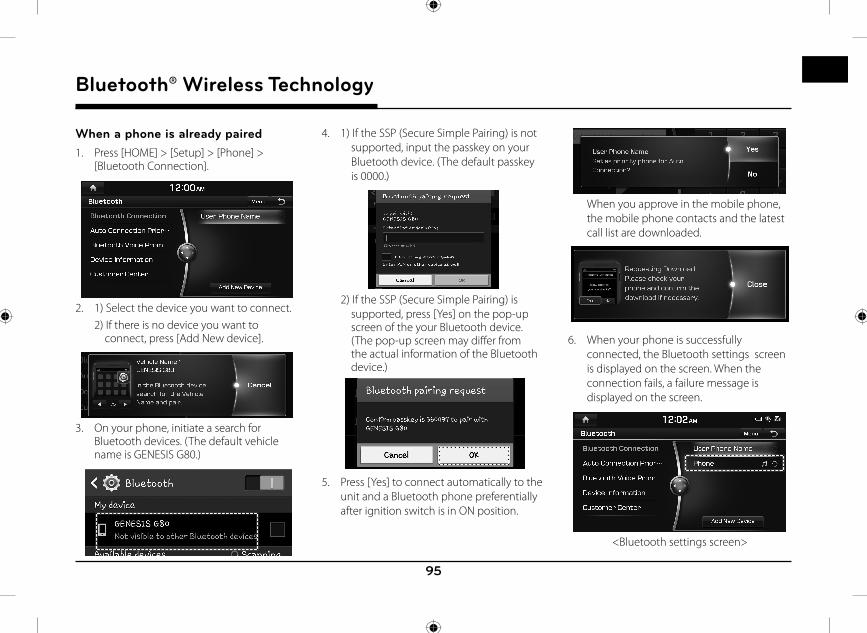
95
Bluetooth® Wireless Technology
When a phone is already paired1. Press [HOME] > [Setup] > [Phone] >
[Bluetooth Connection].
2. 1) Select the device you want to connect. 2) If there is no device you want to
connect, press [Add New device].
3. On your phone, initiate a search for Bluetooth devices. (The default vehicle name is GENESIS G80.)
4. 1) If the SSP (Secure Simple Pairing) is not supported, input the passkey on your Bluetooth device. (The default passkey is 0000.)
2) If the SSP (Secure Simple Pairing) is supported, press [Yes] on the pop-up screen of the your Bluetooth device. (The pop-up screen may diff er from the actual information of the Bluetooth device.)
5. Press [Yes] to connect automatically to the unit and a Bluetooth phone preferentially after ignition switch is in ON position.
When you approve in the mobile phone, the mobile phone contacts and the latest call list are downloaded.
6. When your phone is successfully connected, the Bluetooth settings screen is displayed on the screen. When the connection fails, a failure message is displayed on the screen.
<Bluetooth settings screen>
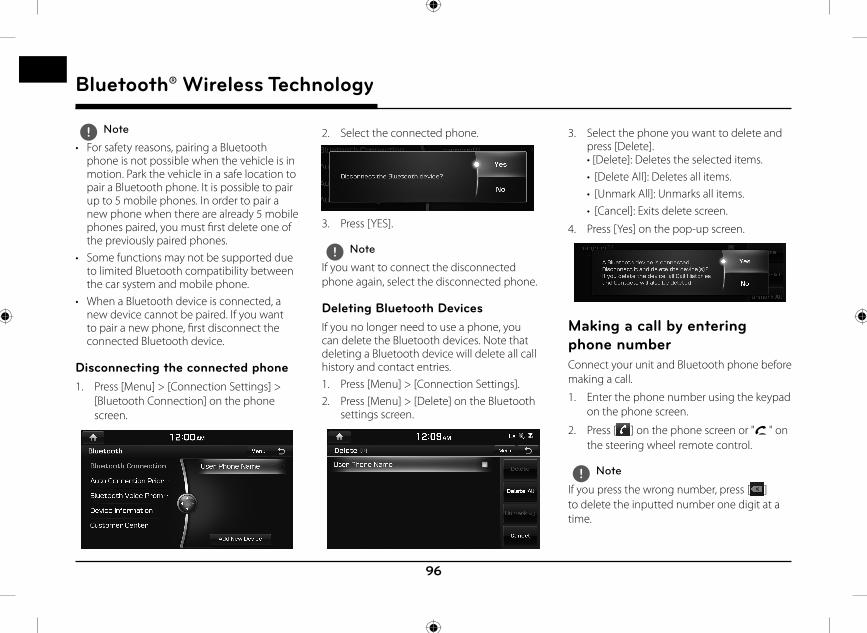
96
Bluetooth® Wireless Technology
, Note
• For safety reasons, pairing a Bluetooth phone is not possible when the vehicle is in motion. Park the vehicle in a safe location to pair a Bluetooth phone. It is possible to pair up to 5 mobile phones. In order to pair a new phone when there are already 5 mobile phones paired, you must fi rst delete one of the previously paired phones.
• Some functions may not be supported due to limited Bluetooth compatibility between the car system and mobile phone.
• When a Bluetooth device is connected, a new device cannot be paired. If you want to pair a new phone, fi rst disconnect the connected Bluetooth device.
Disconnecting the connected phone1. Press [Menu] > [Connection Settings] >
[Bluetooth Connection] on the phone screen.
2. Select the connected phone.
3. Press [YES].
, Note
If you want to connect the disconnected phone again, select the disconnected phone.
Deleting Bluetooth DevicesIf you no longer need to use a phone, you can delete the Bluetooth devices. Note that deleting a Bluetooth device will delete all call history and contact entries.1. Press [Menu] > [Connection Settings].2. Press [Menu] > [Delete] on the Bluetooth
settings screen.
3. Select the phone you want to delete and press [Delete].• [Delete]: Deletes the selected items.• [Delete All]: Deletes all items.• [Unmark All]: Unmarks all items.• [Cancel]: Exits delete screen.
4. Press [Yes] on the pop-up screen.
Making a call by entering phone numberConnect your unit and Bluetooth phone before making a call.
1. Enter the phone number using the keypad on the phone screen.
2. Press [ ] on the phone screen or " " on the steering wheel remote control.
, Note
If you press the wrong number, press [ ] to delete the inputted number one digit at a time.
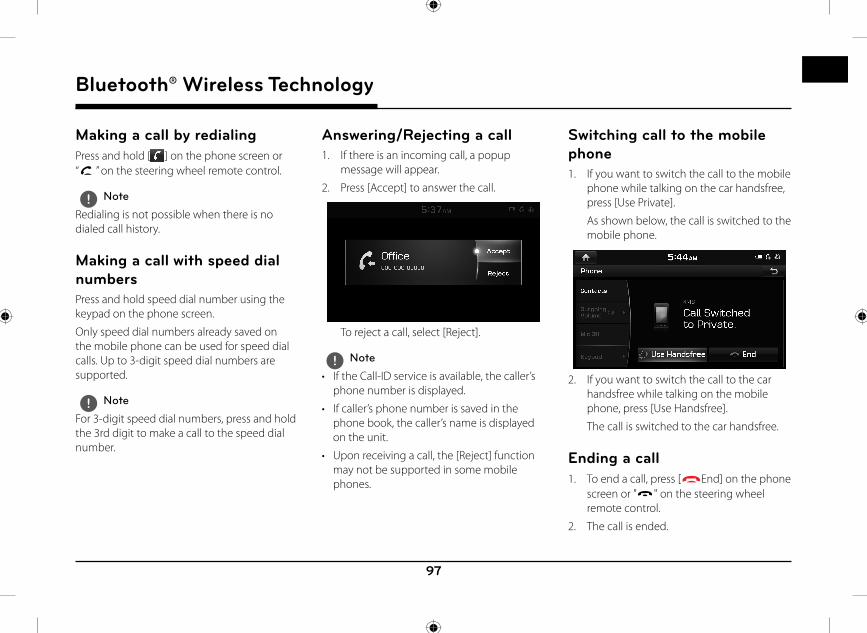
97
Bluetooth® Wireless Technology
Making a call by redialingPress and hold [ ] on the phone screen or “ ” on the steering wheel remote control.
, Note
Redialing is not possible when there is no dialed call history.
Making a call with speed dial numbersPress and hold speed dial number using the keypad on the phone screen.
Only speed dial numbers already saved on the mobile phone can be used for speed dial calls. Up to 3-digit speed dial numbers are supported.
, Note
For 3-digit speed dial numbers, press and hold the 3rd digit to make a call to the speed dial number.
Answering/Rejecting a call1. If there is an incoming call, a popup
message will appear.
2. Press [Accept] to answer the call.
To reject a call, select [Reject].
, Note
• If the Call-ID service is available, the caller’s phone number is displayed.
• If caller’s phone number is saved in the phone book, the caller’s name is displayed on the unit.
• Upon receiving a call, the [Reject] function may not be supported in some mobile phones.
Switching call to the mobile phone1. If you want to switch the call to the mobile
phone while talking on the car handsfree, press [Use Private].
As shown below, the call is switched to the mobile phone.
2. If you want to switch the call to the car handsfree while talking on the mobile phone, press [Use Handsfree].
The call is switched to the car handsfree.
Ending a call1. To end a call, press [ End] on the phone
screen or " " on the steering wheel remote control.
2. The call is ended.
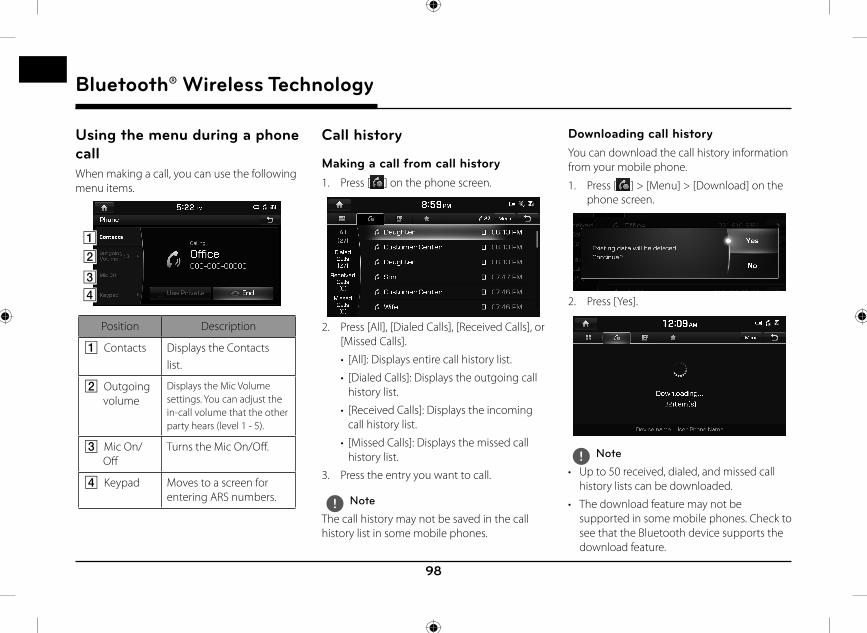
98
Bluetooth® Wireless Technology
Using the menu during a phone callWhen making a call, you can use the following menu items.
A
D
C
B
Position Description
A Contacts Displays the Contactslist.
B Outgoing volume
Displays the Mic Volume settings. You can adjust the in-call volume that the other party hears (level 1 - 5).
C Mic On/Off
Turns the Mic On/Off.
D Keypad Moves to a screen for entering ARS numbers.
Call history
Making a call from call history1. Press [ ] on the phone screen.
2. Press [All], [Dialed Calls], [Received Calls], or [Missed Calls].
• [All]: Displays entire call history list.
• [Dialed Calls]: Displays the outgoing call history list.
• [Received Calls]: Displays the incoming call history list.
• [Missed Calls]: Displays the missed call history list.
3. Press the entry you want to call.
, Note
The call history may not be saved in the call history list in some mobile phones.
Downloading call historyYou can download the call history information from your mobile phone.
1. Press [ ] > [Menu] > [Download] on the phone screen.
2. Press [Yes].
, Note
• Up to 50 received, dialed, and missed call history lists can be downloaded.
• The download feature may not be supported in some mobile phones. Check to see that the Bluetooth device supports the download feature.
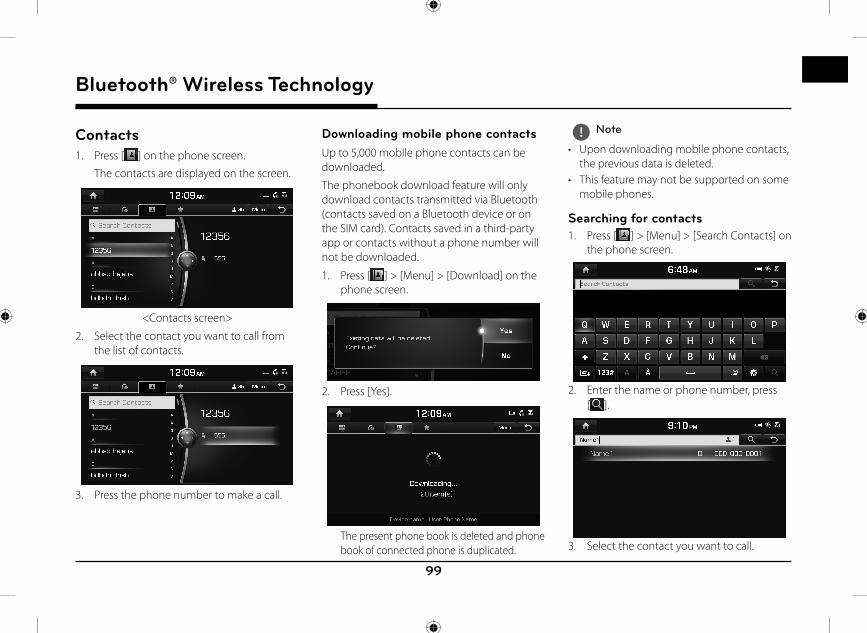
99
Bluetooth® Wireless Technology
Contacts1. Press [ ] on the phone screen.
The contacts are displayed on the screen.
<Contacts screen>
2. Select the contact you want to call from the list of contacts.
3. Press the phone number to make a call.
Downloading mobile phone contactsUp to 5,000 mobile phone contacts can be downloaded.
The phonebook download feature will only download contacts transmitted via Bluetooth (contacts saved on a Bluetooth device or on the SIM card). Contacts saved in a third-party app or contacts without a phone number will not be downloaded.
1. Press [ ] > [Menu] > [Download] on the phone screen.
2. Press [Yes].
The present phone book is deleted and phone book of connected phone is duplicated.
, Note
• Upon downloading mobile phone contacts, the previous data is deleted.
• This feature may not be supported on some mobile phones.
Searching for contacts1. Press [ ] > [Menu] > [Search Contacts] on
the phone screen.
2. Enter the name or phone number, press [ ].
3. Select the contact you want to call.
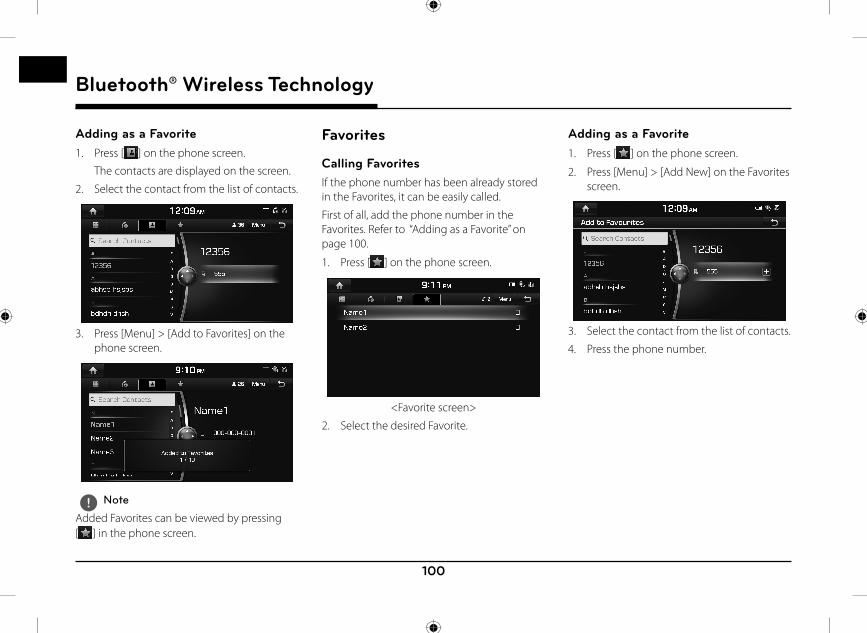
100
Bluetooth® Wireless Technology
Adding as a Favorite1. Press [ ] on the phone screen.
The contacts are displayed on the screen.
2. Select the contact from the list of contacts.
3. Press [Menu] > [Add to Favorites] on the phone screen.
, Note
Added Favorites can be viewed by pressing [ ] in the phone screen.
Favorites
Calling FavoritesIf the phone number has been already stored in the Favorites, it can be easily called.
First of all, add the phone number in the Favorites. Refer to “Adding as a Favorite” on page 100.
1. Press [ ] on the phone screen.
<Favorite screen>
2. Select the desired Favorite.
Adding as a Favorite1. Press [ ] on the phone screen.
2. Press [Menu] > [Add New] on the Favorites screen.
3. Select the contact from the list of contacts.
4. Press the phone number.
101
Bluetooth® Wireless Technology
Deleting Favorites1. Press [ ] on the phone screen.
2. Press [Menu] > [Delete] on the Favorites screen.
3. Select the item you want to delete and press [Delete].
• [Delete]: Deletes the selected items.
• [Delete All]: Deletes all items.
• [Unmark All]: Unmarks all items.
• [Cancel]: Exits delete screen.
Setting Bluetooth Connection1. Press [ ], [ ], [ ], or [ ] on the phone
screen.
2. Press [Menu] > [Connection Settings].
3. For more details, refer to “Phone” on page 140.
102
Voice Recognition System
What is voice recognition?Voice recognition technology runs the system as ordered by recognizing your voice command to help with the operation of multimedia while you are driving the car. Regretfully, not all possible voice commands are recognized by the system due to technological limitations. To make up for these limitations, the system displays the voice commands that are available for you to use.There are errors in communication between people. Likewise, voice recognition sometimes misunderstands your voice command under certain circumstances. If this happens, either check the screen for the available options and say the command again, or manually select and press the button for the corresponding command on the screen.
Voice recognition features by languageVoice recognition support availability varies according to the language set for the system.
Please verify the current language setting before using the voice recognition.
• If you change the language set for the system to Korean, voice recognition will not be supported. Change the system language to other language.
Operating voice command
Condition for voice command systemMost of the functions can be operated by voice. Please follow the instructions below for optimal voice recognition performance.
• To improve the voice recognition performance, keep your car interior quiet by closing all windows and the sunroof.
• Press the voice recognition button and say the desired voice command after the beep sound.
• The microphone is positioned above the driver. Voice commands should be spoken by driver practicing proper posture.
• Pronounce the voice commands naturally and clearly as if in a normal conversation.
• Special symbols of Phonebook Name are not considered in voice recognition.Ex) James-Smith : “James Smith”
• House number or digits in Phonebook Name should be spoken discretely.Ex) S1234 : “South one two three four”
• Depending on the specifi cations, some commands may not be supported.
Starting voice recognition1. Press “ ” on the steering wheel remote
control.
2. Say a command.
, Note
• For proper recognition, please say the command after the voice instruction and beep sound.
• When starting voice recognition, the voice command entry window with six representative commands is displayed.
• If voice recognition is in [Beginner], then the system will provide the detailed voice recognition guidance.If voice recognition is in [Normal], then the system will provide the simple version of voice recognition guidance.If voice recognition is in [Expert], then you will only hear a beep.For further details, refer to “Voice recognition” on page 142.
Voice Recognition System
103
Voice Recognition System
Skipping prompt messagesWhile a prompt is playing, press quickly on the steering wheel remote control labeled with “ “. The prompt is immediately ended and a beep will sound. After the beep, please say the voice command.
Re-starting voice recognitionWhile the system waits for input, press quickly on the steering wheel remote control labeled with “ “. The beep tone will sound, indicating the system is listening for a new input. Say a voice command.
Ending voice recognition• While voice recognition is operating, press
and hold the control labeled “ “ on the steering wheel remote control, or say ‘Exit’.
• While using voice recognition, pressing other button except on the steering wheel remote control or a different button on head unit will end voice recognition.
Adjusting voice recognition volumeWhile voice recognition is operating, turn “VOL” knob on the head unit or press “VOL+/VOL-” on the steering wheel remote control.
Basic operation for voice command (Setting FM)1. Press the control on the steering wheel
remote control labeled " ".
The system waits for your command and displays a list of available commands on the screen.
2. Once the icon changes into the icon on the pop-up screen, a beep will sound. Say ‘FM’.
Voice recognition quick start (Manual Control)The usual way of activating voice recognition is waiting for the voice guide and then speaking your command for a task. Since this method requires that you wait a while for the voice guide, you can select one of the commands shown on the screen to speed up the process.You might fi nd this feature useful when you do
not want to wait for the full voice guide or when the system does not recognize your voice.
About voice command “Help”1. Press the “ ” on the steering wheel
remote control.2. Once the icon changes into the
icon on the pop-up screen with a beep sound, say “Help”.
The available commands are displayed on the screen.
3. Select or say the displayed command on the screen.

104
Voice command listVoice recognition commands are classifi ed as “Global Commands” and “Local Commands”.• Global commands (X) : Commands that can be used immediately after activating voice recognition.• Local commands (e) : Commands that can be used in specifi c multimedia/navigation/Bluetooth mode states.
, Note
Some global and local commands will operate properly only when a USB, iPod, Bluetooth or other device has been connected.
Phone commands• Voice commands related to phone calls can be used after connecting the Bluetooth phone device.• To call a person, for example “Call <John Smith>” whose name is listed in contacts, you must fi rst download the mobile phone contacts.
(Up to 5,000 mobile phone contacts can be downloaded.) For more details on downloading contacts, see “Downloading mobile phone contacts” on page 99.• After downloading the Bluetooth phone contacts, it will take some time to convert the phone contacts into voice data during which time you
cannot make a call by name yet. The time that it taken to convert voice data may vary depending on the number of contacts downloaded.
Command Operation
X Call Downloaded mobile phone contacts is displayed on the screen, and afterwards, you can make a call by speaking the name.
X Call <Name> You can immediately make a call to (name) in the downloaded mobile phone contacts.
Ex.) “Call John Smith”
X Call <Name> on Mobile
You can immediately make a call to (name) in the downloaded mobile phone contacts saved as ‘mobile’.
Ex.) “Call John Smith on mobile”
X Call <Name> at Work You can immediately make a call to (name) in the downloaded mobile phone contacts saved as ‘offi ce’.
Ex.) “Call John Smith at work”
X Call <Name> at Home
You can immediately make a call to (name) in the downloaded mobile phone contacts saved as ‘home’.
Ex.) “Call John Smith at home”
Voice Recognition System
105
X Call <Name> on Other
You can immediately make a call to (name) in the downloaded mobile phone contacts saved as another phone category except ‘mobile, home, offi ce’. Ex.) “Call John Smith on other”
X Dial number Displays a screen where you can say a phone number to dial.
X Dial <Phone #> You can make a call by directly speaking the number you want to call. Ex.) Dial 123-456-7890 : “Dial one two three four five six seven eight nine zero”
X Redial Directly calls the number that you last dialed.
X Call history Displays your Call History, where you can say the list number to make a call.
X Change Bluetooth Device
You can change available Bluetooth device.
Radio commands
Command Operation
X Radio Plays the most recent radio channels from FM, AM, and SiriusXM™.
X FM Plays FM radio.
X FM <87.5 ~ 107.9> Tunes to FM <Frequency> according to what you say. Ex.) FM 87.5 : “FM eighty seven point fi ve”
X AM Plays AM radio.
X AM <530 ~ 1710> Tunes to AM <Frequency> according to what you say. Ex.) AM 530 : “AM fi ve hundred thirty”e Preset <1–18> Tunes to your preset stations (FM/AM: 1 to 12, SiriusXM: 1 to 18).
X SiriusXM™ Plays SiriusXM™ radio.
X SiriusXM™ Channel
<0~999>
Tunes to SiriusXM™ Channel <Channel Number> according to what you say.
Ex.) SiriusXM™ Channel 23: SiriusXM™ Channel twenty three
e Channel <0~999> In SiriusXM™ Radio mode, tunes to the channel <Channel Number> that you say.
Voice Recognition System
106
Voice Recognition System
Media commandsCheck the followings before you use media commands.
1. If media is not connected or playable files in media do not exist when you use media commands, a voice message will tell you that this is not available at present.
2. If you say a command that equal to current status, then it will maintain the current status. Ex.) Saying “USB music” while USB music file is playing.
Command Operation
X Music The previously played music source will resume playing.
X Disc Plays a disc that is currently inserted.
X iPod Plays a music file of iPod that is currently connected. It works identically when iPhone is connected and if not iPod but USB is connected, it will plays a music file of USB instead of iPod. USB and iPod command are interchangeable.
X USB Plays or displays a file of USB that is currently connected. If not USB but iPod is connected, it plays a music file of iPod instead of USB.
X Bluetooth Audio Plays a music file of currently connected Bluetooth mobile phone. It may not be supported according to Bluetooth connection condition.
X AUX Plays a music file of external device connected in the AUX jack.
X Jukebox Plays a file of jukebox saved in the system.
X Jukebox Music Plays a music file saved in jukebox.
X USB Music Plays a music file from the connected USB that was recently played.
107
Voice Recognition System
Audio CD commands
Command Operation
e Play Starts to play a track. If a track is already playing, the track continues to play.
e Pause If a track is playing, this will pause the track. If the track is already paused, the track will remain paused.
e Track <1~99> This will play the track number spoken.
e Shuffl e This will make the system play all tracks in a random order. If the track is already playing in a random order, no change will occur.
e Shuffl e Off This cancels playing in a random order and returns to playing tracks sequentially. If the tracks are already being played sequentially, no change will occur.
e Repeat This will repeat the track being played. If ‘Repeat’ is already active, no change will occur.
e Repeat Off This cancels ‘Repeat’ and returns to playing tracks sequentially. If the tracks are already being played sequentially, no change will occur.
108
Voice Recognition System
MP3 CD/ USB music/ Jukebox music/ iPod® commands
Command Operation
e Play Plays a stopped track. If it is playing, it remains the current condition.
e Pause Pauses a playing track. If it is paused, it remains the current condition.
e Shuffl e Plays randomly all tracks. If it is randomly playing, it remains the current condition.
e Shuffl e Off Cancels the random playing and sequentially plays all tracks. If it is sequentially playing, it remains the current condition.
e Repeat Repeats the playing track. If it is repeating, it remains the current condition.
e Repeat Off Cancels the repeat and sequentially plays all tracks. If it is sequentially playing, it remains the current condition.
Bluetooth audio/ AUX commands For Bluetooth audio, there are differences in the supported functions according to the connected devices, and the commands such as play, pause, etc. are not supported.
For AUX (external device), video, and image, the commands such as play, pause, etc. are not supported.
109
Voice Recognition System
Navigation commandsCheck the following before you use navigation commands :
1. Search for and find addresses located in the state or province your car is currently in.
If you want to search in another state, say the name of state/province and then say the address.
"Find Address" command is classified by states/provinces to provide you with faster service.
2. Some commands such as “Cancel Route” are available only when the destination is fixed.
Command Operation
X Find Address in <State>
• Finds the address in <State> and sets it as the destination. Ex.) Find Address in California
• To fi nd an address, you should say “House Number → Street → City” (in order, excluding the state).Ex.) 300 (Three Zero Zero), Main Street, Almond
X Find Address Finds the address and sets it as the destination.
X Find POI Finds the nearest points of interest from your current location.
After this command, you can fi nd the name of a location step-by-step.
X Find <POI> Immediately fi nds <Category> of POI nearest to your current location. For more details of <Category>, see the “List of Nearest Locations” on page 113. Ex.) Find “Parking”
X Map Moves to the current position on the navigation map.
X Previous Points Displays a list combining Previous Destinations, Previous Searches, and Previous Starting Points all together.
You can set a destination by saying the list number.
X Previous Destinations Displays a list of recent destinations and you can set a destination by saying the number on the list.
X Previous Searches Displays a list of recent searches, where you can set a destination by saying the number on the list.
110
Voice Recognition System
X Previous Starting Points
Displays a list of recent starting points and you can set a destination by saying the number on the list.
X Traffi c Information Moves to the Traffi c Information menu screen.
X Go Home Set your home as the destination. Your home address must be set up in the Navigation System.
X Go to Work Set the destination to your offi ce/place of work. Your offi ce/place of work must be set up in the Navigation System.
X Turn Guidance On Turns on the voice guidance system.
X Turn Guidance Off Turns off the voice guidance system.
X Zoom In Zooms in on the navigation map to the fullest.
X Zoom Out Zooms out from the navigation map to the fullest.
X Cancel Route Cancels the route to the fi xed destination and exits guidance.
X Destination Information Tells you the remaining distance and time to your destination.
X Route Options Restarts the route to your destination. You can select either “Faster Time” or “Shorter Distance”.
X Emergency Services Displays a list of nearest Police Station, Hospital, Dealership, or Road Assistance. You can set a destination by saying the list number.
X Police Station Displays a list of the nearest police stations. You can set a destination by saying number on the list.
X Hospital Displays a list of the nearest hospitals. You can set a destination by saying number on the list.
X Dealership Displays a list of the nearest car dealerships. You can set a destination by saying number on the list.
111
Voice Recognition System
X Road Assistance Displays a list of the nearest road assistance locations. You can set a destination by saying number on the list.
X Show Route Displays a map overview of the entire route to your destination.
X Find Faster Time Route Calculates the route based on the fastest arrival time.
X Find Shorter Distance Route
Calculates the route based on the shortest distance.
112
Voice Recognition System
Other Commands (Commands used in List / Help/ etc.)
Command Operation
X Help Goes to the voice recognition help screen. All available commands can then be identifi ed and used.
e Yes/No When voice recognition is active, this command is used when an answer is requested for a confi rmation question.
e Line 1-5 (One-Five) When you cannot select a certain name, such as in Call History, you can select it using line number.
Simple numbers, such as “one” and “two”, can be recognized.
e Next/Previous When fi ve or more searched items are listed, you can move to the previous or next page using a voice command.
e Manual Input When Dial or Destination search results are displayed, this command is used to search manually rather than searching using a voice command.
Voice recognition stops after this command is used.
e Go Back Goes back to the previous screen.
X Exit Ends the voice recognition.
113
Voice Recognition System
List of Nearest LocationsNavigation location names may be changed after a software update.
Restaurants
• Fast Food Restaurants• Arby’s• Boston Market• BURGER KING• Carl’s Jr• Chick-fi l-A• Chipotle• Church’s Chicken• Dairy Queen• Firehouse Subs• Fleming’s• Hardee’s• IHOP• In-N-Out Burger• Jack in the Box• Jimmy John’s• KFC• Little Caesars• Long John Silver’s• McAlister’s Deli• McDonald’s• Panda Express• Panera Bread• Popeyes• Quiznos Sub• Schlotzsky’s
• SONIC• SUBWAY• Taco Bell• Taco John’s• Waffl e House• Wendy’s• White Castle• Blimpie• Checkers• Culver’s• Five Guys Burgers and
Fries• Jamba Juice• Jersey Mike’s Subs• Smoothie King• Steak n Shake• Whataburger• Coff ee Shops• Starbucks• Dunkin’ Donuts• Tim Hortons• American Restaurants• Applebee’s• Bahama Breeze• Boston’s Restaurant &
Sports Bar
• Cheeseburger in Paradise
• Chili’s Grill & Bar• Cool River• Denny’s• Frisch’s Big Boy• Good Eats• III Forks• Lee Roy Selmon’s• Lone Star Steakhouse &
Saloon• Longhorn Steakhouse• Luckys Cafe• Outback Steakhouse• Ponderosa• Publix• Seasons 52• Sheetz• Silver Fox• Texas Roadhouse• TGI Friday’s• The Capital Grille• A&W• Bob Evans• Buff alo Wild Wings• Cracker Barrel Old
Country Store• Golden Corral• Red Robin• Ruby Tuesday• Wingstop• Italian Restaurants• Bonefi sh Grill• Carrabba’s Italian Grill• Chuck E Cheese’s• Domino’s Pizza• Olive Garden• Papa John’s• Papa Murphy’s• Pizza 73• Pizza Hut• pizza pizza• Cici’s Pizza• Godfather’s• Hungry Howie’s Pizza• Marco’s Pizza• Latin American
Restaurants• Mexican Restaurants• Cantina Laredo• Chevys• El Chico
• Del Taco• Moe’s Southwest Grill• Qdoba• Asian Restaurants• Chinese Restaurants• PF Chang’s China Bistro• Japanese Restaurants• Korean Restaurants• Seafood Restaurants• Red Lobster• Captain D’s• Vegetarian Restaurants• French Restaurants• Continental Restaurants• African Restaurants• Other Restaurants• Auntie Anne’s• Baskin-Robbins• Haagen-Dazs• Hooters• Roy’s• TCBY• VAN DER VALK• Bojangles’• Cold Stone Creamery• Zaxby’s
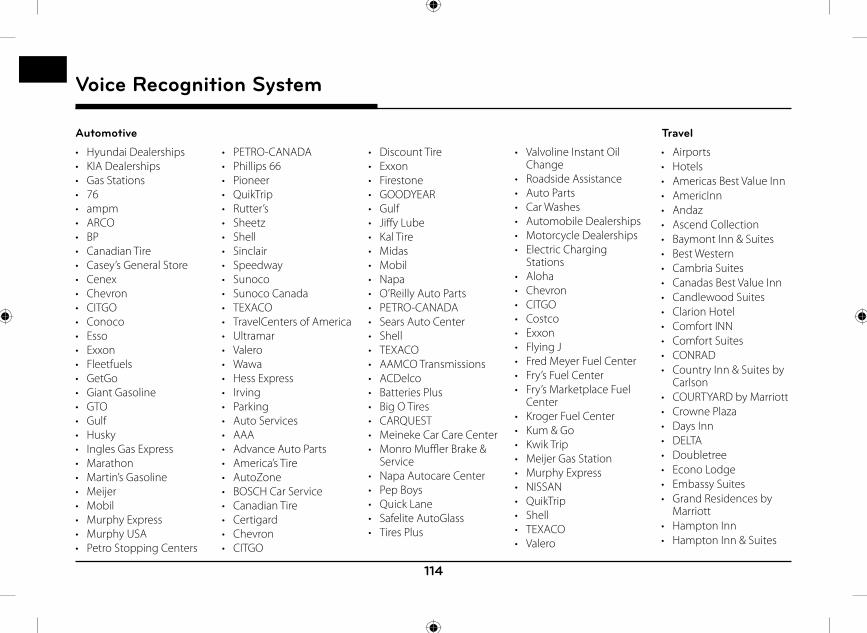
114
Voice Recognition System
• Hyundai Dealerships• KIA Dealerships• Gas Stations• 76• ampm• ARCO• BP• Canadian Tire• Casey’s General Store• Cenex• Chevron• CITGO• Conoco• Esso• Exxon• Fleetfuels• GetGo• Giant Gasoline• GTO• Gulf• Husky• Ingles Gas Express• Marathon• Martin’s Gasoline• Meijer• Mobil• Murphy Express• Murphy USA• Petro Stopping Centers
• PETRO-CANADA• Phillips 66• Pioneer• QuikTrip• Rutter’s• Sheetz• Shell• Sinclair• Speedway• Sunoco• Sunoco Canada• TEXACO• TravelCenters of America• Ultramar• Valero• Wawa• Hess Express• Irving• Parking• Auto Services• AAA• Advance Auto Parts• America’s Tire• AutoZone• BOSCH Car Service• Canadian Tire• Certigard• Chevron• CITGO
• Discount Tire• Exxon• Firestone• GOODYEAR• Gulf• Jiff y Lube• Kal Tire• Midas• Mobil• Napa• O’Reilly Auto Parts• PETRO-CANADA• Sears Auto Center• Shell• TEXACO• AAMCO Transmissions• ACDelco• Batteries Plus• Big O Tires• CARQUEST• Meineke Car Care Center• Monro Muffl er Brake &
Service• Napa Autocare Center• Pep Boys• Quick Lane• Safelite AutoGlass• Tires Plus
• Valvoline Instant Oil Change
• Roadside Assistance• Auto Parts• Car Washes• Automobile Dealerships• Motorcycle Dealerships• Electric Charging
Stations• Aloha• Chevron• CITGO• Costco• Exxon• Flying J• Fred Meyer Fuel Center• Fry’s Fuel Center• Fry’s Marketplace Fuel
Center• Kroger Fuel Center• Kum & Go• Kwik Trip• Meijer Gas Station• Murphy Express• NISSAN• QuikTrip• Shell• TEXACO• Valero
• Airports• Hotels• Americas Best Value Inn• AmericInn• Andaz• Ascend Collection• Baymont Inn & Suites• Best Western• Cambria Suites• Canadas Best Value Inn• Candlewood Suites• Clarion Hotel• Comfort INN• Comfort Suites• CONRAD• Country Inn & Suites by
Carlson• COURTYARD by Marriott• Crowne Plaza• Days Inn• DELTA• Doubletree• Econo Lodge• Embassy Suites• Grand Residences by
Marriott• Hampton Inn• Hampton Inn & Suites
Automotive Travel
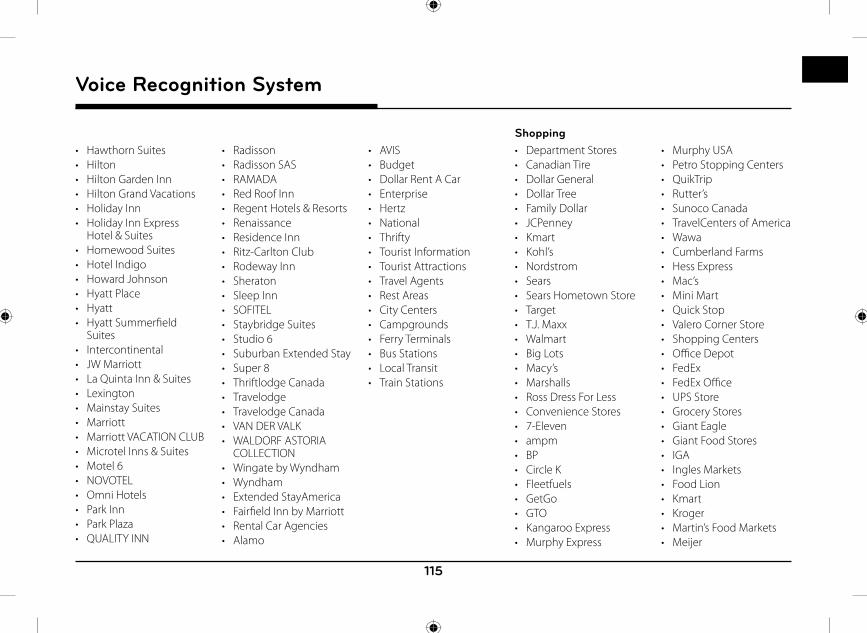
115
Voice Recognition System
• Hawthorn Suites• Hilton• Hilton Garden Inn• Hilton Grand Vacations• Holiday Inn• Holiday Inn Express
Hotel & Suites• Homewood Suites• Hotel Indigo• Howard Johnson• Hyatt Place• Hyatt• Hyatt Summerfi eld
Suites• Intercontinental• JW Marriott• La Quinta Inn & Suites• Lexington• Mainstay Suites• Marriott• Marriott VACATION CLUB• Microtel Inns & Suites• Motel 6• NOVOTEL• Omni Hotels• Park Inn• Park Plaza• QUALITY INN
• Radisson• Radisson SAS• RAMADA• Red Roof Inn• Regent Hotels & Resorts• Renaissance• Residence Inn• Ritz-Carlton Club• Rodeway Inn• Sheraton• Sleep Inn• SOFITEL• Staybridge Suites• Studio 6• Suburban Extended Stay• Super 8• Thriftlodge Canada• Travelodge• Travelodge Canada• VAN DER VALK• WALDORF ASTORIA
COLLECTION• Wingate by Wyndham• Wyndham• Extended StayAmerica• Fairfi eld Inn by Marriott• Rental Car Agencies• Alamo
• AVIS• Budget• Dollar Rent A Car• Enterprise• Hertz• National• Thrifty• Tourist Information• Tourist Attractions• Travel Agents• Rest Areas• City Centers• Campgrounds• Ferry Terminals• Bus Stations• Local Transit• Train Stations
• Department Stores• Canadian Tire• Dollar General• Dollar Tree• Family Dollar• JCPenney• Kmart• Kohl’s• Nordstrom• Sears• Sears Hometown Store• Target• T.J. Maxx• Walmart• Big Lots• Macy’s• Marshalls• Ross Dress For Less• Convenience Stores• 7-Eleven• ampm• BP• Circle K• Fleetfuels• GetGo• GTO• Kangaroo Express• Murphy Express
• Murphy USA• Petro Stopping Centers• QuikTrip• Rutter’s• Sunoco Canada• TravelCenters of America• Wawa• Cumberland Farms• Hess Express• Mac’s• Mini Mart• Quick Stop• Valero Corner Store• Shopping Centers• Offi ce Depot• FedEx• FedEx Offi ce• UPS Store• Grocery Stores• Giant Eagle• Giant Food Stores• IGA• Ingles Markets• Food Lion• Kmart• Kroger• Martin’s Food Markets• Meijer
Shopping
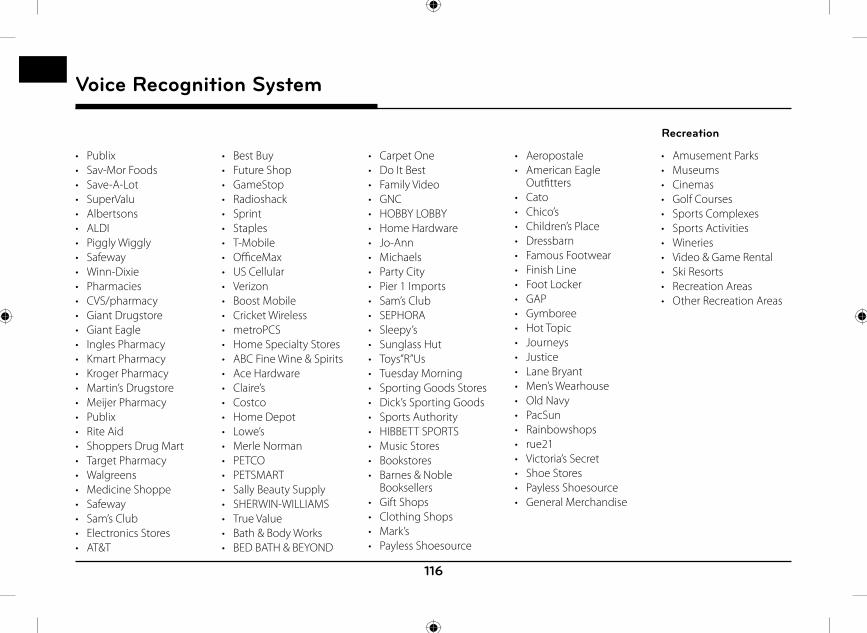
116
Voice Recognition System
• Publix• Sav-Mor Foods• Save-A-Lot• SuperValu• Albertsons• ALDI• Piggly Wiggly• Safeway• Winn-Dixie• Pharmacies• CVS/pharmacy• Giant Drugstore• Giant Eagle• Ingles Pharmacy• Kmart Pharmacy• Kroger Pharmacy• Martin’s Drugstore• Meijer Pharmacy• Publix• Rite Aid• Shoppers Drug Mart• Target Pharmacy• Walgreens• Medicine Shoppe• Safeway• Sam’s Club• Electronics Stores• AT&T
• Best Buy• Future Shop• GameStop• Radioshack• Sprint• Staples• T-Mobile• Offi ceMax• US Cellular• Verizon• Boost Mobile• Cricket Wireless• metroPCS• Home Specialty Stores• ABC Fine Wine & Spirits• Ace Hardware• Claire’s• Costco• Home Depot• Lowe’s• Merle Norman• PETCO• PETSMART• Sally Beauty Supply• SHERWIN-WILLIAMS• True Value• Bath & Body Works• BED BATH & BEYOND
• Carpet One• Do It Best• Family Video• GNC• HOBBY LOBBY• Home Hardware• Jo-Ann• Michaels• Party City• Pier 1 Imports• Sam’s Club• SEPHORA• Sleepy’s• Sunglass Hut• Toys”R”Us• Tuesday Morning• Sporting Goods Stores• Dick’s Sporting Goods• Sports Authority• HIBBETT SPORTS• Music Stores• Bookstores• Barnes & Noble
Booksellers• Gift Shops• Clothing Shops• Mark’s• Payless Shoesource
• Aeropostale• American Eagle
Outfi tters• Cato• Chico’s• Children’s Place• Dressbarn• Famous Footwear• Finish Line• Foot Locker• GAP• Gymboree• Hot Topic• Journeys• Justice• Lane Bryant• Men’s Wearhouse• Old Navy• PacSun• Rainbowshops• rue21• Victoria’s Secret• Shoe Stores• Payless Shoesource• General Merchandise
• Amusement Parks• Museums• Cinemas• Golf Courses• Sports Complexes• Sports Activities• Wineries• Video & Game Rental• Ski Resorts• Recreation Areas• Other Recreation Areas
Recreation
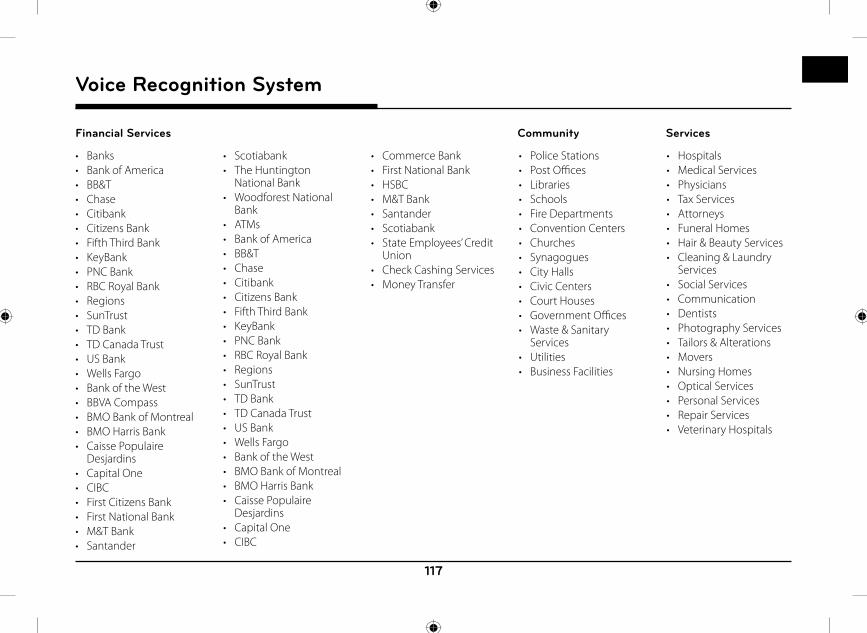
117
Voice Recognition System
• Banks• Bank of America• BB&T• Chase• Citibank• Citizens Bank• Fifth Third Bank• KeyBank• PNC Bank• RBC Royal Bank• Regions• SunTrust• TD Bank• TD Canada Trust• US Bank• Wells Fargo• Bank of the West• BBVA Compass• BMO Bank of Montreal• BMO Harris Bank• Caisse Populaire
Desjardins• Capital One• CIBC• First Citizens Bank• First National Bank• M&T Bank• Santander
• Scotiabank• The Huntington
National Bank• Woodforest National
Bank• ATMs• Bank of America• BB&T• Chase• Citibank• Citizens Bank• Fifth Third Bank• KeyBank• PNC Bank• RBC Royal Bank• Regions• SunTrust• TD Bank• TD Canada Trust• US Bank• Wells Fargo• Bank of the West• BMO Bank of Montreal• BMO Harris Bank• Caisse Populaire
Desjardins• Capital One• CIBC
• Commerce Bank• First National Bank• HSBC• M&T Bank• Santander• Scotiabank• State Employees’ Credit
Union• Check Cashing Services• Money Transfer
• Police Stations• Post Offi ces• Libraries• Schools• Fire Departments• Convention Centers• Churches• Synagogues• City Halls• Civic Centers• Court Houses• Government Offi ces• Waste & Sanitary
Services• Utilities• Business Facilities
• Hospitals• Medical Services• Physicians• Tax Services• Attorneys• Funeral Homes• Hair & Beauty Services• Cleaning & Laundry
Services• Social Services• Communication• Dentists• Photography Services• Tailors & Alterations• Movers• Nursing Homes• Optical Services• Personal Services• Repair Services• Veterinary Hospitals
Financial Services ServicesCommunity
118
Siri®
Operating Siri® command
What is Siri®?Apple wants to integrate the Siri to specifi c voice control system by working with car manufacturers.
You can ask Siri through the “ “ button on the steering wheel remote control while driving.The Apple device (iOS device) screen does not light up to minimize impact on the driving. If there is “Eyes-free” function, you can operate the Siri feature. (Making phone calls, Playing music, Listening to or writing a text message, Finding the destination by using the map, Looking for calendar information, etc)
Starting Siri®1. Connect your Apple device (iOS device) to
AVN system through Bluetooth.
Please check whether your Apple device (iOS device) supports Siri and turning Siri On.
2. Press and hold “ ” on the steering wheel remote control.
<Siri screen>
3. Say a command.
For proper recognition, please say the command after the voice instruction and Siri beep tone.
Re-starting Siri®• While system waits, press “ ” on the
steering wheel remote control. The command waiting condition is ended and the beep tone will make sound. After the “beep”, say the voice command.
• Press [Speak] on the Siri screen. The command waiting condition is ended and the beep tone will make sound. After the “beep”, say the voice command.
Ending Siri®• While Siri is operating, press and hold “ ”
on the steering wheel remote control or say “Exit”.
• While using voice recognition, pressing other button except on the steering wheel remote control or a different button on head unit will end Siri feature recognition.
• Press [Exit] on the Siri screen.
Adjusting Siri® volumeWhile Siri is operating, turn “VOL” knob on the head unit or press “VOL+/VOL-” on the steering wheel remote control.
, Note
• Please see the AVN system only supports “Music” and “Phone” related functions. Other functions will be performed in the your Apple device (iOS device).
• Eyes-Free mode would be activated automatically while you are driving. If the car is stopped (when the transmission lever is put to P), Eyes-Free mode would be deactivated automatically.
Siri®
119
About SiriusXM™ DataThe SiriusXM Data Service is a paid membership satellite radio service which provides users with weather, traffic, fuel prices, stocks, sports, and movie times information. For information on registration or related content, please visit the SiriusXM radio website (www. siriusxm.com).
Accessing SiriusXM™ Data1. Press [HOME] > [SiriusXM Data].
<SiriusXM Data screen>
2. If you want to subscribe to the SiriusXM Data Service, press [Subscription] > [Call] to enable Services.
SiriusXM™ Weather Information (USA Only)
Current weather information (USA Only)This service provides current weather information in your region.1. Press [HOME] > [SiriusXM Data]. This current weather information is
displayed on the screen.
<SiriusXM Data screen>2. Press [Weather] to check the detail
information.
Weather forecast (USA Only)This service provides weather forecasts for the next fi ve days including today in your region.
1. Press [Weather] > [Menu] in SiriusXM Data screen.
2. Press [Forecast].
• Press [Menu] > [Today] to move to current weather information screen.
• Press [Menu] > [Location List] to move to the Location List screen.
SiriusXM™ Data
SiriusXM™ Data
120
• Press [Menu] > [Weather & Security Alerts] to move to the Weather & Security Alerts screen.
• Press [Menu] > [Weather Map] to move to the Radar Map screen.
Weather information in other region (USA Only)This service provides weather information in other region.
1. Press [Weather] > [Menu] > [Location List] > [Cities] in SiriusXM Data screen.
<Location List>
2. Select the desired region.
, Note
If you want to display weather information in your current location, press [ ].
Weather information at ski resorts (USA Only)This service provides weather and facility information at ski resorts.1. Press [Weather] > [Menu] > [Location List]
> [Ski Resorts] in SiriusXM Data screen.
2. Select the desired ski resort.
, Note
If you want to check weather information in your current location, press [ ].
SiriusXM™ Data

121
Searching for other region or ski resort (USA Only)1. Press [Cities] or [Ski Resorts] > [Menu] >
[Search] on the Location List.
2. Enter the desired region or ski resort, press [ ].
3. Select the desired item.
4. If you want to add the selected item in the Favorites, press [Add Favorite].
If you want to delete the item saved in the Favorites, press [Delete Favorite].
Favorites (USA Only)If the city or ski resort have already been stored in the Favorites, it can be easily recalled.
Add the city or ski resort in the Favorites. Refer to “Adding to Favorites” on page 121.
1. Press [Favorites] on the Location List.
2. Select the desired item.
Adding to Favorites (USA Only)A maximum of 10 items can be added.
1. Press [Favorites] > [Menu] > [Add Favorite] on the Location List.
2. Enter the desired location, press [ ].
3. Select the desired item.
SiriusXM™ Data
122
Reordering Favorites (USA Only)The added items in Favorites can be reordered.
1. Press [Favorites] > [Menu] > [Reorder] in Location List.
2. Press the desired item.
3. Move up and down and press the selected item, or drag it to the desired position.
Deleting Favorites (USA Only)1. Press [Favorites] > [Menu] > [Delete] in
Location List.
2. Select the item you want to delete and press [Delete].
• [Delete All]: Deletes all items.
• [Unmark All]: Unmarks all items.
• [Cancel]: Exits delete screen.
Weather & Security Alerts (USA Only)Provides weather warnings and advisories, such as Tornado, Storm, Flood, Winter, Wind etc..
1. Press [Weather] > [Menu] > [Weather & Security Alerts] in SiriusXM Data screen.
• Press [Menu] > [Prioritization Levels] > [All], [Low], [High] or [Severe] to set the prioritization levels.
• Press [Menu] > [Set Range] > [50 miles], [100 miles], [200 miles] or [300 miles] to set the distance range.
• Press [Menu] > [Marine/coastal] to set whether to include regional information of the Marine/coastal.
• Press [Menu] > [Show Popup] to set whether or not to display alert pop-up.
SiriusXM™ Data
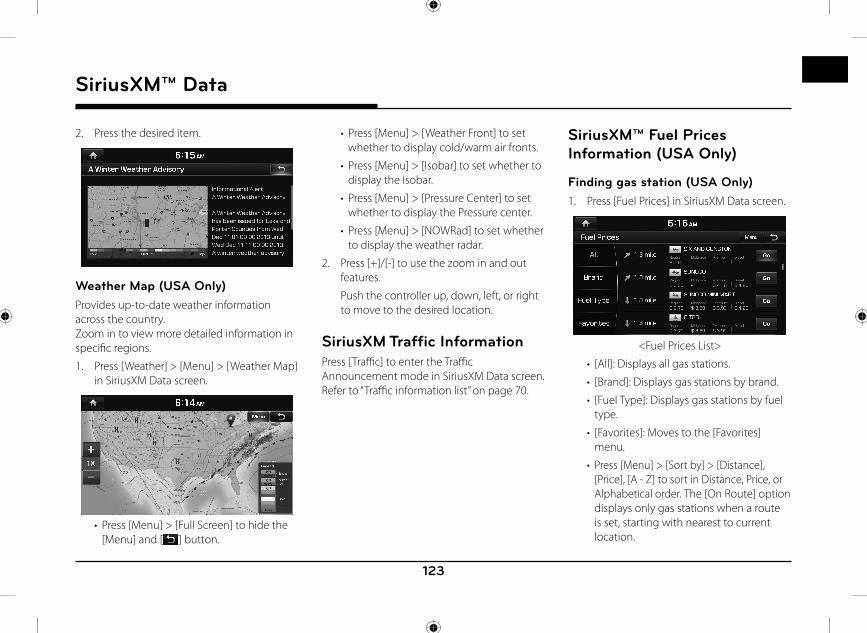
123
2. Press the desired item.
Weather Map (USA Only)Provides up-to-date weather information across the country.Zoom in to view more detailed information in specifi c regions.
1. Press [Weather] > [Menu] > [Weather Map] in SiriusXM Data screen.
• Press [Menu] > [Full Screen] to hide the [Menu] and [ ] button.
• Press [Menu] > [Weather Front] to set whether to display cold/warm air fronts.
• Press [Menu] > [Isobar] to set whether to display the Isobar.
• Press [Menu] > [Pressure Center] to set whether to display the Pressure center.
• Press [Menu] > [NOWRad] to set whether to display the weather radar.
2. Press [+]/[-] to use the zoom in and out features.
Push the controller up, down, left, or right to move to the desired location.
SiriusXM Traffic InformationPress [Traffi c] to enter the Traffi c Announcement mode in SiriusXM Data screen.Refer to “Traffi c information list” on page 70.
SiriusXM™ Fuel Prices Information (USA Only)
Finding gas station (USA Only)1. Press [Fuel Prices] in SiriusXM Data screen.
<Fuel Prices List>
• [All]: Displays all gas stations.
• [Brand]: Displays gas stations by brand.
• [Fuel Type]: Displays gas stations by fuel type.
• [Favorites]: Moves to the [Favorites] menu.
• Press [Menu] > [Sort by] > [Distance], [Price], [A - Z] to sort in Distance, Price, or Alphabetical order. The [On Route] option displays only gas stations when a route is set, starting with nearest to current location.
SiriusXM™ Data
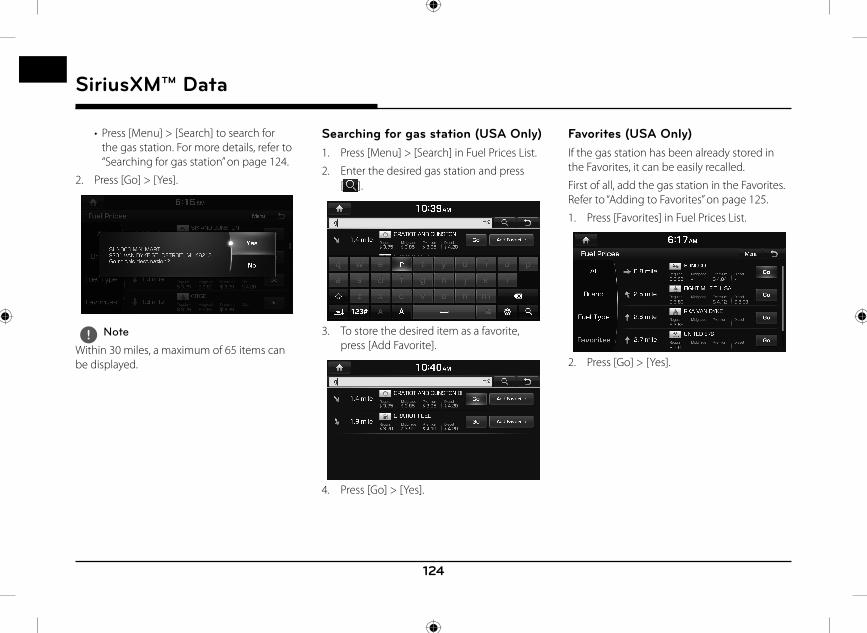
124
• Press [Menu] > [Search] to search for the gas station. For more details, refer to “Searching for gas station” on page 124.
2. Press [Go] > [Yes].
, Note
Within 30 miles, a maximum of 65 items can be displayed.
Searching for gas station (USA Only)1. Press [Menu] > [Search] in Fuel Prices List.
2. Enter the desired gas station and press [ ].
3. To store the desired item as a favorite, press [Add Favorite].
4. Press [Go] > [Yes].
Favorites (USA Only)If the gas station has been already stored in the Favorites, it can be easily recalled.
First of all, add the gas station in the Favorites. Refer to “Adding to Favorites” on page 125.
1. Press [Favorites] in Fuel Prices List.
2. Press [Go] > [Yes].
SiriusXM™ Data
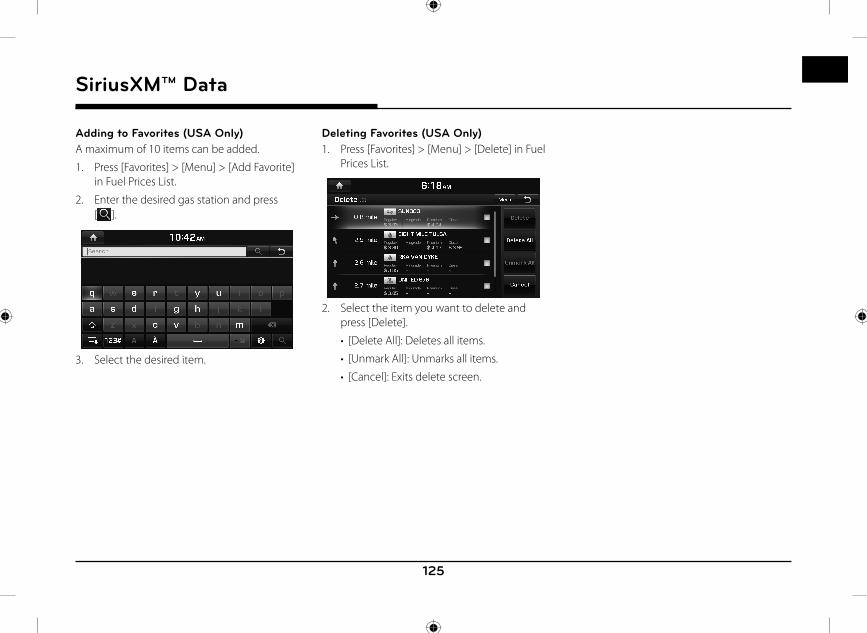
125
SiriusXM™ Data
Adding to Favorites (USA Only)A maximum of 10 items can be added.
1. Press [Favorites] > [Menu] > [Add Favorite] in Fuel Prices List.
2. Enter the desired gas station and press [ ].
3. Select the desired item.
Deleting Favorites (USA Only)1. Press [Favorites] > [Menu] > [Delete] in Fuel
Prices List.
2. Select the item you want to delete and press [Delete].
• [Delete All]: Deletes all items.
• [Unmark All]: Unmarks all items.
• [Cancel]: Exits delete screen.
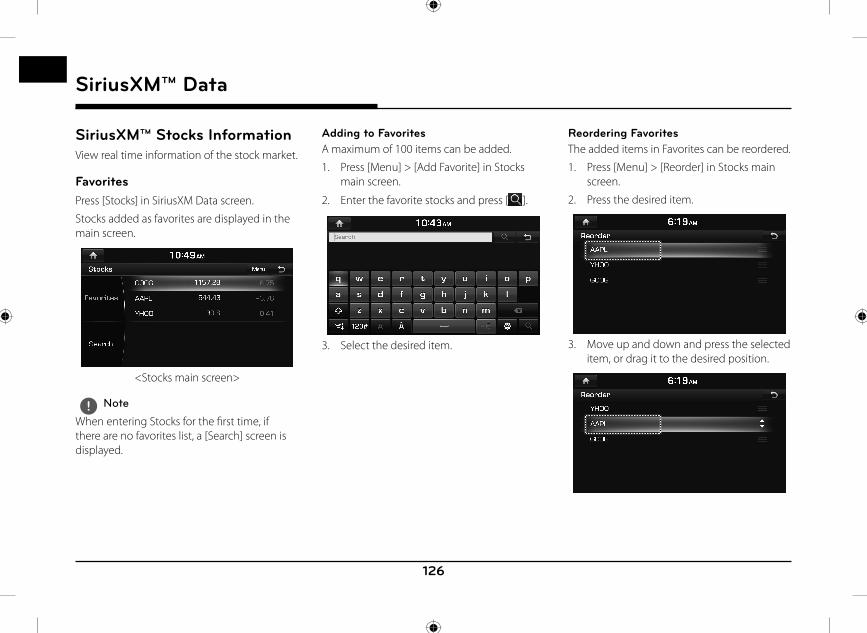
126
SiriusXM™ Data
SiriusXM™ Stocks InformationView real time information of the stock market.
FavoritesPress [Stocks] in SiriusXM Data screen.
Stocks added as favorites are displayed in the main screen.
<Stocks main screen>
, Note
When entering Stocks for the fi rst time, if there are no favorites list, a [Search] screen is displayed.
Adding to FavoritesA maximum of 100 items can be added.
1. Press [Menu] > [Add Favorite] in Stocks main screen.
2. Enter the favorite stocks and press [ ].
3. Select the desired item.
Reordering FavoritesThe added items in Favorites can be reordered.
1. Press [Menu] > [Reorder] in Stocks main screen.
2. Press the desired item.
3. Move up and down and press the selected item, or drag it to the desired position.
127
SiriusXM™ Data
Deleting Favorites1. Press [Menu] > [Delete] in Stocks main
screen.
2. Select the item you want to delete and press [Delete].
• [Delete All]: Deletes all items.
• [Unmark All]: Unmarks all items.
• [Cancel]: Exits delete screen.
Stock Search1. Press [Search] in Stocks main screen.
2. Enter your favorite stocks and press [ ].
3. Press [Add Favorite] to save them.
4. Added stocks will display in the Favorites screen.
SiriusXM™ Sports InformationProvides real-time information on scores and schedules all major sports.
1. Press [Sports] in SiriusXM™ Data screen.
<Sports main screen>
2. Press the desired item to view related sports information.
128
SiriusXM™ Data
• Press [Schedule] or [Menu] > [Schedule] to display schedules for the next seven days.
• Press [Score] or [Menu] > [Scores] to display scores for 2 days from today.
• Press [Menu] > [SXM Radio Game Zone] to tune into current games in Game Zone.
• Press [Menu] > [News] to check new information for each sport.
Favorites1. Press [Favorites] in Sports main screen.
Football, Baseball, Basketball and Ice Hockey teams added as favorites will display in the Favorites list.
2. Select the favorite team.
, Note
If there are no favorites added, press [Search] to fi nd and add your favorite teams.
Adding to Favorites1. Press [Menu] > [Add Favorite] in Sports
main screen.
2. Enter the favorite teams and press [ ].
3. Select the desired item.
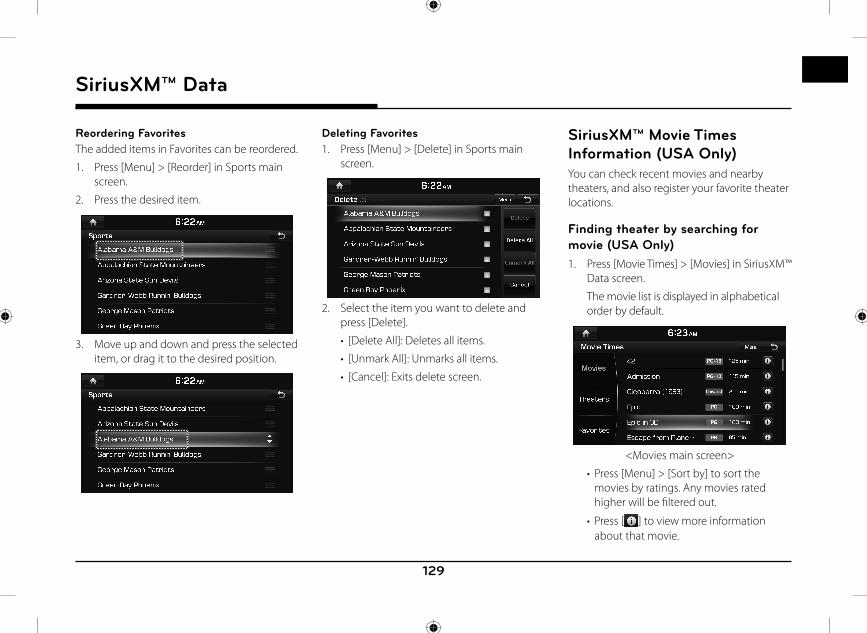
129
SiriusXM™ Data
Reordering FavoritesThe added items in Favorites can be reordered.
1. Press [Menu] > [Reorder] in Sports main screen.
2. Press the desired item.
3. Move up and down and press the selected item, or drag it to the desired position.
Deleting Favorites1. Press [Menu] > [Delete] in Sports main
screen.
2. Select the item you want to delete and press [Delete].
• [Delete All]: Deletes all items.
• [Unmark All]: Unmarks all items.
• [Cancel]: Exits delete screen.
SiriusXM™ Movie Times Information (USA Only)You can check recent movies and nearby theaters, and also register your favorite theater locations.
Finding theater by searching for movie (USA Only)1. Press [Movie Times] > [Movies] in SiriusXM™
Data screen.
The movie list is displayed in alphabetical order by default.
<Movies main screen>
• Press [Menu] > [Sort by] to sort the movies by ratings. Any movies rated higher will be fi ltered out.
• Press [ ] to view more information about that movie.
130
SiriusXM™ Data
2. Press the desired theater.
The theater list is displayed on the screen.
• Press [Menu] > [Sort by] > [Distance] or [Starting Time] to sort in Distance or Starting Time order.
3. Press [Go] > [Yes].
Viewing movie list by searching for theater (USA Only)1. Press [Theaters] on the Movie Times main
screen.
The theater list is displayed on the screen.
• Press [Menu] > [Sort by] > [Distance] or [A - Z] to sort in Distance or Alphabetical order.
• Press [Menu] > [Search] to search for the theater. For more details, refer to “Searching for gas station” on page 124.
2. Press the desired theater.
The movie list is displayed on the screen.
• Press [Go] > [Yes] to fi nd the theater you selected.
• Press [ ] to make a call to theater.
• Press [ ] to view more information about that movie.
131
SiriusXM™ Data
Favorites (USA Only)1. Press [Favorites] on the Movies main
screen.
Favorites is displayed on the screen. Favorites shows a list of theater added by the user.
• Press [Menu] > [Add Favorite] to add the desired theater to Favorites. For more details, refer to “Adding to Favorites” on page 131.
• Press [Menu] > [Delete] to delete the Favorites. For more details, refer to “Deleting Favorites” on page 131.
2. Press [Go] > [Yes].
, Note
If there are no favorites added, press [Search] to fi nd and add your favorite theaters.
Adding to Favorites (USA Only)1. Press [Favorites] > [Menu] > [Add Favorite]
on the Movie Times main screen.
2. Enter the favorite theater, press [ ].
3. Select the desired item.
Deleting Favorites (USA Only)1. Press [Menu] > [Delete] on the Movie
Times main screen.
2. Select the item you want to delete and press [Delete].
• [Delete All]: Deletes all items.
• [Unmark All]: Unmarks all items.
• [Cancel]: Exits delete screen.

132
What is Android Auto/Apple CarPlay?Securely access your smartphone while driving. Various functions of your smartphone are displayed on and operable from the screen of the multimedia device (e.g. navigation, making a call, listening to music etc.)When connected, an Android Auto/Apple CarPlay icon appears on the screen. Available functions and operations may differ depending on the company model.For more information, visit the Google or Apple website.
- Google: http://support.google.com/androidauto/ - Apple: http://www.apple.com/ios/carplay/
Cautions• Android Auto is a registered trademark of
Google Inc.• Apple CarPlay is a registered trademark of
Apple Inc.• Android Auto and Apple CarPlay are
unavailable if the phone OS is not the latest version or if the phone cannot be recognized due to a shutdown caused by a failure or defect in the device itself.
• Your phone may not be recognised if its battery is low. Charge your phone then try again.
• If your phone is shut down due to a defect in the device itself, reset your phone and try again.
• If the USB cable of the Android Auto/ Apple CarPlay device is repeatedly disconnected and reconnected in a short period of time, the phone may malfunction. This can also cause a device failure.
• The device recognition time may diff er depending on the device type and fi rmware/OS version.
• Using the USB cable that came with the phone is recommended. (Using a non-genuine product may cause noise or malfunction.)
• Normal operations cannot be guaranteed if the phone is arbitrarily manipulated while Android Auto/Apple CarPlay is active.
• Apple CarPlay cannot be run while making a call vie Bluetooth.
• Android Auto or Apple CarPlay may not operate normally due to mobile phone issues.
• Carrier charges may apply when using Android Auto or Apple CarPlay.
※ Some features may not operate normally according to the version of iOS and Android.
The following problems may occur due to phone-related issues:
[Android Auto] - Intermittent black screens appear when entering Android Auto.
- Diff erentiation of phones that support Android Auto and those which do not, may not be possible.
- Black screens appear in some areas of the screen due to app errors.
[Apple CarPlay] - Intermittent black screens appear when entering Apple CarPlay.
- Black screens appear in some areas of the screen due to app errors when navigating between screens in Apple CarPlay.
- The audio volume is depending on the volume status of the phone. If the phone volume is set to 0, then no sound will be hearable even if the multimedia system´s volume is set to maximum.
- The sound output of a call may be cut upon disconnecting Apple CarPlay during a call via Apple CarPlay.
※ If services do not work properly due to problems similar to the specifi ed above, check your phone, and if necessary, reconnect your phone after restarting.
Android Auto/Apple CarPlay
Android Auto/Apple CarPlay
133
Android Auto/Apple CarPlay
Using Android Auto or Apple CarPlay1. Make sure only genuine USB cables are
used that were provided by the mobile phone´s manufacturer.
2. Enter [Android Auto] or [Apple CarPlay] from the [HOME] screen.
3. Now the features such as navigation, music and phone are ready to be used.
NOTICE• Before connecting your mobile phone, check
whether Android Auto or Apple CarPlay is activated in the [Phone Projection] menu.
• After connecting the mobile phone, the phone has to be unlocked and the disclaimers on the phone have to be accepted in order to launch Android Auto or Apple CarPlay.
• The screens and features displayed on the multimedia system correspond to the screens and features provided by Google or Apple. They are subject to changes according to the policy of the respective company.
NOTICE-Android Auto• Bluetooth media features will be disabled
when Android Auto is activated. After removing the USB cable, these features will be available again.
• If Android Auto is not activated even after a successful connection, follow these steps: - Check whether an error occurred on the phone.
- Check whether Android Auto has been closed on the phone.
- Check whether Android Auto is activated in the [Phone Projection] menu.
• If Android Auto does not work normally even after a reconnection has been made, visit the Google website http://support.google.com/ androidauto.
• Please refer to the following websites to check the available countries for the [Android Auto].https://www.android.com/auto
NOTICE-Apple CarPlay• Bluetooth phone/media features will be
disabled when Apple CarPlay is activated. After removing the USB cable, these features will be available again.
• If Apple CarPlay is not activated even after a successful connection, follow these steps: - Check whether Apple CarPlay is disabled in the iPhone´s application settings.
- Check whether Apple CarPlay is activated in the [Phone Projection] menu.
• If Apple CarPlay does not work normally even after a reconnection has been made, visit the Apple website http://www.apple.com/ios/carplay/
• Please refer to the following websites to check the available countries for the [Apple CarPlay].http://www.apple.com/ios/feature-availability/
134
Settings
[Setup] menu overview
NavigationSoundDisplayPhoneVoice RecognitionClockGeneralPhone ProjectionE-ManualSystem Info
[Setup] menu
NavigationThis menu describes navigation settings.
GeneralThis menu is used to change general settings.1. Press [HOME] > [Setup] > [Navigation] >
[General]. Or press [NAV] > [Settings] > [General].
2. Select the desired items.• [Unit]: Changes the unit between the “mi”
and “km”.• [Show Prev. Dest. at Navi. Start-up.]:
Changes the previous destination view setting when starting Navigation. When this is selected and when navigation is started without a route planned, a list of previous destination will be displayed.
• [GPS Information]: Check the GPS information.
DisplayThis menu is used to change the display environment settings.1. Press [HOME] > [Setup] > [Navigation] >
[Display]. Or press [NAV] > [Settings] > [Display].
2. Select the desired items.
• [Map Mode]: Sets the Map Mode to [Full Map] or [Show Turn List].
• [Map Display]: Sets the Map Display to [Heading Up], [3D] or [North UP].
• [3D Buildings]: Shows or hides buildings on the map.
• [Auto Zoom]: Sets whether to set the zoom level automatically or not.
• [Display Traffi c]: Sets whether to display the traffi c information or not.
• [Map Font]: Sets the Map Font to [Small], [Medium] or [Large].
• [Illumination]: Sets the Illumination to [Automatic], [Daylight] or [Night]. - [Automatic]: Adjusts the brightness automatically according to surrounding brightness.
- [Daylight]: Always keeps the brightness on high regardless of surrounding brightness.
- [Night]: Always keeps the brightness on low regardless of surrounding brightness.
• [Automatic return after scrolling]: Sets whether to return to the current position on the map automatically after scrolling or not.
Settings

135
Settings
GuidanceThis menu is used to change the guidance settings.
1. Press [HOME] > [Setup] > [Navigation] > [Guidance]. Or press [NAV] > [Settings] > [Guidance].
2. Select the desired items.
• [Curve Alert]: Sets whether to display the Curve Alert or not.
• [Speed Limit]: Sets whether to display the Speed Limit alert or not.
• [Number of Guidance Prompts]: Sets the number of guidance prompts to [Fewer] or [More].
RouteThis menu is used to change the route settings.
1. Press [HOME] > [Setup] > [Navigation] > [Route]. Or press [NAV] > [Settings] > [Route].
2. Set whether to search for the Alternative Routes or not.
, Note
“Alternative Routes “ shows the options of “Faster Time” route and “Shorter Distance” route. However, the “Shorter Distance” route in most cases does not have traffi c information, so the time to destination for the “Shorter Distance” route may not always be accurate.
TrafficThis menu is used to change the traffi c information event settings.1. Press [HOME] > [Setup] > [Navigation] >
[Traffic]. Or press [NAV] > [Settings] > [Traffic].
2. Set whether to display the Traffi c Event Popup or not.
Import/Export1. Press [HOME] > [Setup] > [Navigation] >
[Import/Export]. Or press [NAV] > [Settings] > [Import/Export].
136
Settings
2. Select the desired item.
• [Import Address Book from USB]: The latest data of Address Book which have been exported to a USB device will be imported to your navigation device.
• [Export Address Book to USB]: Export the Address Book on your navigation device to a USB device.
, Note
• The amount of data available for importing to a USB device is limited based on the number of address book items supported by the navigation system.
• If the data stored on the USB device uses diff erent coordinates than those used by the current system, the importing location may change.
• Please make sure that the address book have been successfully imported before use.
• Only USB devices formatted in FAT16/32 are supported.
• Certain USB devices may not be supported due to compatibility issues.
SoundThis menu is used to adjust the sound eff ects for the whole system.The image of this product may be diff erent from the actual product.
Volume RatioThis menu is used to set the volume ratio.
1. Press [HOME] > [Setup] > [Sound] > [Volume Ratio].
2. Select the desired item.
• [Navigation guidance priority]: Lowers all other audio volumes when Navigation prompts are playing.
• [Back-up Warning Priority]: Lowers all other audio volumes when the vehicle shifts into reverse.
Navigation VolumeThis menu is used to set the navigation volume.1. Press [HOME] > [Setup] > [Sound] >
[Navigation Volume].
2. Select the desired item.
• [Use Map Screen Volume Buttons]: Adjusts the volume using the volume buttons on the map screen.
• [Use Map Screen Volume Buttons or Volume Knob]: Adjusts the volume by using the volume buttons on the map screen or by turning the volume knob when the navigation guidance is playing.
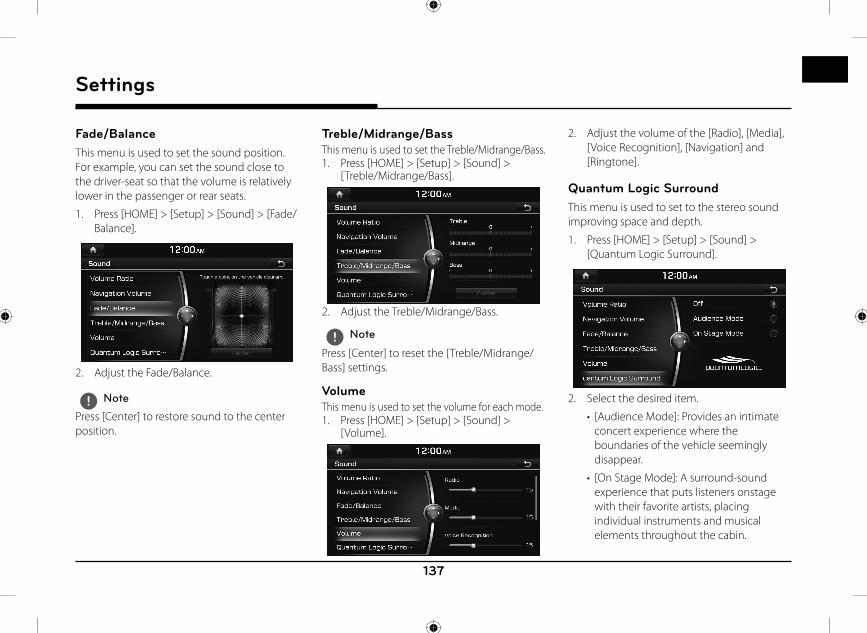
137
Settings
Fade/BalanceThis menu is used to set the sound position. For example, you can set the sound close to the driver-seat so that the volume is relatively lower in the passenger or rear seats.
1. Press [HOME] > [Setup] > [Sound] > [Fade/Balance].
2. Adjust the Fade/Balance.
, Note
Press [Center] to restore sound to the center position.
Treble/Midrange/BassThis menu is used to set the Treble/Midrange/Bass.1. Press [HOME] > [Setup] > [Sound] >
[Treble/Midrange/Bass].
2. Adjust the Treble/Midrange/Bass.
, Note
Press [Center] to reset the [Treble/Midrange/Bass] settings.
VolumeThis menu is used to set the volume for each mode.1. Press [HOME] > [Setup] > [Sound] >
[Volume].
2. Adjust the volume of the [Radio], [Media], [Voice Recognition], [Navigation] and [Ringtone].
Quantum Logic SurroundThis menu is used to set to the stereo sound improving space and depth.
1. Press [HOME] > [Setup] > [Sound] > [Quantum Logic Surround].
2. Select the desired item.
• [Audience Mode]: Provides an intimate concert experience where the boundaries of the vehicle seemingly disappear.
• [On Stage Mode]: A surround-sound experience that puts listeners onstage with their favorite artists, placing individual instruments and musical elements throughout the cabin.
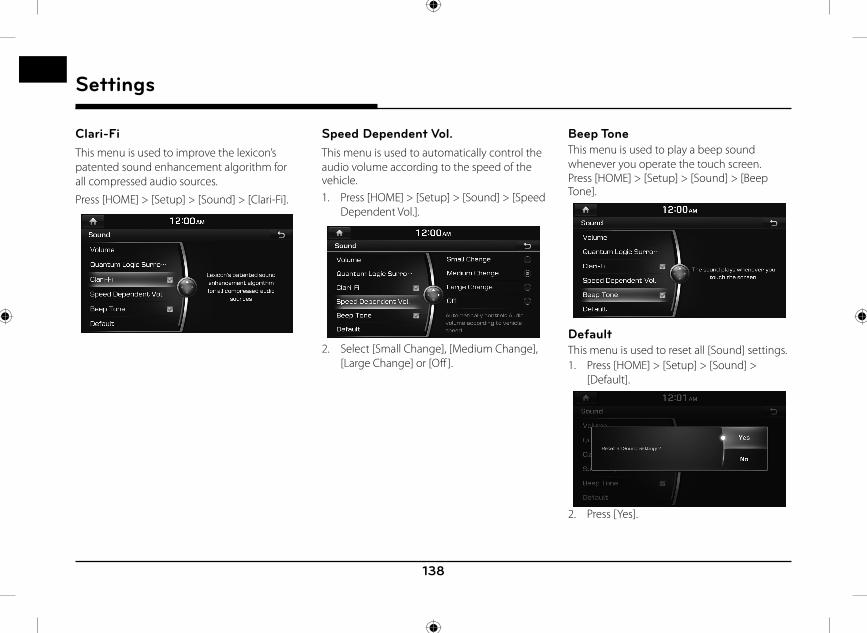
138
Settings
Clari-FiThis menu is used to improve the lexicon’s patented sound enhancement algorithm for all compressed audio sources.
Press [HOME] > [Setup] > [Sound] > [Clari-Fi].
Speed Dependent Vol.This menu is used to automatically control the audio volume according to the speed of the vehicle.1. Press [HOME] > [Setup] > [Sound] > [Speed
Dependent Vol.].
2. Select [Small Change], [Medium Change], [Large Change] or [Off ].
Beep ToneThis menu is used to play a beep sound whenever you operate the touch screen.Press [HOME] > [Setup] > [Sound] > [Beep Tone].
DefaultThis menu is used to reset all [Sound] settings.1. Press [HOME] > [Setup] > [Sound] >
[Default].
2. Press [Yes].
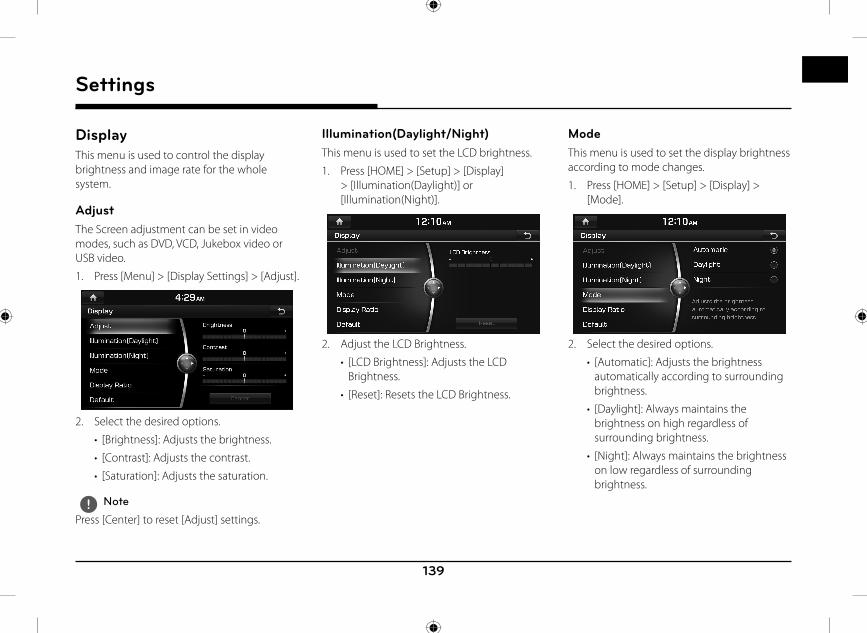
139
Settings
DisplayThis menu is used to control the display brightness and image rate for the whole system.
AdjustThe Screen adjustment can be set in video modes, such as DVD, VCD, Jukebox video or USB video.
1. Press [Menu] > [Display Settings] > [Adjust].
2. Select the desired options.
• [Brightness]: Adjusts the brightness.
• [Contrast]: Adjusts the contrast.
• [Saturation]: Adjusts the saturation.
, Note
Press [Center] to reset [Adjust] settings.
Illumination(Daylight/Night)This menu is used to set the LCD brightness.
1. Press [HOME] > [Setup] > [Display] > [Illumination(Daylight)] or [Illumination(Night)].
2. Adjust the LCD Brightness.
• [LCD Brightness]: Adjusts the LCD Brightness.
• [Reset]: Resets the LCD Brightness.
ModeThis menu is used to set the display brightness according to mode changes.
1. Press [HOME] > [Setup] > [Display] > [Mode].
2. Select the desired options.
• [Automatic]: Adjusts the brightness automatically according to surrounding brightness.
• [Daylight]: Always maintains the brightness on high regardless of surrounding brightness.
• [Night]: Always maintains the brightness on low regardless of surrounding brightness.
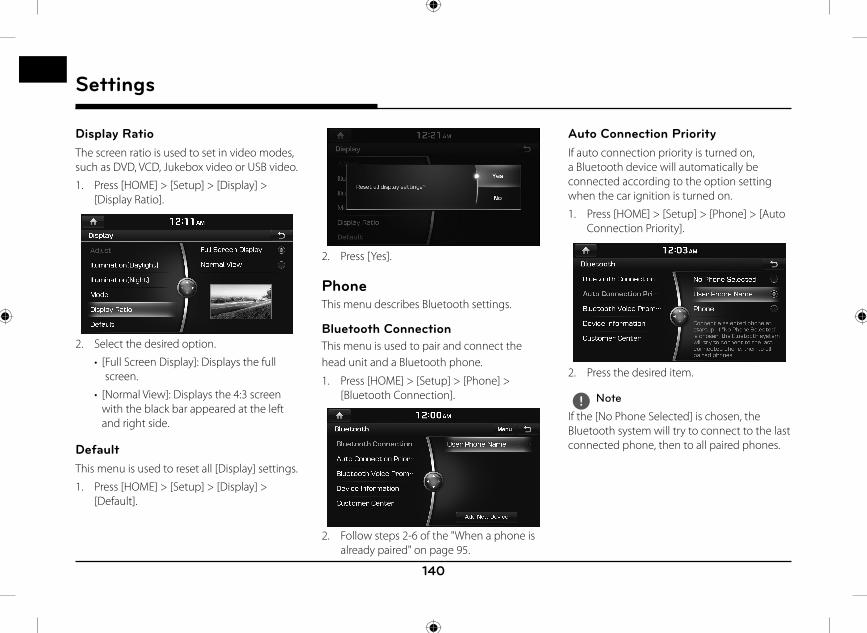
140
Settings
Display RatioThe screen ratio is used to set in video modes, such as DVD, VCD, Jukebox video or USB video.
1. Press [HOME] > [Setup] > [Display] > [Display Ratio].
2. Select the desired option.
• [ Full Screen Display]: Displays the full screen.
• [Normal View]: Displays the 4:3 screen with the black bar appeared at the left and right side.
DefaultThis menu is used to reset all [Display] settings.
1. Press [HOME] > [Setup] > [Display] > [Default].
2. Press [Yes].
PhoneThis menu describes Bluetooth settings.
Bluetooth ConnectionThis menu is used to pair and connect the head unit and a Bluetooth phone.
1. Press [HOME] > [Setup] > [Phone] > [Bluetooth Connection].
2. Follow steps 2-6 of the "When a phone is already paired" on page 95.
Auto Connection PriorityIf auto connection priority is turned on, a Bluetooth device will automatically be connected according to the option setting when the car ignition is turned on.
1. Press [HOME] > [Setup] > [Phone] > [Auto Connection Priority].
2. Press the desired item.
, Note
If the [No Phone Selected] is chosen, the Bluetooth system will try to connect to the last connected phone, then to all paired phones.
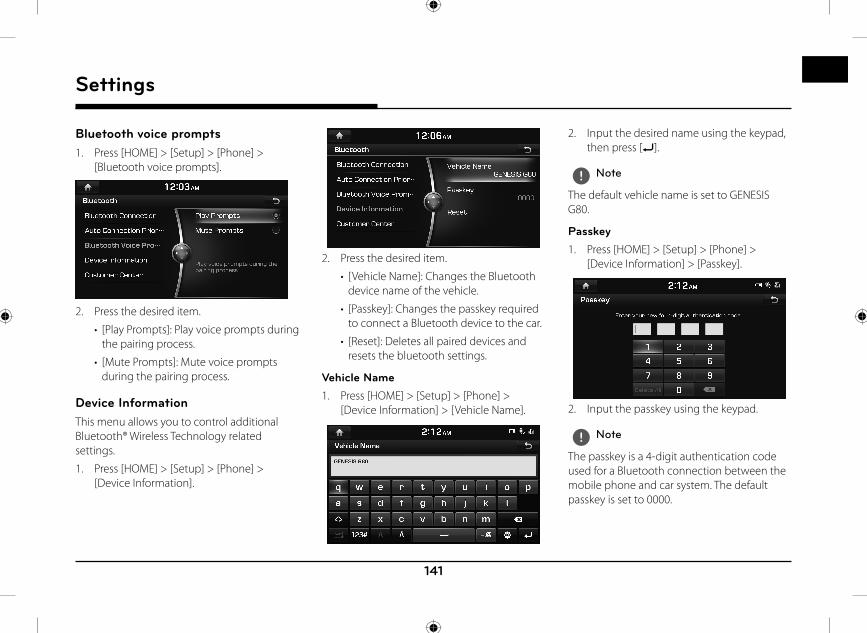
141
Settings
Bluetooth voice prompts1. Press [HOME] > [Setup] > [Phone] >
[Bluetooth voice prompts].
2. Press the desired item.
• [Play Prompts]: Play voice prompts during the pairing process.
• [Mute Prompts]: Mute voice prompts during the pairing process.
Device InformationThis menu allows you to control additional Bluetooth® Wireless Technology related settings.
1. Press [HOME] > [Setup] > [Phone] > [Device Information].
2. Press the desired item.
• [Vehicle Name]: Changes the Bluetooth device name of the vehicle.
• [Passkey]: Changes the passkey required to connect a Bluetooth device to the car.
• [Reset]: Deletes all paired devices and resets the bluetooth settings.
Vehicle Name1. Press [HOME] > [Setup] > [Phone] >
[Device Information] > [Vehicle Name].
2. Input the desired name using the keypad, then press [9].
, Note
The default vehicle name is set to GENESIS G80.
Passkey1. Press [HOME] > [Setup] > [Phone] >
[Device Information] > [Passkey].
2. Input the passkey using the keypad.
, Note
The passkey is a 4-digit authentication code used for a Bluetooth connection between the mobile phone and car system. The default passkey is set to 0000.
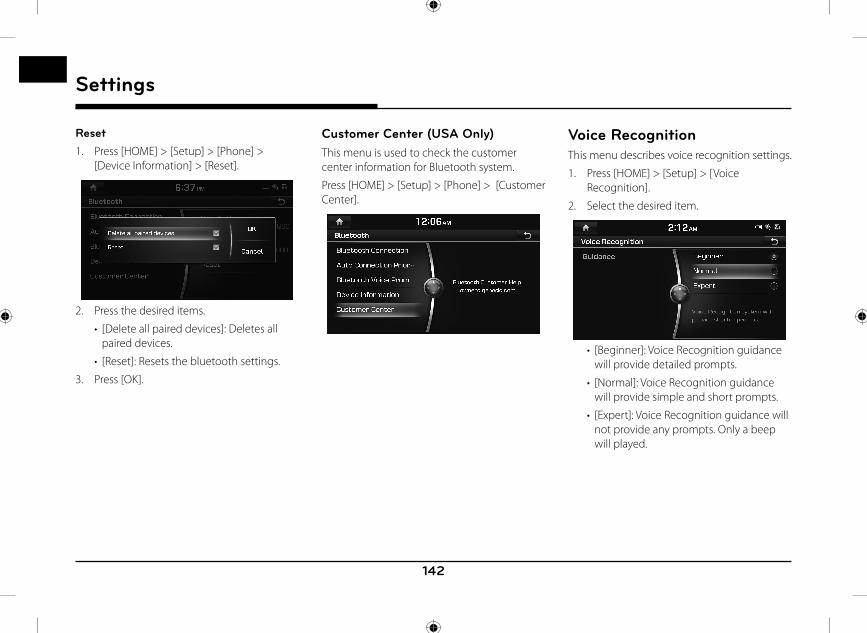
142
Settings
Reset1. Press [HOME] > [Setup] > [Phone] >
[Device Information] > [Reset].
2. Press the desired items.
• [Delete all paired devices]: Deletes all paired devices.
• [Reset]: Resets the bluetooth settings.
3. Press [OK].
Customer Center (USA Only)This menu is used to check the customer center information for Bluetooth system.
Press [HOME] > [Setup] > [Phone] > [Customer Center].
Voice RecognitionThis menu describes voice recognition settings.
1. Press [HOME] > [Setup] > [Voice Recognition].
2. Select the desired item.
• [Beginner]: Voice Recognition guidance will provide detailed prompts.
• [Normal]: Voice Recognition guidance will provide simple and short prompts.
• [Expert]: Voice Recognition guidance will not provide any prompts. Only a beep will played.
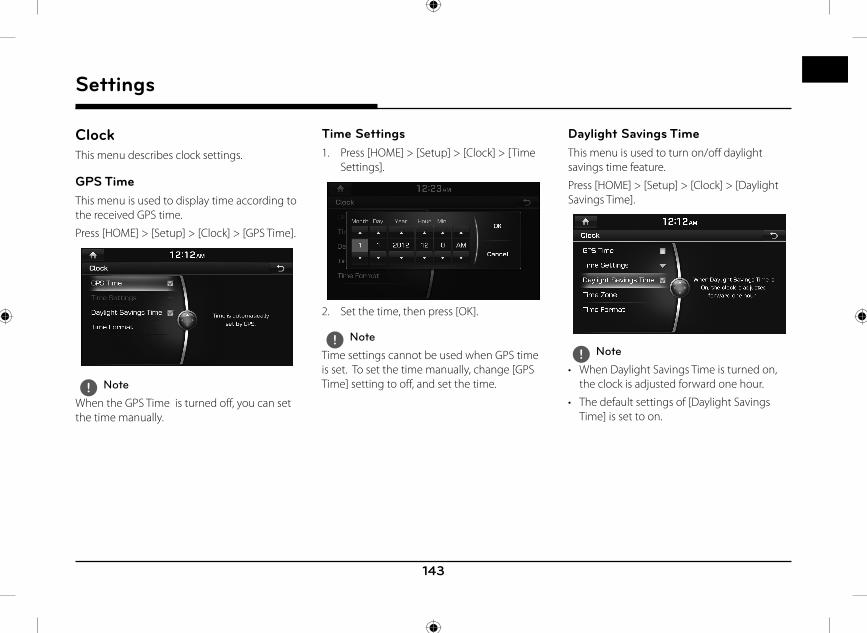
143
Settings
ClockThis menu describes clock settings.
GPS TimeThis menu is used to display time according to the received GPS time.
Press [HOME] > [Setup] > [Clock] > [GPS Time].
, Note
When the GPS Time is turned off , you can set the time manually.
Time Settings1. Press [HOME] > [Setup] > [Clock] > [Time
Settings].
2. Set the time, then press [OK].
, Note
Time settings cannot be used when GPS time is set. To set the time manually, change [GPS Time] setting to off , and set the time.
Daylight Savings TimeThis menu is used to turn on/off daylight savings time feature.
Press [HOME] > [Setup] > [Clock] > [Daylight Savings Time].
, Note
• When Daylight Savings Time is turned on, the clock is adjusted forward one hour.
• The default settings of [Daylight Savings Time] is set to on.
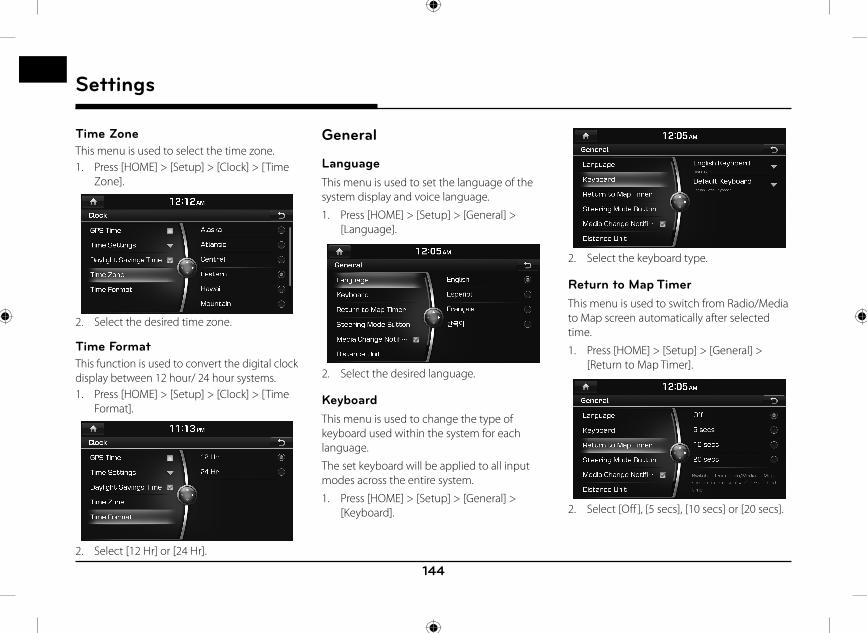
144
Settings
Time ZoneThis menu is used to select the time zone.1. Press [HOME] > [Setup] > [Clock] > [Time
Zone].
2. Select the desired time zone.
Time FormatThis function is used to convert the digital clock display between 12 hour/ 24 hour systems.1. Press [HOME] > [Setup] > [Clock] > [Time
Format].
2. Select [12 Hr] or [24 Hr].
General
LanguageThis menu is used to set the language of the system display and voice language.
1. Press [HOME] > [Setup] > [General] > [Language].
2. Select the desired language.
KeyboardThis menu is used to change the type of keyboard used within the system for each language.
The set keyboard will be applied to all input modes across the entire system.
1. Press [HOME] > [Setup] > [General] > [Keyboard].
2. Select the keyboard type.
Return to Map TimerThis menu is used to switch from Radio/Media to Map screen automatically after selected time.
1. Press [HOME] > [Setup] > [General] > [Return to Map Timer].
2. Select [Off ], [5 secs], [10 secs] or [20 secs].

145
Settings
Steering Mode buttonThis menu is used to access to selected media by using "MODE" button on the steering wheel remote control. Only active/available media can be accessed.
1. Press [HOME] > [Setup] > [General] > [Steering Mode button].
2. Select the desired features.
Media Change NotificationsA notifi cation pop-up containing media information will be shown whenever the content changes, except on the current displayed media screen.
Press [HOME] > [Setup] > [General] > [Media Change Notifi cations].
Distance UnitThis menu is used to select the Distance Unit to [mi] or [km].
1. Press [HOME] > [Setup] > [General] > [ Distance Unit].
2. Press the desired item.
Screen SaverThis menu is used to select the screen displayed when the system power is turned off .
1. Press [HOME] > [Setup] > [General] > [ Screen Saver].
2. Press the desired item.
• [Digital Clock]: Displays digital clock screen.
• [Analog Clock]: Displays analog clock screen.
• [None]: The system does not show a screen saver when the display or power is off .
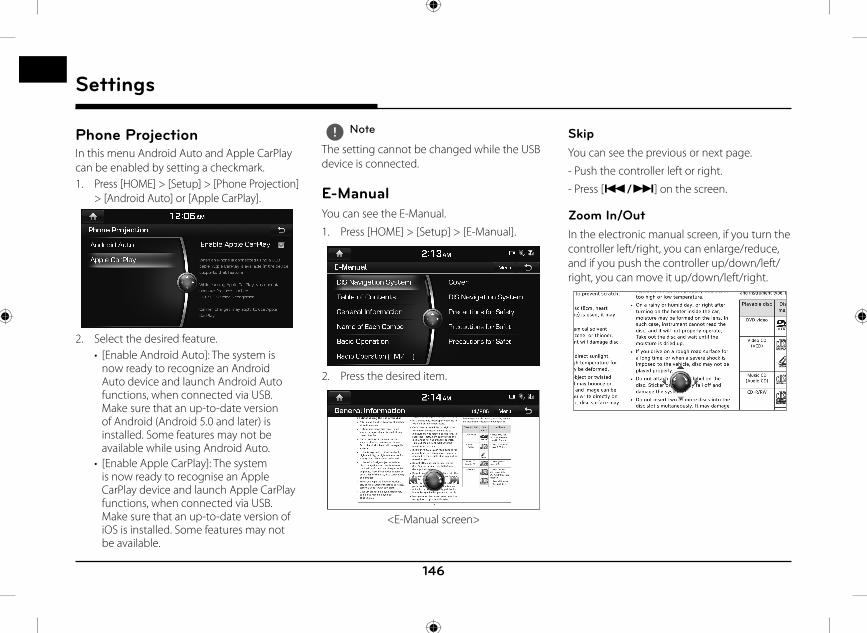
146
Settings
Phone ProjectionIn this menu Android Auto and Apple CarPlay can be enabled by setting a checkmark.1. Press [HOME] > [Setup] > [Phone Projection]
> [Android Auto] or [Apple CarPlay].
2. Select the desired feature.• [Enable Android Auto]: The system is
now ready to recognize an Android Auto device and launch Android Auto functions, when connected via USB. Make sure that an up-to-date version of Android (Android 5.0 and later) is installed. Some features may not be available while using Android Auto.
• [Enable Apple CarPlay]: The system is now ready to recognise an Apple CarPlay device and launch Apple CarPlay functions, when connected via USB. Make sure that an up-to-date version of iOS is installed. Some features may not be available.
, Note
The setting cannot be changed while the USB device is connected.
E-ManualYou can see the E-Manual.
1. Press [HOME] > [Setup] > [E-Manual].
2. Press the desired item.
<E-Manual screen>
SkipYou can see the previous or next page.
- Push the controller left or right.
- Press [C/V] on the screen.
Zoom In/OutIn the electronic manual screen, if you turn the controller left/right, you can enlarge/reduce, and if you push the controller up/down/left/right, you can move it up/down/left/right.
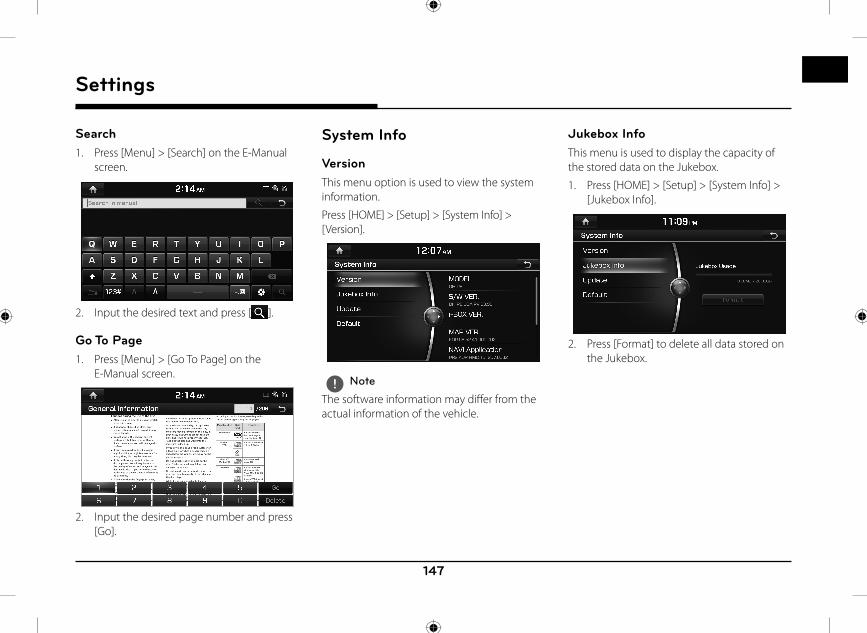
147
Settings
Search1. Press [Menu] > [Search] on the E-Manual
screen.
2. Input the desired text and press [ ].
Go To Page1. Press [Menu] > [Go To Page] on the
E-Manual screen.
2. Input the desired page number and press [Go].
System Info
VersionThis menu option is used to view the system information.
Press [HOME] > [Setup] > [System Info] > [Version].
, Note
The software information may diff er from the actual information of the vehicle.
Jukebox InfoThis menu is used to display the capacity of the stored data on the Jukebox.
1. Press [HOME] > [Setup] > [System Info] > [Jukebox Info].
2. Press [Format] to delete all data stored on the Jukebox.
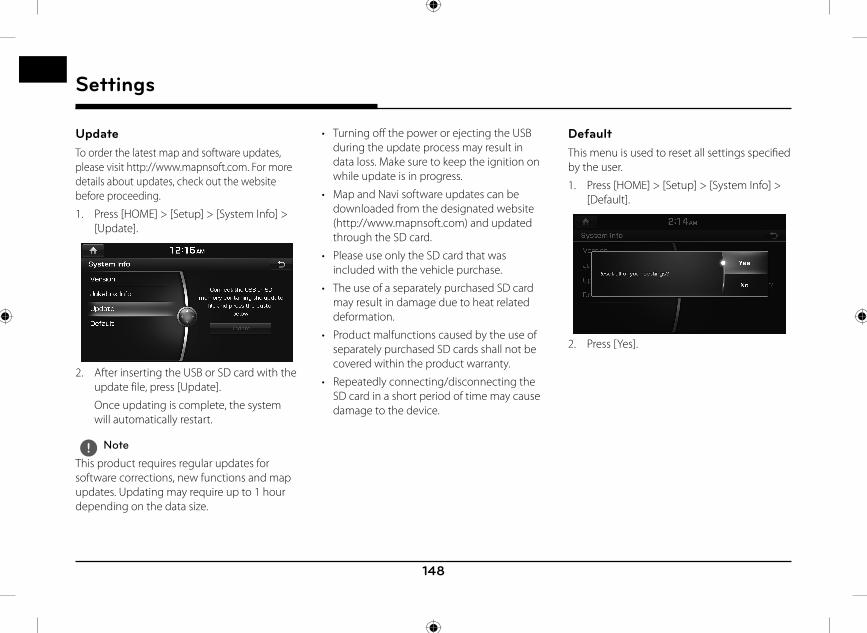
148
Settings
UpdateTo order the latest map and software updates, please visit http://www.mapnsoft.com. For more details about updates, check out the website before proceeding.
1. Press [HOME] > [Setup] > [System Info] > [Update].
2. After inserting the USB or SD card with the update file, press [Update].
Once updating is complete, the system will automatically restart.
, Note
This product requires regular updates for software corrections, new functions and map updates. Updating may require up to 1 hour depending on the data size.
• Turning off the power or ejecting the USB during the update process may result in data loss. Make sure to keep the ignition on while update is in progress.
• Map and Navi software updates can be downloaded from the designated website (http://www.mapnsoft.com) and updated through the SD card.
• Please use only the SD card that was included with the vehicle purchase.
• The use of a separately purchased SD card may result in damage due to heat related deformation.
• Product malfunctions caused by the use of separately purchased SD cards shall not be covered within the product warranty.
• Repeatedly connecting/disconnecting the SD card in a short period of time may cause damage to the device.
DefaultThis menu is used to reset all settings specifi ed by the user.
1. Press [HOME] > [Setup] > [System Info] > [Default].
2. Press [Yes].
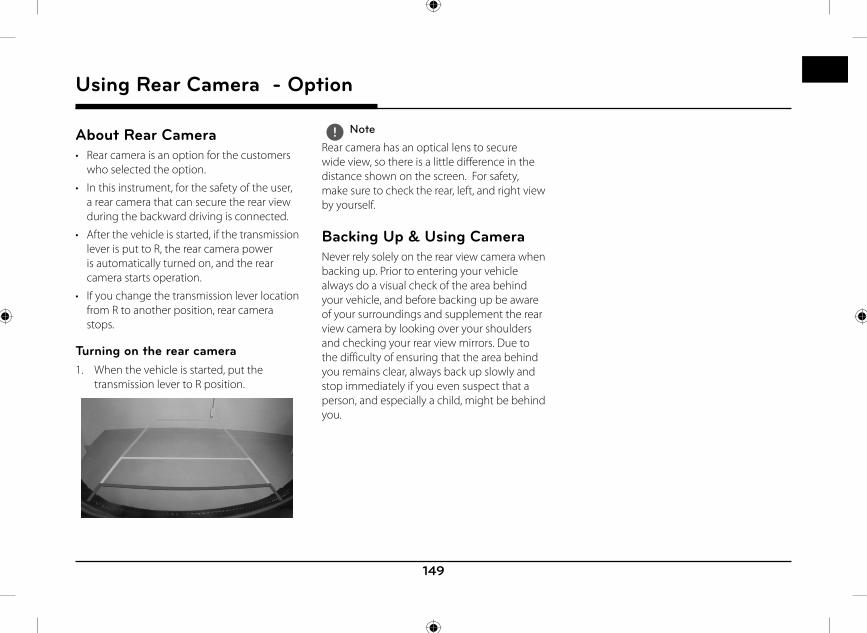
149
Using Rear Camera - Option
About Rear Camera• Rear camera is an option for the customers
who selected the option.
• In this instrument, for the safety of the user, a rear camera that can secure the rear view during the backward driving is connected.
• After the vehicle is started, if the transmission lever is put to R, the rear camera power is automatically turned on, and the rear camera starts operation.
• If you change the transmission lever location from R to another position, rear camera stops.
Turning on the rear camera1. When the vehicle is started, put the
transmission lever to R position.
, Note
Rear camera has an optical lens to secure wide view, so there is a little diff erence in the distance shown on the screen. For safety, make sure to check the rear, left, and right view by yourself.
Backing Up & Using CameraNever rely solely on the rear view camera when backing up. Prior to entering your vehicle always do a visual check of the area behind your vehicle, and before backing up be aware of your surroundings and supplement the rear view camera by looking over your shoulders and checking your rear view mirrors. Due to the difficulty of ensuring that the area behind you remains clear, always back up slowly and stop immediately if you even suspect that a person, and especially a child, might be behind you.
Using Rear Camera - Option
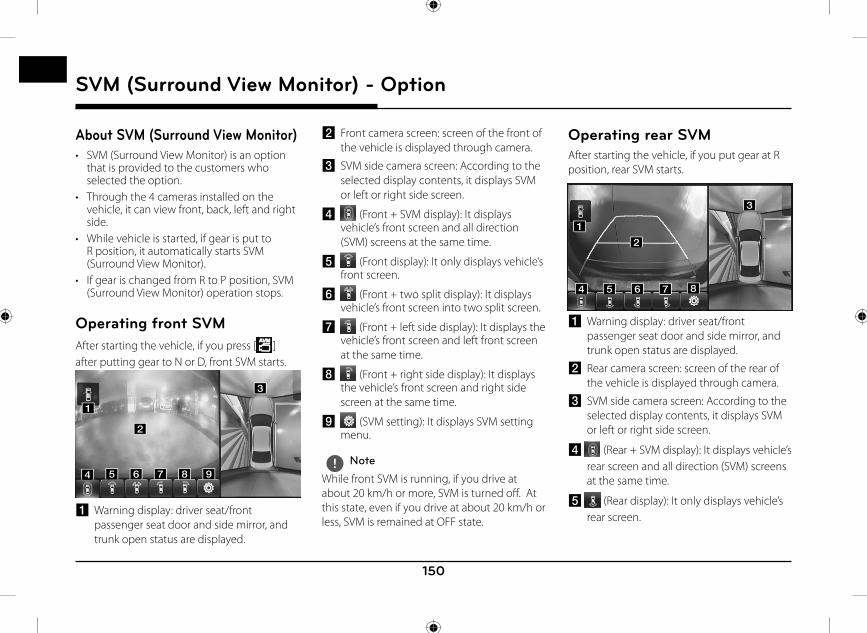
150
SVM (Surround View Monitor) - Option
About SVM (Surround View Monitor) • SVM (Surround View Monitor) is an option
that is provided to the customers who selected the option.
• Through the 4 cameras installed on the vehicle, it can view front, back, left and right side.
• While vehicle is started, if gear is put to R position, it automatically starts SVM (Surround View Monitor).
• If gear is changed from R to P position, SVM (Surround View Monitor) operation stops.
Operating front SVM After starting the vehicle, if you press [ ] after putting gear to N or D, front SVM starts.
dd ee ff gg hh ii
aa
bb
cc
a Warning display: driver seat/front passenger seat door and side mirror, and trunk open status are displayed.
b Front camera screen: screen of the front of the vehicle is displayed through camera.
c SVM side camera screen: According to the selected display contents, it displays SVM or left or right side screen.
d (Front + SVM display): It displays vehicle’s front screen and all direction (SVM) screens at the same time.
e (Front display): It only displays vehicle’s front screen.
f (Front + two split display): It displays vehicle’s front screen into two split screen.
g (Front + left side display): It displays the vehicle’s front screen and left front screen at the same time.
h (Front + right side display): It displays the vehicle’s front screen and right side screen at the same time.
i (SVM setting): It displays SVM setting menu.
, Note
While front SVM is running, if you drive at about 20 km/h or more, SVM is turned off . At this state, even if you drive at about 20 km/h or less, SVM is remained at OFF state.
Operating rear SVM After starting the vehicle, if you put gear at R position, rear SVM starts.
dd ee ff gg hh
aa
bb
cc
a Warning display: driver seat/front passenger seat door and side mirror, and trunk open status are displayed.
b Rear camera screen: screen of the rear of the vehicle is displayed through camera.
c SVM side camera screen: According to the selected display contents, it displays SVM or left or right side screen.
d (Rear + SVM display): It displays vehicle’s rear screen and all direction (SVM) screens at the same time.
e (Rear display): It only displays vehicle’s rear screen.
SVM (Surround View Monitor) - Option
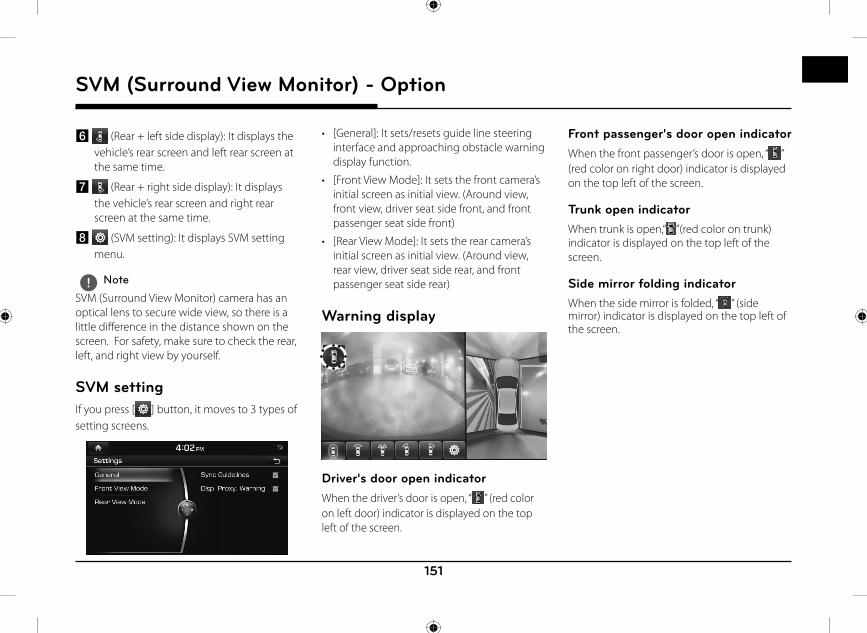
151
SVM (Surround View Monitor) - Option
f (Rear + left side display): It displays the vehicle’s rear screen and left rear screen at the same time.
g (Rear + right side display): It displays the vehicle’s rear screen and right rear screen at the same time.
h (SVM setting): It displays SVM setting menu.
, Note
SVM (Surround View Monitor) camera has an optical lens to secure wide view, so there is a little diff erence in the distance shown on the screen. For safety, make sure to check the rear, left, and right view by yourself.
SVM setting If you press [ ] button, it moves to 3 types of setting screens.
• [General]: It sets/resets guide line steering interface and approaching obstacle warning display function.
• [Front View Mode]: It sets the front camera’s initial screen as initial view. (Around view, front view, driver seat side front, and front passenger seat side front)
• [Rear View Mode]: It sets the rear camera’s initial screen as initial view. (Around view, rear view, driver seat side rear, and front passenger seat side rear)
Warning display
Driver's door open indicatorWhen the driver’s door is open, “ ” (red color on left door) indicator is displayed on the top left of the screen.
Front passenger's door open indicatorWhen the front passenger’s door is open, “ ” (red color on right door) indicator is displayed on the top left of the screen.
Trunk open indicator When trunk is open,“ ”(red color on trunk) indicator is displayed on the top left of the screen.
Side mirror folding indicatorWhen the side mirror is folded, “ ” (side mirror) indicator is displayed on the top left of the screen.
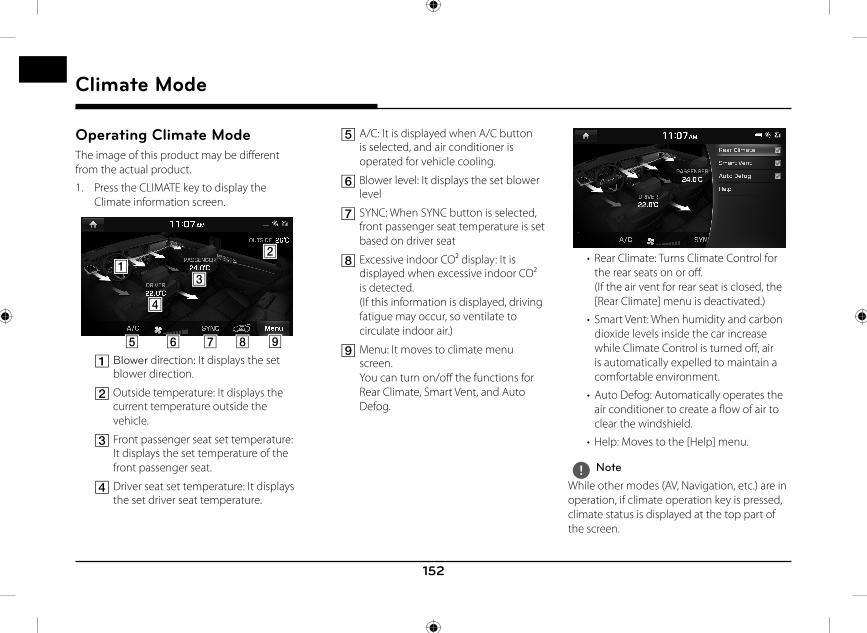
152
Climate Mode
Operating Climate ModeThe image of this product may be different from the actual product.
1. Press the CLIMATE key to display the Climate information screen.
E F G H I
A
D
C
B
A Blower direction: It displays the set blower direction.
B Outside temperature: It displays the current temperature outside the vehicle.
C Front passenger seat set temperature: It displays the set temperature of the front passenger seat.
D Driver seat set temperature: It displays the set driver seat temperature.
E A/C: It is displayed when A/C button is selected, and air conditioner is operated for vehicle cooling.
F Blower level: It displays the set blower level
G SYNC: When SYNC button is selected, front passenger seat temperature is set based on driver seat
H Excessive indoor CO2 display: It is displayed when excessive indoor CO2 is detected. (If this information is displayed, driving fatigue may occur, so ventilate to circulate indoor air.)
I Menu: It moves to climate menu screen. You can turn on/off the functions for Rear Climate, Smart Vent, and Auto Defog.
• Rear Climate: Turns Climate Control for the rear seats on or off . (If the air vent for rear seat is closed, the [Rear Climate] menu is deactivated.)
• Smart Vent: When humidity and carbon dioxide levels inside the car increase while Climate Control is turned off , air is automatically expelled to maintain a comfortable environment.
• Auto Defog: Automatically operates the air conditioner to create a fl ow of air to clear the windshield.
• Help: Moves to the [Help] menu.
, Note
While other modes (AV, Navigation, etc.) are in operation, if climate operation key is pressed, climate status is displayed at the top part of the screen.
Climate Mode
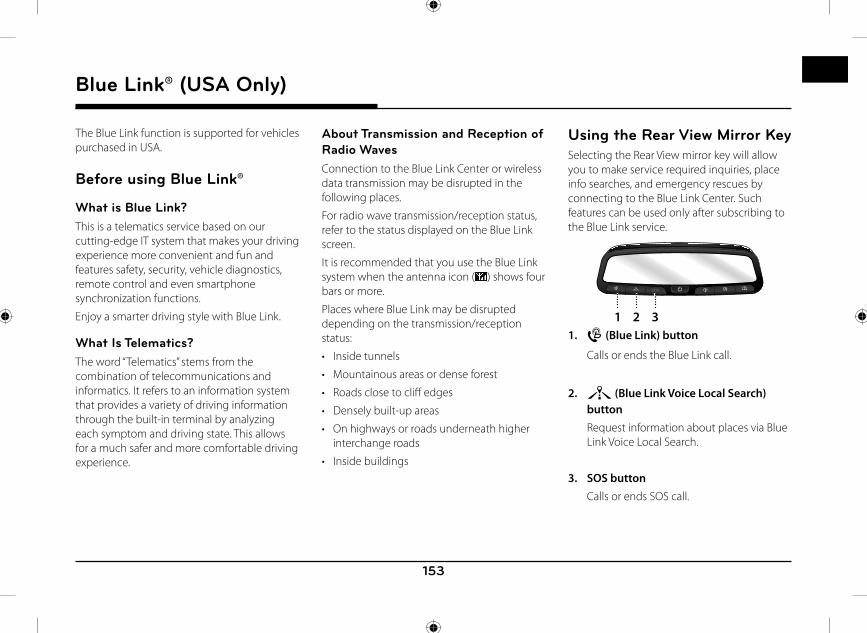
153
The Blue Link function is supported for vehicles purchased in USA.
Before using Blue Link®
What is Blue Link?This is a telematics service based on our cutting-edge IT system that makes your driving experience more convenient and fun and features safety, security, vehicle diagnostics, remote control and even smartphone synchronization functions.
Enjoy a smarter driving style with Blue Link.
What Is Telematics?The word “Telematics” stems from the combination of telecommunications and informatics. It refers to an information system that provides a variety of driving information through the built-in terminal by analyzing each symptom and driving state. This allows for a much safer and more comfortable driving experience.
About Transmission and Reception of Radio WavesConnection to the Blue Link Center or wireless data transmission may be disrupted in the following places.
For radio wave transmission/reception status, refer to the status displayed on the Blue Link screen.
It is recommended that you use the Blue Link system when the antenna icon ( ) shows four bars or more.
Places where Blue Link may be disrupted depending on the transmission/reception status:
• Inside tunnels
• Mountainous areas or dense forest
• Roads close to cliff edges
• Densely built-up areas
• On highways or roads underneath higher interchange roads
• Inside buildings
Using the Rear View Mirror KeySelecting the Rear View mirror key will allow you to make service required inquiries, place info searches, and emergency rescues by connecting to the Blue Link Center. Such features can be used only after subscribing to the Blue Link service.
1 2 31. (Blue Link) button
Calls or ends the Blue Link call.
2. (Blue Link Voice Local Search) button
Request information about places via Blue Link Voice Local Search.
3. SOS button Calls or ends SOS call.
Blue Link® (USA Only)
Blue Link® (USA Only)
154
Connecting with the Blue Link® Center1. Press [ ] on the Rear View Mirror to
connect with the Blue Link Center.
Blue Link® Voice Local Search
What is Blue Link® Voice Local Search?With Blue Link network service, you can search for Google-provided place names with your voice.
Separated from Voice Recognition in the steering wheel, it specializes in place name searches and may be run with a [ ] key in the rear-view mirror.
The search is done through network services; it is only available when connected to a communication network.
Starting Blue Link® Voice Local SearchPress [ ] key in the rear-view mirror (less than 0.8 seconds) to start Blue Link Voice Local Search.
A
CB
Name Description
A Example command
Shows an example to ask for a place search.
B Manual search switch button
Switches the Blue Link Voice Local Search screen to manual search.
C End button Ends Blue Link Voice Local Search.
(With Blue Link Voice Local Search, press [ ] key in the rear-view mirror again to end the service.)
, Note
If you change the language set for the system to Korean or French, this function will not be supported. Change the system language to other language.
Blue Link® (USA Only)
155
Blue Link® (USA Only)
Blue Link® Safety and Security
Auto Crash NotificationProvides immediate assistance when an accident occurs and an airbag is deployed.
In this event, an ACN signal, containing customer and location information, will automatically be transmitted to the response center. Upon receipt of the signal, a response specialist will attempt to establish voice communications with the vehicle occupants and forward any pertinent information to Blue Link emergency services.
SOSCustomers request emergency Blue Link emergence services by pressing the dedicated “SOS" button in the vehicle. This action transmits vehicle information and location to specially trained response specialists, who assist in coordinating the dispatch of appropriate emergency assistance to the customer.
The response specialist remains on the line with the customer until advised assistance has arrived.
Stolen Vehicle RecoveryIn the event a customer’s vehicle is reported stolen (and a stolen vehicle report has been fi led with the appropriate police department), the response center can provide assistance to the police in an attempt to recover the vehicle.
Vehicle SlowdownUsed with Stolen Vehicle Recovery, this enables law enforcement to gradually reduce the engine power of the vehicle, thus slowing it down to safe levels. A warning shall be transmitted to the driver prior to the slowdown procedure.
Vehicle ImmobilizationUsed with Stolen Vehicle Recovery, this enables law enforcement to send a signal to the vehicle which immobilizes the engine management system, thus preventing startup. This capability is only valid when the ignition is off , but can be saved for later immobilization if the vehicle is on or in motion at the time of signal transmission.
156
Blue Link® (USA Only)
Getting Started with Blue Link®Use Blue Link features such as Driving Info and Vehicle Diagnostics. Blue Link features can be used after activating the service. A separate fee may be charged for using Blue Link, and features may diff er according to your service plan.
1. Select [HOME] > [Blue Link].
• [Driving Info]: Displays information such as Driving Time/Idle Time, Deceleration/Acceleration Distribution, Driving Speed and Driving Distance.
• [Send to Car with Google]: Displays information about Places received via Blue Link Voice Local Search.
• [Vehicle Diagnostics]: Inspects vehicle malfunctions and provides diagnostics.
• [Apps]: Displays paid or free applications with related information for installation.
• [Blue Link Settings]: Activates Blue Link service, sets Wi-Fi network, and displays modem information.
Driving InfoThis service can be used while your car is stopped and the engine is on.
1. Select [HOME] > [Blue Link] > [Driving Info].
2. Select [Menu] > [Update] to receive up-to-date driving information.
157
Blue Link® (USA Only)
Send to Car with GoogleYou can check information about Places received via Blue Link Voice Local Search. To use the “Send to Car with Google” function, fi rst you need to sign up to the Blue Link.
1. Select [HOME] > [Blue Link] > [Send to Car with Google].
2. Select the desired place.
A
C
B
Feature Description
A Dial Displays the phone number of a selected place. Press the number to make a call.
B View Map Displays the address of a selected place. Press the address to view map.
C a/d
(Previous/ Next)
Displays the previous or next place information.
Vehicle DiagnosticsYou can have your vehicle inspected only after stopping the vehicle because some control units can’t be diagnosed while driving.
Vehicle Diagnostics will be canceled if you switch to another screen while diagnosis is in progress.
To receive result details, you need to fi rst sign up to the Blue Link.
1. Select [HOME] > [Blue Link] > [Vehicle Diagnostics].
2. Select the desired item.
A B
Name Description
A Blue Link Center
Calls the Blue Link Center to check for vehicle problems
B Close Ends the Vehicle Diagnostics.

158
Apps
Download Center With Download Center, you can install paid/free applications or check for related information. Only Blue Link center verifi ed applications can be installed. You can use Download Center after agreeing to the terms of service and use on the screen. (Only 1 time for initial launch is required.)
Download Center and downloaded apps require a network connection through Wi-Fi.
1. Select [HOME] > [Blue Link] > [Apps].
2. 1) Select [Download Center].
AC
B
D
2) Select [Download Center] > [Menu] > [My Apps].
E
F
• [A]: Button state changes according to the application state.
Name Description
Download Downloads free applications.
Purchase Downloads paid applications.
Re-download Downloads deleted applications after previously installing them.
Retry Downloads the applications that failed to download due to network or system errors.
Blue Link® (USA Only)
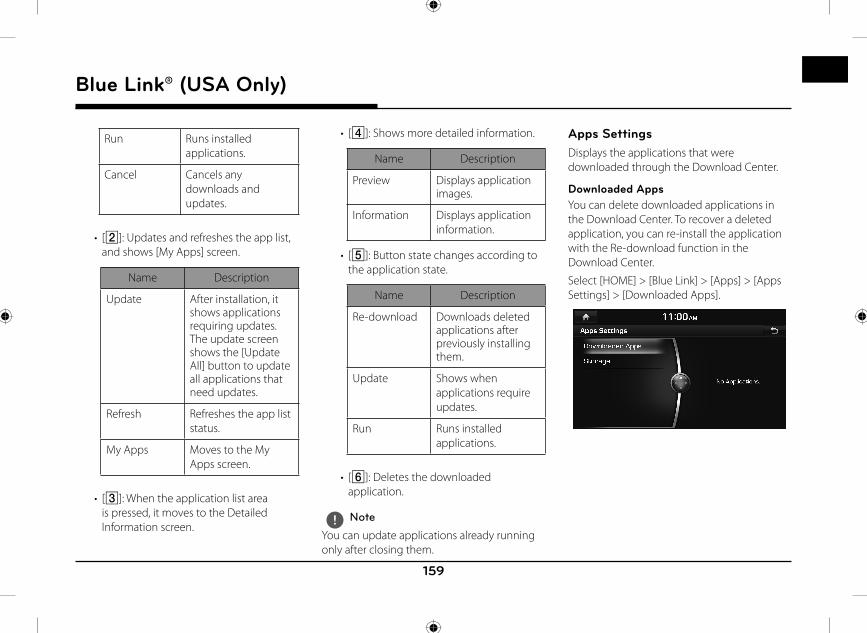
159
Run Runs installed applications.
Cancel Cancels any downloads and updates.
• [B]: Updates and refreshes the app list, and shows [My Apps] screen.
Name Description
Update After installation, it shows applications requiring updates. The update screen shows the [Update All] button to update all applications that need updates.
Refresh Refreshes the app list status.
My Apps Moves to the My Apps screen.
• [C]: When the application list area is pressed, it moves to the Detailed Information screen.
• [D]: Shows more detailed information.
Name Description
Preview Displays application images.
Information Displays application information.
• [E]: Button state changes according to the application state.
Name Description
Re-download Downloads deleted applications after previously installing them.
Update Shows when applications require updates.
Run Runs installed applications.
• [F]: Deletes the downloaded application.
, Note
You can update applications already running only after closing them.
Apps SettingsDisplays the applications that were downloaded through the Download Center.
Downloaded AppsYou can delete downloaded applications in the Download Center. To recover a deleted application, you can re-install the application with the Re-download function in the Download Center.
Select [HOME] > [Blue Link] > [Apps] > [Apps Settings] > [Downloaded Apps].
Blue Link® (USA Only)
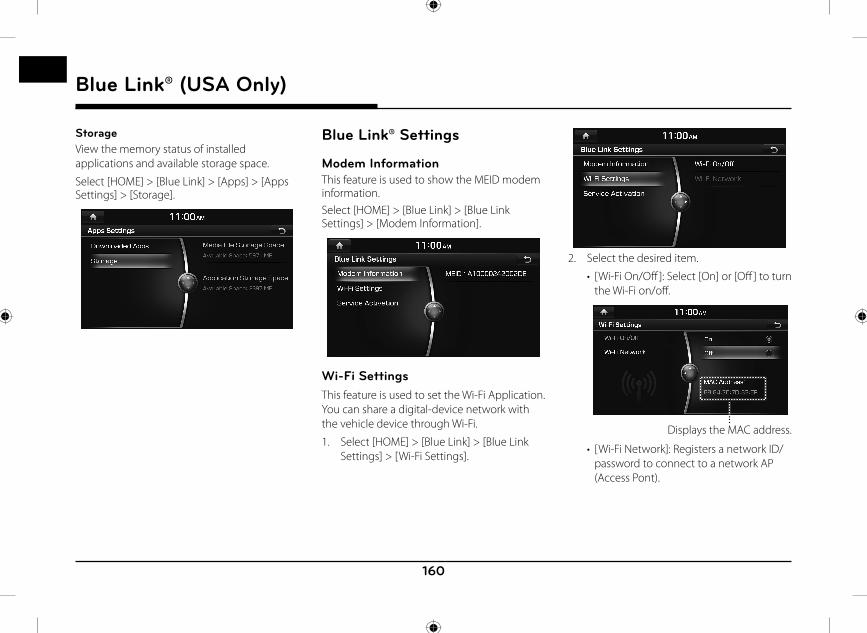
160
StorageView the memory status of installed applications and available storage space.
Select [HOME] > [Blue Link] > [Apps] > [Apps Settings] > [Storage].
Blue Link® Settings
Modem InformationThis feature is used to show the MEID modem information.Select [HOME] > [Blue Link] > [Blue Link Settings] > [Modem Information].
Wi-Fi SettingsThis feature is used to set the Wi-Fi Application. You can share a digital-device network with the vehicle device through Wi-Fi.
1. Select [HOME] > [Blue Link] > [Blue Link Settings] > [Wi-Fi Settings].
2. Select the desired item.
• [Wi-Fi On/Off ]: Select [On] or [Off ] to turn the Wi-Fi on/off .
Displays the MAC address.
• [Wi-Fi Network]: Registers a network ID/password to connect to a network AP (Access Pont).
Blue Link® (USA Only)
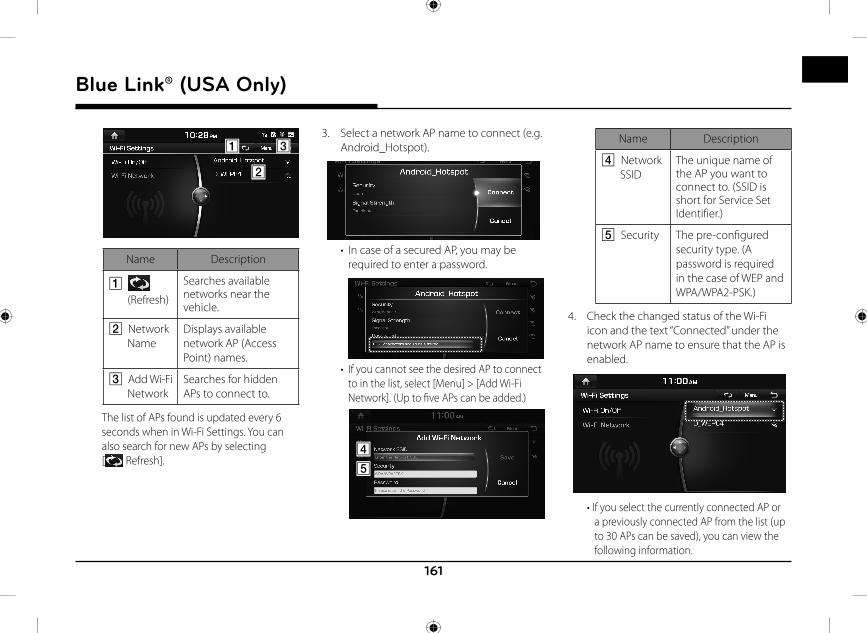
161
Blue Link® (USA Only)
A C
B
Name Description
A (Refresh)
Searches available networks near the vehicle.
B Network Name
Displays available network AP (Access Point) names.
C Add Wi-Fi Network
Searches for hidden APs to connect to.
The list of APs found is updated every 6 seconds when in Wi-Fi Settings. You can also search for new APs by selecting [ Refresh].
3. Select a network AP name to connect (e.g. Android_Hotspot).
• In case of a secured AP, you may be required to enter a password.
• If you cannot see the desired AP to connect to in the list, select [Menu] > [Add Wi-Fi Network]. (Up to fi ve APs can be added.)
D
E
Name Description
D Network SSID
The unique name of the AP you want to connect to. (SSID is short for Service Set Identifier.)
E Security The pre-confi gured security type. (A password is required in the case of WEP and WPA/WPA2-PSK.)
4. Check the changed status of the Wi-Fi icon and the text “Connected” under the network AP name to ensure that the AP is enabled.
• If you select the currently connected AP or a previously connected AP from the list (up to 30 APs can be saved), you can view the following information.
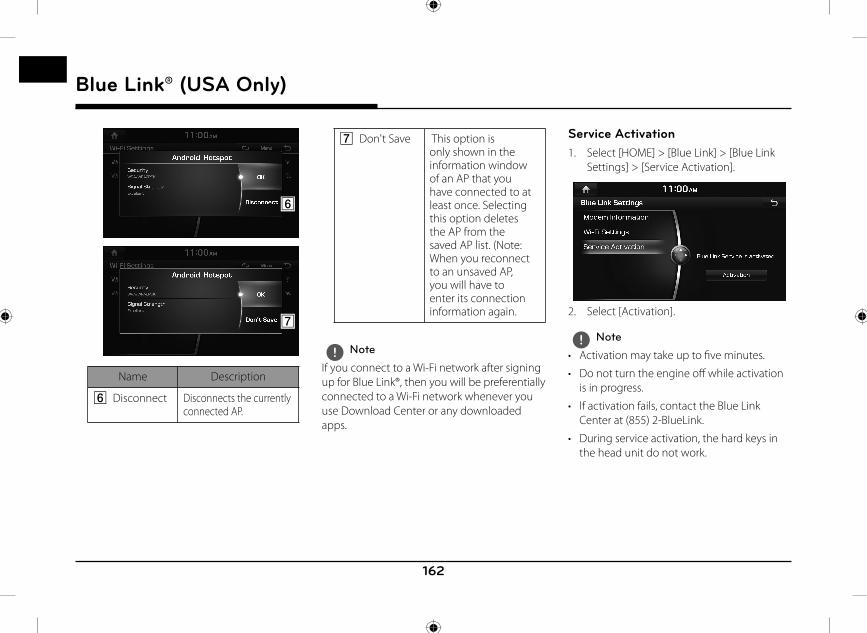
162
Blue Link® (USA Only)
F
G
Name Description
F Disconnect Disconnects the currently connected AP.
G Don't Save This option is only shown in the information window of an AP that you have connected to at least once. Selecting this option deletes the AP from the saved AP list. (Note: When you reconnect to an unsaved AP, you will have to enter its connection information again.
, Note
If you connect to a Wi-Fi network after signing up for Blue Link®, then you will be preferentially connected to a Wi-Fi network whenever you use Download Center or any downloaded apps.
Service Activation1. Select [HOME] > [Blue Link] > [Blue Link
Settings] > [Service Activation].
2. Select [Activation].
, Note
• Activation may take up to fi ve minutes.
• Do not turn the engine off while activation is in progress.
• If activation fails, contact the Blue Link Center at (855) 2-BlueLink.
• During service activation, the hard keys in the head unit do not work.
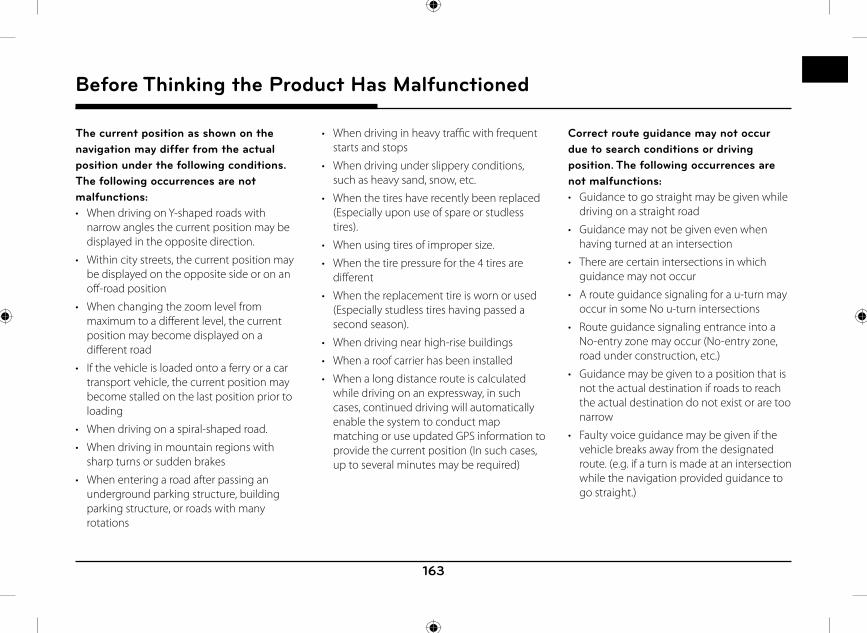
163
Before Thinking the Product Has Malfunctioned
The current position as shown on the navigation may differ from the actual position under the following conditions. The following occurrences are not malfunctions:• When driving on Y-shaped roads with
narrow angles the current position may be displayed in the opposite direction.
• Within city streets, the current position may be displayed on the opposite side or on an off -road position
• When changing the zoom level from maximum to a diff erent level, the current position may become displayed on a diff erent road
• If the vehicle is loaded onto a ferry or a car transport vehicle, the current position may become stalled on the last position prior to loading
• When driving on a spiral-shaped road.
• When driving in mountain regions with sharp turns or sudden brakes
• When entering a road after passing an underground parking structure, building parking structure, or roads with many rotations
• When driving in heavy traffi c with frequent starts and stops
• When driving under slippery conditions, such as heavy sand, snow, etc.
• When the tires have recently been replaced (Especially upon use of spare or studless tires).
• When using tires of improper size.
• When the tire pressure for the 4 tires are diff erent
• When the replacement tire is worn or used (Especially studless tires having passed a second season).
• When driving near high-rise buildings
• When a roof carrier has been installed
• When a long distance route is calculated while driving on an expressway, in such cases, continued driving will automatically enable the system to conduct map matching or use updated GPS information to provide the current position (In such cases, up to several minutes may be required)
Correct route guidance may not occur due to search conditions or driving position. The following occurrences are not malfunctions:• Guidance to go straight may be given while
driving on a straight road
• Guidance may not be given even when having turned at an intersection
• There are certain intersections in which guidance may not occur
• A route guidance signaling for a u-turn may occur in some No u-turn intersections
• Route guidance signaling entrance into a No-entry zone may occur (No-entry zone, road under construction, etc.)
• Guidance may be given to a position that is not the actual destination if roads to reach the actual destination do not exist or are too narrow
• Faulty voice guidance may be given if the vehicle breaks away from the designated route. (e.g. if a turn is made at an intersection while the navigation provided guidance to go straight.)
Before Thinking the Product Has Malfunctioned
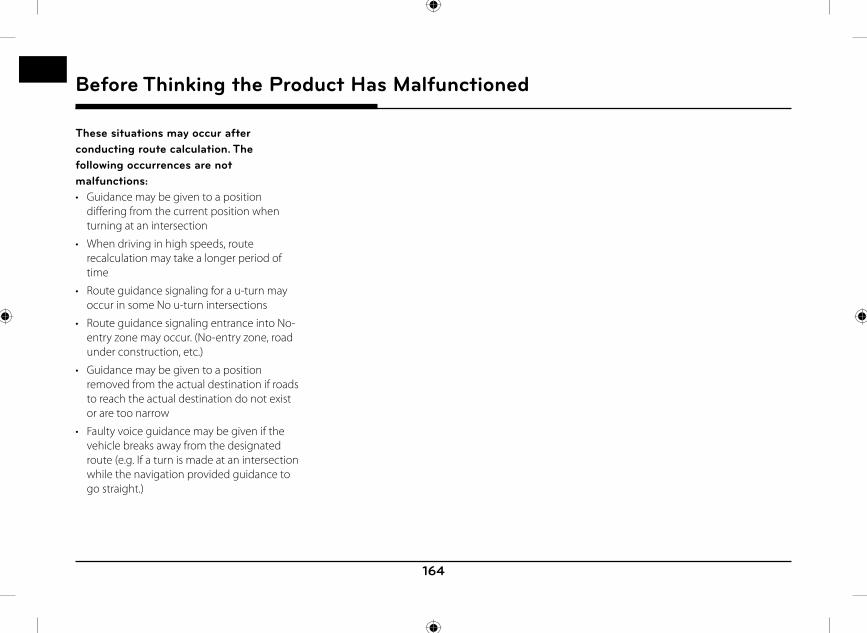
164
Before Thinking the Product Has Malfunctioned
These situations may occur after conducting route calculation. The following occurrences are not malfunctions:• Guidance may be given to a position
diff ering from the current position when turning at an intersection
• When driving in high speeds, route recalculation may take a longer period of time
• Route guidance signaling for a u-turn may occur in some No u-turn intersections
• Route guidance signaling entrance into No-entry zone may occur. (No-entry zone, road under construction, etc.)
• Guidance may be given to a position removed from the actual destination if roads to reach the actual destination do not exist or are too narrow
• Faulty voice guidance may be given if the vehicle breaks away from the designated route (e.g. If a turn is made at an intersection while the navigation provided guidance to go straight.)
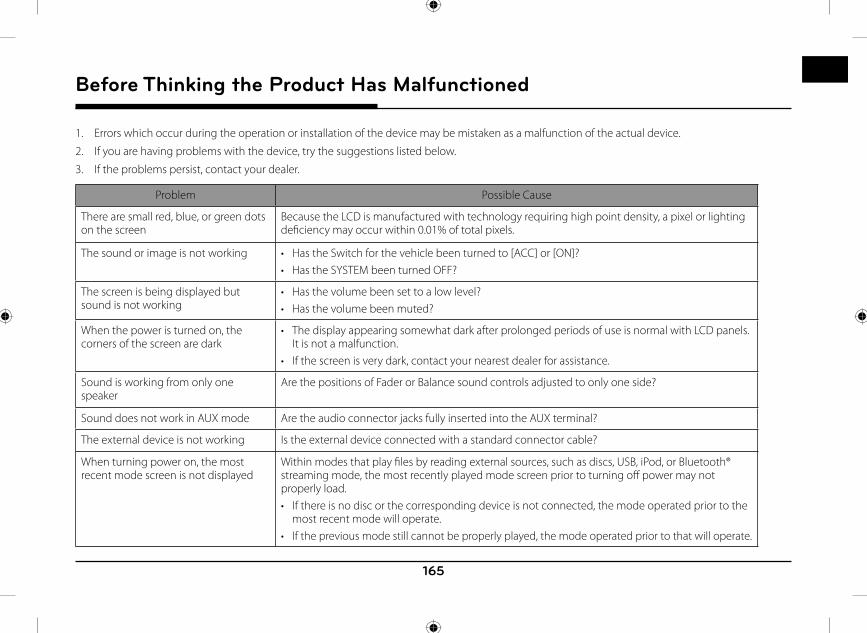
165
Before Thinking the Product Has Malfunctioned
1. Errors which occur during the operation or installation of the device may be mistaken as a malfunction of the actual device.
2. If you are having problems with the device, try the suggestions listed below.
3. If the problems persist, contact your dealer.
Problem Possible Cause
There are small red, blue, or green dots on the screen
Because the LCD is manufactured with technology requiring high point density, a pixel or lighting defi ciency may occur within 0.01% of total pixels.
The sound or image is not working • Has the Switch for the vehicle been turned to [ACC] or [ON]?• Has the SYSTEM been turned OFF?
The screen is being displayed but sound is not working
• Has the volume been set to a low level?• Has the volume been muted?
When the power is turned on, the corners of the screen are dark
• The display appearing somewhat dark after prolonged periods of use is normal with LCD panels. It is not a malfunction.
• If the screen is very dark, contact your nearest dealer for assistance.
Sound is working from only one speaker
Are the positions of Fader or Balance sound controls adjusted to only one side?
Sound does not work in AUX mode Are the audio connector jacks fully inserted into the AUX terminal?
The external device is not working Is the external device connected with a standard connector cable?
When turning power on, the most recent mode screen is not displayed
Within modes that play fi les by reading external sources, such as discs, USB, iPod, or Bluetooth® streaming mode, the most recently played mode screen prior to turning off power may not properly load.• If there is no disc or the corresponding device is not connected, the mode operated prior to the
most recent mode will operate.• If the previous mode still cannot be properly played, the mode operated prior to that will operate.
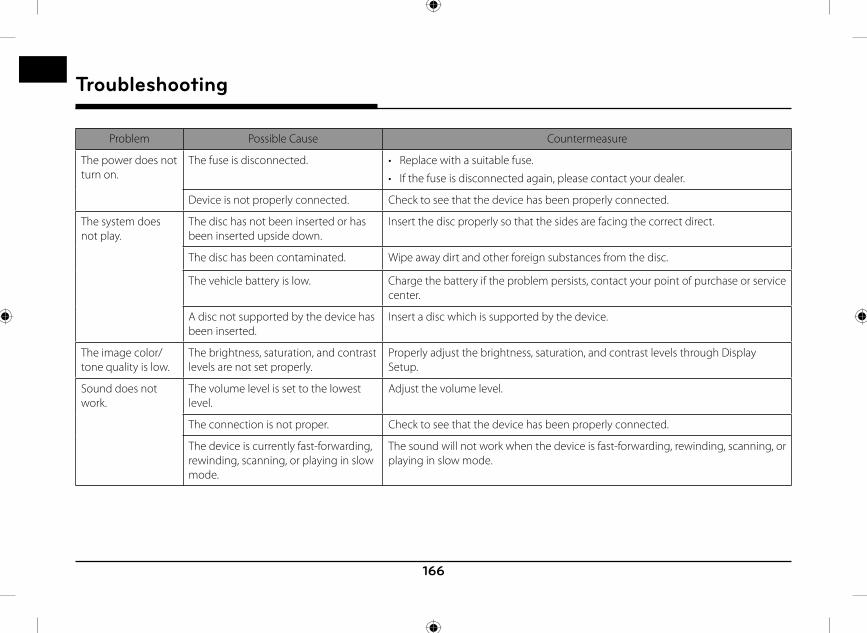
166
Troubleshooting
Problem Possible Cause Countermeasure
The power does not turn on.
The fuse is disconnected. • Replace with a suitable fuse.
• If the fuse is disconnected again, please contact your dealer.
Device is not properly connected. Check to see that the device has been properly connected.
The system does not play.
The disc has not been inserted or has been inserted upside down.
Insert the disc properly so that the sides are facing the correct direct.
The disc has been contaminated. Wipe away dirt and other foreign substances from the disc.
The vehicle battery is low. Charge the battery if the problem persists, contact your point of purchase or service center.
A disc not supported by the device has been inserted.
Insert a disc which is supported by the device.
The image color/tone quality is low.
The brightness, saturation, and contrast levels are not set properly.
Properly adjust the brightness, saturation, and contrast levels through Display Setup.
Sound does not work.
The volume level is set to the lowest level.
Adjust the volume level.
The connection is not proper. Check to see that the device has been properly connected.
The device is currently fast-forwarding, rewinding, scanning, or playing in slow mode.
The sound will not work when the device is fast-forwarding, rewinding, scanning, or playing in slow mode.
Troubleshooting
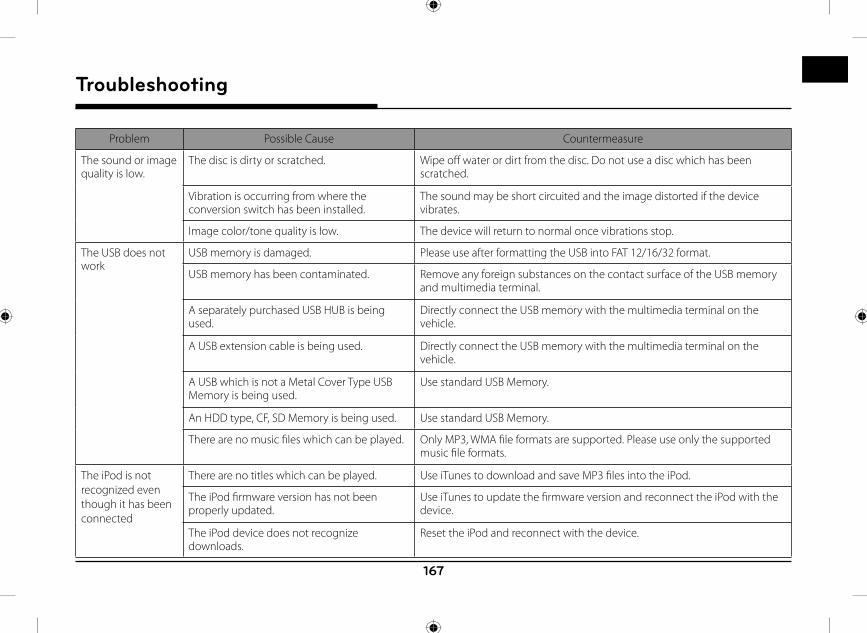
167
Troubleshooting
Problem Possible Cause Countermeasure
The sound or image quality is low.
The disc is dirty or scratched. Wipe off water or dirt from the disc. Do not use a disc which has been scratched.
Vibration is occurring from where the conversion switch has been installed.
The sound may be short circuited and the image distorted if the device vibrates.
Image color/tone quality is low. The device will return to normal once vibrations stop.
The USB does not work
USB memory is damaged. Please use after formatting the USB into FAT 12/16/32 format.
USB memory has been contaminated. Remove any foreign substances on the contact surface of the USB memory and multimedia terminal.
A separately purchased USB HUB is being used.
Directly connect the USB memory with the multimedia terminal on the vehicle.
A USB extension cable is being used. Directly connect the USB memory with the multimedia terminal on the vehicle.
A USB which is not a Metal Cover Type USB Memory is being used.
Use standard USB Memory.
An HDD type, CF, SD Memory is being used. Use standard USB Memory.
There are no music fi les which can be played. Only MP3, WMA fi le formats are supported. Please use only the supported music fi le formats.
The iPod is not recognized even though it has been connected
There are no titles which can be played. Use iTunes to download and save MP3 fi les into the iPod.
The iPod fi rmware version has not been properly updated.
Use iTunes to update the fi rmware version and reconnect the iPod with the device.
The iPod device does not recognize downloads.
Reset the iPod and reconnect with the device.
168
Trademarks and Licenses
DivX®
• ABOUT DIVX VIDEO: DivX® is a digital video format created by DivX, LLC, a subsidiary of Rovi Corporation. This is an offi cial DivX Certifi ed® device that has passed rigorous testing to verify that it plays DivX video. Visit divx.com for more information and software tools to convert your fi les into DivX videos.
• ABOUT DIVX VIDEO-ON-DEMAND: This DivX Certifi ed® device must be registered in order to play purchased DivX Video-on-Demand (VOD) movies. To obtain your registration code, locate the DivX VOD section in your device setup menu. Go to vod.divx.com for more information on how to complete your registration.
• DivX Certifi ed® to play DivX® video, including premium content.
• DivX®, DivX Certifi ed® and associated logos are trademarks of Rovi Corporation or its subsidiaries and are used under license.
• Covered by one or more of the following U.S. patents: 7,295,673; 7,460,668; 7,515,710; 7,519,274
iPod®iPod® is a registered trademark of Apple Inc.
SiriusXM™
SiriusXM™ is a registered trademark of SiriusXM™ Satellite Radio Inc. All rights reserved.
DOLBY®
Manufactured under license from Dolby Laboratories. Dolby and double-D symbol are trademarks of Dolby Laboratories.
DTS®
For DTS patents, see http://patents.dts.com. Manufactured under license from DTS Licensing Limited. DTS, the Symbol, & DTS and the Symbol together are registered trademarks, and DTS Digital Surround is a trademark of DTS, Inc. © DTS, Inc. All Rights Reserved.
Bluetooth® Wireless Technology
The Bluetooth Wireless Technology word mark and logos are registered trademarks owned by Bluetooth Wireless Technology SIG, Inc.
Gracenote®
CD, DVD, Blu-ray Disc, and music and video-related data from Gracenote, Inc., copyright © 2000 to present Gracenote. Gracenote Software, copyright © 2000 to present Gracenote. One or more patents owned by Gracenote apply to this product and service. See the Gracenote website for a non-exhaustive list of applicable Gracenote patents. Gracenote, CDDB, MusicID, MediaVOCS, the Gracenote logo and logotype, and the “Powered by Gracenote” logo are either registered trademarks or trademarks of Gracenote in the United States and/or other countries. Music and video recognition technology and related data are provided by Gracenote®. Gracenote is the industry standard in music recognition technology and related content delivery. For more information, please visit www.gracenote.com.Portions of the content is copyright © Gracenote or its providers.Gracenote® End User License AgreementThis application or device contains software from Gracenote, Inc. of Emeryville, California (“Gracenote”). The software from Gracenote (the “Gracenote Software”) enables this application to perform disc and/or fi le identifi cation and obtain music-related
Trademarks and Licenses
169
Trademarks and Licenses
information, including name, artist, track, and title information (“Gracenote Data”) from online servers or embedded databases (collectively, “Gracenote Servers”) and to perform other functions. You may use Gracenote Data only by means of the intended End-User functions of this application or device.You agree that you will use Gracenote Data, the Gracenote Software, and Gracenote Servers for your own personal non-commercial use only. You agree not to assign, copy, transfer or transmit the Gracenote Software or any Gracenote Data to any third party. YOU AGREE NOT TO USE OR EXPLOIT GRACENOTE DATA, THE GRACENOTE SOFTWARE, OR GRACENOTE SERVERS, EXCEPT AS EXPRESSLY PERMITTED HEREIN.You agree that your non-exclusive license to use the Gracenote Data, the Gracenote Software, and Gracenote Servers will terminate if you violate these restrictions. If your license terminates, you agree to cease any and all use of the Gracenote Data, the Gracenote Software, and Gracenote Servers. Gracenote reserves all rights in Gracenote Data, the Gracenote Software, and the Gracenote Servers, including all ownership rights. Under no circumstances will Gracenote become liable for any payment to you for any information that you provide. You agree that Gracenote, Inc. may enforce
its rights under this Agreement against you directly in its own name.The Gracenote service uses a unique identifi er to track queries for statistical purposes. The purpose of a randomly assigned numeric identifi er is to allow the Gracenote service to count queries without knowing anything about who you are. For more information, see the web page for the Gracenote Privacy Policy for the Gracenote service.The Gracenote Software and each item of Gracenote Data are licensed to you “AS IS.” Gracenote makes no representations or warranties, express or implied, regarding the accuracy of any Gracenote Data from in the Gracenote Servers. Gracenote reserves the right to delete data from the Gracenote Servers or to change data categories for any cause that Gracenote deems suffi cient. No warranty is made that the Gracenote Software or Gracenote Servers are error-free or that functioning of Gracenote Software or Gracenote Servers will be uninterrupted. Gracenote is not obligated to provide you with new enhanced or additional data types or categories that Gracenote may provide in the future and is free to discontinue its services at any time.GRACENOTE DISCLAIMS ALL WARRANTIES EXPRESS OR IMPLIED, INCLUDING, BUT
NOT LIMITED TO, IMPLIED WARRANTIES OF MERCHANTABILITY, FITNESS FOR A PARTICULAR PURPOSE, TITLE, AND NON-INFRINGEMENT. GRACENOTE DOES NOT WARRANT THE RESULTS THAT WILL BE OBTAINED BY YOUR USE OF THE GRACENOTE SOFTWARE OR ANY GRACENOTE SERVER. IN NO CASE WILL GRACENOTE BE LIABLE FOR ANY CONSEQUENTIAL OR INCIDENTAL DAMAGES OR FOR ANY LOST PROFITS OR LOST REVENUES.© Gracenote, Inc. 2009
HD Radio™ Technology
HD Radio™ Technology manufactured under license from iBiquity Digital Corporation. U.S. and Foreign Patents. HD Radio™ and the HD, HD Radio, and “Arc” logos are proprietary trademarks of iBiquity Digital Corp.
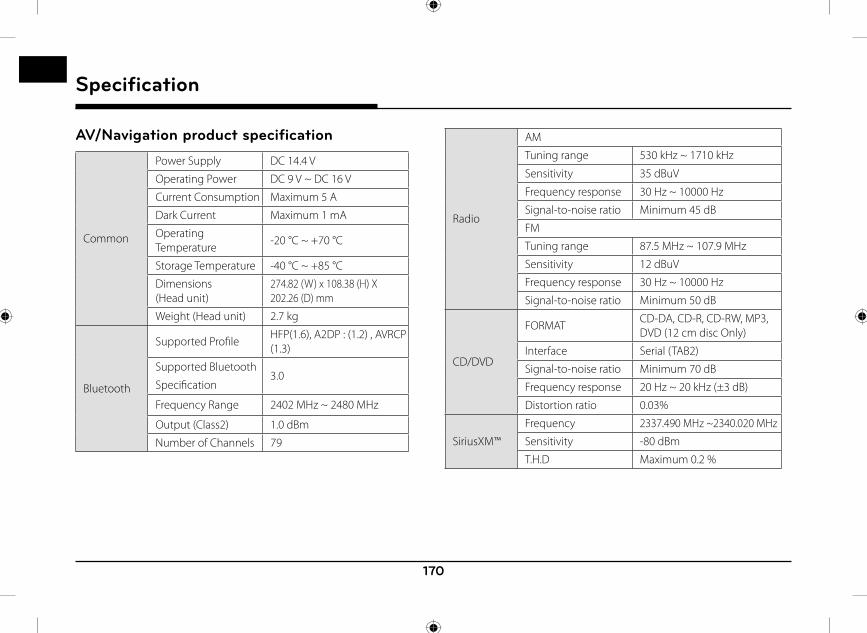
170
Specification
AV/Navigation product specification
Common
Power Supply DC 14.4 V
Operating Power DC 9 V ~ DC 16 V
Current Consumption Maximum 5 A
Dark Current Maximum 1 mA
Operating Temperature
-20 °C ~ +70 °C
Storage Temperature -40 °C ~ +85 °C
Dimensions (Head unit)
274.82 (W) x 108.38 (H) X 202.26 (D) mm
Weight (Head unit) 2.7 kg
Bluetooth
Supported Profi leHFP(1.6), A2DP : (1.2) , AVRCP (1.3)
Supported Bluetooth
Specifi cation3.0
Frequency Range 2402 MHz ~ 2480 MHz
Output (Class2) 1.0 dBm
Number of Channels 79
Radio
AM
Tuning range 530 kHz ~ 1710 kHz
Sensitivity 35 dBuV
Frequency response 30 Hz ~ 10000 Hz
Signal-to-noise ratio Minimum 45 dB
FM
Tuning range 87.5 MHz ~ 107.9 MHz
Sensitivity 12 dBuV
Frequency response 30 Hz ~ 10000 Hz
Signal-to-noise ratio Minimum 50 dB
CD/DVD
FORMATCD-DA, CD-R, CD-RW, MP3, DVD (12 cm disc Only)
Interface Serial (TAB2)
Signal-to-noise ratio Minimum 70 dB
Frequency response 20 Hz ~ 20 kHz (±3 dB)
Distortion ratio 0.03%
SiriusXM™
Frequency 2337.490 MHz ~2340.020 MHz
Sensitivity -80 dBm
T.H.D Maximum 0.2 %
Specification
171
Specification
TFT-LCD
Screen Size233.95 mm (9.2 inches)
204 (W) x 114.72 (H) mm (Active area)
Resolution 921,600 pixel
Operating
Method
TFT (Thin Film Transistor) Active Matrix, In Plane Switching (IPS)
Viewing AngleViewing Angle free (R/L 178(Min), U/D 178(Min.))
Internal Lighting LED
• To obtain the source code under GPL, LGPL, MPL and other open source licenses, that is contained in this product, please visit http://opensource.lge.com. In addition to the source code, all referred license terms, warranty disclaimers and copyright notices are available for download. LG Electronics will also provide open source code to you on CD-ROM for a charge covering the cost of performing such distribution (such as the cost of media, shipping and handling) upon email request to [email protected]. This off er is valid for three (3) years from the date on which you purchased the product.
• Designs and specifi cations are subject to change without prior notice.
172
Blue Link® terminal product specification
Common
Power Supply DC 14.4 V
Operating Power DC 9 V ~ DC 16 V
Current Consumption
Maximum 2 A
Dark current after
96hAfter Acc off , ADM off and 96 hours (Maximum 0.8 mA or less)
Dark current within 96h
- After Acc off , ADM off , average current in 96 hours (Maximum 10 mA or less)
- After Acc off , ADM off , average current in 20 seconds (Maximum 50 mA or less)
Operating Temperature
-20 °C ~ +70 °C
Storage Temperature -40 °C ~ +85 °C
Dimensions (I-BOX unit)
233.4 (W) x 116 (H) X 38.6 (D)mm
Weight (I-BOX unit) 852.5 g
Name of the equipment (Model name)
Unit Assy I-BOX (TS310B1AX)
Manufactured date 2014. . .
Manufacturer / Country
Hyundai Mobis Co., Ltd. / Korea
CDMA part
Frequency
TX : 824 MHz~849 MHz (BC0)
1850 MHz~1910 MHz (BC1)
RX : 869 MHz~894 MHz (BC0)
1930 MHz~1990 MHz (BC1)
Reception sensitivity -104 dBM under (FER=0.5 % under)
Transmission output23.01 dBM ~ 30 dBM Power Class3 (BC0), Power Class2 (BC1), Conducted
Wi-Fi part
802.11bTx power: 16 ± 2 dBm
Sensitivity: PER 8 % or less/ -76 dBm
802.11gTx power: 12 ± 2 dBm
Sensitivity: PER 10 % or less/ -65 dBm
802.11nTx power: 12 ± 2 dBm
Sensitivity: PER 10 % or less/ -64 dBm
FCC Certifi cation
FCC Identifi er TQ8-TS310B1AX
Name of Grantee HYUNDAI MOBIS CO.LTD
Equipment Class PCS Licensed Transmitter
Notes Premium Gen 2.0 I-BOX
• For more information on open licenses and legal notices, refer to the website below. http://www.mobiszone.co.kr/front/mall/jsp/manual/avn_download_center_manual.jsp
Specification


P/N:MFL69919738