Embed Size (px)
Citation preview
1993 Prelude Online Reference Owner's Manual Use these links (and links throughout this manual) to navigate through this reference. For a printed owner's manual, click on authorized manuals or go to www.helminc.com.
Contents
Owner's Identification Form Introduction ......................................................................................................................................... i A Few Words About Safety ................................................................................................................. ii
Driver and Passenger Safety ..............................................................................................................3Proper use and care of your vehicle's seat belts, and Supplemental Restraint System. Instruments and Controls ................................................................................................................. 29Instrument panel indicator and gauge, and how to use dashboard and steering column controls. Comfort and Convenience Features ................................................................................................ 67How to operate the climate control system, the audio system, and other convenience features. Before Driving................................................................................................................................... 97What gasoline to use, how to break-in your new vehicle, and how to load luggage and other cargo. Driving .............................................................................................................................................. 107The proper way to start the engine, shift the transmission, and park, plus towing a trailer. Maintenance ..................................................................................................................................... 127The Maintenance Schedule shows you when you need to take your vehicle to the dealer. Appearance Care.............................................................................................................................. 175Tips on cleaning and protecting your vehicle. Things to look for if your vehicle ever needs body repairs. Taking Care of the Unexpected ...................................................................................................... 183This section covers several problems motorists sometimes experience, and how to handle them. Technical Information..................................................................................................................... 203ID numbers, dimensions, capacities, and technical information. Warranty and Customer Relations (U.S. and Canada) ................................................................ 215A summary of the warranties covering your new Acura, and how to contact us. Authorized Manuals (U.S. only)...................................................................................................... 221How to order manuals and other technical literature. Index...................................................................................................................................................... I
Gas Station InformationInformation you need when you pull up to the fuel pump.
Introduction
Congratulations ! Your selection of a 1993 Honda Prelude was a wise investment. It will give you years of drivingpleasure.
To enhance the enjoyment of your new car, take time to study this manual. In it, you will learn about your car'smany conveniences and useful features. Following the service interval and maintenance recommendations willhelp keep your driving trouble-free while preserving your investment.
Keep this owner's manual in your car so you can refer to it at any time. Please make sure the manual stays withthe car if you sell it. The next owner wil l find it just as helpful.
Several other booklets in the glove box explain the warranties that protect your Honda. We suggest you readthem carefully so you understand the coverages and the responsibilities of ownership.
When your car needs scheduled maintenance, keep in mind that your Honda dealer's service staff is specially-trained in the service and maintenance of the many systems unique to your Honda. Your Honda dealer is dedi-cated to your satisfaction and will be pleased to answer any questions and concerns.
Best wishes and happy motoring.American Honda Motor Co., Inc.Honda Canada Inc.
31SS0611
Main Menu ▲ ▼
Safety Messages
Your safety and the safety of others is very important. We have providedmany important safety messages in this manual and on the vehicle.Please read these messages carefully.
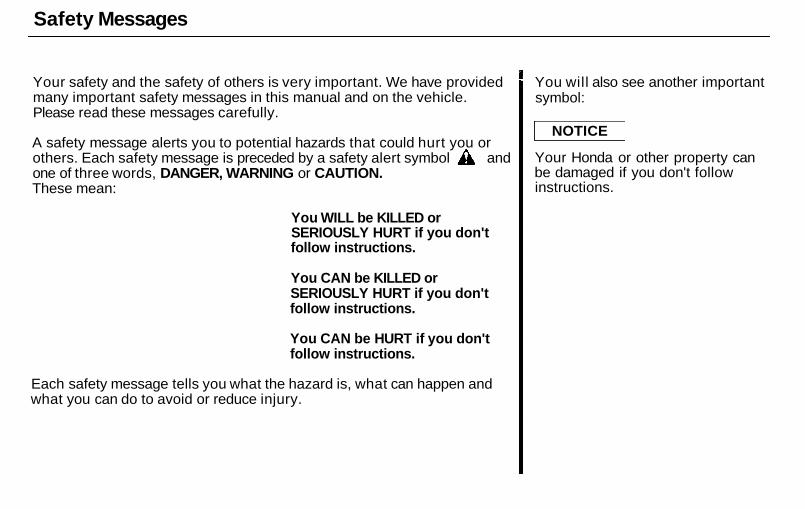
A safety message alerts you to potential hazards that could hurt you orothers. Each safety message is preceded by a safety alert symbol andone of three words, DANGER, WARNING or CAUTION.These mean:
You WILL be KILLED orSERIOUSLY HURT if you don'tfollow instructions.
You CAN be KILLED orSERIOUSLY HURT if you don'tfollow instructions.
You CAN be HURT if you don'tfollow instructions.
Each safety message tells you what the hazard is, what can happen andwhat you can do to avoid or reduce injury.
You will also see another importantsymbol:
Your Honda or other property canbe damaged if you don't followinstructions.
NOTICE
Main Menu ▲ ▼
Driver and Passenger Safety
This section gives you importantinformation about occupantprotection. It shows how to use seatbelts properly. It explains theSupplemental Restraint System.And it gives useful informationabout how to protect infants andchildren in your car.
Your Occupant ProtectionSystem........................................ 4
The Seat Belt Systemand How It Works.................... 5
Why Wear Seat Belts................... 5Important Safety Reminders..... 5Seat Belt System Components... 6Lap/Shoulder Belt........................ 6Wearing Seat Belts Properly...... 6Wearing a Lap/Shoulder
Belt............................................. 7Advice for Pregnant Women..... 8Seat Belt Maintenance................ 9
Supplemental Restraint System.. 10Important Safety Reminder..... 11How the Driver's Airbag
Works........................................ 12How the Passenger's Airbag
Works........................................ 13How the SRS Indicator Light
Works....................................... 14System Service........................... 14System Service Precautions...... 15
Additional Safety Information ..... 16Seat-back Position...................... 16Door Locks................................... 16
Storing Cargo Safely................. 17Driving with Pets....................... 17
Child Safety..................................... 18Where Should Children Sit?..... 18Important Safety Reminders... 19General Guidelinesfor Restraining ChildrenUnder 18 kg (40 Ibs)............... 19
Restrainingan Infant Who WeighsLess Than 9 kg (20 Ibs)......... 20
Restraininga Child Who Weighs Between9 and 18 kg (20 and 40 Ibs).... 20
Restraining a Child Who WeighsOver 18 kg (40 Ibs).................. 21
Using a Seat BeltLocking Clip............................ 21
Using Child Restraintswith Tethers............................ 22
Storing a Child Seat................... 23Alcohol and Drugs.......................... 24Carbon Monoxide Hazard ............ 25Reporting Safety Defects
(US Cars)...................................... 26Safety Labels.................................. 27
Driver and Passenger Safety
Main Menu ▲ ▼
Your Occupant Protection System
Your Honda is equipped with seatbelts and other features that worktogether to protect you and yourpassengers during a crash.
Seat belts are the most importantpart of your occupant protectionsystem. When worn properly, seatbelts can reduce the chance ofserious injury or death in a crash.
Foradded protection during asevere frontal collision, yourPrelude has a SupplementalRestraint System (SRS) with adriver's airbag. The Si 4WS andVTEC models sold in the U.S, andSR 4WS and SR-V models sold inCanada also have a passenger'sairbag.
Two indicator lights are also partof your safety system. One remindsyou to make sure you and yourpassengers wear your seat belts.The other alerts you to a possibleproblem with your supplementalrestraint system (see page 14).
The seats, head restraints, and doorlocks also play a role in occupantsafety. For example, reclining theseat-back can decrease the effec-tiveness of your seat belt. Headrestraints can help protect yourneck and head, especially duringrear-end impacts. Door locks helpkeep your doors from being acciden-tally opened during a crash.
To get the maximum protectionfrom your occupant protectionsystem, check the following beforeyou drive away:
Everyone in the car is wearing aseat belt properly (see page 6) .Infants and small children areproperly secured in child safetyseats (see page 18).Both doors are closed and locked(see page 16).Seat-backs are upright (see page16).There are no loose items thatcould be thrown around and hurtsomeone during a crash orsudden stop (see page 17).
By following these guidelines, youcan reduce injuries to yourself andyour passengers in many crashsituations. Remember, however,that no safety system can preventall injuries or deaths that can occurin severe crashes.
Driver and Passenger Safety
Main Menu Table of Contents ▲ ▼
The Seat Belt System and How It Works
Why Wear Seat BeltsWearing seat belts, and wearingthem properly, is fundamental toyour safety and the safety of yourpassengers.
During a crash or emergency stop,seat belts can help keep you frombeing thrown against the inside ofthe car, against other occupants, orout of the car.
Of course, seat belts cannotcompletely protect you in everycrash. But, in most cases, seat beltsreduce your chance of seriousinjury. They can even save yourlife. That is why many states andall Canadian provinces require youto wear seat belts.
Important Safety RemindersSeat belts are designed for adultsand larger children. Al l infants andsmall children must be properlyrestrained in child safety seats (seepage 18).
A pregnant woman needs to wear aseat belt to protect herself and herunborn child (see page 8).
Two people should never use thesame seat belt. If they do, theycould be very seriously injured in acrash.
Do not place the shoulder portion ofa lap/shoulder belt under your armor behind your back. This couldincrease the chance of seriousinjuries in a crash.
Do not put shoulder belt pads orother accessories on seat belts.They can reduce the effectivenessof the belts and increase the chanceof injury.
Driver and Passenger Safety
Not wearing a seat belt in-creases the chance of beingkilled or seriously hurt in acrash.
Be sure you and your passen-gers always wear seat beltsand wear them properly.
Main Menu Table of Contents ▲ ▼
The Seat Belt System and How It Works
Seat Belt System ComponentsYour Honda has lap/shoulder seatbelts in all four seating positions.
Your seat belt system also includesa light on the instrument panel toremind you to fasten your seat belt,and to make sure your passengersfasten theirs. This light comes onwhen you turn on the ignition ifyou have not fastened your seatbelt. A beeper also sounds forseveral seconds (see page 33).
The following pages cover moreabout the seat belt components andhow they work.
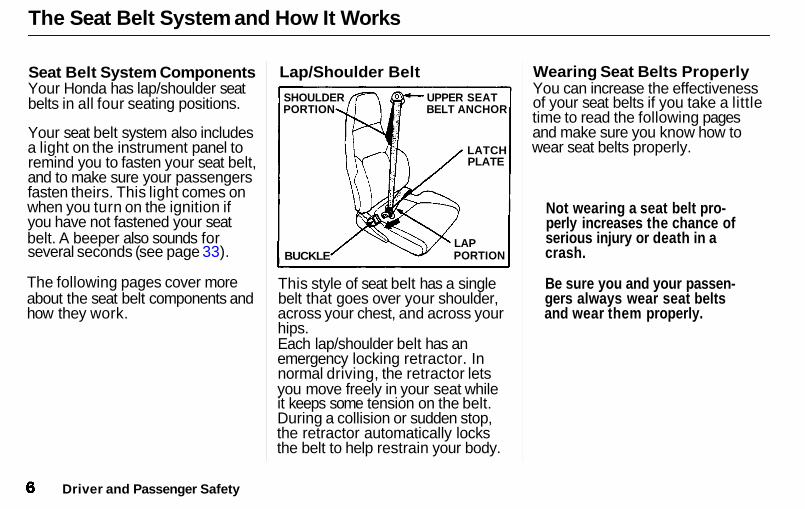
Lap/Shoulder Belt
This style of seat belt has a singlebelt that goes over your shoulder,across your chest, and across yourhips.Each lap/shoulder belt has anemergency locking retractor. Innormal driving, the retractor letsyou move freely in your seat whileit keeps some tension on the belt.During a collision or sudden stop,the retractor automatically locksthe belt to help restrain your body.
Wearing Seat Belts ProperlyYou can increase the effectivenessof your seat belts if you take a littletime to read the following pagesand make sure you know how towear seat belts properly.
Driver and Passenger Safety
SHOULDERPORTION
UPPER SEATBELT ANCHOR
LAPPORTION
LATCHPLATE
BUCKLE
Not wearing a seat belt pro-perly increases the chance ofserious injury or death in acrash.
Be sure you and your passen-gers always wear seat beltsand wear them properly.
Main Menu Table of Contents ▲ ▼

The Seat Belt System and How It Works
Wearing a Lap/Shoulder Belt
Before putting on a front seat belt,be sure your seat is adjustedforward or backward to a gooddriving or riding position and theback of your seat is upright (seepage 51).
1. Pull the latch plate across yourbody and insert it into the buckle.Tug on the belt to make sure thelatch is securely locked.
2. Check that the belt is not twisted.
3. Position the lap portion of thebelt as low as possible acrossyour hips, not across yourstomach. This lets your strongpelvic bones take the force of acrash.
4. Pull up on the shoulder part ofthe belt to remove any slack.Make sure the belt goes overyour collarbone and across yourchest.
CONTINUED
Driver and Passenger Safety
Main Menu Table of Contents ▲ ▼
The Seat Belt System and How It Works
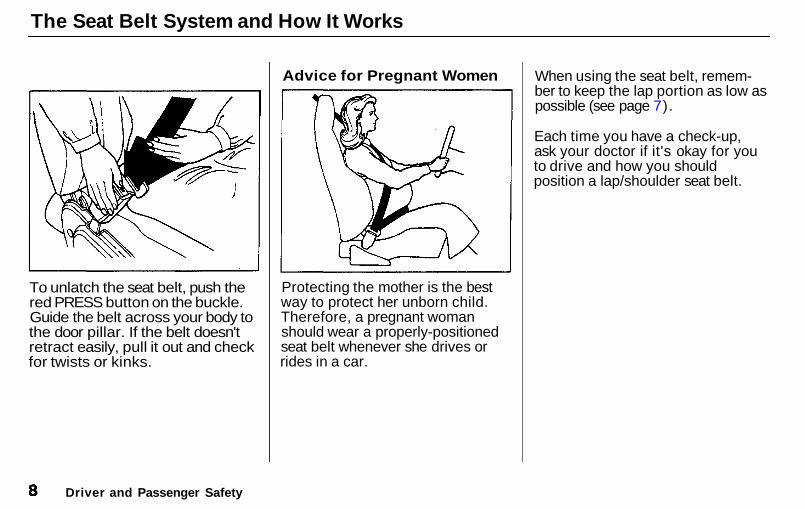
To unlatch the seat belt, push thered PRESS button on the buckle.Guide the belt across your body tothe door pillar. If the belt doesn'tretract easily, pull it out and checkfor twists or kinks.
Advice for Pregnant Women
Protecting the mother is the bestway to protect her unborn child.Therefore, a pregnant womanshould wear a properly-positionedseat belt whenever she drives orrides in a car.
When using the seat belt, remem-ber to keep the lap portion as low aspossible (see page 7).
Each time you have a check-up,ask your doctor if it's okay for youto drive and how you shouldposition a lap/shoulder seat belt.
Driver and Passenger Safety
Main Menu Table of Contents ▲ ▼
The Seat Belt System and How It Works
Seat Belt MaintenanceFor safety, you should check thecondition of your seat belts regu-larly.
Pull out each belt fully and look forfrays, cuts, burns, and wear. Checkthat the latches work smoothly andthe lap/shoulder belts retract easily.Any belt not in good condition ornot working properly should bereplaced.
If a seat belt is worn during a crash,have your dealer replace the beltand inspect the anchors for damage.
For information on how to cleanyour seat belts, see page 179.
Driver and Passenger Safety
Main Menu Table of Contents ▲ ▼
Supplemental Restraint System
The supplemental restraint systemincludes an airbag to help protectyour head and chest during a se-vere frontal collision. This systemdoes not replace your seat belt. Itsupplements, or adds to, the protec-tion offered by your seat belt.
The system on the Si 4WS andVTEC models in the U.S, and SR4WS and SR-V models in Canadaalso includes a front passenger'sairbag.
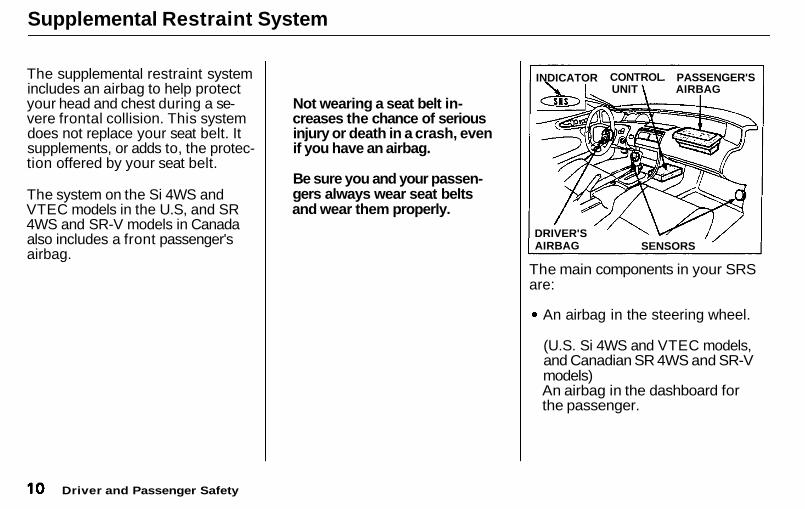
The main components in your SRSare:
An airbag in the steering wheel.
(U.S. Si 4WS and VTEC models,and Canadian SR 4WS and SR-Vmodels)An airbag in the dashboard forthe passenger.
Driver and Passenger Safety
Not wearing a seat belt in-creases the chance of seriousinjury or death in a crash, evenif you have an airbag.
Be sure you and your passen-gers always wear seat beltsand wear them properly.
INDICATOR CONTROLUNIT
PASSENGER'SAIRBAG
DRIVER'SAIRBAG SENSORS
Main Menu Table of Contents ▲ ▼
Supplemental Restraint System
A diagnostic system that, whenthe ignition is ON (II), continu-ally monitors the sensors, controlunit, airbag activator, and allrelated wiring.
An indicator light to warn you ofa possible problem with thesystem.
Emergency power backup in caseyour car's electrical system isdisconnected in a crash.
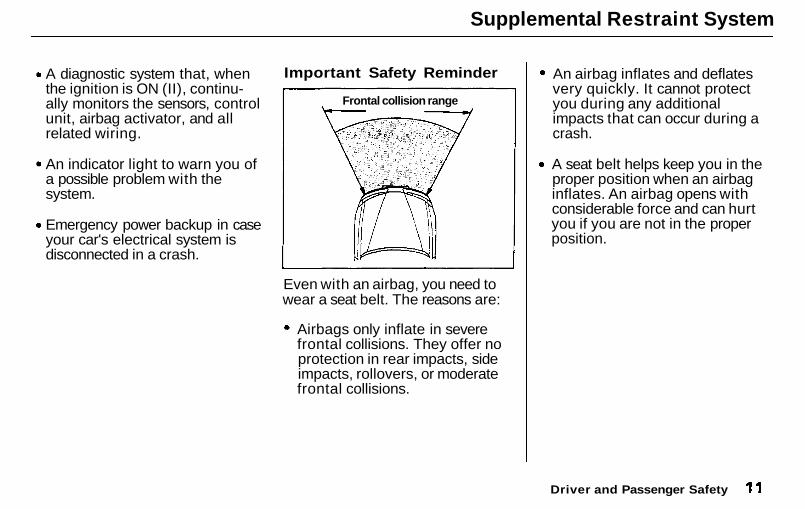
Important Safety Reminder
Even with an airbag, you need towear a seat belt. The reasons are:
Airbags only inflate in severefrontal collisions. They offer noprotection in rear impacts, sideimpacts, rollovers, or moderatefrontal collisions.
An airbag inflates and deflatesvery quickly. It cannot protectyou during any additionalimpacts that can occur during acrash.
A seat belt helps keep you in theproper position when an airbaginflates. An airbag opens withconsiderable force and can hurtyou if you are not in the properposition.
Driver and Passenger Safety
Frontal collision range
Main Menu Table of Contents ▲ ▼
Supplemental Restraint System
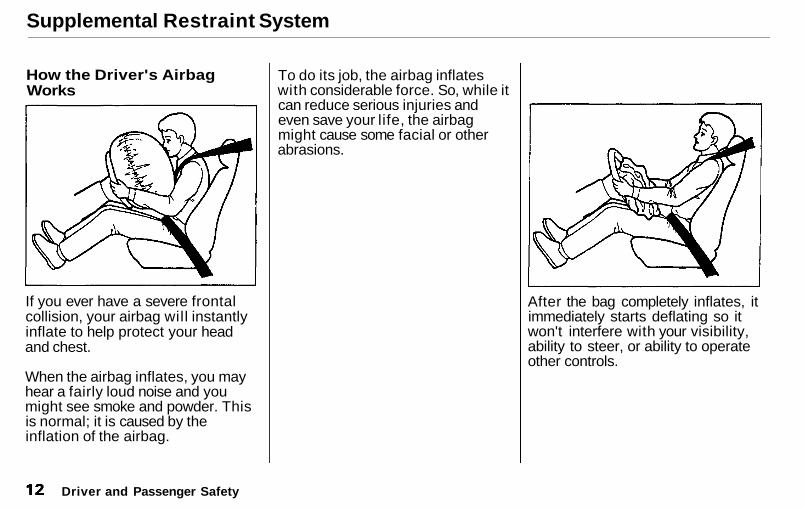
How the Driver's AirbagWorks
If you ever have a severe frontalcollision, your airbag will instantlyinflate to help protect your headand chest.
When the airbag inflates, you mayhear a fairly loud noise and youmight see smoke and powder. Thisis normal; it is caused by theinflation of the airbag.
To do its job, the airbag inflateswith considerable force. So, while itcan reduce serious injuries andeven save your life, the airbagmight cause some facial or otherabrasions.
After the bag completely inflates, itimmediately starts deflating so itwon't interfere with your visibility,ability to steer, or ability to operateother controls.
Driver and Passenger Safety
Main Menu Table of Contents ▲ ▼
Supplemental Restraint System
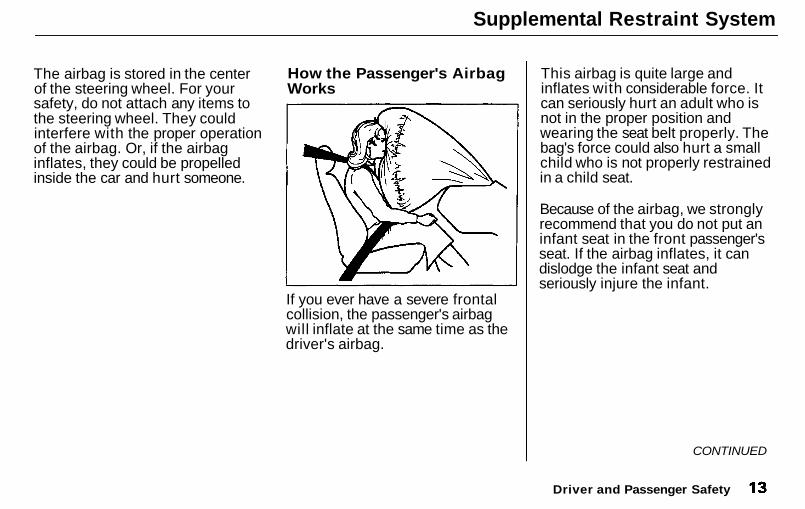
The airbag is stored in the centerof the steering wheel. For yoursafety, do not attach any items tothe steering wheel. They couldinterfere with the proper operationof the airbag. Or, if the airbaginflates, they could be propelledinside the car and hurt someone.
How the Passenger's AirbagWorks
If you ever have a severe frontalcollision, the passenger's airbagwill inflate at the same time as thedriver's airbag.
This airbag is quite large andinflates with considerable force. Itcan seriously hurt an adult who isnot in the proper position andwearing the seat belt properly. Thebag's force could also hurt a smallchild who is not properly restrainedin a child seat.
Because of the airbag, we stronglyrecommend that you do not put aninfant seat in the front passenger'sseat. If the airbag inflates, it candislodge the infant seat andseriously injure the infant.
CONTINUED
Driver and Passenger Safety
Main Menu Table of Contents ▲ ▼
Supplemental Restraint System
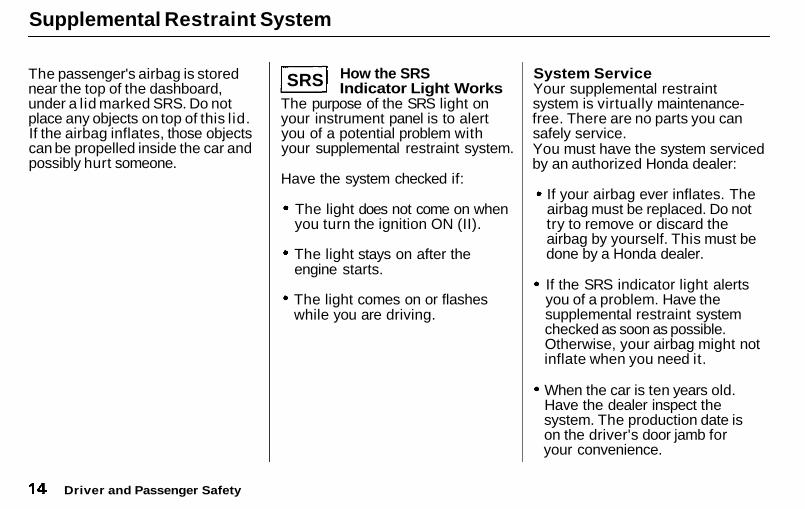
The passenger's airbag is storednear the top of the dashboard,under a lid marked SRS. Do notplace any objects on top of this l id.If the airbag inflates, those objectscan be propelled inside the car andpossibly hurt someone.
How the SRSIndicator Light Works
The purpose of the SRS light onyour instrument panel is to alertyou of a potential problem withyour supplemental restraint system.
Have the system checked if:
The light does not come on whenyou turn the ignition ON (II).
The light stays on after theengine starts.
The light comes on or flasheswhile you are driving.
System ServiceYour supplemental restraintsystem is virtually maintenance-free. There are no parts you cansafely service.You must have the system servicedby an authorized Honda dealer:
If your airbag ever inflates. Theairbag must be replaced. Do nottry to remove or discard theairbag by yourself. This must bedone by a Honda dealer.
If the SRS indicator light alertsyou of a problem. Have thesupplemental restraint systemchecked as soon as possible.Otherwise, your airbag might notinflate when you need it.
When the car is ten years old.Have the dealer inspect thesystem. The production date ison the driver's door jamb foryour convenience.
Driver and Passenger Safety
SRS
Main Menu Table of Contents ▲ ▼
Supplemental Restraint System
System Service PrecautionsDo not modify your steering wheelor any other part of the supple-mental restraint system. Modifica-tions could make the system inef-fective.
Do not tamper with the system'scomponents or wiring. This couldcause the airbag to inflate inadver-tently, possibly injuring someonevery seriously.
Tell anyone who works on your carthat you have a supplementalrestraint system. Failure to followthe procedures and precautions inthe official Honda service manualcould result in personal injury ordamage to the system.
Scrapping an entire car that has anuninflated airbag can be dangerous.Get assistance from a Honda dealerif your car must be scrapped.
If you sell your car, please be sureto tell the new owner that the carhas a supplemental restraint sys-tem. Alert them to the informationand precautions in this part of theowner's manual.
Driver and Passenger Safety
Main Menu Table of Contents ▲ ▼
Additional Safety Information
The seat belts and airbag are obvi-ously important parts of your occu-pant protection system.
In addition, you should know thatsitting upright, locking the doors,and stowing things properly canalso increase your safety andpossibly even save your life.
Seat-back PositionThe seat-backs should be in anupright position for you and yourpassengers to get the most protec-tion from the seat belts.
If you recline a seat-back, youreduce the protective capability ofyour seat belt. The farther a seat-back is reclined, the greater therisk that you will slide under thebelt in a severe crash and be veryseriously injured.
For information on how to adjustthe seat-back, see page 52.
Door LocksIt is not safe to leave your car doorsunlocked. A passenger, especially achild, could open a door andaccidentally fall out. Also, there is agreater chance of being thrown outof the car during a crash when thedoors are not locked.
Driver and Passenger Safety
Main Menu Table of Contents ▲ ▼
Additional Safety Information
Storing Cargo SafelyBefore you drive, make sure youfirst securely store or tie down anyitems that could be thrown aroundthe car and hurt someone, orinterfere with your ability tooperate the controls.
Do not put any items on top of therear shelf. They can block yourview and they could be thrownabout the car in a crash.
Be sure to keep compartment doorsclosed when the car is moving. If afront passenger hits the door of anopen glove box, for example, hecould injure his knees.
For information on loading cargo,see page 106.
Driving with PetsLoose pets can be a hazard whileyou are driving. An unrestrainedpet can interfere with your abilityto drive the car. In a crash orsudden stop, loose pets or cages canbe thrown around inside the carand hurt you or your passengers. Itis also for their safety that petsshould be properly restrained inyour car.
The recommended way to restraina medium-sized or larger dog iswith a special traveling harness.This harness can be secured to therear seat with a seat belt. Travelharnesses are available at petstores.
A small dog, cat, or other smallanimal will be safest in a pet carrierwith rigid sides. Choose a style thatallows you to secure it to the car'sseat by routing a seat belt throughthe carrier's handle.
For further information, contactyour veterinarian or local animalprotection society.
Driver and Passenger Safety
Main Menu Table of Contents ▲ ▼
Child Safety
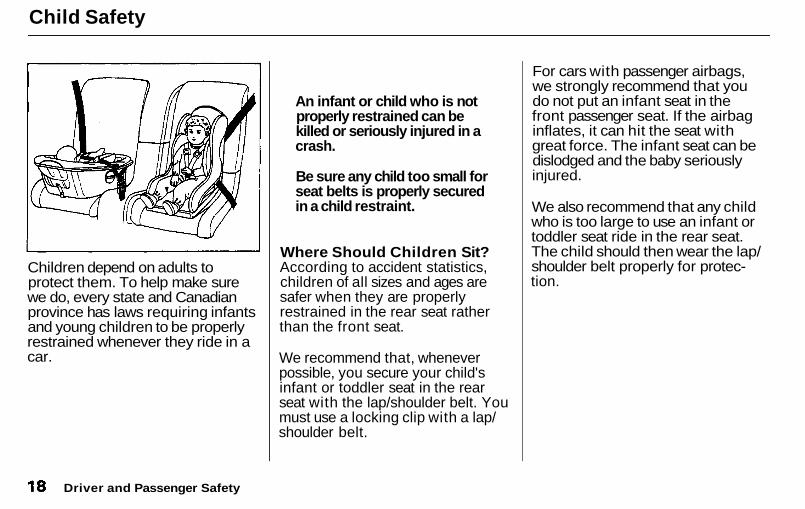
Children depend on adults toprotect them. To help make surewe do, every state and Canadianprovince has laws requiring infantsand young children to be properlyrestrained whenever they ride in acar.
Where Should Children Sit?According to accident statistics,children of all sizes and ages aresafer when they are properlyrestrained in the rear seat ratherthan the front seat.
We recommend that, wheneverpossible, you secure your child'sinfant or toddler seat in the rearseat with the lap/shoulder belt. Youmust use a locking clip with a lap/shoulder belt.
For cars with passenger airbags,we strongly recommend that youdo not put an infant seat in thefront passenger seat. If the airbaginflates, it can hit the seat withgreat force. The infant seat can bedislodged and the baby seriouslyinjured.
We also recommend that any childwho is too large to use an infant ortoddler seat ride in the rear seat.The child should then wear the lap/shoulder belt properly for protec-tion.
Driver and Passenger Safety
An infant or child who is notproperly restrained can bekilled or seriously injured in acrash.
Be sure any child too small forseat belts is properly securedin a child restraint.
Main Menu Table of Contents ▲ ▼
Child Safety
Important Safety RemindersNever hold a baby or child on yourlap when riding in a car. If you arewearing your seat belt, the violentforces created during a crash willtear the child from your arms. Thechild could be seriously hurt orkilled.
If you are holding a child and notwearing a seat belt in a crash, youcould crush the child against thecar's interior.
Never put your seat belt overyourself and a child. During a crash,the belt could press deep into thechild, causing serious internalinjuries.
Two children should never use thesame seat belt. If they do, theycould be very seriously injured in acrash.
General Guidelines forRestraining Children Under18 kg (40 Ibs)Use an approved child seat. The seatmust meet Federal Motor VehicleSafety Standard 213 (FMVSS-213)or Canadian Motor Vehicle SafetyStandards. Look for the manufac-turer's statement of compliance onthe box and seat.
Use a seat of the right size. Makesure the seat fits your child. Checkthe seat manufacturer's instruc-tions and labels for height andweight limits.
Secure the child seat to the car. A l lapproved child seats are designedto be secured to the car seat by thelap belt or the lap belt portion of alap/shoulder belt. A child whoseseat is not properly secured to thecar can be endangered in a crash.
To properly route a seat beltthrough a child seat, follow the seatmaker's instructions. You must usea locking clip with a lap/shoulderbelt (see page 21).
Secure the child in the child seat.Make sure the infant or child isfirmly secured to the child seat.Use the straps provided, andcarefully follow the manufacturer'sinstructions.
Driver and Passenger Safety
Main Menu Table of Contents ▲ ▼
Child Safety
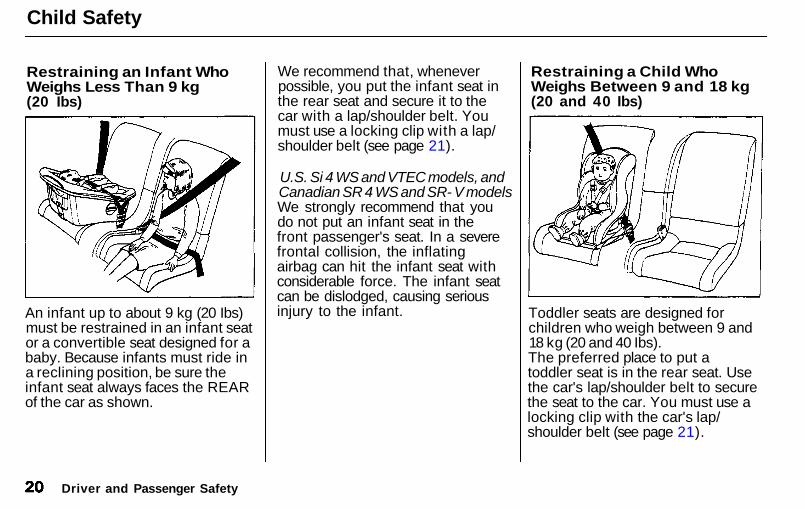
Restraining an Infant WhoWeighs Less Than 9 kg(20 Ibs)
An infant up to about 9 kg (20 Ibs)must be restrained in an infant seator a convertible seat designed for ababy. Because infants must ride ina reclining position, be sure theinfant seat always faces the REARof the car as shown.
We recommend that, wheneverpossible, you put the infant seat inthe rear seat and secure it to thecar with a lap/shoulder belt. Youmust use a locking clip with a lap/shoulder belt (see page 21).
U.S. Si 4 WS and VTEC models, andCanadian SR 4 WS and SR- V modelsWe strongly recommend that youdo not put an infant seat in thefront passenger's seat. In a severefrontal collision, the inflatingairbag can hit the infant seat withconsiderable force. The infant seatcan be dislodged, causing seriousinjury to the infant.
Restraining a Child WhoWeighs Between 9 and 18 kg(20 and 40 Ibs)
Toddler seats are designed forchildren who weigh between 9 and18 kg (20 and 40 Ibs).The preferred place to put atoddler seat is in the rear seat. Usethe car's lap/shoulder belt to securethe seat to the car. You must use alocking clip with the car's lap/shoulder belt (see page 21).
Driver and Passenger Safety
Main Menu Table of Contents ▲ ▼
Child Safety
Restraining a Child WhoWeighs Over 18 kg (40 Ibs)
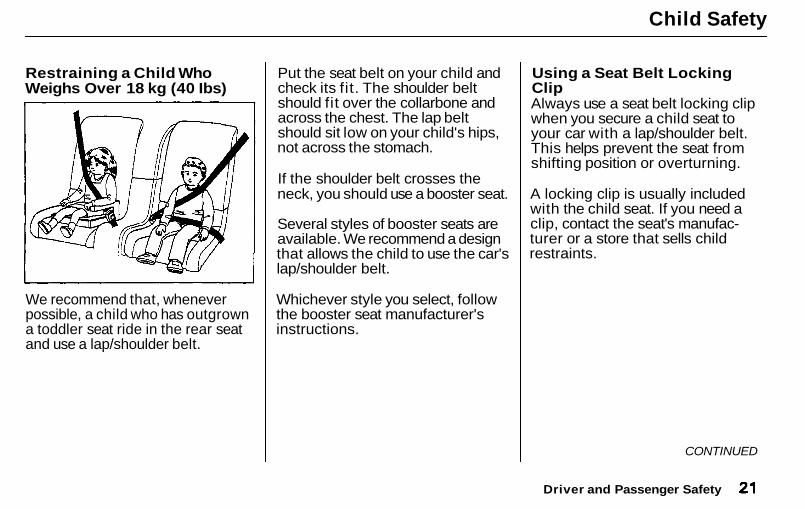
We recommend that, wheneverpossible, a child who has outgrowna toddler seat ride in the rear seatand use a lap/shoulder belt.
Put the seat belt on your child andcheck its fit. The shoulder beltshould fit over the collarbone andacross the chest. The lap beltshould sit low on your child's hips,not across the stomach.
If the shoulder belt crosses theneck, you should use a booster seat.
Several styles of booster seats areavailable. We recommend a designthat allows the child to use the car'slap/shoulder belt.
Whichever style you select, followthe booster seat manufacturer'sinstructions.
Using a Seat Belt LockingClipAlways use a seat belt locking clipwhen you secure a child seat toyour car with a lap/shoulder belt.This helps prevent the seat fromshifting position or overturning.
A locking clip is usually includedwith the child seat. If you need aclip, contact the seat's manufac-turer or a store that sells childrestraints.
Driver and Passenger Safety
CONTINUED
Main Menu Table of Contents ▲ ▼
Child Safety
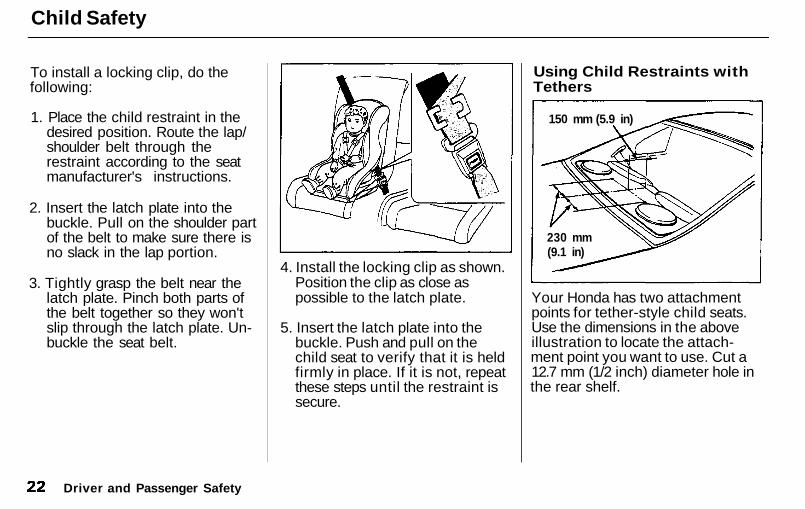
To install a locking clip, do thefollowing:
1. Place the child restraint in thedesired position. Route the lap/shoulder belt through therestraint according to the seatmanufacturer's instructions.
2. Insert the latch plate into thebuckle. Pull on the shoulder partof the belt to make sure there isno slack in the lap portion.
3. Tightly grasp the belt near thelatch plate. Pinch both parts ofthe belt together so they won'tslip through the latch plate. Un-buckle the seat belt.
4. Install the locking clip as shown.Position the clip as close aspossible to the latch plate.
5. Insert the latch plate into thebuckle. Push and pull on thechild seat to verify that it is heldfirmly in place. If it is not, repeatthese steps until the restraint issecure.
Using Child Restraints withTethers
Your Honda has two attachmentpoints for tether-style child seats.Use the dimensions in the aboveillustration to locate the attach-ment point you want to use. Cut a12.7 mm (1/2 inch) diameter hole inthe rear shelf.
Driver and Passenger Safety
150 mm (5.9 in)
230 mm(9.1 in)
Main Menu Table of Contents ▲ ▼
Child Safety
Then install the tether hardwarethat came with the child seat.Tighten the bolt to:22 N.m(2.2 kg-m,16 Ib-ft)
If you are not sure how to installthe bracket, have it installed byyour Honda dealer.
If you need an anchor plate andmounting hardware, you can obtainthem by writing to:
American Honda Motor Co., Inc.Consumer Affairs1919 Torrance Blvd.Torrance, CA 90501-2746
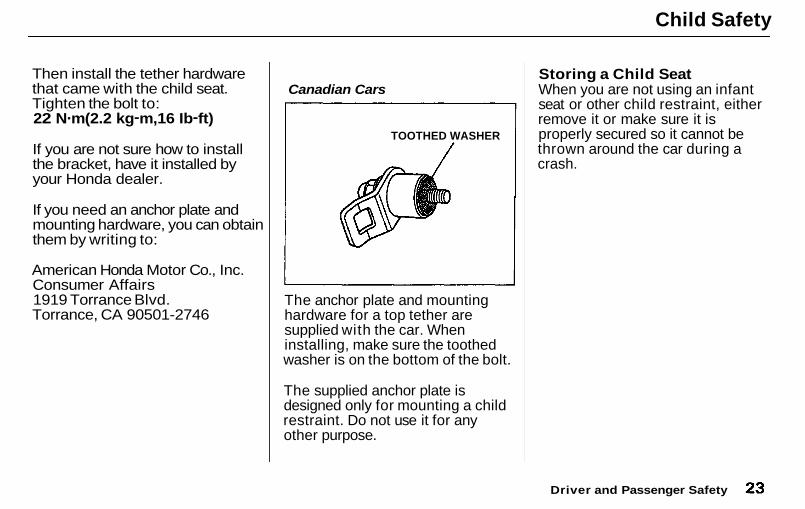
Canadian Cars
The anchor plate and mountinghardware for a top tether aresupplied with the car. Wheninstalling, make sure the toothedwasher is on the bottom of the bolt.
The supplied anchor plate isdesigned only for mounting a childrestraint. Do not use it for anyother purpose.
Storing a Child SeatWhen you are not using an infantseat or other child restraint, eitherremove it or make sure it isproperly secured so it cannot bethrown around the car during acrash.
Driver and Passenger Safety
TOOTHED WASHER
Main Menu Table of Contents ▲ ▼
Alcohol and Drugs
Driving a car requires your full at-tention and alertness. Traffic condi-tions change rapidly. You must beable to react just as rapidly. Alcoholor drugs directly affect your alert-ness and ability to react. Even pre-scription and non-prescription medi-cines can have this effect.
There are laws that deal withdrunken driving. These laws definehow much alcohol it takes in yoursystem to be legally "drunk." How-ever, your judgment and reactiontime get worse with every drink—even the first one.
The safest thing you can do isnever drink and drive. This can bedone if you plan ahead. If you knowyou are going to be drinking, makeplans to ride with a friend who willnot be drinking.
What if you find that you've beendrinking and cannot get a ride froma friend? Find alternative transpor-tation. Call a taxi. Take a bus.Many communities have transporta-tion services devoted to shuttlingpeople who have been drinking.
If you have no choice but to drive,stop drinking and give yourself lotsof time to sober up. Time is theonly thing that can make you sober.Things like coffee or a cold showerdon't speed up the process.
If you see friends trying to getbehind the wheel after drinking,stop them. Drive them yourself orarrange other transportation. If youthink you are interfering, remem-ber that your interference will keepthem from sharing the road withyou.
Driver and Passenger Safety
Main Menu Table of Contents ▲ ▼
Carbon Monoxide Hazard
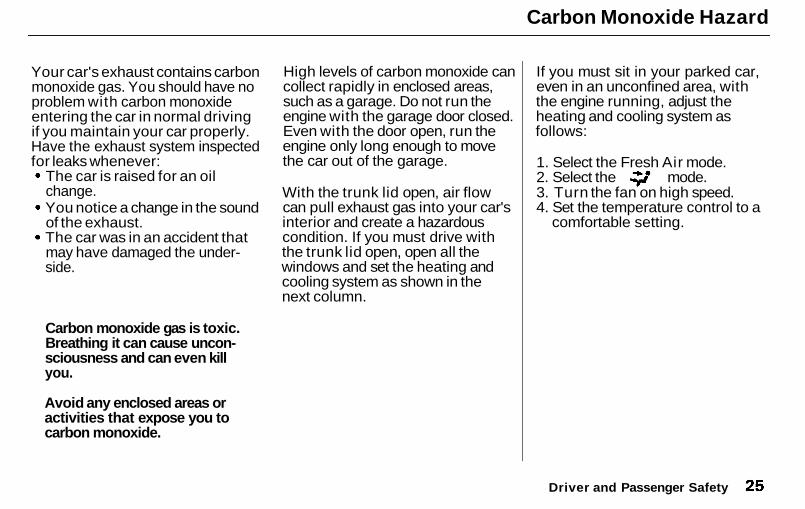
Your car's exhaust contains carbonmonoxide gas. You should have noproblem with carbon monoxideentering the car in normal drivingif you maintain your car properly.Have the exhaust system inspectedfor leaks whenever:
The car is raised for an oilchange.You notice a change in the soundof the exhaust.The car was in an accident thatmay have damaged the under-side.
High levels of carbon monoxide cancollect rapidly in enclosed areas,such as a garage. Do not run theengine with the garage door closed.Even with the door open, run theengine only long enough to movethe car out of the garage.
With the trunk lid open, air flowcan pull exhaust gas into your car'sinterior and create a hazardouscondition. If you must drive withthe trunk lid open, open all thewindows and set the heating andcooling system as shown in thenext column.
If you must sit in your parked car,even in an unconfined area, withthe engine running, adjust theheating and cooling system asfollows:
1. Select the Fresh Air mode.2. Select the mode.3. Turn the fan on high speed.4. Set the temperature control to a
comfortable setting.
Driver and Passenger Safety
Carbon monoxide gas is toxic.Breathing it can cause uncon-sciousness and can even killyou.
Avoid any enclosed areas oractivities that expose you tocarbon monoxide.
Main Menu Table of Contents ▲ ▼
Reporting Safety Defects (US Cars)
If you believe that your vehicle hasa defect which could cause a crashor could cause injury or death, youshould immediately inform theNational Highway Traffic SafetyAdministration (NHTSA) in addi-tion to notifying American HondaMotor Co., Inc.
If NHTSA receives similar com-plaints, it may open an investiga-tion, and if it finds that a safetydefect exists in a group of vehicles,it may order a recall and remedycampaign. However, NHTSA can-not become involved in individualproblems between you, your dealer,or American Honda Motor Co., Inc.
To contact NHTSA, you mayeither call the Auto Safety Hotlinetoll-free at 1-800-424-9393 (or 366-0123 in Washington D.C. area) orwrite to: NHTSA, U.S. Departmentof Transportation, Washington,D.C. 20590. You can also obtainother information about motorvehicle safety from the Hotline.
Driver and Passenger Safety
Main Menu Table of Contents ▲ ▼
Safety Labels
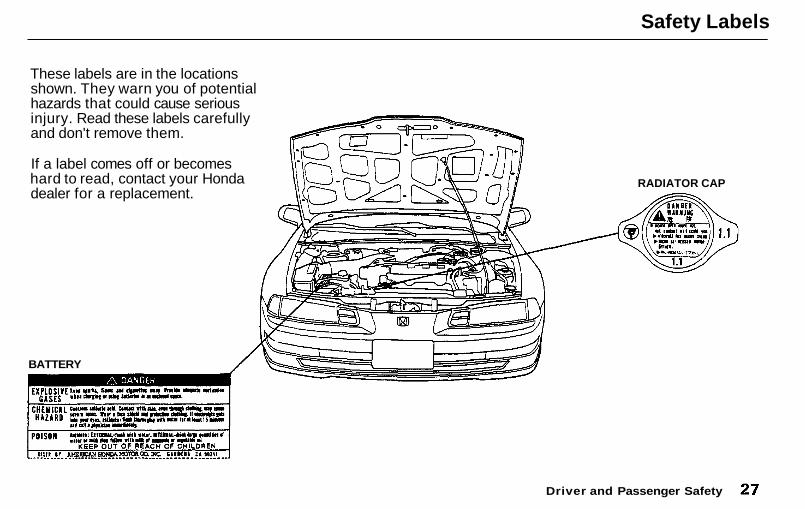
These labels are in the locationsshown. They warn you of potentialhazards that could cause seriousinjury. Read these labels carefullyand don't remove them.
If a label comes off or becomeshard to read, contact your Hondadealer for a replacement.
Driver and Passenger Safety
RADIATOR CAP
BATTERY
Main Menu Table of Contents ▲ ▼
Instruments and Controls
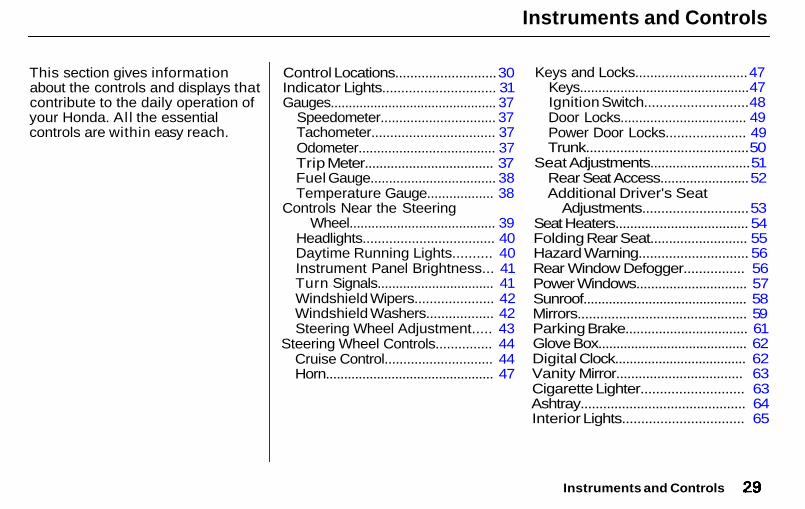
This section gives informationabout the controls and displays thatcontribute to the daily operation ofyour Honda. Al l the essentialcontrols are within easy reach.
Control Locations........................... 30Indicator Lights.............................. 31Gauges.............................................. 37
Speedometer............................... 37Tachometer................................. 37Odometer..................................... 37Trip Meter................................... 37Fuel Gauge.................................. 38Temperature Gauge.................. 38
Controls Near the SteeringWheel........................................ 39
Headlights................................... 40Daytime Running Lights.......... 40Instrument Panel Brightness... 41Turn Signals................................ 41Windshield Wipers..................... 42Windshield Washers.................. 42Steering Wheel Adjustment..... 43
Steering Wheel Controls............... 44Cruise Control............................. 44Horn.............................................. 47
Keys and Locks.............................. 47Keys.............................................. 47Ignition Switch........................... 48Door Locks.................................. 49Power Door Locks..................... 49Trunk........................................... 50
Seat Adjustments........................... 51Rear Seat Access........................ 52Additional Driver's Seat
Adjustments............................ 53Seat Heaters.................................... 54Folding Rear Seat.......................... 55Hazard Warning............................. 56Rear Window Defogger................ 56Power Windows.............................. 57Sunroof............................................. 58Mirrors............................................. 59Parking Brake................................. 61Glove Box......................................... 62Digital Clock.................................... 62Vanity Mirror.................................. 63Cigarette Lighter........................... 63Ashtray............................................ 64Interior Lights................................ 65
Instruments and Controls
Main Menu ▲ ▼
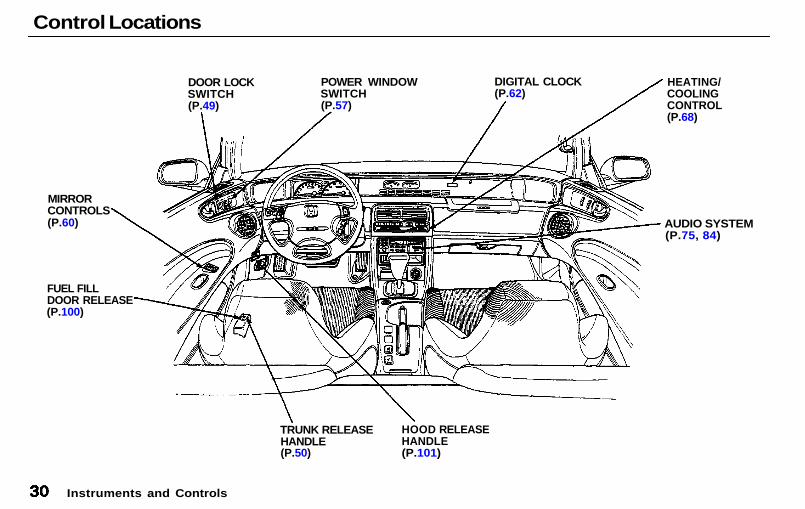
Control Locations
Instruments and Controls
AUDIO SYSTEM(P.75, 84)
HOOD RELEASEHANDLE(P.101)
DOOR LOCKSWITCH(P.49)
POWER WINDOWSWITCH(P.57)
DIGITAL CLOCK(P.62)
HEATING/COOLINGCONTROL(P.68)
MIRRORCONTROLS(P.60)
FUEL FILLDOOR RELEASE(P.100)
TRUNK RELEASEHANDLE(P.50)
Main Menu Table of Contents ▲ ▼
Indicator Lights
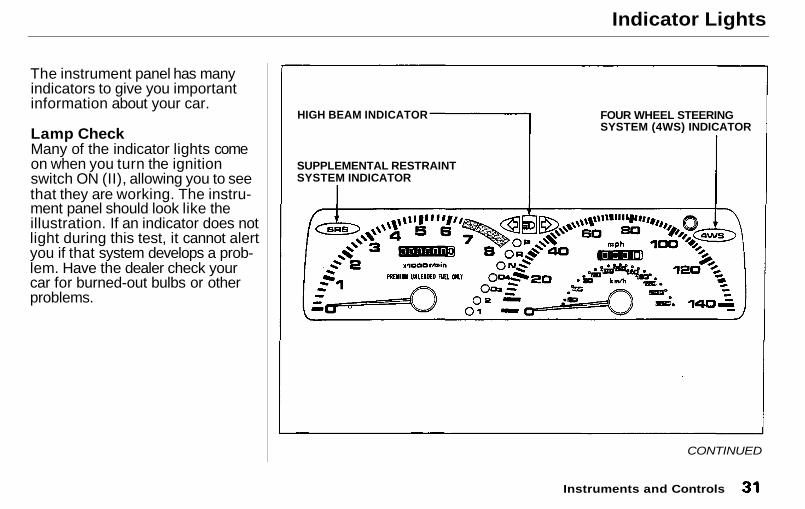
The instrument panel has manyindicators to give you importantinformation about your car.
Lamp CheckMany of the indicator lights comeon when you turn the ignitionswitch ON (II), allowing you to seethat they are working. The instru-ment panel should look like theillustration. If an indicator does notlight during this test, it cannot alertyou if that system develops a prob-lem. Have the dealer check yourcar for burned-out bulbs or otherproblems.
Instruments and Controls
CONTINUED
HIGH BEAM INDICATOR FOUR WHEEL STEERINGSYSTEM (4WS) INDICATOR
SUPPLEMENTAL RESTRAINTSYSTEM INDICATOR
Main Menu Table of Contents ▲ ▼
Indicator Lights
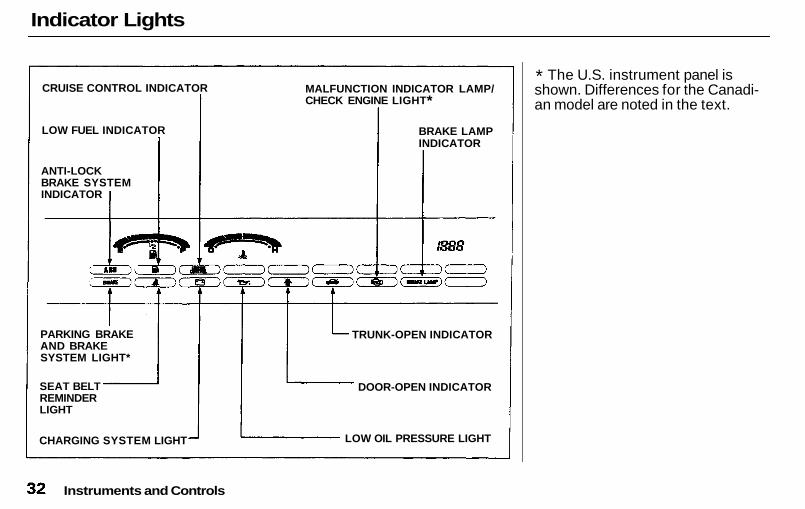
* The U.S. instrument panel isshown. Differences for the Canadi-an model are noted in the text.
Instruments and Controls
CRUISE CONTROL INDICATOR
LOW FUEL INDICATOR
ANTI-LOCKBRAKE SYSTEMINDICATOR
MALFUNCTION INDICATOR LAMP/CHECK ENGINE LIGHT*
TRUNK-OPEN INDICATOR
DOOR-OPEN INDICATOR
PARKING BRAKEAND BRAKESYSTEM LIGHT*
SEAT BELTREMINDERLIGHT
CHARGING SYSTEM LIGHT LOW OIL PRESSURE LIGHT
BRAKE LAMPINDICATOR
Main Menu Table of Contents ▲ ▼
Indicator Lights
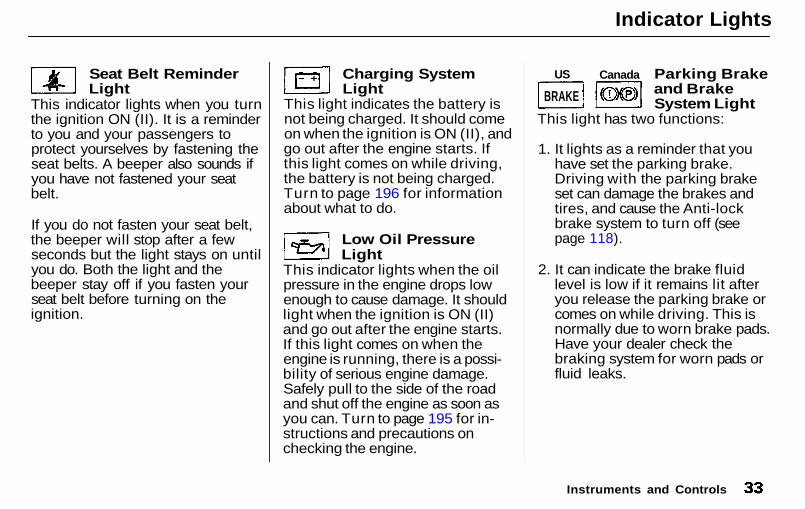
Seat Belt ReminderLight
This indicator lights when you turnthe ignition ON (II). It is a reminderto you and your passengers toprotect yourselves by fastening theseat belts. A beeper also sounds ifyou have not fastened your seatbelt.
If you do not fasten your seat belt,the beeper will stop after a fewseconds but the light stays on untilyou do. Both the light and thebeeper stay off if you fasten yourseat belt before turning on theignition.
Charging SystemLight
This light indicates the battery isnot being charged. It should comeon when the ignition is ON (II), andgo out after the engine starts. Ifthis light comes on while driving,the battery is not being charged.Turn to page 196 for informationabout what to do.
Low Oil PressureLight
This indicator lights when the oilpressure in the engine drops lowenough to cause damage. It shouldlight when the ignition is ON (II)and go out after the engine starts.If this light comes on when theengine is running, there is a possi-bility of serious engine damage.Safely pull to the side of the roadand shut off the engine as soon asyou can. Turn to page 195 for in-structions and precautions onchecking the engine.
Canada Parking Brakeand BrakeSystem Light
This light has two functions:
1. It lights as a reminder that youhave set the parking brake.Driving with the parking brakeset can damage the brakes andtires, and cause the Anti-lockbrake system to turn off (seepage 118).
2. It can indicate the brake fluidlevel is low if it remains lit afteryou release the parking brake orcomes on while driving. This isnormally due to worn brake pads.Have your dealer check thebraking system for worn pads orfluid leaks.
Instruments and Controls
US
BRAKE
Main Menu Table of Contents ▲ ▼
Indicator Lights
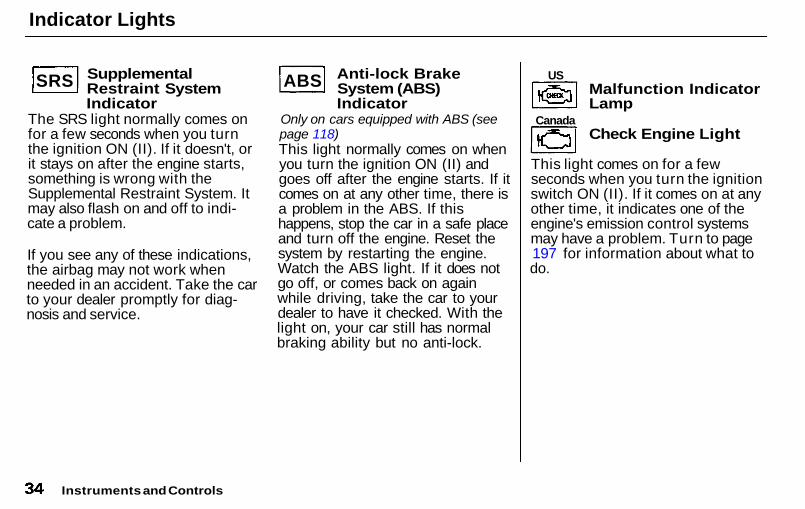
SupplementalRestraint SystemIndicator
The SRS light normally comes onfor a few seconds when you turnthe ignition ON (II). If it doesn't, orit stays on after the engine starts,something is wrong with theSupplemental Restraint System. Itmay also flash on and off to indi-cate a problem.
If you see any of these indications,the airbag may not work whenneeded in an accident. Take the carto your dealer promptly for diag-nosis and service.
Anti-lock BrakeSystem (ABS)Indicator
Only on cars equipped with ABS (seepage 118)This light normally comes on whenyou turn the ignition ON (II) andgoes off after the engine starts. If itcomes on at any other time, there isa problem in the ABS. If thishappens, stop the car in a safe placeand turn off the engine. Reset thesystem by restarting the engine.Watch the ABS light. If it does notgo off, or comes back on againwhile driving, take the car to yourdealer to have it checked. With thelight on, your car still has normalbraking ability but no anti-lock.
Malfunction IndicatorLamp
Check Engine Light
This light comes on for a fewseconds when you turn the ignitionswitch ON (II). If it comes on at anyother time, it indicates one of theengine's emission control systemsmay have a problem. Turn to page197 for information about what todo.
Instruments and Controls
SRS ABS
Canada
US
Main Menu Table of Contents ▲ ▼
Indicator Lights
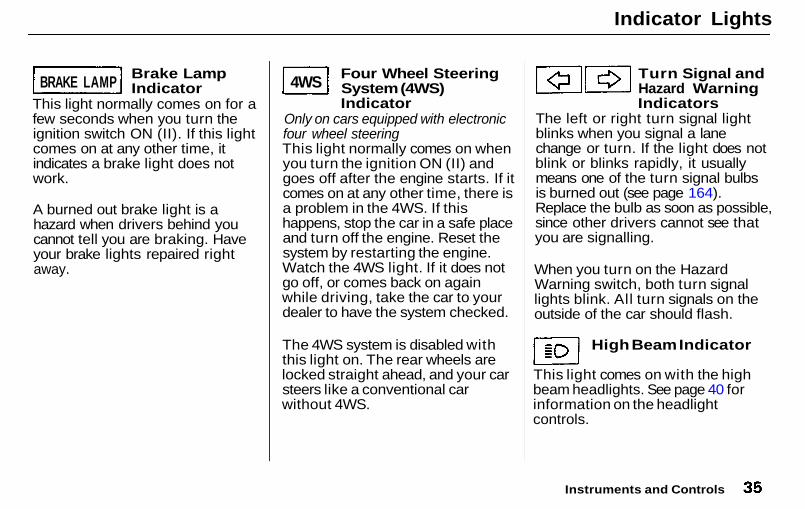
Brake LampIndicator
This light normally comes on for afew seconds when you turn theignition switch ON (II). If this lightcomes on at any other time, itindicates a brake light does notwork.
A burned out brake light is ahazard when drivers behind youcannot tell you are braking. Haveyour brake lights repaired rightaway.
Four Wheel SteeringSystem (4WS)Indicator
Only on cars equipped with electronicfour wheel steeringThis light normally comes on whenyou turn the ignition ON (II) andgoes off after the engine starts. If itcomes on at any other time, there isa problem in the 4WS. If thishappens, stop the car in a safe placeand turn off the engine. Reset thesystem by restarting the engine.Watch the 4WS light. If it does notgo off, or comes back on againwhile driving, take the car to yourdealer to have the system checked.
The 4WS system is disabled withthis light on. The rear wheels arelocked straight ahead, and your carsteers like a conventional carwithout 4WS.
Turn Signal andHazard WarningIndicators
The left or right turn signal lightblinks when you signal a lanechange or turn. If the light does notblink or blinks rapidly, it usuallymeans one of the turn signal bulbsis burned out (see page 164).Replace the bulb as soon as possible,since other drivers cannot see thatyou are signalling.
When you turn on the HazardWarning switch, both turn signallights blink. All turn signals on theoutside of the car should flash.
High Beam Indicator
This light comes on with the highbeam headlights. See page 40 forinformation on the headlightcontrols.
Instruments and Controls
BRAKE LAMP 4WS
Main Menu Table of Contents ▲ ▼

Gauges
Fuel GaugeThis shows how much fuel youhave. The fuel gauge is fullyelectronic, lighting one of theindicator bars to show the currentfuel level. It is most accurate whenyou are driving or parked on levelground. The indicated fuel levelmay vary when you are driving oncurved or hilly roads.
As a test, all the indicator bars inthe fuel gauge light for severalseconds when you turn the ignitionto ON (II).
Temperature GaugeThe temperature gauge is fullyelectronic. It uses a series ofilluminated indicator bars to showthe engine coolant's temperaturerange. Under normal drivingconditions, you will see one of thebars at the display's midpoint. Inmore severe driving conditions,such as very hot weather orclimbing a long hill, the engine mayget hot enough to illuminate thewhite indicator on the right side ofthe gauge. If the red indicatorabove the H comes on, pull safelyto the side of the road. Turn topage 193 for instructions andprecautions on checking theengine's cooling system.
As a test, all the indicator bars inthe temperature gauge illuminatewhen you turn the ignition ON (II).
Instruments and Controls
FUEL GAUGE TEMPERATUREGAUGE
Main Menu Table of Contents ▲ ▼
Controls Near the Steering Wheel
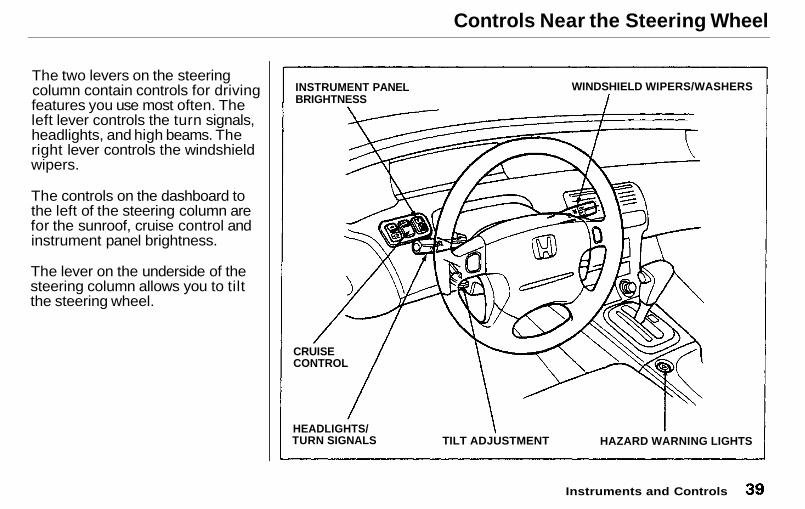
The two levers on the steeringcolumn contain controls for drivingfeatures you use most often. Theleft lever controls the turn signals,headlights, and high beams. Theright lever controls the windshieldwipers.
The controls on the dashboard tothe left of the steering column arefor the sunroof, cruise control andinstrument panel brightness.
The lever on the underside of thesteering column allows you to tiltthe steering wheel.
Instruments and Controls
INSTRUMENT PANELBRIGHTNESS
WINDSHIELD WIPERS/WASHERS
CRUISECONTROL
HEADLIGHTS/TURN SIGNALS TILT ADJUSTMENT HAZARD WARNING LIGHTS
Main Menu Table of Contents ▲ ▼
Controls Near the Steering Wheel
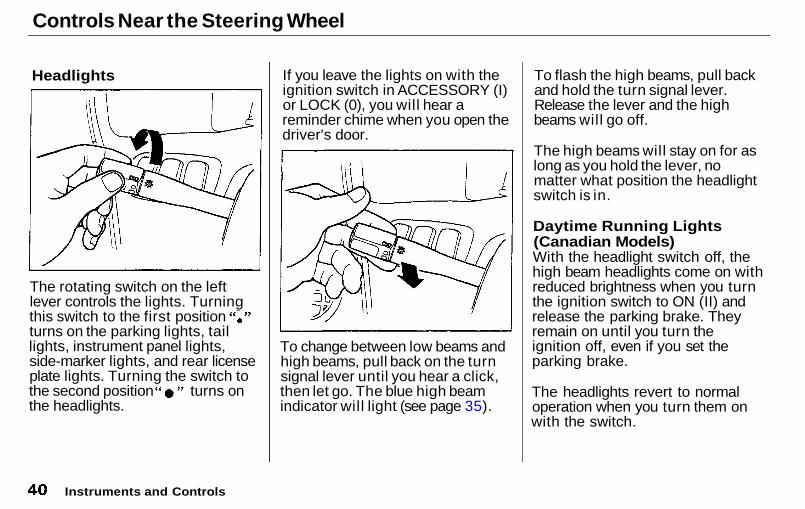
Headlights
The rotating switch on the leftlever controls the lights. Turningthis switch to the first positionturns on the parking lights, taillights, instrument panel lights,side-marker lights, and rear licenseplate lights. Turning the switch tothe second position turns onthe headlights.
If you leave the lights on with theignition switch in ACCESSORY (I)or LOCK (0), you will hear areminder chime when you open thedriver's door.
To change between low beams andhigh beams, pull back on the turnsignal lever until you hear a click,then let go. The blue high beamindicator will light (see page 35).
To flash the high beams, pull backand hold the turn signal lever.Release the lever and the highbeams will go off.
The high beams will stay on for aslong as you hold the lever, nomatter what position the headlightswitch is in.
Daytime Running Lights(Canadian Models)With the headlight switch off, thehigh beam headlights come on withreduced brightness when you turnthe ignition switch to ON (II) andrelease the parking brake. Theyremain on until you turn theignition off, even if you set theparking brake.
The headlights revert to normaloperation when you turn them onwith the switch.
Instruments and Controls
Main Menu Table of Contents ▲ ▼
Controls Near the Steering Wheel
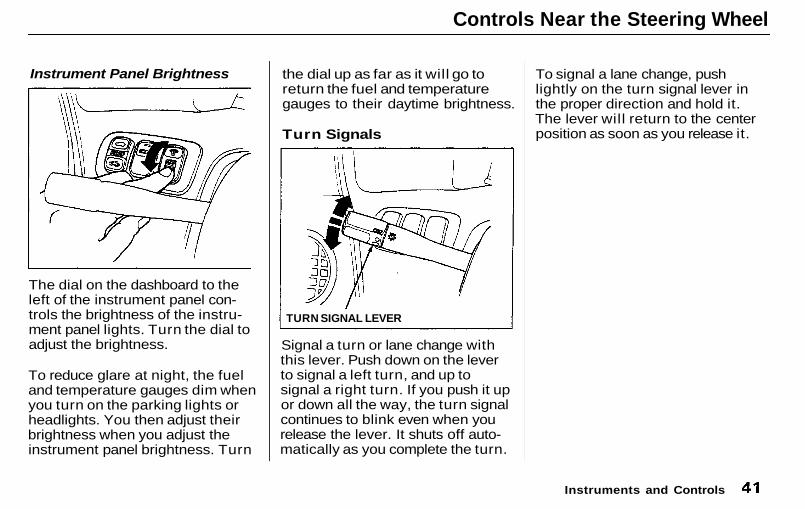
Instrument Panel Brightness
The dial on the dashboard to theleft of the instrument panel con-trols the brightness of the instru-ment panel lights. Turn the dial toadjust the brightness.
To reduce glare at night, the fueland temperature gauges dim whenyou turn on the parking lights orheadlights. You then adjust theirbrightness when you adjust theinstrument panel brightness. Turn
the dial up as far as it will go toreturn the fuel and temperaturegauges to their daytime brightness.
Turn Signals
Signal a turn or lane change withthis lever. Push down on the leverto signal a left turn, and up tosignal a right turn. If you push it upor down all the way, the turn signalcontinues to blink even when yourelease the lever. It shuts off auto-matically as you complete the turn.
To signal a lane change, pushlightly on the turn signal lever inthe proper direction and hold it.The lever will return to the centerposition as soon as you release it.
Instruments and Controls
TURN SIGNAL LEVER
Main Menu Table of Contents ▲ ▼
Controls Near the Steering Wheel
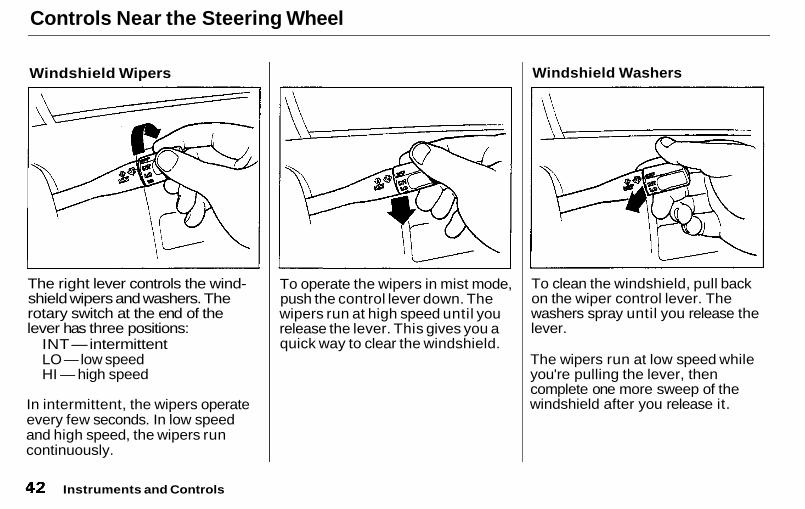
Windshield Wipers
The right lever controls the wind-shield wipers and washers. Therotary switch at the end of thelever has three positions:
INT — intermittentLO — low speedHI — high speed
In intermittent, the wipers operateevery few seconds. In low speedand high speed, the wipers runcontinuously.
To operate the wipers in mist mode,push the control lever down. Thewipers run at high speed until yourelease the lever. This gives you aquick way to clear the windshield.
Windshield Washers
To clean the windshield, pull backon the wiper control lever. Thewashers spray until you release thelever.
The wipers run at low speed whileyou're pulling the lever, thencomplete one more sweep of thewindshield after you release it.
Instruments and Controls
Main Menu Table of Contents ▲ ▼
Controls Near the Steering Wheel
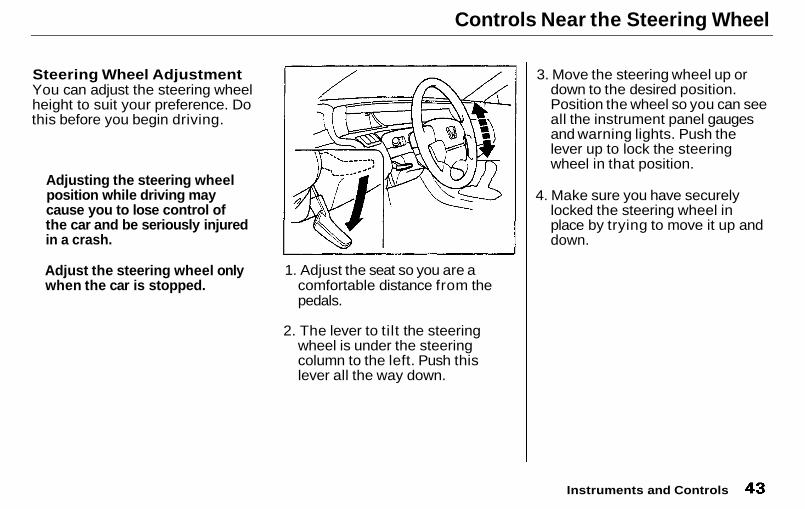
Steering Wheel AdjustmentYou can adjust the steering wheelheight to suit your preference. Dothis before you begin driving.
1. Adjust the seat so you are acomfortable distance from thepedals.
2. The lever to tilt the steeringwheel is under the steeringcolumn to the left. Push thislever all the way down.
3. Move the steering wheel up ordown to the desired position.Position the wheel so you can seeall the instrument panel gaugesand warning lights. Push thelever up to lock the steeringwheel in that position.
4. Make sure you have securelylocked the steering wheel inplace by trying to move it up anddown.
Instruments and Controls
Adjusting the steering wheelposition while driving maycause you to lose control ofthe car and be seriously injuredin a crash.
Adjust the steering wheel onlywhen the car is stopped.
Main Menu Table of Contents ▲ ▼
Steering Wheel Controls
Cruise ControlCruise control allows you tomaintain a set speed above 25 mph(40 km/h) without keeping yourfoot on the accelerator pedal. It isfor cruising on straight, openhighways. It is not recommendedfor conditions such as city driving,winding roads, slippery roads,heavy rain, or bad weather. Youshould have full control of the carunder those conditions.
The cruise control, as it operates,moves the accelerator pedal. Youcan damage your car's acceleratormechanism by resting your footunder the pedal and blocking themovement.
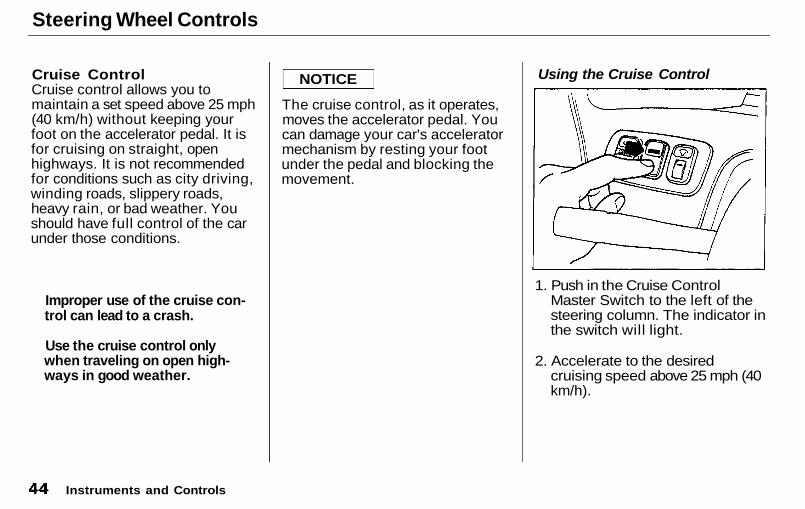
Using the Cruise Control
1. Push in the Cruise ControlMaster Switch to the left of thesteering column. The indicator inthe switch will light.
2. Accelerate to the desiredcruising speed above 25 mph (40km/h).
Instruments and Controls
Improper use of the cruise con-trol can lead to a crash.
Use the cruise control onlywhen traveling on open high-ways in good weather.
NOTICE
Main Menu Table of Contents ▲ ▼
Steering Wheel Controls
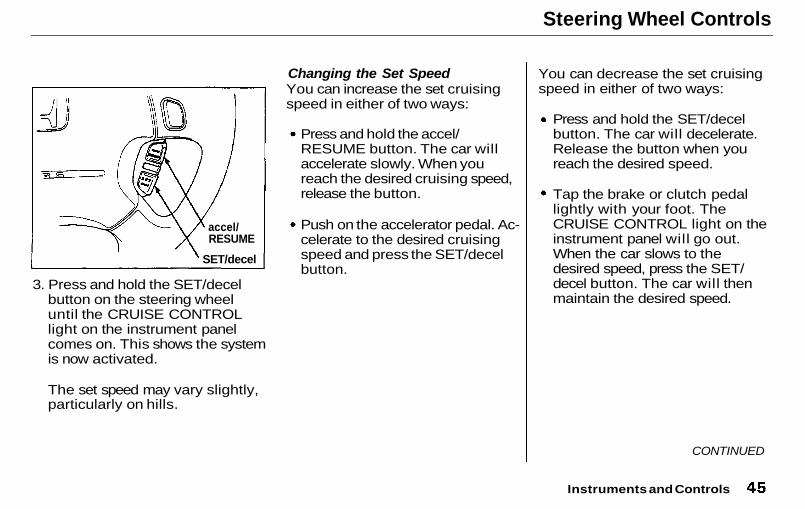
3. Press and hold the SET/decelbutton on the steering wheeluntil the CRUISE CONTROLlight on the instrument panelcomes on. This shows the systemis now activated.
The set speed may vary slightly,particularly on hills.
Changing the Set SpeedYou can increase the set cruisingspeed in either of two ways:
Press and hold the accel/RESUME button. The car willaccelerate slowly. When youreach the desired cruising speed,release the button.
Push on the accelerator pedal. Ac-celerate to the desired cruisingspeed and press the SET/decelbutton.
You can decrease the set cruisingspeed in either of two ways:
Press and hold the SET/decelbutton. The car will decelerate.Release the button when youreach the desired speed.
Tap the brake or clutch pedallightly with your foot. TheCRUISE CONTROL light on theinstrument panel will go out.When the car slows to thedesired speed, press the SET/decel button. The car will thenmaintain the desired speed.
CONTINUED
Instruments and Controls
accel/RESUME
SET/decel
Main Menu Table of Contents ▲ ▼
Steering Wheel Controls
Even with the cruise control turnedon, you can still use the acceleratorpedal to speed up for passing. Aftercompleting the pass, take your footoff the accelerator pedal. The carwil l return to the set cruising speed.
Resting your foot on the brake orclutch pedal wil l cause the cruisecontrol to cancel.
Cancelling the Cruise ControlAny of these actions cause thecruise control to cancel.
Tap the brake or, clutch pedal.
Press the SET/decel and RE-SUME/accel buttons at the sametime.
Press the Cruise Control MasterSwitch.
When you tap the brake or clutchpedal, or press the SET and RE-SUME buttons at the same time,the CRUISE CONTROL light onthe instrument panel wil l go outand the car wil l begin to slow down.You can use the accelerator pedalin the normal way.
If you use the brake or clutch pedalto cancel cruise control, the systemretains the previously-set cruisingspeed. To return to that speed, ac-celerate to above 25 mph (40 km/h)and press the RESUME/accelbutton until the CRUISE CON-TROL light comes on. The car willaccelerate to the same cruisingspeed as before.
If you cancel CRUISE CONTROLby pressing the SET and RESUMEbuttons at the same time, thepreviously-set cruising speed iserased. To use the cruise control,accelerate to the desired cruising
speed and press the SET/decelbutton.
Pressing the Cruise Control MasterSwitch turns the system completelyoff and erases the previous cruisingspeed from memory. To use thesystem again, refer to Using theCruise Control.
Instruments and Controls
Main Menu Table of Contents ▲ ▼
Steering Wheel Controls, Keys and Locks
Horn
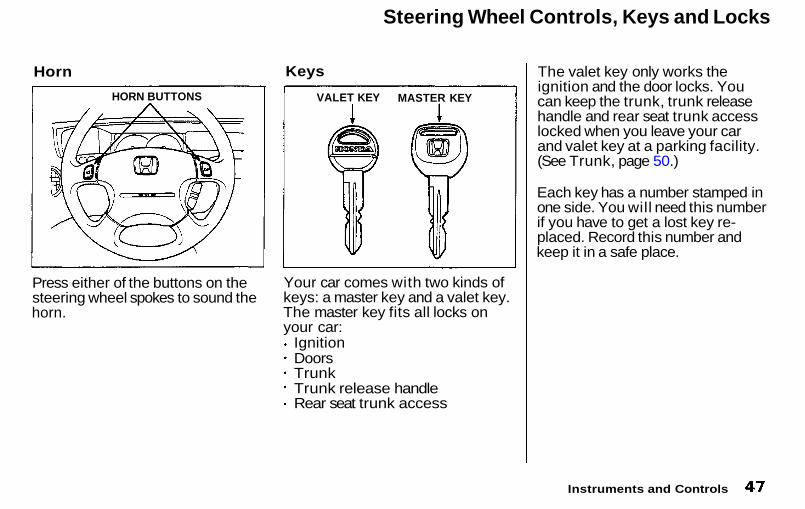
Press either of the buttons on thesteering wheel spokes to sound thehorn.
Keys
Your car comes with two kinds ofkeys: a master key and a valet key.The master key fits all locks onyour car:
IgnitionDoorsTrunkTrunk release handleRear seat trunk access
The valet key only works theignition and the door locks. Youcan keep the trunk, trunk releasehandle and rear seat trunk accesslocked when you leave your carand valet key at a parking facility.(See Trunk, page 50.)
Each key has a number stamped inone side. You will need this numberif you have to get a lost key re-placed. Record this number andkeep it in a safe place.
Instruments and Controls
VALET KEY MASTER KEYHORN BUTTONS
Main Menu Table of Contents ▲ ▼
Keys and Locks
Ignition Switch
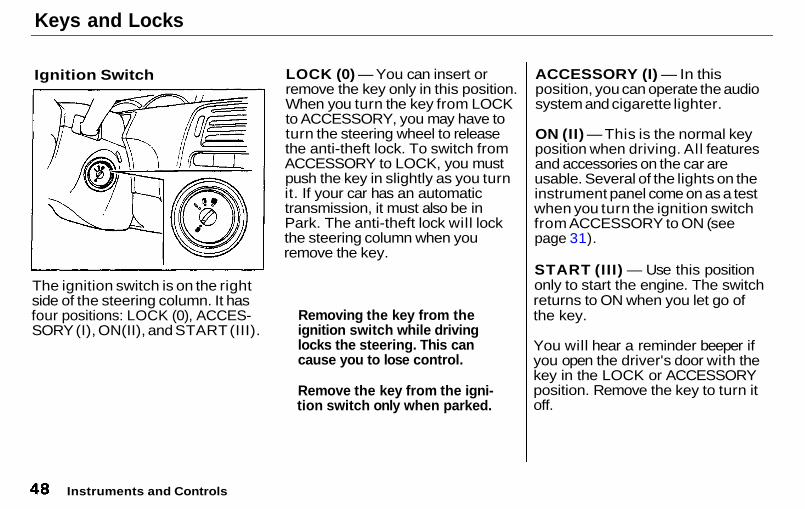
The ignition switch is on the rightside of the steering column. It hasfour positions: LOCK (0), ACCES-SORY (I), ON(II), and START (III).
LOCK (0) — You can insert orremove the key only in this position.When you turn the key from LOCKto ACCESSORY, you may have toturn the steering wheel to releasethe anti-theft lock. To switch fromACCESSORY to LOCK, you mustpush the key in slightly as you turnit. If your car has an automatictransmission, it must also be inPark. The anti-theft lock will lockthe steering column when youremove the key.
ACCESSORY (I) — In thisposition, you can operate the audiosystem and cigarette lighter.
ON (II) — This is the normal keyposition when driving. Al l featuresand accessories on the car areusable. Several of the lights on theinstrument panel come on as a testwhen you turn the ignition switchfrom ACCESSORY to ON (seepage 31).
START (II I) — Use this positiononly to start the engine. The switchreturns to ON when you let go ofthe key.
You will hear a reminder beeper ifyou open the driver's door with thekey in the LOCK or ACCESSORYposition. Remove the key to turn itoff.
Instruments and Controls
Removing the key from theignition switch while drivinglocks the steering. This cancause you to lose control.
Remove the key from the igni-tion switch only when parked.
Main Menu Table of Contents ▲ ▼
Keys and Locks
Door Locks
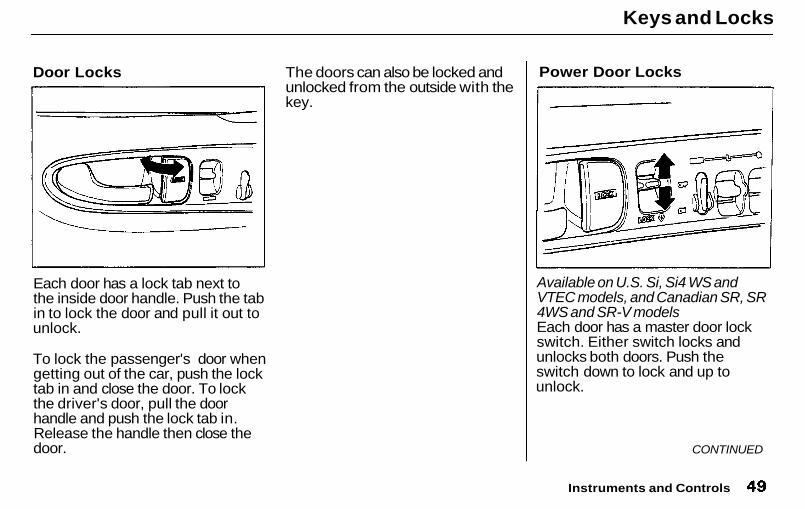
Each door has a lock tab next tothe inside door handle. Push the tabin to lock the door and pull it out tounlock.
To lock the passenger's door whengetting out of the car, push the locktab in and close the door. To lockthe driver's door, pull the doorhandle and push the lock tab in.Release the handle then close thedoor.
The doors can also be locked andunlocked from the outside with thekey.
Power Door Locks
Available on U.S. Si, Si4 WS andVTEC models, and Canadian SR, SR4WS and SR-V modelsEach door has a master door lockswitch. Either switch locks andunlocks both doors. Push theswitch down to lock and up tounlock.
CONTINUED
Instruments and Controls
Main Menu Table of Contents ▲ ▼

Keys and Locks
Both doors lock when you push inthe lock tab on the driver's door, orlock the driver's door from theoutside with the key. Only thedriver's door unlocks when you usethe key or lock tab. To unlock thepassenger's door, use the masterdoor lock switch or pull out thelock tab on passenger's door.
Lockout PreventionIf you forget and leave the key inthe ignition switch, LockoutPrevention will not allow you tolock the driver's door. With eitherdoor open and the key in theignition, the master door lockswitches are disabled. If you try tolock the driver's door by pushing inthe lock tab, the tabs on both doorsimmediately pop up.
Trunk
You can open the trunk in twoways:
Pull the trunk release handle tothe left of the driver's seat.
Use the master key to open thetrunk lock. The valet key doesnot work in this lock.
To close the trunk, press down onthe trunk lid.
See page 106 for cargo loading andweight limit information. Keep thetrunk lid closed at all times whiledriving to avoid damaging the lidand getting exhaust gas in theinterior. See Carbon MonoxideHazard on page 25.
Instruments and Controls
TRUNK RELEASEHANDLE
MASTER KEY
Main Menu Table of Contents ▲ ▼
Keys and Locks, Seat Adjustments
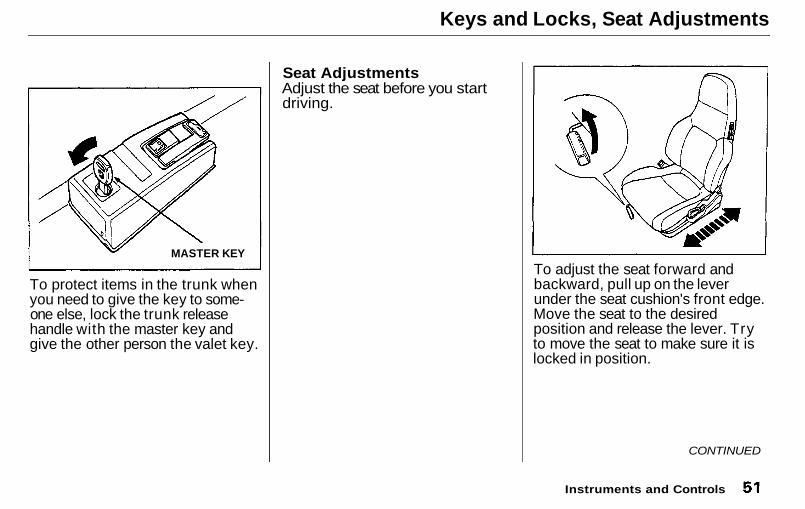
To protect items in the trunk whenyou need to give the key to some-one else, lock the trunk releasehandle with the master key andgive the other person the valet key.
Seat AdjustmentsAdjust the seat before you startdriving.
To adjust the seat forward andbackward, pull up on the leverunder the seat cushion's front edge.Move the seat to the desiredposition and release the lever. Tryto move the seat to make sure it islocked in position.
Instruments and Controls
MASTER KEY
CONTINUED
Main Menu Table of Contents ▲ ▼
Seat Adjustments
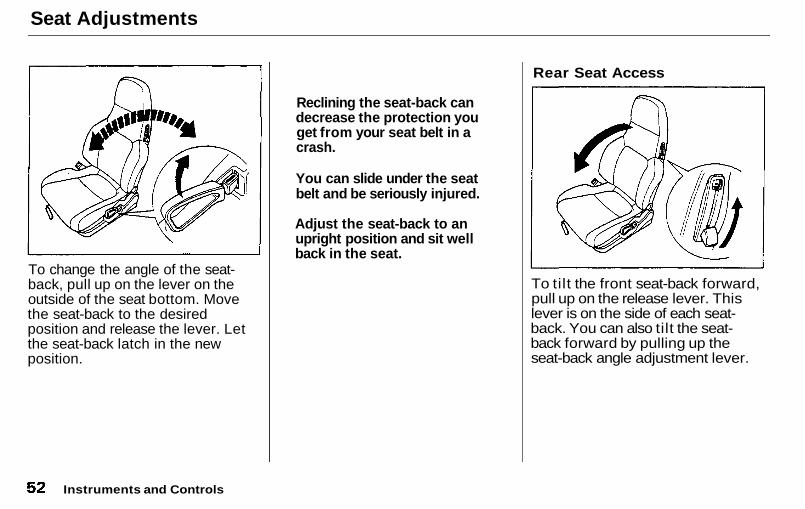
To change the angle of the seat-back, pull up on the lever on theoutside of the seat bottom. Movethe seat-back to the desiredposition and release the lever. Letthe seat-back latch in the newposition.
Rear Seat Access
To tilt the front seat-back forward,pull up on the release lever. Thislever is on the side of each seat-back. You can also tilt the seat-back forward by pulling up theseat-back angle adjustment lever.
Instruments and Controls
Reclining the seat-back candecrease the protection youget from your seat belt in acrash.
You can slide under the seatbelt and be seriously injured.
Adjust the seat-back to anupright position and sit wellback in the seat.
Main Menu Table of Contents ▲ ▼
Seat Adjustments
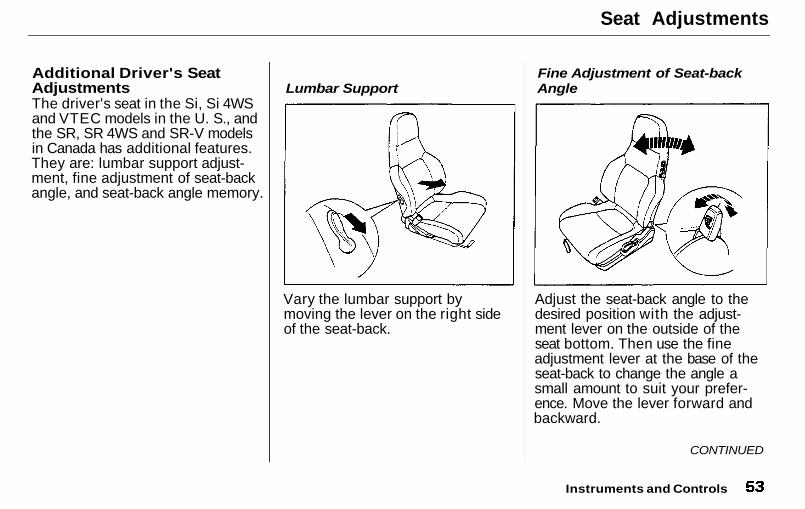
Additional Driver's SeatAdjustmentsThe driver's seat in the Si, Si 4WSand VTEC models in the U. S., andthe SR, SR 4WS and SR-V modelsin Canada has additional features.They are: lumbar support adjust-ment, fine adjustment of seat-backangle, and seat-back angle memory.
Lumbar Support
Vary the lumbar support bymoving the lever on the right sideof the seat-back.
Fine Adjustment of Seat-backAngle
Adjust the seat-back angle to thedesired position with the adjust-ment lever on the outside of theseat bottom. Then use the fineadjustment lever at the base of theseat-back to change the angle asmall amount to suit your prefer-ence. Move the lever forward andbackward.
Instruments and Controls
CONTINUED
Main Menu Table of Contents ▲ ▼

Seat Adjustments, Seat Heaters
Seat-back Angle Memory
After you have adjusted the seat-back angle, press the MEMORYbutton. This retains the setting sothe seat-back will return to thatposition after you tilt it forward forrear seat access. If you do not pressthe MEMORY button, the seat-back will return to about themidpoint of its adjustment range.You will then have to readjust theangle to your preference.
Seat Heaters
Available only on SR 4 WS and SR- Vmodels in CanadaBoth front seats are equipped withseat heaters. The ignition must beON (II) to use them. Push theheater switch to turn the power onor off. The pilot lamp lights andremains on while the heaters are on.
Do not use the seat heaters whenthe engine is off or when idling fora long period of time. They candrain the battery, making your carhard to start.
Instruments and Controls
INDICATORS
Main Menu Table of Contents ▲ ▼
Folding Rear Seat
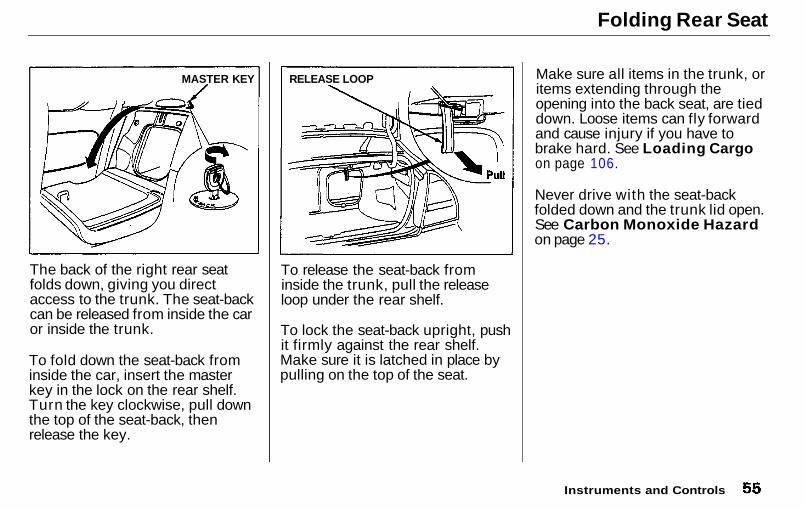
The back of the right rear seatfolds down, giving you directaccess to the trunk. The seat-backcan be released from inside the caror inside the trunk.
To fold down the seat-back frominside the car, insert the masterkey in the lock on the rear shelf.Turn the key clockwise, pull downthe top of the seat-back, thenrelease the key.
To release the seat-back frominside the trunk, pull the releaseloop under the rear shelf.
To lock the seat-back upright, pushit firmly against the rear shelf.Make sure it is latched in place bypulling on the top of the seat.
Make sure all items in the trunk, oritems extending through theopening into the back seat, are tieddown. Loose items can fly forwardand cause injury if you have tobrake hard. See Loading Cargoon page 106.
Never drive with the seat-backfolded down and the trunk lid open.See Carbon Monoxide Hazardon page 25.
Instruments and Controls
MASTER KEY RELEASE LOOP
Main Menu Table of Contents ▲ ▼
Hazard Warning, Rear Window Defogger
Hazard Warning
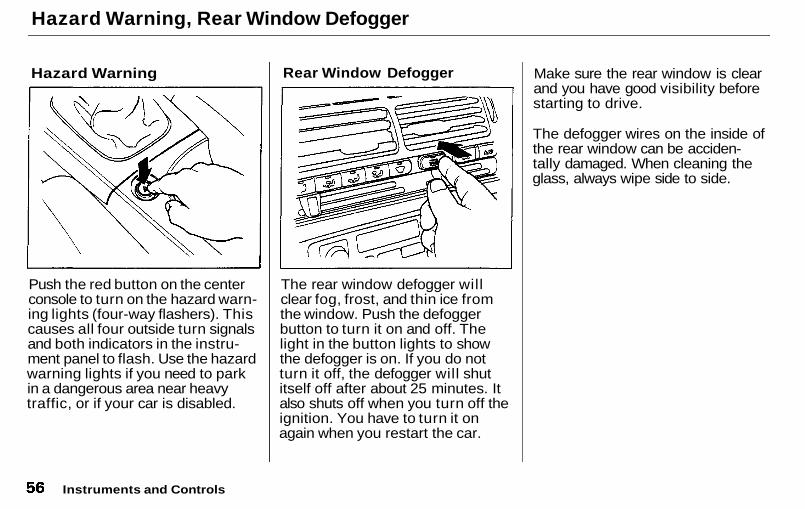
Push the red button on the centerconsole to turn on the hazard warn-ing lights (four-way flashers). Thiscauses all four outside turn signalsand both indicators in the instru-ment panel to flash. Use the hazardwarning lights if you need to parkin a dangerous area near heavytraffic, or if your car is disabled.
Rear Window Defogger
The rear window defogger willclear fog, frost, and thin ice fromthe window. Push the defoggerbutton to turn it on and off. Thelight in the button lights to showthe defogger is on. If you do notturn it off, the defogger will shutitself off after about 25 minutes. Italso shuts off when you turn off theignition. You have to turn it onagain when you restart the car.
Make sure the rear window is clearand you have good visibility beforestarting to drive.
The defogger wires on the inside ofthe rear window can be acciden-tally damaged. When cleaning theglass, always wipe side to side.
Instruments and Controls
Main Menu Table of Contents ▲ ▼
Power Windows
Your car's windows are electri-cally-powered. Turn the ignitionswitch to ON (II) to raise or lowerany window.
Each door has a switch thatcontrols its window. To open thewindow, push the switch down andhold it. Release the switch whenyou want the window to stop. Closethe window by pushing the switchup and holding it.
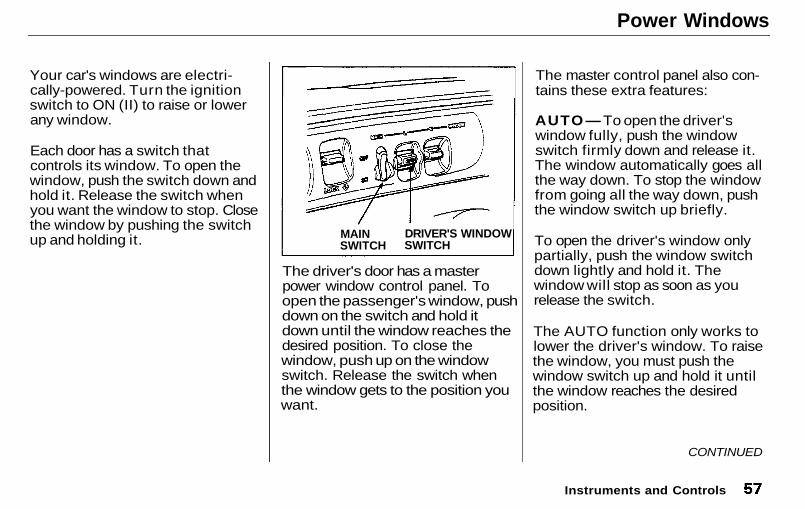
The driver's door has a masterpower window control panel. Toopen the passenger's window, pushdown on the switch and hold itdown until the window reaches thedesired position. To close thewindow, push up on the windowswitch. Release the switch whenthe window gets to the position youwant.
The master control panel also con-tains these extra features:
AUTO — To open the driver'swindow fully, push the windowswitch firmly down and release it.The window automatically goes allthe way down. To stop the windowfrom going all the way down, pushthe window switch up briefly.
To open the driver's window onlypartially, push the window switchdown lightly and hold it. Thewindow will stop as soon as yourelease the switch.
The AUTO function only works tolower the driver's window. To raisethe window, you must push thewindow switch up and hold it untilthe window reaches the desiredposition.
CONTINUED
Instruments and Controls
MAINSWITCH
DRIVER'S WINDOWSWITCH
Main Menu Table of Contents ▲ ▼

Power Windows, Sunroof
The MAIN switch controls powerto the passenger's window. Withthis switch off, the passenger'swindow cannot be raised or lower-ed. The MAIN switch does notaffect the driver's window. Keepthe MAIN switch off when youhave children in the car so they donot injure themselves by operatingthe windows unintentionally.
The power window system has akey-off delay function. The win-dows will still operate for up to tenminutes after you turn off the igni-tion. Opening either front door can-cels the delay function. You mustturn the ignition ON (II) againbefore you can raise or lower thewindows.
Sunroof
Use the switch on the dashboard toopen and close the sunroof. Theignition must be ON (II). Push andhold the switch to open thesunroof. Release the switch whenthe sunroof reaches the desiredposition. To close the sunroof, pressand hold the switch.
Instruments and Controls
Closing a power window on achild's hands or fingers cancause serious injury.
Make sure your children areaway from the windowsbefore closing them.
Main Menu Table of Contents ▲ ▼
Sunroof, Mirrors
The sunroof has a key-off delay.You can still open and close thesunroof for up to ten minutes afteryou turn off the ignition. The key-off delay cancels as soon as youopen either front door. You mustthen turn the ignition ON (II) forthe sunroof to operate.
If you try to open the sunroof inbelow-freezing temperatures, orwhen it is covered with snow or ice,you can damage the sunroof panelor motor.
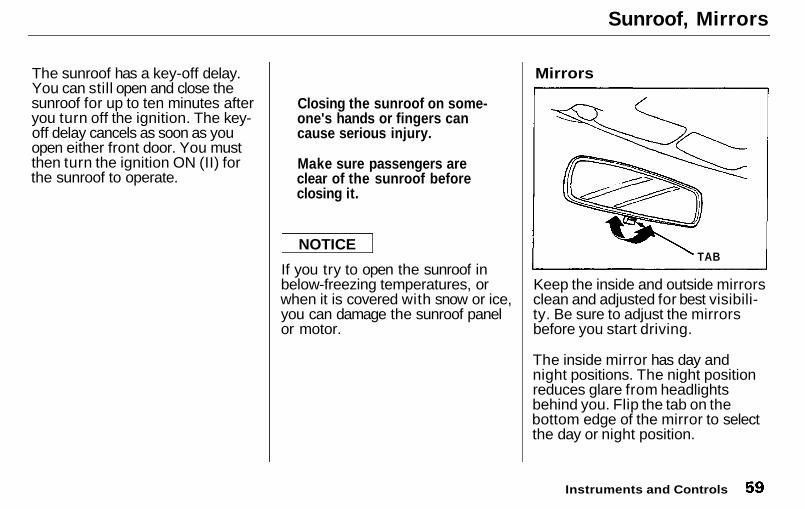
Mirrors
Keep the inside and outside mirrorsclean and adjusted for best visibili-ty. Be sure to adjust the mirrorsbefore you start driving.
The inside mirror has day andnight positions. The night positionreduces glare from headlightsbehind you. Flip the tab on thebottom edge of the mirror to selectthe day or night position.
Instruments and Controls
TABNOTICE
Closing the sunroof on some-one's hands or fingers cancause serious injury.
Make sure passengers areclear of the sunroof beforeclosing it.
Main Menu Table of Contents ▲ ▼
Mirrors
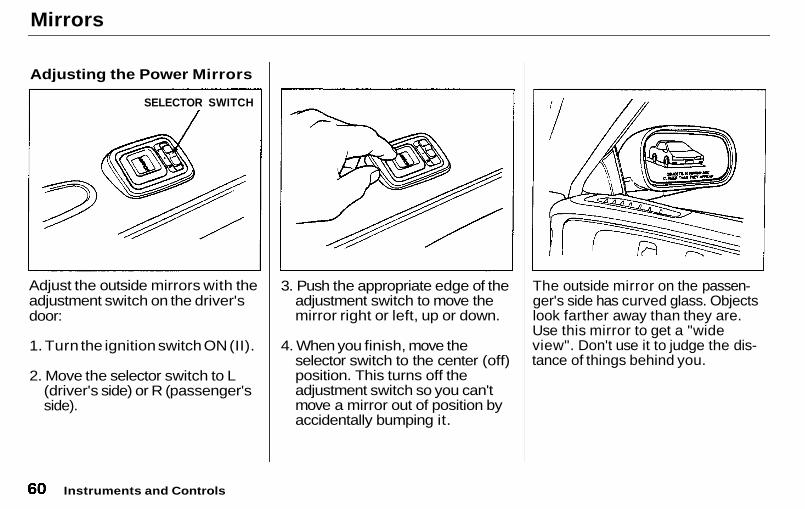
Adjusting the Power Mirrors
Adjust the outside mirrors with theadjustment switch on the driver'sdoor:
1. Turn the ignition switch ON (II).
2. Move the selector switch to L(driver's side) or R (passenger'sside).
3. Push the appropriate edge of theadjustment switch to move themirror right or left, up or down.
4. When you finish, move theselector switch to the center (off)position. This turns off theadjustment switch so you can'tmove a mirror out of position byaccidentally bumping it.
The outside mirror on the passen-ger's side has curved glass. Objectslook farther away than they are.Use this mirror to get a "wideview". Don't use it to judge the dis-tance of things behind you.
Instruments and Controls
SELECTOR SWITCH
Main Menu Table of Contents ▲ ▼
Mirrors, Parking Brake
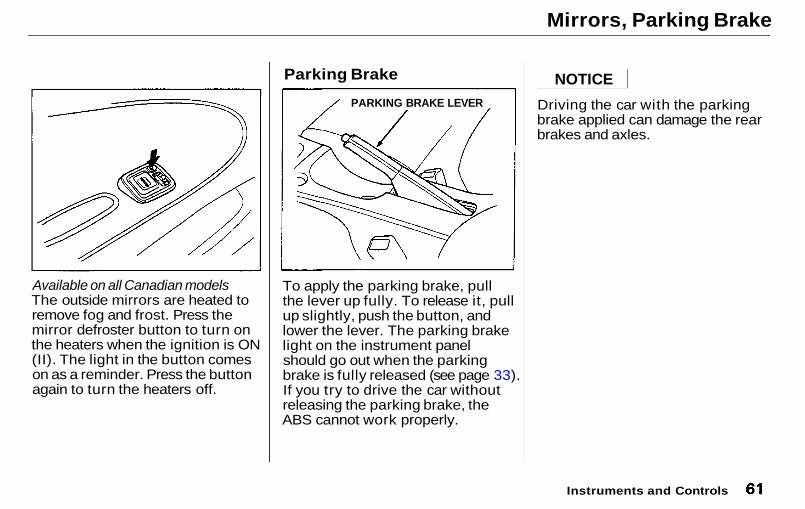
Available on all Canadian modelsThe outside mirrors are heated toremove fog and frost. Press themirror defroster button to turn onthe heaters when the ignition is ON(II). The light in the button comeson as a reminder. Press the buttonagain to turn the heaters off.
Parking Brake
To apply the parking brake, pullthe lever up fully. To release it, pullup slightly, push the button, andlower the lever. The parking brakelight on the instrument panelshould go out when the parkingbrake is fully released (see page 33).If you try to drive the car withoutreleasing the parking brake, theABS cannot work properly.
Driving the car with the parkingbrake applied can damage the rearbrakes and axles.
Instruments and Controls
PARKING BRAKE LEVER
NOTICE
Main Menu Table of Contents ▲ ▼
Glove Box, Digital Clock
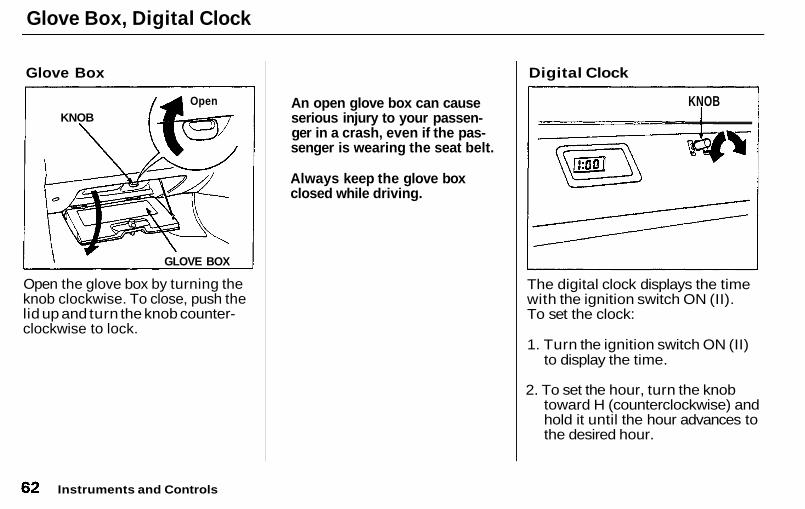
Glove Box
Open the glove box by turning theknob clockwise. To close, push thelid up and turn the knob counter-clockwise to lock.
Digital Clock
The digital clock displays the timewith the ignition switch ON (II).To set the clock:
1. Turn the ignition switch ON (II)to display the time.
2. To set the hour, turn the knobtoward H (counterclockwise) andhold it until the hour advances tothe desired hour.
Instruments and Controls
KNOBOpen
GLOVE BOX
An open glove box can causeserious injury to your passen-ger in a crash, even if the pas-senger is wearing the seat belt.
Always keep the glove boxclosed while driving.
KNOB
Main Menu Table of Contents ▲ ▼
Digital Clock, Vanity Mirror, Cigarette Lighter
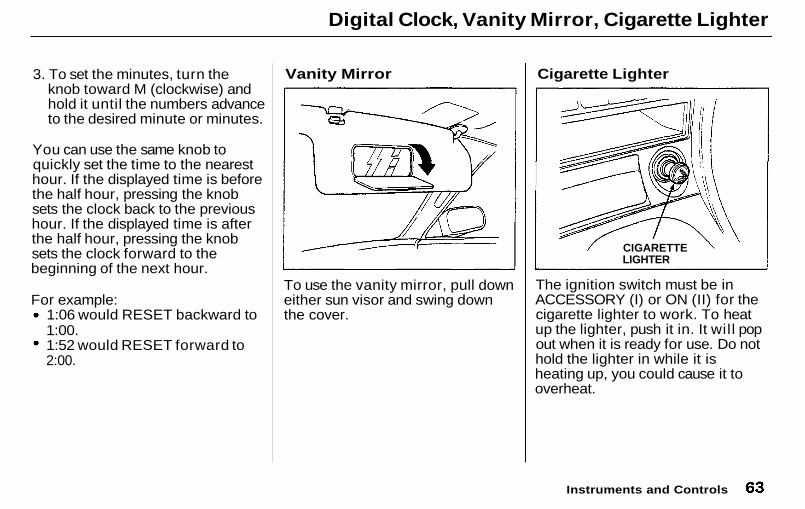
3. To set the minutes, turn theknob toward M (clockwise) andhold it until the numbers advanceto the desired minute or minutes.
You can use the same knob toquickly set the time to the nearesthour. If the displayed time is beforethe half hour, pressing the knobsets the clock back to the previoushour. If the displayed time is afterthe half hour, pressing the knobsets the clock forward to thebeginning of the next hour.
For example:1:06 would RESET backward to1:00.1:52 would RESET forward to2:00.
Vanity Mirror
To use the vanity mirror, pull downeither sun visor and swing downthe cover.
Cigarette Lighter
The ignition switch must be inACCESSORY (I) or ON (II) for thecigarette lighter to work. To heatup the lighter, push it in. It wil l popout when it is ready for use. Do nothold the lighter in while it isheating up, you could cause it tooverheat.
Instruments and Controls
CIGARETTELIGHTER
Main Menu Table of Contents ▲ ▼
Ashtrays
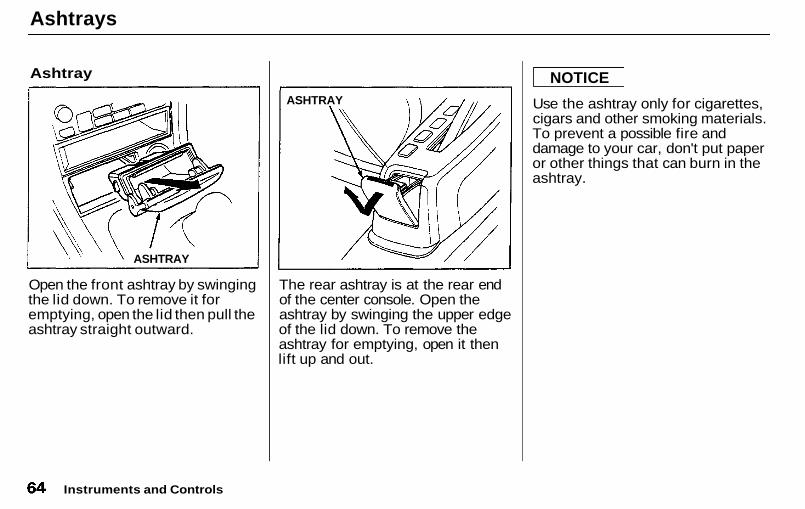
Ashtray
Open the front ashtray by swingingthe lid down. To remove it foremptying, open the lid then pull theashtray straight outward.
The rear ashtray is at the rear endof the center console. Open theashtray by swinging the upper edgeof the lid down. To remove theashtray for emptying, open it thenlift up and out.
Use the ashtray only for cigarettes,cigars and other smoking materials.To prevent a possible fire anddamage to your car, don't put paperor other things that can burn in theashtray.
Instruments and Controls
ASHTRAY
NOTICEASHTRAY
Main Menu Table of Contents ▲ ▼
Interior Lights
Ceiling Light
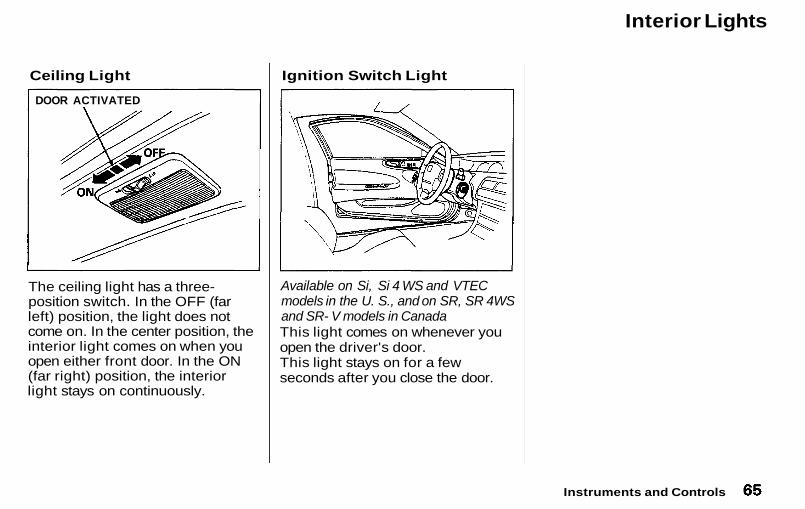
The ceiling light has a three-position switch. In the OFF (farleft) position, the light does notcome on. In the center position, theinterior light comes on when youopen either front door. In the ON(far right) position, the interiorlight stays on continuously.
Ignition Switch Light
Available on Si, Si 4 WS and VTECmodels in the U. S., and on SR, SR 4WSand SR- V models in CanadaThis light comes on whenever youopen the driver's door.This light stays on for a fewseconds after you close the door.
Instruments and Controls
DOOR ACTIVATED
Main Menu Table of Contents ▲ ▼
Comfort and Convenience Features
The heating and air conditioning*system in your car provides a com-fortable driving environment in allweather conditions.
The audio sound system is veryversatile. To get the most from thissystem, take the time to learn whatthe controls do.Some models have an anti-theftsystem that requires a codenumber to enable it.
* Air conditioning is optional on Smodel.
Heating and Cooling...................... 68What Each Control Does.......... 70How to Use the System............. 71
Controlling Air FlowDirection.............................. 71
Ventilation............................... 71To Cool..................................... 72To Dehumidify and Defog
with A/C............................... 73To Heat.................................... 74To Defrost............................... 74To Turn Everything off ....... 74
Audio System (S)............................ 75Adjusting the Sound.................. 76Operating the Radio.................. 77Presetting.................................... 79Radio Frequencies..................... 80Operating the Cassette
Player........................................ 81Cassette Search Functions....... 82
Audio System (Except S).............. 84Adjusting the Sound.................. 85Operating the Radio .................. 86Presetting.................................... 88Radio Frequencies..................... 90Operating the Cassette
Player........................................ 91Cassette Search Functions....... 92
Caring for the Cassettes Player.. 94Theft Protection............................. 95
Comfort and Convenience Features
Main Menu ▲ ▼

Heating and Cooling
This system has full heating,ventilation, and air conditioning*capabilities. You can adjust thesystem controls to mix these invarious combinations. The airflows into the interior at threepossible levels, which you canselect.
(S model only)A Genuine Honda air conditioningsystem is available from yourdealer. It meets Honda's highquality standards and is designed tofit your car. If you purchased yourcar without air conditioning, it canbe installed at any time. Pleasecontact your dealer for moreinformation.
* Air conditioning is optional on Smodel.
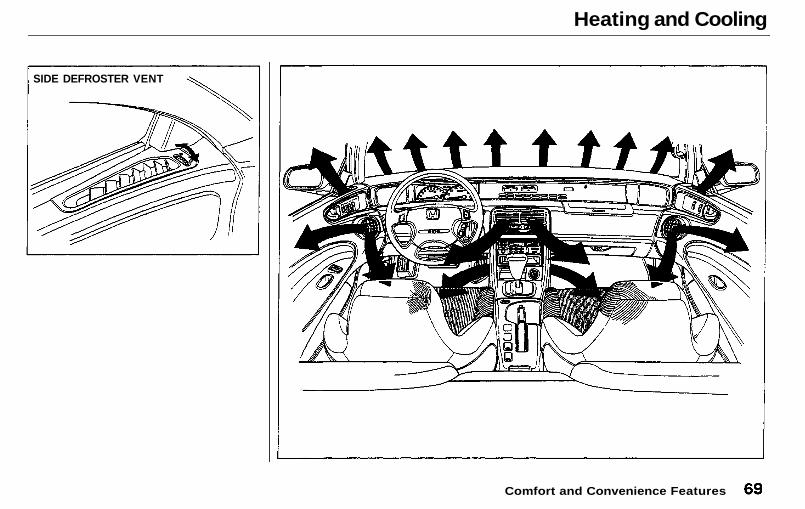
The direction of airflow from thevents in the center of the dash-board and the corner vents in eachdoor is adjustable. Move the tab inthe center of each vent up-and-down and side-to-side.
The center, corner and sidedefroster vents can be opened andclosed with the dials next to them.
The heating and cooling systemdraws air through the exteriorvents at the bottom of the wind-shield. Keep these vents clear ofleaves and other debris.
Comfort and Convenience Features
CORNER VENTCENTER VENT
Main Menu Table of Contents ▲ ▼
Heating and Cooling
Comfort and Convenience Features
SIDE DEFROSTER VENT
Main Menu Table of Contents ▲ ▼
Heating and Cooling
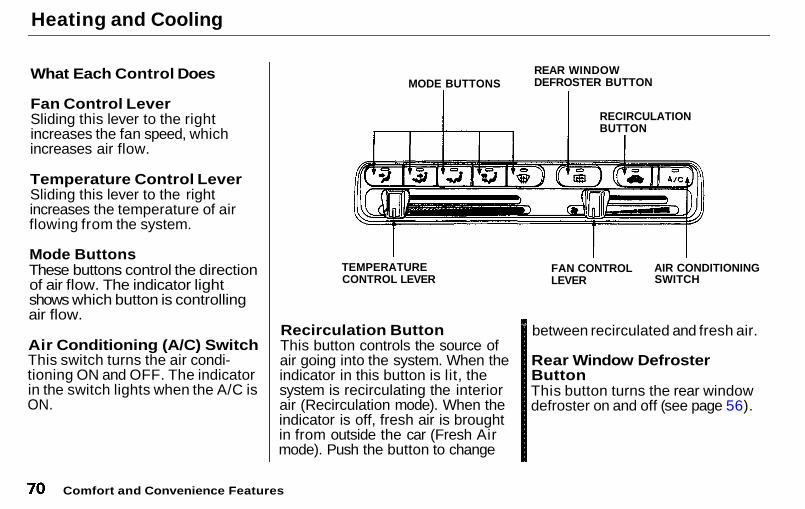
What Each Control Does
Fan Control LeverSliding this lever to the rightincreases the fan speed, whichincreases air flow.
Temperature Control LeverSliding this lever to the rightincreases the temperature of airflowing from the system.
Mode ButtonsThese buttons control the directionof air flow. The indicator lightshows which button is controllingair flow.
Air Conditioning (A/C) SwitchThis switch turns the air condi-tioning ON and OFF. The indicatorin the switch lights when the A/C isON.
MODE BUTTONSREAR WINDOWDEFROSTER BUTTON
RECIRCULATIONBUTTON
TEMPERATURECONTROL LEVER
Recirculation ButtonThis button controls the source ofair going into the system. When theindicator in this button is lit, thesystem is recirculating the interiorair (Recirculation mode). When theindicator is off, fresh air is broughtin from outside the car (Fresh Airmode). Push the button to change
FAN CONTROLLEVER
AIR CONDITIONINGSWITCH
between recirculated and fresh air.
Rear Window DefrosterButtonThis button turns the rear windowdefroster on and off (see page 56).
Comfort and Convenience Features
Main Menu Table of Contents ▲ ▼
Heating and Cooling
How to Use the SystemThis section covers the best way touse the system for ventilation,cooling, dehumidifying, defrostingand heating. In most cases, themode and air source selections areonly recommendations. You mayprefer different settings.
Use Recirculation mode to heat orcool the interior more quickly, or tokeep out smoke and dust. Leavingthe system in the recirculationmode with the A/C off can causethe windows to fog up. Switch toFresh Air mode as soon as theinterior reaches a comfortabletemperature or the outside smoky,dusty condition clears.
The engine must be running for theheater and air conditioning to pro-vide hot and cold air. The heateruses engine coolant to warm the air.If the engine is cold, it will be sever-al minutes before you feel warm aircirculating.
The air conditioning system doesnot depend on engine temperature.It can produce cold air almostimmediately.
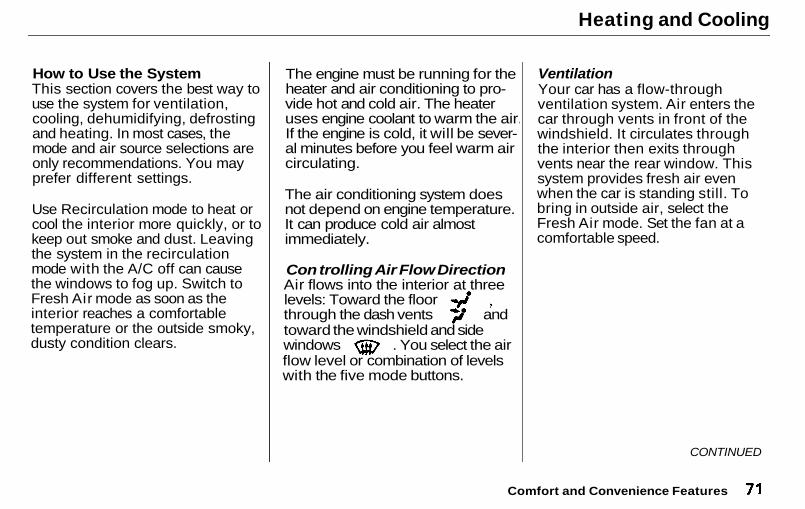
Con trolling Air Flow DirectionAir flows into the interior at threelevels: Toward the floorthrough the dash vents andtoward the windshield and sidewindows . You select the airflow level or combination of levelswith the five mode buttons.
VentilationYour car has a flow-throughventilation system. Air enters thecar through vents in front of thewindshield. It circulates throughthe interior then exits throughvents near the rear window. Thissystem provides fresh air evenwhen the car is standing still. Tobring in outside air, select theFresh Air mode. Set the fan at acomfortable speed.
CONTINUED
Comfort and Convenience Features
Main Menu Table of Contents ▲ ▼
Heating and Cooling
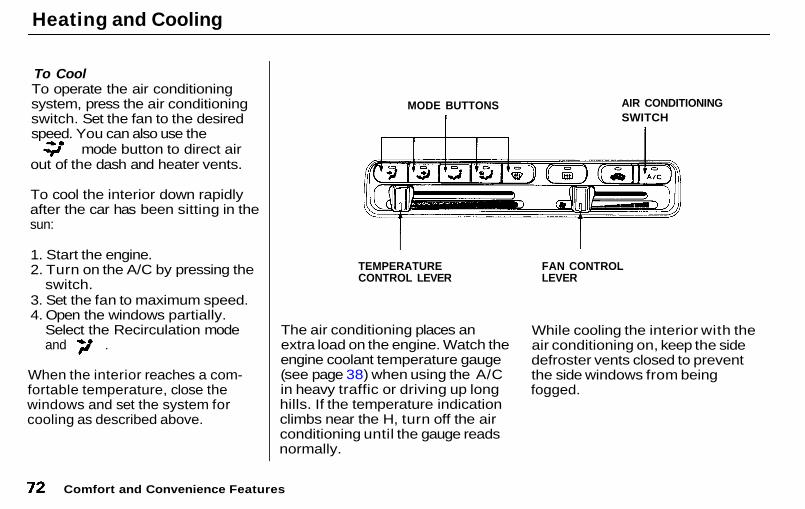
To CoolTo operate the air conditioningsystem, press the air conditioningswitch. Set the fan to the desiredspeed. You can also use the
mode button to direct airout of the dash and heater vents.
To cool the interior down rapidlyafter the car has been sitting in thesun:
1. Start the engine.2. Turn on the A/C by pressing the
switch.3. Set the fan to maximum speed.4. Open the windows partially.
Select the Recirculation modeand .
When the interior reaches a com-fortable temperature, close thewindows and set the system forcooling as described above.
The air conditioning places anextra load on the engine. Watch theengine coolant temperature gauge(see page 38) when using the A/Cin heavy traffic or driving up longhills. If the temperature indicationclimbs near the H, turn off the airconditioning until the gauge readsnormally.
While cooling the interior with theair conditioning on, keep the sidedefroster vents closed to preventthe side windows from beingfogged.
Comfort and Convenience Features
MODE BUTTONSSWITCH
TEMPERATURECONTROL LEVER
FAN CONTROLLEVER
AIR CONDITIONING
Main Menu Table of Contents ▲ ▼
Heating and Cooling
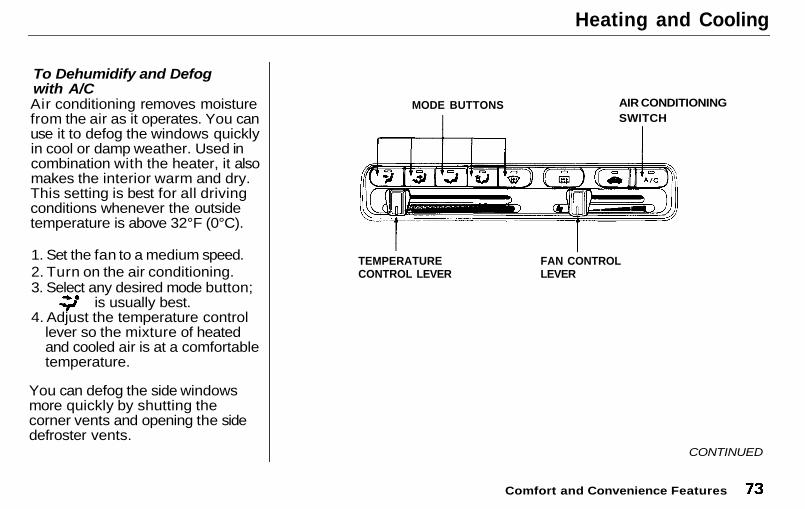
To Dehumidify and Defogwith A/CAir conditioning removes moisturefrom the air as it operates. You canuse it to defog the windows quicklyin cool or damp weather. Used incombination with the heater, it alsomakes the interior warm and dry.This setting is best for all drivingconditions whenever the outsidetemperature is above 32°F (0°C).
1. Set the fan to a medium speed.2. Turn on the air conditioning.3. Select any desired mode button;
is usually best.4. Adjust the temperature control
lever so the mixture of heatedand cooled air is at a comfortabletemperature.
You can defog the side windowsmore quickly by shutting thecorner vents and opening the sidedefroster vents.
CONTINUED
Comfort and Convenience Features
FAN CONTROLLEVER
AIR CONDITIONINGSWITCH
TEMPERATURECONTROL LEVER
MODE BUTTONS
Main Menu Table of Contents ▲ ▼
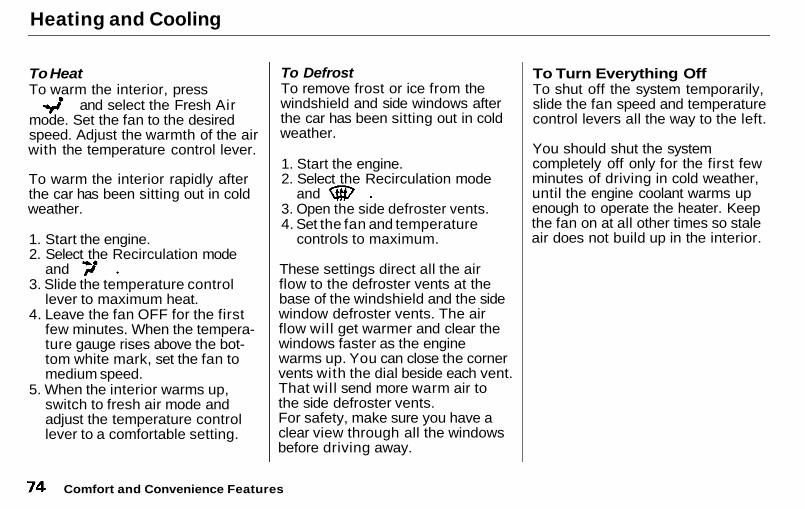
Heating and Cooling
To HeatTo warm the interior, press
and select the Fresh Airmode. Set the fan to the desiredspeed. Adjust the warmth of the airwith the temperature control lever.
To warm the interior rapidly afterthe car has been sitting out in coldweather.
1. Start the engine.2. Select the Recirculation mode
and3. Slide the temperature control
lever to maximum heat.4. Leave the fan OFF for the first
few minutes. When the tempera-ture gauge rises above the bot-tom white mark, set the fan tomedium speed.
5. When the interior warms up,switch to fresh air mode andadjust the temperature controllever to a comfortable setting.
To DefrostTo remove frost or ice from thewindshield and side windows afterthe car has been sitting out in coldweather.
1. Start the engine.2. Select the Recirculation mode
and3. Open the side defroster vents.4. Set the fan and temperature
controls to maximum.
These settings direct all the airflow to the defroster vents at thebase of the windshield and the sidewindow defroster vents. The airflow wil l get warmer and clear thewindows faster as the enginewarms up. You can close the cornervents with the dial beside each vent.That wil l send more warm air tothe side defroster vents.For safety, make sure you have aclear view through all the windowsbefore driving away.
To Turn Everything OffTo shut off the system temporarily,slide the fan speed and temperaturecontrol levers all the way to the left.
You should shut the systemcompletely off only for the first fewminutes of driving in cold weather,until the engine coolant warms upenough to operate the heater. Keepthe fan on at all other times so staleair does not build up in the interior.
Comfort and Convenience Features
Main Menu Table of Contents ▲ ▼

Audio System (S)
AM/FM/Cassette StereoAudio SystemThe audio system described here isstandard equipment on the S model.
Your Honda audio system is easy touse, and will give clear AM/FMreception. The preset buttons allowyou to select six stations on eachband.
The cassette system usesDolby B®* noise reduction to giveexcellent sound reproduction. Thesystem also senses when a metal orchromium-dioxide (CrO2) tape isbeing played and adjusts accord-ingly.The cassette player features auto-reverse for continuous play.
* Dolby noise reduction manufac-tured under license from DolbyLaboratories Licensing Corpo-ration."DOLBY" and the double-D symbol
are trademarks of DolbyLaboratories Licensing Corpo-ration.
Comfort and Convenience Features
CASSETTE SLOT TUNE BAR
PRESETBUTTONS
ON/VOL KNOB AM/FMBUTTON
SEEK/SKIPSWITCH
Main Menu Table of Contents ▲ ▼
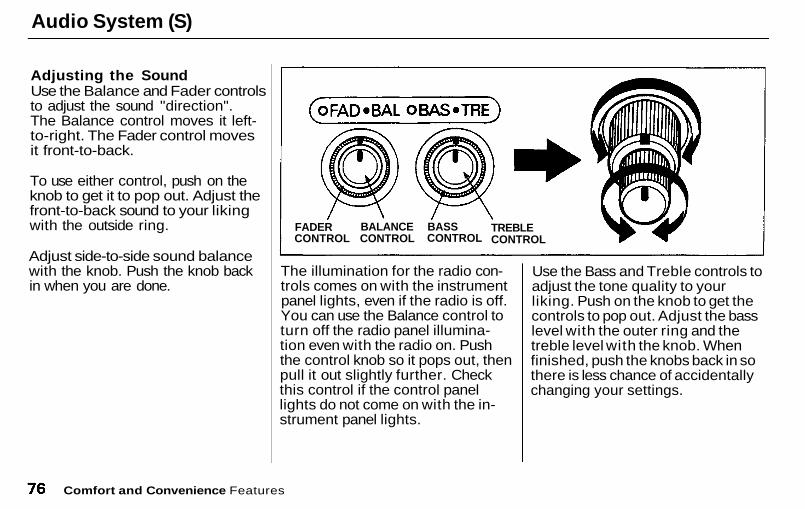
Audio System (S)
Adjusting the SoundUse the Balance and Fader controlsto adjust the sound "direction".The Balance control moves it left-to-right. The Fader control movesit front-to-back.
To use either control, push on theknob to get it to pop out. Adjust thefront-to-back sound to your likingwith the outside ring.
Adjust side-to-side sound balancewith the knob. Push the knob backin when you are done.
The illumination for the radio con-trols comes on with the instrumentpanel lights, even if the radio is off.You can use the Balance control toturn off the radio panel illumina-tion even with the radio on. Pushthe control knob so it pops out, thenpull it out slightly further. Checkthis control if the control panellights do not come on with the in-strument panel lights.
Use the Bass and Treble controls toadjust the tone quality to yourliking. Push on the knob to get thecontrols to pop out. Adjust the basslevel with the outer ring and thetreble level with the knob. Whenfinished, push the knobs back in sothere is less chance of accidentallychanging your settings.
Comfort and Convenience Features
FADERCONTROL
BALANCECONTROL
BASSCONTROL
TREBLECONTROL
Main Menu Table of Contents ▲ ▼
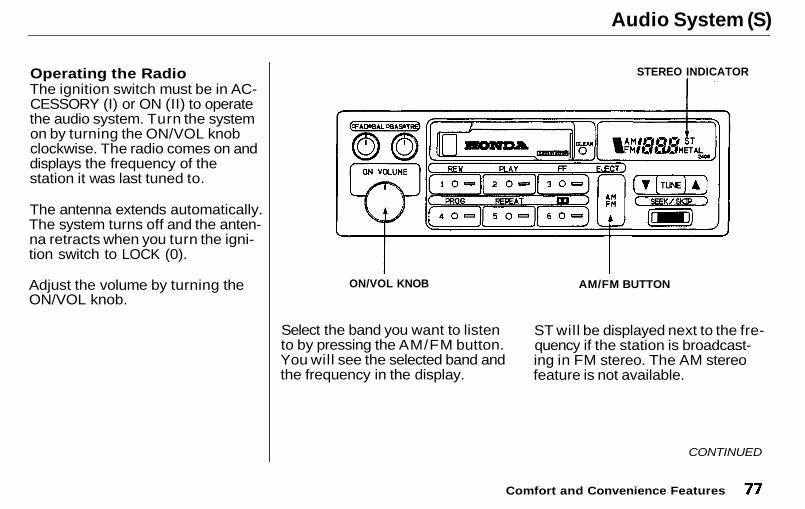
Audio System (S)
Operating the RadioThe ignition switch must be in AC-CESSORY (I) or ON (II) to operatethe audio system. Turn the systemon by turning the ON/VOL knobclockwise. The radio comes on anddisplays the frequency of thestation it was last tuned to.
The antenna extends automatically.The system turns off and the anten-na retracts when you turn the igni-tion switch to LOCK (0).
Adjust the volume by turning theON/VOL knob.
Select the band you want to listento by pressing the AM/FM button.You will see the selected band andthe frequency in the display.
ST will be displayed next to the fre-quency if the station is broadcast-ing in FM stereo. The AM stereofeature is not available.
CONTINUED
Comfort and Convenience Features
STEREO INDICATOR
AM/FM BUTTONON/VOL KNOB
Main Menu Table of Contents ▲ ▼
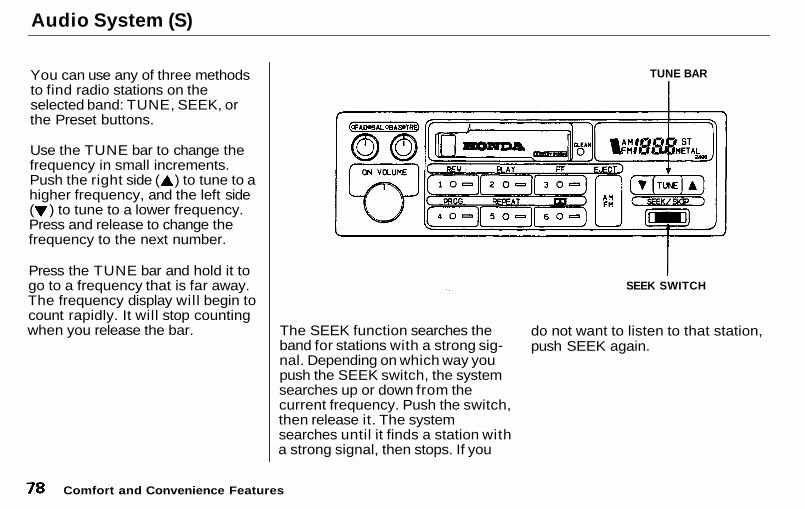
Audio System (S)
You can use any of three methodsto find radio stations on theselected band: TUNE, SEEK, orthe Preset buttons.
Use the TUNE bar to change thefrequency in small increments.Push the right side ( ) to tune to ahigher frequency, and the left side( ) to tune to a lower frequency.Press and release to change thefrequency to the next number.
Press the TUNE bar and hold it togo to a frequency that is far away.The frequency display will begin tocount rapidly. It will stop countingwhen you release the bar. The SEEK function searches the
band for stations with a strong sig-nal. Depending on which way youpush the SEEK switch, the systemsearches up or down from thecurrent frequency. Push the switch,then release it. The systemsearches until it finds a station witha strong signal, then stops. If you
do not want to listen to that station,push SEEK again.
Comfort and Convenience Features
SEEK SWITCH
TUNE BAR
Main Menu Table of Contents ▲ ▼
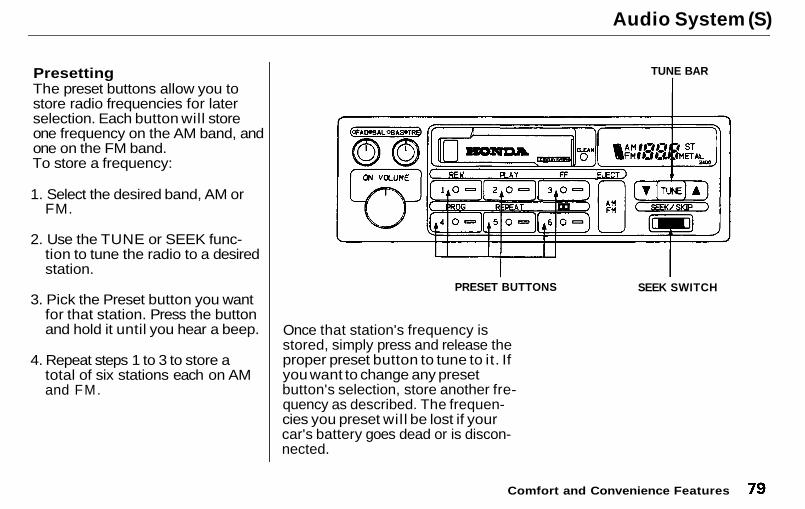
Audio System (S)
PresettingThe preset buttons allow you tostore radio frequencies for laterselection. Each button will storeone frequency on the AM band, andone on the FM band.To store a frequency:
1. Select the desired band, AM orFM.
2. Use the TUNE or SEEK func-tion to tune the radio to a desiredstation.
3. Pick the Preset button you wantfor that station. Press the buttonand hold it until you hear a beep.
4. Repeat steps 1 to 3 to store atotal of six stations each on AMand F M .
Once that station's frequency isstored, simply press and release theproper preset button to tune to it. Ifyou want to change any presetbutton's selection, store another fre-quency as described. The frequen-cies you preset wil l be lost if yourcar's battery goes dead or is discon-nected.
Comfort and Convenience Features
PRESET BUTTONS SEEK SWITCH
TUNE BAR
Main Menu Table of Contents ▲ ▼
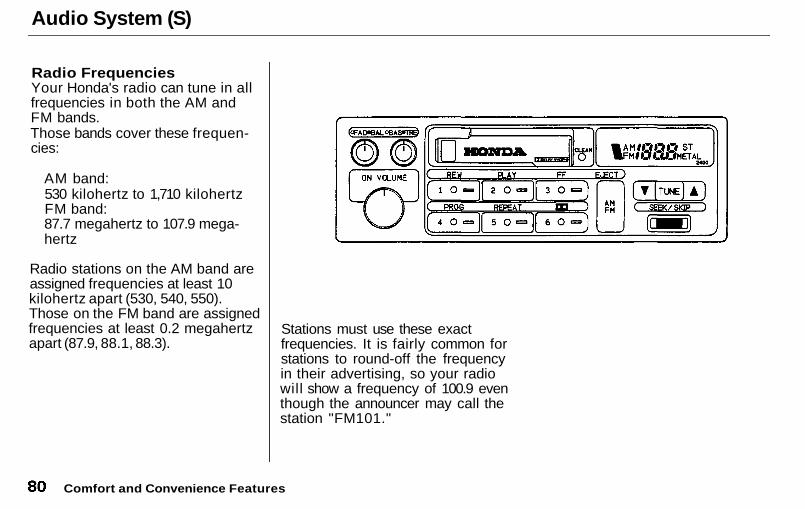
Audio System (S)
Radio FrequenciesYour Honda's radio can tune in allfrequencies in both the AM andFM bands.Those bands cover these frequen-cies:
AM band:530 kilohertz to 1,710 kilohertzFM band:87.7 megahertz to 107.9 mega-hertz
Radio stations on the AM band areassigned frequencies at least 10kilohertz apart (530, 540, 550).Those on the FM band are assignedfrequencies at least 0.2 megahertzapart (87.9, 88.1, 88.3).
Stations must use these exactfrequencies. It is fairly common forstations to round-off the frequencyin their advertising, so your radiowill show a frequency of 100.9 eventhough the announcer may call thestation "FM101."
Comfort and Convenience Features
Main Menu Table of Contents ▲ ▼
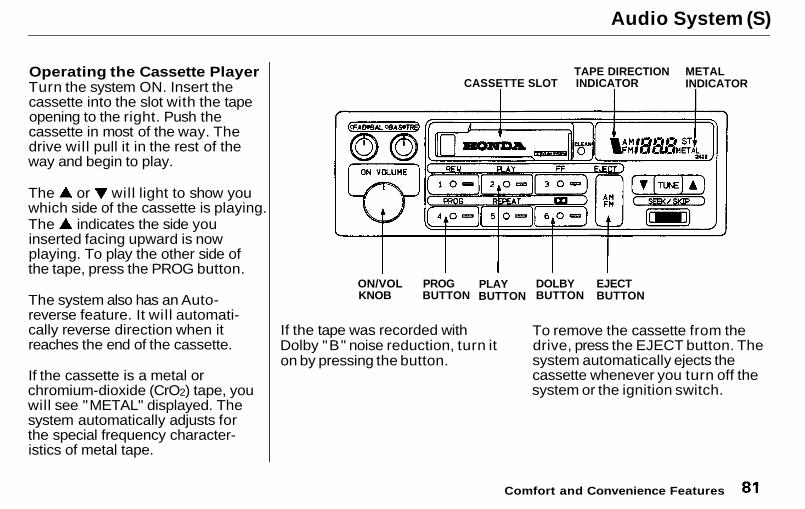
Audio System (S)
Operating the Cassette PlayerTurn the system ON. Insert thecassette into the slot with the tapeopening to the right. Push thecassette in most of the way. Thedrive will pull it in the rest of theway and begin to play.
The or will light to show youwhich side of the cassette is playing.The indicates the side youinserted facing upward is nowplaying. To play the other side ofthe tape, press the PROG button.
The system also has an Auto-reverse feature. It will automati-cally reverse direction when itreaches the end of the cassette.
If the cassette is a metal orchromium-dioxide (CrO2) tape, youwill see "METAL" displayed. Thesystem automatically adjusts forthe special frequency character-istics of metal tape.
If the tape was recorded withDolby "B" noise reduction, turn iton by pressing the button.
To remove the cassette from thedrive, press the EJECT button. Thesystem automatically ejects thecassette whenever you turn off thesystem or the ignition switch.
Comfort and Convenience Features
CASSETTE SLOTTAPE DIRECTIONINDICATOR
METALINDICATOR
ON/VOLKNOB
PROGBUTTON
PLAYBUTTON
DOLBYBUTTON
EJECTBUTTON
Main Menu Table of Contents ▲ ▼
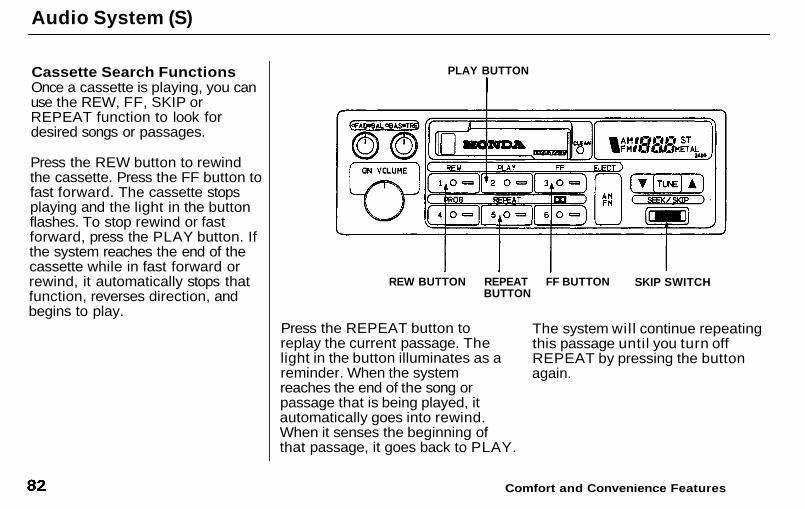
Audio System (S)
Cassette Search FunctionsOnce a cassette is playing, you canuse the REW, FF, SKIP orREPEAT function to look fordesired songs or passages.
Press the REW button to rewindthe cassette. Press the FF button tofast forward. The cassette stopsplaying and the light in the buttonflashes. To stop rewind or fastforward, press the PLAY button. Ifthe system reaches the end of thecassette while in fast forward orrewind, it automatically stops thatfunction, reverses direction, andbegins to play.
Press the REPEAT button toreplay the current passage. Thelight in the button illuminates as areminder. When the systemreaches the end of the song orpassage that is being played, itautomatically goes into rewind.When it senses the beginning ofthat passage, it goes back to PLAY.
The system wil l continue repeatingthis passage until you turn offREPEAT by pressing the buttonagain.
Comfort and Convenience Features
PLAY BUTTON
REW BUTTON REPEATBUTTON
FF BUTTON SKIP SWITCH
Main Menu Table of Contents ▲ ▼
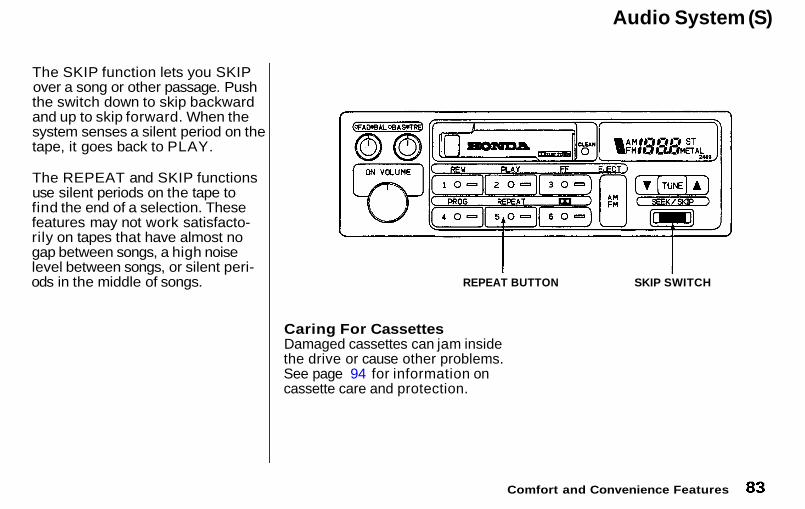
Audio System (S)
The SKIP function lets you SKIPover a song or other passage. Pushthe switch down to skip backwardand up to skip forward. When thesystem senses a silent period on thetape, it goes back to PLAY.
The REPEAT and SKIP functionsuse silent periods on the tape tofind the end of a selection. Thesefeatures may not work satisfacto-rily on tapes that have almost nogap between songs, a high noiselevel between songs, or silent peri-ods in the middle of songs.
Caring For CassettesDamaged cassettes can jam insidethe drive or cause other problems.See page 94 for information oncassette care and protection.
Comfort and Convenience Features
REPEAT BUTTON SKIP SWITCH
Main Menu Table of Contents ▲ ▼
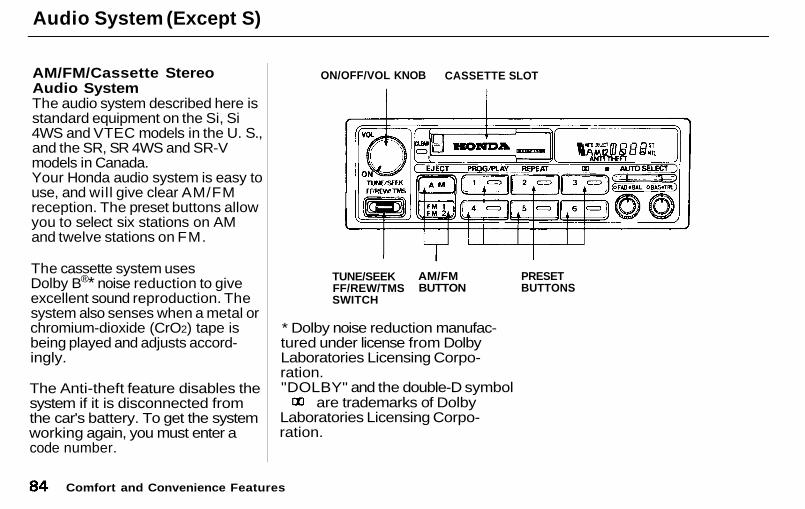
Audio System (Except S)
AM/FM/Cassette StereoAudio SystemThe audio system described here isstandard equipment on the Si, Si4WS and VTEC models in the U. S.,and the SR, SR 4WS and SR-Vmodels in Canada.Your Honda audio system is easy touse, and will give clear AM/FMreception. The preset buttons allowyou to select six stations on AMand twelve stations on FM.
The cassette system usesDolby B®* noise reduction to giveexcellent sound reproduction. Thesystem also senses when a metal orchromium-dioxide (CrO2) tape isbeing played and adjusts accord-ingly.
The Anti-theft feature disables thesystem if it is disconnected fromthe car's battery. To get the systemworking again, you must enter acode number.
* Dolby noise reduction manufac-tured under license from DolbyLaboratories Licensing Corpo-ration."DOLBY" and the double-D symbol
are trademarks of DolbyLaboratories Licensing Corpo-ration.
Comfort and Convenience Features
ON/OFF/VOL KNOB CASSETTE SLOT
TUNE/SEEKFF/REW/TMSSWITCH
AM/FMBUTTON
PRESETBUTTONS
Main Menu Table of Contents ▲ ▼
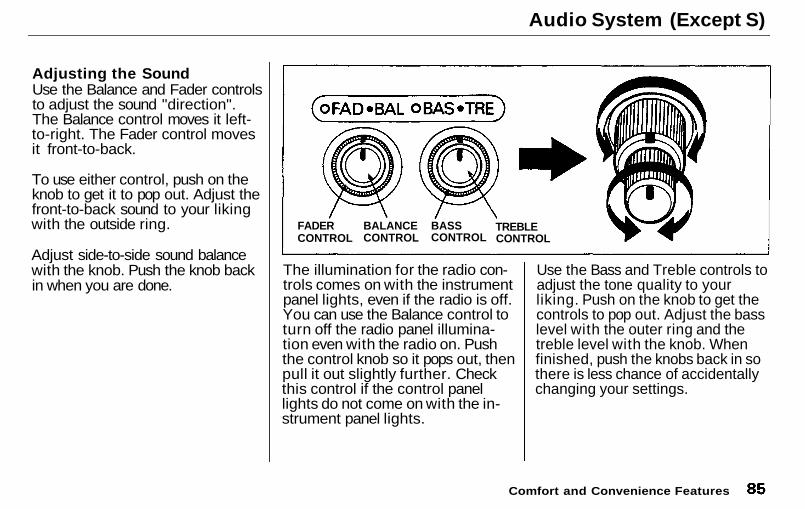
Audio System (Except S)
Adjusting the SoundUse the Balance and Fader controlsto adjust the sound "direction".The Balance control moves it left-to-right. The Fader control movesit front-to-back.
To use either control, push on theknob to get it to pop out. Adjust thefront-to-back sound to your likingwith the outside ring.
Adjust side-to-side sound balancewith the knob. Push the knob backin when you are done.
The illumination for the radio con-trols comes on with the instrumentpanel lights, even if the radio is off.You can use the Balance control toturn off the radio panel illumina-tion even with the radio on. Pushthe control knob so it pops out, thenpull it out slightly further. Checkthis control if the control panellights do not come on with the in-strument panel lights.
Use the Bass and Treble controls toadjust the tone quality to yourliking. Push on the knob to get thecontrols to pop out. Adjust the basslevel with the outer ring and thetreble level with the knob. Whenfinished, push the knobs back in sothere is less chance of accidentallychanging your settings.
Comfort and Convenience Features
FADERCONTROL
BALANCECONTROL
BASSCONTROL
TREBLECONTROL
Main Menu Table of Contents ▲ ▼
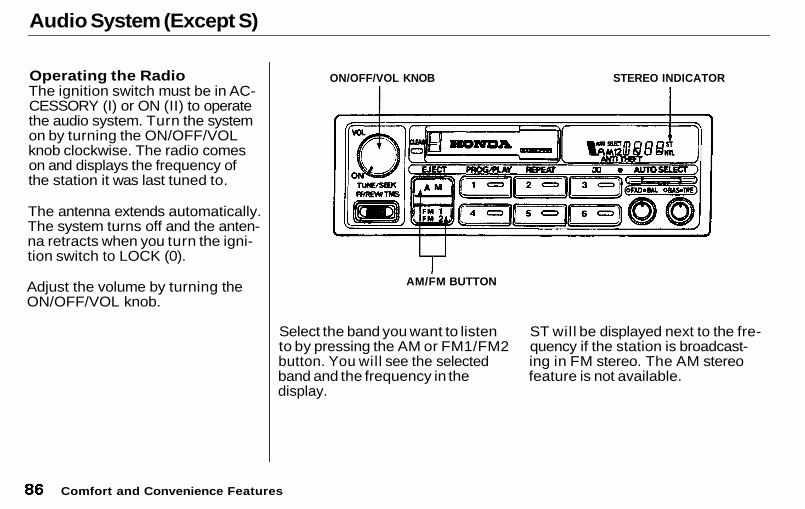
Audio System (Except S)
Operating the RadioThe ignition switch must be in AC-CESSORY (I) or ON (II) to operatethe audio system. Turn the systemon by turning the ON/OFF/VOLknob clockwise. The radio comeson and displays the frequency ofthe station it was last tuned to.
The antenna extends automatically.The system turns off and the anten-na retracts when you turn the igni-tion switch to LOCK (0).
Adjust the volume by turning theON/OFF/VOL knob.
Select the band you want to listento by pressing the AM or FM1/FM2button. You wil l see the selectedband and the frequency in thedisplay.
ST will be displayed next to the fre-quency if the station is broadcast-ing in FM stereo. The AM stereofeature is not available.
Comfort and Convenience Features
ON/OFF/VOL KNOB STEREO INDICATOR
AM/FM BUTTON
Main Menu Table of Contents ▲ ▼
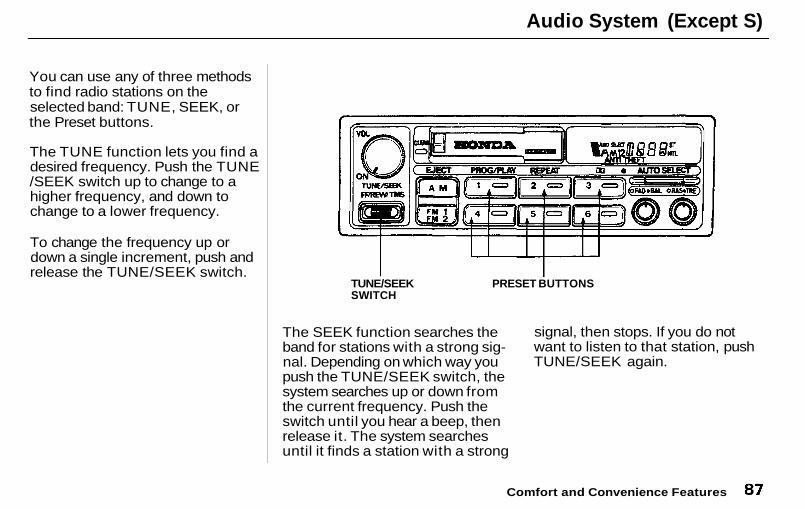
Audio System (Except S)
You can use any of three methodsto find radio stations on theselected band: TUNE, SEEK, orthe Preset buttons.
The TUNE function lets you find adesired frequency. Push the TUNE/SEEK switch up to change to ahigher frequency, and down tochange to a lower frequency.
To change the frequency up ordown a single increment, push andrelease the TUNE/SEEK switch.
The SEEK function searches theband for stations with a strong sig-nal. Depending on which way youpush the TUNE/SEEK switch, thesystem searches up or down fromthe current frequency. Push theswitch until you hear a beep, thenrelease it. The system searchesuntil it finds a station with a strong
signal, then stops. If you do notwant to listen to that station, pushTUNE/SEEK again.
Comfort and Convenience Features
TUNE/SEEKSWITCH
PRESET BUTTONS
Main Menu Table of Contents ▲ ▼
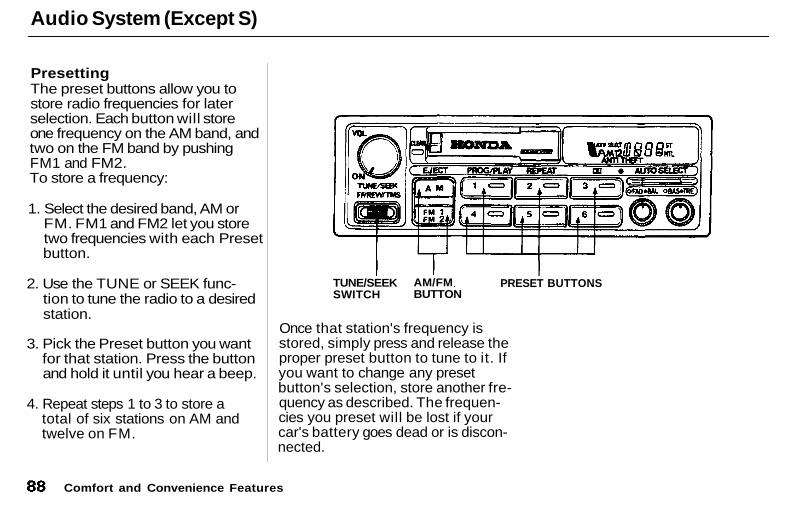
Audio System (Except S)
PresettingThe preset buttons allow you tostore radio frequencies for laterselection. Each button will storeone frequency on the AM band, andtwo on the FM band by pushingFM1 and FM2.To store a frequency:
1. Select the desired band, AM orFM. FM1 and FM2 let you storetwo frequencies with each Presetbutton.
2. Use the TUNE or SEEK func-tion to tune the radio to a desiredstation.
3. Pick the Preset button you wantfor that station. Press the buttonand hold it until you hear a beep.
4. Repeat steps 1 to 3 to store atotal of six stations on AM andtwelve on FM.
Once that station's frequency isstored, simply press and release theproper preset button to tune to it. Ifyou want to change any presetbutton's selection, store another fre-quency as described. The frequen-cies you preset will be lost if yourcar's battery goes dead or is discon-nected.
Comfort and Convenience Features
TUNE/SEEKSWITCH
AM/FMBUTTON
PRESET BUTTONS
Main Menu Table of Contents ▲ ▼
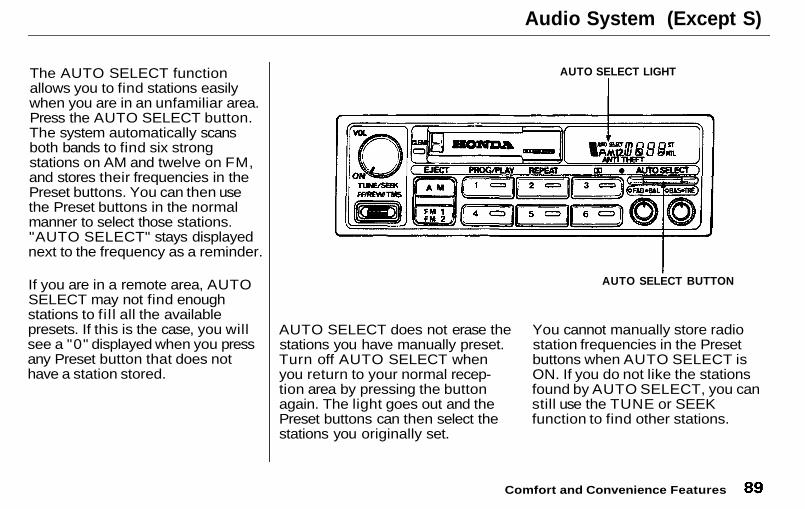
Audio System (Except S)
The AUTO SELECT functionallows you to find stations easilywhen you are in an unfamiliar area.Press the AUTO SELECT button.The system automatically scansboth bands to find six strongstations on AM and twelve on FM,and stores their frequencies in thePreset buttons. You can then usethe Preset buttons in the normalmanner to select those stations."AUTO SELECT" stays displayednext to the frequency as a reminder.
If you are in a remote area, AUTOSELECT may not find enoughstations to fi l l all the availablepresets. If this is the case, you willsee a "0" displayed when you pressany Preset button that does nothave a station stored.
AUTO SELECT does not erase thestations you have manually preset.Turn off AUTO SELECT whenyou return to your normal recep-tion area by pressing the buttonagain. The light goes out and thePreset buttons can then select thestations you originally set.
You cannot manually store radiostation frequencies in the Presetbuttons when AUTO SELECT isON. If you do not like the stationsfound by AUTO SELECT, you canstill use the TUNE or SEEKfunction to find other stations.
Comfort and Convenience Features
AUTO SELECT BUTTON
AUTO SELECT LIGHT
Main Menu Table of Contents ▲ ▼
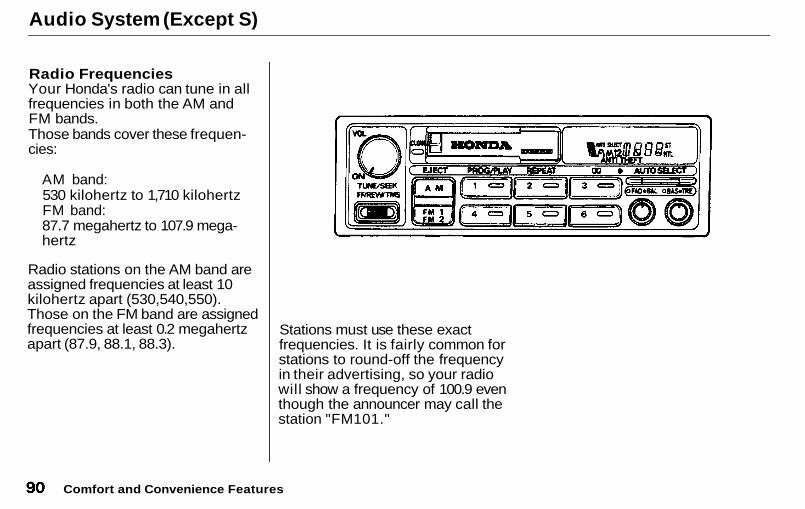
Audio System (Except S)
Radio FrequenciesYour Honda's radio can tune in allfrequencies in both the AM andFM bands.Those bands cover these frequen-cies:
AM band:530 kilohertz to 1,710 kilohertzFM band:87.7 megahertz to 107.9 mega-hertz
Radio stations on the AM band areassigned frequencies at least 10kilohertz apart (530,540,550).Those on the FM band are assignedfrequencies at least 0.2 megahertzapart (87.9, 88.1, 88.3).
Stations must use these exactfrequencies. It is fairly common forstations to round-off the frequencyin their advertising, so your radiowill show a frequency of 100.9 eventhough the announcer may call thestation "FM101."
Comfort and Convenience Features
Main Menu Table of Contents ▲ ▼
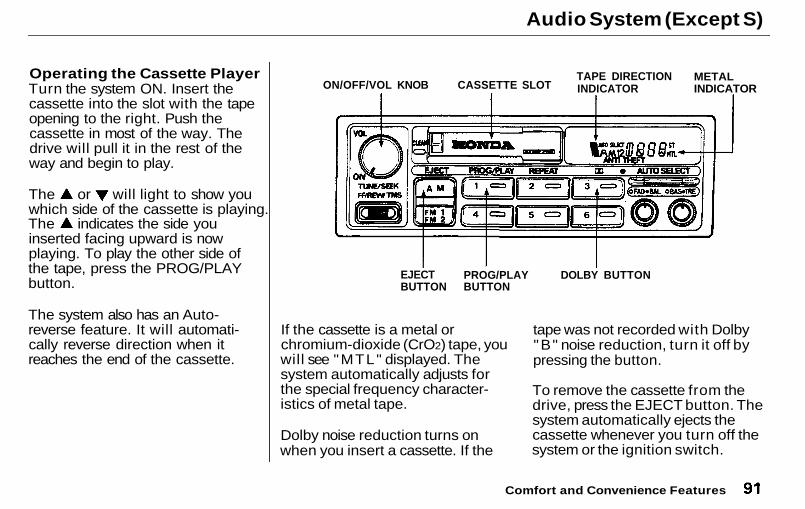
Audio System (Except S)
Operating the Cassette PlayerTurn the system ON. Insert thecassette into the slot with the tapeopening to the right. Push thecassette in most of the way. Thedrive will pull it in the rest of theway and begin to play.
The or will light to show youwhich side of the cassette is playing.The indicates the side youinserted facing upward is nowplaying. To play the other side ofthe tape, press the PROG/PLAYbutton.
The system also has an Auto-reverse feature. It will automati-cally reverse direction when itreaches the end of the cassette.
If the cassette is a metal orchromium-dioxide (CrO2) tape, youwill see " M T L " displayed. Thesystem automatically adjusts forthe special frequency character-istics of metal tape.
Dolby noise reduction turns onwhen you insert a cassette. If the
tape was not recorded with Dolby"B " noise reduction, turn it off bypressing the button.
To remove the cassette from thedrive, press the EJECT button. Thesystem automatically ejects thecassette whenever you turn off thesystem or the ignition switch.
Comfort and Convenience Features
ON/OFF/VOL KNOB CASSETTE SLOTTAPE DIRECTIONINDICATOR
METALINDICATOR
EJECTBUTTON
PROG/PLAYBUTTON
DOLBY BUTTON
Main Menu Table of Contents ▲ ▼
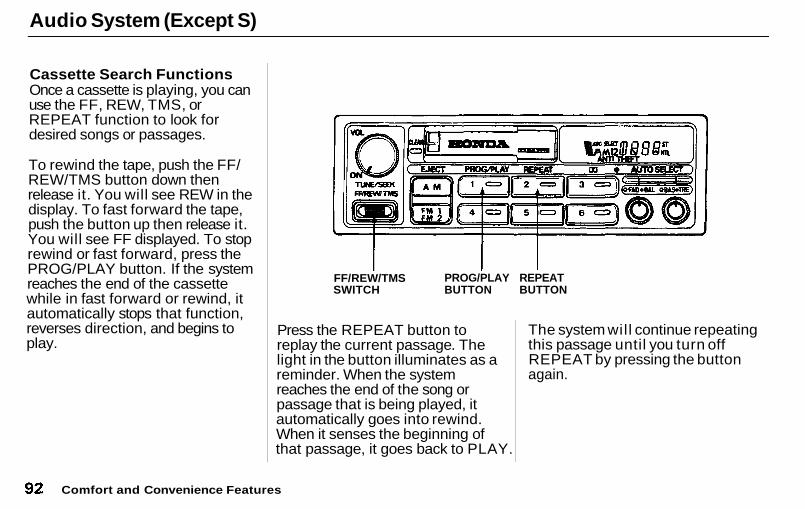
Audio System (Except S)
Cassette Search FunctionsOnce a cassette is playing, you canuse the FF, REW, TMS, orREPEAT function to look fordesired songs or passages.
To rewind the tape, push the FF/REW/TMS button down thenrelease it. You will see REW in thedisplay. To fast forward the tape,push the button up then release it.You will see FF displayed. To stoprewind or fast forward, press thePROG/PLAY button. If the systemreaches the end of the cassettewhile in fast forward or rewind, itautomatically stops that function,reverses direction, and begins toplay.
Press the REPEAT button toreplay the current passage. Thelight in the button illuminates as areminder. When the systemreaches the end of the song orpassage that is being played, itautomatically goes into rewind.When it senses the beginning ofthat passage, it goes back to PLAY.
The system wil l continue repeatingthis passage until you turn offREPEAT by pressing the buttonagain.
Comfort and Convenience Features
REPEATBUTTON
PROG/PLAYBUTTON
FF/REW/TMSSWITCH
Main Menu Table of Contents ▲ ▼
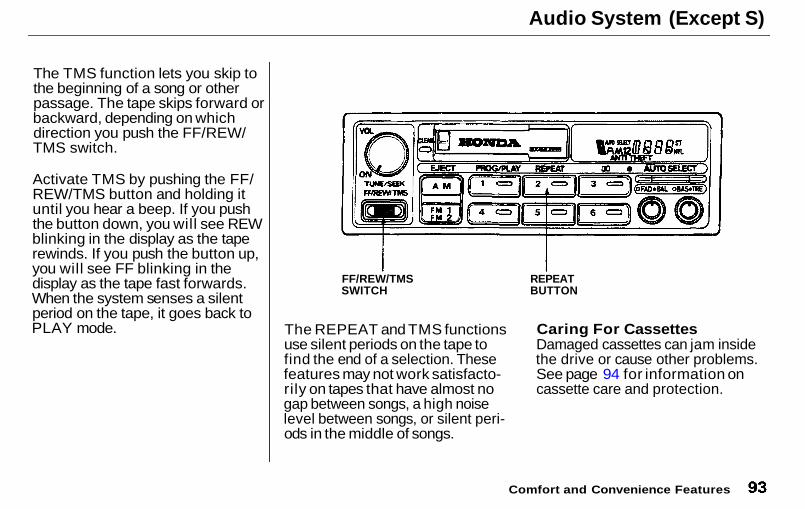
Audio System (Except S)
The TMS function lets you skip tothe beginning of a song or otherpassage. The tape skips forward orbackward, depending on whichdirection you push the FF/REW/TMS switch.
Activate TMS by pushing the FF/REW/TMS button and holding ituntil you hear a beep. If you pushthe button down, you will see REWblinking in the display as the taperewinds. If you push the button up,you will see FF blinking in thedisplay as the tape fast forwards.When the system senses a silentperiod on the tape, it goes back toPLAY mode. The REPEAT and TMS functions
use silent periods on the tape tofind the end of a selection. Thesefeatures may not work satisfacto-rily on tapes that have almost nogap between songs, a high noiselevel between songs, or silent peri-ods in the middle of songs.
Caring For CassettesDamaged cassettes can jam insidethe drive or cause other problems.See page 94 for information oncassette care and protection.
Comfort and Convenience Features
REPEATBUTTON
FF/REW/TMSSWITCH
Main Menu Table of Contents ▲ ▼
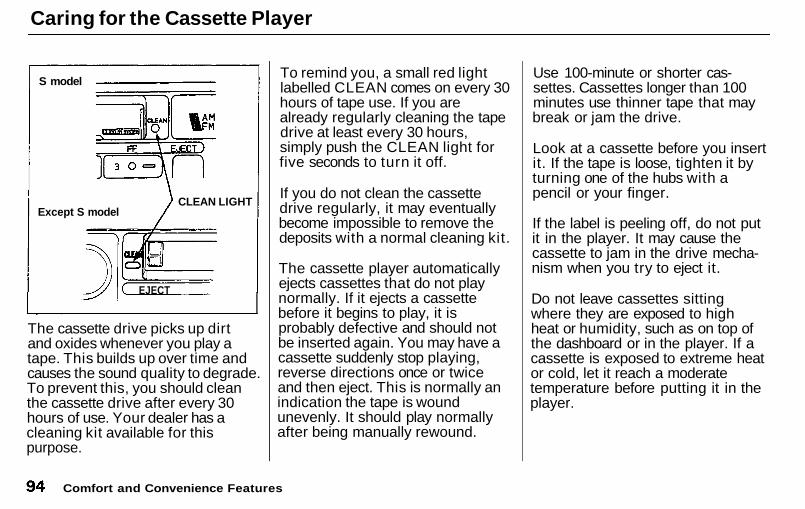
Caring for the Cassette Player
The cassette drive picks up dirtand oxides whenever you play atape. This builds up over time andcauses the sound quality to degrade.To prevent this, you should cleanthe cassette drive after every 30hours of use. Your dealer has acleaning kit available for thispurpose.
To remind you, a small red lightlabelled CLEAN comes on every 30hours of tape use. If you arealready regularly cleaning the tapedrive at least every 30 hours,simply push the CLEAN light forfive seconds to turn it off.
If you do not clean the cassettedrive regularly, it may eventuallybecome impossible to remove thedeposits with a normal cleaning kit.
The cassette player automaticallyejects cassettes that do not playnormally. If it ejects a cassettebefore it begins to play, it isprobably defective and should notbe inserted again. You may have acassette suddenly stop playing,reverse directions once or twiceand then eject. This is normally anindication the tape is woundunevenly. It should play normallyafter being manually rewound.
Use 100-minute or shorter cas-settes. Cassettes longer than 100 minutes use thinner tape that maybreak or jam the drive.
Look at a cassette before you insertit. If the tape is loose, tighten it byturning one of the hubs with apencil or your finger.
If the label is peeling off, do not putit in the player. It may cause thecassette to jam in the drive mecha-nism when you try to eject it.
Do not leave cassettes sittingwhere they are exposed to highheat or humidity, such as on top ofthe dashboard or in the player. If acassette is exposed to extreme heator cold, let it reach a moderatetemperature before putting it in theplayer.
Comfort and Convenience Features
CLEAN LIGHTExcept S model
S model
EJECT
Main Menu Table of Contents ▲ ▼
Theft Protection
Theft Protection is standard on theSi, Si 4WS and VTEC models in theU. S., and the SR, SR 4WS andSR-V models in Canada.
Your audio system is protected by acode number. The system immedi-ately disables itself whenever theradio/player unit is disconnectedfrom the battery. To make it workagain, you must enter a five-digitcode with the station Presetbuttons.
Your dealer should have given youtwo copies of your audio system'scode number with your car. Keepone of these copies at home, andthe other in your wallet or a con-cealed place in the car.
If your car's battery is discon-nected or goes dead, the audiosystem will disable itself. The nexttime you turn on the radio you willsee "Code" in the frequency display.Use the Preset buttons to enter thefive-digit code. If entered correctly,the radio will start to play.
You will then have to store yourfavorite stations in the Presetbuttons. Your original settingswere lost when power was discon-nected.
Comfort and Convenience Features
Main Menu Table of Contents ▲ ▼
Before Driving
Before you begin driving yourHonda, you should know what gaso-line to use, and how to check thelevels of important fluids. You alsoneed to know how to properly stowluggage or packages. This sectionwill help you. If you plan to add anyaccessories to your car, please readthe information in this section first.
Break-in Period.............................. 98Gasoline............................................ 98
Oxygenated Fuels...................... 98Driving in Foreign Countries... 99
Service Station Procedures........ 100Filling the Fuel Tank.............. 100Opening the Hood..................... 101
Fuel Economy............................... 104Vehicle Condition..................... 104Driving Habits.......................... 104
Accessories.................................... 105Loading Cargo.............................. 106
Before Driving
Main Menu ▲ ▼
Break-in Period, Gasoline
Break-in PeriodHelp assure your car's futurereliability and performance bypaying extra attention to how youdrive during the first 1,000 km (600miles).During this period:
Avoid full-throttle starts andrapid acceleration.
If you need to add oil, use theengine oil recommended in thisowner's manual.
Avoid hard braking. New brakesneed to be broken-in by moderateuse for the first 300 km (200miles).
You should follow these same re-commendations with an overhauledor exchanged engine, or when thebrakes are relined.
GasolineYour Honda is designed to operatemost effectively on unleadedgasoline.
We recommend gasolines con-taining detergent additives thathelp prevent fuel system andengine deposits.
Using gasoline containing lead willdamage your car's emissioncontrols. This contributes to airpollution and can void certain partsof your warranty.
(S model)Use an unleaded gasoline with apump octane number of 86 orhigher. Use of a lower octanegasoline can cause a persistent,heavy metallic rapping noise in theengine that can lead to mechanicaldamage.
(All other models)Use a premium unleaded gasolinewith a pump octane number of 91or higher.If you are unable to find premiumunleaded, you may substitute anunleaded regular gasoline. Theengine will compensate for thelower octane, but you may notice aslight decrease in power as a result.
Oxygenated FuelsSome conventional gasolines arebeing blended with alcohol or anether compound. These gasolinesare collectively referred to asoxygenated fuels. To meet clean airstandards, some areas of theUnited States and Canada useoxygenated fuels to help reduceemissions.
If you use an oxygenated fuel, besure it is unleaded and meets theminimum octane rating require-ment.
Before Driving
Main Menu Table of Contents ▲ ▼
Gasoline
Before using an oxygenated fuel,try to confirm the fuel's contents.Some states/provinces require thisinformation to be posted on thepump.
The following are the EPA-approved percentages of oxygen-ates:
ETHANOL (ethyl or grain alcohol)You may use gasoline containingup to 10% ethanol by volume.Gasoline containing ethanol may bemarketed under the name "Gasohol.
MTBE (Methyl Tertiary ButylEther)You may use gasoline containingup to 15% MTBE by volume.
METHANOL (methyl or woodalcohol)You may use gasoline containingup to 5% methanol by volume aslong as it also contains cosolvents
and corrosion inhibitors to protectthe fuel system. Gasoline con-taining more than 5% methanol byvolume may cause starting and/orperformance problems. It may alsodamage metal, rubber and plasticparts of your fuel system.
If you notice any undesirableoperating symptoms, try anotherservice station or switch to anotherbrand of gasoline.
Fuel system damage or perfor-mance problems resulting from theuse of an oxygenated fuel con-taining more than the percentagesof oxygenates given above are notcovered under warranty.
Driving in Foreign CountriesUsing any type of leaded gasolinein your Honda will affect perform-ance and damage its emission con-trols. Unleaded gasoline may not beavailable in other countries. If youare planning to take your car out-side the U.S. or Canada, write toHonda at the address shown forinformation about any modifica-tions your car may need. Be sure toinclude the year and model of yourcar.
U.S. Owners:American Honda Motor Co., Inc.Consumer Affairs1919 Torrance Blvd.Torrance, CA 90501-2746
Canadian Owners:Honda Canada Inc.715 Milner Ave.Scarborough, Ontario M1B 2K8
Before Driving
Main Menu Table of Contents ▲ ▼
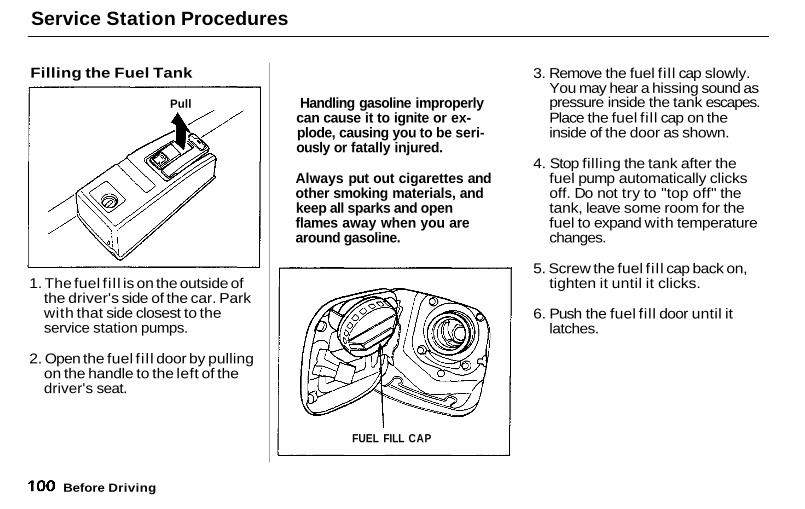
Service Station Procedures
Filling the Fuel Tank
1. The fuel f i l l is on the outside ofthe driver's side of the car. Parkwith that side closest to theservice station pumps.
2. Open the fuel f i l l door by pullingon the handle to the left of thedriver's seat.
3. Remove the fuel fil l cap slowly.You may hear a hissing sound aspressure inside the tank escapes.Place the fuel fill cap on theinside of the door as shown.
4. Stop filling the tank after thefuel pump automatically clicksoff. Do not try to "top off" thetank, leave some room for thefuel to expand with temperaturechanges.
5. Screw the fuel f i l l cap back on,tighten it until it clicks.
6. Push the fuel fill door until itlatches.
Before Driving
Pull Handling gasoline improperlycan cause it to ignite or ex-plode, causing you to be seri-ously or fatally injured.
Always put out cigarettes andother smoking materials, andkeep all sparks and openflames away when you arearound gasoline.
FUEL FILL CAP
Main Menu Table of Contents ▲ ▼
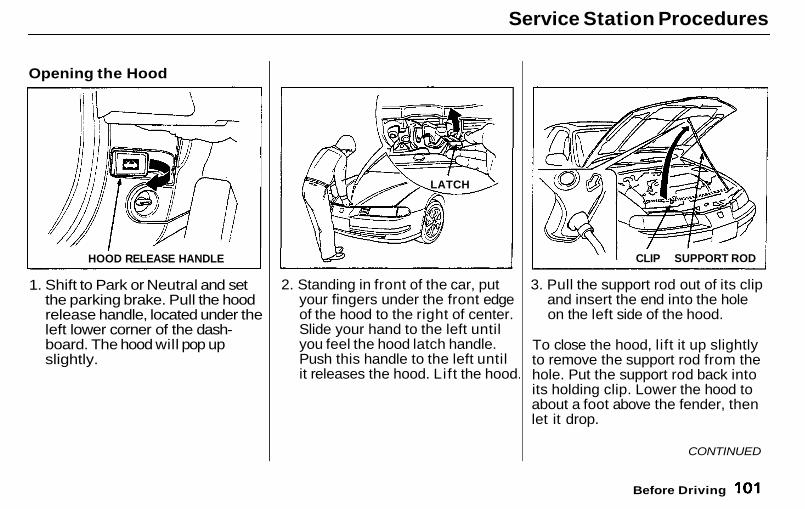
Service Station Procedures
Opening the Hood
1. Shift to Park or Neutral and setthe parking brake. Pull the hoodrelease handle, located under theleft lower corner of the dash-board. The hood will pop upslightly.
2. Standing in front of the car, putyour fingers under the front edgeof the hood to the right of center.Slide your hand to the left untilyou feel the hood latch handle.Push this handle to the left untilit releases the hood. Li f t the hood.
3. Pull the support rod out of its clipand insert the end into the holeon the left side of the hood.
To close the hood, lift it up slightlyto remove the support rod from thehole. Put the support rod back intoits holding clip. Lower the hood toabout a foot above the fender, thenlet it drop.
Before Driving
HOOD RELEASE HANDLE
LATCH
CLIP SUPPORT ROD
CONTINUED
Main Menu Table of Contents ▲ ▼
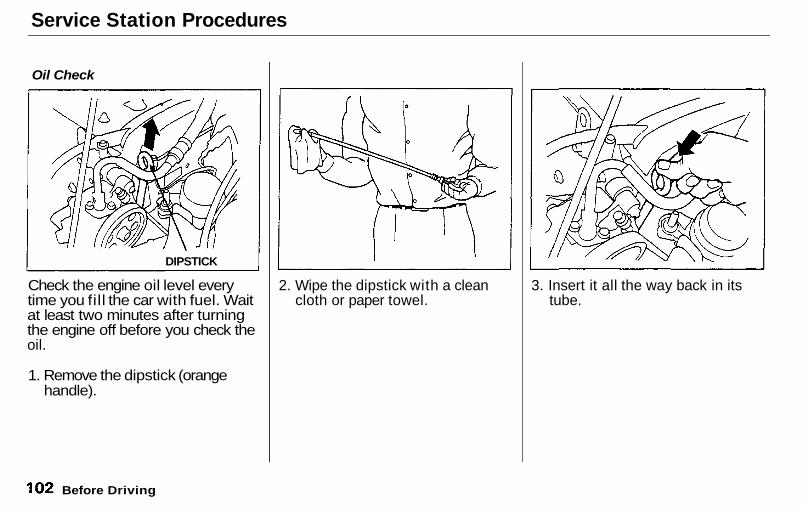
Service Station Procedures
Oil Check
Check the engine oil level everytime you fill the car with fuel. Waitat least two minutes after turningthe engine off before you check theoil.
1. Remove the dipstick (orangehandle).
2. Wipe the dipstick with a cleancloth or paper towel.
3. Insert it all the way back in itstube.
Before Driving
DIPSTICK
Main Menu Table of Contents ▲ ▼
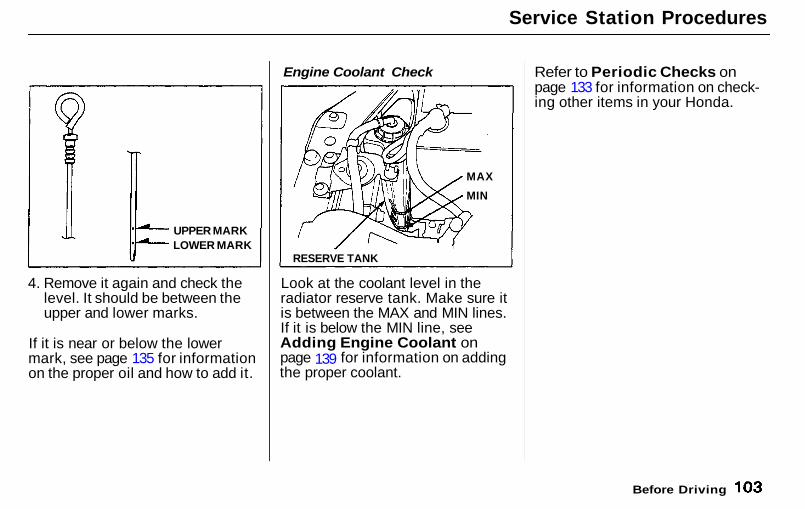
Service Station Procedures
4. Remove it again and check thelevel. It should be between theupper and lower marks.
If it is near or below the lowermark, see page 135 for informationon the proper oil and how to add it.
Engine Coolant Check
Look at the coolant level in theradiator reserve tank. Make sure itis between the MAX and MIN lines.If it is below the MIN line, seeAdding Engine Coolant onpage 139 for information on addingthe proper coolant.
Refer to Periodic Checks onpage 133 for information on check-ing other items in your Honda.
Before Driving
UPPER MARKLOWER MARK
MAX
MIN
RESERVE TANK
Main Menu Table of Contents ▲ ▼
Fuel Economy
The condition of your car and yourdriving habits are the two mostimportant things that affect thefuel mileage you get.
Vehicle ConditionAlways maintain your car accord-ing to the maintenance schedule.This wil l keep it in top operatingcondition.
An important part of that mainte-nance is the Periodic Checks(see page 133). For example anunderinf lated tire causes more"rolling resistance," which usesfuel. It also wears out faster, socheck the tire pressure at leastmonthly. In winter, the build-up ofsnow on your car's underside addsweight and rolling resistance.Frequent cleaning helps your fuelmileage and reduces the chance ofcorrosion.
Driving HabitsYou can improve fuel economy bydriving moderately. Rapid acceler-ation, abrupt cornering, and hardbraking use more fuel.
Always drive in the highest gearthat allows the engine to run andaccelerate smoothly.
Depending on traffic conditions, tryto maintain a constant speed. Everytime you slow down and speed up,your car uses extra fuel. Use thecruise control, when appropriate, toincrease fuel economy.
A cold engine uses more fuel than awarm engine. It is not necessary to"warm-up" a cold engine by lettingit idle for a long time. You candrive away in about a minute, nomatter how cold it is outside. Theengine will warm up faster, and youget better fuel economy. To cutdown on the number of "cold starts,"try to combine several short tripsinto one.
The air conditioning puts an extraload on the engine which makes ituse more fuel. Turn off the A/C tocut down on air conditioning use.Use the flow-through ventilationwhen the outside air temperature ismoderate.
Before Driving
Main Menu Table of Contents ▲ ▼
Accessories
Your Honda dealer has many acces-sories available to personalize yourcar. Some of these are audio sys-tems, alloy wheels, air conditioning,and color-coordinated carpet floormats. A l l Genuine Honda Acces-sories have been approved by ourengineers for installation and useon your car, and are covered bywarranty. For a complete guide tothe Genuine Honda Accessoriesavailable, see your dealer for a 1993Accessories brochure.
Some non-Honda accessories youcan buy in the "aftermarket" aredesigned for universal applications.Although they may fit your Honda,they may not be within factoryspecifications. For example, after-market wheels may not meetHonda's specifications for widthand offset. They could cause sus-pension problems which would notbe covered by your warranty. Im-properly-designed accessories canadversely affect your car's han-dling and stability.
Your car has several computer-controlled systems, including theSRS system, the engine's fuelinjection, and the Anti-lock brakesystem. Strong electronic inter-ference can affect their operation.
Electronic communications equip-ment, such as cellular telephonesand two-way radios are regulatedby the FCC (CRTC in Canada) andshould not interfere with your car'ssystems. Improper installation, orusing electrical equipment notintended for mobile use mayinterfere with your car's operation.If you want to install a cellulartelephone, other mobile communi-cations equipment or even add-onstereo amplifiers, please discuss itfirst with your Honda dealer.
In many cases, improper instal-lation is the real cause of problemswith aftermarket accessories. Havethese accessories installed by quali-fied technicians who are familiarwith your Honda. If possible, haveyour Honda dealer inspect the finalinstallation.
Before Driving
Main Menu Table of Contents ▲ ▼
Loading Cargo
The maximum load you can carryin your Honda is 325 kg (700 Ibs). Itincludes the total weight of allpassengers and their belongings,any accessories, and the tongueweight of a trailer. This 325 kg (700Ibs) figure is shown as the VehicleCapacity Weight on the tire infor-mation label attached to the driver'sdoor jamb.
To figure out how much cargo youcan carry:
Figure the total "occupantweight" you will be transporting.To do this, multiply the numberof people (driver and all passen-gers) by 70 kg (150 Ibs).Subtract this number from theVehicle Capacity Weight (325 kg/700 Ibs).If you are towing a trailer,subtract the tongue weight. SeeTowing a Trailer on page 122.
This final number is the totalweight of cargo you can load in oron the car. With four occupants(driver and three passengers), themaximum recommended weightfor cargo is 45 kg (100 Ibs).
Where you store this cargo, andhow well you secure it, are just asimportant as how much it weighs.Make sure you load cargo so it wil lnot shift while driving. Whenstoring items in the trunk, placethem as far forward as possible.You could store additional items onthe floor behind the front seats.Make sure they cannot roll underthe front seat and interfere withthe pedals.
If you must carry large objects thatprevent you from closing the trunklid, be aware that exhaust gas canenter the interior. See CarbonMonoxide Hazard on page 25.
Never place items on the shelfbehind the back seat. Those itemscan fly forward and injure you oryour passengers if you brake hardor are involved in a collision.
Before Driving
Main Menu Table of Contents ▲ ▼
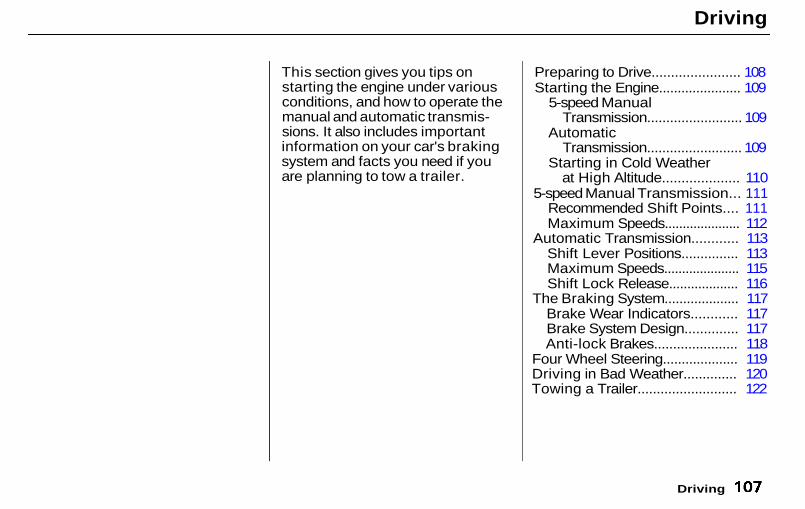
Driving
This section gives you tips onstarting the engine under variousconditions, and how to operate themanual and automatic transmis-sions. It also includes importantinformation on your car's brakingsystem and facts you need if youare planning to tow a trailer.
Preparing to Drive....................... 108Starting the Engine...................... 109
5-speed ManualTransmission......................... 109
AutomaticTransmission......................... 109
Starting in Cold Weatherat High Altitude.................... 110
5-speed Manual Transmission... 111Recommended Shift Points.... 111Maximum Speeds..................... 112
Automatic Transmission............ 113Shift Lever Positions............... 113Maximum Speeds..................... 115Shift Lock Release................... 116
The Braking System.................... 117Brake Wear Indicators............ 117Brake System Design.............. 117Anti-lock Brakes...................... 118
Four Wheel Steering.................... 119Driving in Bad Weather.............. 120Towing a Trailer.......................... 122
Driving
Main Menu ▲ ▼
Preparing to Drive
You should do the following checksand adjustments every day beforeyou drive your car.
1. Make sure all windows, mirrors,and outside lights are clean andunobstructed. Remove frost,snow, or ice.
2. Check that the hood and trunkare fully closed.
3. Check that any items you may becarrying with you inside arestored properly or fastened downsecurely.
4. Check the adjustment of the seat(see page 51).
5. Check the adjustment of theinside and outside mirrors (seepage 59).
6. Check the adjustment of thesteering wheel (see page 43).
7. Make sure the doors are securelyclosed and locked.
8. Fasten your seat belt. Check thatyour passengers have fastenedtheir seat belts (see page 7).
9. Turn the ignition ON (II). Checkthe indicator lights in the instru-ment panel.
10. Start the engine.
11. Check the gauges and indicatorlights in the instrument panel(see page 31).
Driving
Main Menu Table of Contents ▲ ▼
Starting the Engine
5-speed Manual Transmission1. Apply the parking brake.
2. In cold weather, turn off allelectrical accessories to reducethe drain on the battery.
3. Push the clutch pedal down allthe way. START (III) does notfunction unless the clutch pedalis depressed.
4. Without touching the acceleratorpedal, turn the ignition key to theSTART (III) position. If theengine does not start right away,do not hold the key in START(III) for more than 15 seconds ata time. Pause for at least 10seconds before trying again.
5. If the engine does not startwithin 15 seconds, or starts butstalls right away, repeat step 4with the accelerator pedalpressed half-way down. If theengine starts, release pressure onthe accelerator pedal so theengine does not race.
6. If the engine still does not start,press the accelerator pedal all theway down and hold it there whilestarting in order to clear flooding.As before, keep the ignition keyin the START (III) position forno more than 15 seconds. Returnto step 5 if the engine does notstart. If it starts, lift your foot offthe accelerator pedal so theengine does not race.
Automatic Transmission1. Apply the parking brake.
2. In cold weather, turn off allelectrical accessories to reducethe drain on the battery.
3. Make sure the shift lever is inPark. Press on the brake pedal.
4. Without touching the acceleratorpedal, turn the ignition key to theSTART (III) position. If theengine does not start right away,do not hold the key in START(III) for more than 15 seconds ata time. Pause for at least 10seconds before trying again.
CONTINUED
Driving
Main Menu Table of Contents ▲ ▼
Starting the Engine
5. If the engine does not startwithin 15 seconds, or starts butstalls right away, repeat step 4with the accelerator pedalpressed half-way down. If theengine starts, release pressure onthe accelerator pedal so theengine does not race.
6. If the engine still does not start,press the accelerator pedal all theway down and hold it there whilestarting in order to clear flooding.As before, keep the ignition keyin the START (III) position forno more than 15 seconds. Returnto step 5 if the engine does notstart. If it starts, lift your foot offthe accelerator pedal so theengine does not race.
Starting in Cold Weather atHigh Altitude (Above 2,400meters/8,000 feet)An engine is harder to start in coldweather. The thinner air found athigh altitude above 2,400 meters(8,000 feet) adds to the problem.Use the following procedure:
1. Turn off all electrical accessoriesto reduce the drain on thebattery.
2. Push the accelerator pedal half-way to the floor and hold it therewhile starting the engine. Do nothold the ignition key in START(III) for more than 15 seconds.When the engine starts, releasethe accelerator pedal graduallyas the engine speeds up andsmooths out.
3. If the engine fails to start in step2, push the accelerator pedal tothe floor and hold it there whileyou try to start the engine for nomore than 15 seconds. If theengine does not start, return tostep 2.
Driving
Main Menu Table of Contents ▲ ▼
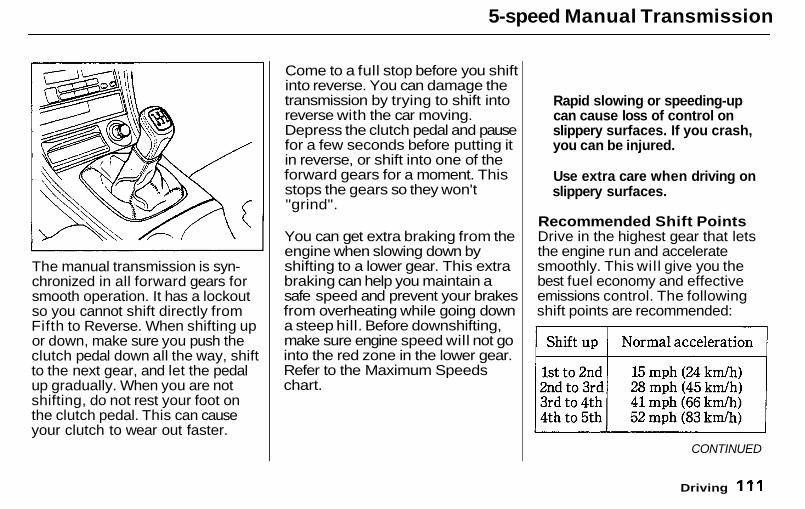
5-speed Manual Transmission
The manual transmission is syn-chronized in all forward gears forsmooth operation. It has a lockoutso you cannot shift directly fromFifth to Reverse. When shifting upor down, make sure you push theclutch pedal down all the way, shiftto the next gear, and let the pedalup gradually. When you are notshifting, do not rest your foot onthe clutch pedal. This can causeyour clutch to wear out faster.
Come to a full stop before you shiftinto reverse. You can damage thetransmission by trying to shift intoreverse with the car moving.Depress the clutch pedal and pausefor a few seconds before putting itin reverse, or shift into one of theforward gears for a moment. Thisstops the gears so they won't"grind".
You can get extra braking from theengine when slowing down byshifting to a lower gear. This extrabraking can help you maintain asafe speed and prevent your brakesfrom overheating while going downa steep hill. Before downshifting,make sure engine speed will not gointo the red zone in the lower gear.Refer to the Maximum Speedschart.
Recommended Shift PointsDrive in the highest gear that letsthe engine run and acceleratesmoothly. This wil l give you thebest fuel economy and effectiveemissions control. The followingshift points are recommended:
CONTINUED
Driving
Rapid slowing or speeding-upcan cause loss of control onslippery surfaces. If you crash,you can be injured.
Use extra care when driving onslippery surfaces.
Main Menu Table of Contents ▲ ▼
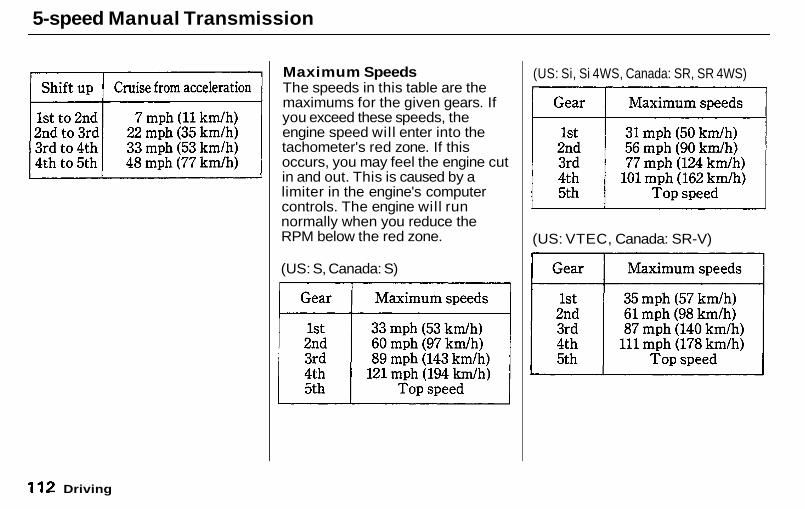
5-speed Manual Transmission
Maximum SpeedsThe speeds in this table are themaximums for the given gears. Ifyou exceed these speeds, theengine speed will enter into thetachometer's red zone. If thisoccurs, you may feel the engine cutin and out. This is caused by alimiter in the engine's computercontrols. The engine will runnormally when you reduce theRPM below the red zone.
(US: S, Canada: S)
(US: Si, Si 4WS, Canada: SR, SR 4WS)
(US: VTEC, Canada: SR-V)
Driving
Main Menu Table of Contents ▲ ▼
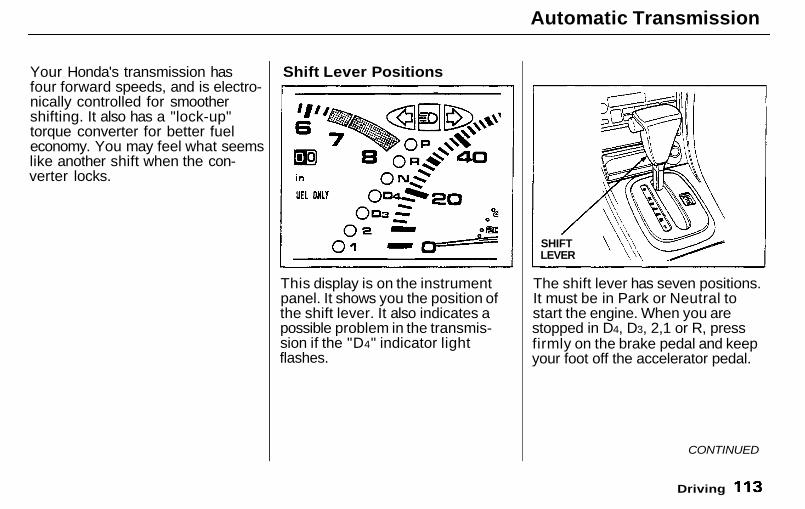
Automatic Transmission
Your Honda's transmission hasfour forward speeds, and is electro-nically controlled for smoothershifting. It also has a "lock-up"torque converter for better fueleconomy. You may feel what seemslike another shift when the con-verter locks.
Shift Lever Positions
This display is on the instrumentpanel. It shows you the position ofthe shift lever. It also indicates apossible problem in the transmis-sion if the "D4" indicator lightflashes.
The shift lever has seven positions.It must be in Park or Neutral tostart the engine. When you arestopped in D4, D3, 2,1 or R, pressfirmly on the brake pedal and keepyour foot off the accelerator pedal.
CONTINUED
Driving
SHIFTLEVER
Main Menu Table of Contents ▲ ▼
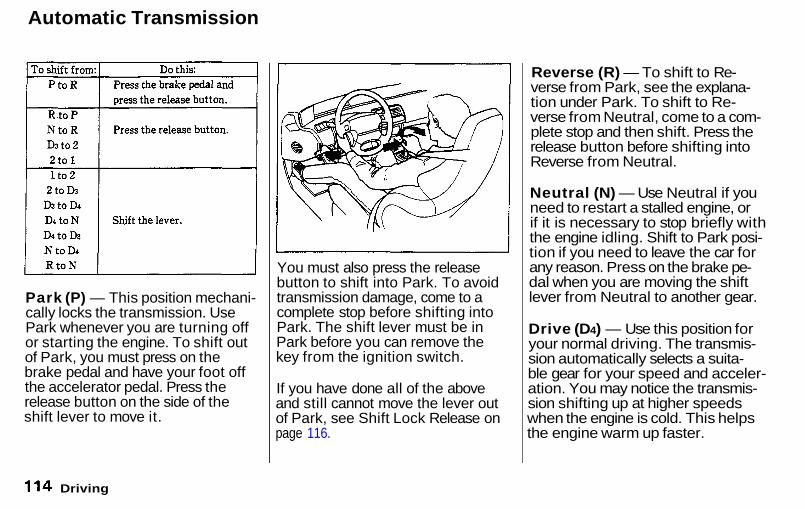
Automatic Transmission
Park (P) — This position mechani-cally locks the transmission. UsePark whenever you are turning offor starting the engine. To shift outof Park, you must press on thebrake pedal and have your foot offthe accelerator pedal. Press therelease button on the side of theshift lever to move it.
You must also press the releasebutton to shift into Park. To avoidtransmission damage, come to acomplete stop before shifting intoPark. The shift lever must be inPark before you can remove thekey from the ignition switch.
If you have done all of the aboveand still cannot move the lever outof Park, see Shift Lock Release onpage 116.
Reverse (R) — To shift to Re-verse from Park, see the explana-tion under Park. To shift to Re-verse from Neutral, come to a com-plete stop and then shift. Press therelease button before shifting intoReverse from Neutral.
Neutral (N) — Use Neutral if youneed to restart a stalled engine, orif it is necessary to stop briefly withthe engine idling. Shift to Park posi-tion if you need to leave the car forany reason. Press on the brake pe-dal when you are moving the shiftlever from Neutral to another gear.
Drive (D4) — Use this position foryour normal driving. The transmis-sion automatically selects a suita-ble gear for your speed and acceler-ation. You may notice the transmis-sion shifting up at higher speedswhen the engine is cold. This helpsthe engine warm up faster.
Driving
Main Menu Table of Contents ▲ ▼
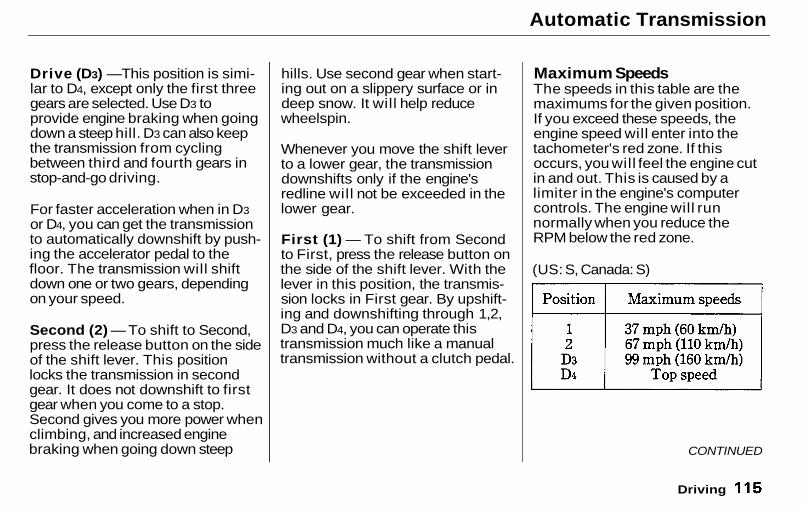
Automatic Transmission
Drive (D3) —This position is simi-lar to D4, except only the first threegears are selected. Use D3 toprovide engine braking when goingdown a steep hill. D3 can also keepthe transmission from cyclingbetween third and fourth gears instop-and-go driving.
For faster acceleration when in D3or D4, you can get the transmissionto automatically downshift by push-ing the accelerator pedal to thefloor. The transmission will shiftdown one or two gears, dependingon your speed.
Second (2) — To shift to Second,press the release button on the sideof the shift lever. This positionlocks the transmission in secondgear. It does not downshift to firstgear when you come to a stop.Second gives you more power whenclimbing, and increased enginebraking when going down steep
hills. Use second gear when start-ing out on a slippery surface or indeep snow. It will help reducewheelspin.
Whenever you move the shift leverto a lower gear, the transmissiondownshifts only if the engine'sredline will not be exceeded in thelower gear.
First (1) — To shift from Secondto First, press the release button onthe side of the shift lever. With thelever in this position, the transmis-sion locks in First gear. By upshift-ing and downshifting through 1,2,D3 and D4, you can operate thistransmission much like a manualtransmission without a clutch pedal.
Maximum SpeedsThe speeds in this table are themaximums for the given position.If you exceed these speeds, theengine speed will enter into thetachometer's red zone. If thisoccurs, you will feel the engine cutin and out. This is caused by alimiter in the engine's computercontrols. The engine will runnormally when you reduce theRPM below the red zone.
(US: S, Canada: S)
Driving
CONTINUED
Main Menu Table of Contents ▲ ▼
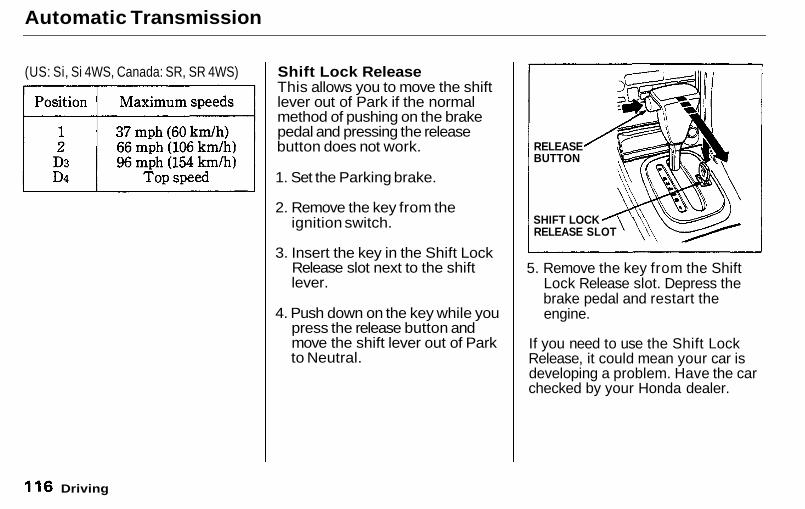
Automatic Transmission
(US: Si, Si 4WS, Canada: SR, SR 4WS) Shift Lock ReleaseThis allows you to move the shiftlever out of Park if the normalmethod of pushing on the brakepedal and pressing the releasebutton does not work.
1. Set the Parking brake.
2. Remove the key from theignition switch.
3. Insert the key in the Shift LockRelease slot next to the shiftlever.
4. Push down on the key while youpress the release button andmove the shift lever out of Parkto Neutral.
5. Remove the key from the ShiftLock Release slot. Depress thebrake pedal and restart theengine.
If you need to use the Shift LockRelease, it could mean your car isdeveloping a problem. Have the carchecked by your Honda dealer.
Driving
RELEASEBUTTON
SHIFT LOCKRELEASE SLOT
Main Menu Table of Contents ▲ ▼

The Braking System
Your Honda is equipped with discbrakes at all four wheels. Thebraking system is power-assisted toreduce the effort needed on thebrake pedal.
Put your foot on the brake pedalonly when you intend to brake.Resting your foot on the pedalkeeps the brakes applied lightly,causing them to build up heat. Heatbuild-up can reduce how well yourbrakes work. It also keeps yourbrake lights on all the time, con-fusing drivers behind you.
Constant application of the brakeswhen going down a long hill buildsup heat and reduces their effective-ness. Use the engine to assist thebrakes by downshifting to a lowergear and taking your foot off theaccelerator pedal.
Check your brakes after drivingthrough deep water. Apply thebrakes moderately to see if theyfeel normal. If not, apply themgently and frequently until they do.Since a longer distance is needed tostop with wet brakes, be extracautious and alert in your driving.
Brake Wear IndicatorsAll four brakes have audible brakewear indicators.When the brake pads need re-placing, you will hear a distinctivemetallic "screeching" sound whenyou apply the brakes. If you do nothave the brake pads replaced, theywill begin screeching all the time.
Your brakes may sometimes squealor squeak when you apply themlightly. Do not confuse this with thebrake wear indicators. They makea very audible "screeching".
Brake System DesignThe hydraulic system that operatesthe brakes has two separate cir-cuits. Each circuit works diago-nally across the car (the left-frontbrake is connected with the right-rear brake, etc.). If one circuitshould develop a problem, you wil lstill have braking at two wheels.
Driving
CONTINUED
Front
Main Menu Table of Contents ▲ ▼
The Braking System
If this happens, you will immediate-ly notice that the brake pedal goesdown much farther and you need topress on it much harder. A muchlonger distance wil l be needed tostop the car.
Slow the car by downshifting to alower gear and removing your footfrom the accelerator pedal. Pull tothe side of the road as soon as it issafe. Because of the longer stop-ping distance needed, brake systemfailure is very hazardous. It is bestto have your car towed, but if youmust drive the car in this condition,be extremely cautious. Have yourcar repaired as soon as possible.
Anti-lock BrakesThe Prelude Si, Si 4WS and VTECmodels in the U.S. and SR, SR 4WSand SR-V models in Canada havean Anti-lock Brake System (ABS)as standard equipment.
ABS helps you maintain steeringcontrol. It does this by helping youto prevent the wheels from lockingup and skidding.
The ABS is always "On". Itrequires no special effort or drivingtechnique. You will feel a pulsationin the brake pedal when the ABSactivates.
Activation varies with the amountof traction your tires have. On drypavement, you will need to press onthe brake pedal very hard beforeyou feel the pedal pulsation thatmeans the ABS has activated.However, you may feel the ABSactivate immediately if you aretrying to stop on snow or ice. Underall conditions, the ABS is helping toprevent the wheels from locking soyou can retain steering control.You should continue to press on thebrake pedal with the same force.
You may feel a slight movement ofthe brake pedal just after you startthe engine. This is the ABSworking.
Driving
Main Menu Table of Contents ▲ ▼
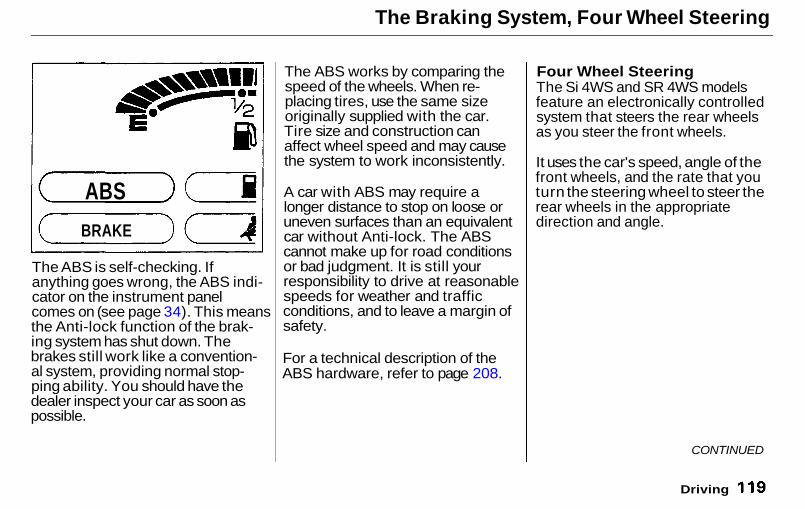
The Braking System, Four Wheel Steering
The ABS is self-checking. Ifanything goes wrong, the ABS indi-cator on the instrument panelcomes on (see page 34). This meansthe Anti-lock function of the brak-ing system has shut down. Thebrakes still work like a convention-al system, providing normal stop-ping ability. You should have thedealer inspect your car as soon aspossible.
The ABS works by comparing thespeed of the wheels. When re-placing tires, use the same sizeoriginally supplied with the car.Tire size and construction canaffect wheel speed and may causethe system to work inconsistently.
A car with ABS may require alonger distance to stop on loose oruneven surfaces than an equivalentcar without Anti-lock. The ABScannot make up for road conditionsor bad judgment. It is still yourresponsibility to drive at reasonablespeeds for weather and trafficconditions, and to leave a margin ofsafety.
For a technical description of theABS hardware, refer to page 208.
Four Wheel SteeringThe Si 4WS and SR 4WS modelsfeature an electronically controlledsystem that steers the rear wheelsas you steer the front wheels.
It uses the car's speed, angle of thefront wheels, and the rate that youturn the steering wheel to steer therear wheels in the appropriatedirection and angle.
Driving
CONTINUED
ABS
BRAKE
Main Menu Table of Contents ▲ ▼
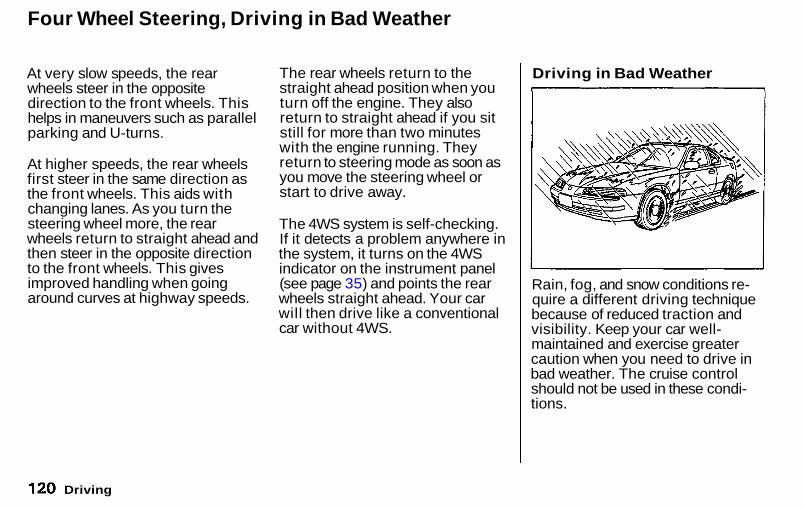
Four Wheel Steering, Driving in Bad Weather
At very slow speeds, the rearwheels steer in the oppositedirection to the front wheels. Thishelps in maneuvers such as parallelparking and U-turns.
At higher speeds, the rear wheelsfirst steer in the same direction asthe front wheels. This aids withchanging lanes. As you turn thesteering wheel more, the rearwheels return to straight ahead andthen steer in the opposite directionto the front wheels. This givesimproved handling when goingaround curves at highway speeds.
The rear wheels return to thestraight ahead position when youturn off the engine. They alsoreturn to straight ahead if you sitstill for more than two minuteswith the engine running. Theyreturn to steering mode as soon asyou move the steering wheel orstart to drive away.
The 4WS system is self-checking.If it detects a problem anywhere inthe system, it turns on the 4WSindicator on the instrument panel(see page 35) and points the rearwheels straight ahead. Your carwill then drive like a conventionalcar without 4WS.
Driving in Bad Weather
Rain, fog, and snow conditions re-quire a different driving techniquebecause of reduced traction andvisibility. Keep your car well-maintained and exercise greatercaution when you need to drive inbad weather. The cruise controlshould not be used in these condi-tions.
Driving
Main Menu Table of Contents ▲ ▼
Driving in Bad Weather
Driving Technique — Alwaysdrive slower than you would in dryweather. It takes your car longer toreact, even in conditions that mayseem just barely damp. Applysmooth, even pressure to all thecontrols. Abrupt steering wheelmovements or sudden, hard appli-cation of the brakes can cause lossof control in wet weather. Be extracautious for the first few miles ofdriving while you adjust to thechange in driving conditions. Thisis especially true in snow. A personcan forget some snow-driving tech-niques during the summer months.Practice is needed to relearn thoseskills.
Exercise extra caution whendriving in rain after a long dry spell.After months of dry weather, thefirst rains bring oil to the surface ofthe roadway, making it slippery.
Visibility — Being able to seeclearly in all directions and beingvisible to other drivers are impor-tant in all weather conditions. Thisis more difficult in bad weather. Tobe seen more clearly during day-light hours, turn on your headlights.
Inspect your windshield wipers andwashers frequently. Keep the wind-shield washer reservoir full of theproper fluid. Replace the wind-shield wiper blades if they start tostreak the windshield or leave partsunwiped. Use the defrosters and airconditioning to keep the windowsfrom fogging up on the inside (seepage 73).
Traction — Check your tiresfrequently for wear and properpressure. Both are important inpreventing "hydroplaning" (loss oftraction on a wet surface). In thewinter, mount snow tires on all fourwheels for the best handling.
Watch road conditions carefully,they can change from moment tomoment. Wet leaves can be as slip-pery as ice. "Clear" roads can havepatches of ice. Driving conditionscan be very hazardous when theoutside temperature is near freez-ing. The road surface can becomecovered with areas of water pud-dles mixed with areas of ice, soyour traction can change withoutwarning.
Be careful when downshifting. Iftraction is low, you can lock up thedrive wheels for a moment andcause a skid.
Driving
CONTINUED
Main Menu Table of Contents ▲ ▼

Driving in Bad Weather, Towing a Trailer
Be very cautious when passing, orbeing passed by other vehicles. Thespray from large vehicles reducesyour visibility, and the windbuffeting can cause you to losecontrol.
Towing a TrailerYour Honda is designed primarilyto carry passengers and their cargo.You can use it to tow a trailer ifyou carefully observe some generalrules.
The total weight of the trailerand everything loaded in it mustnot exceed 450 kg (1,000 Ibs).
The "tongue load" should neverexceed 50 kg (110 Ibs). This is theamount of weight the trailer putson the hitch when it is fully-loaded. As a rule of thumb, thetongue load should be 10% of thetotal trailer package.For example, if the trailer and itsload weigh 225 kg (500 Ibs), thetongue load should be 22.5 kg (50Ibs). Adjust the the trailer's cargoto change the tongue load. Startby putting approximately 60% ofthe cargo toward the front and40% toward the rear. Never loadthe trailer so the back is heavierthan the front. This takes weightoff your car's rear axle andreduces traction.
Driving
Main Menu Table of Contents ▲ ▼
Towing a Trailer
The combined weight of the car,all passengers and their luggage,and tongue load must not exceedthe Gross Vehicle Weight Rating.The GVWR is printed on theCertification label attached tothe driver's door jamb (see page204).
The combined weight of the car,all passengers and their luggage,and tongue load also must notexceed the Gross Axle WeightRating. The GAWR is alsoshown on the Certification label.It tells you the maximum load forthe front and rear axles. It ispossible that your towing pack-age does not exceed the GVWRbut does exceed the GAWR.Improper trailer loading, and/ortoo much luggage in the trunkcan overload the rear axle. Redis-tribute the load and check theaxle weights again.
The best way to confirm that yourtotal towing package is withinthese specifications is to get itweighed. Load the car and traileras you normally would while tow-ing, and take them to a public scale.Have them check the total weightand the weight at each axle, thencompare them to the specifications.
Trailer HitchesYour Honda dealer, or the HondaCustomer Relations Zone Office,can give you advice on the properhitch for your car. Never use ahitch that mounts only to the rearbumper. The bumper is notdesigned to handle that type of load.The hitch should bolt to theunderbody of the car and distributethe load over a wide area. Alwayshave a trailer hitch installed by aqualified technician.
A trailer hitch that is not adequatefor the size of the trailer, or a hitchthat is improperly installed, cancause damage to the underside ofyour car.
Driving
NOTICE
Improperly loading your carand trailer can seriously affectits steering and braking per-formance, causing a crash inwhich you can be seriouslyinjured.
Check the loading of your carand trailer carefully beforestarting to drive.
Main Menu Table of Contents ▲ ▼
Towing a Trailer
MirrorsMany states and provinces havelaws requiring special outsidemirrors when you are towing atrailer. Check the laws in your area.You may want to install mirrors,even if they are not required. Hookup the trailer and see how much itobscures your ability to see behindyou with the standard mirrors. Ifyou cannot see directly behind you,or have a large blind spot next tothe trailer or the car, you shouldinstall mirrors intended for towing.
Connecting the TrailerMost trailers that have a grossweight of 450 kg (1,000 Ibs) do nothave their own braking system. Ifyou are thinking of getting a trailerthat does have brakes, make surethey are electrically-operated.There are no provisions in your carto tap into its hydraulic brakingsystem. Any attempt to attach thetrailer's brakes to your car'shydraulic system, no matter howsuccessful it may seem, will lowerbraking effectiveness and create apotential hazard.
Always use a safety chain whentowing a trailer. Connect the safetychain securely at both ends. Makesure the chain crosses under thetongue so it will catch the trailer ifit becomes unhitched. Leaveenough slack in the chain so it can'tbind in a sharp turn. Do not let itdrag on the ground.
Before Starting OutAs you are preparing to tow yourtrailer, do the following:
Measure the trailer's tongue load.You can do this with a bathroomscale.Verify that the hitch and safetychain are securely fastened.Check the condition and airpressure of all tires on the trailerand your car. Low tire pressurecan seriously affect the handling.Also check the spare tire.With everything loaded and thetrailer connected, check that therear of the car is not sagging. Ifso, redistribute the load in thecar.Check that all lights on the carare working properly.
Driving
Main Menu Table of Contents ▲ ▼
Towing a Trailer
Towing SafetyYour car will not stop as quicklywith a trailer in tow. Leave extradistance between your car andother vehicles. Avoid braking orturning suddenly. This could causethe trailer to jackknife or possiblyturn over.
Keep in mind that your totalvehicle is now much longer. Leavemore room when making turns.The trailer tracks a smaller arcthan the car and can hit or run oversomething that the car misses.When passing another vehicle,make sure the trailer is clear beforechanging lanes.
The car/trailer combination is moreaffected by crosswinds and buffet-ing. When being passed by a largevehicle, keep a constant speed andsteer straight ahead. If there is toomuch wind buffeting, slow down toget out of the other vehicle's airturbulence.
Towing a trailer puts an extra loadon your car. You should have yourcar serviced according to the"Maintenance schedule undersevere driving conditions" on page130.
This extra load is magnified whenyou are driving in hilly terrain.Watch the temperature gaugeclosely when climbing hills. If itgets near the hot area, turn off theair conditioning (if it is on). If thisdoes not reduce the heat, it may benecessary to pull to the side of theroad and wait for the engine to cool.If the automatic transmission shiftsfrequently between 3rd and 4thgears, put it in D3. This wil l helpprevent the transmission fromoverheating. Help keep the brakesfrom overheating by shifting to alower gear when going downhill.If you have to stop while going up-hill, do not hold the car in place bypressing on the accelerator. Thiscan cause the automatic transmis-sion to overheat. Use the parkingbrake or footbrake.
CONTINUED
Driving
Main Menu Table of Contents ▲ ▼

Towing a Trailer
When parking your car and trailer,especially on a hill, be sure tofollow all the normal precautions.Turn your front wheels into thecurb, set the parking brake firmly,and put the transmission in 1st orReverse (manual) or Park (auto-matic). In addition, place wheelchocks at each of the trailer's tires.
Backing up with a trailer is diffi-cult and takes practice. Driveslowly, make small movementswith the steering wheel, and havesomeone stand outside to guide you.Grip the steering wheel on thebottom (rather than the usual posi-tion near the top). Move your handto the left to get the trailer to moveto the left, and right to move thetrailer right.
Driving
Main Menu Table of Contents ▲ ▼
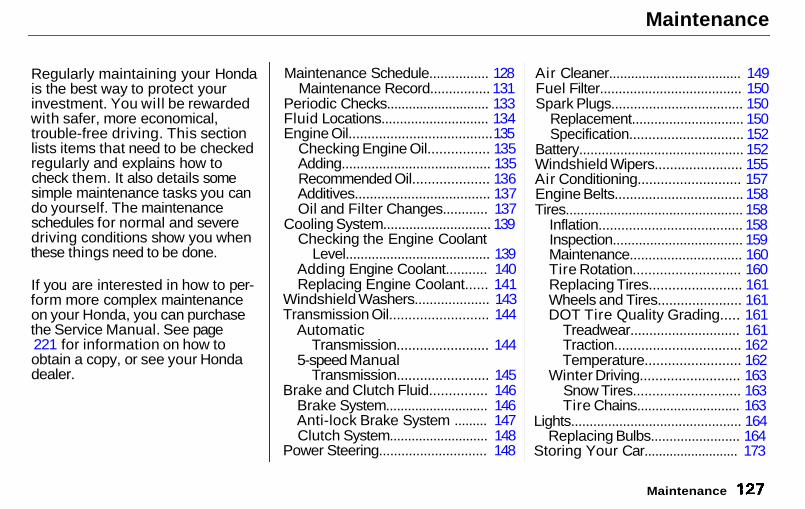
Maintenance
Regularly maintaining your Hondais the best way to protect yourinvestment. You will be rewardedwith safer, more economical,trouble-free driving. This sectionlists items that need to be checkedregularly and explains how tocheck them. It also details somesimple maintenance tasks you cando yourself. The maintenanceschedules for normal and severedriving conditions show you whenthese things need to be done.
If you are interested in how to per-form more complex maintenanceon your Honda, you can purchasethe Service Manual. See page221 for information on how toobtain a copy, or see your Hondadealer.
Maintenance Schedule................ 128Maintenance Record................ 131
Periodic Checks............................ 133Fluid Locations............................. 134Engine Oil...................................... 135
Checking Engine Oil................ 135Adding........................................ 135Recommended Oil.................... 136Additives.................................... 137Oil and Filter Changes............ 137
Cooling System............................. 139Checking the Engine Coolant
Level....................................... 139Adding Engine Coolant........... 140Replacing Engine Coolant...... 141
Windshield Washers.................... 143Transmission Oil.......................... 144
AutomaticTransmission........................ 144
5-speed ManualTransmission........................ 145
Brake and Clutch Fluid............... 146Brake System............................ 146Anti-lock Brake System ......... 147Clutch System........................... 148
Power Steering............................. 148
Air Cleaner.................................... 149Fuel Filter...................................... 150Spark Plugs................................... 150
Replacement.............................. 150Specification.............................. 152
Battery............................................ 152Windshield Wipers....................... 155Air Conditioning........................... 157Engine Belts.................................. 158Tires................................................ 158
Inflation...................................... 158Inspection................................... 159Maintenance.............................. 160Tire Rotation............................ 160Replacing Tires........................ 161Wheels and Tires...................... 161DOT Tire Quality Grading..... 161
Treadwear............................. 161Traction................................. 162Temperature......................... 162
Winter Driving.......................... 163Snow Tires............................ 163Tire Chains............................ 163
Lights.............................................. 164Replacing Bulbs........................ 164
Storing Your Car.......................... 173
Maintenance
Main Menu ▲ ▼
Maintenance Schedule
The Required MaintenanceSchedule specifies how often youshould have your car serviced, andwhat things need attention. It isessential that your car be servicedas scheduled to retain its high levelof safety, dependability, andemission control performance.
The services and time or kilomet-rage (mileage) intervals shown inthe maintenance schedule assumeyou wil l use your car as normaltransportation for passengers andtheir possessions. You should:
Avoid exceeding your car's loadlimit. This puts excess strain onthe engine, brakes, and manyother parts of your car. The loadlimit is shown on the label in theglove box.
Operate your car on reasonableroads within the legal speed limit.
Drive your car regularly over adistance of several kilometers(miles).
Always use unleaded gasolinewith the proper octane (see page
98).
Your authorized Honda dealerknows your car best, and canprovide competent, efficientservice. However, service at adealer is not mandatory to keepyour warranties in effect. Mainte-nance may be done by any qualifiedservice facility or person who isskilled in this type of automotiveservice. Keep all the receipts asproof of completion, and have theperson who does the work f i l l outthe maintenance record on page131. Check your warranty booklet
for more information.
We recommend the use of GenuineHonda parts and fluids or theirequivalent whenever you havemaintenance done. These are thesame high-quality items that wentinto your car when it was new, soyou can be sure they fit andperform flawlessly.
U.S. Cars:Maintenance, replacement orrepair of emission controldevices and systems may bedone by any automotive re-pair establishment or indi-vidual using parts that are"certified" to EPA standards.
Vehicles sold in California haveslightly different maintenancerequirements. These are noted inthe Required Maintenance Sche-dule. Other maintenance operationsare required by California regula-tions, and condition the emissionwarranty.
Maintenance
Main Menu Table of Contents ▲ ▼
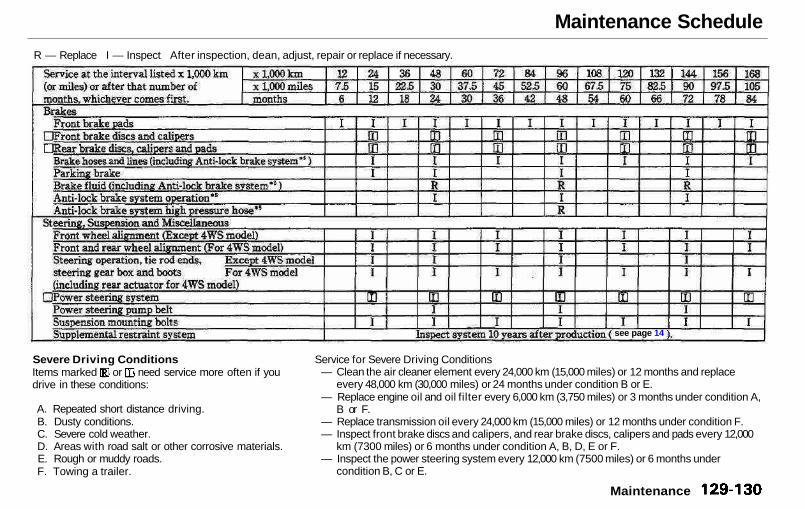
Maintenance Schedule
R — Replace I — Inspect After inspection, dean, adjust, repair or replace if necessary.
Severe Driving ConditionsItems marked or need service more often if youdrive in these conditions:
A. Repeated short distance driving.B. Dusty conditions.C. Severe cold weather.D. Areas with road salt or other corrosive materials.E. Rough or muddy roads.F. Towing a trailer.
Service for Severe Driving Conditions— Clean the air cleaner element every 24,000 km (15,000 miles) or 12 months and replace
every 48,000 km (30,000 miles) or 24 months under condition B or E.— Replace engine oil and oil filter every 6,000 km (3,750 miles) or 3 months under condition A,
B or F.— Replace transmission oil every 24,000 km (15,000 miles) or 12 months under condition F.— Inspect front brake discs and calipers, and rear brake discs, calipers and pads every 12,000
km (7300 miles) or 6 months under condition A, B, D, E or F.— Inspect the power steering system every 12,000 km (7500 miles) or 6 months under
condition B, C or E.
Maintenance
see page 14
Main Menu Table of Contents ▲ ▼
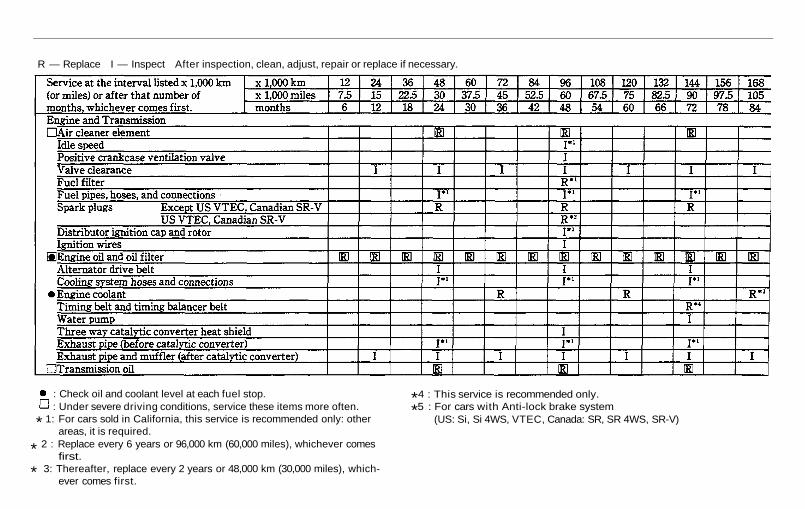
R — Replace I — Inspect After inspection, clean, adjust, repair or replace if necessary.
: Check oil and coolant level at each fuel stop.: Under severe driving conditions, service these items more often.
* 1: For cars sold in California, this service is recommended only: otherareas, it is required.
* 2 : Replace every 6 years or 96,000 km (60,000 miles), whichever comesfirst.
* 3: Thereafter, replace every 2 years or 48,000 km (30,000 miles), which-ever comes first.
*4 : This service is recommended only.
*5 : For cars with Anti-lock brake system(US: Si, Si 4WS, VTEC, Canada: SR, SR 4WS, SR-V)
Main Menu Table of Contents ▲ ▼
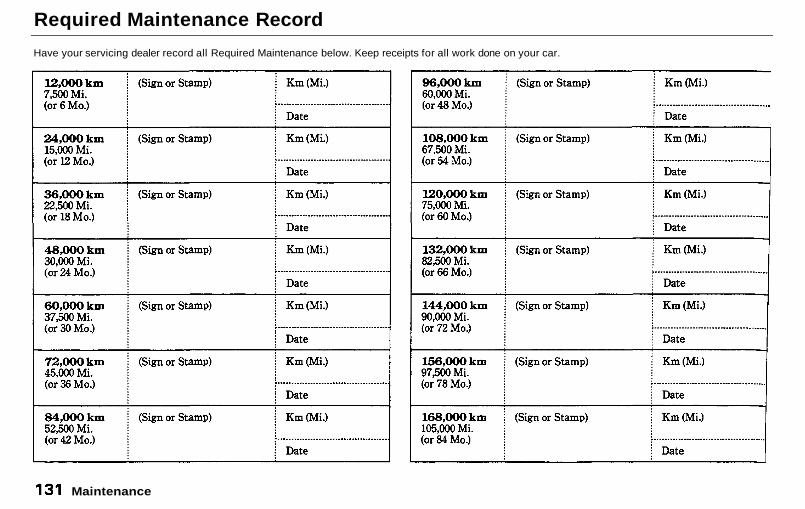
Required Maintenance Record
Have your servicing dealer record all Required Maintenance below. Keep receipts for all work done on your car.
Maintenance
Main Menu Table of Contents ▲ ▼
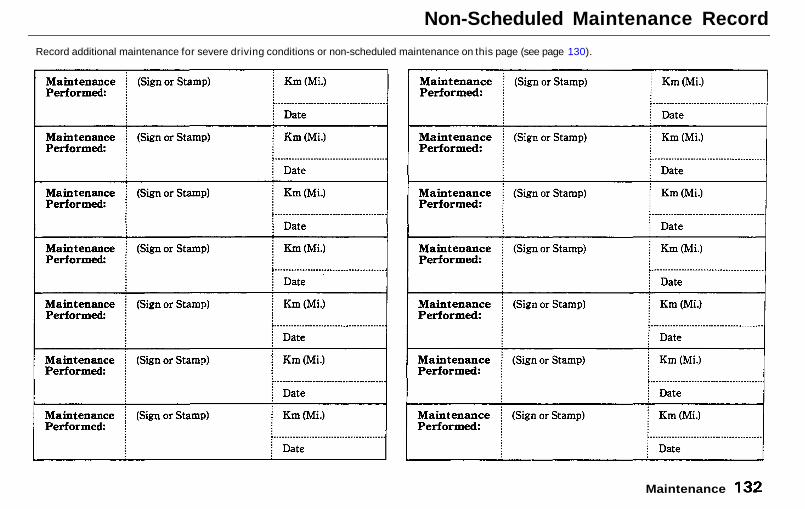
Non-Scheduled Maintenance Record
Record additional maintenance for severe driving conditions or non-scheduled maintenance on this page (see page 130).
Maintenance
Main Menu Table of Contents ▲ ▼
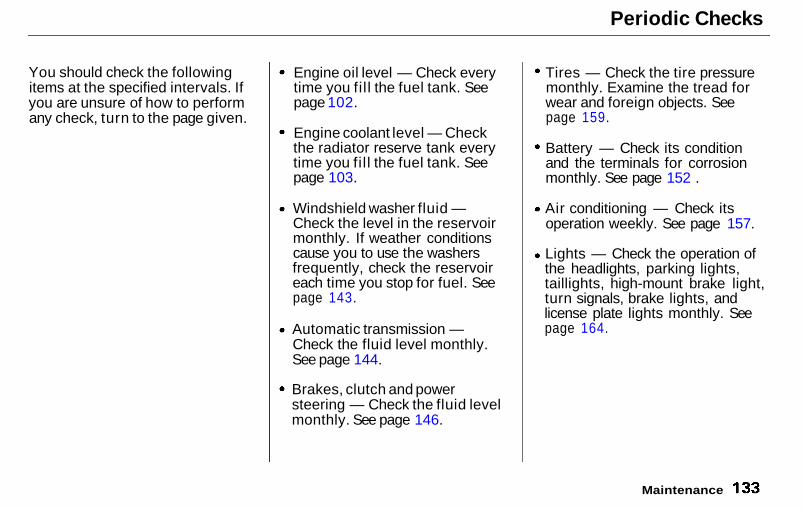
Periodic Checks
You should check the followingitems at the specified intervals. Ifyou are unsure of how to performany check, turn to the page given.
Engine oil level — Check everytime you fi l l the fuel tank. Seepage 102.
Engine coolant level — Checkthe radiator reserve tank everytime you fi l l the fuel tank. Seepage 103.
Windshield washer fluid —Check the level in the reservoirmonthly. If weather conditionscause you to use the washersfrequently, check the reservoireach time you stop for fuel. Seepage 143.
Automatic transmission —Check the fluid level monthly.See page 144.
Brakes, clutch and powersteering — Check the fluid levelmonthly. See page 146.
Tires — Check the tire pressuremonthly. Examine the tread forwear and foreign objects. Seepage 159.
Battery — Check its conditionand the terminals for corrosionmonthly. See page 152 .
Air conditioning — Check itsoperation weekly. See page 157.
Lights — Check the operation ofthe headlights, parking lights,taillights, high-mount brake light,turn signals, brake lights, andlicense plate lights monthly. Seepage 164.
Maintenance
Main Menu Table of Contents ▲ ▼
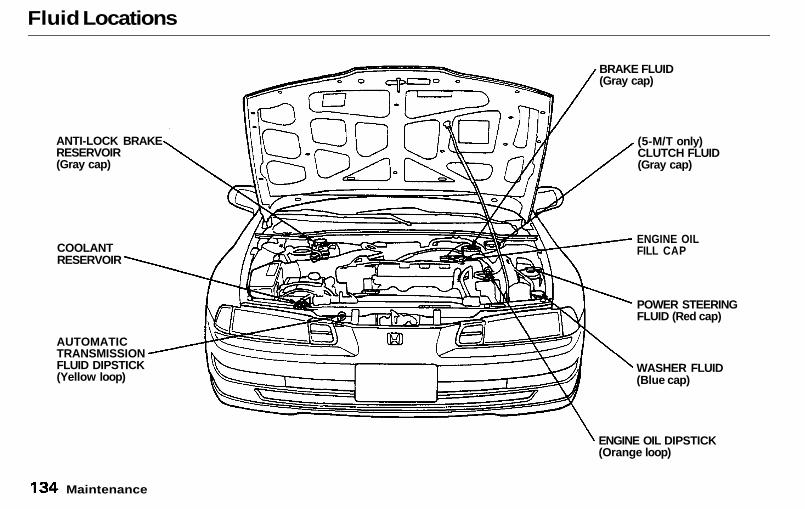
Fluid Locations
ANTI-LOCK BRAKERESERVOIR(Gray cap)
COOLANTRESERVOIR
AUTOMATICTRANSMISSIONFLUID DIPSTICK(Yellow loop)
BRAKE FLUID(Gray cap)
(5-M/T only)CLUTCH FLUID(Gray cap)
ENGINE OILFILL CAP
POWER STEERINGFLUID (Red cap)
WASHER FLUID(Blue cap)
ENGINE OIL DIPSTICK(Orange loop)
Maintenance
Main Menu Table of Contents ▲ ▼
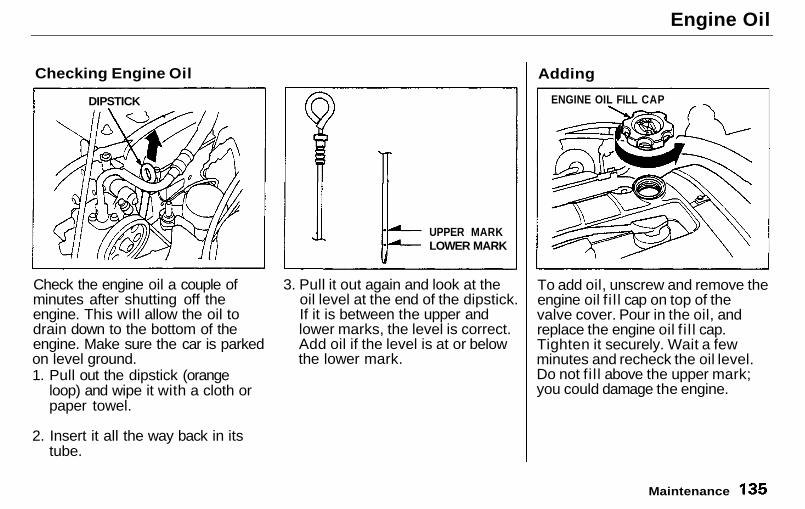
Engine Oil
Checking Engine Oil
Check the engine oil a couple ofminutes after shutting off theengine. This will allow the oil todrain down to the bottom of theengine. Make sure the car is parkedon level ground.1. Pull out the dipstick (orange
loop) and wipe it with a cloth orpaper towel.
2. Insert it all the way back in itstube.
3. Pull it out again and look at theoil level at the end of the dipstick.If it is between the upper andlower marks, the level is correct.Add oil if the level is at or belowthe lower mark.
Adding
To add oil, unscrew and remove theengine oil f i l l cap on top of thevalve cover. Pour in the oil, andreplace the engine oil f i l l cap.Tighten it securely. Wait a fewminutes and recheck the oil level.Do not fi l l above the upper mark;you could damage the engine.
Maintenance
DIPSTICK
UPPER MARKLOWER MARK
ENGINE OIL FILL CAP
Main Menu Table of Contents ▲ ▼
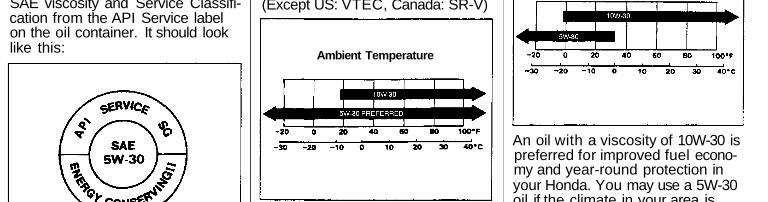
Engine Oil
Recommended OilOil is a major contributor to yourengine's performance and longevity.Always use a premium-grade deter-gent oil. You can determine an oil'sSAE viscosity and Service Classifi-cation from the API Service labelon the oil container. It should looklike this:
The numbers in the middle tell youthe oil's SAE viscosity or weight.Select the oil for your car accord-ing to this chart:
(Except US: VTEC, Canada: SR-V)
Ambient Temperature
An oil with a viscosity of 5W-30 ispreferred for improved fuel econo-my and year-round protection inyour Honda. You may use a 10W-30oil if the temperature in your areanever goes below 20°F (—7°C).
(US: VTEC, Canada: SR-V)
Ambient Temperature
An oil with a viscosity of 10W-30 ispreferred for improved fuel econo-my and year-round protection inyour Honda. You may use a 5W-30oil if the climate in your area iswithin the temperature rangeshown on the chart.
Maintenance
Main Menu Table of Contents ▼▲
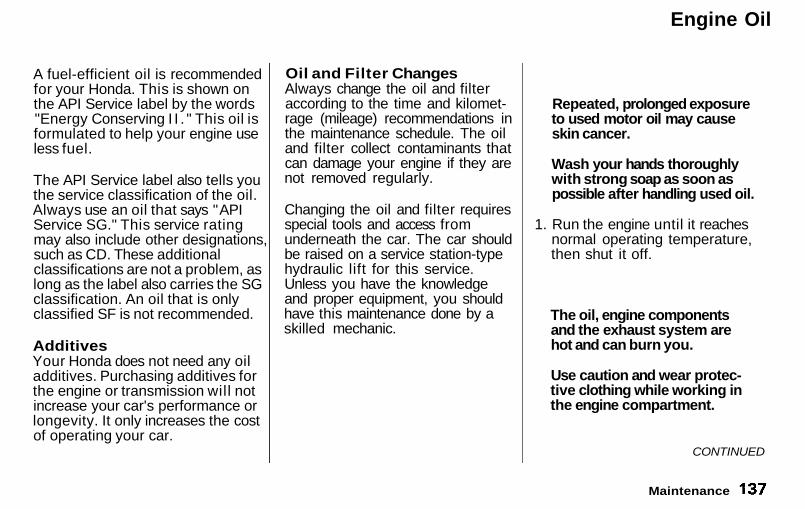
Engine Oil
A fuel-efficient oil is recommendedfor your Honda. This is shown onthe API Service label by the words"Energy Conserving I I . " This oil isformulated to help your engine useless fuel.
The API Service label also tells youthe service classification of the oil.Always use an oil that says "APIService SG." This service ratingmay also include other designations,such as CD. These additionalclassifications are not a problem, aslong as the label also carries the SGclassification. An oil that is onlyclassified SF is not recommended.
AdditivesYour Honda does not need any oiladditives. Purchasing additives forthe engine or transmission will notincrease your car's performance orlongevity. It only increases the costof operating your car.
Oil and Filter ChangesAlways change the oil and filteraccording to the time and kilomet-rage (mileage) recommendations inthe maintenance schedule. The oiland filter collect contaminants thatcan damage your engine if they arenot removed regularly.
Changing the oil and filter requiresspecial tools and access fromunderneath the car. The car shouldbe raised on a service station-typehydraulic lift for this service.Unless you have the knowledgeand proper equipment, you shouldhave this maintenance done by askilled mechanic.
1. Run the engine until it reachesnormal operating temperature,then shut it off.
CONTINUED
Maintenance
The oil, engine componentsand the exhaust system arehot and can burn you.
Use caution and wear protec-tive clothing while working inthe engine compartment.
Repeated, prolonged exposureto used motor oil may causeskin cancer.
Wash your hands thoroughlywith strong soap as soon aspossible after handling used oil.
Main Menu Table of Contents ▲ ▼
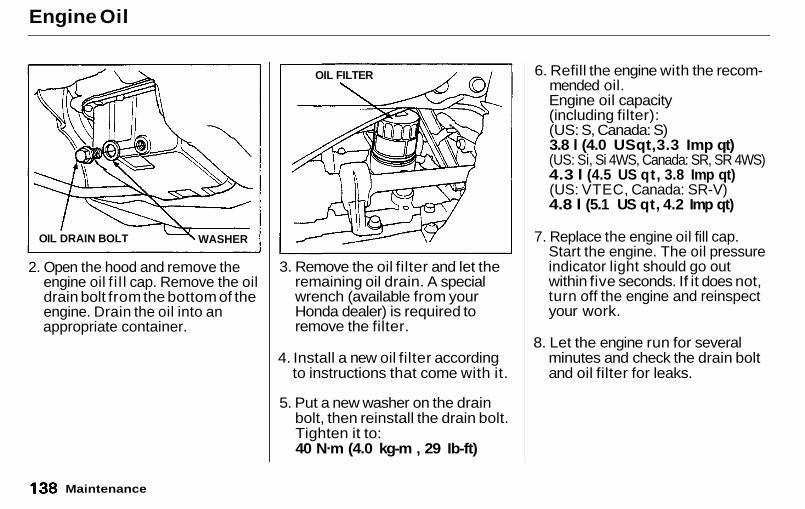
Engine Oil
2. Open the hood and remove theengine oil f i l l cap. Remove the oildrain bolt from the bottom of theengine. Drain the oil into anappropriate container.
3. Remove the oil filter and let theremaining oil drain. A specialwrench (available from yourHonda dealer) is required toremove the filter.
4. Install a new oil filter accordingto instructions that come with it.
5. Put a new washer on the drainbolt, then reinstall the drain bolt.Tighten it to:40 N.m (4.0 kg-m , 29 Ib-ft)
6. Refill the engine with the recom-mended oil.Engine oil capacity(including filter):(US: S, Canada: S)3.8 l (4.0 USqt,3.3 Imp qt)(US: Si, Si 4WS, Canada: SR, SR 4WS)4.3 l (4.5 US qt , 3.8 Imp qt)(US: VTEC, Canada: SR-V)4.8 l (5.1 US qt, 4.2 Imp qt)
7. Replace the engine oil fill cap.Start the engine. The oil pressureindicator light should go outwithin five seconds. If it does not,turn off the engine and reinspectyour work.
8. Let the engine run for severalminutes and check the drain boltand oil filter for leaks.
Maintenance
OIL DRAIN BOLT WASHER
OIL FILTER
Main Menu Table of Contents ▲ ▼
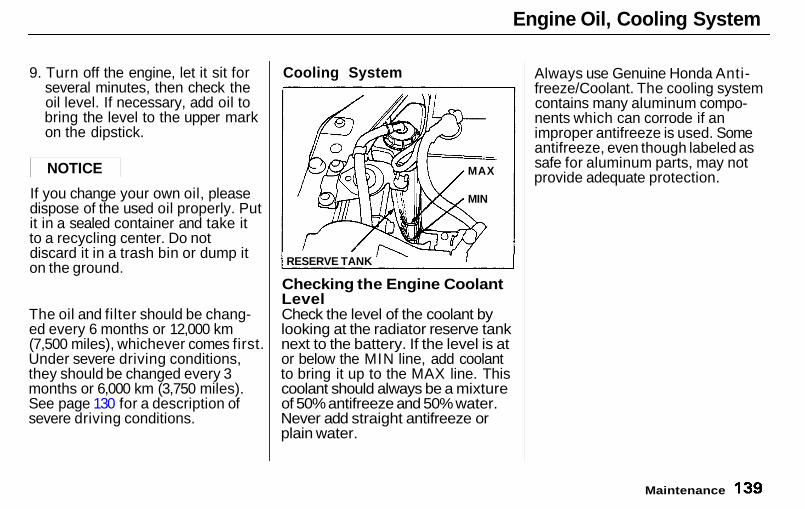
Engine Oil, Cooling System
9. Turn off the engine, let it sit forseveral minutes, then check theoil level. If necessary, add oil tobring the level to the upper markon the dipstick.
If you change your own oil, pleasedispose of the used oil properly. Putit in a sealed container and take itto a recycling center. Do notdiscard it in a trash bin or dump iton the ground.
The oil and filter should be chang-ed every 6 months or 12,000 km(7,500 miles), whichever comes first.Under severe driving conditions,they should be changed every 3months or 6,000 km (3,750 miles).See page 130 for a description ofsevere driving conditions.
Cooling System
Checking the Engine CoolantLevelCheck the level of the coolant bylooking at the radiator reserve tanknext to the battery. If the level is ator below the MIN line, add coolantto bring it up to the MAX line. Thiscoolant should always be a mixtureof 50% antifreeze and 50% water.Never add straight antifreeze orplain water.
Always use Genuine Honda Anti-freeze/Coolant. The cooling systemcontains many aluminum compo-nents which can corrode if animproper antifreeze is used. Someantifreeze, even though labeled assafe for aluminum parts, may notprovide adequate protection.
Maintenance
NOTICE
RESERVE TANK
MAX
MIN
Main Menu Table of Contents ▲ ▼
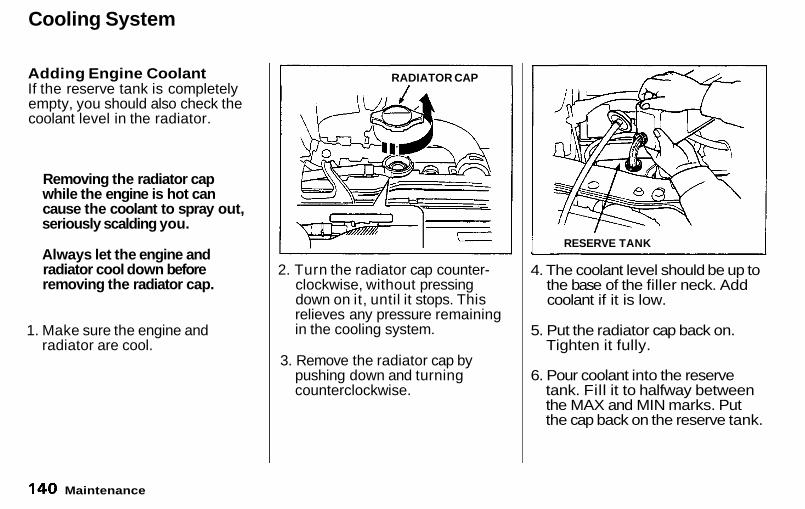
Cooling System
Adding Engine CoolantIf the reserve tank is completelyempty, you should also check thecoolant level in the radiator.
1. Make sure the engine andradiator are cool.
2. Turn the radiator cap counter-clockwise, without pressingdown on it, until it stops. Thisrelieves any pressure remainingin the cooling system.
3. Remove the radiator cap bypushing down and turningcounterclockwise.
4. The coolant level should be up tothe base of the filler neck. Addcoolant if it is low.
5. Put the radiator cap back on.Tighten it fully.
6. Pour coolant into the reservetank. Fill it to halfway betweenthe MAX and MIN marks. Putthe cap back on the reserve tank.
Maintenance
Removing the radiator capwhile the engine is hot cancause the coolant to spray out,seriously scalding you.
Always let the engine andradiator cool down beforeremoving the radiator cap.
RADIATOR CAP
RESERVE TANK
Main Menu Table of Contents ▲ ▼
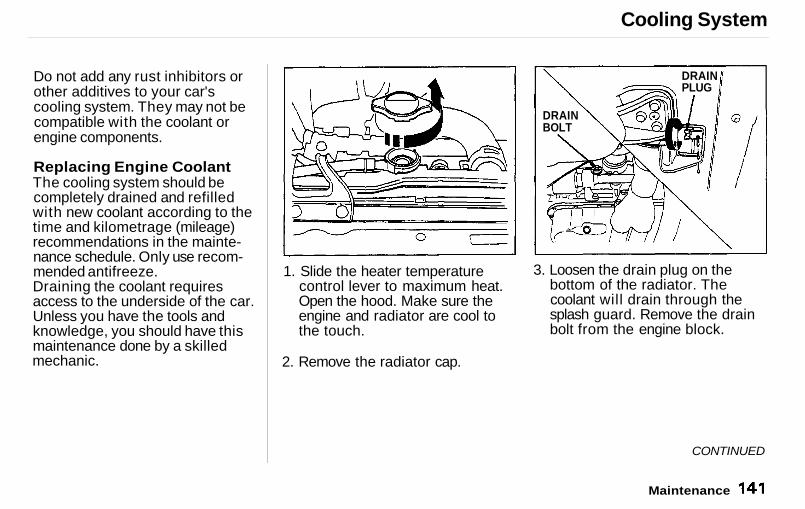
Cooling System
Do not add any rust inhibitors orother additives to your car'scooling system. They may not becompatible with the coolant orengine components.
Replacing Engine CoolantThe cooling system should becompletely drained and refilledwith new coolant according to thetime and kilometrage (mileage)recommendations in the mainte-nance schedule. Only use recom-mended antifreeze.Draining the coolant requiresaccess to the underside of the car.Unless you have the tools andknowledge, you should have thismaintenance done by a skilledmechanic.
1. Slide the heater temperaturecontrol lever to maximum heat.Open the hood. Make sure theengine and radiator are cool tothe touch.
2. Remove the radiator cap.
3. Loosen the drain plug on thebottom of the radiator. Thecoolant will drain through thesplash guard. Remove the drainbolt from the engine block.
CONTINUED
Maintenance
DRAINPLUG
DRAINBOLT
Main Menu Table of Contents ▲ ▼
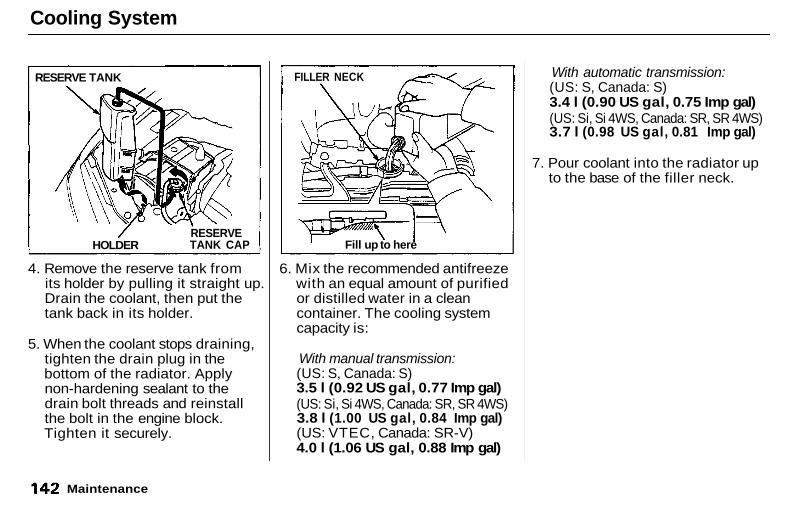
Cooling System
4. Remove the reserve tank fromits holder by pulling it straight up.Drain the coolant, then put thetank back in its holder.
5. When the coolant stops draining,tighten the drain plug in thebottom of the radiator. Applynon-hardening sealant to thedrain bolt threads and reinstallthe bolt in the engine block.Tighten it securely.
6. Mix the recommended antifreezewith an equal amount of purifiedor distilled water in a cleancontainer. The cooling systemcapacity is:
With manual transmission:(US: S, Canada: S)3.5 l (0.92 US gal, 0.77 Imp gal)(US: Si, Si 4WS, Canada: SR, SR 4WS)3.8 l (1.00 US gal, 0.84 Imp gal)(US: VTEC, Canada: SR-V)4.0 l (1.06 US gal, 0.88 Imp gal)
With automatic transmission:(US: S, Canada: S)3.4 l (0.90 US gal, 0.75 Imp gal)(US: Si, Si 4WS, Canada: SR, SR 4WS)3.7 l (0.98 US gal, 0.81 Imp gal)
7. Pour coolant into the radiator upto the base of the filler neck.
Maintenance
RESERVE TANK
RESERVETANK CAPHOLDER
FILLER NECK
Fill up to here
Main Menu Table of Contents ▲ ▼
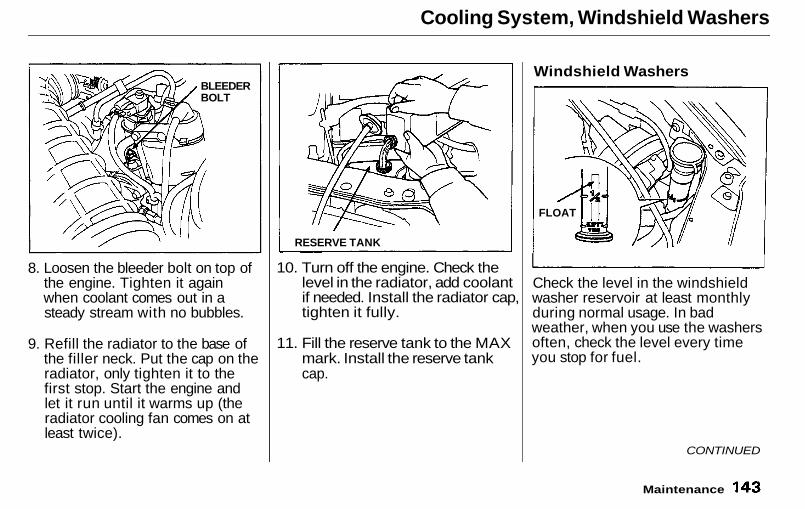
Cooling System, Windshield Washers
8. Loosen the bleeder bolt on top ofthe engine. Tighten it againwhen coolant comes out in asteady stream with no bubbles.
9. Refill the radiator to the base ofthe filler neck. Put the cap on theradiator, only tighten it to thefirst stop. Start the engine andlet it run until it warms up (theradiator cooling fan comes on atleast twice).
10. Turn off the engine. Check thelevel in the radiator, add coolantif needed. Install the radiator cap,tighten it fully.
11. Fill the reserve tank to the MAXmark. Install the reserve tankcap.
Windshield Washers
Check the level in the windshieldwasher reservoir at least monthlyduring normal usage. In badweather, when you use the washersoften, check the level every timeyou stop for fuel.
CONTINUED
BLEEDERBOLT
RESERVE TANK
FLOAT
Maintenance
Main Menu Table of Contents ▲ ▼
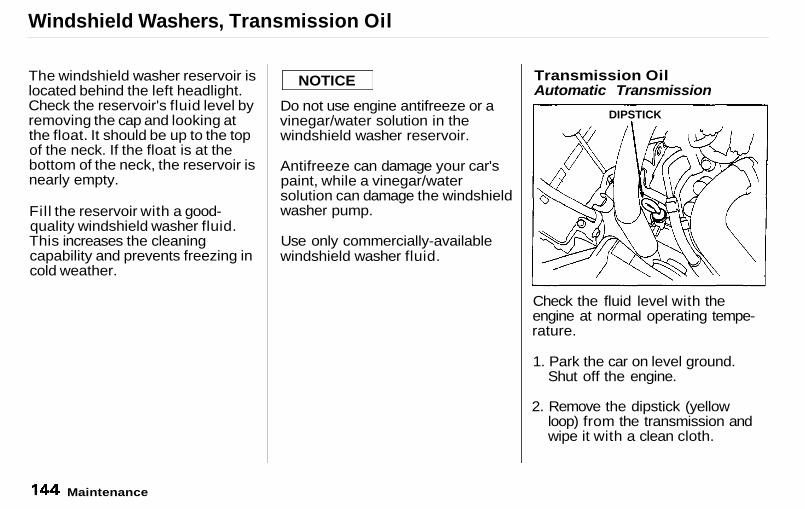
Windshield Washers, Transmission Oil
The windshield washer reservoir islocated behind the left headlight.Check the reservoir's fluid level byremoving the cap and looking atthe float. It should be up to the topof the neck. If the float is at thebottom of the neck, the reservoir isnearly empty.
Fill the reservoir with a good-quality windshield washer fluid.This increases the cleaningcapability and prevents freezing incold weather.
Do not use engine antifreeze or avinegar/water solution in thewindshield washer reservoir.
Antifreeze can damage your car'spaint, while a vinegar/watersolution can damage the windshieldwasher pump.
Use only commercially-availablewindshield washer fluid.
Transmission OilAutomatic Transmission
Check the fluid level with theengine at normal operating tempe-rature.
1. Park the car on level ground.Shut off the engine.
2. Remove the dipstick (yellowloop) from the transmission andwipe it with a clean cloth.
Maintenance
NOTICE
DIPSTICK
Main Menu Table of Contents ▲ ▼
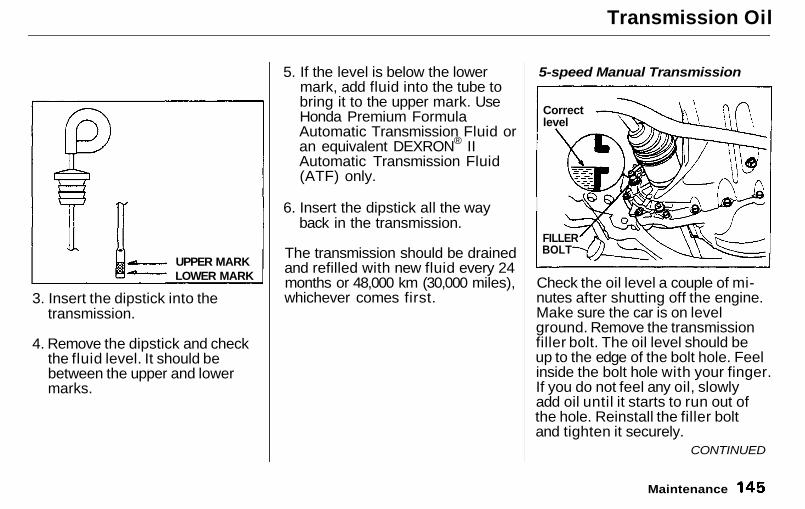
Transmission Oil
3. Insert the dipstick into thetransmission.
4. Remove the dipstick and checkthe fluid level. It should bebetween the upper and lowermarks.
5. If the level is below the lowermark, add fluid into the tube tobring it to the upper mark. UseHonda Premium FormulaAutomatic Transmission Fluid oran equivalent DEXRON® IIAutomatic Transmission Fluid(ATF) only.
6. Insert the dipstick all the wayback in the transmission.
The transmission should be drainedand refilled with new fluid every 24months or 48,000 km (30,000 miles),whichever comes first.
5-speed Manual Transmission
Check the oil level a couple of mi-nutes after shutting off the engine.Make sure the car is on levelground. Remove the transmissionfiller bolt. The oil level should beup to the edge of the bolt hole. Feelinside the bolt hole with your finger.If you do not feel any oil, slowlyadd oil until it starts to run out ofthe hole. Reinstall the filler boltand tighten it securely.
Maintenance
UPPER MARKLOWER MARK
Correctlevel
FILLERBOLT
CONTINUED
Main Menu Table of Contents ▲ ▼
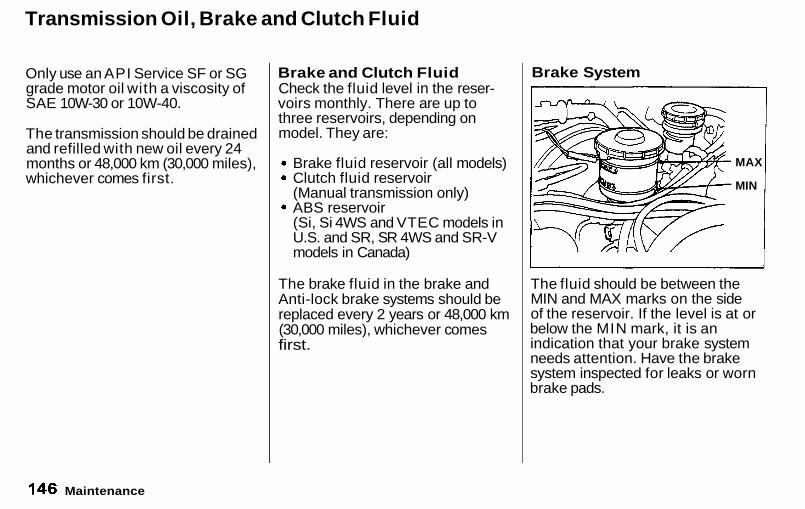
Transmission Oil, Brake and Clutch Fluid
Only use an API Service SF or SGgrade motor oil with a viscosity ofSAE 10W-30 or 10W-40.
The transmission should be drainedand refilled with new oil every 24months or 48,000 km (30,000 miles),whichever comes first.
Brake and Clutch FluidCheck the fluid level in the reser-voirs monthly. There are up tothree reservoirs, depending onmodel. They are:
Brake fluid reservoir (all models)Clutch fluid reservoir(Manual transmission only)ABS reservoir(Si, Si 4WS and VTEC models inU.S. and SR, SR 4WS and SR-Vmodels in Canada)
The brake fluid in the brake andAnti-lock brake systems should bereplaced every 2 years or 48,000 km(30,000 miles), whichever comesfirst.
Brake System
The fluid should be between theMIN and MAX marks on the sideof the reservoir. If the level is at orbelow the MIN mark, it is anindication that your brake systemneeds attention. Have the brakesystem inspected for leaks or wornbrake pads.
Maintenance
MAX
MIN
Main Menu Table of Contents ▲ ▼
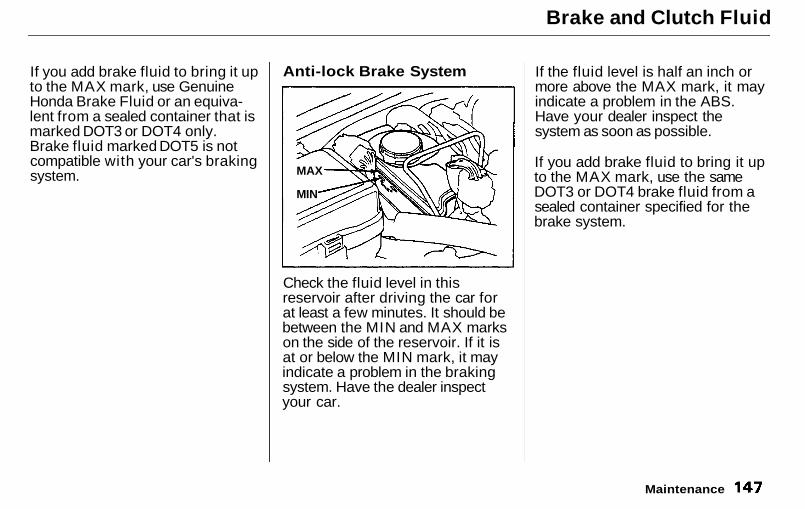
Brake and Clutch Fluid
If you add brake fluid to bring it upto the MAX mark, use GenuineHonda Brake Fluid or an equiva-lent from a sealed container that ismarked DOT3 or DOT4 only.Brake fluid marked DOT5 is notcompatible with your car's brakingsystem.
Anti-lock Brake System
Check the fluid level in thisreservoir after driving the car forat least a few minutes. It should bebetween the MIN and MAX markson the side of the reservoir. If it isat or below the MIN mark, it mayindicate a problem in the brakingsystem. Have the dealer inspectyour car.
If the fluid level is half an inch ormore above the MAX mark, it mayindicate a problem in the ABS.Have your dealer inspect thesystem as soon as possible.
If you add brake fluid to bring it upto the MAX mark, use the sameDOT3 or DOT4 brake fluid from asealed container specified for thebrake system.
Maintenance
MAX
MIN
Main Menu Table of Contents ▲ ▼

Brake and Clutch Fluid, Power Steering
Clutch System
The fluid should be between theMIN and MAX marks on the sideof the reservoir. If it is not, addbrake fluid to bring it up to thatlevel. Use the same DOT3 or DOT4brake fluid from a sealed containerspecified for the brake system.
Low fluid level can indicate a leakin the clutch system. Have thissystem inspected as soon aspossible.
Power Steering
You should check the fluid level inthe power steering reservoirmonthly. Check the level when theengine is cold. Look at the side ofthe reservoir. The fluid should bebetween the UPPER LEVEL andLOWER LEVEL. If it is below theLOWER LEVEL, add powersteering fluid to the UPPERLEVEL.
Using automatic transmission fluidor another brand of power steeringfluid wil l damage the system. Useonly GENUINE HONDA PowerSteering Fluid-V.
A low power steering fluid levelcan indicate a leak in the system.Check the fluid level frequentlyand have the system inspected assoon as possible.
Maintenance
MAX
UPPERLEVEL
LOWERLEVEL
NOTICE
MIN
Main Menu Table of Contents ▲ ▼
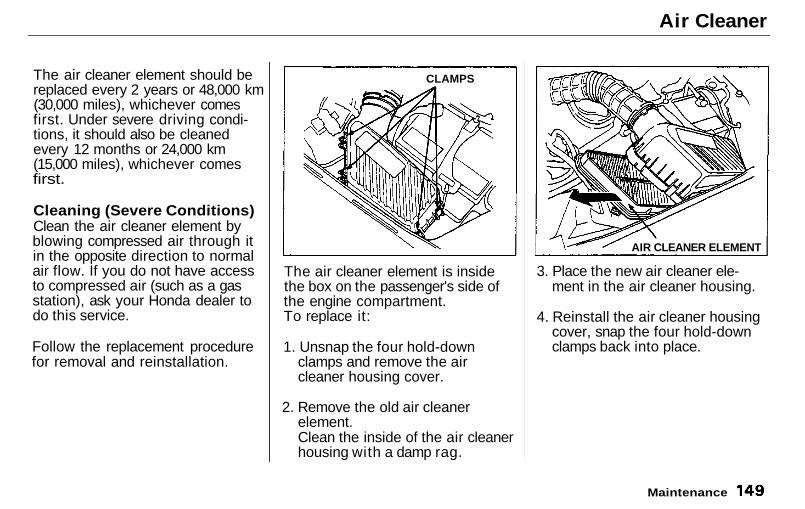
Air Cleaner
The air cleaner element should bereplaced every 2 years or 48,000 km(30,000 miles), whichever comesfirst. Under severe driving condi-tions, it should also be cleanedevery 12 months or 24,000 km(15,000 miles), whichever comesfirst.
Cleaning (Severe Conditions)Clean the air cleaner element byblowing compressed air through itin the opposite direction to normalair flow. If you do not have accessto compressed air (such as a gasstation), ask your Honda dealer todo this service.
Follow the replacement procedurefor removal and reinstallation.
The air cleaner element is insidethe box on the passenger's side ofthe engine compartment.To replace it:
1. Unsnap the four hold-downclamps and remove the aircleaner housing cover.
2. Remove the old air cleanerelement.Clean the inside of the air cleanerhousing with a damp rag.
3. Place the new air cleaner ele-ment in the air cleaner housing.
4. Reinstall the air cleaner housingcover, snap the four hold-downclamps back into place.
Maintenance
AIR CLEANER ELEMENT
CLAMPS
Main Menu Table of Contents ▲ ▼
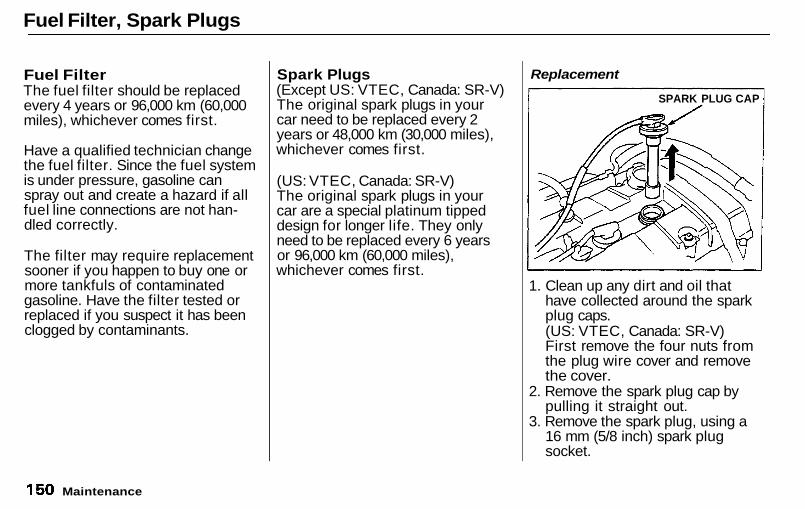
Fuel Filter, Spark Plugs
Fuel FilterThe fuel filter should be replacedevery 4 years or 96,000 km (60,000miles), whichever comes first.
Have a qualified technician changethe fuel filter. Since the fuel systemis under pressure, gasoline canspray out and create a hazard if allfuel line connections are not han-dled correctly.
The filter may require replacementsooner if you happen to buy one ormore tankfuls of contaminatedgasoline. Have the filter tested orreplaced if you suspect it has beenclogged by contaminants.
Spark Plugs(Except US: VTEC, Canada: SR-V)The original spark plugs in yourcar need to be replaced every 2years or 48,000 km (30,000 miles),whichever comes first.
(US: VTEC, Canada: SR-V)The original spark plugs in yourcar are a special platinum tippeddesign for longer life. They onlyneed to be replaced every 6 yearsor 96,000 km (60,000 miles),whichever comes first.
Replacement
1. Clean up any dirt and oil thathave collected around the sparkplug caps.(US: VTEC, Canada: SR-V)First remove the four nuts fromthe plug wire cover and removethe cover.
2. Remove the spark plug cap bypulling it straight out.
3. Remove the spark plug, using a16 mm (5/8 inch) spark plugsocket.
Maintenance
SPARK PLUG CAP
Main Menu Table of Contents ▲ ▼
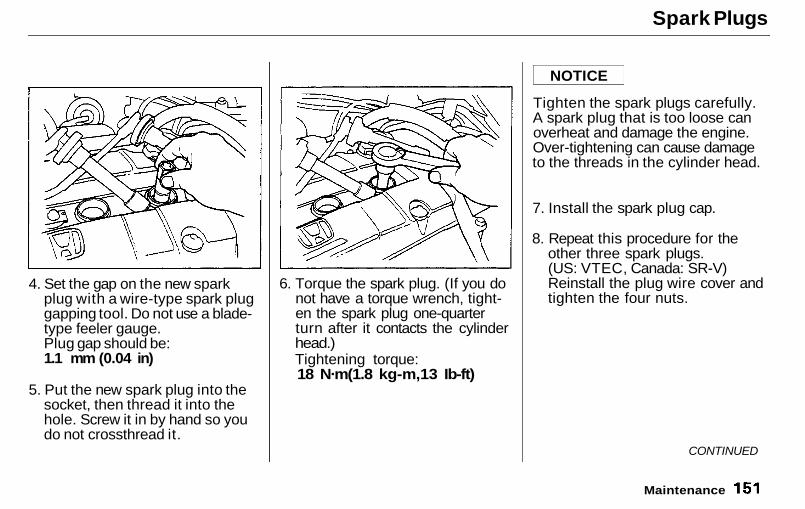
Spark Plugs
4. Set the gap on the new sparkplug with a wire-type spark pluggapping tool. Do not use a blade-type feeler gauge.Plug gap should be:1.1 mm (0.04 in)
5. Put the new spark plug into thesocket, then thread it into thehole. Screw it in by hand so youdo not crossthread it.
6. Torque the spark plug. (If you donot have a torque wrench, tight-en the spark plug one-quarterturn after it contacts the cylinderhead.)Tightening torque:18 N.m(1.8 kg-m,13 Ib-ft)
Tighten the spark plugs carefully.A spark plug that is too loose canoverheat and damage the engine.Over-tightening can cause damageto the threads in the cylinder head.
7. Install the spark plug cap.
8. Repeat this procedure for theother three spark plugs.(US: VTEC, Canada: SR-V)Reinstall the plug wire cover andtighten the four nuts.
CONTINUED
Maintenance
NOTICE
Main Menu Table of Contents ▲ ▼
Spark Plugs, Battery
(US: VTEC, Canada: SR-V)Normal driving conditions
NGK: PZFR6F-11Nippondenso: PKJ 20CR-L11
Hot climates, or continuous highspeed driving
NGK: PFR7G-11Nippondenso: PK22PR-L11
BatteryCheck the condition of your car'sbattery monthly. You should checkfor proper electrolyte level andcorrosion on the terminals.
Maintenance
Specifications:
(US: S, Canada: S)Normal driving conditions
NGK: ZFR5F-11Nippondenso: KJ16CR-L11
Hot climates, or continuous highspeed driving
NGK: ZFR6F-11Nippondenso: KJ20CR-L11
(US: Si, Si 4WS, Canada: SR, SR 4WS)Normal driving conditions
NGK: ZFR6F-11Nippondenso: KJ20CR-L11
Hot climates, or continuous highspeed driving
NGK: ZFR7F-11Nippondenso: KJ22CR-L11
The battery gives off explo-sive hydrogen gas during nor-mal operation. A spark or openflame can cause the battery toexplode with enough force tokill or seriously hurt you.
Keep all sparks, open flames,and smoking materials awayfrom the battery.
Wear protective clothing and aface shield, or have a skilledmechanic do the battery main-tenance.
Main Menu Table of Contents ▲ ▼
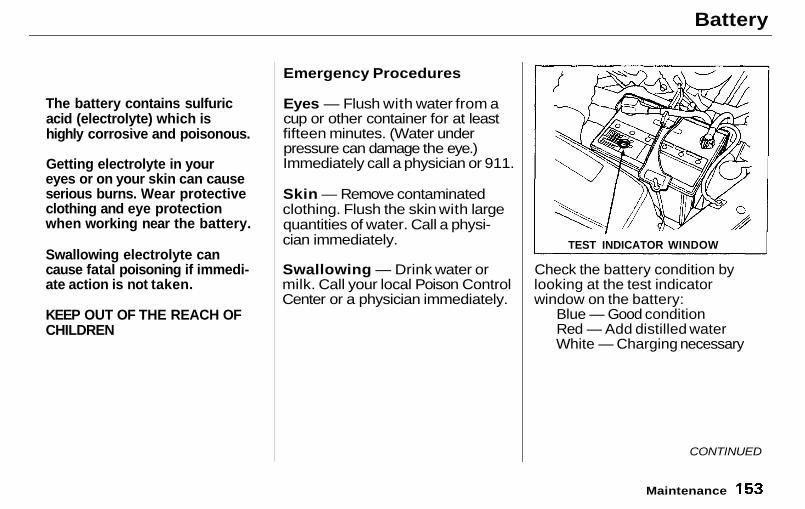
Battery
Emergency Procedures
Eyes — Flush with water from acup or other container for at leastfifteen minutes. (Water underpressure can damage the eye.)Immediately call a physician or 911.
Skin — Remove contaminatedclothing. Flush the skin with largequantities of water. Call a physi-cian immediately.
Swallowing — Drink water ormilk. Call your local Poison ControlCenter or a physician immediately.
Check the battery condition bylooking at the test indicatorwindow on the battery:
Blue — Good conditionRed — Add distilled waterWhite — Charging necessary
CONTINUED
Maintenance
TEST INDICATOR WINDOW
The battery contains sulfuricacid (electrolyte) which ishighly corrosive and poisonous.
Getting electrolyte in youreyes or on your skin can causeserious burns. Wear protectiveclothing and eye protectionwhen working near the battery.
Swallowing electrolyte cancause fatal poisoning if immedi-ate action is not taken.
KEEP OUT OF THE REACH OFCHILDREN
Main Menu Table of Contents ▲ ▼
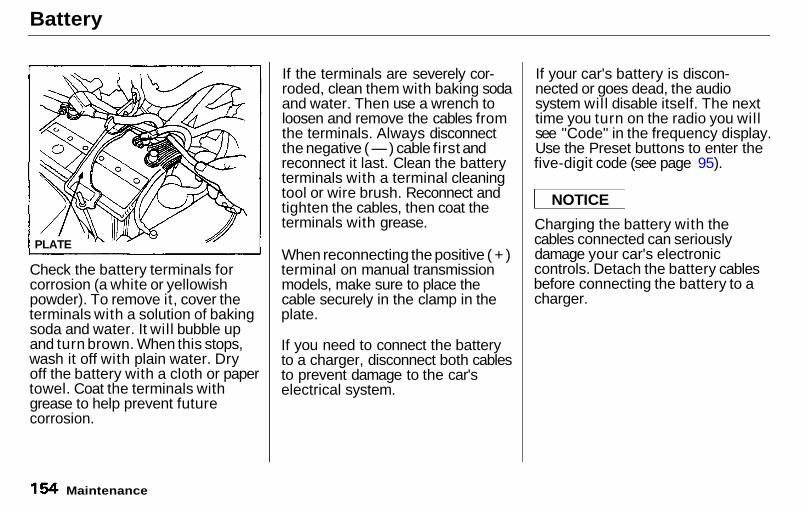
Battery
Check the battery terminals forcorrosion (a white or yellowishpowder). To remove it, cover theterminals with a solution of bakingsoda and water. It will bubble upand turn brown. When this stops,wash it off with plain water. Dryoff the battery with a cloth or papertowel. Coat the terminals withgrease to help prevent futurecorrosion.
If the terminals are severely cor-roded, clean them with baking sodaand water. Then use a wrench toloosen and remove the cables fromthe terminals. Always disconnectthe negative ( — ) cable first andreconnect it last. Clean the batteryterminals with a terminal cleaningtool or wire brush. Reconnect andtighten the cables, then coat theterminals with grease.
When reconnecting the positive ( + )terminal on manual transmissionmodels, make sure to place thecable securely in the clamp in theplate.
If you need to connect the batteryto a charger, disconnect both cablesto prevent damage to the car'selectrical system.
If your car's battery is discon-nected or goes dead, the audiosystem will disable itself. The nexttime you turn on the radio you willsee "Code" in the frequency display.Use the Preset buttons to enter thefive-digit code (see page 95).
Charging the battery with thecables connected can seriouslydamage your car's electroniccontrols. Detach the battery cablesbefore connecting the battery to acharger.
Maintenance
PLATE
NOTICE
Main Menu Table of Contents ▲ ▼
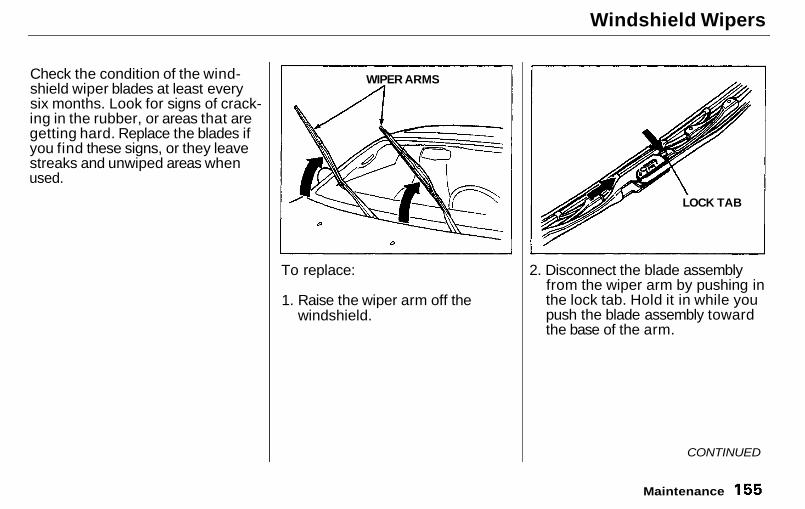
Windshield Wipers
Check the condition of the wind-shield wiper blades at least everysix months. Look for signs of crack-ing in the rubber, or areas that aregetting hard. Replace the blades ifyou find these signs, or they leavestreaks and unwiped areas whenused.
To replace:
1. Raise the wiper arm off thewindshield.
2. Disconnect the blade assemblyfrom the wiper arm by pushing inthe lock tab. Hold it in while youpush the blade assembly towardthe base of the arm.
CONTINUED
Maintenance
WIPER ARMS
LOCK TAB
Main Menu Table of Contents ▲ ▼
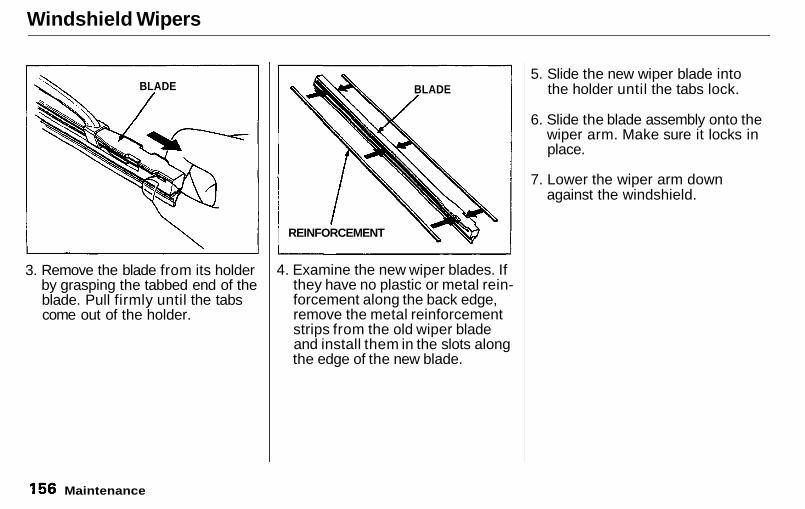
Windshield Wipers
3. Remove the blade from its holderby grasping the tabbed end of theblade. Pull firmly until the tabscome out of the holder.
4. Examine the new wiper blades. Ifthey have no plastic or metal rein-forcement along the back edge,remove the metal reinforcementstrips from the old wiper bladeand install them in the slots alongthe edge of the new blade.
5. Slide the new wiper blade intothe holder until the tabs lock.
6. Slide the blade assembly onto thewiper arm. Make sure it locks inplace.
7. Lower the wiper arm downagainst the windshield.
Maintenance
BLADE BLADE
REINFORCEMENT
Main Menu Table of Contents ▲ ▼

Air Conditioning
Optional for S modelYour car's air conditioning is asealed system. Any major mainte-nance, such as recharging, shouldbe done by a qualified technician.There are a couple of things youcan do to make sure the air condi-tioning works efficiently.
Periodically check the engine'sradiator and air conditioningcondenser for leaves, insects, anddirt stuck to the front surface.These block the air flow andreduce cooling efficiency. Use alight spray from a hose or a softbrush to remove them.
The condenser and radiator finsbend easily. Only use a low-pressure spray or soft-bristle brushto clean them.
Run the air conditioning at leastonce a week during the coldweather months. Run it for at leastten minutes while you are drivingat a steady speed with the engine atnormal operating temperature.This circulates the lubricating oilcontained in the refrigerant.
If the air conditioning does not getas cold as before, it is probablybecause some of the refrigerant hasleaked from the system. Have yourdealer check the system for leaksand recharge the system withRefrigerant R134a.Charging quantity:600 — 650 g (21.2—23.0 oz)
Whenever you have the air condi-tioning system serviced, make surethe service facility uses a refrige-rant recycling system. This systemcaptures the refrigerant for reuse.Releasing refrigerant into the at-mosphere can damage the environ-ment.
Maintenance
AIR CONDITIONINGCONDENSER
NOTICENOTICE
Main Menu Table of Contents ▲ ▼
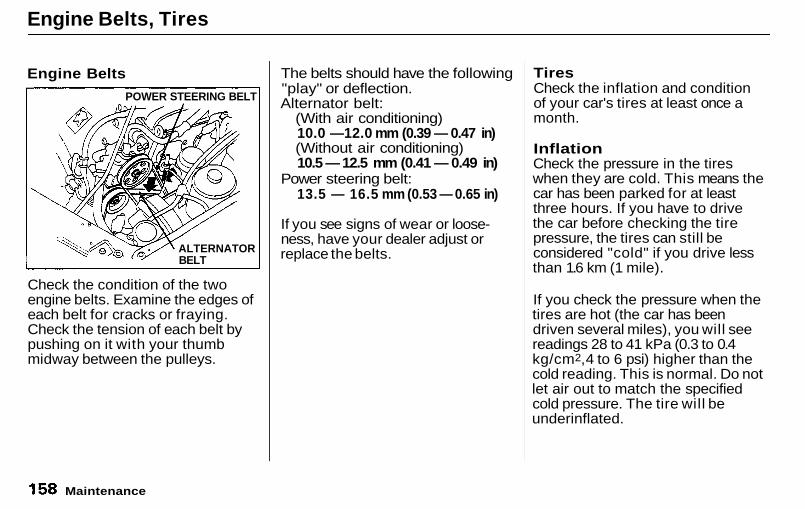
Engine Belts, Tires
Engine Belts
Check the condition of the twoengine belts. Examine the edges ofeach belt for cracks or fraying.Check the tension of each belt bypushing on it with your thumbmidway between the pulleys.
The belts should have the following"play" or deflection.Alternator belt:
(With air conditioning)10.0 —12.0 mm (0.39 — 0.47 in)(Without air conditioning)10.5 — 12.5 mm (0.41 — 0.49 in)
Power steering belt:13.5 — 16.5 mm (0.53 — 0.65 in)
If you see signs of wear or loose-ness, have your dealer adjust orreplace the belts.
TiresCheck the inflation and conditionof your car's tires at least once amonth.
InflationCheck the pressure in the tireswhen they are cold. This means thecar has been parked for at leastthree hours. If you have to drivethe car before checking the tirepressure, the tires can still beconsidered "cold" if you drive lessthan 1.6 km (1 mile).
If you check the pressure when thetires are hot (the car has beendriven several miles), you will seereadings 28 to 41 kPa (0.3 to 0.4kg/cm2,4 to 6 psi) higher than thecold reading. This is normal. Do notlet air out to match the specifiedcold pressure. The tire will beunderinflated.
Maintenance
POWER STEERING BELT
ALTERNATORBELT
Main Menu Table of Contents ▲ ▼
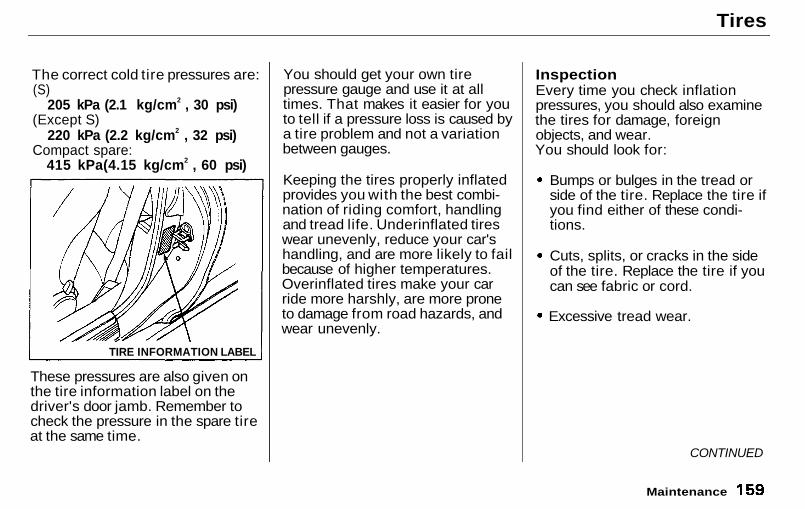
Tires
The correct cold tire pressures are:(S)
205 kPa (2.1 kg/cm2 , 30 psi)(Except S)
220 kPa (2.2 kg/cm2 , 32 psi)Compact spare:
415 kPa(4.15 kg/cm2 , 60 psi)
These pressures are also given onthe tire information label on thedriver's door jamb. Remember tocheck the pressure in the spare tireat the same time.
You should get your own tirepressure gauge and use it at alltimes. That makes it easier for youto tell if a pressure loss is caused bya tire problem and not a variationbetween gauges.
Keeping the tires properly inflatedprovides you with the best combi-nation of riding comfort, handlingand tread life. Underinflated tireswear unevenly, reduce your car'shandling, and are more likely to failbecause of higher temperatures.Overinflated tires make your carride more harshly, are more proneto damage from road hazards, andwear unevenly.
InspectionEvery time you check inflationpressures, you should also examinethe tires for damage, foreignobjects, and wear.You should look for:
Bumps or bulges in the tread orside of the tire. Replace the tire ifyou find either of these condi-tions.
Cuts, splits, or cracks in the sideof the tire. Replace the tire if youcan see fabric or cord.
Excessive tread wear.
CONTINUED
Maintenance
TIRE INFORMATION LABEL
Main Menu Table of Contents ▲ ▼
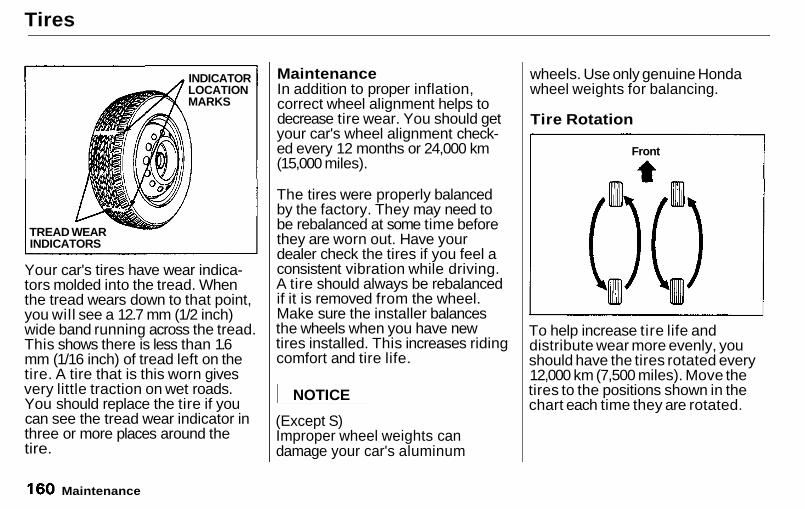
Tires
Your car's tires have wear indica-tors molded into the tread. Whenthe tread wears down to that point,you will see a 12.7 mm (1/2 inch)wide band running across the tread.This shows there is less than 1.6mm (1/16 inch) of tread left on thetire. A tire that is this worn givesvery little traction on wet roads.You should replace the tire if youcan see the tread wear indicator inthree or more places around thetire.
MaintenanceIn addition to proper inflation,correct wheel alignment helps todecrease tire wear. You should getyour car's wheel alignment check-ed every 12 months or 24,000 km(15,000 miles).
The tires were properly balancedby the factory. They may need tobe rebalanced at some time beforethey are worn out. Have yourdealer check the tires if you feel aconsistent vibration while driving.A tire should always be rebalancedif it is removed from the wheel.Make sure the installer balancesthe wheels when you have newtires installed. This increases ridingcomfort and tire life.
(Except S)Improper wheel weights candamage your car's aluminum
wheels. Use only genuine Hondawheel weights for balancing.
Tire Rotation
To help increase tire life anddistribute wear more evenly, youshould have the tires rotated every12,000 km (7,500 miles). Move thetires to the positions shown in thechart each time they are rotated.
Maintenance
Front
INDICATORLOCATIONMARKS
TREAD WEARINDICATORS
NOTICE
Main Menu Table of Contents ▲ ▼
Tires
Replacing TiresThe tires that came with yourHonda were selected to match theperformance capabilities of the carand provide the best combination ofhandling, ride comfort, and long life.You should replace them withradial tires of the same size, loadrange, and speed rating. Mixingradial and bias-ply or bias-beltedtires on your car can reduce itsbraking ability, traction, andsteering accuracy.
It is best to replace all four tires atthe same time. If that is not possi-ble or necessary, then replace thetwo front tires or the two rear tiresas a pair. Replacing just one tirecan seriously affect your car's han-dling.If you ever need to replace a wheel,make sure you use an identicalstyle wheel that originally came onyour Honda. Replacement wheelsare available at your Honda dealer.
Wheels and Tires
Wheel:(S)
14x5.5JJ(Except S)
15x6.5JJ
Tire:(S)
185/70R1487H(Except S)
205/55R1587V
DOT Tire Quality Grading(US Cars)The tires on your car meet all U.S.Federal Safety Requirements. Al ltires are also graded for treadwear,traction, and temperature perform-ance according to Department ofTransportation (DOT) standards.The following explains thesegradings.
TreadwearThe treadwear grade is a compara-tive rating based on the wear rateof the tire when tested under con-trolled conditions on a specifiedgovernment test course. For exam-ple, a tire graded 150 would wearone and one half (1-1/2) times aswell on the government course as atire graded 100. The relative per-formance of tires depends upon theactual conditions of their use, how-ever, and may depart significantlyfrom the norm due to variations indriving habits, service practicesand differences in road character-istics and climate.
CONTINUED
Maintenance
Main Menu Table of Contents ▲ ▼
Tires
TractionThe traction grades, from highestto lowest, are A, B, and C, and theyrepresent the tire's ability to stopon wet pavement as measuredunder controlled conditions onspecified government test surfacesof asphalt and concrete. A tiremarked C may have poor tractionperformance.
Warning: The traction grade as-signed to this tire is based on brak-ing (straight ahead) traction testsand does not include cornering(turning) traction.
TemperatureThe temperature grades are A (thehighest), B, and C, representing thetire's resistance to the generationof heat and its ability to dissipateheat when tested under controlledconditions on a specified indoorlaboratory test wheel. Sustainedhigh temperature can cause thematerial of the tire to degenerateand reduce tire life, and excessivetemperature can lead to sudden tirefailure. The grade C corresponds toa level of performance which allpassenger car tires must meetunder the Federal Motor VehicleSafety Standard No. 109. Grades Band A represent higher levels ofperformance on the laboratory testwheel than the minimum requiredby law.
Warning : The temperature gradefor this tire is established for a tirethat is properly inflated and notoverloaded. Excessive speed,underinflation, or excessive loadingeither separately or in combination,can cause heat build-up andpossible tire failure.
Maintenance
Main Menu Table of Contents ▲ ▼
Tires
Winter DrivingTires that are marked "M+S" or"All Season" on the sidewall havean all-weather tread design. Theyshould be suitable for most winterdriving conditions. Tires withoutthese markings are designed foroptimum traction in dry conditions.They may not provide adequateperformance in winter driving.For the best performance in snowyor icy conditions, you should installsnow tires or tire chains. They maybe required by local laws undercertain conditions.
Snow TiresIf you mount snow tires on yourHonda, make sure they are radialtires of the same size and loadrange as the original tires. Mountsnow tires on all four wheels tobalance your car's handling in allweather conditions. Keep in mindthe traction provided by snow tireson dry roads may not be as high asyour car's original-equipment tires.You should drive cautiously evenwhen the roads are clear. Checkwith the tire dealer for maximumspeed recommendations.
Tire ChainsMount snow chains on your carwhen warranted by driving condi-tions or required by local laws.Make sure the chains are the cor-rect size for your tires. Install themonly on the front tires. If metalchains are used, they must be SAEclass"S". Cable type traction de-vices can also be used.
When installing chains, follow themanufacturer's instructions andmount them as tightly as you can.Drive slowly with chains installed.If you hear the chains contactingthe body or chassis, stop andtighten them. If they still makecontact, slow down until it stops.Remove the chains as soon as youbegin driving on cleared roads.
Chains of the wrong size or that areimproperly installed can damageyour car's brake lines, suspension,body, and wheels. Stop driving ifyou hear the chains hitting any partof the car.
Maintenance
NOTICE
Main Menu Table of Contents ▲ ▼
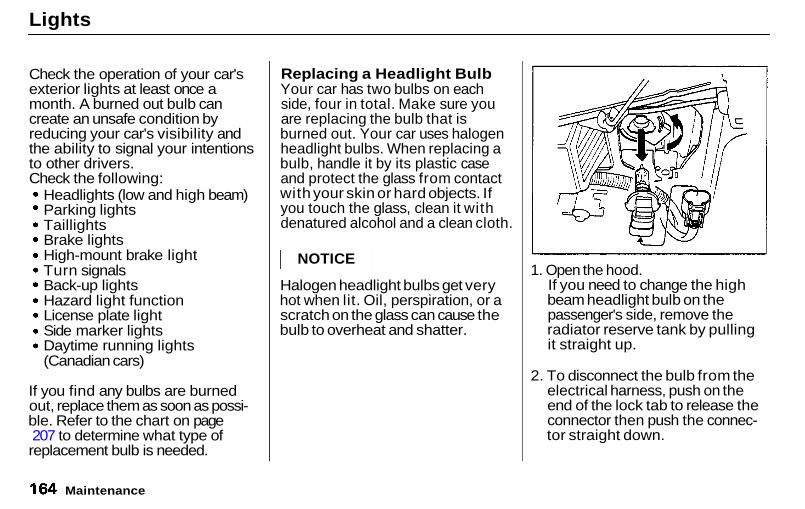
Lights
Check the operation of your car'sexterior lights at least once amonth. A burned out bulb cancreate an unsafe condition byreducing your car's visibility andthe ability to signal your intentionsto other drivers.Check the following:
Headlights (low and high beam)Parking lightsTaillightsBrake lightsHigh-mount brake lightTurn signalsBack-up lightsHazard light functionLicense plate lightSide marker lightsDaytime running lights(Canadian cars)
If you find any bulbs are burnedout, replace them as soon as possi-ble. Refer to the chart on page207 to determine what type ofreplacement bulb is needed.
Replacing a Headlight BulbYour car has two bulbs on eachside, four in total. Make sure youare replacing the bulb that isburned out. Your car uses halogenheadlight bulbs. When replacing abulb, handle it by its plastic caseand protect the glass from contactwith your skin or hard objects. Ifyou touch the glass, clean it withdenatured alcohol and a clean cloth.
Halogen headlight bulbs get veryhot when lit. Oil, perspiration, or ascratch on the glass can cause thebulb to overheat and shatter.
1. Open the hood.If you need to change the highbeam headlight bulb on thepassenger's side, remove theradiator reserve tank by pullingit straight up.
2. To disconnect the bulb from theelectrical harness, push on theend of the lock tab to release theconnector then push the connec-tor straight down.
Maintenance
NOTICE
Main Menu Table of Contents ▲ ▼
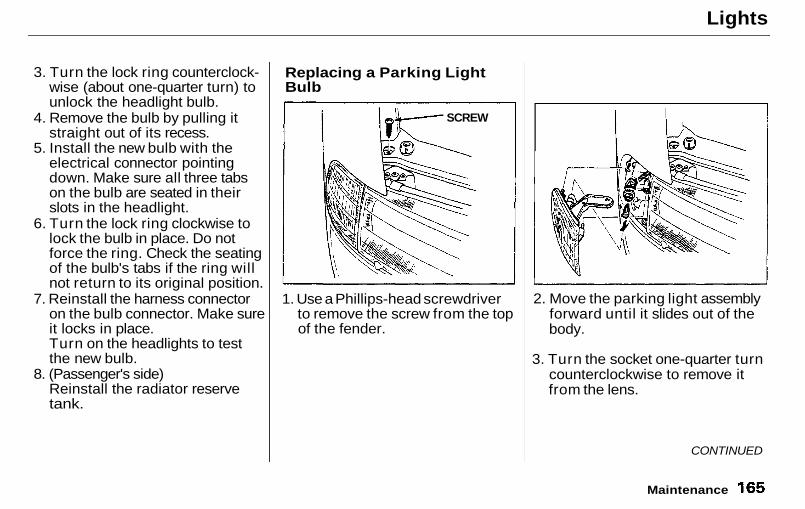
Lights
3. Turn the lock ring counterclock-wise (about one-quarter turn) tounlock the headlight bulb.
4. Remove the bulb by pulling itstraight out of its recess.
5. Install the new bulb with theelectrical connector pointingdown. Make sure all three tabson the bulb are seated in theirslots in the headlight.
6. Turn the lock ring clockwise tolock the bulb in place. Do notforce the ring. Check the seatingof the bulb's tabs if the ring willnot return to its original position.
7. Reinstall the harness connectoron the bulb connector. Make sureit locks in place.Turn on the headlights to testthe new bulb.
8. (Passenger's side)Reinstall the radiator reservetank.
Replacing a Parking LightBulb
1. Use a Phillips-head screwdriverto remove the screw from the topof the fender.
2. Move the parking light assemblyforward until it slides out of thebody.
3. Turn the socket one-quarter turncounterclockwise to remove itfrom the lens.
CONTINUED
Maintenance
SCREW
Main Menu Table of Contents ▲ ▼
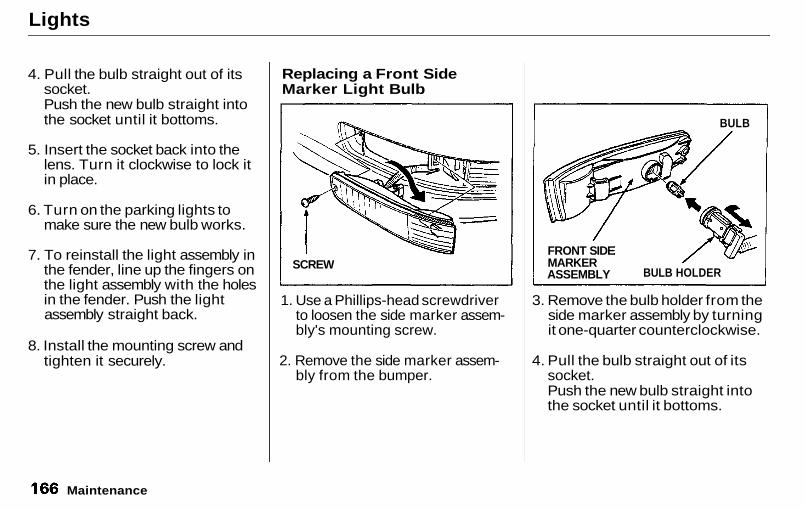
Lights
4. Pull the bulb straight out of itssocket.Push the new bulb straight intothe socket until it bottoms.
5. Insert the socket back into thelens. Turn it clockwise to lock itin place.
6. Turn on the parking lights tomake sure the new bulb works.
7. To reinstall the light assembly inthe fender, line up the fingers onthe light assembly with the holesin the fender. Push the lightassembly straight back.
8. Install the mounting screw andtighten it securely.
Replacing a Front SideMarker Light Bulb
1. Use a Phillips-head screwdriverto loosen the side marker assem-bly's mounting screw.
2. Remove the side marker assem-bly from the bumper.
3. Remove the bulb holder from theside marker assembly by turningit one-quarter counterclockwise.
4. Pull the bulb straight out of itssocket.Push the new bulb straight intothe socket until it bottoms.
Maintenance
SCREW
BULB
FRONT SIDEMARKERASSEMBLY BULB HOLDER
Main Menu Table of Contents ▲ ▼
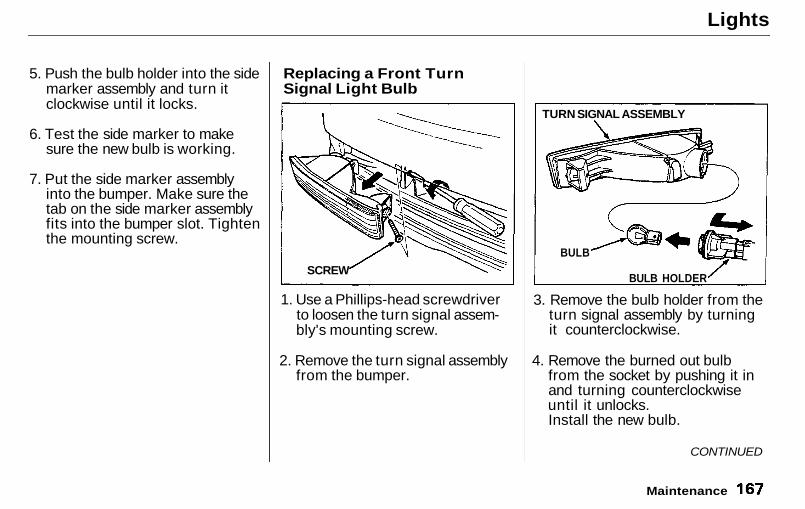
Lights
5. Push the bulb holder into the sidemarker assembly and turn itclockwise until it locks.
6. Test the side marker to makesure the new bulb is working.
7. Put the side marker assemblyinto the bumper. Make sure thetab on the side marker assemblyfits into the bumper slot. Tightenthe mounting screw.
Replacing a Front TurnSignal Light Bulb
1. Use a Phillips-head screwdriverto loosen the turn signal assem-bly's mounting screw.
2. Remove the turn signal assemblyfrom the bumper.
3. Remove the bulb holder from theturn signal assembly by turningit counterclockwise.
4. Remove the burned out bulbfrom the socket by pushing it inand turning counterclockwiseuntil it unlocks.Install the new bulb.
Maintenance
BULB
BULB HOLDERSCREW
CONTINUED
TURN SIGNAL ASSEMBLY
Main Menu Table of Contents ▲ ▼
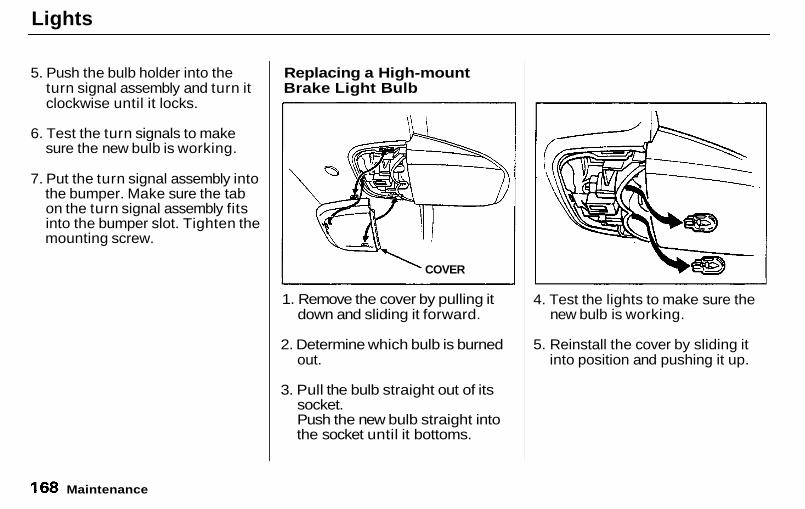
Lights
5. Push the bulb holder into theturn signal assembly and turn itclockwise until it locks.
6. Test the turn signals to makesure the new bulb is working.
7. Put the turn signal assembly intothe bumper. Make sure the tabon the turn signal assembly fitsinto the bumper slot. Tighten themounting screw.
Replacing a High-mountBrake Light Bulb
1. Remove the cover by pulling itdown and sliding it forward.
2. Determine which bulb is burnedout.
3. Pull the bulb straight out of itssocket.Push the new bulb straight intothe socket until it bottoms.
4. Test the lights to make sure thenew bulb is working.
5. Reinstall the cover by sliding itinto position and pushing it up.
Maintenance
COVER
Main Menu Table of Contents ▲ ▼
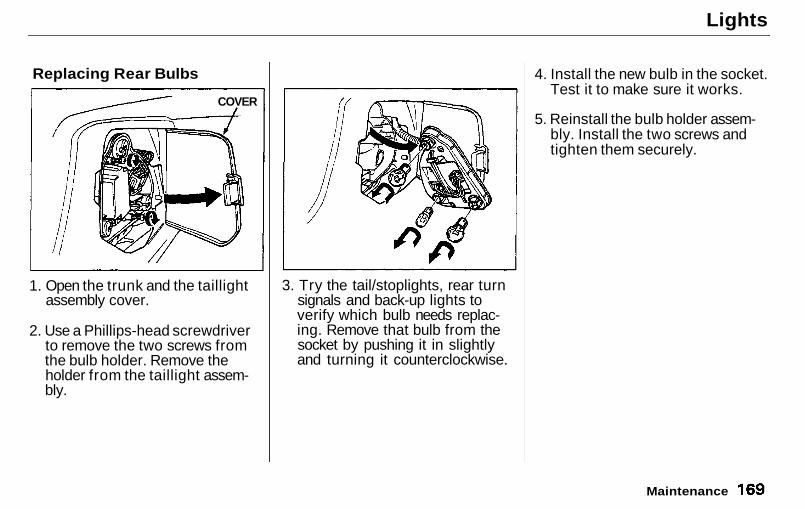
Lights
Replacing Rear Bulbs
1. Open the trunk and the taillightassembly cover.
2. Use a Phillips-head screwdriverto remove the two screws fromthe bulb holder. Remove theholder from the taillight assem-bly.
3. Try the tail/stoplights, rear turnsignals and back-up lights toverify which bulb needs replac-ing. Remove that bulb from thesocket by pushing it in slightlyand turning it counterclockwise.
4. Install the new bulb in the socket.Test it to make sure it works.
5. Reinstall the bulb holder assem-bly. Install the two screws andtighten them securely.
Maintenance
COVER
Main Menu Table of Contents ▲ ▼
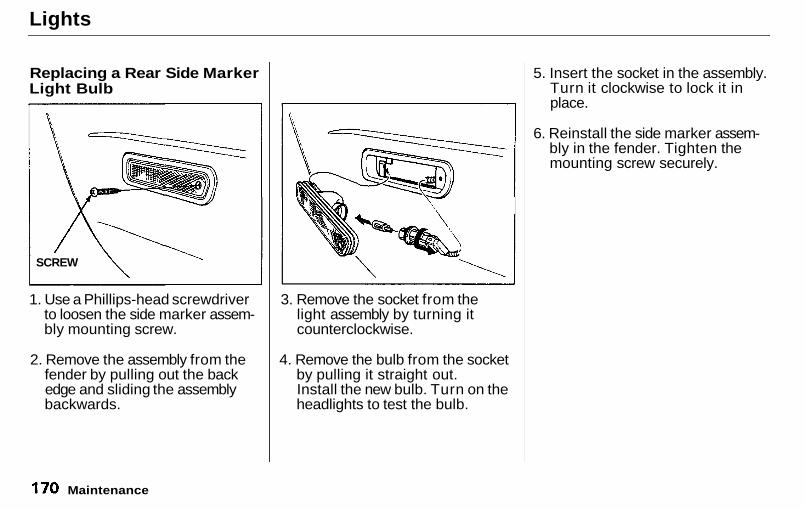
Lights
Replacing a Rear Side MarkerLight Bulb
1. Use a Phillips-head screwdriverto loosen the side marker assem-bly mounting screw.
2. Remove the assembly from thefender by pulling out the backedge and sliding the assemblybackwards.
3. Remove the socket from thelight assembly by turning itcounterclockwise.
4. Remove the bulb from the socketby pulling it straight out.Install the new bulb. Turn on theheadlights to test the bulb.
5. Insert the socket in the assembly.Turn it clockwise to lock it inplace.
6. Reinstall the side marker assem-bly in the fender. Tighten themounting screw securely.
Maintenance
SCREW
Main Menu Table of Contents ▲ ▼
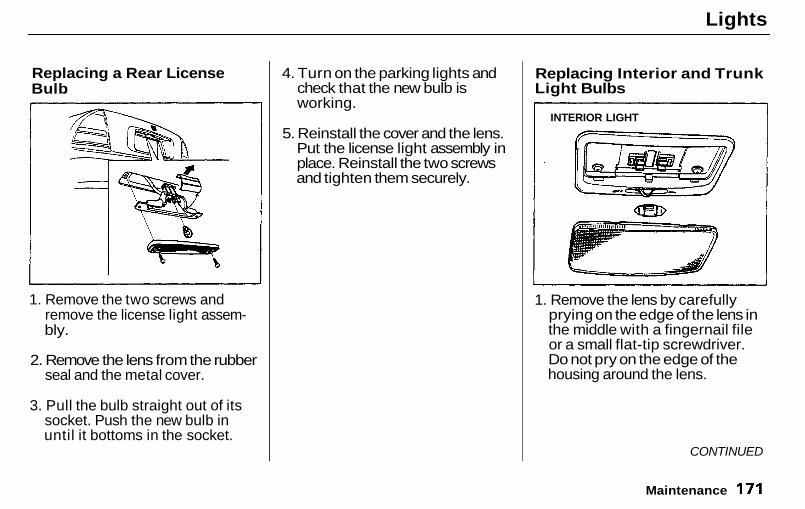
Lights
Replacing a Rear LicenseBulb
1. Remove the two screws andremove the license light assem-bly.
2. Remove the lens from the rubberseal and the metal cover.
3. Pull the bulb straight out of itssocket. Push the new bulb inuntil it bottoms in the socket.
4. Turn on the parking lights andcheck that the new bulb isworking.
5. Reinstall the cover and the lens.Put the license light assembly inplace. Reinstall the two screwsand tighten them securely.
Replacing Interior and TrunkLight Bulbs
1. Remove the lens by carefullyprying on the edge of the lens inthe middle with a fingernail fileor a small flat-tip screwdriver.Do not pry on the edge of thehousing around the lens.
CONTINUED
Maintenance
INTERIOR LIGHT
Main Menu Table of Contents ▲ ▼
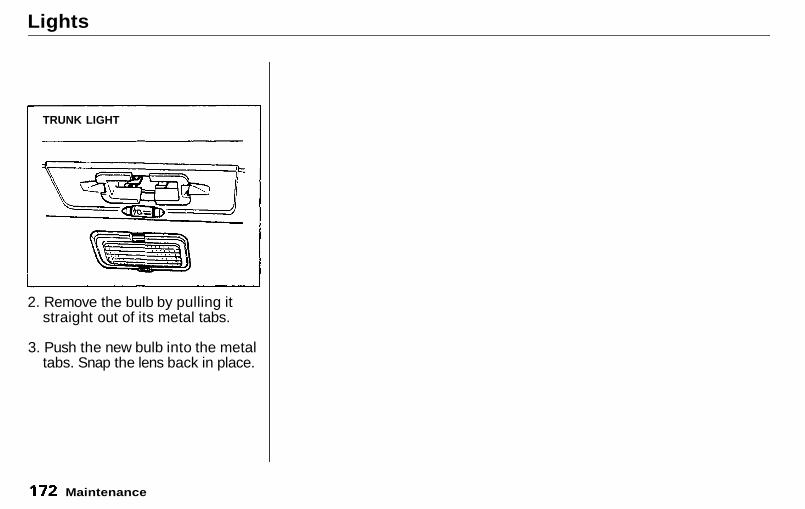
Lights
2. Remove the bulb by pulling itstraight out of its metal tabs.
3. Push the new bulb into the metaltabs. Snap the lens back in place.
Maintenance
TRUNK LIGHT
Main Menu Table of Contents ▲ ▼

Storing Your Car
If you need to park your car for anextended period (more than 1month), there are several thingsyou should do to prepare it forstorage. Proper preparation helpsprevent deterioration and makes iteasier to get your car back on theroad. It is best to store your carindoors if at all possible.
Fill the fuel tank.
Change the engine oil and filter(see page 137).
Wash and dry the exteriorcompletely.
Clean the interior. Make sure thecarpeting, floor mats, etc. arecompletely dry.
Leave the parking brake off. Putthe transmission in Reverse(manual) or Park (automatic).
Block the rear wheels.
If the car is to be stored for alonger period, it should besupported on jackstands so thetires are off the ground.
Leave one window open slightly(if the car is being stored indoors).
Disconnect the battery.
Cover the car with a"breathable" car cover, one madefrom a porous material such ascotton. Nonporous materials,such as plastic sheeting, trapmoisture which can damage thepaint.
If possible, run the engine for awhile periodically (preferablyonce a month).
If you store your car for 12 monthsor longer, have your Honda dealerperform the inspections called forin the 24 months/48,000 km (30,000miles) maintenance schedule assoon as you take it out of storage(see page 129). The replacementscalled for in the maintenanceschedule are not needed unless thecar has actually reached that timeor mileage.
Maintenance
Main Menu Table of Contents ▲ ▼
Appearance Care
Regular cleaning and polishing ofyour Honda helps to keep it "new"looking. This section gives youhints on how to clean and preserveyour car's appearance: the paint,brightwork, wheels and interior.Also included are several thingsyou can do to help prevent corro-sion.
Exterior Care................................ 176Washing..................................... 176Waxing....................................... 177Aluminum Wheels................... 177Paint Touch-up......................... 178
Interior Care.................................. 179Carpeting................................... 179Fabric......................................... 179Vinyl........................................... 179Seat Belts................................... 179Windows..................................... 180Air Fresheners.......................... 180
Corrosion Protection................... 180Body Repairs................................. 181
Appearance Care
Main Menu ▲ ▼
Exterior Care
WashingFrequent washing helps preserveyour car's beauty. Dirt and grit canscratch the paint, while tree sapand bird droppings can perma-nently ruin the finish.
Wash your car in a shady area, notin direct sunlight. If the car isparked in the sun, move it into theshade and let the exterior cooldown before you start.
Chemical solvents and strongcleaners can damage the paint,metal, and plastic on your car. Onlyuse the solvents and cleanersrecommended in this Owner'sManual.
Rinse the car thoroughly withcool water to remove loose dirt.
Fill a bucket with cool water.Mix in a mild detergent, such asdishwashing liquid or a productmade especially for car washing.
Wash the car, using the waterand detergent solution and a soft-bristle brush, sponge, or softcloth. Start at the top and workyour way down. Rinse frequently.
Check the body for road tar, treesap, etc. Remove these stainswith tar remover or turpentine.Rinse it off immediately so itdoes not harm the finish. Remem-ber to re-wax these areas, even ifthe rest of the car does not needwaxing.
When you have washed andrinsed the whole exterior, dry itwith a chamois or soft towel.Letting it air-dry will causedulling and water spots.
As you dry the car, inspect it forchips and scratches that couldallow corrosion to start. Repairthem with touch-up paint (see page178).
Appearance Care
NOTICE
Main Menu Table of Contents ▲ ▼
Exterior Care
WaxingAlways wash and dry the whole carbefore waxing it. You should waxyour car, including the metal trim,whenever water sits on the surfacein large patches. It should form intobeads or droplets after waxing.
You should use a quality liquid orpaste wax. Apply it according tothe instructions on the container. Ingeneral, there are two types ofproducts:
Waxes — A wax coats the finishand protects it from damage byexposure to sunlight, air pollution,etc. You should use a wax on yourHonda when it is new.
Polishes — Polishes and cleaner/waxes can restore the shine topaint that has oxidized and lostsome of its shine. They normallycontain mild abrasives and solventsthat remove the top layer of thefinish. You should use a polish onyour Honda if the finish does nothave its original shine after using awax.
Cleaning tar, insects, etc. withremovers also takes off the wax.Remember to re-wax those areas,even if the rest of the car does notneed waxing.
Aluminum WheelsClean your Honda's aluminum alloywheels as you do the rest of theexterior. Wash them with the samesolution, and rinse them thoroughly.
The wheels have a protective clear-coat that keeps the aluminum fromcorroding and tarnishing. Usingharsh chemicals, including somecommercial wheel cleaners, or stiffbrushes can damage this clear-coat.Only use a mild detergent and softbrush or sponge to clean the wheels.
Appearance Care
Main Menu Table of Contents ▲ ▼
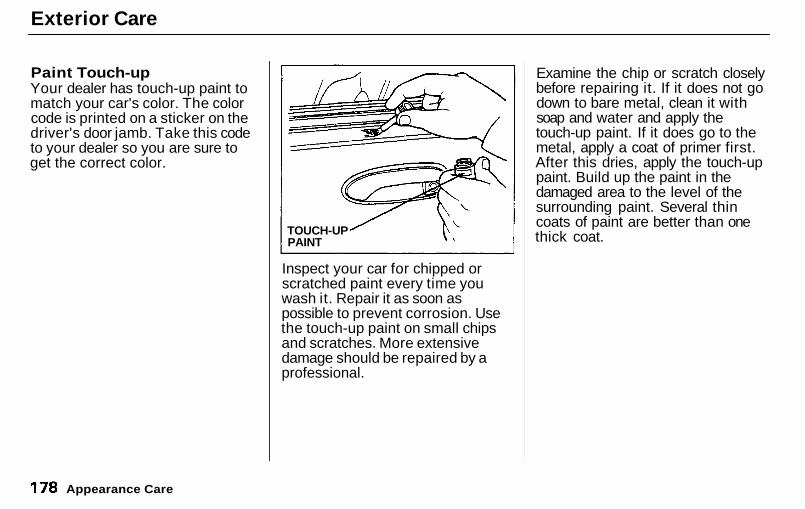
Exterior Care
Paint Touch-upYour dealer has touch-up paint tomatch your car's color. The colorcode is printed on a sticker on thedriver's door jamb. Take this codeto your dealer so you are sure toget the correct color.
Inspect your car for chipped orscratched paint every time youwash it. Repair it as soon aspossible to prevent corrosion. Usethe touch-up paint on small chipsand scratches. More extensivedamage should be repaired by aprofessional.
Examine the chip or scratch closelybefore repairing it. If it does not godown to bare metal, clean it withsoap and water and apply thetouch-up paint. If it does go to themetal, apply a coat of primer first.After this dries, apply the touch-uppaint. Build up the paint in thedamaged area to the level of thesurrounding paint. Several thincoats of paint are better than onethick coat.
Appearance Care
TOUCH-UPPAINT
Main Menu Table of Contents ▲ ▼
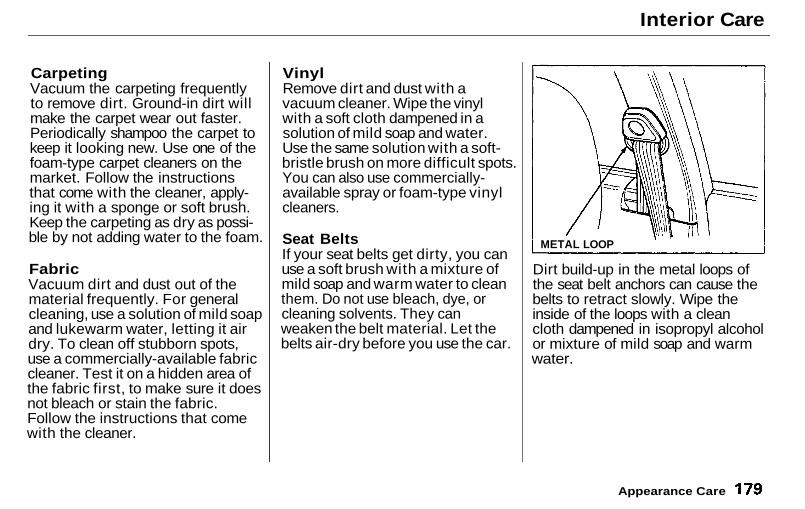
Interior Care
CarpetingVacuum the carpeting frequentlyto remove dirt. Ground-in dirt willmake the carpet wear out faster.Periodically shampoo the carpet tokeep it looking new. Use one of thefoam-type carpet cleaners on themarket. Follow the instructionsthat come with the cleaner, apply-ing it with a sponge or soft brush.Keep the carpeting as dry as possi-ble by not adding water to the foam.
FabricVacuum dirt and dust out of thematerial frequently. For generalcleaning, use a solution of mild soapand lukewarm water, letting it airdry. To clean off stubborn spots,use a commercially-available fabriccleaner. Test it on a hidden area ofthe fabric first, to make sure it doesnot bleach or stain the fabric.Follow the instructions that comewith the cleaner.
VinylRemove dirt and dust with avacuum cleaner. Wipe the vinylwith a soft cloth dampened in asolution of mild soap and water.Use the same solution with a soft-bristle brush on more difficult spots.You can also use commercially-available spray or foam-type vinylcleaners.
Seat BeltsIf your seat belts get dirty, you canuse a soft brush with a mixture ofmild soap and warm water to cleanthem. Do not use bleach, dye, orcleaning solvents. They canweaken the belt material. Let thebelts air-dry before you use the car.
Dirt build-up in the metal loops ofthe seat belt anchors can cause thebelts to retract slowly. Wipe theinside of the loops with a cleancloth dampened in isopropyl alcoholor mixture of mild soap and warmwater.
Appearance Care
METAL LOOP
Main Menu Table of Contents ▲ ▼
Interior Care, Corrosion Protection
WindowsClean the windows, inside and out,with a commercially-available glasscleaner. You can also use a mixtureof one part white vinegar to tenparts water. This will remove thehaze that builds up on the inside ofthe windows. Use a soft cloth orpaper towels to clean all glass andclear plastic surfaces.
The rear window defogger wiresare bonded to the inside of the glass.Wiping vigorously up-and-downcan dislodge and break the defog-ger wires. When cleaning the rearwindow, use gentle pressure andwipe side-to-side.
Air FreshenersIf you want to use an air freshener/deodorizer in the interior of yourcar, it is best to use a solid type.Some liquid air fresheners containchemicals that may cause parts ofthe interior trim and fabric to crackor discolor.
If you use a liquid air freshener,make sure you fasten it securely soit does not spill as you drive.
Corrosion ProtectionTwo factors normally contribute tocausing corrosion in your car:
1. Moisture trapped in body cavi-ties. Dirt and road salt that col-lects in hollows on the undersideof the car stays damp, promotingcorrosion in that area.
2. Removal of paint and protectivecoatings from the exterior andunderside of the car.
Many corrosion-preventive mea-sures are built into your Honda.You can help keep your car fromcorroding by performing somesimple periodic maintenance:
Repair chips and scratches in thepaint as soon as you discoverthem.
Appearance Care
NOTICE
Main Menu Table of Contents ▲ ▼
Corrosion Protection, Body Repairs
Inspect and clean out the drainholes in the bottom of the doorsand body.
Check the floor coverings fordampness. Carpeting and floormats may remain damp for a longtime, especially in winter. Thisdampness can eventually causethe floor panels to corrode.
Use a high-pressure spray toclean the underside of your car.This is especially important inareas that use road salt in winter.It is also a good idea in humidclimates and areas subject to saltair. Cars equipped with ABShave a sensor and wiring at eachwheel. Be careful not to damagethem.
Have the corrosion-preventivecoatings on the underside of yourcar inspected and repairedperiodically.
Body RepairsBody repairs affect your car'sresistance to corrosion. If your carneeds repairs after a collision, payclose attention to the parts used inthe repair and the quality of thework.
Make sure the repair facility usesgenuine Honda replacement bodyparts. Some companies makesheetmetal pieces that seem toduplicate the original Honda bodyparts, but are actually inferior in fit,finish, and quality. Once installed,they do not give the same high-quality appearance and level ofcorrosion resistance.
When reporting your collision tothe insurance company, tell themyou want genuine Honda partsused in the repair. Although mostinsurers recognize the higherquality of original parts, some maytry to specify that the repairs bedone with the "lowest cost" partsavailable. You should investigatethis before any repairs are begun.
Take your car to your authorizedHonda dealer for inspection afterthe repairs are completed. He canmake sure that quality materialswere used, and that corrosion-preventive coatings were applied toall repaired and replaced parts.
Appearance Care
Main Menu Table of Contents ▲ ▼
Taking Care of the Unexpected
This section covers the more-common problems that motoristsexperience with their cars. It givesyou information about how tosafely evaluate the problem andwhat to do to correct it. If theproblem has stranded you on theside of the road, you may be able toget going again. If not, you will alsofind instructions on getting yourcar towed.
Compact Spare Tire..................... 184Changing a Flat Tire................... 185If Your Engine Won't Start........ 190
Nothing Happens...................... 190The Starter Operates
Normally................................ 191Jump Starting................................ 191If Your Engine Overheats.......... 193Low Oil Pressure.......................... 195Charging System Indication...... 196Malfunction Indicator Lamp/
Check Engine Light................. 197Closing the Sunroof..................... 198Fuses............................................... 199
Checking and Replacing......... 200Towing........................................... 202
Taking Care of the Unexpected
Main Menu ▲ ▼
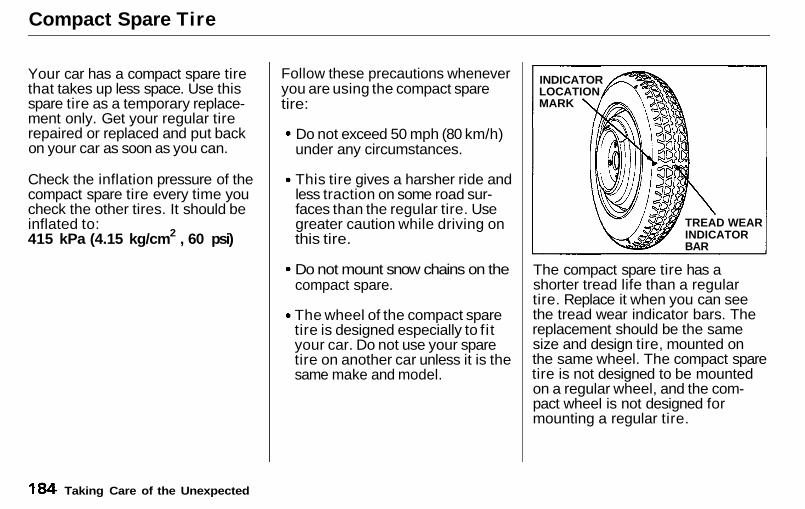
Compact Spare Tire
Your car has a compact spare tirethat takes up less space. Use thisspare tire as a temporary replace-ment only. Get your regular tirerepaired or replaced and put backon your car as soon as you can.
Check the inflation pressure of thecompact spare tire every time youcheck the other tires. It should beinflated to:415 kPa (4.15 kg/cm2 , 60 psi)
Follow these precautions wheneveryou are using the compact sparetire:
Do not exceed 50 mph (80 km/h)under any circumstances.
This tire gives a harsher ride andless traction on some road sur-faces than the regular tire. Usegreater caution while driving onthis tire.
Do not mount snow chains on thecompact spare.
The wheel of the compact sparetire is designed especially to f i tyour car. Do not use your sparetire on another car unless it is thesame make and model.
The compact spare tire has ashorter tread life than a regulartire. Replace it when you can seethe tread wear indicator bars. Thereplacement should be the samesize and design tire, mounted onthe same wheel. The compact sparetire is not designed to be mountedon a regular wheel, and the com-pact wheel is not designed formounting a regular tire.
Taking Care of the Unexpected
TREAD WEARINDICATORBAR
INDICATORLOCATIONMARK
Main Menu Table of Contents ▲ ▼
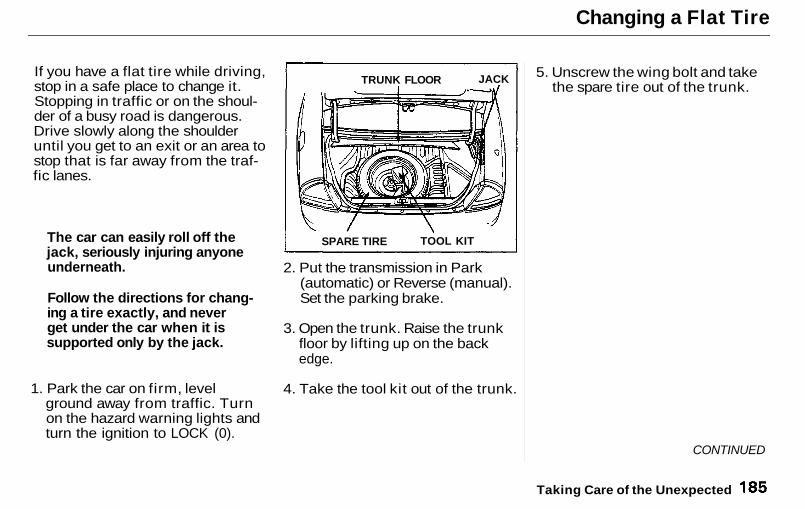
Changing a Flat Tire
If you have a flat tire while driving,stop in a safe place to change it.Stopping in traffic or on the shoul-der of a busy road is dangerous.Drive slowly along the shoulderuntil you get to an exit or an area tostop that is far away from the traf-fic lanes.
1. Park the car on firm, levelground away from traffic. Turnon the hazard warning lights andturn the ignition to LOCK (0).
2. Put the transmission in Park(automatic) or Reverse (manual).Set the parking brake.
3. Open the trunk. Raise the trunkfloor by lifting up on the backedge.
4. Take the tool kit out of the trunk.
5. Unscrew the wing bolt and takethe spare tire out of the trunk.
CONTINUED
Taking Care of the Unexpected
The car can easily roll off thejack, seriously injuring anyoneunderneath.
Follow the directions for chang-ing a tire exactly, and neverget under the car when it issupported only by the jack.
TRUNK FLOOR JACK
TOOL KITSPARE TIRE
Main Menu Table of Contents ▲ ▼
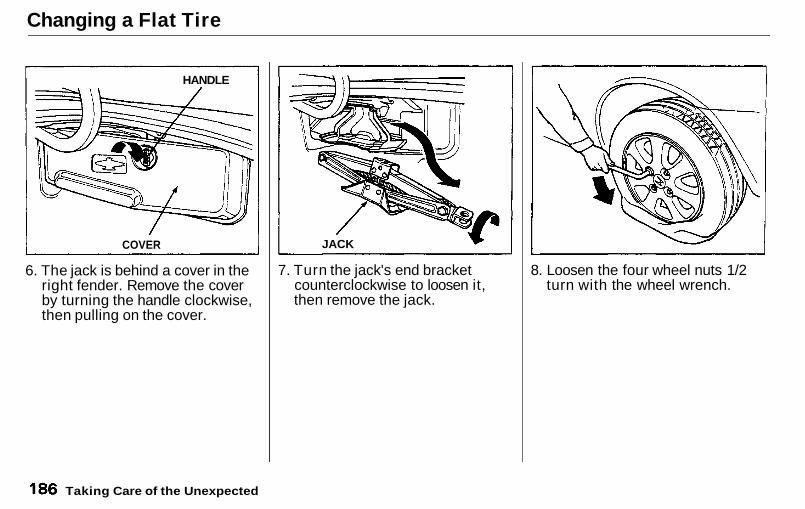
Changing a Flat Tire
6. The jack is behind a cover in theright fender. Remove the coverby turning the handle clockwise,then pulling on the cover.
7. Turn the jack's end bracketcounterclockwise to loosen it,then remove the jack.
8. Loosen the four wheel nuts 1/2turn with the wheel wrench.
Taking Care of the Unexpected
COVER
HANDLE
JACK
Main Menu Table of Contents ▲ ▼
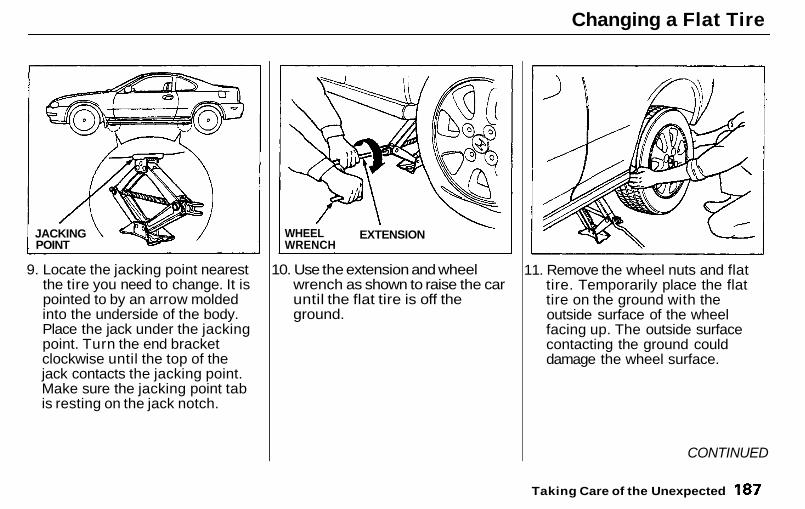
Changing a Flat Tire
9. Locate the jacking point nearestthe tire you need to change. It ispointed to by an arrow moldedinto the underside of the body.Place the jack under the jackingpoint. Turn the end bracketclockwise until the top of thejack contacts the jacking point.Make sure the jacking point tabis resting on the jack notch.
10. Use the extension and wheelwrench as shown to raise the caruntil the flat tire is off theground.
11. Remove the wheel nuts and flattire. Temporarily place the flattire on the ground with theoutside surface of the wheelfacing up. The outside surfacecontacting the ground coulddamage the wheel surface.
CONTINUED
Taking Care of the Unexpected
JACKINGPOINT
EXTENSIONWHEELWRENCH
Main Menu Table of Contents ▲ ▼
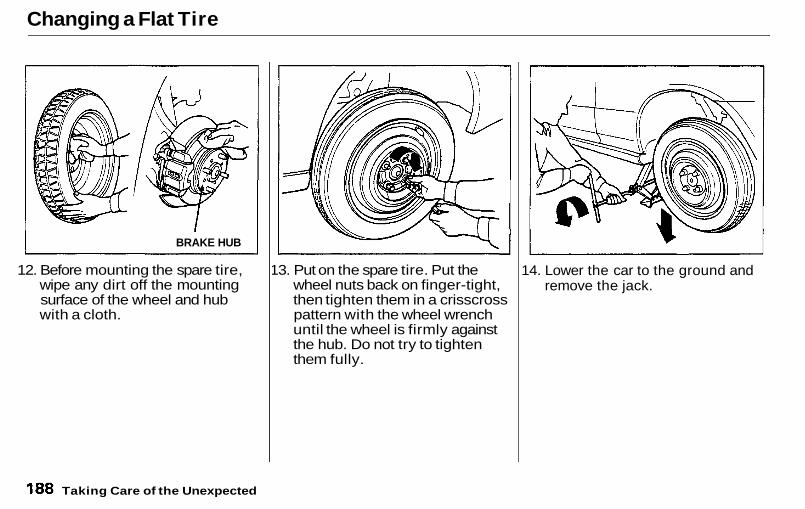
Changing a Flat Tire
12. Before mounting the spare tire,wipe any dirt off the mountingsurface of the wheel and hubwith a cloth.
13. Put on the spare tire. Put thewheel nuts back on finger-tight,then tighten them in a crisscrosspattern with the wheel wrenchuntil the wheel is firmly againstthe hub. Do not try to tightenthem fully.
14. Lower the car to the ground andremove the jack.
Taking Care of the Unexpected
BRAKE HUB
Main Menu Table of Contents ▲ ▼
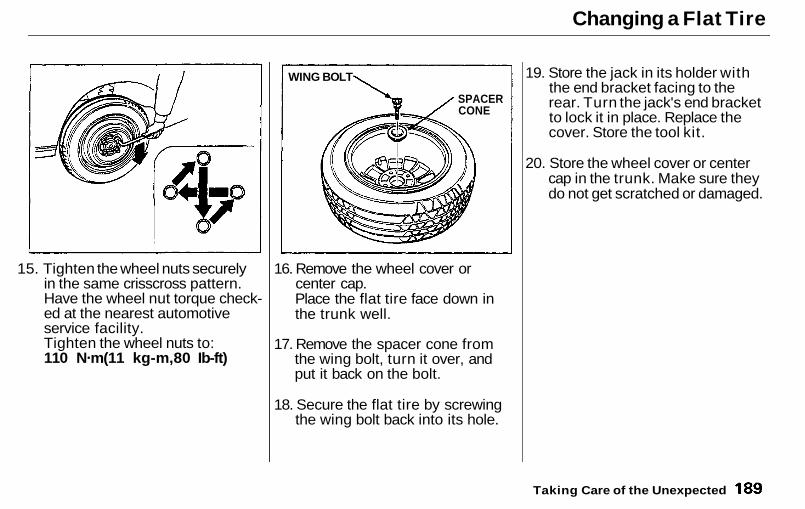
Changing a Flat Tire
15. Tighten the wheel nuts securelyin the same crisscross pattern.Have the wheel nut torque check-ed at the nearest automotiveservice facility.Tighten the wheel nuts to:110 N.m(11 kg-m,80 Ib-ft)
16. Remove the wheel cover orcenter cap.Place the flat tire face down inthe trunk well.
17. Remove the spacer cone fromthe wing bolt, turn it over, andput it back on the bolt.
18. Secure the flat tire by screwingthe wing bolt back into its hole.
19. Store the jack in its holder withthe end bracket facing to therear. Turn the jack's end bracketto lock it in place. Replace thecover. Store the tool kit.
20. Store the wheel cover or centercap in the trunk. Make sure theydo not get scratched or damaged.
Taking Care of the Unexpected
SPACERCONE
WING BOLT
Main Menu Table of Contents ▲ ▼
If Your Engine Won't Start
Diagnosing why your engine won'tstart falls into two areas, dependingon what you hear when you turnthe key to START (III):
You hear nothing, or almostnothing. The engine's startermotor does not operate at all, oroperates very slowly.
You can hear the starter motoroperating normally, but theengine does not start up and run.
Nothing Happens or theStarter Motor Operates VerySlowlyWhen you turn the ignition switchto START (III), you do not hear thenormal noise of the engine trying tostart. You may hear a clickingsound or series of clicks, or nothingat all.Check these things:
Check the transmission interlock.If you have a manual trans-mission, the clutch pedal must bepushed all the way to the floor orthe starter will not operate. Withan automatic transmission, itmust be in Park or Neutral.
Turn the ignition switch to ON(II). Turn on the headlights andcheck their brightness. If theheadlights are very dim or don'tlight at all, the battery is dis-charged. See Jump Starting onpage 191 .
Turn the ignition switch toSTART (III). If the headlights donot dim, check the condition ofthe fuses. If the fuses are OK,there is probably somethingwrong with the electrical circuitfor the ignition switch or startermotor. You will need a qualifiedtechnician to determine theproblem. (See Towing on page202.)
If the headlights dim noticeablyor go out when you try to startthe engine, either the battery isdischarged or the connectionsare corroded. Check the condi-tion of the battery and terminalconnections (see page 153). Youcan then try jump starting thecar from a booster battery (seepage 191).
Taking Care of the Unexpected
Main Menu Table of Contents ▲ ▼
If Your Engine Won't Start, Jump Starting
The Starter OperatesNormallyIn this case, the starter motorsounds normal when you turn theignition switch to START (III), butthe engine does not run.
Are you using the proper startingprocedure? Refer to Startingthe Engine on page 109.
Do you have fuel? Turn theignition switch to ON (II) for aminute and watch the fuel gauge.
There may be an electricalproblem, such as no power to thefuel pump. Check all the fuses(see page 199).
If you find nothing wrong, you willneed a qualified technician to findthe problem. See Towing on page202.
Jump StartingIf your car's battery has run down,you may be able to start the engineby using a booster battery.Although this seems like a simpleprocedure, there are several precau-tions you should take. Follow thedirections closely.
You cannot start a Honda with anautomatic transmision by pushingor pulling it.
To jump start your car:
1. Open the hood and check thephysical condition of the battery(see page 152). In very coldweather, check the condition ofthe electrolyte. If it seems slushyor like ice, do not try jumpstarting until it thaws.
If a battery sits in extreme cold, theelectrolyte inside can freeze.Attempting to jump start with afrozen battery can cause it torupture or explode.
2. Turn off all the electrical acces-sories: heater, A/C, stereo system,lights, etc.Put the transmission in Neutralor Park and set the parkingbrake.
Taking Care of the Unexpected
A battery can explode if youdo not follow the correct pro-cedure, seriously injuring any-one nearby.
Keep all sparks, open flames,and smoking materials awayfrom the battery.
NOTICE
CONTINUED
Main Menu Table of Contents ▲ ▼
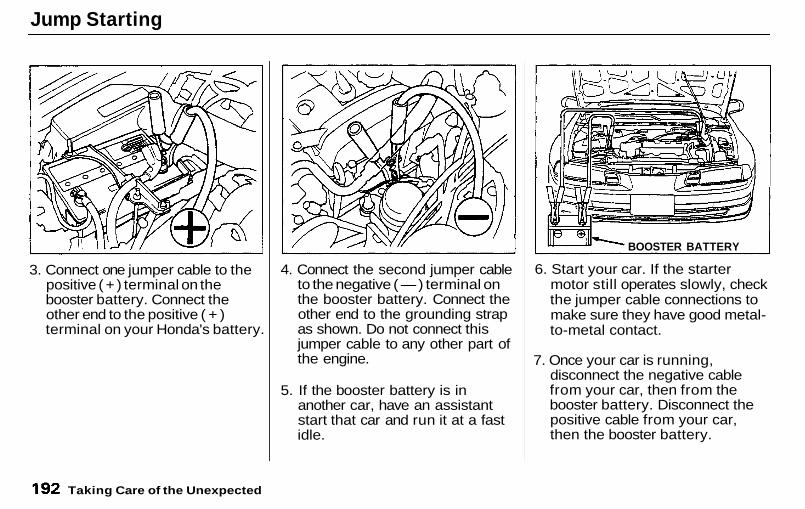
Jump Starting
3. Connect one jumper cable to thepositive ( + ) terminal on thebooster battery. Connect theother end to the positive ( + )terminal on your Honda's battery.
4. Connect the second jumper cableto the negative ( — ) terminal onthe booster battery. Connect theother end to the grounding strapas shown. Do not connect thisjumper cable to any other part ofthe engine.
5. If the booster battery is inanother car, have an assistantstart that car and run it at a fastidle.
6. Start your car. If the startermotor still operates slowly, checkthe jumper cable connections tomake sure they have good metal-to-metal contact.
7. Once your car is running,disconnect the negative cablefrom your car, then from thebooster battery. Disconnect thepositive cable from your car,then the booster battery.
Taking Care of the Unexpected
BOOSTER BATTERY
Main Menu Table of Contents ▲ ▼
If Your Engine Overheats
Your car's temperature gaugeshould register in the midrangeunder most conditions. It mayregister higher if you are drivingup a long steep hill on a very hotday. If it illuminates the redmarker at the right end of thegauge, you should determine thereason.
Driving with the temperaturegauge's red marker lit can causeserious damage to your engine.
Your car can overheat for severalreasons, such as lack of coolant or amechanical problem. The onlyindication may be the temperaturegauge illuminating the red marker.Or you may see steam or spraycoming from under the hood. Ineither case, you should takeimmediate action.
1. Safely pull to the side of the road.Put the transmission in neutralor Park and set the parkingbrake. Turn off the climatecontrol and all other accessories.Turn on the hazard warningindicators.
2. If you see steam and/or spraycoming from under the hood,turn off the engine.
3. If you do not see steam or spray,leave the engine running andwatch the temperature gauge. Ifthe high heat is due to overload-ing (climbing a long, steep hill ona hot day with the A/C running,for example), the engine shouldstart to cool down almost immedi-ately. If it does, wait until thetemperature gauge comes downto the midpoint then continuedriving.
4. If the temperature gaugecontinues to display the redmarker, turn off the engine.
5. Wait until you see no more signsof steam or spray, then open thehood.
Taking Care of the Unexpected
CONTINUED
Steam and spray from an over-heated engine can seriouslyscald you.
Do not open the hood if steamis coming out.
NOTICE
Main Menu Table of Contents ▲ ▼
If Your Engine Overheats
6. Look for any obvious coolantleaks, such as a split radiatorhose. Everything is still extreme-ly hot, so use caution. If you finda leak, it must be repaired beforeyou continue driving (seeTowing on page 202).
7. If you don't find an obvious leak,check the coolant level in theradiator reserve tank (see page139). If the level is below the
MIN mark, add coolant to half-way between the MIN and MAXmarks.
8. If there was no coolant in thereserve tank, you may also haveto add coolant to the radiator.Let the engine cool down untilthe temperature gauge registersbelow the midpoint, or lower,before checking the radiator.
9. Using gloves or a large heavycloth, turn the radiator capcounterclockwise, withoutpushing down, to the first stop.This releases any remainingpressure in the cooling system.After the pressure releases, pushdown on the cap and turn it untilit comes off.
10 . Start the engine and set thetemperature control lever tomaximum. Add coolant to theradiator up to the base of thefiller neck. If you do not have theproper coolant mixture available,you can add plain water.Remember to have the coolingsystem drained and refilled withthe proper mixture as soon asyou can.
11. Put the radiator cap back ontightly. Run the engine andwatch the temperature gauge. Ifit illuminates the red markeragain, the engine needs repair.(See Towing on page 202.)
12. If the temperature stays normal,check the coolant level in theradiator reserve tank. If it hasgone down, add coolant to theMAX mark. Put the cap back ontightly.
Taking Care of the Unexpected
Removing the radiator capwhile the engine is hot cancause the coolant to spray out,seriously scalding you.
Always let the engine andradiator cool down beforeremoving the radiator cap.
Main Menu Table of Contents ▲ ▼
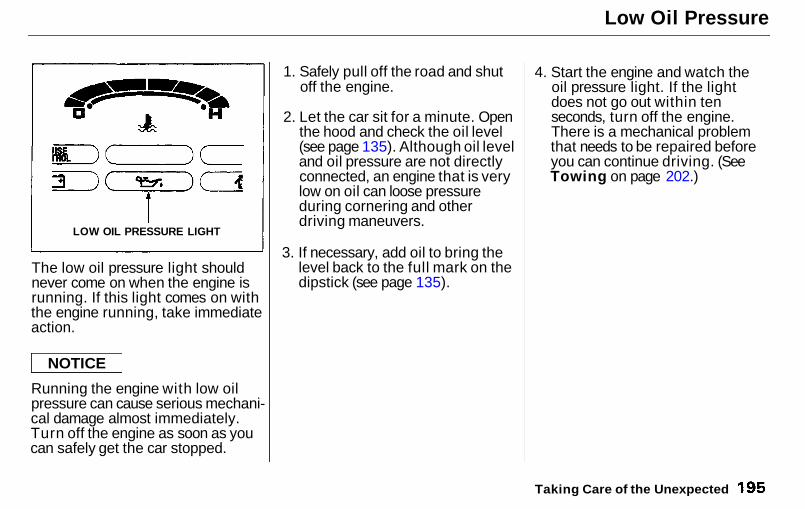
Low Oil Pressure
The low oil pressure light shouldnever come on when the engine isrunning. If this light comes on withthe engine running, take immediateaction.
Running the engine with low oilpressure can cause serious mechani-cal damage almost immediately.Turn off the engine as soon as youcan safely get the car stopped.
1. Safely pull off the road and shutoff the engine.
2. Let the car sit for a minute. Openthe hood and check the oil level(see page 135). Although oil leveland oil pressure are not directlyconnected, an engine that is verylow on oil can loose pressureduring cornering and otherdriving maneuvers.
3. If necessary, add oil to bring thelevel back to the full mark on thedipstick (see page 135).
4. Start the engine and watch theoil pressure light. If the lightdoes not go out within tenseconds, turn off the engine.There is a mechanical problemthat needs to be repaired beforeyou can continue driving. (SeeTowing on page 202.)
Taking Care of the Unexpected
NOTICE
LOW OIL PRESSURE LIGHT
Main Menu Table of Contents ▲ ▼
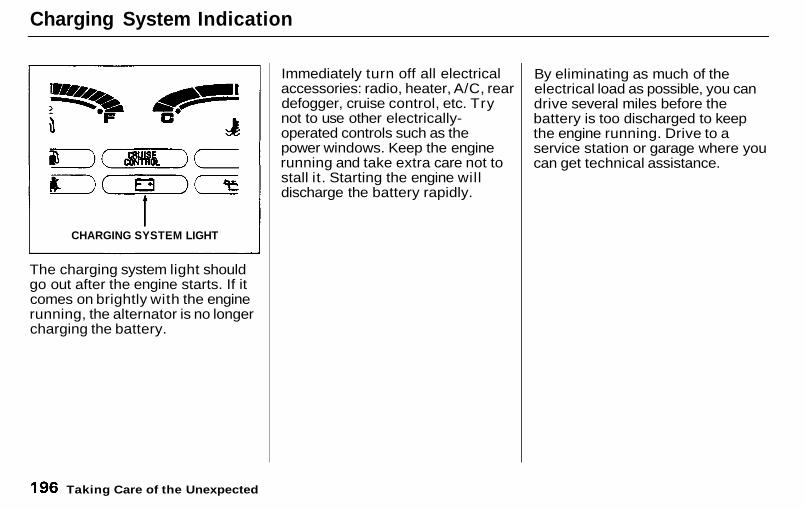
Charging System Indication
The charging system light shouldgo out after the engine starts. If itcomes on brightly with the enginerunning, the alternator is no longercharging the battery.
Immediately turn off all electricalaccessories: radio, heater, A/C, reardefogger, cruise control, etc. Trynot to use other electrically-operated controls such as thepower windows. Keep the enginerunning and take extra care not tostall it. Starting the engine willdischarge the battery rapidly.
By eliminating as much of theelectrical load as possible, you candrive several miles before thebattery is too discharged to keepthe engine running. Drive to aservice station or garage where youcan get technical assistance.
Taking Care of the Unexpected
CHARGING SYSTEM LIGHT
Main Menu Table of Contents ▲ ▼
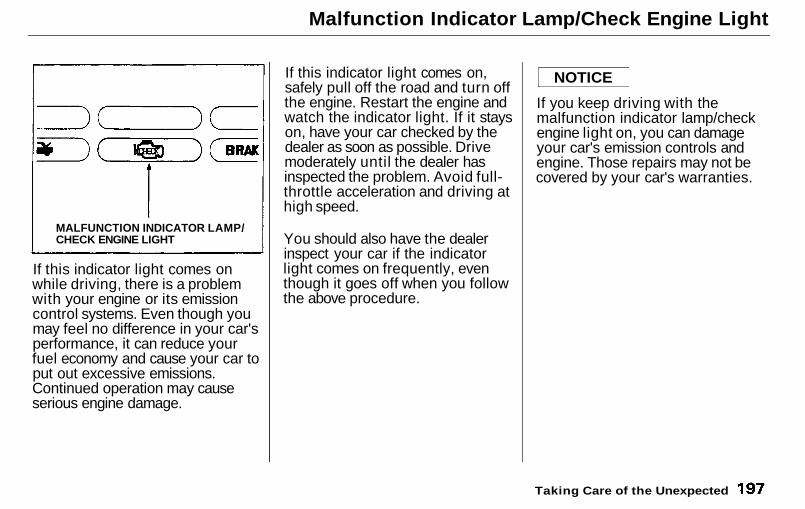
Malfunction Indicator Lamp/Check Engine Light
If this indicator light comes onwhile driving, there is a problemwith your engine or its emissioncontrol systems. Even though youmay feel no difference in your car'sperformance, it can reduce yourfuel economy and cause your car toput out excessive emissions.Continued operation may causeserious engine damage.
If this indicator light comes on,safely pull off the road and turn offthe engine. Restart the engine andwatch the indicator light. If it stayson, have your car checked by thedealer as soon as possible. Drivemoderately until the dealer hasinspected the problem. Avoid full-throttle acceleration and driving athigh speed.
You should also have the dealerinspect your car if the indicatorlight comes on frequently, eventhough it goes off when you followthe above procedure.
If you keep driving with themalfunction indicator lamp/checkengine light on, you can damageyour car's emission controls andengine. Those repairs may not becovered by your car's warranties.
Taking Care of the Unexpected
NOTICE
MALFUNCTION INDICATOR LAMP/CHECK ENGINE LIGHT
Main Menu Table of Contents ▲ ▼
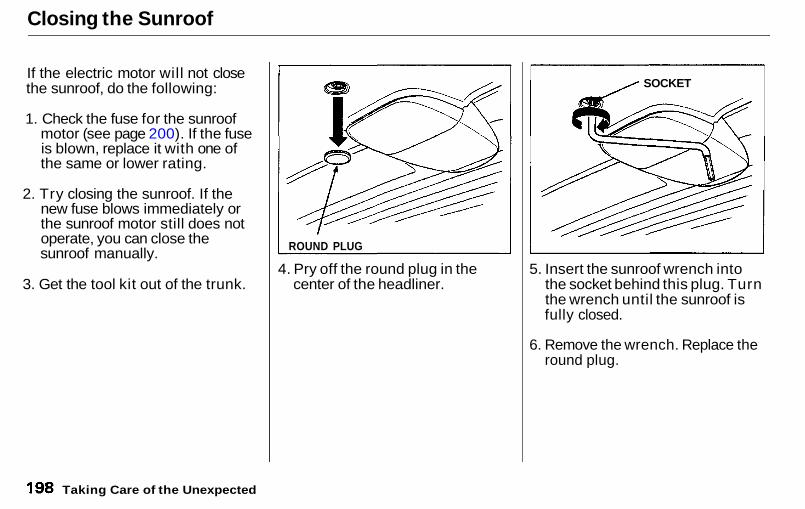
Closing the Sunroof
If the electric motor will not closethe sunroof, do the following:
1. Check the fuse for the sunroofmotor (see page 200). If the fuseis blown, replace it with one ofthe same or lower rating.
2. Try closing the sunroof. If thenew fuse blows immediately orthe sunroof motor still does notoperate, you can close thesunroof manually.
3. Get the tool kit out of the trunk.4. Pry off the round plug in the
center of the headliner.5. Insert the sunroof wrench into
the socket behind this plug. Turnthe wrench until the sunroof isfully closed.
6. Remove the wrench. Replace theround plug.
Taking Care of the Unexpected
ROUND PLUG
SOCKET
Main Menu Table of Contents ▲ ▼
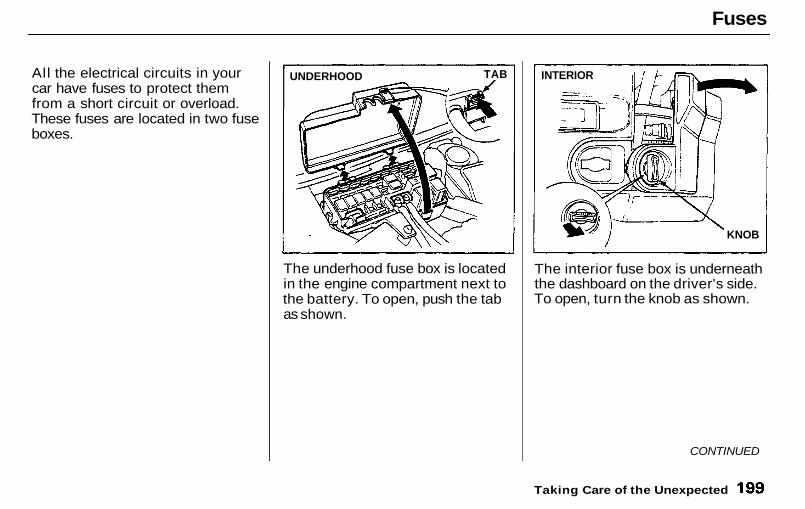
Fuses
All the electrical circuits in yourcar have fuses to protect themfrom a short circuit or overload.These fuses are located in two fuseboxes.
The underhood fuse box is locatedin the engine compartment next tothe battery. To open, push the tabas shown.
The interior fuse box is underneaththe dashboard on the driver's side.To open, turn the knob as shown.
CONTINUED
Taking Care of the Unexpected
INTERIOR
KNOB
UNDERHOOD TAB
Main Menu Table of Contents ▲ ▼
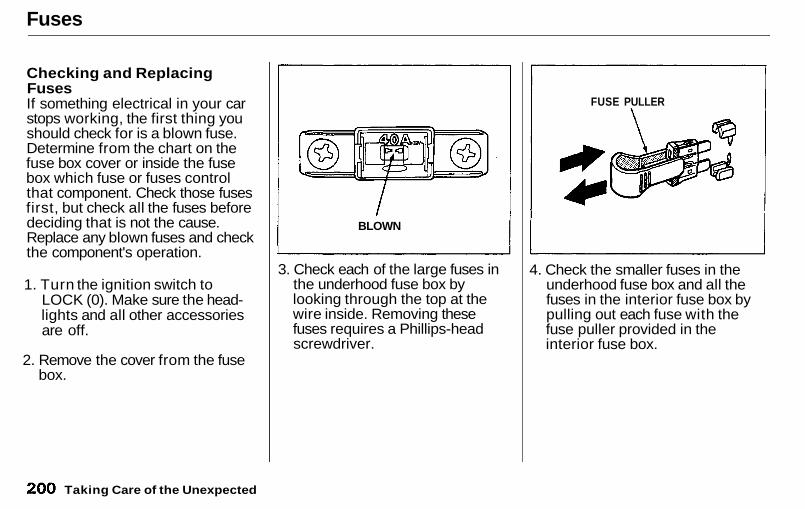
Fuses
Checking and ReplacingFusesIf something electrical in your carstops working, the first thing youshould check for is a blown fuse.Determine from the chart on thefuse box cover or inside the fusebox which fuse or fuses controlthat component. Check those fusesfirst, but check all the fuses beforedeciding that is not the cause.Replace any blown fuses and checkthe component's operation.
1. Turn the ignition switch toLOCK (0). Make sure the head-lights and all other accessoriesare off.
2. Remove the cover from the fusebox.
3. Check each of the large fuses inthe underhood fuse box bylooking through the top at thewire inside. Removing thesefuses requires a Phillips-headscrewdriver.
4. Check the smaller fuses in theunderhood fuse box and all thefuses in the interior fuse box bypulling out each fuse with thefuse puller provided in theinterior fuse box.
Taking Care of the Unexpected
BLOWN
FUSE PULLER
Main Menu Table of Contents ▲ ▼
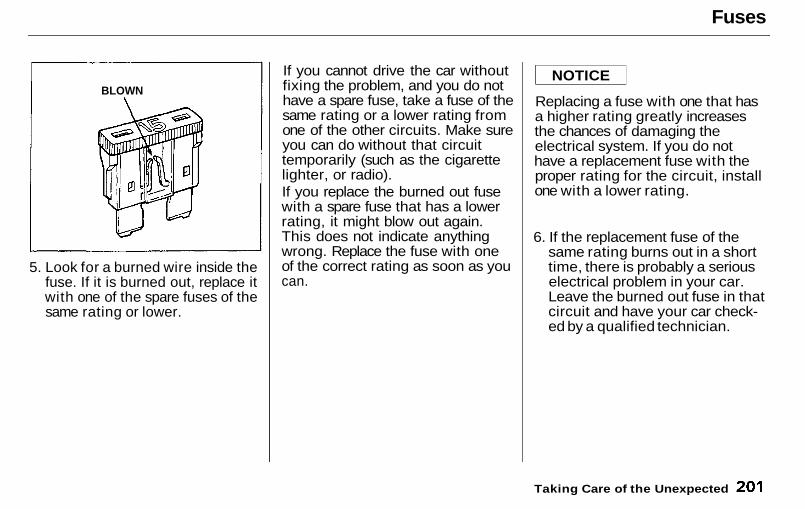
Fuses
5. Look for a burned wire inside thefuse. If it is burned out, replace itwith one of the spare fuses of thesame rating or lower.
If you cannot drive the car withoutfixing the problem, and you do nothave a spare fuse, take a fuse of thesame rating or a lower rating fromone of the other circuits. Make sureyou can do without that circuittemporarily (such as the cigarettelighter, or radio).If you replace the burned out fusewith a spare fuse that has a lowerrating, it might blow out again.This does not indicate anythingwrong. Replace the fuse with oneof the correct rating as soon as youcan.
Replacing a fuse with one that hasa higher rating greatly increasesthe chances of damaging theelectrical system. If you do nothave a replacement fuse with theproper rating for the circuit, installone with a lower rating.
6. If the replacement fuse of thesame rating burns out in a shorttime, there is probably a seriouselectrical problem in your car.Leave the burned out fuse in thatcircuit and have your car check-ed by a qualified technician.
Taking Care of the Unexpected
NOTICEBLOWN
Main Menu Table of Contents ▲ ▼
Towing
If your car needs to be towed, call aprofessional towing service or, ifyou belong to one, an organizationthat provides roadside assistance.Never tow your car behind anothercar with just a rope or chain. It isvery dangerous.
Emergency TowingThere are three popular methods oftowing a car:
Flat-bed Equipment — Theoperator loads your car on the backof a truck. This is the best wayof transporting your Honda.
Wheel Lift Equipment — The towtruck uses two pivoting arms thatgo under the tires (front or rear)and lift them off the ground. Theother two wheels remain on theground.
Sling-type Equipment — The towtruck uses metal cables with hookson the ends. These hooks go aroundparts of the frame or suspensionand the cables lift that end of thecar off the ground. Your car's sus-pension and body can be seriouslydamaged if this method of towingis attempted.
If your Honda cannot be trans-ported by flat-bed, it should betowed with the front wheels off theground. If due to damage, your carmust be towed with the frontwheels on the ground, do thefollowing:
5-speed Manual TransmissionRelease the parking brake.Shift the transmission to Neutral.
Automatic TransmissionRelease the parking brake.Start the engine.Shift to D4, then to N.Turn off the engine.
Improper towing preparation willdamage the transmission. Followthe above procedure exactly. If youcannot shift the transmission orstart the engine (automatic trans-mission), your car must be trans-ported on a flat-bed.
It is best to tow the car no far-ther than 80 km (50 miles), andkeep the speed below 35 mph (55km/h).
Trying to lift or tow your car bythe bumpers will cause seriousdamage. The bumpers are notdesigned to support the car'sweight.
Taking Care of the Unexpected
NOTICE
NOTICE
Main Menu Table of Contents ▲ ▼
Technical Information
The diagrams in this section giveyou the dimensions and capacitiesof your Honda, and the locations ofthe identification numbers. Theexplanations of several electronicand mechanical systems on yourHonda are for the more technically-oriented owner.
Identification Numbers............... 204Specifications................................ 206Anti-lock Brake System ............. 208Supplemental Restraint
System........................................ 209Four Wheel Steering................... 210Emission Controls......................... 211
The Clean Air Act.................... 211Crankcase Emission Control
System.................................... 211Evaporative Emission Control
System.................................... 211Exhaust Emission Controls.... 212
PGM-FI System.................... 212Ignition Timing Control
System................................ 212Exhaust Gas
Recirculation..................... 212Three Way Catalytic
Converter........................... 212Replacement Parts................... 212
Three Way CatalyticConverter................................... 213
Technical Information
Main Menu ▲ ▼
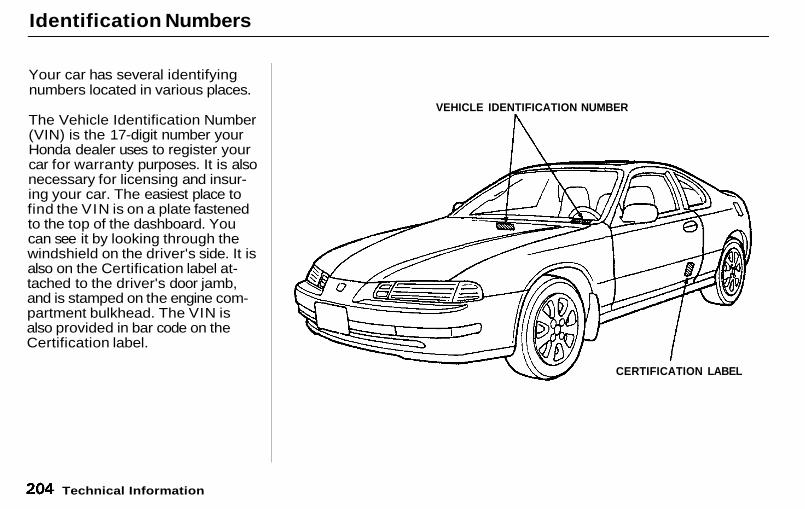
Identification Numbers
Your car has several identifyingnumbers located in various places.
The Vehicle Identification Number(VIN) is the 17-digit number yourHonda dealer uses to register yourcar for warranty purposes. It is alsonecessary for licensing and insur-ing your car. The easiest place tofind the VIN is on a plate fastenedto the top of the dashboard. Youcan see it by looking through thewindshield on the driver's side. It isalso on the Certification label at-tached to the driver's door jamb,and is stamped on the engine com-partment bulkhead. The VIN isalso provided in bar code on theCertification label.
VEHICLE IDENTIFICATION NUMBER
CERTIFICATION LABEL
Technical Information
Main Menu Table of Contents ▲ ▼
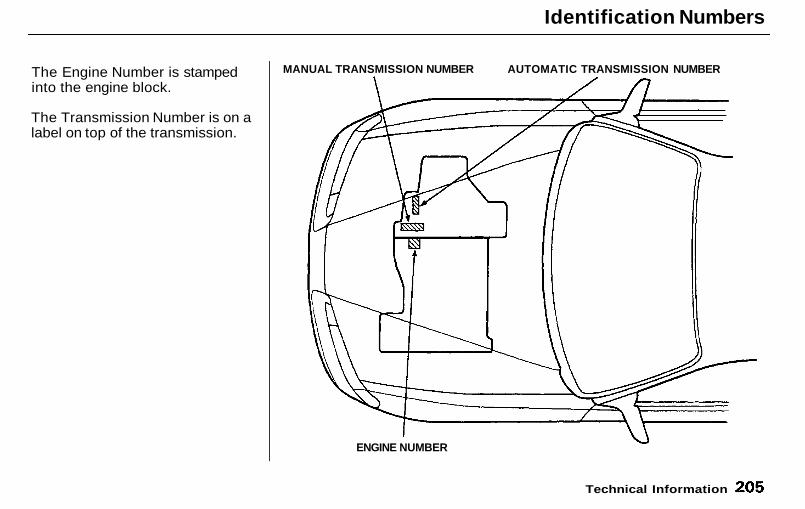
Identification Numbers
The Engine Number is stampedinto the engine block.
The Transmission Number is on alabel on top of the transmission.
ENGINE NUMBER
Technical Information
MANUAL TRANSMISSION NUMBER AUTOMATIC TRANSMISSION NUMBER
Main Menu Table of Contents ▲ ▼
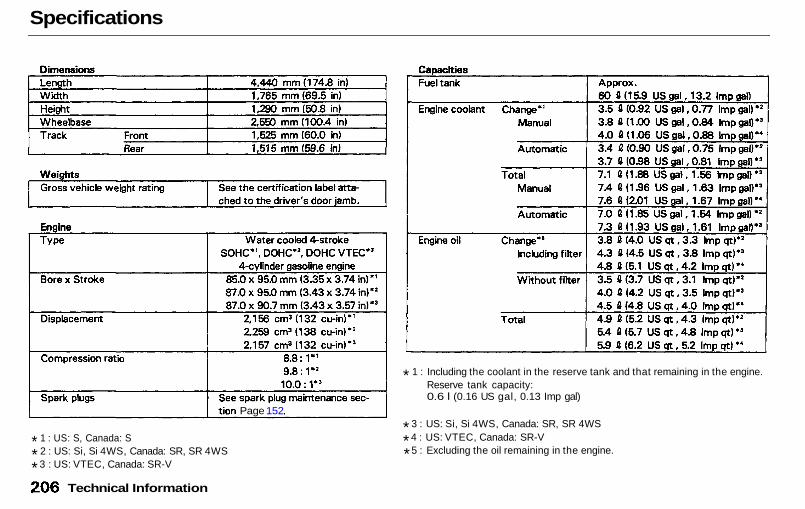
Specifications
* 1 : US: S, Canada: S
* 2 : US: Si, Si 4WS, Canada: SR, SR 4WS
* 3 : US: VTEC, Canada: SR-V
* 1 : Including the coolant in the reserve tank and that remaining in the engine.Reserve tank capacity:0.6 l (0.16 US gal, 0.13 Imp gal)
* 3 : US: Si, Si 4WS, Canada: SR, SR 4WS
* 4 : US: VTEC, Canada: SR-V
* 5 : Excluding the oil remaining in the engine.
Technical Information
Page 152
Main Menu Table of Contents ▲ ▼
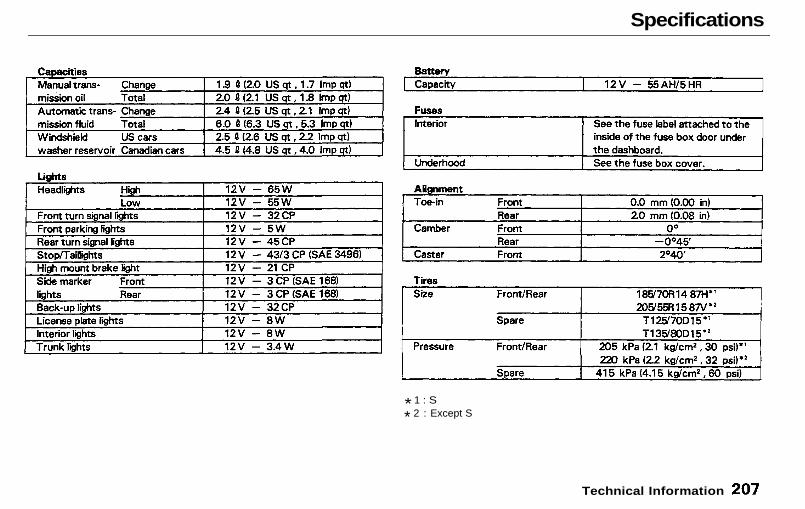
Specifications
* 1 : S
* 2 : Except S
Technical Information
Main Menu Table of Contents ▲ ▼

Anti-lock Brake System
The Anti-lock Brake System (ABS)is standard equipment on thePrelude Si, Si 4WS and VTECmodels sold in the U.S. and SR, SR4WS and SR-V models sold inCanada. It is not available on anyother models.
The ABS works by measuring howfast the wheels are turning duringbraking and comparing their speed.If any wheel is rotating muchslower than the others (on theverge of locking up and skidding),the system reduces hydraulicpressure to that wheel's brakecaliper. When that wheel's speedmatches the other wheels, thesystem applies normal hydraulicpressure. This can take placeseveral times per second at eachwheel. You feel the ABS workingas rapid pulsations in the brakepedal.
Each wheel has a wheel speedsensor assembly. As the wheelrotates, the sensor sends electricalpulses to the ABS control unit. Thepulse frequency varies with thewheel speed.
The electrical output of the ABScontrol unit is connected to themodulator/solenoid unit. Duringbraking, the ABS control unitmonitors the pulse frequenciesfrom the four wheels. When thecontrol unit detects a wheel lockingup, it energizes the appropriatesolenoid in the modulator/solenoidunit. There are three solenoids: onefor each front wheel, and one forthe rear wheels. The energizedsolenoid reduces hydraulic pres-sure to one side of a modulatorvalve. This, in turn, reduces hydrau-lic pressure in the brake line goingto the affected wheel. When thatwheel speeds up because of the re-duced braking effort, the control
unit de-energizes the solenoid. Thisbuilds hydraulic pressure on themodulator valve. The pressure in-creases in the hydraulic line to thewheel.
For the system to react quickly, themodulator/solenoid unit must havebrake fluid under high pressure.This is supplied by an accumulatorthat is pressurized by an electricpump. A pressure-sensing switchon the accumulator controls thispump.
The control unit also contains errordetection circuitry. It monitors theoperation of the wheel sensors,solenoids, pump, and electronics. Ifthe control unit detects any faults,it shuts off power to the pumpmotor and solenoids. The light onthe instrument panel comes on.The brakes then work like aconventional system without anti-lock capabilities.
Technical Information
Main Menu Table of Contents ▲ ▼
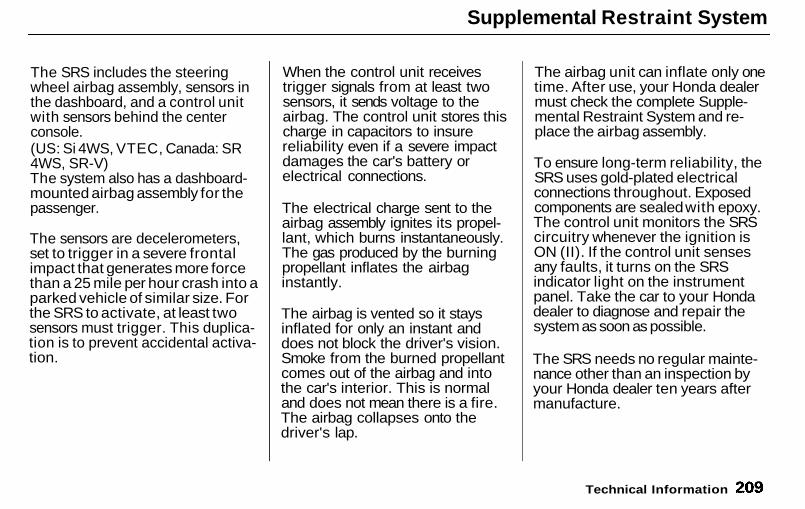
Supplemental Restraint System
The SRS includes the steeringwheel airbag assembly, sensors inthe dashboard, and a control unitwith sensors behind the centerconsole.(US: Si 4WS, VTEC, Canada: SR4WS, SR-V)The system also has a dashboard-mounted airbag assembly for thepassenger.
The sensors are decelerometers,set to trigger in a severe frontalimpact that generates more forcethan a 25 mile per hour crash into aparked vehicle of similar size. Forthe SRS to activate, at least twosensors must trigger. This duplica-tion is to prevent accidental activa-tion.
When the control unit receivestrigger signals from at least twosensors, it sends voltage to theairbag. The control unit stores thischarge in capacitors to insurereliability even if a severe impactdamages the car's battery orelectrical connections.
The electrical charge sent to theairbag assembly ignites its propel-lant, which burns instantaneously.The gas produced by the burningpropellant inflates the airbaginstantly.
The airbag is vented so it staysinflated for only an instant anddoes not block the driver's vision.Smoke from the burned propellantcomes out of the airbag and intothe car's interior. This is normaland does not mean there is a fire.The airbag collapses onto thedriver's lap.
The airbag unit can inflate only onetime. After use, your Honda dealermust check the complete Supple-mental Restraint System and re-place the airbag assembly.
To ensure long-term reliability, theSRS uses gold-plated electricalconnections throughout. Exposedcomponents are sealed with epoxy.The control unit monitors the SRScircuitry whenever the ignition isON (II). If the control unit sensesany faults, it turns on the SRSindicator light on the instrumentpanel. Take the car to your Hondadealer to diagnose and repair thesystem as soon as possible.
The SRS needs no regular mainte-nance other than an inspection byyour Honda dealer ten years aftermanufacture.
Technical Information
Main Menu Table of Contents ▲ ▼
Four Wheel Steering
The Si 4WS model in the U. S andthe SR 4WS model in Canada areequipped with an electronic FourWheel Steering system.
As inputs, the 4WS system uses avehicle speed sensor and a sensorto measure how far the frontwheels are turned.
The electronic control unit for 4WSsystem uses these inputs to deter-mine which direction to steer therear wheels, and at what angle.Depending on vehicle speed and theangle of the front wheels, the rearwheels wi l l be "countersteered"(steered in the opposite direction ofthe front wheels) or "same-steered"(steered in the same direction asthe front wheels).
The 4WS electronic control unitdrives an electric motor built intothe rear steering box. Sensors forrear wheel angle and speed providefeedback. The electronic controlunit uses this feedback to comparethe actual rear wheel angle to thedesired angle.
When the driver turns the frontwheels with the car traveling lessthan 18 mph (30 km/h), the rearwheels are countersteered. Theangle of countersteer increases asthe angle of the front wheels in-creases, to a maximum counter-steer angle of six degrees. Thisimproves response when parallelparking or making sharp turns.
Above 18 mph (30 km/h), the rearwheels are same-steered as thedriver begins to turn the steeringwheel. The rear wheel angle forany given steering wheel angle isnot fixed; it increases as vehicle
speed increases. This improvesresponse in lane-changing maneu-vers.
As the driver continues to turn thesteering wheel, the rear wheels aresteered back to the straight-aheadposition and then to countersteermode. As with same steer, theangle of countersteer varies withvehicle speed; increasing and thendecreasing as the speed rises. Thisgives improved handling in low,medium, and high speed curves.
The 4WS system's electroniccontrol unit monitors the sensorswhenever the ignition is ON. If itdetects a problem anywhere in thesystem, it lights the 4WS indicatoron the instrument panel and turnsthe system off. With the system off,the rear wheels remain pointedstraight ahead. Your car will thendrive like a conventional carwithout 4WS.
Technical Information
Main Menu Table of Contents ▲ ▼
Emission Controls
The burning of gasoline in yourcar's engine produces several by-products. Some of these are carbonmonoxide (CO), oxides of nitrogen(NOx) and hydrocarbons (HC).Gasoline evaporating from the tankalso produces hydrocarbons. Con-trolling the production of NOx, CO,and HC is important to the environ-ment. Under certain conditions ofsunlight and climate, NOx and HCreact to form photochemical "smog."Carbon monoxide does not contri-bute to smog creation, but it is apoisonous gas.
The Clean Air ActThe United States Clean Air Act*sets standards for automobileemissions. It also requires thatautomobile manufacturers explainto owners how their emissioncontrols work and what to do tomaintain them. This sectionsummarizes how the emission con-trols work. Scheduled maintenanceis on page 129.
* In Canada, Honda vehiclescomply with the Canadian MotorVehicle Safety Standards (CMVSS)for Emissions valid at the time theyare manufactured.
Crankcase Emission ControlSystemYour car has a Positive CrankcaseVentilation System. This keepsgasses that build up in the engine'scrankcase from going into theatmosphere. The Positive Crank-case Ventilation valve routes themfrom the crankcase back to theintake manifold. They are thendrawn into the engine and burned.
Evaporative EmissionControl SystemAs gasoline evaporates in the fueltank, an evaporative emissioncontrol canister filled with charcoaladsorbs the vapor. It is stored inthis canister while the engine is off.After the engine is started andwarmed up, the vapor is drawn intothe engine and burned duringdriving.
Technical Information
Main Menu Table of Contents ▲ ▼
Emission Controls
Exhaust Emission ControlsThe exhaust emission controlsinclude four systems: PGM-FI,Ignition Timing Control, ExhaustGas Recirculation and Three WayCatalytic Converter. These foursystems work together to controlthe engine's combustion andminimize the amount of HC, CO,and NOx that comes out thetailpipe. The exhaust emissioncontrol systems are separate fromthe crankcase and evaporativeemission control systems.
PGM-FI SystemThe PGM-FI System on this modelis a sequential multiport fuelinjection.The PGM-FI System on your carhas three subsystems: Air Intake,Engine Control, and Fuel Control.The Engine Control Module (ECM)uses various sensors to determinehow much air is going into theengine. It then controls how much
fuel to inject under all operatingconditions.
Ignition Timing Control SystemThis system constantly adjusts theignition timing, reducing theamount of HC, CO and NOxproduced.
Exhaust Gas Recirculation(EGR)The Exhaust Gas Recirculation(EGR) system takes some of theexhaust gas and routes it back intothe intake manifold. Adding ex-haust gas to the air/fuel mixture re-duces the amount of NOx producedwhen the fuel is burned.
Three Way Catalytic ConverterThe three way catalytic converteris in the exhaust system. Throughchemical reactions, it converts HC,CO, and NOx in the engine'sexhaust to carbon dioxide (CO2),dinitrogen (N2), and water vapor.
Replacement PartsThe emission control systems aredesigned and certified to work to-gether in reducing emissions tolevels that comply with the CleanAir Act. To make sure the emis-sions remain low, you should useonly new genuine Honda replace-ment parts or their equivalent forrepairs. Using lower quality partsmay increase the emissions fromyour car.
The emissions control systems arecovered by warranties separatefrom the rest of your car. Readyour warranty manual for moreinformation.
Technical Information
Main Menu Table of Contents ▲ ▼
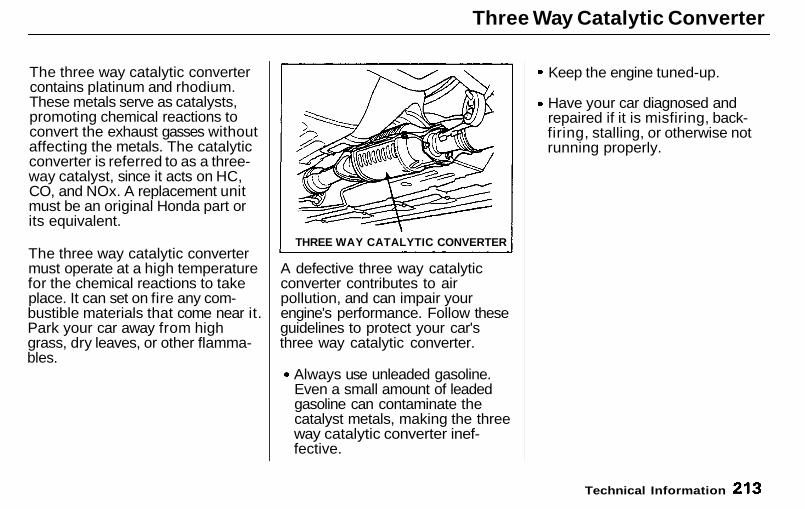
Three Way Catalytic Converter
The three way catalytic convertercontains platinum and rhodium.These metals serve as catalysts,promoting chemical reactions toconvert the exhaust gasses withoutaffecting the metals. The catalyticconverter is referred to as a three-way catalyst, since it acts on HC,CO, and NOx. A replacement unitmust be an original Honda part orits equivalent.
The three way catalytic convertermust operate at a high temperaturefor the chemical reactions to takeplace. It can set on fire any com-bustible materials that come near it.Park your car away from highgrass, dry leaves, or other flamma-bles.
A defective three way catalyticconverter contributes to airpollution, and can impair yourengine's performance. Follow theseguidelines to protect your car'sthree way catalytic converter.
Always use unleaded gasoline.Even a small amount of leadedgasoline can contaminate thecatalyst metals, making the threeway catalytic converter inef-fective.
Keep the engine tuned-up.
Have your car diagnosed andrepaired if it is misfiring, back-firing, stalling, or otherwise notrunning properly.
Technical Information
THREE WAY CATALYTIC CONVERTER
Main Menu Table of Contents ▲ ▼
Warranty and Customer Relations
Warranty Coverages.................... 216Customer Relations
Information................................ 217U.S. Zone Office Map.................. 218Canada Zone Office Map............ 219Authorized Manuals.................... 221
Warranty and Customer Relations
Main Menu ▲ ▼
Warranty Coverages
U.S. CarsYour new Honda is covered bythese warranties:
New Car Limited Warranty —provides coverage for defects inmaterials and workmanship for 3years or 57,600 km (36,000 miles).
Emission Control Systems De-fects Warranty and EmissionsPerformance Warranty — thesetwo warranties cover your car'semission control systems. Time,mileage, and coverage are condi-tional. Please read the warrantymanual for exact information.
Original Equipment BatteryLimited Warranty — providescoverage for 36 months, with 100%coverage for the first 24 months.
Seat Belt Limited Warranty — aseat belt that fails to functionproperly is covered for the usefullife of the car.
Rust Perforation LimitedWarranty — body panels that rustthrough from the inside will berepaired or replaced for up to 36months. There is no mileage limit.
Accessory Limited Warranty —Genuine Honda Accessories arecovered under this warranty. Timeand mileage limits depend on thetype of accessory and other factors.Please read your warranty manualfor details.
Replacement Parts LimitedWarranty — provides coverage fordefects in materials and workman-ship for 12 months or 19,200 km(12,000 miles).
Replacement Battery LimitedWarranty — provides coverage forup to 36 months, with 100% cover-age for the first 12 months.
Replacement Muffler LifetimeLimited Warranty — providescoverage for as long as the pur-chaser of the muffler owns the car.
There are restrictions and exclu-sions which apply to all these war-ranties. Please read the 1993 HondaWarranties booklet that came withyour car for precise information onwarranty coverages. Your Honda'soriginal tires are covered by theirmanufacturer. Tire warranty infor-mation is in a separate booklet.
Canada CarsPlease refer to the 1993 Warrantyand Maintenance Guide that camewith your car.
Warranty and Customer Relations
Main Menu Table of Contents ▲ ▼
Customer Relations Information
Honda dealership personnel aretrained professionals. They shouldbe able to answer all your questions.If you encounter a problem thatyour dealership does not solve toyour satisfaction, please discuss itwith the dealership's management.The Service Manager or GeneralManager can help. Almost allproblems are solved in this way.
If you are dissatisfied with thedecision made by the dealership'smanagement, contact your HondaCustomer Relations Zone Office.Refer to the U.S. and CanadianZone Office maps on the followingpages.
When you call or write, please giveus this information:
Vehicle Identification Number(see page 204)Name and address of the dealerwho services your carDate of purchaseMileage on your carYour name, address, and tele-phone numberA detailed description of theproblemName of the dealer who sold thecar to you
Warranty and Customer Relations
Main Menu Table of Contents ▲ ▼
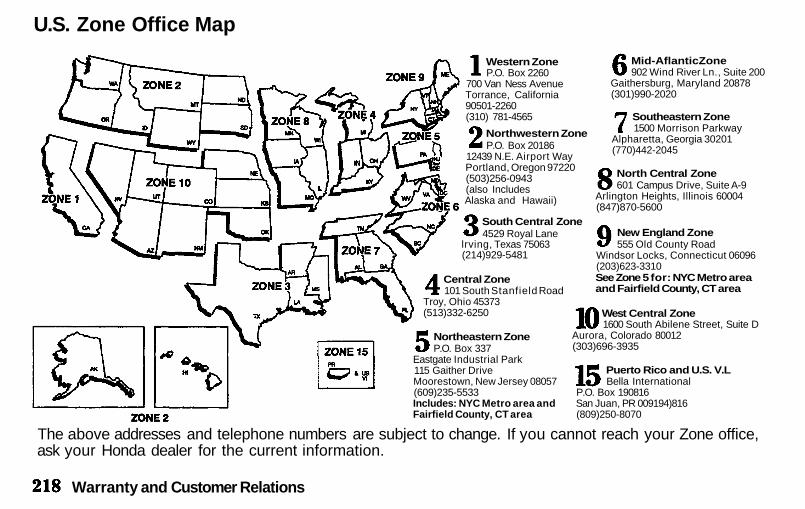
U.S. Zone Office Map
Western ZoneP.O. Box 2260
700 Van Ness AvenueTorrance, California90501-2260(310) 781-4565
Northwestern ZoneP.O. Box 20186
12439 N.E. Airport WayPortland, Oregon 97220(503)256-0943(also IncludesAlaska and Hawaii)
South Central Zone4529 Royal Lane
lrving, Texas 75063(214)929-5481
Central Zone101 South Stanfield Road
Troy, Ohio 45373(513)332-6250
Northeastern ZoneP.O. Box 337
Eastgate Industrial Park115 Gaither DriveMoorestown, New Jersey 08057(609)235-5533Includes: NYC Metro area andFairfield County, CT area
Mid-AflanticZone902 Wind River Ln., Suite 200
Gaithersburg, Maryland 20878(301)990-2020
Southeastern Zone1500 Morrison Parkway
Alpharetta, Georgia 30201(770)442-2045
North Central Zone601 Campus Drive, Suite A-9
Arlington Heights, Illinois 60004(847)870-5600
New England Zone555 Old County Road
Windsor Locks, Connecticut 06096(203)623-3310See Zone 5 for: NYC Metro areaand Fairfield County, CT area
West Central Zone1600 South Abilene Street, Suite D
Aurora, Colorado 80012(303)696-3935
Puerto Rico and U.S. V.LBella International
P.O. Box 190816San Juan, PR 009194)816(809)250-8070
The above addresses and telephone numbers are subject to change. If you cannot reach your Zone office,ask your Honda dealer for the current information.
Warranty and Customer Relations
Main Menu Table of Contents ▲ ▼
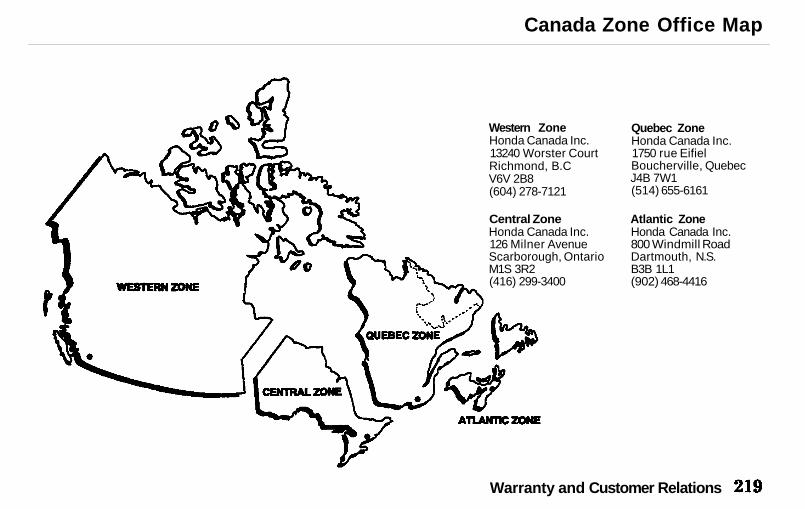
Canada Zone Office Map
Western ZoneHonda Canada Inc.13240 Worster CourtRichmond, B.CV6V 2B8(604) 278-7121
Central ZoneHonda Canada Inc.126 Milner AvenueScarborough, OntarioM1S 3R2(416) 299-3400
Quebec ZoneHonda Canada Inc.1750 rue EifielBoucherville, QuebecJ4B 7W1(514) 655-6161
Atlantic ZoneHonda Canada Inc.800 Windmill RoadDartmouth, N.S.B3B 1L1(902) 468-4416
Warranty and Customer Relations
Main Menu Table of Contents ▲ ▼
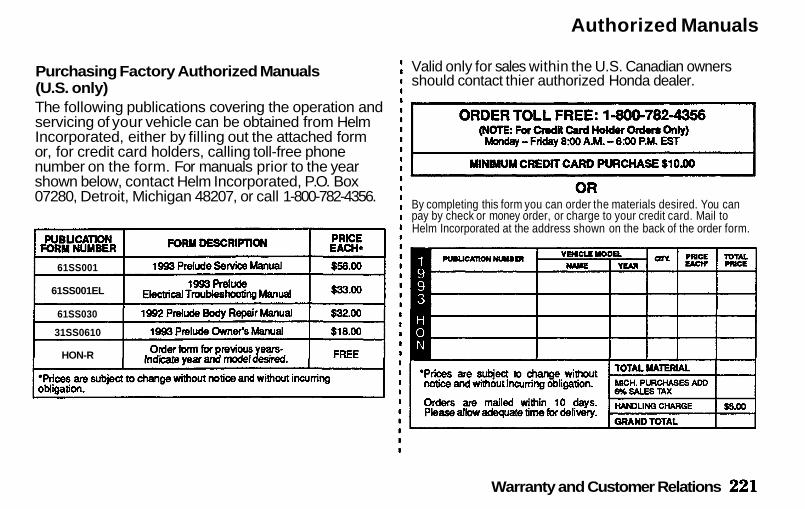
Authorized Manuals
Purchasing Factory Authorized Manuals(U.S. only)The following publications covering the operation andservicing of your vehicle can be obtained from HelmIncorporated, either by filling out the attached formor, for credit card holders, calling toll-free phonenumber on the form. For manuals prior to the yearshown below, contact Helm Incorporated, P.O. Box07280, Detroit, Michigan 48207, or call 1-800-782-4356.
Valid only for sales within the U.S. Canadian ownersshould contact thier authorized Honda dealer.
By completing this form you can order the materials desired. You canpay by check or money order, or charge to your credit card. Mail toHelm Incorporated at the address shown on the back of the order form.
Warranty and Customer Relations
61SS001
61SS001EL
61SS030
31SS0610
HON-R
Main Menu Table of Contents ▲ ▼
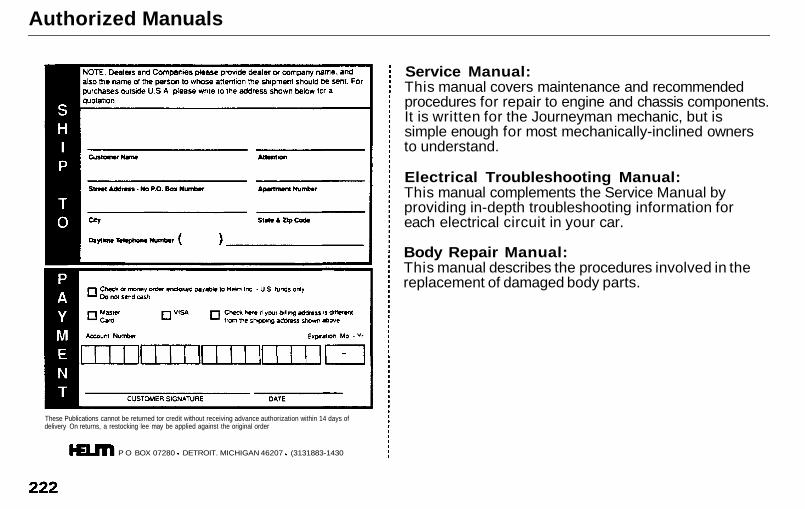
Authorized Manuals
These Publications cannot be returned tor credit without receiving advance authorization within 14 days ofdelivery On returns, a restocking lee may be applied against the original order
P O BOX 07280 DETROIT. MICHIGAN 46207 (3131883-1430
Service Manual:This manual covers maintenance and recommendedprocedures for repair to engine and chassis components.It is written for the Journeyman mechanic, but issimple enough for most mechanically-inclined ownersto understand.
Electrical Troubleshooting Manual:This manual complements the Service Manual byproviding in-depth troubleshooting information foreach electrical circuit in your car.
Body Repair Manual:This manual describes the procedures involved in thereplacement of damaged body parts.
Main Menu Table of Contents ▲ ▼
Index
AccessoriesInstallation................................. 105
ACCESSORY(Ignition Key Position).............. 48
AddingAutomatic Transmission
Fluid........................................ 144Brake Fluid............................... 146Clutch Fluid.............................. 148Engine Coolant......................... 139Engine Oil.................................. 135Manual Transmission Fluid... 145Power Steering Fluid.............. 148Windshield Washer Fluid....... 143
Additional Safety Information.... 16Door Locks.................................. 16Driving with Pets....................... 17Seat-back Position..................... 16Storing Cargo Safely................. 17
Additives, Engine Oil................... 137Adjustments
Mirrors......................................... 59Seats.............................................. 51Steering Wheel........................... 43
Airbag (SRS)................................... 10Air Cleaner.................................... 149Air Conditioning............................. 68
Maintenance.............................. 157Usage............................................ 68
Air Outlets (Vents)......................... 68Air Pressure, Tires...................... 159Alcohol and Drugs.......................... 24Alcohol in Gasoline........................ 98Antifreeze...................................... 139Anti-lock Brakes (ABS)
Description................................ 208Indicator Light................... 34, 119Operation................................... 118
Anti-theft Steering ColumnLock............................................. . 48
Appearance Care.......................... 175Ashtray............................................ 64Audio System.................................. 75Automatic Speed Control............. 44Automatic Transmission............ 113
Capacity, Fluid......................... 206Checking Fluid Level.............. 144Shifting....................................... 113Shift Lever Positions............... 113Shift Lock Release................... 116
BatteryCharging System Light............. 33Jump Starting............................ 191Maintenance.............................. 152Specifications............................ 207
Before Driving................................ 97Belts, Seat.......................................... 5Body Repair................................... 181Brakes
Anti-lock System (ABS).......... 118Break-in, New Linings.............. 98Fluid............................................ 146Light, Burned-out.................... 169Parking......................................... 61System Light............................... 33Wear Indicators........................ 117
Brakes, ABSDescription................................ 208Operation................................... 118System Indicator................ 34, 119
Braking System ............................ 117Break-in, New Car......................... 98
CONTINUED
Main Menu ▲ ▼
Index
Brightness Control,Instruments................................. 41
Brights, Headlights........................ 40Bulb Replacement
Back-up Lights......................... 169Brake Lights............................. 169Front Parking Lights.............. 165Front Side Marker Lights...... 166Headlights................................. 164High-mount Brake Light........ 168License Plate Lights................ 171Rear Side Marker Lights........ 170Specifications............................ 207Turn Signal Lights.................. 167
Bulbs, Halogen.............................. 164
Cables, Jump Starting With........ 191Capacities Chart........................... 206Carbon Monoxide Hazard ............ 25Cargo, Loading............................. 106Cassette Player
Care............................................... 94Operation............................. 81, 91
CAUTION, Explanation of........... . ii
Certification Label....................... 204Chains............................................. 163Change Oil
How to........................................ 137When to...................................... 129
Changing a Flat Tire................... 185Changing Engine Coolant........... 140Charging System Light......... 33, 196Check Engine Light.............. 34, 197Checking
Automatic TransmissionFluid........................................ 144
Battery Condition..................... 152Brake Fluid............................... 146Clutch Fluid.............................. 148Engine Belts.............................. 158Engine Coolant......................... 139Engine Oil.................................. 135Fuses........................................... 199Manual Transmission Fluid... 145Power Steering Fluid.............. 148
Checklist, Before Driving........... 108Child Safety..................................... 18Cigarette Lighter........................... 63Cleaner, Air................................... 149
CleaningExterior...................................... 176Interior....................................... 179Seat Belts................................... 179Vinyl........................................... 179
CLEAN Light................................. 94Clock, Setting the........................... 62Clutch Fluid.................................. 148CO in the Exhaust........................ 211Cold Weather, Starting in........... 110Compact Spare.............................. 184Consumer Information................ 217Controls, Instruments and............ 29Coolant
Adding........................................ 140Checking.................................... 139Proper Solution......................... 139Temperature Gauge.................. 38
Corrosion Protection................... 180Crankcase Emission Control
System........................................ 211Cruise Control Operation .............. 44Customer Relations Office......... 217
Main Menu ▲ ▼
Index
DANGER, Explanation of.............. iiDashboard........................................ 30Daytime Running Lights.............. 40Dead Battery, What to Do........... 191Defects, Reporting Safety............ 26Defogger, Rear Window............... 56Defrosting the Windows............... 74DEXRON® II Automatic
Transmission Fluid.................. 145Dimensions.................................... 206Dimming the Headlights .............. 40Dipstick
Automatic Transmission........ 144Engine Oil.................................. 135
Directional Signals......................... 41Disabled, Towing Your Car If... 202Disc Brake Wear Indicators....... 117Disposal of Used Oil..................... 139Doors
Locking and Unlocking ............ 49Power Door Locks..................... 49
DOT Tire Quality Grading......... 161Downshifting, 5-speed Manual
Transmission............................. 111
Driving........................................... 107Economy.................................... 104In Bad Weather......................... 120In Foreign Countries................. 99
Economy, Fuel.............................. 104Emergencies on the Road........... 183
Battery, Jump Starting............ 191Changing a Flat Tire............... 185Charging System Light........... 196Check Engine Light................. 197Checking the Fuses................. 200Low Oil Pressure Light........... 195Malfunction Indicator
Lamp....................................... 197Manually Closing Sunroof...... 198Overheated Engine.................. 193
Emergency Brake.......................... 61Emergency Flashers...................... 56Emission Controls......................... 211Engine
Belts............................................ 158Check Light....................... 34, 197Coolant Temperature Gauge... 38
Malfunction IndicatorLamp................................ 34, 197
Oil Pressure Light............. 33, 195Oil, What Kind to Use............. 136Overheating............................... 193Specifications............................ 206
Ethanol in Gasoline........................ 99Evaporative Emission
Controls...................................... 211Exhaust Fumes............................... 25Expectant Mothers, Use of
Seat Belts by.................................. 8Exterior, Cleaning the................. 176
Fabric, Cleaning........................... 179Fan, Interior.................................... 68Fan, Radiator.................................. 27Features, Comfort
and Convenience........................ 67Filling the Fuel Tank.................. 100Filters
Fuel............................................. 150Oil................................................ 137
CONTINUED
Main Menu ▲ ▼

Index
First Gear, Shifting...................... 1115-speed Manual Transmission,
Checking Fluid Level.............. 1455-speed Manual Transmission,
Shifting the................................ 111Flashers, Hazard Warning ........... 56Flat Tire, Changing a.................. 185Fluids
Automatic Transmission........ 144Brake.......................................... 146Clutch......................................... 148Manual Transmission.............. 145Power Steering......................... 148Windshield Washer.................. 143
FM Stereo RadioReception.............................. 75, 84
Folding Rear Seat.......................... 55Foreign Countries, Driving in...... 99Four-way Flashers......................... 56Four Wheel Steering (4WS)
Description................................ 210Indicator Light........................... 35Operation.................................... 119
Front End, Towing by EmergencyWrecker..................................... 202
Fuel................................................... 98Fill Door and Cap ..................... 100Filter........................................... 150Gauge............................................ 38Octane Requirement................. 98Oxygenated................................. 98Tank, Filling the ...................... 100
Fuses, Checking the.................... 200
Gas Mileage, Improving.............. 104Gasohol.............................................98Gasoline............................................ 98
Filter........................................... 150Gauge............................................ 38Octane Requirement................. 98Tank, Filling the ...................... 100
Gas Station Procedures............... 100Gauges
Engine Coolant Temperature.. 38Fuel............................................... 38
Gearshift Lever PositionsAutomatic Transmission........ 1135-speed Manual
Transmission......................... 111
Glass Cleaning.............................. 180Glove Box......................................... 62
Halogen Headlight Bulbs............ 164Hazard Warning Flashers............ 56Headlights
Daytime Running Lights.......... 40High Beam Indicator................. 35High Beams, Turning on.......... 40Low Beams, Turning on........... 40Reminder Chime........................ 40Replacing Halogen Bulbs....... 164Turning on................................... 40
Heating and Cooling...................... 68High Altitude, Starting at........... 110High-Low Beam Switch ............... 40Hood, Opening the........................ 101Horn.................................................. 47Hot Coolant, Warning about...... 140Hydraulic Clutch.......................... 148Hydroplaning................................. 121
Main Menu ▲ ▼
Index
Identification Number,Vehicle...................................... 204
If Your Car Has to be Towed .... 202Ignition
Keys.............................................. 47Switch........................................... 48Timing Control System........... 212
Indicator Lights, InstrumentPanel............................................. 31
Infant Restraint.............................. 20Inflation, Proper Tire.................. 158Inside Mirror................................... 59Inspection, Tire............................. 159Instrument Panel............................ 30Instrument Panel Brightness....... 41Interior Cleaning.......................... 179Interior Lights................................ 65Introduction....................................... i
Jacking up the Car....................... 187Jack, Tire....................................... 185Jump Starting................................ 191
Keys.................................................. 47
Label, Certification...................... 204Lane Change, Signaling................ 41Lap/Shoulder Belts.......................... 6Leaking of Exhaust into Car........ 25Lighter, Cigarette.......................... 63Lights
Bulb Replacement.................... 164Indicator....................................... 31Parking......................................... 40Turn Signal.................................. 41
Loading Cargo.............................. 106LOCK (Ignition Key Position)..... 48Locks
Anti-theft Steering Column..... 48Fuel Fill Door............................ 100Glove Box.................................... 62Power Door.................................. 49Trunk........................................... 50
Low Coolant Level....................... 139
Maintenance.................................. 127Periodic Items........................... 133Record.................................131 - 132Schedule.............................129 - 130
Manual Transmission.................. 111Manual Transmission Fluid....... 145Maximum Shift Speeds....... 112, 115Meters, Gauges............................... 37Methanol in Gasoline..................... 98Mirrors, Adjusting......................... 59
Neutral Gear Position.................. 114New Vehicle Break-in................... 98
Lower Gear, Downshiftingto a ...................................111
Low Oil Pressure Light......... 33, 195Lubricant Specifications
Chart........................................... 206Luggage......................................... 106
CONTINUED
Main Menu ▲ ▼
Index
Normal Shift Speeds.................... 111NOTICE, Explanation of................ iiNumbers, Identification.............. 204
Occupant Protection System......... 4Octane Requirement, Gasoline.... 98Odometer......................................... 37Odometer, Trip............................... 37Oil
Change, How to........................ 137Change, When to...................... 129Checking Engine...................... 135Pressure Light............................ 33Selecting Proper Viscosity
Chart....................................... 136ON (Ignition Key Position)........... 48Opening the Hood......................... 101Opening the Trunk........................ 50Operation in Foreign Countries... 99Outside Mirrors.............................. 60Overheating, Engine.................... 193
Panel Brightness Control............. . 41Park Gear Position....................... 114Parking Brake................................. 61Parking Lights................................ 40Parking Over Things that
Burn............................................ 213PGM-FI System............................ 212Polishing and Waxing.................. 177Power
Door Locks.................................. 49Mirrors......................................... 60Steering...................................... 148Windows....................................... 57
Pregnancy, Using Seat Belts......... . 8Proper Seat Belt Usage.................. . 6
Radiator Overheating.................. 193Radio/Cassette Sound System..... 75Rear End Towing......................... 202Rear Lights, Bulb
Replacement.............................. 169Rear Seat, Folding ......................... 55
Rear View Mirror .......................... 59Rear Window Defogger ................ 56Reclining the Seat Backs.............. 52Recommended Shift Speeds....... 111Reminder Lights............................. 31Replacement Information
Air Cleaner................................ 149Coolant....................................... 141Engine Oil and Filter............... 137Fuel Filter.................................. 150Fuses........................................... 200Light Bulbs................................ 164Schedule..................................... 129Spark Plugs............................... 150Tires............................................ 161Wiper Blades............................. 155
Replacing Seat Belts After aCrash.............................................. . 9
Reserve Tank, Coolant............... 139Restraint, Child............................... 18Reverse Gear Position................. 114Rotation, Tire................................ 160
Main Menu ▲ ▼
Index
Safety Belts....................................... 5Safety Defects, Reporting............ 26Safety Labels, Location of............ 27Safety Messages............................... iiSeat Belts........................................... 5
Advice for Pregnant Women..... 8Child Seat Anchor Plate........... 22Cleaning..................................... 179Frayed or Torn............................. 9Maintenance.................................. 9Reminder Light and Beeper..... 33Replacement.................................. 9System Components.................... 6Tether Attachment Points....... 22Use During Pregnancy................ 8Wearing a Lap/Shoulder Belt.... 7
Seats, Adjusting the....................... 51Serial Number............................... 204Service Intervals.......................... 129Service Manual............................. 221Service Station Procedures........ 100Setting the Clock............................ 62
ShiftingThe Automatic
Transmission......................... 113The 5-speed Manual
Transmission......................... 111Shift Lever Position
Indicator...............................36, 113Side Marker Lights, Bulb
Replacement in......................... 166Signaling Turns.............................. 41Snow Tires..................................... 163Solvent-type Cleaners................. 176Sound System................................. 75Spare Tire
Inflating..................................... 184Specifications............................ 207
Spark Plugs, Replacing............... 150Specifications Charts.................. 206Speed Control.................................. 44Speedometer.................................... 37SRS Indicator............................14, 34START (Ignition Key Position).. 48Starting the Engine...................... 109
In Cold Weatherat High Altitude.................... 110
With a Dead Battery................ 191
Steam Coming from Engine....... 193Steering Wheel
Adjustment.................................. 43Anti-theft Column Lock........... 48
Stereo Sound System..................... 75Storing Your Car.......................... 173Sunroof............................................. 58
Closing Manually..................... 198Operation..................................... 58
Supplemental Restraint SystemService Precautions................... 15Servicing...................................... 14SRS Indicator........................ 14, 34System Components.................. 10Technical Description............. 209
Tachometer..................................... 37Taillights, Changing Bulbs in.... 169Taking Care of the
Unexpected............................... 183Tape Player..................................... 81
CONTINUED
Main Menu ▲ ▼
Index
Technical DescriptionsAnti-lock Brake System......... 208Emission Control Systems...... 211Four Wheel Steering............... 210Supplemental Restraint
System.................................... 209Three Way Catalytic
Converter............................... 213Temperature Gauge...................... 38Tether Attachment Points........... 22Time, Setting the.......................... . 62Tire Chains.................................... 163Tire, How to Change a Flat........ 185Tires................................................ 158
Air Pressure.............................. 158Checking Wear......................... 159Compact Spare.......................... 184DOT Tire Quality Grading..... 161Inflation...................................... 158Inspection................................... 159Replacing................................... 161Rotating..................................... 160Snow........................................... 163Specifications............................ 207
Tools, Tire Changing .................. 185Torn Seat Belts................................. 9
TowingA Trailer.................................... 122Emergency Wrecher................ 202
TransmissionChecking Fluid Level,
Automatic.............................. 144Checking Fluid Level,
Manual................................... 145Fluid Selection.......................... 145Identification Number............ 204Shifting the Automatic........... 113Shifting the Manual................. 111
Treadwear..................................... 161Trip Meter....................................... 37Trunk................................................ 50
Opening the................................. 50Open Monitor Light................... 36
Turn Signals.................................... 41
Underside, Cleaning.................... 176Unexpected, Taking Care
of the........................................... 183Uniform Tire Quality Grading.. 161Unleaded Gasoline......................... 98
Upholstery Cleaning.................... 179Used Oil, How to Dispose of....... 139
Vanity Mirror.................................. 63Vehicle Capacity Load................ 106Vehicle Dimensions..................... 206Vehicle Identification Number.. 204Vehicle Storage.............................. 173Ventilation.......................................... 71VIN................................................. 204Vinyl Cleaning.............................. 179Viscosity, Oil................................. 136
Warning BeepersKey in Ignition............................. 47Seat Belts..................................... 33
WARNING, Explanation of.......... . iiWarning Labels, Location of......... 27Warranty Coverages..................... 216Washer, Windshield
Checking the Fluid Level......... 143Operation....................................... 42
Main Menu ▲ ▼
Washing.......................................... 176Waxing and Polishing.................. 177Wheels
Adjusting the Steering.............. 43Alignment and Balance........... 160Compact Spare.......................... 184Wrench....................................... 186
WindowsCleaning..................................... 180Operating the Power................. 57Rear, Defogger........................... 56
WindshieldCleaning....................................... 42Defroster...................................... 74
Wipers, WindshieldChanging Blades....................... 155Operation..................................... 42
Worn Tires..................................... 159Wrecker, Emergency Towing ... 202
Index
Main Menu ▲ ▼
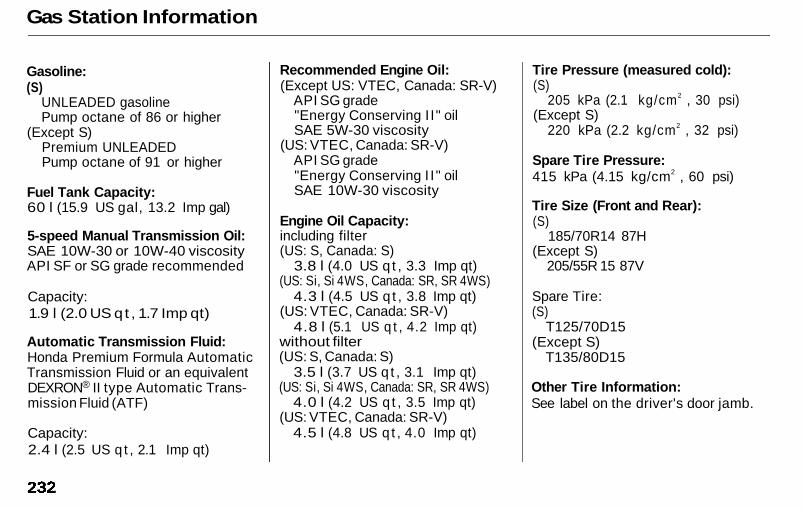
Gas Station Information
Gasoline:(S)
UNLEADED gasolinePump octane of 86 or higher
(Except S)Premium UNLEADEDPump octane of 91 or higher
Fuel Tank Capacity:60 l (15.9 US gal, 13.2 Imp gal)
5-speed Manual Transmission Oil:SAE 10W-30 or 10W-40 viscosityAPI SF or SG grade recommended
Capacity:1.9 l (2.0 US q t , 1.7 Imp qt)
Automatic Transmission Fluid:Honda Premium Formula AutomaticTransmission Fluid or an equivalentDEXRON® II type Automatic Trans-mission Fluid (ATF)
Capacity:2.4 l (2.5 US q t , 2.1 Imp qt)
Recommended Engine Oil:(Except US: VTEC, Canada: SR-V)
API SG grade"Energy Conserving I I " oilSAE 5W-30 viscosity
(US: VTEC, Canada: SR-V)API SG grade"Energy Conserving I I " oilSAE 10W-30 viscosity
Engine Oil Capacity:including filter(US: S, Canada: S)
3.8 l (4.0 US q t , 3.3 Imp qt)(US: Si, Si 4WS, Canada: SR, SR 4WS)
4.3 l (4.5 US q t , 3.8 Imp qt)(US: VTEC, Canada: SR-V)
4.8 l (5.1 US q t , 4.2 Imp qt)without filter(US: S, Canada: S)
3.5 l (3.7 US q t , 3.1 Imp qt)(US: Si, Si 4WS, Canada: SR, SR 4WS)
4.0 l (4.2 US q t , 3.5 Imp qt)(US: VTEC, Canada: SR-V)
4.5 l (4.8 US q t , 4.0 Imp qt)
Tire Pressure (measured cold):(S)
205 kPa (2.1 kg/cm2 , 30 psi)(Except S)
220 kPa (2.2 kg/cm2 , 32 psi)
Spare Tire Pressure:415 kPa (4.15 kg/cm2 , 60 psi)
Tire Size (Front and Rear):(S)
185/70R14 87H(Except S)
205/55R 15 87V
Spare Tire:(S)
T125/70D15(Except S)
T135/80D15
Other Tire Information:See label on the driver's door jamb.
Main Menu ▲ ▼
![Finale 2008a - [Prelude II-20.MUS]](https://img.dokumen.tips/doc/110x75/6335f55e29fb49e5aa0b03cc/finale-2008a-prelude-ii-20mus.jpg)


