Embed Size (px)
Citation preview


❏ Creating a project step by step explanation
❏ Your first app using Android Studio on Ubuntu 14.04
Contents

❏ File → New Project. Type the name of the project as shown in the screenshot.
Steps

❏ Application Name: Name of the application that you want to create. It will appear along with the icon on the phone. So please use a short name which will be visible.
❏ In the second screen, please choose the Minimum SDK. You can also decide whether you want to create a build for TV and Wear also. Minimum SDK means the minimum version of the Android OS which you app will support. For example if you create an app for Ice Cream Sandwich it will run in Jelly Bean, KitKat and Lollypop. But if you create something in Lollypop, it will not be compatible with previous versions. Also you can not go for Froyo or Cupcake as there are many changes done in the later releases and functionality will be very less in the previous versions. So the best way is to go to the Google Play and find out the distribution of the OS and then decide which build you should go for based on the geography.


❏ In the next screen, select an activity. Activity means a screen in your app. Every screen in Android is usually an activity (At beginner level it is better to understand like this. )
❏ You must have an activity for the app. ❏ For now, I have chosen a Blank activity.

❏ Activity Name: Name of the activity to load. ❏ Layout Name : Every screen (activity) UI is designed using an XML File. This
Layout will define the layout of the activity. ❏ Title : It is the title of the activity. In the case of blank activity, it is not required. It
is used only in the case of Map Activity. In the case of MAP activity the Title Bar and this title is same.
❏ Menu Resource Name : This file will decide what should be displayed when the user clicks on the Menu of the android app screen.

Check whether the setup is correct
❏ Click on the Run → Run (Alt + Shift + F10) ❏ Studio will ask you to Choose a Device. You need to create a virtual android
device. Please note that the android device which you create must have an operating system equal to or newer version than what you have selected while creating the project.
❏

Creating a device (Android Virtual Manager)

Now you can create your own device from the list of the devices. You can go to advanced settings if you have 2 or 3 GB Ram as by default the AVD will allocated 512 MB RAM. You can reduce it to 256 MB RAM if you are not creating high end applications.
Click on Create Virtual Device (Bottom Left corner)

I launched the application with Nexus 5

https://developer.android.com/sdk/installing/index.html?pkg=studio
References
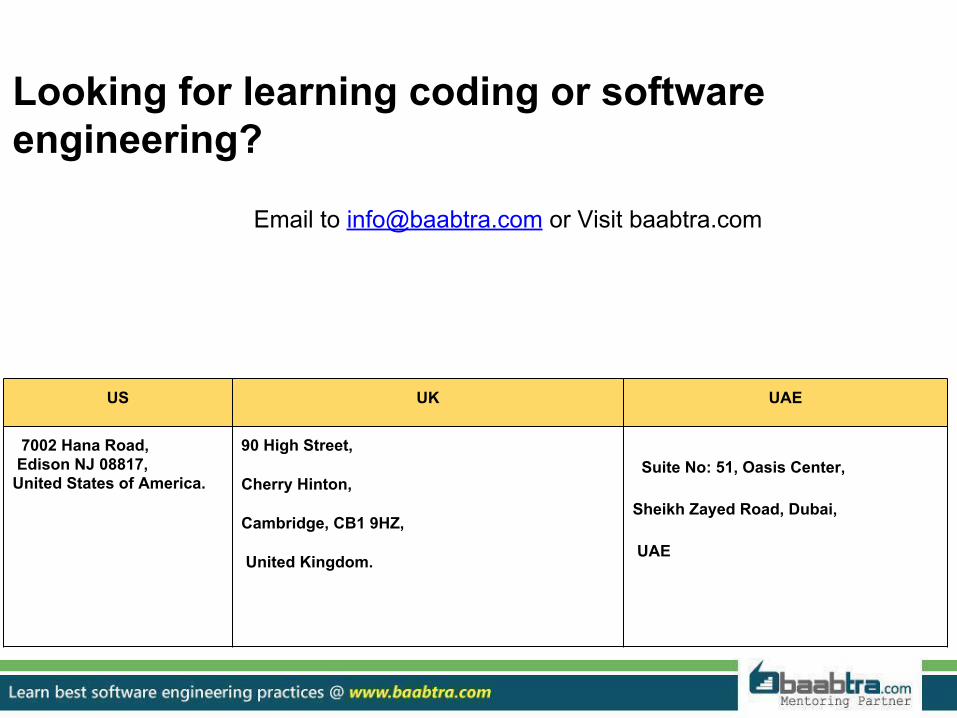
US UK UAE
7002 Hana Road, Edison NJ 08817, United States of America.
90 High Street,
Cherry Hinton,
Cambridge, CB1 9HZ,
United Kingdom.
Suite No: 51, Oasis Center,
Sheikh Zayed Road, Dubai,
UAE
Email to [email protected] or Visit baabtra.com
Looking for learning coding or software engineering?

India Centres
Emarald Mall (Big Bazar Building)Mavoor Road, Kozhikode,Kerala, India.Ph: + 91 – 495 40 25 550
NC Complex, Near Bus StandMukkam, Kozhikode,Kerala, India.Ph: + 91 – 495 40 25 550
Cafit Square IT Park,Hilite Business Park,KozhikodeKerala, India.
Email: [email protected]
TBI - NITCNIT Campus, Kozhikode.Kerala, India.
Start up VillageEranakulam,Kerala, India.
Start up VillageUL CCKozhikode, Kerala