Embed Size (px)
DESCRIPTION
Admm crp oracle payroll
Citation preview

Oracle HRMS CRP - Oracle Payroll
Abu Dhabi Motorsports Management
ADMM
Author: Feras Ahmad
Creation Date : 15-12-2012
Control Number : BR110 /PAY/15-12-2012
Version : 01
Approvals:
ADMM RepresentativeIDS Representative
IDC/ADMM page 1

Document Control
Change Record
Date Author Version Change Reference
15-12-2012 Feras Ahmad 01 No previous document
Reviewers
Name Position
Feras Ahmad Oracle HRMS Consultant
Distribution
Copy No.
Name Location
1 Library Master Project Library
2 ADMM ADMM Office Library3
4
IDC/ADMM page 2

Table of Contents
Document Control........................................................2
Change Record...............................................................................2
Reviewers.......................................................................................2
Distribution.....................................................................................2
Table of Contents.........................................................3
Introduction.................................................................6
1. Compensation Elements Setup...............................7
1.1 CES Overview.........................................................................7
1.2 CES Making Manual Element Entries......................................8
1.3 CES Defining an Element......................................................10
1.4 CES Defining An Element's Input Values..............................15
1.5 CES Writing Or Editing A Formula.........................................17
1.6 CES Defining Formula Processing And Result Rules.............19
1.7 CES Define Element Links....................................................22
1.8 CES Defining An Absence Type............................................25
1.9 CES Deleting Element Entries...............................................27
1.10 CES Define Balances............................................................28
2. Salary Administration...........................................33
2.1 SA Overview.........................................................................33
2.2 SA Defining A Salary Basis...................................................34
2.3 SA Salary Proposal...............................................................37
IDC/ADMM page 3

3. Compensation Entry and Reporting.......................39
3.1 CER Overview.......................................................................39
3.2 CER Batch Element Entry.....................................................40
3.3 CER Creating Or Editing Individual Batch Lines....................43
3.4 CER Retrieving Existing Batch Lines.....................................45
3.5 CER Reviewing BEE Process Results.....................................46
3.6 CER Transferring a BEE Batch..............................................48
3.7 CER Purging a Batch From the BEE Tables...........................49
3.8 CER Rolling Back a BEE Process...........................................50
3.9 CER Listing Employees by Element......................................51
3.10 CER Viewing Element Entry History......................................53
4. Payroll.................................................................55
4.1 P Overview...........................................................................55
4.2 P Defining A Payroll..............................................................56
4.3 P Deleting Payrolls................................................................59
4.4 P Defining a Payment Method..............................................60
4.5 P Entering Payment Methods For An Employee Assignment 62
4.6 P Mapping Cost Allocation to the Accounting Flexfield.........64
4.7 P Running Post-Run Processes For QuickPay........................66
4.8 P Data Costed At The Organization And Assignment Levels.70
4.9 P Correcting Run Results: Reversals.....................................72
4.10 P Update Payroll Run............................................................73
4.11 P RetroPay Set......................................................................74
4.12 P Defining Global Values......................................................75
4.13 P Setting Up User Tables, Columns and Rows......................76
IDC/ADMM page 4

4.14 P Entering Table Values........................................................80
4.15 P Creating An Assignment Set..............................................82
4.16 P Defining Consolidation Sets...............................................85
5. Processes and Reports.........................................86
5.1 PR Overview.........................................................................86
5.2 PR Submit Processes And Reports........................................87
5.3 PR View Request..................................................................97
IDC/ADMM page 5

Introduction
The purpose of this document is to facilitate the functions of the ADMM Human Resources and Payroll staff with a simple step-by-step guide to all the essential functionality of the Oracle HRMS product.Although this manual is by no means comprehensive in the scope of the functionality, it does cover the core functionality relevant from an end user perspective.
IDC/ADMM page 6

1. Compensation Elements Setup
1.1 CES Overview
This section contains the following subjects which are needed to understand and to use Compensation Elements Setup
1. Defining an Element
2. Making Manual Element Entries
3. Defining an Element's Input Values
4. Writing or Editing a Formula
5. Defining Formula Processing and Result Rules
6. Define Element Links
7. Deleting Element Entries
8. Define Balances
IDC/ADMM page 7

1.2 CES Making Manual Element Entries
Navigation Path : People -> Enter and maintain -> Assignment -> Entries
1.2.1 MEE Introduction
1. You enter compensation and basic benefits for employee assignments in the Element Entries window. If employees are assigned to a salary basis, you enter their salaries in the Salary Administration window.
2. You can use the Element Entries window to make entries or to query existing entries. Use the Period field, Classification field, and Processing Types option buttons to restrict the entries you see when making inquiries.
3. The Processed check box shows if Oracle Payroll has processed the entry in the current pay period.
1.2.2 MEE To Enter An Element For An Employee Assignment:
1. Follow the Navigation Path2. If necessary, change your effective date to:
The correct start date for a recurring element entry Any date in the correct pay period for a nonrecurring element entryIf the pay period is closed at your effective date, you cannot enter any nonrecurring elements that process in payroll runs. If a current or future pay period is closed, you cannot enter any recurring elements that process in payroll runs.
3. To reduce the list of elements to choose from, select a classification, a processing type, or both in the first region.
4. In the Element Name field, select an element.Elements this employee is eligible for by means of a standard link appear automatically.
The system displays a warning message if the employee fails to meet any qualifying conditions of age or length of service.
5. If the Costing field is enterable, you can enter cost codes, for example to indicate the cost center the employee's time should be charged to.
6. You can select a reason for an element entry you make or update. As part of your system setup, you can enter valid reasons for the Lookup Type ELE_ENTRY_REASON.
7. You can check the Override check box to create an entry that overrides all other entries of this element in the current period. You cannot create an override entry if one already exists, or if any of the entries of this element have been adjusted.
8. If you want to create a one-time entry of a recurring element, check the Additional check box.An Additional entry is valid only for the current pay period, shown in the Effective Dates fields.
IDC/ADMM page 8

You can only check Additional if: The element definition allows additional entries, and An additional entry does not already exist for the assignment in this
period, and The employee is assigned to a payroll There is a payroll period defined at your effective date
9. Choose the Entry Values button to open the Entry Values window.10. Enter values in the Entry Values fields. Notice that:
Entry to some fields may not be permitted. Some fields may be required. Some fields may have a list of values; others may be validated as you
leave the field. You will receive a message if your entry is not a valid value.
Some fields may contain default values. If the default value is in quotation marks, it is a "hot default".
11. To determine the processing sequence of multiple entries in the payroll run, enter a subpriority number in the Processing Priority field. Lower priority numbers process first.
12. Save your work.
1.3 Defining an Element
IDC/ADMM page 9

Navigation Path : Total Compensation -> Basic -> Element Description
1.3.1 The Main Concepts
1. Use the Element window to create an element to represent compensation and benefit types or earnings and deductions.
2. We explain how to define elements using a Payroll responsibility (that is, a responsibility with the HR User Type profile option set to Payroll User or HR with Payroll User).
1.3.2 To Enter Dates, names and a classification for the element:
3. Follow the Navigation Path4. Set your effective date early enough to handle any historical element entries
you want to make. Note that an element cannot be linked or entered until its start date.
5. Enter a unique: Name Reporting nameStart the names with a letter of the alphabet (not a number or symbol). The reporting name is a short identifier for reports and pay advices.
6. Enter a description for the element. 7. Select a Primary Classification.
This controls an element's processing priority and the balances it feeds. If you are defining a salary element for Salary Administration, you must select the classification Earnings.
1.3.3 To Enter Processing Information For The Element:
8. Select the processing type. Select Recurring if an entry of this element applies in every period until the entry is ended, or Nonrecurring if an entry applies in one pay period only. The dates of the pay period are determined by the payroll to which the employee is assigned.If you are defining a salary element for salary administration, you must select the type Recurring. If you are defining an absence element for absence management, you must select the type Nonrecurring.
9. Select a termination rule to determine how entries of the element are processed after termination of the employee: Actual Termination if you want recurring entries to close down on the
date the employee leaves. For a nonrecurring element, select Actual Termination if you want the entries to close down at the end of the pay period in which the employee leaves, or on the date the assignment ends (the final process date) if this is earlier.
Final Close if you want the entries to stay open beyond the employee's leaving date so that you can continue to pay the employee.If you are a Payroll user, you can also select:
Last Standard Process for all recurring and nonrecurring elements if you want their entries to close down on the Last Standard Process date or
IDC/ADMM page 10

on the date the assignment ends (the final process date) if this is earlier. The Last Standard Process date defaults to the last day of the pay period in which the employee is terminated, but you can set it to a later period when you terminate an employee.
10. Select the Multiple Entries Allowed check box if you want to give an employee more than one entry of the element at the same time.
11. Select the Additional Entries Allowed check box if you want to make occasional one-time entries of a recurring element (instead of, or in addition to, a normal recurring entry).
12. Select the Closed for Entry check box if you want to prevent any new entries being made for the element, either temporarily or permanently. This does not affect any existing entries of the element.
Use this feature with caution. When you perform certain important tasks in Oracle HRMS, the application may automatically create or delete element entries. These tasks include hiring and terminating people, and updating assignments. Therefore, if you check Closed for Entry on an element, this might prevent users terminating employees and updating assignments. If there are standard links for the element, it will also prevent users hiring people who are eligible for the element.
1.3.4 DE Oracle Payroll Users:
13. Select the Process in Run check box if you want the element to process in payroll runs.
14. Select the Indirect Results check box if you want the element only to accept entries from indirect formula results. Leave the check box unchecked if you want to accept entries both from indirect formula results and from manual entries in the Element Entries window.
15. Select the Adjustment Only check box if you want to use the element only for creating balance adjustments.
16. Select the Third Party Payments check box if you want to use the element only for creating third party payments.
17. Overwrite the default priority number in the Priority field if you want to determine the order in which the element processes within its classification range. Lower numbers process before higher ones.If the order of processing within the element classification is not important, you can accept the default priority number, which is the midpoint of the range.
18. Select a formula in the Skip Rule field if you have written a skip rule formula to determine the circumstances in which the element should be processed.
1.3.5 To Select Currencies For Element Entry Values And Processing:
The default currency for element entry values is the base currency defined for the Business Group. You can select a different currency for the element if required.
IDC/ADMM page 11

19. Select the currency in the Input field if you want to make element entries in a currency other than the base currency of the Business Group.
Oracle Payroll Users: For Information type elements, you can select a different output currency because these elements do not feed the Payments balance. When you do this, Oracle Payroll converts the entry values to the output currency before they are processed in the payroll run.
1.3.6 To Define Qualifying Conditions For Receiving The Element:
20. Enter the age in the Age field if there is a minimum age for employees to receive the element.
21. Enter a number in the Length of Service field and select a unit of measure (such as months or years) in the Units field if there is a minimum length of service employees must work before receiving the element.
22. Select the Standard check box if you want the element to be entered automatically for all employees who are eligible. You cannot check Standard if the element is nonrecurring or if Multiple Entries are allowed.
23. Save the element definition.
IDC/ADMM page 12

1.4 Defining An Element's Input Values
Navigation Path : Total Compensation -> Element Description -> Input Values
1.4.1 DEIV Introduction
Use the Input Values window to define the input values for the element. You can define up to 15 input values for an element.Payroll users: If you are creating balance feeds for individual elements, ensure you define an input value of the same unit of measure as the balance. Money units must be the same currency.
1.4.2 DEIV To Define Input Values:
1. Follow the Navigation Path2. Set your effective date early enough to handle any historical element entries
you want to make.3. Enter or query the element in the Element window and choose the Input
Values button.4. Enter the name of the first input value. Remember that if you want to define a
pay value to hold run results, you must name it Pay Value.5. Select the unit type of your input value (money, hours, character, date,
number, or time). A Pay Value must have the unit type Money if the element is in a Payments type classification.
6. You can enter numbers in the Sequence field to change the order in which the input values appear in the Entry Values window.
7. Check the Required check box if all entries of the element must have a value for this input.
8. Check the User Enterable check box if users can enter a value for this input. Uncheck it if you want to ensure that the default value is entered for all employees.
9. Check the Database Item check box if you want the value to be available to formulas or QuickPaint inquiries.
10. Database Items are simple identifiers that the system uses to find specific items of information in the human resources database.
1.4.3 DEIV Entering Element-Level Defaults For An Input Value:
11. Enter the value in the Default field.12. If you want existing entries to be updated whenever the default is changed,
check the Hot Default check box. The input value must be required if you want to use this option.A hot default appears in the Entry Values window in quotation marks.Warning: If a user overrides a hot default in the Entry Values window, subsequent changes to the default will not affect the entry. For this reason,
IDC/ADMM page 13

you may prefer to use BEE to change defaults for large groups of employees, rather than the hot default feature.
1.4.4 Defining Entry Validation For An Input Value:
13. Do one of the following: Enter maximum and minimum values for the input. Select a Lookup Type to act as a lookup supplying a list of valid values. Select a formula to validate entries for this input value. Formulas can
return messages to users about the success or failure of the validation.14. Select Warning or Error to determine whether the system warns users that an
entry is invalid or prevents them from saving an invalid entry. You cannot select a value if you chose a Lookup because a user cannot enter an invalid value for an input value validated by lookup.
IDC/ADMM page 14

1.5 Writing Or Editing A Formula
1. Set your effective date to the date when you want to begin using the formula.2. To write a new formula, enter the formula's name and select a type. To edit
an existing formula, query its name.3. Choose the Edit button to open a blank Edit Formula window where you can
write a new formula, or modify an existing one.4. If you want to select database items, choose the Show Items button to display
the Database Items window and run a query. Copy and paste items from this window to the Edit Formula window.
5. When you finish writing or editing the formula, choose the Verify button to compile it. This process identifies any syntax errors in your formula.Once you have compiled any formula, new functions or changes to existing functions made after the first time you compile, are not used. You must logout of Oracle HRMS and login again. You can now compile your formula and the new functions and/or changes to existing functions will be included.
6. When the formula is verified successfully, save it.7. Your next step depends on the type of formula:
If the formula is of type Oracle Payroll, you must associate it with an element in the Formula Result Rules window.
If the formula is of type Element Skip, you select it in the Skip Rule field of the Element window.
If the formula is of type Element Input Validation, you select it in the Formula field of the Input Values window when you are defining an element.
If the formula is of type User Table Validation, you select it in the Formula field of the Columns window when you are defining a user table structure.
If the formula is of type Accrual, Accrual Carryover, or Accrual Ineligibility, you select it in the Accrual Plan window.
If the formula is of type Accrual Subformula, you call it from another formula of type Accrual.
If the formula is used for benefits administration, you select the formula in the Rules field of the appropriate benefits window.
Test your formula in the situation you intend to use it (such as, in a test payroll run) to ensure it contains no logical errors.
IDC/ADMM page 15

IDC/ADMM page 16

1.6 Defining Formula Processing And Result Rules
Navigation Path : Total Compensation -> Basic -> Formula result
1.6.1 DFR Introduction
1. Use the Formula Result Rules window to associate one or more formula processing rules with an element.
2. At minimum, an element needs one standard processing rule. This identifies the formula the payroll run uses to process the element for employees with an Active assignment status (and a Payroll system status of Process). You can define other processing rules if you need to use different formulas for assignments at other statuses. For example, you could have two rules for a Wages element: Standard Wages and Paid Training Leave.
3. Also use this window to define how each formula result is used by the payroll run.
1.6.2 DFR To Associate Processing Rules With Elements:
4. Follow the Navigation Path5. Set your effective date to the start date for the processing rule.6. Select the element for which you are entering rules. The element's
description and classification automatically display.7. In the Processing Rules region, select Standard and the regular formula for
the element. If you have other formulas for this element, select them and the assignment statuses you want to associate with them.Note: If you select a formula with inputs that do not match the element, you will receive a warning message, but you can still save your rule. Remember to update the formula before running the payroll.
8. Save your entries.
1.6.3 DFR To Define Formula Result Rules For Each Processing Rule:
9. Click on a processing rule to select it.10. In the Formula Results region, select a formula result name from the list of
results specified when the formula was written.11. Select the appropriate formula result type. There are five possible types:
Direct result: This is the element's run result. Indirect result: This result passes as an element entry to another
nonrecurring element not yet processed. Message: The formula issues messages under certain conditions. For
example, a formula can check a loan repayment balance and, if the
IDC/ADMM page 17

balance is zero, issue the message "Loan is repaid." You read formula messages using the View Run Messages window.
Stop: This formula result uses the effective date of the payroll run to put an end date on a recurring entry of this or another element (which must be defined with multiple entries not allowed.)
Update recurring entry: This result updates recurring entries of this or another element. The receiving element must be defined with multiple entries not allowed unless you are passing a recurring element's entries to itself, that is updating another entry of the same element.
12. If you select Indirect Result, Stop, or Update Recurring Entry as the formula result type, select the name of the element and input value to which you want to pass the formula result. This element must have a processing priority causing it to process after the element sending the result.
13. If you select Message as the formula result type, select a message severity level. There are three choices: Fatal: When a message with this severity results from your formula,
the run rolls back all processing for the employee assignment. Warning: A message with this level of severity does not affect payroll
processing but warns the user of a possible problem. Information: A message with this level of severity simply gives
information.
1.6.4 DFR Correcting And Updating Processing Rules
When you add a formula result it takes on the effective end date of its processing rule. Any date effective changes you make to existing processing rules can affect formula results as follows:
Update: If you update a processing rule or give it an effective end date, all the rule's currently effective and future-dated formula results automatically get identical end dates.
Correction: If you correct a processing rule, all its currently effective and future-dated formula results remain unchanged.
Future delete: If you delete all future changes scheduled for a processing rule, this also deletes any future changes scheduled for the rule's formula results.
IDC/ADMM page 18

IDC/ADMM page 19

1.7 CES Define Element Links
Navigation Path : Total Compensation -> Basic -> Link Use the Element Link window to define groups of assignments that are eligible for an element.
1.7.1 DEL To Define An Element Link:
1. Follow the Navigation Path2. Set your effective date to the date you want the eligibility criteria to come
into effect.3. In the Element Name field, select the Element for which you are defining a
link.4. Check the Standard check box if you want all employees who are made
eligible by the link to receive the element automatically. 5. You can only create a standard link if the element is recurring and multiple
entries are not allowed by the element definition.6. In the Eligibility Criteria region, select the assignment components that
constitute this eligibility rule. If you want to link to all employees, do not enter any eligibility criteria.You can link to all payrolls or to a specific payroll. Do one of the following: Leave the Payroll field blank and check the Link to all Payrolls check box
if you want employees assigned to any payroll to be eligible. This rule excludes employees who are not assigned to a payroll.
Select the name of a specific payroll if you want only employees on that payroll to be eligible for the element. Do not check the Link to all Payrolls check box.
Leave both fields blank if assignment to a payroll is irrelevant to eligibility for the element.
1.7.2 DEL To Enter Costing Information For The Link:
7. Select the Constable Type. The default is Not Costed, meaning that the system maintains no costing information for the element. To allow entry of costing information at all levels, including the
assignment and element entry levels, select Costed. This is the appropriate selection for most elements representing earnings types.
If you want all entries of the element to be allocated to the same account, select Fixed Costed.
If you want to distribute overhead costs (such as employer contributions to a pension plan) over other elements, select Distributed. Then select a Distribution Set.
8. Check the Transfer to GL check box if the payroll run results from this link should be transferred to the general ledger.
IDC/ADMM page 20

9. Use the Costing field to select a GL account code and, if present, account codes of labor distribution or other systems in which to collect the run results of this element. Then use the Balancing field to select the GL account that balances this one.For deductions elements: Select the code for the GL account to credit in the Costing field, and the
code for the account to debit in the Balancing field.For elements in all other classifications: Select the code for the GL account code to debit in the Costing field,
and the code for the account to credit in the Balancing field.
1.7.3 DEL To Enter Qualifying Conditions For The Link:
10. Go to the Qualifying Conditions region. Here you can add or change age or length of service requirements for this particular eligibility rule.The system checks these conditions when you make an entry of the element. If the employee does not meet the qualifying conditions, you receive a warning.
1.7.4 DEL To Adjust Input Values For The Link:
11. Save your link definition and choose the Input Values button to display the Link Input Values window.
12. Enter a new default or change one entered at the element level13. Check the Costed box to maintain costing information for an input value.14. Change the maximum, minimum or both for an input value. Logically, the new
values should be within the range you defined for the element as a whole. However the system does not enforce this.
IDC/ADMM page 21

IDC/ADMM page 22

1.8 CES Defining An Absence Type
Navigation Path : Total Compensation -> Basic -> Absence Types
Use the Absence Attendance Type window to define an absence type and associate it with an element to hold the absence balance.
1.8.1 DAT To Define An Absence Type:
1. Follow the Navigation Path2. Enter a name and category for the absence type. 3. In the Associated Element region, select the element defined for this absence
type. The name of the element's input value that holds the time taken or time remaining for this absence type appears in the Input Value field, and the unit of measure for the input value appears in the Units region.
4. In the Balance region, select Increasing for each entry to the absence element's input value to add to a running total of time taken to date for this absence type. Select increasing balances for absence types for PTO accrual plans, and for most other absence types.For absence types that have a set maximum amount of hours or days allowed, you may select Decreasing. In this case, each absence recorded reduces an initial balance entered for the absence type, to show time remaining to be taken for the type.
Decreasing balances require more maintenance. You must enter an initial balance amount for each new hire eligible for the absence type, and must initialize the balance for all eligible employees at the start of each year.
5. Optionally, select reasons that are valid for entries of this type of absence.6. Save the absence type.
IDC/ADMM page 23

IDC/ADMM page 24

1.9 CES Deleting Element Entries
Navigation Path : Fast Path -> Entries
1.9.1 DEE To Delete A Nonrecurring Element Entry:
1. Set your effective date to any date within the payroll period for which the entry exists.
2. Click on the entry to select it, choose Delete Record, and save.
1.9.2 DEE To Delete A Recurring Element Entry:
1. Follow the Navigation Path2. Set your effective date to any date within the payroll period for which the
entry exists.3. Click on the entry to select it and choose Delete Record.4. Choose Purge in the dialog box that displays, and save.
Note: Your ability to purge element entries is controlled by the user profile option HR: Purge Element Entry Permission, which is set by your system administrator. You may be able to purge all element entries, entries of information elements only, or none.
1.9.3 DEE Deleting Processed Entries
You can delete an element entry that the payroll run has processed. You receive a warning message. This does not remove the payroll run results so you can consult these for a complete record of payroll processing and payments.
To reprocess corrected element entries from the past, run the retropay processes.
IDC/ADMM page 25

1.10 CES Define Balances
Navigation Path : Total Compensation -> Basic -> Balance
1.10.1 DB Introduction
1. Oracle Payroll has many predefined balances installed with the system. You can define other balances.
2. Defining a balance includes defining its feeds and dimensions. When you select feeds for the balance you have to choose between specifying element input values directly and selecting element classifications to determine the feeds. You cannot choose both methods together.
3. You define balances in the Balance window.
1.10.2 DB To Define A User Balance:
1. Follow the Navigation Path.
2. Do one of the following: Enter a unique name and a reporting name for the new balance. If you
do not provide a reporting name, the first seven characters of the balance name appear on reports.
IDC/ADMM page 26

Query any user balances you want to change.3. Enter the unit of measure for the balance. The choices are days, hours (listed
in different formats), integer, money and number. If you select money as the unit you must also select a currency. Do not select the Use for Remuneration check box. This displays which predefined balance is the Remuneration balance. Only one balance within a legislation can have this value.
4. Go to the Balance Feeds window or to the Balance Classifications window.
IDC/ADMM page 27

1.10.3 DB In The Balance Feeds Window:
5. Set your effective date to the start date for the balance feeds.6. Select one or more elements to feed the balance. Only those elements whose
input values have the same unit of measure as the balance are listed. When you select an element, its classification is displayed. You can select elements with different classifications.
7. Select the input value that is to feed the balance.For most payroll balances select Pay Value so that the element's run result feeds the balance.
8. Select Add or Subtract for the balance feed.
IDC/ADMM page 28

1.10.4 DB In The Balance Classifications Window:
9. Select one or more element classifications and select Add or Subtract for each. The run results of all elements in the classification will feed the balance. The list includes all the primary and secondary element classifications that are valid for this balance. If you select a secondary classification, you cannot also select its parent primary classification.Secondary classifications are not used in the North American or Singapore versions of Oracle Payroll at this time.
1.10.5 DB In The Balance Dimensions Window,
10. select the dimensions you require.
IDC/ADMM page 29

You can remove any dimension previously selected for a user-defined balance. You can also add dimensions to the startup balances included with your system, and later remove these additional dimensions. However, you cannot remove the dimensions that were predefined for the startup balances.To hold balances for a fiscal year that is different from the calendar year, you must supply the fiscal year start date for your Business Group.
11. Optionally, select the Grossup Balance check box for one of the dimensions, to make the balance eligible for grossup.
1.10.6 DB In The Initial Balance Feed Window
12. you can see details of the element and input value used for the Initial Balance feed. This feed is defined by implementation consultants prior to performing an initial balance upload at implementation time.
IDC/ADMM page 30
2. Salary Administration
2.1 SA Overview
This section contains the following subjects which are needed to understand and to use SALARY ADMINISTRATION
1. Defining a Salary Basis
2. Salary Proposal
3. Entering Salary Surveys
IDC/ADMM page 31

2.2 SA Defining A Salary Basis
Navigation Path : Total Compensation -> Basic -> Salary Basis
2.2.1 DSB Introduction
1. Use the Salary Basis window to define a salary basis for each salary element to be used for salary administration.
2. This establishes the duration for which a salary is quoted, for example, hourly, monthly or annually.
2.2.2 DSB To Define A Salary Basis:
1. Follow the Navigation Path2. Enter an appropriate name for the salary basis.
If you are using predefined elements, go to step 4, otherwise go to step 2.
2.2.3 DSB Without Predefined Elements
3. Select a pay basis, for example, Annual or Hourly.If you selected Annual or Monthly, Oracle HRMS identifies the number of payments and enters 1 or 12 in the Pay Annualization Factor field. You can change this value, if required.If you selected Hourly, the Pay Annualization Factor field is blank. Enter your own values, if required.If you select Period, leave the Pay Annualization Factor field blank, Oracle HRMS uses the payroll period of your employee as the annualization factor.Note: The pay basis is for information only. For example, to enable you to compare salaries.
4. Select the name of the salary element and input value associated with this salary basis.Now go to step 6.
2.2.4 DSB With Predefined Elements
5. Select the appropriate pay basis for the predefined element you plan to use. For example, select Monthly Salary for the Regular Salary element in the US.If you selected Annual or Monthly, Oracle HRMS identifies the number of payments and enters 1 or 12 in the Pay Annualization Factor field. You can change this value, if required.If you selected Hourly, the Pay Annualization Factor field is blank. Enter your own values, if required.
IDC/ADMM page 32

If you select Period, leave the Pay Annualization Factor field blank, Oracle HRMS uses the payroll period of your employee as the annualization factor.Note: The pay basis is for information only. For example, to enable you to compare salaries.
6. Select the appropriate element and input value (for example, in the US, Regular Salary and the input value Monthly Salary, or Regular Wages and the input value Rate).
2.2.5 DSB All
7. Select a grade rate to associate with the salary basis, if required.Oracle HRMS uses the grade rate to validate your salary proposals. You receive a warning if the salary you enter for an employee is not within the grade rate range defined for the employee's grade.In doing this check, the system takes account of the hours in the employee's standard work week. It compares the hours on the employee's assignment with those entered for their organization.If the employee works fewer than the standard hours per week for the organization, the system pro-ratas the permissible minimum and maximum grade rate values before validating the salary.
8. Select the grade rate basis (Hourly, Monthly, Annual, or Period) for the rate if you selected a grade rate. For example, if your grade rate specifies the valid monthly salary ranges for each grade, select Monthly Salary in the Grade Rate Basis field.If you selected Annual or Monthly, Oracle HRMS identifies the number of payments and enters 1 or 12 in the Grade Annualization Factor field. You can change this value, if required.If you selected Hourly, the Grade Annualization Factor field is blank. Enter your own values, if required.If you selected Period, leave the Grade Annualization Factor field blank, Oracle HRMS uses the payroll period of your employee as the annualization factor.Note: This is for information only. For example, to enable you to compare salaries within grades.
9. Save your changes.
IDC/ADMM page 33

IDC/ADMM page 34

2.3 SA Salary Proposal
Navigation Path : People -> Enter and maintain -> Assignment -> Salary
2.3.1 SP Introduction
1. Use the Salary Administration window to enter a starting salary amount for a newly hired employee, or to enter a salary amount for a current employee assigned to a new salary basis. This could be, for example, an employee moving from an hourly wage to a monthly salary.
2. Notice that you cannot enter multiple components of a starting salary for a newly hired employee or one assigned to a new salary basis.
3. You must assign a payroll to an employee before entering a salary.4. Use the Salary Management folder to approve multiple salary proposals or to
download salary information to a spreadsheet. In the spreadsheet you can enter new proposals, edit existing proposals, and approve salary components. Then you can upload your changes to the database.
2.3.2 SP To Enter A Salary For A New Employee (Or One Assigned To A New Salary Basis):
1. Follow the Navigation Path2. Enter the start date for the salary in the Change Date field (in the Salary
Proposal region). For a new hire, this is usually the hire date.The employee must have an active assignment on this date. If you are changing the salary basis, you must enter the exact date it changes.
3. Enter the amount of the salary in either the Change Value or the New Value field.
4. Select a reason for the salary, if required.5. Rank the employee if required.
For example, you might want to rank the employee at the time of the proposal and track them later on. If you do rank the employee, enter a value greater than zero.
6. Enter or change the Next Review date, if required.7. Select a performance review to associate with the salary review, if required.
This is a performance review you previously created using the Performance window.
8. Save the new salary. You do not have to approve the new salary, Oracle HRMS approves it automatically.
IDC/ADMM page 35

IDC/ADMM page 36

3. Compensation Entry and Reporting
3.1 CER Overview
This section contains the following subjects which are needed to understand and to use COMPENSATION ENTRY AND REPORTING
1. Batch Element Entry
2. Creating or Editing Individual Batch Lines
3. Retrieving Existing Batch Lines
4. Reviewing BEE Process Results
5. Transferring a BEE Batch
6. Purging a Batch From the BEE Tables
7. Rolling Back a BEE Process
8. Listing Employees by Element
9. Viewing Element Entry History
IDC/ADMM page 37

3.2 CER Batch Element Entry
Navigation Path : Mass information Exchange -> Batch Element Entry
3.2.1 BEE Entering A Batch Header
You can enter batches of element entries in the Batch Header and Batch Lines windows.
The header identifies the batch and determines what happens if any of the batch lines duplicate existing element entries.
3.2.2 BEE To Enter A Batch Header And Control Totals:
1. Follow the Navigation Path.2. Set your effective date to the date when you want the entries to take effect.3. Enter a name for the batch, and enter a reference number and the source of
the batch, if you require these for your own reference.4. Select what action the process should take if one of the batch lines matches
an existing element entry for an assignment at the effective date. Create New Entry - The process creates a new entry if multiple entries
of the element are allowed by the element definition. If multiple entries are not allowed, the process sets the status of the batch line to Error.
Reject Entry - The process sets the status of the batch line to Error. Change Existing Entry - The process corrects or updates the existing
entry. If there is more than one existing entry, the process sets the status of the batch line to Error.
The Undefined option is display-only (for batches created using SQL*Plus or a similar tool).
5. If you selected Change Existing Entry, select the type of date effective change to be made to recurring entries: Update - The process changes the existing entry from the effective
date, but preserves the previous information. If there are future-dated changes to the existing entry, the process inserts the change before the next scheduled change.
Correct - The process corrects the existing entry from its start date through to its end date. Any future-dated changes are unaffected.
Override - The process changes the existing entry from the effective date, but preserves the previous information. If there are future-dated changes to the existing entry, the process replaces all future-dated changes with the batch line.
Notice that if you select this option, you cannot check the Reject if Future Changes check box.
The Undefined option is display-only (for batches created using SQL*Plus or a similar tool).
IDC/ADMM page 38

6. If you want to reject batch lines that match entries that start in the future or for which future changes are scheduled, check the Reject if Future Changes check box.
7. Notice that if you check this box, you cannot select the Override option.8. If you want the batch to be purged from the temporary tables after successful
transfer to Oracle HRMS, check the Purge After Transfer check box.Attention: You cannot roll back a batch transfer if you have purged the batch from the BEE tables.
9. If you are going to use the Assignment Lines window and you want the system to display automatically any existing lines in this batch for an assignment and element set you select, check the Auto Query box.
10. If you are going to use the Batch Lines window and you want the system to display an error if you enter an invalid assignment number, check the Auto Validation box.
3.2.3 BEE Control Totals
11. If you use control totals to validate the batch before transfer, choose the Totals button.
12. Select a batch control type (such as Hours, to sum all the values in the Hours input value, or Line Count, to check the number of lines in the batch).
13. Enter the control total for each control type. 14. You can enter as many types and totals as you require.
IDC/ADMM page 39

3.3 CER Creating Or Editing Individual Batch Lines
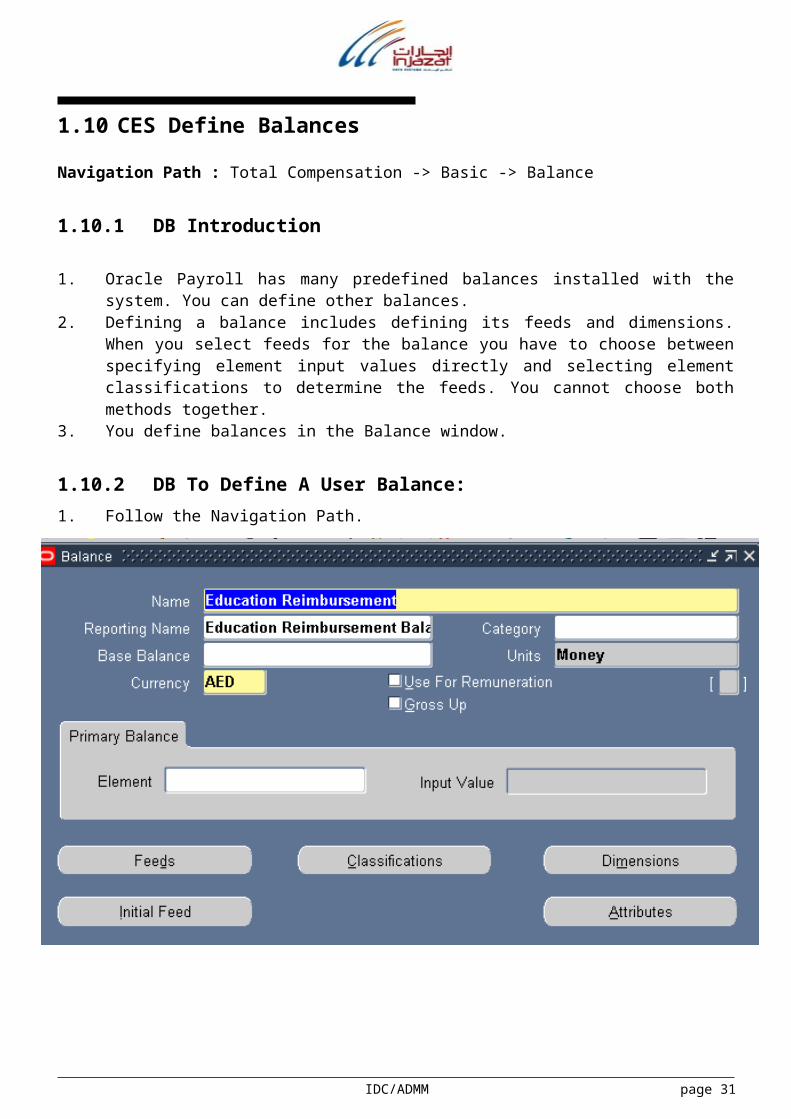
3.3.1 IBL Introduction
1. In the Batch Lines window, you can enter new lines for individual assignments, and you can view and edit lines created automatically for an assignment set. You can speed up entry of new lines by entering default input values
2. A batch can contain lines for as many elements as you require. Lines within a batch can have different effective dates.
3.3.2 IBL To Enter Individual Batch Lines:
1. Enter or query a batch header in the Batch Header window, and choose the Element Lines button.
2. Select the element for which you want to make entries.3. To enter default values to speed up the data entry, choose the Defaults
button. The Defaults window displays the input values for the selected element.
4. Enter default values in any of the fields in the Defaults window. These defaults apply to all new entries in the batch, but not to any entries you have already made. You can change the defaults at any time during your data entry.
5. Uncheck the Display check box for any field that you do not want to display in the Lines window. You can hide any fields for which the default is correct for every entry.
6. In the Lines window, enter the data required for the batch. Lists of values are available on some fields, but no validation is enforced during data entry.
7. The following fields may be available depending on your localization and the element you selected: Enter Further Information for this element entry. Select a date in the Date Earned field if you want to establish an earned
date for an earnings element that is outside of the current payroll period. (For localizations outside North America, this is for information only.)
Select a third party payment method in the Payee field to enter information about a third party recipient of a payment resulting from a deduction.
8. Enter a number in the Subpriority field if you want to determine the processing sequence of multiple entries in the payroll run. Lower priority numbers process first.
9. You can override the Effective Date for any line. This is the effective start date for a new entry or the effective date of an update.
10. If you selected an absence element, enter the absence start and end dates. BEE uses these dates to create an absence record.
IDC/ADMM page 40

11. Save your entries. If you want to make entries for another element, select the element, enter new defaults, enter the lines, then save again.
IDC/ADMM page 41

3.4 CER Retrieving Existing Batch Lines
3.4.1 REBL To Retrieve Existing Batch Lines:
1. Do one of the following: Select the element in the Element field. Check the Unknown Elements check box if you are querying batch lines
entered for an invalid element (or no element) by SQL*Plus or another tool.
2. Choose the Find button.
3.4.2 REBL Updating A Batch
You can update a batch at any time before you transfer it. If you make any changes to a batch with the status Validated or Error, the batch status changes to Unprocessed.
IDC/ADMM page 42

3.5 CER Reviewing BEE Process Results
3.5.1 RBPR To Review Batch Process Results:
1. Query one or more batches by name, reference, or status in the Batch Summary window.
2. If a batch status is Error, at least one line, control total, or the header is in error.
3. Click on a batch to select it and choose the Errors button to identify the problem with a batch that has the status Error. The Messages window opens. You can view all messages or query them by type: Batch Header, Batch Line Level, or Control Total.
IDC/ADMM page 43

4. To see and correct a batch, click on it in the Batch Summary window and choose the View Batch button. The Batch Header window opens with the selected batch displayed.
5. From the header window, you can view lines, control totals, or messages: To view the status of individual lines in the batch, choose the Element
Lines button. In the Batch Lines window, select an element and choose Find.
If you entered control totals for the batch, choose the Totals button on the Batch Header window to view the status for each control type.
To view messages for the whole batch, or all lines, or control totals, choose the Messages button. Use the option group at the top of the Messages window to control which messages are displayed.
IDC/ADMM page 44

3.6 CER Transferring a BEE Batch
3.6.1 TBB Introduction
1. A batch exists in the temporary BEE tables only until you run the transfer process to create element entries in the Oracle HRMS Entries table.
2. You can also transfer several batches together from the Batch Summary window.
3.6.2 TBB To Transfer A Batch:
1. Query the batch in the Batch Header window, and choose the Process button.2. Select Transfer, and choose Start. The system displays the concurrent request
ID so that you can query it on the Requests window.3. When the concurrent request is completed, query the batch in the Batch
Header window.
If the Batch Status is Transferred, there were no errors in the batch and the process has created the element entries. The process may have issued messages associated with the batch header, lines, or control totals.
If the Batch Status is Error, the process has set the status of at least one line, or control total to Error. Check the status fields in the Batch Lines window and the Control Totals window, and review the messages issued by the process.
IDC/ADMM page 45

3.7 CER Purging a Batch From the BEE Tables
3.7.1 PB Introduction
1. If the Purge After Transfer check box on the Batch Header window is checked when you run the transfer process, the batch is deleted from the BEE tables automatically after the transfer. If the box is not checked, you can purge the batch by running a separate process.
2. You can purge a batch with any status.3. You cannot roll back a batch transfer if you have purged the batch from the
BEE tables.4. You can also purge several batches together from the Batch Summary
window.
3.7.2 PB To Purge A Batch:
1. Query the batch in the Batch Header window, and choose the Process button.2. Select Purge, and choose Start. The system displays the concurrent request ID
so that you can query it on the Requests window.
IDC/ADMM page 46
3.8 CER Rolling Back a BEE Process
Navigation Path : Processes and Reports -> Submit Processes and Reports
3.8.1 RB Introduction
1. After a successful BEE transfer, you can roll back the transfer process if you want to completely remove it, provided you have not purged the batch from the BEE tables. You can choose to purge the batch as part of the rollback process.
2. The process interlock rule (which prevents you rolling back a payroll process if any further processing has taken place) does not apply to BEE Rollback. You can still perform the rollback even if run results from payroll processing exist for any of the lines.
3. If the batch included absence entries, the rollback removes the absence records as well as the element entries.
4. You run the BEE Rollback process from the Submit Requests window.
3.8.2 RB To Roll Back A BEE Process
1. Follow the Navigation Path.2. Select the batch header name of the process you want to roll back.3. Enter Yes to cancel the rollback process if the system detects run results for
any of the batch lines. Enter No if you want the system to complete the rollback even though run results exist.
4. Enter Yes to keep the batch after the rollback. Enter No to delete the batch after the rollback.
IDC/ADMM page 47

3.9 CER Listing Employees by Element
Navigation Path : View -> histories -> Entries
3.9.1 LEE Introduction
1. In the List Employees by Element window, you can view a list of the employees with entries to an element in any period of time you choose. You can also see the last entry value for each assignment.
2. If your system administrator has customized this window, you may be restricted to selecting elements of a certain processing type or element set.
3.9.2 LEE To View A List Of Employees Receiving An Element:
1. Follow the Navigation Path2. Select an element.3. Select Current Employees, Ex-employees, or both.4. You can also enter a date range. Both date fields default to your effective
date.5. You can enter additional query criteria in the Element Entries region.6. Run the query.
The Element Entries region displays all entries of the element for employees of the type you selected in the chosen time period.
Note: This window does not display datetracked updates to recurring element entries. You only see the latest value (within your chosen time period) of each element entry. The date of the last datetracked update may vary from employee to employee.
IDC/ADMM page 48

IDC/ADMM page 49

3.10 CER Viewing Element Entry History
Navigation Path : View -> Lists -> Employees by element
3.10.1 VEEH Introduction
1. In the View Element Entry History for Employee window you can view, for a single employee assignment, a history of entries for: One element All recurring elements, all nonrecurring elements, or both Elements from a selected classification
2. If your system administrator has customized this window, you may be restricted to viewing elements of a certain processing type or element set.
3.10.2 VEEH To View Element Entry History For An Employee:
1. Follow the Navigation Path2. Enter your selection criteria. You can:
Select a classification. Select a processing type. Enter a date range. The end date defaults to your effective date.
2. Place your cursor in the Element Name field and run the query.The window displays all entries of the types of element you selected within the time period, including datetracked updates to entries. New entries are shown in bold to contrast with datetracked updates, which are listed under the initial entry.
3. Select an entry and choose the Entry Values button to view the entry values.
IDC/ADMM page 50

IDC/ADMM page 51

4. Payroll
4.1 P Overview
You can define as many payrolls as you need to meet the payroll processing needs of your enterprise. Each payroll has one pay frequency only, such as weekly or monthly, so the payroll of an employee assignment determines the pay frequency for the employee.This section contains the following subjects which are needed to understand and to use the PAYROLL
1. Defining a Payroll
2. Deleting Payrolls
3. Defining a Payment Method
4. Entering Payment Methods for an Employee Assignment
5. Mapping Cost Allocation to the Accounting Flexfield
6. Running Post-Run Processes for QuickPay
7. Data Costed at the Organization and Assignment Levels
8. Correcting Run Results: Reversals
9. Update payroll Run
10. RetroPay Set
11. Defining Global Values
12. Setting Up User Tables, Columns and Rows
13. Entering Table Values
14. Creating an Assignment Set
15. Defining Consolidation Sets
IDC/ADMM page 52

4.2 P Defining A Payroll
Navigation Path : Payroll -> Description
Use the Payroll window to define a payroll, including its calendar and valid payment methods.
4.2.1 DEFP To Define A New Payroll:
1. Follow the Navigation Path.2. Set your effective date to a date early enough to handle any historical
information you want to enter. Your effective date must be on or before the first period start date of the payroll calendar.
3. Enter the payroll's name and select its period type from the list. 4. Enter the end date of the payroll's first period, and the number of years for
which the system should initially generate the payroll's calendar. You can increase this number later to generate additional years.When you enter the First Period End Date, make sure that the corresponding start date of the first period is after the start date of the payroll.
5. In the Date Offset region, you can change the zero default to a negative or positive number of days before or after the period end date. For example, for a semi-monthly payroll, the Cut Off date can be 3 days before the period end date (-3), while the Scheduled Run and Check dates can be 5 and 7 days after this date, respectively. The Check Date, sometimes called Pay Date, is the date of constructive
receipt of pay, on which paychecks become negotiable. The Scheduled Run Date is the date scheduled for the Regular run of
this payroll each period. The Cut Off date, included for your reference, is the final date for
entering or changing payroll information before a run.These offsets are the defaults for the calendar. You can manually make date changes in the calendar, for example when an offset date falls on a weekend or holiday, by choosing the Period Dates button.
6. Select a default payment method for employees who have no valid personal payment method. You cannot select a method using magnetic tape because this requires information about employees' bank accounts.
7. Select a default consolidation set for this payroll. One consolidation set is created automatically when you define your Business Group. Oracle Payroll users can create other consolidation sets for payroll processing.
8. In the Costing region, you can enter information about the set of books and suspense account holding costing information for this payroll.The information you enter here depends on the setup of your Cost Allocation key flexfield.
9. Check the Negative Payment Allowed checkbox if you want the pre-payments process to include negative payments. If you leave the box unchecked, pre-payments ignores negative payments.
IDC/ADMM page 53

10. If you are an Oracle Payroll user, enter the Statutory Information field to open the Statutory Information window.Your Oracle localization team may have created fields in this window.The Statutory Information field is not visible if your HR:User Type profile option is set to HR User.
11. Save your work.12. Choose the Period Dates button to view the calendar generated for your
payroll. In the Period Dates window: You can view the default offset dates for every period, and you can
manually override any of these dates in any record. You can change the payroll's default Open status in any period to
Closed to prevent further element entries. You can also reopen the period if necessary.
13. Choose the Valid Payment Methods button to add valid payment methods for this payroll.
In the Valid Payment Methods window, the default payment method for the payroll appears automatically. You can add other methods. First set your effective date to the date you want the method to become valid.
An employee assigned to this payroll can have any number of personal payment methods chosen from those you enter here for the payroll.
IDC/ADMM page 54

4.3 P Deleting Payrolls
You can delete a payroll if there are no active employee assignments or element links to it. However, if you have run processing for a payroll it is not advisable to delete it. If necessary, define a new payroll and simply discontinue use of the old payroll.
4.3.1 DELP To Delete A Payroll:
1. Remove any element links or employee assignments to the payroll.2. Query the payroll in the Payroll window, choose Delete Record and Save.
IDC/ADMM page 55

4.4 P Defining a Payment Method
Navigation Path : Payroll -> Payment Method
4.4.1 DPM Introduction
1. Define payment methods for the enterprise in the Organizational Payment Method window.
2. You can define multiple payment methods for the same type. For example, you might have different source bank accounts for payments.
3. After you define your Payment Methods you can enter the appropriate methods for each payroll you define.
4. After you assign an employee to a payroll you can enter payment details for each employee in the Personal Payment Method window. For example, for employees who work overseas, you may want to record more than one payment method with different percentages, and currencies.
4.4.2 DPM To Define A Payment Method:
1. Follow the Navigation Path.2. Set your effective date to the date you want to begin using the payment
method.3. Enter a name for the payment method, and select its type.
You can create as many payment methods for each type as you require. For example, if you have different source bank accounts for different payrolls, you must create separate payment methods.
4. The base currency for the Business Group appears. For some payment methods, you can select another currency.
5. Select the Third Party Payment check box if this method is for making payments to third parties, for example for employee benefits or court-ordered deductions.
6. Enter the Bank Details field to open the Bank Details window. Enter information about the account from which payments are coming.
7. Enter Further Information if your Oracle localization team has defined extra fields in this protected flexfield.
8. Select Set of Books to indicate the set of books to use if you intend to reconcile payments using Oracle Cash Management.
9. Select GL Cash Account to indicate the cash account to use for the reconciliation of paymentsThe entry for Description is entered by default, depending on what you enter as the GL Cash Account details.
10. Save your work.
IDC/ADMM page 56

IDC/ADMM page 57

4.5 P Entering Payment Methods For An Employee Assignment
Navigation Path : Fast Path -> Pay Methods
4.5.1 PME Introduction
1. For each employee assignment, you can enter one or more payment methods, selecting from the list of valid methods for the employee's payroll.
2. If you enter multiple methods (for example because the employee is paid from more than one source account), you can enter the proportion of pay for each method and its processing priority. An assignment can have two instances of the same payment method, for example if salary is divided between two bank accounts.
3. Employees with no personal payment method on record receive pay by the default payment method of their payrolls.
4. You enter payment methods for employee assignments in the Personal Payment Method window. You can also use this window to enter the payee for third party payments.
5. To enter payment methods you must: Assign the employee to a payroll. For third party payment methods, define the payee in the Organization
window (using the classification Payee Organization) or the Contact window (using the relationship Payments Recipient).
4.5.2 PME To Enter A Personal Payment Method For Remuneration:
1. Follow the Navigation Path.2. Set your effective date to the date on which to begin paying the employee by
this method.3. In the Name field, select a payment method.4. Enter a number in the Priority field to determine the order for Oracle Payroll
to use each payment method. It uses the method with the lowest number first.
5. Enter either the amount or percentage of the assignment's pay to be paid by this method.If the total of the amounts you allocate to payment methods is less than the amount to be paid, Oracle Payroll uses the payment method with the highest priority number to pay the excess.
6. For everywhere apart from the UK, if the payment method is a magnetic transfer type, open the Bank Details window for entry of information about the employee's bank account.
IDC/ADMM page 58

IDC/ADMM page 59

4.6 P Mapping Cost Allocation to the Accounting Flexfield
4.6.1 MCA Introduction:
1. If your installation includes Oracle Payroll and Oracle General Ledger, you can run the Transfer to GL process in each payroll period after you have run the Costing process.
2. The Transfer to GL process transfers costing results to the GL Accounting flexfield.
3. Before running this process, you must map segments of the Cost Allocation flexfield to the corresponding segment of the Accounting flexfield for each payroll.
4.6.2 MCA To Map Cost Allocation To Accounting Flexfield Segments:
1. Set your effective date to the date from which this mapping should take effect.
2. Query the payroll for which you are performing the mapping. Its period type appears in the Period field.
3. Select the set of books for whose Accounting flexfield you are performing the mapping. Costing information from a payroll can go to only one set of books.
4. Select the name of a Cost Allocation flexfield segment in the Payroll Costing Segment field for which a corresponding segment exists in the Accounting flexfield. Select the name of the corresponding segment in the GL Chart of Accounts Segment field. Repeat this process for all the Cost Allocation flexfield segments for which there is a corresponding segment in the Accounting flexfield.
5. Save your entries.
IDC/ADMM page 60

IDC/ADMM page 61

4.7 P Running Post-Run Processes For QuickPay
Navigation Path : Fast Path -> QuickPay
4.7.1 RPPQ To Define A QuickPay Run For An Employee Assignment:
1. Follow the Navigation Path.
2. Set your effective date to the day you want to make the QuickPay payment.The Payroll Period displays for the date selected, and the Date Paid and Date Earned for this period also display. Date Paid is the regular payment date for your legislation. You can update the Date Paid field, but only to another period's regular payment date.If you select an effective date for which there is no valid payroll period, all three fields remain blank. You cannot select an effective date earlier than the start date of the parent record - the employee assignment.
3. Select a consolidation set.The default is the consolidation set for the assignment's payroll.
IDC/ADMM page 62

The Number field remains blank and the status field remains set to Unprocessed until the QuickPay run process is completed.
4. If your legislation makes use of run types, select the run type for this QuickPay.
5. Enter a pay advice date and message if required. These fields are for information only.
6. Save your QuickPay definition.All assignment processes for the assignment's payroll must have a status of Complete for you to save the definition. If not, you see an assignment interlock failure message. Check the status of the assignment processes in the Assignment Processes window, and delete, roll back or rerun any non-Complete processes.If the QuickPay Run itself displays In Error or Marked for Retry, choose the Retry Run button to run the process again.
4.7.2 RPPQ To Execute A QuickPay Run For An Employee Assignment:
1. Choose the Element Selection button if you want to check or verify element entries for the QuickPay run. All the elements for the assignment that exist as of Date Earned are listed in the Element Selection window. Select or clear the Include in Run check box for elements you want to include or exclude from the run.
IDC/ADMM page 63

2. You can choose the Entry Values button to view entry values for each element.You cannot create, update or delete entries or entry values in the Element Selection and Entry Values windows. You can only select or clear the Include check box for entries.
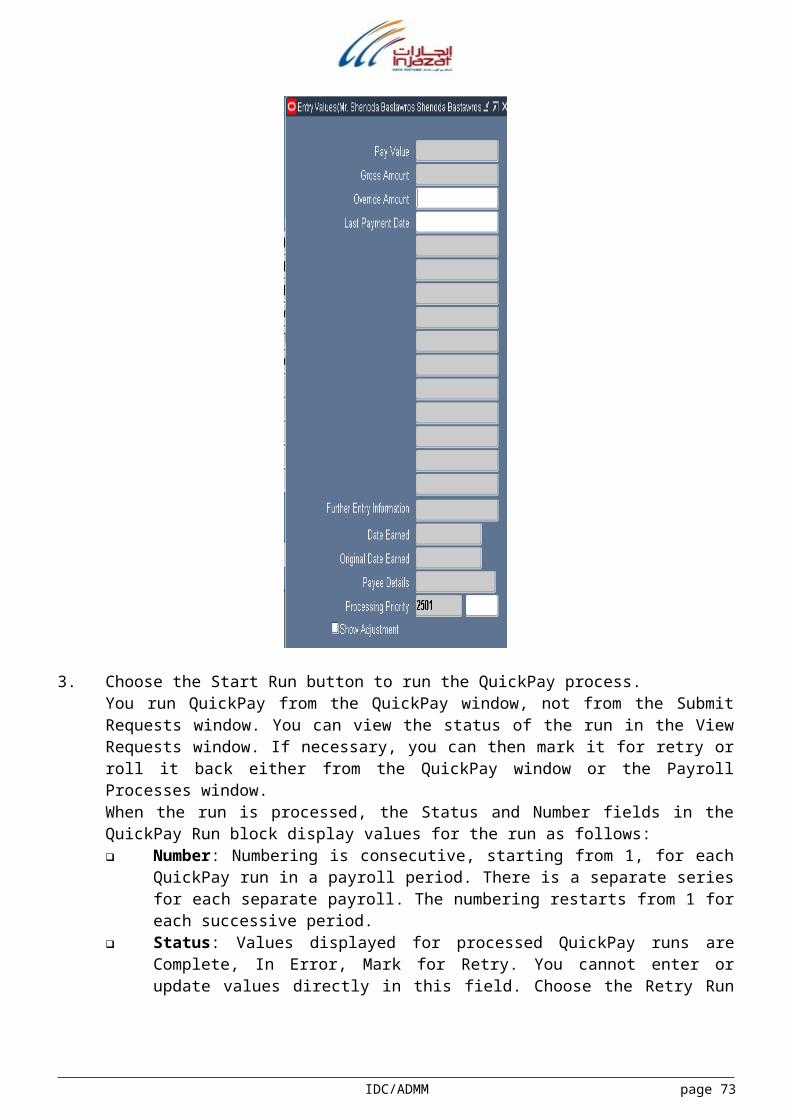
3. Choose the Start Run button to run the QuickPay process.You run QuickPay from the QuickPay window, not from the Submit Requests window. You can view the status of the run in the View Requests window. If necessary, you can then mark it for retry or roll it back either from the QuickPay window or the Payroll Processes window.When the run is processed, the Status and Number fields in the QuickPay Run block display values for the run as follows: Number: Numbering is consecutive, starting from 1, for each QuickPay
run in a payroll period. There is a separate series for each separate payroll. The numbering restarts from 1 for each successive period.
Status: Values displayed for processed QuickPay runs are Complete, In Error, Mark for Retry. You cannot enter or update values directly in this
IDC/ADMM page 64

field. Choose the Retry Run button to rerun the QuickPay process for runs with the status In Error or Marked for Retry.
IDC/ADMM page 65

4.8 P Data Costed At The Organization And Assignment Levels
When setting up an internal organization for which most or all labor costs go to the same cost center, select that cost center from the appropriate segment of the Cost Allocation flexfield when defining the organization.
For example, if the labor costs of most of the employees in the Commercial Sales Group go against the cost center Sales, select Sales from the list of cost centers when defining the organization Commercial Sales Group. This means that by default, the system accumulates labor costs for each employee assigned to the Commercial Sales Group for the cost center Sales.
Perhaps the costs of some employees assigned to this group should exceptionally be charged to a different cost center. For these employees, you can enter the correct costing information on their assignments. Entries at the assignment level override entries at the organization level.
There may also be employees regularly assigned to work in this group only part time, who work elsewhere the rest of the time. In cases like these, it is not necessary to give employees two assignments. You can enter a number of cost centers for one assignment, specifying the percentage of labor costs to charge to each:
Cost centers with specified labor costs table:
Proportion Seg. 1 Cost Center
50% Sales
50% Public Relations
You can also enter other types of costing information at the assignment level. For example, if a Production Department employee regularly works 80% of the time on one product line and 20% on another, you can enter this on the assignment.
IDC/ADMM page 66

Employee labor distribution table:
Proportion Seg. 3 Labor Dist. Code
80% H201
20% H202
Notice that assignment level entries are datetracked, so you can enter changes ahead of time.
IDC/ADMM page 67
4.9 Correcting Run Results: Reversals
Navigation Path : Fast Path -> Reverse Payroll Run
1. Follow the Navigation Path to reverse a payroll run or QuickPay for an assignment.
2. Select the run you want to reverse.3. All the payroll runs for the assignment are displayed when you open the
window.4. Select the Reverse check box for the run you want to reverse.5. The consolidation set for the run automatically displays as the consolidation
set for the reversal.6. Select a different consolidation set if you want to process the reversal in a
different set to the original run set.
IDC/ADMM page 68

4.10 Update Payroll Run
Navigation Path : payroll -> Update payroll Run
IDC/ADMM page 69

4.11 RetroPay Set
Navigation Path : payroll -> RetroPay Set
1. Follow the Navigation Path.2. In the RetroPay Set window, enter a name and a description for the RetroPay
set you are creating. Save this information before moving to the next block.3. Select the balance in which the RetroPay process will create new values. For
example, this could be Gross Pay to Date. You can select more than one balance. However, for RetroPay by Run the balance dimension must always be ASG_RETRO_RUN.For RetroPay by Aggregate, if you plan to run the process over several past payroll periods, check that you are not going to go through an end of year or similar period where balance totals are reset to zero. If necessary, adjust the balance dimension span to ITD.
4. Select the RetroPay element you have defined to receive the values of the updated balance.
5. Select an input value for the element. Normally this will be Pay Value.
IDC/ADMM page 70

4.12 P Defining Global Values
Navigation Path : Total Compensation -> Basic -> Global Values
4.12.1 DGV Introduction
1. Use global values to store information that does not change often, but you refer to frequently, as for example Company Name, or company-wide percentages used in the calculation of certain bonuses.
2. You can use global values as variables in formulas by simply referring to the global value by name.
3. You can never change a global value using a formula. You change global values in the Globals window. Global values are datetracked so you can make date effective changes ahead of time.
4. Global values are available to all formulas within a Business Group.
4.12.2 DGV To Define A Global Value:
1. Follow the Navigation Path.2. Set your effective date to the date when you want to begin using the global
value.3. Enter a name, data type (number, text, or date), and value. You can also
enter a description.
IDC/ADMM page 71

4.13 P Setting Up User Tables, Columns and Rows
Navigation Path : Other Definitions -> Table Structure
You set up user tables in the Table Structure window.
4.13.1 STCR To Set Up The Structure Of A Table:
1. Follow the Navigation Path.
2. Set your effective date to the date from which you want the table's row labels to take effect.
3. Enter the table name.4. For the table's match type, select Match or Range. Select Match if each row is
for one item, such as one job or one code. Select Range if each row is for a range of numeric values, such as an age range or a pay range.
5. If the match type is Match, select Date, Number or Text as the Key Units of Measure, depending on whether entries in the rows are dates, numbers, or alphanumeric text.If the table's match type is Range, the Key Units of Measure automatically becomes Number.
6. Enter the row label as the Row Title.For example, if the table rows refer to rate codes, an appropriate row title would be Rate Code. If the rows refer to age ranges, you might use the title Age Range.
7. Save your work, and choose the Columns button to go to the Columns window.
IDC/ADMM page 72
4.13.2 STCR To Set Up Columns:
1. Enter labels for the table columns in the Name field.To add a new column to a table that already exists, place the cursor on the name of the column after which you want to enter the new column name, and choose Insert Record from the Edit menu to obtain a clear field.
2. If you are using formula validation for a column's entries, select the name of the validation formula for the column.
3. Save your work and close the window.
IDC/ADMM page 73

4.13.3 STCR To Set Up Rows:
1. In the Table Structure window, choose the Rows button to go to the Rows window.
2. If the match type of the table is Match, enter the label for each table row in the fields under the heading Exact.If the match type of the table is Range, enter numbers representing the lower and upper boundary of each row's range.
3. In the Sequence fields, you can optionally enter a number for each row label to determine the order in which it appears on a list in the Table Values window. Logical sequencing of row labels helps users enter table values rapidly and accurately.
4. When you are finished, save your work and close the window. Your table is now set up and ready to receive entries into its columns.
IDC/ADMM page 74

4.14 P Entering Table Values
Navigation Path : Fast Path -> QuickPay
4.14.1 ETV Introduction
1. If you have set up user-defined tables, you can enter and maintain values in the Table Values window.
2. You can access table values from any formula used for input-value validation, payroll calculation or definition of skip-rules, assignment sets or QuickPaint reports. You can access this information using the GET_TABLE_VALUE function.
3. The system administrator can create configured versions of the Table Values window so that you use each version for one user table only.
4.14.2 ETV To Enter Values Into Table Columns:
1. Follow the Navigation Path.
2. Set your effective date to the date from which you want the entries to take effect.
3. Query the table name.4. With the cursor in the Column Name field, use the up and down arrows to
locate the name of the column in which you want to make entries.
IDC/ADMM page 75

5. In the Values region, select each row for which you want to make an entry. You select rows in the Exact field or the Lower Bound field, depending on the match type of the table.
6. For each row, make the appropriate entry in the Value field.7. Save your work.
IDC/ADMM page 76

4.15 P Creating An Assignment Set
Navigation Path : Payroll -> Assignment set
4.15.1 CAS There Are Three Uses Of Assignment Sets In Oracle HRMS:
1. You can run a QuickPaint report for a set of assignments, rather than individual assignments.
2. You can process subsets of the employees assigned to a payroll. Normally you initiate payroll runs and other post-run processes for one or more payrolls at a time. However, if you need to process smaller groups within a single payroll, you define an assignment set.
3. You can use a BEE concurrent process to create an identical batch line for each assignment in an assignment set.
4.15.2 CAS There Are Three Ways To Define The Set:
1. You can enter selection criteria, which the system generates into a formula. When you use the assignment set, Oracle FastFormula runs the formula to find the assignments that match the criteria. It checks all the assignments in the Business Group or, if you select a payroll when you define the set, all the assignments to that payroll. When you define the set you can also include or exclude individual assignments to modify the set created by the formula.
2. You can select individually all the assignments you want to include in the set.3. You can start from a full set of all the employees in the Business Group or all
the employees assigned to a selected payroll. Then you can exclude individual assignments from the set.
IDC/ADMM page 77

4.15.3 CAS To Define A Set By Including Or Excluding Assignments:
1. Follow the Navigation Path.2. Enter a unique name for the set.3. If you are defining a set for payroll processing, select a Payroll.4. Save the new set.5. Choose the Amendment button.
6. Do one of the following: If you want to create a small set of assignments, select Include in the
Inc/Exc field and select all the assignments for the set. If you want to start from the full set of assignments for the payroll or
Business Group, select Exclude in the Inc/Exc field and select assignments to remove from the set.
7. Save your set.
IDC/ADMM page 78

4.16 P Defining Consolidation Sets
Navigation Path : Payroll -> Consolidation
You must always select a consolidation set before starting a payroll run. This is because the consolidation set provides essential labelling for each payroll run. This applies even if you are only processing one payroll or one assignment set. When you have defined a consolidation set, it is then available for selection when you start a payroll run.You define consolidation sets in the Consolidation Sets window.
4.16.1 DCS To Define A Consolidation Set:
8. Follow the Navigation Path.9. Enter the name of a new consolidation set and save.
4.16.2 DCS To Delete A Consolidation Set:
1. Query the consolidation set.2. Choose Edit, Delete Record.
You can only delete a consolidation set if it is not the default set for a payroll and if it is not associated with any payroll processes.
IDC/ADMM page 79

5. Processes and Reports
5.1 PR Overview
This section contains the following subjects which are needed to understand and to use PROCESSES AND REPORTS
1. Submit Processes and reports
2. View Request
IDC/ADMM page 80

5.2 PR Submit Processes And Reports
Navigation Path : Processes And Reports -> Submit Processes And Reports
There are two types of request: Single request : This allows you to submit an individual request. Request set : This allows you to submit a predefined set of request.
5.2.1 SPR Submitting A Request
Standard Request Submission gives you control over how you run your requests and request sets. This section describes how you customize and submit a request using the Submit Request window.There are three elements to submitting a request. Selecting the request or request set to be submitted, defining a submission schedule, and providing completion options.
Selecting the request or request set may require you to provide request parameters and the output language.
Defining a schedule can be as simple as submitting as soon as possible or using a more complex schedule that you define when you first submit your request and may be used for other requests in the future.
Completion options allow you to deliver request output to others and specify which printers and how many copies of the output you want to produce for each request.
You can submit as many requests as you like from the Submit Request window. You can even submit a request more than once if you want to run the same request with different parameter values.Refer to the user's guide of your Oracle Applications product to learn how to access the Submit Request window from your application.
The following flow diagram outlines the steps required to submit a request.
IDC/ADMM page 81

To Submit A Request:1. Follow the Navigation Path.2. Check the Request option to submit single requests.
3. Choose OK.
IDC/ADMM page 82

Submitting Requests4. Use the Copy... button to take advantage of previously entered request
submissions.5. Select the Name of the request (report or program) you want to run from the
list of available requests.
Your responsibility's request group determines which requests appear in the list.
Defining Parameters6. A Parameters window automatically appears if you select a request that
requires parameter values and your profile option Flexfields: Open Descr Window is set to Yes. The prompts in the Parameters window are specific to the request you select. The example in the figure below requires the parameters Application Name and Responsibility Name.
IDC/ADMM page 83

Some requests require you to enter parameter values so that you can specify the scope of information you want in the request output. Some requests don't have parameters at all. Some parameter fields also have a list of values available to ensure you choose a valid parameter value while other parameters are optional and require no value. Use the List of Values icon to display a list of valid values for a parameter.
Default values may be predefined for one or more of the parameters associated with your request. The default values are automatically applied to these parameters when the parameters window is opened. However; if you do not open the parameters window, default values are only applied to required parameters.
7. Once you enter the values in the required parameter fields and choose OK, the Parameters window closes, and your parameter values are concatenated and displayed in the Parameters field.
Determining Output Language8. If your site supports multiple languages, you can select which language is
used for your request output. Choose Languages... to open the Language window. Use the Select All button to produce output in all languages supported at your site or check individual languages. If the language selection is predefined in the report, the Language window does not open.
Each language creates its own request, so the number of languages determines the number of concurrent requests created and tracked in the Requests window.
Defining a Submission Schedule The scheduling window provides you with several scheduling options. You can choose to re-use a schedule you previously defined and saved, or define a new schedule. You can define your schedule to run a request as soon as
IDC/ADMM page 84

possible, at a specific time, or repeatedly at specific intervals, on specific days of the week or month.
9. Choose Schedule... to open the Scheduling window.
IDC/ADMM page 85

10. Choose a type of schedule from the following:
Apply a Saved Schedule
Allows you to re-use a previously defined and saved schedule. You may modify the saved schedule for this one submission or save the modified schedule with a new name for future use.
If you intend to use the saved schedule as defined, you can proceed to step 13.
As Soon as Possible
Submits your request as soon as possible. If you choose this schedule type, proceed to step 13.
Once Submits your request once at the time and date you specify. Periodically Submits your request repeatedly at the interval you specify. On Specific Days Submits your request repeatedly on specific days of the week or
month. Advanced This option is reserved for future releases.
11. Many schedule types require additional information to complete the schedule. Use the steps associated with your selected schedule type:
Once When you choose Once, a special time field appears that lets you specify the time of day you want to submit your request. Use the calendar by selecting the List of Values icon in the field to select a date and time to submit your request.
Periodically When you choose Periodically, several new fields appear that let you specify the interval of minutes, hours, days, or months that you want to wait before resubmitting a request. You can also specify whether to count your interval from the requested start time of the request or from the completion time of the request.
Use the List of Values calendar to select start and end dates to define the period in which you want to submit your request.
If you do not specify a start time, Oracle Applications uses the value from your user profile option Concurrent:Request Start Time or the current time as the default.
Whether a request completes successfully or in error, Oracle Applications immediately submits the next run only if the next requested start date and time is on or before the end date and time you specify. If you do not specify an end date, the request or request set repeats indefinitely until you cancel it. Select the interval from the poplist and enter the number of intervals between each submission of your request. Choose to count your interval from the beginning or completion of the
prior run. If your request contains date parameters, you can choose "Increment
date parameters each run" to have the value for that parameter be adjusted to match the resubmission interval. For example, if the value
IDC/ADMM page 86

for the parameter is 25-JUL-1997 07:00:00 and your interval is monthly, the parameter is adjusted to 25-AUG-1997 07:00:00 for the next submission.
On Specific Days
When you choose On Specific Days, new fields and calendars appear that let you specify which day of the week and/or month to submit your request.
Use the List of Values calendar to select start and end dates to define the period in which you want to submit your request.
If you do not specify a start time, Oracle Applications uses the value from your user profile option Concurrent:Request Start Time or the current time as the default.
Whether a request completes successfully or in error, Oracle Applications immediately submits the next run only if the next requested start date and time is on or before the end date and time you specify. If you do not specify an end date, the request or request set repeats indefinitely until you cancel it.
Use the monthly calendar template to specify dates during the month to submit your request. You can choose the date by clicking it. When you select a date such as the 5th, your request is resubmitted on the 5th of each month until the end date is reached.
Use the weekly template to specify which day of the week to schedule your request.
You can select as many dates as you require.
12. To save your schedule, check the Save this schedule check box. You must also provide a unique name for each schedule you save. Optionally, enter a description of your schedule.
13. Choose OK.
Defining Completion Options 14. In the Upon Completion... region, use the Save all Output Files to write your
request output to a file. If you wish to view your output online, you must use this check box.
15. Choose Options...
Oracle Applications automatically uses the default values determined by your logon and profile options as listed below:
Logon Used as the default for the notification field. Printer Determines the default printer. Concurrent: Report Copies
Used as the default for the number of copies for the printer defined in the Printer profile option.
Concurrent: Save Output
Determines whether to save your report output by default.
IDC/ADMM page 87

In some cases the defaults are determined by the program definition.
16. Specify additional people to notify, or replace your name if you do not want to be notified.
17. Select a language for each person notified.18. Select a print style from the poplist. 19. Use the LOV to select the printers you want used to produce a hard copy of
your report. Each printer will produce at least one copy of the report. If you need more than one copy for a particular printer, use the Copies field to enter the number of copies you want printed.
Some requests may have a required Style or Printer that you cannot change.
20. Choose OK.21. When you are done specifying scheduling and completion options, choose
Submit.
Once you submit your request, the Requests window opens and provides you with the current status of your request and the request ID number.Oracle Applications assigns a request ID to each request submission so that you can identify the results of the request when it is complete. You can use the request ID to query for your request output in the Requests window. Oracle Applications also assigns a new request ID number to each resubmission of a request and displays the request ID in the log file of the previous request.
22. If you wish to submit another request, simply repeat Steps 1 through 21. All the requests that you submit for the current session appear in the Requests window.
IDC/ADMM page 88

5.2.2 To Submit A Request Set:
1. Check Request Set in the Submit a New Request window and choose OK.
2. In the Submit Request Set window enter the name of the Request Set.Alternatively, choose Copy a Prior Request button to use a previously defined request set submission.
3. The requests assigned to the request set are displayed in the multi-row region and may be modified for this request set submission. When you move your cursor to the Parameters field for a request,
Oracle Applications displays a Parameters window specific to that report. If there are no parameters, then the field is disabled.
When you finish entering the required parameter values for a request, choose OK to close the window.
If you wish to define completion options, open the Upon Completion... window for each request and enter your completion options.
If you wish to view a request's output online, you must check the Save all Output Files check box for that request in the Upon Completion... window.
4. Choose the Schedule window to define a schedule for this request set submission.
5. When you submit a request set, Oracle Applications assigns a request ID to the request set as well as to each request in the request set. The request ID for each request is displayed in the output and log files of the request set. Oracle Applications also assigns a new request ID to each resubmission of a request set, and displays the request ID of the new request set in the log file of the previous request set.
IDC/ADMM page 89

IDC/ADMM page 90

5.3 PR View Request
5.3.1 VR Introduction
1. You can use the Requests window to view a list of all submitted concurrent requests, check whether your request has run, change aspects of a request's processing options, diagnose errors, or find the position of your request in the queues of available concurrent managers.
2. Refer to the Menu Paths appendix of your application's user's guide to learn how to access this window from your application.
3. If your system administrator sets the profile option Concurrent:Report Access Level to "User," the Requests window displays the concurrent requests for the current user. If your system administrator sets the profile option to "Responsibility," the Requests window displays the concurrent requests for the current responsibility in addition to requests for the current user.
5.3.2 VR To Use The Find Requests Window:
1. Upon initial navigation to the Requests window, you are directed to the Find Requests window.
Use the Find Requests window to specify the types of requests you want to see. You can choose to view your completed requests, your requests in progress, or all of your requests by selecting the appropriate option group.
IDC/ADMM page 91

In addition, you can look for a particular request using the Specific Requests option group. Use the find criteria fields as you would for any other find window to specify as many or as few details as you need to locate the desired request information.
You can use the Specific Requests region to view requests that you did not submit by entering a requestor other than yourself or using wildcards such as the "%" to query all requests.
Depending on the value of the profile option Concurrent: Report Access Level, some concurrent requests may not be shown.
Although you can list all submitted concurrent requests, you can generally only view detail, report output, and request log file information for your own concurrent requests. However, if the user profile Concurrent:Report Access Level is set to Responsibility, you can review the details of all requests submitted for the current responsibility and username.
2. Use the Order By poplist to specify the order in which you want your requests displayed.
IDC/ADMM page 92

5.3.3 VR To Use The Requests Window:
1. Move your cursor to the record that represents the request you want to examine in detail.Each record shows you the the request ID, request name, phase and status of the request, as well as the parameters used by the request. If the request is part of a request set, the request ID for the parent request is provided in the Parent column.From the Requests window you can Cancel a request or put it on hold if the status of the Request is pending. If the status is completed, you can view the output or the logs generated by the request. Lastly you can always review the details of the request submission.
2. Choose View Details...
IDC/ADMM page 93

5.3.4 VR To Review And Update A Request's Schedule:
The Date Started and Date Completed are displayed in thewindow's upper region.
1. Choose Schedule... to see more detailed information.You can update the scheduling information for your request if it meets all of the following criteria: you made the initial request. the request has not yet run. the program does not prevent request updates.
IDC/ADMM page 94

5.3.5 To Review And Update A Request's Completion Options:
Choose Options... from the Upon Completion... region to see: Names of people to notify Name of printer used Number of copies to print Print Style
You can update the completion option information for your request if it meets all of the following criteria: you made the initial request. the request has not yet run. the program does not prevent request updates.
5.3.6 VR Tracking Your Request In The Concurrent Manager's Queue:
1. With your cursor on a record of interest in the Requests window, choose Managers from the Tools menu. This window lets you view your request's position within each available concurrent manager's queue, if the request has not run yet.
IDC/ADMM page 95

The Manager Log entry on the Tools menu is disabled for all users except the system administrator. This choice lets the system administrator open a window displaying the concurrent manager's log file for the request.
2. Choose the Manager Queue button to display the Concurrent Manager Queue window. This window displays the queue of requests waiting to be processed by the concurrent manager you select in the Concurrent Managers window.
5.3.7 VR To Reprint Your Request:
With your cursor on a record of interest in the Requests window, choose Reprint... from the Tools menu to reprint a request's output. When you choose Reprint..., a window appears allowing you to enter a printer, number of copies, and style for reprinting of the request. Choose OK in the Reprint window to reprint the request.
This menu entry is disabled if the request has not yet run.
5.3.8 VR To View Request Diagnostics:
With your cursor on a record of interest in the Requests window, choose Diagnostics to display a window containing information about when the request completed and if it did not complete, a message explaining why not.
IDC/ADMM page 96