Cisco Video SurveillanceOL-23994-01
C H A P T E R 9
Using Smart SearchCisco Smart Search allows operators to search through live or archived video to locate where motion is detected. This chapter explains how to use the Smart Search feature. It includes these topics:
• Understanding Smart Search, page 9-1
• Understanding the Motion Index Settings Window, page 9-2
• Creating an Index of Live or Archived Video, page 9-6
• Viewing Still Images from a Motion Index, page 9-11
• Using Send Event to View a Motion Event in Cisco VSM, page 9-16
• Using Smart Search with Saved Video Clips, page 9-19
Understanding Smart SearchTo locate and view motion events, you must first create a motion index of the live or archived video. The indexing process identifies motion in the video, and saves a set of still images from those events on your local or network drive.
To create the motion index, click the Smart Search icon in the top right corner of a selected video pane. A separate Smart Search window opens, which allows you to further refine your search and begin the index process. Once the index is created, use the Search function in the Smart Search window to view the still images.
9-1 Manager User Guide, Release 6.3.1

Chapter 9 Using Smart SearchUnderstanding the Motion Index Settings Window
Note The Smart Search buttons and icons appear only if enabled by the Administrator.
See the “Creating an Index of Live or Archived Video” section on page 9-6 and the “Viewing Still Images from a Motion Index” section on page 9-11 for more information.
Understanding the Motion Index Settings WindowFigure 9-1 shows the Motion Index Settings window, which is used to define the video processing, the start and stop time in the video, and the specific area of the image where motion will be detected. Use these settings to complete the procedures in the “Creating an Index of Live or Archived Video” section on page 9-6 and the “Using Smart Search with Saved Video Clips” section on page 9-19.
Note After the motion index is created, you can use the Search function to search for and view motion event images included in the index. See the “Viewing Still Images from a Motion Index” section on page 9-11.
9-2Cisco Video Surveillance Manager User Guide, Release 6.3.1
OL-23994-01

Chapter 9 Using Smart SearchUnderstanding the Motion Index Settings Window
Figure 9-1 Motion Index Settings Window
1 Video Types—Display only. Displays the type of video being viewed based on the selected video source. For example: Live Stream or Archive Stream.
Stream ID—Display only. Displays the motion index ID used to select and view the index after indexing is complete.
2 Index Settings—See the “Index Settings” section on page 9-4 for more information.
3 Time of Interest—Defines the start and end date and time of the video to be indexed for video archives. This option is disabled for live streams.
9-3Cisco Video Surveillance Manager User Guide, Release 6.3.1
OL-23994-01

Chapter 9 Using Smart SearchUnderstanding the Motion Index Settings Window
Index Settings
The index settings in the Motion Index Settings window define how the video is processed. Table 9-1 describes these index settings.
4 Area of Interest—Defines the areas of the video frame in which motion is detected and indexed.
• Click Select All or Clear All to select or deselect the entire video view. The selected area for detecting motion are displayed with a color mask.
• Click Brush to display a drawing tool and select the areas in which to detect motion. The selected areas for detecting motion are displayed with a color mask.
• Click Eraser to use the eraser tool to remove the color mask from selected areas. When the color mask is removed, those areas are not included in the motion detection index.
• Click Colors to change the color of the mask.
Table 9-1 Index Settings
Data • Choose Delete Old Data to delete any existing index for the video source. This removes the index entries from a previous search, and replaces it with the results of the new search. This is the default for archive video.
• Choose Append to Current Data to retain any current searches from the video source, and create a new index for that video source. This is the default for live video streams.
Tip An index is a set of still images from motion events that occurred in the live or archived video.
9-4Cisco Video Surveillance Manager User Guide, Release 6.3.1
OL-23994-01

Chapter 9 Using Smart SearchUnderstanding the Motion Index Settings Window
Processing • Choose Normal to process the video frame by frame. This method is the most accurate method to locate motion events, but also requires more time to complete. For example, 10 minutes are required to process a 10 minute archive. This option is the default for processing live video.
• Choose Fast to process the video as quickly as it can be steamed over the network. This method is generally 5 times as fast as normal processing, but may not be as accurate. This option is the default for processing archived video.
Scene Type • Choose Indoor for high sensitivity motion detection.
• Choose Outdoor for low normal sensitivity motion detection to avoid capturing small moving objects, such as leaves or small animals.
Time of Interest
Video Archives only. Choose the Start and End date and time for the video that is used to create the index.
Note This option is available only when Processing is set to Normal. This option is disabled for live streams. Live streams are indexed until manually stopped.
Sensitivity Click and drag the slider from Low to High sensitivity to define the amount of motion that is required to trigger recording of an index image.
• High sensitivity indexes detect and record smaller objects and objects with less movement.
• Low sensitivity indexes detect larger objects and objects with more movement. For example, use Low to avoid unnecessary indexing of small animals outdoors, or movement of paper and other objects indoors.
• The default is Med (medium).
Tip The Sensitivity setting applies only to the Area of Interest.
Table 9-1 Index Settings (continued)
9-5Cisco Video Surveillance Manager User Guide, Release 6.3.1
OL-23994-01

Chapter 9 Using Smart SearchCreating an Index of Live or Archived Video
Creating an Index of Live or Archived VideoTo locate and view motion events, you must first index the live or archived video. The indexing process identifies motion in the video, and saves a set of still images from those events on your local or network drive.
To create an index of live or archived video, follow these steps:
Procedure
Step 1 Verify that Use Smart Search is enabled in the Administrator Settings pages.
The Smart Search buttons and icons that Figure 9-3 shows appear only if the Use SmartSearch option is enabled in the Settings panel in the Administrator pages. For instructions, see the “Configuring System Settings” section on page 6-27.
Step 2 Choose the camera feed or video archive in which you want to locate motion events.
See the “Viewing Live and Archived Video” section on page 8-11.
Step 3 Display the video pane controls by checking the Title Bars and Video Tools check boxes, as shown in Figure 9-2.
Days to Keep Data
Enter the number of days to store the index files on your computer. Index files are automatically deleted after this time.
• The default is 7 days for live or archived video. If the default value is changed, the new number becomes the default for the current index and any new indexes.
• The maximum value is 365 days.
• If the field is blank, a value of 0 is automatically used. The video is processed, but any motion event images are deleted after 12 hours if the Smart Search application is running. Images are also deleted if the application is closed and then relaunched.
Use Defaults To restore the default values, click Use Defaults.
Table 9-1 Index Settings (continued)
9-6Cisco Video Surveillance Manager User Guide, Release 6.3.1
OL-23994-01
Chapter 9 Using Smart SearchCreating an Index of Live or Archived Video
Figure 9-2 Video Pane Controls
The checkboxes are located in the bottom left corner of the toolbar. See the “Understanding the Toolbars” section on page 8-35 for more information.
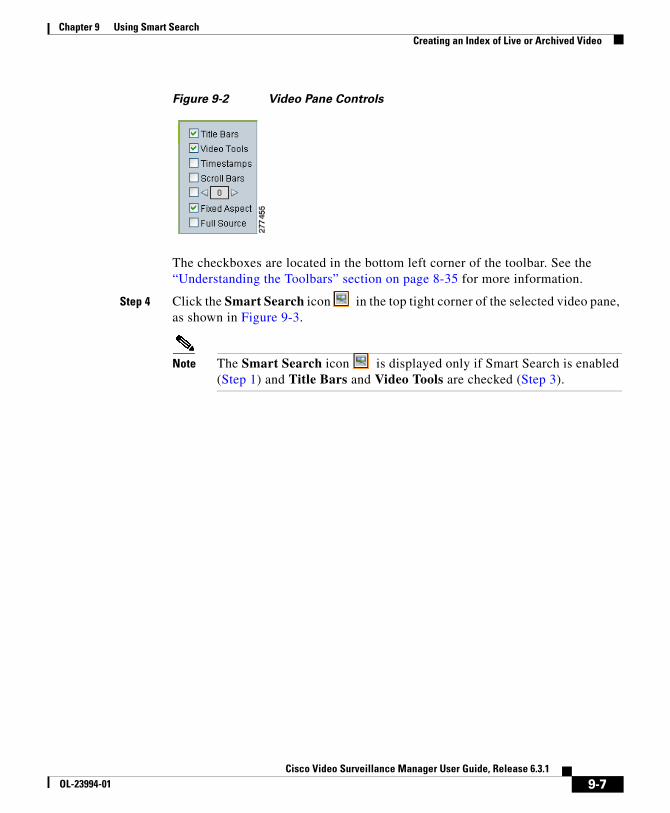
Step 4 Click the Smart Search icon in the top tight corner of the selected video pane, as shown in Figure 9-3.
Note The Smart Search icon is displayed only if Smart Search is enabled (Step 1) and Title Bars and Video Tools are checked (Step 3).
9-7Cisco Video Surveillance Manager User Guide, Release 6.3.1
OL-23994-01
Chapter 9 Using Smart SearchCreating an Index of Live or Archived Video
Figure 9-3 Launching Smart Search
Step 5 The first time that you click the Smart Search icon , the system prompts you to install the Cisco Smart Search client application.
Follow the on-screen instructions to perform this installation, if necessary.
1 Title Bars and Video Tools check boxes.
2 Smart Search icon.
9-8Cisco Video Surveillance Manager User Guide, Release 6.3.1
OL-23994-01

Chapter 9 Using Smart SearchCreating an Index of Live or Archived Video
Note You can also manually download and install the Smart Search application. To do so, go to the Software & Downloads panel in the Administrator pages, click the Smart Search link and follow the installation instructions. For more information, see the “Managing Software and Downloads” section on page 4-2.)
Other Video Types, such as Video Clip, are used when importing video from another source. See the “Using Smart Search with Saved Video Clips” section on page 9-19. The Stream ID is editable for non-VSOM video sources.
When the Smart Search application launches on your computer, the Motion Index Settings window appears, as shown in Figure 9-1.
Step 6 Make the motion index settings described in the “Understanding Smart Search” section on page 9-1.
Step 7 Click OK in the Motion Index Settings window to start the indexing process.
The indexing window appears.
For archived video, a progress bar shows the status of total video processed. After the indexing process completes, images for the motion events in the archived video are added to the index.
For live video streams, the indexing continues until it is manually stopped. The amount of time elapsed since indexing began is shown at the bottom of the screen. All motion events that occurred during the elapsed time are added to the index.
Step 8 (Optional) Write down the names for the Smart Search index to help locate the index for viewing (see the “Viewing Still Images from a Motion Index” section on page 9-11).
The index name is in the Camera field. For example: Camera: archive$361 or Camera: feed$80.
9-9Cisco Video Surveillance Manager User Guide, Release 6.3.1
OL-23994-01

Chapter 9 Using Smart SearchCreating an Index of Live or Archived Video
Step 9 Use the following controls to stop or start the indexing process:
• Blue arrow —Starts playing the video
• Blue bars —Pauses the video playback
• Green button —Starts the indexing process
• Red button —Stops the indexing process
Note The buttons are active or inactive depending on the indexing status.
Step 10 (Optional) Specify the maximum amount of disk space that can be used to store Smart Search index files:
a. Choose Input > Set Minimum Disk Space.
b. Enter the maximum amount of disk space, in gigabytes.
c. Click OK to save the setting.
Note If the maximum disk space is exceeded, a pop-up message appears with detailed instructions to clean up the disk space, as shown in Figure 9-4. The video continues to play but index processing is not performed. The existing index images are saved on your hard disk, but no additional images are saved until additional disk space is available. When data is deleted and disk space is freed, Smart Search automatically resumes index processing.
9-10Cisco Video Surveillance Manager User Guide, Release 6.3.1
OL-23994-01

Chapter 9 Using Smart SearchViewing Still Images from a Motion Index
Figure 9-4 Warning and Instructions if Disk Space is Exceeded
Tip Choose Help > Help Contents for additional information about the Smart Search user interface and toolbar.
Viewing Still Images from a Motion IndexA motion index is a series of snapshots from all motion events or events based on criteria that you specify.
9-11Cisco Video Surveillance Manager User Guide, Release 6.3.1
OL-23994-01

Chapter 9 Using Smart SearchViewing Still Images from a Motion Index
To view the still images that are included in a motion index, follow these steps:
Procedure
Step 1 In the Cisco VSM Operator page, click the Smart Search button in the bottom right of the toolbar to launch the Smart Search application.
The Smart Search buttons and icons at are shown in Figure 9-3 appear only if the Use SmartSearch option is enabled in the Settings panel in the VSOM Administrator pages. For instructions, see the “Configuring System Settings” section on page 6-27.
Tip You can also launch the Smart Search application from the Windows Start Menu. Choose Start > All Programs > Cisco Video Surveillance > Smart Search.
Step 2 Choose Search... from the Search menu, as shown in Figure 9-5.
Figure 9-5 Search a Smart Search Index
Step 3 Choose the index for an archive or live feed, and then click OK.
• Archives are named Cameraarchive<StreamID>.
• Live video streams are named Camerafeed<StreamID>.
• The StreamID is assigned when you created the index. See in the “Creating an Index of Live or Archived Video” section on page 9-6.
Step 4 Take the following actions to define the area of the video in which motion is to be detected (see Figure 9-6):
9-12Cisco Video Surveillance Manager User Guide, Release 6.3.1
OL-23994-01

Chapter 9 Using Smart SearchViewing Still Images from a Motion Index
Figure 9-6 Define the Search Area
a. Use the image grid to define the search area. Only index images that include motion in the colored area are displayed. Use the options that are under the grid to add or remove the colored mask:
– Click Clear All or Select All to clear all selected areas of the grid, or to select the entire grid.
– Click Brush and use the brush tool to color specific areas of the grid. The colored areas will be included in the search.
– Click Eraser and use the eraser tool to remove the color from specific areas of the grid. Clear areas (without color) will not be included in the search.
– Click Change Color and select a color to change the color of the selected areas.
9-13Cisco Video Surveillance Manager User Guide, Release 6.3.1
OL-23994-01

Chapter 9 Using Smart SearchViewing Still Images from a Motion Index
b. (Optional) To search for motion events within a time range, uncheck the Ignore time box, and then choose a Start time and End time.
c. Click OK to perform the search.
When the search completes, the Search Results window appears. This window displays thumbnail images for detected motion events.
Step 5 In the Search Results window double-click a thumbnail image to view the motion detected for the indicated date and time range (see Figure 9-7).
Figure 9-7 Choosing a Motion Event from the Index
Step 6 Use the Search Result Details window to move through the motion events for the date and time range (seeFigure 9-8).
9-14Cisco Video Surveillance Manager User Guide, Release 6.3.1
OL-23994-01

Chapter 9 Using Smart SearchViewing Still Images from a Motion Index
Figure 9-8 Navigate the Search Result Images
• Click the Next and Previous buttons to skip to the next or previous motion time range (which are represented by the thumbnails in Step 5.
• Click Next Frame or Previous Frame to skip through the current time range frame by frame.
• Click Play to play the thumbnail images for the current time range in sequence. Click Stop to pause the playback.
• Check Show Highlighted Motion to display a color grid in each frame over the area of the image in which motion was detected
Step 7 Click Close to close the window.
Tip Choose Help > Help Contents for additional information about the Smart Search user interface.
9-15Cisco Video Surveillance Manager User Guide, Release 6.3.1
OL-23994-01

Chapter 9 Using Smart SearchUsing Send Event to View a Motion Event in Cisco VSM
Using Send Event to View a Motion Event in Cisco VSM
To view a Smart Search motion event in the Cisco VSM Operator window, highlight a thumbnail image in the Search Results window and click the Send Event button. The archived video for that image will play in the Cisco VSM Operator window.
Note This option is available only for archived clips that are still stored in your VSM system.
To view a Smart Search motion event in Cisco VSM, follow these steps:
Procedure
Step 1 Index the motion events for a video archive, as described in the “Creating an Index of Live or Archived Video” section on page 9-6.
Step 2 Choose the archive in Cisco VSM, as described in the “Viewing Archived Video” section on page 8-18.
Step 3 Click the Smart Search icon in the top tight corner of the selected video pane, as shown in Figure 9-9.
Note The Smart Search icon is displayed only if Smart Search is enabled and Title Bars and Video Tools are checked. See the “Creating an Index of Live or Archived Video” section on page 9-6.
9-16Cisco Video Surveillance Manager User Guide, Release 6.3.1
OL-23994-01

Chapter 9 Using Smart SearchUsing Send Event to View a Motion Event in Cisco VSM
Figure 9-9 Launching Smart Search
Step 4 When the Smart Search prompt appears, choose Search Existing Records.
Step 5 Define the area of the video in which motion is to be detected for viewing (see Figure 9-10).
Only index images that include motion in the colored area are displayed. Use the options that are under the grid to add or remove the colored mask
• Click Clear All or Select All to clear all selected areas of the grid, or to select the entire grid.
1 Title Bars and Video Tools check boxes.
2 Smart Search icon.
9-17Cisco Video Surveillance Manager User Guide, Release 6.3.1
OL-23994-01

Chapter 9 Using Smart SearchUsing Send Event to View a Motion Event in Cisco VSM
• Click Brush and use the brush tool to color specific areas of the grid. The colored areas will be included in the search.
• Click Eraser and use the eraser tool to remove the color from specific areas of the grid. Clear areas (without color) will not be included in the search.
• Click Change Color and select a color to change the color of the selected areas.
Figure 9-10 Define the Search Area
9-18Cisco Video Surveillance Manager User Guide, Release 6.3.1
OL-23994-01

Chapter 9 Using Smart SearchUsing Smart Search with Saved Video Clips
Step 6 In the Search Results window, highlight a motion event entry, and click the Send Event button, (see Figure 9-11).
Figure 9-11 Send Event Button
The motion event appears in the Operator window.
Step 7 Use the archive controls to navigate the video archive.
See the “Using the Playback Controls” section on page 8-40
Using Smart Search with Saved Video ClipsVideo files that are saved on your computer or a network computer in AVI or WMV format can be loaded into Smart Search and indexed for motion events. The index is available for viewing in the Smart Search application.
To index and view motion events for a saved video file, follow these steps:
Procedure
Step 1 Click the Smart Search Smart Search button in the bottom right of the toolbar to launch the Smart Search application.
The Smart Search buttons and icons that Figure 9-3 shows appear only if the Use SmartSearch option is enabled in the Settings panel in VSOM Administrator pages. For instructions, see the “Configuring System Settings” section on page 6-27.
9-19Cisco Video Surveillance Manager User Guide, Release 6.3.1
OL-23994-01
Chapter 9 Using Smart SearchUsing Smart Search with Saved Video Clips
Tip You can also launch the Smart Search application from the Windows Start Menu. Choose Start > All Programs > Cisco Video Surveillance > Smart Search.
Step 2 Choose File > Open Clip and then choose the desired file from the Select Video File window.
Step 3 In the Motion Index Settings window, take these actions:
a. In the Stream ID field, enter a stream ID for the clip.
The StreamID is used to identify the clip for viewing and can be any string of characters.
b. Enter the other Index Motion settings, as described in the “Understanding Smart Search” section on page 9-1.
Step 4 Click OK.
The clip appears in the indexing status window.
9-20Cisco Video Surveillance Manager User Guide, Release 6.3.1
OL-23994-01

Chapter 9 Using Smart SearchUsing Smart Search with Saved Video Clips
Figure 9-12 Clip Displayed
Step 5 Use the following controls in the indexing status window to control the indexing process:
• Blue arrow —to match Starts playing the video.
• Blue bars —Pauses the video playback
• Green button —Starts the indexing process
• Red button —Stops the indexing process
Note The buttons are active or inactive, depending on the indexing status.
9-21Cisco Video Surveillance Manager User Guide, Release 6.3.1
OL-23994-01
Chapter 9 Using Smart SearchUsing Smart Search with Saved Video Clips
Step 6 After the index is created, you can view the motion thumbnails and images as described in the “Viewing Still Images from a Motion Index” section on page 9-11.
Tip Choose Help > Help Contents for additional information about the Smart Search user interface and toolbar.
9-22Cisco Video Surveillance Manager User Guide, Release 6.3.1
OL-23994-01
Recommended