Page 1 of 58
Disclaimer: For Accenture Internal Use Only
SAP BW Tutorial
Author – Sanjeev Chettri & Amit Ladsaongikar ,
First Run Project – BW Team.
Page 2 of 58
Disclaimer: For Accenture Internal Use Only
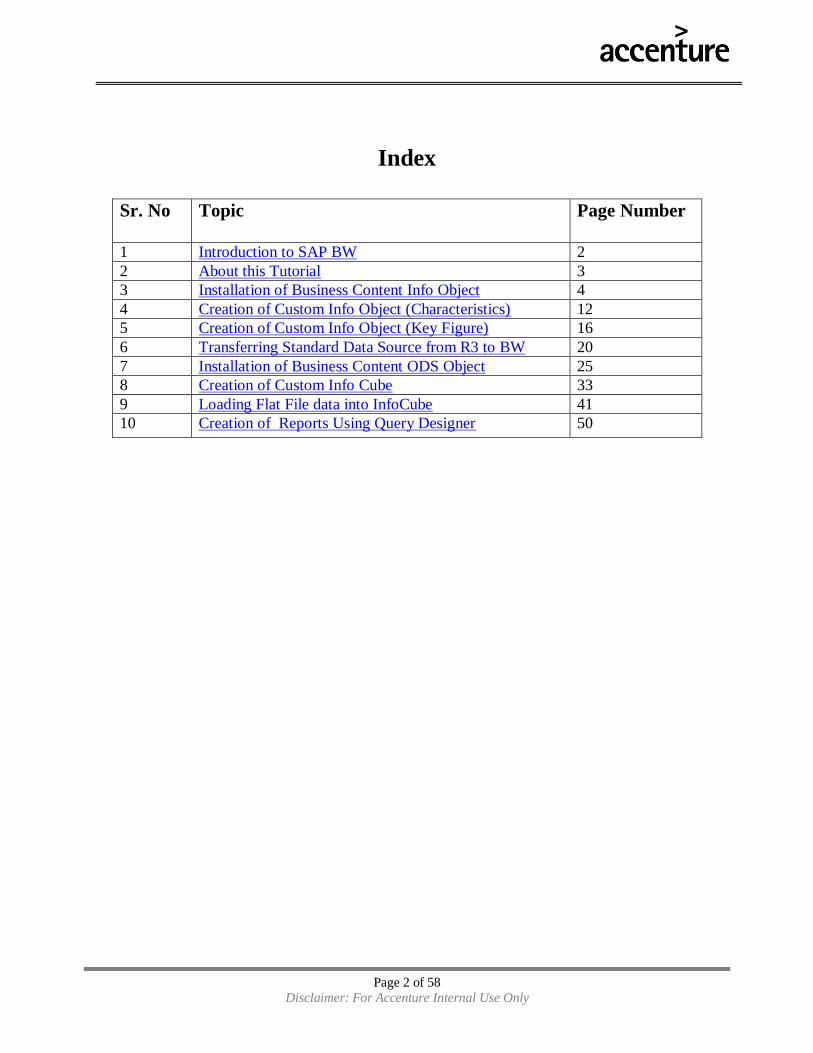
Index
Sr. No Topic
Page Number
1 Introduction to SAP BW 2
2 About this Tutorial 3
3 Installation of Business Content Info Object 4
4 Creation of Custom Info Object (Characteristics) 12
5 Creation of Custom Info Object (Key Figure) 16
6 Transferring Standard Data Source from R3 to BW 20
7 Installation of Business Content ODS Object 25
8 Creation of Custom Info Cube 33
9 Loading Flat File data into InfoCube 41
10 Creation of Reports Using Query Designer 50

Page 3 of 58
Disclaimer: For Accenture Internal Use Only
1. Introduction to SAP BW
With the growing network of processes and systems, the need for efficient management
support systems is also increasing. However for this it is not enough to place a company
strategically and give guidelines for its further development. Instead it is essential to have
real time analysis and graphical visualization of the key performance indicators.
With the evaluation of online applications, which focused on high availability and good
response time, the OLTP (Online Transactional Processing) applications soon became
central to running business, as the online transaction became an essential part of direct
interaction with the customer. However, the custom development of OLTP led to several
challenges as aging of applications, no documentation, inability to change system once
developed, etc. An additional problem with many online applications was lack of
integration among them. Each online application was developed according to its own
specification, and a different set of requirements shaped each one. There was no common
understanding of what was „a customer‟, „a product‟, „a transaction‟, etc and they valued
current data. But there is a real value in historical data. Because there was no corporate
integrated data or historical data, data was difficult to access. Even if accessed, data was
not trustworthy. There was an essential difference between operational data and
informational data. The need for Informational Information processing came with the
development of Online Analytical Processing.
Online Analytical Processing (OLAP) technologies enable you to perform flexible
analyses from a variety of business perspectives. It is based on a multi-dimensional data
model that is achieved using relational database tables.
An application example of the OLAP is the SAP Business Warehouse System. A
Business Warehouse System is configured so that large quantities of historical and
operative data can be formatted with acceptable response times. It comes as a valuable
tool for developing data warehouses that accurately and effectively assist in critical
business decision making. It facilitates easy-to-use and high-performance extraction,
transfer, transformation, and loading of data from a variety of data sources, including
such comprehensive business management systems as SAP R/3.
SAP BW now plays a central role in nearly every solution brought in market by SAP. It
facilitates forecasting and strategic analysis on the basis of accumulated historical data
and helped in delivering better customer service with optimized business operations and
improved corporate performance.
Goto Index

Page 4 of 58
Disclaimer: For Accenture Internal Use Only
2. About this Tutorial
This document was created for the purpose of providing the information about creating
basic objects in SAP BW version 3.1C . We have tried to in-corporate most of the tasks
with their
screen shots so that people who are new to BW can use this document as a reference
when they are building various basic objects in SAP BW.
Before you start using this document , we suggest that you first have a good
understanding about OLAP Processing, the star schema and extended star schema model.
Also, having a good understanding about the various BW objects like InfoObjects, Info
Cubes, ODS, Transfer Rules, Update Rules, Info Source , Data Source,InfoPackage and
Reports is recommended.
We would welcome suggestions and feedbacks .to make this document better and hope
this document would help you in your quest to learn BW . Enjoy SAP…….
Goto Index

Page 5 of 58
Disclaimer: For Accenture Internal Use Only
3. Installation of Business Content (BC) Info Object
InfoObjects:
Business evaluation objects (customers. sales revenues) are known in BW as Info
Objects. They are divided into characteristics, key figures, units and time characteristics.
InfoObjects are the smallest information units in BW. They structure the information
needed to create data targets. InfoObjects with attributes or texts can be either a pure data target or an InfoProvider (if it is being reported).
Following are the steps to install Business Content Info Objects:
1) Go to transaction RSA1. Click on the button “Business Content” on the left side frame.
You will able to see the following screen.
The extreme left frame shows the different types of BC objects like Info Provider, Info
Object, and Info Source etc.
2) Click on the “Info Object” label on the extreme left menu.
Page 6 of 58
Disclaimer: For Accenture Internal Use Only
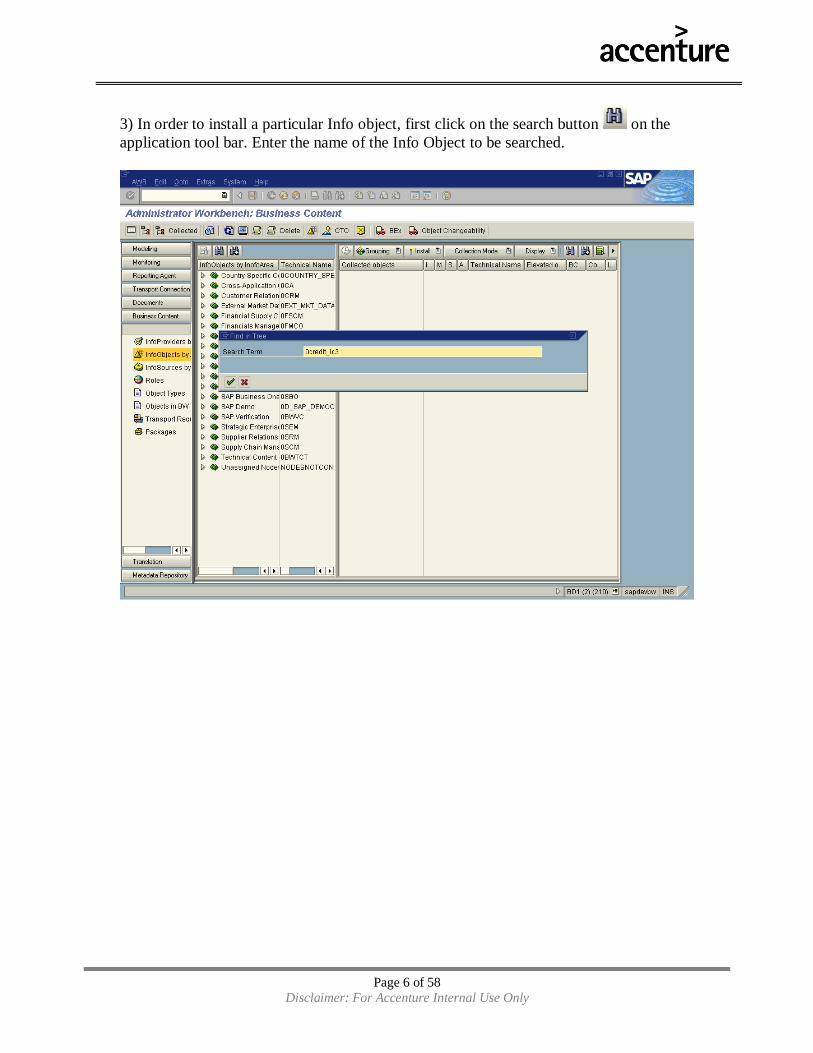
3) In order to install a particular Info object, first click on the search button on the
application tool bar. Enter the name of the Info Object to be searched.

Page 7 of 58
Disclaimer: For Accenture Internal Use Only
4. Once the required info object will be located and can be seen on the second frame,
drag the Info object in the 3rd
frame (Right side) Collected objects.

Page 8 of 58
Disclaimer: For Accenture Internal Use Only
5. Repeat the step no 4, so as to collect about 10 Info objects.

Page 9 of 58
Disclaimer: For Accenture Internal Use Only
6. In order to install the Business Content Info Objects, Click on the Install button (In the
3rd
frame extreme right frame).
In order to install the objects in background chose the option, “Install in Background”
.
One dialog box will be displayed for overwriting the objects.
Click on “Yes”.
7. A job will be created in the background.

Page 10 of 58
Disclaimer: For Accenture Internal Use Only
You can check for the status of the job in transaction SM35
8. In order to check for the installation of the Info Object, go to Transaction RSD1.
Give the name of the Info Object Installed and click on display.

Page 11 of 58
Disclaimer: For Accenture Internal Use Only
You will be able to see the Info object. Also the last change on by will be the User Id of
the person who installed BC object.

Page 12 of 58
Disclaimer: For Accenture Internal Use Only
Goto Index
4. Creation of Custom Info Object (Characteristics)
Page 13 of 58
Disclaimer: For Accenture Internal Use Only
InfoObjects:
Business evaluation objects (customers. sales revenues,...) are known in BW as
InfoObjects. They are divided into characteristics, key figures, units and time
characteristics.
InfoObjects are the smallest information units in BW. They structure the information
needed to create data targets. InfoObjects with attributes or texts can be either a pure data
target or an InfoProvider (if it is being reported).
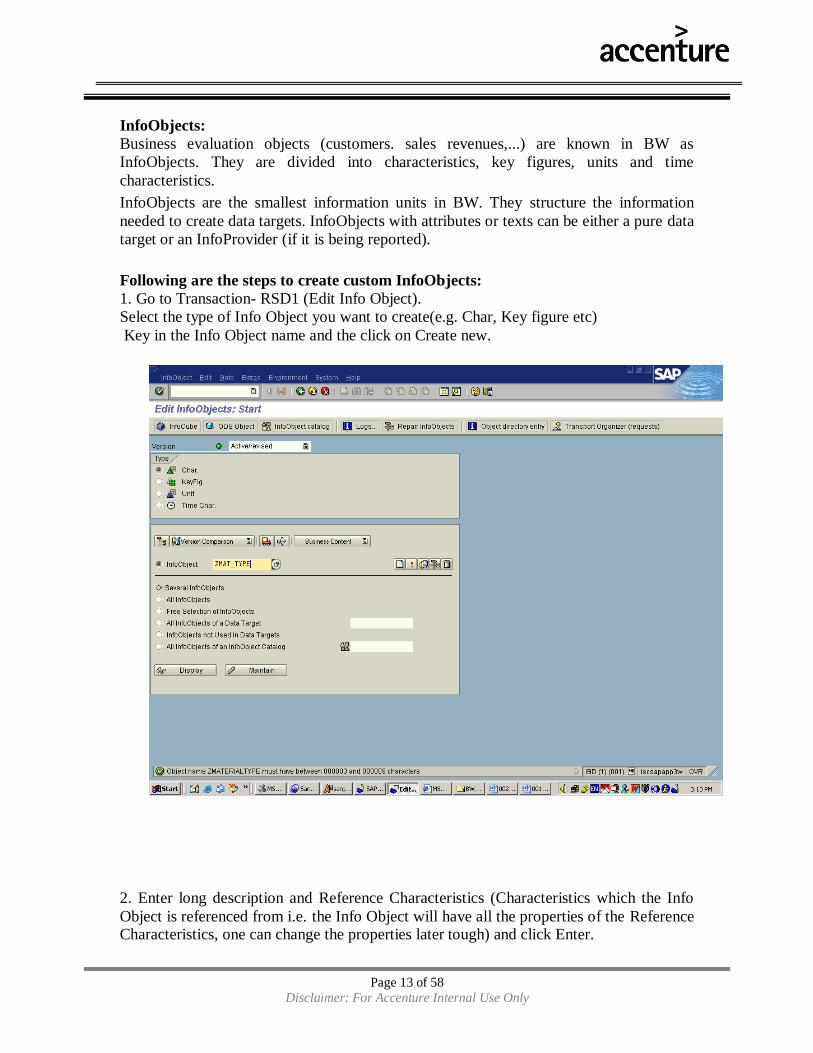
Following are the steps to create custom InfoObjects: 1. Go to Transaction- RSD1 (Edit Info Object).
Select the type of Info Object you want to create(e.g. Char, Key figure etc)
Key in the Info Object name and the click on Create new.
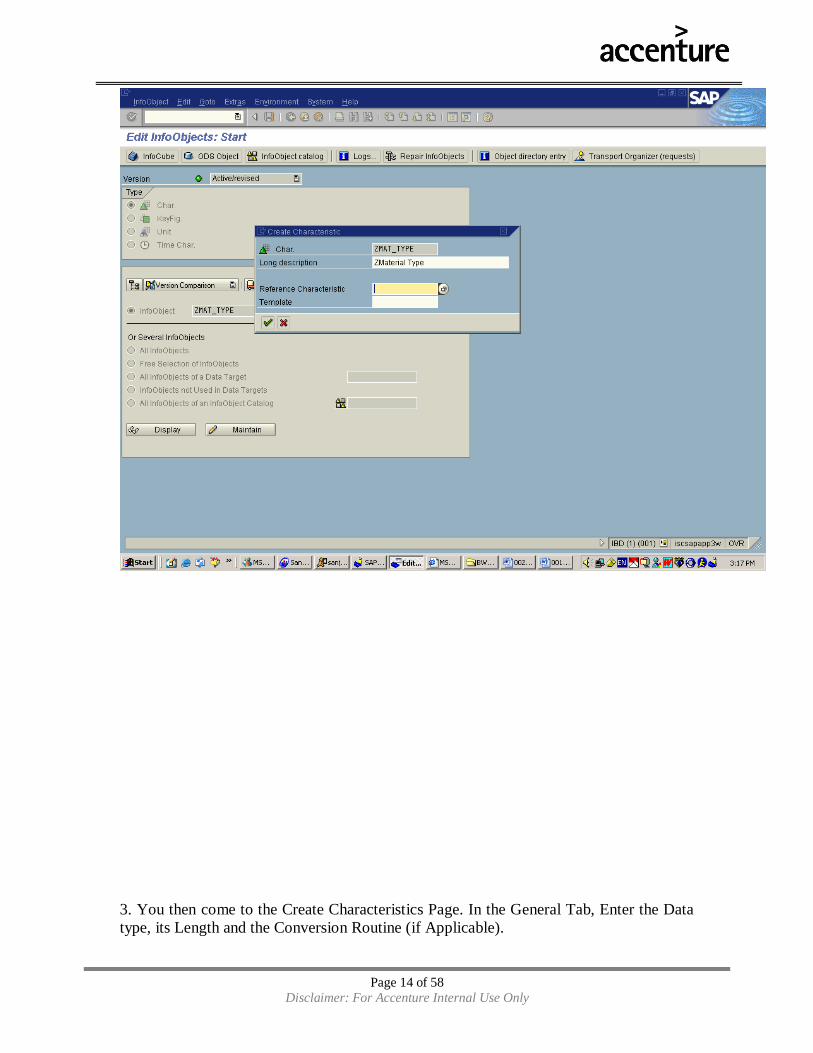
2. Enter long description and Reference Characteristics (Characteristics which the Info
Object is referenced from i.e. the Info Object will have all the properties of the Reference Characteristics, one can change the properties later tough) and click Enter.
Page 14 of 58
Disclaimer: For Accenture Internal Use Only
3. You then come to the Create Characteristics Page. In the General Tab, Enter the Data
type, its Length and the Conversion Routine (if Applicable).

Page 15 of 58
Disclaimer: For Accenture Internal Use Only
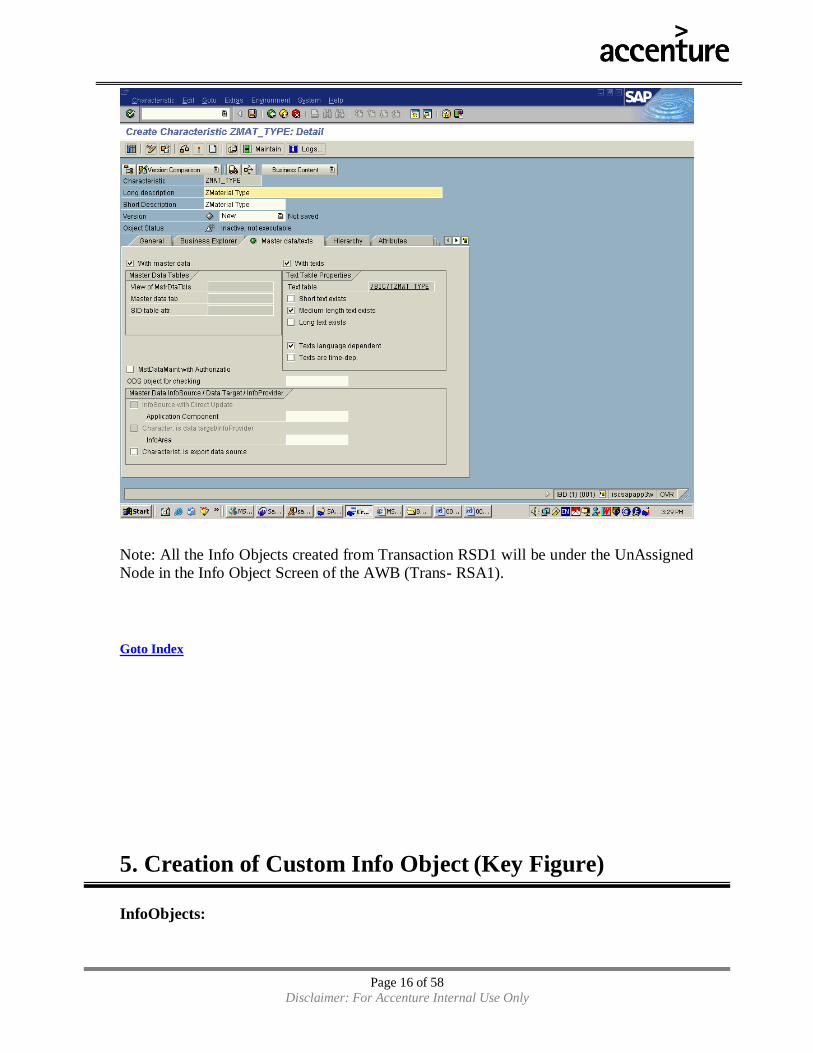
4. In the Master data/texts Tab tick the check box if the Info Object has master data and
text. You can specify the length of the text as well (for e.g. Short, Medium etc). Save and Activate the Info Object.
Page 16 of 58
Disclaimer: For Accenture Internal Use Only
Note: All the Info Objects created from Transaction RSD1 will be under the UnAssigned
Node in the Info Object Screen of the AWB (Trans- RSA1).
Goto Index
5. Creation of Custom Info Object (Key Figure)
InfoObjects:

Page 17 of 58
Disclaimer: For Accenture Internal Use Only
Business evaluation objects (customers. sales revenues,...) are known in BW as
InfoObjects. They are divided into characteristics, key figures, units and time
characteristics.
InfoObjects are the smallest information units in BW. They structure the information
needed to create data targets. InfoObjects with attributes or texts can be either a pure data
target or an InfoProvider (if it is being reported).
1.Go to Transaction- RSD1 (Edit Info Object).
Select the type of Info Object you want to create(e.g. Char, Key figure etc)
Key in the Info Object name and the click on Create new.
2. Enter long description and Reference Characteristics (Characteristics which the Info
Object is referenced from i.e. the Info Object will have all the properties of the Reference
Characteristics, one can change the properties later tough) and click Enter.

Page 18 of 58
Disclaimer: For Accenture Internal Use Only
3. You then come to the Create KeyFigure Page. In the Type/Unit Tab select the type,
the data type and Unit Currency( if Applicable).

Page 19 of 58
Disclaimer: For Accenture Internal Use Only
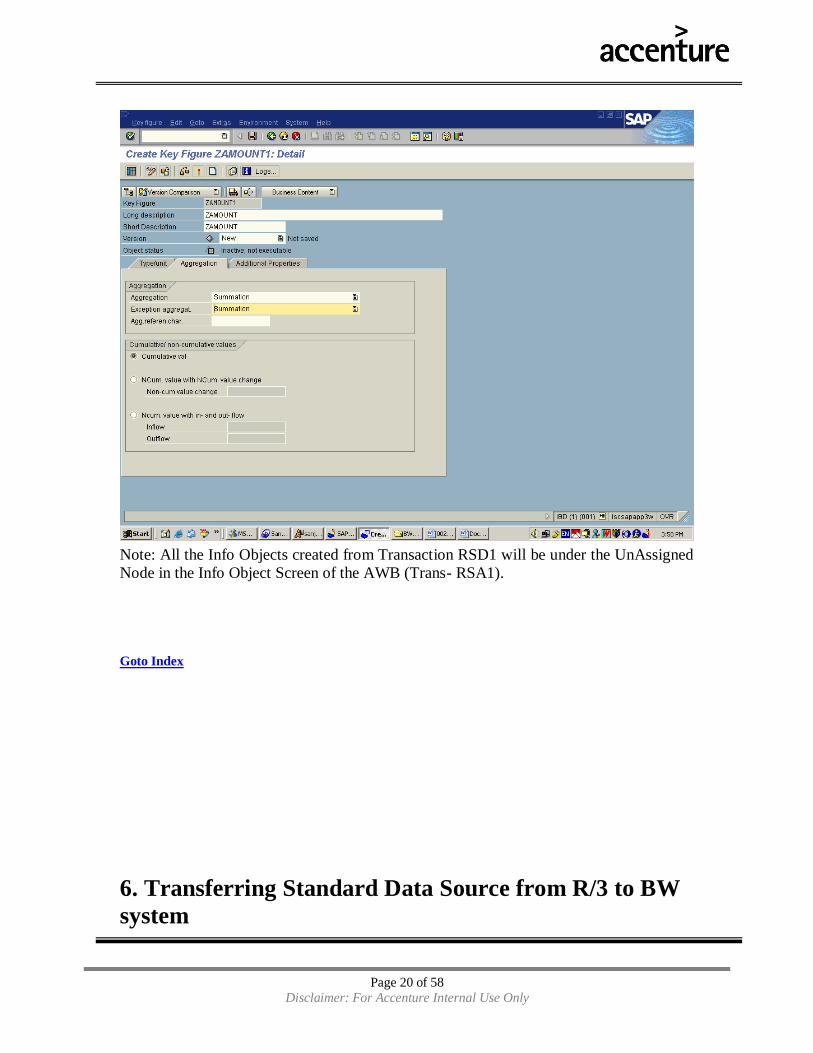
4. In the Aggregation Tab select the Aggregation and exception Aggregation and the
Cumulative /non Cumulative Values .
Save and Activate.
Page 20 of 58
Disclaimer: For Accenture Internal Use Only
Note: All the Info Objects created from Transaction RSD1 will be under the UnAssigned
Node in the Info Object Screen of the AWB (Trans- RSA1).
Goto Index
6. Transferring Standard Data Source from R/3 to BW
system

Page 21 of 58
Disclaimer: For Accenture Internal Use Only
Function: The function of this object is to transfer business content data source, purchase order
header (2LIS_02_HDR) from R/3 source system and replication of this into the BW
system so as to transfer data to the corresponding data target.
The following steps illustrate the procedure to transfer standard data source from R/3 and
replication into BW system.
Step 1: Install Data Source from Business Content (Transaction- RSA5) in R/3 system.
Alternatively, from IMG (SBIW) -> Business Content Data Sources -> Transfer
Business Content Data Sources.
Select the Data Source (2LIS_02_HDR- PO Header Data) and choose „Transfer
Data Sources‟ Button on Tool Bar.

Page 22 of 58
Disclaimer: For Accenture Internal Use Only
Step 2: Go to „Postprocess DataSources and Hierarchy‟ from the transaction RSA6,
alternatively, from IMG (SBIW) -> Postprocessing DataSources -> Edit
DataSources and Application Component Hierarchy.
Select the Data Source (2LIS_02_HDR- PO Header Data) and choose „Transport
Data Sources‟ Button on Tool Bar.

Page 23 of 58
Disclaimer: For Accenture Internal Use Only
Step 3: Select the R/3 Source system from the „Source System‟ tree in Administration
Workbench (Transaction- RSA1) and choose „Replicate Data Sources‟ option
under the appropriate application component node (from Context Menu).
After Replication at Node- MM in RSA1 source sys.
Page 24 of 58
Disclaimer: For Accenture Internal Use Only
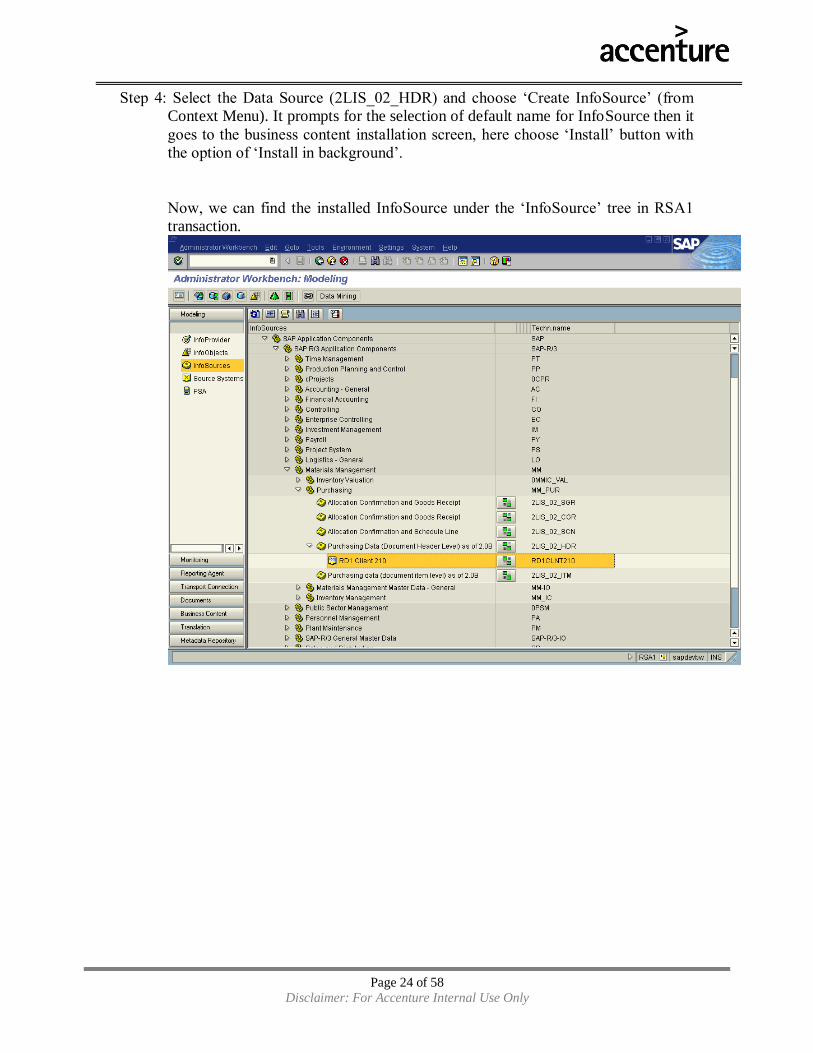
Step 4: Select the Data Source (2LIS_02_HDR) and choose „Create InfoSource‟ (from
Context Menu). It prompts for the selection of default name for InfoSource then it
goes to the business content installation screen, here choose „Install‟ button with
the option of „Install in background‟.
Now, we can find the installed InfoSource under the „InfoSource‟ tree in RSA1
transaction.

Page 25 of 58
Disclaimer: For Accenture Internal Use Only
Step 5: Select the Info Source (2LIS_02_HDR) and „Activate‟ under the transfer and
communication structure screen of the InfoSource.
Goto Index

Page 26 of 58
Disclaimer: For Accenture Internal Use Only
7. Installation of Business Content (BC) ODS Object
ODS Object:
An ODS object acts as a storage location for consolidated and cleaned-up transaction data
(transaction data or master data, for example) on the document (atomic) level. This data can be evaluated using a Bex query.
An ODS object contains key fields (for example, document number/item) and data fields
that can also contain character fields (for example, order status, customer) as key figures.
The data from an ODS object can be updated with a delta update into InfoCubes and/or
other ODS objects or master data tables (attributes or texts) in the same system or across different systems.
Unlike multi-dimensional data storage using InfoCubes, the data in ODS objects is stored
in transparent, flat database tables.
Following are the steps to Install Business Content ODS Objects:
1) Go to transaction RSA1. Click on the button “Business Content” on the left side frame.
You will able to see the following screen.
The extreme left frame shows the different types of BC objects like Info Provide, Info
Object, and Info Source etc.
2) Click on the “Info provider” label on the extreme left menu. (It is selected by default.)
Page 27 of 58
Disclaimer: For Accenture Internal Use Only
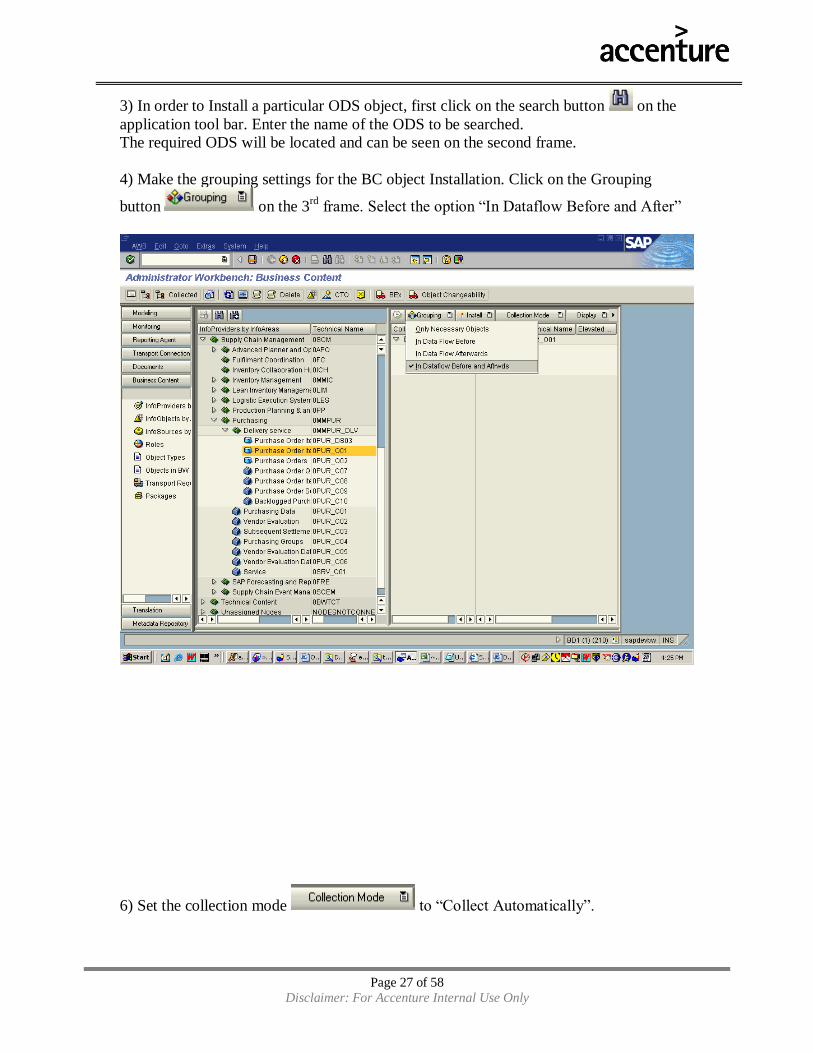
3) In order to Install a particular ODS object, first click on the search button on the
application tool bar. Enter the name of the ODS to be searched.
The required ODS will be located and can be seen on the second frame.
4) Make the grouping settings for the BC object Installation. Click on the Grouping
button on the 3rd
frame. Select the option “In Dataflow Before and After”
6) Set the collection mode to “Collect Automatically”.

Page 28 of 58
Disclaimer: For Accenture Internal Use Only
7) Now Drag the selected ODS object in the 3rs frame – collected objects.

Page 29 of 58
Disclaimer: For Accenture Internal Use Only
8) Repeat the step no 7, If number of ODS objects to be installed is more.
9) In order to Install the Business Content ODS Objects, Click on the Install button (In
the 3rd
frame extreme right frame).
In order to Install the objects in background chose the option, “Install In Background”.

Page 30 of 58
Disclaimer: For Accenture Internal Use Only
One dialog box will be displayed for overwriting the objects.
Click on “Yes”.
10) A job will be created in the background.
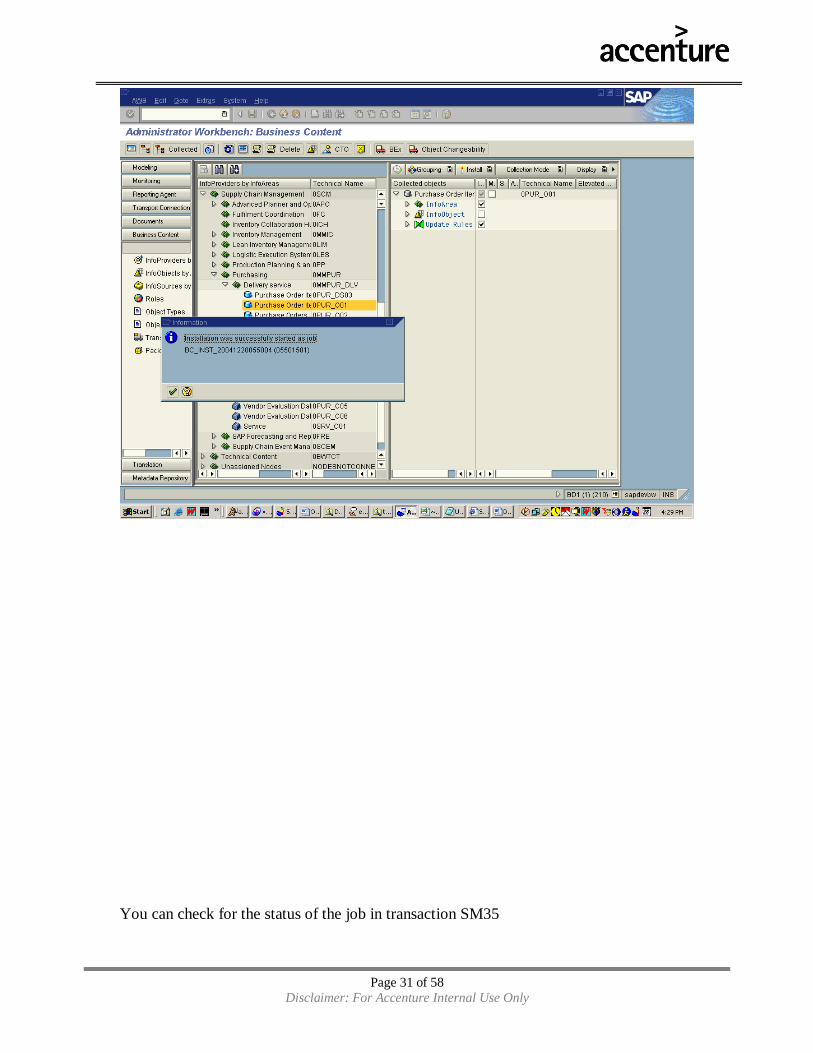
Page 31 of 58
Disclaimer: For Accenture Internal Use Only
You can check for the status of the job in transaction SM35

Page 32 of 58
Disclaimer: For Accenture Internal Use Only
11) In order to check for the installation of the ODS Object, go to Transaction RSA1.
Give the name of the ODS Object Installed and click on display.

Page 33 of 58
Disclaimer: For Accenture Internal Use Only
Goto Index
8. Creation of Custom Info Cube
InfoCube:

Page 34 of 58
Disclaimer: For Accenture Internal Use Only
An Info cube is the data object in BW. An InfoCube is a quantity of relational tables
arranged according to the star schema: A large fact table in the middle surrounded by
several dimension tables
An InfoCube can function as both a data target and an Info Provider.
From a reporting point of view, an InfoCube describes a self-contained dataset, for
example, of a business-orientated area. This dataset can be evaluated in a BEx query.
InfoCubes are supplied with data from one or more InfoSources or ODS objects (Basic
InfoCube) or with data from a different system (RemoteCube, SAP RemoteCube, virtual
InfoCube with Services, transactional InfoCube).
There are various types of InfoCube:
1. Physical data stores:
Basic InfoCubes
Transactional InfoCubes
2. Virtual data stores:
RemoteCube
SAP RemoteCube
Virtual InfoCube with Services
Following are the steps to InfoCube:
1) Go to transaction RSA1. By default, modeling tab will be selected.
2) Click on InfoProvider Icon on the left side frame of the screen.
Select the Info Area in which we have to create the InfoCube. Right click on the Info
Area, and select the option “Create Info Cube”

Page 35 of 58
Disclaimer: For Accenture Internal Use Only

Page 36 of 58
Disclaimer: For Accenture Internal Use Only
3) Give the technical name and description of the InfoCube. Select the InfoCube type
as Basic Cube. Click on create button at the bottom.
4) Now we need to assign the Characteristics Info Objects, Time Characteristics and
Key figure info objects to the InfoCube.
Page 37 of 58
Disclaimer: For Accenture Internal Use Only
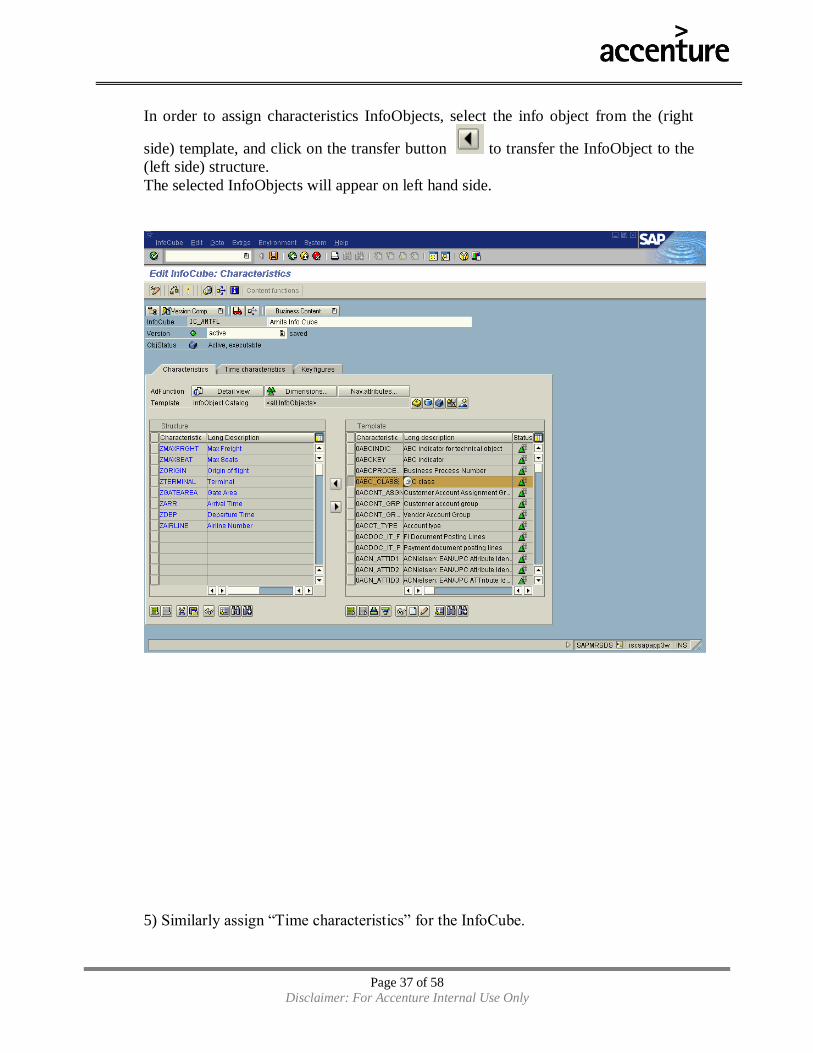
In order to assign characteristics InfoObjects, select the info object from the (right
side) template, and click on the transfer button to transfer the InfoObject to the
(left side) structure.
The selected InfoObjects will appear on left hand side.
5) Similarly assign “Time characteristics” for the InfoCube.

Page 38 of 58
Disclaimer: For Accenture Internal Use Only
6) Assign the key figure InfoObjects, in a similar manner.
Page 39 of 58
Disclaimer: For Accenture Internal Use Only
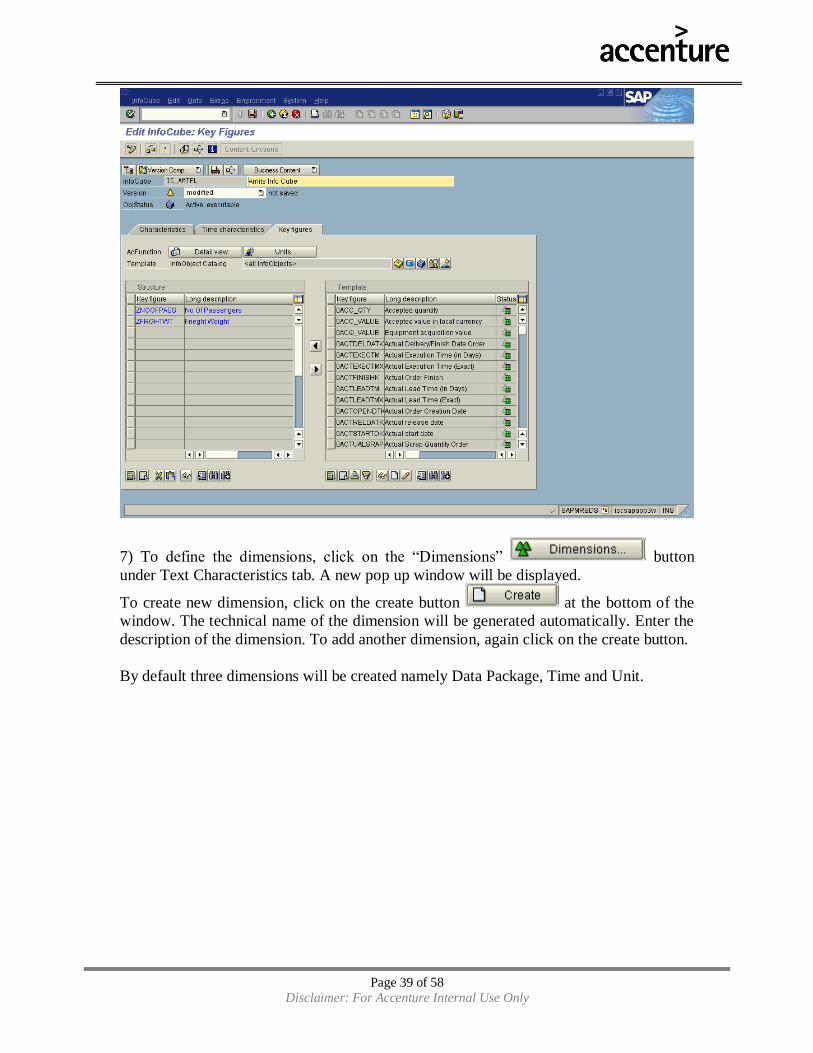
7) To define the dimensions, click on the “Dimensions” button
under Text Characteristics tab. A new pop up window will be displayed.
To create new dimension, click on the create button at the bottom of the
window. The technical name of the dimension will be generated automatically. Enter the
description of the dimension. To add another dimension, again click on the create button.
By default three dimensions will be created namely Data Package, Time and Unit.

Page 40 of 58
Disclaimer: For Accenture Internal Use Only

Page 41 of 58
Disclaimer: For Accenture Internal Use Only
8) To assign the characteristics to the dimensions created, click on the “Assign” tab.
The screen displays the list available dimensions at the top right corner and the list of
available characteristics info objects blow this.
In order to assign the InfoObjects to the dimension, select the InfoObject(s). Place the
cursor on the dimension, to which these InfoObject(s) should be assigned. Now click on
the Assign button . The InfoObject(s) will be assigned to the
dimension selected.
Repeat the step to assign the remaining InfoObjects to the dimensions created.
9) Save and activate the InfoCube created.
Goto Index
9. Loading flat file data into an InfoCube

Page 42 of 58
Disclaimer: For Accenture Internal Use Only
1. Create an Info Area:
1.1 Modeling -> InfoProvider -> Create InfoArea (Choose from Context Menu)
1.2 Give technical name and long description for the InfoArea.
Page 43 of 58
Disclaimer: For Accenture Internal Use Only
2. Create InfoObjects- Prepare necessary characteristics and keyfigures which facilitate
flat file extraction and place in appropriate InfoObject Catalog. (Follow the steps as
per documents 0020 & 0021 for creating characteristics and key figures respectively)
3. Build InfoCube: Follow the document < 0050 How to create Info Cube.doc> to
create the InfoCube „GMAC PO data Cube‟ (ZC_PODATA) under the InfoArea „Info
Area GMAC‟ (ZIA_GMAC_DATATARGET).
The following table shows the complete structure of the InfoCube ZC_PODATA.
InfoCube ZC_PODATA GMAC PO data Cube
Status Created Info Object Description Type Length Dim/Da
ta Status of info
object
ZORDNUM Order Number NUMC 10 Dim2 Created
ZMATGROUP Material Group CHAR 4 Dim1 Created
ZMATTYP Material Type CHAR 20 Dim1 Created
ZPOGRP Purchasing Group CHAR 4 Dim2 Created
0VENDOR Vendor CHAR 10 Dim3 Created
0CALDAY Calendar day DATS 8 DimT Created
ZORDQUNTY Order Quantity QUAN Data Created
Note: Data- Key Figure, Dim- Dimension
Dim1- Material Dim, Dim2- PO Ord Dim, Dim3- Vendor Dim &
DimT- Time Dimension
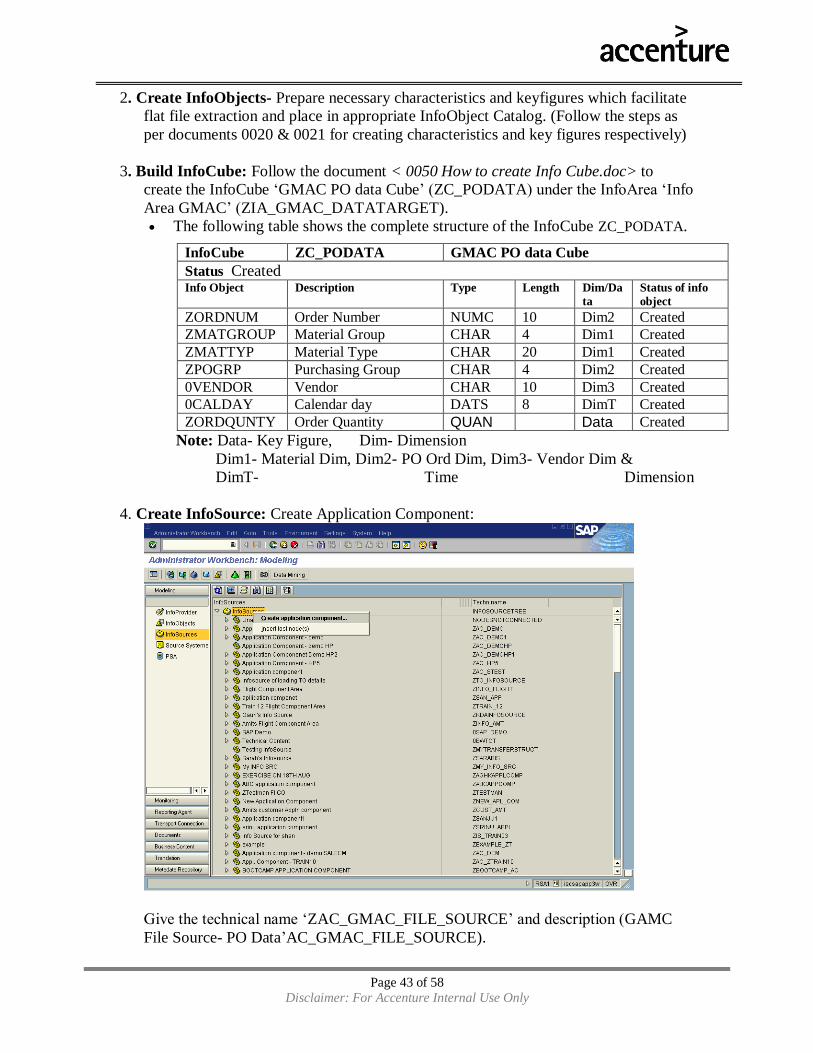
4. Create InfoSource: Create Application Component:
Give the technical name „ZAC_GMAC_FILE_SOURCE‟ and description (GAMC
File Source- PO Data‟AC_GMAC_FILE_SOURCE).
Page 44 of 58
Disclaimer: For Accenture Internal Use Only
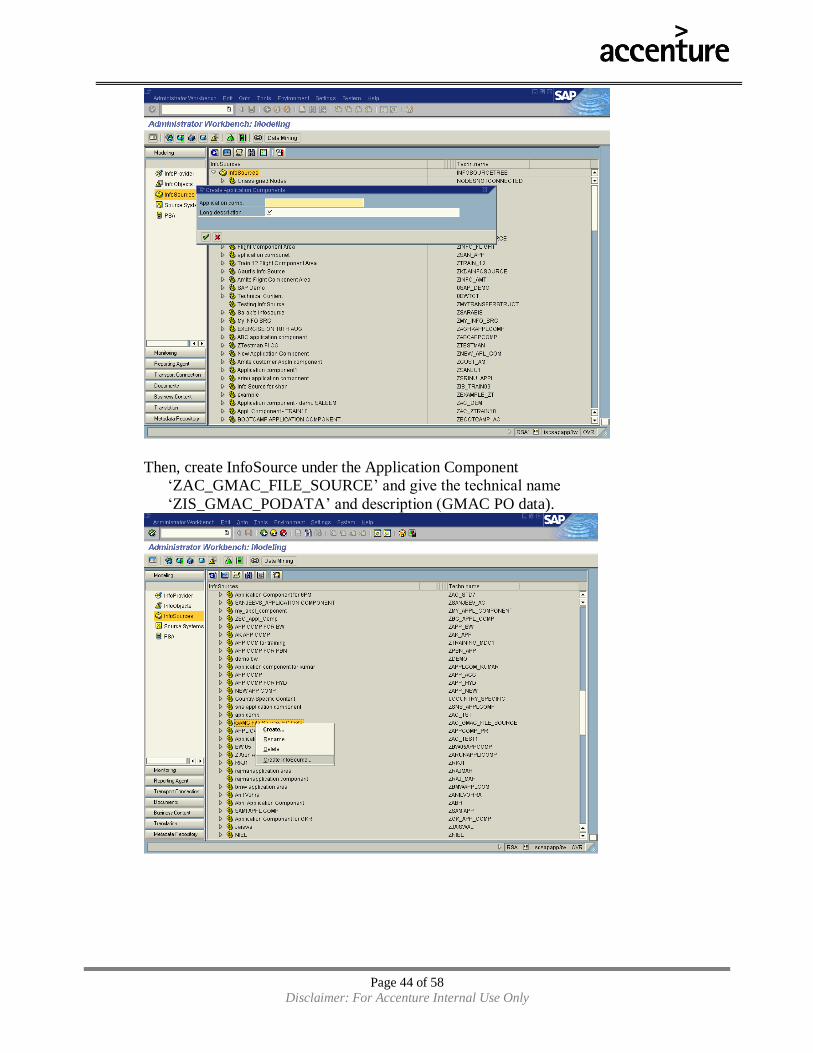
Then, create InfoSource under the Application Component
„ZAC_GMAC_FILE_SOURCE‟ and give the technical name
„ZIS_GMAC_PODATA‟ and description (GMAC PO data).

Page 45 of 58
Disclaimer: For Accenture Internal Use Only
Enter the InfoObjects into the InfoSource „Communication Structure‟.

Page 46 of 58
Disclaimer: For Accenture Internal Use Only
Save the structure and give the logical source system name (select the source system-
Z_TESTF „GMAC SOURCE SYSTEM FOR FILE‟), it creates the transfer
structure along with transfer rule and activate the InfoSource.

Page 47 of 58
Disclaimer: For Accenture Internal Use Only
5. Create Update Rules:
Right click on the InfoCube ZC_PODATA „GMAC PO data Cube‟ and choose
„Create Update Rules‟.
Give the InfoSource name and choose „Next Screen‟ button

Page 48 of 58
Disclaimer: For Accenture Internal Use Only
Activate the Update Rules
6. Create InfoPackage:
Choose create InfoPackage option from the InfoSource logical source structure Z_TESTF
„GMAC SOURCE SYSTEM FOR FILE‟.

Page 49 of 58
Disclaimer: For Accenture Internal Use Only
In the External data Tab of the Info Package, State the File type and the name of the file ,
with the file type and also mention the type of data separator which is used in the Flat
file. If you want you ignore the Header or number of rows, then you can state that also.

Page 50 of 58
Disclaimer: For Accenture Internal Use Only
Execute the load process by choosing the option „Start‟ from „Schedule‟ tab.
Goto Index
10. Creation of Reports using BEX Analyzer

Page 51 of 58
Disclaimer: For Accenture Internal Use Only
Step 1:
In BW key in the Transaction-- RRMX.(You can also open the Analyzer from the Start Menu-Programs Business ExplorerAnalyzer).
Step 2:

Page 52 of 58
Disclaimer: For Accenture Internal Use Only
Click on Open Queries
To create a new Query. Select the info Provider and then click on New Button on the
RHS Top Corner.
Page 53 of 58
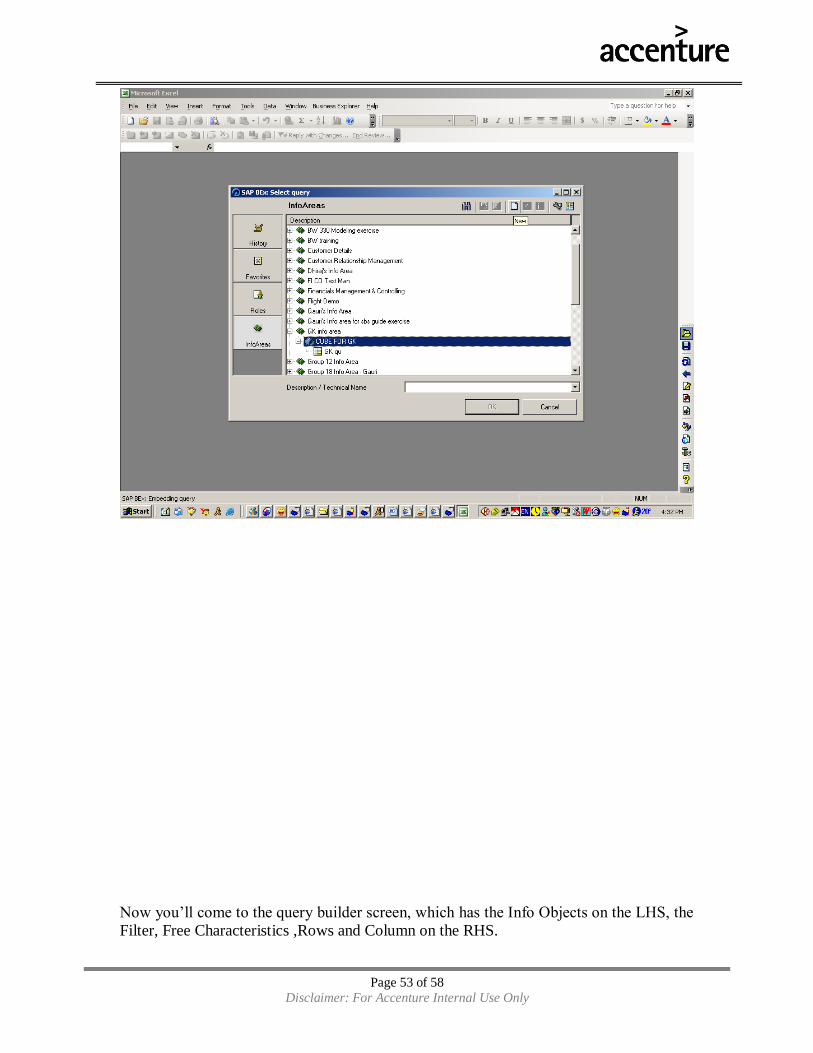
Disclaimer: For Accenture Internal Use Only
Now you‟ll come to the query builder screen, which has the Info Objects on the LHS, the
Filter, Free Characteristics ,Rows and Column on the RHS.

Page 54 of 58
Disclaimer: For Accenture Internal Use Only
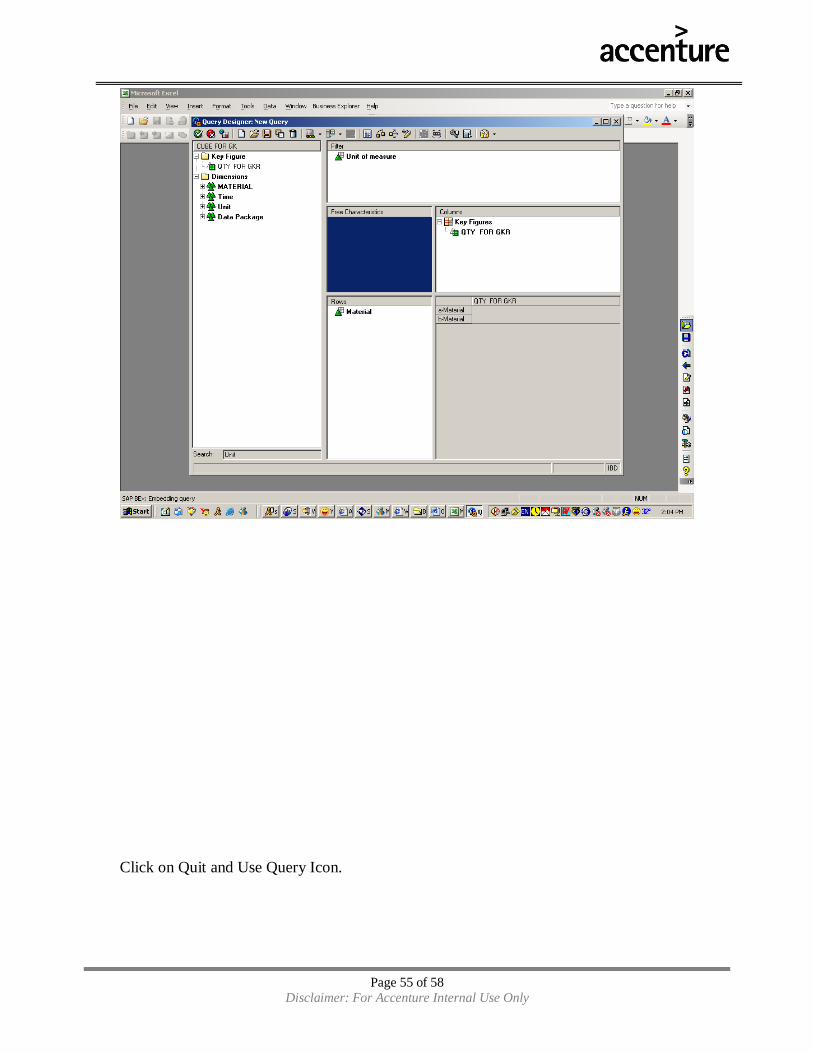
Now, Drag and drop the Info Objects into the frameset as required.
Page 55 of 58
Disclaimer: For Accenture Internal Use Only
Click on Quit and Use Query Icon.

Page 56 of 58
Disclaimer: For Accenture Internal Use Only
Page 57 of 58
Disclaimer: For Accenture Internal Use Only
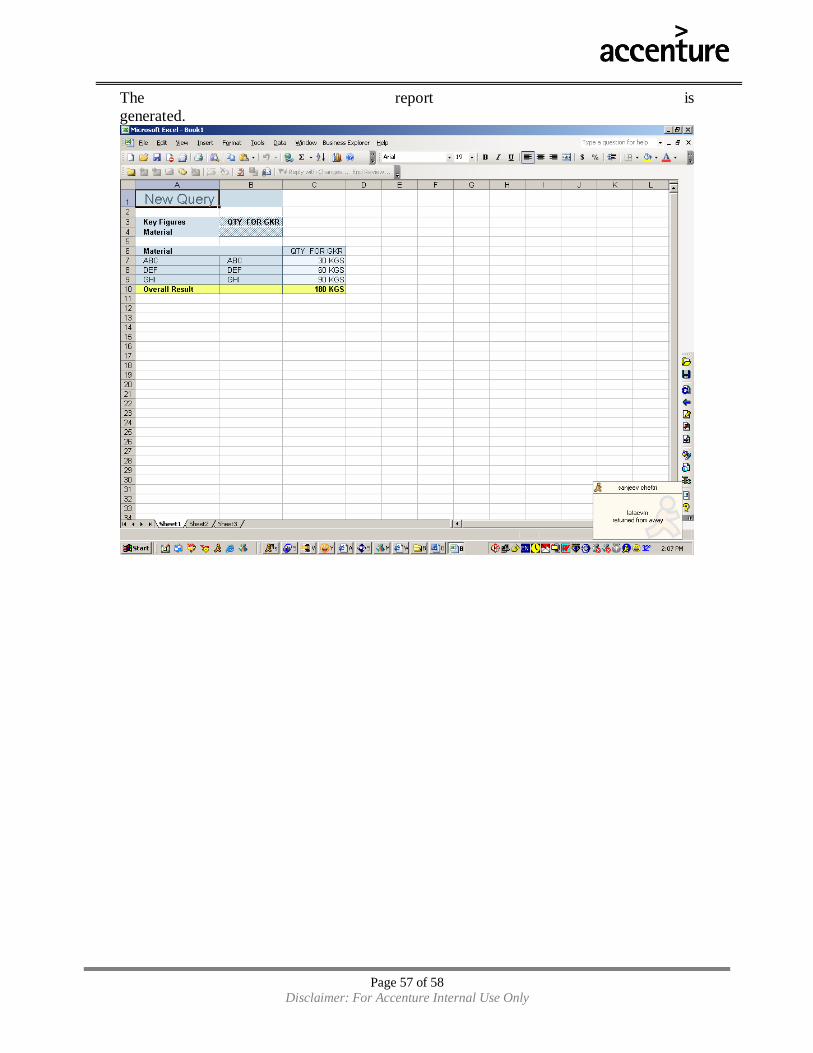
The report is
generated.

Page 58 of 58
Disclaimer: For Accenture Internal Use Only
Note: you can change the query (Local and global definition, If you change it locally then
you can save it as work book)
Goto Index
Recommended