Print Management version 2.3.15
Administrator's Guide
November 2014 www.lexmark.com
Contents
Overview.....................................................................................................4Supported printers....................................................................................................................................5
Using Lexmark Management Console...........................................................6Accessing Lexmark Management Console................................................................................................6
Configuring the application.......................................................................................................................6
Configuring chunk size for device discovery and policy updates..............................................................9
Scheduling cleanup tasks...........................................................................................................................9
Managing Print Management.....................................................................11Accessing Print Management Console....................................................................................................11
Using the Print Queue and RePrint Queue tabs......................................................................................12
Using the Delegate tab............................................................................................................................13
Using the Badges tab...............................................................................................................................14
Using the Function Access tab.................................................................................................................14
Using the Quotas tab...............................................................................................................................15
Using the Alternate Locations tab...........................................................................................................17
Using the Print Track Devices tab............................................................................................................17
Testing the solution.................................................................................................................................17
Managing and generating a report.............................................................19Generating reports..................................................................................................................................19
Scheduling reports..................................................................................................................................19
Troubleshooting.........................................................................................21Firmware failure [9yy.xx].........................................................................................................................21
An application error about a missing bean on the home screen............................................................21
Profile server is not responding..............................................................................................................21
Unable to add new devices using LMC....................................................................................................21
“Out of Policy” error message still appears even after multiple tries to update the policy....................22
“Unsupported Device” error message appears when installing a badge reader to the printer..............22
“Unable to Read Badge Data” error message appears when swiping the badge...................................22
Print jobs released by the users do not appear in the print queue.........................................................22
An error has occurred when swiping the badge.....................................................................................23
Page count is inaccurate..........................................................................................................................23
Contents 2

Appendix....................................................................................................24
Notices.......................................................................................................40
Index..........................................................................................................41
Contents 3
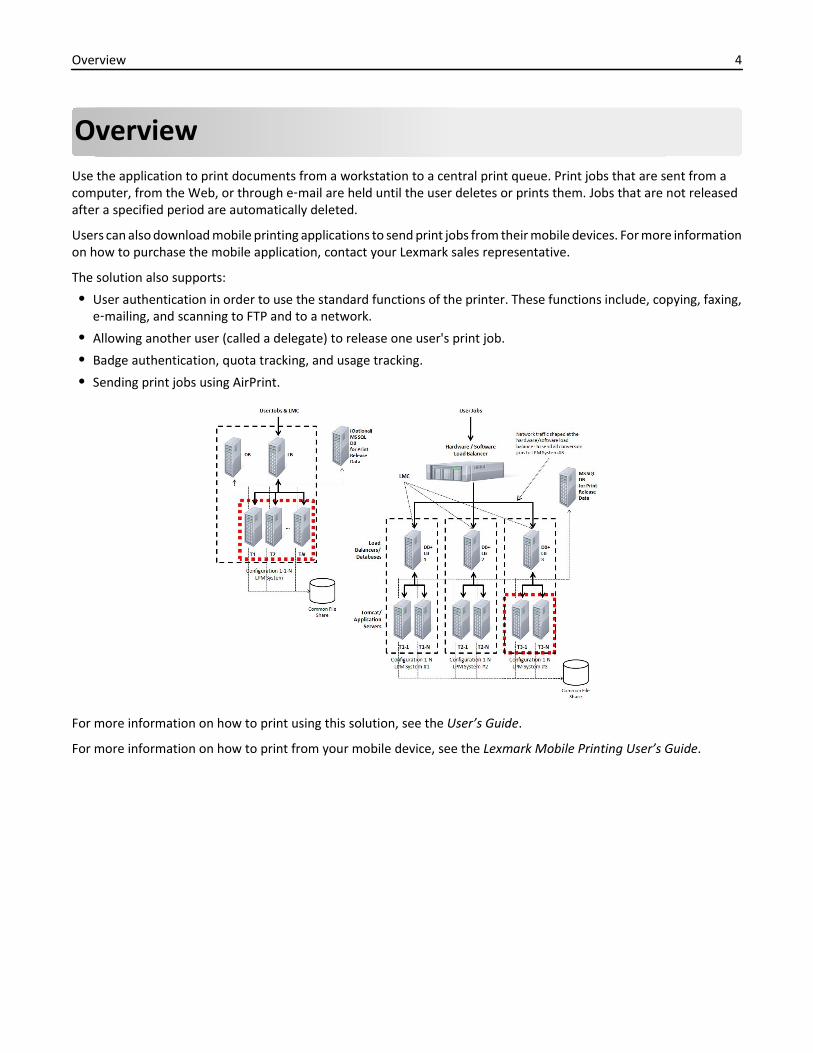
OverviewUse the application to print documents from a workstation to a central print queue. Print jobs that are sent from acomputer, from the Web, or through e‑mail are held until the user deletes or prints them. Jobs that are not releasedafter a specified period are automatically deleted.
Users can also download mobile printing applications to send print jobs from their mobile devices. For more informationon how to purchase the mobile application, contact your Lexmark sales representative.
The solution also supports:
• User authentication in order to use the standard functions of the printer. These functions include, copying, faxing,e‑mailing, and scanning to FTP and to a network.
• Allowing another user (called a delegate) to release one user's print job.
• Badge authentication, quota tracking, and usage tracking.
• Sending print jobs using AirPrint.
For more information on how to print using this solution, see the User’s Guide.
For more information on how to print from your mobile device, see the Lexmark Mobile Printing User’s Guide.
Overview 4
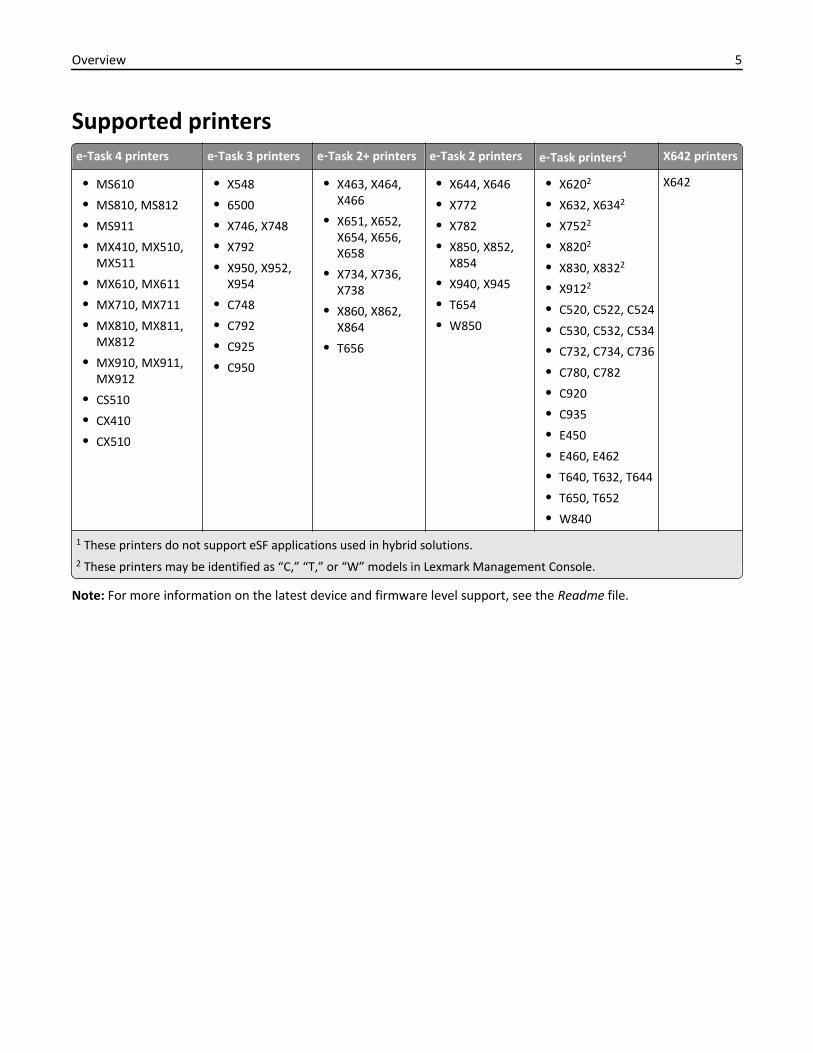
Supported printerse‑Task 4 printers e‑Task 3 printers e‑Task 2+ printers e‑Task 2 printers e‑Task printers1 X642 printers
• MS610
• MS810, MS812
• MS911
• MX410, MX510,MX511
• MX610, MX611
• MX710, MX711
• MX810, MX811,MX812
• MX910, MX911,MX912
• CS510
• CX410
• CX510
• X548
• 6500
• X746, X748
• X792
• X950, X952,X954
• C748
• C792
• C925
• C950
• X463, X464,X466
• X651, X652,X654, X656,X658
• X734, X736,X738
• X860, X862,X864
• T656
• X644, X646
• X772
• X782
• X850, X852,X854
• X940, X945
• T654
• W850
• X6202
• X632, X6342
• X7522
• X8202
• X830, X8322
• X9122
• C520, C522, C524
• C530, C532, C534
• C732, C734, C736
• C780, C782
• C920
• C935
• E450
• E460, E462
• T640, T632, T644
• T650, T652
• W840
X642
1 These printers do not support eSF applications used in hybrid solutions.2 These printers may be identified as “C,” “T,” or “W” models in Lexmark Management Console.
Note: For more information on the latest device and firmware level support, see the Readme file.
Overview 5
Using Lexmark Management Console
Accessing Lexmark Management Console1 Launch Lexmark Management Console (LMC) from your Web browser using either of the following URLs:
• http://hostname:9780/lmc
• https://hostname/lmc
where hostname is the host name or IP address of the computer on which the server is installed.
Notes:
• It may take several minutes to start all services when the server is first booted. If LMC cannot be accessedimmediately after booting the system, then wait a few minutes, and then try again.
• Cookies must be enabled on your Web browser in order to use LMC.
• Adobe Flash Player 10 or later is required. If your Web browser settings do not allow ActiveX controls to run,then manually upgrade the plug‑in by visiting the Adobe Web site.
2 Type the administrator user name and password, and then click Login.
Notes:
• The default user name and password are both admin.
• If LMC is configured to connect to an LDAP server, then any valid user name and password can be used.
Configuring the application
Changing the status of the serverPrint Management lets administrators control whether jobs are sent to the server from the load balancer.
1 Access Lexmark Management Console from your Web browser, and then click the System tab.
2 Select a server.
3 Click Set Online or Set Offline.
Note: Set Offline still allows administrators to stay connected to the server.
Configuring the application settings for your environmentNote: Before changing the settings, contact Lexmark Help Desk to make sure that the change is appropriate andnecessary.
During the initial installation, your Lexmark Integration Specialist configures the settings of the solution to meet theneeds of your environment. If you need to modify the settings because of user feedback or configuration changes withinyour environment, then do the following:
1 Access Lexmark Management Console from your Web browser, and then click the Solutions tab.
2 From the Solutions section, click PrintReleasev2.
Using Lexmark Management Console 6
3 From the Tasks section, click Configuration, and then change the settings.
4 Click Apply.
Adding printers to a device groupWhen you expand to other departments or locations, you need to add devices to the solution. Before adding devicesto the solution, make sure you have obtained licenses from your Lexmark Technical Program Manager.
Typically, you need to add devices to the existing device group to have the same local settings as all other devices inthe group. Creating groups also lets you better organize all your devices, such as by location, and modify differentconfigurations in the local settings, such as Authentication Method, Print All Settings, and Keypad Only Device Settings.
1 Access Lexmark Management Console from your Web browser, and then click the Device Groups tab.
2 From the Device Groups section, click Add, and then type a name for your device group.
Note: If you want to use the existing group, then select the name of your device.
3 From the Tasks section, select Discovery Profiles.
4 In the address field, type the IP address of the printer, and then click Add.
Notes:
• You can add only one IP address at a time.
• Do not fill up any information in the fields unless that information is already configured on the printers thatare added.
5 Click Discover.
6 From the Discovery section, select the Discover new devices only check box, and then click Discover.
7 Click Done.
8 To verify that your printer is successfully added, click Summary or Discovered Devices from the Tasks section.
Configuring the home screenWhen new printers are added to the solution, you may need to configure the home screen if your printer is part of anew device group or if your printer is a different model from the previously configured printer. Because different deviceclasses have different capabilities, a separate custom home screen must be configured for each device class. For a listof supported printers in each device class, see “Supported printers” on page 5.
1 Access Lexmark Management Console from your Web browser, and then click the Device Groups tab.
2 From the Device Groups section, select a device group you want to configure, and then click Home Screen from theTasks section.
3 From the Home Screen section, select the type of printer you want to configure.
Note: Make sure to select the Use this home screen as part of the device group’s policy check box.
4 If you have not configured your home screen, then select the number of buttons you want to appear on your homescreen from the Layout menu.
5 Assign a button, action, and profile to each function.
Using Lexmark Management Console 7
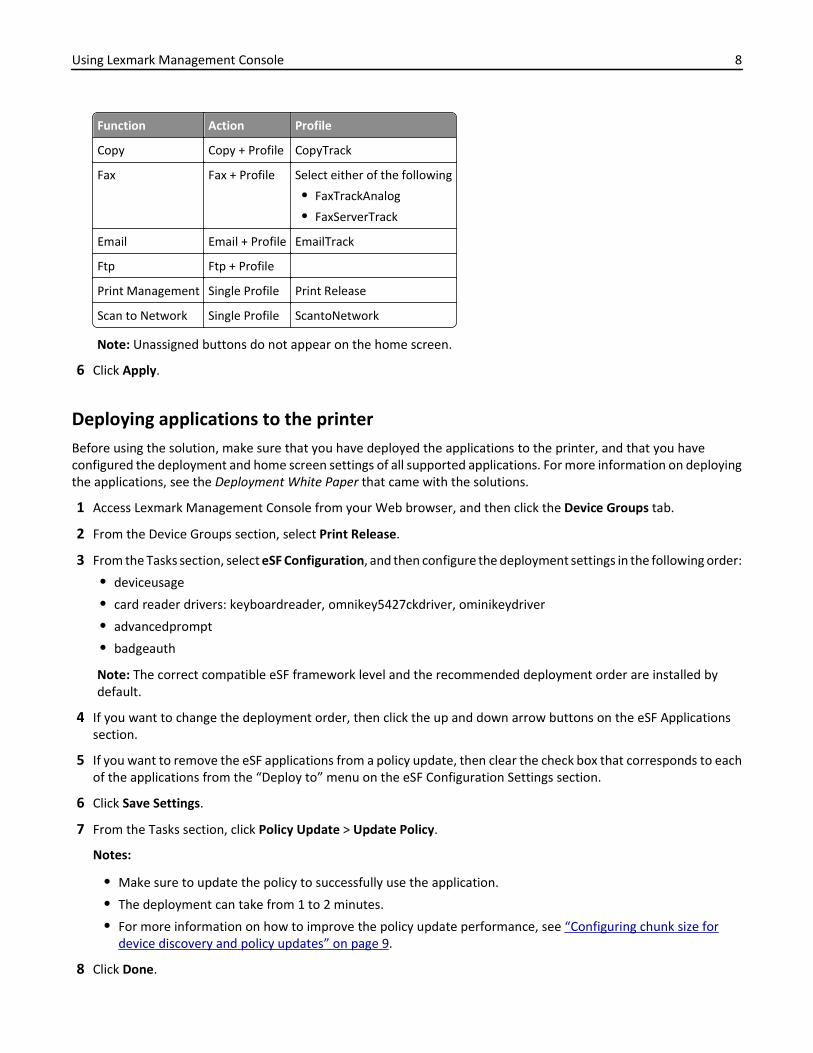
Function Action Profile
Copy Copy + Profile CopyTrack
Fax Fax + Profile Select either of the following
• FaxTrackAnalog
• FaxServerTrack
Email Email + Profile EmailTrack
Ftp Ftp + Profile
Print Management Single Profile Print Release
Scan to Network Single Profile ScantoNetwork
Note: Unassigned buttons do not appear on the home screen.
6 Click Apply.
Deploying applications to the printerBefore using the solution, make sure that you have deployed the applications to the printer, and that you haveconfigured the deployment and home screen settings of all supported applications. For more information on deployingthe applications, see the Deployment White Paper that came with the solutions.
1 Access Lexmark Management Console from your Web browser, and then click the Device Groups tab.
2 From the Device Groups section, select Print Release.
3 From the Tasks section, select eSF Configuration, and then configure the deployment settings in the following order:
• deviceusage
• card reader drivers: keyboardreader, omnikey5427ckdriver, ominikeydriver
• advancedprompt
• badgeauth
Note: The correct compatible eSF framework level and the recommended deployment order are installed bydefault.
4 If you want to change the deployment order, then click the up and down arrow buttons on the eSF Applicationssection.
5 If you want to remove the eSF applications from a policy update, then clear the check box that corresponds to eachof the applications from the “Deploy to” menu on the eSF Configuration Settings section.
6 Click Save Settings.
7 From the Tasks section, click Policy Update > Update Policy.
Notes:
• Make sure to update the policy to successfully use the application.
• The deployment can take from 1 to 2 minutes.
• For more information on how to improve the policy update performance, see “Configuring chunk size fordevice discovery and policy updates” on page 9.
8 Click Done.
Using Lexmark Management Console 8
Configuring Universal Configuration File (UCF)
1 Access Lexmark Management Console from your Web browser, and then click the Solutions tab.
2 From the Solutions section, select Print Releasev2.
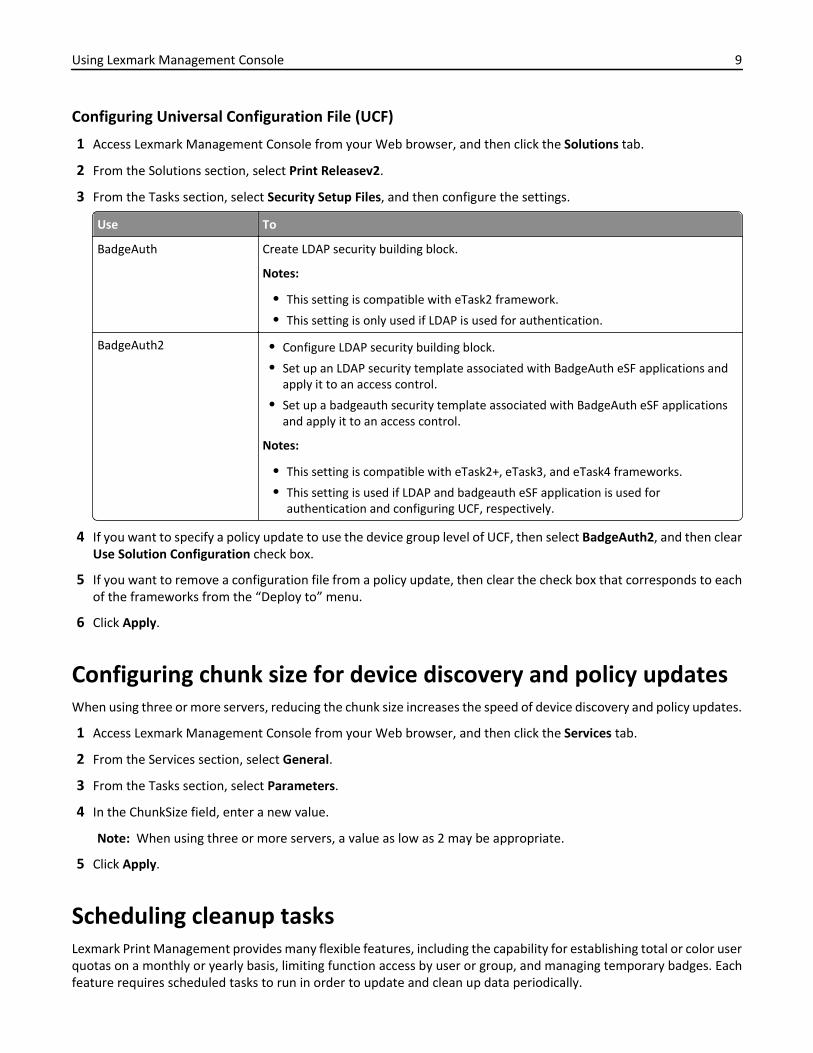
3 From the Tasks section, select Security Setup Files, and then configure the settings.
Use To
BadgeAuth Create LDAP security building block.
Notes:
• This setting is compatible with eTask2 framework.
• This setting is only used if LDAP is used for authentication.
BadgeAuth2 • Configure LDAP security building block.
• Set up an LDAP security template associated with BadgeAuth eSF applications andapply it to an access control.
• Set up a badgeauth security template associated with BadgeAuth eSF applicationsand apply it to an access control.
Notes:
• This setting is compatible with eTask2+, eTask3, and eTask4 frameworks.
• This setting is used if LDAP and badgeauth eSF application is used forauthentication and configuring UCF, respectively.
4 If you want to specify a policy update to use the device group level of UCF, then select BadgeAuth2, and then clearUse Solution Configuration check box.
5 If you want to remove a configuration file from a policy update, then clear the check box that corresponds to eachof the frameworks from the “Deploy to” menu.
6 Click Apply.
Configuring chunk size for device discovery and policy updatesWhen using three or more servers, reducing the chunk size increases the speed of device discovery and policy updates.
1 Access Lexmark Management Console from your Web browser, and then click the Services tab.
2 From the Services section, select General.
3 From the Tasks section, select Parameters.
4 In the ChunkSize field, enter a new value.
Note: When using three or more servers, a value as low as 2 may be appropriate.
5 Click Apply.
Scheduling cleanup tasksLexmark Print Management provides many flexible features, including the capability for establishing total or color userquotas on a monthly or yearly basis, limiting function access by user or group, and managing temporary badges. Eachfeature requires scheduled tasks to run in order to update and clean up data periodically.
Using Lexmark Management Console 9
If you are using quotas, then quotas must be reset in order to automatically delete data for the previous year and allowall users to start with new, full quotas. This task should be scheduled to run once a year on a schedule that works bestfor your business processes. For example, many schools run this task at the beginning of each school year.
If you are using function access, you need to periodically update users’ group information to make sure that they aregetting access to the functions granted to their user role. The frequency at which this task runs is at your discretionand may be dictated by how frequently users move around within groups in your environment.
For temporary badges, it is important to reset the user information associated with the badges so that when the badgeis assigned to a new user, the new user must re-register and cannot gain access to the previous user’s jobs. The frequencyat which this task runs is at your discretion and may be dictated by how long you assign temporary badges.
1 Access Lexmark Management Console from your Web browser, and then click the System tab.
2 From the System section, select Schedule.
3 Click Add > Script > Next > None > Next.
4 Select the solution you want to configure and the script associated with your task.
• ResetFAUserGroup—This lets you reset the function access limit of the group.
• PrintDelete—This lets you automatically delete print jobs in a period of time.
• GenerateCSV—This lets you generate report in a period of time.
• TempBadgeDelete—This lets you delete temporary badge data.
• ResetQuota—This lets you reset user quotas annually.
• ResetUserGroup—This lets you update users that are already defined in the database to their current group.
5 Click Next.
6 From the “Choose a frequency” dialog, specify the start date and time and how often the cleanup occurs.
7 Click Finish.
Using Lexmark Management Console 10
Managing Print Management
Accessing Print Management Console1 Launch Print Management Console (PMC) from your Web browser using either of the following URLs:
• http://hostname:9780/printrelease/index.html
• https://hostname/printrelease/index.html
where hostname is the network address of the load balancer.
2 Type the administrator user name and password, and then click Login.
Notes:
• The default user name and password are both admin.
• If PMC is configured to connect to an LDAP server, then type your LDAP user name and password.
• PMC is supported only in Internet Explorer version 6 to Internet Explorer version 9.
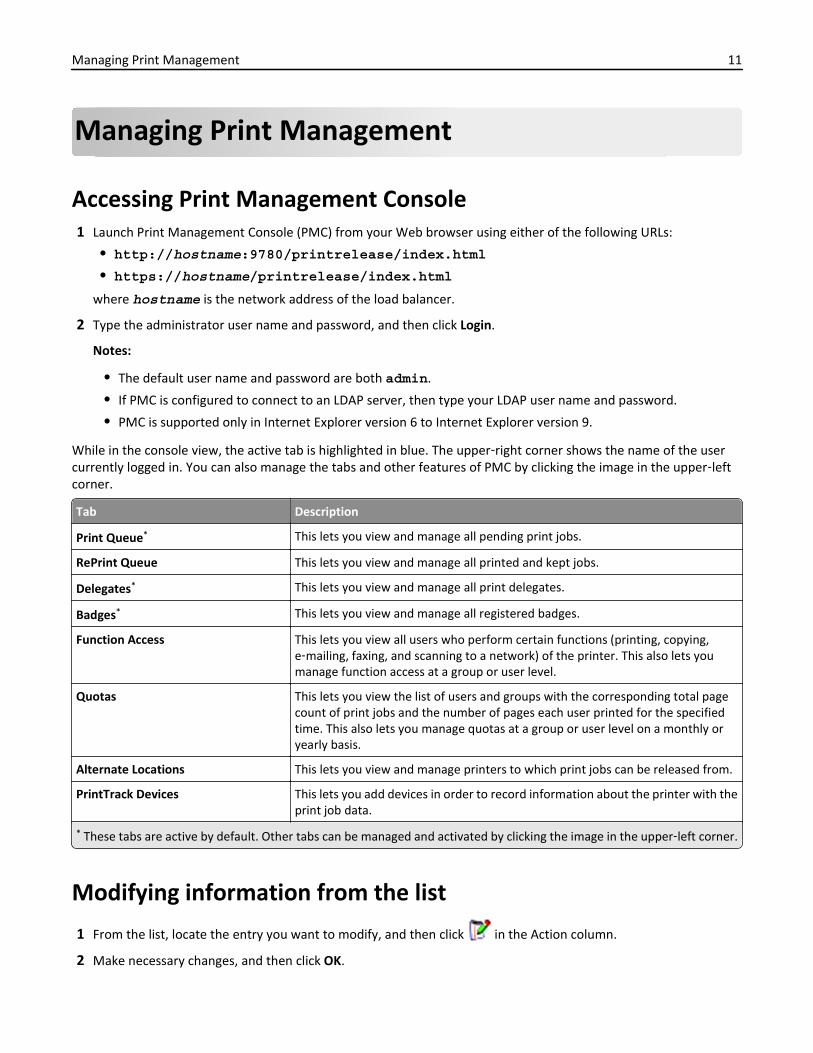
While in the console view, the active tab is highlighted in blue. The upper‑right corner shows the name of the usercurrently logged in. You can also manage the tabs and other features of PMC by clicking the image in the upper‑leftcorner.
Tab Description
Print Queue* This lets you view and manage all pending print jobs.
RePrint Queue This lets you view and manage all printed and kept jobs.
Delegates* This lets you view and manage all print delegates.
Badges* This lets you view and manage all registered badges.
Function Access This lets you view all users who perform certain functions (printing, copying,e‑mailing, faxing, and scanning to a network) of the printer. This also lets youmanage function access at a group or user level.
Quotas This lets you view the list of users and groups with the corresponding total pagecount of print jobs and the number of pages each user printed for the specifiedtime. This also lets you manage quotas at a group or user level on a monthly oryearly basis.
Alternate Locations This lets you view and manage printers to which print jobs can be released from.
PrintTrack Devices This lets you add devices in order to record information about the printer with theprint job data.
* These tabs are active by default. Other tabs can be managed and activated by clicking the image in the upper‑left corner.
Modifying information from the list
1 From the list, locate the entry you want to modify, and then click in the Action column.
2 Make necessary changes, and then click OK.
Managing Print Management 11
Deleting entries from the list
1 From the list, locate the entry you want to delete, and then click in the Action column.
2 Click OK to confirm.
Logging out from the consoleOn the upper‑right corner of the page, click Logout.
Using the Print Queue and RePrint Queue tabsThe Print Queue tab lets you view all submitted print jobs that are not yet released or deleted.
The RePrint Queue tab lets you view all submitted print jobs that were released at least once but not yet deleted. Thelist appears if the "Delete Printed Jobs After Specified Hours" option is set to a value greater than 0.
Viewing and managing print queues1 Access Print Management Console from your Web browser, and then click the Print Queue tab or the RePrint
Queue tab.
2 In the Filter menu, select the appropriate data field, and then set a criteria for your search.
3 In the text field, type the word that defines your search, and then click Apply Filter.
4 View the following print job information.
• Site—This shows the site code of the Print Management system.
• User—This shows the Windows user ID who submitted the print jobs in the queue.
• Job Name—This shows the file name of the print jobs in the queue.
• Pages—This indicates the total number of pages of a print job in the queue.
• Date Submitted—This indicates the date and time the print job was submitted.
• Delegate—This shows the name of the user or group who has allowed to print the job.
• Actions—This allows you to view job properties, delete, edit, delegate, or print a job in the queue.
To view a specific print job, click with the following additional print job information:
• Color—This indicates whether the job was printed in black and white or in color.
• Duplex—This indicates whether the job was printed on one or both sides of the page.
• Paper Size—This indicates the size of the paper set to a print job in the queue.
5 To sort the items in the column, click the column header.
• —This sorts the column in ascending order.
• —This sorts the column in descending order.
Managing Print Management 12
Delegating print jobs
1 From the list, locate the print job, and then click in the Action column.
2 From the Delegate Job dialog, assign a delegate or delegate group, and then click OK.
Releasing print jobs1 Access Print Management Console from your Web browser, and then click the Print Queue tab or the RePrint
Queue tab.
2 Locate the job you want to print, and then click the printer icon in the Actions column.
3 Type the printer address, and then click OK.
Notes:
• If the Multi‑Select feature is configured, then select the print jobs you want to print, and then click Print. Youcan configure Multi‑Select by clicking the image in upper‑left corner of the Print Management Console, and thenmodifying it in the Queue Tab Options section.
• This feature allows you to print if the printer fails to authenticate the credentials or if the job needs to bereleased by a person other than a delegate.
Using the Delegate tabA delegate is a person who is allowed to release another person's print job. For example, an administrative assistantmight release print jobs submitted by an executive.
The Delegates tab lets you view and manage individual delegates or delegate groups associated with a given user. Youcan designate a user as the delegate or as part of a delegate group for more than one person. However, you candesignate only one delegate or delegate group to each user.
Adding delegate groups1 Access Print Management Console from your Web browser, and then click the Delegates tab > Add Delegate Group.
Note: If the Add Delegate Group button does not appear, then click Manage Delegate Groups.
2 From the Add Group dialog, type the name of the group.
3 Type the Windows user ID, and then click Add.
Note: You can add only one user ID at a time.
4 Click OK.
Adding delegates1 Access Print Management Console from your Web browser, and then click the Delegates tab > Add Delegate.
Note: If the Add Delegate button does not appear, then click Manage Delegates.
2 From the Add Delegate dialog, type the name of the user.
Managing Print Management 13

3 If you want to add an individual delegate, then select Single User, and then type the Window user ID.
4 If you want to add a delegate in a group, then select Delegate Group, and then select a group from the list.
5 Select the Update the delegate for existing print jobs check box.
Note: If you do not select the check box, then the delegate is allowed only to release future print jobs.
6 Click OK.
Using the Badges tabIf badge authentication is going to be used, then configure the solution to allow users to register their badges whenusing the solution for the first time.
The Badges tab lets you view badges that are registered for the solution. It also lets you modify badge information andadd them manually.
Registering badge IDs1 Access Print Management Console from your Web browser, and then click the Badges tab > Add Badge.
2 From the Add Badge dialog, type the Windows user ID and the badge ID.
Note: Make sure that the badge ID is mapped to the Windows user ID to get the correct print jobs the usersubmitted in the print queue.
3 Click Add.
Adding temporary badge IDs1 Access Print Management Console from your Web browser, and then click the Badges tab > Temporary Badges.
2 From the Temporary Badges dialog, type the temporary badge ID you want to add, and then click Add.
Note: You can add only one badge ID at a time.
3 Click OK.
Using the Function Access tab
Managing the default user function access1 Access Print Management Console from your Web browser, and then click the Function Access tab > Default User.
2 From the Default User dialog, select which printer functions the new user is allowed to access, and then click OK.
Managing Print Management 14

Managing default group function access
Make sure that you have enabled the group function access in the Configuration options in Print Management Console.
1 Click Manage Groups > Default Group.
2 From the Default Group dialog, select which printer functions the new user is allowed to access, and then clickOK.
Adding groupsBefore you can add a group, make sure to enable the group function access.
1 Access Print Management Console from your Web browser, and then click the Function Access tab > Add Group.
Note: If the Add Group button does not appear, then click Manage Groups.
2 From the Add Group dialog, type the name of the group, and then select which printer functions the user is allowedto access.
3 Click OK.
Adding users1 Access Print Management Console from your Web browser, and then click Function Access > Add User.
2 From the Add User dialog, type the Windows user ID, and then select which printer functions the user is allowedto access.
Note: If a group has been added, then select a group to which the user belongs.
3 Click OK.
Using the Quotas tabThe Quotas tab lets you view and manage groups' and users' print quotas.
Viewing and managing quotasYou can manage quotas on a monthly or yearly basis. When monthly quotas are used, the user will receive a newallocation of pages on the first day of each month. There is no carryover of unused pages from previous months. Whenquotas are tracked annually, the user gets a much larger allocation of pages at the first of each year.
1 Access Print Management Console from your Web browser, and then click the Quotas tab.
2 In the Filter menu, select the appropriate data field, and then set a criteria for your search.
Note: The settings in the data field vary depending on the settings selected in the Quota View and Usage Viewmenus.
3 In the text field, type the word that defines your search, and then click Apply Filter.
4 In the Quota View menu, select the impressions you want to view.
• All Quota (T/C)—This shows the overall total number of pages a user can print or copy.
• Total Quota—This shows the total number of pages a user can print or copy.
Managing Print Management 15
• Color Quota—This shows the total number of pages a user can print or copy in color.
5 In the Usage View menu, select a period to view.
• This Month
• Last Month
• Last 3 Months
• Last 6 Months
• Last 12 Months
6 To sort the items in the column, click the column header.
• —This sorts the column in ascending order.
• —This sorts the column in descending order.
Adding groupsYou may choose to manage quotas at a group or user level. If group quotas are implemented, then a user’s quota wouldbe established dependent on the Active Directory (AD) group to which they belong. For example, you may have anemployee hierarchy where users in one group (ex. Marketing) would logically print more than users in another group(ex. Helpdesk). You could establish quotas specific to each group and, thus, users in each group will get the appropriatenumber of pages assigned. If you manage quotas at an individual user basis, then a default quota value will be establishedfor all users as they are registered or entered. The administrator manages any individual quota changes, if needed.
The group that corresponds to the AD group must be added manually. The group name must match the name in theAD group.
1 Access Print Management Console from your Web browser, and then click the Quotas tab > Add Group.
Note: If the Add Group button does not appear, then click Manage Groups.
2 From the Add Group dialog, type the name of the group, and then set the following:
• Total Quota—This is the total number of pages a user is allowed to print or copy.
• Color Quota—This is the total number of pages a user is allowed to print or copy in color.
Note: The individual user quota supercedes the group quota if both quotas are set for a user.
3 Click OK.
Adding users to a groupClicking Manage Users lets you view the list of all users, the group to which each user belongs, and the number of pageseach user printed for the specified time frame. By default, the quotas that appear are the total number of pages orcolor pages printed. You can modify the quota view and time frame by using the "Quota View" and "Usage View" filters.
1 Access Print Management Console from your Web browser, and then click the Quotas tab > Add User.
Note: If the Add User button does not appear, then click Manage Users to return to the list of current users.
2 From the Add User dialog, type the Windows user ID, and then select the group to which the user belongs.
3 Click OK.
Managing Print Management 16
Using the Alternate Locations tabPrint Management lets users release print jobs using printers from other locations. This tab lets you view and managethese printers.
Allowing users to release print jobs to another printer1 Access Print Management Console from your Web browser, and then click the Alternate Locations tab > Add
Alternate Locations.
2 From the Add Alternate Locations dialog, set the following:
• Release IP—This is the IP address of the printer where the print job is submitted.
• Alternate IP—This is the IP address of the printer where the print job is released.
• Alternate Display Name—This is the name of the printer where the print job is released.
• Alternate Model Name—This is the model name of the printer where the print job is released.
• Alternate Device is Color—This indicates whether the printer where the print job is released prints in color.
3 Click OK.
Using the Print Track Devices tab
Tracking print jobsLexmark Print Management lets administrators track users’ print jobs to devices that are not sent to the printer printqueue. Jobs are still printed through a shared Windows print queue but directly to the printer instead of being held forrelease. If print jobs are being tracked to any devices, administrators must add the information in the Print Track DevicesTab to make sure that information about the printer gets stored with the print job data. This is completely optional,and users can still print from printers that are not configured. However, if not added, the model and device type (suchas color or mono) will not be stored in the usage data.
1 Access Print Management Console, and then click the PrintTrack Devices tab > Add Print Track Device.
2 From the Add Print Track Device dialog, set the following settings.
• Site—This is where the print job is released.
• Address—This is the IP address of the printer where the print job is released.
• Model Name—This is the model name of the printer where the print job is released.
• Model Type—This is the model type of the printer where the print job is released.
• Comment—This is an optional field where administrators can add information about the printer.
3 Click OK.
Testing the solutionAfter changing the configuration or adding devices to the device group, you need to configure a client workstation tomake sure that print queueing is working properly.
1 Open the printer wizard.
Managing Print Management 17

In Windows 8From the Search charm, type run, and then navigate to:Apps list > Run > type control printers > OK > Add devices and printers
In Windows 7 and Vista
a Click > Run.
b In the Start Search dialog, type control printers.
c Click Add a printer > Add a network, wireless or Bluetooth printer.
In Windows XP or earliera Click Start > Run.
b In the Run dialog, type control printers.
c Click File > Add Printer.
2 Select the option that lets you connect to your network printer, and then type the destination folder where yourprinter is located.
3 Set the printer as default, and then select the option that lets you print a page, if prompted.
4 From the printer home screen, touch Print Release.
5 Select the print job that contains the test page, and then touch Print Selected.
Managing Print Management 18
Managing and generating a report
Generating reportsThis lets you analyze usage trends across the user population. You can export the data from the usage tracking databaseto a .csv file that can be used in Excel or with some other reporting tool to analyze the data. This export can be configuredto provide only data for a specific time frame.
1 Access Lexmark Management Console from your Web browser, and then click the System tab.
2 From the Systems section, select Reports.
3 From the Available Reports section, select PR ‑ Full Data Export, and then specify the reporting period.
4 Select the output format you want to generate.
• PDF—This generates a report in PDF format.
• CSV—This generates a report in Excel format.
5 If you want to save the exported tile, then do the following:
a Select the Save To check box, and then click the button next to the “Save to” field.
b Specify the path of the folder where you want to save the file, and then click OK.
6 If you want to send the report to an e‑mail address, then do the following:
a Select the Email To check box, and then click the button next to the “Email to” field.
b Specify the recipient of your e‑mail and other information, and then click OK.
7 Click Run Report.
Scheduling reports1 Access Lexmark Management Console from your Web browser, and then click the System tab.
2 From the System section, select Schedule, and then click Add.
Note: If you want to modify the existing schedule, then select the scheduled task, and then click Edit.
3 From the “Choose task” dialog, select Report, and then click Next.
4 From the Available Reports section, select PR ‑ Full Data Export, and then specify the reporting period.
5 Select the output format you want to generate.
• PDF—This generates a report in PDF format.
• CSV—This generates a report in Excel format.
6 If you want to save the exported file, then do the following:
a Select the Save To check box, and then click the button next to the “Save to” field.
b Specify the path of the folder where you want to save the file, and then click OK.
Managing and generating a report 19

7 If you want to send the report to an e‑mail address, then do the following:
a Select the Email To check box, and then click the button next to the “Email to” field.
b Specify the recipient of your e‑mail and other information, and then click OK.
8 Click Next.
9 From the “Choose the frequency” dialog, specify the start date and time and how often the generated report runs,and then click Finish.
Managing and generating a report 20
Troubleshooting
Firmware failure [9yy.xx]The firmware on the device needs to be updated.
Contact Lexmark Help Desk for more information on the latest firmware update.
An application error about a missing bean on the home screenRestart the Lexmark Solutions Application Server service on the LDD server.
Profile server is not responding
MAKE SURE THAT ALL REQUIRED LEXMARK SERVICES ON THE LDD LOAD BALANCER ARE
RUNNING
1 From the LDD load balancer, navigate to:
Settings > Control Panel > Administrative Tools > Services
2 Make sure that the following services are in a Started state:
• Firebird Server ‑ Default Instance
• Lexmark Solutions Backup and Restore Agent
• Apache2
• Lexmark Solutions Apache Agent
• Lexmark Solutions Web (or Protocol)
• Adaptor
• Lexmark Solutions License Manager
MAKE SURE THAT LEXMARK SOLUTIONS APPLICATION SERVER IS RUNNING
Restart the Lexmark Solutions Application Server service on the LDD server.
Unable to add new devices using LMC
MAKE SURE THAT YOUR PRINTER HAS SUFFICIENT LICENSES
1 From LMC, click the System tab, and then select Licenses.
2 Check if the licenses of your printer are added on the server and are not expired.
Note: If you have not purchased licenses or if the licenses are expired, then contact your Lexmark TechnicalProgram Manager.
Troubleshooting 21
“Out of Policy” error message still appears even after multipletries to update the policyThe licenses may not be configured to allow the number of devices in the group. Contact your Lexmark TechnicalProgram Manager to determine the number of printers for which licensing was purchased.
“Unsupported Device” error message appears when installing abadge reader to the printer
MAKE SURE THAT THE APPROPRIATE DRIVER IS INSTALLED ON THE PRINTER
If you do not know the driver that is required, then check another working printer in the environment or contactLexmark Help Desk.
“Unable to Read Badge Data” error message appears whenswiping the badge
MAKE SURE THE BADGE READER HAS THE CORRECT CONFIGURATION FILE
If you do not know the required configuration file, then check another working printer in your environment or contactLexmark Help Desk.
Print jobs released by the users do not appear in the printqueue
MAKE SURE THAT THE LEXMARK UNIVERSAL PRINT DRIVER IS INSTALLED AND THE PORT ISCONFIGURED TO THE PRINT MANAGEMENT SERVER
For more information, contact Lexmark Help Desk.
MAKE SURE THAT THE DOCUMENT NAME AND THE USER ID ARE CORRECT AND THAT THE USER
WAS NOT LOGGED IN USING A DIFFERENT USER ID WHEN PRINTING
For more information, see “Viewing and managing print queues” on page 12.
MAKE SURE THAT THE BADGE ID IS REGISTERED TO THE CORRECT USER IDFor more information, see “Registering badge IDs” on page 14.
Troubleshooting 22

An error has occurred when swiping the badge
MAKE SURE THAT THE BADGE ID IS REGISTERED TO THE PRINT MANAGEMENT CONSOLE
For more information, see “Registering badge IDs” on page 14.
RESTART THE PRINTER
The card reader may be having issues that require the printer to be restarted.
Page count is inaccurate
MAKE SURE THAT THE PRINT JOBS ARE NOT SENT UNTIL THEY ARE FINISHED SPOOLING
1 From the printer folder, right‑click your printer, and then click Printer properties or Properties.
2 Click the Advanced tab, and then select the following check boxes:
• Spool print documents so program finishes printing faster.
• Start printing after last page is spooled.
3 Click OK.
Note: Print Management page count tracking is for trending purposes only and is not designed for billing.
Troubleshooting 23
Appendix
Contacting Lexmark Help DeskWhen contacting Lexmark Help Desk, make sure that you have the following information to expedite handling of issues:
• The PIN of your company, if provided.
• The version of LDD your printer is currently connected to.
To obtain the version, do the following:
1 Access Lexmark Management Console from your Web browser.
2 From the top section of the page, click About.
• The version of the Print Management solution you are currently using.
To obtain the version, do the following:
1 Access Lexmark Management Console from your Web browser.
2 Click the Solutions tab, and then select PrintReleasev2 in the Solutions section.
3 From the Tasks section, select Summary, and then find the version section.
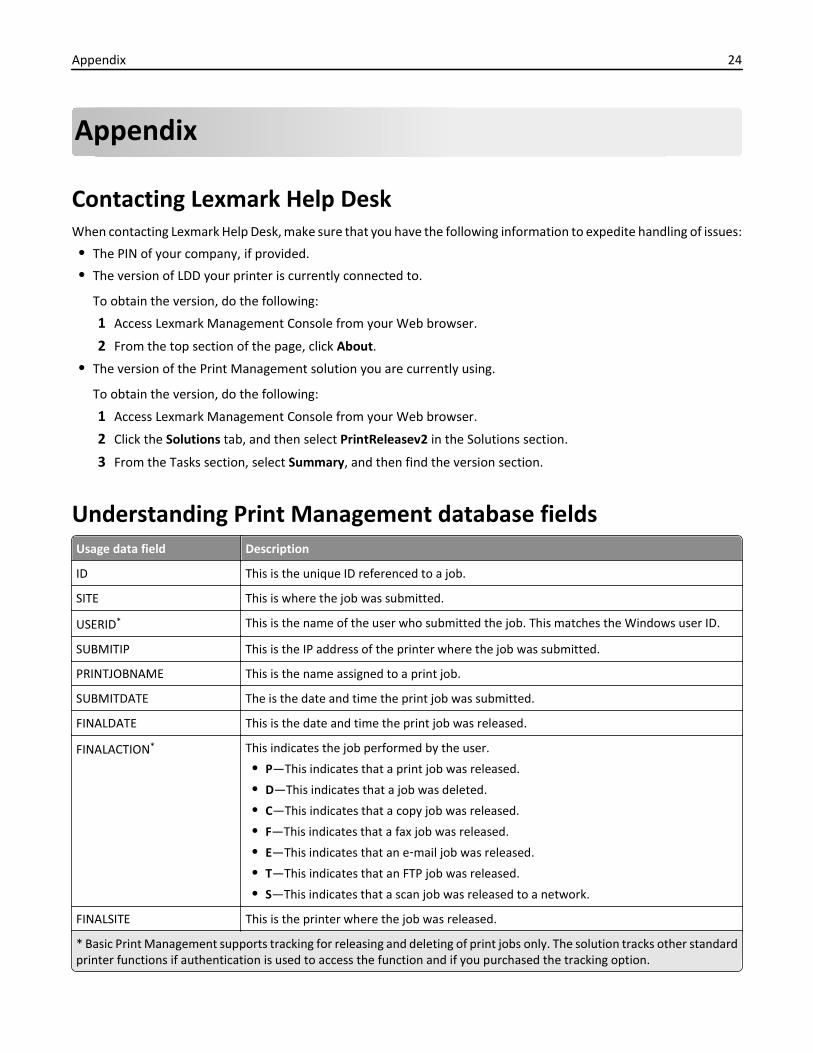
Understanding Print Management database fieldsUsage data field Description
ID This is the unique ID referenced to a job.
SITE This is where the job was submitted.
USERID* This is the name of the user who submitted the job. This matches the Windows user ID.
SUBMITIP This is the IP address of the printer where the job was submitted.
PRINTJOBNAME This is the name assigned to a print job.
SUBMITDATE The is the date and time the print job was submitted.
FINALDATE This is the date and time the print job was released.
FINALACTION* This indicates the job performed by the user.
• P—This indicates that a print job was released.
• D—This indicates that a job was deleted.
• C—This indicates that a copy job was released.
• F—This indicates that a fax job was released.
• E—This indicates that an e‑mail job was released.
• T—This indicates that an FTP job was released.
• S—This indicates that a scan job was released to a network.
FINALSITE This is the printer where the job was released.
* Basic Print Management supports tracking for releasing and deleting of print jobs only. The solution tracks other standardprinter functions if authentication is used to access the function and if you purchased the tracking option.
Appendix 24
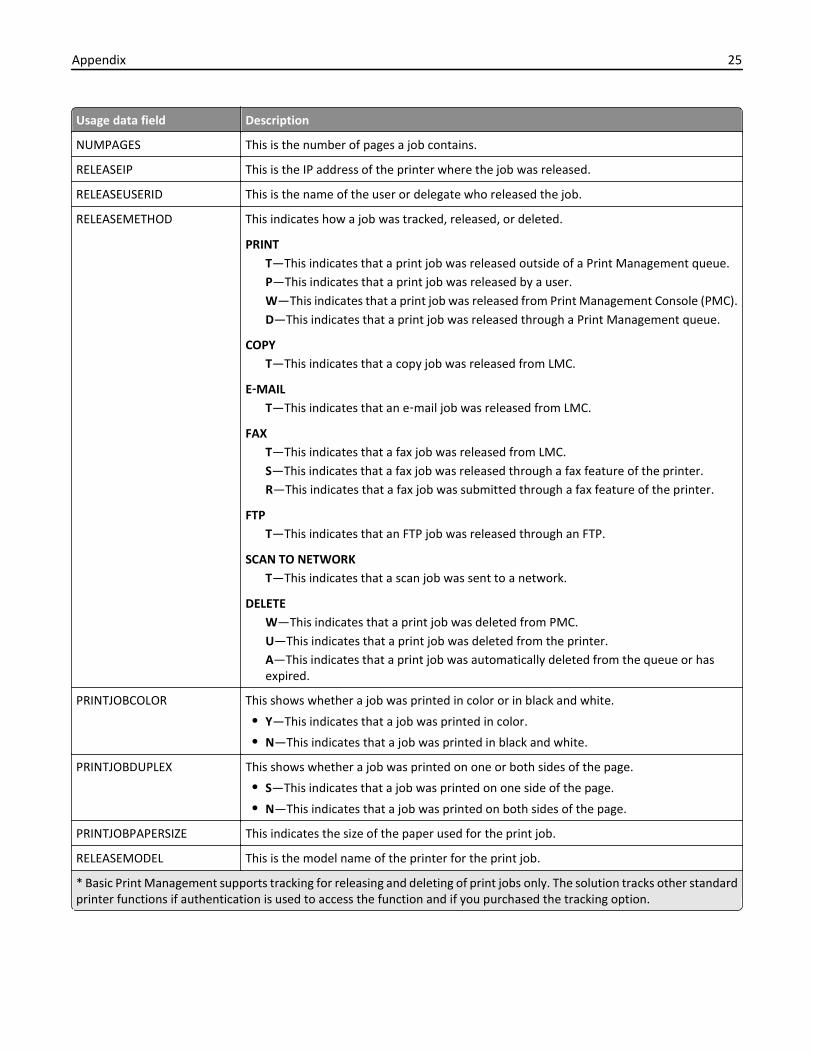
Usage data field Description
NUMPAGES This is the number of pages a job contains.
RELEASEIP This is the IP address of the printer where the job was released.
RELEASEUSERID This is the name of the user or delegate who released the job.
RELEASEMETHOD This indicates how a job was tracked, released, or deleted.
PRINTT—This indicates that a print job was released outside of a Print Management queue.P—This indicates that a print job was released by a user.W—This indicates that a print job was released from Print Management Console (PMC).D—This indicates that a print job was released through a Print Management queue.
COPYT—This indicates that a copy job was released from LMC.
E‑MAILT—This indicates that an e‑mail job was released from LMC.
FAXT—This indicates that a fax job was released from LMC.S—This indicates that a fax job was released through a fax feature of the printer.R—This indicates that a fax job was submitted through a fax feature of the printer.
FTPT—This indicates that an FTP job was released through an FTP.
SCAN TO NETWORKT—This indicates that a scan job was sent to a network.
DELETEW—This indicates that a print job was deleted from PMC.U—This indicates that a print job was deleted from the printer.A—This indicates that a print job was automatically deleted from the queue or hasexpired.
PRINTJOBCOLOR This shows whether a job was printed in color or in black and white.
• Y—This indicates that a job was printed in color.
• N—This indicates that a job was printed in black and white.
PRINTJOBDUPLEX This shows whether a job was printed on one or both sides of the page.
• S—This indicates that a job was printed on one side of the page.
• N—This indicates that a job was printed on both sides of the page.
PRINTJOBPAPERSIZE This indicates the size of the paper used for the print job.
RELEASEMODEL This is the model name of the printer for the print job.
* Basic Print Management supports tracking for releasing and deleting of print jobs only. The solution tracks other standardprinter functions if authentication is used to access the function and if you purchased the tracking option.
Appendix 25
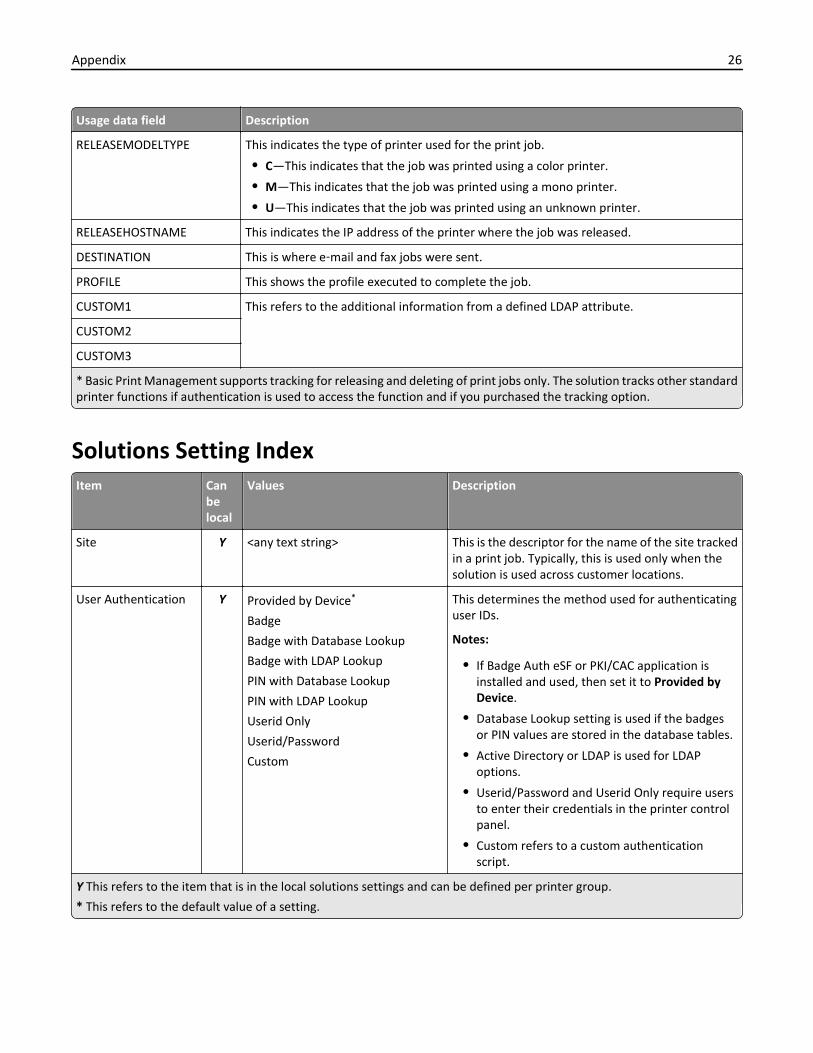
Usage data field Description
RELEASEMODELTYPE This indicates the type of printer used for the print job.
• C—This indicates that the job was printed using a color printer.
• M—This indicates that the job was printed using a mono printer.
• U—This indicates that the job was printed using an unknown printer.
RELEASEHOSTNAME This indicates the IP address of the printer where the job was released.
DESTINATION This is where e‑mail and fax jobs were sent.
PROFILE This shows the profile executed to complete the job.
CUSTOM1 This refers to the additional information from a defined LDAP attribute.
CUSTOM2
CUSTOM3
* Basic Print Management supports tracking for releasing and deleting of print jobs only. The solution tracks other standardprinter functions if authentication is used to access the function and if you purchased the tracking option.
Solutions Setting IndexItem Can
belocal
Values Description
Site Y <any text string> This is the descriptor for the name of the site trackedin a print job. Typically, this is used only when thesolution is used across customer locations.
User Authentication Y Provided by Device*
Badge
Badge with Database Lookup
Badge with LDAP Lookup
PIN with Database Lookup
PIN with LDAP Lookup
Userid Only
Userid/Password
Custom
This determines the method used for authenticatinguser IDs.
Notes:
• If Badge Auth eSF or PKI/CAC application isinstalled and used, then set it to Provided byDevice.
• Database Lookup setting is used if the badgesor PIN values are stored in the database tables.
• Active Directory or LDAP is used for LDAPoptions.
• Userid/Password and Userid Only require usersto enter their credentials in the printer controlpanel.
• Custom refers to a custom authenticationscript.
Y This refers to the item that is in the local solutions settings and can be defined per printer group.
* This refers to the default value of a setting.
Appendix 26
Item Canbelocal
Values Description
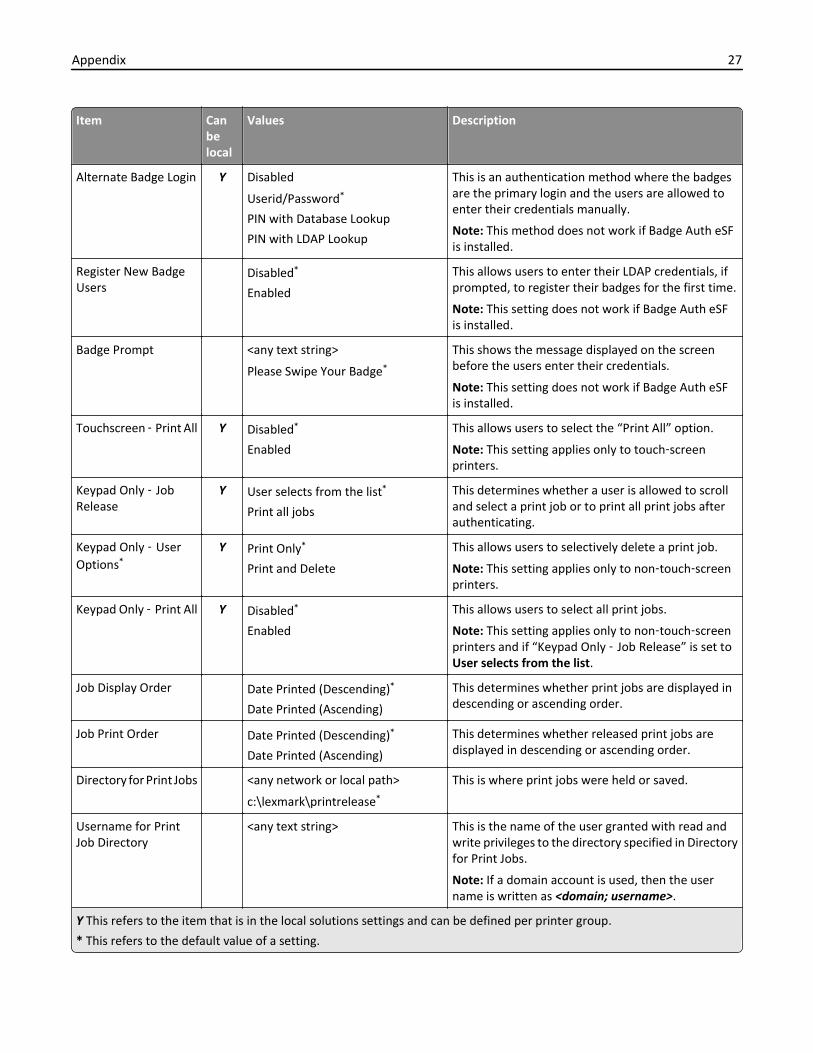
Alternate Badge Login Y Disabled
Userid/Password*
PIN with Database Lookup
PIN with LDAP Lookup
This is an authentication method where the badgesare the primary login and the users are allowed toenter their credentials manually.
Note: This method does not work if Badge Auth eSFis installed.
Register New BadgeUsers
Disabled*
Enabled
This allows users to enter their LDAP credentials, ifprompted, to register their badges for the first time.
Note: This setting does not work if Badge Auth eSFis installed.
Badge Prompt <any text string>
Please Swipe Your Badge*
This shows the message displayed on the screenbefore the users enter their credentials.
Note: This setting does not work if Badge Auth eSFis installed.
Touchscreen ‑ Print All Y Disabled*
Enabled
This allows users to select the “Print All” option.
Note: This setting applies only to touch‑screenprinters.
Keypad Only ‑ JobRelease
Y User selects from the list*
Print all jobs
This determines whether a user is allowed to scrolland select a print job or to print all print jobs afterauthenticating.
Keypad Only ‑ UserOptions*
Y Print Only*
Print and Delete
This allows users to selectively delete a print job.
Note: This setting applies only to non‑touch‑screenprinters.
Keypad Only ‑ Print All Y Disabled*
Enabled
This allows users to select all print jobs.
Note: This setting applies only to non‑touch‑screenprinters and if “Keypad Only ‑ Job Release” is set toUser selects from the list.
Job Display Order Date Printed (Descending)*
Date Printed (Ascending)
This determines whether print jobs are displayed indescending or ascending order.
Job Print Order Date Printed (Descending)*
Date Printed (Ascending)
This determines whether released print jobs aredisplayed in descending or ascending order.
Directory for Print Jobs <any network or local path>
c:\lexmark\printrelease*
This is where print jobs were held or saved.
Username for PrintJob Directory
<any text string> This is the name of the user granted with read andwrite privileges to the directory specified in Directoryfor Print Jobs.
Note: If a domain account is used, then the username is written as <domain; username>.
Y This refers to the item that is in the local solutions settings and can be defined per printer group.
* This refers to the default value of a setting.
Appendix 27

Item Canbelocal
Values Description
Password for Print JobDirectory
<any text string> This is the password assigned to the user granted withread and write privileges to the directory specified inDirectory for Print Jobs.
Directory forEncrypted Print Jobs
<any network or local path>
c:\lexmark\printrelease*
This is where encrypted print jobs are saved. Theadministrator uses PrintCryption or smart cards toencrypt the print jobs.
Job EncryptionMethod
Device Certificate*
User Certificate
This indicates the certificate used to decryptencrypted print jobs before the jobs are released.
• Select Device Certificate if PrintCryption is used.
• Select User Certificate if smart cards are used.
Delete Unprinted JobsAfter Specified Hours
1–168
10*
This indicates the number of hours the printer waitsbefore a print job is deleted.
Delete Printed JobsAfter Specified Hours
1–24
0*
This indicates the number of hours the printer waitsbefore a released and kept job for reprinting isdeleted.
Notes:
• 0 disables reprinting.
• Any value from 1 to 24 enables reprinting.
Function Access Disabled*
By Userid
By Group
This determines whether certain printer functions areaccessed by user or group.
User Quotas Disabled*
By Userid
By Group
This determines the number of quota a user or groupis set for print and copy job.
Quota Duration Monthly*
Yearly
This determines whether quotas are measured on amonthly or yearly basis.
Default User TotalQuota
<any positive integer value>
0*
This indicates the initial number of pages the user isallowed to print or copy.
Default User ColorQuota
<any positive integer value>
0*
This indicates the initial number of pages the user isallowed to print or copy in color.
Default User Allow Yes*
No
This indicates whether a user is allowed to print incolor.
Quota for GroupMembers
By Group*
By User
This determines if an administrator can override thequotas for individual users or all users in a group.
Note: This setting only applies when User Quotas isset to By Group.
Y This refers to the item that is in the local solutions settings and can be defined per printer group.
* This refers to the default value of a setting.
Appendix 28
Item Canbelocal
Values Description
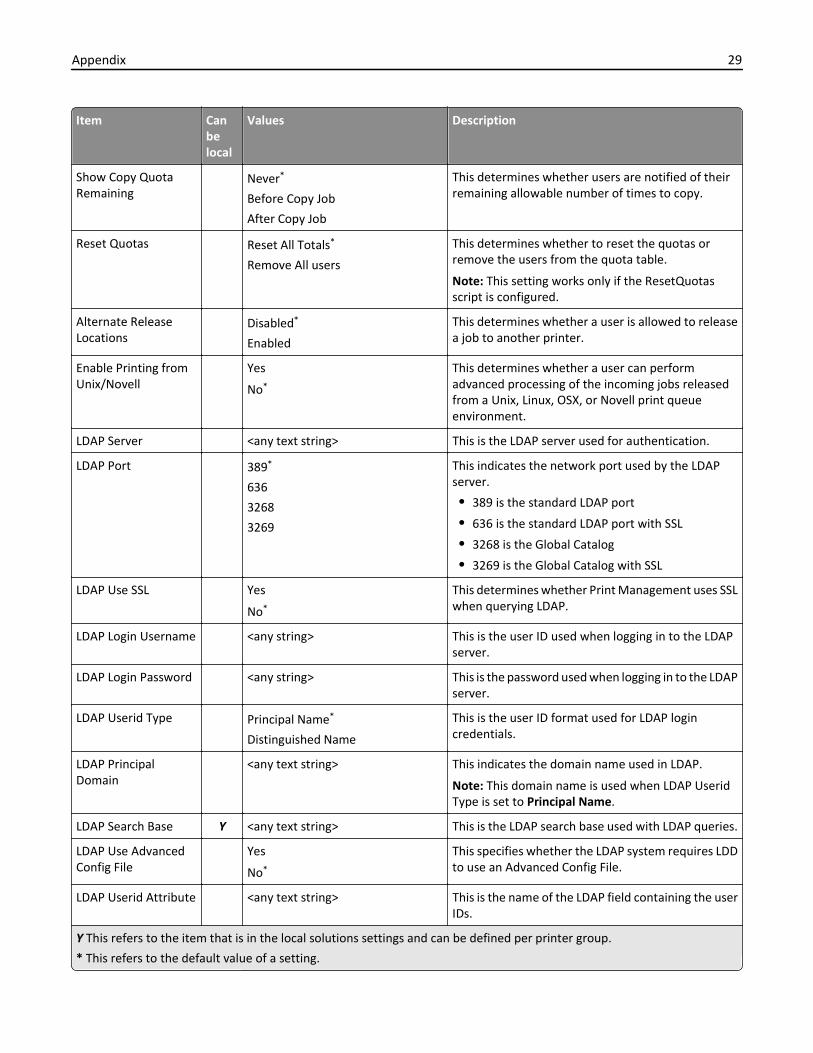
Show Copy QuotaRemaining
Never*
Before Copy Job
After Copy Job
This determines whether users are notified of theirremaining allowable number of times to copy.
Reset Quotas Reset All Totals*
Remove All users
This determines whether to reset the quotas orremove the users from the quota table.
Note: This setting works only if the ResetQuotasscript is configured.
Alternate ReleaseLocations
Disabled*
Enabled
This determines whether a user is allowed to releasea job to another printer.
Enable Printing fromUnix/Novell
Yes
No*
This determines whether a user can performadvanced processing of the incoming jobs releasedfrom a Unix, Linux, OSX, or Novell print queueenvironment.
LDAP Server <any text string> This is the LDAP server used for authentication.
LDAP Port 389*
636
3268
3269
This indicates the network port used by the LDAPserver.
• 389 is the standard LDAP port
• 636 is the standard LDAP port with SSL
• 3268 is the Global Catalog
• 3269 is the Global Catalog with SSL
LDAP Use SSL Yes
No*
This determines whether Print Management uses SSLwhen querying LDAP.
LDAP Login Username <any string> This is the user ID used when logging in to the LDAPserver.
LDAP Login Password <any string> This is the password used when logging in to the LDAPserver.
LDAP Userid Type Principal Name*
Distinguished Name
This is the user ID format used for LDAP logincredentials.
LDAP PrincipalDomain
<any text string> This indicates the domain name used in LDAP.
Note: This domain name is used when LDAP UseridType is set to Principal Name.
LDAP Search Base Y <any text string> This is the LDAP search base used with LDAP queries.
LDAP Use AdvancedConfig File
Yes
No*
This specifies whether the LDAP system requires LDDto use an Advanced Config File.
LDAP Userid Attribute <any text string> This is the name of the LDAP field containing the userIDs.
Y This refers to the item that is in the local solutions settings and can be defined per printer group.
* This refers to the default value of a setting.
Appendix 29

Item Canbelocal
Values Description
LDAP BadgeidAttribute
<any text string> This is the name of the LDAP field containing thebadge numbers.
Note: This setting is required if User Authenticationis set to Badge with LDAP Lookup.
LDAP PinID Attribute <any text string> This is the name of the LDAP field containing the PINnumbers.
Note: This setting is required if User Authenticationis set to PIN with LDAP Lookup.
LDAP Email Attribute <any text string>
mail*This is the name of the LDAP field containing users’e‑mail addresses.
Note: This setting is required if any of the advancede‑mail features is used.
LDAP Home DirectoryAttribute
<any text string>
homeDirectory*
This is the name of the LDAP field containing users’home directories.
Note: This setting is required if Scan to Networkprofile and destination settings are configured inUser’s Home Directory.
LDAP CustomAttribute 1
<any text string> This setting is used only when users have additionalLDAP attributes in tracked usage data.
LDAP CustomAttribute 2
LDAP CustomAttribute 3
Copy ‑ Return to CopyScreen
Yes
No*
This determines whether the printer allows users toreturn to the copy home screen after a copy jobcompletes.
Copy ‑ WarningThreshold
0 ‑ 999 This indicates the number of copies that a userrequires to confirm before the copy job was released.
Notes:
• 999 is the factory default setting.
• 0 disables this feature.
Copy ‑ Copy CenterThreshold
<any integer> This determines the number of pages allowed on asingle copy job.
Notes:
• If the number of pages exceeds the maximum,then a prompt informing users to use the CopyCenter appears, and then the users can notproceed with the copy job.
• 0 is the factory default setting.
Y This refers to the item that is in the local solutions settings and can be defined per printer group.
* This refers to the default value of a setting.
Appendix 30

Item Canbelocal
Values Description
Copy Center ErrorMessage
<any text string>
This job is too large to be processedon this device. It must be sent to theCopy Center.*
This shows an error message when the number ofpages exceeds to the maximum number of pages setin Copy ‑ Copy Center Threshold.
Email ‑ From Source LDAP*
Database
Device
This indicates what e‑mail address to use whensending an e‑mail from a printer.
Notes:
• LDAP and Database use the user’s e‑mailaddress.
• Device uses the e‑mail address configured inthe printer e‑mail settings.
Email ‑ User can onlysend to self
Yes
No*
This determines whether users send e‑mails tothemselves or to any other e‑mail addresses.
Email ‑ Send User acopy
Yes*
No
This determines whether users receive a copy ofe‑mail jobs released.
Email ‑ TrackDestination
Yes
No*
This determines whether to track the e‑mailaddresses in the “TO” field every time an e‑mail jobcompletes.
Email ‑ Send Thru MFP*
Server
This determines whether the user sends an e‑mailfrom a printer or an LDD server.
Email ‑ Return to EmailScreen
Yes
No*
This determines whether the printer allows users toreturn to the e‑mail home screen after an e‑mail jobcompletes.
Email ‑ MaximumAttachment Size
<any integer> This determines the maximum size of the file inmegabyte a user can attach to an e‑mail.
Notes:
• 0 is the factory default setting. Setting it to 0disables the checking of the attachment.
• If the size of the file exceeds the maximum,then the user can not proceed with the e‑mailjob.
Email ‑ Maximum SizeError Message
<any text string>
The attachment exceeds themaximum allowed size set by youremail system; the email cannot besent.*
This shows an error message when the size of the fileexceeds to the maximum size set in Email ‑ MaximumAttachment Size.
Fax ‑ Track Destination Yes
No*
This determines whether the printer tracks faxdestination numbers every time a fax job completes.
Y This refers to the item that is in the local solutions settings and can be defined per printer group.
* This refers to the default value of a setting.
Appendix 31
Item Canbelocal
Values Description
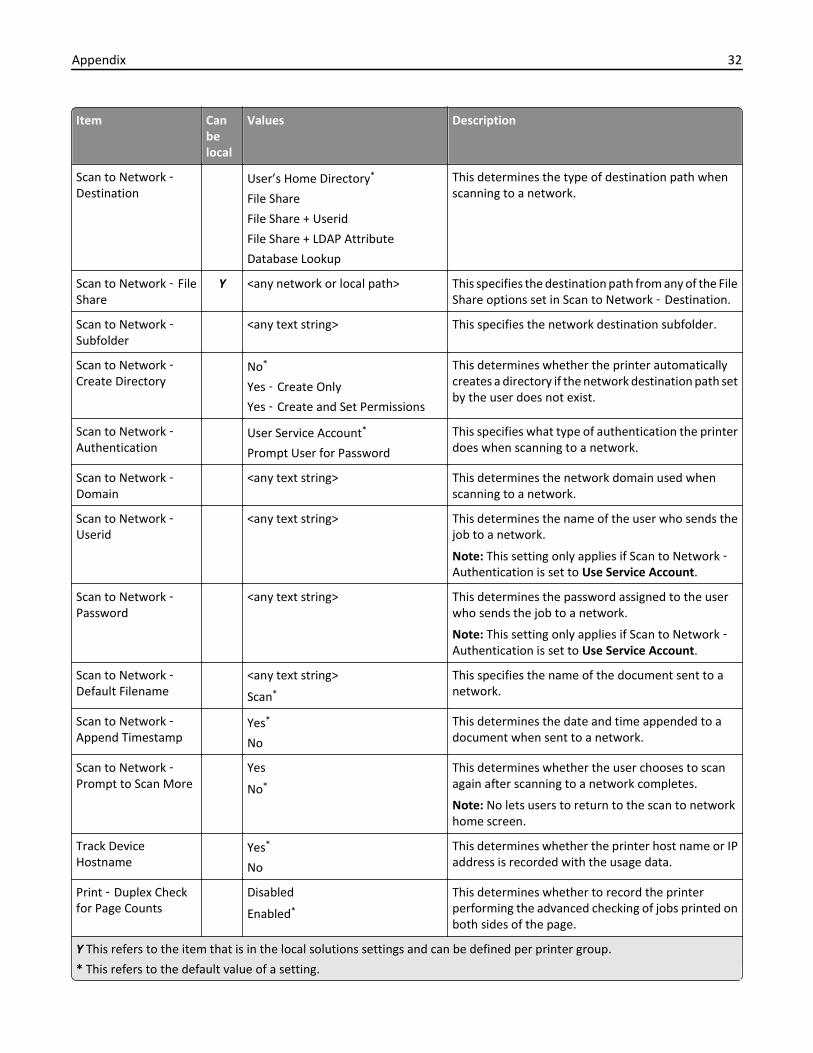
Scan to Network ‑Destination
User’s Home Directory*
File Share
File Share + Userid
File Share + LDAP Attribute
Database Lookup
This determines the type of destination path whenscanning to a network.
Scan to Network ‑ FileShare
Y <any network or local path> This specifies the destination path from any of the FileShare options set in Scan to Network ‑ Destination.
Scan to Network ‑Subfolder
<any text string> This specifies the network destination subfolder.
Scan to Network ‑Create Directory
No*
Yes ‑ Create Only
Yes ‑ Create and Set Permissions
This determines whether the printer automaticallycreates a directory if the network destination path setby the user does not exist.
Scan to Network ‑Authentication
User Service Account*
Prompt User for Password
This specifies what type of authentication the printerdoes when scanning to a network.
Scan to Network ‑Domain
<any text string> This determines the network domain used whenscanning to a network.
Scan to Network ‑Userid
<any text string> This determines the name of the user who sends thejob to a network.
Note: This setting only applies if Scan to Network ‑Authentication is set to Use Service Account.
Scan to Network ‑Password
<any text string> This determines the password assigned to the userwho sends the job to a network.
Note: This setting only applies if Scan to Network ‑Authentication is set to Use Service Account.
Scan to Network ‑Default Filename
<any text string>
Scan*
This specifies the name of the document sent to anetwork.
Scan to Network ‑Append Timestamp
Yes*
No
This determines the date and time appended to adocument when sent to a network.
Scan to Network ‑Prompt to Scan More
Yes
No*
This determines whether the user chooses to scanagain after scanning to a network completes.
Note: No lets users to return to the scan to networkhome screen.
Track DeviceHostname
Yes*
No
This determines whether the printer host name or IPaddress is recorded with the usage data.
Print ‑ Duplex Checkfor Page Counts
Disabled
Enabled*
This determines whether to record the printerperforming the advanced checking of jobs printed onboth sides of the page.
Y This refers to the item that is in the local solutions settings and can be defined per printer group.
* This refers to the default value of a setting.
Appendix 32
Item Canbelocal
Values Description
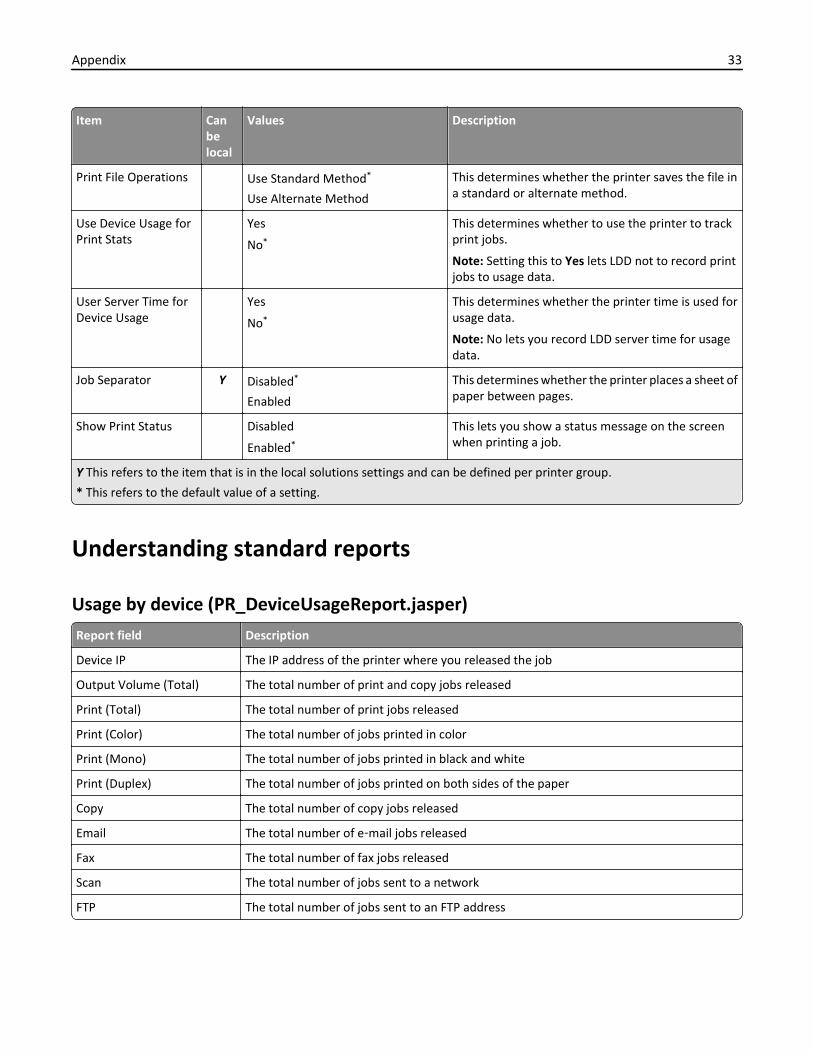
Print File Operations Use Standard Method*
Use Alternate Method
This determines whether the printer saves the file ina standard or alternate method.
Use Device Usage forPrint Stats
Yes
No*
This determines whether to use the printer to trackprint jobs.
Note: Setting this to Yes lets LDD not to record printjobs to usage data.
User Server Time forDevice Usage
Yes
No*
This determines whether the printer time is used forusage data.
Note: No lets you record LDD server time for usagedata.
Job Separator Y Disabled*
Enabled
This determines whether the printer places a sheet ofpaper between pages.
Show Print Status Disabled
Enabled*
This lets you show a status message on the screenwhen printing a job.
Y This refers to the item that is in the local solutions settings and can be defined per printer group.
* This refers to the default value of a setting.
Understanding standard reports
Usage by device (PR_DeviceUsageReport.jasper)
Report field Description
Device IP The IP address of the printer where you released the job
Output Volume (Total) The total number of print and copy jobs released
Print (Total) The total number of print jobs released
Print (Color) The total number of jobs printed in color
Print (Mono) The total number of jobs printed in black and white
Print (Duplex) The total number of jobs printed on both sides of the paper
Copy The total number of copy jobs released
Email The total number of e‑mail jobs released
Fax The total number of fax jobs released
Scan The total number of jobs sent to a network
FTP The total number of jobs sent to an FTP address
Appendix 33
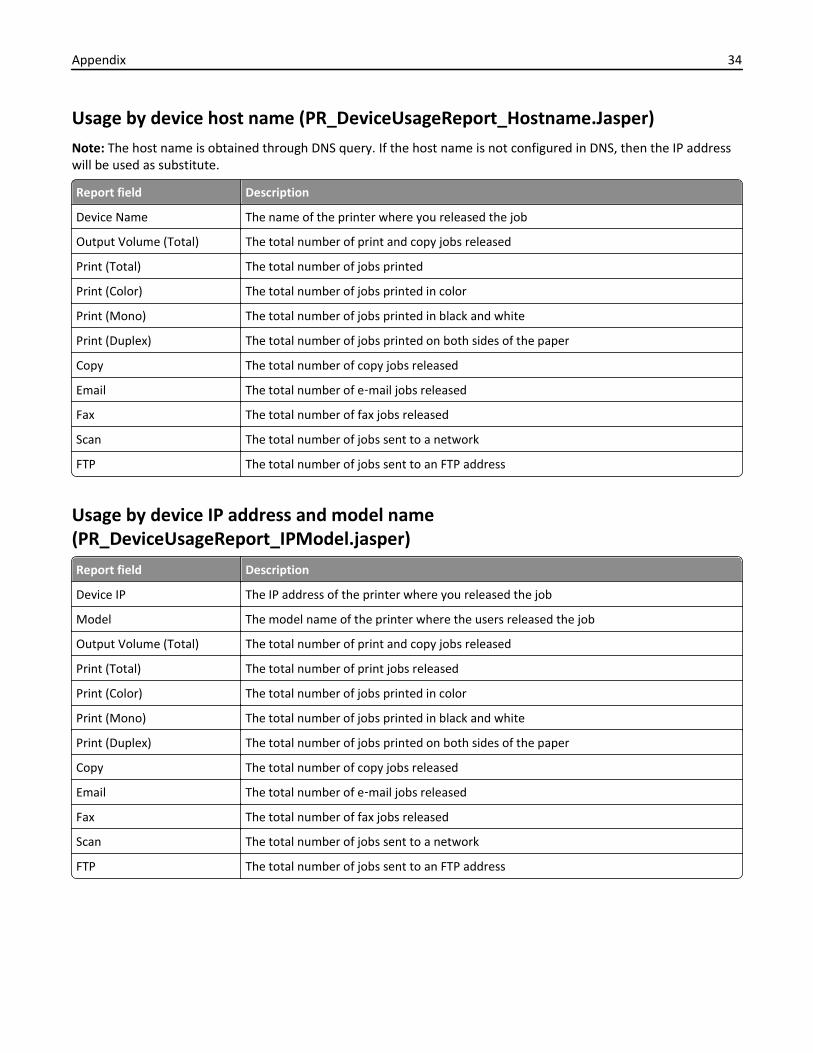
Usage by device host name (PR_DeviceUsageReport_Hostname.Jasper)Note: The host name is obtained through DNS query. If the host name is not configured in DNS, then the IP addresswill be used as substitute.
Report field Description
Device Name The name of the printer where you released the job
Output Volume (Total) The total number of print and copy jobs released
Print (Total) The total number of jobs printed
Print (Color) The total number of jobs printed in color
Print (Mono) The total number of jobs printed in black and white
Print (Duplex) The total number of jobs printed on both sides of the paper
Copy The total number of copy jobs released
Email The total number of e‑mail jobs released
Fax The total number of fax jobs released
Scan The total number of jobs sent to a network
FTP The total number of jobs sent to an FTP address
Usage by device IP address and model name(PR_DeviceUsageReport_IPModel.jasper)
Report field Description
Device IP The IP address of the printer where you released the job
Model The model name of the printer where the users released the job
Output Volume (Total) The total number of print and copy jobs released
Print (Total) The total number of print jobs released
Print (Color) The total number of jobs printed in color
Print (Mono) The total number of jobs printed in black and white
Print (Duplex) The total number of jobs printed on both sides of the paper
Copy The total number of copy jobs released
Email The total number of e‑mail jobs released
Fax The total number of fax jobs released
Scan The total number of jobs sent to a network
FTP The total number of jobs sent to an FTP address
Appendix 34
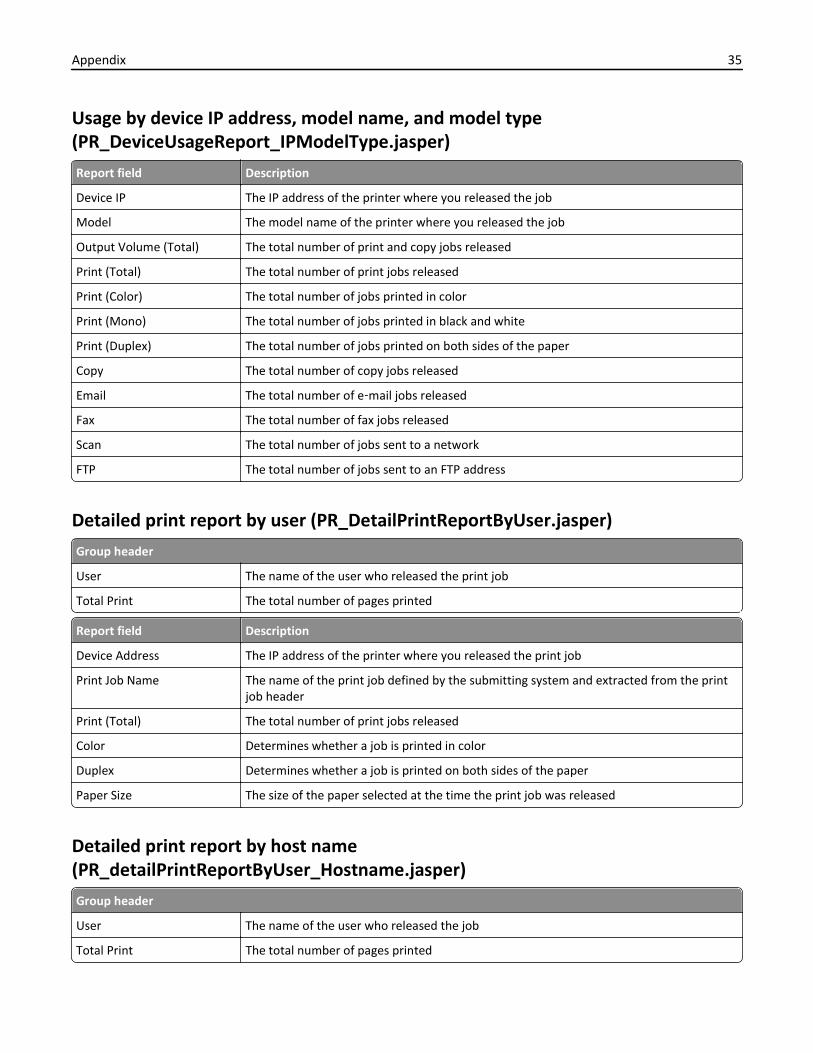
Usage by device IP address, model name, and model type(PR_DeviceUsageReport_IPModelType.jasper)
Report field Description
Device IP The IP address of the printer where you released the job
Model The model name of the printer where you released the job
Output Volume (Total) The total number of print and copy jobs released
Print (Total) The total number of print jobs released
Print (Color) The total number of jobs printed in color
Print (Mono) The total number of jobs printed in black and white
Print (Duplex) The total number of jobs printed on both sides of the paper
Copy The total number of copy jobs released
Email The total number of e‑mail jobs released
Fax The total number of fax jobs released
Scan The total number of jobs sent to a network
FTP The total number of jobs sent to an FTP address
Detailed print report by user (PR_DetailPrintReportByUser.jasper)
Group header
User The name of the user who released the print job
Total Print The total number of pages printed
Report field Description
Device Address The IP address of the printer where you released the print job
Print Job Name The name of the print job defined by the submitting system and extracted from the printjob header
Print (Total) The total number of print jobs released
Color Determines whether a job is printed in color
Duplex Determines whether a job is printed on both sides of the paper
Paper Size The size of the paper selected at the time the print job was released
Detailed print report by host name(PR_detailPrintReportByUser_Hostname.jasper)
Group header
User The name of the user who released the job
Total Print The total number of pages printed
Appendix 35

Report field Description
Hostname The host name of the printer where you released the job
Print Job Name The name of the print job defined by the submitting system and extracted from the printjob header
Print (Total) The total number of print jobs released
Color Whether a job is printed in color
Duplex Whether a job is printed on both sides of the paper
Paper Size The size of the paper selected at the time the job was released
Detailed print report by printer IP address, model name, and model type(PR_detailPrintReportByUser_ IPMMT.jasper)
Group header
User The name of the user who released the print job
Total Print The total number of pages printed
Report field Description
Device IP The IP address of the printer where you released the print job
Model The model name of the printer where you released the print job
Model Type The model type of the printer where you released the print job
Print Job Name The name of the print job defined by the submitting system and extracted from the printjob header.
Print (Total) The total number of print jobs released
Color Determines whether a job is printed in color
Duplex Determines whether a job is printed on both sides of the paper
Paper Size The size of the paper selected at the time the print job was released
Detailed print report by printer IP address and model type(PR_detailPrintReportByUser_ IPModelType.jasper)
Group header
User The name of the user who released the print job
Total Print The total number of pages printed
Report field Description
Device IP The IP address of the printer where you released the print job
Model Type The model type of the printer where you released the print job
Print Job Name The name of the print job defined by the submitting system and extracted from the printjob header
Appendix 36

Report field Description
Print (Total) The total number of print jobs released
Color Determines whether a job is printed in color
Duplex Determines whether a job is printed on both sides of the paper
Paper Size The size of the paper selected at the time the print job was released
Color or mono printing report by user (PR_ColorMonoByUser.jasper)
Report field Description
User The name of the user who released the print job
Print (Total) The total number of print jobs released
Print (Mono) The total number of jobs printed in black and white
Print (Color) The total number of jobs printed in color
Usage report defined in Custom1 field (PR_[custom1]UsageReport.jasper)
Group header
Custom1 The variable name defined as attribute for grouping users in LDAP database
Report field Description
User The name of the user who released the job
Copy The total number of copy jobs released
Email The total number of e‑mail jobs released
Fax The total number of fax jobs released
Print (Total) The total number of print jobs released
Print (Mono) The total number of jobs printed in black and white
Print (Color) The total number of jobs printed in color
Print (Duplex) The total number of jobs printed on both sides of the paper
Single‑sided or two‑sided printing report by user(PR_simplexDuplexByUser.jasper)
Report field Description
User The name of the user who released the job
Print (Total) The total number of print jobs released
Print (Simplex) The total number of jobs printed on one side of the paper
Print (Duplex) The total number of jobs printed on both sides of the paper
Appendix 37
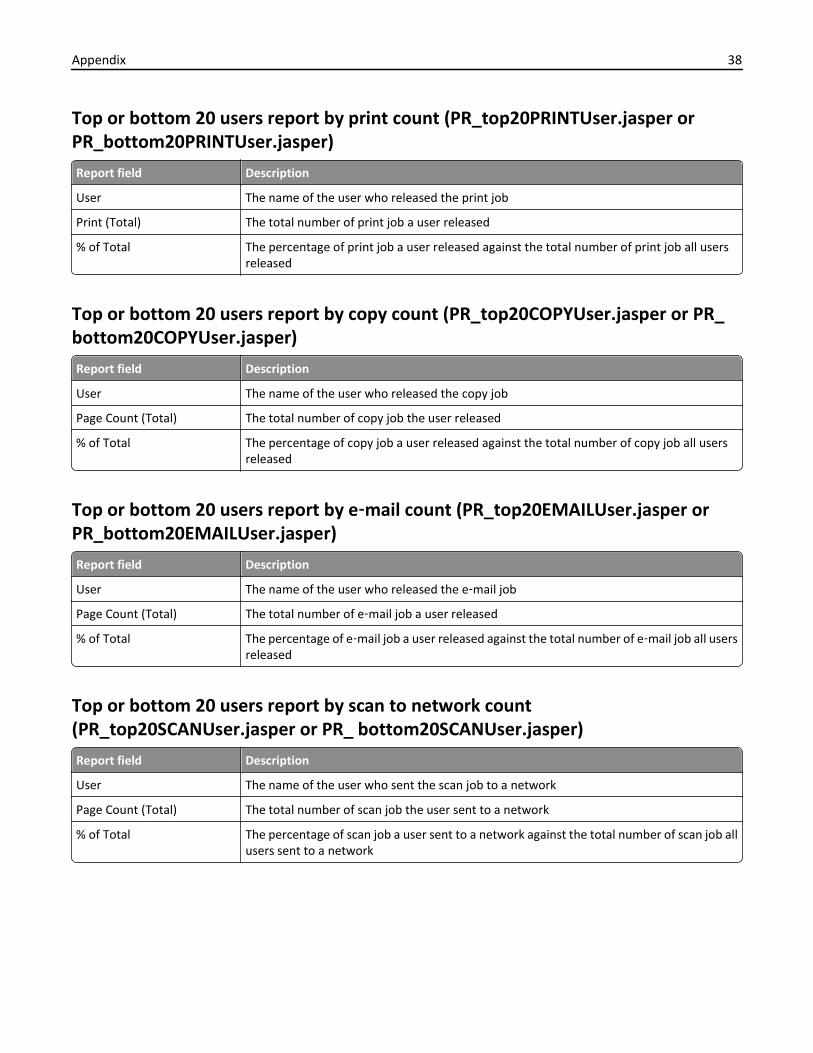
Top or bottom 20 users report by print count (PR_top20PRINTUser.jasper orPR_bottom20PRINTUser.jasper)
Report field Description
User The name of the user who released the print job
Print (Total) The total number of print job a user released
% of Total The percentage of print job a user released against the total number of print job all usersreleased
Top or bottom 20 users report by copy count (PR_top20COPYUser.jasper or PR_bottom20COPYUser.jasper)
Report field Description
User The name of the user who released the copy job
Page Count (Total) The total number of copy job the user released
% of Total The percentage of copy job a user released against the total number of copy job all usersreleased
Top or bottom 20 users report by e‑mail count (PR_top20EMAILUser.jasper orPR_bottom20EMAILUser.jasper)
Report field Description
User The name of the user who released the e‑mail job
Page Count (Total) The total number of e‑mail job a user released
% of Total The percentage of e‑mail job a user released against the total number of e‑mail job all usersreleased
Top or bottom 20 users report by scan to network count(PR_top20SCANUser.jasper or PR_ bottom20SCANUser.jasper)
Report field Description
User The name of the user who sent the scan job to a network
Page Count (Total) The total number of scan job the user sent to a network
% of Total The percentage of scan job a user sent to a network against the total number of scan job allusers sent to a network
Appendix 38

Top or bottom 20 users report by fax count (PR_top20FAXUser.jasper or PR_bottom20FAXUser.jasper)
Report field Description
User The name of the user who released the fax job
Page Count (Total) The total number of fax job the user released
% of Total The percentage of fax job a user released against the total number of fax job all users released
Deleted pages report by user (PR_pageDeletedByUser.jasper)
Report field Description
User The name of the user who deleted the jobs
Page Count (Total) The total number of all deleted jobs
Deleted User The total number of jobs the user deleted
Deleted System The total number of jobs the system automatically deleted
% of Total The percentage of jobs the user and the system deleted against the total number of alldeleted jobs
Appendix 39
Notices
Edition notice
November 2014
The following paragraph does not apply to any country where such provisions are inconsistent with local law:LEXMARK INTERNATIONAL, INC., PROVIDES THIS PUBLICATION “AS IS” WITHOUT WARRANTY OF ANY KIND, EITHEREXPRESS OR IMPLIED, INCLUDING, BUT NOT LIMITED TO, THE IMPLIED WARRANTIES OF MERCHANTABILITY OR FITNESSFOR A PARTICULAR PURPOSE. Some states do not allow disclaimer of express or implied warranties in certaintransactions; therefore, this statement may not apply to you.
This publication could include technical inaccuracies or typographical errors. Changes are periodically made to theinformation herein; these changes will be incorporated in later editions. Improvements or changes in the products orthe programs described may be made at any time.
References in this publication to products, programs, or services do not imply that the manufacturer intends to makethese available in all countries in which it operates. Any reference to a product, program, or service is not intended tostate or imply that only that product, program, or service may be used. Any functionally equivalent product, program,or service that does not infringe any existing intellectual property right may be used instead. Evaluation and verificationof operation in conjunction with other products, programs, or services, except those expressly designated by themanufacturer, are the user’s responsibility.
For Lexmark technical support, visit http://support.lexmark.com.
For information on supplies and downloads, visit www.lexmark.com.
© 2014 Lexmark International, Inc.
All rights reserved.
Trademarks
Lexmark and Lexmark with diamond design are trademarks of Lexmark International, Inc., registered in the UnitedStates and/or other countries.
All other trademarks are the property of their respective owners.
AirPrint and the AirPrint logo are trademarks of Apple, Inc.
GOVERNMENT END USERS
The Software Program and any related documentation are "Commercial Items," as that term is defined in 48 C.F.R.2.101, "Computer Software" and "Commercial Computer Software Documentation," as such terms are used in 48 C.F.R.12.212 or 48 C.F.R. 227.7202, as applicable. Consistent with 48 C.F.R. 12.212 or 48 C.F.R. 227.7202-1 through 227.7207-4,as applicable, the Commercial Computer Software and Commercial Software Documentation are licensed to the U.S.Government end users (a) only as Commercial Items and (b) with only those rights as are granted to all other end userspursuant to the terms and conditions herein.
Notices 40
IndexSymbols“Out of Policy” error message stillappears even after multiple tries toupdate the policy
troubleshooting 22“Unable to Read Badge Data” errormessage appears when swiping thebadge
troubleshooting 22“Unsupported Device” errormessage appears when installing abadge reader to the printer
troubleshooting 22
Aaccessing
Lexmark Management Console 6accessing Print ManagementConsole 11adding delegate groups 13adding delegates 13adding groups 16
function access 15adding printers to a device group 7adding temporary badge IDs 14adding users
function access 15adding users to a group 16
function access 15allowing users to release print jobsto another printer 17alternate locations
configuring 17application settings
configuring 6applications
deploying 8
Bbadge IDs
registering 14bottom 20 users report by copycount
understanding standard report 38bottom 20 users report by e‑mailcount
understanding standard report 38
bottom 20 users report by faxcount
understanding standard report 39bottom 20 users report by printcount
understanding standard report 38bottom 20 users report by scan tonetwork count
understanding standard report 38
Cchanging the status of the server 6chunk size
configuring 9cleanup tasks
scheduling 9color printing report by user
understanding standard report 37configuring chunk size for devicediscovery and policy updates 9configuring the application settingsfor your environment 6configuring the home screen 7contacting Lexmark Help Desk 24
Ddelegate groups
adding 13delegates
adding 13delegating print jobs 12deleted pages report by user
understanding standard report 39deleting entries 11deploying applications
using UCF files 8deploying applications to theprinter 8detailed print report by host name
understanding standard report 35detailed print report by IP address
understanding standardreport 36
detailed print report by modelname
understanding standard report 36
detailed print report by model type understanding standard
report 36detailed print report by user
understanding standard report 35device groups
adding printers to 7discovery
configuring chunk size 9
Eerror that occurred when swipingthe badge
troubleshooting 23
Ffirmware failure [9yy.xx] 21
Ggenerating reports 19group quotas
setting 16groups
adding 15, 16adding users to 16
Hhome screen
configuring 7
Iimproving performance
configuring chunk size 9
LLexmark Management Console
accessing 6logging out 11
Mmanaging group quotas 15managing groups
default function access 14function access 15
managing print queues 12managing user quotas 15
Index 41

managing users default function access 14
missing bean on the homescreen 21modifying entries 11mono printing report by user
understanding standard report 37
Nnotices 40
Ooverview 4
Print Management Console 11
Ppage count is inaccurate
troubleshooting 23policy updates
configuring chunk size 9print jobs
releasing 13releasing to another printer 17tracking 17
print jobs released by the users donot appear in the print queue
troubleshooting 22Print Management Console
accessing 11overview 11
Print Management database fields understanding 24
printers adding to a device group 7
printers supported 5profile server is not responding
troubleshooting 21
Rregistering badge IDs 14releasing print jobs 13reports
generating 19scheduling 19
Sscheduling cleanup tasks 9scheduling reports 19server status
changing 6
setting group quotas 16setting the default functionaccess 14single‑sided (simplex) printingreport by user
understanding standard report 37solutions setting index 26supported printers 5
Ttemporary badge IDs
adding 14testing the solution 17top 20 users report by copy count
understanding standard report 38top 20 users report by e‑mail count
understanding standard report 38top 20 users report by fax count
understanding standard report 39top 20 users report by print count
understanding standard report 38top 20 users report by scan tonetwork count
understanding standard report 38tracking print jobs 17troubleshooting
error that occurred when swipingthe badge 23
firmware failure [9yy.xx] 21missing bean on the home
screen 21page count is inaccurate 23print jobs released by the users do
not appear in the print queue 22profile server is not responding 21unable to add new devices using
LMC 21“Out of Policy” error message still
appears even after multiple triesto update the policy 22
“Unable to Read Badge Data”error message appears whenswiping the badge 22
“Unsupported Device” errormessage appears when installinga badge reader to the printer 22
two‑sided (duplex) printing reportby user
understanding standard report 37
Uunable to add new devices usingLMC
troubleshooting 21understanding Print Managementdatabase fields 24understanding standard report
bottom 20 users report by copycount 38
bottom 20 users report by e‑mailcount 38
bottom 20 users report by faxcount 39
bottom 20 users report by printcount 38
bottom 20 users report by scan tonetwork count 38
color printing report by user 37deleted pages report by user 39detailed print report by host
name 35detailed print report by IP
address 36detailed print report by model
name 36detailed print report by model
type 36detailed print report by user 35mono printing report by user 37single‑sided (simplex) printing
report by user 37top 20 users report by copy
count 38top 20 users report by e‑mail
count 38top 20 users report by fax
count 39top 20 users report by print
count 38top 20 users report by scan to
network count 38two‑sided (duplex) printing report
by user 37usage by device 33usage by device host name 34usage by device IP address 34, 35usage by device model
name 34, 35usage by device model type 35usage report defined in Custom1
field 37
Index 42
usage by device understanding standard report 33
usage by device host name understanding standard report 34
usage by device IP address understanding standard
report 34, 35usage by device model name
understanding standardreport 34, 35
usage by device model type understanding standard report 35
usage report defined in Custom1field
understanding standard report 37users
adding 15using UCF files
deploying applications 8
Vviewing and managing printqueues 12viewing and managing quotas 15viewing group quotas 15viewing print queues 12viewing user quotas 15
Index 43
Recommended