
NEUROLOGY CLINICAL SKILLS

NEUROLOGY CLINICAL SKILLS
1
TABLE OF CONTENTS
Introduction ............................................................................................... 4
Cranial Nerve Examination ......................................................................... 5
Visual Assessment .................................................................................. 6
Motor Assessment ............................................................................... 15
Sensory Assessment ............................................................................. 16
Upper Limb Motor Examination ............................................................... 18
Inspection ............................................................................................. 18
Tone ..................................................................................................... 19
Power ................................................................................................... 20
Reflexes ................................................................................................ 21
Coordination ........................................................................................ 22
Other tests............................................................................................ 23
Lower Limb Motor Examination ............................................................... 25
Inspection ............................................................................................. 25
Tone ..................................................................................................... 25
Power ................................................................................................... 26
Reflexes ................................................................................................ 27

NEUROLOGY CLINICAL SKILLS
2
Coordination ........................................................................................ 27
Gait....................................................................................................... 28
Upper Limb Sensory Examination ............................................................ 30
Superficial Pain (Pin Prick) ................................................................... 30
Temperature ........................................................................................ 31
Vibration .............................................................................................. 31
Joint position sense.............................................................................. 31
Light touch ........................................................................................... 31
Cortical Sensation ................................................................................ 32
Lower Limb sensory Examination ............................................................ 34
Superficial Pain (Pin Prick) ................................................................... 34
Temperature ........................................................................................ 34
Vibration .............................................................................................. 35
Joint position ........................................................................................ 35
Light Touch ........................................................................................... 35
Additional Tests ................................................................................... 36
Higher Mental Function Examination ...................................................... 37
Speech .................................................................................................. 38
Higher Cortical Functions ..................................................................... 40

NEUROLOGY CLINICAL SKILLS
3
Frontal release signs ............................................................................. 43
Consciousness ...................................................................................... 43
Localising a Lesion .................................................................................... 44
Basic (Honestly!) Neuroanatomy ......................................................... 44
Surgical Sieves ...................................................................................... 48
Neuro Fridge Magnets.......................................................................... 48

NEUROLOGY CLINICAL SKILLS
4
INTRODUCTION
Neurology is a fascinating area of medicine that unfortunately often fills
students with dread and thoughts of impossibly complex neuroanatomy,
incredibly rare diagnoses, and patients who we can do little for.
This couldn’t be further from the truth. We believe that neurology is
often presented in a confusing and complicated way that puts students
off. This booklet is not intended to a be a comprehensive textbook of
neurology but a quick reference guide for how we think the neurological
examination should be performed and thought about. Our hope is that it
will make learning neurology easy, rewarding, and most of all interesting!
Finally, we would like to point you in the direction of
https://teesneuro.org, a website lovingly built by Dr Archibald with
recordings of neurology lectures, videos of how to perform a
neurological examination, revision notes on neurological disorders, and
neurology cases to work through. We hope you find it useful!
Dr Ross Fowkes Neurology Teaching Fellow, South Tees Hospitals NHS Trust Dr Aye Moe Neurology Teaching Fellow, South Tees Hospitals NHS Trust Dr Neil Archibald Consultant Neurologist, South Tees Hospitals NHS Trust Dr Gina Kennedy Consultant Neurologist, South Tyneside and Sunderland NHS Trust Dr Tim Williams Consultant Neurologist, Newcastle upon Tyne Hospitals NHS Trust

NEUROLOGY CLINICAL SKILLS
5
CRANIAL NERVE EXAMINATION
You will have all been taught to examine the cranial nerves in order from
I – XII. Not only is this really difficult to remember, it takes ages and is not
how any neurologist actually examines cranial nerves. It also makes you
think all abnormalities are caused by problems with the cranial nerves
when they can be caused by any part of the motor pathway. You aren’t
just testing the cranial nerves when you examine the face; in the same
way as testing the power in the arms tests the motor cortex, white
matter tracts, brainstem, spinal cord, peripheral nerve, neuromuscular
junction, and muscle, testing the motor function of the face tests all
these parts of the motor pathway too!
The easiest and quickest way to examine the cranial nerves is to split it
into 3 parts, each with 5 bits to examine:
• Visual assessment:
1. Visual acuity
2. Visual fields
3. Eye movements
4. Pupils
5. Fundi
• Motor assessment:
1. Forehead
2. Eyes
3. Mouth
4. Neck
5. Shoulders (Trapezius)

NEUROLOGY CLINICAL SKILLS
6
• Sensory assessment:
1. Taste
2. Smell
3. Facial sensation
4. Hearing
5. Consider the corneal and gag reflex
And that’s it!
Let’s go through each section in a bit more detail.
VISUAL ASSESSMENT
VISUAL ACUITY
Check corrected visual acuity (i.e. glasses/contacts should be worn) and
document that it was corrected.
A full-size Snellen chart should be used from 6 metres away (half size
ones for 3 metres are also available).
Ask the patient to cover one eye stand the appropriate distance away
and read down to the smallest letters they can see.
The visual acuity is the distance the patient is from the chart/the distance
from which a person with normal acuity could see the letters. For
example, 6/18 would mean that a person could read letters at 6 metres
that a person with normal visual acuity could read at 18 metres.
Near vision can also be checked using a Jaeger chart.

NEUROLOGY CLINICAL SKILLS
7
VISUAL FIELDS
When testing a patient’s visual fields, you are crudely checking them
against your own. To do this:
1. Sit approximately 1 metre away from the patient with your eyes at
the same level as the patient.
2. Ask the patient to cover one eye and cover your mirror image eye
e.g. if the patient covers their right eye, cover or close your left eye.
3. Ask the patient to look at your eye and make sure they keep looking
at your eye throughout the visual field check (ensure you are also
looking at the patient’s eye!).
4. Ensure your hand is halfway between you and the patient (otherwise
the test will be invalid) and gradually move your fingers from the
beyond your peripheral vision into the centre. Do this from each of
the four quadrants in each eye.
5. Ask the patient to tell you as soon as they see your fingers.
You and the patient should see your fingers at the same time (if you both
have normal visual fields). Check all four quadrants of the visual field for
each eye. Subtle visual field defects will not be picked up with this
technique (they will need specialist equipment in the ophthalmology
department), but it can be useful for large defects. See Figure 1 for the
classic visual field defects and their associated lesions.
You can also check the blind spot during this part of the examination. To
do this, stay in the same position as for visual fields (level with the
patient, approximately 1 metre away, both of you covering/closing one
eye, and both looking at each other’s eye).
1. Hold a red hat pin (because everyone has one of those lying around)
in your hand at eye level, equidistant between the patient and
yourself.

NEUROLOGY CLINICAL SKILLS
8
2. Starting in the midline slowly move the pin laterally.
3. You should notice the red pin disappear in your peripheral vision.
4. Ask the patient if the pin has disappeared. If it hasn’t, you can move
the pin slowly forwards and backwards to make sure you are holding
the pin equidistantly between you.
5. When the pin has disappeared for both you and the patient, you can
work out how big their blind spot is compared to yours by moving it
up and down, and side to side, and asking the patient when it
reappears.
The pin should reappear for you both at roughly the same time, if it
reappears for you significantly before the patient this can indicate an
enlarged blind spot. This is often due to optic nerve swelling (which can
be caused by increased intracranial pressure).

NEUROLOGY CLINICAL SKILLS
9
Figure 1 - Visual field defects

NEUROLOGY CLINICAL SKILLS
10
EYE MOVEMENTS
Eye movements are complicated but there are a few tricks to help.
Firstly, give yourself enough time in the examination to think about what you’re examining and if it is normal or abnormal. It is helpful to hold the patients head in a fixed position; this also allows elevation of eyelids in case of ptosis and for downgaze and puts you at arm’s length. The further back you are and the slower you conduct your examination of smooth eye movement the more you will see. Ensure you go to the extremes of lateral and vertical gaze.
In neurology we are particularly interested in whether the eyes turn together in the same direction, if they don’t we call this dysconjugate gaze.
Eye movement examination should include:
• Voluntary saccades
• Pursuit
• Targeted saccades
VOLUNTARY SACCADES
Saccades are the small rapid movements of the eye seen as it jumps from
fixation on one point to another.
Examine these by asking the patient to look to the right then to the left.
You can repeat this a couple of times. Then ask them to look up and
down. Again, repeat this a couple of times. You may need to hold the
eyelid up when observing downwards gaze.
From this brief examination you should have some idea if there is any
restriction in movement of the eyes and you may see nystagmus.

NEUROLOGY CLINICAL SKILLS
11
PURSUIT
Ask the patient to follow your finger in the shape of an “H” and look for
any restriction in eye movements and any nystagmus (see Figure 3).
TARGETED SACCADES
Ask the patient to look at your nose and then your hand held to the
lateral extreme of field and repeat this in quick succession. This may
reveal ‘overshoot’ (hypermetria) or stepwise movements of the eyes
(hypometria). This is also a really good way to see dysconjugate gaze for
example in patients with AN internuclear ophthalmoplegia (INO, see
Figure 2).
Figure 2 - Right INO - ipsilateral failure of adduction and contralateral
nystagmus

NEUROLOGY CLINICAL SKILLS
12
Figure 3 - Eye Movements

NEUROLOGY CLINICAL SKILLS
13
PUPILS
To examine the pupils, you need to check the pupillary reflexes to light
and accommodation.
To assess the reflex to light, shine a pen torch into each pupil in turn and
check if the pupil constricts.
To assess the accommodation reflex, ask the patient to fix their gaze on
something in the distance then hold your finger in front of their nose. Ask
the patient to then fix their gaze on your finger. A normal response is for
the eyes to converge on the target and for the pupils to constrict.
You can also check for a relative afferent pupillary defect (RAPD) using
the “swinging light test”. Perform this by moving the pen torch from one
pupil to another, if one of the pupils dilates when light shines into it then
this is evidence of a RAPD.
FUNDI
Examination of the fundi with an ophthalmoscope is challenging and
takes lots of practice! However, it is important that you can recognise a
normal fundus.
Figure 4 - What you see in a textbook vs what you see in reality!

NEUROLOGY CLINICAL SKILLS
14
Ideally you will need a dark room and pupil dilating eye drops to get a
good view. However, this isn’t always possible.
The biggest tip is to get very close to the patient (and then get closer
again!); you really do need to be as close as possible to the patient to
have a chance of seeing anything. Make sure you look in the patient’s
right eye with your right eye and their left eye with your left eye so that
you don’t end up with your face directly in front of the patient’s face.
Start the dial at 0 (but know you may need to change this – if you are
short sighted, you’ll need to rotate the dial through the red numbers
until the fundus is in focus) and look through the ophthalmoscope for the
red reflex. Move toward the patient’s eye following the red reflex in.
With a bit of luck, you’ll see some blood vessels. In the eye “all roads lead
to Rome”, so, if you follow the blood vessels you should make your way
to the optic disc. Have a look at the colour (pale or not?) and the contour
(swollen or not?) of the optic disc. Then, have a good look at the blood
vessels, looking for haemorrhage or exudates. Finally, ask the patient to
look directly at the light to look at the macula.
Keep practicing this again and again. If you get good at only one bit, then
it MUST be the ability to see the optic nerve margins reliably. One day,
when you can’t see them, and you normally can, it will tell you the
patient has optic disc swelling and you might just save their life!

NEUROLOGY CLINICAL SKILLS
15
MOTOR ASSESSMENT
With motor assessment of the cranial nerves you are checking for any
weakness of the muscles of facial expression (CNVII) and the muscles of
mastication (motor component of CNV). See https://teesneuro.org/how-
to-examine/motor-cranial-nerves/ for a video.
1. Forehead
• “Raise your eyebrows”- check for any asymmetry (CNVII).
Weakness of the forehead indicates a lower motor neurone
(LMN) CNVII (usually Bell’s) palsy.
2. Eyes
• “Screw your eyes up tightly” - try to open the patient’s eyes,
you may notice that one of the eyes is easier to open than
the other. This will help pick up on any subtle weakness you
might not see on inspection alone (CNVII). Again, weakness
of eye closure is most common with a LMN palsy.
3. Mouth
• “Show me your teeth” – look for any drooping of the mouth
(CNVII).
• “Clench your jaw” – feel the masseter muscle bulk, and
“open your mouth against my hand” (pterygoids CNV –
muscles of mastication).
• “Open your mouth wide” – inspect the tongue for wasting,
fasciculation, deviation by ask the patient to move their
tongue from side-to-side looking for speed, and smoothness
of the movement (CNXII).
• Say “Ahh”. Look at the palate move. Is it symmetrical? (CN
IX & X).

NEUROLOGY CLINICAL SKILLS
16
• “Purse your lips together” – try to open each side of the
patient’s lips, again this will test for more subtle weakness
(CNVII).
• Speech is often assessed during the history, but you can
also assess it here as the CNs can cause a dysarthria or
dysphonia (CNIX, X, XII. See the speech section for more
details Pg.37).
4. Neck
• “Turn your head to the side” – ask the patient to keep their
head in place whilst attempting to pull it towards the
midline (CNXI).
5. Shoulders
• “Shrug your shoulders” – push down on the patient’s
shoulders to check for power of the trapezius muscle
(CNXI).
Once you’ve learnt this sequence, you’ll be able to assess the motor
cranial nerves in about 1 minute.
SENSORY ASSESSMENT
See https://teesneuro.org/how-to-examine/sensory-cranial-nerves/ for a
video of this.
1. Ask about taste (CNVII – anterior 2/3s, CNIX – posterior 1/3)
2. Ask about smell (CNI)
3. Test light sensation with cotton wool, on each side of the face, on
the forehead, cheeks, and chin (i.e. the three divisions of CNV). Also
consider the oral cavity (CNV) and corneal reflex (CNV – see below).

NEUROLOGY CLINICAL SKILLS
17
4. Briefly check hearing by whispering a number in each of the patient’s
ears and asking them to repeat the number (CNVIII). You can
consider Rinne’s and Weber’s tests at this point:
• Rinne’s – alternate a vibrating 512Hz tuning fork between
the patient’s mastoid process (bone conduction) and just
next to their ear (air conduction). Ask which is louder. A
normal result is for air conduction to be louder than bone
conduction. In neural deafness air conduction is better than
bone; in conductive deafness bone conduction is better
than air.
• Weber’s – place a vibrating 512Hz tuning fork in the centre
of the patient’s forehead and ask if the sound is heard
loudest left / right / centre. A normal result is the centre. In
neural deafness, sound is heard best in the unaffected ear,
in conductive deafness the sound is heard best in the
affected ear.
5. Mention the corneal reflex (afferent - CNV and efferent - CNVII) and
gag reflex (afferent - CNIX and efferent - X).

NEUROLOGY CLINICAL SKILLS
18
UPPER LIMB MOTOR EXAMINATION
Motor examination is frequently taught or written about in a way which
is complicated and confusing. We hope the approach below will be
simple, quick, and most importantly make you look like you know what
you’re doing!
Having said all that, you should still use a traditional structured approach
to examination with inspection, tone, power, reflexes, and coordination
in that order. See https://teesneuro.org/how-to-examine/motor-
assessment/ for a video.
INSPECTION
This is an active process (i.e. see don’t just look!). Invaluable features of
neurological disease will not fall into your eyeballs as you absent-
mindedly gawp at the patient! You also need to make sure that you
actively seek diagnostically important negative or positive inspection
findings. Do this by closely looking at the patient’s arms, ensuring they
are properly exposed. Key things to look for are:
• Wasting – look at the muscle bulk in the arms and hands. The thenar
and hypothenar eminences are often missed.
• Tremor – or any additional/abnormal movements.
• Fasciculation (not fasciculations! Fasciculation is always singular like
constipation, not constipations!) – small areas of involuntary muscle
fibre contraction. DO NOT flick the patient’s muscles but do take
time to be confident that fasciculation is either present or not!

NEUROLOGY CLINICAL SKILLS
19
TONE
In simple terms, tone is normal, increased, or decreased. Increased tone
can be categorised as spasticity or rigidity.
SPASTICITY
Spasticity is seen in patients with upper motor neurone problems e.g. a
stroke. It is ‘velocity-dependent’ meaning that you may need to move the
limb quickly to pick it up.
To examine for spasticity, take the patient’s hand as though you are
shaking it and turn it quickly from prone to supine, whilst at the same
time flexing and extending at the wrist and elbow. If spasticity is present,
you will feel a ‘catch’ as you move the arm.
RIGIDITY
Rigidity is seen in patients with basal ganglia (extrapyramidal) problems
such as Parkinson’s disease. It is present through the full range of
movement and regardless of whether the movement is quick or slow. It is
often described as “lead pipe” rigidity because the patient’s limb feels
like bending a lead pipe (which we all obviously do on a regular basis).
To examine for rigidity, you can gently and slowly passively flex and
extent a patient’s wrist. You are feeling for resistance on movement.
Counter-activation is a Neurologist’s trick to accentuate rigidity. To do
this, ask the patient to perform a counter-activation task with their other
arm (e.g. pretend to paint a wall or open and close their fist approx. once
per second) whilst you assess tone. This can dramatically increase rigidity
and importantly it looks like you know what you’re doing!

NEUROLOGY CLINICAL SKILLS
20
POWER
There is a whole range of different techniques and practice regarding
which movements to check and how to grade them. However, you
should generally assess two movements, typically flexion and extension,
at each of the major joints in the upper and lower limbs. The key
movements you need to assess are:
• Shoulder abduction and adduction - proximal power.
• Elbow flexion and extension
• Wrist flexion (median nerve) and extension (radial nerve)
• Finger extension (radial nerve) and flexion (median and ulnar nerves)
– distal power.
• Finger abduction (ulnar nerve) – intrinsic hand muscle function.
• Thumb abduction (median nerve) – intrinsic hand muscle function.
Most of the other upper limb movements you can test are not
particularly helpful where weakness is generalised but are vital when
considering individual nerve or myotomal problems – generally a more
specialist examination. However, you should be able to pick up features
of an isolated median, ulnar, or radial nerve palsy.
Weakness can be described simply as mild, moderate, or severe or
alternatively using the MRC power scale.
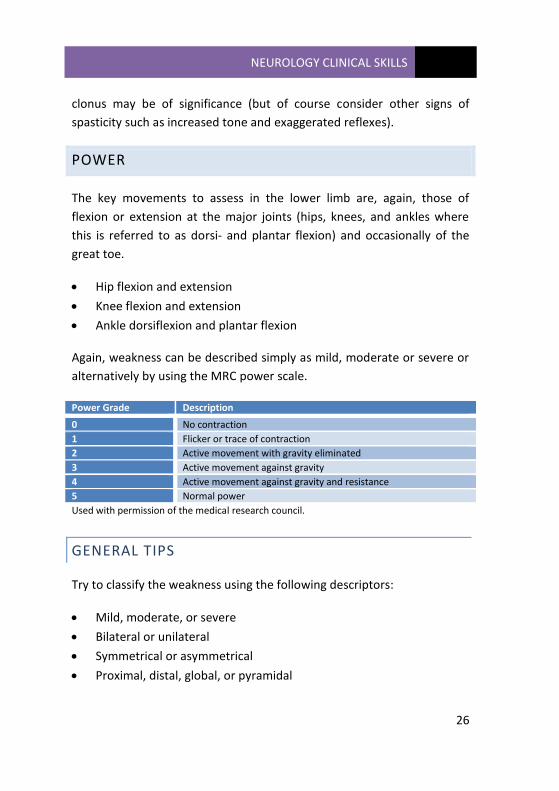
Power Grade Description
0 No contraction
1 Flicker or trace of contraction
2 Active movement with gravity eliminated
3 Active movement against gravity
4 Active movement against gravity and resistance
5 Normal power
Used with permission of the medical research council.

NEUROLOGY CLINICAL SKILLS
21
GENERAL TIPS
Try to classify the weakness using the following descriptors:
• Mild, moderate, or severe
• Bilateral or unilateral
• Symmetrical or asymmetrical
• Proximal, distal, global, or pyramidal
REFLEXES
Trying to assess reflexes fills students with fear. We’ve all heard the
phrase “I’m not that good at reflexes” echo through the corridors of the
undergraduate centre. Assessing reflexes takes practice (like any other
examination technique) but you need to be comfortable with your
technique and trusting of your tendon hammer! Reflexes may be absent
and if consistent with other clinical features, can be a major diagnostic
clue!
You are looking to assess if any reflex(es) is normal, absent or brisk
(exaggerated).
In general, hold the tendon hammer loosely at the end of the handle and
let it fall like a pendulum to strike the tendon, rather than holding it tight
like your life depends on it! Watching a practiced neurologist or a video
can help (https://teesneuro.org/how-to-examine/how-to-improve-your-
motor-exam/ 12:53).
In the upper limb we routinely check three reflexes:
• Biceps (C5/6) – place your non-dominant thumb over the biceps
tendon at the distal end of the upper arm. Strike your thumb with

NEUROLOGY CLINICAL SKILLS
22
the tendon hammer and look for contraction of the biceps tendon
and feel for this underneath your thumb.
• Supinator (C5/6) – place two of your non-dominant fingers over the
tendon of brachioradialis (approximately 5-10cm proximal to the
wrist on the radial side). The elbow should flex slightly, and the hand
should supinate.
• Triceps (C7) – strike the triceps tendon (just proximal to the elbow
directly with the tendon hammer and look for contraction of the
triceps muscle.
If you are having difficulty, reinforcement techniques, such as asking the
patient to clench their teeth (for upper limbs) or interlock their hands
and pull them apart (for lower limb reflexes), can help to confirm the
presence or absence of reflexes.
COORDINATION
You are mainly looking for signs of incoordination in this part of upper
limb assessment (although you may have already found signs of this with
eye movement – nystagmus, dysarthria, or gait assessment – broad-
based and unsteady).
Ask the patient to touch their nose and then your extended index
fingertip. Ensure your fingertip is far enough away that the patient’s arm
is fully outstretched when the patient touches your finger. You are
looking to see if this can be conducted with “speed and neatness”, but
also for tremor (called an “intention tremor” if at the end of the
movement to your finger tip) and ‘past-pointing’ (dysmetria or
inaccuracy of the movement), which are usually caused by an ipsilateral
cerebellar lesion (cerebellar ataxia) or a major loss of sensory function in
that limb (sensory ataxia). Do not move your finger about when doing

NEUROLOGY CLINICAL SKILLS
23
this, it serves no purpose to make interpretation of inaccurate
movements more difficult!
Then ask the patient to tap on the back of one of their hands or on their
thigh with their hand as quickly as possible. Patients with ataxia struggle
with this movement, appearing clumsy. Listen and look for consistent
rate, rhythm and force of movement (the key components of normal
cerebellar function).
Finally, you can ask the patient to place one hand on top of the other and
then turn it over repeatedly. This rapid alternating movement tests for
evidence of dysdiadochokinesia which again, is seen with cerebellar
lesions. This is not a helpful sign as patients with problems like
Parkinson’s, arthritis, weakness etc. will all struggle with this. As such, it
adds little or nothing to the information gleaned from the “hand tapping”
test above.
OTHER TESTS
FATIGABILITY
If you are suspicious of a neuromuscular junction problem such as
myasthenia gravis, you may want to check for signs of fatigability which is
one of the hallmarks of myasthenia. There are a couple of ways of testing
for this:
• Check if the patient has any weakness in shoulder abduction. Then,
ask the patient to quickly abduct and adduct their arms with their
elbows flexed for about 1 minute (as though they are flapping
wings). Again, check for weakness of shoulder abduction. If there is
now weakness present this is evidence of fatigability.

NEUROLOGY CLINICAL SKILLS
24
• Fatigability can also be checked by asking the patient to look
upwards at your finger for >1minute. If their eyelids droop this is
evidence of fatigability.
BRADYKINESIA
If you are suspicious of a movement disorder e.g. Parkinson’s disease,
you may want to check for further evidence of bradykinesia (i.e. slow
movement). There are a couple of ways to test for this (see Figure 5):
• Ask the patient to bring their forefinger and thumb together and
then move them fully apart. Ask them to do this repeatedly and as
quickly as they can. Patient’s with Parkinson’s disease will struggle to
move their finger/thumb quickly and will display gradually smaller
movements as they go on.
• Ask the patient to rotate their hand as though they are polishing a
doorknob. Again, the movements will get slower and smaller.
Figure 5 - Tests for bradykinesia

NEUROLOGY CLINICAL SKILLS
25
LOWER LIMB MOTOR EXAMINATION
The same principles of motor examination of the upper limb apply.
INSPECTION
As in the upper limbs, the key things to look for are:
• Wasting – look at the muscle bulk of the quads and both anterior
and posterior compartments of the calf
• Tremor – or any additional/abnormal movements.
• Fasciculation – small areas of involuntary muscle fibre contraction
(DO NOT flick your patient!)
TONE
To assess tone in the lower limb, ask the patient to relax their legs and
then roll each in turn from side to side. Look at the foot to make sure it is
passively flopping from side to side as you roll the leg and remember this
is also informing you about tone at the hip (you get that for free!).
Next briskly lift the patient’s knees whilst the leg is relaxed and extended
on the bed/couch. You may feel a catch as you do this if tone is
increased. The patient’s heel should stay on the bed if tone is normal.
Finally, assess for clonus by supporting the patient’s knee, flexing it to
90⁰, and then briskly dorsiflexing and partially everting the foot and
holding it there (video of how to assess for clonus
https://teesneuro.org/how-to-examine/tone/). A couple of beats of
clonus or more can be normal, especially in young female patients, or
patients with heightened anxiety. Prolonged or, in particular, asymmetric
NEUROLOGY CLINICAL SKILLS
26
clonus may be of significance (but of course consider other signs of
spasticity such as increased tone and exaggerated reflexes).
POWER
The key movements to assess in the lower limb are, again, those of
flexion or extension at the major joints (hips, knees, and ankles where
this is referred to as dorsi- and plantar flexion) and occasionally of the
great toe.
• Hip flexion and extension
• Knee flexion and extension
• Ankle dorsiflexion and plantar flexion
Again, weakness can be described simply as mild, moderate or severe or
alternatively by using the MRC power scale.
Power Grade Description
0 No contraction
1 Flicker or trace of contraction
2 Active movement with gravity eliminated
3 Active movement against gravity
4 Active movement against gravity and resistance
5 Normal power
Used with permission of the medical research council.
GENERAL TIPS
Try to classify the weakness using the following descriptors:
• Mild, moderate, or severe
• Bilateral or unilateral
• Symmetrical or asymmetrical
• Proximal, distal, global, or pyramidal

NEUROLOGY CLINICAL SKILLS
27
REFLEXES
You are looking to assess if any reflex(es) is normal, absent or brisk
(exaggerated).
In general, hold the tendon hammer loosely at the end of the handle and
let it fall like a pendulum to strike the tendon, rather than holding it tight
like your life depends on it! In the lower limbs we routinely check three
reflexes:
• Knee (L3/4) – strike the patella tendon (distal to the patella) directly
with the tendon hammer and look for contraction of the quadriceps.
• Ankle (L5/S1) – partially dorsiflex the foot and strike the Achilles
tendon directly. This can be done by externally rotating the patient’s
leg to expose the Achilles tendon Look for contraction of the
gastrocnemius muscles and plantarflexion of the foot.
• The plantar reflex – run a blunt object (e.g. an orange stick or a
thumb nail) up the lateral border of the sole of the foot and across
the base of the metatarsals. A normal response is for the toes to flex.
An abnormal response is for the 1st toe to extend and the other toes
to splay.
If you are having difficulty, reinforcement techniques, such as asking the
patient to clench their teeth (for upper limbs) or interlock their hands
and pull them apart (for lower limb reflexes), can help confirm the
presence or otherwise of reflexes.
COORDINATION
Ask the patient to run their heel from the opposite knee down to the tip
of the opposite great toe. Look for uncoordinated or clumsy movements
that might be in keeping with ataxia.

NEUROLOGY CLINICAL SKILLS
28
GAIT
A neurological examination is not complete without an assessment of the
patient’s gait. Assessing gait can be tricky but it can tell you a huge
amount about the patient in front of you (for example a patient who can
walk probably does not have significant lower limb weakness). There are
a few characteristic gaits you should be aware of. This video helpfully
highlights several important abnormal gaits youtu.be/FFki8FtaByw.
ATAXIC GAIT
This is the classic “drunk” gait. It is broad based (the feet are far apart)
and unsteady, with irregular stride length and frequency. Patients will
struggle with tandem gait.
PARKINSONIAN GAIT
This is typically a narrow gait with small shuffling steps. The patient’s
steps accelerate as they walk (festination). You may also notice reduced
arm swing (unilateral or bilateral) and/or a tremor.
HEMIPLEGIC GAIT
Most commonly seen following a stroke, the patient typically has a flexed
upper limb on the affected side and drags their extended and stiff lower
limb in a semi-circle motion (circumduction).
SENSORY ATAXIC GAIT
This gait is due to problems with loss of sensory or proprioceptive
feedback from the lower limbs (e.g. a peripheral neuropathy). The gait is

NEUROLOGY CLINICAL SKILLS
29
broad based and stomping (the patient stomps their feet down on the
ground to increase sensory feedback and be sure they are on the
ground!). Symptoms are typically worse in the dark as the patient loses
visual input to enable them to determine their body position (so-called
symptomatic Rombergism).
Formal Romberg testing (see below) is often positive. Ask the patient to
stand with their feet together and close their eyes, in a positive test, the
patient will fall (and should be caught!).

NEUROLOGY CLINICAL SKILLS
30
UPPER LIMB SENSORY EXAMINATION
In real life, neurologists rarely perform a sensory examination – just ask
them. Generally, a sensory history is far more important and informative
than is an actual sensory examination. It is the least objective component
of the neurological examination and as such it should be focused and
only conducted to confirm the sensory history or clinical diagnosis.
How you test sensation should to some extent be driven by the pattern
of sensory loss you are looking for or expecting from the history, e.g.
starting distally to proximally for a suspected peripheral neuropathy.
SUPERFICIAL PAIN (PIN PRICK)
Use a “Neurotip” to test for pin prick sensation. Be sure to explain to the
patient that you are testing their ability to feel a sharp pin or a significant
change in that sensation. You do not need to alternate sharp and dull
sides of the “Neurotip” as this adds nothing, and you do not need the
patient to close their eyes.
Test the sternum or neck as the ‘normal’ area. Then map out the
dermatomes (by asking the patient if they can feel the pin and if it feels
the same on both sides). See suggested points for testing on Figure 6. If
you find an abnormality, map it out a bit (not too much) and try to decide
if this is:
a) Dermatomal (nerve root)
b) A particular nerve (peripheral nerve)
c) Glove & stocking (peripheral nerves)
d) Something else (!)
If it is patchy, just call it patchy and move on.

NEUROLOGY CLINICAL SKILLS
31
TEMPERATURE
You can crudely test temperature sensation using a tuning fork and
asking the patient if this feels cold. Usually, this is performed for
peripheral neuropathy or a spinal cord lesion, so start distally and work
proximally, asking the patient if they can feel the cold of the tuning fork.
VIBRATION
Use a 128Hz tuning fork and ask the patient if they can feel a buzzing
sensation – establish this first by placing a vibrating tuning fork on the
sternum (and perhaps even asking that they recognise when you stop the
vibration with you hand). Start at the distal IP joint of the 2nd digit and if
sensation is impaired, work proximally (MCP → radial styloid →
olecranon →acromion).
JOINT POSITION SENSE
Demonstrate this to the patient by moving the distal phalanx of the
thumb either up or down. Then ask the patient to close their eyes and
tell you whether you are moving their thumb up or down. The sensitivity
of joint position sense (JPS) is ≤ 1o of arc, so only small deviations up or
down are required if JPS is preserved. If sensation is impaired move to a
more proximal joint e.g. the wrist.
LIGHT TOUCH
Light touch sensation is the least useful and most subjective part of a
sensory examination and is deliberately placed it at the end. Use cotton
wool and follow the same approach as pin prick sensation. See suggested
points for dermatomal testing on Figure 6.

NEUROLOGY CLINICAL SKILLS
32
In reality, light touch sensation can be easily, effectively and reliably
assessed with the fingertips.
CORTICAL SENSATION
If you are suspicious of a parietal lobe lesion you can assess for:
• Sensory inattention – ask the patient to close their eyes and ask
them which hand is being touched – left, right, or both. If they don’t
register one of the arms when both are touched this can indicate a
contralateral parietal lesion. Only very light touch should be used.
• Astereognosis – the patient will be unable to identify objects (e.g. a
coin or key) by touch with their eyes close.

NEUROLOGY CLINICAL SKILLS
33
Figure 6 - Dermatomes of the upper and lower limb with suggested
points for testing

NEUROLOGY CLINICAL SKILLS
34
LOWER LIMB SENSORY EXAMINATION
The approach to the lower limb sensory examination is similar to that
applied in upper limb sensory examination.
SUPERFICIAL PAIN (PIN PRICK)
Use a “Neurotip” to test for pin prick sensation. Be sure to explain to the
patient that you are testing their ability to feel a sharp pin or a significant
change in that sensation. You do not need to alternate sharp and dull
sides of the “Neurotip” as this adds nothing, and you do not need the
patient to close their eyes.
Test the sternum or neck as the ‘normal’ area. Then map out the
dermatomes (by asking the patient if they can feel the pin and if it feels
the same on both sides). See suggested points for testing on Figure 6. If
you find an abnormality, map it out a bit (not too much) and try to decide
if this is:
a) A sensory level (spinal cord)
b) Dermatomal (nerve root)
c) A particular nerve (peripheral nerve)
d) Glove & stocking (peripheral nerves)
e) Something else (!)
If it is patchy, just call it patchy and move on.
TEMPERATURE
You can crudely test temperature sensation using a tuning fork and
asking the patient if this feels cold. Usually, this is performed for

NEUROLOGY CLINICAL SKILLS
35
peripheral neuropathy or a spinal cord lesion, so start distally and work
proximally, asking the patient if they can feel the cold of the tuning fork.
VIBRATION
Use a 128Hz tuning fork and ask the patient if they can feel a buzzing
sensation – establish this first by placing a vibrating tuning fork on the
sternum (and perhaps even asking that they recognise when you stop the
vibration with you hand). Start at the distal IP joint of the 2nd digit and if
sensation is impaired, work proximally to various bony prominences
(base of great toe → medial malleolus → tibial plateau → ASIS).
JOINT POSITION
Demonstrate this to the patient by moving the distal phalanx of the great
toe up or down (make sure you hold the toe at the sides, not on top). The
sensitivity of JPS is ≤ 1o of arc, so only small deviations up or down are
required if JPS is preserved. If sensation is impaired move to a more
proximal joint e.g. the ankle.
LIGHT TOUCH
Light touch sensation is the least useful and most subjective part of a
sensory examination and is deliberately placed it at the end. Use cotton
wool and follow the same approach as pin prick sensation. See suggested
points for dermatomal testing on Figure 6.

NEUROLOGY CLINICAL SKILLS
36
ADDITIONAL TESTS
ROMBERG’S SIGN
Maintaining upright position requires intact functioning of at least 2 of:
vision, vestibular function and proprioception. Romberg’s test eliminates
vision so that patient has to rely on proprioception and vestibular
function to maintain stability. It is a sign of impaired proprioception, i.e.
sensory ataxia.
Ask the patient to stand with their feet together with hands to their sides
and look straight ahead. Watch for any swaying of the trunk. Then ask
the patient to close their eyes and look for any swaying or instability (give
assurance to patient that you will catch if they fall). If the patient
stumbles or falls when their eyes are closed, Romberg’s is positive.
NB: if the patient has cerebellar ataxia, they will be unsteady with their
eyes open and closed.
TANDEM WALKING
Ask patient to walk in a straight line with their feet heel-to-toe. Patients
with cerebellar or sensory ataxia will be unsteady when trying to perform
this gait.

NEUROLOGY CLINICAL SKILLS
37
HIGHER MENTAL FUNCTION EXAMINATION
Assessing higher mental function consists of the following:
• Intellect, memory, personality and mood
• Speech and cognitive function
Taking a history is often the first step in assessing higher mental function
as the way the patient presents their story and answers questions often
reveal deficits. It is often necessary to take a collateral history if the
patient has cognitive deficits.
When taking a history from a patient with suspected impairment of
higher mental function you should cover:
• Orientation – this is really useful to see if the patient knows who,
where and when they are.
• Onset – a sudden onset and fluctuating cognitive problem could
make you suspect delirium, a sub-acute onset could indicate
depression, and a chronic progressive course may be the result of a
neurodegenerative disorder (remember cognitive failure is seen in a
number of neurodegenerative disorders, not just Alzheimer’s!).
• Memory - recent events, significant life events and memory
regarding general and factual knowledge.
• Language - difficulties with spoken language, reading, and writing.
• Visuospatial and executive skills - the ability to carry out day to day
activities such as dressing, DIY projects, planning social events etc.
• Visual perception - the ability to recognize faces, objects, signs, and
colours.
• Personality, mood and appetite - cognitive dysfunction can be due to
psychiatric problems such as depression. For this reason, it is also
important to ask about anxiety, hallucinations, and delusions.

NEUROLOGY CLINICAL SKILLS
38
SPEECH
Abnormalities of speech include problems with language, articulation,
and phonation and are often first noticed in the history. There are 3 d’s
to look for in an assessment of speech:
DYSPHASIA
Dysphasia is an impairment of higher language function, which is typically
either an inability to comprehend or produce fluent spoken or written
(dysgraphia) language, or sometimes both! This is a cortical hemispheric
problem (i.e. not a cranial nerve problem). There are two important
broad patterns to know about and recognise (although patient’s often
have incomplete or mixed features):
• Receptive, Wernicke’s or fluent dysphasia – patients cannot
understand language. This is classically a temporal lobe lesion
(Wernicke’s area). Patients will speak fluently but what they say will
be nonsense. Test this by asking them to follow 1, 2, or 3 stage
commands (e.g. stick out your tongue). Patients will be unable to
follow commands because they cannot understand them. Make sure
you don’t inadvertently demonstrate the instruction as this
somewhat gives the game away!
• Expressive, Broca’s or non-fluent dysphasia – patients cannot
produce language. This is classically due to a frontal lobe lesion
(Broca’s area). Patients’ speech will be effortful but convey meaning.
They are able to understand language. Test this by asking them to
name objects (e.g. a pen), patients will struggle to name the object
and find this frustrating. They may display circumlocution – talking
around an object (e.g. “writing ink tube” for a pen).

NEUROLOGY CLINICAL SKILLS
39
DYSARTHRIA
Dysarthria is abnormal articulation resulting from damage to nerves or
the muscles responsible for speech production. The patient can
understand and produce language, but their speech is slurred due to
weakness of the muscles involved in delivering speech such as the palate,
tongue and mouth.
To examine for dysarthria, listen to the patient’s speech during the
history, it typically sounds slurred. You can ask the patient to say the days
of the week / months of the year to get a sample of their speech. Then
ask the patient to say repeat consonants “b-b-b-b” (lips), “t-t-t-t”
(tongue), “k-k-k-k” (tongue and palate), “g-g-g-g” (palate).
Dysarthria can be:
• Spastic – due to UMN lesions (e.g. stroke, MND) and the patients
typically have stiff tongues. They may also have a brisk jaw-jerk
reflex. Sometimes referred to as a pseudobulbar palsy.
• Ataxic – due to cerebellar or brainstem lesions. The patient sounds
“drunk”. Listen for rate, rhythm and force of the speech.
• Flaccid – due to lower LMN or NMJ weakness (e.g. myasthenia
gravis, GBS). The patient’s voice sounds slurred, nasal and breathy.
Sometimes referred to as a bulbar palsy.
To try and distinguish the type of dysarthria and look for other signs on
examination (e.g. signs of spasticity for spastic dysarthria, signs of ataxia
for ataxic dysarthria, LMN signs for flaccid dysarthria) that might help to
establish the cause.
NEUROLOGY CLINICAL SKILLS
40
DYSPHONIA
Dysphonia is an abnormality with the voice producing organs such as
vocal cords and resonating sound boxes. The content of speech and
articulation are normal, but voice production is low in volume or
abnormal in sound. This is often present in basal ganglia disorders such
as Parkinson’s disease.
To examine for dysphonia, ask the patient to cough or say
“eeeeeeeeeee”.
HIGHER CORTICAL FUNCTIONS
This refers to the capacity to perceive one’s surroundings and one’s self
in relationship to those surroundings and to perform complex pre-
programmed function (like walking!).
• Agnosia - is the inability to recognize objects in space, colours, faces
or one’s own body parts.
• Apraxia - is the inability to undertake a skilled motor act despite
intact power, sensation and co-ordination.
Patients presenting with cognitive disorders should have a detailed
history taken and a full neurological examination. You can also use
specific cognitive screening tools such to assess for cognitive problems.
• The Montreal Cognitive Assessment (MoCA) is a 30 point test used
as a screening tool for cognitive impairment (see Figure 7).
• The Abbreviated Mental Test Score (AMTS) is a 10-point test which is
a useful initial screen tool for acute or chronic confusion. The patient
scores one point for each correct answer (see Figure 8).
• The Addenbrooke’s Cognitive Examination is an extended 100-point
assessment that tests a broader range of cognitive domains in depth.

NEUROLOGY CLINICAL SKILLS
41
Figure 7 - the Montreal Cognitive Assessment (MOCA)

NEUROLOGY CLINICAL SKILLS
42
Figure 8 - Abbreviated Mental Test Score
Figure 9 - Glasgow Coma Scale (GCS)

NEUROLOGY CLINICAL SKILLS
43
FRONTAL RELEASE SIGNS
These are primitive reflexes and their presence is suggestive of pathology
in the frontal lobes. However, a proportion of elderly patients will have
positive frontal release signs without pathology. There are lots of these
and their utility in daily clinical practice is debatable.
• Grasp reflex – to elicit, lightly stroke your hand across the patient’s
palm. A positive response consists of involuntary grasping.
• Palmo-mental reflex – it is elicited by stroking the thenar eminence
and a positive response consists of contraction of the ipsilateral chin
muscles. Best conducted with patients’ eyes closed.
• Glabellar tap –With the patient sitting, tap gently and repetitively
with index finger in the mid-line between eyebrows. Continued
blinking after two or three taps is abnormal.
CONSCIOUSNESS
Patients can present with unconscious, diminished, or deranged
consciousness as a result of a huge variety of neurological problems and
it can be useful to classify their level of consciousness. This is often done
using the Glasgow Coma Scale (GCS).
The GCS grades the level of consciousness between 3 and 15 according to
the patient’s eye response, verbal response, and motor response (see
Figure 9).

NEUROLOGY CLINICAL SKILLS
44
LOCALISING A LESION
The ability to localise a neurological lesion (i.e. work out which bit of the
nervous system is causing the symptoms and signs a particular patient
has) is the core key skill of a neurologist (there are of course others!). Not
only does it make you look improbably clever when you request a scan,
but it allows you to make a reasonable and rational differential diagnosis
to guide further investigation. Furthermore, in cases where the diagnosis
is clinical e.g. Parkinson’s disease, localising the lesion allows you to
make the diagnosis without need for further testing - what could be
more satisfying than that!
Localisation is a skill that requires practice to perfect, but with the
framework below you’ll be doing a better job than most non-
neurologists. See the neurology for dummies lecture more information
(https://teesneuro.org/lectures/neurology-for-dummies/).
BASIC (HONESTLY!) NEUROANATOMY
Neuroanatomy can be very, very complicated or very, very simple and we
definitely subscribe to the latter! Most neurologists don’t use a vast
amount of neuroanatomy on a daily basis, but a few basic principles are
important to help you localise the lesion.
Firstly, the nervous system is split into the central and peripheral nervous
systems. For simplicity, each section has 5 bits and each of these bits is
associated with certain symptoms/signs and diseases (see Figure 10). For
weakness there is an even simpler division - upper motor neurone and
lower motor neurone weakness.

NEUROLOGY CLINICAL SKILLS
45
By knowing which symptoms/signs are associated with which bit of the
nervous system, you can make a reasonable guess as to where the lesion
is and therefore what the underlying disease process is!
CENTRAL NERVOUS SYSTEM
Nervous System Component
Symptoms/Signs Pathology (common examples)
1. Cortex Behaviour, cognition/memory, language, seizures
Stroke, tumours, epilepsy
2. Basal ganglia Increased/decreased movement
Parkinson’s disease
3. Brainstem and cerebellum
Motor and sensory (inc face), ataxia
Stroke, MS
4. Spinal cord Motor, sensory, bladder, bowel
MS, tumours, spondylotic disc disease
5. Cauda equina Motor, sensory (lower limb), bladder, bowel
Tumours, spondylotic disc disease
PERIPHERAL NERVOUS SYSTEM
Nervous System Component
Symptoms/Signs Pathology (common examples)
1. Anterior horn cells
Motor, fasciculation Motor neurone disease
2. Nerve root Motor, sensory, pain Spondylotic disc disease
3. Peripheral nerve Motor, sensory, decreased reflexes
Diabetes, Guillain–Barré syndrome
4. Neuromuscular junction
Fatigability Myasthenia gravis
5. Muscle Proximal weakness, wasting, normal sensation
Idiopathic inflammatory myopathies

NEUROLOGY CLINICAL SKILLS
46
UPPER AND LOWER MOTOR NEURONE WEAKNESS
Another important concept is the idea of upper (so-called pyramidal) and
lower (so-called flaccid) motor neurone lesions (UMN and LMN). When
you see a patient with weakness, classifying their symptoms/signs as
either an upper or lower motor neurone pattern helps you quickly work
out if the lesion is in the central or peripheral nervous system (or both!).
The upper motor neurone is principally inhibitory in function (things
“increase” when it fails); whilst the lower motor neurone adds power and
bulk! An easy way to remember this is using the table below (STORM is
an acronym for the clinical features) and noting that everything goes
down in LMN lesions.
Clinical Feature UMN LMN
Strength ↓ ↓
Tone ↑ ↓
Others Clonus Fasciculation
Reflexes ↑ ↓
Muscle bulk - ↓
Babinski’s ↑ ↓

NEUROLOGY CLINICAL SKILLS
47
Figure 10 - Basic Neuroanatomy

NEUROLOGY CLINICAL SKILLS
48
SURGICAL SIEVES
Once you’ve decided which bit of the nervous system is being affected,
you need to decide what the underlying disease process is. Sometimes
this may be relatively obvious, but neurology is full of weird and
wonderful diagnoses! One way of trying to systematically think through
the possibilities is the use of a surgical sieve. There are numerous
mnemonics but one we like is VITAMIN-DIC:
V - Vascular I - Inflammatory T - Trauma A - Autoimmune M - Metabolic I - Infection N - Neoplastic D -Degenerative I -Iatrogenic C - Congenital Duration and tempo of onset of symptoms is vital in considering their cause. For example, vascular pathologies are usually sudden onset whereas this is less likely to be the case for neoplastic (slow or sub-acute in evolution) or congenital (often from birth) causes. Using some commonsense reasoning will help you narrow down the possibilities and, in combination with your knowledge of basic neuroanatomy, should enable you to have a reasonable guess at the diagnosis.
NEURO FRIDGE MAGNETS
Once you’ve seen a patient with a neurological presentation you’ll need
to be able to summarise the clinical features, not only to be able to speak
to the (hopefully) kindly neurologist on-call, but also to help draw out the

NEUROLOGY CLINICAL SKILLS
49
salient features so you can try and work out what is going on! In clinical
reasoning terms this is a ‘problem representation’ – a succinct medical
description of the clinical features of the case that should hopefully
trigger a differential diagnosis from your mental store of illness scripts.
A simple way to describe the myriad of neurological symptoms and signs
is to imagine descriptive neurological terms as fridge magnets – you can
combine them in various ways to describe any condition. See Figure 11
for a suggested scheme for describing neurological presentations. You
can then add descriptive terms relating to the lateralisation and
symmetry. Finally, you can describe any specific neurological features
e.g. sensory, motor, visual etc. An example might be:
“This is a 32-year-old woman presenting with a sub-acute resolving
neurological disorder characterised by unilateral asymmetrical moderate
weakness in the right leg with upper motor neurone signs”.
There are also terms which describe different patterns of
neuropathology, see the table on the next page for definitions and
typical symptoms.
For a more in-depth look at neuro-babble see this online lecture
(https://teesneuro.org/lectures/how-to-think-and-speak-like-a-
neurologist/).
NEUROLOGY CLINICAL SKILLS
50
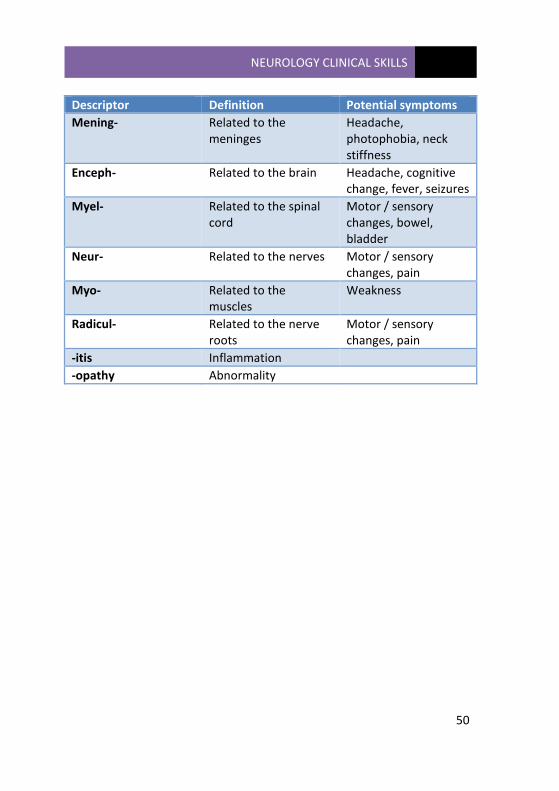
Descriptor Definition Potential symptoms
Mening- Related to the meninges
Headache, photophobia, neck stiffness
Enceph- Related to the brain Headache, cognitive change, fever, seizures
Myel- Related to the spinal cord
Motor / sensory changes, bowel, bladder
Neur- Related to the nerves Motor / sensory changes, pain
Myo- Related to the muscles
Weakness
Radicul- Related to the nerve roots
Motor / sensory changes, pain
-itis Inflammation
-opathy Abnormality

NEUROLOGY CLINICAL SKILLS
51
Figure 11 - Neuro Fridge Magnets
Recommended


![Clinical Stroke Neurology[1].1](https://img.dokumen.tips/doc/110x75/577cda181a28ab9e78a4da13/clinical-stroke-neurology11.jpg)
