Introduction to IMAP Email with Outlook 2003Version 4 – August 2006
Massachusetts Institute of Technology

Outlook 2003 – Eudora FeatureComparison
Eudora Outlook Page
Mailboxes Mailbox Folders p. 4, 5, 10, 11
Out mailbox Sent ItemsDraftsOutbox (holds mail until sent)
p. 5, 20
Attachments Attachments - can’t accessfiles directly but can saveand/or delete from e-mailmessage
p. 7-8
Filters Rules p. 13
Address Book Address Book p. 6, 16
Nicknames Distribution List p. 17
Directory Services Select Names p. 16
Delete – select message(s)and Delete; Empty Trash tocomplete the process
Delete – select message(s)and Delete; Purge DeletedMessages or Empty DeletedItems Folder to complete theprocess
p. 11
Personalities Accounts Tools Menu/E-mail Accounts
Signature Signature p. 9
Stationary No Stationary – use Signature p. 9

Outlook 2003 Quick Start Guide v4 Page 4http://web.mit.edu/ist/topics/email/migration.htm [email protected]
Getting Started
This Quick Start class assumes that:
1. Outlook 2003 is configured for use at MIT. If you need help with configuration please see Outlook2003 for Windows: MIT Recommended Settings (http://itinfo.mit.edu/article.php?id=7064).
2. If you are migrating from another email program such as Eudora it is assumed thatprocess has already taken place. For information about migrating see Email Migration atMIT (http://web.mit.edu/ist/topics/email/migration.html).
3. You are familiar with the features of at least one email program.
About Outlook 2003
Outlook 2003 is part of the Microsoft Office 2003 Professional suite of programs. It has manyfeatures and menus in common with Word and the other Office programs. If your department ispart of the Microsoft Campus Agreement then you should have access to Office 2003 Professional.
Outlook 2003 manages and organizes email messages, schedules, tasks, notes, contacts, andother information. Because it has so many functions it is more complicated to learn than OutlookExpress 6, the other recommended Windows email client, but you can use Outlook 2003 as anemail program without using any of the other features. If you used filters in Eudora to directincoming email to certain folders you will want to use the Rules feature in Outlook 2003. Thisfeature does not work with IMAP email in Outlook Express.
The Outlook 2003 Window
The first time you open Outlook 2003 your window may look like the window below. This is theOutlook 2003 screen which appears by default. Click on the Inbox folder with the name of your PO(post office) server .
Outlook 2003 Quick Start Guide v4 Page 5http://web.mit.edu/ist/topics/email/migration.htm [email protected]
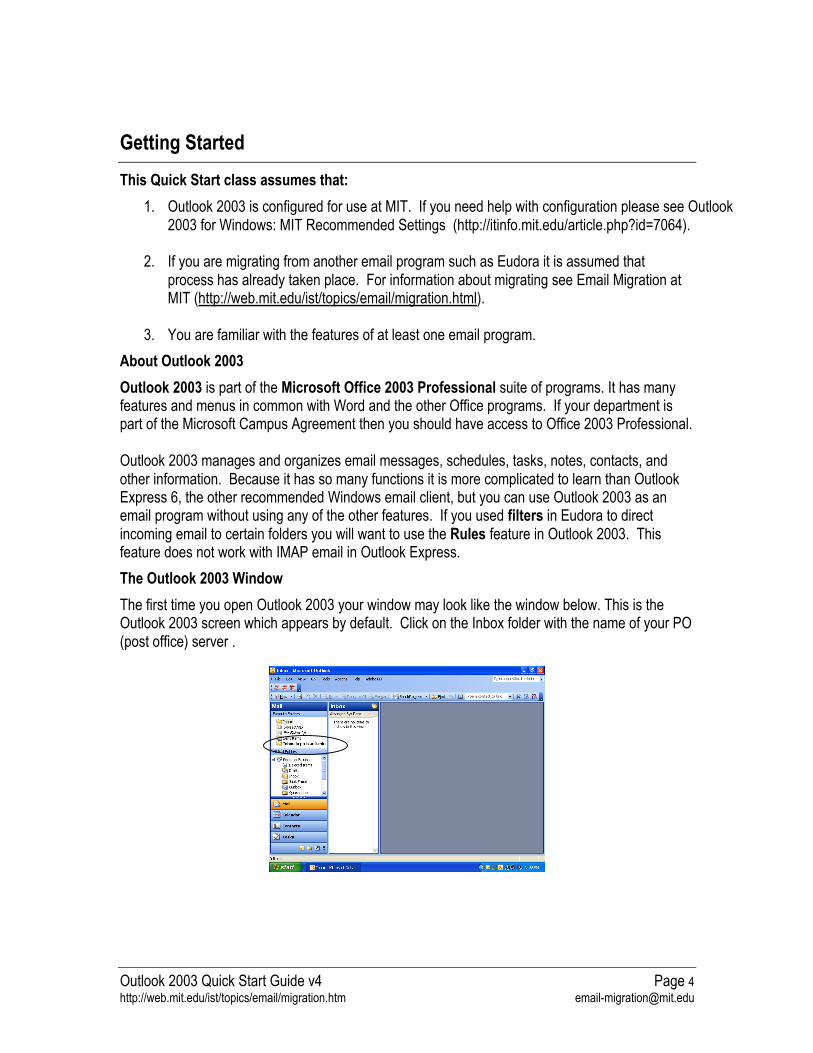
This picture shows a typical Outlook 2003 Window.
Area Description
1 – Folder List The Folder List shows all folders in which mail may be stored. This list includesfolders on the IMAP mail server and folders on the computer you are using. Itincludes folders you create and folders which are part of Outlook e.g., Drafts, DeletedItems, Junk E-mail, Outbox and Sent Items.
2 – Navigation Pane
[Alt-F1 to hide or show]
The Navigation Pane lists the different functions in Outlook like Mail, Contacts andCalendar. Click on a function name to bring it into view in the main windows. TheNavigation Pane may be customized to show just the Mail function. It may also behidden from view.
3 – Menus and Toolbars Toolbars can be customized. After you’ve used Outlook for a while remember to addyour frequently used menu choices to the toolbars.
4 – Message List This window shows information about each mail message in the selected mailbox(Inbox in the picture above).
5 – Reading Pane This shows the body of the message selected in the Message List.
2
3
51
4

Outlook 2003 Quick Start Guide v4 Page 6http://web.mit.edu/ist/topics/email/migration.htm [email protected]
The Basics: Read and Send Email
Reading Email Messages [CTRL-1 to show mail]
After Outlook 2003 downloads your messages, or after you click the Send/Receive button on the toolbar, you can read messages either in a message window or in the Preview Pane.
1. Click the Inbox icon on the Folders List under poXX.mit.edu (XX is your po box number,e.g., po14.mit.edu) to show the mail in your inbox.
2. To view a message in the Reading Pane, click the message in the Message List.3. To view the message in a separate window, double-click the message in the Message List.
Reply to a Message [CTRL-R to reply or CTRL-SHIFT-R to reply to all]
1. With the message open in the Reading Pane or a separate window click on the toolbar toselect Reply to Sender, Reply to All, or Forward .
2. A new reply window will open into which you can type your reply.3. Type your message, and then click the Send button on the toolbar.
Reading Messages Stored in a Folder
1. Click to select the folder name in the Folder list or use CTRL-Y to select a folder.Messages from that folder will be displayed. Use the scroll bar to see more messages.
2. Select the message to view in the Reading Pane or double-click to view in a separatewindow.
Sending Email Messages
1. On the toolbar, click the Write Message button or press CTRL-N.2. In the To: or Cc: boxes, type the e-mail name of each recipient, separating names with a
comma or semicolon.3. To show the Bcc: field if it’s currently unavailable, select Bcc Field on the View menu.4. Type a message title in the Subject box.5. Type your message, and then click the Send button on the toolbar or press
CTRL-S.6. If you are composing a message offline, your message will be saved in the Outbox. It will
be sent automatically when you go back online.7. To save a draft of your message to work on later, click Save on the File menu. This saves
a copy in the Drafts folder of computer you are using. To save a draft of your messageon the server so you can get to it from any computer, choose Copy to Folder from the Filemenu and save to your IMAP Drafts folder (the one under your poXX.mit.edu Inbox).

Outlook 2003 Quick Start Guide v4 Page 7http://web.mit.edu/ist/topics/email/migration.htm [email protected]
Inserting Email Addresses
When adding an email address to a message or a reply you can have Outlook 2003 automaticallyenter the address in three different ways. More information about the Address Book andContacts is provided later in this document.
1. When manually entering an address Outlook 2003 will automatically complete an addressyou have used recently. Type enough letters to get to the name you want.
Note: to turn this option on go to Tools>E-Mail Options>Advanced E-Mail Options>SuggestNames While Completing…..
2. You may enter an email address from the Contacts list (click Contacts in the NavigationPane). Select the name and click New Message to Contact from the Actions menu.
3. Or you may click on , , or in a new or reply message window toopen the Address Book’s Select Names dialog box. Select a contact name and click toadd the address to the appropriate field.

Outlook 2003 Quick Start Guide v4 Page 8http://web.mit.edu/ist/topics/email/migration.htm [email protected]
Attachments
In Eudora attachments are saved as separate files in an easily accessible folder. Outlook uses amore complicated arrangement. By default attachments are saved with their mail messages alltogether in one single file. You can:
• read and edit an attachment• save an attachment on your computer• keep an attachment with it’s message• remove an attachment from it’s message
A message with an attachment, shows a paper clip icon displayed in the Message List.
Opening Attachments
From the Reading Pane [NOTE: attachment opens as Read-Only]1. Double-click the icon to open the attachment in it’s native program2. OR, right-click the attachment and choose Open
From a Message Window1. Open the email message in a message window2. Double-click the icon to open the attachment in it’s native program3. OR, right-click the attachment and choose Open
Saving Edited Attachments with Original email Message
[NOTE: you must open attachment from a Message Window]1. Open the attachment in it’s native program and make changes2. Close the document and click Yes to save changes3. Back in Outlook, close the message window and click Yes to saving changes
Note: A new copy of your message will be created with the changes. The old copy of yourmessage will be marked for deletion.
Saving Attachments onto your Computer Directly from a MessageFrom the Message List
1. Select a message in the message list2. Choose File > Save Attachments…3. Choose the attachment to save or choose All Attachments to save multiple attachments
From the Reading Pane or a Message Window1. Right-Click on the attachment and choose Save As…
Outlook 2003 Quick Start Guide v4 Page 9http://web.mit.edu/ist/topics/email/migration.htm [email protected]
Saving Edited Attachments on your Computer
From within the native application1. Open the attachment in it’s native program and make changes2. Choose Save As… from the File menu and choose a save location3. After saving quit the application4. NOTE: the original version of the attachment is still saved with the mail message [see
Remove Message below]
Remove Attachments1. From a message window right-click the name of the attachment2. Choose Remove from the pop-up menu
NOTE: Deleting a message will also delete its attachments.
Sending Attachments
1. From within a new message or reply window go to the Insert menu and click File or click
the Insert File button on the toolbar.2. Find the file you want to attach, select it and click Insert.3. The file will be listed in the Attach field in the message header. Click the Attach field
button to select additional files to attach.

Outlook 2003 Quick Start Guide v4 Page 10http://web.mit.edu/ist/topics/email/migration.htm [email protected]
Check the Spelling of Messages
1. In a new message or reply message window, click Spelling the Tools menu or press F7.2. To customize the way your spelling checker works, on the Tools menu, click Options, and
then select the Spelling tab.
Creating and Using Signatures
1. On the Tools menu, select Options, then click the Mail Format tab.2. Click the Signatures button at the bottom to add or edit signatures.3. Click New, enter a name for your signature and use the Start with a blank signature option.
Click Next.4. Enter the text for your signature click Finish. Repeat to add more signatures. Select an
existing signature and click Edit to make changes. Click OK.5. To automatically use a signature on every mail message, reply or forward from this point
on, select the signature to use.6. To use a signature on some but not every message or to choose among different
signatures, select <none> for your signature choices. Then, when you compose amessage and you’re ready to insert your signature, click Signature on the Insert menu. Ifyou have more than one signature a list pops up. Choose the signature you want to use.
Using Signatures to Create Boilerplate Text (Eudora Stationary)
There is no feature in Outlook 2003 to create boilerplate (i.e., reusable) text. However,you can accomplish the same thing by creating a signature with the reusable text. Youcan even add a log or other graphic. Then simply insert the signature into a new message.

Outlook 2003 Quick Start Guide v4 Page 11http://web.mit.edu/ist/topics/email/migration.htm [email protected]
Organizing Messages: IMAP and Local Folders
What is IMAP?
IMAP (Internet Message Access Protocol) is a client-server approach to email in which email iskept on MIT’s central mail server. When you work with email, Outlook 2003 connects to the postoffice server to access your email. Since your email stays on the server, you can easily access itfrom different computers at different locations, using any IMAP email client (e.g., Webmail).
You create folders, like Eudora mailboxes, in Outlook 2003 to store groups of email messages.These folders may be created to store mail messages on MIT’s central email server, or locally onyour computer. Knowing where your mail is located is critical to working successfully with IMAP.
View Folders and Messages
1. In the Folder List click a folder name. You will see a list of the messages in that folderdisplayed in the messages window.
2. To display subfolders in the Folder List, click the plus sign (+) to the left of each of a folder.All the subfolders appear beneath their main folder, and the plus sign becomes a minussign.
3. To see your inbox, click Inbox under the pox.mit.edu.
Create a New Folder
1. On the File menu, point to Folder, and then click New Folder or press CTRL-SHIFT-E.2. Type a name for the new folder.3. To place your new folder, click the folder name under which you want the new folder to
appear. Click on Personal Folders or poX.mit.edu to create a folder at the top level ofyour local or IMAP folders.
4. Click OK.
Move or Copy a Message to a Folder
1. In the message list, select the message or messages you want to move or copy.2. On the Edit menu, click Move to Folder or Copy to Folder or press CTRL-SHIFT-V, and
then select the destination folder, and click OK.3. Or, you can move a message by selecting it in the message list and dragging it to a folder
in the Folder List.4. Or, from a message window, select Move to Folder from the Edit menu, select the
destination folder from the list, then click OK.
Outlook 2003 Quick Start Guide v4 Page 12http://web.mit.edu/ist/topics/email/migration.htm [email protected]
Remove a Folder
1. Click the folder in the Folder List.2. On the File menu, click Folder, then choose Delete “Folder name”. You will be warned
about deleting messages if there are any in the folder.
Note: You cannot delete or rename the Inbox, Outbox, Sent Items, Deleted Items, Drafts,Search or Junk E-mail folders, or the name of your PO Box.
Deleting IMAP Email Messages
Outlook 2003 deletes IMAP mail in two stages. When you select a message and choose Delete,the message is then marked for deletion. It remains visible in the messages list with a line throughit. At this point you may still undelete the message. When you select Purge Deleted Messages,any messages marked for deletion are then permanently deleted from the current mailbox folderONLY.
Note: You can choose to hide messages marked for deletion. On the View menu, clickArrange By, then choose Current View and finally select Hide Messages Marked for Deletion.
Delete a Message from an IMAP Folder
1. In the message list, select the message.2. On the toolbar, click the Delete button or press CTRL-D. This marks the message you
want to delete.3. On the Edit menu, click Purge Deleted Messages to remove the deleted items
permanently. Once you purge a message, it cannot be recovered.4. To restore a message that is marked for deletion on an IMAP server, select the message
and click Undelete on the Edit menu.
Note: You must be connected for the deletions to occur; if you are not connected, the purgedmessages will be deleted the next time you connect. See Working Offline below.
Delete a Message from a Local Folder
Deleting messages from a local folder works differently from IAMP email but also has two stages.
1. In the message list, select the message, or messages to delete.2. Click the Delete button on the toolbar. The message is moved to the Deleted Items
folder stored locally on the current computer. Use CTRL-D to move a message theDeleted Items folder. Use SHIFT-DELETE to permanently delete a message.
3. To restore a deleted message, select the message and move it to a different folder.4. When you are completely sure you want to delete messages stored in the Deleted Items
folder, go to the Tools menu and choose Empty Deleted Items or right-click the DeletedItems folder from the Folder list then click Empty Deleted Items Folder on the shortcutmenu. This will permanently delete all mail messages in the Deleted Items folder.
Outlook 2003 Quick Start Guide v4 Page 13http://web.mit.edu/ist/topics/email/migration.htm [email protected]
IMAP Quotas
MIT allots each individual 500 megabytes of storage on the central mail server. You will be warnedwhen you approach 90% of your limit. You can check your IMAP quota via the web athttps://nic.mit.edu/postoffice/quota. This requires certificates. To learn more about IMAP quotassee Managing Your Email Quota at http://web.mit.edu/ist/topics/email/manage.html.
You should be able to stay within that limit by regularly checking your current free space and bydownloading older mail or mail with large attachments from the server to your local computer atregular intervals. You can also remove attachments and keep the message. Remember to purgemessages marked for deletion. Unpurged messages count against your quota. You must purgeeach mailbox individually. You might want to add the Purge Deleted Messages button to yourtoolbar.
It is also advisable to empty your Spamscreen folder often as this folder collects many messagesfor you. See Spam Screening at MIT at http://web.mit.edu/ist/services/email/nospam/index.html.
Back-up your IMAP Email
All IMAP mailboxes stored on the MIT mail servers are backed up regularly in case of catastrophicserver failure. IS&T does not provide a service for restoring email that you delete from the serverintentionally or by accident. Mail lost due to server/system failure will be restored. Mail lost throughuser error/deletion will not.
To back up your IMAP email, you must copy your email from your Inbox or other IMAP folder to alocal folder. Once it is on your local machine, the mail will be backed up as part of your regularbackup routine, e.g., through TSM. You may also wish to copy the downloaded mail onto a CD orother external storage media.
Note: TSM will only back up you locally saved email if Outlook is closed.
Archiving
All mail and attachments on your local computer are saved in a file named outlook.pst. Mail olderthan 6 months is archived by default to a file named archive.pst. New mailbox folders you createmust be set to archive by selecting the mailbox folder and choosing Properties from the file menuand then the AutoArchive tab.
Archive setting are located at Tools>Options>Other>AutoArchive.
To learn more about backing up email see Backing up Your Email athttp://web.mit.edu/ist/topics/email/backup.html.
Outlook 2003 Quick Start Guide v4 Page 14http://web.mit.edu/ist/topics/email/migration.htm [email protected]
Use Rules to Filter Incoming Mail into Folders
As with Eudora Filters, Outlook 2003 uses Rules to manage incoming messages based on criteriayou describe.
1. From the Tools menu, choose Rules and Alerts.
2. Click the New Rule button.
3. Click the choice for Start from a blank rule.
4. In Step 1 - select Check messages when they arrive. In Step 2 – select Apply this ruleafter the message arrives, then click Next.
5. On the following screen select the condition or conditions to trigger this rule (e.g., frompeople or distribution list) and in Step 2 click on the condition you selected and use thedialog box to give the condition a value. (e.g. from John Rogers). Then click Next.
6. On the next screen choose the results you want to happen (e.g. move to specified folder)if the condition is met and give the result a value (e.g., Project X folder). Then click Next.
7. Choose any exceptions to this rule and give the exception a value. ). Then click Next.
8. On the next screen give your rule a name. You have the option to run the rule onmessages already in your Inbox. Click Finish to complete your rule.
9. If you return to the Rules and Alerts dialog box you will see that you have the option to turnoff a rule by deselecting the check box, changing a rule, deleting a rule, moving a rule upor down in the order, or Running a Rule Now.
Outlook 2003 Quick Start Guide v4 Page 15http://web.mit.edu/ist/topics/email/migration.htm [email protected]
Finding Messages and Text
It is possible to find messages by searching a mailbox using criteria. It is also possible to find textwithin a message.
Use the Find command to locate messages in a single mailbox folder based on a text search. Usethe Advanced Find to locate messages in multiple mailbox folders based on advanced criteria. In amessage window use the Find command to locate specific text.
To Find Messages in a Single Mailbox
1. On the Tools menu choose Find then choose Find in the sub-menu. You may also click on
the Find icon in the toolbar, or simply press CTRL-E. A Find bar will appearabove the list of messages.
2. In the Find bar type the text you are looking for into the Look for: box.3. Click on the folder you wish to search in the Folder List.4. Click on Options and select Search All Text in Each Message to search in the body of
each message.5. Click on Find Now to begin the search.6. Click on Clear to show all the messages in the folder again.
Using the Advanced Search
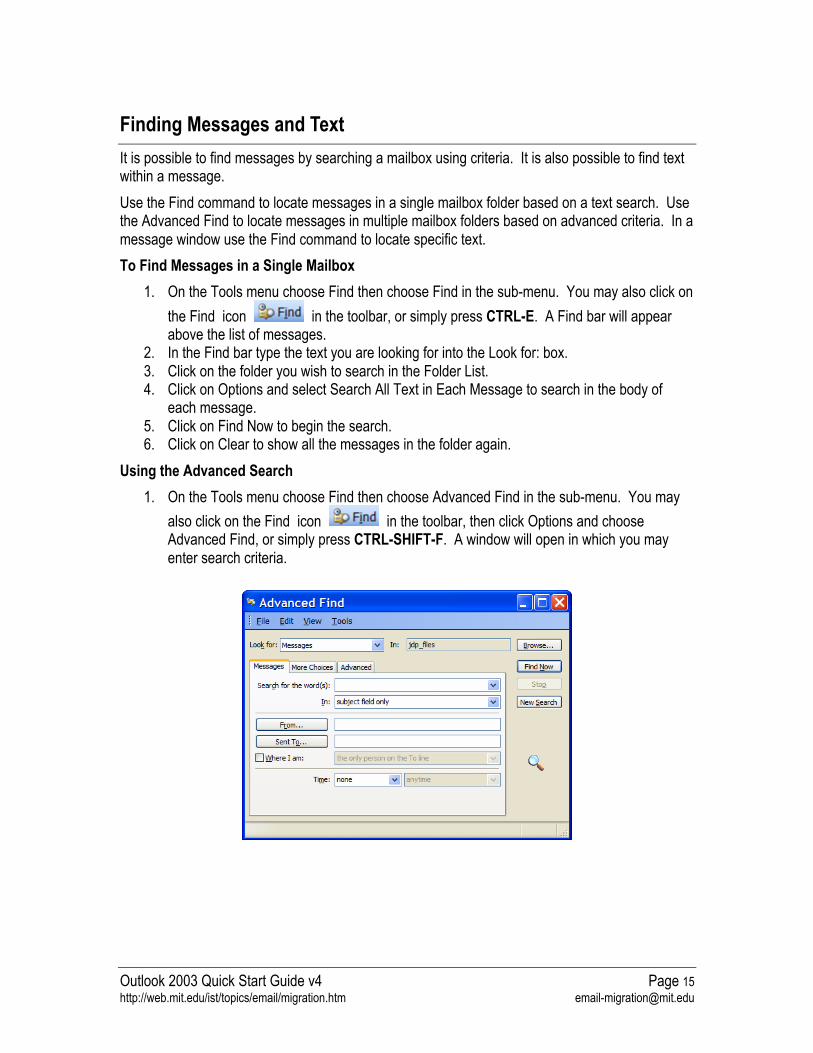
1. On the Tools menu choose Find then choose Advanced Find in the sub-menu. You may
also click on the Find icon in the toolbar, then click Options and chooseAdvanced Find, or simply press CTRL-SHIFT-F. A window will open in which you mayenter search criteria.
Outlook 2003 Quick Start Guide v4 Page 16http://web.mit.edu/ist/topics/email/migration.htm [email protected]
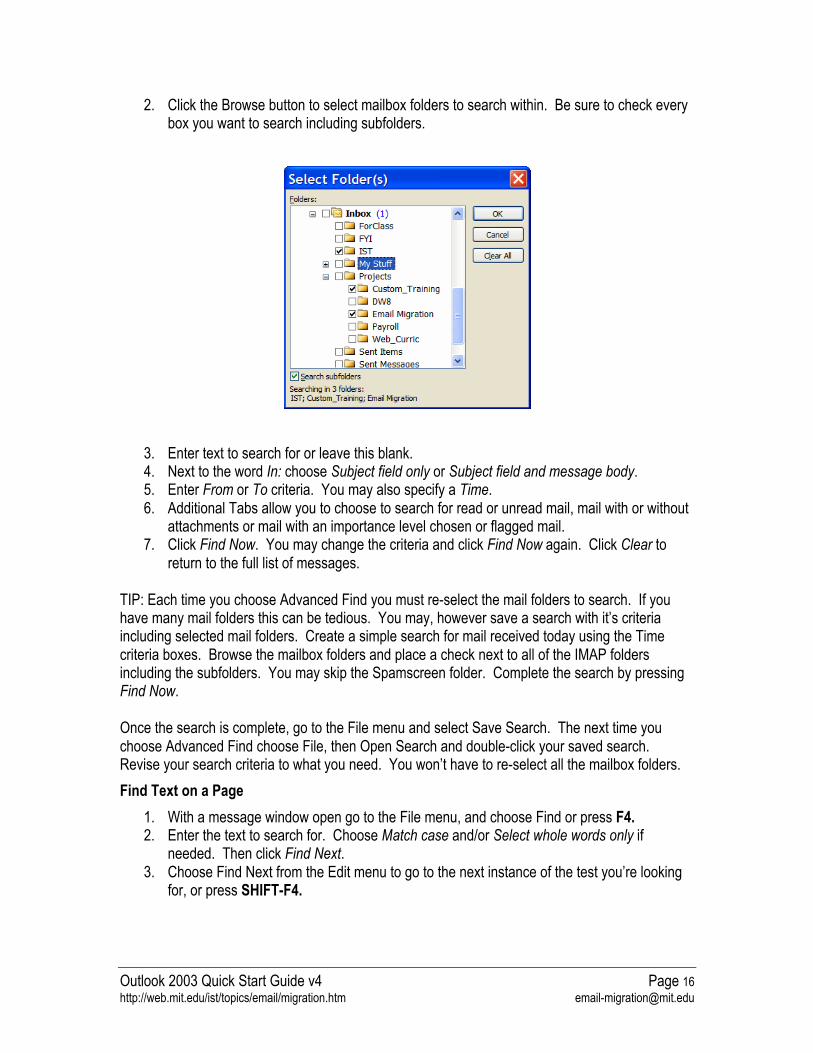
2. Click the Browse button to select mailbox folders to search within. Be sure to check everybox you want to search including subfolders.
3. Enter text to search for or leave this blank.4. Next to the word In: choose Subject field only or Subject field and message body.5. Enter From or To criteria. You may also specify a Time.6. Additional Tabs allow you to choose to search for read or unread mail, mail with or without
attachments or mail with an importance level chosen or flagged mail.7. Click Find Now. You may change the criteria and click Find Now again. Click Clear to
return to the full list of messages.
TIP: Each time you choose Advanced Find you must re-select the mail folders to search. If youhave many mail folders this can be tedious. You may, however save a search with it’s criteriaincluding selected mail folders. Create a simple search for mail received today using the Timecriteria boxes. Browse the mailbox folders and place a check next to all of the IMAP foldersincluding the subfolders. You may skip the Spamscreen folder. Complete the search by pressingFind Now.
Once the search is complete, go to the File menu and select Save Search. The next time youchoose Advanced Find choose File, then Open Search and double-click your saved search.Revise your search criteria to what you need. You won’t have to re-select all the mailbox folders.
Find Text on a Page
1. With a message window open go to the File menu, and choose Find or press F4.2. Enter the text to search for. Choose Match case and/or Select whole words only if
needed. Then click Find Next.3. Choose Find Next from the Edit menu to go to the next instance of the test you’re looking
for, or press SHIFT-F4.

Outlook 2003 Quick Start Guide v4 Page 17http://web.mit.edu/ist/topics/email/migration.htm [email protected]
Contacts, the Address Book and the On-Line Directory
Contacts provides a place to store contact information for use in managing email addresses forOutlook 2003 messages, but may also be used as a general contact manager for home and workaddresses, phone and fax numbers and personal information such as birthdays or anniversaries.
Note: It is possible to import contact information from another program. This may have beendone as part of the process to migrate your email from Eudora to Outlook 2003.
The Address Book will display names and email addresses only and will show them from yourContacts or from the On-line Directory. The Address Book is a handy way to look up and insert anemail address into a message. Only Contacts who have a valid email address (includes @xxx.xxx)as part of their contact information will be displayed in the Address Book.
Add a Contact Manually
1. On the Navigation Pane, click Contacts. You should see contacts listed as Address Cards.2. On the toolbar click the New button.3. Add the information for your new contact. Click different tabs to include different types of
information.
Add a Contact From a Message
1. In a message you are viewing or replying to, right-click the person's name, and then clickAdd to Outlook Contacts.
2. In the Contacts card created, add any additional information for the new contact.3. Click the Save and Close button.
Add a Contact from the Online Directory
An easy way to add more complete information is to look up a person in the online directory andautomatically transfer their information to Contacts. To do this, Outlook 2003 must be configuredfor LDAP (Lightweight Directory Access Protocol). See Help and Information to get more details onconfiguring LDAP. This process uses the search feature in the Address Book and once found, willlet you add a name as a new Contact.
1. On the toolbar click the Address Book icon or press CTRL-SHIFT-B.2. In the Show Names from the: box, select ldap.mit.edu.
3. From the toolbar in the Address Book, click on the Find Items icon.4. Type in the last name or email (Alias) of the person you are looking for, and choose Begins
with or Contains, then click OK.
Outlook 2003 Quick Start Guide v4 Page 18http://web.mit.edu/ist/topics/email/migration.htm [email protected]
5. Find the name in the list of names found and click the Add to Contacts button.6. In the Contacts card created, add any additional information for the new contact.7. Click the Save and Close button.
Create a Distribution List (Eudora Nicknames)
1. On the Go menu or the Navigation pane select Contacts, or press CTRL-3.2. On the File menu choose New Distribution List.3. Type a name for the list then click the Select Members button.4. In the Show Names from the: pop-up menu-up menu select Contacts.5. Select a contact to be a member of the list and click the Members button. Repeat to add
more names to the list. Click OK after the last name has been added.6. Click Save and Close on the toolbar.7. Return to email by selecting Mail on the Go menu or on the Navigation pane or by pressing
CTRL-1.8. Insert the distribution list name as you would any other address on the To: or CC: line of a
new message.9. To expand the list to show the individual member email addresses click the plus next to the
list name then click OK in the dialog box.

Outlook 2003 Quick Start Guide v4 Page 19http://web.mit.edu/ist/topics/email/migration.htm [email protected]
Customize How Outlook Looks
Outlook 2003 let’s you change the way the screen looks by making different choices in the Viewmenu. Several Views, or arrangements of columns and formatting are set up by default but Viewscan be added or customized.
Change the Display of the Reading Pane
The Reading Pane lets you view message contents without opening the message in a separatewindow. You can customize the Reading Pane.
1. On the View menu, click Reading Pane and choose Right, Bottom or Off to hide or positionthe Pane.
2. To resize the Reading Pane and the Message List, point to the divider between them untilyou see a double arrow, and then click and drag the divider.
Sort the Columns in the Message List
1. On the View menu, choose Arrange By, and select, or de-select the columns to sort by.2. Or, click the head of the column.
Change the View
1. On the View menu, choose Arrange By, then Custom.2. Change the View by clicking a button to add or delete Fields, change the Sort order,
Group messages by a field to hide or show large blocks of messages, or change OtherSettings such as font and gridlines.
Use Views to Show or Hide Messages
There are at least two possibilities for hiding some messages.
1. On the View menu choose Arrange By and then Show in Groups. Messages are displayedin groups. If you have not specified a group, they are grouped chronologically. Click theplus and minus symbols to open and close groups.
2. On the View menu choose Arrange By and then Current View you can choose to hide ofgroup messages which have been marked for deletion or limit the messages beingdisplayed to the last seven.

Outlook 2003 Quick Start Guide v4 Page 20http://web.mit.edu/ist/topics/email/migration.htm [email protected]
To Color Messages
1. Select one message from the person whose messages you'd like to see in a differentcolor.
2. On the Tools menu, click Organize to display the Organize pane.3. In the Organize pane, click Using Colors.4. In the first bulleted item, you should see the words From and the name of the person who
sent you the message. Then you should see the word in and a drop-down list box.5. Click the box to select a color (or keep the default).6. Click Apply Color.

Outlook 2003 Quick Start Guide v4 Page 21http://web.mit.edu/ist/topics/email/migration.htm [email protected]
Customize How Outlook Works
Customize the Toolbars
1. To change the Toolbar in the main window, click Toolbars on the View menu.2. Choose among the 4 possible Toolbars or click Customize to add or remove tools from the
toolbars.
Options
Outlook 2003 has many features which may be customized, changing the way the programoperates. Some of these options are quite useful while others are less critical.
To access options click Options on the Tools menu and select the appropriate tab. Make thechanges you want, then click OK. Click the Question Mark icon to see an explanation of thechoices on all the tabs.
E-mail Options Save copies of messages in Sent Items folder
Automatically save copies of unsent messages
On replies and forwards
Advanced Email Options
(on E-mail Options tab)
When new items arrive in my Inbox
Suggest names while completing To, Cc and Bcc fields
Mail Format Compose in this message format (Plain Text is recommended)
Use Office 2003 for editing (no need to use this)
Fonts (choose fonts for reading and composing messages)
Signatures (see handout)
Spelling Choose the options you prefer (same as Word)
Other Empty Deleted Items Folder upon exiting
Make Outlook the Default program
Advanced Options
(on Other tab)
Startup in this Folder (set this for your IMAP Inbox)
Warn before permanently deleting items (your choice)
Outlook 2003 Quick Start Guide v4 Page 22http://web.mit.edu/ist/topics/email/migration.htm [email protected]
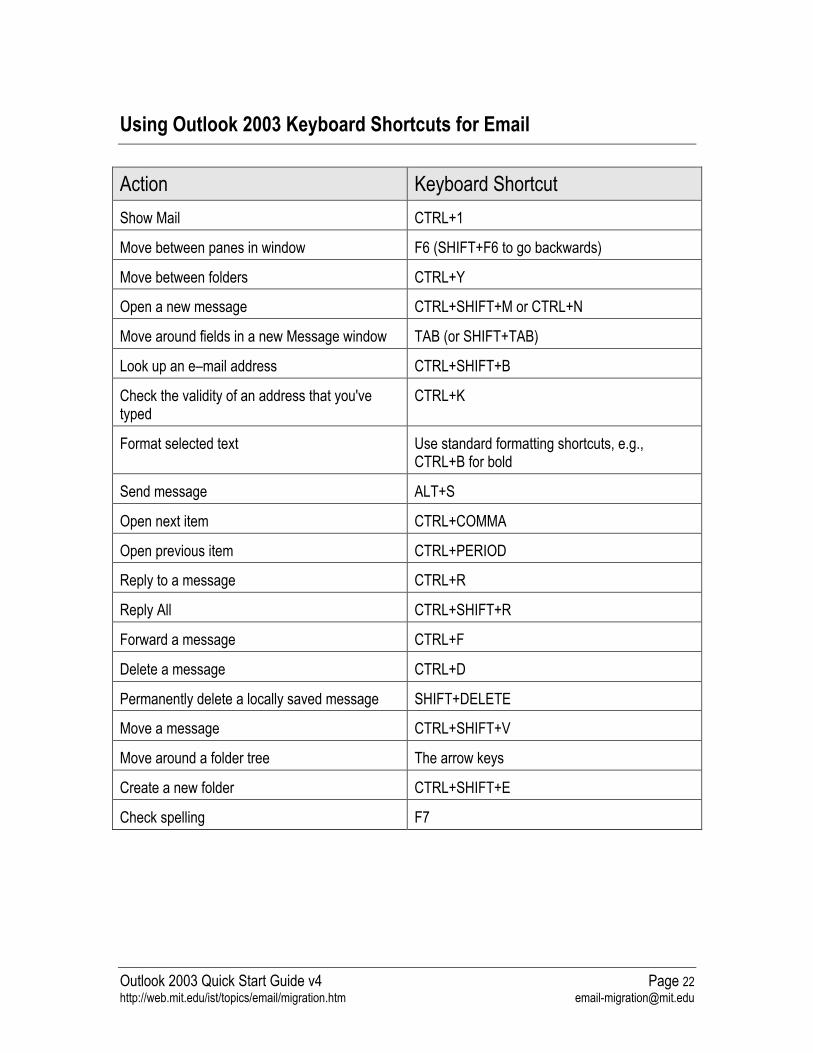
Using Outlook 2003 Keyboard Shortcuts for Email
Action Keyboard Shortcut
Show Mail CTRL+1
Move between panes in window F6 (SHIFT+F6 to go backwards)
Move between folders CTRL+Y
Open a new message CTRL+SHIFT+M or CTRL+N
Move around fields in a new Message window TAB (or SHIFT+TAB)
Look up an e–mail address CTRL+SHIFT+B
Check the validity of an address that you'vetyped
CTRL+K
Format selected text Use standard formatting shortcuts, e.g.,CTRL+B for bold
Send message ALT+S
Open next item CTRL+COMMA
Open previous item CTRL+PERIOD
Reply to a message CTRL+R
Reply All CTRL+SHIFT+R
Forward a message CTRL+F
Delete a message CTRL+D
Permanently delete a locally saved message SHIFT+DELETE
Move a message CTRL+SHIFT+V
Move around a folder tree The arrow keys
Create a new folder CTRL+SHIFT+E
Check spelling F7
Outlook 2003 Quick Start Guide v4 Page 23http://web.mit.edu/ist/topics/email/migration.htm [email protected]
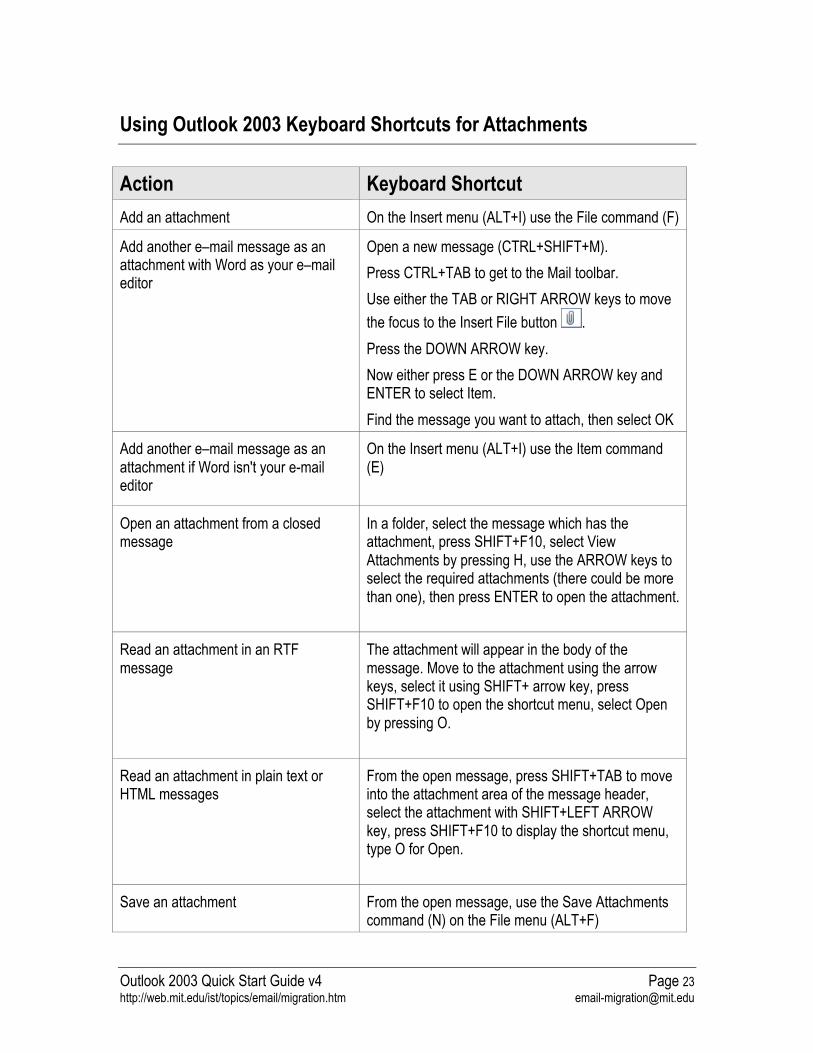
Using Outlook 2003 Keyboard Shortcuts for Attachments
Action Keyboard Shortcut
Add an attachment On the Insert menu (ALT+I) use the File command (F)
Add another e–mail message as anattachment with Word as your e–maileditor
Open a new message (CTRL+SHIFT+M).
Press CTRL+TAB to get to the Mail toolbar.
Use either the TAB or RIGHT ARROW keys to move
the focus to the Insert File button .
Press the DOWN ARROW key.
Now either press E or the DOWN ARROW key andENTER to select Item.
Find the message you want to attach, then select OK
Add another e–mail message as anattachment if Word isn't your e-maileditor
On the Insert menu (ALT+I) use the Item command(E)
Open an attachment from a closedmessage
In a folder, select the message which has theattachment, press SHIFT+F10, select ViewAttachments by pressing H, use the ARROW keys toselect the required attachments (there could be morethan one), then press ENTER to open the attachment.
Read an attachment in an RTFmessage
The attachment will appear in the body of themessage. Move to the attachment using the arrowkeys, select it using SHIFT+ arrow key, pressSHIFT+F10 to open the shortcut menu, select Openby pressing O.
Read an attachment in plain text orHTML messages
From the open message, press SHIFT+TAB to moveinto the attachment area of the message header,select the attachment with SHIFT+LEFT ARROWkey, press SHIFT+F10 to display the shortcut menu,type O for Open.
Save an attachment From the open message, use the Save Attachmentscommand (N) on the File menu (ALT+F)
Outlook 2003 Quick Start Guide v4 Page 24http://web.mit.edu/ist/topics/email/migration.htm [email protected]
Help and Information
For general help a great place to start is the Microsoft Office Outlook Help in the Outlook Helpmenu. Click Table of Contents to get an organized list of Help topics.
Microsoft Online has some excellent help including online tutorials for Outlook 2003.http://office.microsoft.com/en-us/assistance/CH790018071033.aspx
For complete information about migrating from another mail client, see Email Migration at MIT.http://web.mit.edu/ist/topics/email/migration.html
For complete information about using Outlook 2003 at MIT, see Outlook 2003 for Windows.http://itinfo.mit.edu/product.php?vid=614
For help with configuring, see Outlook 2003 for Windows: MIT Recommended Settings.http://itinfo.mit.edu/article.php?id=7064
For more on IMAP, see Guide to IMAP at MIT.http://web.mit.edu/ist/topics/email/imap.html
For more information on backup procedures, see Backing up Your Emailhttp://web.mit.edu/ist/topics/email/backup.html.
For help setting up access to the online directory, see Outlook 2003 for Windows: Configuring forLDAP http://itinfo.mit.edu/article.php?id=7920
For general information about using email at MIT, see Email at MIT.http://web.mit.edu/ist/topics/email/index.html
For help with email or other computer questions, contact the Computing [email protected] 617-253-1101
Recommended


![[MS-STANOIMAP]: Outlook Internet Message ... - Microsoft… · Outlook Internet Message Access Protocol (IMAP) Standards Support This document provides a statement of standards support](https://img.dokumen.tips/doc/110x75/60030d0ca209200b772419e8/ms-stanoimap-outlook-internet-message-microsoft-outlook-internet-message.jpg)


![[MS-STANOIMAP]: Outlook Internet Message Access Protocol (IMAP](https://img.dokumen.tips/doc/110x75/6204ef0b4c89d3190e0cb1d1/ms-stanoimap-outlook-internet-message-access-protocol-imap.jpg)