FUJITSU StorageETERNUS DX S4/S3 seriesHybrid Storage Systems
Configuration Guide (NAS)
System configuration design/basic settings for NAS environments
P3AM-8072-17ENZ0
Table of Contents
1. NAS System Design 11
Unified Configuration.................................................................................................................... 11
Supported Protocols ...................................................................................................................... 12CIFS .......................................................................................................................................................................12
NFS........................................................................................................................................................................13
FTP/FXP .................................................................................................................................................................13
Operating Environment for Clients................................................................................................ 14Confirmed OS ........................................................................................................................................................14
NAS System (NAS Volume Management)...................................................................................... 17NAS File Systems ...................................................................................................................................................18
NAS Volume ..........................................................................................................................................................21
Block Size ..............................................................................................................................................................24
File System Specification............................................................................................................... 24
Data Encryption ............................................................................................................................ 26
2. Designing NAS Operations 27
NAS Server Name (Host Name)..................................................................................................... 27
User Management ........................................................................................................................ 28Authentication Server ...........................................................................................................................................29
Fixed User Account................................................................................................................................................32
Local User Authentication .....................................................................................................................................33
Access Control (ACL Function) ....................................................................................................... 35Access Control in a CIFS Environment ....................................................................................................................36
Access Control in an NFS Environment ..................................................................................................................36
Access Control in a Shared CIFS/NFS Environment .................................................................................................37
CIFS Access Permission Settings .................................................................................................... 37
File Sharing................................................................................................................................... 38CIFS Operation.......................................................................................................................................................40
NFS Operation .......................................................................................................................................................42
Home Directories .......................................................................................................................... 44
Quota............................................................................................................................................ 45
2FUJITSU Storage ETERNUS DX S4/S3 series Hybrid Storage Systems Configuration Guide (NAS)
Copyright 2018 FUJITSU LIMITEDP3AM-8072-17ENZ0
Snapshot....................................................................................................................................... 47
Backup.......................................................................................................................................... 50
Packet Trace Acquisition ............................................................................................................... 50
Audit Log ...................................................................................................................................... 52
Meta Cache Distribution................................................................................................................ 53
File Lock........................................................................................................................................ 55Client Resource Deallocation.................................................................................................................................55
NFS File Lock Takeover Function............................................................................................................................57
Performance Index........................................................................................................................ 60
Sparse File Inflation ...................................................................................................................... 60
3. Connection Interface Configuration 64
NAS Interface (NIC-CA).................................................................................................................. 64
Redundant Method....................................................................................................................... 67Single Path Connection .........................................................................................................................................67
Multipath Connection (Active-Active Connection) .................................................................................................68
Bonding ................................................................................................................................................................70
Network Path Control.................................................................................................................... 75
FTP/FXP ......................................................................................................................................... 76
4. NAS Environment Configuration 78
Thin Provisioning Pool (TPP) Creation........................................................................................... 79
NAS Volume Creation .................................................................................................................... 80
Bonding Settings .......................................................................................................................... 82
NAS Interface Settings .................................................................................................................. 84
VLAN Settings ............................................................................................................................... 86
DNS Server Settings....................................................................................................................... 87
NAS Server Name Settings ............................................................................................................ 89
Authentication Server Settings...................................................................................................... 90
Local User Authentication Settings ............................................................................................... 93Local Group Creation .............................................................................................................................................93
Local User Creation ...............................................................................................................................................94
Table of Contents
3FUJITSU Storage ETERNUS DX S4/S3 series Hybrid Storage Systems Configuration Guide (NAS)
Copyright 2018 FUJITSU LIMITEDP3AM-8072-17ENZ0
Authentication Method Change ............................................................................................................................97
Shared Folder Creation (CIFS/NFS) ................................................................................................ 99
Home Directories ........................................................................................................................ 104
FTP/FXP Settings ......................................................................................................................... 107FTP Setting ..........................................................................................................................................................107
FXP Setting..........................................................................................................................................................108
Quota Settings ............................................................................................................................ 109
Snapshot Settings ....................................................................................................................... 115Basic Settings for Snapshot .................................................................................................................................115
Snapshot Restoration..........................................................................................................................................122
Audit Log Setup .......................................................................................................................... 125
Meta Cache Distribution Settings ................................................................................................ 128Manual Execution of Meta Cache Distribution.....................................................................................................128
Automatic Execution of Meta Cache Distribution ................................................................................................129
5. Packet Trace Acquisition Settings 131
6. System Status Check 135
Checking the Shared Folders ....................................................................................................... 136
Checking the Home Directories ................................................................................................... 138
Checking the NAS Interfaces ....................................................................................................... 139
Checking the NAS Environment Settings..................................................................................... 141
Checking the Quota Management .............................................................................................. 143
Checking the Snapshots .............................................................................................................. 145
Checking the Backup Information ............................................................................................... 146
7. How to Access from Clients 147
Access from CIFS Clients .............................................................................................................. 147
Access from NFS Clients............................................................................................................... 148
8. Backup/Restore Settings 150
Backup Settings .......................................................................................................................... 150
Backup........................................................................................................................................ 150
Table of Contents
4FUJITSU Storage ETERNUS DX S4/S3 series Hybrid Storage Systems Configuration Guide (NAS)
Copyright 2018 FUJITSU LIMITEDP3AM-8072-17ENZ0
Restoration ................................................................................................................................. 150
9. Backup Software Settings 151
Notes When Using Arcserve Backup ............................................................................................ 151
Notes When Using NetVault SmartDisk ....................................................................................... 152
Notes When Using NetWorker..................................................................................................... 152
Notes When Using NetBackup .................................................................................................... 153
Notes When Using ETERNUS SF TSM............................................................................................ 153
10. Troubleshooting 154
Configuration Errors .................................................................................................................... 154
Operation Errors.......................................................................................................................... 158
Required Information for Inquiries.............................................................................................. 164
A. Function Specification List 166
NAS Volume Specifications.......................................................................................................... 166
File System Specifications ........................................................................................................... 168
Available Functions for Each Software ........................................................................................ 169
B. Snapshot Configurable NAS Volume Capacity (Guideline) 172
C. Audit Log Messages 178
Audit Log Format ........................................................................................................................ 178
Output Examples of the Audit Logs............................................................................................. 180
D. Notes for Data Migrations 182
Actions to Take Before Data Migrations ...................................................................................... 182
Property Information of the Files that are Migrated from the Windows OS ................................. 183
E. Firmware Release Information 185
Table of Contents
5FUJITSU Storage ETERNUS DX S4/S3 series Hybrid Storage Systems Configuration Guide (NAS)
Copyright 2018 FUJITSU LIMITEDP3AM-8072-17ENZ0
List of Figures
Figure 1 SAN/NAS Connection Diagrams ................................................................................................................11Figure 2 NAS File Systems ......................................................................................................................................18Figure 3 Initial Deployment of Meta Cache ............................................................................................................21Figure 4 How Free Space Is Recognized..................................................................................................................25Figure 5 Authentication Server...............................................................................................................................29Figure 6 Home Directories......................................................................................................................................44Figure 7 Quota (for Each User or Group) ................................................................................................................45Figure 8 Quota (for Each Shared Folder) ................................................................................................................46Figure 9 Snapshot ..................................................................................................................................................48Figure 10 Packet Trace Acquisition...........................................................................................................................51Figure 11 Audit Log..................................................................................................................................................52Figure 12 Meta Cache Distribution...........................................................................................................................53Figure 13 Single Path Connection (When a NAS Connection Is Used).......................................................................67Figure 14 Multipath Connection (Active-Active Connection) (When a NAS Connection Is Used)...............................68Figure 15 Bonding ...................................................................................................................................................70Figure 16 Multipath Connection When Using Bonding.............................................................................................73Figure 17 FTP/FXP ....................................................................................................................................................76Figure 18 Bonding Settings......................................................................................................................................82Figure 19 Example Schedule Settings for Snapshots ..............................................................................................116Figure 20 Example of Creating Operation Volume and NAS Snapshot Destination Volume....................................117Figure 21 RAID Group Creation...............................................................................................................................118Figure 22 Snapshot Destination Volume (SDPV) Creation ......................................................................................118Figure 23 Snapshot Restoration .............................................................................................................................122Figure 24 Operational Configuration (When a Backup Is Performed Using QuickOPC with OPC Restoration)..........172Figure 25 Operational Configuration (When a Secondary Backup Is Performed Using a Backup between ETERNUS DX
Storage Systems (REC)) ..........................................................................................................................175
6FUJITSU Storage ETERNUS DX S4/S3 series Hybrid Storage Systems Configuration Guide (NAS)
Copyright 2018 FUJITSU LIMITEDP3AM-8072-17ENZ0
List of Tables
Table 1 Number of File Systems............................................................................................................................17Table 2 System Volumes .......................................................................................................................................20Table 3 Expanded System Volume........................................................................................................................20Table 4 Maximum Capacity of Files and Volumes for Each Block Size ...................................................................24Table 5 Maximum Number of Quota Settings .......................................................................................................46Table 6 Maximum Number of Generations (per ETERNUS DX or Volume) and Number of Target Volumes for Snap-
shots ........................................................................................................................................................47Table 7 Required Capacity of SDV/SDPV (Guideline)..............................................................................................48Table 8 Specifications of the Client Resource Deallocation Function (through ETERNUS CLI) ................................55Table 9 Operations That Are Stopped during a Re-Notification Grace Period of the NFS File Lock Information .....57Table 10 Maximum Number of File Locks That Can Be Taken Over (per Controller) ................................................58Table 11 Performance Requirements (during Random Access) for the ETERNUS DX ...............................................60Table 12 Number of Available NAS Interfaces (per ETERNUS DX)............................................................................64Table 13 NAS Firewall .............................................................................................................................................65Table 14 Estimated Required Time for Failover or Failback.....................................................................................69Table 15 Features of the Bonding Operation Mode ................................................................................................71Table 16 Recovery Requirements After a Link Down State for All Member Ports .....................................................72Table 17 Configuration Errors ...............................................................................................................................154Table 18 Operation Errors .....................................................................................................................................158Table 19 Maximum Number of TPPs/NAS TPVs (NAS Volumes) That Can Be Created (For the ETERNUS DX100 S4/
DX200 S4 and the ETERNUS DX500 S4/DX600 S4) ..................................................................................166Table 20 Maximum Number of TPPs/NAS TPVs (NAS Volumes) That Can Be Created (For the ETERNUS DX100 S3/
DX200 S3 and the ETERNUS DX500 S3/DX600 S3) ..................................................................................166Table 21 File System Specifications (Max.) ...........................................................................................................168Table 22 Available Functions for Operation Management Interfaces....................................................................169Table 23 Guidelines for Snapshot Configurable NAS Volume Capacity (When QuickOPC Is Used)..........................173Table 24 Guidelines for Snapshot Configurable NAS Volume Capacity (When QuickOPC and REC Are Used) .........176Table 25 Details of Each Item in Audit Log Messages ...........................................................................................178Table 26 Details That Are Displayed in "syscall" ....................................................................................................179Table 27 Actions to Take Before Data Migrations..................................................................................................182Table 28 Inheritable Property Information for Migrations from Windows OS ........................................................183Table 29 Release Information List ........................................................................................................................185
7FUJITSU Storage ETERNUS DX S4/S3 series Hybrid Storage Systems Configuration Guide (NAS)
Copyright 2018 FUJITSU LIMITEDP3AM-8072-17ENZ0
Preface
Fujitsu would like to thank you for purchasing the FUJITSU Storage ETERNUS DX100 S4/DX200 S4, ETERNUSDX500 S4/DX600 S4, ETERNUS DX100 S3/DX200 S3, ETERNUS DX500 S3/DX600 S3 (hereinafter collectively refer-red to as ETERNUS DX).
The ETERNUS DX is a unified storage system that is designed to be used as a SAN connection type storage sys-tem for Fujitsu servers (Fujitsu SPARC Servers, PRIMEQUEST, or PRIMERGY) or non-Fujitsu servers and as a net-work connection type storage system for servers and client PCs.
This manual provides the system design to use an ETERNUS DX in a NAS environment and explains how to con-figure the NAS environment.
This manual is intended for use of the ETERNUS DX in regions other than Japan.
This manual applies to controller firmware versions V10L14 to V10L81.
The supported functions and specifications depend on the controller firmware version of the ETERNUS DX. Forthe firmware release information, refer to "E. Firmware Release Information" (page 185).
Seventeenth Edition
April 2018
Trademarks
Third-party trademark information related to this product is available at:
http://www.fujitsu.com/global/products/computing/storage/eternus/trademarks.html
About This Manual
Intended AudienceThis manual is intended for field engineers who configure NAS environments in the ETERNUS DX or for systemadministrators.
Related Information and DocumentsThe latest version of this manual and the latest information for your model are available at:
http://www.fujitsu.com/global/support/products/computing/storage/disk/manuals/
Refer to the following manuals of your model as necessary:
"ETERNUS Web GUI User's Guide"
"Design Guide (Basic)"
"Configuration Guide (Basic)"
"ETERNUS CLI User's Guide"
"Operation Guide (Basic)"
8FUJITSU Storage ETERNUS DX S4/S3 series Hybrid Storage Systems Configuration Guide (NAS)
Copyright 2018 FUJITSU LIMITEDP3AM-8072-17ENZ0
Document Conventions
■ Third-Party Product Names
• Oracle Solaris may be referred to as "Solaris", "Solaris Operating System", or "Solaris OS".
• Microsoft® Windows Server® may be referred to as "Windows Server".
■ Notice Symbols
The following notice symbols are used in this manual:
Indicates information that you need to observe when using the ETERNUS storage system.Make sure to read the information.
Indicates information and suggestions that supplement the descriptions included in thismanual.
■ Icons Used in This Manual
The following icons show the availability of the settings for each software.
The black icon indicates that the setting is available for the relevant software.
Icons with colors other than black indicate that the setting is not available for the relevant software.
● Example
The following example shows that the setting is available with ETERNUS CLI, ETERNUS SF Storage Cruiser, andETERNUS SF Express.
● Software Icons
ETERNUS Web GUI
ETERNUS CLI
ETERNUS SF Storage Cruiser (Web Console)
ETERNUS SF Express (Web Console)
ETERNUS SF AdvancedCopy Manager (Web Console)
ETERNUS SF (CLI)
Preface
9FUJITSU Storage ETERNUS DX S4/S3 series Hybrid Storage Systems Configuration Guide (NAS)
Copyright 2018 FUJITSU LIMITEDP3AM-8072-17ENZ0
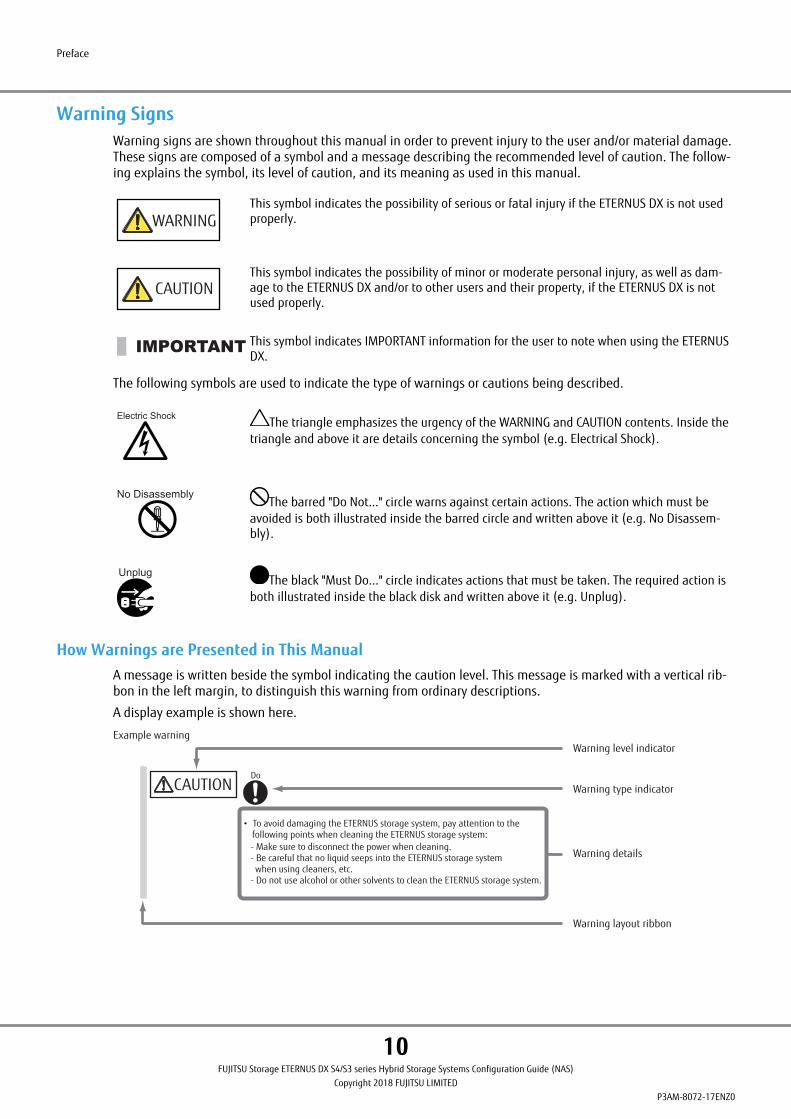
Warning SignsWarning signs are shown throughout this manual in order to prevent injury to the user and/or material damage.These signs are composed of a symbol and a message describing the recommended level of caution. The follow-ing explains the symbol, its level of caution, and its meaning as used in this manual.
This symbol indicates the possibility of serious or fatal injury if the ETERNUS DX is not usedproperly.
This symbol indicates the possibility of minor or moderate personal injury, as well as dam-age to the ETERNUS DX and/or to other users and their property, if the ETERNUS DX is notused properly.
This symbol indicates IMPORTANT information for the user to note when using the ETERNUSDX.
The following symbols are used to indicate the type of warnings or cautions being described.
Electric Shock The triangle emphasizes the urgency of the WARNING and CAUTION contents. Inside thetriangle and above it are details concerning the symbol (e.g. Electrical Shock).
No DisassemblyThe barred "Do Not..." circle warns against certain actions. The action which must be
avoided is both illustrated inside the barred circle and written above it (e.g. No Disassem-bly).
UnplugThe black "Must Do..." circle indicates actions that must be taken. The required action is
both illustrated inside the black disk and written above it (e.g. Unplug).
How Warnings are Presented in This ManualA message is written beside the symbol indicating the caution level. This message is marked with a vertical rib-bon in the left margin, to distinguish this warning from ordinary descriptions.
A display example is shown here.
Warning level indicator
Warning type indicator
Warning details
• To avoid damaging the ETERNUS storage system, pay attention to the following points when cleaning the ETERNUS storage system:
Warning layout ribbon
Example warning
- Make sure to disconnect the power when cleaning.- Be careful that no liquid seeps into the ETERNUS storage system when using cleaners, etc.- Do not use alcohol or other solvents to clean the ETERNUS storage system.
CAUTIONDo
Preface
10FUJITSU Storage ETERNUS DX S4/S3 series Hybrid Storage Systems Configuration Guide (NAS)
Copyright 2018 FUJITSU LIMITEDP3AM-8072-17ENZ0

1. NAS System Design
This chapter describes the protocols and client OSs that are supported in a NAS environment of an ETERNUS DX,as well as the structure of a NAS system.
Unified ConfigurationWhen using the ETERNUS DX as a unified storage system, install the Unified kit and the NAS interface (NIC-CA).
Figure 1 SAN/NAS Connection Diagrams
LAN(Ethernet)
Windows client UNIX clientServer
NAS volumesSAN volumes
CIFS protocol NFS protocol
NIC-CA
Server
SAN NAS
CA CA
FC iSCSI
ETERNUS DX
11FUJITSU Storage ETERNUS DX S4/S3 series Hybrid Storage Systems Configuration Guide (NAS)
Copyright 2018 FUJITSU LIMITEDP3AM-8072-17ENZ0
Supported ProtocolsThe ETERNUS DX supports Common Internet File System (CIFS), a file sharing protocol for Windows, and NFS, afile sharing protocol for UNIX/Linux. In addition to CIFS and NFS, the ETERNUS DX supports FTP/FXP.
NAS protocols other than CIFS, NFS, and FTP/FXP are not supported.
The CIFS protocol service for the ETERNUS DX is realized by using Samba software.
CIFS and NFS are client/server protocols that can perform file management such as exclusive control on the NASside, which allows exclusive control over each file and simultaneous access. A file sharing environment with dif-ferent OSs, such as Windows and UNIX/Linux, can be configured.
CIFSThe CIFS is a protocol that is used for file sharing in Windows system environments.
Files on the network can be shared.
■ SMB Version
The ETERNUS DX supports access from a Windows client using SMB1.0, SMB2.0, SMB2.1, SMB3.0, SMB3.02, orSMB3.1.1 protocol.
In addition, the following SMB functions are supported.
• SMB2.1 Large MTU
• SMB2.1 Unbuffered Handle
• SMB3.0 Large MTU
• SMB3.0 Encryption
The ETERNUS DX connects to Windows clients by using an SMB version that supports the protocol used by theWindows client for access.
When the SMB version is changed due to a controller firmware update on the ETERNUS DX, the change takeseffect after the session is re-established.
During the design phase
If the controller firmware version is earlier than V10L61, the ETERNUS DX uses SMB1.0 to communicate withthe Active Directory authentication server.
For this reason, disabling SMB1.0 in the Active Directory authentication server causes user authentication fail-ures which in turn make the shared folder inaccessible.
Before disabling SMB1.0 of the Active Directory authentication server, update the ETERNUS DX controller firm-ware version to V10L61 or later.
■ Symbolic Link
Creating and using symbolic links that are supported by SMB2.0, for directories/files in any shared folder (net-work drive) on the ETERNUS DX are available from the directories/files on the NTFS file system of the Windowsclient.
In addition, for shared folders created in shared CIFS/NFS environment, referencing and using the symbolic linkfor directories and files created by UNIX client from the Windows client are available.
Note that symbolic links between shared folders (network drives) are not supported (cannot be used from theWindows client).
1. NAS System DesignSupported Protocols
12FUJITSU Storage ETERNUS DX S4/S3 series Hybrid Storage Systems Configuration Guide (NAS)
Copyright 2018 FUJITSU LIMITEDP3AM-8072-17ENZ0
■ SMB Encryption
The ETERNUS DX provides a function to encrypt data communicated using SMB3.0 with an SMB protocol base.SMB Encryption is a function that encrypts file access communication but not the actual files.
SMB encryption can be enabled or disabled with ETERNUS Web GUI or ETERNUS CLI. Encryption is enabled forsessions that are established after enabling the encryption setting.
■ Large MTU
The Maximum Transmission Unit (MTU) for communication using SMB3.0 can be extended from 64KB to1,024KB. This enables effective utilization of the network bandwidth.
Large MTU is automatically enabled for communications that use SMB3.0. Changing the enable/disable settingis not possible.
NFSThe Network File System (NFS) is a protocol that is used for file sharing in UNIX or Linux system environments.
File sharing for NFS can be performed by mounting a shared directory from a client.
NFS v2, v3, and v4.0 are supported for the ETERNUS DX.
File lock using Network Lock Manager (NLM) v4 is supported.
For the NFS v4.0 protocol, the lease period and the grace period are each 100 seconds. In addition, the NFS v4.0protocol supports stateful access.
• The lease period indicates the time for the ETERNUS DX to determine whether the NFS client has stopped.During this period, resources in the NFS clients such as locks are retained in the ETERNUS DX.
• The grace period indicates a time to prevent the lock from becoming lost by notifying the NFS client thatthe NFS service has been restarted and securing time to reclaim the existing lock again.
• In the ETERNUS DX, the port that is used by the NFS client must be specified with port number 1023 or less.
FTP/FXPWith File Transfer Protocol (FTP), the shared folder can be accessed. With File eXchange Protocol (FXP), data inthe shared folder can be transferred between ETERNUS DX storage systems.
1. NAS System DesignSupported Protocols
13FUJITSU Storage ETERNUS DX S4/S3 series Hybrid Storage Systems Configuration Guide (NAS)
Copyright 2018 FUJITSU LIMITEDP3AM-8072-17ENZ0
Operating Environment for ClientsThe ETERNUS DX can be connected to OSs that support available protocols for the ETERNUS DX.
For details on the protocols that are supported by the ETERNUS DX, refer to "Supported Protocols" (page 12).
For NFS access, it is necessary for the client to use a port number of less than 1024.
The confirmed OS for NFS v4.0 can be connected to the ETERNUS DX.
Confirmed OSThe following OSs are confirmed to connect to the ETERNUS DX as a NAS client.
• The confirmed OSs with the CIFS protocol
- Windows Server 2008
- Windows Server 2008 R2
- Windows Server 2012
- Windows Server 2012 R2
- Windows Server 2016
- Windows 7
- Windows 8.1
- Windows 10
• The confirmed OSs with the NFS v3 protocol
- Red Hat Enterprise Linux 5
- Red Hat Enterprise Linux 6
- Red Hat Enterprise Linux 7.0
- Red Hat Enterprise Linux 7.1
- Red Hat Enterprise Linux 7.2
- Red Hat Enterprise Linux 7.3
- Red Hat Enterprise Linux 7.4
- Solaris 9
- Solaris 10 1/13 (Update 11)
- Solaris 11.2
- Solaris 11.3
- VMware vSphere 5.0 Update 3
- VMware vSphere 5.1 Update 3
- VMware vSphere 5.5 Update 3b
- VMware vSphere 6.0 Update 1b
- Oracle VM 3
- AIX 7.1
- HP-UX 11i v3
• The confirmed OSs with the NFS v4.0 protocol
The confirmed OSs for the NFS v4.0 protocol are used as supported OSs.
- Red Hat Enterprise Linux 6.6
- Red Hat Enterprise Linux 6.7
- Red Hat Enterprise Linux 6.8
1. NAS System DesignOperating Environment for Clients
14FUJITSU Storage ETERNUS DX S4/S3 series Hybrid Storage Systems Configuration Guide (NAS)
Copyright 2018 FUJITSU LIMITEDP3AM-8072-17ENZ0
- Red Hat Enterprise Linux 6.9
- Red Hat Enterprise Linux 7.0
- Red Hat Enterprise Linux 7.1
- Red Hat Enterprise Linux 7.2
- Red Hat Enterprise Linux 7.3
- Red Hat Enterprise Linux 7.4
- Solaris 10 1/13 (Update 11)
- Solaris 11.2
- Solaris 11.3
• The confirmed OSs with FTP / FXP
Regardless of the OS type, access is possible as long as an FTP client is used.
During the design phase
• Microsoft-provided Windows NFS service cannot be used.
• Mounting a CIFS shared folder from UNIX/Linux by specifying "cifs" in the "mount" command is not suppor-ted.
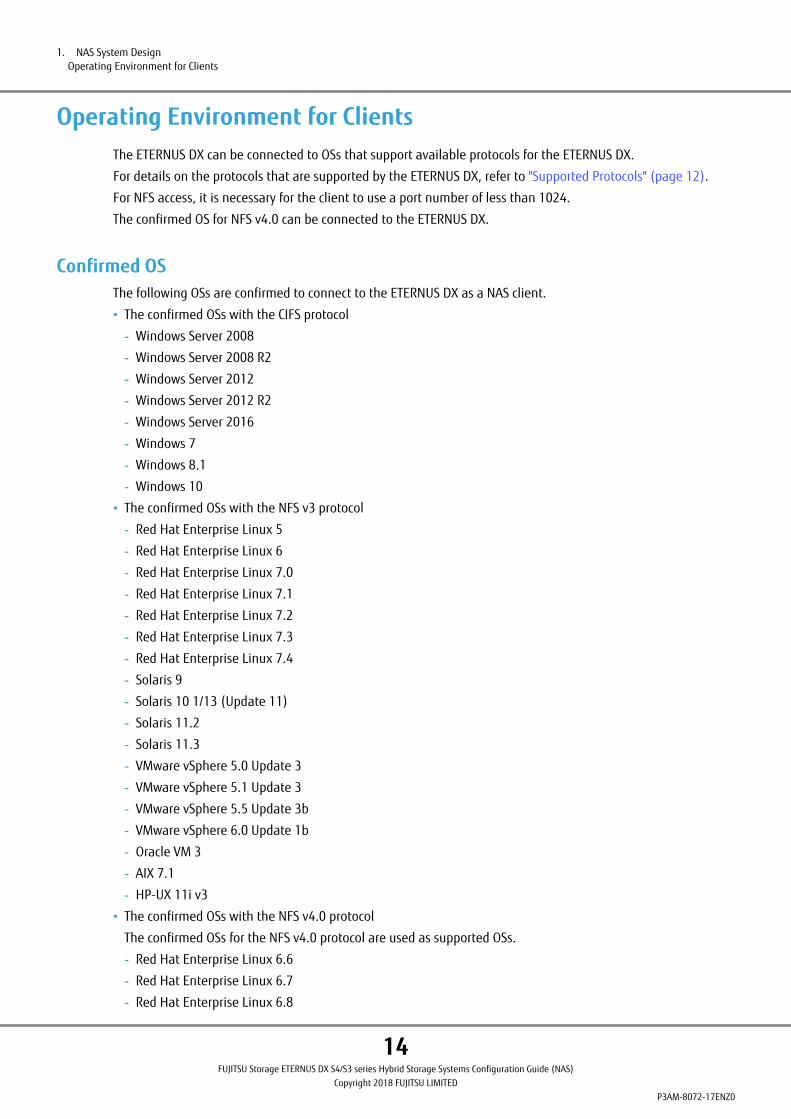
• When accessing with a Solaris OS client, there are combinations with the network environment where con-nections may not be possible. The following table shows connectibility.
OSConnectibility
IPv4 environment IPv6 environment
Solaris 9 ¡ ´ (*1)
Solaris 10 ¡ ´ (*1)
Solaris 11 ¡ ¡
¡: Connectable, ´: Not connectable
*1 : The client port number must be less than 1024 in order to connect to the NAS port of the ETERNUSDX. Since the port number is 1024 or more for the connected port on a Solaris 9 client and a So-laris 10 client, these clients cannot connect to the NAS port of the ETERNUS DX.
During the configuration phase
• To use the NFS client in the ETERNUS DX, apply the following patches or errata.
If the patches or errata are not applied, the NFS mount may fail, an I/O error may occur, or a file lock take-over may not be possible.
NFS protocol OS Patch or errata
NFS v3 Red Hat Enterprise Linux 6 Red Hat Enterprise Linux 6.6 or later
NFS v4.0 Solaris 10 150401-21 or later
Solaris 11 SRU16061 (Oracle SRU11.3.9.4.0) or later
Red Hat Enterprise Linux 6.6 Red Hat Enterprise Linux 6.7 or later
Red Hat Enterprise Linux 7.1 RHSA-2015:1534-1
1. NAS System DesignOperating Environment for Clients
15FUJITSU Storage ETERNUS DX S4/S3 series Hybrid Storage Systems Configuration Guide (NAS)
Copyright 2018 FUJITSU LIMITEDP3AM-8072-17ENZ0
During the operation phase
• If the IP address of the NAS port is taken over due to a failover or a failback, or if the NAS backup volumesare mounted or unmounted, an NFS access error or a response failure may occur.
If an error occurs, re-execute the application with the NFS client. If an error or a response failure occurswhen re-executing the application, restart the NAS client.
The following table shows the relevant OSs.
NFS protocol OS
NFS v3 Red Hat Enterprise Linux 6Solaris 11AIXHP-UX
NFS v4.0 Red Hat Enterprise Linux 6 (6.6 or later)Red Hat Enterprise Linux 7.0Red Hat Enterprise Linux 7.1Red Hat Enterprise Linux 7.2Red Hat Enterprise Linux 7.3Solaris 10Solaris 11
• If the load of the NAS system is high, NFS access may fail.
If an error occurs, re-execute the application with the NFS client.
The following table shows the relevant OSs.
NFS protocol OS
NFS v3 None
NFS v4.0 Red Hat Enterprise Linux 6 (6.6 or later)
• If the ETERNUS DX is used as a VMware datastore, the IP address of the NAS port may be taken over due to afailover or a failback, and the following events may occur during a VM snapshot acquisition.
- Virtual machines are powered off, rebooted, or enter a unresponsive state.
- VM snapshot acquisitions fail.
- OS installations to virtual machines fail.
If problems such as these occur, check that a failover or failback is not being performed for the IP address ofthe ETERNUS DX, and reboot the virtual machine or perform the failed operation again.
• When an NFS mount is performed from a client of Red Hat Enterprise Linux 7.0 or later, executing the "df"command after the snapshot directory is accessed may display the snapshot directory as a mount point.
In this case, wait for a while without accessing the snapshot directory to resolve the display issue. It takesthe "fs.nfs.nfs_mountpoint_timeout" kernel parameter ´ a maximum of approximately 2 (seconds).
1. NAS System DesignOperating Environment for Clients
16FUJITSU Storage ETERNUS DX S4/S3 series Hybrid Storage Systems Configuration Guide (NAS)
Copyright 2018 FUJITSU LIMITEDP3AM-8072-17ENZ0
NAS System (NAS Volume Management)File systems of up to 128TB can be created in the ETERNUS DX NAS system. One file system can be created for aNAS volume. The number of file systems (NAS volumes) that can be created varies depending on the models.
Table 1 Number of File Systems
Model Number of file systems
ETERNUS DX100 S4 2
ETERNUS DX200 S4 4
ETERNUS DX500 S4 4
ETERNUS DX600 S4 8
ETERNUS DX100 S3 1 (*1)2 (*2)
ETERNUS DX200 S3 2 (*3)4 (*4)
ETERNUS DX500 S3 4
ETERNUS DX600 S3 8
*1: Number of file systems when any of the following conditions is applied.
• When the controller firmware version is earlier than V10L53
• When the Memory Extension (ETFMCA / ETFMCA-L / ETDMCAU / ETDMCAU-L) is installed
• When the cache memory included in the Unified kit is installed
*2: Number of file systems when the Memory Extension (ETFMCC / ETFMCC-L / ETDMCCU / ETDMCCU-L) is instal-led for controller firmware version V10L53 or later.
*3: Number of file systems when the Memory Extension is not installed (but cache memory included in theUnified kit is installed).
*4: Number of file systems when the Memory Extension is installed for controller firmware version V10L33 orlater.
System volumes are required in the ETERNUS DX to control the NAS system. In addition, system managementarea is required for each file system.
1. NAS System DesignNAS System (NAS Volume Management)
17FUJITSU Storage ETERNUS DX S4/S3 series Hybrid Storage Systems Configuration Guide (NAS)
Copyright 2018 FUJITSU LIMITEDP3AM-8072-17ENZ0
After creating a shared folder in the file system, accessing the shared folder from the client becomes available,and directories and files can be stored in it. Access control can be set for each shared folder, directory, and file.
Figure 2 NAS File Systems
$SYSVOL1 $SYSVOL2 $SYSVOL3
User Data
TPV#0 for NAS
System management area
(Approx. 300GB) User Data
System managementarea
(Approx. 300GB)
TPV#x for SAN
Thin Provisioning Pool (TPP) RAID group
SDV#x (Generation management data)
SDPV#1 (Saved snapshot data)
cm0-nas-ex-sysvol cm1-nas-ex-sysvol
TPV#1 for NAS (Backup destination)
User Data
NAS File SystemsWhen the first NAS Thin Provisioning Volume (TPV) is created in the ETERNUS DX, system volumes ($SYSVOL1,$SYSVOL2, and $SYSVOL3) are automatically created in the same pool where the TPV is created and then theNAS file system is created.
A NAS file system can be used as a shared folder with Windows or UNIX/Linux. For VMware, the NAS file systemcan be used as a data store to store data such as configuration information and the OS of the virtual machine.
1. NAS System DesignNAS System (NAS Volume Management)
18FUJITSU Storage ETERNUS DX S4/S3 series Hybrid Storage Systems Configuration Guide (NAS)
Copyright 2018 FUJITSU LIMITEDP3AM-8072-17ENZ0
During the configuration phase
• The time it takes to create a file system (NAS volume) varies depending on whether system volumes exist.If system volumes do not exist within the ETERNUS DX, creating a file system takes 10 to 15 minutes longerthan usual because system volumes are created while creating the file system.
In ETERNUS Web GUI, the progress of a file system creation may remain at 99%. Although this gives theimpression that the process has been stopped, the process is still continuing. The process is completed inabout 30 minutes.
• The total capacity of the NAS user volumes, NAS backup volumes, and the system volumes (17GB) must notexceed the maximum pool capacity. TPVs and FTVs for a SAN connection are also included.
For more details about the maximum pool capacity setting, refer to "Set Thin Provisioning" in "ETERNUSWeb GUI User's Guide".
During the operation phase
• The procedure for deleting the system volume differs depending on the controller firmware version.
- For controller firmware versions earlier than V10L51
Contact your maintenance engineer to delete the system volumes. The ETERNUS DX must be rebootedafter the system volumes are deleted.
- For controller firmware versions V10L51 or later
1 Delete all the NAS volumes.
2 Delete all the expanded system volumes.
3 Delete all the system volumes.
When the system volumes are deleted, the NAS system reboots. When performing a NAS configurationafter deleting the system volume, check whether the reboot is complete and the status of the NAS Engineis "Maintenance/0xE000" using ETERNUS CLI.
Deleting all system volumes ($SYSVOL1, $SYSVOL2, and $SYSVOL3) at once is recommended. When sys-tem volumes are deleted one by one, delete the next system volume after the system is rebooted.
1. NAS System DesignNAS System (NAS Volume Management)
19FUJITSU Storage ETERNUS DX S4/S3 series Hybrid Storage Systems Configuration Guide (NAS)
Copyright 2018 FUJITSU LIMITEDP3AM-8072-17ENZ0
■ System Volumes
A system volume consists of three volumes that has a total capacity of 17GB. Two of the three system volumesare for the Rootfs partition for each controller. The remaining volume is for the file system management parti-tion.
System volume names cannot be changed.
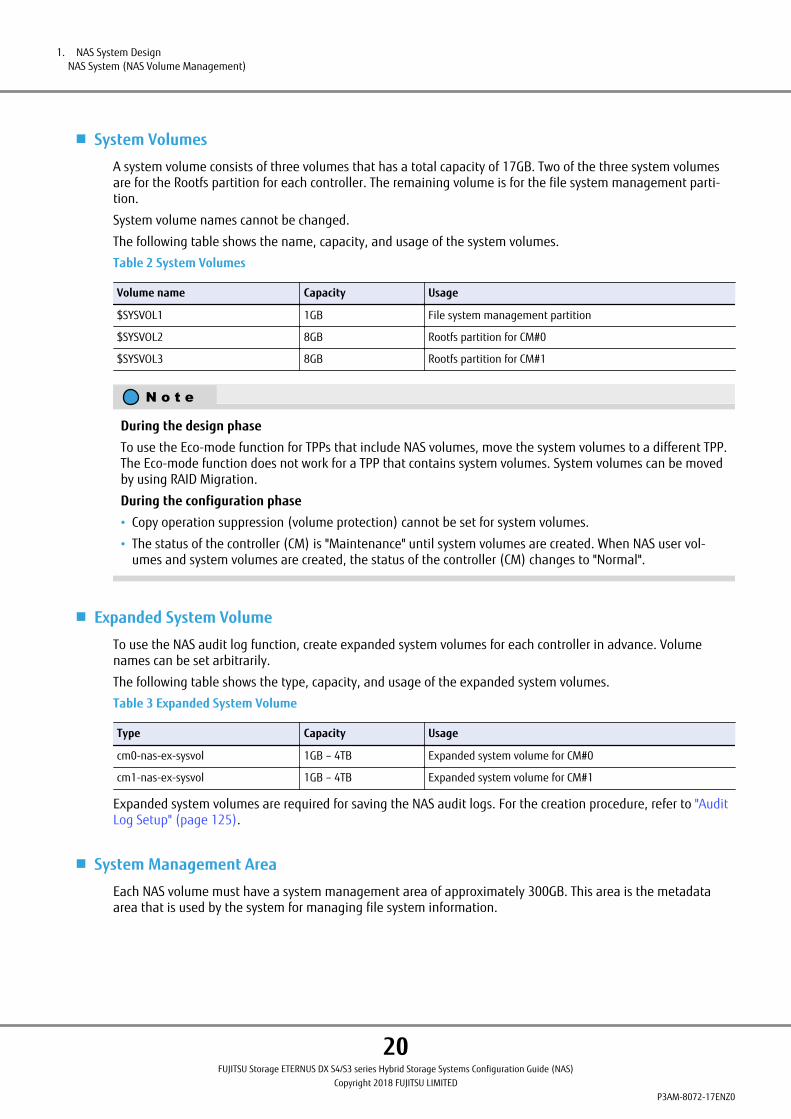
The following table shows the name, capacity, and usage of the system volumes.
Table 2 System Volumes
Volume name Capacity Usage
$SYSVOL1 1GB File system management partition
$SYSVOL2 8GB Rootfs partition for CM#0
$SYSVOL3 8GB Rootfs partition for CM#1
During the design phase
To use the Eco-mode function for TPPs that include NAS volumes, move the system volumes to a different TPP.The Eco-mode function does not work for a TPP that contains system volumes. System volumes can be movedby using RAID Migration.
During the configuration phase
• Copy operation suppression (volume protection) cannot be set for system volumes.
• The status of the controller (CM) is "Maintenance" until system volumes are created. When NAS user vol-umes and system volumes are created, the status of the controller (CM) changes to "Normal".
■ Expanded System Volume
To use the NAS audit log function, create expanded system volumes for each controller in advance. Volumenames can be set arbitrarily.
The following table shows the type, capacity, and usage of the expanded system volumes.
Table 3 Expanded System Volume
Type Capacity Usage
cm0-nas-ex-sysvol 1GB – 4TB Expanded system volume for CM#0
cm1-nas-ex-sysvol 1GB – 4TB Expanded system volume for CM#1
Expanded system volumes are required for saving the NAS audit logs. For the creation procedure, refer to "AuditLog Setup" (page 125).
■ System Management Area
Each NAS volume must have a system management area of approximately 300GB. This area is the metadataarea that is used by the system for managing file system information.
1. NAS System DesignNAS System (NAS Volume Management)
20FUJITSU Storage ETERNUS DX S4/S3 series Hybrid Storage Systems Configuration Guide (NAS)
Copyright 2018 FUJITSU LIMITEDP3AM-8072-17ENZ0
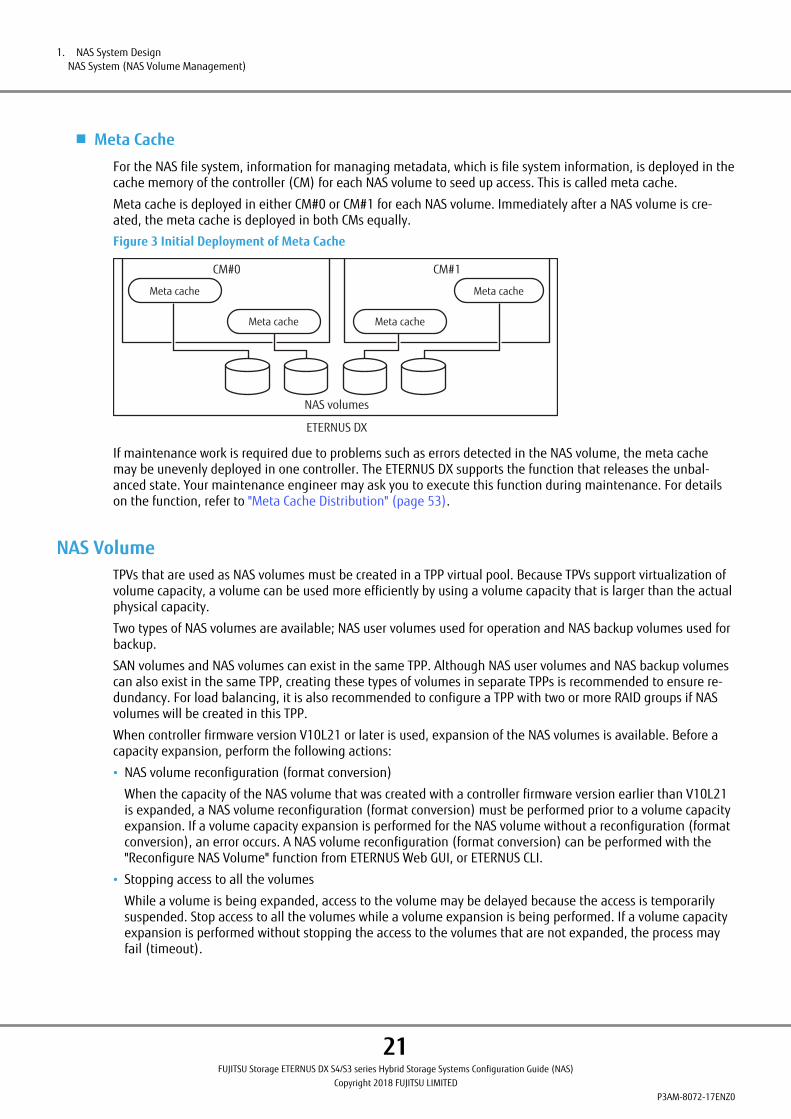
■ Meta Cache
For the NAS file system, information for managing metadata, which is file system information, is deployed in thecache memory of the controller (CM) for each NAS volume to seed up access. This is called meta cache.
Meta cache is deployed in either CM#0 or CM#1 for each NAS volume. Immediately after a NAS volume is cre-ated, the meta cache is deployed in both CMs equally.
Figure 3 Initial Deployment of Meta Cache
NAS volumes
Meta cache
Meta cache Meta cache
CM#0 CM#1
ETERNUS DX
Meta cache
If maintenance work is required due to problems such as errors detected in the NAS volume, the meta cachemay be unevenly deployed in one controller. The ETERNUS DX supports the function that releases the unbal-anced state. Your maintenance engineer may ask you to execute this function during maintenance. For detailson the function, refer to "Meta Cache Distribution" (page 53).
NAS VolumeTPVs that are used as NAS volumes must be created in a TPP virtual pool. Because TPVs support virtualization ofvolume capacity, a volume can be used more efficiently by using a volume capacity that is larger than the actualphysical capacity.
Two types of NAS volumes are available; NAS user volumes used for operation and NAS backup volumes used forbackup.
SAN volumes and NAS volumes can exist in the same TPP. Although NAS user volumes and NAS backup volumescan also exist in the same TPP, creating these types of volumes in separate TPPs is recommended to ensure re-dundancy. For load balancing, it is also recommended to configure a TPP with two or more RAID groups if NASvolumes will be created in this TPP.
When controller firmware version V10L21 or later is used, expansion of the NAS volumes is available. Before acapacity expansion, perform the following actions:
• NAS volume reconfiguration (format conversion)
When the capacity of the NAS volume that was created with a controller firmware version earlier than V10L21is expanded, a NAS volume reconfiguration (format conversion) must be performed prior to a volume capacityexpansion. If a volume capacity expansion is performed for the NAS volume without a reconfiguration (formatconversion), an error occurs. A NAS volume reconfiguration (format conversion) can be performed with the"Reconfigure NAS Volume" function from ETERNUS Web GUI, or ETERNUS CLI.
• Stopping access to all the volumes
While a volume is being expanded, access to the volume may be delayed because the access is temporarilysuspended. Stop access to all the volumes while a volume expansion is being performed. If a volume capacityexpansion is performed without stopping the access to the volumes that are not expanded, the process mayfail (timeout).
1. NAS System DesignNAS System (NAS Volume Management)
21FUJITSU Storage ETERNUS DX S4/S3 series Hybrid Storage Systems Configuration Guide (NAS)
Copyright 2018 FUJITSU LIMITEDP3AM-8072-17ENZ0
During the configuration phase
• Do not format the NAS volume. If it was formatted, delete the NAS volume and create it again.
• Do not configure the QoS setting to NAS volumes.
• Do not perform TPV/FTV capacity optimization (Zero Reclamation) for NAS user volumes, NAS backup vol-umes, or the system volumes.
• When creating multiple NAS volumes in a Thin Provisioning Pool that is configured with Nearline SAS disks,wait at least 10 minutes after each NAS volume is created before creating the next one.
During the operation phase
• An error occurs when a volume capacity expansion is performed with backup and Snapshot settings alreadyconfigured. Delete the backup and Snapshot settings before performing a volume capacity expansion. Donot delete the backup volume at this point because the volume is necessary for restoration if the volumecapacity expansion fails and data on the drive is corrupted. Delete the backup volume and reset the backupand Snapshot after volume capacity expansion is completed successfully.
• When the NAS volume is being reconfigured (format conversion), do not access the volume or mount thevolume to CIFS or NFS from the client. If these operations are performed, an I/O error will occur because thevolume is unmounted during the reconfiguration process. For controller firmware versions V10L31 and lat-er, because the file lock state is released for all file systems, execute the NAS volume reconfiguration (for-mat conversion) after stopping operations for all file systems.
• For NAS volumes where a NAS volume reconfiguration (format conversion) was performed or for newly cre-ated NAS volumes, do not restore backup data that was acquired before the reconfiguration. Acquire back-up data after reconfiguring the NAS volumes.
• If NAS user volumes and NAS backup volumes are mounted from a UNIX/Linux client, do not run the follow-ing functions on them.
- Volume deletion
- Volume formatting
During the configuration phase
The threshold can be set for TPVs for NAS in the same way as TPVs for SAN.
During the operation phase
A NAS volume reconfiguration (format conversion) takes up to 15 minutes.
■ NAS User Volumes
A NAS user volume must have an area of 300GB for the system management area, and an area of 100GB ormore for the user area to store user data. Create a TPV with a capacity of 400GB or more for the NAS user vol-ume.
For example, when a 3TB NAS user volume is created, 0.3TB is reserved for the system management area and2.7TB is reserved for the user data area.
A NAS user volume (TPV) may be up to 128TB. Note that the total TPV capacity must be smaller than the maxi-mum capacity of the TPP. The capacity of a NAS user volume can be expanded after it is created. When capacityexpansion is performed using ETERNUS Web GUI, select [Expand TPV] from the [Volume] screen.
1. NAS System DesignNAS System (NAS Volume Management)
22FUJITSU Storage ETERNUS DX S4/S3 series Hybrid Storage Systems Configuration Guide (NAS)
Copyright 2018 FUJITSU LIMITEDP3AM-8072-17ENZ0
During the configuration phase
The following operations cannot be performed for NAS user volumes in which a shared folder exists.
• Volume deletion
• Volume formatting
■ NAS Backup Volumes
NAS backup volumes are created in TPVs to back up NAS user volumes. One NAS backup volume can be createdfor a NAS user volume. The maximum number of NAS backup volumes is the same as the NAS user volumes.
NAS backup volumes can be created with ETERNUS CLI or ETERNUS SF AdvancedCopy Manager. For details, referto "Available Functions for Each Software" (page 169). NAS user volumes can be restored from NAS backup vol-umes. A backup or restore of NAS user volumes is performed with volume copy using QuickOPC.
To restore data for each file, manually copy the files to restore from the client after mounting the NAS backupvolumes.
In addition, NAS backup volumes can be backed up to and restored from remote ETERNUS DX storage systems.ETERNUS SF AdvancedCopy Manager is required for backup/restore.
Note that the NAS backup volume is stored in a different destination from the snapshot.
During the configuration phase
A NAS backup volume must be created with the same capacity as the backup source volume.
During the operation phase
In the ETERNUS DX100 S3 with a controller firmware version earlier than V10L53, do not mount NAS backupvolumes.
During the operation phase
Before deleting NAS backup volumes, remove client connections from the NAS backup volumes (by unmount-ing (for NFS) or disconnecting the network drive (for CIFS)) and unmount the NAS backup volumes by usingthe ETERNUS SF software.
■ NAS Snapshot Destination Volumes
To acquire snapshots, volumes to store snapshot control information and Snapshot data. Snap Data Volume(SDV) is a generation management volume used as the copy destination. Snap Data Pool Volume (SDPV) is usedfor saving snapshot data.
• SDV
A volume that is used to store the snapshot control information. When snapshot settings are performed, anSDV with the same capacity as the NAS user volume is created for the specified number of generations.
• SDPV
A volume that is pooled in an SDP to store snapshot data. Create an SDPV before acquiring snapshots. An SDPVmust have enough size to store snapshot. If the SDP size is insufficient, an error occurs for a snapshot.
1. NAS System DesignNAS System (NAS Volume Management)
23FUJITSU Storage ETERNUS DX S4/S3 series Hybrid Storage Systems Configuration Guide (NAS)
Copyright 2018 FUJITSU LIMITEDP3AM-8072-17ENZ0
SDVs and SDPVs cannot be created in a TPP. SDVs are automatically created in the RAID group that is specifiedwhen setting snapshot. SDPVs must be created separately. When acquiring 128 generations of snapshots, aRAID group for registering an SDV and a RAID group for registering an SDPV must be prepared separately.
Block SizeAn optimal block size can be set for the file system according to the operation. In addition, file systems withdifferent block sizes can exist together in a single ETERNUS DX.
A block size is a unit for managing files within the ETERNUS DX. Files are stored in blocks that are divided into afixed size. A small block size minimizes areas used by each file, thereby improving the storage efficiency of asystem that creates many small-sized files.
The block size is fixed at 256KB for NAS volumes that are created with controller firmware versions earlier thanV10L31. For NAS volumes that are created with controller firmware versions V10L31 or later, the block size canbe specified when volumes are created.
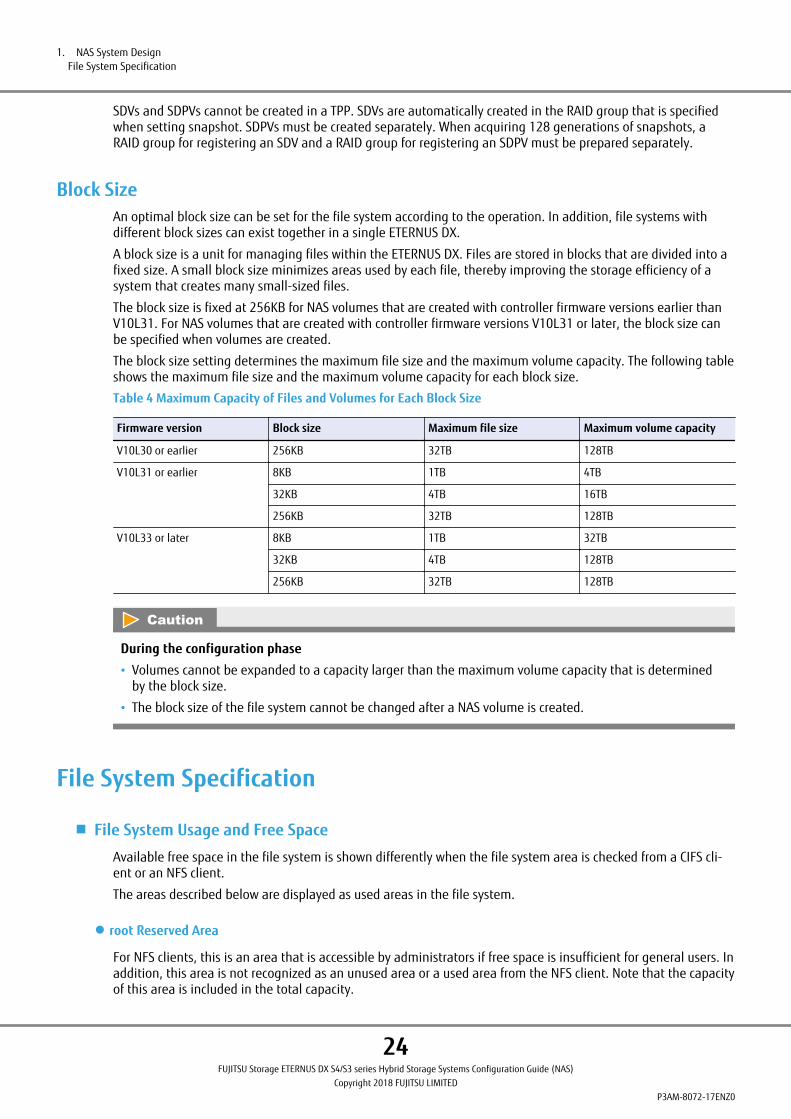
The block size setting determines the maximum file size and the maximum volume capacity. The following tableshows the maximum file size and the maximum volume capacity for each block size.
Table 4 Maximum Capacity of Files and Volumes for Each Block Size
Firmware version Block size Maximum file size Maximum volume capacity
V10L30 or earlier 256KB 32TB 128TB
V10L31 or earlier 8KB 1TB 4TB
32KB 4TB 16TB
256KB 32TB 128TB
V10L33 or later 8KB 1TB 32TB
32KB 4TB 128TB
256KB 32TB 128TB
During the configuration phase
• Volumes cannot be expanded to a capacity larger than the maximum volume capacity that is determinedby the block size.
• The block size of the file system cannot be changed after a NAS volume is created.
File System Specification
■ File System Usage and Free Space
Available free space in the file system is shown differently when the file system area is checked from a CIFS cli-ent or an NFS client.
The areas described below are displayed as used areas in the file system.
● root Reserved Area
For NFS clients, this is an area that is accessible by administrators if free space is insufficient for general users. Inaddition, this area is not recognized as an unused area or a used area from the NFS client. Note that the capacityof this area is included in the total capacity.
1. NAS System DesignFile System Specification
24FUJITSU Storage ETERNUS DX S4/S3 series Hybrid Storage Systems Configuration Guide (NAS)
Copyright 2018 FUJITSU LIMITEDP3AM-8072-17ENZ0

For CIFS clients, this is an area that cannot be used by administrators or general users.
The capacity of root reserved area ranges from 1GB to 1,277GB, which is 1% of the user area that is specifiedwhen creating NAS volumes (excluding the system management area).
● Access Client Reserved Area
The reserved area that is secured in advance for the file system to read data efficiently. This area is used to writethe user data.
This area is recognized as a used area from the CIFS client, the NFS client, ETERNUS Web GUI, and ETERNUS CLI.
The capacity of the access client reserved area (approximately 1.5GB to 6GB) depends on the NAS volume size.
Figure 4 How Free Space Is Recognized
NAS volume
Unused area(free capacity)
Systemmanagement
area
Access clientreserved area
rootreserved area
Approx. 300GB
User data area
Approx.1.5GB to 6GB
Physical capacityhas been assigned
Not shown as a used areaby the "df" command, which isexecuted in the UNIX/Linux clientthat mounts the NFS
Shown as used areasby the volume's propertiesthat are displayed in Windows
Windows client
UNIX/Linux client
During the operation phase
• If "Out of NAS Capacity" for the Setup Event Notification function is enabled, an event is notified when allareas including the root reserved area are used.
• The usage status of a NAS volume can be checked via ETERNUS Web GUI or ETERNUS CLI. The used capacitythat is displayed includes the capacity of the access client reserved area regardless of the protocol (CIFS,NFS, and CIFS/NFS) that is used for the shared folder. The used capacity and the free capacity do not includethe capacity of the root reserved area. The capacity of the root reserved area is included in the total capaci-ty.
1. NAS System DesignFile System Specification
25FUJITSU Storage ETERNUS DX S4/S3 series Hybrid Storage Systems Configuration Guide (NAS)
Copyright 2018 FUJITSU LIMITEDP3AM-8072-17ENZ0
Data EncryptionBy using Self Encrypting Drives (SED) or the firmware data encryption function, NAS volume data can be encryp-ted.
Because data encryption is performed using the firmware in the ETERNUS DX controller, the performance is de-graded when compared to unencrypted data access.
Because SEDs do not affect system performance, encrypting the data with SEDs is recommended when systemperformance is prioritized.
For details on data encryption, refer to "Design Guide (Basic)".
During the design phase
For each ETERNUS DX, select and specify "AES128", "AES256", or "Fujitsu Original Encryption" as the encryptionmode for the firmware data encryption function. To specify the encryption mode, refer to the following notes.
• For the ETERNUS DX100 S4/DX100 S3
Set the encryption mode to "Fujitsu Original Encryption". AES encryption modes cannot be used becausesetting "AES128" or "AES256" deteriorates the performance of the NAS function.
• For the ETERNUS DX200 S4, the ETERNUS DX500 S4/DX600 S4, the ETERNUS DX200 S3, and the ETERNUSDX500 S3/DX600 S3
It is highly recommended that the encryption mode is set to "Fujitsu Original Encryption".
1. NAS System DesignData Encryption
26FUJITSU Storage ETERNUS DX S4/S3 series Hybrid Storage Systems Configuration Guide (NAS)
Copyright 2018 FUJITSU LIMITEDP3AM-8072-17ENZ0
2. Designing NAS Operations
This chapter describes user management, access control, and file sharing in a NAS system. This chapter also ex-plains the available NAS functions for the ETERNUS DX.
NAS Server Name (Host Name)A 12-digit NAS server name is automatically set for the ETERNUS DX according to the following rules:
DX<10-digit ETERNUS DX serial number>
The NAS server name can be changed to any name by using ETERNUS Web GUI or ETERNUS CLI. For the configu-ration procedures, refer to "NAS Server Name Settings" (page 89).
Because the NAS server name (or NetBIOS name) is not broadcast, when a NAS server name is used for CIFSaccess, make sure that the name resolution is enabled in the DNS server.
For Active Directory authentication, the NAS Engine of the ETERNUS DX uses the NAS server name as a NetBIOSname.
After the NAS server name (NetBIOS name) is changed, the authentication server must be registered again. Ifthe Active Directory authentication server information has already been registered before the NAS server name(NetBIOS name) is changed, perform the following operation:
1 Delete the configuration information for the Active Directory authentication server before changing theNAS server name.
To delete the information, use the "Set Authentication Server" function in ETERNUS Web GUI or the "set nas-ad" command in ETERNUS CLI.
2 Change the NAS server name.
To change the information, use the "Change NAS Server Name" function in ETERNUS Web GUI or the "setnas-server" command in ETERNUS CLI.
3 Set the information for the ETERNUS DX and the Active Directory authentication server again.
27FUJITSU Storage ETERNUS DX S4/S3 series Hybrid Storage Systems Configuration Guide (NAS)
Copyright 2018 FUJITSU LIMITEDP3AM-8072-17ENZ0
User ManagementThis section describes user management for NAS connection with the ETERNUS DX. User management for NASclients is performed with an authentication server or with local user authentication.
● Windows (CIFS) Environment
When the Active Directory authentication server is used, access can be controlled based on the registered useraccounts in the authentication server.
When an authentication server is not used, access using the following methods.
• For controller firmware versions earlier than V10L53
All users share a fixed user account for access.
• For controller firmware versions V10L53 or later
Local users/local groups can be created. Access is available on a per local user/local group basis. For details,refer to "Local User Authentication" (page 33).
If the controller firmware version is earlier than V10L53 and an authentication server is not used, upgradingthe controller firmware to V10L53 or later automatically creates the local user "shareuser$". This user can beoperated in the same way as a fixed user account.
● UNIX/Linux (NFS) Environment
When the LDAP authentication server (such as OpenLDAP) is used, access can be controlled based on the regis-tered user accounts in the authentication server. When NFS access is used, the folders that the administratormounts can be accessed by all users.
2. Designing NAS OperationsUser Management
28FUJITSU Storage ETERNUS DX S4/S3 series Hybrid Storage Systems Configuration Guide (NAS)
Copyright 2018 FUJITSU LIMITEDP3AM-8072-17ENZ0
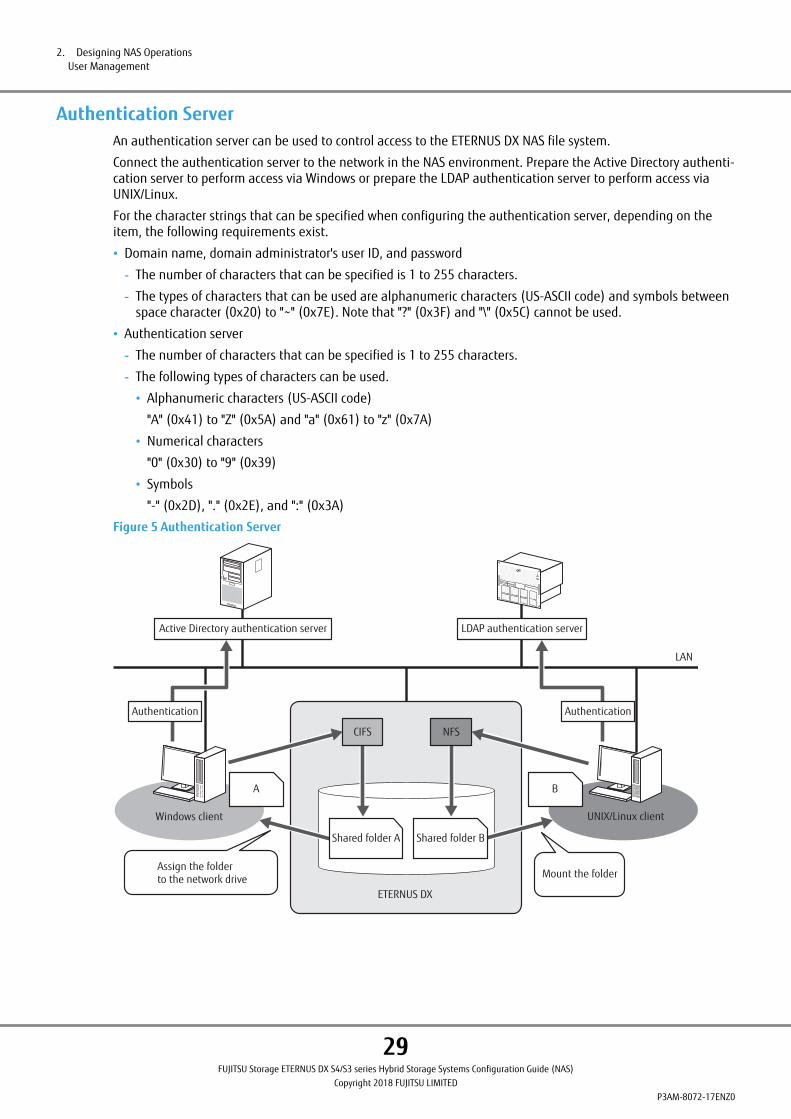
Authentication ServerAn authentication server can be used to control access to the ETERNUS DX NAS file system.
Connect the authentication server to the network in the NAS environment. Prepare the Active Directory authenti-cation server to perform access via Windows or prepare the LDAP authentication server to perform access viaUNIX/Linux.
For the character strings that can be specified when configuring the authentication server, depending on theitem, the following requirements exist.
• Domain name, domain administrator's user ID, and password
- The number of characters that can be specified is 1 to 255 characters.
- The types of characters that can be used are alphanumeric characters (US-ASCII code) and symbols betweenspace character (0x20) to "~" (0x7E). Note that "?" (0x3F) and "\" (0x5C) cannot be used.
• Authentication server
- The number of characters that can be specified is 1 to 255 characters.
- The following types of characters can be used.
• Alphanumeric characters (US-ASCII code)
"A" (0x41) to "Z" (0x5A) and "a" (0x61) to "z" (0x7A)
• Numerical characters
"0" (0x30) to "9" (0x39)
• Symbols
"-" (0x2D), "." (0x2E), and ":" (0x3A)
Figure 5 Authentication Server
Active Directory authentication server
ETERNUS DX
UNIX/Linux client
LDAP authentication server
Assign the folderto the network drive Mount the folder
LAN
Windows client
BA
Shared folder A Shared folder B
CIFS NFS
AuthenticationAuthentication
2. Designing NAS OperationsUser Management
29FUJITSU Storage ETERNUS DX S4/S3 series Hybrid Storage Systems Configuration Guide (NAS)
Copyright 2018 FUJITSU LIMITEDP3AM-8072-17ENZ0
■ Authentication in a CIFS Environment
A login authentication by the Active Directory authentication server (Kerberos authentication method) or the lo-cal user authentication setting is required to perform user management of the directories and files with CIFSaccess.
The ETERNUS DX supports Active Directory's one-way and two-way explicit trust relationships. For example, whenthe trusting domain is set in the ETERNUS DX, setting the trust relationship of the domains as one-way or two-way gives the trusted domain user access to the ETERNUS DX.
File access control information is stored for each directory or file in a CIFS environment in the same way as in anormal Windows environment.
Access privileges to read and write to shared folders can be assigned for each user or each group.
For Active Directory authentication, specify the user name in the following format:
netbios_domain_name\User_name
Example: domain\user1
During the design phase
The time in the ETERNUS DX and the Active Directory authentication server must be synchronized to performoperations with the Active Directory authentication server. Automatic time correction by the Network TimeProtocol (NTP) is recommended.
During the design phase
If the controller firmware version is earlier than V10L61, the ETERNUS DX uses SMB1.0 to communicate withthe Active Directory authentication server.
For this reason, disabling SMB1.0 in the Active Directory authentication server causes user authentication fail-ures which in turn make the shared folder inaccessible.
Before disabling SMB1.0 of the Active Directory authentication server, update the ETERNUS DX controller firm-ware version to V10L61 or later.
During the configuration phase
• For Active Directory authentication, the NAS Engine of the ETERNUS DX uses the ETERNUS DX's host name asa NetBIOS name.
For details on the ETERNUS DX's host name, refer to "NAS Server Name (Host Name)" (page 27).
• Active Directory's two-way, transitive trust relationships are not supported.
• The maximum number of users that can be managed using Active Directory is 100,000.
2. Designing NAS OperationsUser Management
30FUJITSU Storage ETERNUS DX S4/S3 series Hybrid Storage Systems Configuration Guide (NAS)
Copyright 2018 FUJITSU LIMITEDP3AM-8072-17ENZ0
■ Authentication in an NFS Environment
A login authentication by the LDAP authentication server (such as OpenLDAP) is required to perform user man-agement of directories and files with NFS access.
During the design phase
Operations using an LDAP authentication server that is running Active Directory Lightweight Directory Serv-ices are not supported.
During the configuration phase
• To use the LDAP authentication server, add the administrator to manage subdirectories under the targetdirectory tree in the LDAP authentication server in advance. In addition, set this administrator as the LDAPdomain administrator when setting the authentication server from ETERNUS Web GUI or ETERNUS CLI.
The procedure to set a directory tree administrator varies depending on the software. The examples whenusing the following products are as follows.
- When the 389 Directory Server (formerly called as Fedora Directory Server) is used
Register the administrator to manage subdirectories under the target directory tree using "ldapadd" com-mand or GUI screen after installing the package in addition to the "Directory Server Manager (accountthat is specified with Directory Manager DN)" that is input when installing the package.
- When OpenLDAP is used
Because an administrator has already been registered during the package installation, additional set-tings are not required.
- When Oracle Unified Directory (OUD) is used
Create the administrator to manage subdirectories under the target directory tree in addition to the "Di-rectory Server Manager" that is input when creating the instance. Register the administrator to managesubdirectories under the target directory tree using the "ldapadd" command or GUI screen.
During the operation phase
The access privilege for the shared folder cannot be changed from an NFS client by executing the "mount"command with an option to assign a Read-Write (rw) access privilege when this shared folder is created withthe operation management interface (ETERNUS Web GUI or ETERNUS CLI) so that it supports the NFS protocoland receives a Read (r) access privilege.
2. Designing NAS OperationsUser Management
31FUJITSU Storage ETERNUS DX S4/S3 series Hybrid Storage Systems Configuration Guide (NAS)
Copyright 2018 FUJITSU LIMITEDP3AM-8072-17ENZ0
■ Authentication in a CIFS/NFS Environment
Guaranteeing the integrity of the user information between the Active Directory authentication server and theLDAP authentication server is the responsibility of the operation administrator. To guarantee the integrity of theuser information, the RID of the Active Directory authentication server and the last digits of the UID/GID for theLDAP authentication server must be different.
To manage users and groups using both Active Directory and LDAP authentication servers, map the Windowssecurity identifiers (SID), UNIX/Linux user identifiers (UID), and group identifiers (GID) to secure uniqueness ofuser information.
The UID and GID for the LDAP authentication server must be set according to the user ID and group ID of theActive Directory authentication server when mapping the user information. To perform user registration for theLDAP authentication server, register the number on the last part of the user SID and group SID that are regis-tered in the Active Directory authentication server after adding 10,000,000 as UID and GID. An example of thelast part of the SID is "nnnn" for SID "S-1-5-21-xxxx-yyyy-zzzz-nnnn".
For operations that use the Active Directory authentication server or the LDAP authentication server, a NAS con-figuration error, a NAS Engine down, or a snapshot failure described in "Available Functions for Each Software"(page 169) may occur if communication with the authentication server is unavailable due to a network error.
Fixed User Account
■ CIFS Environment
The following account is used for all users who are not managed with the Active Directory authentication serveror with the function that is described in "Local User Authentication" (page 33).
User name: shareuser$
Password: share!
The fixed user account (shareuser$) cannot be used if users are managed with the Active Directory authentica-tion server.
For controller firmware versions V10L53 or later, the fixed user account is not available in the initial settings.The fixed user account must be created in the local user authentication setting.
However, if the controller firmware version is earlier than V10L53 and an authentication server is not used, up-grading the controller firmware to V10L53 or later automatically creates the local user "shareuser$". This usercan be operated in the same way as a fixed user account. "shareuser$" can be deleted and recreated. However,the previous password (share!) cannot be specified for the re-creation because the password must contain eightcharacters or more.
■ NFS Environment
If user management with the LDAP authentication server is not performed, or access control with ACL is not per-formed, all of the users that perform NFS access are allowed access. Only an administrator can perform themount operation for access.
2. Designing NAS OperationsUser Management
32FUJITSU Storage ETERNUS DX S4/S3 series Hybrid Storage Systems Configuration Guide (NAS)
Copyright 2018 FUJITSU LIMITEDP3AM-8072-17ENZ0

Local User AuthenticationLocal user authentication is a function that manages local users/groups who can access the shared folder with-out using the authentication server and can enable CIFS access on a per created local user/local group basis.Specify the access permission of the shared folder when the shared folder is created. Authentication server andlocal user authentication cannot be used simultaneously.
During the configuration phase
When a shared folder is created using CIFS/NFS and the same access privilege is used between CIFS and NFS,the user name, user ID, group name, and group ID of the client that performs an NFS access must match theuser name, user ID, group name, and group ID that are created on the ETERNUS DX.
Local user/local group management (such as creating, changing, and modifying) can be performed from ETER-NUS Web GUI or ETERNUS CLI. For local users/local groups, up to 100 can be created for each. However, threelocal groups are used for the BUILTIN groups.
Local users can belong to one primary group and multiple secondary groups. Only the local user who created thefiles or directories and local users in the same group can access these files or directories.
Registered local users can be used for the following functions.
• Shared folder owner/group
• CIFS access permission settings for shared folders
• Quota settings on a per local user/local group basis
• Home directories
• Account authentication for FTP connections
● Primary Group
Primary group is the group that is set for the directories and files that were created by the local user. A local usermust belong to one of the primary groups. If the primary group is not specified when the local user is created,the local user will belong to "sharegroup$" which is the shared group of all local users.
● Secondary Group
Secondary group is the subgroup for accessing directories and files that were created by the other users. Localusers can belong to multiple secondary groups (up to 16 groups) in addition to the primary group. Local userswho do not belong to any secondary groups can be created.
During the operation phase
• When operations are migrated from the authentication server to local user authentication, deleting the lo-cal user/local group settings and reconfiguring the user on the authentication server side are required.
• BUILTIN groups can be used only for secondary groups.
• BUILTIN groups cannot be deleted. Even if BUILTIN groups exist, authentication server settings can be per-formed.
• If the controller firmware version is earlier than V10L53 and the fixed user account "shareuser$" is used,upgrading the controller firmware to V10L53 or later automatically creates the local user "shareuser$". Thisuser can be operated in the same way as a fixed user account. For details, refer to "Fixed User Account"(page 32).
2. Designing NAS OperationsUser Management
33FUJITSU Storage ETERNUS DX S4/S3 series Hybrid Storage Systems Configuration Guide (NAS)
Copyright 2018 FUJITSU LIMITEDP3AM-8072-17ENZ0

For the character strings that can be specified when the local user authentication is configured, the followingrequirements exist depending on the item.
• Local user names and local group names
- The number of characters that can be specified is 1 to 32 characters.
- The following types of characters can be used.
• Alphanumeric characters and symbols ("-", "_", "$") (US-ASCII code)
• The first character must be an alphanumeric character or an underscore ("_"). A dollar sign ("$") can onlybe used for the last character. A local group name consisting of only numbers cannot be set.
- In addition, local users and local groups using the same name cannot be created. The characters are case-insensitive.
- Because the following character strings are reserved words, they cannot be specified.
adm, audio, bin, cdrom, cgred, daemon, dialout, dip, disk, everyone, floppy, ftp, games, gopher, halt,kmem, ldap, lock, lp, mail, mailnull, man, mem, nfsnobody, nobody, nscd, nslcd, ntp, operator, oprofile,root, rpc, rpcuser, saslauth, shutdown, smmsp, sshd, sync, sys, tape, tcpdump, tty, users, utempter, utmp,uucp, vcsa, video, wheel
- When a local user is used in Windows (CIFS) environments, the local user name must be different from thelocal group name. If the same name is used for the local user and the local group without case sensitivity,access control may not be set correctly for Windows.
• Password
- The number of characters that can be specified is 8 to 32 characters.
- The types of characters that can be used are alphanumeric characters and symbols (US-ASCII code).
2. Designing NAS OperationsUser Management
34FUJITSU Storage ETERNUS DX S4/S3 series Hybrid Storage Systems Configuration Guide (NAS)
Copyright 2018 FUJITSU LIMITEDP3AM-8072-17ENZ0
Access Control (ACL Function)A NAS file system reserves extended ACL areas to store permission entries. 256 extended ACL areas can be regis-tered for files and directories. In addition, ACLs that are registered for files and directories can also be refer-enced.
In a CIFS environment, the following well-known SIDs are supported.
• Domain SIDs (S-1-5-21-*)
• Administrators (S-1-5-32-544)
• Users (S-1-5-32-545)
• Backup Operators (S-1-5-32-551)
The folders and files registered with Administrators, Users, and Backup Operators are accessible from the Do-main Admins group, the Domain Users group, and the fixed user account (shareuser$), respectively. For localusers, access to files and folders is granted by setting the group to which the user belongs in the Administratorsgroup, the Users group, or the Backup Operators group.
Accessing to files or directories is not allowed even if unsupported well-known SIDs are specified for the ACLfunction. Refer to the following site for the well-known SIDs list.
• Well-known security identifiers in Windows operating systems
https://support.microsoft.com/en-us/kb/243330
During the configuration phase
• If there are more ACLs than the maximum number of ACL entries that can be registered for each NAS vol-ume, the access privileges information for the target files or directories may be deleted.
• Do not change the following access control settings for the root folder of the shared folder from the client.
- Owner
- Group
- Access privilege
If these settings are changed from a client, the clients may become unable to access the shared folder.
Access control settings must be configured for subfolders and files under the shared folder.
During the operation phase
If the ETERNUS DX is used as the backup destination or the data migration destination, and if a file that is setwith an ACL of an SID that does not exist in the ETERNUS DX user management (authentication server or localuser authentication) is copied to the ETERNUS DX, the copied file will become inaccessible. Do not copy theACL information of an SID that does not exist in the ETERNUS DX user management.
2. Designing NAS OperationsAccess Control (ACL Function)
35FUJITSU Storage ETERNUS DX S4/S3 series Hybrid Storage Systems Configuration Guide (NAS)
Copyright 2018 FUJITSU LIMITEDP3AM-8072-17ENZ0
Access Control in a CIFS EnvironmentFor CIFS access, Windows-ACL supported file access management is performed.
Windows' Access Based Enumeration (ABE) is supported. With ABE, directories and files can be hidden to userswho do not have access privileges. ABE can be enabled or disabled with ETERNUS Web GUI or ETERNUS CLI.
The supported ABE partly differs in specification from the actual Windows ABE. Directories and files without readaccess privilege are hidden even if write access privilege or special access privilege is set.
If the same name is used for the local user and the local group without case sensitivity when a local user isregistered in ACL, access control may not be set correctly for Windows. When a local user is used in Windows(CIFS) environments, delete either the user ("shareuser$") or the group ("shareuser$") and create a local userand local group using a different name.
During the configuration phase
The owner and group settings of a shared folder do not automatically set the access privileges for subfoldersand files under that shared folder. For subfolders and files under the shared folder, manually set the appropri-ate access privileges as necessary.
Access Control in an NFS EnvironmentWhen using NFS access, the access control varies depending on the NFS version.
POSIX ACL is used for NFS v3.
POSIX-ACL has the following permission attributes for file access; Read (r), Write (w), and Execute (x). In addi-tion, an ownership is set for directories and files. This ownership includes entries for the file owner (Owner), thegroup that the owner belongs to (Group), and other users (Others).
2. Designing NAS OperationsAccess Control (ACL Function)
36FUJITSU Storage ETERNUS DX S4/S3 series Hybrid Storage Systems Configuration Guide (NAS)
Copyright 2018 FUJITSU LIMITEDP3AM-8072-17ENZ0
Access Control in a Shared CIFS/NFS EnvironmentWhen the CIFS protocol and the NFS protocol are used, the access control varies depending on the version ofNFS.
POSIX ACL is used for NFS v3.
For details on POSIX ACL, refer to "Access Control in an NFS Environment" (page 36).
If the same name is used for the local user and the local group without case sensitivity when a local user isregistered in ACL, access control may not be set correctly for Windows. When a local user is used in Windows(CIFS) environments, delete either the user ("shareuser$") or the group ("shareuser$") and create a local userand local group using a different name.
During the operation phase
• Even though advanced security settings are specified with Windows-ACL, the ACL security setting for someusers or groups may be unintentionally overwritten by an ACL setting that is performed later or may not beenabled when the CIFS protocol and the NFS protocol are used at the same time.
• Even though advanced security settings are specified with Windows-ACL, the UNIX POSIX-ACL converts themto Read permissions, Write permissions, and Execute permissions and maps these permissions.
Accesses from other Windows clients are controlled by privileges mapped to POSIX-ACL.
• When adding ACL user from Windows, a security ID (Security ID) may be displayed instead of the name thatis specified from other Windows clients. If this occurs, disconnect the network drive and wait for a while.After rebooting the network drive, the specified name is displayed.
CIFS Access Permission SettingsAccess permissions can be set for a specific user or group when a CIFS shared folder is created.
The group "everyone" can be specified as a group. Access permissions can be changed for existing CIFS sharedfolders. The CIFS access permission setting can grant access permissions for users or groups who have accesspermissions that are granted by the ACL function.
When "everyone" is specified as the group, the privileges that are set for "everyone" are granted to all users.However, users that are granted the "rw" access privilege can read and write data regardless of the privilegesthat are set for "everyone".
Access permissions for the CIFS shared folders can be changed using ETERNUS Web GUI or ETERNUS CLI.
The changed settings are applied to sessions that are established after the change.
If NAS volumes that are backed up in the ETERNUS DX with a controller firmware version earlier than V10L51 arerestored to an ETERNUS DX with a controller firmware version V10L51 or later, folder access permissions aregranted according to the default settings (where access permissions are not granted to any specific user orgroup).
During the configuration phase
To use the CIFS access permission setting for access control of a shared folder, either omit the owner andgroup settings or specify "root" when creating a shared folder. For details on the owner and group settings ofthe shared folder, refer to "File Sharing" (page 38).
2. Designing NAS OperationsCIFS Access Permission Settings
37FUJITSU Storage ETERNUS DX S4/S3 series Hybrid Storage Systems Configuration Guide (NAS)
Copyright 2018 FUJITSU LIMITEDP3AM-8072-17ENZ0
File SharingEach client can share files in the NAS file system for the ETERNUS DX. For file sharing, the CIFS protocol is usedfor Windows and the NFS protocol is used for UNIX/Linux.
■ Shared Folder
To share files, create shared folders in the file system for the ETERNUS DX that support the protocol that is to beused. Shared folders are directories that are created in the root directory of the file system.
Up to 256 shared folders can be created in the ETERNUS DX. When creating multiple file systems, the total num-ber of shared folders in each file system cannot exceed 256.
During the operation phase
Before deleting all the data in the shared folder with the NAS data deletion function or before deleting theshared folders, remove the client connections (by unmounting for NFS or by disconnecting the network drivefor CIFS).
■ Access Privileges (Permissions) for Shared Folders
Each shared folder can be set with a protocol that enables access to it and the range of access that is allowed.
For shared folders, "Owner" for the folder and "Group" to which the owner belongs can be specified. A user thatreceives ownership or a user in a group that receives ownership is granted access privileges (permissions) to theshared folders. Regardless of whether the authentication server (Active Directory or LDAP) is used, if the sharedfolder is created by omitting the Owner setting and the Group setting, "root" is set as the owner of the sharedfolder and has full control (rwxrwxrwx).
Hosts that are allowed or denied access to the shared folders can be specified. In an IPv6 environment, globaladdresses and local addresses can be set with an IP address. Link-local addresses cannot be set with an IP ad-dress.
During the configuration phase
• If only the owner is specified for the shared folder, the "rwx" access privilege is added for the specified user.For this setting, other users cannot access the shared folder.
• If only the group is specified for the shared folder, the "rwx" access privilege is added for the root user andthe specified group. For this setting, other users cannot access the shared folder.
• For shared folders that are accessed with CIFS access, the recommended configuration is to set the ownerand group to "root" and then configure the CIFS access permission setting for access control.
- If the owner and group of the shared folder is "root", access control cannot be performed for the root fold-er of the shared folder. Therefore, set the access privileges using the CIFS access permission setting.
- If the owner and group of the CIFS shared folder or CIFS/NFS shared folder is not "root", users who are notthe owner or users who do not belong to the group are denied access to the shared folder.
- Even if the access privilege is set to "everyone" by the CIFS access permission setting or by the access con-trol setting of the CIFS client, if the owner and group of the shared folder is not "root", users who are notthe owner or users who do not belong to the group cannot access those shared folders.
2. Designing NAS OperationsFile Sharing
38FUJITSU Storage ETERNUS DX S4/S3 series Hybrid Storage Systems Configuration Guide (NAS)
Copyright 2018 FUJITSU LIMITEDP3AM-8072-17ENZ0
During the design phase
• The types of characters that can be used for the owner name and group name are alphanumeric characters(or US-ASCII codes) and symbols from the space character (0x20) to the tilde "~" (0x7E). Note that "?"(0x3F) and "\" (0x5C) cannot be used.
• The types of characters that can be used for CIFS Allowed Hosts, CIFS Denied Hosts, and NFS Allowed Hostsare alphanumeric characters (or US-ASCII codes) and symbols from the space character (0x20) to the tilde"~" (0x7E). Note that "?" (0x3F) and "\" (0x5C) cannot be used.
• The owner and group of a shared folder cannot be assigned with the character strings below because theyare reserved words. This applies even if the character strings are registered in the authentication server.
Reserved words that cannot be assigned to the owner Reserved words that cannot be assigned to the group
shareuser$, bin, daemon, adm, lp, sync, shutdown, halt,mail, uucp, operator, games, gopher, ftp, nobody, vcsa, rpc,nscd, ntp, saslauth, mailnull, smmsp, rpcuser, nfsnobody,sshd, nslcd, tcpdump, oprofile
shareuser$, bin, daemon, sys, adm, tty, disk, lp, mem,kmem, wheel, mail, uucp, man, games, gopher, video, dip,ftp, lock, audio, nobody, users, utmp, utempter, floppy, vcsa,rpc, nscd, cdrom, tape, dialout, ntp, saslauth, mailnull,smmsp, rpcuser, nfsnobody, sshd, ldap, tcpdump, oprofile
■ Character Set
For the ETERNUS DX in a Unified configuration, UTF-8 is used as the character set.
File names and directory names are set with the UTF-8 character set.
During the operation phase
• Specifications for the character set and the length of the file name depends on the OS. File names must betaken into consideration when sharing files.
- The following table shows the character set and the file name length for Windows and UNIX/Linux.
OS Character set File name length
Windows UTF-8 (Unicode) Up to 255 bytes
UNIX/Linux UTF-8 Up to 255 bytes
- Note that the following characters cannot be used for file names in Windows.
" (double quotation mark), * (asterisk), / (slash), : (colon), <, >, ?, \, |
• The maximum length for a UNIX/Linux directory path name is 1,005 bytes.
Although UNIX/Linux allows up to 1,023 bytes for the directory path name, internal processes for the ETER-NUS DX uses 18 bytes so the maximum length for path names are reduced to 1,005 bytes.
2. Designing NAS OperationsFile Sharing
39FUJITSU Storage ETERNUS DX S4/S3 series Hybrid Storage Systems Configuration Guide (NAS)
Copyright 2018 FUJITSU LIMITEDP3AM-8072-17ENZ0
CIFS OperationThis section describes an operation in which the CIFS protocol is used.
In a Windows environment, domain-based operations are supported.
■ Switching between SMB1.0/2.0/3.0
For versions of the SMB protocol, SMB3.0 is enabled by default.
To change the version of the SMB protocol, execute the following procedure.
1 Specify the protocol version that is to be changed in the "-smb-version" parameter of the ETERNUS CLI "setnas-server" command, and then execute the command.
2 Reestablish a session for the CIFS client that is to be connected.
During the configuration phase
SMB1.0 is used to authenticate access from the ETERNUS DX to the Active Directory authentication server. Forthis reason, if SMB1.0 is disabled, the authentication settings cannot be modified or the shared folder be-comes inaccessible. Before disabling SMB1.0 of the Active Directory authentication server, update the ETER-NUS DX controller firmware version to V10L61 or later.
During the configuration phase
• When the CIFS client is Windows 8.1 or Windows Server 2012 R2, or later, if SMB1.0 is disabled, even if theprotocol version is changed to SMB1.0 with the "set nas-server" command, connections cannot be made us-ing SMB1.0.
• If the SMB protocol version was changed to SMB1.0 or SMB2.0 with the encryption function of SMB3.0 stillenabled, disable the encryption function when accessing the shared folder.
■ Alternate Data Stream
The NAS file system in the ETERNUS DX supports the Alternate Data Streams (ADS). Multiple data streams can beassigned to a file. When a file that includes ADS is copied via the CIFS protocol, the ADS information is stored in adifferent file in the ".streams" folder on the shared folder.
The ADS information cannot be preserved for the following cases.
• If the file is moved or copied to a non-ETERNUS DX file system that does not support ADS.
• If the file, regardless of whether it is in the ETERNUS DX, is moved or copied with protocols other than the CIFSprotocol
Note that the access performance may be reduced if ADS information is added to a file. The maximum amountof characters that can be set with the ADS is 64KB.
2. Designing NAS OperationsFile Sharing
40FUJITSU Storage ETERNUS DX S4/S3 series Hybrid Storage Systems Configuration Guide (NAS)
Copyright 2018 FUJITSU LIMITEDP3AM-8072-17ENZ0
Because ADS information (or Zone Identifier) is added to files that are downloaded from the Internet, copyingthese files to the CIFS shared folder may not be possible. In this case, confirm that the downloaded files are safe,remove the file block from the property screen, and then copy the files to the CIFS shared folder.
During the configuration phase
The ADS information cannot be preserved if the following operations are performed.
• Snapshot files are being viewed or restored.
• NAS backup volume files are being viewed.
When NAS backup volumes are restored, the ADS information is preserved only if they are restored to the ex-isting NAS user volumes. If NAS backup volumes are restored to different NAS user volumes, the ADS informa-tion cannot be preserved.
During the operation phase
Do not use the ".streams" folder which is directly under the shared folder because it is a folder used for theNAS system.
■ Displaying/Hiding Alternate Data Streams
From ETERNUS CLI, the settings can be changed to show or hide the ADS information (".streams" folder or file).Perform the following procedure to change the settings.
1 Execute the ETERNUS CLI "set nas-server" command by specifying "yes" or "no" for the "-show-cifs-ads-files"parameter.
2 Reestablish a session for the CIFS client that is to be connected.
During the configuration phase
If the ADS information is hidden, the ".streams" folder or file cannot be displayed or created in the sharedfolder.
■ Changing the Settings for Anonymous Access
The setting to allow anonymous access for the CIFS access can be changed.
If anonymous access is used, CIFS access from the CIFS client is allowed without specifying the username andpassword.
Anonymous access is useful for troubleshooting or for test environments but is not recommended for normaloperations.
2. Designing NAS OperationsFile Sharing
41FUJITSU Storage ETERNUS DX S4/S3 series Hybrid Storage Systems Configuration Guide (NAS)
Copyright 2018 FUJITSU LIMITEDP3AM-8072-17ENZ0
Perform the following procedure to change the settings for anonymous access.
1 Execute the ETERNUS CLI "set nas-server" command by specifying "yes" or "no" for the "-cifs-restrict-anony-mous" parameter.
2 Execute the ETERNUS CLI "show nas-server" command and then check the displayed result for "CIFS restrictanonymous".
During the operation phase
For Windows with a setting that does not permit anonymous access, anonymous access to the ETERNUS DX isnot available.
NFS OperationThis section describes an operation in which the NFS protocol is used.
During the configuration phase
If a data write needs to be ensured, set "Synchronous I/O" so that the data is reliably written in the ETERNUSDX.
In the case where "Asynchronous I/O" is set, data may not be written immediately in the ETERNUS DX if theNFS client is used for cache or a network error occurs.
■ Enabling / Disabling NFS v4.0
For the NFS protocol versions, NFS v4.0 is disabled by default.
The following procedure shows the operations for enabling or disabling NFS v4.0.
1 If the NAS volumes of the ETERNUS DX are mounted with NFS mount using the NFS client, unmount theNAS volume.
2 For the ETERNUS CLI "set nas-server" command, specify "enable" or "disable" for the "-nfsv4" parameter andexecute.
3 Stop all server access connecting with the SAN environment.
4 Use ETERNUS Web GUI or ETERNUS CLI to reboot the ETERNUS DX.
2. Designing NAS OperationsFile Sharing
42FUJITSU Storage ETERNUS DX S4/S3 series Hybrid Storage Systems Configuration Guide (NAS)
Copyright 2018 FUJITSU LIMITEDP3AM-8072-17ENZ0
5 Mount the NAS volumes in the ETERNUS DX from the NFS client.
During the configuration phase
Be sure to reboot the storage system after using this procedure to change "enable" or "disable" for the "-nfsv4"parameter of the "set nas-server" command. If the operation is resumed without rebooting the storage sys-tem, access may stop when a failover or a failback is triggered by a controller failure.
During the configuration phase
The enabling or disabling of NFS v4.0 can be performed when the controller firmware version is V10L51 orlater.
During the operation phase
• After the hot update is complete, even if the controller firmware version is switched to a version that sup-ports NFS v4.0 (V10L51 or later), the currently mounted NFS client will still be using NFS v2 or v3. Opera-tions can continue as is within the usable range of NFS v2 or v3.
• For the procedure to mount from the NFS client, refer to "Access from NFS Clients" (page 148).
■ Commands
Different capacity values are shown for the results of the "df" command (shows the usage status of disk drives inUNIX/Linux) and the "du" command (shows the used capacity of disk drives for the directory).
• The "df" command shows the total capacity of used and reserved areas in the file system.
• The "du" command shows the total capacity of the files that are actually used in a directory and all of the sub-directories under it.
2. Designing NAS OperationsFile Sharing
43FUJITSU Storage ETERNUS DX S4/S3 series Hybrid Storage Systems Configuration Guide (NAS)
Copyright 2018 FUJITSU LIMITEDP3AM-8072-17ENZ0
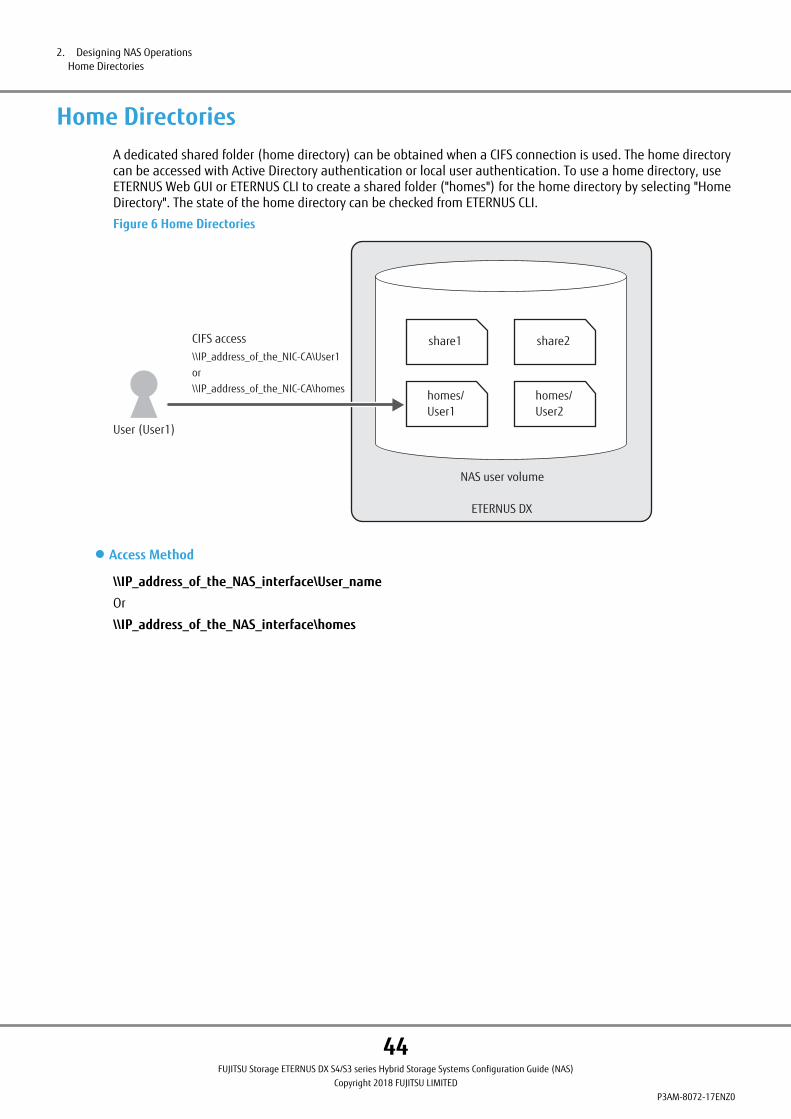
Home DirectoriesA dedicated shared folder (home directory) can be obtained when a CIFS connection is used. The home directorycan be accessed with Active Directory authentication or local user authentication. To use a home directory, useETERNUS Web GUI or ETERNUS CLI to create a shared folder ("homes") for the home directory by selecting "HomeDirectory". The state of the home directory can be checked from ETERNUS CLI.
Figure 6 Home Directories
ETERNUS DX
CIFS access share1
homes/User1
homes/User2
share2
NAS user volume
\\IP_address_of_the_NIC-CA\User1or\\IP_address_of_the_NIC-CA\homes
User (User1)
● Access Method
\\IP_address_of_the_NAS_interface\User_name
Or
\\IP_address_of_the_NAS_interface\homes
2. Designing NAS OperationsHome Directories
44FUJITSU Storage ETERNUS DX S4/S3 series Hybrid Storage Systems Configuration Guide (NAS)
Copyright 2018 FUJITSU LIMITEDP3AM-8072-17ENZ0
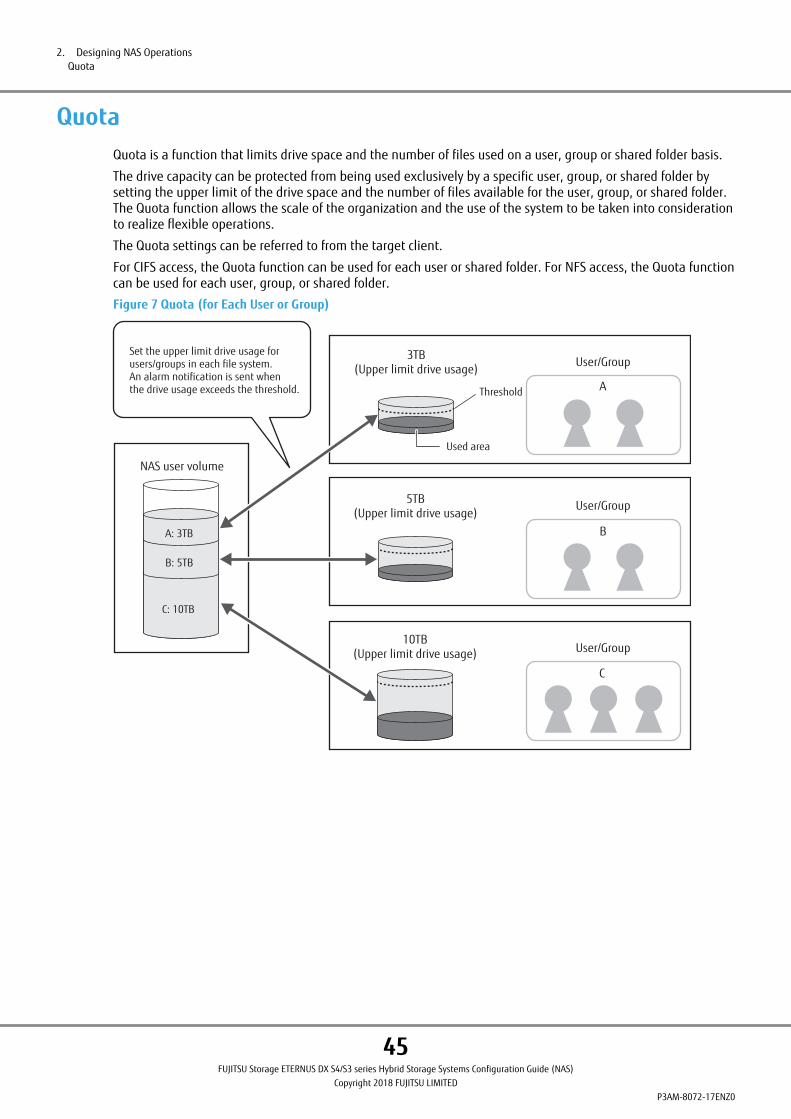
QuotaQuota is a function that limits drive space and the number of files used on a user, group or shared folder basis.
The drive capacity can be protected from being used exclusively by a specific user, group, or shared folder bysetting the upper limit of the drive space and the number of files available for the user, group, or shared folder.The Quota function allows the scale of the organization and the use of the system to be taken into considerationto realize flexible operations.
The Quota settings can be referred to from the target client.
For CIFS access, the Quota function can be used for each user or shared folder. For NFS access, the Quota functioncan be used for each user, group, or shared folder.
Figure 7 Quota (for Each User or Group)
NAS user volume
Set the upper limit drive usage for users/groups in each file system.An alarm notification is sent when the drive usage exceeds the threshold.
C
B
A
10TB(Upper limit drive usage)
5TB(Upper limit drive usage)
3TB(Upper limit drive usage)
A: 3TB
B: 5TB
C: 10TB
Used area
Threshold
User/Group
User/Group
User/Group
2. Designing NAS OperationsQuota
45FUJITSU Storage ETERNUS DX S4/S3 series Hybrid Storage Systems Configuration Guide (NAS)
Copyright 2018 FUJITSU LIMITEDP3AM-8072-17ENZ0
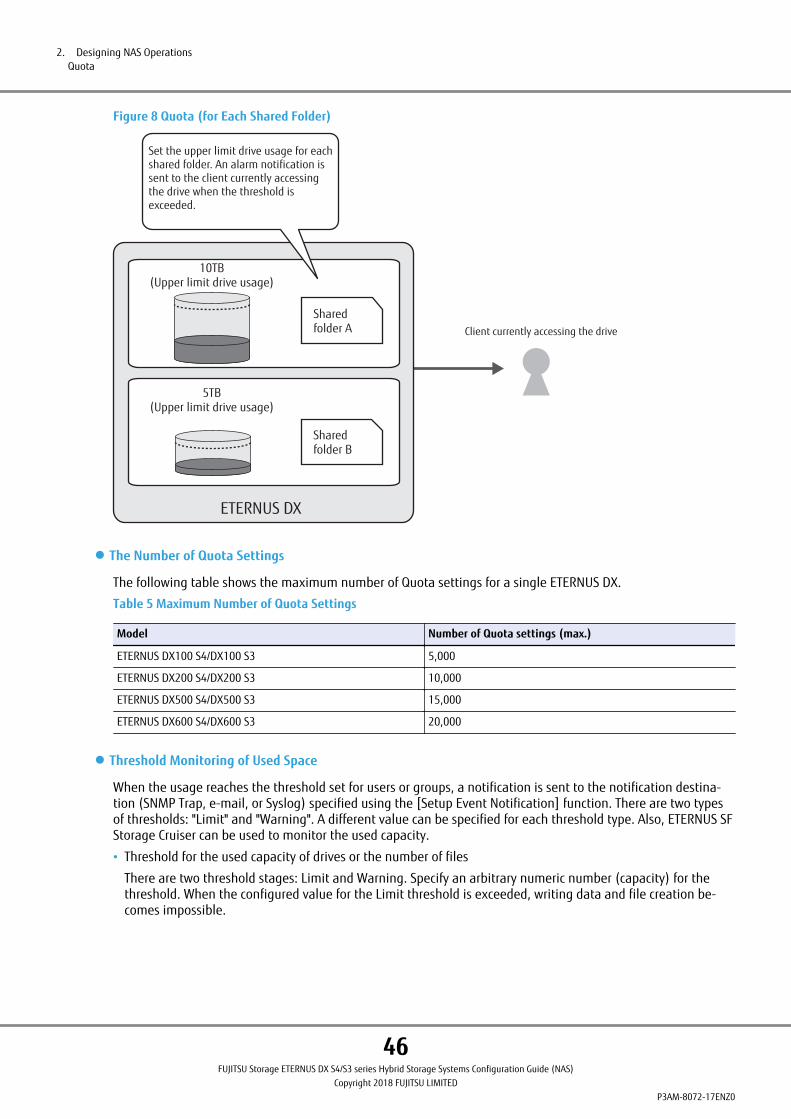
Figure 8 Quota (for Each Shared Folder)
ETERNUS DX
Client currently accessing the drive
Set the upper limit drive usage for each shared folder. An alarm notification is sent to the client currently accessing the drive when the threshold is exceeded.
Shared folder B
Shared folder A
10TB(Upper limit drive usage)
5TB(Upper limit drive usage)
● The Number of Quota Settings
The following table shows the maximum number of Quota settings for a single ETERNUS DX.
Table 5 Maximum Number of Quota Settings
Model Number of Quota settings (max.)
ETERNUS DX100 S4/DX100 S3 5,000
ETERNUS DX200 S4/DX200 S3 10,000
ETERNUS DX500 S4/DX500 S3 15,000
ETERNUS DX600 S4/DX600 S3 20,000
● Threshold Monitoring of Used Space
When the usage reaches the threshold set for users or groups, a notification is sent to the notification destina-tion (SNMP Trap, e-mail, or Syslog) specified using the [Setup Event Notification] function. There are two typesof thresholds: "Limit" and "Warning". A different value can be specified for each threshold type. Also, ETERNUS SFStorage Cruiser can be used to monitor the used capacity.
• Threshold for the used capacity of drives or the number of files
There are two threshold stages: Limit and Warning. Specify an arbitrary numeric number (capacity) for thethreshold. When the configured value for the Limit threshold is exceeded, writing data and file creation be-comes impossible.
2. Designing NAS OperationsQuota
46FUJITSU Storage ETERNUS DX S4/S3 series Hybrid Storage Systems Configuration Guide (NAS)
Copyright 2018 FUJITSU LIMITEDP3AM-8072-17ENZ0
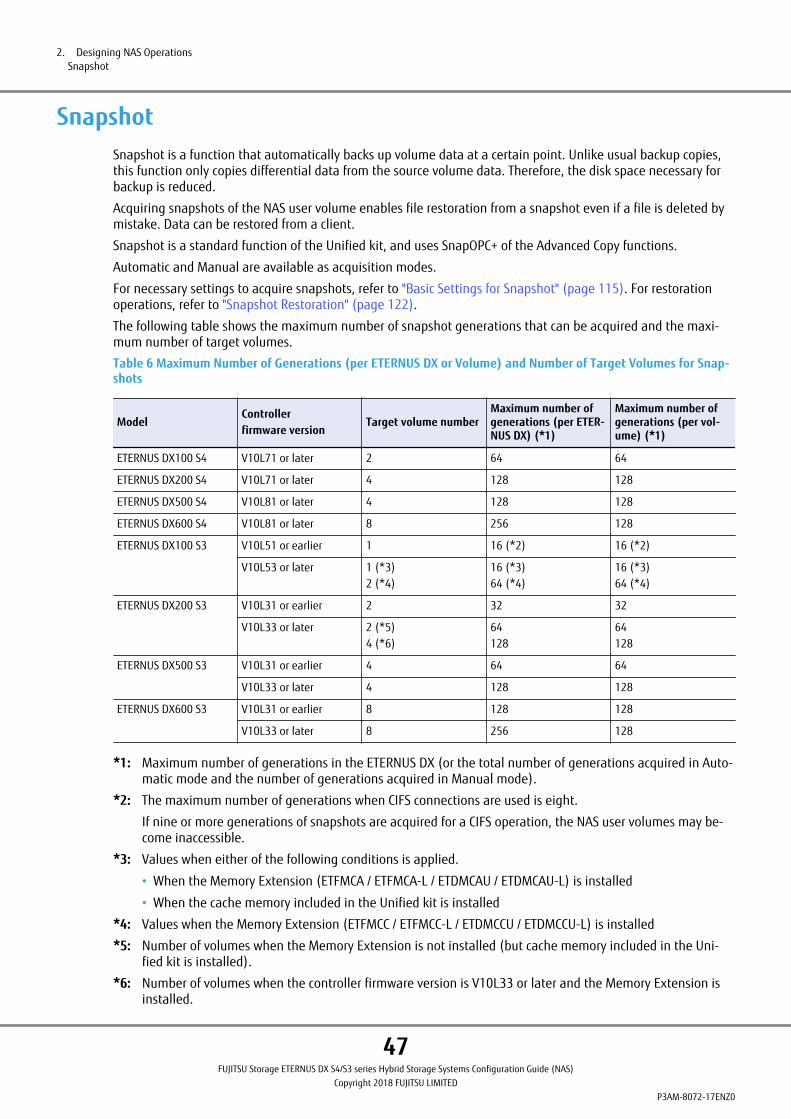
SnapshotSnapshot is a function that automatically backs up volume data at a certain point. Unlike usual backup copies,this function only copies differential data from the source volume data. Therefore, the disk space necessary forbackup is reduced.
Acquiring snapshots of the NAS user volume enables file restoration from a snapshot even if a file is deleted bymistake. Data can be restored from a client.
Snapshot is a standard function of the Unified kit, and uses SnapOPC+ of the Advanced Copy functions.
Automatic and Manual are available as acquisition modes.
For necessary settings to acquire snapshots, refer to "Basic Settings for Snapshot" (page 115). For restorationoperations, refer to "Snapshot Restoration" (page 122).
The following table shows the maximum number of snapshot generations that can be acquired and the maxi-mum number of target volumes.
Table 6 Maximum Number of Generations (per ETERNUS DX or Volume) and Number of Target Volumes for Snap-shots
ModelControllerfirmware version
Target volume numberMaximum number ofgenerations (per ETER-NUS DX) (*1)
Maximum number ofgenerations (per vol-ume) (*1)
ETERNUS DX100 S4 V10L71 or later 2 64 64
ETERNUS DX200 S4 V10L71 or later 4 128 128
ETERNUS DX500 S4 V10L81 or later 4 128 128
ETERNUS DX600 S4 V10L81 or later 8 256 128
ETERNUS DX100 S3 V10L51 or earlier 1 16 (*2) 16 (*2)
V10L53 or later 1 (*3)2 (*4)
16 (*3)64 (*4)
16 (*3)64 (*4)
ETERNUS DX200 S3 V10L31 or earlier 2 32 32
V10L33 or later 2 (*5)4 (*6)
64128
64128
ETERNUS DX500 S3 V10L31 or earlier 4 64 64
V10L33 or later 4 128 128
ETERNUS DX600 S3 V10L31 or earlier 8 128 128
V10L33 or later 8 256 128
*1: Maximum number of generations in the ETERNUS DX (or the total number of generations acquired in Auto-matic mode and the number of generations acquired in Manual mode).
*2: The maximum number of generations when CIFS connections are used is eight.
If nine or more generations of snapshots are acquired for a CIFS operation, the NAS user volumes may be-come inaccessible.
*3: Values when either of the following conditions is applied.
• When the Memory Extension (ETFMCA / ETFMCA-L / ETDMCAU / ETDMCAU-L) is installed
• When the cache memory included in the Unified kit is installed
*4: Values when the Memory Extension (ETFMCC / ETFMCC-L / ETDMCCU / ETDMCCU-L) is installed
*5: Number of volumes when the Memory Extension is not installed (but cache memory included in the Uni-fied kit is installed).
*6: Number of volumes when the controller firmware version is V10L33 or later and the Memory Extension isinstalled.
2. Designing NAS OperationsSnapshot
47FUJITSU Storage ETERNUS DX S4/S3 series Hybrid Storage Systems Configuration Guide (NAS)
Copyright 2018 FUJITSU LIMITEDP3AM-8072-17ENZ0
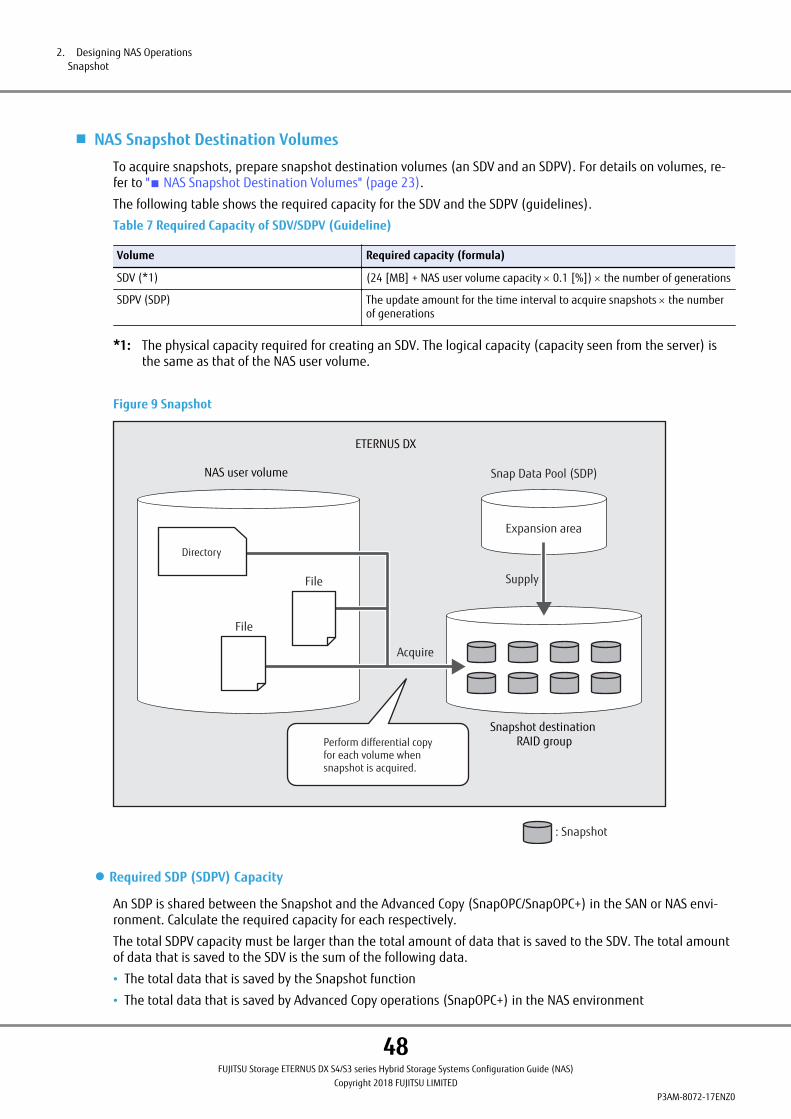
■ NAS Snapshot Destination Volumes
To acquire snapshots, prepare snapshot destination volumes (an SDV and an SDPV). For details on volumes, re-fer to "■ NAS Snapshot Destination Volumes" (page 23).
The following table shows the required capacity for the SDV and the SDPV (guidelines).
Table 7 Required Capacity of SDV/SDPV (Guideline)
Volume Required capacity (formula)
SDV (*1) (24 [MB] + NAS user volume capacity ´ 0.1 [%]) ´ the number of generations
SDPV (SDP) The update amount for the time interval to acquire snapshots ´ the numberof generations
*1: The physical capacity required for creating an SDV. The logical capacity (capacity seen from the server) isthe same as that of the NAS user volume.
Figure 9 Snapshot
Snapshot destination RAID group
NAS user volume
File
File
Expansion area
Directory
: Snapshot
ETERNUS DX
Snap Data Pool (SDP)
Supply
Acquire
Perform differential copyfor each volume whensnapshot is acquired.
● Required SDP (SDPV) Capacity
An SDP is shared between the Snapshot and the Advanced Copy (SnapOPC/SnapOPC+) in the SAN or NAS envi-ronment. Calculate the required capacity for each respectively.
The total SDPV capacity must be larger than the total amount of data that is saved to the SDV. The total amountof data that is saved to the SDV is the sum of the following data.
• The total data that is saved by the Snapshot function
• The total data that is saved by Advanced Copy operations (SnapOPC+) in the NAS environment
2. Designing NAS OperationsSnapshot
48FUJITSU Storage ETERNUS DX S4/S3 series Hybrid Storage Systems Configuration Guide (NAS)
Copyright 2018 FUJITSU LIMITEDP3AM-8072-17ENZ0
• The total data that is saved by Advanced Copy operations (SnapOPC/SnapOPC+) in the SAN environment
● SDPE Capacity
Snap Data Pool Element (SDPE) is a unit of pool area to be allocated from an SDPV to an SDV (copy destinationarea). When data is written to the copy destination, the SDP is divided into small units called SDPE, so that onlyas much as is required is used.
1GB, 2GB, or 4GB can be specified for an SDPE unit. Specify as small a value as possible, because the usage effi-ciency of area allocation improves as the SDPE unit becomes smaller.
The maximum SDP capacity differs depending on the specified SDPE unit. When a small value is specified for theSDPE, the maximum SDP capacity will be smaller. Because a storage area exceeding the copy source capacity(logical SDV capacity) that was specified during the SDV creation cannot be supplied, set a large value to theSDPE capacity only when the total data capacity that is to be saved to the SDV exceeds the total SDP capacitythat is to be created.
● Number of SDPVs
Multiple SDPVs with a maximum of 2TB capacity can be created. When SDPVs are created, the total capacity ofthe SDPVs is pooled as an SDP.
Distribute SDPVs to multiple RAID groups so that the load is not concentrated on a specific drive. In addition,distribute controlling CMs of the RAID groups where the SDPVs are created so that load is balanced.
When SDPVs are concentrated on one RAID group, the time required for restoration increases as the number ofsnapshot generations to acquire increases.
■ How to Check Snapshot Data
Acquired snapshot data can be verified from the client with the following methods.
Data in the snapshot destination has been assigned a Read-Only access privilege and can only be referred tofrom the client.
● CIFS Client
Identical to Windows shadow copy, snapshot data can be verified from the client using Explorer. Open the direc-tory or file properties and when the [Previous Versions] tab screen is selected, a list of collected data is dis-played.
● NFS Client
After a shared folder is mounted, snapshot data can be referred to from the ".snap" directory under that sharedfolder.
Snapshots are saved to directories that are created using the acquisition time stamp as the name under the".snap" directory in the shared folder.
2. Designing NAS OperationsSnapshot
49FUJITSU Storage ETERNUS DX S4/S3 series Hybrid Storage Systems Configuration Guide (NAS)
Copyright 2018 FUJITSU LIMITEDP3AM-8072-17ENZ0
A directory is created according to the following naming rule.
@GMT—yyyy.mm.dd—hh.mm.ss
"yyyy.mm.dd" indicates year/month/day, "hh.mm.ss" indicates the Greenwich Mean Time (GMT) and the seconds(ss) are rounded off.
For example, when "/mnt/share_dir/" is mounted as the shared folder, the snapshot of file (A) in the shared fold-er is acquired to the following destination (B).
A. Copy source file
/mnt/share_dir/aaa.txt (*1)
B. Snapshot destination
/mnt/share_dir/.snap/@GMT—2014.06.10—09.13.00/aaa.txt (*2)
*1: "/mnt/share_dir/" is the mount point of the shared folder.
*2: "@GMT—2014.06.10—09.13.00" is the directory where the snapshots acquired at 9:13 AM on June 10, 2014are saved.
BackupThe ETERNUS DX links ETERNUS SF AdvancedCopy Manager and performs high-speed backups and restorationsby using the Advanced Copy function. Each NAS user volume is copied. QuickOPC can be used for local copies. Forthe remote copies, Remote Equivalent Copy (REC) is available. Copying from the ETERNUS DX to other cabinetsuses SAN connections to transfer data.
For details on backup and restoration of NAS volumes, refer to "ETERNUS SF Web Console Manual". For details onbackup between multiple storage systems using REC, refer to "ETERNUS SF AdvancedCopy Manager OperationGuide for Copy Control Module".
Packet Trace AcquisitionWhen trouble occurs on the network, problems can be quickly resolved with an analysis of the network traceinformation to determine the cause (of the trouble). In the packet trace acquisition setting, the maximum sizeof each file, the number to divide the file by, and the maximum length of each packet can be specified. Fordetails on these settings, refer to "5. Packet Trace Acquisition Settings" (page 131).
2. Designing NAS OperationsBackup
50FUJITSU Storage ETERNUS DX S4/S3 series Hybrid Storage Systems Configuration Guide (NAS)
Copyright 2018 FUJITSU LIMITEDP3AM-8072-17ENZ0
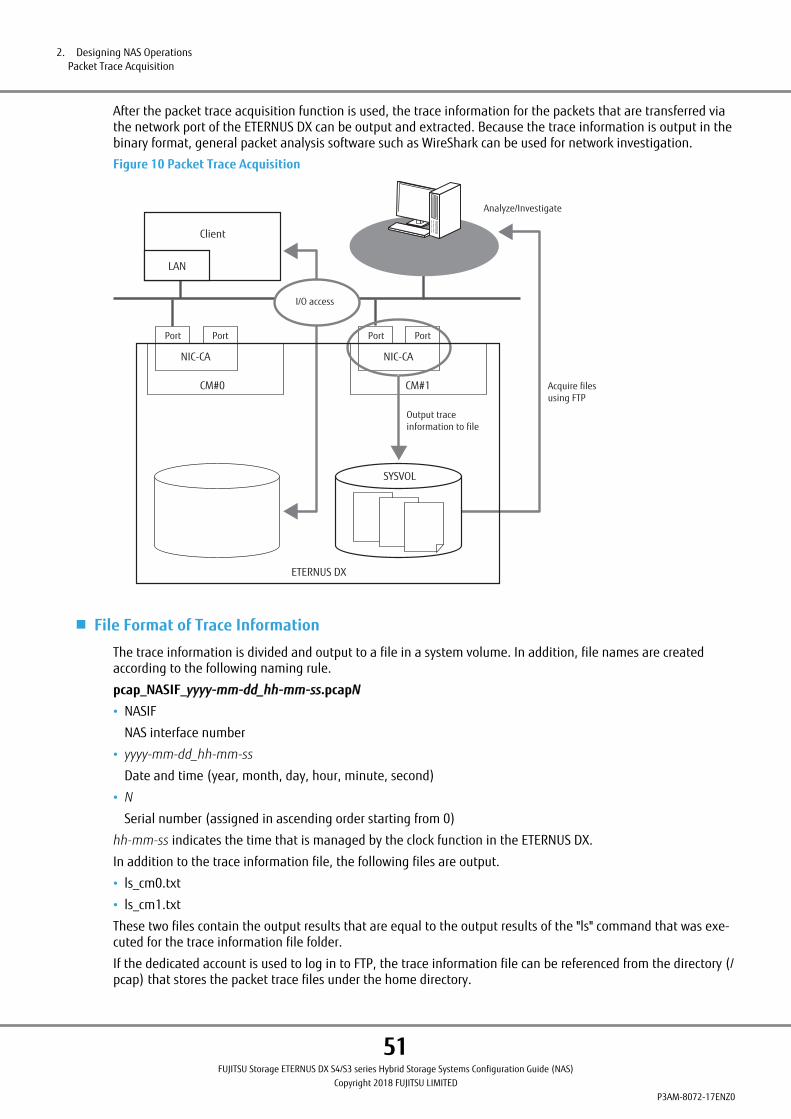
After the packet trace acquisition function is used, the trace information for the packets that are transferred viathe network port of the ETERNUS DX can be output and extracted. Because the trace information is output in thebinary format, general packet analysis software such as WireShark can be used for network investigation.
Figure 10 Packet Trace Acquisition
Analyze/Investigate
Acquire filesusing FTP
LAN
Client
NIC-CA
Port
CM#1
Output trace information to file
ETERNUS DX
PortPort Port
NIC-CA
I/O access
CM#0
SYSVOL
■ File Format of Trace Information
The trace information is divided and output to a file in a system volume. In addition, file names are createdaccording to the following naming rule.
pcap_NASIF_yyyy-mm-dd_hh-mm-ss.pcapN
• NASIF
NAS interface number
• yyyy-mm-dd_hh-mm-ss
Date and time (year, month, day, hour, minute, second)
• N
Serial number (assigned in ascending order starting from 0)
hh-mm-ss indicates the time that is managed by the clock function in the ETERNUS DX.
In addition to the trace information file, the following files are output.
• ls_cm0.txt
• ls_cm1.txt
These two files contain the output results that are equal to the output results of the "ls" command that was exe-cuted for the trace information file folder.
If the dedicated account is used to log in to FTP, the trace information file can be referenced from the directory (/pcap) that stores the packet trace files under the home directory.
2. Designing NAS OperationsPacket Trace Acquisition
51FUJITSU Storage ETERNUS DX S4/S3 series Hybrid Storage Systems Configuration Guide (NAS)
Copyright 2018 FUJITSU LIMITEDP3AM-8072-17ENZ0
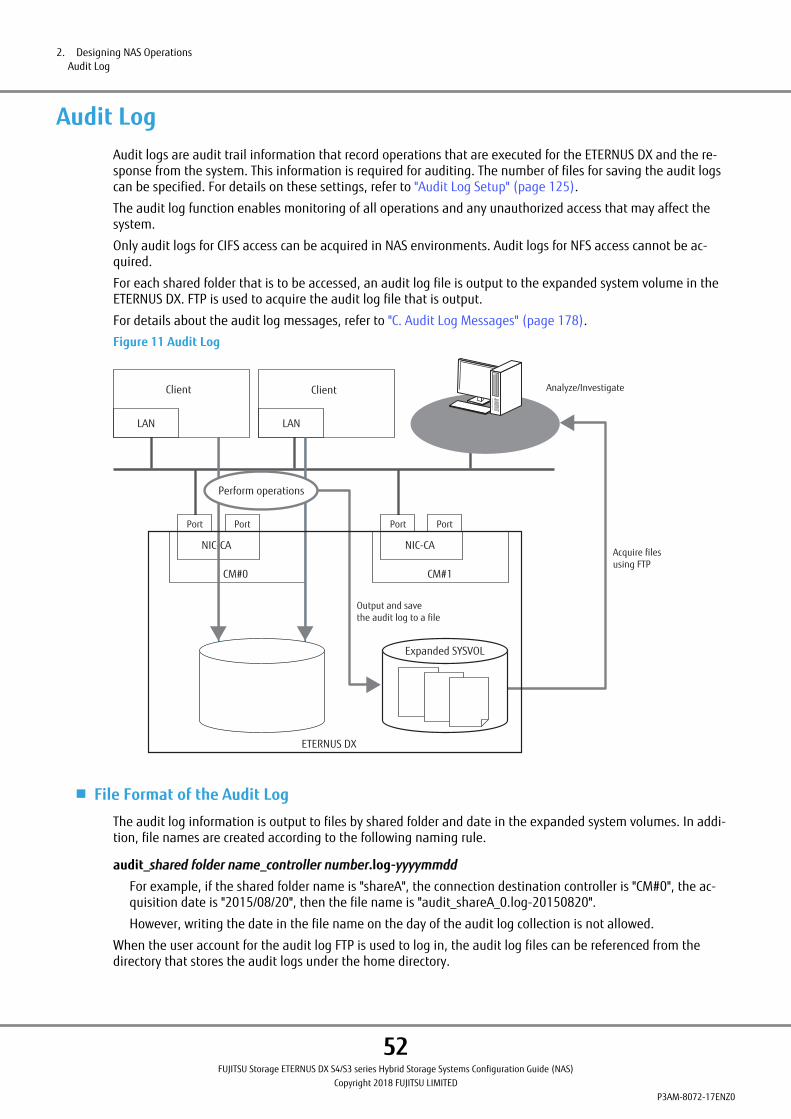
Audit LogAudit logs are audit trail information that record operations that are executed for the ETERNUS DX and the re-sponse from the system. This information is required for auditing. The number of files for saving the audit logscan be specified. For details on these settings, refer to "Audit Log Setup" (page 125).
The audit log function enables monitoring of all operations and any unauthorized access that may affect thesystem.
Only audit logs for CIFS access can be acquired in NAS environments. Audit logs for NFS access cannot be ac-quired.
For each shared folder that is to be accessed, an audit log file is output to the expanded system volume in theETERNUS DX. FTP is used to acquire the audit log file that is output.
For details about the audit log messages, refer to "C. Audit Log Messages" (page 178).
Figure 11 Audit Log
Analyze/Investigate
Acquire filesusing FTP
Output and save the audit log to a file
LAN
Client
LAN
Client
NIC-CA
Port
CM#1
ETERNUS DX
PortPort
CM#0
Port
NIC-CA
Perform operations
Expanded SYSVOL
■ File Format of the Audit Log
The audit log information is output to files by shared folder and date in the expanded system volumes. In addi-tion, file names are created according to the following naming rule.
audit_shared folder name_controller number.log-yyyymmdd
For example, if the shared folder name is "shareA", the connection destination controller is "CM#0", the ac-quisition date is "2015/08/20", then the file name is "audit_shareA_0.log-20150820".
However, writing the date in the file name on the day of the audit log collection is not allowed.
When the user account for the audit log FTP is used to log in, the audit log files can be referenced from thedirectory that stores the audit logs under the home directory.
2. Designing NAS OperationsAudit Log
52FUJITSU Storage ETERNUS DX S4/S3 series Hybrid Storage Systems Configuration Guide (NAS)
Copyright 2018 FUJITSU LIMITEDP3AM-8072-17ENZ0
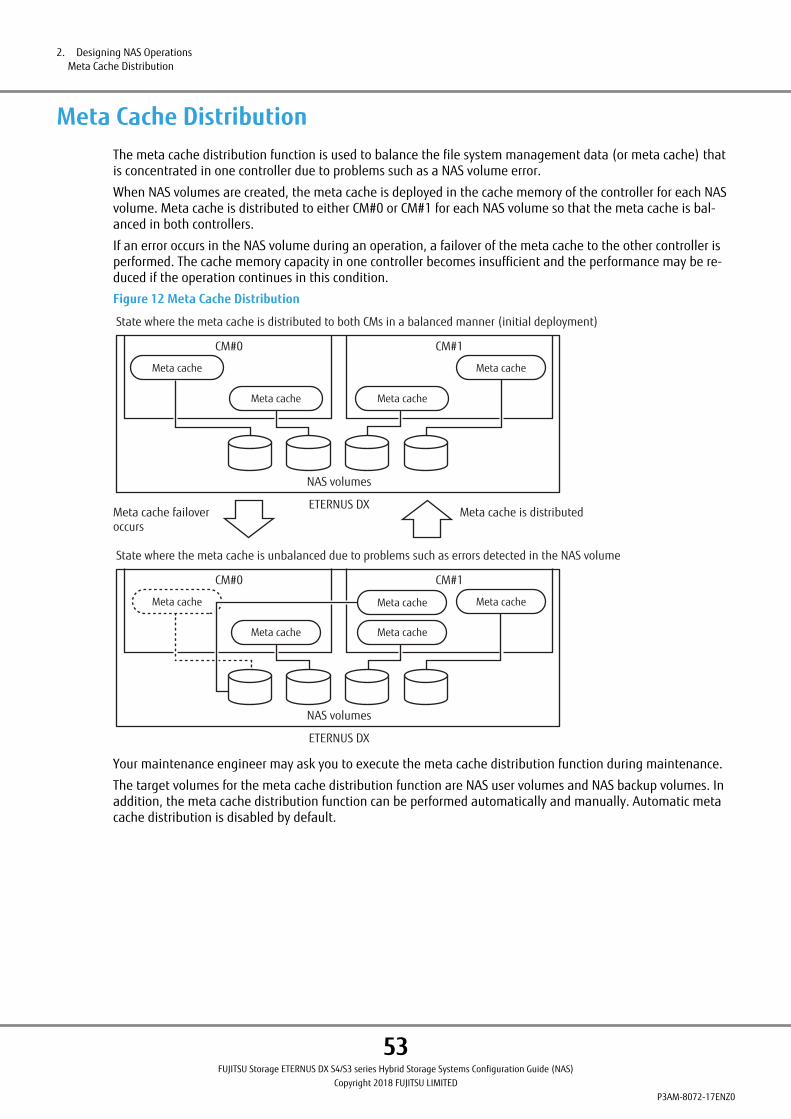
Meta Cache DistributionThe meta cache distribution function is used to balance the file system management data (or meta cache) thatis concentrated in one controller due to problems such as a NAS volume error.
When NAS volumes are created, the meta cache is deployed in the cache memory of the controller for each NASvolume. Meta cache is distributed to either CM#0 or CM#1 for each NAS volume so that the meta cache is bal-anced in both controllers.
If an error occurs in the NAS volume during an operation, a failover of the meta cache to the other controller isperformed. The cache memory capacity in one controller becomes insufficient and the performance may be re-duced if the operation continues in this condition.
Figure 12 Meta Cache Distribution
State where the meta cache is distributed to both CMs in a balanced manner (initial deployment)
NAS volumes
Meta cache
Meta cache Meta cache
Meta cache
CM#0 CM#1
ETERNUS DX
NAS volumes
Meta cache
Meta cache Meta cache
CM#0 CM#1
ETERNUS DX
State where the meta cache is unbalanced due to problems such as errors detected in the NAS volume
Meta cache
Meta cache
Meta cache is distributedMeta cache failover occurs
Your maintenance engineer may ask you to execute the meta cache distribution function during maintenance.
The target volumes for the meta cache distribution function are NAS user volumes and NAS backup volumes. Inaddition, the meta cache distribution function can be performed automatically and manually. Automatic metacache distribution is disabled by default.
2. Designing NAS OperationsMeta Cache Distribution
53FUJITSU Storage ETERNUS DX S4/S3 series Hybrid Storage Systems Configuration Guide (NAS)
Copyright 2018 FUJITSU LIMITEDP3AM-8072-17ENZ0
During the configuration phase
• The meta cache distribution function can be executed manually or automatically.
If automatic execution is selected, meta cache distribution is executed automatically on a regular basis (ev-ery hour on the half hour) and when a controller is implemented according to the imbalanced state of themeta cache. When the meta cache distribution function is executed, I/O responses may be delayed for sev-eral tens of seconds to two minutes.
Manual execution is recommended if the I/O response delay becomes an issue.
• The meta cache may be distributed to a controller that is different from the initial deployment in the follow-ing situations.
- When the controller or NAS engine is abnormal, or when the controller is implemented after stopping formaintenance.
- When the ETERNUS DX is rebooted
During the design phase
Accessing NAS file systems via the NAS interface of the controller where the meta cache is deployed may en-hance performance. Therefore, when mounting the shared folder, set the IP address of the NAS interface thatis in the same CM as the initial meta cache deployment. The initial meta cache deployment and the IP ad-dress of the NAS interface can be checked using ETERNUS Web GUI or ETERNUS CLI.
2. Designing NAS OperationsMeta Cache Distribution
54FUJITSU Storage ETERNUS DX S4/S3 series Hybrid Storage Systems Configuration Guide (NAS)
Copyright 2018 FUJITSU LIMITEDP3AM-8072-17ENZ0

File Lock
Client Resource DeallocationThe Client Resource Deallocation function is used to forcefully release the file that is occupied by the client andcheck the holding state of the lock.
During a file lock state, when the client machine goes down while accessing the file or a path error occurs be-tween the client and the ETERNUS DX, the lock that was held may remain in the controller of the failover source.If another client issues a lock request when locks are being held, the process remains in a wait state until a filelock can be acquired.
In order to resolve the issue where a client process permanently remains in a wait state, locks held by any clientand locks that remain in any controller can be released. In addition, the lock state information can be acquiredand displayed.
The following methods show how to release the remaining locks and how to check the lock state.
• Releasing the lock and acquiring information on the lock state through ETERNUS CLI
• Releasing the lock and acquiring information on the lock state through SSH from the operational LAN
■ Releasing/Displaying the Locks through ETERNUS CLI
The following table shows the specifications of the Client Resource Deallocation function that is availablethrough ETERNUS CLI.
Table 8 Specifications of the Client Resource Deallocation Function (through ETERNUS CLI)
Item Specification
Supported protocols CIFS, NFS v3, NFS v4.0
Lock release unit The client IP address or the controller (CM) that is specified
Acquisition unit of the lock state in-formation
The client IP address or the controller (CM) that is specified
Maximum number of lock releases 100,000
The following procedure shows the operations for displaying the lock state and releasing the lock.
1 Log in to ETERNUS CLI using the administrator account.
2 Execute the "show nas-lock" command.
Confirm that the IP address of the lock release target client is displayed in the output results.
During the operation phase
The IP addresses of the clients where a possible lock is being held are displayed with the "show nas-lock"command.
Therefore, the IP addresses of the clients where a lock is not being held may also be displayed.
2. Designing NAS OperationsFile Lock
55FUJITSU Storage ETERNUS DX S4/S3 series Hybrid Storage Systems Configuration Guide (NAS)
Copyright 2018 FUJITSU LIMITEDP3AM-8072-17ENZ0
3 Execute the "delete nas-lock" command by specifying the IP address of the client that was confirmed inStep 2.
4 Execute the "show nas-lock" command again.
Confirm that the IP address that was specified in Step 3 is not displayed in the output results.
■ Releasing/Displaying the Locks through SSH from the Operational LAN
To release the lock through SSH from the operational LAN, PRIMECLUSTER Wizard for NAS, which is an optionalproduct of FUJITSU Software PRIMECLUSTER, must be installed on the client.
Perform the following settings with ETERNUS CLI in preparation for releasing the lock through SSH from the op-erational LAN.
1 Execute the "set nas-port" command to change the state of the PRIMECLUSTER port (28950) to "OPEN".
2 Execute the "show nas-port" command to check that the state of the PRIMECLUSTER port (28950) is "OPEN".
For details, refer to the manual for PRIMECLUSTER Wizard for NAS.
During the operation phase
Release the lock through ETERNUS CLI if an error occurs in the ETERNUS DX or in the path to the ETERNUS DX(CA error and CA port error) or a machine down occurs while the client acquires a lock. If the lock is releasedthrough ETERNUS CLI after recovering from a failure, even though the lock was released, the lock is restoreddue to retries from the client and appears as though the lock was not released.
During the operation phase
Releasing locks for each file or lock, and releasing locks with a specified protocol are not supported.
2. Designing NAS OperationsFile Lock
56FUJITSU Storage ETERNUS DX S4/S3 series Hybrid Storage Systems Configuration Guide (NAS)
Copyright 2018 FUJITSU LIMITEDP3AM-8072-17ENZ0
NFS File Lock Takeover Function
■ Takeover Process for the NAS File Lock Information
If the IP address for the NAS port is taken over by a different controller due to a failover/failback, the file lockinformation takeover process that was acquired by the NFS client is performed in the NAS system of the ETERNUSDX.
The takeover process of the file lock information is performed only when NFS v4.0 is used to mount the volume.
The takeover process of the file lock information is realized by re-notifying the NAS system of the NFS client's filelock information. Because of that, if the NAS system file is not re-notified from the NFS client due to the I/O load,the network environment, or the NFS client operation, the file lock information is not taken over and the file lockis released.
While waiting for a re-notification, other than the takeover process, some operations from the NFS client arestopped.
The grace period for the re-notification after the IP address is taken over is 100 seconds. However, the graceperiod may be extended to 175 seconds for the following conditions.
• When a hot update of the controller firmware is performed
• When a hot preventive maintenance is performed on the CM
• When the controller is starting up
• When the VLAN settings are being performed
• When the NIC-CA has failed
• When the CA port has failed
In addition, if the failover/failback is conflicted, the takeover process of the file lock information is performedagain.
The operations in the following table are stopped during the grace period.
Table 9 Operations That Are Stopped during a Re-Notification Grace Period of the NFS File Lock Information
OperationsProtocol
NFS v3 NFS v4.0
LOOKUP I/O continuation I/O continuation
READ/WRITE I/O continuation I/O stop
LOCK setting/viewing/releasing I/O stop I/O stop
2. Designing NAS OperationsFile Lock
57FUJITSU Storage ETERNUS DX S4/S3 series Hybrid Storage Systems Configuration Guide (NAS)
Copyright 2018 FUJITSU LIMITEDP3AM-8072-17ENZ0
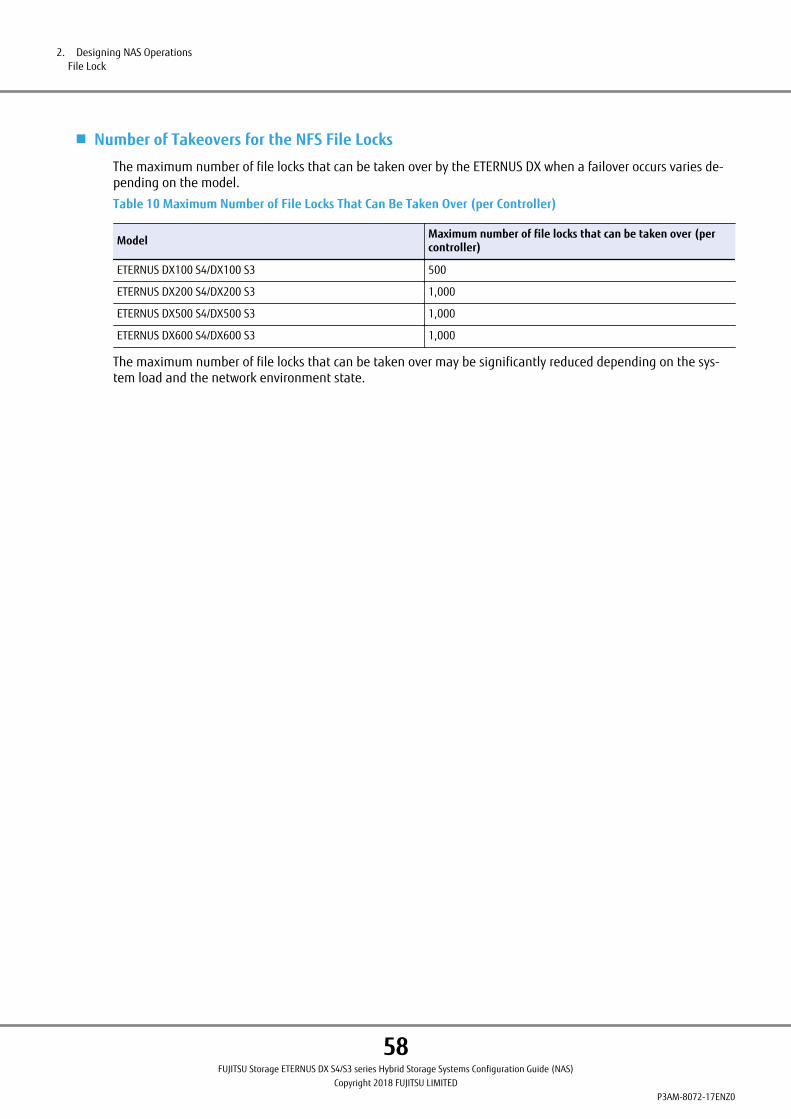
■ Number of Takeovers for the NFS File Locks
The maximum number of file locks that can be taken over by the ETERNUS DX when a failover occurs varies de-pending on the model.
Table 10 Maximum Number of File Locks That Can Be Taken Over (per Controller)
Model Maximum number of file locks that can be taken over (percontroller)
ETERNUS DX100 S4/DX100 S3 500
ETERNUS DX200 S4/DX200 S3 1,000
ETERNUS DX500 S4/DX500 S3 1,000
ETERNUS DX600 S4/DX600 S3 1,000
The maximum number of file locks that can be taken over may be significantly reduced depending on the sys-tem load and the network environment state.
2. Designing NAS OperationsFile Lock
58FUJITSU Storage ETERNUS DX S4/S3 series Hybrid Storage Systems Configuration Guide (NAS)
Copyright 2018 FUJITSU LIMITEDP3AM-8072-17ENZ0
During the operation phase
• A takeover process of file lock information can be performed if the controller firmware version is V10L51 orlater.
• A takeover process of the file lock information is supported only if the OS of the used NFS client has verifiedthe operation and NFS v4.0 is used
For OSs that have verified the operation, refer to "Confirmed OS" (page 14).
• If the file lock information is not re-notified from the NFS client because of a network path error, the filelock information for the target NFS client will be lost from the NAS system.
• If the lock is released during a failover/failback, the conflicting process may acquire a lock. As a result, mul-tiple processes may unintentionally run simultaneously and the files may become damaged.
• If the NFS client OS is Solaris, the maximum number of file locks that can be taken over is approximately200 per client. If the number exceeds 200, the lock state may not be taken over.
• For clients that connect with NFS, do not set the firewall when communicating with the ETERNUS DX. Other-wise, the NFS client cannot detect a failover/failback and the file lock information will be lost.
• If the OS of the NFS client is Solaris, disable the IP network multipathing (IPMP). If this is enabled, the NFSclient cannot detect a failover/failback and the file lock information will be lost.
• If access to both controllers (CM#0 and CM#1) are disconnected at the same time because of an event suchas turning the ETERNUS DX on/off, machine down recovery, or a path disconnection to both controllers(CM#0 and CM#1), the NFS file lock takeover function will not work normally.
• To enable the NFS file lock takeover function, unmount the NFS client, update the controller firmware forboth controllers (CM#0 and CM#1) to V10L51 or later, and then perform the NFS mount again.
• When performing operations that include file locks, the operation cannot be guaranteed before a controllerfirmware update in cold mode or a downgrade of the controller firmware is performed. In this case, firstunmount using the NFS client, perform an upgrade or a downgrade of the controller firmware, and thenperform an NFS mount via the NFS client again.
• Operations can continue during a hot update of the controller firmware from versions earlier than V10L51to version V10L51 or later for both controllers (CM#0 and CM#1), however the NFS file lock takeover func-tion will not work normally. Therefore, file locking operations are not guaranteed during a hot update.
• If the "forced nas-fsunmount" command is executed, the controller that is not specified as the unmount tar-get also enters the grace period. As a result, the I/O for the controller that is not specified as the unmounttarget also stops during the grace period.
• Do not mount the same shared folder in the ETERNUS DX from the same client more than once. The take-over process of the file lock information may not be performed correctly.
2. Designing NAS OperationsFile Lock
59FUJITSU Storage ETERNUS DX S4/S3 series Hybrid Storage Systems Configuration Guide (NAS)
Copyright 2018 FUJITSU LIMITEDP3AM-8072-17ENZ0
Performance IndexThis section describes the performance index when configuring a NAS environment.
Although the ETERNUS DX has sufficient throughput, the performance degrades when the load is high. Perform-ance requirements (indices for process performance) must be taken into consideration.
The following table provides the performance requirements for the ETERNUS DX.
Table 11 Performance Requirements (during Random Access) for the ETERNUS DX
Item For a system focusing on online response For a system focusing on batch through-put
CM (CPU) busy ratio 80% or less 90% or less
Disk busy ratio 60% or less 80% or less
Response time 20ms or less No standard value
The performance requirements in Table 11 are based on the items below that are measured with ETERNUS SFStorage Cruiser when the SAN function is used.
• CM (CPU) busy ratio
CM load (CPU usage) ratio
• Disk busy ratio
Disk usage busy ratio
• Response time
Read and Write response times for each LUN and RAID groups (ms)
Sparse File InflationThe Sparse File Inflation function is provided for preventing a reduction in performance when sparse files areaccessed. An example of a sparse file is a thin virtual disk that is a type of VMware virtual disk. If I/Os are per-formed to sparse files with a large capacity, the files are fragmented and the access performance may be re-duced.
The Sparse File Inflation function inflates all areas (or overwrites all the areas with zeros) in the specified sparsefile (or thin virtual disk). A reduction in access performance can be prevented by executing the Sparse File Infla-tion function for the thin virtual disks that the VMware virtual machines use before an OS is installed in the vir-tual machines.
2. Designing NAS OperationsPerformance Index
60FUJITSU Storage ETERNUS DX S4/S3 series Hybrid Storage Systems Configuration Guide (NAS)
Copyright 2018 FUJITSU LIMITEDP3AM-8072-17ENZ0
During the operation phase
• Do not execute the Sparse File Inflation function for the currently running virtual disks. When an inflation isperformed, all areas in the file are overwritten with zeros and all existing data is deleted. The Sparse FileInflation function is used on the assumption that it inflates thin virtual disks that have just been createdand do not contain any data.
• Do not perform I/Os for the files where Sparse File Inflation is being performed.
• If the NAS engine terminates with an error such as when the power to the ETERNUS DX is disconnected dur-ing an inflation, the inflation process is suspended. After the system is restored from the error, execute the"start nas-file-inflate" command of ETERNUS CLI with the "-overwrite-whole-file" option specified to performthe inflation again.
• When the inflated file is copied, the copied file is fragmented and the performance is reduced. Perform aninflation after copying.
• Files that are to be inflated using the Sparse File Inflation function are not targets for the Quota function.Therefore, the drive usage amount may exceed the limit value.
• Until the command prompt is returned after the "start nas-file-inflate" command is executed, regardless ofwhether the inflation is complete, the results may not be displayed correctly if the "show nas-file-inflate"command or "show nas-share-progress" command of ETERNUS CLI is executed from a different terminal. Af-ter the command prompt is returned, execute the "show nas-file-inflate" command or the "show nas-share-progress" command.
• The "start nas-file-inflate" command may terminate with an error due to a capacity shortage regardless ofwhether free space is available. This happens when a contiguous large area cannot be secured and a reduc-tion in access performance cannot be prevented. Delete large unnecessary files or add disks.
• When sparse files in the Thin Provisioning NAS volume are inflated, the physical area will be secured for thecapacity of the sparse files that are overwritten with zeros.
Therefore, when a snapshot of the ETERNUS DX is acquired for the NAS user volume that includes inflatedfiles, the areas that are overwritten with zeros are also detected as differential data.
• To use VMware, refer to the following notes.
- In the following cases, the inflation status of xxx-flat.vmdk is output. This does not affect the inflationresults.
• xxx.vmdk is specified for the "show nas-file-inflate" command.
• The "show nas-share-progress" command is executed while xxx.vmdk is being inflated.
- From the beginning of the inflation, the inflation target file is seen as a thick virtual disk in the datastorebrowser of VMware vSphere Web Client, but the inflation is not complete. Make sure that the inflationprocess is complete with the "show nas-file-inflate" command before using the file.
- When inflated thin virtual disks and the virtual machine that has those thin virtual disks are cloned withVMware functions (such as vMotion), files in the vMotion destination are fragmented and performance isreduced.
- Do not use the VMware "Inflate" function because files may become fragmented.
2. Designing NAS OperationsSparse File Inflation
61FUJITSU Storage ETERNUS DX S4/S3 series Hybrid Storage Systems Configuration Guide (NAS)
Copyright 2018 FUJITSU LIMITEDP3AM-8072-17ENZ0
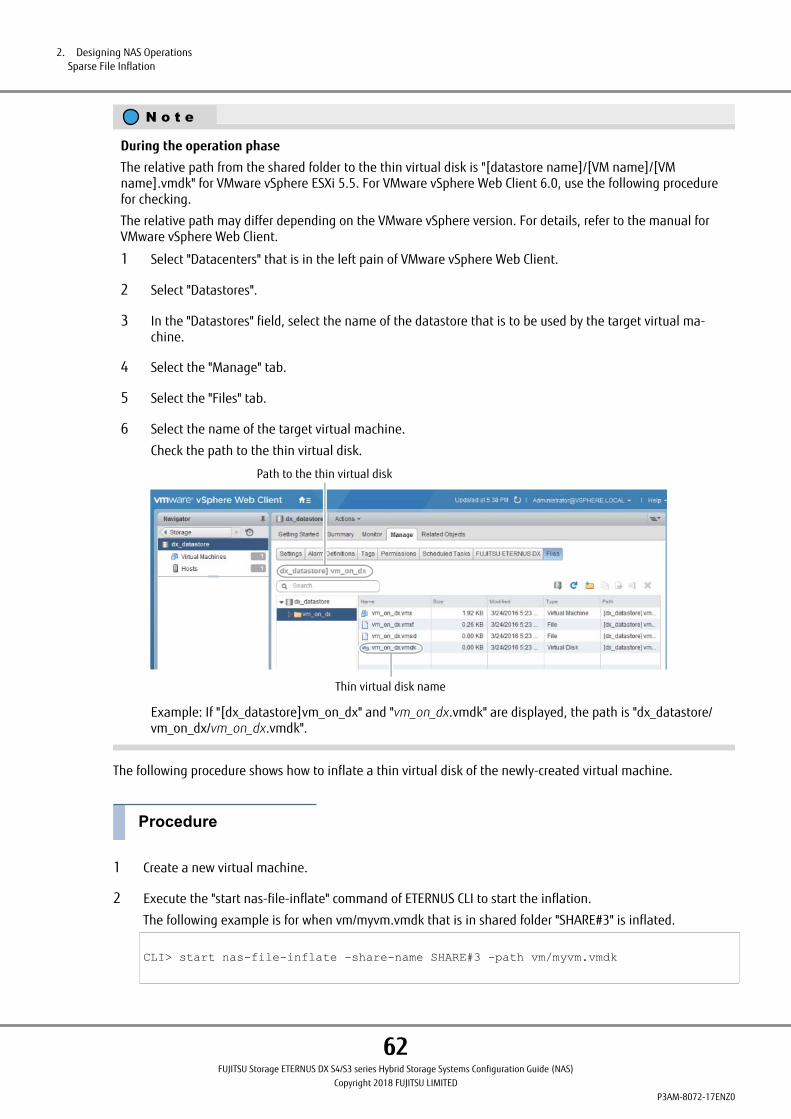
During the operation phase
The relative path from the shared folder to the thin virtual disk is "[datastore name]/[VM name]/[VMname].vmdk" for VMware vSphere ESXi 5.5. For VMware vSphere Web Client 6.0, use the following procedurefor checking.
The relative path may differ depending on the VMware vSphere version. For details, refer to the manual forVMware vSphere Web Client.
1 Select "Datacenters" that is in the left pain of VMware vSphere Web Client.
2 Select "Datastores".
3 In the "Datastores" field, select the name of the datastore that is to be used by the target virtual ma-chine.
4 Select the "Manage" tab.
5 Select the "Files" tab.
6 Select the name of the target virtual machine.
Check the path to the thin virtual disk.
Path to the thin virtual disk
Thin virtual disk name
Example: If "[dx_datastore]vm_on_dx" and "vm_on_dx.vmdk" are displayed, the path is "dx_datastore/vm_on_dx/vm_on_dx.vmdk".
The following procedure shows how to inflate a thin virtual disk of the newly-created virtual machine.
1 Create a new virtual machine.
2 Execute the "start nas-file-inflate" command of ETERNUS CLI to start the inflation.
The following example is for when vm/myvm.vmdk that is in shared folder "SHARE#3" is inflated.
CLI> start nas-file-inflate -share-name SHARE#3 -path vm/myvm.vmdk
2. Designing NAS OperationsSparse File Inflation
62FUJITSU Storage ETERNUS DX S4/S3 series Hybrid Storage Systems Configuration Guide (NAS)
Copyright 2018 FUJITSU LIMITEDP3AM-8072-17ENZ0
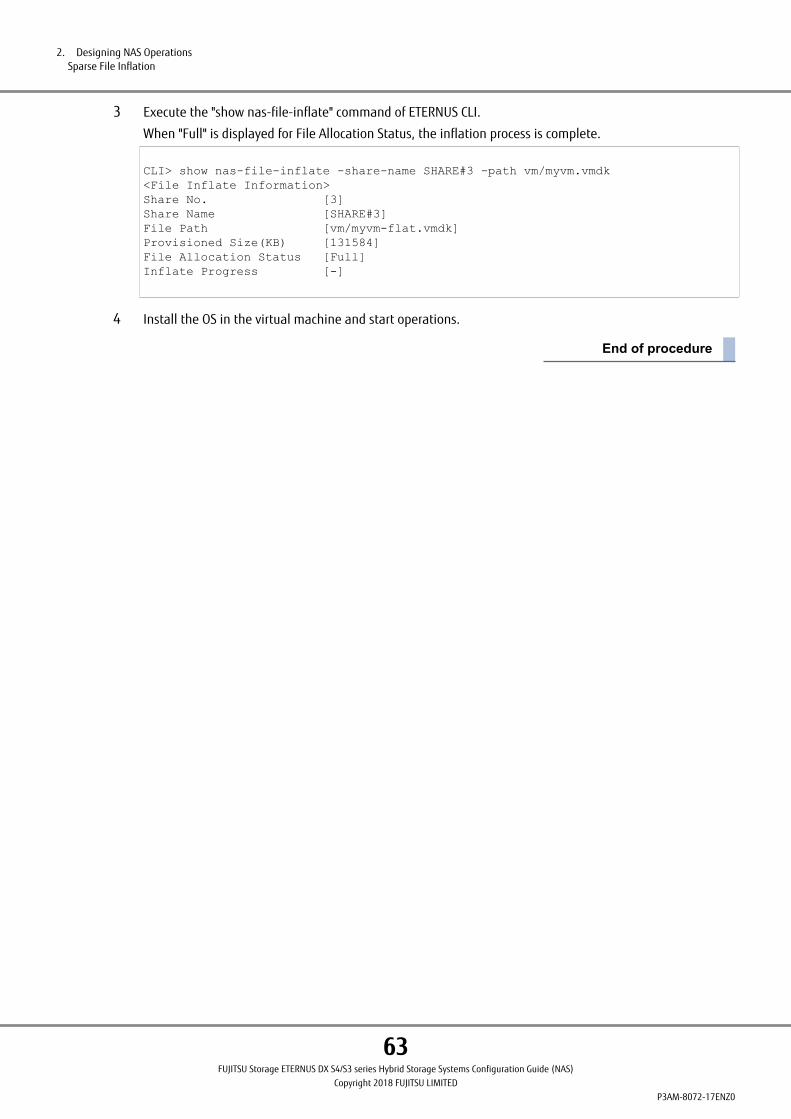
3 Execute the "show nas-file-inflate" command of ETERNUS CLI.
When "Full" is displayed for File Allocation Status, the inflation process is complete.
CLI> show nas-file-inflate -share-name SHARE#3 -path vm/myvm.vmdk<File Inflate Information>Share No. [3]Share Name [SHARE#3]File Path [vm/myvm-flat.vmdk]Provisioned Size(KB) [131584]File Allocation Status [Full]Inflate Progress [-]
4 Install the OS in the virtual machine and start operations.
2. Designing NAS OperationsSparse File Inflation
63FUJITSU Storage ETERNUS DX S4/S3 series Hybrid Storage Systems Configuration Guide (NAS)
Copyright 2018 FUJITSU LIMITEDP3AM-8072-17ENZ0
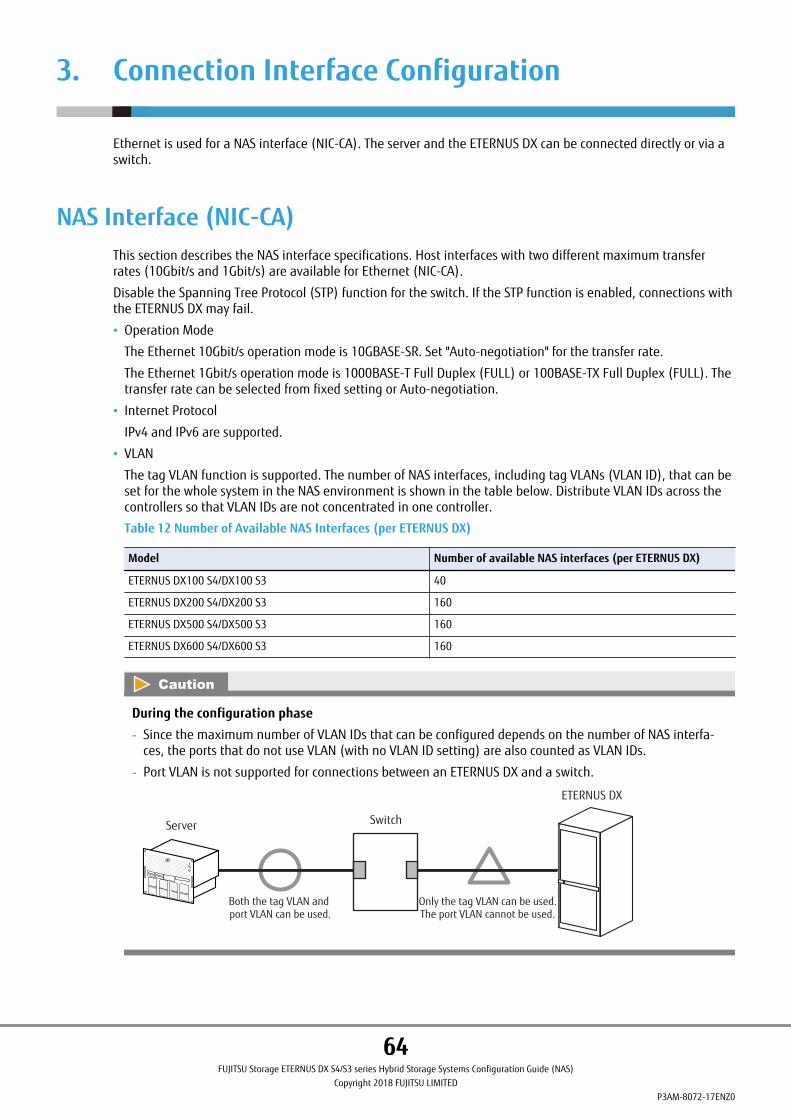
3. Connection Interface Configuration
Ethernet is used for a NAS interface (NIC-CA). The server and the ETERNUS DX can be connected directly or via aswitch.
NAS Interface (NIC-CA)This section describes the NAS interface specifications. Host interfaces with two different maximum transferrates (10Gbit/s and 1Gbit/s) are available for Ethernet (NIC-CA).
Disable the Spanning Tree Protocol (STP) function for the switch. If the STP function is enabled, connections withthe ETERNUS DX may fail.
• Operation Mode
The Ethernet 10Gbit/s operation mode is 10GBASE-SR. Set "Auto-negotiation" for the transfer rate.
The Ethernet 1Gbit/s operation mode is 1000BASE-T Full Duplex (FULL) or 100BASE-TX Full Duplex (FULL). Thetransfer rate can be selected from fixed setting or Auto-negotiation.
• Internet Protocol
IPv4 and IPv6 are supported.
• VLAN
The tag VLAN function is supported. The number of NAS interfaces, including tag VLANs (VLAN ID), that can beset for the whole system in the NAS environment is shown in the table below. Distribute VLAN IDs across thecontrollers so that VLAN IDs are not concentrated in one controller.
Table 12 Number of Available NAS Interfaces (per ETERNUS DX)
Model Number of available NAS interfaces (per ETERNUS DX)
ETERNUS DX100 S4/DX100 S3 40
ETERNUS DX200 S4/DX200 S3 160
ETERNUS DX500 S4/DX500 S3 160
ETERNUS DX600 S4/DX600 S3 160
During the configuration phase
- Since the maximum number of VLAN IDs that can be configured depends on the number of NAS interfa-ces, the ports that do not use VLAN (with no VLAN ID setting) are also counted as VLAN IDs.
- Port VLAN is not supported for connections between an ETERNUS DX and a switch.
Server Switch
ETERNUS DX
Both the tag VLAN and port VLAN can be used.
Only the tag VLAN can be used.The port VLAN cannot be used.
64FUJITSU Storage ETERNUS DX S4/S3 series Hybrid Storage Systems Configuration Guide (NAS)
Copyright 2018 FUJITSU LIMITEDP3AM-8072-17ENZ0
• Jumbo Frame
Enabling Jumbo Frame increases the amount of data that can be transferred for each Frame. The range thatcan be set is from 1,280 to 9,000 bytes.
During the configuration phase
The targets are different for specifiable MTUs in the Jumbo Frame and Large MTUs that are supported inSMB3.0.
For Jumbo Frame, the size of the data transmission unit of the Ethernet (frame) is specified.
Large MTU is a data transmission unit that can be delivered through a network when transferring files usingthe CIFS protocol.
• Firewall
Firewall settings can be configured for each port with the following network protocols.
Table 13 NAS Firewall
Usage Protocol Port number Default setting
NFS v3 tcp/udp 2049/111/28900/28901/28902/28903 OPEN
NFS v4.0 tcp 2049 OPEN
CIFS tcp 139/445 OPEN
CIFS udp 137/138 (*1) OPEN
LDAP tcp 389 OPEN
RIP (IPv4) udp 520 OPEN
RIP (IPv6) udp 521 OPEN
ICMP ICMP — OPEN
FTP tcp 21 CLOSED
FXP tcp 31000 to 31999 CLOSED
Local User Password tcp 30022 CLOSED
PRIMECLUSTER tcp 28950 CLOSED
*1: The CIFS client uses the same port number.
3. Connection Interface ConfigurationNAS Interface (NIC-CA)
65FUJITSU Storage ETERNUS DX S4/S3 series Hybrid Storage Systems Configuration Guide (NAS)
Copyright 2018 FUJITSU LIMITEDP3AM-8072-17ENZ0
During the configuration phase
• For the NAS system of the ETERNUS DX, "0528:866c:29ce:4005:3b03:9764:ed89:e3f1/126" is used as an IPv6address. Therefore, connections with servers and clients with IP addresses within the range of "0528:866c:29ce:4005:3b03:9764:ed89:e3f1/126" are not possible.
• When the NFS v3 protocol is used in a firewall environment, set the firewall so that communication is possi-ble between the NAS interface and the NFS client.
For communication from the NFS client to the NAS interface, enable ports 2049 / 111 / 28900 / 28901 /28902 / 28903 (TCP/UDP).
For communication from the NAS interface to the NFS client, using ports 2049 / 111 (TCP/UDP) or the portmapper to enable communication for the port and protocol that are assigned dynamically to the NFS rela-ted daemon is required.
The ports/protocols that are assigned to the NFS related daemon depend on the settings of the NFS client.Check the settings of the NFS client.
3. Connection Interface ConfigurationNAS Interface (NIC-CA)
66FUJITSU Storage ETERNUS DX S4/S3 series Hybrid Storage Systems Configuration Guide (NAS)
Copyright 2018 FUJITSU LIMITEDP3AM-8072-17ENZ0
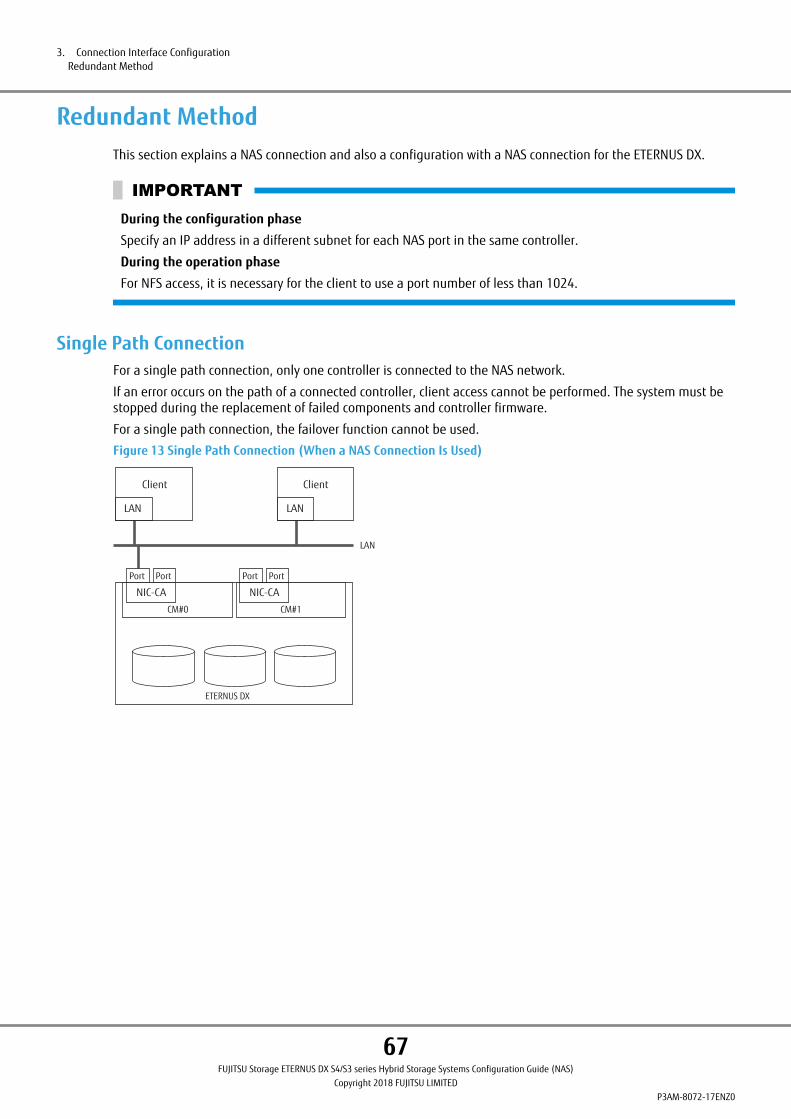
Redundant MethodThis section explains a NAS connection and also a configuration with a NAS connection for the ETERNUS DX.
During the configuration phase
Specify an IP address in a different subnet for each NAS port in the same controller.
During the operation phase
For NFS access, it is necessary for the client to use a port number of less than 1024.
Single Path ConnectionFor a single path connection, only one controller is connected to the NAS network.
If an error occurs on the path of a connected controller, client access cannot be performed. The system must bestopped during the replacement of failed components and controller firmware.
For a single path connection, the failover function cannot be used.
Figure 13 Single Path Connection (When a NAS Connection Is Used)
LAN
PortPortPortPort
LAN
Client
LAN
Client
ETERNUS DX
NIC-CANIC-CA
CM#0 CM#1
3. Connection Interface ConfigurationRedundant Method
67FUJITSU Storage ETERNUS DX S4/S3 series Hybrid Storage Systems Configuration Guide (NAS)
Copyright 2018 FUJITSU LIMITEDP3AM-8072-17ENZ0
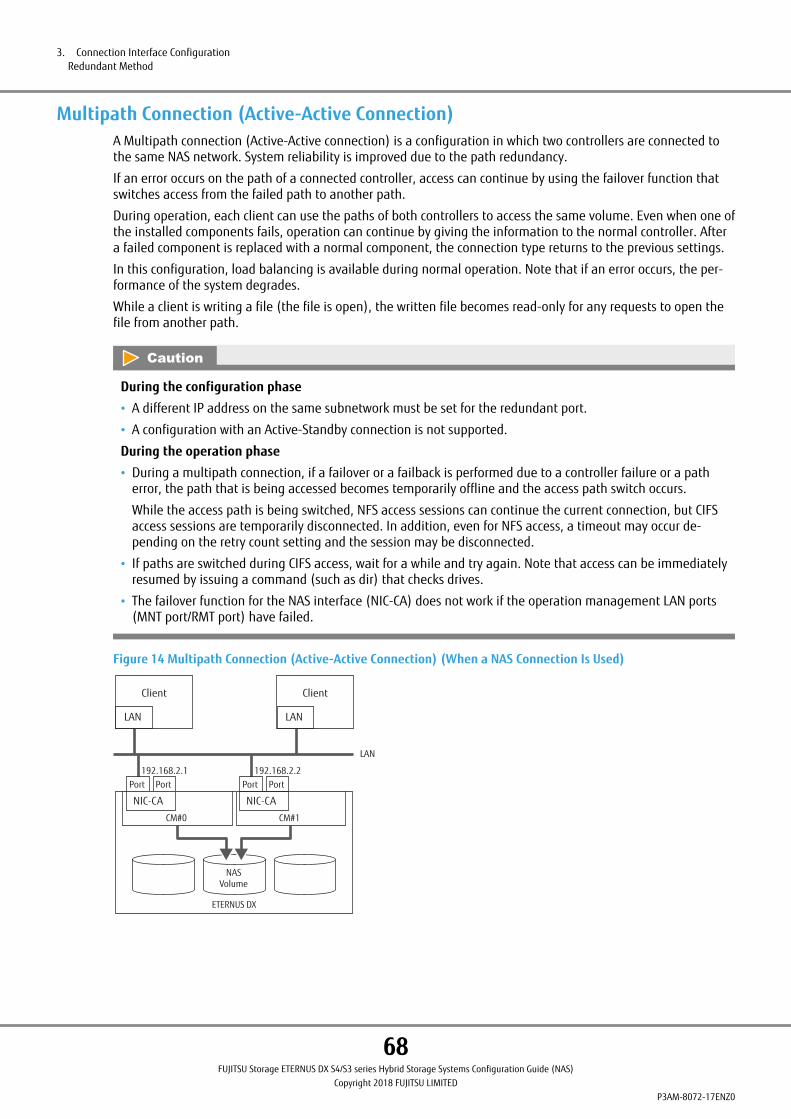
Multipath Connection (Active-Active Connection)A Multipath connection (Active-Active connection) is a configuration in which two controllers are connected tothe same NAS network. System reliability is improved due to the path redundancy.
If an error occurs on the path of a connected controller, access can continue by using the failover function thatswitches access from the failed path to another path.
During operation, each client can use the paths of both controllers to access the same volume. Even when one ofthe installed components fails, operation can continue by giving the information to the normal controller. Aftera failed component is replaced with a normal component, the connection type returns to the previous settings.
In this configuration, load balancing is available during normal operation. Note that if an error occurs, the per-formance of the system degrades.
While a client is writing a file (the file is open), the written file becomes read-only for any requests to open thefile from another path.
During the configuration phase
• A different IP address on the same subnetwork must be set for the redundant port.
• A configuration with an Active-Standby connection is not supported.
During the operation phase
• During a multipath connection, if a failover or a failback is performed due to a controller failure or a patherror, the path that is being accessed becomes temporarily offline and the access path switch occurs.
While the access path is being switched, NFS access sessions can continue the current connection, but CIFSaccess sessions are temporarily disconnected. In addition, even for NFS access, a timeout may occur de-pending on the retry count setting and the session may be disconnected.
• If paths are switched during CIFS access, wait for a while and try again. Note that access can be immediatelyresumed by issuing a command (such as dir) that checks drives.
• The failover function for the NAS interface (NIC-CA) does not work if the operation management LAN ports(MNT port/RMT port) have failed.
Figure 14 Multipath Connection (Active-Active Connection) (When a NAS Connection Is Used)
NASVolume
LAN
ETERNUS DX
PortPort
NIC-CA
PortPort
NIC-CA
LAN
Client
LAN
Client
CM#0 CM#1
192.168.2.1 192.168.2.2
3. Connection Interface ConfigurationRedundant Method
68FUJITSU Storage ETERNUS DX S4/S3 series Hybrid Storage Systems Configuration Guide (NAS)
Copyright 2018 FUJITSU LIMITEDP3AM-8072-17ENZ0
During the operation phase
If an error occurs on one of the two ports that are set for redundancy by the multipath connection settingsand the path cannot be accessed, the IP address is taken over by the other port.
For example, when a controller or NIC-CA error occurs on the CM#0 side (IP address: 192.168.2.1) in the con-nection configuration shown in Figure 14, the paired ports on the CM#1 side (IP address: 192.168.2.2) takesover the processes for the CM#0 side and receives access to both 192.168.2.1 and 192.168.2.2.
● Estimated Required Time for Failover or Failback
The time it takes for a failover or a failback varies depending on the events that occurred, the OS used, and thenetwork environment or configuration.
The following table shows the estimated required time.
Table 14 Estimated Required Time for Failover or Failback
Event Estimated required time
When an error is detected in a NAS port or a path (*1) Approx. 1 minute
Approx. 1 minute + 100 or 175 sec-onds (*2)
• When an error is detected in a controller or a NIC-CA
• When a NIC-CA is replaced (for the ETERNUS DX500 S4/DX600 S4 and theETERNUS DX500 S3/DX600 S3)
Approx. 3 minutes
Approx. 3 minutes + 100 or 175 sec-onds (*2)
• When a preventive maintenance isperformed for a controller
• When components are replaced ina controller
• When a memory expansion is per-formed for a controller
• When a hot update of the controllerfirmware is performed
• When a NIC-CA is replaced (for theETERNUS DX100 S4/DX200 S4 andthe ETERNUS DX100 S3/DX200 S3)
For NFS operations (includingCIFS/NFS operations)
Approx. 3 minutes + 100 or 175 sec-onds (*2)
Approx. 5 to 10 minutes + 100 or 175seconds (*2) (*3)
Only for CIFS operations Approx. 3 minutes
*1: The estimated time when an error is detected in a NAS port.
If errors occur in multiple ports, time is required to switch each port after errors are detected.
*2: Required time including the grace period for NFS operations
For NFS operations, a grace period is required after a failover or a failback. For details, refer to "NFS FileLock Takeover Function" (page 57).
*3: Time required for the following cases
• If the controller firmware version is V10L51 or V10L53
• If NFS v4.0 is enabled and the controller firmware version is V10L61 or later
For more details on enabling and disabling NFS v4.0, refer to "■ Enabling / Disabling NFS v4.0" (page42).
3. Connection Interface ConfigurationRedundant Method
69FUJITSU Storage ETERNUS DX S4/S3 series Hybrid Storage Systems Configuration Guide (NAS)
Copyright 2018 FUJITSU LIMITEDP3AM-8072-17ENZ0
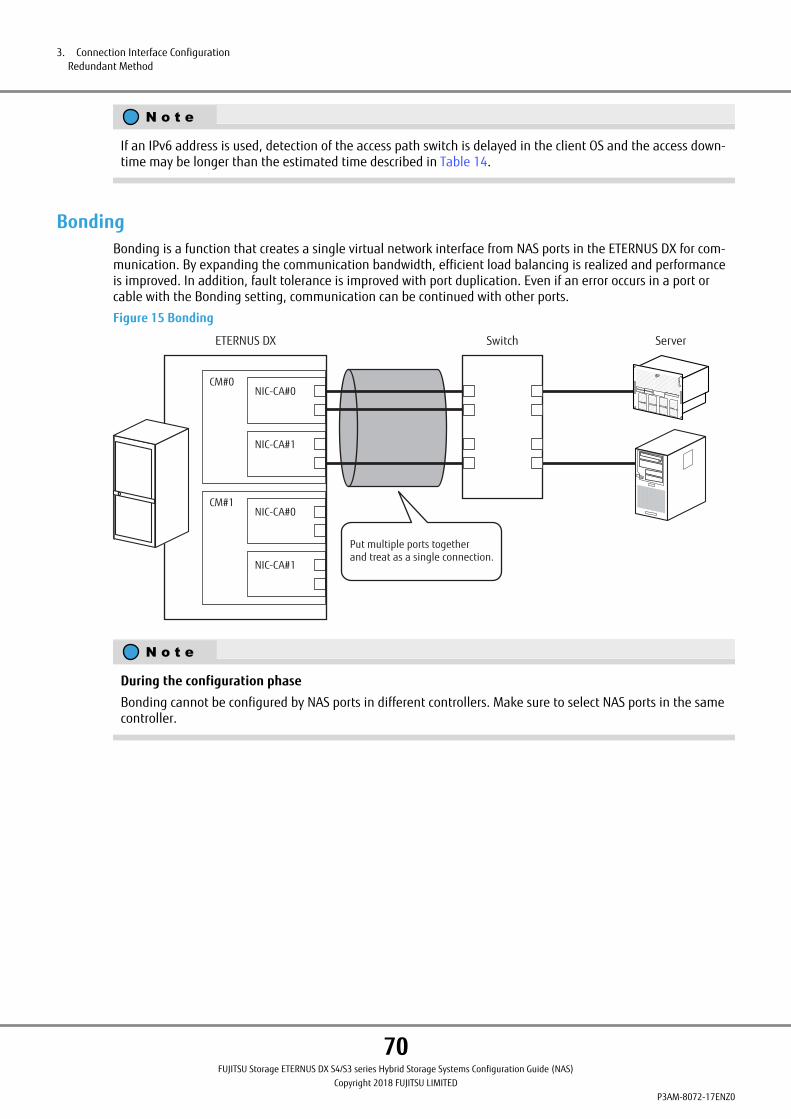
If an IPv6 address is used, detection of the access path switch is delayed in the client OS and the access down-time may be longer than the estimated time described in Table 14.
BondingBonding is a function that creates a single virtual network interface from NAS ports in the ETERNUS DX for com-munication. By expanding the communication bandwidth, efficient load balancing is realized and performanceis improved. In addition, fault tolerance is improved with port duplication. Even if an error occurs in a port orcable with the Bonding setting, communication can be continued with other ports.
Figure 15 Bonding
ETERNUS DX Switch Server
Put multiple ports together and treat as a single connection.
NIC-CA#0
NIC-CA#1
CM#0
NIC-CA#0
NIC-CA#1
CM#1
During the configuration phase
Bonding cannot be configured by NAS ports in different controllers. Make sure to select NAS ports in the samecontroller.
3. Connection Interface ConfigurationRedundant Method
70FUJITSU Storage ETERNUS DX S4/S3 series Hybrid Storage Systems Configuration Guide (NAS)
Copyright 2018 FUJITSU LIMITEDP3AM-8072-17ENZ0

■ Bonding Operation Mode
Six operation modes are available for Bonding. Select the appropriate mode according to the usage. Using Mode4 is recommended when there are no special requirements.
The following table shows the features of each mode.
Table 15 Features of the Bonding Operation Mode
Mode NamePerformance improvements (load bal-ancing) Fault tolerance Functions required for the
switchTransmission Reception
0 balance-rr ¡ Depending on switch ¡ Ether Channel
1 active-backup ´ ´ ¡ IGMP
2 balance-xor ¡ (*1) Depending on switch ¡ Ether Channel
4 802.3ad ¡ (*1) Depending on switch ¡ LACP (IEEE 802.3ad)
5 balance-tlb ¡ ´ ¡ IGMP
6 balance-alb ¡ △ (*2) ¡ IGMP
¡: Possible ´: Impossible △: Partially supported —: N/A
*1: With the Exclusive-OR (XOR) operation, packets are transferred using the NAS port that matches the MACaddress of the incoming request. Because load balancing methods depend on the XOR operation, commu-nications traffic may be unbalanced.
*2: Load balancing during reception is not performed for ports specified with IPv6 addresses.
• Mode 0 (balance-rr)
Enables performance improvements (load balancing). All NAS ports are used in a rotation (round-robin) fortransmitting. Reception depends on the switch setting.
The switch must have the Ether Channel function. For some switches, Ether Channel is also called "port trunk-ing" or "link aggregation".
Connect the ETERNUS DX and the switch directly. Note that settings may be required for some switch models.For details, refer to relevant manuals of the switch.
• Mode 1 (active-backup)
Dedicated to the duplication function. One NAS port is used to transfer packets during normal operation. If anerror occurs in the active port, a different port is used.
Connecting a different switch to each port can improve fault tolerance. The switch to be connected must sup-port Internet Group Management Protocol (IGMP).
• Mode 2 (balance-xor)
Enables performance improvements (load balancing). In transmission, data is distributed according to the set-tings in the connection destination. Reception depends on the switch setting.
The switch must have the Ether Channel function. For some switches, "Ether Channel" is also called "port trunk-ing" or "link aggregation".
Connect the ETERNUS DX and the switch directly. Note that settings may be required for some switch models.For details, refer to relevant manuals of the switch.
• Mode 4 (802.3ad)
Enables performance improvements (load balancing). Data is distributed according to the methods compati-ble with the IEEE 802.3ad Dynamic link aggregation standards. Ports used for receiving and transmitting aredetermined by multiple information.
3. Connection Interface ConfigurationRedundant Method
71FUJITSU Storage ETERNUS DX S4/S3 series Hybrid Storage Systems Configuration Guide (NAS)
Copyright 2018 FUJITSU LIMITEDP3AM-8072-17ENZ0
Use a switch compatible with IEEE 802.3ad Link Aggregation.
Connect the ETERNUS DX and the switch directly. Note that settings may be required for some switch models.For details, refer to relevant manuals of the switch.
• Mode 5 (balance-tlb)
Enables performance improvements (load balancing). Transmission performs a load balance dynamically ac-cording to the speed (load status) of each NAS port. Only one port is used for receiving at any time.
Connecting a different switch to each port can improve fault tolerance. The switch to be connected must sup-port Internet Group Management Protocol (IGMP).
• Mode 6 (balance-alb)
Enables performance improvements (load balancing). In addition to the Mode 5 (balance-tlb) function, loadbalancing is also performed when receiving data. In reception, data is distributed according to the settings inthe connection destination.
Connecting a different switch to each port can improve fault tolerance. The switch to be connected must sup-port Internet Group Management Protocol (IGMP).
During the configuration phase
Set the same transfer rate and transfer mode for interface ports configured in the single Bonding. Combininginterface ports with differing transfer rates and transfer modes is not recommended.
■ Recovery Requirements After a Link Down State for All Member Ports
Specify "1" for the "linkaggregation collecting minimum count" in the switch setting. If a value other than "1" isset, the operation may not work correctly. For switches other than the Fujitsu SR-X series, this set item may havedifferent names and specifications.
For example, if "1" is specified for the "linkaggregation collecting minimum count" when four ports are used toconfigure Bonding, the Bonding function remains enabled until all of the four ports become unavailable. Whenone of the failed ports is restored for communication after all of the ports have failed, the Bonding function isenabled.
The requirements to recover communication using the Bonding function after all ports have failed are shown inthe following table. Note that a failback condition is applied when a multipath connection is configured withBonding.
Table 16 Recovery Requirements After a Link Down State for All Member Ports
Firmware version
Whether or not themultipath configura-tion has been config-ured with Bonding
Bonding mode Recovery requirements
V10L21 No Other than Mode 4(802.3ad)
Any one port must be linked up
Mode 4 (802.3ad) All member ports must be linked up
Yes Any mode All member ports must be linked up
V10L31 or later No Any mode Any one port must be linked up
Yes Any mode All member ports must be linked up
3. Connection Interface ConfigurationRedundant Method
72FUJITSU Storage ETERNUS DX S4/S3 series Hybrid Storage Systems Configuration Guide (NAS)
Copyright 2018 FUJITSU LIMITEDP3AM-8072-17ENZ0
■ Multipath Connection When Using Bonding
To configure a multipath connection, set multipath with master ports with the Bonding setting. For ports config-ured with a multipath connection, IP addresses in the same subnet must be specified.
The following shows an example of a connection when bundling two NAS interface ports by Bonding, definingtwo VLANs for the virtual devices, and configuring a multipath (Active-Active connection).
Figure 16 Multipath Connection When Using Bonding
MultipathBonding Bonding
Client Client
NIC-CA#0 NIC-CA#0
CM#0 CM#1
ETERNUS DXNAS portIP: 192.168.10.1 VLAN ID: 1IP: 192.168.11.3 VLAN ID: 2
NAS redundant portIP :192.168.10.2 VLAN ID: 1IP :192.168.11.4 VLAN ID: 2
Master port
Member port
Master port
Member port
Switch
3. Connection Interface ConfigurationRedundant Method
73FUJITSU Storage ETERNUS DX S4/S3 series Hybrid Storage Systems Configuration Guide (NAS)
Copyright 2018 FUJITSU LIMITEDP3AM-8072-17ENZ0
During the operation phase
The following description shows how the failover works when ports are set for redundancy using a multipathconnection and configured with two sets of Bonding groups each with two ports.
NIC-CA#1
CM#0
ETERNUS DX
0 1 2 3
NIC-CA#1NIC-CA#0 NIC-CA#0
CM#1
0 1 2 3
DCBA
: Bonding group
Configure a Bonding group using neighboring ports- CM#0 CA#1 Port#0 and CM#0 CA#1 Port#1- CM#0 CA#1 Port#2 and CM#0 CA#1 Port#3- CM#1 CA#1 Port#0 and CM#1 CA#1 Port#1- CM#1 CA#1 Port#2 and CM#1 CA#1 Port#3
Configure a multipath using ports withthe same port number- CM#0 CA#1 Port#0 and CM#1 CA#1 Port#0- CM#0 CA#1 Port#1 and CM#1 CA#1 Port#1- CM#0 CA#1 Port#2 and CM#1 CA#1 Port#2- CM#0 CA#1 Port#3 and CM#1 CA#1 Port#3
If each Bonding group connects to a different system (segment) and one of the ports become inaccessible,the other Bonding group port continues the connection.
NIC-CA#1
CM#0
ETERNUS DX
0 1 2 3
NIC-CA#1NIC-CA#0 NIC-CA#0
CM#1
0 1 2 3
DCBA
Inaccessible
If Port#0 cannot be accessed, continued access is performed with Port#1 and a failover is not performed.
If the other port also becomes inaccessible, the failover function is executed, and the IP address is taken overby a port of a different controller. In this case, the other Bonding groups (B and D) are not affected by thisoperation.
NIC-CA#1
CM#0
ETERNUS DX
0 1 2 3
NIC-CA#1NIC-CA#0 NIC-CA#0
CM#1
0 1 2 3
DCBA
Inaccessible
Performs a failover to Bonding group C(takes over the IP address)
Bonding groups B and Dare not affected
3. Connection Interface ConfigurationRedundant Method
74FUJITSU Storage ETERNUS DX S4/S3 series Hybrid Storage Systems Configuration Guide (NAS)
Copyright 2018 FUJITSU LIMITEDP3AM-8072-17ENZ0
Network Path ControlTo connect multiple subnetworks to networks in the NAS environment, configure the appropriate path informa-tion between the ETERNUS DX and the client. If the settings are not correct, path control does not work and con-nection fail or data transfer takes long time because the appropriate path is not selected.
Use the "NAS Interface Settings" function to set the path information.
To access the NAS port on the ETERNUS DX from a client in the different network via a gateway device, performone of the following NAS interface settings.
• Enable the RIP setting (enabled by default).
• Set the route information.
• Enable the RIP setting and set the route information.
Although the client can still access the NAS interface port by specifying the gateway from the NAS interface set-up, it is not recommended.
Configure a network so that the same NAS interface is used to send and receive traffic from the client.
Network configurations that use different NAS interfaces to send and receive traffic (asymmetric routing) are notsupported.
Client
ETERNUS DX
PortPort
NIC-CA
PortPort
NIC-CA
CM#0
PortPort
NIC-CA
PortPort
NIC-CA
CM#1
10.1.10.1
10.1.10.100 10.1.20.100
10.1.20.1 10.1.10.2 10.1.20.2
Gateway Gateway
Network A10.1.10.0/24
Network B10.1.20.0/24
Network C10.1.11.0/24
Network D10.1.21.0/24
ETERNUS CLI can perform the RIP setting and set the route information. ETERNUS Web GUI can perform the RIPsetting.
If multiple gateways are set in the NAS environment using the NAS interface settings, due to firmware changes,etc. the user specified gateway may be changed back to the default gateway, and network connections may fail.For that reason, do not specify a gateway, instead use RIP settings and root information to specify paths evenwhen connecting to different networks through the gateway. If a gateway must be set in an environment whereRIP settings are unavailable, specify only one gateway in the NAS connection environment for the ETERNUS DX.
3. Connection Interface ConfigurationNetwork Path Control
75FUJITSU Storage ETERNUS DX S4/S3 series Hybrid Storage Systems Configuration Guide (NAS)
Copyright 2018 FUJITSU LIMITEDP3AM-8072-17ENZ0
During the configuration phase
The ETERNUS DX supports RIP v1/v2 and RIPng as routing protocols.
Routing protocols are used among the routers to share routing table information that is dynamically updatedby the routers.
FTP/FXPShared folders can be accessed using the File Transfer Protocol (FTP) and the File eXchange Protocol (FXP).
Up to five shared folders can be published using FTP.
For FXP, data in the shared folder can be transferred between ETERNUS DX storage systems.
For access using FTP and FXP, a user authentication in the authentication servers (Active Directory authentica-tion servers and LDAP authentication servers) or an account that is registered in the local user authenticationsetting is required.
Figure 17 FTP/FXP
Shared folder
ETERNUS DX
Operational LAN
Shared folder
ETERNUS DX
FTP client Authentication server
Access shared folders with FTP
The authenticationserver authenticatesusers
Transfer datawith FXP
When the user account that is registered in the authentication servers is used for the FTP login, the shared fold-ers that are published in the home directory can be accessed. Files in the folder can be downloaded and can beuploaded to shared folders.
3. Connection Interface ConfigurationFTP/FXP
76FUJITSU Storage ETERNUS DX S4/S3 series Hybrid Storage Systems Configuration Guide (NAS)
Copyright 2018 FUJITSU LIMITEDP3AM-8072-17ENZ0
During the operation phase
• Both active mode and passive mode can be used as the connection mode for FTP and FXP.
• A total of 50 sessions can be accessed with FTP and FXP at the same time.
• Volumes for snapshots and backup volumes cannot be accessed with FTP connections.
• Encrypted communications (FTPS/SFTP/FXSP) are not supported.
• If a failover or failback occurs during an FTP, the connection is disconnected and must be reconnected fromthe FTP client side.
• In the ETERNUS DX100 S3, if NAS FTP is used at the same time with the I/O of NFS or with the I/O of CIFS, theCPU Busy rate may reach 100% and the FTP session may disconnect.
If an error message (for example: No control session for command) is displayed on the FTP client side whenan FTP session disconnects, perform the I/O via FTP again.
• For NAS FTP, if a large quantity of small files were written (with a PUT operation) continuously (for exam-ple: tens of thousands of files with tens of KB were written), FTP may be terminated abnormally accordingto the OS/FTP tools' specification on the FTP client side.
If FTP is terminated abnormally and an error message (for example: Could not bind the data socket: Addressalready in use) is displayed on the FTP client side, continue process after dividing the number of files.
3. Connection Interface ConfigurationFTP/FXP
77FUJITSU Storage ETERNUS DX S4/S3 series Hybrid Storage Systems Configuration Guide (NAS)
Copyright 2018 FUJITSU LIMITEDP3AM-8072-17ENZ0
4. NAS Environment Configuration
This chapter explains how to configure a NAS environment for an ETERNUS DX. The Thin Provisioning functionmust be enabled in advance because it is used to operate NAS volumes.
This chapter explains general setting operations with ETERNUS Web GUI.
To configure a NAS environment, the following settings are required:
● Thin Provisioning Pool (TPP) Creation
Prepare a pool that is used to create NAS volumes. For details, refer to "Thin Provisioning Pool (TPP) Creation"(page 79).
● NAS Volume Creation
Create TPVs that are used as NAS volumes. For details, refer to "NAS Volume Creation" (page 80).
● Bonding Settings
Create a single virtual network interface from the NAS ports in the ETERNUS DX. For details, refer to "BondingSettings" (page 82).
● NAS Interface Settings
Create information on the interface for NAS network connection. Configure here when duplicating NAS ports andperforming a multipath connection (Active-Active connection). For details, refer to "NAS Interface Settings"(page 84).
● VLAN Settings
Perform the tag VLAN settings. This settings can be performed at the same time as a NAS interface creation. Fordetails, refer to "VLAN Settings" (page 86).
● Authentication Server Settings
Set the authentication server that is used to control access to the NAS environment. For details, refer to "Authen-tication Server Settings" (page 90). For using local user authentication, refer to "Local User Authentication Set-tings" (page 93).
● Local User Authentication Settings
Perform a local user authentication setting. For details, refer to "Local User Authentication Settings" (page 93).For using the authentication server, refer to "Authentication Server Settings" (page 90).
● Shared Folder Creation (CIFS/NFS)
Create a shared folder that is used to access NAS user volumes via CIFS/NFS. For details, refer to "Shared FolderCreation (CIFS/NFS)" (page 99).
● Home Directory Settings
If the used protocol is CIFS, a home directory can be used. For details, refer to "Home Directories" (page 104).
● Quota Settings
Perform the settings to limit drive space and the number of files used on a user, group, or shared folder basis.For details, refer to "Quota Settings" (page 109).
78FUJITSU Storage ETERNUS DX S4/S3 series Hybrid Storage Systems Configuration Guide (NAS)
Copyright 2018 FUJITSU LIMITEDP3AM-8072-17ENZ0
● Snapshot Settings
Perform the settings to back up volume data at a regular interval according to the day of the week. For details,refer to "Snapshot Settings" (page 115).
● Audit Log Setup
Perform the settings to collect the audit logs for the CIFS access. For details, refer to "Audit Log Setup" (page125).
● Meta Cache Distribution Settings
Set the parameters to perform a meta cache distribution. For details, refer to "Meta Cache Distribution Settings"(page 128).
During the configuration phase
When "Authentication Server Settings" or "Shared Folder Creation" is performed, communication is establishedbetween the ETERNUS DX and the authentication server. Make sure that both of the controllers can communi-cate with the authentication server before setting authentication servers and creating shared holders.
Each controller must satisfy the following three conditions in order for the ETERNUS DX storage systems tocommunicate with the authentication server.
• IP addresses are assigned to one or more ports in the NAS interface settings.
• NAS ports are ready for communication with (linked up to) the authentication server.
• The multipath is configured with a multipath connection (Active-Active connection).
Note that a configuration with an Active-Standby connection is not supported.
If the above conditions are not satisfied and communication errors occur, satisfy these conditions and performthe settings again.
Thin Provisioning Pool (TPP) Creation
Create a TPP that is used to register NAS volumes. The Thin Provisioning function must be enabled in advance.For more details, refer to "ETERNUS Web GUI User's Guide".
In addition, NAS volumes can be created in an existing pool. The creation procedure is the same as when TPPsare created for a SAN.
The procedure to create a TPP is as follows:
1 Click the [Thin Provisioning] tab on the navigation of the ETERNUS Web GUI screen.
The [Thin Provisioning Pool] screen appears.
4. NAS Environment ConfigurationThin Provisioning Pool (TPP) Creation
79FUJITSU Storage ETERNUS DX S4/S3 series Hybrid Storage Systems Configuration Guide (NAS)
Copyright 2018 FUJITSU LIMITEDP3AM-8072-17ENZ0
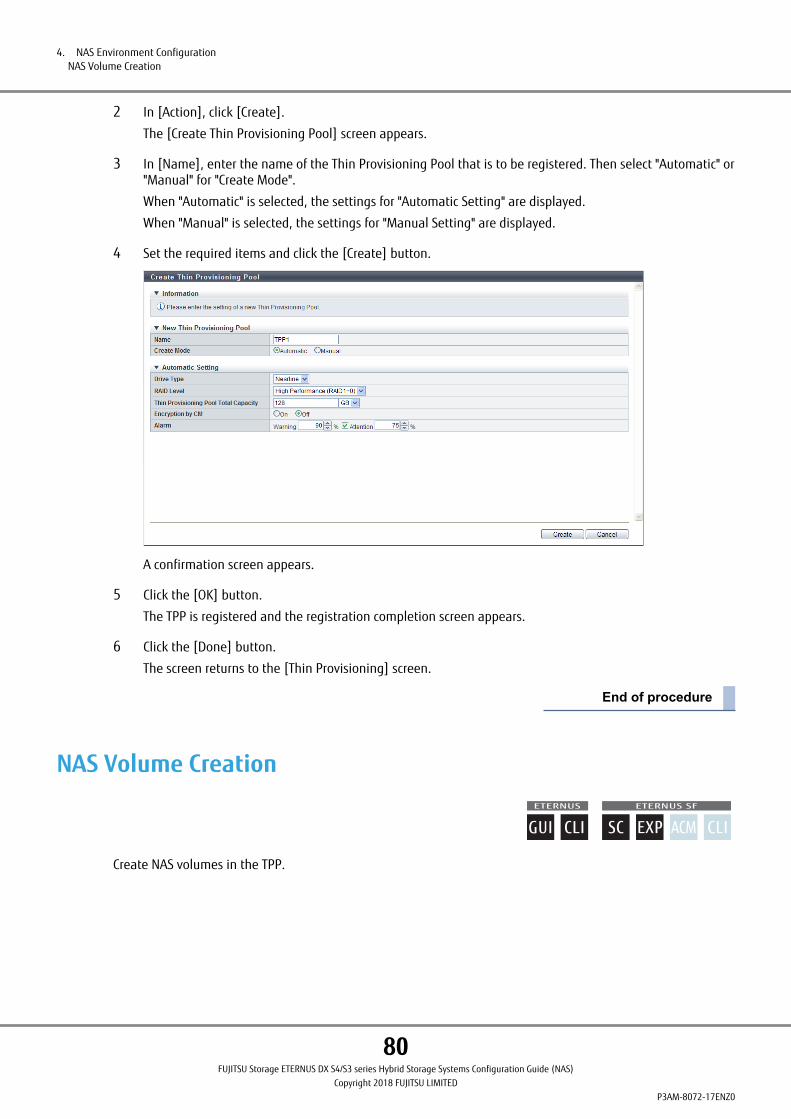
2 In [Action], click [Create].
The [Create Thin Provisioning Pool] screen appears.
3 In [Name], enter the name of the Thin Provisioning Pool that is to be registered. Then select "Automatic" or"Manual" for "Create Mode".
When "Automatic" is selected, the settings for "Automatic Setting" are displayed.
When "Manual" is selected, the settings for "Manual Setting" are displayed.
4 Set the required items and click the [Create] button.
A confirmation screen appears.
5 Click the [OK] button.
The TPP is registered and the registration completion screen appears.
6 Click the [Done] button.
The screen returns to the [Thin Provisioning] screen.
NAS Volume Creation
Create NAS volumes in the TPP.
4. NAS Environment ConfigurationNAS Volume Creation
80FUJITSU Storage ETERNUS DX S4/S3 series Hybrid Storage Systems Configuration Guide (NAS)
Copyright 2018 FUJITSU LIMITEDP3AM-8072-17ENZ0
During the configuration phase
• One file system is created for each NAS volume. A system management area (300GB) is required for eachfile system. If a sufficient physical area cannot be secured for the system management area, NAS volumescannot be created. In addition, specify a 100GB or larger user area.
Take the system management area and the root reserved area into consideration when estimating the NASvolume capacity. For details, refer to "File System Specification" (page 24).
• To create NAS volumes with ETERNUS Web GUI, use the [Volume] screen. NAS volumes cannot be created byselecting [Create Volume] in the [Thin Provisioning Pool] screen.
The procedure to create a NAS volume is as follows:
1 Click the [Volume] tab on the navigation of the ETERNUS Web GUI screen.
The [Volume] screen appears.
2 In [Action], click [Create].
The [Create Volume] screen appears.
3 Set the required items in the [Create Volume] screen and click the [Create] button.
• Type
Select [NAS Volume].
• Capacity
Specify a capacity that includes the system management area (300GB). The minimum capacity is 400GB;the system management area and 100GB for the user management area.
• NAS FS Block Size
Select the file system block size.
4. NAS Environment ConfigurationNAS Volume Creation
81FUJITSU Storage ETERNUS DX S4/S3 series Hybrid Storage Systems Configuration Guide (NAS)
Copyright 2018 FUJITSU LIMITEDP3AM-8072-17ENZ0

A confirmation screen appears.
4 Click the [OK] button.
The volume is created and the registration completion screen appears.
5 Click the [Done] button.
The screen returns to the [Volume] screen.
Bonding Settings
This section provides the required procedure to configure Bonding.
Create a single virtual network interface from the NAS ports in the ETERNUS DX to use the Bonding function. Upto 15 member ports can be set for a single master port.
The following procedure is an example of setting the Bonding mode to mode6 for CM#0 CA#1 Port#0 as themaster port, and CM#0 CA#1 Port#1, CM#0 CA#1 Port#2, and CM#0 CA#1 Port#3 as member ports.
Figure 18 Bonding Settings
NIC-CA#1
CM#0
ETERNUS DX
0 1 2 3
NIC-CA#1NIC-CA#0 NIC-CA#0
CM#1
0 1 2 3
Master port
Mem
ber port
Create a Bonding groupthat operates in mode 6
1 Set the necessary parameters and execute the "set nas-bonding" command of ETERNUS CLI.
set nas-bonding -master-port 010 -member-port 011,012,013 -mode 6 -hash-policy L23
-master-port
Specify a port that is to become the master port.
4. NAS Environment ConfigurationBonding Settings
82FUJITSU Storage ETERNUS DX S4/S3 series Hybrid Storage Systems Configuration Guide (NAS)
Copyright 2018 FUJITSU LIMITEDP3AM-8072-17ENZ0
During the configuration phase
• The following ports cannot be specified.
- Non-NAS ports
- Ports that are set as member ports
- Ports in which multipathing is configured
• When Bonding is configured to a port for the first time, the NAS interface port setting is deletedfrom the specified port.
When the specified port has already been configured with Bonding, the NAS interface port settingis maintained.
-member-port
Optional. Specify a port that is to become a member port. Multiple ports can be specified by separatingeach port with a comma (,). When adding member ports, specify only the ports that are to be added.Specifying ports that have already been set as member ports of the target master port does not causean error.
During the configuration phase
• The following ports cannot be specified.
- Non-NAS ports
- Ports that are set as master ports
- Ports that are set as member ports of other master ports
- Ports in which multipathing is configured
- Ports that are in a CM that is different from the master port.
• The NAS interface port setting is deleted from the ports that are specified as member ports.
-mode
Optional. Specify the Bonding mode.
Mode Name
0 balance-rr
1 active-backup
2 balance-xor
4 802.3ad
5 balance-tlb
6 balance-alb
-hash-policy
Optional. Specify a hash policy. If omitted, a policy equivalent to L2 is set.
4. NAS Environment ConfigurationBonding Settings
83FUJITSU Storage ETERNUS DX S4/S3 series Hybrid Storage Systems Configuration Guide (NAS)
Copyright 2018 FUJITSU LIMITEDP3AM-8072-17ENZ0
During the configuration phase
The setting is enabled only when 2 (balance-xor) or 4 (802.3ad) is set for -mode.
However, if -mode is a value other than 2 or 4, the specification is available but the setting will beignored.
Hash policy Description
L2 Layer2 (default)
L23 Layer2+3
L34 Layer3+4
NAS Interface Settings
Set the connection information for the NAS interface (NIC-CA) and create the NAS network interface. To performa multipath configuration in order to use the failover function, set which redundant ports are used.
Caution is necessary for configurations when connecting to multiple networks through a gateway. Refer to cau-tions in "Network Path Control" (page 75).
During the configuration phase
• When a NAS interface is created or changed, the NAS engine in the ETERNUS DX automatically restarts theCIFS access service. CIFS client access may be unavailable for a few tens of seconds. If data cannot be writ-ten with the CIFS access, wait for a while and then try again.
NFS access is available regardless of whether CIFS access is available or not.
• System volumes must be created in advance to perform the settings for the NAS interface. System volumesare automatically created when the NAS volume is created for the first time. The following configurationscannot be performed if no system volumes ($SYSVOL1, $SYSVOL2, and $SYSVOL3) are created in the ETER-NUS DX.
- NAS interface settings
- Authentication server settings
1 Click the [Connectivity] tab on the navigation of the ETERNUS Web GUI screen, and then click "NAS" — "NASInterface" in [Category].
The [NAS Interface] screen appears.
4. NAS Environment ConfigurationNAS Interface Settings
84FUJITSU Storage ETERNUS DX S4/S3 series Hybrid Storage Systems Configuration Guide (NAS)
Copyright 2018 FUJITSU LIMITEDP3AM-8072-17ENZ0
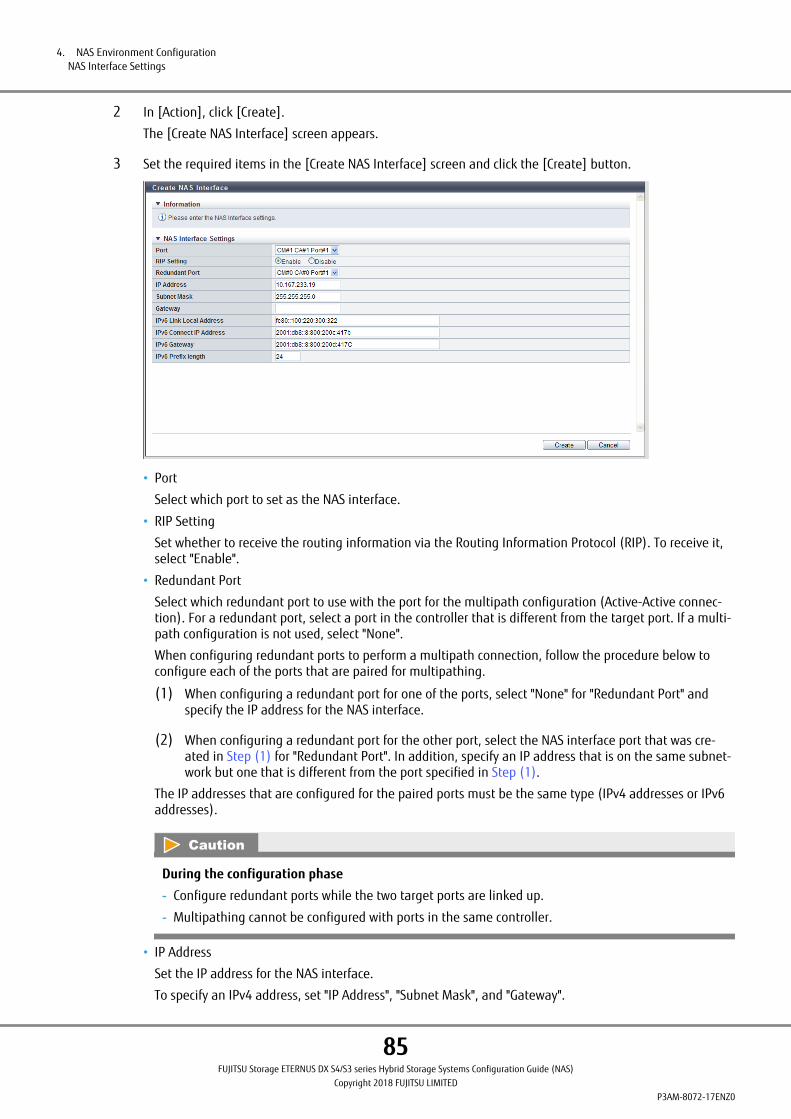
2 In [Action], click [Create].
The [Create NAS Interface] screen appears.
3 Set the required items in the [Create NAS Interface] screen and click the [Create] button.
• Port
Select which port to set as the NAS interface.
• RIP Setting
Set whether to receive the routing information via the Routing Information Protocol (RIP). To receive it,select "Enable".
• Redundant Port
Select which redundant port to use with the port for the multipath configuration (Active-Active connec-tion). For a redundant port, select a port in the controller that is different from the target port. If a multi-path configuration is not used, select "None".
When configuring redundant ports to perform a multipath connection, follow the procedure below toconfigure each of the ports that are paired for multipathing.
(1) When configuring a redundant port for one of the ports, select "None" for "Redundant Port" andspecify the IP address for the NAS interface.
(2) When configuring a redundant port for the other port, select the NAS interface port that was cre-ated in Step (1) for "Redundant Port". In addition, specify an IP address that is on the same subnet-work but one that is different from the port specified in Step (1).
The IP addresses that are configured for the paired ports must be the same type (IPv4 addresses or IPv6addresses).
During the configuration phase
- Configure redundant ports while the two target ports are linked up.
- Multipathing cannot be configured with ports in the same controller.
• IP Address
Set the IP address for the NAS interface.
To specify an IPv4 address, set "IP Address", "Subnet Mask", and "Gateway".
4. NAS Environment ConfigurationNAS Interface Settings
85FUJITSU Storage ETERNUS DX S4/S3 series Hybrid Storage Systems Configuration Guide (NAS)
Copyright 2018 FUJITSU LIMITEDP3AM-8072-17ENZ0
To specify an IPv6 address, set "IPv6 Link Local Address", "IPv6 Connect IP Address", "IPv6 Gateway", and"IPv6 Prefix length".
During the configuration phase
For multipath connections (Active-Active connections), set a different IP address on the same subnet-work in each controller port for redundancy.
A confirmation screen appears.
4 Click the [OK] button.
The NAS interface is created and the registration completion screen appears.
5 Click the [Done] button.
The screen returns to the [NAS Interface] screen.
VLAN Settings
This section provides the necessary procedure to configure VLAN.
Use the NAS interface settings function to perform the basic settings to use the VLAN function.
During the configuration phase
• To use VLAN and Bonding at the same time, complete the Bonding setup and then perform VLAN configura-tion. Bonding configures one virtual network from multiple NAS ports. VLANs must be created in this virtualnetwork.
• Distribute VLAN IDs across the controllers so that VLAN IDs are not concentrated in one controller.
• Do not specify an IP address on the same subnet for each NAS interface (including the VLAN settings) in thesame controller.
Do not perform the settings that are shown in the following example.
Example:
- CM#0 CA#0 Port#0
IP address: 192.168.10.1
Subnet mask: 255.255.255.0
- CM#0 CA#1 Port#0
IP address: 192.168.10.2
Subnet mask: 255.255.255.0
Do not specify the same subnet address with different VLAN IDs in the same controller.
4. NAS Environment ConfigurationVLAN Settings
86FUJITSU Storage ETERNUS DX S4/S3 series Hybrid Storage Systems Configuration Guide (NAS)
Copyright 2018 FUJITSU LIMITEDP3AM-8072-17ENZ0
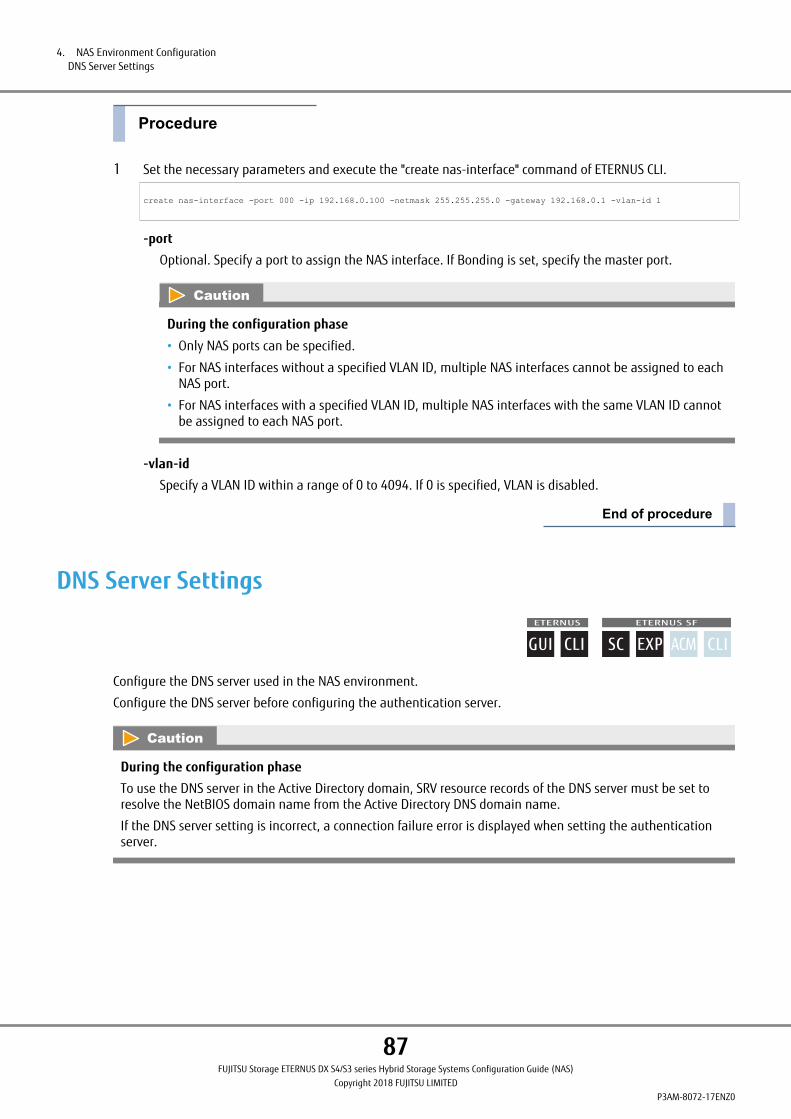
1 Set the necessary parameters and execute the "create nas-interface" command of ETERNUS CLI.
create nas-interface -port 000 -ip 192.168.0.100 -netmask 255.255.255.0 -gateway 192.168.0.1 -vlan-id 1
-port
Optional. Specify a port to assign the NAS interface. If Bonding is set, specify the master port.
During the configuration phase
• Only NAS ports can be specified.
• For NAS interfaces without a specified VLAN ID, multiple NAS interfaces cannot be assigned to eachNAS port.
• For NAS interfaces with a specified VLAN ID, multiple NAS interfaces with the same VLAN ID cannotbe assigned to each NAS port.
-vlan-id
Specify a VLAN ID within a range of 0 to 4094. If 0 is specified, VLAN is disabled.
DNS Server Settings
Configure the DNS server used in the NAS environment.
Configure the DNS server before configuring the authentication server.
During the configuration phase
To use the DNS server in the Active Directory domain, SRV resource records of the DNS server must be set toresolve the NetBIOS domain name from the Active Directory DNS domain name.
If the DNS server setting is incorrect, a connection failure error is displayed when setting the authenticationserver.
4. NAS Environment ConfigurationDNS Server Settings
87FUJITSU Storage ETERNUS DX S4/S3 series Hybrid Storage Systems Configuration Guide (NAS)
Copyright 2018 FUJITSU LIMITEDP3AM-8072-17ENZ0
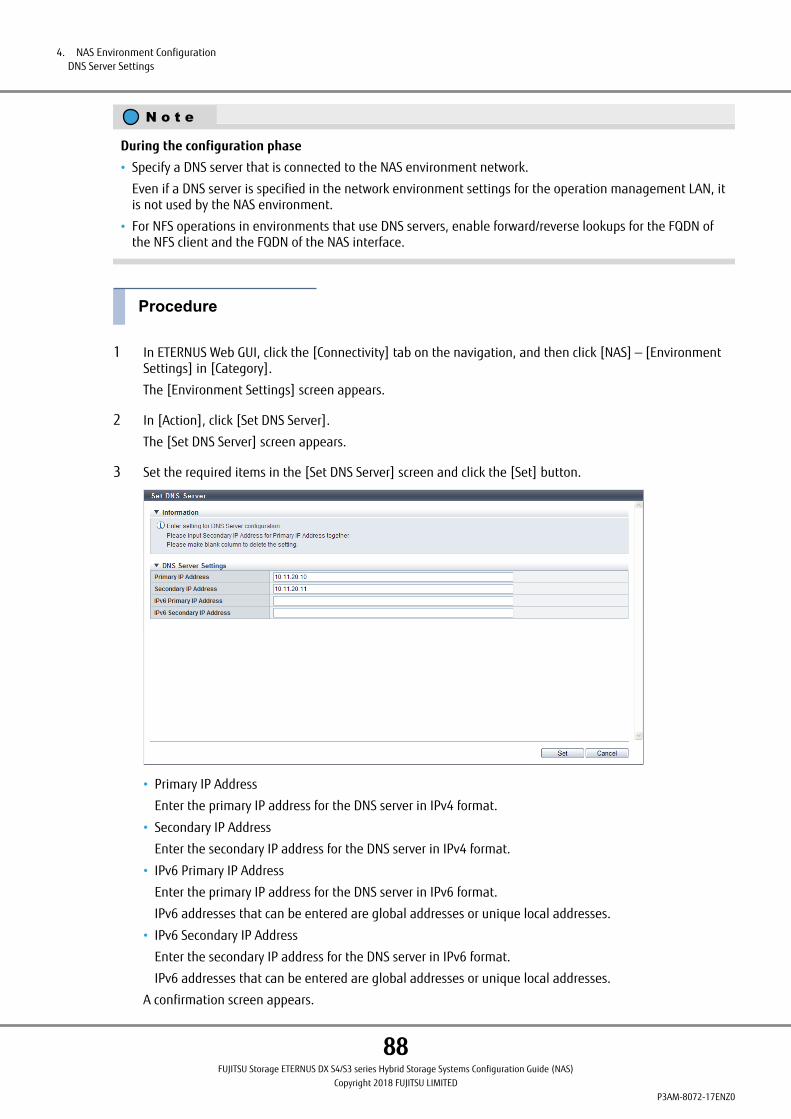
During the configuration phase
• Specify a DNS server that is connected to the NAS environment network.
Even if a DNS server is specified in the network environment settings for the operation management LAN, itis not used by the NAS environment.
• For NFS operations in environments that use DNS servers, enable forward/reverse lookups for the FQDN ofthe NFS client and the FQDN of the NAS interface.
1 In ETERNUS Web GUI, click the [Connectivity] tab on the navigation, and then click [NAS] — [EnvironmentSettings] in [Category].
The [Environment Settings] screen appears.
2 In [Action], click [Set DNS Server].
The [Set DNS Server] screen appears.
3 Set the required items in the [Set DNS Server] screen and click the [Set] button.
• Primary IP Address
Enter the primary IP address for the DNS server in IPv4 format.
• Secondary IP Address
Enter the secondary IP address for the DNS server in IPv4 format.
• IPv6 Primary IP Address
Enter the primary IP address for the DNS server in IPv6 format.
IPv6 addresses that can be entered are global addresses or unique local addresses.
• IPv6 Secondary IP Address
Enter the secondary IP address for the DNS server in IPv6 format.
IPv6 addresses that can be entered are global addresses or unique local addresses.
A confirmation screen appears.
4. NAS Environment ConfigurationDNS Server Settings
88FUJITSU Storage ETERNUS DX S4/S3 series Hybrid Storage Systems Configuration Guide (NAS)
Copyright 2018 FUJITSU LIMITEDP3AM-8072-17ENZ0
4 Click the [OK] button.
The DNS server is set and the registration completion screen appears.
5 Click the [Done] button.
The screen returns to the [Environment Settings] screen.
NAS Server Name Settings
Set the name that will be used when changing the NAS server name (host name) for the ETERNUS DX that isused in the NAS environment. The default NAS server name can also be used. For details on the default NASserver name, refer to "NAS Server Name (Host Name)" (page 27).
For Active Directory authentication, the NAS Engine of the ETERNUS DX uses the NAS server name as a NetBIOSname.
During the configuration phase
Specifying the NAS server name has the following requirements.
• The number of characters that can be specified is 1 to 15 characters.
• The following types of characters can be used.
- Alphanumeric characters (US-ASCII code)
"A" (0x41) to "Z" (0x5A) and "a" (0x61) to "z" (0x7A)
- Numerical characters
"0" (0x30) to "9" (0x39)
- "-" (hyphen) (0x2D)
The "-" cannot be used as the first and/or the last character of the NAS server name.
• Do not use special characters (symbols) except for a hyphen. If these characters are used, the process ofcreating shared folders will result in an error.
1 In ETERNUS Web GUI, click the [Connectivity] tab on the navigation, and then click [NAS] — [EnvironmentSettings] in [Category].
The [Environment Settings] screen appears.
2 In [Action], click [Change NAS Server Name].
The [Change NAS Server Name] screen appears.
4. NAS Environment ConfigurationNAS Server Name Settings
89FUJITSU Storage ETERNUS DX S4/S3 series Hybrid Storage Systems Configuration Guide (NAS)
Copyright 2018 FUJITSU LIMITEDP3AM-8072-17ENZ0
3 Set the required items in the [Change NAS Server Name] screen and click the [Change] button.
A confirmation screen appears.
4 Click the [OK] button.
The NAS server name is changed and the registration completion screen appears.
5 Click the [Done] button.
The screen returns to the [Environment Settings] screen.
Authentication Server Settings
Set the Active Directory authentication servers and the LDAP authentication servers that are used in the NASenvironment. The maximum number of authentication servers that can be set for each server type is three.
If the Active Directory authentication server is configured, user management of the directories and files are pos-sible, but the fixed user account (shareuser$) cannot be used. Note that the local user settings and the localgroup settings must be deleted when local user authentication is used. For details, refer to "Local User Authenti-cation" (page 33).
By setting the LDAP authentication servers, user management of directories and files can be performed for ac-cess via the NFS protocol.
4. NAS Environment ConfigurationAuthentication Server Settings
90FUJITSU Storage ETERNUS DX S4/S3 series Hybrid Storage Systems Configuration Guide (NAS)
Copyright 2018 FUJITSU LIMITEDP3AM-8072-17ENZ0
During the configuration phase
• The setting must be performed when the NAS interface is in an Active-Active connection state.
If the authentication servers are set while the NAS interface is in an Active-Standby connection state or afailover state, an error occurs.
• System volumes and the NAS interface must be created in advance to perform the settings for the authenti-cation servers. System volumes are automatically created when the NAS volume is created for the first time.The following configurations cannot be performed if no system volumes ($SYSVOL1, $SYSVOL2, and $SYS-VOL3) are created in the ETERNUS DX.
- NAS interface settings
- Authentication server settings
• To set authentication servers, specify each server with an IP address or an FQDN. Note that a DNS server isrequired for name resolution when using an FQDN to specify the authentication server. Configure the DNSserver before configuring the authentication server.
• The DNS server function is required to use the domain name for operations with Active Directory authenti-cation. For that reason, when using an Active Directory authentication server, always configure the DNSserver. If the DNS server is not set up, the Active Directory server is temporarily set as the DNS server.
• Perform an operation setting of the user management in the authentication server or in the local user au-thentication before creating shared folders in the ETERNUS DX.
• If an LDAP authentication server is not being used, delete the LDAP authentication server from the authen-tication server settings.
• When using Active Directory authentication, make sure to configure the following DNS settings.
- Enable forward/reverse lookups for the host name FQDN of the Active Directory server
Configuration example:
Configure the DNS setting to enable the name resolutions of "adserver.example.com" and "example.com"for the following case.
Host name of the Active Directory server: adserver
Domain name of the Active Directory server: example.com
- Enable forward/reverse lookups for the host name FQDN of the Windows client
During the configuration phase
• Before setting up the authentication server, connect both of the controllers to the authentication server tomake communication between them ready.
• Active Directory's two-way, transitive trust relationships are not supported.
1 In ETERNUS Web GUI, click the [Connectivity] tab on the navigation, and then click [NAS] — [EnvironmentSettings] in [Category].
The [Environment Settings] screen appears.
2 In [Action], click [Set Authentication Server].
The [Set Authentication Server] screen appears.
4. NAS Environment ConfigurationAuthentication Server Settings
91FUJITSU Storage ETERNUS DX S4/S3 series Hybrid Storage Systems Configuration Guide (NAS)
Copyright 2018 FUJITSU LIMITEDP3AM-8072-17ENZ0
3 Set the required items in the [Set Authentication Server] screen and click the [Set] button.
Set the items of the "Active Directory Authentication Settings" or "LDAP Authentication Settings" accordingto the authentication servers that are to be used.
During the configuration phase
• To set a new authentication server, setting the domain name, the domain administrator, and the au-thentication server is required.
• In "LDAP Authentication Settings", specifying both "Domain Name" and "Domain Administrator" is re-quired. Set the dc attribute as "Domain Name", and the cn attribute as "Domain Administrator" for thebind DN that is used for LDAP authentication.
Configuration example:
If bind DN is "cn=Manager,dc=test,dc=local", then set "Domain Name" as "test.local" and "Domain Ad-ministrator" as "Manager".
• Specify each LDAP authentication server with an IP address to set up the authentication server if aDNS server is not used.
• For details on the characters that can be specified, refer to "Authentication Server" (page 29).
• Domain Name
Specify the domain name of the authentication server.
• Domain Administrator
Specify the administrator name of the authentication server.
• Change Password
To change the password of an authentication server administrator, select the checkbox.
• Domain Administrator's Password
Input the password for the authentication server administrator.
When inputting the Domain Administrator's Password, select the Change Password checkbox and theninput the same password in the confirmation field.
4. NAS Environment ConfigurationAuthentication Server Settings
92FUJITSU Storage ETERNUS DX S4/S3 series Hybrid Storage Systems Configuration Guide (NAS)
Copyright 2018 FUJITSU LIMITEDP3AM-8072-17ENZ0
• Authentication Server (1) – (3)
Input an IPv4 address, an IPv6 address, or an FQDN for the authentication server.
A confirmation screen appears.
4 Click the [OK] button.
The authentication server is set and the registration completion screen appears.
5 Click the [Done] button.
The screen returns to the [Environment Settings] screen.
Local User Authentication Settings
To perform a user management without using the authentication server, perform a local user authentication set-ting. If the local user authentication is used with CIFS, the local user settings are enabled after CIFS is re-connec-ted.
The following procedure is used to set the local user authentication.
Local Group CreationCreate a local group to which the local user belongs.
1 In ETERNUS Web GUI, click the [Connectivity] tab on the navigation, and then click [NAS] - [EnvironmentSettings] in [Category].
The [Environment Settings] screen appears.
2 Click the [Local Group] tab in [Environment Settings] and then click [Add Local Group] in [Action].
The [Add Local Group] screen appears.
4. NAS Environment ConfigurationLocal User Authentication Settings
93FUJITSU Storage ETERNUS DX S4/S3 series Hybrid Storage Systems Configuration Guide (NAS)
Copyright 2018 FUJITSU LIMITEDP3AM-8072-17ENZ0
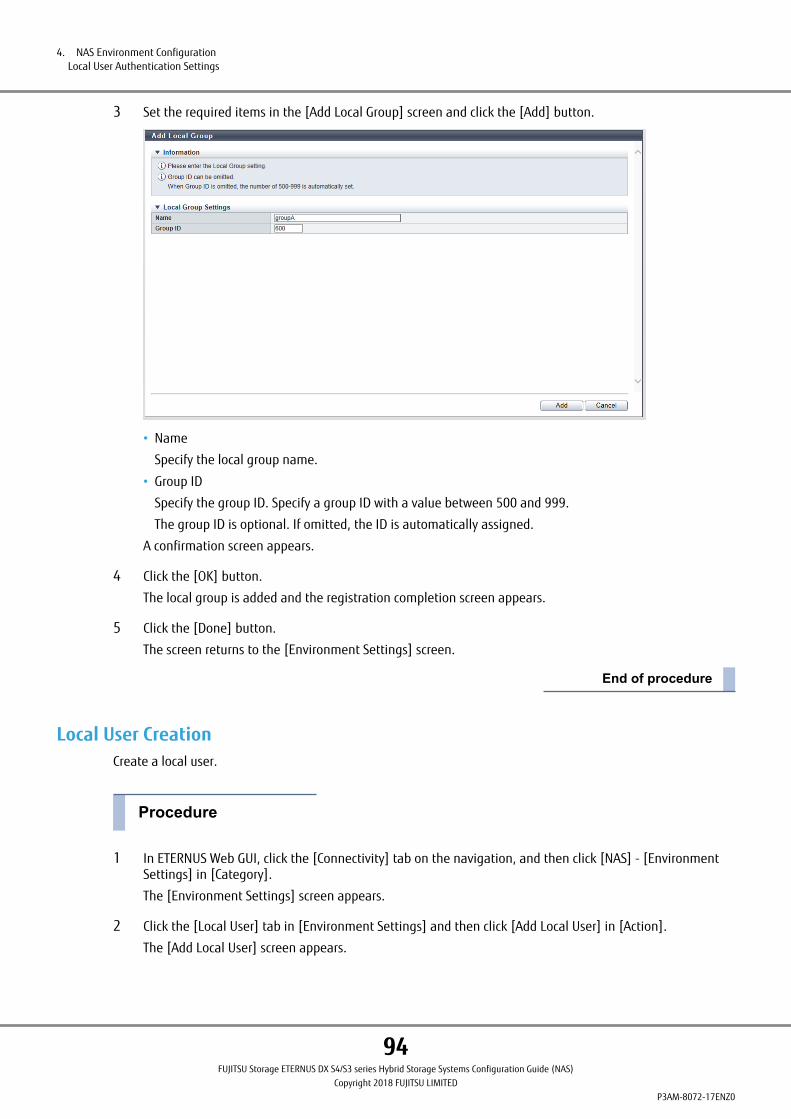
3 Set the required items in the [Add Local Group] screen and click the [Add] button.
• Name
Specify the local group name.
• Group ID
Specify the group ID. Specify a group ID with a value between 500 and 999.
The group ID is optional. If omitted, the ID is automatically assigned.
A confirmation screen appears.
4 Click the [OK] button.
The local group is added and the registration completion screen appears.
5 Click the [Done] button.
The screen returns to the [Environment Settings] screen.
Local User CreationCreate a local user.
1 In ETERNUS Web GUI, click the [Connectivity] tab on the navigation, and then click [NAS] - [EnvironmentSettings] in [Category].
The [Environment Settings] screen appears.
2 Click the [Local User] tab in [Environment Settings] and then click [Add Local User] in [Action].
The [Add Local User] screen appears.
4. NAS Environment ConfigurationLocal User Authentication Settings
94FUJITSU Storage ETERNUS DX S4/S3 series Hybrid Storage Systems Configuration Guide (NAS)
Copyright 2018 FUJITSU LIMITEDP3AM-8072-17ENZ0
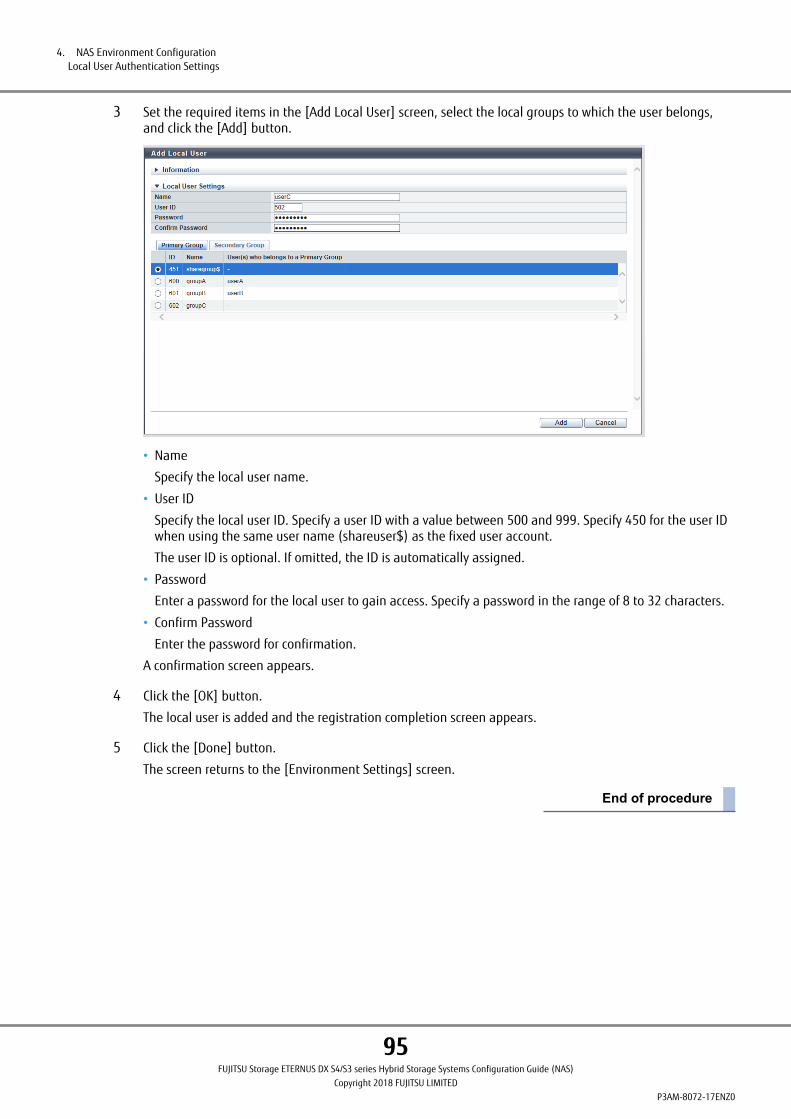
3 Set the required items in the [Add Local User] screen, select the local groups to which the user belongs,and click the [Add] button.
• Name
Specify the local user name.
• User ID
Specify the local user ID. Specify a user ID with a value between 500 and 999. Specify 450 for the user IDwhen using the same user name (shareuser$) as the fixed user account.
The user ID is optional. If omitted, the ID is automatically assigned.
• Password
Enter a password for the local user to gain access. Specify a password in the range of 8 to 32 characters.
• Confirm Password
Enter the password for confirmation.
A confirmation screen appears.
4 Click the [OK] button.
The local user is added and the registration completion screen appears.
5 Click the [Done] button.
The screen returns to the [Environment Settings] screen.
4. NAS Environment ConfigurationLocal User Authentication Settings
95FUJITSU Storage ETERNUS DX S4/S3 series Hybrid Storage Systems Configuration Guide (NAS)
Copyright 2018 FUJITSU LIMITEDP3AM-8072-17ENZ0
■ Changing the Local User Password
Besides using the management LAN, users can change their local user password from the user LAN (NIC-CA).Local user passwords can be changed from ETERNUS Web GUI or ETERNUS CLI. Note that the local user passwordcan only be changed from the Master CM.
During the operation phase
• Do not perform local user/local group operations from the management LAN and password change opera-tions from the user LAN at the same time.
• Multiple local users cannot change their passwords at the same time. Password change operations that areexecuted at a later time result in an error.
The following procedure is used to change the local user password. This section describes the procedure for whenETERNUS CLI is used.
1 Execute the "set nas-port" command of ETERNUS CLI from the management LAN to specify "open" for thefirewall setting of the port used to change the password for local user authentication (30022) that is in theNIC-CA port.
The following example is for when the firewall setting for the port used to change the password for localuser authentication of CM#0 CA#0 Port#0 is set to "open".
set nas-port -port 000 -local-user-password open
2 Using the local user account of the password change target, connect to the port for changing the local userauthentication password (30022) using SSH from the NIC-CA port for which the firewall is set to "open".
The following example is for when the password of user (testusr_uid_599) is changed via the NIC-CA port(172.16.0.70). The specification method may differ depending on the client OS.
ssh [email protected] -p 30022 fLog in using the "ssh" command (with the port specified). [email protected]'s password: fEnter the current password.
3 Enter the changed password and the password for confirmation.
New password: fEnter the changed password. Retype new password: fRe-enter the changed password (for confirmation).
Completed.
Press any key to logout: fPress any key to log out.
4. NAS Environment ConfigurationLocal User Authentication Settings
96FUJITSU Storage ETERNUS DX S4/S3 series Hybrid Storage Systems Configuration Guide (NAS)
Copyright 2018 FUJITSU LIMITEDP3AM-8072-17ENZ0
Authentication Method ChangeThe following procedures are used to change the authentication method.
■ When Changing the Authentication Method from Local User Authentication to an Authenti-cation Server
The following procedure is used to change the authentication method from local user authentication to the au-thentication server.
1 Delete all local users/local groups except for the BUILTIN groups.
2 Perform an Active Directory authentication setting.
For details, refer to "Authentication Server Settings" (page 90).
3 Use the Active Directory domain user account to copy the files that were created during the local user au-thentication to the other shared folder.
4 If the files that were created during the local user authentication are not needed, use the "clear nas-data"command in ETERNUS CLI to delete them.
■ When Changing the Authentication Method from an Authentication Server to Local User Au-thentication
The following procedure is used to change the authentication method from the authentication server to localuser authentication.
1 Delete the Active Directory authentication settings.
2 Create a local user/local group.
For details, refer to "Local User Authentication Settings" (page 93).
3 Use the local user account to copy the files that were created during the Active Directory authentication tothe other shared folder.
4 If the files that were created during an Active Directory authentication are not needed, use the "clear nas-data" command of ETERNUS CLI to delete them.
5 For operations in CIFS environments, set the security ID using the "set nas-server" command of ETERNUSCLI.
set nas-server -server-sid S-1-5-21-x-x-x
4. NAS Environment ConfigurationLocal User Authentication Settings
97FUJITSU Storage ETERNUS DX S4/S3 series Hybrid Storage Systems Configuration Guide (NAS)
Copyright 2018 FUJITSU LIMITEDP3AM-8072-17ENZ0
To check the security ID that is to be specified for "-server-sid", execute the following command in Power-Shell CLI via the CIFS client. Specify the file name that was created by the local user.
get-acl <Name_of_any_file_in_the_shared_folder> | fl
The security ID that is to be specified using ETERNUS CLI is S-1-5-21-x-x-x (where x is a numerical valuefrom 0 to 4294967295) that is displayed for "Owner" and "Group" in the result.
■ When Changing the Authentication Method from the Fixed User Account (shareuser$) to Lo-cal User Authentication
The following procedure is used to change the authentication method from the fixed user account (shareuser$)that was used with firmware version V10L51 or earlier to local user authentication.
1 Create a local user/local group.
For details, refer to "Local User Authentication Settings" (page 93).
2 Use a local user account to copy the files that were created using the fixed user account (shareuser$) toanother shared folder.
3 When access is controlled in CIFS environments, delete either the user ("shareuser$") or the group ("share-user$").
4 For operations in CIFS environments, set the security ID using the "set nas-server" command of ETERNUSCLI.
set nas-server -server-sid S-1-5-21-x-x-x
To check the security ID that is to be specified for "-server-sid", execute the following command in Power-Shell CLI via the CIFS client. Specify the file name that was created by the local user.
get-acl <Name_of_any_file_in_the_shared_folder> | fl
The security ID that is to be specified using ETERNUS CLI is S-1-5-21-x-x-x (where x is a numerical valuefrom 0 to 4294967295) that is displayed for "Owner" and "Group" in the result.
4. NAS Environment ConfigurationLocal User Authentication Settings
98FUJITSU Storage ETERNUS DX S4/S3 series Hybrid Storage Systems Configuration Guide (NAS)
Copyright 2018 FUJITSU LIMITEDP3AM-8072-17ENZ0
Shared Folder Creation (CIFS/NFS)
Create folders that can be shared among users. Access protocols can be set for each shared folder. To limit acces-sible hosts, set hosts that are allowed or denied access. In addition, "Owner" and "Group" can be specified foreach shared folder.
When the used protocol is "CIFS" or "CIFS/NFS", the Opportunistic locking function (or Oplocks) can be specified.File data can be cached in the CIFS client by enabling this function.
If enabled, notifications to the ETERNUS DX can be reduced during file operations using the CIFS client. As a re-sult, the performance can be improved due to less network traffic.
If the used protocol is CIFS, a home directory can be used. For details about how to use home directories, refer to"Home Directories" (page 104).
During the configuration phase
• If an Alternate Data Stream (ADS) is used, do not enable the Oplocks settings.
• If a shared folder is created with the same name as a user when home directories are used, the createdshared folder is used as the home directory of the user and the shared folder for home directories ("homes")is not used. The shared folder can be accessed in the same manner as home directories and can be ac-cessed by other users who have access privileges.
• Disabling Oplocks is recommended when multiple users perform an operation on the same file. If multipleusers perform an operation on the same file when Oplocks is enabled, synchronizing the cache with theETERNUS DX fails and the data may become corrupted depending on the network conditions.
During the operation phase
Do not create a folder or a file named ".streams" in the shared folder.
4. NAS Environment ConfigurationShared Folder Creation (CIFS/NFS)
99FUJITSU Storage ETERNUS DX S4/S3 series Hybrid Storage Systems Configuration Guide (NAS)
Copyright 2018 FUJITSU LIMITEDP3AM-8072-17ENZ0
During the configuration phase
• Shared folder names have conditions on the unavailable characters (reserved words and prohibited charac-ters) and a limit on the number of characters (up to 76 characters) available.
- The following strings cannot be used regardless of case.
. .. .snap global homes printers ipc$ .streams
- The following characters cannot be used.
• Symbols
"\" (0x5C), "/" (0x2F), ":" (0x3A), "*" (0x2A), "?" (0x3F), """ (0x22), "<" (0x3C), ">" (0x3E), "|" (0x7C), "="(0x3D), "," (0x2C), ";" (0x3B), "[" (0x5B), "]" (0x5D), "+" (0x2B), "%" (0x25)
• Spaces (0x20)
- The character string "$bak" cannot be used alone or as a suffix.
- The character string "@GMT" cannot be used alone or as a prefix. The characters are case-insensitive.
• Japanese character sets with non-ASCII characters (UTF-8) can be used for the shared folder names.
However, if the client OS does not support Japanese, the shared folder names may be garbled in the man-agement software, or operations using the shared folder may fail with an error. When specifying, check ifJapanese is supported by each client OS. If Japanese is not supported, do not use Japanese character sets.
• Do not mount CIFS shared folders using the NFS v4.0 protocol. If a mount is performed, creating a sharedfolder with the same name as the target shared folder may fail. If a shared folder with the same name can-not be created, creating a shared folder with a different name makes creating a shared folder with thesame name possible.
• The same name as an existing shared folder cannot be used in the ETERNUS DX. An error occurs if a sharedfolder with the same name as an existing shared folder is set.
• When a new shared folder is created, "Yes (Writable)" is enabled and Oplocks is set to "Disable (Do notuse)". To change these settings, use the Modify Shared Folder function.
• If CIFS is used for the protocol and local user authentication for the access permission, specify the local useror local group that is to be allowed access with [CIFS Permissions].
1 Click the [Connectivity] tab on the navigation of the ETERNUS Web GUI screen, and then click "NAS" in [Cat-egory].
The [NAS] screen appears.
2 In [Action], click [Create Shared Folder].
The [Create Shared Folder] screen appears.
4. NAS Environment ConfigurationShared Folder Creation (CIFS/NFS)
100FUJITSU Storage ETERNUS DX S4/S3 series Hybrid Storage Systems Configuration Guide (NAS)
Copyright 2018 FUJITSU LIMITEDP3AM-8072-17ENZ0
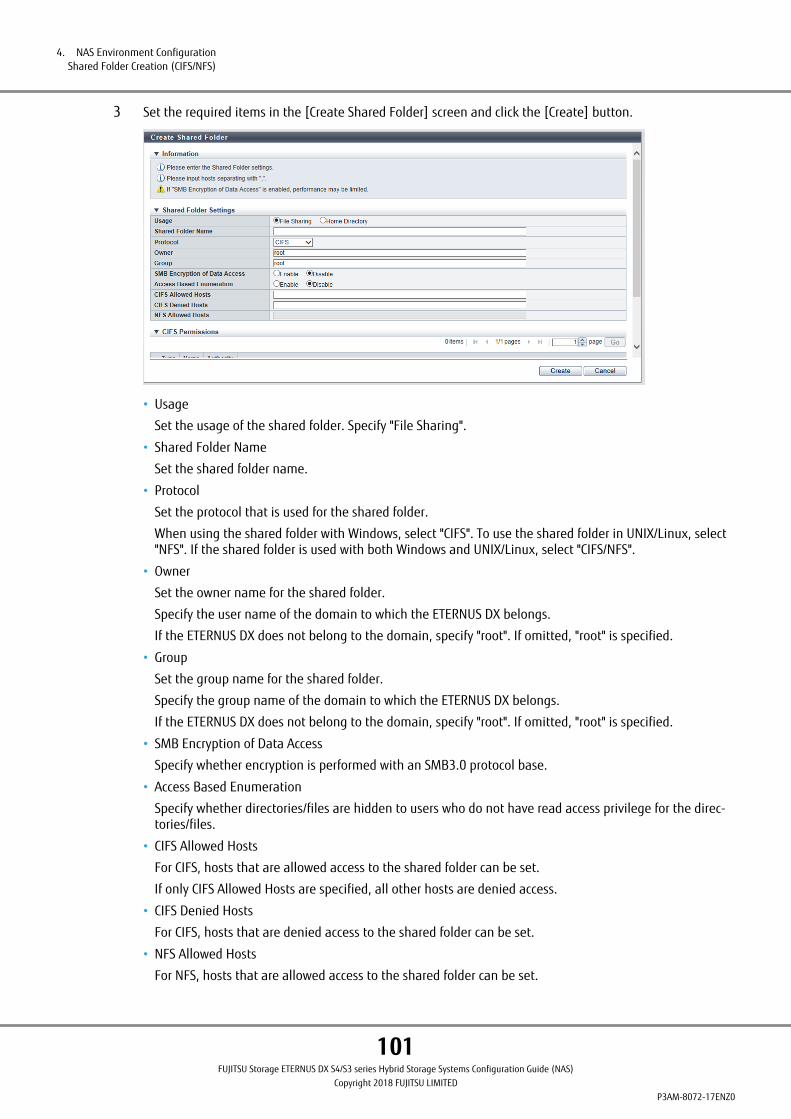
3 Set the required items in the [Create Shared Folder] screen and click the [Create] button.
• Usage
Set the usage of the shared folder. Specify "File Sharing".
• Shared Folder Name
Set the shared folder name.
• Protocol
Set the protocol that is used for the shared folder.
When using the shared folder with Windows, select "CIFS". To use the shared folder in UNIX/Linux, select"NFS". If the shared folder is used with both Windows and UNIX/Linux, select "CIFS/NFS".
• Owner
Set the owner name for the shared folder.
Specify the user name of the domain to which the ETERNUS DX belongs.
If the ETERNUS DX does not belong to the domain, specify "root". If omitted, "root" is specified.
• Group
Set the group name for the shared folder.
Specify the group name of the domain to which the ETERNUS DX belongs.
If the ETERNUS DX does not belong to the domain, specify "root". If omitted, "root" is specified.
• SMB Encryption of Data Access
Specify whether encryption is performed with an SMB3.0 protocol base.
• Access Based Enumeration
Specify whether directories/files are hidden to users who do not have read access privilege for the direc-tories/files.
• CIFS Allowed Hosts
For CIFS, hosts that are allowed access to the shared folder can be set.
If only CIFS Allowed Hosts are specified, all other hosts are denied access.
• CIFS Denied Hosts
For CIFS, hosts that are denied access to the shared folder can be set.
• NFS Allowed Hosts
For NFS, hosts that are allowed access to the shared folder can be set.
4. NAS Environment ConfigurationShared Folder Creation (CIFS/NFS)
101FUJITSU Storage ETERNUS DX S4/S3 series Hybrid Storage Systems Configuration Guide (NAS)
Copyright 2018 FUJITSU LIMITEDP3AM-8072-17ENZ0

Specify hosts that are allowed access (mount operation). If the NFS Allowed Hosts are specified, all otherhosts are denied access.
During the configuration phase
• CIFS Allowed Hosts, CIFS Denied Hosts, and NFS Allowed Hosts cannot be specified with IPv6 link-localaddresses.
- If IPv6 link-local addresses are used for CIFS Allowed Hosts, all CIFS access is denied.
- If IPv6 link-local addresses are used for NFS Allowed Hosts, all NFS access is denied.
When the IPv6 format is used, use IPv6 global addresses. When the IPv6 format is not used, use IPv4addresses (global or local addresses).
• The setting values of CIFS Allowed Hosts and CIFS Denied Hosts affect the access control over hosts asshown below. Some combinations of the setting values for CIFS Allowed Hosts and CIFS Denied Hostsmay allow access from unintended hosts.
- The CIFS Allowed Hosts setting has a higher priority than the CIFS Denied Hosts setting. If the samesubnet or the same IP address is specified in both of the settings, CIFS client access is allowed fromthe relevant network.
- CIFS client access is allowed from networks that are not specified in either setting.
- If neither setting is configured, access is allowed from any host.
- If CIFS Allowed Hosts or CIFS Denied Hosts is configured or changed, the setting is enabled after thehosts are reconnected.
• For details on the characters that can be specified for CIFS Allowed Hosts, CIFS Denied Hosts and NFSAllowed Hosts, refer to "Authentication Server" (page 29).
During the operation phase
Do not change the following access control settings for the root folder of the shared folder from the cli-ent.
• Owner
• Group
• Access privilege
If these settings are changed from a client, the clients may become unable to access the shared folder.
4. NAS Environment ConfigurationShared Folder Creation (CIFS/NFS)
102FUJITSU Storage ETERNUS DX S4/S3 series Hybrid Storage Systems Configuration Guide (NAS)
Copyright 2018 FUJITSU LIMITEDP3AM-8072-17ENZ0
During the configuration phase
• There are conditions for the characters that can be used in the shared folder name. For details, refer to"File Sharing" (page 38).
• Use the following format to specify CIFS Allowed Hosts, CIFS Denied Hosts, or NFS Allowed Hosts withIPv6 addresses.
- IPv6 address specification
A setting example is shown below.
2001:333:333:33::
::1
- IPv6 address range specification
Use the "IPv6 address/prefix length" format. A setting example is shown below.
2001:333:333:33::/64
• When the [SMB Encryption of Data Access] setting is changed, the session currently connected to thetarget shared folders is disconnected. However, if the target folders are shared with CIFS clients, thesession is not disconnected until the sharing is stopped. The SMB Encryption setting takes effect afterthe session is re-established.
• When configuring SMB Encryption in shared folders, SMB2.1 or earlier clients cannot access the sharedfolders. A confirmation screen appears when attempting to access the shared folders. However, eventhough authentication information is entered, access is denied.
• When the [Access Based Enumeration] setting is changed, the session currently connected to the tar-get shared folders is disconnected.
The Access Based Enumeration (ABE function) setting takes effect after the session is re-established.
A confirmation screen appears.
4 Click the [OK] button.
The shared folder is created and the registration completion screen appears.
5 Click the [Done] button.
The screen returns to the [NAS] screen.
4. NAS Environment ConfigurationShared Folder Creation (CIFS/NFS)
103FUJITSU Storage ETERNUS DX S4/S3 series Hybrid Storage Systems Configuration Guide (NAS)
Copyright 2018 FUJITSU LIMITEDP3AM-8072-17ENZ0
Home Directories
If the used protocol is CIFS, a home directory can be used. A home directory is available by selecting "Home Di-rectory" to create a shared folder for the home directory ("homes") when shared folders are created.
During the configuration phase
• The same parameters that are set in the shared folder can be set for the shared folder used for the homedirectory, but the following parameters are fixed.
- Shared Folder Name (fixed to "homes")
- Protocol (fixed to "CIFS")
- Writable (fixed to "rw")
- ABE function (fixed to "disable")
- CIFS access permission settings (N/A)
- NFS Allowed Hosts (N/A)
• User names that are used to access the home directory have a condition that they can only contain alpha-numeric characters and symbols ("-", "_", and "$") (or US-ASCII code).
If a user name with characters other than these characters is specified, the home directory cannot be used.
If a user name with characters other than these characters is specified to access "\\IP_ad-dress_of_the_NAS_interface", the user name may appear correctly but the home directory is not accessible.
During the operation phase
• Deleting of Active Directory users and deleting of local users are not operated together with the deletion ofthe home directory. Local users and home directories must be deleted separately.
• The specified home directory cannot be completely deleted for the following cases. After disconnecting theCIFS connection that is being used, delete the home directory again.
- A file is being created in the home directory
• To confirm that the home directory of the specified user has been successfully deleted, execute the follow-ing command with ETERNUS CLI and make sure the user's home directory does not exist.
show nas-share-progress -mode nas-home-directory-deletion
After confirming that the home directory which is currently being deleted does not exist, execute the "shownas-home-directory" command of ETERNUS CLI and check the list of home directories. Since the home direc-tories may not be completely deleted if the NAS engine fails during the deletion process, delete the homedirectory again.
4. NAS Environment ConfigurationHome Directories
104FUJITSU Storage ETERNUS DX S4/S3 series Hybrid Storage Systems Configuration Guide (NAS)
Copyright 2018 FUJITSU LIMITEDP3AM-8072-17ENZ0
During the operation phase
• Home directories cannot be accessed with FTP connections.
• Use the Delete Shared Folder function by specifying "homes" to delete the shared folders for the home di-rectories.
• Use the Clear NAS Data function by specifying "homes" to delete the home directories for all users.
• Use the "delete nas-home-directory" command of ETERNUS CLI to delete the home directory of each user.
1 Click the [Connectivity] tab on the navigation of the ETERNUS Web GUI screen, and then click "NAS" in [Cat-egory].
The [NAS] screen appears.
2 In [Action], click [Create Shared Folder].
The [Create Shared Folder] screen appears.
3 Set the required items in the [Create Shared Folder] screen and click the [Create] button.
• Usage
Set the usage of the shared folder. Specify "Home Directory".
• Shared Folder Name
Set the shared folder name. "homes" is fixed.
• Protocol
Set the protocol that is used for the shared folder. "CIFS" is fixed.
• Owner
Set the owner name for the shared folder.
Specify the user name of the domain to which the ETERNUS DX belongs.
Owner specification is relevant only when backups or restores are performed ("8. Backup/Restore Set-tings" (page 150)).
4. NAS Environment ConfigurationHome Directories
105FUJITSU Storage ETERNUS DX S4/S3 series Hybrid Storage Systems Configuration Guide (NAS)
Copyright 2018 FUJITSU LIMITEDP3AM-8072-17ENZ0
The owner is a user that can access the shared folders ("$homes" or "homes$bak") that become availablewhen backups that include home directories are restored or mounted.
If omitted, "root" is specified.
• Group
Set the group name for the shared folder.
Specify the group name of the domain to which the ETERNUS DX belongs.
Group specification is relevant only when backups or restores are performed ("8. Backup/Restore Set-tings" (page 150)).
The group can access the shared folders ("$homes" or "homes$bak") that become available when back-ups which include home directories are restored or mounted.
Note that BUILTIN groups cannot be specified.
If omitted, "root" is specified.
• SMB Encryption of Data Access
Specify whether encryption is performed with an SMB3.0 protocol base.
• Access Based Enumeration
Specify whether directories/files are hidden to users who do not have read access privilege for the direc-tories/files. "Disable" is fixed.
• CIFS Allowed Hosts
Hosts that are allowed access to the home directory can be specified.
If only CIFS Allowed Hosts are specified, all other hosts are denied access.
• CIFS Denied Hosts
Hosts that are denied access to the home directory can be specified.
• NFS Allowed Hosts
Specification is not necessary.
Refer to Step 3 in "Shared Folder Creation (CIFS/NFS)" (page 99) for notes when setting each item.
A confirmation screen appears.
4 Click the [OK] button.
The home directory is created and the registration completion screen appears.
5 Click the [Done] button.
The screen returns to the [NAS] screen.
4. NAS Environment ConfigurationHome Directories
106FUJITSU Storage ETERNUS DX S4/S3 series Hybrid Storage Systems Configuration Guide (NAS)
Copyright 2018 FUJITSU LIMITEDP3AM-8072-17ENZ0
FTP/FXP Settings
This section provides the required procedures to configure the FTP function and the FXP function.
During the operation phase
• The creation date and time information of the files that are obtained using FTP/FXP are displayed in theGreenwich Mean Time (GMT).
• FTP commands STAT and SYST are not supported.
FTP SettingUse ETERNUS CLI to perform the setup to use FTP.
The configuration procedure for FTP is shown below.
1 Set the necessary parameters and execute the "set nas-ftp" command of ETERNUS CLI to set up the sharedfolder that is to be published via FTP.
The following example is for when the shared folder #1 is published via FTP.
set nas-ftp -share-number 1
-share-number
Specify the shared folder that is to be published via FTP using the shared folder number.
The shared folder can also be published by specifying with "-share-name" instead of "-share-number".
2 Set the necessary parameters and execute the "set nas-port" command of ETERNUS CLI to change the fire-wall settings for the FTP connection to "open" ("close" as default).
The following example is for when the firewall setting for the FTP connection of CM#0 CA#0 Port#0 ischanged to "open".
set nas-port -port 000 -ftp open
-ftp
Specify whether to enable or disable the firewall setting of the FTP connection. To disable this function,specify "open" here.
4. NAS Environment ConfigurationFTP/FXP Settings
107FUJITSU Storage ETERNUS DX S4/S3 series Hybrid Storage Systems Configuration Guide (NAS)
Copyright 2018 FUJITSU LIMITEDP3AM-8072-17ENZ0
3 From the NIC-CA port, log in to the ETERNUS DX via FTP using the account that is registered in the authenti-cation server or the account that is registered in the local user authentication setting.
The shared folders that are published in the home directory for FTP can be accessed.
FXP SettingUse ETERNUS CLI to perform the setup to use FXP.
During the configuration phase
When performing an FXP connection, make sure that the firewall settings of the FXP connection and the FTPconnection are both set to "open".
The configuration procedure for FXP is shown below.
1 Set the necessary parameters and execute the "set nas-ftp" command of ETERNUS CLI to set up the sharedfolder that is to be published via FTP.
The following example is for when the shared folder #1 is published via FTP.
set nas-ftp -share-number 1
-share-number
Specify the shared folder that is to be published via FTP using the shared folder number.
The shared folder can also be published by specifying with "-share-name" instead of "-share-number".
2 Set the necessary parameters and execute the "set nas-server" command of ETERNUS CLI to enable the FXPfunction (disabled as default).
set nas-server -fxp enable
-fxp
Specify whether to enable or disable the FXP function. To enable this function, specify "enable" here.
3 Set the necessary parameters and execute the "set nas-port" command to set the firewall setting for theFTP connection and the FXP connection to "open" ("close" as default).
The following example is for when the firewall setting for the FTP connection and FXP connection of CM#0CA#0 Port#0 is set to "open".
set nas-port -port 000 -ftp open -fxp open
4. NAS Environment ConfigurationFTP/FXP Settings
108FUJITSU Storage ETERNUS DX S4/S3 series Hybrid Storage Systems Configuration Guide (NAS)
Copyright 2018 FUJITSU LIMITEDP3AM-8072-17ENZ0
-ftp
Specify whether to enable or disable the firewall setting of the FTP connection. To disable this function,specify "open" here.
-fxp
Specify whether to enable or disable the firewall setting of the FXP connection. To disable this function,specify "open" here.
4 From the NIC-CA port, log in to the ETERNUS DX via FTP using the account that was registered in the au-thentication server.
After an FTP login, the directory that is exclusive for FTP publishing is the home directory.
Between each ETERNUS DX, a data transfer is performed between the published shared folders.
Quota Settings
This section provides the required procedure to set a quota.
The following basic settings are required to use the Quota function.
• A quota for each user or group is set for users or groups that are registered in the authentication server.
Register users or groups in the authentication server in advance.
• The types of available quotas vary depending on the controller firmware versions. A quota can be used foreach user or group when the controller firmware version is V10L21 or later, and a quota can be used for eachshared folder when the controller firmware version is V10L51 or later. When a TPV that was created with thecontroller firmware version earlier than the supported versions (for every quota) is used, a format conversionmust be performed from ETERNUS CLI before the quota setting.
The format conversion procedure is as follows.
1 Use the "reconfigure nas-fs" command to execute a NAS volume reconfiguration.
2 Use the "forced nas-fsunmount" command to unmount the target NAS volume for both controllers.
3 Use the "start nas-fsck" command in "repair mode" to execute a format conversion of the file system.
4 Use the "forced nas-fsmount" command to remount.
• The Quota function sets one or both types of thresholds ("Warning" and "Limit") for the used drive space or forthe number of files.
- When the warning threshold is exceeded
Since this is a predictive notification, writing to the target NAS user volume is not prohibited.
- When the limit threshold is exceeded
Writing to the target NAS user volume is prohibited.
• For a single quota setting information (or each row of the quota target list), a total of four thresholds can beset for the used drive space ("Warning" and "Limit") and the number of files ("Warning" and "Limit"). However,setting "0" to all four thresholds (which includes setting the used drive space to "Not Specified") is not allowed.At least one threshold must have a valid value.
4. NAS Environment ConfigurationQuota Settings
109FUJITSU Storage ETERNUS DX S4/S3 series Hybrid Storage Systems Configuration Guide (NAS)
Copyright 2018 FUJITSU LIMITEDP3AM-8072-17ENZ0
• Add the quota setting information to multiple users, groups and shared folders. Regardless of the environ-ment that is to be used, the maximum number of quota setting information that can be added in a singleoperation (by clicking the [Add] button on the lower part of the screen) is 100.
• The following events can be notified with the method that is set in advance using the Setup Event Notificationfunction. For more details, refer to "ETERNUS Web GUI User's Guide".
- The used drive space or the number of files has exceeded the threshold
- The used drive space or the number of files has returned to within the threshold
During the configuration phase
• Quotas cannot be set for snapshots and backup volumes.
• Do not set a Quota for the administrator (root).
• Backing up the file system after setting or deleting a Quota is recommended.
• Even when usable drive space has been specified for each user, group, or shared folder, the drive space canbe used over the limit but within the range of the "disk usage limit value + 2GB". However, files that are tobe inflated using the Sparse File Inflation function are not targets for the Quota function. Therefore, thedrive usage amount may exceed the limit value.
The number of files cannot exceed the specified threshold.
4. NAS Environment ConfigurationQuota Settings
110FUJITSU Storage ETERNUS DX S4/S3 series Hybrid Storage Systems Configuration Guide (NAS)
Copyright 2018 FUJITSU LIMITEDP3AM-8072-17ENZ0
During the configuration phase
• Specifying the user name and group name has the following requirements.
- The number of characters that can be specified is 1 to 255 characters.
- The types of characters that can be used are alphanumeric characters (US-ASCII code) and symbols be-tween space character (0x20) to "~" (0x7E). Note that "?" (0x3F) and "\" (0x5C) cannot be used.
• For CIFS access users, set the limit of the drive capacity that is used to be less than the drive capacity. If avalue larger than the drive capacity is specified, correct capacity cannot be referred from the Windows cli-ent.
• Set the warning value and the limit value equal to or less than the drive capacity. Areas such as the man-agement area that prevents user data from being written cannot be used. For details, refer to "File SystemSpecification" (page 24).
• When setting a Quota for the user who performs CIFS access using the Active Directory authentication, cre-ate a shared folder by specifying CIFS as the protocol to use and set a Quota.
• The Quota process time is increased in proportion to the number of Quota settings. In addition, the re-sponse time of the authentication server is affected by the Quota process time. Therefore, the responsetime for the authentication server must be taken into consideration when designing the system.
• The types of available quotas vary depending on the controller firmware versions. A quota can be used foreach user or group when the controller firmware version is V10L21 or later, and a quota can be used foreach shared folder when the controller firmware version is V10L51 or later. When a TPV that was createdwith the controller firmware version earlier than the supported versions (for every quota) is used, a formatconversion must be performed from ETERNUS CLI before the quota setting.
Furthermore, if a quota is set for a TPV that was created with a controller firmware version earlier than thesupported versions (for every quota) without a format conversion, an error occurs. For more details on theformat conversion, refer to "Quota Settings" (page 109).
During the operation phase
• If Quota settings are deleted when the authentication server is inaccessible, inconsistencies may occur inthe Quota information. When inconsistencies occur (such as Quota restrictions being applied to users with-out a Quota setting), restore the Quota information by executing the "start nas-fsck" command from ETER-NUS CLI.
• If the capacity of the drive that is used reaches the limit, writing or creating files for the relevant drive isstopped. The status screen for ETERNUS Web GUI or ETERNUS CLI indicates the limit status, but an errormessage or event notification that indicates that the limit has been exceeded is not reported at this point.A notification is reported when a file operation has failed because the limit has been exceeded.
• Events are notified at 10 min intervals when a threshold is exceeded or when a Warning is released lower-ing the threshold.
• When the limit value of the quota setting is reached during a file operation, that file operation fails (orcauses an error). However, if a sync option is not specified when an NFS mount is performed from an NFSclient, the error is not notified.
The procedure to perform a quota management is shown below.
4. NAS Environment ConfigurationQuota Settings
111FUJITSU Storage ETERNUS DX S4/S3 series Hybrid Storage Systems Configuration Guide (NAS)
Copyright 2018 FUJITSU LIMITEDP3AM-8072-17ENZ0
1 Click the [Connectivity] tab on the navigation screen in ETERNUS Web GUI, and then click [NAS] - [QuotaManagement] in [Category].
2 In [Action], click [Add Quota Setting].
The [Add Quota Setting] screen appears.
3 Select a NAS user volume to add the quota setting information.
4. NAS Environment ConfigurationQuota Settings
112FUJITSU Storage ETERNUS DX S4/S3 series Hybrid Storage Systems Configuration Guide (NAS)
Copyright 2018 FUJITSU LIMITEDP3AM-8072-17ENZ0
4 Add the quota setting information to the quota target.
(1) Click the [Add] button on the bottom right of the quota target.
The [Add Quota Target] screen appears.
(2) Set the required items and click the [OK] button.
• Type
Select a quota target.
- User
Select this item when the target is a user.
- Group
Select this item when the target is a group.
- Share
Select this item when the target is a shared folder.
• Name
Enter the target user name, group name, or shared folder name.
The character string that can be specified has the following requirements.
- The types of characters that can be used are alphanumeric characters and symbols (0x20 to 0x7Ein ASCII [US-ASCII]). Note that "?" (0x3F) and "\" (0x5C) cannot be used.
- The number of characters that can be specified is 1 to 255 characters.
• Drive Space
Enter the warning value for the drive usage in the quota target. The input requirements are as fol-lows.
- Warning (0 to 128TB)
If "0" is entered or no values are specified, "Not Specified" (unlimited) is registered in the ETER-NUS DX.
Enter the limit value for the drive usage in the quota target.
4. NAS Environment ConfigurationQuota Settings
113FUJITSU Storage ETERNUS DX S4/S3 series Hybrid Storage Systems Configuration Guide (NAS)
Copyright 2018 FUJITSU LIMITEDP3AM-8072-17ENZ0
- Limit (0 to 128TB)
If "0" is entered or no values are specified, "Not Specified" (unlimited) is registered in the ETER-NUS DX.
• File Count
Enter the warning value for the number of files in the quota target.
- Warning (0 to 134217723)
If "0" is entered, "Not Specified" (unlimited) is registered in the ETERNUS DX.
Enter the limit value for the number of files in the quota target.
- Limit (0 to 134217723)
If "0" is entered, "Not Specified" (unlimited) is registered in the ETERNUS DX.
During the configuration phase
If both the warning and limit values are specified, the limit value must be larger than thewarning value.
(3) To set multiple quota settings for the selected NAS user volume, repeat Step (1) through Step (2).
5 Click the [Add] button.
The quota setting is performed and a registration completion screen appears.
6 Click the [Done] button.
The screen returns to the [Quota Management] screen.
4. NAS Environment ConfigurationQuota Settings
114FUJITSU Storage ETERNUS DX S4/S3 series Hybrid Storage Systems Configuration Guide (NAS)
Copyright 2018 FUJITSU LIMITEDP3AM-8072-17ENZ0
Snapshot Settings
This section provides an explanation of the necessary settings for snapshots, and how to acquire and restoresnapshots.
Basic Settings for SnapshotPerform the basic settings to use the Snapshot function. The following settings are necessary.
• Setting the necessary area for Snapshot
Prepare a RAID group where Snapshot control information is to be saved and a Snapshot destination volume(SDPV). An existing RAID group can be used.
Use a RAID group that has sufficient space for the number of generations. SDPVs are used as pool volumes.Take the area for the snapshot generations and the amount of updates between generations into considera-tion when configuring the area necessary for Snapshots.
• Settings related to the snapshot copy operations
Specify the copy table size. The value that is set here is also used for the Advanced Copy functions.
• Settings for the Snapshot function
Perform the necessary settings for a snapshot acquisition. Specify the number of snapshot generations to ac-quire, data destination RAID group, and an acquisition schedule.
When starting the Snapshot operation after completing the basic settings, snapshots are automatically acquiredaccording to the specified schedule.
During the configuration phase
Operating a snapshot acquired while a file is opened with write authority may not be possible after a restora-tion. Make sure to acquire snapshots while files are not in use. When acquiring snapshots multiple times aday, make sure to acquire snapshots during non-business hours at least one generation per day.
During the operation phase
• The Snapshot function only backs up differential data. A separate full backup is recommended since there isno function to restore the whole volume if an error occurs in a NAS user volume.
• The Snapshot function shares resources with the Advanced Copy functions. Therefore, the number of copysessions, the amount of copy table used, and the amount of volume used for copy operations all affect eachother. If resources are not sufficient, snapshot acquisition may fail.
• When the copy source data is updated, an SDP is allocated for the differential data. Note that the snapshotsof all generations cannot be referred to if free space in the SDP runs out. If an error occurs due to insuffi-cient free space in the SDP, delete the snapshot settings and reconfigure.
4. NAS Environment ConfigurationSnapshot Settings
115FUJITSU Storage ETERNUS DX S4/S3 series Hybrid Storage Systems Configuration Guide (NAS)
Copyright 2018 FUJITSU LIMITEDP3AM-8072-17ENZ0
During the configuration phase
• A snapshot cannot be acquired without a mounted NAS user volume.
• If the NAS user volume of the snapshot acquisition target is encrypted, encryption must be enabled whencreating a SDPV.
• When snapshots are acquired up to the specified number of generations, older snapshots are automaticallydeleted in chronological order and new snapshots are acquired. Therefore, set the schedule taking into con-sideration how many generations may be required for restoration.
During the operation phase
• The Snapshot function must be stopped before performing a backup or restoration.
• When an old snapshot is deleted while the CIFS/NFS client is continuously accessing that snapshot, the ac-quisition of new snapshots may fail. The session of the CIFS client that accessed the old snapshot may betemporarily disconnected. If an access error is detected, connect again.
• If the ETERNUS DX is in a high-load state, snapshots may be acquired behind the specified time or the ac-quisition may fail.
• The ".snap" directory is a special directory for snapshot references.
Although the ".snap" directory exists from the time the NAS volume is created, it cannot be displayed usingcommands such as "ls" and "find", and performing directory operations on the ".snap" directory itself causeerrors. To access data under the ".snap" directory, move to the ".snap" directory using the "cd" command orspecify a direct path.
A directory or a file named ".snap" cannot be created in the shared folder.
If a directory or a file named ".snap" is created in the shared folder using controller firmware versions earlierthan V10L31, it will become inaccessible after the controller firmware is upgraded to V10L31 or later.
■ Example Schedule Settings for Snapshots
The following example explains a case when a backup is acquired every day of the week using the Snapshotgeneration copy in order to manage generation data.
Figure 19 Example Schedule Settings for Snapshots
NAS user volume
7th generation
6th generation
5th generation
4th generation
3rd generation
2nd generation
1st generation
Client
ETERNUS DX
Snapshot
Snapshot on Monday
Snapshot on Tuesday
Snapshot on Wednesday
Snapshot on Thursday
Snapshot on Friday
Snapshot on Saturday
Snapshot on Sunday
4. NAS Environment ConfigurationSnapshot Settings
116FUJITSU Storage ETERNUS DX S4/S3 series Hybrid Storage Systems Configuration Guide (NAS)
Copyright 2018 FUJITSU LIMITEDP3AM-8072-17ENZ0
● ETERNUS DX Environment
The explanation in this section is provided on the assumption that the following system environment is used.
In this example, a volume where control information for seven Snapshot generations is saved (generation man-agement volume) and a volume where snapshots are saved (snapshot destination volume) are registered in asingle RAID group.
The capacity of the operation volume (NAS user volume) is 1TB, the update amount per snapshot is 50GB, and asnapshot destination volume (350GB) for saving seven generations is prepared. For snapshot destination vol-ume capacity guidelines, refer to "Snapshot" (page 47).
Figure 20 Example of Creating Operation Volume and NAS Snapshot Destination Volume
ETERNUS DX
TPP
RAID group 1 (RAID5)
TPV
Snap Data Volume (SDV) (*1)
Snap Data Pool Volume (SDPV) (*2)
1TB
350GB
Generation management volume
Operation volume
Snapshot destination volume
sdv0
sdpv
Main
sdv1 sdv2 sdv3 sdv4 sdv5 sdv6
*1: SDV is the volume where control information is saved when the Snapshot is executed.
*2: SDPV is the volume where snapshot data is saved.
4. NAS Environment ConfigurationSnapshot Settings
117FUJITSU Storage ETERNUS DX S4/S3 series Hybrid Storage Systems Configuration Guide (NAS)
Copyright 2018 FUJITSU LIMITEDP3AM-8072-17ENZ0
Preparations for Acquiring SnapshotsPerform preparations that are necessary for acquiring snapshots.
● RAID Group Creation
Create a Snapshot destination RAID group that is different from the TPP where the NAS user volume has beenregistered.
When a RAID group for storing snapshots is specified, a generation management volume (SDV) proportional tothe required number of generations is automatically created. The logical capacity for the SDV is the same as theNAS user volume. 0.1% of the logical volume capacity is required for the SDV physical capacity. For details, referto Table 7.
Figure 21 RAID Group Creation
Generation management volume
sdv0 - sdv6(Snap Data Volume)
Snapshot destination RAID group
● Snapshot Destination Volume (SDPV) Creation
Create a Snapshot destination volume (SDPV) in the RAID group for saving snapshots.
Figure 22 Snapshot Destination Volume (SDPV) Creation
Snapshot destination volume
sdpv(Snap Data Pool Volume)
350GB
Snapshot destination RAID group
During the configuration phase
Up to 128 volumes can be created in a RAID group. When acquiring snapshots for 128 generations, create anSDPV and SDV in different RAID groups.
For procedures on how to create RAID groups and how to create SDPVs, refer to "Configuration Guide (Basic)".
● Advanced Copy Settings
On the controller cache memory, set the copy table size used by the firmware. This copy table is used as an areafor the copy progress management when the Snapshot function is executed.
The copy table size settings are shared with the Advanced Copy functions. For setup procedures, refer to "Config-uration Guide (Basic)".
4. NAS Environment ConfigurationSnapshot Settings
118FUJITSU Storage ETERNUS DX S4/S3 series Hybrid Storage Systems Configuration Guide (NAS)
Copyright 2018 FUJITSU LIMITEDP3AM-8072-17ENZ0
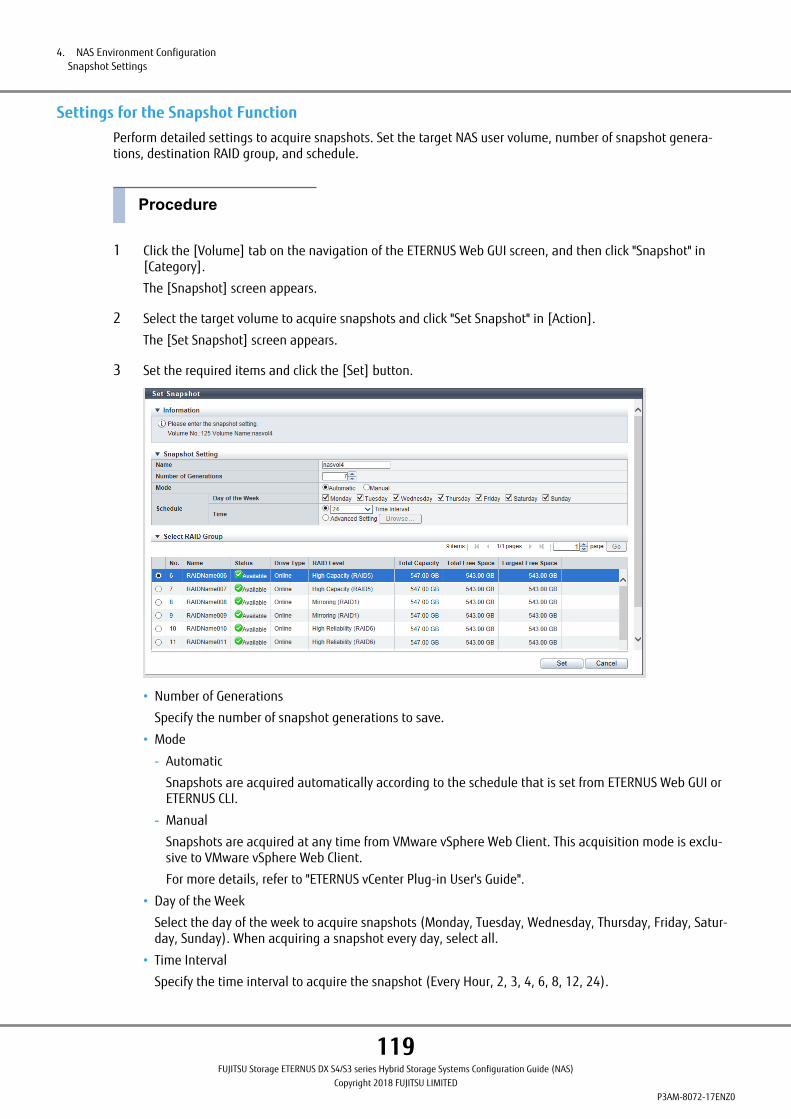
Settings for the Snapshot FunctionPerform detailed settings to acquire snapshots. Set the target NAS user volume, number of snapshot genera-tions, destination RAID group, and schedule.
1 Click the [Volume] tab on the navigation of the ETERNUS Web GUI screen, and then click "Snapshot" in[Category].
The [Snapshot] screen appears.
2 Select the target volume to acquire snapshots and click "Set Snapshot" in [Action].
The [Set Snapshot] screen appears.
3 Set the required items and click the [Set] button.
• Number of Generations
Specify the number of snapshot generations to save.
• Mode
- Automatic
Snapshots are acquired automatically according to the schedule that is set from ETERNUS Web GUI orETERNUS CLI.
- Manual
Snapshots are acquired at any time from VMware vSphere Web Client. This acquisition mode is exclu-sive to VMware vSphere Web Client.
For more details, refer to "ETERNUS vCenter Plug-in User's Guide".
• Day of the Week
Select the day of the week to acquire snapshots (Monday, Tuesday, Wednesday, Thursday, Friday, Satur-day, Sunday). When acquiring a snapshot every day, select all.
• Time Interval
Specify the time interval to acquire the snapshot (Every Hour, 2, 3, 4, 6, 8, 12, 24).
4. NAS Environment ConfigurationSnapshot Settings
119FUJITSU Storage ETERNUS DX S4/S3 series Hybrid Storage Systems Configuration Guide (NAS)
Copyright 2018 FUJITSU LIMITEDP3AM-8072-17ENZ0
• Select RAID Group
Specify the RAID group where the SDV is to be created.
A confirmation screen appears.
4 Click the [OK] button.
The snapshot settings are performed and the registration completion screen appears.
5 Click the [Done] button.
The screen returns to the [Snapshot] screen.
4. NAS Environment ConfigurationSnapshot Settings
120FUJITSU Storage ETERNUS DX S4/S3 series Hybrid Storage Systems Configuration Guide (NAS)
Copyright 2018 FUJITSU LIMITEDP3AM-8072-17ENZ0
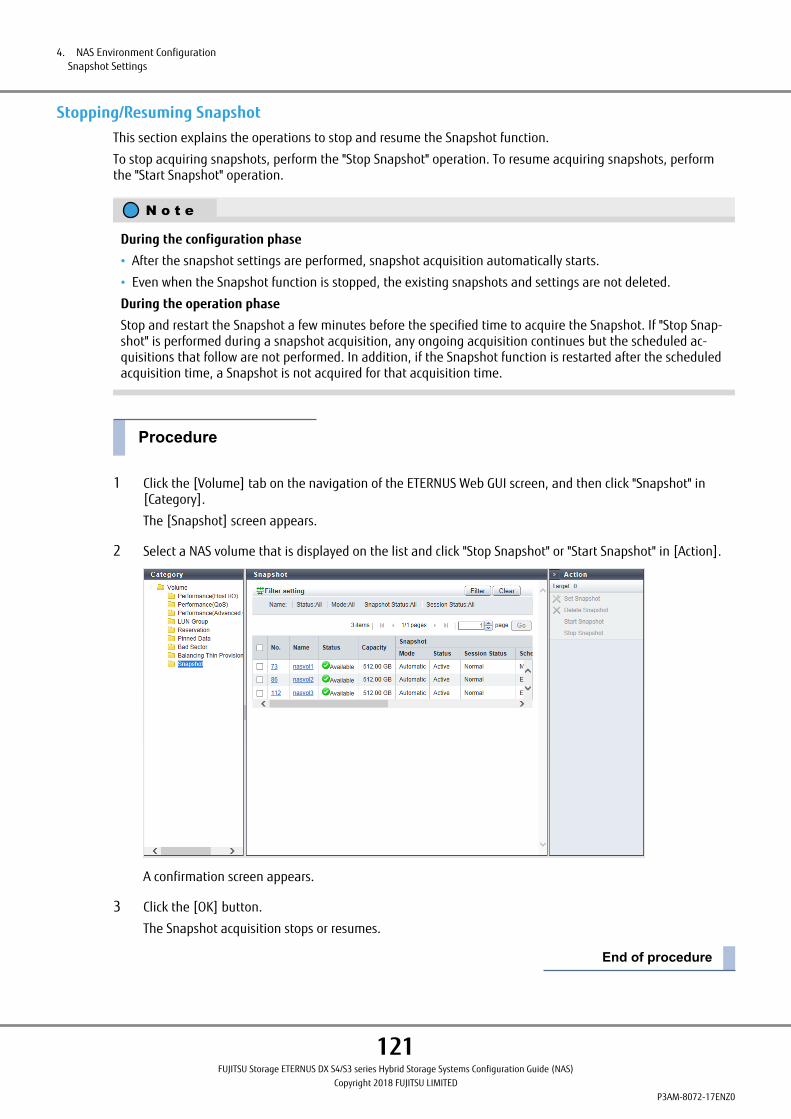
Stopping/Resuming SnapshotThis section explains the operations to stop and resume the Snapshot function.
To stop acquiring snapshots, perform the "Stop Snapshot" operation. To resume acquiring snapshots, performthe "Start Snapshot" operation.
During the configuration phase
• After the snapshot settings are performed, snapshot acquisition automatically starts.
• Even when the Snapshot function is stopped, the existing snapshots and settings are not deleted.
During the operation phase
Stop and restart the Snapshot a few minutes before the specified time to acquire the Snapshot. If "Stop Snap-shot" is performed during a snapshot acquisition, any ongoing acquisition continues but the scheduled ac-quisitions that follow are not performed. In addition, if the Snapshot function is restarted after the scheduledacquisition time, a Snapshot is not acquired for that acquisition time.
1 Click the [Volume] tab on the navigation of the ETERNUS Web GUI screen, and then click "Snapshot" in[Category].
The [Snapshot] screen appears.
2 Select a NAS volume that is displayed on the list and click "Stop Snapshot" or "Start Snapshot" in [Action].
A confirmation screen appears.
3 Click the [OK] button.
The Snapshot acquisition stops or resumes.
4. NAS Environment ConfigurationSnapshot Settings
121FUJITSU Storage ETERNUS DX S4/S3 series Hybrid Storage Systems Configuration Guide (NAS)
Copyright 2018 FUJITSU LIMITEDP3AM-8072-17ENZ0
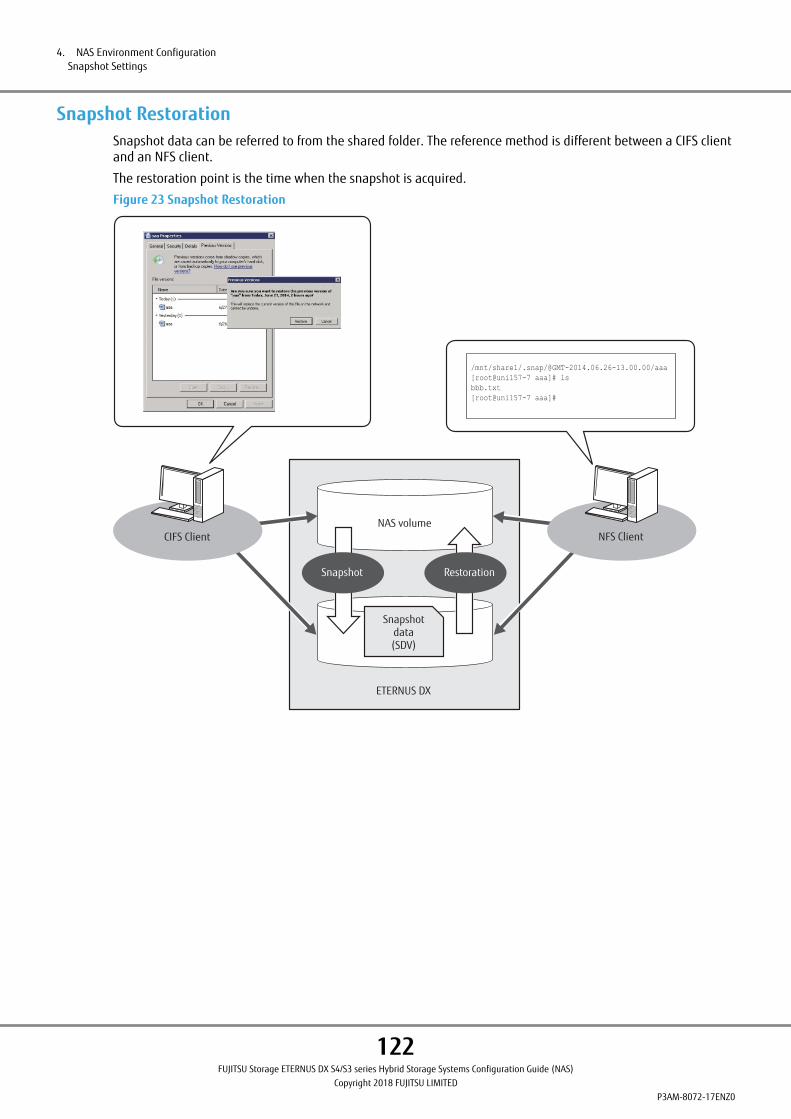
Snapshot RestorationSnapshot data can be referred to from the shared folder. The reference method is different between a CIFS clientand an NFS client.
The restoration point is the time when the snapshot is acquired.
Figure 23 Snapshot Restoration
ETERNUS DX
Snapshotdata(SDV)
NAS volume
Restoration Snapshot
/mnt/share1/.snap/@GMT-2014.06.26-13.00.00/aaa[root@uni157-7 aaa]# lsbbb.txt[root@uni157-7 aaa]#
NFS ClientCIFS Client
4. NAS Environment ConfigurationSnapshot Settings
122FUJITSU Storage ETERNUS DX S4/S3 series Hybrid Storage Systems Configuration Guide (NAS)
Copyright 2018 FUJITSU LIMITEDP3AM-8072-17ENZ0
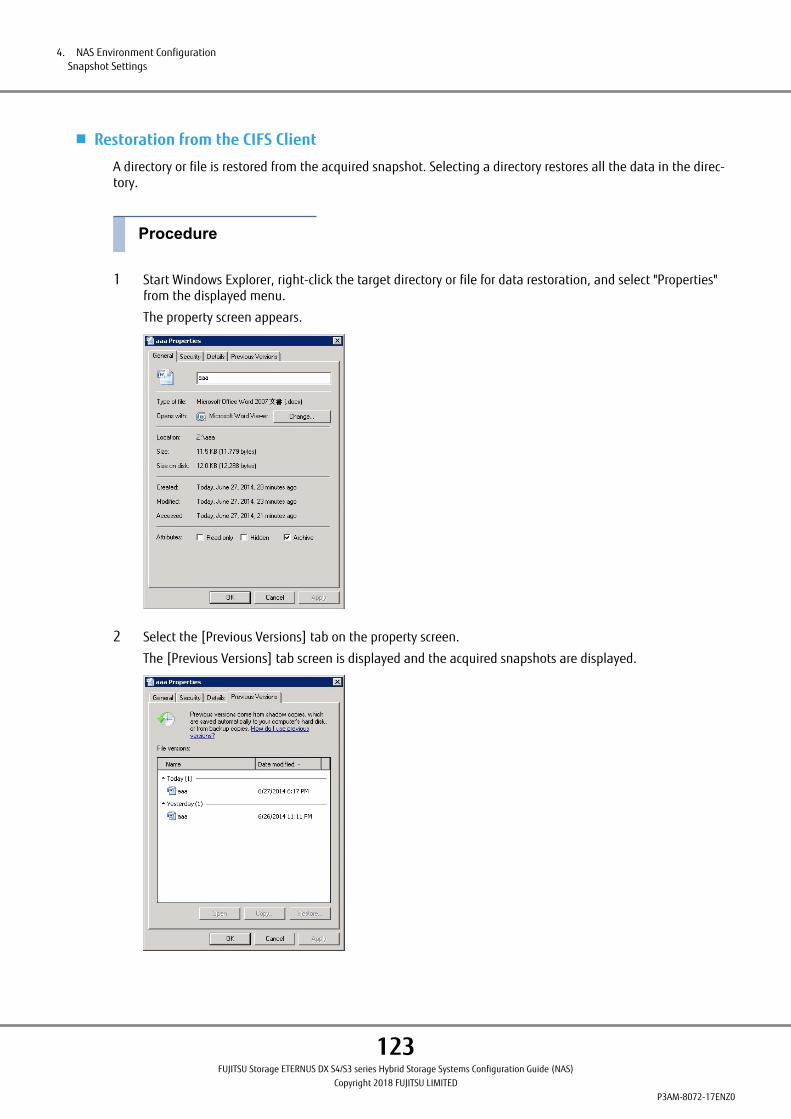
■ Restoration from the CIFS Client
A directory or file is restored from the acquired snapshot. Selecting a directory restores all the data in the direc-tory.
1 Start Windows Explorer, right-click the target directory or file for data restoration, and select "Properties"from the displayed menu.
The property screen appears.
2 Select the [Previous Versions] tab on the property screen.
The [Previous Versions] tab screen is displayed and the acquired snapshots are displayed.
4. NAS Environment ConfigurationSnapshot Settings
123FUJITSU Storage ETERNUS DX S4/S3 series Hybrid Storage Systems Configuration Guide (NAS)
Copyright 2018 FUJITSU LIMITEDP3AM-8072-17ENZ0
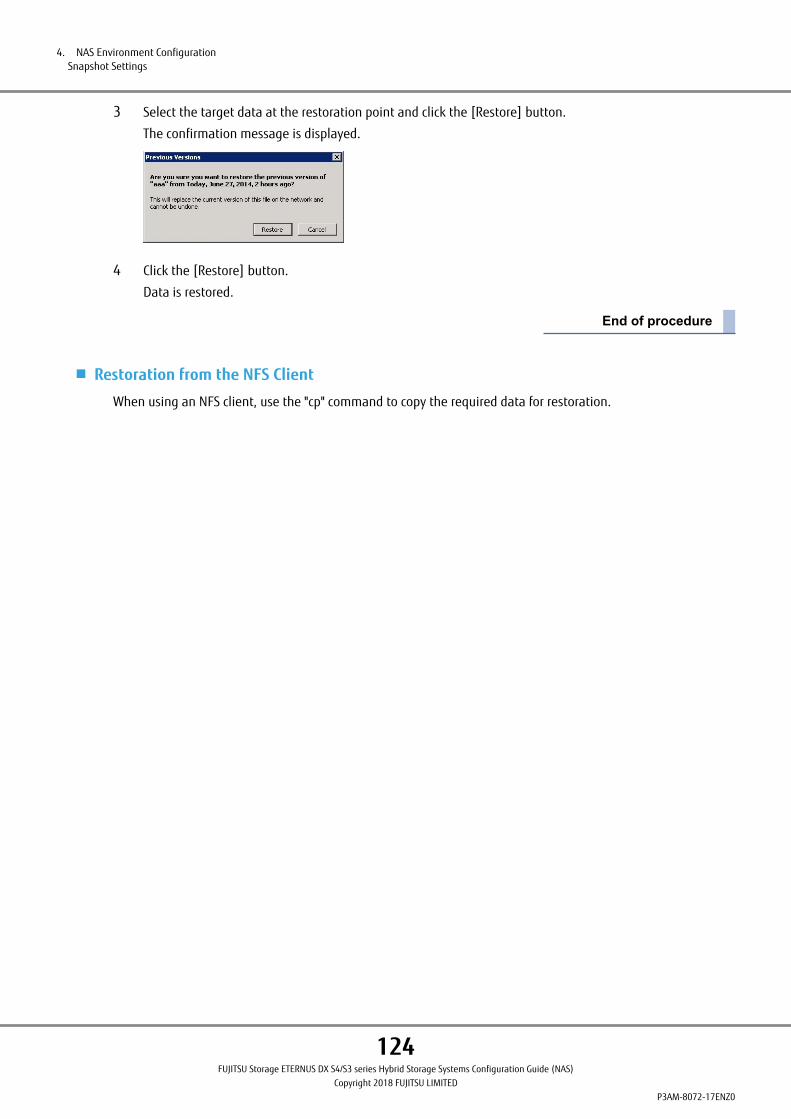
3 Select the target data at the restoration point and click the [Restore] button.
The confirmation message is displayed.
4 Click the [Restore] button.
Data is restored.
■ Restoration from the NFS Client
When using an NFS client, use the "cp" command to copy the required data for restoration.
4. NAS Environment ConfigurationSnapshot Settings
124FUJITSU Storage ETERNUS DX S4/S3 series Hybrid Storage Systems Configuration Guide (NAS)
Copyright 2018 FUJITSU LIMITEDP3AM-8072-17ENZ0
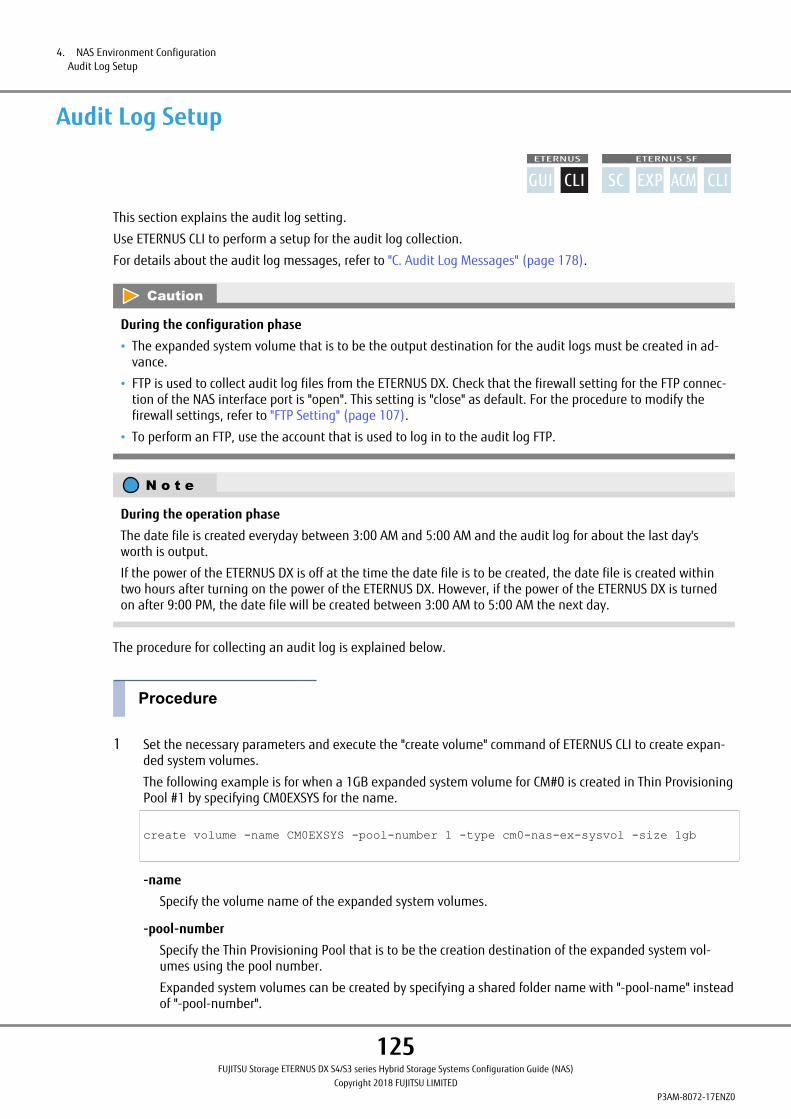
Audit Log Setup
This section explains the audit log setting.
Use ETERNUS CLI to perform a setup for the audit log collection.
For details about the audit log messages, refer to "C. Audit Log Messages" (page 178).
During the configuration phase
• The expanded system volume that is to be the output destination for the audit logs must be created in ad-vance.
• FTP is used to collect audit log files from the ETERNUS DX. Check that the firewall setting for the FTP connec-tion of the NAS interface port is "open". This setting is "close" as default. For the procedure to modify thefirewall settings, refer to "FTP Setting" (page 107).
• To perform an FTP, use the account that is used to log in to the audit log FTP.
During the operation phase
The date file is created everyday between 3:00 AM and 5:00 AM and the audit log for about the last day'sworth is output.
If the power of the ETERNUS DX is off at the time the date file is to be created, the date file is created withintwo hours after turning on the power of the ETERNUS DX. However, if the power of the ETERNUS DX is turnedon after 9:00 PM, the date file will be created between 3:00 AM to 5:00 AM the next day.
The procedure for collecting an audit log is explained below.
1 Set the necessary parameters and execute the "create volume" command of ETERNUS CLI to create expan-ded system volumes.
The following example is for when a 1GB expanded system volume for CM#0 is created in Thin ProvisioningPool #1 by specifying CM0EXSYS for the name.
create volume -name CM0EXSYS -pool-number 1 -type cm0-nas-ex-sysvol -size 1gb
-name
Specify the volume name of the expanded system volumes.
-pool-number
Specify the Thin Provisioning Pool that is to be the creation destination of the expanded system vol-umes using the pool number.
Expanded system volumes can be created by specifying a shared folder name with "-pool-name" insteadof "-pool-number".
4. NAS Environment ConfigurationAudit Log Setup
125FUJITSU Storage ETERNUS DX S4/S3 series Hybrid Storage Systems Configuration Guide (NAS)
Copyright 2018 FUJITSU LIMITEDP3AM-8072-17ENZ0
-type
Specify the volume type.
-size
Specify the volume size of the expanded system volumes that are to be created. The size can be speci-fied in the range of 1GB – 4TB.
During the configuration phase
• If an expanded system volume with a large size is created using Nearline SAS disks, a timeout errormay occur for the ETERNUS CLI command.
From the time the command is executed until the timeout error occurs (or a duration of approximately20 minutes), other ETERNUS CLI commands cannot be used because the command response is not re-turned.
If the command input is available after a timeout error, execute the "show volumes -type tpv" com-mand and check the NAS System Volume Format Status of the expanded system volume.
- If "Creating filesystem" is displayed, the expanded system volume is being created.
Wait for a while and re-execute the "show volumes -type tpv" command to check.
- If "Complete" is displayed, the expanded system volume creation is complete. Proceed to the nextstep.
Generally, if a 4TB expanded system volume is created when the I/O load is low, it takes about 40minutes to complete the creation.
• When 100,000 files are accessed every day, secure a capacity of about 50GB as a one month standard.
2 Set the necessary parameters and execute the "set nas-audit" command of ETERNUS CLI to enable the auditlog function for each ETERNUS DX (disabled as default).
The following example enables the audit log function by specifying a generation of 60 days for saving theaudit log file.
set nas-audit -mode enable -rotate-count 60
-mode
Specify whether to enable or disable the audit log function for the target ETERNUS DX. To enable thisfunction, specify "enable" here.
-rotate-count
Optional. Specify the number of generations for saving the rotated audit log files.
If omitted, this parameter is set to 30.
3 Set the necessary parameters and execute the "set nas-share" command of ETERNUS CLI to enable the au-dit log function for each shared folder.
The following example is for when the audit log function is enabled for the shared folder name SHARE1.
set nas-share -share-name SHARE1 -audit-log enable
-share-name
Specify the shared folder name.
4. NAS Environment ConfigurationAudit Log Setup
126FUJITSU Storage ETERNUS DX S4/S3 series Hybrid Storage Systems Configuration Guide (NAS)
Copyright 2018 FUJITSU LIMITEDP3AM-8072-17ENZ0
-audit-log
Specify whether to enable or disable the audit log function for the shared folder. To enable the auditlog, specify "enable" here.
4 Execute the "create nas-engine -user" command of ETERNUS CLI to create a user account that is used to login to the audit log FTP.
The following example is for when user name USER1 is specified and a user account that is used to log inthe audit log FTP is created. After the command is executed, an input prompt is displayed. Specify a pass-word in the range of 8 to 32 characters.
create nas-engine-user -type audit -name USER1
-type
Specify the user type. Specify "audit" here to create a user account for the audit log FTP.
-name
Specify the user name.
The character string that can be specified for the user name has the following requirements.
• The number of characters that can be specified is 1 to 19 characters.
• The following types of characters can be used.
- Alphanumeric characters (US-ASCII code)
- Numerical characters
• The following reserved words cannot be specified.
adm, audio, bin, cdrom, cgred, daemon, dialout, dip, disk, floppy, ftp, games, gopher, halt, kmem,ldap, lock, lp, mail, mailnull, man, mem, nfsnobody, nobody, nscd, nslcd, ntp, operator, oprofile, root,rpc, rpcuser, saslauth, shareuser$, shutdown, smmsp, sshd, sync, sys, tape, tcpdump, tty, users,utempter, utmp, uucp, vcsa, video, wheel
• Different user account names must be used for the audit log FTP and the investigation log FTP.
• The user name that is registered in the authentication server cannot be used.
• The characters are case-insensitive for Active Directory authentication servers.
5 Execute the "show nas-audit-log-information" command of ETERNUS CLI to check the amount of audit logsthat are output for each shared folder.
show nas-audit-log-information -share-number 1
6 From the NIC-CA port, log in to the FTP using the account that was created in Step 4 to collect the audit logfile.
When the user account for the audit log FTP is used for the login, the directory that is exclusive for auditlogs is the home directory.
7 Analyze the audit log files that are collected.
8 After the analysis, the "clear nas-audit-log" command of ETERNUS CLI can be executed to delete unnecessa-ry audit log files.
The following example is for when the audit logs of shared folder #1 are deleted.
clear nas-audit-log -share-number 1
4. NAS Environment ConfigurationAudit Log Setup
127FUJITSU Storage ETERNUS DX S4/S3 series Hybrid Storage Systems Configuration Guide (NAS)
Copyright 2018 FUJITSU LIMITEDP3AM-8072-17ENZ0
Specify the shared folder that contains the audit log files that are to be deleted. Specify "-all", when all theaudit logs are targets.
-share-number
Specify the target shared folder using the shared folder number.
Unnecessary audit log files can also be deleted by specifying the shared folder with "-share-name" in-stead of "-share-number".
During the operation phase
• The target files during an audit log collection cannot be deleted even if the shared folder that is ena-bled for the audit log collection is specified as a deletion target.
• When a shared folder is deleted, the audit logs for this shared folder are deleted.
Meta Cache Distribution Settings
This section describes the settings when a meta cache distribution is performed. Automatic meta cache distribu-tion is disabled by default.
Manual Execution of Meta Cache DistributionIf the file system management data in the target NAS user volumes and NAS backup volumes are still in theinitial distribution state, even if meta cache distribution is executed, the meta cache will not be moved. Thecurrent distribution state of the file system management data can be confirmed from ETERNUS Web GUI or ETER-NUS CLI.
During the operation phase
During a meta cache distribution, operations for the target volume may be delayed for several minutes.
This section describes the procedure to perform a manual meta cache distribution.
4. NAS Environment ConfigurationMeta Cache Distribution Settings
128FUJITSU Storage ETERNUS DX S4/S3 series Hybrid Storage Systems Configuration Guide (NAS)
Copyright 2018 FUJITSU LIMITEDP3AM-8072-17ENZ0
1 In ETERNUS Web GUI, click the [Connectivity] tab on the navigation and then click "Meta Cache Distribu-tion" under "NAS" in [Category].
The [Meta Cache Distribution] screen appears.
2 Select the target volume and click [Initialize Distribution] in [Action].
A confirmation screen appears.
3 Click the [OK] button.
Meta cache distribution is executed and a completion screen appears.
4 Click the [Done] button.
The [Meta Cache Distribution] screen appears.
Automatic Execution of Meta Cache DistributionBy enabling the automatic execution of this function, a check is performed on whether or not a relocation isnecessary for all the NAS user volumes and NAS backup volumes when the NAS engine starts up and every houron the half hour, and a meta cache distribution is performed if required.
4. NAS Environment ConfigurationMeta Cache Distribution Settings
129FUJITSU Storage ETERNUS DX S4/S3 series Hybrid Storage Systems Configuration Guide (NAS)
Copyright 2018 FUJITSU LIMITEDP3AM-8072-17ENZ0
During the operation phase
• During a meta cache distribution, operations for the target volume may be delayed for several minutes.
• When the following functions and automatic meta cache distribution are executed at the same time, thefirst process is executed until completion and then the next process is performed. If the process that wasexecuted first does not complete even after about 5 minutes, an error occurs.
- Volume capacity expansion
- Snapshot acquisition (manual and automatic)
- NAS volume backup
This section describes the procedure to perform an automatic meta cache distribution.
1 In ETERNUS Web GUI, click the [Connectivity] tab on the navigation and then click "Meta Cache Distribu-tion" under "NAS" in [Category].
The [Meta Cache Distribution] screen appears.
2 Click [Enable Automatic Distribution] in [Action].
A confirmation screen appears.
3 Click the [OK] button.
Automatic meta cache distribution is set to "Enable" and a completion screen appears.
4 Click the [Done] button.
The [Meta Cache Distribution] screen appears.
4. NAS Environment ConfigurationMeta Cache Distribution Settings
130FUJITSU Storage ETERNUS DX S4/S3 series Hybrid Storage Systems Configuration Guide (NAS)
Copyright 2018 FUJITSU LIMITEDP3AM-8072-17ENZ0
5. Packet Trace Acquisition Settings
This chapter provides the required procedure to acquire packet traces.
The output trace information is saved in a system volume. To prevent a capacity shortage in the system volume,set an upper limit for the file size that is to be output in advance so that the file capacity does not exceed thefree space in the destination system volume.
After analyzing the trace information, delete any unnecessary trace information files in the ETERNUS DX.
During the configuration phase
• Packet trace acquisitions place load on the system and may reduce the performance of NAS I/Os.
Disabling the packet trace function during normal operation and enabling it to investigate errors is recom-mended.
• FTP is used to retrieve the trace information file from the ETERNUS DX. Check that the firewall setting forthe FTP connection of the NAS interface port is "open". This setting is "close" as default. For the procedure tomodify the firewall settings, refer to "FTP Setting" (page 107).
• When performing an FTP, use the FTP login account used for investigating logs. Although this account iscreated with an expiration date, the account is disabled even before the expiration date if the ETERNUS DXis turned off, the firmware is updated, or the controller is replaced.
• To acquire packet traces, the recommended timing is when the CM (CPU) busy ratio of the current operationis half the performance index or less. For details on the performance index, refer to "Performance Index"(page 60).
During the operation phase
• The creation date and time information of the files that are obtained using FTP are displayed in the Green-wich Mean Time (GMT).
• The output file is divided and created in the order of rotation. When the number of files exceeds the limit,information is output to the first file that was created and files are overwritten in chronological order fromthe oldest file.
• Packet trace acquisition is stopped when the ETERNUS DX is rebooted. This does not restart automatically.
In addition, the packet trace acquisition may stop if the network setting is changed or an error occurs in thenetwork port.
Use ETERNUS CLI to configure packet trace acquisitions.
The procedure for acquiring packet traces is provided below.
1 Check the free space in the system volume.
Specify the packet trace size that can be output so that the size does not exceed the free space.
131FUJITSU Storage ETERNUS DX S4/S3 series Hybrid Storage Systems Configuration Guide (NAS)
Copyright 2018 FUJITSU LIMITEDP3AM-8072-17ENZ0
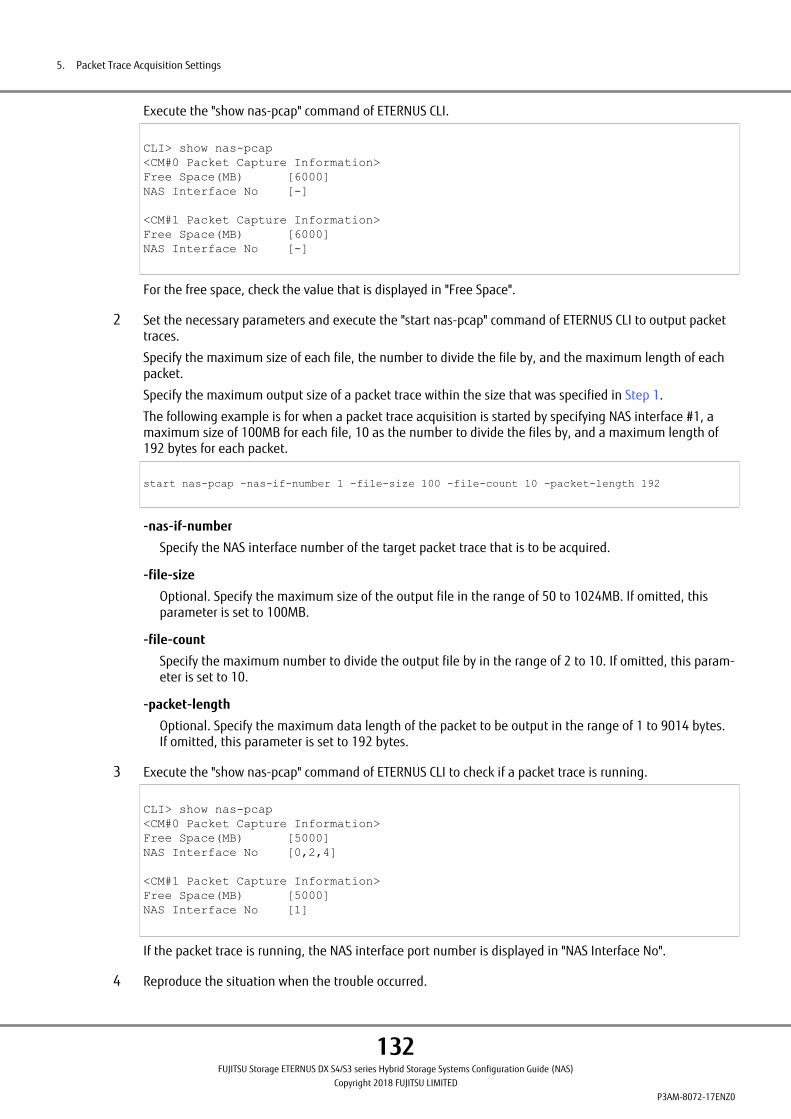
Execute the "show nas-pcap" command of ETERNUS CLI.
CLI> show nas-pcap<CM#0 Packet Capture Information>Free Space(MB) [6000]NAS Interface No [-]
<CM#1 Packet Capture Information>Free Space(MB) [6000]NAS Interface No [-]
For the free space, check the value that is displayed in "Free Space".
2 Set the necessary parameters and execute the "start nas-pcap" command of ETERNUS CLI to output packettraces.
Specify the maximum size of each file, the number to divide the file by, and the maximum length of eachpacket.
Specify the maximum output size of a packet trace within the size that was specified in Step 1.
The following example is for when a packet trace acquisition is started by specifying NAS interface #1, amaximum size of 100MB for each file, 10 as the number to divide the files by, and a maximum length of192 bytes for each packet.
start nas-pcap -nas-if-number 1 -file-size 100 -file-count 10 -packet-length 192
-nas-if-number
Specify the NAS interface number of the target packet trace that is to be acquired.
-file-size
Optional. Specify the maximum size of the output file in the range of 50 to 1024MB. If omitted, thisparameter is set to 100MB.
-file-count
Specify the maximum number to divide the output file by in the range of 2 to 10. If omitted, this param-eter is set to 10.
-packet-length
Optional. Specify the maximum data length of the packet to be output in the range of 1 to 9014 bytes.If omitted, this parameter is set to 192 bytes.
3 Execute the "show nas-pcap" command of ETERNUS CLI to check if a packet trace is running.
CLI> show nas-pcap<CM#0 Packet Capture Information>Free Space(MB) [5000]NAS Interface No [0,2,4]
<CM#1 Packet Capture Information>Free Space(MB) [5000]NAS Interface No [1]
If the packet trace is running, the NAS interface port number is displayed in "NAS Interface No".
4 Reproduce the situation when the trouble occurred.
5. Packet Trace Acquisition Settings
132FUJITSU Storage ETERNUS DX S4/S3 series Hybrid Storage Systems Configuration Guide (NAS)
Copyright 2018 FUJITSU LIMITEDP3AM-8072-17ENZ0
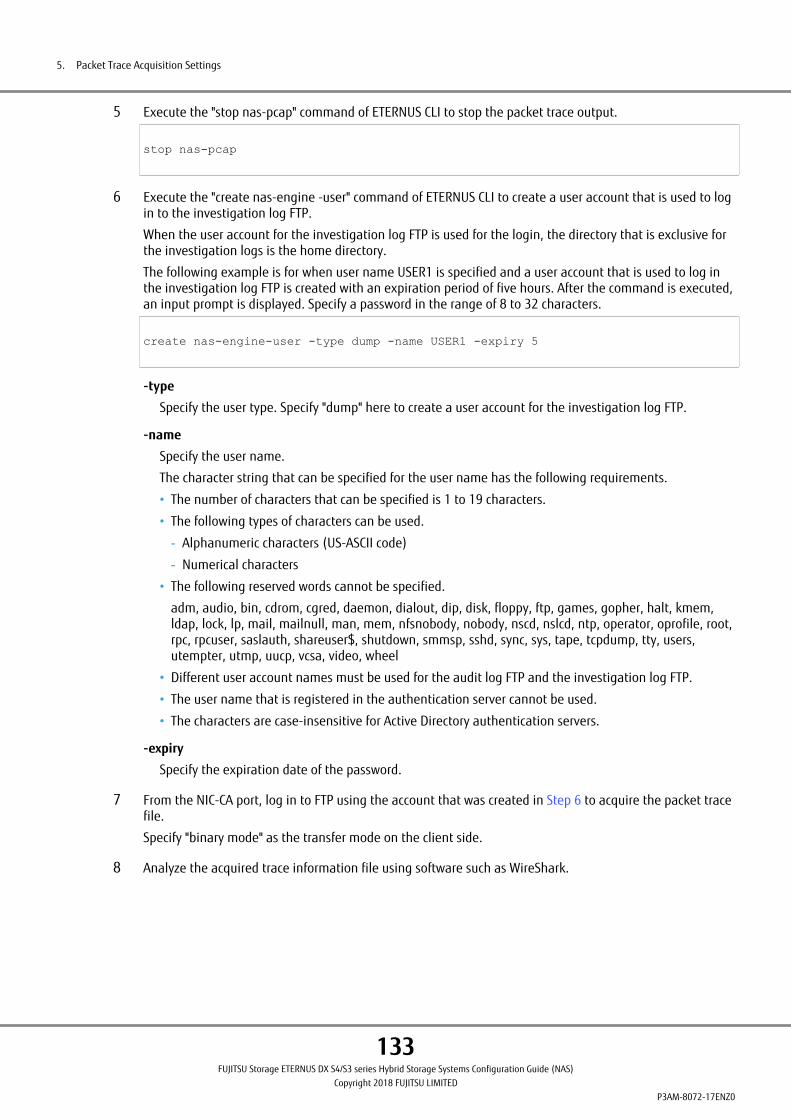
5 Execute the "stop nas-pcap" command of ETERNUS CLI to stop the packet trace output.
stop nas-pcap
6 Execute the "create nas-engine -user" command of ETERNUS CLI to create a user account that is used to login to the investigation log FTP.
When the user account for the investigation log FTP is used for the login, the directory that is exclusive forthe investigation logs is the home directory.
The following example is for when user name USER1 is specified and a user account that is used to log inthe investigation log FTP is created with an expiration period of five hours. After the command is executed,an input prompt is displayed. Specify a password in the range of 8 to 32 characters.
create nas-engine-user -type dump -name USER1 -expiry 5
-type
Specify the user type. Specify "dump" here to create a user account for the investigation log FTP.
-name
Specify the user name.
The character string that can be specified for the user name has the following requirements.
• The number of characters that can be specified is 1 to 19 characters.
• The following types of characters can be used.
- Alphanumeric characters (US-ASCII code)
- Numerical characters
• The following reserved words cannot be specified.
adm, audio, bin, cdrom, cgred, daemon, dialout, dip, disk, floppy, ftp, games, gopher, halt, kmem,ldap, lock, lp, mail, mailnull, man, mem, nfsnobody, nobody, nscd, nslcd, ntp, operator, oprofile, root,rpc, rpcuser, saslauth, shareuser$, shutdown, smmsp, sshd, sync, sys, tape, tcpdump, tty, users,utempter, utmp, uucp, vcsa, video, wheel
• Different user account names must be used for the audit log FTP and the investigation log FTP.
• The user name that is registered in the authentication server cannot be used.
• The characters are case-insensitive for Active Directory authentication servers.
-expiry
Specify the expiration date of the password.
7 From the NIC-CA port, log in to FTP using the account that was created in Step 6 to acquire the packet tracefile.
Specify "binary mode" as the transfer mode on the client side.
8 Analyze the acquired trace information file using software such as WireShark.
5. Packet Trace Acquisition Settings
133FUJITSU Storage ETERNUS DX S4/S3 series Hybrid Storage Systems Configuration Guide (NAS)
Copyright 2018 FUJITSU LIMITEDP3AM-8072-17ENZ0
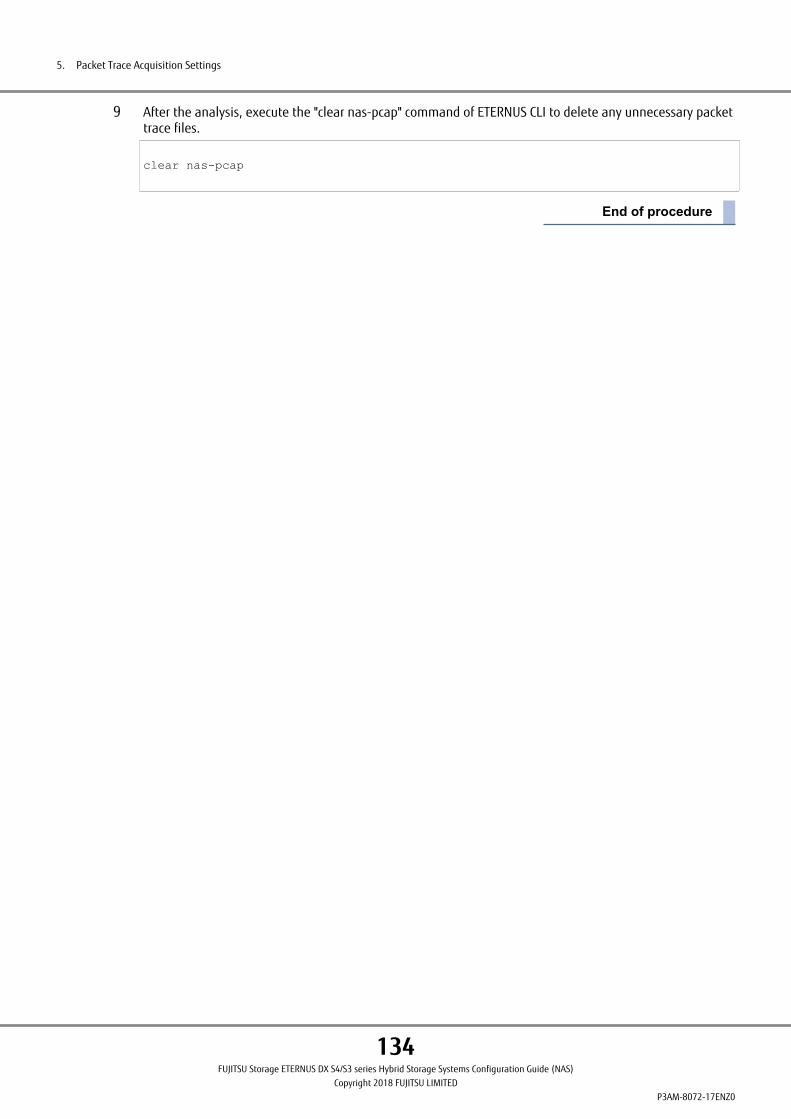
9 After the analysis, execute the "clear nas-pcap" command of ETERNUS CLI to delete any unnecessary packettrace files.
clear nas-pcap
5. Packet Trace Acquisition Settings
134FUJITSU Storage ETERNUS DX S4/S3 series Hybrid Storage Systems Configuration Guide (NAS)
Copyright 2018 FUJITSU LIMITEDP3AM-8072-17ENZ0
6. System Status Check
Check the status of the ETERNUS DX with ETERNUS Web GUI, ETERNUS CLI or the ETERNUS SF software.
If the file system capacity is checked immediately after the NAS volume is created, some capacity is recognizedas being a used area even when no file writing has been performed.
The file system capacity can be checked with the following methods:
• For CIFS client
Display the properties in Windows.
• For NFS client
Mount the file system via UNIX/Linux and then execute the "df" command.
• For ETERNUS Web GUI
Display the [NAS] screen of the [Connectivity] category.
• For ETERNUS CLI
Execute the "show nas-df" command.
135FUJITSU Storage ETERNUS DX S4/S3 series Hybrid Storage Systems Configuration Guide (NAS)
Copyright 2018 FUJITSU LIMITEDP3AM-8072-17ENZ0
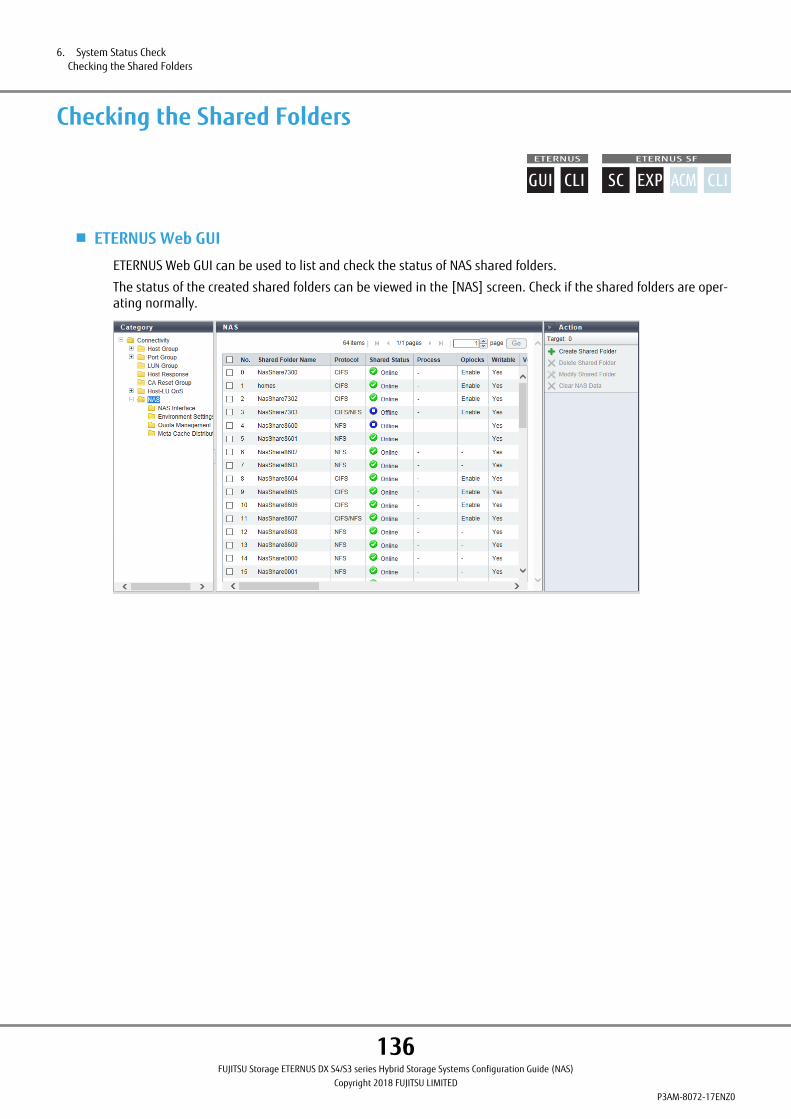
Checking the Shared Folders
■ ETERNUS Web GUI
ETERNUS Web GUI can be used to list and check the status of NAS shared folders.
The status of the created shared folders can be viewed in the [NAS] screen. Check if the shared folders are oper-ating normally.
6. System Status CheckChecking the Shared Folders
136FUJITSU Storage ETERNUS DX S4/S3 series Hybrid Storage Systems Configuration Guide (NAS)
Copyright 2018 FUJITSU LIMITEDP3AM-8072-17ENZ0
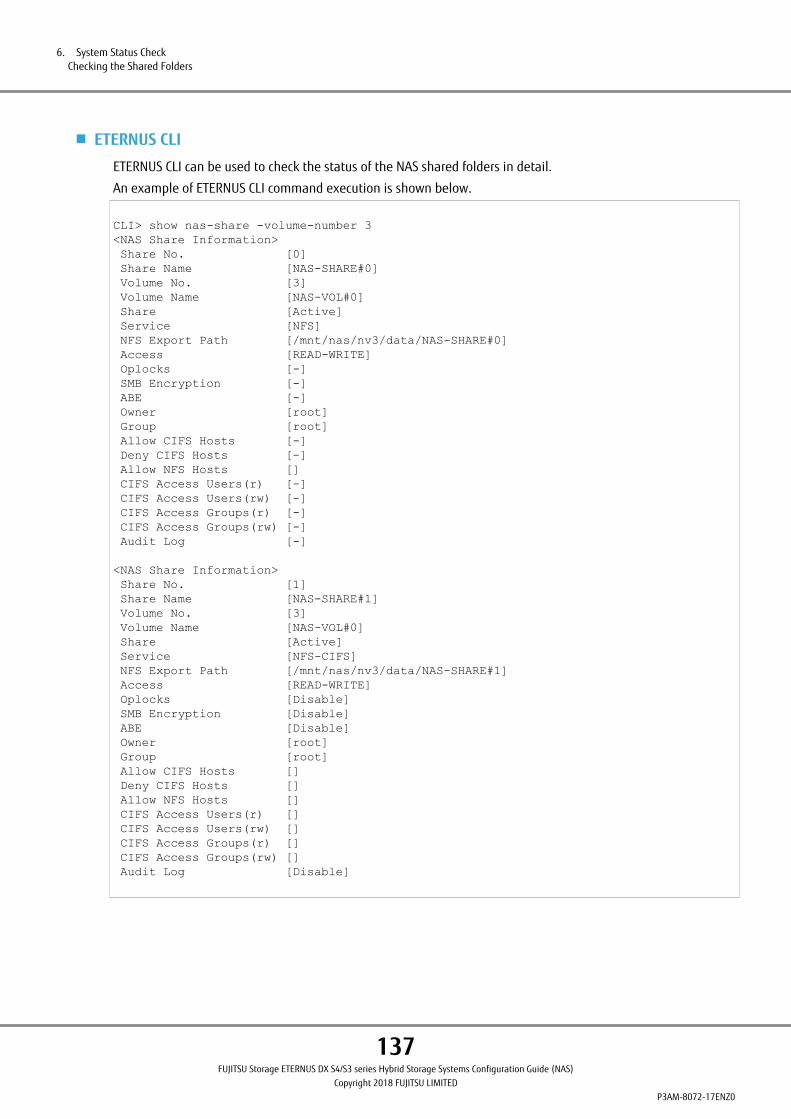
■ ETERNUS CLI
ETERNUS CLI can be used to check the status of the NAS shared folders in detail.
An example of ETERNUS CLI command execution is shown below.
CLI> show nas-share -volume-number 3<NAS Share Information> Share No. [0] Share Name [NAS-SHARE#0] Volume No. [3] Volume Name [NAS-VOL#0] Share [Active] Service [NFS] NFS Export Path [/mnt/nas/nv3/data/NAS-SHARE#0] Access [READ-WRITE] Oplocks [-] SMB Encryption [-] ABE [-] Owner [root] Group [root] Allow CIFS Hosts [-] Deny CIFS Hosts [-] Allow NFS Hosts [] CIFS Access Users(r) [-] CIFS Access Users(rw) [-] CIFS Access Groups(r) [-] CIFS Access Groups(rw) [-] Audit Log [-]
<NAS Share Information> Share No. [1] Share Name [NAS-SHARE#1] Volume No. [3] Volume Name [NAS-VOL#0] Share [Active] Service [NFS-CIFS] NFS Export Path [/mnt/nas/nv3/data/NAS-SHARE#1] Access [READ-WRITE] Oplocks [Disable] SMB Encryption [Disable] ABE [Disable] Owner [root] Group [root] Allow CIFS Hosts [] Deny CIFS Hosts [] Allow NFS Hosts [] CIFS Access Users(r) [] CIFS Access Users(rw) [] CIFS Access Groups(r) [] CIFS Access Groups(rw) [] Audit Log [Disable]
6. System Status CheckChecking the Shared Folders
137FUJITSU Storage ETERNUS DX S4/S3 series Hybrid Storage Systems Configuration Guide (NAS)
Copyright 2018 FUJITSU LIMITEDP3AM-8072-17ENZ0

Checking the Home Directories
■ ETERNUS CLI
The list of home directories can be checked from ETERNUS CLI.
An example of ETERNUS CLI command execution is shown below.
CLI> show nas-home-directorydomainA\userAdomainA\userAAdomainA\userAAAdomainB\userAdomainB\userBuserAuserBBASICuserABC
6. System Status CheckChecking the Home Directories
138FUJITSU Storage ETERNUS DX S4/S3 series Hybrid Storage Systems Configuration Guide (NAS)
Copyright 2018 FUJITSU LIMITEDP3AM-8072-17ENZ0
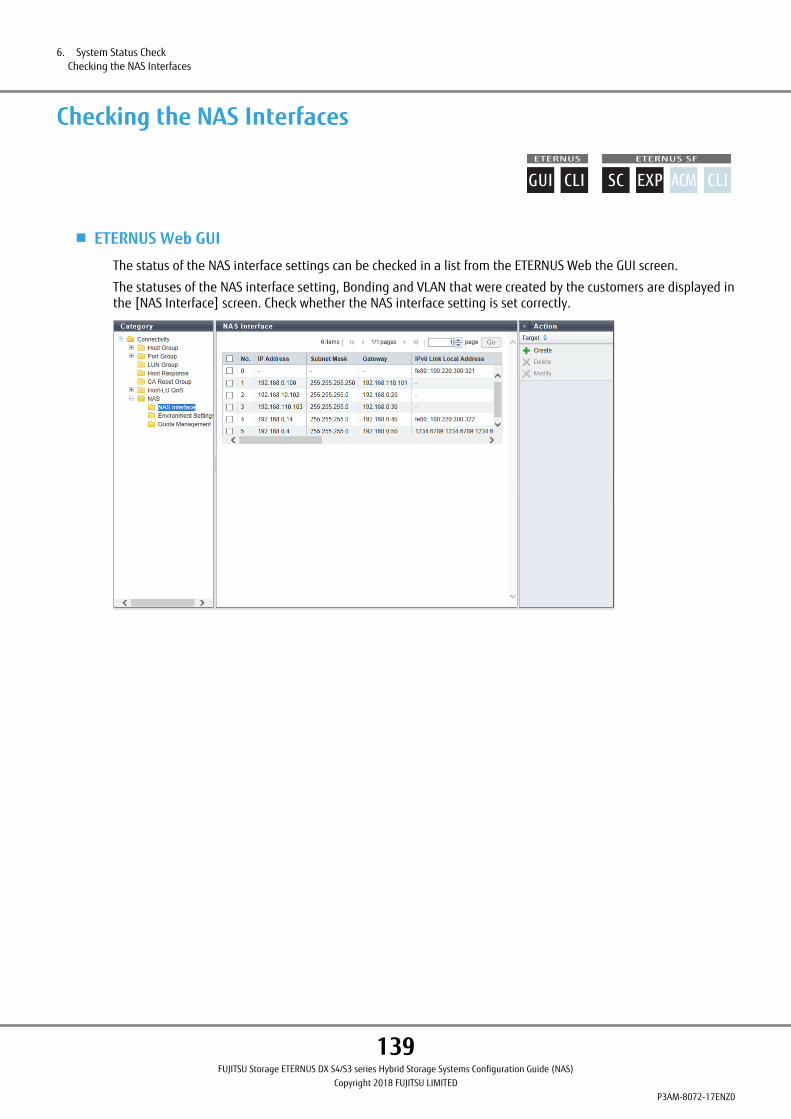
Checking the NAS Interfaces
■ ETERNUS Web GUI
The status of the NAS interface settings can be checked in a list from the ETERNUS Web the GUI screen.
The statuses of the NAS interface setting, Bonding and VLAN that were created by the customers are displayed inthe [NAS Interface] screen. Check whether the NAS interface setting is set correctly.
6. System Status CheckChecking the NAS Interfaces
139FUJITSU Storage ETERNUS DX S4/S3 series Hybrid Storage Systems Configuration Guide (NAS)
Copyright 2018 FUJITSU LIMITEDP3AM-8072-17ENZ0
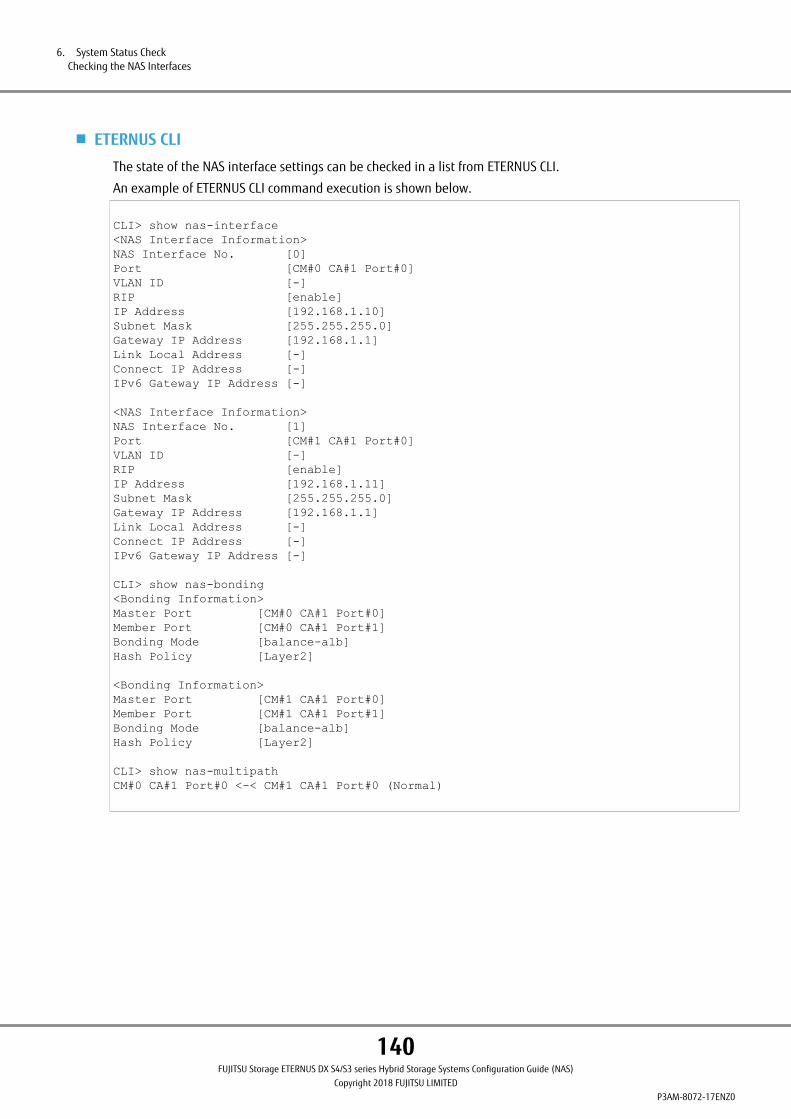
■ ETERNUS CLI
The state of the NAS interface settings can be checked in a list from ETERNUS CLI.
An example of ETERNUS CLI command execution is shown below.
CLI> show nas-interface<NAS Interface Information>NAS Interface No. [0]Port [CM#0 CA#1 Port#0]VLAN ID [-]RIP [enable]IP Address [192.168.1.10]Subnet Mask [255.255.255.0]Gateway IP Address [192.168.1.1]Link Local Address [-]Connect IP Address [-]IPv6 Gateway IP Address [-]
<NAS Interface Information>NAS Interface No. [1]Port [CM#1 CA#1 Port#0]VLAN ID [-]RIP [enable]IP Address [192.168.1.11]Subnet Mask [255.255.255.0]Gateway IP Address [192.168.1.1]Link Local Address [-]Connect IP Address [-]IPv6 Gateway IP Address [-]
CLI> show nas-bonding<Bonding Information>Master Port [CM#0 CA#1 Port#0]Member Port [CM#0 CA#1 Port#1]Bonding Mode [balance-alb]Hash Policy [Layer2]
<Bonding Information>Master Port [CM#1 CA#1 Port#0]Member Port [CM#1 CA#1 Port#1]Bonding Mode [balance-alb]Hash Policy [Layer2]
CLI> show nas-multipathCM#0 CA#1 Port#0 <-< CM#1 CA#1 Port#0 (Normal)
6. System Status CheckChecking the NAS Interfaces
140FUJITSU Storage ETERNUS DX S4/S3 series Hybrid Storage Systems Configuration Guide (NAS)
Copyright 2018 FUJITSU LIMITEDP3AM-8072-17ENZ0
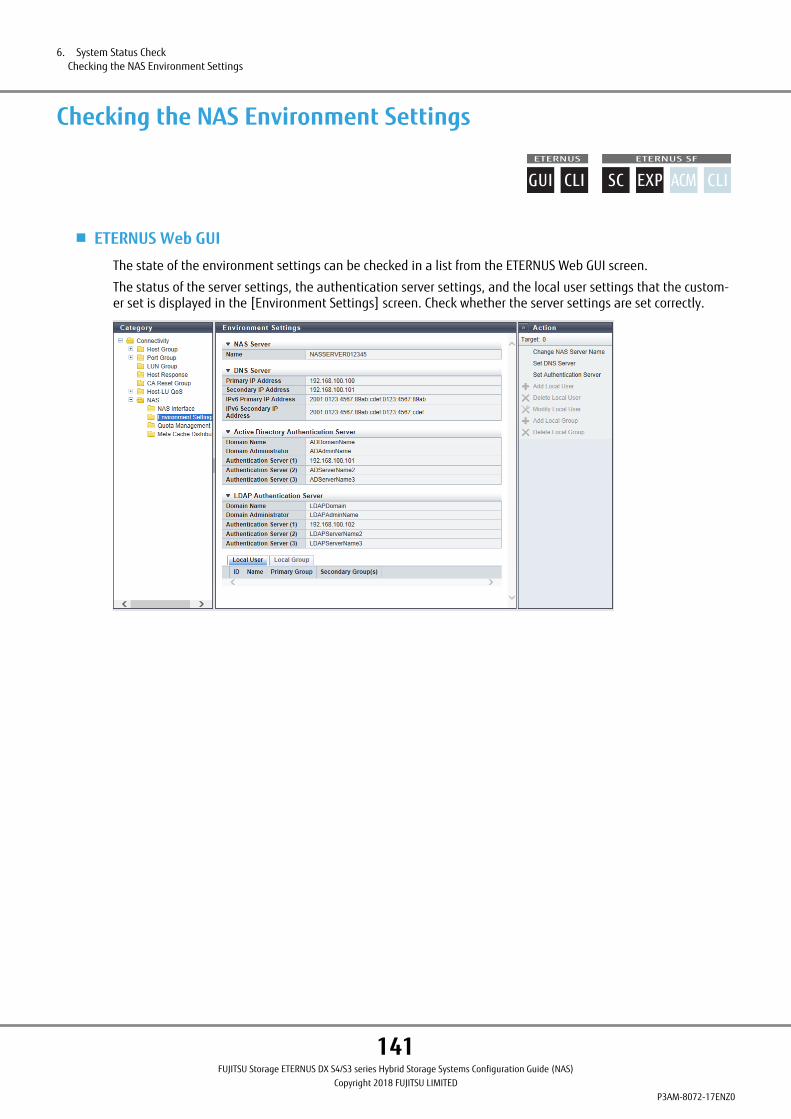
Checking the NAS Environment Settings
■ ETERNUS Web GUI
The state of the environment settings can be checked in a list from the ETERNUS Web GUI screen.
The status of the server settings, the authentication server settings, and the local user settings that the custom-er set is displayed in the [Environment Settings] screen. Check whether the server settings are set correctly.
6. System Status CheckChecking the NAS Environment Settings
141FUJITSU Storage ETERNUS DX S4/S3 series Hybrid Storage Systems Configuration Guide (NAS)
Copyright 2018 FUJITSU LIMITEDP3AM-8072-17ENZ0
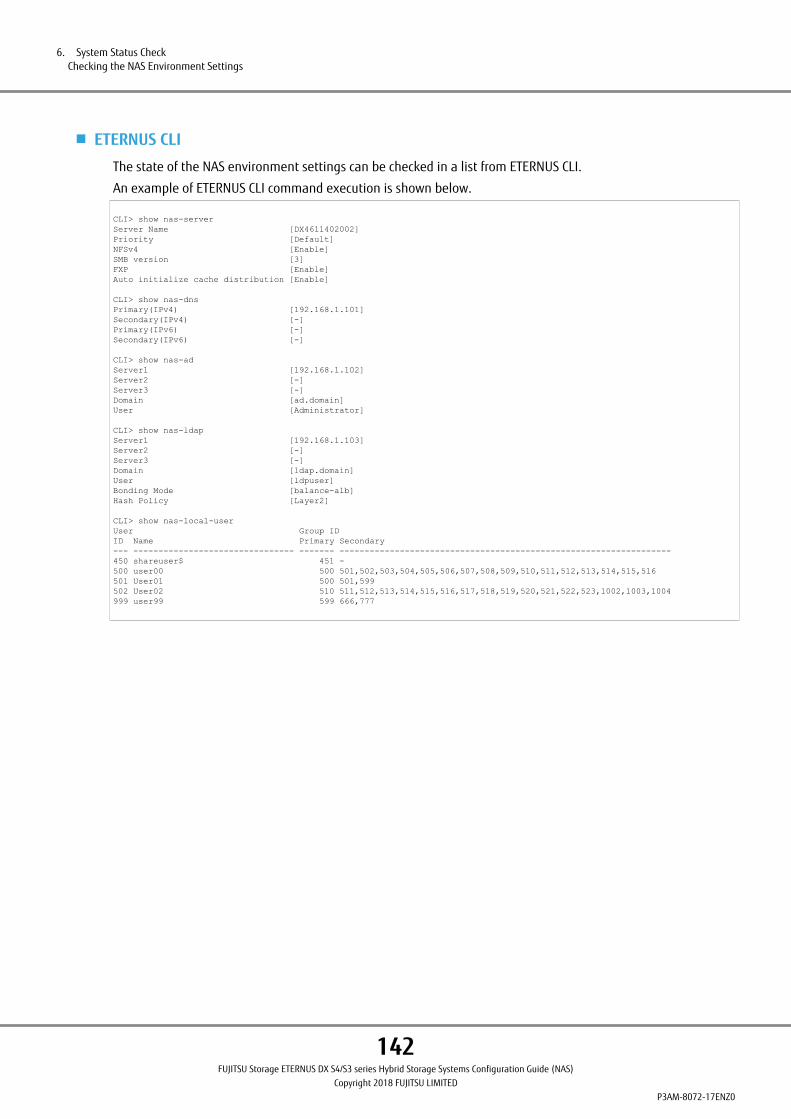
■ ETERNUS CLI
The state of the NAS environment settings can be checked in a list from ETERNUS CLI.
An example of ETERNUS CLI command execution is shown below.
CLI> show nas-serverServer Name [DX4611402002]Priority [Default]NFSv4 [Enable]SMB version [3]FXP [Enable]Auto initialize cache distribution [Enable]
CLI> show nas-dnsPrimary(IPv4) [192.168.1.101]Secondary(IPv4) [-]Primary(IPv6) [-]Secondary(IPv6) [-]
CLI> show nas-adServer1 [192.168.1.102]Server2 [-]Server3 [-]Domain [ad.domain]User [Administrator]
CLI> show nas-ldapServer1 [192.168.1.103]Server2 [-]Server3 [-]Domain [ldap.domain]User [ldpuser]Bonding Mode [balance-alb]Hash Policy [Layer2]
CLI> show nas-local-userUser Group IDID Name Primary Secondary --- -------------------------------- ------- ------------------------------------------------------------------450 shareuser$ 451 -500 user00 500 501,502,503,504,505,506,507,508,509,510,511,512,513,514,515,516501 User01 500 501,599502 User02 510 511,512,513,514,515,516,517,518,519,520,521,522,523,1002,1003,1004999 user99 599 666,777
6. System Status CheckChecking the NAS Environment Settings
142FUJITSU Storage ETERNUS DX S4/S3 series Hybrid Storage Systems Configuration Guide (NAS)
Copyright 2018 FUJITSU LIMITEDP3AM-8072-17ENZ0
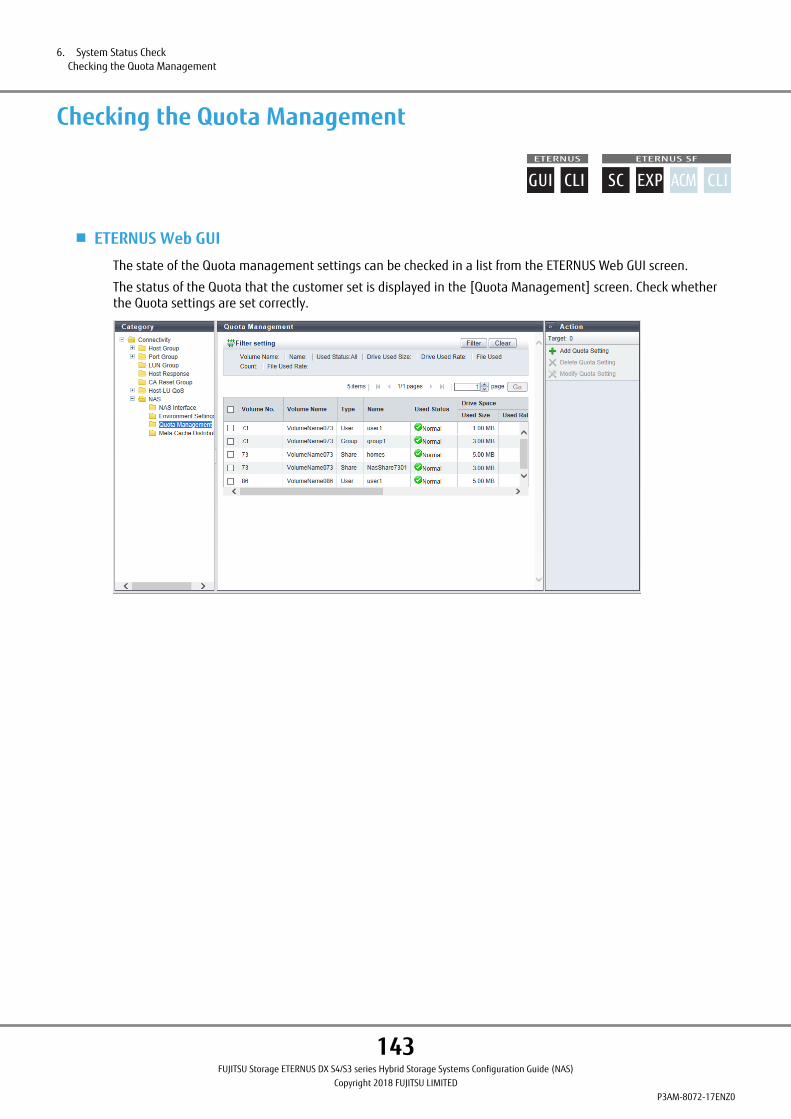
Checking the Quota Management
■ ETERNUS Web GUI
The state of the Quota management settings can be checked in a list from the ETERNUS Web GUI screen.
The status of the Quota that the customer set is displayed in the [Quota Management] screen. Check whetherthe Quota settings are set correctly.
6. System Status CheckChecking the Quota Management
143FUJITSU Storage ETERNUS DX S4/S3 series Hybrid Storage Systems Configuration Guide (NAS)
Copyright 2018 FUJITSU LIMITEDP3AM-8072-17ENZ0
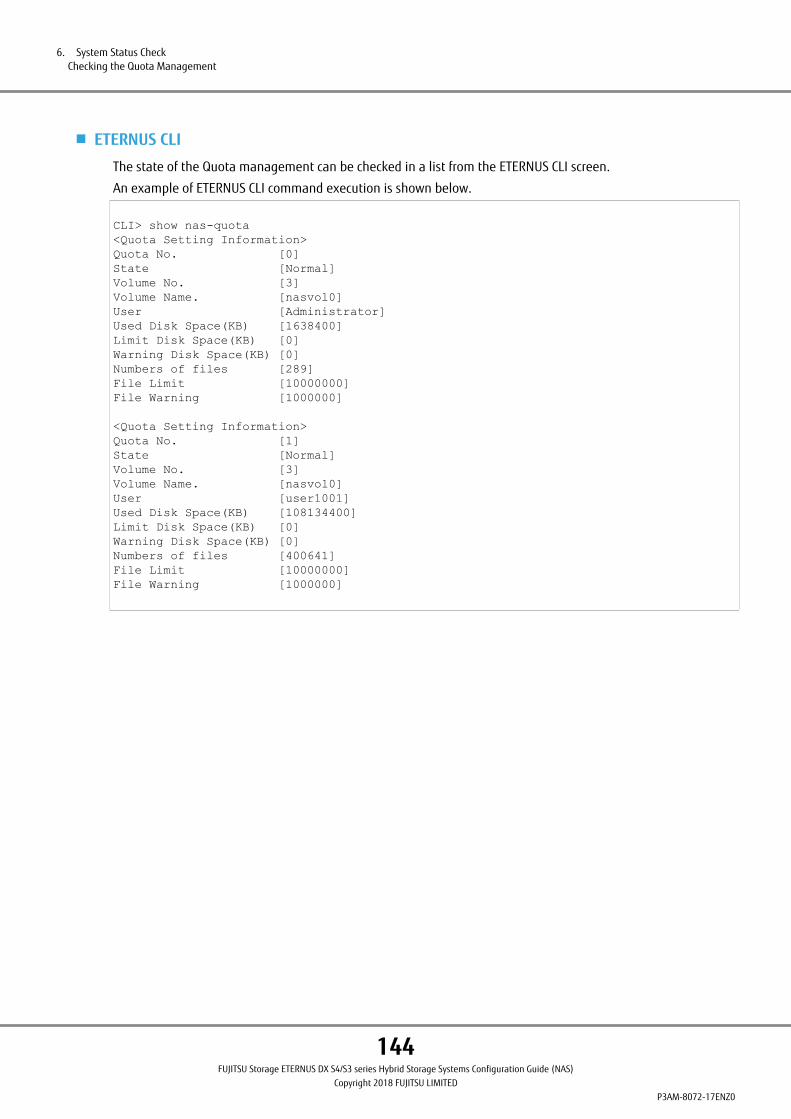
■ ETERNUS CLI
The state of the Quota management can be checked in a list from the ETERNUS CLI screen.
An example of ETERNUS CLI command execution is shown below.
CLI> show nas-quota<Quota Setting Information>Quota No. [0]State [Normal]Volume No. [3]Volume Name. [nasvol0]User [Administrator]Used Disk Space(KB) [1638400]Limit Disk Space(KB) [0]Warning Disk Space(KB) [0]Numbers of files [289]File Limit [10000000]File Warning [1000000]
<Quota Setting Information>Quota No. [1]State [Normal]Volume No. [3]Volume Name. [nasvol0]User [user1001]Used Disk Space(KB) [108134400]Limit Disk Space(KB) [0]Warning Disk Space(KB) [0]Numbers of files [400641]File Limit [10000000]File Warning [1000000]
6. System Status CheckChecking the Quota Management
144FUJITSU Storage ETERNUS DX S4/S3 series Hybrid Storage Systems Configuration Guide (NAS)
Copyright 2018 FUJITSU LIMITEDP3AM-8072-17ENZ0
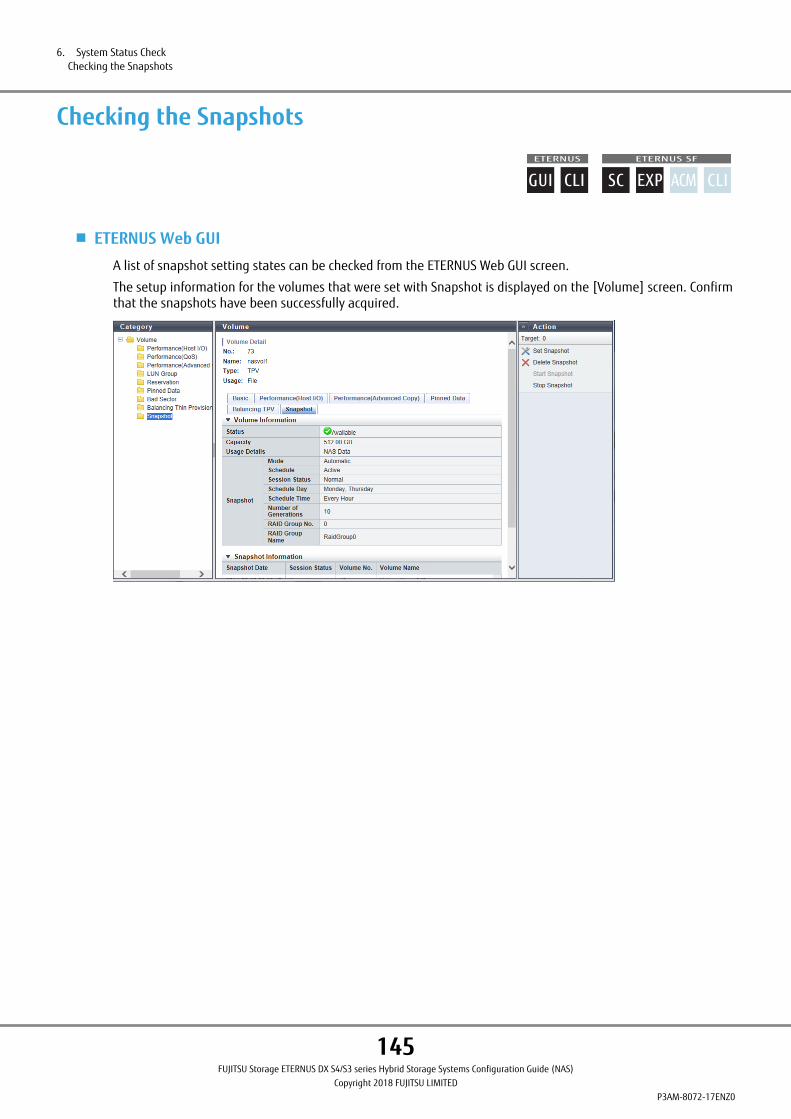
Checking the Snapshots
■ ETERNUS Web GUI
A list of snapshot setting states can be checked from the ETERNUS Web GUI screen.
The setup information for the volumes that were set with Snapshot is displayed on the [Volume] screen. Confirmthat the snapshots have been successfully acquired.
6. System Status CheckChecking the Snapshots
145FUJITSU Storage ETERNUS DX S4/S3 series Hybrid Storage Systems Configuration Guide (NAS)
Copyright 2018 FUJITSU LIMITEDP3AM-8072-17ENZ0
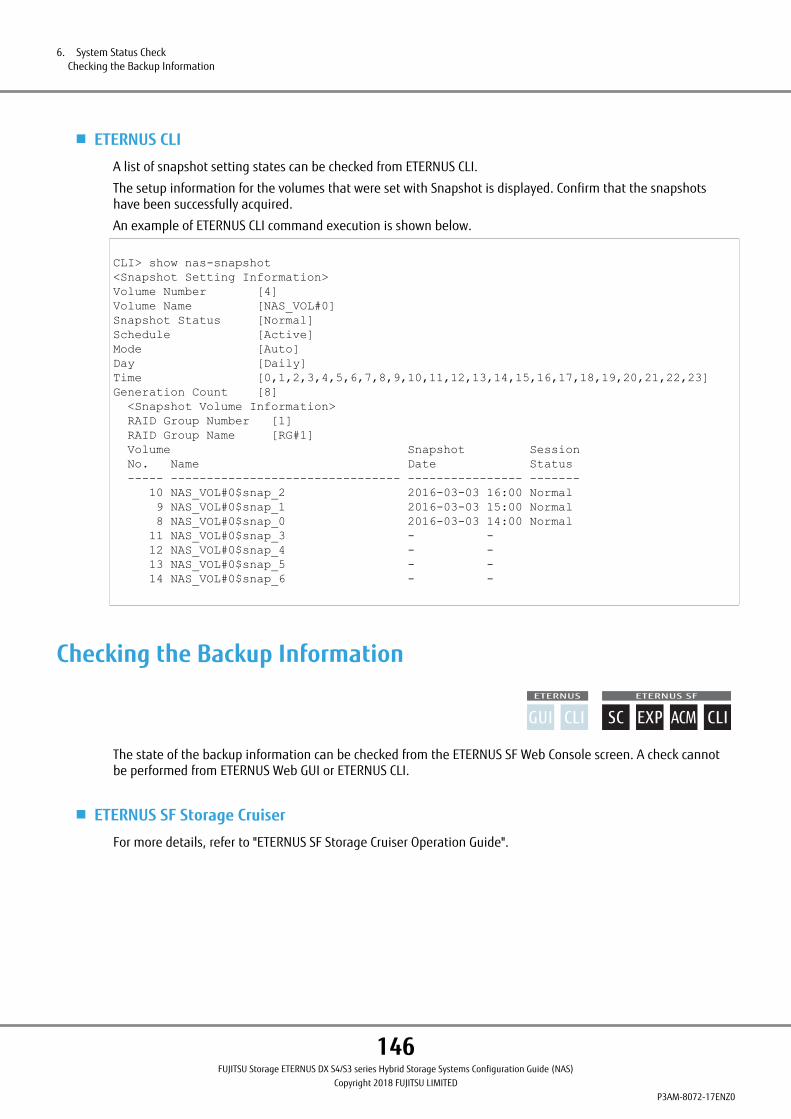
■ ETERNUS CLI
A list of snapshot setting states can be checked from ETERNUS CLI.
The setup information for the volumes that were set with Snapshot is displayed. Confirm that the snapshotshave been successfully acquired.
An example of ETERNUS CLI command execution is shown below.
CLI> show nas-snapshot<Snapshot Setting Information>Volume Number [4]Volume Name [NAS_VOL#0]Snapshot Status [Normal]Schedule [Active]Mode [Auto]Day [Daily]Time [0,1,2,3,4,5,6,7,8,9,10,11,12,13,14,15,16,17,18,19,20,21,22,23]Generation Count [8] <Snapshot Volume Information> RAID Group Number [1] RAID Group Name [RG#1] Volume Snapshot Session No. Name Date Status ----- -------------------------------- ---------------- ------- 10 NAS_VOL#0$snap_2 2016-03-03 16:00 Normal 9 NAS_VOL#0$snap_1 2016-03-03 15:00 Normal 8 NAS_VOL#0$snap_0 2016-03-03 14:00 Normal 11 NAS_VOL#0$snap_3 - - 12 NAS_VOL#0$snap_4 - - 13 NAS_VOL#0$snap_5 - - 14 NAS_VOL#0$snap_6 - -
Checking the Backup Information
The state of the backup information can be checked from the ETERNUS SF Web Console screen. A check cannotbe performed from ETERNUS Web GUI or ETERNUS CLI.
■ ETERNUS SF Storage Cruiser
For more details, refer to "ETERNUS SF Storage Cruiser Operation Guide".
6. System Status CheckChecking the Backup Information
146FUJITSU Storage ETERNUS DX S4/S3 series Hybrid Storage Systems Configuration Guide (NAS)
Copyright 2018 FUJITSU LIMITEDP3AM-8072-17ENZ0
7. How to Access from Clients
Access from CIFS ClientsTo gain access via Windows, assign a network drive and set file sharing to the shared folder.
To assign a network drive, enter the following string in the address bar.
\\IP_address_of_the_NAS_interface\Shared_folder_name
The authentication process during access varies depending on whether an authentication server or local userauthentication is set.
• When Active Directory authentication is used
Enter the user name and password that are registered in the Active Directory authentication server. Specify theuser name in the following format:
netbios_domain_name\User_name
Example: domain\user1
Authentication is not required for a client that previously accessed the Active Directory authentication server.
• When local user authentication is used
Enter the user name and password that are registered as a local user. Note that an authentication is not re-quired when the same user name and password are used for both the ETERNUS DX and the CIFS client.
• When authentication is not used
Enter "shareuser$" for the user name and "share!" for the password.
For controller firmware versions V10L53 and later, "shareuser$" can be deleted and recreated. However, theprevious password (share!) cannot be specified for the re-creation because the password must contain eightcharacters or more.
During the operation phase
If the I/O load is increased and CIFS is used for connections between the Windows 10 client and the CIFSshared folder or the CIFS/NFS shared folder where SMB Encryption is enabled, there are cases in which theshared folder may become disconnected. For that case, reconnect the shared folder.
If the connection to the shared folder is disconnected again even after reconnecting, review the amount of I/Ofrom the Windows 10 client to the shared folder.
147FUJITSU Storage ETERNUS DX S4/S3 series Hybrid Storage Systems Configuration Guide (NAS)
Copyright 2018 FUJITSU LIMITEDP3AM-8072-17ENZ0
Access from NFS ClientsTo perform access via UNIX/Linux, mount to the shared folder. Log in to UNIX/Linux and execute the "su" com-mand to switch the user to the administrator. Mount the shared folder by executing the "mount" command toallow access and then log in to UNIX/Linux via LDAP authentication. Writing to or reading from the shared folderbecomes available.
During the operation phase
• When mounting from an NFS client, if the "mount" command is executed without specifying the "rsize" op-tion or the "wsize" option, the buffer size that is applied during Read/Write operations is set. The settingvalue varies depending on the models.
Model Setting value
ETERNUS DX100 S4/DX100 S3 512KB
ETERNUS DX200 S4/DX200 S3 1MB
ETERNUS DX500 S4/DX500 S3 1MB
ETERNUS DX600 S4/DX600 S3 1MB
In this case, data with the same size as the buffer is resent to environments where access from remote sitesis retransmitted frequently. When mounting from an NFS client, specify the "rsize" option or the "wsize" op-tion as required to reduce the buffer size.
The buffer size setting may be different depending on the NFS client. For details, check the specifications ofthe NFS client.
• If NFS v4.0 is enabled and version specification is omitted when mounting from the client, the followingclients are connected with NFS v4.0.
- Red Hat Enterprise Linux 6 or later
- Solaris 10 or later
During the operation phase
When the limit value of the quota setting is reached during a file operation, that file operation fails (or causesan error). However, if a sync option is not specified when an NFS mount is performed from an NFS client, theerror is not notified.
Logging in to UNIX/Linux enables access to the shared folders when LDAP authentication is not used.
Specify the following character strings when executing the "mount" command.
Note that the <Path_of_the_shared_folder> can be specified with one of the following methods.
• /mnt/nas/nv<Volume_number>/data/<Shared_folder_name>
• The <NFS Export Path> that can be checked with the "show nas-share" command of ETERNUS CLI.
For a display example of the "show nas-share" command, refer to the execution example of the ETERNUS CLIcommand in "Checking the Shared Folders" (page 136).
7. How to Access from ClientsAccess from NFS Clients
148FUJITSU Storage ETERNUS DX S4/S3 series Hybrid Storage Systems Configuration Guide (NAS)
Copyright 2018 FUJITSU LIMITEDP3AM-8072-17ENZ0
● For Solaris
• When the controller firmware version is V10L51 or later, executing the following command performs a mountwith NFS v4.0.
mount -F nfs <IP_address_of_the_NAS_interface>:<Path_of_the_shared_folder> <Mount_destination_directory>
• Executing the following command performs a mount with NFS v3.
mount -F nfs -o vers=3 <NAS_host_name>:<Path_of_the_shared_folder> <Mount_destination_directory>
• Executing the following command performs a mount with NFS v4.0.
mount -F nfs -o vers=4 <IP_address_of_the_NAS_interface>:<Path_of_the_shared_folder> <Mount_destination_directory>
● For Linux
• When the controller firmware version is V10L51 or later, executing the following command performs a mountwith NFS v4.0.
mount -t nfs <IP_address_of_the_NAS_interface>:<Path_of_the_shared_folder> <Mount_destination_directory>
• Executing the following command performs a mount with NFS v3.
mount -t nfs -o nfsvers=3 <IP_address_of_the_NAS_interface>:<Path_of_the_shared_folder> <Mount_destination_directory>
• Executing the following command performs a mount with NFS v4.0.
mount -t nfs4 <IP_address_of_the_NAS_interface>:<Path_of_the_shared_folder> <Mount_destination_directory>
For details on the function to automatically perform mounting at the startup of the UNIX/Linux OS, refer to themanuals of the relevant OS.
7. How to Access from ClientsAccess from NFS Clients
149FUJITSU Storage ETERNUS DX S4/S3 series Hybrid Storage Systems Configuration Guide (NAS)
Copyright 2018 FUJITSU LIMITEDP3AM-8072-17ENZ0
8. Backup/Restore Settings
This chapter provides the settings required to back up NAS volumes and the procedures to back up and restoreNAS volumes.
ETERNUS SF AdvancedCopy Manager is required for using the backup/restore function.
A configuration for the backup/restore function cannot be performed from ETERNUS Web GUI or ETERNUS CLI.
Backup Settings
For more details, refer to "ETERNUS SF Web Console Guide".
Backup
For more details, refer to "ETERNUS SF Web Console Guide".
Restoration
For more details, refer to "ETERNUS SF Web Console Guide".
150FUJITSU Storage ETERNUS DX S4/S3 series Hybrid Storage Systems Configuration Guide (NAS)
Copyright 2018 FUJITSU LIMITEDP3AM-8072-17ENZ0
9. Backup Software Settings
Use backup software to back up or restore files using the ETERNUS DX as a backup device. Data is transferred tothe NAS user volume in the ETERNUS DX through the NAS network.
This chapter describes the necessary settings and notes for backup software that can be used in NAS environ-ments for the ETERNUS DX.
During the operation phase
When restoring NAS user volumes, restore them to existing NAS user volumes or to newly created NAS uservolumes without deleting the existing ones.
During the configuration phase
For details on how to set up and operate backup software, refer to the manual for the backup software.
Notes When Using Arcserve BackupWhen Active Directory authentication is being performed, the user who is using Arcserve Backup must belong tothe "Domain Admins" group.
When local user authentication is being performed, the user who is using Arcserve Backup must belong to "BUIL-TIN\Administrators" or "BUILTIN\Backup Operators".
If the controller firmware version is earlier than V10L53 and "shareuser$" is used, Arcserve Backup can be usedwith "shareuser$".
151FUJITSU Storage ETERNUS DX S4/S3 series Hybrid Storage Systems Configuration Guide (NAS)
Copyright 2018 FUJITSU LIMITEDP3AM-8072-17ENZ0
Notes When Using NetVault SmartDisk
In Red Hat Enterprise Linux environments, to back up data to a shared folder that was created for NFS sharedenvironments using NetVault SmartDisk, perform either of the following settings.
• To set "no_root_squash" to all backup hosts that use the shared folder, specify "root" for "Owner" and "Group" ofthe shared folder.
For ETERNUS CLI, if "Owner" and "Group" are omitted, "root" is specified.
• To set "no_root_squash" to a specific backup host, use the "create nas-share" command or the "set nas-share"command of ETERNUS CLI to specify the "no_root_squash" option for the backup host.
This is available for controller firmware versions V10L53 and later.
For more details, refer to "ETERNUS CLI User's Guide".
Notes When Using NetWorker
In Red Hat Enterprise Linux environments or in Solaris OS environments, to back up data to a shared folder thatwas created for NFS shared environments using NetWorker, perform either of the following settings.
• To set "no_root_squash" to all backup hosts that use the shared folder, specify "root" for "Owner" and "Group" ofthe shared folder.
For ETERNUS CLI, if "Owner" and "Group" are omitted, "root" is specified.
• To set "no_root_squash" to a specific backup host, use the "create nas-share" command or the "set nas-share"command of ETERNUS CLI to specify the "no_root_squash" option for the backup host.
This is available for controller firmware versions V10L53 and later.
For more details, refer to "ETERNUS CLI User's Guide".
9. Backup Software SettingsNotes When Using NetVault SmartDisk
152FUJITSU Storage ETERNUS DX S4/S3 series Hybrid Storage Systems Configuration Guide (NAS)
Copyright 2018 FUJITSU LIMITEDP3AM-8072-17ENZ0

Notes When Using NetBackup
In Red Hat Enterprise Linux environments or in Solaris OS environments, to back up data to a shared folder thatwas created for NFS shared environments using NetBackup, perform either of the following settings.
• To set "no_root_squash" to all backup hosts that use the shared folder, specify "root" for "Owner" and "Group" ofthe shared folder.
For ETERNUS CLI, if "Owner" and "Group" are omitted, "root" is specified.
• To set "no_root_squash" to a specific backup host, use the "create nas-share" command or the "set nas-share"command of ETERNUS CLI to specify the "no_root_squash" option for the backup host.
This is available for controller firmware versions V10L53 and later.
For more details, refer to "ETERNUS CLI User's Guide".
The ETERNUS DX is not displayed for "network" in the left frame of the NetBackup [Backup, Archive, and Restore]backup screen because of the specifications of the ETERNUS DX. Therefore, folders and files in the CIFS sharedenvironments of the ETERNUS DX cannot be backed up. Perform manual backups or scheduled backups using apolicy.
In Windows environments, when data is restored to a shared folder that was created for CIFS shared environ-ments using NetBackup, the audit information is not restored.
Notes When Using ETERNUS SF TSMIn Windows environments, to back up data from a shared folder that was created for CIFS shared environmentsusing ETERNUS SF TSM, set "skipntpermissions yes" in the "dsm.opt" file.
When backups are performed from CIFS shared environments, the audit information is not backed up.
9. Backup Software SettingsNotes When Using NetBackup
153FUJITSU Storage ETERNUS DX S4/S3 series Hybrid Storage Systems Configuration Guide (NAS)
Copyright 2018 FUJITSU LIMITEDP3AM-8072-17ENZ0
10. Troubleshooting
This chapter explains how to troubleshoot the errors that occur during a NAS environment system configurationor system operation.
Configuration ErrorsIf the problem persists, contact your maintenance engineer according to "Required Information for Inquiries"(page 164).
Table 17 Configuration Errors
No. Symptom Cause Resolution
1 An error message "ED198 (Proc-ess is timeout.)" or "ED710 (NASinternal error.)" is output whenthe "set nas-ad" command orthe "create nas-share" commandis executed.
A network error occurred creatingan environment where commu-nication is temporarily not possi-ble.
Execute the command again.
2 An error message "ED710 (NASinternal error.)" is output whenthe "create nas-volume" com-mand is executed.
The free space in the Thin Provi-sioning Pool (TPP) is insufficient.
If the free capacity in the TPP is insufficient, delete thecreated NAS volumes, secure 417GB or more free ca-pacity, and then execute the "create nas-volume"command to create NAS volumes.
154FUJITSU Storage ETERNUS DX S4/S3 series Hybrid Storage Systems Configuration Guide (NAS)
Copyright 2018 FUJITSU LIMITEDP3AM-8072-17ENZ0
No. Symptom Cause Resolution
3 An error message "ED727 (Do-main join error.)" is output whenthe "create nas-share" commandor the "set nas-ad" command isexecuted.
• The Active Directory authenti-cation server setting is incor-rect.
• No Active Directory servers areregistered in the DNS.
• The NAS interface setting is in-correct.
• If Active Directory was previ-ously set using an existing do-main within the same domaintree as the specified domain,the Active Directory settingmay fail due to a Windows re-striction (https://tech-net.microsoft.com/en-us/library/dn535779(v=ws.11).aspx) that the machinewith an overlapping ServicePrincipal Name (SPN) for Ac-tive Directory cannot exist inthe same forest.
• If the IP address for the Active Directory server is in-correctly set- If an error message is output after executing the
"set nas-ad" command, set the correct IP address,and then re-execute the command.
- If an error message is output after executing the"create nas-share" command, set the correct IPaddress, execute the "set nas-ad" command, andthen re-execute the "create nas-share" command.
• If the domain name of the Active Directory server isincorrectly set- If an error message is output after executing the
"set nas-ad" command, set the correct domainname, and then re-execute the command.
- If an error message is output after executing the"create nas-share" command, set the correct do-main name, execute the "set nas-ad" command,and then re-execute the "create nas-share" com-mand.
• If a user that holds authority over the Active Direc-tory was not specified as the domain administratorfor the Active Directory using the "set nas-ad" com-mand or if that user's password is incorrect- If an error message is output after executing the
"set nas-ad" command, specify the correct user,and then re-execute the command.
- If an error message is output after executing the"create nas-share" command, specify the correctuser, execute the "set nas-ad" command, andthen re-execute the "create nas-share" command.
• If Active Directory servers are not registered in theDNS, configure the DNS so the FQDN can be re-solved for the Active Directory, and then re-executethe command.
• If the NAS interface setting is wrong, correctly setthe value. Make sure that the NAS interface is in anActive-Active connection state, and then re-executethe command.
10. TroubleshootingConfiguration Errors
155FUJITSU Storage ETERNUS DX S4/S3 series Hybrid Storage Systems Configuration Guide (NAS)
Copyright 2018 FUJITSU LIMITEDP3AM-8072-17ENZ0
No. Symptom Cause Resolution
3 An error message "ED727 (Do-main join error.)" is output whenthe "create nas-share" commandor the "set nas-ad" command isexecuted.
• The Active Directory authenti-cation server setting is incor-rect.
• No Active Directory servers areregistered in the DNS.
• The NAS interface setting is in-correct.
• If Active Directory was previ-ously set using an existing do-main within the same domaintree as the specified domain,the Active Directory settingmay fail due to a Windows re-striction (https://tech-net.microsoft.com/en-us/library/dn535779(v=ws.11).aspx) that the machinewith an overlapping ServicePrincipal Name (SPN) for Ac-tive Directory cannot exist inthe same forest.
• When checking the Directory Service of the applica-tion and the service log from the event viewer ofthe specified Active Directory server in environ-ments that use a domain tree configuration for Ac-tive Directory and the following message is output
Error XX/XX/20XX XX:XX:XX XX ActiveDirectory_DomainService 2974 Global Catalog ----------------------------- The attribute value provided is not unique in the forest or partition. Attribute: servicePrincipalName Value=HOST/SERVER CN=SERVER,CN=Computers,DC=child,DC=DXS3TEST3,DC=LOCAL Winerror: 8647 See http://go.microsoft.com/fwlink/?LinkID=279782 for more details on this policy. -----------------------------
Perform one of the following procedures.- Use an Active Directory domain (such as a parent
domain and a child domain) that is different fromthe specified Active Directory domain to deletethe computer account with the NAS server nameof the ETERNUS DX.For information on how to delete the computeraccounts, refer to the following URL.https://technet.microsoft.com/en-us/library/cc754624.aspx
- Change the NAS server name from ETERNUS WebGUI or ETERNUS CLI of the ETERNUS DX.
4 An error message "ED728 (Serv-er connection error.)" is outputwhen the "create nas-share"command, the "set nas-ad" com-mand, or the "set nas-ldap"command is executed.
• A network error has occurred.• The NAS interface setting is in-
correct.
• If an unknown error occurs on the network and com-munication is not possible, communication with theActive Directory authentication server may tempora-rily become unavailable. Wait for a while and thenexecute the command again.
• If the NAS interface setting is wrong, correctly setthe value. Make sure that the NAS interface is in anActive-Active connection state, and then re-executethe command.
5 An error message "ED729 (Clockskew too great.)" is output whenthe "create nas-share" commandor the "set nas-ad" command isexecuted.
The time for the Active Directoryauthentication server and thetime specified in the ETERNUS DXdiffer by five minutes or more.
The time synchronization setting is incorrect and thetime of the Active Directory authentication server andthe time specified in the ETERNUS DX may differ byfive minutes or more. Synchronize the time and thenexecute the command again.
6 An error message "ED72A (Im-proper user or group.)" is outputwhen the "create nas-share"command is executed.
The user name or the groupname is incorrect.
A user name or group name that cannot be used mayhave been specified. Specify a correct user name orgroup name, and then re-execute the command.
7 An error message "ED72B (Useror group does not exists.)" isoutput when the "create nas-share" command is executed.
The user name or the groupname is incorrect.
The specified user name or group name does not ex-ist. Specify a correct user name or group name, andthen re-execute the command.
10. TroubleshootingConfiguration Errors
156FUJITSU Storage ETERNUS DX S4/S3 series Hybrid Storage Systems Configuration Guide (NAS)
Copyright 2018 FUJITSU LIMITEDP3AM-8072-17ENZ0
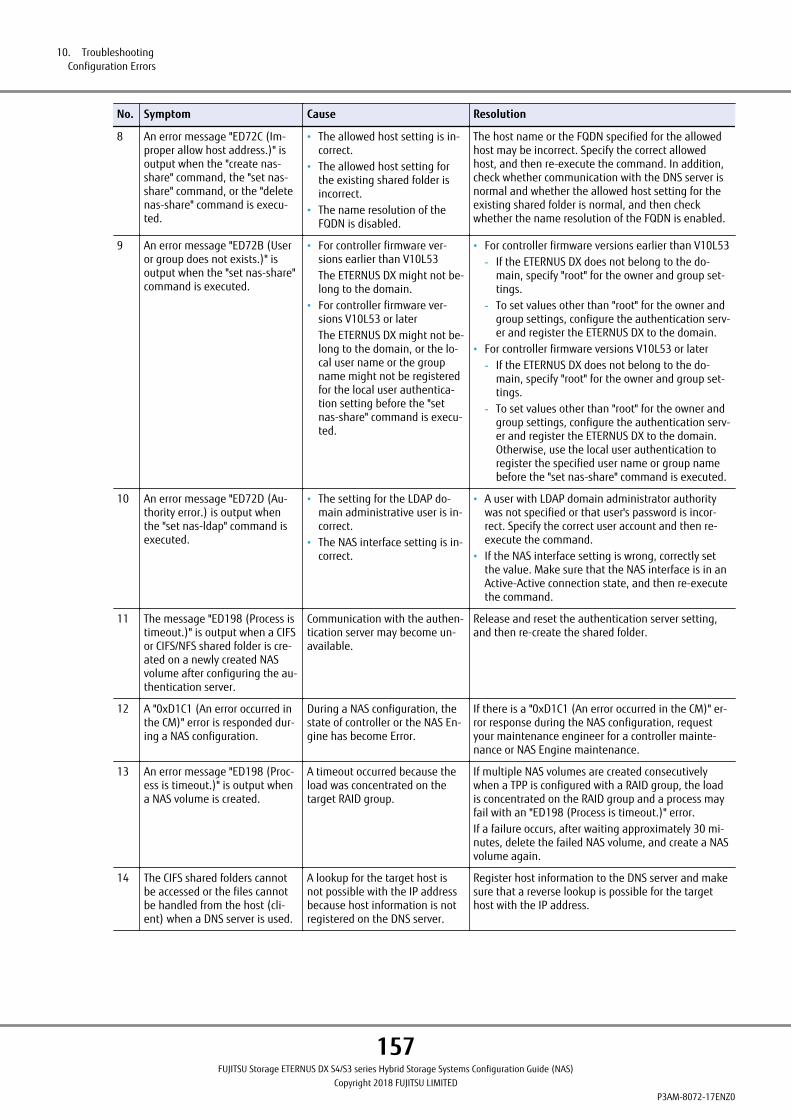
No. Symptom Cause Resolution
8 An error message "ED72C (Im-proper allow host address.)" isoutput when the "create nas-share" command, the "set nas-share" command, or the "deletenas-share" command is execu-ted.
• The allowed host setting is in-correct.
• The allowed host setting forthe existing shared folder isincorrect.
• The name resolution of theFQDN is disabled.
The host name or the FQDN specified for the allowedhost may be incorrect. Specify the correct allowedhost, and then re-execute the command. In addition,check whether communication with the DNS server isnormal and whether the allowed host setting for theexisting shared folder is normal, and then checkwhether the name resolution of the FQDN is enabled.
9 An error message "ED72B (Useror group does not exists.)" isoutput when the "set nas-share"command is executed.
• For controller firmware ver-sions earlier than V10L53The ETERNUS DX might not be-long to the domain.
• For controller firmware ver-sions V10L53 or laterThe ETERNUS DX might not be-long to the domain, or the lo-cal user name or the groupname might not be registeredfor the local user authentica-tion setting before the "setnas-share" command is execu-ted.
• For controller firmware versions earlier than V10L53- If the ETERNUS DX does not belong to the do-
main, specify "root" for the owner and group set-tings.
- To set values other than "root" for the owner andgroup settings, configure the authentication serv-er and register the ETERNUS DX to the domain.
• For controller firmware versions V10L53 or later- If the ETERNUS DX does not belong to the do-
main, specify "root" for the owner and group set-tings.
- To set values other than "root" for the owner andgroup settings, configure the authentication serv-er and register the ETERNUS DX to the domain.Otherwise, use the local user authentication toregister the specified user name or group namebefore the "set nas-share" command is executed.
10 An error message "ED72D (Au-thority error.) is output whenthe "set nas-ldap" command isexecuted.
• The setting for the LDAP do-main administrative user is in-correct.
• The NAS interface setting is in-correct.
• A user with LDAP domain administrator authoritywas not specified or that user's password is incor-rect. Specify the correct user account and then re-execute the command.
• If the NAS interface setting is wrong, correctly setthe value. Make sure that the NAS interface is in anActive-Active connection state, and then re-executethe command.
11 The message "ED198 (Process istimeout.)" is output when a CIFSor CIFS/NFS shared folder is cre-ated on a newly created NASvolume after configuring the au-thentication server.
Communication with the authen-tication server may become un-available.
Release and reset the authentication server setting,and then re-create the shared folder.
12 A "0xD1C1 (An error occurred inthe CM)" error is responded dur-ing a NAS configuration.
During a NAS configuration, thestate of controller or the NAS En-gine has become Error.
If there is a "0xD1C1 (An error occurred in the CM)" er-ror response during the NAS configuration, requestyour maintenance engineer for a controller mainte-nance or NAS Engine maintenance.
13 An error message "ED198 (Proc-ess is timeout.)" is output whena NAS volume is created.
A timeout occurred because theload was concentrated on thetarget RAID group.
If multiple NAS volumes are created consecutivelywhen a TPP is configured with a RAID group, the loadis concentrated on the RAID group and a process mayfail with an "ED198 (Process is timeout.)" error.If a failure occurs, after waiting approximately 30 mi-nutes, delete the failed NAS volume, and create a NASvolume again.
14 The CIFS shared folders cannotbe accessed or the files cannotbe handled from the host (cli-ent) when a DNS server is used.
A lookup for the target host isnot possible with the IP addressbecause host information is notregistered on the DNS server.
Register host information to the DNS server and makesure that a reverse lookup is possible for the targethost with the IP address.
10. TroubleshootingConfiguration Errors
157FUJITSU Storage ETERNUS DX S4/S3 series Hybrid Storage Systems Configuration Guide (NAS)
Copyright 2018 FUJITSU LIMITEDP3AM-8072-17ENZ0
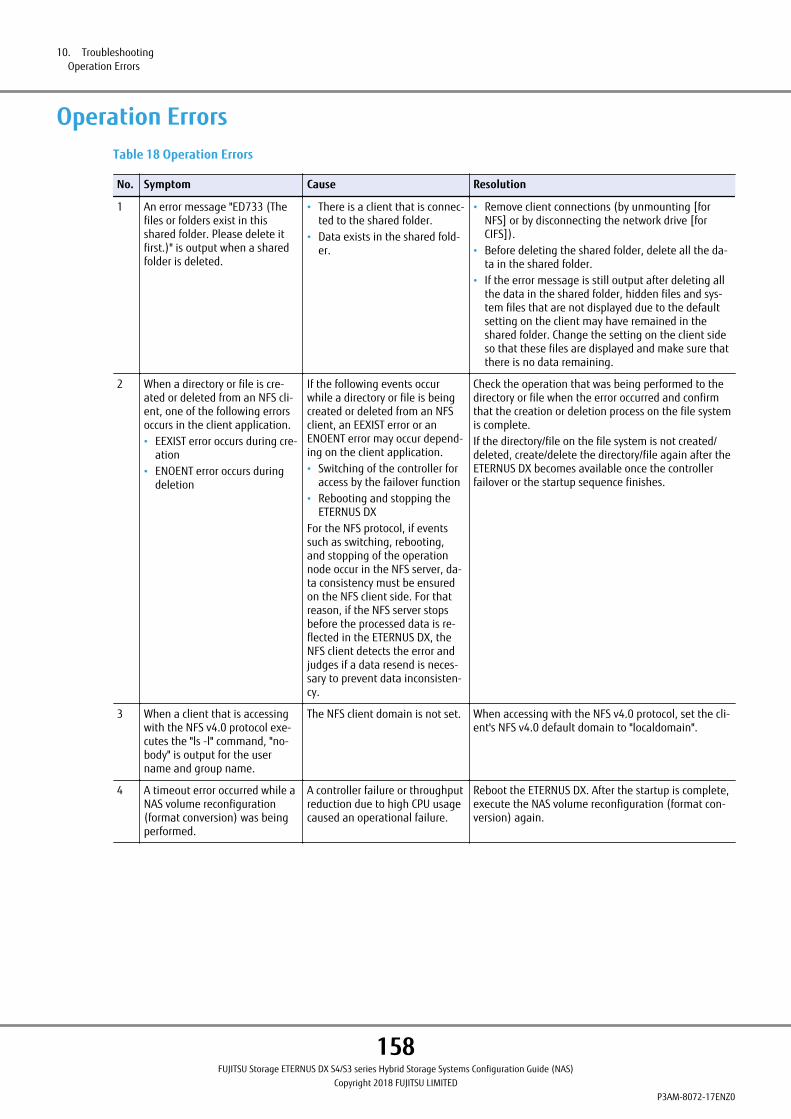
Operation ErrorsTable 18 Operation Errors
No. Symptom Cause Resolution
1 An error message "ED733 (Thefiles or folders exist in thisshared folder. Please delete itfirst.)" is output when a sharedfolder is deleted.
• There is a client that is connec-ted to the shared folder.
• Data exists in the shared fold-er.
• Remove client connections (by unmounting [forNFS] or by disconnecting the network drive [forCIFS]).
• Before deleting the shared folder, delete all the da-ta in the shared folder.
• If the error message is still output after deleting allthe data in the shared folder, hidden files and sys-tem files that are not displayed due to the defaultsetting on the client may have remained in theshared folder. Change the setting on the client sideso that these files are displayed and make sure thatthere is no data remaining.
2 When a directory or file is cre-ated or deleted from an NFS cli-ent, one of the following errorsoccurs in the client application.• EEXIST error occurs during cre-
ation• ENOENT error occurs during
deletion
If the following events occurwhile a directory or file is beingcreated or deleted from an NFSclient, an EEXIST error or anENOENT error may occur depend-ing on the client application.• Switching of the controller for
access by the failover function• Rebooting and stopping the
ETERNUS DXFor the NFS protocol, if eventssuch as switching, rebooting,and stopping of the operationnode occur in the NFS server, da-ta consistency must be ensuredon the NFS client side. For thatreason, if the NFS server stopsbefore the processed data is re-flected in the ETERNUS DX, theNFS client detects the error andjudges if a data resend is neces-sary to prevent data inconsisten-cy.
Check the operation that was being performed to thedirectory or file when the error occurred and confirmthat the creation or deletion process on the file systemis complete.If the directory/file on the file system is not created/deleted, create/delete the directory/file again after theETERNUS DX becomes available once the controllerfailover or the startup sequence finishes.
3 When a client that is accessingwith the NFS v4.0 protocol exe-cutes the "ls -l" command, "no-body" is output for the username and group name.
The NFS client domain is not set. When accessing with the NFS v4.0 protocol, set the cli-ent's NFS v4.0 default domain to "localdomain".
4 A timeout error occurred while aNAS volume reconfiguration(format conversion) was beingperformed.
A controller failure or throughputreduction due to high CPU usagecaused an operational failure.
Reboot the ETERNUS DX. After the startup is complete,execute the NAS volume reconfiguration (format con-version) again.
10. TroubleshootingOperation Errors
158FUJITSU Storage ETERNUS DX S4/S3 series Hybrid Storage Systems Configuration Guide (NAS)
Copyright 2018 FUJITSU LIMITEDP3AM-8072-17ENZ0
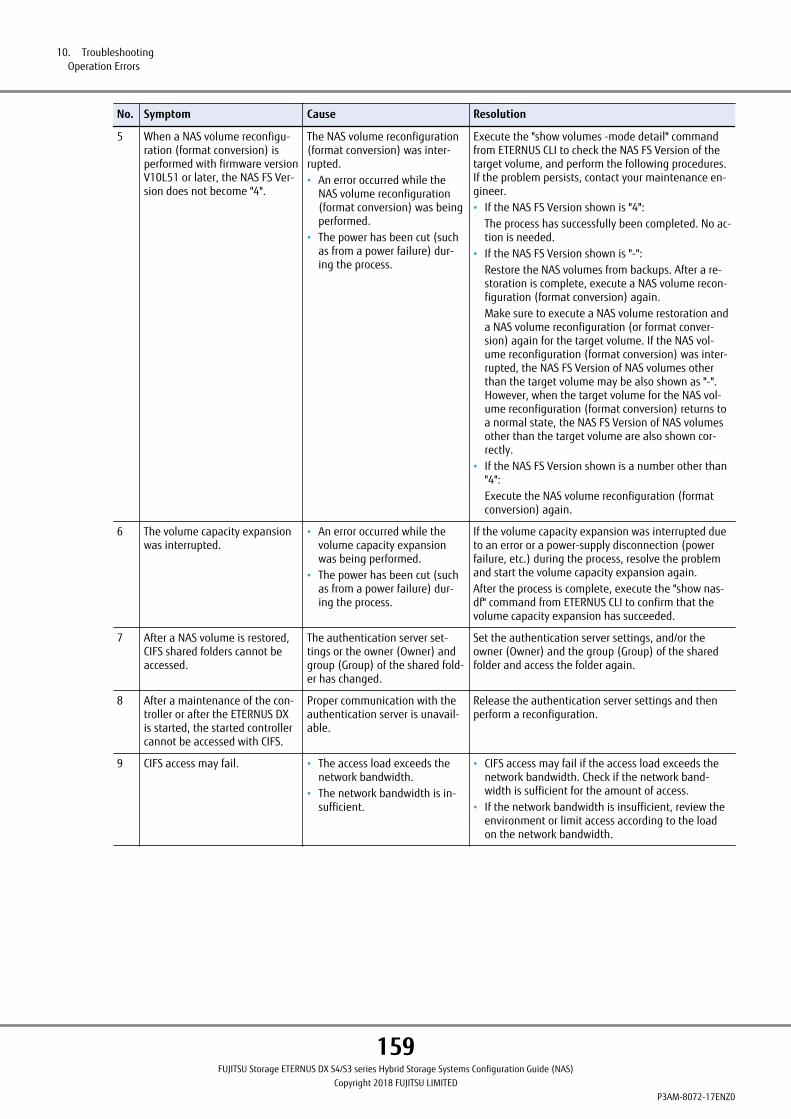
No. Symptom Cause Resolution
5 When a NAS volume reconfigu-ration (format conversion) isperformed with firmware versionV10L51 or later, the NAS FS Ver-sion does not become "4".
The NAS volume reconfiguration(format conversion) was inter-rupted.• An error occurred while the
NAS volume reconfiguration(format conversion) was beingperformed.
• The power has been cut (suchas from a power failure) dur-ing the process.
Execute the "show volumes -mode detail" commandfrom ETERNUS CLI to check the NAS FS Version of thetarget volume, and perform the following procedures.If the problem persists, contact your maintenance en-gineer.• If the NAS FS Version shown is "4":
The process has successfully been completed. No ac-tion is needed.
• If the NAS FS Version shown is "-":Restore the NAS volumes from backups. After a re-storation is complete, execute a NAS volume recon-figuration (format conversion) again.Make sure to execute a NAS volume restoration anda NAS volume reconfiguration (or format conver-sion) again for the target volume. If the NAS vol-ume reconfiguration (format conversion) was inter-rupted, the NAS FS Version of NAS volumes otherthan the target volume may be also shown as "-".However, when the target volume for the NAS vol-ume reconfiguration (format conversion) returns toa normal state, the NAS FS Version of NAS volumesother than the target volume are also shown cor-rectly.
• If the NAS FS Version shown is a number other than"4":Execute the NAS volume reconfiguration (formatconversion) again.
6 The volume capacity expansionwas interrupted.
• An error occurred while thevolume capacity expansionwas being performed.
• The power has been cut (suchas from a power failure) dur-ing the process.
If the volume capacity expansion was interrupted dueto an error or a power-supply disconnection (powerfailure, etc.) during the process, resolve the problemand start the volume capacity expansion again.After the process is complete, execute the "show nas-df" command from ETERNUS CLI to confirm that thevolume capacity expansion has succeeded.
7 After a NAS volume is restored,CIFS shared folders cannot beaccessed.
The authentication server set-tings or the owner (Owner) andgroup (Group) of the shared fold-er has changed.
Set the authentication server settings, and/or theowner (Owner) and the group (Group) of the sharedfolder and access the folder again.
8 After a maintenance of the con-troller or after the ETERNUS DXis started, the started controllercannot be accessed with CIFS.
Proper communication with theauthentication server is unavail-able.
Release the authentication server settings and thenperform a reconfiguration.
9 CIFS access may fail. • The access load exceeds thenetwork bandwidth.
• The network bandwidth is in-sufficient.
• CIFS access may fail if the access load exceeds thenetwork bandwidth. Check if the network band-width is sufficient for the amount of access.
• If the network bandwidth is insufficient, review theenvironment or limit access according to the loadon the network bandwidth.
10. TroubleshootingOperation Errors
159FUJITSU Storage ETERNUS DX S4/S3 series Hybrid Storage Systems Configuration Guide (NAS)
Copyright 2018 FUJITSU LIMITEDP3AM-8072-17ENZ0
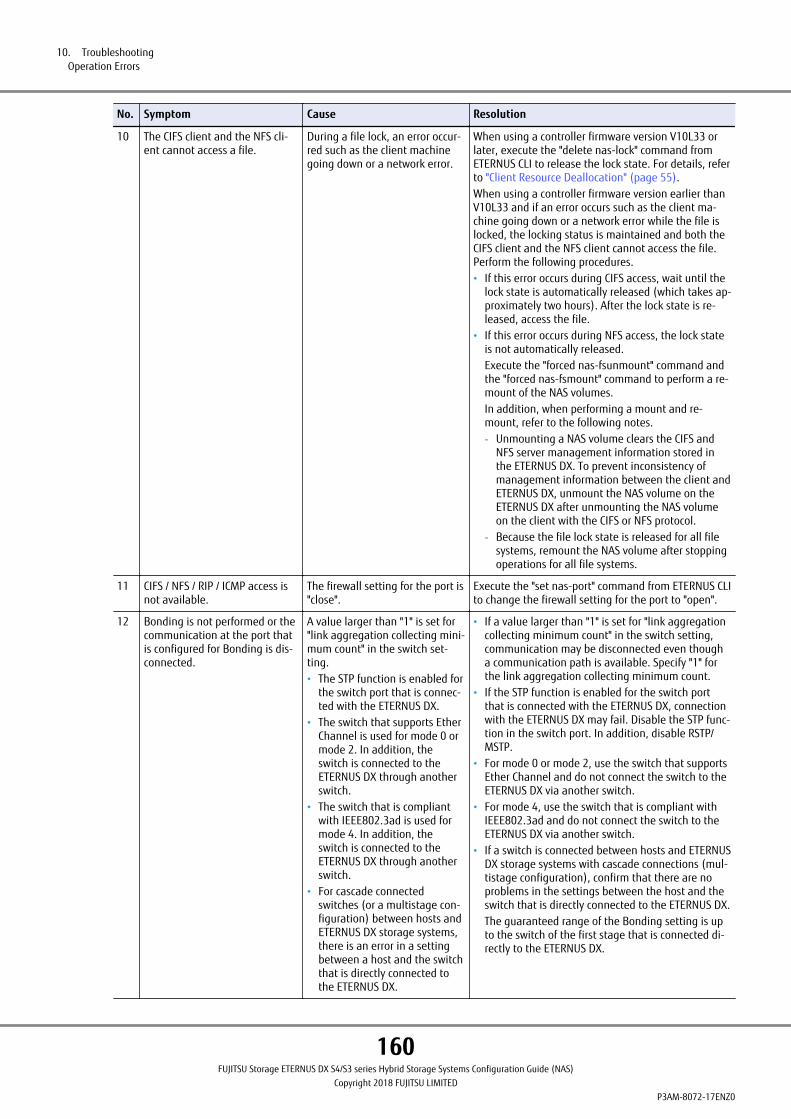
No. Symptom Cause Resolution
10 The CIFS client and the NFS cli-ent cannot access a file.
During a file lock, an error occur-red such as the client machinegoing down or a network error.
When using a controller firmware version V10L33 orlater, execute the "delete nas-lock" command fromETERNUS CLI to release the lock state. For details, referto "Client Resource Deallocation" (page 55).When using a controller firmware version earlier thanV10L33 and if an error occurs such as the client ma-chine going down or a network error while the file islocked, the locking status is maintained and both theCIFS client and the NFS client cannot access the file.Perform the following procedures.• If this error occurs during CIFS access, wait until the
lock state is automatically released (which takes ap-proximately two hours). After the lock state is re-leased, access the file.
• If this error occurs during NFS access, the lock stateis not automatically released.Execute the "forced nas-fsunmount" command andthe "forced nas-fsmount" command to perform a re-mount of the NAS volumes.In addition, when performing a mount and re-mount, refer to the following notes.- Unmounting a NAS volume clears the CIFS and
NFS server management information stored inthe ETERNUS DX. To prevent inconsistency ofmanagement information between the client andETERNUS DX, unmount the NAS volume on theETERNUS DX after unmounting the NAS volumeon the client with the CIFS or NFS protocol.
- Because the file lock state is released for all filesystems, remount the NAS volume after stoppingoperations for all file systems.
11 CIFS / NFS / RIP / ICMP access isnot available.
The firewall setting for the port is"close".
Execute the "set nas-port" command from ETERNUS CLIto change the firewall setting for the port to "open".
12 Bonding is not performed or thecommunication at the port thatis configured for Bonding is dis-connected.
A value larger than "1" is set for"link aggregation collecting mini-mum count" in the switch set-ting.• The STP function is enabled for
the switch port that is connec-ted with the ETERNUS DX.
• The switch that supports EtherChannel is used for mode 0 ormode 2. In addition, theswitch is connected to theETERNUS DX through anotherswitch.
• The switch that is compliantwith IEEE802.3ad is used formode 4. In addition, theswitch is connected to theETERNUS DX through anotherswitch.
• For cascade connectedswitches (or a multistage con-figuration) between hosts andETERNUS DX storage systems,there is an error in a settingbetween a host and the switchthat is directly connected tothe ETERNUS DX.
• If a value larger than "1" is set for "link aggregationcollecting minimum count" in the switch setting,communication may be disconnected even thougha communication path is available. Specify "1" forthe link aggregation collecting minimum count.
• If the STP function is enabled for the switch portthat is connected with the ETERNUS DX, connectionwith the ETERNUS DX may fail. Disable the STP func-tion in the switch port. In addition, disable RSTP/MSTP.
• For mode 0 or mode 2, use the switch that supportsEther Channel and do not connect the switch to theETERNUS DX via another switch.
• For mode 4, use the switch that is compliant withIEEE802.3ad and do not connect the switch to theETERNUS DX via another switch.
• If a switch is connected between hosts and ETERNUSDX storage systems with cascade connections (mul-tistage configuration), confirm that there are noproblems in the settings between the host and theswitch that is directly connected to the ETERNUS DX.The guaranteed range of the Bonding setting is upto the switch of the first stage that is connected di-rectly to the ETERNUS DX.
10. TroubleshootingOperation Errors
160FUJITSU Storage ETERNUS DX S4/S3 series Hybrid Storage Systems Configuration Guide (NAS)
Copyright 2018 FUJITSU LIMITEDP3AM-8072-17ENZ0
No. Symptom Cause Resolution
13 A snapshot was acquired, how-ever the acquired snapshot isnot displayed in [Properties] -[Previous Versions] on the CIFSclient.
• There are no differences be-tween the acquired snapshotand the current file.
• Cache is enabled on the Win-dows client.
Perform one of the following procedures.• Procedure 1
Overwrite the target file to update it.If the target file is identical to the snapshot, the ac-quired snapshot may not appear in [Previous Ver-sions].
• Procedure 2Disable the cache in the Windows client.
14 In an environment where bothNFS and CIFS are used, an errormessage related to the authen-tication server is output whenthe "create nas-share" commandor the "set nas-share" commandis executed.
An error occurred while process-ing the command.
An Active Directory authentication error in the CIFSshared folder settings or an LDAP authentication errorin the NFS shared folder settings may have occurred.Check the status of the Active Directory authenticationserver or the LDAP authentication server according tothe content of the error message.
15 The snapshots have not beensuccessfully acquired at the con-figured time.
• The required resources for ac-quiring snapshots are not suf-ficient.
• An error has occurred in thecontroller or the NAS Engine.
• If required resources for acquiring snapshots are notsufficient, snapshot acquisitions fail.Check the status of the following items.- Is the copy table size sufficient?- Is the required SDP (SDPV) space sufficient?
• If the controller or the NAS Engine fails during asnapshot acquisition, the snapshot acquisition mayfail.Check whether any errors occurred in the ETERNUSDX when the snapshot acquisition failed.
16 Mounting the NAS backup vol-umes has failed.
A mount was performed for theNAS backup volume when noCIFS shared folders exist.
Create at least one CIFS shared folder and then mountthe NAS backup volume again.
17 An NFS client becomes unable torecognize some of the directo-ries and files in a snapshot thathas been acquired, or recognizethe reference directory for asnapshot (.snap/@GMT-yyyy.mm.dd.-hh.mm.ss/).This symptom does not occurwith CIFS clients.
Old cache information of the di-rectory information may remainin the NFS client and prevent itfrom recognizing some parts ofthe snapshot.Depending on the timing, thissymptom may occur if the follow-ing events occur while the NFSclient references the snapshotdestination.• Snapshot acquisition• ETERNUS DX reboot• Controller restart due to a con-
troller error or controller im-plementation during mainte-nance
After this symptom occurs, it can be resolved when asnapshot is acquired. This is because the snapshot ac-quisition updates the directory information.If this symptom has to be resolved at any time, re-mount the shared folder that contains the snapshotfor which this symptom occurs from the NFS client.
18 An error message "EBEC5 (All ofquota setting failed. Specifieduser or group may not exist.)" isoutput when a trusted domainuser is specified during a quotasetting for the NAS volume.
A trusted domain user is not rec-ognized by the ETERNUS DX.
After logging in to the shared folder as a trusted do-main user, perform a quota setting again.
19 When Active Directory authenti-cation is set, the trusted domainuser cannot access the directo-ries/files under the shared fold-er.
If the number of configured trus-ted domains is 421 or more forthe cumulative total, access tothe directories/files that are cre-ated by the trusted domain usermay become unavailable.
Contact your maintenance engineer.
10. TroubleshootingOperation Errors
161FUJITSU Storage ETERNUS DX S4/S3 series Hybrid Storage Systems Configuration Guide (NAS)
Copyright 2018 FUJITSU LIMITEDP3AM-8072-17ENZ0
No. Symptom Cause Resolution
20 After the ACL settings of the rootdirectory for the shared folderare changed, the shared foldercannot be accessed.
If Active Directory authenticationis set, if a user other than root isset for the owner of the sharedfolder and root is set for thegroup, some of the ALC settingsmay be lost after the ACL set-tings are changed by a user otherthan owner.
With the privileges of the user specified as the ownerof the shared folder, undo the changes that weremade with the client to the access privileges and theproperties of the root directory.To allow access from clients that are not the owner ofthe shared folder and are not in the group of theshared folder, change the owner and the group of theshared folder to "root" and then take one of the fol-lowing actions.• Set the access restrictions using the CIFS access per-
mission setting.• Create subfolders under the shared folder and set
the appropriate access privileges from the client.
21 When a quota for the NAS vol-ume is referenced, the trusteddomain user information is dis-played as "Unknown".
A trusted domain user is not rec-ognized by the ETERNUS DX.
Log in to the shared folder using a trusted domainuser.
22 An error message "ED710 (An in-ternal error.)" is output whenthe shared folders with a specificname are created.
If a mount is performed for a CIFSshared folder with NFS v4.0 andthe relevant shared folder is de-leted, the resource for NFS re-mains and shared folders withthe same names cannot be cre-ated.
If an NFS shared folder with the different name is cre-ated, creating a shared folder with the same name be-comes possible.
23 After the "set nas-share" com-mand or the "delete nas-share"command is executed and an er-ror occurs, the specified sharedfolder cannot be accessed.
While the "set nas-share" com-mand or the "delete nas-share"command is running, the con-troller is switched by the failoverfunction.
After the failover process of the controller is complete,execute the "set nas-share" command or the "deletenas-share" command again.
24 After the "set nas-ad" commandis executed and an error occurs,the shared folder cannot be ac-cessed.
While the "set nas-ad" commandis running, the controller isswitched by the failover function.
After the failover process of the controller is complete,execute the "set nas-ad" command again.
25 An error message "ED739 (Oneor more clients have connectedto this shared folder. Please dis-connect it first.)" is output whena shared folder is deleted, or anerror message "ED748 (The usercannot be deleted because it iscurrently being used to access toa shared folder.)" is output whena local user is deleted.
The NAS file in the target CIFSshared folder is locked or theNAS file is locked by the targetlocal user.The file may remain locked if thenetwork is disconnected with theclient or if the client is rebooted.
Release the lock of the target NAS file with the "deletenas-lock" command.
26 The following error message isoutput when a NAS volume isdeleted.• For ETERNUS CLI
ED710 (An internal error oc-curs in the NAS system)
• For ETERNUS Web GUIAn error detected in NAS En-gine. Specified volumes can-not be deleted.
The ETERNUS DX failed to deletethe NAS volume.
Perform one of the following operations.• Reboot the ETERNUS DX. After the reboot is com-
plete, execute the NAS volume deletion again.• Restore one NAS system volume at a time for both
CMs. After the restoration is complete, execute theNAS volume deletion again.For details on the restoration of the NAS system vol-ume, refer to "NAS Function Restoration" in "ETER-NUS CLI User's Guide" or "Recover NAS System Vol-ume" in "ETERNUS Web GUI User's Guide".A failover or failback of the controller is performedwhen the NAS system volume is restored. For de-tails, refer to "Multipath Connection (Active-ActiveConnection)" (page 68).
10. TroubleshootingOperation Errors
162FUJITSU Storage ETERNUS DX S4/S3 series Hybrid Storage Systems Configuration Guide (NAS)
Copyright 2018 FUJITSU LIMITEDP3AM-8072-17ENZ0
No. Symptom Cause Resolution
27 After the local user setting ischanged, the new setting is notapplied (for example, accesswith groups is not possible afterthe change).
To apply the changed local usersettings in a CIFS environment,the CIFS session must be recon-nected by the target local user.However, if file lock informationremains, the changed settingmay not be applied just by re-connecting.
Execute the "delete nas-lock" command to delete theinformation of the file that is locked by that target lo-cal user and then reconnect the CIFS session.
28 NAS Engine down occurred whileoperating the ETERNUS DX withthe LDAP authentication serverthat is specified for the authen-tication server setting.
The specified LDAP authentica-tion server is not available or isin a state where a connectioncannot be made.
Specify the available LDAP authentication server againin the authentication server setting or delete the un-used LDAP authentication server setting.
29 "ED721 (Invalid operation.)" isoutput when the "forced nas-fsmount" command is executed.
A volume is being checked or re-stored with the "start nas-fsck"command.
After using the "show nas-fsck" command to confirmthat there are no volumes being checked or restored,try again.
30 Error message "ED198 (Processis timeout.)" is output whenmultiple shared folders are de-leted.
Due to temporary load, the dele-tion process timed out.
Reduce the number of shared folders to delete to 128or less, and try again.
31 Files cannot be copied to theCIFS shared folder.
The ADS information (or ZoneIdentifier) is added to files thatare downloaded from the Inter-net.
Confirm that the downloaded files are safe and re-move the file block from the property screen.
10. TroubleshootingOperation Errors
163FUJITSU Storage ETERNUS DX S4/S3 series Hybrid Storage Systems Configuration Guide (NAS)
Copyright 2018 FUJITSU LIMITEDP3AM-8072-17ENZ0
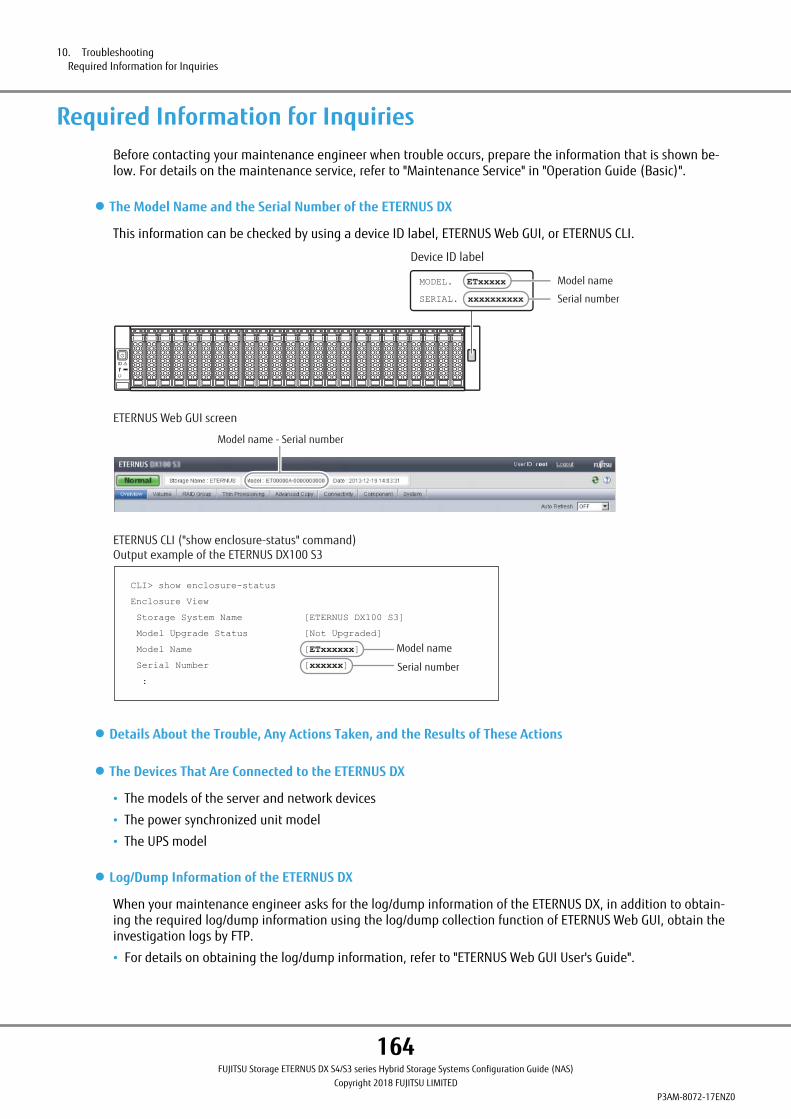
Required Information for InquiriesBefore contacting your maintenance engineer when trouble occurs, prepare the information that is shown be-low. For details on the maintenance service, refer to "Maintenance Service" in "Operation Guide (Basic)".
● The Model Name and the Serial Number of the ETERNUS DX
This information can be checked by using a device ID label, ETERNUS Web GUI, or ETERNUS CLI.
MODEL. ETxxxxx
SERIAL. xxxxxxxxxx
Model name
Serial number
Device ID label
ETERNUS Web GUI screen
ETERNUS CLI ("show enclosure-status" command)Output example of the ETERNUS DX100 S3
CLI> show enclosure-status
Storage System Name [ETERNUS DX100 S3]
Enclosure View
Model Upgrade Status [Not Upgraded]
Model name
Serial numberSerial Number [xxxxxx]
Model Name [ETxxxxxx]
:
Model name - Serial number
● Details About the Trouble, Any Actions Taken, and the Results of These Actions
● The Devices That Are Connected to the ETERNUS DX
• The models of the server and network devices
• The power synchronized unit model
• The UPS model
● Log/Dump Information of the ETERNUS DX
When your maintenance engineer asks for the log/dump information of the ETERNUS DX, in addition to obtain-ing the required log/dump information using the log/dump collection function of ETERNUS Web GUI, obtain theinvestigation logs by FTP.
• For details on obtaining the log/dump information, refer to "ETERNUS Web GUI User's Guide".
10. TroubleshootingRequired Information for Inquiries
164FUJITSU Storage ETERNUS DX S4/S3 series Hybrid Storage Systems Configuration Guide (NAS)
Copyright 2018 FUJITSU LIMITEDP3AM-8072-17ENZ0
• To obtain the investigation logs by FTP, obtain the log/dump information with ETERNUS Web GUI, create a useraccount that is used to log in to the investigation log FTP, and the obtain the logs under the following directo-ries of both controllers by FTP.
/naslog/*
/pdfs/*
For the creation procedure of the user account that is used to log in to the investigation log FTP, refer to"5. Packet Trace Acquisition Settings" (page 131).
10. TroubleshootingRequired Information for Inquiries
165FUJITSU Storage ETERNUS DX S4/S3 series Hybrid Storage Systems Configuration Guide (NAS)
Copyright 2018 FUJITSU LIMITEDP3AM-8072-17ENZ0
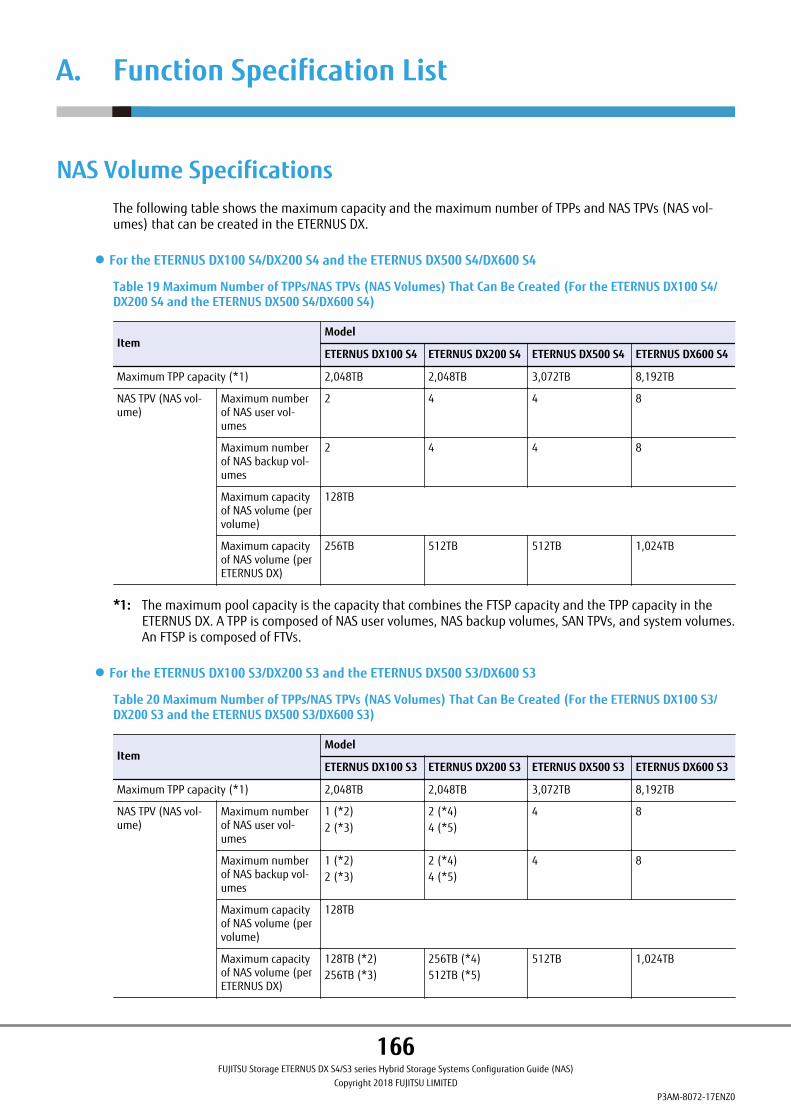
A. Function Specification List
NAS Volume SpecificationsThe following table shows the maximum capacity and the maximum number of TPPs and NAS TPVs (NAS vol-umes) that can be created in the ETERNUS DX.
● For the ETERNUS DX100 S4/DX200 S4 and the ETERNUS DX500 S4/DX600 S4
Table 19 Maximum Number of TPPs/NAS TPVs (NAS Volumes) That Can Be Created (For the ETERNUS DX100 S4/DX200 S4 and the ETERNUS DX500 S4/DX600 S4)
ItemModel
ETERNUS DX100 S4 ETERNUS DX200 S4 ETERNUS DX500 S4 ETERNUS DX600 S4
Maximum TPP capacity (*1) 2,048TB 2,048TB 3,072TB 8,192TB
NAS TPV (NAS vol-ume)
Maximum numberof NAS user vol-umes
2 4 4 8
Maximum numberof NAS backup vol-umes
2 4 4 8
Maximum capacityof NAS volume (pervolume)
128TB
Maximum capacityof NAS volume (perETERNUS DX)
256TB 512TB 512TB 1,024TB
*1: The maximum pool capacity is the capacity that combines the FTSP capacity and the TPP capacity in theETERNUS DX. A TPP is composed of NAS user volumes, NAS backup volumes, SAN TPVs, and system volumes.An FTSP is composed of FTVs.
● For the ETERNUS DX100 S3/DX200 S3 and the ETERNUS DX500 S3/DX600 S3
Table 20 Maximum Number of TPPs/NAS TPVs (NAS Volumes) That Can Be Created (For the ETERNUS DX100 S3/DX200 S3 and the ETERNUS DX500 S3/DX600 S3)
ItemModel
ETERNUS DX100 S3 ETERNUS DX200 S3 ETERNUS DX500 S3 ETERNUS DX600 S3
Maximum TPP capacity (*1) 2,048TB 2,048TB 3,072TB 8,192TB
NAS TPV (NAS vol-ume)
Maximum numberof NAS user vol-umes
1 (*2)2 (*3)
2 (*4)4 (*5)
4 8
Maximum numberof NAS backup vol-umes
1 (*2)2 (*3)
2 (*4)4 (*5)
4 8
Maximum capacityof NAS volume (pervolume)
128TB
Maximum capacityof NAS volume (perETERNUS DX)
128TB (*2)256TB (*3)
256TB (*4)512TB (*5)
512TB 1,024TB
166FUJITSU Storage ETERNUS DX S4/S3 series Hybrid Storage Systems Configuration Guide (NAS)
Copyright 2018 FUJITSU LIMITEDP3AM-8072-17ENZ0
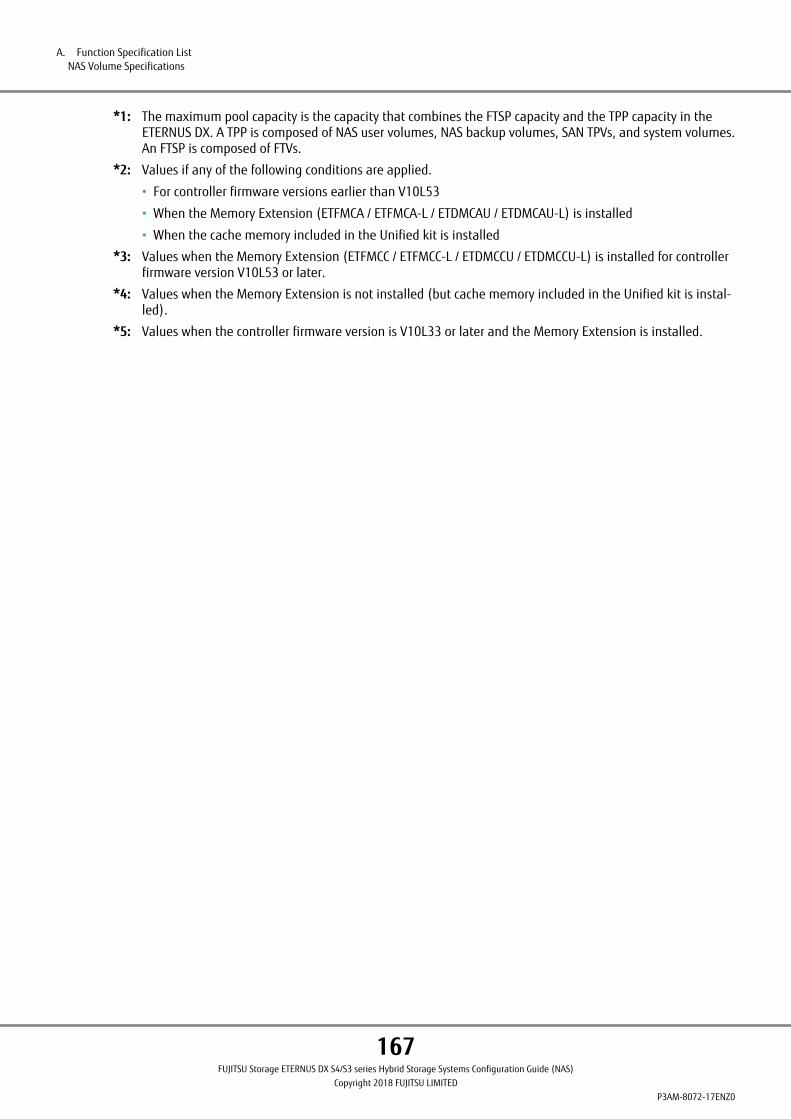
*1: The maximum pool capacity is the capacity that combines the FTSP capacity and the TPP capacity in theETERNUS DX. A TPP is composed of NAS user volumes, NAS backup volumes, SAN TPVs, and system volumes.An FTSP is composed of FTVs.
*2: Values if any of the following conditions are applied.
• For controller firmware versions earlier than V10L53
• When the Memory Extension (ETFMCA / ETFMCA-L / ETDMCAU / ETDMCAU-L) is installed
• When the cache memory included in the Unified kit is installed
*3: Values when the Memory Extension (ETFMCC / ETFMCC-L / ETDMCCU / ETDMCCU-L) is installed for controllerfirmware version V10L53 or later.
*4: Values when the Memory Extension is not installed (but cache memory included in the Unified kit is instal-led).
*5: Values when the controller firmware version is V10L33 or later and the Memory Extension is installed.
A. Function Specification ListNAS Volume Specifications
167FUJITSU Storage ETERNUS DX S4/S3 series Hybrid Storage Systems Configuration Guide (NAS)
Copyright 2018 FUJITSU LIMITEDP3AM-8072-17ENZ0
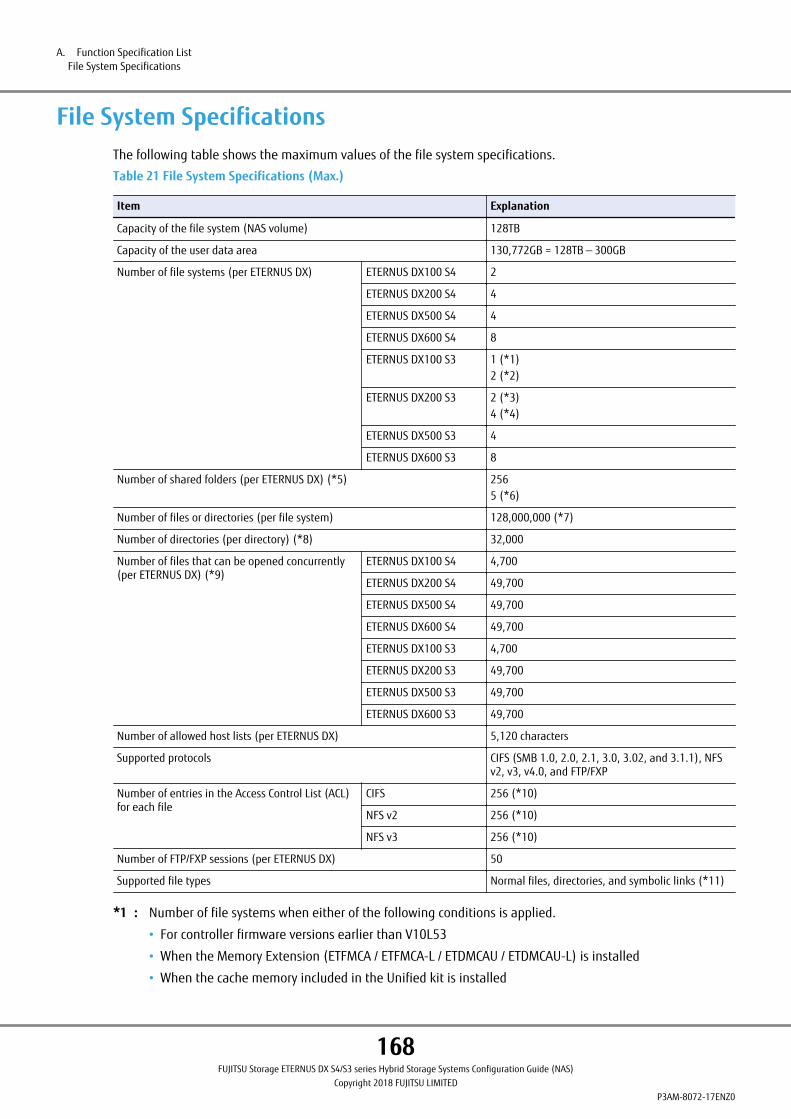
File System SpecificationsThe following table shows the maximum values of the file system specifications.
Table 21 File System Specifications (Max.)
Item Explanation
Capacity of the file system (NAS volume) 128TB
Capacity of the user data area 130,772GB = 128TB — 300GB
Number of file systems (per ETERNUS DX) ETERNUS DX100 S4 2
ETERNUS DX200 S4 4
ETERNUS DX500 S4 4
ETERNUS DX600 S4 8
ETERNUS DX100 S3 1 (*1)2 (*2)
ETERNUS DX200 S3 2 (*3)4 (*4)
ETERNUS DX500 S3 4
ETERNUS DX600 S3 8
Number of shared folders (per ETERNUS DX) (*5) 2565 (*6)
Number of files or directories (per file system) 128,000,000 (*7)
Number of directories (per directory) (*8) 32,000
Number of files that can be opened concurrently(per ETERNUS DX) (*9)
ETERNUS DX100 S4 4,700
ETERNUS DX200 S4 49,700
ETERNUS DX500 S4 49,700
ETERNUS DX600 S4 49,700
ETERNUS DX100 S3 4,700
ETERNUS DX200 S3 49,700
ETERNUS DX500 S3 49,700
ETERNUS DX600 S3 49,700
Number of allowed host lists (per ETERNUS DX) 5,120 characters
Supported protocols CIFS (SMB 1.0, 2.0, 2.1, 3.0, 3.02, and 3.1.1), NFSv2, v3, v4.0, and FTP/FXP
Number of entries in the Access Control List (ACL)for each file
CIFS 256 (*10)
NFS v2 256 (*10)
NFS v3 256 (*10)
Number of FTP/FXP sessions (per ETERNUS DX) 50
Supported file types Normal files, directories, and symbolic links (*11)
*1 : Number of file systems when either of the following conditions is applied.
• For controller firmware versions earlier than V10L53
• When the Memory Extension (ETFMCA / ETFMCA-L / ETDMCAU / ETDMCAU-L) is installed
• When the cache memory included in the Unified kit is installed
A. Function Specification ListFile System Specifications
168FUJITSU Storage ETERNUS DX S4/S3 series Hybrid Storage Systems Configuration Guide (NAS)
Copyright 2018 FUJITSU LIMITEDP3AM-8072-17ENZ0
*2 : Number of file systems when the Memory Extension (ETFMCC / ETFMCC-L / ETDMCCU / ETDMCCU-L) is in-stalled for controller firmware version V10L53 or later.
*3 : Number of file systems when the Memory Extension is not installed (but cache memory included in theUnified kit is installed).
*4 : Number of file systems when the Memory Extension is installed for controller firmware version V10L33 orlater.
*5 : Total number of directories in an ETERNUS DX that can be created in a root directory of the file system.
*6 : Number of shared folders for FTP/FXP.
*7 : Total number of directories and files. The maximum number of directories and files that is shown in thistable may not be possible in some environments.
*8 : The maximum number of subdirectories that can be created in a directory. To create more than 32,000subdirectories, some measures must be taken such as distributing the subdirectories into multiple direc-tories.
*9 : The maximum total number of files that can be concurrently opened using CIFS and NFS.
If more than the maximum number of files are concurrently open, a client application may return an I/Oerror when it writes to a file.
The maximum number of files that can be operated does not change even when multiple clients operatefiles at the same time.
*10: If the number of ACL entries in the NAS volume (file system) has reached the limit, the value above maybe smaller than 256.
The total number of ACL entries that can be recorded per NAS volume is as follows:
CIFS-ACL: 6,539,968,512 (6,237 ´ 1,0242)
POSIX-ACL: 46,187,675,648 (44,048 ´ 1,0242)
*11: Hard links support normal files only.
Available Functions for Each SoftwareETERNUS Web GUI, ETERNUS CLI, or ETERNUS SF software can be used to configure a NAS environment as well asperform operation management settings. The operations that can be performed depend on the software that isbeing used.
The following table shows the available functions for each software.
Table 22 Available Functions for Operation Management Interfaces
Function ETERNUS WebGUI ETERNUS CLI
ETERNUS SFStorage Cruis-er (Web Con-sole) (*1)
ETERNUS SFAdvanced-Copy Manag-er (Web Con-sole) (*1)
ETERNUS SFExpress (WebConsole) (*1)
ETERNUS SF(CLI)
NAS Interface(NIC-CA)
Status display ¡ ¡ ¡ — ¡ ´
Jumbo Frame Setting ´ ¡ — — — —
Display ¡ ¡ — — — —
SMB Encryp-tion
Setting ¡ ¡ ¡ — ¡ ´
Display ¡ ¡ ¡ — ¡ ´
Access BasedEnumeration(ABE)
Setting ¡ ¡ ¡ — ¡ ´
Display ¡ ¡ ¡ — ¡ ´
A. Function Specification ListAvailable Functions for Each Software
169FUJITSU Storage ETERNUS DX S4/S3 series Hybrid Storage Systems Configuration Guide (NAS)
Copyright 2018 FUJITSU LIMITEDP3AM-8072-17ENZ0
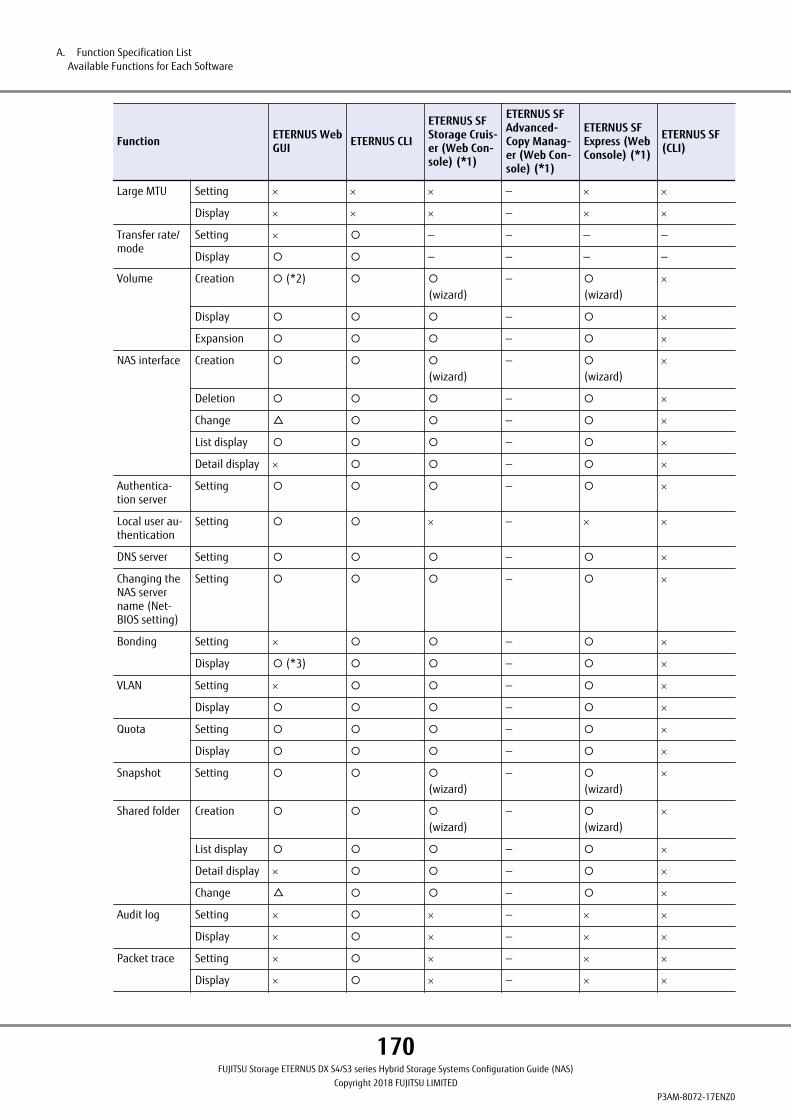
Function ETERNUS WebGUI ETERNUS CLI
ETERNUS SFStorage Cruis-er (Web Con-sole) (*1)
ETERNUS SFAdvanced-Copy Manag-er (Web Con-sole) (*1)
ETERNUS SFExpress (WebConsole) (*1)
ETERNUS SF(CLI)
Large MTU Setting ´ ´ ´ — ´ ´
Display ´ ´ ´ — ´ ´
Transfer rate/mode
Setting ´ ¡ — — — —
Display ¡ ¡ — — — —
Volume Creation ¡ (*2) ¡ ¡
(wizard)— ¡
(wizard)´
Display ¡ ¡ ¡ — ¡ ´
Expansion ¡ ¡ ¡ — ¡ ´
NAS interface Creation ¡ ¡ ¡
(wizard)— ¡
(wizard)´
Deletion ¡ ¡ ¡ — ¡ ´
Change △ ¡ ¡ — ¡ ´
List display ¡ ¡ ¡ — ¡ ´
Detail display ´ ¡ ¡ — ¡ ´
Authentica-tion server
Setting ¡ ¡ ¡ — ¡ ´
Local user au-thentication
Setting ¡ ¡ ´ — ´ ´
DNS server Setting ¡ ¡ ¡ — ¡ ´
Changing theNAS servername (Net-BIOS setting)
Setting ¡ ¡ ¡ — ¡ ´
Bonding Setting ´ ¡ ¡ — ¡ ´
Display ¡ (*3) ¡ ¡ — ¡ ´
VLAN Setting ´ ¡ ¡ — ¡ ´
Display ¡ ¡ ¡ — ¡ ´
Quota Setting ¡ ¡ ¡ — ¡ ´
Display ¡ ¡ ¡ — ¡ ´
Snapshot Setting ¡ ¡ ¡
(wizard)— ¡
(wizard)´
Shared folder Creation ¡ ¡ ¡
(wizard)— ¡
(wizard)´
List display ¡ ¡ ¡ — ¡ ´
Detail display ´ ¡ ¡ — ¡ ´
Change △ ¡ ¡ — ¡ ´
Audit log Setting ´ ¡ ´ — ´ ´
Display ´ ¡ ´ — ´ ´
Packet trace Setting ´ ¡ ´ — ´ ´
Display ´ ¡ ´ — ´ ´
A. Function Specification ListAvailable Functions for Each Software
170FUJITSU Storage ETERNUS DX S4/S3 series Hybrid Storage Systems Configuration Guide (NAS)
Copyright 2018 FUJITSU LIMITEDP3AM-8072-17ENZ0
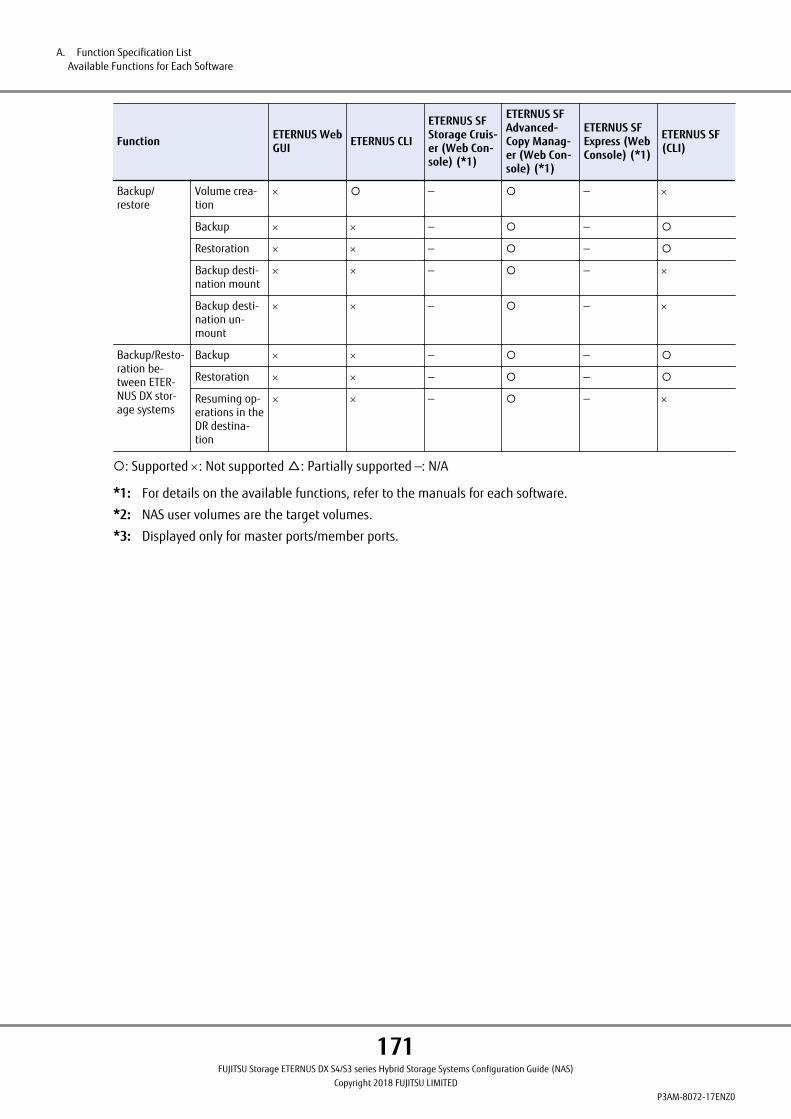
Function ETERNUS WebGUI ETERNUS CLI
ETERNUS SFStorage Cruis-er (Web Con-sole) (*1)
ETERNUS SFAdvanced-Copy Manag-er (Web Con-sole) (*1)
ETERNUS SFExpress (WebConsole) (*1)
ETERNUS SF(CLI)
Backup/restore
Volume crea-tion
´ ¡ — ¡ — ´
Backup ´ ´ — ¡ — ¡
Restoration ´ ´ — ¡ — ¡
Backup desti-nation mount
´ ´ — ¡ — ´
Backup desti-nation un-mount
´ ´ — ¡ — ´
Backup/Resto-ration be-tween ETER-NUS DX stor-age systems
Backup ´ ´ — ¡ — ¡
Restoration ´ ´ — ¡ — ¡
Resuming op-erations in theDR destina-tion
´ ´ — ¡ — ´
¡: Supported ´: Not supported △: Partially supported —: N/A
*1: For details on the available functions, refer to the manuals for each software.
*2: NAS user volumes are the target volumes.
*3: Displayed only for master ports/member ports.
A. Function Specification ListAvailable Functions for Each Software
171FUJITSU Storage ETERNUS DX S4/S3 series Hybrid Storage Systems Configuration Guide (NAS)
Copyright 2018 FUJITSU LIMITEDP3AM-8072-17ENZ0
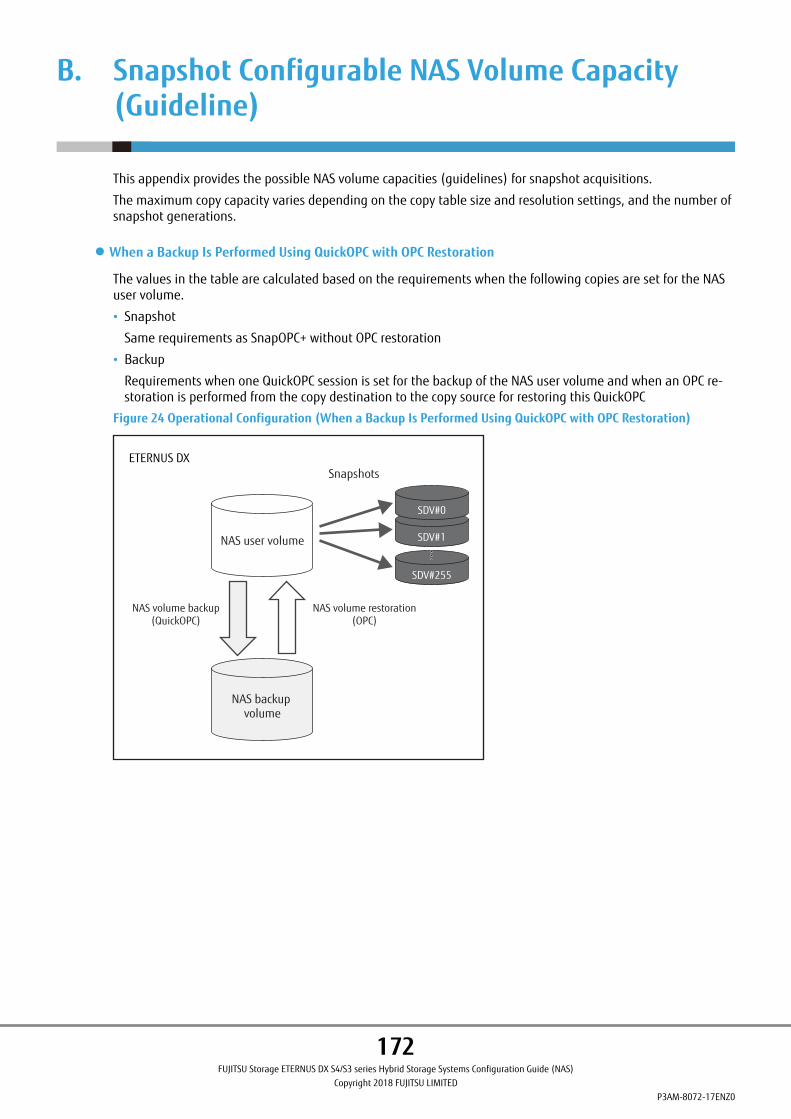
B. Snapshot Configurable NAS Volume Capacity(Guideline)
This appendix provides the possible NAS volume capacities (guidelines) for snapshot acquisitions.
The maximum copy capacity varies depending on the copy table size and resolution settings, and the number ofsnapshot generations.
● When a Backup Is Performed Using QuickOPC with OPC Restoration
The values in the table are calculated based on the requirements when the following copies are set for the NASuser volume.
• Snapshot
Same requirements as SnapOPC+ without OPC restoration
• Backup
Requirements when one QuickOPC session is set for the backup of the NAS user volume and when an OPC re-storation is performed from the copy destination to the copy source for restoring this QuickOPC
Figure 24 Operational Configuration (When a Backup Is Performed Using QuickOPC with OPC Restoration)
NAS backup volume
NAS user volume
NAS volume backup(QuickOPC)
SDV#255
SDV#1
SDV#0
NAS volume restoration(OPC)
ETERNUS DXSnapshots
172FUJITSU Storage ETERNUS DX S4/S3 series Hybrid Storage Systems Configuration Guide (NAS)
Copyright 2018 FUJITSU LIMITEDP3AM-8072-17ENZ0
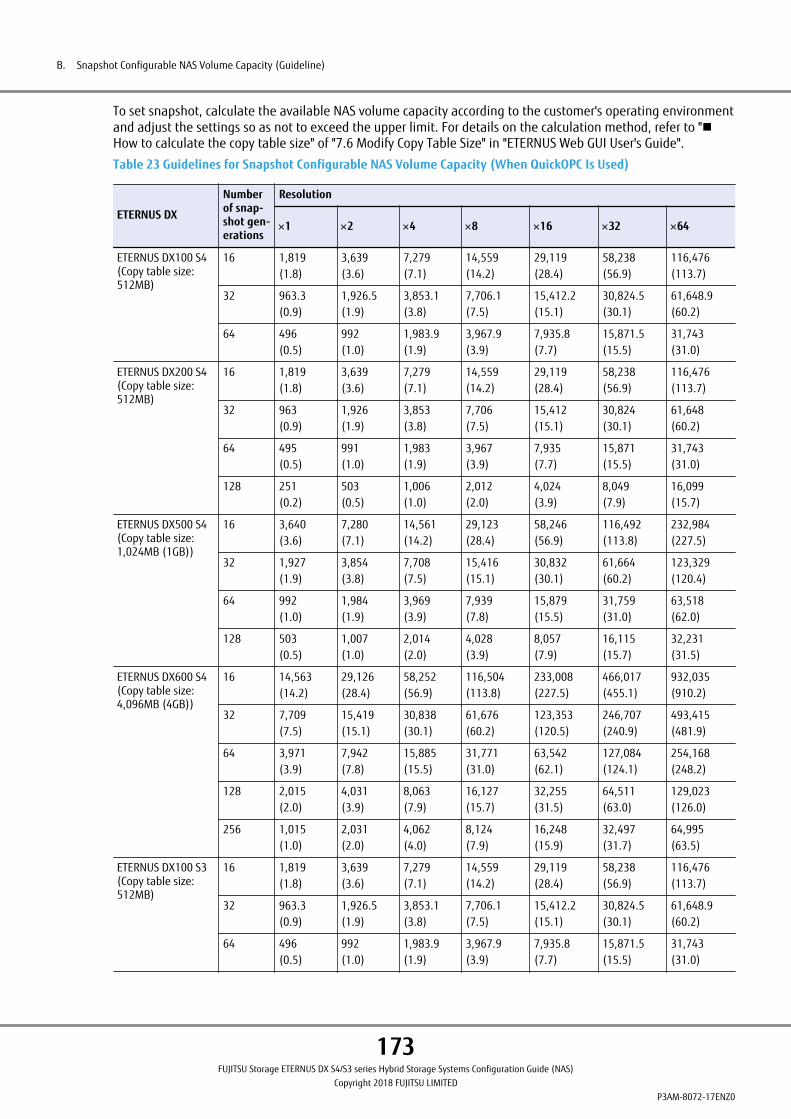
To set snapshot, calculate the available NAS volume capacity according to the customer's operating environmentand adjust the settings so as not to exceed the upper limit. For details on the calculation method, refer to "nHow to calculate the copy table size" of "7.6 Modify Copy Table Size" in "ETERNUS Web GUI User's Guide".
Table 23 Guidelines for Snapshot Configurable NAS Volume Capacity (When QuickOPC Is Used)
ETERNUS DX
Numberof snap-shot gen-erations
Resolution
´1 ´2 ´4 ´8 ´16 ´32 ´64
ETERNUS DX100 S4(Copy table size:512MB)
16 1,819(1.8)
3,639(3.6)
7,279(7.1)
14,559(14.2)
29,119(28.4)
58,238(56.9)
116,476(113.7)
32 963.3(0.9)
1,926.5(1.9)
3,853.1(3.8)
7,706.1(7.5)
15,412.2(15.1)
30,824.5(30.1)
61,648.9(60.2)
64 496(0.5)
992(1.0)
1,983.9(1.9)
3,967.9(3.9)
7,935.8(7.7)
15,871.5(15.5)
31,743(31.0)
ETERNUS DX200 S4(Copy table size:512MB)
16 1,819(1.8)
3,639(3.6)
7,279(7.1)
14,559(14.2)
29,119(28.4)
58,238(56.9)
116,476(113.7)
32 963(0.9)
1,926(1.9)
3,853(3.8)
7,706(7.5)
15,412(15.1)
30,824(30.1)
61,648(60.2)
64 495(0.5)
991(1.0)
1,983(1.9)
3,967(3.9)
7,935(7.7)
15,871(15.5)
31,743(31.0)
128 251(0.2)
503(0.5)
1,006(1.0)
2,012(2.0)
4,024(3.9)
8,049(7.9)
16,099(15.7)
ETERNUS DX500 S4(Copy table size:1,024MB (1GB))
16 3,640(3.6)
7,280(7.1)
14,561(14.2)
29,123(28.4)
58,246(56.9)
116,492(113.8)
232,984(227.5)
32 1,927(1.9)
3,854(3.8)
7,708(7.5)
15,416(15.1)
30,832(30.1)
61,664(60.2)
123,329(120.4)
64 992(1.0)
1,984(1.9)
3,969(3.9)
7,939(7.8)
15,879(15.5)
31,759(31.0)
63,518(62.0)
128 503(0.5)
1,007(1.0)
2,014(2.0)
4,028(3.9)
8,057(7.9)
16,115(15.7)
32,231(31.5)
ETERNUS DX600 S4(Copy table size:4,096MB (4GB))
16 14,563(14.2)
29,126(28.4)
58,252(56.9)
116,504(113.8)
233,008(227.5)
466,017(455.1)
932,035(910.2)
32 7,709(7.5)
15,419(15.1)
30,838(30.1)
61,676(60.2)
123,353(120.5)
246,707(240.9)
493,415(481.9)
64 3,971(3.9)
7,942(7.8)
15,885(15.5)
31,771(31.0)
63,542(62.1)
127,084(124.1)
254,168(248.2)
128 2,015(2.0)
4,031(3.9)
8,063(7.9)
16,127(15.7)
32,255(31.5)
64,511(63.0)
129,023(126.0)
256 1,015(1.0)
2,031(2.0)
4,062(4.0)
8,124(7.9)
16,248(15.9)
32,497(31.7)
64,995(63.5)
ETERNUS DX100 S3(Copy table size:512MB)
16 1,819(1.8)
3,639(3.6)
7,279(7.1)
14,559(14.2)
29,119(28.4)
58,238(56.9)
116,476(113.7)
32 963.3(0.9)
1,926.5(1.9)
3,853.1(3.8)
7,706.1(7.5)
15,412.2(15.1)
30,824.5(30.1)
61,648.9(60.2)
64 496(0.5)
992(1.0)
1,983.9(1.9)
3,967.9(3.9)
7,935.8(7.7)
15,871.5(15.5)
31,743(31.0)
B. Snapshot Configurable NAS Volume Capacity (Guideline)
173FUJITSU Storage ETERNUS DX S4/S3 series Hybrid Storage Systems Configuration Guide (NAS)
Copyright 2018 FUJITSU LIMITEDP3AM-8072-17ENZ0

ETERNUS DX
Numberof snap-shot gen-erations
Resolution
´1 ´2 ´4 ´8 ´16 ´32 ´64
ETERNUS DX200 S3(Copy table size:512MB)
16 1,819(1.8)
3,639(3.6)
7,279(7.1)
14,559(14.2)
29,119(28.4)
58,238(56.9)
116,476(113.7)
32 963(0.9)
1,926(1.9)
3,853(3.8)
7,706(7.5)
15,412(15.1)
30,824(30.1)
61,648(60.2)
64 495(0.5)
991(1.0)
1,983(1.9)
3,967(3.9)
7,935(7.7)
15,871(15.5)
31,743(31.0)
128 251(0.2)
503(0.5)
1,006(1.0)
2,012(2.0)
4,024(3.9)
8,049(7.9)
16,099(15.7)
ETERNUS DX500 S3(Copy table size:1,024MB (1GB))
16 3,640(3.6)
7,280(7.1)
14,561(14.2)
29,123(28.4)
58,246(56.9)
116,492(113.8)
232,984(227.5)
32 1,927(1.9)
3,854(3.8)
7,708(7.5)
15,416(15.1)
30,832(30.1)
61,664(60.2)
123,329(120.4)
64 992(1.0)
1,984(1.9)
3,969(3.9)
7,939(7.8)
15,879(15.5)
31,759(31.0)
63,518(62.0)
128 503(0.5)
1,007(1.0)
2,014(2.0)
4,028(3.9)
8,057(7.9)
16,115(15.7)
32,231(31.5)
ETERNUS DX600 S3(Copy table size:4,096MB (4GB))
16 14,563(14.2)
29,126(28.4)
58,252(56.9)
116,504(113.8)
233,008(227.5)
466,017(455.1)
932,035(910.2)
32 7,709(7.5)
15,419(15.1)
30,838(30.1)
61,676(60.2)
123,353(120.5)
246,707(240.9)
493,415(481.9)
64 3,971(3.9)
7,942(7.8)
15,885(15.5)
31,771(31.0)
63,542(62.1)
127,084(124.1)
254,168(248.2)
128 2,015(2.0)
4,031(3.9)
8,063(7.9)
16,127(15.7)
32,255(31.5)
64,511(63.0)
129,023(126.0)
256 1,015(1.0)
2,031(2.0)
4,062(4.0)
8,124(7.9)
16,248(15.9)
32,497(31.7)
64,995(63.5)
Unit: GB (rounded down to the nearest whole number), the contents of the parentheses are TB.
B. Snapshot Configurable NAS Volume Capacity (Guideline)
174FUJITSU Storage ETERNUS DX S4/S3 series Hybrid Storage Systems Configuration Guide (NAS)
Copyright 2018 FUJITSU LIMITEDP3AM-8072-17ENZ0
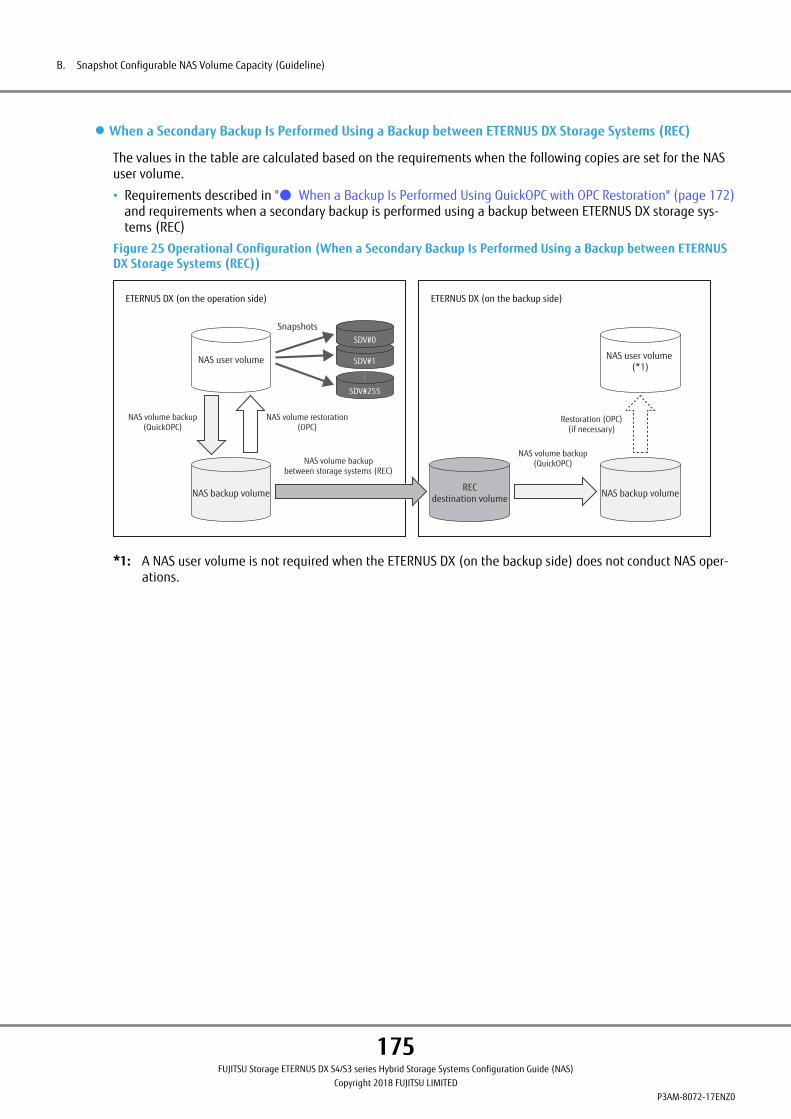
● When a Secondary Backup Is Performed Using a Backup between ETERNUS DX Storage Systems (REC)
The values in the table are calculated based on the requirements when the following copies are set for the NASuser volume.
• Requirements described in "● When a Backup Is Performed Using QuickOPC with OPC Restoration" (page 172)and requirements when a secondary backup is performed using a backup between ETERNUS DX storage sys-tems (REC)
Figure 25 Operational Configuration (When a Secondary Backup Is Performed Using a Backup between ETERNUSDX Storage Systems (REC))
NAS backup volume
NAS user volume
NAS volume backup(QuickOPC)
SDV#255
SDV#1
SDV#0
NAS volume restoration(OPC)
ETERNUS DX (on the operation side)
Snapshots
RECdestination volume NAS backup volume
ETERNUS DX (on the backup side)
NAS volume backupbetween storage systems (REC)
NAS volume backup(QuickOPC)
NAS user volume (*1)
Restoration (OPC)(if necessary)
*1: A NAS user volume is not required when the ETERNUS DX (on the backup side) does not conduct NAS oper-ations.
B. Snapshot Configurable NAS Volume Capacity (Guideline)
175FUJITSU Storage ETERNUS DX S4/S3 series Hybrid Storage Systems Configuration Guide (NAS)
Copyright 2018 FUJITSU LIMITEDP3AM-8072-17ENZ0
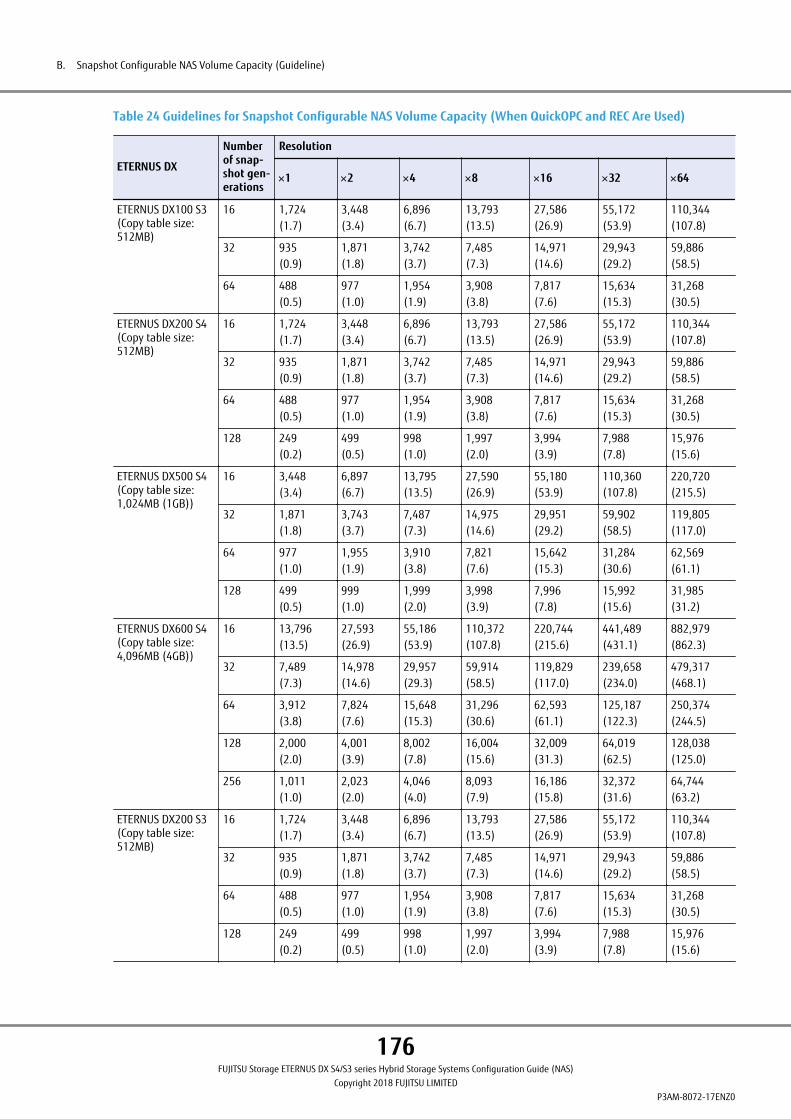
Table 24 Guidelines for Snapshot Configurable NAS Volume Capacity (When QuickOPC and REC Are Used)
ETERNUS DX
Numberof snap-shot gen-erations
Resolution
´1 ´2 ´4 ´8 ´16 ´32 ´64
ETERNUS DX100 S3(Copy table size:512MB)
16 1,724(1.7)
3,448(3.4)
6,896(6.7)
13,793(13.5)
27,586(26.9)
55,172(53.9)
110,344(107.8)
32 935(0.9)
1,871(1.8)
3,742(3.7)
7,485(7.3)
14,971(14.6)
29,943(29.2)
59,886(58.5)
64 488(0.5)
977(1.0)
1,954(1.9)
3,908(3.8)
7,817(7.6)
15,634(15.3)
31,268(30.5)
ETERNUS DX200 S4(Copy table size:512MB)
16 1,724(1.7)
3,448(3.4)
6,896(6.7)
13,793(13.5)
27,586(26.9)
55,172(53.9)
110,344(107.8)
32 935(0.9)
1,871(1.8)
3,742(3.7)
7,485(7.3)
14,971(14.6)
29,943(29.2)
59,886(58.5)
64 488(0.5)
977(1.0)
1,954(1.9)
3,908(3.8)
7,817(7.6)
15,634(15.3)
31,268(30.5)
128 249(0.2)
499(0.5)
998(1.0)
1,997(2.0)
3,994(3.9)
7,988(7.8)
15,976(15.6)
ETERNUS DX500 S4(Copy table size:1,024MB (1GB))
16 3,448(3.4)
6,897(6.7)
13,795(13.5)
27,590(26.9)
55,180(53.9)
110,360(107.8)
220,720(215.5)
32 1,871(1.8)
3,743(3.7)
7,487(7.3)
14,975(14.6)
29,951(29.2)
59,902(58.5)
119,805(117.0)
64 977(1.0)
1,955(1.9)
3,910(3.8)
7,821(7.6)
15,642(15.3)
31,284(30.6)
62,569(61.1)
128 499(0.5)
999(1.0)
1,999(2.0)
3,998(3.9)
7,996(7.8)
15,992(15.6)
31,985(31.2)
ETERNUS DX600 S4(Copy table size:4,096MB (4GB))
16 13,796(13.5)
27,593(26.9)
55,186(53.9)
110,372(107.8)
220,744(215.6)
441,489(431.1)
882,979(862.3)
32 7,489(7.3)
14,978(14.6)
29,957(29.3)
59,914(58.5)
119,829(117.0)
239,658(234.0)
479,317(468.1)
64 3,912(3.8)
7,824(7.6)
15,648(15.3)
31,296(30.6)
62,593(61.1)
125,187(122.3)
250,374(244.5)
128 2,000(2.0)
4,001(3.9)
8,002(7.8)
16,004(15.6)
32,009(31.3)
64,019(62.5)
128,038(125.0)
256 1,011(1.0)
2,023(2.0)
4,046(4.0)
8,093(7.9)
16,186(15.8)
32,372(31.6)
64,744(63.2)
ETERNUS DX200 S3(Copy table size:512MB)
16 1,724(1.7)
3,448(3.4)
6,896(6.7)
13,793(13.5)
27,586(26.9)
55,172(53.9)
110,344(107.8)
32 935(0.9)
1,871(1.8)
3,742(3.7)
7,485(7.3)
14,971(14.6)
29,943(29.2)
59,886(58.5)
64 488(0.5)
977(1.0)
1,954(1.9)
3,908(3.8)
7,817(7.6)
15,634(15.3)
31,268(30.5)
128 249(0.2)
499(0.5)
998(1.0)
1,997(2.0)
3,994(3.9)
7,988(7.8)
15,976(15.6)
B. Snapshot Configurable NAS Volume Capacity (Guideline)
176FUJITSU Storage ETERNUS DX S4/S3 series Hybrid Storage Systems Configuration Guide (NAS)
Copyright 2018 FUJITSU LIMITEDP3AM-8072-17ENZ0
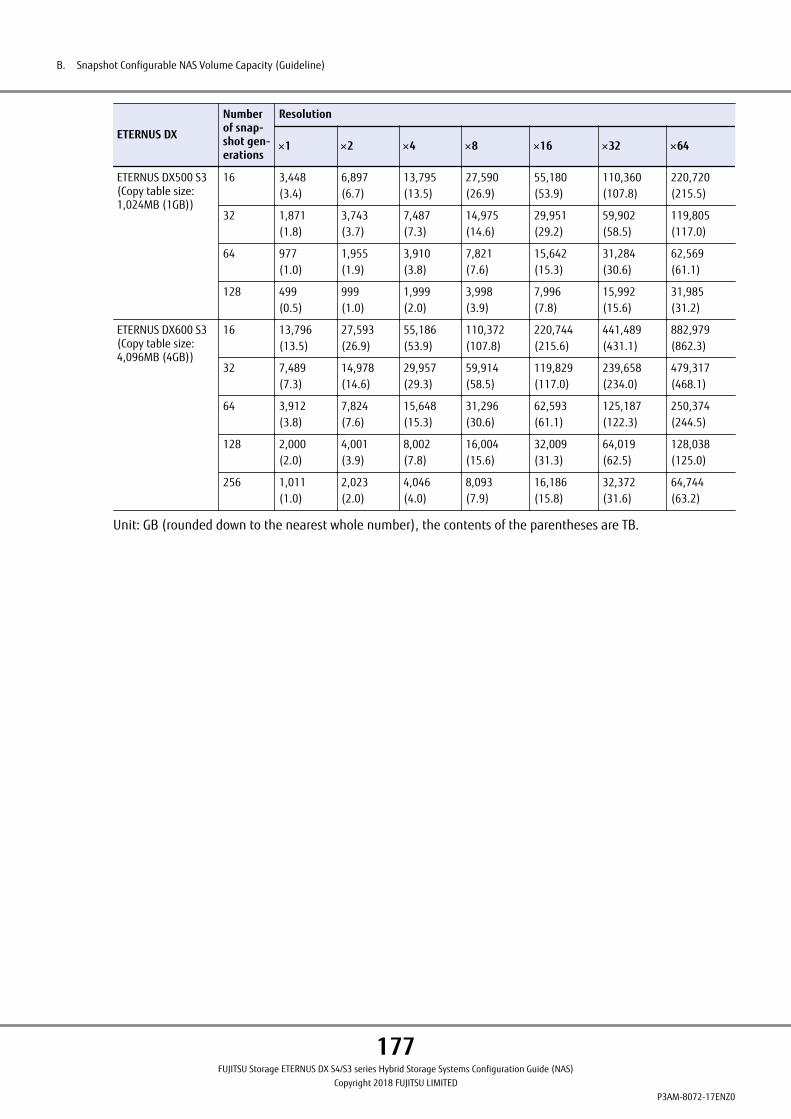
ETERNUS DX
Numberof snap-shot gen-erations
Resolution
´1 ´2 ´4 ´8 ´16 ´32 ´64
ETERNUS DX500 S3(Copy table size:1,024MB (1GB))
16 3,448(3.4)
6,897(6.7)
13,795(13.5)
27,590(26.9)
55,180(53.9)
110,360(107.8)
220,720(215.5)
32 1,871(1.8)
3,743(3.7)
7,487(7.3)
14,975(14.6)
29,951(29.2)
59,902(58.5)
119,805(117.0)
64 977(1.0)
1,955(1.9)
3,910(3.8)
7,821(7.6)
15,642(15.3)
31,284(30.6)
62,569(61.1)
128 499(0.5)
999(1.0)
1,999(2.0)
3,998(3.9)
7,996(7.8)
15,992(15.6)
31,985(31.2)
ETERNUS DX600 S3(Copy table size:4,096MB (4GB))
16 13,796(13.5)
27,593(26.9)
55,186(53.9)
110,372(107.8)
220,744(215.6)
441,489(431.1)
882,979(862.3)
32 7,489(7.3)
14,978(14.6)
29,957(29.3)
59,914(58.5)
119,829(117.0)
239,658(234.0)
479,317(468.1)
64 3,912(3.8)
7,824(7.6)
15,648(15.3)
31,296(30.6)
62,593(61.1)
125,187(122.3)
250,374(244.5)
128 2,000(2.0)
4,001(3.9)
8,002(7.8)
16,004(15.6)
32,009(31.3)
64,019(62.5)
128,038(125.0)
256 1,011(1.0)
2,023(2.0)
4,046(4.0)
8,093(7.9)
16,186(15.8)
32,372(31.6)
64,744(63.2)
Unit: GB (rounded down to the nearest whole number), the contents of the parentheses are TB.
B. Snapshot Configurable NAS Volume Capacity (Guideline)
177FUJITSU Storage ETERNUS DX S4/S3 series Hybrid Storage Systems Configuration Guide (NAS)
Copyright 2018 FUJITSU LIMITEDP3AM-8072-17ENZ0
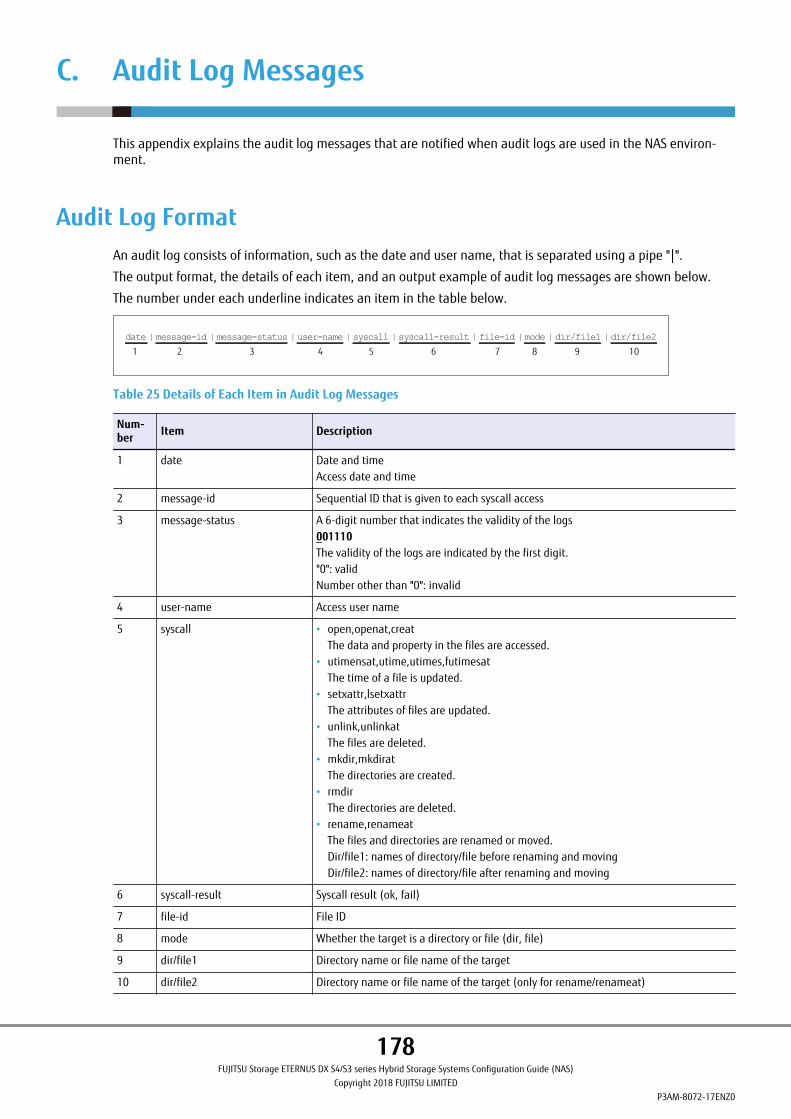
C. Audit Log Messages
This appendix explains the audit log messages that are notified when audit logs are used in the NAS environ-ment.
Audit Log FormatAn audit log consists of information, such as the date and user name, that is separated using a pipe "|".
The output format, the details of each item, and an output example of audit log messages are shown below.
The number under each underline indicates an item in the table below.
date | message-id | message-status | user-name | syscall | syscall-result | file-id | mode | dir/file1 | dir/file2
1 2 3 4 6 7 8 9 105
Table 25 Details of Each Item in Audit Log Messages
Num-ber Item Description
1 date Date and timeAccess date and time
2 message-id Sequential ID that is given to each syscall access
3 message-status A 6-digit number that indicates the validity of the logs001110The validity of the logs are indicated by the first digit."0": validNumber other than "0": invalid
4 user-name Access user name
5 syscall • open,openat,creatThe data and property in the files are accessed.
• utimensat,utime,utimes,futimesatThe time of a file is updated.
• setxattr,lsetxattrThe attributes of files are updated.
• unlink,unlinkatThe files are deleted.
• mkdir,mkdiratThe directories are created.
• rmdirThe directories are deleted.
• rename,renameatThe files and directories are renamed or moved.Dir/file1: names of directory/file before renaming and movingDir/file2: names of directory/file after renaming and moving
6 syscall-result Syscall result (ok, fail)
7 file-id File ID
8 mode Whether the target is a directory or file (dir, file)
9 dir/file1 Directory name or file name of the target
10 dir/file2 Directory name or file name of the target (only for rename/renameat)
178FUJITSU Storage ETERNUS DX S4/S3 series Hybrid Storage Systems Configuration Guide (NAS)
Copyright 2018 FUJITSU LIMITEDP3AM-8072-17ENZ0
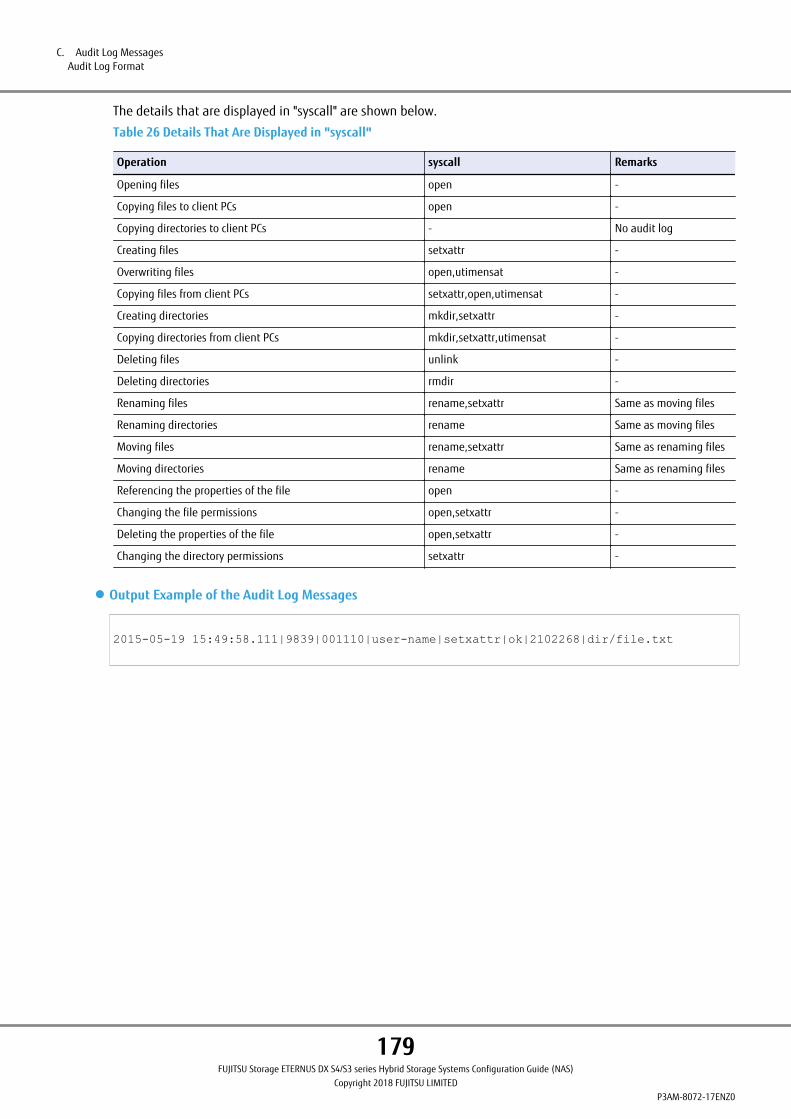
The details that are displayed in "syscall" are shown below.
Table 26 Details That Are Displayed in "syscall"
Operation syscall Remarks
Opening files open -
Copying files to client PCs open -
Copying directories to client PCs - No audit log
Creating files setxattr -
Overwriting files open,utimensat -
Copying files from client PCs setxattr,open,utimensat -
Creating directories mkdir,setxattr -
Copying directories from client PCs mkdir,setxattr,utimensat -
Deleting files unlink -
Deleting directories rmdir -
Renaming files rename,setxattr Same as moving files
Renaming directories rename Same as moving files
Moving files rename,setxattr Same as renaming files
Moving directories rename Same as renaming files
Referencing the properties of the file open -
Changing the file permissions open,setxattr -
Deleting the properties of the file open,setxattr -
Changing the directory permissions setxattr -
● Output Example of the Audit Log Messages
2015-05-19 15:49:58.111|9839|001110|user-name|setxattr|ok|2102268|dir/file.txt
C. Audit Log MessagesAudit Log Format
179FUJITSU Storage ETERNUS DX S4/S3 series Hybrid Storage Systems Configuration Guide (NAS)
Copyright 2018 FUJITSU LIMITEDP3AM-8072-17ENZ0
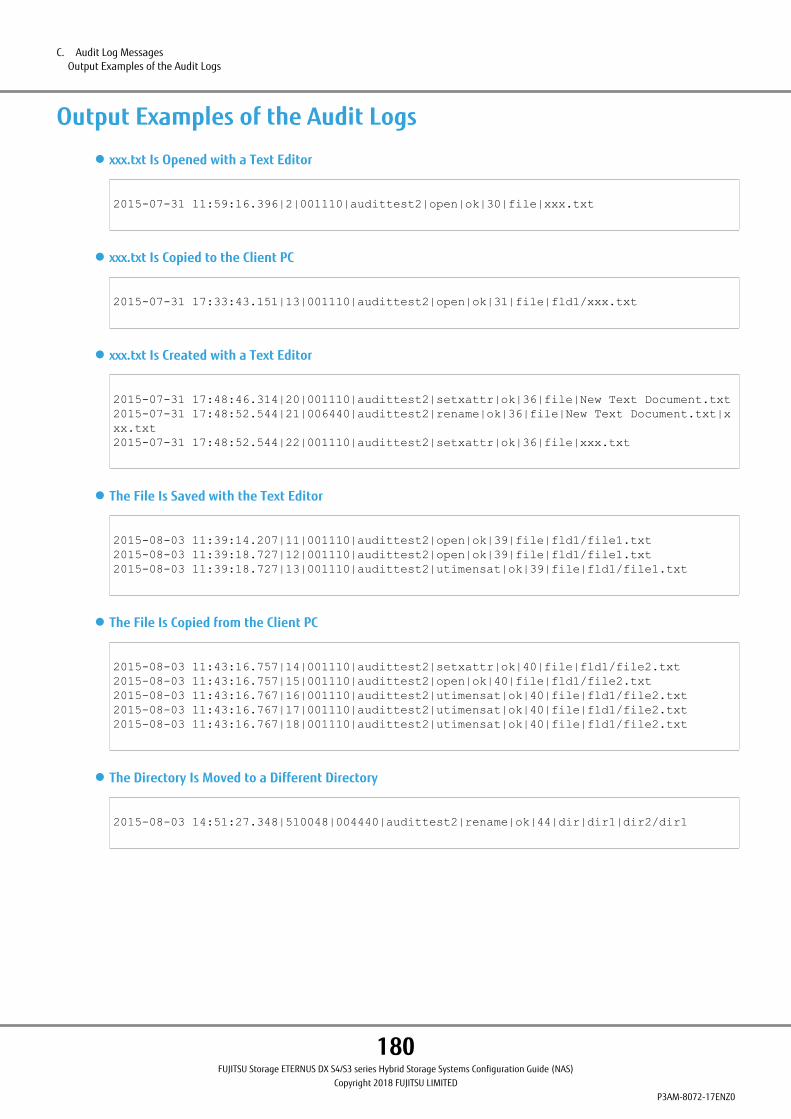
Output Examples of the Audit Logs
● xxx.txt Is Opened with a Text Editor
2015-07-31 11:59:16.396|2|001110|audittest2|open|ok|30|file|xxx.txt
● xxx.txt Is Copied to the Client PC
2015-07-31 17:33:43.151|13|001110|audittest2|open|ok|31|file|fld1/xxx.txt
● xxx.txt Is Created with a Text Editor
2015-07-31 17:48:46.314|20|001110|audittest2|setxattr|ok|36|file|New Text Document.txt2015-07-31 17:48:52.544|21|006440|audittest2|rename|ok|36|file|New Text Document.txt|xxx.txt2015-07-31 17:48:52.544|22|001110|audittest2|setxattr|ok|36|file|xxx.txt
● The File Is Saved with the Text Editor
2015-08-03 11:39:14.207|11|001110|audittest2|open|ok|39|file|fld1/file1.txt2015-08-03 11:39:18.727|12|001110|audittest2|open|ok|39|file|fld1/file1.txt2015-08-03 11:39:18.727|13|001110|audittest2|utimensat|ok|39|file|fld1/file1.txt
● The File Is Copied from the Client PC
2015-08-03 11:43:16.757|14|001110|audittest2|setxattr|ok|40|file|fld1/file2.txt2015-08-03 11:43:16.757|15|001110|audittest2|open|ok|40|file|fld1/file2.txt2015-08-03 11:43:16.767|16|001110|audittest2|utimensat|ok|40|file|fld1/file2.txt2015-08-03 11:43:16.767|17|001110|audittest2|utimensat|ok|40|file|fld1/file2.txt2015-08-03 11:43:16.767|18|001110|audittest2|utimensat|ok|40|file|fld1/file2.txt
● The Directory Is Moved to a Different Directory
2015-08-03 14:51:27.348|510048|004440|audittest2|rename|ok|44|dir|dir1|dir2/dir1
C. Audit Log MessagesOutput Examples of the Audit Logs
180FUJITSU Storage ETERNUS DX S4/S3 series Hybrid Storage Systems Configuration Guide (NAS)
Copyright 2018 FUJITSU LIMITEDP3AM-8072-17ENZ0
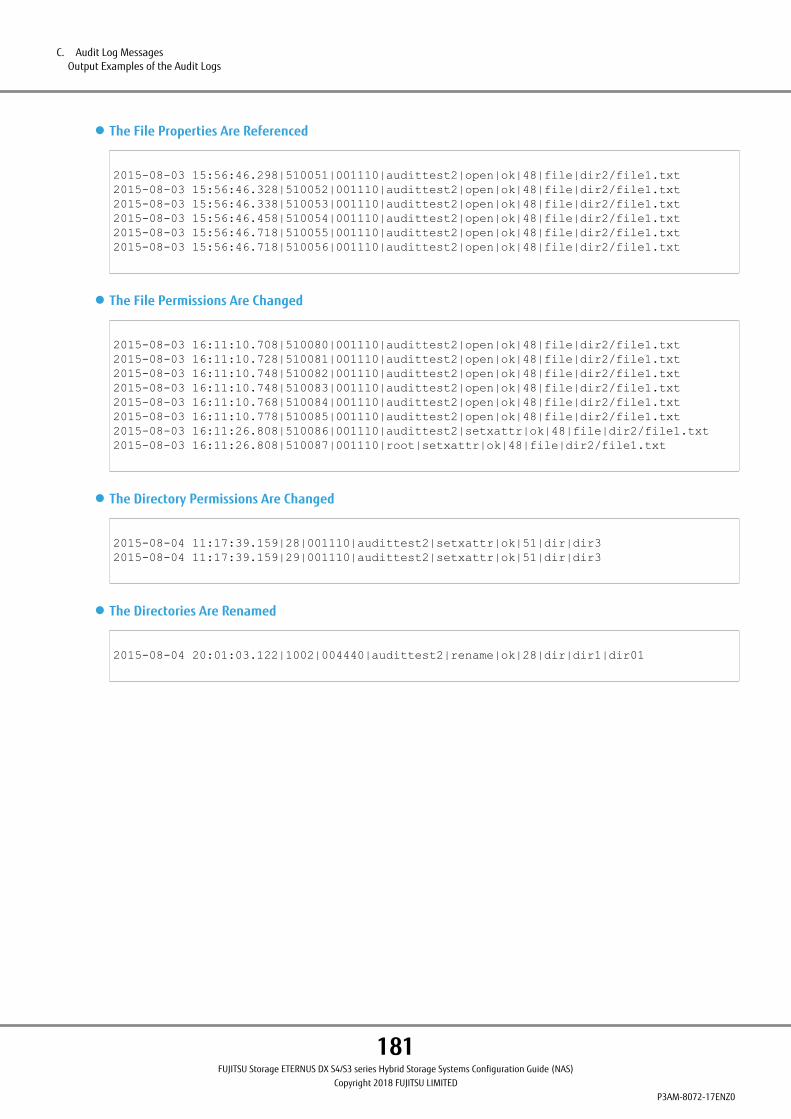
● The File Properties Are Referenced
2015-08-03 15:56:46.298|510051|001110|audittest2|open|ok|48|file|dir2/file1.txt2015-08-03 15:56:46.328|510052|001110|audittest2|open|ok|48|file|dir2/file1.txt2015-08-03 15:56:46.338|510053|001110|audittest2|open|ok|48|file|dir2/file1.txt2015-08-03 15:56:46.458|510054|001110|audittest2|open|ok|48|file|dir2/file1.txt2015-08-03 15:56:46.718|510055|001110|audittest2|open|ok|48|file|dir2/file1.txt2015-08-03 15:56:46.718|510056|001110|audittest2|open|ok|48|file|dir2/file1.txt
● The File Permissions Are Changed
2015-08-03 16:11:10.708|510080|001110|audittest2|open|ok|48|file|dir2/file1.txt2015-08-03 16:11:10.728|510081|001110|audittest2|open|ok|48|file|dir2/file1.txt2015-08-03 16:11:10.748|510082|001110|audittest2|open|ok|48|file|dir2/file1.txt2015-08-03 16:11:10.748|510083|001110|audittest2|open|ok|48|file|dir2/file1.txt2015-08-03 16:11:10.768|510084|001110|audittest2|open|ok|48|file|dir2/file1.txt2015-08-03 16:11:10.778|510085|001110|audittest2|open|ok|48|file|dir2/file1.txt2015-08-03 16:11:26.808|510086|001110|audittest2|setxattr|ok|48|file|dir2/file1.txt2015-08-03 16:11:26.808|510087|001110|root|setxattr|ok|48|file|dir2/file1.txt
● The Directory Permissions Are Changed
2015-08-04 11:17:39.159|28|001110|audittest2|setxattr|ok|51|dir|dir32015-08-04 11:17:39.159|29|001110|audittest2|setxattr|ok|51|dir|dir3
● The Directories Are Renamed
2015-08-04 20:01:03.122|1002|004440|audittest2|rename|ok|28|dir|dir1|dir01
C. Audit Log MessagesOutput Examples of the Audit Logs
181FUJITSU Storage ETERNUS DX S4/S3 series Hybrid Storage Systems Configuration Guide (NAS)
Copyright 2018 FUJITSU LIMITEDP3AM-8072-17ENZ0
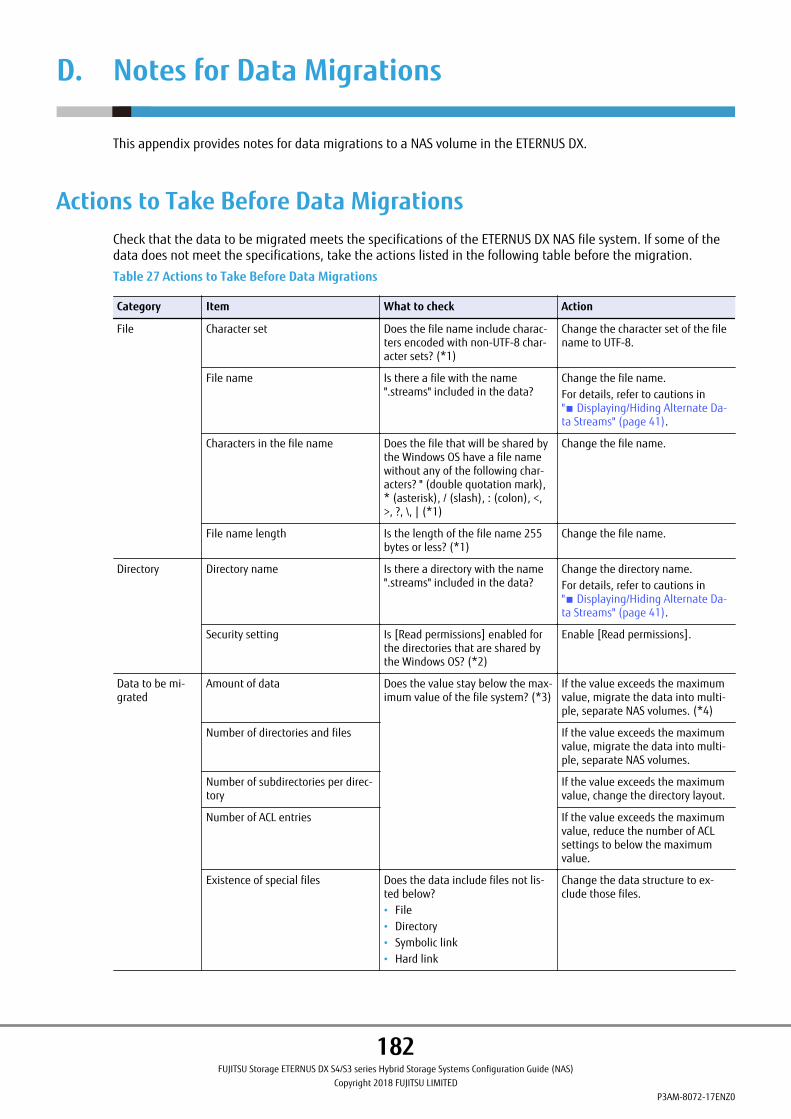
D. Notes for Data Migrations
This appendix provides notes for data migrations to a NAS volume in the ETERNUS DX.
Actions to Take Before Data MigrationsCheck that the data to be migrated meets the specifications of the ETERNUS DX NAS file system. If some of thedata does not meet the specifications, take the actions listed in the following table before the migration.
Table 27 Actions to Take Before Data Migrations
Category Item What to check Action
File Character set Does the file name include charac-ters encoded with non-UTF-8 char-acter sets? (*1)
Change the character set of the filename to UTF-8.
File name Is there a file with the name".streams" included in the data?
Change the file name.For details, refer to cautions in"■ Displaying/Hiding Alternate Da-ta Streams" (page 41).
Characters in the file name Does the file that will be shared bythe Windows OS have a file namewithout any of the following char-acters? " (double quotation mark),* (asterisk), / (slash), : (colon), <,>, ?, \, | (*1)
Change the file name.
File name length Is the length of the file name 255bytes or less? (*1)
Change the file name.
Directory Directory name Is there a directory with the name".streams" included in the data?
Change the directory name.For details, refer to cautions in"■ Displaying/Hiding Alternate Da-ta Streams" (page 41).
Security setting Is [Read permissions] enabled forthe directories that are shared bythe Windows OS? (*2)
Enable [Read permissions].
Data to be mi-grated
Amount of data Does the value stay below the max-imum value of the file system? (*3)
If the value exceeds the maximumvalue, migrate the data into multi-ple, separate NAS volumes. (*4)
Number of directories and files If the value exceeds the maximumvalue, migrate the data into multi-ple, separate NAS volumes.
Number of subdirectories per direc-tory
If the value exceeds the maximumvalue, change the directory layout.
Number of ACL entries If the value exceeds the maximumvalue, reduce the number of ACLsettings to below the maximumvalue.
Existence of special files Does the data include files not lis-ted below?• File• Directory• Symbolic link• Hard link
Change the data structure to ex-clude those files.
182FUJITSU Storage ETERNUS DX S4/S3 series Hybrid Storage Systems Configuration Guide (NAS)
Copyright 2018 FUJITSU LIMITEDP3AM-8072-17ENZ0
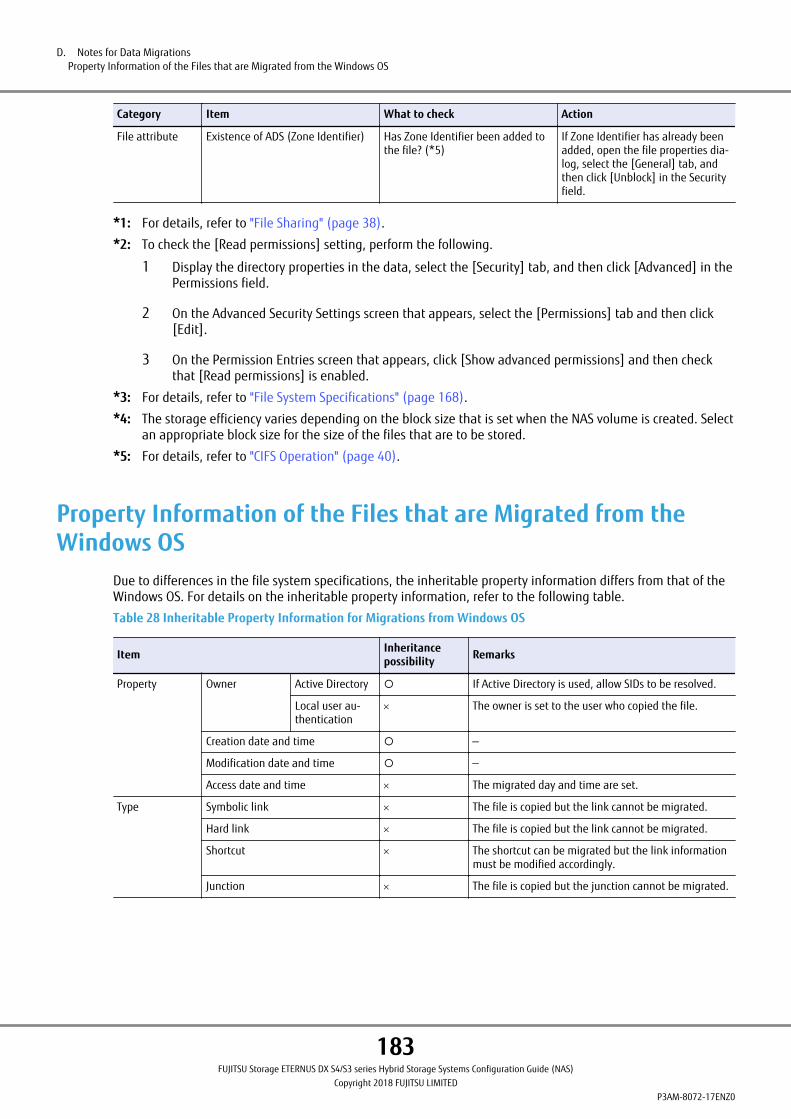
Category Item What to check Action
File attribute Existence of ADS (Zone Identifier) Has Zone Identifier been added tothe file? (*5)
If Zone Identifier has already beenadded, open the file properties dia-log, select the [General] tab, andthen click [Unblock] in the Securityfield.
*1: For details, refer to "File Sharing" (page 38).
*2: To check the [Read permissions] setting, perform the following.
1 Display the directory properties in the data, select the [Security] tab, and then click [Advanced] in thePermissions field.
2 On the Advanced Security Settings screen that appears, select the [Permissions] tab and then click[Edit].
3 On the Permission Entries screen that appears, click [Show advanced permissions] and then checkthat [Read permissions] is enabled.
*3: For details, refer to "File System Specifications" (page 168).
*4: The storage efficiency varies depending on the block size that is set when the NAS volume is created. Selectan appropriate block size for the size of the files that are to be stored.
*5: For details, refer to "CIFS Operation" (page 40).
Property Information of the Files that are Migrated from theWindows OS
Due to differences in the file system specifications, the inheritable property information differs from that of theWindows OS. For details on the inheritable property information, refer to the following table.
Table 28 Inheritable Property Information for Migrations from Windows OS
Item Inheritancepossibility Remarks
Property Owner Active Directory ¡ If Active Directory is used, allow SIDs to be resolved.
Local user au-thentication
´ The owner is set to the user who copied the file.
Creation date and time ¡ —
Modification date and time ¡ —
Access date and time ´ The migrated day and time are set.
Type Symbolic link ´ The file is copied but the link cannot be migrated.
Hard link ´ The file is copied but the link cannot be migrated.
Shortcut ´ The shortcut can be migrated but the link informationmust be modified accordingly.
Junction ´ The file is copied but the junction cannot be migrated.
D. Notes for Data MigrationsProperty Information of the Files that are Migrated from the Windows OS
183FUJITSU Storage ETERNUS DX S4/S3 series Hybrid Storage Systems Configuration Guide (NAS)
Copyright 2018 FUJITSU LIMITEDP3AM-8072-17ENZ0
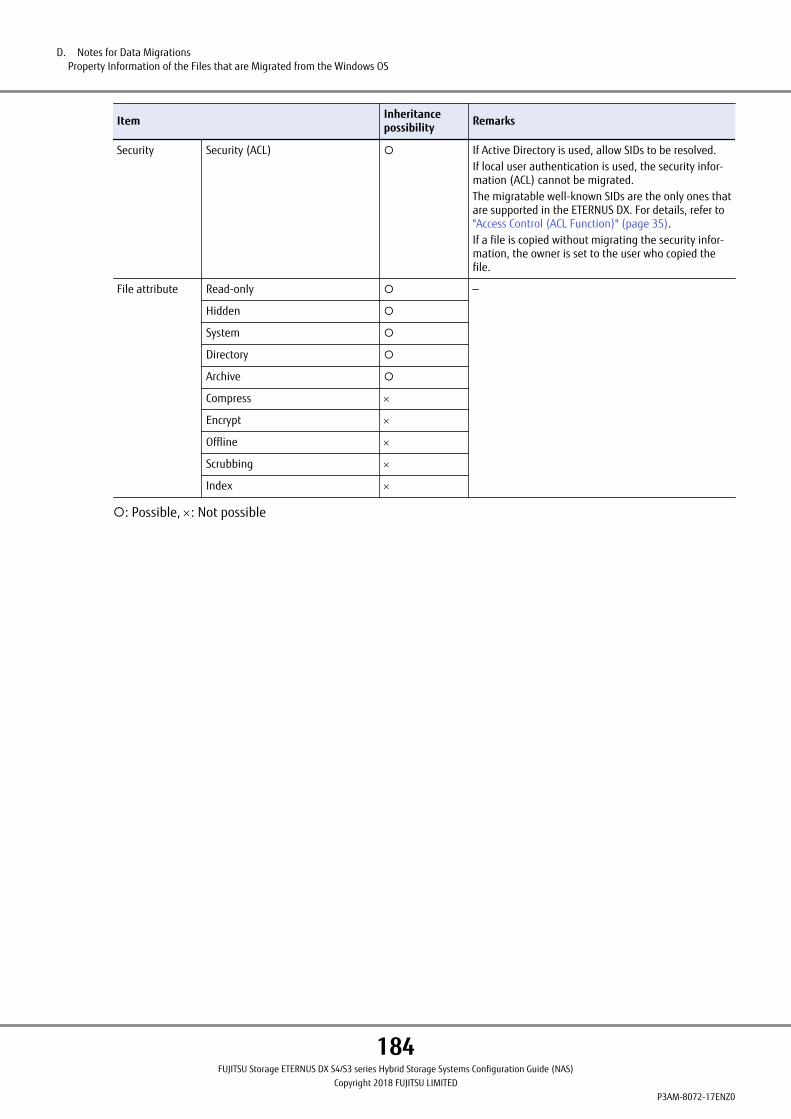
Item Inheritancepossibility Remarks
Security Security (ACL) ¡ If Active Directory is used, allow SIDs to be resolved.If local user authentication is used, the security infor-mation (ACL) cannot be migrated.The migratable well-known SIDs are the only ones thatare supported in the ETERNUS DX. For details, refer to"Access Control (ACL Function)" (page 35).If a file is copied without migrating the security infor-mation, the owner is set to the user who copied thefile.
File attribute Read-only ¡ —
Hidden ¡
System ¡
Directory ¡
Archive ¡
Compress ´
Encrypt ´
Offline ´
Scrubbing ´
Index ´
¡: Possible, ´: Not possible
D. Notes for Data MigrationsProperty Information of the Files that are Migrated from the Windows OS
184FUJITSU Storage ETERNUS DX S4/S3 series Hybrid Storage Systems Configuration Guide (NAS)
Copyright 2018 FUJITSU LIMITEDP3AM-8072-17ENZ0
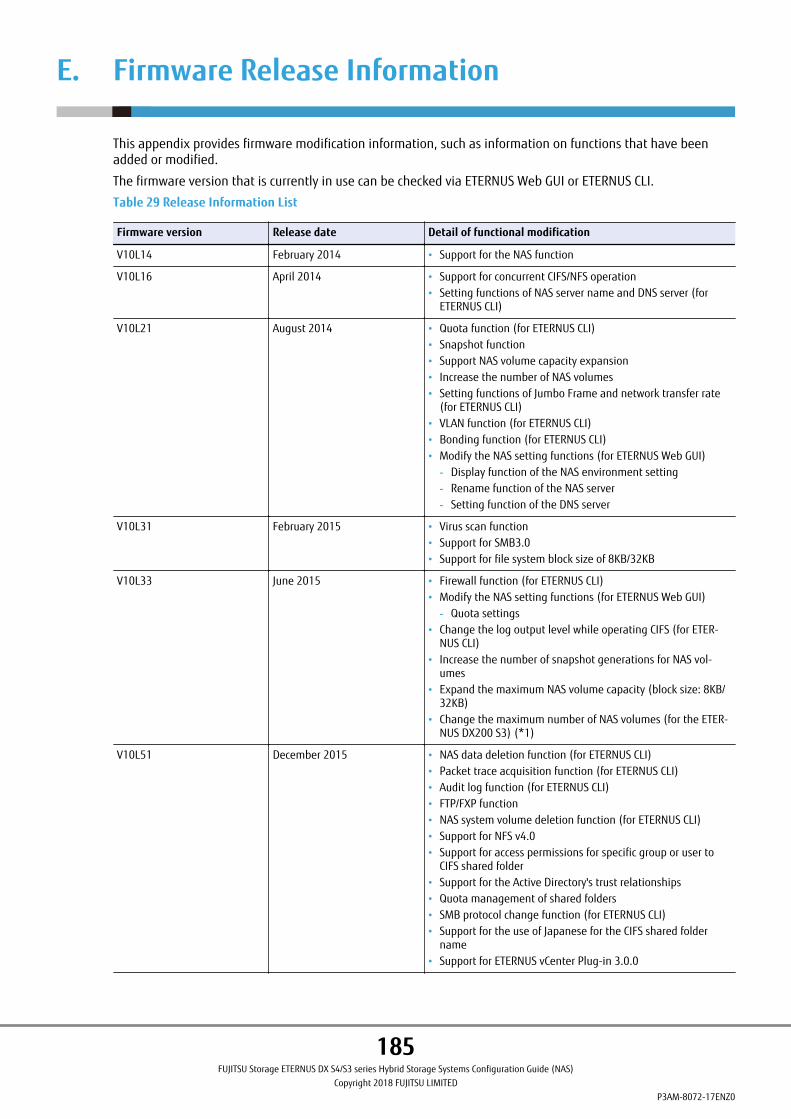
E. Firmware Release Information
This appendix provides firmware modification information, such as information on functions that have beenadded or modified.
The firmware version that is currently in use can be checked via ETERNUS Web GUI or ETERNUS CLI.
Table 29 Release Information List
Firmware version Release date Detail of functional modification
V10L14 February 2014 • Support for the NAS function
V10L16 April 2014 • Support for concurrent CIFS/NFS operation• Setting functions of NAS server name and DNS server (for
ETERNUS CLI)
V10L21 August 2014 • Quota function (for ETERNUS CLI)• Snapshot function• Support NAS volume capacity expansion• Increase the number of NAS volumes• Setting functions of Jumbo Frame and network transfer rate
(for ETERNUS CLI)• VLAN function (for ETERNUS CLI)• Bonding function (for ETERNUS CLI)• Modify the NAS setting functions (for ETERNUS Web GUI)- Display function of the NAS environment setting- Rename function of the NAS server- Setting function of the DNS server
V10L31 February 2015 • Virus scan function• Support for SMB3.0• Support for file system block size of 8KB/32KB
V10L33 June 2015 • Firewall function (for ETERNUS CLI)• Modify the NAS setting functions (for ETERNUS Web GUI)- Quota settings
• Change the log output level while operating CIFS (for ETER-NUS CLI)
• Increase the number of snapshot generations for NAS vol-umes
• Expand the maximum NAS volume capacity (block size: 8KB/32KB)
• Change the maximum number of NAS volumes (for the ETER-NUS DX200 S3) (*1)
V10L51 December 2015 • NAS data deletion function (for ETERNUS CLI)• Packet trace acquisition function (for ETERNUS CLI)• Audit log function (for ETERNUS CLI)• FTP/FXP function• NAS system volume deletion function (for ETERNUS CLI)• Support for NFS v4.0• Support for access permissions for specific group or user to
CIFS shared folder• Support for the Active Directory's trust relationships• Quota management of shared folders• SMB protocol change function (for ETERNUS CLI)• Support for the use of Japanese for the CIFS shared folder
name• Support for ETERNUS vCenter Plug-in 3.0.0
185FUJITSU Storage ETERNUS DX S4/S3 series Hybrid Storage Systems Configuration Guide (NAS)
Copyright 2018 FUJITSU LIMITEDP3AM-8072-17ENZ0
Firmware version Release date Detail of functional modification
V10L53 June 2016 • Change the maximum number of NAS volumes (for the ETER-NUS DX100 S3) (*2)
• Increase the number of snapshot generations for NAS vol-umes (for the ETERNUS DX100 S3) (*2)
• Support for the "no_root_squash" setting for NFS shared fold-ers (for ETERNUS CLI)
• Local user authentication• Home directories• Meta cache distribution (for ETERNUS CLI)
V10L61 December 2016 • Delete the virus scan function
V10L71 April 2017 • Support for the ETERNUS DX100 S4/DX200 S4
V10L81 November 2017 • Support for the ETERNUS DX500 S4/DX600 S4
*1: When the Memory Extension (ETFMCB / ETFMCB-L / ETDMCBU / ETDMCBU-L) is installed
*2: When the Memory Extension (ETFMCC / ETFMCC-L / ETDMCCU / ETDMCCU-L) is installed
E. Firmware Release Information
186FUJITSU Storage ETERNUS DX S4/S3 series Hybrid Storage Systems Configuration Guide (NAS)
Copyright 2018 FUJITSU LIMITEDP3AM-8072-17ENZ0

FUJITSU Storage ETERNUS DX S4/S3 series Hybrid Storage SystemsConfiguration Guide (NAS)
P3AM-8072-17ENZ0
Date of issuance: April 2018Issuance responsibility: FUJITSU LIMITED
• The content of this manual is subject to change without notice.
• This manual was prepared with the utmost attention to detail.
However, Fujitsu shall assume no responsibility for any operational problems as the result of errors, omissions, or theuse of information in this manual.
• Fujitsu assumes no liability for damages to third party copyrights or other rights arising from the use of any informationin this manual.
• The content of this manual may not be reproduced or distributed in part or in its entirety without prior permission fromFujitsu.
Recommended