1
Employee Self Service Features
Contents View Paycheck .......................................................................................................................................................... 2
Sample Paycheck ...................................................................................................................................................... 3
View Absence Requests ............................................................................................................................................ 4
View Absence Balances............................................................................................................................................. 5
Add/Change a Home Address ................................................................................................................................... 6
Add/Change Home Address cont’d ............................................................................................................................ 7
Add a Mailing Address ............................................................................................................................................... 8
Add/Change Contact Details ...................................................................................................................................... 9
Add/Change Contact Details cont’d ......................................................................................................................... 10
Add/Change Emergency Contacts ........................................................................................................................... 11
Add/Change Emergency Contacts cont’d ................................................................................................................. 12
Add/Change Emergency Contacts cont’d ................................................................................................................. 13
Additional Information Tab ....................................................................................................................................... 14
2
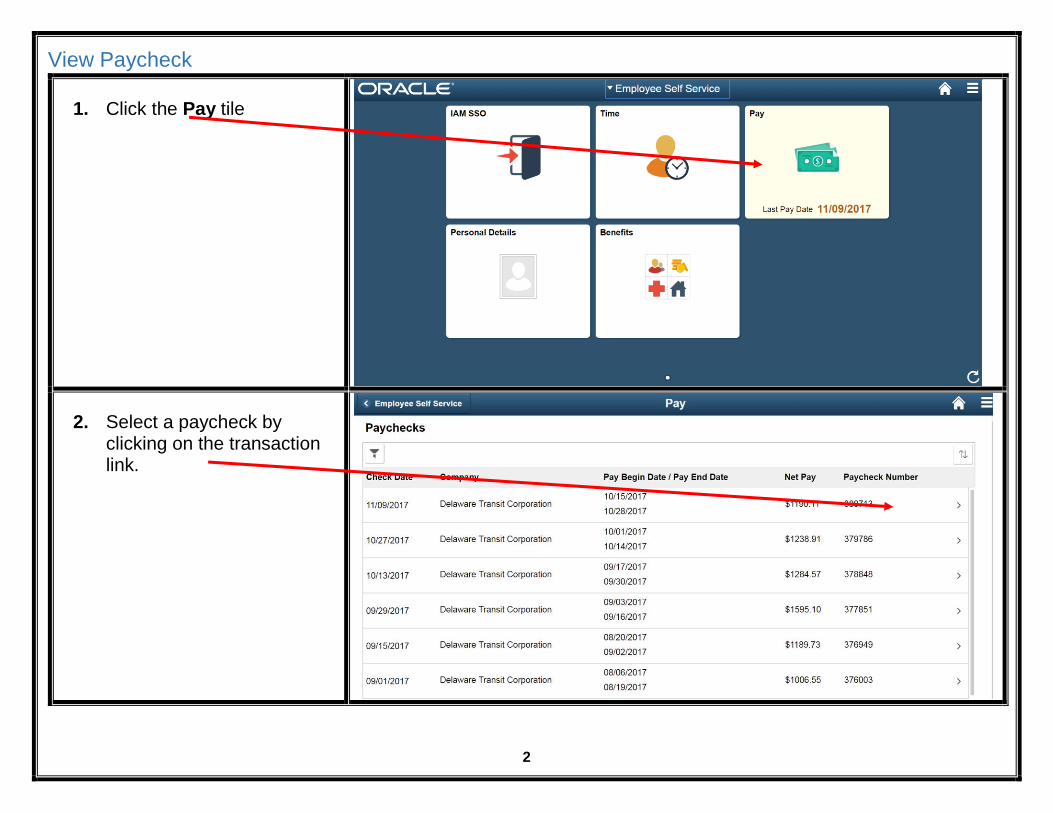
View Paycheck
1. Click the Pay tile
2. Select a paycheck by clicking on the transaction link.

3
Sample Paycheck
3. Right click on pdf and click Print.

4
View Absence Requests
Use the Time page to access
employee self-service absence transactions
4. Click the Time tile on the Employee Self Service home page.
5. Click on the View Requests link.
Click here to filter your absence
requests by start date, end date, absence type, and absence status
6. Select a previously submitted
absence to view by clicking on the transaction link.

5
View Absence Balances
7. Click on the Time tile on the
Employee Self Service home page.
8. Click the Absence Balances link.
These are the most up to date
Absence Balances available as of the date shown

6
Add/Change a Home Address
9. Click the Personal Details tile
on the Employee Self Service home page.
10. Click an address on the
Addresses (summary) tab to update an existing address. OR
11. Click the Add Address button or icon to add a new address.
This option is available for an
address type (home or mailing address) only if no address currently exists.

7
Add/Change Home Address cont’d
12. Select Change As Of date and edit using the calendar provided.
13. Click the Country look up button and select the United States from the list.
14. Enter the Address. 15. Enter the City. 16. Click the State look up button and
select the state you reside in from the drop down list.
17. Enter the five digit Postal number.
18. Enter the County name. 19. Click the Save button.
8
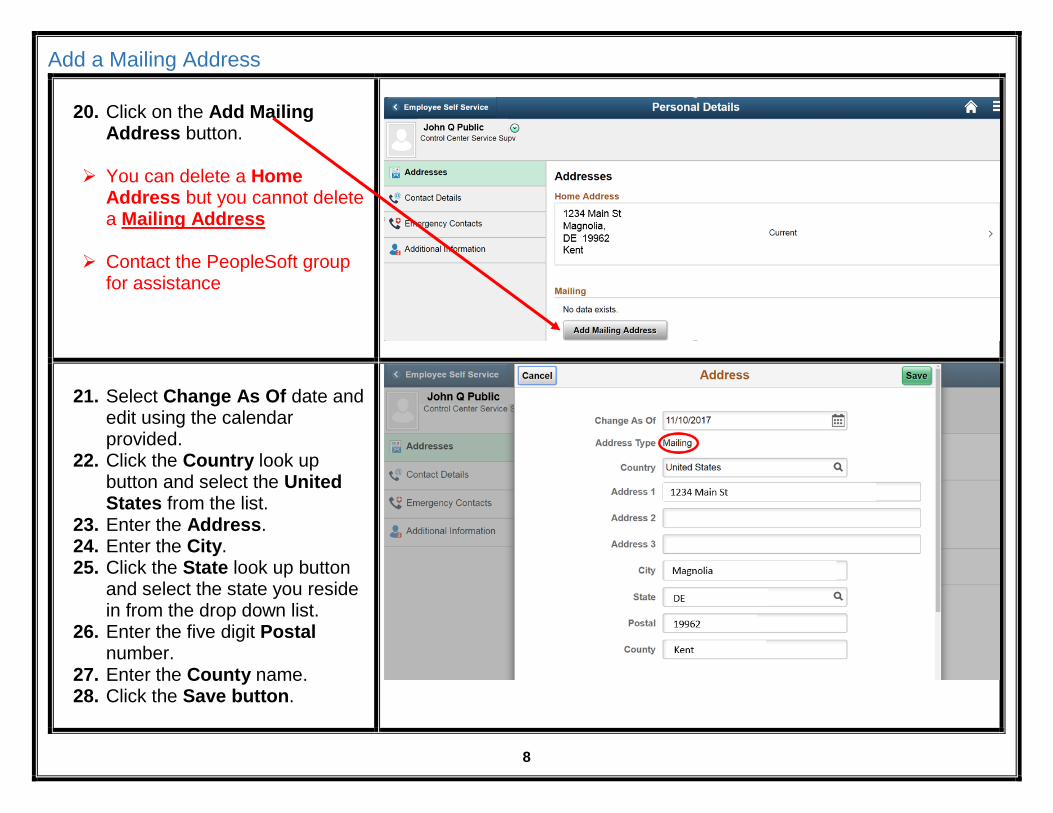
Add a Mailing Address
20. Click on the Add Mailing
Address button. You can delete a Home
Address but you cannot delete a Mailing Address
Contact the PeopleSoft group for assistance
21. Select Change As Of date and
edit using the calendar provided.
22. Click the Country look up button and select the United States from the list.
23. Enter the Address. 24. Enter the City. 25. Click the State look up button
and select the state you reside in from the drop down list.
26. Enter the five digit Postal number.
27. Enter the County name. 28. Click the Save button.

9
Add/Change Contact Details
Use the Contact Details tab
to review your phone numbers and email addresses
29. Click on a phone number on the Contact Details page to update or delete an existing phone number.
OR
30. Click the Plus Sign to create a new phone number contact.
31. Select Type of phone number from drop down.
32. Check Preferred if Main contact number.
33. Enter the Phone Number. 34. Enter an Extension (If
applicable). 35. Click the Save button.

10
Add/Change Contact Details cont’d
Use the Email Address page to add, update, or delete an email address
36. Click on an E-mail Address on the Contact Details page to update or delete an existing address.
OR
37. Click the Plus Sign to create a new E-mail Address.
38. Select Email Type from drop down.
39. Check the Preferred check box if it is the main address.
40. Enter an Email Address on the description line.
41. Click the Save button.

11
Add/Change Emergency Contacts
Use the Emergency Contacts tab to view/Update a list of your emergency contacts
42. Click an existing Emergency
Contact to view and update the contact’s information or to delete the contact.
43. Click on the Plus Sign to create a new contact.
On this page, the contact name and relationship are enterable
Existing address and phone number information is read only
You can provide multiple phone numbers for an emergency contact, but only one address
44. Enter a Contact Name. 45. Select a Relationship from
the drop down. 46. Check Preferred box if the
contact is the main contact
12
Add/Change Emergency Contacts cont’d
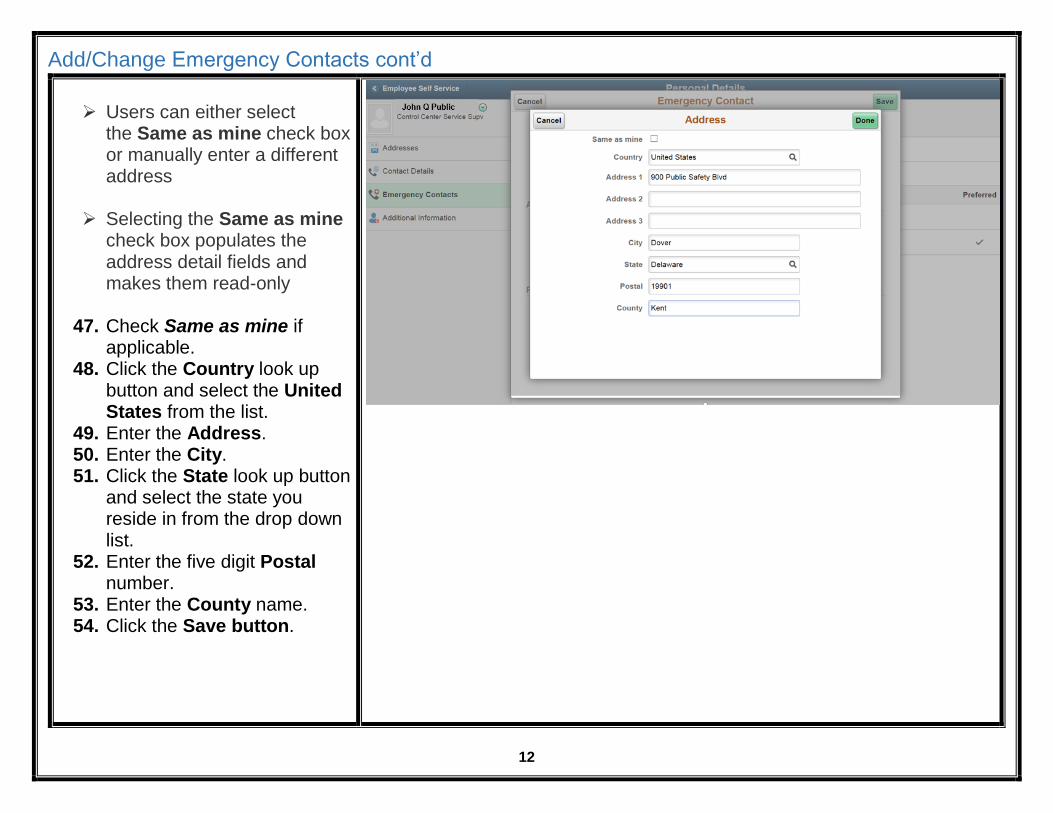
Users can either select
the Same as mine check box or manually enter a different address
Selecting the Same as mine check box populates the address detail fields and makes them read-only
47. Check Same as mine if
applicable. 48. Click the Country look up
button and select the United States from the list.
49. Enter the Address. 50. Enter the City. 51. Click the State look up button
and select the state you reside in from the drop down list.
52. Enter the five digit Postal number.
53. Enter the County name. 54. Click the Save button.
13
Add/Change Emergency Contacts cont’d
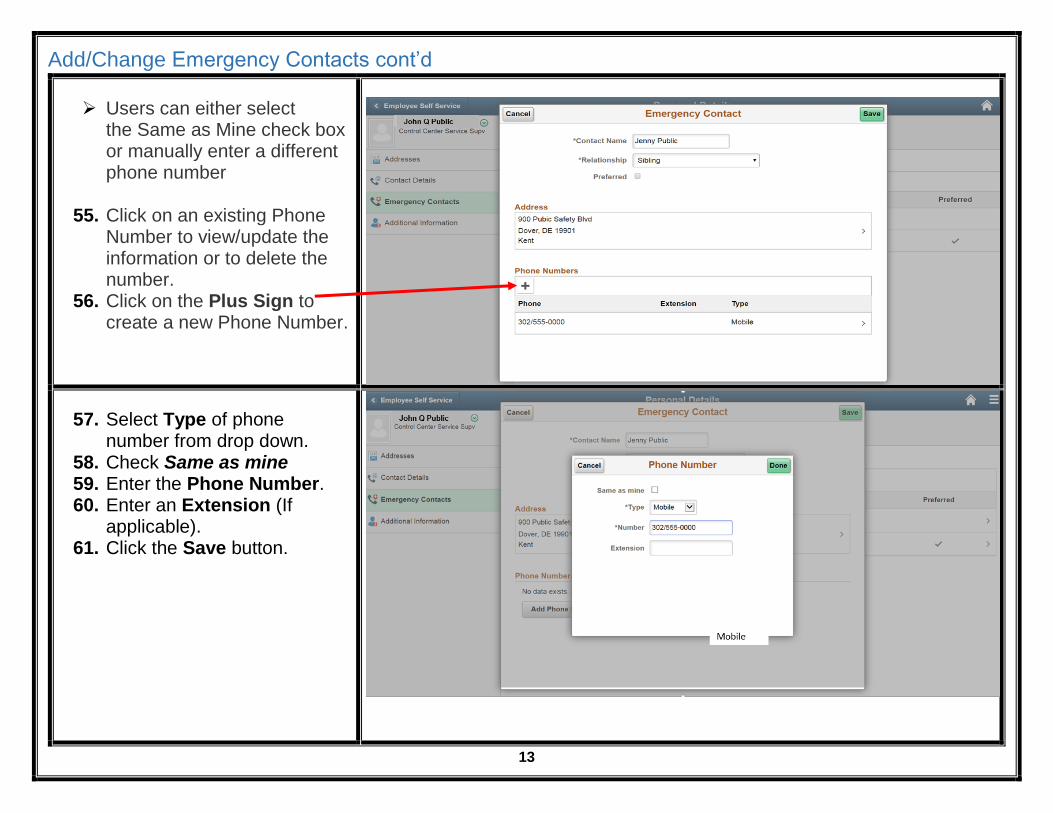
Users can either select the Same as Mine check box or manually enter a different phone number
55. Click on an existing Phone
Number to view/update the information or to delete the number.
56. Click on the Plus Sign to create a new Phone Number.
57. Select Type of phone number from drop down.
58. Check Same as mine 59. Enter the Phone Number. 60. Enter an Extension (If
applicable). 61. Click the Save button.

14
Additional Information Tab
Users cannot edit the information that appears on this page. Instead, informational text directs users to contact the human resources department if information is incorrect
The absence of information is intentional
Recommended