EN
DIGITAL VOICE RECORDER
DS-9500DS-9000INSTRUCTIONS
Thank you for purchasing an Olympus digital voice recorder.Please read these instructions for information about using the product correctly and safely.Keep the instructions handy for future reference.
To ensure successful recording, we recommend that you test the record function and volume before use.

2EN
1 Getting startedMain features ....................................4Names of parts ..................................5
Recorder/ Docking station ........................... 5Display ................................................................. 6
Inserting the battery ........................8Charge the battery ...........................9
Charge using the docking station ............. 9Charging directly via USB cable ................. 9Using the lithium ion battery ....................10
Power supply from AC adapter or USB cable .........................................11Turn the power on ..........................12Memory card ...................................12
Compatible memory cards ........................12Inserting and ejecting a memory card ....13
Setting time and date [Time & date] ...................................14
Changing the time and date .....................15Selecting folders and files ..............16Operate the slide switch .................17
2 Basic operationsRecording ........................................18
New recording ................................................19Overwrite recording .....................................20Insert recording..............................................21
Hands-free recording .....................22Recording monitor..........................22Playback ..........................................23Erasing .............................................25
Erasing files ......................................................25Partially erasing a file ...................................27
3 Advanced operationsDisplaying file information ............28Device lock function .......................29Setting the Author ID and Worktype .........................................30Verbal Comment .............................31Share the dictation file via Wi-Fi (DS-9500 only) ................................32Index marks .....................................35How to use the menu ......................36Menu items ......................................38
File menu .................................................38
Recording menu ....................................38
LCD/ Sound menu ................................40
Device menu ...........................................40Editing the Worktype information ..........42
Formatting the memory card [Format] ...........................................44Customizing the recorder ..............46
4 Managing files on your PCOlympus Dictation Management System (ODMS) ...............................49
Operating environment ..............................50Using online help ..........................................50
Connecting to your PC ....................51Connecting to your PC using the USB cable ......................................51Connecting to your PC using the docking station ..........................51Disconnecting from your PC .....................52
Table of contents

3EN
1
2
3
4
5
Table of contents5 Other information
Device care ......................................53Alarm message list ..........................54Troubleshooting .............................55Accessories (optional) ....................57Copyright and trademark information .....................................58Safety precautions ..........................59Specifications ..................................65
Indications used in this manual
NOTE
Describes precautions and operations that should be absolutely avoided in using the voice recorder.
TIPDescribes useful information and hints that will help you getting the most out of your voice recorder.
☞Indicates reference pages describing details or related information.
This manual is the advanced version. Additionally, the basic version (Quick User Guide), which summarizes basic operation, is also included with this product.

4
1
ENM
ain features
Main featuress Slide switch operation for ease of use
and fast response.s Three Programmable smart buttons
F1,F2 and F3 (☞ P.47).s Three recording modes are available
for selection: DSS, PCM, and MP3 (☞ P.39).
s Three microphone modes are provided. Select the one that is the best match for your purpose or usage environment (☞ P.38).
s Data encryption function for securing recordings on the device.*1
It is possible to set the Encryption level to [High] (256 bit), [Standard] (128 bit) or [No] (deactivates the function).
s Lithium ion battery rechargeable via USB cable or AC adapter.*2
s This recorder is compatible with USB 2.0, enabling fast data transfer to a computer.
s Five folders and up to 200 files per folder, for a maximum of 1,000 recordings (☞ P.18).When using ODMS (Olympus Dictation Management System) software, it is possible to create up to seven folders (max. 1,400 files) (☞ P.47, P.49).
s Device Lock function to prevent unauthorized access to device (☞ P.29, P.46).Authentication system via password.
Getting started
s Large color LCD display.s Index mark function which is useful to
search particular points in the dictation files (☞ P.35).
s Verbal comment function which allows transcriptionists to instantly search and playback instructions on their computer (☞ P.31).
s Priority Setting (☞ P.38).You can set a priority level on each file recorded.
s This recorder has a drop resistance of 1.5 m.
s Rubbing alcohol can be used to keep this recorder clean (☞ P.53).
s A function is provided to resume operation from sleep when you pick the recorder up from your desk.*3
s A Wi-Fi function is available (☞ P.32, P.47).*3
By using Wi-Fi, you can share dictation files with transcriptionists at any time and from any location without needing to return to the office.
s ODMS (Olympus Dictation Management System) and DSS Player (DSS Player for Mac) software included (☞ P.49).*4
It is possible to customize the recorder in a number of ways.
*1 PCM and MP3 files cannot be encrypted.*2 An AC adapter is included with only the DS-9500.*3 This function is available with only the DS-9500.*4 Box content differs depending on the version you
purchased.

5
1
EN
Names of parts
9
0
!
@
#
$
&
^
%
3
5
6
1
2
7
8
4
*(
)
-=
qw
er
yt
Names of parts
1 q (earphone) jack2 Built-in 2nd microphone (L)3 Display4 Programmable smart (F1,F2,F3) buttons5 + (volume) button6 0 (rewind) button7 – (volume) button8 Built-in speaker9 SD card slot0 m (microphone) jack! Built-in main microphone (R)@ NEW button# LED indicator light$ Slide (sREC/ 4STOP/ `PLAY/ 7REV) switch
Docking station:A docking station is included with only the DS-9500.
% OK/MENU button^ 9 (fast forward) button& k (erase) button* POWER (ON/OFF) switch( Battery cover release button) Battery cover- Docking station connector= USB connectorq Foot switch connector w AC adaptor jack e USB connector (micro-B) r Ethernet cable connector
To use Ethernet, connect the bundled AC adaptor to CR21.
t Connector y Security slot
Recorder/ Docking station

6
1
ENNam
es of parts
Names of parts
7
6
5
3 43 4
3
1 2
1 2
1 2
7
8
0
!
9
@
3 #
%
$
1 2
Display in the file list *
Display in the recording mode Display in the playback mode
Display in the device information
Display

7
1
EN
Names of parts
Names of parts
1 Recording media indicator[ ]: Internal memory[ ]: SD card[ ]: SD card lock status
2 Wi-Fi status indicator *[ ]: Signal strength[ ] [ ]: Communications status
3 Battery status indicator4 Slide switch guide
[ ]: Recording indicator[ ]: Stop indicator[ ]: Playback indicator[ ]: Fast-rewind indicator
5 Current recording time6 Recording level meter7 File information area
[ ]: File lock[ ]: Speech recognition[ ]: Worktype[ ]: Option item[ ]: Author
8 Current playback time
9 File length0 Current position! Playback position bar@ Device information area
[ ] [ ] [ ], etc.: Recording mode[ ] [ ] [ ]: Microphone sensitivity[ ]: VCVA (Variable Control Voice Actuator)
# File status *[ ]: Recording pending[ ]: Transcription in progress[ ]: Transcription finished[ ]: Speech recognition finished[ ]: Wi-Fi transfer success[ ]: Wi-Fi transfer failed[ ]: USB transfer success[ ]: E-mail transfer success[ ]: E-mail transfer failed
$ Current folder *% File name and recording date/time *
[ ]: Priority
* DS-9500 only

8
1
ENInserting the battery
Inserting the batteryThis recorder uses a lithium ion battery specified by Olympus (Li-92B). Do not use any other type of battery.
1 Lightly press down on the battery cover release button, then open the battery cover, as shown in the illustration below.
1
2
2 Insert the battery observing the correct polarity as shown in the illustration, then close the battery cover.• Insert the battery by sliding in direction A
while pushing down in direction B.
• The supplied battery is not fully charged. It is recommended to fully charge it before using the recorder for the first time or after the battery has been left unattended for a long time (☞ P.9).
Battery indicator
The battery indicator on the display will decrease as the battery loses power.
(100-20% White) (19-1% Red) (0 %)
• When the battery indicator turns red, charge the battery as soon as possible. When the battery is too weak, [ ] and [Battery low] will appear on the display and the recorder will shut down.
NOTE
• Turn off the recorder before removing the battery. Removing the battery while the recorder is still in use may cause malfunctions, file corruption or file loss.
• Remove the battery if you are not going to use the recorder for an extended period of time.
• After removing the battery, it may become necessary to re-set the time and date if you leave the battery out of the recorder for more than 1 minute or if you remove the battery right after loading it into the recorder.

9
1
EN
Charge the battery
After loading the battery into the recorder, you can charge it by connecting the USB cable to the recorder, or by using the docking station in combination with the USB cable or the AC adapter.
Charge using the docking stationThe docking station and AC adapter are included with the DS-9500, and sold separately for the DS-9000.
Charge using docking station and AC adapter
Fully charge the battery (approx. 2 hours) before use.
1 Connect the AC adapter to the docking station.
2 Firmly press the recorder all the way into the docking station as shown in the illustration.
2
1
CHARGE indicator light
• The CHARGE indicator light turns on when charging starts, and turns off when charging is complete.
Charge the batteryCharge using docking station and USB cable
Fully charge the battery (approx. 4 hours) before use. Verify that the recorder is in stop mode.
Connect the USB cable to the docking station.
Charging directly via USB cableAfter loading the battery into the recorder, you can charge it by connecting the USB cable to the recorder.Connect the USB cable to the recorder.

10
1
ENCharge the battery
Charge the batteryRecommended temperature range of use:During operation: 0°C - 42°C/ 32°F - 107.6°FCharging: 5°C - 35°C/ 41°F - 95°FUsing the battery outside the above temperature range may result in declining efficiency and shorter battery life.
NOTE
• When disposing the batteries, always observe the local laws and regulations. Contact your local recycling center for proper disposal methods.
• If battery is not fully discharged, protect it against short-circuiting (e.g. by taping the contacts) before disposal.
For customers in Germany:Olympus has a contract with the GRS (Joint Battery Disposal Association) in Germany to ensure environmentally friendly disposal.
NOTE
• Charge the battery frequently during the first period of use. The battery will perform better after several charge/discharge cycles.
• Models of batteries which are different from the included one may not be charged.
• Charging the battery via the USB cable connection may not be successful depending on the power capacity of the USB port in your PC. Use the AC adapter instead.
• Do not set or remove the recorder from the docking station while operating.
• Do not charge the recorder through a USB hub.• Do not attach or remove the battery if the USB
cable is connected.
Using the lithium ion batteryThis recorder uses a lithium ion battery specified by Olympus (Li-92B). Do not use any other type of battery.
Cautions concerning the battery
Read the following instructions carefully when you use the battery.
Discharging:Rechargeable batteries self-discharge while not in use. Charge it regularly before use.
Battery life:Over time, the rechargeable battery may gradually wear down. When the operating time becomes shorter even if the rechargeable battery is fully charged under the specified condition, replace it with a new one.
Operating temperature:Rechargeable batteries are chemical products. Battery efficiency may vary even when operating within the recommended temperature range.This is an inherent nature of these products.

11
1
EN
Power supply from
AC adapter or USB cable
Use the AC adapter or USB cable when recording for extended period of time.The docking station and AC adapter are included with the DS-9500, and sold separately for the DS-9000.
Use the AC adapter
Plug the AC adapter into a household power outlet and connect the power plug to the recorder via the docking station. Always turn off the recorder before you connect power.
Detecting abnormal voltage
If the recorder detects a DC power voltage outside the allowed voltage range (4.4-5.5V), then [Power supply error Remove power plug] will appear on the display, and all operation will stop. The recorder will not be operable if abnormal voltage is detected. Use the AC adapter.
Power supply from AC adapter or USB cable
Use the USB cable
1 Verify that the recorder is in stop mode.
2 Connect the USB cable to the recorder.

12
1
ENTurn the pow
er on/Mem
ory card
Move the POWER switch to ON position to activate the recorder.
POWER
ON
OFF
Turn the power onThe recorder has its own internal memory, and also supports standard SD/SDHC cards sold separately.
Compatible memory cardsThe recorder supports memory card capacity from 4 GB up to 32 GB.
For a list of memory card compatible with the recorder, please visit the product homepage at the Olympus website applicable to your region or contact your Olympus reseller where you purchased the product.
NOTE
• When initializing (formatting) a memory card, confirm that no necessary data is stored on the memory card beforehand. Initialization completely erases the existing data on the memory card.
• Memory cards formatted (initialized) by another device, like a computer, may not be recognized. Be sure to format them with this recorder before use.
• The memory card has a service life. When reaching the end of its life, writing or erasing data on the memory card will be disabled. In this case, replace the memory card.
• If you use a PC card adapter compatible with the memory card to save or delete some data on the memory card, the maximum recording time on the memory card may be decreased. To recover the original recording time, initialize/format the memory card in the recorder.
Memory card
Memory cards compatibility
13
1
EN
Mem
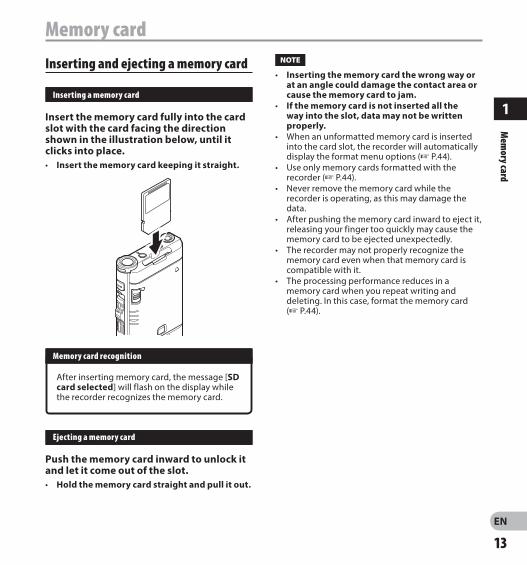
ory cardMemory cardInserting and ejecting a memory card
Inserting a memory card
Insert the memory card fully into the card slot with the card facing the direction shown in the illustration below, until it clicks into place.• Insert the memory card keeping it straight.
Memory card recognition
After inserting memory card, the message [SD card selected] will flash on the display while the recorder recognizes the memory card.
Ejecting a memory card
Push the memory card inward to unlock it and let it come out of the slot.• Hold the memory card straight and pull it out.
NOTE
• Inserting the memory card the wrong way or at an angle could damage the contact area or cause the memory card to jam.
• If the memory card is not inserted all the way into the slot, data may not be written properly.
• When an unformatted memory card is inserted into the card slot, the recorder will automatically display the format menu options (☞ P.44).
• Use only memory cards formatted with the recorder (☞ P.44).
• Never remove the memory card while the recorder is operating, as this may damage the data.
• After pushing the memory card inward to eject it, releasing your finger too quickly may cause the memory card to be ejected unexpectedly.
• The recorder may not properly recognize the memory card even when that memory card is compatible with it.
• The processing performance reduces in a memory card when you repeat writing and deleting. In this case, format the memory card (☞ P.44).

14
1
ENSetting tim
e and date [Time & date]
If you set the time and date beforehand, the information when the file is recorded is automatically stored for each file. Setting the time and date beforehand enables easier file management.
When you use the recorder for the first time after purchasing it, or when the battery has been inserted without the device being used for a long time, the [Set time & date] will appear. However, when a Password has been set as the device lock function (☞ P.29), the recorder will go to the time and date set screen after verification (unlocking).
1 Press the 9 or 0 button to select the item to set.
2 Press the + or − button to set.
• You can select the order of the “Month”, “Day” and “Year” by pressing the F2 (M/D/Y) button while setting them.
3 Press the OK/MENU button to complete the setting.• The clock will start from the set date and
time. Press the OK/MENU button according to the time signal.
T I P
• Moving the slide switch to a position other than STOP (4) while setting the time and date will cancel the time and date setting. The recorder will return to the previous time and date.
• You can set the time and date from your PC using ODMS and DSS Player software (☞ P.46).
Setting time and date [Time & date]
OK/MENU button+, − button9, 0 button
F1, F2, F3 button
Select the item from the “hour”, “minute”, “month”, “day” and “year” with a flashing point.
You can select between 12 and 24 hour display by pressing the F2 (24H) button while setting the hour and minute.

15
1
EN
Setting time and date [Tim
e & date]Setting time and date [Time & date]Changing the time and dateIf the current time and date is not correct, set it using the procedure below.
1 When the file display screen appears, press the OK/MENU button while the voice recorder is in stop mode.
2 Press the + or − button to select [Device menu] tab.
[Device menu] tab
• You can change the menu display by moving the settings tab cursor.
3 Press the OK/MENU or 9 button.
4 Press the + or − button to select [Time & date].
5 Press the OK/MENU button.• The following steps are the same as Step 1
through Step 3 of “Setting time and date [Time & date]” (☞ P.14).
6 Press the F3 (EXIT) button to exit the menu screen.

16
1
ENSelecting folders and files
Selecting folders and filesFor DS-9500: 1 When the file display screen appears,
press the F1 (LIST) button while the voice recorder is in stop mode.• A list of the files stored in the folder appears.
• Go to step 2 if the desired file is in another folder, and to step 5 if it is in the file list.
2 Press the F1 (LIST) or 0 button.• The folder list screen will be displayed.
3 Press the + or – to select the folder.
4 Press the OK/MENU or 9 button.
5 Press the + or – button to select the desired file.
6 Press the OK/MENU or 9 button.
Select a file using the filter function
1 When the file list display screen appears, press the F2 (FILTER) button.
2 Press the + or – button to select the filtering method.
[All]: Displays all of the files.
[Status]: Filters the files by file status.
[Worktype ID]: Filters the files by Worktype ID.
• Pressing the F1 (BACK) button will return to the previous screen, and pressing the F2 (CLOSE) button will close the popup and display the file list screen.
3 Press the OK/MENU or 9 button.
• If you selected [Status] or [Worktype ID], you can narrow down the files even further. Select an item and then press the OK/MENU or 9 button.
When [Status] is selected.

17
1
EN
Operate the slide switch
Selecting folders and files 4 Press the + or – button to select the
desired file.
5 Press the OK/MENU or 9 button.
T I P
• If you move the slide switch to the PLAY (`) position while a file is selected in the file list, playback begins immediately.
For DS-9000:If the desired file is in the same folder, select it by performing the operation of step 4*.
* A file can be selected with the operation of step 4 on the DS-9500 as well.
1 When the file display screen appears, press the F1 (FOLDER) button while the voice recorder is in stop mode.• The folder list screen will be displayed.
2 Press the +, – or F1 (FOLDER) button to select the folder.
3 Press the OK/MENU or 9 button.
4 While the file is being displayed, press the 9 or 0 button.
Current folder and file name
N OT E
• There is no file list display function for the DS-9000.
Operate the slide switchSlide the slide switch on the side of the recorder up or down to perform the recording, stop, playback, and fast-rewind operations.You can determine the current position at a glance even from the front because the slide switch works in conjunction with the slide switch guide on the screen.
T I P
• If you use the ODMS software, you can change the assignments of the NEW button and slide switch (☞ P.47).
Slide switch
The place indicated large in the slide switch guide is the current slide switch position.
POWER
ON
OFF Recording
Stop
Playback
Fast-rewind
The figure shows the stop position.

2
18EN
Recording
Basic operations
By default, the recorder has five folders, [A], [B], [C], [D], [E]. These five folders can be selectively used to distinguish the kind of recording. Up to 200 messages can be recorded per folder.
Record function
Before starting recording over a previously recorded file, the RECORD function can be set to the following:• Append: Attaches the new recording to the end
of the previously recorded file (☞ P.19).• Overwrite (default): Overwrites and deletes part
of the previously recorded file starting from the chosen position (☞ P.20).
• Insert: The recorded file will be inserted in the middle of the previously recorded file, starting from the chosen recording position. The original file will be kept (☞ P.21).
By default, the RECORD function is configured to record using the overwrite option.Recording will start from the current position of the existing file.
N OT E
• Append recording, overwrite recording, and insert recording are not available for MP3 files.
• Insert recording is not available for PCM files (DS-9500 only).
RecordingRecording related settings
Recording related settings can be configured to provide a suitable recording environment.• Hands-free recording (☞ P.22).• Recording monitor (☞ P.22).• Verbal Comment (☞ P.31).• Microphone mode [Mic mode] (☞ P.38).• Microphone sensitivity [Mic sense] (☞ P.38).• Recording modes [Rec mode] (☞ P.39).• Using the Variable Control Voice Actuator
[VCVA] (☞ P.39).

2
19EN
RecordingRecording
1
2
3
a
b
New recordingCreate a new file to record in.
1 Press the NEW button to create a new file.• [New file] appears in the display.• It is possible to select the Worktype from
the Worktype list uploaded using the ODMS software (☞ P.46).
a New file name
2 Move the slide switch to the REC (s) position to start recording.• The LED indicator lights in red. Turn the
microphone in the direction of the source to be recorded.
b Recording elapsed time
3 Move the slide switch to the STOP (4) position to stop recording.• If you want to append additional recordings
to the same file, move the slide switch to the REC (s) position again.
NOTE
• During recording, a beep will sound whenever the remaining recording time reaches 60, 30, and 10 seconds.
• When the remaining recording time reaches 60 seconds, the record indicator light will start flashing. The light will flash faster when the remaining recording time decreases from 30 to 10 seconds.
• [Memory full] or [Folder full] will be displayed when the memory or folder capacity is full.− Delete unnecessary files before recording any further (☞ P.25) or transfer dictation files to your PC.− Change the recording media at [Memory select] setting (☞ P.40) or change to a memory card with
free space.

2
20EN
Recording
Recording
2
3
a
Overwrite recordingYou can overwrite a previously recorded file starting from any point within the file. When using overwriting, the overwritten part will be erased.
1 Select and play the file you want to overwrite.• Stop the playback at the point you want to
start overwriting.
NOTE
• A file’s creation time and date will be updated to the time and date the file was last edited.
• You cannot select a recording mode different from the one set onto the original file.
• Overwrite recording is not available for MP3 files.
2 Move the slide switch to the REC (s) position to start overwriting.• The LED indicator lights in red.
3 Move the slide switch to the STOP (4) position to stop overwriting.a Total recording time of the file

2
21EN
RecordingRecording
3
4
2
5
a
Insert recordingAdditional recording can be inserted into previously recorded file.
1 Select and play the file you want to insert an additional recording into.
2 While playing the file, press the F1 (INSERT) button to insert an additional recording.• [Insert Rec?] will appear on the display.
3 Move the slide switch to the REC (s) position to start inserting the additional recording.• [Insert rec] will appear on the display. The
LED indicator lights in blue.
a Elapsed time during insert recording
4 Move the slide switch to the STOP (4) position to stop inserting the additional recording.
5 Press the F3 (EXIT) button to stop insert recording.
NOTE
• The recording’s time and date will be updated to the one of the latest recording inserted.
• You cannot select a recording mode different from the one set onto the original file.
• Insert recording is not available for MP3 files.• Insert recording is not available for PCM files (DS-9500 only).

2
22EN
Hands-free recording/Recording monitor
The recorder can be used as a hands-free recording device. To set up the recorder for hands-free operation, connect the optional Olympus Foot Switch to the back of the docking station and place the recorder in the docking station as shown in the illustration below.You can set the Hands-free function of the recorder to [Dictation] (default) or [Transcription] by using the customize functions of the ODMS software (☞ P.47). Using the ODMS software you can also change the functions of the foot pedals.For more details, refer to the online help for ODMS software (☞ P.50).
NOTE
• Move the slide switch to the STOP (4) position before connecting it to the docking station for hands-free recording.
• To record with better quality using the hands-free recording function, set the microphone sensitivity to [High] (☞ P.38), or use an external microphone.
It is possible to monitor your recording by listening to it even while the recording is in progress. In order to do so, insert the earphone plug into the q (earphone) jack and use the + or – buttons to control the volume level.
+, − (Volume) button
NOTE
• When connecting an earphone or an external microphone’s plug, insert the plug all the way in as shown in the illustration above.
• To avoid irritation to the ear, insert the earphone after turning down the volume level.
• Do not place earphones near a microphone as this may cause feedback.
• The monitored audio may differ from the actually recorded audio.
Hands-free recording Recording monitor

2
23EN
Playback
3
1
2
You can playback a file starting from any point.
1 Select the file, then move the slide switch to the PLAY (`) position to start playback.• The LED indicator lights in green.
a Elapsed playback time
2 Press the + or – button to adjust the volume.• The volume can be adjusted within a range
from [00] to [30].
3 Move the slide switch to the STOP (4) position at any point you want to stop the playback.
Playback
a

2
24EN
Playback
Playback
Playback functions Operation How to cancel
Fast Forward (FF)
Press the 9 button once while in stop mode. Move the slide switch to a position other than the STOP (4) position.• The recorder starts the operation of
the set position.Press the OK/MENU button.
Rewind (REW)
Press the 0 button once while in stop mode.
Cue (Cue)
Press and hold the 9 button while in stop or playback mode.
Release the button.
Review (Rev)
Press and hold the 0 button while in stop or playback mode.
Release the button.
Move the slide switch to the REV (7 ) position. Release the slide switch.
Playback Speed Press the F2 (SPEED) button during playback.• The playback speed will change at each press
of the F2 (SPEED) button.Play (playback):Playback at normal speed.Slow play (slow playback):Playback speed slows down (-50%), and “Slow play” will be displayed.Fast play (fast playback):Playback speed becomes faster (+50%), and “Fast play” will be displayed.
———
NOTE
• If you press the 9 button once while fast-forwarding or twice while in stop mode, the recorder will stop at the end of the file (F.Skip).
• If you press the 0 button once while rewinding or twice while in stop mode, the recorder will stop at the beginning of the file (B.Skip). If the 0 button is pressed within 2 seconds, the recorder skips to the beginning of the previous file.
• If you press and hold the 9 button while fast forwarding (FF), the recorder will continue to skip forward.• If you press and hold the 0 button while rewinding (REW), the recorder will continue to skip backward.• The Cue and Review speed can be set from [Speed 1] to [Speed 5] (☞ P.41). Cue and Review playback
sound can be set to [On] or [Off] (☞ P.41).

2
25EN
ErasingErasingErasing filesA selected file can be erased from a folder. Also, all files in a folder can be erased simultaneously.
For DS-9500:
1 Select the file you want to erase.
2 Press the k (erase) button.
3 Press the + button to select [Start], then press the OK/MENU button.• The display changes to [Erasing] and erasing
will start.• [Erased] is displayed when the file is erased.
Erasing a file from the file list display screen
1 When the file list display screen appears, press the k (erase) button.
2 Select the file you want to erase, then press the OK/MENU button.
• A check mark is added to the selected file. Pressing the OK/MENU button again clears the check mark.
• If you press the F1 (ALL) button, check marks are added to all of the files stored in the folder. Pressing the F1 (ALL) button again clears all of the check marks.
3 Press the F2 (EXEC) button.

2
26EN
Erasing
Erasing 4 Press the + button to select [Start],
then press the OK/MENU button.• The display changes to [Erasing] and erasing
will start.• [Erased] is displayed when the file is erased.
For DS-9000:
1 Select the file you want to erase.
2 Press the k (erase) button.
3 Press the + button to select [Erase all] or [Erase one file].
[Erase all]: All files in a folder can be erased simultaneously.
[Erase one file]: Erase one file.
4 Press the OK/MENU button.
5 Press the + button to select [Start], then press the OK/MENU button.• The display changes to [Erasing] and erasing
will start.• [Erased] is displayed when the file is erased.
NOTE
• An erased file cannot be restored.• The erasing process may take up to 10 seconds.
Do not interrupt this process or data may be damaged.
• Files cannot be erased in the following cases.- Files are locked (☞ P.38).- Files stored on a locked memory card.

2
27EN
ErasingErasingPartially erasing a fileAny unnecessary part of a file can be erased.
1 Playback the file you would like to partially erase.
2 Press the k (erase) button at the point you want to start erasing.• While playback continues, [Start point] will
appear on the display.
3 In the position you want to end partial erase, press the k (erase) button again.
• The erase starting point (time) set in step 2 and the ending point (time) set in this step will be displayed alternatively for 8 seconds.
• If you let the playback continue until the end of the file, or in case of a Verbal comment (☞ P.31) before it, that will be considered the ending point of the partial erase.
4 Press the k (erase) button to confirm the erasure.• The display changes to [Partial erasing] and
erasing will start.• When [Partial erase completed] appears on
the display, partial erase is complete.
NOTE
• If the k (erase) button is not pressed within 8 seconds after the [Start point] and [End point] are alternately displayed, the recorder will revert to play back status.
• MP3 files cannot be partially erased.• PCM files cannot be partially erased (DS-9500
only).• An erased file cannot be restored.• The erasing process may take up to 10 seconds.
Do not interrupt this process or data may be damaged.
• Files cannot be partially erased in the following cases.- Files are locked (☞ P.38).- Partial erasing is not possible on parts of files
with a Verbal comment on them (☞ P.31).- Files are inside a locked memory card.

28
3
ENDisplaying file inform
ation
The recorder can display a variety of information related to the current file.
1 Select the file containing the information to display.
[INFO]
• The F3 button becomes [INFO] when in stop mode in the case of the DS-9000 and when the New file screen is displayed in the case of the DS-9500.
Displaying file information
Advanced operations
2 Press the F3 (INFO) button.
• The following information will be displayed: [Date] [Author ID] [Worktype]
[Option item]
3 Press the F3 (EXIT) button to exit the information screen.

29
3
EN
Device lock function
Access to the recorder can be restricted by using the Device Lock function. Password authentication can be safer for your data in case the recorder is lost.The password can be set by using the ODMS software (☞ P.46).When the password has been registered, you will be asked for it on start-up.
1 Use the +, –, 9 or 0 buttons to select a number.
2 Press the OK/MENU button to set a number.
• A [ s ] will appear in the selected first digit and the flashing cursor will move to the next one over (to the right). Repeat steps 1 and 2 to enter all four digits.
• Pressing the k (erase) button at any time will erase the last entry and move the cursor to the previous entry (to the left).
Authentication halt mode
If the password does not match after five consecutive tries, the recorder will enter into authentication halt mode for ten minutes.After ten minutes the password history will be deleted, and the recorder will return to the password input screen.
Device lock function 3 After all four digits have been entered,
press the F2 (ENTER) button.
• If the 4 digit number entered matches the registered password then the start-up message will appear and the recorder will start-up.
• The default password when using the ODMS software to set the password for the first time is “0000”.

30
3
ENSetting the Author ID and W
orktype
Every file recorded on the recorder will include the Author ID and Worktype as part of its header information. To create multiple Author IDs and Worktypes on the recorder, use the bundled ODMS software to create and upload a data list (list of Author IDs and Worktypes) to the recorder. For more details, refer to the online help for ODMS software (☞ P.46).By default the Author ID is set to “DS9500” or “DS9000”.
Setting an Author ID
1 Turn ON the recorder.• When [Prompt for author ID at Power-
on.] has been set through ODMS software (☞ P.46), the registered Author ID list will appear.
2 Press the + or – button to select the Author ID that you want to assign to the recorder from the ID list.
3 Press the OK/MENU button to set the ID.
• When more than one Author ID exists/ is registered on the recorder, the ID list will be displayed.
NOTE
• Up to 10 Author ID entries can be registered (up to a maximum of 16 characters).
Setting the Worktype
Up to 20 Worktypes can be registered and uploaded to the recorder using the ODMS software. Each Worktype can have up to 10 optional items associated with it. Worktypes and Optional Items can be used on the recorder to populate the file header information. Refer to the ODMS software online help (☞ P.50) for registering/setting up Optional Items through the ODMS software.The Worktype information of the recorded or uploaded files can be edited with the menu settings of the recorder (☞ P.42).
1 While the recorder is in stop mode, press the NEW button.• When [Prompt for Worktype ID on new
recordings.] has been set through ODMS software (☞ P.46), the Worktypes uploaded to the recorder will appear in a list.
2 Press the + or – button to select a Worktype from the Worktype list.
3 Press the OK/MENU button to set the Worktype.• The selected Worktype and a maximum of
20 Optional Items associated to it can be recorded as file header information.
• It is possible to add an extra Value to the Optional Items list of the selected Worktype. In order to do so, go to the Worktype information screen (☞ P.42). For more details, refer to the online help for ODMS software (☞ P.50).
Setting the Author ID and Worktype

31
3
EN
Verbal Comm
ent
Verbal comments are useful to append vocal instructions while recording.It is possible to search and playback Verbal comments using the ODMS and DSS Player software. Verbal comments are also useful to give instructions to transcriptionists.
Setting a Verbal Comment
1 While the recorder is in recording mode, press and hold the F1 (VERBAL) button.
• Data recorded while pressing the F1 (VERBAL) button will be recorded as Verbal Comment.
Locating a Verbal Comment
2 When playing back a file, press and hold the 9 or 0 button.• The recorder stops for 1 second when it
reaches the Verbal Comment.• The verbal comment part has a different
color.
Verbal Comment part
Clearing a Verbal Comment
1 When playing a Verbal Comment, press the k (erase) button.
2 Press the + button to select [Delete], then press the OK/MENU button.
NOTE
• Up to 32 Verbal comments can be set within a file.
• When a file is locked or set to read-only, or when the memory card is locked, Verbal comments cannot be erased.
• When the recorder has been set to DSS Classic mode, it is not possible to record Verbal Comments.
Verbal Comment
32
3
ENShare the dictation file via W
i-Fi (DS-9500 only)
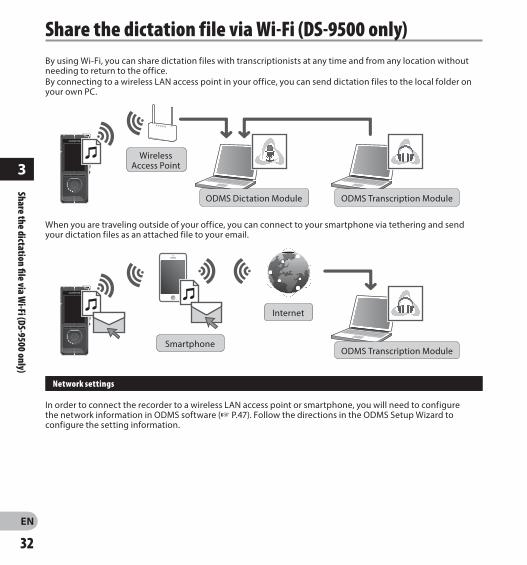
Share the dictation file via Wi-Fi (DS-9500 only)By using Wi-Fi, you can share dictation files with transcriptionists at any time and from any location without needing to return to the office. By connecting to a wireless LAN access point in your office, you can send dictation files to the local folder on your own PC.
Wireless Access Point
ODMS Dictation Module ODMS Transcription Module
When you are traveling outside of your office, you can connect to your smartphone via tethering and send your dictation files as an attached file to your email.
Internet
SmartphoneODMS Transcription Module
Network settings
In order to connect the recorder to a wireless LAN access point or smartphone, you will need to configure the network information in ODMS software (☞ P.47). Follow the directions in the ODMS Setup Wizard to configure the setting information.
33
3
EN
Share the dictation file via Wi-Fi (DS-9500 only)
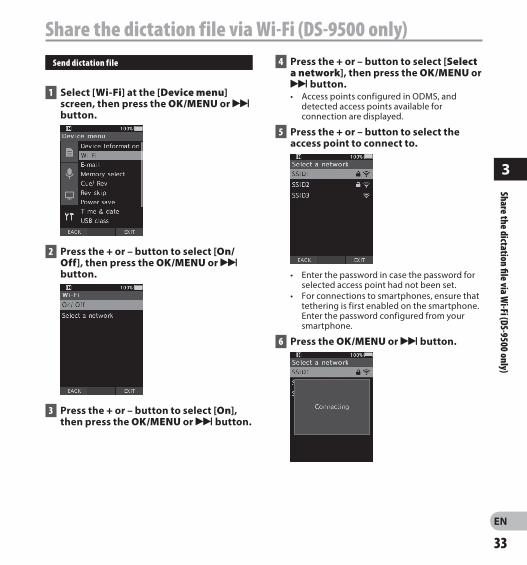
Share the dictation file via Wi-Fi (DS-9500 only)Send dictation file
1 Select [Wi-Fi] at the [Device menu] screen, then press the OK/MENU or 9 button.
2 Press the + or – button to select [On/Off], then press the OK/MENU or 9 button.
3 Press the + or – button to select [On], then press the OK/MENU or 9 button.
4 Press the + or – button to select [Select a network], then press the OK/MENU or 9 button.• Access points configured in ODMS, and
detected access points available for connection are displayed.
5 Press the + or – button to select the access point to connect to.
• Enter the password in case the password for selected access point had not been set.
• For connections to smartphones, ensure that tethering is first enabled on the smartphone. Enter the password configured from your smartphone.
6 Press the OK/MENU or 9 button.

34
3
ENShare the dictation file via W
i-Fi (DS-9500 only)
Share the dictation file via Wi-Fi (DS-9500 only) 7 After dictation is completed, press F3
(SEND) button.
8 Press the + or – button to select [to Folder] or [by E-mail].
[to Folder]: The dictation file will be sent to the folder specified in ODMS.
[by E-mail]: Addresses which had been previously registered will be displayed. Select the address which you wish to send to. E-mail addresses can be registered in ODMS, or from the recorder by selecting [Device Menu] > [by E-mail] > [Delivery address] > [Add].
9 Press the OK/MENU button.
10 Press the + or – button to select [Yes], then press the OK/MENU button.

35
3
EN
Index marks
Index marks can be placed into a file during recording or playback. Index marks are used to provide a quick and easy way to identify important or significant parts within the file.
Setting an index mark
1 While the recorder is in recording mode or in playback mode, press the F3 (INDEX) button.
Locating an index mark
2 While playing back a file, press and hold the 9 or 0 button.
2: index mark
• The recorder stops for 1 second when it reaches the index mark.
Clearing an index mark
1 Select a file in which index marks you want to erase are contained.
2 Press the 9 or 0 button to select the index mark to erase.
3 While the index number appears for approximately 2 seconds on the display, press the k (erase) button.
• The index mark is erased.
NOTE
• Up to 32 index marks can be set within a file.• When a file is locked or set to read-only, or when
the memory card is locked, index mark cannot be erased.
• If the recorder has been set to DSS Classic mode, index marks are limited to a maximum of 16 for each file.
Index marks

36
3
ENHow
to use the menu
How to use the menuItems in menus are categorized by tabs, so select a tab first and move to a desired item to quickly set it. You can set each menu item as follows.
OK/MENU button+, − button9, 0 button
F1, F3 button
1 When the file display screen appears, press the OK/MENU button while the voice recorder is in stop mode.• The menu will appear on the display.
2 Press the + or − button to select the tab containing the item you want to set.• You can change the menu display by moving
the settings tab cursor.
3 Press the OK/MENU or 9 button to move the cursor to the desired setting item.• You can change the menu display by moving
the settings tab cursor.
4 Press the + or − button to select the desired setting item.• Move to the menu item you want to set.

37
3
EN
How to use the m
enuHow to use the menu
Menu list
File menu [File information]
[Priority]
[Status]
[File lock]
[Worktype]
Recording menu [Mic mode]
[Mic sense]
[Rec mode]
[VCVA]
LCD/ sound menu [Backlight]
[LED]
[Beep]
[Language]
Device menu [Device Information]
[Wi-Fi]
[E-mail]
[Memory select]
[Cue/ Rev]
[Rev skip]
[Power save]
[Time & date]
[USB class]
[Reset settings]
[Format]
5 Press the OK/MENU or 9 button.• Move to the setting of the selected item.
6 Press the + or – button to change the setting.
7 Press the OK/MENU button to finalize the setting.• You will be informed that the settings have
been established via the screen.
• You can cancel the setting and return to the previous screen by pressing the F1 (BACK) or 0 button instead of the OK/MENU button.
8 Press the F3 (EXIT) button to exit the menu screen.

38
3
ENM
enu items
File menu
File information
The recorder can display a variety of information related to the current file.
Priority
By default, the F2 button is programmed with the Priority function. The setting can also be performed from the menu.You can set a priority level on each file recorded. You can select “high” or “normal”. The default is normal level.[Set]:
High level.[Cancel]:
Normal level.• Each time the F2 (PRIORITY) button is pressed
the Priority level will change (high/normal).
Status
When you set [Pending] to the file, the file becomes “Pending file”. If “Download file” is set to “Finished file” by ODMS software, the [Pending] file is not transferred and only [Finished] file (edited file) will be transferred to your PC.[Pending]:
Sets to a file of “editing” and [ ] will appear on the information display.
[Finished]: Sets to a file of “already edited”.
File lock
The File lock function allows you to prevent important files from being accidentally erased.[Lock]:
Locks the file and prevents it from being erased. [ ] will appear on the display.
[Unlock]: Unlocks the file and allows it to be erased.
Menu itemsWorktype
The Worktype information of the recorded or uploaded files can be edited with the menu settings of the recorder.For details, see “Editing the Worktype information” (☞ P.42).
Recording menu
Mic mode
To achieve high-quality audio recordings, select from the three microphone modes which best matches to your usage or environment.[Dictation 1]:
Recommended for recording in quiet environment.
[Dictation 2]: Narrows the directionality of the recording in order to capture the voice of the speaker. This is effective when recording in noisy environment.
[Conference]: Records in high quality stereo which is useful when recording multiple number of users in a conference room. Mic sense will be fixed to the Intelligent Auto Mode. In this mode, recording levels are automatically adjusted to match the volume of the sound source.
Mic sense
You can select from the three microphone sensitivities to meet recording needs.[High]:
The highest recording sensitivity. Suited to recording conferences.
[Mid]: Suited to recording dictation.
[Low]: The lowest recording sensitivity. Suited to recording close-talk.

39
3
EN
Menu item
sMenu items
Rec mode
Three recording formats are available for selection: DS2, WAV, and MP3.
1 Select [DSS], [PCM] or [MP3].
2 Select the options.When [DSS] is selected:[DSS Pro QP] [DSS Pro SP]: The recorded file will be DS2 format.
When [PCM] is selected:[22.05kHz Stereo] [22.05kHz Mono]*: The recorded file will be WAV format.
When [MP3] is selected:[128kbps Stereo] [64kbps Mono]*: The recorded file will be MP3 format.
* Mono recording• If you use the ODMS software, you can select
[DSS SP].
VCVA
The VCVA feature extends recording time and conserves memory by stopping recording during silent periods, which helps the playback to be more efficient. When the microphone senses that sounds have reached a preset threshold volume level, the built-in Variable Control Voice Actuator (VCVA) starts recording automatically, and stops when the volume drops below the threshold level.
1 Select [On].
2 Move the slide switch to the REC (s) position to start recording.• When the sound volume is lower than the
preset actuation sound level, recording automatically stops after 1 second approximately, and [Standby] flashes on the display. The record indicator light turns on when recording starts and flashes when recording pauses.
Level meter (varies according to the sound volume being recorded)
Adjust the start/stop actuation level:While the recorder is in recording mode, press the 9 or 0 button to adjust the actuation level.• The VCVA level can be set to any of 15 different
values.• The higher the value is, the more sensitive the
recorder can react to sounds. At the highest value, even the faintest sound will activate recording.
• The VCVA actuation level can be adjusted according to the ambient (background) noise.
Start level (moves to the right/left according to the set level)
• The start/stop actuation level also varies depending on the selected microphone sensitivity mode (☞ P.38).
• To ensure successful recordings, prior testing and adjustment of the start/stop actuation level is recommended.

40
3
ENM
enu items
Menu items
LCD/ Sound menu
Backlight
By default, the display will remain lit for about 10 seconds when a button on the recorder is pressed.
1 Select [Lighting time], [Dim light time] or [Brightness].
2 Select the options.When [Lighting time] is selected:[5 seconds] [10 seconds] [30 seconds] [1 minute] [2 minutes] [5 minutes]: Set the backlight duration.
When [Dim light time] is selected:[30 seconds] [1 minute] [2 minutes] [5 minutes] [Always On]: Set the time after which the backlight dims.
When [Brightness] is selected:[01] [02] [03]: Sets the brightness of the backlight when lit.
LED
You can set it so the record indicator light does not turn on.[On]:
LED light will be set.[Off]:
LED light will be canceled.
Beep
When the Beep is set to other than [Off], the recorder will beep in case of error.[Volume 3] [Volume 2] [Volume 1]:
Beep is enabled. The higher the number is, the louder the volume.
[Off]: Beep is disabled.
Language
You can set the language for the recorder’s user interface.[Čeština] [Dansk] [Deutsch] [English] [Español] [Français] [Italiano] [Nederlands] [Polski] [Русский] [Svenska]:• The languages available may vary depending
on the country/region where the product is purchased.
Device menu
Device Information
The currently set recording mode, microphone sensitivity, and VCVA are indicated by icons, and you can also check [Mic mode], [Internal memory], [SD card] (when a SD card is inserted), [Model], [Version], and [Serial No.].
Wi-Fi (DS-9500 only)
By using Wi-Fi, you can share dictation files with transcriptionists at any time and from any location without needing to return to the office.For details, see “Share the dictation file via Wi-Fi (DS-9500 only)” (☞ P.32).
E-mail (DS-9500 only)
When you are traveling outside of your office, you can connect to your smartphone via tethering and send your dictation files as an attached file to your email.For details, see “Send dictation file” (☞ P.33).
Memory select
When there is a SD card (sold separately) in the voice recorder, you can select whether to record on the internal memory or on the SD card.• The recording media ([ ] or [ ]) will appear
on the display.

41
3
EN
Menu item
sMenu items
Time & date
Setting the time and date beforehand enables easier file management.For details, see “Setting time and date [Time & date]” (☞ P.14).
USB class
You can set the USB class of this recorder with a USB connection to [Composite] or [Storage Class].[Composite]:
In the 3 classes of Storage, USB audio and human interface device, USB connection is possible. While connected via USB in [Composite], the recorder can be used as the USB speaker and the USB microphone in addition to storage class.
[Storage Class]: USB connection is possible in only storage class.
Reset settings
To reset the menu settings to their default values use [Reset settings] under [Device menu], or use the ODMS and DSS Player software.
Format
Memory cards that have been used in non-Olympus devices, or memory cards that are not recognized by the recorder, must be formatted before they can be used with the recorder.• Formatting the memory card will erase all the
stored data, including locked files.For details, see “Formatting the memory card [Format]” (☞ P.44).
Cue/ Rev
The playback sound of Cue and Review operation and Cue and Review speed can be set.
1 Select [Sound] or [Speed].[Sound]:
Set the playback sound of Cue and Review to On or Off.
[Speed]: Set the Cue and Review speed.
2 Select the options.When [Sound] is selected:[On]:
Activate the playback sound of Cue and Review.
[Off]: Disables this function.
When [Speed] is selected: You can adjust the Cue and Review speed
level from [Speed 1] to [Speed 5].• Cue and Review speed level becomes faster
as the numerical value becomes larger.
Rev skip
This function reverse skips (rewinds) the file being played back for a set amount of time and it is a convenient way to move the playback position or repeat playing a short phrase.[1 second] [2 seconds] [5 seconds] Rewinds the set amount of time and starts
playback.
Power save
By default, the recorder will enter into Power Save mode if not used for more than 10 minutes.[5 minutes] [10 minutes] [30 minutes] [1 hour]: Set the length of time before the recorder will
enter into Power Save mode.[Off]:
Disables this function.• If any button is pressed, time count will restart.

42
3
ENM
enu items
Menu itemsEditing the Worktype information
1 Select the file for which you want to edit the Worktype information (☞ P.16).
2 Select [Worktype] at the [File menu] screen, then press the OK/MENU or 9 button.
3 Press the F2 (EDIT) button.
4 Press the + or – button to select [Type Worktype] or [Select from Worktype list], then press the OK/MENU or 9 button.
[Type Worktype]: This will take you to the Worktype information screen and allow you to modify the Worktype information that has been registered for the file.
[Select from Worktype list]: You can re-select Worktype from the Worktype list.
1 Press the + or − button to select the Worktype.
2 Press the OK/MENU button.
5 Press the + or – button on the Worktype information screen to select the Option Item, then press the OK/MENU or 9 button.• The Option Item name input screen will be
displayed.• When inputting or editing an Option Item
name, only characters recognized by the ODMS software can be used.
Worktype information screen
Option Item name input screen
6 Entering characters.
a Input name display area
b Cursorc Input positiond Keyboard window
c
bd
a

43
3
EN
Menu item
sMenu items
s Character selection: +, –, 0, 9 button: Use these buttons to
select the character you want to input on the Keyboard window.
s Character confirmation: OK/MENU button: Use this button to
confirm your selection.
s Character deletion: ERASE button: Use this button to delete a
character.s Moving the entry column: When pressing the + button if the cursor is on
top of the Keyboard window, the cursor will disappear. An Input position within the input name display area will change from flashing to lighting.
9 button: Each time the button is pressed, the input position moves one space to the right. The Input position can be moved up to the space next (right) to the last character.
0 button: Each time the button is pressed, the input position moves one space to the left. The Input position can be moved up to the first character.
– button: The Input position changes from lighting to flashing. The cursor is lit on the “0” string within the Keyboard window, and makes character selection available.
Entry is performed by insert entry. When the character in the Input position has already been finalized, the character after the cursor will move one column to the right.
s Maximum entered character count: The Option item name can be entered up to
the number of characters specified below. Preset default values can also be set for the option items to simplify data entry process.
Option item name: 20 characters
s Canceling the entered contents: Press the F1 (BACK) button, and select
[Yes], then press the OK/MENU button when inputting characters: This will delete the entered content for the selected item and return you to the Worktype information screen.
Press the F3 (EXIT) button, and select [Yes], then press the OK/MENU button when inputting characters: This will delete the entered content for the selected item and return the recorder to stop mode.
7 Press the F2 (FINISH) button.• The recorder will return to the Worktype
information screen.• When you create a new file and input a
Worktype, press the F2 (FINISH) button again in the File information screen to get entered into the stop state in the New File.

44
3
ENForm
atting the mem
ory card [Format]
Memory cards that have been used in non-Olympus devices, or memory cards that are not recognized by the recorder, must be formatted before they can be used with the recorder.
1 Select [Format] at the [Device menu] screen.
2 Press the OK/MENU or 9 button.
3 Press the + or – button to select [SD card] option.
Formatting the memory card [Format] 4 Press the OK/MENU or 9 button.
5 Press the + button to select [Start] option.
6 Press the OK/MENU button.
45
3
EN
Formatting the m
emory card [Form
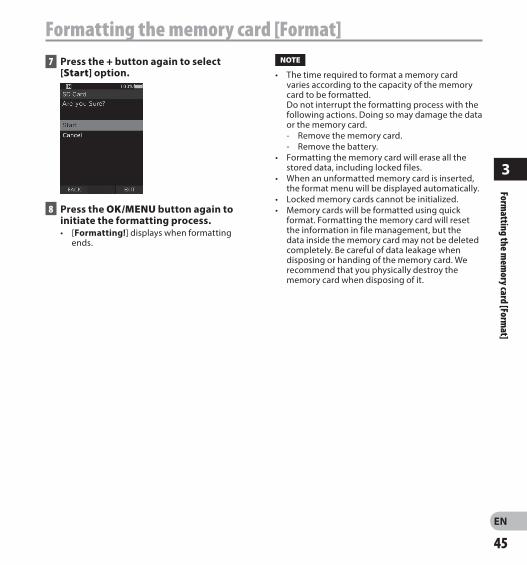
at]Formatting the memory card [Format] 7 Press the + button again to select
[Start] option.
8 Press the OK/MENU button again to initiate the formatting process.• [Formatting!] displays when formatting
ends.
NOTE
• The time required to format a memory card varies according to the capacity of the memory card to be formatted. Do not interrupt the formatting process with the following actions. Doing so may damage the data or the memory card.- Remove the memory card.- Remove the battery.
• Formatting the memory card will erase all the stored data, including locked files.
• When an unformatted memory card is inserted, the format menu will be displayed automatically.
• Locked memory cards cannot be initialized.• Memory cards will be formatted using quick
format. Formatting the memory card will reset the information in file management, but the data inside the memory card may not be deleted completely. Be careful of data leakage when disposing or handing of the memory card. We recommend that you physically destroy the memory card when disposing of it.

46
3
ENCustom
izing the recorder
You can customize various settings of the recorder using the ODMS software (☞ P.49).For more details, refer to the online help for ODMS software (☞ P.50).
Common settings
You can set the default values for each of the recorder’s menu items.
Administrative settings
❏ GeneralAccessibility:• You can disable the k (erase), OK/MENU, and
0 (rewind) buttons.
Splash Message:• You can set the contents that appear in the
message which is displayed during start-up.
Alarm:• You can set an alarm to not sound for errors,
button operations, etc.
❏ DisplayInformation Area in Rec Mode:• You can split the information display area for file
display into an upper area and lower area, and set the Blank, Author ID, Worktype, and Option Item display items.
File Information in List View (DS-9500 only):• You can set the time and date, Worktype, and
Option Item display items for the information display area for file list display.
LED Color:• You can set the LED lighting colors for when new,
overwrite, append, and insert recording and for when playback to any of off, red, green, blue, orange, and yellow.
Customizing the recorder
❏ Device SecurityYou can customize / adjust / set / configure various settings related to the recorder’s device lock function.
PIN Code:• You can set the password for startup.
Device Lock:• Device lock function Enable/ Disable.• Settings related to the timing for setting the
device lock.• Changing the number of allowable input errors
(mismatches) for the password.
❏ Author ListYou can customize / adjust / set / configure settings related to the Author.
Author List:• Register multiple Author IDs (up to max. 10
items).• Set the priority level for each Author ID.• Select the Author ID you want to be used by
default.
Author Selection:• Choose to Enable/ Disable the Author ID
selection at the recorder start-up.• Display only the files of the selected author on
the recorder.
❏ Worktype ListYou can customize / adjust / set / configure settings related to the Worktype.
Worktype List:• Register Worktypes (up to max. 20 items).• Set the option items for each Worktype (up to
max.10 options).• Select the Worktype you want to be used by
default.
Worktype Selection:• Choose to activate/deactivate the Worktype
selection when the recorder is in New mode.

47
3
EN
Customizing the recorder
Customizing the recorder
❏ Device FoldersYou can customize / adjust / set / configure various settings related to the recorder’s folders.
Enabled:• Change the number of usable folders.
Folder Name:• Change the folder name.
Worktype:• Set the folder's Worktype.
AutoLock:• Set the Auto Lock on a file to Yes/No.
Encryption:• Select a folder’s Encryption level. It is possible to set the Encryption level to [High]
(256 bit), [Standard] (128 bit) or [No] (deactivates the function).
Password:• Set the folder's Encryption Password.
Speech Recognition:• You can specify whether or not to automatically
add files downloaded from the recorder to the speech recognition queue.
❏ RecordingYou can customize / adjust / set / configure various settings related to the recorder’s Dictation files.
DSS Format:• Select the recording format (DSS Classic/DSS Pro).
Record function:• Select the recording mode (Overwrite/Append/
Insert).
File download:• Select the files you want to be transferred to the
PC (All files/Finished files).
❏ Programmable ButtonsYou can change the allocated functions for the Programmable Smart Buttons (F1, F2, F3 buttons), the NEW button, and the Slide Switch.
New and Slide Switch functions:• Select a combination of functions.
Programmable Buttons:• Select the function to associate to the
Programmable buttons (F1, F2, F3 buttons) for each mode (New, Stop, File list*, Recording, Playback mode).
* DS-9500 only
❏ Hands FreeYou can customize / adjust / set / configure settings related to the Hands-Free operation with the Foot Switch (optional).
❏ Wireless Network (DS-9500 only)You can customize / adjust / set / configure various settings related to the recorder’s wireless network.
Wi-Fi• Set Wi-Fi to ON/OFF.
Quick Send• You can switch the mode to file transfer mode
when a new file is created.
Network List• Configure the settings for the network.• Set the lists for each Network (up to max.10 lists).
❏ Wireless Download (DS-9500 only)You can customize / adjust / set / configure various settings related to the recorder’s wireless download.
Wireless Download• You can set the use of Wireless Communication
Service (WCS) to Enable/Disable.
Wireless Communication Service• Set the IP address and port number.

48
3
ENCustom
izing the recorder
Customizing the recorderDownload Path• Set the download destination for files.
Clock Synchronization• Set Clock Synchronization to Enable/Disable.
Delete• Set automatic deletion of sent files and the
number of days for file deletion.
Rename• Set the naming rules for when files are
downloaded.
WAV Conversion• You can set whether or not to convert files from
DSS to WAV when downloading.
❏ E-mail Profile (DS-9500 only)You can customize / adjust / set / configure various settings related to the recorder’s E-mail.
E-mail Profile List• You can configure the settings for email.• Set the lists for each E-mail Profile (up to max.10
lists).• When configuring the authentication settings for
the SMTP server, you can set the user name and other settings of the login account.
Mail Template• Set the subject and body text for email to be
sent.
Delete• Set automatic deletion of sent files and the
number of days for file deletion.

49
4
EN
Olympus Dictation M
anagement System
(ODMS)
Managing files on your PC
ODMS* is a fully featured software that provides a simple to use but sophisticated method for managing your recordings. This software can be downloaded from each local Olympus Websites. Main features of the software is the following.* Box content differs depending on the version you purchased.
1. Instant File Sharing• Share dictated file via a shared folder, email or FTP.• Prioritize important files to be transcribed for a quicker turnaround.• Identify your dictations throughout the workflow with Author ID, Worktypes and Option Item.
2. Efficient Document Creation• Various playback functionality for efficient transcription.• Support background/ real-time speech recognition by Dragon.• Combination of above provides further efficiency.
3. Secure Workflow• Dictated / transcribed files are protected with automatic 256-bit AES file encryption.
In order to download the software, please access the website in your respective region.
(Europe, Middle east and Africa) http://www.olympus.eu/sds-downloads/(The Americas) https://www.olympusamericaprodictation.com/odms-r7(Oceania) https://www.olympus.com.au/support/
Olympus Dictation Management System (ODMS)

50
4
ENOlym
pus Dictation Managem
ent System (ODM
S)
Olympus Dictation Management System (ODMS)Operating environment
Windows
Operating System:Microsoft Windows 7/8.1/10(Standard installation)
PC:Windows PC with at least one available USB port
Macintosh
Operating System:Mac OS X 10.10 to 10.13(Standard installation)
PC:Apple Macintosh series PC with at least one available USB port
NOTE
• Even when the requirements for the operating environment are satisfied, updated versions, multiboot environments, self-modified PCs and other compatible machines will not be covered under the operational warranty.
• Macintosh version does not support voice recognition software.
• For information on the latest OS upgrades compatibility, visit the Olympus Web page at http://www.olympus-global.com
Using online helpFor information on the ODMS and DSS Player software usage and features, refer to the online help.To start online Help:
ODMS software (Windows)
1 While ODMS software is running, select the [Help] menu, [Contents].
2 While ODMS software is running, press F1 on the keyboard.
DSS Player software (Macintosh)
While DSS Player software is running, select [DSS Player Help] from the [Help] menu.
NOTE
• The Online help will be available after ODMS and DSS Player software installation.

51
4
EN
Connecting to your PCConnecting to your PCConnecting to your PC using the USB cable
1 Boot the PC. 2 Connect the USB cable to the USB port
of the PC.
3 Connect the USB cable to the connecting terminal on the bottom of the recorder.
• [Remote (Composite)] is displayed on the recorder if the USB cable is connected.
After connecting the recorder to your PC, it will be powered through the USB cable.When connected to a PC, the memory card will be recognized by the PC as separate removable disk drives.
NOTE
• NEVER remove the memory card or disconnect the USB cable while the record indicator light is flashing. If you do, the data will be destroyed.
• Some PC’s may not supply sufficient power and the recorder fails to connect. Refer to your PC user’s manual regarding the USB port on your PC.
• Do not connect the recorder to a PC by using a USB hub. Make sure to connect to a USB port on your PC.
• Make sure to push the cable connector all the way in. Otherwise, the recorder may not operate properly.
Connecting to your PC using the docking station
The docking station is included with the DS-9500, and sold separately for the DS-9000.
Place the recorder in the docking station
1 Connect the USB cable to the USB port of the PC.
2 Connect the USB cable to the docking station as shown in the illustration.
3 Set the recorder in the docking station.
2
3
• [Remote (Composite)] is displayed on the recorder if the USB cable is connected.
• If the AC adapter is connected as well, power will be supplied from the AC adapter.
52
4
ENConnecting to your PC
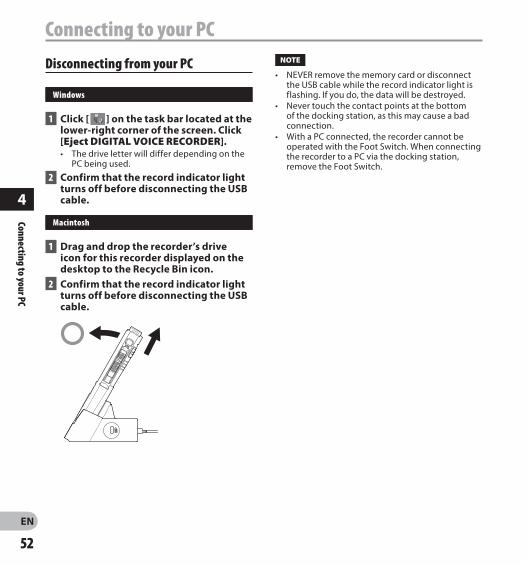
Connecting to your PCDisconnecting from your PC
Windows
1 Click [ ] on the task bar located at the lower-right corner of the screen. Click [Eject DIGITAL VOICE RECORDER].• The drive letter will differ depending on the
PC being used.
2 Confirm that the record indicator light turns off before disconnecting the USB cable.
Macintosh
1 Drag and drop the recorder’s drive icon for this recorder displayed on the desktop to the Recycle Bin icon.
2 Confirm that the record indicator light turns off before disconnecting the USB cable.
NOTE
• NEVER remove the memory card or disconnect the USB cable while the record indicator light is flashing. If you do, the data will be destroyed.
• Never touch the contact points at the bottom of the docking station, as this may cause a bad connection.
• With a PC connected, the recorder cannot be operated with the Foot Switch. When connecting the recorder to a PC via the docking station, remove the Foot Switch.

53
5
EN
Device careOther information
Device cares Exterior
Wipe gently with a soft cloth. If the device is very dirty, soak the cloth in mild soapy water and wring well. Wipe the device with the damp cloth and then wipe it with a dry cloth.
s DisplayWipe gently with a soft cloth.
Using alcohol disinfectant solution
NOTE
• Make sure that your device is turned OFF.• Do not use other than ethanol for disinfection
(76.9 to 81.4 v/v%) and isopropanol for disinfection (70 v/v%).
• The docking station cannot be cleaned with alcohol disinfectant solution.
1 Soak a soft cloth in the disinfectant solution and then wring the cloth to prevent dripping.
2 Wipe the device gently.
3 Wipe the device well with a soft dry cloth so that no solution remains.
f Caution• Do not use disinfectant solution to clean
the LED and each sensor.• Do not rub the device strongly when using
disinfectant solution. The paint or print may peel off.
• Do not spray disinfectant solution directly onto the device. The device does not have a waterproof design so solution may enter inside the device and affect the electronic parts.

54
5
ENAlarm
message list
Alarm message list
Message Explanation Action
[Battery low] The remaining battery power is low. Charge the battery (☞ P.9).
[Power supply error Remove power plug]
Voltage outside of the allowable limit has been detected. Use the dedicated AC Adapter (☞ P.11).
[File locked] Editing or deleting the file is not possible. Unlock the file (☞ P.38).
[Further marking not possible]
The maximum number of Index marks has been reached (max 32 Index marks per file). If the recorder has been set to DSS Classic mode, index marks are limited to a maximum of 16 for each file.
Erase index marks that are no longer required (☞ P.35).
[Verbal Comment full]The maximum number of Verbal comments has been reached (max 32 Verbal comments per file).
Erase unnecessary Verbal comments (☞ P.31).
[Memory full] No remaining memory. Erase unnecessary files or insert another memory card (☞ P.13, P.25).
[Folder full] The maximum number of files has been reached (max 200 files per folder). Erase unnecessary files (☞ P.25).
[Erasing error] An error occurred while erasing. Erase once again. When an erase error occurs, format the memory card (☞ P.44).
[Card error] The memory card was not recognized correctly. Remove and insert the memory card again (☞ P.13).
[Format error] A formatting problem occurred. Format again (☞ P.44).
[Memory error] An internal memory error occurred. Contact the Olympus Customer Support Center (☞ back cover).
[Insert SD card] The recorder cannot find the memory card. Insert a memory card (☞ P.13).
[Switch position error] The position of the slide switch is incorrect. Align the slide switch with the correct position (☞ P.17).
[Can't create the system file. Erase unnecessary file via PC.]
The management file cannot be created due to insufficient space on the memory card.
Connect the recorder to a computer and delete unnecessary files.

55
5
EN
TroubleshootingTroubleshooting
Symptom Probable cause Action
Nothing appears on the display.
The remaining battery power is low. Charge the battery (☞ P.9).
The recorder is turned off. Turn the power on (☞ P.12).
The recorder is currently in Power Save mode. Press any button.
Unable to record.
The memory card does not have enough memory.
Erase unnecessary files or insert another memory card (☞ P.13, P.25).
The memory card is unformatted. Format the memory card (☞ P.44).
The maximum number of files has been reached. Change to any other folder (☞ P.16).
The file is locked. Unlock the file from the file menu (☞ P.38).
The memory card is locked. Unlock the memory card.
No playback tone heard.
The earphone is connected. Unplug the earphones to use the internal speaker.
The volume level is set to [00]. Adjust the volume level (☞ P.23).
Unable to erase.The file is locked. Unlock the file from the file menu (☞ P.38).
The memory card is locked. Unlock the memory card.
Noise heard during playback.
Objects brushed against the voice recorder while recording. ———
The recorder was placed near a mobile phone or fluorescent lamp while recording or during playback.
Avoid using the recorder near cell phones or fluorescent lamps.
Recording level too low. The microphone sensitivity is too low. Set the microphone sensitivity to the conference
mode and try again (☞ P.38).

56
5
ENTroubleshooting
Troubleshooting
Symptom Probable cause Action
Unable to set index marks.
The maximum number of index marks has been reached. Erase unnecessary index marks (☞ P.35).
The file is locked. Unlock the file from the file menu (☞ P.38).
The memory card is locked. Unlock the memory card.
Unable to set verbal comments.
The maximum number of verbal comments has been reached. Erase unnecessary verbal comments (☞ P.31).
Cannot find the recorded file. Wrong recording media or folder. Switch to the correct recording media or folder
(☞ P.16, P.18, P.40).
Cannot connect to a PC.
Sometimes a connection cannot be made with some PCs running Windows XP, Vista, 7, 8 or 8.1.
You need to change the PC’s USB settings. See ODMS software online help for details (☞ P.50).
Cannot connect to a Wi-Fi network.
The Wi-Fi function is set to [Off]. Change the [Wi-Fi] setting to [On] (☞ P.33).
The connection settings of the W-Fi network are incorrect. Check the settings of the Wi-Fi function.
The voice recorder is in a location that radio signals cannot reach.
Check for obstacles between the voice recorder and access point.

57
5
EN
Accessories (optional)Accessories (optional)s External microphone: ME15
A lavalier omni-directional microphone that clips to clothing. Used to record your own voice or people near you.
s PC transcription kit: AS-9000The AS-9000 transcription kit provides you with a Foot Switch, a headset and ODMS and DSS Player software for easy transcription of DSS recordings.In order to use the AS-9000 transcription kit, the docking station (CR21) will be necessary (optional).
s Foot switch: RS31HConnect to the USB docking station with DS-9500/DS-9000 for hands-free transcription.
s Telephone pickup: TP8Earphone type microphone can be plugged into your ear while phoning. The voice or conversation over the phone can be clearly recorded.
s Lithium ion battery: LI-92BThis lithium ion rechargeable battery is manufactured by Olympus. It is best paired with the UC90 battery charger.
s AC adapter (5V): A517 & F-5ACIn order to charge the battery, the docking station (CR21) will be necessary (optional).
s Docking station: CR21 & CR15The CR21/CR15 is designed for Olympus DS-9500/DS-9000/DS-2600.Use with only compatible Olympus products.

58
5
ENCopyright and tradem
ark information
• The contents of this document may be changed in the future without advanced notice. Contact our Customer Support Center for the latest information relating to product names and model numbers.
• The illustration of the screen and the recorder shown in this manual may differ from the actual product. The utmost care has been taken to ensure the integrity of this document, but if you find a questionable item, error or omission, please contact our Customer Support Center.
• Any liability for passive damages or damage of any kind occurred due to data loss incurred by a defect of the product, repair performed by the third party other than Olympus or an Olympus authorized service station, or any other reason is excluded.
Trademarks and registered trademarks
• SD and SDHC are trademarks of SD Card Association.• Wi-Fi is a registered trademark of the Wi-Fi Alliance. The Wi-Fi CERTIFIED logo is a certification mark of the
Wi-Fi Alliance.• This product incorporates an MP3 audio codec developed by Institute of Super Compression Technologies, Inc.
All other brand or product names in this manual are the trademarks or registered trademarks of their respective owners.
Copyright and trademark information
The software in DS-9500 and DS-9000 may include third party software. Any third party software is subject to the terms and conditions, imposed by the owners or licensors of that software, under which software is provided to you.Those terms and other third party software notices, if any, may be found in the software notice PDF file stored at http://www.olympus.co.jp/en/support/imsg/digicamera/download/notice/notice.cfm
59
5
EN
Safety precautionsSafety precautionsBefore using your new recorder, read this manual carefully to ensure that you know how to operate it safely and correctly. Keep this manual in an easily accessible location for future reference.
The warning symbols indicate important safety related information. To protect yourself and others from personal injury or damage to property, it is essential that you always read the warnings and information provided.
f DangerIf the product is used without observing the information given under this symbol, serious injury or death may result.
f WarningIf the product is used without observing the information given under this symbol, injury or death may result.
f CautionIf the product is used without observing the information given under this symbol, minor personal injury, damage to the equipment, or loss of valuable data may result.
Convention used in this manual• In this manual, SD and SDHC cards are
generally referred to as a “memory card”.• The word “ODMS” is used to refer to the
Olympus Dictation Management System in Windows environment.
• The word “DSS Player” is used to refer to the DSS Player for Mac in Apple Macintosh environment.
• This manual shows the English on screen display in the illustrations and explanations. You can select the display language for this recorder. For details, see “Language” (☞ P.40).
Caution for usage environment• To protect the high-precision technology
contained in this product, never leave the recorder in the places listed below, no matter if in use or storage:
• Places where temperatures and/ or humidity are high or go through extreme changes. Direct sunlight, beaches, locked cars, or near other heat sources (stove, radiator, etc.) or humidifiers.
• Near flammable items or explosives.• In wet places, such as bathrooms or in the
rain.• In places prone to strong vibrations.• Never drop the recorder or subject it to
severe shocks or vibrations.• The recorder may malfunction if it is used in
a location where it is subject to a magnetic/ electromagnetic field, radio waves, or high voltage, such as near a TV set, microwave, video game, loud speakers, large monitor unit, TV/radio tower, or transmission towers. In such cases, turn the recorder off and on again before further operation.

60
5
ENSafety precautions
Safety precautions• Avoid recording or playing back near
cellular phones or other wireless equipment, as they may cause interference and noise. If you experience noise, move to another place, or move the recorder further away from such equipment.
• Do not use organic solvents such as alcohol and lacquer thinner to clean the unit.
Warning regarding data loss• Recorded content in memory may be
destroyed or erased by operating mistakes, unit malfunction, or during repair work. It is recommended to back up and save important content to other media such as a computer hard disk.
• Any liability for passive damages or damage of any kind occurred due to data loss incurred by a defect of the product, repair performed by the third party other than Olympus, an Olympus authorized service station or any other reason is excluded from the Olympus liability.
Handling the recorder
f Warning• Keep the recorder out of the reach of
children and infants to prevent the following dangerous situation that could cause serious injury:1. Accidentally swallowing the battery,
memory cards or other small parts.2. Accidentally being injured by the
moving parts of the recorder.• Do not disassemble, repair or modify the
unit yourself.
• Use SD and SDHC memory cards only. Never use other types of memory cards. If you accidentally insert another type of memory card into the recorder, contact an authorized distributor or service center. Do not try to remove the memory card by force.
• Do not operate the unit while operating a vehicle.
f Caution• Stop using the recorder immediately if you
notice any unusual odors, noise, or smoke around it.
• Never remove the battery with bare hands, which may cause a fire or burn your hands.
• Do not leave the recorder in places where it may be subject to extremely high temperatures. Doing so may cause parts to deteriorate and, in some circumstances, cause the recorder to catch fire. Do not use the charger or AC adapter if it is covered. This could cause overheating, resulting in fire.
• Handle the recorder with care to avoid getting a low-temperature burn.
• When the recorder contains metal parts, overheating can result in a low-temperature burn. Pay attention to the following:
• When used for a long period, the recorder will get hot. If you hold on to the recorder in this state, a low-temperature burn may be caused.
• In places subject to extremely cold temperatures, the temperature of the recorder’s body may be lower than the environmental temperature. If possible, wear gloves when handling the recorder in cold temperatures.
61
5
EN
Safety precautionsSafety precautions
• If a battery leaks fluid onto your clothing or skin, remove the clothing and flush the affected area with clean, running cold water immediately. If the fluid burns your skin, seek medical attention immediately.
• Keep batteries out of the reach of children.• If you notice anything unusual when using
this product such as abnormal noise, heat, smoke, or a burning odor:1. Remove the battery immediately while
being careful not to burn yourself, and;2. Call your dealer or local Olympus
representative for service.• Do not use the USB power supply via
the car cigarette lighter socket or the self-modified power supply. It may cause overheating, fire, electric shock or malfunctions.
f Caution• The bundled/included rechargeable
battery is exclusively for use with Olympus digital voice recorder DS-9500/DS-9000.
• There is a risk of explosion if the battery is replaced with the incorrect battery type.
• Dispose of the used battery following the instructions.
• Please recycle batteries to help save our planet’s resources. When you throw away dead batteries, be sure to cover their terminals and always observe local laws and regulations.
• Always charge a rechargeable battery when using it for the first time, or if it has not been used for a long period.
• Rechargeable batteries have limited lifetime. When the operating time becomes shorter even if the rechargeable battery is fully charged, replace it with a new one.
Battery handling precautions
f Danger• The recorder uses a special lithium ion
battery from Olympus. Charge the battery with the specified AC adapter or charger. Do not use any other AC adapters or chargers.
• The battery should never be exposed to flame, heated, short-circuited or disassembled.
• Never heat or incinerate battery.• Take precautions when carrying or storing
batteries to prevent them from coming into contact with any metal objects such as jewelry, pins, fasteners, etc.
• To prevent causing battery leaks or damaging their terminals, carefully follow all instructions regarding the use of batteries. Never attempt to disassemble a battery or modify it in any way, solder, etc.
• If battery fluid gets into your eyes, flush your eyes immediately with clear, cold running water and seek medical attention immediately.
f Warning• Keep batteries dry at all times.• If rechargeable batteries have not been
recharged within the specified time, stop charging them and do not use them.
• Do not use a battery if it is cracked or broken.
• Never subject batteries to strong shocks or continuous vibration.
• If a battery leaks, becomes discolored or deformed, or becomes abnormal in any other way during operation, stop using the recorder.

62
5
ENSafety precautions
Safety precautionsDocking station
f Danger• Never disconnect the AC adapter or power
cord with a wet hand. This may cause electric shock or injury.
• Only use the dedicated AC adapter with the docking station. Using it in combination with other AC adapters may cause overheating, fire, or malfunction.
f Warning• Never disassemble, modify, or repair the
docking station yourself. This may cause fire, electric shock, or injury.
• Never use the docking station in locations where it might come into contact with liquids. Getting the docking station wet may cause fire or electric shock.
• Do not drop the docking station or allow it to suffer extreme shocks. This may cause damage, or fire or electric shock.
• Do not touch the connector or insert the metal wires or similar object into any of the plugs. This may cause fire, or electric shock..
f Caution• Unplug the AC adapter or power cord from
the docking station and AC outlet when not using for extended periods of time. If this precaution is not followed and the docking station is damaged then fire may occur.
• The docking station (CR21) is designed specifically for Olympus DS-9500/DS-9000. Do not use with other products.
AC adapter
f Danger• The supplied power cord is specific for the
AC adapter only. Do not use the power cord for other product. Also, do not use a power cord of other product for the AC adapter.
• Be sure to use the AC adapter with the proper voltage (AC 100 - 240 V). Using it with other voltage levels may cause fire, explosion, overheating, electric shock or injury.
• For safety, be sure to unplug the AC adapter from the outlet before performing maintenance or cleaning. Also, never plug in or disconnect the power plug with a wet hand. This may cause electric shock or injury.
• Use only Olympus’ special AC adapter.Attempting to use other equipment could cause fire or electric shock due to heating, deformation, etc.
f Warning• Do not attempt to disassemble, repair or
modify the AC adapter in any way.• Keep foreign objects including water,
metal, or flammable substances from getting inside the product.
• Do not moisten the AC adapter or touch it with a wet hand.
• Do not use the AC adapter in the vicinity of flammable gas (including gasoline, benzine and lacquer thinner).
• Always stop recording before connecting or disconnecting the power supply plug.

63
5
EN
Safety precautionsSafety precautions• When the AC adapter is not in use,
disconnect the power supply plug from the power outlet.
• Use only power supply of the correct voltage, as indicated on the adapter.
In case: ➤ ... the internal parts of the AC adapter
are exposed because it has been dropped or otherwise damaged:
➤ ... the AC adapter is dropped in water, or if water, metal flammable substances or other foreign objects get inside it:
➤ ... you notice anything unusual when using the AC adapter such as abnormal noise, heat, smoke, or a burning odor:
1. do not touch any of the exposed parts;2. immediately disconnect the power
supply plug from the power outlet, and;3. call your dealer or local Olympus
representative for servicing. Continued use of the AC adapter under these circumstances could result in electric shock, fire or injury.
f Caution:• Do not use the AC adapter if the power
plug is damaged or the plug is not completely connected to the outlet. This may cause fire, overheating, electric shock, short circuit or damage.
• Unplug the AC Adapter from AC outlet when not using. If this precaution is not followed, fire, overheating or electric shock may occur.
• Make sure to hold the plug when removing the power plug from the outlet. Do not bend the cord excessively or put heavy objects on it. This may cause fire, overheating, electric shock or damage.
LCD monitor• The LCD used for the monitor is made
with high-precision technology. However, black spots or bright spots of light may appear on the LCD monitor. Due to its characteristics or the angle at which you are viewing the monitor, the spot may not be uniform in color and brightness. This is not a malfunction.
Memory card
f Warning:• Do not touch the memory card contacts.
This may damage the memory card.• Do not place the memory card in locations
with static electricity.• Store the memory card in a location that
is out of the reach of children. In case of accidental ingestion, consult a physician immediately.
• Even when formatting or erasing are performed, only the file management information of the internal memory and/or memory card is updated and the recorded data is not completely erased. When disposing of the voice recorder or a memory card, be sure to destroy it, format and record silence until the recording time runs out, or perform a similar operation in order to prevent the leakage of personal information.
64
5
ENSafety precautions
Safety precautionsWi-Fi Function (For DS-9500)• When using the recorder in a medical
institution, follow the instructions of that medical institution.
• Turn OFF the power of the recorder when near electronic equipment that handles high-precision control or weak signals. The electronic equipment may malfunction or otherwise be adversely affected.
• Keep a distance of at least 22 cm from the location where a pacemaker is implanted.Electric waves from this recorder could affect the operation of a pacemaker.
• Turn OFF the recorder power when on airplane.Security of the service could be affected.
• The Wi-Fi function of the device is designed to be used in the following regions.
➤ America:United states, Canada
➤ Europe:Austria, Belgium, Bulgaria, Croatia, Cyprus, Czech Republic, Denmark, Estonia, Finland, France, Germany, Greece, Hungary, Ireland, Italy, Latvia, Lithuania, Luxemburg, Malta, Netherlands, Poland, Portugal, Romania, Slovakia, Slovenia, Spain, Sweden, United Kingdom
➤ Oceania:Australia, New Zealand
Do not use the Wi-Fi function of the device in regions other than those mentioned above. Also do not use the Wi-Fi function outside of the country or region of purchase. Using the function could violate the radio signal restrictions in that country. We will assume no responsibility whatsoever for the use of this technology.
• Communication may be affected if there are reinforced structures, metal or concrete between the device and the Wi-Fi access point.
• Communication performance may be affected if the device is used near a microwave, cordless telephone set, or device that uses the 2.4GHz frequency band at the same time. When using the device, keep a sufficient distance away from such equipment.
• To the extent possible, try not to use the device near mobile phones, televisions, or radios. Mobile phones, PHS, TV sets, and radios use different frequencies than the device but electromagnetic waves generated from Wi-Fi products including this device could generate noise in audio or video images.
Notes on security when using Wi-Fi products• With a Wi-Fi connection, information is
exchanged wirelessly and as long as radio signals reach the unit, flexible connection is possible. However, because radio signals can penetrate through obstacles (wood, glass, etc.), if there is no security-related setting, the following problems could occur.
• A malicious third party intentionally intercepts radio signals to spy on communication content.
• Unauthorized intrusion causes the leaking of important information.
• Intercepted communication contents are rewritten and transmitted.
• Destructive computer viruses are released that can destroy data or systems.
• Should a problem occur for an inevitable reason due to the specifications of the Wi-Fi connection, we assume no responsibility whatsoever for any damage incurred.

65
5
EN
SpecificationsSpecifications
General points
4 Recording formatDS2 (Digital Speech Standard Pro)Linear PCM (Pulse Code Modulation)MP3 (MPEG-1 Audio Layer3)
4 StorageInternal NAND FLASH memory: 2 GBSD/SDHC card: Supports 4 GB to 32 GB* Some recording media memory capacity is used as a
management area, so the actual usable capacity will always be slightly less than the displayed capacity.
4 Sampling frequencyDSS format
DSS Pro QP 16 kHz
DSS Pro SP 12 kHz
PCM format
22.05kHz Stereo 22.05 kHz
22.05kHz Mono 22.05 kHz
MP3 format
128kbps Stereo 44.1 kHz
64kbps Mono 44.1 kHz
4 DisplaySize: 2.4 inchesResolution: 240 × 320 pixelsType: TFT color LCD
4 SpeakerBuilt-in 11 × 15 mm dynamic speaker
4 Maximum working output320 mW (8 Ω speaker)
4 Maximum headphone outputâ 150 mV (conforms to EN 50332-2)
4 Wireless standards(DS-9500 only)IEEE802.11 b/g/n/a/ac56 mW or less
Firmware Ver.1.0 or later• The communication speed and distance may vary
depending on ambient conditions such as the radio environment, obstacles and installation environment.
SecurityWEP, WPA/WPA2 Personal, WPA/WPA2 Enterprise
For customers in Europe2412 - 2472 MHz5180 - 5320 MHz5500 - 5580 MHz5660 - 5700 MHz5745 - 5825 MHz25 mW or less (5745-5825 MHz)for indoor use only (5180 - 5320 MHz)
For customers in Oceania2412 - 2472 MHz5180 - 5320 MHz5500 - 5580 MHz5660 - 5700 MHz5745 - 5825 MHz25 mW or less (5745-5825 MHz)for indoor use only (5180 - 5320 MHz)
For customers in North AmericaFor customers in Canada2412 - 2462 MHz5180 - 5320 MHz5500 - 5580 MHz5660 - 5700 MHz5745 - 5825 MHzfor indoor use only (5180 - 5240 MHz)
4 MIC jackø 3.5 mm impedance 2 kΩ
4 MIC jackø 3.5 mm impedance 8 Ω or more

66
5
ENSpecifications
Specifications4 Power source
Standard voltage: 3.6 VBattery: Lithium-ion battery (LI-92B)External power supply: USB connection, AC adapter (A517, F-5AC) (DC5V)
4 External dimensions120.8 mm × 49.8 mm × 18.6 mm (Not including largest projection)
4 Weight116.5 g (including battery)
4 Operating temperatureDuring operation: 0 °C to 42 °C (32 °F to 107.6 °F)Charging: 5 °C to 35 °C (41 °F to 95 °F)
Overall frequency response
4 When recording from microphonejackDSS format
DSS Pro QP 200 Hz to 7000 Hz
DSS Pro SP 200 Hz to 5000 Hz
PCM format
22.05kHz Stereo 50 Hz to 8000 Hz
22.05kHz Mono 50 Hz to 8000 Hz
MP3 format
128kbps Stereo 50 Hz to 15000 Hz
64kbps Mono 50 Hz to 13000 Hz
4 When recording with built-in microphone50 Hz to 15000 Hz(The upper and lower limit values of the frequency response depend on each recording format and microphone mode.)
Guide to battery life
The following values are for reference only.
4 During recording mode (Built-in microphone):For DS-9500:DSS format
DSS Pro QP Approx. 9 h
DSS Pro SP Approx. 9.5 h
PCM format
22.05kHz Stereo Approx. 10.5 h
22.05kHz Mono Approx. 10.5 h
MP3 format
128kbps Stereo Approx. 10 h
64kbps Mono Approx. 10 h
For DS-9000:DSS format
DSS Pro QP Approx. 18 h
DSS Pro SP Approx. 21 h
PCM format
22.05kHz Stereo Approx. 20 h
22.05kHz Mono Approx. 20 h
MP3 format
128kbps Stereo Approx. 30 h
64kbps Mono Approx. 30 h
4 During playback mode (Earphone playback):For DS-9500:All mode: Approx. 10 h
For DS-9000:All mode: Approx. 21 h

67
5
EN
SpecificationsSpecifications
Guide to recording times
The following values are for reference only.
DSS format
Recording media DSS Pro QP DSS Pro SP
Internal memory 2 GB 163 h 334 h
SD card
32 GB 2350 h 4810 h
16 GB 1170 h 2410 h
8 GB 585 h 1200 h
PCM format
Recording media 22.05kHz Stereo
22.05kHz Mono
Internal memory 2 GB 6.5 h 13 h
SD card
32 GB 94 h 188 h
16 GB 47 h 94 h
8 GB 23.5 h 47 h
MP3 format
Recording media 128kbps Stereo 64kbps Mono
Internal memory 2 GB 36 h 72 h
SD card
32 GB 520 h 1040 h
16 GB 260 h 520 h
8 GB 130 h 260 h
• The above are the standard times, and the available recording time will vary depending on the card.
• Available recording time may be shorter if many short recordings are made.
• Total recording time of several files. The maximum recording time per file is 99 hours 59 minutes.
Specifications and design are subject to change without notice. Battery life is measured by Olympus. It varies greatly according to the conditions of use.
68EN
For customers in North AmericaThe DS-9500/DS-9000 is part of the Olympus Professional Dictation System. Your certified professional dealer has been fully trained on the entire Olympus Professional Dictation range, including dictation, transcription devices and software. For technical assistance and guidance relating to installation and set up, please contact your professional dealer from whom you purchased the system.
FCC Notice• This equipment has been tested and found
to comply with the limits for a Class B digital device, pursuant to Part 15 of the FCC Rules. These limits are designed to provide reasonable protection against harmful interference in a residential installation.
• This equipment generates, uses, and can radiate radio frequency energy and, if not installed and used in accordance with the instructions, may cause harmful interference to radio communications.
• However, there is no guarantee that interference will not occur in a particular installation. If this equipment does cause harmful interference to radio or television reception, which can be determined by turning the equipment off and on, the user is encouraged to try to correct the interference by one or more of the following measures:
➤ Reorient or relocate the receiving antenna.
➤ Increase the separation between the equipment and receiver.
➤ Connect the equipment into an outlet on a circuit different from that to which the receiver is connected.
➤ Consult the dealer or an experienced radio/TV technician for help.
➤ Use only Olympus’ supplied cable or AC adapter when you connect the applicable equipment to an external device or a power outlet.
• Any unauthorized changes or modifications to this equipment would void the user’s authority to operate it. DS-9500 is equipped with wlan device with IC and FCC ID:
➤ FCC ID: YSKW80 ➤ IC: 4763E-W80
• The available scientific evidence does not show that any health problems are associated with using low power wireless devices. There is no proof, however, that these low power wireless devices are absolutely safe. Low power Wireless devices emit low levels of radio frequency energy (RF) in the microwave range while being used. Whereas high levels of RF can produce health effects (by heating tissue), exposure of low-level RF that does not produce heating effects causes no known adverse health effects. Many studies of low-level RF exposures have not found any biological effects. Some studies have suggested that some biological effects might occur, but such findings have not been confirmed by additional research. DS-9500 has been tested and found to comply with FCC/ IC radiation exposure limits set forth for an uncontrolled environment and meets the FCC radio frequency (RF) Exposure Guidelines in Supplement C to OET65 and RSS-102 of the IC radio frequency (RF) Exposure rules. SAR testing has been done at a distance of 0 cm from the body and the head.

69EN
FCC CautionChanges or modifications not expressly approved by the party responsible for compliance could void the user’s authority to operate the equipment. This transmitter must not be co-located or operated in conjunction with any other antenna or transmitter. To maintain compliance with FCC’s RF exposure guidelines, use only the supplied antenna. Unauthorized antenna, modification, or attachments could damage the transmitter and may violate FCC regulations.
For customers in USADeclaration of ConformityModel Number: DS-9500/DS-9000Trade Name: OLYMPUSResponsible Party: OLYMPUS AMERICA INC.Address: 3500 Corporate Parkway, P.O. Box 610, Center Valley, PA 18034-0610, U.S.A.Telephone Number: 484-896-5000
Tested To Comply With FCC StandardsFOR HOME OR OFFICE USEThis device complies with Part 15 of FCC Rules and Industry Canada license-exempt RSS standard(s).Operation is subject to the following two conditions:(1) This device may not cause harmful
interference, and (2) This device must accept any interference
received, including interference that may cause undesired operation of this device.
For customers in CanadaCAN ICES-3 (B)/NMB-3 (B)

70EN
For customers in EuropeProfessional dictation devices from Olympus are distributed via specially trained and educated partners. Therefore please contact your local Certified Olympus Partner for Professional Audio Systems to get highly qualified support in your language. Find your local partner with our Dealer Locator on www.olympus-europa.com/voice
Telephone support (only English speaking):United Kingdom: 0845 521 8588
(Monday - Friday 8 am - 5 pm GMT)Republic of Ireland: 00 44 1582 483320
(Monday - Friday 8 am - 5 pm GMT)Europe, Middle East, Russia & Africa:
00 800 7000 1000* (Monday - Friday 9 am - 6 pm CET)
E-mail (only English speaking)[email protected]
Hardware repairPlease contact our customer support center [email protected] number: 00 800 - 67 10 84 00*Charged number +49 40-237 73 899(Monday – Thursday 8 am - 5 pm, /
Friday 8 am - 3:30 pm GMT)
* 00800-calls are free of charge. Only valid for Germany, Austria, Netherlands, Belgium, France, Italy, Denmark, Switzerland, Portugal, Norway, Sweden, Finland, Spain, Czech,
Republic, Hungary, Poland, Iceland, Bulgaria, Israel, Latvia, Lithuania, Estonia, Russia, South Africa.Some phone service providers do not permit access to 00800 numbers or require an additional prefix. Charges may apply here. Please contact your service provider directly for more details.
The “CE” mark indicates that this product complies with the European requirements for safety, health, environment and customer protection. CE-mark products are for sale in Europe.
This symbol [crossed-out wheeled bin WEEE Annex IV] indicates separate collection of waste electrical and electronic equipment in the EU countries. Please do not throw the equipment into the domestic refuse. Please use the return and collection systems available in your country for the disposal of this product.
This symbol [crossed-out wheeled bin Directive 2006/66/EC Annex II] indicates separate collection of waste batteries in the EU countries. Please do not throw the batteries into the domestic refuse. Please use the return and collection systems available in your country for the disposal of the waste batteries.

71EN
(For DS-9500)
To prevent possible hearing damage, do not listen at high volume levels for long periods.
Hereby, Olympus Corporation declares that the radio equipment type DS-9500 is in compliance with Directive 2014/53/EU.The full text of the EU declaration of conformity is available at the following internet address: http://www.olympus-europa.com/SAR testing has been done at a distance of 0 cm from the body and the head.This product supports wlan.Radio function of this equipment is not allowed to use in the geographical area within a radius of 20 km from the centre of Ny-Alesund on Svalbard.

EN-BS1871-01 date of issue 2018.03. AP
2951 Ishikawa-machi, Hachioji-shi, Tokyo 192-8507, Japanhttp://www.olympus.com
OLYMPUS CORPORATION
3500 Corporate Parkway, P.O. Box 610, Center Valley, PA 18034-0610, U.S.A.E-mail: [email protected]
http://www.olympusamerica.com
OLYMPUS AMERICA INC.
(Premises) Wendenstrasse 14 – 18, 20097 Hamburg, GermanyTel. +49 40 - 23 77 3-0
(Goods delivery) Modul H, Willi-Bleicher Str. 36, 52353 Düren, Germany (Letters) Postfach 10 49 08, 20034 Hamburg, Germany
http://www.olympus-europa.com
OLYMPUS EUROPA SE & CO. KG
Level 4, 97 Waterloo Road,Macquarie Park NSW 2113Tel: +61 2 9886 3992
http://www.olympus.com.au
OLYMPUS AUSTRALIA PTY LTD.
Recommended