DGS Prolog Manager
& Prolog Converge User
Manual
Table of Contents Prolog Overview Flowchart 1
Entering a New Project 2
Solicitations 7 Contracts Module 14 Change Orders 21 Change Order Workflow Diagram 24 Meeting Minutes 25
• Creating New Set from Existing 32
Uploading Files 34
Drawings and Specs, Drawing Packages 35
• Linking a Drawing to an Item 39 • Create Single Item 41 • Creating a Drawing Package 43
Project Action List 46
Requests For Information (RFI) 53
• Review and Response (A/E) 55 • Creating New 63
Submittals 74
• Reviewing Package Items 76
• Attaching Files 80 • Adding Reviewers 83 • Creating Submittal Items and Submittal Register 87 • Printing/Emailing Submittal Log for Approval 90 • Creating a Submittal Package 93 • Adding Reviewers and Submitting the Package 95 • Attaching Files (Actual Submittals) to the Package 96 • Creating a Package Revision 99
Entering a Contract Invoice (DGS PM Only) 101
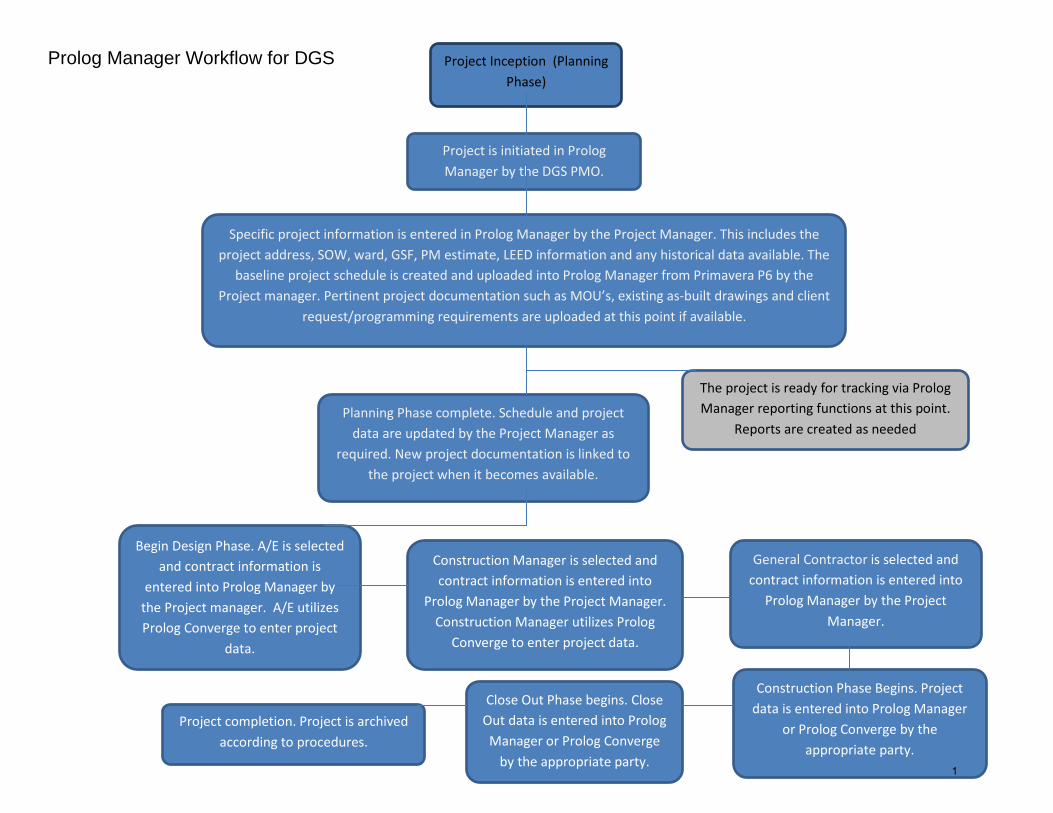
Prolog Manager Workflow for DGS Project Inception (Planning Phase)
Project is initiated in Prolog Manager by the DGS PMO.
Specific project information is entered in Prolog Manager by the Project Manager. This includes the project address, SOW, ward, GSF, PM estimate, LEED information and any historical data available. The
baseline project schedule is created and uploaded into Prolog Manager from Primavera P6 by the Project manager. Pertinent project documentation such as MOU’s, existing as-built drawings and client
request/programming requirements are uploaded at this point if available.
Planning Phase complete. Schedule and project data are updated by the Project Manager as
required. New project documentation is linked to the project when it becomes available.
The project is ready for tracking via Prolog Manager reporting functions at this point.
Reports are created as needed
Begin Design Phase. A/E is selected and contract information is
entered into Prolog Manager by the Project manager. A/E utilizes Prolog Converge to enter project
data.
Construction Manager is selected and contract information is entered into
Prolog Manager by the Project Manager. Construction Manager utilizes Prolog
Converge to enter project data.
General Contractor is selected and contract information is entered into
Prolog Manager by the Project Manager.
Construction Phase Begins. Project data is entered into Prolog Manager
or Prolog Converge by the appropriate party.
Close Out Phase begins. Close Out data is entered into Prolog Manager or Prolog Converge
by the appropriate party.
Project completion. Project is archived according to procedures.
1
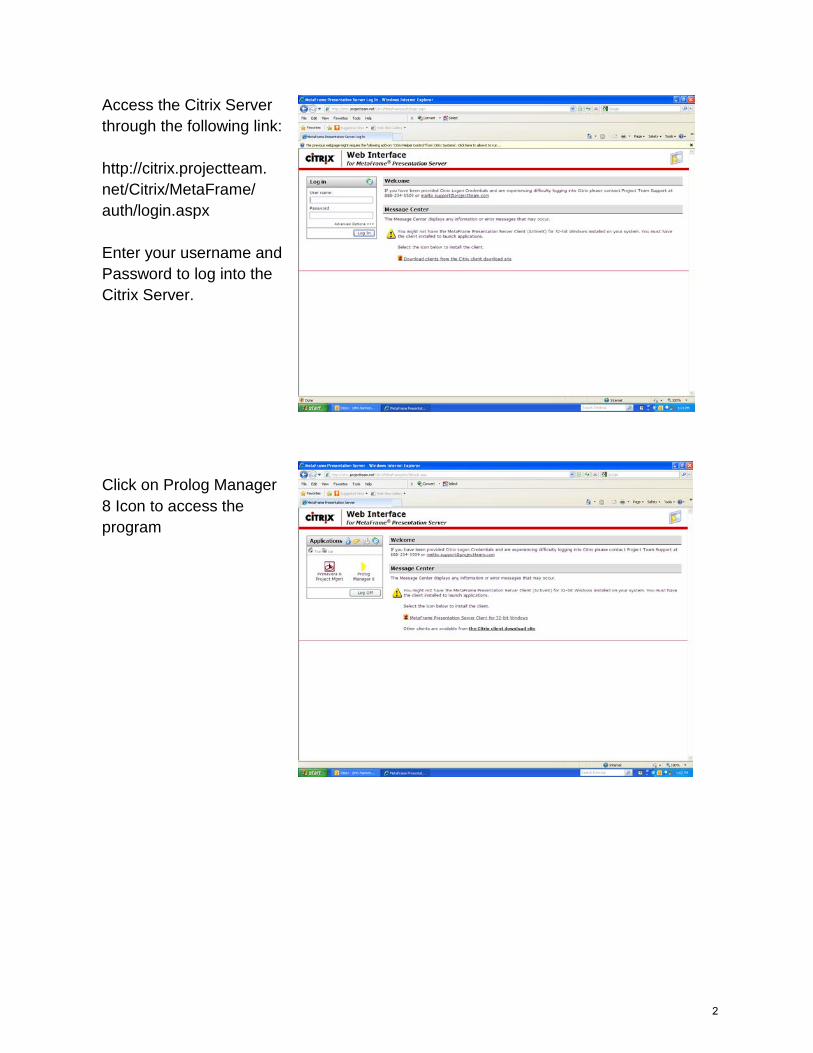
Access the Citrix Server through the following link: http://citrix.projectteam. net/Citrix/MetaFrame/ auth/login.aspx Enter your username and Password to log into the Citrix Server. Click on Prolog Manager 8 Icon to access the program
2
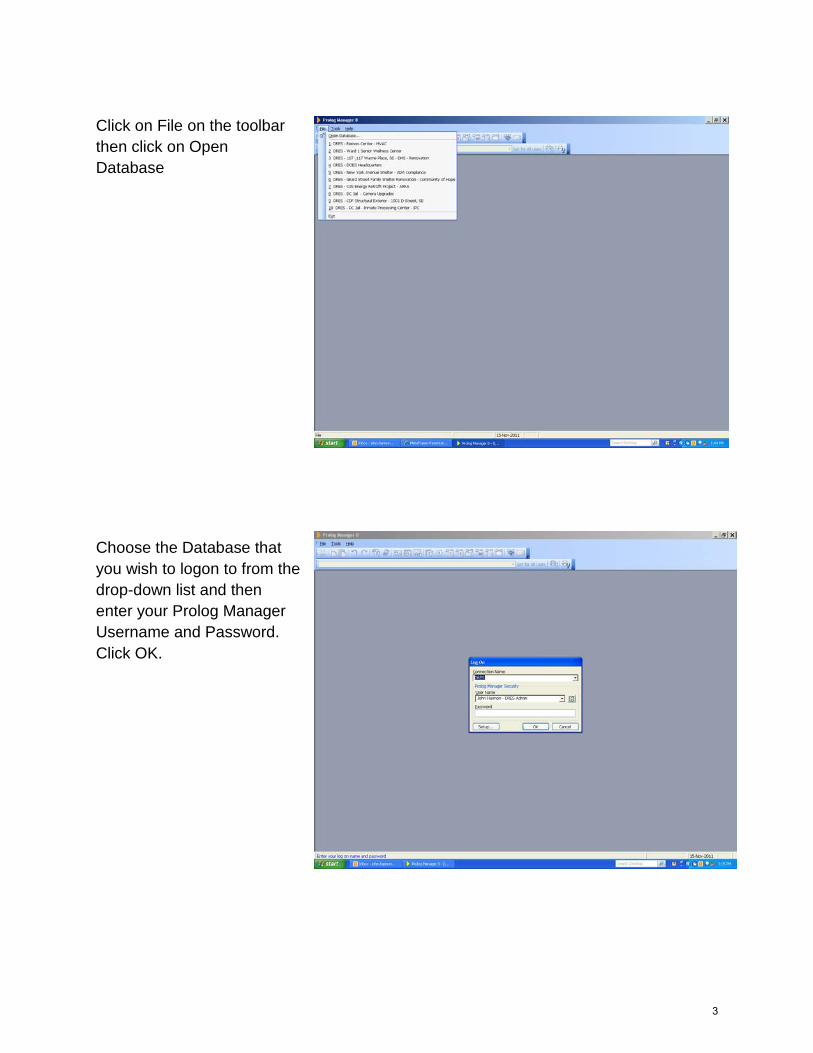
Click on File on the toolbar then click on Open Database Choose the Database that you wish to logon to from the drop-down list and then enter your Prolog Manager Username and Password. Click OK.
3
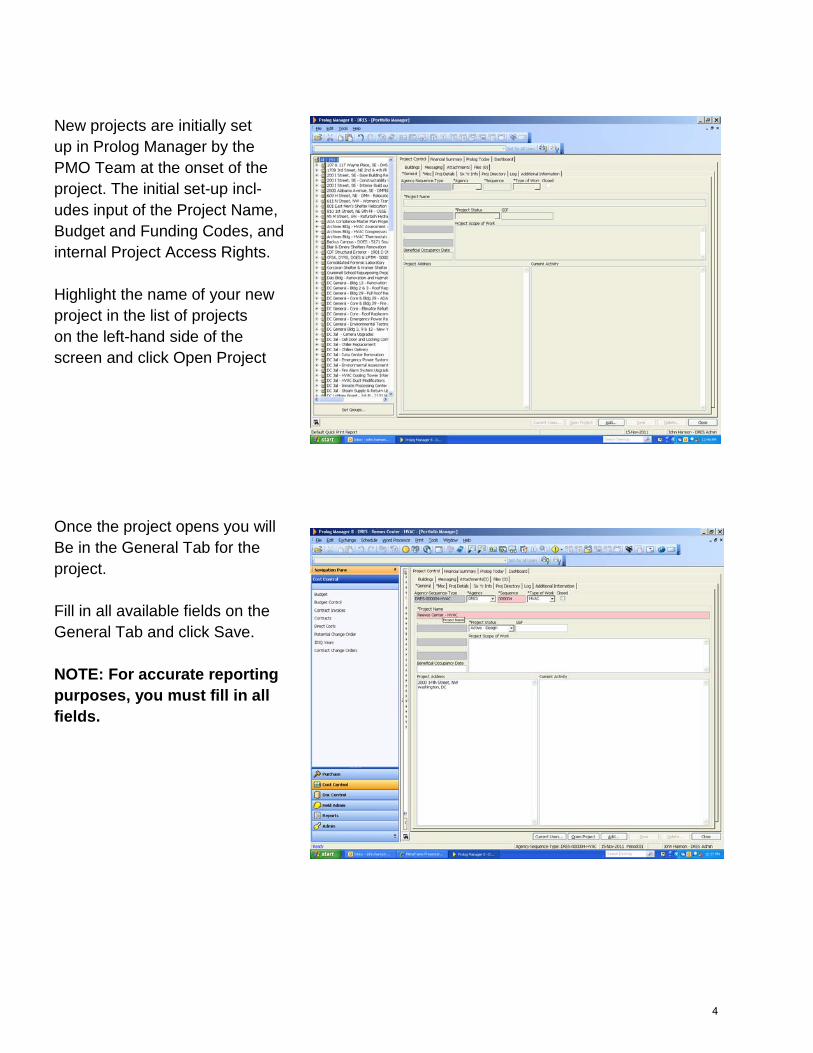
New projects are initially set up in Prolog Manager by the PMO Team at the onset of the project. The initial set-up incl- udes input of the Project Name, Budget and Funding Codes, and internal Project Access Rights. Highlight the name of your new project in the list of projects on the left-hand side of the screen and click Open Project Once the project opens you will Be in the General Tab for the project. Fill in all available fields on the General Tab and click Save. NOTE: For accurate reporting purposes, you must fill in all fields.
4
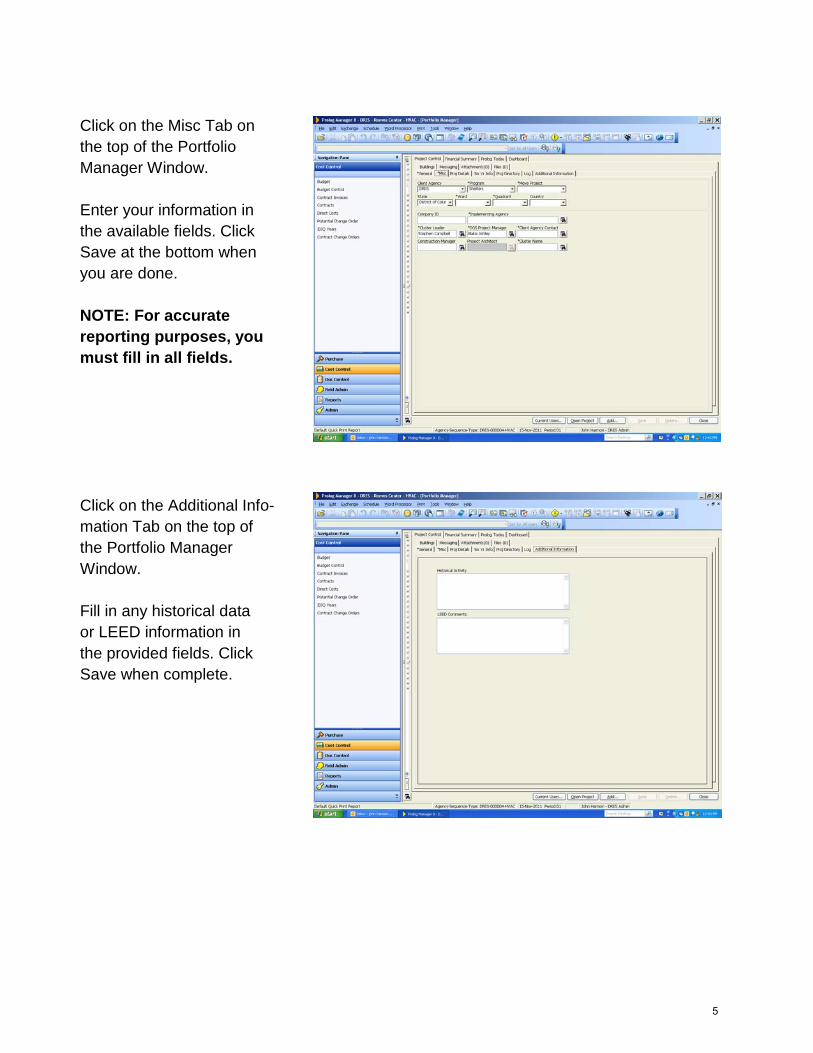
Click on the Misc Tab on the top of the Portfolio Manager Window. Enter your information in the available fields. Click Save at the bottom when you are done. NOTE: For accurate reporting purposes, you must fill in all fields. Click on the Additional Info- mation Tab on the top of the Portfolio Manager Window. Fill in any historical data or LEED information in the provided fields. Click Save when complete.
5
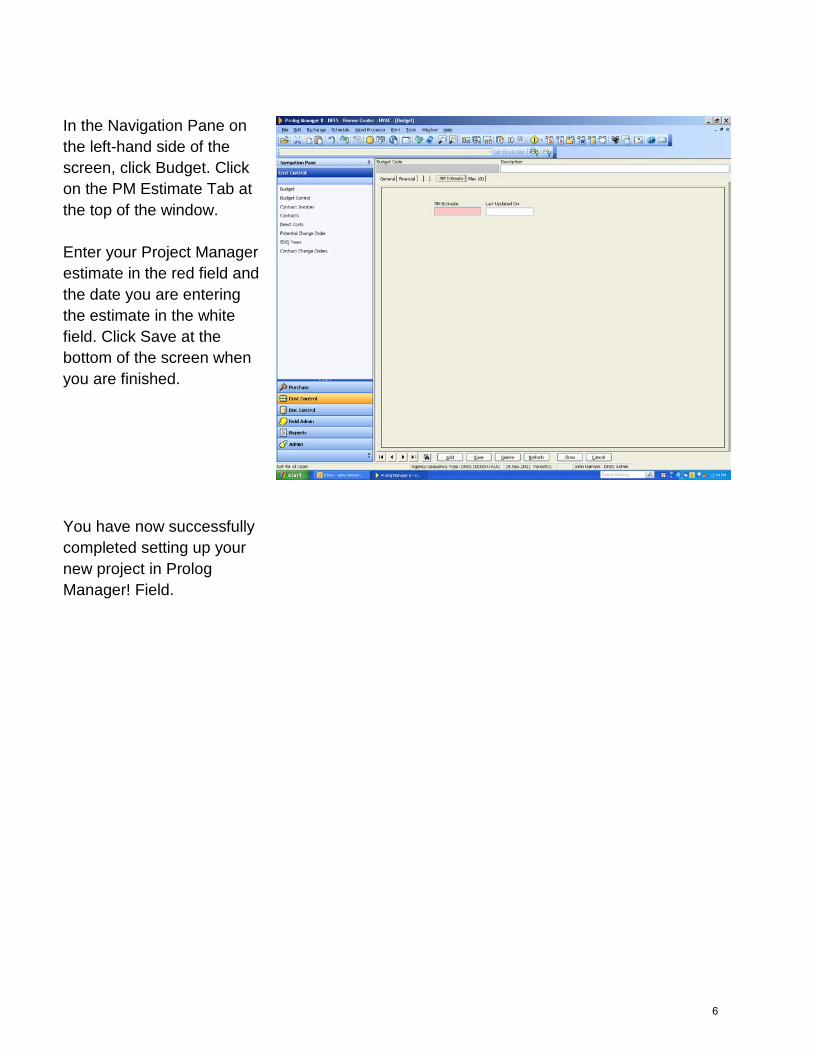
In the Navigation Pane on the left-hand side of the screen, click Budget. Click on the PM Estimate Tab at the top of the window. Enter your Project Manager estimate in the red field and the date you are entering the estimate in the white field. Click Save at the bottom of the screen when you are finished. You have now successfully completed setting up your new project in Prolog Manager! Field.
6
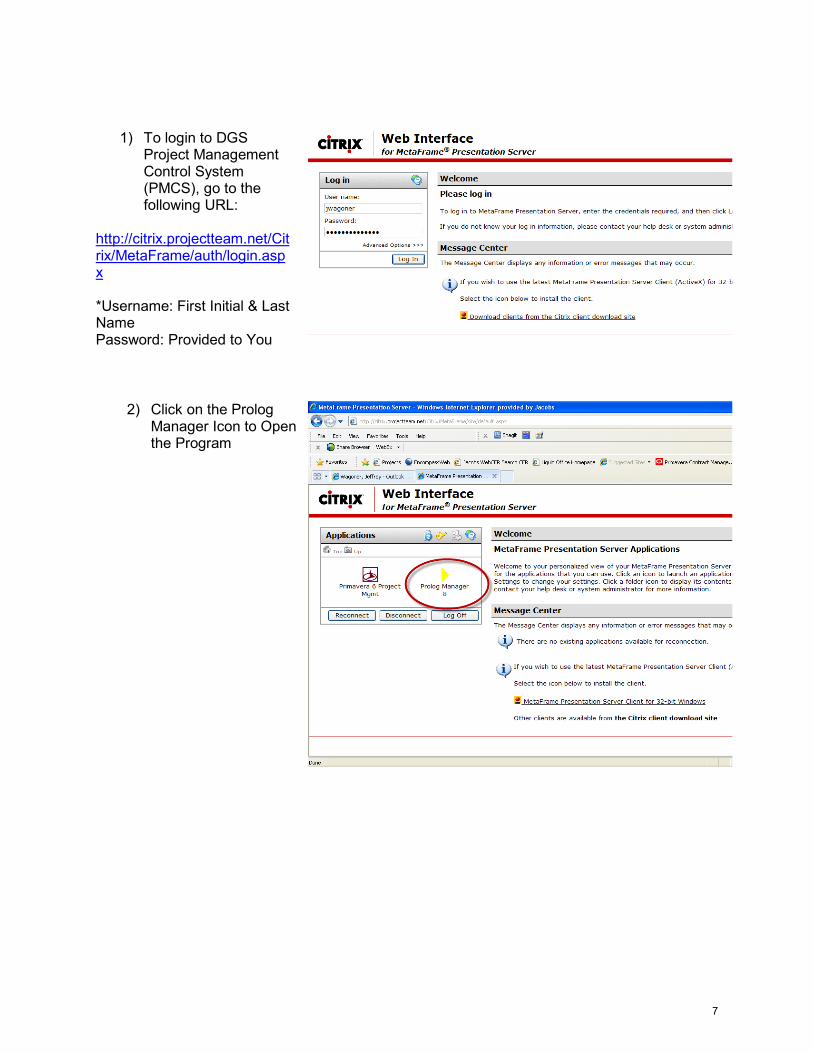
1) To login to DGS Project Management Control System (PMCS), go to the following URL:
http://citrix.projectteam.net/Citrix/MetaFrame/auth/login.aspx *Username: First Initial & Last Name Password: Provided to You
2) Click on the Prolog
Manager Icon to Open the Program
7
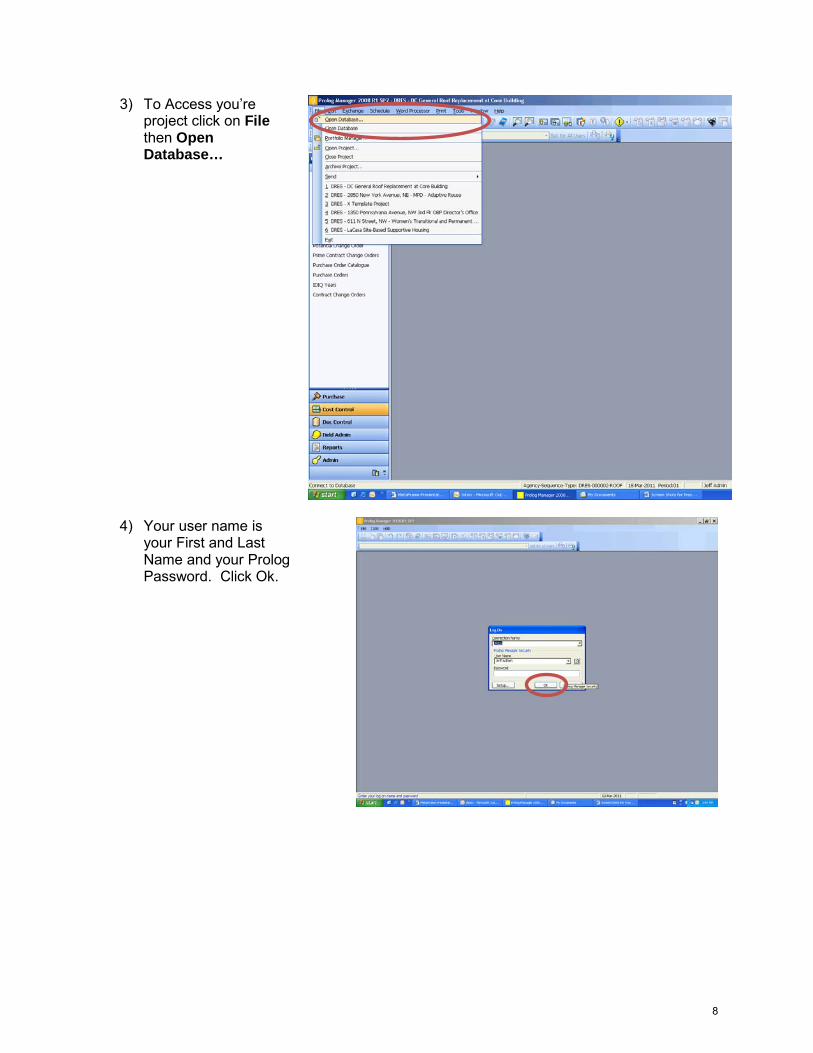
3) To Access you’re project click on File then Open Database…
4) Your user name is your First and Last Name and your Prolog Password. Click Ok.
8

5) To open a project, select The Project you wish then Choose Open Project by click on it.
NOTE: To run your initial report you can open any project as it searches all of them.
6) You’re now in Prolog Manager and ready to start your work.
9
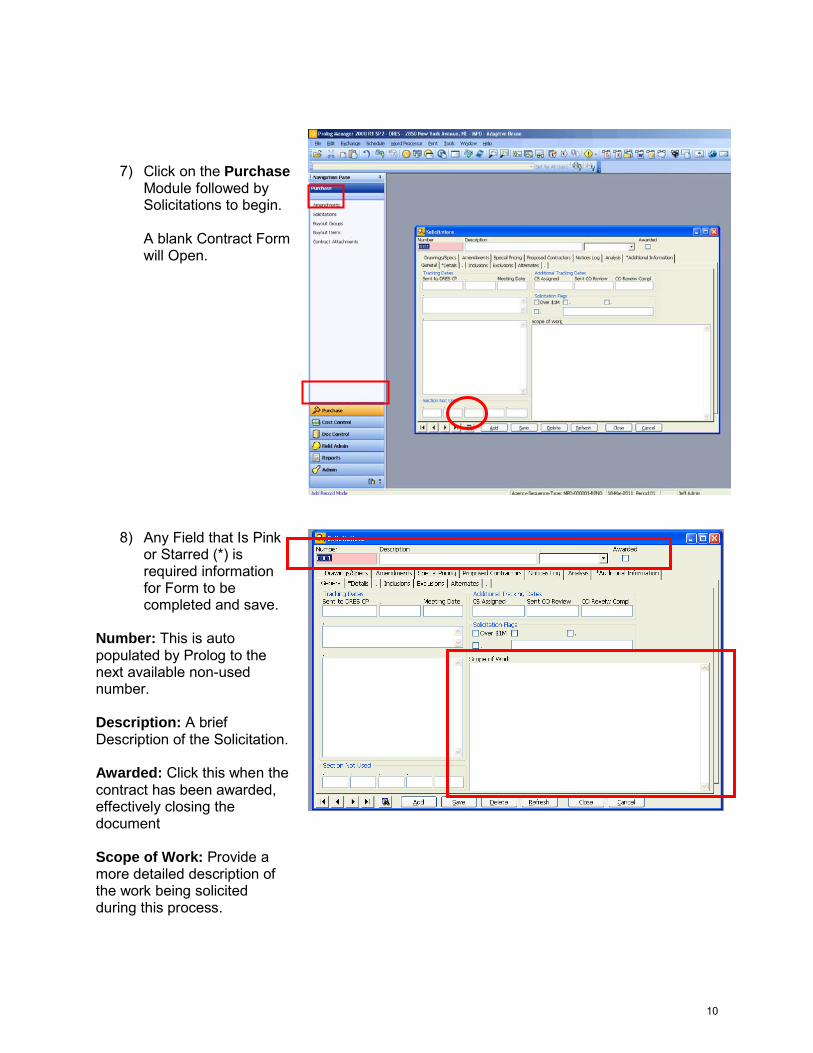
7) Click on the Purchase Module followed by Solicitations to begin.
A blank Contract Form will Open.
8) Any Field that Is Pink or Starred (*) is required information for Form to be completed and save.
Number: This is auto populated by Prolog to the next available non-used number. Description: A brief Description of the Solicitation. Awarded: Click this when the contract has been awarded, effectively closing the document Scope of Work: Provide a more detailed description of the work being solicited during this process.
10
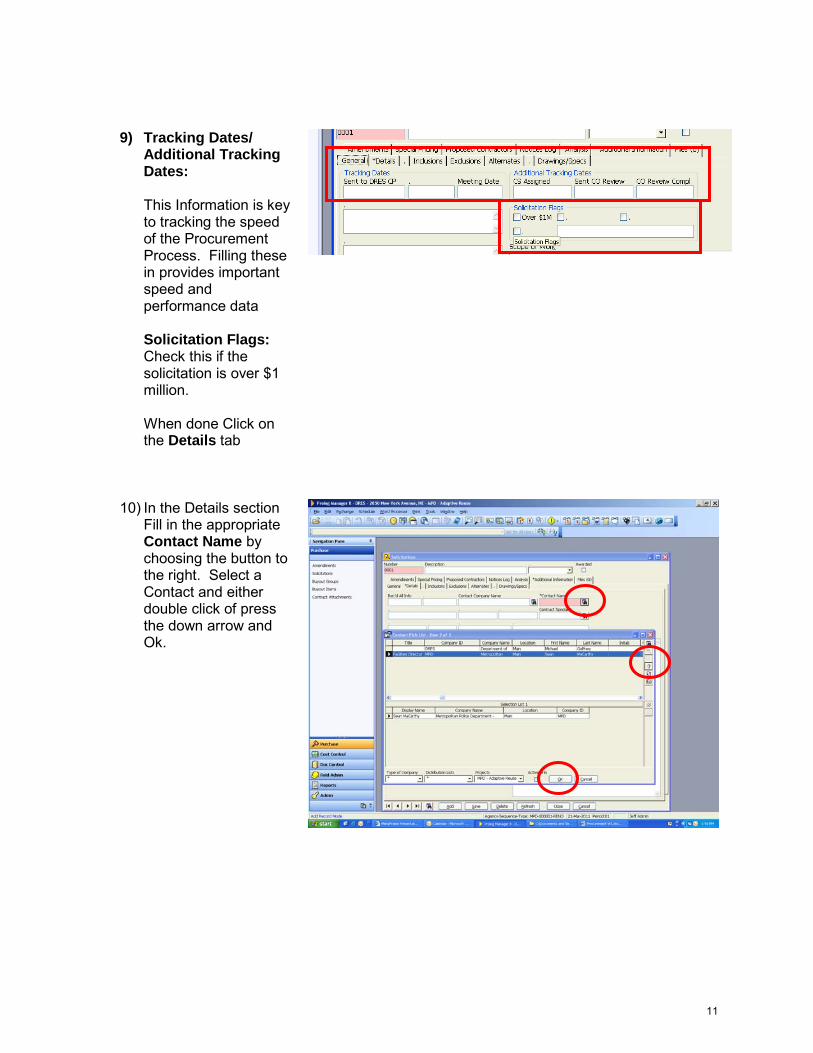
9) Tracking Dates/ Additional Tracking Dates:
This Information is key to tracking the speed of the Procurement Process. Filling these in provides important speed and performance data Solicitation Flags: Check this if the solicitation is over $1 million. When done Click on the Details tab
10) In the Details section Fill in the appropriate Contact Name by choosing the button to the right. Select a Contact and either double click of press the down arrow and Ok.
11
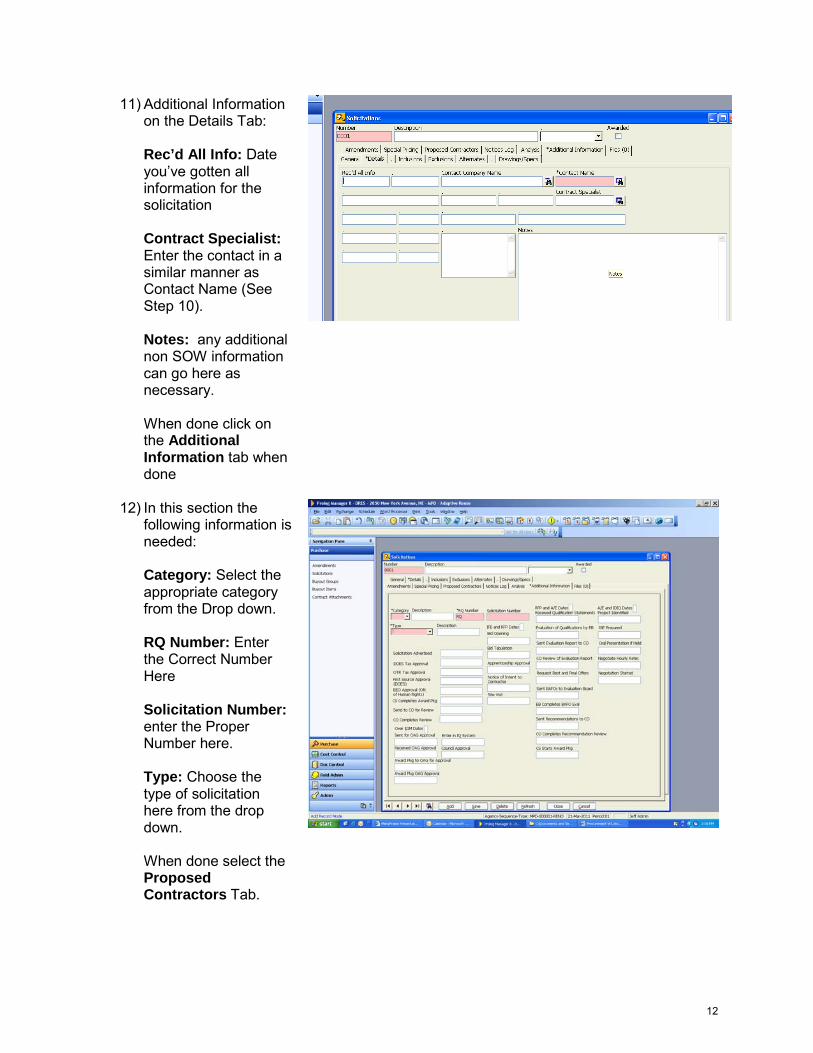
11) Additional Information on the Details Tab:
Rec’d All Info: Date you’ve gotten all information for the solicitation Contract Specialist: Enter the contact in a similar manner as Contact Name (See Step 10). Notes: any additional non SOW information can go here as necessary. When done click on the Additional Information tab when done
12) In this section the following information is needed:
Category: Select the appropriate category from the Drop down. RQ Number: Enter the Correct Number Here Solicitation Number: enter the Proper Number here. Type: Choose the type of solicitation here from the drop down. When done select the Proposed Contractors Tab.
12

13) Use this tab to track the contractors associated with the Solicitation.
Number this will auto populate by Prolog Contractor Name: Choose the button on the right side of the box. See Step 10 for adding contacts. The Contact will auto fill with the main company contact. Change if Different. Declined: Check this if the solicitation is eventually not accepted
14) Reason For Declined: Fill in Reason here. . Received Date: Date the Solicitation was received. Signed By/Signed by Title: Person who signed and their title information here. Witness/Witness Title/Witness on: Person who signed as witness, their title and the date they signed.
13
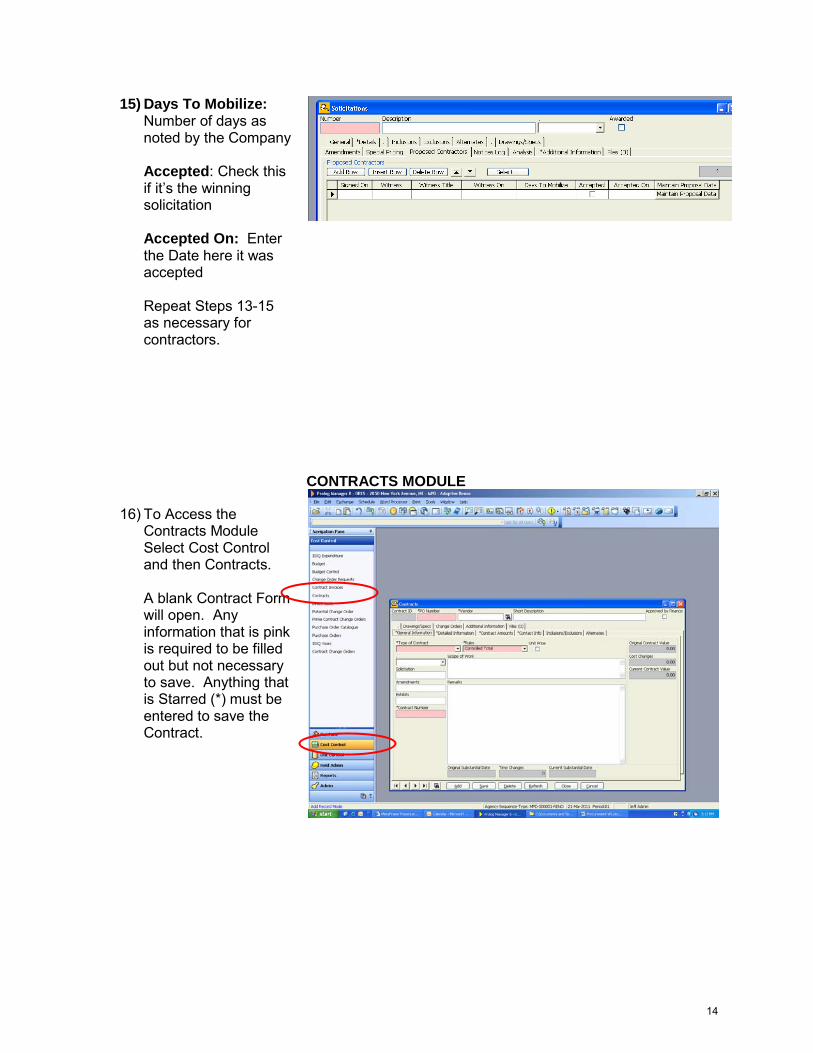
15) Days To Mobilize: Number of days as noted by the Company Accepted: Check this if it’s the winning solicitation Accepted On: Enter the Date here it was accepted Repeat Steps 13-15 as necessary for contractors.
CONTRACTS MODULE
16) To Access the Contracts Module Select Cost Control and then Contracts. A blank Contract Form will open. Any information that is pink is required to be filled out but not necessary to save. Anything that is Starred (*) must be entered to save the Contract.
14
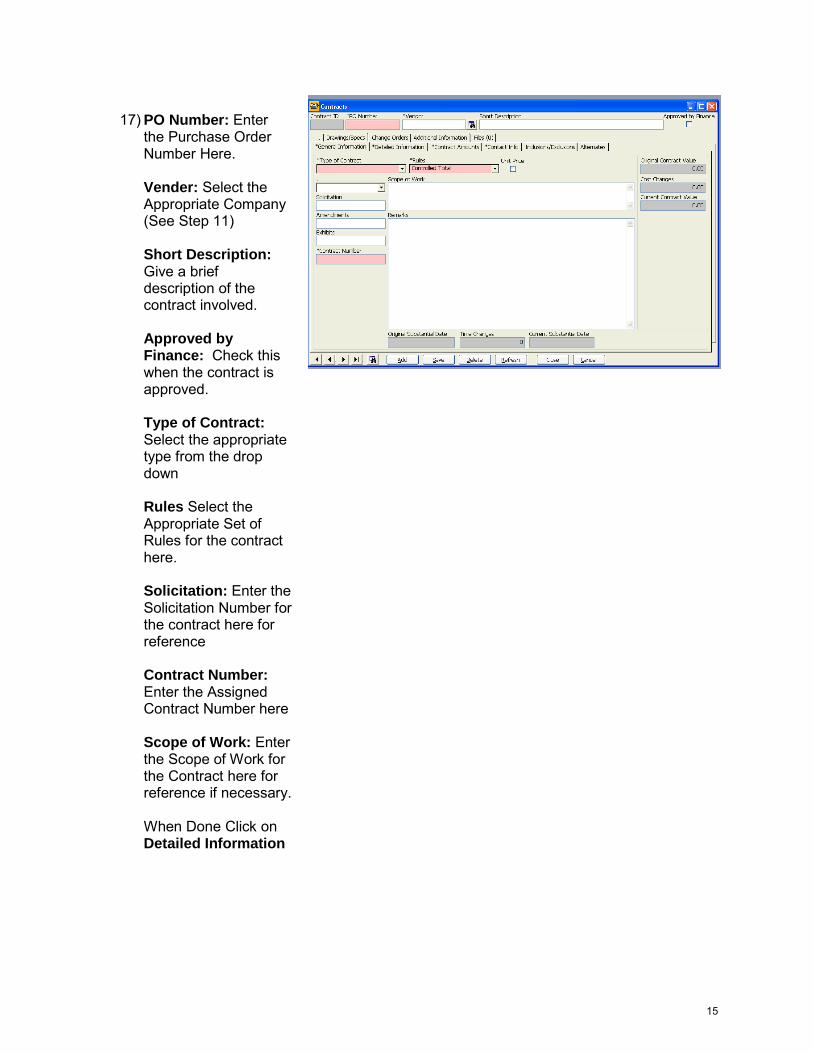
17) PO Number: Enter the Purchase Order Number Here. Vender: Select the Appropriate Company (See Step 11) Short Description: Give a brief description of the contract involved. Approved by Finance: Check this when the contract is approved. Type of Contract: Select the appropriate type from the drop down Rules Select the Appropriate Set of Rules for the contract here. Solicitation: Enter the Solicitation Number for the contract here for reference Contract Number: Enter the Assigned Contract Number here Scope of Work: Enter the Scope of Work for the Contract here for reference if necessary. When Done Click on Detailed Information
15
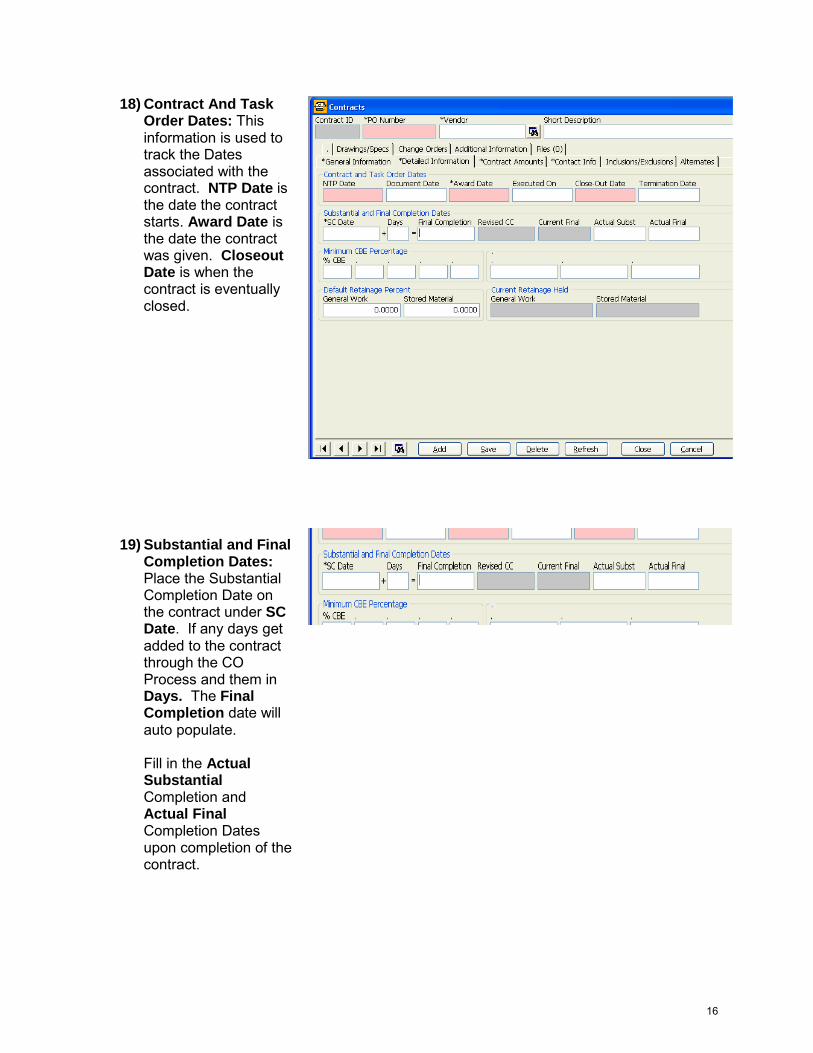
18) Contract And Task Order Dates: This information is used to track the Dates associated with the contract. NTP Date is the date the contract starts. Award Date is the date the contract was given. Closeout Date is when the contract is eventually closed.
19) Substantial and Final Completion Dates: Place the Substantial Completion Date on the contract under SC Date. If any days get added to the contract through the CO Process and them in Days. The Final Completion date will auto populate. Fill in the Actual Substantial Completion and Actual Final Completion Dates upon completion of the contract.
16
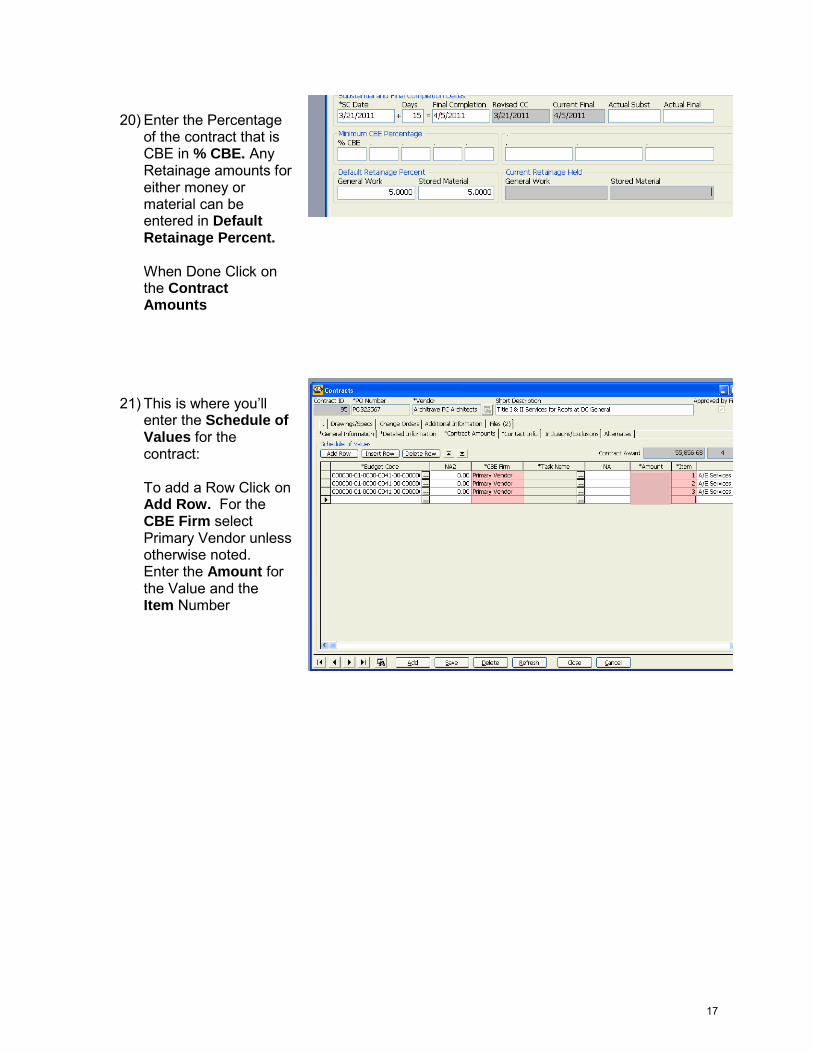
20) Enter the Percentage of the contract that is CBE in % CBE. Any Retainage amounts for either money or material can be entered in Default Retainage Percent. When Done Click on the Contract Amounts
21) This is where you’ll enter the Schedule of Values for the contract: To add a Row Click on Add Row. For the CBE Firm select Primary Vendor unless otherwise noted. Enter the Amount for the Value and the Item Number
17
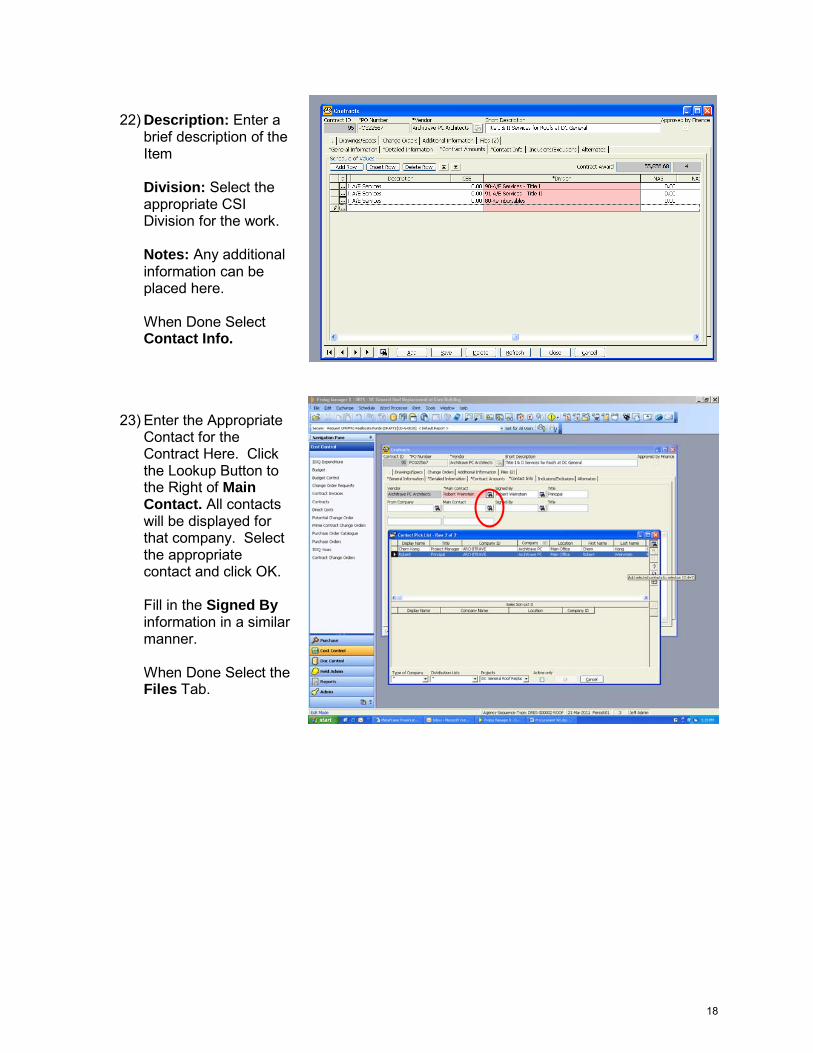
22) Description: Enter a brief description of the Item Division: Select the appropriate CSI Division for the work. Notes: Any additional information can be placed here. When Done Select Contact Info.
23) Enter the Appropriate Contact for the Contract Here. Click the Lookup Button to the Right of Main Contact. All contacts will be displayed for that company. Select the appropriate contact and click OK. Fill in the Signed By information in a similar manner. When Done Select the Files Tab.
18
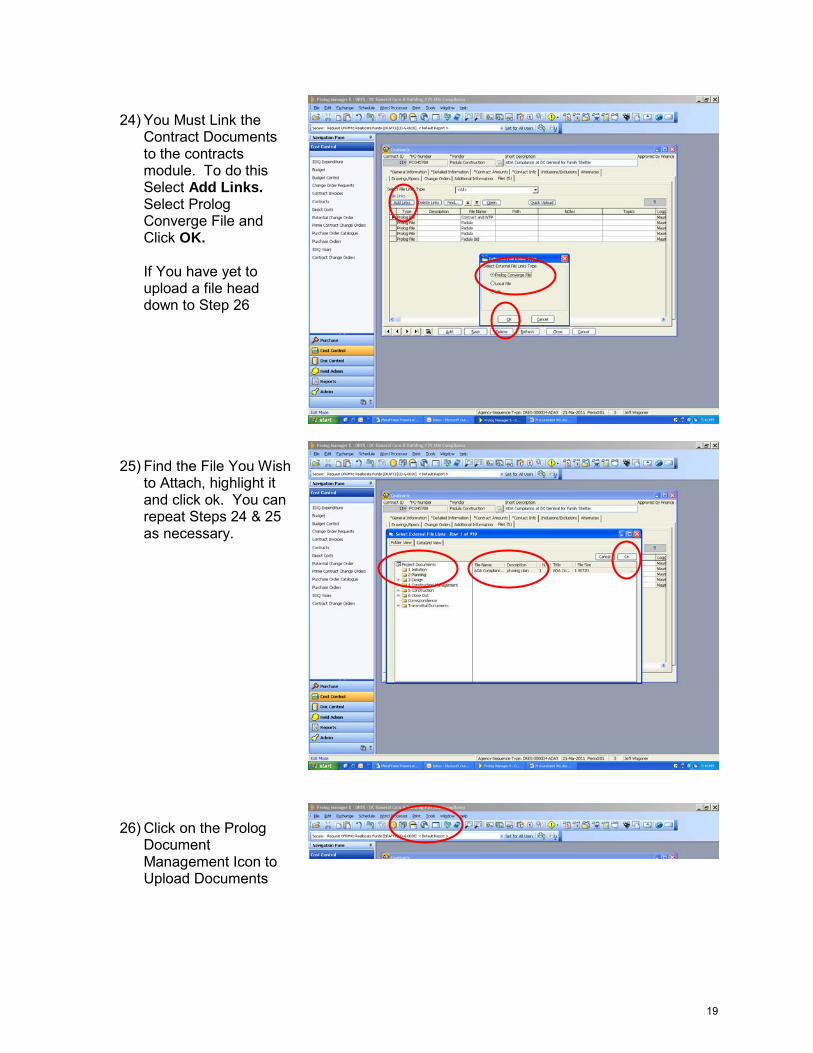
24) You Must Link the Contract Documents to the contracts module. To do this Select Add Links. Select Prolog Converge File and Click OK. If You have yet to upload a file head down to Step 26
25) Find the File You Wish to Attach, highlight it and click ok. You can repeat Steps 24 & 25 as necessary.
26) Click on the Prolog Document Management Icon to Upload Documents
19
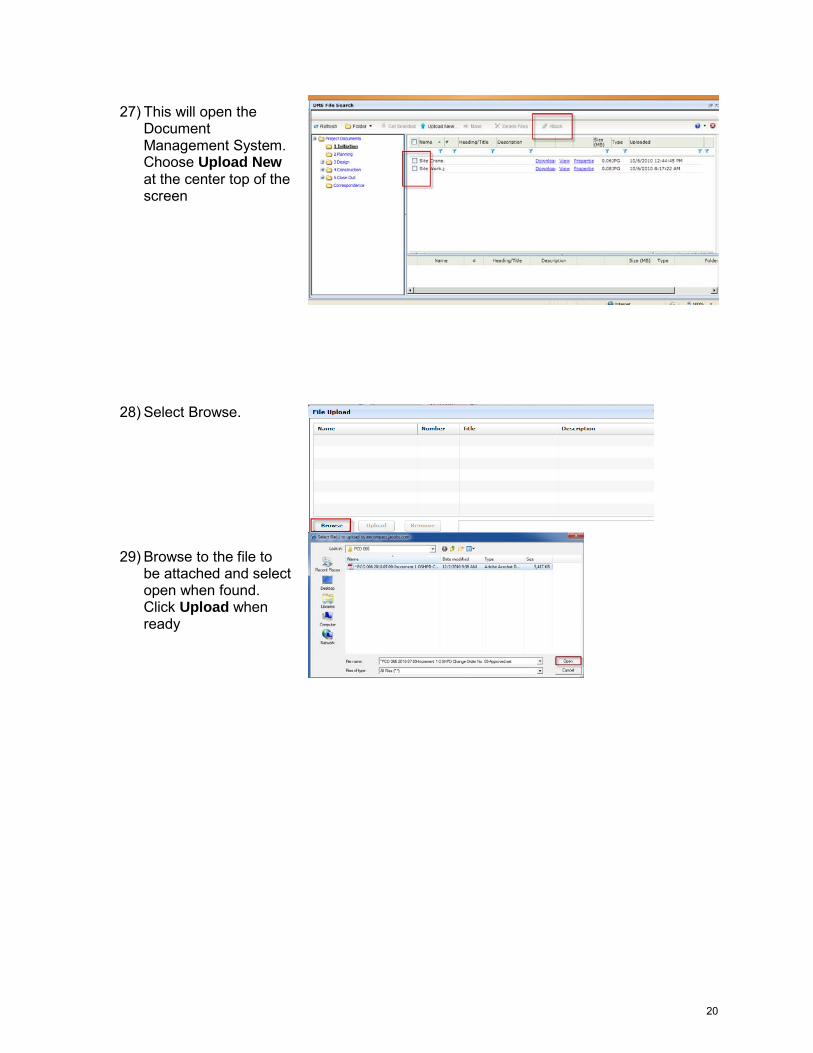
27) This will open the Document Management System. Choose Upload New at the center top of the screen
28) Select Browse.
29) Browse to the file to be attached and select open when found. Click Upload when ready
20
CREATING CHANGE ORDERS TO CONTRACTS
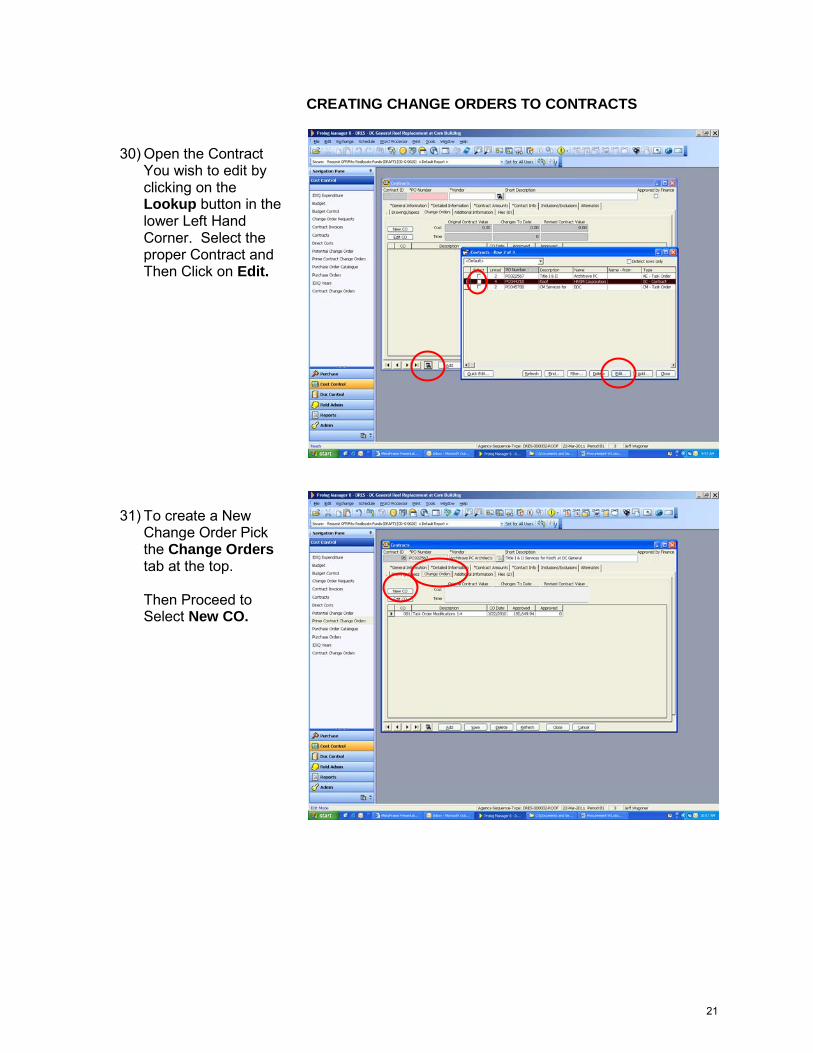
30) Open the Contract You wish to edit by clicking on the Lookup button in the lower Left Hand Corner. Select the proper Contract and Then Click on Edit.
31) To create a New Change Order Pick the Change Orders tab at the top. Then Proceed to Select New CO.
21
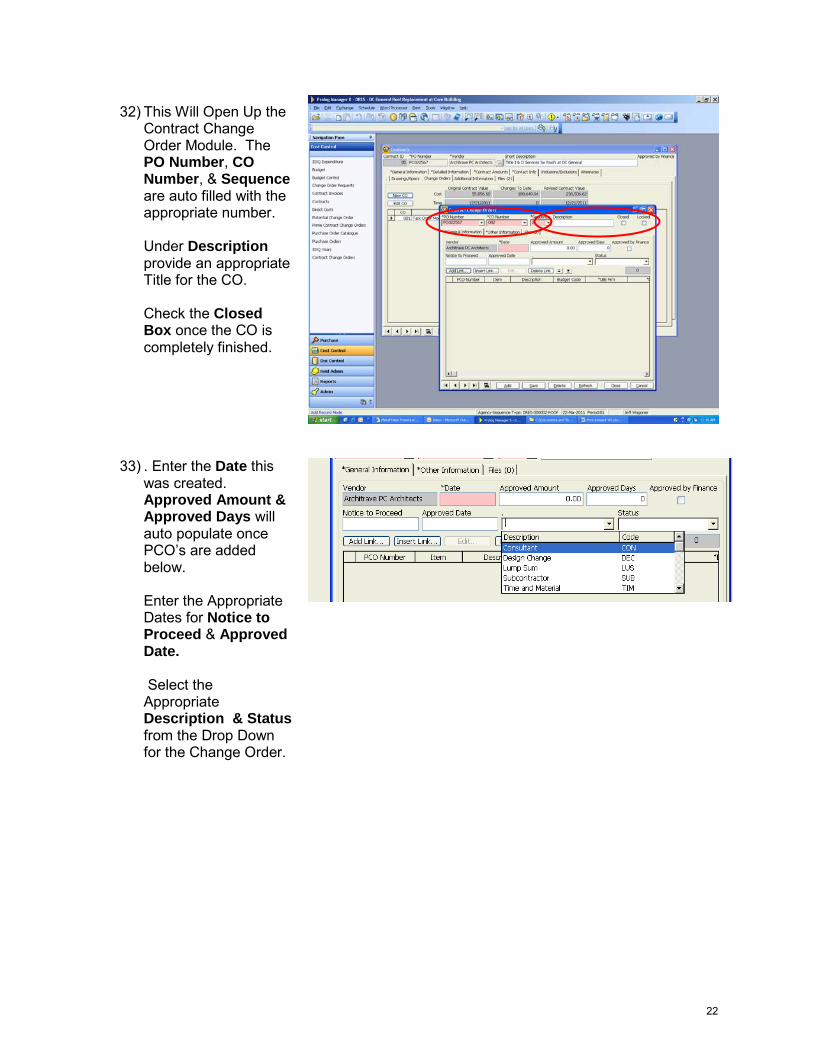
32) This Will Open Up the Contract Change Order Module. The PO Number, CO Number, & Sequence are auto filled with the appropriate number. Under Description provide an appropriate Title for the CO. Check the Closed Box once the CO is completely finished.
33) . Enter the Date this was created. Approved Amount & Approved Days will auto populate once PCO’s are added below. Enter the Appropriate Dates for Notice to Proceed & Approved Date. Select the Appropriate Description & Status from the Drop Down for the Change Order.
22
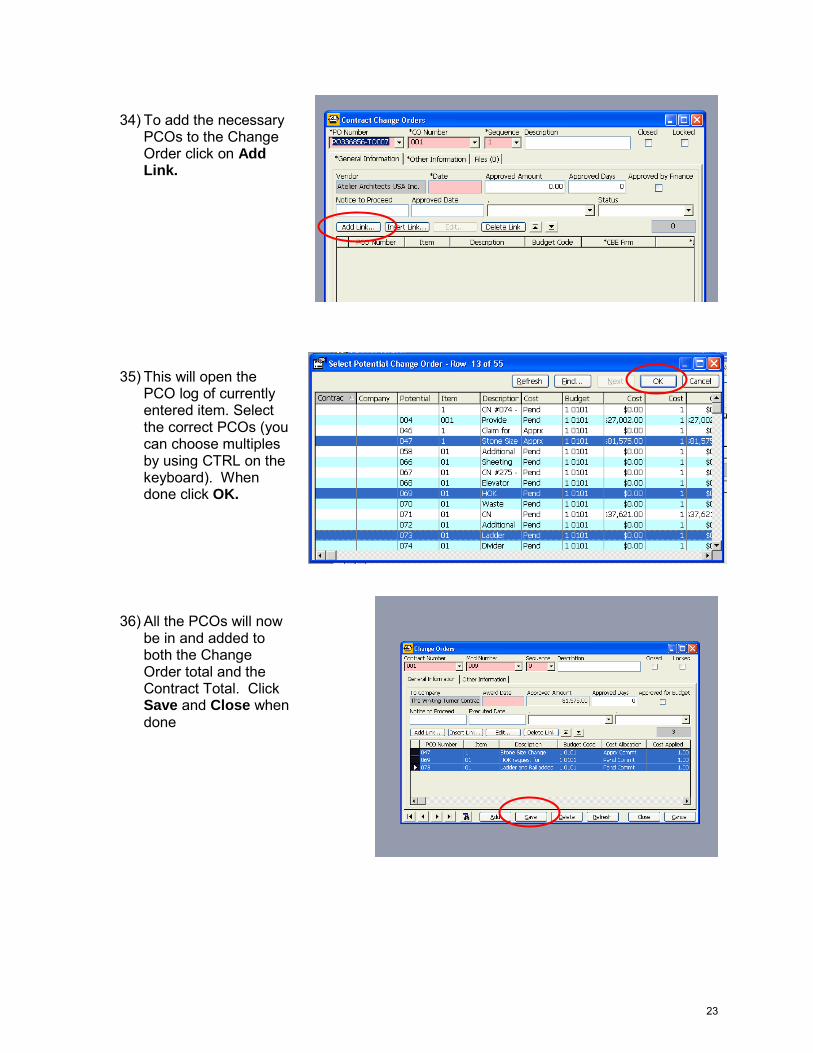
34) To add the necessary PCOs to the Change Order click on Add Link.
35) This will open the PCO log of currently entered item. Select the correct PCOs (you can choose multiples by using CTRL on the keyboard). When done click OK.
36) All the PCOs will now be in and added to both the Change Order total and the Contract Total. Click Save and Close when done
23
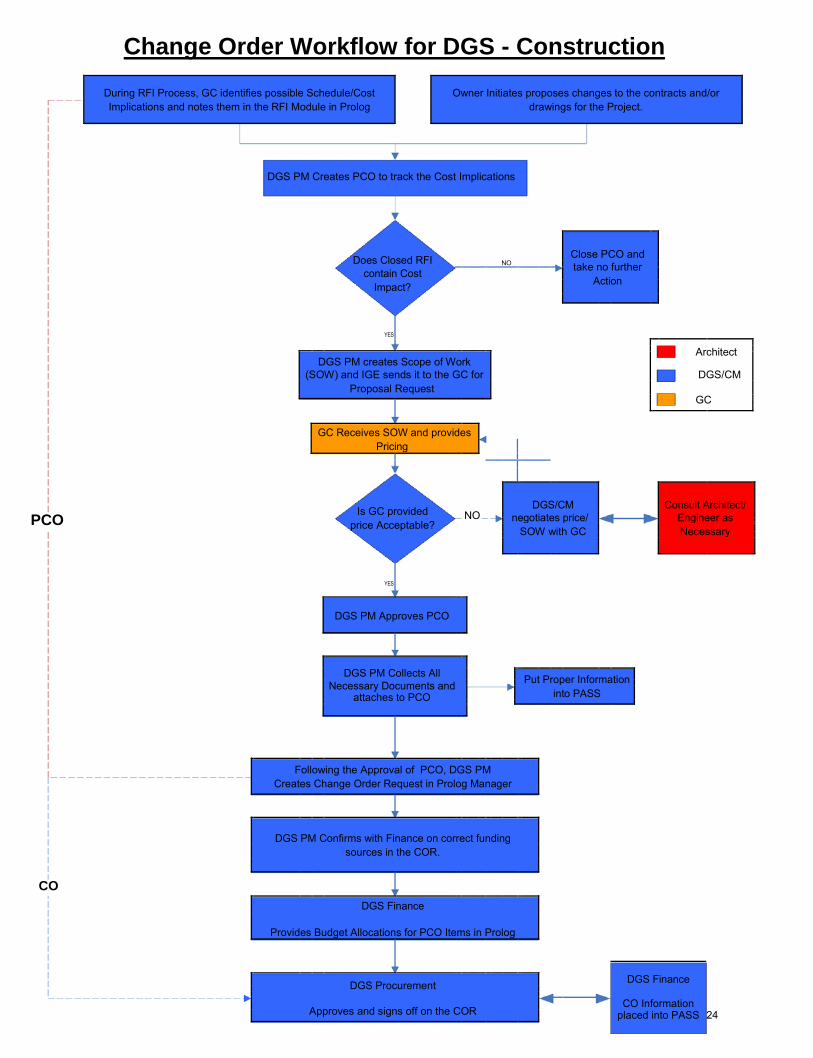
Change Order Workflow for DGS - Construction
During RFI Process, GC identifies possible Schedule/Cost Owner Initiates proposes changes to the contracts and/or Implications and notes them in the RFI Module in Prolog drawings for the Project.
DGS PM Creates PCO to track the Cost Implications PCO
CO
Does Closed RFI Close PCO and
NO take no further
contain Cost
Action
Impact?
YES
Architect
DGS PM creates Scope of Work
DGS/CM
(SOW) and IGE sends it to the GC for
Proposal Request GC
GC Receives SOW and provides
Pricing
Is GC provided NO DGS/CM Consult Architect/
negotiates price/ Engineer as
price Acceptable?
SOW with GC Necessary
YES
DGS PM Approves PCO
DGS PM Collects All
Put Proper Information
Necessary Documents and
into PASS
attaches to PCO
Following the Approval of PCO, DGS PM
Creates Change Order Request in Prolog Manager
DGS PM Confirms with Finance on correct funding
sources in the COR.
DGS Finance
Provides Budget Allocations for PCO Items in Prolog
DGS Finance
DGS Procurement
Approves and signs off on the COR
CO Information
placed into PASS
24
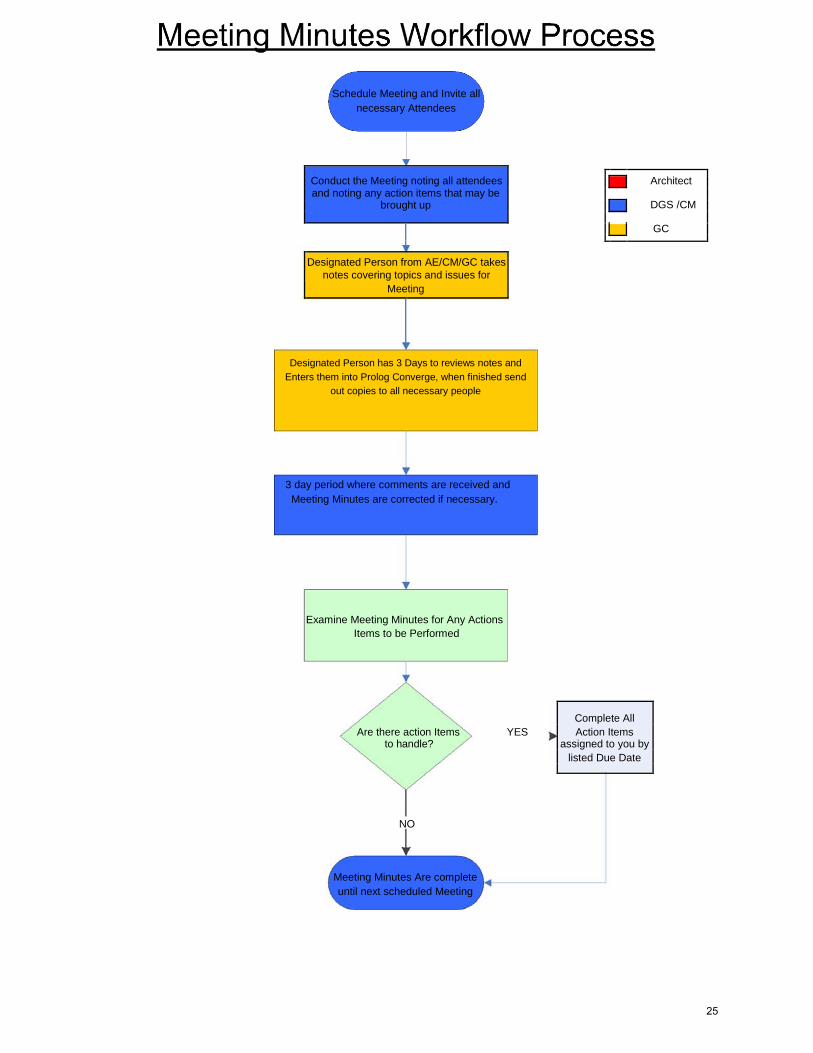
Schedule Meeting and Invite all necessary Attendees
Conduct the Meeting noting all attendees
Architect
and noting any action items that may be DGS /CM
brought up
GC
Designated Person from AE/CM/GC takes
notes covering topics and issues for
Meeting
Designated Person has 3 Days to reviews notes and
Enters them into Prolog Converge, when finished send out copies to all necessary people
3 day period where comments are received and Meeting Minutes are corrected if necessary.
Examine Meeting Minutes for Any Actions
Items to be Performed
Are there action Items Complete All
YES Action Items
to handle? assigned to you by
listed Due Date
NO
Meeting Minutes Are complete until next scheduled Meeting
25
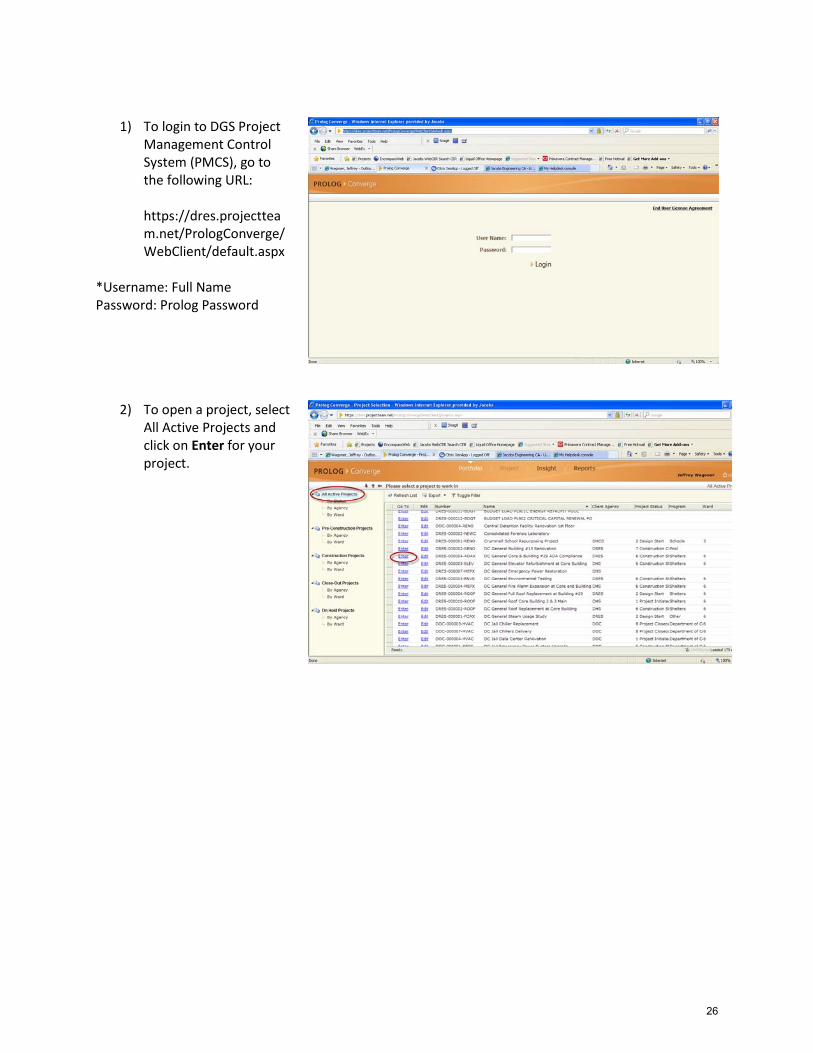
1) To login to DGS Project Management Control System (PMCS), go to the following URL: https://dres.projectteam.net/PrologConverge/WebClient/default.aspx
*Username: Full Name Password: Prolog Password
2) To open a project, select All Active Projects and click on Enter for your project.
26
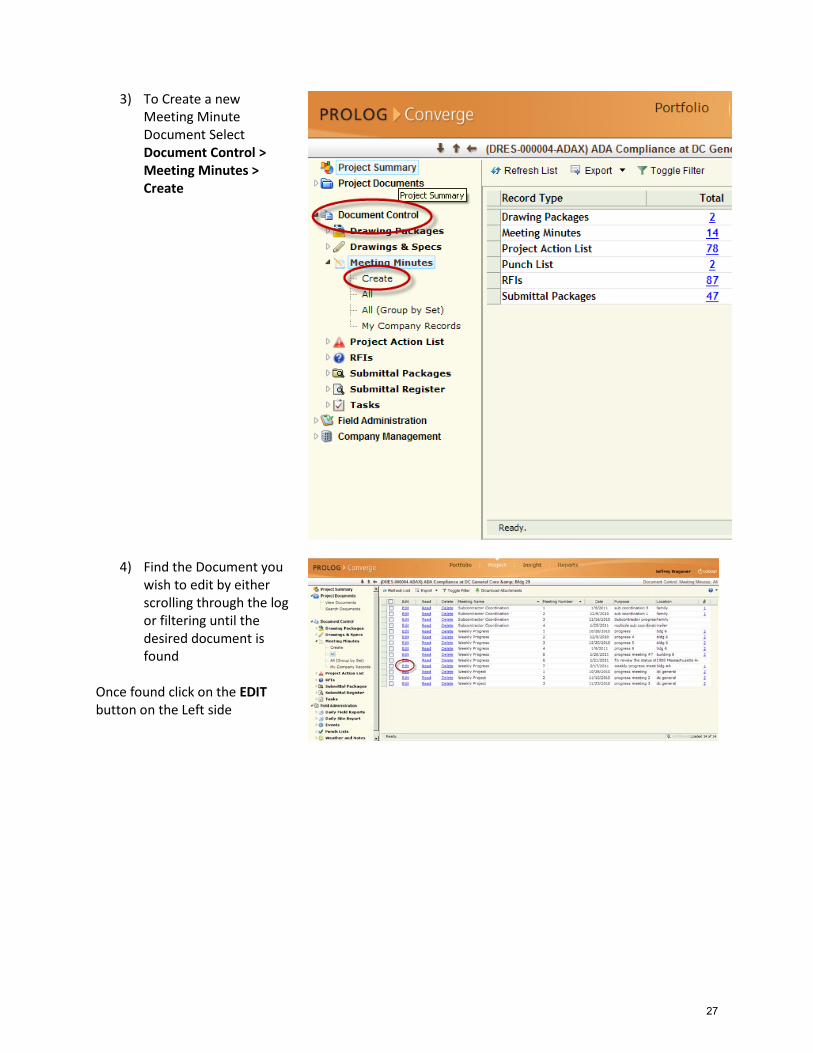
3) To Create a new Meeting Minute Document Select Document Control > Meeting Minutes > Create
4) Find the Document you wish to edit by either scrolling through the log or filtering until the desired document is found
Once found click on the EDIT button on the Left side
27
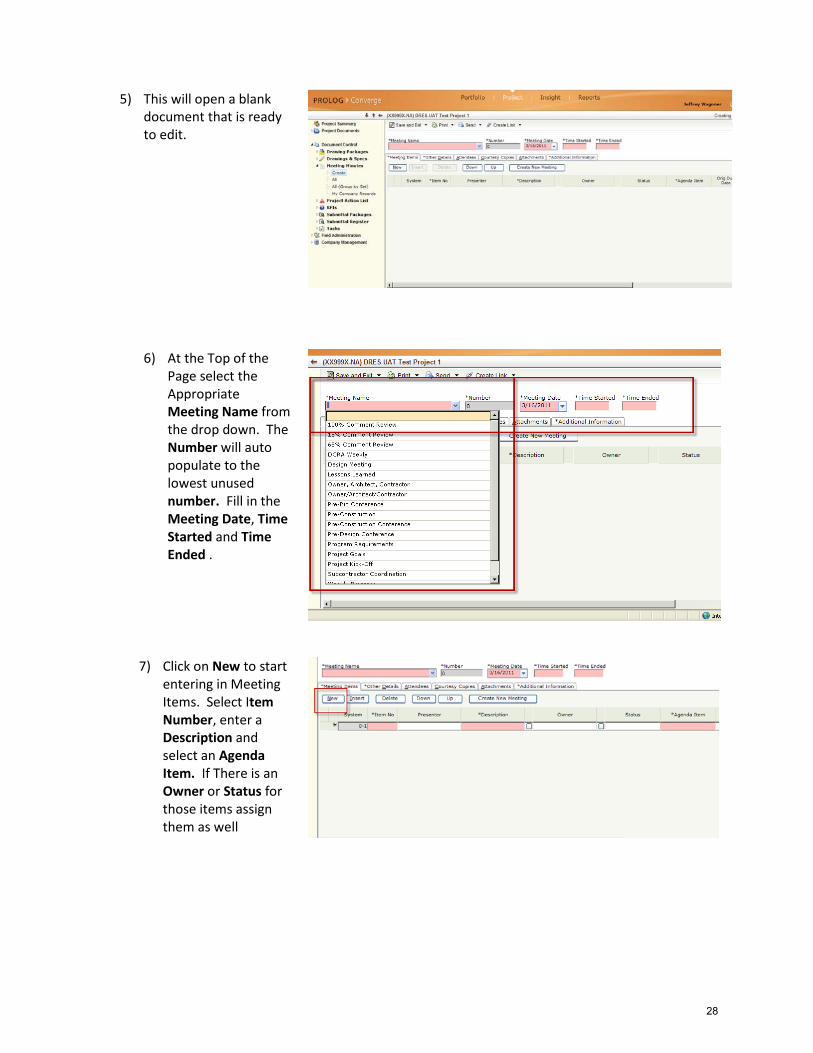
5) This will open a blank document that is ready to edit.
6) At the Top of the Page select the Appropriate Meeting Name from the drop down. The Number will auto populate to the lowest unused number. Fill in the Meeting Date, Time Started and Time Ended .
7) Click on New to start entering in Meeting Items. Select Item Number, enter a Description and select an Agenda Item. If There is an Owner or Status for those items assign them as well
28
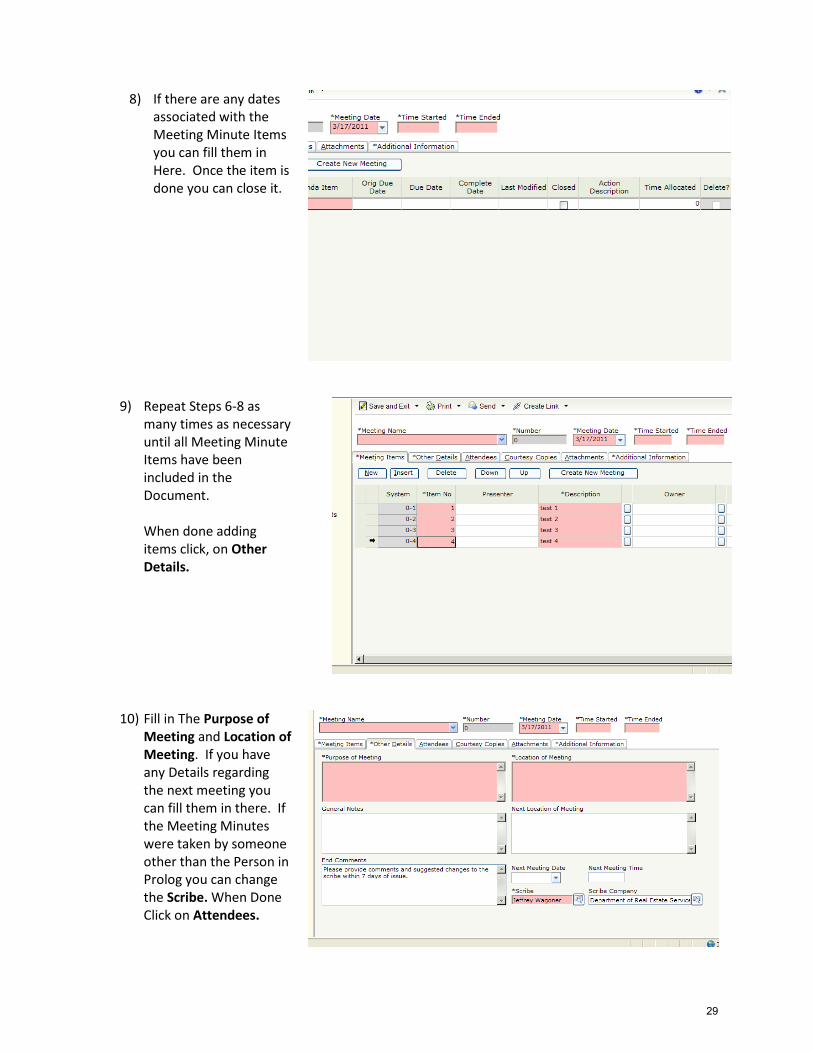
8) If there are any dates associated with the Meeting Minute Items you can fill them in Here. Once the item is done you can close it.
9) Repeat Steps 6-8 as many times as necessary until all Meeting Minute Items have been included in the Document.
When done adding items click, on Other Details.
10) Fill in The Purpose of Meeting and Location of Meeting. If you have any Details regarding the next meeting you can fill them in there. If the Meeting Minutes were taken by someone other than the Person in Prolog you can change the Scribe. When Done Click on Attendees.
29
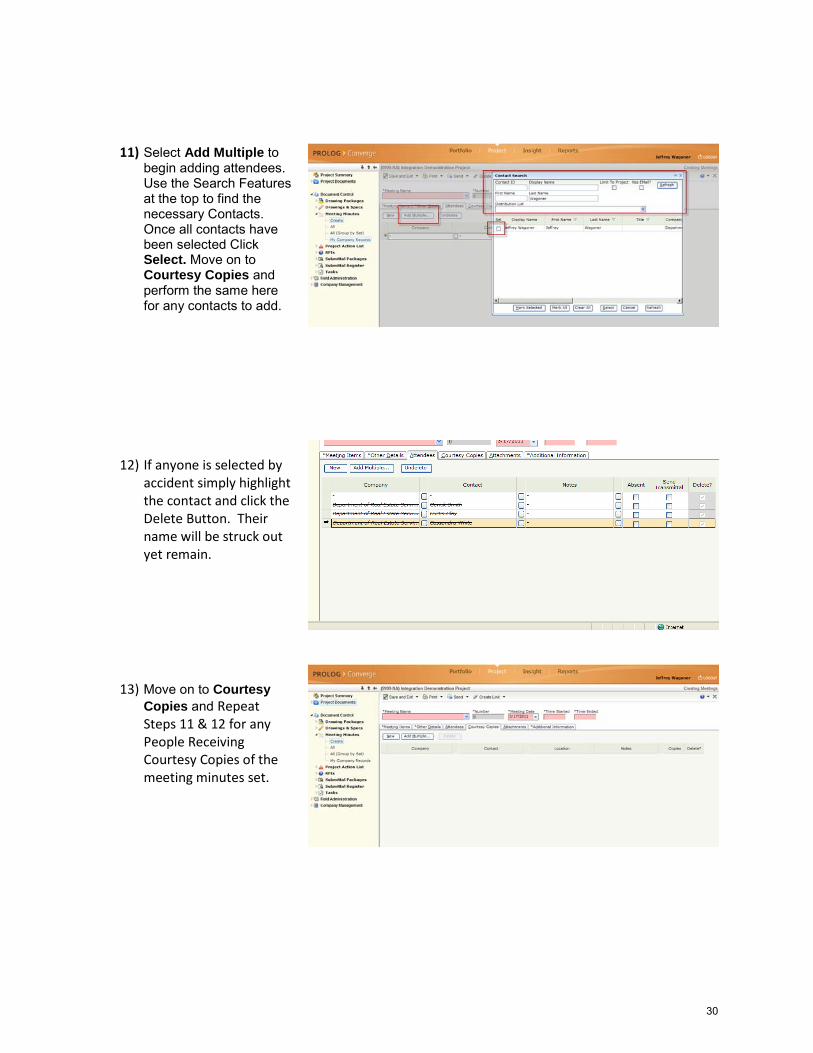
11) Select Add Multiple to begin adding attendees. Use the Search Features at the top to find the necessary Contacts. Once all contacts have been selected Click Select. Move on to Courtesy Copies and perform the same here for any contacts to add.
12) If anyone is selected by accident simply highlight the contact and click the Delete Button. Their name will be struck out yet remain.
13) Move on to Courtesy Copies and Repeat Steps 11 & 12 for any People Receiving Courtesy Copies of the meeting minutes set.
30
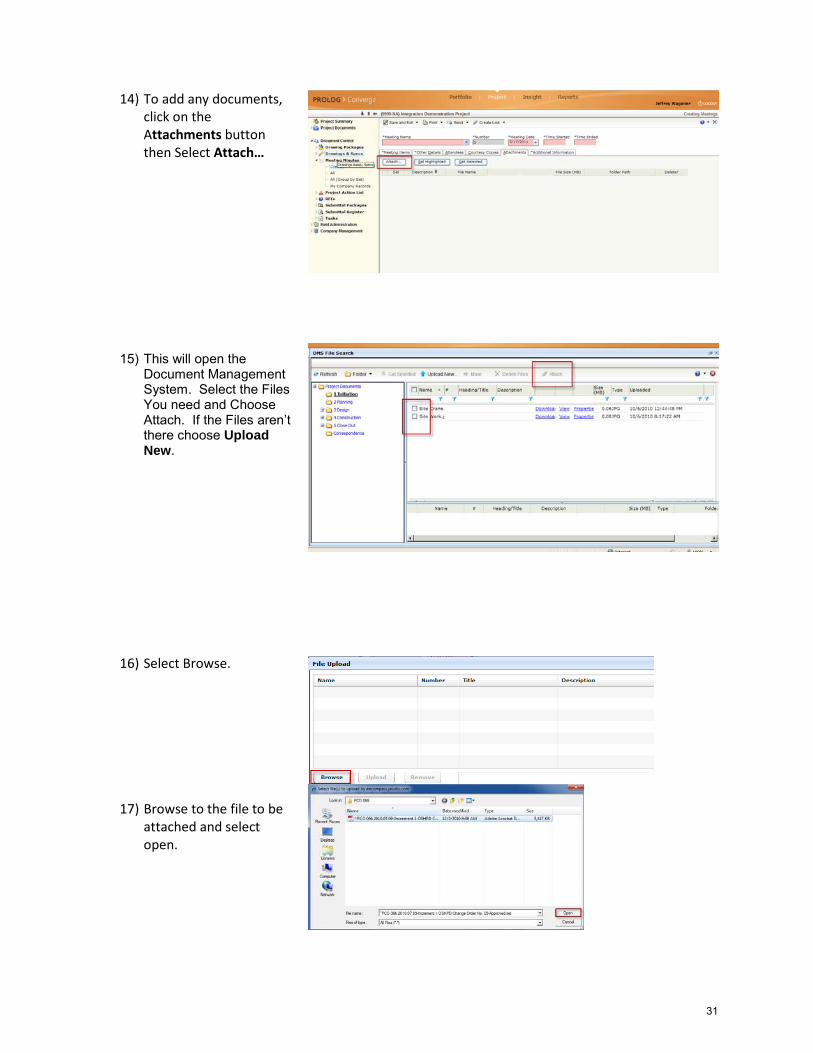
14) To add any documents, click on the Attachments button then Select Attach…
15) This will open the Document Management System. Select the Files You need and Choose Attach. If the Files aren’t there choose Upload New.
16) Select Browse.
17) Browse to the file to be attached and select open.
31
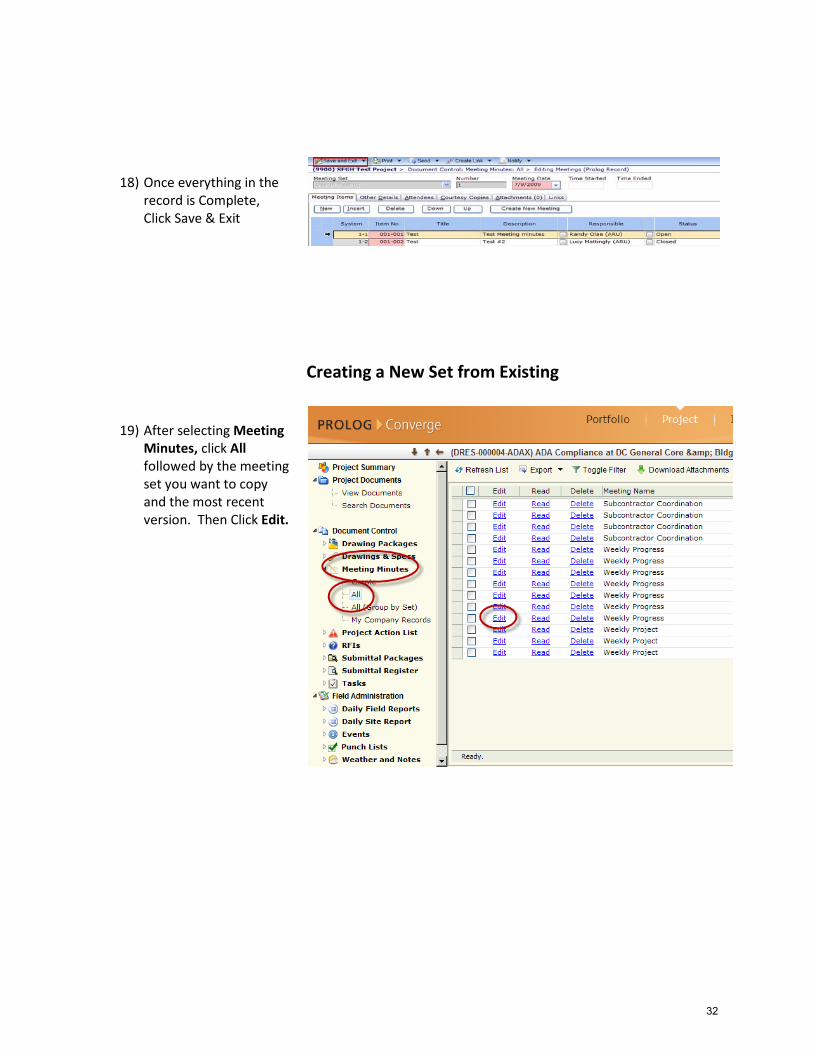
18) Once everything in the record is Complete, Click Save & Exit
Creating a New Set from Existing
19) After selecting Meeting Minutes, click All followed by the meeting set you want to copy and the most recent version. Then Click Edit.
32
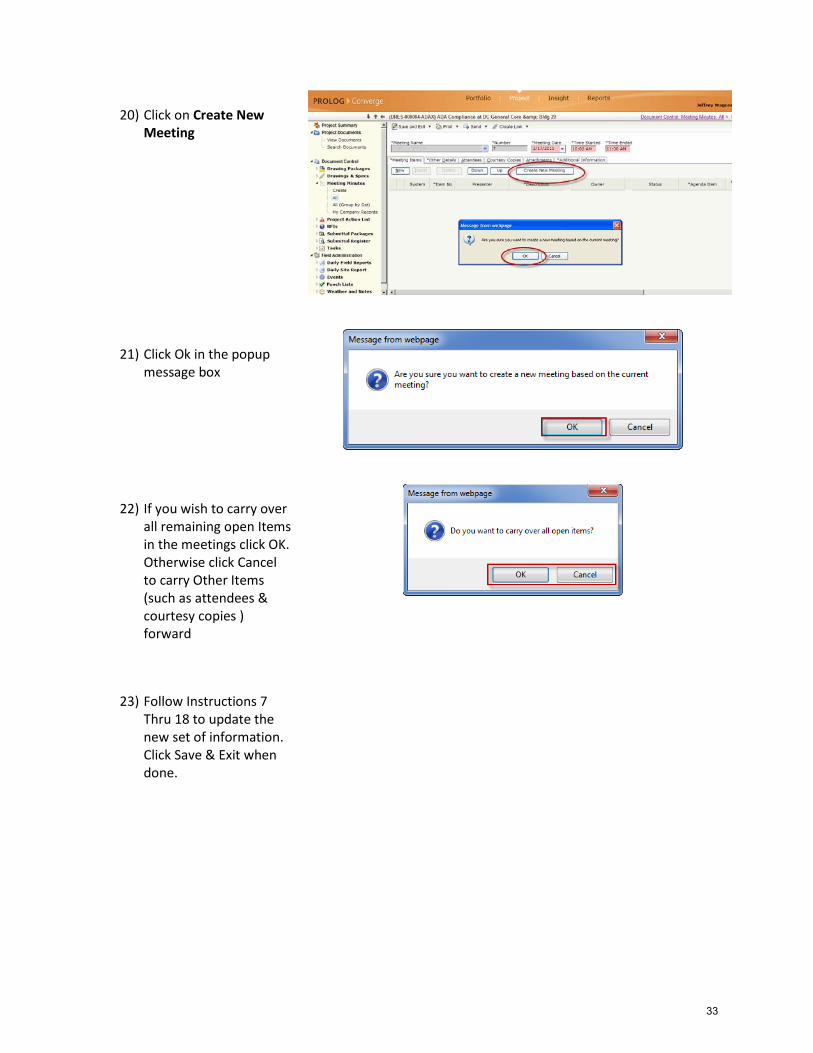
20) Click on Create New Meeting
21) Click Ok in the popup message box
22) If you wish to carry over all remaining open Items in the meetings click OK. Otherwise click Cancel to carry Other Items (such as attendees & courtesy copies ) forward
23) Follow Instructions 7 Thru 18 to update the new set of information. Click Save & Exit when done.
33
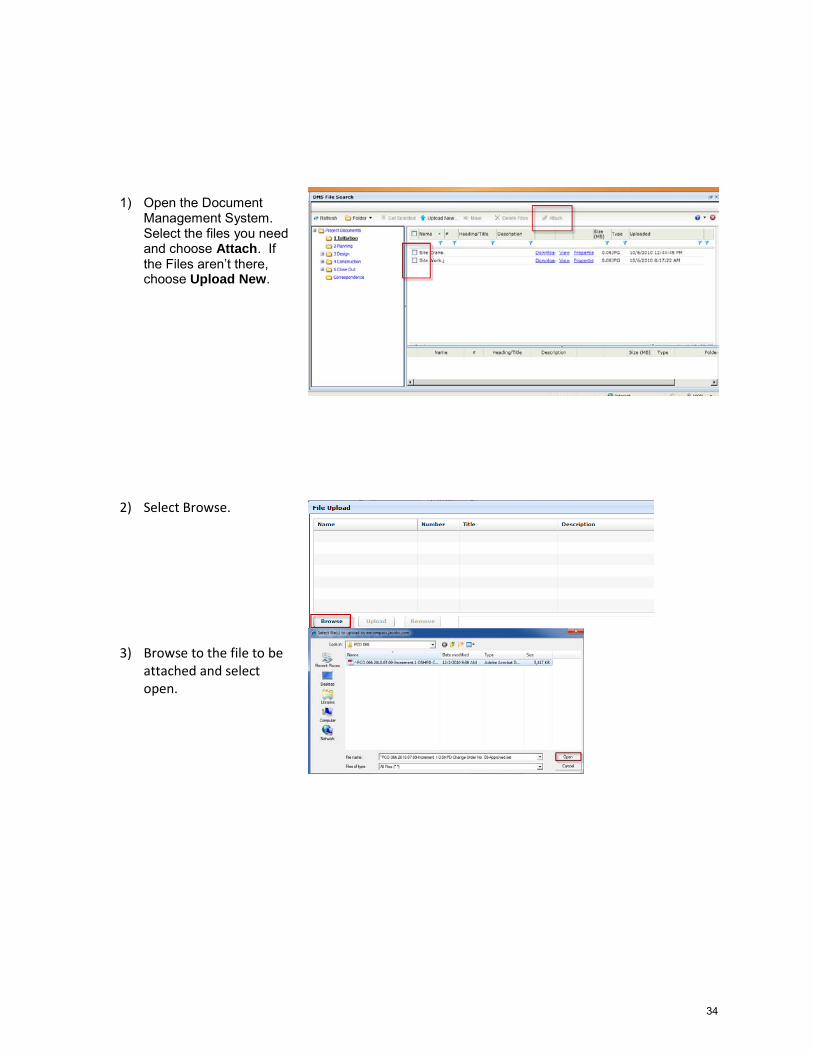
1) Open the Document Management System. Select the files you need and choose Attach. If the Files aren’t there, choose Upload New.
2) Select Browse.
3) Browse to the file to be attached and select open.
34
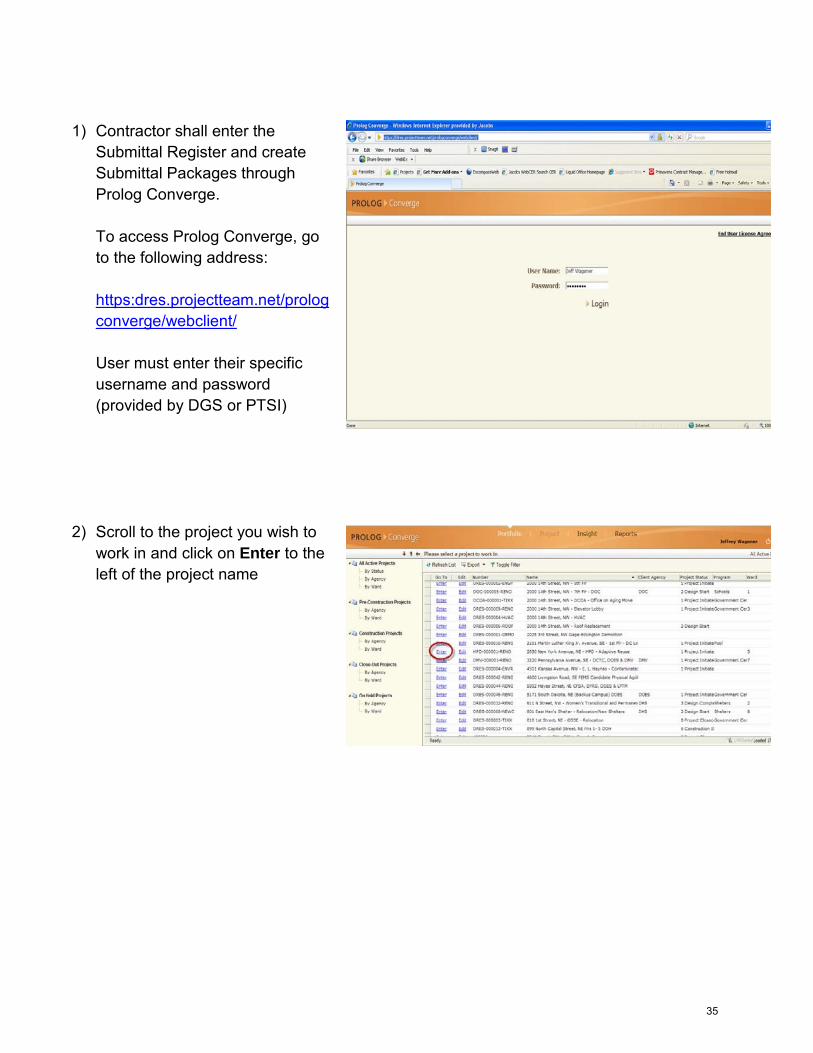
1) Contractor shall enter the Submittal Register and create Submittal Packages through Prolog Converge. To access Prolog Converge, go to the following address: https:dres.projectteam.net/prologconverge/webclient/ User must enter their specific username and password (provided by DGS or PTSI)
2) Scroll to the project you wish to work in and click on Enter to the left of the project name
35
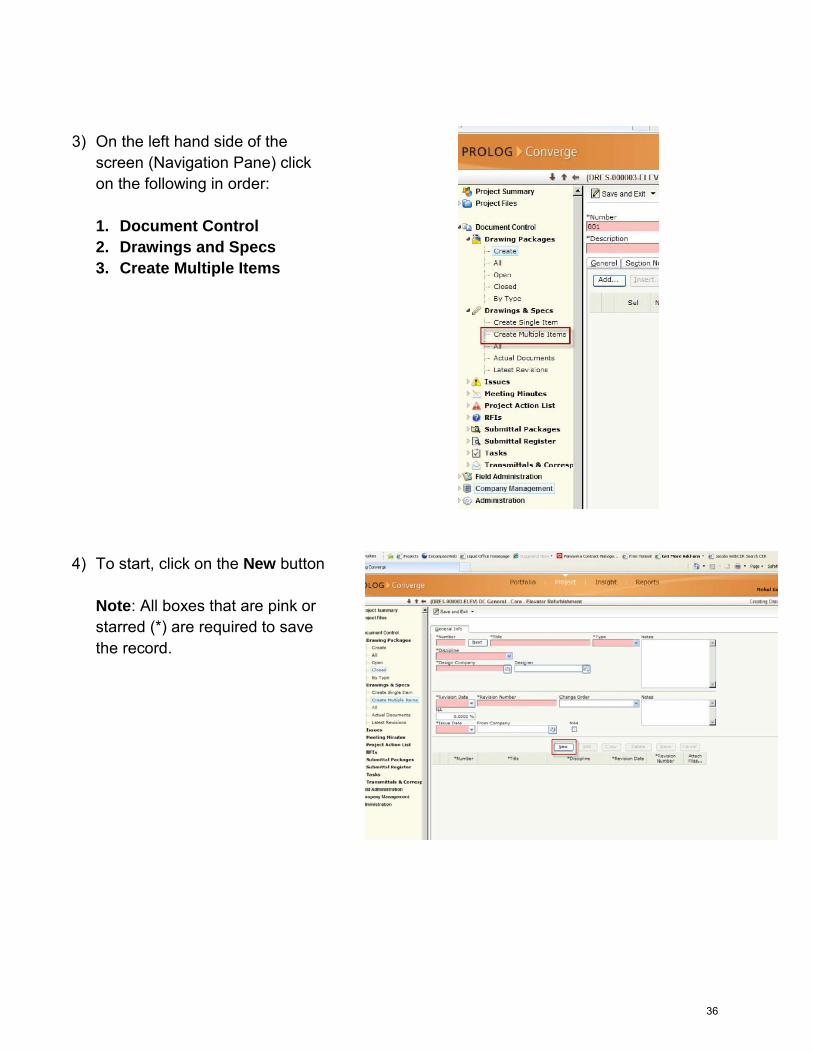
3) On the left hand side of the screen (Navigation Pane) click on the following in order: 1. Document Control 2. Drawings and Specs 3. Create Multiple Items
4) To start, click on the New button
Note: All boxes that are pink or starred (*) are required to save the record.
36
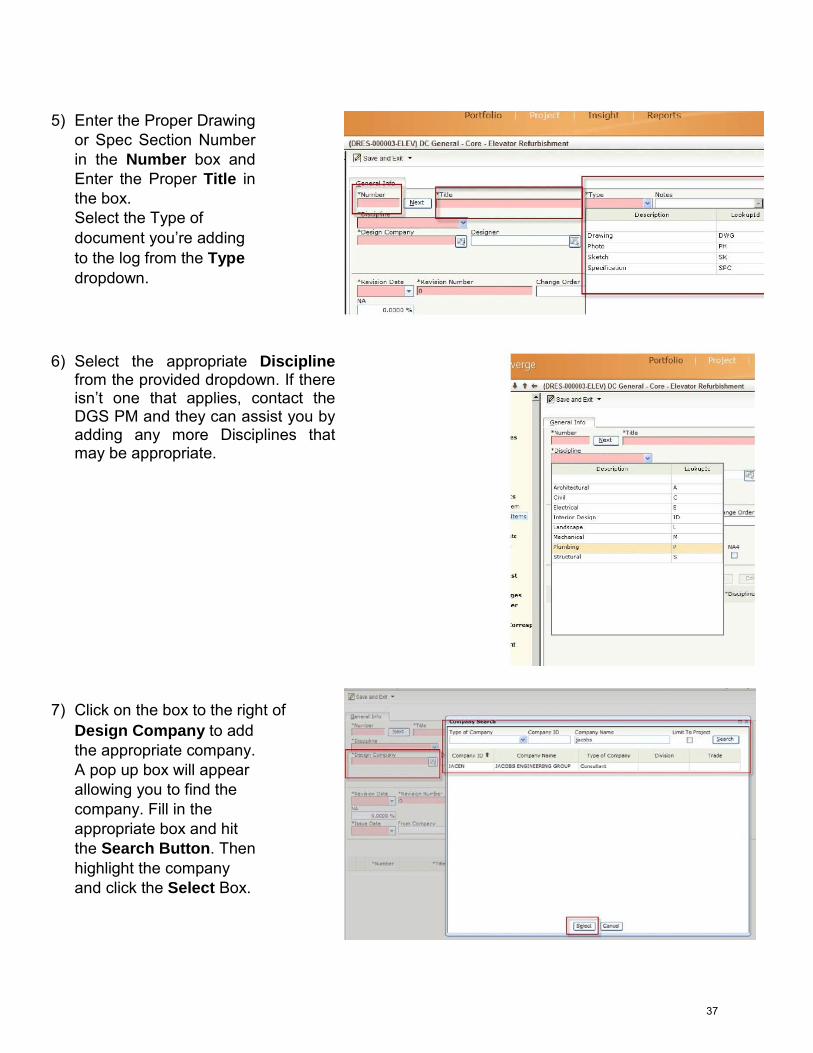
5) Enter the Proper Drawing or Spec Section Number in the Number box and Enter the Proper Title in the box. Select the Type of document you’re adding to the log from the Type dropdown.
6) Select the appropriate Discipline from the provided dropdown. If there isn’t one that applies, contact the DGS PM and they can assist you by adding any more Disciplines that may be appropriate.
7) Click on the box to the right of
Design Company to add the appropriate company. A pop up box will appear allowing you to find the company. Fill in the appropriate box and hit the Search Button. Then highlight the company and click the Select Box.
37
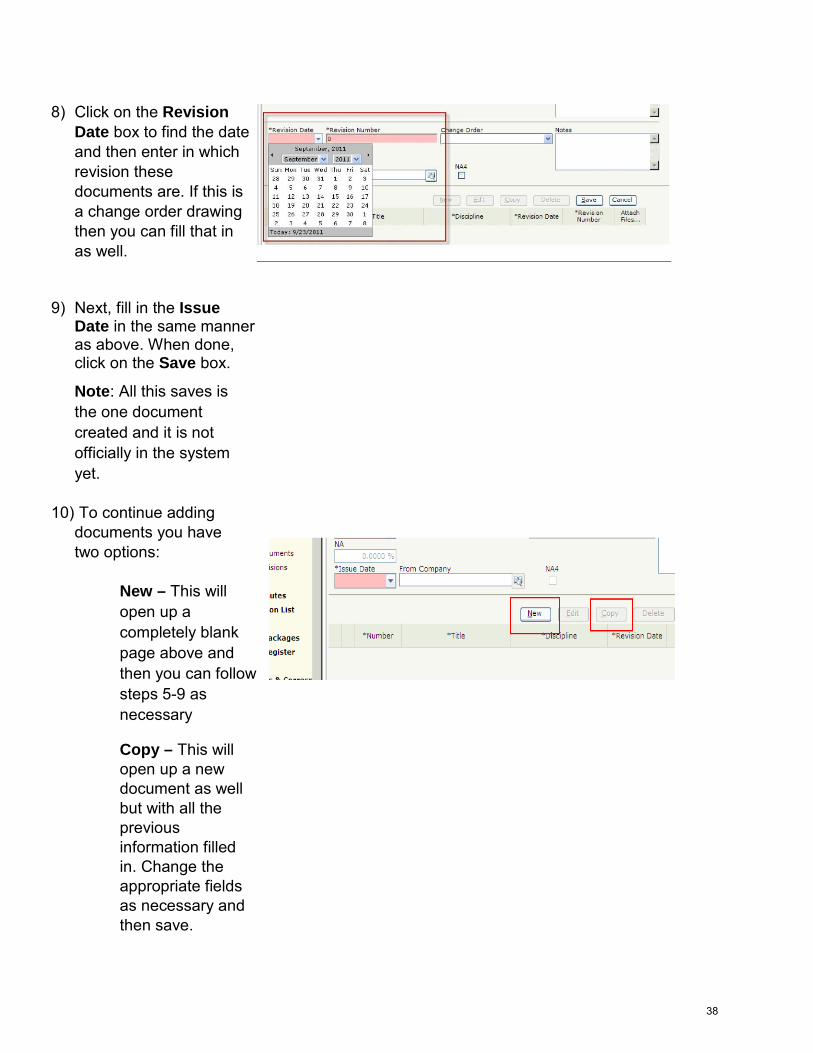
8) Click on the Revision
Date box to find the date and then enter in which revision these documents are. If this is a change order drawing then you can fill that in as well.
9) Next, fill in the Issue
Date in the same manner as above. When done, click on the Save box.
Note: All this saves is the one document created and it is not officially in the system yet.
10) To continue adding
documents you have two options:
New – This will open up a completely blank page above and then you can follow steps 5-9 as necessary
Copy – This will open up a new document as well but with all the previous information filled in. Change the appropriate fields as necessary and then save.
38
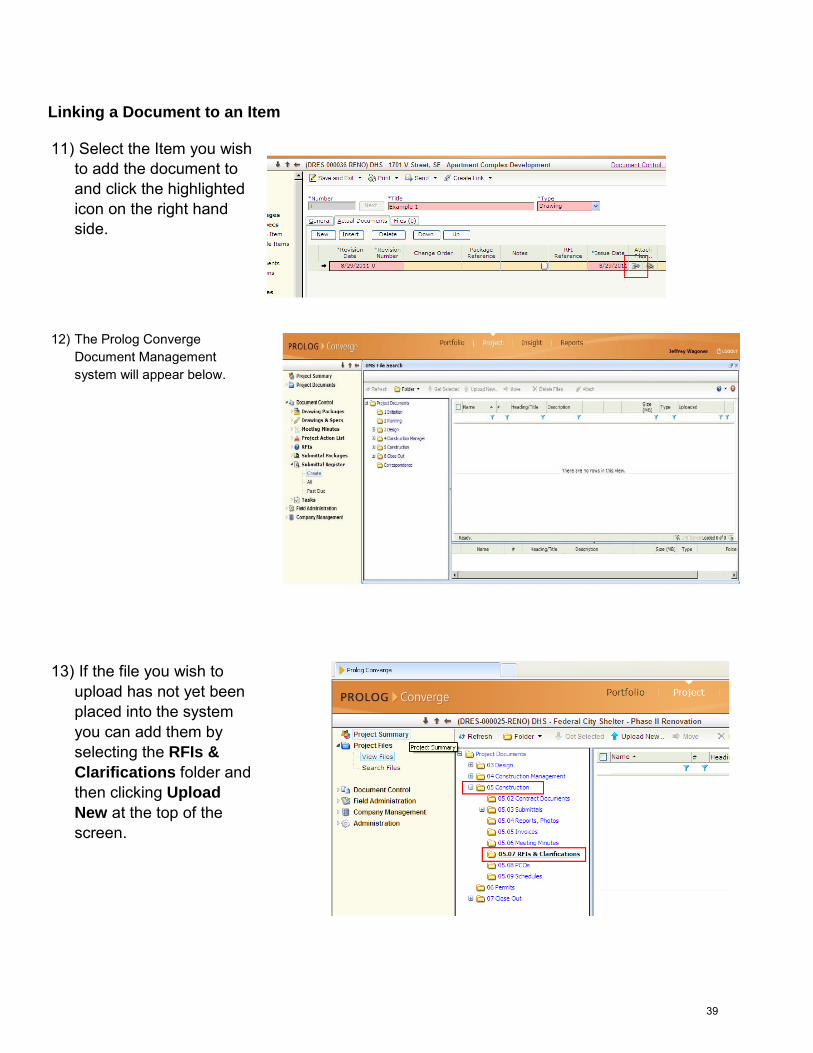
Linking a Document to an Item 11) Select the Item you wish
to add the document to and click the highlighted icon on the right hand side.
12) The Prolog Converge
Document Management system will appear below.
13) If the file you wish to
upload has not yet been placed into the system you can add them by selecting the RFIs & Clarifications folder and then clicking Upload New at the top of the screen.
39
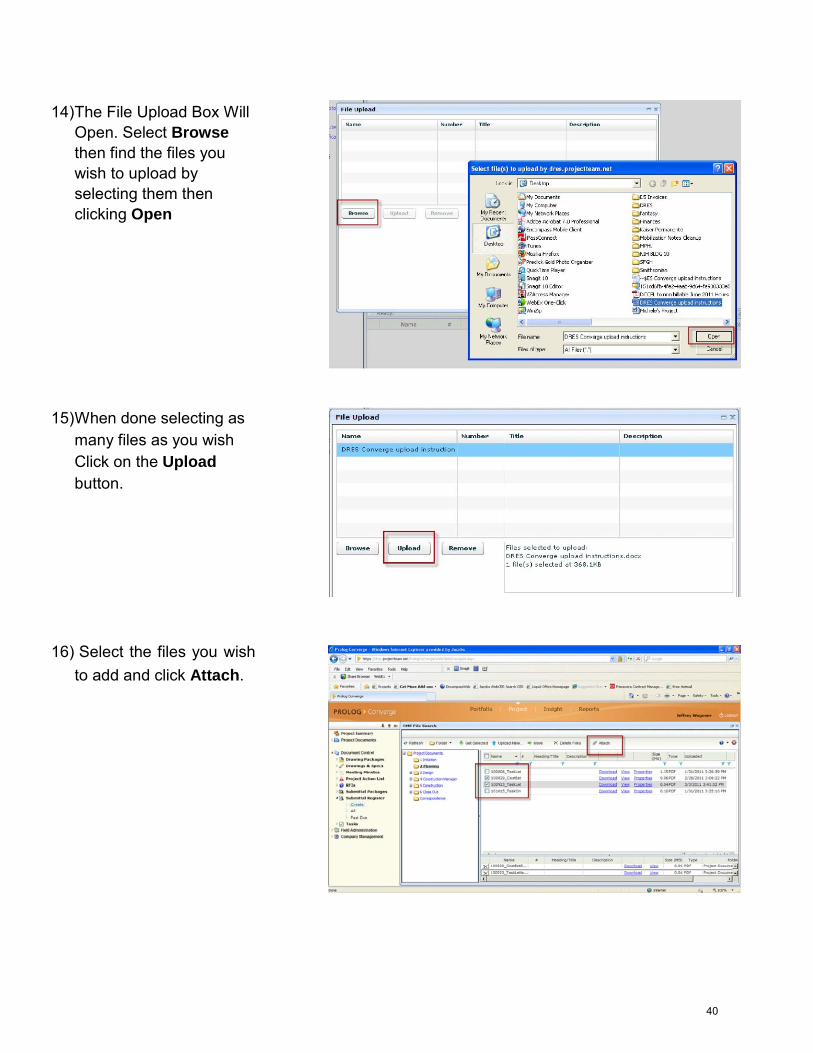
14) The File Upload Box Will
Open. Select Browse then find the files you wish to upload by selecting them then clicking Open
15) When done selecting as
many files as you wish Click on the Upload button.
16) Select the files you wish
to add and click Attach.
40
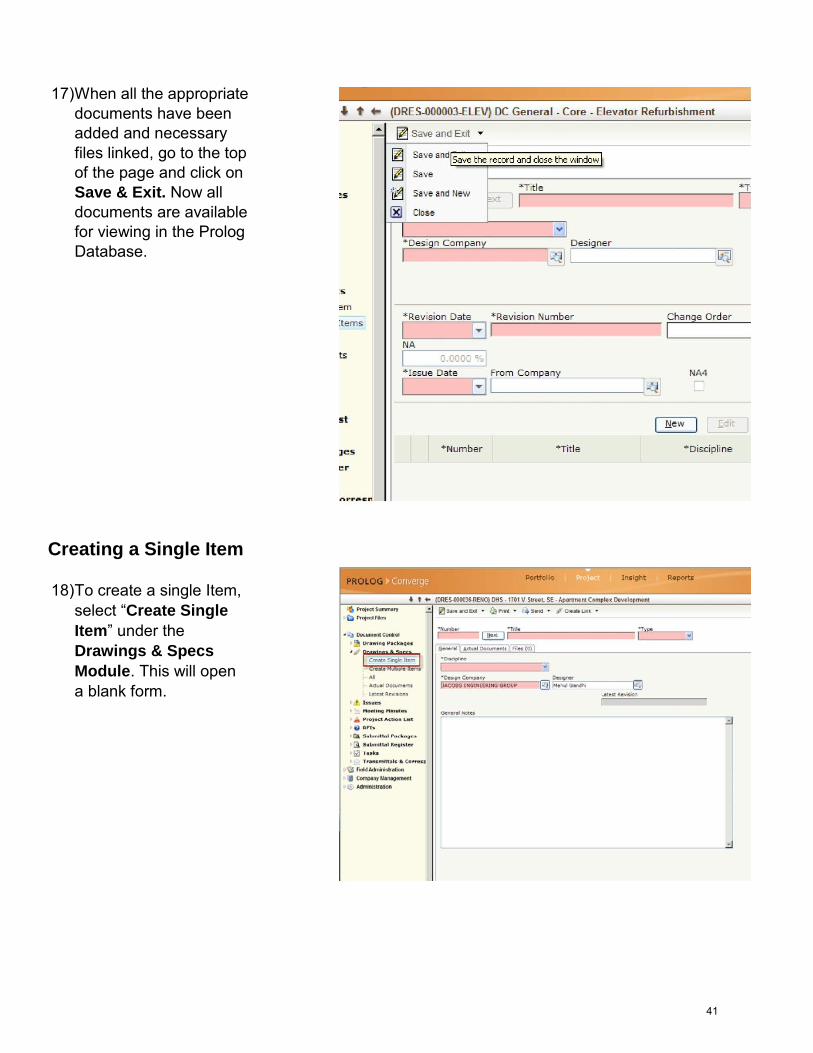
17) When all the appropriate
documents have been added and necessary files linked, go to the top of the page and click on Save & Exit. Now all documents are available for viewing in the Prolog Database.
Creating a Single Item 18) To create a single Item,
select “Create Single Item” under the Drawings & Specs Module. This will open a blank form.
41
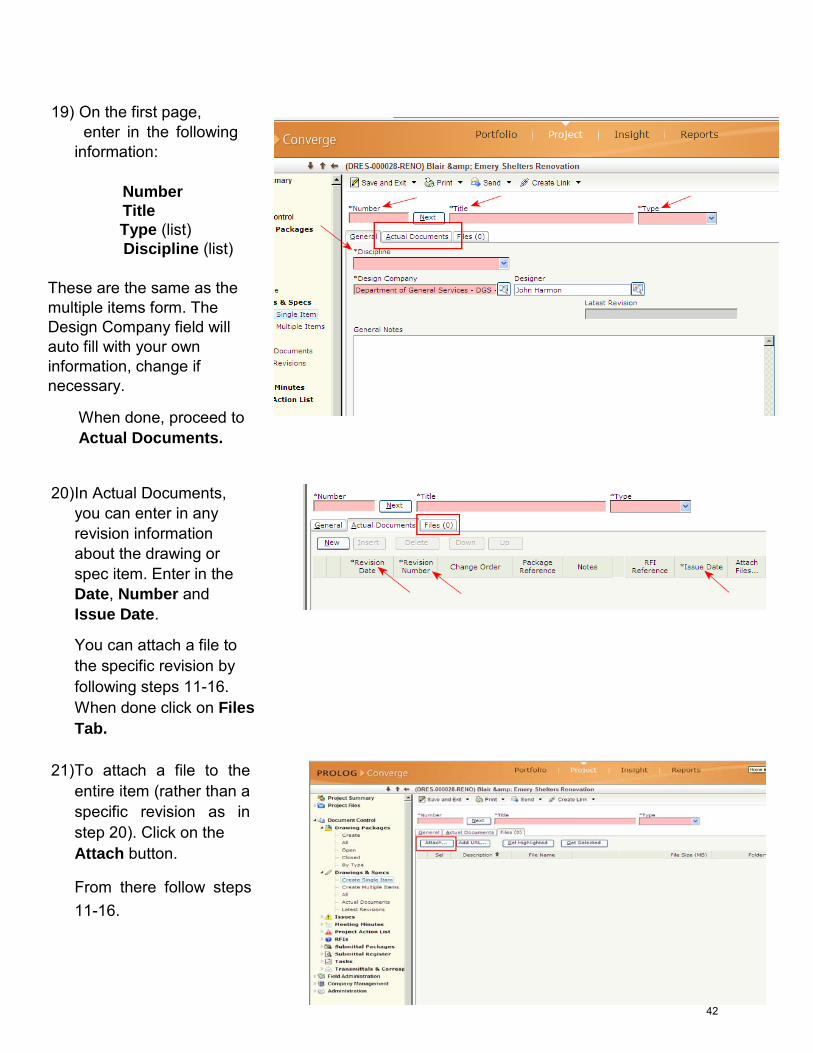
19) On the first page,
enter in the following information:
Number Title
Type (list) Discipline (list) These are the same as the multiple items form. The Design Company field will auto fill with your own information, change if necessary.
When done, proceed to Actual Documents.
20) In Actual Documents, you can enter in any revision information about the drawing or spec item. Enter in the Date, Number and Issue Date.
You can attach a file to the specific revision by following steps 11-16. When done click on Files Tab.
21) To attach a file to the entire item (rather than a specific revision as in step 20). Click on the Attach button.
From there follow steps 11-16.
42
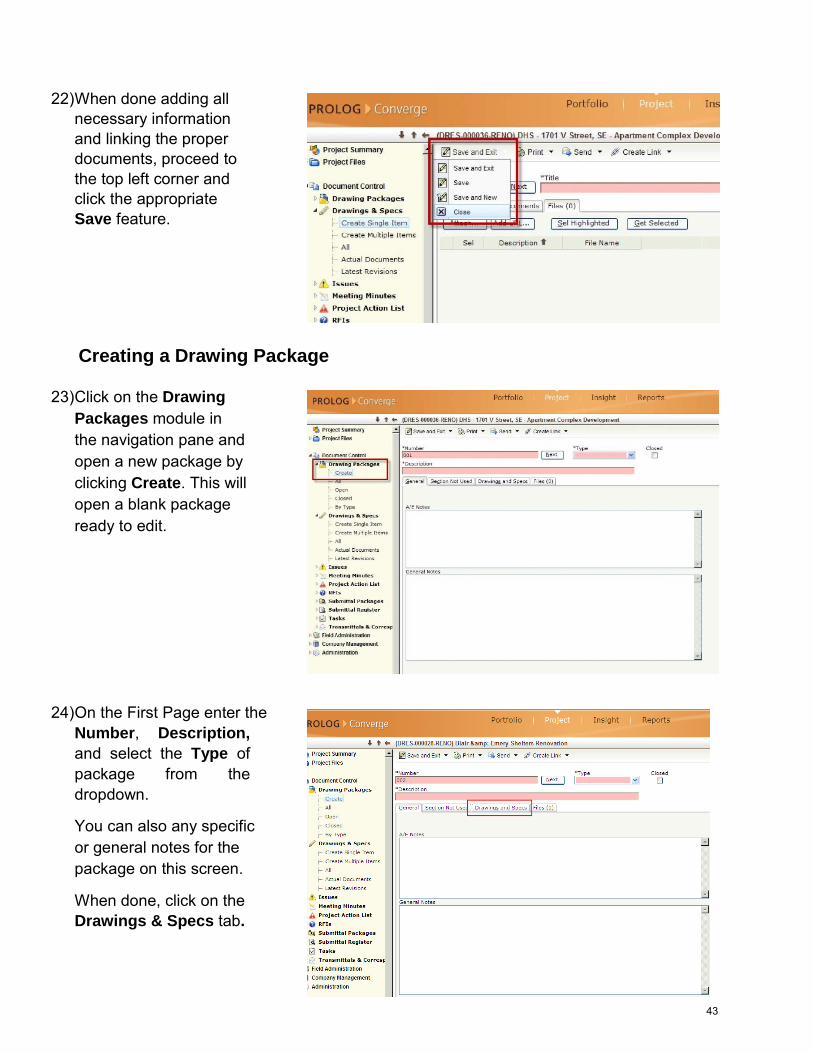
22) When done adding all necessary information and linking the proper documents, proceed to the top left corner and click the appropriate Save feature. Creating a Drawing Package
23) Click on the Drawing Packages module in the navigation pane and open a new package by clicking Create. This will open a blank package ready to edit.
24) On the First Page enter the Number, Description, and select the Type of package from the dropdown.
You can also any specific or general notes for the package on this screen.
When done, click on the Drawings & Specs tab.
43
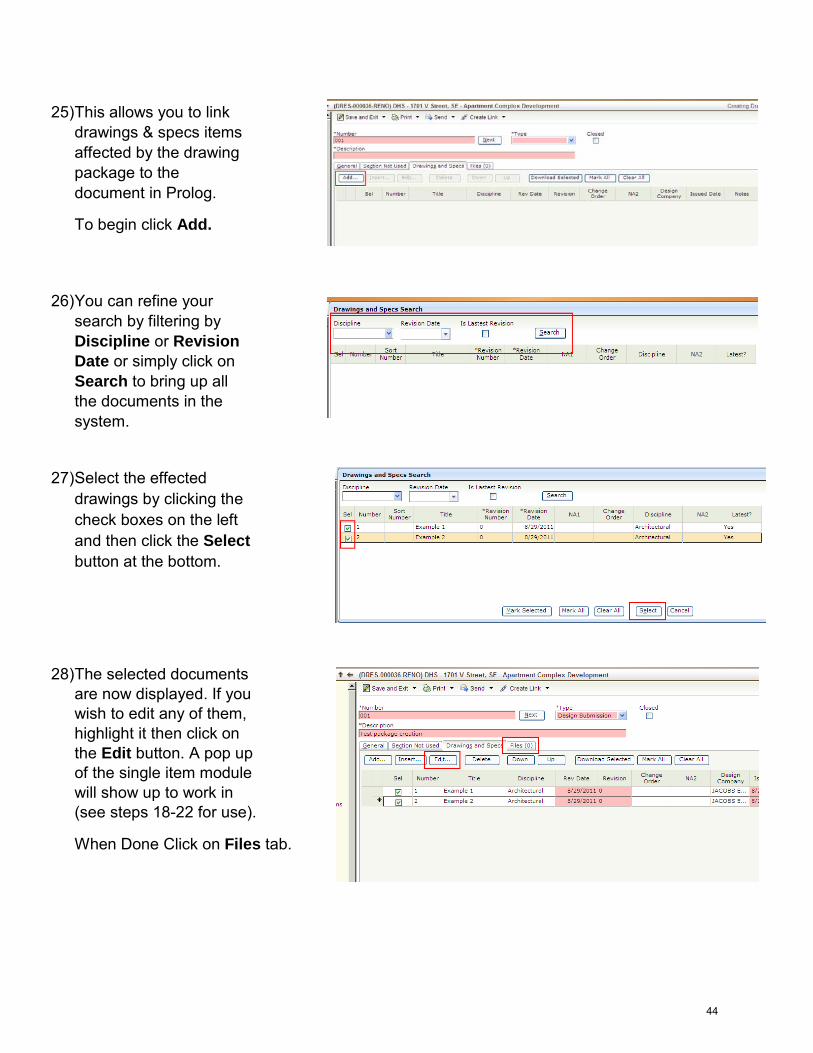
25) This allows you to link drawings & specs items affected by the drawing package to the document in Prolog.
To begin click Add.
26) You can refine your search by filtering by Discipline or Revision Date or simply click on Search to bring up all the documents in the system.
27) Select the effected
drawings by clicking the check boxes on the left and then click the Select button at the bottom.
28) The selected documents
are now displayed. If you wish to edit any of them, highlight it then click on the Edit button. A pop up of the single item module will show up to work in (see steps 18-22 for use).
When Done Click on Files tab.
44
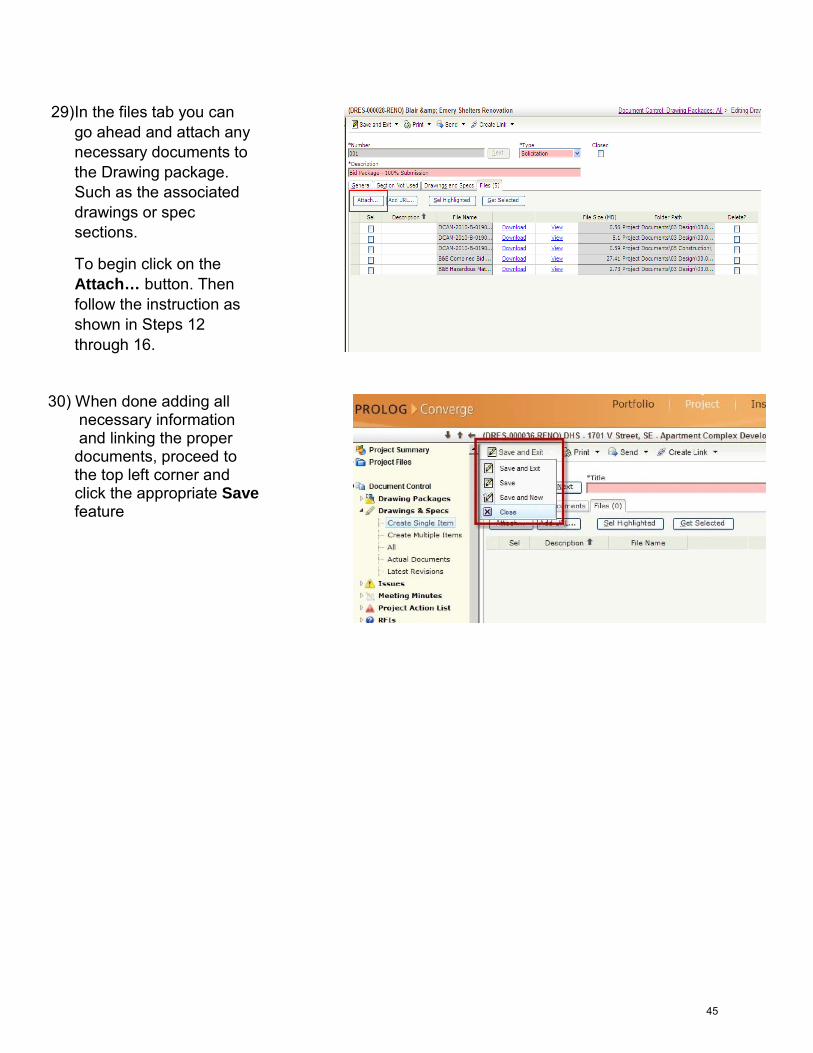
29) In the files tab you can
go ahead and attach any necessary documents to the Drawing package. Such as the associated drawings or spec sections.
To begin click on the Attach… button. Then follow the instruction as shown in Steps 12 through 16.
30) When done adding all necessary information and linking the proper documents, proceed to the top left corner and click the appropriate Save feature
45
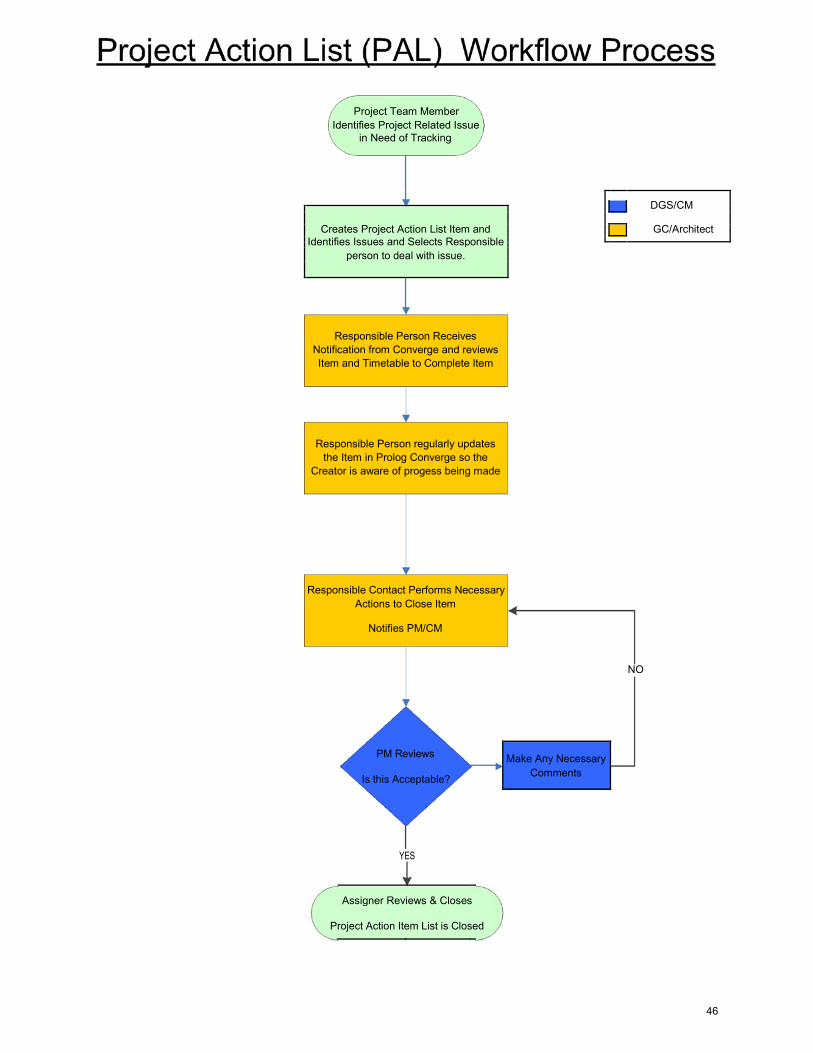
Project Team Member
Identifies Project Related Issue in Need of Tracking
DGS/CM
Creates Project Action List Item and
GC/Architect
Identifies Issues and Selects Responsible
person to deal with issue.
Responsible Person Receives
Notification from Converge and reviews Item and Timetable to Complete Item
Responsible Person regularly updates the Item in Prolog Converge so the
Creator is aware of progess being made Responsible Contact Performs Necessary
Actions to Close Item
Notifies PM/CM
NO
PM Reviews Make Any Necessary
Is this Acceptable? Comments
YES
Assigner Reviews & Closes
Project Action Item List is Closed
46
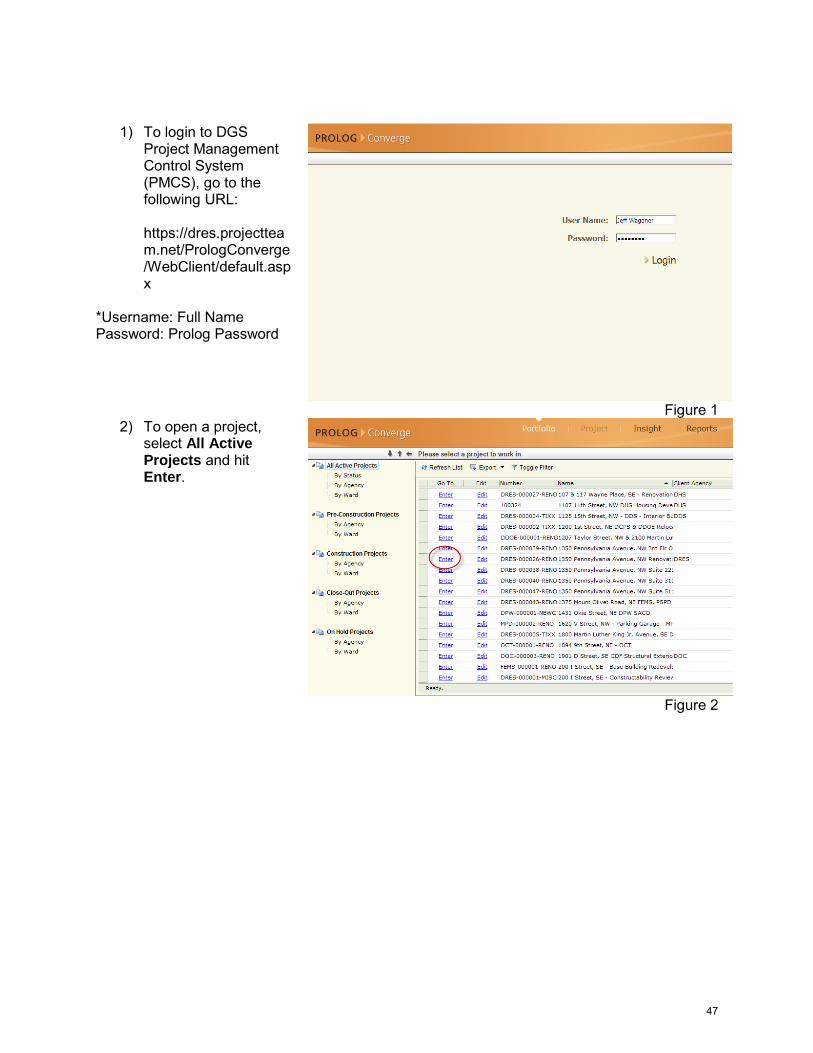
1) To login to DGS Project Management Control System (PMCS), go to the following URL: https://dres.projectteam.net/PrologConverge/WebClient/default.aspx
*Username: Full Name Password: Prolog Password
Figure 1
2) To open a project, select All Active Projects and hit Enter.
Figure 2
47
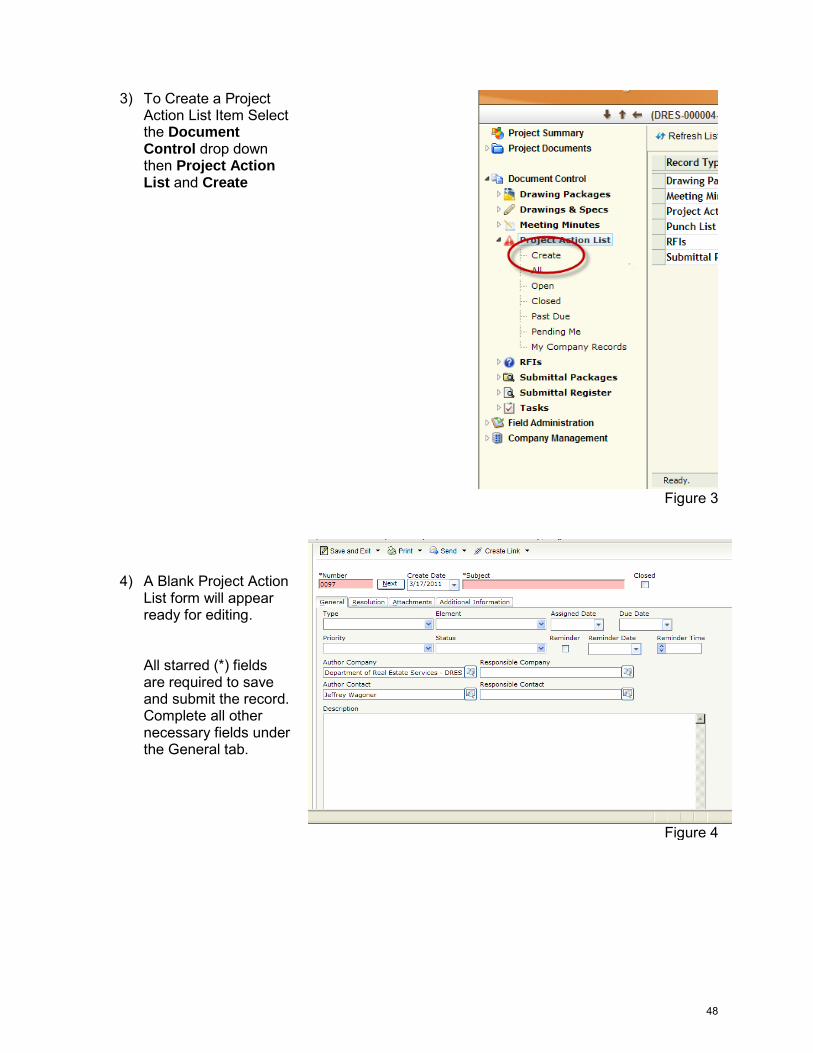
3) To Create a Project Action List Item Select the Document Control drop down then Project Action List and Create
Figure 3
4) A Blank Project Action
List form will appear ready for editing. All starred (*) fields are required to save and submit the record. Complete all other necessary fields under the General tab.
Figure 4
48
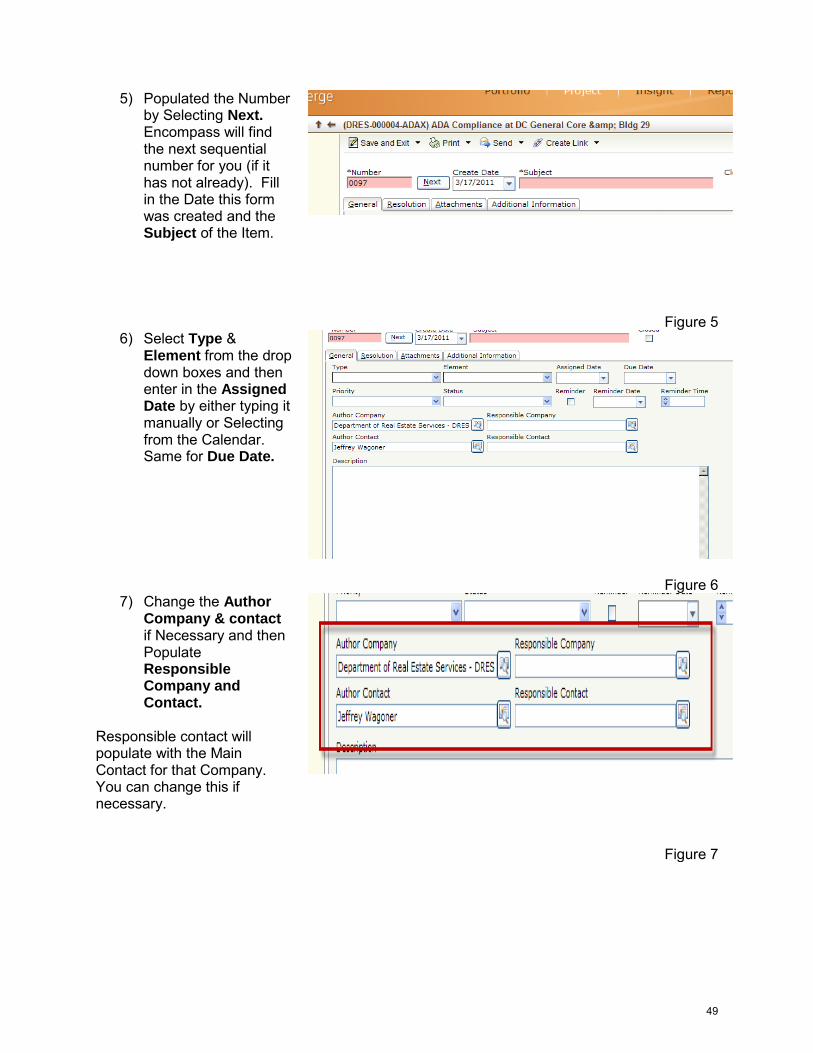
5) Populated the Number by Selecting Next. Encompass will find the next sequential number for you (if it has not already). Fill in the Date this form was created and the Subject of the Item.
Figure 5 6) Select Type &
Element from the drop down boxes and then enter in the Assigned Date by either typing it manually or Selecting from the Calendar. Same for Due Date.
Figure 6
7) Change the Author Company & contact if Necessary and then Populate Responsible Company and Contact.
Responsible contact will populate with the Main Contact for that Company. You can change this if necessary.
Figure 7
49
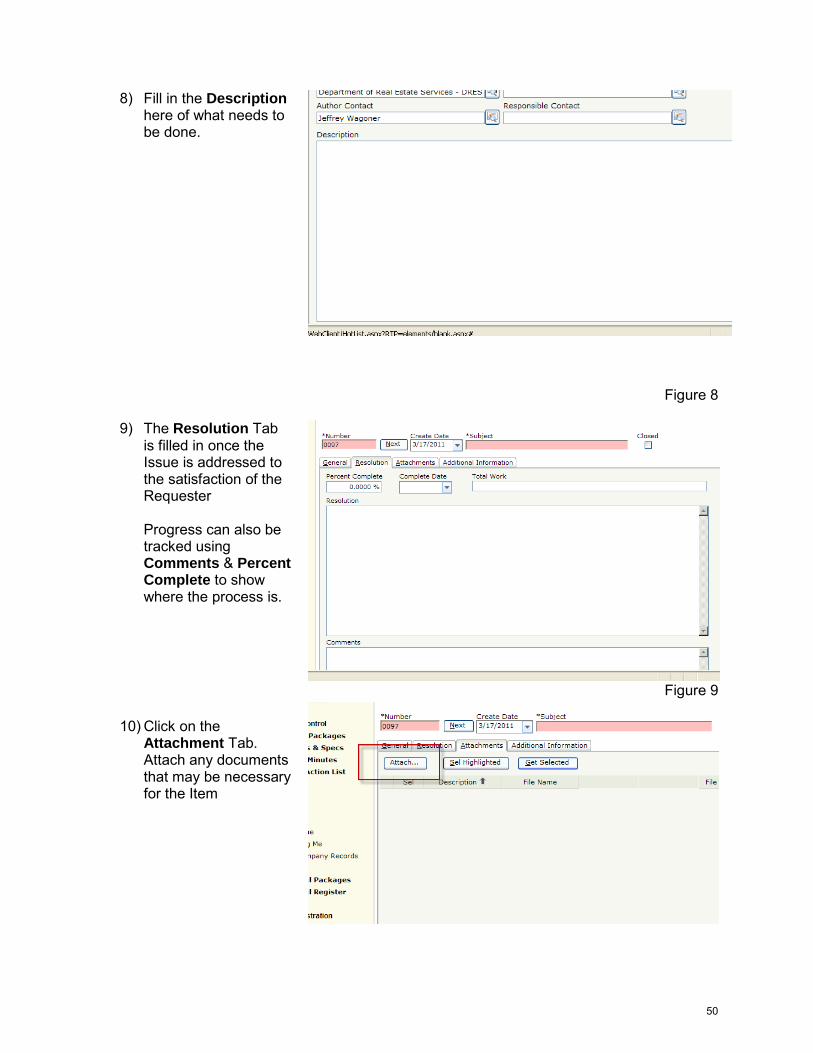
8) Fill in the Description here of what needs to be done.
Figure 8
9) The Resolution Tab is filled in once the Issue is addressed to the satisfaction of the Requester Progress can also be tracked using Comments & Percent Complete to show where the process is.
Figure 9
10) Click on the Attachment Tab. Attach any documents that may be necessary for the Item
50
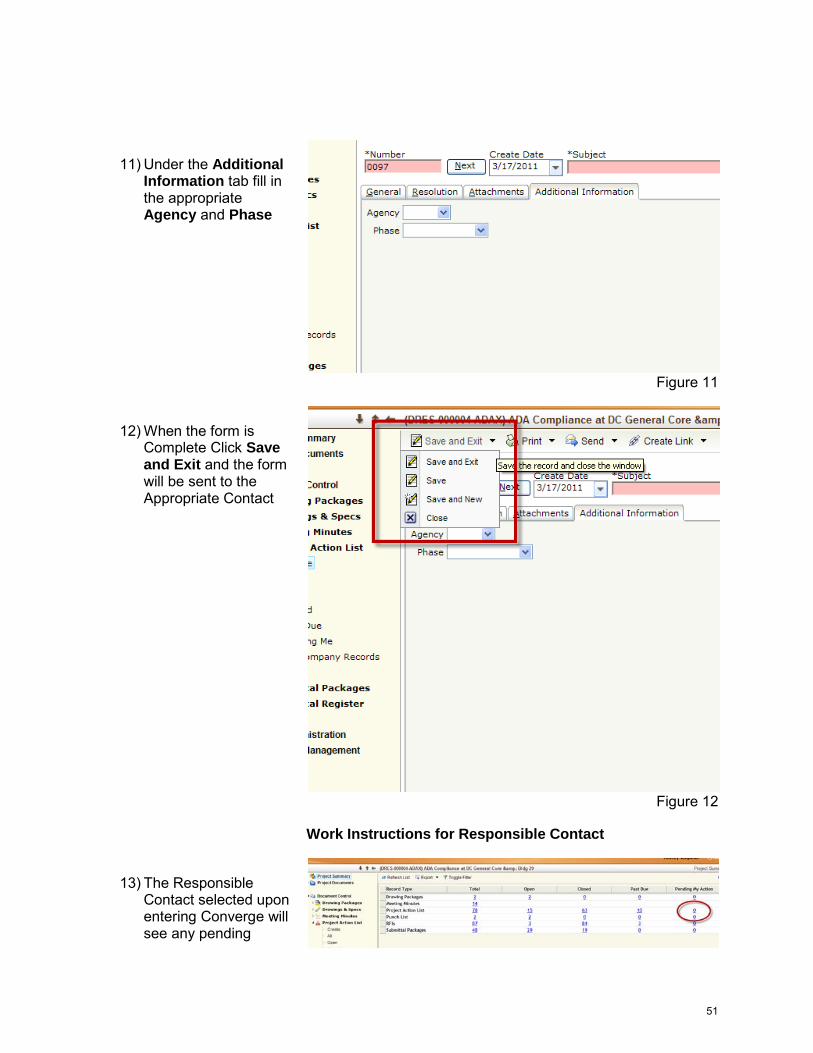
11) Under the Additional Information tab fill in the appropriate Agency and Phase
Figure 11
12) When the form is Complete Click Save and Exit and the form will be sent to the Appropriate Contact
Figure 12
Work Instructions for Responsible Contact
13) The Responsible Contact selected upon entering Converge will see any pending
51
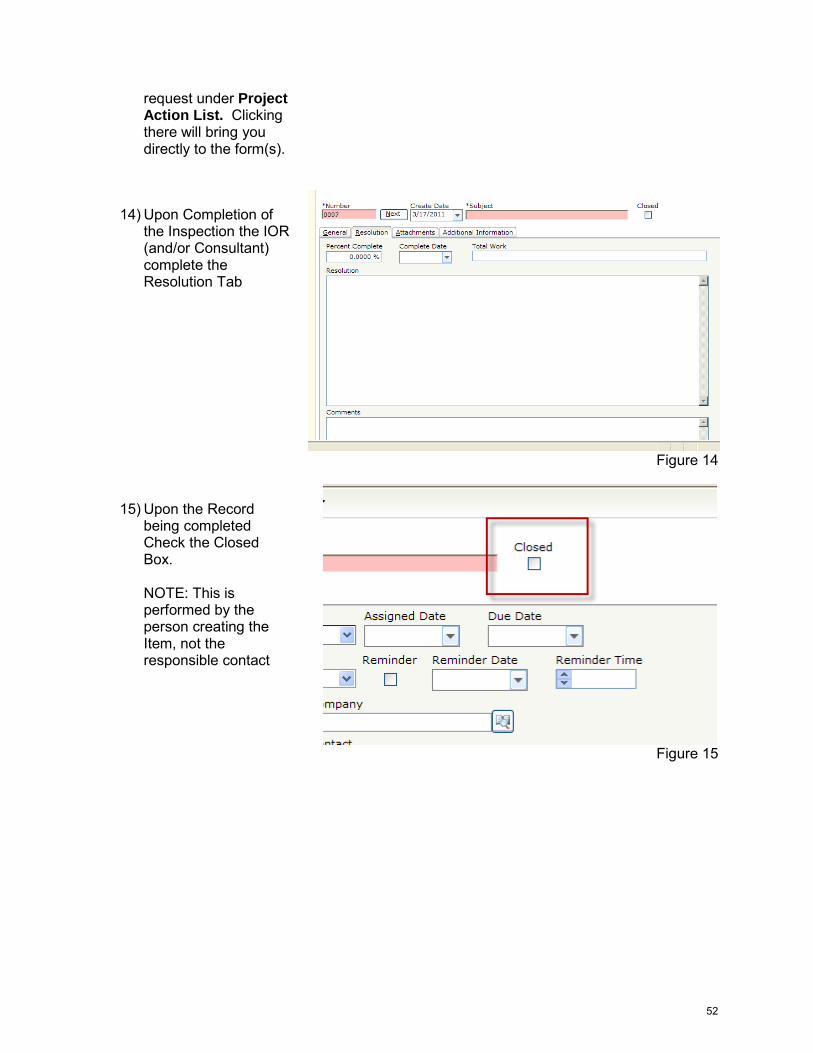
request under Project Action List. Clicking there will bring you directly to the form(s).
14) Upon Completion of the Inspection the IOR (and/or Consultant) complete the Resolution Tab
Figure 14
15) Upon the Record being completed Check the Closed Box. NOTE: This is performed by the person creating the Item, not the responsible contact
Figure 15
52
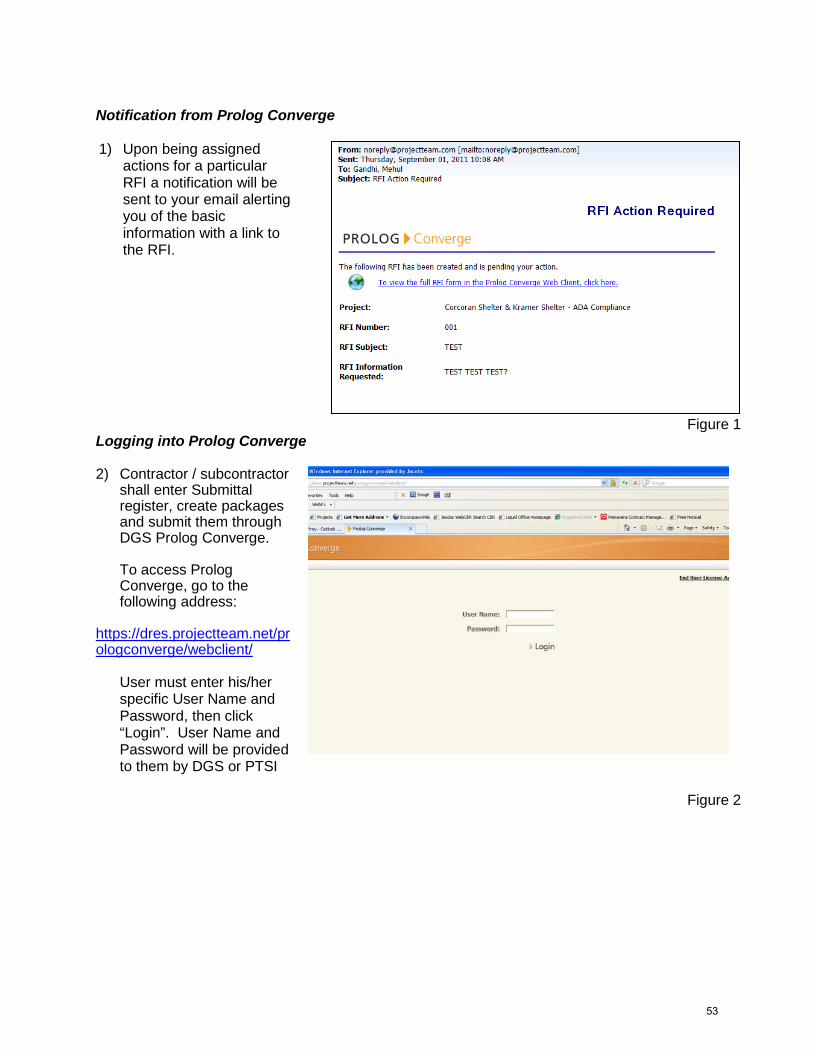
Notification from Prolog Converge 1) Upon being assigned
actions for a particular RFI a notification will be sent to your email alerting you of the basic information with a link to the RFI.
Figure 1 Logging into Prolog Converge 2) Contractor / subcontractor
shall enter Submittal register, create packages and submit them through DGS Prolog Converge. To access Prolog Converge, go to the following address:
https://dres.projectteam.net/prologconverge/webclient/
User must enter his/her specific User Name and Password, then click “Login”. User Name and Password will be provided to them by DGS or PTSI
Figure 2
53
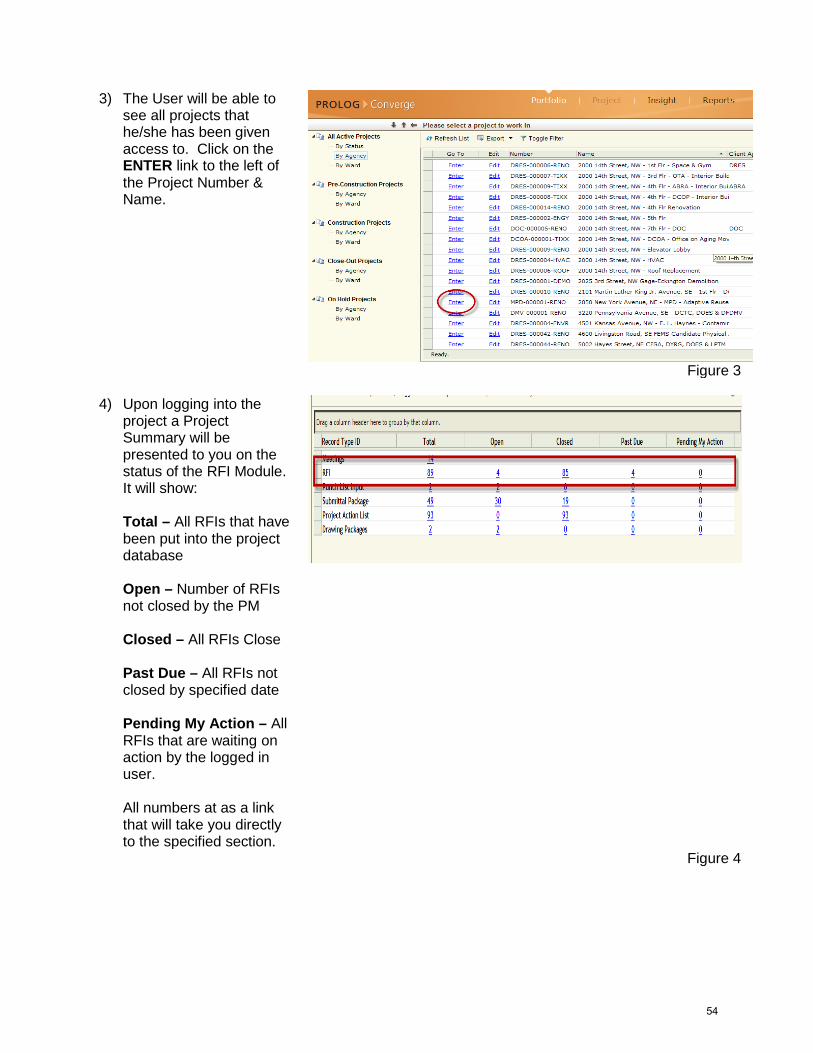
3) The User will be able to see all projects that he/she has been given access to. Click on the ENTER link to the left of the Project Number & Name.
Figure 3
4) Upon logging into the
project a Project Summary will be presented to you on the status of the RFI Module. It will show: Total – All RFIs that have been put into the project database Open – Number of RFIs not closed by the PM Closed – All RFIs Close Past Due – All RFIs not closed by specified date Pending My Action – All RFIs that are waiting on action by the logged in user. All numbers at as a link that will take you directly to the specified section.
Figure 4
54
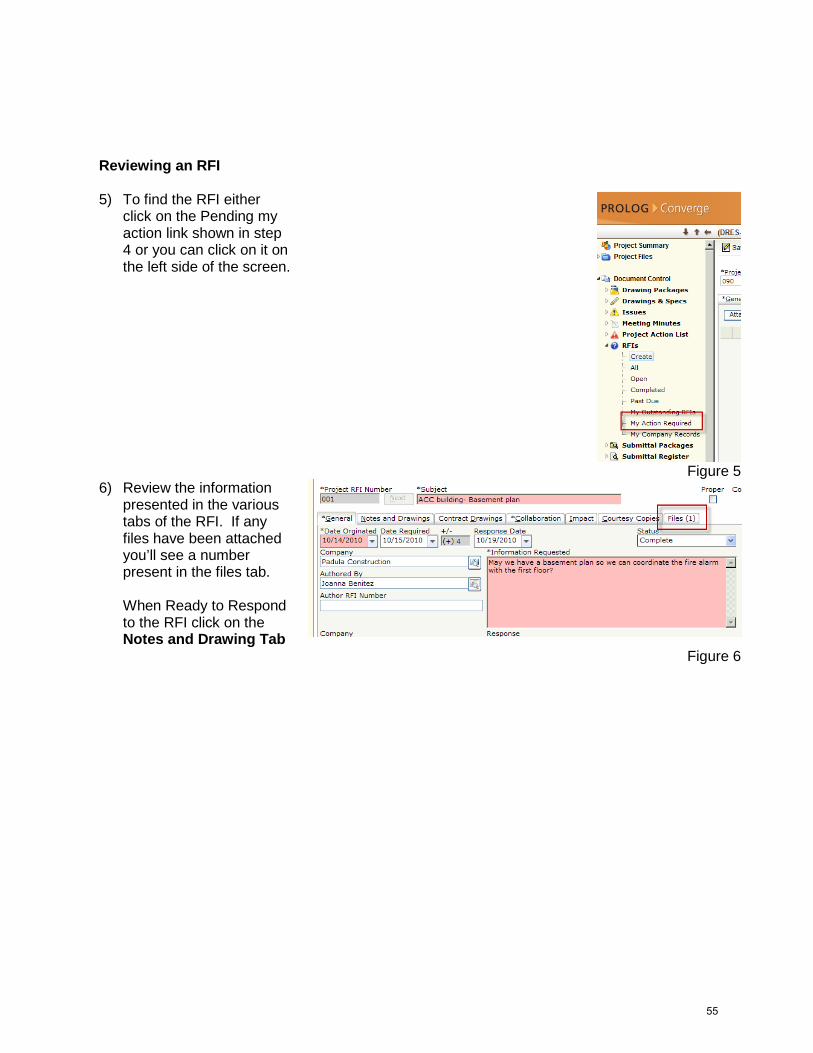
Reviewing an RFI 5) To find the RFI either
click on the Pending my action link shown in step 4 or you can click on it on the left side of the screen.
Figure 5 6) Review the information
presented in the various tabs of the RFI. If any files have been attached you’ll see a number present in the files tab. When Ready to Respond to the RFI click on the Notes and Drawing Tab
Figure 6
55

7) To respond to the RFI, Type any answers in the Comments section. This section is available only to the CM, AE & DGS PM allowing for an open discussion of the issues pertained in the RFI. When Done Proceed to Files.
8) Add any and all
necessary documents (for example: marked up drawings or field photos) that will help in the answering of RFIs. To begin select the attached button.
Figure 8
56
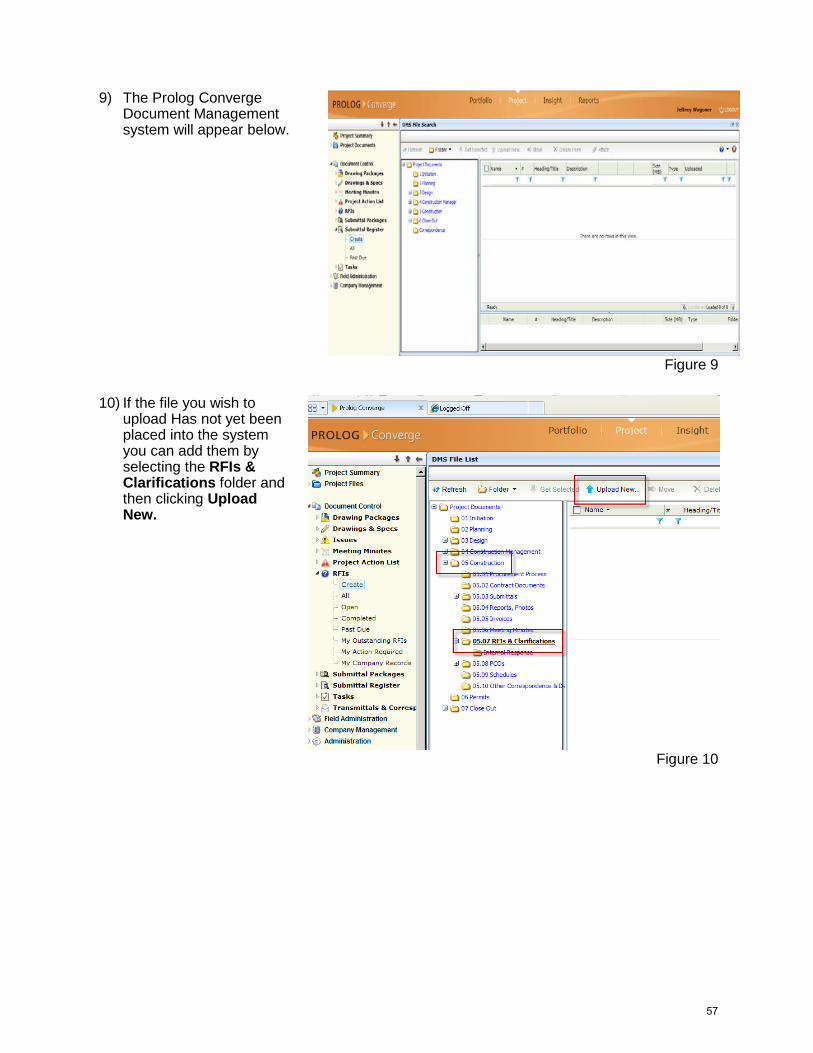
9) The Prolog Converge Document Management system will appear below.
Figure 9
10) If the file you wish to upload Has not yet been placed into the system you can add them by selecting the RFIs & Clarifications folder and then clicking Upload New.
Figure 10
57
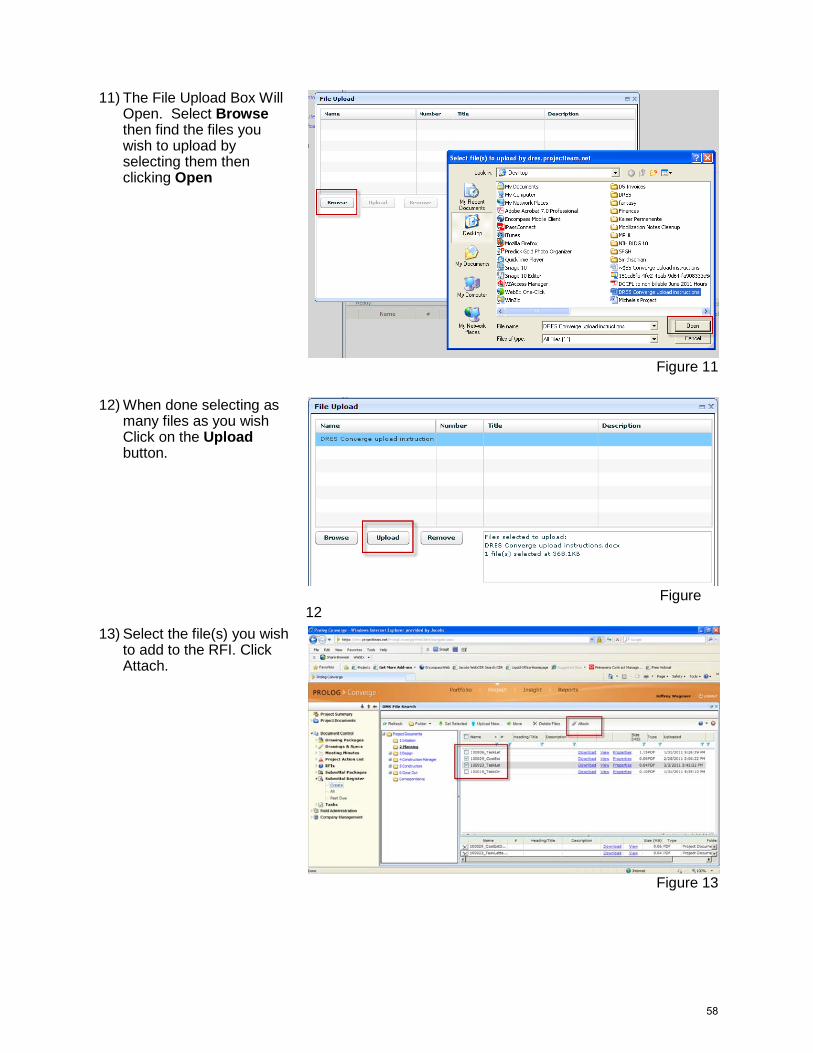
11) The File Upload Box Will Open. Select Browse then find the files you wish to upload by selecting them then clicking Open
Figure 11
12) When done selecting as many files as you wish Click on the Upload button.
Figure
12 13) Select the file(s) you wish
to add to the RFI. Click Attach.
Figure 13
58
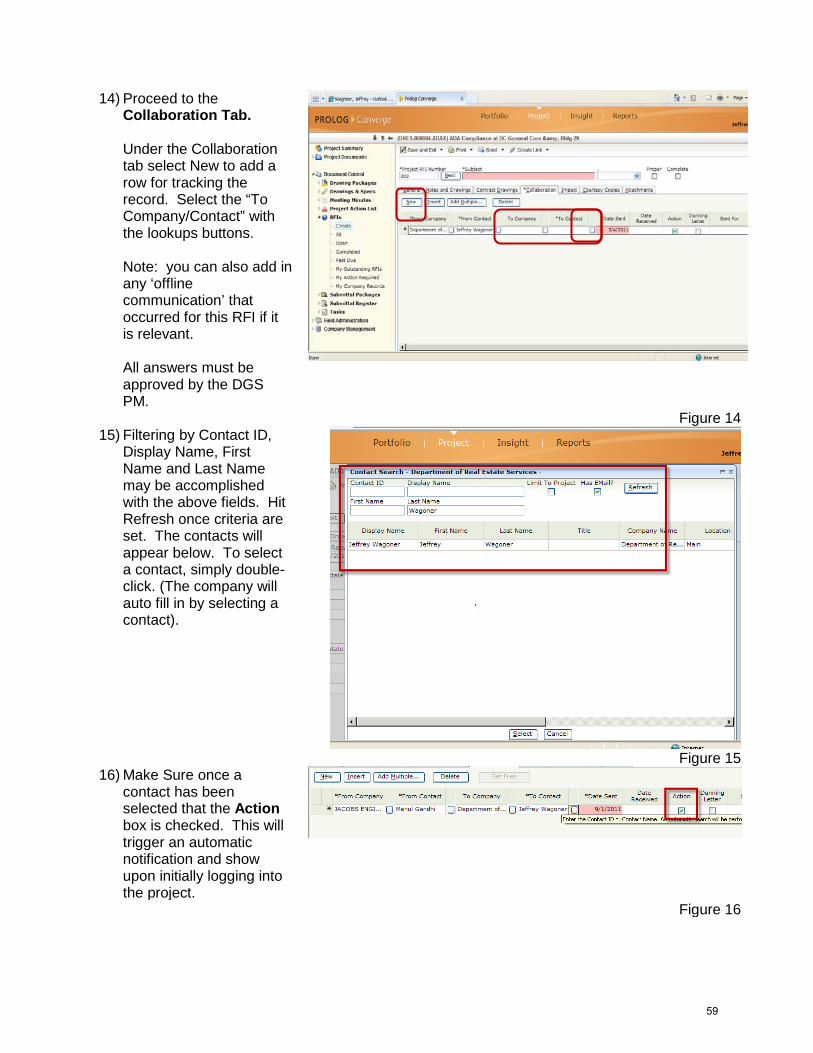
14) Proceed to the Collaboration Tab. Under the Collaboration tab select New to add a row for tracking the record. Select the “To Company/Contact” with the lookups buttons. Note: you can also add in any ‘offline communication’ that occurred for this RFI if it is relevant. All answers must be approved by the DGS PM.
Figure 14 15) Filtering by Contact ID,
Display Name, First Name and Last Name may be accomplished with the above fields. Hit Refresh once criteria are set. The contacts will appear below. To select a contact, simply double-click. (The company will auto fill in by selecting a contact).
Figure 15 16) Make Sure once a
contact has been selected that the Action box is checked. This will trigger an automatic notification and show upon initially logging into the project.
Figure 16
59
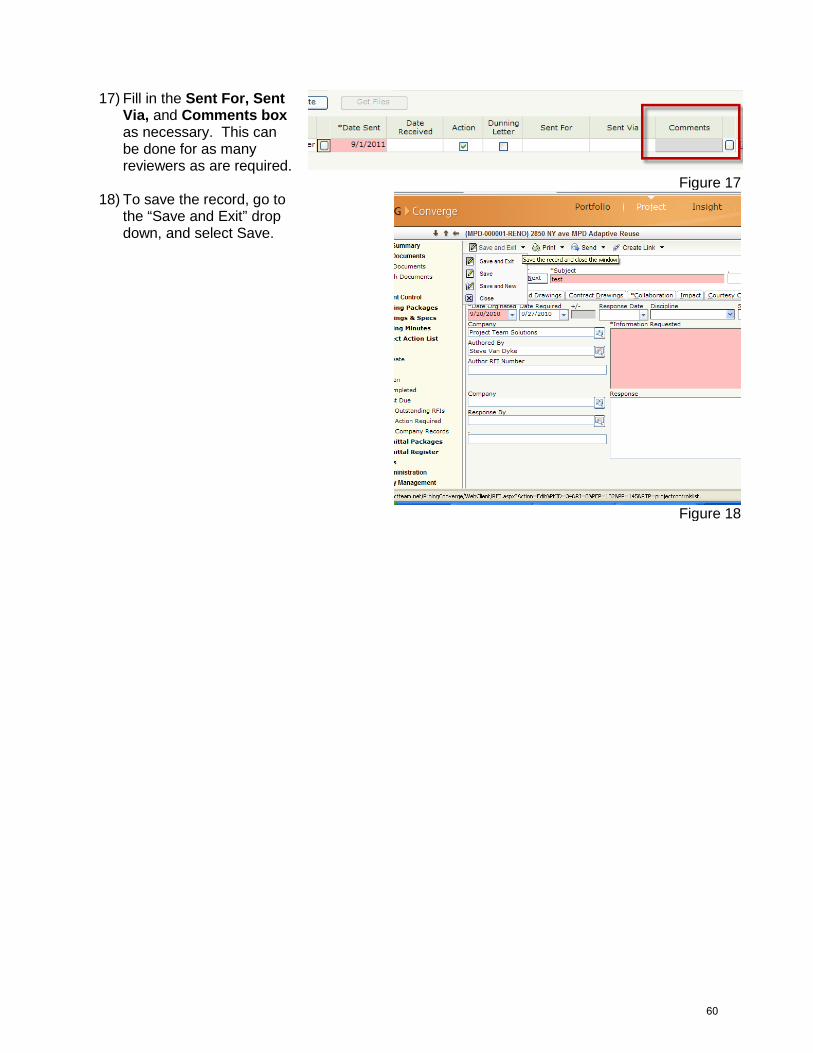
17) Fill in the Sent For, Sent Via, and Comments box as necessary. This can be done for as many reviewers as are required.
Figure 17 18) To save the record, go to
the “Save and Exit” drop down, and select Save.
Figure 18
60
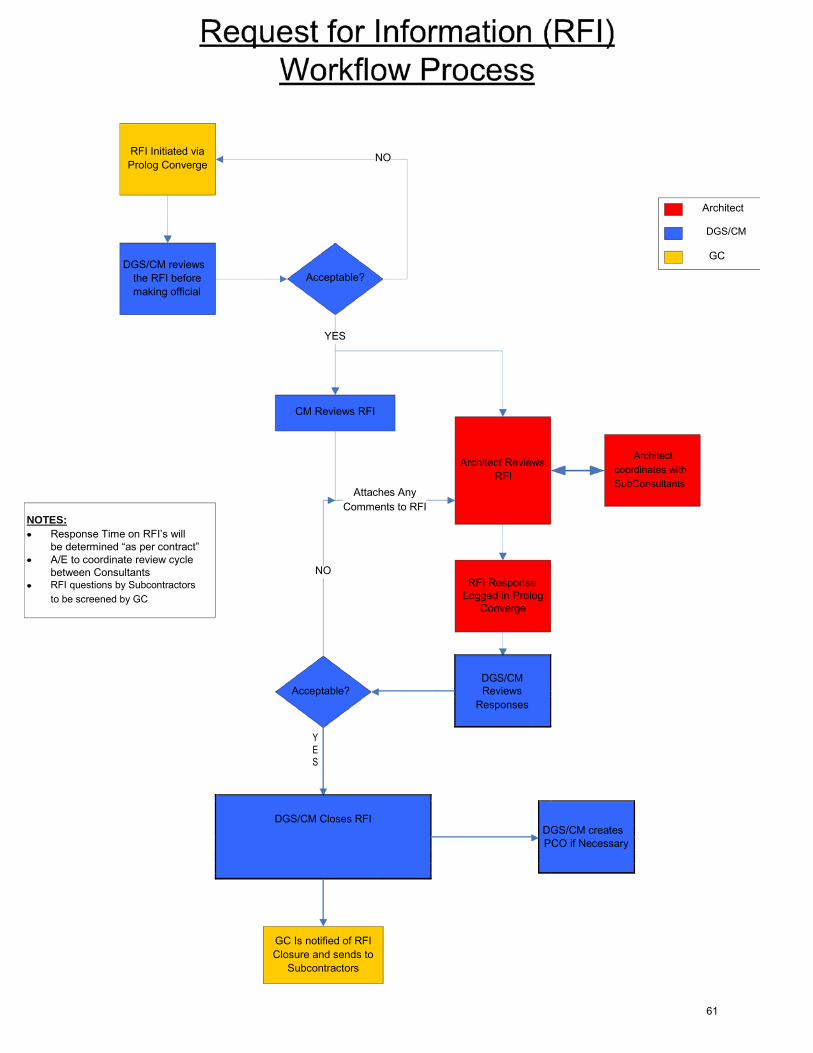
RFI Initiated via Prolog Converge
DGS/CM reviews the RFI before making official
NOTES:
Response Time on RFI’s will be determined “as per contract” A/E to coordinate review cycle between Consultants RFI questions by Subcontractors to be screened by GC
NO
Acceptable?
YES CM Reviews RFI
Architect Reviews RFI
Attaches Any Comments to RFI
NO RFI Response
Logged in Prolog Converge
Architect
DGS/CM
GC
Architect coordinates with SubConsultants
DGS/CM
Acceptable? Reviews
Responses
YES
DGS/CM Closes RFI
DGS/CM creates
PCO if Necessary
GC Is notified of RFI Closure and sends to
Subcontractors
61

Work Instructions for the RFI Module for the GC in Prolog Converge 1) Contractor / subcontractor
shall enter Submittal register, create packages and submit them through DGS Prolog Converge. To access Prolog Converge, go to the following address:
https://dres.projectteam.net/prologconverge/webclient/
User must enter his/her specific User Name and Password, then click “Login”. User Name and Password will be provided to them by DRES or PTSI
Figure 1 2) The User will be able to see
all projects that he/she has been given access to. Click on the ENTER link to the left of the Project Number & Name.
Figure 2
3) Upon logging into the
project a Project Summary will be presented to you on the status of the RFI Module. It will show: Total – All RFIs that have been put into the project database Open – Number of RFIs not
62
closed by the PM Closed – All RFIs Close Past Due – All RFIs not closed by specified date Pending My Action – All RFIs that are waiting on action by the logged in user. All numbers at as a link that will take you directly to the specified section.
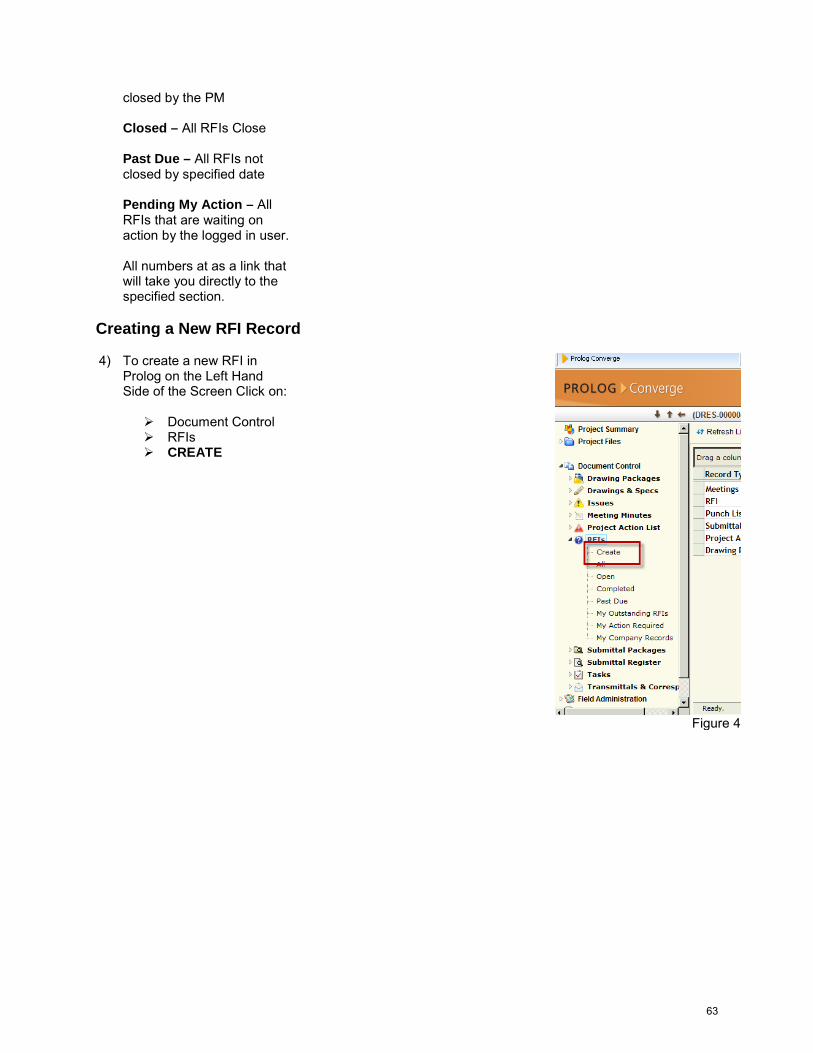
Creating a New RFI Record 4) To create a new RFI in
Prolog on the Left Hand Side of the Screen Click on: Document Control RFIs CREATE
Figure 4
63
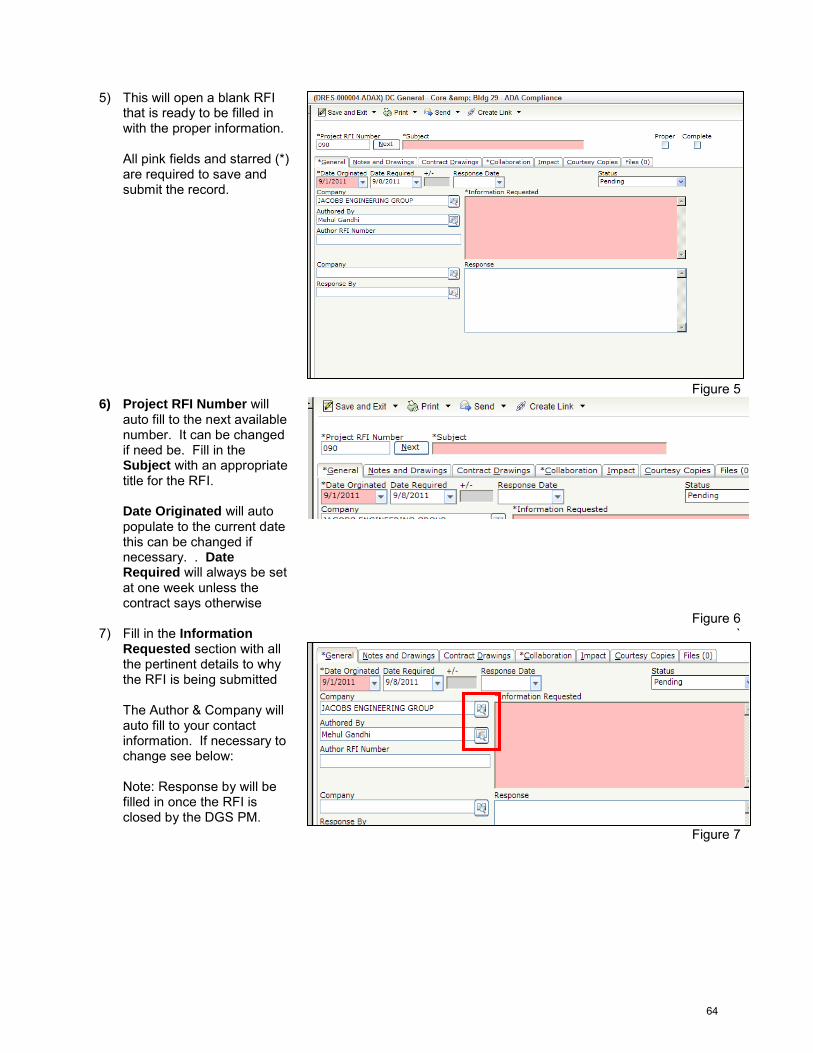
5) This will open a blank RFI that is ready to be filled in with the proper information. All pink fields and starred (*) are required to save and submit the record.
Figure 5 6) Project RFI Number will
auto fill to the next available number. It can be changed if need be. Fill in the Subject with an appropriate title for the RFI. Date Originated will auto populate to the current date this can be changed if necessary. . Date Required will always be set at one week unless the contract says otherwise
Figure 6 7) Fill in the Information
Requested section with all the pertinent details to why the RFI is being submitted The Author & Company will auto fill to your contact information. If necessary to change see below: Note: Response by will be filled in once the RFI is closed by the DGS PM.
`
Figure 7
64
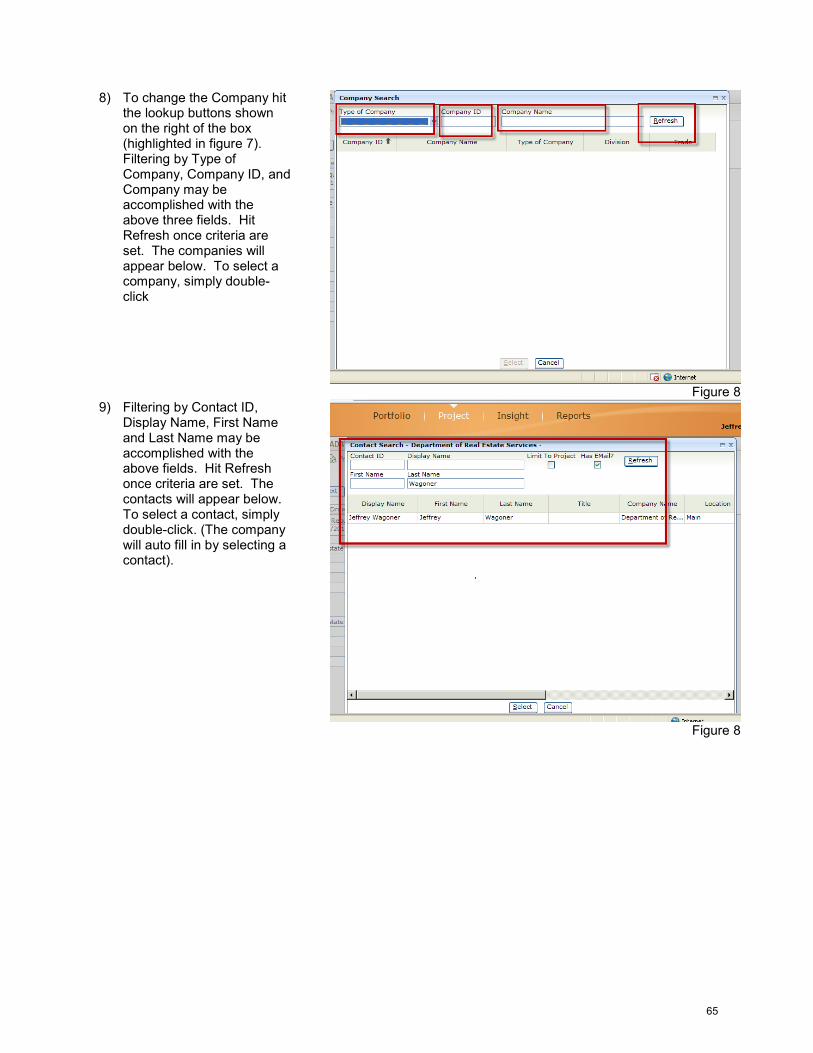
8) To change the Company hit the lookup buttons shown on the right of the box (highlighted in figure 7). Filtering by Type of Company, Company ID, and Company may be accomplished with the above three fields. Hit Refresh once criteria are set. The companies will appear below. To select a company, simply double-click
Figure 8 9) Filtering by Contact ID,
Display Name, First Name and Last Name may be accomplished with the above fields. Hit Refresh once criteria are set. The contacts will appear below. To select a contact, simply double-click. (The company will auto fill in by selecting a contact).
Figure 8
65
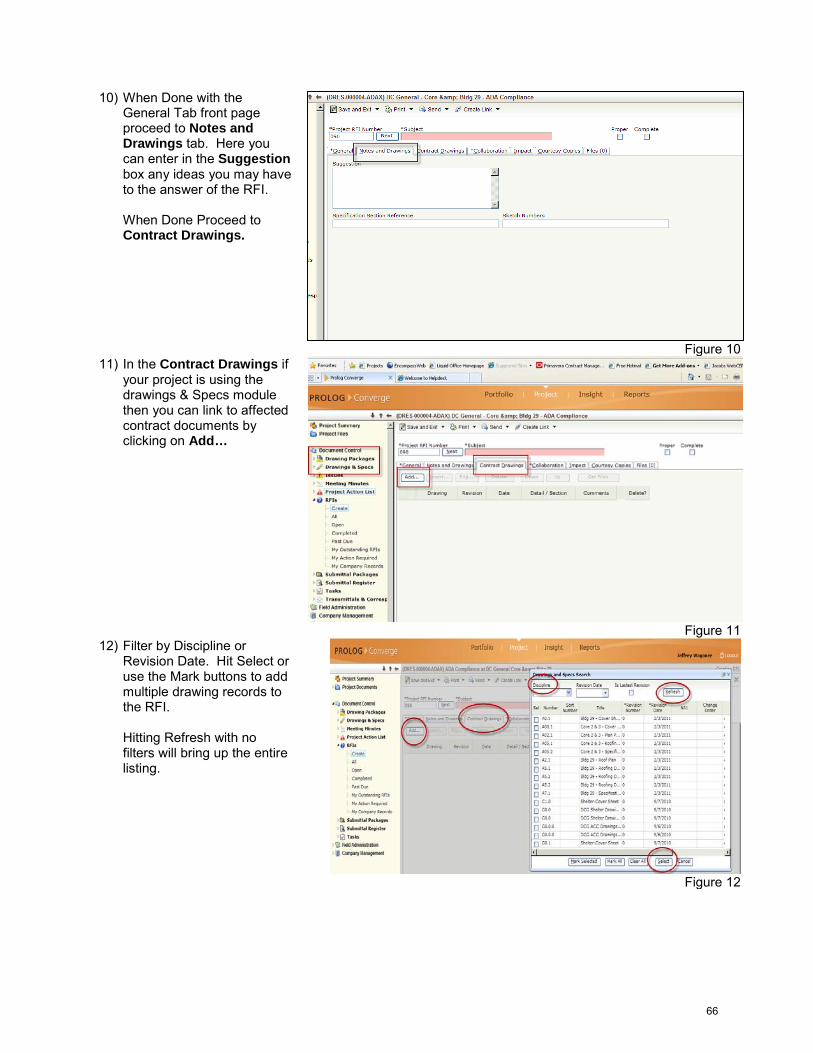
10) When Done with the General Tab front page proceed to Notes and Drawings tab. Here you can enter in the Suggestion box any ideas you may have to the answer of the RFI. When Done Proceed to Contract Drawings.
Figure 10 11) In the Contract Drawings if
your project is using the drawings & Specs module then you can link to affected contract documents by clicking on Add…
Figure 11 12) Filter by Discipline or
Revision Date. Hit Select or use the Mark buttons to add multiple drawing records to the RFI. Hitting Refresh with no filters will bring up the entire listing.
Figure 12
66
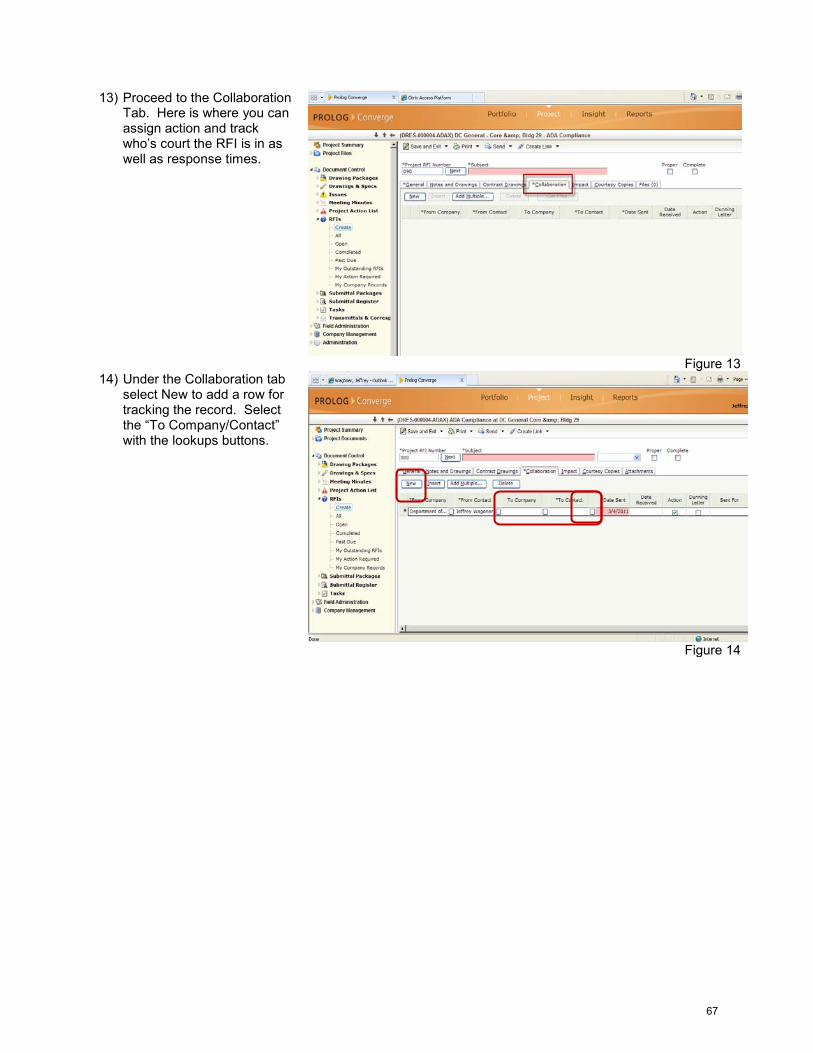
13) Proceed to the Collaboration Tab. Here is where you can assign action and track who’s court the RFI is in as well as response times.
Figure 13 14) Under the Collaboration tab
select New to add a row for tracking the record. Select the “To Company/Contact” with the lookups buttons.
Figure 14
67
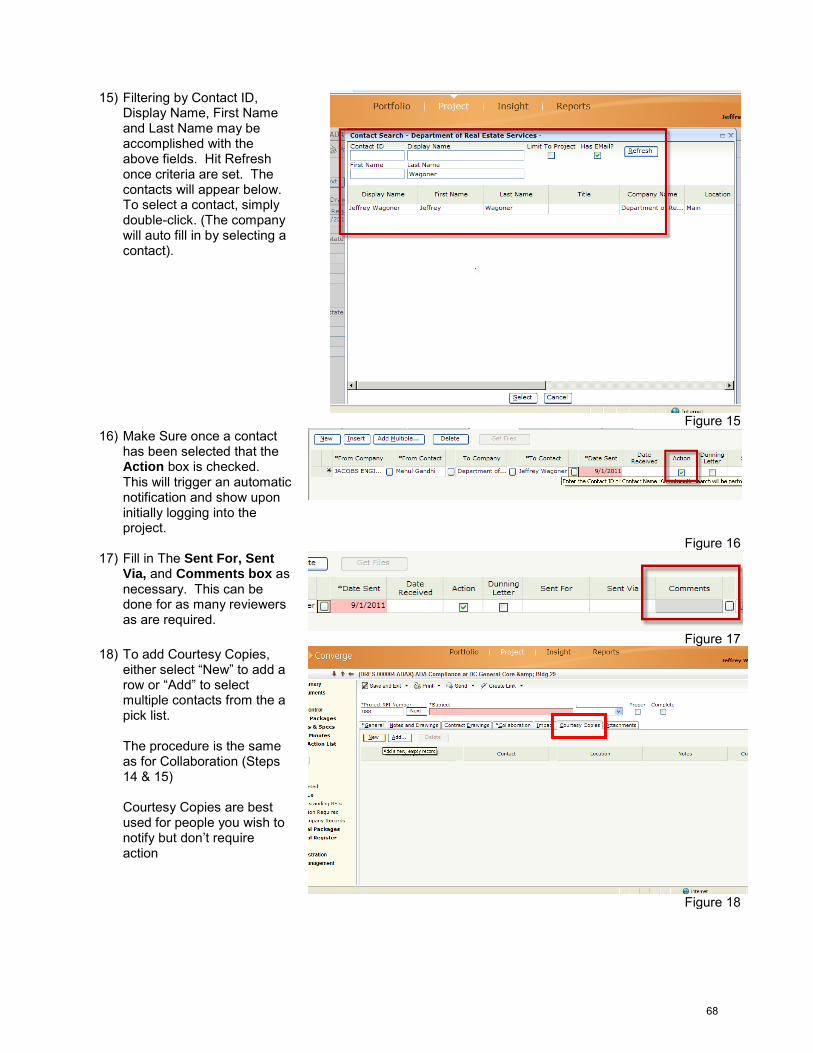
15) Filtering by Contact ID, Display Name, First Name and Last Name may be accomplished with the above fields. Hit Refresh once criteria are set. The contacts will appear below. To select a contact, simply double-click. (The company will auto fill in by selecting a contact).
Figure 15 16) Make Sure once a contact
has been selected that the Action box is checked. This will trigger an automatic notification and show upon initially logging into the project.
Figure 16 17) Fill in The Sent For, Sent
Via, and Comments box as necessary. This can be done for as many reviewers as are required.
Figure 17 18) To add Courtesy Copies,
either select “New” to add a row or “Add” to select multiple contacts from the a pick list. The procedure is the same as for Collaboration (Steps 14 & 15) Courtesy Copies are best used for people you wish to notify but don’t require action
Figure 18
68
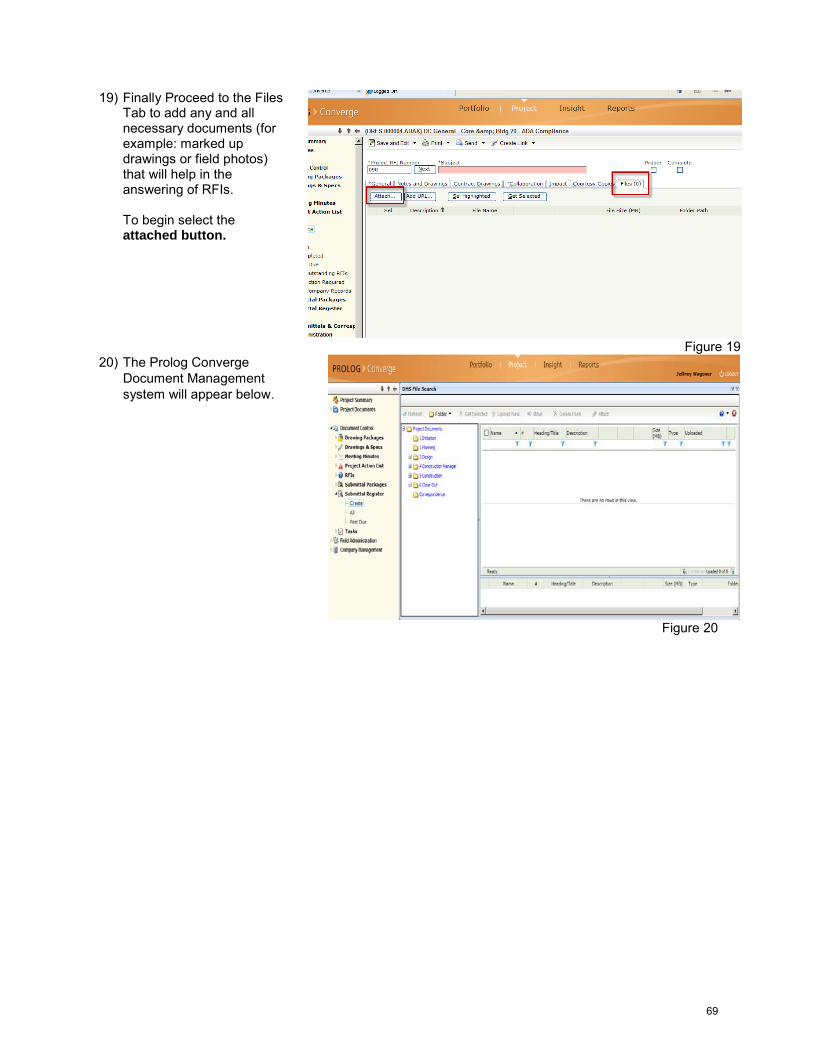
19) Finally Proceed to the Files Tab to add any and all necessary documents (for example: marked up drawings or field photos) that will help in the answering of RFIs. To begin select the attached button.
Figure 19 20) The Prolog Converge
Document Management system will appear below.
Figure 20
69
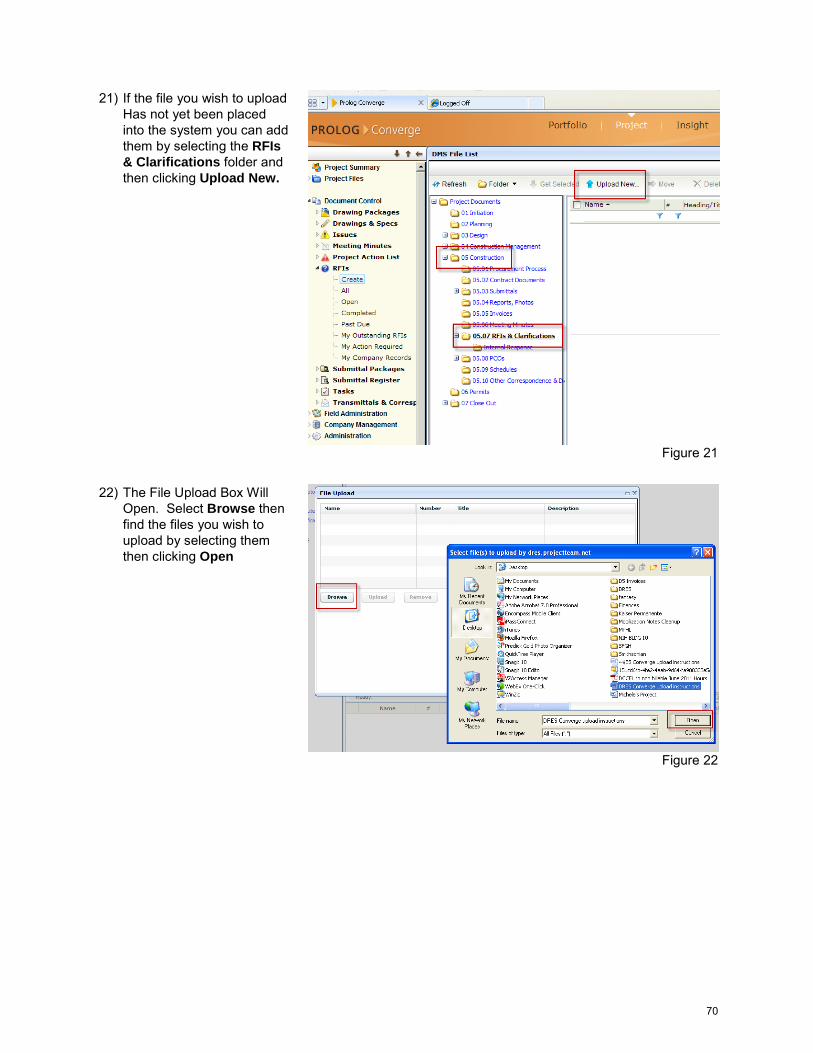
21) If the file you wish to upload Has not yet been placed into the system you can add them by selecting the RFIs & Clarifications folder and then clicking Upload New.
Figure 21
22) The File Upload Box Will Open. Select Browse then find the files you wish to upload by selecting them then clicking Open
Figure 22
70
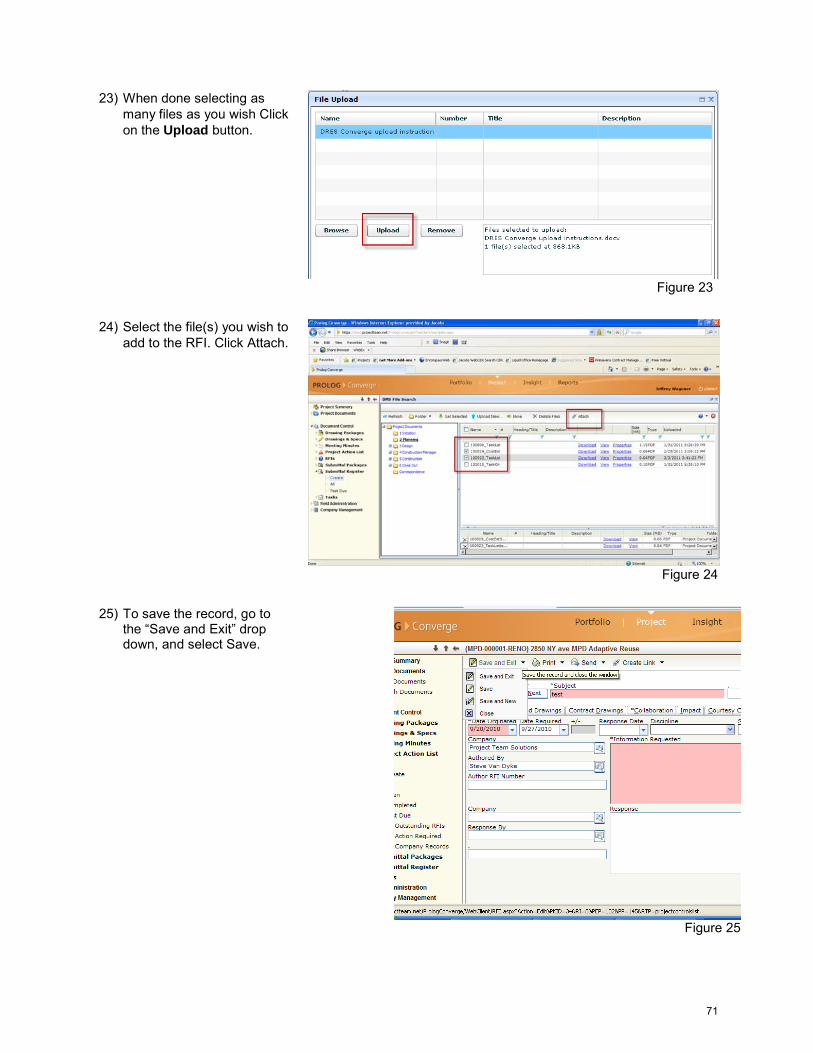
23) When done selecting as many files as you wish Click on the Upload button.
Figure 23
24) Select the file(s) you wish to add to the RFI. Click Attach.
Figure 24
25) To save the record, go to the “Save and Exit” drop down, and select Save.
Figure 25
71
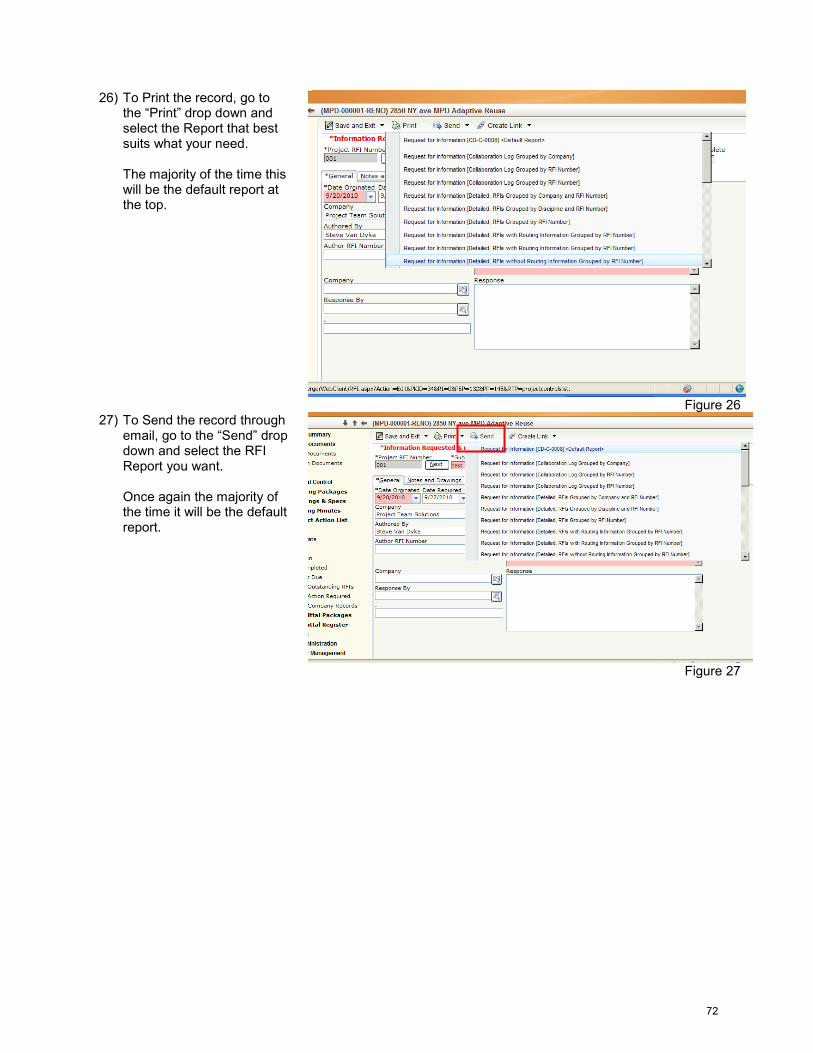
26) To Print the record, go to the “Print” drop down and select the Report that best suits what your need. The majority of the time this will be the default report at the top.
Figure 26 27) To Send the record through
email, go to the “Send” drop down and select the RFI Report you want. Once again the majority of the time it will be the default report.
Figure 27
72
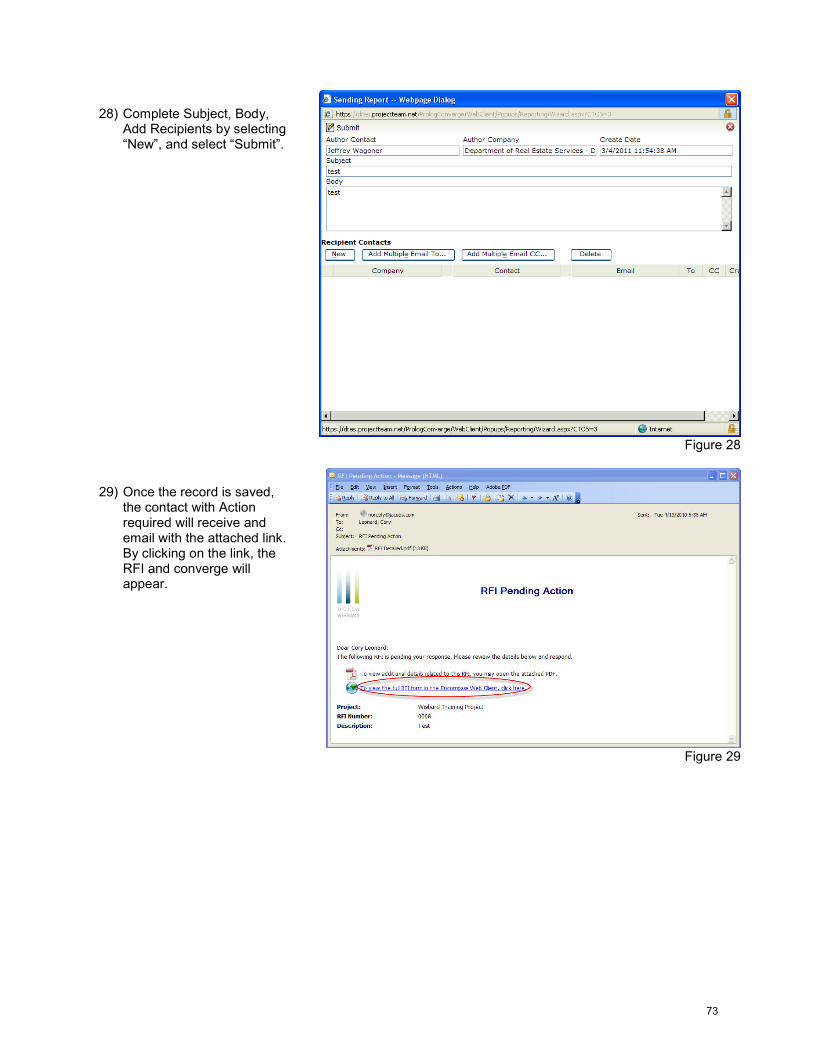
28) Complete Subject, Body, Add Recipients by selecting “New”, and select “Submit”.
Figure 28
29) Once the record is saved, the contact with Action required will receive and email with the attached link. By clicking on the link, the RFI and converge will appear.
Figure 29
73
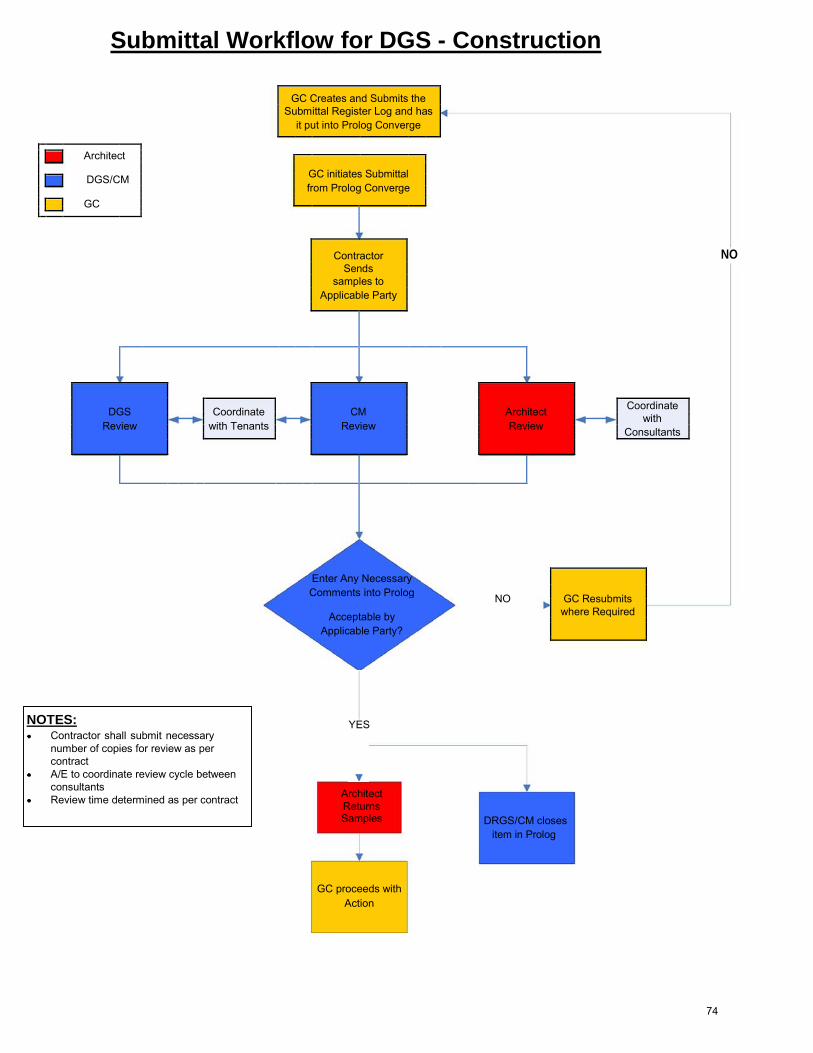
Submittal Workflow for DGS - Construction GC Creates and Submits the
Submittal Register Log and has
it put into Prolog Converge
Architect
GC initiates Submittal
DGS/CM
from Prolog Converge
GC
NO
Contractor
Sends
samples to
Applicable Party
DGS Coordinate CM Architect Coordinate
with
Review with Tenants Review Review
Consultants
NOTES:
Contractor shall submit necessary number of copies for review as per contract A/E to coordinate review cycle between consultants Review time determined as per contract
Enter Any Necessary
Comments into Prolog NO GC Resubmits
Acceptable by where Required
Applicable Party?
YES
Architect
Returns
Samples DRGS/CM closes
item in Prolog
GC proceeds with Action
74
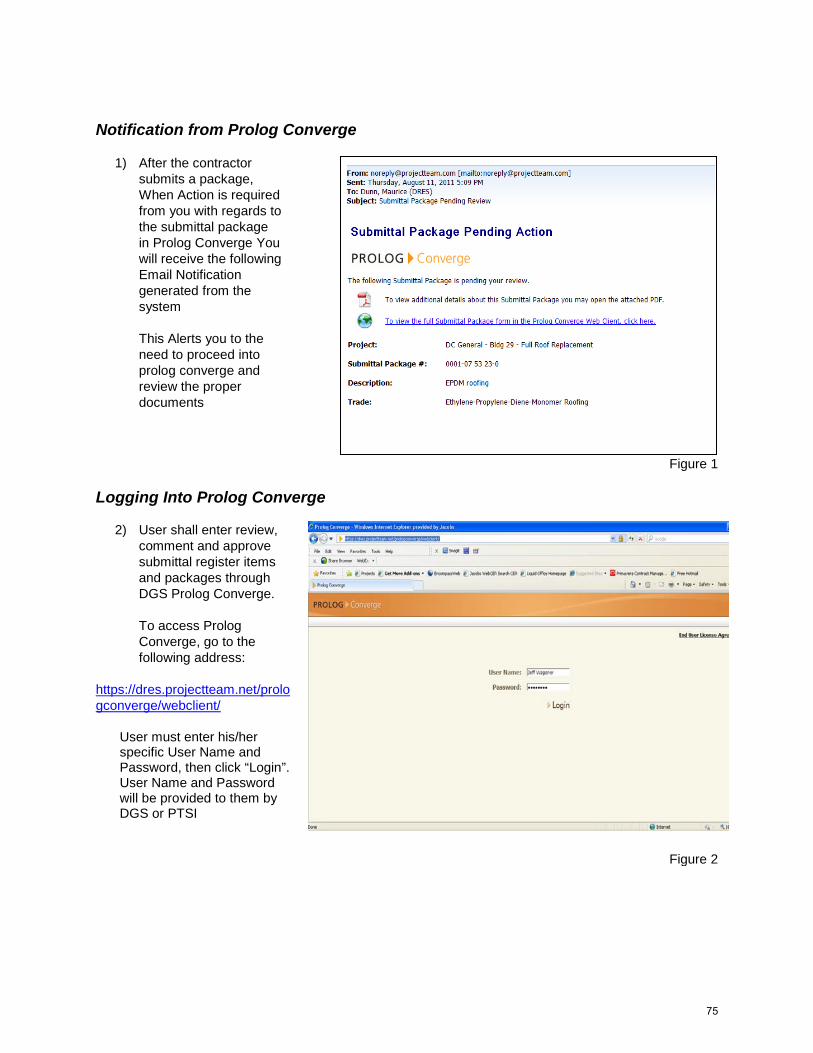
Notification from Prolog Converge
1) After the contractor submits a package, When Action is required from you with regards to the submittal package in Prolog Converge You will receive the following Email Notification generated from the system This Alerts you to the need to proceed into prolog converge and review the proper documents
Figure 1 Logging Into Prolog Converge
2) User shall enter review, comment and approve submittal register items and packages through DGS Prolog Converge. To access Prolog Converge, go to the following address:
https://dres.projectteam.net/prologconverge/webclient/
User must enter his/her specific User Name and Password, then click “Login”. User Name and Password will be provided to them by DGS or PTSI
Figure 2
75
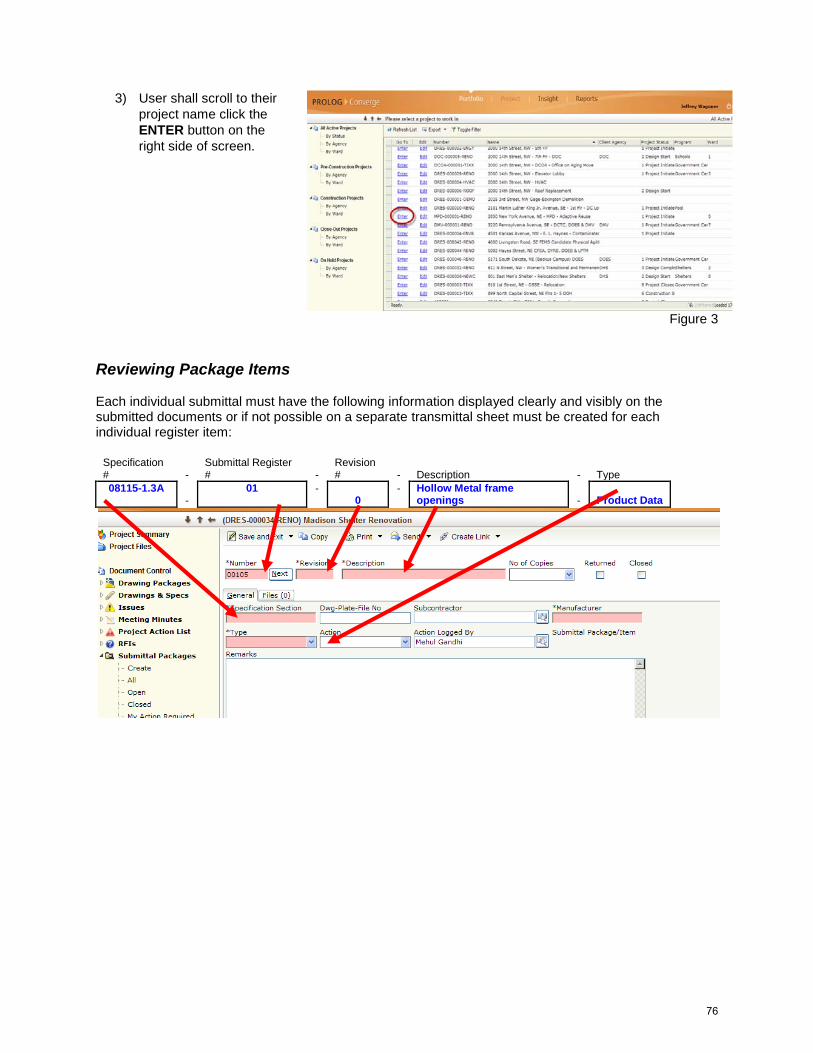
3) User shall scroll to their project name click the ENTER button on the right side of screen.
Figure 3 Reviewing Package Items Each individual submittal must have the following information displayed clearly and visibly on the submitted documents or if not possible on a separate transmittal sheet must be created for each individual register item:
Specification # -
Submittal Register # -
Revision # - Description - Type
08115-1.3A -
01 - 0
- Hollow Metal frame openings - Product Data
76
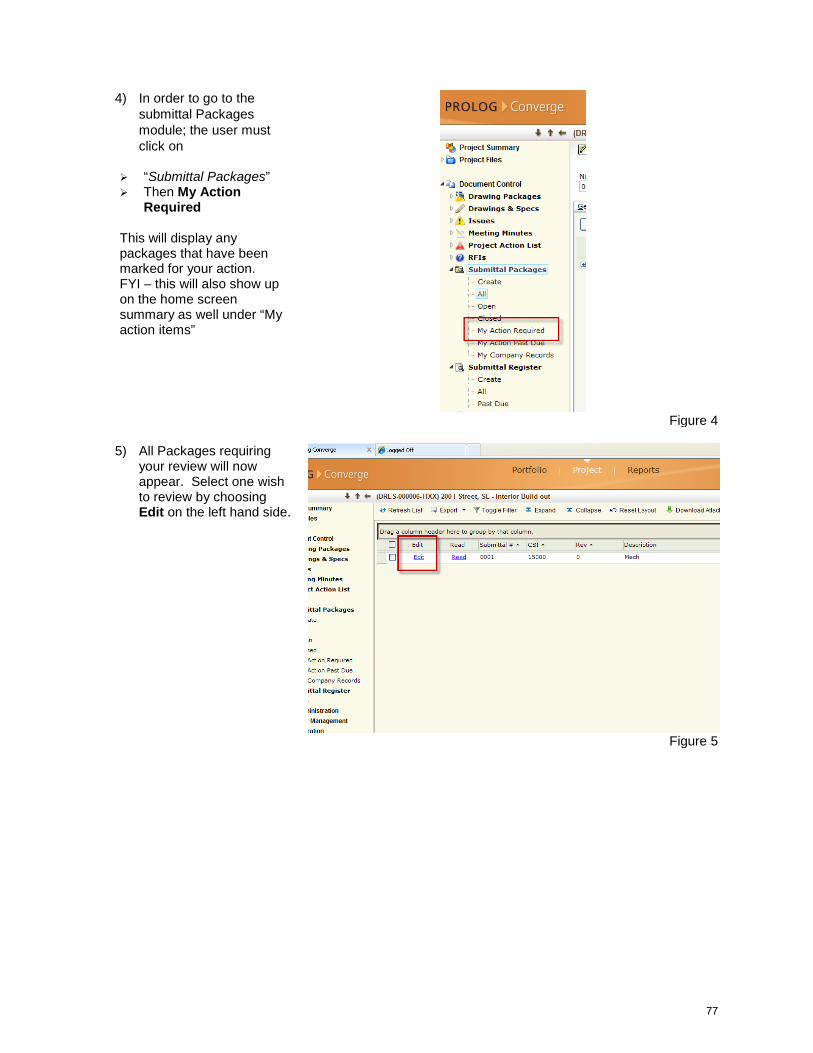
4) In order to go to the submittal Packages module; the user must click on
“Submittal Packages” Then My Action
Required This will display any packages that have been marked for your action. FYI – this will also show up on the home screen summary as well under “My action items”
Figure 4
5) All Packages requiring your review will now appear. Select one wish to review by choosing Edit on the left hand side.
Figure 5
77
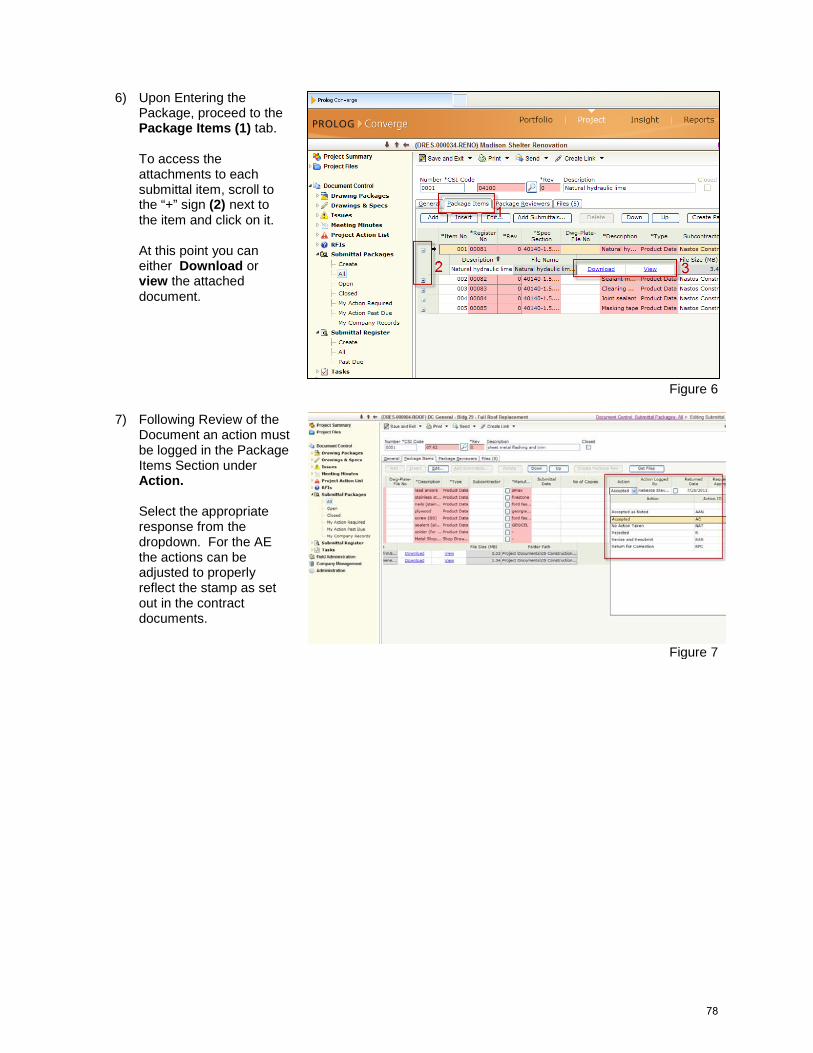
6) Upon Entering the Package, proceed to the Package Items (1) tab. To access the attachments to each submittal item, scroll to the “+” sign (2) next to the item and click on it. At this point you can either Download or view the attached document.
Figure 6
7) Following Review of the Document an action must be logged in the Package Items Section under Action. Select the appropriate response from the dropdown. For the AE the actions can be adjusted to properly reflect the stamp as set out in the contract documents.
Figure 7
78
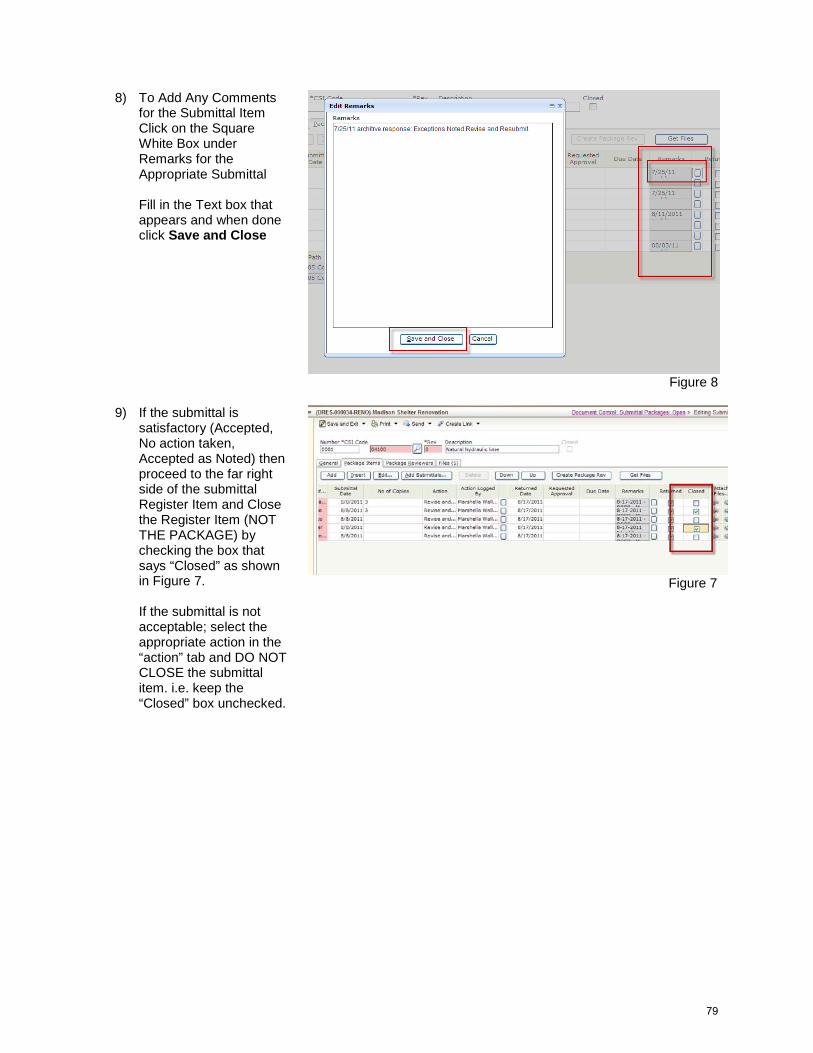
8) To Add Any Comments for the Submittal Item Click on the Square White Box under Remarks for the Appropriate Submittal Fill in the Text box that appears and when done click Save and Close
Figure 8
9) If the submittal is satisfactory (Accepted, No action taken, Accepted as Noted) then proceed to the far right side of the submittal Register Item and Close the Register Item (NOT THE PACKAGE) by checking the box that says “Closed” as shown in Figure 7. If the submittal is not acceptable; select the appropriate action in the “action” tab and DO NOT CLOSE the submittal item. i.e. keep the “Closed” box unchecked.
Figure 7
79
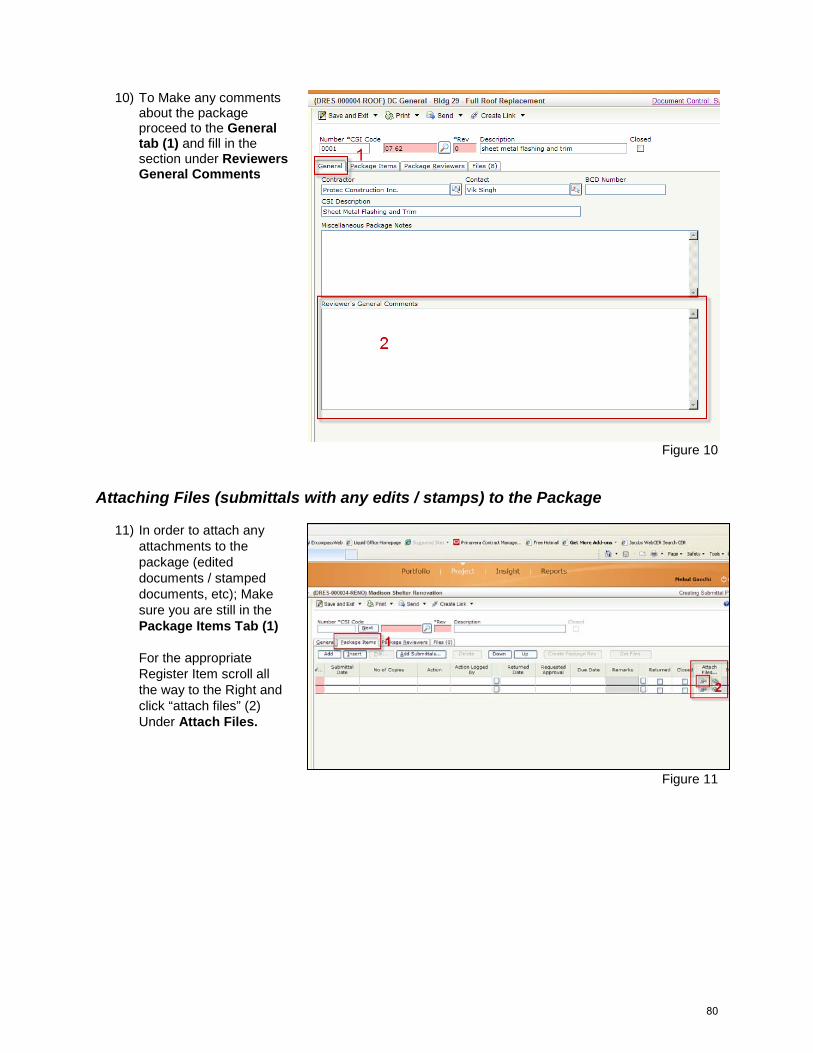
10) To Make any comments about the package proceed to the General tab (1) and fill in the section under Reviewers General Comments
Figure 10
Attaching Files (submittals with any edits / stamps) to the Package
11) In order to attach any attachments to the package (edited documents / stamped documents, etc); Make sure you are still in the Package Items Tab (1) For the appropriate Register Item scroll all the way to the Right and click “attach files” (2) Under Attach Files.
Figure 11
80
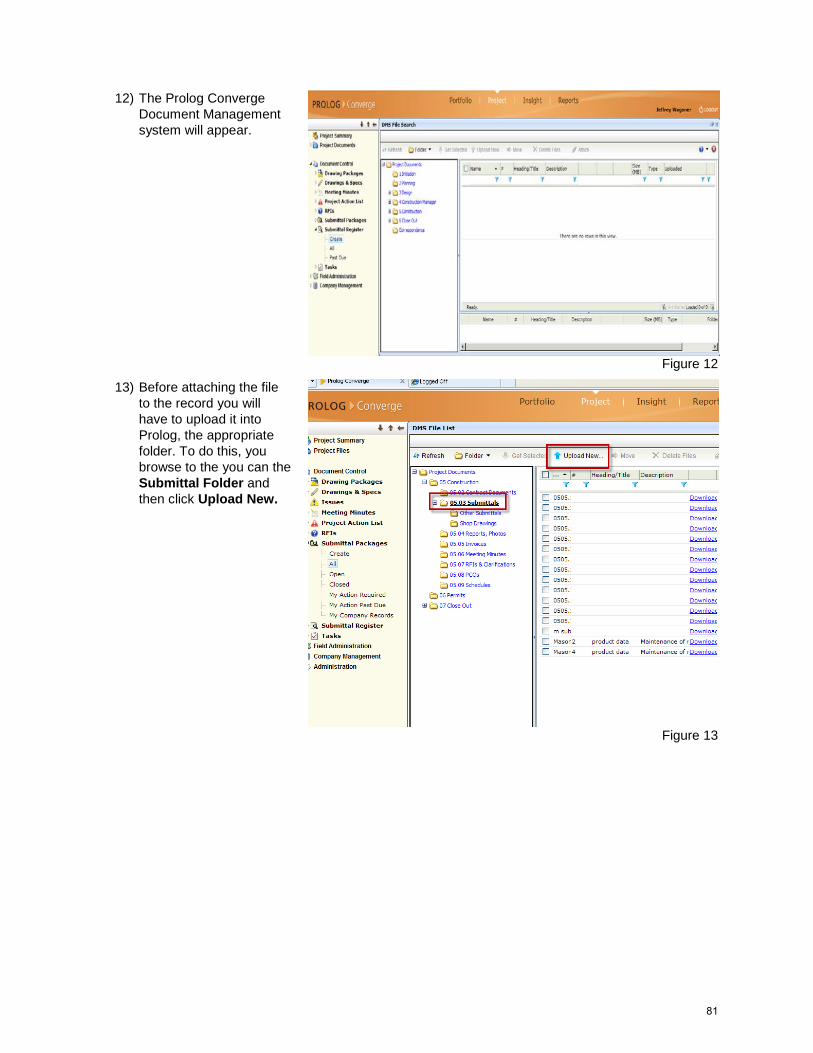
12) The Prolog Converge Document Management system will appear.
Figure 12
13) Before attaching the file to the record you will have to upload it into Prolog, the appropriate folder. To do this, you browse to the you can the Submittal Folder and then click Upload New.
Figure 13
81
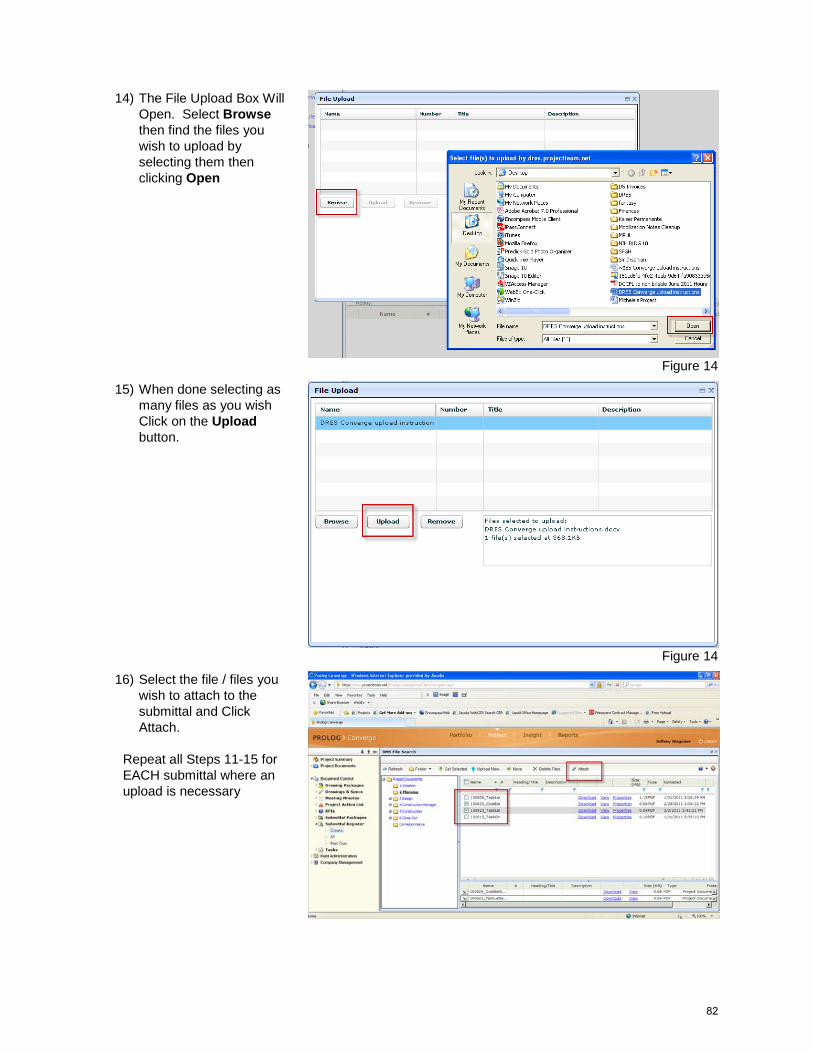
14) The File Upload Box Will Open. Select Browse then find the files you wish to upload by selecting them then clicking Open
Figure 14
15) When done selecting as many files as you wish Click on the Upload button.
Figure 14
16) Select the file / files you wish to attach to the submittal and Click Attach.
Repeat all Steps 11-15 for EACH submittal where an upload is necessary
82
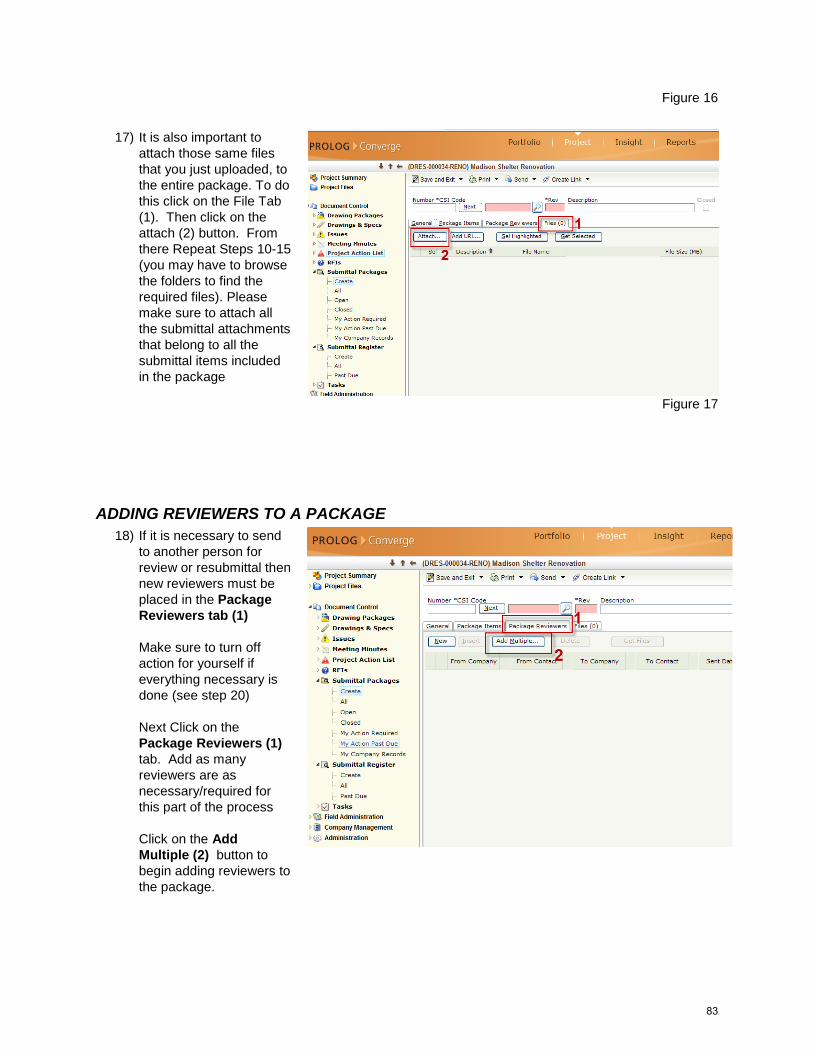
Figure 16
17) It is also important to attach those same files that you just uploaded, to the entire package. To do this click on the File Tab (1). Then click on the attach (2) button. From there Repeat Steps 10-15 (you may have to browse the folders to find the required files). Please make sure to attach all the submittal attachments that belong to all the submittal items included in the package
Figure 17
ADDING REVIEWERS TO A PACKAGE 18) If it is necessary to send
to another person for review or resubmittal then new reviewers must be placed in the Package Reviewers tab (1) Make sure to turn off action for yourself if everything necessary is done (see step 20) Next Click on the Package Reviewers (1) tab. Add as many reviewers are as necessary/required for this part of the process Click on the Add Multiple (2) button to begin adding reviewers to the package.
83
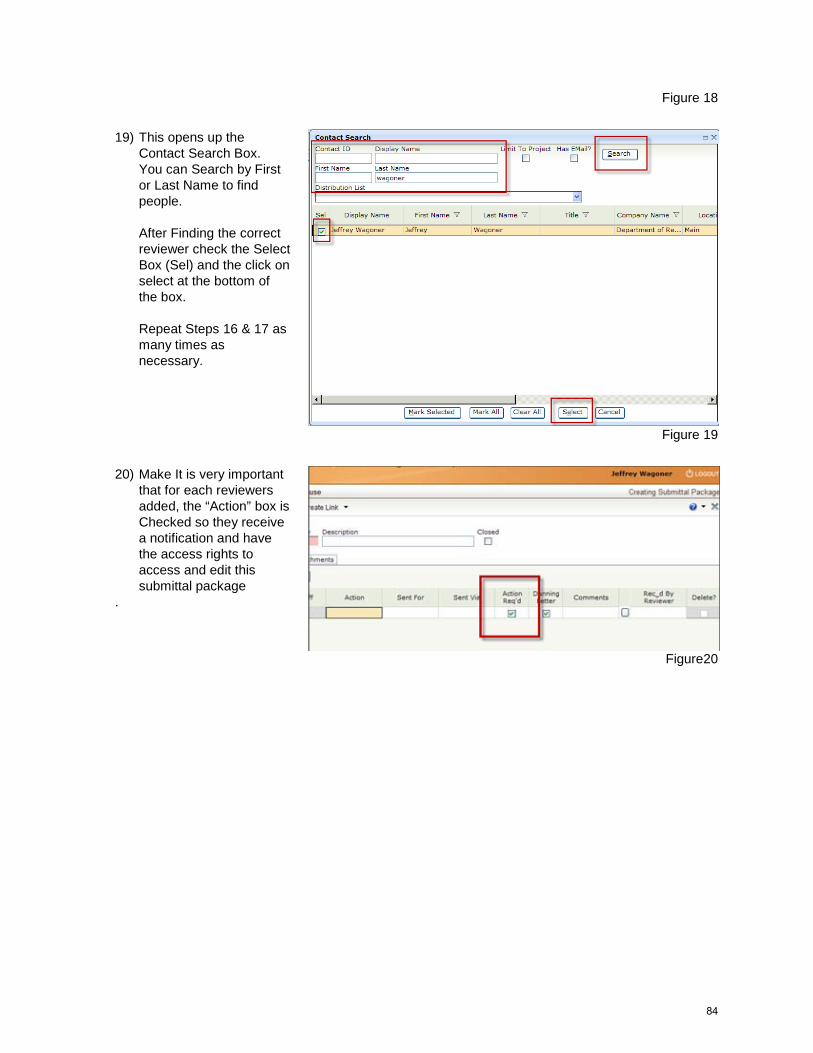
Figure 18
19) This opens up the Contact Search Box. You can Search by First or Last Name to find people. After Finding the correct reviewer check the Select Box (Sel) and the click on select at the bottom of the box. Repeat Steps 16 & 17 as many times as necessary.
Figure 19
20) Make It is very important that for each reviewers added, the “Action” box is Checked so they receive a notification and have the access rights to access and edit this submittal package
.
Figure20
84
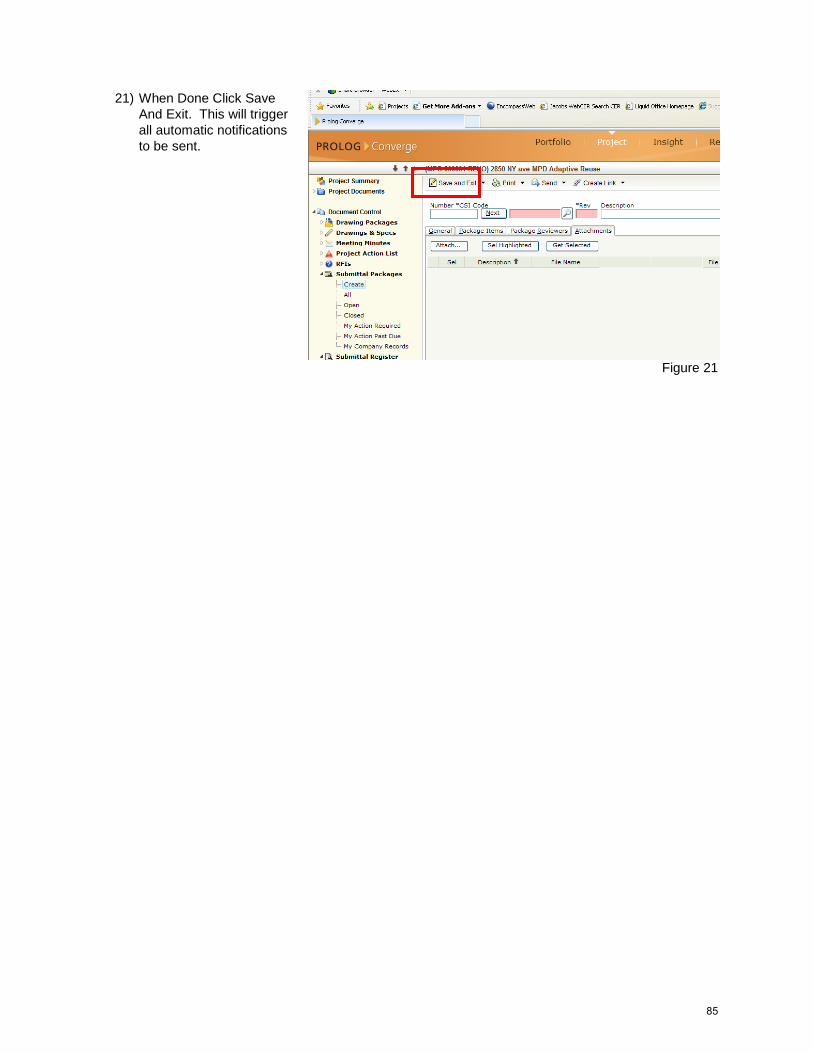
21) When Done Click Save And Exit. This will trigger all automatic notifications to be sent.
Figure 21
85
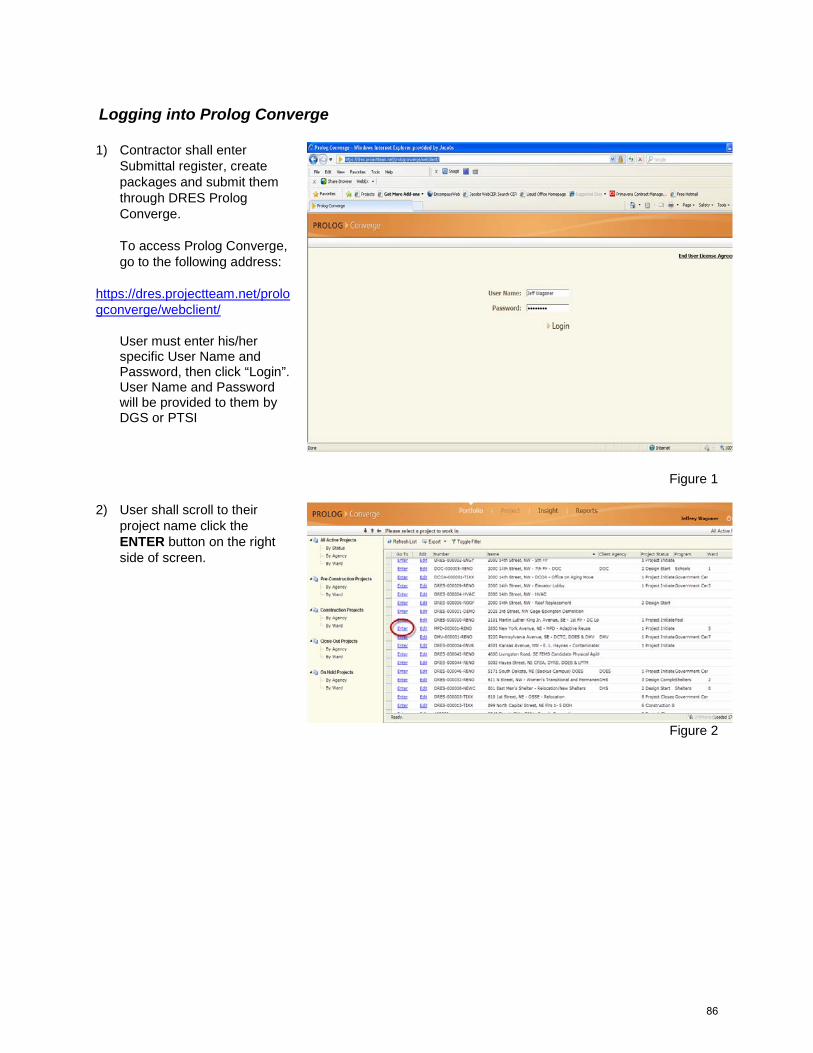
Logging into Prolog Converge
1) Contractor shall enter Submittal register, create packages and submit them through DRES Prolog Converge. To access Prolog Converge, go to the following address:
https://dres.projectteam.net/prologconverge/webclient/
User must enter his/her specific User Name and Password, then click “Login”. User Name and Password will be provided to them by DGS or PTSI
Figure 1 2) User shall scroll to their
project name click the ENTER button on the right side of screen.
Figure 2
86
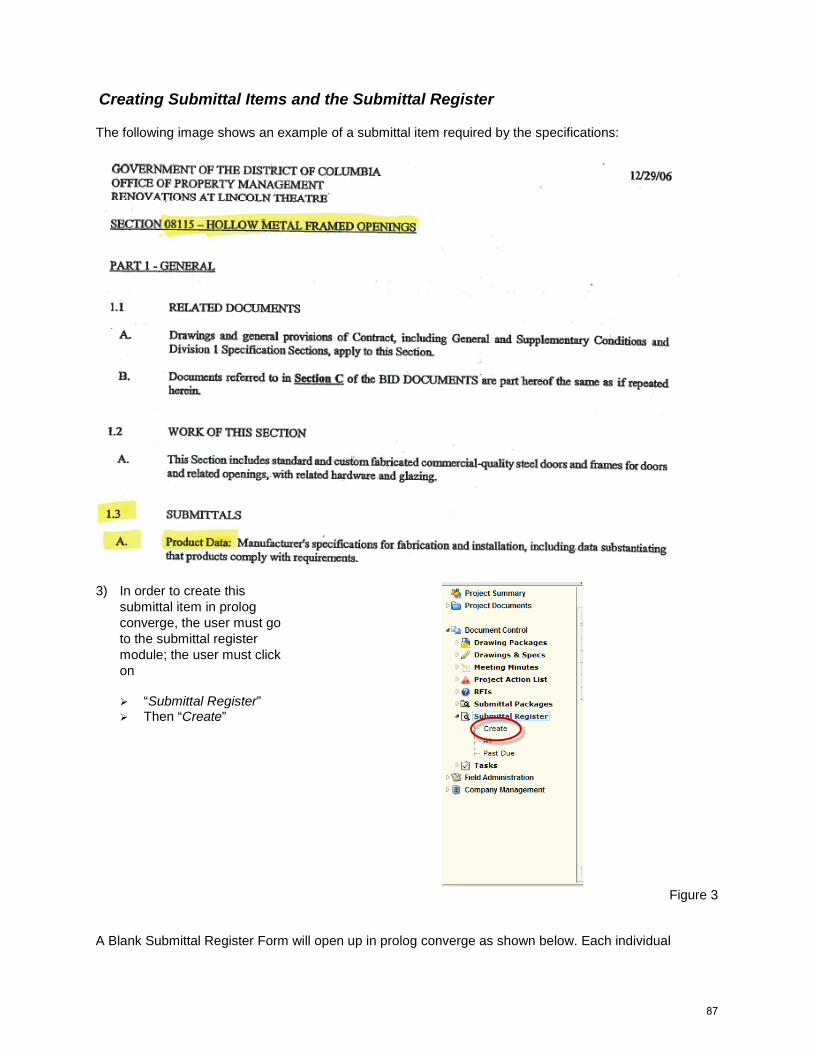
Creating Submittal Items and the Submittal Register The following image shows an example of a submittal item required by the specifications:
3) In order to create this submittal item in prolog converge, the user must go to the submittal register module; the user must click on
“Submittal Register” Then “Create”
Figure 3
A Blank Submittal Register Form will open up in prolog converge as shown below. Each individual
87
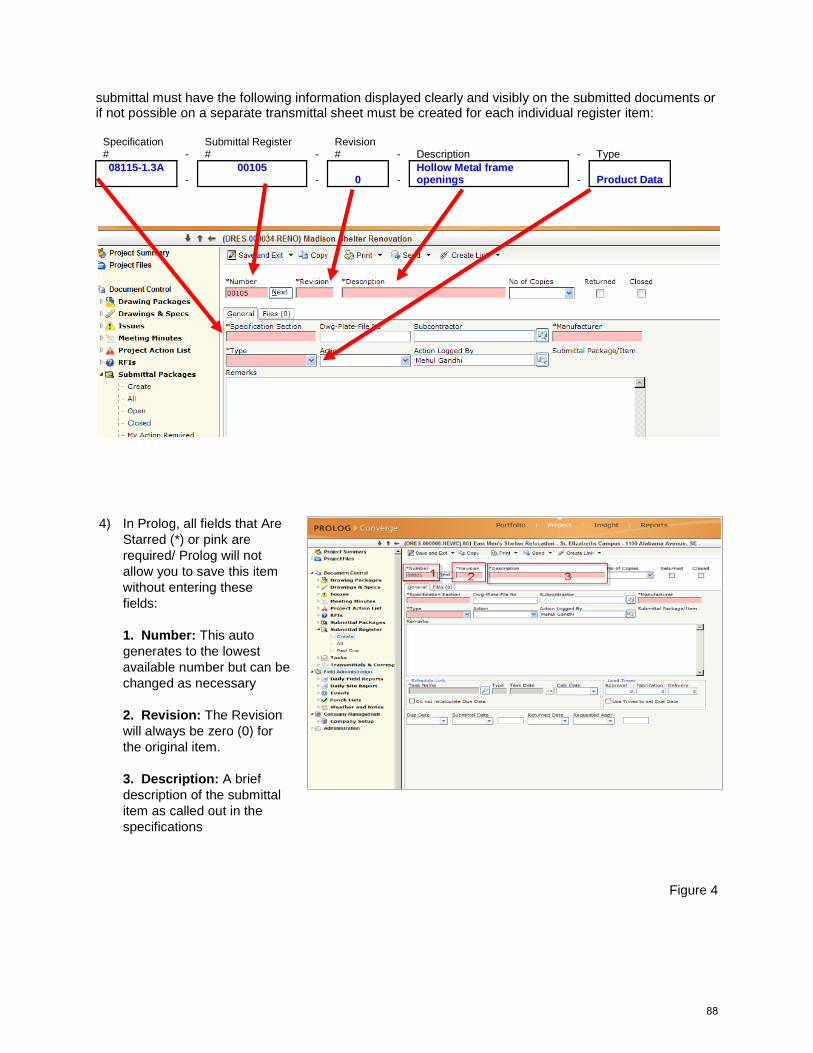
submittal must have the following information displayed clearly and visibly on the submitted documents or if not possible on a separate transmittal sheet must be created for each individual register item:
Specification # -
Submittal Register # -
Revision # - Description - Type
08115-1.3A -
00105 - 0 -
Hollow Metal frame openings - Product Data
4) In Prolog, all fields that Are
Starred (*) or pink are required/ Prolog will not allow you to save this item without entering these fields: 1. Number: This auto generates to the lowest available number but can be changed as necessary 2. Revision: The Revision will always be zero (0) for the original item. 3. Description: A brief description of the submittal item as called out in the specifications
Figure 4
88

5) 4. Specification Section:
This is the area where the item is called out in the specifications. For Example: 08115-1.3A 5. Manufacturer: If known enter their name here. If not TBD is acceptable and expected to be filled in later 6. Type: Selection the appropriate submittal type from the Drop Down.
Figure 5 6) Fill in the Due dates for all
submittals (the date the contractor plans to submit this). This field is not marked mandatory, but is still important information to provide.
Figure 6
89
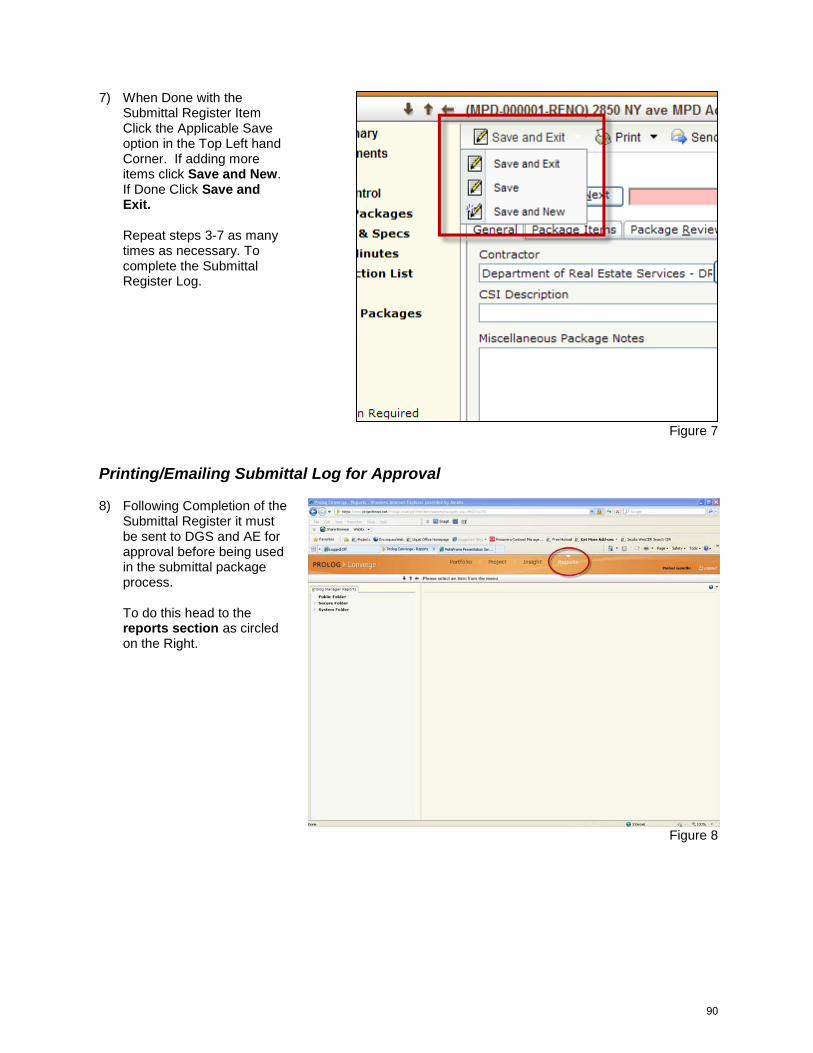
7) When Done with the Submittal Register Item Click the Applicable Save option in the Top Left hand Corner. If adding more items click Save and New. If Done Click Save and Exit. Repeat steps 3-7 as many times as necessary. To complete the Submittal Register Log.
Figure 7
Printing/Emailing Submittal Log for Approval
8) Following Completion of the Submittal Register it must be sent to DGS and AE for approval before being used in the submittal package process. To do this head to the reports section as circled on the Right.
Figure 8
90
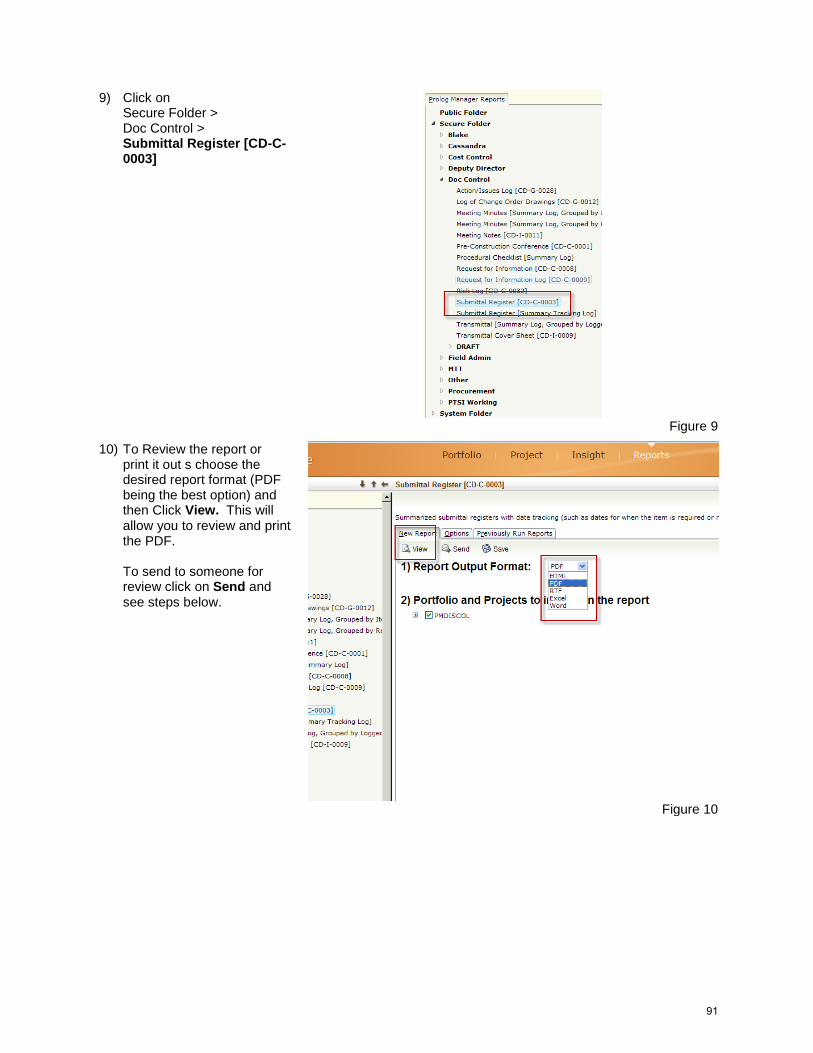
9) Click on Secure Folder > Doc Control > Submittal Register [CD-C-0003]
Figure 9
10) To Review the report or print it out s choose the desired report format (PDF being the best option) and then Click View. This will allow you to review and print the PDF. To send to someone for review click on Send and see steps below.
Figure 10
91
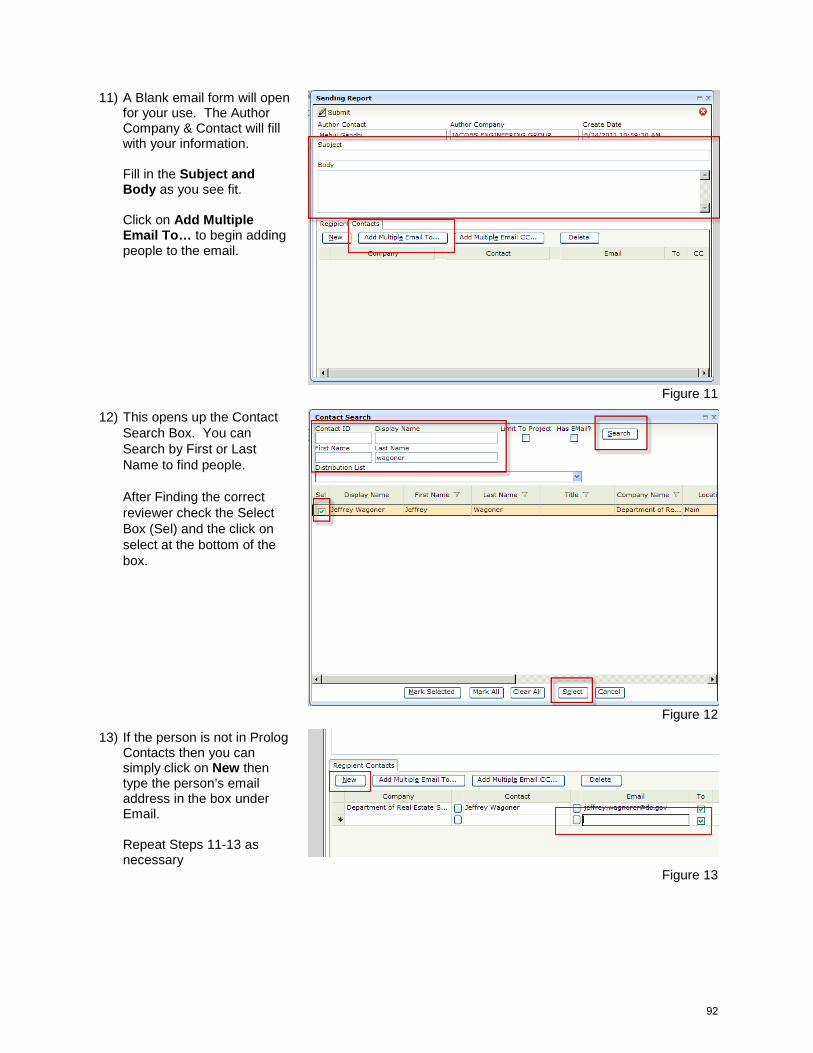
11) A Blank email form will open for your use. The Author Company & Contact will fill with your information. Fill in the Subject and Body as you see fit. Click on Add Multiple Email To… to begin adding people to the email.
Figure 11
12) This opens up the Contact Search Box. You can Search by First or Last Name to find people. After Finding the correct reviewer check the Select Box (Sel) and the click on select at the bottom of the box.
Figure 12
13) If the person is not in Prolog Contacts then you can simply click on New then type the person’s email address in the box under Email. Repeat Steps 11-13 as necessary
Figure 13
92

14) When Done Click Submit and an email with the attached report will be sent to the proper contacts for review.
Figure 14
Creating a Submittal Package
15) The next step is to create the
submittal package and route it for review and approval. The user must go the Submittal Package module, under document control and Select “Create”
Figure 15
16) This Will Open a Blank Submittal Package. All Pink Fields are mandatory / required fields. Prolog will not allow you to save the record without entering these fields.
93
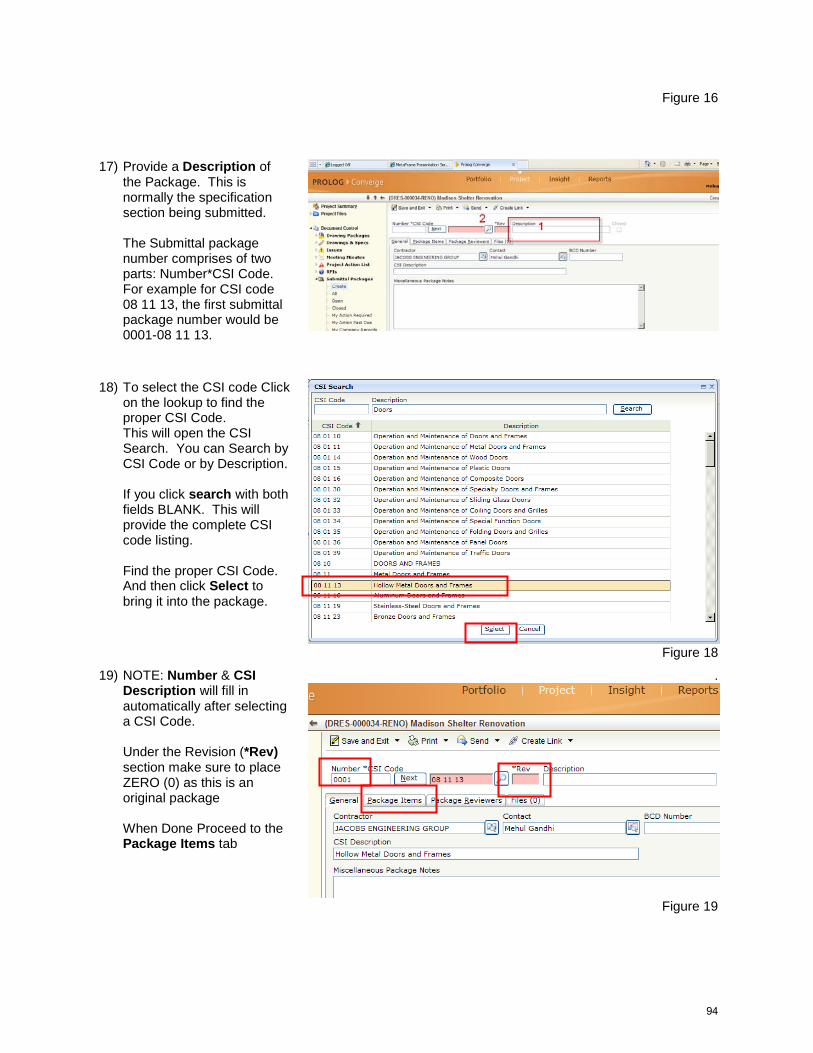
Figure 16
17) Provide a Description of the Package. This is normally the specification section being submitted. The Submittal package number comprises of two parts: Number*CSI Code. For example for CSI code 08 11 13, the first submittal package number would be 0001-08 11 13.
18) To select the CSI code Click on the lookup to find the proper CSI Code. This will open the CSI Search. You can Search by CSI Code or by Description. If you click search with both fields BLANK. This will provide the complete CSI code listing. Find the proper CSI Code. And then click Select to bring it into the package.
Figure 18
19) NOTE: Number & CSI Description will fill in automatically after selecting a CSI Code. Under the Revision (*Rev) section make sure to place ZERO (0) as this is an original package When Done Proceed to the Package Items tab
.
Figure 19
94
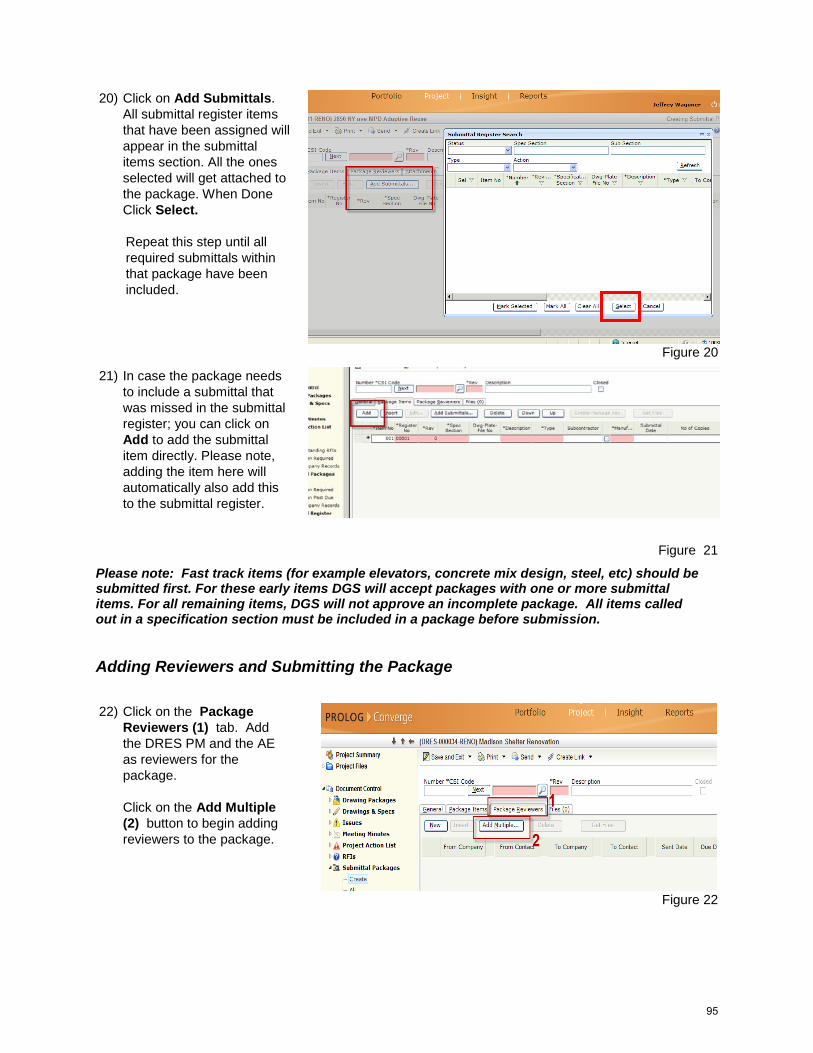
20) Click on Add Submittals. All submittal register items that have been assigned will appear in the submittal items section. All the ones selected will get attached to the package. When Done Click Select.
Repeat this step until all required submittals within that package have been included.
Figure 20
21) In case the package needs to include a submittal that was missed in the submittal register; you can click on Add to add the submittal item directly. Please note, adding the item here will automatically also add this to the submittal register.
Figure 21
Please note: Fast track items (for example elevators, concrete mix design, steel, etc) should be submitted first. For these early items DGS will accept packages with one or more submittal items. For all remaining items, DGS will not approve an incomplete package. All items called out in a specification section must be included in a package before submission.
Adding Reviewers and Submitting the Package 22) Click on the Package
Reviewers (1) tab. Add the DRES PM and the AE as reviewers for the package. Click on the Add Multiple (2) button to begin adding reviewers to the package.
Figure 22
95
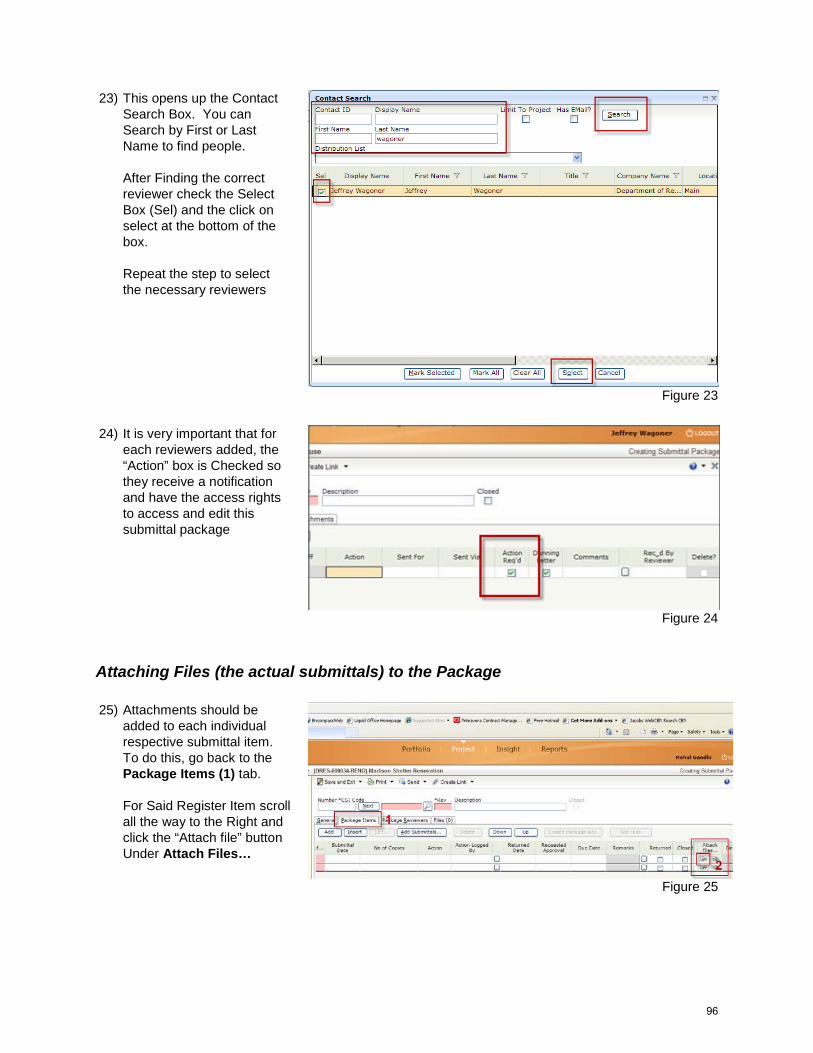
23) This opens up the Contact Search Box. You can Search by First or Last Name to find people. After Finding the correct reviewer check the Select Box (Sel) and the click on select at the bottom of the box. Repeat the step to select the necessary reviewers
Figure 23
24) It is very important that for
each reviewers added, the “Action” box is Checked so they receive a notification and have the access rights to access and edit this submittal package
Figure 24
Attaching Files (the actual submittals) to the Package
25) Attachments should be added to each individual respective submittal item. To do this, go back to the Package Items (1) tab. For Said Register Item scroll all the way to the Right and click the “Attach file” button Under Attach Files…
Figure 25
96
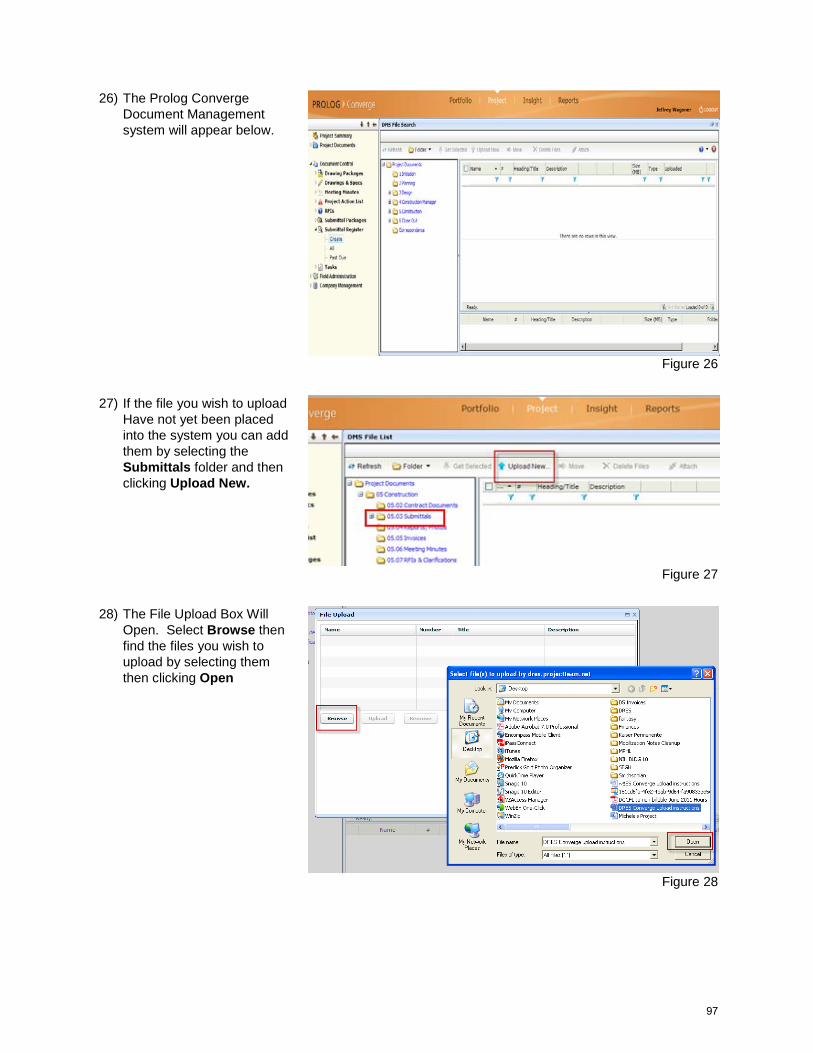
26) The Prolog Converge Document Management system will appear below.
Figure 26
27) If the file you wish to upload Have not yet been placed into the system you can add them by selecting the Submittals folder and then clicking Upload New.
Figure 27
28) The File Upload Box Will Open. Select Browse then find the files you wish to upload by selecting them then clicking Open
Figure 28
97
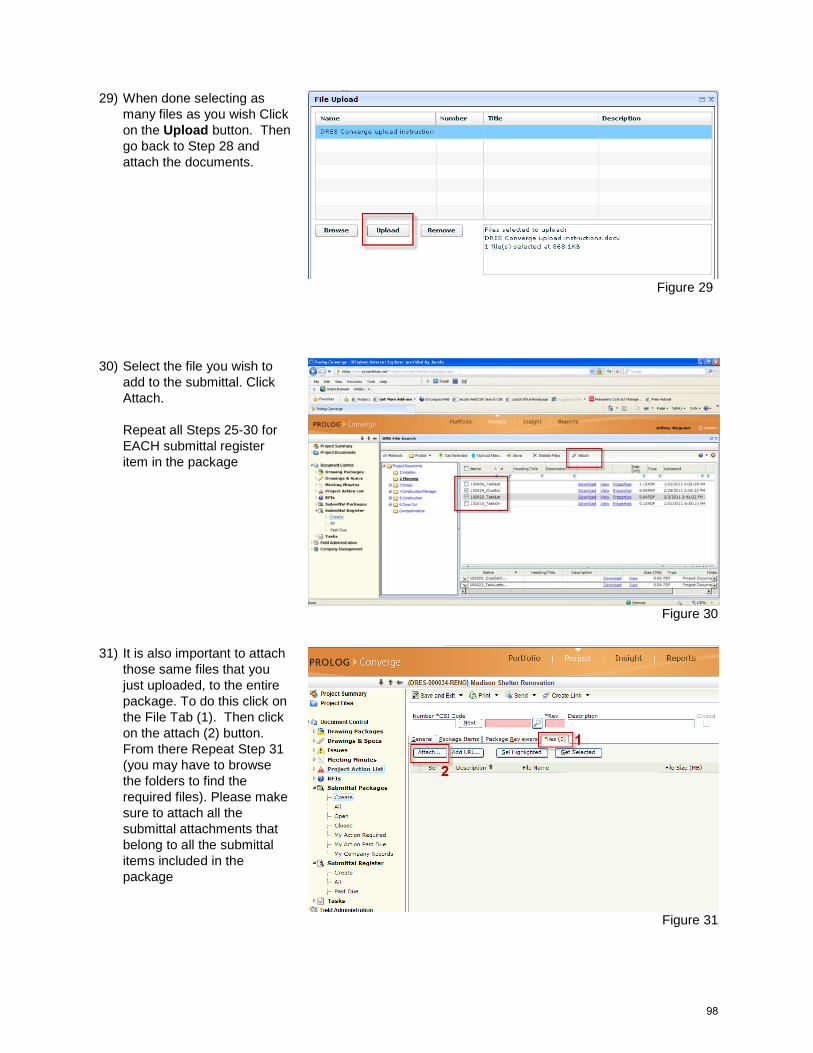
29) When done selecting as many files as you wish Click on the Upload button. Then go back to Step 28 and attach the documents.
Figure 29
30) Select the file you wish to add to the submittal. Click Attach. Repeat all Steps 25-30 for EACH submittal register item in the package
Figure 30
31) It is also important to attach those same files that you just uploaded, to the entire package. To do this click on the File Tab (1). Then click on the attach (2) button. From there Repeat Step 31 (you may have to browse the folders to find the required files). Please make sure to attach all the submittal attachments that belong to all the submittal items included in the package
Figure 31
98
Please note: The contractor is responsible for clearly identifying the applicable item on the submitted documents (product data, shop drawing, samples and/or warranties) by circling the items.
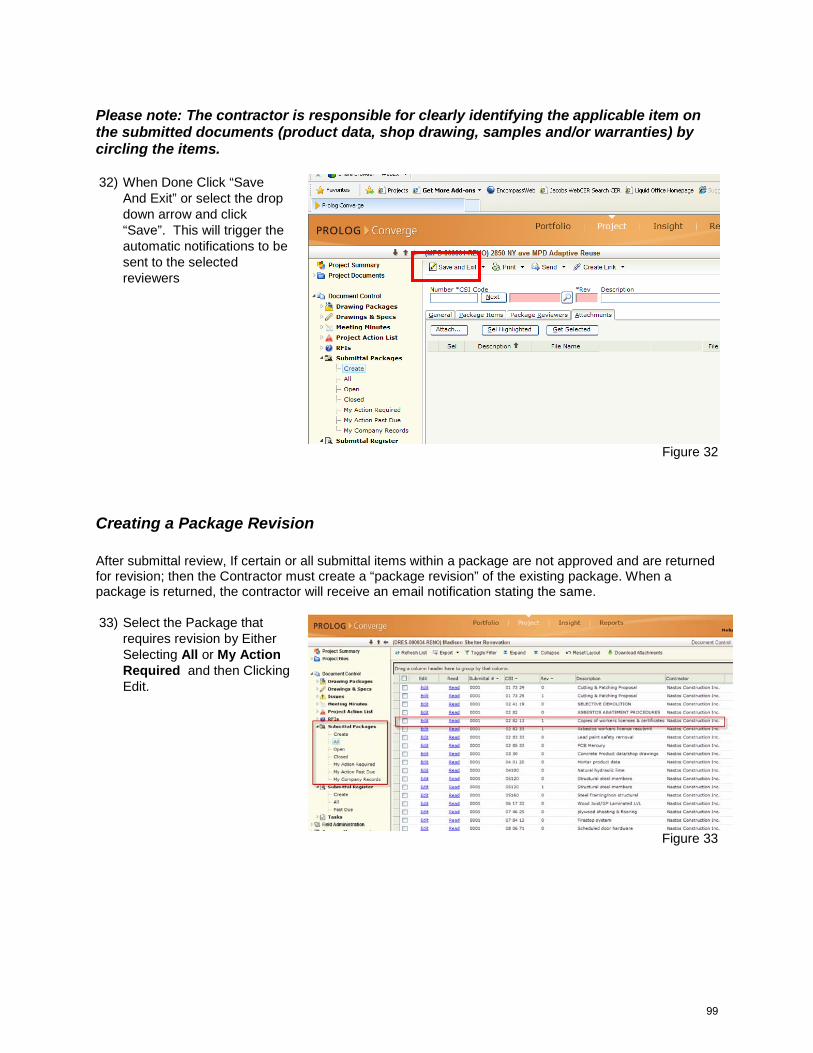
32) When Done Click “Save And Exit” or select the drop down arrow and click “Save”. This will trigger the automatic notifications to be sent to the selected reviewers
Figure 32
Creating a Package Revision
After submittal review, If certain or all submittal items within a package are not approved and are returned for revision; then the Contractor must create a “package revision” of the existing package. When a package is returned, the contractor will receive an email notification stating the same. 33) Select the Package that
requires revision by Either Selecting All or My Action Required and then Clicking Edit.
Figure 33
99
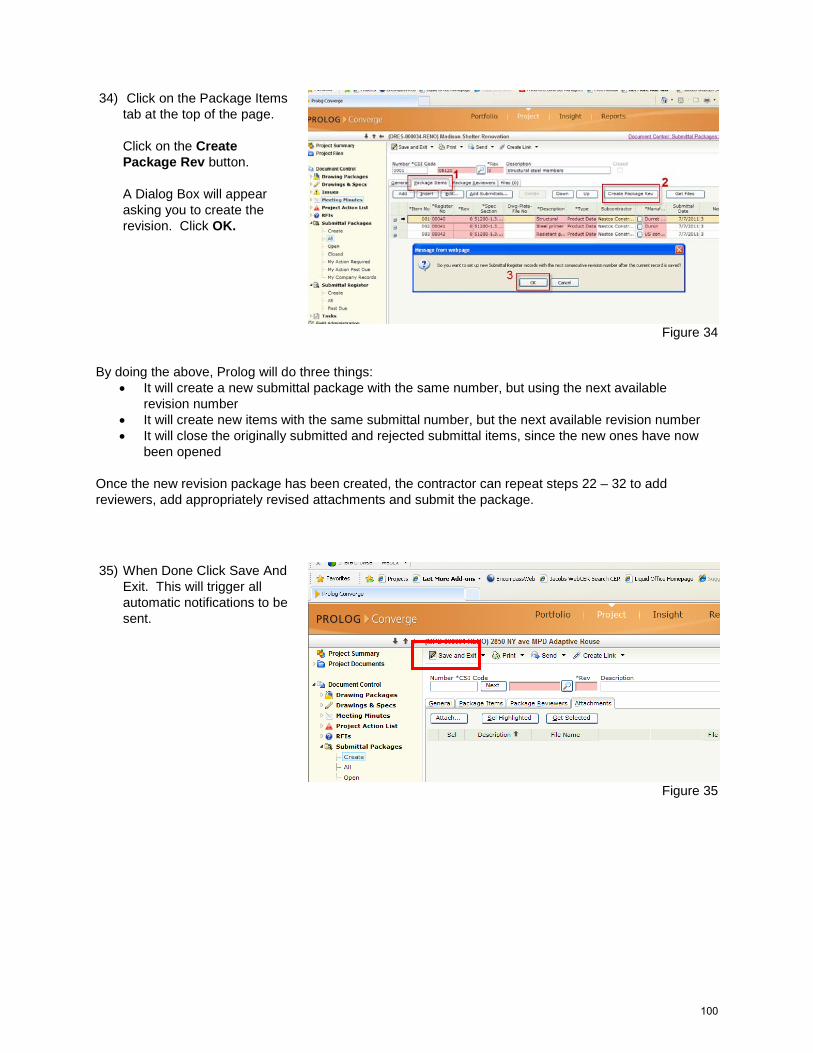
34) Click on the Package Items tab at the top of the page. Click on the Create Package Rev button. A Dialog Box will appear asking you to create the revision. Click OK.
Figure 34
By doing the above, Prolog will do three things: • It will create a new submittal package with the same number, but using the next available
revision number • It will create new items with the same submittal number, but the next available revision number • It will close the originally submitted and rejected submittal items, since the new ones have now
been opened Once the new revision package has been created, the contractor can repeat steps 22 – 32 to add reviewers, add appropriately revised attachments and submit the package.
35) When Done Click Save And Exit. This will trigger all automatic notifications to be sent.
Figure 35
100
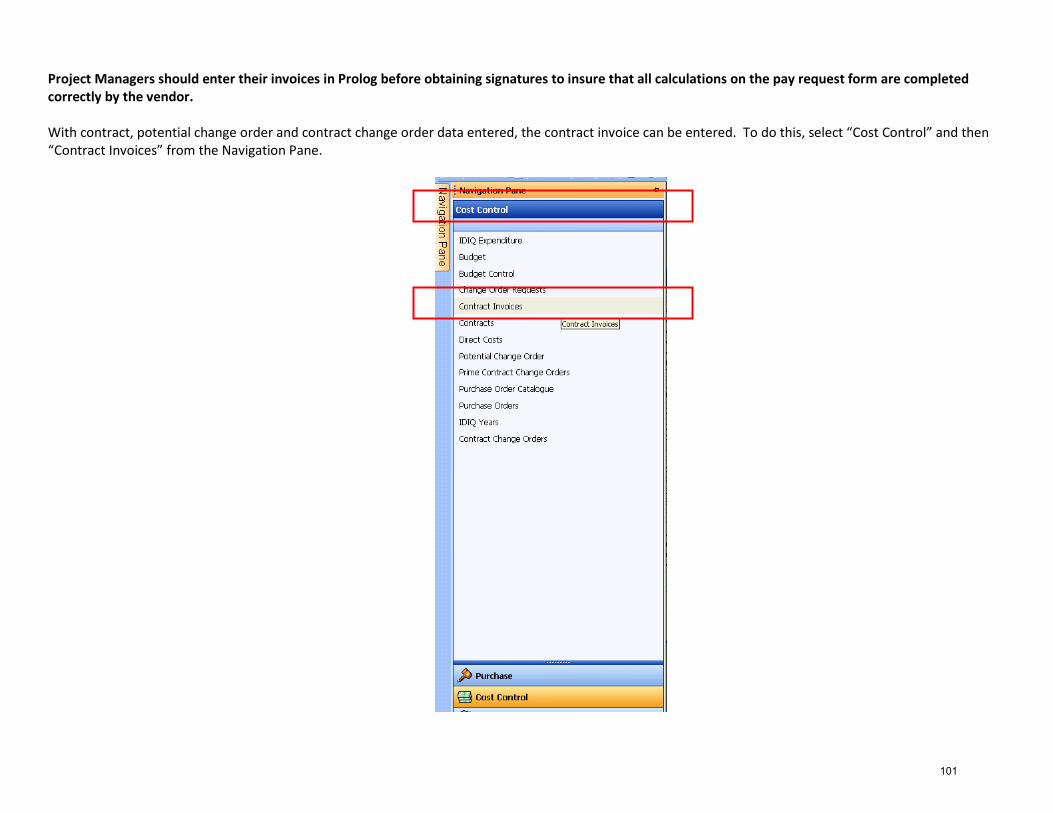
Project Managers should enter their invoices in Prolog before obtaining signatures to insure that all calculations on the pay request form are completed correctly by the vendor. With contract, potential change order and contract change order data entered, the contract invoice can be entered. To do this, select “Cost Control” and then “Contract Invoices” from the Navigation Pane.
101
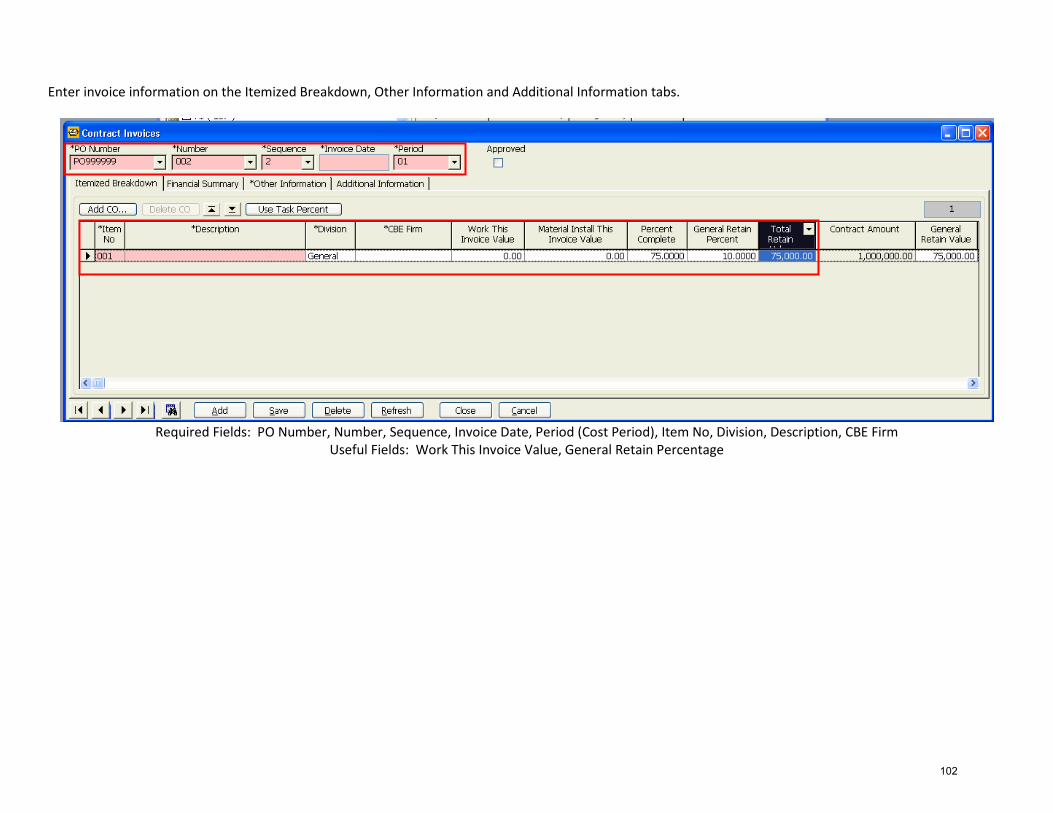
Enter invoice information on the Itemized Breakdown, Other Information and Additional Information tabs.
Required Fields: PO Number, Number, Sequence, Invoice Date, Period (Cost Period), Item No, Division, Description, CBE Firm
Useful Fields: Work This Invoice Value, General Retain Percentage
102
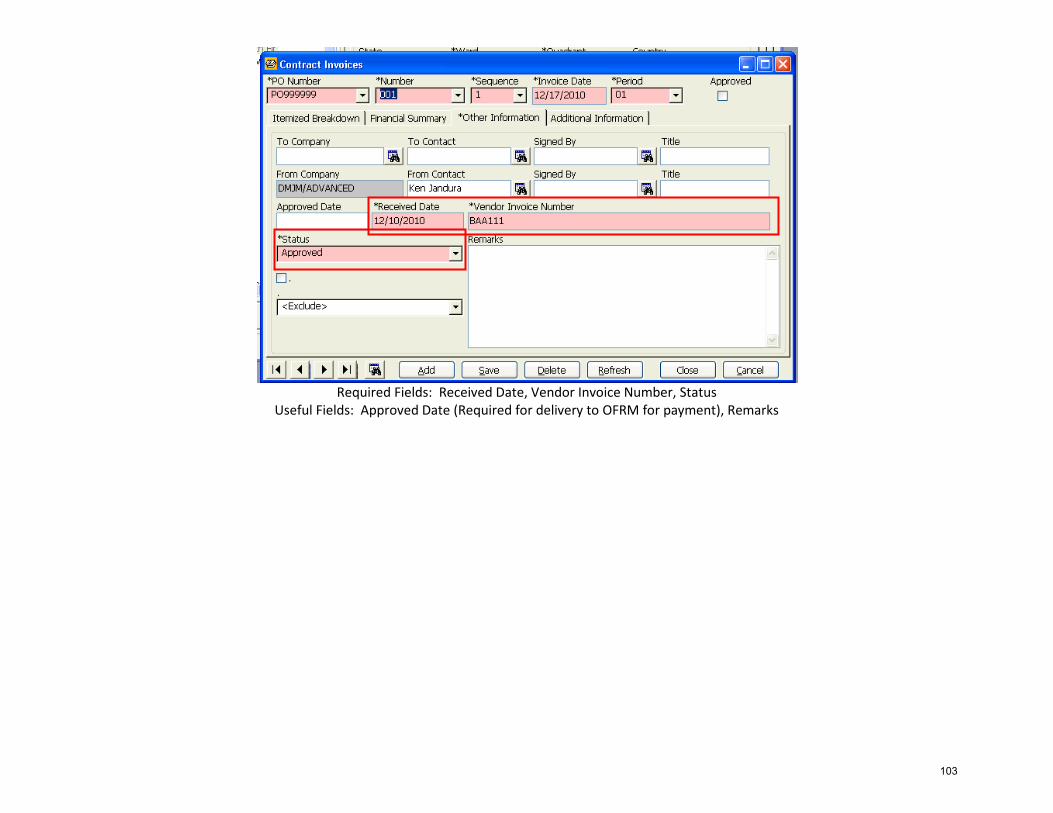
Required Fields: Received Date, Vendor Invoice Number, Status
Useful Fields: Approved Date (Required for delivery to OFRM for payment), Remarks
103
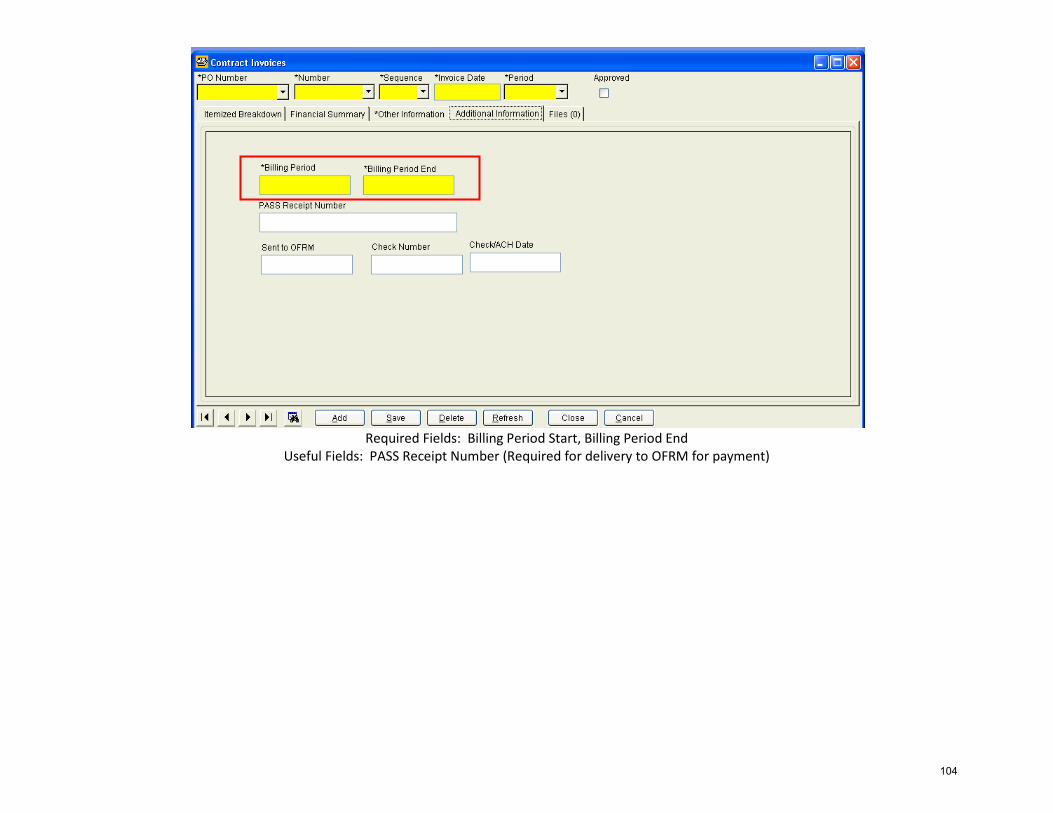
Required Fields: Billing Period Start, Billing Period End
Useful Fields: PASS Receipt Number (Required for delivery to OFRM for payment)
104
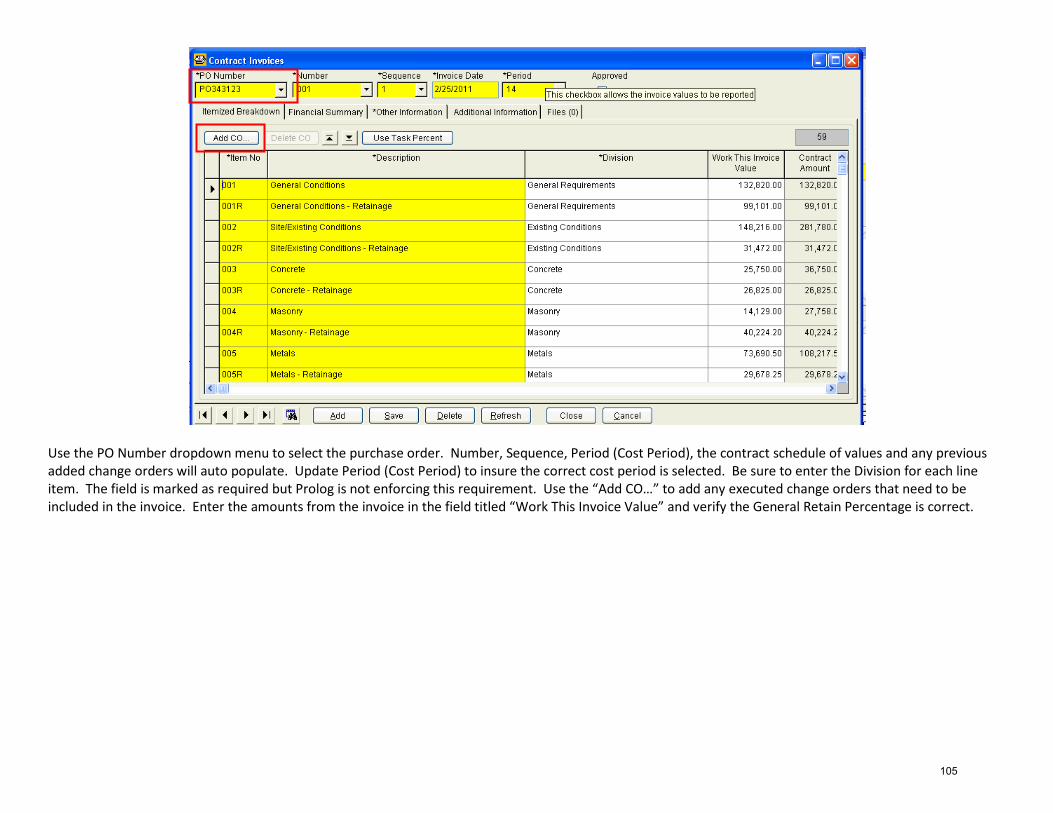
Use the PO Number dropdown menu to select the purchase order. Number, Sequence, Period (Cost Period), the contract schedule of values and any previous added change orders will auto populate. Update Period (Cost Period) to insure the correct cost period is selected. Be sure to enter the Division for each line item. The field is marked as required but Prolog is not enforcing this requirement. Use the “Add CO…” to add any executed change orders that need to be included in the invoice. Enter the amounts from the invoice in the field titled “Work This Invoice Value” and verify the General Retain Percentage is correct.
105
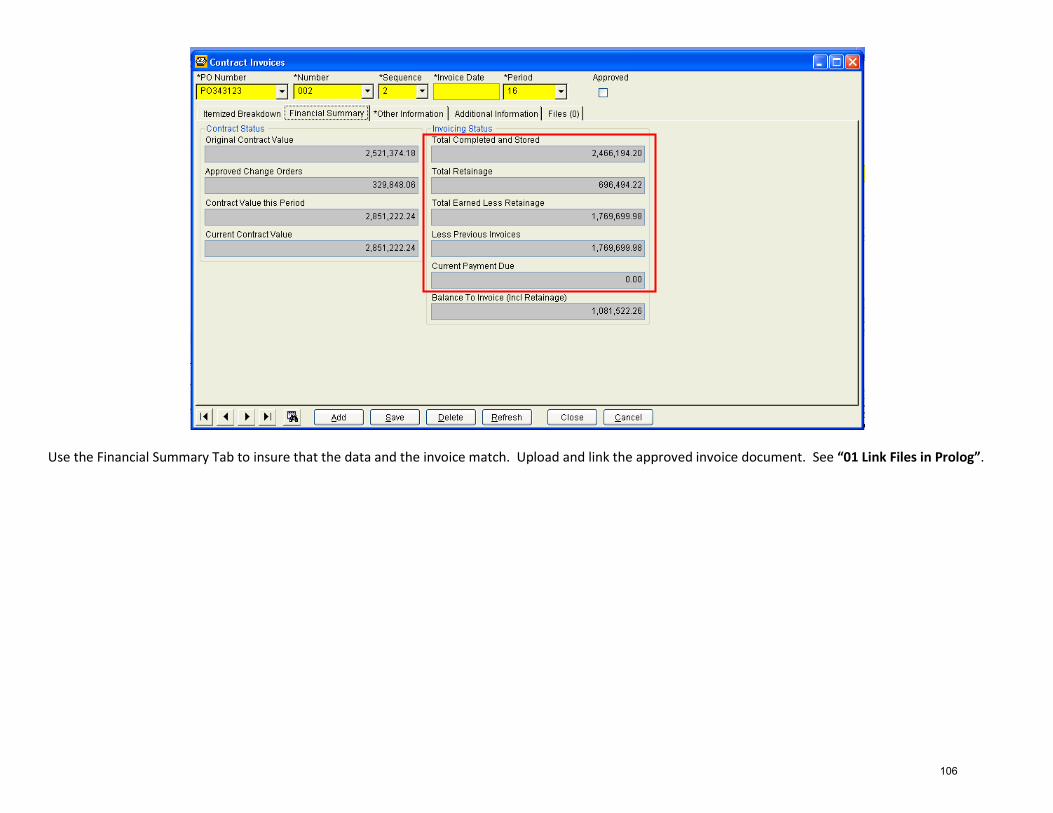
Use the Financial Summary Tab to insure that the data and the invoice match. Upload and link the approved invoice document. See “01 Link Files in Prolog”.
106
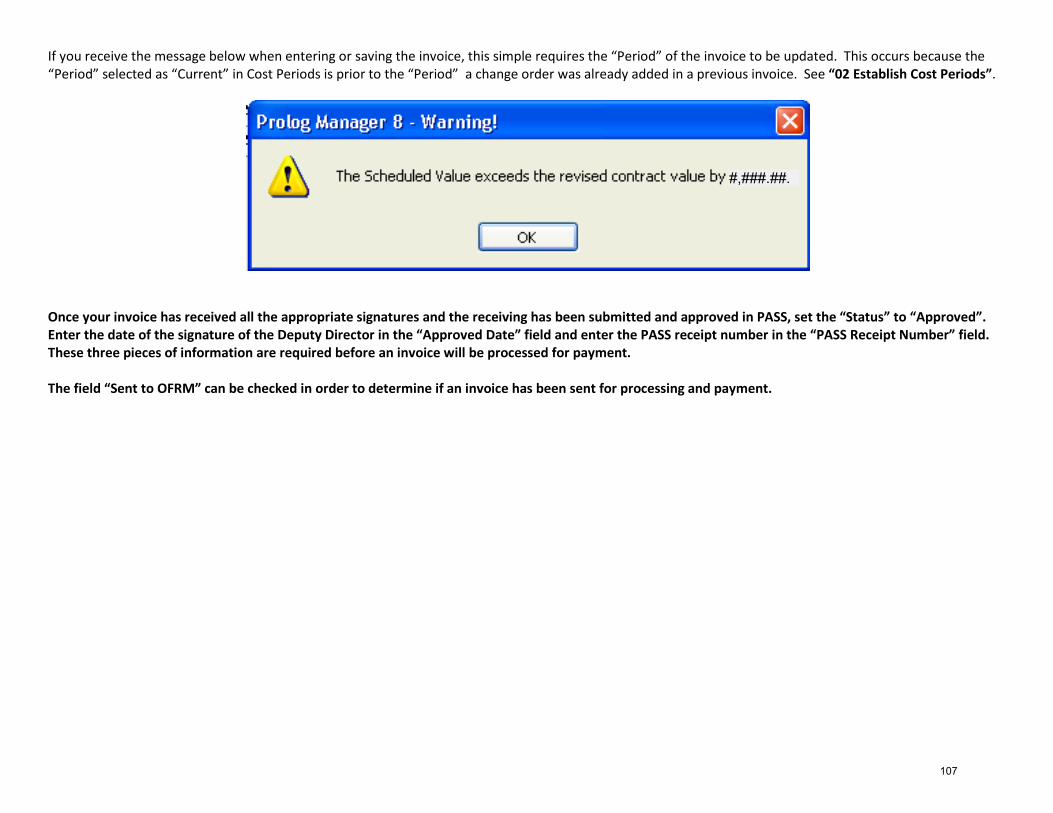
If you receive the message below when entering or saving the invoice, this simple requires the “Period” of the invoice to be updated. This occurs because the “Period” selected as “Current” in Cost Periods is prior to the “Period” a change order was already added in a previous invoice. See “02 Establish Cost Periods”.
Once your invoice has received all the appropriate signatures and the receiving has been submitted and approved in PASS, set the “Status” to “Approved”. Enter the date of the signature of the Deputy Director in the “Approved Date” field and enter the PASS receipt number in the “PASS Receipt Number” field. These three pieces of information are required before an invoice will be processed for payment. The field “Sent to OFRM” can be checked in order to determine if an invoice has been sent for processing and payment.
#,###.##.
107
Recommended