MITEL – SIP CoE
Technical Configuration Notes
Configure Ascom IP-DECT for use with MiVoice Office
SIP CoE 14-4940-00311

ii
NOTICE
The information contained in this document is believed to be accurate in all respects but is not warranted by Mitel Networks™ Corporation (MITEL®). The information is subject to change without notice and should not be construed in any way as a commitment by Mitel or any of its affiliates or subsidiaries. Mitel and its affiliates and subsidiaries assume no responsibility for any errors or omissions in this document. Revisions of this document or new editions of it may be issued to incorporate such changes.
No part of this document can be reproduced or transmitted in any form or by any means - electronic or mechanical - for any purpose without written permission from Mitel Networks Corporation.
TRADEMARKS
Mitel is a trademark of Mitel Networks Corporation.
Windows and Microsoft are trademarks of Microsoft Corporation.
Other product names mentioned in this document may be trademarks of their respective companies and are hereby acknowledged.
Mitel Technical Configuration Notes – Configure MiVoice Office (formerly Mitel 5000 CP) for use with Ascom IP-DECT
March 2014, 14-4940-00311
®,™ Trademark of Mitel Networks Corporation © Copyright 2014, Mitel Networks Corporation
All rights reserved

Table of Contents
iii
Contents
OVERVIEW ............................................................................................................................. 1
Interop History.........................................................................................................................1
Interop Status..........................................................................................................................1
Software & Hardware Setup ...................................................................................................1
Tested Features......................................................................................................................2
Device Limitations...................................................................................................................3
Network Topology ...................................................................................................................4
GENERAL CONFIGURATION NOTES ............................................................................. 5
MiVoice Office Configuration Notes .......................................................................................5
Network Requirements ........................................................................................................... 5 Assumptions for the MiVoice Office Programming .................................................................... 5 Software License – SIP Licensing ........................................................................................... 6 Add a SIP Phone in MiVoice Office ......................................................................................... 7 SIP Phone’ configuration details.............................................................................................. 8 Voice Mailbox Creation......................................................................................................... 10 SIP Phone Groups ............................................................................................................... 14 Call Configurations ............................................................................................................... 17 Music-on-Hold (MOH) Configuration...................................................................................... 18
Ascom IP-DECT Configuration Notes ..................................................................................20
Configure the IP-DECT base station...................................................................................... 20 Configure DECT System ...................................................................................................... 21 Configure Supplementary Services ....................................................................................... 22 Configure PARI.................................................................................................................... 22 Configure SARI.................................................................................................................... 23 Configure Air Sync ............................................................................................................... 23 Configure Users ................................................................................................................... 24 Subscribe the handsets ........................................................................................................ 25 Log in the handsets .............................................................................................................. 26


14-4940-00311 Ascom IP-DECT
Overview
This document provides a reference to Mitel Authorized Solutions providers for configuring the MiVoice Office to host the Ascom IP-DECT SIP telephones. Different SIP devices can be configured in various configurations depending on your VoIP solution. This document covers a basic Ascom IP-DECT setup with required options setup.
Interop History
Version Date Reason
1 March 2014 Initial Interop with MiVoice Office and the Ascom IP-DECT
Interop Status
The Interop of the Ascom IP-DECT SIP telephones has been given a Certification status. This device will be included in the SIP CoE Reference Guide. The status the Ascom IP-DECT achieved is:
The most common certification which means the device/service has been tested and/or validated by the Mitel SIP CoE team. Product support will provide all necessary support related to the interop, but issues unique or specific to the 3rd party will be referred to the 3rd party as appropriate
Software & Hardware Setup
This was the test setup to generate a basic SIP call between the Ascom IP-DECT and MiVoice Office.
Manufacturer Variant Software Version
Mitel MiVoice Office (formerly 5000 CP) 6.0.9.61
Ascom Ascom IP-DECT (IPBS2) 7.0.5
Mitel 5340 (SIP) 05.02.03.01
Mitel 5360 (IP) 05.02.02.08

14-4940-00311 Ascom IP-DECT
2
Tested Features
This is an overview of the features tested during the Interop test cycle and not a detailed view of the test cases. Please see the SIP Line Side Interoperability Test Plans for detailed test cases.
Feature Feature Description Issues
Basic Call Making and Receiving basic calls
DTMF Signal Sending DTMF after call setup (i.e. mailbox password)
Call Hold Putting a call on hold
Call Transfer Transferring a call to another destination Call Forward Forwarding a call to another destination
Conference Conferencing multiple calls together
Redial Last Number Redial
MWI Message Waiting Indication
Dynamic Extension
Multiple sets ringing when one number dialed
T.38 Fax Fax Messages Not Supported
G.711 Fax Fax Messages Not Supported
- No issues found - Issues found, cannot recommend to use - Issues found

14-4940-00311 Ascom IP-DECT
Device Limitations
This is a list of problems or not supported features when Ascom IP-DECT are connected to the MiVoice Office.
Feature Problem Description
Call Conference Conference cannot be initiated from Ascom IP-DECT handset.
Recommendation: None
14-4940-00311 Ascom IP-DECT
4
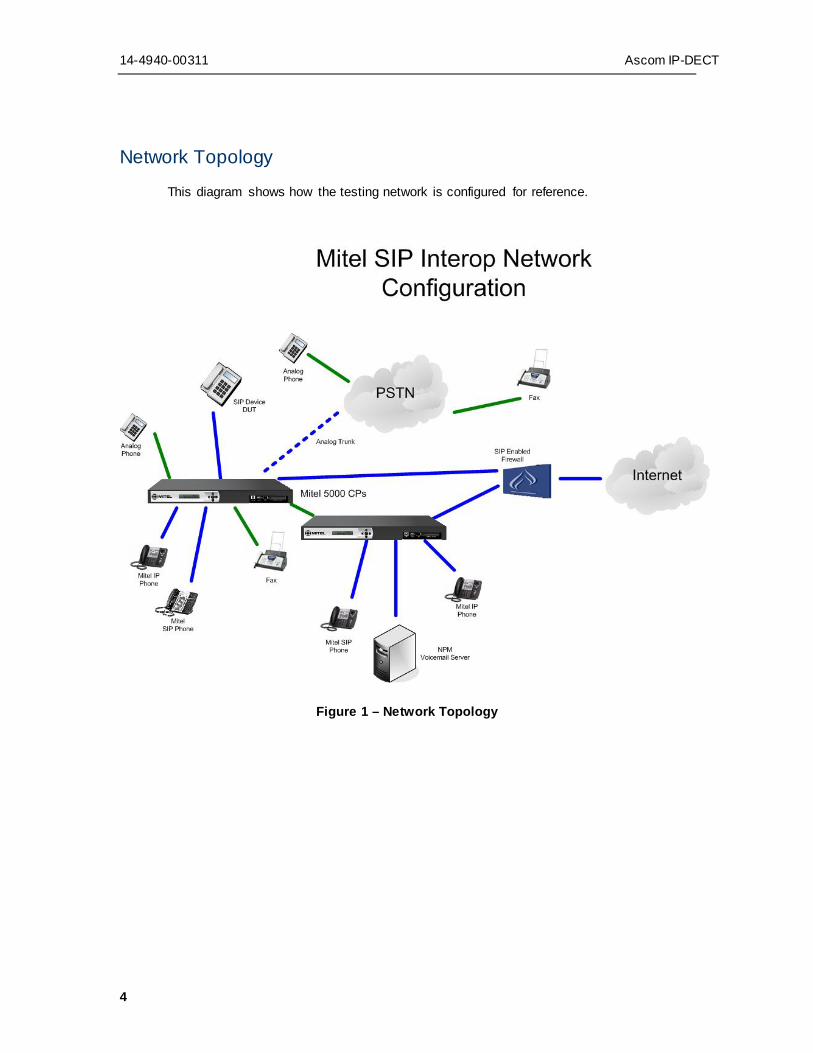
Network Topology
This diagram shows how the testing network is configured for reference.
Figure 1 – Network Topology

14-4940-00311 Ascom IP-DECT
General Configuration Notes
These notes offer basic guidelines how a device can be configured in a customer environment and how the Ascom IP-DECT was configured in our test environment.
For more detailed information on the programming of MiVoice Office, please refer to the Mitel 5000 CP Features and Programming Guide.
Disclaimer: Although Mitel has attempted to setup the interop testing facility as closely as possible to a customer premise environment, implementation setup could be different onsite. YOU MUST EXERCISE YOUR OWN DUE DILIGENCE IN REVIEWING, planning, implementing, and testing a customer configuration.
MiVoice Office Configuration Notes
The following steps show how to program MiVoice Office to connect with the Ascom IP-DECT.
Network Requirements
• There must be adequate bandwidth to support the voice over IP. As a guide, the Ethernet bandwidth is approx 85 Kb/s per G.711 voice session and 29 Kb/s per G.729 voice session (assumes 20ms packetization). As an example, for 20 simultaneous SIP sessions, the Ethernet bandwidth consumption will be approx 1.7 Mb/s for G.711 and 0.6Mb/s. Almost all Enterprise LAN networks can support this level of traffic without any special engineering. Please refer to the 5000 Engineering guidelines for further information.
• For high quality voice, the network connectivity must support a voice-quality grade of service (packet loss <1%, jitter < 30ms, one-way delay < 80ms).
Assumptions for the MiVoice Office Programming
• The SIP signaling connection uses UDP on Port 5060.

14-4940-00311 Ascom IP-DECT
6
Software License – SIP Licensing
Ensure that MiVoice Office is equipped with enough Category ‘F’ Phones licenses for the connection of SIP end points. This can be verified within the Software License Feature section form.
Figure 2 – Software License

14-4940-00311 Ascom IP-DECT
Add a SIP Phone in MiVoice Office Navigate to System->Device and Feature Codes->Phones->Local (for networked configurations). Right click on the free space in right hand side pane and select Create SIP Phone as shown in Figure 3. Pick (or type in) the extension number for the new SIP phone and click OK.
Figure 3 – SIP phone creation

14-4940-00311 Ascom IP-DECT
8
SIP Phone’ configuration details
After successful creation of a new SIP phone, double click on it. The default configuration settings will be displayed as shown in Figure 4.
In this screen, you may need to change some of the settings:
1. Passcode – this passcode is used for Remote Programming feature such as call forward to the public network. The default passcode is the extension number of the phone.
2. Configure Audio settings for camped, held and ringing calls as required. For instance, you can change the audio playback ringing, camped or holding scenarios to File-Based Music-on-Hold and described later in this document.
3. Take a note of SIP Phone Group number since we will need it later.
Figure 4 – SIP phone configuration overview
Associated Extensions
Click Associated Extensions node as shown in Figure 5.
Configure Voice Mail extension according to the site configuration. Also, configure Outgoing Extension to allow this SIP phone to seizure some definite trunk line when making an outbound call.

14-4940-00311 Ascom IP-DECT
Figure 5 – Settings for Associated Extensions
Flags
The use of Flags can differ from site to site. In our test environment, we use the settings as shown in Figure 6.

14-4940-00311 Ascom IP-DECT
10
Figure 6 – Flag settings (an example)
Voice Mailbox Creation By default, when the new phone has been added to MiVoice Office, there was no voicemail box created for this extension. That’s why, if you click Mailboxes node as in Figure 6, you don’t see any mailboxes associated with this new extension. So, we have to create the user’s voice mailbox manually.
Navigate to Voice Processor->Devices->Mailboxes->Local (for networked configurations).
Right click on the free space in right hand side pane and select Create Associated Mailboxes as shown in Figure 7.
Select the phone type – SIP Phone, and click Next. Click on newly created SIP phone and click Add Items button. Then click Finish button.

14-4940-00311 Ascom IP-DECT
Figure 7 – Mailbox creation
After successful creation of the new voice mailbox, double click on it to view its settings. Since the associated user has never accessed the voicemail before, the default mailbox initialization status is set to No and the System Greeting is being used as the default one. The default passcode to access voice mailbox is 1111.
So, make a call from Ascom IP-DECT into the voicemail pilot number to initialize the mailbox. (You need to change the passcode and record the voicemail box’ name and greetings). Configure some other options as required. See the example in Figure 8.

14-4940-00311 Ascom IP-DECT
12
Figure 8 – Voice mailbox settings
When configuring call forwarding to a voicemail box, it is not enough to create the mailbox and assign it to the phone. You also have to define the Forwarding Path and assign it to the phone. To do this:
1. Navigate to System->Phone Related Information->System Forwarding Paths 2. Define at least Forwarding Point 1 for the selected path. In the example in Figure 9,
we defined extension 2500 as the forwarding point for the path #1. Extension 2500 represents the pilot number to dial Basic voicemail (BVM).
NOTE: You can create many Forwarding Paths for various circumstances. For easier identification later on, we would recommend to enter a text in the Description field as shown in Figure 9.

14-4940-00311 Ascom IP-DECT
Figure 9 - Example of Forwarding Path definition
Now, when Forwarding Path #1 is configured, we can assign it to the phone:
1. Navigate to System->Device and Feature Codes->Phones-><Phone’s extension number>->Forwarding Paths
2. Right click in right hand pane and select Add to Forwarding Paths List 3. Select the Forwarding Paths and click Next 4. Select the required Forwarding Path’s number (#1) and click Add Items button 5. Click Finish NOTE: If you wish to forward unanswered internal calls to the defined Forwarding Point, set parameter Fwd Call Type – IC Calls to “Yes” as shown on Figure 10.

14-4940-00311 Ascom IP-DECT
14
Figure 10 - Example of the properties for defined Forwarding Path
SIP Phone Groups
Previously, we noticed the SIP Phone Group’ number in SIP Phone’ configuration details section. Now we need to configure some settings there.
Navigate to System->Device and Feature Codes->SIP Peers->SIP Phone Groups and collapse the node where our SIP phone resides in (P9006 in our test environment). Click Configuration as shown in Figure 11.
In Configuration screen, we can see in which Call Configuration this SIP phone resides in. You can access the Call Configuration for this Phone Group by double clicking on it. See section Call Configuration section later in this document for details.
Here, we also can define whether Camp-on allowed or not and change the phones’ operational status to e.g. Out-of-Service – Maintenance.
Make sure that Maximum Number of Calls is set to 2! Otherwise, Call Forwarding on Busy will not work.

14-4940-00311 Ascom IP-DECT
Figure 11 – SIP Phone Groups’ configuration
Authentication
To increase the security of SIP devices Mitel recommends enabling In-Bound Authentication where possible. Click Authentication and ensure that option Enable In-bound Authentication is set to “Yes” as shown in Figure 12.
Enter alphanumerical details in the In-Bound Authentication Username and Password fields. NOTE: Make sure that these Username and Password match the settings for the SIP authentication in your Ascom IP-DECT (see section Configure Users and Figure 22).
Making these changes will provide an increased level of security as the SIP device is challenged for logon, and its username and password checked against those you have configured.

14-4940-00311 Ascom IP-DECT
16
Figure 12 – Authentication setting for the SIP Phone Group
MWI
The MWI field determines whether the phone accepts Message Waiting Indication (MWI) from MiVoice Office. Verify that option Accept MWI is set to Yes. See Figure 13 for details.
Leave the configuration option for NAT Settings at its default value. Registrations – All fields there are read-only and will appear after SIP device registered with MiVoice Office.

14-4940-00311 Ascom IP-DECT
Figure 13 – MWI settings
Call Configurations
Call configurations define the settings that IP and SIP phones use when connected to calls. You can assign multiple devices to a specific call configuration.
By default, all IP devices are being placed in Call Configuration 1, which is programmable. For the SIP phones, you assign the Call Configuration to the SIP Phone Groups.
You can program up to 25 different Call Configurations.
Set Audio Frames/IP Packet to “2” which corresponds to the RTP packet rate of 20ms.
Ensure that DTMF Encoding Setting and Transmit Lever are set according to the site requirements.
Also set the required Speech Encoding Setting.
See an example in Figure 14.

14-4940-00311 Ascom IP-DECT
18
To view the list of the SIP Phone Groups that are currently assigned to the call configuration, navigate to:
6. System->IP-Related Information->Call Configurations->SIP Phone Groups 7. Click the SIP Phone’s group number.
Figure 14 – Call Configuration
Music-on-Hold (MOH) Configuration
There is a built-in port located on the back of MiVoice Office chassis where you can connect an external music source. Alternatively, you can use File-Based MOH which plays the audio file stored in system memory. NOTE: This feature requires the File-Based MOH Source software license.
Before File-Based MOH will be enabled in MiVoice Office, you have to convert your music file into 8bit, Mono, non-proprietary G.711 format. The converted file must have extension .n64u.
After file conversion step, you have to upload this .n64u audio file to MiVoice Office using the web connection (and not through the Mitel DB Programming!). For details, please refer to the Mitel 5000 CP Features and Programming Guide.

14-4940-00311 Ascom IP-DECT
When preparation steps are completed, you can enable File-Based MOH for the SIP phone.
Navigate to SIP phone’s main configuration page as in Figure 4.
As an example, let’s set File-Based MOH for the Calls Holding for this Device. Click corresponding line in Value column and select “File-Based MOH” as shown in Figure 15.
Right click on Extended Value and follow the wizard to pick and assign the newly uploaded audio file as the source of music.
Figure 15 – Select File-Based MOH

14-4940-00311 Ascom IP-DECT
20
Ascom IP-DECT Configuration Notes
The following steps show the basics of how to configure the Ascom IP-DECT to interconnect with the MiVoice Office. The configuration settings below are the main reference points and by no means be considered as the comprehensive configuration instructions.
Configure the IP-DECT base station
Navigate to the DECT and click on the Master and enter the following: • Mode, Select Active from the dropdown box (Reset required) • Check the Enable PARI Function check box • Protocol, Select SIP from the dropdown box • Proxy, Enter the IP address of the MiVoice office. • Check the Enbloc Dialing check box • Check the Allow DTMF through RTP check box. • Registration Time-To-Live 300 sec. • Hold Signalling, sendonly • Check the Register With Number check box. Click the OK button to continue (not shown in Figure 16).
Figure 16 – Configure DECT Master

14-4940-00311 Ascom IP-DECT
Configure DECT System Click on the System tab and enter the following: • System Name Enter a System Name • Password Enter a Password • Confirm Password Confirm the Password • Subscriptions Select With System AC from the dropdown box • Authentication Code Enter a DECT handset subscribe code • Tones Select the location for use of the local dial tone • Default Language Select the required Language for the display management • Frequency Select the required Frequency from the dropdown box • Enabled Carriers Select the number of Carriers required (normally as default) • Local R-Key Handling Check the box • Coder Select the preferred Coder from the Coder dropdown box Click the OK button to continue.
Figure 17 – DECT System

14-4940-00311 Ascom IP-DECT
22
Configure Supplementary Services Click on the Suppl.Serv tab and enter the following: • Check the Enable Supplementary Services check box • MWI Mode Select User dependent interrogate number from the dropdown box • MWI Notify Number; Enter number to VM Click the OK button to continue. See Figure 18 for details.
Figure 18 – Supplementary Services
Configure PARI It is only necessary to change the PARI if there is other IP-DECT systems within radio coverage using the same System id. See Figure 19.

14-4940-00311 Ascom IP-DECT
Figure 19 – Configure PARI
Configure SARI Click on the SARI tab. The SARI is an Ascom provided activation code which is needed for the system to function. Contact Ascom to obtain a SARI. Enter the SARI value (note the actual value has been hidden on the screen shown below for security reasons). Click the OK button to continue.
Figure 20 – Configure SARI
Configure Air Sync At least one Radio must be in Sync Master mode, additional Radios can also be in Sync Master mode for backup reasons. Avoid to configure the Pari Master as Sync Master. Click on the Air Sync tab and select Master from the Sync Mode dropdown box. Click the Resynchronize on command radio button. Click the OK button to continue. See Figure 21.

14-4940-00311 Ascom IP-DECT
24
Figure 21 – Configure Air Sync
Configure Users Navigate to the Users and click on the Users tab. The Park value is displayed. This value is needed when programming Ascom wireless DECT handsets. Note, the PARK information is derived from the SARI and should be obtained from an Ascom associate (Note the actual PARK and PARK 3rd pty values have been hidden on the screen shown in Figure 22 for security reasons). Click the new link to provision a new user account. When the Edit type web page is presented click on the User radio button and enter the following: • Long Name Enter any descriptive name that identifies this user (must be unique) • Number Enter the extension assigned to this user (must be unique) • Password Enter the Password. The password must match the previously
configured value in MiVoice Office. See section Authentication and Figure 12.
• Confirm Password Confirm Password • Idle Display Enter a display name which will be displayed on the DECT Handset
screen • Auth. Code Enter the Auth. Code if required (used for handset log in) Once all the user information has been configured click the OK button. Repeat this process for each user being added to the system.

14-4940-00311 Ascom IP-DECT
Figure 22 – Configure Users
Subscribe the handsets Subscribe the handset to the DECT system • Enter a system name (If left empty the System name from the DECT Master will be used) • Park code is only necessary if there is more than one DECT system in the area • Enter the System Authentication Code Password (Note, the AC code is the System AC
configured in Figure 17) • Protection of the registration prevent the user to un-subscribe from the phone user interface
Figure 23 – Subscribe handset

14-4940-00311 Ascom IP-DECT
26
Log in the handsets • Dial *x*yyyy*zzzz#
- x is the home Master-id for this user, see Figure 16 - yyyy is the Number you want login to - zzzz is the Authentication Code for this user (if used), see Figure 22
Figure 24 – Log in handset

14-4940-00311 Ascom IP-DECT
Recommended