© 2019 NTT DATA Corporation
NTT DATA Corporation Purchasing Department
Ariba Usage Guide_Delivery/Invoicing_Ver.1.1

© 2019 NTT DATA Corporation 2
1. Introduction1-1. About This Guide
1-2. Structure of Ariba Usage Guide
1-3. Scope of This Guide
1-4. How to See Various Materials
2. Delivery/Invoicing Operational Rules2-1. Preconditions for Delivery/Invoicing
2-2. Points to Note regarding Persons for Implementing the
Invoicing Registration
2-3. How to Set Invoice Numbers
3. How to Implement Delivery/Invoicing,
Submission and Completion3-1. Flow for Invoicing Registration Tasks on Ariba
3-2. Checking Delivery by E-mail
3-3. Procedures for Displaying Orders
3-4. Procedures for Implementing the Invoicing Registration
3-5. How to Check Situations of Implementing the Invoicing Registration
3-6. How to Modify Invoicing Content
Revision History

© 2019 NTT DATA Corporation 3
1. Introduction
1-1. About This Guide
1-2. Structure of Ariba Usage Guide
1-3. Scope of This Guide
1-4. How to See Various Materials

© 2019 NTT DATA Corporation 4
1-1. About This Guide
NTT DATA and the group companies participating in SSC (purchasing tasks) (*) (the “Buyer”) will
start using a system provided by SAP Ariba (“Ariba”) for purchasing contract procedures (from
orders/order confirmation to delivery/invoicing) with supplier companies (the “Supplier”) from
August 17, 2020.
This document is the guide that enables the Supplier to use Ariba for smooth purchasing
transactions with the Buyer.
The guides are prepared per task handled by the Supplier.
Images (especially screen captures) appeared in the guides are as of a date of revising each
guide. Images in the guides may be different from images on the system due to changes in UI
and other reasons.
Please understand possible differences in advance.
* For group companies participating in SSC (purchasing tasks), see the URL below:
https://www.nttdata.com/jp/ja/about-us/proc/g-ssc/
* The group companies participating in SSC shall be valid from the time when NTT Data makes the announcement.

© 2019 NTT DATA Corporation 5
1-2. Structure of Ariba Usage Guide
Below is the structure of the “Ariba Usage Guide.” See a guide suitable for your purpose.
Guide title Outline
Ariba Usage Guide_CommonExplains procedures for logging in and out Ariba and
various contact information on how to operate Ariba
Ariba Usage Guide_Order
Confirmation
Explains procedures for implementing order
confirmation on Ariba
Ariba Usage
Guide_Delivery/Invoicing
Explains procedures for creating invoices and checking
payment announcement on Ariba

© 2019 NTT DATA Corporation 6
Qu
ota
tion
Pu
rch
asin
g
req
ue
st/a
pp
rova
l/
ord
er p
lac
em
en
t
De
live
ry/
acc
ep
tan
ce
/
paym
en
t
Purchasing Platform
Buyer Supplier
This section explains the overall image of purchasing contract procedures and the scope of this
Guide.
Qu
ota
tion
• A request for quotation and a quotation reply (collaboration) are
implemented on a system through Ariba.
Pu
rch
asin
g
req
ue
st/a
pp
rova
l/
ord
er p
lac
em
en
t
• After approval by the Buyer, a purchase order is sent to the Supplier. The
Supplier receives and checks the purchase order form through Ariba.
• The Supplier uses an order confirmation function of Ariba to show its
intention of order approval (order confirmation).
• Order confirmation and written individual contracts which are executed on a
paper basis are digitalized.
Deliv
ery
/
ac
ce
pta
nce
/
pa
ym
en
t
• The Supplier uses an invoicing registration function of Ariba to implement
task completion reports and delivery/invoicing registration.
• Buyer pays the contract price in accordance with the payment terms on the
contract between Buyer and Supplier.
Supplement information on overview of Supplier tasks
1-3. Scope of This Guide
Not scope of Ariba for overseas suppliersRequest for quotation
Quotation reply
Order Confirmation
Delivery/invoicing
Invoicing information check
Payment receipt
Payment
Purchasing request
Order placement
Approval
Not scope of Ariba for overseas
suppliers
Scope of this Guide
© 2019 NTT DATA Corporation 7
1-4. How to See Various Materials
You can see documents such as reference materials for initial settings for use of Ariba and tasks
not described in this Guide on our website [https://www.nttdata.com/jp/ja/about-us/proc/].
At the bottom of the website, there are some links for the documents in English, and you can
download the documents you need.

© 2019 NTT DATA Corporation 8
2. Delivery/Invoicing
Operational Rules
2-1. Preconditions for Delivery/Invoicing
2-2. Points to Note regarding Persons for Implementing the Invoicing Registration
2-3. How to Set Invoice Numbers
© 2019 NTT DATA Corporation 9
2-1. Preconditions for Delivery/Invoicing
Submit vouchers related to delivery/acceptance and invoices on the Invoicing
Registration on Ariba or through means such as e-mails.
In the event of any discrepancy between the items shown on an Ariba screen
and the content of attached files in the Invoicing Registration, the items on the
screen will take priority.
© 2019 NTT DATA Corporation 10
2-2. Points to Note regarding Persons for Implementing the Invoicing Registration
Ariba does not have workflows that enable to be used in implementing the
Invoicing Registration. We would like to thank you for your consideration on
operational aspects. The Invoicing Registration should be implemented
directly by or after approval of any person with necessary authorization.
If the Invoicing Registration is implemented by a non-authorized user, this is
deemed to have implemented the effective Invoicing Registration. Please
understand it in advance.
The Supplier should establish operational rules and thoroughly implement
them internally.
© 2019 NTT DATA Corporation 11
2-3. How to Set Invoice Numbers
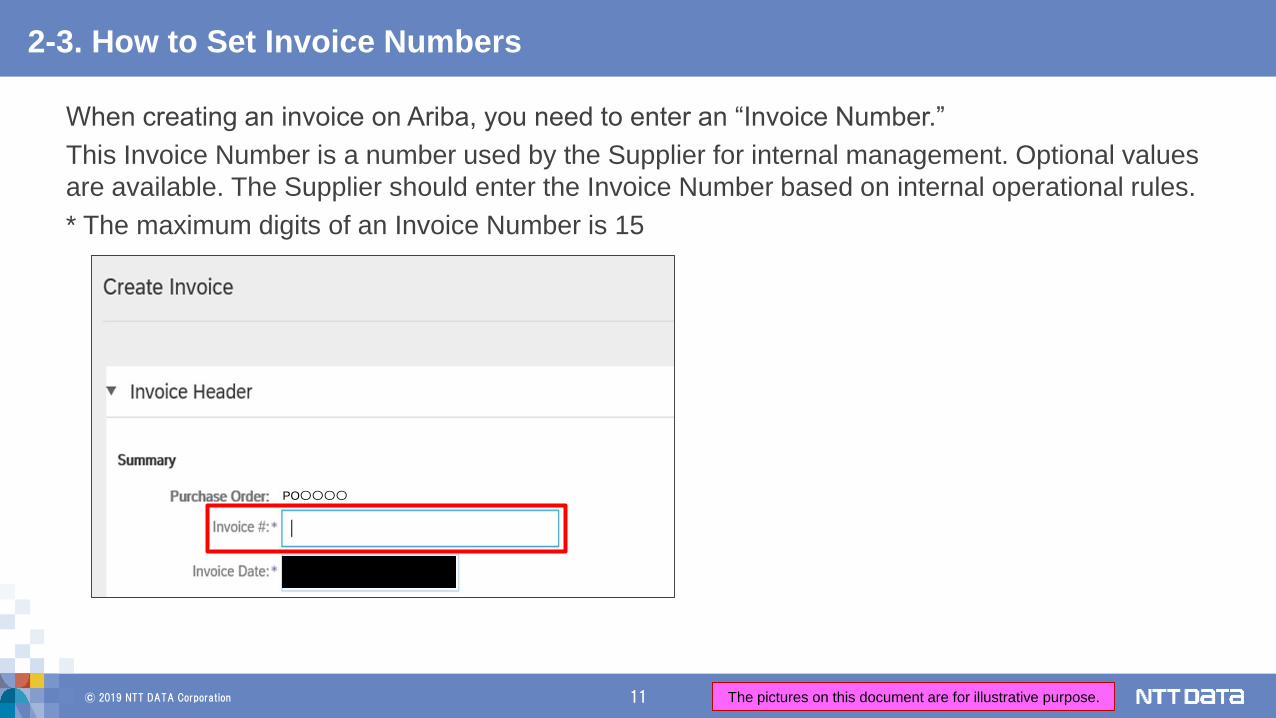
When creating an invoice on Ariba, you need to enter an “Invoice Number.”
This Invoice Number is a number used by the Supplier for internal management. Optional values
are available. The Supplier should enter the Invoice Number based on internal operational rules.
* The maximum digits of an Invoice Number is 15
PO〇〇〇〇
The pictures on this document are for illustrative purpose.

© 2019 NTT DATA Corporation 12
3. How to Implement
Delivery/Invoicing, Submission
and Completion3-1. Flow for Invoicing Registration Tasks on Ariba
3-2. Checking Delivery by E-mail
3-3. Procedures for Displaying Orders
3-4. Procedures for Implementing the Invoicing Registration
3-5. How to Check Situations of Implementing the Invoicing Registration
3-6. How to Modify Invoicing Content

© 2019 NTT DATA Corporation 13
3-1. Flow for Invoicing Registration Tasks on Ariba
This section explains the standard flow for tasks from the Invoicing Registration to payment receipt
confirmation.Buyer Supplier Explanation
The Supplier logs in Ariba in order to implement the Invoicing
Registration
The Supplier selects the applicable Order and implements the
Invoicing Registration (creates an invoice)
The Buyer receives an e-mail notifying implementation of the
Invoicing Registration from the Supplier and checks the content
The Buyer checks an invoice and acceptance vouchers and then
conducts acceptance
The Buyer makes payment to the Supplier
Logs in Ariba
Implements the Invoicing
Registration (creates an invoice)
Makes payment
Receives and checks a
notice e-mail
Conducts acceptance
Send Confirmation Request
by E-mailCheck delivery and reply
the result
The Supplier order checking delivery by E-mail, and the Buyer
reply the result.

© 2019 NTT DATA Corporation 14
3-2. Checking Delivery by E-mail
Before Invoicing via Ariba, supplier should send E-mail to order checking delivery. The E-mail should follow
the rule below. Also, when supplier creates invoice on Ariba, supplier should attach the evidence files such
as a completion report or the checked E-mail replied by Supervisor.
E-mail Sample to order
checking delivery
E-mail Sample to pass the
check
From: Project Manager of supplier
To: Supervisor of buyer* If PM doesn’t send the e-mail, PM should be put on CC.
.
From: Supervisor of buyer
To: Project Manager of supplier
CC: Manager of supervisor of buyer* If supervisor doesn’t send the e-mail, supervisor should be put on CC.
Title: Po xxxx: Confirmation request regarding with “Contract Name” Title: Re: Po xxxx: Confirmation request regarding with “Contract Name”
Title should include
“Purchase Order Number”
and “Contract Name”.
Body: I am attaching some files as delivery of “Contract Name”.
Please verify them and let me know the result of the check.
Attachments: Delivery such as Completion Report
Body: I received all attached files, and they have no issues.
The date of check: YYYY/MM/DD
The attached delivery files on this e-mail should be the passed ones,
so you should not change them and will attach them when you will
create the invoice on Ariba.
Attachments: Delivery such as Completion Report

© 2019 NTT DATA Corporation 15
3-3. Procedures for Displaying Orders_1/4
This section explains procedures for displaying the Order in order to implement the Invoicing
Registration.
1. Log in Ariba and click the “Inbox” tab
Click the
“Inbox” tab
2. Click the “Order/Release” on the displayed submenu
Click the “Orders and Releases”
The pictures on this document are for illustrative purpose.

© 2019 NTT DATA Corporation 16
PO〇〇〇〇
3-3. Procedures for Displaying Orders_2/4
3. The “Order/Release” screen appears. Click the “Order Number” for the applicable Order
Click the “Order Number”
The pictures on this document are for illustrative purpose.

© 2019 NTT DATA Corporation 17
3-3. Procedures for Displaying Orders_3/4
* You can also select the applicable Order from the list of the Orders requiring invoice processing.
The list is displayed on the Ariba Home Screen.
Click the “Order Number”
PO〇〇〇〇
PO〇〇〇〇
PO〇〇〇〇
The pictures on this document are for illustrative purpose.

© 2019 NTT DATA Corporation 18
3-3. Procedures for Displaying Orders_4/4
3. The Order for conducting the Delivery/Invoicing appears
PO〇〇〇〇
PO〇〇〇〇
The pictures on this document are for illustrative purpose.
© 2019 NTT DATA Corporation 19
PO〇〇〇〇
PO〇〇〇〇
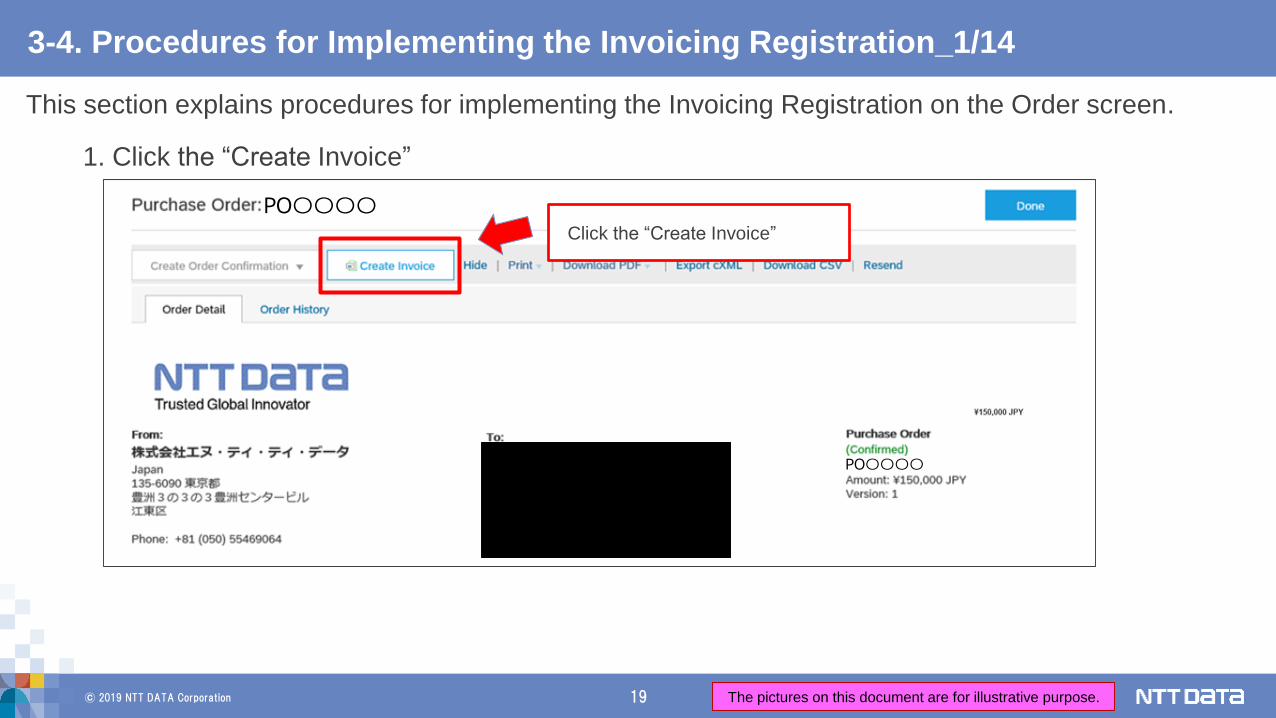
3-4. Procedures for Implementing the Invoicing Registration_1/14
This section explains procedures for implementing the Invoicing Registration on the Order screen.
1. Click the “Create Invoice”
Click the “Create Invoice”
The pictures on this document are for illustrative purpose.

© 2019 NTT DATA Corporation 20
3-4. Procedures for Implementing the Invoicing Registration_2/14
2. The “Create Invoice” screen appears. Check the content of the Order
PO〇〇〇〇
The pictures on this document are for illustrative purpose.

© 2019 NTT DATA Corporation 21
3-4. Procedures for Implementing the Invoicing Registration_3/14
3. Confirm that there are no errors in the displayed content and enter the “Invoice Number”
Enter the “Invoice
Number” set by the
Supplier
PO〇〇〇〇
The pictures on this document are for illustrative purpose.

© 2019 NTT DATA Corporation 22
3-4. Procedures for Implementing the Invoicing Registration_4/14
4. Click the “Add to Header” and click the “Attachment” on the displayed submenu
Click the “Add to Header”
Click the
“Attachment”
PO〇〇〇〇
123456
The pictures on this document are for illustrative purpose.

© 2019 NTT DATA Corporation 23
3-4. Procedures for Implementing the Invoicing Registration_5/14
5. The attached file section is added. Select a file such as a task completion report from the “Reference”
Click the “Reference” to select a file to
be attached on the displayed dialogue
PO〇〇〇〇
123456
The pictures on this document are for illustrative purpose.

© 2019 NTT DATA Corporation 24
3-4. Procedures for Implementing the Invoicing Registration_6/14
Check the displayed file
name and click the “Add
Attachement”
The file displayed in ① is
attached
* Repeat the procedures if
you attach several files
6. The selected file name appears. Click the “Add Attachment” and attach the file to the invoice
C¥xxx¥xxx¥Sample.xlsx
The pictures on this document are for illustrative purpose.

© 2019 NTT DATA Corporation 25
• If you want to change the Quantity, please notify the
person in charge of this purchasing order outside Ariba
since a change contract is required.
• Partial delivery is unavailable.
• Also, please don’t change the Unit Price.
3-4. Procedures for Implementing the Invoicing Registration_7/14
7. Confirm the 「Quantity」 and the 「Unit Price」 on the invoice.
• Please enter the actual amount price in the Unit Price
according to actual result.
“The Fixed price” case
(example) Purchasing goods
“Flexible price” case
(example) Service
The Delivery/Invoicing can be conducted per
statement. Confirm that only the applicable statement
is included.
* If it is not included, click it to exclude.
「Quantity」 and 「Unit Price」 of the purchasing order are default values.
Please carry out invoicing registration according to the above for each case.
The pictures on this document are for illustrative purpose.

© 2019 NTT DATA Corporation 26
3-4. Procedures for Implementing the Invoicing Registration_8/14
8. The pages explain invoicing procedures if you incurred any Out-of-Pocket expenses.
Click the “Add” and click the “Add Products” on the displayed submenu
* If there are Out-of-Pocket expenses incurred, and the contract stipulates that the buyer should
bear Out-of-Pocket expenses, please operate following procedure.
Click the “Add Material”
Click the “Add”
The pictures on this document are for illustrative purpose.

© 2019 NTT DATA Corporation 27
3-4. Procedures for Implementing the Invoicing Registration_9/14
Checkmark the added statement
9. The blank statement is added. Checkmark the added statement and click the “Process Statement.”
Click the “Tax” on the displayed submenu.
* If there are Out-of-Pocket expenses incurred, and the contract stipulates that the buyer should bear
Out-of-Pocket expenses, please operate following procedure.
Click the “Line Item
Actions”
Click the “Tax”Note that you should
select “0% Sales Tax”. The pictures on this document are for illustrative purpose.

© 2019 NTT DATA Corporation 28
3-4. Procedures for Implementing the Invoicing Registration_10/14
Enter the “No.” which equals to
the number of statements
Enter the content of Out-of-Pocket
expenses such as accommodation and
travel expenses in the “Explanation”
10. Enter the “No.” and the “Explanation” for the added statement
* If there are Out-of-Pocket expenses incurred, and the contract stipulates that the buyer should bear
Out-of-Pocket expenses, please operate following procedure.
The pictures on this document are for illustrative purpose.

© 2019 NTT DATA Corporation 29
3-4. Procedures for Implementing the Invoicing Registration_11/14
Enter “1” in the “Quantity”
Enter the word “Total” in the
“Unit”
* Do not enter an amount
Enter the total amount
of Out-of-Pocket
expenses in the “Unit
Price”
11. Enter the “Volume,” the “Unit” and “the Unit Price” for the added statement
* If there are Out-of-Pocket expenses incurred, and the contract stipulates that the buyer should bear
Out-of-Pocket expenses, please operate following procedure.
Confirm that “0%
Tax Sales” in the
displayed “Category” Enter the Amount
of the total Out-of-
Pocket expenses
The pictures on this document are for illustrative purpose.

© 2019 NTT DATA Corporation 30
3-4. Procedures for Implementing the Invoicing Registration_12/14
Click the “Update”
Confirm that the
content of the
Delivery/Invoicing
is updated, and
then click the
“Next”
12. Click the “Update.” After confirming that the information is updated on the screen, click the “Next”
* If there are Out-of-Pocket expenses incurred, and the contract stipulates that the buyer should bear
Out-of-Pocket expenses, please operate following procedure.
123456
The pictures on this document are for illustrative purpose.
© 2019 NTT DATA Corporation 31
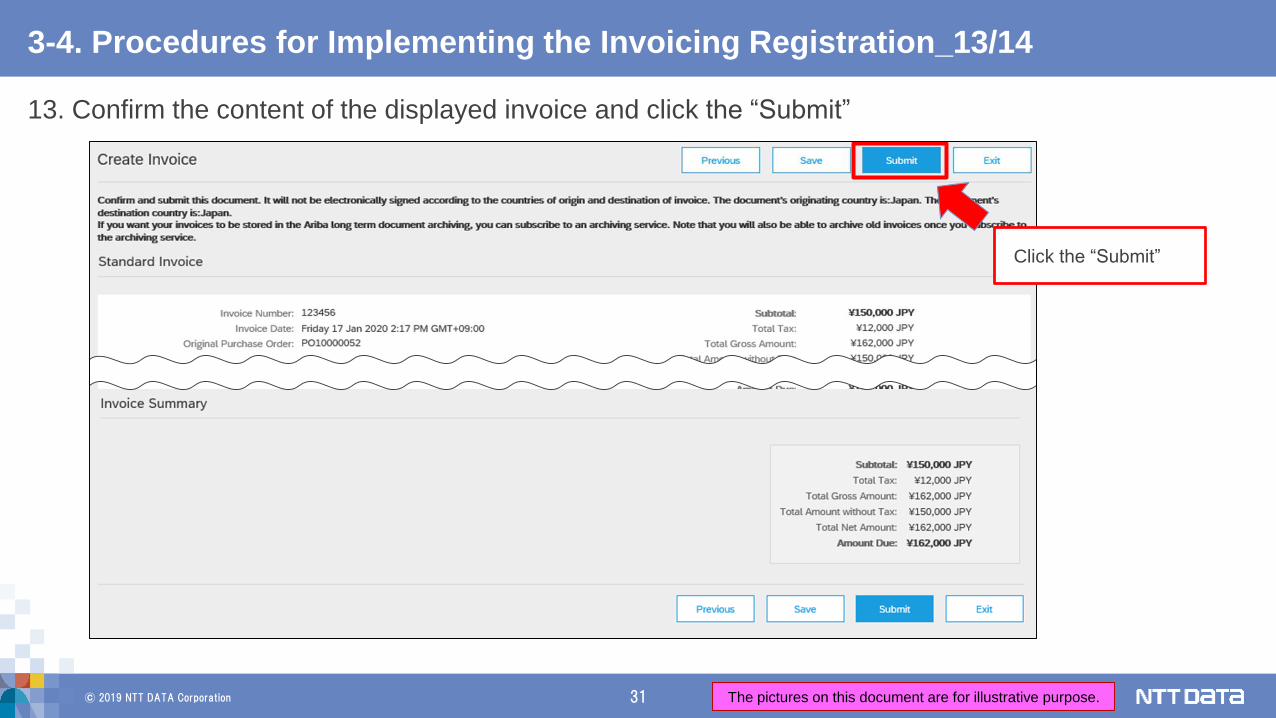
3-4. Procedures for Implementing the Invoicing Registration_13/14
13. Confirm the content of the displayed invoice and click the “Submit”
Click the “Submit”
The pictures on this document are for illustrative purpose.

© 2019 NTT DATA Corporation 32
3-4. Procedures for Implementing the Invoicing Registration_14/14
14. The invoice has been submitted. The Invoicing Registration is completed
The pictures on this document are for illustrative purpose.

© 2019 NTT DATA Corporation 33
3-5. How to Check Situations of Implementing the Invoicing Registration
On the “Order Status” which is an item displayed on a screen, you can check the situations of
implementing the Invoicing Registration.
The Order Status can be checked on the Order/Release screen and the Order Details screen.
Before Invoicing Registration After Invoicing Registration
Order/
Release
screen
Order
Details
screen
Order Status: “Confirmed”
Order Status: “Confirmed”
Order Status: “Invoiced"
Order Status: “Invoiced"
PO〇〇〇〇 PO〇〇〇〇
PO〇〇〇〇
There is no
description
on an
invoice
PO〇〇〇〇
The screen
shows that
the invoiced
The pictures on this document are for illustrative purpose.

© 2019 NTT DATA Corporation 34
3-6. How to Modify Invoicing Content
If you need to modify the content after implementing the Invoicing Registration due to
unavoidable reasons, you should use means such as e-mails to harmonize recognition with the
Buyer outside Ariba. The Supplier cannot cancel the Order on Ariba. The Supplier should ask the
Buyer to reject the issued invoice, edit the invoice after the Buyer completes necessary actions
and issue the invoice again.

© 2019 NTT DATA Corporation 35
Revision History
© 2019 NTT DATA Corporation 36
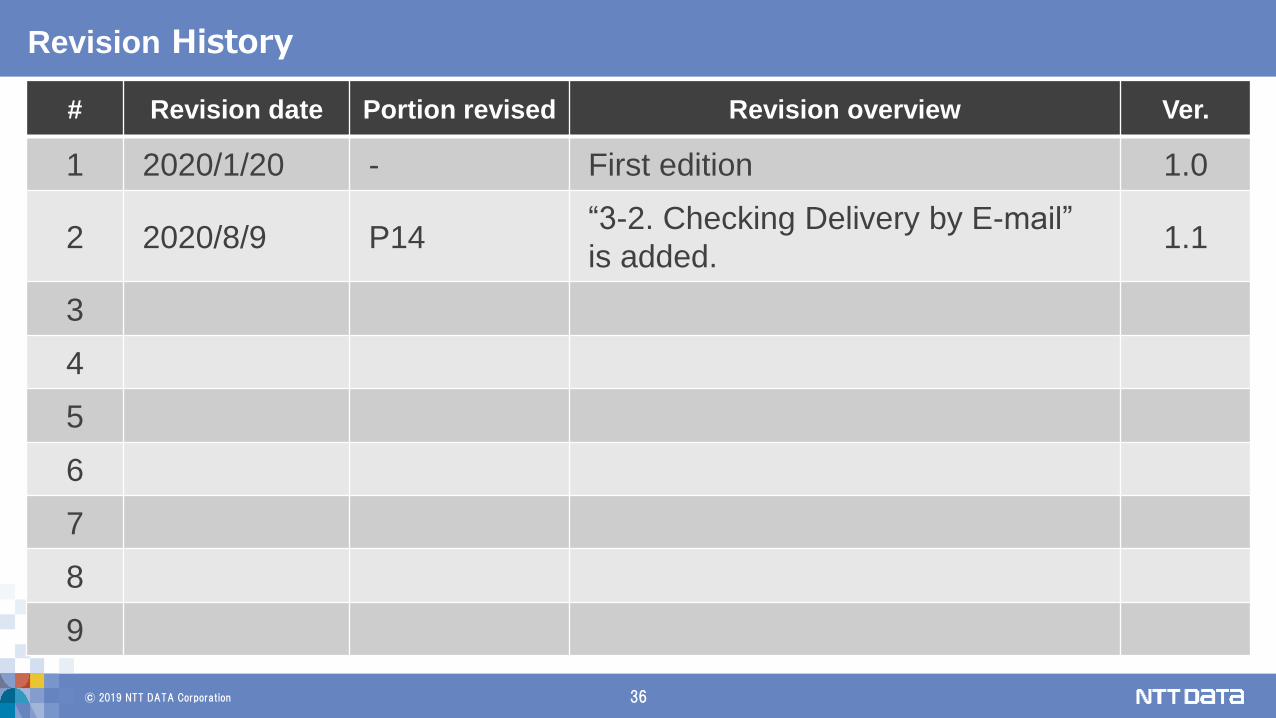
Revision History
# Revision date Portion revised Revision overview Ver.
1 2020/1/20 - First edition 1.0
2 2020/8/9 P14“3-2. Checking Delivery by E-mail”
is added. 1.1
3
4
5
6
7
8
9

© 2019 NTT DATA Corporation
Recommended