Embed Size (px)
Citation preview
Intellix® Payments | 1
YOUR QUICK START GUIDE TOINTELLIX® PAYMENTS
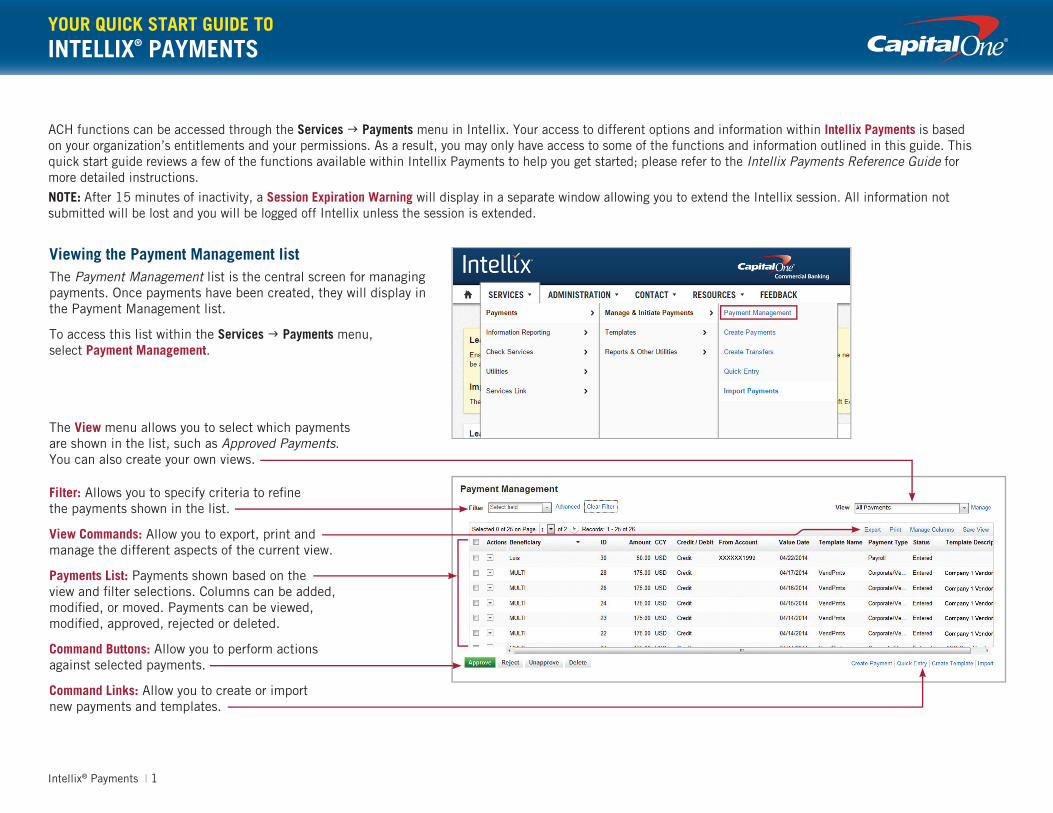
Viewing the Payment Management listThe Payment Management list is the central screen for managing payments. Once payments have been created, they will display in the Payment Management list.
To access this list within the Services g Payments menu, select Payment Management.
The View menu allows you to select which payments are shown in the list, such as Approved Payments. You can also create your own views.
Filter: Allows you to specify criteria to refi ne the payments shown in the list.
View Commands: Allow you to export, print and manage the different aspects of the current view.
Payments List: Payments shown based on the view and fi lter selections. Columns can be added, modifi ed, or moved. Payments can be viewed, modifi ed, approved, rejected or deleted.
Command Buttons: Allow you to perform actions against selected payments.
Command Links: Allow you to create or import new payments and templates.
ACH functions can be accessed through the Services g Payments menu in Intellix. Your access to different options and information within Intellix Payments is based on your organization’s entitlements and your permissions. As a result, you may only have access to some of the functions and information outlined in this guide. This quick start guide reviews a few of the functions available within Intellix Payments to help you get started; please refer to the Intellix Payments Reference Guide for more detailed instructions.
NOTE: After 15 minutes of inactivity, a Session Expiration Warning will display in a separate window allowing you to extend the Intellix session. All information not submitted will be lost and you will be logged off Intellix unless the session is extended.

Intellix® Payments | 2
Creating a New Freeform PaymentClick Create Payment under the Services g Payments menu or from the bottom of the Payment Management screen.
Select the Payment Type (Payroll, Corporate/Vendor Payments, etc.) and complete the Originator Information. NOTE: The Value Date is the effective date of the transaction.
Enter the Benefi ciary Information for the payment. The options available in the Benefi ciary Information Section vary based on the Payment Type selected. A. Click Save and Add Another to add additional benefi ciaries. You can
add addenda, comments and other optional data below the benefi ciary information.
B. You may also add the benefi ciary to the Benefi ciary Address Book for future use by selecting the applicable radio button at the bottom of the screen.
Click Submit. See page 6 for details on approving this payment.
3
2
4
1
2
3
1
A
B
4
1

Intellix® Payments | 3
Creating a Template
Templates store payment data and allow you to quickly create new payments based on the details specifi ed in the template.
Click Create Template under the Services g Payments menu or from the bottom of the Payment Management screen.
Select the Payment Type (Payroll, Corporate/Vendor Payments, etc.), enter a name and description for the template, and click Continue.
Complete the details regarding the payment origin (Originator Information). The options available in the Originator Information section vary based on the Payment Type selected.
Enter the Transaction Information for the payment.
A. Click Save and Add Another to add additional benefi ciaries. You can also add addenda, comments and other optional data below the benefi ciary information.
B. Click Summary View to see and edit benefi ciary information in tabular format.
Click Submit. See page 6 for details on the approval process.
2
3
5
1
2
3
4
5
A
1
4
B
1

Intellix® Payments | 4
Creating a Payment from a Template
Payments can be created based on a predefined template, but you can only change the Value Date (effective date) and amounts for each beneficiary.
Click Maintain Templates under the Services g Payments g Templates menu.
Click on the Action Menu button next to the template you wish to use, and select Copy as Payment.
Change the payment Value Date and Payment Amounts as desired. You can also place payments on hold, or send a prenote as part of this process.
Submit the payment. See page 6 for details on the approval process.
1
2
3
4
1
2
4
3

Intellix® Payments | 5
Importing a NACHA-formatted File as a Payment
Click Import Payments from the Services g Payments g Manage & Initiate Payments menu.
On the Import File screen click the radio button to select the NACHA File Import format.
Click the Choose File button to select the file to be imported.
Click the Import button to begin the import process.
The File Import In Progress window displays. Close this window. The import will continue in the background and you can proceed with other work in Intellix while the import concludes.
If the import is successful, the payment will appear in Payment Management in Entered status. The payment must be approved by an authorized approver. See page 6 for details on approvals. If the import fails, a message will appear in the messages window on the Intellix menu bar.
Repairing an imported file
If the file imports in a Needs Repair status, this means that data such as the ABA or Value Date are missing or invalid. In this case, the file can be repaired directly in Intellix.
Select Modify from the Actions menu.
Make changes to the data as needed.
Click Submit. The payment will now appear in Entered status and must be approved by an authorized approver. See page 6 for details on approvals.
1
2
3
4
5
6
1
2
3
Intellix® Payments | 6
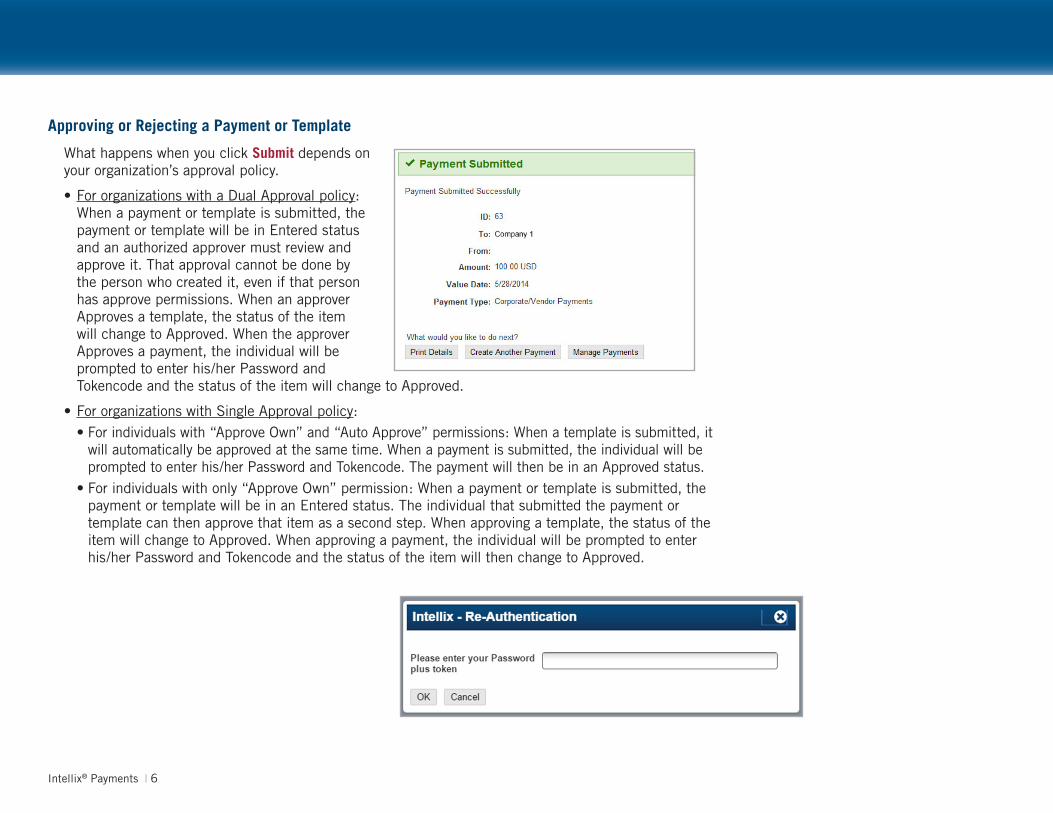
Approving or Rejecting a Payment or Template
What happens when you click Submit depends on your organization’s approval policy.
• For organizations with a Dual Approval policy: When a payment or template is submitted, the payment or template will be in Entered status and an authorized approver must review and approve it. That approval cannot be done by the person who created it, even if that person has approve permissions. When an approver Approves a template, the status of the item will change to Approved. When the approver Approves a payment, the individual will be prompted to enter his/her Password and Tokencode and the status of the item will change to Approved.
• For organizations with Single Approval policy: • For individuals with “Approve Own” and “Auto Approve” permissions: When a template is submitted, it
will automatically be approved at the same time. When a payment is submitted, the individual will be prompted to enter his/her Password and Tokencode. The payment will then be in an Approved status.
• For individuals with only “Approve Own” permission: When a payment or template is submitted, the payment or template will be in an Entered status. The individual that submitted the payment or template can then approve that item as a second step. When approving a template, the status of the item will change to Approved. When approving a payment, the individual will be prompted to enter his/her Password and Tokencode and the status of the item will then change to Approved.
Intellix® Payments | 7
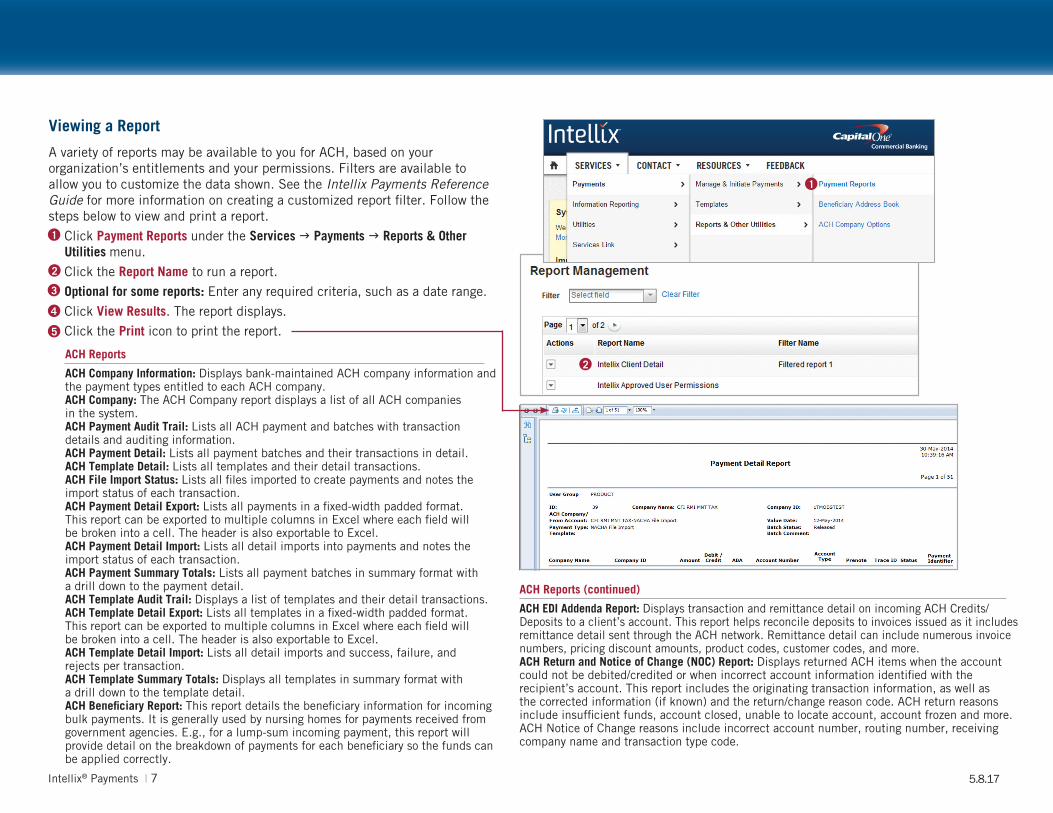
Viewing a Report
A variety of reports may be available to you for ACH, based on your organization’s entitlements and your permissions. Filters are available to allow you to customize the data shown. See the Intellix Payments Reference Guide for more information on creating a customized report filter. Follow the steps below to view and print a report.
Click Payment Reports under the Services g Payments g Reports & Other Utilities menu.
Click the Report Name to run a report.
Optional for some reports: Enter any required criteria, such as a date range.
Click View Results. The report displays.
Click the Print icon to print the report.
2
1
2
3
4
5
ACH Reports
ACH Company Information: Displays bank-maintained ACH company information and the payment types entitled to each ACH company. ACH Company: The ACH Company report displays a list of all ACH companies in the system.ACH Payment Audit Trail: Lists all ACH payment and batches with transaction details and auditing information.ACH Payment Detail: Lists all payment batches and their transactions in detail. ACH Template Detail: Lists all templates and their detail transactions. ACH File Import Status: Lists all files imported to create payments and notes the import status of each transaction. ACH Payment Detail Export: Lists all payments in a fixed-width padded format. This report can be exported to multiple columns in Excel where each field will be broken into a cell. The header is also exportable to Excel.ACH Payment Detail Import: Lists all detail imports into payments and notes the import status of each transaction.ACH Payment Summary Totals: Lists all payment batches in summary format with a drill down to the payment detail.ACH Template Audit Trail: Displays a list of templates and their detail transactions.ACH Template Detail Export: Lists all templates in a fixed-width padded format. This report can be exported to multiple columns in Excel where each field will be broken into a cell. The header is also exportable to Excel. ACH Template Detail Import: Lists all detail imports and success, failure, and rejects per transaction.ACH Template Summary Totals: Displays all templates in summary format with a drill down to the template detail. ACH Beneficiary Report: This report details the beneficiary information for incoming bulk payments. It is generally used by nursing homes for payments received from government agencies. E.g., for a lump-sum incoming payment, this report will provide detail on the breakdown of payments for each beneficiary so the funds can be applied correctly.
ACH Reports (continued)
ACH EDI Addenda Report: Displays transaction and remittance detail on incoming ACH Credits/ Deposits to a client’s account. This report helps reconcile deposits to invoices issued as it includes remittance detail sent through the ACH network. Remittance detail can include numerous invoice numbers, pricing discount amounts, product codes, customer codes, and more.ACH Return and Notice of Change (NOC) Report: Displays returned ACH items when the account could not be debited/credited or when incorrect account information identified with the recipient’s account. This report includes the originating transaction information, as well as the corrected information (if known) and the return/change reason code. ACH return reasons include insufficient funds, account closed, unable to locate account, account frozen and more. ACH Notice of Change reasons include incorrect account number, routing number, receiving company name and transaction type code.
1
5.8.17