Embed Size (px)
Citation preview

Yealink T46U IP PhoneUser guide

ContentsWhat’s in the box? 3
Let’s get started 4
Check you’re set up on Cloud Voice 7
Getting to know your phone 8
Phone display 10
Using your phone 11
Additional features 14
General information 15
2
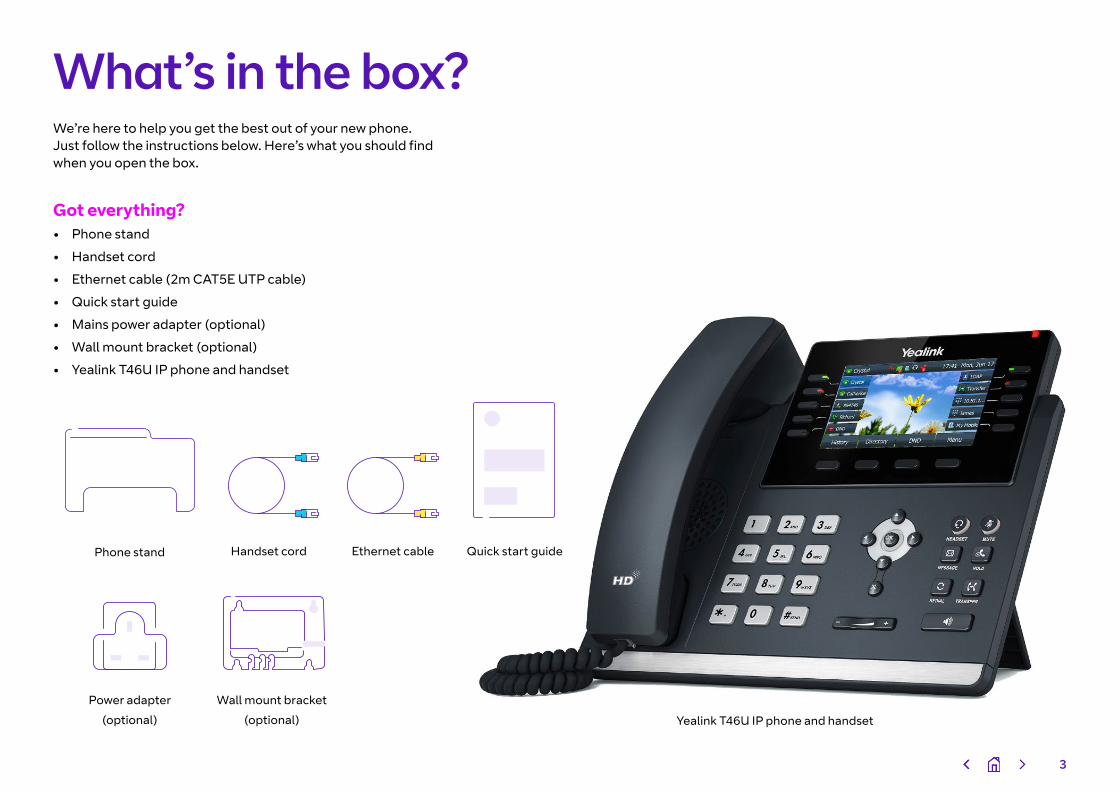
What’s in the box?We’re here to help you get the best out of your new phone. Just follow the instructions below. Here’s what you should find when you open the box.
Got everything?• Phone stand
• Handset cord
• Ethernet cable (2m CAT5E UTP cable)
• Quick start guide
• Mains power adapter (optional)
• Wall mount bracket (optional)
• Yealink T46U IP phone and handset
Phone stand
Wall mount bracket
(optional)
Handset cord Ethernet cable Quick start guide
Power adapter
(optional) Yealink T46U IP phone and handset
3
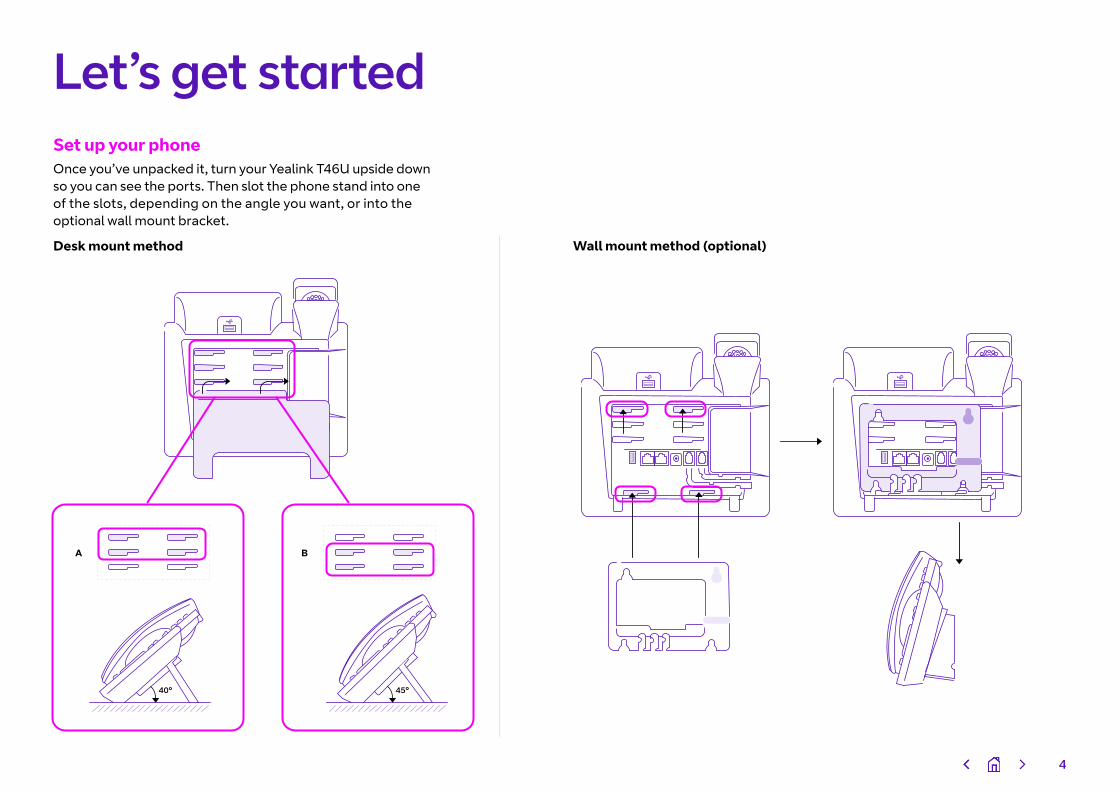
45°40°
A B
Let’s get startedSet up your phoneOnce you’ve unpacked it, turn your Yealink T46U upside down so you can see the ports. Then slot the phone stand into one of the slots, depending on the angle you want, or into the optional wall mount bracket.
Desk mount method Wall mount method (optional)
4
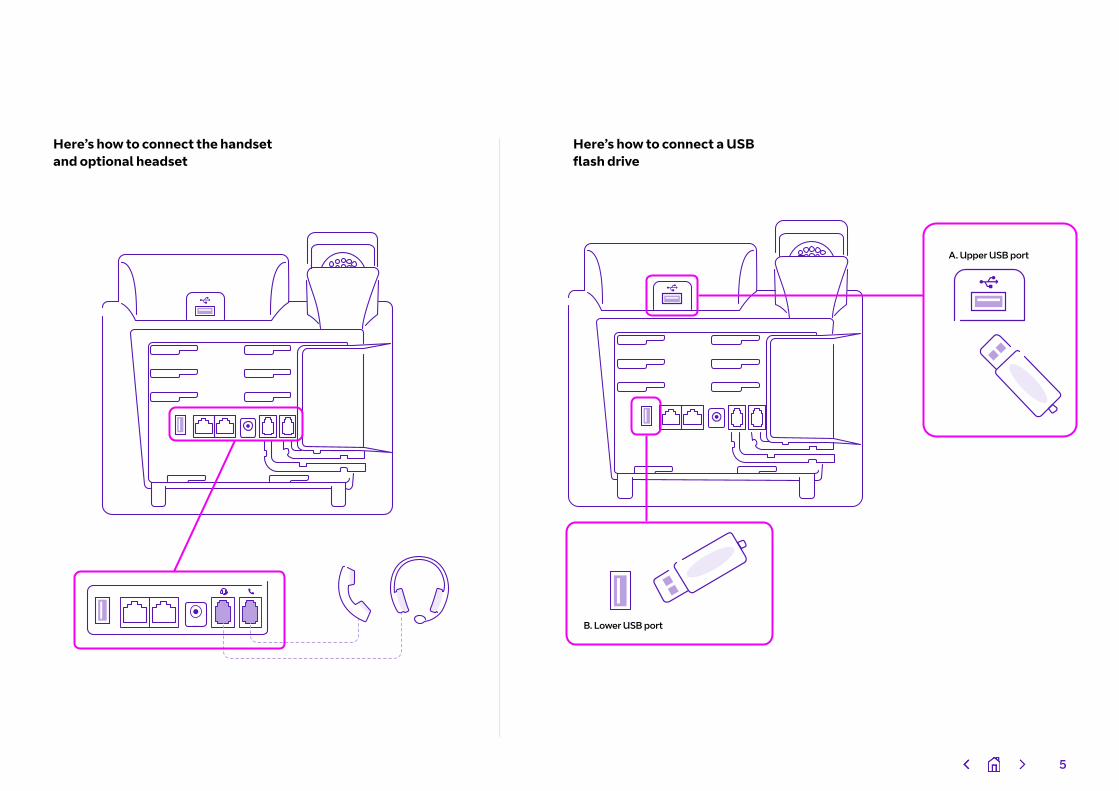
Here’s how to connect the handset and optional headset
Here’s how to connect a USB flash drive
A. Upper USB port
B. Lower USB port
5
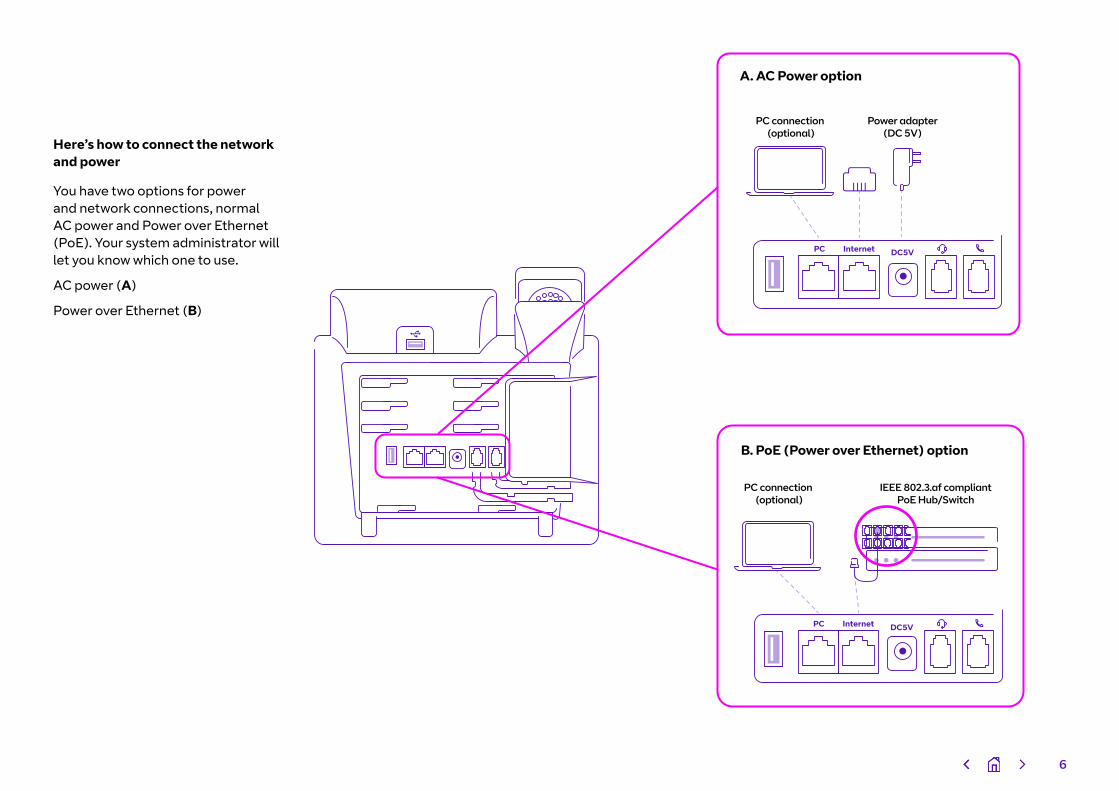
A. AC Power option
PC connection (optional)
Power adapter(DC 5V)
PC Internet DC5V
B. PoE (Power over Ethernet) option
PC connection (optional)
IEEE 802.3.af compliantPoE Hub/Switch
PC Internet DC5V
You have two options for power and network connections, normal AC power and Power over Ethernet (PoE). Your system administrator will let you know which one to use.
AC power (A)
Power over Ethernet (B)
Here’s how to connect the network and power
6

Your phone comes with everything you need to get set up on Cloud Voice.
Once your phone’s connected to the network, it’ll update its firmware. This might take some time, so please be patient. Once it’s finished, it’ll show this symbol:
If something has gone wrong, you’ll see this symbol:
If this happens, just give us a call on 0800 389 0537 and we’ll be able to help.
Once everything is updated and ready to go, your Cloud Voice number will show on the screen, like this:
Check you’re set up on Cloud Voice
7
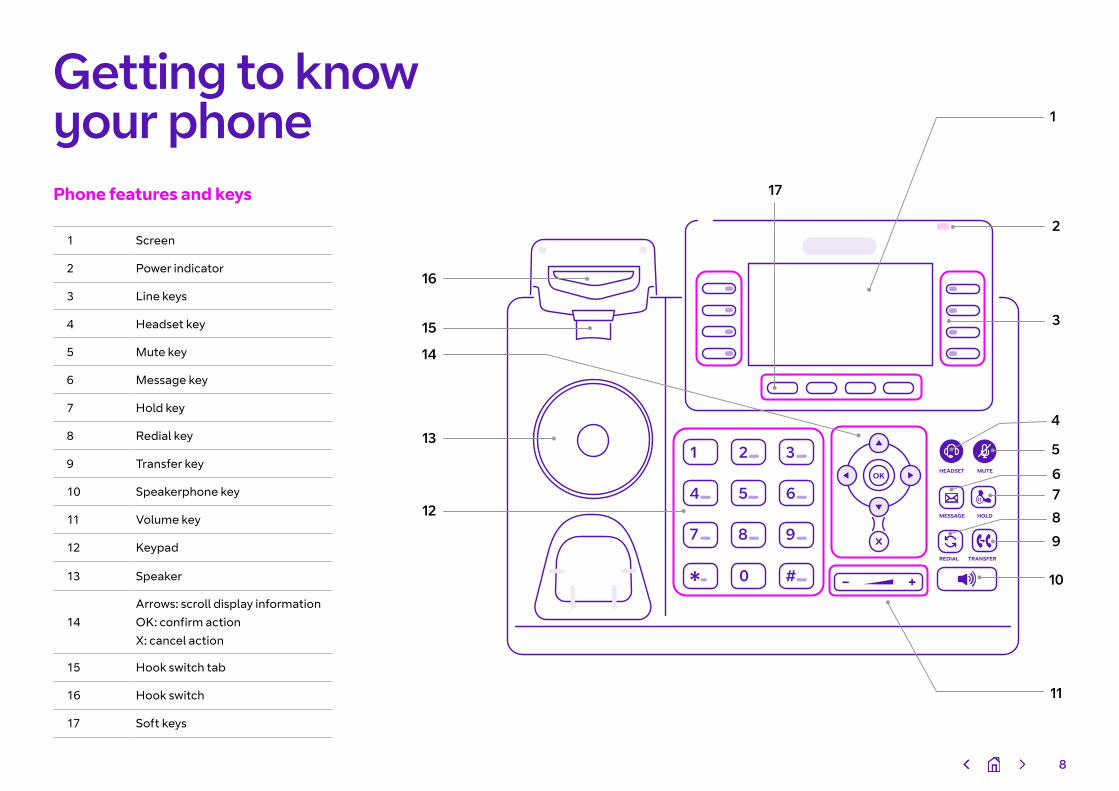
Getting to know your phone Phone features and keys
1 Screen
2 Power indicator
3 Line keys
4 Headset key
5 Mute key
6 Message key
7 Hold key
8 Redial key
9 Transfer key
10 Speakerphone key
11 Volume key
12 Keypad
13 Speaker
14Arrows: scroll display informationOK: confirm actionX: cancel action
15 Hook switch tab
16 Hook switch
17 Soft keys
1
1 2 3OK
654
7 8 9
#0*
HEADSET
MESSAGE
REDIAL TRANSFER
HOLD
MUTE
2
11
3
17
14
12
13
16
15
5
4
10
76
8
9
8
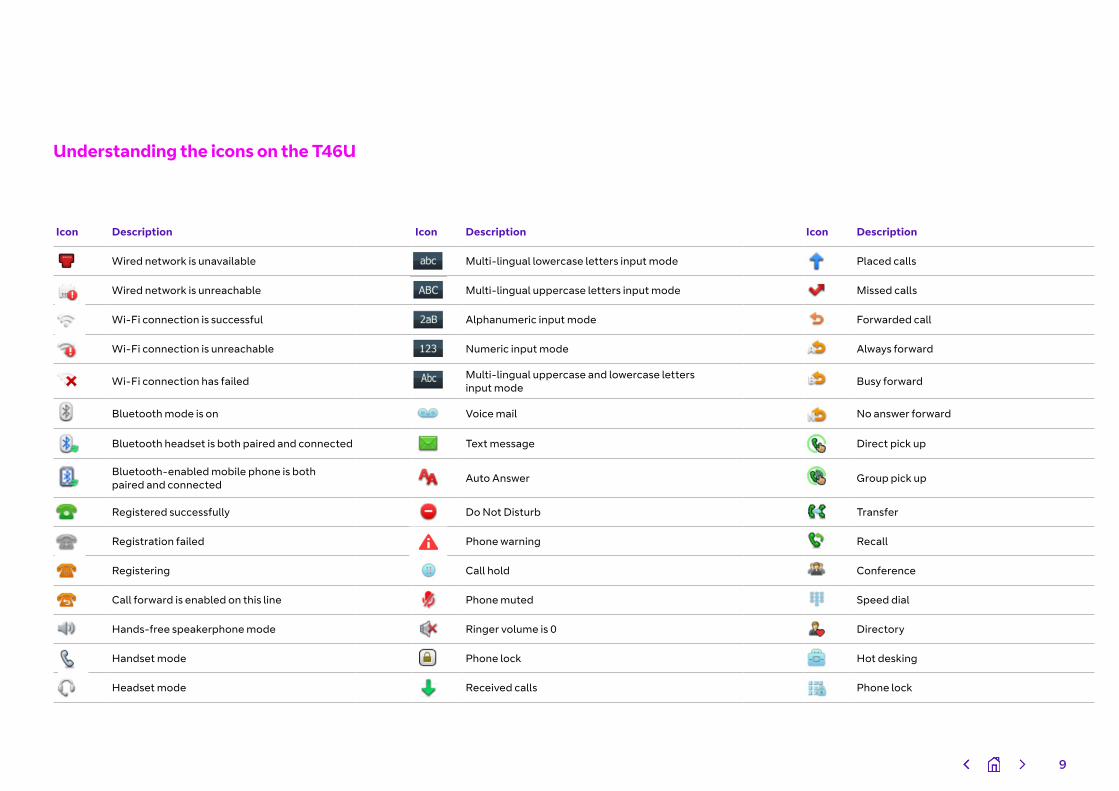
Understanding the icons on the T46U
Icon Description Icon Description Icon Description
Wired network is unavailable Multi-lingual lowercase letters input mode Placed calls
Wired network is unreachable Multi-lingual uppercase letters input mode Missed calls
Wi-Fi connection is successful Alphanumeric input mode Forwarded call
Wi-Fi connection is unreachable Numeric input mode Always forward
Wi-Fi connection has failed Multi-lingual uppercase and lowercase letters input mode Busy forward
Bluetooth mode is on Voice mail No answer forward
Bluetooth headset is both paired and connected Text message Direct pick up
Bluetooth-enabled mobile phone is both paired and connected Auto Answer Group pick up
Registered successfully Do Not Disturb Transfer
Registration failed Phone warning Recall
Registering Call hold Conference
Call forward is enabled on this line Phone muted Speed dial
Hands-free speakerphone mode Ringer volume is 0 Directory
Handset mode Phone lock Hot desking
Headset mode Received calls Phone lock
9
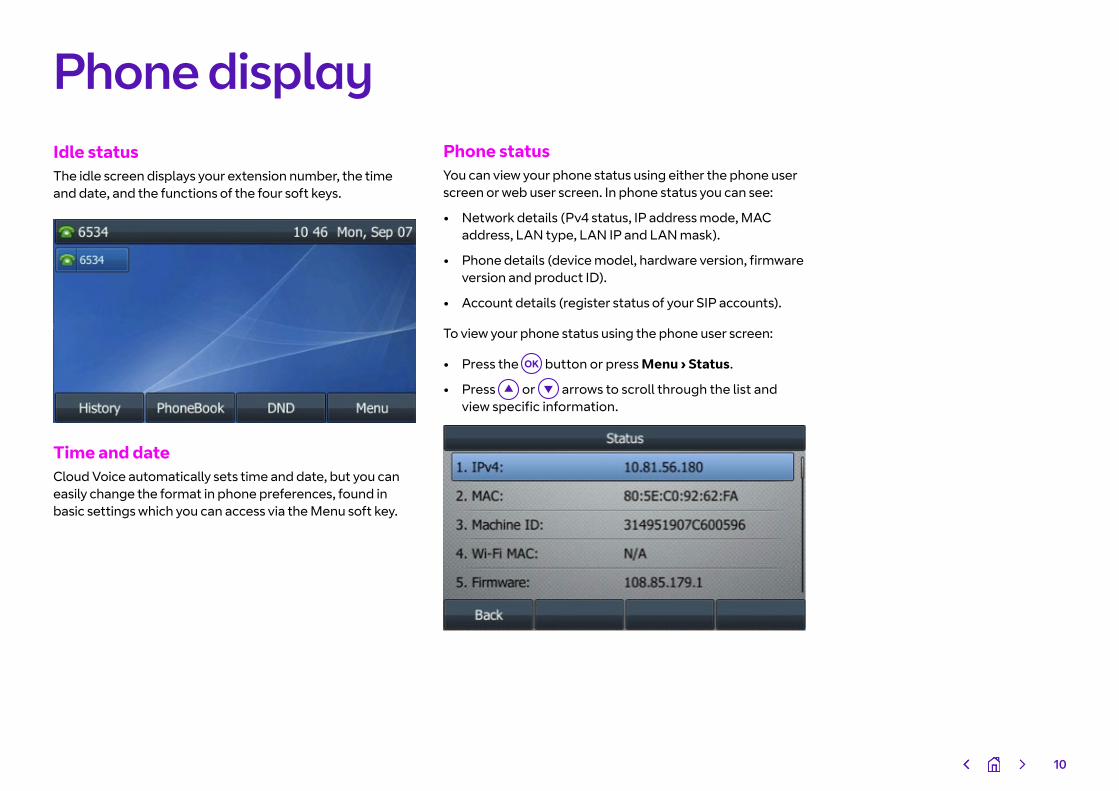
Idle statusThe idle screen displays your extension number, the time and date, and the functions of the four soft keys.
Time and dateCloud Voice automatically sets time and date, but you can easily change the format in phone preferences, found in basic settings which you can access via the Menu soft key.
Phone statusYou can view your phone status using either the phone user screen or web user screen. In phone status you can see:
• Network details (Pv4 status, IP address mode, MAC address, LAN type, LAN IP and LAN mask).
• Phone details (device model, hardware version, firmware version and product ID).
• Account details (register status of your SIP accounts).
To view your phone status using the phone user screen:
• Press the button or press Menu › Status.
• Press or arrows to scroll through the list and view specific information.
Phone display
10
Using your phoneMaking callsYou can use your Yealink T46U like a regular phone to make calls, in various ways:
• Make a call from the keypad.
• Make multiple calls.
• Redial a number.
• Make an international call.
• Make a call from your Call History.
• Make a call from the Directory.
• Switching between Handset, Speakerphone and Headset Modes.
Make a call from the keypadUsing the keypad, you can enter a number to make a call, and displays a list of previously placed calls or contacts in your directory. You can also select the contact you want to call from the search list, the placed call list or from your Directory.
Do one of the following:
• Start typing a phone number.
• Press the desired line key.
• Pick up the handset, press the Speakerphone key or the Headset key .
Enter a number or select a contact, then select Send.
The phone will show the contact in your Directory regardless of whether you’ve dialled in local format or international format.
Make multiple callsWhen you are already in a call, you can put it on hold and make a new call.
Do one of the following:
• Press a line key. The active call is placed on hold.
• Press the key or Hold to place the original call on hold.
• Select New Call.
Enter a number or select a contact, then select Send, OR:
• Press the key or Hold to place the original call on hold.
• Enter a number or select a contact.
• Select New Call.
Redial a number The phone keeps a record of all the calls you’ve made. To recall a contact you recently called:
• Press the key.
• Highlight the call you want to return, and select Send.
Make an international callYou can make calls to international numbers on your phone.
• Press and hold digit key 0 on the phone keypad until the plus sign (+) appears.
• Enter the phone number with the country code.
• Select Send.
Make a call from your call historyYou can make calls to contacts from your History list, which contains calls that were recently placed, answered, missed, or forwarded.
• Press History or navigate to Menu->History.
• Select the relevant call list.
• Highlight a contact, and select Send.
Make a call from the directoryYou can make a call to a contact directly from your directory.
• Select Phonebook or navigate to Menu->Directory->Phonebook.
• Highlight the contact you want to call, and select Send.
Switching between Handset, Speakerphone and Headset modesYou can choose your desired mode before making a call, or alternate between Speakerphone, Headset and Handset modes during a call.
When using the speakerphone or the headset, the LED indicator glows green.
• During the call, pick up the handset, and press the Speakerphone key , or the Headset key .
• For example, if you're using the handset, press the Headset key to switch to the headset, or press the Speakerphone key to switch to the speakerphone.
11
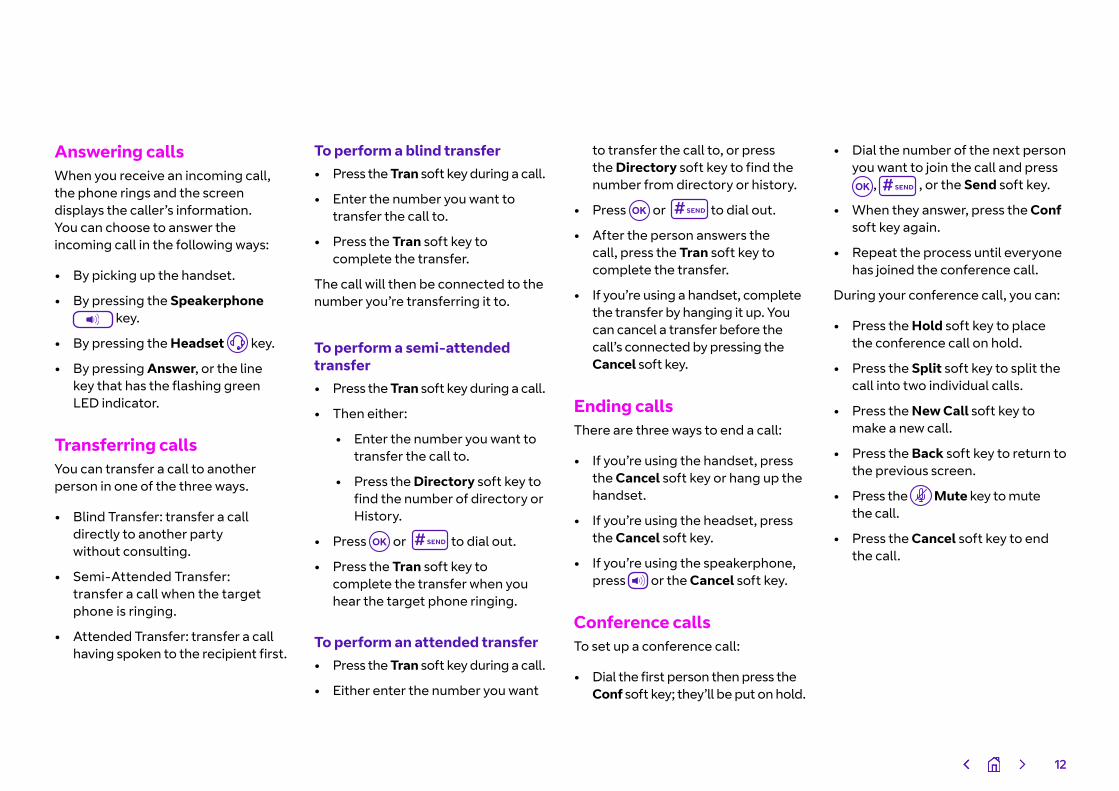
Answering callsWhen you receive an incoming call, the phone rings and the screen displays the caller’s information. You can choose to answer the incoming call in the following ways:
• By picking up the handset.
• By pressing the Speakerphone key.
• By pressing the Headset key.
• By pressing Answer, or the line key that has the flashing green LED indicator.
Transferring callsYou can transfer a call to another person in one of the three ways.
• Blind Transfer: transfer a call directly to another party without consulting.
• Semi-Attended Transfer: transfer a call when the target phone is ringing.
• Attended Transfer: transfer a call having spoken to the recipient first.
To perform a blind transfer• Press the Tran soft key during a call.
• Enter the number you want to transfer the call to.
• Press the Tran soft key to complete the transfer.
The call will then be connected to the number you’re transferring it to.
To perform a semi-attended transfer• Press the Tran soft key during a call.
• Then either:
• Enter the number you want to transfer the call to.
• Press the Directory soft key to find the number of directory or History.
• Press or to dial out.
• Press the Tran soft key to complete the transfer when you hear the target phone ringing.
To perform an attended transfer• Press the Tran soft key during a call.
• Either enter the number you want
to transfer the call to, or press the Directory soft key to find the number from directory or history.
• Press or to dial out.
• After the person answers the call, press the Tran soft key to complete the transfer.
• If you’re using a handset, complete the transfer by hanging it up. You can cancel a transfer before the call’s connected by pressing the Cancel soft key.
Ending callsThere are three ways to end a call:
• If you’re using the handset, press the Cancel soft key or hang up the handset.
• If you’re using the headset, press the Cancel soft key.
• If you’re using the speakerphone, press or the Cancel soft key.
Conference calls To set up a conference call:
• Dial the first person then press the Conf soft key; they’ll be put on hold.
• Dial the number of the next person you want to join the call and press
, , or the Send soft key.
• When they answer, press the Conf soft key again.
• Repeat the process until everyone has joined the conference call.
During your conference call, you can:
• Press the Hold soft key to place the conference call on hold.
• Press the Split soft key to split the call into two individual calls.
• Press the New Call soft key to make a new call.
• Press the Back soft key to return to the previous screen.
• Press the Mute key to mute the call.
• Press the Cancel soft key to end the call.
12
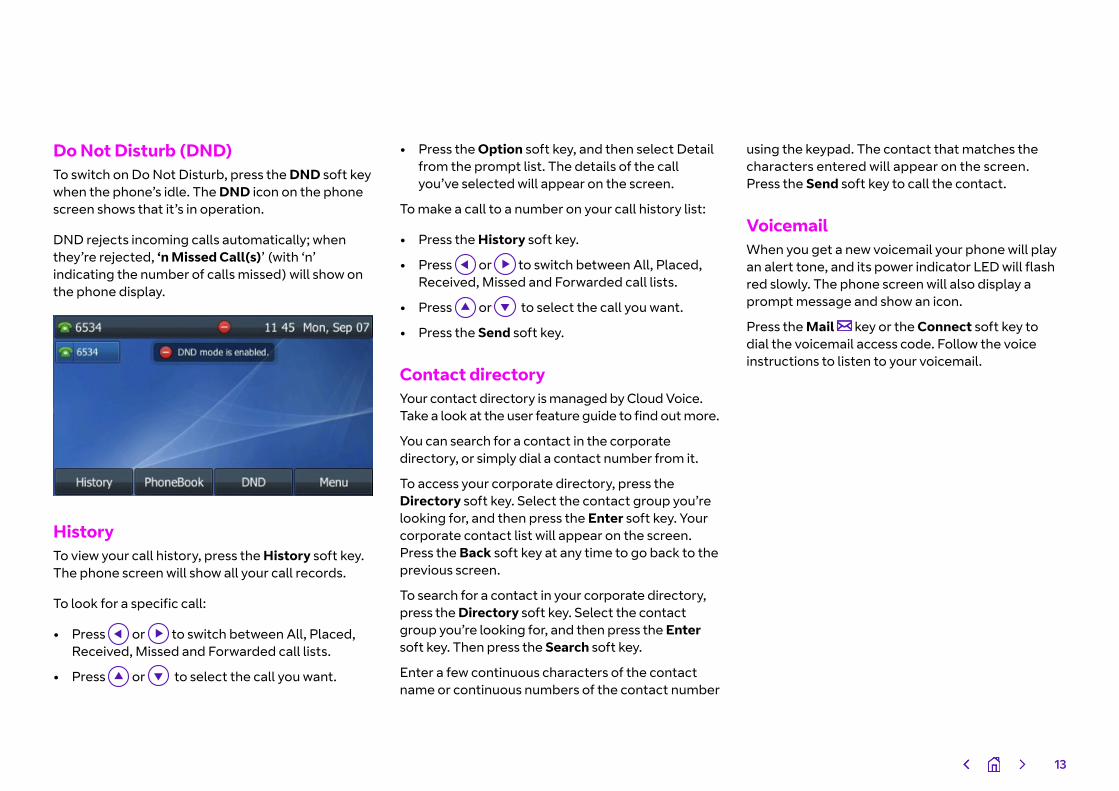
Do Not Disturb (DND)To switch on Do Not Disturb, press the DND soft key when the phone’s idle. The DND icon on the phone screen shows that it’s in operation.
DND rejects incoming calls automatically; when they’re rejected, ‘n Missed Call(s)’ (with ‘n’ indicating the number of calls missed) will show on the phone display.
HistoryTo view your call history, press the History soft key. The phone screen will show all your call records.
To look for a specific call:
• Press or to switch between All, Placed, Received, Missed and Forwarded call lists.
• Press or to select the call you want.
• Press the Option soft key, and then select Detail from the prompt list. The details of the call you’ve selected will appear on the screen.
To make a call to a number on your call history list:
• Press the History soft key.
• Press or to switch between All, Placed, Received, Missed and Forwarded call lists.
• Press or to select the call you want.
• Press the Send soft key.
Contact directoryYour contact directory is managed by Cloud Voice. Take a look at the user feature guide to find out more.
You can search for a contact in the corporate directory, or simply dial a contact number from it.
To access your corporate directory, press the Directory soft key. Select the contact group you’re looking for, and then press the Enter soft key. Your corporate contact list will appear on the screen. Press the Back soft key at any time to go back to the previous screen.
To search for a contact in your corporate directory, press the Directory soft key. Select the contact group you’re looking for, and then press the Enter soft key. Then press the Search soft key.
Enter a few continuous characters of the contact name or continuous numbers of the contact number
using the keypad. The contact that matches the characters entered will appear on the screen. Press the Send soft key to call the contact.
VoicemailWhen you get a new voicemail your phone will play an alert tone, and its power indicator LED will flash red slowly. The phone screen will also display a prompt message and show an icon.
Press the Mail key or the Connect soft key to dial the voicemail access code. Follow the voice instructions to listen to your voicemail.
13

Additional FeaturesYou can use your Yealink T46U phone with an RJ9 headset, USB headset, wireless headset adapter, Bluetooth dongle or Wi-Fi dongle as accessories. Please refer to the user guides of each accessory for details.
Headset
To use a headset:• RJ9 headset: connect an RJ9 headset to the
headset port of your phone.
• USB headset: connect a USB headset to the USB port of your phone.
• Wireless headset via adapter: connect a Yealink wireless headset adapter EHS40 to the USB port of your phone, then connect your wireless headset to the EHS40.
Bluetooth dongleYou can connect your phone to a Bluetooth-enabled headset or mobile phone. The phone can connect to two Bluetooth devices at the same time.
Using Bluetooth:• Bluetooth headset: connect your Yealink
Bluetooth dongle to the USB port of your phone
and enable Bluetooth, then pair your phone with Bluetooth headset. You can use your Bluetooth headset to handle calls. Please refer to the user guide of the Bluetooth headset for instructions.
• Mobile phone: connect your Yealink Bluetooth dongle to the USB port of your phone and enable Bluetooth, then pair your phone with your mobile phone. You can then sync your mobile contacts to your Yealink phone so it can handle mobile calls.
Wi-Fi dongleYou can connect your Yealink T46U to a wireless network.
To use Wi-Fi:• Connect your Yealink Wi-Fi dongle to the USB
port of your phone, and enable Wi-Fi.
• Scan and select the desired wireless network to connect.
14
General informationImportant – 999 or 112 emergency calls• Your Cloud Voice number is
registered to a specific address, so when you make a 999 or 112 call from your phone number, that’s the address the emergency services will see.
• If you use Cloud Voice at a different address, the registered address won’t automatically change. So if your work location changes, please let your administrator know so they can update your registered address.
• You might not be able to make 999 or 112 calls if there’s a power or network failure, or you’re using the service from an app or mobile phone.
Safety informationDo not open the handset or the base. This could expose you to high voltages or other risks. If your phone needs to be repaired, call us on 0800 389 0537 and we’ll be able to help.
CleaningClean the handset and base with a damp (not wet) cloth, or an antistatic wipe. Never use household polish as this will damage the product. Never use a dry cloth as this may cause a static shock.
Environmental• Do not expose to direct sunlight.
• Make sure your phone is on a dry, flat surface, not on a carpet or anything which has fibres. Make sure it can always get a free flow of air over its surfaces.
• Do not submerge any part of your product in water and do not use it in damp or humid conditions, such as bathrooms.
• Do not expose your product to fire, explosive or other hazardous conditions.
• There’s a slight chance your phone could be damaged by an electrical storm. Should this happen, contact your BT service desk.
Product disposal instructions• The symbol shown here
and on your phone means your product is classed as electrical or electronic equipment. You shouldn’t throw it away with other office waste once at the end of its working life.
• The Waste of Electrical and Electronic Equipment (WEEE) Directive (2002/96/EC) has been put in place to recycle products using best available recovery and recycling techniques to minimize the impact on the environment, treat any hazardous substances and avoid the increasing landfill.
• Business users should contact their suppliers and check the terms and conditions of the purchase contract and ensure that this product is not mixed with other commercial waste for disposal.
Guarantee Your IP Phone is guaranteed for a period of 12 months from the date of purchase. Your guarantee covers the repair or replacement of your phone or any of its parts (other than batteries) if they’re faulty or below standard, or they break because of bad workmanship or materials. If your product is more than 28 days old, it might be replaced with a refurbished or repaired product.
The conditions of this guarantee are: • The guarantee shall only apply
to defects that occur within the 12-month guarantee period.
• You provide proof of purchase.
• You’ll need to return your phone to us according to our instructions.
• We don’t cover any faults or problems that are caused by accidents, misuse, fair wear and tear, neglect, or if you’ve tried to repair the equipment yourself.
This guarantee does not affect your statutory rights.
15

Offices worldwide
The services described in this publication are subject to availability and may be modified from time to time. Services and equipment are provided subject to British Telecommunications plc’s respective standard conditions of contract. Nothing in this publication forms any part of any contract.
© British Telecommunications plc 2021. Registered office: 81 Newgate Street, London EC1A 7AJ. Registered in England No. 1800000.
July 2021
16