Embed Size (px)
Citation preview

White Paper
xCelerated Composition Platform Extension
Points Adding customization to xCP 2.x applications
Abstract
This white paper explains how Java, JavaScript, viewers and custom themes can be added to and invoked from xCP 2.x applications.
November 2012

xCP 2.x Extension Points 2
Copyright © 2012 EMC Corporation. All Rights Reserved.
EMC believes the information in this publication is accurate as of its publication date. The information is subject to change without notice.
The information in this publication is provided “as is.” EMC Corporation makes no representations or warranties of any kind with respect to the information in this publication, and specifically disclaims implied warranties of merchantability or fitness for a particular purpose. This document is provided "as- is" and does not guarantee EMC's support or approval. Please consult the official product documentation or the Product Support team regarding any questions of supportability.
Use, copying, and distribution of any EMC software described in this publication requires an applicable software license.
For the most up-to-date listing of EMC product names, see EMC Corporation Trademarks on EMC.com.
VMware is a registered trademarks of VMware, Inc. in the United States and/or other jurisdictions. All other trademarks used herein are the property of their respective owners.

xCP 2.x Extension Points 3
Table of Contents
Executive summary.................................................................................................. 5
Java Extensions ....................................................................................................... 5 Adding Java Extension ........................................................................................................ 5
Adding custom Java code to a process................................................................................ 6
Example (with parameters / return value being Java primitive types) .............................. 6
Example with Java Bean parameters/return value........................................................... 8
Custom Java Code to access DFC IDfSession ..................................................................... 12
Adding Custom Priority and Aging logic for Tasks.............................................................. 13
Example ........................................................................................................................... 13
Adding a Custom Java Function ........................................................................................ 16
Example ....................................................................................................................... 16
Adding a third party JDBC Driver in xCP ............................................................................. 19
Adding a third party JMS (Java Messaging Service) Provider in xCP ................................... 20
Clear BOF cache……………………………………………………………………………………………………………21
Custom Widgets .................................................................................................... 22 Creating a New Widget...................................................................................................... 22
JavaScript Content File.................................................................................................. 22
Widget XML File Outline................................................................................................ 22
Creating a New Function ................................................................................................... 29
Packaging a Custom Components JAR file ......................................................................... 32
Manifest File................................................................................................................. 33
Other files .................................................................................................................... 33
Troubleshooting ............................................................................................................... 34
Custom Themes..................................................................................................... 34 Creating a New Theme ...................................................................................................... 35
Creating the Main Sass File .......................................................................................... 35
Overriding CSS Selectors .............................................................................................. 35
Changing xCP global Sass variables ............................................................................. 36
Creating New Custom CSS Class ....................................................................................... 38
Packaging a Custom Theme JAR file .................................................................................. 39
Manifest File................................................................................................................. 39
Sass files ..................................................................................................................... 40
Applying the Custom Theme ............................................................................................. 40
Testing Theme Changes Iteratively.................................................................................... 41
Deploying the Custom Theme ........................................................................................... 41
Viewer Framework ................................................................................................. 41 Viewer Client Side Framework........................................................................................... 42
The ViewerManager Object ........................................................................................... 42
The ViewerObject Object .............................................................................................. 42

xCP 2.x Extension Points 4
Implementing a Viewer Object .......................................................................................... 44
Viewer Profile ................................................................................................................... 45
Viewer Capabilities....................................................................................................... 45
Design Features................................................................................................................ 47
Supported Formats ........................................................................................................... 48
Environment Settings ....................................................................................................... 48
Viewer Attributes and Parameters..................................................................................... 52
Server Side Viewer Framework API ................................................................................ 54
IViewerParameterHandler Interface .............................................................................. 54
IViewerDocumentHandler Interface .............................................................................. 56
IViewerAnnotationHandler Interface ............................................................................. 57
IViewerAuditTrailHandler Interface ............................................................................... 58
IViewerAutomationHandler Interface ............................................................................ 58
ViewerProfile Class....................................................................................................... 58
ViewerMapping Class ................................................................................................... 59
ViewerController Class and ViewerFrameworkController Class ...................................... 59
ViewerControlBean Class ............................................................................................. 59

xCP 2.x Extension Points 5
Executive summary
This preliminary white paper describes the extension points for xCelerated Composition Platform (xCP) applications – that is, the points at which custom code can be injected into applications.
Java can be added and invoked in several ways: as a POJO (plain old java object) that can be invoked in a process (or stateless process), as a function that can be invoked from expressions, as a third-party database or JMS driver, or as a custom aging algorithm for tasks.
JavaScript can be added and used as a custom widget or a custom function. Sass can be added to provide custom themes.
Custom viewers are considered an extension point as well.
This paper contains information and examples on each form of extension.
Java Extensions
Adding Java Extension
For xCP 2.x, follow these steps to add a Java Extension Artifact manually:
1. Before creating a Java Extension Artifact, obtain the following information:
a. Name / Label of the artifact
b. Primary Class
c. List of implementation jars - the jar(s) containing the primary class and all the classes that primary class depends on
d. List of interfaces that the primary class implements - the interfaces are used to identify the Java Extension Artifacts so that they are used in right context. E.g. if interface of an artifact is “java.sql.Driver”, it is used in the context of JDBC Drivers.
2. Place the Artifact XML template under /<Application_Root>/Artifacts/Java Modules/<artifact_name>.javamodule. The following is an example of a sample Artifact XML template:
<?xml version="1.0" encoding="UTF-8"?>
<nsJavaModule:JavaModule xmlns:nsJavaModule="http://xcp.emc.com/javamodule" urn="urn:xcp:com.emc.xcp.artifact.javamodule.category:Artifacts/Java Modules/<artifact_name>.javamodule" categoryId="com.emc.xcp.artifact.javamodule.category" name="<artifact_name>" label="<Label of the artifact>" implementationClass="<Implementation class>">
<interfaceClassNames><interface_class_name></interfaceClassNames> <!—Optional
0 or more-->

xCP 2.x Extension Points 6
<implementationJars contentPath="content/modules/<implementation_jar_name>"/> < !—1 or more -->
</nsJavaModule:JavaModule>
3. Place the jars in /<Application_Root>/content/modules/ as per the “contentPath” attribute in above XML. This path is relative to application root folder.
The source code/binary for all the following examples is packaged in the file XcpJavaExtensionSamples.zip. All the compiled classes in the following examples are in XcpJavaExtensionSamples.jar. Note: The section ‘Adding Java Extension’ is applicable only for xCP 2.0, 2.1 and 2.2 releases of xCPDesigner.
Adding custom Java code to a process
Java Code added as Java Extension Artifact can be called from the “Execute Java Service Activity Template” in the process. There are not any special requirements for the Java code such as implementing any specific interface to be used in this activity template.
The data type of the parameters and the return value must be a Java primitive types, Byte[ ] (and/or byte[ ]), or a JavaBean object. BLOB (Binary Large Object) and binary data are represented as Byte Array. Char data type is not currently supported.
Example (with parameters / return value being Java primitive types)
The following utility class generates a unique ID based on the UUID.
package mypackage.utils;
import java.util.UUID;
public class UniqueIDGenerator {
public static String generateUniqueId(String prefix) {
int hashCode = UUID.randomUUID().hashCode();
String guidHashCode = Integer.toString(hashCode);
if (guidHashCode.startsWith("-"))
{
guidHashCode = prefix + guidHashCode.replace("-", "3");
}
return guidHashCode;

xCP 2.x Extension Points 7
}

xCP 2.x Extension Points 8
}
Create a Java Extension Artifact “uniqueidgenerator.javamodule” with:
a) XcpJavaExtensionSamples.jar (in which the above compiled class exists) as implementation jar and
b) “mypackage.utils.UniqueIDGenerator” as primary class.
Add the “uniqueidgenerator” Java Extension Artifact to your project (see the earlier section “Adding Java Extension” on how to create a Java Extension Artifact). Now “Unique ID Generator” can be called from “Execute Java Service” activity template in a Process.

xCP 2.x Extension Points 9
Example with Java Bean parameters/return value
You can also use Java Bean style inputs and outputs from the methods.
package mypackage.utils;
public class Customer {
private String firstName;
private String lastName;
public String getFirstName() {
return firstName;
}
public void setFirstName(String firstName) {
this.firstName = firstName;
}
public String getLastName() {
return lastName;

xCP 2.x Extension Points 10
}
public void setLastName(String lastName) {
this.lastName = lastName;
}
}
Customer Manager :
package mypackage.utils;
public class CustomerManager {
public void createCustomer(Customer customer) {
//System.out.println("Customer Created");
}
}
Create a Java Extension Artifact “customermanager.javamodule” with:
a) XcpJavaExtensionSamples.jar (in which the above compiled class exists) as implementation jar and
b) “mypackage.utils. CustomerManager” as primary class.
Add the “Customer Manager” Java Extension Artifact to your application (see the earlier section “Adding Java Extension” on how to create a Java Extension Artifact). Now the “Customer Manager” Java Extension can be called from “Execute Java Service” activity template in a Process.

xCP 2.x Extension Points 10

xCP 2.x Extension Points 11

xCP 2.x Extension Points 12
Custom Java Code to access DFC IDfSession
You can add Java Code as Java Extension Artifact that can be called from the “Execute Java Service Activity Template” in the process. Within this custom Java code, if DFC IDfSession is required the custom Java class has to extend the class com.documentum.fc.client.DfSingleDocbaseModule. With this you can call getSession() method from your Java Code. The system does not take care of releasing the session automatically. The session obtained using getSession() has to be released by calling releaseSession(session).
Below example makes use of getSession() and releaseSession() to fetch the list of users from the docbase.
package com.documentum.xcp;
import com.documentum.fc.client.*; import com.documentum.fc.common.DfException; import com.documentum.fc.common.IDfLoginInfo; import com.documentum.fc.common.DfId;
public class DocbaseOperations extends DfSingleDocbaseModule {
public String[] getUsers() { String docbaseUsers[] = new String[100]; IDfCollection coll = null; IDfSession mySession = null; try {
mySession = getSession(); String myQuery = "select user_name from dm_user"; IDfQuery myDFQuery = new DfQuery(myQuery); coll = myDFQuery.execute(mySession, IDfQuery.DF_QUERY); int i = 0; while (coll.next()) {
docbaseUsers[i] = coll.getString("user_name"); i++;
} } catch (DfException ex) {
throw new RuntimeException(ex); } finally { if(mySession != null) { releaseSession(mySession); } } return docbaseUsers;
} }

xCP 2.x Extension Points 13
Adding Custom Priority and Aging logic for Tasks
There may be situations where both the initial priority and the amount that priority increments need to be calculated dynamically. In these cases, you create a priority module that the system uses instead of using the work queue policy to set priority and aging logic. You can select a priority module when creating the work queue policy.
You can use process data to set the initial priority and increase the priority based on values
in the workflow. For example, if a loan application belonging to a preferred customer comes through a work queue, it can be immediately placed at a higher priority value than a loan application from other customers. In addition, if the loan request is for a greater amount or comes from a preferred loan broker, then the priority can be increased at a higher rate, ensuring that the queue supervisor is alerted if the task is not completed within a specified period of time. This kind of logic is especially useful to increase the priority of a task as it nears a deadline or some other time restriction—the priority is increased more rapidly as the deadline approaches, pushing the task up the queue at a higher rate.
A Custom Priority class has to
Implement the interface com.documentum.bpm.priority.IWQTaskPriority.
The above interface class is in xcp-java-extensions-bpm.jar. Compiling this class requires this jar to be in the classpath.
The IWQTaskPriority interface has two methods that need to be implemented: int getInitialPriority(IDfSession session, IDfWorkitemEx witem) throws DfException; int getIncrementPriority(IDfSession session, IDfWorkitemEx witem) throws DfException;
Example package mypackage.mypriority;
import com.documentum.bpm.IDfWorkitemEx; import com.documentum.bpm.priority.IWQTaskPriority; import com.documentum.fc.client.IDfSession; import com.documentum.fc.common.DfException;
public class MyCustomPriority implements IWQTaskPriority
/** * This example calculates priority from Process Data Variables. * There is Process Data Variable defined in the Process: * - is_vip (boolean) * - broker_class (string) */
public int getInitialPriority(IDfSession session, IDfWorkitemEx witem) throws DfException {
Boolean is_vip = (Boolean) witem.getPrimitiveVariableValue("is_vip"); if (is_vip.booleanValue() ) {
return 10; } else {

xCP 2.x Extension Points 14
return 5; }
}
public int getIncrementPriority(IDfSession session, IDfWorkitemEx witem) throws DfException {
String broker_class = (String) witem.getPrimitiveVariableValue("broker_class");;
if (broker_class.equalsIgnoreCase("A")) return 10; // increment_priority = 10
if (broker_class.equalsIgnoreCase("B")) return 5; // increment_priority = 5
else return 0; // increment_priority = 0
} }
Create a Java Extension Artifact “mycustompriority.javamodule” with:
a) XcpJavaExtensionSamples.jar (in which the above compiled class exists) as implementation jar
b) “mypackage.mypriority.MyCustomPriority” as primary class and
c) “com.documentum.bpm.priority.IWQTaskPriority” as interface

xCP 2.x Extension Points 15

xCP 2.x Extension Points 16
Adding a Custom Java Function
xCP 2.x packages many out-of-the-box functions (Date, String, Math etc..), all of which follow a specific pattern to be used in xCP Designer and runtime.
A Custom function class can contain one or more static methods that could be manifested as function(s) in xCP Designer and available during runtime. For a java class to be a custom function class, it has to
Implement the interface com.emc.xcp.expressions.functions.FunctionClass.
Have static methods with the annotation @XcpFunction. As part of this annotation one could override the name of the function visible in the xCP Designer and also specify the category under which it shows up in the xCP Designer.
This above interface “FunctionClass” and the annotation class “XcpFunction” is available in jar xcp-java-extensions-functions.jar.
Example
package mypackage.samples;
import com.emc.xcp.expressions.FunctionClass;
import com.emc.xcp.expressions.XcpFunction;
public class SampleFunctionClass implements FunctionClass {
@XcpFunction(name="getZipCode", category = "Zip Functions")
public static int getZipCode(String strInput) {
try{
String zipStr = strInput.split("-")[0];
return Integer.parseInt(zipStr);
} catch (NumberFormatException nfe) {
throw new RuntimeException("Input value is not a valid Zip");
}
}
}

xCP 2.x Extension Points 17
This custom function class should include all the code required within itself or specify dependent jars needed for it to compile and run.
Create a Java Extension Artifact “samplefunctionclass.javamodule” with:
a) XcpJavaExtensionSamples.jar (in which the above compiled class exists) as implementation jar and
b) “mypackage.samples. SampleFunctionClass” as primary class.
c) “com.emc.xcp.expressions.FunctionClass” as interface class name.
See the earlier section “Adding Java Extension” on how to create a Java Extension Artifact.
The function “getZipcode” shows up in the xCP Designer for consumption in server side expressions (e.g. in Business Object Event conditions, Process activity transitional conditions, etc.) under the category “Zip Functions.” Once the application

xCP 2.x Extension Points 18
containing this Java Extension Artifact is deployed, the functions are available during runtime.

xCP 2.x Extension Points 19
Adding a third party JDBC Driver in xCP
Third party JDBC drivers are available from the corresponding database vendors.
Follow this procedure to add the Java Extension Artifact “oracledriver.javamodule” for “Oracle JDBC Driver”:
1. Download ojdbc5.jar from Oracle. Use this as implementation jar.
2. Use “oracle.jdbc.driver.OracleDriver” as primary class and
3. "java.sql.Driver" as interface class.
Add the “Oracle JDBC Driver” Java Extension Artifact to your application (see the earlier section “Adding Java Extension” on how to create a Java Extension Artifact).
Now this driver will be listed in the Database Endpoint Artifact Editor which in turn could be used in all the Database related activities in the Process.
Note: Oracle driver is available out of the box for xCP 2.x.

xCP 2.x Extension Points 20
Adding a third party JMS (Java Messaging Service) Provider in xCP
Third party JMS drivers are downloadable from the corresponding JMS Server vendors.
Follow this procedure to add the Java Extension Artifact “tibcojmsdriver.javamodule” for “Tibco JMS Provider”:
1. Download tibjms.jar from Tibco. Use this as implementation jar.
2. Use “com.tibco.tibjms.naming.TibjmsInitialContextFactory” as primary class and
3. "javax.naming.spi.InitialContextFactory " as interface class.
Add the “Tibco JMS Provider” Java Extension Artifact to your application (see the earlier section “Adding Java Extension” on how to create a Java Extension Artifact). Now this JMS Provider can be used in a JMS Endpoint Artifact Editor which in turn could be used in all the JMS related activities in the Process.
Note: Tibco JMS Provider is available out of the box xCP 2.x.

xCP 2.x Extension Points 21
Clear BOF Cache
Java Modules are deployed as Standard BOF modules in the repository. DFC maintains a BOF cache where the interface and implementation jars are downloaded and cached on the client machine. Typically, the BOF cache is refreshed automatically if there is a change in BOF module. In some cases, where the BOF cache is not refreshed, they have to be handled manually.
Stop the application server and delete the BOF cache on the application server on which following services are running:
• Process Integrator inbound services • Java Method Server • BAM server • xCP Application • Other Documentum clients which uses the Java Module.
The cache folder location is specified by the ‘dfc.cache.dir’ property in the dfc.properties file. Its default value is the ‘cache’ subdirectory of the directory indicated by the dfc.data.dir property in the dfc.properties file. Clearing the ‘bof’ folder contents clears the BOF cache.

xCP 2.x Extension Points 22
Custom Widgets
Creating a New Widget
xCP 2.x packages many out-of-the-box widgets, all of which follow a specific pattern to be used in for xCP Designer.
For every widget, there are 2 essential components
JavaScript content file(s)
A component definition XML file
The JavaScript file should include all the code needed for the UI-Runtime to work, most of it would extend various ExtJS components while adding whatever custom functionality is needed.
The component definition XML file defines how the widget is saved and provides the detailed information on what properties the widget should contain.
JavaScript Content File
The JavaScript content file has only one requirement--the definition of the class:
Ext.define("myNamespace.widgets.myCustomWidget", {
extend: "Ext.form.Text",
alias: "widget.myWidgetXType",
The custom widget has to be defined with a name, in this case ”myNamespace.widgets.myCustomWidget,” which usually extends an ExtJS widget, in this case “Ext.form.Text.” An “alias” must to be given in the form of “widget.<xtype of widget>.”
The xtype of a widget is specified in the widget’s definition XML file, which is explained below. In order for the widget to be recognized by the system, the alias has to be in the given format, otherwise the widget will be unusable.
Widget XML File Outline
The XML is defined so that xCPDesigner knows how to configure the properties of the widget and to save it properly. The format is defined by model_schema.xsd, which is available here. The complete sample XML can also be found here.
<Widget> tag
<widget xmlns="http://documentum.emc.com/2010/UI-Model" id="myCustomWidgetID" xtype="myWidgetXType" version="1.0.0000.001">

xCP 2.x Extension Points 23
The <widget> tag tells xCP Designer this is a Widget, and it includes the following attributes
xmlns – The namespace for this widget – it has to “http://documentum.emc.com/2010/UI-Model.”
id – The ID used for this widget. This ID attribute has to be unique amongst all defined widgets.
xtype – The XTYPE of the widget. This is defined as the type of the widget so that the Runtime will know to look at this defined XML for properties.
version – Numeric version string.
<Name > tag
<name>My Custom Widget</name>
The name of the widget will be shown in the Widgets Palette of the Page Editor, allowing the ability to identify which type of widget it is.
<Description > tag
<description>My custom description explaining what this widget does.</description>
The <description> tag will be used as the tooltip in the Widgets Palette.
<Icon > tag
<icon src="icons/mycustomwidget_wig.png" width="16" height="16"/>
<icon src="icons/mycustomwidget_24_wig.png" width="24" height="24"/>
The <icon> tag specifies the location of the icon files in the packaged jar. There are two icons used by xCP Designer, one to be placed next to the widget in the Widgets Palette, another to be used when the widget is dragged in the canvas.
In order for an icon to be placed next to the widget in the Widgets Palette, the icon name has to contain the string “_wig”, and be defined to have width and height of “16”.
In order for an icon to be placed next to the widget when dragged, the icon name has to contain the string “_wig” and be defined to have width and height of “24”.
<Content > tag
<content src="content/widget/MyCustomWidget.js" type="text/javascript" nls="widget/MyCustomWidget-strings.js"/>
The <content> tag defines the location of the JavaScript files that will be used to render this widget.
src – The source path of the file within the packaged jar.
type – Use “text/javascript” to tell xCP Designer this is a JavaScript file.

xCP 2.x Extension Points 24
nls – The path of other JavaScript files used for localization. The root of the search for nls files will be “locales/content/<country code>/”, in the example above, the file “MyCustomwidget-strings.js” should be located in “locales/content/<country code>/widget”.
<Category > tag
<category>xcpPalette:Custom</category>
The <category> tag determines which section the widget appears under in the Widgets Palette. It must be one of the following possible values. If not, the widget will not appear in the Widgets Palette, and the user will not be able to add that widget into their pages.
xcpPalette:Navigation
xcpPalette:Layout
xcpPalette:Input
xcpPalette:Selection
xcpPalette:List
xcpPalette:Text
xcpPalette:Presentation
xcpPalette:Action
xcpPalette:Custom
<Configuration > tag
Refer to “Widget XML <Configuration> Tag.”.
<ExpressionProperties > tag
Refer to “Widget XML <ExpressionProperties> Tag”.
Widget XML <Configuration> Tag
The <configuration> tag defines the set of attributes for the defined widget, these attributes collectively will determine the JSON that is generated for the widget. This tag can have the following tag types as its children, in the order specified.
1. <databound> - This tag is optional, and there cannot be more than one instance of this tag.
2. <propertyInfo> - This tag is also optional, and there are no limits as to the number of occurrences.

xCP 2.x Extension Points 25
<Databound> tag
The <databound> tag is a special type of <propertyInfo> tag. It usually has the “name” attribute to be “value” and a “<type>” value of “EXPRESSION.” The explanation for these can be found in the following section.
<PropertyInfo> tag
The <propertyInfo> tag describes the different attributes and values for a particular name-value pair in the JSON. The tag will contain varying pieces of information which can include the following.
How the property will be presented in xCP Designer.
Validation rules on the property.
The data type of the property. (String, Integer, Boolean, Expression)
Any default value this property may have.
And many more.
<PropertyInfo> tag attributes
<propertyInfo name="propertyName" hidden="true">
This example is a property with the name “propertyName” and is set to be hidden.
The following list shows the available attributes to the <propertyInfo> tag:
name – A required string attribute defining the name of the property.
hidden – An optional boolean attribute declaring whether this property should show up in the properties view of xCP Designer or not.
localizable - An option boolean attribute to determine whether this property’s value will be externalized for translation or not.
There are special <propertyInfo> tags that are used for certain situations, please refer to the Special <propertyInfo> names section for more info.
<Label> tag
<label>My own label</label>
This is the label that will be shown in the properties view in xCP Designer, next to the input editor for this property.
<Type> tag
<type>STRING</type>
This determines what editor will be used to change the value of this property – the valid options are listed below.
STRING – A text field will be used.
INTEGER – A text field will be used.

xCP 2.x Extension Points 26
BOOLEAN – A check box will be used.
EXPRESSION – An expression editor will be used. The expression editor’s
configuration will have to be defined using the <expression> tag.
<Constraint> tag
<constraint>
<validator type="maxLength" maxLength="60"/>
</constraint>
A <constraint> may be defined to limit the length of the value. Currently, only “maxLength” is defined, and in order to use it, a second attribute maxLength has to be defined as in the example shown.
<Defaultvalue> tag
<defaultvalue>My default value</defaultvalue>
The defined default value will be used as the value of this property. A fixed value can be set by using <defaultValue> together with the “hidden” attribute of <propertyInfo>.
<Expression> tag
<expression>
<setterFunName>myCustomSetValue</setterFunName>
<contextTree>
<include>PRIMARY_CONTEXT</include>
<include>APP_CONTEXT</include>
<include>WIDGET_CONTEXT</include>
<include>DATASOURCE_OUTPUT</include>
<include>SINGLE_OBJECT_DATA_SERVICE_OUTPUT</include>
</contextTree>
</expression>
The <expression> tag is necessary if the <type> of the property is set to “EXPRESSION.”
The <setterFunName> is the name of the JavaScript function that will be used when the data is to be stored. In this example, the function myCustomSetValue will be called to set the value of this property. It is crucial that the JavaScript defines the function that is specified here, whether in the custom JavaScript file, or in the base JS classes it extends.
The <contextTree> tag determines where the value for the expression can be selected from. The available options are listed below.
APP_CONTEXT – The context of the Application, contains information such as the name of the application, the logged in user, etc.

xCP 2.x Extension Points 27
PRIMARY_CONTEXT – The primary context of the page, if one exists. For example, a “View Customer” page’s primary context would be the Customer, where its attributes can be used as part of the expression. (Customer.firstName)
WIDGET_CONTEXT – The context for other widgets on the page. Including this allows the usage the data that is stored in other widgets on the page. One example of this usage would be to append a prefix or suffix to a string.
DATASOURCE_INPUT – The context can come from the input of a Data Source Instance.
DATASOURCE_OUTPUT – The context can come from the output of a Data Source Instance.
SINGLE_OBJECT_DATA_SERVICE_OUTPUT – The context can come from the output of a Data Source Instance if all outputs do not contain repeating attributes.
Widget XML <ExpressionProperties> Tag
<expressionProperties>
<propertyInfo name="value">
<label>Value</label>
<getterFun>
<name>this.getValueFromWidget</name>
<arguments>
<argument>EVALUATION_CONTEXT</argument>
<argument>WIDGET_ID</argument>
<argument>PROPERTY_ID</argument>
</arguments>
</getterFun>
<changeEvents>
<eventInfo name="change"/>
</changeEvents>
</propertyInfo>
</expressionProperties>
The <expressionProperties> tag defines which attributes can be used in the expression editor. In this example, the “value” property is available, meaning the “value” of this widget can be used in any of the expression editors to compose a valid expression.
<PropertyInfo> Tag

xCP 2.x Extension Points 28
The <propertyInfo> tag’s “name” attribute should correspond to the name of the property defined in the <configuration> section, to specify which property this is referring to. The most common usage would be to get the value from a widget, as in this example here.
<Label> Tag
This defines the label of the property that is shown in xCP Designer.
<GetterFun> Tag
The <getterFun> tag defines the JavaScript function that will be used to get the value from this property, specifying the name and arguments for this JavaScript function. For the example above, the function to be used would be this.getValueFromWidget with three function arguments.
<Name> Tag
This specifies the name of the function, the most common way of using this <getterFun> is to get the value from the widget, in which “this.getValueFromWidget” should be used. Another defined function name is “this.getValueFromSelectionModel” for widgets that allow selection, for example, a results list. If there are functions defined in your widget’s JavaScript file, they can also be used, for example “myNamespace.myWidgetName.myFunctionName.”
<Arguments> Tag
The children of this tag specify the arguments that will be passed into this function. Possible values for the individual <argument> tag can be the following.
EVALUATION_CONTEXT – The context from which all information can be retrieved, this is required.
WIDGET_ID – Passes in the ID of the widget.
MODEL_ID – Passes in the ID of the model, for example, it could be a Customer model.
DATASERVICE_INSTANCE_ID – Passes in the ID of the data service instance.
PROPERTY_ID – Passes in the ID of the property, in this example this would pass in “value”.
PARAMETER_NAMESPACE – This is used for Application Parameters, passing in the namespace of the parameter.
For “this.getValueFromWidget” and “this.getValueFromSelectionModel,” the arguments has to be EVALUATION_CONTEXT, WIDGET_ID and PROPERTY_ID in this order. This is because these functions are pre-defined. If a new function is to be defined, only the arguments that are necessary to calculate the value have to be passed in.

xCP 2.x Extension Points 29
Special <propertyInfo> names
There are a few property name keywords that would appear differently in the properties view in xCP Designer. They are as follows.
valueType – This will show a dropdown of the list of different types available. Examples include String, Integer, Float, Datetime, Boolean etc.
isRepeating – This will show a checkbox that allows the user to decide whether the data should be repeating or not. Use this in conjunction with hidden=”true” to make the custom widget a repeating valued widget only.
repeatingAttributeFormat –This will show two drop-downs to allow you to decide how to represent the repeating attribute. One allows you to specify whether to use a new line to separate multiple values, and the other allows you to specify a separator.
A few other properties can specify the behavior of the widget to be read-only, hidden or disabled under different circumstances. All these attributes have to be EXPRESSION types in order for it to be honored. The expression editor will be placed in a “Behavior” tab in the properties view. An example of the XML is given below.
readonly – Specifying when the widget is read-only.
hidden – Specifying when the widget is hidden.
disabled – Specifying when the widget is disabled.
<propertyInfo name="hidden">
<label>Hidden when</label>
<type>EXPRESSION</type>
<expression>
<setterFunName>setHidden</setterFunName>
<contextTree>
<include>PRIMARY_CONTEXT</include>
<include>APP_CONTEXT</include>
<include>WIDGET_CONTEXT</include>
</contextTree>
</expression>
</propertyInfo>
Creating a New Function
As with widget, there are many functions that are packaged out-of-the-box, and these too, follow a specific pattern to be used in xCP Designer.
A function also consists of JavaScript files as well as a definition XML file.

xCP 2.x Extension Points 30
JavaScript Content File
// myCustomFunction.js
Ext.namespace ('abcompany.functions');
/*
* Comments for myCustomFunction
*/
abcompany.functions.myCustomFunction = function (str1, str2) {
return str1 + str2;
}
The JavaScript file should contain a function definition along with the required namespace definition. In this simple example, the namespace is defined to be “abcompany.functions,” and the function concatenates two strings.
Function XML File Outline
<function xmlns="http://documentum.emc.com.com/2010/UI-Model" id="JSFunction-myCustomFunction" version="1.0.0000.001">
The <function> tag tells xCP Designer this is a Function, and it includes the following attributes
xmlns – The namespace for this function – it has to “http://documentum.emc.com/2010/UI-Model”
id – The ID used for this function. This ID attribute has to be unique amongst all defined functions.
version – Numeric version string.
<Name> tag
<name>myCustomFunction</name>
The name of the function is shown in the expression editors of the Page Editor, allowing the ability to identify which function it is.
<Description > tag
<description>Returns the concatenated values of the two input parameters</description>
The <description> tag is used as the tooltip for the Function.
<Content > tag
<content src="content/function/MyCustomFunction.js" type="text/javascript"/>

xCP 2.x Extension Points 31
The <content> tag defines the location of the JavaScript files that is used to execute this function.
src – The source path of the file within the packaged jar.
type – Use “text/javascript” to tell xCP Designer this is a JavaScript file.
nls – The path of other JavaScript files used for localization. The root of the search for nls files is ”locales/content/<country code>/”.
<Namespace> tag
<namespace>abcompany.functions</namespace>
This has to match the namespace of the JavaScript function as it is used to generate the caller to the custom function.
<CategoryName> tag
<categoryName>String</categoryName>
The <categoryName> defines the category of the function by its return type. The possible values are as follows.
String
Mathematical
Date
<ReturnType> tag
<returnType isRepeating="false">STRING</returnType>
The <returnType> tag lets xCP Designer know what type is to be expected as the outcome of this custom function. This is needed because the expression editor in xCP Designer uses this information to perform its validation.
isRepeating attribute – Lets xCP Designer know whether to treat it as a single value or a repeating value.
The possible values for the <returnType> string are as follows.
STRING
INTEGER
FLOAT
DATETIME
BOOLEAN
<Params> tag
<params>
<param name="str1" required="true">

xCP 2.x Extension Points 32
<type isRepeating="false">STRING</type>
</param>
<param name="str12" required="true">
<type isRepeating="false">STRING</type>
</param>
</params>
The <params> tag contains a list of <param> tags that list the individual parameters that the function can take in.
<Param> tag
The <param> tag defines information for each parameter. The attributes can include the following.
name – A required attribute that defines the name of the parameter.
required – Allows xCP Designer to know whether this parameter is required or not, in order to validate the function input. Once a non-required parameter is defined, no required parameters can follow, as there is no way for xCP Designer to know which value corresponds to which parameter.
It contains a child <type> tag, which is explained below.
<Type> tag
The <type> tag defines the type of the parameter, and can have one attribute “isRepeating,” to define whether the parameter can be repeating or not. The list of possible values for the type is as follows.
STRING
INTEGER
FLOAT
DATETIME
BOOLEAN
ANY – Specifying ANY means xCP Designer will not check the type of this particular input parameter when it validates the function inputs.
Packaging a Custom Components JAR file
The JAR file should contain the following components.
Manifest file Definition
XML file(s) JavaScript
content file(s)
Icon(s) used by the custom component

xCP 2.x Extension Points 33
Properties file(s) used for localization
Manifest File
Manifest-Version: 1.0
Ant-Version: Apache Ant 1.7.1
Created-By: 20.5-b03 (Sun Microsystems Inc.)
Copyright: EMC Corporation
Version: 1.0
Build-Version: 1.0.0000.0001
Built-By: John Doe
Built-Date: 2012-05-17 00:12:43
Component-Bundle: my-custom-widget
Bundle-Version: 1.1
Bundle-Name: MyCustomWidget
Bundle-SymbolicName: MyCustomWidget
NAMESPACE: mcw
The Manifest file has to be in the JAR with the path “META-INF/MANIFEST.MF.” This name is case-sensitive.
There is one attribute in the manifest file “Component-Bundle” (case sensitive) that is required. The existence of this attribute tells xCP Designer that this is a JAR with custom components defined and should be picked up. The value of this attribute, in this case “my-custom-widget” will be this JAR’s identifier, as well as the base folder path for the component JAR (explained below). This value has to be unique across the application.
Other files
The rest of the files should be in a base folder that is named after the value of the “Component-Bundle” attribute in the manifest file. By convention, the JAR file should contain the following structure, match to the example manifest file given above.
META-INF
o MANIFEST.MF
my-custom-widget
o config – Definition XML files should go in this folder, sub-folder structure recommended for easy organization.
o content – JavaScript files should go in this folder. The folder structure has to match the <content> tag defined in XML.
o icons – Icons should go here. The folder structure has to match the ones defined in the <icon> tags in XML.

xCP 2.x Extension Points 34
o locales – localization files should go in here.
Troubleshooting
Blank Page Editor Canvas
In xCPDesigner, we merge all the JavaScript files as a single .js file to be used by the Page Editor canvas, if a blank canvas is seen after adding new custom widgets or custom functions, then it is very likely that the newly added JavaScript files has an error. At this point the way to fix this would be to remove the library, fix the JavaScript files and re-import the library. If pages render correctly after importing libraries, then it can be concluded that the newly added library is syntactically correct.
Canvas renders, but new custom widget cannot be found in Widgets Palette
Make sure the widget’s definition XML has the correct <category> tag included, please see the <Category> tag section.
Custom Themes
xCP 2.x’s System Default Theme is built on top of ExtJS’s theming system, which uses Sass and Compass to make it easy to customize the look of the application.
Sass is a CSS extension that has some great features including variables, mixins, functions and partials. It is compiled to standard CSS by the Sass engine.
Compass is a Sass framework that provides a library of Sass functions and mixins, in addition to the build-in Sass functions.
.scss Compass
+ Sass Engine
.css .css
For more information about Sass, visit Sass’s official website http://sass-lang.com

xCP 2.x Extension Points 35
For more information about Compass, visit Compass’s official website: http://compass-style.org
Creating a New Theme
Creating the Main Sass File
xCP 2.x packages out-of-the-box system default theme. While the default look works for many users, there are use cases where custom look is preferred. In xCP 2.x, it allows user to import a custom theme library.
To create a theme library that customizes the default theme, the first step is to create a text file with the extention .scss on the local file system. The name of the scss file could be any valid URL addressable file name. The content of the .scss file could contain CSS, Sass, or both. This file then needs to be packaged to a jar file which will be imported to xCP Designer as a theme library.
Overriding CSS Selectors
After the Sass file is created, you need to determine what needs to be customized. Once you figured out what to customize, then you need to figure out what CSS selectors are used for those styles. The easiest way to do that is to use browser’s developer tools such as FireFox’s FireBug or Chrome’s Developer Tool.
Once you have determined which CSS selectors need to be changed, you can copy those selectors and properties and paste them to the Sass file that was just created, and then modify them.
For example, to change the default button color to orange, the CSS selector that needs to be modified is
“x-btn-default-small.” The main custom Sass file would look like this:
The way that it works is that xCP 2.x runtime loads the system default CSS first, and then loads the custom theme CSS, if it’s defined. Component bundle CSS is loaded last. CSS specification states that the rules in later style sheets have greater precedence over the earlier ones. Therefore, the custom theme styles can override the system default styles.
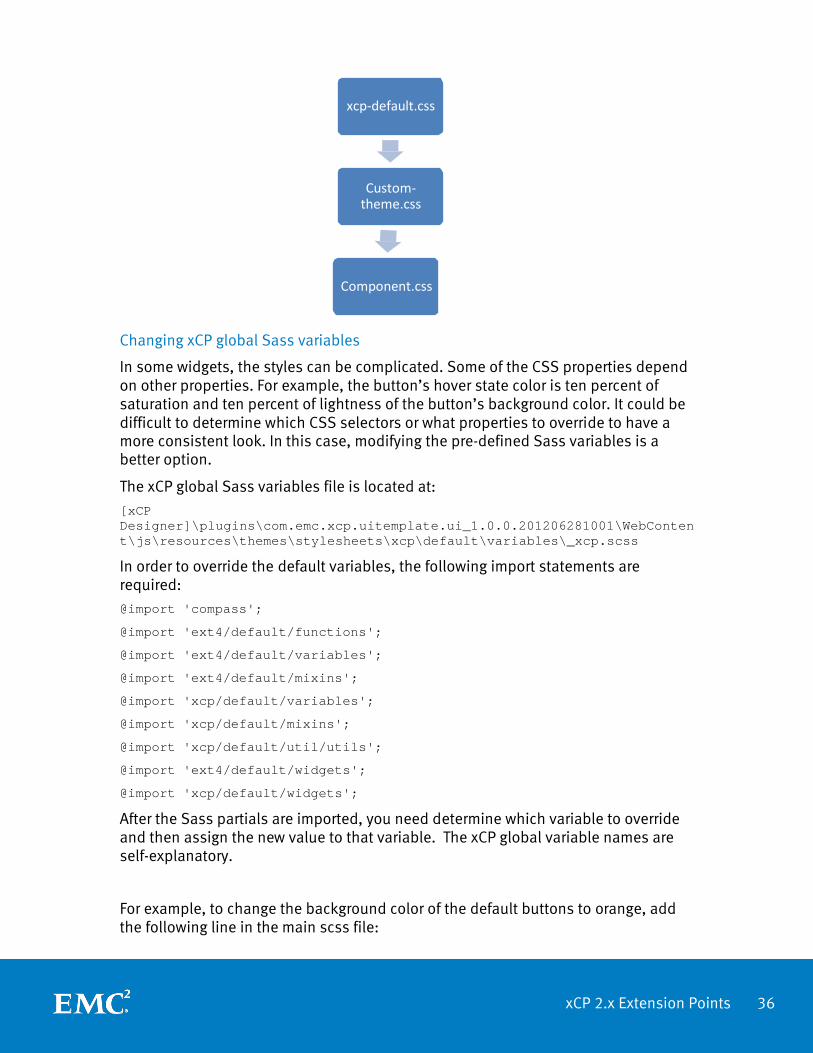
xCP 2.x Extension Points 36
xcp-default.css
Custom- theme.css
Component.css
Changing xCP global Sass variables
In some widgets, the styles can be complicated. Some of the CSS properties depend on other properties. For example, the button’s hover state color is ten percent of saturation and ten percent of lightness of the button’s background color. It could be difficult to determine which CSS selectors or what properties to override to have a more consistent look. In this case, modifying the pre-defined Sass variables is a better option.
The xCP global Sass variables file is located at:
[xCP Designer]\plugins\com.emc.xcp.uitemplate.ui_1.0.0.201206281001\WebConten t\js\resources\themes\stylesheets\xcp\default\variables\_xcp.scss
In order to override the default variables, the following import statements are required:
@import 'compass';
@import 'ext4/default/functions';
@import 'ext4/default/variables';
@import 'ext4/default/mixins';
@import 'xcp/default/variables';
@import 'xcp/default/mixins';
@import 'xcp/default/util/utils';
@import 'ext4/default/widgets';
@import 'xcp/default/widgets';
After the Sass partials are imported, you need determine which variable to override and then assign the new value to that variable. The xCP global variable names are self-explanatory.
For example, to change the background color of the default buttons to orange, add the following line in the main scss file:

xCP 2.x Extension Points 37
$xcp-widget-button-color: orange;
Changing the $xcp-widget-button-color automatically changes the button’s hover state and pressed state color, because of the following variables that are defined in the _xcp.scss:
$xcp-widget-button-color-over: adjust-color($xcp-widget-button-color, $saturation: 10%, $lightness: 10%);
$xcp-widget-button-color-pressed: adjust-color($xcp-widget-button-color, $saturation: -5%, $lightness: -5%);
Changing the variable itself is not enough to customize the widget, because the mixins that are referencing the variables are not included. In this case, it is “extjs- button” and “xcp-widget-button” that define the button styles. Since ExtJs mixins do not reference xCP variables, you need to override them first by adding the following line:
@import 'xcp/default/variables/ext-override/widget-button';
Then include the following mixins:
@include extjs-button;
@include xcp-widget-button;
The main custom scss file would look something like this:

xCP 2.x Extension Points 38
System Default Theme Directory Structure
xCP Designer’s system default theme Sass files are located in the following folder:
[xCP Designer]/plugins/com.emc.xcp.uitemplate.ui_[version]/WebContent/js/reso urces/themes/stylesheets/xcp/default
Here is what the folder structure looks like:
/mixins - contains all the mixins that are shared by all widgets
/util - helper mixins
/variables – contains all the xCP variables and ExtJs variables that are overridden
/widgets – contains all the xCP widget mixins and ExtJS widget mixins that are overriden
/_ext-all-imports.scss - contains all ExtJs imorts
/_ext-all-widgets - contains all ExtJs widgets mixins
/_mixins.scss - imports all xCP mixins partials
/_variables.scss - imports all xCP variable partials
/_widgets.scss – imports all xCP widgets mixin partials
/_xcp-default.scss - main Sass file for system default theme
Creating New Custom CSS Class
xCP Designer provides a way to add a custom CSS class in some widgets. This allows you to customize only that particular instance of the widget, instead of all the instances of that widget in the whole application.
For example, in the column box properties panel style tab, there is a CSS class field where user can enter the custom CSS classes.

xCP 2.x Extension Points 39
In this case, “my-column-box” CSS class can be defined in the custom theme’s main scss file:
The new CSS selector can be reused in other widgets, as long as other widgets are to have the same property and are referencing it in the CSS class.
Packaging a Custom Theme JAR file
The JAR file should contain the following components:
Manifest file
Sass file(s)
Manifest File
Manifest-Version: 1.0
Ant-Version: Apache Ant 1.7.1
Created-By: 20.5-b03 (Sun Microsystems Inc.)
Copyright: EMC Corporation
Version: 1.0
Build-Version: 1.0.0000.0001
Built-By: John Doe
Built-Date: 2012-05-17 00:12:43
Theme-Name: My Custom Theme
Theme-Sass-File: my-custom-theme.scss
The Manifest file has to be in the JAR with the path “META-INF/MANIFEST.MF”. This name is case sensitive.

xCP 2.x Extension Points 40
There are two attributes in the manifest file “Theme-Name” and “Theme-Sass-File” that are required. The existence of these attributes tells xCP Designer that this is a JAR with a custom theme defined and should be picked up.
The value of this attribute “Theme-Name,” in this case “My Custom Theme,” appears in the application theme dropdown under the Basics tab of xCP Designer’s master page once it has been imported as a library. For information on how to import a library, see the xCP Designer’s online Help.
Sass files
The value of the attribute “Theme-Sass-File” is the name of the main sass file for this custom theme, with a “.scss” extension, for example, “my-custom-theme.scss.” The value can also include paths, for example,
“sass/my-custom-theme.scss”, where “sass” is a folder at the root level inside the theme library jar.
For more information on the content of the main sass file, please refer to the section “Creating a New Theme.”
Applying the Custom Theme
After the theme is imported as a library, the theme library jar file is copied to the “lib” folder inside xCP Designer’s application folder:
[xCP Designer]/Applications/[application name]/[project name]/lib
To apply the custom theme, select the theme from the list, and click “Apply.”
After clicking “Apply,” all the files in the theme library jar are extracted to this location:
[xCP Designer]/Applications/[MyCustomApp]/.metadata/.plugins/com.emc.xcp.uite mplate.ui/resources/custom-themes/[<name space>.<library name>- <version>.jar]
The main sass file inside the custom theme is then compiled by the Sass engine. The output of the compilation is saved to this location:

xCP 2.x Extension Points 41
[xCP Designer]/Applications/[MyCustomApp]/[MyCustomApp]/src/main/webapp/js/re sources/css
Testing Theme Changes Iteratively
Web visual designis generally an iterative process. You frequently need to make changes to the CSS to verify it visually. The most efficient way to make changes to CSS and test the result immediately is to use the browser’s developer tools, such as FireBug.
There are cases where it is necessary to modify the custom theme scss file and apply it repeatedly in xCP Designer.
To do this, the custom theme can be updated by modifying the scss file inside the library jar in [xCP Designer]\[application name]\[project name]\lib\[theme jar file] by using some zip/jar file utility tools, such as 7-zip, which has the feature of editing the files inline.
After the jar file is updated, click “Apply” in the Basics tab of the master page to
compile the scss files in the theme library jar and update the pages again.
Deploying the Custom Theme
The compiled custom theme CSS is deployed to the following location in the application server as part of the application deployment:
[application root]/js/resources/css
In order for the runtime theme manager to pick up the applied custom theme CSS, a configuration entry is created in [application root ]/js/AppConfiguration.js:
supportedThemes: [{name: ‘My Custom Theme’,cssFile: 'my-custom- theme.css',isCustomTheme: true}…]
When the page is loading in the browser, this custom theme CSS file gets loaded after xCP Designer’s system default theme CSS, which means that the CSS selector in custom theme CSS can override the same selector in the system default theme. For more information on overriding system default theme CSS selector, go to “Creating a New Theme” section.
Viewer Framework
The Viewer Framework supports the easy deployment and integration of in-house and 3rd party content viewers. It supports document modification operations such as deleting, inserting, re-ordering, and extracting pages. The Viewer Framework also supports annotations, auditing, fallback mechanisms in document content retrieval, and viewer control re-use.

xCP 2.x Extension Points 42
xCP 2.x is shipped with five in-house viewers: xCP Content Viewer, xCP Media Viewer, xCP Desktop Plugin, Acrobat Reader, and browser. xCP 2.x is also equipped to support Daeja.
The Viewer Framework consists of two functional units:
1. A client side framework (Ext-JS/JavaScript based) responsible for viewer rendering, viewer events handling, inter widget event handling and supporting some of the advanced document imaging features that generally are not implemented at the individual viewer controls;
2. A server side framework that includes a public API, application service entry point implementations, viewer profiles for each viewer provider, and a format to viewer mapping. The provision of the API allows professional services and customers to extend the viewer framework programmatically.
The following sections describe the viewer client and server side frameworks, and integrating a third party viewer.
Viewer Client Side Framework
The viewer widget is the center of the client side viewer framework. It is built on top of Ext-JS. It incorporates a thumbnail control and a page modification panel, and a panel for displaying a viewer control. A viewer widget at runtime can be considered a “viewer control”, which renders into a real viewer control and the thumbnail control and the page modification toolbar which to supplements the content viewing features. Displaying the thumbnail control and the page modification toolbar is optional depending on the design time settings.
The client side viewer framework is packaged in a widget jar: xcp-ivf-widgets.jar.
The ViewerManager Object
The viewer widget supports the use of multiple instances on a page. On the client side viewer framework, all instances of the viewer widget on a page are managed by a singleton JavaScript class called xcp.common.ViewerManager.
The ViewerManager object instantiates the implementation objects for individual viewer integrations. The instantiation process requires the presence of a JavaScript class with the name of the viewer provider. For example, if a viewer provider is named AXViewer, it is expected that a JavaScript implementation class named xcp.viewer.impl.AXViewer is available. If it is not available, the class cannot be instantiated, and an instance of ViewerObject class is instantiated instead.
The ViewerObject Object
The xcp.viewer.impl.ViewerObject is a JavaScript class implemented in Ext-JS style. ViewerObject is the base class of all viewer implementations. All Viewers must derive from this class and inherit common functionalities of viewers. It defines a series of methods with some common for all viewer providers, and others are specific to individual viewers. Without the derived class, when the viewer control is initialized at runtime, the framework instantiates an instance of ViewerObject class to delegate the

xCP 2.x Extension Points 43
viewer. When the default delegation happens, the functionality of the viewer is restricted to those implemented at the ViewerObject class.
Make note of the following interface methods
preRender(initJson) This method enables the viewer implementation to render extra HTML or scripts that work with the viewer control. This method is invoked by the framework after the viewer implementation object is instantiated. The implementation of this method returns JavaScript/HTML block in text which is prefixed to the HTML content that represents the viewer control itself. The single argument is the initialization json content returned from the /ivf/initialization service call. The default implementation of this method simply returns an empty string.
renderControl(providerType, attributeList, parameterList)
This method renders the viewer control. It returns the HTML element representing the viewer control, including all necessary attributes and initialization parameters. This method is called by the framework after the preRender method but before the postRender method. The first argument indicates the type of viewer control. It could be <object> for ActiveX control, <applet> for Java Applet, or <iframe> for a HTML content viewer. The second and the third arguments contain a list of attributes and initialization parameters for the viewer. The default implementation simply renders the provider type followed by all attributes and then all parameters, without peeking into individual values for the parameters. For viewers that require custom rendering, you can override the default behavior by implementing this method in your viewer implementation.
postRender(initJson)
This method enables the viewer implementation to render extra HTML or scripts that work with the viewer control. This method is called by the framework after the renderControl method is invoked. The implementation of this method returns JavaScript/HTML block in text which is appended to the HTML content that represents the viewer control.. The single argument is the initialization json content returned from the /ivf/initialization service call. The default implementation of this method simply returns an empty string.
getPageCount()
This method returns the number of pages of the current document. The framework calls this method to get the number of pages so that the thumbnail control can be initialized correctly. The default implementation returns 1. If the viewer does not provide this information, then the thumbnail only displays one page, even though there may be many pages in the document. For viewers that do not expose a mechanism to get the number of pages, the thumbnail should be disabled for this viewer. You can do this by setting the supportAutomation property to false in the viewer profile.

xCP 2.x Extension Points 44
handleViewerEvent(eventide, eventData) This method handles events raised from within the viewer control. You must link this method with the event mechanism exposed by the viewer control. Implementing this method provides the communication mechanism between the viewer control, the thumbnail control, and the viewer widget. There are several events from the viewer control to be aware of:
o The event for when the viewer control is initialized and the first page of the document is opened. Upon receiving this event, you should call the initializeThumbnail method to initialize the thumbnail control;
o The event for when a user navigates through pages of a document. Upon receiving this event, the setThumbnailFocus method should be invoked in order to keep the page focus in the thumbnail control synchronized with the page selection in the viewer;
o The event for when a document or page has failed. Upon receiving this event from the viewer, the getNextDocumentFallbackUrl method or the getNextAnnotationFallbackUrl method should be invoked, depending on which one failed. This approach implements the fallback mechanism;
o The event for when printing from within the viewer is complete. This is optional. You will only need to implement this if you want your viewer to audit printing.
Implementing a Viewer Object
Implementing a viewer object is not required if your viewer is simple. However, if the viewer you are integrating into xCP2.x viewer framework supports viewer automation and other advanced content viewing features, implement your own viewer object so that it works better with the viewer framework.
The base class you extend is xcp.viewer.impl.ViewerObject, which is implemented in Ext-JS style. For example, if you give your viewer provider a unique name “MyViewer”, then the implementation is:
Ext.define(“xcp.viewer.impl.MyViewer”, {
extend : “xcp.viewer.impl.ViewerObject”,
constructor : function(elementId) {
var config = {},
this.elementId = config.elementId = elementId;
config.providerName = “MyViewer”;
this.callParent([config]);
}

xCP 2.x Extension Points 45
});
This class inherits all implementations from the base class. For simple customizations, you can implement the preRender and postRender methods, and if needed override the renderControl method to change the default behavior of viewer control rendering. After packaging this code into your viewer bundle jar and deploying the jar on application server, your viewer will be correctly delegated through MyViewer object.
This is not required if you just want your viewer to be delegated at the runtime. The viewer framework has code to take care of viewer delegation when a viewer does not have its own viewer object implementation. In reality, you want to implement more interface methods so that your viewer is well integrated with the thumbnail control and the entire client side viewer framework. The getPageCount, nextPage, prevPage gotoPage and the handleViewerEvent are the minimum methods to implement.
Viewer Profile
A viewer profile is a XML configuration file containing all information about the viewer provider and the target environment in which the viewer operates. The viewer profile is consumed by the framework API at the server side.
<viewerProfile name="Daeja"
xmlns=http://www.emc.com/xcp/ivf/ViewerProfile.xsd
xmlns:xsi="http://www.w3.org/2001/XMLSchema- instance">
…………………
</viewerProfile>
Table 3.1 Viewer Profile
A viewer profile contains 5 categories of information, mostly read-only or information that doesn’t change much once the system is configured. All the 5 categories of information are explained below.
Viewer Capabilities
Viewer capabilities are a set of Boolean values that indicate the capabilities of each viewer control. These settings do not change until a viewer vendor releases a new version of the viewer control that makes a specific capability available. The viewer framework uses these capabilities at the viewer control rendering at runtime. For example, if you declare a viewer does not support annotations, the viewer framework does not need to call DFC to get a list of annotation URLs. In another example, if you declare that a viewer does not support relative URLs, the viewer framework generates absolute URLs for that particular viewer control. Some items in this category can help to debug viewer related issues when you don’t know whether the issue is at the viewer, the integration, or the ACS/BOCS server.

xCP 2.x Extension Points 46
The following table lists the capabilities that the viewer framework supports:
<viewerCapabilities>
<supportLocalFile>true</supportLocalFile>
<supportPageServing>true</supportPageServing>
<supportDistrbutedContentDelivery>true</supportDistrbutedContentDelivery>
<supportRelativeUrl>true</supportRelativeUrl>
<supportUrlFallback>true</supportUrlFallback>
<supportIRMContainer>false</supportIRMContainer>
<supportAutomation>true</supportAutomation>
</viewerCapabilities>
The following capabilities require explanation:
supportDistributedContentDelivery. This capability indicates whether the viewer supports retrieving documents/annotations from the ACS/BOCS server which is the EMC preferred content delivery system. For all viewer providers, this feature is set to true as ACS/BOCS is the proven solution for content delivery in a geographically distributed environment. However, there are occasions when the customer may want to turn this feature off, at least temporarily. For example, when an ACS server is not available at a customer site, the customer may want to turn this feature off so that the viewer framework does not take extra computer clock cycles to call DFC to retrieve ACS/BOCS URLs. This technique can also be applied when the customer does not have DIS installed. This capability should also help the customer and an EMC support engineer diagnose content display issues for a particular viewer control, since if this capability is turned off, documents/annotation content will be delivered from the application server instead of ACS/BOCS server to the viewer control.
supportUrlFallback. This capability depends on viewer’s support of the fallback mechanisms for content retrieval. Not all viewers support the viewer framework fallback mechanism which requires the viewer control being able to automate via JavaScript.
supportAutomation. This capability determines whether the viewer control supports automation by way of JavaScript. For viewer controls with automation capabilities, the viewer framework can implement the control reuse feature so that the viewer control on a web page does not initialize repeatedly when the user wants to display the second document from the same viewer. For viewer controls that do not support automation, the control reuse feature is not operational. Instead, the viewer control must be re-initialized when a user displays the second document from the same viewer control.
supportIRMContainer. Displaying IRM protected documents from a web browser is challenging. The IRM protected document must be kept encrypted at the server side and during content delivery. Only at the client side, the

xCP 2.x Extension Points 47
content is decrypted with a key provided by the end user. Decryption of an IRM protected document requires the installation of the IRM client at the workstation of the end user.
Design Features
This category provides the feature enablement for the viewer control when it’s being placed on a page or is contained in another component. A typical use case is when you want to disable a feature temporarily across the application. This is different from the feature enablement during page design. Disabling a design feature from the viewer profile disables this feature across the entire application, so you don’t have to perform feature disabling page by page for all pages that host the viewer widget.
The following table lists the content of this category for Daeja:
<featureEnablement>
<annotation>
<enable>true</enable>
<tagname/>
</annotation>
<annotationCreation>
<enable>true</enable>
<tagname/>
</annotationCreation>
<thumbnail>
<enable>true</enable>
<tagname/>
</thumbnail>
<printing>
<enable>true</enable>
<tagname/>
</printing>
<export>
<enable>true</enable>
<tagname/>
</export>
<contentModification>
<enable>true</enable>
<tagname/>

xCP 2.x Extension Points 48
</contentModification>
</featureEnablement>
Design time settings for these features override the default values set in the viewer parameters section below. For example, at design time, if the Printing feature is disabled (set to false) on a page or component, even though the viewer parameter printButtons is set to true by default, the Daeja viewer does not display the print buttons at runtime. The tagName property under each design feature links a designable feature to a particular viewer parameter.
Supported Formats
Supported formats category lists all the formats supported by the viewer. This list is read by each Viewer and displayed in the Viewers and Formats mapping page in xCP Designer.
The following table provides an example of the XML content in this category:
<supportedFormats>
<format name="pdf">
<pageModification>false</pageModification>
<supportAnnotations>false</supportAnnotations>
<dosExtensions>
<ext>pdf</ext>
</dosExtensions>
</format>
</supportedFormats>
Environment Settings
This category provides the environmental settings for the viewer framework. Information contained in this category tells the viewer framework about the underlying system on which it is running. Values specified in this category rarely change after the system is set up and running. The viewer framework uses settings in this category to render viewer controls. The viewer framework also uses the information in this category to handle requests from the viewer control in a generic way which helps achieve the second objective described at the beginning of this document.
The following lists the content of this category for the Daeja viewer:
<environmentalSettings>
<pageServingThreshold>100000</pageServingThreshold>
<annotationFormat>anno_daeja</annotationFormat>
<automationLibrary/>
<parameterHandler>

xCP 2.x Extension Points 49
com.emc.xcp.ivf.runtime.handlers.params.DaejaParameterHandler
</parameterHandler>
<requestHandlers>
<handlerSpecification name="documentDownload">
<baseurl>/ivf/document</baseurl>
<handler>
com.emc.xcp.ivf.runtime.handlers.requests.DefaultDocumentHandler</handler>
<tagname>filename</tagname>
</handlerSpecification>
<handlerSpecification name="documentUpload">
<baseurl>/ivf/savedocument</baseurl>
<handler>
com.emc.xcp.ivf.runtime.handlers.requests.DefaultDocumentHandler</handler>
<tagname/>
</handlerSpecification>
<handlerSpecification name="annotationDownload">
<baseurl>/ivf/annotation?type=anno</baseurl>
<handler>
com.emc.xcp.ivf.runtime.handlers.requests.DaejaAnnotationRequestHandler
</handler>
<tagname>annotationFile</tagname>
</handlerSpecification>
<handlerSpecification name="annotationUpload">
<baseurl>/ivf/saveannotation</baseurl>
<handler>
com.emc.xcp.ivf.runtime.handlers.requests.DefaultAnnotationHandler</handler>
<tagname>annotationSaveServlet</tagname>
</handlerSpecification>
<handlerSpecification name="pageDeletion">
<baseurl>/ivf/deletepages</baseurl>
<handler>
com.emc.xcp.ivf.runtime.handlers.requests.DefaultPageModificationHandler
</handler>
<tagname/>
</handlerSpecification>
<handlerSpecification name="pageReorder">
<baseurl>/ivf/reorderpages</baseurl>

xCP 2.x Extension Points 50
<handler>
com.emc.xcp.ivf.runtime.handlers.requests.DefaultPageModificationHandler
</handler>
<tagname/>
</handlerSpecification>
<handlerSpecification name="pageInsertion">
<baseurl>/ivf/insertpages</baseurl>
<handler>
com.emc.xcp.ivf.runtime.handlers.requests.DefaultPageModificationHandler
</handler>
<tagname/>
</handlerSpecification>
<handlerSpecification name="pageExtraction">
<baseurl>/ivf/extractpages</baseurl>
<handler>
com.emc.xcp.ivf.runtime.handlers.requests.DefaultPageModificationHandler
</handler>
<tagname/>
</handlerSpecification>
<handlerSpecification name="controlReuse">
<baseurl>/ivf/automation</baseurl>
<handler>
com.emc.xcp.ivf.runtime.handlers.requests.DaejaViewerReuseHandler</handler>
<tagname/>
</handlerSpecification>
<handlerSpecification name="printAuditing">
<baseurl>/ivf/clientaudit?act=Print</baseurl>
<handler>
com.emc.xcp.ivf.runtime.handlers.requests.DefaultAuditTrailHandler</handler>
<tagname/>
</handlerSpecification>
<handlerSpecification name="exportAuditing">
<baseurl>/ivf/clientaudit?act=Export</baseurl>
<handler>
com.emc.xcp.ivf.runtime.handlers.requests.DefaultAuditTrailHandler</handler>
<tagname/>

xCP 2.x Extension Points 51
</handlerSpecification>
</requestHandlers>
</environmentalSettings>
Below are short descriptions of each of XML element in this category:
pageServingThreshold: The value for this element specifies the threshold content size for the page serving to initiate. The default value is 100KB. Content larger than this size qualifies for page serving.
annotationFormat: This element indicates to the viewer framework the format name that the viewer provider uses to store annotation contents in the repository. For Adobe Reader, there are no annotation capabilities, so the value is set to empty string. However, for viewers that are capable of handling annotations as separate contents from the document, this field must contain the name of format that the annotation contents are stored in Documentum repository. The name must be unique so that the annotation content will not be confused with annotation content for other viewer providers;
automationLibrary: This field contains the name of the viewer object for a particular viewer provider. The value is case sensitive, as the viewer framework will use this name to instantiate your viewer object at runtime. You can leave this field emptyif the name of the viewer object is the same as the name of the viewer provider, and the implementation is under the xcp.viewer.impl namespace. Otherwise, you must provide the fully qualified class name of your viewer object;
parameterHandler: This element contains a Java class name which implements the IViewerParameterHandler interface. Modern rich client viewers expose many attributes and parameters required for the viewer control to initialize on a web page. Most of the attributes and parameters take static values, while others take values that have a runtime context dependency. Details about the viewer attributes and parameters are explained in next section. This element provides a mechanism to automate the rendering of viewer attributes and parameters, and gives each viewer provider an opportunity to provide values that they think are appropriate. A basic parameter handler is provided so that for a simple viewer there is no need to implement its own parameter handler interface. Simply dropping a configuration file is enough to add a new viewer provider to the supported list of viewer framework. Details of the IViewerParameterHandler interface are explained in the Viewer Framework API section;
requestHandlers: Request handlers handle HTTP requests from individual viewer controls directly, or from the viewer framework at the client side during runtime. HTTP requests from the viewer and the client side viewer framework include the following 7 categories:
o Get document content
o Post document content

xCP 2.x Extension Points 52
o Get annotation content
o Post annotation content
o Post print audit trail
o Post export audit trail
o Viewer control automation.
The following table illustrates the XML snippet for the request handler for annotation content retrieval. Other types of request handlers are similar.
<handlerSpecification name="annotationDownload">
<baseurl>/ivf/annotation?type=anno</baseurl>
<handler>
com.emc.xcp.ivf.runtime.handlers.requests.DaejaAnnotationRequestHandler
</handler>
<tagname>annotationFile</tagname>
</handlerSpecification>
The baseUrl property provides a URL pattern from where the viewer control gets annotation content. When the control is rendered, the objectId query parameter is appended to the value provided in this property. The Handler property contains a Java class name that implements the IViewerAnnotationHandler interface. This handler Java class is called by the viewer framework when there is a HTTP request from a viewer control for annotation content. This way, we provide the opportunity for an individual viewer provider to handle such requests themselves. Finally, the tagName property indicates to the viewer framework which viewer control attribute or parameter that the baseUrl should apply to. The value provided must exist in the attribute list or the parameter list that the viewer control supports. During viewer control rendering, or during viewer control automation, the baseUrl is provided as the value for the specified parameter or attribute. This approach makes it possible for a simple viewer control to be added to the support list of the viewer framework without writing code. At the same time, for sophisticated viewer controls such as Daeja, simply dropping a viewer profile into the system, and implementing the IViewerAnnotationHandler interface is sufficient. The IViewerAnnotationHandler and other request handler interfaces are discussed later.
Viewer Attributes and Parameters
The viewer framework supports all types of viewer architectures, whether it is an ActiveX control, a Java applet, a browser plug-in, or pure HTML. Adobe Flash and Microsoft SilverLight can be categorized into one of these architectures. Modern rich client viewers require many attributes and parameters for the viewer control to initialize on a web page. For example, both Daeja ViewOne Pro and IGC Brava support

xCP 2.x Extension Points 53
a few dozen attributes and parameters. Viewer control vendors use these parameters to indicate where to get document content, how to display the content inside the viewer, how to customize the viewer control for special viewing requirements, specify which features to enable/disable, and to tell the browser where to download the viewer control binaries from the app server. It is also a common practice for viewer control vendors to add new parameters to fix bugs, or add new features. The list of viewer control parameters is dynamic.
This category of the viewer profile contains all viewer specific attributes and parameters used to initialize the viewer control. Most of the values contained in this category are static, and rarely change after deployment.
This category of the viewer profile contains 3 subsets of information: viewer control type, a list of viewer attributes, and a list of viewer parameters. The viewer control type property indicates to the viewer framework the HTML tag the viewer control must rendered at runtime.
Following table is the XML snippet for Daeja viewer.
<viewerControl type=”applet”>
<attributes>
<attr name=”codebase” value=”/ivf/providers/daeja” type=”url”>
……………
</attributes>
<parameters>
<param name="cabbase" type=”static”><value>viewone.cab</value></property>
..……
</parameters>
</viewerControl>
Attributes and the Parameters properties have a type attribute describing the nature of the viewer attribute or parameter. The type attribute can contain the following values:
Static: Directs the viewer framework to take the value and render the attribute as is.
url: Indicates to the viewer framework that the value is a URL. Depending on whether the viewer supports a relative URL, the viewer framework either renders the default value as is in the viewer profile, or prefixes the default value with the appropriate protocol, server, and port information to make an absolute URL. If the value starts with http:// or https://, the attribute/parameter is treated as static.
Runtime: Indicates to the viewer framework that the default parameter handler is capable of handling this viewer parameter. No custom parameter handling is required. For runtime parameters, mapping must be provided in the Design

xCP 2.x Extension Points 54
Features section, or in the Request Handlers section. At the viewer control runtime, design time values have precedence over the default values set in the viewer profile.
Custom: Indicates to the viewer framework that a custom parameter handler will handle this parameter. The viewer framework calls the parameter handler provided at the parameterHandler property. The parameter handler generates a value for parameter rendering at runtime.
For all viewer controls, you can add or remove parameters from this category, as long as the viewer control understands the name of the parameter and the format follows the syntax. For simple viewer controls, if all attributes and parameters are declared static or runtime types, you do not need to write a custom parameter handler. This makes it possible to drop a viewer profile into the system in order to get the new viewer control into the support list of the viewer framework.
The viewer profile must be placed under the following runtime class path:
com/emc/xcp/config/app/ivf/providers/
Failure to place the viewer profile in the correct location means that the viewer and the integration will not be recognized by the framework.
Server Side Viewer Framework API
The Viewer Framework API provides a set of interfaces for handling viewer parameters and HTTP requests. There is a basic implementation for these public interfaces. For any third party viewer integration, custom handler implementation can be done by extending these classes.
API also provides classes to load viewer profile and viewer format mappings.
IViewerParameterHandler Interface
This interface defines several public methods. A basic implementation of this interface is also provided in DefaultParameterHandler class.
getCustomAttribute method Implementation of this method provides the ability to handle viewer attributes declared custom in the viewer profile. The default value is passed to this method, but the implementation can alter the value from the default according to the HTTP request object, the viewer runtime context, the design time settings, or the default values of other parameters and attributes. The viewer framework runtime at the server side calls this implementation every time for each attribute declared custom type. When returned null, the implementation indicates to the viewer framework to not render this particular attribute during runtime.
getCustomParameter method Implementation of this method provides the ability to handle viewer parameters that are declared custom type in the viewer profile. The viewer framework runtime at the server side calls this implementation every time for

xCP 2.x Extension Points 55
each viewer parameter declared custom type. The default value for the parameter is passed to this method, but the implementation can alter the value from the default according to the HTTP request object, the viewer runtime context, the design time settings, or the default values of other parameters. When returned null, the implementation indicates to the viewer framework to not render this parameter at runtime.
getDocumentUrls method Implementation of this method returns an array of URLs for a specific document. The default implementation of this method at the DefaultParamterHandler class returns a prioritized array of ACS/BOCS URLs based on the proximity of ACS/BOCS servers to the client making the request. A URL pointing to the application server is also appended to the end of the array, so that if all ACS/BOCS fails, clients can fall back to the application server for image retrieval. The viewer framework passes the first URL in the array to the viewer’s initialization parameter, and keeps the rest of the URLs for the viewer to fall back to. Implementation of this method can also override this behavior to suit its own needs. The viewer provider can do this by implementing this method in its own parameter handler class.
getDefaultDocumentUrl method Implementation of this method returns the default URL for a specific document. The default implementation of this method at the DefaultParameterHandler class returns the first URL that the getDocumentUrls method returns. The URL fallback mechanism for document content retrieval starts from this URL.
getAnnotationUrls method Implementation of this method returns an array of URLs for an annotation object that belongs to a specific user. The default implementation of this method at the DefaultParameterHandler class returns a prioritized array of ACS/BOCS URLs based on the proximity of ACS/BOCS servers to the client making the request. A URL pointing to the application server is also appended to the end of the array so that when all ACS/BOCS servers fail, clients can fall back to the application server for annotation retrieval. The viewer framework passes the first URL in the array to viewer’s initialization parameter, and keeps the rest of the URLs for the viewer to fall back to. Implementations of this method can override this behavior for complex annotation retrieval protocols. Viewer providers can do this by implementing this method in their own parameter handler class, but only use the base class implementation as a way to get to a single annotation. In DIS (Document Image Services), each user only has one dm_note object associated with a single document object.
getDefaultAnnotationUrl method Implementation of this method returns the default URL for the annotation content for a specific document. The default implementation of this method at the DefaultParameterHandler class returns the first URL the getAnnotationUrls

xCP 2.x Extension Points 56
method returns. The URL fallback mechanism for annotation content retrieval starts from this URL.
getDefaultDocumentUploadUrl method Implementation of this method returns the servlet URL that processes document content upload requests. The default implementation of this method at the DefaultParameterHandler class simply returns the requestHandler property of the DocumentRequestHandler class specified at the viewer profile.
getDefaultAnnotationUploadUrl method Implementation of this method returns the servlet URL that processes the annotation content upload requests from the viewer. The default implementation of this method at the DefaultParameterHandler class returns the value of the requestHandler property of the AnnotationRequestHandler class specified in the viewer profile.
getBaseUrl method Implementation of this method returns the base URL for the application server. The value returned from this method is used to construct the URLs for various server resources depending on the viewer’s capability of handling relative URLs. The default implementation of this method at the DefaultParameterHandler class provides this capability.
IViewerDocumentHandler Interface
This interface defines 3 public methods. Implementation of this interface is responsible for delivering documents from the application server, and saving new document content uploaded from the viewers. Implementation of this interface provides the ultimate fallback for document retrieval when ACS/BOCS is not available. The implementation class name must be provided in the requestHandler property of the DocumentRequestHandler class specified in the viewer profile, for both getDocument and saveDocument requests. A basic handler implementation, the DefaultDocumentHandler class, is provided with this API to handle document download and upload requests from the viewers.
documentRetrievalRequestHandler method Implementation of this method handle requests from viewer controls for document content. Although ACS/BOCS is the preferred mechanism for content delivery, when all ACS/BOCS servers fail, the application server is responsible for delivering the content. This is the part of the fallback mechanism implemented with the viewer framework. Implementing this method means choosing to forward the request to a servlet that delivers a specific document, or stream the document content by itself. The default implementation of this method at the DefaultDocumentHandler class streams the document content to the requesting viewer directly.
documentUploadRequestHandler method Implementation of this method handle requests from viewer control for

xCP 2.x Extension Points 57
document upload. The default implementation of this method at the DefaultDocumentHandler class saves the uploaded file content by either replacing the original document content or creating a new version, based on configurations.
isDocumentFallbackUrl method Implementation of this method checks whether a given document URL is the fallback URL declared in the baseUrl property of the DocumentRequestHandler class. The default implementation of this method at the DefaultParamterHandler class compares the given URL with the one declared at the baseUrl property of the DocumentRequestHandler class. The method returns a value of true if the pattern is the same, and returns a value of false if the pattern is different. The viewer framework uses this method to determine whether or not to forward the document retrieval request to an internal servlet capable of delivering content from the application server.
IViewerAnnotationHandler Interface
This interface defines 3 public methods. Implementation of this interface is responsible for delivering annotation content from the application server, and saving new annotation content uploaded from the viewers. Implementation of this interface provides the ultimate fallback for annotation retrieval when ACS/BOCS is not available. The implementation class name must be provided in the requestHandler property of the AnnotationRequestHandler class. In a basic handler implementation, the DefaultAnnotationHandler class is provided with this API to handle annotation download and upload requests from the viewers.
annotationRetrievalRequestHandler method Implementation of this method handles requests for annotation retrieval from viewer controls. For viewer controls with complicated communication protocols for annotation retrieval, it is recommended that this method be implemented to handle annotation for a single user as well as annotations for all users of a specified document.
annotationUploadRequestHandler method Implementation of this method handles requests for uploading new annotation content from the viewer controls. The default implementation of this method at the DefaultAnotationHandler class saves the uploaded annotation content into a dm_note object with the specified annotation format associated with the viewer profile. The default implementation assumes that the login user is only able to modify annotations he or she owns. Other user annotations are read-only to the login user.
isAnnotationFallbackUrl Implementation of this method checks whether the given annotation retrieval URL is the fallback URL declared in the baseUrl property of the AnnotationRequestHanlder class. The default implementation of this method in the DefaultParameterHandler class compares a given URL with the URL declared in the baseUrl property of the AnnotationRequestHandler class. The

xCP 2.x Extension Points 58
method returns a value of true if the pattern is the same, and a value of false if the pattern is different.
IViewerAuditTrailHandler Interface
This interface defines a single method called auditingRequestHandler. Implementing this interface enables the recording of audit trail events for document printing and exports from within the viewer control. Two default implementations, the DefaultPrintAuditingRequestHandler and DefaultExportAuditingRequestHandler, take client requests for print auditing and export auditing respectively and create audit trail entries in the repository. You can customize this default behavior by deriving your own handler implementation from these two classes and override the auditingRequestHandler method.
If a viewer control does not raise an event when an end user clicks the print button from within the viewer, then it is not necessary to implement this interface. The supportPrintAuditing viewer capability should be set to false, and the printAuditTrail field at the viewer profile should be left empty.
IViewerAutomationHandler Interface
This interface defines a single method called automationRequestHandler. Implementing this interface collects runtime information (such as object ID and file format) and returns it to the viewer control so that it can load the next document. This interface is invoked by the viewer framework when the viewer widget makes a request to display a second document using the same viewer control. This is the control reuse feature. There is no default implementation of this interface because every viewer control is different in how to automate the viewer with JavaScript. Some viewer controls do not support automation.
If a viewer control does not support automation with JavaScript, then implementation of this interface is not necessary. In this case, the supportAutomation viewer capability should be set to false, and the viewerAutomation field in the viewer profile should be left empty. With these settings, the viewer control is re-initialized by the viewer widget.
ViewerProfile Class
This is the model class for the viewer profile XML. It is the Java representation of the viewer profile. An instance of this class identifies a single viewer profile deployed for each custom application. The viewer framework uses Spring MVC to load a specific viewer profile from the specified class path. The viewer framework creates and populates an instance of this class that is used for almost all service operations initiated by either the viewer control or the viewer widget on the client side. Within a custom application, there should be a single instance of the viewer profile object for each viewer provider. Spring MVC manages the singleton nature of the viewer profile during runtime.

xCP 2.x Extension Points 59
ViewerMapping Class
The ViewerMapping class is a utility class that loads the format to viewer mapping for a specific application. Methods to update and create new mappings are also provided. At runtime, the viewer framework calls this class to get the viewer provider name when provided the file format. This occurs before loading the corresponding viewer profile.
Use this class to enumerate all viewer providers deployed for the application.
ViewerController Class and ViewerFrameworkController Class
The server side viewer framework that interfaces with the Application Services is a thin layer. The ViewerController class implements this layer. It is built on top of the Spring MVC framework. All client side service requests come through this layer, to leverageg the functionaly of the framework on object serializations and injection of controls. In addition to the ViewerProfile object, the ViewerConroller class prepares a DFC session manager, a runtime context, and the design time context prior to passing them to the ViewerFrameworkController class. The ViewerFrameworkController class is where viewer framework business logic is implemented.
Separation of the business logic implementation from the Spring MVC framework dependent service wrapper makes the viewer framework flexible so that it can be applied to other server side frameworks.
ViewerControlBean Class
An instance of this class during runtime contains the information needed for the client side to initialize the viewer widget and render and initialize a specific viewer control. At runtime, the instance is serialized into json data format for consumption by the viewer widget and the integrations for individual viewers.


![Homepage [] · 2016-12-11 · Compo on Compos i ± ion Composition Compo si tion Composition Composition Composition Composition ... Cylinder TRIM Steatite TRIM REC TUNING VFO TUNING](https://img.dokumen.tips/doc/110x75/5f99801b70d8f630802d58e4/homepage-2016-12-11-compo-on-compos-i-ion-composition-compo-si-tion-composition.jpg)