Embed Size (px)
Citation preview

Xerox® WorkCentre® 3335/3345Multifunction PrinterUser Guide
Version 1.0September 2016

©2016 Xerox Corporation. All rights reserved. Xerox®, Xerox and Design®, Phaser®,PhaserSMART®, PhaserMatch®, PhaserCal®, PhaserMeter™, CentreWare®, PagePack®,eClick®, PrintingScout®, Walk-Up®, WorkCentre®, FreeFlow®, SMARTsend®, Scan to PCDesktop®, MeterAssistant®, SuppliesAssistant®, Xerox Secure Access Unified ID System®,Xerox Extensible Interface Platform®, ColorQube®, Global Print Driver®, andMobile ExpressDriver® are trademarks of Xerox Corporation in theUnited States and / or other countries.
Adobe®, Adobe PDF logo, Reader®, Adobe® TypeManager®, ATM™, Flash®, Macromedia®,Photoshop®, and PostScript® are trademarks or registered trademarks of Adobe Systems,Inc.
Apple®, Bonjour®, EtherTalk™, TrueType®, iPad®, iPhone®, iPod®, iPod touch®, AirPrint® andthe AirPrint®, Mac®, and Mac OS® are trademarks or registered trademarks of Apple Inc.in the U.S. and other countries.
HP-GL®, HP-UX®, and PCL® are registered trademarks of Hewlett-Packard Corporation inthe United States and/or other countries.
IBM®andAIX®are registered trademarks of International BusinessMachines Corporationin the United States and/or other countries.
Microsoft®, Windows Vista®, Windows®, andWindows Server® are registered trademarksof Microsoft Corporation in the United States and other countries.
Novell®, NetWare®, NDPS®, NDS®, IPX™, and Novell Distributed Print Services™ aretrademarks or registered trademarks of Novell, Inc. in the United States and othercountries.
SGI® and IRIX® are registered trademarks of Silicon Graphics International Corp. or itssubsidiaries in the United States and/or other countries.
Sun, Sun Microsystems, and Solaris are trademarks or registered trademarks of Oracleand/or its affiliates in the United States and other countries.
McAfee®, ePolicyOrchestrator®, andMcAfee ePO™are trademarks or registered trademarksof McAfee, Inc. in the United States and other countries.
UNIX® is a trademark in the United States and other countries, licensed exclusivelythrough X/ Open Company Limited.
PANTONE® and other Pantone, Inc. trademarks are the property of Pantone, Inc.

Table of Contents
1 Safety....................................................................................................1-1Notices and Safety..............................................................................................................1-1Electrical Safety....................................................................................................................1-2
General Guidelines.................................................................................................1-2Power Cord................................................................................................................1-2Emergency Power Off...........................................................................................1-3Laser Safety..............................................................................................................1-3
Operational Safety..............................................................................................................1-3Operational Guidelines.........................................................................................1-3Ozone Release..........................................................................................................1-4Printer Location.......................................................................................................1-4Printer Supplies........................................................................................................1-4
Maintenance Safety...........................................................................................................1-5Printer Symbols.....................................................................................................................1-5Environmental, Health, and Safety Contact Information...................................1-9
2 Features................................................................................................2-1Parts of the Printer...............................................................................................................2-1
Front View.................................................................................................................2-1Document Feeder......................................................................................2-1
Rear View...................................................................................................................2-2Internal Components............................................................................................2-3Control Panel............................................................................................................2-4
Information Pages...............................................................................................................2-6Accessing and Printing the Information Pages..........................................2-6Printing the Configuration Report at the Control Panel..........................2-6
Administration Features....................................................................................................2-7Xerox® CentreWare® Internet Services...........................................................2-7
Accessing Xerox®CentreWare® Internet Services.......................................2-7
Locating the IP Address of the Printer...........................................................2-7Automatic Data Collection.................................................................................2-8Maintenance Assistant.........................................................................................2-8
Enabling Maintenance Assistant........................................................2-8Billing and Usage Information.........................................................................2-9
More Information................................................................................................................2-9
iXerox® WorkCentre® 3335/3345 Multifunction PrinterUser Guide

3 Installation and Setup....................................................................3-1Installation and Setup Overview...................................................................................3-1Selecting a Location for the Printer..............................................................................3-2Connecting the Printer.......................................................................................................3-2
Selecting a Connection Method.......................................................................3-2Connecting the Printer to the Network..........................................................3-4Connecting to a Computer Using USB...........................................................3-4Connecting to a Telephone Line.......................................................................3-5Turning On or Off the Printer.............................................................................3-5
Configuring Network Settings........................................................................................3-7About TCP/IP and IP Addresses........................................................................3-7
Enabling the Printer for Scanning.................................................................................3-7Power Saver Mode...............................................................................................................3-8
Power Saver Levels.................................................................................................3-8Exiting Power Saver Mode...................................................................................3-8Setting the Power Saver Mode Timers at the Control Panel.................3-8
Installing the Software......................................................................................................3-8Operating System Requirements......................................................................3-9Installing Drivers and Utilities for Windows................................................3-9Installing Print Drivers for Macintosh OS X Version 10.9 and
Later................................................................................................................3-10Installing Scan Drivers for Macintosh..........................................................3-10Installing the Print Drivers for UNIX and Linux.......................................3-12Other Drivers..........................................................................................................3-12
Installing the Printer as a Web Service on Devices..............................................3-13Installing a WSD Printer Using the Add Device Wizard.......................3-13Installing a WSD Printer Manually Using the Add Printer
Wizard............................................................................................................3-13AirPrint, Mopria, Google Cloud Print, and NFC......................................................3-13
4 Paper and Media...............................................................................4-1Supported Paper...................................................................................................................4-1
Ordering Paper.........................................................................................................4-1General Paper Loading Guidelines..................................................................4-1Paper That Can Damage Your Printer............................................................4-1Paper Storage Guidelines....................................................................................4-2Supported Paper Types and Weights..............................................................4-2Supported Standard Paper Sizes......................................................................4-3Supported Custom Paper Sizes.........................................................................4-3Supported Paper Types and Weights for Automatic 2-Sided
Printing.............................................................................................................4-3
Xerox® WorkCentre® 3335/3345 Multifunction PrinteriiUser Guide
Table of Contents

Supported Standard Paper Sizes for Automatic 2-SidedPrinting.............................................................................................................4-4
Supported Custom Paper Sizes for Automatic 2-SidedPrinting.............................................................................................................4-5
Loading Paper.......................................................................................................................4-6Loading Paper in the Bypass Tray....................................................................4-6Loading Paper in Tray 1.......................................................................................4-9Loading Paper in Optional Tray 2..................................................................4-12Configuring the Duplex Unit Width Size....................................................4-14
Printing on Special Paper...............................................................................................4-16Envelopes................................................................................................................4-16
Guidelines for Printing Envelopes.....................................................4-16Loading Envelopes in the Bypass Tray...........................................4-17
Labels........................................................................................................................4-19Guidelines for Printing Labels............................................................4-19Loading Labels in the Bypass Tray...................................................4-20
Transparencies......................................................................................................4-21Guidelines for Printing Transparencies..........................................4-22
5 Printing..................................................................................................5-1Printing Overview.................................................................................................................5-1Selecting Printing Options................................................................................................5-1
Print Driver Help......................................................................................................5-2Windows Printing Options..................................................................................5-2
Setting Default Printing Options for Windows..............................5-2Selecting Windows Print Options for an Individual Job............5-3Saving a Set of Commonly Used Printing Options for
Windows.............................................................................................5-3Macintosh Printing Options................................................................................5-3
Selecting Printing Options for Macintosh........................................5-3Saving a Set of Commonly Used Printing Options for
Macintosh..........................................................................................5-4Linux Printing Options..........................................................................................5-4
Launching Xerox® Printer Manager....................................................5-4
Printing from a Linux Workstation.....................................................5-4Managing Jobs........................................................................................................5-5
Managing Jobs at the Control Panel.................................................5-5Managing Jobs in Xerox® CentreWare® Internet
Services...............................................................................................5-6Printing Features.....................................................................................................5-6
Printing on Both Sides of the Paper...................................................5-6Selecting Paper Options for Printing.................................................5-7
iiiXerox® WorkCentre® 3335/3345 Multifunction PrinterUser Guide
Table of Contents
Printing Multiple Pages to a Single Sheet.......................................5-7Scaling...........................................................................................................5-7Print Quality.................................................................................................5-7
Saved Jobs.................................................................................................................5-8Print From..................................................................................................................5-8
Printing from Saved Jobs........................................................................5-8Printing from a USB Flash Drive..........................................................5-9
6 Copying.................................................................................................6-1Basic Copying........................................................................................................................6-1
Document Glass......................................................................................................6-1Document Glass Guidelines..................................................................6-1Using the Document Glass....................................................................6-2
Document Feeder...................................................................................................6-2Document Feeder Guidelines...............................................................6-2Using the Document Feeder.................................................................6-3
Selecting Copy Settings.....................................................................................................6-3Basic Settings...........................................................................................................6-3
Selecting a Paper Tray.............................................................................6-3Selecting 2-Sided Copy Options..........................................................6-3Specifying the Size of the Original.....................................................6-4
Image Quality Settings........................................................................................6-5Specifying the Original Type................................................................6-5Making the Image Lighter or Darker.................................................6-5Automatically Suppressing Background Variation......................6-5
Output Adjustments..............................................................................................6-6Reducing or Enlarging the Image.......................................................6-6Erasing the Edges of Copies..................................................................6-6Page Layout.................................................................................................6-6Shifting the Image...................................................................................6-7
Output Format Settings.......................................................................................6-7Selecting Book Copying..........................................................................6-7Creating a Booklet....................................................................................6-7Including Covers........................................................................................6-8Adding Transparency Separators........................................................6-8
ID Card Copying......................................................................................................6-9
7 Scanning...............................................................................................7-1Loading Documents for Scanning.................................................................................7-1
Using the Document Glass.................................................................................7-1Document Glass Guidelines..................................................................7-2
Xerox® WorkCentre® 3335/3345 Multifunction PrinterivUser Guide
Table of Contents

Using the Document Feeder..............................................................................7-2Document Feeder Guidelines...............................................................7-2
Scanning to a USB Flash Drive.......................................................................................7-3Scanning to a Shared Folder on a Network Computer.........................................7-4
Sharing a Folder on a Windows Computer...................................................7-4Sharing a Folder Using Macintosh OS X Version 10.7 and
Later...................................................................................................................7-4Adding a Folder as an Address Book Entry Using CentreWare
Internet Services...........................................................................................7-5Scanning to a Folder on a Network Computer............................................7-5
Scanning to an Email Address........................................................................................7-6Scanning to a Computer...................................................................................................7-6Sending a Scanned Image to a Destination............................................................7-7Adjusting Scanning Settings...........................................................................................7-7
Setting the Output Color.....................................................................................7-7Setting the Scan Resolution...............................................................................7-8Selecting 2-Sided Scanning................................................................................7-8Setting the File Format.........................................................................................7-8Lightening or Darkening the Image...............................................................7-8Automatically Suppressing Background Variation....................................7-9Specifying the Original Size................................................................................7-9Erasing Edges...........................................................................................................7-9
8 Faxing....................................................................................................8-1Basic Faxing...........................................................................................................................8-1
Using the Document Glass.................................................................................8-2Document Glass Guidelines..................................................................8-2
Using the Document Feeder..............................................................................8-3Document Feeder Guidelines...............................................................8-3
Selecting Fax Options.........................................................................................................8-3Specifying the Size of the Original..................................................................8-3Sending a Delayed Fax.........................................................................................8-4Automatically Suppressing Background Variation....................................8-4Sending Header Text.............................................................................................8-4To Lighten or Darken an Image........................................................................8-5
Storing a Fax in a Local Mailbox....................................................................................8-5Printing Local Mailbox Documents...............................................................................8-5Sending a Fax to a Remote Mailbox............................................................................8-5Storing a Fax for Local or Remote Polling..................................................................8-6Polling a Remote Fax..........................................................................................................8-6Printing or Deleting Stored Faxes..................................................................................8-6Using the Address Book....................................................................................................8-6
vXerox® WorkCentre® 3335/3345 Multifunction PrinterUser Guide
Table of Contents

Adding an Individual Entry to the Device Address Book........................8-6Editing an Individual Address Book Entry....................................................8-7
9 Maintenance.......................................................................................9-1Cleaning the Printer............................................................................................................9-1
General Precautions...............................................................................................9-1Cleaning the Exterior............................................................................................9-2Cleaning the Scanner............................................................................................9-2
Cleaning the Document Glass.............................................................9-2Ordering Supplies.................................................................................................................9-5
When to Order Supplies.......................................................................................9-5Viewing Printer Supply Status...........................................................................9-5Consumables............................................................................................................9-5Routine Maintenance Items..............................................................................9-6Toner Cartridges......................................................................................................9-6
General Precautions for the Toner Cartridge..................................9-6Replacing a Toner Cartridge.................................................................9-7
Drum Cartridges......................................................................................................9-7General Precautions for the Drum Cartridge..................................9-7Replacing a Drum Cartridge.................................................................9-7
Recycling Supplies..................................................................................................9-8Moving the Printer...............................................................................................................9-8Billing and Usage Information....................................................................................9-10
10 Troubleshooting............................................................................10-1General Troubleshooting................................................................................................10-1
Restarting the Printer.........................................................................................10-1Printer Fails to Power On...................................................................................10-2Printer Resets or Turns Off Frequently.........................................................10-2Document Prints from Wrong Tray...............................................................10-3Automatic 2-Sided Printing Problems..........................................................10-3Paper Tray Fails to Close...................................................................................10-3Printing Takes Too Long.....................................................................................10-3Printer Fails to Print.............................................................................................10-4Printer Makes Unusual Noises........................................................................10-5Condensation has Formed Inside the Printer...........................................10-5
Paper Jams...........................................................................................................................10-6Minimizing Paper Jams......................................................................................10-6Locating Paper Jams...........................................................................................10-7Clearing Paper Jams...........................................................................................10-8
Clearing Paper Jams from the Document Feeder......................10-8
Xerox® WorkCentre® 3335/3345 Multifunction PrinterviUser Guide
Table of Contents

Clearing Paper Jams at the Bypass Tray....................................10-16Clearing Paper Jams from Tray 1..................................................10-17Clearing Paper Jams from Tray 2..................................................10-18Clearing Paper Jams from the Output Tray...............................10-21Clearing Paper Jams from the Inside the Printer....................10-22Clearing Paper Jams from the Back of the Printer.................10-23Clearing Paper Jams from the Duplex Area..............................10-26
Troubleshooting Paper Jams........................................................................10-27Multiple Sheets Pulled Together....................................................10-27Paper Misfeeds......................................................................................10-27Label and Envelope Misfeeds..........................................................10-28Paper Jam Message Stays On.........................................................10-28Jams During Automatic 2-Sided Printing...................................10-29
Print-Quality Problems..................................................................................................10-29Controlling Print Quality.................................................................................10-30Solving Print-Quality Problems....................................................................10-30
Copy and Scan Problems.............................................................................................10-35Fax Problems....................................................................................................................10-36
Problems Sending Faxes.................................................................................10-36Problems Receiving Faxes..............................................................................10-37
Getting Help.....................................................................................................................10-39Control Panel Messages..................................................................................10-39
Control Panel Help...............................................................................10-39Viewing Warning Messages on the Control Panel..................10-39Viewing Error and Alert Messages on the Control
Panel...............................................................................................10-39Viewing Job Status on the Control Panel...................................10-40
Using the Integrated Troubleshooting Tools ........................................10-40Accessing and Printing the Information Pages.......................10-41Setting Access Rights for the Configuration Report and
Information Pages....................................................................10-41Available Information Pages........................................................................10-43Online Support Assistant................................................................................10-44More Information.............................................................................................10-45
A Specifications.....................................................................................A-1Printer Configurations and Options.............................................................................A-1
Available Configurations.....................................................................................A-1Standard Features..................................................................................................A-2
Physical Specifications.......................................................................................................A-4Weights and Dimensions....................................................................................A-4
viiXerox® WorkCentre® 3335/3345 Multifunction PrinterUser Guide
Table of Contents

WorkCentre® 3335 Weights and Dimensions................................A-4
WorkCentre® 3345 Weights and Dimensions................................A-4
Physical Specifications for WorkCentre® 3335 StandardConfiguration................................................................................................A-5
Physical Specifications for WorkCentre® 3345 StandardConfiguration................................................................................................A-5
Clearance Requirements for Standard Configuration.............................A-6Environmental Specifications.........................................................................................A-6
Temperature.............................................................................................................A-6Relative Humidity...................................................................................................A-6Elevation....................................................................................................................A-6
Electrical Specifications....................................................................................................A-7Power Supply Voltage and Frequency............................................................A-7Power Consumption..............................................................................................A-7
Performance Specifications.............................................................................................A-8Print Warm-up Time..............................................................................................A-8Print Speed................................................................................................................A-8
B Regulatory Information..................................................................B-1Basic Regulations.................................................................................................................B-1
ENERGY STAR® Qualified Product....................................................................B-1
United States FCC Regulations.........................................................................B-1European Union......................................................................................................B-2European Union Lot 4 Imaging Equipment Agreement
Environmental Information.....................................................................B-2Environmental Information Providing Environmental
Solutions and Reducing Cost......................................................B-2Germany....................................................................................................................B-4
Germany - Blue Angel..............................................................................B-4Blendschutz.................................................................................................B-4Lärmemission..............................................................................................B-4Importeur.....................................................................................................B-4
Turkey RoHS Regulation.......................................................................................B-5Regulatory Information for 2.4 GHz Wireless Network
Adapter............................................................................................................B-5Copy Regulations.................................................................................................................B-5
United States...........................................................................................................B-5Canada.......................................................................................................................B-7Other Countries.......................................................................................................B-7
Fax Regulations....................................................................................................................B-8United States...........................................................................................................B-8
Fax Send Header Requirements..........................................................B-8
Xerox® WorkCentre® 3335/3345 Multifunction PrinterviiiUser Guide
Table of Contents

Data Coupler Information.....................................................................B-8Canada.......................................................................................................................B-9European Union...................................................................................................B-10
Radio Equipment and Telecommunications TerminalEquipment Directive...................................................................B-10
South Africa...........................................................................................................B-10New Zealand..........................................................................................................B-10
Material Safety Data Sheets........................................................................................B-11
C Recycling and Disposal....................................................................C-1All Countries...........................................................................................................................C-1North America.......................................................................................................................C-1European Union...................................................................................................................C-1
Domestic/Household Environment.................................................................C-1Professional/Business Environment................................................................C-2Collection and Disposal of Equipment and Batteries..............................C-2
Business Users in the European Union.............................................C-2Disposal Outside of the European Union........................................C-2
Battery Symbol Note............................................................................................C-3Battery Removal.....................................................................................................C-3
Other Countries....................................................................................................................C-3
ixXerox® WorkCentre® 3335/3345 Multifunction PrinterUser Guide
Table of Contents

Xerox® WorkCentre® 3335/3345 Multifunction PrinterxUser Guide
Table of Contents

1Safety
Your printer and the recommended supplies have been designed and tested to meetstrict safety requirements. Attention to the following information ensures the continuedand safe operation of your Xerox printer.
Notices and SafetyRead the following instructions carefully before operating your printer. Refer to theseinstructions to ensure the continued safe operation of your printer.
Your Xerox® printer and supplies are designed and tested to meet strict safetyrequirements. These include safety agency evaluation and certification, and compliancewith electromagnetic regulations and established environmental standards.
The safety and environment testing and performance of this product have been verifiedusing Xerox® materials only.
NoteUnauthorized alterations, which can include the addition of new functions or theconnection of external devices, can affect the product certification. Formore information,contact your Xerox representative.
1-1Xerox® WorkCentre® 3335/3345 Multifunction PrinterUser Guide

Electrical Safety
General Guidelines
Warning
• Do not push objects into slots or openings on the printer. Touching a voltage pointor shorting out a part could result in fire or electric shock.
• Do not remove the covers or guards that are fastened with screws unless you areinstalling optional equipment and are instructed to do so. Turn off the printer whenperforming these installations. Disconnect the power cordwhen removing covers andguards for installing optional equipment. Except for user-installable options, thereare no parts that you can maintain or service behind these covers.
WarningThe following are hazards to your safety:
• The power cord is damaged or frayed.• Liquid is spilled into the printer.• The printer is exposed to water.• The printer emits smoke, or the surface is unusually hot.• The printer emits unusual noise or odors.• The printer causes a circuit breaker, fuse, or other safety device to activate.
If any of these conditions occur, do the following:
1. Turn off the printer immediately.2. Disconnect the power cord from the electrical outlet.3. Call an authorized service representative.
Power Cord• Use the power cord supplied with your printer.• Do not use an extension cord or remove or modify the power cord plug.• Plug the power cord directly into a properly grounded electrical outlet. Ensure that
each end of the cord is connected securely. If you do not know if an outlet is grounded,ask an electrician to check the outlet.
• Do not use a ground adapter plug to connect the printer to an electrical outlet thatdoes not have a ground connection terminal.
WarningAvoid the potential of electrical shock by ensuring that the printer is grounded properly.Electrical products can be hazardous if misused.
• Verify that the printer is plugged into an outlet that is providing the correct voltageand power. Review the electrical specification of the printer with an electrician ifnecessary.
• Do not place the printer in an area where people can step on the power cord.
Xerox® WorkCentre® 3335/3345 Multifunction Printer1-2User Guide
Safety

• Do not place objects on the power cord.• If the power cord becomes frayed or worn, replace it.• Do not plug or unplug the power cord while the power switch is in the On position.• To avoid electrical shock and damage to the cord, grasp the plug when unplugging
the power cord.• Ensure that the electrical outlet is near the printer and is easily accessible.
The power cord is attached to the printer as a plug-in device on the back of the printer.If it is necessary to disconnect all electrical power from the printer, disconnect the powercord from the electrical outlet.
Emergency Power Off
If any of the following conditions occur, power the printer off immediately. Disconnectthe power cord from the electrical outlet. Contact an authorized Xerox servicerepresentative to correct the problem if any of the following occurs:
• The equipment emits unusual odors or makes unusual noises.• The power cable is damaged or frayed.• A wall panel circuit breaker, fuse, or other safety device has been tripped.• Liquid is spilled into the printer.• The printer is exposed to water.• Any part of the printer is damaged.
Laser Safety
This printer complies with laser product performance standards set by governmental,national, and international agencies and is certified as a Class 1 Laser Product. Theprinter does not emit hazardous light because the beam is enclosed completely duringall modes of customer operation and maintenance.
Laser WarningUse of controls, adjustments, or performance of procedures other than those specifiedin this manual can result in hazardous radiation exposure.
Operational SafetyYour printer and supplies were designed and tested to meet strict safety requirements.These include safety agency examination, approval, and compliance with establishedenvironmental standards.
Your attention to the following safety guidelines helps to ensure the continued, safeoperation of your printer.
Operational Guidelines• Do not remove any paper trays while the printer is printing.• Do not open the doors when the printer is printing.
1-3Xerox® WorkCentre® 3335/3345 Multifunction PrinterUser Guide
Safety

• Do not move the printer when it is printing.• Keep hands, hair, neckties, and so on, away from the exit and feed rollers.• Covers, which require tools for removal, protect the hazard areas within the printer.
Do not remove the protective covers.
Hot WarningThe metallic surfaces in the fuser area are hot. Always use caution when removingpaper jams from this area and avoid touching any metallic surfaces.
Ozone Release
This printer produces ozone during normal operation. The amount of ozone produceddepends on copy volume. Ozone is heavier than air and is not produced in amounts largeenough to harm anyone. Install the printer in a well-ventilated room.
For more information in the United States and Canada, go to one of the following:
• WorkCentre® 3335: www.xerox.com/environment• WorkCentre® 3345: www.xerox.com/environment
In other markets, contact your local Xerox representative or go to one of the following:
• WorkCentre® 3335: www.xerox.com/environment_europe• WorkCentre® 3345: www.xerox.com/environment_europe
Printer Location• Place the printer on a level, solid, non-vibrating surface with adequate strength to
hold its weight. To find the weight for your printer configuration, refer to PhysicalSpecifications.
• Do not block or cover the slots or openings on the printer. These openings are providedfor ventilation and to prevent overheating of the printer.
• Place the printer in an areawhere there is adequate space for operation and servicing.• Place the printer in a dust-free area.• Do not store or operate the printer in an extremely hot, cold, or humid environment.• Do not place the printer near a heat source.• Do not place the printer in direct sunlight to avoid exposure to light-sensitive
components.• Do not place the printer where it is exposed directly to the cold air flow from an air
conditioning system.• Do not place the printer in locations that are susceptible to vibrations.• For optimum performance, use the printer at the elevations specified in Elevation.
Printer Supplies• Use supplies that are designed for your printer. The use of unsuitable materials can
cause poor performance and a possible safety hazard.• Follow all warnings and instructionsmarked on, or supplied with the product, options,
and supplies.
Xerox® WorkCentre® 3335/3345 Multifunction Printer1-4User Guide
Safety
• Store all consumables in accordance with the instructions provided on the packageor container.
• Keep all consumables away from the reach of children.• Never throw toner, print cartridges, drum cartridges, or toner containers into an open
flame.• When handling cartridges, such as toner cartridges, avoid skin or eye contact with
toner. Eye contact can cause irritation and inflammation. Do not attempt todisassemble the cartridge, which can increase the risk of skin or eye contact.
CautionUse of non-Xerox supplies is not recommended. The XeroxWarranty, Service Agreement,and Total Satisfaction Guarantee do not cover damage, malfunction, or degradationof performance caused by use of non-Xerox supplies, or the use of Xerox supplies notspecified for this printer. The Total Satisfaction Guarantee is available in the UnitedStates and Canada. Coverage could vary outside these areas. For details, contact yourXerox representative.
Maintenance Safety• Do not attempt to perform any maintenance procedure that is not described
specifically in the documentation supplied with your printer.• Do not use aerosol cleaners. Clean with a dry lint-free cloth only.• Do not burn any consumables or routine maintenance items.• For information on Xerox supplies recycling programs, go to one of the following:
- WorkCentre® 3335: www.xerox.com/gwa- WorkCentre® 3345: www.xerox.com/gwa
WarningDo not use aerosol cleaners. Aerosol cleaners can cause explosions or fires when usedon electromechanical equipment.
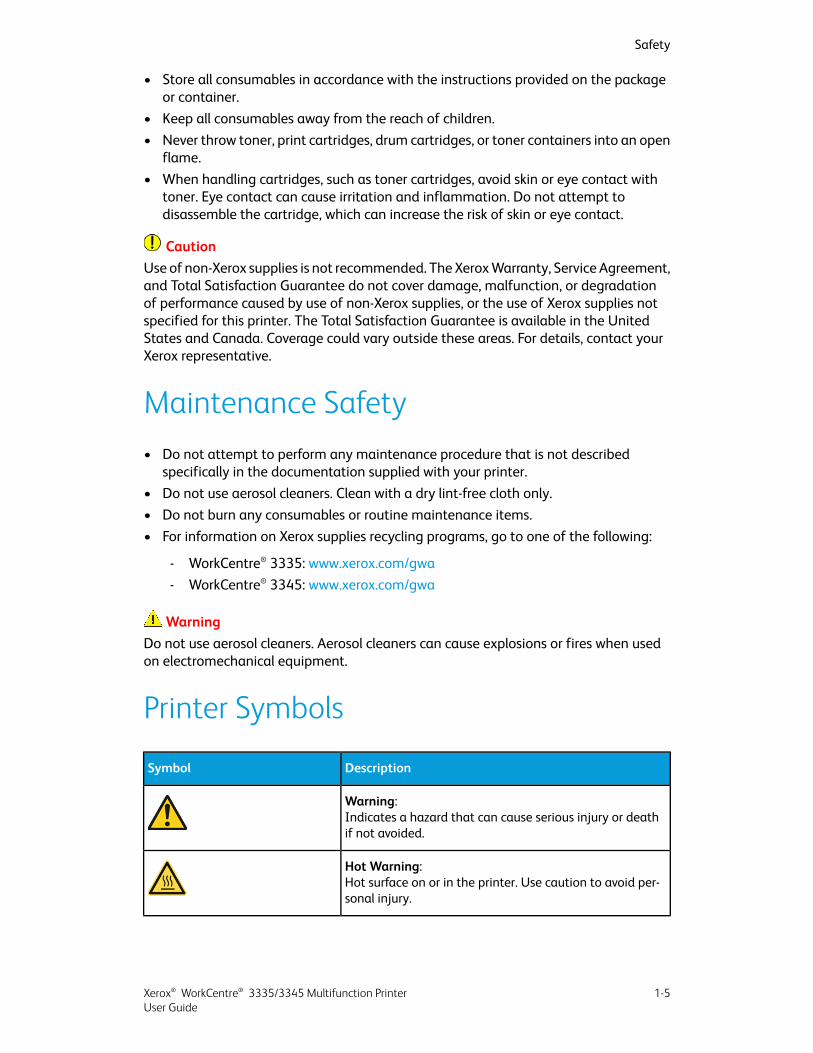
Printer Symbols
DescriptionSymbol
Warning:Indicates a hazard that can cause serious injury or deathif not avoided.
Hot Warning:Hot surface on or in the printer. Use caution to avoid per-sonal injury.
1-5Xerox® WorkCentre® 3335/3345 Multifunction PrinterUser Guide
Safety

DescriptionSymbol
Caution:Indicates a mandatory action to take to avoid damage tothe property.
Do not touch the part or area of the printer.
Do not expose the drum cartridges to direct sunlight.
Do not burn the toner cartridges.
Do not burn the drum cartridges.
Do not touch the part or area of the printer.
DescriptionSymbol
Do not use paper attached with staples or any other formof binding clip.
Do not use folded, creased, curled, or wrinkled paper.
Do not load or use inkjet paper.
Do not use transparencies or overhead projector sheets.
Do not reload paper previously printed on or used.
Do not copy money, revenue stamps, or postage stamps.
Xerox® WorkCentre® 3335/3345 Multifunction Printer1-6User Guide
Safety

DescriptionSymbol
Add paper or media.
Paper jam
Lock
Unlock
Document
Paper
WLANWireless Local Area Network
LANLocal Area Network
USBUniversal Serial Bus
Telephone Line
Modem Line
Postcard
Load envelopes in the tray with the flaps closed and facingup.
Load envelopes in the tray with the flaps open and facingup.
1-7Xerox® WorkCentre® 3335/3345 Multifunction PrinterUser Guide
Safety
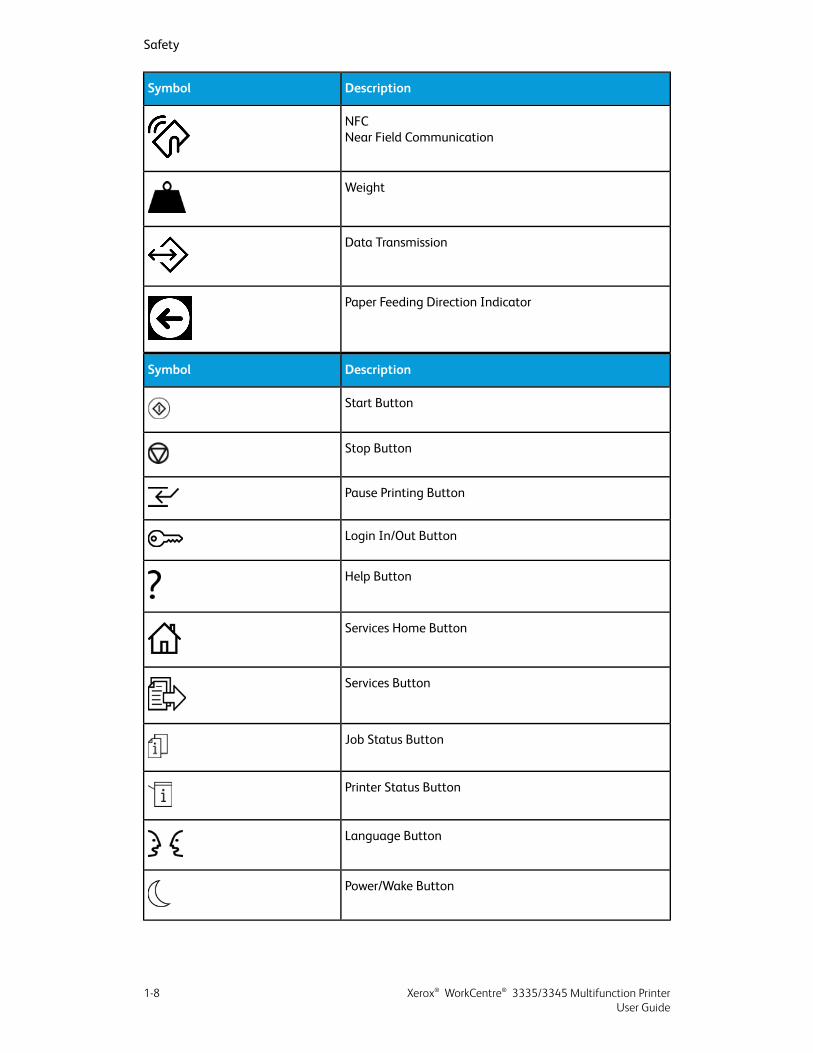
DescriptionSymbol
NFCNear Field Communication
Weight
Data Transmission
Paper Feeding Direction Indicator
DescriptionSymbol
Start Button
Stop Button
Pause Printing Button
Login In/Out Button
Help Button
Services Home Button
Services Button
Job Status Button
Printer Status Button
Language Button
Power/Wake Button
Xerox® WorkCentre® 3335/3345 Multifunction Printer1-8User Guide
Safety

DescriptionSymbol
Clear All Button
Clear Button
Dial Pause/Redial Button
This item can be recycled. For details, refer to Recycling andDisposal.
Environmental, Health, and SafetyContact InformationFormore information on Environment, Health, and Safety in relation to this Xerox productand supplies, contact the following customer help lines:
• United States and Canada: 1-800-ASK-XEROX (1-800-275-9376)• Europe: +44 1707 353 434
For product safety information in the United States, go to one of the following:
• WorkCentre® 3335: www.xerox.com/environment• WorkCentre® 3345: www.xerox.com/environment
For product safety information in Europe, go to one of the following:
• WorkCentre® 3335: www.xerox.com/environment_europe• WorkCentre® 3345: www.xerox.com/environment_europe
1-9Xerox® WorkCentre® 3335/3345 Multifunction PrinterUser Guide
Safety

Xerox® WorkCentre® 3335/3345 Multifunction Printer1-10User Guide
Safety

2Features
Parts of the Printer
Front View
7.1. Document Feeder Top CoverOptional Feeder Tray 2with 550-SheetCapacity 8. Document Feeder Input Tray
2. Tray 1 with 250-Sheet Capacity 9. Document Feeder Output Tray3. Bypass Tray 10. USB Port4. Output Tray 11. Control Board Cover5. Control Panel6. Card Reader Bay for optional NFC
Enablement Kit
Document Feeder
The WorkCentre 3335® uses an Automatic Document Feeder (ADF).
2-1Xerox® WorkCentre® 3335/3345 Multifunction PrinterUser Guide

The WorkCentre 3345® uses a Reversing Automatic Document Feeder (RADF).
Rear View
6.1. Telephone Line SocketPower Receptacle2. 7.Power Switch Extension Telephone Socket
8.3. Rear DoorUSB Port for Service only4. 9.Network Port Duplex Unit5. USB Port
Xerox® WorkCentre® 3335/3345 Multifunction Printer2-2User Guide
Features

Internal Components
4.1. Document Glass CoverDrum Cartridge2. 5.Toner Cartridge Document Feeder3. Document Glass
2-3Xerox® WorkCentre® 3335/3345 Multifunction PrinterUser Guide
Features

Control Panel
The control panel consists of a touch screen and buttons that you press to control thefunctions available on the printer. You can use the control panel to:
• View the current operating status of the device.• Access printer features.• Access reference materials.• Access the Tools and Setup menus.• Access the Troubleshooting menus and videos.• View status messages about paper tray levels and supplies.• View any errors or warnings that are occurring on the device.
DescriptionNameItem
This button displays the status of the printer on thetouch screen.
Machine Status Button1
This button displays all active, secure, or completed jobson the touch screen.
Job Status Button2
This button returns you to the active service from theJob Status or Machine Status screens, or to a presetservice.
Services Button3
This button provides access to printer features such ascopy, scan, and fax on the touch screen.
Services Home Button4
The screen displays information and provides access toprinter functions.
Touch Screen Display5
This button provides access to password-protectedfeatures.
Log In/Out Button6
This button displays information about the current se-lection on the touch screen.
Help Button7
Xerox® WorkCentre® 3335/3345 Multifunction Printer2-4User Guide
Features

DescriptionNameItem
This button changes the touch screen language andkeyboard settings.
Language Button8
This button enters and exits the low-power mode.Power Saver button9
This button clears previous and changed settings forthe current selection. To reset all features to their defaultsettings and clear existing scans, press this button twice.
Clear All Button10
This button stops the current job temporarily. To cancelor resume your job, follow the onscreen instructions.
Stop Button11
This button starts the selected copy, scan, fax, or PrintFrom job, such as Print from USB.
Start Button12
This button pauses the current job to run amore urgentprint, copy, or fax job.
Interrupt Button13
This button inserts a pause in a telephone numberwhenit transmits a fax.
Dial Pause Button14
This button deletes numeric values or the last digitentered using the alphanumeric keys.
C (clear) Button15
The keypad enters alphanumeric information.Alphanumeric Keypad16
2-5Xerox® WorkCentre® 3335/3345 Multifunction PrinterUser Guide
Features

Information PagesYour printer has a set of information pages that you can access from the control paneltouch screen. These information pages include Customer Support access, installedoptions, and more.
Accessing and Printing the Information Pages
To access the full list of information pages for your printer:1. At the printer control panel, press the Help button.
A list of information pages that you can print appears.
2. To scroll through the list of available pages, touch and drag your finger up or downon the menu. Touch the desired page, then touch Print.
NoteTo print all of the information pages, at the bottom of the list, touchAll InformationPages, then touch Print.
3. To return to the Home screen, touch (X).
Printing the Configuration Report at the Control Panel
The Configuration Report provides product information including installed options,network settings, port setup, tray information, and more.
NoteTo turn off automatic printing of a Configuration Report, refer to Turning Off AutomaticPrinting of the Configuration Report.
1. At the printer control panel, press the Help button.2. Touch System Configuration Report.3. Touch Print.4. To return to the Services Home menu, press the Services Home button.
Xerox® WorkCentre® 3335/3345 Multifunction Printer2-6User Guide
Features

Administration FeaturesFor details, refer to the System Administrator Guide:
• www.xerox.com/office/WC3335docs• www.xerox.com/office/WC3345docs
Xerox® CentreWare® Internet Services
Xerox® CentreWare® Internet Services is the administration and configuration softwareinstalled on the embedded Web server in the printer. It allows you to configure andadminister the printer from a Web browser.
Xerox® CentreWare® Internet Services requires:
• A TCP/IP connection between the printer and the network in Windows, Macintosh,UNIX, or Linux environments.
• TCP/IP and HTTP enabled in the printer.• A network-connected computer with a Web browser that supports JavaScript.
Accessing Xerox®CentreWare® Internet Services1. At your computer, open a Web browser.2. In the address field, type the IP address of the printer.3. Press Enter or Return.
Locating the IP Address of the Printer
You can view the IP address of your printer on the control panel or on the ConfigurationReport.
To install print drivers for a network-connected printer, you need the IP address of yourprinter. You also need the IP address to access and configure any printer settings inXerox® CentreWare® Internet Services.1. To view the IP address of the printer on the control panel:
a) At the printer control panel, press theMachine Status button.b) Touch theMachine Information tab.
If the system administrator has set the Display Network Settings to show the IPaddress, it appears at the top of theMachine Information list.
NoteIf the IP address does not appear, print the Configuration Report or contact yoursystem administrator.
2. To print a Configuration Report, perform the following steps:a) At the printer control panel, press the Help button.b) Touch System Configuration Report.c) Touch Print.
2-7Xerox® WorkCentre® 3335/3345 Multifunction PrinterUser Guide
Features

NoteAfter the printer has been on for two minutes, print the Configuration Report.
• The TCP/IP address appears in the Network Setup section of the page.• If the IP address that appears on the page is a system default address, such
as 169.254.xxx.xxx, the printer did not acquire an IP address from the DHCPserver.
• Wait two minutes, then print the Configuration Report again.• After two minutes, if the IP address does not appear, contact the system
administrator.
d) To close the window, touch X to close.
Automatic Data Collection
The printer automatically collects data and transmits it to a secure off-site location.Xerox or a designated service provider uses this data to support and service the printer,or for billing, supplies replenishment, or product improvement. Automatically transmitteddata can include product registration,meter readings, supplies levels, printer configurationand settings, software version, and problem or fault-code data. Xerox cannot read, view,or download the content of your documents that reside on or pass through your printeror any of your information management systems.
To turn off automatic data collection:1. At your computer, open a Web browser.2. In the address field, type the IP address of the printer.3. Press Enter or Return.4. On the Xerox® CentreWare® Internet ServicesWelcome page, select the link in the
note regarding automated services.Selecting this link opens the SMart eSolutions Setup page in Xerox® CentreWare®
Internet Services. From this page, you can disable SMart eSolutions by selectingNotEnrolled > Apply.
NoteAdministrator credentials are required to disable SMart eSolutions. If you do not haveadministrator credentials, contact the administrator for the printer.
Maintenance Assistant
Your printer includes a built-in diagnostic capability allowing you to send diagnosticinformation directly to Xerox. Maintenance Assistant is a remote diagnostic tool thatoffers a fast way to resolve potential issues, receive assistance, and automate thetroubleshooting or repair process.
Enabling Maintenance Assistant
Before you begin: If your network uses a proxy server, configure the Proxy Server settingsof the printer to ensure that the printer can connect to the Internet.1. From the Printer Status window, clickHelp > Xerox® CentreWare® Internet Services.2. From Xerox® CentreWare® Internet Services, click Status > SMart eSolutions.
Xerox® WorkCentre® 3335/3345 Multifunction Printer2-8User Guide
Features

3. From Smart eSolutions, clickMaintenance Assistant.4. To send status information to Xerox, click Start an Online Troubleshooting Session
at www.Xerox.com.5. After the data is sent, your browser is redirected to www.xerox.com to start your
online troubleshooting session.
Billing and Usage Information
Billing and printer usage information appears on the Billing Meters information screen.The impression counts shown are used for billing. For details on viewing this information,refer to Billing and Usage Information in the Maintenance chapter.
More InformationYou can obtain more information about your printer from these sources:
LocationResource
Packaged with the printer and can be downloaded at:
• www.xerox.com/office/WC3335docs• www.xerox.com/office/WC3345docs
Installation Guide
• www.xerox.com/office/WC3335docs• www.xerox.com/office/WC3345docs
Other documentation for yourprinter
• www.xerox.com/office/WC3335support• www.xerox.com/office/WC3345support
Technical support information foryour printer, including online tech-nical support, Online Support Assist-ant, and driver downloads.
Press the control panel Help (?) button.Information about menus or errormessages
Print from the control panel, or from Xerox® CentreWare®
Internet Services, select Properties > Services > Printing >Reports.
Information Pages
From Xerox® CentreWare® Internet Services, select Help.Xerox® CentreWare® Internet Ser-vices documentation
• www.xerox.com/office/WC3335supplies• www.xerox.com/office/WC3345supplies
Order supplies for your printer
2-9Xerox® WorkCentre® 3335/3345 Multifunction PrinterUser Guide
Features

LocationResource
www.xerox.com/office/businessresourcecenterA resource for tools and informa-tion, including interactive tutorials,printing templates, helpful tips, andcustomized features to meet yourindividual needs.
• WorkCentre®3335:www.xerox.com/office/worldcontacts• WorkCentre®3345:www.xerox.com/office/worldcontacts
Local sales and support center
• WorkCentre® 3335: www.xerox.com/office/register• WorkCentre® 3345: www.xerox.com/office/register
Printer registration
www.direct.xerox.com/Xerox® Direct online store
Xerox® WorkCentre® 3335/3345 Multifunction Printer2-10User Guide
Features

3Installation and Setup
Refer to:
• Installation Guide packaged with your printer.• System Administrator Guide:
- www.xerox.com/office/WC3335docs- www.xerox.com/office/WC3345docs
Installation and Setup OverviewBefore printing, ensure that your computer and the printer are plugged in, turned on,and connected. Configure the initial settings of the printer. On your computer, installthe driver software and utilities on your computer.
You can connect to your printer directly from your computer using USB, or connect toa network using an Ethernet cable or wireless connection. Hardware and cablingrequirements vary for the different connectionmethods. Routers, network hubs, networkswitches, modems, Ethernet cables, and USB cables are not included with your printerandmust be purchased separately. Xerox recommends an Ethernet connection because,typically, it is faster than aUSB connection, and it provides access to Xerox®CentreWare®
Internet Services.
NoteIf the Software and Documentation disc is not available, you can download the latestdrivers at:
• www.xerox.com/office/WC3335drivers• www.xerox.com/office/WC3345drivers
3-1Xerox® WorkCentre® 3335/3345 Multifunction PrinterUser Guide

Related Topics:
Selecting a Location for the Printer
Selecting a Connection Method
Connecting the Printer
Configuring Network Settings
Installing the Software
Selecting a Location for the Printer• Select a dust-free area with temperatures from 10–30°C (50–90°F), and relative
humidity 20–80%.
NoteSudden temperature fluctuations can affect print quality. Rapid heating of a coldroom can cause condensation inside the printer, directly interfering with imagetransfer.
• Place the printer on a level, solid, non-vibrating surface with adequate strength forthe weight of the printer. The printer must be horizontal with all four feet in solidcontact with the surface. To find the weight for your printer configuration, refer toPhysical Specifications.
• Select a location with adequate clearance to access supplies and to provide properventilation. To find the clearance requirements for your printer, refer to ClearanceRequirements for Standard Configuration.
• After positioning the printer, you are ready to connect it to the power source andcomputer or network.
Connecting the Printer
Selecting a Connection Method
The printer can be connected to your computer using a USB cable or an Ethernet cable.The method you select depends on how your computer is connected to the network. AUSB connection is a direct connection and is the easiest to set up. An Ethernet connectionis used for networking. If you are using a network connection, ensure that you understandhow your computer is connected to the network. For details, refer to About TCP/IP andIP Addresses.
Note
• Not all options listed are supported on all printers. Some options apply only to aspecific printer model, configuration, operating system, or driver type.
• Hardware and cabling requirements vary for the different connection methods.Routers, network hubs, network switches, modems, Ethernet cables, and USB cablesare not included with your printer and must be purchased separately.
Xerox® WorkCentre® 3335/3345 Multifunction Printer3-2User Guide
Installation and Setup

Network
If your computer is connected to an office network or home network, use an Ethernetcable to connect the printer to a network port. Ethernet networks can support manycomputers, printers, and devices simultaneously. In most cases, Ethernet connection isfaster than USB and provides direct access to printer settings using Xerox® CentreWare®
Internet Services.
Wireless Network
If your network includes a wireless router or wireless access point, you can connect theprinter to the network with awireless connection. Awireless network connection providesthe same access and services as a wired connection provides. A wireless networkconnection is typically faster than USB and allows direct access to the setting of theprinter using Xerox® CentreWare® Internet Services.
USB
If you connect the printer to one computer and do not have a network, use a USBconnection. A USB connection offers fast data speeds, but typically not as fast as anEthernet connection. In addition, a USB connection does not provide access to Xerox®
CentreWare® Internet Services.
Telephone
To send and receive faxes, the multifunction printer must be connected to a dedicatedtelephone line.
3-3Xerox® WorkCentre® 3335/3345 Multifunction PrinterUser Guide
Installation and Setup

Connecting the Printer to the Network
Use a Category 5 or higher Ethernet cable to connect the printer to the network. AnEthernet network is used for one or more computers and supports many printers andsystems simultaneously. An Ethernet connection provides direct access to printer settingsusing Xerox® CentreWare® Internet Services.
To connect the printer:1. Ensure that the printer is powered off.2. Connect one end of a Category 5 or higher Ethernet cable to the Ethernet port on
the printer. Connect the other end of the Ethernet cable to a correctly configurednetwork port on a hub or router.
3. Connect the power cord to the printer, and plug the cord into an electrical outlet.4. Turn on the printer.
For details on configuring network settings, refer to the System Administrator Guideat:
• www.xerox.com/office/WC3335docs• www.xerox.com/office/WC3345docs
5. Enter the printer IP address or set Xerox® CentreWare® Internet Services toautomatically discover the network IP address of the printer.
Connecting to a Computer Using USB
To connect using USB, you need Windows 7, Windows 8 or later, Windows Server 2008or later, or Macintosh OS X version 10.9 or later.
To connect the printer to the computer using a USB cable:1. Connect the B end of a standard A/B USB 2.0 cable to the USB Port on the front,
right side of the printer.2. Connect the A end of the USB cable to the USB port on the computer.3. If the Windows Found New Hardware Wizard appears, select Cancel.4. Install the print drivers. For details, refer to Installing the Software.
Xerox® WorkCentre® 3335/3345 Multifunction Printer3-4User Guide
Installation and Setup
Connecting to a Telephone LineNoteNot all options listed are supported on all printers. Some options apply only to a specificprinter model, configuration, operating system, or driver type.
1. Connect a standard RJ11 cable, No. 26 AmericanWire Gauge (AWG) or larger, to theLine port on the back of the printer.
2. Connect the other end of the RJ11 cable to an operating telephone line.3. Enable and configure the Fax functions.
For details, refer to the System Administrator Guide at:
• www.xerox.com/office/WC3335docs• www.xerox.com/office/WC3345docs
Turning On or Off the Printer
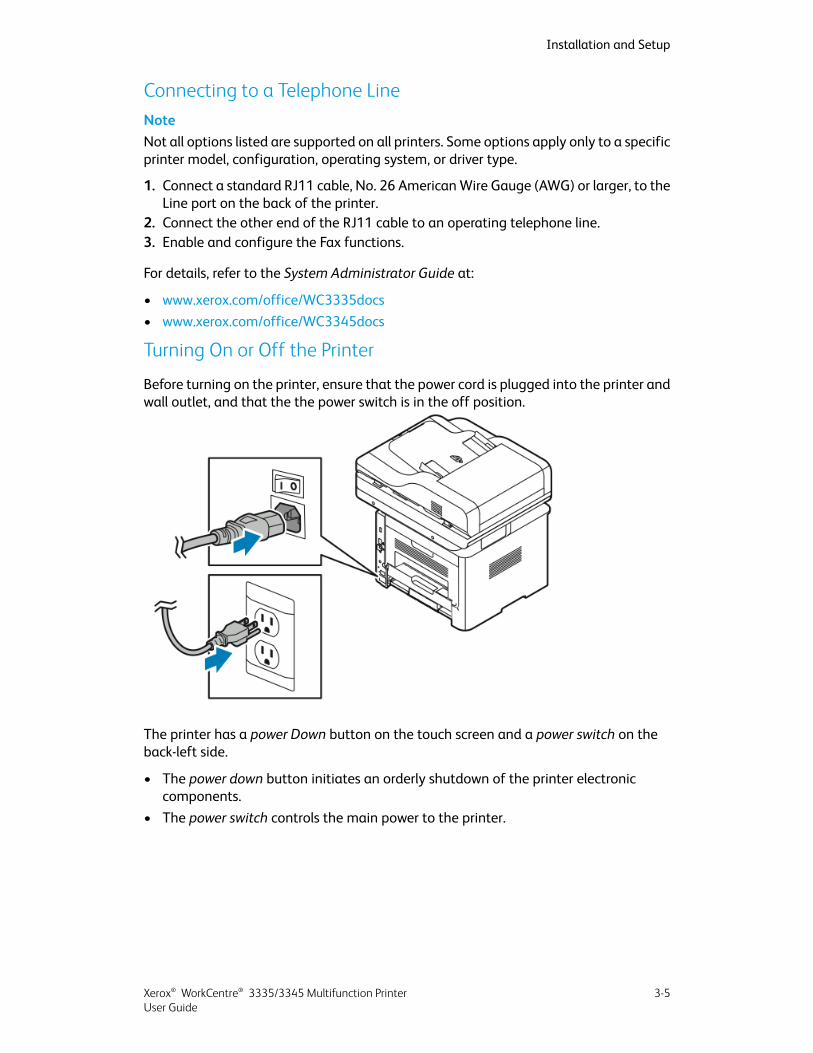
Before turning on the printer, ensure that the power cord is plugged into the printer andwall outlet, and that the the power switch is in the off position.
The printer has a power Down button on the touch screen and a power switch on theback-left side.
• The power down button initiates an orderly shutdown of the printer electroniccomponents.
• The power switch controls the main power to the printer.
3-5Xerox® WorkCentre® 3335/3345 Multifunction PrinterUser Guide
Installation and Setup

.1. To turn on the printer, press the power switch to the On position.
NoteIf the power switch is on, but the printer is powered off, the printer was turned offusing the control panel. To power on the printer, press the power switch to the Offposition first, then to the On position.
2. To turn off the printer:
Caution
• To prevent a printer malfunction, perform the control panel shutdown first.• Do not plug or unplug the power cord while the printer is powered on.
a) At the printer control panel, press the Power Saver button.b) Touch Power Down.
NoteWhenall of the control panel lights are off, the printer power-off sequence is complete.Pressing the power switch off is optional.
Xerox® WorkCentre® 3335/3345 Multifunction Printer3-6User Guide
Installation and Setup

Configuring Network Settings
About TCP/IP and IP Addresses
Computers and printers primarily use TCP/IP protocols to communicate over an Ethernetnetwork. Generally, Macintosh computers use either TCP/IP or the Bonjour protocol tocommunicate with a network printer. For Macintosh OS X systems, TCP/IP is preferred.Unlike TCP/IP, however, Bonjour does not require printers or computers to have IPaddresses.
With TCP/IP protocols, each printer and computer must have a unique IP address. Manynetworks and cable andDSL routers have aDynamic Host Configuration Protocol (DHCP)server. A DHCP server automatically assigns an IP address to every computer and printeron the network that is configured to use DHCP.
If you use a cable or DSL router, for information on IP addressing, refer to thedocumentation for your router.
Enabling the Printer for ScanningIf the printer is connected to a network, you can scan to any of the following locations.
• FTP• SMB• HTTP• HTTPS• SFTP• An email address• A shared folder on your computer
For details, refer to Xerox® CentreWare® Internet Services.
NoteIf your printer is connected using the USB cable, you cannot scan to an email addressor a network location, such as a shared folder on your computer.
For details, refer to the System Administrator Guide at:
• www.xerox.com/office/WC3335docs• www.xerox.com/office/WC3345docs
3-7Xerox® WorkCentre® 3335/3345 Multifunction PrinterUser Guide
Installation and Setup

Power Saver ModePower Savermode reduces power consumptionwhen the printer is left idle for a specifiedperiod.
Power Saver Levels
There are two levels of Power Saver mode.
• Power Saver Mode 1: After a specified period of inactivity, the touch screen dimsand the printer operates on reduced power consumption.
• Power Saver Mode 2: After a specified period of inactivity, the touch screen turnsoff and the printer enters standby mode.
Exiting Power Saver Mode
The printer exits Power Saver mode automatically when any of the following eventsoccur:
• Pressing a button on the control panel• Touching the UI screen• Receiving data from a connected device• Opening any door or cover on the printer
Setting the Power Saver Mode Timers at the Control PanelNoteYou must have administrator credentials to perform the following procedure. If you donot have administrator credentials, contact the printer administrator.
1. At the printer control panel, press theMachine Status button.2. Touch Device Settings > General > Power Saver Timer.3. To select the desired time, press the arrow buttons, or enter a value using the numeric
keypad.
• Specify how long the printer remains idle before it goes from ready mode tolow-power mode.
• Specify how long the printer remains idle before automatically going fromlow-power mode to sleep mode.
4. Touch OK.
Installing the SoftwareBefore you install driver software, verify that the printer is plugged in, turned on,connected correctly, and has a valid IP address. If you cannot find the IP address, referto Locating the IP Address of the Printer.
Xerox® WorkCentre® 3335/3345 Multifunction Printer3-8User Guide
Installation and Setup
If the Software and Documentation disc is not available, download the latest drivers at:
• www.xerox.com/office/WC3335drivers• www.xerox.com/office/WC3345drivers
Operating System Requirements• Windows Vista, Windows 7, Windows 8, Windows 8.1, Windows 10, Windows Server
2008, Windows Server 2008 R2, and Windows Server 2012• Macintosh OS X version 10.9 and later• UNIX and Linux: Your printer supports connection to various UNIX platforms through
the network interface. For details, refer to:
- www.xerox.com/office/WC3335drivers- www.xerox.com/office/WC3345drivers
Installing Drivers and Utilities for Windows
To access all the features of your printer, install the Xerox® print driver and the Xerox®
scan driver.
To install the print and scan driver software:1. Insert the Software and Documentation disc into the appropriate drive on your
computer. The installer starts automatically.If the installer does not start automatically, navigate to the drive, and double-clickthe Setup.exe installer file.
2. To change the language, click Language.3. Select your language, then click OK.4. Click Install Drivers > Install Print and Scan Drivers.5. To accept the license agreement, click I Agree.6. From the list of discovered printers, select your printer, then click Next.7. If your printer does not appear in the list of discovered printers, click Extended Search.8. If your printer still does not appear in the list of discovered printers, and you know
the IP address, choose one of the following:
• At the top of the window, click theNetwork Printer icon, and enter the IP addressor the DNS name of the printer.
• Click Search, and from the list of discovered printers, select your printer, then clickNext.
9. If the printer still does not appear in the list of discovered printers, and you do notknow the IP address:a) Click Advanced Search.b) If you know the gateway address and subnet mask, click the top button and
enter the addresses into the Gateway and Subnet Mask fields.c) If you know the address of another printer on the same subnet, click the middle
button and enter the address in the IP Address field.d) Click Search.e) From the list of discovered printers, select your printer, then click Next.
3-9Xerox® WorkCentre® 3335/3345 Multifunction PrinterUser Guide
Installation and Setup

NoteWhen the printer appears in theDiscovered Printers window, it displays the IP address.Record the IP address for future use.
10. Select the desired driver.11. Click Install.12. If the installer prompts you for the IP address, enter the IP address of the printer.13. If the installer prompts you to restart your computer, click Restart to complete the
installation of the drivers.14. To complete the installation, click Finish.
Installing Print Drivers for Macintosh OS X Version 10.9 and Later
Use this procedure to install the Xerox print driver to access all features of your printer.
To install the print driver software:1. Insert the Software and Documentation disc into the appropriate drive on your
computer.2. To view the .dmg file for your printer, on your desktop, click the disc icon.3. Open the .dmg file, then navigate to the appropriate installer file for your operating
system.4. To begin installation, open the Installer package file.5. To acknowledge the warning and introductory messages, click Continue. Click
Continue again.6. To accept the license agreement, click Continue, then click Agree.7. To accept the current installation location, click Install, or select another location for
the installation files, then click Install.8. Enter your password, then click Install Software.9. Select your printer in the list of discovered printers, then click Continue. If your printer
does not appear in the list of discovered printers:a) Click the Network Printer icon.b) Type the IP address of your printer, then click Continue.c) Select your printer in the list of discovered printers, then click Continue.
10. To accept the print queue message, click Continue.11. To accept the installation success message, click Close.12. To verify that the print driver recognizes the installed options:
a) From the Apple menu, click System Preferences > Printers and Scanners.b) Select the printer from the list, then click Options & Supplies.c) Click Options.d) Confirm that all of the options installed on the printer appear correct.e) If you change settings, clickOK, close the window, then exit System Preferences.
Installing Scan Drivers for Macintosh
To install the scan driver software:1. To download the latest driver, go to:
• www.xerox.com/office/WC3335drivers
Xerox® WorkCentre® 3335/3345 Multifunction Printer3-10User Guide
Installation and Setup

• www.xerox.com/office/WC3345drivers
2. Download the appropriate package for your operating system.3. To view the .dmg file for your printer, on your desktop, click the disc icon.4. Open the Scan Installer.dmg file, then navigate to the appropriate installer file for
your operating system.5. Open the Scan Installer package file.6. To acknowledge the warning and introductory messages, click Continue.7. To accept the license agreement, click Continue, then click Agree.8. Click Continue again.9. Enter your password, then click OK.10. If prompted to close other installations, click Continue Installing.11. To restart, click Log Out.
3-11Xerox® WorkCentre® 3335/3345 Multifunction PrinterUser Guide
Installation and Setup

Installing the Print Drivers for UNIX and LinuxNote
• To install the UNIX print drivers on your computer, root or superuser privileges arerequired.
• This procedure requires an Internet connection.
To install Linux drivers, perform the following steps, then select Linux instead of UNIXfor the operating system and package.
To install the print driver software:1. On the printer control panel, for the IP address, do the following:
a) Allow the printer to set up a DHCP address.b) Print the Configuration Report and keep it for reference.
For details on how to print the Configuration Report, refer to Printing theConfiguration Report at the Control Panel.
c) From the Configuration Report, verify that the TCP/IP protocol is enabled andthe network cable is installed.
2. At your computer, do the following:a) From the print driver website for your printer, select your printer model.b) From the Operating System menu, select UNIX, then click Go.c) Select the appropriate package for your operating system.d) To begin downloading, click the Start button.
3. In the notes below the driver package that you selected, click the Installation Guidelink, then follow the installation instructions.
Other Drivers
The following drivers are available for download:
• The Xerox®Global Print Driver works with any printer on your network, including thoseprinters made by other manufacturers. At installation, it configures itself for yourindividual printer upon installation.
• The Xerox® Mobile Express Driver works with any printer available to your computerthat supports standard PostScript. Each time you select Print, it configures itself forthe correct printer. If you travel frequently to the same sites, you can save yourfavorite printers in that location and the driver saves your settings.
Download the drivers at:
• www.xerox.com/office/WC3335drivers• www.xerox.com/office/WC3345drivers
Xerox® WorkCentre® 3335/3345 Multifunction Printer3-12User Guide
Installation and Setup

Installing the Printer as a Web Service onDevicesWeb Services on Devices (WSD) allow a client to discover and access a remote deviceand its associated services across a network. WSD supports device discovery, control,and use.
Installing a WSD Printer Using the Add Device Wizard1. At your computer, click Start, then select Devices and Printers.2. To launch the Add Device Wizard, click Add a Device.3. In the list of available devices, select the one you want to use, then click Next.
NoteIf the printer you want to use does not appear in the list, click the Cancel button. AddtheWSD printer manually using the Add Printer Wizard; for details, refer to Installinga WSD Printer Manually Using the Add Printer Wizard.
4. Click Close.
Installing a WSD Printer Manually Using the Add Printer Wizard1. At your computer, click Start, then select Devices and Printers.2. To launch the Add Printer Wizard, click Add a Printer.3. Click Add a network, wireless, or Bluetooth printer.4. In the list of available devices, select the one you want to use, then click Next.5. If the printer that you want does not appear in the list, click The printer that I want
is not listed.6. Select Add a printer using a TCP/IP address or hostname, then click Next.7. For the Device type field, selectWeb Services Device.8. In the Hostname or IP address field, enter the printer IP address. Click Next.9. Select an option for sharing the printer with others in your network.10. To identify the printer for sharing, enter a share name, location, and comments to
identify the printer. Click Next.11. To set the printer as the default, select an option. To test the connection, click Print
a Test Page.12. Click Finish.
AirPrint, Mopria, Google Cloud Print, andNFCThe following allow you to print without requiring a print driver:
3-13Xerox® WorkCentre® 3335/3345 Multifunction PrinterUser Guide
Installation and Setup

AirPrint
Use AirPrint to print from awired or wireless device directly without using a print driver.AirPrint is a software feature that allows you to print from wired or wireless AppleiOS-basedmobile devices andMacOS-based devices without the need to install a printdriver. AirPrint-enabled printers allow you to print or fax directly from aMac, an iPhone,iPad, or iPod touch.
Mopria
Mopria is a software feature that enables users to print from mobile devices withoutrequiring a print driver. You can use Mopria to print from your mobile device toMopria-enabled printers.
Google Cloud Print
Google Cloud Print allows you to print documents from an Internet-connected devicewithout using a print driver. Documents stored in the cloud, a personal computer, tablet,or smartphone can be sent to the printer from anywhere.
NFC (Near Field Communication)
Near field communication (NFC) is a technology that enables devices to communicatewhen they are within 10 centimeters of each other. You can use NFC to obtain thenetwork interface to establish a TCP/IP connection between your device and the printer.
For more information, refer to the System Administrator Guide:
• www.xerox.com/office/WC3335docs• www.xerox.com/office/WC3345docs
Xerox® WorkCentre® 3335/3345 Multifunction Printer3-14User Guide
Installation and Setup
4Paper and Media
Supported PaperYour printer is designed to use various paper and other media types. To ensure the bestprint quality and to avoid jams, follow the guidelines in this section.
For best results, use Xerox paper and media recommended for your printer.
Ordering Paper
To order paper or other media, contact your local reseller or visit:
• www.xerox.com/office/WC3335supplies• www.xerox.com/office/WC3345supplies
General Paper Loading Guidelines• Fan paper before loading it in the paper tray.• Do not overfill the paper trays. Do not load paper above the maximum fill line in the
tray.• Adjust the paper guides to fit the paper size.• If excessive jams occur, use paper or other approved media from a new package.• Do not print on label media after a label has been removed from a sheet.• Use only paper envelopes.• Print envelopes 1-sided only.
Paper That Can Damage Your Printer
Some paper and othermedia types can cause poor output quality, increased paper jams,or damage your printer. Do not use the following:
• Rough or porous paper• Inkjet paper• Non-laser glossy or coated paper• Paper that has been photocopied
4-1Xerox® WorkCentre® 3335/3345 Multifunction PrinterUser Guide

• Paper that has been folded or wrinkled• Paper with cutouts or perforations• Stapled paper• Envelopes with windows, metal clasps, side seams, or adhesives with release strips• Padded envelopes• Plastic media
CautionThe Xerox® Warranty, Service Agreement, or Xerox® Total Satisfaction Guarantee doesnot cover damage caused by using unsupported paper or specialty media. The Xerox®
Total Satisfaction Guarantee is available in the United States and Canada. Coveragecould vary outside these areas. For details, please contact your local Xerox representative.
Paper Storage Guidelines
Storing paper and other media properly contributes to optimum print quality.
• Store paper in dark, cool, relatively dry locations. Most paper is susceptible to damagefrom ultraviolet and visible light. Ultraviolet light, from the sun and fluorescent bulbs,is particularly damaging to paper.
• Reduce the exposure of paper to strong lights for long periods of time.• Maintain constant temperatures and relative humidity.• Avoid storing paper in attics, kitchens, garages, or basements. These spaces aremore
likely to collect moisture.• Store paper flat, either on pallets, cartons, shelves, or in cabinets.• Avoid food or drinks in the area where paper is stored or handled.• Do not open sealed packages of paper until you are ready to load the paper into the
printer. Leave stored paper in the original packaging. The paper wrapper protects thepaper from moisture loss or gain.
• Some specialmedia is packaged inside resealable plastic bags. Store themedia insidethe bag until you are ready to use it. Keep unused media in the bag and reseal it forprotection.
Supported Paper Types and Weights
WeightsPaper TypesTrays
70–85 g/m2
70–85 g/m2
70–85 g/m2
70–85 g/m2
60–70 g/m2
85–105 g/m2
106–163 g/m2
105–120 g/m2
60–85 g/m2
Not Applicable
PlainLetterheadPre-printedHole-PunchedLightweightHeavyweightCardstockBondRecycledArchival
Bypass andTrays 1 and 2
Xerox® WorkCentre® 3335/3345 Multifunction Printer4-2User Guide
Paper and Media

WeightsPaper TypesTrays
Not ApplicableTransparencyBypass Tray and Tray1 only
120–150 g/m2
75–90 g/m2
60–220 g/m2
LabelsEnvelopeCustom
Bypass Tray only
Supported Standard Paper Sizes
North American Standard SizesEuropean Standard SizesTray
Letter (216 x 279 mm, 8.5 x 11 in.)Legal (216 x 356 mm, 8.5 x 14 in.)Oficio (216 x 343 mm, 8.5 x 13.5 in.)Folio (216 x 330 mm, 8.5 x 13 in.)Executive (184 x 267 mm, 7.25 x10.5 in.)Statement (140 x 216 mm, 5.5 x8.5 in.)
A4 (210 x 297 mm, 8.3 x 11.7 in.)A5 (148 x 210 mm, 5.8 x 8.3 in.)JIS B5 (182 x 257 mm, 7.2 x10.1 in.)ISO B5 (176 x 250 mm, 6.9 x9.8 in.)A6 (105 x 148 mm, 4.1 x 5.8 in.)
Bypass and Trays 1and 2
Postcard (102 x 152 mm, 4 x 6 in.)No. 10 envelope (241 x 105 mm, 4.1x 9.5 in.)No. 9 envelope (114 x 162 mm, 4.5 x6.38 in.)Monarch envelope (98 x 190 mm, 3.9x 7.5 in.)Index Card (76.2 x 127 mm, 3 x 5 in.)
C5 envelope (162 x 229 mm, 6.4 x9 in.)C6 envelope (114 x 162 mm, 4.5 x6.38 in.)DL envelope (110 x 220 mm, 4.33x 8.66 in.)Index Card (76.2 x 127 mm, 3 x5 in.)Postcard (100 x 148 mm, 3.94 x5.83 in.)
Bypass Tray only
Supported Custom Paper Sizes
LengthWidthTray
148–356 mm (5.8–14 in.)98–216 mm (3.9–8.5 in.)Bypass Tray
148–356 mm (5.8–14 in.)105–216 mm (4.1–8.5 in.)Trays 1 and 2
Supported Paper Types andWeights for Automatic 2-Sided Printing
WeightsPaper Types
60–70 g/m2Lightweight
60–85 g/m2Recycled
4-3Xerox® WorkCentre® 3335/3345 Multifunction PrinterUser Guide
Paper and Media
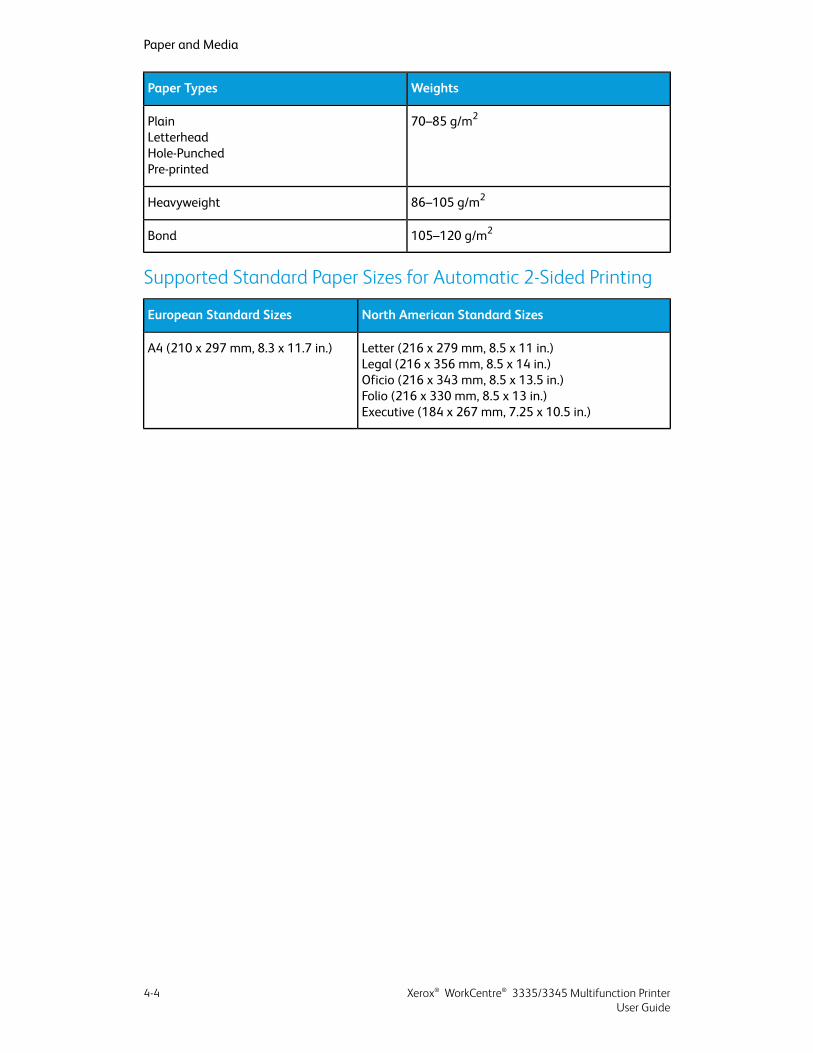
WeightsPaper Types
70–85 g/m2PlainLetterheadHole-PunchedPre-printed
86–105 g/m2Heavyweight
105–120 g/m2Bond
Supported Standard Paper Sizes for Automatic 2-Sided Printing
North American Standard SizesEuropean Standard Sizes
Letter (216 x 279 mm, 8.5 x 11 in.)Legal (216 x 356 mm, 8.5 x 14 in.)Oficio (216 x 343 mm, 8.5 x 13.5 in.)Folio (216 x 330 mm, 8.5 x 13 in.)Executive (184 x 267 mm, 7.25 x 10.5 in.)
A4 (210 x 297 mm, 8.3 x 11.7 in.)
Xerox® WorkCentre® 3335/3345 Multifunction Printer4-4User Guide
Paper and Media

Supported Custom Paper Sizes for Automatic 2-Sided Printing
ThicknessSizesMedia TypesSource
60~163 g (16~43 lb.)A4, Letter, Legal, Exec-utive, Folio, Oficio, ISOB5, JIS B5, A5, A6
Plain, Lightweight,Heavyweight, Bond,Cardstock, Recycled,Archive
Tray 1 or 2
60~220 g (16~58 lb.)A4, Letter, Legal, Exec-utive, Folio, Oficio, ISOB5, JIS B5, A5, A6, 3 in.x 5 in.
Plain, Lightweight,Heavyweight, Bond,Cardstock, Cotton,Colored, Pre-Printed,Recycled, Archive,Transparency, Label
Bypass Tray
Monarch, No.10, DL,C5, C6
Envelope
International PostCard
Cardstock
Odd size: min 75 mmwidth x125mm length
Custom
60~120 g (16~32 lb.)A4, Letter, Legal, Folio,Oficio
Plain, Lightweight,Heavyweight, Bond,Recycled
Duplex
4-5Xerox® WorkCentre® 3335/3345 Multifunction PrinterUser Guide
Paper and Media

Loading Paper
Loading Paper in the Bypass Tray
To load paper in the bypass tray:1. Open the bypass tray.
NoteIf the bypass tray is open and loaded with paper already, remove any paper that isa different size or type.
a) To open the bypass tray, press the cover.
b) Fully extend the bypass tray.
Xerox® WorkCentre® 3335/3345 Multifunction Printer4-6User Guide
Paper and Media

2. Move the length and width guides out.
3. Flex the sheets back and forth and fan them, then align the edges of the stack on alevel surface. This procedure separates any sheets that are stuck together and reducesthe possibility of jams.
NoteTo avoid jams and misfeeds, do not remove paper from its packaging until you areready to use it.
4-7Xerox® WorkCentre® 3335/3345 Multifunction PrinterUser Guide
Paper and Media

4. Load the paper in the tray, and adjust the width guides until they touch the edgesof the paper.
NoteDo not load paper above the maximum fill line. Overfilling can cause paper jams.
• Load hole-punched paper with the holes toward the left side of the printer.
• For 1-sided and 2-sided printing, to load letterhead or pre-printed paper, placeletterhead face up with the top edge going into the printer first.
Xerox® WorkCentre® 3335/3345 Multifunction Printer4-8User Guide
Paper and Media

5. If the control panel Paper Settings screen prompts you, verify the paper size, type,and color.
6. Touch Confirm.
Loading Paper in Tray 1
Tray 1 holds a maximum of 250 sheets.1. Pull out and remove the tray.
2. Move the length and width guides out.a) Pinch the guide lever on each guide.b) Slide the guides outward until they stop.
4-9Xerox® WorkCentre® 3335/3345 Multifunction PrinterUser Guide
Paper and Media

c) Release the levers.
3. Flex the sheets back and forth and fan them, then align the edges of the stack on alevel surface. This procedure separates any sheets that are stuck together and reducesthe possibility of jams.
4. Load the paper into the tray as shown, and adjust the paper guides in the tray tomatch the size of the paper.
Xerox® WorkCentre® 3335/3345 Multifunction Printer4-10User Guide
Paper and Media

• Load paper into the tray with the print side face down.• Load hole-punched paper with the holes toward the right side of the printer.• Do not load paper above themaximum fill line. Overfilling can cause paper jams.
5. Slide the tray into the printer and push it in all the way.
6. If the control panel Paper Settings screen prompts you, verify the paper size, type,and color.
7. Touch Confirm.
4-11Xerox® WorkCentre® 3335/3345 Multifunction PrinterUser Guide
Paper and Media

Loading Paper in Optional Tray 2
Tray 2 holds a maximum of 550 sheets.1. To remove the tray from the printer, pull out the tray until it stops, lift the front of
the tray slightly, then pull it out.
2. Move the length and width guides out.a) Pinch the guide lever on each guide.b) Slide the guides outward until they stop.c) Release the levers.
Xerox® WorkCentre® 3335/3345 Multifunction Printer4-12User Guide
Paper and Media

3. Flex the sheets back and forth and fan them, then align the edges of the stack on alevel surface. This procedure separates any sheets that are stuck together and reducesthe possibility of jams.
4. Load the paper into the tray as shown, and adjust the paper guides in the tray tomatch the size of the paper.
• Load paper into the tray with the print side face down.• Load hole-punched paper with the holes toward the right side of the printer.• Do not load paper above themaximum fill line. Overfilling can cause paper jams.
4-13Xerox® WorkCentre® 3335/3345 Multifunction PrinterUser Guide
Paper and Media

5. Slide the tray into the printer and push it in all the way.
6. If the control panel Paper Settings screen prompts you, verify the paper size, type,and color.
7. Touch Confirm.
Configuring the Duplex Unit Width Size
Use the following procedure to change the duplex unit width size.
NoteThe duplex unit is preset to either Letter/Legal width-size or A4 width-size depending onyour country.
1. Pull out and remove the duplex unit from the back of the printer.
2. Adjust the width guide:a) To access the width guide, flip over the duplex unit.
Xerox® WorkCentre® 3335/3345 Multifunction Printer4-14User Guide
Paper and Media

NoteThe width guide is located on the bottom of the duplex unit.
b) Adjust the width guide to match the width of paper you will be using.
NoteWidth size may be either Letter/Legal or A4.
c) Flip the tray over.
4-15Xerox® WorkCentre® 3335/3345 Multifunction PrinterUser Guide
Paper and Media

3. Insert the duplex unit back into the printer and push it in all the way.
Printing on Special PaperTo order paper, transparencies, or other media, contact your local reseller or go to:
• www.xerox.com/office/WC3335supplies• www.xerox.com/office/WC3345supplies
EnvelopesNoteYou can print envelopes only from the bypass tray. For details, see Supported StandardPaper Sizes.
Guidelines for Printing Envelopes• Print quality depends on the quality and construction of the envelopes. Try another
envelope brand if you do not get desired results.• Maintain constant temperatures and relative humidity.• Store unused envelopes in their packaging to avoid excess moisture and dryness
which can affect print quality and cause wrinkling. Excessive moisture can cause theenvelopes to seal before or during printing.
• Before loading envelopes into the tray, remove air bubbles by setting a heavy bookon top of them.
• In the print driver software, select Envelope as the paper type.• Do not use padded envelopes. Use envelopes that lie flat on a surface.• Do not use envelopes with heat-activated glue.• Do not use envelopes with press-and-seal flaps.• Use only paper envelopes.• Do not use envelopes with windows or metal clasps.
Xerox® WorkCentre® 3335/3345 Multifunction Printer4-16User Guide
Paper and Media

Loading Envelopes in the Bypass Tray1. Open the bypass tray.
NoteIf the bypass tray is open and loaded with paper already, remove any paper that isa different size or type.
a) To open the bypass tray, press the cover.
b) Fully extend the bypass tray.
2. Move the length and width guides out.
4-17Xerox® WorkCentre® 3335/3345 Multifunction PrinterUser Guide
Paper and Media

If you do not load envelopes in the bypass tray right after they have been removedfrom the packaging, they can bulge. To avoid jams, flatten the envelopes.
3. To load envelopes, place the envelopes with the print side up, flaps closed and down,and the flap of the envelope to the left.
4. If the control panel Paper Settings screen prompts you, verify the paper size, type,and color.
5. When finished, touch Confirm.
Xerox® WorkCentre® 3335/3345 Multifunction Printer4-18User Guide
Paper and Media

LabelsNoteYou can print labels only from the Bypass Tray.
Guidelines for Printing Labels
CautionDo not use any sheet where labels are missing, curled, or pulled away from the backingsheet. It could damage the printer.
• Use labels designed for laser printing.• Do not use vinyl labels.• Do not feed a sheet of labels through the printer more than once.• Do not use dry gum labels.• Print only on one side of the sheet of labels. Use full sheet labels only.• Store unused labels flat in their original packaging. Leave the sheets of labels inside
the original packaging until ready to use. Return any unused sheets of labels to theoriginal packaging and reseal it.
• Do not store labels in extremely dry or humid conditions or extremely hot or coldconditions. Storing them in extreme conditions can cause print-quality problems orcause them to jam in the printer.
• Rotate stock frequently. Long periods of storage in extreme conditions can causelabels to curl and jam in the printer.
• In the print driver software, select Label as the paper type.• Before loading labels, remove all other paper from the bypass tray.
4-19Xerox® WorkCentre® 3335/3345 Multifunction PrinterUser Guide
Paper and Media
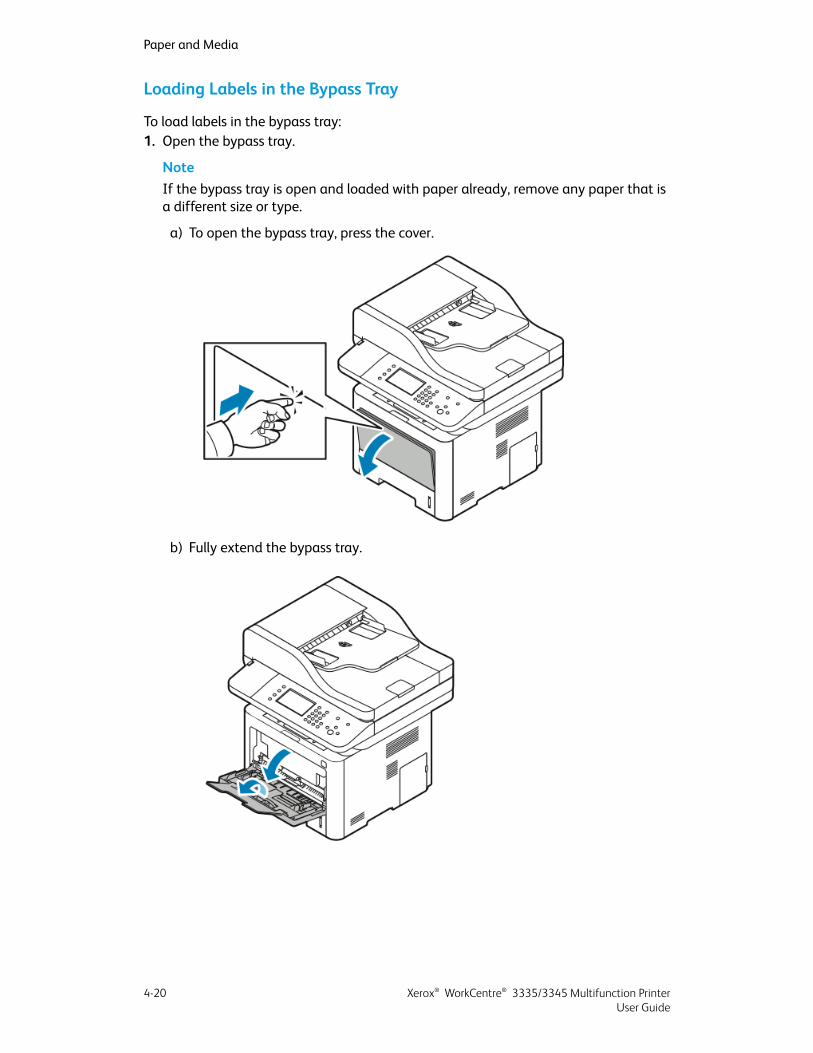
Loading Labels in the Bypass Tray
To load labels in the bypass tray:1. Open the bypass tray.
NoteIf the bypass tray is open and loaded with paper already, remove any paper that isa different size or type.
a) To open the bypass tray, press the cover.
b) Fully extend the bypass tray.
Xerox® WorkCentre® 3335/3345 Multifunction Printer4-20User Guide
Paper and Media

2. Move the length and width guides out.
3. Load the labels face up.
4. Adjust the guides until they touch the edges of the paper.5. If the control panel prompts you, verify the paper size, type, and color in the Paper
Settings screen.6. When finished, touch Confirm.
TransparenciesNoteYou can print transparencies only from the bypass tray.
4-21Xerox® WorkCentre® 3335/3345 Multifunction PrinterUser Guide
Paper and Media

Guidelines for Printing Transparencies• Remove all paper before loading transparencies in the bypass tray.• Handle transparencies by the edges using both hands. Fingerprints or creases can
cause poor print quality.• After loading transparencies, change the paper type to Transparency on the printer
control panel.• In the print driver software, for paper type, select Transparency.• Do not loadmore than 20 transparencies. Overloading the tray can cause the printer
to jam.• Do not fan transparencies.
Xerox® WorkCentre® 3335/3345 Multifunction Printer4-22User Guide
Paper and Media

5Printing
Printing OverviewBefore printing, your computer and the printer must be plugged in, turned on, andconnected to an active network.Make sure that you have the correct print driver softwareinstalled on your computer. For details, refer to Installing the Software.1. Select the appropriate paper.2. Load paper in the appropriate tray.3. At the printer control panel, specify the size and type.4. In your software application, access the print settings. Formost software applications,
press CTRL > P for Windows or CMD > P for Macintosh.5. Select your printer.6. To access the print driver settings for Windows, select Properties or Preferences. For
Macintosh select Xerox® Features.7. Select the desired options.8. To send the job to the printer, click Print.
Related Topics:
Loading Paper
Selecting Printing Options
Printing on Both Sides of the Paper
Printing on Special Paper
Selecting Printing OptionsPrinting options, also called print driver software options, are specified as PrintingPreferences in Windows, and Xerox® Features in Macintosh. Printing options includesettings for 2-sided printing, page layout, and print quality. You can choose defaultsettings for various printing options; formore information refer to SettingDefault PrintingOptions forWindows and Selecting PrintingOptions forMacintosh. Printing options thatyou set from within the software application are temporary and are not saved.
5-1Xerox® WorkCentre® 3335/3345 Multifunction PrinterUser Guide

Print Driver Help
Xerox® print driver software Help is available from the Printing Preferences window. Tosee print driver help, click the Help (?) button in the bottom left corner of the PrintingPreferences window.
Information about Printing Preferences appears in the Help window on two tabs:
• Contents provides a list of the driver tabs at the top and the areas at the bottom ofthe Printing Preferences window. To find explanations for each of the driver fieldsand areas, in the Printing Preferences window, click the Contents tab.
• Search provides a field where you can enter the topic or function for which you needinformation.
Windows Printing OptionsSetting Default Printing Options for Windows
When you print from any software application, the printer uses the print job settingsspecified in the Printing Preferences window. You can specify yourmost common printingoptions and save them so that you do not have to change them every time you print.
For example, if you want to print on both sides of the paper for most jobs, in PrintingPreferences, specify 2-sided printing.
To select default printing options:1. On your computer, navigate to the list of printers:
a) ForWindows Vista, click Start > Control Panel > Hardware and Sound > Printers.b) For Windows 7, click Start > Devices and Printers.c) For Windows 8, click Control Panel > Devices and Printers.
NoteIf the Control Panel icon does not appear on the desktop, right-click on thedesktop, then select Personalize > Control Panel Home > Devices and Printers.
Xerox® WorkCentre® 3335/3345 Multifunction Printer5-2User Guide
Printing

2. In the list, right-click the icon for your printer and click Printing Preferences.3. In the Printing Preferences window, click a tab, select the options, then click OK to
save.
For more information aboutWindows print driver options, in the Printing Preferenceswindow, click the Help button (?).
Selecting Windows Print Options for an Individual Job
To use special printing options for a particular job, you can change the PrintingPreferences before sending the job to the printer. For example, if you want the highestprint quality when you print a document, in Printing Preferences, select Enhanced, thensubmit the print job.1. With the document open in your software application, access the print settings. For
most software applications, click File > Print or press CTRL > P.2. To open the Properties window, select your printer, then click the Properties or
Preferences button. The title of the button varies depending on your application.3. In the Properties window, click a tab, then make selections.4. To save your selections and close the Properties window, click OK.5. To send the job to the printer, click OK.
Saving a Set of Commonly Used Printing Options for Windows
You can define and save a set of options, so that you can apply them to future printjobs.
To save a set of printing options:1. With the document open in your application, click File > Print.2. Select the printer, then click Properties.3. In the Properties window, select the desired settings for each tab.4. To save the settings, click the arrow to the right of the Saved Settings field at the
bottom of the window, then click Save As.5. Type a name for the set of printing options, then to save the set of options in the
Saved Settings list, clickOK.6. To print using these options, select the name from the list.
Macintosh Printing OptionsSelecting Printing Options for Macintosh
To use specific printing options, change the settings before sending the job to the printer.1. With the document open in your application, click File > Print.2. Select your printer.3. Select Xerox® Features.4. Select the desired options.5. Click Print.
5-3Xerox® WorkCentre® 3335/3345 Multifunction PrinterUser Guide
Printing

Saving a Set of Commonly Used Printing Options for Macintosh
You can define and save a set of options, so that you can apply them to future printjobs.
To save a set of printing options:1. With the document open in your application, click File > Print.2. In the printer list, select your printer.3. Select the desired printing options.4. To save the settings, select Save Current Settings as Preset.
Linux Printing OptionsLaunching Xerox® Printer ManagerTo launch Xerox® Printer Manager from a command line prompt:1. Login in as root.2. Type xeroxprtmgr.3. Press Enter or Return.
Printing from a Linux Workstation
The Xerox® print driver accepts a job ticket setting file that contains preset printingfeatures. You can also submit print requests through the command line using lp/lpr. Formore information about Linux printing, click theHelp (?) button in the Xerox® print driver.1. Create a print queue. To set up a queue, refer to the System Administrator Guide:
• www.xerox.com/office/WC3335docs• www.xerox.com/office/WC3345docs
2. With the desired document or graphic open in your application, open the Print dialogbox.For most software applications, click File > Print or press CTRL > P.
3. Select the target print queue.4. Close the Print dialog box.5. In the Xerox® print driver, select the available printer features.6. Click Print.
Xerox® WorkCentre® 3335/3345 Multifunction Printer5-4User Guide
Printing

Creating a Job Ticket Using the Xerox Print Driver1. In a command line prompt, open the Xerox® print driver, login as root, and type
xeroxprtmgr.2. On the My Printers screen, select the printer.3. In the top corner, click Edit Printer, then select options for the print job.4. Click Save As, then store the job ticket in your home directory.
Personally identifiable information, such as a Secure Print passcode, is not saved inthe job ticket. You can specify the information on the command line.
To print using the job ticket, type the command lp -d{Target_Queue} -oJT=<path_to_ticket> <file_name>.
The following commands are examples of how to print using a job ticket:
lp -d{Target_Queue} -oJT={Absolute_Path_To_Job_Ticket}{Path_To_Print_File}
lp -dMyQueue -oJT=/tmp/DuplexedLetterhead /home/user/PrintReadyFile
lp -dMyQueue -oJT=/tmp/Secure -oSecurePasscode=1234/home/user/PrintReadyFile
Managing JobsManaging Jobs at the Control Panel
From the control panel Job Status screen, you can view lists of active jobs or completedjobs. You can pause, delete, print, or view job progress or job details for a selected job.
To Pause and Restart Printing1. To pause printing, at the control panel, press the Interrupt Printing button.2. To resume printing, press the Interrupt Printing button.
To Pause a Print Job in Progress with the Option to Delete It1. At the control panel press the Stop button.2. Do one of the following:
• To delete the print job, touch Cancel.• To resume the print job, touch Resume.
5-5Xerox® WorkCentre® 3335/3345 Multifunction PrinterUser Guide
Printing

To View Active or Completed Jobs1. At the control panel, press the Job Status button.2. To see a list of specific job types, touch a tab.
• To view jobs that are in process or waiting to process, touch the Active tab.
• To view completed Jobs, touch the Completed Jobs tab.
• To view details about a job, touch the job name.
To Delete an Active Job1. At the control panel, press the Job Status button.2. Touch the Active tab.3. Touch the folder of the active job.4. Touch Delete.
The system administrator can restrict users from deleting jobs. If a systemadministrator has restricted job deletion, you can view the jobs, but not delete them.Only the user that sent the job or the system administrator can delete an active printjob.
Managing Jobs in Xerox® CentreWare® Internet Services
You can view a list of active jobs and delete print jobs from the Active Jobs list in Xerox®
CentreWare® Internet Services. You can also print, copy, move, or delete saved jobs. Fordetails, refer to the Help in Xerox® CentreWare® Internet Services
Printing FeaturesPrinting on Both Sides of the Paper
Paper Types for Automatic 2-Sided Printing
The printer can print a 2-sided document automatically on supported paper. Beforeprinting a 2-sided document, verify that the paper type and weight are supported. Fordetails, refer to Supported Paper Types and Weights for Automatic 2-Sided Printing.
Printing a 2-Sided Document
Options for Automatic 2-Sided Printing are specified in the print driver. The print driveruses the settings for portrait or landscape orientation from the application for printingthe document.
2-Sided Page Layout Options
You can specify the page layout for 2-sided printing, which determines how the printedpages turn. These settings override the application page-orientation settings.
Xerox® WorkCentre® 3335/3345 Multifunction Printer5-6User Guide
Printing

LandscapePortrait
2-Sided Print, Flip onShort Edge
2-Sided Print2-Sided Print, Flip onShort Edge
2-Sided Print
Selecting Paper Options for Printing
There are two ways to select the paper for your print job:
• Let the printer automatically select which paper to use based on the document size,paper type, and paper color you specify.
• Select a specific tray loaded with the desired paper.
Printing Multiple Pages to a Single Sheet
Whenprinting amultiple-page document, you can printmore than one pageon a single sheet of paper.1. On the Page Layout tab, select Pages Per Sheet.2. Select 1, 2, 4, 6, 9, or 16 pages per side.
Page Layout is on the Document Options tab.
Scaling
Scaling reduces or enlarges the original document to match the selected output papersize. InWindows, the Scale Options are located in the print driver on the PrintingOptionstab in the Paper field.
To access Scale Options, click the arrow at the right side of the Paper field, select OtherSize, then select Advanced Paper Size.
• No Scaling: This option does not change the size of the page image printed on theoutput paper, and 100% appears in the percentage box. If the original size is largerthan the output size, the page image is cropped. If the original size is smaller thanthe output size, extra space appears around the page image.
• Automatically Scale: This option scales the document to fit the selected OutputPaper Size. The scaling amount appears in the percentage box below the sampleimage.
• Manually Scale: This option scales the document by the amount entered in thepercentage box below the preview image.
Print Quality
Print-quality modes:
• Standard print-quality mode: 600 x 600 dpi (dots per inch)• Enhanced print-quality mode: 600 x 600 x 5 dpi (1200 x 1200 enhanced image
quality)
5-7Xerox® WorkCentre® 3335/3345 Multifunction PrinterUser Guide
Printing

NoteThe print resolutions are indicated for PostScript print drivers only. The only print-qualitymode for PCL is Enhanced.
Saved Jobs
You can use the controls in the Saved jobs window to save the job, or you can print andsave the job for future use.
Print From
Print From allows printing of documents stored on the printer, on a computer on anetwork, or on a USB Flash drive.
Printing from Saved Jobs1. At the control panel, press the Services button, then touch Saved Jobs.2. Touch the name of the saved job that you want to print.3. Touch OK.4. Press the green Start button.5. After the job prints, to return to the list of saved jobs, touch Browse.
Xerox® WorkCentre® 3335/3345 Multifunction Printer5-8User Guide
Printing

Printing from a USB Flash Drive
You can print .pdf, .ps, .pcl, .prn, .tiff, and .xps files directly from a USB Flash drive.
NoteIf USB ports are disabled, you cannot use aUSB card reader for authentication, to updatethe software, or to print from a USB Flash drive.
The system administrator must set up this feature before you can use it. For details,refer to the System Administrator Guide at:
• www.xerox.com/office/WC3335docs• www.xerox.com/office/WC3345docs
To print from a USB Flash drive:1. Insert your USB Flash drive in a USB port on the printer. The Print from USB window
appears.The list at the bottom of the window displays the folders and printable files on theUSB Flash drive.
2. To scroll through the list and locate the printable file, next to the list, use the arrows.3. If the print file is in a folder, to open the folder, touch the folder name.4. Touch the name of the printable file.5. Select the number of copies, paper size, paper color, paper type, 2-sided printing, and
finishing options.6. Press the green Start button.7. To go back to the last screen, touch Back.8. To look for other folders and printable files, touch Browse.
5-9Xerox® WorkCentre® 3335/3345 Multifunction PrinterUser Guide
Printing

Xerox® WorkCentre® 3335/3345 Multifunction Printer5-10User Guide
Printing
6Copying
Basic Copying1. To clear previous settings, at the control panel, press the yellow Clear All button. The
Clear All Confirmation screen appears.2. Touch Confirm or Close.3. Load your original documents.
• Use the document glass for single pages or paper that cannot be fed using thedocument feeder. Place the first page of the document face down, in the top leftcorner of the document glass.
• Use the document feeder for multiple or single pages. Remove any staples andpaper clips from the pages and place them face up in the document feeder.
4. Press the Services Home button, then touch Copy.5. To enter the number of copies, use the alphanumeric keypad on the touch screen or
the control panel. Touch the Right arrow.6. Change the copy settings as needed. Refer to Selecting Copy Settings.7. Press the green Start button.
• To pause or cancel a copy job, at the control panel, press the red Stop button.• To interrupt a copy job, at the control panel, press the Interrupt Printing button.
Document Glass
Document Glass Guidelines
The document glass accommodates original sizes up to 210 x 297mm (A4/8.5 x 11 in.).Use the document glass rather than the document feeder to copy or scan the followingtypes of originals documents:
• Paper with paper clips or staples attached• Paper with wrinkles, curls, folds, tears, or notches• Coated or carbonless paper or items other than paper such as cloth or metal
6-1Xerox® WorkCentre® 3335/3345 Multifunction PrinterUser Guide

• Envelopes• Books
Using the Document Glass
1. Lift the document feeder cover.2. Place the first page face down in the upper-left corner of the document glass.3. Align the originals to the matching paper size printed on the edge of the glass.
• The document glass accommodates original sizes up to 210 x 297 mm (A4/8.5x 11 in.).
• The document glass automatically detects letter (8.5 x 11 in.), A4, and smallerpaper sizes.
Document Feeder
Document Feeder Guidelines
When loading original documents into the document feeder, follow these guidelines:
• Insert originals face up with the top of the page entering the feeder first.• Only place loose sheets of paper in the document feeder.• Adjust the paper guides so that they fit against the original documents.• Insert paper in the document feeder only when ink on the paper is dry.• Do not load original documents above theMAX fill line.
Xerox® WorkCentre® 3335/3345 Multifunction Printer6-2User Guide
Copying

Using the Document Feeder
• The document feeder accepts paper weights from 50–105 g/m² (12.5–28 lb.) for2-sided pages.
• The document feeder accepts paper sizes from 145 x 145 mm (5.7 x 5.7 in.) through216 x 356 mm (8.5 x 14 in.) for 1-sided pages, and 176 x 250 mm (6.93 x 9.84 in.)through 216 x 356 mm (8.5 x 14 in.) for 2-sided pages.
• The maximum feeder capacity is approximately 100 sheets of 75 g/m² paper.
1. Insert originals face up, with page one on top.2. Adjust the paper guides so that they fit against the original documents.
Selecting Copy Settings
Basic SettingsSelecting a Paper Tray1. At the printer control panel, press the Services Home button.2. Touch Copy.3. On the Copy tab, touch the Right arrow.4. Touch the Paper Supply tab.5. Touch one of the options.6. Touch OK.
Selecting 2-Sided Copy Options1. At the printer control panel, press the Services Home button.2. Touch Copy.3. On the Copy tab, touch the Right arrow.4. Touch 2-Sided Copying.5. Touch an option.6. Touch OK.
6-3Xerox® WorkCentre® 3335/3345 Multifunction PrinterUser Guide
Copying

Specifying the Size of the Original
To scan the correct area of the original, specify the original size.1. At the printer control panel, press the Services Home button.2. Touch Copy.3. On the Copy tab, touch the Right arrow.4. Scroll down to and touch Original Size .5. Touch an option.
• Preset Scan Area: You can specify the area to scan when it matches a standardpaper size.
NoteGrayed-out options are not available.
• Custom Scan Area: You can specify the height and width of the area to scan.
6. Touch OK.
Xerox® WorkCentre® 3335/3345 Multifunction Printer6-4User Guide
Copying

Image Quality Settings
Specifying the Original Type
The printer optimizes the image quality of the copies based on the type of images inthe original document and how the original was created.1. At the printer control panel, press the Services Home button.2. Touch Copy.3. On the Copy tab, touch the Right arrow.4. Scroll down to and touch Original Type.5. Select an option.6. Touch OK.
Making the Image Lighter or Darker1. At the printer control panel, press the Services Home button.2. Touch Copy.3. On the Copy tab, touch the Right arrow.4. Scroll down to and touch the Lighten/Darken tab.5. Adjust the slider as needed.6. Touch OK.
Automatically Suppressing Background Variation
When scanning originals printed on thin paper, text or images printed on one side ofthe paper can be seen on the other side. Use the Auto Suppression setting to reduce thesensitivity of the printer to variations in light background colors.1. At the printer control panel, press the Services Home button.2. Touch Copy.3. On the Copy tab, touch the Right arrow.4. Scroll down to and touch Background Suppression.5. For Background Suppression, touchAuto Suppression.6. Touch OK.
6-5Xerox® WorkCentre® 3335/3345 Multifunction PrinterUser Guide
Copying

Output AdjustmentsReducing or Enlarging the Image
You can reduce the image to as little as 25% of its original size or enlarge it as much as400%.
To reduce or enlarge the image:1. At the printer control panel, press the Services Home button.2. Touch Copy.3. On the Copy tab, touch the Right arrow.4. Touch Reduce/Enlarge.5. Touch an option.
• To reduce or enlarge the percentage incrementally, touch Plus (+) orMinus (-).• To reduce or enlarge the percentage incrementally, touch the arrows.• To reduce or enlarge the percentage using the alphanumeric keypad, touch the
current displayed value, then enter a value.• Touch OK.
6. Touch OK.
Erasing the Edges of Copies
You can erase content from the edges of your copies by specifying the amount to eraseon the right, left, top, and bottom edges.1. At the printer control panel, press the Services Home button.2. Touch Copy.3. On the Copy tab, touch the Right arrow.4. Scroll down to and touch Edge Erase.5. Select an option.6. Touch OK.
Page Layout
You can use Page Layout to place a defined number of pages on one or both sides ofthe paper.
NotePage Layout is disabled unless a preset Original Size is selected.
1. At the printer control panel, press the Services Home button.2. Touch Copy.3. On the Copy tab, touch the Right arrow.4. Scroll down to and touch Page Layout.5. Touch an option.6. For Paper Supply, touch the desired tray.7. Touch OK.
Xerox® WorkCentre® 3335/3345 Multifunction Printer6-6User Guide
Copying

Shifting the Image
You can change the placement of an image on the copy page. For Image Shift to functioncorrectly, position originals as follows.1. Perform one of the following:
• For the Document Feeder, position originals face up, short edge entering thefeeder first.
• For the Document Glass, position originals face down in the back-left corner ofthe document glass with the short edge to the left.
2. At the printer control panel, press the Services Home button.3. Touch Copy.4. On the Copy tab, touch the Right arrow.5. Scroll down to and touch Image Shift.6. If the drop-downmenu is set to Off, touch the drop-down arrow and select an option:
• Auto Center• Margin Shift
7. Touch OK.
Output Format SettingsSelecting Book Copying
When copying a book, magazine, or other bound document, you can copy either the leftor right page onto a single sheet of paper. You can copy both the left and right pagesonto two sheets of paper, or as a single image on one sheet of paper.
NoteBook Copying is disabled unless a preset Original Size is selected.
1. At the printer control panel, press the Services Home button.2. Touch Copy.3. On the Copy tab, touch the Right arrow.4. Scroll down to and touch Book Copying .5. Touch an option, then touch OK.
Creating a Booklet
You can print copies in booklet format. The booklet feature reduces the original pageimages to fit two images on each side of the printed page.
NoteIn this mode, the printer scans all of the originals before it prints the copies.
1. At the printer control panel, press the Services Home button.2. Touch Copy.3. On the Copy tab, touch the Right arrow.4. Scroll down to and touch Booklet Creation.5. Touch On.
6-7Xerox® WorkCentre® 3335/3345 Multifunction PrinterUser Guide
Copying

6. Select the desired options.7. Touch OK.
Including Covers
You can print the first and last pages of your copy job on different paper, such as coloredor heavyweight paper. The printer selects the paper from a different tray. The coverscan be blank or printed.1. Load the pages of the original document to be copied into the document feeder.2. If necessary, load the paper to be used as the body pages of the copy into the desired
tray.3. Load the paper stock to be used for covers in a different tray.4. At the printer control panel, press the Services Home button.5. Touch Copy.6. On the Copy tab, touch the Right arrow.7. Under Paper Supply, touch the tray that contains the paper for the body pages of
the job.8. Touch OK.9. Scroll down to and touch Covers.10. Touch an option.11. From the Cover menu, choose the desired option:
• Blank• Print on Side 1 only• Print on Both Sides
12. From the Tray Selection menu under the Cover menu, touch the tray from which toprint the covers.
13. Touch OK.14. On the Copy tab, touch the Left arrow.15. Select the Quantity of copies.16. Press the green Start button.
Adding Transparency Separators
You can add blank sheets of paper between each printed transparency. Ensure that thesize and orientation of the separators is the same as the transparencies.
NoteIf the paper supply is set to Auto Select, you cannot add transparency separators.
1. At the printer control panel, press the Services Home button.2. Touch Copy.3. On the Copy tab, touch the Right arrow.4. Scroll down to and touch Transparency Separators.5. Select an option:
• Off: This option does not insert a page between the transparencies.• Blank: This option inserts a blank page between the transparencies.
Xerox® WorkCentre® 3335/3345 Multifunction Printer6-8User Guide
Copying

• Printed: This option inserts a printed sheet of paper between the transparencies.
6. For Paper Supply, touch the desired tray.7. Touch OK.
ID Card Copying
You can copy both sides of an ID card or small document onto one side of paper. Eachside is copied using the same location on the document glass. The printer stores bothsides and prints them side by side on the paper.1. Press the Services Home button, then scroll down and touch ID Card Copy.2. Select the number of copies using the keypad.3. Touch the Right arrow.4. To change the options for paper supply, to lighten or darken an image or to switch
on auto suppression, in the IDCard Copy screen, touch each tab andmake appropriatechanges.
5. Lift the document cover.6. Place the ID card, or a document smaller than half the selected paper supply size, in
the upper left corner of the document glass.7. Press the green Start button.
The first side of the ID card is copied and stored, and you will be prompted to turnover the ID card and press Start.
8. Repeat the previous steps to copy the second side of the ID card.The second side of the ID card is copied, and the copy is generated.
9. Lift the document cover and remove the ID card or document.
6-9Xerox® WorkCentre® 3335/3345 Multifunction PrinterUser Guide
Copying

Xerox® WorkCentre® 3335/3345 Multifunction Printer6-10User Guide
Copying

7Scanning
The system administrator must set up this feature before you can use it. For details,refer to the System Administrator Guide at:
• www.xerox.com/office/WC3335docs• www.xerox.com/office/WC3345docs
Loading Documents for Scanning
Using the Document Glass
1. Lift the document feeder cover.2. Place the first page face down in the upper-left corner of the document glass.3. Align the originals to the matching paper size printed on the edge of the glass.
• The document glass accommodates original sizes up to 210 x 297 mm (A4/8.5x 11 in.).
• The document glass automatically detects letter (8.5 x 11 in.), A4, and smallerpaper sizes.
7-1Xerox® WorkCentre® 3335/3345 Multifunction PrinterUser Guide

Document Glass Guidelines
The document glass accommodates original sizes up to 210 x 297mm (A4/8.5 x 11 in.).Use the document glass rather than the document feeder to copy or scan the followingtypes of originals documents:
• Paper with paper clips or staples attached• Paper with wrinkles, curls, folds, tears, or notches• Coated or carbonless paper or items other than paper such as cloth or metal• Envelopes• Books
Using the Document Feeder
• The document feeder accepts paper weights from 50–105 g/m² (12.5–28 lb.) for2-sided pages.
• The document feeder accepts paper sizes from 145 x 145 mm (5.7 x 5.7 in.) through216 x 356 mm (8.5 x 14 in.) for 1-sided pages, and 176 x 250 mm (6.93 x 9.84 in.)through 216 x 356 mm (8.5 x 14 in.) for 2-sided pages.
• The maximum feeder capacity is approximately 100 sheets of 75 g/m² paper.
1. Insert originals face up, with page one on top.2. Adjust the paper guides so that they fit against the original documents.
Document Feeder Guidelines
When loading original documents into the document feeder, follow these guidelines:
• Insert originals face up with the top of the page entering the feeder first.• Only place loose sheets of paper in the document feeder.• Adjust the paper guides so that they fit against the original documents.• Insert paper in the document feeder only when ink on the paper is dry.• Do not load original documents above theMAX fill line.
Xerox® WorkCentre® 3335/3345 Multifunction Printer7-2User Guide
Scanning

Scanning to a USB Flash DriveYou can scan a document and store the scanned file on a USB Flash drive. Scaning to aUSB supports scans in .jpg, .pdf, and .tiff file formats.1. Load the original on the document glass or in the document feeder.2. Insert your USB Flash drive into the USB port on the side of the printer.
The control panel touch screen displays the USB Device Detected screen.3. If the USB Device Detected screen does not display automatically, on the control
panel, touch Scan to USB.4. Change scan settings as needed. For details, refer to Adjusting Scanning Settings.5. To begin the scan, press Start.
NoteDo not remove the USB Flash drive until prompted. If you remove the Flash drivebefore the transfer is complete, the file can become unusable and other files on thedrive can be damaged.
7-3Xerox® WorkCentre® 3335/3345 Multifunction PrinterUser Guide
Scanning
Scanning to a Shared Folder on aNetworkComputerBefore you can scan to a shared folder, you must share the folder, then add the folderas an Address Book entry in Xerox® CentreWare® Internet Services.
Sharing a Folder on a Windows Computer
Before you begin:
• Verify that your computer security software allows for file sharing.• Verify that File and Printer Sharing For Microsoft Networks is enabled for each of
your connections.
NoteFor assistance, contact your system administrator.
To turn on sharing:1. Open Windows Explorer.2. Right-click the folder you want to share, then select Properties.3. Click the Sharing tab, then click Advanced Sharing.4. Select Share this folder.5. Click Permissions.6. Select the Everyone group, and verify that all permissions are enabled.7. Click OK.8. Click OK again.9. Click Close.
Remember the Share name for later use.
Sharing a Folder Using Macintosh OS X Version 10.7 and Later1. From the Apple menu, select System Preferences.2. From the View menu, select Sharing.3. From the Service list, select File Sharing.4. Under Shared Folders, click the plus icon (+).
A folder list appears.5. Select the folder that you want to share on the network, then click Add.6. To modify access rights for your folder, select it. The groups activate.7. From the Users list, click Everyone, then use the arrows to select Read & Write.8. Click Options.9. To share the folder with Windows computers, select Share files and folders using
SMB.10. To share the folder with specific users, next to the user name, select On.11. Click Done.12. Close the System Preferences window.
Xerox® WorkCentre® 3335/3345 Multifunction Printer7-4User Guide
Scanning

NoteWhen you open a shared folder, a Shared Folder banner appears in the Finder forthe folder and subfolders.
Adding a Folder as an Address Book Entry Using CentreWareInternet Services1. At your computer, open a Web browser, in the address field, type the IP address of
the printer, then press Enter or Return.2. Click Address Book.3. Under Network Scan (Comp./Serv.), click Computer/Server Address Book.4. Click Add next to any empty field, and enter the following information:
• Name: Enter the name that you want to appear in the Address Book.• Server Type: Select Computer (SMB).• Host Address: Enter the IP address of your computer.• Port Number: Enter the default port number for SMB, 139, or select a number from
the range provided.• Login Name: Enter your computer user name.• Login Password: Enter your computer login password.• Reenter Password: Enter your login password again.• Name of Shared Directory: Enter a name for the directory or folder. For example,
if you want the scanned files to go in a folder named scans type scans.• Subdirectory Path: Enter the path of the folder on the FTP server. For example,
if you want the scanned files to go in a folder named colorscans inside the scansfolder, type /colorscans.
5. Click Save Changes.
Scanning to a Folder on a Network Computer1. Load the original document on the document glass or in the automatic document
feeder.2. On the printer control panel, touch Scan to.3. Touch the Right Arrow button until the Scan To Network screen appears.4. Touch OK.5. At Scan to, touch OK.6. At Computer (Network), touch OK.7. Use the arrow buttons to select the shared folder on your computer, then touch OK.8. If you want to change any other scan settings, use the arrow buttons to select the
setting, and make your changes. For details, refer to Adjusting Scanning Options.9. To begin the scan, press Start.
7-5Xerox® WorkCentre® 3335/3345 Multifunction PrinterUser Guide
Scanning

Scanning to an Email AddressNoteWhen using this feature, the images you scan are sent as email attachments.
Before scanning to email, configure the email SMTP and FromField properties. Youmusthave at least one email address in the address book. If email properties are not properlyconfigured, the Email icon appears grayed out on the touch screen.1. Load the original document on the document glass or in the document feeder.2. On the printer control panel, touch Scan to.3. Touch the Right Arrow button until the Scan To Email screen appears.4. Choose the option for selecting the recipient:
• Keypad: This option allows you to enter the email address manually. Use thekeypad to enter the address.
• Address Book: This option allows you to select an email address from the AddressBook.
NoteWhen using the Address Book, use the arrow buttons to select the address for thedesired recipient.
5. Press the green Start button.
Scanning to a ComputerIf the system administrator enables Remote Start in Xerox® CentreWare® InternetServices, you can scan images directly from the scanner to a PC. Using Microsoft ClipOrganizer, you can scan, import, and store images from the printer. You can also scandirectly from the printer to a computer using most TWAIN-compliant scanningapplications.1. At the printer, load the original document on the document glass or in the document
feeder.2. At your computer, click Start > Programs > Microsoft Office > Microsoft Office
Tools > Microsoft Clip Organizer.3. Click File > Add Clips to Organizer > From Scanner or Camera.4. Click Device > Xerox TWAIN Driver.5. Click Custom Insert.6. If multiple scanners are installed on your computer, click Select Scan Device, select
the scanner, then click Select.7. To select a size for the scanned image, clickScan Size, then select an option.8. To select the sides to scan from the original document, click Side to Scan, then select
an option:
• 1-Sided Scan: This option scans only one side of the original document or imageand produces 1-sided output files.
• 2-Sided Scan: This option scans both sides of the original document or image.
Xerox® WorkCentre® 3335/3345 Multifunction Printer7-6User Guide
Scanning

• 2-Sided Scan, Short Edge: This option scans both sides of the original image onthe short edge.
• To select the resolution to scan the image, click Resolution, then select an option.
9. To adjust the scan color, click Image Color and select an option:
• Auto: This option detects the color content in the original image. If the originalimage is color, the printer scans in full color. If the original is a black and whitedocument, the printer scans in black and white only.
• Color: This option scans in full color.• Grayscale: This option detects color content and scans as various shades of gray.• Black and White: This option scans in black and white only.• To scan the image, click Scan.
10. To select the resolution to scan the image, click Resolution, then select an option.11. To scan the image, click Scan.
Sending a Scanned Image to aDestinationBefore scanning to a destination, configure the destination folders on the server or sharethe folder on a personal computer. In addition, you must have at least one Scan ToDestination in the address book. If Scan To Destination properties are not properlyconfigured, the Scan To icon appears grayed out on the touch screen.
To scan an image and send it to a destination:1. Load the original document on the document glass or in the document feeder.2. Touch Scan To > Scan Contacts.3. Select an option.4. Select the desired name from the list, then touch OK.5. Change scan settings as needed.6. Press the green Start button.
For details, refer to Adjusting Scanning Settings.
Adjusting Scanning Settings
Setting the Output Color
If the original image contains color, you can scan the image in color or in black andwhite. Selecting black andwhite significantly reduces the file size of the scanned images.
To set the output color:1. At the printer control panel, press Clear All, then press Services Home.2. Touch Scan To.
7-7Xerox® WorkCentre® 3335/3345 Multifunction PrinterUser Guide
Scanning

3. Touch the Right Arrow button until the Scan To...Features screen appears.4. Touch Output Color.5. Select a color mode.6. Touch OK.
Setting the Scan Resolution
The scan resolution depends on how you plan to use the scanned image. Scan resolutionaffects both the size and image quality of the scanned image file. Higher scan resolutionproduces better image quality and a larger file size.1. At the printer control panel, press Clear All, then press Services Home.2. Touch Scan To.3. Touch the Right Arrow button until the Scan To...Features screen appears.4. Scroll down and touch Resolution.5. Select an option.6. Touch OK.
Selecting 2-Sided Scanning
2-Sided Scanning scans both sides of the original document.
Note2-Sided Scanning is only available on devices that have a duplex document feeder.
1. At the printer control panel, press Clear All, then press Services Home.2. Touch Scan To, then touch and hold the Right Arrow button until Scan To...Features
appears.3. Touch 2-Sided Scanning.4. Select an option.5. Touch OK.
Setting the File Format1. At the printer control panel, press Clear All, then press Services Home.2. Touch Scan To, then touch and hold the Right Arrow button until Scan To...Features
appears.3. Touch File.4. Using the menu, select a file type, then type the file name using the keypad.5. Touch OK.
Lightening or Darkening the Image1. At the printer control panel, press Clear All, then press Services Home.2. Touch Scan To, then touch and hold the Right Arrow button until Scan To...Features
appears.3. Scroll down, then touch Lighten/Darken.4. Using the slider control, make the desired adjustment.5. Touch OK.
Xerox® WorkCentre® 3335/3345 Multifunction Printer7-8User Guide
Scanning

Automatically Suppressing Background Variation
When scanning original documents that are printed on thin paper, text or images printedon one side of the paper can be seen on the other side. Use the Auto Suppression settingto reduce the sensitivity of the printer to variations in light background colors.1. At the printer control panel, press Clear All, then press Services Home.2. Touch Scan To, then touch and hold the Right Arrow button until Scan To...Features
appears.3. Touch Background Suppression.4. Choose Enable or Disable.5. Touch OK.
Specifying the Original Size1. At the printer control panel, press Clear All, then press Services Home.2. Touch Scan To, then touch and hold the Right Arrow button until Scan To...Features
appears.3. Touch Original Size.4. Select an option.5. Touch OK.
Erasing Edges1. At the printer control panel, press Clear All, then press Services Home.2. Touch Scan To, then touch and hold the Right Arrow button until Scan To...Features
appears.3. Touch Scan To Edge.4. Select an option.5. Touch OK.
7-9Xerox® WorkCentre® 3335/3345 Multifunction PrinterUser Guide
Scanning

Xerox® WorkCentre® 3335/3345 Multifunction Printer7-10User Guide
Scanning

8Faxing
The system administrator must set up this feature before you can use it. For details, seethe System Administrator Guide at:
• www.xerox.com/office/WC3335docs• www.xerox.com/office/WC3345docs
Basic FaxingTo send a fax:1. Load your original documents:
• Use the document glass for single pages or paper that cannot be fed using thedocument feeder. Place the first page of the document face down, in the top-leftcorner of the document glass.
• Use the document feeder for multiple or single pages. Remove any staples andpaper clips from the pages and place them face up in the document feeder.
2. Press the Services Home button, then touch Fax.3. Address the fax using one or more of the available options:
• Enter Recipient: This option allows you to enter a fax number manually.• Manual DialMode: This option allows you to insert characters, such asDial Pause,
in a fax number.• Device Address Book: This option allows you to access the printer address book.
4. Adjust additional fax options as needed.For details, refer to Selecting Fax Options.
5. Press the green Start button.The printer scans the pages and transmits the document when all pages have beenscanned.
8-1Xerox® WorkCentre® 3335/3345 Multifunction PrinterUser Guide

Using the Document Glass
1. Lift the document feeder cover.2. Place the first page face down in the upper-left corner of the document glass.3. Align the originals to the matching paper size printed on the edge of the glass.
• The document glass accommodates original sizes up to 210 x 297 mm (A4/8.5x 11 in.).
• The document glass automatically detects letter (8.5 x 11 in.), A4, and smallerpaper sizes.
Document Glass Guidelines
The document glass accommodates original sizes up to 210 x 297mm (A4/8.5 x 11 in.).Use the document glass rather than the document feeder to copy or scan the followingtypes of originals documents:
• Paper with paper clips or staples attached• Paper with wrinkles, curls, folds, tears, or notches• Coated or carbonless paper or items other than paper such as cloth or metal• Envelopes• Books
Xerox® WorkCentre® 3335/3345 Multifunction Printer8-2User Guide
Faxing

Using the Document Feeder
• The document feeder accepts paper weights from 50–105 g/m² (12.5–28 lb.) for2-sided pages.
• The document feeder accepts paper sizes from 145 x 145 mm (5.7 x 5.7 in.) through216 x 356 mm (8.5 x 14 in.) for 1-sided pages, and 176 x 250 mm (6.93 x 9.84 in.)through 216 x 356 mm (8.5 x 14 in.) for 2-sided pages.
• The maximum feeder capacity is approximately 100 sheets of 75 g/m² paper.
1. Insert originals face up, with page one on top.2. Adjust the paper guides so that they fit against the original documents.
Document Feeder Guidelines
When loading original documents into the document feeder, follow these guidelines:
• Insert originals face up with the top of the page entering the feeder first.• Only place loose sheets of paper in the document feeder.• Adjust the paper guides so that they fit against the original documents.• Insert paper in the document feeder only when ink on the paper is dry.• Do not load original documents above theMAX fill line.
Selecting Fax Options
Specifying the Size of the Original
To ensure that you are scanning the correct area of the documents, specify the originalsize.
To specify the original size:1. At the printer control panel, press Services Home.2. Touch Fax, then touch an option.3. At the top of the screen, touch the right arrow two times, then touch Original Size.
8-3Xerox® WorkCentre® 3335/3345 Multifunction PrinterUser Guide
Faxing

4. Touch an option, then touch OK.
Sending a Delayed Fax
You can scan and save a fax on the printer, then send it at a later time.
NoteA delay time of 15 minutes or more must be set; otherwise, the job is sent immediately.
1. At the printer control panel, press Services Home.2. Touch Fax.3. At the top of the screen, touch the right arrow two times, scroll down, and touch
Delay Send.4. Use the drop-down menu to set the feature to ON.5. Touch the Hour field, then touch the arrows to set a number.6. Touch theMinute field, then touch the arrows to set a number.7. If your printer is set to display the 12-hour clock, touch AM or PM.8. Touch OK.
Automatically Suppressing Background Variation
When scanning originals printed on thin paper, text or images printed on one side ofthe paper can be seen on the other side. Use the Auto Suppression setting to reduce thesensitivity of the printer to variations in light background colors.
To select Auto Suppression:1. At the printer control panel, press Services Home.2. Touch Fax.3. At the top of the Fax Features screen, touch the Right arrow two times.4. Scroll down to and touch Background Suppression.5. Choose either Off or Auto Suppression.6. Touch OK.
Sending Header Text
The system administrator must set up this feature before you can use it. For details,refer to the System Administrator Guide at:
• www.xerox.com/office/WC3335docs• www.xerox.com/office/WC3345docs
To include the fax header text:1. At the printer control panel, press Services Home.2. Touch Fax.3. At the top of the Fax Features screen, touch the Right arrow two times.4. Scroll down to and touch Send Header Text.5. Choose either Off or On.6. Touch OK.
Xerox® WorkCentre® 3335/3345 Multifunction Printer8-4User Guide
Faxing

To Lighten or Darken an Image1. At the printer control panel, press Services Home.2. Touch Fax.3. At the top of the Fax Features screen, touch the Right arrow two times.4. Touch Lighten/Darken.5. Using the slider control, make the adjustment.6. Touch OK.
Storing a Fax in a Local MailboxThe system administrator must create a mailbox and enable and configure Store toMailbox before you can use these features. For details, refer to the SystemAdministratorGuide at:
• www.xerox.com/office/WC3335docs• www.xerox.com/office/WC3345docs
To store a fax in a local mailbox:1. At the printer control panel, press Services Home.2. Touch Fax > Mailboxes.3. Touch Store To Mailbox > Local Mailbox.4. Enter a mailbox number and passcode, then touch OK.
Printing Local Mailbox DocumentsTo use this feature, you must have documents stored in a mailbox.
To print local mailbox documents:1. At the printer control panel, press Services Home.2. Touch Fax > Mailboxes.3. Touch Print From Mailbox.4. Touch Local Mailbox.5. Enter a mailbox number and pass code, and touch Print.
Sending a Fax to a Remote Mailbox1. At the printer control panel, press Services Home.2. Touch Fax > Mailboxes.3. Touch Store To Mailbox > Remote Mailbox.4. Enter a remote fax number.5. Enter a remote mailbox number and passcode, then touch OK.
8-5Xerox® WorkCentre® 3335/3345 Multifunction PrinterUser Guide
Faxing

Storing a Fax for Local or Remote PollingTurn on Secure or Non-Secure Local Polling tomake fax documents stored on one printeravailable for remote polling by other printers.When Secure Local Polling is on, you createa list of fax numbers that are allowed to access the stored faxes on the printer.
To store a fax:1. At the printer control panel, press Services Home.2. Touch Fax > Polling.3. Touch Store Locally for Remote Polling.4. Touch an option.5. Touch OK.
Polling a Remote FaxYou can retrieve documents that were stored using local polling on another faxmachine.
To poll a remote fax:1. At the printer control panel, press Services Home.2. Touch Fax > Polling.3. Touch Retrieve/Print Remote Files.4. Type the fax number.5. Touch OK.
Printing or Deleting Stored Faxes1. At the printer control panel, press Services Home.2. Touch Fax > Polling.3. Touch Local File Management, then select Print All Files or Delete All Files.
Using the Address Book
Adding an Individual Entry to the Device Address Book
The Device Address Book stores a maximum of 2000 contacts. If the Add button isunavailable, the address book has reached its file limit.
NoteBefore you can use this feature, the system administrator must enable Create/EditContact from Touch Screen for All Users.
To add a recipient to the Device Address Book:1. At the printer control panel, press Services Home.
Xerox® WorkCentre® 3335/3345 Multifunction Printer8-6User Guide
Faxing
2. Touch Fax > Enter Recipient.3. To enter a name, fax number, or optional email address, touch each field, then enter
the details.4. Touch OK.
Editing an Individual Address Book Entry1. At the printer control panel, press Services Home.2. Touch Fax > Device Address Book.3. Touch the Address Book Entry.4. Touch the Contact Name.5. To edit the fields, touch Details.6. To delete the contact, touch Remove.
8-7Xerox® WorkCentre® 3335/3345 Multifunction PrinterUser Guide
Faxing

Xerox® WorkCentre® 3335/3345 Multifunction Printer8-8User Guide
Faxing

9Maintenance
Cleaning the Printer
General Precautions
CautionWhen cleaning your printer do not use organic or strong chemical solvents or aerosolcleaners. Do not pour fluids directly into any area. Use supplies and cleaning materialsonly as directed in this documentation.
WarningKeep all cleaning materials out of the reach of children.
WarningDo not use pressurized spray cleaning aids on or in the printer. Some pressurized sprayscontain explosive mixtures and are not suitable for use in electrical applications. Use ofpressurized spray cleaners increases the risk of fire and explosion.
CautionDo not remove the covers or guards that are fastened with screws. You cannot maintainor service any parts that are behind these covers and guards. Do not attempt anymaintenance procedure that is not described in the documentation supplied with yourprinter.
WarningInternal parts of the printer can be hot. Use caution when doors and covers are open.
• Do not place anything on top of the printer.• Do not open covers and doors during printing.• Do not tilt the printer while it is in use.• Do not touch the electrical contacts or gears. Doing so could damage the printer and
cause the print quality to deteriorate.• Ensure that any parts removed during cleaning are replaced before you plug in the
printer.
9-1Xerox® WorkCentre® 3335/3345 Multifunction PrinterUser Guide

Cleaning the Exterior
Clean the exterior of the printer once a month.
CautionDo not spray detergent directly on the printer. Liquid detergent could enter the printerthrough a gap and cause problems. Never use cleaning agents other than water or milddetergent.
1. Wipe the paper tray, output tray, control panel, and other parts with a damp, softcloth.
2. After cleaning, wipe with a dry, soft cloth.
NoteFor stubborn stains, apply a small amount of mild detergent to the cloth and gentlywipe the stain off.
Cleaning the Scanner
Clean the scanner about once a month, when anything is spilled on it, or when debris ordust collect on any of the surfaces. Keep the feed rollers clean to ensure the best possiblecopies and scans.
Cleaning the Document Glass1. Slightly dampen a soft, lint-free cloth with water.2. Remove any paper from the document feeder.3. Open the document cover.
4. Wipe the surface of the document glass until it is clean and dry.
Xerox® WorkCentre® 3335/3345 Multifunction Printer9-2User Guide
Maintenance

For best results, to remove marks and streaks, use a standard glass cleaner.
5. Wipe the Constant Velocity Transport (CVT) glass until it is free of debris, and it isclean and dry.
NoteThe CVT glass is the long narrow strip to the left of the document glass.
9-3Xerox® WorkCentre® 3335/3345 Multifunction PrinterUser Guide
Maintenance

6. Wipe the white underside of the document cover until it is clean and dry.
7. Close the document cover.
Xerox® WorkCentre® 3335/3345 Multifunction Printer9-4User Guide
Maintenance
Ordering Supplies
When to Order Supplies
Awarning appears on the control panel when the Toner Cartridge or the Smart Kit DrumCartridge are near their replacement time. Verify that you have replacements on hand.It is important to order these itemswhen themessages first appear to avoid interruptionsto your printing. An errormessage appears on the control panel when the Toner Cartridgeor the Smart Kit Drum Cartridge must be replaced.
Order supplies from your local reseller or go to:
• www.xerox.com/office/WC3335supplies• www.xerox.com/office/WC3345supplies
CautionUse of non-Xerox supplies is not recommended. The XeroxWarranty, Service Agreement,and Total Satisfaction Guarantee do not cover damage, malfunction, or degradationof performance caused by use of non-Xerox supplies, or the use of Xerox supplies notspecified for this printer. The Total Satisfaction Guarantee is available in the UnitedStates and Canada. Coverage could vary outside these areas. Please contact your Xeroxrepresentative for details.
Viewing Printer Supply Status
You can check the status and percentage of life remaining for your printer supplies atany time using CentreWare Internet Services or the control panel.
NoteTo view printer supply status using Xerox® CentreWare® Internet Services, refer theSystem Administrator's Guide at:
• www.xerox.com/office/WC3335docs• www.xerox.com/office/WC3345docs
To view printer supply status using the control panel:1. At the printer, press the Services Home button.2. Press theMachine Status button.3. Touch the Supplies tab. A listing of all supplies status appears.
Consumables
Consumables are printer supplies that get depleted during the operation of the printer.The consumable supplies for this printer is the genuine Xerox® Black Toner Cartridgeand the Xerox® Smart Kit Drum Cartridge.
9-5Xerox® WorkCentre® 3335/3345 Multifunction PrinterUser Guide
Maintenance

Note
• Each consumable includes installation instructions.• To ensure print quality, the toner cartridge and drum cartridge are designed to cease
functioning at a predetermined point.
CautionUse of non-Xerox supplies is not recommended. Use of toner with other than genuineXerox® Toner can affect print quality and printer reliability. Xerox® Toner is the onlytoner designed andmanufactured under strict quality controls by Xerox for use with thisspecific printer.
Routine Maintenance Items
Routinemaintenance items are printer parts that have a limited life and require periodicreplacement. Replacements can be parts or kits. Routinemaintenance items are typicallycustomer replaceable.
NoteEach routine maintenance item includes installation instructions.
Routine maintenance items for this printer include the following:
• Standard Capacity Toner Cartridge• High Capacity Toner Cartridge• Extra High-Capacity Toner Cartridge• Drum Cartridge
NoteNot all options listed are supported on all printers. Some options apply only to specificprinter models or configurations.
Toner CartridgesGeneral Precautions for the Toner Cartridge
Warning
• When replacing a toner cartridge, be careful not to spill the toner. If any toner spills,avoid contact with clothes, skin, eyes, and mouth. Do not inhale the toner dust.
• Keep toner cartridges out of the reach of children. If a child accidentally swallowstoner, have the child spit out the toner, and rinse the mouth with water. Consult aphysician immediately.
• Use a damp cloth to wipe off spilled toner. Never use a vacuum cleaner to removespills. Electric sparks inside the vacuum cleaner can cause a fire or explosion. If youspill a large volume of toner, contact your local Xerox representative.
• Never throw a toner cartridge into an open flame. Remaining toner in the cartridgecan catch fire and cause burn injuries or an explosion.
Xerox® WorkCentre® 3335/3345 Multifunction Printer9-6User Guide
Maintenance

Replacing a Toner Cartridge
When a toner cartridge approaches the end of its usable life span, the control paneldisplays a toner-low message. When a toner cartridge is empty, the printer stops anddisplays a message on the control panel.
NoteEach toner cartridge includes installation instructions.
Cause and SolutionPrinter Status Message
The toner cartridge is low. Order a new tonercartridge.
Low Toner Status: Ensure that a new TonerCartridge is available.
The toner cartridge is empty. Open the frontcover, then replace the toner cartridge.
Replace Toner Cartridge
Drum CartridgesGeneral Precautions for the Drum Cartridge
CautionDonot expose the drum cartridge to direct sunlight or strong indoor fluorescent lighting.Do not touch or scratch the surface of the drum.
CautionDo not leave the covers and doors open for any length of time, especially in well-litplaces. Light exposure can damage the drum cartridge.
WarningNever throw a drum cartridge into an open flame. The cartridge can catch fire and causeburn injuries or an explosion.
Replacing a Drum Cartridge
When a drum cartridge approaches the end of its usable life span, the control paneldisplays a drum-cartridge low message. When a drum cartridge is empty, the printerstops and displays a message on the control panel.
NoteEach drum cartridge includes installation instructions.
Cause and SolutionPrinter Status Message
The drum cartridge is low. Order a new drumcartridge.
Image Unit Low Status. Ensure that a newDrum Cartridge is available.
The drum cartridgemust be replaced. Open thefront cover, then replace the drum cartridge.
No message but the printer stops printing.
9-7Xerox® WorkCentre® 3335/3345 Multifunction PrinterUser Guide
Maintenance

Recycling Supplies
For more information on the Xerox® supplies recycling program, go to:
• WorkCentre® 3335: www.xerox.com/gwa• WorkCentre® 3345: www.xerox.com/gwa
Moving the Printer
Warning
• To prevent electric shock, never touch the power plug with wet hands.• When removing the power cord, ensure that you pull the plug and not the cord. Pulling
the cord can damage it, which can lead to fire or electric shock.
CautionWhen moving the printer, do not tilt it more than 10 degrees to the front, back, left, orright. Tilting the printer more than 10 degrees can cause toner spillage.
WarningIf the optional 550-sheet feeder is installed, uninstall it before you move the printer. Ifthe optional 550-sheet feeder is not fixed to the printer securely, it can fall to the groundand cause injury
Follow these instructions when moving the printer:1. Turn off the printer and disconnect the power cord and other cables from the back
of the printer. For details, refer to Turning the Printer On and Off.2. Remove any paper or other media from the output tray.3. When moving the printer from one location to another, use caution to ensure that
the printer does not topple.4. Lift and carry the printer as shown in the illustration.
Xerox® WorkCentre® 3335/3345 Multifunction Printer9-8User Guide
Maintenance

• Repack the printer and its options using the original packing material and boxesor a Xerox Repackaging Kit. For a repacking kit and instructions, go to:
- www.xerox.com/office/WC3335support- www.xerox.com/office/WC3345support
• When moving the printer over a long distance, remove the toner cartridges anddrum cartridges to prevent toner from spilling.
CautionFailure to repackage the printer properly for shipment can result in damage notcovered by the Xerox® Warranty, Service Agreement, or Total Satisfaction Guarantee.The Xerox® Warranty, Service Agreement, or Total Satisfaction Guarantee do notcover damage to the printer caused by improper moving.
5. After moving the printer:a) Reinstall any parts you removed.b) Reconnect the printer to the cables and power cord.c) Plug in and switch on the printer.
9-9Xerox® WorkCentre® 3335/3345 Multifunction PrinterUser Guide
Maintenance

Billing and Usage InformationBilling and printer usage information appears on the Billing Meters information screen.The impression counts shown are used for billing.
To view Billing and Usage information:1. At the printer control panel, press theMachine Status button.2. To view basic impression counts, touch the Billing Information tab.
A page is one side of a sheet of paper that can be printed on one or two sides. A sheetprinted on two sides counts as two impressions.Themachine serial number, number of black impressions, number of total impressions,and the Usage Counters tab appear.
3. To view and update all usage counters, touch the Usage Counters tab.4. Use the drop-down menu to select and view any of the following:
• Impressions• Sheets• Images Sent• Fax Impressions• All Usage
5. If necessary, touch the Update Counters tab to bring all counter data up to currentusage.
Xerox® WorkCentre® 3335/3345 Multifunction Printer9-10User Guide
Maintenance

10Troubleshooting
General TroubleshootingThis section contains procedures to help you locate and resolve problems. Resolve someproblems by simply restarting the printer.
Restarting the Printer
To restart the printer:1. Press Power Saver.2. Touch Power Down.3. To restart the printer, switch on the power switch.
NoteIf restarting the printer does not resolve the problem, refer to Printer Fails to PowerOn and Printer Resets or Turns Off Frequently.
10-1Xerox® WorkCentre® 3335/3345 Multifunction PrinterUser Guide

Printer Fails to Power On
SolutionsProbable Causes
Turn on the power switch. For details, refer to Turningthe Printer On and Off.
The power switch is not turned on.
Turn off the printer power switch, and plug the powercord securely into the outlet. For details, refer to Turn-ing the Printer On and Off.
The power cord is not correctly pluggedinto the outlet.
• Plug another electrical appliance into the outletand see if it operates properly.
• Try a different outlet.
Something is wrong with the outletconnected to the printer.
Use a power source within the specifications for theprinter. For details, refer to Turning the Printer On andOff.
The printer is connected to an outletwith a voltage or frequency that doesnot match the printer specifications.
CautionPlug the three-wire cord with grounding prong directly into a grounded AC outlet.
Printer Resets or Turns Off Frequently
SolutionsProbable Causes
Turn off the printer, confirm that the powercord is plugged in correctly to the printer andthe outlet, then switch on the printer.
The power cord is not plugged into the outletcorrectly.
Turn off the printer, then turn it on again. Fromthe printer control panel, access the Informa-tion Pages menu, then print the Error Historyreport. If the error persists, contact your Xeroxrepresentative.
A system error occurred.
Turn off the printer, then connect the powercord to a suitable outlet.
The printer is connected to an uninterruptiblepower supply.
Plug the printer directly into the outlet or intoa power strip that is not sharedwith other high-power devices.
The printer is connected to a power strip sharedwith other high-power devices.
Xerox® WorkCentre® 3335/3345 Multifunction Printer10-2User Guide
Troubleshooting

Document Prints fromWrong Tray
SolutionsProbable Causes
1. Check the tray selected in the print driver.2. Go to the page setup or printer settings of
the application from which you are print-ing.
3. Set the paper source to match the trayselected in the print driver or set the papersource to Automatically Select.
Application and print driver have conflictingtray selections.
Automatic 2-Sided Printing Problems
SolutionsProbable Causes
• Ensure that you are using a supported papersize and weight for 2-sided printing. Envel-opes and labels cannot be used for 2-sidedprinting.
• For details, refer to Supported StandardTypes and Weights for Automatic 2-SidedPrinting and Supported Standard PaperSizes for Automatic 2-Sided Printing.
Unsupported or incorrect paper.
In the print driver Properties, select 2-SidedPrint on the Paper/Output tab.
Incorrect setting.
Paper Tray Fails to Close
SolutionProbable Cause
Some debris or an object is blocking the tray.The paper tray does not close fully.
Printing Takes Too Long
SolutionsProbable Causes
It takes more time to print on certain types ofspecial paper. Ensure that the paper type is setproperly in the driver and at the printer controlpanel. For details, refer to Print Speed.
The printer is set to a slower printingmode. Forexample, the printer could be set to print onHeavyweight paper.
It takes time for printing to start when theprinter is exiting Power Saver mode.
The printer is in Power Saver mode.
10-3Xerox® WorkCentre® 3335/3345 Multifunction PrinterUser Guide
Troubleshooting

SolutionsProbable Causes
Determine if a print spooler or a computersharing the printer is buffering all print jobs andthen spooling them to the printer. Spooling canslow print speeds. To test the speed of theprinter, print some information pages such asthe Office Demo Page. If the page prints at therated speed of the printer, you could have anetwork or printer installation issue. For help,contact the system administrator.
The way the printer was installed on the net-work could be an issue.
Wait. No action is needed.The job is complex.
Change the print-quality mode in the printdriver to Standard.
The print-quality mode in the driver is set toEnhanced.
Printer Fails to Print
SolutionsProbable Causes
• To clear the error, turn off the printer, thenturn it on again.
• If the error persists, contact your Xerox rep-resentative.
The printer has an error.
Load paper into the tray.The printer is out of paper.
Replace the empty toner cartridge.A toner cartridge is empty.
Turn off the printer, confirm that the powercord is plugged in correctly to the printer andthe outlet, then switch on the printer. For de-tails, refer to Turning the Printer On and Off. Ifthe error persists, contact your Xerox represent-ative.
The power cord is not correctly plugged intothe outlet.
Xerox® WorkCentre® 3335/3345 Multifunction Printer10-4User Guide
Troubleshooting
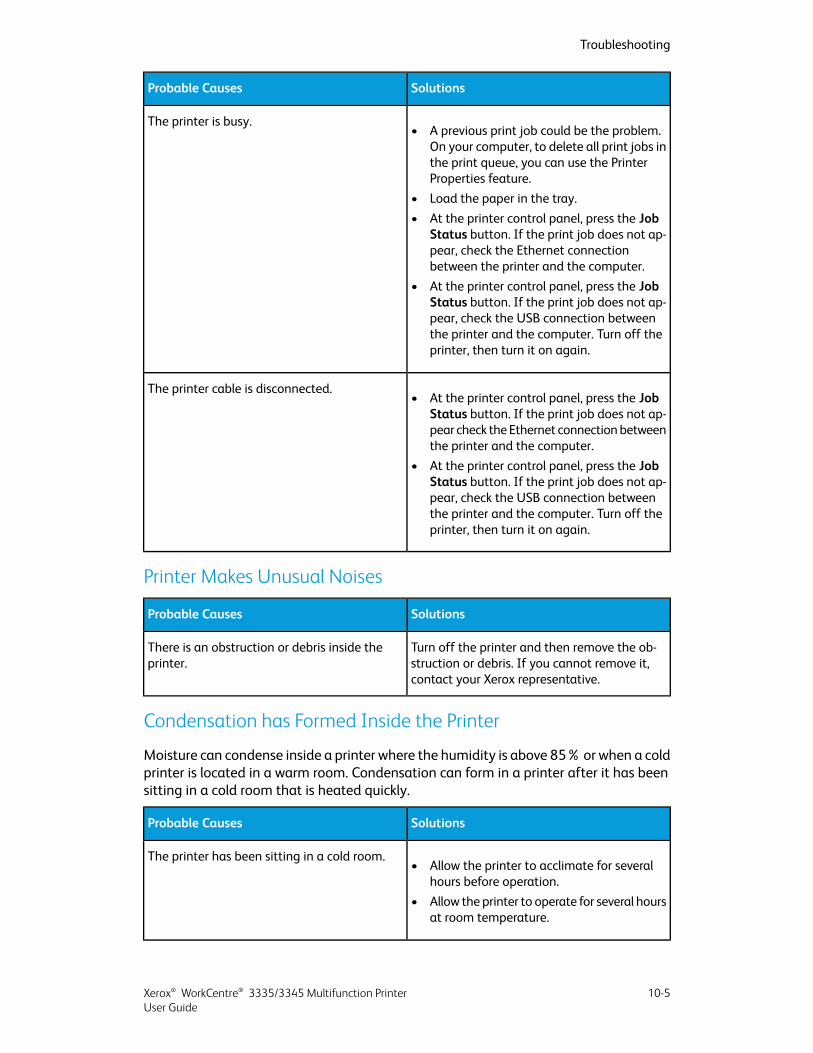
SolutionsProbable Causes
• A previous print job could be the problem.On your computer, to delete all print jobs inthe print queue, you can use the PrinterProperties feature.
• Load the paper in the tray.• At the printer control panel, press the Job
Status button. If the print job does not ap-pear, check the Ethernet connectionbetween the printer and the computer.
• At the printer control panel, press the JobStatus button. If the print job does not ap-pear, check the USB connection betweenthe printer and the computer. Turn off theprinter, then turn it on again.
The printer is busy.
• At the printer control panel, press the JobStatus button. If the print job does not ap-pear check the Ethernet connectionbetweenthe printer and the computer.
• At the printer control panel, press the JobStatus button. If the print job does not ap-pear, check the USB connection betweenthe printer and the computer. Turn off theprinter, then turn it on again.
The printer cable is disconnected.
Printer Makes Unusual Noises
SolutionsProbable Causes
Turn off the printer and then remove the ob-struction or debris. If you cannot remove it,contact your Xerox representative.
There is an obstruction or debris inside theprinter.
Condensation has Formed Inside the Printer
Moisture can condense inside a printer where the humidity is above 85%or when a coldprinter is located in a warm room. Condensation can form in a printer after it has beensitting in a cold room that is heated quickly.
SolutionsProbable Causes
• Allow the printer to acclimate for severalhours before operation.
• Allow the printer to operate for several hoursat room temperature.
The printer has been sitting in a cold room.
10-5Xerox® WorkCentre® 3335/3345 Multifunction PrinterUser Guide
Troubleshooting

SolutionsProbable Causes
• Reduce the humidity in the room.• Move the printer to a location where the
temperature and relative humidity arewithin the operating specifications.
The relative humidity of the room is too high.
Paper Jams
Minimizing Paper Jams
The printer is designed to function with minimal paper jams using Xerox supportedpaper. Other paper types can cause jams. If supported paper is jamming frequently inone area, clean that area of the paper path.
The following can cause paper jams:
• Selecting the incorrect paper type in the print driver.• Using damaged paper.• Using unsupported paper.• Loading paper incorrectly.• Overfilling the tray.• Adjusting the paper guides improperly.
Most jams can be prevented by following a simple set of rules:
• Use only supported paper. For details, refer to Supported Paper.• Follow proper paper handling and loading techniques.• Always use clean, undamaged paper.• Avoid paper that is curled, torn, moist, creased, or folded.• To separate the sheets before loading into the tray, fan the paper.• Observe the paper tray fill line; never overfill the tray.• After inserting paper in any tray, adjust the paper guides in the trays. A paper guide
that is not properly adjusted can cause poor print quality, misfeeds, skewed prints,and printer damage.
• After loading the trays, select the correct paper type and size on the control panel.• When printing, in the print driver, select the correct type and size for the print job.• Store paper in a dry location.• Use only Xerox paper and transparencies designed for the printer.
Avoid the following:
• Polyester-coated paper that is specially designed for inkjet printers.• Paper that is folded, wrinkled, or excessively curled.• Loading more than one type, size, or weight of paper in a tray at the same time.
Xerox® WorkCentre® 3335/3345 Multifunction Printer10-6User Guide
Troubleshooting

• Overfilling the trays.• Allowing the output tray to overfill.
Locating Paper Jams
WarningTo avoid injury, never touch a labeled area on or near the heat roller in the fuser. If asheet of paper is wrapped around the heat roller, do not try to remove it immediately.Switch off the printer immediately and wait 30 minutes for the fuser to cool. After theprinter cools, try to remove the jammed paper. If the error persists, contact your Xeroxrepresentative.
CautionDo not attempt to clear any paper jams using tools or instruments. This can permanentlydamage the printer.
10-7Xerox® WorkCentre® 3335/3345 Multifunction PrinterUser Guide
Troubleshooting

The following illustration shows where paper jams can occur along the paper path:
5.1. Back of the PrinterBypass Tray and Inside the Front ofthe Printer 6. Duplex Area
2. Document Feeder Top Cover 7. Tray 13. Document Feeder Input Tray 8. Optional Tray 24. Document Feeder Inside Cover
Clearing Paper JamsClearing Paper Jams from the Document Feeder1. Remove any documents from the document feeder.
Xerox® WorkCentre® 3335/3345 Multifunction Printer10-8User Guide
Troubleshooting

2. Open the document feeder top cover.
3. If the paper is jammed in the exit of the document feeder, gently pull it out in thedirection shown.
10-9Xerox® WorkCentre® 3335/3345 Multifunction PrinterUser Guide
Troubleshooting

4. If the jammed paper is not caught in the entry of the document feeder, gently pullit out in the direction shown.
5. If the jammed paper cannot be seen, perform the following steps to remove it.a) Open the inner cover.
Xerox® WorkCentre® 3335/3345 Multifunction Printer10-10User Guide
Troubleshooting

b) Gently pull out the jammed paper in the direction shown.
c) Close the inner cover.
10-11Xerox® WorkCentre® 3335/3345 Multifunction PrinterUser Guide
Troubleshooting

6. Close the document feeder top cover.
7. To remove paper from the document feeder inside cover, perform the following steps:a) Lift the document feeder.
Xerox® WorkCentre® 3335/3345 Multifunction Printer10-12User Guide
Troubleshooting

b) Gently pull out any jammed paper.
c) Close the document feeder.
8. Remove any jammed paper from the document feeder output tray.
10-13Xerox® WorkCentre® 3335/3345 Multifunction PrinterUser Guide
Troubleshooting

a) Raise the document feeder input tray.
b) Gently pull out the jammed paper in the direction shown.
Xerox® WorkCentre® 3335/3345 Multifunction Printer10-14User Guide
Troubleshooting
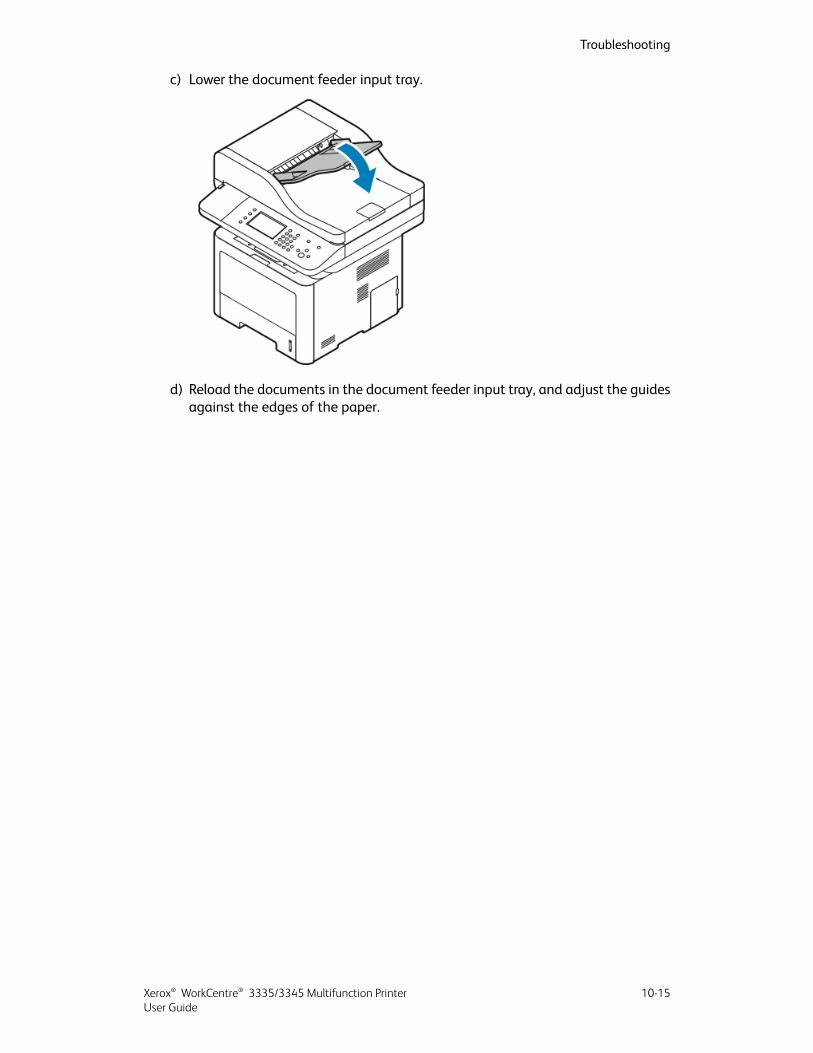
c) Lower the document feeder input tray.
d) Reload the documents in the document feeder input tray, and adjust the guidesagainst the edges of the paper.
10-15Xerox® WorkCentre® 3335/3345 Multifunction PrinterUser Guide
Troubleshooting

Clearing Paper Jams at the Bypass Tray1. Remove any paper from the bypass tray.2. Where the tray connects to the printer, clear any paper that is jammed.
3. If the paper is torn, check inside the printer for pieces of paper, then gently removethem. If you cannot remove the paper fragments easily, contact your Xeroxrepresentative.
4. When you reload the bypass tray, fan the paper and ensure that all four corners alignneatly.
5. If the control panel prompts you, verify the paper size and type on the screen.6. Touch Confirm.
Xerox® WorkCentre® 3335/3345 Multifunction Printer10-16User Guide
Troubleshooting

Clearing Paper Jams from Tray 1
To resolve the error that appears on the control panel, clear all paper from the paperpath.1. Pull out tray 1 until it stops.
2. To remove any jammed paper, gently pull it straight out as shown.
If the paper does not move when you pull it, or if you do not see the paper in thisarea, refer to Clearing Paper Jams from the Inside the Printer.
10-17Xerox® WorkCentre® 3335/3345 Multifunction PrinterUser Guide
Troubleshooting

3. Close the tray.
4. If the control panel prompts you, on the Paper Settings screen, verify the paper size,type, and color.
5. Touch Confirm.
Clearing Paper Jams from Tray 2
To resolve the error that appears on the control panel, clear all paper from the paperpath.1. Pull out tray 2 until it stops.
Xerox® WorkCentre® 3335/3345 Multifunction Printer10-18User Guide
Troubleshooting

2. To remove any jammed paper, gently pull it straight out as shown.
3. If the paper does not move when you pull it, or if you do not see the paper in thisarea, perform the following:a) Pull tray 1 out.
10-19Xerox® WorkCentre® 3335/3345 Multifunction PrinterUser Guide
Troubleshooting

b) To remove any jammed paper, gently pull it straight up and out as shown.
If the paper does not move when you pull, or if you do not see the paper in thisarea, refer to Clearing Paper Jams from the Inside the Printer.
c) Push in tray 1.
Xerox® WorkCentre® 3335/3345 Multifunction Printer10-20User Guide
Troubleshooting

4. Push in tray 2.
5. If the control panel prompts you, in the Paper Settings screen, verify the paper size,type, and color.
6. Touch Confirm.
Clearing Paper Jams from the Output Tray1. To clear any jammed paper from the output tray area, gently pull it straight out as
shown.
2. If the paper tears or does not move when pulled, refer to Clearing Paper Jams fromthe Back of the Printer.
3. If necessary, to resume printing, follow any remaining instructions on the controlpanel.
10-21Xerox® WorkCentre® 3335/3345 Multifunction PrinterUser Guide
Troubleshooting

Clearing Paper Jams from the Inside the Printer1. Press the release lever, then open the front cover of the printer.
2. To remove any jammed paper from inside the printer, gently pull it straight out asshown.
Xerox® WorkCentre® 3335/3345 Multifunction Printer10-22User Guide
Troubleshooting

3. Close the front cover.
Clearing Paper Jams from the Back of the Printer1. Remove any jammed paper from the exit area at the back of the printer.
If the paper does not move when you pull it, continue to the next step.
10-23Xerox® WorkCentre® 3335/3345 Multifunction PrinterUser Guide
Troubleshooting

2. Press the release lever, then open the back cover of the printer.
3. Gently remove any jammed paper from the back of the printer.
4. Gently remove any jammed paper from the fuser area.
WarningThe area around the fuser can be hot. Use caution to avoid injury.
If the paper does not move when you pull it, continue to the next step.
Xerox® WorkCentre® 3335/3345 Multifunction Printer10-24User Guide
Troubleshooting

5. If paper is jammed in the fuser, perform the following steps:a) Lower both green levers, then open the fuser.
b) Remove the jammed paper.c) To open the paper guide, press down both tabs to release the latches, then lower
the paper guide.
d) Remove any jammed paper from the paper guide area.e) Close the paper guide.f) Close the fuser.
10-25Xerox® WorkCentre® 3335/3345 Multifunction PrinterUser Guide
Troubleshooting
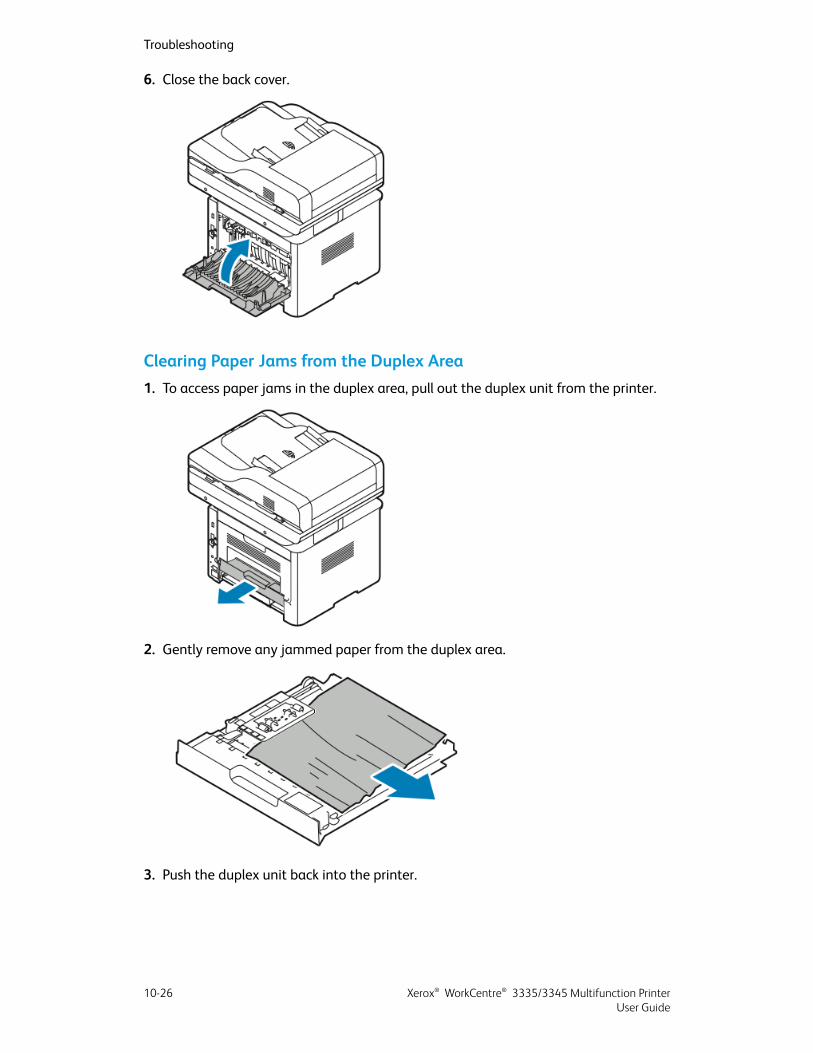
6. Close the back cover.
Clearing Paper Jams from the Duplex Area1. To access paper jams in the duplex area, pull out the duplex unit from the printer.
2. Gently remove any jammed paper from the duplex area.
3. Push the duplex unit back into the printer.
Xerox® WorkCentre® 3335/3345 Multifunction Printer10-26User Guide
Troubleshooting

NoteEnsure that the duplex unit is fully pushed in.
Troubleshooting Paper JamsMultiple Sheets Pulled Together
SolutionsProbable Causes
Remove some of the paper. Do not load paperpast the fill line.
The paper tray is too full.
Remove the paper, align the edges, then reloadit.
The edges of the paper are not even.
Remove the paper from the tray, then replaceit with new dry paper.
The paper is moist from humidity.
Try a new ream of paper.Do not fan transparencies before loading themin tray.
Too much static electricity is present.
Use only Xerox-approved paper. For details,refer to Supported Paper.
Using unsupported paper.
Feed paper one sheet at a time.Humidity is too high for coated paper.
Paper Misfeeds
SolutionsProbable Causes
• Remove the misfed paper and reposition itproperly in the tray.
• Adjust the paper guides in the tray tomatchthe size of the paper.
The paper is not correctly positioned in the tray.
10-27Xerox® WorkCentre® 3335/3345 Multifunction PrinterUser Guide
Troubleshooting

SolutionsProbable Causes
Remove some of the paper. Do not load paperpast the fill line.
The paper tray is too full.
Adjust the paper guides in the tray to matchthe size of the paper.
The paper guides are not correctly adjusted tothe paper size.
Remove the paper, smooth it out, and reloadit. If it still misfeeds, do not use that paper.
The tray contains warped or wrinkled paper.
Remove the moist paper and replace it withnew, dry paper.
The paper is moist from humidity.
Use only Xerox approved paper. For details,refer to Supported Paper.
Using paper of the wrong size, thickness, ortype.
Label and Envelope Misfeeds
SolutionsProbable Causes
Do not use any sheet where labels are missing,curled, or pulled away from the backing sheet.
Labels are missing, curled, or are pulling awayfrom the backing sheet.
• Load label sheets according to the instruc-tions from the manufacturer.
• Load labels print side up in the bypass tray.• Do not load labels in the high-capacity
feeder.
The label sheet is facing the wrong way in thetray.
• Load envelopes in the bypass tray with theprint side up, flaps closed, and the shortedge leading into the printer.
• Ensure that the width guides rest looselyagainst the edge of the envelopes withoutrestricting their movement.
Envelopes are loaded incorrectly in the bypasstray.
The heat and pressure of the laser printingprocess can cause wrinkling. Use supportedenvelopes. For details refer to Guidelines forPrinting Envelopes.
Envelopes are wrinkling.
Paper Jam Message Stays On
SolutionsProbable Causes
Recheck the paper path. Ensure that you haveremoved all of the jammed paper.
Some paper remains jammed in the printer.
Xerox® WorkCentre® 3335/3345 Multifunction Printer10-28User Guide
Troubleshooting

SolutionsProbable Causes
Check the doors on the printer. Close any doorthat is open.
One of the printer doors is open.
NoteCheck for any torn pieces of paper in the paper path, then remove the paper.
Jams During Automatic 2-Sided Printing
SolutionsProbable Causes
• Use only Xerox-approved paper. For details,refer to Supported Paper Types andWeightsfor Automatic 2-Sided Printing.
• For automatic 2-sided printing, do not usetransparencies, envelopes, labels, reusedpaper, damaged paper, or paper heavierthan 105 g/m².
Using paper of the wrong size, thickness, ortype.
Load paper into the correct tray. For details,refer to Supported Paper.
Paper is loaded in the wrong tray.
Load the tray with only one type and size ofpaper.
Tray is loaded with mixed paper.
Print-Quality ProblemsYour printer is designed to produce consistently high-quality prints. If you observeprint-quality problems, use the information in this section to troubleshoot the problem.For more information, go to:
• www.xerox.com/office/WC3335support• www.xerox.com/office/WC3345support
CautionThe Xerox Warranty, Service Agreement, or Xerox Total Satisfaction Guarantee doesnot cover damage caused by using unsupported paper or specialty media. The XeroxTotal Satisfaction Guarantee is available in the United States and Canada. Coveragecan vary outside of these areas. For details, contact your local Xerox representative.
NoteTo ensure consistent print quality, the toner cartridges and imaging units for manymodels of equipment are designed to cease functioning at a predetermined point.
10-29Xerox® WorkCentre® 3335/3345 Multifunction PrinterUser Guide
Troubleshooting

Controlling Print Quality
Various factors can affect the quality of the output of your printer. For consistent andoptimum print quality, use paper designed for your printer and set the paper typecorrectly. To maintain optimum print quality, follow the guidelines in this section.
Temperature and humidity affect the quality of the printed output. The guaranteedrange for optimal print quality is 10–30ºC (50–90ºF) and 20–80% relative humidity.
Solving Print-Quality Problems
When the print quality is poor, select the closest symptom from the following table andsee the corresponding solution to correct the problem. You can also print a Demo Pageto determine the print-quality problem more precisely.
If the print quality does not improve after carrying out the appropriate action, contactyour Xerox representative.
NoteTo maintain print quality, when toner becomes low, a warning message appears on thecontrol panel.When the toner cartridge is empty, the printer stops printing, and awarningmessage appears that prompts you to replace the toner cartridge. The printer stopsprinting until you install a new toner cartridge.
Xerox® WorkCentre® 3335/3345 Multifunction Printer10-30User Guide
Troubleshooting

SolutionsSymptom
• To check the toner level, check the controlpanel, use the print driver, or Xerox®Centre-Ware® Internet® Services. If the toner cart-ridge is almost empty, replace it.
• Verify that the toner cartridge is approvedfor use in this printer, and replace it asneeded. For best results, use a genuine Xer-ox® toner cartridge.
• Ensure that the print qualitymode is not setto Toner Saver. Toner Saver is useful fordraft-quality output.
• Replace the paperwith a recommended sizeand type, then confirm that your printer andprint driver settings are correct.
• Verify that the paper is dry and that suppor-ted paper is used. If not, change the paper.
• Change the Paper Type settings in the printdriver.
• In the print driver, open the Printing Prefer-encesmenu, select the Paper/Output tab,then change the Paper Type setting.
• If printer is located in a high-altitude envir-onment, adjust the altitude setting of theprinter. For details, refer to the System Ad-ministrator Guide at:
- www.xerox.com/office/WC3335docs- www.xerox.com/office/WC3345docs
The output is too light.
• Change the Paper Type settings in the printdriver. For example, change Plain to Light-weight Cardstock.
• In the print driver, open the Printing Prefer-encesmenu, select the Paper/Output tab,then change the Paper Type setting.
• Verify that the paper is the correct size, type,and weight. If not, change the paper set-tings.
• Verify that the printer is plugged into anoutlet that is providing the correct voltageand power. Review the electrical specifica-tion of the printer with an electrician if ne-cessary.
• For details, refer to Electrical Specifications.
Toner smears or print comes off.The output has stains on the back side.
10-31Xerox® WorkCentre® 3335/3345 Multifunction PrinterUser Guide
Troubleshooting

SolutionsSymptom
• Ensure that the toner cartridge is installedcorrectly.
• Verify that the toner cartridge is approvedfor use in this printer, and replace it asneeded. For best results, use a genuine Xer-ox® toner cartridge.
• Use the Heavyweight or Cardstock papertype setting, or use a paper type with asmoother surface.
• Ensure that the humidity in the room iswithin specifications. For details, refer toRelative Humidity.
• For details, refer to Selecting a Location forthe Printer.
Random spots on the output, or the image isblurry.
Turn off the printer, then turn it on again.If the error persists, contact your Xerox repres-entative.
The output is blank.
Replace the Smart Kit Drum Cartridge.Contact your Xerox representative.
Streaks appear in the output.
• Verify that the paper is the correct size, type,and weight. If not, change the paper set-tings.
• Ensure that the humidity is within specifica-tions. For details, refer to Selecting a Loca-tion for the Printer.
The output has a mottled appearance.
Xerox® WorkCentre® 3335/3345 Multifunction Printer10-32User Guide
Troubleshooting

SolutionsSymptom
• Verify that the paper is the correct size, type,and weight. If not, change the paper set-tings.
• Change the Paper Type settings in the printdriver.
• In the print driver, open the Printing Prefer-encesmenu, select the Paper/Output tab,then change the Paper Type setting.
• Replace the Drum Cartridge.
Ghosting appears in the printed output.
• To check the toner level, check the controlpanel, use the print driver, or Xerox®Centre-Ware® Internet® Services. If the toner cart-ridge is almost empty, replace it.
• Verify that the toner cartridge is approvedfor use in this printer, and replace it asneeded. For best results, use a genuine Xer-ox® toner cartridge.
• Replace the Drum Cartridge.
Auger marks appear on the printed output.
• Verify that the paper is the correct size, type,and weight for the printer and that it isloaded properly. If not, change the paper.
• Try a new ream of paper.• Change the Paper Type settings in the print
driver.• In the print driver, open the Printing Prefer-
encesmenu, select the Paper/Output tab,then change the Paper Type setting.
The output print is wrinkled or stained.
• Verify that envelopes are loaded properlyin the bypass tray.
• Follow the guidelines for printing on envel-opes. For details, refer to Guidelines forPrinting Envelopes.
Envelopes arewrinkled or creasedwhenprinted.
• Verify that the paper is loaded properly.• Verify that the margins are set correctly in
the application that you are using.
The top margin is incorrect.
10-33Xerox® WorkCentre® 3335/3345 Multifunction PrinterUser Guide
Troubleshooting

SolutionsSymptom
1. Print a solid image over the entire surfaceof one sheet of paper.
2. Load the printed sheet into the tray withthe printed side face down.
3. Print five blank pages to remove debrisfrom the fuser rollers.
The printed surface of the paper is bumpy.
Xerox® WorkCentre® 3335/3345 Multifunction Printer10-34User Guide
Troubleshooting

Copy and Scan ProblemsIf the copy or scan quality is poor, refer to the following table.
SolutionsSymptoms
There is debris on the document glass. Whenscanning, the paper from the document feederpasses over the debris creating lines or streaks.Clean all glass surfaces with a lint-free cloth.
Lines or streaks are present in copies onlymadefrom the document feeder.
There is debris on the document glass. Whenscanning, the debris creates a spot on the im-age. Clean all glass surfaces with a lint-freecloth.
Spots are present in copies taken from thedocument glass.
Turn on Background Suppression.The reverse side of the original appears on thecopy or scan.
To lighten or darken the image, use the Light-en/Darken tab in either the Scan To or Copyfunction.
The image is too light or too dark.
If the problem persists, for online support information, go to:
• www.xerox.com/office/WC3335support• www.xerox.com/office/WC3345support
10-35Xerox® WorkCentre® 3335/3345 Multifunction PrinterUser Guide
Troubleshooting

Fax ProblemsNoteIf you cannot send and receive faxes, ensure that you are connected to an approvedanalog or digital telephone line.
If you cannot send or receive faxes correctly, refer to the following tables.
Problems Sending Faxes
SolutionsCausesSymptoms
Use the document glass tosend the fax.
The document is too thick, toothin, or too small.
The document is not scannedusing the document feeder.
Adjust the document feederguides to fit the width of thedocument.
The document feeder guidesare not adjusted to the widthof the document.
The document is scannedat anangle.
Position the document cor-rectly.
The document is incorrectlypositioned.
The fax that the recipient re-ceived is blurry.
Clean the document glass.The document glass is dirty.
Adjust the resolution. Adjustthe contrast.
The text in the document is toolight.
Verify that the telephone lineis working, then resend the fax.
There is a problem with thetelephone connection.
Make a copy to verify that yourprinter is operating correctly.If the copy was printed cor-rectly, have the recipient verifythe condition of the receivingfax machine.
There is a problemwith the faxmachine of the caller.
• Document feeder: Place theoriginal document face up.
• Document glass: Place theoriginal document facedown.
The document was loaded in-correctly.
The fax received by the recipi-ent is blank.
Xerox® WorkCentre® 3335/3345 Multifunction Printer10-36User Guide
Troubleshooting

SolutionsCausesSymptoms
Verify the fax number.The fax number is wrong.Fax was not transmitted.
Verify the telephone line con-nection. If it is disconnected,connect it.
The telephone line is incor-rectly connected.
Contact the recipient.There is a problemwith the faxmachine of the recipient.
Verify that the fax is installedand enabled.
The fax is not installed or is notenabled.
Ensure that Server Fax is dis-abled.
Server Fax is enabled.
If the problem persists, for online support information, go to:
• www.xerox.com/office/WC3335support• www.xerox.com/office/WC3345support
Problems Receiving Faxes
SolutionsCausesSymptoms
Verify that the printer canmake clean copies. If it can,re-quest the caller resend the fax.
There is a problem with thetelephone connection or withthe fax machine of the caller.
The received fax is blank.
Contact the sender.The sender loaded the pagesincorrectly.
If the job contains severalgraphics, the printer may nothave enough memory. Theprinter does not answer ifmemory is low. Delete storeddocuments and jobs then waitfor the existing job to com-plete. This increases availablememory.
Not enough memory.The printer answers the call,but does not accept incomingdata.
Confirm the original size of thedocuments. Documents can bereduced based on the availablepaper supply in the printer.
The paper supply in the printerdoes not match the documentsize sent.
The received fax size is re-duced.
10-37Xerox® WorkCentre® 3335/3345 Multifunction PrinterUser Guide
Troubleshooting

SolutionsCausesSymptoms
Set the printer to automaticreception.
The printer is set to receivefaxes manually.
Faxes cannot be receivedautomatically.
Load paper if it is empty, andthen print the faxes stored inthe memory.
The memory is full.
Verify the telephone line con-nection. If it is disconnected,connect it.
The telephone line is incor-rectly connected.
Make a copy to verify that yourprinter is operating correctly.If the copy prints correctly, re-quest the recipient to verifythat the faxmachine is operat-ing correctly.
There is a problemwith the faxmachine of the sender.
If the problem persists, for online support information, go to:
• www.xerox.com/office/WC3335support• www.xerox.com/office/WC3345support
Xerox® WorkCentre® 3335/3345 Multifunction Printer10-38User Guide
Troubleshooting

Getting HelpXerox provides several automatic diagnostic utilities to help you maintain printerproductivity and print quality.
Control Panel Messages
The printer control panel provides information and troubleshooting help. When a faultor warning condition occurs, the control panel displays a message informing you of theproblem. In many cases, the control panel also displays an animated graphic showingthe location of the problem, such as the location of a paper jam. For many status andwarning messages, the control panel Help provides additional information.
Control Panel Help
To view more information about error or status messages on the control panel, touchthe Help button.
The control panel menu items also have associated help text that describes the menuitem.
Viewing Warning Messages on the Control Panel
When a warning condition occurs, a message appears on the control panel to informyou of the problem.Warningmessages inform you about printer conditions, such as lowsupplies or open doors, that require your attention. If more than one warning conditionoccurs, only one appears on the control panel.
Viewing Error and Alert Messages on the Control Panel
When an error condition occurs, a message appears on the control panel to inform youof the problem. Error messages warn you about printer conditions that prevent theprinter from printing or degrade printing performance. If more than one error occurs,only one is displayed on the control panel.
10-39Xerox® WorkCentre® 3335/3345 Multifunction PrinterUser Guide
Troubleshooting

To view a list of the current errors on the control panel:1. Press theMachine Status button, then touch the Active Messages tab.2. Touch the Faults and Alertsmenu, then choose an option.
• Faults: This menu shows the error messages that affect the operation of theprinter and the corresponding fault codes.
• Alerts: This menu shows alert messages regarding the current job status of theprinter and the corresponding alert codes.
Viewing Job Status on the Control Panel
To view current or saved jobs on the control panel:1. At the control panel, press the Job Status button.2. To view a list of active jobs, touch Active Jobs.3. To view a list of personal and secure jobs, touch Personal & Secure Jobs.4. To view a list of completed jobs, touch Completed Jobs.
Using the Integrated Troubleshooting Tools
Your printer has a printable set of reports. Two of them, the Demo Page and the ErrorMessage Report, can help with troubleshooting certain problems. The Demo Page printsan image to show the current ability of the printer to print. The Error Message Reportprints information on the most recent printer errors.
Xerox® WorkCentre® 3335/3345 Multifunction Printer10-40User Guide
Troubleshooting

Accessing and Printing the Information Pages
To access the full list of information pages for your printer:1. At the printer control panel, press the Help button.
A list of information pages that you can print appears.
2. To scroll through the list of available pages, touch and drag your finger up or downon the menu. Touch the desired page, then touch Print.
NoteTo print all of the information pages, at the bottom of the list, touchAll InformationPages, then touch Print.
3. To return to the Home screen, touch (X).
Setting Access Rights for the Configuration Report and InformationPages
Use the following procedures to prevent the Configuration Report from printingautomatically whenever the device powers on, or to the change access rights for theConfiguration Report and Information Pages.
Setting the Access Rights for Information Pages1. At the printer control panel, press theMachine Status button, then touch the Tools
tab.2. Touch Device Settings > Information Pages.
NoteIf this feature does not appear, log in as a system administrator. For details, refer tothe System Administration Guide at:
• WorkCentre® 3335: www.xerox.com/office/WC3335docs• WorkCentre® 3345: www.xerox.com/office/WC3345docs
3. Choose one of the following:
• To restrict users fromprinting the Information Pages, touch SystemAdministratorOnly.
• To allow all users access, touch All Users.
4. Touch OK.
Setting Access Rights for the Configuration Report1. At the printer control panel, press theMachine Status button, then touch the Tools
tab.2. Touch Device Settings > System Configuration.
10-41Xerox® WorkCentre® 3335/3345 Multifunction PrinterUser Guide
Troubleshooting

NoteIf this feature does not appear, log in as a system administrator. For details, refer tothe System Administration Guide at:
• WorkCentre® 3335: www.xerox.com/office/WC3335docs• WorkCentre® 3345: www.xerox.com/office/WC3345docs
3. Choose one of the following:
• To restrict users from printing the Configuration Report, touch SystemAdministrator Only.
• To allow all users access, touch All Users.
4. Touch OK.
Turning Off Automatic Printing of the Configuration Report1. At the printer control panel, press theMachine Status button, then touch the Tools
tab.2. Touch Device Settings > System Configuration.
NoteIf this feature does not appear, log in as a system administrator. For details, refer tothe System Administration Guide at:
• WorkCentre® 3335: www.xerox.com/office/WC3335docs• WorkCentre® 3345: www.xerox.com/office/WC3345docs
3. Select an option:
• To print the Configuration Report at power on, touch Yes.• To disable the setting, touch No.
4. Touch OK.
Xerox® WorkCentre® 3335/3345 Multifunction Printer10-42User Guide
Troubleshooting

Available Information Pages
Information pages provide important details to help you troubleshoot issues or analyzeprinter use. You can print information pages from the printer control panel.
DescriptionInformation Page
The Configuration Report provides product in-formation including, installed options, networksettings, port setup, tray information, andmore.
Configuration Report
The Customer Assistance Report provides asummary of relevant information that you canprovide to a Xerox support representative whenyou call for assistance.
Customer Assistance Report
The Demo page provides a demonstration ofthe current print quality.
Demo Page
Prints the supplies information page.Supplies Usage Report
The Email Sent Report provides a record ofemails sent, including From, To, Date & Time,Subject, and Result.
Email Sent Report
The Error Message Report provides a record oferrors, including fault and alert codes and dateand time of the error.
Error Message Report
The Fax Broadcast Report provides a record ofbroadcast faxes, including total pages scanned,remote station, start time, and result.
Fax Broadcast Report
The FaxOptions Report displays the current faxsettings.
Fax Options Report
The Fax Phone Book displays a list of namesand fax numbers.
Fax Phone Book
The Fax Protocol Report provides fax controlfield data, fax information field data, andSend/Receive information.
Fax Protocol Report
The Fax Receive Report provides a record offaxes received.
Fax Receive Report
The Fax Transmission Report provides a recordof faxes sent.
Fax Transmission Report
The Group Address Book displays contents ofthe Group Address Book, including group num-ber, group name, user name, and email address.
Group Address Book
10-43Xerox® WorkCentre® 3335/3345 Multifunction PrinterUser Guide
Troubleshooting
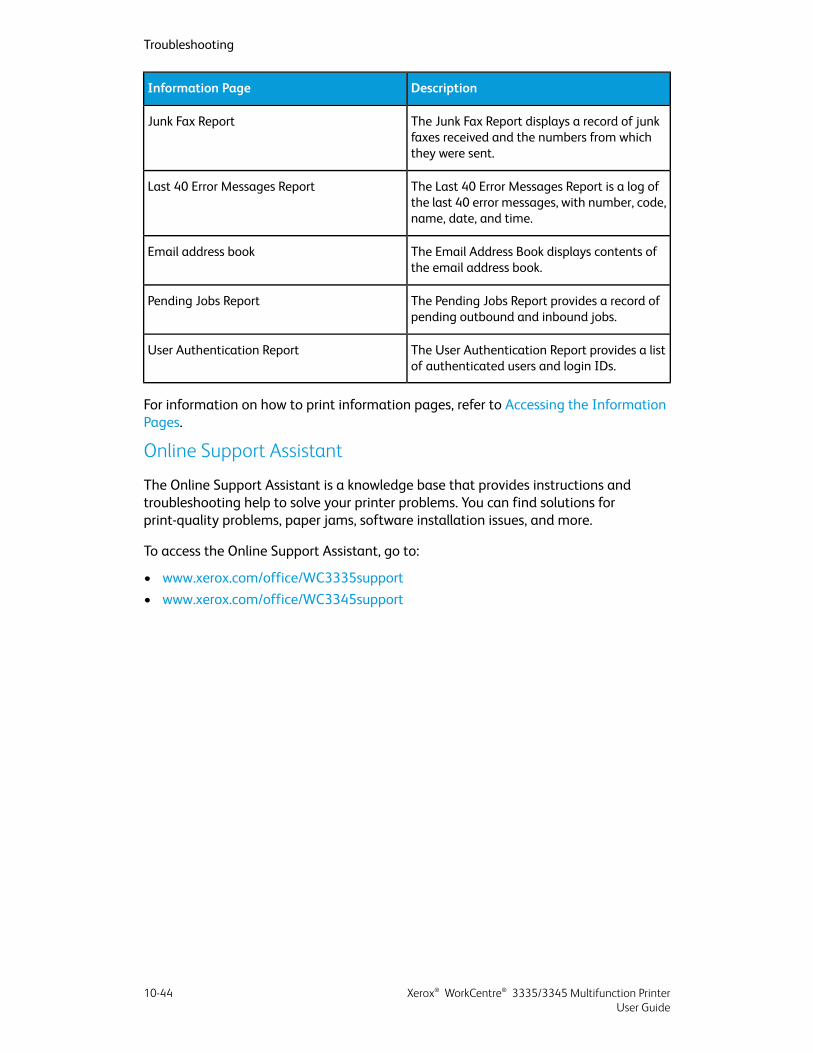
DescriptionInformation Page
The Junk Fax Report displays a record of junkfaxes received and the numbers from whichthey were sent.
Junk Fax Report
The Last 40 Error Messages Report is a log ofthe last 40 error messages, with number, code,name, date, and time.
Last 40 Error Messages Report
The Email Address Book displays contents ofthe email address book.
Email address book
The Pending Jobs Report provides a record ofpending outbound and inbound jobs.
Pending Jobs Report
The User Authentication Report provides a listof authenticated users and login IDs.
User Authentication Report
For information on how to print information pages, refer to Accessing the InformationPages.
Online Support Assistant
The Online Support Assistant is a knowledge base that provides instructions andtroubleshooting help to solve your printer problems. You can find solutions forprint-quality problems, paper jams, software installation issues, and more.
To access the Online Support Assistant, go to:
• www.xerox.com/office/WC3335support• www.xerox.com/office/WC3345support
Xerox® WorkCentre® 3335/3345 Multifunction Printer10-44User Guide
Troubleshooting

More Information
You can obtain more information about your printer from these sources:
LocationResource
Packagedwith the printer and can be downloadedat:
• www.xerox.com/office/WC3335docs• www.xerox.com/office/WC3345docs
Installation Guide
• www.xerox.com/office/WC3335docs• www.xerox.com/office/WC3345docs
Other documentation for your printer
• www.xerox.com/office/WC3335support• www.xerox.com/office/WC3345support
Technical support information for yourprinter, including online technical support,Online Support Assistant, and driver down-loads.
At the printer control panel, press Help.In Xerox® CentreWare® Internet Services, clickProperties > General Setup > Configuration >Print System Data List.
Information Pages
In Xerox® CentreWare® Internet Services, clickHelp.
Xerox® CentreWare® Internet Services docu-mentation
• www.xerox.com/office/WC3335supplies• www.xerox.com/office/WC3345supplies
Order supplies for your printer
www.xerox.com/office/businessresourcecenterA resource for tools and information, includ-ing interactive tutorials, printing templates,helpful tips, and customized features tomeetyour individual needs.
• WorkCentre® 3335: www.xerox.com/of-fice/worldcontacts
• WorkCentre® 3345: www.xerox.com/of-fice/worldcontacts
Local sales and support center
• WorkCentre® 3335: www.xerox.com/office/re-gister
• WorkCentre® 3345: www.xerox.com/office/re-gister
Printer registration
www.direct.xerox.com/Xerox® Direct online store
10-45Xerox® WorkCentre® 3335/3345 Multifunction PrinterUser Guide
Troubleshooting

Xerox® WorkCentre® 3335/3345 Multifunction Printer10-46User Guide
Troubleshooting

ASpecifications
Printer Configurations and Options
Available Configurations
This printer is available in the following configurations:
• WorkCentre® 3335: This configuration is a network printer and includes the followingfeatures and options:
- Copy- Print- Scan- Fax- Automatic Document Feeder (ADF)- 50-sheet bypass tray- Tray 1 with 250-sheet capacity- Optional tray 2 with 550-sheet capacity
• WorkCentre® 3345: This configuration is a network printer and includes the followingfeatures and options:
- Copy- Print- Scan- Fax- Reversing Automatic Document Feeder (RADF)- 50-sheet bypass tray- Tray 1 with 250-sheet capacity- Optional tray 2 with 550-sheet capacity
A-1Xerox® WorkCentre® 3335/3345 Multifunction PrinterUser Guide

Standard Features
WorkCentre® 3335:
• Letter (8.5 x 11 in.):Maximum35prints-per-minute (ppm)• A4: Maximum 33 ppm
WorkCentre® 3345:
• Letter (8.5 x 11 in.): Maximum 42 ppm• A4: Maximum 40 ppm
Print speed
WorkCentre® 3335:
• Letter (8.5 x 11 in.): Maximum 17 ppm• A4: Maximum 16 ppm
WorkCentre® 3345:
• Letter (8.5 x 11 in.): Maximum 21 ppm• A4: Maximum 20 ppm
2-Sided print speed
• Standard print-quality mode: 600 x 600 dpi• Enhanced print-quality mode: 1200 x 1200 dpi
Print resolution
1.5 GBStandard Memory (DRAM)
512 MBFlash Memory (ROM)
3-GB Internal Hard driveStorage
• Bypass tray with 50-sheet capacity• Tray 1 with 250-sheet capacity• Optional Tray 2 with 550-sheet capacity
Paper capacity
Legal (216 x356 mm, 8.5 x14 in.)Maximum print size
Standard2-Sided Printing
1-Sided copy:
• WorkCentre® 3335: 30 copies per minute• WorkCentre® 3345: 40 copies per minute
2-Sided copy:
• WorkCentre® 3335: 12 copies per minute• WorkCentre® 3345: 12 copies per minute
These specifications are for Single Document, Multiple Copy(SDMC)
Copy speed
600 x 600 dpiCopy resolution
Xerox® WorkCentre® 3335/3345 Multifunction PrinterA-2User Guide
Specifications

Legal (216 x 356 mm, 8.5 x 14 in.)Maximum copy size
• WorkCentre® 3335: Automatic Document Feeder• WorkCentre® 3345: Reversing Automatic Document
Feeder
Document feeder
50 sheetsDocument feeder capacity
• Optical: 600 x 600 dpi
• Enhanced: Up to 4800 x 4800 dpi
Scan resolution
• USB• Email• Computer
Supported scanning
• Document Glasss: 216 x 297 mm, 8.5 x 11.7 in.• Document Feeder: 216 x 356 mm, 8.5 x 14 in.
Maximum scan size
• JPEG• TIFF• PDF• XPS
Email and Scan file formats
109 mm (4.3 in.) LCD touch screen and keypad navigationControl panel
• Universal Serial Bus (USB 2.0)• USB Flash drive• Ethernet 10/100/1000 Base-T• Wireless• WiFi• Mopria• AirPrint
Connectivity
Xerox® CentreWare® Internet ServicesRemote Access
A-3Xerox® WorkCentre® 3335/3345 Multifunction PrinterUser Guide
Specifications

Physical Specifications
Weights and DimensionsWorkCentre® 3335 Weights and Dimensions
Optional Configuration(with Tray 1 and Tray 2)
Standard Configuration(with Tray 1 only)
41.5 cm (16.3 in.)41.5 cm (16.3 in.)Width
47.7 cm (18.80 in.)42.1 cm (16.6 in.)Depth
59.4 cm (23.4 in.)45.0 cm (17.7 in.)Height
21.06 kg (46.44 lb.)15.54 kg (34.26 lb.)Weight
WorkCentre® 3345 Weights and Dimensions
Optional Configuration(with Tray 1 and Tray 2)
Standard Configuration(with Tray 1 only)
46.9 cm (18.5 in.)46.9 cm (18.5 in.)Width
50.0 cm (19.7 in.)44.4 cm (17.5 in.)Depth
62.5 cm (24.5 in.)48.2 cm (19.0 in.)Height
22.9 kg (50.41 lb.)17.34 kg (38.23 lb.)Weight
Xerox® WorkCentre® 3335/3345 Multifunction PrinterA-4User Guide
Specifications

Physical Specifications for WorkCentre® 3335 StandardConfiguration
Physical Specifications for WorkCentre® 3345 StandardConfiguration
A-5Xerox® WorkCentre® 3335/3345 Multifunction PrinterUser Guide
Specifications

Clearance Requirements for Standard Configuration
Environmental Specifications
Temperature• Optimum Temperature: 16–30°C (61–86°F)• Storage Temperature: from –20 through 40°C (from –4 through 104°F)
Relative Humidity
Minimum–Maximum Humidity Range: 10–90%, less than 90% when in the packaging
• Optimum Humidity: 30–70%• Operating Humidity: 20–80% Relative Humidity
NoteUnder extreme environmental conditions, such as 10°C (50°F) and 85% relative humidity,defects can occur due to condensation.
Elevation
For optimum performance, use the printer at elevations below 2500 m (8,202 ft.).
Xerox® WorkCentre® 3335/3345 Multifunction PrinterA-6User Guide
Specifications

Electrical Specifications
Power Supply Voltage and Frequency
Power Supply FrequencyPower Supply Voltage
50 Hz60 Hz
110–127 VAC +/-10%, (99–135 VAC)
50 Hz60 Hz
220–240 VAC +/-10%, (198–264 VAC)
Power Consumption• Energy Saver Mode (Sleep): Less than 3.5W• Continuous printing: Less than 700W• Ready/Standby: Less than 50W
This printer does not consume electric power when the power switch is turned off evenif the printer is connected to an AC outlet.
A-7Xerox® WorkCentre® 3335/3345 Multifunction PrinterUser Guide
Specifications

Performance Specifications
Print Warm-up Time• Power on:• Recovery from Sleep Mode:
Print Speed• WorkCentre® 3335: up to 35 ppm for Letter and 33 ppm for A4.• WorkCentre® 3345: up to 42 ppm for Letter and 40 ppm for A4.
Several factors affect print speed:
• 2-sided printing:
- WorkCentre® 3335: up to 17 ppm for Letter (8.5 x 11 in.) and 16 ppm for A4 (210x 297 mm)
- WorkCentre® 3345: up to 21 ppm for Letter (8.5 x 11 in.) and 20 ppm for A4 (210x 297 mm)
• Print mode: Standard is the fastest print mode. Enhanced is half speed or slower.• Paper size: Letter (8.5 x 11 in.) and A4 (210 x 297 mm) sizes share the fastest print
speed.• Paper type: Plain paper prints faster than Cardstock or Heavyweight.• Paper weight: Lightweight prints faster than heavier paper, such as Cardstock and
Labels.
Xerox® WorkCentre® 3335/3345 Multifunction PrinterA-8User Guide
Specifications

BRegulatory Information
Basic RegulationsXerox has tested this printer to electromagnetic emission and immunity standards. Thesestandards are designed to mitigate interference caused or received by this printer in atypical office environment.
ENERGY STAR® Qualified ProductThe WorkCentre® 3335/3345 is ENERGY STAR® qualified under the ENERGY STARProgram Requirements for Imaging Equipment.The ENERGYSTARand ENERGYSTARmark are registeredUnited States trademarks.The ENERGY STAR Imaging Equipment Program is a team effort between theUnited States, European Union, and Japanese governments and the office equip-ment industry to promote energy-efficient copiers, printers, fax, multifunctionprinters, personal computers, andmonitors. Reducing product energy consumptionhelps combat smog, acid rain, and long-term changes to the climate by decreasingthe emissions that result from generating electricity.Xerox ENERGY STAR equipment is preset at the factory. Your printer is deliveredwith the timer, for switching to Power Saver Mode from the last copy/print out, setat 1 or 2 minutes. A more detailed description of this feature can be found in thePower Saver section of this guide.
United States FCC Regulations
This equipment has been tested and found to comply with the limits for a Class B digitaldevice, pursuant to Part 15 of the FCC Rules. These limits are designed to providereasonable protection against harmful interference when the equipment is operated ina commercial environment. This equipment generates, uses, and can radiate radiofrequency energy. If it is not installed and used in accordance with these instructions,itmay cause harmful interference to radio communications. Operation of this equipmentin a residential area is likely to cause harmful interference in which case the user will berequired to correct the interference at his/her own expense.
B-1Xerox® WorkCentre® 3335/3345 Multifunction PrinterUser Guide

If this equipment does cause harmful interference to radio or television reception, whichcan be determined by turning the equipment off and on, the user is encouraged to tryto correct the interference by one or more of the following measures:
• Reorient or relocate the receiving antenna.• Increase the separation between the equipment and receiver.• Connect the equipment into an outlet on a circuit different from that to which the
receiver is connected.• Consult the dealer or an experienced radio/TV technician for help.
Changes ormodifications to this equipment not approved by Xerox can void the authorityof the user to operate this equipment.
NoteTo ensure compliance with Part 15 of the FCC rules, use shielded interface cables.
European UnionThe CE mark applied to this product symbolizes a declaration of conformity byXerox with the following applicable Directives of the European Union as of thedates indicated:
• February 26, 2014: Low Voltage Directive 2014/35/EU• February 26, 2014: Electromagnetic Compatibility Directive 2014/30/EU• March 9, 1999: Radio & Telecommunications Terminal Equipment Directive
1999/5/EC
This printer, if used properly in accordance with the instructions, is not dangerous forthe consumer or for the environment.
To ensure compliance with European Union regulations, use shielded interface cables.
A signed copy of the Declaration of Conformity for this printer can be obtained fromXerox.
European Union Lot 4 Imaging Equipment AgreementEnvironmental InformationEnvironmental Information Providing Environmental Solutions andReducing Cost
The following information has been developed to assist users and has been issued inrelation to the European Union (EU) Energy Related Products Directive, specifically theLot 4 study on Imaging Equipment. This requiresmanufacturers to improve environmentalperformance of in scope products and supports the EU action plan on energy efficiency.
In scope products are Household and Office equipment that meet the following criteria.
• Standard monochrome format products with a maximum speed less than 66 A4images per minute
• Standard color format products with a maximum speed less than 51 A4 images perminute
Xerox® WorkCentre® 3335/3345 Multifunction PrinterB-2User Guide
Regulatory Information

Introduction
The following information has been developed to assist users and has been issued inrelation to the European Union (EU) Energy Related Products Directive, specifically theLot 4 study on Imaging Equipment. This requiresmanufacturers to improve environmentalperformance of in scope products and supports the EU action plan on energy efficiency.
In scope products are Household and Office equipment that meet the following criteria.
• Standard monochrome format products with a maximum speed less than 66 A4images per minute
• Standard color format products with a maximum speed less than 51 A4 images perminute
Environmental Benefits of Duplex Printing
Most Xerox products have duplex printing, also known as 2-sided printing, capability.This enables you to print on both sides of the paper automatically, and therefore helpsto reduce the use of valuable resources by reducing your paper consumption. The Lot 4Imaging Equipment agreement requires that onmodels greater than or equal to 40 ppmcolor or greater than or equal to 45 ppm monochrome the duplex function has beenauto enabled, during the setup and driver installation. Some Xerox models below thesespeed bands may also be enabled with 2-sided printing settings defaulted on at thetime of install. Continuing to use the duplex function will reduce the environmentalimpact of your work. However, should you require simplex/1-sided printing, you maychange the print settings in the print driver.
Paper Types
This product can be used to print on both recycled and virgin paper, approved to anenvironmental stewardship scheme, which complies with EN12281 or a similar qualitystandard. Lighter weight paper (60 g/m²), which contains less raw material and thussave resources per print, may be used in certain applications.We encourage you to checkif this is suitable for your printing needs.
ENERGY STAR (European Union Information)
The ENERGY STAR program is a voluntary scheme to promote the development andpurchase of energy efficientmodels, which help to reduce environmental impact. Detailson the ENERGY STAR program and models qualified to ENERGY STAR can be found atthe following website: www.energystar.gov/find_a_product
Power Consumption and Activation Time
The amount of electricity a product consumes depends on the way the device is used.This product is designed and configured to enable you to reduce your electricity costs.After the last print, the device switches to Ready mode. In this mode, the device canprint again immediately. If the product is not used for a period of time, the deviceswitches to a Power Saver mode. In these modes, to enable reduced product powerconsumption, only essential functions remain active.
B-3Xerox® WorkCentre® 3335/3345 Multifunction PrinterUser Guide
Regulatory Information

The product takes slightly longer to produce the first print after it exits Power Savermode than it takes in Readymode. This delay is the result of the systemwaking up fromPower Saver mode and is typical of most imaging products on the market.
You can set a longer activation time or completely deactivate the Power Saver mode.This device can take longer to switch to a lower energy level.
To learn more about Xerox participation in sustainability initiatives, go to:www.xerox.com/about-xerox/environment/enus.html .
Environmental Choice Certified to Office Machines CCD-035
This product is certified to Environmental Choice standard for office ma-chines, meeting all requirements for reduced environmental impact. As partof achieving certification, Xerox Corporation has proven this product meetsthe Environmental Choice criteria for energy efficiency. Certified copier,printer, multifunctional device, and fax productsmust alsomeet criteria suchas reduced chemical emissions and demonstrate compatibility with recycledsupplies. Environmental Choice was established in 1988 to help consumersfind products and serviceswith reduced environmental impacts. Environment-al Choice is a voluntary, multi-attribute, and lifecycle-based environmentalcertification. This certification indicates that a product has undergone rigor-ous scientific testing, exhaustive auditing, or both, to prove its compliancewith stringent, third-party, environmental performance standards.
GermanyGermany - Blue Angel
RAL, the German Institute for Quality Assurance and Labeling, has awardedthis device the Blue Angel Environmental Label. This label distinguishes itas a device that satisfies Blue Angel criteria for environmental acceptabilityin terms of device design,manufacture, and operation. Formore information,go to: www.blauer-engel.de .
Blendschutz
Das Gerät ist nicht für die Benutzung im unmittelbaren Gesichtsfeld amBildschirmarbeitsplatz vorgesehen. Um störende Reflexionen amBildschirmarbeitsplatzzu vermeiden, darf dieses Produkt nicht im unmittelbaren Gesichtsfeld platziert werden.
Lärmemission
Maschinenlärminformations-Verordnung3. GPSGV:Der höchste Schalldruckpegel beträgt70 dB(A) oder weniger gemäß EN ISO 7779.
Importeur
Xerox GmbH
Hellersbergstraße 2-4
41460 Neuss
Xerox® WorkCentre® 3335/3345 Multifunction PrinterB-4User Guide
Regulatory Information

Deutschland
Turkey RoHS Regulation
In compliance with Article 7 (d), we hereby certify “it is in compliance with theEEEregulation.”
“EEE yönetmeliğine uygundur.”
Regulatory Information for 2.4 GHz Wireless Network Adapter
This product contains a 2.4-GHz Wireless LAN radio transmitter module which complieswith the requirements specified in FCC Part 15, Industry Canada RSS-210 and EuropeanCouncil Directive 99/5/EC.
Operation of this device is subject to the following two conditions: (1) this device maynot cause harmful interference, and (2) this devicemust accept any interference received,including interference that may cause undesired operation.
Changes or modifications to this device not specifically approved by the XeroxCorporation may void the user's authority to operate this equipment.
Copy Regulations
United States
Congress, by statute, has forbidden the reproduction of the following subjects undercertain circumstances. Penalties of fine or imprisonmentmay be imposed on those guiltyof making such reproductions.
1. Obligations or Securities of the United States Government, such as:
• Certificates of Indebtedness.• National Bank Currency.• Coupons from Bonds.• Federal Reserve Bank Notes.• Silver Certificates.• Gold Certificates.• United States Bonds.• Treasury Notes.• Federal Reserve Notes.• Fractional Notes.• Certificates of Deposit.• Paper Money.• Bonds and Obligations of certain agencies of the government, such as FHA and
so on.• Bonds. United States Savings Bonds may be photographed only for publicity
purposes in connection with the campaign for the sale of such bonds.
B-5Xerox® WorkCentre® 3335/3345 Multifunction PrinterUser Guide
Regulatory Information

• Internal Revenue Stamps. If it is necessary to reproduce a legal document onwhich there is a canceled revenue stamp, this may be done provided thereproduction of the document is performed for lawful purposes.
• Postage Stamps, canceled or uncanceled. For philatelic purposes, Postage Stampsmay be photographed, provided the reproduction is in black and white and isless than 75% or more than 150% of the linear dimensions of the original.
• Postal Money Orders.• Bills, Checks, or Drafts of money drawn by or upon authorized officers of the
United States.• Stamps and other representatives of value, of whatever denomination, which
have been or may be issued under any Act of Congress.• Adjusted Compensation Certificates for Veterans of the World Wars.
2. Obligations or Securities of any Foreign Government, Bank, or Corporation.3. Copyrightedmaterials, unless permission of the copyright owner has been obtained
or the reproduction falls within the “fair use” or library reproduction rights provisionsof the copyright law. Further information of these provisions may be obtained fromthe Copyright Office, Library of Congress, Washington, D.C. 20559. Ask for CircularR21.
4. Certificate of Citizenship or Naturalization. Foreign Naturalization Certificates maybe photographed.
5. Passports. Foreign Passports may be photographed.6. Immigration papers.7. Draft Registration Cards.8. Selective Service Induction papers that bear any of the following Registrant’s
information:
• Earnings or Income.• Court Record.• Physical or mental condition.• Dependency Status.• Previous military service.• Exception: United States military discharge certificates may be photographed.
9. Badges, Identification Cards, Passes, or Insignia carried by military personnel, or bymembers of the various Federal Departments, such as FBI, Treasure, and so on(unless photograph is ordered by the head of such department or bureau).
Reproducing the following is also prohibited in certain states:
• Automobile Licenses.• Drivers’ Licenses.• Automobile Certificates of Title.
The preceding list is not all inclusive, and no liability is assumed for its completeness oraccuracy. In case of doubt, consult your attorney.
Xerox® WorkCentre® 3335/3345 Multifunction PrinterB-6User Guide
Regulatory Information

For more information about these provisions contact the Copyright Office, Library ofCongress, Washington, D.C. 20559. Ask for Circular R21.
Canada
Parliament, by stature, has forbidden the reproduction of the following subjects undercertain circumstances. Penalties of fine or imprisonmentmay be imposed on those guiltyof making such reproductions.
• Current bank notes or current paper money• Obligations or securities of a government or bank• Exchequer bill paper or revenue paper• The public seal of Canada or of a province, or the seal of a public body or authority
in Canada, or of a court of law• Proclamations, orders, regulations, or appointments, or notices thereof (with intent
to falsely cause same to purport to have been printed by the Queens Printer forCanada, or the equivalent printer for a province)
• Marks, brands, seals, wrappers, or designs used by or on behalf of the Governmentof Canada or of a province, the government of a state other than Canada or adepartment, board, Commission, or agency established by theGovernment of Canadaor of a province or of a government of a state other than Canada
• Impressed or adhesive stamps used for the purpose of revenue by the Governmentof Canada or of a province or by the government of a state other than Canada
• Documents, registers, or records kept by public officials charged with the duty ofmaking or issuing certified copies thereof, where the copy falsely purports to be acertified copy thereof
• Copyrighted material or trademarks of any manner or kind without the consent ofthe copyright or trademark owner
This list is provided for your convenience and assistance, but it is not all-inclusive, andno liability is assumed for its completeness or accuracy. In case of doubt, consult yoursolicitor.
Other Countries
Copying certain documents may be illegal in your country. Penalties of fine orimprisonment may be imposed on those found guilty of making such reproductions.
• Currency notes• Bank notes and checks• Bank and government bonds and securities• Passports and identification cards• Copyright material or trademarks without the consent of the owner• Postage stamps and other negotiable instruments
This list is not inclusive and no liability is assumed for either its completeness or accuracy.In case of doubt, contact your legal counsel.
B-7Xerox® WorkCentre® 3335/3345 Multifunction PrinterUser Guide
Regulatory Information

Fax Regulations
United StatesFax Send Header Requirements
The Telephone Consumer Protection Act of 1991 makes it unlawful for any person touse a computer or other electronic device, including a faxmachine, to send anymessageunless suchmessage clearly contains in amargin at the top or bottomof each transmittedpage or on the first page of the transmission, the date and time it is sent and anidentification of the business or other entity, or other individual sending the messageand the telephone number of the sending machine or such business, other entity, orindividual. The telephone number provided may not be a 900 number or any othernumber for which charges exceed local or long-distance transmission charges.
Data Coupler Information
This equipment complies with Part 68 of the FCC rules and the requirements adoptedby the Administrative Council for Terminal Attachments (ACTA). On the cover of thisequipment is a label that contains, among other information, a product identifier in theformatUS:AAAFA##BXXXX. If requested, this numbermust be provided to the TelephoneCompany.
A plug and jack used to connect this equipment to the premises wiring and telephonenetwork must comply with the applicable FCC Part 68 rules and requirements adoptedby theACTA. A compliant telephone cord andmodular plug is providedwith this product.It connects to a compatible modular jack that is also compliant. See installationinstructions for details.
You can safely connect the printer to the following standardmodular jack: USOC RJ-11Cusing the compliant telephone line cord (with modular plugs) provided with theinstallation kit. See installation instructions for details.
The Ringer Equivalence Number (REN) is used to determine the number of devices thatcan be connected to a telephone line. Excessive RENs on a telephone line could resultin the devices not ringing in response to an incoming call. In most but not all areas, thesum of RENs should not exceed five (5.0). To be certain of the number of devices thatcan be connected to a line, as determined by the RENs, contact the local TelephoneCompany. For products approved after July 23, 2001, the REN is part of the productidentifier that has the format US:AAAFA##BXXXX. The digits represented by ## are theREN without a decimal point (for example, 03 is a REN of 0.3). For earlier products, theREN is separately shown on the label.
To order the correct service from the local Telephone Company, you could also have toquote the codes in the following list:
• Facility Interface Code (FIC) = 02LS2• Service Order Code (SOC) = 9.0Y
Xerox® WorkCentre® 3335/3345 Multifunction PrinterB-8User Guide
Regulatory Information

CautionAsk your local Telephone Company for the modular jack type installed on your line.Connecting this machine to an unauthorized jack can damage telephone companyequipment. You, not Xerox, assume all responsibility and/or liability for any damagecaused by the connection of this machine to an unauthorized jack.
If this Xerox® equipment causes harm to the telephone network, the Telephone Companycould temporarily discontinue service to the telephone line to which it is connected. Ifadvance notice is not practical, the Telephone Company notifies you of the disconnectionas soon as possible. If the Telephone Company interrupts your service, they can adviseyou of your right to file a complaint with the FCC if you believe that it is necessary.
The Telephone Company could change its facilities, equipment, operations, or procedureswhich could affect the operation of the equipment. If the Telephone Company changessomething that affects the operation of the equipment, they should notify you in orderfor you to make necessary modifications to maintain uninterrupted service.
If you experience trouble with this Xerox® equipment, please contact the appropriateservice center for repair or warranty information. Contact information is contained inthe Machine Status menu on the printer and in the back of the Troubleshooting sectionof the User Guide. If the equipment is causing harm to the telephone network, theTelephone Company may request you to disconnect the equipment until the problemis resolved.
Only a Xerox Service Representative or an authorized Xerox Service provider areauthorized to make repairs to the printer. This applies at any time during or after theservice warranty period. If unauthorized repair is performed, the remainder of thewarranty period is null and void.
This equipment must not be used on party lines. Connection to party line service issubject to state tariffs. Contact the state public utility commission, public servicecommission, or corporation commission for information.
Your office could have specially wired alarm equipment connected to the telephone line.Make sure that the installation of this Xerox® equipment does not disable your alarmequipment.
If you have questions aboutwhat could disable alarmequipment, consult your TelephoneCompany or a qualified installer.
Canada
This product meets the applicable Industry Canada technical specifications.
A representative designated by the supplier should coordinate repairs to certifiedequipment. Repairs or alterationsmade by the user to this device, or devicemalfunctions,could cause the telecommunications company to request you to disconnect theequipment.
For user protection,make sure that the printer is properly grounded. The electrical groundconnections of the power utility, telephone lines, and internalmetallic water pipe systems,if present, must be connected together. This precaution could be vital in rural areas.
B-9Xerox® WorkCentre® 3335/3345 Multifunction PrinterUser Guide
Regulatory Information

WarningDo not attempt to make such connections yourself. Contact the appropriate electricinspection authority, or electrician, to make the ground connection.
The REN assigned to each terminal device provides an indication of the maximumnumber of terminals allowed to be connected to a telephone interface. The terminationon an interface could consist of any combination of devices. The only limitation to thenumber of devices is the requirement that the sum of the RENs of the devices does notexceed 5. For the Canadian REN value, please see the label on the equipment.
European UnionRadio Equipment and Telecommunications Terminal EquipmentDirective
The Facsimile has been approved in accordance with the Council Decision 1999/5/ECfor pan-European single terminal connection to the public switched telephone network(PSTN). However, due to differences between the individual PSTNs provided in differentcountries, the approval does not give an unconditional assurance of successful operationon every PSTN network terminal point.
In the event of a problem you should contact your authorized local dealer.
This product has been tested to and is compliant with ES 203 021-1, -2, -3, a specificationfor terminal equipment for use on analog-switched telephone networks in the EuropeanEconomic Area. This product provides a user-adjustable setting of the country code. Thecountry code should be set prior to connecting this product to the network. Refer to thecustomer documentation for the procedure for setting the country code.
NoteAlthough this product can use either loop disconnect (pulse) or DTMF (tone) signaling,we recommend that you set it to use DTMF signaling for more reliable and faster callsetup.Modification of this product, connection to external control software, or connectionto an external control apparatus not authorized by Xerox®will invalidate its certification.
South Africa
This modem must be used in conjunction with an approved surge protection device.
New Zealand1. The grant of a Telepermit for any item of terminal equipment indicates only that
Telecom has accepted that the item complies with minimum conditions forconnection to its network. It indicates no endorsement of the product by Telecom,it does not provide any sort of warranty, and it does not imply that any Telepermittedproduct is compatible with all Telecom network services. Above all, it provides noassurance that any item will work correctly in all respects with another item ofTelepermitted equipment of a different make or model.
Xerox® WorkCentre® 3335/3345 Multifunction PrinterB-10User Guide
Regulatory Information

The equipment may not be capable of correct operation at the higher data speedsdesignated. 33.6kbps and 56kbps connections are likely to be restricted to lower bitrates when connected to some PSTN implementations. Telecom will accept noresponsibility for difficulties that arise in such circumstances.
2. Immediately disconnect this equipment should it become physically damaged, thenarrange for its disposal or repair.
3. This modem shall not be used in any manner which could constitute a nuisance toother Telecom customers.
4. This device is equipped with pulse dialing, while the Telecom standard is DTMF tonedialing. There is no guarantee that Telecom lines will always continue to supportpulse dialing.
5. Use of pulse dialing, when this equipment is connected to the same line as otherequipment, may give rise to 'bell tinkle' or noise and cause a false answer condition.If you encounter such problems, do not contact the Telecom Faults Service.
6. DTMF tones dialing is the preferredmethod because it is faster than pulse (decadic)dialing and is readily available on almost all New Zealand telephone exchanges.
WarningNo '111' or other calls can be made from this device during a mains power failure.
7. This equipment may not provide for the effective hand-over of a call to anotherdevice connected to the same line.
8. Some parameters required for compliance with Telecom Telepermit requirementsare dependent on the equipment (computer) associated with this device. Theassociated equipment shall be set to operate within the following limits forcompliance with Telecom Specifications:
For repeat calls to the same number:
• There shall be nomore than 10 call attempts to the same number within any 30minute period for any single manual call initiation, and
• For automatic calls to different numbers:• The equipment shall be set to ensure that automatic calls to different numbers
are spaced such that there is no less than five seconds between the end of onecall attempt and the beginning of another.
9. For correct operation, total of the RNs of all devices connected to a single line atany time should not exceed five.
Material Safety Data SheetsFor Material Safety Data information regarding your printer, go to:
• North America:
- WorkCentre® 3335: www.xerox.com/msds- WorkCentre® 3345: www.xerox.com/msds
• European Union:
B-11Xerox® WorkCentre® 3335/3345 Multifunction PrinterUser Guide
Regulatory Information

WorkCentre® 3335: www.xerox.com/environment_europe-- WorkCentre® 3345: www.xerox.com/environment_europe
For the Customer Support Center phone numbers, go to:
• WorkCentre® 3335: www.xerox.com/office/worldcontacts• WorkCentre® 3345: www.xerox.com/office/worldcontacts
.
Xerox® WorkCentre® 3335/3345 Multifunction PrinterB-12User Guide
Regulatory Information

CRecycling and Disposal
All CountriesIf you are managing the disposal of your Xerox product, please note that the printermay contain lead, mercury, perchlorate, and other materials whose disposal may beregulated due to environmental considerations. The presence of these materials is fullyconsistent with global regulations applicable at the time that the product was placedon the market. For recycling and disposal information, contact your local authorities.Perchlorate Material: This product may contain one or more Perchlorate-containingdevices, such as batteries. Special handling may apply, please seewww.dtsc.ca.gov/hazardouswaste/perchlorate.
North AmericaXerox operates an equipment take-back and reuse/recycle program. Contact your Xeroxrepresentative (1-800-ASK-XEROX) to determine if this Xerox product is part of theprogram. For more information about Xerox environmental programs, visitwww.xerox.com/environment for WorkCentre® 3335 or www.xerox.com/environmentfor WorkCentre® 3345, or for recycling and disposal information, contact your localauthorities.
European UnionSome equipmentmay be used in both a domestic/household and a professional/businessapplication.
Domestic/Household EnvironmentApplication of this symbol on your equipment is confirmation that you shouldnot dispose of the equipment in the normal household waste stream.
C-1Xerox® WorkCentre® 3335/3345 Multifunction PrinterUser Guide

In accordance with European legislation, end-of-life electrical and electronic equipmentsubject to disposal must be segregated from household waste.
Private households within EU member states may return used electrical and electronicequipment to designated collection facilities free of charge. Please contact your localdisposal authority for information.
In some member states, when you purchase new equipment, your local retailer may berequired to take back your old equipment free of charge. Please ask your retailer forinformation.
Professional/Business EnvironmentApplication of this symbol on your equipment is confirmation that you mustdispose of this equipment in compliance with agreed national procedures.
In accordance with European legislation, end-of-life electrical and electronic equipmentsubject to disposal must be managed within agreed procedures.
Prior to disposal, please contact your local reseller or Xerox representative for end-of-lifetake-back information.
Collection and Disposal of Equipment and Batteries
• These symbols on the products and/or accompanying documents meanthat used electrical and electronic products and batteries should not bemixed with general household waste.
• For proper treatment, recovery, and recycling of old products and usedbatteries, please take them to applicable collection points, in accordancewith your national legislation and theDirective 2002/96/ECand2006/66/EC.
• By disposing of these products and batteries correctly, you will help to savevaluable resources and prevent any potential negative effects on humanhealth and the environmentwhich could otherwise arise from inappropriatewaste handling.
• For more information about collection and recycling of old products andbatteries, please contact your localmunicipality, your waste disposal service,or the point of sale where you purchased the items.
• Penaltiesmay be applicable for incorrect disposal of this waste, in accordancewith national legislation.
Business Users in the European Union
If you wish to discard electrical and electronic equipment, please contact your dealer orsupplier for further information.
Disposal Outside of the European Union
These symbols are only valid in the European Union. If you wish to discard these items,please contact your local authorities or dealer and ask for the correctmethod of disposal.
Xerox® WorkCentre® 3335/3345 Multifunction PrinterC-2User Guide
Recycling and Disposal

Battery Symbol NoteThis wheeled-bin symbol may be used in combination with a chemical symbol.This establishes compliance with the requirements set out by the Directive.
Battery Removal
Batteries should only be replaced by a manufacturer-approved service facility.
Other CountriesPlease contact your local waste management authority to request disposal guidance.
C-3Xerox® WorkCentre® 3335/3345 Multifunction PrinterUser Guide
Recycling and Disposal

Xerox® WorkCentre® 3335/3345 Multifunction PrinterC-4User Guide
Recycling and Disposal