Embed Size (px)
Citation preview

8/9/2019 Word Basic Handout
http://slidepdf.com/reader/full/word-basic-handout 1/14
Microsoft Word 2007 Overview
LC Notebook Tab VII: Computer Skills
Handout Quick Table of Contents
Microsoft Office Ribbon p. 3 Saving Your Work p. 7 Inserting Clip Art p. 11Keyboard Shortcuts p. 5 Page Layout p. 7 Printing p. 12Keyboard Navigation p. 5 Formatting Paragraphs p. 8 Accessing Word Help p. 13Compatibility Checker p. 6 Bullets and Numbering p. 9 Additional Resources p. 14
Inserting Tables p. 10
Microsoft Word is an application designed primarily for word processing, although you can also use it for a mailmerge, or to create tables. The Word 2007 interface has many differences from the 2003 version, with the mainfunctional differences outlined in this packet. The Intermediate Word packet, available from the Staff LearningComputer Training Handouts page: http://www.lib.umd.edu/groups/learning/handouts.html, includes additionalinformation on clip art, document styles, tracking changes and inserting a table of contents into a document.
SSStttaaar r r tttiiinnnggg W W W ooor r r d d d 2 2 2 0 0 0 0 0 0 7 7 7
The best way to start learning the new features of Word 2007 is by starting the program. Steps to perform will appear in highlighted yellow text throughout this handout. Start your own blank document and follow the steps indicated.
To start Microsoft Word 2007 :1) Go to your Start menu.2) Then go to Programs and look for Microsoft Office.3) A series of Microsoft programs will appear. Select Microsoft Word 2007 to launch this program.
The graphic below highlights some of the major changes in the new Word interface:

8/9/2019 Word Basic Handout
http://slidepdf.com/reader/full/word-basic-handout 2/14
UM Libraries – Word 2007 Overview 2
Title Bar
At the top of the window is a blue bar called the title bar . The title bar contains the name of the application(Microsoft Word ) and the name of the document you are working in (automatically called “Document 1” until you
rename it). The title bar also includes the minimize/maximize, restore, and close buttons . Near the title
bar are the Office Button, Quick Access Toolbar, and the Office Ribbon, all of which are new to Office 2007 .
Microsoft Office Button
The Microsoft Office Button groups together commands that are related to managing the Word programand your entire Word document. The Office Button replaces the File menu found in previous versions of MicrosoftOffice. When you select the Office Button, you will see the following options on the left-hand side of the menu:
Create a new document.
Open an existing document.
Convert a document in an earlier version of Word to Word 2007 format (see pg. 6).
Save your file in the default (Word 2007) format (see pg. 7).
Provides options to save your file in the standard (default) format, or as a template or Word 97-2003 document.
Provides print options – including print preview.
Provides options to allow you to prepare a document for distribution, including checking for compatibility with earlier versions of Word or restricting access to a document.
Allows documents to be e-mailed or faxed online.
Provides advanced options for distributing documents via a blog or shared workspace.
Closes the current open document. If changes have been made prior to closing – you willbe prompted to first save your document.
Displays the Word Options menu, allowing you to customize Word features such asautocorrect or document display options.
Closes Microsoft Word . (NOTE: The close button on the title bar can also be used toclose your Word session.)
Explore the Office Button options now.
On the right-hand side of the Office Button menu, you will see a list of Recent Documents. After you have created,viewed or edited a document in Word 2007 , its name willappear in the Recent Documents list for easy access. Adocument can be permanently listed in Recent Documents
by selecting the pushpin icon next to the filename.Once selected, the pushpin icon will change to a “pinned”

8/9/2019 Word Basic Handout
http://slidepdf.com/reader/full/word-basic-handout 3/14
UM Libraries – Word 2007 Overview 3
position . “Pinned” documents may be unselected by clicking on the pushpin icon.
Quick Access Toolbar
The Quick Access Toolbar appears next to the Office Button and initially contains the save,
redo and undo functions. (See page 7 for more information about saving your work.) As you work with Word 2007 ,you may find that you use certain commands more frequently than others. You can customize the toolbar by
selecting the icon to add additional functions (such as close file). You can also choose to minimize the OfficeRibbon, described below. (NOTE: Minimizing the Office Ribbon is not recommended unless you are extremelyfamiliar with Office keyboard commands.)
Microsoft Office Ribbon
The Microsoft Office Ribbon replaces the Menu bar/tool bar from earlier editions of Microsoft Office, and is another one of the major design changes in Office 2007 . The Office Ribbon contains commands you will use with variousOffice products, personalized for each program. On the Ribbon, you will find commands grouped by function. Whenyou open an existing document or create a new document – the Office Ribbon will appear with the Home tab active.
On the Home tab – you will find commands arranged in five “groups”: Clipboard, Font, Paragraph, Styles, andEditing. To see what a particular ribbon button does, pause your mouse pointer over the button and a brief description will appear. Try this now.
The second tab is the Insert tab. Click on this tab to explore the commands for Pages, Tables, Illustrations, Links,Headers and Footers, Text and Symbols:
The third tab is the Page Layout tab. On this tab you will find commands grouped for Document Themes, PageSetup, Page Background, Paragraph Setup and Image Arrangement. Explore the commands on this tab now. Pagelayout will be covered more fully on page 7 of this handout.
Next to the Page Layout tab you will find the References tab. Items on this tab are designed to assist you in creatinglonger documents – and allow you to insert such items as endnotes, cross-references or an index. Explore this tabnow.

8/9/2019 Word Basic Handout
http://slidepdf.com/reader/full/word-basic-handout 4/14
UM Libraries – Word 2007 Overview 4
The Mailings tab appears next to the References tab on the Microsoft Ribbon. Commands are grouped on this tab toassist you in creating mass mailings, envelopes and labels. Explore this tab now.
The Review tab appears next to the Mailings tab, and provides options for proofing, commenting and comparingdocuments. You can also choose to password protect a document from this tab. Explore this tab now. Of note is thespell check feature available on this tab, located in the Proofing group.
One tab to become familiar with is the View tab. Commands grouped on this tab allow you to select document views,show and hide gridlines or rulers, zoom text, arrange document windows or view and record macros. Explore this tabnow.
If you have additional helper applications on your computer (such as Documents to Go for a Palm device) - you mayaccess commands for those programs from the Add-Ins tab.
Additional tabs will appear as you work with documents. Some will appear when you insert or select a table, pictureor drawing. Others will appear when you select a command such as print preview.
Status Bar
At the bottom of the screen you will see the status bar , which displays information to keep you informed as to thecurrent state of Word . At the bottom of the status bar you will see the page number and word count for your document, as well as the proofing indicator. If there are no grammatical or spelling errors in your document, the
check icon appears, whereas the error icon will appear if proofing errors were found. (NOTE: To correct
proofing errors – select the icon and follow the directions that appear on the screen.) On the lower right corner
of the Word status bar are five icons . Starting from the left to right, the icons are: print layout, full
screen reading, web layout, outline view, and draft view. Choose each of these views now – being sure to return to
the print layout option when you are finished. Until you are more familiar with Word 2007 – you may wish toleave the view setting at the default state – print layout. You can also zoom in and out of your document by selecting
the zoom indicator . Try this now, returning your document to 100% zoom levelbefore proceeding. To customize the status bar (to display such features as caps lock or remove features such asword count), right click on the status bar and select the option from the menu that appears.

8/9/2019 Word Basic Handout
http://slidepdf.com/reader/full/word-basic-handout 5/14
UM Libraries – Word 2007 Overview 5
HHHeeelllpppf f f uuulll W W W ooor r r d d d KKKeeeyyybbboooaaar r r ddd SSShhhooor r r tttcccuuutttsss
Although you are encouraged to use the Microsoft Office Ribbon as you work with your document, as in mostMicrosoft Office products, a number of keyboard shortcuts exist in Word that can save you time:
CTRL+O Open
CTRL+Z Undo CTRL+Y Redo. In some cases, if there is nothing to redo, this
repeats the last action.
CTRL+S Save
CTRL+P Activates the Print menu.
ALT+F4 Closes the active window. You will be prompted to saveyour document before closing if necessary.
CTRL+B Bold
CTRL+I Italic
CTRL+U Underline
CTRL+R Align text right
CTRL+E Align text center
CTRL+L Align text left
CTRL+C Copy
CTRL+X Cut
CTRL+V Paste
CTRL+F Find
CTRL+H Replace
CTRL+A Select whole document
F7 Spell checker
SHIFT+F7 Thesaurus
Try several of these shortcuts now to familiarize yourself with these commands.
HHHeeelllpppf f f uuulll KKKeeeyyybbboooaaar r r ddd NNNaaavvviiigggaaattt iiiooonnn HHHiiinnntttsss
Keyboard navigation Select this key
Go to the beginning of the current line of text
HOME
Go to the end of the current line of text END
Go to the beginning of the document CTRL+HOME
Go to the end of the document CTRL+END
Go up one full screen PAGE UP
Go down one full screen PAGE DOWN
Go to the beginning of the previous page CTRL+PAGE UP
Go to the beginning of the next page CTRL+PAGE DOWN
Text selection Press SHIFT+ any of the followingkeystrokes to select text:
Left one character at a time LEFT ARROW
Right one character at a time RIGHT ARROW
Down one line at a time DOWN ARROW
Up one line at a time UP ARROW
Left one word at a time CTRL+ LEFT ARROW
Right one word at a time CTRL+ RIGHT ARROW
Try several of these shortcuts now to familiarize yourself with these commands.

8/9/2019 Word Basic Handout
http://slidepdf.com/reader/full/word-basic-handout 6/14
UM Libraries – Word 2007 Overview 6
OOOf f f f f f iiiccceee LLLiiivvveee PPPr r r eeevvviiieeewww aaannnddd MMMiiinnniii TTToooooolllbbbaaar r r
Two of the newest features in Office 2007 are live preview and the mini toolbar. Both of these are designed to assistyou with document previewing and formatting. The Live Preview feature temporarily applies formatting on any text or object you have selected, when you hover your mouse over a formatting button. This allows you to have a “sneakpeek” of how the option would affect the appearance of the object, without actually applying it. The temporary
formatting is removed when the mouse pointer is moved from the button.
To see Live Preview in action, type a sentence into your Word document. Then, select the text you just typed by left-clicking and dragging over the text. Then, hover your mouse over one of the formatting buttons on the Office Ribbonto see the formatting changes temporarily applied to your selected text.
Try this now…Type a sentence into a blank Word document, such as: The quick brown fox jumped over the lazy dog.
Select the text highlight option from the Font group (on the Home tab). Choose the down-arrow at the endof the text highlight icon and hover over the various colors in the submenu. As you do this, you will notice theselected text will change to preview the selected color. Click on a color of your choice, or select “No Color”.
In addition to Live Preview, you will likely encounter the Mini Toolbar as you prepareyour documents. When you highlight text you have typed, the Mini Toolbar will start toappear as a transparent box above the selected text. As you move your mouse towardthe mini toolbar, it becomes more solid in appearance and can be used to select several common formatting options.(NOTE: You can also make formatting changes from the Ribbon options.) If you ignore the mini toolbar, it willeventually disappear when you continue working.
HELPFUL HINT: If you do not wish to have the Live Preview and/or Mini Toolbar features active while you are working in Word , you may turn off one or both of thesefeatures by going to the Office Button, and choosing Word Options Popular andunselecting the appropriate check box(es).
CCCooommmpppaaattt iiibbbiii lll iiitttyyy MMMooodddeee iiinnn W W W ooor r r d d d 2 2 2 0 0 0 0 0 0 7 7 7
When you open a document in Word 2007 that was created in an earlier version of Word , a function calledCompatibility Mode is activated. When this happens, the words [Compatibility Mode] will appear in the title bar of thedocument window, as in the example below:
Compatibility Mode ensures that no new or enhanced features available in Word 2007 are applied while you areworking with a document, so that people who are using previous versions of Word will have full editing capabilities.You can choose to work in Compatibility Mode, or you can convert your document to Word 2007 file format. To do
this, select the Convert option from the Microsoft Office Button. Converting a document allows youto access Word 2007 features. However, individuals who are using previous versions of Word may be preventedfrom or have difficulty editing certain portions of the document that were created by using new or enhanced featuresavailable in Word 2007 . If you think your document may be viewed by individuals who do not have access to Word 2007 , you will want to save it as a Word 97-2003 document (see next page). When you save a Word 97–2003 document in the Word 2007 format, Compatibility Mode is automatically turned off unless you select the Maintaincompatibility with Word 97–2003 check box in the Save As dialog box. For more information on Word 2007 ’sCompatibility Mode, visit: http://office.microsoft.com/en-us/word/HA100444751033.aspx.

8/9/2019 Word Basic Handout
http://slidepdf.com/reader/full/word-basic-handout 7/14
UM Libraries – Word 2007 Overview 7
SSSaaavvviiinnnggg Y Y Yooouuur r r WWWooor r r kkk
When you are creating and editing documents – you will want to be sure to periodically save your work. To do this,you may either:
• Use the Save option from the Quick Access Toolbar .
• Use the Save or Save As options accessible from the Office Button.o NOTE: The Save As feature includes options that will allow you to save your document as a
document template or as a Word 97-2003 document.
• Use the CTRL+S keyboard shortcut.
Try this now…Save your open document to the desktop in Word 2007 format using one of the command optionslisted above.
If you have edited your document after saving it, you will also be prompted to save your document when you choose
the Exit Word feature from the Office Button or select the close button at the top of the title bar.
Helpful Hint: Word also has an autosave feature that will periodically back up your document in case the program
stops responding. The default for autosave is 10 minutes. If you wish to change the autosave interval, you can do soby clicking on the Office Button, going to Word Options, and selecting the Save tab. Change the default setting asdesired and click OK.
PPPaaagggeee LLLaaayyyooouuuttt OOOpppttt iiiooonnnsss
A number of changes can be made to the layout of your document by selecting the Page Layout tab on your OfficeRibbon. (NOTE: This replaces the File Page Setup option in earlier versions of Word .) Three of the most popular options are margins, page orientation, and page breaks.
MarginsIn order to change the margins of your document, choose the Margins icon in the Page Setup commandgroup. You can adjust the Margins by selecting one of seven pre-designed options, or create your ownmargin setup by selecting the Custom Margins…option. Tr y this now. Select the Custom Margin optionand set your document margins to 1.5” on each side and 1.25” for the top and bottom. Watch the small
preview in the lower part of the dialog box as it adjusts accordingly. Click Cancel to return to your document without changing margins.
(NOTE: The default margin setup for Word 2007 is 1” on top, bottom and sides, while the default for Word 2003 was1” on the top and bottom and 1.25” on the left and right.)

8/9/2019 Word Basic Handout
http://slidepdf.com/reader/full/word-basic-handout 8/14
UM Libraries – Word 2007 Overview 8
Page Orientation
The Page Orientation icon allows you to change the page orientation to either Portrait or Landscape format. The Word default is portrait, while landscape format may be useful if you
need to create charts or other documents horizontally. Try this now. Select the Page Orientation icon and change thesetting to Landscape. Note the change on your blank document. Select Portrait to return your document to the
standard orientation.
FFFooor r r mmmaaatttttt iiinnnggg PPPaaar r r aaagggr r r aaappphhhsss
When creating a document, you may find the need to use several types of formatting for paragraphs. Many of the most frequently-used options are found inthe Paragraph group of the Home tab.
There are four options are available to justify your text – as represented by the
following buttons in the Paragraph group: . From left to right,
these icons represent the options to: Align Left, Center, Align Right, or Justify.
You can also choose line spacing of your paragraph from this same command group, by selecting the Line Spacing
icon . By selecting this icon, you can easily set your line spacing from single to triple spaced, or create your own spacing option.
To change paragraph indentation – select the Increase Indent or Decrease Indent buttons from the
Paragraph group, or select the arrow next to the Paragraph group . Doingthis will launch the paragraph dialog box, from where you can select first line or hanging indentations and further customize the amount by which your text is indented on the left and right.
Try this now. Launch the Paragraph dialogbox and set the left and right indentations to.5” with a First Line indent. Click OK. Typetwo lines of text and see how it appears.Delete the text and re-launch the Paragraphdialog box. Reset the options and click OK.
Similar paragraph options may be found on the Page Layout tab in theParagraph group. From here, you can also change the line left and rightindentations as well as the spacing before and after paragraphs. Clickingon the arrow at the bottom right of the Paragraph group will launch thesame Paragraph dialog box seen previously.
FFFooor r r mmmaaatttttt iiinnnggg FFFooonnntttsss
The default font for Word 2007 is Calibri (body) 11 point. In order to
change fonts in your document, select the desired word, sentence or
8/9/2019 Word Basic Handout
http://slidepdf.com/reader/full/word-basic-handout 9/14
UM Libraries – Word 2007 Overview 9
paragraph (see page 5 for text selection tips). To change the font formatting, select an option from the Font groupingin the Home tab.
To change the font style or size for selected text, click the drop-down arrow to the right of the font name/size box andselect the appropriate option. The Live Preview option discussed on page 6 will allow you to see a preview of the fontstyle/size change as you scroll through available font options and sizes. Click to select a font style/size you desire.
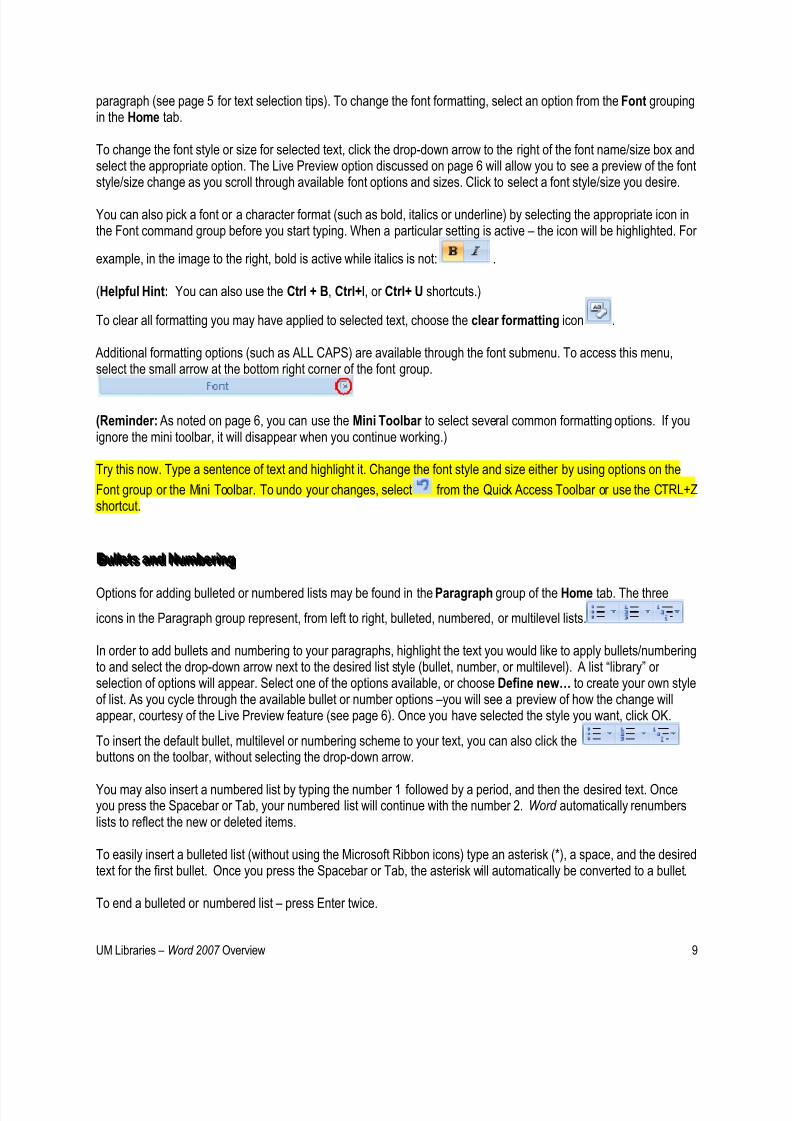
You can also pick a font or a character format (such as bold, italics or underline) by selecting the appropriate icon inthe Font command group before you start typing. When a particular setting is active – the icon will be highlighted. For
example, in the image to the right, bold is active while italics is not: .
(Helpful Hint: You can also use the Ctrl + B, Ctrl+I, or Ctrl+ U shortcuts.)
To clear all formatting you may have applied to selected text, choose the clear formatting icon .
Additional formatting options (such as ALL CAPS) are available through the font submenu. To access this menu,select the small arrow at the bottom right corner of the font group.
(Reminder: As noted on page 6, you can use the Mini Toolbar to select several common formatting options. If youignore the mini toolbar, it will disappear when you continue working.)
Try this now. Type a sentence of text and highlight it. Change the font style and size either by using options on the
Font group or the Mini Toolbar. To undo your changes, select from the Quick Access Toolbar or use the CTRL+Zshortcut.
BBBuuulll llleeetttsss aaannnddd NNNuuummmbbbeeer r r iiinnnggg
Options for adding bulleted or numbered lists may be found in the Paragraph group of the Home tab. The three
icons in the Paragraph group represent, from left to right, bulleted, numbered, or multilevel lists.
In order to add bullets and numbering to your paragraphs, highlight the text you would like to apply bullets/numberingto and select the drop-down arrow next to the desired list style (bullet, number, or multilevel). A list “library” or selection of options will appear. Select one of the options available, or choose Define new… to create your own styleof list. As you cycle through the available bullet or number options –you will see a preview of how the change willappear, courtesy of the Live Preview feature (see page 6). Once you have selected the style you want, click OK.
To insert the default bullet, multilevel or numbering scheme to your text, you can also click thebuttons on the toolbar, without selecting the drop-down arrow.
You may also insert a numbered list by typing the number 1 followed by a period, and then the desired text. Onceyou press the Spacebar or Tab, your numbered list will continue with the number 2. Word automatically renumberslists to reflect the new or deleted items.
To easily insert a bulleted list (without using the Microsoft Ribbon icons) type an asterisk (*), a space, and the desiredtext for the first bullet. Once you press the Spacebar or Tab, the asterisk will automatically be converted to a bullet.
To end a bulleted or numbered list – press Enter twice.

8/9/2019 Word Basic Handout
http://slidepdf.com/reader/full/word-basic-handout 10/14
UM Libraries – Word 2007 Overview 10
Helpful Hint: You can sort items in a bulleted list into ascending or descending order by selecting the sortbutton on the Paragraph group of the Home tab.
Try this now…follow the directions that appear below to add a bulleted or numbered list to your sample document.
IIInnnssseeer r r ttt iiinnnggg OOObbb j j jeeeccctttsss
Tables
There are several options available in Word 2007 for inserting tables. The first option is to select the Table button from the Insert tab. The Insert Table menu will appear, with a series of boxes. Use your mouse tomove to the right and downward to insert a table up to eight rows long and ten columns wide. (For example,
if you want to create a table three columns wide with five rows, drag your mouse to highlight three columns and five rows and release your mousebutton. Your table will appear.) You may also select the Insert Table submenu
to specify a larger table.
Another option for inserting tables is to add a quick table to your documentby selecting one of several predesigned tables that are packaged with Word 2007 . To insert a quick table – select the Table button from the Insert tab. Thelast option on the drop-down list that appears is Quick Tables
. Select Quick Tables and a drop-downmenu of preformatted tables will appear. Highlight the desired table format,and release your mouse. The desired quick table will appear in your document. To customize the quick table, highlight the sample text and insertyour own.
Once you insert a table (or select a table in an existing document), two additional menus will appear under the TableTools heading. The table layout and design menus will allow you to format and edit tables within your document.
To add bullets or numbering to text as you type:1. Type 1. (the numeral 1 and a period) to start a numbered list or * (asterisk) to start a bulleted list, and then
press SPACEBAR or TAB.2. Type any text you want.3. Press ENTER to add the next list item. Word automatically inserts the next number or bullet.4. To create a sub list of bulleted items, press TAB after the bullet appears. It will be indented with a different
style of bullet.5. To finish the list, press ENTER twice, or press BACKSPACE to delete the last bullet or number in the list.

8/9/2019 Word Basic Handout
http://slidepdf.com/reader/full/word-basic-handout 11/14
UM Libraries – Word 2007 Overview 11
Try this now. In your blank document – go to the Insert tab and select Table. Insert a 3X3 table. With the tableselected – take a moment to familiarize yourself with the table design and table layout menus.
In the sample table below, note that the cross in the box in the upper left corner of the table indicates the table hasbeen selected. This selection box also allows you to move your table within your document. The double-arrowed linethat appears on the left-hand side of the table allows you to either expand or shrink column widths. (You can also
expand and shrink row heights as well, by positioning your cursor on a row line.)
Use the Tab button to move from cell to cell within your table.
To insert columns or rows into a table, place an insertion point within the table at the desiredlocation and go to the Rows and Columns command box in the Layout tab. Select theappropriate option from the icons available:
To delete a table already inserted in a document – select the table, and go to the Layout tab. Select theDelete icon, and choose Delete Table. (NOTE: You may also delete individual cells, columns or rowsusing options available from this icon.)
Additional concepts for formatting tables are covered in the Intermediate Word 2007 packet.
Clip Art
In order to insert Clip Art or graphics in your documents, go to the Insert tab and select the Clip Art icon.
A menu will appear on the right side of your screen, with a search box toallow you to search for clip art on a desired theme or subject. Select a termto search, and click GO. A list of related clip art graphics will appear.
NOTE: For a larger selection of clip art, select the option at the bottom of the clip artsearch box to search for additional images.
In order to insert the image in your document, place your mouse over the desired clip art andclick, and it will automatically be inserted into your document, as in the turtle example to theright:
Once you have inserted a clip art image (or have selected an image inserted in a document) anew tab labeled Format will appear on your Microsoft Office Ribbon under the heading PictureTools:

8/9/2019 Word Basic Handout
http://slidepdf.com/reader/full/word-basic-handout 12/14
UM Libraries – Word 2007 Overview 12
Options on the Format tab enable you to resize, position or otherwise modify your clip art image.
To modify and move your picture, select the clip art object. From the Format tab, choose the Text Wrapping option
in the Arrange group, and select Tight in order to have your clip art wrap closely aroundsurrounding text.
To place a border around an inserted clip art image, select the Picture Border option from thePicture Styles group and choose a line width and color for your border.
To resize an image – select the image and choose one of the four opaque circles on one of thecorners. Click on it and drag to enlarge or reduce your image as needed.
To delete an inserted image, select the image and press Delete.
Try this now. Insert a clip art image in your sample document, and resize it as needed to fit on your page. With your image selected – review the options on the Format menu.
IMPORTANT NOTE: If you add a clip art image to your document while it is in Compatibility Mode, a new tab willappear on the Microsoft Office Ribbon, labeled Picture Tools: Format. Icons on this tab are slightly different fromthose which appear in a Word 2007 document, but will allow you to control the layout and position of your clip art.
To close the clip art search pane, select the “X” on the right-hand side of the Clip artwindow.
Additional information regarding working with clip art images can be found in the Intermediate Word packet.
PPPr r r iiinnnttt iiinnnggg
To print your document, choose the Office Button, and select Print.Three options will appear:
• To print a specified number of copies or to select a particular printer, choose the Print option.
• To send one copy of your document to the default printer –
select Quick Print.• To review your document prior to sending it to the printer, and
make needed changes to margins and document layout, select Print Preview. When you are satisfied withthe layout of your document – select Print, or if you wish to make changes to your document before printing
– select Close Print Preview to return to your original document.
Try this now. Examine the three Print options available to you from the Office button.

8/9/2019 Word Basic Handout
http://slidepdf.com/reader/full/word-basic-handout 13/14
UM Libraries – Word 2007 Overview 13
TTTiiipppsss aaannnddd TTTr r r iiiccckkksss
The best way to learn more about Microsoft Word 2007 is to practice! Here are some helpful “tips and tricks” to assistyou in using the program more effectively:
• Take advantage of the context-sensitive menus that appear when you right-click the mouse. (This same trickworks throughout Windows applications.)
• If you are tired of Microsoft Word second-guessing your every move, change the AutoCorrect and AutoFormatsettings! To do this, click on the Office Button and select Word Options. Choose the Proofing tab. Click on
the AutoCorrect Options button and select the AutoFormat as you Type tab.Uncheck the appropriate boxes and click OK. (Press Cancel if you decide not to make any changes.)
• Do you want to locate a word, number, or phrase within your document? Use the Find feature. Go to the Editing
group (on the Home tab), select the Find option, and enter the text of what you are looking for inyour document. (NOTE: You can also use the keyboard command CTRL + F to perform this same function.)
• Did you misspell an important name throughout an entire document? If this occurs, highlight the incorrect word,
and go to the Home ribbon’s Editing panel and select Replace . Type in the correct spelling in theReplace With box, and click Replace All.
• Would you like to turn off the annoying green grammar checker? Click the Office Button and select WordOptions. Click on the Proofing tab and uncheck the box next to Mark grammar errors as you type.
• To display or hide non-printing characters, go to the Paragraph group (on the Home tab), and click the
Show/Hide Paragraph button .
•
To switch among open documents, go to the Window group (on the View tab) and select Switch Windows.Click the name of the document you wish to view.
AAAcccccceeessssssiiinnnggg W W W ooor r r d d d HHHeeelllppp
To access help features within Word , click on the Help button at the upper-rightcorner of the Microsoft Ribbon, or press F1. The Word help window will appear. Youcan either browse the help menu for assistance with a general topic, or type in akeyword or phrase in the Search box
, located at the top of the help box
and click Search. Your search results will appear in the Word help box. Click on theappropriate link.
To print a help topic, click on the Print icon in the Word Help window. Thedefault setting for the help window is to remain visible on top of other windows. To
change this feature, click on the Keep On Top icon so that it appears as a
pushpin on its side . To return to the default “Keep on Top” setting, click on the

8/9/2019 Word Basic Handout
http://slidepdf.com/reader/full/word-basic-handout 14/14
UM Libraries – Word 2007 Overview 14
sideways icon (Not On Top). Alternatively, you may select the minimize icon from the top right corner of the help
window. To close the help window – click on the Close icon at the upper right-corner of the Help window.
AAAddddddiii tttiiiooonnnaaalll RRReeesssooouuur r r ccceeesss
If you are interested in learning more about Office 2007 , and Word in particular, there are two titles available for youto check out from the Learning Curriculum Resource Library:
Cox, Joyce, et al. Step by Step 2007 Microsoft Office System. Redmond, WA: Microsoft, 2007.
Perry, Greg. Microsoft Office 2007 All In One. Indianapolis, IN: Sams, 2007.
A complete listing of titles in the Learning Curriculum Resource Library is available at:http://www.lib.umd.edu/groups/learning/lcrlibrary.html.
You may also wish to consult these online Word guides:
Microsoft Word 2007 . University of Wisconsin – Eau Claire. http://www.uwec.edu/help/word07.htm
Microsoft Office Training Home Page. http://office.microsoft.com/training [Select “Word 2007” in “Browse TrainingCourses”.]
CCCr r r eeedddiii tttsss:::
Material in this packet adapted from Stephen Spohn, Jr.’s Microsoft Word 97 for Beginners tutorial and Word 2003
Overview by Ambika Sankaran. Revised and updated by Maggie Saponaro, Staff Learning and Development,December 2007.
Rev 12/13/07