Embed Size (px)
Citation preview
–1–
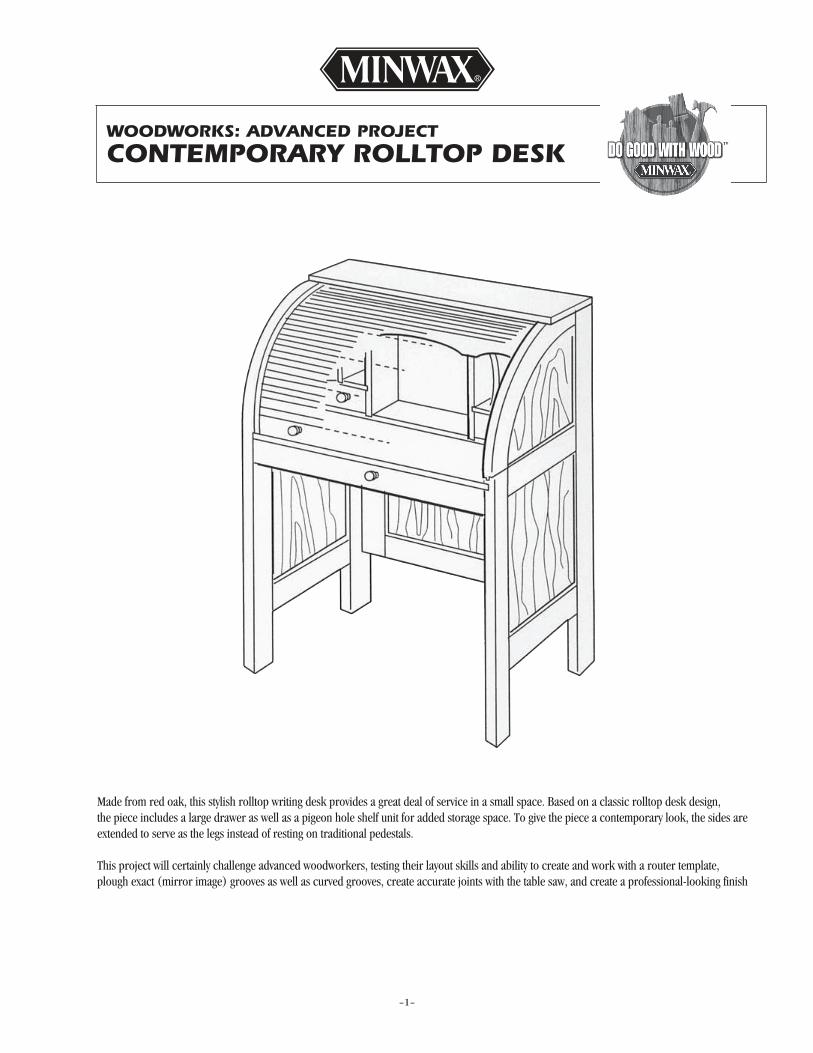
Made from red oak, this stylish rolltop writing desk provides a great deal of service in a small space. Based on a classic rolltop desk design, the piece includes a large drawer as well as a pigeon hole shelf unit for added storage space. To give the piece a contemporary look, the sides are extended to serve as the legs instead of resting on traditional pedestals.
This project will certainly challenge advanced woodworkers, testing their layout skills and ability to create and work with a router template, plough exact (mirror image) grooves as well as curved grooves, create accurate joints with the table saw, and create a professional-looking finish
WOODWORKS: ADVANCED PROJECT
CONTEMPORARY ROLLTOP DESK

CONTINUED - WOODWORKS: ADVANCED CONTEMPORARY ROLLTOP DESK
–2–
TOOLS REQUIRED:
MATERIALS REQUIRED:See Shopping and Cutting Lists
STAINING AND FINISHING PRODUCTS:
– Pencil – Ruler (zigzag or tape)– Square (framing, combination or try) – 4 ft. T-square, or straight edge – Assorted files, rasps– Phillips screwdriver (medium)– Hammer and fine nail set – Mallet (wooden or plastic)
Recommended FinishMinwax® Pre-Stain Wood ConditionerMinwax® Wood Finish™
Minwax® Fast-Drying Polyurethane
Alternate finish Minwax® PolyShades®
MiscellaneousMinwax® Fine Finishing BrushesClean ragsPaint thinner, if requiredWater-filled metal container with cover
– Block plane– Assorted clamps– Assorted wood chisels– Saws (dovetail, band, radial arm)– Table saw and dado head set – Jointer– Wood shaper– Drill press (or portable electric drill)
– Sanders(stationary belt, portable belt, random orbit, pad)– Planer– Cordless drill-driver with Phillips driver bit– Safety glasses– Respirator– Router (with 5/16” and 3/4” straight bits and rounding over bit)
BEFORE YOU BEGINThis project requires 4/4 and 1/2” solid lumber and 1/4” cabinet grade veneer plywood. Since the majority of plywood panels are exposed to view on both sides, die plywood purchased should have cabinet-grade veneer on both sides. If two-sided material is not available, you can affix flexible veneer to the appropriate surfaces. Flexible veneer is widely available, comes in wide rolls and is easy to apply.
PROCEDUREI. Carcase - Layout and Cutting1. Start by laying out the two curved rails (part A). For accuracy, make full size paper patterns for each of the two pieces (see diagrams for dimensions); carefully cut them out and tack them to the stock using a small amount of rubber cement. Note: Both pieces can be cut from a 10 1/2 x 30” board if laid out as shown.
2. Cut the curved rails using the radial arm saw to square the ends and cut the top portion; use the bandsaw to cut the curves.
3. Rip stock to width for all rails (parts D and F) and stiles (parts B, C, E) for the sides and back; cut pieces to length (see cutting list for exact measurements).
4. Mark each piece for the centered groove and tenon cuts. Note: All tenons and grooves are 1/4” wide x 3/8” deep unless otherwise indicated. Refer to diagrams for groove length information.
5. Set up dado cutter on the table saw to cut die centered grooves. Note: The grooves in the side stiles (part B) stop 7” from die bottom
Builder’s Tip: Put two tape markers on the saw table opposite the lead and tail points. The two markers will guide you when making the partial groove cuts at the start or end of a run. This procedure also enables you to face the same side of each piece against the rip fence, which will help you avoid any problems due to inconsistencies in stock thickness (a common occurrence in hardwoods).
6. Using a 1/4” chisel, square the ends of the stopped grooves(parts B,C,E).
7. Set up a tenoning jig for the grooves on the top ends of thefront stiles (part C). Cut grooves.
8. Next, cut the tenons on the rails (parts A, D, F). Start by making the shoulder cuts (width cut) on both sides of each end. Note that it will be necessary to shift the guide board to the other side of the blade for half of the cuts.
Builder’s Tip: The shoulder cuts on the curved rails (part A) are best done on a radial arm saw. Clamp a square board in place against the fence to serve as a stop to gauge the depth of the cuts and to align the curves. Abut the end of the rail against the stop, then make the cuts. Then, use the table saw to make the cheek cuts (length cut). Note: If you have a multi-blade dado set you can make both cheek cuts in one pass by using only the two outside blades and a 1/4" spacer. Otherwise, make two passes with a conventional blade.
9. Next, cut the grooves in the edges of die curved rails on a shaper with a l/4”-wide cutter. If you don't have access to a shaper, you can cut the grooves by making several passes with a router fitted with a slot cutter. The slot cutter will cut 1/2” deep although only a 3/8” deep groove is required. This is of no consequence; you need only adjust die dimensions of the plywood panel insert.

–3–
CONTINUED - WOODWORKS: ADVANCED CONTEMPORARY ROLLTOP DESK
Builder’s Tip: If you must use the router to create the grooves on the curved rails, for best results make each groove in several slow passes, with each succeeding cut slightly deeper than the previous one.
10. When the tongues and grooves have been completed, set up the dado head to cut the two stopped wide rabbets on the two back stiles (part B). The rabbet should be 5/16” deep x 13/16” wide, coming to a slightly rounded stop 7” from the bottom.
11. Next, sand all the inside edges of the stiles and rails. Dry assemble die pieces and measure the grooved openings for the plywood inserts (parts G,H,I J). Sand the sharp corners of the frame at this time; wipe clean.
12. Cut the plywood panels to size. If you need to apply the flexible veneer, do so now. Cut the veneer slightly oversize and attach with appropriate amounts of veneer glue or contact cement. Trim off overhang. Allow glue to set.
13. Lay out and cut desktop slab (part L2). To start, rough cut a pair of boards to be edge-glued. Align the boards so they present the most pleasing visual grain; mark the mating pieces for the biscuit locations. Cut biscuit grooves with plate joiner. Apply carpenter’s glue to board edges and biscuits; join boards, making sure ends are aligned, and clamp together using bar clamps. Set aside for at least four hours. When glue is completely dry, remove clamps and cut to size.
14. Lay out and cut the desk top (part LI) to size. Cut the tambour stop (part K2) to length, sand smooth and affix to underside of desk top, 1/2“ back from front edge. Set assembly aside.
II. Assembly - Back and Side Frames1. Assemble back frame. Apply glue to tenons on bottom rad (part F) and insert into the back stiles (part E). Slide in bottom plywood panel (part G) followed by the middle rail (part F). Then, slide in the top plywood panel (part H) followed by die third and final rail (part F), which should have glue on die tenons. Clamp pieces in place and set aside to dry. When dry, slightly round the bottom outside edge of die stiles (part E) to mate with the rounded rabbets in the side stiles (part B).
2. Assemble side frames. For each, start by applying glue to tenons on the bottom rail (part D) and insert into the side stiles (parts C and B). Slide in bottom plywood panel (part I) followed by the middle rail (part D). Finally, add the upper plywood panel (part J) and die curved rail (part A). Set assemblies aside over night.
3. When the glue has dried, sand the faces of the frames. Then, use the router with a straight cutter to make the dadoes (1/8” x 13/16”) in the sides and back for the desktop slab (part L2).
4. Create a plywood template (see diagram) to cut the grooves in die sides that will receive the sliding tambour door. Cut out the template with a band or jig saw and carefully sand away any blade marks.
5. Lay out the template on die first side frame, setting it back 15/16”. Tack template in place so its curved edge is parallel to the curved edge of the curved rail. Then, use a 5/16” diameter straight cutter with a router-template bushing guide to cut the grooves. Repeat for second side. Note: Take extra care when positioning the template on the second side, as the tambour door grooves need to be exact mirror images.
III. Tambour Door1. The 25 tambour slats (part N) are ripped from 1/2” stock on die table saw with the blade tilted at a 10 degree angle. A molding head cutter with a small radius curve is used to round the slat corners. Note: Use a feather board to keep the pieces snug against the rip fence.
2. Cut slats to length (see plans for dimensions). To cut the end rabbets on die underside of each slat, start by aligning the ends and taping them together. Then, clamp on a guide stick and make a pass with the dado head on the radial-arm saw. Using a guide stick helps you cut all the rabbets at the same time and guarantees that they will all have the same dimensions. Sand surfaces smooth and wipe clean.
3. A piece of 10 oz. canvas (part P) is used to join the slats. To assemble, start by taping the square yard of canvas to the workbench. Then, carefully lay out and tack down two guide strips – one along die back, the other along a side – making sure the strips meet at a right angle. Note: The side guide should be less than 1/4” thick to permit the rabbet shoulders to abut accurately.
4. Starting from the back edge and working forward, position and join the 25 slats to the canvas using contact cement. Note: It is imperative that you read and understand all contact cement application and safety instructions before proceeding with this step. After the 25 slats are in place, complete the door by affixing the tambour's bottom rail (part M - see diagram for dimensions) to the front and a retaining strip (part 0) on the backside of the canvas aligned behind the bottom rail. The knobs will be attached to the bottom rail and secured with screws drilled through the retailing strip.
5. Set tambour door assembly aside over night. After cement has set, position door knobs on tambour's bottom rail 4” in from each end. Mark the knob location; drill holes for screws. Insert screws from back side through retaining strip; screw knobs into place.
IV. Assembly1. Bore pilot holes for the screws in the top (part LI), back frame and side frames, using a 1/16” drill bit (see diagram for hole placement). Then, dry assemble the desk with desktop slab inserted and hold pieces in place with bar clamps. Now, continue drilling die pilot holes into the desktop slab and into die top edges of die vertical members.
2. Disassemble the piece and finish drilling to counterbore and enlarge screw holes in the outer members.
3. For the sake of convenience, it’s wise to sand, stain and finish the inside surfaces of the desk at this stage, while the piece is disassembled (See Section VI).
4. When the finish is dry, assemble the desk. After applying glue to the mating surfaces, attach the first side frame and the desktop slab to the back. Screw the pieces into place and wipe away any excess glue. Insert the tambour unit into the first side; attached the second side and finally the top. Screw the pieces into place.
5. As the final step, cut the required number of wood plugs. Squirt glue into each screw hole and press plugs into place to conceal screwheads. If possible, allow plugs to rest over night before sanding. Projecting plugs should be sanded flush with cabinet surface using 120-grit paper in the random orbit sander. Finish all carcase sanding using 150-grit paper in die pad sander always working with the grain.

–4–
CONTINUED - WOODWORKS: ADVANCED CONTEMPORARY ROLLTOP DESK
V. Pigeon Hole Shelf Unit (PHSU) and Large Drawer1. With the desk assembled, the PHSU and large drawer now can be constructed. To start, remeasure the desk to determine accurate dimensions for the two pieces. If necessary, alter the dimensions in the plans to suit.
2. Lay out and cut the required members (parts Q through DD) to size. Plough the necessary rabbets (see diagram for dimensions) in the PHSU top (part T), PHSU drawer fronts (part AA) and larger drawer members (parts Q and R).
3. Dry assemble the PHSU and large drawer to check for fit and size. Make any necessary adjustments.
4. Again, for the sake of convenience, it’s wise to sand, stain and finish the PHSU and drawer while the pieces are disassembled (See Section VI).
5. When the finish is dry, assemble PHSU and drawer using straightforward construction techniques.
Builder’s Tip: Since the sides, back and bottom of the two small drawers in the PHSU are made of 1/4” plywood stock, and will carry little weight, they can be assembled using simple butt joints and brads. However, the front pieces (part AA) are made of oak and will require rabbets for assembly as indicated previously.
6. Locate and bore holes for the large and small drawer knobs. Attach knobs.
7. Finally, lay out and cut the rails (part Kl) for the large drawer (see plans for dimensions). Position rails on inside of each side frame and nail into place.
8. Install PHSU and drawer into desk assembly.
VI. Sanding, Staining, Finishing1. Read and follow label instructions for all products.
2. Sand surfaces smooth, then wipe with a tack cloth to remove all traces of dust.
3. If working with a soft wood, such as pine, apply Minwax® Pre-Stain Wood Conditioner according to label instructions. Wait 15 minutes, and wipe away excess using a clean rag.
4. Within two hours, apply the Minwax® Wood Finish™ of your choice to all surfaces using a clean brush and with-the-grain strokes. Remember to stir the stain well - do not shake. Allow stain to penetrate for 5-15 minutes. Wipe off excess with clean, lint-free rag. Additional coats may be applied for deeper color. Allow to dry at least 4-6 hours between coats.
5. Stir Minwax® Fast-Drying Polyurethane before and during use. Do not shake. Using a natural bristle brush, apply a thin coat to all stained surfaces per label instructions.
6. Allow finish to dry for at least three hours (longer if conditions are humid); when dry lightly sand again using 220-grit paper and wipe clean.
7. Apply second coat and let dry. When dry, install the drawers knobs.
8. Allow finish to cure for approximately two weeks.
Optional Stain/FinishFor stain and polyurethane protection in one easy step, use any Minwax® PolyShades® color according to label instructions.
FINISHER’S TIPS• Most woodworkers agree that raw wood should be sanded to at least the 150 grit stage, before applying any finishing materials. Sandings between coats should be done with 180 to 220 grit abrasives.
• If you’re working with a water-based finish, such as Minwax® Polycrylic® Protective Finish, don’t use the standard tipping-off procedure. Instead: (1) Transfer a full brush-load to the surface and quickly spread using with-the-grain strokes. (2) Immediately use cross-grain strokes to eliminate any chance of holidays (missed spots). (3) Complete using with-the-grain strokes across the full length of the surface, being careful not to leave any heavy spots.
• When additional surface protection is desired, apply two or three coats of Minwax® Paste Finishing Wax over all exposed surfaces. Let stand for 10 minutes, then buff with a clean fiber scrub brush. Finish buffing with a clean, lint-free cloth.
• It is critical that all stains and finishes be allowed to dry thoroughly between coats. Remember, drying times can vary due to humidity and other climatic conditions.
VII. Cleanup• If you have product left over, wipe the can rim so that product in the rim won’t dry out and prevent the lid from forming a tight seal.
• Clean brushes used for oil-based finishes with mineral spirits.

–5–
CONTINUED - WOODWORKS: ADVANCED CONTEMPORARY ROLLTOP DESK
VIII. Product SafetyDANGER! HARMFUL OR FATAL IF SWALLOWED. SKIN IRRITANT. COMBUSTIBLE. KEEP OUT OF REACH OF CHILDREN.
WARNING! Removal of old paint by sanding, scraping or other means may generate dust or fumes that contain lead. Exposure to lead dust or fumes may cause brain damage or other adverse health effects,especially in children or pregnant women. Controlling exposure to lead or other hazardous substances requires the use of proper protective equipment, such as properly fitted respirator (NIOSH approved) and proper containment and cleanup. For more information, call the National Lead Information Center at 1-800-424-LEAD (in U.S.) or contact your local health authority.
DANGER: Contains mineral spirits. Harmful or fatal if swallowed. Do not take internally. Skin irritant. Avoid contact with skin and eyes. Wear rubber gloves and safety glasses when handling. Combustible. Do not use or store near heat, sparks, flame or other source of ignition. Close container after each use. Avoid inhalation and use only with adequate ventilation. If using indoors, open all windows and doors to make sure there is fresh air movement. If you experience lightheadedness, dizziness or headaches, increase fresh air movement or leave the area. Reports have associated repeated and prolonged occupational overexposure to solvents with permanent brain and nervous system damage. Intentional misuse by deliberately concentrating and inhaling the contents may be harmful or fatal.
FIRST AID: If swallowed: Do not induce vomiting. Call physician immediately.
FOR SKIN CONTACT: Wash thoroughly with soap and water. If irritation persists, get medical attention.
FOR EYE CONTACT: IMMEDIATELY flush eyes thoroughly with water, then remove any contact lenses. Continue to flush eyes with water for at least 15 minutes. If irritation persists, get medical attention.
IF AFFECTED BY INHALATION: Immediately remove to fresh air. If symptoms persist, call physician.
IX. Safe Disposal of Rags & WastePlease be mindful of the safe way to dispose of used rags and other waste. Rags, steel wool and other waste soaked with oil finishes may spontaneously catch fire if improperly discarded. Place rags, steel wool and waste immediately after use in a water-filled metal container. Tightly seal and then dispose of in accordance with local regulations. Be sure to keep the container out of reach of children.

CONTINUED - WOODWORKS: ADVANCED CONTEMPORARY ROLLTOP DESK
–6–
MATERIALS SHOPPING LIST Nominal Dimensions
CUTTING LIST Actual Dimensions
While oak was used in ihe prototype, mahogany, cherry, walnut and even pine are equally suitable woods for this project. If: to check for dimensional differences in stock.
Before cutting pieces to size, double-check all measurements. This way, if there is any deviation from the dimensions shown in the drawings, you can change them to suit the piece you are building. Be sure to mark any dimension changes in color on the original drawings.
Hardware:• 19 2 1/2” no. 12 flathead wood screws
• Two 1 1/4” no. 12 flathead wood screws
• 6 1” no. 12 flathead wood screws
Miscellaneous:• Professional strength wood glue
• Minwax® Fine Finishing Brushes
• Tack cloth
• Clean rags
• Water-filled metal container with lid
• Sanding block (100-through 220-grit)
• Minwax® Wood Finish™ Stain Markers™
• Mineral spirits
• Contact cement
Quantity Nominal Dimensions Material1 pc. 1/2” x 8” x 72” Red Oak1 pc. 1/2” x 8” x 96” Red Oak1 pc. 1/2” x 8” x 144” Red Oak1 pc. 1” x 8” x 96” Red Oak2 pc. 1” x 12” x 96” Red Oak 1 pc. 1/4” x 48” x 96” Red oak, double-sided veneer grade plywood.1 pc (opt) 18 x 96 Red Oak flexible veneer (note: This is the minimum size available, actual size needed, if necessary, is 16 x 60”)1 sq.yard Canvas3 model no.BP-724-30 Amerock* knobs (or equivalent)2 model no. BP-725-30 Amerock* knobs (or equivalent)16 1/2” Wood plugs (cut from red oak)8 3/8” x 2” Grooved dowels
Key Part Actual Dimensions Pcs. RequiredA Curved rails Cut both from one board (3/16” x 10 1/2” x 30”) 2B Stile (sides) 13/16” x 3” x 42 ” 2C Stile (sides) 13/16” x 3” x 28 1/2” 2D Rail (sides) 13/16” x 3” x 14 3/4” 4E Stile (back) 13/16” x 3” x 35” 2F Rail (back) 13/16” x 3” x 23 3/4” 3 G Back panel (top) 1/4” x 16 1/4” x 23 3/4” 1 (plywood) H Back panel (bottom) 1/4” x 11 1/4” x 23 3/4” 1 (plywood) I Side panel (bottom) 1/4” x 14 3/4” x 16 1/4” 2 (plywood) J Side panel (top) 1/4” x 11 1/4” x 14 3/4” 2 (plywood)K1 Drawer rail 13/16” x 7/8” x 17 1/2” 2K2 Tambour stop 13/16” x 3/8” x 28 3/8” 1 L1 Top 13/16” x 3/8” x 28 3/8” 1 L2 Desktop 13/16” x 19 3/8” x 28 5/8” 1 (glued up) M Tambour bottom rail 1/2” x 1 3/8” x 28 7/8” 1 N Tambour slats 1/2” x 3/4” x 28 7/8” 25 O Retaining strip 1/8” x 1 1/4” x 27 7/8” 1 P Canvas 1 sq. yard 1Q Drawer (front and back) 13/16” x 2 1/4” x 28 1/8” 2 R Drawer (sides) 1/2” x 2 1/4” x 18 1/4” 2 S Drawer (bottom) 1/4” x 18 1/4” x 27 5/8” 1 (plywood) T PHSU lop and bottom 1/2” x 5 1/2” x 28 1/8” 2 U PHSU sides 1/2” x 5 1/2” x 11” 2 V PHSU large dividers 1/2” x 5 1/2” x 11” 2 W PHSU small dividers 1/2” x 5 1/4” x 8” 3 X PHSU shelves 1/2” x 5 1/4” x 8” 2 Y PHSU fascia 1/4” x 1 1/4” x 28 1/8” 1 (plywood) Z PHSU back 1/4” x 11” x 27 5/8” 1 (plywood) AA PHSU sm.drawer (front) 1/4” x 2 7/16” x 7 3/8” 2 BB PHSU sm.drawer (back) 1/4” x 2 7/16” x 7 3/8” 2 (plywood) CC PHSU sm.drawer (side) 1/4” x 2 7/16” x 5” 4 (plywood) DD PHSU sm.drawer (bottom) 1/4” x 4 3/4” x 7 3/8” 2 (plywood)

CONTINUED - WOODWORKS: ADVANCED CONTEMPORARY ROLLTOP DESK
–7–

CONTINUED - WOODWORKS: ADVANCED CONTEMPORARY ROLLTOP DESK
–8–