Embed Size (px)
Citation preview

Wireless APP Camera
Installation and Operating Instructions
C935IP
Version 1.0
PLEASE READ THESE INSTRUCTIONS CAREFULLY BEFORE USING THIS PRODUCT
AND KEEP THIS MANUAL FOR FUTURE REFERENCE.

The state of art WAPP camera is capable of deliver high quality Digital High
Definition (HD) video to your smart-mobile device(s), which would require
higher internet bandwidth. Due to your local internet environment condition,
your mobile device(s) may display black-screen or temporary disconnect to
the WAPP camera.
Make sure the WAPP camera is operating with sufficient internet
bandwidth, 1Mbps (upload/download speed) is suggested.
For best performance, the smart-mobile device(s) need to be on Wi-Fi
or 4G mobile network in order to receive maximum download speed.
When the internet transmission is low, your WAPP APP will
automatically switch to Relay Mode:
By adjusting to “Better Streaming” in the system setting section
may improve the WAPP APP performance.
Your internet bandwidth is limited. For best performance, try to avoid
more than two users connecting to the WAPP camera simultaneously.
Make sure your smart-mobile device(s) is equipped with up-to-date
technology, 1.5GHz dual core processor or equivalent is suggested.
If the signal strength of your Wi-Fi router is weak, there are several
ways to improve transmission:
Change router/camera relative position to receive better signal.
Use wire Ethernet cable on the WAPP camera to establish
connection between WAPP camera and your router.
Use Wi-Fi repeater/extender to maximize the service range of
your Wi-Fi route.
Switch your router to 11b/11g mode in order to improve router
service range.
Purchase extension cable or high gain antenna for your camera
from the WAPP vendor.
Please make sure the memory card used is CLASS10 rated.

1
CONTENTS
INTRODUCTION ............................................................................................................. 2
WIRELESS DEVICES OPERATING RANGE .................................................................. 2
IMPORTANT SAFETY PRECAUTIONS ....................................................................... 2
KIT CONTENT .............................................................................................................................. 4
SAFETY AND INSTALLATION TIPS ....................................................................................... 5
NIGHT VISION ....................................................................................................... 6
CAMERA INSTALLATION .................................................................................................... 6
CAMERA OVERVIEW ................................................................................................................ 6
DOWNLOAD AND SETUP THE APP ............................................................................ 8
LIVE VIEW / SNAPSHOT / RECORDING .............................................................. 11
VIEWING YOUR SNAPSHOTS ........................................................................................ 12
PLAYBACK YOUR VIDEOS ..................................................................................................... 12
MAIN PAGE OVERVIEW ......................................................................................................... 16
ADVANCED SETTING ....................................................................................................... 21
ADMIN PASSWORD .................................................................................................. 22
EMAIL ALERT ................................................................................................................................. 22
TIME ZONE.................................................................................................................23
DAYLIGHT SAVING .............................................................................................................. 23
DEVICE SECURITY CODE ................................................................................................. 23
VIDEO SETTINGS ........................................................................................................... 23
WI-FI SETTING ................................................................................................................ 24
SENSITIVITY SETTING ................................................................................................. 25
EMAIL SETTING ............................................................................................................. 25
SD CARD SETTING ......................................................................................................... 26
OVERWRITE SD CARD.................................................................................................. 26
PROFILE SETTING ......................................................................................................... 26
DEVICE INFORMATION ......................................................................................... 26
PRODUCTION SPECIFICATION .................................................................................... 30
STORAGE MEDIA MANAGEMENT ............................................................................... 31

2
INTRODUCTION
PLEASE READ BEFORE YOU START Always use discretion when installing CCTV equipment, especially when there is
perceived policy. Enquire relevant local regulations applicable to the lawful installation
of video recording/surveillance. Third party consent may be required.
WIRELESS DEVICES OPERATING RANGE Ensure the signal reception viewed from the wireless camera(s) is the best possible
reception between the camera(s) and the Wi-Fi router. If necessary, reduce the
distance between the camera(s) and the Wi-Fi router to improve overall system
performance. Wireless Color Camera Recordable CCTV Kit operating on a secure
digital 2.4GHz frequency which could greatly reduce interference from product such
as wireless routers, cordless phones or microwave ovens.
IMPORTANT SAFETY PRECAUTIONS
Damages caused by non-compliance with this operating manual will void the warranty!
We will not assume any liability for damages to items or persons caused by improper
handling or non-compliance with the safety notices! Any warranty claim will be null and
void in such cases.
1. Do not drop, puncture or disassemble the camera; otherwise the warranty will be
voided.
2. Avoid all contact with water, and dry hands before using.
3. Never tug on the power cords. Use the plug to unplug it from the wall outlet.
4. Do not expose the camera to high temperature or leave it in direct sunlight. Doing so
may damage the camera or cause camera temporary malfunction.
5. Use the devices with care. Avoid pressing hard on the camera body.
6. For your own safety, avoid using the camera or power off the camera when there is a
storm or lightning.
7. Remove the power adapter during long periods between usages.
8. Use only the accessories and power adapters supplied by the manufacturer.
9. To meet the regulations pertaining to parental responsibility, keep the devices out of
the reach of infants.
10. Check power cables, do not get crushed or damaged by sharp edges whenever the
devices are in operation.

3
FCC Compliance Statement: This
device complies with Part 15 of the
FCC rules. Operation is subjected
to the following two conditions: (1)
this device may not cause harmful interference,
and (2) this device must accept any interference
received, including interference that may cause
undesired operation.
Products with CE Marking comply with
EMC Directive (2004/108/EC); Low
Voltage Directive (73/23/EEC);
R&TTE(1999/5/EC); ROHS Directive
(2011/65/EU) issued by the Commission of the
European Community. Compliance with these
directives implies conformity to the following
European Norms: EMC: EN 301 489
LVD: EN 60950
Radio: EN 300 328
FCC/CE WARNING This equipment has been tested and found to comply with limits for a Class B digital
device, pursuant to Part 15 of the FCC rules and ETSI(EN) 300328. These limits are
designed to provide reasonable protection against harmful interference in residential
installations. This equipment generates, uses, and can radiate radio frequency energy, and
if not installed and used in accordance with the instructions, may cause harmful
interference to radio communications. However, there is no guarantee that interference
will not occur in a particular installation. If this equipment does interference to radio or
television equipment reception, which can be determined by turning the equipment off and
on, the user is encouraged to try to correct the interference by one or more of the
following measures: -Reorient or relocate the receiving antenna.-Move the equipment
away from the receiver.-Plug the equipment into an outlet on a circuit different from that
to which the receiver is connected.-Consult the dealer or an experienced radio/television
technician for additional suggestions. You are cautioned that any change or modifications
to the equipment not expressly approved by the party responsible for compliance could
void your authority to operate such equipment.
DISPOSAL
If the camera system no longer functions or can no longer be repaired, it
must be disposed of according to the valid statutory regulations. Disposal
of spent batteries/accumulators:
You are required by law (Battery Ordinance) to return all spent batteries
and accumulators. Disposing of spent batteries/accumulators with common household
waste is prohibited! Batteries/accumulators that contain hazardous substances are marked
with the symbols on the side. These symbols indicate that it is prohibited to dispose of
these batteries/accumulators in the household waste. The abbreviations for the respective
heavy metals are: Cd=cadmium, Hg=mercury, Pb=lead. You can return spent batteries and
accumulators that can no longer be charged to the designated collection points in your
community, outlets or wherever batteries or accumulators are sold. Following these
instructions will allow you to fulfill the legal requirements and contribute to the protection
of our environment!

B Camera Stand x 1
D Power Adapter x 1
F Rj45 Connect Jack x 1
F Quick Start Guide x 1
KIT CONTENT
A Wireless App Camera x 1
C Camera Antenna x 1
E Screw Pack x 1
G Manual CD x 1
Tools Required: Electric drill
5mm masonry drill bit
15mm masonry drill bit No. 2 Philips screwdriver
For best system performance: - iOS: iPhone4S / iPad2 / Mini iPad or above. Maximum 12 registered camera connections. - Android: 1.5G dual core processor or above / 960*540 pixel or above. Maximum 12 registered camera connections. - Storage: Class 10 memory card. - Bandwidth: 1Mbps or above upload/download speed suggested.

SAFETY AND INSTALLATION TIPS
Do not attempt to open the units with the power adaptor plug connected to avoid any risk of personal injury.
When installing CCTV camera(s), always follow manufacturer's advice when using power tools, steps, ladders, etc. and wear suitable protective equipment (e.g. safety goggles) when drilling holes. Before drilling holes through walls, check for hidden electricity cables and water pipes. The use of cable/pipe detector is advisable.
It is also advisable to avoid exposing any cameras to extreme weather conditions (e.g., under a gutter which is prone to any water leaks). When installing any cameras with this unit, it is advisable to use cable conduit to protect any video/power extension cables from being exposed externally and to prevent/reduce the chances of the cables being tampered with. After drilling any hole though an external wall for a cable, ensure the hole is sealed up around the cable using a sealant to prevent drafts.
To prevent a fire or electrical shock hazard, do not attempt to open the housing while the unit is exposed to rain, water or wet conditions. There are no user serviceable parts inside. Refer servicing to qualified service personnel. Avoid pointing the camera(s) directly at the sun or any bushes, tree branches or moving objects that might unnecessarily cause the camera to record.
5

NIGHT VISION
The camera has built-in infrared LEDs to allow you to view at night for 24-hour surveillance. The LEDs will automatically activate at night and the picture viewed will turn to black and white. The night viewing range is up to 5 meters.
CAMERA INSTALLATION
Secure camera stand on the stable surface.
Loosen up the Thumb screw.
Adjust proper view angle then secure the joint with T-bolt.
Ceiling Mount Wall Mount
6

CAMERA OVERVIEW
Antenna
Power Indicator Signal Indicator
SD Card Slot
PIR Infrared LEDs
Stand
RJ-45 Cable
Power Cable
7
8
DOWNLOAD AND SETUP THE APP The Wireless APP camera is designed to deliver live video footage directly to your smart phone or tablet device. Please follow these steps to download, setup and use the APP.
APP Name: OMGuard HD
Download the App 1. From you smart phone or tablet device, click the APP Store/Google Play
and search for “OMGuard HD”. 2. Once located the APP, select download. 3. Once download completed, you will find the APP icon on your mobile
device screen.
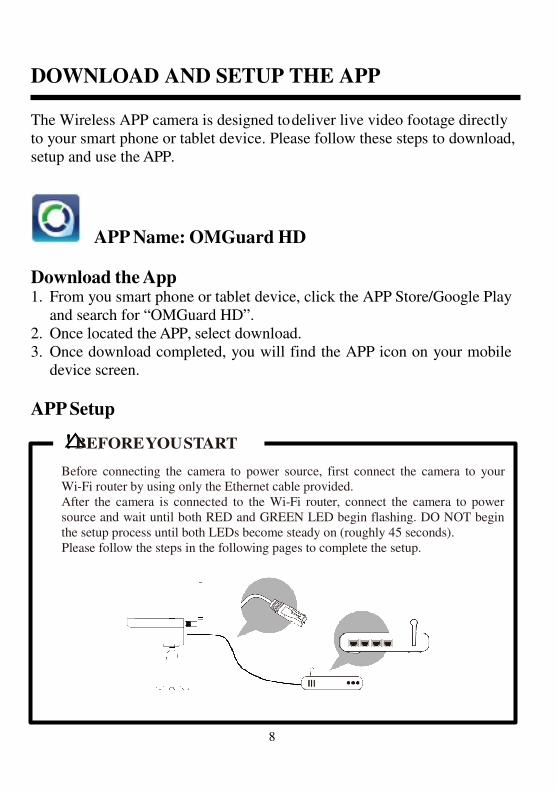
APP Setup
△! BEFORE YOU START
Before connecting the camera to power source, first connect the camera to your Wi-Fi router by using only the Ethernet cable provided. After the camera is connected to the Wi-Fi router, connect the camera to power source and wait until both RED and GREEN LED begin flashing. DO NOT begin the setup process until both LEDs become steady on (roughly 45 seconds). Please follow the steps in the following pages to complete the setup.

9
1. Make sure the mobile device you are using is connected to the same Wi-Fi router the camera is connected to.
2. Locate the “OMGuard HD” icon in your mobile device and launch the App.
3. Tap the ADD CAMERA icon to add a new camera. Then click the SEARCH button for a quick setup. The APP will search available camera(s) connecting to the Wi-Fi router and display the camera information in the pop up list. Select the camera from the list and the APP will automatically add the camera’s DID code to the DID column. Enter the default password 123456.
(iOS) (Android)
Note: After you have entered the default password, the APP will remind you to change the default password.
4. Click SAVE to complete the camera settings. The system confirms the user identity and grants permission to user access.
5. You can refer to "ADD CAMERA" section for detail on adding additional
camera(s).

10
In most cases, you can successfully add the camera according to the steps above. However, the camera will not find the network if Wi-Fi router turns off the SSID broadcasting function. Please enable the SSID broadcasting to complete the settings.
Note: Most Wi-Fi routers broadcast the Service Set Identifier (SSID) by default. This is the name of your wireless network, and SSID broadcasting is how Wi-Fi-enabled devices find networks.
The camera will only accept SSID composed with English alphabet charactors and arebic numbers, none-English and special charactors (!@#$%, ect.) will not be accepted.

11
LIVE VIEW / SNAPSHOT / RECORDING
Tap to take snapshot image(s) of the video. The captured snapshots will be stored in your mobile device.
Tap to turn ON/OFF the volume.
Tap to Start/Stop recording. The recorded video file will be stored in the memory card of your camera.
Tap to return to the main page.
The APP allows users to have access to live video. User can take snapshot image(s) and record the live video.
When you launch the App on the smart phone or tablet, the image displaying on the main screen is the very last automatically captured snapshot from the live view of the previous established session. Tap the image to enter live view mode.
The controls and layout of the APP have been customized to meet the operating system requirements of the mobile device. The main page may vary, depending on your mobile device. By default, the live view is displayed in portrait mode. You can also turn the device sideways to switch to landscape mode for a larger view.
Note: Once the recording is started by motion detection or manually, the APP will continue the recording for 1 minute. User cannot stop the recording during this period.

12
VIEWING YOUR SNAPSHOTS
For iOS You snapshots will be named with the time stamp and saved into the
Camera Roll location of your mobile device.
For Android You snapshots will be named with the time stamp and saved into the Photo Gallery > snapshot folder on your mobile device.
PLAYBACK YOUR VIDEOS
The recorded video file(s) on your camera is automatically saved to the memory card inserted in your camera. You can remotely access the file(s) for playback via your mobile device.
Tap the CAMERA SETTING icon on the main page.
(iOS) (Android)

13
Tap EVENT LIST icon and the Date-Time filter would appear. User may define the period for system to display all available recorded file(s) for playback.
During the playback, you can tap the PAUSE icon to pause / resume the video, MUTE to deactivate/activate the audio function and GO BACK icon to return to the event list section. You may also review recorded video file(s) with your PC. For best performance, please use “Free Video Converter” from http://www.freemake.com/free_video_converter/, or Video LAN from http://www.videolan.org/.
The video is using FFmpeg codes and is H.264 compression method.
User’s local network environment condition (example: upload/download speed) may cause improper video playback (black screen), when it happens, please leave the playback mode and try again at later time.
APP layout may vary depending on the display panel size of your mobile devices. Please refer to the release note from the APP Store/Google Play for more details.

To Download/Delete the video file(s) in the EVENT LIST section, please follow the steps below:
.DOWNLOAD
Long press the video clip to download the file onto your movbile device.
Note: During the download process, system will stop both the live view and recording functions. APP will automatically inform any user accessing the camera that the systemis busy and the connection has been terminated.
14

15
This function helps user to easily withdraw the recorded file(s) from the
memory card. It is strongly suggested to download the file(s) at your
home Wi-Fi network (WLAN), meaning the mobile device(s) is
connecting to the same Wi-Fi router as the camera. Minimum bandwidth
requirment is 1Mbps (upload/download). Download process may be force
stopped if the bandwidth becomes too slow and cannot continue.
Note: For Android system, please use "MX Player" APP for playback
downloaded video file(s). You can find "MX Player" from Google Play
(free of charge).
Note: If you are experiencing scattering video image, please switch the
decoder function of the MX Player to "S/W Decoder".
.DELETE
First select the file(s) by tapping the file name, following by taping on the Trashcan icon to delete selected file(s) Multiple files can be selected for delete.
Check the video clip
Then tap the trash can icon

16
MAIN PAGE OVERVIEW
The MAIN PAGE section offers user an overview for all registered camera(s), including camera status (connected/disconnected). User can quickly access the camera(s) in the list. When multiple cameras are registered, scroll down to locate the registered camera for access.
(iOS) (Android)
ADD CAMERA
The ADD CAMERA icon allows you to register additional camera(s) to the system. The system supports up to 3 concurrent user connections.
1. Connect the additional camera to the Wi-Fi router using the provided
Ethernet cable. The Wi-Fi router must be the same as what your mobile device is connecting with.
2. Tap the ADD CAMERA icon. The System Information panel appears.
Specify a name or use the default system name for your camera in the SYSTEM NAME field.
3. Enter the DID code that provided with your camera in the DID column.

17
4. Enter the default password 123456 in the Security Code column.
5. Click SAVE to complete the camera settings. The APP attempts to
establish camera connection. Once the camera is successfully connected, the “Connected” status will be shown on the left upper corner.
6. Repeat step 2 to 5 to add more cameras.

18
In the CAMERA SETTING section you will allow to (1)
configure system setting, (2) unregister camera from the APP
and (3) enter event list for recorded video file(s) playback. Tap
the CAMERA SETTING icon to enter/exit CAMERA
SETTING.
Tap the CAMERA SETTING icon. The following icons appear on the panel.
(iOS) (Android)
Tap the ADVANCED SETTING icon to setup camera
configuration. (Please refer to "Advanced Setting" for detail).
Tap the DELETE icon to remove the camera connection.
Tap the EVENT LIST icon to check or playback the recorded
events. (Please refer to "Playback Your Video" for detail).
The INFORMATION icon allows you to enable PIN lock, push notification function and check the App information.

19
SETUP PIN LOCK
(iOS) (Android)
If you enable PIN Lock, the user will be asked to enter the PIN code when you launch the APP.
1. Enable the “Enable lock when starting” function. Then enter your PIN
code. 2. Confirm your PIN code again.
Note: If you forgot your PIN code, please uninstall the APP and reinstall it on the mobile device.
NOTIFY (PUSH NOTIFICATION) The WAPP camera supports motion detection function. When any event is detected in the camera site, you’ll receive push notification on the mobile devices for the event recognized by the camera.
For iOS If you want to enable/disable it, please follow the steps on your iOS mobile device:

20
1. Launch Settings from your Home screen. 2. Tap Notifications. 3. Scroll down to find “OMGuard HD” APP and tap on it. 4. Switch the toggle to ON/OFF in Notification Center.
Note: It takes time for the changes to take effect in iOS, normally within 2 hours.
For Android If you want to enable/disable it, please follow the steps below.
Note: The internet connection and wireless network interference may influence the performance of push notification service.
ABOUT APP/API Version Info
(iOS) (Android)
Tap the ABOUT icon to check the APP Version when necessary.

21
ADVANCED SETTING
This chapter explains the advanced settings for administrator. Administrator
is the one who owns the administration password and has the full control to
the WAPP camera. The administrator can access all WAPP functions and
settings, while general users can receive the surveillance images for live
view/screen capture/video recording and may not manage the camera settings.
Admin Password The security code required to enter Advanced Setting for system setting management
Email Alert Enable / Disable receiving E-Mail alert (after
system detecting motion) on your mobile divice.
Please make sure you have setup the E-Mail
Setting correctly and have activated Motion
Detection function.
Time Zone Setup the appropriate time zone
Daylight saving Turn ON/OFF the daylight saving function.
Device Security Code The password required for remote access
Video Setting Configure the video quality and local power frequency
Wi-Fi Setting Manage your Wi-Fi Network
Sensitivity Setting Setup the camera sensitivity for motion detection
Email Setting Setup your email account for E-mail alert
SD Card Format Format/Setup the SD card
Profile Setting Save the current camera settings and apply the settings to other cameras
Device Information Check the App and API Kernel version
Note: It may take more than one minute for some routers to update the registered devices. When you complete advanced settings and return to device list, please wait for a while allowing your router to finish the camera registration.

22
ADMIN PASSWORD
The Admin Password is a specific security code for administrator to change the advanced settings. The default admin password is 123456. Please use this function to change the default admin password into your personal admin password. For the protection of your system configuration, every time you change the advanced settings, you need to enter the admin password. Please change the admin password periodically.
Note: If you forgot your admin password, please long press the reset button on the camera DC jack for 5 seconds to restore the password into factory default value 123456 (please refer to the Camera Overviewsection). All settings will be restored to factory default. You will need to configure your camera from the start.
EMAIL ALERT The camera supports the motion detection function, which is capable of detecting movements within the camera view, following with notifying user the sudden event with push notification and/or email alert, system can also begin recording.
When motion detection is enabled and system detects movement: - System will begin recording. - With Push Notification enabled, system will send out notification
message to user’s mobile device. - With Email Alert enabled, system will send out Email to alert user the
event.
Function Setting Action (when movement is detected)
Email Alert ON Camera: Start video recording Email account: Email alert
Push Notification ON Camera: Start video recording Mobile Device: Text notification
Motion Detection OFF Camera: Manual Recording Email account: No action Mobile Device: No action
Note: By default, the system has been limited to send out the email alert every 15
minutes to prevent overloading user’s email account.

23
TIME ZONE
The drop-down list shows the world time zone. Select the time zone that will work the best for you. If your date/time is during the daylight saving time period, please check the Daylight Saving box to adjust the system time properly.
DAYLIGHT SAVING
Activate/Deactivate the daylight saving function.
DEVICE SECURITY CODE
The Device Security Code is a specific security code to access the camera. The default password of the camera is 123456. Please use this function to change the default password into your personal security code.
1. Type in the old password. 2. Type in the new password and confirm the new password again. 3. Tap OK to save the setting.
Note: 1. Change password in system information page accordingly. 2. If you forget the Device Security Code, please hold down the reset button (P.8)
for 5seconds to reset the system to factory default. All settings will be restored to factory default. You will need to configure your camera from the start.
VIDEO SETTINGS
This section allows you to configure the video quality and environment mode.
Video Quality The Video Quality setting section allows you to adjust the quality of the
video streaming. By selecting better video image will allow you to view
high resolution image. By selecting better streaming will allow the video to
display more smoothly (quality depend on local internet environment).
Only select better image when you have sufficient bandwidth and updated
mobile device(s). Please refer to P.4 for system requirment.

24
Envi r onment Mode The Environment Mode settings allows you to select the power line frequency used at the location of WAPP camera. The power line frequency varies depending on geographic region. It may cause image flicker if wrong frequency is selected. Please check with local authorities for proper setting.
Low Light Enhancement
The Low Light Enhancement Mode is for improving the night view video image
by providing 5 levels to select from (5 = brightest).
WI-FI SETTING
The Wi-Fi setting allows you to choose the wireless connection and setup the Wi-Fi environment.
When you tap the “Manage Wi-Fi network” button, the system automatically scans the nearby network and shows the available Wi-Fi routers in the drop-down list. Choose the appropriate Wi-Fi router and enter the Wi-Fi router password if necessary. Due to security concerns, it is suggested to use the WPA/WPA2/ WPA2-PSK protocol for Wi-Fi network.
Note: 1. When the Wi-Fi connection is completed and you unplug the Ethernet cable,
the camera will reboot and it will take several minutes to establish the connection. Please re-launch the APP when you see the green signal indicator lights up.
2. The WAPP camera is designed to work with the legal Wi-Fi channels in your
region. Please refer to your Wi-Fi router manual to choose an appropriate channel for WAPP camera.
3. If camera fails to connect to the Wi-Fi router, please hold down reset button
for 2 seconds to reset the system and repeat register process again.

25
SENSITIVITY SETTING
This defines the camera parameter for motion detection.
Detection Mode PIR is hardware-based biomass detection. SOFTWARE uses advance software analysis to enhance PIR accuracy.
Motion Detection (available for Software Mode ONLY) HIGH – Suitable for detecting smaller object(s) within 5 to 6 meters LOW – Suitable for detecting larger object(s) within 3 to 5 meters
Note: The HIGH/LOW setting for Motion Detection only takes effect when user chooses “PIR & SOFTWARE” in Detect Mode.
EMAIL SETTING
The email setting allows you to configure the email environment, email account and password. Gmail account is suggested.
Click the “Use SSL” check box will transmit the data in encryption. This setting requires the Simple Mail Transfer Protocol (SMTP) configuration. Most ISPs use the SMTP method to transfer outbound mail via the internet. Only use the SMTP that supports SSL.
Gmail Setting (suggested)
SMTP Server smtp.gmail.com Enter the gmail SMTP server
SMTP Port 465 Enter the SMTP port 465
Username [email protected] Enter your email address
Password XXXXXXXX Enter the password for this gmail account

26
Email to [email protected] Enter the email address for the recipient who receives the email alert.
SD CARD SETTING
Formatting your memory card will ERASE all the data from it and you will not be able to get the data back. Please back up your video files BEFORE formatting the memory card.
Note: The system is optimized to Class 10 memory card. Memory card with lower specification will decrease the recording and playback function efficiency.
During format process, all recording & viewing will stop until format process completes.
OVERWRITE SD CARD
This function will overwrite the oldest files when the micro memory card is full. Turning on this function will enable the system to start overwriting the old files when the available memory card capacity is not enough. This ensures the most up to date video recordings can be saved so that you won’t miss any important information.
Note: You will want to reformat the memory card from time to time to ensure the
condition of the storage device. Your camera system will not work properly if the
memory card become corrupted.
PROFILE SETTING
This function allows you to save the following customized settings of camera. This is useful if you want to apply the same settings to another WAPP camera quickly. You won’t have to make all settings for each camera manually. �Time zone �Vido setting �Sensitivity setting
�Email setting �Overwrite Setting
DEVICE INFORMATION
This section shows the device information about the camera, including device version, total size and available size of the memory card.

27
TROUBLE SHOOTING
IF… SOLUTION
The APP cannot found the camera
• Make sure your network supports the DHCP protocol.
• Make sure the camera and your mobile device
connect to the same Wi-Fi router for the first setting.
• Make sure the Wi-Fi router is activated. • Make sure the camera is properly powered on.
• Use the “ADD CAMERA” function to
manually add the camera.
Wi-Fi router is not shown in the drop down list
• Make sure SSID broadcasting function is enabled in the Wi-Fi router. Consult your Wi-Fi router manufacturer for the settings if necessary.
• Change the wireless security protocol of your Wi-Fi router into WPA/WPA2/WPA2-PSK. Due to security concerns, WEP protocol is not suggested for some Wi-Fi routers.
Note: WPA/WPA2/WPA2-PSK encryption protocols are newer and more effective security standards for wireless networks than the older and less-secure WEP protocol.
No image appears • Make sure the power adaptor is not damaged
or defective and plugged into an electrical outlet with power.
• Relocate the camera to obtain the best reception of wireless signals.
• Make sure the camera is properly configured in App.
• Make sure the mobile device is connected to
3G/4G/Wi-Fi properly.

28
Low wireless signal
Poor image quality
• Wireless devices such as wireless home stereo system may reduce the signal strength. Leave as much space as possible between the camera/mobile device and these wireless devices.
• Clean the camera lens using lens cleaning cloth. Spots or dust on the lens can also cause image quality problems.
Motion detection is not working or over-react
• Make sure the sensitivity setting is turned ON (please refer to the Sensitivity Setting section).
• In motion detection mode, a moving object
within the camera viewing angle is necessary to trigger the motion sensor for recording
The APP cannot record any video clips
• Make sure the SD card has been correctly inserted
• Make sure the motion detection function has
been enabled. (please refer to the Sensitivity
Setting section). • Please format the SD card when it is used for
the first time (please refer to the SD Card
Format section) • Make sure you are using Class 10 rated
memory card.
Email alert is not working
• Make sure the email alert function is enabled (please refer to the Email Alert section).
• Gmail account is suggested for the email alert
function. Make sure you have setup the system configuration as suggested in the Email Alert
section. • Make sure the email address is has been
correctly entered.

29
Bright white spots appear at night time
• The camera's infrared LEDs produce invisible
light that reflects off surfaces such as glass. Install the camera on the other side of windows or place the lens flush against the surface to improve the night vision. It is suggested to install camera(s) under well-lit area.
Note: Please check the environment rating (Ingress) of the camera(s) before installing outdoors.
Memory card error • Make sure the memory card is correctly
inserted and formatted.
• Use the provided memory card within the package to ensure proper operation.
• Make sure your are using Class 10 rated
memory card.
Note: Please backup the data before formatting. Format function will erase all the data on the memory card.
Wrong data and time are shown.
• Wrong date and/or time will result in
unexpected record schedule. Make sure you’ve selected the correct time zone (please refer to
the Time Zone section). • Confirm the system date/time of the mobile
device to ensure correct operation.
• System will clock itself when connect to the
internet. Make sure the system is connected properly to the internet. You may use your mobile device to access the system to see if remote view is functioning properly.

30
PRODUCTION SPECIFICATION
Networking Parameter
Wireless Technology IEEE 802.11 b/g/n
Network Connection Ethernet (10/100 Base-T/Base -TX); Wi-Fi
Network Protocols TCP/IP, UDP, SMTP, NTP, DHCP, ARP
Simultaneous Viewers 3 concurrent sessions
Security WPA /WPA2/WPA2-PSK (TKIP, 128 bit AES)
Camera Parameter
Image Sensor Mega pixel CMOS
Antenna 3dBi Dipole
Housing Weather resistance metal
Environment Rating (Ingress) IP66
Light Source Environment Indoor (50Hz); Indoor(60Hz); Outdoor
Local Storage T Flash memory (not included in the package)
Min. Illumination 1~8 lux
Lowlight resolution 6 IR LEDs with IR switcher
Lowlight visibility 8 meters above
Video Audio Parameter
Image Compression H.264
Image Resolution HD 1280x720
Recording Frame Rate 720P@20 FPS
Supported Mobile Device
iOS requirement iPhone 4S / iPad Mini / iPad 2 with iOS 6.0 or above
Android requirement Android 4.1X or above
Hardware requirement 1.5GHz dual core or above
1GB or above internal memory, 960 x 540 pixel panel or
above
General Parameter
Power Requirements 100~240V switching power supply DC 5V 1A
Operating Temperature -10°~+50°C

31
STORAGE MEDIA MANAGEMENT
Micro SD Card Capacity
(Class 10)
HD / Better Image Better Streaming
4G 150 events 180 events
8G 300 events 360 events
16G 600 events 720 events
32G 1,200 events 1,440 events