Embed Size (px)
Citation preview

Windows SharePoint Services Installation Guide
www.SchmittDotNet.com
Version 1.4
10/11/2010

Windows SharePoint Services Installation Guide
© 2005 - 2010 Michael Schmitt Page 2 of 36 Version: 1.4
Copyright and Disclaimers This guide is for informational purposes only. THE AUTHOR MAKES NO WARRANTIES, EXPRESS OR
IMPLIED, IN THIS DOCUMENT.
Complying with all applicable copyright laws is the responsibility of the user. Without limiting the
rights under copyright, no part of this document may be reproduced, stored in, or introduced into a
retrieval system, or transmitted in any form or by any means (electronic, mechanical, photocopying,
recording, or otherwise), or for any purpose, without the express written permission of the author.
© 2005 - 2010 Michael Schmitt (www.SchmittDotNet.com). All rights reserved.
The names of actual companies and products mentioned herein may be the trademarks of their
respective owners.
History
Version Date Author Changes
1.3 02/23/2006 Michael Schmitt Installing SharePoint Services with SQL Server
2005.
1.4 10/11/2010 Michael Schmitt Reformatted.

Windows SharePoint Services Installation Guide
© 2005 - 2010 Michael Schmitt Page 3 of 36 Version: 1.4
Table of Contents
Copyright and Disclaimers ..................................................................................................2
History 2
Table of Contents...............................................................................................................3
Required Software .............................................................................................................4
Windows SharePoint Services and Frontpage Server Extensions .........................................4
Setting up Windows SharePoint Services ............................................................................7
Post-Setup Configuration ................................................................................................. 12
Create Local User Accounts .............................................................................................................12
Configure SharePoint Application Pools .........................................................................................14
Configure Data Access Credentials .................................................................................................16
Create the SharePoint Configuration Database ..............................................................................19
Set the Default SharePoint Content Database Server ....................................................................22
Create the SharePoint Site ..............................................................................................................23
Extend the SharePoint Site ..............................................................................................................29
Verify Data Access Credentials ........................................................................................................33
Verify the SharePoint Site ...............................................................................................................35

Windows SharePoint Services Installation Guide
© 2005 - 2010 Michael Schmitt Page 4 of 36 Version: 1.4
Required Software This guide describes installing Windows SharePoint Services 2.0 on a development workstation.
Typical benefits are:
Providing a runtime environment for web parts development.
Preparing a BizTalk Server 2004 installation. Some features of BizTalk Server require
Windows SharePoint Services.
To avoid conflicts with existing web applications, we choose a non-intrusive approach here:
Windows SharePoint Services should work with an existing (local) SQL Server 2005 instance.
Any edition of SQL Server 2005 (including the SQL Server 2005 Express Edition) is
appropriate.
No existing web site should be extended by Windows SharePoint Services. A new web site
will be created to be extended by Windows SharePoint Services.
The new SharePoint extended web site should be associated with a separate application pool.
Windows SharePoint Services 2.0 is an add-on for Windows Server 2003. So, Windows Server 2003 is
required!
These are the prerequisites for installing Windows SharePoint Services 2.0:
Windows Server 2003 (Standard Edition or better, English version preferred).
Windows Server 2003 Service Pack 1.
Latest patch level, i.e. all patches from the Microsoft Update web site installed.
Application Server Role enabled (so that IIS, ASP.NET are available).
.NET Framework 2.0 (required by SQL Server 2005) and .NET Framework 1.1 (required by
Windows SharePoint Services 2.0).
SQL Server 2005 (any edition). English version preferred.
The Windows SharePoint Services 2.0 can be downloaded for free from the Microsoft web site. We
will set up the Windows SharePoint Services with Service Pack 2.
Caution: There are also distributions of SharePoint Services and SharePoint Services SP2 as stand-
alone packages. Be sure that you install the package containing SP2.
Install the language version of the Windows SharePoint Services compatible with the language
version of your operating system. If you need different languages of SharePoint extended web pages,
additional SharePoint Language Template Packs can be installed.
Windows SharePoint Services and Frontpage Server Extensions Windows Server 2003 includes the Frontpage 2002 Server Extensions as a component that can be
installed optionally.

Windows SharePoint Services Installation Guide
© 2005 - 2010 Michael Schmitt Page 5 of 36 Version: 1.4
If the Application Server Role is enabled (required for setting up Windows SharePoint Services!) or if
Visual Studio 2003 is installed, it is very likely that the Frontpage Server Extensions are already
installed.
This is no problem, as long as the following restriction is obeyed:
Windows SharePoint Services and Frontpage 2002 Server Extensions must never extend the same
web site!
Usually, there is a Default Web Site listening at port 80.
Installing the Frontpage 2002 Server Extensions, you get another web site called Microsoft
SharePoint Administration listening at a port randomly chosen by the setup program. This name is
confusing since this web site has nothing to do with SharePoint.
Installing the Windows SharePoint Services 2.0, we will set up two more web sites, the SharePoint
Site listening on port 8081, and the SharePoint Central Administration web site listening on a port
randomly chosen by the setup program.
Here is the configuration we want to achieve:
The Default Web Site (port 80) might optionally be extended by the Frontpage 2002 Server
Extensions, but will not be extended by the Windows SharePoint Services.
The SharePoint Site (port 8081) will be extended by the Windows SharePoint Services.
All other web sites are not extended by any of those services.

Windows SharePoint Services Installation Guide
© 2005 - 2010 Michael Schmitt Page 6 of 36 Version: 1.4
This configuration is displayed in Frontpage Server Extensions 2002 Server Administration like this:
Do not extend any of the unextended sites with Frontpage 2002 Server Extensions!
Here is the SharePoint Central Administration view of the same configuration:
Do not upgrade the Default Web Site to SharePoint Services!

Windows SharePoint Services Installation Guide
© 2005 - 2010 Michael Schmitt Page 7 of 36 Version: 1.4
Setting up Windows SharePoint Services We are installing the Windows SharePoint Services 2.0 distribution package including Service Pack
2.
Open a command prompt, navigate to the folder where the setup package is located, and execute
setupsts.exe remotesql=yes
Wait for the License Agreement dialog. Confirm to Accept the terms in the License Agreement and
click Next.

Windows SharePoint Services Installation Guide
© 2005 - 2010 Michael Schmitt Page 8 of 36 Version: 1.4
Choose the Server Farm setup type. Do not choose the Typical Installation!
Click Next.

Windows SharePoint Services Installation Guide
© 2005 - 2010 Michael Schmitt Page 9 of 36 Version: 1.4
Confirm to start the setup process by clicking Install.

Windows SharePoint Services Installation Guide
© 2005 - 2010 Michael Schmitt Page 10 of 36 Version: 1.4
Wait for the setup process to finish. This can take several minutes and a couple of command
windows (iisreset, …) might become visible.

Windows SharePoint Services Installation Guide
© 2005 - 2010 Michael Schmitt Page 11 of 36 Version: 1.4
On completion of the setup process, the Configure Administrative Virtual Server web page is
automatically opened in Internet Explorer.
Close the configuration page. It will not work at this stage!
Continue with the post-setup configuration steps!

Windows SharePoint Services Installation Guide
© 2005 - 2010 Michael Schmitt Page 12 of 36 Version: 1.4
Post-Setup Configuration The post-setup configuration steps are important to finalize the installation of Windows SharePoint
Services!
Create Local User Accounts In the Local Users and Groups MMC snap-in, create two local user accounts:
apstsadmin
apsts
(ap = application pool.) Be sure that Password never expires.

Windows SharePoint Services Installation Guide
© 2005 - 2010 Michael Schmitt Page 13 of 36 Version: 1.4
Be sure that both accounts (apstsadmin and apsts) are members of both the IIS_WPG and the
STS_WPG group.

Windows SharePoint Services Installation Guide
© 2005 - 2010 Michael Schmitt Page 14 of 36 Version: 1.4
Configure SharePoint Application Pools The StsAdminAppPool has been created automatically during setup of Windows SharePoint Services.
In the rare case that the StsAdminAppPool has not been created automatically, create it now!
In IIS Manager snap-in, right-click StsAdminAppPool, and set the application pool’s identity to
<NameOfWorkstation>\apstsadmin.
Right-click StsAdminAppPool once again, and click first Stop and then Start (i.e. restart the
application pool).
Right-click the Application Pools node and choose New -> Application Pool.

Windows SharePoint Services Installation Guide
© 2005 - 2010 Michael Schmitt Page 15 of 36 Version: 1.4
Type StsAppPool as the name of the new application pool, and confirm the default settings by
clicking OK.
Right-click the newly generated StsAppPool, choose Properties, and set the Identity of the
application pool to <NameOfWorkstation>\apsts.
Restart the StsAppPool.

Windows SharePoint Services Installation Guide
© 2005 - 2010 Michael Schmitt Page 16 of 36 Version: 1.4
Configure Data Access Credentials Open the Microsoft SQL Server Management Studio, and connect to the (local) SQL Server 2005
instance which will be storing the SharePoint administration and content databases.
Right-click Security -> Logins, and choose New Login.

Windows SharePoint Services Installation Guide
© 2005 - 2010 Michael Schmitt Page 17 of 36 Version: 1.4
On the General page, type in (or choose) <NameOfWorkstation>\apstsadmin. Choose Windows
Authentication.
Windows SharePoint Services Installation Guide
© 2005 - 2010 Michael Schmitt Page 18 of 36 Version: 1.4
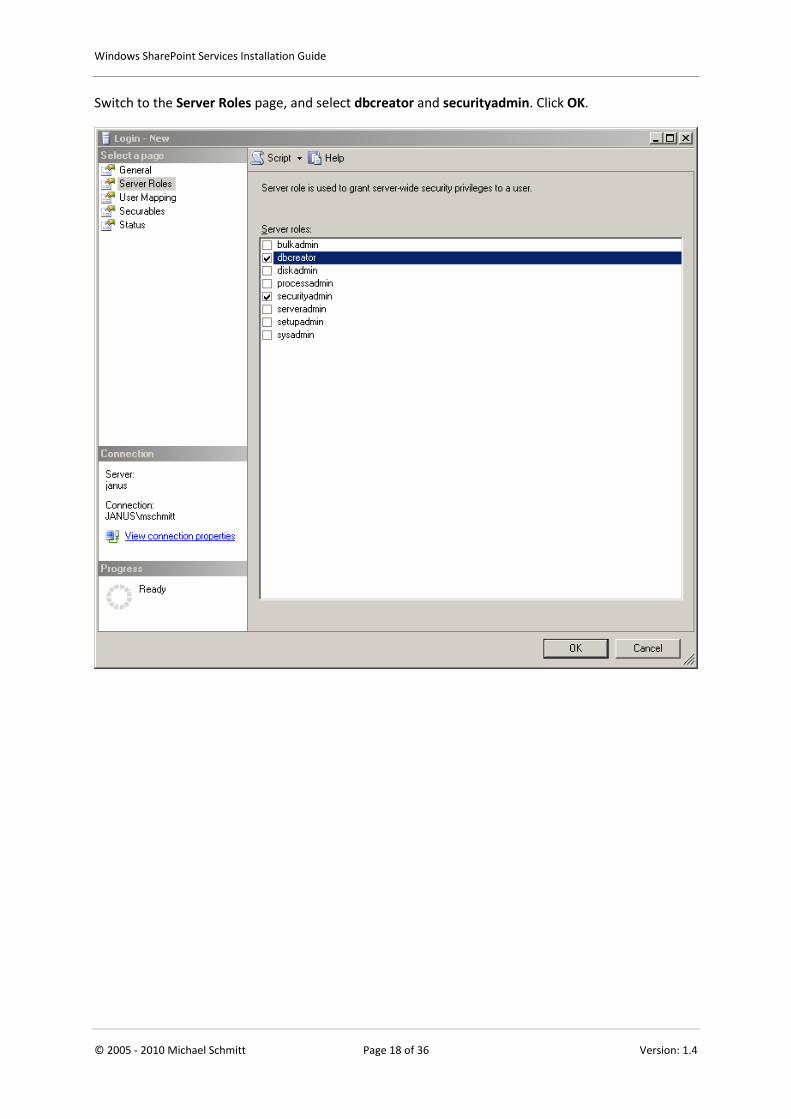
Switch to the Server Roles page, and select dbcreator and securityadmin. Click OK.

Windows SharePoint Services Installation Guide
© 2005 - 2010 Michael Schmitt Page 19 of 36 Version: 1.4
Create the SharePoint Configuration Database Now the apstsadmin account has sufficient credentials for creating the SharePoint Configuration
Database.
Open All Programs -> Administrative Tools -> SharePoint Central Administration.
Choose Use an existing application pool and select StsAdminAppPool.
On the same web page, choose NTLM as security configuration. Click OK.
Follow the advice to execute iisreset at a command prompt, and click OK after iisreset has been
finished.

Windows SharePoint Services Installation Guide
© 2005 - 2010 Michael Schmitt Page 20 of 36 Version: 1.4
The Set Configuration Database Server web page opens up.
Database server: Type the name of the SQL Server 2005 instance which will store the configuration
database. If the local default instance is intended, this is just the name of your workstation.
Type stsadmin as the name of the configuration database.
Use Windows authentication.
Select Users already have domain accounts. Do not create active directory accounts.
Click OK.

Windows SharePoint Services Installation Guide
© 2005 - 2010 Michael Schmitt Page 21 of 36 Version: 1.4
Now the Central Administration web page opens up. This indicates that the configuration database
has been created successfully. To be sure, confirm the existence of stsadmin in the SQL Server
Management Studio.

Windows SharePoint Services Installation Guide
© 2005 - 2010 Michael Schmitt Page 22 of 36 Version: 1.4
Set the Default SharePoint Content Database Server What is missing is at least one SharePoint content database. First, we set the default content
database server.
Open All Programs -> Administrative Tools -> SharePoint Central Administration.
In the Server Configuration section, click Set default content database server.
Type the name of the SQL Server 2005 instance which should store the default content database. If
the local default instance is intended, this is just the name of your workstation.
Click OK.

Windows SharePoint Services Installation Guide
© 2005 - 2010 Michael Schmitt Page 23 of 36 Version: 1.4
Create the SharePoint Site Since we don’t want to extend the Default Web Site with Windows SharePoint Services, we create a
separate web site for SharePoint.
Create an appropriate physical folder for the new web site.
In IIS Manager snap-in, right-click Web Sites, and choose New -> Web Site.
Confirm the Welcome dialog by clicking Next.

Windows SharePoint Services Installation Guide
© 2005 - 2010 Michael Schmitt Page 24 of 36 Version: 1.4
Type SharePoint Site as Description of the web site. Click Next.
Type 8081 as TCP port this site should use. Click Next.

Windows SharePoint Services Installation Guide
© 2005 - 2010 Michael Schmitt Page 25 of 36 Version: 1.4
Choose an appropriate physical folder, e.g. D:\WebApps\StsSite.
Allow anonymous access.
Click Next.
Confirm the default Web Site Access Permissions. Click Next.

Windows SharePoint Services Installation Guide
© 2005 - 2010 Michael Schmitt Page 26 of 36 Version: 1.4
Confirm the successful creation of the web site by clicking Finish.
Windows SharePoint Services Installation Guide
© 2005 - 2010 Michael Schmitt Page 27 of 36 Version: 1.4
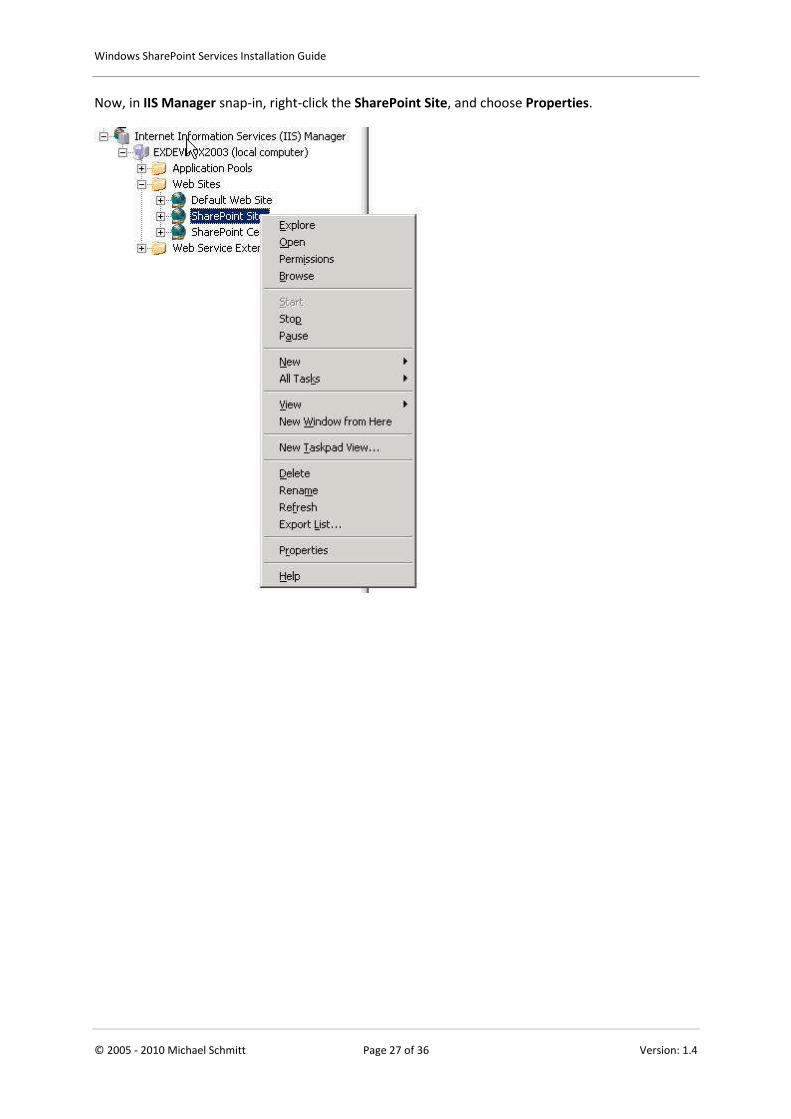
Now, in IIS Manager snap-in, right-click the SharePoint Site, and choose Properties.
Windows SharePoint Services Installation Guide
© 2005 - 2010 Michael Schmitt Page 28 of 36 Version: 1.4
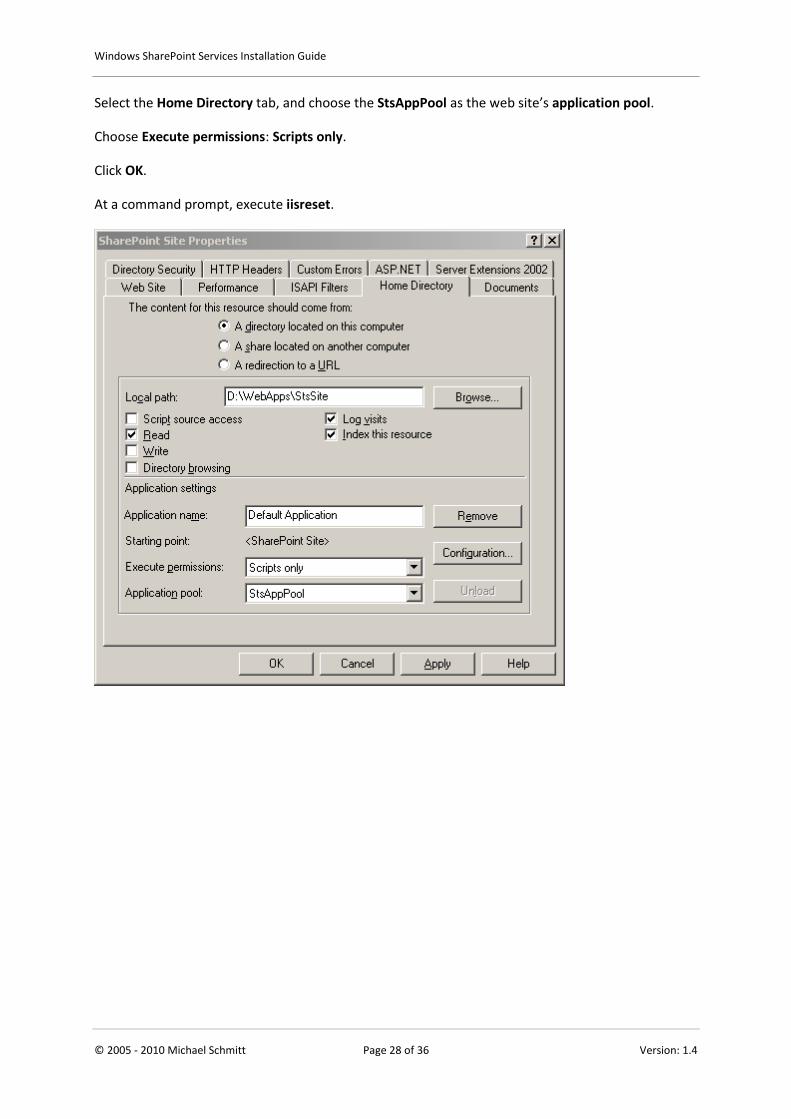
Select the Home Directory tab, and choose the StsAppPool as the web site’s application pool.
Choose Execute permissions: Scripts only.
Click OK.
At a command prompt, execute iisreset.

Windows SharePoint Services Installation Guide
© 2005 - 2010 Michael Schmitt Page 29 of 36 Version: 1.4
Extend the SharePoint Site We are now going to extend the SharePoint Site with the SharePoint Services. This will create a
SharePoint content database for this site.
Open All Programs -> Administrative Tools -> SharePoint Central Administration.
In the Virtual Server Configuration section, click Extend or upgrade virtual server.
Be sure to go to the complete list.
Windows SharePoint Services Installation Guide
© 2005 - 2010 Michael Schmitt Page 30 of 36 Version: 1.4
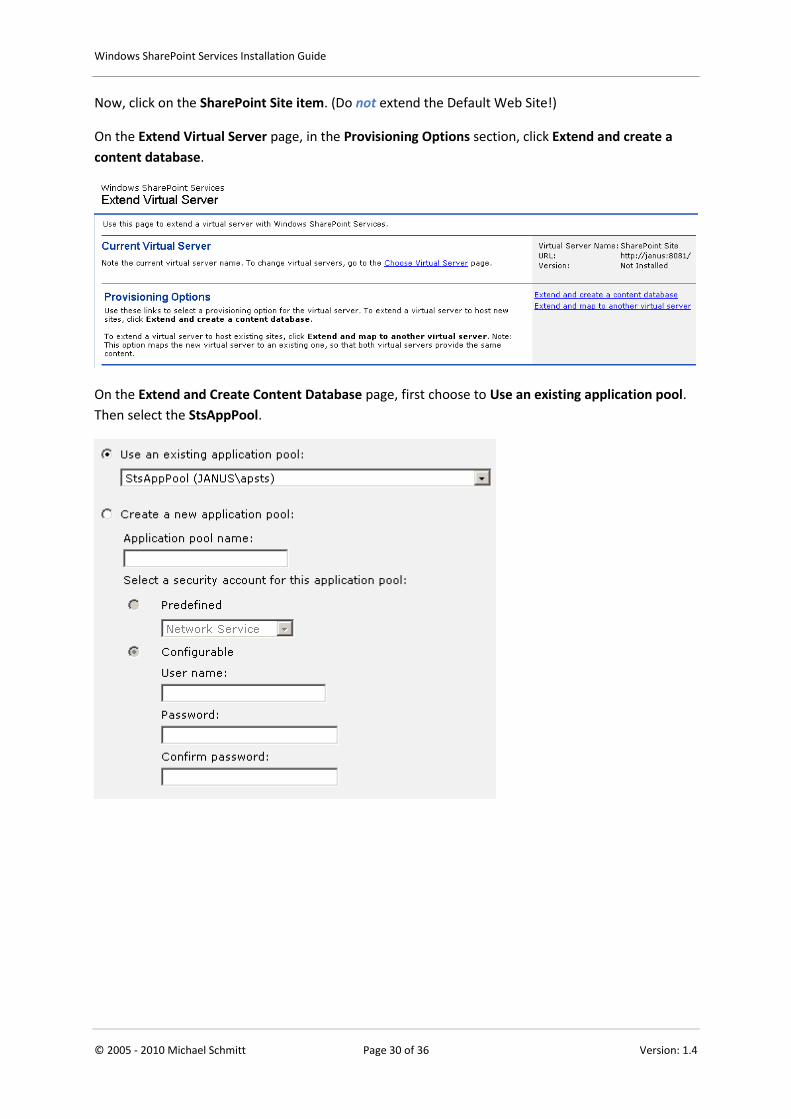
Now, click on the SharePoint Site item. (Do not extend the Default Web Site!)
On the Extend Virtual Server page, in the Provisioning Options section, click Extend and create a
content database.
On the Extend and Create Content Database page, first choose to Use an existing application pool.
Then select the StsAppPool.

Windows SharePoint Services Installation Guide
© 2005 - 2010 Michael Schmitt Page 31 of 36 Version: 1.4
Type in an account with local administrator credentials as Site Owner.
Type in an email address for support (may be fictitious).
In the Database Information section, choose not to Use default content database server.
Type the name of the SQL Server 2005 instance which should store the content database for this site.
If the local default instance is intended, this is just the name of your workstation.
Type stscontent as Database name.
In the Security Configuration section, choose NTLM.
Now, confirm all settings on the Extend and Create Content Database page by clicking OK.

Windows SharePoint Services Installation Guide
© 2005 - 2010 Michael Schmitt Page 32 of 36 Version: 1.4
Wait for the configuration to be applied. This can be a couple of minutes!
This is the expected message.
Click OK.
Windows SharePoint Services Installation Guide
© 2005 - 2010 Michael Schmitt Page 33 of 36 Version: 1.4
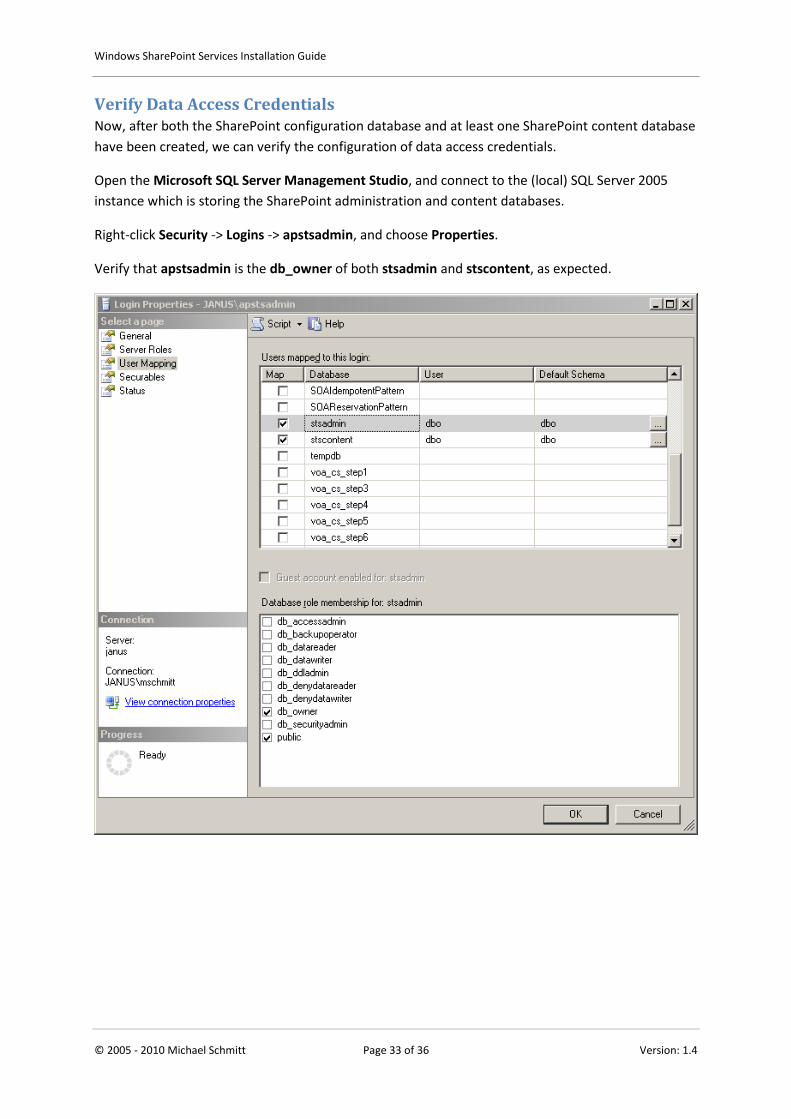
Verify Data Access Credentials Now, after both the SharePoint configuration database and at least one SharePoint content database
have been created, we can verify the configuration of data access credentials.
Open the Microsoft SQL Server Management Studio, and connect to the (local) SQL Server 2005
instance which is storing the SharePoint administration and content databases.
Right-click Security -> Logins -> apstsadmin, and choose Properties.
Verify that apstsadmin is the db_owner of both stsadmin and stscontent, as expected.

Windows SharePoint Services Installation Guide
© 2005 - 2010 Michael Schmitt Page 34 of 36 Version: 1.4
Note that a SQL Server login for the apsts account has been created automatically during the
previous configuration steps.
Verify that also apsts is db_owner of both stsadmin and stscontent.

Windows SharePoint Services Installation Guide
© 2005 - 2010 Michael Schmitt Page 35 of 36 Version: 1.4
Verify the SharePoint Site Final step is to verify the SharePoint Site.
In IIS Manager snap-in, right-click SharePoint Site and click Browse.
Alternatively, open http://localhost:8081 in Internet Explorer.
Windows SharePoint Services Installation Guide
© 2005 - 2010 Michael Schmitt Page 36 of 36 Version: 1.4
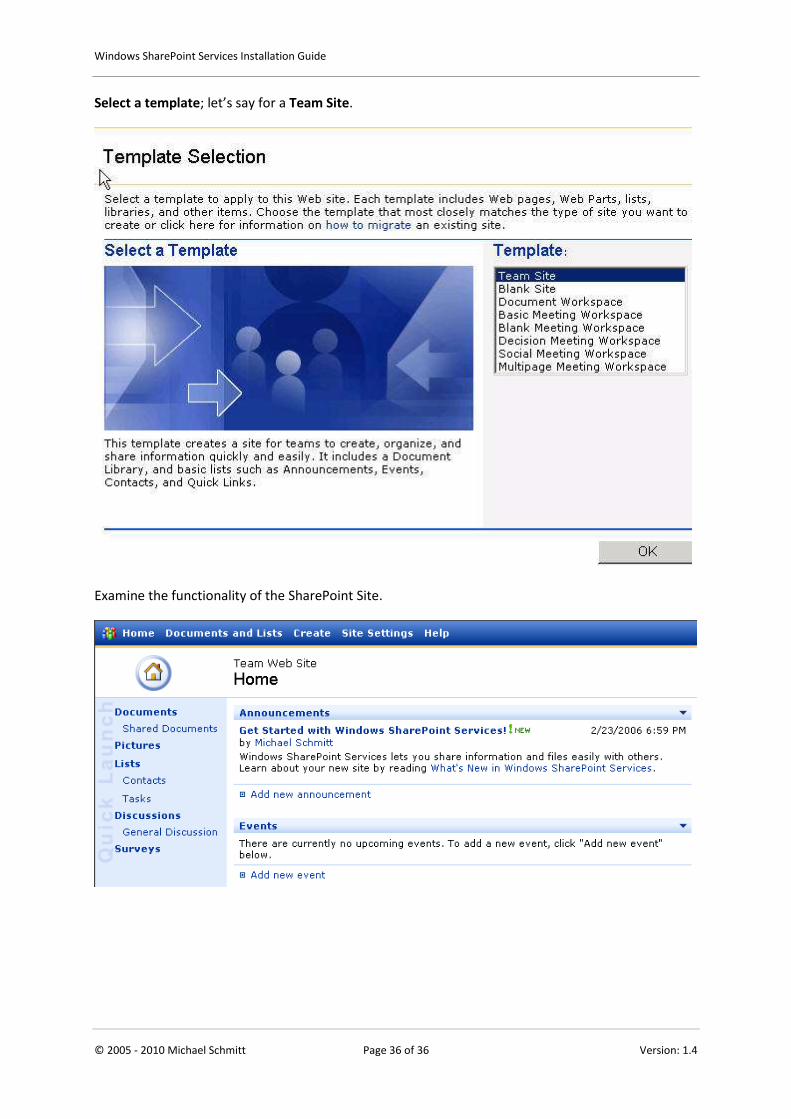
Select a template; let’s say for a Team Site.
Examine the functionality of the SharePoint Site.