Embed Size (px)
DESCRIPTION
Windows Cluster Setup
Citation preview
For Internal Use Only
HPES ITO Delivery Operations India
Windows Cluster Setup - Metso

HPES ITO Delivery Operations India
Windows Cluster setup
Important Confidentiality NoticeThe information (data) contained on all sheets of this document constitutes confidential information of Hewlett–Packard Company or its affiliates (collectively hereinafter “HP”).
This document is not for release to external Customers.
Document Information
Document Title: Windows Cluster
Process Name: Technical
Prepared By: D.Ravindra Sharma
Document Owner: Suresh Mohan Patel
Document URL: http://teams2.sharepoint.hp.com/teams/Metso%20Wintel%20DTS/Miscellaneous/Change%20management/Standard%20Operating%20Procedure/Windows%20Cluster%20Setup.doc
The latest version of this document is stored electronically. Any printed copy is an uncontrolled copy for reference or training purposes only.
Version History
Version No.
Version Date
Prepared By
Reviewed By
Approved By
Affected Section and Description of Change
1.0 11/Feb/2010
D.Ravindra Sharma
Ganesh Kumar
Suresh Patel
Initial update
R.01.01
29/Jul/2010
Ganesh Kumar
Abhranil Dhar
Suresh Patel
Changed the document template.
HPES ITO Delivery Operations HP Restricted Page 2 of 35
© Copyright 2010 Hewlett–Packard Development Company, L.P.
Valid agreement required.

HPES ITO Delivery Operations India
Windows Cluster setup
This document is described Basic of windows cluster
Agenda
What Is Cluster Technology?Advantages of ClusterTypes of Cluster Technology in Microsoft WindowsMicrosoft Cluster Service (Server Cluster) Hardware configuration ChecklistsSoftware configuration ChecklistsNetwork configuration ChecklistsStorage configuration Checklists/Quorum DiskConfiguring the Cluster Service Post-Installation Configuration Testing Cluster InstallationTroubleshooting Cluster events
Cluster Technology
A cluster is a group of independent servers working collectively and running the Microsoft Cluster Service. Server clusters provide high availability, failback, scalability, and manageability for resources and applications.
Advantages of Cluster
High Availability Failback Manageability Scalability
Types of Cluster Technology in Microsoft Windows
MSCS: A server cluster is a group of independent servers working collectively for a Mission Critical Application. E.g. DHCP, Print server, Exchange, SQL, file server etc.
NLB: Network Load Balancing (NLB) is the IP load balancing. With NLB, incoming TCP traffic, User Datagram Protocol (UDP) traffic, and Generic Routing encapsulation (GRE) traffic requests are distributed among the cluster members. E.g.: Web Server, Internet Based application
HPES ITO Delivery Operations HP Restricted Page 3 of 35
© Copyright 2010 Hewlett–Packard Development Company, L.P.
Valid agreement required.
HPES ITO Delivery Operations India
Windows Cluster setup
CLB: Component Load Balancing allows COM+ components to be load balanced. COM+ components are compiled software objects that are usable from a variety of different languages including VBS, ASP, Visual Basic, and C++. They provide a useful way of bundling software into convenient and reusable entities. In CLB, the COM+ components are maintained on servers in a separate COM+ cluster.
MSCS (Server Cluster)
Cluster Aware Application/Services :
Distributed Transaction Coordinator, DHCP, WINS, or cluster-aware programs such as Exchange Server or SQL Server etc.
Types Of MSCS:
• Active/Active• Active/Passive
Operating System Number of nodes Storage
Windows NT 4.0 Enterprise Edition
2 SCSI
Windows 2000 Advanced Server
2 SCSI
HPES ITO Delivery Operations HP Restricted Page 4 of 35
© Copyright 2010 Hewlett–Packard Development Company, L.P.
Valid agreement required.

HPES ITO Delivery Operations India
Windows Cluster setup
Windows 2000 Datacenter Server
2 SCSI
Windows Server 2003, Enterprise Edition
2 SCSI
Windows Server 2003, Enterprise x64 Edition
2 SCSI
Windows Server 2003, Datacenter Edition
2 SCSI
Windows Server 2003, Datacenter x64 Edition
2 SCSI
Windows NT 4.0 Enterprise Edition
2 Fibre Channel
Windows 2000 Advanced Server
2 Fibre Channel
Windows 2000 Datacenter Server
4 Fibre Channel
Windows Server 2003, Enterprise Edition
8 Fibre Channel, iSCSI, or SAS
Windows Server 2003, Enterprise x64 Edition
8 Fibre Channel, iSCSI, or SAS
Windows Server 2003, Enterprise Edition for Itanium based system
8 Fibre Channel, iSCSI, or SAS
Windows Server 2008, Datacenter Edition
8 Fibre Channel, iSCSI, or SAS
Windows Server 2003, Datacenter x64 Edition
8 Fibre Channel, iSCSI, or SAS
Windows Server 2003, Datacenter Edition for Itanium-based Systems
8 Fibre Channel, iSCSI, or SAS
HPES ITO Delivery Operations HP Restricted Page 5 of 35
© Copyright 2010 Hewlett–Packard Development Company, L.P.
Valid agreement required.

HPES ITO Delivery Operations India
Windows Cluster setup
Windows Server 2008, Enterprise Edition
8 Fibre Channel, iSCSI, or SAS
Windows Server 2008, Enterprise Edition for Itanium-based Systems
8 Fibre Channel, iSCSI, or SAS
Windows Server 2008, Datacenter Edition
8 Fibre Channel, iSCSI, or SAS
Windows Server 2008, Datacenter Edition for Itanium-based Systems
8 Fibre Channel, iSCSI, or SAS
Windows Server 2008, Enterprise x64 Edition
16 Fibre Channel, iSCSI, or SAS
Windows Server 2008, Datacenter x64 Edition
16 Fibre Channel, iSCSI, or SAS
Hardware Configuration Checklist:
• All hardware should be identical, slot for slot, card for card, BIOS, firmware revisions, and so on, for all nodes. This makes configuration easier and eliminates compatibility problems.
• Clustering hardware must be on the “Cluster/Multi-Cluster Device” Hardware Compatibility List. Support for Multiple Clusters Attached to the Same SAN Device
• SCSI or Fiber Channel.
• At least two NICs for each node (One for public & One for Private)
• NICS on PCI slots
HPES ITO Delivery Operations HP Restricted Page 6 of 35
© Copyright 2010 Hewlett–Packard Development Company, L.P.
Valid agreement required.

HPES ITO Delivery Operations India
Windows Cluster setup
• Each cluster network must fail independently of all other cluster networks. This means that two cluster networks must not have a component in common that can cause both to fail simultaneously. For example, the use of a multiport network adapter to attach a node to two cluster networks would not satisfy this requirement in most cases because the ports are not independent.
Software Configuration Checklist:
• Suitable Windows OS• An existing domain model with name resolution method• The Cluster service requires a domain user account that is a member of the
Local Administrators group on each node, under which the Cluster service can run.
• For security reasons, granting domain administrator rights to the cluster service account is not recommended.
• Set the password settings to User Cannot Change Password and Password Never Expires.
• All nodes in the cluster must be members of the same domain and be able to access a domain controller and a DNS server. They can be configured as member servers or domain controllers. You should have at least one domain controller on the same network segment as the cluster. For high availability. another domain controller should also be available to remove a single point of failure.
• The first domain controller in the forest/domain will take on all Operations Master Roles. You can redistribute these roles to any node. However, if a node fails, the Operations Master Roles assumed by that node will be unavailable. Therefore, it is recommended that you do not run Operations Master Roles on any cluster node.
• Because of the complexity and overhead involved in making cluster-nodes domain controllers, it is recommended that all nodes should be member servers.
• Multi path Software (Option)
Network Configuration Checklist:
• Fault-tolerant network cards or network adapter teaming• Static IP Address On Each NICs• All nodes should communicate to each other & should be in same domain• One Unique NetBIOS name & IP for Cluster.• Each cluster network must fail independently of all other cluster networks. This
means that two cluster networks must not have a component in common that
HPES ITO Delivery Operations HP Restricted Page 7 of 35
© Copyright 2010 Hewlett–Packard Development Company, L.P.
Valid agreement required.

HPES ITO Delivery Operations India
Windows Cluster setup
can cause both to fail simultaneously. For example, the use of a multiport network adapter to attach a node to two cluster networks would not satisfy this requirement in most cases because the ports are not independent
• Rename the icons in the Network Connections window as Public & Private (Heartbeat)
• PING –a node_name command to do a reverse lookup on the IP Addresses. • Heart Beat NIC: IP address (Private type of class A/B/C)
10.0.0.0 through 10.255.255.255 (Class A)
172.16.0.0 through 172.31.255.255 (Class B)
192.168.0.0 through 192.168.255.255 (Class C)
In DNS tab “Register this connection’s addresses in DNS” & Use this connection’s DNS suffix in DNS registration” options should be unchecked and in gray by default.
In WINS tab “Disable NetBIOS over TCP/IP” should be checked.
Change Link Speed & duplex value to “100 MBPS/Full Duplex” in Heartbeat NIC Advance Properties. Microsoft Recomends 10MBPS/Half Duplex if you are not sure.
Add a new DWORD value in the following
path : HKEY_LOCAL_MACHINE\System\CurrentControlSet\Services\Tcpip\ParametersValue Name: DisableDHCPMediaSense
Data Type : REG_DWORD
Data : 1
The public network backup route for internal cluster communication. To do so, configure the roles of these networks as either "Internal Cluster Communications Only" or "All Communications" for the Cluster service.
For Heartbeat only the Internet Protocol (TCP/IP) check box should be selected.
Storage Configuration Checklist:
All Shared disks including the quorum disk must be on a different controller then the one used by the system drive.
To have multiple disk resources and to do Active/Active configurations multiple logical disk is recommended for each partition instead of one logical partition & multiple partition in that.
Verify that disks attached to the shared bus can be seen from all nodes. This can be checked at the host adapter setup level.
HPES ITO Delivery Operations HP Restricted Page 8 of 35
© Copyright 2010 Hewlett–Packard Development Company, L.P.
Valid agreement required.
HPES ITO Delivery Operations India
Windows Cluster setup
SCSI devices must be assigned unique SCSI identification numbers and properly terminated according to the manufacturer’s instructions.
All shared disks must be configured as basic disks. Note: Dynamic Disk Configuration Unavailable for Server Cluster Disk Resources Software fault tolerance is not natively supported on cluster shared disks. All shared disks must be configured as master boot record (MBR) disks on
systems running the 64-bit versions of Windows Server 2003. • All partitions on the clustered disks must be formatted as NTFS. • Hardware fault-tolerant RAID configurations are recommended for all disks.• A minimum of two logical shared drives is recommended.
Quorum Disk:
The quorum disk is used to store cluster configuration database checkpoints and log files that help manage the cluster and maintain consistency. The following quorum disk procedures are recommended:
Create a logical drive with a minimum size of 50 MB to be used as a quorum disk, 500 MB is optimal for NTFS.
Dedicate a separate disk as a quorum resource. A quorum disk failure could cause the entire cluster to fail; therefore, it is
strongly recommended that you use a volume on a hardware RAID array. Do not use the quorum disk for anything other than cluster management.
The quorum resource plays a crucial role in the operation of the cluster. In every cluster, a single resource is designated as the quorum resource. A quorum resource can be any Physical Disk resource with the following functionality:
It replicates the cluster registry to all other nodes in the server cluster. By default, the cluster registry is stored in the following location on each node: %SystemRoot%\Cluster\Clusdb. The cluster registry is then replicated to the MSCS\Chkxxx.tmp file on the quorum drive. These files are exact copies of each other. The MSCS\Quolog.log file is a transaction log that maintains a record of all changes to the checkpoint file. This means that nodes that were offline can have these changes appended when they rejoin the cluster.
If there is a loss of communication between cluster nodes, the challenge response protocol is initiated to prevent a "split brain" scenario. In this situation, the owner of the quorum disk resource becomes the only owner of the cluster and all the resources. The owner then makes the resources available for clients. When the node that owns the quorum disk functions incorrectly, the surviving nodes arbitrate to take ownership of the device.
• To proceed, turn off all nodes. Turn on the shared storage devices, and then turn on node 1.
• Create Partitions & format all the partitions in NTFS in First Node. Change any Drive Letter according to Application requirements
HPES ITO Delivery Operations HP Restricted Page 9 of 35
© Copyright 2010 Hewlett–Packard Development Company, L.P.
Valid agreement required.

HPES ITO Delivery Operations India
Windows Cluster setup
• Should check mark all shared logical drives available for access by ServerA (Node1)
• Scan for New Drive on ServerB (Node 2). Should check mark all shared logical drives available for access by ServerB (Node2)
• To avoid corrupting the cluster disks, make sure that Windows Server 2003 and the Cluster service are installed, configured, and running on at least one node before you start an operating system on another node. It is critical to never have more then one node on until the Cluster service is configured
Configuring the Cluster Service
You must supply all initial cluster configuration information in the first installation phase.
Note: During Cluster service configuration on node 1, you must turn off all other nodes. All shared storage devices should be turned on.
To configure the first node
1. Click Start, click All Programs, click Administrative Tools, and then click Cluster Administrator.
2. When prompted by the Open Connection to Cluster Wizard, click Create new Cluster in the Action drop-down list, as shown in Figure below.
3. Verify that you have the necessary prerequisites to configure the cluster,
• as shown in Figure below. Click Next.
HPES ITO Delivery Operations HP Restricted Page 10 of 35
© Copyright 2010 Hewlett–Packard Development Company, L.P.
Valid agreement required.
HPES ITO Delivery Operations India
Windows Cluster setup
4. Type a unique NetBIOS name for the cluster (up to 15 characters), and then click Next. In the example shown in Figure below, the cluster is named MyCluster.) Adherence to DNS naming rules is recommended.
HPES ITO Delivery Operations HP Restricted Page 11 of 35
© Copyright 2010 Hewlett–Packard Development Company, L.P.
Valid agreement required.

HPES ITO Delivery Operations India
Windows Cluster setup
5. If you are logged on locally with an account that is not a Domain Account with Local Administrative privileges, the wizard will prompt you to specify an account. This is not the account the Cluster service will use to start.
Note: If you have appropriate credentials, the prompt mentioned in step 5 and shown in Figure below may not appear
HPES ITO Delivery Operations HP Restricted Page 12 of 35
© Copyright 2010 Hewlett–Packard Development Company, L.P.
Valid agreement required.
HPES ITO Delivery Operations India
Windows Cluster setup
6. Because it is possible to configure clusters remotely, you must verify or type the name of the server that is going to be used as the first node to create the cluster, as shown in Figure below. Click Next.
HPES ITO Delivery Operations HP Restricted Page 13 of 35
© Copyright 2010 Hewlett–Packard Development Company, L.P.
Valid agreement required.

HPES ITO Delivery Operations India
Windows Cluster setup
Note: The Install wizard verifies that all nodes can see the shared disks the same. In a complex storage area network the target identifiers (TIDs) for the disks may sometimes be different, and the Setup program may incorrectly detect that the disk configuration is not valid for Setup. To work around this issue you can click the Advanced button, and then click Advanced (minimum) configuration.
HPES ITO Delivery Operations HP Restricted Page 14 of 35
© Copyright 2010 Hewlett–Packard Development Company, L.P.
Valid agreement required.

HPES ITO Delivery Operations India
Windows Cluster setup
7. Figure below illustrates that the Setup process will now analyze the node for possible hardware or software problems that may cause problems with the installation. Review any warnings or error messages. You can also click the Details button to get detailed information about each one
HPES ITO Delivery Operations HP Restricted Page 15 of 35
© Copyright 2010 Hewlett–Packard Development Company, L.P.
Valid agreement required.

HPES ITO Delivery Operations India
Windows Cluster setup
8. Type the unique cluster IP address (in this example 172.26.204.10), and then click Next.
As shown in Figure below, the New Server Cluster Wizard automatically associates the cluster IP address with one of the public networks by using the subnet mask to select the correct network. The cluster IP address should be used for administrative purposes only, and not for client connections.
HPES ITO Delivery Operations HP Restricted Page 16 of 35
© Copyright 2010 Hewlett–Packard Development Company, L.P.
Valid agreement required.

HPES ITO Delivery Operations India
Windows Cluster setup
1. 9. Type the user name and password of the cluster service account that was created during pre-installation. (In the example in Figure below, the user name is “Cluster”). Select the domain name in the Domain drop-down list, and then click Next. At this point, the Cluster Configuration Wizard validates the user account and password.
HPES ITO Delivery Operations HP Restricted Page 17 of 35
© Copyright 2010 Hewlett–Packard Development Company, L.P.
Valid agreement required.

HPES ITO Delivery Operations India
Windows Cluster setup
10. Review the Summary page, shown in Figure below, to verify that all the information that is about to be used to create the cluster is correct. If desired, you can use the quorum button to change the quorum disk designation from the default auto-selected disk.
The summary information displayed on this screen can be used to reconfigure the cluster in the event of a disaster recovery situation. It is recommended that you save and print a hard copy to keep with the change management log at the server.
Note: The Quorum button can also be used to specify a Majority Node Set (MNS) quorum model. This is one of the major configuration differences when you create an MNS cluster.
HPES ITO Delivery Operations HP Restricted Page 18 of 35
© Copyright 2010 Hewlett–Packard Development Company, L.P.
Valid agreement required.

HPES ITO Delivery Operations India
Windows Cluster setup
11. Review any warnings or errors encountered during cluster creation. To do this, click the plus signs to see more, and then click Next. Warnings and errors appear in the Creating the Cluster page as shown in Figure below
HPES ITO Delivery Operations HP Restricted Page 19 of 35
© Copyright 2010 Hewlett–Packard Development Company, L.P.
Valid agreement required.

HPES ITO Delivery Operations India
Windows Cluster setup
12. Click Finish to complete the installation. Figure below illustrates the final step.
HPES ITO Delivery Operations HP Restricted Page 20 of 35
© Copyright 2010 Hewlett–Packard Development Company, L.P.
Valid agreement required.

HPES ITO Delivery Operations India
Windows Cluster setup
Note: To view a detailed summary, click the View Log button or view the text file stored in the following location:%SystemRoot%\System32\LogFiles\Cluster\ClCfgSrv.Log
Validating the Cluster Installation
Use the Cluster Administrator (CluAdmin.exe) to validate the cluster service installation on node 1.
To validate the cluster installation
HPES ITO Delivery Operations HP Restricted Page 21 of 35
© Copyright 2010 Hewlett–Packard Development Company, L.P.
Valid agreement required.

HPES ITO Delivery Operations India
Windows Cluster setup
• Click Start, click Programs, click Administrative Tools, and then click Cluster Administrator.
• Verify that all resources came online successfully, as shown in Figure below.
Note As general rules, do not put anything in the Cluster group, do not take anything out of the cluster group, and do not use anything in the Cluster group for anything other than cluster administration.
Configuring the Second Node
Installing the cluster service on the other nodes requires less time than on the first node. Setup configures the cluster service network settings on the second node based on the configuration of the first node. You can also add multiple nodes to the cluster at the same time, and remotely.
Note: For this section, leave node 1 and all shared disks turned on. Then turn on all other nodes. The cluster service will control access to the shared disks at this point to eliminate any chance of corrupting the volume.
• Open Cluster Administrator on Node 1. • Click File, click New, and then click Node.• The Add Cluster Computers Wizard will start. Click Next.• If you are not logged on with appropriate credentials, you will be asked to
specify a domain account that has administrative rights over all nodes in the cluster.
HPES ITO Delivery Operations HP Restricted Page 22 of 35
© Copyright 2010 Hewlett–Packard Development Company, L.P.
Valid agreement required.

HPES ITO Delivery Operations India
Windows Cluster setup
• Enter the machine name for the node you want to add to the cluster. Click Add. Repeat this step, shown in Figure below, to add all other nodes that you want. When you have added all nodes, click Next.
• The Setup wizard will perform an analysis of all the nodes to verify that they are configured properly.
• Type the password for the account used to start the cluster service.• Review the summary information that is displayed for accuracy. The summary
information will be used to configure the other nodes when they join the cluster.• Review any warnings or errors encountered during cluster creation, and then
click Next.• Click Finish to complete the installation.
HPES ITO Delivery Operations HP Restricted Page 23 of 35
© Copyright 2010 Hewlett–Packard Development Company, L.P.
Valid agreement required.

HPES ITO Delivery Operations India
Windows Cluster setup
Post-Installation Configuration
Now that the networks have been configured correctly on each node and the Cluster service has been configured, you need to configure the network roles to define their functionality within the cluster. Here is a list of the network configuration options in Cluster Administrator:
• Enable for Cluster use: If this check box is selected, the cluster service uses this network. This check box is selected by default for all networks.
• Client access only (public network): Select this option if you want the cluster service to use this network adapter only for external communication with other clients. No node-to-node communication will take place on this network adapter.
• Internal cluster communications only (private network): Select this option if you want the cluster service to use this network only for node-to-node communication.
• All communications (mixed network): Select this option if you want the cluster service to use the network adapter for node-to-node communication and for communication with external clients. This option is selected by default for all networks.
• This white paper assumes that only two networks are in use. It explains how to configure these networks as one mixed network and one private network. This is the most common configuration. If you have available resources, two dedicated redundant networks for internal-only cluster communication are recommended.
Heartbeat Configuration
• Start Cluster Administrator.• In the left pane, click Cluster Configuration, click Networks, right-click
Private, and then click Properties. • Click Internal cluster communications only (private network), as shown in
Figure below
HPES ITO Delivery Operations HP Restricted Page 24 of 35
© Copyright 2010 Hewlett–Packard Development Company, L.P.
Valid agreement required.

HPES ITO Delivery Operations India
Windows Cluster setup
Heartbeat Adapter Prioritization
If two or more networks were configured for node-to-node communication specify the order in which the cluster service will use the network adapters for communication between nodes.
• Start Cluster Administrator.• In the left pane, right-click the cluster name (in the upper left corner), and then
click Properties.• Click the Network Priority tab, as shown in Figure below.• Verify that the Private network is listed at the top. Use the Move Up or Move
Down buttons to change the priority order.
HPES ITO Delivery Operations HP Restricted Page 25 of 35
© Copyright 2010 Hewlett–Packard Development Company, L.P.
Valid agreement required.

HPES ITO Delivery Operations India
Windows Cluster setup
• Click OK
Configuring The Public Network NIC:
• Start Cluster Administrator.• In the left pane, click Cluster Configuration, click Networks, right-click
Private, and then click Properties.• Right-click Public, and then click Properties (shown in Figure below).• Click to select the Enable this network for cluster use check box. • Click the All communications (mixed network) option, and then click OK
HPES ITO Delivery Operations HP Restricted Page 26 of 35
© Copyright 2010 Hewlett–Packard Development Company, L.P.
Valid agreement required.
HPES ITO Delivery Operations India
Windows Cluster setup
• Quorum Disk Configuration• The Cluster Configuration Wizard automatically selects the drive that is to be
used as the quorum device. It will use the smallest partition that is larger then 50 MB. You may want to change the automatically selected disk to a dedicated disk that you have designated for use as the quorum.
• To configure the quorum disk• Start Cluster Administrator (CluAdmin.exe).• Right-click the cluster name in the upper-left corner, and then click Properties.• Click the Quorum tab.• In the Quorum resource list box, select a different disk resource. In Figure
below, Disk Q is selected in the Quorum resource list box.• If the disk has more than one partition, click the partition where you want the
cluster-specific data to be kept, and then click OK.
HPES ITO Delivery Operations HP Restricted Page 27 of 35
© Copyright 2010 Hewlett–Packard Development Company, L.P.
Valid agreement required.

HPES ITO Delivery Operations India
Windows Cluster setup
Creating a Boot Delay
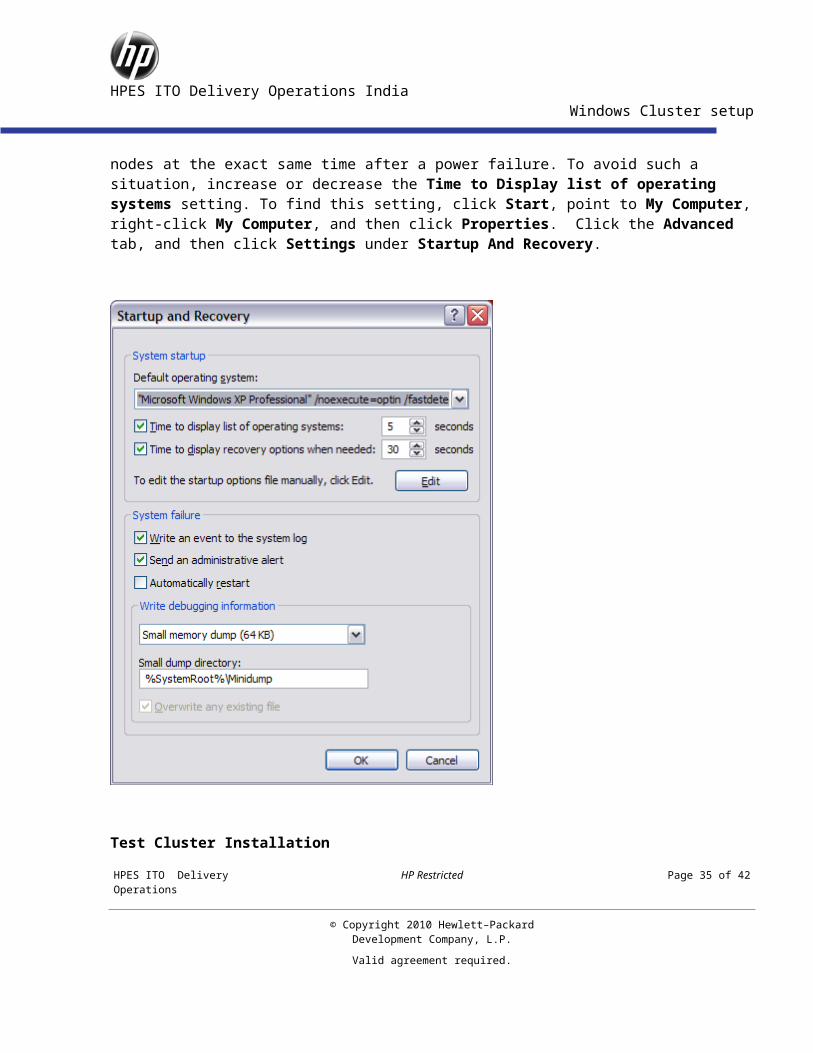
In a situation where all the cluster nodes boot up and attempt to attach to the quorum resource at the same time, the Cluster service may fail to start. For example, this may occur when power is restored to all nodes at the exact same time after a power failure. To avoid such a situation, increase or decrease the Time to Display list of operating systems setting. To find this setting, click Start, point to My Computer, right-click My Computer, and then click Properties. Click the Advanced tab, and then click Settings under Startup And Recovery.
HPES ITO Delivery Operations HP Restricted Page 28 of 35
© Copyright 2010 Hewlett–Packard Development Company, L.P.
Valid agreement required.

HPES ITO Delivery Operations India
Windows Cluster setup
Test Cluster Installation
There are several methods for verifying a cluster service installation after the Setup process is complete. These include:
• Cluster Administrator: If installation was completed only on node 1, start Cluster Administrator, and then attempt to connect to the cluster. If a second node was installed, start Cluster Administrator on either node, connect to the cluster, and then verify that the second node is listed.
• Services Applet: Use the services snap-in to verify that the cluster service is listed and started.
HPES ITO Delivery Operations HP Restricted Page 29 of 35
© Copyright 2010 Hewlett–Packard Development Company, L.P.
Valid agreement required.

HPES ITO Delivery Operations India
Windows Cluster setup
• Event Log: Use the Event Viewer to check for ClusSvc entries in the system log. You should see entries confirming that the cluster service successfully formed or joined a cluster.
• Cluster service registry entries: Verify that the cluster service installation process wrote the correct entries to the registry. You can find many of the registry settings under HKEY_LOCAL_MACHINE\Cluster
• Click Start, click Run, and then type the Virtual Server name. Verify that you can connect and see resources.
• Start Cluster Administrator, right-click a resource, and then click “Initiate Failure”. The resource should go into an failed state, and then it will be restarted and brought back into an online state on that node. Conduct “Initiate Failure” test three more times on that same resource. On the fourth failure, the resources should all failover to another node in the cluster.
• Stop cluster service in one node & then check Cluster Administrator console in other node
• Move all resources to one node, and then press the power button on the front of that server to turn it off. If you have an ACPI compliant server, the server will perform an “Emergency Shutdown” and turn off the server. Start Cluster Administrator on another node and verify that all resources failover and come online on another node correctly.
Warning: Performing the Emergency Shutdown test may cause data corruption and data loss. Do not conduct this test on a production server
Test Failover
• To verify that resources will failover• Click Start, click Programs, click Administrative Tools, and then click
Cluster Administrator, as shown in Figure below.• Right-click the Disk Group 1 group, and then click Move Group. The group
and all its resources will be moved to another node. After a short period of time, the Disks will be brought online on the second node. Watch the window to see this shift. Quit Cluster Administrator.
HPES ITO Delivery Operations HP Restricted Page 30 of 35
© Copyright 2010 Hewlett–Packard Development Company, L.P.
Valid agreement required.

HPES ITO Delivery Operations India
Windows Cluster setup
Troubleshooting Cluster events
HPES ITO Delivery Operations HP Restricted Page 31 of 35
© Copyright 2010 Hewlett–Packard Development Company, L.P.
Valid agreement required.

HPES ITO Delivery Operations India
Windows Cluster setup
HPES ITO Delivery Operations HP Restricted Page 32 of 35
© Copyright 2010 Hewlett–Packard Development Company, L.P.
Valid agreement required.

HPES ITO Delivery Operations India
Windows Cluster setup
HPES ITO Delivery Operations HP Restricted Page 33 of 35
© Copyright 2010 Hewlett–Packard Development Company, L.P.
Valid agreement required.

HPES ITO Delivery Operations India
Windows Cluster setup
HPES ITO Delivery Operations HP Restricted Page 34 of 35
© Copyright 2010 Hewlett–Packard Development Company, L.P.
Valid agreement required.
HPES ITO Delivery Operations India
Windows Cluster setup
Thank You
– End of document –
HPES ITO Delivery Operations HP Restricted Page 35 of 35
© Copyright 2010 Hewlett–Packard Development Company, L.P.
Valid agreement required.


![[MS-CSVP]: Failover Cluster: Setup and Validation … · Failover Cluster: Setup and Validation Protocol ... Failover Cluster: Setup and Validation Protocol (ClusPrep) ... cluster](https://img.dokumen.tips/doc/110x75/5add98057f8b9ae1408d3169/ms-csvp-failover-cluster-setup-and-validation-cluster-setup-and-validation.jpg)