Embed Size (px)
Citation preview
iven the fact that win-dows create large holes in a house’s exterior, I’m always shocked to see
how many builders in our area don’t install them correctly. In the nine years that I’ve been building and renovating homes, I’ve seen win-dows that haven’t been integrated with the housewrap, improperly flashed installations, and even win-dows with no flashing at all. Not only does improper installation affect the durability and warranty of the windows, but it also exposes the wall cavity to moisture problems.
Like any builders, my crew and I want to use efficient practices that won’t negatively affect the quality of our work. For us, that means using a pragmatic approach to installing windows with worst-case scenarios and long-term durability in mind.
water gets behind sidingBased on conversations with subcon-tractors and local building officials, we’ve concluded that the reasons windows aren’t installed correctly
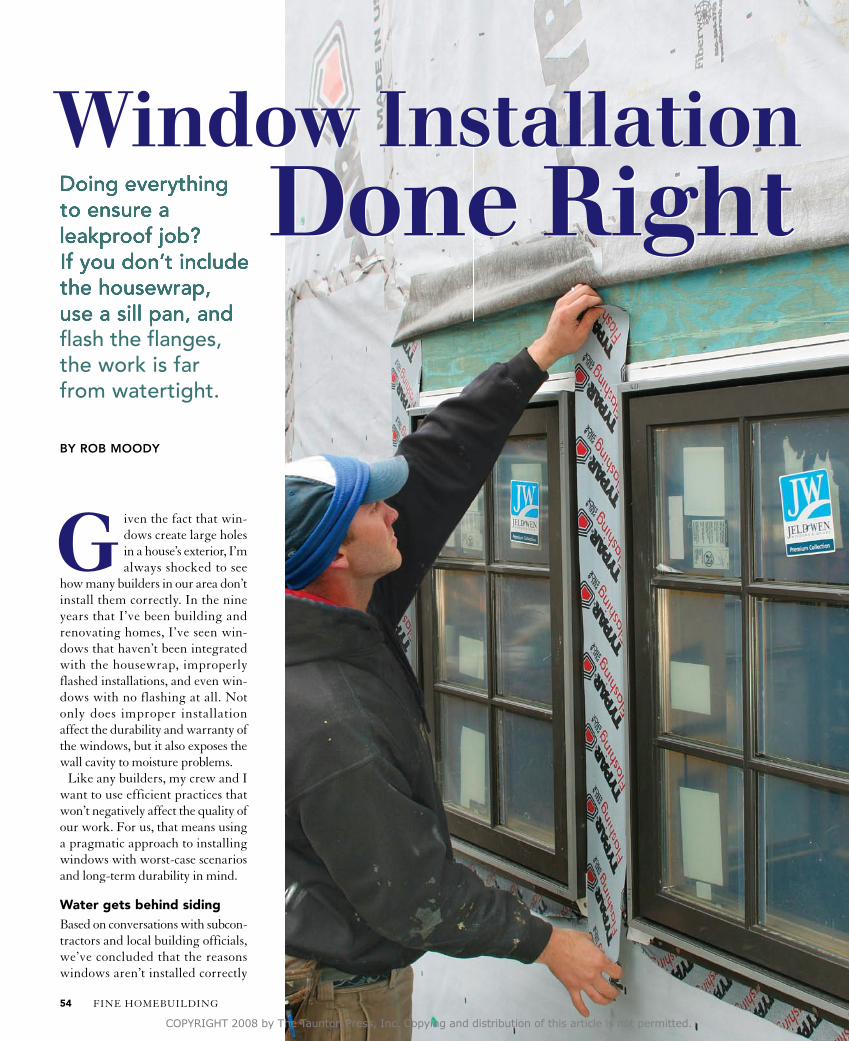
Doing everything to ensure a leakproof job? If you don’t include the housewrap, use a sill pan, and flash the flanges, the work is far from watertight.
BY ROB MOODY
Doing everything to ensure a leakproof job? If you don’t include the housewrap, use a sill pan, and
Window Installation Done Right
G
FINE HOMEBUILDING54
COPYRIGHT 2008 by The Taunton Press, Inc. Copying and distribution of this article is not permitted.
Window Installation Done Right
HOUSEWRAP GETS A SPECIAL CUT
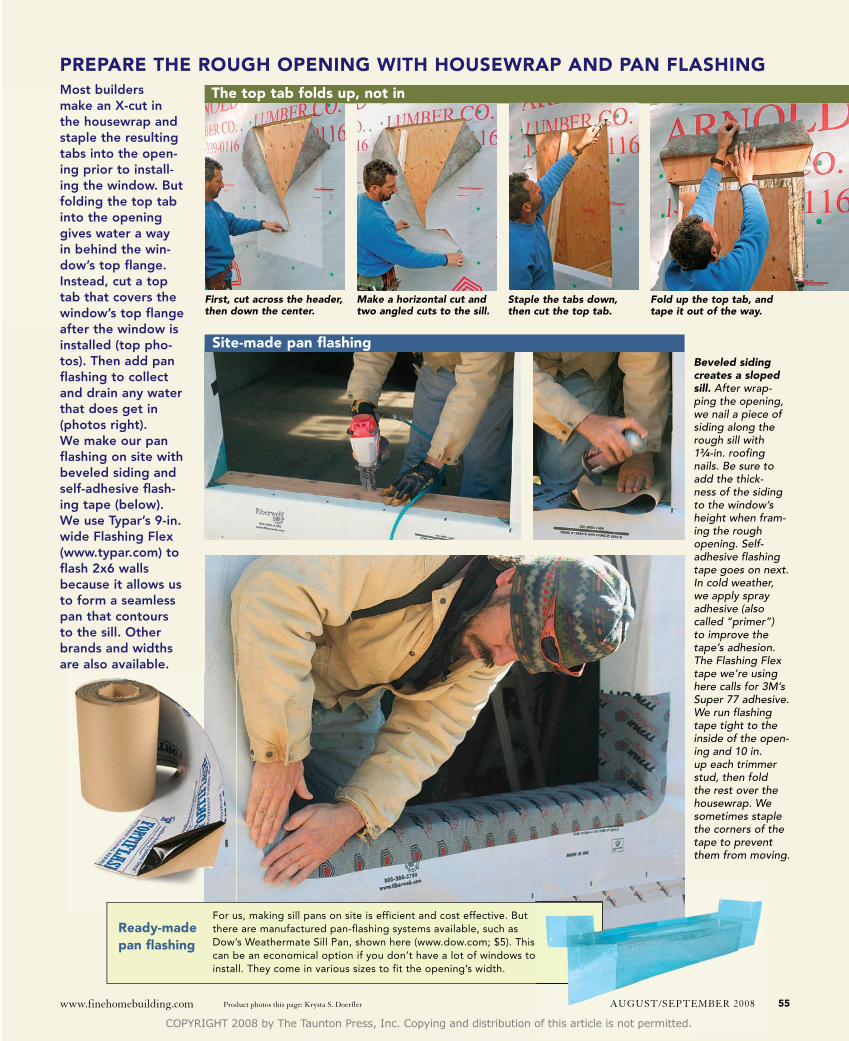
Most builders make an X-cut in the housewrap and staple the resulting tabs into the open-ing prior to install-ing the window. But folding the top tab into the opening gives water a way in behind the win-dow’s top flange. Instead, cut a top tab that covers the window’s top flange after the window is installed (top pho-tos). Then add pan flashing to collect and drain any water that does get in (photos right). We make our pan flashing on site with beveled siding and self-adhesive flash-ing tape (below). We use Typar’s 9-in. wide Flashing Flex (www.typar.com) to flash 2x6 walls because it allows us to form a seamless pan that contours to the sill. Other brands and widths are also available.
pRepaRe The Rough opening wiTh housewRap and pan Flashing
First, cut across the header, then down the center.
Staple the tabs down, then cut the top tab.
Make a horizontal cut and two angled cuts to the sill.
Fold up the top tab, and tape it out of the way.
The top tab folds up, not in
site-made pan flashing
Ready-made pan flashing
For us, making sill pans on site is efficient and cost effective. But there are manufactured pan-flashing systems available, such as Dow’s Weathermate Sill Pan, shown here (www.dow.com; $5). This can be an economical option if you don’t have a lot of windows to install. They come in various sizes to fit the opening’s width.
Beveled siding creates a sloped sill. After wrap-ping the opening, we nail a piece of siding along the rough sill with 13⁄4-in. roofing nails. Be sure to add the thick-ness of the siding to the window’s height when fram-ing the rough opening. Self-adhesive flashing tape goes on next. In cold weather, we apply spray adhesive (also called “primer”) to improve the tape’s adhesion. The Flashing Flex tape we’re using here calls for 3M’s Super 77 adhesive. We run flashing tape tight to the inside of the open-ing and 10 in. up each trimmer stud, then fold the rest over the housewrap. We sometimes staple the corners of the tape to prevent them from moving.
www.finehomebuilding.com product photos this page: Krysta s. Doerfler AUGUsT/sEpTEMBEr 2008 55
COPYRIGHT 2008 by The Taunton Press, Inc. Copying and distribution of this article is not permitted.
often stem from an unrealistic expectation about the effective-ness of siding in keeping mois-ture out of the wall cavity. What many window installers don’t realize is that no matter how well siding is installed, moisture finds its way between it and the housewrap.
When moisture ends up on a layer as slick as housewrap, it does a logical thing: It slides down the wall. Once that mois-ture reaches the window, it eas-ily finds its way into the rough opening through even the tiniest holes. Moisture that leaks into a wall cavity causes mold to grow. Mold is bad, for materials and for humans. That’s why we do everything we can to keep water moving out and away from the window by integrating it with the housewrap. Read the window manufacturer’s guidelinesMost window manufacturers recognize the disastrous effect improper installation of their products can have on a home, including significant energy loss. That’s why they provide detailed installation instructions for their products. Following these in-structions helps to keep the wall cavity dry and fulfills the win-dow manufacturer’s warranty.
Although the photos show my crew installing metal-clad win-dows with integral flanges, the steps outlined here offer a look at fundamental elements found in most manufacturers’ instal-lation guidelines. They address forming the waterproof sill pan, shimming the window so that it works properly, and flashing the flanges to shed water. These steps will receive LEED points as well.
In the sidebar on p. 59, con-tributing editor (and coastal builder) Mike Guertin offers guidance on hanging two other flange-style windows, including an approach to flashing them
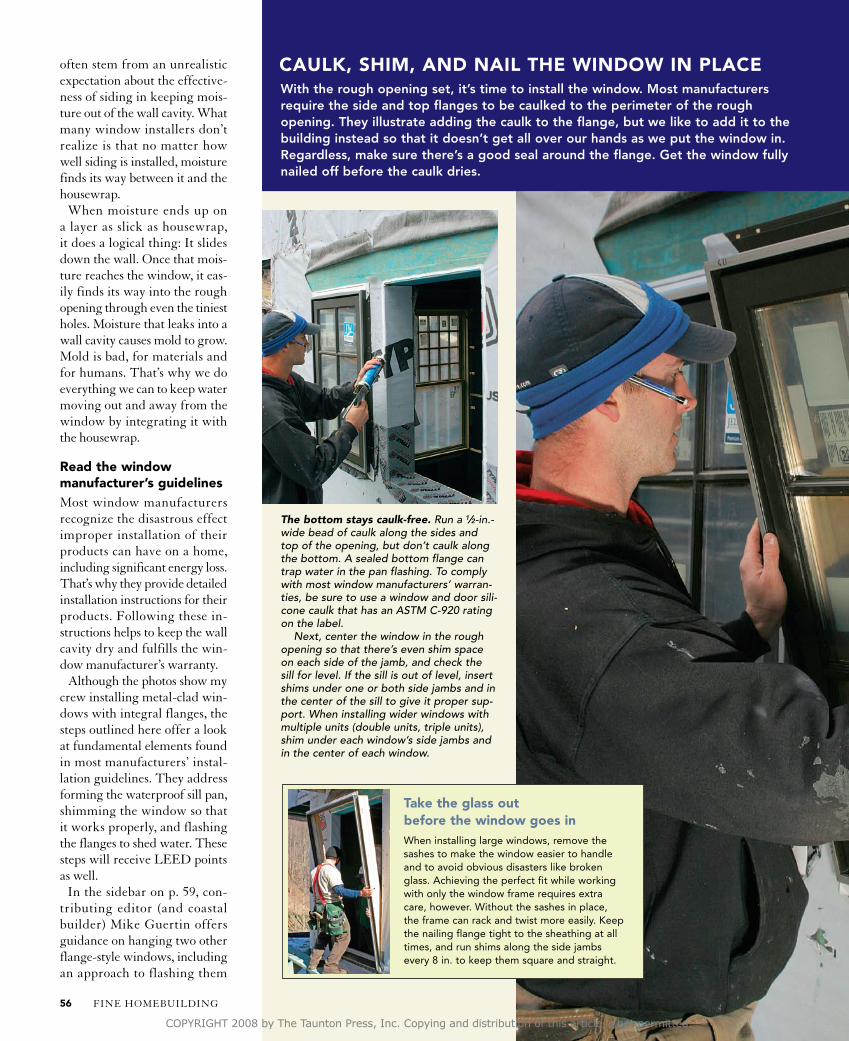
When installing large windows, remove the sashes to make the window easier to handle and to avoid obvious disasters like broken glass. Achieving the perfect fit while working with only the window frame requires extra care, however. Without the sashes in place, the frame can rack and twist more easily. Keep the nailing flange tight to the sheathing at all times, and run shims along the side jambs every 8 in. to keep them square and straight.
Take the glass out before the window goes in
The bottom stays caulk-free. Run a 1⁄2-in.-wide bead of caulk along the sides and top of the opening, but don’t caulk along the bottom. A sealed bottom flange can trap water in the pan flashing. To comply with most window manufacturers’ warran-ties, be sure to use a window and door sili-cone caulk that has an ASTM C-920 rating on the label. Next, center the window in the rough opening so that there’s even shim space on each side of the jamb, and check the sill for level. If the sill is out of level, insert shims under one or both side jambs and in the center of the sill to give it proper sup-port. When installing wider windows with multiple units (double units, triple units), shim under each window’s side jambs and in the center of each window.
With the rough opening set, it’s time to install the window. Most manufacturers require the side and top flanges to be caulked to the perimeter of the rough opening. They illustrate adding the caulk to the flange, but we like to add it to the building instead so that it doesn’t get all over our hands as we put the window in. Regardless, make sure there’s a good seal around the flange. Get the window fully nailed off before the caulk dries.
caulk, shim, and nail The window in place
FINE HOMEBUILDING56
COPYRIGHT 2008 by The Taunton Press, Inc. Copying and distribution of this article is not permitted.
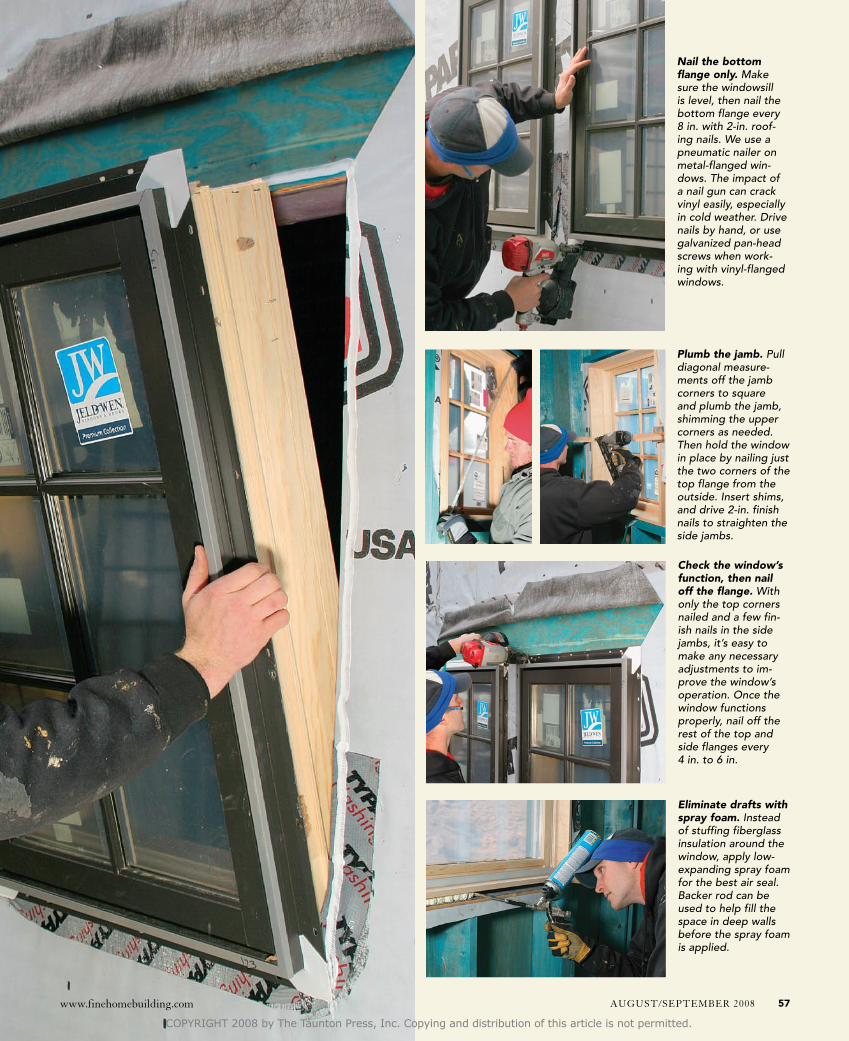
Nail the bottom flange only. Make sure the windowsill is level, then nail the bottom flange every 8 in. with 2-in. roof-ing nails. We use a pneumatic nailer on metal-flanged win-dows. The impact of a nail gun can crack vinyl easily, especially in cold weather. Drive nails by hand, or use galvanized pan-head screws when work-ing with vinyl-flanged windows.
Plumb the jamb. Pull diagonal measure-ments off the jamb corners to square and plumb the jamb, shimming the upper corners as needed. Then hold the window in place by nailing just the two corners of the top flange from the outside. Insert shims, and drive 2-in. finish nails to straighten the side jambs.
Check the window’s function, then nail off the flange. With only the top corners nailed and a few fin-ish nails in the side jambs, it’s easy to make any necessary adjustments to im-prove the window’s operation. Once the window functions properly, nail off the rest of the top and side flanges every 4 in. to 6 in.
Eliminate drafts with spray foam. Instead of stuffing fiberglass insulation around the window, apply low-expanding spray foam for the best air seal. Backer rod can be used to help fill the space in deep walls before the spray foam is applied.
www.finehomebuilding.com AUGUsT/sEpTEMBEr 2008 57
COPYRIGHT 2008 by The Taunton Press, Inc. Copying and distribution of this article is not permitted.
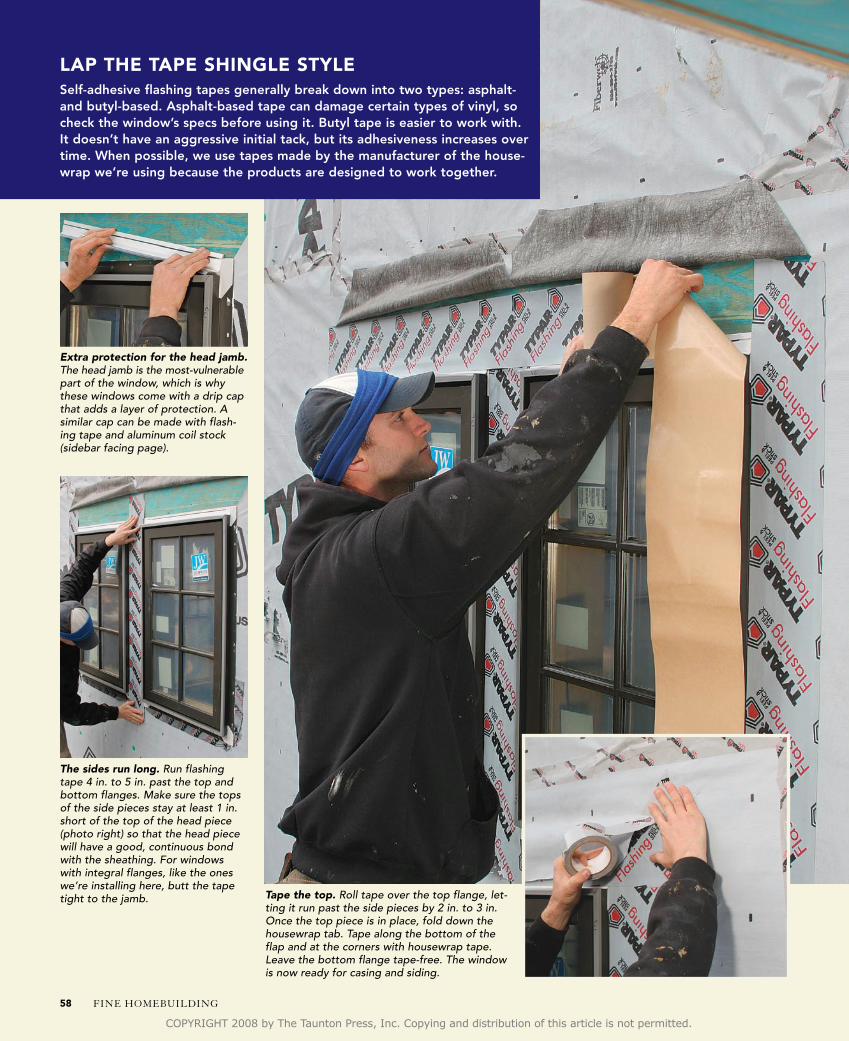
Extra protection for the head jamb. The head jamb is the most-vulnerable part of the window, which is why these windows come with a drip cap that adds a layer of protection. A similar cap can be made with flash-ing tape and aluminum coil stock (sidebar facing page).
The sides run long. Run flashing tape 4 in. to 5 in. past the top and bottom flanges. Make sure the tops of the side pieces stay at least 1 in. short of the top of the head piece (photo right) so that the head piece will have a good, continuous bond with the sheathing. For windows with integral flanges, like the ones we’re installing here, butt the tape tight to the jamb.
lap The Tape shingle sTyle Self-adhesive flashing tapes generally break down into two types: asphalt- and butyl-based. Asphalt-based tape can damage certain types of vinyl, so check the window’s specs before using it. Butyl tape is easier to work with. It doesn’t have an aggressive initial tack, but its adhesiveness increases over time. When possible, we use tapes made by the manufacturer of the house-wrap we’re using because the products are designed to work together.
Tape the top. Roll tape over the top flange, let-ting it run past the side pieces by 2 in. to 3 in. Once the top piece is in place, fold down the housewrap tab. Tape along the bottom of the flap and at the corners with housewrap tape. Leave the bottom flange tape-free. The window is now ready for casing and siding.
FINE HOMEBUILDING58
COPYRIGHT 2008 by The Taunton Press, Inc. Copying and distribution of this article is not permitted.

that goes beyond manufacturers’ basics. We figure that our sill- pan and flashing approach adds about 10 minutes to the installa-tion time for each window and an average of $15 in materials for each double-hung unit. That’s relatively cheap insurance for such a large investment.
when guidelines conflict These days, every housewrap, flashing-tape, and window manufacturer has a specific set of installation guidelines that must be followed to uphold each re-spective product’s warranty. so what do you do when they con-tradict one another?
We follow Mike Guertin’s ad-vice and use the most-restrictive protocol. For instance, when the window manufacturer shows no flashing details, we follow the tape or housewrap instructions. When one set of instructions calls for a simple flat sill pan and another calls for a sloped pan, create a sloped pan. It’s unlikely someone will claim you didn’t follow the instructions by doing more than is called for.
When in doubt, though, fol-low the window manufacturer’s instructions. The Interna- tional residential Code (r613.1) r e q u i r e s w i n d o w s t o b e “installed and flashed according to manufacturers’ instructions.” If there’s ever a problem, you’ve done what was required by the building code. □
Rob Moody is president of The EcoBuilders in Asheville, N.C. Paul Bobbitt, the com-pany’s building-science spe-cialist and project manager, contributed to this article. Photos by Chris Ermides, except where noted.
Mechanical flanges fit into grooves around the window jamb. They rely on a ribbed spline to stay engaged in the groove. The spline and a narrow gasket work together to keep out water. Hinge-style flanges are shipped folded against the frame, which leaves the corners incomplete. Manufacturers supply metal or plastic corner pieces to be applied and caulked once the window is hung (photo below). Nonhinged-style flanges overlap to form the flange corner. One benefit of mechanical
flanges is that if they become damaged dur-ing installation, they are easy to replace. You install them by tapping a wood block along the inside tab (photo top right). The downside is that they can become disen-gaged after installation for a variety of reasons (for example, the siding installer pushes or bumps the jamb,
or someone steps on the sill before it’s shimmed in place).
To reduce the chance of window leaks, I make sure that everyone who works around them is aware of damage areas. I also shim around the window jamb’s perimeter every 6 in. and screw through the jamb and shims into the framing. Finally, (1) I lap the flash-ing tape about 1⁄4 in. onto the side jambs and then over the flange and housewrap. At the window head, (2) I run the tape over the jamb and down onto the window face by 1⁄8 in. to 1⁄4 in. I then install metal cap flashing over the head-flashing tape (3) to conceal the tape.
Not all flanged windows are made the same. The windows shown in this article have an integral nail-
ing flange, which means that the flange is part of the window’s exterior cladding. Integral flanges are
a good design because there aren’t seams or joints for water to sneak past. Hinged and nonhinged
mechanical (also called applied) flanges are also found on vinyl and metal-clad windows. Although
these flange styles aren’t inferior to integral flanges, they have a few vulnerable areas that require
extra attention during installation. —Mike Guertin is a contributing editor.
Mechanical flanges require extra attention
Hinged Nonhinged
By Mike Guertin
Hinged
Look for the Magazine Extras section on our home page to learn about flashing a window’s head cas-ing and to see another method of sill-pan flashing.
FineHomebuilding.com
1 2
3
www.finehomebuilding.com AUGUsT/sEpTEMBEr 2008 59
COPYRIGHT 2008 by The Taunton Press, Inc. Copying and distribution of this article is not permitted.