Embed Size (px)
Citation preview

WF35 User Manual
Rev 2.1a / 02-18-2011
Touch Dynamic, Inc.
http://www.touchdynamic.com
Copyright © 2011 Touch Dynamic, Inc. All rights reserved.
This User Manual is published by Touch Dynamic, Inc. without any warranty. Improvements and changes to this
User Manual necessitated typographical errors, inaccuracies of current information, or improvements to programs
and/or equipment, may be made by Touch Dynamic, Inc. any time and without notice. Such changes will, however,
be incorporated into new editions of this User Manual.

FCC Statement This device complies with Part 15 of the FCC rules. Operation is subject to the following two conditions: (1) this
device may not cause harmful interference, and (2) this device must accept any interference received, including
interference that may cause undesired operation.
Changes or modifications not expressly approved by the party responsible for compliance could avoid the users’
authority to operate the equipment.
Important Safety Information PLEASE READ THIS CAREFULLY BEFORE USING WF35 POS PDA
Always treat your product with care and keep it in a clean and dust-free place
Do not expose PDA to moisture or humidity
Do not expose PDA to extreme high or low temperatures
Do not attempt to disassemble your product
Use only the chargers and batteries approved by Touch Dynamic, Inc. The use of any other type may invalidate
any approval and warranty. No reverse charging with other chargers, they may have inverse polarity
Never use the charger if the plug is damaged
Never touch the charger it your hands/feet are wet
Do not expose the charger to water, it may cause electrical fires
Do not repair the charger yourself for your safety
To reduce the risk of fire or burns, do not disassemble crush or puncture the battery
Recycle or dispose of the battery safely and properly according to local laws and regulations
Do not dispose of the battery in fire or water
Do not let the metal contacts on the battery touch other metal object, it could lead to short-circuit and damage
the battery
Only approval batteries, chargers that are designed for the model can be used with the PDA unit

Document Revision History
To facilitate reading of new or changed content, please see the change mark (vertical line) showing at
the left hand side of the paragraphs.
Doc
version
Release
Date
Author Major Changes
Rev 2.1a 2011-02-18 Dennis Minor corrections
Chapter 14 removed
Updated Chapter 1
Rev 2.1 2009-12-01 James Minor corrections
Content update in chapter 12
Rev 2.0 2009-10-06 James First release of WF35 user manual, based on major
ROM v2.0 release.

Contents
Chapter 1: Overview ........................................................................... 1
1.1 Front, Back, Side & Bottom Components ................................................. 1
1.2 LED Status ........................................................................................... 2
1.3 System Tray Icons (Taskbar) .................................................................. 2
1.4 Battery & Charging ............................................................................... 4
1.5 Power ON / OFF .................................................................................... 8
1.6 Suspend (Sleep) / Resume (Wakeup) PDA ............................................... 9
1.7 Soft Reset (Reboot) .............................................................................. 9
1.8 Clean Reset (Restore to factory default) ................................................ 10
1.9 Stylus & Screen Calibration .................................................................. 11
1.10 Anti-drop strap, Anti-slip hand strap & Leather case ................................ 12
1.11 Screen Protectors ............................................................................... 14
Chapter 2: System Information ......................................................... 16
2.1 S/N (Serial No.), Memory & Version ...................................................... 16
2.2 Operating System Information ............................................................. 17
2.3 Wi-Fi & Network Information ................................................................ 17
Chapter 3: Administrator & User Mode .............................................. 18
3.1 Introduction ....................................................................................... 18
3.2 Administrator Login and Default Mode ................................................... 20
3.3 User Mode Restrictions ........................................................................ 21
3.4 Customizing Administrator / User Mode Shortcuts ................................... 21
3.5 Application Auto-run via SD Card .......................................................... 22
3.6 Change Administrator Password............................................................ 22
Chapter 4: Regional Settings ............................................................. 24
4.1 Date & Time Setup ............................................................................. 24
4.2 Auto Time Synchronization .................................................................. 24
4.3 Regional Settings ................................................................................ 25
4.4 Multi-lingual User Interface .................................................................. 25
Chapter 5: Windows Explorer (File Manager) .................................... 26
5.1 Windows Explorer Options ................................................................... 26
5.2 Creating Shortcuts .............................................................................. 27
5.3 Recycle Bin ........................................................................................ 28
Chapter 6: ActiveSync (PC Synchronization) ..................................... 29

6.1 Configure ActiveSync via USB .............................................................. 29
6.2 Running ActiveSync via USB ................................................................ 30
Chapter 7: Wi-Fi ................................................................................ 31
7.1 Wi-Fi Status and Taskbar Icon .............................................................. 31
7.2 Wi-Fi boot up default state ................................................................... 31
7.3 Single / locked SSID feature ................................................................ 32
7.4 Configure static IP address & DNS ........................................................ 34
7.5 Wi-Fi Seamless Roaming ..................................................................... 35
7.6 Always-on W-Fi .................................................................................. 36
7.7 WLAN Profile Recovery ........................................................................ 37
7.8 Remote wake up PDA .......................................................................... 37
7.9 Wi-Fi periodic keep-alive ...................................................................... 38
7.10 Wi-Fi Auto off and Auto connection retry ............................................... 39
7.11 Wi-Fi Performance & Battery Performance .............................................. 40
7.12 Notes to Application Developers ........................................................... 40
Chapter 8: Bluetooth ......................................................................... 42
8.1 Bluetooth Status and Taskbar Icon ........................................................ 42
8.2 Bluetooth boot up default state ............................................................ 42
8.3 Supported Bluetooth Services .............................................................. 43
8.4 Bluetooth Searching & Pairing .............................................................. 44
8.5 Bluetooth Service – Serial Port Profile (SPP) ........................................... 46
8.6 Bluetooth Service – Dial-up Networking Profile (DUN) ............................. 47
8.7 Bluetooth Service – ActiveSync ............................................................ 51
8.8 Bluetooth Settings .............................................................................. 54
Chapter 9: Power Management ......................................................... 55
9.1 Battery & Charging Status ................................................................... 55
9.2 Power Settings ................................................................................... 55
9.3 Battery Low ....................................................................................... 56
Chapter 10: Terminal Services Client / Remote Desktop ..................... 57
10.1 TSC/RDP Profile & Auto-logon .............................................................. 57
10.2 RDP Auto-start Application ................................................................... 59
10.3 RDP with Magstripe Card Reader........................................................... 60
10.4 RDP Profile File Format ........................................................................ 61
10.5 Common modifications of RDP profile file ............................................... 63
10.6 Deploying RDP profile file .................................................................... 64
10.7 Best Practice deploying RDP Application ................................................. 64
10.8 Developer Note - RDP with Bluetooth Printer .......................................... 65

Chapter 11: System Clone / Backup / Restore .................................... 66
11.1 Introduction ....................................................................................... 66
11.2 Local Backup Disk ............................................................................... 67
11.3 System Clone / Backup ....................................................................... 68
11.4 System Restore .................................................................................. 69
11.5 System Restore with WLAN profile ........................................................ 70
11.6 Missing Backup Disk ............................................................................ 72
Chapter 12: Magstripe Card Reader (MSR) .......................................... 73
12.1 Introduction ....................................................................................... 73
12.2 Attaching MSR .................................................................................... 74
12.3 Configure MSR by Configuration Utility .................................................. 74
12.4 Configure MSR by WF35 ...................................................................... 76
12.5 MSR data encryption ........................................................................... 77
12.6 MSR data encryption via RDP ............................................................... 78
Chapter 13: Misc. Configurations ........................................................ 79
13.1 Backlight ........................................................................................... 79
13.2 Display .............................................................................................. 79
13.3 Audio ................................................................................................ 80
13.4 Screen Rotation .................................................................................. 81
13.5 Taskbar & Task Switching ..................................................................... 81
13.6 Task Manager ..................................................................................... 82
13.7 Shortcut Button .................................................................................. 83

WF35 Manual
http://www.touchdynamic.com Version 2.1a
P.1
Chapter 1: Overview
1.1 Front, Back, Side & Bottom Components
No. Name Descriptions
1 Power / Main LED LED for Wi-Fi & battery status
2 Programmable LED LED could be controlled by application via SDK
3 Speaker Built-in speaker
4 Reset button Press it to soft reset (reboot) PDA
5 Battery cover
6 Shortcut key Programmable shortcut key for launching application
or sending key event
7 SD card cover & slot For inserting SD card as external storage
8 Headset jack 2.5mm phone headset
9 Charging / Power jack Connect to AC-to-DC adaptor for charging or power
supply
10 / 12 Stylus
11 Power key Press to power on / Press-n-hold to power off
In power on status, press to toggle PDA to sleep or
wake up (In sleep mode, it saves power yet Wi-Fi
connection is still online)
13 USB jack Connect to PC for data synchronization (via Microsoft
ActiveSync)
14 Screw mount For mounting add-on devices, e.g. Magstripe card read
(MSR)

WF35 Manual
http://www.touchdynamic.com Version 2.1a
P.2
1.2 LED Status
Power / Main LED (left) indicates Wi-Fi & battery status.
LED status Descriptions
Red flash Battery low
Red solid Battery very low (will auto off PDA soon)
Amber flash Battery charging
Green solid Battery full
Blue flash (quickly) Wi-Fi searching
Blue flash (slowly) Wi-Fi connected
Off Wi-Fi disconnected / Wi-Fi auto off status
1.3 System Tray Icons (Taskbar)
System tray icons in taskbar are listed below.
Tray Icon Descriptions
Start menu
Start > Settings > Control Panel for control panels
Start > Programs for installed programs
WLAN tray icon.
WLAN OFF WLAN auto OFF
WLAN searching WLAN connected
Double tap to open WLAN panel
Bluetooth tray icon.
Bluetooth OFF Bluetooth turning ON Bluetooth ON
Double tap to open Bluetooth panel
Battery level
Battery charging Battery full
Double tap to open Power panel
USB connection tray icon
Indicates an ActiveSync connection with PC is established
Clock
Double tap to open date/time panel

WF35 Manual
http://www.touchdynamic.com Version 2.1a
P.3
Tray Icon Descriptions
Input method tray icon
Tap to hide or show onscreen soft keyboard
Tap-n-hold and drag up to select input method
English Keyboard
English European
Traditional Chinese Keyboard
Phonetic 注音 ChangJie 仓颉 Simplified 速成
Simplified Chinese Keyboard
PinYin 拼音 ShuangPin 双拼 WangMa 王码
WuBi 五笔
Handwriting Recognizer
or English / Chinese handwriting recognizer
Task switching button
Tap to switch between active applications

WF35 Manual
http://www.touchdynamic.com Version 2.1a
P.4
1.4 Battery & Charging
Loading Battery
1. Align the metal contacts of the battery with the contacts inside the battery compartment.
2. Press the battery downwards until it fits the battery compartment. Push the battery until
it is automatically locked.
3. Slide the battery cover upwards
Unloading Battery
1. Press-n-hold the power key to turn off the PDA. Remove the battery cover by sliding it
downwards.
2. Push the battery lock rightwards to unlock the battery
3. Gently lift the battery from left side and then take it out.

WF35 Manual
http://www.touchdynamic.com Version 2.1a
P.5
Battery Charging
Insert to DC jack
Battery charging
Plug the charger to the electrical socket
Connect the charger plug to DC jack of the PDA
LED indicates amber flash during charging.
Battery charging tray icon will be displayed in the
taskbar.
Battery is full
When fully charged, LED indicates green solid.
100% battery tray icon will be displayed.

WF35 Manual
http://www.touchdynamic.com Version 2.1a
P.6
Battery Charger BC35
BC35 is a standalone battery charging unit that can charge standard & extended batteries.
BC35 enables unlimited battery runtime for non-stop operations of a busy restaurant. BC35
also facilitates better asset management. Unlike consumer PDAs, user no longer requires to
put their whole unit of PDA in the charging cradle, where the unit is placed in a common area,
but to simply replace by a fully charged battery from the BC35. Because of this, users are
fully responsible for the units all the time. This helps reduce the loss and damage of the
units since the responsibility of the units are clearly defined.
When power charger is connected to the
power outlet the Status Indicator LED
turns solid green.
When the battery is charging the LED
turns solid red.
When the battery is fully charged the LED
turns green.

WF35 Manual
http://www.touchdynamic.com Version 2.1a
P.7
To insert the battery, place it as shown
on the picture.
Push on the battery to pull the battery
clip down and slide battery toward the
battery connectors.
The clip should be released once the
battery is properly connected.
The Status indicator should change
the color from green to red, once the
battery is installed and charging
begins.
To remove the battery, press on the
battery clip and remove the battery.

WF35 Manual
http://www.touchdynamic.com Version 2.1a
P.8
1.5 Power ON / OFF
To power on the PDA, press the power key softly. The LED
should be green solid if power is enough to turn on a PDA
otherwise it will be red.
System info is displayed on the boot up screen
Serial No. (SN), an globally unique no. to identify a
PDA
ROM version, the version of system firmware
ROM release date
ROM languages (e.g. Eng+SC+TC is English +
Simplified Chinese + Traditional Chinese)
Windows CE Edition (Professional Edition)
Clock Speed (400MHz)
Note:
If LED is red solid when power key is pressed, the
battery level is very low and the PDA needs charging.
If NO LED is seen when power key is pressed, it
indicates no power is supplying to the PDA. It is most
probably due to missing battery, no DC power or
battery level is completely empty.
To power off the PDA, press-n-hold the power key for 1
second. System will pop up a message “POWER OFF”
before it shutdowns the system.

WF35 Manual
http://www.touchdynamic.com Version 2.1a
P.9
1.6 Suspend (Sleep) / Resume (Wakeup) PDA
PDA can be suspended like sleeping, called “sleep mode” to achieve maximum power saving.
When PDA is in sleep mode, the LCD backlight and touch panel are off, CPU is in sleeping status
while Wi-Fi can be kept connected.
To force sleeping (suspend) of the PDA manually, lightly press the power key.
To wake up (resume) PDA manually, lightly press the power key again. Once woken up,
PDA is back to the original status with the LCD backlight on and CPU running.
NOTE: Please refer to “Chapter 9: Power Management”
The PDA has a unique “sleep mode” that allows maximum power
saving yet Wi-Fi connection could be kept online.
1.7 Soft Reset (Reboot)
Soft reset may be necessary in case system does not response any button & screen contacts.
The soft reset is like a reboot of the system. It does not erase any installed programs or
saved data.
Always save the data within the active programs running on PDA before performing a soft reset
or unsaved data may be discarded.
To perform a soft reset:
Locate reset button at PDA rear, top right hand corner
Lightly press the reset button by stylus
System will be rebooted
Note: “soft reset” is a force reboot of system. It discards all
recent changes of system settings or file content that are
pending for flushing to the physical flash memory.
Always use “Power off” (press-n-hold power key) to turn off the
PDA or recent changes of system settings / registry may not be
saved to the file system of the physical flash memory
Reset button (use stylus to press button)

WF35 Manual
http://www.touchdynamic.com Version 2.1a
P.10
1.8 Clean Reset (Restore to factory default)
In case a thorough reset of PDA is required, clean reset can be performed to erase all installed
programs, settings and data. The clean reset is equivalent to restoring system to factory
default.
To perform a clean reset:
Turn off the PDA (press-n-hold the power key)
Press-n-hold the power key (keep holding)
Press-n-release the reset button by stylus
Keep holding the power key for few seconds until “Restore to Factory Default” screen is
seen. Follow the screens below:
Tap “Yes” to confirm Tap “Yes” to double confirm Reformat in progress. It takes
few minutes to complete
“Clean reset” is a process to restore system to factory default.
All data and programs will be lost.

WF35 Manual
http://www.touchdynamic.com Version 2.1a
P.11
1.9 Stylus & Screen Calibration
In case touch screen could not respond to tapping positions on screen accurately, recalibration
may be necessary. Click Start > Settings > Control Panel > Stylus > Calibration (Tab
page)
Tap “recalibration” Follow targets and tap the screen
by stylus
Calibration completed
In case the screen does not respond to double click correctly, sensitivity of double-tap may
need adjustment. Click Start > Settings > Control Panel > Stylus > Double-Tap (Tab
page)
Double tap on the checkers Double tap icon to verify Icon should be changed in
response to the double tap

WF35 Manual
http://www.touchdynamic.com Version 2.1a
P.12
1.10 Anti-drop strap, Anti-slip hand strap & Leather case
Standard PDA package comes with anti-drop and anti-slip hand straps. These straps,
especially the anti-drop strap, are effective accessories to help protect PDA from damaging
when the unit drops to the ground.
Leather case is an optional accessory to further strength the protection of PDAs.
Anti-drop strap
The anti-drop strap attaches to PDA bottom
strap hole
One ending of the strap is a lock designed to
attach to user’s belt position
The middle part of the strap is an elastic spring
that is able to absorb the force when the PDA
unit is hitting the ground or when PDA is out of
users’ hands
A detachable design to facilitate users to return
the PDA units to their supervisors / managers
Leather Case
Leather is used together with anti-drop strap
Note: Protective flip cover has to be removed
when leather case is used
Front view of leather case with anti-drop strap

WF35 Manual
http://www.touchdynamic.com Version 2.1a
P.13
Anti-slip hand strap
The anti-slip hand strap is basically a
hook-and-loop strap
Each strap needs a pair of locks. The locks
should be placed in a correct direction and
sequence
The length of the strap is adjustable for different
size of users’ hands.

WF35 Manual
http://www.touchdynamic.com Version 2.1a
P.14
Align the locks to PDA’s top and bottom strap
holes position.
Lightly insert the lock and attach it to the PDA
Tips: To fix the lock, it needs to insert-n-rotate
until you hear a “tic” sound
Anti-slip hand strap can be used together with
the anti-drop strap
Anti-drop strap is a highly recommended accessory using with
the PDA. It is site proven that it helps reduce damaging of PDA
effectively.
1.11 Screen Protectors
Each standard package of PDA provides a piece of screen protector film. The film helps

WF35 Manual
http://www.touchdynamic.com Version 2.1a
P.15
protect touch screen from scratches, tears, dirt, dust, oil and grease effectively.
Screen protector film is a highly recommended accessory to help
protect touch screen from wear & tear.

WF35 Manual
http://www.touchdynamic.com Version 2.1a
P.16
Chapter 2: System Information
2.1 S/N (Serial No.), Memory & Version
System information provides important information for deployment and ongoing support. To
access the info, tap Start > Settings > Control Panel > System Info
S/N is a globally unique serial no. to
identify a PDA
Total flash memory doesn’t include the 38MB system
ROM and the 20MB backup disk (Actual physical total =
128MB) Storage memory is RAM allocated for system storage
space (system cache) Program memory refers to RAM allocated for running
applications 32MB RAM is occupied by the system ROM and about
32MB RAM is left for system & applications
ROM version
Release date
Multi-lingual operating system
language
Windows CE licensing
CPU clock speed
Address type IP Address Subnet mask Default gateway WLAN network card MAC address

WF35 Manual
http://www.touchdynamic.com Version 2.1a
P.17
2.2 Operating System Information
Operating system information is shown at Start > Settings > Control Panel > System
Windows CE 5.0 Operating System
Samsung Processor
“Storage memory” refers to system cache memory Cache memory may be fine tuned to attain optimal
performance but excessive cache also reduces available
memory for applications
2.3 Wi-Fi & Network Information
Wi-Fi and network information provides important information for network configuration.
Double tap the Windows taskbar WLAN tray icon or tap Start > Settings > Control Panel >
WLAN > IP Information (tab page)
TCP/IP info of Wi-Fi network
IP Address / Subnet Mask / Default
Gateway / WLAN NIC MAC Address
More detail info about TCP/IP settings, e.g. DNS servers,
DHCP lease expire time.

WF35 Manual
http://www.touchdynamic.com Version 2.1a
P.18
Chapter 3: Administrator & User Mode
3.1 Introduction
WF35 PDA has two distinct modes of operation: Administrator Mode and User Mode.
In Administrator Mode, system administrators or field service technicians have full rights to
configure system settings and install / un-install applications. This is a mode typically used
for initial stage of setup and ongoing maintenance.
User Mode, as its name implies, is specially designed for end users who use the PDA as a
dedicated working terminal or appliance. Since system configurations are completely hidden in
user mode, e.g. IP address, Wi-Fi keys, application shortcuts & etc, system integrators (SIs)
would find deploying WF35 solutions much fewer support calls in compare with deploying
consumer based PDAs. Since users have no way to access to file system in this mode, no files
or local database can be tampered or taken out of the device. Therefore, data security could
be enforced effortlessly.
The desktop / program shortcuts could be customized independently in Administrator Mode
and User Mode. Standard control panel features in admin mode are reduced in user mode.
The characteristics of the Administrator Mode and User Mode are summarized in below table:
Mode Description
Administrator Mode An operating mode for administrators & System integrators.
Full administrative rights in major system configurations:
1. Network settings, e.g. Wi-Fi profile settings
2. Program installation / un-installation
3. File manager for file, folder, shortcuts access
4. Driver / OS update
5. System backup & restore
User Mode An operating mode for end users or operators in production site.
The PDA works like a kiosk. Only designated applications (via
shortcuts) are allowed to execute.
Access to system configuration is prohibited
User mode enables zero support of the PDA because all system
settings are hidden from the end users.

WF35 Manual
http://www.touchdynamic.com Version 2.1a
P.19
The following are screen captures for comparing administrator & user mode. In user mode,
only limited set of control panel features are available.
Administrator Mode User Mode
Full items in start menu
Configurable items in start menu (default is
empty)
Full features in control panel
Limited features in Control panel
Note:
In user mode, panel features are further
restricted by hiding some tab pages of
setting.
For example, WLAN panel in user mode has
no “Advanced” tab page to configure
settings.
Another example is “System backup”.
Only “restore” is allowed in user mode for
system recovery.

WF35 Manual
http://www.touchdynamic.com Version 2.1a
P.20
3.2 Administrator Login and Default Mode
A brand new PDA is pre-configured to run as Administrator Mode. All features can be
accessed without restrictions. To configure default boot up mode, follow the steps below:
Administrator login
Turn off the PDA (press-n-hold power key)
Press-n-hold power key (keep holding)
Press-n-release the button once
Hold the power key for 1 second and then release
(Holding for few seconds will jump to “restore to
factory default”)
Administrator login screen is displayed
Enter password (default is 12345678)
Note:
Administrator password should not be disclosed to
end users
Password can be changed by an administrator tool
(refer to Chapter 3.6 - Change administrator
password)
Administrator Menu
Correct logon password will display a menu for
administrator (similar to BIOS menu of a PC)
To change default mode as user, select “Change
default Mode”
If administrator needs to go to user mode once to
examine the use mode settings, simply select “Start
OS (User Mode)”. This will not change the default
mode
Similarly, if default mode is user, administrator may
want to go to admin mode once by selecting “Start
OS (Admin mode)

WF35 Manual
http://www.touchdynamic.com Version 2.1a
P.21
3.3 User Mode Restrictions
The following table summarizes the restrictions in user mode.
Items Purpose
System settings change
(Most are features of control panel)
No changes on environment pre-configured by
administrator
No support due to accidentally changes of settings
Application shortcut change
(Desktop & program shortcuts)
No changes of application environment
Program installation / un-installation No installation of unauthorized applications, e.g. games,
personal utilities
No removal of pre-configured applications & runtime
libraries
Direct access to files & local databases
(via File Manager)
No unauthorized access to files & database
No copying of data out of PDA
No program installation via SD card
Note: Administrator should not create shortcut to file manager
in user mode
ActiveSync connection Prevent unauthorized installation / un-installation of
applications
Prevent direct access to files, local database & setting
systems
3.4 Customizing Administrator / User Mode Shortcuts
Program shortcuts displayed in the desktop or Start > Programs can be customized
independently in admin & user mode. Typically, user mode may contain only one or two
application shortcuts. Special shortcut folders for different purposes are listed below:
Shortcuts Administrator Mode User Mode
Desktop shortcuts
(Shown on top of wallpaper)
\Windows\Desktop \Windows\Desktop_user
Program shortcuts
(Start > programs)
\Windows\Programs \Windows\Programs_user

WF35 Manual
http://www.touchdynamic.com Version 2.1a
P.22
** Auto startup programs,
e.g. background process
\Windows\Startup \Windows\Startup_user
Note:
System level programs placed in both \Windows\Startup & \Windows\Startup_user should not
be deleted, e.g. MsrIconControl.exe, ReadSysInfo.exe
3.5 Application Auto-run via SD Card
Configuring a large of number of PDAs could be a time consuming task. With this in mind, the
PDA is specially designed to enable autorun of designated program when a SD card is inserted.
For example, it allows auto-run a POS installation program.
The autorun.inf is a plain text file that must be placed at the root directory of a SD card. The
format is as follows:
[autorun.inf]
Open=XXXX
XXXX is the auto-run application. Note that XXXX cannot contains any space or it cannot be
executed, e.g. \POS\SetupApp.exe is a valid definition but \POS\Setup App.exe would
be ignored.
3.6 Change Administrator Password
It is recommended to change default admin password before deploying PDA to customer sites.
To facilitate changing password of a number of PDAs, a separate “Admin Password Changer”
SD card utility is provided.

WF35 Manual
http://www.touchdynamic.com Version 2.1a
P.23
Change administrator password
Copy AdminPwdChanger.exe and password.txt to a
SD Card folder
Open password.txt and edit entry below:
ENCRYPTION_KEY=KKKKK
OLD_ADMIN_PASSWORD=PPPPPP
NEW_ADMIN_PASSWORD=NNNNN
Where:
KKKKK is a key combination of numbers and in
capital letters (Minimum length = 8, Maximum
length = 16)
PPPPP is the original password (Minimum length=8,
Maxium length=16)
NNNNN is the new password (Minimum length=8,
Maximum length=16)
Create a autorun.inf in SD Card to run
AdminPwdChanger.exe utility, new password could
be deployed to a number of PDAs easily

WF35 Manual
http://www.touchdynamic.com Version 2.1a
P.24
Chapter 4: Regional Settings
4.1 Date & Time Setup
To change date/time and time zone, double tap the Windows taskbar Real Time Clock (e.g.) or
tap Start > Settings > Control Panel > Date/time (Date /time tab page)
Adjust date & time
Time zone must be properly configured if “Time Sync” is
used. Otherwise, system could not display correct time
according to local time zone setting.
4.2 Auto Time Synchronization
The “Time Sync” feature enables auto time synchronization with any time server supporting
Simple Network Time Protocol (SNTP) on the network via Wi-Fi connection. Tap Start >
Settings > Control Panel > Date/time (Time Sync tab page)
By default, the SNTP Time Sync function is enabled.
To enable/disable the Time Sync function, tap to
check/uncheck the “SNTP Time Sync” checkbox.
The default SNTP server is time.nist.gov.
System integrator could configure a POS server with
SNTP service for synchronizing date/time to all PDAs.
In that case, SNTP server address could be IP
address like 192.168.x.y.
Default Time Sync refresh period is 3600 seconds
(i.e. 60 minutes).
Tap the “Update” button to manually perform a
Time Sync operation immediately. (Remember to set
the correct a time zone)

WF35 Manual
http://www.touchdynamic.com Version 2.1a
P.25
NOTE:
Time sync is disabled in sleep mode. Next time sync
attempt will be deferred when PDA is manually
woken up.
4.3 Regional Settings
Regional settings like date & time format, number and currency format can be configured in
Start > Settings > Control Panel > Regional Settings > Region (Tab page)
Tap “customize” Tap “Time” tab page Select time format
4.4 Multi-lingual User Interface
The PDA is a multi-lingual system. System language can be changed in Start > Settings >
Control Panel > Regional Settings > Language (Tab Page). It requires a reboot to
make language change effective. (Note: The PDA has in-built support of English, Traditional
Chinese & Simplified Chinese languages)
Select language Reboot required

WF35 Manual
http://www.touchdynamic.com Version 2.1a
P.26
Chapter 5: Windows Explorer (File Manager)
5.1 Windows Explorer Options
Windows Explorer is one of most frequently used tool like File Manager. It provides all basic
file operations like copy, cut, paste, paste shortcut, delete & etc. There are options could be
configured as follows:
Windows Explorer can be opened
via “My device” & Programs
Default style of file / folder
display.
“Storage card” is the folder
for SD Card
Display address bar (view >
Address Bar)
Folder “\Storage Card” points to
the SD Card
Change to Small Icons Small icons is the style enables
fast file and folder browsing

WF35 Manual
http://www.touchdynamic.com Version 2.1a
P.27
To display hidden & system
folders / files, go to view >
options
Uncheck options as above Temp and Windows are hidden
folders (by default, file manager
hides these folders)
5.2 Creating Shortcuts
There are 2 ways to create a shortcut: “Copy & Paste Shortcut” using Windows Explorer and
ActiveSync. The following is an example using Windows Explorer.
Copy a file or folder Paste a shortcut on the desktop Shortcut created

WF35 Manual
http://www.touchdynamic.com Version 2.1a
P.28
5.3 Recycle Bin
By default, deleted files are temporary stored in the Recycle Bin before they are permanently
deleted from the file system. The behavior and the capacity of the recycle bin can be
configured as follows:
Tap-n-hold the icon, select
properties in the popup menu.
Deleted files may be removed immediately by option “Do
not move files to recycle bin…”
The maximum size of recycle could be adjusted by the
sliding bar

WF35 Manual
http://www.touchdynamic.com Version 2.1a
P.29
Chapter 6: ActiveSync (PC Synchronization)
Microsoft ActiveSync is a Windows Mobile software that allows user to synchronize Windows Mobile
and other Windows CE-based devices with a Windows-based PC.
If a PC is running Windows Vista, ActiveSync is managed through the Windows Mobile Device Center.
For earlier versions of Windows, Microsoft ActiveSync is needed to be installed. The Microsoft
ActiveSync 4.5 is recommended for installation.
The ActiveSync enables files browsing, applications installation/removal. The PDA supports
ActiveSync via USB (default option) and Bluetooth (optional – details please refer to session “Chapter
8.7 - Bluetooth Service - ActiveSync”).
6.1 Configure ActiveSync via USB
By default, the PDA uses the USB port for the PC connection to ActiveSync. User may double
check the status on Start > Settings > Control Panel > PC Connection
Windows XP Professional is used for illustration purpose. Make sure ActiveSync is properly
installed.
Right click ActiveSync tray icon in the Windows taskbar
Select “Connection Settings…” from the pop up menu.
Enable the “Allow USB connections” checkbox option

WF35 Manual
http://www.touchdynamic.com Version 2.1a
P.30
6.2 Running ActiveSync via USB
Make sure PDA is under administrator mode (since USB is disabled in User mode by design for
security purpose).
Connect PDA to PC via mini-USB cable. PC’s ActiveSync will be started automatically.
The ActiveSync tray icon will changes from grey to green
The ActiveSync startup dialog appears. Select “No” and press “Next”
Press “Explore” to browse the files and folders of the PDA remotely
When ActiveSync is connected, PDA has a tray icon to indicate such status. Note that
ActiveSync connection will disable “sleep mode” even ActiveSync is idle

WF35 Manual
http://www.touchdynamic.com Version 2.1a
P.31
Chapter 7: Wi-Fi
7.1 Wi-Fi Status and Taskbar Icon
Double tap WLAN tray icon or tap Start > Settings > Control Panel > WLAN to open WLAN
panel. Tap the Wi-Fi on/off button to manually turn on or off the Wi-Fi. The connected network
name (SSID), MAC address, signal strength, .channel, etc are shown in the main page
WLAN is off
WLAN icon: grey with red
cross
Wi-Fi LED: off
Top WLAN button to turn it on
Wi-Fi is searching for networks
(access points)
Wi-Fi icon: amber
Wi-Fi LED: blue flash (quick)
Wi-Fi connected to a access
point
Wi-Fi icon: green
Wi-Fi LED: blue flash (slow)
7.2 Wi-Fi boot up default state
By default, Wi-Fi is turned on after booting up.
For offline application, Wi-Fi default state could be
configured as “off”
Note:
WLAN last on/off state is not remembered in the
system. The behavior follows the settings in this
option.

WF35 Manual
http://www.touchdynamic.com Version 2.1a
P.32
7.3 Single / locked SSID feature
Single / locked SSID is a special feature to lock to a designated network (i.e Access Points with
the same SSID). This ensures users will not accidentally connect to nearby access points
(APs) and cause interruption of POS application and support calls.
Tap WLAN on/off button to
turn on Wi-Fi
Tap “Choose Network”
Wi-Fi displays all available
networks*.
Double tap a network name to
start configuring it
For hidden network, double
tap “Add New” to add a profile
manually
Enter SSID via on-screen
keyboard
Select authentication and
encryption types
For WEP, uncheck both “The
key is provided automatically”
and “Enable 802.1x
authentication”
Enter a network key
Tips: Since network key can
be as long as 26 characters
(WEP 128-bit key). Such key
could be copied and pasted
from a text file in Notepad.
To paste, tap-n-hold the input
field of network key. Select
“Paste” in the popup menu
Notepad is found at Start >
Programs
Press “OK” to exit after all
parameters are correctly
entered
* Note: A Wi-Fi access point can be configured to broadcast or hide its SSID. Only networks with
broadcasting SSID can be searched and seen by any Wi-Fi device.

WF35 Manual
http://www.touchdynamic.com Version 2.1a
P.33
Check “Lock to single WLAN
network” checkbox and press
“Connect & Lock” button
Wi-Fi will connect to the
network with “Locked” state
Single / locked SSID feature
guarantees Wi-Fi will not
connect to network other than
the one defined in the system
Wi-Fi successfully connects to
a network
Wi-Fi tray icon turns to green
and LED is blue flash (slow)
Delete a SSID profile
To delete a SSID profile
Press “unlock”
The original locked SSID will
be changed to “preferred”
Press-n-hold the SSID
Select “delete” from the popup
menu
“Single / locked SSID” feature ensures PDA only connects to
designated network
WF35 Manual
http://www.touchdynamic.com Version 2.1a
P.34
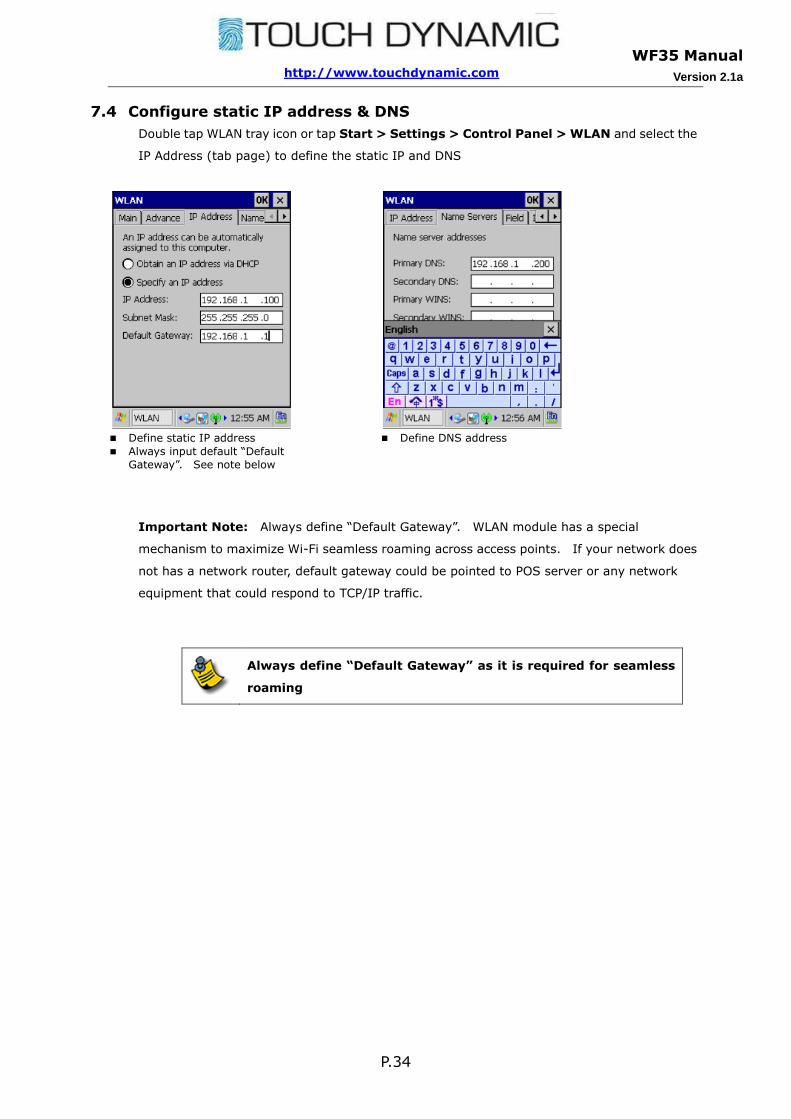
7.4 Configure static IP address & DNS
Double tap WLAN tray icon or tap Start > Settings > Control Panel > WLAN and select the
IP Address (tab page) to define the static IP and DNS
Define static IP address
Always input default “Default
Gateway”. See note below
Define DNS address
Important Note: Always define “Default Gateway”. WLAN module has a special
mechanism to maximize Wi-Fi seamless roaming across access points. If your network does
not has a network router, default gateway could be pointed to POS server or any network
equipment that could respond to TCP/IP traffic.
Always define “Default Gateway” as it is required for seamless
roaming

WF35 Manual
http://www.touchdynamic.com Version 2.1a
P.35
7.5 Wi-Fi Seamless Roaming
Wi-Fi reliability lies in the ability and performance of Wi-Fi seamless roaming. With the
enhanced WLAN driver and firmware, the PDA typically roams across access points (with same
SSID) less than a second. The PDA provides genuine roaming, which online applications will
not aware of the roaming process while the network session (TCP/IP) could be maintained.
This ensures no interruption to real-time POS applications.
To configure Wi-Fi roaming, tap Start > Settings > Control Panel > WLAN > Advance
(Tab page)
Multiple Access Points (AP) Environment
For multiple APs site, it is important to perform wireless site survey
to figure out the best placement of access points in order to provide
the best coverage of wireless signal with the least signal
interference.
Roaming Trigger Level “-68dBm”is an optimal value for most
environments. The mechanism works like below:
When the signal strength of a Wi-Fi connection becomes weak
and beyond roaming trigger level, Wi-Fi will search for nearby
APs in background transparent to users. The searching will
not impact existing Wi-Fi connection.
If an AP could be searched with signal strength better than
10dBm of the trigger level, i.e. -58dBm if -68dBm is the trigger
level. Wi-Fi will roam to this AP automatically.
Note:
Roaming trigger level is also a key performance meter to the
wireless site survey. For example, -68dBm is equivalent to a
performance level that in every single location of a wireless site,
there should be one AP providing signal strength -58dBm or better.
If APs are placed with the least interference (e.g. adjacent channel
1, 6, 11) and they have fully covered the site, seamless roaming
could be achieved easily.

WF35 Manual
http://www.touchdynamic.com Version 2.1a
P.36
Single Access Point Environment
For single AP site, since there is no more access point with stronger
signal that would be roamed, defining -90dBm is optimal. This will
disable system from searching for nearby access point and thus will
save power.
For detail tips and tricks of deploying multiple APs in a wireless
site, please refer to the document “Best Practices for
Deployment POS PDA - Wireless Site Planning &
Implementation”
7.6 Always-on W-Fi
Wi-Fi remains connected in “Sleep mode”
WF35 is a unique POS PDA features “Always-on Wi-Fi”. This is a
design to Keep Wi-Fi connected even PDA is in sleep mode. By
default, it is turned on. See checkbox “Keep connected when OS
sleeps”
When PDA enters “sleep mode”, touch screen and LCD are off, CPU is
in sleeping status for maximum power saving while Wi-Fi connection
is kept connected. By default this feature is enabled.
In “sleep mode”, pressing the power key will wake up the PDA
manually. Online POS application could transmit data to POS server
as long as PDA has woken up without any delay re-connecting to
network.
If “Always-on Wi-Fi” is disabled, it could achieve maximum power
saving in “sleep mode”. However, it will take 5 to 10 seconds to
re-connect to AP if PDA is woken up manually. This may defeat the
key requirement of the always-on Wi-Fi connectivity of a POS
application.

WF35 Manual
http://www.touchdynamic.com Version 2.1a
P.37
7.7 WLAN Profile Recovery
If Wi-Fi may not function properly, e.g. SSID is lost because of
registry corruption, the recovery function allows restoration of the
last-known-good WLAN profile.
If “Recover WLAN settings” button is pressed, it needs reboot to
perform the recovery.
This feature reduces potential support due to abnormal Wi-Fi
behavior in case of system registry issue.
7.8 Remote wake up PDA
Remote wake up PDA
When the option “keep connected when OS sleeps” is enabled and
the PDA is in sleep mode, the PDA can be woken up by incoming
network events (i.e. a Unicast IP packet to the PDA) so that
application would be able to process the network packets timely.
ARP IP Filter
This UNICAST ARP IP filter should be turned on as default option. In
“Sleep mode”, CPU is sleeping but Wi-Fi module is still working in
superb low power mode. In this mode, the module could listen to
network (IP) traffic and the IP filter processes only the traffic sending
to the device matching its own MAC address. The network
packages will be carried forward to WLAN driver and wake up the
PDA.

WF35 Manual
http://www.touchdynamic.com Version 2.1a
P.38
7.9 Wi-Fi periodic keep-alive
Periodic keep-alive
There is common that access points would kill Wi-Fi connection
session if it has been idle for few minutes. This causes issue to
application requiring always-on Wi-Fi.
Since PDA is not being notified of such session drop evets, new
outgoing network traffic from PDA application will suddenly trigger
reconnection of Wi-Fi. It means users will experience 10+ seconds
delay until connection is re-established.
To avoid connection session drop due to prolonged idle, the PDA has
a “Periodic keep alive” feature that would talk to AP periodically to
avoid connection session drop. By default, 3-minutes is an optimal
value for most APs.
Note:
If idle connection setting could be configured by AP (however, most has no such option), it should be
defined such that it is longer than the value of periodic keep alive.

WF35 Manual
http://www.touchdynamic.com Version 2.1a
P.39
7.10 Wi-Fi Auto off and Auto connection retry
PDA in Wi-Fi auto off state
Wi-Fi Auto off
When PDA is out of signal range, system would start searching for
another one in a limited time frame defined in “Auto Off WLAN after
disconnected”. It is a design to prevent battery from being drained
quickly as Wi-Fi searching is a power consuming process. By
default, this feature is enabled and WLAN will be off if no AP is found
for 1 minute.
Wi-Fi Auto Retry after Auto Off
When Wi-Fi is in auto off state, “Auto retry WLAN connection” will
retry connecting to AP if it has been idle for a time frame equal to the
value defined in “Auto off WLAN after disconnected”. If the value is
1 minute, the feature will wait for 1 minute and start searching for
AP.
Thus, if there is no signal, PDA will search AP for 1 minute and then
jump to Wi-Fi auto off for 1 minute. This cycle will repeat itself until
Wi-Fi connection could be successfully established. This process
strike a balance between power saving and Wi-Fi connectivity.
Wi-Fi auto off dialog box
When PDA is in Wi-Fi auto off state, a dialog box “WLAN is auto off!
Tap here to restart” will be displayed at lower right of the screen.
User may trigger reconnection to AP immediately by tapping this
without waiting or tapping the Wi-Fi tray icon.

WF35 Manual
http://www.touchdynamic.com Version 2.1a
P.40
7.11 Wi-Fi Performance & Battery Performance
Wi-Fi Best Performance vs Best Battery
An AP broadcasts its beacons for every 100ms. Wi-Fi client devices
need to listen to such beacons for Wi-Fi link quality check as well as
checking for any buffered data that needs to retrieve from the AP.
Wi-Fi client is allowed to listen to beacons less frequently to save
power but its network performance will be reduced. Such listening
interval is defined from 1 to 5 (technically, it is Beacon Listening
Interval BLI 1 to 5, corresponding to 100ms to 500ms).
The shorter the BLI, the better the performance, i.e. the faster
response for PDA to receive buffered data from the access point. The
longer the BLI (i.e. 500ms), the better the battery performance.
For most scenarios, BLI 3 is optimal and it is the default value of
Wi-Fi.
7.12 Notes to Application Developers
When it comes to online POS application, TCP/IP network programming is a key concern to
developers because it is the core communication module governing the robustness and
stability of the application.
In general, for a PDA online application, its TCP/IP network traffic is either initiated by PDA
client or POS server. Different programming approaches should be considered in different
scenarios. The following are useful tips for developers concerning about this.
Client-initiated design
“Wi-Fi always online” feature keeps Wi-Fi connection to the AP even the PDA is in sleep
mode. Whenever user presses the power key to wake up the PDA, the client application
immediately send traffic to the POS server without experience any delay.
Due to the fact the server is always listening to incoming traffics, it is optional for the
client application to validate the TCP connection before doing a client-server operation.
However, the server initiated traffics are treated differently. Please see the next section
for details.

WF35 Manual
http://www.touchdynamic.com Version 2.1a
P.41
Server-initiated design
The “Wi-Fi always online” feature allows “server initiated” network traffic even when PDA
has entered sleep mode. This allows server to wake up the PDA for alert function or data
synchronization request.
In theory, when PDA has entered sleep mode, any incoming unicast IP package can wake
up the PDA from sleeping. However, in practice, the effect depends on the types of
traffic sending to the PDA.
If the sender traffic is a ping request and a connectionless UDP package, it is quite
common that a single traffic is not sufficient to wake up the host PDA. More often, it takes
several pings or UPD packets to fully wake up the PDA.
If sender traffic is a connection oriented TCP package, sender’s network layer may need
auto-retry mechanism until the PDA wakes and acknowledges.
For the best practices of server initiated traffics, server needs to keep sending alive
requests to PDA in every second until the PDA acknowledge before the actual
server-client operation.
Optimal keep-alive design
WLAN module has a special auto power saving mechanism if connection has been idle for
5 seconds. If an application keeps sending data to server or vice versa from server to
PDA, WLAN module will be draining power 10 times greater than in auto power saving
state. Thus, it is advisable that time between keep-alive packages should be greater
than 30 seconds. This will strike a balance between power saving and Wi-Fi
connectivity.

WF35 Manual
http://www.touchdynamic.com Version 2.1a
P.42
Chapter 8: Bluetooth
8.1 Bluetooth Status and Taskbar Icon
Double tap the Bluetooth tray icon or tap Start > Settings > Control Panel > Bluetooth to
open Bluetooth panel. Tap the Bluetooth on/off button to manually turn on or off the
Bluetooth. The Bluetooth device name, Bluetooth BD address and number of added service are
shown in the main page.
Bluetooth is off
Bluetooth icon: grey
Bluetooth is turning on
Bluetooth icon: amber
Bluetooth is on
Bluetooth icon: blue
Bluetooth info displayed
8.2 Bluetooth boot up default state
Bluetooth Boot up default on/off option
By default, Bluetooth is off after booting up.
To configure the boot up Bluetooth default state, simply tap to select
the Bluetooth boot up option “ON” or “OFF” radio button.
Note:
By design, system will not remember the last Bluetooth on/off state
after power off. It will only follow the Bluetooth boot up default
state option.

WF35 Manual
http://www.touchdynamic.com Version 2.1a
P.43
8.3 Supported Bluetooth Services
The table below lists the supported Bluetooth profiles/services and their corresponding roles.
To simply representation of a Bluetooth and its state, each service has its own set of icons to
reflect its state.
# Service Supported Role Service Icon state
Available Added Activated
1 Serial Port (SPP) Initiator (Device A) only
2 Dial-up Network (DUN) Data Terminal (DT) only
3 Microsoft ActiveSync ** Client only
4 Object Push (OPP) Push server only
5 File Transfer (FTP) Both client & server
Note:
Bluetooth panel is able to browse the available services of a Bluetooth device. For
example, a Bluetooth printer commonly exposes its serial port service for remote
connection. When such service is seen from the PDA, the icon is in grey indicating it is
“Available”
When PDA pairs with a Bluetooth device and a service is selected and added, the icon will
change from “Available” (grey) to “Added” (colorful)
When an added service is activated, e.g. serial port of a Bluetooth printer is activated
with a local virtual COM port for POS application, the icon will change from “Added” to
“Activated”. Activated services have arrow on the icons.

WF35 Manual
http://www.touchdynamic.com Version 2.1a
P.44
8.4 Bluetooth Searching & Pairing
The screens below illustrate an example PDA’s Bluetooth panel searches for and pairs with a
Bluetooth enabled PC.
Turn on Bluetooth by tapping
the on/off button
Tap “Search” tab page
A list of available Bluetooth
device searched
Select the desired Bluetooth
device (upper listbox) and
select one of its service (lower
listbox), tap “Add service”
It starts pairing with a device
by a PIN code
Enter a Bluetooth PIN code
The PC prompts for Bluetooth PIN code
Matching PIN code should be entered or pairing of PDA & PC fails

WF35 Manual
http://www.touchdynamic.com Version 2.1a
P.45
When pairing is done,
authentication process
between two Bluetooth
devices is completed
Press “OK” to activate the
selected service
When the selected service is
activated, the icon is changed
to one with arrow indication.
In Bluetooth panel main page,
it displays one service is
added.
The paired tab page displays
all paired devices
To delete a paired device,
press “Delete Device”
To delete / deactivate a
service, press “Delete Service”
/ “Deactivate Service”

WF35 Manual
http://www.touchdynamic.com Version 2.1a
P.46
8.5 Bluetooth Service – Serial Port Profile (SPP)
Typical use of Bluetooth Serial Port Profile (SPP) is printing via Bluetooth mobile printer.
Follow the screens below to demonstrate the pairing of the PDA with mobile printer.
Turn on Bluetooth In “Search” tab page, press
“Search”. SPP-R200 requires
PIN code if it is being searched
Enter default PIN code “0000”
Select device “SPP-R200”
Select “Serial Port” service
available for device
“SPP-R200”
Tap “Add service”
Press “OK” to activate the
service
The activation of serial port
service creates a local virtual
COM/RS232 port for PDA
application
Select a local virtual COM port
“COM6”
Run printer test Utlity*.
Enter COM6: as PortName and
press “Openport”
Press “PrintText” to print
Press “ClosePort” to close the
COM port connection

WF35 Manual
http://www.touchdynamic.com Version 2.1a
P.47
8.6 Bluetooth Service – Dial-up Networking Profile (DUN)
Typical use of Bluetooth Dial-up Networking Profile (DUN) is to establish online connection to
an Internet ready mobile phone via GRPS/EDGE/HSDPA data communication.
The following illustrates an example on configuring PDA a Dial-up Networking Profile (DUN
profile) that is able to initiate a Bluetooth connection to a mobile phone for Internet web
browsing.
Technically, the mobile phone exposes its “Modem dial up” service to the PDA. When this
service is activated, PDA creates a “virtual local modem” corresponding to the mobile phone.
The DUN profile will make sure of such modem to establish mobile communication network for
Internet connectivity.
Configure dialing properties
Tap Start > Settings > Control Panel > Dialing
Tap “Edit” Enter “G” to all input fields
“G” means dialing without any
prefix code
Tap “OK” to return
Tap “OK” to exit the panel

WF35 Manual
http://www.touchdynamic.com Version 2.1a
P.48
Create Dial-up Networking Profile (DUN profile)
Tap Start > Settings > Control Panel > Network and Dial Connections > Make New
Connection
Enter a DUN profile name
Tap “Next”
Since the DUN profile needs
with Bluetooth modem
exposed by mobile phone, tap
“Bluetooth”
Make sure Bluetooth is on
Goto “Search” tab page
Select the phone device
“S700i”
Select service “Modem Dial
Up”
Tap “Add Service”
Enter a Bluetooth PIN code to
pair with the mobile phone
Press “OK” to activate the
service
This will create a “virtual local
modem” in the PDA device

WF35 Manual
http://www.touchdynamic.com Version 2.1a
P.49
The icon of “Modem dial up”
service has a arrow indicating
it is activated
Press OK to exit
Select the phone device as
modem
Tap “Configure”
In “Call options” tab page,
enter a dial up command
string. This string is different
for each mobile operator
The string in the screen is for
Smartone operator in Hong
Kong
Tap “OK”
Tap “Next” Enter “*99#” for GPRS dial up
This phone no. may be
different for different phone
operator
Tap “finish”
A new DUN connection is
created

WF35 Manual
http://www.touchdynamic.com Version 2.1a
P.50
Initiate a Dial-up Networking via Bluetooth
Tap Start > Settings > Control Panel > Network and Dial Connections
Turn off Wi-Fi first
Double tap the DUN profile
Tap “Connect” Status message is seen:
Opening port > Dialing *99#
> Device connected > User
authenticated > Connected
Tap “Hide”
There is a dial up networking
tray icon in the taskbar
Open Internet Explorer (IE)
The IE could open a web page
via DUN profile (via mobile
phone)
To end the DUN session,
double tap the DUN tray icon
Press “Cancel”

WF35 Manual
http://www.touchdynamic.com Version 2.1a
P.51
8.7 Bluetooth Service – ActiveSync
The following illustrates an example on configuring the PDA and Bluetooth enabled PC for
ActiveSync communication.
Add Bluetooth ActiveSync Service
Make sure Bluetooth is on
Tap “Search”
Select a PC from the device list Select “ActiveSync” service
Tap “Add Sevice”
Enter Bluetooth PIN code
Press “OK”
Enter the same PIN code in the
PC
Press “OK” to activate the
service
“ActiveSync” service icon has
an arrow indicating it is
activated. Press OK to exit

WF35 Manual
http://www.touchdynamic.com Version 2.1a
P.52
Goto Start > Settings >
Control Panel > PC
Connection
Default ActiveSync connection
is USB
Tap “Change”
Select “Bluetooth”
Press “OK”
ActiveSync connection type is
changed to Bluetooth
Tap “OK” to exit
Configure PC’s ActiveSync for Bluetooth connection
In the PC, go to “Device Manager” via Start >
Control Panel > System > Hardware (tab page) >
Device Manager
In Ports (COM & LPT) category, a virtual COM port is
created by Bluetooth module when pairing of PDA &
PC is done
Configure ActiveSync to communicate with the
virtual COM port
Enable “Allow wireless connections ….”
In “Allow connections to one of …”, select the virtual
COM port

WF35 Manual
http://www.touchdynamic.com Version 2.1a
P.53
Initiate an ActiveSync connection from PDA
In file manager, tap view >
options, uncheck all
checkboxes and tap OK
This will show all hidden files &
folders
Run “repllog.exe” located at
“\Windows\’ folder
The “repllog.exe” initiates
Bluetooth connection to PC for
ActiveSync communication

WF35 Manual
http://www.touchdynamic.com Version 2.1a
P.54
8.8 Bluetooth Settings
Double tap the Bluetooth tray icon or tap Start > Settings > Control Panel > Bluetooth >
Main > Settings (tag page)
Allow connection from
All devices – allow searching the PDA and to connect to it by
any devices
Paired device only – only accept connections from paired
devices
Searchable by near by Bluetooth device
Default is enabled
If disabled, PDA will not be searchable and near by Bluetooth
devices will not see it
Allow Bluetooth settings in user mode
Default is disabled
If enabled, tab page “Settings” could be access in user mode
Allow create / change of paired device in user mode
Default is disabled
If enabled, most Bluetooth function, e.g. pairing, add/delete
service, could be accessed.

WF35 Manual
http://www.touchdynamic.com Version 2.1a
P.55
Chapter 9: Power Management
9.1 Battery & Charging Status
Open Power settings at Start > Control Panel > Power or tapping power tray icon
Running with battery Battery charging
9.2 Power Settings
Power schemes define the power saving settings
“Slower CPU speed in dim state” refers to PDA capability to run
slower to save power when backlight is dim/off
Power saving cycle follows a 3-step mechanism (refer to the left
screen as an example):
1. After 1 minute idle, backlight is dim and CPU runs slower.
Tapping the screen would revert backlight to original
intensity and idle timer is reset. CPU is back to full speed.
2. If dim state remains for another 1 minute, backlight and
touch panel would be turned off to save more power.
3. Default suspend setting “Auto” will force CPU to enter “sleep
mode”. If suspend setting is “Never”, CPU will never sleep
and keep running but it doesn’t affect turning off of touch
screen and LCD for power saving.
4. Although system looks like off because tapping screen would not wake up the screen, Wi-Fi
connection is kept. LED is blue flash (slowly)
5. Lightly press power key could wake up PDA to the original status: backlight / touch screen are
turned on, CPU runs in full speed.
In “sleep mode”, most electronic components including Wi-Fi module are in superb low power state.
This explains why PDA could standby for few days even Wi-Fi connection is still maintained.

WF35 Manual
http://www.touchdynamic.com Version 2.1a
P.56
NOTE:
WF35 is a unique POS PDA to have Wi-Fi always-on capability even system is in deep sleep
mode. It behaves like a PDA phone that incoming SMS or call would wake up the system
when screen and touch panel are both off.
User training may be necessary to get familiar with this power saving behavior. Most users
will accept “power key to wake up” feature once they understand this helps extend battery
life.
9.3 Battery Low
Battery Low Warnings
When battery level drops down to 10%, power indicator / LED
turns to red Flash
When battery level drops down to 5%, system popup Battery
warning. Power indicator / LED turns to red solid
Battery Empty & PDA Auto Shutdown
When battery level drops down to 0%
System popup auto shutdown warning box and the PDA will auto
shutdown to avoid further user operations
Power indicator / LED remains in red solid
Note:
After battery becomes empty and PDA auto shutdown, pressing
power key cannot boot up the PDA
User is advised to recharge the empty battery or battery lifetime
will be shortened if such empty state has been stayed for a long
time.

WF35 Manual
http://www.touchdynamic.com Version 2.1a
P.57
Chapter 10: Terminal Services Client / Remote Desktop
10.1 TSC/RDP Profile & Auto-logon
WF35 supports Microsoft Terminal Services Client (TSC) / Remote Desktop (RDP) as well as
auto-login and auto-start application. (TSC & RDP refers to the same technology)
To create a RDP profile, follow the screens below.
Double tap “Remote Desktop
Connection”
Enter IP address of the TSC /
RDP server in “Computer”
input field
Tap “Options”
Enter logon username &
password
Enable “Save Password”
Tap “Save as” to create a RDP
profile with auto-logon feature
Save as a RDP profile to
desktop
A RDP profile created
Double tap the profile file to
initiate a RDP connection
Remote desktop of the server
is displayed as if running a
local application.
No username & password are
required to enter. This is the
“auto-logon” feature.
Top connection bar is shown
by default

WF35 Manual
http://www.touchdynamic.com Version 2.1a
P.58
To hide the bar, open RDP
profile file by Notepad (Start >
programs)
RDP profile file is an UNICODE
text file
Search entry “BBarEnabled”
The default value “1” is to
show top connection bar
Change to value “0” and save
the file
Double tap the RDP profile file
Top connection bar is now
hidden
To quit the RDP session, it
needs to log off from the
remote desktop
Press “log off”

WF35 Manual
http://www.touchdynamic.com Version 2.1a
P.59
10.2 RDP Auto-start Application
WF35 RDP solution enables auto-start designated RDP application after auto-logon to the POS
server. This avoids accidental changes of desktop setting as well as prohibits access to “Start
menu” of the remote desktop.
Without auto-start setup, RDP
displays remote desktop with
start menu & desktop
shortcuts
To enable auto-start, open RDP file by notepad
Add 2 lines:
AlternateShell:s:<app> and WorkingDir:s:<folder>
The added lines are highlighted above

WF35 Manual
http://www.touchdynamic.com Version 2.1a
P.60
10.3 RDP with Magstripe Card Reader
For RDP application running with WF35 Magstripe Card Reader add-on module, it needs to
modify a RDP profile entry “KeyboardHookMode:i:0” with value “0”. By default this value is 1.
This adjustment avoids incorrect characters translation when MSR input characters are
passing to the backend RDP application.
Change entry
“KeyboardHookMode:i:1” to
value “0”
When RDP works with MSR, it needs to modify the RDP profile
file. Change the value of“KeyboardHookMode:i:0” to “0”.

WF35 Manual
http://www.touchdynamic.com Version 2.1a
P.61
10.4 RDP Profile File Format
RDP profile file could be edited to change its behavior. The table below is technical reference
of the RDP profile file format.
Keyword:type:value Description
AudioRedirectionMode:i:0 Indicates where the audio plays. A value of zero (0) indicates that
the audio plays on the host computer. A value of 1 indicates that
the audio plays on the remote device. A value of 2 indicates that
the audio does not play.
AutoReconnectionEnabled:i:1 Indicates whether an attempt is made to automatically reconnect
to the host if a connection is lost. A value of 1 indicates that
automatic reconnection is enabled. A value of zero (0) indicates
that it is disabled.
BBarEnabled:i:1 Indicates whether to display the connection bar. A value of zero
(0) indicates that the connection bar is not displayed. A value of 1
indicates that it is displayed.
BBarShowMinimizeBtn:i:1 Indicates whether to display the minimize button on the
connection bar. A value of zero (0) indicates that the minimize
button is not displayed. A value of 1 indicates that it is displayed.
BbarShowPinButton:i:0 Indicates whether the pin button on the connection bar is
displayed. A value of zero (0) indicates that pin button is not
displayed, the connection bar remains on top, and all server
output will appear below it. A value of 1 indicates that the pin
button is displayed so that a user can unpin the connection bar
from the UI.
BBarShowRestoreBtn:i:1 Indicates whether to display the restore button on the connection
bar. A value of zero (0) indicates that the restore button is not
displayed. A value of 1 indicates that it is displayed.
BBarPinned:i:1 Indicates whether to pin the connection bar to the shell. A value
of zero (0) indicates that the connection bar is hidden
automatically when the cursor is moved away from the
connection bar. A value of 1 indicates that the connection bar is
always displayed.
BitmapCacheSize:i:1500 Specifies the size, in KB, of the bitmap cache in memory. The
maximum value is 32000.
BitmapPersistCacheLocation:s
:\Temp
Indicates the location of the bitmap cache.
BitmapPersistenceEnabled:i:0 Indicates whether bitmap caching is selected. A value of zero (0)
indicates that bitmap caching is not selected. A value of 1
indicates that it is selected.
ColorDepthID:i:4 Indicates the color depth in bits per pixel (bpp). A value of zero
(0) indicates 4 bpp. A value of 1 indicates 8 bpp. A value of 2
indicates 15 bpp. A value of 3 indicates 16 bpp. A value of 4
indicates 24 bpp.
The default value is either 24bpp, or the color depth at which the
OS boots, whichever is less.
Compress:i:1 Enables file and directory compression. Compression is on by
default and it is recommended that it remain so.

WF35 Manual
http://www.touchdynamic.com Version 2.1a
P.62
ConnectToServerConsole:i:0 Used only in non-Windows-based Thin Client configurations. It
indicates the console to connect to from the command line. A
value of zero (0) indicates that the command connects to a
Terminal Services session. Windows XP Professional ignores this
setting. A value of 1 indicates that the command connects to the
host console.
desktopheight:i:1024 Indicates height of the display, in pixels. The default value is the
resolution at which the OS boots.
desktopwidth:i:1280 Indicates width of the display, in pixels. The default value is the
resolution at which the OS boots.
disable full window drag:i:1 Indicates whether full window drag capability is enabled or
disabled. A value of 1 indicates that full window drag is enabled. A
value of zero (0) indicates that it is disabled.
disable menu anims:i:1 Indicates whether menu animation is enabled or disabled. A value
of 1 indicates that animation is enabled. A value of zero (0)
indicates that it is disabled.
disable themes:i:0 Indicates whether themes are enabled or disabled. A value of 1
indicates that themes are enabled. A value of zero (0) indicates
that themes are disabled.
disable wallpaper:i:1 Indicates whether wallpaper is disabled or enabled. A value of 1
indicates that wallpaper is enabled. A value of zero (0) indicates
that it is disabled.
DisableFileAccess:i:1 Indicates whether the user has access to the local file system. A
value of 1 indicates that access to the local file system is disabled
and the Save As and Open buttons are not available in the UI. A
value of zero (0) indicates that the user has access to the local file
system.
domain:s:C1554501-A Indicates the domain of the person who can log on to the remote
device. There is no default.
EnableDriveRedirection:i:1 Indicates whether drive redirection is enabled. A value of 1
indicates that drive redirection is on. A value of zero (0) indicates
that it is off.
EnablePortRedirection:i:1 Indicates whether COM port redirection is enabled. A value of 1
indicates that COM port redirection is on. A value of zero (0)
indicates that it is off.
EnablePrinterRedirection:i:1 Indicates whether printer redirection is enabled. A value of 1
indicates that printer redirection is on, and a value of zero (0)
indicates that it is off.
EnableSCardRedirection:i:1 Specifies whether redirection of smart cards is allowed. A value of
1 indicates that redirection of smart cards is on. A value of zero
(0) indicates that it is off.
KeyboardHookMode:i:2 Indicates what is displayed when ALT-TAB is pressed on the
keyboard. A value of zero (0) indicates items on the local device
are displayed. A value of 1 indicates items on the remote device
are displayed. A value of 2 indicates that the device is full-screen
only.
MaxReconnectAttempts:i:20 Indicates the maximum number of attempts that are made to
reconnect to the host after a connection is lost.
MCSPort:i:3389 Indicates the alternate Winsock port for the RDP. The default
value is 3389. Change this value to an appropriate value if the
terminal server is listening on a different port.

WF35 Manual
http://www.touchdynamic.com Version 2.1a
P.63
Password:s:<password> Indicates the password of the person identified in the UserName
keyword.
Note Windows CE reads saved passwords, but does not have
the ACLs to securely write passwords.
ServerName:s:65.4.18. Specifies the IP address of the remote device.
StartFullScreen:i:1 Indicates whether the Terminal Service session starts in full
screen. A value of 1 indicates that the session starts in full screen.
A value of zero (0) indicates that it does not.
AlternateShell:s:<startup shell
or application>
Indicates the alternate shell or startup application to use in a
session.
Note You can restrict usage after a user logs in by setting this
value to a specific application on the server. The user will only be
allowed to use the application that you specify.
UserName:s:<name> Indicates the user name of a person who can log on to the remote
device.
WorkingDir:s:<folder> Indicates the folder that contains the alternate shell or startup
application.
10.5 Common modifications of RDP profile file
The following are common modifications of RDP profile file
Keyword:type:value Common modifications
BBarEnabled:i:1 Default: 1 (show top connection bar)
Modification: 0 (to hide the bar)
AlternateShell:s:<startup shell
or application>
Default: <empty>
Modification: <designated POS app, e.g. c:\POS\POS.exe>
WorkingDir:s:<folder> Default: <empty>
Modification: <working folder of the POS folder, e.g. c:\POS\>
Password:b:<password>
Default: <empty>
Modification: <encrypted password generated by “Remote
Desktop connection” shortcut>
UserName:s:<name>
Default: <empty>
Modification: <username filled by “Remote Desktop connection”
shortcut>
ServerName:s:<RDP server> Default: <empty>
Modification: <IP address filled by “Remote Desktop connection”
shortcut>
KeyboardHookMode:i:2 Default: 1
Modification: 0 (avoid incorrect translation of characters if PDA is
working with MSR add-on module)

WF35 Manual
http://www.touchdynamic.com Version 2.1a
P.64
10.6 Deploying RDP profile file
A RDP profile file with auto-logon feature contains an encrypted password entry
“Password:b:<encrypted password>”. This is a design to avoid clear text password
accessible to unauthorized persons.
However, same logon password yields different encrypted passwords in different PDA units.
Therefore, deploying RDP profile file to a number of PDAs cannot be achieved simply by
copying the file. This is due to the fact that each PDA has its own encryption key of password.
In that case, it needs to create a backup image of a master configured PDA with RDP profile.
Deploying to a number of PDAs should be done by restoring the backup image. This ensures
all PDAs could run the same RDP profile file without password incorrect error.
10.7 Best Practice deploying RDP Application
The following are important tips to deploy a RDP solution.
Best Practice Reason
Assign username per PDA unit
(e.g. PDA01, PDA02, PDA03)
Administrator could identity a RDP session and its associated
processes (application) by username
In case of issue, administrator could end the session or kill the
process for a specific PDA unit
Disable screen saver For each username running RDP application (e.g. PDA01, PDA02),
screen saver MUST be disabled
Note: screen saving setting is user specific
RDP client displays whatever remote desktop is displaying.
When the desktop is screen saving, a complete black screen is
displayed in the PDA screen.
Users may think that PDA is in sleep mode. However, pressing
power key will not wake up but to bring PDA into sleep mode, also
a black screen. After several power key attempt, users may
consider there is an issue in PDA or application
Restrict each username to one
session
In “Terminal Services Configuration” > Server Settings, define
“Yes” to “Restrict each user to one session”
This avoids repeated logon exceeding the license count
Deployment via backup/restore
utility
Avoids incorrect auto-logon password because of different
encryption key for each PDA.
End users access to RDP profile
under user mode only
Avoids accidental changes of RDP profile file content that causes
problem in connecting to RDP server
Screen saver MUST be disabled for the username used for RDP
application.

WF35 Manual
http://www.touchdynamic.com Version 2.1a
P.65
10.8 Developer Note - RDP with Bluetooth Printer
A RDP application is a process running at the server backend. The PDA client only provides
redirection of screen display of this process. Thus, the RDP application could not direct access
to PDA’s resources like COM/RS232 port exposed by the Bluetooth printer.
In that case, if a RDP POS application needs Bluetooth printing feature, it needs an agent
program to bridge between the backend RDP application and the Bluetooth printer.
With a consideration that PDA is by nature a mobile device that its Wi-Fi connection may be
dropped if the PDA is out of signal range, this agent program should be carefully designed.
The following is a suggested design of this agent program.
PDA’s agent program for Bluetooth printer
First of all, each PDA will pair with a Bluebooth printer to establish a virtual local COM / RS232
port. Since each PDA runs an independent POS RDP application in the server backend. This
program should create a TCP listen port to communicate with the agent program running
locally in the PDA.
This agent program has three functions.
1. When PDA is powered on, this agent program runs automatically (putting on the startup
folder) and actively connect to server POS process to establish a printing connection.
Once established, the connection is kept.
2. When printing of guest check / receipt is initiated by the backend RDP application,
printing commands will be sent to the agent program and perform actual printing via the
local virtual COM port.
3. In case the PDA is out of signal range, the agent program should detect TCP connection
drop and perform re-try mechanism. If connection is established, TCP connection is
kept.
The mechanism above is basically a client-server design but the PDA’s agent program (client
side) initiates and controls the TCP connection instead of from server.

WF35 Manual
http://www.touchdynamic.com Version 2.1a
P.66
Chapter 11: System Clone / Backup / Restore
11.1 Introduction
WF35 is a unique POS PDA features powerful System Clone (similar to PC Norton Ghost
utility*), Backup / Restore & ROM upgrade tools at no additional cost. Since this is a feature
fully integrates with the system ROM, it is always ready to use even the PDA is being
configured starting from scratch after clean reset.
With backup tool and user mode locking PDA configurations, it dramatically changes the way
of deploying & supporting PDA solutions. To see the benefits, see the comparison below:
Scenario Consumer PDA WF35 PDA
PDA setup Setup one-by-one, very time
consuming
Must be performed onsite
Standardization of configurations
is very difficult
Prepare one master image and clone
to many PDAs
All backup images could be prepared
at office before restoring to PDA
onsite
Local Backup Disk No local backup disk
Extra SD Card is required for each
PDA and is subject to loss easily
Default 20MB backup disk is created
locally on the PDA
Individual system backup could be
stored in this local backup disk
No extra SD Card is required
Accidental changes of
PDA setup
Very easily
Create interruption to operations
Onsite support required
Virtually zero support as end users
cannot change any configurations in
User Mode
Performance of
restore
Slow
Typically more than 5 minutes
Very Fast
Typically less than 1 minute
ROM upgrade Separated utility and procedure
Need PC & USB cable
Upgrade one-by-one
A SD card is sufficient to upgrade
Upgrade many units at the same time
as long as there are many SD Cards
Cost License cost per PDA unit Come with free of charge
* Note: Norton Ghost is a product of Symantec. Symantec is a registered trademark of Symantec
Corporation. (http://www.symantec.com)

WF35 Manual
http://www.touchdynamic.com Version 2.1a
P.67
11.2 Local Backup Disk
A 20MB local backup disk is partitioned from the onboard 128MB flash memory.
Local backup disk Default size is 20MB
For the best practice of PDA deployment, system administrators should create a snapshot
backup image and store it locally for each PDA every time when there are configuration
changes. In case of system recovery, end users could restore from this local backup image
quickly and effortlessly without calling the technical support. This helps realize zero support
of the PDA and significantly cut support cost. To end users, this self-service recovery would
minimize interruption to PDA operations.
It is specially designed not to erase any files in local backup size if Clean Reset is performed.
This is to ensure system administrators still have a chance to retrieve the last known good
backup image.

WF35 Manual
http://www.touchdynamic.com Version 2.1a
P.68
11.3 System Clone / Backup
Under Admin mode, start backup at Start > Settings > Control Panel > System Backup >
Select Backup option
System Backup
Backup location: SDCard (\Storage Card) or Local Backup Disk
(\Backup disk)
Need to match serial no: If checked, backup image could only be
restored on the same PDA
Backup System: This is the default and recommended backup
option as it enables fast system restoration by creating small
backup image, typically in few MB. This option is best used with
“\Backup disk” location. However, it also requires restore on the
same ROM version. This option would NOT backup admin
password & default mode of PDA
Backup boot disk: This creates backup image with ROM files,
typically more than 48MB and requires the SD card as backup
destination. This option is best used for ROM upgrade purpose.
This option would backup admin password & default mode of PDA
Note:
Backup option is disabled in user mode
Backup filename is in format cloneCCYYMMDDHHMMSS.img
Backup file could be renamed but prefix “clone” & suffix “.img”
must be maintained, e.g. clone Restaurant A.img
When backup starts, Wi-Fi would be stopped automatically for the
best backup performance
Backup would not start if battery is under 50%. However, this
checking doesn’t apply if PDA is being charged

WF35 Manual
http://www.touchdynamic.com Version 2.1a
P.69
11.4 System Restore
Start restore at Start > Settings > Control Panel > System Backup > Select Restore
option
Step 1: Precaution for ROM upgrade!!!
When restoring the boot disk, i.e. ROM files, it is HIGHLY
recommended PDA is plugged with the charger. Should power
suddenly stop during restoring, ROM files may be corrupted, which
means returning to factory for repair may be necessary
Stop Wi-Fi to ensure maximum restore performance. Goto Control
Panel > WLAN > Press WLAN button to turn if off
Step 2: Select backup image file
Select File…
Select location: SDCard (\Storage Card) or Local Backup Disk
(\Backup disk)
Select backup image file (those with prefix “clone” & suffix “.img”)
Press OK
Step 3: Start Restore
The panel displays info of the selected backup image file, e.g. ROM
version & original S/N
Press Start to restore
Once started, it would check the integrity and condition of the
backup image file. The restore process would be stopped if the
one of the following conditions is true:
Image file is corrupted
Restore on different PDA if the backup image is created
requiring serial no. matching
Restore on different ROM version if the backup image is
created by “backup system” option. Restoring files on

WF35 Manual
http://www.touchdynamic.com Version 2.1a
P.70
unmatched ROM version would create system instability and
corruption issue
Note:
Restore is allowed on both admin & user mode
When restore starts, Wi-Fi would be stopped automatically for the best restore performance.
Restore would not start if battery is under 50%. However, it doesn’t apply if PDA is being charged
After successfully restore and press OK, PDA will reboot and screen calibration is required
11.5 System Restore with WLAN profile
Apart from the convenience that system administrators could deploy many PDAs by restoring
a master copy of PDA clone image, different WLAN profiles including SSID, authentication,
encryption, IP address, DNS address & etc, could also be applied per restore task.
This is a very handy feature that not only enables standardization of application settings, it
also allows restoration of the specific IP and WLAN info when PDAs are being deployed to the
production environment, which SSID & IP address are different from the master copy of PDA
image.
The “File” button selects clone image to restore.
Enable “Restore local IP address” and browse a INI file, which
specifies SSID and IP address info could be restored

WF35 Manual
http://www.touchdynamic.com Version 2.1a
P.71
File format – WLAN.ini
The following is a WLAN.ini file that could be used for restoring specific WLAN & IP address info.
[Network]
Use DHCP=0
IP Address=192.168.18.51
Subnet Mask=255.255.255.0
Default Gateway=192.168.18.1
Primary DNS=192.168.18.1
Secondary DNS=
Primary WINS=
Secondary WINS=
[Wlan]
SSID=WFWEP
NetworkType=1
SecurityType=1
EncryptionType=1
NetworkKey=12345678901234567890123456
WEPKeyIndex=1
SingleNetworkLock=1
[Control]
RestoreWlanIni=0
[Comment]
WirelessNetworkType:
WirelessNetworkType_Infrastructure = 1
WirelessNetworkType_AdHoc = 2
SecurityType:
SecurityType_Open = 1
SecurityType_Shared_WEP = 2
SecurityType_WPA_EAP = 4
SecurityType_WPA_PSK = 5
SecurityType_WPA2_EAP = 6
SecurityType_WPA2_PSK = 7
SecurityType_Both = 8
EncryptionType:
EncryptionType_None = 0,
EncryptionType_WEP = 1
EncryptionType_TKIP = 2
EncryptionType_AES = 3
EAPType:
EAPType_None = 0
EAPType_PAP = 1
EAPType_Chap = 2
EAPType_MD5 = 4
EAPType_EAP = 6
EAPType_TLS = 13
EAPType_LEAP = 17
EAPType_TTLS = 21
EAPType_PEAP = 25
EAPType_MSCHAPv2 = 26

WF35 Manual
http://www.touchdynamic.com Version 2.1a
P.72
11.6 Missing Backup Disk
If local backup disk is missing, goto Start > Settings > Control Panel > Storage Manager
Select “Backup Disk”
Press “Dismount”
Press “Format”
Press “yes” to confirm format
It takes few minutes to
complete
Backup disk formatted
Press “New” to create a new
partition
Enter “Part00” the partition
name and press OK
Partition “Part00” created
The suffix * indicates the
partition is mounted
Local backup disk is found in
the file manager

WF35 Manual
http://www.touchdynamic.com Version 2.1a
P.73
Chapter 12: Magstripe Card Reader (MSR)
12.1 Introduction
The Magstripe Card Reader (MSR) USB add-on module is designed from scratch for reliability,
security, durability, affordability & software compatibility.
Unlike common CF/SD card based MSR solutions, Touch Dynamic’s MSR has a far more reliable
attachment mechanism which could withstand heavy duty and frequent swiping of credit cards
/ magstripe cards in busy hospitality environment. MSR can easily locks to PDA simply by a
screw driver via MSR bottom hole.
For data security, the MSR has a unique encryption feature at MSR’s hardware level. The
encryption key can be configured by POS ISVs/SIs. This reduces the risk customer credit
card data, originally stored in clear-text format, could be captured by unauthorized persons or
trusted programs (e.g. notepad).
Since customers have no idea what program is actually running on the PDA, it simply cannot
tell whether their cards data are processed securely within a trusted POS application or is
stolen for mis-use. The encryption feature avoids potential mis-use of credit card data
because only trusted POS applications, integrated with Touch Dynamic decryption SDK/API,
could decrypt the card data within the application memory.
Touch Dynamic’s MSR design is programming friendly. Since MSR emulates keyboard input,
integrating with POS application is as easy as reading a text field. It doesn’t require special
programming interfaces like ActiveX, DLL & RS232. This also allows easy RDP application
development.
Handheld based MSR is by nature a compact module
and its rail length for card swipe is relatively shorter
than conventional desktop one. Because of this,
Touch Dynamic’s MSR is carefully designed such that
its magnetic head is positioned at the left, instead of at
the middle. This will maximize the rail length and
thus ensure high success read rate. There is an
arrow on MSR to guide users to swipe a card from right
to left.

WF35 Manual
http://www.touchdynamic.com Version 2.1a
P.74
12.2 Attaching MSR
Place MSR at PDA bottom
Connect MSR to PDA via USB
socket
Softly push the MSR towards
PDA until it is good fit to the
USB socket
Fasten MSR with PDA via the
screw at the MSR bottom
12.3 Configure MSR by Configuration Utility
Download the utility from Touch Dynamic Web Site
Custom USB cable (mini-USB cable +
converter)
The custom cable connects to WF35 MSR &
PC.
Full set of MSR functions could be modified by a Magstripe Card Reader Configuration Utility
via a custom USB cable.

WF35 Manual
http://www.touchdynamic.com Version 2.1a
P.75
Run the configuration utility “hid_msr.exe”. At bottom left, “Device Found” indicates WF35
MSR is found.
Configuration Notes
TK[1/2/3] SS/ES SS is start sentinel / ES is end sentinel
According to ISO standard of magstripe card data:
Track1 SS/ES: % / ? Track2 SS/ES: ; / ?
Track3 SS/ES: + / ?
Decode Mode Some tracks may be disabled
Default track data order is TK1-TK2-TK3
TK[1/2/3] Prefix /
Suffix
Additional prefix / suffix can be added to track 1/2/3
Package Prefix / Suffix Additional Prefix / suffix characters can be added to beginning /
ending of 3-track data
For example, it is very common to add newline at package
suffix. So, newline is the default suffix.
TK[1/2/3] Error
Message
If there is error reading a track, specific error message could be
defined. By default, it is empty.
For example, you may define “ERR” as error message
Data Encryption Yes or No.
By default, data encryption is No.
Encryption Key A 16-characters key.
By default, the key is “WF35ABCDEFGHIJKL”
You are recommended to change this key for production
environment
Serial Number MSR serial no (S/N). For MSR demo unit, S/N is empty.
Load / Save Settings Settings can be saved / loaded via a text file.
For default values, always use WF35.MAP. Otherwise, MSR
data may be incorrectly translated.
Language For correct mapping of characters (from MSR to PDA), it needs
to use language file WF35.key.
Refresh Refresh to re-connect MSR.
Note that “refresh” does not retrieve settings from MSR internal
memory, except encryption status (Yes/No).
Update Write all MSR settings to the MSR internal memory
Delimiter Reserved fields. Read only.

WF35 Manual
http://www.touchdynamic.com Version 2.1a
P.76
To update configuration of a MSR, always follows the steps below:
“Load settings”: open WF35.map
For language, press “Select”, use WF35.key (if you use English, MSR may translate
characters incorrectly)
Apply necessary configuration changes and press “Update” to update MSR device
(It is suggested to save the configuration before update)
12.4 Configure MSR by WF35
A limited set of MSR functions could be configured via PDA.
Configure MSR setting at Start > Settings > Control Panel > MSR
Sound Setting
ON: When MSR is plugged to the PDA, system will play the MSR
plug-in tone and the taskbar displays a MSR tray icon. Similarly,
when the MSR is removed, system will play a sound and hide the
taskbar MSR icon.
Encryption Setting
ON: When read card data, the data will be shown as encrypted
scrambled message
Encryption key: This is to set the encryption key into the MSR
Note:
The encryption input field is only for writing a new encryption key
to MSR hardware. It doesn’t display existing encryption key of
the attached MSR for security purpose
Default MSR encryption key is WF35ABCDEFGHIJKL. In
production environment, this key should be changed for
better security

WF35 Manual
http://www.touchdynamic.com Version 2.1a
P.77
12.5 MSR data encryption
Data encryption is a unique feature to protect clear-text credit card (Magstripe card) data from
being copied easily by notepad or any untrusted applications.
Clear-text data without encryption
By default MSR encryption is off.
Swiping of a magstripe card will generate clear-text keyboard
input that could be captured by Notepad
Download MSR Test Utility
Download the utility from Touch Dynamic website
MSR test utility demonstrates how decryption mechanism could be
incorporated to the POS application. Thus, only trusted
application could decrypt the card data within program memory
MSR Test Utility
Run MsrTest.exe
Default encryption key is WF35ABCDEFGHIJKL
Tap the input focus on text box and swipe a card
Data is encrypted like a scrambled message
Press “Decrypt” to decrypt the original data

WF35 Manual
http://www.touchdynamic.com Version 2.1a
P.78
12.6 MSR data encryption via RDP
Application running via RDP is indeed server-side application. Touch Dynamic’s MSR works
perfectly with server-side RDP POS application as well as local PDA application.
Since MSR would generate characters like “@#$%~”, default RDP configuration may translate
such characters incorrectly or it would activate “sticky key” feature of Windows XP/Server. To
avoid this, one line of RDP file has to be modified. See below:
When RDP works with MSR, it needs to modify the RDP profile
file. Change the value of“KeyboardHookMode:i:0” to “0”.
To demonstrate MSR via RDP, follow the screenshots below:
First of all, create a RDP file via “Remote Desktop
Connection”. You could save the password &
username to facilitate “Auto logon RDP”
Open the RDP file by notepad (Start > Programs >
notepad).
Modify one line:
“KeyboardHookMode:i:0”. By default, this value is
“1”. Value “0” ensures no improper translation of
characters from keyboard input generated by the MSR.
Copy the files to server. Connect PDA to server via
RDP.
Run “Msr Test.exe” at server side. First, locate
focus on “Input a string” box and swipe a credit card
at WF35.
Press “Decrypt” to retrieve original card data
For the source code of this demo utility, please refer to
file “MsrTest-source WIN32.zip” in the folder.
The POS app could integrate with this decryption
library (DLL) so that credit card data could be
processed securely within application.

WF35 Manual
http://www.touchdynamic.com Version 2.1a
P.79
Chapter 13: Misc. Configurations
13.1 Backlight
Adjust backlight intensity at Start > Settings > Control Panel >
Backlight
13.2 Display
Wallpaper and Windows style, e.g. default font, can be defined at Start > Settings > Control
Panel > Display
Define wallpaper
Select scheme to change style of Windows display

WF35 Manual
http://www.touchdynamic.com Version 2.1a
P.80
13.3 Audio
Adjust system sound level at Start > Settings > Control Panel > Audio. The sound could
be turned off for quiet restaurant environment.
Audio Playback Settings
Playback Volume: Use the slide bar to adjust audio playback
volume
User may also specify sound enabled/disabled for different
system events and operations.
Audio Record Settings
Recording Volume: Use the slide bar to adjust the audio
recording volume
Automatic Level Control (ALC): to adjust record level
automatically

WF35 Manual
http://www.touchdynamic.com Version 2.1a
P.81
13.4 Screen Rotation
Tap Start > Settings > Control Panel > Screen Rotation to switch screen orientation
between portrait and landscape mode.
Landscape mode has options for right
or left hand
Reboot is required for rotating screen
13.5 Taskbar & Task Switching
There are few options to configure a taskbar. Tap Start > Settings > Taskbar and Start
Menu
To configure taskbar,
top ”Taskbar & Start Menu”
Enable task switching
button
It requires reboot to enable
task switching button

WF35 Manual
http://www.touchdynamic.com Version 2.1a
P.82
The task switching button is displayed at lower right corner of the screen
Tap it to show a list of active applications
To switch to an active application, simply tap on the application name
Note: It is suggested to turn off this feature in user mode because users may accidentally
minimize active applications in the taskbar. However, developers or system administrators
may find it convenient to switch between different windows for more complicated tasks.
13.6 Task Manager
Task Manager at Start > Settings > Control Panel > TaskMgr lists all active applications
The “End Task” button is able to force close an application especially
when it behaves abnormally.
For instance, an application hanging the system could be killed by this
feature.

WF35 Manual
http://www.touchdynamic.com Version 2.1a
P.83
13.7 Shortcut Button
Configure shortcut at Start > Settings > Control Panel > Shortcut. The shortcut button
is located at PDA’s left side.
Launch an application: An application to launch when the
shortcut button is pressed. The parameters of the application
could be defined.
Emulate keyboard output: Send out the key when shortcut
button is pressed


![SPARK Examiner User Manual – Release 7.3 [NT]didawiki.cli.di.unipi.it/lib/exe/fetch.php/... · SPARK Examiner User Manual – Release 7.3 EXM/UM Issue: 7.3 1 Page 5 of 95 Overview](https://img.dokumen.tips/doc/110x75/5e83da2ef8c7a53a1209a091/spark-examiner-user-manual-a-release-73-nt-spark-examiner-user-manual-a-release.jpg)