Embed Size (px)
Citation preview

Smoothboard 2.0 Updates
Software Version: 2.0
Document Version: 1.0
Website : http://www.smoothboard.net
Email : [email protected]
Attribution NonCommercial No Derivatives cc by-nc-nd
http://creativecommons.org/licenses/by‐nc‐nd/3.0/

Smoothboard Tech
Email: [email protected]
Website: www.smoothboard.net
Introduction
i
Table of Contents
Chapter 1 Introduction ........................................................................................................................ 1
1.1 What’s New in Smoothboard 2.0? .......................................................................................... 1
1.2 Requirements .......................................................................................................................... 2
Chapter 2 Features .............................................................................................................................. 3
2.1 Floating Toolbar ...................................................................................................................... 3
2.2 Click and Hold Trigger ............................................................................................................. 6
2.3 Smart Menu ............................................................................................................................ 8
2.4 Annotation ............................................................................................................................ 13
2.5 Outside Screen Toggle .......................................................................................................... 21
2.6 Calibration ............................................................................................................................. 22
2.7 Configurations ....................................................................................................................... 23
Chapter 3 Resources .......................................................................................................................... 25

Smoothboard Tech
Email: [email protected]
Website: www.smoothboard.net
Copyright 2010 Smoothboard Tech (Singapore Reg. No.: 53154267W)
Chapter: Introduction
1
Chapter 1 Introduction
Smoothboard allows you to easily transform your flat screen display (projected screen or flat panel)
into an interactive whiteboard with just a Wiimote and IR Pen.
Smoothboard provides an intuitive interface that enables users to interact with their computer
directly at the screen. Smoothboard also allows you to control the computer away from the screen
with the use of the Wiimote. With Smoothboard, you will have impressive presentations that can be
free from the mouse and keyboard.
This document will describe the new features that are available for Smoothboard 2.0 in comparison
with Smoothboard 1.6.
For full features of Smoothboard 2.0 and previous versions, you can visit
http://www.smoothboard.net
1.1 What’s New in Smoothboard 2.0? Extended Annotation features –
o Size, Color, Shape (Line, Arrow, Rectangle, Ellipse, Scribble)
o Undo/Redo (15 steps)
o Select and Move/Resize

Smoothboard Tech
Email: [email protected]
Website: www.smoothboard.net
Copyright 2010 Smoothboard Tech (Singapore Reg. No.: 53154267W)
Chapter: Introduction
2
o Screen Tools (Background Color (White/Black), Background Lines/Grid, Snapshot Screen, Snapshot Region, Open Snapshot Folder).
Smart Menu, alternative to Floating Toolbar. Allows quick access to Right Click, Middle Click
(for scrolling) and all the Floating Toolbar’s Functionality.
Click and Hold trigger ‐ Activates Right Click or Smart Menu if the IR pen is held down for
about 1 second.
Floating Toolbar is now resizable and can docked to the sides of the screen.
Outside Screen Toggles now fixed with Up and Down triggers on both sides of the screen.
Bottom of the screen used to toggle to Right Click.
Restart calibration by clicking and holding the IR pen for more than 2 seconds during
calibration.
Configurations for ‐ minimizing to taskbar, minimize application when launched, switch
calibration settings for Primary/Secondary Wiimotes, show/hide Floating Toolbar when
launched, saved snapshot folder.
Executables are now signed with our Smoothboard Tech certificate to prevent unauthorized
changes after the release of the compilation.
1.2 Requirements The requirements for Smoothboard 2.0 are the same with the previous versions. If your computer is
able to run Smoothboard 1.x, you should be able to run Smoothboard 2.0 without any issues.

Smoothboard Tech
Email: [email protected]
Website: www.smoothboard.net
Copyright 2010 Smoothboard Tech (Singapore Reg. No.: 53154267W)
Chapter: Features
3
Chapter 2 Features
2.1 Floating Toolbar The Floating Toolbar allows you to quickly access pre‐defined settings to trigger specific events on
your computer such as key press combinations, and launching of files. In addition, the Floating
Toolbar gives you the convenience of using Smoothboard’s built‐in annotation features.
By default, we have included two settings files; Annotation and PowerPoint.
Similar like before, you are able to create additional settings files for specific users for other
applications. Please refer to the Smoothboard User Guide for steps to create your own settings file.
2.1.1 Resizing and Docking The new Floating Toolbar can be resized and docked to the sides of the screen.
To resize the Floating Toolbar, click and drag the corner of the Floating Toolbar.

Smoothboard Tech
Email: [email protected]
Website: www.smoothboard.net
Copyright 2010 Smoothboard Tech (Singapore Reg. No.: 53154267W)
Chapter: Features
4
The Floating Toolbar will automatically turn to a horizontal or vertical orientation while resizing.
After resizing, you can adjust the position of the Floating Toolbar by clicking on the SB icon or on any
white space on the Floating Toolbar.
To minimize the Floating Toolbar, click on the Minimize button. The minimized Floating Toolbar can
then be reposition or maximized when required.

Smoothboard Tech
Email: [email protected]
Website: www.smoothboard.net
Copyright 2010 Smoothboard Tech (Singapore Reg. No.: 53154267W)
Chapter: Features
5
2.1.2 Using Floating Toolbar The usage of the Floating Toolbar is Smoothboard 2.0 is similar to the earlier version except for the
addition of extended menus.
The following shows some examples of the positions of the extended menu depending on the
orientation and position of the Floating Toolbar.
2.1.3 Floating Toolbar Configurations
By default, the Floating Toolbar is shown when Smoothboard is launched. You are able to disable
this by unselecting Show Floating Toolbar when launched found under Settings‐>Whiteboard‐
>Floating Toolbar.
Smoothboard Tech
Email: [email protected]
Website: www.smoothboard.net
Copyright 2010 Smoothboard Tech (Singapore Reg. No.: 53154267W)
Chapter: Features
6
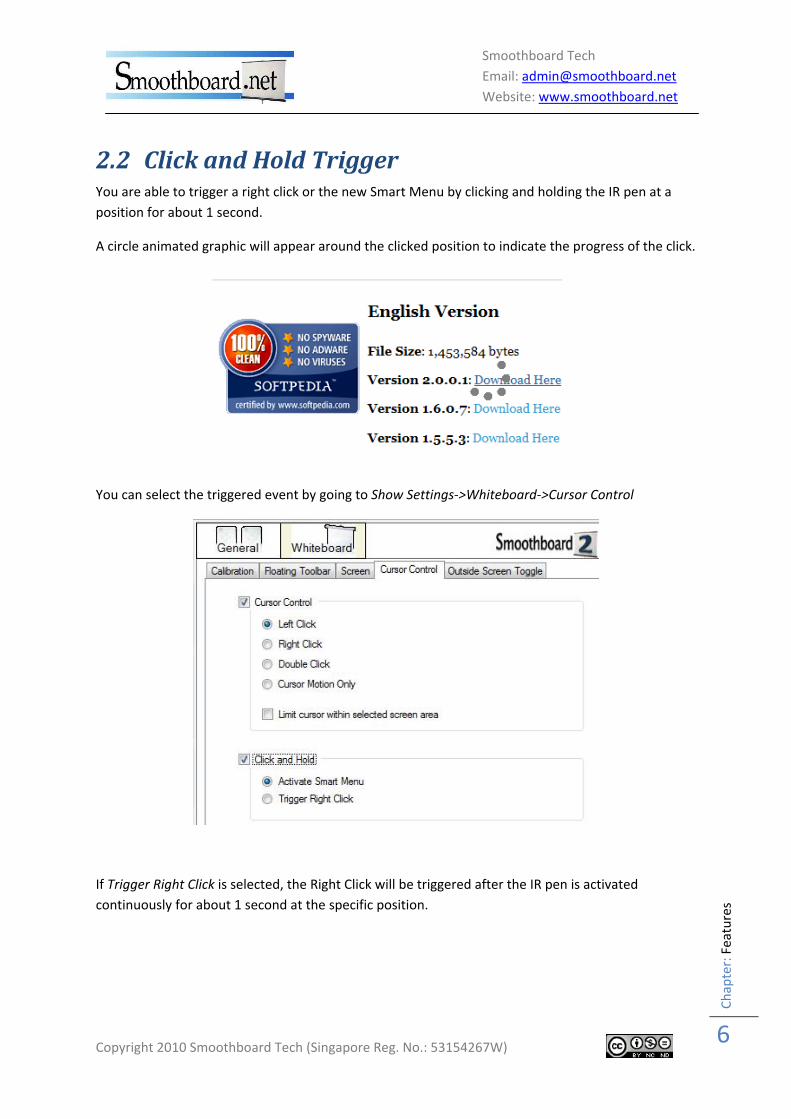
2.2 Click and Hold Trigger You are able to trigger a right click or the new Smart Menu by clicking and holding the IR pen at a
position for about 1 second.
A circle animated graphic will appear around the clicked position to indicate the progress of the click.
You can select the triggered event by going to Show Settings‐>Whiteboard‐>Cursor Control
If Trigger Right Click is selected, the Right Click will be triggered after the IR pen is activated
continuously for about 1 second at the specific position.
Smoothboard Tech
Email: [email protected]
Website: www.smoothboard.net
Copyright 2010 Smoothboard Tech (Singapore Reg. No.: 53154267W)
Chapter: Features
7
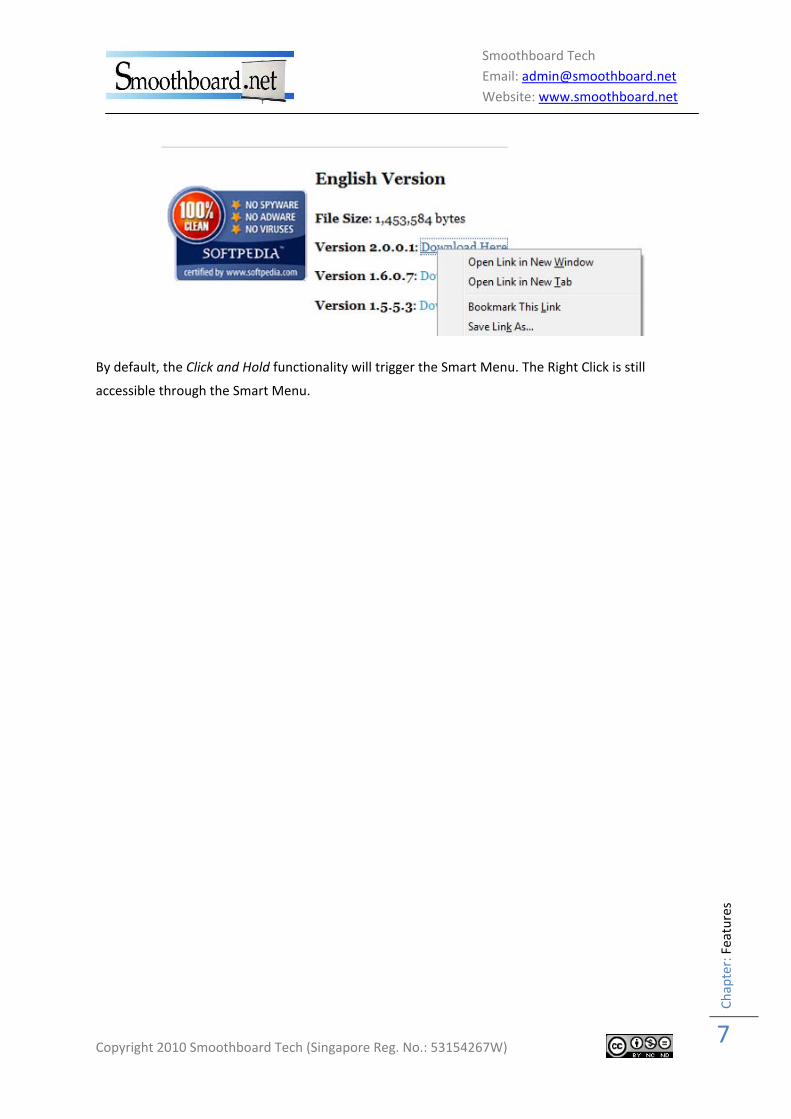
By default, the Click and Hold functionality will trigger the Smart Menu. The Right Click is still
accessible through the Smart Menu.

Smoothboard Tech
Email: [email protected]
Website: www.smoothboard.net
Copyright 2010 Smoothboard Tech (Singapore Reg. No.: 53154267W)
Chapter: Features
8
2.3 Smart Menu The Smart Menu is a new addition to Smoothboard that allows you to use the Floating Toolbar’s
features on any part of the screen without the need of the Floating Toolbar. In addition, the Smart
Menu has Middle Click Scroll and Right Click functionality.
This feature will be useful for users who do not use the Floating Toolbar but would like easy access
to the functions provided such as for Annotation and PowerPoint control.
2.3.1 Triggering Smart Menu Smart Menu can be displayed by activating the IR pen on a specific spot on the screen for about 1
second.
When not in use, Smart Menu will automatically disappear and if you would like to display the Smart
Menu again, you can click and hold the IR pen till the Smart Menu appears.
Note: Smart Menu may not appear if the clicked position is near the
Floating Toolbar as you will be able to directly click on the
Floating Toolbar for this case.
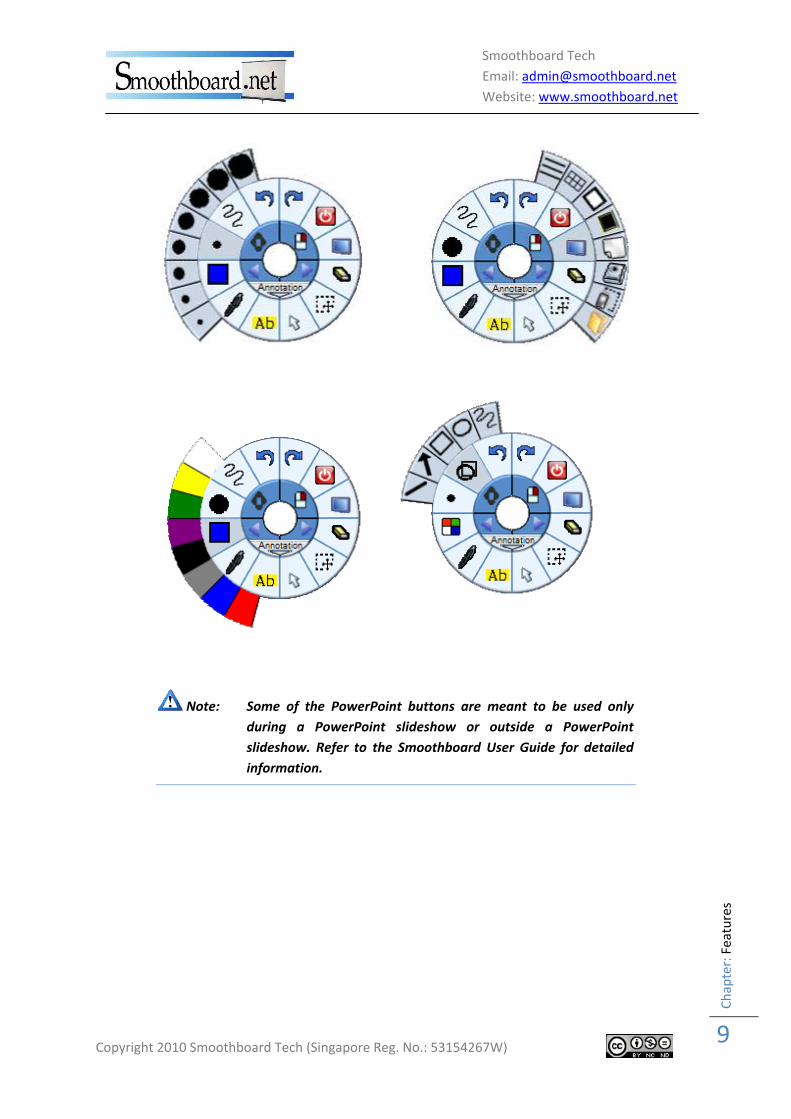
2.3.2 Using Smart Menu As the functionality of the Smart Menu is similar with the Floating Toolbar, you can click on any of
the 12 buttons to activate a specific functionality.
Certain buttons in the Annotation Menu has extended functionality such as the Color, Shape, Size
and Screen Tool buttons.
Smoothboard Tech
Email: [email protected]
Website: www.smoothboard.net
Copyright 2010 Smoothboard Tech (Singapore Reg. No.: 53154267W)
Chapter: Features
9
Note: Some of the PowerPoint buttons are meant to be used only
during a PowerPoint slideshow or outside a PowerPoint
slideshow. Refer to the Smoothboard User Guide for detailed
information.

Smoothboard Tech
Email: [email protected]
Website: www.smoothboard.net
Copyright 2010 Smoothboard Tech (Singapore Reg. No.: 53154267W)
Chapter: Features
10
2.3.3 Right Click and Middle Click Scroll The two buttons at the centre allows you to trigger the Middle Click Scroll and Right Click.
If the Right Click button is chosen, a Right Click will be triggered on the original clicked position.
Click and Hold on the position where you
would like the Right Click to be triggered.
When Smart Menu appears, click on the
Right Click icon.
The Right Click will be triggered.

Smoothboard Tech
Email: [email protected]
Website: www.smoothboard.net
Copyright 2010 Smoothboard Tech (Singapore Reg. No.: 53154267W)
Chapter: Features
11
The Middle Click Scroll allows you to navigate a large document or website easily. This works
similarly like an actual Middle Mouse button.
After selecting the Middle Click Scroll
button, you can click and drag on any
part of the screen to scroll.
Drag the cursor away from the center
point and the document or website will
scroll towards the same direction.
The further the cursor is away from the
center point, the faster the scroll. When
the cursor is at the center point, the
scrolling will stop temporarily.
To stop scrolling, release the IR pen.
Note: The Middle Click Scroll will work only in applications that
support this functionality such as web browsers (Internet
Explorer, Firefox, and Chrome) and document readers (Adobe
Reader, Ms Word).

Smoothboard Tech
Email: [email protected]
Website: www.smoothboard.net
Copyright 2010 Smoothboard Tech (Singapore Reg. No.: 53154267W)
Chapter: Features
12
2.3.4 Switching Between Settings All the Floating Toolbar’s configurations are available in the Smart Menu. Therefore, by default we
have included the Annotation and PowerPoint settings.
To switch between pre‐existing settings, you can
click on the Left/Right arrows or the area below
the two arrows.
The drop down menu will display all the available
settings files.
Click on the required settings file.
Smart Menu will now be switched to the chosen
settings file.

Smoothboard Tech
Email: [email protected]
Website: www.smoothboard.net
Copyright 2010 Smoothboard Tech (Singapore Reg. No.: 53154267W)
Chapter: Features
13
2.4 Annotation
Smoothboard 2.0 has a built‐in Annotation feature that allows you to write on top of any window
with ease. The Annotation features can be accessed via the Floating Toolbar and Smart Menu.
Pen
The Pen feature allows you to write directly on top of any window or document.
Highlighter
Similar to the Pen feature, the Highlighter feature allows you to highlight on your screen.

Smoothboard Tech
Email: [email protected]
Website: www.smoothboard.net
Copyright 2010 Smoothboard Tech (Singapore Reg. No.: 53154267W)
Chapter: Features
14
Cursor
If you would like your drawings to stay on the screen and control the cursor again, click on the
Cursor button.
Erase
Click once to turn to Eraser mode where you are able to erase like an actual eraser.
Click twice to Erase All.
Undo/Redo
Undo to previous annotation states for up to 15 steps.
Color
Change the color of the Pen or Highlighter through the Color extended menu.
Size
Modify the size of the current Pen or Highlighter through the Size extended menu.
Shape
Switch between the various drawing modes available through the Shape extended menu.

Smoothboard Tech
Email: [email protected]
Website: www.smoothboard.net
Copyright 2010 Smoothboard Tech (Singapore Reg. No.: 53154267W)
Chapter: Features
15
The current drawing mode can be seen on the Floating Toolbar or Smart Menu. In Addition, the
cursor will reflect the selected shape.
Select
The Select tool allows you to select a portion of the screen to be moved or resized.
Click and Drag on any part of the screen to move the selected area.
If you would like to resize the selected area, click on the bottom right resize icon and drag to the
required size.

Smoothboard Tech
Email: [email protected]
Website: www.smoothboard.net
Copyright 2010 Smoothboard Tech (Singapore Reg. No.: 53154267W)
Chapter: Features
16
The Select tool also allows you to remove a portion of the screen by selecting the region and then
dragging the region out of the screen area.
Tip: To move the selected area, you can click and drag on any part
of the screen.
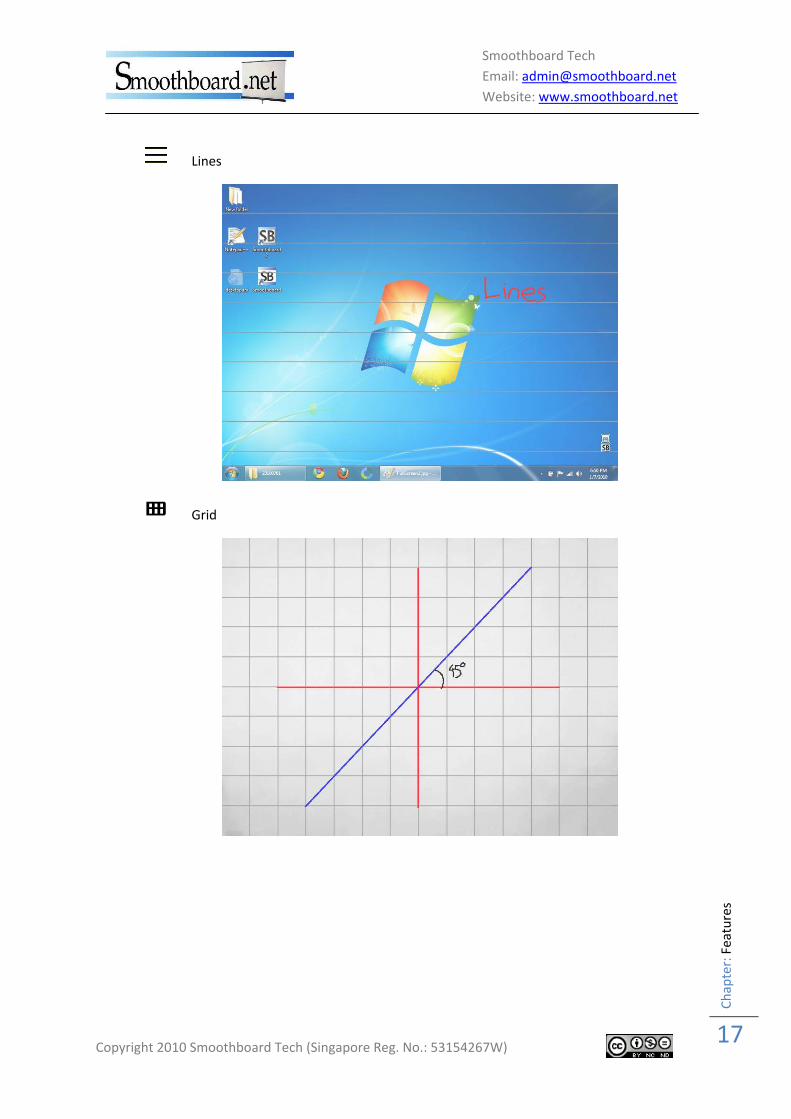
Screen
The Screen tool provides extended options to set the background overlay and also snapshot tools.
Smoothboard Tech
Email: [email protected]
Website: www.smoothboard.net
Copyright 2010 Smoothboard Tech (Singapore Reg. No.: 53154267W)
Chapter: Features
17
Lines
Grid

Smoothboard Tech
Email: [email protected]
Website: www.smoothboard.net
Copyright 2010 Smoothboard Tech (Singapore Reg. No.: 53154267W)
Chapter: Features
18
White Background
Black Background
Clear Background
Snapshot Whole Screen

Smoothboard Tech
Email: [email protected]
Website: www.smoothboard.net
Copyright 2010 Smoothboard Tech (Singapore Reg. No.: 53154267W)
Chapter: Features
19
Snapshot Specific Region
You can select the screen area you would like the snapshot to be taken.
Open Snapshot Folder
You can retrieve the previously saved snapshots by clicking on the Open Snapshots Folder.

Smoothboard Tech
Email: [email protected]
Website: www.smoothboard.net
Copyright 2010 Smoothboard Tech (Singapore Reg. No.: 53154267W)
Chapter: Features
20
2.4.1 Annotation Context Menu When the Annotation mode is activated and there is an overlay on the screen, you can Right Click to
show the context menu for the annotation features.

Smoothboard Tech
Email: [email protected]
Website: www.smoothboard.net
Copyright 2010 Smoothboard Tech (Singapore Reg. No.: 53154267W)
Chapter: Features
21
2.5 Outside Screen Toggle The Outside Screen Toggle allows you to use the area outside the screen region that is still tracked
by the Wiimote. In Smoothboard 1.x, there are 12 customizable areas but we have fixed this to only
the left and right sides having the Up and Down triggers and the bottom of the screen to toggle to
Right Click.
This new update to the Outside Screen Toggle will minimize the learning curve required to familiarize
with the areas as there are only 3 types of triggers present. You are able to easily change slides
during your presentation without interrupting the flow of the presentation. In addition, the Right
Click toggle will be useful for most presentations and desktop navigations.
The Up and Down triggers support click and hold functionality where the key triggered will be
automatically repeated if the IR pen remains activated in the area. This will be useful for scrolling
down a long document or website.
You can activate or deactivate the Outside Screen Toggle by going to Settings‐>Whiteboard‐>Outside
Screen Toggle.

Smoothboard Tech
Email: [email protected]
Website: www.smoothboard.net
Copyright 2010 Smoothboard Tech (Singapore Reg. No.: 53154267W)
Chapter: Features
22
2.6 Calibration Previously if you have adjusted the Wiimote or clicked the IR pen wrongly during calibration, you
had to manually restart the calibration by quitting or pressing the A button on the Wiimote.
In Smoothboard 2.0, you can restart the calibration by just clicking and holding the IR pen for more
than 2 seconds regardless of the position of the IR pen. The calibration point will return to the first
position at the top left corner.
As you are able to restart calibration by positioning the IR pen anywhere, you can also point the IR
pen towards the Wiimote and activate the IR pen for more than 2 seconds to restart the calibration.

Smoothboard Tech
Email: [email protected]
Website: www.smoothboard.net
Copyright 2010 Smoothboard Tech (Singapore Reg. No.: 53154267W)
Chapter: Features
23
2.7 Configurations
2.7.1 Application In Smoothboard 2.0, we have added the Application tab under Settings‐>General‐>Application
Smoothboard can be set to be launched minimized. This is useful if you have already calibrated the
Wiimote with the screen.
In addition, Smoothboard can be shown in the taskbar when minimized instead of only appearing in
the system tray. This option is for users who are unable to access the system tray icons.
The Snapshot Directory can be configured by browsing to the required folder. The default location is
set to the Snapshots folder in the Smoothboard installation directory.
2.7.2 Wiimote
In addition to the Switch Primary and Secondary Wiimotes, we have added a new button, Switch
Wiimotes without switching calibration data in Settings‐.General‐>Wiimote. This feature can be used
if you have a permanent setup with multiple Wiimotes where the Wiimotes occasionally mixed up

Smoothboard Tech
Email: [email protected]
Website: www.smoothboard.net
Copyright 2010 Smoothboard Tech (Singapore Reg. No.: 53154267W)
Chapter: Features
24
between the Primary and Secondary Wiimotes. With this, you do not need to recalibrate if the
Wiimotes are connected in a different order but you can just click this button.

Smoothboard Tech
Email: [email protected]
Website: www.smoothboard.net
Copyright 2010 Smoothboard Tech (Singapore Reg. No.: 53154267W)
Chapter: Resources
25
Chapter 3 Resources Smoothboard Software Download ‐ http://www.smoothboard.net/download
Download the latest version of Smoothboard in more than 20 languages.
Smoothboard Resellers ‐ http://www.smoothboard.net/resellers
Purchase all your Wiimote Whiteboard needs including the Smoothboard software from our
official resellers.
Smoothboard and Wiimote Whiteboard Wiki ‐ http://www.boonjin.com/smoothboard
Complete guide to all your Wiimote Whiteboard needs
Smoothboard User Guide ‐ http://www.smoothboard.net/files/doc/Smoothboard_User_Guide.pdf
Downloadable and printable guide for Smoothboard
Smoothboard’s Developer Blog ‐ http://www.boonjin.com
Get to know the Smoothboard Developer up‐close.
Smoothboard Facebook Fan Page ‐ http://www.facebook.com/smoothboard
Updates and Tips for all Smoothboard users.
Smoothboard Twitter Page ‐ http://www.twitter.com/smoothboard
Instant updates via tweets from the Smoothboard Team.
Wiimote Project Forum ‐ http://www.wiimoteproject.com/wiimote‐smoothboard/
Discussion forum for Wiimote users.
Technical and Sales Support – [email protected]