Embed Size (px)
Citation preview
IBM Tivoli Access Manager
WebSEAL Installation GuideVersion 4.1
SC32-1133-01
���


IBM Tivoli Access Manager
WebSEAL Installation GuideVersion 4.1
SC32-1133-01
���

NoteBefore using this information and the product it supports, read the information in “Notices”, on page 45.
Fifth Edition: (August 2003)
This edition replaces GC32-0683-01
© Copyright International Business Machines Corporation 1999, 2003. All rights reserved.US Government Users Restricted Rights – Use, duplication or disclosure restricted by GSA ADP Schedule Contractwith IBM Corp.
Contents
Preface . . . . . . . . . . . . . . . . . . . . . . . . . . . . . . . . . . . . vWho should read this book . . . . . . . . . . . . . . . . . . . . . . . . . . . . . . vWhat this book contains . . . . . . . . . . . . . . . . . . . . . . . . . . . . . . . vPublications . . . . . . . . . . . . . . . . . . . . . . . . . . . . . . . . . . . vi
Release information . . . . . . . . . . . . . . . . . . . . . . . . . . . . . . . . viBase information. . . . . . . . . . . . . . . . . . . . . . . . . . . . . . . . . viWebSEAL information . . . . . . . . . . . . . . . . . . . . . . . . . . . . . . . viWeb security information. . . . . . . . . . . . . . . . . . . . . . . . . . . . . . viiDeveloper references . . . . . . . . . . . . . . . . . . . . . . . . . . . . . . . viiTechnical supplements . . . . . . . . . . . . . . . . . . . . . . . . . . . . . . viiRelated publications . . . . . . . . . . . . . . . . . . . . . . . . . . . . . . . viiiAccessing publications online. . . . . . . . . . . . . . . . . . . . . . . . . . . . . x
Accessibility . . . . . . . . . . . . . . . . . . . . . . . . . . . . . . . . . . . xContacting software support . . . . . . . . . . . . . . . . . . . . . . . . . . . . . . xConventions used in this book . . . . . . . . . . . . . . . . . . . . . . . . . . . . . x
Typeface conventions . . . . . . . . . . . . . . . . . . . . . . . . . . . . . . . xOperating system differences. . . . . . . . . . . . . . . . . . . . . . . . . . . . . xi
Chapter 1. Installation overview . . . . . . . . . . . . . . . . . . . . . . . . . 1Supported platforms. . . . . . . . . . . . . . . . . . . . . . . . . . . . . . . . . 1Disk and memory requirements . . . . . . . . . . . . . . . . . . . . . . . . . . . . . 1Installation packages. . . . . . . . . . . . . . . . . . . . . . . . . . . . . . . . . 2Software prerequisites . . . . . . . . . . . . . . . . . . . . . . . . . . . . . . . . 2
WebSEAL server prerequisites . . . . . . . . . . . . . . . . . . . . . . . . . . . . 2WebSEAL ADK prerequisites . . . . . . . . . . . . . . . . . . . . . . . . . . . . . 3
Installation options . . . . . . . . . . . . . . . . . . . . . . . . . . . . . . . . . 3
Chapter 2. Using easy installation . . . . . . . . . . . . . . . . . . . . . . . . 5WebSEAL easy installation programs . . . . . . . . . . . . . . . . . . . . . . . . . . . 5
Using the WebSEAL easy installation program . . . . . . . . . . . . . . . . . . . . . . . 6Using the WebSEAL ADK easy installation program . . . . . . . . . . . . . . . . . . . . . 7
Configuring WebSEAL using the easy installation programs . . . . . . . . . . . . . . . . . . . 8Obtaining configuration settings interactively . . . . . . . . . . . . . . . . . . . . . . . 8Obtaining configuration settings from response files . . . . . . . . . . . . . . . . . . . . . 10
Easy installation limitations . . . . . . . . . . . . . . . . . . . . . . . . . . . . . . 10
Chapter 3. Using native installation . . . . . . . . . . . . . . . . . . . . . . . 13Installing and configuring WebSEAL server on UNIX . . . . . . . . . . . . . . . . . . . . . 13
Installing WebSEAL server on AIX. . . . . . . . . . . . . . . . . . . . . . . . . . . 14Installing WebSEAL server on HP-UX . . . . . . . . . . . . . . . . . . . . . . . . . 15Installing WebSEAL server on Linux on zSeries . . . . . . . . . . . . . . . . . . . . . . 16Installing WebSEAL server on Solaris . . . . . . . . . . . . . . . . . . . . . . . . . . 16Configuring WebSEAL server on UNIX . . . . . . . . . . . . . . . . . . . . . . . . . 17
Installing the WebSEAL ADK on UNIX . . . . . . . . . . . . . . . . . . . . . . . . . . 19Installing the WebSEAL ADK on AIX . . . . . . . . . . . . . . . . . . . . . . . . . . 19Installing the WebSEAL ADK on HP-UX. . . . . . . . . . . . . . . . . . . . . . . . . 20Installing the WebSEAL ADK on Linux on zSeries . . . . . . . . . . . . . . . . . . . . . 21Installing the WebSEAL ADK on Solaris . . . . . . . . . . . . . . . . . . . . . . . . . 21
Installing WebSEAL server and the WebSEAL ADK on Windows . . . . . . . . . . . . . . . . . 22Configuring WebSEAL server on Windows . . . . . . . . . . . . . . . . . . . . . . . . 23
Chapter 4. Upgrading WebSEAL from version 3.8 to 4.1 . . . . . . . . . . . . . . 25Upgrading WebSEAL on AIX . . . . . . . . . . . . . . . . . . . . . . . . . . . . . 25Upgrading WebSEAL on HP-UX . . . . . . . . . . . . . . . . . . . . . . . . . . . . 26
© Copyright IBM Corp. 1999, 2003 iii
Upgrading WebSEAL on Solaris . . . . . . . . . . . . . . . . . . . . . . . . . . . . 28Upgrading WebSEAL on Windows . . . . . . . . . . . . . . . . . . . . . . . . . . . 29
Chapter 5. Upgrading WebSEAL from version 3.9 to 4.1 . . . . . . . . . . . . . . 31Upgrading WebSEAL on AIX . . . . . . . . . . . . . . . . . . . . . . . . . . . . . 31Upgrading WebSEAL on HP-UX . . . . . . . . . . . . . . . . . . . . . . . . . . . . 32Upgrading WebSEAL on Linux on zSeries . . . . . . . . . . . . . . . . . . . . . . . . . 34Upgrading WebSEAL on Solaris . . . . . . . . . . . . . . . . . . . . . . . . . . . . 35Upgrading WebSEAL on Windows . . . . . . . . . . . . . . . . . . . . . . . . . . . 36
Chapter 6. Unconfiguring and removing WebSEAL . . . . . . . . . . . . . . . . . 39Unconfiguring WebSEAL on UNIX . . . . . . . . . . . . . . . . . . . . . . . . . . . 39Unconfiguring WebSEAL on Windows . . . . . . . . . . . . . . . . . . . . . . . . . . 40Removing WebSEAL from AIX . . . . . . . . . . . . . . . . . . . . . . . . . . . . . 41Removing WebSEAL from HP-UX . . . . . . . . . . . . . . . . . . . . . . . . . . . . 41Removing WebSEAL from Linux on zSeries . . . . . . . . . . . . . . . . . . . . . . . . 42Removing WebSEAL from Solaris . . . . . . . . . . . . . . . . . . . . . . . . . . . . 42Removing WebSEAL from Windows . . . . . . . . . . . . . . . . . . . . . . . . . . . 43
Removing WebSEAL and WebSEAL ADK . . . . . . . . . . . . . . . . . . . . . . . . 43Removing WebSEAL ADK only. . . . . . . . . . . . . . . . . . . . . . . . . . . . 43
Appendix. Notices . . . . . . . . . . . . . . . . . . . . . . . . . . . . . . . 45Trademarks . . . . . . . . . . . . . . . . . . . . . . . . . . . . . . . . . . . 47
iv IBM Tivoli Access Manager: WebSEAL Installation Guide
Preface
IBM® Tivoli® Access Manager WebSEAL is a security manager for Web-basedresources. WebSEAL is a high performance, multi-threaded Web server that appliesfine-grained security policy to the protected Web object space. WebSEAL canprovide single sign-on solutions and incorporate back-end Web application serverresources into its security policy.
Note: IBM Tivoli Access Manager is the new name of the previously releasedsoftware entitled Tivoli SecureWay® Policy Director. Also, for users familiarwith the Tivoli SecureWay Policy Director software and documentation, themanagement server is now referred to as the policy server.
The IBM Tivoli Access Manager WebSEAL Installation Guide explains how to install,configure, and upgrade Tivoli Access Manager WebSEAL software.
Who should read this bookThe target audience for this installation guide includes:v Security administratorsv Network system administratorsv IT architectsv Application developers
Readers should be familiar with:v Internet protocols, including HTTP, TCP/IP, file transfer protocol (FTP), and
telnetv Deployment and management of Web serversv Security management, including authentication and authorization
If you are enabling Secure Sockets Layer (SSL) communication, you also should befamiliar with SSL protocol, key exchange (public and private), digital signatures,cryptographic algorithms, and certificate authorities.
What this book containsThis document contains the following chapters:v Chapter 1, “Installation overview”, on page 1
Lists the supported platforms and describes the software dependencies on theIBM Tivoli Access Manager Base.
v Chapter 2, “Using easy installation”, on page 5
Describes how to use easy installation programs to expedite the installation andconfiguration of a WebSEAL server or WebSEAL ADK system.
v Chapter 3, “Using native installation”, on page 13
Describes how to install and configure WebSEAL and prerequisite software usingnative operating system utilities.
v Chapter 4, “Upgrading WebSEAL from version 3.8 to 4.1”, on page 25
Describes how to upgrade a Version 3.8 WebSEAL server to Version 4.1.v Chapter 5, “Upgrading WebSEAL from version 3.9 to 4.1”, on page 31
© Copyright IBM Corp. 1999, 2003 v
Describes how to upgrade a Version 3.9 WebSEAL server to Version 4.1.v Chapter 6, “Unconfiguring and removing WebSEAL”, on page 39
Describes how to unconfigure and remove WebSEAL from each of the supportedoperating system platforms.
PublicationsThe Tivoli Access Manager library is organized into the following categories:v “Release information”v “Base information”v “WebSEAL information”v “Web security information” on page viiv “Developer references” on page viiv “Technical supplements” on page vii
Release informationv IBM Tivoli Access Manager Read Me First Card
GI11-4198-00 (am41_readme.pdf)Provides information for installing and getting started using Tivoli AccessManager.
v IBM Tivoli Access Manager Release NotesSC32-1130-00 (am41_relnotes.pdf)Provides late-breaking information, such as software limitations, workarounds,and documentation updates.
Base informationv IBM Tivoli Access Manager Base Installation Guide
SC32-1131-01 (am41_install.pdf)Explains how to install, configure, and upgrade Tivoli Access Manager software,including the Web Portal Manager interface.
v IBM Tivoli Access Manager Base Administrator’s GuideSC32-1132-01 (am41_admin.pdf)Describes the concepts and procedures for using Tivoli Access Manager services.Provides instructions for performing tasks from the Web Portal Managerinterface and by using the pdadmin command.
WebSEAL informationv IBM Tivoli Access Manager WebSEAL Installation Guide
SC32-1133-01 (amweb41_install.pdf)Provides installation, configuration, and removal instructions for the WebSEALserver and the WebSEAL application developer kit.
v IBM Tivoli Access Manager WebSEAL Administrator’s GuideSC32-1134-01 (amweb41_admin.pdf)Provides background material, administrative procedures, and technicalreference information for using WebSEAL to manage the resources of yoursecure Web domain.
vi IBM Tivoli Access Manager: WebSEAL Installation Guide
Web security informationv IBM Tivoli Access Manager for WebSphere Application Server User’s Guide
SC32-1136-01 (amwas41_user.pdf)Provides installation, removal, and administration instructions for Tivoli AccessManager for IBM WebSphere® Application Server.
v IBM Tivoli Access Manager for WebLogic Server User’s GuideSC32-1137-01 (amwls41_user.pdf)Provides installation, removal, and administration instructions for Tivoli AccessManager for BEA WebLogic Server.
v IBM Tivoli Access Manager Plug-in for Edge Server User’s GuideSC32-1138-01 (amedge41_user.pdf)Describes how to install, configure, and administer the plug-in for IBMWebSphere Edge Server application.
v IBM Tivoli Access Manager Plug-in for Web Servers User’s GuideSC32-1139-01 (amws41_user.pdf)Provides installation instructions, administration procedures, and technicalreference information for securing your Web domain using the plug-in for Webservers.
Developer referencesv IBM Tivoli Access Manager Authorization C API Developer’s Reference
SC32-1140-01 (am41_authC_devref.pdf)Provides reference material that describes how to use the Tivoli Access Managerauthorization C API and the Access Manager service plug-in interface to addTivoli Access Manager security to applications.
v IBM Tivoli Access Manager Authorization Java Classes Developer’s ReferenceSC32-1141-01 (am41_authJ_devref.pdf)Provides reference information for using the Java™ language implementation ofthe authorization API to enable an application to use Tivoli Access Managersecurity.
v IBM Tivoli Access Manager Administration C API Developer’s ReferenceSC32-1142-01 (am41_adminC_devref.pdf)Provides reference information about using the administration API to enable anapplication to perform Tivoli Access Manager administration tasks. Thisdocument describes the C implementation of the administration API.
v IBM Tivoli Access Manager Administration Java Classes Developer’s ReferenceSC32-1143-01 (am41_adminJ_devref.pdf)Provides reference information for using the Java language implementation ofthe administration API to enable an application to perform Tivoli AccessManager administration tasks.
v IBM Tivoli Access Manager WebSEAL Developer’s ReferenceSC32-1135-01 (amweb41_devref.pdf)Provides administration and programming information for the Cross-domainAuthentication Service (CDAS), the Cross-domain Mapping Framework (CDMF),and the Password Strength Module.
Technical supplementsv IBM Tivoli Access Manager Command Reference
GC32-1107-01 (am41_cmdref.pdf)
Preface vii
Provides information about the command line utilities and scripts provided withTivoli Access Manager.
v IBM Tivoli Access Manager Error Message ReferenceSC32-1144-01 (am41_error_ref.pdf)Provides explanations and recommended actions for the messages produced byTivoli Access Manager.
v IBM Tivoli Access Manager Problem Determination GuideGC32-1106-01 (am41_pdg.pdf)Provides problem determination information for Tivoli Access Manager.
v IBM Tivoli Access Manager Performance Tuning GuideSC32-1145-01 (am41_perftune.pdf)Provides performance tuning information for an environment consisting of TivoliAccess Manager with the IBM Directory server defined as the user registry.
Related publicationsThis section lists publications related to the Tivoli Access Manager library.
The Tivoli Software Library provides a variety of Tivoli publications such as whitepapers, datasheets, demonstrations, redbooks, and announcement letters. The TivoliSoftware Library is available on the Web at:http://www.ibm.com/software/tivoli/library/
The Tivoli Software Glossary includes definitions for many of the technical termsrelated to Tivoli software. The Tivoli Software Glossary is available, in English only,from the Glossary link on the left side of the Tivoli Software Library Web pagehttp://www.ibm.com/software/tivoli/library/
IBM Global Security KitTivoli Access Manager provides data encryption through the use of the IBM GlobalSecurity Kit (GSKit). GSKit is included on the IBM Tivoli Access Manager Base CDfor your particular platform.
The GSKit package installs the iKeyman key management utility, gsk5ikm, whichenables you to create key databases, public-private key pairs, and certificaterequests. The following document is available on the Tivoli Information CenterWeb site in the same section as the IBM Tivoli Access Manager productdocumentation:v Secure Sockets Layer Introduction and iKeyman User’s Guide
(gskikm5c.pdf)Provides information for network or system security administrators who plan toenable SSL communication in their Tivoli Access Manager environment.
IBM DB2 Universal DatabaseIBM DB2® Universal Database™ is required when installing IBM Directory Server,z/OS™, and OS/390® LDAP servers. DB2 is provided on the product CDs for thefollowing operating system platforms:v IBM AIX®
v Microsoft™ Windows™
v Sun Solaris Operating Environment
DB2 information is available at:
http://www.ibm.com/software/data/db2/
viii IBM Tivoli Access Manager: WebSEAL Installation Guide
IBM Directory ServerIBM Directory Server, Version 4.1, is included on the IBM Tivoli Access ManagerBase CD for all platforms except Linux for zSeries™. You can obtain the IBMDirectory Server software for Linux for S/390 at:
http://www.ibm.com/software/network/directory/server/download/
If you plan to use IBM Directory Server as your user registry, see the informationprovided at:
http://www.ibm.com/software/network/directory/library/
IBM WebSphere Application ServerIBM WebSphere Application Server, Advanced Single Server Edition 4.0.3, isincluded on the Web Portal Manager CDs and installed with the Web PortalManager interface. For information about IBM WebSphere Application Server, see:
http://www.ibm.com/software/webservers/appserv/infocenter.html
IBM Tivoli Access Manager for Business IntegrationIBM Tivoli Access Manager for Business Integration, available as a separatelyorderable product, provides a security solution for IBM MQSeries®, Version 5.2,and IBM WebSphere® MQ for Version 5.3 messages. IBM Tivoli Access Manager forBusiness Integration allows WebSphere MQSeries applications to send data withprivacy and integrity by using keys associated with sending and receivingapplications. Like WebSEAL and IBM Tivoli Access Manager for OperatingSystems, IBM Tivoli Access Manager for Business Integration, is one of theresource managers that use the authorization services of IBM Tivoli AccessManager for e-business.
The following documents associated with IBM Tivoli Access Manager for BusinessIntegration Version 4.1 are available on the Tivoli Information Center Web site:v IBM Tivoli Access Manager for Business Integration Administrator’s Guide
(SC23-4831-00)v IBM Tivoli Access Manager for Business Integration Release Notes (GI11-0957-00)v IBM Tivoli Access Manager for Business Integration Read Me First (GI11-0958-00)
IBM Tivoli Access Manager for Operating SystemsIBM Tivoli Access Manager for Operating Systems, available as a separatelyorderable product, provides a layer of authorization policy enforcement on UNIXsystems in addition to that provided by the native operating system. IBM TivoliAccess Manager for Operating Systems, like WebSEAL and IBM Tivoli AccessManager for Business Integration, is one of the resource managers that use theauthorization services of IBM Tivoli Access Manager for e-business.
The following documents associated with IBM Tivoli Access Manager forOperating Systems Version 4.1 are available on the Tivoli Information Center Website:v IBM Tivoli Access Manager for Operating Systems Installation Guide (SC23-4829-00)v IBM Tivoli Access Manager for Operating Systems Administration Guide
(SC23-4827-00)v IBM Tivoli Access Manager for Operating Systems Problem Determination Guide
(SC23-4828-00)v IBM Tivoli Access Manager for Operating Systems Release Notes (GI11-0951-00)v IBM Tivoli Access Manager for Operating Systems Read Me First (GI11-0949-00)
Preface ix
Accessing publications onlineThe publications for this product are available online in Portable Document Format(PDF) or Hypertext Markup Language (HTML) format, or both in the TivoliSoftware Library: http://www.ibm.com/software/tivoli/library
To locate product publications in the library, click the Product manuals link on theleft side of the Library page. Then, locate and click the name of the product on theTivoli Software Information Center page.
Product publications include release notes, installation guides, user’s guides,administrator’s guides, and developer’s references.
Note: To ensure proper printing of PDF publications, select the Fit to page checkbox in the Adobe Acrobat Print window (which is available when you clickFile →Print).
AccessibilityAccessibility features help a user who has a physical disability, such as restrictedmobility or limited vision, to use software products successfully. With this product,you can use assistive technologies to hear and navigate the interface. You also canuse the keyboard instead of the mouse to operate all features of the graphical userinterface.
Contacting software supportBefore contacting IBM Tivoli Software support with a problem, refer to the IBMTivoli Software support Web site at:http://www.ibm.com/software/sysmgmt/products/support/
If you need additional help, contact software support by using the methodsdescribed in the IBM Software Support Guide at the following Web site:http://techsupport.services.ibm.com/guides/handbook.html
The guide provides the following information:v Registration and eligibility requirements for receiving supportv Telephone numbers and e-mail addresses, depending on the country in which
you are locatedv A list of information you should gather before contacting customer support
Conventions used in this bookThis reference uses several conventions for special terms and actions and foroperating system-dependent commands and paths.
Typeface conventionsThe following typeface conventions are used in this reference:
Bold Lowercase commands or mixed case commands that are difficult todistinguish from surrounding text, keywords, parameters, options, namesof Java classes, and objects are in bold.
Italic Variables, titles of publications, and special words or phrases that areemphasized are in italic.
x IBM Tivoli Access Manager: WebSEAL Installation Guide
MonospaceCode examples, command lines, screen output, file and directory namesthat are difficult to distinguish from surrounding text, system messages,text that the user must type, and values for arguments or commandoptions are in monospace.
Operating system differencesThis book uses the UNIX convention for specifying environment variables and fordirectory notation. When using the Windows command line, replace $variable with%variable% for environment variables and replace each forward slash (/) with abackslash (\) in directory paths. If you are using the bash shell on a Windowssystem, you can use the UNIX conventions.
Preface xi

xii IBM Tivoli Access Manager: WebSEAL Installation Guide
Chapter 1. Installation overview
Before you begin installing Tivoli Access Manager WebSEAL or the WebSEALapplication developer kit (ADK), you must become familiar with its componentsand installation options. This chapter includes the following sections:v “Supported platforms”v “Disk and memory requirements”v “Installation packages” on page 2v “Software prerequisites” on page 2v “Installation options” on page 3
AttentionSee the IBM Tivoli Access Manager Release Notes for last-minute information,including required fix packs and patches for each supported operating systemplatform.
Supported platformsTivoli Access Manager WebSEAL and the Tivoli Access Manager WebSEAL ADKare supported on the following platforms:v Sun Solaris Operating System 2.7 and 2.8v AIX 4.3.3 and 5.1.0v Red Hat Linux 7.1 and 7.2v SuSE Linux Enterprise Server 7 for S/390 and zSeries (Kernel 2.4.7, 31-bit, glibc
2.2.4-31, gcc 2.95.3-119) (with Maintenance Patch-CD 1)v SuSE Linux Enterprise Server 7 for IBM zSeries (Kernel 2.4.17, 64-bit with 31-bit
compatibility mode, glibc 2.2.4-12, gcc 2.95.3-61)v HP-UX 11.0 and 11iv Windows NT 4.0 (with Service Pack 6a)v Windows 2000 Advanced Server (with Service Pack 2)
Disk and memory requirementsWebSEAL has the following hardware requirements:v Disk space: 10 MB
When combined with the prerequisite Tivoli Access Manager runtime (65 MB),the minimum required disk space is 75 MB.It is recommended that you reserve an additional 100 MB of disk space forWebSEAL log files.
v Memory: 64 MB Minimum (256 MB Recommended)Note that the 64 MB minimum is in addition to the 64 MB minimum needed bythe Tivoli Access Manager runtime. A total memory of 256 MB or greater willproduce optimum performance results.
© Copyright IBM Corp. 1999, 2003 1
Installation packagesThe IBM Tivoli Access Manager Web Security CD contains installation packages forthe following WebSEAL software:v Tivoli Access Manager WebSEAL
This package includes the WebSEAL server and configuration files.v Tivoli Access Manager WebSEAL ADK
This package contains development APIs for the Tivoli Access ManagerCross-domain Authentication Service (CDAS), the Tivoli Access ManagerCross-domain Mapping Framework (CDMF), and the Tivoli Access ManagerPassword Strength Module.
The Web Security CD also contains the following software prerequisite packages.(These packages are provided to allow you to complete the WebSEAL installationwithout requiring access to the IBM Tivoli Access Manager Base CDs.)v Tivoli Access Manager runtimev IBM Directory clientv IBM Global Security Kit (GSKit)v Tivoli Access Manager ADK
Software prerequisitesThe following sections list the software prerequisites for each of the WebSEALpackages:v “WebSEAL server prerequisites” on page 2v “WebSEAL ADK prerequisites” on page 3
Note: Software prerequisites and any necessary product patches are installedautomatically when using easy installation scripts (UNIX) and batch files(Windows). For more information about easy installation, see “Installationoptions” on page 3.
WebSEAL server prerequisitesThe following prerequisite software must be installed and configured on eachcomputer that hosts a WebSEAL server:v IBM Global Security Kit (GSKit)v IBM Directory clientv Tivoli Access Manager runtime
You must establish a Tivoli Access Manager secure domain before installingWebSEAL or the WebSEAL ADK. To establish a secure domain, the followingsoftware must be installed and configured either on the same computer that hoststhe WebSEAL server or on a remote computer:v Tivoli Access Manager policy serverv A supported LDAP server, such as IBM Directory server
Thus, there are two deployment scenarios for the WebSEAL server:1. On the same computer as the Tivoli Access Manager policy server2. On a different computer from the Tivoli Access Manager policy server
2 IBM Tivoli Access Manager: WebSEAL Installation Guide
In the first scenario, all of the WebSEAL prerequisites are satisfied during theinstallation and configuration of the policy server. Installation of the policy serverrequires installation of the Tivoli Access Manager runtime, the IBM Directoryclient, and GSKit. When you deploy WebSEAL in this configuration, you cansimply install WebSEAL without installing any further prerequisites.
In the second scenario, you must first configure the computer into an existingsecure domain, and then install the WebSEAL server. To configure the computerinto the secure domain, you must install and configure the following software:v IBM Global Security Kit (GSKit)v IBM Directory clientv Tivoli Access Manager runtime
After you have configured the Tivoli Access Manager runtime, you can install andconfigure the WebSEAL server.
Note: The WebSEAL server has no dependencies on the Tivoli Access Managerauthorization server. The authorization server is distributed as part of theIBM Tivoli Access Manager Base for your particular operating system.
WebSEAL ADK prerequisitesThe following software must be installed and configured on the same computer asthe WebSEAL ADK:v IBM Global Security Kit (GSKit)v IBM Directory clientv Tivoli Access Manager runtimev Tivoli Access Manager ADKv Tivoli Access Manager WebSEAL server
To install and use the WebSEAL ADK, you must first install and configure aWebSEAL server. In addition, you must install the Tivoli Access Manager ADK.
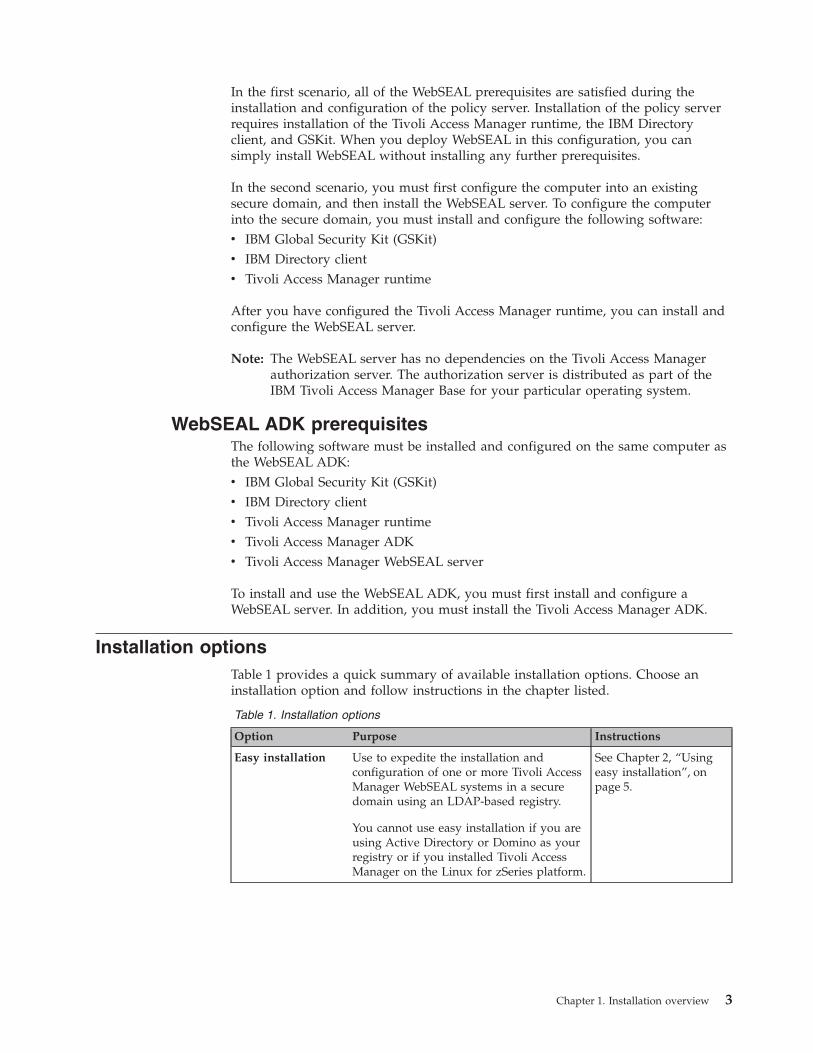
Installation optionsTable 1 provides a quick summary of available installation options. Choose aninstallation option and follow instructions in the chapter listed.
Table 1. Installation options
Option Purpose Instructions
Easy installation Use to expedite the installation andconfiguration of one or more Tivoli AccessManager WebSEAL systems in a securedomain using an LDAP-based registry.
You cannot use easy installation if you areusing Active Directory or Domino as yourregistry or if you installed Tivoli AccessManager on the Linux for zSeries platform.
See Chapter 2, “Usingeasy installation”, onpage 5.
Chapter 1. Installation overview 3
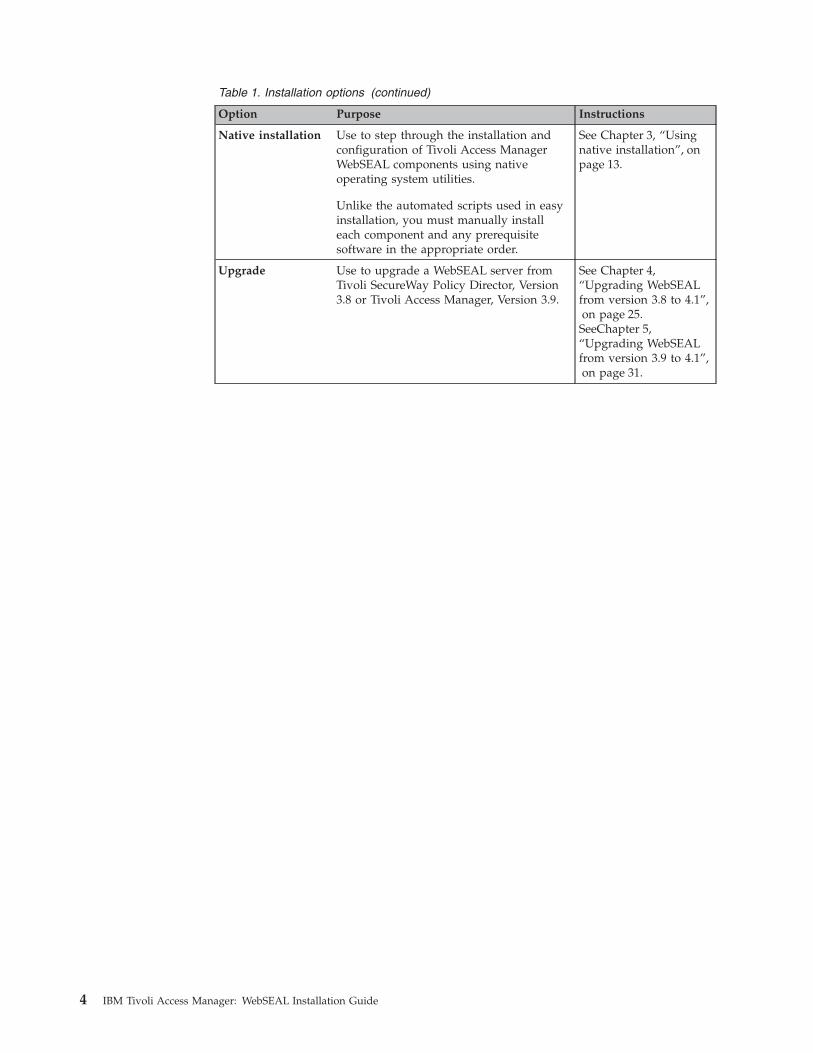
Table 1. Installation options (continued)
Option Purpose Instructions
Native installation Use to step through the installation andconfiguration of Tivoli Access ManagerWebSEAL components using nativeoperating system utilities.
Unlike the automated scripts used in easyinstallation, you must manually installeach component and any prerequisitesoftware in the appropriate order.
See Chapter 3, “Usingnative installation”, onpage 13.
Upgrade Use to upgrade a WebSEAL server fromTivoli SecureWay Policy Director, Version3.8 or Tivoli Access Manager, Version 3.9.
See Chapter 4,“Upgrading WebSEALfrom version 3.8 to 4.1”,on page 25.
SeeChapter 5,“Upgrading WebSEALfrom version 3.9 to 4.1”,on page 31.
4 IBM Tivoli Access Manager: WebSEAL Installation Guide
Chapter 2. Using easy installation
Before you begin
v Install all operating system patches and review system requirements listedin the IBM Tivoli Access Manager Release Notes.
v Become familiar with the configuration decisions that you need to makeduring easy installation. For descriptions of easy installation configurationoptions, see Table 3 on page 9.
v To view status and messages in a language other than English (default),you must install a language support package before running easyinstallation scripts (UNIX) or batch files (Windows). For instructions aboutinstalling language support packages, see the IBM Tivoli Access ManagerBase Installation Guide.
Easy installation makes it easy for you to install a WebSEAL server or WebSEALdevelopment system by automatically installing software prerequisites at the sametime. You can use the easy installation programs as an alternative to usingoperating system utilities such as pkgadd, installp, swinstall or InstallShield.Easy installation also detects when required products are installed and does notattempt to reinstall them.
Easy installation programs prompt you to supply the information necessary forinstallation and configuration of WebSEAL, WebSEAL ADK, and the prerequisitesoftware. The programs provide default values when appropriate. After yousupply the necessary configuration values, the easy installation program installsand configures products and the software prerequisites without any furtherintervention.
The easy installation programs save the configuration information supplied by theuser into a data file called a response file. The easy installation programs can readthe configuration settings from this file during future installations instead ofprompting the user to supply them. This feature enables the easy installationprogram to be run in a non-interactive or silent mode.
The WebSEAL easy installation programs are useful in a variety of deploymentscenarios. You can combine them with the easy installation program for the policyserver to quickly install and configure WebSEAL into a single system in the TivoliAccess Manager secure domain. This can be useful for prototyping, applicationdevelopment, testing, or demonstration purposes. You can also use easyinstallation when deploying multiple WebSEAL servers. In this case, you can usethe response files to expedite the deployment. In addition, the WebSEAL ADK easyinstallation program is useful for quickly setting up a WebSEAL developmentenvironment.
WebSEAL easy installation programsTable 2 on page 6 lists easy installation programs, which are included in the rootdirectory on the IBM Tivoli Access Manager Web Security CD for your particularplatform.
© Copyright IBM Corp. 1999, 2003 5
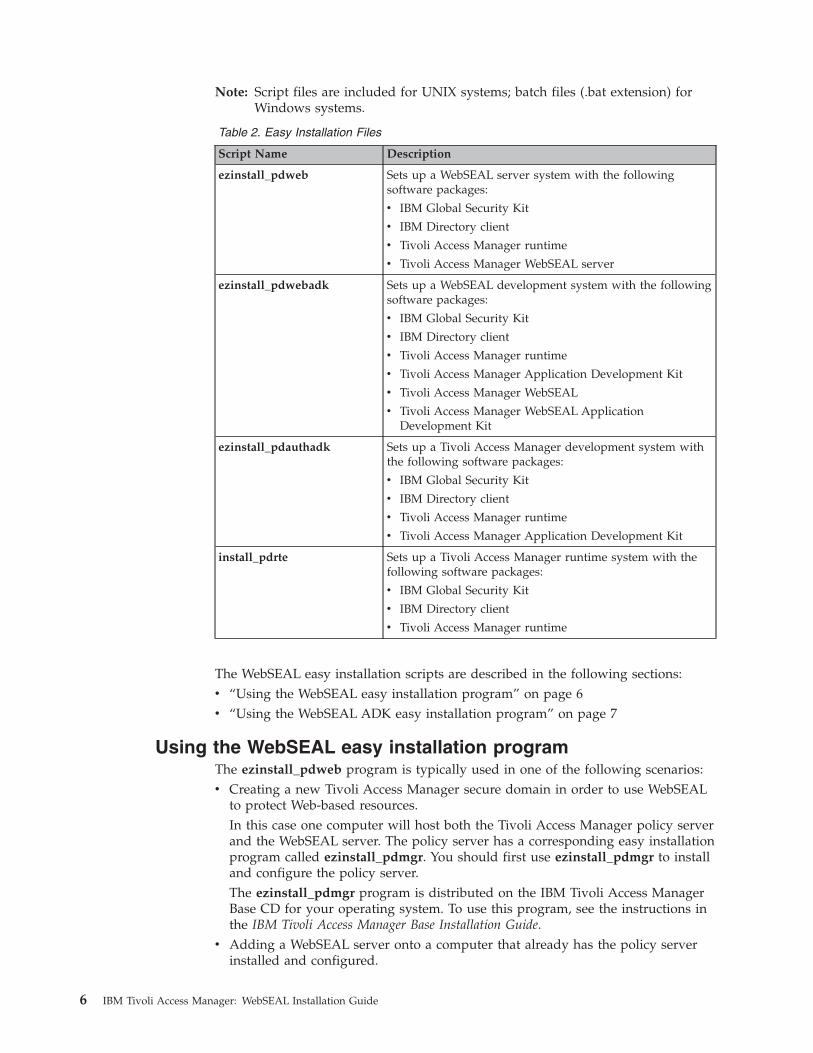
Note: Script files are included for UNIX systems; batch files (.bat extension) forWindows systems.
Table 2. Easy Installation Files
Script Name Description
ezinstall_pdweb Sets up a WebSEAL server system with the followingsoftware packages:
v IBM Global Security Kit
v IBM Directory client
v Tivoli Access Manager runtime
v Tivoli Access Manager WebSEAL server
ezinstall_pdwebadk Sets up a WebSEAL development system with the followingsoftware packages:
v IBM Global Security Kit
v IBM Directory client
v Tivoli Access Manager runtime
v Tivoli Access Manager Application Development Kit
v Tivoli Access Manager WebSEAL
v Tivoli Access Manager WebSEAL ApplicationDevelopment Kit
ezinstall_pdauthadk Sets up a Tivoli Access Manager development system withthe following software packages:
v IBM Global Security Kit
v IBM Directory client
v Tivoli Access Manager runtime
v Tivoli Access Manager Application Development Kit
install_pdrte Sets up a Tivoli Access Manager runtime system with thefollowing software packages:
v IBM Global Security Kit
v IBM Directory client
v Tivoli Access Manager runtime
The WebSEAL easy installation scripts are described in the following sections:v “Using the WebSEAL easy installation program” on page 6v “Using the WebSEAL ADK easy installation program” on page 7
Using the WebSEAL easy installation programThe ezinstall_pdweb program is typically used in one of the following scenarios:v Creating a new Tivoli Access Manager secure domain in order to use WebSEAL
to protect Web-based resources.In this case one computer will host both the Tivoli Access Manager policy serverand the WebSEAL server. The policy server has a corresponding easy installationprogram called ezinstall_pdmgr. You should first use ezinstall_pdmgr to installand configure the policy server.The ezinstall_pdmgr program is distributed on the IBM Tivoli Access ManagerBase CD for your operating system. To use this program, see the instructions inthe IBM Tivoli Access Manager Base Installation Guide.
v Adding a WebSEAL server onto a computer that already has the policy serverinstalled and configured.
6 IBM Tivoli Access Manager: WebSEAL Installation Guide
In this case, the Tivoli Access Manager secure domain has already beenestablished, and you are now extending the domain security to use WebSEAL tosecure Web-based resources. You need only run ezinstall_pdweb. The easyinstallation program prompts the user for the WebSEAL installation andconfiguration information.
v Adding a WebSEAL server when adding a new computer into the Tivoli AccessManager secure domain.In this case, the WebSEAL server will run on a computer that does not host thepolicy server, but instead will communicate with a remote policy server over thenetwork. Computers in this role require that the IBM Tivoli Access Managerruntime be installed and configured to establish communication with the remotepolicy server. This is a prerequisite to installing WebSEAL.The WebSEAL easy installation script ezinstall_pdweb will detect whether ornot the runtime has been installed and configured.
Using the WebSEAL ADK easy installation programThe ezinstall_pdwebadk program is typically used in one of the followingscenarios:v Installing a WebSEAL development environment as part of creating a new Tivoli
Access Manager secure domain in order to use WebSEAL to protect Web-basedresources.In this case one computer will host the Tivoli Access Manager policy server, theWebSEAL server, and the WebSEAL ADK. The policy server has a correspondingeasy installation program called ezinstall_pdmgr. You should first useezinstall_pdmgr to install and configure the policy server, and then useezinstall_pdwebadk to install and configure WebSEAL and WebSEAL ADK.
Note: On Windows NT only, you must first run ezinstall_pdweb.bat to installthe WebSEAL server and then run ezinstall_pdwebadk.bat to install theWebSEAL ADK. On Windows 2000 and on all UNIX platforms, you needonly run ezinstall_pdwebadk.bat to install both WebSEAL and WebSEALADK.
The WebSEAL ADK has a dependency on the Tivoli Access Manager ADKpackage. This package is distributed on the IBM Tivoli Access Manager WebSecurity CD and has its own easy installation program, ezinstall_pdauthadk.The ezinstall_pdwebadk program automatically calls ezinstall_pdauthadk if theADK has not already been installed.
v Adding a WebSEAL server and development environment onto a computer thatalready has the policy server installed and configured.In this case, the Tivoli Access Manager secure domain has already beenestablished, and you are adding WebSEAL to secure Web-based resources, andadding a WebSEAL development environment. You need only runezinstall_pdwebadk. The easy installation program calls ezinstall_pdauthadk ifnecessary to install the prerequisite ADK development environment, and thenprompts the user for both the WebSEAL and WebSEAL ADK installation andconfiguration information.
Note: On Windows NT only, you must first run ezinstall_pdweb to install theWebSEAL server and then run ezinstall_pdwebadk to install theWebSEAL ADK. On Windows 2000 and on all UNIX platforms, you needonly run ezinstall_pdwebadk to install both WebSEAL and WebSEALADK.
Chapter 2. Using easy installation 7
v Adding a WebSEAL server and WebSEAL development environment whenadding a new computer into the Tivoli Access Manager secure domain.In this case, the WebSEAL server and WebSEAL ADK will run on a computerthat does not host the policy server, but instead will communicate with a remotepolicy server over the network. Computers in this role require that the IBMTivoli Access Manager runtime be installed and configured to establishcommunication with the remote policy server. This is a prerequisite to installingWebSEAL. These computers must also have the IBM Tivoli Access ManagerADK package installed as a prerequisite to using the WebSEAL ADK.The ezinstall_pdwebadk program automatically checks for each softwareprerequisite. The easy installation program prompts the user for installation andconfiguration settings for each of the following packages, unless each is alreadyconfigured:– IBM Global Security Kit– IBM Directory client– Tivoli Access Manager runtime– Tivoli Access Manager ADK– Tivoli Access Manager WebSEAL
The easy installation program then installs and configures the WebSEAL ADK.
Note: On Windows NT only, you must first run ezinstall_pdweb to install theWebSEAL server and then run ezinstall_pdwebadk to install theWebSEAL ADK. On Windows 2000 and on all UNIX platforms, you needonly run ezinstall_pdwebadk to install both WebSEAL and WebSEALADK.
Configuring WebSEAL using the easy installation programsThe easy installation programs can obtain the necessary configuration settings intwo different ways. The first time a program is run, it prompts the user to supplyall necessary configuration settings.
When the installation is complete, the easy installation programs save the settingsin a data file called a response file. The next time, and all subsequent times that theeasy installation program is called on the same computer, the program gives theuser the option of using the saved data from the response file, instead of enteringthe configuration information at a command prompt.
These two methods of using the easy installation programs are described in thefollowing sections:v “Obtaining configuration settings interactively” on page 8v “Obtaining configuration settings from response files” on page 10
Obtaining configuration settings interactivelyThe WebSEAL and WebSEAL ADK easy installation programs prompt for allnecessary configuration information. When any software prerequisites have notbeen installed, the WebSEAL and WebSEAL ADK easy installation programsprompt for the necessary information.
The only exception is the prerequisite that WebSEAL has on the installation andconfiguration of a Tivoli Access Manager policy server on one system in the securedomain. If you are creating a new secure domain, you must satisfy this
8 IBM Tivoli Access Manager: WebSEAL Installation Guide
dependence by running the policy server’s own easy installation program. Thisprogram is distributed on the IBM Tivoli Access Manager Base CDs.
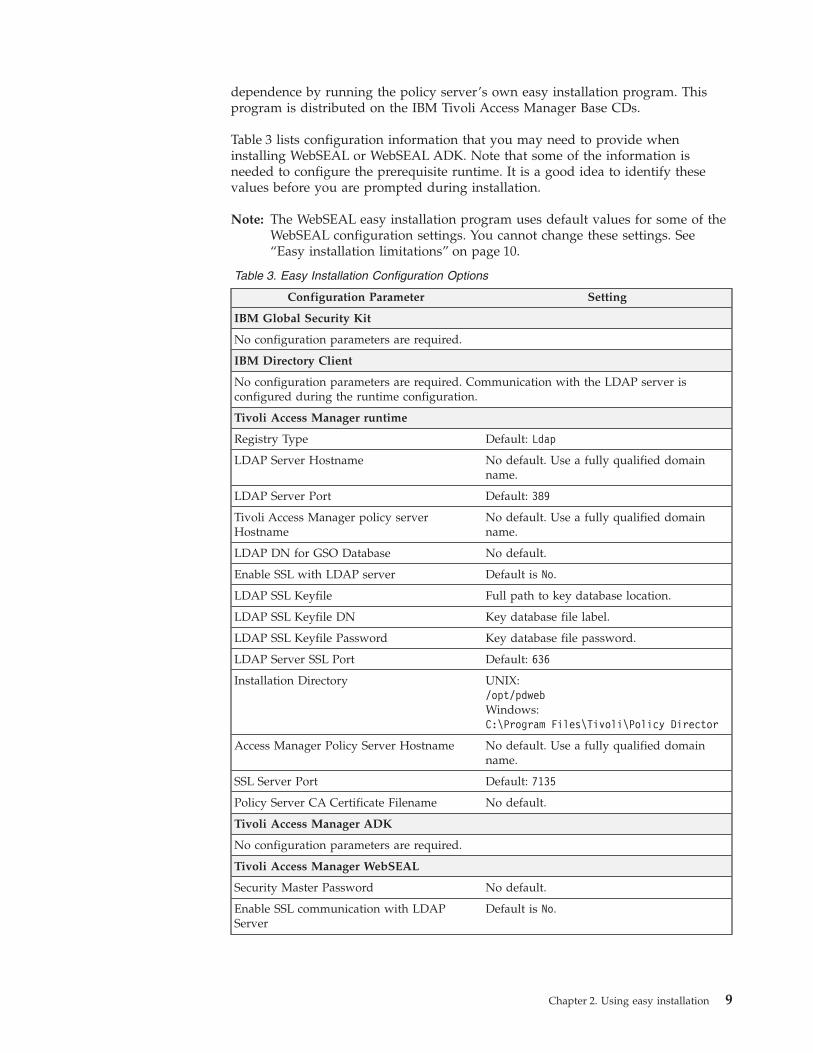
Table 3 lists configuration information that you may need to provide wheninstalling WebSEAL or WebSEAL ADK. Note that some of the information isneeded to configure the prerequisite runtime. It is a good idea to identify thesevalues before you are prompted during installation.
Note: The WebSEAL easy installation program uses default values for some of theWebSEAL configuration settings. You cannot change these settings. See“Easy installation limitations” on page 10.
Table 3. Easy Installation Configuration Options
Configuration Parameter Setting
IBM Global Security Kit
No configuration parameters are required.
IBM Directory Client
No configuration parameters are required. Communication with the LDAP server isconfigured during the runtime configuration.
Tivoli Access Manager runtime
Registry Type Default: Ldap
LDAP Server Hostname No default. Use a fully qualified domainname.
LDAP Server Port Default: 389
Tivoli Access Manager policy serverHostname
No default. Use a fully qualified domainname.
LDAP DN for GSO Database No default.
Enable SSL with LDAP server Default is No.
LDAP SSL Keyfile Full path to key database location.
LDAP SSL Keyfile DN Key database file label.
LDAP SSL Keyfile Password Key database file password.
LDAP Server SSL Port Default: 636
Installation Directory UNIX:/opt/pdwebWindows:C:\Program Files\Tivoli\Policy Director
Access Manager Policy Server Hostname No default. Use a fully qualified domainname.
SSL Server Port Default: 7135
Policy Server CA Certificate Filename No default.
Tivoli Access Manager ADK
No configuration parameters are required.
Tivoli Access Manager WebSEAL
Security Master Password No default.
Enable SSL communication with LDAPServer
Default is No.
Chapter 2. Using easy installation 9
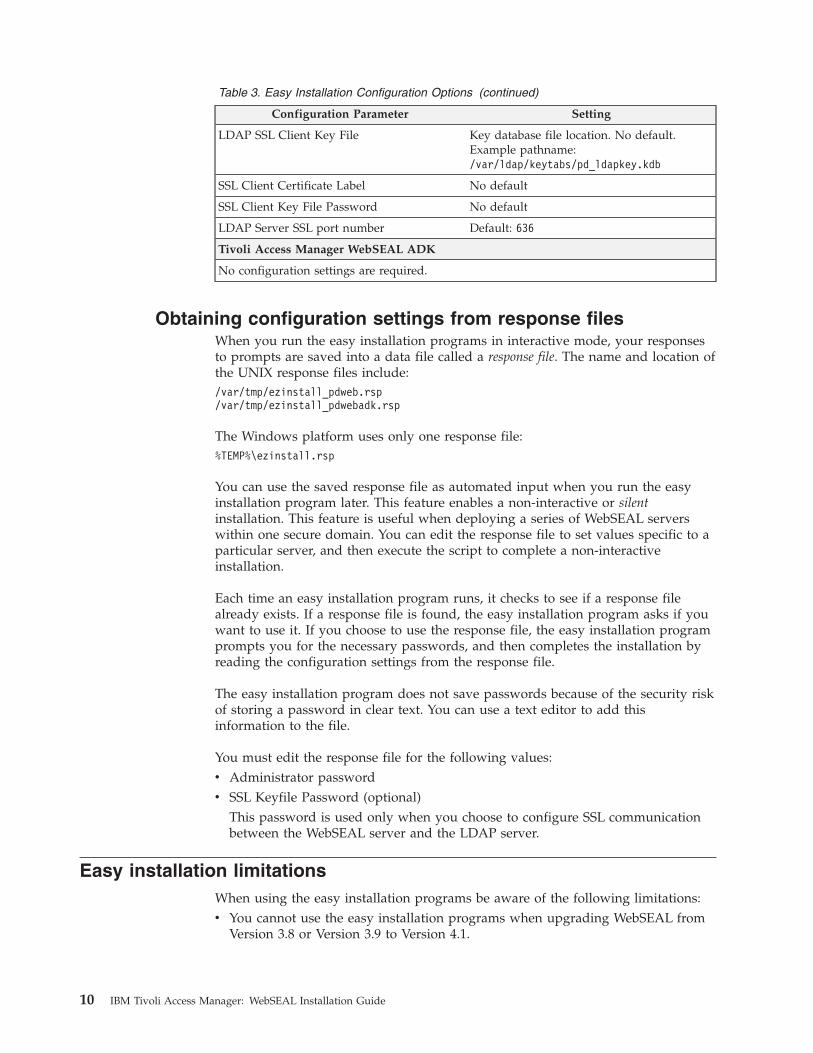
Table 3. Easy Installation Configuration Options (continued)
Configuration Parameter Setting
LDAP SSL Client Key File Key database file location. No default.Example pathname:/var/ldap/keytabs/pd_ldapkey.kdb
SSL Client Certificate Label No default
SSL Client Key File Password No default
LDAP Server SSL port number Default: 636
Tivoli Access Manager WebSEAL ADK
No configuration settings are required.
Obtaining configuration settings from response filesWhen you run the easy installation programs in interactive mode, your responsesto prompts are saved into a data file called a response file. The name and location ofthe UNIX response files include:/var/tmp/ezinstall_pdweb.rsp/var/tmp/ezinstall_pdwebadk.rsp
The Windows platform uses only one response file:%TEMP%\ezinstall.rsp
You can use the saved response file as automated input when you run the easyinstallation program later. This feature enables a non-interactive or silentinstallation. This feature is useful when deploying a series of WebSEAL serverswithin one secure domain. You can edit the response file to set values specific to aparticular server, and then execute the script to complete a non-interactiveinstallation.
Each time an easy installation program runs, it checks to see if a response filealready exists. If a response file is found, the easy installation program asks if youwant to use it. If you choose to use the response file, the easy installation programprompts you for the necessary passwords, and then completes the installation byreading the configuration settings from the response file.
The easy installation program does not save passwords because of the security riskof storing a password in clear text. You can use a text editor to add thisinformation to the file.
You must edit the response file for the following values:v Administrator passwordv SSL Keyfile Password (optional)
This password is used only when you choose to configure SSL communicationbetween the WebSEAL server and the LDAP server.
Easy installation limitationsWhen using the easy installation programs be aware of the following limitations:v You cannot use the easy installation programs when upgrading WebSEAL from
Version 3.8 or Version 3.9 to Version 4.1.
10 IBM Tivoli Access Manager: WebSEAL Installation Guide
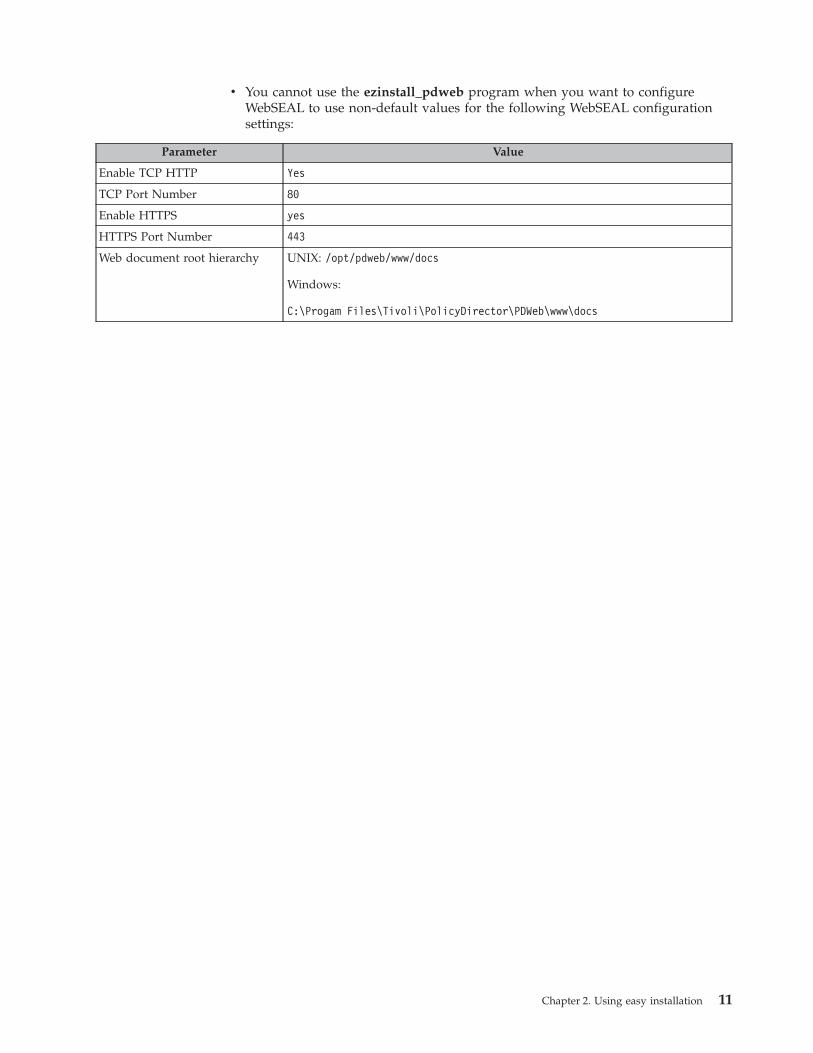
v You cannot use the ezinstall_pdweb program when you want to configureWebSEAL to use non-default values for the following WebSEAL configurationsettings:
Parameter Value
Enable TCP HTTP Yes
TCP Port Number 80
Enable HTTPS yes
HTTPS Port Number 443
Web document root hierarchy UNIX: /opt/pdweb/www/docs
Windows:
C:\Progam Files\Tivoli\PolicyDirector\PDWeb\www\docs
Chapter 2. Using easy installation 11

12 IBM Tivoli Access Manager: WebSEAL Installation Guide
Chapter 3. Using native installation
This chapter provides instructions for installing and configuring the Tivoli AccessManager WebSEAL packages using native installation utilities. This chapter alsoprovides instructions for installing the software prerequisites for each WebSEALpackage.
Note: If you are upgrading WebSEAL from a previous version of Tivoli AccessManager, do not use this chapter. See either Chapter 5, “UpgradingWebSEAL from version 3.9 to 4.1”, on page 31 or Chapter 4, “UpgradingWebSEAL from version 3.8 to 4.1”, on page 25.
The WebSEAL product consists of two packages:v WebSEAL serverv WebSEAL ADK
You can install the WebSEAL server without installing the WebSEAL ADK. If youwant to install the WebSEAL ADK, you must install the WebSEAL server as aprerequisite.
Both the WebSEAL server and the WebSEAL ADK require that the Tivoli AccessManager runtime is installed and configured. In addition, the WebSEAL ADKrequires that the Tivoli Access Manager ADK is installed.
Note: For complete installation instructions and configuration options for theTivoli Access Manager runtime and the Tivoli Access Manager ADK, see theIBM Tivoli Access Manager Base Installation Guide.
This chapter contains separate sections for installing and configuring WebSEALserver and WebSEAL ADK on each supported UNIX system. You must completethe UNIX section for installing WebSEAL server before you use the UNIX sectionfor installing the WebSEAL ADK.
Instructions for installing and configuring WebSEAL server and the WebSEAL ADKon Windows are included in one section.
Note: As an alternative to the instructions in this chapter, you may be able to useeasy installation programs. For more information, see Chapter 2, “Using easyinstallation”, on page 5.
To install WebSEAL, see the instructions in the appropriate section below:v “Installing and configuring WebSEAL server on UNIX” on page 13v “Installing the WebSEAL ADK on UNIX” on page 19v “Installing WebSEAL server and the WebSEAL ADK on Windows” on page 22
Installing and configuring WebSEAL server on UNIXTo install a WebSEAL server on a UNIX system, complete the instructions in theappropriate section:v “Installing WebSEAL server on AIX” on page 14v “Installing WebSEAL server on HP-UX” on page 15
© Copyright IBM Corp. 1999, 2003 13
v “Installing WebSEAL server on Linux on zSeries” on page 16v “Installing WebSEAL server on Solaris” on page 16
After you install the WebSEAL server package, you must configure the WebSEALserver by using the instructions in the following section:v “Configuring WebSEAL server on UNIX” on page 17
Installing WebSEAL server on AIXThe WebSEAL installation separates file extraction from package configuration. Usethe installp utility to install software packages on AIX. Then use the Tivoli AccessManager configuration utility pdconfig to configure WebSEAL.
Note: If you have already installed and configured WebSEAL and need to reinstallit, you must first unconfigure and remove the WebSEAL package. Forinstructions, see Chapter 6, “Unconfiguring and removing WebSEAL”, onpage 39.
To install a WebSEAL server on AIX, complete the following instructions:1. Log in as root.2. Verify that any required patches for your version of the AIX operating system
are installed before continuing. Refer to the IBM Tivoli Access Manager ReleaseNotes for complete software prerequisite information.
3. Determine if this computer has the Tivoli Access Manager runtime configured.The runtime will be configured if the Tivoli Access Manager policy server isinstalled on this computer, or if the computer has previously been added to theTivoli Access Manager secure domain.
4. Do one of the following:v If this computer already has the runtime configured, skip to step 5.v If this computer does not have the Tivoli Access Manager runtime
configured, install and configure the necessary software prerequisites bycompleting platform-specific instructions in the IBM Tivoli Access ManagerBase Installation Guide.
5. Insert the IBM Tivoli Access Manager Web Security for AIX CD and then enter thefollowing command to install the WebSEAL server package:installp -c -a -g -X -d /dev/cd0 PDWeb.Web
Option Description
–c Commits all specified updates that are currently applied but not committed.
–a Applies one or more software products or updates. This is the defaultaction. This flag can be used with the –c flag to apply and commit asoftware product update when installed.
–g When used to install or commit, this flag automatically installs or commits,respectively, any software products or updates that are prerequisites of thespecified software product.
–X Attempts to expand any file systems where there is insufficient space to dothe installation.
–d Specifies where the installation media can be found. For example:
/dev/cd0
6. The WebSEAL files are installed. The Results section of the InstallationSummary table indicates SUCCESS for each package successfully installed.
14 IBM Tivoli Access Manager: WebSEAL Installation Guide
7. To configure the WebSEAL server, see “Configuring WebSEAL server on UNIX”on page 17.
Installing WebSEAL server on HP-UXThe WebSEAL installation separates file extraction from package configuration. Useswinstall to install software packages on HP-UX. Then use the Tivoli AccessManager configuration utility pdconfig to configure WebSEAL.
Note: If you have already installed and configured WebSEAL and need to reinstallit, you must first unconfigure and remove the WebSEAL package. Forinstructions, see Chapter 6, “Unconfiguring and removing WebSEAL”, onpage 39.
To install a WebSEAL server on HP-UX, complete the following steps:1. Log in as user root.2. Verify that any required patches for your version of the HP-UX operating
system are installed before continuing. Refer to the IBM Tivoli Access ManagerRelease Notes for complete software prerequisite information.
3. Insert the IBM Tivoli Access Manager Web Security for HP-UX CD in the drive.4. Start pfs_mountd and then pfsd in the background, if they are not running.
Mount the CD with the pfs_mount command. For example, enter thefollowing:/usr/sbin/pfs_mount /dev/dsk/c0t0d0 /cdrom
where /dev/dsk/c0t0d0 is the CD device and /cdrom is the mount point.5. Determine if this computer already has the Tivoli Access Manager runtime
configured. The runtime will already be configured if the Tivoli AccessManager policy server is installed on this computer, or if the computer haspreviously been added to the secure domain.
6. Do one of the following:v If this computer already has the runtime configured, skip to step 7.v If this computer does not have the Tivoli Access Manager runtime
configured, install and configure the necessary software prerequisites bycompleting platform-specific instructions in the IBM Tivoli Access ManagerBase Installation Guide.
7. Enter the following command to install the WebSEAL server package:swinstall -s /cdrom/hp PDWeb
where /cdrom/hp is the directory and PDWeb specifies the WebSEAL serverpackage.
A message appears indicating that the analysis phase has succeeded. Anothermessage appears indicating that the execution phase is beginning.
Files are extracted from the CD and installed on the hard disk. A messageappears indicating that the execution phase has succeeded.
The swinstall utility exits.8. To configure the WebSEAL server, see “Configuring WebSEAL server on UNIX”
on page 17.
Chapter 3. Using native installation 15
Installing WebSEAL server on Linux on zSeriesThe WebSEAL installation separates file extraction from package configuration. Userpm to install software packages on Linux on zSeries. Then use the AccessManager configuration utility pdconfig to configure WebSEAL.
Note: If you have already installed and configured WebSEAL and need to reinstallit, you must first unconfigure and remove the WebSEAL package. Forinstructions, see Chapter 6, “Unconfiguring and removing WebSEAL”, onpage 39.
To install a WebSEAL server on Linux on zSeries, complete the followinginstructions:1. Log in as user root.2. Verify that any required patches for your version of the Linux on zSeries
operating system are installed before continuing. Refer to the IBM Tivoli AccessManager Release Notes for complete software prerequisite information.
3. Obtain access to the Access Manager WebSEAL for Linux on zSeries rpm files.Note that Linux on zSeries does not support attachment of a CD drive at thistime. Use one of the following methods to obtain the necessary files:v Load the WebSEAL for Linux on zSeries files onto another workstation. Use
ftp to transfer the files to a directory on the Linux for zSeries machine.v Mount the IBM Tivoli Access Manager for Linux on zSeries CD on another
workstation. Then use NFS to access it from the Linux on zSeries machine.The WebSEAL files are located on the CD in the following directory:/zSeries
4. Determine if this computer already has the Tivoli Access Manager runtimeconfigured. The runtime will already be configured if the Tivoli AccessManager policy server is installed on this computer, or if the computer haspreviously been added to the Tivoli Access Manager secure domain.
5. Do one of the following:v If this computer already has the runtime configured, skip to step 6.v If this computer does not have the runtime configured, install and configure
the necessary software prerequisites by completing platform-specificinstructions in the IBM Tivoli Access Manager Base Installation Guide.
6. Enter the following command to install the WebSEAL server package:rpm -i PDWeb-PD-4.1.0-0.s390.rpm
Files are extracted from the CD and installed on the hard disk. The rpm utilityexits.
7. To configure the WebSEAL server, see “Configuring WebSEAL server on UNIX”on page 17.
Installing WebSEAL server on SolarisThe WebSEAL installation separates file extraction from package configuration. Usepkgadd to install software packages on Solaris. Then use the Tivoli AccessManager configuration utility pdconfig to configure WebSEAL.
Note: If you have already installed and configured WebSEAL and need to reinstallit, you must first unconfigure and remove the WebSEAL package. Forinstructions, see Chapter 6, “Unconfiguring and removing WebSEAL”, onpage 39.
16 IBM Tivoli Access Manager: WebSEAL Installation Guide
To install a WebSEAL server on Solaris, complete the following instructions:1. Log in as user root.2. Verify that any required patches for your version of the Solaris operating
system are installed before continuing. Refer to the IBM Tivoli Access ManagerRelease Notes for complete software prerequisite information.
3. Mount the IBM Tivoli Access Manager Web Security for Solaris CD on/cdrom/cdrom0.
4. Change directory to /cdrom/cdrom0/solaris.5. Determine if this computer has the Tivoli Access Manager runtime configured.
The runtime will be configured if the Tivoli Access Manager policy server isinstalled on this computer, or if the computer has previously been added to thesecure domain.
6. Do one of the following:v If this computer already has the runtime configured, skip to step 7.v If this computer does not have the Tivoli Access Manager runtime
configured, install and configure the necessary software prerequisites bycompleting platform-specific instructions in the IBM Tivoli Access ManagerBase Installation Guide.
7. Enter the following command to install the WebSEAL server package:pkgadd -d . PDWeb
A message asks, ″Do you want to install these as setuid/setgid″.8. Type y and press Enter.
When prompted to continue, type y and press Enter.Files are extracted from the CD and installed on the hard disk.A message appears indicating that installation of the WebSEAL package wassuccessful. The pkgadd utility exits.
9. To configure the WebSEAL server, see “Configuring WebSEAL server on UNIX”on page 17.
Configuring WebSEAL server on UNIXUse the Tivoli Access Manager configuration utility pdconfig to configureWebSEAL on a UNIX platform. The configuration steps for the WebSEAL serverare identical on all UNIX platforms.
To configure a WebSEAL server on a UNIX system, complete the followinginstructions:1. As root, enter the following command at a UNIX shell prompt:
pdconfig
The Access Manager for e-business Setup Menu appears.Access Manager for e-business Setup Menu
1. Configure Package2. Unconfigure Package3. Display Configuration Statusx. Exit
Please select the menu item [x]:
2. Type 1 for Configure Package.The Access Manager for e-business Configuration Menu appears.
Chapter 3. Using native installation 17
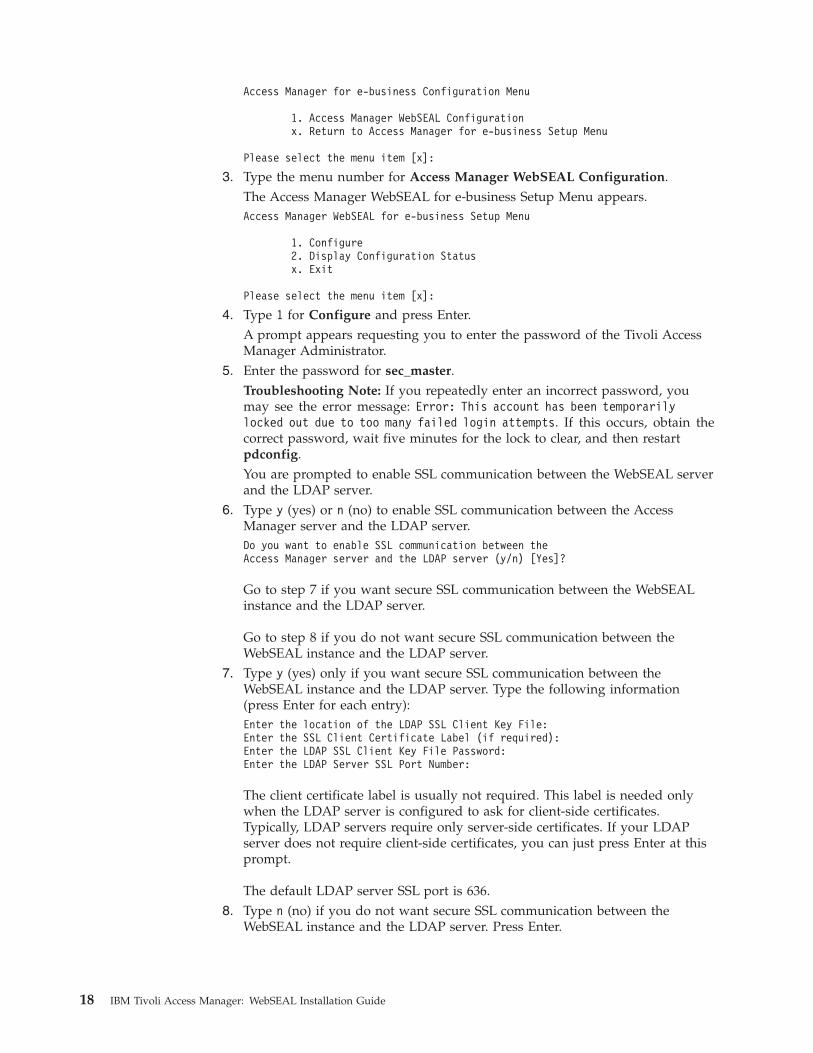
Access Manager for e-business Configuration Menu
1. Access Manager WebSEAL Configurationx. Return to Access Manager for e-business Setup Menu
Please select the menu item [x]:
3. Type the menu number for Access Manager WebSEAL Configuration.The Access Manager WebSEAL for e-business Setup Menu appears.Access Manager WebSEAL for e-business Setup Menu
1. Configure2. Display Configuration Statusx. Exit
Please select the menu item [x]:
4. Type 1 for Configure and press Enter.A prompt appears requesting you to enter the password of the Tivoli AccessManager Administrator.
5. Enter the password for sec_master.Troubleshooting Note: If you repeatedly enter an incorrect password, youmay see the error message: Error: This account has been temporarilylocked out due to too many failed login attempts. If this occurs, obtain thecorrect password, wait five minutes for the lock to clear, and then restartpdconfig.You are prompted to enable SSL communication between the WebSEAL serverand the LDAP server.
6. Type y (yes) or n (no) to enable SSL communication between the AccessManager server and the LDAP server.Do you want to enable SSL communication between theAccess Manager server and the LDAP server (y/n) [Yes]?
Go to step 7 if you want secure SSL communication between the WebSEALinstance and the LDAP server.
Go to step 8 if you do not want secure SSL communication between theWebSEAL instance and the LDAP server.
7. Type y (yes) only if you want secure SSL communication between theWebSEAL instance and the LDAP server. Type the following information(press Enter for each entry):Enter the location of the LDAP SSL Client Key File:Enter the SSL Client Certificate Label (if required):Enter the LDAP SSL Client Key File Password:Enter the LDAP Server SSL Port Number:
The client certificate label is usually not required. This label is needed onlywhen the LDAP server is configured to ask for client-side certificates.Typically, LDAP servers require only server-side certificates. If your LDAPserver does not require client-side certificates, you can just press Enter at thisprompt.
The default LDAP server SSL port is 636.8. Type n (no) if you do not want secure SSL communication between the
WebSEAL instance and the LDAP server. Press Enter.
18 IBM Tivoli Access Manager: WebSEAL Installation Guide
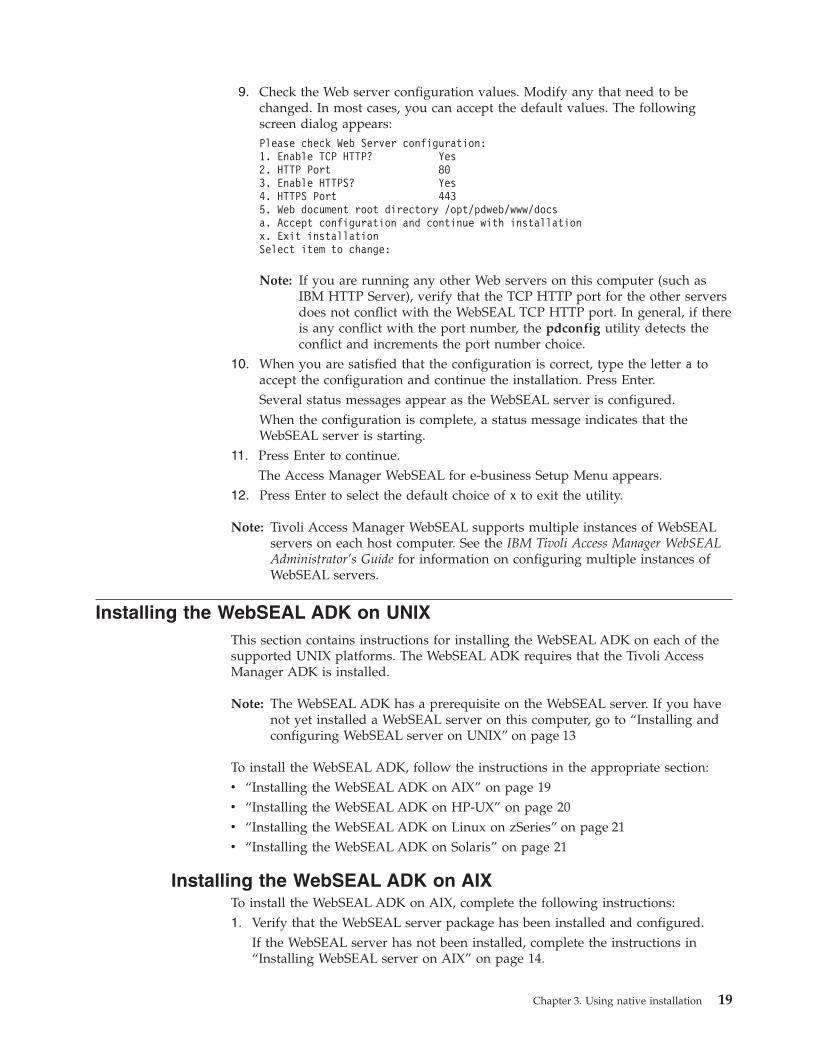
9. Check the Web server configuration values. Modify any that need to bechanged. In most cases, you can accept the default values. The followingscreen dialog appears:Please check Web Server configuration:1. Enable TCP HTTP? Yes2. HTTP Port 803. Enable HTTPS? Yes4. HTTPS Port 4435. Web document root directory /opt/pdweb/www/docsa. Accept configuration and continue with installationx. Exit installationSelect item to change:
Note: If you are running any other Web servers on this computer (such asIBM HTTP Server), verify that the TCP HTTP port for the other serversdoes not conflict with the WebSEAL TCP HTTP port. In general, if thereis any conflict with the port number, the pdconfig utility detects theconflict and increments the port number choice.
10. When you are satisfied that the configuration is correct, type the letter a toaccept the configuration and continue the installation. Press Enter.Several status messages appear as the WebSEAL server is configured.When the configuration is complete, a status message indicates that theWebSEAL server is starting.
11. Press Enter to continue.The Access Manager WebSEAL for e-business Setup Menu appears.
12. Press Enter to select the default choice of x to exit the utility.
Note: Tivoli Access Manager WebSEAL supports multiple instances of WebSEALservers on each host computer. See the IBM Tivoli Access Manager WebSEALAdministrator’s Guide for information on configuring multiple instances ofWebSEAL servers.
Installing the WebSEAL ADK on UNIXThis section contains instructions for installing the WebSEAL ADK on each of thesupported UNIX platforms. The WebSEAL ADK requires that the Tivoli AccessManager ADK is installed.
Note: The WebSEAL ADK has a prerequisite on the WebSEAL server. If you havenot yet installed a WebSEAL server on this computer, go to “Installing andconfiguring WebSEAL server on UNIX” on page 13
To install the WebSEAL ADK, follow the instructions in the appropriate section:v “Installing the WebSEAL ADK on AIX” on page 19v “Installing the WebSEAL ADK on HP-UX” on page 20v “Installing the WebSEAL ADK on Linux on zSeries” on page 21v “Installing the WebSEAL ADK on Solaris” on page 21
Installing the WebSEAL ADK on AIXTo install the WebSEAL ADK on AIX, complete the following instructions:1. Verify that the WebSEAL server package has been installed and configured.
If the WebSEAL server has not been installed, complete the instructions in“Installing WebSEAL server on AIX” on page 14.
Chapter 3. Using native installation 19
2. Verify that you are logged in as root and that the IBM Tivoli Access ManagerWeb Security for AIX CD is in the CD drive.
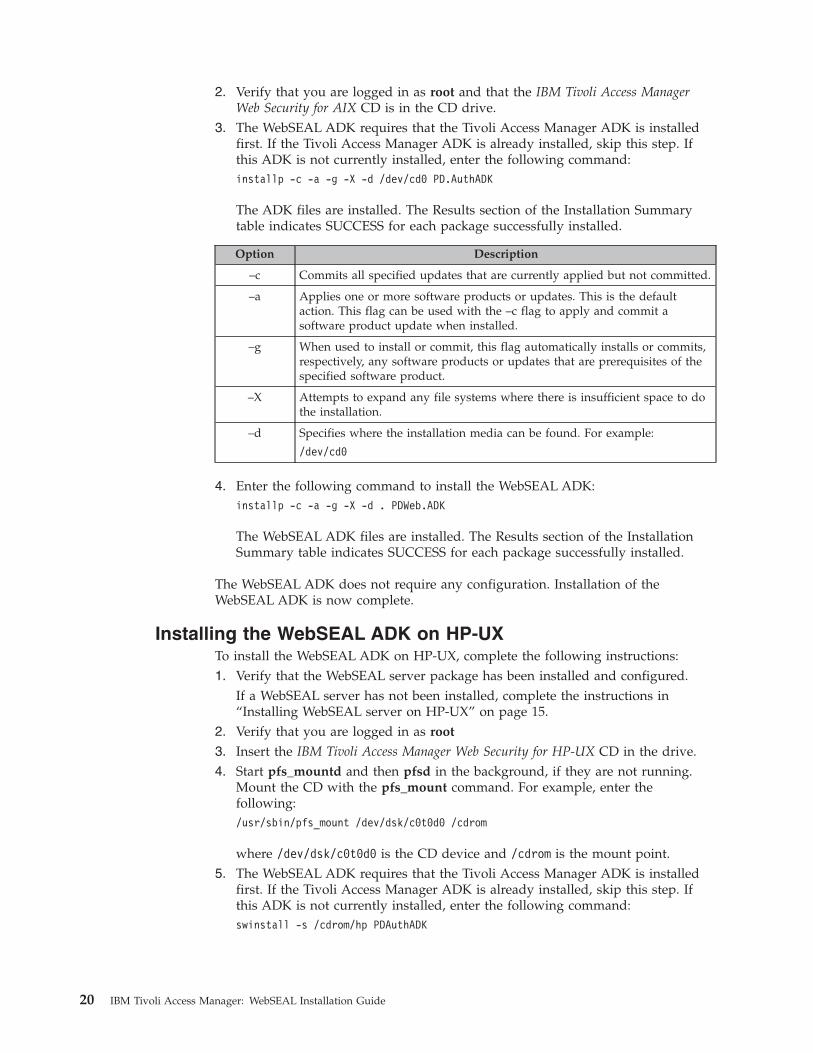
3. The WebSEAL ADK requires that the Tivoli Access Manager ADK is installedfirst. If the Tivoli Access Manager ADK is already installed, skip this step. Ifthis ADK is not currently installed, enter the following command:installp -c -a -g -X -d /dev/cd0 PD.AuthADK
The ADK files are installed. The Results section of the Installation Summarytable indicates SUCCESS for each package successfully installed.
Option Description
–c Commits all specified updates that are currently applied but not committed.
–a Applies one or more software products or updates. This is the defaultaction. This flag can be used with the –c flag to apply and commit asoftware product update when installed.
–g When used to install or commit, this flag automatically installs or commits,respectively, any software products or updates that are prerequisites of thespecified software product.
–X Attempts to expand any file systems where there is insufficient space to dothe installation.
–d Specifies where the installation media can be found. For example:
/dev/cd0
4. Enter the following command to install the WebSEAL ADK:installp -c -a -g -X -d . PDWeb.ADK
The WebSEAL ADK files are installed. The Results section of the InstallationSummary table indicates SUCCESS for each package successfully installed.
The WebSEAL ADK does not require any configuration. Installation of theWebSEAL ADK is now complete.
Installing the WebSEAL ADK on HP-UXTo install the WebSEAL ADK on HP-UX, complete the following instructions:1. Verify that the WebSEAL server package has been installed and configured.
If a WebSEAL server has not been installed, complete the instructions in“Installing WebSEAL server on HP-UX” on page 15.
2. Verify that you are logged in as root
3. Insert the IBM Tivoli Access Manager Web Security for HP-UX CD in the drive.4. Start pfs_mountd and then pfsd in the background, if they are not running.
Mount the CD with the pfs_mount command. For example, enter thefollowing:/usr/sbin/pfs_mount /dev/dsk/c0t0d0 /cdrom
where /dev/dsk/c0t0d0 is the CD device and /cdrom is the mount point.5. The WebSEAL ADK requires that the Tivoli Access Manager ADK is installed
first. If the Tivoli Access Manager ADK is already installed, skip this step. Ifthis ADK is not currently installed, enter the following command:swinstall -s /cdrom/hp PDAuthADK
20 IBM Tivoli Access Manager: WebSEAL Installation Guide
When prompted to continue, type y and press Enter. Files are extracted fromthe CD and installed on the hard disk. A status message appears indicating thatinstallation of the Tivoli Access Manager ADK package was successful. Theswinstall utility exits.
6. Enter the following command to install the WebSEAL ADK:swinstall -s /cdrom/hp PDWebADK
When prompted to continue, type y and press Enter. Files are extracted fromthe CD and installed on the hard disk. A status message appears indicating thatinstallation of the WebSEAL ADK package was successful. The swinstall utilityexits.
The WebSEAL ADK does not require any configuration. Installation of theWebSEAL ADK is now complete.
Installing the WebSEAL ADK on Linux on zSeriesTo install the WebSEAL ADK, complete the following instructions:1. Verify that the WebSEAL server package has been installed and configured.
If the WebSEAL server has not been installed, complete the instructions in“Installing WebSEAL server on Linux on zSeries” on page 16.
2. Verify the following information:v You are logged in as root.v You can access the rpm packages from the IBM Tivoli Access Manager Web
Security for Linux on zSeries CD. Note that this CD cannot be mounted on theLinux for zSeries machine. For access instructions, see “Installing andconfiguring WebSEAL server on UNIX” on page 13.The installation packages are located in the /zSeries directory on the CD.
3. The WebSEAL ADK requires that the Tivoli Access Manager ADK is installedfirst. If the Tivoli Access Manager ADK is already installed, skip this step. Ifthis ADK is not currently installed, enter the following command:rpm -i PDAuthADK*.rpm
Files are extracted from the CD and installed on the hard disk. The rpm utilityexits.
4. Enter the following command to install the WebSEAL ADK:rpm -i PDWebADK-PD-4.1.0-0.s390.rpm
Files are extracted from the CD and installed on the hard disk. The rpm utilityexits.
The WebSEAL ADK does not require any configuration. Installation of theWebSEAL ADK is now complete.
Installing the WebSEAL ADK on SolarisTo install the WebSEAL ADK on Solaris, complete the following instructions:1. Verify that the WebSEAL server package has been installed and configured.
If the WebSEAL server has not been installed, complete the instructions in“Installing WebSEAL server on Solaris” on page 16.
2. Verify the following information:v You are logged in as root.
Chapter 3. Using native installation 21
v The IBM Tivoli Access Manager Web Security for Solaris CD is mounted on/cdrom/cdrom0.
v The current directory is: /cdrom/cdrom0/solaris3. The WebSEAL ADK requires that the Tivoli Access Manager ADK is installed
first. If the Tivoli Access Manager ADK is already installed, skip this step. Ifthis ADK is not currently installed, enter the following command:pkgadd -d . PDAuthADK
When prompted to continue, type y and press Enter. Files are extracted fromthe CD and installed on the hard disk. A status message appears indicating thatinstallation of the Tivoli Access Manager ADK package was successful. Thepkgadd utility exits.
4. Enter the following command to install the WebSEAL ADK:pkgadd -d . PDWebADK
When prompted to continue, type y and press Enter. Files are extracted fromthe CD and installed on the hard disk. A status message appears indicating thatinstallation of the WebSEAL ADK package was successful. The pkgadd utilityexits.
The WebSEAL ADK does not require any configuration. Installation of theWebSEAL ADK is now complete.
Installing WebSEAL server and the WebSEAL ADK on WindowsThe WebSEAL installation separates file extraction from package configuration. Usean InstallShield program to install the WebSEAL files. Next, use the pdconfigconfiguration utility to configure the WebSEAL server.
Note: If you have already installed and configured WebSEAL and need to reinstallit, you must first unconfigure and remove the WebSEAL package. Forinstructions, see Chapter 6, “Unconfiguring and removing WebSEAL”, onpage 39.
To install and configure WebSEAL on Windows, complete the followinginstructions:1. Log in to the Windows domain as a user with Windows administrator
privileges.2. Verify that any required patches for your version of the Windows operating
system are installed before continuing. Refer to the IBM Tivoli Access ManagerRelease Notes for complete software prerequisite information.
3. Insert the IBM Tivoli Access Manager Web Security for Windows CD into the CDdrive.
4. Determine if this computer has the runtime configured. The runtime will beconfigured if the policy server is installed on this computer, or if the computerhas previously been added to the secure domain.
5. Do one of the following:v If this computer already has the runtime configured, skip to step 6 on
page 23.v If this computer does not have the runtime configured, install and configure
the necessary software prerequisites by completing platform-specificinstructions in the IBM Tivoli Access Manager Base Installation Guide.
22 IBM Tivoli Access Manager: WebSEAL Installation Guide
Additionally, if you want to install the WebSEAL ADK, you must install theprerequisite Tivoli Access Manager ADK. Refer to the IBM Tivoli AccessManager Base Installation Guide for complete instructions.
6. Run the WebSEAL InstallShield setup program by double-clicking on thefollowing file (where the letter E: in the following command represents theCD drive):
E:\Windows\PolicyDirector\Disk Images\Disk1\WebSEAL\Disk Images\Disk 1\setup.exe
The Choose Setup Language dialog box appears.7. Select the appropriate language and click OK.
The InstallShield program starts and the Welcome dialog box appears.8. Click Next.
The License Agreement dialog box appears.9. Click Yes to accept the License Agreement.
The Choose Destination Location dialog box appears.10. Accept the default or click Browse to specify an alternative location. Click
Next.The Select Components dialog box appears.
11. Select the check box for each package that you want to install:v PDWeb
This package contains the WebSEAL server and utilities. By default, thispackage is pre-checked.
v PDWebADK
This package contains WebSEAL ADKs. You must select this check box ifyou want to install this package. You must first install PDAuthADK beforeyou can install the PDWebADK package. Installation of PDWebADK willfail if PDAuthADK has not been previously installed.
12. Click Next.The files for the selected packages are extracted to the disk. A messageappears indicating that the packages have been installed.
13. Click Finish to exit the InstallShield program.14. To configure the WebSEAL server, see“Configuring WebSEAL server on
Windows” on page 23.
Configuring WebSEAL server on WindowsTo configure a WebSEAL server, complete the following instructions. The WebSEALADK does not require any configuration.1. Log in to the Windows domain as a user with Windows administrator
privileges.2. Select Start → Programs → Access Manager for e-business → Configuration.
The Access Manager for e-business Configuration dialog box appears.3. Select Access Manager WebSEAL and click Configure.
The Access Manager WebSEAL for e-business Configuration dialog boxappears.
4. Select Default WebSEAL and click Configure.The Access Manager Administrator Password dialogue box appears.
5. Enter the password for sec_master and click OK.Troubleshooting Note: If you repeatedly enter an incorrect password, youmay see the error message: Error: This account has been temporarily
Chapter 3. Using native installation 23
locked out due to too many failed login attempts. If this occurs, obtain thecorrect password, wait five minutes for the lock to clear, and then restart theconfiguration program.
6. The SSL Communication with the LDAP Server dialogue box appears.Go to step 7 if you want secure SSL communication between WebSEAL andthe LDAP server.Go to step 8 if you do not want secure SSL communication between WebSEALand the LDAP server.
7. Check ″yes″ only if you want secure SSL communication between WebSEALand the LDAP server.a. Enter LDAP client SSL information:
v Port number for SSL listeningv Key database file full path locationv Certificate labelv Password for the key database file
b. Click OK.c. The HTTP Properties dialogue box appears. Go to Step 9.
8. Check ″no″ if you do not want secure SSL communication between WebSEALand the LDAP server. Click OK.The HTTP Properties dialogue box appears. Continue with Step 9.
9. Select or deselect the Allow unsecure TCP HTTP access check box. If youallowed unsecure TCP HTTP access, specify the port number. In most cases,you can accept the default port number of 80. If there is any conflict with theport number, the pdconfig utility detects the conflict and increments the portnumber choice.
10. Select or deselect the Allow HTTPS access check box. If you allowed HTTPSaccess, specify the port number. In most cases, you can accept the default portnumber of 443. If there is any conflict with the port number, the pdconfigutility detects the conflict and increments the port number choice. Click OK.The status message Configuring Tivoli Access Manager WebSEAL appears.When configuration completes, a status message states that the configurationwas successful. The Access Manager WebSEAL for e-business Configurationdialog box appears.
11. Click Close.The Access Manager for e-business Configuration dialog box appears.
12. Click Close.Configuration of WebSEAL on Windows is now complete.
Note: Tivoli Access Manager WebSEAL supports multiple instances of WebSEALservers on each host computer. See the IBM Tivoli Access Manager WebSEALAdministrator’s Guide for information on configuring multiple instances ofWebSEAL servers.
24 IBM Tivoli Access Manager: WebSEAL Installation Guide

Chapter 4. Upgrading WebSEAL from version 3.8 to 4.1
Tivoli Access Manager supports an upgrade of Tivoli Access Manager WebSEALfrom Version 3.8 or Version 3.9 to Version 4.1. This chapter describes how toupgrade a Version 3.8 WebSEAL server to Version 4.1.
Note: Please check the IBM Tivoli Access Manager Release Notes on the Tivolisupport Web site for possible limitations to the WebSEAL upgrade process.
Before you can use the following upgrade procedures for WebSEAL, you mustensure that the following Tivoli Access Manager components have been upgradedto Version 4.1:v IBM Global Security Kit (GSKit)v IBM Directory clientv Tivoli Access Manager runtime
Refer to the IBM Tivoli Access Manager Base Installation Guide for instructions onupgrading these components to Version 4.1.
Upgrading WebSEAL on AIXTo upgrade a WebSEAL server on AIX, complete the following instructions:1. Log in as user root.2. Verify that the Tivoli Access Manager secure domain is able to upgrade
WebSEAL:a. Verify that the Tivoli Access Manager policy server for the secure domain
has already been upgraded to Version 4.1. For policy server upgradeinstructions, see the IBM Tivoli Access Manager Base Installation Guide. Verifythat the Tivoli Access Manager policy server is running, and that you cancontact it. You can do this by executing a sample pdadmin command. Forexample:pdadmin login -a sec_master -p passwordpdadmin> acl list
If you cannot log in, do not proceed with the WebSEAL upgrade. Resolvethe login problem before continuing.
3. Stop the WebSEAL server. Enter the following command:/usr/bin/pdweb stop
4. Mount the IBM Tivoli Access Manager Web Security for AIX CD.5. Change directory to:
mount_point/usr/sys/inst.images
6. Obtain the Tivoli Access Manager migrate.conf file. This file is located on theCD in:mount_point/usr/sys/inst.images/migrate/migrate.conf
a. Copy migrate.conf to:/tmp/migrate.conf
b. Edit migrate.conf and add the sec_master password for your securedomain.
© Copyright IBM Corp. 1999, 2003 25
pdadmin-login = sec_masterpdadmin-pwd = sec_master_password
Use the default values for the other entries in migrate.conf.7. Ensure you are located in the inst.images directory.
cd mount_point/usr/sys/inst.images
8. Enter the following command to install the WebSEAL server package:installp -c -a -X -F -d . PDWeb.Web
Files are extracted from the CD and installed on the hard disk.
The Results section of the Installation Summary indicates SUCCESS forpackages successfully installed.
The installp utility exits.
The WebSEAL server is restarted automatically.9. If you want to upgrade the WebSEAL ADK on this computer, install it now.
The WebSEAL ADK has a dependency on the Tivoli Access Manager ADK.Both ADK packages are included on the Web Security CD. If you have notalready installed the Version 4.1 Tivoli Access Manager ADK, install it now. Useinstallp to install each package:installp -c -a -X -F -d . PDAuthADK
installp -c -a -X -F -d . PDWebADK
Files are extracted from the CD and installed on the hard disk.
The Results section of the Installation Summary indicates SUCCESS forpackages successfully installed.
The installp utility exits.
Neither the IBM Tivoli Access Manager ADK package nor the WebSEAL ADKpackage require any configuration steps.
The upgrade of WebSEAL on AIX is now complete.
You do not need to run pdconfig to configure WebSEAL. WebSEAL automaticallyuses the Version 3.8 configuration information. The original webseald.confconfiguration file, with your custom configuration settings, is preserved andupdated with Version 4.1 stanzas and parameters.
Upgrading WebSEAL on HP-UXTo upgrade WebSEAL on HP-UX, complete the following instructions:1. Log in as user root.2. Verify that the Tivoli Access Manager secure domain is able to upgrade
WebSEAL:a. Verify that the Tivoli Access Manager policy server for the secure domain
has already been upgraded to Version 4.1.b. Verify that the Tivoli Access Manager policy server is running, and that
you can contact it. You can do this by executing a sample pdadmincommand. For example:
26 IBM Tivoli Access Manager: WebSEAL Installation Guide
pdadmin login -a sec_master -p passwordpdadmin> acl list
If you cannot log in, do not proceed with the WebSEAL upgrade. Resolvethe login problem before continuing.
3. Copy the WebSEAL certificate key file database and password stash file to atemporary directory:cp /var/pdweb/www/certs/pdsrv.kdb /temporary_directorycp /var/pdweb/www/certs/pdsrv.sth /temporary_directory
4. Enter the following commands:cd /opt/pdweb/.configuretouch upgrade38
5. Stop the WebSEAL server. Enter the following command:/usr/bin/pdweb stop
6. Mount the IBM Tivoli Access Manager Web Security for HP-UX CD:/usr/sbin/pfs_mount mount_device mount_point
For example:/usr/sbin/pfs_mount /dev/dsk/c0t0d0 /cdrom
7. Obtain the Tivoli Access Manager migrate.conf file. This file is located on theCD inmount_point/hp/migrate/migrate.conf
a. Copy migrate.conf to:/tmp/migrate.conf
b. Edit migrate.conf and add the sec_master password for your securedomain.pdadmin-login = sec_masterpdadmin-pwd = sec_master_password
Use the default values for the other entries in migrate.conf.8. Ensure you are located in the hp directory.
cd mount_point/hp
9. Use the swinstall utility to install the WebSEAL server package:swinstall -s mount_point/hp PDWeb
A message appears indicating that the analysis phase has succeeded. Files areextracted from the CD and installed on the hard disk.
A message appears indicating that the execution phase has succeeded. Theswinstall utility exits.
10. If you want to use the WebSEAL ADK on this computer, install it now. If youdo not want to use it, skip this step and go to the next step.The WebSEAL ADK has a dependency on the Tivoli Access Manager ADK.Both ADK packages are included on the Web Security CD.a. Use swinstall to install the Tivoli Access Manager ADK:
swinstall -s /mount_point/hp PDAuthADK
A status message appears when the analysis phase has succeeded. Files areextracted onto the hard disk. A status message appears when the executionphase has succeeded. The swinstall utility exits.
Chapter 4. Upgrading WebSEAL from version 3.8 to 4.1 27
The Tivoli Access Manager ADK package does not require anyconfiguration.
b. Use swinstall to install the WebSEAL ADK:swinstall -s /mount_point/hp PDWebADK
A status message appears when the analysis phase has succeeded. Files areextracted onto the hard disk. A status message appears when the executionphase has succeeded. The swinstall utility exits.
The WebSEAL ADK package does not require any configuration.11. Restore the Version 3.8 WebSEAL certificate files that you preserved before
starting the WebSEAL upgrade:cp /temporary_directory/pdsrv.kdb /opt/pdweb/www/certs/pdsrv.kdbcp /temporary_directory/pdsrv.sth /opt/pdweb/www/certs/pdsrv.sth
12. Run the WebSEAL upgrade script:cd /opt/pdweb/sbinPDWeb_upgrade
Note: After upgrading, the swlist command may still display a listing forPolicy Director WebSEAL 3.8.0. You can ignore this entry. The WebSEAL3.8 binaries have been upgraded to Version 4.1.
Neither the Tivoli Access Manager ADK package nor the WebSEAL ADK packagerequire any configuration steps.
The upgrade of WebSEAL on HP-UX is now complete.
You do not need to run pdconfig to configure WebSEAL. WebSEAL automaticallyuses the Version 3.8 configuration information. The original webseald.confconfiguration file, with your custom configuration settings, is preserved andupdated with Version 4.1 stanzas and parameters.
Upgrading WebSEAL on SolarisTo upgrade a WebSEAL server on Solaris, complete the following instructions:1. Log in as user root.2. Verify that the Tivoli Access Manager secure domain is able to upgrade
WebSEAL:a. Verify that the Tivoli Access Manager policy server for the secure domain
has already been upgraded to Version 4.1.b. Verify that the Tivoli Access Manager policy server is running, and that you
can contact it. You can do this by executing a sample pdadmin command.For example:pdadmin login -a sec_master -p passwordpdadmin> acl list
If you cannot log in, do not proceed with the WebSEAL upgrade. Resolvethe login problem before continuing.
3. Stop the WebSEAL server. Enter the following command:/usr/bin/pdweb stop
4. Mount the IBM Tivoli Access Manager Web Security for Solaris CD on:/cdrom/cdrom0
5. Change directory to:
28 IBM Tivoli Access Manager: WebSEAL Installation Guide
/cdrom/cdrom0/solaris
6. Obtain the Tivoli Access Manager migrate.conf file. This file is located on theCD inmount_point/solaris/migrate/migrate.conf
a. Copy migrate.conf to:/tmp/migrate.conf
b. Edit migrate.conf and add the sec_master password for your securedomain.pdadmin-login = sec_masterpdadmin-pwd = sec_master_password
Use the default values for the other entries in migrate.conf.7. Ensure you are located in the solaris directory.
cd mount_point/solaris
8. Enter the following command to install the WebSEAL server package:pkgadd -a /mount_point/solaris/pddefault -d . PDWeb
Files are extracted from the CD and installed on the hard disk.
A message appears indicating that an upgrade is taking place.
A message appears indicating that installation of the WebSEAL package wassuccessful. The pkgadd utility exits.
The WebSEAL server is restarted automatically.9. If you want to upgrade the WebSEAL ADK on this computer, install it now.
The WebSEAL ADK has a dependency on the Tivoli Access Manager ADK.Both ADK packages are included on the Web Security CD. If you have notalready installed the Version 4.1 Tivoli Access Manager ADK, install it now. Usepkgadd to install each package:pkgadd -a mount_point/solaris/pddefault -d . PDAuthADK
pkgadd -a mount_point/solaris/pddefault -d . PDWebADK
Files are extracted from the CD and installed on the hard disk. A messageappears indicating that installation of the WebSEAL ADK package wassuccessful. The pkgadd utility exits.
Neither the IBM Tivoli Access Manager ADK package nor the WebSEAL ADKpackage require any configuration steps.
The upgrade of WebSEAL on Solaris from Version 3.8 to Version 4.1 is complete.
You do not need to run pdconfig to configure WebSEAL. WebSEAL automaticallyuses the Version 3.8 configuration information. The original webseald.confconfiguration file, with your custom configuration settings, is preserved andupdated with Version 4.1 stanzas and parameters.
Upgrading WebSEAL on WindowsTo upgrade WebSEAL on Windows, complete the following instructions:1. Log in to the Windows domain as a user with Windows administrator
privileges.
Chapter 4. Upgrading WebSEAL from version 3.8 to 4.1 29
2. Verify that the Tivoli Access Manager secure domain is able to upgradeWebSEAL:a. Verify that the Tivoli Access Manager policy server for the secure domain
has already been upgraded to Version 4.1.b. Verify that the Tivoli Access Manager policy server is running, and that you
can contact it. You can do this by executing a sample pdadmin command.For example:MSDOS> pdadmin login -a sec_master -p passwordpdadmin> acl list
If you cannot log in, do not proceed with the WebSEAL upgrade. Resolvethe login problem before continuing.
3. Ensure that the WebSEAL server is not running. Use the Services icon to stopthe WebSEAL server.
4. Insert the IBM Tivoli Access Manager Web Security for Windows CD into the CDdrive.
5. Obtain the Tivoli Access Manager migrate.conf file from the Web Security CD.This file is located on the CD in:E:\Windows\migrate\migrate.conf
a. Copy migrate.conf to:%TEMP%\migrate.conf
If %TEMP% is not set, place migrate.conf in %TMP%.b. Edit migrate.conf and add the sec_master password for your secure
domain.pdadmin-login = sec_masterpdadmin-pwd = sec_master_password
Use the default values for the other entries in migrate.conf.6. Run the WebSEAL setup program: (where the letter E: in the following
command represents the CD drive):MSDOS> E:\Windows\PolicyDirector\Disk Images\Disk1\WebSEAL\Disk Images\Disk1\setup.exe
The Choose Setup Language dialog box appears.7. Select the appropriate language and click OK.
The InstallShield program starts.8. Click Finish to exit the setup program.
WebSEAL is automatically started.
The upgrade of WebSEAL on Windows is now complete.
You do not need to run pdconfig to configure WebSEAL. WebSEAL automaticallyuses the Version 3.8 configuration information. The original webseald.confconfiguration file, with your custom configuration settings, is preserved andupdated with Version 4.1 stanzas and parameters.
30 IBM Tivoli Access Manager: WebSEAL Installation Guide
Chapter 5. Upgrading WebSEAL from version 3.9 to 4.1
Tivoli Access Manager supports an upgrade of Tivoli Access Manager WebSEALfrom Version 3.8 or Version 3.9 to Version 4.1. This chapter describes how toupgrade a Version 3.9 WebSEAL server to Version 4.1.
Note: Please check the IBM Tivoli Access Manager Release Notes on the Tivolisupport Web site for possible limitations to the WebSEAL upgrade process.
Before you can use the following upgrade procedures for WebSEAL, you mustensure that the following Tivoli Access Manager components have been upgradedto Version 4.1:v IBM Global Security Kit (GSKit)v IBM Directory clientv Tivoli Access Manager runtime
Refer to the IBM Tivoli Access Manager Base Installation Guide for instructions onupgrading these components to Version 4.1.
Upgrading WebSEAL on AIXTo upgrade a WebSEAL server on AIX, complete the following instructions:1. Log in as user root.2. Verify that the Tivoli Access Manager secure domain is able to upgrade
WebSEAL:a. Verify that the Tivoli Access Manager policy server for the secure domain
has already been upgraded to Version 4.1.b. Verify that the Tivoli Access Manager policy server is running, and that you
can contact it. You can do this by executing a sample pdadmin command.For example:pdadmin login -a sec_master -p passwordpdadmin> acl list
For policy server upgrade instructions, see the IBM Tivoli Access ManagerBase Installation Guide.
If you cannot log in, do not proceed with the WebSEAL upgrade. Resolvethe login problem before continuing.
3. Stop the WebSEAL server. Enter the following command:/usr/bin/pdweb stop
4. Mount the IBM Tivoli Access Manager Web Security for AIX CD.5. Ensure you are located in the inst.images directory.
cd mount_point/usr/sys/inst.images
6. Enter the following command to install the WebSEAL server package:installp -c -a -X -F -d . PDWeb.Web
Files are extracted from the CD and installed on the hard disk.
© Copyright IBM Corp. 1999, 2003 31
The Results section of the Installation Summary indicates SUCCESS forpackages successfully installed.
The installp utility exits.
The WebSEAL server is restarted automatically.7. If you want to upgrade the WebSEAL ADK on this computer, install it now.
The WebSEAL ADK has a dependency on the Tivoli Access Manager ADK.Both ADK packages are included on the Web Security CD. If you have notalready installed the Version 4.1 Tivoli Access Manager ADK, install it now. Useinstallp to install each package:installp -c -a -X -F -d . PDAuthADK
installp -c -a -X -F -d . PDWebADK
Files are extracted from the CD and installed on the hard disk.
The Results section of the Installation Summary indicates SUCCESS forpackages successfully installed.
The installp utility exits.
Neither the Tivoli Access Manager ADK package nor the WebSEAL ADKpackage require any configuration steps.
The upgrade of WebSEAL on AIX is now complete.
You do not need to run pdconfig to configure WebSEAL. WebSEAL automaticallyuses the Version 3.9 configuration information. The original webseald.confconfiguration file, with your custom configuration settings, is preserved andupdated with Version 4.1 stanzas and parameters.
Upgrading WebSEAL on HP-UXTo upgrade WebSEAL on HP-UX, complete the following instructions:1. Log in as user root.2. Verify that the Tivoli Access Manager secure domain is able to upgrade
WebSEAL:a. Verify that the Tivoli Access Manager policy server for the secure domain
has already been upgraded to Version 4.1.b. Verify that the Tivoli Access Manager policy server is running, and that
you can contact it. You can do this by executing a sample pdadmincommand. For example:# pdadmin login -a sec_master -p passwordpdadmin> acl list
If you cannot log in, do not proceed with the WebSEAL upgrade. Resolvethe login problem before continuing.
3. Copy the WebSEAL certificate key file database and password stash file to atemporary directory:cp /var/pdweb/www/certs/pdsrv.kdb /temporary_directorycp /var/pdweb/www/certs/pdsrv.sth /temporary_directory
4. Enter the following commands:cd /opt/pdweb/.configuretouch upgrade39
32 IBM Tivoli Access Manager: WebSEAL Installation Guide
5. Stop the WebSEAL server. Enter the following command:/usr/bin/pdweb stop
6. Mount the IBM Tivoli Access Manager Web Security for HP-UX CD:/usr/sbin/pfs_mount mount_device mount_point
For example:/usr/sbin/pfs_mount /dev/dsk/c0t0d0 /cdrom
7. Ensure you are located in the hp directory.cd mount_point/hp
8. Use the swinstall utility to install the WebSEAL server package:swinstall -s mount_point/hp PDWeb
A message appears indicating that the analysis phase has succeeded. Files areextracted from the CD and installed on the hard disk.
A message appears indicating that the execution phase has succeeded. Theswinstall utility exits.
9. If you want to use the WebSEAL application developer kit (ADK) on thiscomputer, install it now. If you do not want to use it, skip this step and go tothe next step.The WebSEAL ADK has a dependency on the Tivoli Access Manager ADK.Both ADK packages are included on the WebSEAL CD.a. Use swinstall to install the Tivoli Access Manager ADK:
swinstall -s /mount_point/hp PDAuthADK
A status message appears when the analysis phase has succeeded. Files areextracted onto the hard disk. A status message appears when the executionphase has succeeded. The swinstall utility exits.
The Tivoli Access Manager ADK package does not require anyconfiguration.
b. Use swinstall to install the WebSEAL ADK:swinstall -s /mount_point/hp PDWebADK
A status message appears when the analysis phase has succeeded. Files areextracted onto the hard disk. A status message appears when the executionphase has succeeded. The swinstall utility exits.
The WebSEAL ADK package does not require any configuration.10. Restore the Version 3.9 WebSEAL certificate files that you preserved before
starting the WebSEAL upgrade:cp /temporary_directory/pdsrv.kdb /opt/pdweb/www/certs/pdsrv.kdbcp /temporary_directory/pdsrv.sth /opt/pdweb/www/certs/pdsrv.sth
11. Run the WebSEAL upgrade script:cd /opt/pdweb/sbinPDWeb_upgrade
Note: After upgrading, the swlist command may still display a listing forPolicy Director WebSEAL 3.9.0. You can ignore this entry. The WebSEAL3.9 binaries have been upgraded to Version 4.1.
Neither the Tivoli Access Manager ADK package nor the WebSEAL ADK packagerequire any configuration steps.
Chapter 5. Upgrading WebSEAL from version 3.9 to 4.1 33
The upgrade of WebSEAL on HP-UX is now complete.
You do not need to run pdconfig to configure WebSEAL. WebSEAL automaticallyuses the Version 3.9 configuration information. The original webseald.confconfiguration file, with your custom configuration settings, is preserved andupdated with Version 4.1 stanzas and parameters.
Upgrading WebSEAL on Linux on zSeriesTo upgrade a WebSEAL server on Linux on zSeries, complete the followinginstructions:1. Log in as user root.2. Verify that the Tivoli Access Manager secure domain is able to upgrade
WebSEAL:a. Verify that the Tivoli Access Manager policy server for the secure domain
has already been upgraded to Version 4.1.b. Verify that the Tivoli Access Manager policy server is running, and that
you can contact it. You can do this by executing a sample pdadmincommand. For example:pdadmin login -a sec_master -p passwordpdadmin> acl list
If you cannot log in, do not proceed with the WebSEAL upgrade. Resolvethe login problem before continuing.
3. Copy the WebSEAL certificate key file database and password stash file to atemporary directory:cp /var/pdweb/www/certs/pdsrv.kdb /tmpcp /var/pdweb/www/certs/pdsrv.sth /tmp
4. Enter the following commands:cd /opt/pdweb/.configuretouch upgrade39
5. Stop the WebSEAL server. Enter the following command:/usr/bin/pdweb stop
6. Obtain access to the Access Manager WebSEAL for Linux on zSeries rpm files.Note that Linux on zSeries does not support attachment of a CD drive at thistime. Use one of the following methods to obtain the necessary files:v Load the WebSEAL for Linux on zSeries files onto another workstation. Use
ftp to transfer the files to a directory on the Linux for zSeries machine.v Mount the IBM Tivoli Access Manager for Linux on zSeries CD on another
workstation. Use NFS to access it from the Linux on zSeries machine.The WebSEAL files are located on the CD in the following directory:/zSeries
7. Use the rpm utility to install the WebSEAL server package:rpm -U PDWeb-PD-4.1.0-0.s390.rpm
Files are extracted from the CD and installed on the hard disk.
The rpm utility exits.8. If you want to use the WebSEAL application developer kit (ADK) on this
computer, install it now. If you do not want to use it, skip this step and go tothe next step.
34 IBM Tivoli Access Manager: WebSEAL Installation Guide
The WebSEAL ADK has a dependency on the Tivoli Access Manager ADK.Both ADK packages are included on the WebSEAL CD.a. Use rpm to install the Tivoli Access Manager ADK:
rpm -U PDAuthADK-PD-4.1.0-0.s390.rpm
Files are extracted onto the hard disk. The rpm utility exits.
The Tivoli Access Manager ADK package does not require anyconfiguration.
b. Use rpm to install the WebSEAL ADK:rpm -U PDWebADK-PD-4.1.0-0.s390.rpm
Files are extracted onto the hard disk. The rpm utility exits.
The WebSEAL ADK package does not require any configuration.9. Restore the Version 3.9 WebSEAL certificate files that you preserved before
starting the WebSEAL upgrade:cp /temporary_directory/pdsrv.kdb /opt/pdweb/www/certs/pdsrv.kdbcp /temporary_directory/pdsrv.sth /opt/pdweb/www/certs/pdsrv.sth
10. Run the WebSEAL upgrade script:cd /opt/pdweb/sbin./PDWeb_upgrade
Messages appear indicating the package has been successfully upgraded andthat the server has started.
11. Verify that WebSEAL is running:./pd_start statusAccess Manager ServersServer Enabled Running___________________________________
webseald yes yes
Upgrading WebSEAL on SolarisTo upgrade a WebSEAL server on Solaris, complete the following instructions:1. Log in as user root.2. Verify that the Tivoli Access Manager secure domain is able to upgrade
WebSEAL:a. Verify that the Tivoli Access Manager policy server for the secure domain
has already been upgraded to Version 4.1.b. Verify that the Tivoli Access Manager policy server is running, and that you
can contact it. You can do this by executing a sample pdadmin command.For example:pdadmin login -a sec_master -p passwordpdadmin> acl list
If you cannot log in, do not proceed with the WebSEAL upgrade. Resolvethe login problem before continuing.
3. Stop the WebSEAL server. Enter the following command:/usr/bin/pdweb stop
4. Mount the IBM Tivoli Access Manager Web Security for Solaris CD on:/cdrom/cdrom0
Chapter 5. Upgrading WebSEAL from version 3.9 to 4.1 35
5. Ensure you are located in the solaris directory.cd mount_point/solaris
6. Enter the following command to install the WebSEAL server package:pkgadd -a /mount_point/solaris/pddefault -d . PDWeb
Files are extracted from the CD and installed on the hard disk.
A message appears indicating that an upgrade is taking place.
A message appears indicating that installation of the WebSEAL package wassuccessful. The pkgadd utility exits.
The WebSEAL server is restarted automatically.7. If you want to upgrade the WebSEAL ADK on this computer, install it now.
The WebSEAL ADK has a dependency on the Tivoli Access Manager ADK.Both ADK packages are included on the Web Security CD. If you have notalready installed the Version 4.1 Tivoli Access Manager ADK, install it now. Usepkgadd to install each package:pkgadd -a mount_point/solaris/pddefault -d . PDAuthADK
pkgadd -a mount_point/solaris/pddefault -d . PDWebADK
Files are extracted from the CD and installed on the hard disk. A messageappears indicating that installation of the WebSEAL ADK package wassuccessful. The pkgadd utility exits.
Neither the Tivoli Access Manager ADK package nor the WebSEAL ADKpackage require any configuration steps.
The upgrade of WebSEAL on Solaris from Version 3.9 to Version 4.1 is complete.
You do not need to run pdconfig to configure WebSEAL. WebSEAL automaticallyuses the Version 3.9 configuration information. The original webseald.confconfiguration file, with your custom configuration settings, is preserved andupdated with Version 4.1 stanzas and parameters.
Upgrading WebSEAL on WindowsTo upgrade WebSEAL on Windows, complete the following instructions:1. Log in to the Windows domain as a user with Windows administrator
privileges.2. Verify that the Tivoli Access Manager secure domain is able to upgrade
WebSEAL:a. Verify that the Tivoli Access Manager policy server for the secure domain
has already been upgraded to Version 4.1.b. Verify that the Tivoli Access Manager policy server is running, and that you
can contact it. You can do this by executing a sample pdadmin command.For example:MSDOS> pdadmin login -a sec_master -p passwordpdadmin> acl list
If you cannot log in, do not proceed with the WebSEAL upgrade. Resolvethe login problem before continuing.
36 IBM Tivoli Access Manager: WebSEAL Installation Guide
3. Ensure that the WebSEAL server is not running. Use the Services icon to stopthe WebSEAL server.
4. Insert the IBM Tivoli Access Manager Web Security for Windows CD into the CDdrive.
5. Run the WebSEAL setup program: (where the letter E: in the followingcommand represents the CD drive):
MSDOS> E:\Windows\PolicyDirector\Disk Images\Disk1\WebSEAL\Disk Images\Disk1\setup.exe
The Choose Setup Language dialog box appears.6. Select the appropriate language and click OK.
The InstallShield program starts.7. Click Finish to exit the setup program.
WebSEAL is automatically started.
The upgrade of WebSEAL on Windows is now complete.
You do not need to run pdconfig to configure WebSEAL. WebSEAL automaticallyuses the Version 3.9 configuration information. The original webseald.confconfiguration file, with your custom configuration settings, is preserved andupdated with Version 4.1 stanzas and parameters.
Chapter 5. Upgrading WebSEAL from version 3.9 to 4.1 37

38 IBM Tivoli Access Manager: WebSEAL Installation Guide
Chapter 6. Unconfiguring and removing WebSEAL
This chapter describes how to unconfigure and remove WebSEAL and theWebSEAL ADK.
Note: Unconfiguring of WebSEAL removes all information from the WebSEALjunctions database. Ensure that this information is no longer needed beforeremoving it.
WebSEAL depends on the Tivoli Access Manager runtime. This chapter does notdescribe how to remove the runtime. To remove the runtime, follow theinstructions in the IBM Tivoli Access Manager Base Installation Guide.
WebSEAL unconfiguration and removal is a two step process. First you must usethe pdconfig utility to unconfigure WebSEAL from the secure domain. Then youcan use a platform-specific utility to remove the WebSEAL files from the hard disk.
To unconfigure WebSEAL, complete the instructions in one of the followingsections:v “Unconfiguring WebSEAL on UNIX”v “Unconfiguring WebSEAL on Windows” on page 40
To remove WebSEAL files, complete the instructions in one of the followingsections:v “Removing WebSEAL from AIX” on page 41v “Removing WebSEAL from HP-UX” on page 41v “Removing WebSEAL from Linux on zSeries” on page 42v “Removing WebSEAL from Solaris” on page 42v “Removing WebSEAL from Windows” on page 43
Unconfiguring WebSEAL on UNIXUse the pdconfig configuration utility to unconfigure WebSEAL.1. Log in as root.2. Start the pdconfig configuration utility:
pdconfig
The Access Manager for e-business Setup Menu appears.Access Manager for e-business Setup Menu
1. Configure Package2. Unconfigure Package3. Display Configuration Statusx. Exit
Please select the menu item [x]:
3. Type 2 for Unconfigure Package.The Access Manager for e-business Unconfiguration Menu appears.
4. Type the menu number for Access Manager WebSEAL Unconfiguration.The Access Manager WebSEAL for e-business Setup Menu appears.
© Copyright IBM Corp. 1999, 2003 39
5. Type 2 to Unconfigure.The Access Manager WebSEAL for e-business Unconfiguration Menu appears.
6. Type 1 to select the default WebSEAL server.
Note: If your system configuration contains multiple WebSEAL instances, youmust remove all instances before you can unconfigure the defaultWebSEAL server. An error message warns you when this order ofoperation is not followed.
A prompt appears requesting the password for the Tivoli Access ManagerAdministrator.
7. Enter the password for sec_master.A series of status messages appear. These messages indicate that the server isbeing unconfigured, that log files are being cleaned up, and that outgoingendpoints are being reclaimed. The WebSEAL server is stopped, and a finalstatus message indicates that the unconfiguration was successful.
8. Press Enter.The unconfiguration is complete.The Access Manager WebSEAL for e-business Setup Menu appears.
9. Type x to exit the pdconfig utility.10. Continue to the appropriate section for removing the WebSEAL files from the
UNIX system.
Unconfiguring WebSEAL on WindowsUse the pdconfig configuration utility to unconfigure WebSEAL.
To unconfigure WebSEAL and WebSEAL ADK on Windows, complete thefollowing instructions:1. Log in as a Windows user with administrator privilege.2. Click Start → Programs → Access Manager for e-business → Configuration
The Access Manager for e-business Configuration dialog box appears.3. Select Access Manager WebSEAL and click Unconfigure.
The Access Manager WebSEAL for e-business Configuration dialog boxappears.
4. Select Default WebSEAL and click Unconfigure.The Access Manager Administrator Password dialog box appears.
5. Enter the password for sec_master. Click OK.A message appears indicating that WebSEAL is being unconfigured. The AccessManager WebSEAL for e-business Configuration dialog box appears.
6. Verify that you have unconfigured WebSEAL. The configuration status forDefault WebSEAL is listed as ″no″.
7. Click Close.The Access Manager for e-business Configuration dialog box appears.
8. Click Close.9. Continue to the appropriate section for removing the WebSEAL files from the
Windows system.
40 IBM Tivoli Access Manager: WebSEAL Installation Guide
Removing WebSEAL from AIXUse installp to remove the WebSEAL files from AIX.
Note: You do not have to unconfigure the WebSEAL ADK before removing itsfiles.
1. Log in as root.2. Choose one of the following commands:
v To remove the WebSEAL ADK, enter the following command:installp -u PDWeb.ADK
v To remove WebSEAL, enter the following command:installp -u PDWeb.Web
Option Description
–u Removes the specified software product and any of its installed updatesfrom the system.
Note: You must remove PDWebADK before removing PDWeb.3. The WebSEAL files are removed. The Results section of the Installation
Summary table indicates SUCCESS for each package successfully removed.
Removal of WebSEAL is complete.
If you want to remove the Tivoli Access Manager runtime, follow the instructionsin the IBM Tivoli Access Manager Base Installation Guide.
Removing WebSEAL from HP-UXUse swremove to remove the WebSEAL files from HP-UX.
Note: You do not have to unconfigure the WebSEAL ADK before removing itsfiles.
1. Log in as root.2. Choose one of the following commands:
v To remove the WebSEAL ADK, enter the following command:swremove PDWebADK
v To remove WebSEAL, enter the following command:swremove PDWeb
Note: WebSEAL ADK has a dependency on WebSEAL. Do not try to removeWebSEAL when WebSEAL ADK is still on the system. RemoveWebSEAL ADK first.
A series of status messages appear for each removal selection. A status messageappears indicating that the analysis phase has succeeded. The swremove utilityremoves the WebSEAL files from the hard disk.
When the removal is complete, the swremove utility exits.
Removal of WebSEAL on HP-UX is now complete.
Chapter 6. Unconfiguring and removing WebSEAL 41
If you want to remove the Tivoli Access Manager runtime, follow the instructionsin the IBM Tivoli Access Manager Base Installation Guide.
Removing WebSEAL from Linux on zSeriesUse rpm to remove the WebSEAL files from Linux on zSeries.
Note: You do not have to unconfigure the WebSEAL ADK before removing itsfiles.
1. Log in as root.2. Choose one of the following commands:
v To remove the WebSEAL ADK, enter the following command:rpm -e PDWebADK-PD-4.1.0-0
Note: You must first remove the WebSEAL ADK before you can successfullyremove WebSEAL.
v To remove WebSEAL, enter the following command:rpm -e PDWeb-PD-4.1.0-0
v To remove both the WebSEAL ADK and WebSEAL, enter the followingcommand (the order in which the package arguments are listed makes nodifference):rpm -e PDWebADK-PD-4.1.0-0 PDWeb-PD-4.1.0-0
No message or status appears to confirm the removal of the selected package.The rpm utility exits.
Removal of the selected packages is complete. If you want to remove the TivoliAccess Manager runtime, follow the instructions in the IBM Tivoli Access ManagerBase Installation Guide.
Removing WebSEAL from SolarisUse pkgrm to remove the WebSEAL files from Solaris.
Note: You do not have to unconfigure the WebSEAL ADK before removing itsfiles.
1. Log in as root.2. Choose one of the following commands:
v To remove the WebSEAL ADK, enter the following command:pkgrm PDWebADK
v To remove WebSEAL, enter the following command:pkgrm PDWeb
Note: You must remove PDWebADK before removing PDWeb.v To remove both WebSEAL and the WebSEAL ADK, enter the following
command:pkgrm PDWeb PDWebADK
A prompt appears asking you to confirm the removal of the selected package.3. Type y.
A message asks, ″Do you want to continue with removal of this package″.4. Type y.
42 IBM Tivoli Access Manager: WebSEAL Installation Guide
A status message lists each file as it is removed.
After the postremove script runs, a status message indicates that the removal ofthe software package was successful.
The pkgrm utility exits. Removal of the selected packages is complete.
If you want to remove the Tivoli Access Manager runtime, follow the instructionsin the IBM Tivoli Access Manager Base Installation Guide.
Removing WebSEAL from WindowsWebSEAL on the Windows platform consists of two components: WebSEAL andWebSEAL ADK. You can either remove both components, or can choose to removeonly the WebSEAL ADK component.
If you choose to remove the WebSEAL server, the WebSEAL ADK is automaticallyremoved.
Follow the instructions in the appropriate section:v “Removing WebSEAL and WebSEAL ADK” on page 43v “Removing WebSEAL ADK only” on page 43
Removing WebSEAL and WebSEAL ADKUse the Windows Add/Remove Programs icon interface to remove the files foreach package.
To remove WebSEAL and WebSEAL ADK on Windows, complete the followinginstructions:1. Click the Add/Remove Programs icon.2. Select Access Manager WebSEAL.3. Click Change/Remove.
The Choose Setup Language dialog box appears.4. Select a language and click OK.5. Select the Remove radio button. Click Next.
The Confirm Uninstall dialog box appears.6. Click OK.
The WebSEAL files are removed. The WebSEAL ADK files are also removed.The Maintenance Complete dialog box appears.
7. Click Finish.Removal of WebSEAL is complete.
If you want to remove the Tivoli Access Manager runtime, follow the appropriateinstructions in the IBM Tivoli Access Manager Base Installation Guide.
Removing WebSEAL ADK onlyYou can remove the WebSEAL ADK files without removing the WebSEAL serverfiles.
Note: You do not have to unconfigure the WebSEAL ADK before removing itsfiles.
Chapter 6. Unconfiguring and removing WebSEAL 43
To remove only the WebSEAL ADK on Windows, complete the followinginstructions:1. Click the Add/Remove Programs icon.2. Select Tivoli Access Manager WebSEAL.3. Click Change/Remove.
The Choose Setup Language dialog box appears.4. Select a language and click OK.5. Select the Modify radio button. Click Next.
The Select Components dialog box appears.6. Clear the check box for PDWebADKs.
Note: InstallShield designates this component for removal when you clear thecheck box.
7. Click Next.The WebSEAL ADK files are removed.
8. Click Finish to exit the program.
Removal of the WebSEAL ADK on Windows is now complete.
44 IBM Tivoli Access Manager: WebSEAL Installation Guide
Appendix. Notices
This information was developed for products and services offered in the U.S.A.IBM may not offer the products, services, or features discussed in this document inother countries. Consult your local IBM representative for information on theproducts and services currently available in your area. Any reference to an IBMproduct, program, or service is not intended to state or imply that only that IBMproduct, program, or service may be used. Any functionally equivalent product,program, or service that does not infringe any IBM intellectual property right maybe used instead. However, it is the user’s responsibility to evaluate and verify theoperation of any non-IBM product, program, or service.
IBM may have patents or pending patent applications covering subject matterdescribed in this document. The furnishing of this document does not give youany license to these patents. You can send license inquiries, in writing, to:
IBM Director of LicensingIBM Corporation500 Columbus AvenueThornwood, NY 10594U.S.A
For license inquiries regarding double-byte (DBCS) information, contact the IBMIntellectual Property Department in your country or send inquiries, in writing, to:
IBM World Trade Asia CorporationLicensing2-31 Roppongi 3-chome, Minato-kuTokyo 106, Japan
The following paragraph does not apply to the United Kingdom or any othercountry where such provisions are inconsistent with local law:INTERNATIONAL BUSINESS MACHINES CORPORATION PROVIDES THISPUBLICATION “AS IS” WITHOUT WARRANTY OF ANY KIND, EITHEREXPRESS OR IMPLIED, INCLUDING, BUT NOT LIMITED TO, THE IMPLIEDWARRANTIES OF NON-INFRINGEMENT, MERCHANTABILITY OR FITNESSFOR A PARTICULAR PURPOSE. Some states do not allow disclaimer of express orimplied warranties in certain transactions, therefore, this statement may not applyto you.
This information could include technical inaccuracies or typographical errors.Changes are periodically made to the information herein; these changes will beincorporated in new editions of the publication. IBM may make improvementsand/or changes in the product(s) and/or the program(s) described in thispublication at any time without notice.
Any references in this information to non-IBM Web sites are provided forconvenience only and do not in any manner serve as an endorsement of those Websites. The materials at those Web sites are not part of the materials for this IBMproduct and use of those Web sites is at your own risk.
IBM may use or distribute any of the information you supply in any way itbelieves appropriate without incurring any obligation to you.
© Copyright IBM Corp. 1999, 2003 45
Licensees of this program who wish to have information about it for the purposeof enabling: (i) the exchange of information between independently createdprograms and other programs (including this one) and (ii) the mutual use of theinformation which has been exchanged, should contact:
IBM Corporation2Z4A/10111400 Burnet RoadAustin, TX 78758USA
Such information may be available, subject to appropriate terms and conditions,including in some cases, payment of a fee.
The licensed program described in this information and all licensed materialavailable for it are provided by IBM under terms of the IBM Customer Agreement,IBM International Program License Agreement, or any equivalent agreementbetween us.
Any performance data contained herein was determined in a controlledenvironment. Therefore, the results obtained in other operating environments mayvary significantly. Some measurements may have been made on development-levelsystems and there is no guarantee that these measurements will be the same ongenerally available systems. Furthermore, some measurement may have beenestimated through extrapolation. Actual results may vary. Users of this documentshould verify the applicable data for their specific environment.
Information concerning non-IBM products was obtained from the suppliers ofthose products, their published announcements or other publicly available sources.IBM has not tested those products and cannot confirm the accuracy ofperformance, compatibility or any other claims related to non-IBM products.Questions on the capabilities of non-IBM products should be addressed to thesuppliers of those products.
All statements regarding IBM’s future direction or intent are subject to change orwithdrawal without notice, and represent goals and objectives only.
This information contains examples of data and reports used in daily businessoperations. To illustrate them as completely as possible, the examples include thenames of individuals, companies, brands, and products. All of these names arefictitious and any similarity to the names and addresses used by an actual businessenterprise is entirely coincidental.
COPYRIGHT LICENSE:
This information contains sample application programs in source language, whichillustrates programming techniques on various operating platforms. You may copy,modify, and distribute these sample programs in any form without payment toIBM, for the purposes of developing, using, marketing or distributing applicationprograms conforming to the application programming interface for the operatingplatform for which the sample programs are written. These examples have notbeen thoroughly tested under all conditions. IBM, therefore, cannot guarantee orimply reliability, serviceability, or function of these programs. You may copy,modify, and distribute these sample programs in any form without payment toIBM for the purposes of developing, using, marketing, or distributing applicationprograms conforming to IBM’s application programming interfaces.
46 IBM Tivoli Access Manager: WebSEAL Installation Guide
Each copy or any portion of these sample programs or any derivative work, mustinclude a copyright notice as follows:
© (your company name) (year). Portions of this code are derived from IBM Corp.Sample Programs. © Copyright IBM Corp. _enter the year or years_. All rightsreserved.
If you are viewing this information softcopy, the photographs and colorillustrations may not appear.
TrademarksThe following terms are trademarks or registered trademarks of InternationalBusiness Machines Corporation in the United States, other countries, or both:
AIXDB2IBMIBM logoTivoliTivoli logo
Microsoft, Windows, Windows NT, and the Windows logo are trademarks ofMicrosoft Corporation in the United States, other countries, or both.
Java and all Java-based trademarks and logos are trademarks or registeredtrademarks of Sun Microsystems, Inc. in the United States and other countries.
UNIX is a registered trademark of The Open Group in the United States and othercountries.
Other company, product, and service names may be trademarks or service marksof others.
Appendix. Notices 47

48 IBM Tivoli Access Manager: WebSEAL Installation Guide

����
Printed in U.S.A.
SC32-1133-01