Embed Size (px)
Citation preview

Web Banking User Guide

2
Table of Contents
Welcome to HBZ e-Banking 3
How to Register? 4
▪ Application Form 5
▪ First time online password generation 6-9
▪ Login 10-11
▪ ePasswords 12-14
▪ Change Password 15-16
▪ Forgot Password 17-18
▪ Web Management 19-20
▪ Secure Mail 21-22
Cash Management
▪ Manage Beneficiary 23-25
▪ Outward Remittance – Third Party Fund Transfer 26-28
▪ Authorize Transaction Requests 29
▪ View Outward SWIFT Message 30
▪ View Incoming SWIFT/Remittance Detail 31
▪ Download A/C Statement 32-34
Trade Finance
▪ Letter of Credit – New Application 35-37
▪ Upload Letter of Credit Application 38-39
▪ Amend Letter of Credit Application 40-41
▪ View SWIFT Message (Letter of Credit) 42-43
▪ View discrepant documents 44-45
▪ Import Document under Collection 46-47
▪ Export Document under Letter of Credit / Collection Document 48-49
▪ Trust Receipt 50-51
▪ Invoice Finance 52-53
▪ Add Supporting Document 54-55
▪ Packing Credit 56-57

3
Dear Customer,
Thank you for choosing e-Banking services of Habib Bank Zurich (HK) Limited. We hope this user guide will enable you to access all the eBanking services easily and seamlessly and ensure all your eBanking needs are fulfilled.
Our e-Banking services include:
▪ Check Account Balance▪ View and download account statements▪ View Inward/Outward Remittance▪ Third Party Fund Transfer/Transfer to local HBZ account▪ View/ Open/ Amend - Letter of Credit▪ View Import/ Export Documents under Letter of Credit / Collection▪ Retire TR/ Invoice Finance/ Packing Credit▪ Create/ Reset password online▪ Upload supporting transaction documents▪ View authenticated SWIFT messages▪ Send message securely using Secure Mail▪ HBZ eLocker - Store sensitive data using strong encryption algorithm▪ Multiple login management▪ Receive SMS alerts for transaction of your choice
Our utmost priority is to make your e-Banking experience a secure and seamless one.
Secure ▪ Habib Bank Zurich e-Banking uses the Mobile Authenticator/ HBZSecure Key to prevent any
security-breach.▪ Security Fortification through OTP (One Time Password) via SMS and Email when conducting high
risk transactions.▪ Secure Mail to communicate with end-to-end encryption.
Seamless ▪ Use our e-Banking services at your own convenience and access the aforementioned services.▪ Our User-Friendly Manual will guide you through all the important steps necessary in carrying out
transactions.▪ Track funds and execute transactions at your fingertips.▪ Manage your finances from the comfort of your desk or while on remote.

4
HOW TO REGISTER?
Step 1
Click on “Register for eBanking”.
Step 2
Fill and sign the application form on all pages (with your company chop for Corporates) and send original signed form to the nearest branch or to your relationship manager.
Step 2
Step 1: Click Here

5
APPLICATION FORM
I. HBZ Web & GSM Application
Fill in the form and read the terms and conditions.
Upon successful acceptance, link will be shared on the registered email address with detailed instructions to set the password.
Link: https://hbzhongkong.com/downloads/forms/HBZwebgsmapplication.pdf

6
FIRST TIME ONLINE PASSWORD GENERATION
Step 1 Please click the URL link to go on the login page
Step 2 Input “Login Name”, “Account Type”, “Account Number” and “Captcha” displayed
Click Here
Login Name

7
Step 3 You will receive “One-Time-Password” (OTP) partly on your “mobile number” and partly
through “email”.
Mobile Email
Step 4 Please enter your 20-digit account number (12-01-04-20622- 470-xxxxxx) to open the
attachment.
Step 5 Below is the snapshot of Email “OTP”.
You will receive “OTP” in a password protected PDF. Please enter your account
number to open the attachment.

8
Step 6 Input “OTP” received on your “mobile number” and “email”.
Input “OTP”
Click Here if you do not receive the “OTP” Click Here
Input the below “OTP”

9
Step 7 Input the “Login name” you received on your email and set your “Password” for “Login”.
Step 8 Password is successfully created.
Click Here

10
LOGIN
Step 1 To Login visit our website
Step 2 Input “Login Name”, “Password”, “Challenge code”, select the checkbox and click on “Login “.
Link: https://hbzhongkong.com/
Link: http://www.hbzhongkong.com/
Click Here
Click here to Login

11
ACCOUNT SUMMARY PAGE AFTER LOGIN

12
ePASSWORDS
ePassword are used to open any password protected attachments. For e.g., OTP generated at the time of funds transfers sent to your registered email address.
Step 1 Click on “EPasswords” in the toolbar.
Step 2 Click on the button “OTP” to activate the unique password.
Click Here

13
Step 4 You will receive “Online Transaction Password” on your registered mobile number via SMS. Click
“Confirm” to proceed further.
Step 5 Input your New Password and click on “Change”.
Input “OTP”
Click Here Click Here if you do not receive the “OTP”
Click Here

14
Step 6 Your Password is now successfully changed.

15
CHANGE PASSWORD – EBANKING PASSWORD
For security reasons we advise you to change your password on regular basis.
Step 1 Click on “Change Password” in the toolbar
Step 2 Input “Login Name”, “Current Password”, “New Password” and repeat new password
Click Here
Click Here

16
Step 3 Your password is changed successfully.

17
FORGOT PASSWORD
Step 1 Click on “Forgot Password”
Step 2 Input the required details and Click on “Next” to proceed further and complete the process
Click Here
Click here

18
Step 3 Input the required details and click on “Confirm” to proceed further and complete the process.
You will get a confirmation that the password has been sucessfully reset.
Click here

19
WEB MANAGEMENT
Creation of a sub login Id for secondary user according to the primary user(s) requirement.
Step 1 Click on “Web Management” in the toolbar.
Step 2 Click on “New Secondary Login” from the drop down
Click Here
Click Here
Click here

20
Step 3 Tick the required checkboxes and click on “Process” to authorize the users
Step 4 After successfully creating the “New Secondary login Id”, notify the customer service desk on
the email at [email protected]
Step 5 Registration form will be sent to customer on company registered email address to be chopped
and signed by authorized signatory.
Step 6 Handover original signed form to the nearest branch.
Secondary users can login once they receive the login link to their registered email address.
Click on “Process” to completed the registration for the user
To view account balance please untick the checkbox

21
SECURE MAIL
Secure mail is a tool for users to communicate in a safe environment.
Step 1 Click on “Secure Mail” in the toolbar
Step 2 Choose the branch. Click on “Send” after writing the message or click on “Done” to go back to
“Account summary” page.
Click Here
Choose the “Branch”
Write your message

22
Step 3 Below message will be displayed after your message is sent.

23
MANAGE BENEFICIARY
Step 1 Click on account in which you want to “Manage Beneficiary”.

24
Step 2 Click on “Manage Beneficiary”.
Step 3 Select “Add Beneficiary” or “Delete Beneficiary” from the drop down. Click on “Proceed” to
continue.
Click Here
Choose Here
Click Here

25
Step 4 Choose the “Transfer Type” and click on “Detail” to proceed further.
Step 5 Fill the required details and click on “Proceed”.
The confirmation message for successfully addition of beneficiary will be dispayed.
Choose Here

26
OUTWARD REMITTANCE - THIRD PARTY FUND TRANSFER
Step 1 Choose the “Imprest account” in the currency you want to make “online fund transfer”.
Step 2 Click on “HBZcms – Third Party Fund Transfer”.
Choose the “Imprest Account”
Click Here

27
Step 3 Choose the type of “Transfer”.
Step 4 Click on “Process” to proceed further.
Click Here to “Proceed”
Click to view saved templates
Click Here to “Proceed”
Click to view saved templates
Choose the type of “transfer”
28
Step 5 You will receive an “One-Time-Password” (OTP) on your mobile phone via SMS or through email. OTP is received through email as password protected attachment. To open the attachment, the password set by you under “ePasswords”.
Step 6 Input the OTP in the field “Online Transaction Password”
Step 7 Click confirm when the funds transfer details are displayed for confirmation
The confirmation regarding acceptance of funds transfer request for processing will be displayed.

29
AUTHORIZE TRANSACTION REQUESTS
Authorization of request created by sub login id.
Step 1 Click on “Authorize Transaction Request”.
Pending request will be displayed. Parent Id can authorize them and receive the confirmation.
Click Here

30
VIEW OUTWARD SWIFT MESSAGE
Step 1 Click “View SWIFT Message Sent”.
Step 2 Input the “Date” and Click on “Process”
You can now view/print the displayed SWIFT message.
Click Here
Input Date
Click Here

31
VIEW INCOMING SWIFT/REMITTANCE DETAILS
Step 1 Click “View Incoming SWIFT/Remittance Details”.
Step 2 Input the “Date” and Click on “Process”
You can now view/print the displayed SWIFT message.
Click Here
Input Date
Click Here

32
DOWNLOAD A/C STATEMENT
Step 1 Click on account in which you want to view the “Account Statement”.
Click the account for which you want to view the A/C statement.

33
Step 2 Click on “Download Statement” to view and print the statements.
Step 3 Input the “date” and choose the “format” in which you want to download.
Click Here
Choose file format from the drop down

34
Step 4 Click on “Download”.
You will be able to save the downloaded statement.
Click Here

35
LETTER OF CREDIT – NEW APPLICATION
Step 1 Click on “Letter of Credit Sight”.
Click Here

36
Step 2 Click on “LC Application”.
Step 3 Choose “Open New Documentary Credit” and click “Open As Selected LC”.
Click Here
Click Here to open new LC using existing template.
Choose the “Open New Documentary Credit” for opening a
new LC.

37
Step 4 Fill in the required details and Click “Proceed”.
After filling the LC application form, please upload the application form along with your supporting documents and confirmation message will be displayed.

38
UPLOAD LETTER OF CREDIT APPLICATION
Step 1 Click on “Letter of Credit Sight”.
Click Here

39
Step 2 Click on “Upload Editable PDF Applications”.
Step 3 Click on “Upload Editable PDF Applications”.
The confirmation of successful upload will be displayed.
Click Here
Choose the “Transaction type”
Upload the documents in the given fields required
Click Here

40
AMEND LETTER OF CREDIT APPLICATION
Step 1 Click on “Letter of Credit Sight”.
Click Here

41
Step 2 Click on “Letter of Credit Sight Details”.
Step 3 Choose “LC Application” you want to amend and click “Amend Selected LC”
The Confirmation of receipt of amendment request will be displayed.
Click Here
Choose LC from the drop down

42
VIEW SWIFT MESSAGE
Step 1 Click on “Letter of Credit Sight”.
Click Here

43
Step 2 Click on “View SWIFT Message Sent”.
Step 3 Input the date and Click on “Process” to proceed.
You can now view/print the displayed SWIFT message.
Click Here
Click Here
Input the date

44
IMPORT - VIEW DISCREPANT DOCUMENTS
Step 1 Click on “Letter of Credit Sight”.
Step 2 Click on “Letter of Credit Sight”.
Click Here

45
Step 2 Click on “Outstanding Discrepant Documents”.
Your outstanding Discrepant Documents will be displayed.
Click Here
Click Here

46
IMPORT DOCUMENT UNDER COLLECTION
Step 1 Click on “Import Documents for Collection Sight (FIDBC)”.
Click Here

47
Step 2 Click on “Import Documents for Collection Sight (FIDBC)”.
Outstanding import documents outstanding will be displayed.
Click Here

48
EXPORT DOCUMENT UNDER LETTER OF CREDIT OR COLLECTION
Step 1 Click on “Export Documents Discounted Usance Collection”.
Click Here

49
Step 2 Click on “Export Documents Discounted Usance Collection”.
Outstanding export documents outstanding will be displayed.
Click Here

50
TRUST RECEIPT
Step 1 Click on “Trust Receipt (TR)”.
Click Here

51
Step 2 Click on “Trust Receipt (TR) Details” to view details and click “Trust Receipt (TR)
details/Premature” to settle the document.
Confirmation of receipt of retirement request will be displayed.
Click Here to view the details Click Here to Retire the document and choose the relevant TR
document to retire.

52
INVOICE FINANCE
Step 1 Click on “Invoice Finance”.
Click Here

53
Step 2 Click on “Invoice Finance Details” to view details and click “Retire Document” to settle the
document.
Confirmation of receipt of retirement request will be displayed.
Click Here to view the details
Click Here to Retire the document

54
ADD SUPPORTING DOCUMENTS
Step 1 Choose the “Imprest account” in which you want to upload the document.
Step 2 Click on “Transaction Upload Request”.
Choose the “Imprest Account”
Click Here

55
Step 3 Fill the required fields and choose your “Transaction Type” (Outward Remittance/ Invoice
Finance) Choose your file and click “Upload”
Step 4 Below message is displayed after document upload.
4
Click Here to choose the “file”
Click Here to “Upload”
56
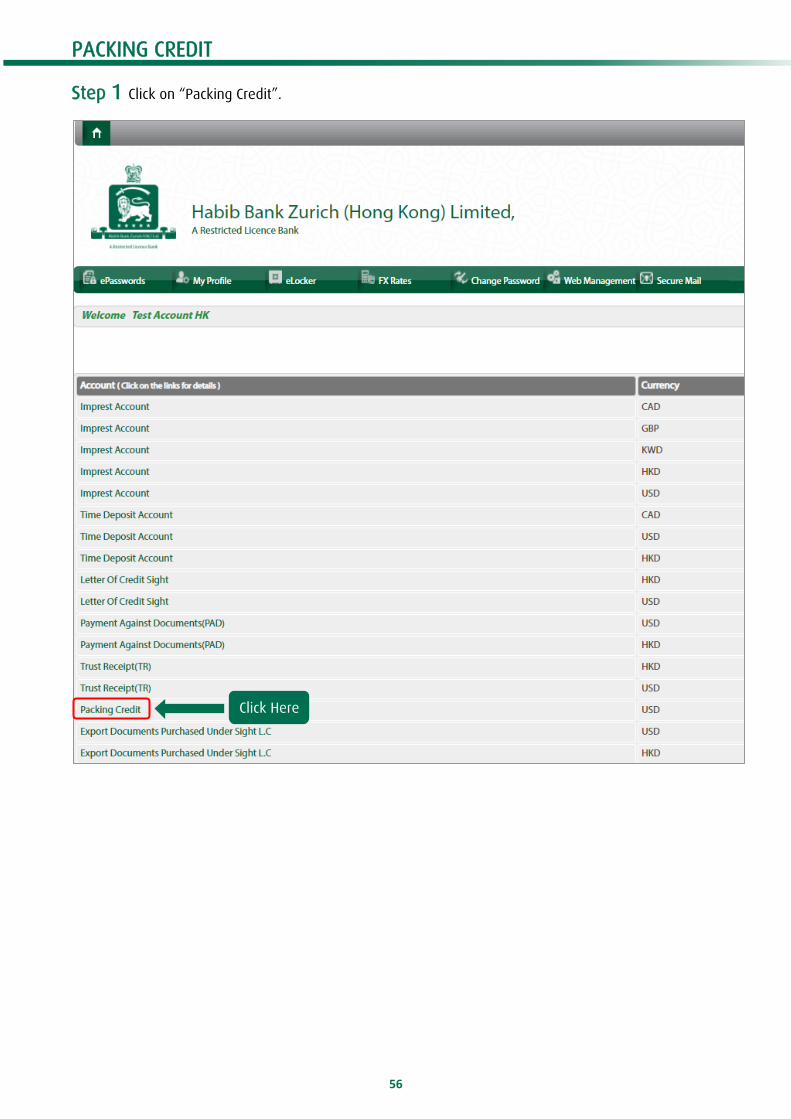
PACKING CREDIT
Step 1 Click on “Packing Credit”.
Click Here

57
Step 2 Click on “Packing Credit Details” to view details and click “Retire Document” to settle the
document.
Confirmation of receipt of retirement request will be displayed.
Click Here to view the details
Click Here to Retire the document

58