Embed Size (px)
Citation preview

Revised 03/16/2015 1 Page
W2 PACKET
You will have to call or email the Financial Services Help Desk ([email protected]) when you are ready to have your file sent. We recommend you wait until Mid-March to do so.

Revised 03/16/2015 2 Page
YOU MAY WANT TO REMOVE THIS PAGE AND KEEP AT YOUR DESK. Box 1 – Total Gross – Flex – Retirement – TSA (Wages tips and other compensation) Box 3 – Total Gross – Flex (Social security wages) Box 5 – Total Gross – Flex (Medicare Wages) Box 16 must match Box 1 (State Wages)
This number in Box 16 MUST match the number in Box 1

Revised 03/16/2015 3 Page
TABLE OF CONTENTS INTRODUCTION .............................................................................................................4
W2 Codes for Deductions ...........................................................................4 W2 Codes for Pay Types ............................................................................5
W2 ACCUMULATOR GROSS AMT. VERIFY ............................................................6
Generating the Report ..................................................................................6 Cleaning up the Report ................................................................................7 Correcting the Report ......................................................................... 9 & 10
CHECKING FOR NEGATIVE YEARLY FIGURES .................................................11 ACCUMULATOR REPORT .........................................................................................12 CREATE W2 FILE .........................................................................................................14 COMPARING FED GROSS TO STATE GROSS .......................................................15 W2 REGISTER TOTALS ONLY ..................................................................................16
CHECKING TOTALS ....................................................................................................17 MAINTAINING W2 FILE .............................................................................................18
PRINTING W2’s .............................................................................................................20 W2 COPIES TO PDF ......................................................................................................22 MAG MEDIA TRANSMITTAL FORM .......................................................................22 EMPLOYEE EARNINGS REPORT .............................................................................23 PRINTING W2 REGISTER ..........................................................................................24

Revised 03/16/2015 4 Page
W2 CHECK LIST
1. Verify that all deduction codes have the correct W2 code on the OPTIONS tab
Payroll & Personnel Auxiliary Files Deduction/Benefit Master
Note: Box 13 can store up to four totals before another form is required. The second form lists basic employee information (i.e. name, SSN) and the additional Box 13 totals.
An employee with a deduction code that has a W-2 code of D, E, F, or H, will have an “X” placed in the Pension Plan square and the Deferred Comp square of Box 15. If an employee has more than 3 items for Box 14, the order for printing is 14Z, 14Y, 14W then 14X

Revised 03/16/2015 5 Page
2. Ensure that all pay types have a correct W-2 code. Pay Type Code F/M
3. Verify that any NON CASH Pay Types have a 5 in the Category Code Field

Revised 03/16/2015 6 Page
W2 accumulator gross amt. Verify This program compares the actual deduction gross totals in the employee’s accumulator files (OLD GROSS) to a newly calculated total (NEW GROSS). The new gross is calculated by looking at the employee’s accumulator records and the Payroll Exception table, as it currently exists when running the program. If the deduction gross in the accumulator’s matches what the system calculates then nothing is done (a record does not get created). If there is a difference between the old and new figures a record is created in the accumulator gross verify program.
Click Human Resources/Payroll – Payroll – Payroll Administration - Accumulator Gross
Verify Click “Generate” from the Side Bar Click “Define” from the Side Bar and tab to the Deduction Ranges
When the program is done running, you will receive a message on how many records were found to be inconsistent. Click OK then click File and Exit
Key In Deductions: For Fica/Med/Fed and State Local Tax if applicable
Click or ENTER Click “Execute” from the Side Bar
Revised 03/16/2015 7 Page
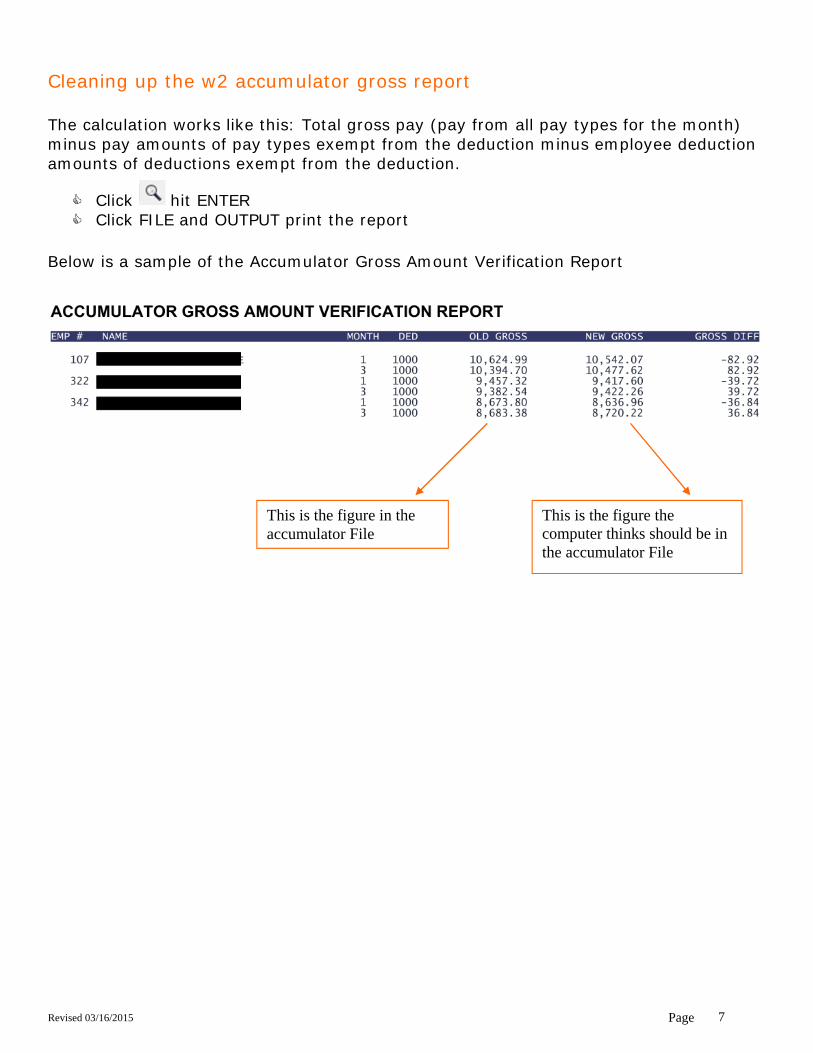
Cleaning up the w2 accumulator gross report The calculation works like this: Total gross pay (pay from all pay types for the month) minus pay amounts of pay types exempt from the deduction minus employee deduction amounts of deductions exempt from the deduction.
Click hit ENTER Click FILE and OUTPUT print the report
Below is a sample of the Accumulator Gross Amount Verification Report
This is the figure in the
accumulator File This is the figure the computer thinks should be in the accumulator File

Revised 03/16/2015 8 Page
HOW TO READ THE ACCUMULATOR GROSS AMOUNT VERIFICATION REPORT
Month - This indicates the month the possible error occurred Deduction - The deduction the possible error occurred on Old Gross - The monthly figure in the Accumulator file New Gross - The monthly figure the computer feels should be in the accumulator file There are basically five reasons for a discrepancy between the accumulator amount and the calculated amount: The Exceptions Table has been changed. The Calculation is using the current exceptions whereas
payroll warrants may have been run with different exception data. Accumulator amounts were updated manually in Accumulator Maintenance The employee was paid only under a pay type that was exempt from taxes, but they also had
deductions that were exempt (pre-tax) from taxes. The system will not generate a negative deduction gross; it will be set to 0.00. When the Accumulator Gross Verify is run, it will calculate a negative.
Deduction amounts were updated in the payroll before the pay amounts were updated. When a deduction record is updated in the Earnings/Deductions File Maintenance, it locks in the amounts associated with that deduction and the deduction gross would not be recalculated if the pay amounts are changed.
Deduction was deleted in the payroll warrant. Wages have to be reported for tax deductions even if no tax amounts are to be taken. These deductions should be updated to take $0 and should not be deleted from the payroll.
It is one of the later two scenarios that is mostly likely the culprit. The way to track this down is to use the Employee Detail History to find all the check dates for the month in question. You will have to calculate the deduction gross manually using the total pay and deductions in the payroll. From your own calculations, you can determine whether the New Gross or the Old Gross is accurate. Questions you should ask yourself for each potential error: All errors should be ask Did I Bypass this deduction 1000 Did this person meet their FICA limit? 3000 & 4000 Did you start a Retirement deduction that is exempt from Federal tax in the
middle of the month?

Revised 03/16/2015 9 Page
How to delete “Correct records” – Old gross field is correct
Click Human Resources/Payroll – Payroll – Payroll Administration - Accumulator Gross Verify
Click for those records that need to be deleted and hit ENTER. (If you need to delete ALL records, just hit ENTER)
Click “Mass Delete” – This will delete ALL records in your FIND Click “Yes” - This will DELETE ALL records in your FIND
Revised 03/16/2015 10 Page
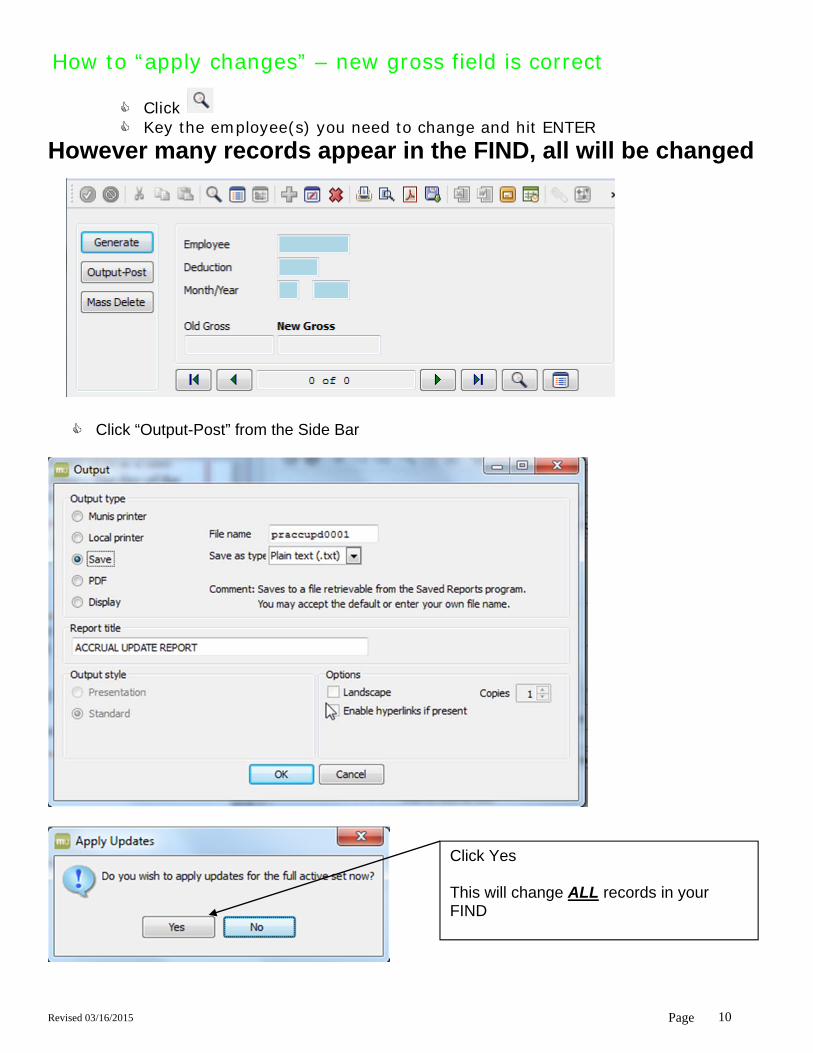
How to “apply changes” – new gross field is correct
Click Key the employee(s) you need to change and hit ENTER
However many records appear in the FIND, all will be changed
Click “Output-Post” from the Side Bar
Click Yes This will change ALL records in your FIND

Revised 03/16/2015 11 Page
CHECKING FOR NEGATIVE ACCUMULATORS Click Human Resources/Payroll – Payroll – Employee History – Accumulator Report
Click on
1. Year should be the calendar year you are processing W2’s for 2. Earning/Deduction code should be done individually for fica, med, Fed, state,
TSA’s, Retirements and Dependant Care. Then check for negative EMPLOYEE AMOUNTS
3. Frequency should be Y
4. Employee Gross <0
Click or ENTER If you find any records, you will need to decide what course of action needs to be taken and fix them. More than likely, you will need to hit the Accumulator Maintenance screen and fix the accumulators manually
1
2
4
3

Revised 03/16/2015 12 Page
ACCUMULATOR REPORT
Click Human Resources/Payroll – Payroll – Employee History – Accumulator Report
Click
1. Calendar Year you are processing W2’s form
2. Code numbers for Fica, Med, Fed, State, TSA, Retirement, Dependent Care, Car allowances and deductions you will be printing in box 14.
3. Frequency of Y
Click or ENTER
You will receive this message, click YES
1
2
3

Revised 03/16/2015 13 Page
Accumulator report
Click “Report Options“ from the Side Bar Click “Define” from the Side Bar
Make sure you have the same boxes checked as in this example
Click Click FILE and EXIT Click File and Output
Click SAFE, hit TAB and enter a file name. Print report from the Saved File Screen
You will compare this report to your W2 register that is printed from page 16

Revised 03/16/2015 14 Page
Creating the w2 work file In order for employees to generate into the W2 File, they MUST have a valid Primary Location Code. Also they must meet at least ONE of the following conditions: FIT Gross > 0 FIT withholding amount > 0 FICA Gross > 0 FICA Withholding Amount > 0 Medicare Gross > 0 Medicare Withholding Amount > 0
Click Human Resources/Payroll – Payroll – W2 and 1099-R Processing - Create W2 & 1099-R Records
Click Define
Click “Define” from the Side Bar
1. Click down and select the appropriate option for your site 2. Fica Gross Limit is the limit for the Calendar Year you are processing 3. Limit is the correct Calendar Limit for Dependent Care which will go in Box 10 4. Combine Employee Numbers by SSN and Populate State Wages with Federal Wage
Amount are BOTH checked 5. Names you want printed next to the amounts in Box 14.
Click and then click CREATE from the side bar
2
1
4
5
3
Key in the CALENDAR year you are processing W2’s for
and click

Revised 03/16/2015 15 Page
CHECKING TO MAKE SURE FED AND STATE GROSSES ARE THE SAME Run the Crystal report called W2 Fed and State Gross not equal. This report will ONLY show the employees’ Fed and State grosses that are different. Enter your district name and w2 year you are processing. You should only get headings on your report. If you have names listed, you will need to figure out which figure is right and fix it in the W2 File Maintenance Screen.
If you have the scenario of Federal gross having figures and state gross with zero’s, it might be a case where these employees never had a state gross deduction taken.

Revised 03/16/2015 16 Page
Generating the w2 register TOTALS
Click Human Resources/Payroll – Payroll – W2 and 1099-R Processing - W-2 and 1099-R Register
Click “Define” from the Side Bar
Click
Click FILE and OUTPUT and Print the report
Compare the W2 Register total to the Accumulator Totals Report created from Pages 14 and 15. Fed and State Grosses will be the same on the W2 register but will be different on the accumulator report. (Retirement is exempt from Fed wages but not State wages) If the totals do NOT match, find the error(s) and fix them and redo page 17 - 18 BEFORE continuing.
Make sure the Employee Number range is 0 to 999999
Make sure you have the correct calendar Year Click TOTALS ONLY
Key in the CALENDAR year you are processing W2’s for
and click

Revised 03/16/2015 17 Page
CHECKING W2 TOTALS TO ACCUMULATOR FILE W2 Register headings 403B – These are your TSA deductions. You will need to add together all you TSA deduction Employee AMOUNTS. This total should match your total on the W2 register. If it doesn’t, you may have deduction(s) without the W2 code of E attached. Check this out on the Deduction/Benefit Master screen under the OPTIONS TAB. Y Code – These are your Retirement Deductions. You will need to add, ONLY THOSE RETIREMENT DEDUCTIONS WITH W2 CODE OF Y, together and compare the total to the total on the W2 Register. W & X codes – These are optional codes you can have printed on your W2 in box 14. W is typically
Health and Dental NON FLEXIBLE deductions. The only reason you would want to print the Health and Dental would be for employees who file the long form. If the file the long form, they can
only claim TAXABLE deductions. If you use W or X codes, again, you will need to identify those deductions and add the accumulator figures together and compare to the W2 Register. State Gross should be the same as Federal Gross. ****NOTE****
If Fica Gross on the Accumulator totals is higher than the W2 Register, you will need to check for 2 conditions.
1. Check in the Accumulator Report for Dependent Care YEARLY employee
amount greater than 5,000.00 2. Check in the Accumulator Report for FICA YEARLY Gross amount greater
than the Fica Gross Limit.
3. Find the difference between W2 Register and Accumulator File for each deduction. Do a find in the accumulator file for the year you are processing, deduction that is off and the amount you are off. You might find it is linked to one employee. (Found if someone has an invalid location code, they will not generate into the W2 file)

Revised 03/16/2015 18 Page
Maintaining w2 file Any changes made in this file ARE NOT reflected in the employees’ accumulator records.
Click Human Resources/Payroll – Payroll – W2 and 1099-R processing - Employee W-2 and 1099-R
Click “Define” from the Side Bar
Make sure the appropriate calendar will populates Click on W-2

Revised 03/16/2015 19 Page
Maintaining w2 file
To Change TSA/Health Care data:
The retirement plan flag is controlled by W-2 Codes D, E, F, H, S, and Y in the deduction/Benefit Master Table in conjunction with a withholding amount in the employees’ accumulators for that deduction. Also, employees that exist in ERS or TRS with a tier other than zero for the calendar year you are processing will be marked for retirement plan.
To VIEW TSA, Click Box 12 To VIEW Retirement Click Box 14

Revised 03/16/2015 20 Page
PRINTING w2’s
Click Human Resources/Payroll – Payroll - W2 and 1099-R Processing - W-2 Forms Print Click “Define” from the Side Bar
1. Make sure W-2 Year is correct 2. Make sure EIN is correct 3. Make sure Employer Name and Address is correct 4. NEW FIELD: Click drop down for options 5. Sort order for how the W’2s will print. 6. W-2 form which will change every year. It will always start with 9811BR. The last two numbers
represent the calendar year you are processing. 7. If you want Primary location, Work Location or Employee # to print on the outside of the W2,
use drop down for options 8. Make sure Employee Number range is 0 to 999999
Click or ENTER
Click File and OUTPUT
1
2
3
4
5
6
S E E E X P L A N A T I O N S B E L O W
7
Key in the CALENDAR year you are processing W2’s for
and click
8

Revised 03/16/2015 21 Page
You will want to run this program twice if you want your copies to be sorted differently from the W2 forms. Submitting w2’s - continued
We recommend you SPOOL the file
Printing w2’s from the spool file When you are ready to print the W2’s from the Saved File, you will need to submit them twice with two different printer names. Below, find your district and the appropriate printer names. You are submitting the W2 file twice; Once to print on Laser forms and once for paper form for your files. Laser Forms Paper Forms Mount Vernon mvw2 mvw2c Town of Union touw2 touw2c
Click on SAVE Hit TAB to be able to change the file name. We would strongly urge you to change the FINE Name to include your district name, W2, and the calendar year. Click OK

Revised 03/16/2015 22 Page
W2 MAG MEDIA SUBMITTAL FORM Email to [email protected]
PAM VAN VORCE
DISTRICT EIN TOTAL # W2’S
IF INTERESTED
SUBMITTING W2 COPIES TO PDF
1. Generate your w2 file and spool it. 2. Go to Spool file and select the mvw2Email (Mount Vernon)

Revised 03/16/2015 23 Page
You may want to hold off printing until after the Mag File has been sent to the government. This way if you made corrections, you aren’t printing the report numerous times. You may want to spool this report and burn on a CD or save it as a PDF so you don’t have to print them.
Employee earnings report Click Human Resources/Payroll – Payroll – State Specific – Northeast - New York - NY
Employee Earnings Report Click “Define” from the Side Bar
1. Check Date – Calendar date range 2. Click drop down for sort order 3. Click drop down for long or short description 4. Click drop down for options 5. Deduction ranges appropriately
Click Click FILE, OUTPUT, click on SAVE, TAB to enter a FILE NAME. We suggest the name to include the calendar year.
Go to the spool file and print the report.
1
4
3
2
5

Revised 03/16/2015 24 Page
Generating the w2 register You may want to hold off printing until after the Mag File has been sent to the government. This way if you made corrections, you aren’t printing the report numerous times.
Click Human Resources/Payroll – Payroll – W2 and 1099-R Processing - W2 and 1099-R Register
Click “Define” from the Side Bar
1. Make sure correct Calendar Year is entered
2. Make sure you REMOVE the check mark in TOTALS ONLY
3. Make sure the Employee Number range is 0 to 999999
Click or Hit ENTER
Click FILE and OUTPUT and SAVE the report
1
3
2
Key in the CALENDAR year you are processing W2’s for
and click


![· 178 w2~uz− 179 w2~− 182 w2¶a 183 w2,v0 185 w2fl 186 w2,´‡ 187 w2,^M 188 w2,â 190 w2,˛− 195 w2,ðg− 196 w2,ðg! 198 w2,ð¾ 200 w2,ð−a 201 w2,ðgG Ž ]* Z˜ ß9ü](https://img.dokumen.tips/doc/110x75/5ec4169f9cf111271f3cdc4b/178-w2uza-179-w2a-182-w2a-183-w2v0-185-w2i-186-w2a-187-w2m-188.jpg)