Embed Size (px)
Citation preview

Public Documentv1.02 2013-08-14PkP
VS1000 UART Voicemail Software
User's Guide
AboutVS1000 UART Voicemail Software is an alternative firmware for the VS1000 Audio Module (http://www.vlsi.fi/en/products/vs1000module.html). It can also be run in any other VS1000 product, like the VS1000 Developer Board, but the board must be equipped with an SPI flash memory.
The VS1000 Voicemail Software makes it possible to...
* Store files on the module's SPI flash
* Read, Erase, Overwrite and List files on the module's SPI flash
* Play ogg audio files on the module's SPI flash
... using serial UART communication.
The UART protocol is simple and can be easily implemented in a microcontroller. Also there is a Windows helper program. With the Windows program and a PC, it's easy to test and learn the module's functionality before starting to write microcontroller code to use the module. The module has 1 kilochar of UART buffer memory. The large amount of buffer memory makes the data flow between the module and a microcontroller flexible.
VS1000 Module
http://www.vlsi.fi/en/products/vs1000module.html

Requirements- VS1000B, VS1000C, VS1000D or VS1000E IC from VLSI Solution Oy.
- SPI flash with at least 128 kilobyte (1 megabit) capacity.- 4 kilobyte eraseble sector size (preferred). (chips with 64 kilobyte sector erase size can be used with software modifications.)- The precompiled binary needs a 2 megabyte (16 megabit) SPI flash, with 4KByteerasable sector size. Other variants need recompilation and/or software modificationsusing VSIDE. Tested with SST25VF016B and MX25L1606E memories.
- UART communication.
- For testing with a PC, you need a 3V UART data cable (VSIDE UART Cable is OK), or a 3V UART to RS-232 level shifter. VS1000 Developer Board has the level shifter.
- With 12.288 MHz crystal, The UART uses 115200 bps baudrate, 8 bits, No parity, 1 stop bit, no flow control.
- Only RX and GND pins need to be connected. TX is strongly recommended for readback.
- 5V power for VS1000.
- The module can be powered with an USB cable. Don't connect he USBN/USBP data lines.
- IO voltage is 3.3 volts, IO pins are NOT 5 volt tolerant!- Audio output (optional).
- Headphones connected to LHP, RHP and GBUF, or Line out.
VS1000 Module Pinout. Use the USB only for power, don't connect the USB data lines. Windows cannot read
the UART module's custom filesystem using USB.Connect the RX and TX pins to your MCU or use 3V USB UART cable or level shifter to connect to a PC.

PreparationsTo use the sofware, the eeprom image EEPROM.IMG must be programmed to the VS1000 Audio Module's Flash memory. That can be done with VSIDE or any other VS1000 24-bit flasher utility or an external prommer. Uniprom can be used if you solder the flash to a VS1053 board for promming.
When the image is programmed correctly, the module will output "VS1000 UART Audio Module V1.0" on the TX pin at power-up. When it's working like the screenshot below, you can continue testing.
If the module contained data from previous software, you need to EraseAll before continuing.
VSIDE's Prommer/Flasher Utility
Prommed, connected to HyperTerminal and powered up.
Using the Upload HelperAfter promming the EEPROM.IMG software into the SPI flash and having succesfully tested with HyperTerminal or some other terminal program that you can communicate with the module, you should first start the UploadHelper.exe Windows program. It will help to get some content uploaded to the module so it can be properly tested.
NOTE: UploadHelper does not communicate with the module, you need HyperTerminal or another terminal program to communicate with the module, but the UploadHelper will help you.
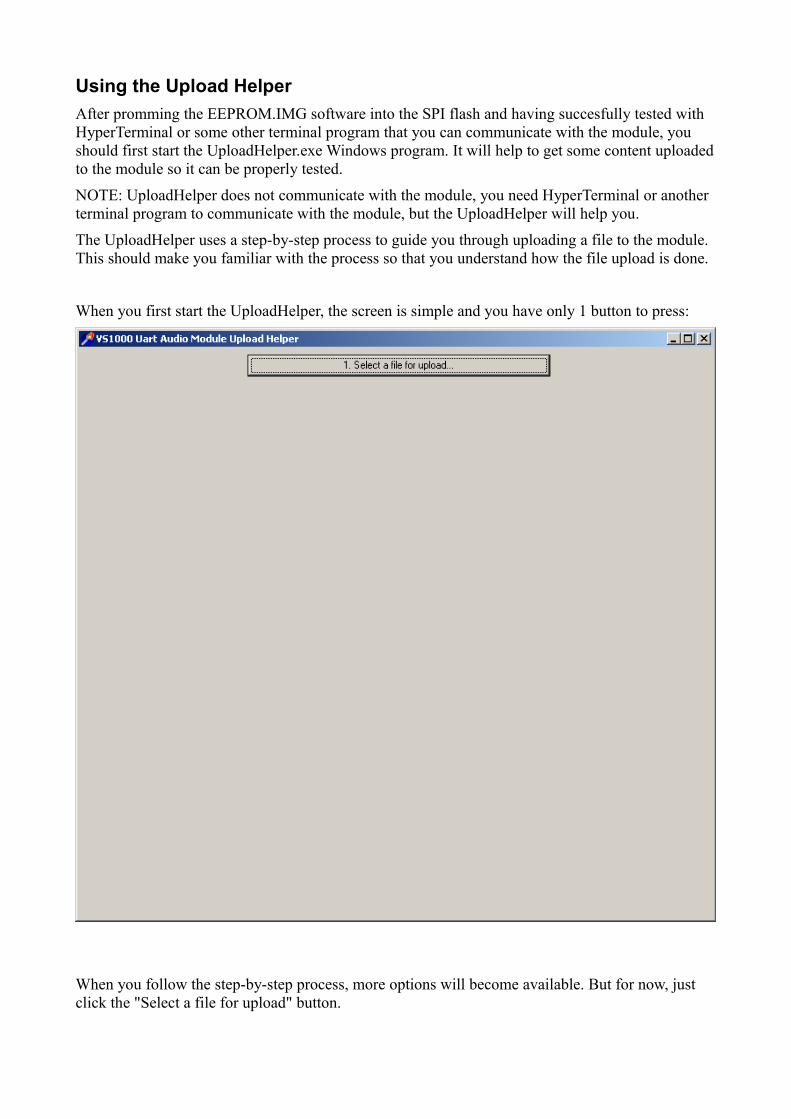
The UploadHelper uses a step-by-step process to guide you through uploading a file to the module. This should make you familiar with the process so that you understand how the file upload is done.
When you first start the UploadHelper, the screen is simple and you have only 1 button to press:
When you follow the step-by-step process, more options will become available. But for now, just click the "Select a file for upload" button.

To test with playing files, you will need some small Ogg Vorbis files on your PC. Find and select a small Ogg file. For example, the "Arwin.ogg" file is 181 kilobytes. Then click "Open". (If you don't have ogg files, select a text file. But you cannot test sound without an ogg file.)
The program does some internal processing for a few seconds and then asks you to start HyperTerminal. Connect HyperTerminal, power up or reset the module and see that you have some output such as "#" characters from the module.
Then press "Ok, I can see some output from the module."
A new button becomes available:
Click the "2. Click this to copy the upload command to Clipboard". This will make a line of text, such as "UArwin.ogg<" and place it into the clipboard. It's the necessary command to command the module to start receiving a new file.

Next, switch to the HyperTerminal and select "Paste to Host" using mouse from the "Edit" menu (or the right-click context menu).
The module will respond like this:
You can see that the upload process is started and the module now asks you to send the file using "upcase hex" characters. Don't touch the HyperTerminal program, especially don't type anything with the keyboard.
Switch back to the UploadHelper program and click the "Ok, now it tells me to send upcase hex now" button. This will unlock the next step.
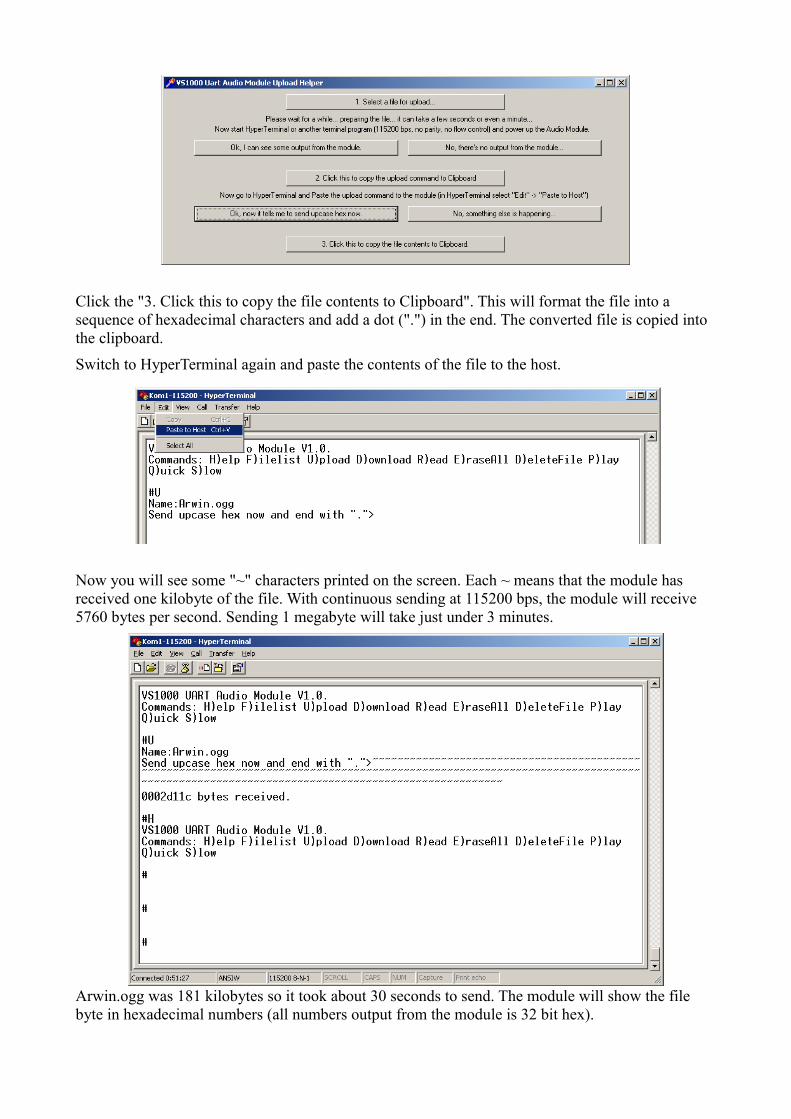
Click the "3. Click this to copy the file contents to Clipboard". This will format the file into a sequence of hexadecimal characters and add a dot (".") in the end. The converted file is copied into the clipboard.
Switch to HyperTerminal again and paste the contents of the file to the host.
Now you will see some "~" characters printed on the screen. Each ~ means that the module has received one kilobyte of the file. With continuous sending at 115200 bps, the module will receive 5760 bytes per second. Sending 1 megabyte will take just under 3 minutes.
Arwin.ogg was 181 kilobytes so it took about 30 seconds to send. The module will show the file byte in hexadecimal numbers (all numbers output from the module is 32 bit hex).

The UploadHelper adds a "H" command to the clipboard after the file, so that you automatically see the command list again. Strictly speaking, the final "H" is not part of the file and can be left out.
You can then complete the steps in the UploadHelper. It just clarifies the process for you a little bit more, and then shows you actually what was uploaded to the module.
You can see the bottom text are now to become familiar with the HEX data format, which is used to upload any file into the module.
Creating a file manuallyTo clarify the protocol a little bit more, let's make a small file into the module using just the keyboard in the HyperTerminal.

- Type U to start Uploading.
- The module will respond "Name:" asking you to give a name for the new file.
- type test.txt and hit [Enter]. The file name can be up to 111 characters long and contain any printable character except '<'. '<' marks the end of the file name, but for convenience you can also use a carriage return or line feed (press [Enter]) to mark the end of the file name. (If you implement the protocol on an MCU, you may like to use '<' instead of newline because if you have a modem or some other data link between your MCU and the module, the modem might surprise you and convert or expand a linefeed or newline to some other form without you knowing about it.)
- The module will respond with "Send upcase hex now and end with "."> You must wait for the ">" because it may take a long time if the module needs to erase an existing file
We will now make a file with contents "ABC". Looking at an ASCII table, it can be seen that "A" is 0x41, "B" is 0x42 and "C" is 0x43.
- Type 414243 into the HyperTerminal. The module will not echo back the characters to you, but you will see one "~" character so you know that the module is receiving data. The 41 will make an "A", the 42 will make a "B" and the 43 will make a C.
- Type a dot character . into the HyperTerminal. This will end the file. The module will indicate that it received 3 bytes.
The complete sequence is like:#UName:test.txtSend upcase hex now and end with ".">414243.~00000003 bytes received.The blue text is text you wrote on the keyboard and the module echoed it back. The red text is text you wrote on the keyboard but the module did not echo it back so you don't see it. The sequence to create the file could also be sent simply as: Utest.txt<414243.
Note that if you use the module's filesystem to store files that have path names, you can have the full path name as the name of the file. But there is no directory support, VS1000 treats all files like
ASCII Code Chart. Each character is made of two hex numbers. For each character, the first hex number is on the left, and the second hex number is on the top. Hex numbers are 0..9 and A..F. Image source: Wikipedia.

they would be in the root directory. If you need directory support, you will need to implement it in your microcontroller.
So if you want to have a file whose name is "C:\My Documents\Ogg Files\1 Music File.ogg", it's perfectly all right, as long as it's less than 112 characters long. But if you want to open that file, you will need to type the complete file name.
Reading a text file Rfilename<You can read a text file with the R command. Here's how to read the test.txt file #RName:test.txt<ABC#Note that the file contents is the "ABC" which we entered earlier in hexadecimal. As said earlier, the "<" after the file name is optional. After the file name, you can have a "<" or carriage return or linefeed or both and it's also ok to insert a carriage return and/or linefeed after the "<".
Reading a binary file Lfilename<You can read any file in binary with the L command. The file is printed in hexadecimal.#LName:test.txt<414243#
Playing a file Pfilename<The P command tells the module to play a file. The file name is case sensitive, so be sure to write the file name with correct uppercase and lowercase letters.#PName:Arwin.ogg<Play..#
Getting a file list FThe F command gives you a file list.#F0002D11C Arwin.ogg00000003 test.txt-00000002 files.001C6000 bytes free.#

The number before a file name indicates the file size in hexadecimal. The module uses hexadecimal characters and fixed width fields because they are easier for a microcontroller to read than decimal numbers, but unlike binary, still usable over a text terminal.
"0002d11c Arwin.ogg" means that Arwin.ogg is 0x0002d11c bytes, meaning 184604 bytes long.
After the file list comes one line which contains just a minus sign so it's easy to detect the end of the file list. Then there are two extra lines: the first shows how many files were found and the next shows how many bytes are free.
Deleting a file DD command deletes a file.
Erasing all files EE command erases all files. With 4K block size, it can take a few seconds.
Getting the command listH command will give you the software version and a command list#HVS1000 UART Audio Module V1.0.Commands: H)elp F)ilelist U)pload downL)oad R)ead E)raseAllD)eleteFile P)lay Q)uick S)low#
Selecting slow UART output SS command will force the VS1000 module to have a delay after each character sent over the UART. This makes it easier for a slow microcontroller to receive the data which the VS1000 module sends.
Note: VS1000 module always accepts all data in full speed using its 1024 character serial input buffer.
Selecting fast UART output QQ ("Quick") command selects fast UART output from the module. This is the default state.

Changes
v1.01 - Added warning message " non-SBFS block, maybe needs Erase?\r" for non-SBFS content(such as files from previous VS1000 module software) which will corrupt operation
- Changed all hex output to uppercase so that file upload and download has same format.
More infoFor more info, please write to [email protected]
Panu-Kristian PoiksaloVLSI Solution Oy

Appendix A
Stored Block Filesystem Panu-Kristian Poiksalo, VLSI Solution Oy 2012-09-11Stored Block FileSystem (SBFS) is a filesystem for (spi) flash memories. Using the random access capability of solid state memories to its advantage, it removes the need for erase and overwrite cycles which traditional disk filesystems such as FAT require, because there is no central directory of files and no block allocation tables. Fragmented files are supported and the filesystem overhead is usually small compared to FAT.
All information in an SBFS filesystem is contained within segments of data called "chunks". A chunk's size must be a multiple of an erasable block in the flash memory, e.g. a chunk is 1, 2, 3 or more eraseblocks. A chunk always starts at an eraseblock boundary. The size of an erasable block can be any amount of kilobytes for which it is possible to write an erase function. For example an implementation for a flash with 4K hardware erasable blocks can choose to implement a block erase function, which always erases two adjacent blocks and thus presents a flash with 8K eraseblock size. This can give speed benefits as the number of possible chunk locations in the flash is reduced: the SBFS does not need to iterate over so many possible locations when scanning over free data areas. Files themselves are stored continuously, if possible, and iterating over any non-empty data area in the flash is fast.
Each chunk is seen as consisting of at least two blocks of 512 bytes. The first 512 byte blocks of each chunk is a chunk header block. It contains a set of data which includes the name of the file to which the chunk belongs, the size of the chunk, the number of payload data bytes (file contents) contained in a file up to the end of the chunk (so this field in the last chunk of the file will contain the file size), a few flags and a pointer to the beginning of the next chunk if the file is fragmented and the chunk is not the last chunk of the file.
Writing a file into the SBFS filesystem is simple because the size of the file does not need to be known before writing to the flash, and it's possible to implement the file system without any RAM buffers, although having a RAM buffer of 512 bytes (one block) available may make the implementation easier.
When a file is written to the SBFS filesystem, first a check is made if a file with the same name already exists. If a chunk header block is found which matches the file name, the chunk is erased. If the chunk was not the last chunk of the file, the next chunk is found by looking at the "next lba" (block address) pointer of the erased header (it is read before erasing), and erased also, until all chunks that make the file are erased.
Continuing with the file write, first empty eraseblock on the flash is located. The lba of the first 512-byte-block of the eraseblock is stored into a local variable firstBlock. If the flash supports byte by byte programming, 'S' is written to the the first byte of the block to prevent misdetection as free space in case of a power failure during programming. If not, it's left unprogrammed. File data is written to the second 512-byte block within the eraseblock and then to the subsequent blocks, without any regard to eraseblock size, until a non-empty 512 byte block is found or the file ends. A 512-byte-block is regarded as empty if its first 16 bits are 0xffff. Provided that only the SBFS handler writes to the flash and the flash was erased before first starting to use it as SBFS storage, this accurately represents whether the block is free or not.
After this, the lba address of the first block is retrieved from the local variable firstBlock, and a header block is written. It will contain the SBFS signature word ('S''B'), the size of the chunk and the file name. If the chunk is the first chunk of the file, it will have the START_OF_FILE flag set. If it's the last chunk of the file, it will have the END_OF_FILE flag set. If it's not the end of the file, the start of the next free eraseblock in the flash is found and its lba address is written to the nextLba pointer of the header block. Then the process will continue until either the file is completely written or no more unused eraseblocks are found in the flash. Then the last written header block will have the END_OF_FILE flag set.
When determining the amount of free space in the flash, all starts of erase blocks must be read to find out if they are free (0xffff) or not. (Note: this is similar to scanning a FAT table.) If ever a non-free chunk header with signature other than 'SB' is found, the flash is corrupted and should be erased or otherwise recovered.
The SBFS filesystem was originally developed for the VS1000 Voicemail Software by Panu-Kristian Poiksalo in September 2012. Please see the sbfs.c implementation in the VS1000 Voicemail source code for more details.