Embed Size (px)
Citation preview

Visual Planning: BIM for Safety Jason A. Reece – Balfour Beatty Construction
CR2789 Not everyone is aware of all of the associated risks and hazards that are involved with complicated construction operations—even the professionals who perform those tasks every day. Special training is required before commencing this type of challenging and potentially dangerous work. This is where BIM aids in communication and training in a safe environment. BIM safety models can present both correct and incorrect practices side-by-side for comparison. This class focuses on how models can be developed and used to explain safety hazards and procedures in a safe virtual environment. It shows how BIM tools such as Autodesk® Revit®-based software, Autodesk® Navisworks® Manage, Autodesk® 3ds Max®, and other modeling tools can greatly enhance communication and even help identify common, complex, and unique safety issues. These models can then be taken out into the field using Autodesk tools, such as the Inventor Publisher mobile app, and referenced on tablets, iPads®, and other mobile devices. Continue the discussion by signing up for "CR2792-R Visual Planning: BIM for Safety–The Roundtable Session."
Learning Objectives At the end of this class, you will be able to:
Learning Objective 1 - Describe different ways to create a model to enhance safety communication
Learning Objective 2 - Explain the effectiveness of traditional safety communication methods versus modeling
Learning Objective 3 - Share case studies where a safety model either improved safety communication or could have
Learning Objective 4 - Identify the tools and techniques for using safety models on mobile devices
About the Speaker
Jason is a leader of Research & Development for Balfour Beatty’s National Capability Center. His role is
to: efficiently and effectively identify new ideas, make the best ideas implementable by the national
business and evaluate existing practices for potential improvements through new technology and
techniques. Topics include: Rapid Virtual Prototyping, design optimization, energy modeling, cost
modeling, data access/mobility, safety applications (APPS), reality capture, digital construction
documents, BIMStorm. Jason was formally the leader of the Fairfax, VA Division VDC team and has
been using BIM for the past 11 years in various construction roles. He is VDC Certified by the Stanford
CIFE program, and a graduate of Penn State in Architectural Engineering. He currently sits on the
BuildingSmart NBIMS project committee, Chairs the ABC Virginia Innovation council, and is part of the
SAME Energy/Sustainability Committee and frequently presents on topics of innovation and technology.
e-mail: [email protected]

CR2789 - Visual Planning: BIM for Safety
2
Script of Presentation:
INTRODUCTION
Slide 4: Safety Minute:
Tamera Kresse was a mother of one precocious teenage daughter and wife to a life-long blue-collar business owner. She and helped run the family owned excavation business for 20 years through 5 presidential terms. She started taking on more on-site responsibilities due to her husband’s failing health, and worried constantly how she would carry on if something would happen to her husband. While excavating a sewer line, Tamera Kresse was walking along side of a 4 foot wide by 9 foot deep trench which is a little bit wider than a couch, and taller than the ceiling in most homes. - The crew was not using a trench box or shoring system to support the cliff of instable soil - Edge of the excavation was not roped off with a highly visible fence, such as orange ones frequently seen on construction sites The Edge collapsed, and Tamera was pulled into the trench - Buried under over a cubic yard of dirt, which weighed over 3000 pounds – as much as a Toyota Corrolla. - It took 2.5 hours to uncover her body, and Tamera Kreese became one of over 1,400 deaths associated with trenching in this country (the seating capacity of the cafeteria).
Slide 3: Q &A
The format for this class is interactive; and I'm planning to eat up all of the question time. However, I WILL answer your questions. You have three options for asking questions: 1) Use the AU APP 2) Tweet at me (@jasonreece) 3) e-mail me ([email protected]) I will post all questions and my answers to the class website after class.
Slide 5 & 6: What do You know?
Slide 8: About Me
My day to day job is research and development, to innovate. But it is really about brining big ideas to life, to make the implementable by my company.
Slide 9: About this presentation (BIM for Safety Title)
Given BIM for Safety presentation a half dozen times: Highly regarded and well received. 3 weeks ago: Experienced a STORY so powerful – I scrapped my planned and practiced presentation. WHY? I realized the message was wrong. The message focused on how to use technology for safety, and not the underlying process that enables our best behaviors. If you stick with me, I’ll tell you my story at the end of classK because I think it will change your perspective as well.

CR2789 - Visual Planning: BIM for Safety
3
Slide 10 & 11: Visual Storytelling
It may seem like I'm making a seemingly small change to the title of the class. This is a MONUMENTAL difference in approach and context of BIM for safety. Some of you are thinking that this is common sense, but through all my contacts, internet searching, and academic research, I have found fewer visual stories used for safety than I have fingers. If this idea were easy to implement, I think I would be able to find more than that.
Slide 12: Visual Storytelling
Today's class is going to be about how we use BIM to tell HIGHLY EFFECTIVE stories. • Why are stories so important? • What makes a good story effective?
PART 1: FACTS & STORYTELLING
Slide 15: The difference between facts and a story
There is a profound difference in the ability for people to retain facts and remember a story. Most people will try to convince of something by: Beating you over the head with facts and information.
Slide 17: Facts about Trenching
Let me give you an example of how fact differs greatly from story: � Between 2000 and 2006 - 271 workers died in trenches � Of workers injured in trenches 53% are unskilled laborers � Cave-ins cause 71% of fatalities � Protective systems are only employed in 24% of incidents � Most deaths are caused by suffocations, as soil weighs 2000 to 3000 pounds per cubic yard � Incidents occur Mondays 36% of the time � 72% of fatalities occur in trenches less than 9 feet deep
Who is going to remember those facts and their details in a month? Tomorrow? In 5 minutes? Who is going to remember those facts and their details in a month? Tomorrow? In 5 minutes? Does anyone think they still remember 25% of that information? These are all IMPORTANT FACTS. Facts that people need to share and act upon.
SECTION 2: VISUAL STORYTELLING
CR2789 - Visual Planning: BIM for Safety
4
Slide 21: ZeFrank and the Power of Vlogging
Does anyone here know what vlogging is? Anyone want to venture an educated guess? Blogging is storytelling; started by armature journalists to tell stories. If blogging was started by journalists, then vlogging was certainly started by film students. Film students study the art of storytelling, but express those stories through visualization.
Slide 22: Traditional “stories” told with data
This is the means in which this information is usually conveyed. It conveys no more than the raw facts and information, and gives no context to the meaning behind the data.
Slide 23: The Whole Pie
The trifecta of a highly effective idea - Facts and Information - Story Telling - visualization All of these things come together in the form of a vlogg
SECTION 3: BIM FOR SAFETY
Slide 27: Trenching BIM for Safety Video
Slide 28 through 40: Trenching BIM for Safety Video
- Show Trenching video - Audience participation, putting a narrative behind the video.
SECTION 4: CONTEXT FOR STORIES
Slide 43: The context in which you tell a story matters:
How many people remember Tamera’s story, or at least the key elements? How about tomorrow? In a month? In a year? Forever? Why will Tamera’s story stick better than just the facts?
Slide 44 & 45: The context in which you tell a story matters:
How you use a visual story is as important as the story it tells. Facts need to be tied to something memorable. Facts will almost never stick with you even after just a few minutes after you hear them. How effective your stories are depends on the context in which you use them.
Slide 46: Example of Context
How to use your visual stories effectively

CR2789 - Visual Planning: BIM for Safety
5
(Switch over to phone or ipad to to demonstrate using trench model on a mobile.) - Grab an audience member to play the "subcontractor"
Slide 47: Trench Story in Action
Context of using the visual story for subcontractor orientation. We have used this trench model I have been using to demonstrate this concept as a tool to facilitate the safety preconstruction meeting. On one of our projects, this was what the utilities subcontractor had to say after just 5 minutes: "We've been doing it wrong all these years" This is a foreman that had been doing this work for 25 years. Who has been through hundreds of safety discussions, been inspected by OSHA, and was as competent of a foreman as you could hope for.
Slide 49: Mass Excavation
Slide 50: Benching
Slide 51: Railing clashes with schedule
Slide 52: Proper railing installation techniques
Slide 53: Embedded Safety tie-off clashes with schedule
SECTION 5: CLOSING
Slide 56: more content
There is a TON of good information, examples, links and my own personal research into the BIM for safety topic on the AU class website.
Slide 59:
If you buy into the importance of storytelling, I suggest you read two definitive books that will help you better understand how to craft a memorable story. The Tipping Point by Malcom Gladwell Made to Stick by (Chip Heath, Dan Heath) If you want to know why, feel free to come up and talk to me after, e-mail me or talk to me after class or read the handouts after I post them. But here is the core message: If you consider yourself an innovator, a technologist, a VDC specialist, or anything similar:

CR2789 - Visual Planning: BIM for Safety
6
Slide 61: Ending Story
Ending story: What happened to cause me to re-build my whole message This is my good friend Rayna. She is an artist, a collector of antiques, a history junkie. She appeared on an episode of "Oddities" and sold an authentic Egyptian mummy head to the store. She is the librarian at my home-town local newspaper. She knows absolutely nothing about construction in general, let alone safety. When I was trying to tell her what I was presenting this week, I had no reference to know what I was talking about. So I showed her this video on YouTube. I sat there and just let her watch. Here is what happened:
(Slide 62) At this point, she told me that: "It looks like that dirt is dangerous."
(Slide 63) At this point, she said: "You can make it safe with end walls on the box"
(Slide 64) At this point, she said that: "there is a place for a ladder to fit now"
(Slide 65) At this point, she said: "that fence is probably important so you don't fall in the hole"
Slide 65: (picture again)
If a librarian can learn how to build safely through a simple visual story: ANYONE CAN
Slide 66:
Stories are powerful. BIM can help us tell impactful stories without saying a single word.
CR2789 - Visual Planning: BIM for Safety
7
YouTube Videos on Story:
http://www.youtube.com/playlist?list=PLbED7F8F9DhGS2UHM_pnXVEQP89-Mw0l7
Nancy Duarte uncovers common structure of greatest communicators http://www.youtube.com/watch?v=1nYFpuc2Umk&list=WLB58F213535364C91
Why are some presentations spellbinding and some not? Well, this is the question Nancy
Duarte takes on as she shares with the audience the secret of an excellent presentation. In this
fascinating talk Nancy Duarte explains the model that she developed for designing
transformative presentations. She explains the essential qualities of an excellent presentation
by analyzing the speeches of Martin Luther King and Steve Jobs. She reminds us that the only
way to spread important ideas is to make sure that one is communicating his or her ideas
effectively using strong presentation skills.
Greg Power - The Power of Story
http://www.youtube.com/watch?v=iExl_rF7zgQ&list=WLB58F213535364C91
Greg Power is President and General Manager of the Canadian operations of world leading
public relations agency Weber Shandwick. Throughout his 30 year career in communications,
Greg has been fascinated by the challenge of building the bridge between a message and an
audience. He has been a journalist, a client and an agency leader and understands the needs of
each role and how they can best work together. In addition to his management duties, he
provides leadership and strategic counsel for a wide variety of Canadian clients with an
emphasis on strategic message development and storytelling.
The mystery of storytelling: Julian Friedmann at TEDxEaling
http://www.youtube.com/watch?v=al3-Kl4BDUQ&list=WLB58F213535364C91
Chimamanda Adichie: The danger of a single story
http://www.youtube.com/watch?v=D9Ihs241zeg
Our lives, our cultures, are composed of many overlapping stories. Novelist Chimamanda
Adichie tells the story of how she found her authentic cultural voice -- and warns that if we hear
only a single story about another person or country, we risk a critical misunderstanding.
Andrew Stanton: The clues to a great story
http://www.youtube.com/watch?v=KxDwieKpawg

CR2789 - Visual Planning: BIM for Safety
8
Filmmaker Andrew Stanton ("Toy Story," "WALL-E") shares what he knows about storytelling --
starting at the end and working back to the beginning.
Elif Shafak: The politics of fiction
http://www.youtube.com/watch?v=Zq7QPnqLoUk
Listening to stories widens the imagination; telling them lets us leap over cultural walls, embrace
different experiences, feel what others feel. Elif Shafak builds on this simple idea to argue that
fiction can overcome identity politics.
Scott McCloud: Understanding comics
http://www.youtube.com/watch?v=fXYckRgsdjI
In this unmissable look at the magic of comics, Scott McCloud bends the presentation format
into a cartoon-like experience, where colorful diversions whiz through childhood fascinations
and imagined futures that our eyes can hear and touch.
BIM for Safety Videos:
Trenching:
http://www.youtube.com/watch?v=B1zwmOzTiUM&list=PLbED7F8F9DhF6pO8UxT2d-lNT-
EDM-Epx&index=1
Mass Excavation:
http://www.youtube.com/watch?v=GigkQElG-W0&list=PLbED7F8F9DhF6pO8UxT2d-lNT-EDM-
Epx&index=2
Excavation Benching:
http://www.youtube.com/watch?v=3_KjqGB7Do4&list=PLbED7F8F9DhF6pO8UxT2d-lNT-EDM-
Epx&index=3
CR2789 - Visual Planning: BIM for Safety
9
Research and References There has been very limited research done by institutional groups on the topic of BIM for Safety.
Acedemia has identified applications of BIM for Safety, the industry has leverage BIM for Safety
visualization, but there are still many more complicated and technology challenges areas for the topic to
expand to. The sections below aggregates the limited research conducted on the topic to date.
BIM used for Design for Safety:
PhD research conducted by Mojtaba Tiabat at Virginia Tech proposed that:
• See “additional Materials”
VTT Study
A research study in Finland conducted by Markku Kiviniemi, Kristiina Sulankivi, Kalle Kähkönen, Tarja
Mäkelä & Maija-Leena Merivirta at VTT: The main objective of the research was to develop procedures
and use of BIM technology for safety planning, management, and communications, as part of the 4D-
construction planning.
• See “additional Materials”
Research and Development Opportunities
Research opportunities conducted by Sathyanarayanan Rajendran: BIM offers several benefits that can
improve construction safety. Currently, including BIM in safety discussions is not common in the
construction industry. Research has shown that industry practitioners perceive BIM has little effect on
safety. This perception needs to change. With a significant effort from construction project teams and
SH&E professionals, using BIM for safety can become the standard. Safety professionals should
encourage team members to use BIM for safety and educate them on how to look for safety concerns
during the BIM review process.
• See “additional Materials”
AGC BIM for Safety Workshop:
While not true research, the workshop held by AGC in collaboration with NIOSH featured case studies
from the industry, and reviewed research areas currently in progress by academia.
• See “additional Materials”
CR2789 - Visual Planning: BIM for Safety
10
Using Autodesk Inventor Publisher:
Producing your stories: Using Autodesk Inventor Publisher Once you have developed a good visual story using your favorite BIM technique, it is time to produce the versions that will be easily shared between the people than need to teach and learn. There are numerous ways to produce videos from BIM programs:
• Creating static images for power point narration
• Recording the sequence of events to produce a 3D or 4D video
• Uploading animations to Youtube But getting our visual stories onto our mobile devices, and having them ready and available when we need them, regardless of an internet connection is critical to being able to leverage the work we put into developing a good story, and its accompanying model.
Autodesk Inventor Publisher Workflow: Produce Visual Stories for Mobile
Devices
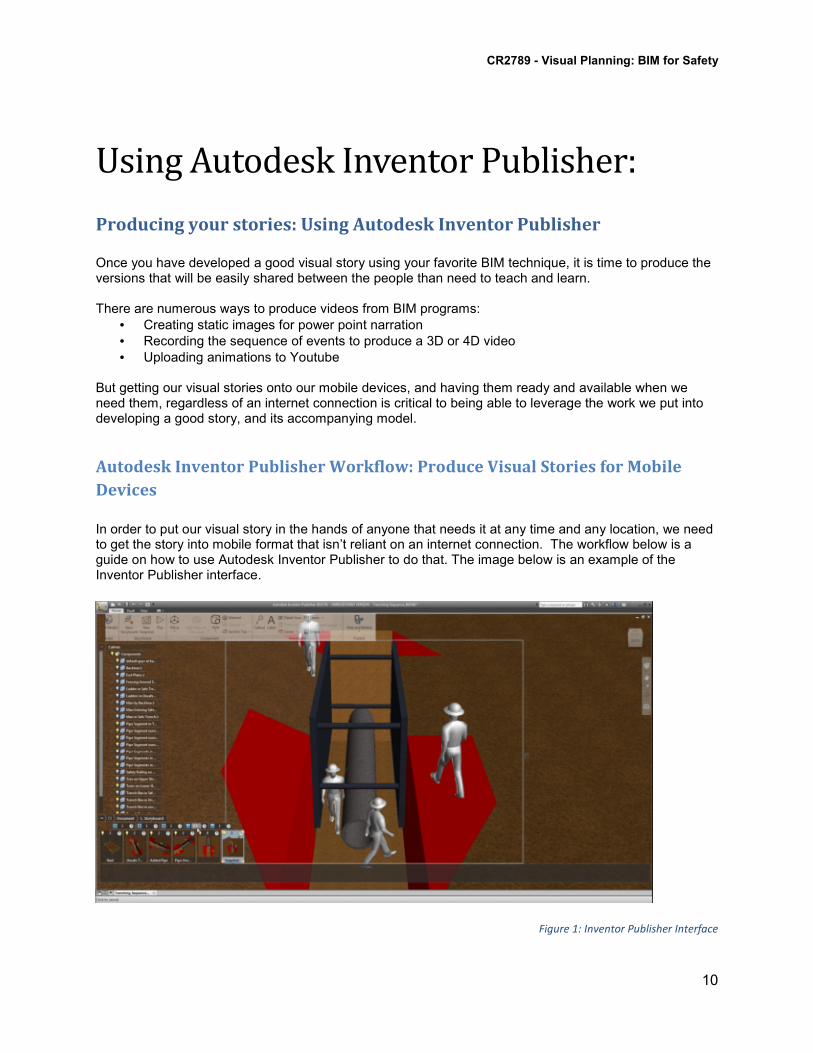
In order to put our visual story in the hands of anyone that needs it at any time and any location, we need to get the story into mobile format that isn’t reliant on an internet connection. The workflow below is a guide on how to use Autodesk Inventor Publisher to do that. The image below is an example of the Inventor Publisher interface.
Figure 1: Inventor Publisher Interface

CR2789 - Visual Planning: BIM for Safety
11
Developing and Exporting the Model:
If you are using Autodesk Revit, all you need to do is export as a DWF or DWG file and open up that file in inventor. There are minimal issues associated with Revit files. Inventor Publisher can bring in several different file formats (DWG, DWF, skp, fbx, and a few other augmented reality formats). However, if you are using another software platform (3Ds MAX, AutoCAD, Bentley, Sketch-up, solidworks, etc) with Inventor Publisher, there are some things you need to consider:
• All geometry planes/faces need to be facing “outwards”. There is usually a front and back side to every face.
• Geometry/objects that you want to manipulate in Inventor publisher needs to be grouped / combined together in the native program into an object
• Do not rely on layer information to identify objects, they need to be their own “grouped” objects in order for Inventor Publisher to recognize them. You won’t be able to manipulate or select specific lines or faces to make them visible or invisible like you can in other programs like Revit and Navisworks
• Always use “textures” for objects instead of native colors (you can create plain color “textures” and use those as solid colors instead of native coloring tools)
Import into Inventor publisher and set your environment
1) It is recommended that you change the perspective from ortho to perspective like the image to the right
2) Change lighting to "light cloud" per the image to the right
Building a "Storyboard"
A storyboard is a movie/television technique that creates static images depicting key elements of a specific scene. Similar techniques are used by graphic novels and comic books to progress the action of the scene. Inventor Publisher is a tool that is used to create those story boards, but using the 3D models as the source of each “board”.
Once you have imported your model into Inventor Publisher, you have all the “imagery” that you need to create a story board, it is now just a matter of creating each board, and making the appropriate object visible or hidden in each view.
1) Create a new “snapshot”, this will be your starting image 2) Adjust your view to be your desired camera angle 3) Toggle different elements on/off in that view, depending on what you want to be visible. 4) Repeat steps 1 through 3 for each “stage” of your storyboard
Figure 2: Change to Perspective
Figure 3: Change to Light Cloud

CR2789 - Visual Planning: BIM for Safety
12
(Each snapshot can be named and a full description can be inserted. These two elements will be displayed automatically when viewed through Publisher Viewer on any mobile device.)
The image below shows how Inventor Publisher displays your storyboard as it progresses
Figure 4: Story Boards
Now, you want to set the transition duration (the time it takes to go from one snapshot to the next)
1) The middle number is how many second the program will take to transition between the two boards. In this example, all of our durations are 1 second.
2) You may also select from three transition options:
• Linear – this creates an even transition from one board to the next
• Accelerating – this will start out the transition slowly, then get constantly faster over the duration
• Smooth – the program will create a smooth transition and path for you
Figure 5: Transition Controls
Publishing the Storyboard to Mobile
1) Under the home button: Go to the web and mobile button. You will have the following options:
• Document - This is just the local model (not for mobile), do not use.
• Storyboard – This is the motion / transition path you have built
• Snapshot – This is just the static model, but for the mobile device (no transitions)
2) Save the file locally
3) Upload the file to box, dropbox or any other means you know to get a file onto a mobile device.
Figure 6: Mobile Publishing

CR2789 - Visual Planning: BIM for Safety
13
You can use your Autodesk 360 account as well if you have one. This works very well. You can upload the file from your computer, then send a link to anyone via e-mail. If they have the IPM APP installed on their device, then they can download and view the model you published.
Open the file in the Inventor Publisher mobile APP (IPM Viewer)
1) Download the IPM Viewer APP
2) Locate the file on your mobile device through whatever means you used, then open the file using IPM viewer. The APP will launch and the file will be available to use.
Tips:
1) Keep geometry simple as possible, complex models will be larger files. It isn’t obvious if there is a limit to final size, but the larger the published file it is, the longer it takes to open on mobile devices.
2) This example is a sketch-up file is about 7 MB, then the working in Inventor Publisher was about 50 MB, and the mobile device published version is about 15 MB. It takes a few seconds to open in the IPM viewer. http://www.youtube.com/watch?v=B1zwmOzTiUM&list=PLbED7F8F9DhF6pO8UxT2d-lNT-EDM-Epx&index=1
3) Try to work exclusively in Revit to create your safety models (Multiple models can be loaded up into one document so portions can come from multiple programs)
4) The orbit takes into account the ENTIRE model so understand that orbiting around a single component that you are focused on is difficult without using the free orbit tool.
5) Sometimes intermediate “key frames” will need to be created in order to complete a smooth transition between two desired camera angles.
6) Camera transitions are much more stable when zoomed further away from objects. Sometimes it is necessary to move out, reorient the camera and then move back in using keyframes.