Embed Size (px)
Citation preview

VERTICAL
DAMPER
REPLACEMENT©2006 Bill Spurlock
Many technicians dread damper work, and it can be troublesome on vertical
pianos because access and visibility are limited, and the work stance of bending over
the keyboard is uncomfortable. Because of these difficulties, some tend to avoid
dampers and thus never develop the skills that would make it easy for them. However,
with a systematic and practiced approach, good damper work is not only possible and
pleasant but also offers an opportunity to improve a piano's performance by upgrading
its damper design.
Here I will cover the complete damper replacement job, including making
improvements to poor original designs and a unique method of pre-adjusting damper
heads before installation of new felts.
Diagnosing Existing Damper ProblemsPoor damping results in excessive after-ring after a key or keys are released, and can be
caused by any of the following conditions:
1. Poor felt-to-string contact, caused by any of the following:
< felt misaligned to the strings
< damaged felt (moth-eaten, torn, etc.)
< weak/broken damper lever springs
< weak/broken pedal spring
< binding trapwork
< damper lever wire adjustments off
< spoon adjustments off
< unison strings not level
2. The wrong type of damper configuration for a given string (e.g. flat damper felt for heavy, low tenor strings).
3. Dampers that are too short or located at the wrong point along the strings’ length so they fail to silence certain
partials, even though the dampers may be in good condition and adjustment.
4. Ringing non-speaking length string segments due to loose or missing stringing braid.
Given this number of possible problems, it is important to approach an after-ring problem with a logical sequence
of tests. Only in this way can you get an overall picture of the damper system and distinguish between trapwork
problems, individual problem dampers, and design deficiencies inherent in a given piano. I suggest the following
sequence of tests to diagnose poor damping:
1. Check for broken damper springs. Step on the pedal two or three times and watch to see that all dampers lift and
return to the strings. If one or more do not return, they may have broken springs, causing poor or no damping on
those notes and allowing them to ring whenever any key on the piano is played.
2. Make sure that the trapwork, damper lift rod, or spoons are not holding the dampers slightly off the strings.
After checking that the pedal return spring is intact, confirm that you have lost motion in the pedal dowel. Next,
push a few strings toward the plate to make sure that the dampers follow the strings for at least 1/16". If they do not,
remove the pedal dowel; if the dampers now follow the strings, the trapwork is somehow failing to return fully. If the
problem remains, the damper lift rod may be binding and thus not falling back away from the damper levers. If there is
lost motion between the lift rod and damper levers but there is still no “follow,” the spoons are holding the damper

2
Figure 1: Muting stick for locating ringing stringslevers up. This can be confirmed by pushing down
slightly on a wippen to force its spoon back toward
the action rail; if that damper then follows, its
spoon or its damper lever wire are out of
adjustment. Of course, lack of damper follow
caused by the trapwork or lift rod will normally
affect all dampers, whereas lack of follow caused by
spoons may only affect individual dampers. You
have now identified or ruled out mechanical
interference preventing the dampers from resting
snugly against the strings.
3. Locate the string or strings that are ringing.
To do this, play a staccato chord to excite the
ringing, and alternately mute out different sections
of the piano to locate the source of the problem.
Although you can use your fingers or forearm to
press against the strings, I like to use a felt covered
wooden stick as shown at right, which allows test
muting of entire sections quickly. By alternately playing your chord and pressing this long mute against different
sections of strings, you can quickly find out which section contains the ringing strings. With a 6" length of mute stick
(or a dry hand) you can zero in on smaller areas and find out whether there is just a single damper, a group of dampers,
or a whole section at fault.
4. Determine the cause of the ringing. Having located the offending dampers, you must determine whether poor
damper alignment or seating is at fault, or whether the dampers are just the wrong length or in the wrong location to
work well. Use your muting stick to press all damper heads in the offending section slightly harder against the strings
immediately after playing a staccato chord. If the ringing is vastly reduced, either damper alignment is slightly off, the
damper felt is worn or damaged, or the damper springs are weak. (By pushing on the dampers you force the felt into
better contact with the strings, overcoming alignment, felt condition, or spring problems.)
Very poor alignment will be obvious as the felt may not be contacting all strings of the unison. Slight alignment
problems may not be so obvious. Plucking individual unison strings or lightly muting the individual strings with one
finger will tell whether all unison strings are being evenly damped. If you find that only one string of a unison rings on
and the other two do not, the damper is misaligned or damaged and not contacting all three strings evenly. Inspecting
the grooves on the surface of flat dampers will show whether they are sitting flat on the strings. For wedge and single
bass dampers, watch closely as they lift on and off the strings; they should not deflect to one side as they come to rest.
To test the springs, pull damper heads back one at a time with your finger. If the springs feel very weak,
strengthening them may correct the ringing; you can experiment on individual dampers to find out. A common mistake
here is to strengthen springs in an attempt to overcome poor alignment or bad felt. This is really treating the symptom rather
than the cause and will only work if so much extra spring tension is added that the touch becomes unbearably heavy.
If pushing against the dampers does not greatly reduce the ringing, the problem has to be in the damper length and
location on the strings; in other words, poor damper design. Such dampers will typically dampen the fundamental tone
reasonably well but will leave one or two partials ringing. Replacing these dampers with new felt of the same length will
have no affect in this case, and is a waste of time.
Choosing New Damper Types for Improved DampingThe tests above should tell you whether damper problems exist, and whether they result from the original dampers
being in poor condition or from poor original design. If the problem is simply due to felt in poor condition,
replacements of the same design as original should work fine. In the case of poor design the next step is to determine
what style of damper you can use that will improve upon the originals.
Older uprights commonly have a lot of after-ring in the bass that can be reduced with a change of damper type. To
experiment with different bass damper designs, first mute all strings in the piano except for a single bass bichord.

3
Figure 2: Making your own long bass dampers
Figure 3: Adding an over-damper
The lowest bichord notes will usually be
the hardest to dampen, and so are good
notes to experiment on. Use your felt-
covered muting sticks (held against the
strings by a couple of hammers wedged off
the hammer rail) to mute out the tenor and
treble. Insert temperament strips between
each bass string (except the test unison)
both above and below the keybed. Now the
entire piano should be well muted, making
it easy to compare different damper designs
on the test note.
Play the test note to get a good idea of
the original damper’s sound. You will
usually hear a combination of the 5th and
6th partials ringing in the bass. This is
because these partials are fairly strong in
this section of the piano, and because the
bass dampers usually sit near 1/5 to 1/6 of
the speaking length.
Replacing the original 13/8" or 13/4"
length dampers with 2" to 23/4" ones will
always make a major improvement. Sources
of longer dampers are: piano manufacturers
that use them or piano supply houses
selling Tokiwa brand parts. Or they can
simply be made up from scratch as
described in figure 2.
After listening to the original damper,
replace it with a longer one and listen again.
(Remove the original from the damper head,
then apply a spot of yellow glue to the new one
and fit its wedges into the strings above the
bare damper head. Pull the head away from the
strings, slide the damper down the strings to the
correct height, and release the head. This
ensures correct alignment to the strings. The
damper can be tested immediately). It is useful
to have three base bichord test dampers on
hand: a 2", 21/2", and a 23/4". Longer is usually
better, but sometimes a 2" or 21/4" will work
best. Bass dampers longer than 3" can be
troublesome; they lack rigidity and their bottom
ends may not lift far enough from the strings.
All longer dampers may require slightly stronger
springs to seat properly. The only further
improvement some pianos respond to is angling
the top ends of the dampers; this allows them to
be mounted higher without interfering with the
hammers. When testing, do not expect to
achieve instant damping—a certain decay rate
is normal and desirable.

4
Figure 4: Damper replacement options
Realize that a bass test note played in a hard, staccato fashion is a very severe test, and a noticeable improvement heard in
a single new test damper will mean a major improvement overall when all bass dampers are replaced with the new style.
On many pianos the worst damping is in the low tenor, especially on the first couple of tenor notes whose dampers
must be very short in order to clear the topmost bass string. Again, mute out all other strings of the piano to experiment on
a problem note. Frequently the problem is not so much the short length of the damper as it is the use of flat felt. If pushing
slightly harder on the test note damper gives adequate damping, and the problem is not simply a very weak spring, then
switching to trichord felt will probably work fine. However if a ringing partial persists even with extra pressure, damper
length is the problem and you have to either lengthen the damper or add an over-damper. If hammers are to be replaced
on the action you have the opportunity to curve the hammer line upwards on the first 4 or 5 tenor hammers to allow
longer dampers to be installed on the first two tenor notes. (Raise the first tenor hammer 5/16", the second 1/4", the third 3/16",
etc.) Alternatively an over-damper can be installed as shown in fig 3. These are usually only necessary on the first 1 or 2
tenor notes. They are troublesome and should only be used as a last resort.
Once you are 2 or 3 notes above the bass break, there will be room to lengthen the tenor dampers if necessary. Just
changing to trichord felt will usually correct problems, but once again the pressure test will confirm whether fit or
placement is at fault. A typical scenario is to install long bass dampers, raise the low-tenor hammer line to allow longer
dampers there, and use trichord felt on the first 6-8 tenor unisons. The higher in the scale you go, the easier the strings are
to damp and the less critical damper placement and type become.
Finally, it is important to only use the best quality damper felt. Since dampers have to be very accurately adjusted to
work properly, uneven or poorly cut felt will sabotage the job no matter how well the rest of the work is done.
Removing the Old Damper FeltDepending upon the condition of the original damper heads, you may decide to replace only the damper felt, or replace
heads and all (see fig 4). New dowel-type heads have the advantage that only one side-to-side wire bend is necessary; this
centers the head over the unison, then the felt is aligned parallel to the unison at the time the dowel is glued into the
head. Tokiwa brand parts are available that
make this an easy conversion.
To remove only the old felt, mount the
action in a cradle and rotate it horizontally,
damper side facing the workbench. Tear off
the front sections of the bass dampers,
leaving only the small mounting felts; but
leave the flat dampers intact. Fill a tin can
with a water/wallpaper remover solution
and bring it up under groups of damper
felts, allowing them to soak up all the
solution they can hold. Do not submerge
any part of the wood blocks unless you are
going to be separating them at their glue
joint. Leave the felt sitting in the
horizontal position for about two hours, or
until the dampers pull away easily leaving
no felt behind. (Excessive soaking risks
penetration of the front wood block and
weakening of the wood-to-wood glue
joint). As soon as you have removed the
old felt, stand the action back up and
lightly scrape any glue residue from the
wood blocks.
5
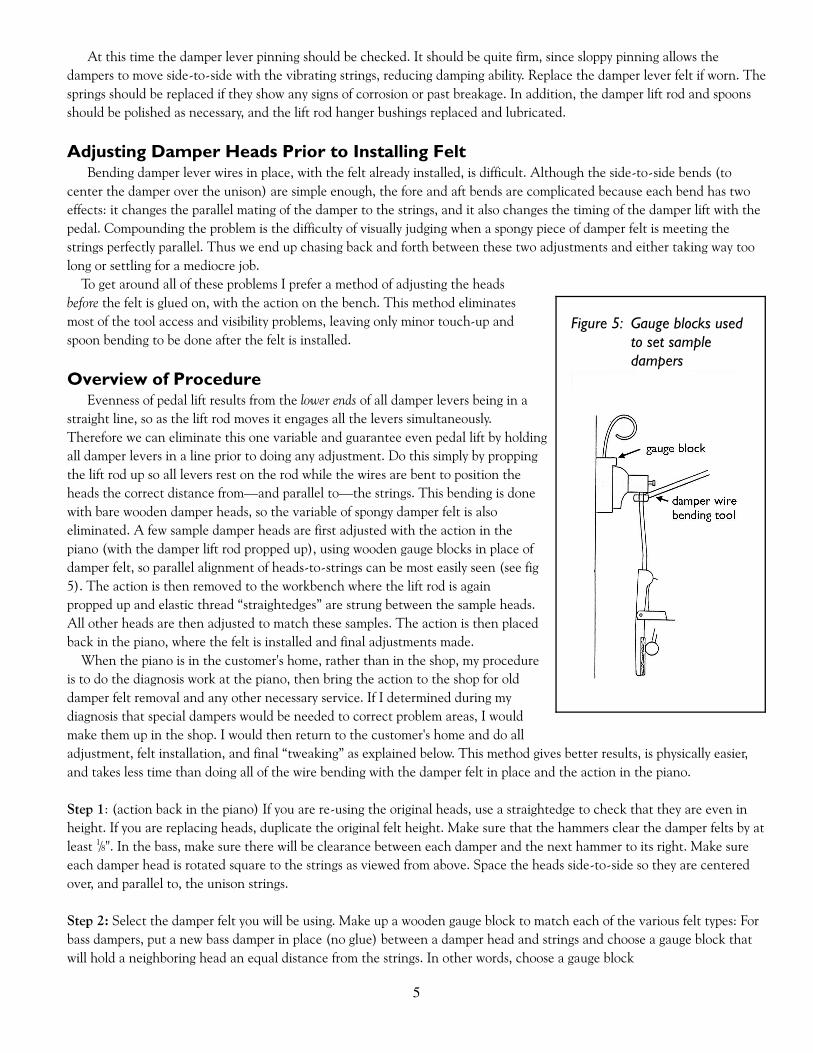
Figure 5: Gauge blocks usedto set sampledampers
At this time the damper lever pinning should be checked. It should be quite firm, since sloppy pinning allows the
dampers to move side-to-side with the vibrating strings, reducing damping ability. Replace the damper lever felt if worn. The
springs should be replaced if they show any signs of corrosion or past breakage. In addition, the damper lift rod and spoons
should be polished as necessary, and the lift rod hanger bushings replaced and lubricated.
Adjusting Damper Heads Prior to Installing FeltBending damper lever wires in place, with the felt already installed, is difficult. Although the side-to-side bends (to
center the damper over the unison) are simple enough, the fore and aft bends are complicated because each bend has two
effects: it changes the parallel mating of the damper to the strings, and it also changes the timing of the damper lift with the
pedal. Compounding the problem is the difficulty of visually judging when a spongy piece of damper felt is meeting the
strings perfectly parallel. Thus we end up chasing back and forth between these two adjustments and either taking way too
long or settling for a mediocre job.
To get around all of these problems I prefer a method of adjusting the heads
before the felt is glued on, with the action on the bench. This method eliminates
most of the tool access and visibility problems, leaving only minor touch-up and
spoon bending to be done after the felt is installed.
Overview of ProcedureEvenness of pedal lift results from the lower ends of all damper levers being in a
straight line, so as the lift rod moves it engages all the levers simultaneously.
Therefore we can eliminate this one variable and guarantee even pedal lift by holding
all damper levers in a line prior to doing any adjustment. Do this simply by propping
the lift rod up so all levers rest on the rod while the wires are bent to position the
heads the correct distance from—and parallel to—the strings. This bending is done
with bare wooden damper heads, so the variable of spongy damper felt is also
eliminated. A few sample damper heads are first adjusted with the action in the
piano (with the damper lift rod propped up), using wooden gauge blocks in place of
damper felt, so parallel alignment of heads-to-strings can be most easily seen (see fig
5). The action is then removed to the workbench where the lift rod is again
propped up and elastic thread “straightedges” are strung between the sample heads.
All other heads are then adjusted to match these samples. The action is then placed
back in the piano, where the felt is installed and final adjustments made.
When the piano is in the customer's home, rather than in the shop, my procedure
is to do the diagnosis work at the piano, then bring the action to the shop for old
damper felt removal and any other necessary service. If I determined during my
diagnosis that special dampers would be needed to correct problem areas, I would
make them up in the shop. I would then return to the customer's home and do all
adjustment, felt installation, and final “tweaking” as explained below. This method gives better results, is physically easier,
and takes less time than doing all of the wire bending with the damper felt in place and the action in the piano.
Step 1: (action back in the piano) If you are re-using the original heads, use a straightedge to check that they are even in
height. If you are replacing heads, duplicate the original felt height. Make sure that the hammers clear the damper felts by at
least 1/8". In the bass, make sure there will be clearance between each damper and the next hammer to its right. Make sure
each damper head is rotated square to the strings as viewed from above. Space the heads side-to-side so they are centered
over, and parallel to, the unison strings.
Step 2: Select the damper felt you will be using. Make up a wooden gauge block to match each of the various felt types: For
bass dampers, put a new bass damper in place (no glue) between a damper head and strings and choose a gauge block that
will hold a neighboring head an equal distance from the strings. In other words, choose a gauge block

6
Figure 6: Propping up lift rod prior to adjusting sample damper heads
that will represent the dimension of the damper felt
to be used. Test both a monochord and a bichord.
Select a gauge block to match the tenor trichord felt
in the same way, and also for the flat dampers. Most
sets of flat dampers are tapered in both length and
thickness, so you will need one gauge block for the
first tenor flat damper and another for the last treble
flat. These gauge blocks will be used to accurately
set the sample damper heads in the piano.
Step 3: Determine how far to prop up the damper
levers with the pedal when adjusting the samples.
This will determine the position of the levers when
the damper felts are installed and resting against the
strings.
< Parameters: The lower ends of the levers must rest
far enough away from the action rail that when the
pedal is released the lift rod can move back away
from them, otherwise ringing dampers will result.
However they should not be so far away from the
rail that the spoons have to be angled outward
severely, causing them to dig into the lever felt.
Normally, it is easiest to just gradually prop the
pedal dowel up until most spoons begin to engage
when the hammers are halfway to the strings, as
shown in figure 6. This setting will minimize later re-
adjusting of the spoons.
The pedal dowel can be propped with a wedge
against the bottom board; however my preference is to use a turnbuckle
between the damper lift rod and the top action post, since this is easiest to
adjust and very stable.
Step 4: With the damper rod propped up in the desired position, carefully
adjust your sample damper heads using the gauge blocks chosen in Step 2.
Normal samples would be the first and last bass damper heads, one head which
will have trichord felt, the first and last heads to have flat felt and one around
note 55. Spend time to adjust the samples accurately, so that the gauge blocks
just fit between the heads and strings without moving the heads back, and so
that the heads sit parallel to the gauge blocks, as shown in figure 5.
Step 5: Place the action on a bench, and prop the lift rod up with the
turnbuckle between the lift rod and a bolt placed in the action bracket, as
shown at right. The position of the rod is not important, as long as all the levers
are resting on the lift rod rather than on the spoons. Do not prop up the lift rod
using a rubber mute between the action rail and the rod; this puts a horizontal
force against the rod, distorting it into a different shape than normal. The
turnbuckle exerts force vertically, in the same direction as the damper lift rod,
and therefore gives the most accurate result.
Now set up a “straight edge” between two samples by running two strands of
fine elastic thread (from a fabric store) between each pair. Fasten the
Figure 7: Turnbuckle used to prop up lift rod with action on the bench

7
Figure 8: Using elastic thread straightedges between samples
Figure 9: Preparing flat felts
Figure 10: Creasingflat dampers duringgluing
thread to the
side of each
sample head
with masking
tape or a drop
of CA glue, and
space it slightly
away from the
face of the
sample head
with a piece of
business card.
See figure 8.
Temporarily
bend any other
damper heads
back away from
the threads if they interfere with a straight line
between samples. Working from the damper
side of the action, you now have unobstructed
access and visibility to adjust all damper heads
in line with the samples. Adjust each damper
head until it is the business card's-thickness
away from the threads. No heads should touch
the threads, otherwise they will upset the straight
line. Repeat with each pair of samples.
Step 6: With the action back in the piano, re-
check that the heads are lined up side-to-side
with the unison strings and adjust as needed.
With the pedal no longer propped up, glue the felt to the heads, letting the damper springs clamp the felt against the strings.
Gluing the dampers on in-place is the best way to ensure perfect alignment of the bass and
trichord felts with their strings. Just apply glue to the felt backing, set the damper into the
strings above the head, pull the head back, then slide the damper down the strings into
position and release the head. Flat dampers need to be clamped in the center or else they will
not glue flat against the blocks, and their crease will be less. To do this, glue on the first flat
damper and one up at the tenor/treble break. Put a length of 1/8" dowel or rod between these
two dampers and the strings, positioned so that it rests in the crease of the felts; these
dampers will hold the rod in place as the other dampers are glued on. The rod will clamp the
dampers flat against the heads so they have a deep crease as shown at right. Repeat for the
section of flat dampers above the treble break.
Fine-Adjust Damper Lift With the PedalAll dampers should now lift fairly evenly with the pedal. Before doing any fine
adjustment, check to see whether one end of the damper section lifts sooner than the other;
if so, remove the action and bend the lift rod hanger slightly for that end so the rod rests
closer to the action rail (push that end toward the rail while pulling the other end away). Be
careful-a very slight bend makes a big difference.
At this point the wire bending required to even out the pedal lift should be very minor,
and not enough to upset the parallel mating of the felt to the strings.

8
Figure 11: Adjusting for even damper lift from the pedalHere I find the
usual wire
bending tools
counter-
productive
because they can
easily upset side-
to-side alignment
slightly in the
process of making
fore and aft
bends, especially
in the bass where
the wires are very
angled. Instead, I
prefer to just use
my fingers and a
hook or
screwdriver, as
shown above, to
make these small
changes. When
the adjustment
gets quite close,
use your foot to
barely wink the
pedal to identify
the first few dampers to move. These can be slowed down by depressing the pedal fully and nudging the heads slightly
with a finger. Remember that your bass and trichord felts are now perfectly aligned with their strings, so try to avoid
any bending that will change their side-to-side position.
Regulating Damper Lift With the KeysDampers must lift evenly with the pedal before adjusting spoons. Damper lift with the spoons greatly affects the
touch resistance of a piano, so it is important that spoon adjustments be as uniform as possible. Although there are
methods of adjusting spoons with the action on the bench, they are not as accurate or as fast as using a well-designed
spoon bending tool with the action in the piano. The first requirement is the proper spoon bender. Fig 12 shows the type
that I favor. Yamaha sells a good one. I suggest getting two and bending the handle of one as shown for use on
compact console actions.
Unlike most adjustments, spoon bending is done blind, so first we must teach our fingers what the tool feels like as
it slips onto the spoon. I suggest the following procedure:
! Choose a full size upright for learning, not a console or studio. Also, practice first in the center of a section, not on
a note at one end of a section.
! Remove the action nuts, tip the action back toward you, look down in and put the tool on a spoon. Notice that the
tool must lean to the side, toward the spoon. Also notice that in the bass section the spoons lean toward the treble, so
the spoon is placed to the right of the wippen being adjusted. In the tenor the spoons usually (but not always) lean
toward the bass, so the tool goes on the left side. Then above the tenor/treble break the spoons usually lean toward
the treble again. Thus you will hold the tool in your right hand in the bass, left hand in the tenor, then back to the
right again in the treble.

9
Figure 12: Adjusting damper spoons
! Slip the tool on and off the spoon, noticing what it feels like. Notice that lifting the wippen slightly moves the spoon
away from the action rail, making it easier to slip the tool in place. Close your eyes and notice what the bender
sounds like as it clicks against the spoon.
! Next, with the tool still on the spoon, push the action forward and, while holding the end of the wippen in one
hand, move the spoon bender up and down slightly with the other to feel how it engages the spoon. Then slip it
down off the spoon and try to slip it back on again without looking. Remember to lift the wippen slightly to make
the spoon more accessible, and to lean the tool to the side. If you're not sure where you are, pull the action back and
look. You may find it helpful to
place a piece of tape around
the handle corresponding to
the end of the wippen, so you
know how far in to reach with
the tool. With your senses of
feel and hearing thus trained,
you should be able to grab the
spoons without looking.
! Prop a damper-lift gauge
against the strings as shown at
right. You can then lift each
wippen, causing its hammer to
bump against the gauge, to test
damper lift. If the gauge
dimension is half the hammer
blow distance, each damper
should just wink as the
hammer bumps the gauge.
! When making adjustments,
hold the spoon bender in one
hand and the end of the
wippen with the other, and
work one against the other.
! Each piano design is different
so you may have to repeat the
initial step of tilting back the
action occasionally with new
designs. Many compact actions
require that you remove the
keys to get enough room to
operate the tool. On spinets
the spoons are adjusted just
like on larger uprights, except
that the tool is held under the
keybed.
Regulating the PedalThe sustain pedal should have a minimum of lost motion, but enough to ensure that the damper lift rod is well clear
of all damper levers at rest so that all dampers rest against the strings with their full spring force. Test by deflecting some
strings inward; the dampers should follow the strings at least 1/16". The sustain pedal travel should also be limited by
blocking felt, to limit damper lift by the pedal to approximately the same amount as the dampers would lift with the
spoons. This adjustment is commonly neglected, even by manufacturers, resulting in excessive stress on the trapwork
and leading to noise and breakage of pedal springs.


![ACATacat.or.th/download/acat_or_th/journal-4/04 - 04.pdf · APmin APmax Appendix G [1] AP APmax Overpressure Relief Damper Damper 12 Relief Damper Relief Damper (Vent) Fire Damper](https://img.dokumen.tips/doc/110x75/5f7cb481641db55595223717/-04pdf-apmin-apmax-appendix-g-1-ap-apmax-overpressure-relief-damper-damper.jpg)