Embed Size (px)
Citation preview

Velos eTools Version 6.1 User Manual
Velos, Inc. 2201 Walnut Ave., Fremont, CA 94538,
P (510)739-4010 F (510)739-4018 www.velos.com
Proprietary and Confidential material for the exclusive use of employees of Velos, Inc. and authorized recipients only

Velos eTools User Manual About this Manual
Version 6.1 2 | P a g e
TTaabbllee ooff CCoonntteenntt
TABLE OF CONTENT........................................................................................................................... 2
ABOUT THIS MANUAL ....................................................................................................................... 6
OUTLINE ......................................................................................................................................... 6
PRODUCT CONVENTIONS ................................................................................................................... 6
Documentation Conventions ................................................................................................................. 6
Velos eResearch Customizations ........................................................................................................... 7
SECTION 1: GETTING STARTED ................................................................................................8
VELOS ETOOLS REQUIREMENTS ........................................................................................................... 8
ACCESSING YOUR NEW ACCOUNT ....................................................................................................... 8
Accessing your Active Account .............................................................................................................. 8
Navigating to your New Account .......................................................................................................... 9
HOW TO IDENTIFY REQUIRED FIELDS ..................................................................................................10
SECTION 2: DATASOURCE SELECTION .................................................................................... 11
SELECTING A DATASOURCE ...............................................................................................................11
Selecting a Datasource for your Database Instance ........................................................................... 11
SECTION 3: MANAGE ACCOUNT ............................................................................................ 13
MANAGING VELOS ETOOLS GROUPS ..................................................................................................13
Creating a New Velos eTools Group .................................................................................................... 14
Editing a Velos eTools Group .............................................................................................................. 16
Using the Admin Group ....................................................................................................................... 16
MANAGING USERS .........................................................................................................................16
Creating a New Velos eTools User ...................................................................................................... 16
Editing a Velos eTools User ................................................................................................................. 17
SECTION 4: DATABASE MAINTENANCE ................................................................................. 19
IDENTIFYING LOGGED IN USERS.........................................................................................................19
VELOS ETOOLS SYSTEM SETTINGS ......................................................................................................20
Editing Database System Settings ....................................................................................................... 20
Editing Autogeneration System Settings ............................................................................................. 21
MODIFYING CODE LISTS ...................................................................................................................21
Adding a New Value to Database Code List Options........................................................................... 22
Editing a Code List Value ..................................................................................................................... 23

Velos eTools User Manual About this Manual
Version 6.1 3 | P a g e
Editing Code List Flags......................................................................................................................... 24
Configuring Study Team Role -Based Access of Statuses .................................................................... 26
Configuring System-wide Status Access .............................................................................................. 28
Configuring Study Team Role Based Access for Coverage Analysis .................................................... 30
Configuring an Organization as Site of Service through the Code List Module ................................... 31
Adding a New Study Team Role through the Code List Module .......................................................... 32
Editing a New Study Team Role .......................................................................................................... 32
Using Sequence Code List .................................................................................................................... 34
WORKING WITH LOOKUPS................................................................................................................34
Adding a Lookup ................................................................................................................................. 34
Import a Static Lookup from a File ............................................................................................................. 34
Create a Dynamic Lookup from a Table/View ................................................................................................. 37
Updating an Existing Lookup .............................................................................................................. 39
USING CONTROL KEY ......................................................................................................................39
Editing Modules, Menus, and Tabs ..................................................................................................... 40
EXECUTING A QUERY IN VELOS ETOOLS ..............................................................................................41
Executing a Query ............................................................................................................................... 41
SECTION 5: REPORT DESIGNER ............................................................................................. 43
USING THE REPORT DESIGNER QUERY MANAGER ................................................................................43
Creating a New Query ......................................................................................................................... 44
Modifying an Existing Query ............................................................................................................... 45
Publishing a Query .............................................................................................................................. 46
Exporting Query Data to CSV .............................................................................................................. 48
WORKING WITH PUBLISHED REPORTS ................................................................................................48
Publishing a New Report ..................................................................................................................... 49
Editing a Published Report .............................................................................................................................. 49
Edit Report SQL ............................................................................................................................................... 49
Edit Report XSL ................................................................................................................................................ 51
USING CREATE FORM VIEW TO VIEW USER-DEFINED FORMS ................................................................51
Creating a New Form View ................................................................................................................. 52
PUBLISHING DATABASE VIEWS TO AD HOC QUERY ...............................................................................53
Publishing a New View to AHQ ........................................................................................................... 53
SECTION 6: DATA MIGRATION .............................................................................................. 55
IMPORTING A NEW DELIMITED FILE ...................................................................................................56

Velos eTools User Manual About this Manual
Version 6.1 4 | P a g e
IMPORT ODBC DB .........................................................................................................................57
Importing a New ODBC DB .................................................................................................................. 57
MIGRATE DATA ..............................................................................................................................57
Creating a New Migration Category ................................................................................................... 58
Using Standard Migration ................................................................................................................... 59
Map Fields ....................................................................................................................................................... 60
Staging Area .................................................................................................................................................... 61
Standard Migration Map Responses ............................................................................................................... 62
Validation ........................................................................................................................................................ 63
Import into Application ................................................................................................................................... 64
Re-migrate on Error ........................................................................................................................................ 65
Using Form Migration ......................................................................................................................... 66
Define Migration ............................................................................................................................................. 66
Map Fields ....................................................................................................................................................... 67
Form Migration Map Responses ..................................................................................................................... 67
Validation ........................................................................................................................................................ 68
Staging Area .................................................................................................................................................... 68
Import into Application ................................................................................................................................... 69
SECTION 7: MANAGE FORMS ................................................................................................ 70
WORKING WITH FORM FROM FILE .....................................................................................................70
Preparing the Form ............................................................................................................................. 71
Importing a New Form ........................................................................................................................ 72
TRANSFERRING A FORM ...................................................................................................................73
Using Form Transfer ............................................................................................................................ 73
USING FORM CUSTOMIZATION .........................................................................................................73
Editing Form XSL ................................................................................................................................. 74
Editing Print XSL .................................................................................................................................. 75
Viewing Form XML .............................................................................................................................. 76
USING CADSR INTEGRATION ............................................................................................................76
Importing a New Form from caDSR .................................................................................................... 77
Download Form XML ....................................................................................................................................... 77
Upload File ...................................................................................................................................................... 78
Import ............................................................................................................................................................. 78
SECTION 8: MANAGE CALENDARS ......................................................................................... 80
WORKING WITH CALENDAR FROM FILE ..............................................................................................80

Velos eTools User Manual About this Manual
Version 6.1 5 | P a g e
Preparing the Calendar ....................................................................................................................... 81
Modifying the Template ...................................................................................................................... 82
Importing a New Calendar .................................................................................................................. 83
USING CALENDAR TRANSFER ............................................................................................................84
Transferring a Calendar ...................................................................................................................... 85
Transferring Patient/Subject Cost Items with Calendar Copy ............................................................. 86
USING IMPORT CDM ......................................................................................................................87
Preparing Charge Description Master ................................................................................................. 87
Importing a CDM ................................................................................................................................. 88
SECTION 9: MANAGE BUDGETS ............................................................................................ 91
IMPORTING A BUDGET FROM FILE .....................................................................................................91
Preparing the Budget .......................................................................................................................... 92
Importing a New Budget ..................................................................................................................... 93
SECTION 10: AUDIT REPORTS................................................................................................ 94
Velos eTools User Manual About this Manual
Version 6.1 6 | P a g e
AAbboouutt tthhiiss MMaannuuaall
OOuuttlliinnee
Velos eTools provides System Administrators with a user interface to perform
database functions such as data maintenance and data migration; forms,
calendar, and budget management; and report design. When you start Velos
eTools, you connect to a database instance that is associated with an instance of
Velos eResearch. Edits you make in Velos eTools are then reflected in the
integrated version of Velos eResearch.
The Velos eTools User Manual is designed to help new and experienced Users
maximize the use of this system. This manual includes conceptual information
and step-by-step instructions for each function.
PPrroodduucctt CCoonnvveennttiioonnss
The following topic identifies the conventions used in this manual and in the
Velos eResearch and Velos eTools products.
DDooccuummeennttaattiioonn CCoonnvveennttiioonnss
This manual uses the following document conventions.
The Velos icon appears throughout the manual. It points out helpful hints
on the functionality of certain options and describes how to best use the
options to get the most out of the application.
Italicized text used to identify the full name of other document referenced in
this manual and in some cases for emphasis.
Bold text is used for table column names, field names, buttons, and the path
to specific screens, such as, Velos eResearch>>Homepage.

Velos eTools User Manual About this Manual
Version 6.1 7 | P a g e
Text such as Add New indicates links displayed in the user interface.
VVeellooss eeRReesseeaarrcchh CCuussttoommiizzaattiioonnss
Depending on whether your account is Velos Hosted or Customer Hosted, your
organization may be able to make customizations to certain areas of the product.
To find out which features can be customized and whether those options are
available to your organization, contact [email protected].

Velos eTools User Manual Section 1: Getting Started
Version 6.1 8 | P a g e
Section 1: Getting Started
This section describes how to access your Velos eTools account and to navigate
the user interface.
VVeellooss eeTToooollss RReeqquuiirreemmeennttss
Velos eTools is a Web-based application. The following platforms/Internet
browsers are supported:
• Internet Explorer 11
• Mozilla Firefox 39 and above
• Velos eResearch v10.0 and above
AAcccceessssiinngg YYoouurr NNeeww AAccccoouunntt
The following diagram shows a typical login process:
AAcccceessssiinngg yyoouurr AAccttiivvee Account
• Go to the Velos eTools Login screen.
• Enter your ‘User Name’ and ‘Password’ information, and click on the
Login button. If you encounter problems logging in, click the Forgot your
login? link to contact customer support.

Velos eTools User Manual Section 1: Getting Started
Version 6.1 9 | P a g e
NNaavviiggaattiinngg ttoo yyoouurr NNeeww AAccccoouunntt
Now that you have successfully logged in to your account, you can begin using
your application. Some tips for navigating around your account have been
provided in the following screenshot and list:
Figure 1: Navigating the Velos eTools user interface
• Click the Help icon to access the Velos eTools User Manual.
• View the version and build numbers in the top panel of each page.

Velos eTools User Manual Section 1: Getting Started
Version 6.1 10 | P a g e
• View the current datasource (the database environment that you are
logged into) for this session.
• View the version of Velos eResearch that you are updating through Velos
eTools.
• View the Velos eTools navigation menu bar on the left side of the page to
access the Velos eTools modules.
HHooww ttoo IIddeennttiiffyy RReeqquuiirreedd FFiieellddss
Required fields may be found within any given function that is being completed. If
an input in a field is required it will be shaded blue and/or marked with a red
asterisk *. See the following image:
Figure 2: Identifying required fields

Velos eTools User Manual Section 2: Datasource Selection
Version 6.1 11 | P a g e
Section 2: Datasource Selection
This section provides you with directions on selecting the appropriate database
instance. The datasource is the name given to the connection set up to a
database from your server.
SSeelleeccttiinngg aa DDaattaassoouurrccee
On logging into Velos eTools, you will see the following screen where you will be
asked to select a datasource from a list of options in a dropdown menu. You will
be connected to the datasource you choose from the dropdown menu for the
duration of your session. Any changes made during your session are saved to
this datasource.
Figure 3: Selecting datasource
SSeelleeccttiinngg aa DDaattaassoouurrccee ffoorr yyoouurr DDaattaabbaassee IInnssttaannccee
• From the Datasource dropdown, select the desired Database Instance.
• The available Datasources are dependent on the Velos eTools user’s
Group access rights. See the next section, Account Management, for a
description of access rights.
• Click the Submit button to accept the Datasource selection.
• The selected Datasource will display prominently at the top of all
subsequent screens. To change the Datasource at any time, click the

Velos eTools User Manual Section 2: Datasource Selection
Version 6.1 12 | P a g e
Select Datasource module in the left navigation menu bar and repeat the
previous steps to select a new Datasource.
Note that the list of available Datasources, typically Test and
Production Velos eResearch environments, are configured by Velos
at the time of the Velos eTools installation. If new Datasources are
needed or existing Datasources have changed, contact Velos
Customer Support to request an update of the Datasource
dropdown.

Velos eTools User Manual Section 3: Manage Account
Version 6.1 13 | P a g e
Section 3: Manage Account
This section provides you with instructions on managing the Velos eTools
account. This feature allows you to set up groups and users; assign access rights
to them for Velos eTools modules including: Database Maintenance, Data
Migration, and Forms and Calendars, and Budgets management; and assign
access to specific datasources. The following table lists the Velos eTools
Manage Account options. You can use these options to add and edit the groups
and users.
MMaannaaggiinngg VVeellooss eeTToooollss GGrroouuppss
To work with groups, select the Groups option from Manage Account, keep in
mind that your ability to edit groups is based on your access rights. Non-admin
user will only be able to edit their group or other groups created by users in their
group.
Figure 4: Selecting Manage Account >> Groups displays a list of all current Groups

Velos eTools User Manual Section 3: Manage Account
Version 6.1 14 | P a g e
CCrreeaattiinngg aa NNeeww VVeellooss eeTToooollss GGrroouupp
To create a new group:
• Click the New Group link.
• Enter the Name and Description of the Group.
• Select the Modules that Users of this Group should be allowed to access.
• Select the Datasources Users of this Group should be allowed to access.
• Click the Submit button to create your Group.

Velos eTools User Manual Section 3: Manage Account
Version 6.1 15 | P a g e
Figure 5: Specify or edit the available group options

Velos eTools User Manual Section 3: Manage Account
Version 6.1 16 | P a g e
EEddiittiinngg aa VVeellooss eeTToooollss GGrroouupp
Users only have edit ability to groups they have access to. Admin and admin
group users will have edit all group capabilities. For non-admin users it will
depend on their group access rights.
To edit a group:
• Select Groups under Manage Account.
• Click the Edit link next to the Group requiring changes.
o If required, change the Name and Description of the Group
o If required, check or uncheck Modules from the list.
o If required, check or uncheck Datasources from the list.
•• Click the Submit button and your Group settings will be saved.
UUssiinngg tthhee AAddmmiinn GGrroouupp
An Admin Group is provided with each installation of Velos eTools and is not
editable. The Admin Group has full access to all Modules and all Datasources in
Velos eTools.
MMaannaaggiinngg UUsseerrss
To work with users, select the Users option from Manage Account.
CCrreeaattiinngg aa NNeeww VVeellooss eeTToooollss UUsseerr
To create a new user:
• Select Users from Account Management.
• Click the New User link.
o Enter details such as First Name, Last Name, and Email Address.
o Select the Group that this User should belong to.

Velos eTools User Manual Section 3: Manage Account
Version 6.1 17 | P a g e
o Define a Login Name and Password for the User.
• Click the Submit button and to create your User.
Figure 6: Selecting Manage Account >> Users displays a list of all currently added Users.
Figure 7: Add or edit the User options for the user.
EEddiittiinngg aa VVeellooss eeTToooollss UUsseerr
Users from the Admin group can edit all users. Any user that does not belong to
the admin group will be limited to edit users within its own group.
To edit a user:
• Select Users from Account Management.
• Click the Edit link for the User requiring modification.
• Edit User details as needed and click the Submit button to save changes.

Velos eTools User Manual Section 3: Manage Account
Version 6.1 18 | P a g e
Note that the Admin User – Velos Administrator – account comes
with each installation of Velos eTools and is not an editable User.
The Admin User belongs to the Admin Group.

Velos eTools User Manual Section 4: Database Maintenance
Version 6.1 19 | P a g e
Section 4: Database Maintenance
This section provides you with instructions on maintaining the Velos eTools
database. The Database Maintenance collection of modules allows the User to
view and edit various settings of the database; view logged in users of Velos
eResearch; view and edit the Velos eResearch Code List table; upload and view
Lookups; and execute basic PL/SQL statements on the database.
IIddeennttiiffyyiinngg LLooggggeedd IInn UUsseerrss
Velos eTools includes a page that provides information about the Users logged
into the corresponding Velos eResearch application at a specific time. This
information is helpful for the Administrator in case there is a need to have all
users logged out to perform a specific action.
Information displayed on this page is:
o User Name
o Organization
o Login Name
o Group
o Email
o Phone
o Login Time
Figure 8: List of logged Users in Velos eResearch.

Velos eTools User Manual Section 4: Database Maintenance
Version 6.1 20 | P a g e
VVeellooss eeTToooollss SSyysstteemm SSeettttiinnggss
The System Settings page displays the current definition of several configurable
settings in the database, for example: Application URL, SMTP Server, and
System Time zone.
EEddiittiinngg DDaattaabbaassee SSyysstteemm SSeettttiinnggss
Use the following steps to edit the Database system settings:
• Select System Settings under DB Maintenance.
• Click Edit corresponding to the setting that you want to modify.
• Specify desired Name and/or Value and click the Submit button.
Figure 9: List of editable system settings.
Note the following points on the preceding System Setup screen:
• The Velos eResearch Application Version setting is for informational
purposes only and cannot be edited.
• The IRB Status setting is tied to application logic that enables various
behaviors in Velos eResearch related to the IRB Approval Status defined
in the code list at the time of implementation.
• Users can configure the system setting (Control Table) to use either
Display Value or Data Value in the Interfield Action setting. This
indicates whether for multiple choice fields, you use the displayed value or
the data value to calculate inter actions (forms).

Velos eTools User Manual Section 4: Database Maintenance
Version 6.1 21 | P a g e
• Study Summary for selected users by clicking the corresponding Edit
setting.
EEddiittiinngg AAuuttooggeenneerraattiioonn SSyysstteemm SSeettttiinnggss
Use the following steps to edit the Autogeneration System Settings:
▪ Select System Settings under DB Maintenance.
▪ Select applicable user from the Select Users dropdown.
▪ Click Edit for the corresponding autogeneration setting you want
to modify.
▪ On the Edit popup, enable or disable autogeneration setting for
the following:
o Patient ID in Patient Demographics.
o Study ID in Study Summary.
o Provide an SQL Prefix for the respective IDs. For example,
‘Velos’, which then becomes the prefix for autogenerated
IDs.
▪ Specify desired Name and/or Value and click the Submit button.
Figure 10: Edit the Select Users – Autogeneration System Settings Values.
MMooddiiffyyiinngg CCooddee LLiissttss
This section of Velos eTools allows Users to modify the database code list
options. These options are available in Velos eResearch as dropdown fields

Velos eTools User Manual Section 4: Database Maintenance
Version 6.1 22 | P a g e
throughout the application. Certain Code Lists also have Flags applied to them
which enable additional application behavior. Some Flags can be edited in Velos
eTools and apply to the More…Screens such as More Study Details and to the
Patient and Study Status screens.
AAddddiinngg aa NNeeww VVaalluuee ttoo DDaattaabbaassee CCooddee LLiisstt OOppttiioonnss
• Select Code List from the DB Maintenance menu.
• Select desired Module/Field from the dropdown. For example, to add a
new value to the Event type field on the Event Library screen in Velos
eResearch, select Event Library-Type from the available Code Lists.
• A list of values for the field will be displayed.
• Click Add New Code List to add a new response for the selected
module/field.
• Enter in the following attributes for the new value:
o Description: mandatory, name of new value, 200 characters max.
o Sequence: mandatory, defaulted, integer, 3 characters max.
o Sub Type: mandatory, defaulted, should be unique within
Module/Field selected, 15 characters max.
Figure 11: List of values for Sponsor.

Velos eTools User Manual Section 4: Database Maintenance
Version 6.1 23 | P a g e
Figure 12: Attributes for adding a new value
EEddiittiinngg aa CCooddee LLiisstt VVaalluuee
Editing a Code List value enables additional attributes such as the option to hide
the value from the drop down field or in the case of the More…Screens such as
More Study Details, define the type of field such as checkbox or dropdown.
• Select Code List from the DB Maintenance menu.
• Select desired Module/Field from the dropdown. For example, to add a
new value to the Event type field on the Event Library screen in Velos
eResearch, select Event Library-Type from the available Code Lists.
• To modify a value, click the Edit link corresponding to any value in the list
for a specific Module/ Field.
• The following attributes can be edited for a given field value.
o Sub Type: mandatory, should be unique within ‘Type’, 15 characters
max.
o Description: mandatory, 200 characters max.
o Sequence: mandatory, must be integer value
o Hide Code List: hides the value from the code list.
• Click the Submit button to save the changes.

Velos eTools User Manual Section 4: Database Maintenance
Version 6.1 24 | P a g e
Figure 13: Attributes for editing a value.
Hiding a value from the Code List means that the value will no longer
appear for prospective data entry. If the values had been historically used
by users of Velos eResearch, then the value will still appear in the
application when the field loads for that given study.
EEddiittiinngg CCooddee LLiisstt FFllaaggss
Certain Code Lists have flags associated with their values. These flags enable
additional behavior in the application and are accessed by editing a value. Here
are the Flag options:
• Browser: indicates that this option should be available for display in a
search browser, for example, study and patient status. Any status code
that has this flag can appear in different Study and Patient search
browsers
• Field Type: This field type is available in More Details fields. In this option
users can select the field type associated with the additional field
• Text: Creates a text field
• Dropdown: Creates a dropdown field; values for the dropdown fields
need to be specified in the ‘HTML Code’ box.
• Checkbox: Creates a checkbox field in More Details fields
• Date: Creates a date field in More Details fields

Velos eTools User Manual Section 4: Database Maintenance
Version 6.1 25 | P a g e
• Text Area: Creates a text area field
• Checkbox group: Creates a checkbox with multiple options in More
Details fields; values for the dropdown fields need to be specified in the
‘HTML Code’ box.
• Read only: Creates a text field in read only state
• Lookup: Creates a lookup field that can be linked to an already
existing lookup in eResearch or any lookup created through eTools;
values for the dropdown fields need to be specified in the ‘HTML Code’
box.
Figure 14: Field Type is a Flag used for fields on the More…Screens
When setting the field type to Dropdown, Checkbox group or Lookup for
any field on the More…Screens, the values of these fields must be pasted into
the text area reading ‘HTML Code’.
Check the box at the bottom of the page for examples regarding HTML Code
for Dropdown, Checkbox group and Lookup fields.
The OPTION VALUE is what is stored in the database, not the display value
for the OPTION tag. Please take this into account for reporting purposes.

Velos eTools User Manual Section 4: Database Maintenance
Version 6.1 26 | P a g e
CCoonnffiigguurriinngg SSttuuddyy TTeeaamm RRoollee --BBaasseedd AAcccceessss ooff SSttaattuusseess
You can configure access to Velos eResearch dropdown menus for study team
roles by predefining the statuses for each study team role type. When users with
one of these study team roles logs into Velos eResearch, they will be able to see
the predefined statuses, configured for their role in the selected dropdown menu.
The following is a list of fields which support the study team role configuration:
Field Name
Form Response Status (form responses)
Study Status Type
Study Status
Form Query Status
Milestone Status
Budget Status
Calendar Study Status
Event Cost Type
Event Coverage Type
For example, you can configure the role of the study coordinator to have access
to the Work in Progress and Freeze statuses for Budget Status. Any user,
logging in as a Study Coordinator will see those two statuses in the Budget
Status dropdown menu in Velos eResearch.
To define the role based access to study statuses:
• From DB Maintenance module select Code List and select the Study
Team – Study Team Role from the dropdown
• For one of the roles, select the Define Code Access link

Velos eTools User Manual Section 4: Database Maintenance
Version 6.1 27 | P a g e
• From the Code List Edit page for the selected study team role, define the
statuses that you want to make available to that study team role.
• Click the Submit button.
Figure 15: For this example, choose Study Team Role code list.
Figure 16: For this example, choose Study Coordinator.

Velos eTools User Manual Section 4: Database Maintenance
Version 6.1 28 | P a g e
Figure 17: For this example, for Form Response Status, check boxes as shown above.
CCoonnffiigguurriinngg SSyysstteemm--wwiiddee SSttaattuuss AAcccceessss
In addition to study team role, statuses can also be configured on the system-
level setting. Each study status has a flag which designates if a status is
available for addition by all users or not. This flag, used in tandem with the role-
based access configuration, can be used to control the statuses available to all
users.
When this flag is selected, the status appears for all users, unless separate
settings are selected for the user role.
To enable or disable the availability of a study status on the system level:
• From DB Maintenance module select Code List and select the desired
module status type from the dropdown
• Click on the Edit link for the desired status
• In the status, select the checkbox to enable the viewing of the status for all users

Velos eTools User Manual Section 4: Database Maintenance
Version 6.1 29 | P a g e
Figure 18: List of values for Form Response Status.
Figure 19: Code List Edit Page.
As shown in the following screenshot, in Velos eResearch, all users will see the
selected status (in this example, Incomplete) in the Forms Response Status
dropdown menu unless there is a role based status control.

Velos eTools User Manual Section 4: Database Maintenance
Version 6.1 30 | P a g e
Figure 20: Form Response Status dropdown menu.
CCoonnffiigguurriinngg SSttuuddyy TTeeaamm RRoollee BBaasseedd AAcccceessss ffoorr CCoovveerraaggee
AAnnaallyyssiiss
You can configure the Event Coverage Type field based on the role assigned to
the user. By default, all event coverage types will be visible for all users. The
dropdown list displaying available coverage types is configurable and is based on
the role assigned to the team and the individual.
Once configured, in Velos eResearch users can:
• Choose a coverage type from a dropdown list of all the applicable
coverage types
• Change the coverage type from a dropdown list of all the applicable
coverage types
For more information on allowing role-based coverage types, please refer to the
Configuring Study Team Role-Based Access of Statuses section.

Velos eTools User Manual Section 4: Database Maintenance
Version 6.1 31 | P a g e
CCoonnffiigguurriinngg aann OOrrggaanniizzaattiioonn aass SSiittee ooff SSeerrvviiccee tthhrroouugghh tthhee CCooddee
LLiisstt MMoodduullee
You can configure an organization type as site of service using the code list
module. Site of Service is an attribute of Organization and Calendar Event. It is
used to designate a facility as the location for a patient event. A list of these sites
is available in the Event Library for use with calendar events.
Once configured, in Velos eResearch users can:
• Configure organization type as site of service when adding a new
organization or modifying an existing one.
• Choose from a dropdown list of organizations configured as site of
service.
To configure an organization as Site of Service:
• Select Code List from the DB Maintenance menu.
• Click the Edit link next to the organization type that you want to configure.
• From the Code List - Edit page, check the This is a ‘Site of Service’ box.
• Click the Submit button.
Figure 21: List of fields for Organization.

Velos eTools User Manual Section 4: Database Maintenance
Version 6.1 32 | P a g e
Figure 22: Configuring Organization type.
AAddddiinngg aa NNeeww SSttuuddyy TTeeaamm RRoollee tthhrroouugghh tthhee CCooddee LLiisstt MMoodduullee
Adding new roles to the Study Team list of potential roles can also be
accomplished through the Code List module.
• Select Code List from the DB Maintenance menu.
• Select Study Team – Study Team Role from the Select Module / Field
dropdown.
• Click the link Add New Code List.
• Enter the name of the new Team Role in the Description field and click the
Submit button.
• To define the access rights for the new Study Team Role, click the Edit
link next to the newly added entry. See the next section on editing the
access rights.
EEddiittiinngg aa NNeeww SSttuuddyy TTeeaamm RRoollee
Defining new Study Team Role access rights or modifying previously defined
Study Team Role access rights is completed by editing the Code List entry for
the role.
• Select Code List from the DB Maintenance menu.
• Select Study Team – Study Team Role from the Select Module / Field
dropdown.

Velos eTools User Manual Section 4: Database Maintenance
Version 6.1 33 | P a g e
• Select the Edit link next to the role for which you need to edit access
rights.
• Select or deselect the checkboxes next to each Study Team Role access
right.
• If this is a newly defined role, then there is no need to check the very last
checkbox on the screen ‘Apply study team role access rights changes
to existing users in study team?’, but if rights are being modified for
previously defined roles, then this option will update the rights for all
historical data for that particular role as opposed to just making it a
prospective change.
Figure 23: Altering Study Team Role access rights.
Note that when selecting the option to ‘Apply study team role
access rights changes to existing users in study team?’ while
editing access rights, this will replace all customized access rights
previously defined for the role being edited.

Velos eTools User Manual Section 4: Database Maintenance
Version 6.1 34 | P a g e
UUssiinngg SSeeqquueennccee CCooddee LLiisstt
To auto-sequence a list of values for a given field, the Sequence Code List
feature can be used. This will sort the values alphabetically and also sequence
the list of values with an interval of 5 between values.
• To auto-sequence a code list, click the Sequence Code List button.
WWoorrkkiinngg wwiitthh LLooookkuuppss
This functionality is used to import external lookup data, create dynamic lookups
based on tables or views, update existing lookups, or view the lookup data. Data
can be imported from a file into the Velos eResearch lookup table ‘ER_LKPLIB’
and then made available for linking to form fields in Library > Form Library > Add
Fields > Lookup.
Figure 24: List of lookups, both static and dynamic.
AAddddiinngg aa LLooookkuupp
Use the following two methods to add a lookup to Velos eTools:
• Import Static Lookup from a File
• Create a Dynamic Lookup from a Table/View
IImmppoorrtt aa SSttaattiicc LLooookkuupp ffrroomm aa FFiillee
• Select Lookup from the DB Maintenance module.
• To import external data from a file, select the Import Static Lookup from
File link.

Velos eTools User Manual Section 4: Database Maintenance
Version 6.1 35 | P a g e
• Specify the following attributes:
o Lookup Name: mandatory, should be unique. This is the name that is
used to identify the lookup within Velos eResearch
o Delimited File name
o Delimiter: mandatory
o Version: optional
o Description: optional, brief description to identify the lookup
o Type: optional, can be used for categorization of lookups
Figure 25: Attributes for adding a static lookup.
Note the delimited file types supported are:
• Comma
• Semicolon
• Pipe
Note the first row of the file should contain Column Name, no special
characters other than ‘_’ (underscore), be one continuous string of
characters (no space) and delimited with same delimiter as the actual data
rows.
Velos eTools User Manual Section 4: Database Maintenance
Version 6.1 36 | P a g e
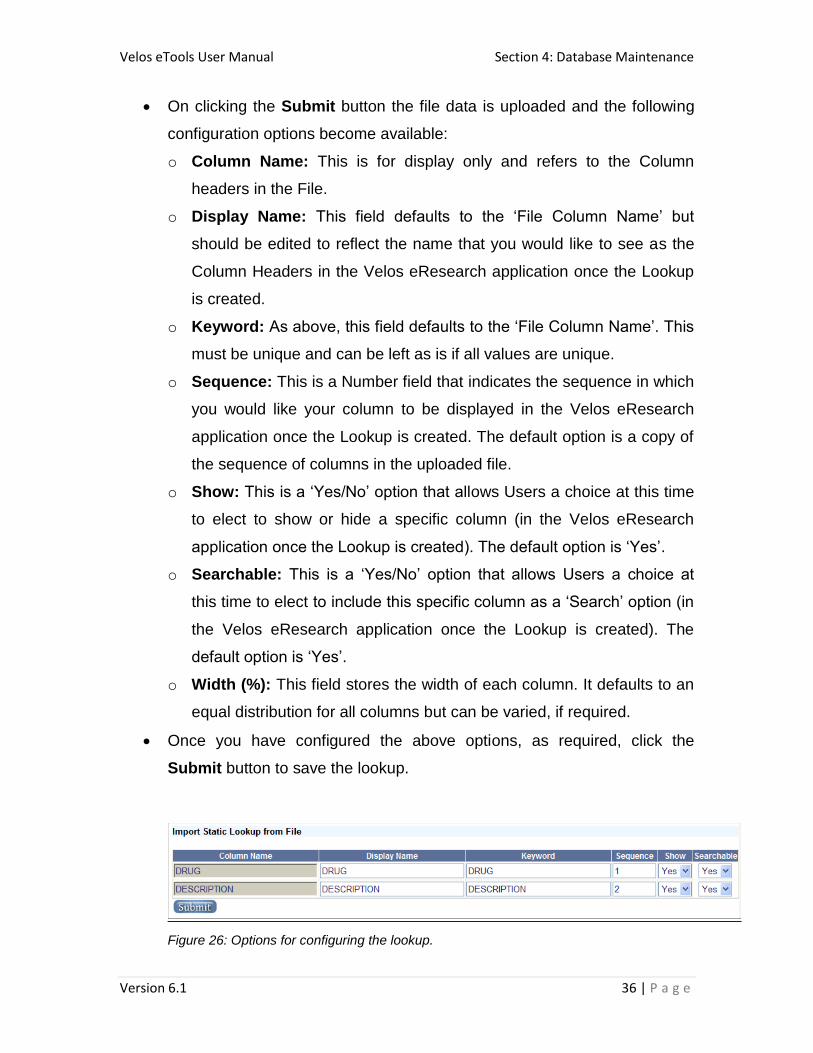
• On clicking the Submit button the file data is uploaded and the following
configuration options become available:
o Column Name: This is for display only and refers to the Column
headers in the File.
o Display Name: This field defaults to the ‘File Column Name’ but
should be edited to reflect the name that you would like to see as the
Column Headers in the Velos eResearch application once the Lookup
is created.
o Keyword: As above, this field defaults to the ‘File Column Name’. This
must be unique and can be left as is if all values are unique.
o Sequence: This is a Number field that indicates the sequence in which
you would like your column to be displayed in the Velos eResearch
application once the Lookup is created. The default option is a copy of
the sequence of columns in the uploaded file.
o Show: This is a ‘Yes/No’ option that allows Users a choice at this time
to elect to show or hide a specific column (in the Velos eResearch
application once the Lookup is created). The default option is ‘Yes’.
o Searchable: This is a ‘Yes/No’ option that allows Users a choice at
this time to elect to include this specific column as a ‘Search’ option (in
the Velos eResearch application once the Lookup is created). The
default option is ‘Yes’.
o Width (%): This field stores the width of each column. It defaults to an
equal distribution for all columns but can be varied, if required.
• Once you have configured the above options, as required, click the
Submit button to save the lookup.
Figure 26: Options for configuring the lookup.

Velos eTools User Manual Section 4: Database Maintenance
Version 6.1 37 | P a g e
CCrreeaattee aa DDyynnaammiicc LLooookkuupp ffrroomm aa TTaabbllee//VViieeww
• Select Lookup from the DB Maintenance module.
• Click the Create Dynamic Lookup from Table/View link.
• Begin typing in the name of the table or view. This field is linked to an
AJAX call that will pull up the entire list of tables and views in the database
for easy completion.
• Double-click the name from the table of available tables/views to accept
the table or view.
• Specify the remaining attributes:
o Lookup Name: mandatory, should be unique. This is the name that is
used to identify the lookup within Velos eResearch
o Version: optional
o Description: optional, brief description to identify the lookup
o Type: optional, can be used for categorization of lookups
Figure 27: Attributes for adding a dynamic lookup.

Velos eTools User Manual Section 4: Database Maintenance
Version 6.1 38 | P a g e
Figure 28: Auto-display of available tables and views.
• On clicking the Submit button, the file data is uploaded and the following
configuration options become available:
o Column Name: This field is for display only and refers to the Column
names in the table.
o Display Name: This field defaults to the ‘Table Column Name’ but
should be edited to reflect the name that you would like to see as the
Column Headers in the Velos eResearch application once the Lookup
is created.
o Keyword: As above, this field defaults to the ‘Table Column Name’.
This must be unique and can be left as is if all values are unique.
o Sequence: This is a Number field that indicates the sequence in which
you would like your column displayed in the Velos eResearch
application once the Lookup is created. The default option is a copy of
the sequence of columns in the table.
o Show: This field is a ‘Yes/No’ option that allows Users a choice at this
time to elect to show or hide a specific column (in the Velos eResearch
application once the Lookup is created). The default option is ‘Yes’.
o Searchable: This field is a ‘Yes/No’ option that allows Users a choice
at this time to elect to include this specific column as a ‘Search’ option
(in the Velos eResearch application once the Lookup is created). The
default option is ‘Yes’.
o Width (%): This field stores the width of each column. It defaults to an
equal distribution for all columns but can be varied, if required.
• Once you have configured the preceding options, as required, click the
Submit button at the bottom of the page and your lookup is ready to use.

Velos eTools User Manual Section 4: Database Maintenance
Version 6.1 39 | P a g e
UUppddaattiinngg aann EExxiissttiinngg LLooookkuupp
• Select Lookup from the DB Maintenance module.
• Click on the Update Lookup link corresponding to the Static Lookup that
needs to be updated.
• The selected option will be displayed in the Lookup Name field.
• Select the relevant Delimited File for uploading from your computer by
clicking the Browse button.
• Specify the delimiter and click the Submit button.
Note that the above step for ‘Update Lookup’ replaces all data in the
existing lookup.
Note that a Dynamic Lookup never needs to be updated.
UUssiinngg CCoonnttrrooll KKeeyy
The Control Key function allows system administrators to configure Navigation
Menu and tabs for all modules in Velos eResearch. This includes editing the
name, visibility status, or sequence associated with the option. Use this function
to rename or reorder the menu or sub link options in the Velos eResearch Main
Menu or to hide any options you do not want to make available to users.
For example, in the Manage Patient module you can:
• Change the order of Manage Patient in the Manage tab
• Rename it from Manage Patient to Manage Subjects
• Rename or reorganize the sequence of the sub links in Manage Patient
• Hide the module/menu/tab from certain users
To have view changes made from Control Key appear in Velos eResearch:
• Restart the application server

Velos eTools User Manual Section 4: Database Maintenance
Version 6.1 40 | P a g e
• With Admin access rights, from Manage Account >> Users, click the
Refresh Menus/Tabs link to refresh the settings and log out of the
application
EEddiittiinngg MMoodduulleess,, MMeennuuss,, aanndd TTaabbss
• Select Control Key from the DB Maintenance module.
• Select the user authorized to make these changes. If you have access to
more than one account within the same environment, this user will be
linked to the account that you are modifying.
• Select the desired module from the Select Module field.
Figure 29: Module and the associated menus and tabs.
• Select the Edit link next to the option that you want to configure.
• Specify the following attributes:
o Module/Menu: mandatory, should be unique. This is the name of the
module, menu, or tab that is used in Velos eResearch Top Navigation
Menu Bar
o Sequence: mandatory, this is the order in which the module, menu
item, or tab appears in Velos eResearch

Velos eTools User Manual Section 4: Database Maintenance
Version 6.1 41 | P a g e
o Visible: Indicates if the module, menu or tab should be visible or
hidden in Velos eResearch
Figure 30: Attributes for editing modules, menus, and tabs.
Once you have configured the preceding options, as required, click the Submit
button at the bottom of the page and your changes will display in Velos
eResearch.
If users are logged in to the system while the changes that are made, they
may need to log out before they view the changes.
EExxeeccuuttiinngg aa QQuueerryy iinn VVeellooss eeTToooollss
The Execute Query function allows system administrators to write SQL queries
directly on the database instance. Only SELECT statements are processed by
the Execute Query function. The results of the query are displayed below the
query window in a paginated view.
EExxeeccuuttiinngg aa QQuueerryy
• Select Execute Query from the DB Maintenance module.
• Type or paste an SQL SELECT statement in the query window and then
click the Execute Query button.

Velos eTools User Manual Section 4: Database Maintenance
Version 6.1 42 | P a g e
Figure 31: Execute query window with results.
Note that only SELECT statements can be run in Velos eTools DB
Maintenance >> Execute Query and Report Designer >> Query
Manager modules.

Velos eTools User Manual Section 5: Report Designer
Version 6.1 43 | P a g e
Section 5: Report Designer
This section provides you with instructions on how to use the Report Designer.
The Report Designer provides the functionality to create and publish custom
reports to Velos eResearch. It also enables the administrator to share
customized database views to the Ad Hoc Query module so that Velos
eResearch users can create their own reports on custom created views.
UUssiinngg tthhee RReeppoorrtt DDeessiiggnneerr QQuueerryy MMaannaaggeerr
The Query Manager function displays all previously created queries. New queries
can be created by typing in SQL code directly, pasting in external SQL code, or
by using the Clipboard. Once a query is created and saved in the Query
Manager, it can be published as a report in Velos eResearch. Each query can
be used to generate multiple reports, if required.
Figure 32: List of previously created queries.

Velos eTools User Manual Section 5: Report Designer
Version 6.1 44 | P a g e
CCrreeaattiinngg aa NNeeww QQuueerryy
To create a new query at any time, use the following steps;
• Select Query Manager from the Report Designer module.
• Click the New Query link at the top of the page.
• Type your SQL into the box provided and use the Execute Query button
to view the results of your query.
• The SQL Clipboard can also be used to quickly identify the
views/tables/columns needed for the query.
o Use the search box to find the view/table OR scroll down the list of
views/tables.
o Double-click the view/table from the viewer to see the available
columns.
o Double-click each column needed in the query in order to copy it to the
Clipboard OR just click the Copy to Clipboard button to copy all
columns to the Clipboard.
o Drag all contents of the Clipboard to the Query Window and execute
the query.
• Once you have the desired results of your query, click the Save Query
button to save your query.
Figure 33: Query Manager window with table/view/column Clipboard.
Velos eTools User Manual Section 5: Report Designer
Version 6.1 45 | P a g e
MMooddiiffyyiinngg aann EExxiissttiinngg QQuueerryy
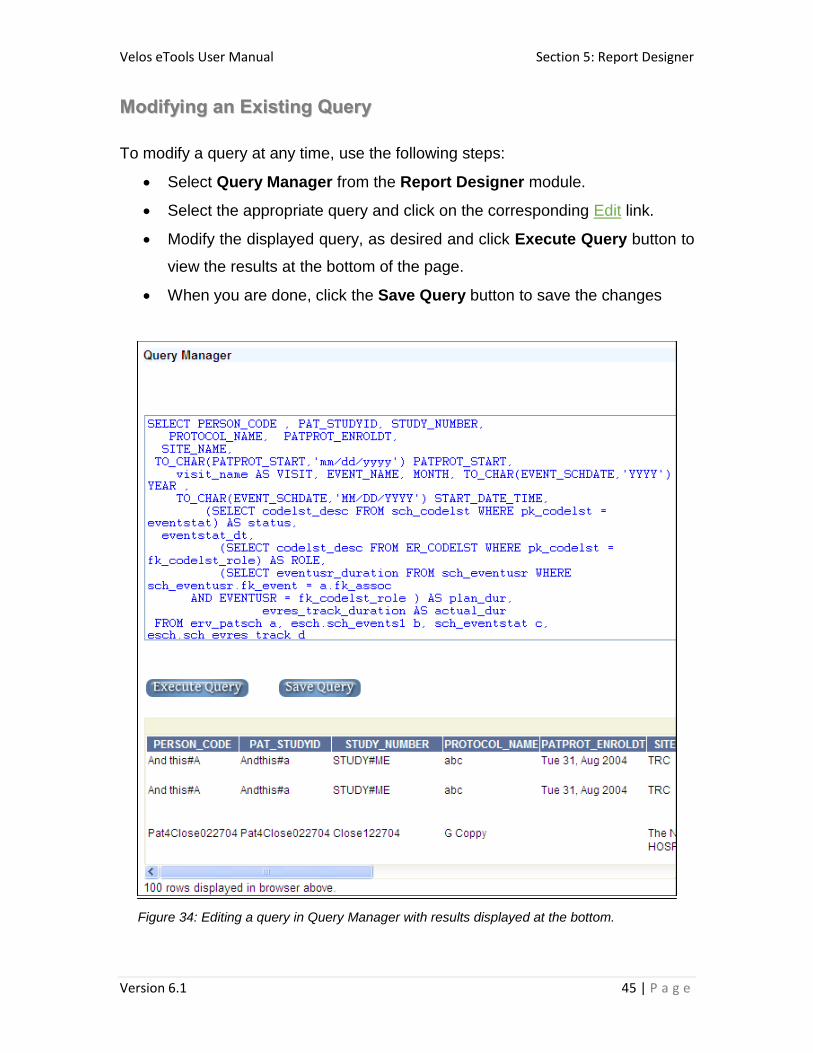
To modify a query at any time, use the following steps:
• Select Query Manager from the Report Designer module.
• Select the appropriate query and click on the corresponding Edit link.
• Modify the displayed query, as desired and click Execute Query button to
view the results at the bottom of the page.
• When you are done, click the Save Query button to save the changes
Figure 34: Editing a query in Query Manager with results displayed at the bottom.

Velos eTools User Manual Section 5: Report Designer
Version 6.1 46 | P a g e
PPuubblliisshhiinngg aa QQuueerryy
To publish a query, use the following steps;
• Select the Query Manager from the Report Designer module.
• To publish a previously saved query to Report Central, click the Publish
link.
• Specify a Report Name. This will be the name displayed to Velos
eResearch users.
• Provide a Description of the report.
• Edit the Report Column Name as needed. These are the column
headers displayed in Velos eResearch to the user. The Column Name is
non-editable.
• Adjust the Width of each column as needed. The default numbers are a
calculated equal distribution for all columns.
• Check Summarize next to each column requiring summary charts at the
top of the report.
• Check Sum Total for each column of the integer type that requires a total
at the end of each grouping or report.
o Additional Exclude: This checkbox provides Users with the option of
excluding a certain field, or column, in the final report to be displayed
o Group By: All Report Columns are available in the three dropdowns in
the ‘Group By’ section. Users should select the field/column that they
would like to group their data by. The ‘Group By’ action works to first
group by the first selection, then second and so on.

Velos eTools User Manual Section 5: Report Designer
Version 6.1 47 | P a g e
Figure 35: Publish report options.

Velos eTools User Manual Section 5: Report Designer
Version 6.1 48 | P a g e
EExxppoorrttiinngg QQuueerryy DDaattaa ttoo CCSSVV
Administrators may need to create queries that do not need to be published as
reports in Velos eResearch but need to be run occasionally. In such cases, the
query can be created and saved. To view this data, the query can be executed.
To export the data to CSV, follow these steps:
• Select Query Manager from the Report Designer module.
• Select the appropriate query and click on the corresponding CSV link
• This will cause the query to be executed and data exported into a CSV file
which can be opened by MS Excel or any text editor.
Figure 36: Dialog box to save CSV file.
WWoorrkkiinngg wwiitthh PPuubblliisshheedd RReeppoorrttss
When a query is published, a copy of the query is created in Query Manager
and made available for editing in Published Reports. Publishing also produces
the XSL necessary to display the report in the browser.
Figure 37: Schematic showing a new instance of the query added to Published Reports from the
Query Manager.

Velos eTools User Manual Section 5: Report Designer
Version 6.1 49 | P a g e
PPuubblliisshhiinngg aa NNeeww RReeppoorrtt
To publish a report to Velos eResearch, start by creating a query in the Query
Manager module. See the preceding topic; Create a New Query, for the steps.
EEddiittiinngg aa PPuubblliisshheedd RReeppoorrtt
Editing a published report is generally entails the following two step process:
• Modification of the report SQL or data layer
• Modification to the report XSL or presentation layer
Figure 38: List of published reports.
EEddiitt RReeppoorrtt SSQQLL
• Select Published Reports under Report Designer.
• Click Edit SQL for the appropriate report.
• The following options are available for editing a published report:
o Report Name: This is the name of the report displayed in Velos
eResearch.
o Hide Report: This checkbox, if checked, will hide the report from
Report Central in Velos eResearch.
o Filters: Apply any of the 10 filters, plus date filters, which users of
Report Central have access to when running reports.
▪ First check the filter in the list of the available 10 filters.
▪ Second, apply the filter code directly to the SQL statement, for
example to apply the studyId filter, the WHERE clause would look
like:

Velos eTools User Manual Section 5: Report Designer
Version 6.1 50 | P a g e
• WHERE fk_study IN (:studyId)
▪ Third, if a date filter is needed, use the following convention on the
date field to be filtered:
• BETWEEN (:fromDate) AND (:toDate)
Figure 39: List of available filters for a published report.
• Save the edited report by clicking the Submit button.
• These changes will be reflected in your report in Velos eResearch.
Figure 40: Editing a published report.
For filter usage use the keyword after the hyphen - in your SQL prefixed by
a colon sign. Keyword is case sensitive.

Velos eTools User Manual Section 5: Report Designer
Version 6.1 51 | P a g e
Example: If you want to use study filter in a report find the keyword from the
applicable filter list, in this case the string is "Study - studyId". The keyword
is studyId, use this keyword in your SQL as shown below:
Sample SQL: SELECT STUDY_NUMBER, STUDY_TITLE FROM ER_STUDY
WHERE PK_STUDY IN (:studyId).
EEddiitt RReeppoorrtt XXSSLL
• To modify the presentation layer of the report, click Edit XSL for the
corresponding report.
• Edit the XSL in the Report XSL window and click the Submit button to
save the changes.
Figure 41: Editing the report XSL.
UUssiinngg CCrreeaattee FFoorrmm VViieeww ttoo VViieeww UUsseerr--DDeeffiinneedd FFoorrmmss
The Create Form View module is a quick and easy way to create a view of a
User-defined form created in Velos eResearch. Making the User-defined form a
view permits more complicated reporting; for example joining multiple form views
and publishing as a report (See the previous two topics, Query Manager and
Velos eTools User Manual Section 5: Report Designer
Version 6.1 52 | P a g e
Published Reports for more details). Form Views are the only views that can
be created from within the Velos eTools interface. All other non-form views must
be created directly in the database.
CCrreeaattiinngg aa NNeeww FFoorrmm VViieeww
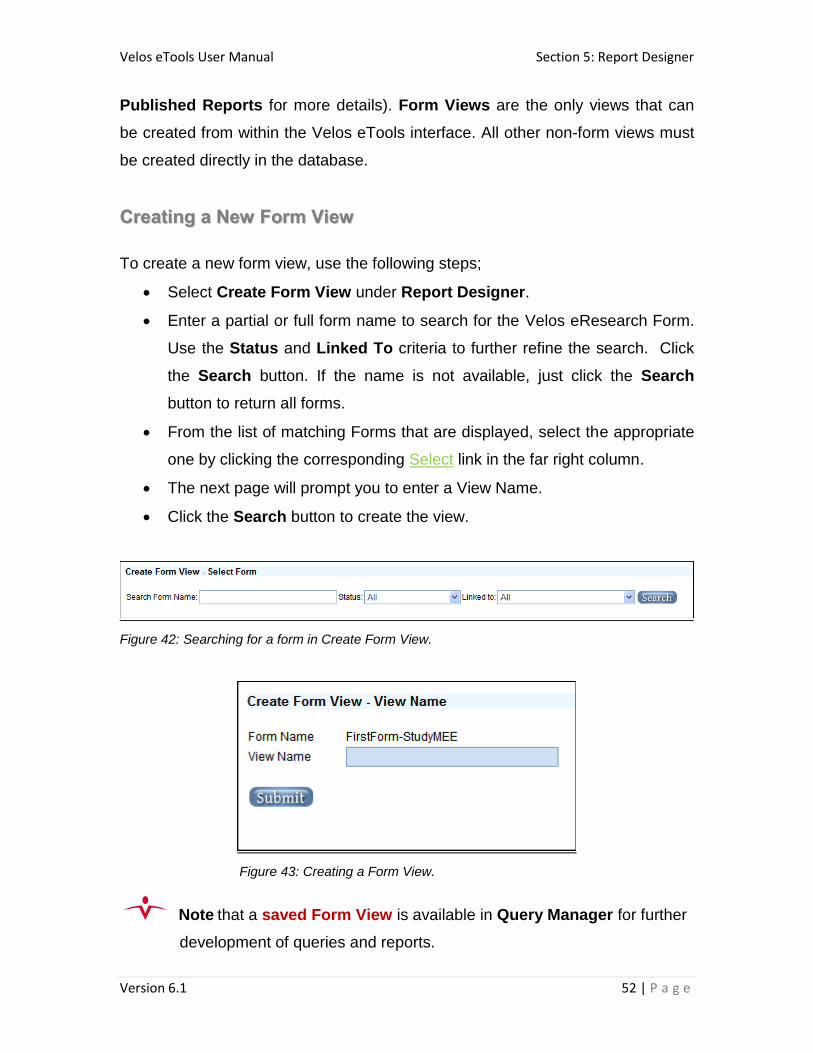
To create a new form view, use the following steps;
• Select Create Form View under Report Designer.
• Enter a partial or full form name to search for the Velos eResearch Form.
Use the Status and Linked To criteria to further refine the search. Click
the Search button. If the name is not available, just click the Search
button to return all forms.
• From the list of matching Forms that are displayed, select the appropriate
one by clicking the corresponding Select link in the far right column.
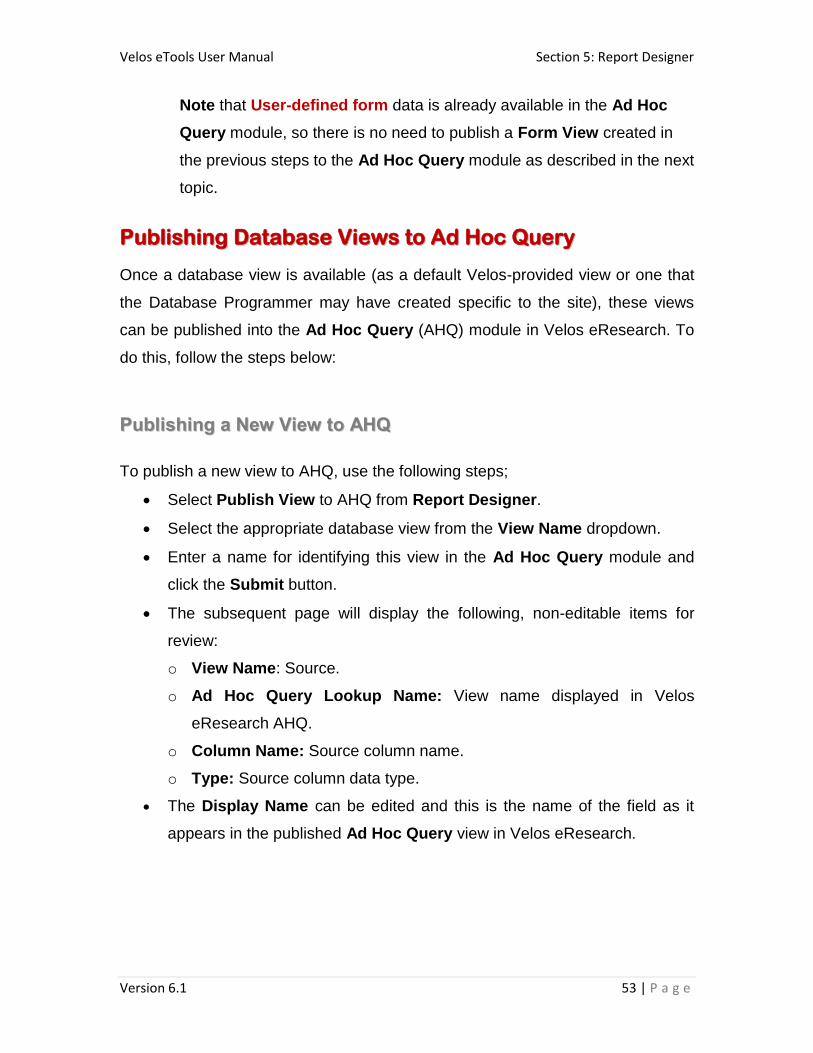
• The next page will prompt you to enter a View Name.
• Click the Search button to create the view.
Figure 42: Searching for a form in Create Form View.
Figure 43: Creating a Form View.
Note that a saved Form View is available in Query Manager for further
development of queries and reports.
Velos eTools User Manual Section 5: Report Designer
Version 6.1 53 | P a g e
Note that User-defined form data is already available in the Ad Hoc
Query module, so there is no need to publish a Form View created in
the previous steps to the Ad Hoc Query module as described in the next
topic.
PPuubblliisshhiinngg DDaattaabbaassee VViieewwss ttoo AAdd HHoocc QQuueerryy
Once a database view is available (as a default Velos-provided view or one that
the Database Programmer may have created specific to the site), these views
can be published into the Ad Hoc Query (AHQ) module in Velos eResearch. To
do this, follow the steps below:
PPuubblliisshhiinngg aa NNeeww VViieeww ttoo AAHHQQ
To publish a new view to AHQ, use the following steps;
• Select Publish View to AHQ from Report Designer.
• Select the appropriate database view from the View Name dropdown.
• Enter a name for identifying this view in the Ad Hoc Query module and
click the Submit button.
• The subsequent page will display the following, non-editable items for
review:
o View Name: Source.
o Ad Hoc Query Lookup Name: View name displayed in Velos
eResearch AHQ.
o Column Name: Source column name.
o Type: Source column data type.
• The Display Name can be edited and this is the name of the field as it
appears in the published Ad Hoc Query view in Velos eResearch.

Velos eTools User Manual Section 5: Report Designer
Version 6.1 54 | P a g e
Figure 44: Selecting a view to publish.
Figure 45: Display of columns to be published.
The view must include the appropriate columns for it to be published to
the Ad Hoc Query.
FK_ACCOUNT Mandatory
FK_PER Required for patient related ad hoc query
FK_STUDY Required for study related ad hoc query
Views being published to the Ad Hoc Query module must first be created
directly in the database by a Database Programmer.

Velos eTools User Manual Section 6: Data Migration
Version 6.1 55 | P a g e
Section 6: Data Migration
This section provides you with instructions on migrating data. The Data Migration
collection of modules facilitates the movement of data from an external source to
the Velos eResearch table structure. Data migrations can be performed to the
standard set of Velos eResearch tables as well as to User-defined forms. The
migration components in Velos eTools handle many of the difficult tasks such as
column mapping, response level mapping, and data validation.

Velos eTools User Manual Section 6: Data Migration
Version 6.1 56 | P a g e
IImmppoorrttiinngg aa NNeeww DDeelliimmiitteedd FFiillee
To import data from a Delimited File into Velos eResearch Temporary Table in
preparation for a data migration, follow these steps:
• Select Import Delimited File from the Data Migration menu.
• Select the Delimited File from your computer for uploading by clicking the
Browse button.
• Specify the Delimiter in your file.
• Enter Table Name (should be unique) and click the Submit button.
Common delimited file types are comma, semicolon, and pipe. Tab
delimited file types are not supported.
The first row of the file should contain the Column Name, have no
special characters other than ‘_’ (underscore), be one continuous string of
characters (no space) and delimited with same delimiter as the actual data
rows.
While creating tables for importing files, use a naming convention specific
to your institution. Velos highly encourages Administrators to NOT use
Velos table naming conventions so that there is an easy distinction in case
issues arise.
The maximum file name length (minus extension) is 15 characters.
Anything beyond that will be truncated to only 15 characters.

Velos eTools User Manual Section 6: Data Migration
Version 6.1 57 | P a g e
IImmppoorrtt OODDBBCC DDBB
To import data directly from an Open Database Connectivity database (ODBC
DB) such as Microsoft Access, you will need to create an ODBC DB Connection
Profile. ODBC is a standard software interface for accessing database
management systems using SQL queries. This Profile uses a datasource name
(DSN) entry that is created on the server where Velos eTools is installed.
Note: Search Microsoft Help for instructions on creating a DSN entry.
IImmppoorrttiinngg aa NNeeww OODDBBCC DDBB
To import a new ODBC DB, use the following steps;
- Select Import ODBC DB from the Data Migration menu.
- Click the Add ODBC DB Connection Profile link.
- Supply the following parameters:
o Name: The ODBC DB Connection Profile name.
o ODBC DSN: The DSN name created directly on the server that
houses Velos eTools.
o User: Username for the database if needed.
o Password: Password for the database if needed.
MMiiggrraattee DDaattaa
Data migration into Velos eResearch can be done for the standard Velos screens
and for User-defined forms. Both are described in this section.

Velos eTools User Manual Section 6: Data Migration
Version 6.1 58 | P a g e
CCrreeaattiinngg aa NNeeww MMiiggrraattiioonn CCaatteeggoorryy
Prior to starting a migration, a Category must first be defined. The Category is a
collection of migrations that may occur at a given time and categories help keep
migration activity organized. For example, if you have a migration of some patient
data for the first quarter, you could create a category called ‘Patient Migration
Q1’. Use the following steps to create a new migration category:
- Select Migrate Data from the Data Migration menu.
- To create a new category, click the New Migration Category link.
- Provide the following attributes for the category:
o Name: required, a name for the category.
o Description: optional, a short description of the kind of migration
activity.
o Audit Trail User: required, the Velos eResearch user that will be
associated to all records migrated, usually the CREATOR field in
the Velos eResearch tables.
- Save the migration category by clicking the Submit button.
Figure 46: Defining a new migration category.
Figure 47: List of defined migration categories.

Velos eTools User Manual Section 6: Data Migration
Version 6.1 59 | P a g e
UUssiinngg SSttaannddaarrdd MMiiggrraattiioonn
A Standard Migration is a migration of data into the core Velos eResearch
tables.
Define Migration
- Select Migrate Data from the Data Migration menu.
- Find the Migration Category, by Name, for which the Standard Migration
will occur and click the Standard link. See previous topic titled Create a
Migration Category to create a migration category, if no migration
category exists.
- Within the Migration Data - Standard window, click the New migration link
to define the data source and target for the migration as defined below:
o Migration Name: required, the name of current migration within
the migration category previously defined.
o Module Name: required, the standard Velos eResearch module or
target for the migrated data, such as Patient Demographics.
o Table Name: required, the name of the temporary table created
when importing data either through the Import Delimited File or
Import ODBC DB modules described earlier in this section. A list of
matching tables will appear as you begin typing the name of the
temporary table. Double click on an option from the list to copy the
table name into the field.
- Click the Submit button to save the definition of the migration into the
Migration Category.

Velos eTools User Manual Section 6: Data Migration
Version 6.1 60 | P a g e
Figure 48: Defining a migration – identifying the source (Table Name) and target (Module Name).
- On successfully submitting the previous step, the system will bring you
back to the main Standard Migration page and you will see your newly
selected Module Name/ Description and Table Name listed in the browser
list with steps needed to complete the migration.
Figure 49: Migration defined and ready to proceed through the steps.
- Click the Table Name (imported source data) in green to verify that the
correct source data was defined for the migration. The number of records
is given in parenthesis to the right of the Table Name.
MMaapp FFiieellddss
- If the source data is correct, then you can begin mapping the fields by
clicking the Edit link under Map Fields, otherwise if the source data is not
correct, click the New migration link to redefine the migration with the
correct source data.

Velos eTools User Manual Section 6: Data Migration
Version 6.1 61 | P a g e
- Mapping fields is a matter of matching the source columns with the target
columns. All required target fields (shown with an asterisk) should be
mapped by picking the corresponding field in the Map To column.
Additional fields can be mapped as needed.
Figure 50: Mapping fields with target on the left and source data
columns on the right in a dropdown.
- Click the Submit button to save the mapping and return to the migration
browser.
- If not all mandatory fields are mapped, then a warning will appear next
to the Edit link under Map Fields (see the Legend for a listing of all the
signals), otherwise a check will appear.
SSttaaggiinngg AArreeaa
- The next step is to bring all of the source data into a Staging Area which
is used to compare all the responses in the source data to possible values
Velos eTools User Manual Section 6: Data Migration
Version 6.1 62 | P a g e
that the Velos eResearch database can accept. To do this, click the Import
link.
- Once data is successfully imported a check will appear next to the
Import link.
- The imported data can be viewed again, if needed, by clicking on the View
link.
Note the Empty link is used to clear the records from the staging area if
there was an error or if the migration needs to be ran again, but there is
no need to empty the Staging Area at this step of the migration.
SSttaannddaarrdd MMiiggrraattiioonn MMaapp RReessppoonnsseess
- The next step is to map values in the source data fields that do not have
corresponding matches in the target fields. Click the Edit link under Map
Responses.
- By default, only a list of unmapped responses will be displayed with
unmapped source values listed on the left and all available target values
listed in a dropdown on the right. Click the radio button ‘Mapped’ to see a
list of mapped responses. These responses are automatically matched by
Velos eTools, so no further editing is required.
- Click the radio button ‘All’ to see a list of all responses, both mapped and
unmapped.
- Return to the ‘Not Mapped’ radio button to complete the mapping of
responses.
- Choose values from Velos eResearch that should be used for the
unmapped Source Values.
- Click the Submit button when all unmapped values are mapped.
- If all values are mapped, then the list of Not Mapped items will be empty.
Click the Back to Migration Page link to continue to the next step.

Velos eTools User Manual Section 6: Data Migration
Version 6.1 63 | P a g e
Figure 51: Mapping responses.
VVaalliiddaattiioonn
- At any time during the migration process, you can validate the progress by
clicking the Validate link.
- This will show the current status of the migration and whether or not each
step is being completed successfully. Validation will display PASS if all
items pass validation or it will list items that could not pass validation.
Figure 52: Examples of validation outcomes on migration steps completed.

Velos eTools User Manual Section 6: Data Migration
Version 6.1 64 | P a g e
Figure 53: Date and number validation with edit ability on source data.
- Click the Edit link next to any item to edit the source data directly in order
to get the source data to validate.
Figure 54: Editing source data directly.
IImmppoorrtt iinnttoo AApppplliiccaattiioonn
- To complete the migration process, click the Import link.
- Importing data into the application could take a few minutes or a few hours
depending on the quantity of data and the module used as the target.
When the import process is complete, the migration browser will reload.
- Click the View Log link to see the result of the migration. The following
data is displayed in the log:
o Total rows in staging area: Data from the source.
o Total rows migrated: Data migrated into the application
successfully.
o Total rows pending migration: Data from the source not yet
migrated.

Velos eTools User Manual Section 6: Data Migration
Version 6.1 65 | P a g e
o Total rows with errors: List number of rows with a link to view
data that did not successfully migrate into the application.
o Total duplicate rows: Number of rows with a link to view data that
already exists in the application and therefore was not migrated.
Duplication occurs if the primary or foreign keys already exist in the
target tables.
o Oracle errors: List of any errors returned by Oracle on migration.
RRee--mmiiggrraattee oonn EErrrroorr
- If some or all of the data did not migrate successfully either because
validation was not completed or there were Oracle errors on importing the
application, you can re-run the migration by first clearing the Staging
Area. Click the Empty link under Staging Area to clear out the source
data from the Staging Area. This does not delete the source table, but
rather it removes the data from the intermediary table or Staging Area.
- Check ‘Delete data from intermediary table’ on the next screen.
- Checking ‘Delete response mapping’ will remove the response level
mapping if needed.
- Click the Submit button to clear the Staging Area.
Figure 55: Options on clearing out the
Staging Area.

Velos eTools User Manual Section 6: Data Migration
Version 6.1 66 | P a g e
UUssiinngg FFoorrmm MMiiggrraattiioonn
The steps needed to complete a form migration nearly mirror those of a standard
migration. Differences in the methodology for a form migration are listed here, but
please see the Using Standard Migration topic for a full review of the
fundamental migration steps.
DDeeffiinnee MMiiggrraattiioonn
- Select Migrate Data from the Data Migration menu.
- Create a new migration category (see previous topic titled Create a New
Migration Category) or choose a previously created migration category
used for a Standard migration.
- Select the Forms link to begin defining the Form migration.
- Click the New migration link and search for the form (target) to be used in
the migration.
- Add the required attributes for defining the migration:
o Migration Name: Name to be displayed in the migration browser
o Table Name: Imported data source table name.
- Click the Submit button to save the Form migration definition.
Figure 56: Searching for a form used for the Form migration.

Velos eTools User Manual Section 6: Data Migration
Version 6.1 67 | P a g e
Figure 57: Migration browser showing Form migration definition and migration steps.
MMaapp FFiieellddss
- To map the source data fields to the target form fields, click the Edit link
under Map Fields.
- Under Table Column Name, select the source column that maps to the
form field. Required form fields are marked with an asterisk.
- The Data Entry Date is a date field on every User-defined form that must
be mapped in the migration. If no date exists in the source data, then use
the {Migration Date} in Table Column Name to populate the form with the
migration date.
- Click the Submit button to save the mapping.
Figure 58: Mapping fields for a form migration.
FFoorrmm MMiiggrraattiioonn MMaapp RReessppoonnsseess
- The next step is to map values in the source data fields that do not have
corresponding matches in the target fields. Click the Edit link under Map
Responses.

Velos eTools User Manual Section 6: Data Migration
Version 6.1 68 | P a g e
- By default, only a list of unmapped responses will be displayed with
unmapped source values listed on the right and all available target values
listed in a dropdown on the left. Click the radio button ‘Mapped’ to see a
list of mapped responses. These responses are automatically matched by
Velos eTools, so no further editing is required.
- Click the radio button ‘All’ to see a list of all responses, both mapped and
unmapped.
- Return to the ‘Not Mapped’ radio button to complete the mapping of
responses.
- Choose the values from Velos eResearch that should be used for the
unmapped Source Values.
- Click the Submit button when all unmapped values are mapped.
- If all values are mapped, then the list of Not Mapped items will be empty.
Click the Back to Migration Page link to continue to the next step.
VVaalliiddaattiioonn
- At any point during the migration steps, you can validate the current
progress of the migration. Click the Validate link to get a summary of
issues, if any, related to the migration.
Figure 59: Validation showing study numbers not present in the database.
SSttaaggiinngg AArreeaa
- Import the data to the Staging Area by clicking the Import link. A check
mark indicates a successful import of the data. An exclamation point
indicates there was an issue with the import and an Error link will appear

Velos eTools User Manual Section 6: Data Migration
Version 6.1 69 | P a g e
for review of the errors. Errors can also be viewed by clicking the Validate
link.
- The result of the import can be viewed by clicking the View link. The
number of records imported into staging is given in parenthesis.
- The Staging Area has the option to be emptied by clicking on the Empty
link, but this is only used if there are issues with validating the data or the
migration had errors. See the topic titled Re-migrate on Error for steps on
how to empty the Staging Area.
IImmppoorrtt iinnttoo AApppplliiccaattiioonn
- To import validated data into the application click the Import link.
- To view the outcome of the imported data click the View Log link.
Figure 60: Display showing a successful migration.

Velos eTools User Manual Section 7: Manage Forms
Version 6.1 70 | P a g e
Section 7: Manage Forms
This section provides you with the instructions required to use the Manage
Forms collection of modules. These modules are intended to help the system
administrator complete many common requests from users such as: transferring
forms from one environment to another; customizing form XML and XSL;
importing form metadata from a delimited file template; and downloading
Common Data Elements (CDE) based forms from the National Cancer Institute
(NCI) through Cancer Data Standards Registry ad Repository (caDSR)
Integration.
WWoorrkkiinngg wwiitthh FFoorrmm ffrroomm FFiillee
Importing a form and its fields from a delimited file can decreases the amount of
time required to develop a form in Velos eResearch. The import process is a
quick way to get the section names, field names, field types, and response
values into Velos eResearch. Further edits to the form can then be made in
Velos eResearch such as formatting the presentation layer or adding more
advanced field types such as lookups and form links.

Velos eTools User Manual Section 7: Manage Forms
Version 6.1 71 | P a g e
PPrreeppaarriinngg tthhee FFoorrmm
To prepare a form, use the following steps:
- Click the Form from File link in the Manage Forms menu.
- Click the form_template.csv link located beneath the Browse button to
see the form import sample template.
- Use the form sample template in to help build your form file so that it is
importable.
- Save the file to your computer.
Figure 61: Downloading the form import template.
Figure 62: Form import sample template.
Note the file can be opened in Excel for easy editing, but after making
changes continue to save the file as a delimited file type.

Velos eTools User Manual Section 7: Manage Forms
Version 6.1 72 | P a g e
IImmppoorrttiinngg aa NNeeww FFoorrmm
To import a new form, use the following steps:
- Select Form from File under the Manage Forms menu.
- Select Form Type from the dropdown menu. The form will be added
under this type in Velos eResearch.
- Provide a unique Form Name for the form.
- Find the form to import by clicking on the Browse button next to
Delimited File name.
- Enter in the Delimiter used for the imported file.
- Click the Submit button to import the form to a staging area.
- The next screen will display all the imported data as editable. If no
changes are needed, click the Submit button to proceed with importing
the form into Velos eResearch.
- Once the form is imported, you can preview the form by clicking on the
Preview link.
Figure 63: Edit form metadata prior to finalizing import.
Figure 64: Preview the new form from Velos eTools.

Velos eTools User Manual Section 7: Manage Forms
Version 6.1 73 | P a g e
TTrraannssffeerrrriinngg aa FFoorrmm
UUssiinngg FFoorrmm TTrraannssffeerr
Transferring forms from one environment to another is easily accomplished with
this module. Velos eResearch users should be able to use their test environment
to build and test forms before activating them in a production environment. This
module provides the system administrator a way to move forms between such
environments.
To transfer a form, use the following steps:
- Select Form Transfer under the Manage Forms menu.
- Search for the form to be transferred by typing in the name in the Search
Form Name field. Use the additional filters, Status and Linked to, to
further limit the results returned.
- Click the Search button to return all matching forms. Transfers can be
performed on all form types and all form statuses.
- Click the Select link next the form identified for transfer.
Figure 65: Search to identify a form for transfer.
UUssiinngg FFoorrmm CCuussttoommiizzaattiioonn
Form customization can be accomplished directly in Velos eTools. Customization
can be performed on the presentation layer, in other words, both the display and
print XSL can be altered. Customization of the XML is not a feature of Form
Customization, but the form XML can be viewed in Velos eTools.

Velos eTools User Manual Section 7: Manage Forms
Version 6.1 74 | P a g e
EEddiittiinngg FFoorrmm XXSSLL
To edit the Form XSL, use the following steps:
- Select Customize Form from the Manage Forms menu.
- Search for the form to be customized by typing in the name in the Search
Form Name field. Use the additional filters, Status and Linked to, to limit
the results returned.
- Click the Search button to return all matching forms. Forms matching the
search criteria will be displayed.
- To edit the Form XSL, the XSL used to display the form in a web browser,
click the Edit link under the Form XSL column.
- Save all modifications to the XSL and click the Submit button.
- A preview of the Form XSL can be seen by clicking the Preview link under
the Form XSL column.
Figure 66: Form customization options.
Figure 67: Modify Form XSL window.

Velos eTools User Manual Section 7: Manage Forms
Version 6.1 75 | P a g e
EEddiittiinngg PPrriinntt XXSSLL
To edit the Print XSL, use the following steps:
- Select Customize Form under the Manage Forms menu.
- Search for the form to be customized by typing in the name in the Search
Form Name field. Use the additional filters, Status and Linked to, to limit
the results returned.
- Click the Search button to return all matching forms. Forms matching the
search criteria will be displayed.
- To edit the Print XSL, the XSL used to prepare the form for printing, click
the Edit link under the Print XSL column.
- Save all modifications to the XSL and click the Submit button.
- A preview of the Print XSL can be seen by clicking the Preview link under
the Print XSL column.
Figure 68: Form customization options.
Figure 69: Modify Print XSL
window.

Velos eTools User Manual Section 7: Manage Forms
Version 6.1 76 | P a g e
VViieewwiinngg FFoorrmm XXMMLL
To view the Form XML, use the following steps:
- Select Customize Form under the Manage Forms menu.
- Search for the form to be customized by typing in the name in the Search
Form Name field. Use the additional filters, Status and Linked to, to limit
the results returned.
- Click the Search button to return all matching forms. Forms matching the
search criteria will be displayed.
- To view the Form XML, click the View link under Form XML.
Figure 70: View Form XML
window.
UUssiinngg ccaaDDSSRR IInntteeggrraattiioonn
The NCI and its’ partners in the research community have worked to standardize
common data elements or CDE’s for NCI-sponsored research to improve
aggregation and management of collected data. The Cancer Data Standards
Repository (caDSR) is a collection of CDE’s and protocol forms that can be
searched with Velos eTools. The caDSR forms can be downloaded into Velos
eResearch using the caDSR Integration module in Velos eTools.

Velos eTools User Manual Section 7: Manage Forms
Version 6.1 77 | P a g e
IImmppoorrttiinngg aa NNeeww FFoorrmm ffrroomm ccaaDDSSRR
DDoowwnnllooaadd FFoorrmm XXMMLL
To download the Form, XML, use the following steps:
- Select caDSR from the Manage Forms menu.
- Download the form from the CDE Browser by clicking the link Get data
from CDE Browser.
- Once in the caDSR, search or browse for the form.
- Select the form and click Download Data Elements as XML from the
available options.
- This will download the form to your local drive.
Figure 71: caDSR Web site with
forms listed by context.

Velos eTools User Manual Section 7: Manage Forms
Version 6.1 78 | P a g e
Figure 72: Selected form is displayed and a link for downloading is available.
Figure 73: Download of XML in progress.
UUppllooaadd FFiillee
- Click the Browse button to find the saved XML file on your local drive.
IImmppoorrtt
- Choose the form category the imported form will be associated to.
- Leave the check box ‘Import to Form Library’ marked if the form
definition should also be included in the Form Library, otherwise, just the
fields will be imported into the field library.
- Leave the check box ‘Import to Field Library’ marked if the form fields
should be included in the Field Library, just the form will be imported into
the form library.
- Click the Submit button to complete the import.
- If the import is successful, then click on the Preview link to view the form.

Velos eTools User Manual Section 7: Manage Forms
Version 6.1 79 | P a g e
Figure 74: Form imported into Velos eResearch.
Note that the caDSR also has the option to download to Excel.
Velos eTools can only import the XML version of the form, not the
Excel version.
Note when importing the form, at least one check box for importing
into the library must be checked. Either Import to Form Library or
Import to Field Library.

Velos eTools User Manual Section 8: Manage Calendars
Version 6.1 80 | P a g e
Section 8: Manage Calendars
This section provides you with the instructions required to use the Manage
Calendars collection of modules. These modules are intended to help the
system administrator complete many common requests from their user base
including: transferring calendars from one environment to another; importing
calendar metadata from a delimited calendar template; and importing a charge
master or CDM into the event library for use with calendar development.
WWoorrkkiinngg wwiitthh CCaalleennddaarr ffrroomm FFiillee
Importing events and visits from a delimited file is a quick way to generate a
calendar in Velos eResearch. Matching to the event library ensures that each
calendar event receives all of the data associated to the event already stored in
the event library. Further edits can be made to the calendar once the import is
complete.

Velos eTools User Manual Section 8: Manage Calendars
Version 6.1 81 | P a g e
PPrreeppaarriinngg tthhee CCaalleennddaarr
To Prepare the Calendar, use the following steps;
- Click the Calendar from File link in Manage Calendars menu.
- Click the calendar_template.csv link located beneath the Browse button.
- Use the provided sample calendar template in Velos eTools to help with
building your calendar so that it is importable.
- Save the file to your computer.
Figure 75: Downloading the calendar import template.
Figure 76: Calendar import sample template.
Note the file can be opened in Excel for easy editing. However, after
making changes, continue to save the file as a delimited file type.
The coverage analysis can be imported through the “Calendar from File”
functionality by adding the code values in the coverage legend next to the
“X” as displayed in Figure 76.

Velos eTools User Manual Section 8: Manage Calendars
Version 6.1 82 | P a g e
MMooddiiffyyiinngg tthhee TTeemmppllaattee
When defining the calendar visits, eTools allows you to define the same time
point types available on eResearch. The following naming conventions should be
used depending on the time point type:
• Fixed Time Point: F|<visit name>|<time interval>
o “F” will always be used to denote Fixed Time Point
o <visit name> should be the name of the visit created
o <time interval> Represented using “M”, “W” or “D” for month, week
and day respectively. Can be used individually or combined
o Examples: F|V1|M1W2D2, F|Visit ABC|M2D4, F|Visit_One|D10
• Dependent Time Point: D|<visit name>|<time interval>|<visit dependency>
o “D” will always be used to denote Dependent Time Point
o <visit name> should be the name of the visit created
o <time interval> Represented using “M”, “W” or “D” for month, week
and day respectively. Can only be used individually
o Examples: D|V2|M1|V1, D|Visit CDE|D2|Visit ABC,
D|Visit_Two|W3|Visit_One
• No Time Point Defined: N|<visit name>
o “N” will always be used to denote No Time Point Defined
o <visit name> should be the name of the visit created
o Examples: N|V3, N|Visit FGH, N|Visit_Three
The coverage analysis can also be determined by adding the code values in the
coverage type legend next to the “X” that marks the intersection between events
and visits. For example, if the coverage option “Billable to Sponsor” has the value
in the coverage type legend “S”, the intersection would look like this: X|S.

Velos eTools User Manual Section 8: Manage Calendars
Version 6.1 83 | P a g e
IImmppoorrttiinngg aa NNeeww CCaalleennddaarr
To import a new calendar, use the following steps:
- Select Calendar from File under the Manage Calendars menu.
- Provide a unique Calendar Name.
- Select the Calendar Type from the Calendar Library that will contain the
new calendar.
- Provide the Calendar Duration (from the file) by typing in the value and
specifying the units from the drop down.
- Find the calendar for import by clicking on the Browse button next to
Delimited File name.
- Enter in the Delimiter used for the imported file.
- Click the Submit button to import the calendar to a staging area.
- The next screen will display the calendar and if an event name matches
that of an event name in the Event Library, then the line will be shaded
blue. At the bottom of the calendar is a checkbox that reads:
“Highlighted events exist in the event library. Do you want to transfer
event attributes (cost/messages/resources/documents) from library?”
Keep this checked to use attributes from the Event Library for all the
imported events that match those already in the Event Library.
- Click the Submit button to proceed with importing the calendar into Velos
eResearch.

Velos eTools User Manual Section 8: Manage Calendars
Version 6.1 84 | P a g e
Figure 77: Calendar in staging area awaiting import.
UUssiinngg CCaalleennddaarr TTrraannssffeerr
Transferring calendars from one environment to another is easily accomplished
with this module. Velos eResearch users should be able to use their test
environment to build and test calendars before activating them in a production
environment. This module provides the system administrator with a way to move
forms between such environments.

Velos eTools User Manual Section 8: Manage Calendars
Version 6.1 85 | P a g e
TTrraannssffeerrrriinngg aa CCaalleennddaarr
The Manage Calendars Calendar Transfer feature allows user to transfer
between databases. To transfer a calendar, use the following steps:
- Select Calendar Transfer under the Manage Calendars menu option.
- Search for the calendar to be transferred by typing in the name in the
Search Calendar field.
- Click the Search button to return all matching calendars.
- Click the Select link next the form identified for transfer to prepare it for
transfer or click the Preview link to preview the calendar.
- After clicking Select, the following attributes must be completed:
o Calendar Name: This is the name that the calendar will have in the
target environment. By default, the source name of the calendar is
provided.
o Transfer Calendar to: This is the target environment.
o Category: This is the calendar category on the target environment that
the form will reside under.
- Click the Submit button to proceed with transferring the calendar.
Figure 78: Search to identify a calendar for transfer.
Figure 79: Selecting the environment for calendar transfer.

Velos eTools User Manual Section 8: Manage Calendars
Version 6.1 86 | P a g e
When you search for calendar transfers, in addition to the calendar name and
description, the Calendar Transfer Search Results Browser displays the calendar
status in the newly transferred calendar data as shown in the following
screenshot. The status values include:
• Work in Progress
• Active
• Offline for Editing
TTrraannssffeerrrriinngg PPaattiieenntt//SSuubbjjeecctt CCoosstt IItteemmss wwiitthh CCaalleennddaarr CCooppyy
When transferring a calendar in Velos eTools, you also transfer any patient costs
items linked to that calendar. Patient cost items are individual budget line items
that are outside of the patient’s treatment schedule such as costs for equipment,
personnel, supplies, or patient care. If these items have been linked to a calendar
at the design level in Velos eResearch (as shown in the following screenshot),
they will be included in the copy of the calendar that is transferred in Velos
eTools.
Figure 80: Patient Cost Category dropdown menu in Patient Calendar.
For more details on linking patient cost items to a calendar, see the “Calendar,
Calendar Library, Creating a Calendar, Patient Cost Items topic in the Velos
eResearch User Manual.

Velos eTools User Manual Section 8: Manage Calendars
Version 6.1 87 | P a g e
Figure 81: List of Calendar transfer status.
UUssiinngg IImmppoorrtt CCDDMM
The CDM or Charge Description Master is a list of procedures and other events
that the hospital maintains. It typically contains an event name, category or
department, CPT code, a cost, and a description. The CDM can be used to
populate the Event Library in Velos eResearch.
PPrreeppaarriinngg CChhaarrggee DDeessccrriippttiioonn MMaasstteerr
To prepare the Charge Description Master, use the following steps:
- Select Import CDM from the Manage Calendars menu.
- Click the chargemaster_template.csv link located beneath the Browse
button to view the sample charge master template. Velos recommends
that you import the template to ensure that if changes were made to this
template that you will have the latest version. You now load the data with
the new template only.
- Use the provided calendar sample template in Velos eTools to help build
your calendar so that it is importable.
- Save the file to your computer.

Velos eTools User Manual Section 8: Manage Calendars
Version 6.1 88 | P a g e
Figure 82: Download chargemaster_template.csv to assist with formatting the CDM.
Figure 83: Charge description master import template.
IImmppoorrttiinngg aa CCDDMM
To import a CDM, use the following steps:
- Select Import CDM from the Manage Calendars menu.
- Find the form for import by clicking on the Browse button next to
Delimited CDM File name.
- Enter in the Delimiter used for the imported file.
- Specify the Audit Trail User to be associated with each imported data
item, in other words, the creator.
- Select the Currency used in the budget.
- Click the Sample Template: chargemaster_template.csv link located
beneath the Browse button to view the sample charge master template.
Note: Velos recommends that you import the template to ensure that if
changes were made to this template that you will have the latest
version with any new fields that have been added to the template.
You can now load the data with the new template only.
- Click the Submit button to import the form to a staging area.

Velos eTools User Manual Section 8: Manage Calendars
Version 6.1 89 | P a g e
- The following screen will allow you to map the source columns to the
target columns.
o To support multiple charge masters, you can configure and link Event
Categories with their respective Event Library Types.
o To support event definition, you can import the names of any sites as
services along with information on facilities and any coverage notes.
o To link additional codes at the Event level with the event definition.
These codes will appear in browsers and searches along with the other
event attributes.
- Click the Submit button to complete mapping and import the CDM into
Velos eResearch.
- The import will either update matching events or it will insert new events if
no match is found. The log screen will indicate the number of records
updated and inserted.

Velos eTools User Manual Section 8: Manage Calendars
Version 6.1 90 | P a g e
Figure 84: Mapping the CDM source to target.
Figure 85: Import log.

Velos eTools User Manual Section 9: Manage Budgets
Version 6.1 91 | P a g e
Section 9: Manage Budgets
This section provides you with the instructions required to use the Manage
Budgets module. This module allows system administrators to import a budget
from a file, much like importing a calendar or form from a file.
IImmppoorrttiinngg aa BBuuddggeett ffrroomm FFiillee
Importing budget items from a comma delimited file is a quick way to generate a
budget in Velos eResearch. The import process accepts any comma delimited
file for import and creates the budget in Velos eResearch for the selected study.
The Manage Budgets module allows the Velos eTools Import Budget from File
process to support line item values for Patient Cost Items, from new budgets
imported into Velos eTools. Patient Cost Items are individual budget line items
that are outside of the patient’s treatment schedule such as costs for equipment,
personnel, supplies, or patient care. If Patient Cost Items have been added to the
imported budget file as budget line items, these budget line items will be included
as part of the newly created budget. These Patient Cost Items are associated
with specific visits on a Study Patient Calendar or Library Calendar.

Velos eTools User Manual Section 9: Manage Budgets
Version 6.1 92 | P a g e
PPrreeppaarriinngg tthhee BBuuddggeett
To prepare a budget, use the following steps:
- Select the Budget from File link in the Manage Budgets menu.
- Click the budget_template.csv link located beneath the Browse button to
view a sample budget template.
- Use the provided budget sample template in Velos eTools to help build
your budget so that it is importable.
- Save the file to your computer.
Figure 86: Downloading the budget import sample template.
Figure 87: Budget import template.
Note: The file can be opened in Excel for easy editing, but after you
make changes, continue to save the file as a comma delimited file type.

Velos eTools User Manual Section 9: Manage Budgets
Version 6.1 93 | P a g e
IImmppoorrttiinngg aa NNeeww BBuuddggeett
To import a new budget, use the following steps:
- Select Budget from File under the Manage Budgets menu.
- Enter in the Budget Name.
- Select the Study Number to associate the budget. As you begin typing the
Study Number a list of matching studies will appear at the bottom of the
screen. Double-click the correct Study Number to auto-fill the field.
- Select the Delimited File name, by clicking the Browse button and finding
the saved budget on your local drive.
- Provide the Delimiter of the file.
- Select an Audit Trail User, or the creator of the budget.
- Click the Submit button to import the budget into Velos eResearch.

Velos eTools User Manual Section 10: Audit Reports
Version 6.1 94 | P a g e
Section 10: Audit Reports
This section provides you with instructions to generate all the Audit Reports
available in eTools. This module is intended to help any user with the appropriate
access rights to view records of all activities performed within the specified
module in Velos eTools during a particular time period
Figure 88: Audit Report module.
.
To generate a desired report, follow the following steps:
- Click on the Audit Report module on the menu in the left hand side.
- Click on the option Report.
- Select the desired report followed by the date range.
- Click the Search button in order to generate the desired report.
Figure 89: Generating Audit Reports.

Velos eTools User Manual Section 10: Audit Reports
Version 6.1 95 | P a g e
The following reports are available in the Audit Report module:
• Manage Account: This report tracks all changes (Insert, Update) that
have been made in the Manage Account module. The report displays the
following values:
▪ User Name: The user name of the person that made the
changes.
▪ Table Name: The table that was modified, either groups or
users.
▪ Column Name: The field that was modified which belongs to
the previously modified table.
▪ Modified on: The date in which the modification was made.
▪ New Value: Shows the new value in the field that was
modified.
▪ Old Value: Shows the old value before the modification was
made.
▪ Action: Displays either “U” (update) or “I” (insert) to describe
the action made by the user.
• Data Source: This report tracks all changes (insert, update, delete) that
have been made to the View Datasource module. The report displays the
following values:
▪ User Name: The user name of the person that made the
changes.
▪ Group Name: The group in which the user who made the
changes belongs to.
▪ Column Name: The field from View Datasource which was
modified.
▪ Modified on: the date in which the modification was made
▪ Old Value: Displays the old value before the modification
was made.

Velos eTools User Manual Section 10: Audit Reports
Version 6.1 96 | P a g e
▪ New Value: Shows the new value after the field was
modified.
▪ Action: For each modification, it shows either “I” (insert), “U”
(update) or “D” (delete).
• Session Tracking (Login Details): This report tracks the login activity of
each user on eTools. The report includes the following information:
▪ User Name: The name of the user that logged into eTools.
▪ Group Name: The group in which the user belongs.
▪ Login Time: The date and time in which the user logged into
eTools.
▪ Logged out time: The date and time in which the user logged
out of eTools.
▪ Login count: The amount of times the user has logged in.
▪ Login duration: The total amount of time in which the user
was logged into eTools, displayed in days,
hours, minutes and seconds.
▪ Average login: The average time the user has been logged
in based on the total login duration and the
amount of times the user has logged in.
▪ Last logged in: The date and time in which the user logged in
for the last time.
• Session Tracking (Datasource Details): This report tracks the
datasource accessed by each user in a specified date range. The report
includes the following information:
▪ User Name: The name of the user that accessed the
datasource.
▪ Group Name: The group in which the user belongs to.
▪ Datasource Name: The name of the datasource that was
accessed.

Velos eTools User Manual Section 10: Audit Reports
Version 6.1 97 | P a g e
▪ Datasource Host: The server in which this datasource is
being hosted.
▪ Datasource Version: The version of the datasource that was
accessed.
▪ Datasource accessed on: The date and time the datasource
was accessed by the user.
• Session Tracking (Page Accessed Details): This report tracks all of the
pages accessed by each user in a given date range. The report includes
the following information:
▪ User Name: The name of the user who accessed the pages
on eTools.
▪ Group Name: The group to which the user belongs to.
▪ Last Accessed: Shows a list of pages accessed by each
user on a determined date range.
▪ Last Accessed on: The date and time the pages were
accessed by the user.
• Executed Query: This report keeps track and displays all the queries that
are executed using eTools. The report includes the following information:
▪ User Name: The name of the user that executed the query.
▪ Group Name: The group to which the user belongs to.
▪ Query Executed: Displays the exact query that was executed
by the user.
▪ Query Executed on: The date and time the query was
executed.
• Report Designer: This report keeps track of all the changes in the Report
Designer module. The report includes the following information:
▪ User Name: The name of the user that made changes to the
module.

Velos eTools User Manual Section 10: Audit Reports
Version 6.1 98 | P a g e
▪ Group Name: The group in which the user belongs.
▪ Column Name: Displays the database field that is being
modified.
▪ Modified on: The date and time the field was
modified/created.
▪ New Value: The new value after the field was modified.
▪ Old Value: The existing value before the field was modified.
▪ New CLOB Value: The new CLOB value after the field was
modified.
▪ Old CLOB Value: the existing value before the CLOB field
was modified
▪ Executed Query: If applicable, will show the exact query that
was executed.
▪ Action: For each modification, it shows either “I” (insert), “U”
(update), “E” (execute) or “D” (delete).
▪ Remark: Displays the Report Designer sub-module that was
modified, possible values: “Form view” or “Query
publishing”.