Embed Size (px)
Citation preview

VBrick Enterprise Media SystemVEMS Mystro® Portal Server v6.3.xAdvanced UI Customization Guide

Copyright
© 2016 VBrick Systems, Inc. All rights reserved.2121 Cooperative Way, Suite 100 Herndon, VA 20171, USA
This publication contains confidential, proprietary, and trade secret information. No part of this document may be copied, photocopied, reproduced, translated, or reduced to any machine-readable or electronic format without prior written permission from VBrick Systems, Inc. Information in this document is subject to change without notice and VBrick assumes no responsibility or liability for any errors or inaccuracies. VBrick, VBrick Systems, the VBrick logo, VEMS Mystro, StreamPlayer, and StreamPlayer Plus are trademarks or registered trademarks of VBrick Systems, Inc. in the United States and other countries. Windows Media, SharePoint, OCS and Lync are trademarked names of Microsoft Corporation in the United States and other countries. All other products or services mentioned in this document are identified by the trademarks, service marks, or product names as designated by the companies who market those products. Inquiries should be made directly to those companies. This document may also have links to third-party web pages that are beyond the control of VBrick. The presence of such links does not imply that VBrick endorses or recommends the content of any third-party web pages. VBrick acknowledges the use of third-party open source software and licenses in some VBrick products. This freely available source code is posted at http://www.vbrick.com/opensource
About VBrick Systems
Founded in 1998, VBrick Systems is a privately held company that has enjoyed rapid growth by helping our customers successfully introduce mission critical video applications across their enterprise networks. Since our founding, VBrick has been setting the standard for quality, performance and innovation in the delivery of live and stored video over IP networks—LANs, WANs and the Internet. With thousands of video appliances installed world-wide, VBrick is the recognized leader in reliable, high-performance, easy-to-use networked video solutions.
VBrick is an active participant in the development of industry standards and continues to play an influential role in the Internet Streaming Media Alliance (ISMA), the MPEG Industry Forum, and Internet2. In 1998 VBrick invented and shipped the world's first MPEG Video Network Appliance designed to provide affordable DVD-quality video across the network. Since then, VBrick's video solutions have grown to include Video on Demand, Management, Security and Access Control, Scheduling, and Rich Media Integration. VBrick solutions are successfully supporting a broad variety of applications including distance learning and training, conferencing and remote office communications, security, process monitoring, traffic monitoring, business and news feeds to the desktop, webcasting, corporate communications, collaboration, command and control, and telemedicine. VBrick serves customers in education, government, healthcare, and financial services markets among others. VBrick products are manufactured in an ISO certified manufacturing facility.

VEMS Mystro Advanced UI Customization Guide iii
Contents
VEMS Mystro Advanced UI Customization GuidePreface . . . . . . . . . . . . . . . . . . . . . . . . . . . . . . . . . . . . . . . . . . . . . . . . . . . . . . . . . . . . . . . . . . . v
Getting Help . . . . . . . . . . . . . . . . . . . . . . . . . . . . . . . . . . . . . . . . . . . . . . . . . . . . . . . . . . . vRelated Documents . . . . . . . . . . . . . . . . . . . . . . . . . . . . . . . . . . . . . . . . . . . . . . . . . . . . . . vFont Conventions . . . . . . . . . . . . . . . . . . . . . . . . . . . . . . . . . . . . . . . . . . . . . . . . . . . . . . viEnvironmental Goals . . . . . . . . . . . . . . . . . . . . . . . . . . . . . . . . . . . . . . . . . . . . . . . . . . . vi
1. Skinning the Portal Server User InterfaceIntroduction . . . . . . . . . . . . . . . . . . . . . . . . . . . . . . . . . . . . . . . . . . . . . . . . . . . . . . . . . . . . . . . 1Color Palette . . . . . . . . . . . . . . . . . . . . . . . . . . . . . . . . . . . . . . . . . . . . . . . . . . . . . . . . . . . . . . 2Defining Themes . . . . . . . . . . . . . . . . . . . . . . . . . . . . . . . . . . . . . . . . . . . . . . . . . . . . . . . . . . . 3Updating Files Modified in v6.2.1 or Earlier . . . . . . . . . . . . . . . . . . . . . . . . . . . . . . . . . . . . . . 5
Client Overrides . . . . . . . . . . . . . . . . . . . . . . . . . . . . . . . . . . . . . . . . . . . . . . . . . . . . . . . . 6How Files are Updated . . . . . . . . . . . . . . . . . . . . . . . . . . . . . . . . . . . . . . . . . . . . . . . . . . . . . . 6
Updating Files and Creating Themes . . . . . . . . . . . . . . . . . . . . . . . . . . . . . . . . . . . . . . . . 6Changing Text and Fonts . . . . . . . . . . . . . . . . . . . . . . . . . . . . . . . . . . . . . . . . . . . . . . . . . 6Changing Images . . . . . . . . . . . . . . . . . . . . . . . . . . . . . . . . . . . . . . . . . . . . . . . . . . . . . . . . 7
New Skinning Examples . . . . . . . . . . . . . . . . . . . . . . . . . . . . . . . . . . . . . . . . . . . . . . . . . . . . . 8Current User Interface . . . . . . . . . . . . . . . . . . . . . . . . . . . . . . . . . . . . . . . . . . . . . . . . . . . 8Sample User Interface (1) . . . . . . . . . . . . . . . . . . . . . . . . . . . . . . . . . . . . . . . . . . . . . . . . . 8Sample User Interface (2) . . . . . . . . . . . . . . . . . . . . . . . . . . . . . . . . . . . . . . . . . . . . . . . . . 9
Saving Skinning Changes during a Software Update . . . . . . . . . . . . . . . . . . . . . . . . . . . . . . . . 9
2. Customizing the Portal Server User InterfaceLanding Page Customization . . . . . . . . . . . . . . . . . . . . . . . . . . . . . . . . . . . . . . . . . . . . . . . . . 11
Change which "Tabs" are Shown . . . . . . . . . . . . . . . . . . . . . . . . . . . . . . . . . . . . . . . . . . 11Change Tabs to Horizontal Stacked Boxes . . . . . . . . . . . . . . . . . . . . . . . . . . . . . . . . . . . 13Choose Widgets to Hide . . . . . . . . . . . . . . . . . . . . . . . . . . . . . . . . . . . . . . . . . . . . . . . . . 15
Player Page Customization. . . . . . . . . . . . . . . . . . . . . . . . . . . . . . . . . . . . . . . . . . . . . . . . . . . 17Choose Widgets to Hide . . . . . . . . . . . . . . . . . . . . . . . . . . . . . . . . . . . . . . . . . . . . . . . . . 18Resize Player . . . . . . . . . . . . . . . . . . . . . . . . . . . . . . . . . . . . . . . . . . . . . . . . . . . . . . . . . . 19Create "Social View" . . . . . . . . . . . . . . . . . . . . . . . . . . . . . . . . . . . . . . . . . . . . . . . . . . . . 20
Content List Customization . . . . . . . . . . . . . . . . . . . . . . . . . . . . . . . . . . . . . . . . . . . . . . . . . . 21Remove Categories . . . . . . . . . . . . . . . . . . . . . . . . . . . . . . . . . . . . . . . . . . . . . . . . . . . . . 21Modify Stored/Live Content "Tabs". . . . . . . . . . . . . . . . . . . . . . . . . . . . . . . . . . . . . . . . 22
Permanent View Options. . . . . . . . . . . . . . . . . . . . . . . . . . . . . . . . . . . . . . . . . . . . . . . . . . . . 25Set User Landing Page . . . . . . . . . . . . . . . . . . . . . . . . . . . . . . . . . . . . . . . . . . . . . . . . . . . . . . 25Login Screen Modifications . . . . . . . . . . . . . . . . . . . . . . . . . . . . . . . . . . . . . . . . . . . . . . . . . . 26
3. Skinning the Set Top Box User InterfaceIntroduction . . . . . . . . . . . . . . . . . . . . . . . . . . . . . . . . . . . . . . . . . . . . . . . . . . . . . . . . . . . . . . 27Files to Be Updated . . . . . . . . . . . . . . . . . . . . . . . . . . . . . . . . . . . . . . . . . . . . . . . . . . . . . . . . 27How to Update Files . . . . . . . . . . . . . . . . . . . . . . . . . . . . . . . . . . . . . . . . . . . . . . . . . . . . . . . 27

iv Contents
Changing the Logo . . . . . . . . . . . . . . . . . . . . . . . . . . . . . . . . . . . . . . . . . . . . . . . . . . . . . 27Changing the Background . . . . . . . . . . . . . . . . . . . . . . . . . . . . . . . . . . . . . . . . . . . . . . . . 28Changing Text and Fonts . . . . . . . . . . . . . . . . . . . . . . . . . . . . . . . . . . . . . . . . . . . . . . . . 28
4. Adding Languages to the Mystro DatabaseOverview . . . . . . . . . . . . . . . . . . . . . . . . . . . . . . . . . . . . . . . . . . . . . . . . . . . . . . . . . . . . . . . . 33(A) Generating a Data File with English Text . . . . . . . . . . . . . . . . . . . . . . . . . . . . . . . . . . . . 33(B) Importing the New Language . . . . . . . . . . . . . . . . . . . . . . . . . . . . . . . . . . . . . . . . . . . . . 34

VEMS Mystro Advanced UI Customization Guide v
VEMS Mystro Advanced UICustomization Guide
PrefaceVEMS Mystro® is the industry's first completely modular enterprise media management system. Our unique widget-based streaming design enables you to personalize and embed IP video within any communications environment such as learning management, mobile worker, and Unified Communications. This document explains how to skin the Portal Server management interface and the Multi-Format Set Top Box interface with your own logo and corporate colors. You can do this skinning using the UI Customization tool in the admin portal pages, or by manipulating the CSS sheets, or a combination of both. You should be familiar with familiar with web design tools like CSS and Javascript, as well as graphics manipulation programs like Adobe Photoshop or Illustrator. The information is arranged as follows.
Getting Help
If you can't find the information you need in this document, or from your reseller, you can contact VBrick Support Services on the web, by e-mail, or by calling 1-203 303-0222. For faster service, be sure to have your VBrick product serial number or support contract number. Support Services can usually answer your technical questions in 24 business hours or less. Note that all VBrick documentation is posted on the web. For more information about any VBrick product, go to www.vbrick.com/documentation
Related Documents
VEMS Mystro Portal Server Admin Guide
1. Skinning the Portal Server User Interface
Explains how to skin the Portal Server user interface with your own logo and colors. You can also define themes with the UI Customization tools or by using the CSS files.
2. Customizing the Portal Server User Interface
Explains how to customize the client interface by hiding or showing tabs and widgets, resizing the player, etc.
3. Skinning the Set Top Box User Interface
Explains how skin the Multi-Format Set Top Box user interface with your own logo and colors.
4. Adding Languages to the Mystro Database
Explains how to add additional languages that can be selected and displayed for the user interface.
Note If you've previously "skinned" the VEMS interface, by replacing image files or creating themes, and you subsequently perform an upgrade, you will need to repeat some of the steps to replicate your changes. Although your changes are not lost, the CSS files and the changes may either have to be reapplied or redone to be active in the user interface. Any skinning done with the UI Customization tool in VEMS Mystro v6.3.1 or higher is maintained during upgrades. See Saving Skinning Changes during a Software Update on page 9.

vi Preface
VEMS Mystro Portal Server User Guide
Multi-Format Set Top Box Quick Start Guide
Font Conventions
Arial bold is used to describe dialog boxes and menu choices, for example: Start > All Programs > VBrick
Courier fixed-width font is used for scripts, code examples, or keyboard commands.
Courier bold fixed-width font is used for user input in scripts, code examples, or keyboard commands.
This bold black font is used to strongly emphasise important words or phrases.
Folder names and user examples in text are displayed in this sans serif font.
User input in text is displayed in this bold sans serif font.
Italics are used in text to emphasize specific words or phrases.
Environmental Goals
At VBrick, we share your environmental concerns. We recognize our responsibilities to our customers, partners, and employees, and also to the communities in which we live. We believe that the same ethics and principles that guide our daily business decisions should be applied to the environment as well. Running our company with a "green" conscience is good for the environment and good for business. We design superior quality, high performance, and energy-efficient products. We're working to conserve energy and to reduce waste and pollution, and are continually exploring ways to reduce our carbon footprint. As a company, we look for ways to be environmentally friendly in designing our products and operating our facilities, and by choosing partners and suppliers who are committed to sustainable development. You can help by recycling batteries and other consumables and by finding new and better ways to protect and preserve our environment.

VEMS Mystro Advanced UI Customization Guide 1
Chapter 1
Skinning the Portal Server User Interface Introduction
The UI Customization feature on the Portal Server Admin pages is used to simplify the customization of your colors and logos. Any changes made using the UI Customization tool will persist between upgrades and are automatically applied to all VEMS Mystro Master servers and Redundant/Subservient servers. Changes made in the CSS files (as described below) must be reapplied after upgrading VEMS Mystro. If you use the tool to define themes and change colors and logos, these updates will persist between upgrades and patches. You can also reskin the application using the CSS files as explained below. The Portal Server Admin Guide provides a detailed description of how to use the UI Customization tool.
This document focuses on what files need to be updated in order to re-skin the existing VEMS user interface yourself. Be aware that existing .css files such as theme.css or themeUser.css may get overwritten during a patch or upgrade. Always make a copy of these files as a backup. Backups will need to be merged with updated files in order to view customization. For a detailed explanation of saving and merging files after an update, see Saving Skinning Changes during a Software Update on page 9.
Topics in this section
Introduction . . . . . . . . . . . . . . . . . . . . . . . . . . . . . . . . . . . . . . . . . . . . . . . . . . . . . . . . . . . . . . . 1Color Palette . . . . . . . . . . . . . . . . . . . . . . . . . . . . . . . . . . . . . . . . . . . . . . . . . . . . . . . . . . . . . . 3Defining Themes . . . . . . . . . . . . . . . . . . . . . . . . . . . . . . . . . . . . . . . . . . . . . . . . . . . . . . . . . . . 2Updating Files Modified in v6.2.1 or Earlier . . . . . . . . . . . . . . . . . . . . . . . . . . . . . . . . . . . . . . 5How Files are Updated . . . . . . . . . . . . . . . . . . . . . . . . . . . . . . . . . . . . . . . . . . . . . . . . . . . . . . 6New Skinning Examples . . . . . . . . . . . . . . . . . . . . . . . . . . . . . . . . . . . . . . . . . . . . . . . . . . . . . 8Saving Skinning Changes during a Software Update . . . . . . . . . . . . . . . . . . . . . . . . . . . . . . . . 9

2 VBrick Systems, Inc.
Figure 1. Portal Server User Interface (Light Theme)
Color PaletteHexadecimal numbers are used on web pages to specify colors and are commonly used in CSS files. The color is defined by its mix of Red, Green and Blue. Using "red," "green" or "blue" is acceptable, but for specific colors, hex colors are required. The color palette in the Define Themes feature on the admin pages can use either the hex color codes, or translates the RGB values in the manual color palette into hex. The current VEMS user interface uses two palettes of colors for the Light and Dark themes. Those colors are shown below:
Table 1. Light and Dark Color Palette
Palette Color Hex Description
Light Black #000000 Text
White #FFFFFF Background
Dark Grey #333333 Borders
Light Grey #999999 Headers and accents
Blue #3366CC Hovers, accents and logo
Dark Black #000000 Backgrounds and headers
White #FFFFFF Titles, some text, misc. borders

Skinning the Portal Server User Interface
VEMS Mystro Advanced UI Customization Guide 3
Additional shades of grey are used as well in both themes. The basic swatch of colors is shown below:
Table 2. Basic Color Palette
Defining ThemesThis topic provides a brief overview of how to create and edit themes. (For a detailed description of how to create and edit themes see the "Define Themes" topic in the Portal Server Admin Guide.) The first step in creating a theme is to define or modify an existing theme (see Figure 2). A theme defines the colors of all elements of the widgets, the logos that the users will see in the Portal Server, the default thumbnail for new videos, and on the webcast page before you go live. You will define the colors, background color or image, text and borders, and background effects. These colors will be available as styles for the theme.
You can preview the colors of the theme (see Figure 3) before you make this live on a system. Each new theme will be visible to user in the Change Theme dropdown at the bottom of every page in the Portal Server user interface. VEMS Mystro stores both the theme and language choice for each user in a cookie. If you create a theme on a Master VEMS Mystro server, it will be replicated on any defined redundant/subservient servers. The default theme
Dark Grey #333333 Application background
Light Grey #999999 Borders
Orange #FF6600 Hovers, accents
Color R G B Hex Swatch
Black 0 0 0 #000000
White 255 255 255 #FFFFFF
Red 255 0 0 #FF0000
Green 0 255 51 #00FF33
Blue 0 51 255 #0033FF
Purple 153 0 255 #9900FF
Orange 255 102 0 #FF6600
Yellow 255 255 0 #FFFF00
Light Grey 204 204 204 #CCCCCC
Grey 153 153 153 #999999
Dark Grey 102 102 102 #666666
Palette Color Hex Description

4 VBrick Systems, Inc.
that is defined and saved using the UI Customization tool will be used for the following elements in the interface.
• VEMS Mystro default theme (users can always change themes using Change Theme dropdown menu).
• Embed code player e.g. embedding code to playback a Flash video in your website• SharePoint integration and the player widget• Basic iPad and Android themes when connecting using the native OS and browser
Figure 2. Add/Edit Theme
Note You can also modify the look-and-feel of the STB interface. See Skinning the Set Top Box User Interface on page 27 for more about this.

Skinning the Portal Server User Interface
VEMS Mystro Advanced UI Customization Guide 5
Figure 3. Preview Theme
Updating Files Modified in v6.2.1 or EarlierIf you updated colors and logos in files in previous versions of VEMS Mystro, you should redo these changes using the Define Themes tool on the Admin interface. All files are located in the C:\Program Files\VBrick\Maduro\VEMSWeb\ directory.
CSSStyles/dark/theme.cssStyles/dark/themeUser.cssStyles/light/theme.cssStyles/light/themeUser.css
DarkStyles/dark/images/VBrickLogo.pngStyles/dark/images/collapse.pngStyles/dark/images/expand.pngStyles/dark/images/seach.pngStyles/dark/images/FeaturedArrow_L.pngStyles/dark/images/FeaturedArrow_R.pngStyles/dark/images/FeaturedArrowOver_L.pngStyles/dark/images/FeaturedArrowOver_R.pngStyles/dark/images/alertFatalWM.pngStyles/dark/images/alertSafeWM.pngStyles/dark/images/alertWarnWM.pngStyles/dark/images/navArrowActive.pngStyles/dark/images/navArrowInactive.pngStyles/dark/images/navArrowTail.png
Light

6 VBrick Systems, Inc.
Styles/light/images/VBrickLogo.pngStyles/light/images/collapse.pngStyles/light/images/expand.pngStyles/light/images/seach.pngStyles/light/images/FeaturedArrow_L.pngStyles/light/images/FeaturedArrow_R.pngStyles/light/images/FeaturedArrowOver_L.pngStyles/light/images/FeaturedArrowOver_R.pngStyles/light/images/alertFatalWM.pngStyles/light/images/alertSafeWM.pngStyles/light/images/alertWarnWM.pngStyles/light/images/navArrowActive.pngStyles/light/images/navArrowInactive.pngStyles/light/images/navArrowTail.png
Client Overrides
VEMS v6.3.1 includes the file clientOVerride.css. This is where all manual customer modifications are saved. These modifications are maintained across upgrades. The clientOverride file is placed in the styles folder for a theme. All user defined overridden styles are maintained across the updates in this file. You may need to import the file again in the theme and themeUser file to reflect the changes.
To import the file:
1. Add the following line at the top of styles\themeUser.css and style\theme.css
@import url(‘clientOverride.css’)
2. Manually restore any changes made inside styles\themeUser.css for theme styles and images after update.
How Files are Updated
Updating Files and Creating Themes
When making minor updates to existing themes, it is always good practice to make a backup copy of the original theme. Using either the "Dark" or "Light" theme as a base, you can find out what has been customized in previous skins and apply this using the Define Themes tool on the UI Customization page.
Changing Text and Fonts
The font used is Verdana with a default of 11px. The font update is in themeUser.css and theme.css files. VBrick recommends using web-safe fonts such as Verdana, Arial, Times Roman, Helvetica or other sans-serif font. If a non-web safe color is used, there may be an adverse impact on the design. It is also not recommended to change the size of the font. Below is a sample of customized text.
#000000 to purple:
Note Default themes cannot be modified. However they can be cloned or will become a second instance of the original themes that includes modifications. For example: if you wish to change the default logo and thumbnail, and retain the rest of the default dark theme you can do so. You can rename the "new" default theme, make it the default, and then delete the old one.
Skinning the Portal Server User Interface
VEMS Mystro Advanced UI Customization Guide 7
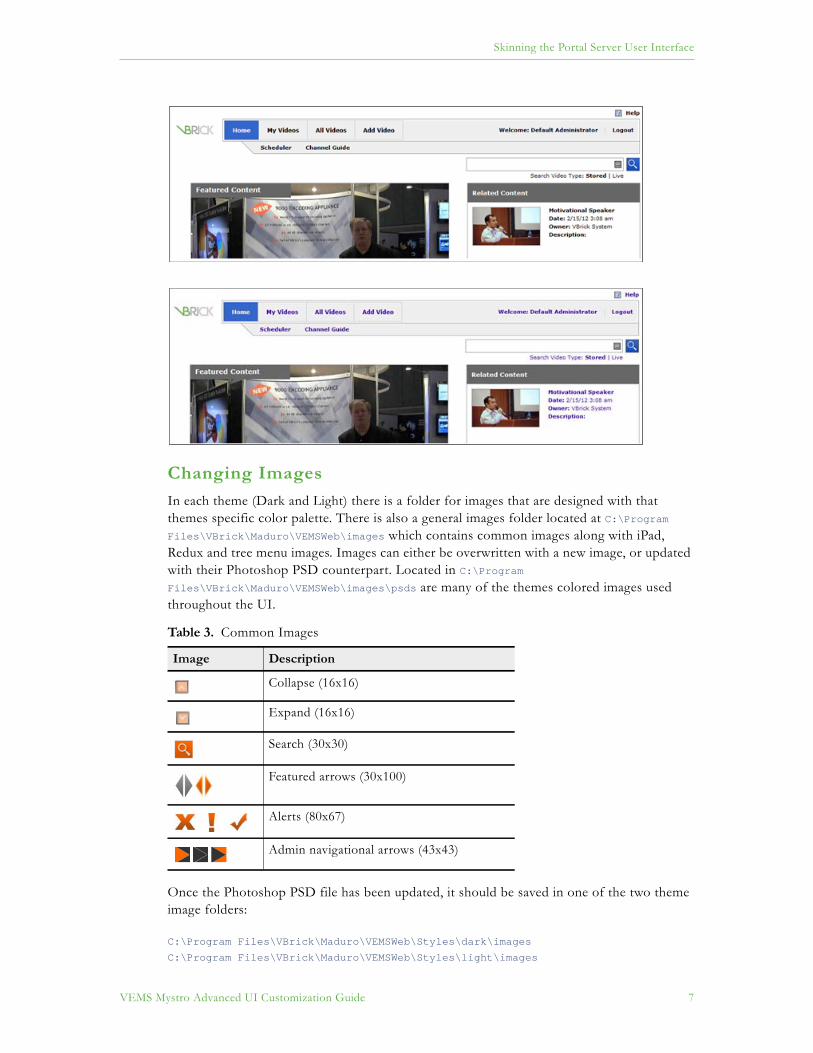
Changing Images
In each theme (Dark and Light) there is a folder for images that are designed with that themes specific color palette. There is also a general images folder located at C:\Program Files\VBrick\Maduro\VEMSWeb\images which contains common images along with iPad, Redux and tree menu images. Images can either be overwritten with a new image, or updated with their Photoshop PSD counterpart. Located in C:\Program Files\VBrick\Maduro\VEMSWeb\images\psds are many of the themes colored images used throughout the UI.
Table 3. Common Images
Once the Photoshop PSD file has been updated, it should be saved in one of the two theme image folders:
C:\Program Files\VBrick\Maduro\VEMSWeb\Styles\dark\imagesC:\Program Files\VBrick\Maduro\VEMSWeb\Styles\light\images
Image Description
Collapse (16x16)
Expand (16x16)
Search (30x30)
Featured arrows (30x100)
Alerts (80x67)
Admin navigational arrows (43x43)

8 VBrick Systems, Inc.
New Skinning Examples
Current User Interface
Sample User Interface (1)
Updated C:\Program Files\VBrick\Maduro\VEMSWeb\Styles\dark\theme.css & themeUser.css
New Palette
#092345 Dark blue - Background, dark elements

Skinning the Portal Server User Interface
VEMS Mystro Advanced UI Customization Guide 9
#153d56 Medium Blue - Application background
#bae4f9 Light blue – Active tabs, borders
#f8f6bc Muted yellow – Sub navigation, text
Updated videoIcon.jpg and search.png.
Sample User Interface (2)
Saving Skinning Changes during a Software UpdateIf you've "skinned" the VEMS user interface by changing css files or replacing files in the default Light and Dark folders (see Updating Files Modified in v6.2.1 or Earlier on page 5), you will have to repeat some steps in order to replicate your changes after a software update. Note that you must save the modified Light and Dark folders before performing an update.
To replicate file changes after a software update:
1. Backup the Light and Dark folders in C:\Program Files\VBrick\Maduro\VEMSWeb\Styles.
2. Run the software update as explained in the Portal Server 6.3.x Release Notes. 3. Navigate to C:\Program Files\VBrick\Maduro\VEMSWeb\Styles and replace the images in
the Light and Dark folders with the images you saved in Step 1. 4. Manually edit the following css files to replicate your previous UI changes. You cannot
simply replace these files with the backups. Styles/dark/theme.css
Styles/dark/themeUser.css
Styles/light/theme.css
Styles/light/themeUser.css
5. Reboot the server and you are done.

10 VBrick Systems, Inc.
VEMS Mystro Advanced UI Customization Guide 11
Chapter 2
Customizing the Portal Server User InterfaceLanding Page Customization
This topic will illustrate use-case examples of customization possibilities within the VEMS Mystro environment. There are multiple customizations that can be made by updating CSS, HTML, JavaScript and XML files. Customization examples are explained using code and visual examples. In order to complete any landing page customization, you must have access to the files located on your VEMS Mystro server, basic knowledge of CSS, HTML, JavaScript and XML.
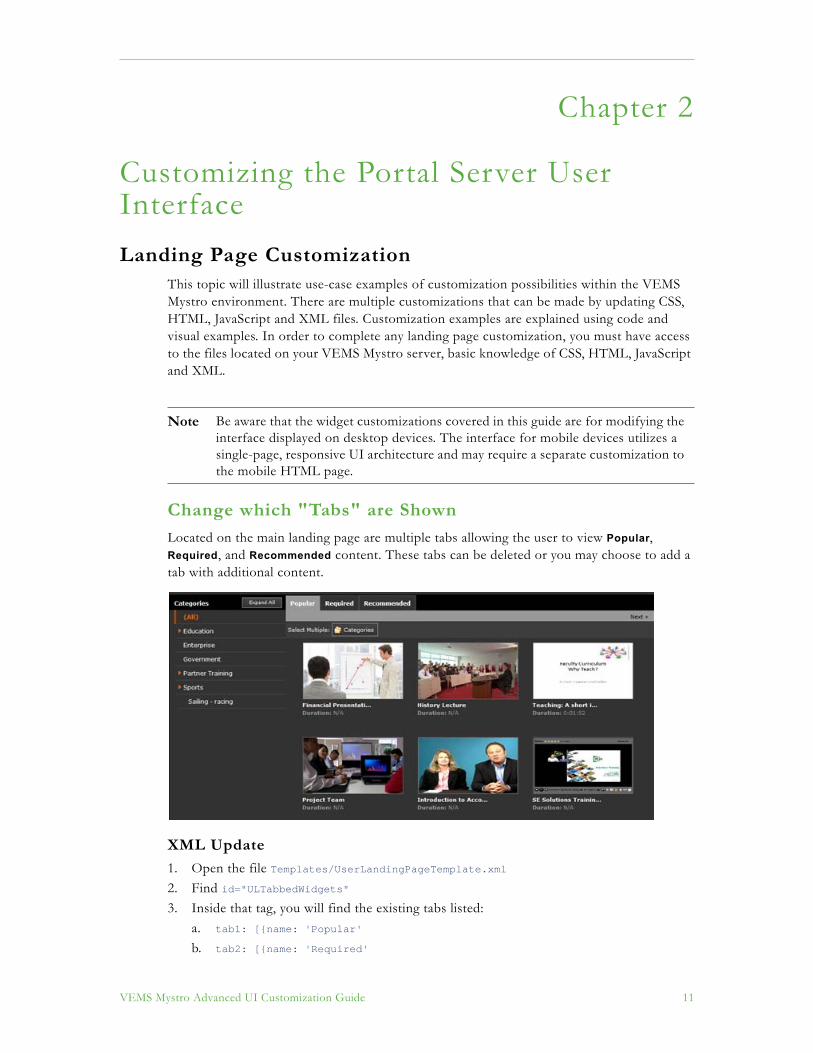
Change which "Tabs" are Shown
Located on the main landing page are multiple tabs allowing the user to view Popular, Required, and Recommended content. These tabs can be deleted or you may choose to add a tab with additional content.
XML Update
1. Open the file Templates/UserLandingPageTemplate.xml2. Find id="ULTabbedWidgets"3. Inside that tag, you will find the existing tabs listed:
a. tab1: [{name: 'Popular' b. tab2: [{name: 'Required'
Note Be aware that the widget customizations covered in this guide are for modifying the interface displayed on desktop devices. The interface for mobile devices utilizes a single-page, responsive UI architecture and may require a separate customization to the mobile HTML page.

12 VBrick Systems, Inc.
4. To add a tab:a. Copy and Paste an existing tab's code lineb. In your new tab's code line, update these fields:
i. widget: 'Widgets/<widget file>.html'
ii. name: '<tab label>'
iii. localizedStringPath:'<tab label>'
c. Adjust all tab code lines so that they are sequential (tab1, tab2, tab3, etc…)d. Make sure that ONLY your first tab (tab1) contains this field:
defaultTab:'true'
XML Update
5. To remove a tab:a. Delete the code line for that tabb. Adjust the remaining tab code lines so that they are sequential (tab1, tab2, tab3,
etc…)c. Find <VBWidget id="ULTabbedWidgetLanding"d. Make sure that this code line references the widget you have listed as tab1:e. If it does not, update these fields:
i. src="Widgets/<widget file>.html"
ii. name="<widget name>"

Customizing the Portal Server User Interface
VEMS Mystro Advanced UI Customization Guide 13
Change Tabs to Horizontal Stacked Boxes
By default, the tabs are aligned side by side allowing for all content to be viewed in the same pane. By clicking each tab, that content is shown. If the desire is to have all content viewable at the same time, it can be achieved by updating the XML and CSS files.
XML Update
1. Open the file Templates/UserLandingPageTemplate.xml2. Find id="filterContainer"
a. Delete that entire code block3. Find id="ULTabbedWidgets"
a. In its containerStyle, make the following changes:
i. Change width to width:100%;
b. Delete all tabs except tab1 c. Update the tab's values with the those of the first widget you want to display:
i. widget: 'Widgets/<widget file>.html'
ii. name: '<tab label>'
iii. localizedStringPath:'<tab label>'
iv. defaultTab:'true'
v. containerWidget: '<create a unique name>'

14 VBrick Systems, Inc.
vi. destination: '<’containerWidget’ name>'
d. In the widget's container containerStyle, make the following changes:
i. Delete float:right;
ii. Change width to width:100%;
4. Find id="ULTabbedWidgetLanding"a. Update the widget that is called with the one you referenced in your tab:
i. id="<’containerWidget’ name from your tab>"
ii. src="Widgets/<widget file>.html"
iii. name="<create a unique name>"
b. In its containerStyle, make the following changes:
i. Change width to width:100%;
c. In the widget's container containerStyle, make the following changes:
i. Delete float:right;
ii. Change width to width:100%;
5. You can now copy and paste those two blocks of code for each widget you want to display. Then:a. Update Tab values:
i. widget: 'Widgets/<widget file>.html'
ii. name: '<tab label>'
iii. localizedStringPath:'<tab label>'
iv. defaultTab:'true'
v. containerWidget: '<create a unique name>'
vi. destination: '<’containerWidget’ name>'
b. Update Widget values:
i. id="<’containerWidget’ name from your tab>"
ii. src="Widgets/<widget file>.html"
iii. name="<create a unique name>"
CSS Update
6. Open the file Styles/user.css and update these styles:a. #widgetBackground .listButton … width:100%; b. #widgetBackground .listButtonBottom … width:100%;
c. #widgetBackground #listFrame … width:100%; d. #bulkFrame … display:none;
e. Add this style:
i. #ContentListWidget #bulkFrame { display:block; }

Customizing the Portal Server User Interface
VEMS Mystro Advanced UI Customization Guide 15
Choose Widgets to Hide
There are several widgets that make up the main landing page. Each of these widgets can be turned on and off to create a custom experience for your users by updating the XML file.
XML Update
1. Open the file Templates/UserLandingPageTemplate.xml2. To hide the Related Content Widget:
a. Find id="RelatedContent"
i. In its containerStyle, add the following attribute:
ii. display:none;
b. Open the file Styles/user.css and update this style:
i. .relatedBackgroundWrap … margin:0 11px 0 0;

16 VBrick Systems, Inc.
3. To hide the System Announcements Widget:a. Find id="Announcements"
i. In its containerStyle, add the following attribute:
ii. display:none;
4. To hide the entire top section of the page (Featured, Related, Announcements):a. Find the <VBPanel that surrounds all three <VBWidget’s
i. In its containerStyle, add the following attribute:
ii. display:none;

Customizing the Portal Server User Interface
VEMS Mystro Advanced UI Customization Guide 17
5. To hide the entire bottom section of the page:a. Find <VBWidget id="filter", <VBWidget id="ULTabbedWidgets", and VBWidget
id="ULTabbedWidgetLanding"
b. In the containerStyle of their containing <VBPanel's add the following attribute:
i. display:none;
Player Page CustomizationThe player page contains related content, metadata information and the video player. Each of these widgets can be turned on and off as well as expanded.
18 VBrick Systems, Inc.
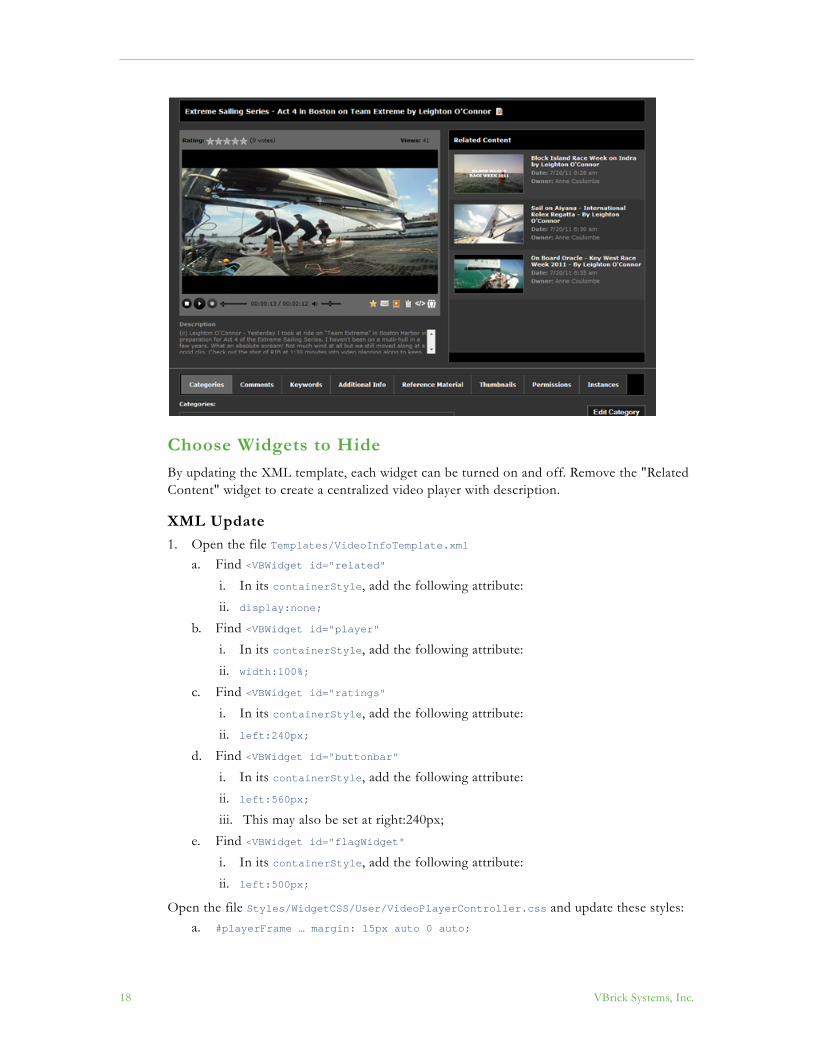
Choose Widgets to Hide
By updating the XML template, each widget can be turned on and off. Remove the "Related Content" widget to create a centralized video player with description.
XML Update
1. Open the file Templates/VideoInfoTemplate.xmla. Find <VBWidget id="related"
i. In its containerStyle, add the following attribute:
ii. display:none;
b. Find <VBWidget id="player"
i. In its containerStyle, add the following attribute:
ii. width:100%;
c. Find <VBWidget id="ratings"
i. In its containerStyle, add the following attribute:
ii. left:240px;
d. Find <VBWidget id="buttonbar"
i. In its containerStyle, add the following attribute:
ii. left:560px;
iii. This may also be set at right:240px;
e. Find <VBWidget id="flagWidget"
i. In its containerStyle, add the following attribute:
ii. left:500px;
Open the file Styles/WidgetCSS/User/VideoPlayerController.css and update these styles:a. #playerFrame … margin: 15px auto 0 auto;

Customizing the Portal Server User Interface
VEMS Mystro Advanced UI Customization Guide 19
Resize Player
By resizing the player and removing Related Content, the result is a large video player screen.
XML Update
1. Follow the steps above to hide Related Content above.2. In the file Templates/VideoInfoTemplate.xml
a. Find <VBWidget id="player"
i. In its dataOverrides, change the following attributes to your desired size:
ii. videoHeight: '506', videoWidth: '900'
iii. In its containerStyle, add the following attribute:
iv. height:700px;
b. Find <VBWidget id="ratings"
i. In its containerStyle, add the following attribute: ii.left:50px;
c. Find <VBWidget id="buttonbar"
i. In its containerStyle, add the following attributes:
ii. left:754px;
top:62px; height:35px;
3. In the file Styles/WidgetCSS/User/VideoPlayerController.css update these styles:a. #playerBackground … height:700px;
b. #playerFrame … width:910px; margin:15px 0 0 44px; (Note: width is videowidth+10)
c. #screenSpace … width: 900px; height: 506px; d. #playerControls … margin: 0;
Note Be aware that on Macintosh players, the video may flicker when the player height is set to greater than 289 px.

20 VBrick Systems, Inc.
e. #videoheaderspace ... width:700px;
Create "Social View"
A social view is the video player with description along with the comment metadata widget viewable and expanded. Users can easily and quickly make comments and view other comments.
XML Update
1. Follow the steps above to Hide Related Content and Resize the Player2. In the file Templates/VideoInfoTemplate.xml
a. Find <VBWidget id="viewInfoPanel" and copy and paste a second version of it
i. In the original's containerStyle, add the following attribute:
ii. display:none;
b. In your new <VBWidget make the following changes:
i. id="<new unique id>"
ii. src="Widgets/ContentCommentsWidget.html"
iii. dataOverrides="{iFrameID:'viewInfoPanel', container:'videoInfo' }"
CSS Update
3. In the file Styles/contentComments.css update this style:a. #commentsBackground … width:950px; padding:0 25px;

Customizing the Portal Server User Interface
VEMS Mystro Advanced UI Customization Guide 21
Content List CustomizationThe default All Videos page combines views of the categories, tabs and actual content list. These widgets can be modified by removing the categories list, adding an embedded player and modifying the tabs similar to the main landing page.
Remove Categories
By removing the categories list, the content list can expand to the entire size of the application.

22 VBrick Systems, Inc.
CSS Update
1. Open the file Styles/WidgetCSS/User/ContentList.css and update these styles:a. In #filterFrame .scroll-pane add this attribute: display:none;b. #ContentListWidget .tSizing … margin:3px;
c. #ContentListWidget .dTitleLink … width:300px;
d. #ContentListWidget .dDuration … width:200px;
e. #ContentListWidget .dClipStart … width:200px;
f. #ContentListWidget .lTitleLink … width:400px;
g. #ContentListWidget .lDuration … width:300px;
h. #ContentListWidget .lClipStart … width:200px;
i. #ContentListWidget .lClipStart p … float:left;
j. Add these new styles:
i. #categoryHeader { display:none; }
ii. #filterFrame .spacer { display:none; }
XML Update
2. In the file Templates/UserTemplatePlayerless.xmla. Find <VBPanel id="listContainer"
i. In its containerStyle, change the following attributes:
ii. margin:0 0 0 -1000px;
iii. width:1000px;
b. In its widget, <VBWidget id="list", change the following attribute:
i. width:1000px;
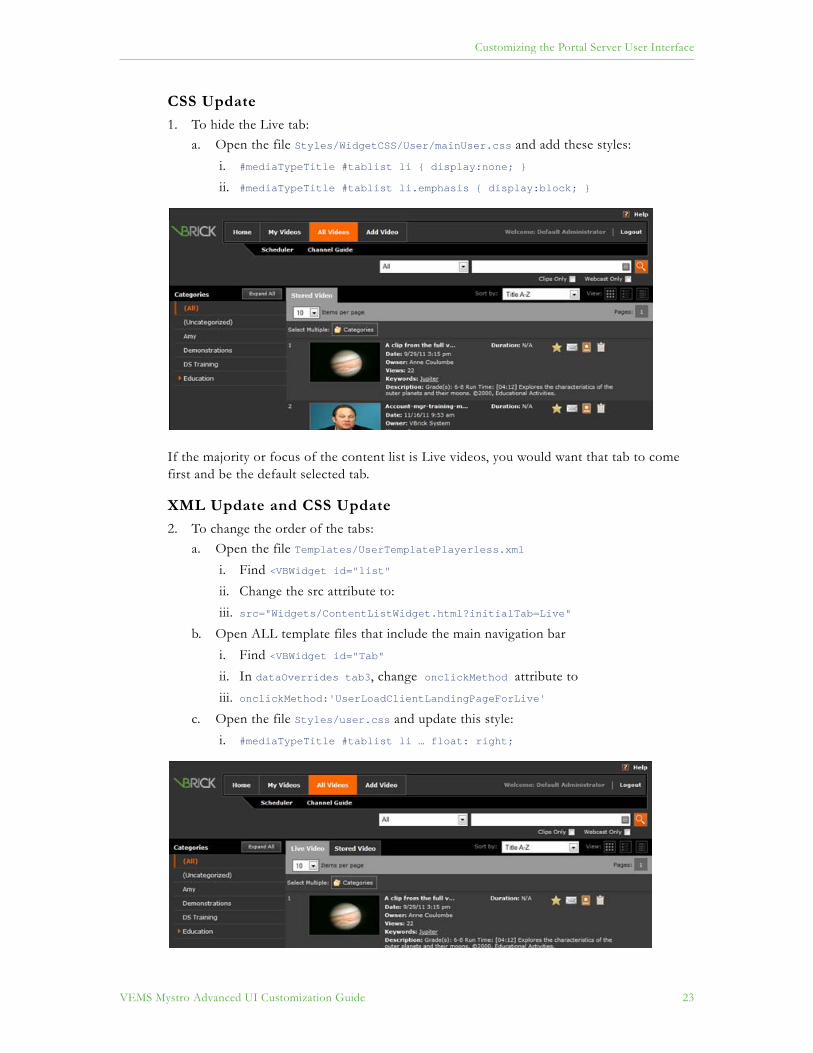
Modify Stored/Live Content "Tabs"
The two tabs by default are Stored and Live. These tabs can be removed, or their order or name can be changed. In some cases, Live content does not exist or is not available. That tab can then be hidden to users.
Customizing the Portal Server User Interface
VEMS Mystro Advanced UI Customization Guide 23
CSS Update
1. To hide the Live tab:a. Open the file Styles/WidgetCSS/User/mainUser.css and add these styles:
i. #mediaTypeTitle #tablist li { display:none; }
ii. #mediaTypeTitle #tablist li.emphasis { display:block; }
If the majority or focus of the content list is Live videos, you would want that tab to come first and be the default selected tab.
XML Update and CSS Update
2. To change the order of the tabs: a. Open the file Templates/UserTemplatePlayerless.xml
i. Find <VBWidget id="list"
ii. Change the src attribute to:
iii. src="Widgets/ContentListWidget.html?initialTab=Live"
b. Open ALL template files that include the main navigation bar
i. Find <VBWidget id="Tab"
ii. In dataOverrides tab3, change onclickMethod attribute to
iii. onclickMethod:'UserLoadClientLandingPageForLive'
c. Open the file Styles/user.css and update this style:
i. #mediaTypeTitle #tablist li … float: right;

24 VBrick Systems, Inc.
Take it a step further and completely remove the Stored Videos tabs.
CSS Update
3. To hide the Stored tab:a. Follow the directions above to swap the Live and Stored tabs.b. Open the file Styles/user.css and add these styles:
i. #mediaTypeTitle #tablist li { display:none; }
ii. #mediaTypeTitle #tablist li.emphasis { display:block; }
An additional customization to the content list is to embed a video player directly on the page.
XML Update and CSS Update
1. Open the file Templates/UserTemplatePlayerless.xml2. Find <VBWidget id="list"
a. In dataOverrides change the playerless attribute to:b. playerless: 'False'
3. In its containing <VBPanel, update this attribute in the containerStylea. margin:420px 0 0 -760px;
4. Find <VBPanel id="filterContainer"5. Immediately above that object, copy and paste this new item:6. <VBPanel containerStyle="float:left; width:1000px; z-index:100; margin:0 0 -
565px; overflow:hidden; position:relative; left:0; top:0;"></VBPanel>
7. Open the file Templates/VideoInfoTemplate.xmla. Find <VBWidget id="player"b. Copy and paste that item inside your new <VBPanel c. Update this attribute in the containerStyle
i. height: 410px; width:100%;
8. Open the file Styles/user.css and update these styles:a. #filterFrame #searchContent … height:474px; margin:0;
b. #playerBackground … width:100%;
c. #playerFrame … float:none; padding-left:0;
d. #mediaDescription … display:none;

Customizing the Portal Server User Interface
VEMS Mystro Advanced UI Customization Guide 25
Permanent View OptionsThe default theme is "Dark." This theme can be modified and the modified theme can then become the default theme by following the instructions below.1. Open the file: C:\Maduro\UserInterfaces\VEMSWeb\Scripts\themeHome.js 2. Find the function: ManageTheme() 3. Find the line: var theme; 4. Replace with: var theme = ‘<permanent theme name>’; 5. Find the lines:
if ($.cookie('styleTheme'))
theme = $.cookie('styleTheme');
else
theme = $.cookie('defaultTheme');
6. Replace with:
// if ($.cookie('styleTheme'))
// theme = $.cookie('styleTheme');
// else
// theme = $.cookie('defaultTheme');
Set User Landing PageThe default landing page is UserLandingPageTemplate.xml. That page can be modified as discussed above, or changed to a completely different page after login.
Note When editing this file, change <template name>.xml to the actual name you use for the landing page template.

26 VBrick Systems, Inc.
HTML Update
1. Open the file index.htmla. Find the line:
window.location = "VEMSWeb/VEMSHost.html?VBTemplate=Templates/UserLoginTemplate.xml&landingTemplate=Templates/UserTemplatePlayerless.xml&userHomePageTemplate=Templates/
UserLandingPageTemplate.xml";
b. And replace it with:window.location = "VEMSWeb/VEMSHost.html?VBTemplate=Templates/UserLoginTemplate.xml&landingTemplate=Templates/UserTemplatePlayerless.xml&userHomePageTemplate=Templates/<template
name>.xml";
2. Open the file VemsWeb/Widgets/UserWelcomeWidget.htmla. Find the line:
LoginRedirect('Templates/UserLoginTemplate.xml&landingTemplate=Templates/UserTemplatePlayerless.xml&userHomePageTemplate=Templates/
UserLandingPageTemplate.xml');
b. And replace it with:LoginRedirect('Templates/UserLoginTemplate.xml&landingTemplate=Templates/UserTemplatePlayerless.xml&userHomePageTemplate=Templates/<template
name>.xml');
3. Open VemsWeb/Widgets/LoginWidget.htmla. Find line:$('#loginLink').click(function () { ClearCookiesThenRedirect('Templates/UserLoginTemplate.xml&landingTemplate=Templates/UserTemplatePlayerless.xml&userHomePageTemplate=Templates/UserLandingPageTemplate.xml') });
b. And replace it with:$('#loginLink').click(function () { ClearCookiesThenRedirect('Templates/UserLoginTemplate.xml&landingTemplate=Templates/UserTemplatePlayerless.xml&userHomePageTemplate=Templates/UserTemplatePlayerless.xml') });
4. Open the file VemsWeb/Templates/UserLoginTemplate.xmla. Change two areas in the <VBWidget’s dataOverrides section to:
i. landingTemplate: '<template name>.xml'
ii. userHomeTemplate: '<template name>.xml'
Login Screen ModificationsThe initial login page allows users to log in to either the user application or the administration application. The "Admin" button can be hidden from view removing the option to log in.1. Open file Styles\WidgetCSS\Admin\login.css and update the style for:
a. Find style for # SwitchBtnDiv and add attribute visibility:hidden; in css.

VEMS Mystro Advanced UI Customization Guide 27
Chapter 3
Skinning the Set Top Box User Interface
Introduction This topic explains what files need to be updated in order to re-skin the existing Multi-Format Set Top Box user interface. Be aware that updated CSS files such as general.css may get overwritten during a patch or upgrade. Always make a copy of these files as a backup. You will need to merge backups with updated files in order to view customizations.
Topics in the section
Introduction . . . . . . . . . . . . . . . . . . . . . . . . . . . . . . . . . . . . . . . . . . . . . . . . . . . . . . . . . . . . . . 27Files to Be Updated . . . . . . . . . . . . . . . . . . . . . . . . . . . . . . . . . . . . . . . . . . . . . . . . . . . . . . . . 27How to Update Files . . . . . . . . . . . . . . . . . . . . . . . . . . . . . . . . . . . . . . . . . . . . . . . . . . . . . . . 27
Files to Be UpdatedFiles to be updated are on the server on which VEMS Mystro portal services are installed. All files are located in the C:\Program Files\VBrick\Maduro\STB\ directory.
CSS VEMSPisces/css/general.css VEMSPisces/PiscesFullscreenMode.htm
Images
VEMSPisces /images/banner.jpg VEMSPisces /images/ VBrickLogo.gif VEMSPisces/images/search.png
How to Update Files
Changing the Logo
You can change the logo by either overwriting the existing VBrick logo or by updating the CSS file to point to the new image. All logo images should be PNG or GIF with transparent background or be a self-contained design. Dimensions are 63px wide by 53px high. A resolution of 72dpi is recommended.
The current logo can be found and overwritten in:
C:\Program Files\VBrick\Maduro\STB\VEMSPisces\images\VBrickLogo.gif
The current css can be changed in:
C:\Program Files\VBrick\Maduro\STB\VEMSPisces\css\general.css (line #30)
Note This document explains how to re-skin the Multi-Format STB. The same process is used for the AmiNET130 STB. The only difference is that the AmiNET130 pages are found in: C:\Program Files\VBrick\Maduro\UserInterfaces\STB\VEMSAmino

28 VBrick Systems, Inc.
#divHeader
{position:absolute;background:url(../images/VBrickLogo.gif);background-repeat:no-repeat;background-position:20px top;
}
Figure 4. VBrick Logo Page
Changing the Background
C:\Program Files\VBrick\Maduro\VEMSPisces\css\general.css
Site background is set to black. Update line #11 with a new background color or image:body{
background:black url(tv:mask);
Changing Text and Fonts
The font used is Arial. To update the font, open the general.css file. It is recommended to use web safe fonts such as Verdana, Arial, Times Roman, Helvetica, or sans-serif. If a non-

Skinning the Set Top Box User Interface
VEMS Mystro Advanced UI Customization Guide 29
web safe color is used, there may be an impact to the design. It is also not recommended to change the size of the font.
C:\Program Files\VBrick\STB\VEMSPisces\css\general.css (update line #12) body{
background:black url(tv:mask);font-family:Arial;height:100%;margin:0px;overflow:hidden;padding:0px;width:100%;
Do a search and replace to change the font throughout the document. Search for:
font-family:Arial;
Text colors tend to be either black or white. There are a few cases where the text color is grey, orange or blue especially when used as a hover effect. To do a broad search and replace on all text colors, as used above for font-family, use the lines below. C:\Program Files\VBrick\Maduro\VEMSPisces\css\general.css
Update line #22
background-color:White;
Update line #36
background-color:#333333;
Update line #44
background:black url(tv:mask);
Update line #54
background-color:White;
Update line #63
background:black url(tv:mask);
Update line #75
background-color:#333333;/*added*/
Update line #84
background-color: white;
Update line #114
color:White;
Update lines #123 – 124

30 VBrick Systems, Inc.
border: 2px solid #ff6600;
background-color:#333333;
Update line #131
background-color:#333333;
Update line #138
background-color:#333333;
Update line #143
background-color:#999;
Update line #147
color:black;
Update line #151
background-color:white;
Update lines #159 – 160
border:solid 1px #666666;
background-color:#ff6600;
Update line #166
background-color:#000;
Update lines #176 – 177
background-color:#fff;
color:White;
Update line #190
color:Red;
Update line #198
border:2px solid #666666; background-color:#000;padding:20px;text-align:center;
color:White;
Update line #206
background-color:#000;
Update line #212
background-color:#333333;padding:20px;border:2px solid #666666;
If using the full screen mode, update styles in the css on the top of the htm page:C:\Program Files\VBrick\STB\VEMSPisces\PiscesFullscreenMode.htm

Skinning the Set Top Box User Interface
VEMS Mystro Advanced UI Customization Guide 31
Update line #14
background:black url(tv:mask);
Update line #15
font-family:Arial;
Update lines #46 – 51border:solid 1px black;
background:#ccc;
padding:2px 2px 2px 2px;
font-weight:bold;
font-family:verdana;
text-align:center;
Update line #56
color:White;
Update lines #63 – #65
font-family:verdana;
font-size:10pt;
color:black;

32 VBrick Systems, Inc.

VEMS Mystro Advanced UI Customization Guide 33
Chapter 4
Adding Languages to the Mystro DatabaseOverview
This topic explains how to load a new language into VEMS Mystro database. It explains the procedure to load a new locale and its corresponding screen text in the appropriate language into the VEMS Mystro database. After this is done, the new language will appear as one of the choices in the Preferred Language in the Global Settings. The procedure is divided into two major steps: (1) generation of a data file from the database containing all the English text value strings and their IDs; and (2) importation of a new locale and its corresponding data file containing the translated text into the database. Generation of data needs to be done once whereas importing a new locale can be repeated for as many new languages are desired. These steps are run on the VEMS Mystro system server containing the Microsoft SQL Server database to be loaded with the new language, using the SQL Server Management Studio application.
Topics in this section
Overview . . . . . . . . . . . . . . . . . . . . . . . . . . . . . . . . . . . . . . . . . . . . . . . . . . . . . . . . . . . . . . . . 33(A) Generating a Data File with English Text . . . . . . . . . . . . . . . . . . . . . . . . . . . . . . . . . . . . 33(B) Importing the New Language . . . . . . . . . . . . . . . . . . . . . . . . . . . . . . . . . . . . . . . . . . . . . 34
(A) Generating a Data File with English Text To generate a data file with English text:
1. Open up the SQL Server Management Studio application.2. Connect to the SQL Server named “<MystroServerName>\MADURO” where
<MystroServerName> is replaced with the name of the Mystro system server.3. Expand the entries under Databases on the left side of the window.4. Right-click on Maduro under Databases, and select Tasks > Export Data… to start the
Import and Export Wizard.5. If the Wizard popup shows the “Welcome to …” window, click on Next.6. The Choose a Data Source window appears. If the Data source field is not set to “SQL
Server Native Client”, select that choice.7. The Server name field should already be set to the same server as in Step 2. If it is not,
select the same server name.8. Select the same authentication as was used to connect to the SQL Server in Step 2.9. The Database field should already be set to “Maduro”. If it is not, select it.10. Click the Next button. The Choose a Destination window appears.11. Set the Destination field to “Flat File”.12. Set the File name field to the full path name where you want the output .txt file to be
written. You can use the Browse button to set the File name. 13. Set the Unicode option on (it is to the right of the Locale field.)14. Leave the other fields at their defaults. The format of the data file will be delimited fields.

34 VBrick Systems, Inc.
15. Click the Next button. The Specify Table Copy or Query window appears.16. Select the “Write a query to specify the data to transfer” option.17. Click the Next button. The Provide a Source Query window appears.18. Enter the following query in the window:
SELECT [LocaleID] ,[Value] ,[LocalizedStringClassID]
FROM [Maduro].[dbo].[LocalizedStringValue]
19. Click the Next button. The Configure Flat File Destination window appears.20. For the Source table field, the value should already be set to “[Query]”.21. Set the Row delimiter to “{CR}{LF}”.22. Set the Column delimiter to “Tab”. Note that commas, colons, semicolons, and
vertical bars cannot be used as delimiters because they appear in screen messages. 23. Click the Next button. The Save and Run Package window appears.24. Make sure only the “Run immediately” option is checked.25. Click the Next button. The Complete the Wizard window appears.26. Verify the choices and click Finish button.27. The operation progress window appears, showing the running status of the data export.
After the data export finishes running, close the Import and Export Wizard.28. You should now have a data file in the location specified in Step 12.
(B) Importing the New LanguageThe following series of steps can be run any number of times to add as many additional languages as desired. For each language, all of the following substeps should be run.
To add languages:
1. Determine the locale name and description of the new language.
A locale name is the name of a culture in the format "<languagecode2>-<country/regioncode2>", where <languagecode2> is a lowercase two-letter language code and <country/regioncode2> is an uppercase two-letter country/region code both derived from ISO standards. To get the culture name for a specific language, you can scroll through the list of culture names available in IE. To see the list, do the following:
a. Open Internet Explorer.b. Open up the Internet Options.c. On the General tab, click Languages.d. In the Language Preference popup, click “Add…”.e. A list of language descriptions and their associated culture names pops up. The
culture names are enclosed in brackets after the language description.2. In the SQL Server Management Studio application, expand the entries under Databases
on the left side of the window if they are collapsed. Expand the entries under Maduro and then Tables.
3. Scroll down to the dbo.Locale table item. Right click on Locale and select ‘Edit Top 200 Rows”. A tab for the Locale table appears showing the results of the edit query.
4. Click in the box in the Name column in the last row that has a NULL value in it. Enter the locale name as determined in Step 1. Press the Tab key to go to the Description column in the same row.

Adding Languages to the Mystro Database
VEMS Mystro Advanced UI Customization Guide 35
5. Enter the language description. Press the Enter key. An exclamation icon will appear on the row.
6. Execute the edit query again by selecting Query Designer-> Execute SQL to refresh the data. Note the value of the LocaleID for the row you just added for use in Step 8.
7. Copy the data file from the generated data to a new data file.8. Edit the new data file to refer to the new LocaleID and contain translations of the
English text fields. Be sure to change only the LocaleID and the text field leaving all the other fields exactly the same. Changing other fields in the file will cause screen messages to display in the wrong places. The format of the data file is one entry per line with 3 tab-separated fields per line.
• The 1st field is the Locale ID.
• The 2nd field is the text string.
• The 3rd field is the String ID. This field should not be changed.
For example, suppose the language of Spanish as spoken in Spain is being added. Suppose the LocaleID for this is 2 as noted from Step 6. The line in the English data file that reads as follows:
1<TAB>Add New User<TAB>20
would be changed to:
2<TAB>Añadir nuevo usuario<TAB>20
Note the LocaleID was changed from 1 to 2, and the text was translated.
9. In the Server Management application, right-click on Maduro under Databases, and select Tasks -> Import Data… to start the Import and Export Wizard.
10. The Choose a Data Source window appears. Set the Data source to “Flat File Source”.11. Wait until the windows redraws. Set the File name to the edited data file from Step 8.12. Set the Unicode option on (it is to the right of the Locale field.)13. Leave the other fields at their default values. The format of the data file is delimited
fields.14. Click the Next button. The window changes to the Columns data. The row delimiter
should be “{CR}{LF}” and the Column delimiter should be “Tab”. The bottom part of the window shows a preview of the imported data.
15. Click the Next button. The Choose a Destination window appears.16. If the Destination field is not set to “SQL Server Native Client”, select that choice.17. The Server name field should already be set to the same server as in Step A-2. If it is not,
select the same server name.18. Select the same authentication as was used to connect to the SQL Server in Step A-2.19. The Database field should already be set to “Maduro”. If it is not, select it.20. Click the Next button. The Select Source Tables and Views window appears. 21. Click on the entry under the Destination column and select
“[dbo].[LocalizedStringValue]”. Expand the width of the window if needed to see all of the text in the Destination choices.
22. Click the Edit Mappings button. The Column Mappings pop-up appears.23. Make sure the “Append rows to the destination table” option is selected.24. In the row for Column 0, click on the Destination field and choose “LocaleID”.
a. In the row for Column 1, click on the Destination field and choose “Value”.

36 VBrick Systems, Inc.
b. In the row for Column 2, click on the Destination field and choose “LocalizedStringClassID”.
25. Click OK in the Mappings pop-up. The pop-up closes.26. Click the Next Button. The Review Data Type Mapping window appears. Verify the
mappings are as set in Step 24. Ignore the warning symbols on the rows for Columns 0 and 2.
27. Click the Next button. The Save and Run Package window appears.28. Make sure only the “Run immediately” option is checked.29. Click the Next button. The Complete the Wizard window appears.30. Verify the choices and click the Finish button.31. The operation progress window appears, showing the running status of the data import.
After the data import finishes running, close the Import and Export Wizard.32. You should now be able to see the new language as one of the choices in the Preferred
Language in the Global Settings.


VBrick Systems, Inc.2121 Cooperative Way, Suite 100
Herndon, VA 20171