Embed Size (px)
Citation preview
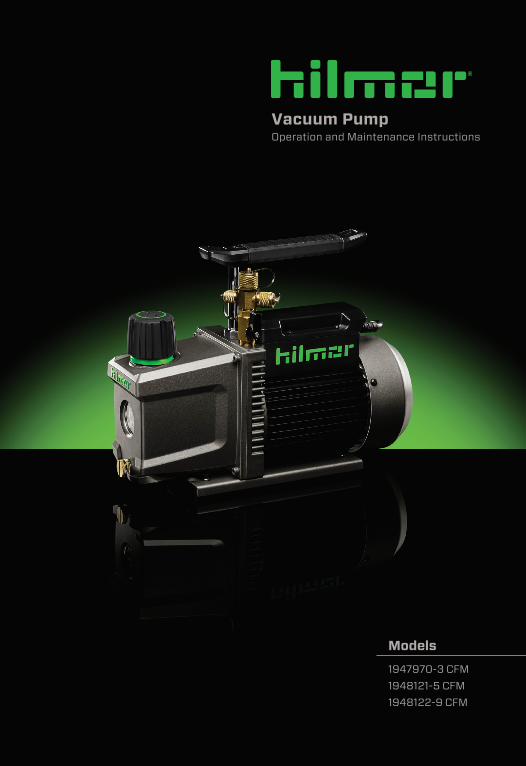
Models 1947970-3 CFM 1948121-5 CFM 1948122-9 CFM
Vacuum PumpOperation and Maintenance Instructions

Introduction ........................................................................................................3Key Features ......................................................................................................4 Safety/Limited Warranty ...............................................................................5Grounding Instructions ..................................................................................6Quick Start Guide ............................................................................................. 7Maintenance ......................................................................................................8Pump Components ..........................................................................................9Technical Specifications .............................................................................10Operating Instructions ............................................................................ 11-12Troubleshooting ............................................................................................. 13Technical Drawing .......................................................................................... 14
TABLE OF CONTENTS
2
IMPORTANT:This hilmor Vacuum Pump has been drained of oil for shipment. Do not operate without adding hilmor Vacuum Pump Oil.
INTRODUCTIONIt is important to read the entire instruction manual carefully for a complete understanding of the hilmor Vacuum Pump features, limitations and specifications before use. hilmor products are designed and manufactured to be used by trained and licensed technicians. Incorrect use may result in accidents, injuries or death. Refer to page 5 for safety precautions.
The hilmor Vacuum Pumps come with a two-year limited warranty. Visit hilmor.com/registration to register the pumps and activate the warranty.
The serial number can be found on the motor plate.
hilmor Vacuum Pumps are factory-tested to guarantee 25 microns of ultimate vacuum. Please inspect the hilmor Vacuum Pump immediately for any in-transit damage.
See hilmor.com for other languages.3
KEY FEATURESEASY OIL CHANGE
• A sloped and channeled housing helps drain oil fast.
• Easy access to a large oil fill port.
• Quickly identify oil level and detect contamination through a large sight glass.
DURABLE CONSTRUCTION AND LONG LIFE
• Automatic thermal overload protection to protect the pump.
• Intake filter helps prevent particulates from damaging the pump.
• Gas ballast removes excess moisture and extends oil life.
EXTRA CONFIDENCE
• A blank-off valve isolates the hilmor Vacuum Pump from the system for accurate vacuum readings and easy oil changes while maintaining vacuum.
HANDS-FREE CARRY
• Two durable hoist points make transporting the hilmor Vacuum Pump easier.
• Compatible with the hilmor HVAC/R Carrying Strap.
The hilmor Vacuum Pump has several field-inspired features to make usage easier, including:
301 Chestnut Street, East Longmeadow, MA 01028 + 1-800-628-8810 4
SAFETY PRECAUTIONS:To prevent personal injury, please read the operating manual carefully and operate only as instructed by following the guidelines listed below.
1. Wear safety glasses, gloves and all other recommended safety gear when working with refrigerants. Contact with refrigerants may cause injury. Please see any warnings associated with refrigerants.
2. Confirm all associated devices are grounded correctly before energizing circuit to avoid electrical shock hazards.
3. Standard operation will cause certain parts of the pump to be hot. Avoid touching the pump housing or motor during operation.
4. CAUTION: To reduce risk of electric shock or injury, use only in dry locations. Store indoors.
LIMITED WARRANTY:• The hilmor Vacuum Pump has a two-year limited warranty from the
purchase date.
• Product must be registered at hilmor.com/registration to activate the warranty.
• Warranty service claims are subject to authorized inspection for product defects. If registered products are found defective, hilmor will repair or replace them within the warranty period.
• Often, a returned hilmor Vacuum Pump can be serviced with field maintenance, such as changing the oil or making minor adjustments found in the Troubleshooting section of this manual. If the problem persists, contact hilmor Technical Support at 1-800-628-8810 or visit the hilmor website, hilmor.com.
SAFETY/LIMITED WARRANTY
301 Chestnut Street, East Longmeadow, MA 01028 + 1-800-628-8810 6See hilmor.com for other languages.5
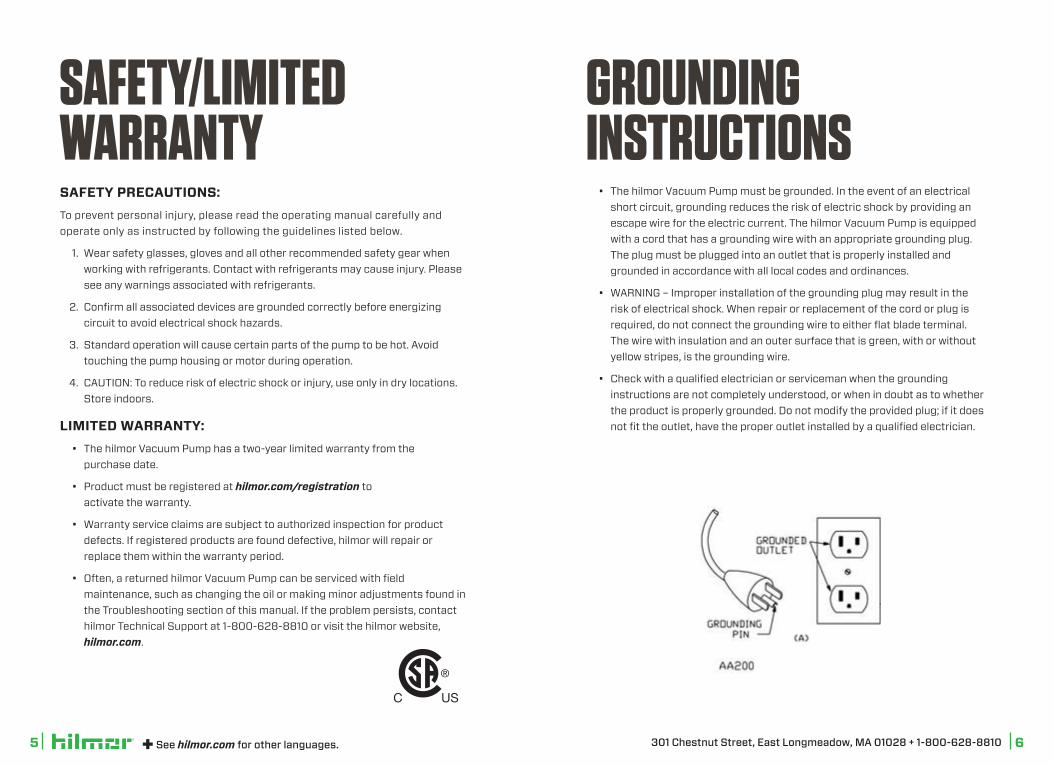
• The hilmor Vacuum Pump must be grounded. In the event of an electrical short circuit, grounding reduces the risk of electric shock by providing an escape wire for the electric current. The hilmor Vacuum Pump is equipped with a cord that has a grounding wire with an appropriate grounding plug. The plug must be plugged into an outlet that is properly installed and grounded in accordance with all local codes and ordinances.
• WARNING – Improper installation of the grounding plug may result in the risk of electrical shock. When repair or replacement of the cord or plug is required, do not connect the grounding wire to either flat blade terminal. The wire with insulation and an outer surface that is green, with or without yellow stripes, is the grounding wire.
• Check with a qualified electrician or serviceman when the grounding instructions are not completely understood, or when in doubt as to whether the product is properly grounded. Do not modify the provided plug; if it does not fit the outlet, have the proper outlet installed by a qualified electrician.
GROUNDING INSTRUCTIONS
VACUUM PUMP OIL:• The condition and type of oil used in the hilmor Vacuum Pump are extremely
important to achieve deep vacuum. For premium performance, use hilmor Vacuum Pump Oil, which is a low-vapor pressure oil that improves vacuum performance and cold weather start-up.
• For best results, change the oil after every hilmor Vacuum Pump use.
OIL CHANGE PROCEDURE: For best results, drain oil from the hilmor Vacuum Pump immediately after evacuation to ensure that the pump is still warm and contaminants are still suspended in the oil.
1. Turn hilmor Vacuum Pump off.
2. Remove the oil drain plug, drain the contaminated oil into a container and dispose of it properly. Tilt the hilmor Vacuum Pump forward slightly to remove the residual oil.
3. Reattach the oil drain plug. Remove the oil fill cap, and fill the oil reservoir with new hilmor Vacuum Pump Oil until oil level has reached between the Min and Max markings on the sight glass.
4. Replace the oil fill cap.
IF OIL IS BADLY CONTAMINATED, FOLLOW THESE STEPS TO FLUSH: 1. Drain any oil in the hilmor Vacuum Pump, following the steps above.
2. Remove the oil reservoir for cleaning by removing the four screws that hold it to the hilmor Vacuum Pump.
3. Remove the oil reservoir and wipe with a clean rag.
4. Reassemble the reservoir by carefully placing the gasket into the groove, being careful not to pinch the gasket.
5. Replace all four screws by tightening to 106 in–lbs (12 n-m), and make sure the oil reservoir is tightly attached to the hilmor Vacuum Pump.
6. Refill with oil and check for leaks.
7. Let the hilmor Vacuum Pump run until it is warmed up.
8. Turn the hilmor Vacuum Pump off, then change the oil following the steps above.
MAINTENANCE
301 Chestnut Street, East Longmeadow, MA 01028 + 1-800-628-8810 8See hilmor.com for other languages.7
Add hilmor Vacuum Pump Oil until it has reached between the Min and Max levels on the sight glass.
Plug hilmor Vacuum Pump into a power source.
Connect hilmor Vacuum Pump to the system with evacuation hoses.
Turn hilmor Vacuum Pump on.
Open gas ballast, then close after pulling to approximately 3,000 microns.
Pull vacuum to desired vacuum level.
Blank off system at manifold or hilmor Valve Core Removal Tool.
Open unused inlet fitting and break vacuum; turn hilmor Vacuum Pump off and close inlet fitting.
Remove evacuation hoses.
QUICK START GUIDE

PUMP COMPONENTS TECHNICAL SPECIFICATIONS
Part Number 1947970 1948121 1948122
Model 3 CFM 5 CFM 9 CFM
Ultimate Vacuum 25 microns 25 microns 25 microns
Motor 1/3 HP 1/2 HP 1 HP
Voltage 120v 120v 120v
Frequency 60Hz 60Hz 60Hz
Amps 4.5 7.5 5.5
RPM 1720 3440 1720
Intake Fitting 1/4", 3/8" 1/4", 3/8", 1/2" 1/4", 3/8", 1/2"
Oil Capacity 11 oz. 11 oz. 15 oz.
Dimensions 13.6", 5.5", 10.7" 13.6", 5.5", 10.7" 15.9", 5.9", 11.2"
Net Weight 23 lbs. 24 lbs. 36 lbs.
Inlet Tree Fitting Hoist Points
Power Cord
Electrical Housing
Fan Cover
Motor
Base
Blank-off Valve
Oil Fill Port/Exhaust
Oil Housing
Sight Glass
Oil Drain Plug
301 Chestnut Street, East Longmeadow, MA 01028 + 1-800-628-8810 10See hilmor.com for other languages.9
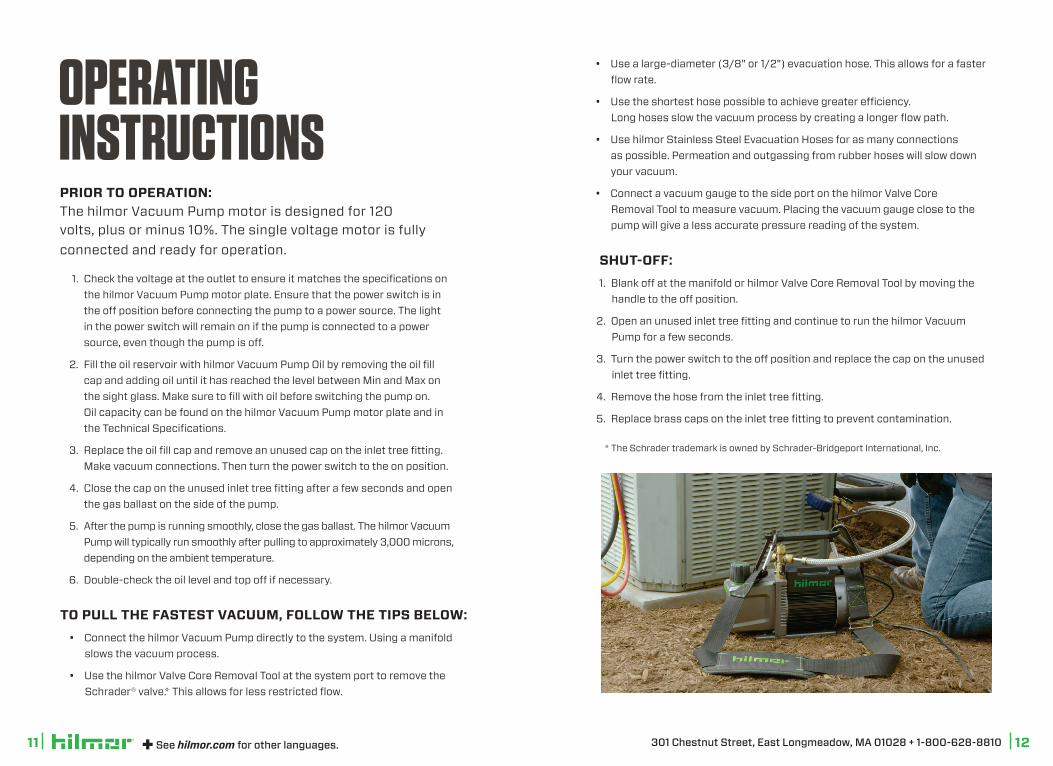
PRIOR TO OPERATION:The hilmor Vacuum Pump motor is designed for 120 volts, plus or minus 10%. The single voltage motor is fully connected and ready for operation.
1. Check the voltage at the outlet to ensure it matches the specifications on the hilmor Vacuum Pump motor plate. Ensure that the power switch is in the off position before connecting the pump to a power source. The light in the power switch will remain on if the pump is connected to a power source, even though the pump is off.
2. Fill the oil reservoir with hilmor Vacuum Pump Oil by removing the oil fill cap and adding oil until it has reached the level between Min and Max on the sight glass. Make sure to fill with oil before switching the pump on. Oil capacity can be found on the hilmor Vacuum Pump motor plate and in the Technical Specifications.
3. Replace the oil fill cap and remove an unused cap on the inlet tree fitting. Make vacuum connections. Then turn the power switch to the on position.
4. Close the cap on the unused inlet tree fitting after a few seconds and open the gas ballast on the side of the pump.
5. After the pump is running smoothly, close the gas ballast. The hilmor Vacuum Pump will typically run smoothly after pulling to approximately 3,000 microns, depending on the ambient temperature.
6. Double-check the oil level and top off if necessary.
OPERATING INSTRUCTIONS
See hilmor.com for other languages.11
SHUT-OFF: 1. Blank off at the manifold or hilmor Valve Core Removal Tool by moving the
handle to the off position.
2. Open an unused inlet tree fitting and continue to run the hilmor Vacuum Pump for a few seconds.
3. Turn the power switch to the off position and replace the cap on the unused inlet tree fitting.
4. Remove the hose from the inlet tree fitting.
5. Replace brass caps on the inlet tree fitting to prevent contamination.
TO PULL THE FASTEST VACUUM, FOLLOW THE TIPS BELOW:• Connect the hilmor Vacuum Pump directly to the system. Using a manifold
slows the vacuum process.
• Use the hilmor Valve Core Removal Tool at the system port to remove the Schrader® valve.* This allows for less restricted flow.
301 Chestnut Street, East Longmeadow, MA 01028 + 1-800-628-8810 12
* The Schrader trademark is owned by Schrader-Bridgeport International, Inc.
• Use a large-diameter (3/8" or 1/2") evacuation hose. This allows for a faster flow rate.
• Use the shortest hose possible to achieve greater efficiency. Long hoses slow the vacuum process by creating a longer flow path.
• Use hilmor Stainless Steel Evacuation Hoses for as many connections as possible. Permeation and outgassing from rubber hoses will slow down your vacuum.
• Connect a vacuum gauge to the side port on the hilmor Valve Core Removal Tool to measure vacuum. Placing the vacuum gauge close to the pump will give a less accurate pressure reading of the system.
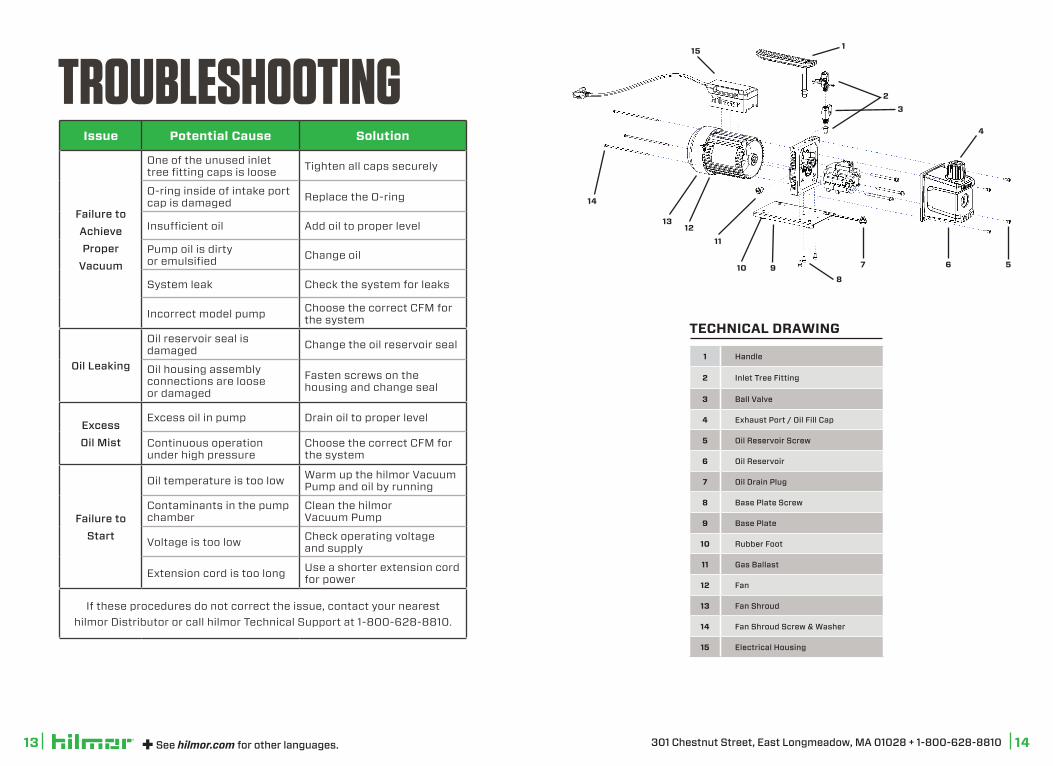
TECHNICAL DRAWING
1 Handle
2 Inlet Tree Fitting
3 Ball Valve
4 Exhaust Port / Oil Fill Cap
5 Oil Reservoir Screw
6 Oil Reservoir
7 Oil Drain Plug
8 Base Plate Screw
9 Base Plate
10 Rubber Foot
11 Gas Ballast
12 Fan
13 Fan Shroud
14 Fan Shroud Screw & Washer
15 Electrical Housing
See hilmor.com for other languages.13
15 1
4
567910
1213
14
11
8
32
301 Chestnut Street, East Longmeadow, MA 01028 + 1-800-628-8810 14
TROUBLESHOOTINGIssue Potential Cause Solution
Failure to Achieve Proper
Vacuum
One of the unused inlet tree fitting caps is loose Tighten all caps securely
O-ring inside of intake port cap is damaged Replace the O-ring
Insufficient oil Add oil to proper level
Pump oil is dirty or emulsified Change oil
System leak Check the system for leaks
Incorrect model pump Choose the correct CFM for the system
Oil Leaking
Oil reservoir seal is damaged Change the oil reservoir seal
Oil housing assembly connections are loose or damaged
Fasten screws on the housing and change seal
Excess Oil Mist
Excess oil in pump Drain oil to proper level
Continuous operation under high pressure
Choose the correct CFM for the system
Failure to Start
Oil temperature is too low Warm up the hilmor Vacuum Pump and oil by running
Contaminants in the pump chamber
Clean the hilmor Vacuum Pump
Voltage is too low Check operating voltage and supply
Extension cord is too long Use a shorter extension cord for power
If these procedures do not correct the issue, contact your nearest hilmor Distributor or call hilmor Technical Support at 1-800-628-8810.

301 Chestnut Street, East Longmeadow, MA 01028 hilmor.com + 1-800-628-8810