Embed Size (px)
Citation preview

Page 1 of 43
Using the HTC-Vive with Unity
Introduction/Prerequisites
Introduction:
This tutorial will walk through the steps necessary to get basic interaction with 3d models within Unity using the HTC-Vive virtual reality system. This tutorial is adapted and condensed from Ray Wenderlich’s HTC-Vive Unity tutorial:
https://www.raywenderlich.com/149239/htc-vive-tutorial-unity
This tutorial assumes HTC-Vive software, drivers, SteamVR, Unity and associated accounts are installed and created. If you need to install the HTC-Vive software and hardware, download the installer, which also provides a step by step guide in setting up the HTC-Vive VR hardware at the url speci ied below under the prerequisites.
Prerequisites:
HTC-Vive software and drivers and SteamVR client:https://www.vive.com/us/setup/This setup program will guide the user through setting up the HTC-Vive hardware for a given space, including room calibration, installing HTC-Vive drivers and the SteamVR client. If you do not already have a SteamVR user id and password, you will prompted to create one. Each time you setup the HTC-Vive hardware in a new physical location, you can calibrate the system by selecting “Run Room Setup” from within the SteamVR client application.
Unity 3d:
https://unity3d.com/
Follow the installation prompts and create a Unity id if you do not already have one
Sublime Text 3:
https://www.sublimetext.com/
HTC-VIVE WITH UNITY

Page 2 of 43
Section 1:
Configuring SteamVR/Unity integration
First, download the Unity starter project from:
http://www.saic.edu/~ekuehn/FVNMA-HTC-Vive_StarterProject.zip
Overview:In this section we will download and install the SteamVR plugin for Unity and then configure the project to use the SteamVR and CameraRig prefabs from the plugin. The “CameraRig” prefab replaces the normal camera and gives Unity access to device information from the left and right hand controllers and the headset through C# scripts.
Note: Throughout the process of building the project, if you are presented with a pop-up dialog asking you to apply recommended settings, Select “Accept All”
Installing and configuring the SteamVR plugin for Unitya. Pull up the “Asset Store” window and search for “SteamVR” Select the SteamVR plugin and
then select “Import” on the next page.b. When prompted about “Importing Complete Project” select “Import” againc. The “Import Unity Package” Dialog will pop up, showing the SteamVR components that will be
installed, select “Import” again and select “I Made a Backup. Go Ahead!” when the “Api UpdateRequired” dialog pops up.
Step a:
HTC-VIVE WITH UNITY

Page 3 of 43
Step b:
HTC-VIVE WITH UNITY

Page 4 of 43
Step c:
DragtheSteamVR plugin components into your hierarchy and configure the “CameraRig”
a. In your “Assets” window you should have a “SteamVR” directory now, expand that directoryand select the “Prefabs” directory. Select both the “CameraRig” and “SteamVR” prefabs.
b. Drag the “SteamVR” and “CameraRig” prefabs into your hierarchy and delete the “MainCamera” in the hiearchy as it will interfere with the SteamVR “CameraRig”.
c. c. Select “CameraRig” and set its Z position.
Step a: Step b:
HTC-VIVE WITH UNITY

Page 5 of 43
Step c:
At this point you should be able to run the project and look around the 3d environment though the headset. You should see 3d representations of the left and right controllers as well. So far looking around is all you will be able to do. In the next section we will add a few physics components and a C# script to the left and right controllers so that you can interact with the 3d environment.
HTC-VIVE WITH UNITY

Page 6 of 43
Overview:
In this section we will add physics components to the left and right controllers and put together a short C# script called “ControllerHitGrabObject” that will allow us to hit and pick up the 3d objects in the virtual environment. Before we begin this section make sure and have Sublime Text installed and follow the instructions below to configure Unity to use it for editing C# scripts.Configuring Unity to use Sublime Text for editing C# scripts:
a. Open “Preferences” in Unity.b. Select “External Tools” and then select the “External Script Editor” button then “Browse...”.
Browse to C:\Program Files\Sublime Text 3\sublime_text
HTC-VIVE WITH UNITY
Section 2:CONTROLLER PHYSICS AND ENVIRONMENT INTERACTION

Page 7 of 43
Add and configure physics components for the “Controller (left)” and “Controller (right)”objects of the "Camera Rig."
a. Select both “Controller (left)” and “Controller (right)” in the hierarchy. Push the“Add Component” button in the Inpector Window and select “Physics” then“Rigidbody” make sure “Is Kinematic” is checked for the Rigidbody, and that“Use Gravity” is unchecked.
b. Push the “Add Component” button again and select “Physics” again, this timeselecting the “Box Collider” component. Make sure “Is Trigger” is not checkedand confgiure the center and size of the collider. This collider takes care of thecontrollers hitting 3d objects.
c. Cr eate another “Box Collider”, this time making sure “Is Trigger” is checked andconfigure the center and size as in step b. This collider will work with triggerevents.
HTC-VIVE WITH UNITY

Page 8 of 43
Step a: Add a Rigidbody
Step b: Add a Box Collider for hitting a 3d object
HTC-VIVE WITH UNITY

Page 9 of 43
Step c: Add another box collider with same configuration with “Is Trigger” checked
When selected, the left and right controllers should now display the following in the Inspector:
HTC-VIVE WITH UNITY
Page 10 of 43
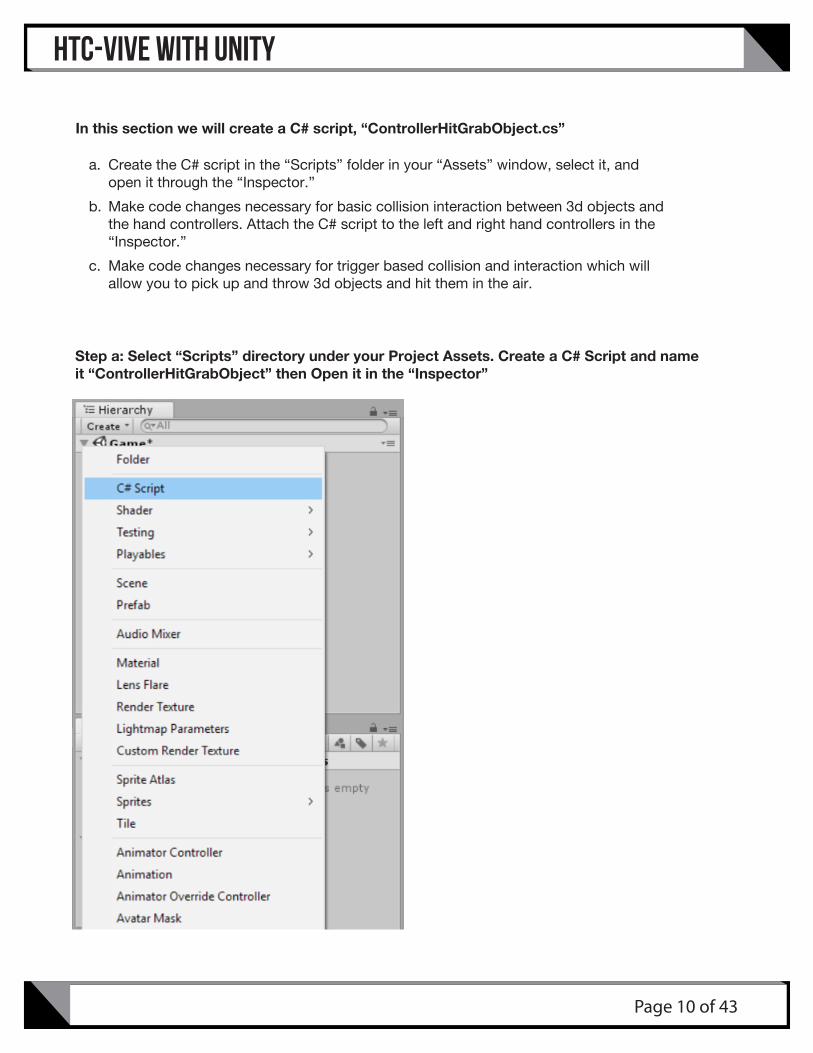
In this section we will create a C# script, “ControllerHitGrabObject.cs”
a. Create the C# script in the “Scripts” folder in your “Assets” window, select it, andopen it through the “Inspector.”
b. Make code changes necessary for basic collision interaction between 3d objects andthe hand controllers. Attach the C# script to the left and right hand controllers in the“Inspector.”
c. Make code changes necessary for trigger based collision and interaction which willallow you to pick up and throw 3d objects and hit them in the air.
Step a: Select “Scripts” directory under your Project Assets. Create a C# Script and name it “ControllerHitGrabObject” then Open it in the “Inspector”
HTC-VIVE WITH UNITY

Page 11 of 43
Step b: Open “ControllerHitGrabObject” from the “Inspector.” Sublime Text will open with some boiler-plate code. Replace the “Start” routine shown highlighted in “Hit Code #1” with the code provided below so that your C# script looks like “Hit Code #2”
Hit Code #1:
HTC-VIVE WITH UNITY

Page 12 of 43
private SteamVR_TrackedObject trackedObj;
private SteamVR_Controller.Device Controller {
get { return SteamVR_Controller.Input((int)trackedObj.index); } }
void Awake() {
trackedObj = GetComponent<SteamVR_TrackedObject>(); }
Step b: Copy the code below and paste it into Sublime Text, overwritting the “void Start()” routine so that your code looks like “Hit Code #2” below.
Hit Code #2
HTC-VIVE WITH UNITY

Page 13 of 43
Step b: Attach “ControllerHitGrabObject” to the left and right hand controllers in the “Inspector” by dragging the script into the “Inspector” pane. You should now be able to run the project and the controllers will collide with the cubes, balls and bricks in the 3d scene.
HTC-VIVE WITH UNITY

Page 14 of 43
Step c: In this step we will add additional code to “ControllerHitGrabObject” that uses the controller triggers as events to create a physics “joint” between the Box Collider attched to the controllers and the 3d object that was collided with when the trigger was pressed. This has the effect of “picking up” the object. Upon releasing the trigger the joint is removed and the velocity and angular velocity of the controller is applied to the object so that it can be “thrown”.
First we introduce two more global variables for storing the 3d object the controller collides with and storing the reference to the object while it is “in hand”, which is while the trigger is pressed:
private GameObject collidingObject;
private GameObject objectInHand;
Cut and paste the code above into “ControllerHitGrabObject” so it looks like the image below:
HTC-VIVE WITH UNITY

Page 15 of 43
Next we add a function for setting the “collidingObject” variable, put right underneath the “Awake” routine:
private void SetCollidingObject(Collider col){
if (collidingObject || !col.GetComponent<Rigidbody>()) { return; } collidingObject = col.gameObject;}
Check below that your code looks like the higlighted section:
HTC-VIVE WITH UNITY

Page 16 of 43
Next we will include three routines that are called for the different states of the controller trigger:
“OnTriggerEnter”, “OnTriggerStay” and “OnTriggerExit”, these functions are automatically called as callbacks anytime trigger events occur. We use them here to set the colliding object and to set it to null when it is released.
//Trigger methods//set collider on trigger eventpublic void OnTriggerEnter(Collider other){ SetCollidingObject(other);}//set collider on stay (hold event)public void OnTriggerStay(Collider other){ SetCollidingObject(other);}//set collidingObject to null on trigger releasepublic void OnTriggerExit(Collider other){ if (!collidingObject) { return; } collidingObject = null; }
HTC-VIVE WITH UNITY

Page 17 of 43
Check that your code matches the image below:
HTC-VIVE WITH UNITY

Page 18 of 43
Next we will add routines for grabbing an object and releasing it and the associated helper routines. The “GrabObject” routine assigns the reference to the 3d object stored in “collidingObject” to “objectInHand” and creates a fixed joint that is attached to the controller’s rigidbody object. “ReleaseObject” destroys the fixed joint created in “GrabObject” (through the AddFixedJoint() call) and applies the velocity and angular velocity of the controller to the 3d object that is being released. It also sets “objectInHand” to null.
private void GrabObject(){ objectInHand = collidingObject; collidingObject = null; var joint = AddFixedJoint(); joint.connectedBody = objectInHand.GetComponent<Rigidbody>();}
private FixedJoint AddFixedJoint(){{ FixedJoint fx = gameObject.AddComponent<FixedJoint>(); fx.breakForce = 20000; fx.breakTorque = 20000; return fx;}
private void ReleaseObject()
{ if (GetComponent<FixedJoint>()) GetComponent<FixedJoint>().connectedBody = null; Destroy(GetComponent<FixedJoint>()); objectInHand.GetComponent<Rigidbody>().velocity = Controller.velocity; objectInHand.GetComponent<Rigidbody>().angularVelocity = Controller.angularVelocity; } objectInHand = null;}
HTC-VIVE WITH UNITY

Page 19 of 43
HTC-VIVE WITH UNITY

Page 20 of 43
Finally we will add the “GrabObject” and “ReleaseObject” functions to the update routine. Copy and paste the following into the “void Update()” routine. When the trigger is down and “collidingObject” is defined and “GrabObject” is called, an object will be picked up. When it is released with “objectInHand” defined, “ReleaseObject” is called and the object will be released and have the velocity of the controllers applied to it:
if (Controller.GetHairTriggerDown()){
if (collidingObject) {
GrabObject(); }}if (Controller.GetHairTriggerUp()){
if (objectInHand) {
ReleaseObject(); }}
HTC-VIVE WITH UNITY

Page 21 of 43
Now if you run the project, you should be able to collide with 3d objects and pick them up by pressing and holding the trigger on the hand controllers. When you release the trigger the velocity and angular velocity of the controller will be applied to the object so that you can throw it. You can also toss it into the air and hit it with a contoller.
In the next section we will put the C# code together to create a laser pointer and use the laser pointer to teleport around the 3d scene.
HTC-VIVE WITH UNITY

Page 22 of 43
1. Create a 3d cube, material and prefab for the laser pointer.
a. Create a 3d cube named “Laser” in your hierarchy and set its position and scaleb. Create a new Material named “Laser” set the shader as an “Unlit/Color” and change the color to redc. Copy the “Laser” object from your hiearchy to your “Prefabs” folder and delete the “Laser” from your
hiearchy
Step a: Add a new 3d cube in your hiearchy and name it laser, set its Position and Scale as below
Section 3: Creating a Laser Pointer and using it to teleport around the 3d scene
Overview:In this section we will add the C# scripts necessary to create a “LaserPointer” when the center button on the hand controllers is pushed. In addition a “teleport reticle” will be drawn where the “LaserPointer” beam intersects with an object. Through the use of a special layer , this location is used to teleport the CameraRig to the location of the reticle if it terminates on the Floor or Table of the Level.
HTC-VIVE WITH UNITY

Page 23 of 43
Step b: Create a new Material, name it “Laser”, set the shader type to “Unlit/Color” and the color to red. Drag the newly created Material to the “Laser” object in the hiearchy.
Select “Create” under Project and select “Material” Name the new material “Laser” so your Materials folder looks as below:
With the “Laser” material selected change the “Shader” value in the Inspector from “Standard” to “Unlit/Color” and change the color to red
HTC-VIVE WITH UNITY

Page 24 of 43
Step c: Drag the “Laser” material from your Materials folder, to the “Laser” object in your hierarchy. Select “Prefabs” under your Project pane, and drag the “Laser” object from the hiearchy to the “Prefabs” folder. Delete the “Laser” object from your hiearchy.
HTC-VIVE WITH UNITY

Page 25 of 43
Your hierarchy should now look as follows:
2. In this part we’ll create a C# script that will create a laser pointer when the center button on thecontrollers is pushed.
a. Create a new C# script in your Project pane and name it “LaserPointer” open it in the Inspector
b. Add C# code from variable and functions needed to create a LaserPointer
c. Attach the “LaserPointer” script to both the left and right controllers and attached the laser prefabto the “LaserPointer” script dialog for the controllers
Step a:
HTC-VIVE WITH UNITY

Page 26 of 43
Step b: Add the familiar code snippets that give you the controller objects and the objects needed for displaying a laser pointer when the center button is pushed, put these bits of code above the “void Start()” routine rather than removing it this time:
private SteamVR_TrackedObject trackedObj;
//laser pointer objectspublic GameObject laserPrefab;private GameObject laser;private Transform laserTransform;private Vector3 hitPoint;
private SteamVR_Controller.Device Controller {
get { return SteamVR_Controller.Input((int)trackedObj.index); } }
void Awake() {
trackedObj = GetComponent<SteamVR_TrackedObject>(); }
HTC-VIVE WITH UNITY

Page 27 of 43
Make sure your code looks like the image below:
HTC-VIVE WITH UNITY

Page 28 of 43
Steb b: Next we’ll add a function “ShowLaser” below the “Awake” method.
private void ShowLaser(RaycastHit hit) {
laser.SetActive(true);laserTransform.position = Vector3.Lerp(trackedObj.transform.position,
hitPoint, .5f);laserTransform.LookAt(hitPoint); laserTransform.localScale = new Vector3(laserTransform.localScale.x,
laserTransform.localScale.y,hit.distance); }
HTC-VIVE WITH UNITY

Page 29 of 43
Step b: In the “Update” method add the following code to call “ShowLaser” and set the point where the laser hits (hitPoint) on the “Controller.GetPress” event.
if (Controller.GetPress(SteamVR_Controller.ButtonMask.Touchpad)){
RaycastHit hit;if (Physics.Raycast(trackedObj.transform.position, transform.forward, out hit, 100)){
hitPoint = hit.point;ShowLaser(hit);
}} else { laser.SetActive(false);}
HTC-VIVE WITH UNITY

Page 30 of 43
Step b: Finally, add the following two lines to the start method to instantiate and initialize the laser object:
//laser pointerlaser = Instantiate(laserPrefab);laserTransform = laser.transform;
HTC-VIVE WITH UNITY

Page 31 of 43
Step c: Make sure the “Scripts” folder is selected in your “Project” pane and select both controllers in your hiearchy. Drag the “LaserPointer” to the “Inspector” for the left and right controllers as below:
HTC-VIVE WITH UNITY

Page 32 of 43
If you run the project you should now be able to see a laser beam projected from the hand controllers when you press and hold on the center button. In the next section we’ll add the C# code needed to use the laser beam to teleport around the 3d scene.
3. In this part we’ll add the C# code necessary to draw a “teleport reticle” where te laser beam terminates,if that surface is the floor or the table in the 3d scene (CanTeleport layer) then the position of the reticle willbecome the new position of the user in the 3d scene.
a. First we’ll make sure the “CanTeleport” layer is defined and set for the “Floor” and “Table” objects inyour hiearchy.
b. Add C# code to our LaserPointer script for drawing the teleport reticle and using its position to teleportthe location of the CameraRig
c. Set the Teleport Mask to the CanTeleport Layer and set the Teleport Reticle Offset
Step c: Select the “Prefabs” folder in your “Project” pane while both the left and right controllers are still selected in your hiearchy. Drag the “Laser” prefab into the “Laser Prefab” box in the “LaserPointer” dialog:
HTC-VIVE WITH UNITY

Page 33 of 43
Step a: Open “Level” in your hiearchy and select “Floor” check to see if “Layer” is set to “CanTeleport”. If it isn’t then select the layer dropdown menu and select “Add Layer...” Then add “CanTeleport” under “User Layer 8”
HTC-VIVE WITH UNITY

Page 34 of 43
Step b: Open “LaserPointer” from the “Inspector” and add the following variables for drawing the teleport reticle and storing its position and copies of the CameraRig and CameraHead:
//laser pointer teleport objectspublic Transform cameraRigTransform; public GameObject teleportReticlePrefab;private GameObject reticle;private Transform teleportReticleTransform; public Transform headTransform; public Vector3 teleportReticleOffset; public LayerMask teleportMask; private bool shouldTeleport;
HTC-VIVE WITH UNITY

Page 35 of 43
Step b: In the “Update” method, change the if statement that tests if a ray casted from the controller hits an object to add an additional argument for the “teleportMask”, add code to store the position of the teleport reticle and set its state as active:
HTC-VIVE WITH UNITY

Page 36 of 43
Step b: Add code to store the teleport reticle’s position and state in the “Update” method:
reticle.SetActive(true);teleportReticleTransform.position = hitPoint + teleportReticleOffset;shouldTeleport = true;
HTC-VIVE WITH UNITY

Page 37 of 43
Step b: Add line for resetting active state for the reticle outside in the else part of the “Controller.GetPress” if statement:
reticle.SetActive(false);
HTC-VIVE WITH UNITY

Page 38 of 43
Step b: Next we will add the method for teleporting, this will ultmately set the positin of the VR CameraRig to the position of the teleport reticle:
private void Teleport(){
shouldTeleport = false;reticle.SetActive(false);Vector3 difference = cameraRigTransform.position - headTransform.position;difference.y = 0;cameraRigTransform.position = hitPoint + difference;
}
HTC-VIVE WITH UNITY
Page 39 of 43
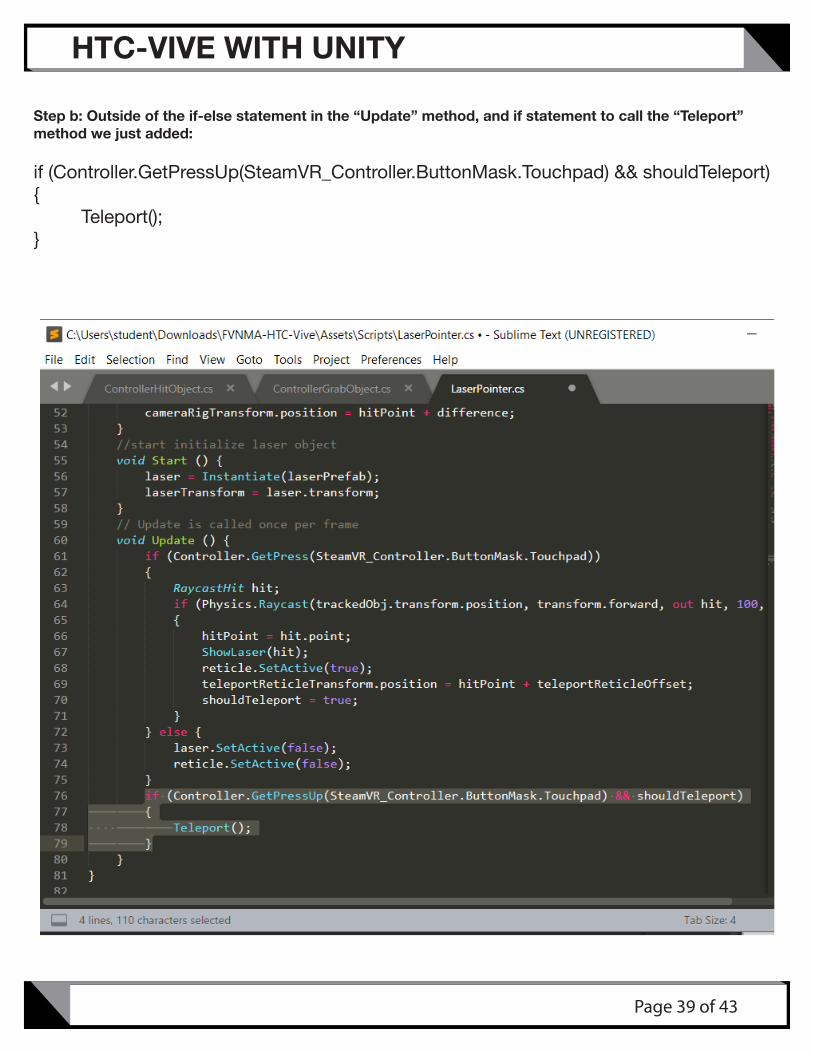
Step b: Outside of the if-else statement in the “Update” method, and if statement to call the “Teleport” method we just added:
if (Controller.GetPressUp(SteamVR_Controller.ButtonMask.Touchpad) && shouldTeleport){ Teleport();}
HTC-VIVE WITH UNITY

Page 40 of 43
Step b: Finally, add code to instantiate and initialize the teleport reticle in the “Start()” method:
//teleport reticlereticle = Instantiate(teleportReticlePrefab);teleportReticleTransform = reticle.transform;
HTC-VIVE WITH UNITY

Page 41 of 43
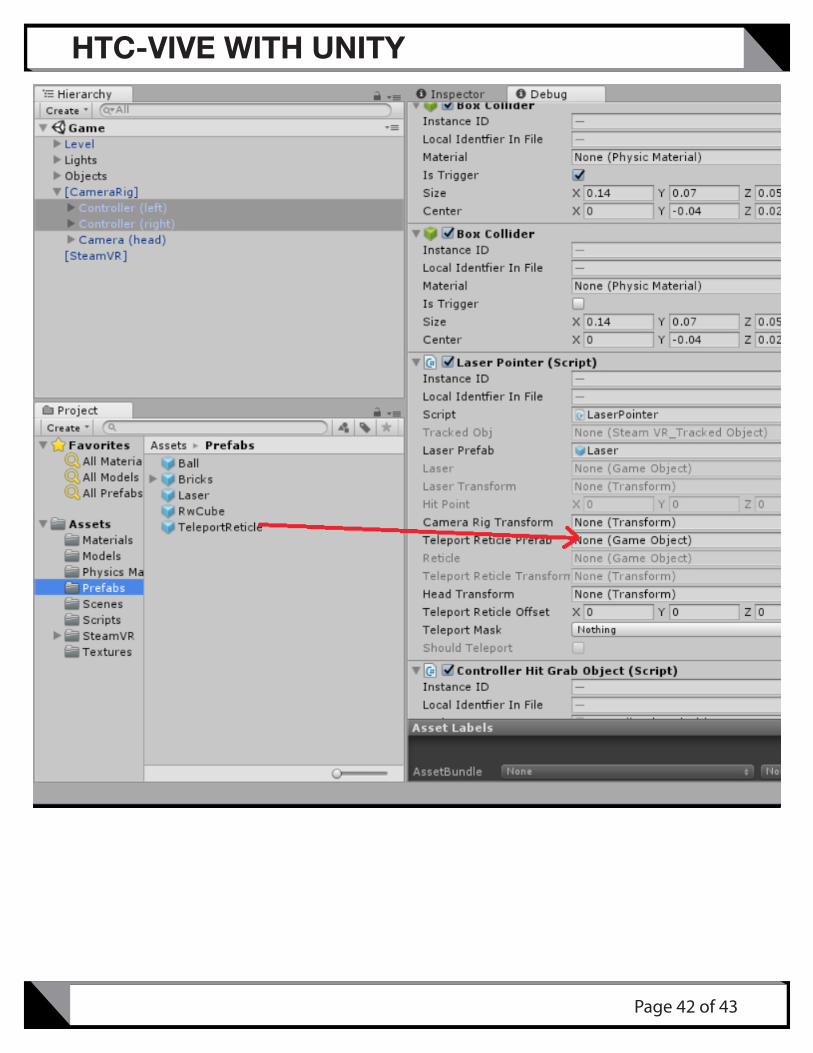
Step c: Select both controllers in your hiearchy and make sure the “LaserPointer” dialog is visible in the “Inspector”. Drag the “CameraRig” and “CameraHead” from your hiearchy into the corresponding locations on the “LaserPointer” dialog. Then select “Prefabs” in your “Project” pane and drag the “TeleportReticle” prefab to the corresponding location on the “LaserPointer” dialog.
HTC-VIVE WITH UNITY
Page 42 of 43
HTC-VIVE WITH UNITY

Page 43 of 43
Step c: Make sure the “TeleportMask” is set to the “CanTeleport” layer and that the “Teleport Reticle Offset” is set to: X: 0 Y: 0.05 Z: 0
Now if you run the project you should be able to teleport to different locations in the 3d scene as long as the teleport reticle is on the Floor or the Table when you let got of the center button.
This concludes the HTC-Vive with Unity tutorial. You should now have completed the steps to enable basic interaction and movement in a 3d scene creating Unity, using the HTC-Vive VR system. For a more in depth description of the various code snippets, and more information on Unity and the HTC-Vive generally, please be sure to check out the source of the this tutorial at:
https://www.raywenderlich.com/149239/htc-vive-tutorial-unity
HTC-VIVE WITH UNITY