Embed Size (px)
Citation preview

Edition: August 2000
The following paragraph does not apply to any country where such provisions are inconsistent with local law:LEXMARK INTERNATIONAL, INC., PROVIDES THIS PUBLICATION “AS IS” WITHOUT WARRANTY OF ANY KIND,EITHER EXPRESS OR IMPLIED, INCLUDING, BUT NOT LIMITED TO, THE IMPLIED WARRANTIES OFMERCHANTABILITY OR FITNESS FOR A PARTICULAR PURPOSE. Some states do not allow disclaimer of expressor implied warranties in certain transactions; therefore, this statement may not apply to you.
This publication could include technical inaccuracies or typographical errors. Changes are periodically made to theinformation herein; these changes will be incorporated in later editions. Improvements or changes in the products orthe programs described may be made at any time.
Comments about this publication may be addressed to Lexmark International, Inc., Department F95/032-2, 740 WestNew Circle Road, Lexington, Kentucky 40550, U.S.A. In the United Kingdom and Eire, send to Lexmark InternationalLtd., Marketing and Services Department, Westhorpe House, Westhorpe, Marlow Bucks SL7 3RQ. Lexmark may useor distribute any of the information you supply in any way it believes appropriate without incurring any obligation toyou. You can purchase additional copies of publications related to this product by calling 1-800-553-9727. In theUnited Kingdom and Eire, call 0628-481500. In other countries, contact your point of purchase.
References in this publication to products, programs, or services do not imply that the manufacturer intends to makethese available in all countries in which it operates. Any reference to a product, program, or service is not intended tostate or imply that only that product, program, or service may be used. Any functionally equivalent product, program,or service that does not infringe any existing intellectual property right may be used instead. Evaluation andverification of operation in conjunction with other products, programs, or services, except those expressly designatedby the manufacturer, are the user’s responsibility.
Lexmark and Lexmark with diamond design are trademarks of Lexmark International, Inc. registered in the UnitedStates and/or other countries.
Kodak is a trademark of Eastman Kodak Company.
Iomega and Zip are trademarks of Iomega Corporation registered in the U.S. Patent and Trademark Office and inother countries and the Zip 100 brand block is a trademark of Iomega Corporation.
Other trademarks are the property of their respective owners.
© Copyright 2000 Lexmark International, Inc. and Eastman Kodak Company.All rights reserved.
UNITED STATES GOVERNMENT RESTRICTED RIGHTSThis software and documentation are provided with RESTRICTED RIGHTS. Use, duplication or disclosure by theGovernment is subject to restrictions as set forth in subparagraph (c)(1)(ii) of the Rights in Technical Data andComputer Software clause at DFARS 252.227-7013 and in applicable FAR provisions: Lexmark International, Inc.,Lexington, KY 40550.
Lexmark confidential until announced
iii
Contents
Contents
Chapter 1: Getting started ............................................... 1
Setting up your printer ................................................................... 1
Installing the print cartridges .................................................... 2Loading paper .......................................................................... 3Aligning the print cartridges ..................................................... 4Printing a test page.................................................................. 5Setting up your printer with a computer ................................... 6
Chapter 2: Understanding your printer .......................... 9
Identifying the parts of your printer .............................................. 9
Using the operator panel ............................................................ 11
Verifying camera compatibility .................................................... 11
Inserting a camera card .............................................................. 12
Using the Quick Start screen ...................................................... 13
Using Photo and Print Preview ................................................... 14
Understanding the Idle Screen ................................................... 14
Changing Languages .................................................................. 14
Chapter 3: Printing photos without
a computer ....................................................................... 15
Understanding the Printer Menus ............................................... 15
Choosing a paper type from the operator panel ......................... 16
Choosing a paper size ................................................................ 17

Lexmark confidential until announced
iv
Con
tent
s
Changing print quality ................................................................. 18
Choosing the page layout ........................................................... 18
Using Layout Default ................................................................... 20
Selecting photos to print ............................................................ 20
Using the Photos to Print option ................................................. 21
Choosing the number of sets to print .......................................... 22
Photo Editing Selections ............................................................. 22
Cropping photos .................................................................... 22Rotating a photo .................................................................... 23Selecting a border for your photo .......................................... 23Adding text to your photo....................................................... 24Brightness feature.................................................................. 25Auto Enhance ........................................................................ 25
Resetting Factory Defaults .......................................................... 26
Chapter 4: Using an external Zip drive .........................27
Connecting your external Zip drive ............................................. 27
Attaching your printer to the Zip drive ......................................... 27
Copying photos to your Zip drive ................................................ 28
Erasing photos from your camera card ....................................... 29
Printing from your Zip disk .......................................................... 29
Chapter 5: Using your printer with
a computer ........................................................................31
Step 1: Load the paper ............................................................... 32
Step 2: Customize the printer settings ........................................ 33
Step 3: Print your document ....................................................... 36
Understanding the Card Reader ................................................. 36
KODAK Picture Page Software ................................................... 37
Lexmark confidential until announced
v
Contents
Chapter 6: Printing beyond the basics ......................... 39
Printing on both sides of a sheet of paper .................................. 39
Printing handouts ........................................................................ 41
Printing booklets ......................................................................... 42
Printing posters ........................................................................... 44
Chapter 7: Caring for your cartridges .......................... 47
Using your computer for cartridge maintenance ......................... 47
Using your operator panel for cartridge maintenance ................. 52
Cleaning and preserving print cartridges .................................... 53
Chapter 8: Troubleshooting .......................................... 55
Understanding the operator panel error messages .................... 55
Printing problems without a computer ......................................... 57
Printing problems with your computer ......................................... 58
General printing problems with or without your computer ........... 60
KODAK Customer Support Center ............................................. 63
Chapter 9: Appendix ...................................................... 65
Installing printer software ............................................................ 65
Uninstalling printer software ........................................................ 65
Statement of Limited Warranty ................................................... 65
Electronic emission notices ......................................................... 67
Notices ........................................................................................ 68
Energy Star ................................................................................. 68
Power Supply information .......................................................... 68
Safety information ....................................................................... 68
Index ............................................................................... 69

Lexmark confidential until announced
vi
Con
tent
s
Lexmark confidential until announcedG
ettingstarted
1
1 Getting started
Your printer is a general purpose color inkjet printer that provides highquality text and photos. You can use your printer by itself to print photos, orconnect it to a computer for other printing needs.
Setting up your printer
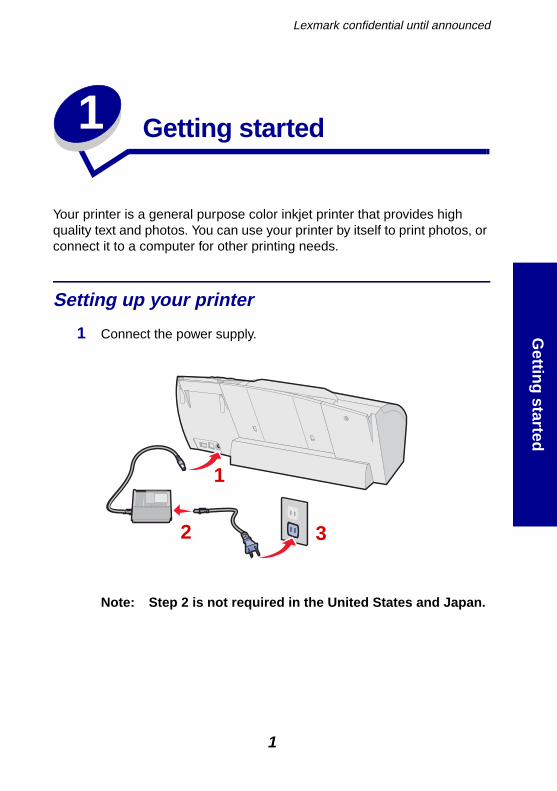
1 Connect the power supply.
Note: Step 2 is not required in the United States and Japan.
1
2 3
Lexmark confidential until announcedG
ettin
gst
arte
d
2
Select Language appears on the operator panel display to indicatethe power is on.
Note: If you need help identifying the operator panel buttons, seepage 11.
2 Press on the operator panel to scroll through thelanguages.
3 Press Select when you see the language you want.
Select Paper Size appears on the operator panel display.
4 Press on the operator panel to scroll through the papersizes.
5 Press Select when you see the paper size you want.
6 Continue with “Installing the print cartridges” in the followingsection.
Installing the print cartridges
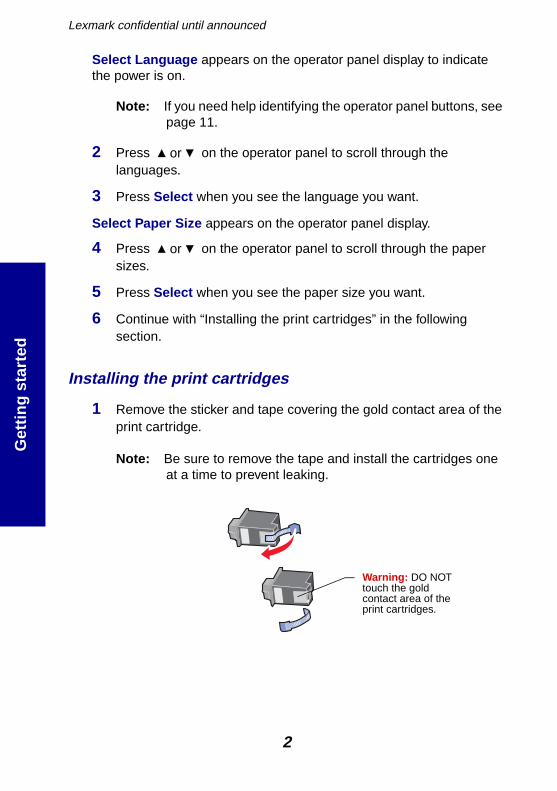
1 Remove the sticker and tape covering the gold contact area of theprint cartridge.
Note: Be sure to remove the tape and install the cartridges oneat a time to prevent leaking.
or
or
Warning: DO NOTtouch the goldcontact area of theprint cartridges.

Lexmark confidential until announcedG
ettingstarted
3
2 Match the cartridge cap color to the cartridge carrier color andinstall the cartridge in the printer.
3 Close the front cover.
Loading paper
1 Pull out the paper support and paper exit tray.
Snap
Raise the frontcover.
Insert thecartridges into theprint cartridgecarrier.
Push back firmly onthe cartridge until itsnaps securely intoplace.
a b c
a b
c
Paper exit tray
Paper support
Lexmark confidential until announcedG
ettin
gst
arte
d
4
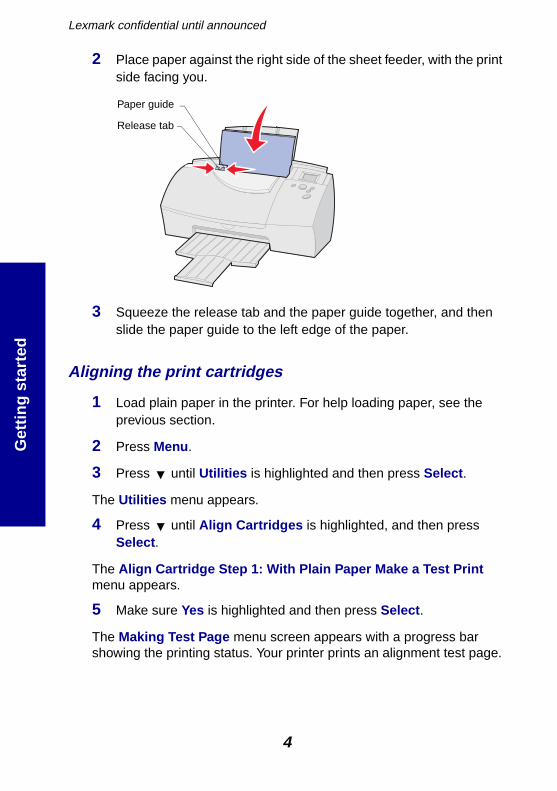
2 Place paper against the right side of the sheet feeder, with the printside facing you.
3 Squeeze the release tab and the paper guide together, and thenslide the paper guide to the left edge of the paper.
Aligning the print cartridges
1 Load plain paper in the printer. For help loading paper, see theprevious section.
2 Press Menu .
3 Press until Utilities is highlighted and then press Select .
The Utilities menu appears.
4 Press until Align Cartridges is highlighted, and then pressSelect .
The Align Cartridge Step 1: With Plain Paper Make a Test Printmenu appears.
5 Make sure Yes is highlighted and then press Select .
The Making Test Page menu screen appears with a progress barshowing the printing status. Your printer prints an alignment test page.
Paper guide
Release tab

Lexmark confidential until announcedG
ettingstarted
5
The test page prints several alignment patterns, depending on thecartridge combination installed. Each pattern has a number under it.The test page that prints is similar to the one shown:
6 From each alignment group on the test page, find the numberunder the alignment pattern that comes closest to forming astraight line.
For example, in sample group A, the arrow points to the pattern thatcomes closest to forming a straight line.
7 In the Align Cartridge dialog box, press to select thenumbers from the printed test page that come closest to forming astraight line.
8 After setting groups A, B, C, and D, press Select .
Printing a test page
1 Make sure no camera card is inserted.
2 Press Print to print a test page.
or

Lexmark confidential until announcedG
ettin
gst
arte
d
6
Setting up your printer with a computer
Before you begin:
• Prepare your printer for printing. (See page 1)• Make sure you have a USB cable.• Make sure Microsoft Windows is running on your computer.
To install the KODAK PPM200 printer software:
1 Connect the USB cable to the computer and printer.
2 Click Next when the first screen appears.
Note: When you connect your printer to a computer, the MicrosoftWindows software on your computer detects newhardware and asks you to navigate through the “Add NewHardware Wizard” with a series of dialog boxes. Completethe following steps to finish this process and reach theKODAK PPM200 Install Printer Software screen.
3 Place the KODAK PPM200 Printer Software CD into yourcomputer’s CD-ROM drive.
Lexmark confidential until announcedG
ettingstarted
7
4 Make sure the first option is selected on the second screen, andthen click Next .
5 Select the CD-ROM option on the next screen, and then clickNext .
6 Click Next or Finish on any subsequent screens.
The KODAK PPM200 software installation screen appears.
Note: Prior to installing the KODAK PPM200 software, you canchoose other options such as Learn, Registering online orBrowse (KODAK Web Site, Technical Support or PersonalPicture Maker Supplies).
7 Choose from the following install options:
– Personal Picture Maker Driver– KODAK Picture Page Software– Install All Software
8 Follow the on-screen instructions.
Note: If the KODAK PPM200 screen does not appear, click Start ,Run . Type the letter of your CD-ROM drive followed by:\setup . Click OK.
Congratulations!
You have successfully set up your printer.

Lexmark confidential until announcedG
ettin
gst
arte
d
8
Lexmark confidential until announced
9
2
Understanding
yourprinter
Understanding your printer
This chapter describes the parts of your printer and their functions.
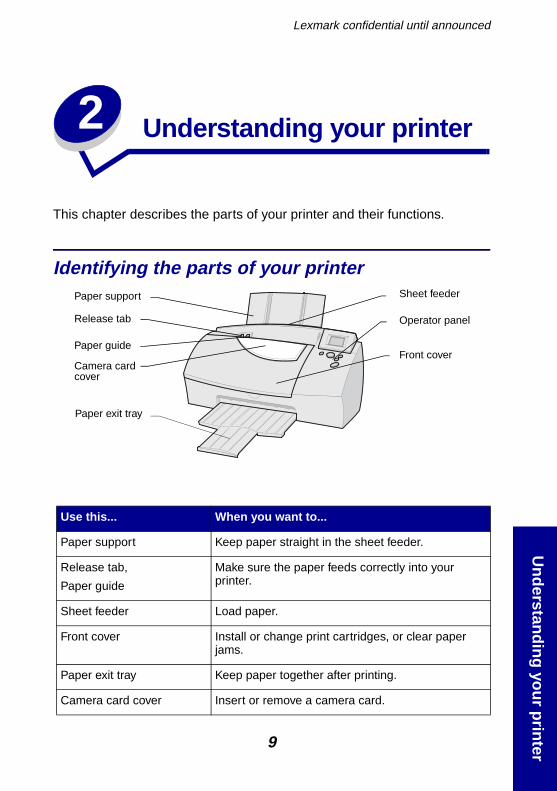
Identifying the parts of your printer
Use this... When you want to...
Paper support Keep paper straight in the sheet feeder.
Release tab,
Paper guide
Make sure the paper feeds correctly into yourprinter.
Sheet feeder Load paper.
Front cover Install or change print cartridges, or clear paperjams.
Paper exit tray Keep paper together after printing.
Camera card cover Insert or remove a camera card.
Paper support
Release tab
Camera cardcover
Paper exit tray
Sheet feeder
Operator panel
Front coverPaper guide
Lexmark confidential until announced
10
Und
erst
andi
ngyo
urpr
inte
r
Operator panel • Select setup options.• Select photos for printing.• Select special printing options.• Select photo storage options.• Display and clear status or error messages.
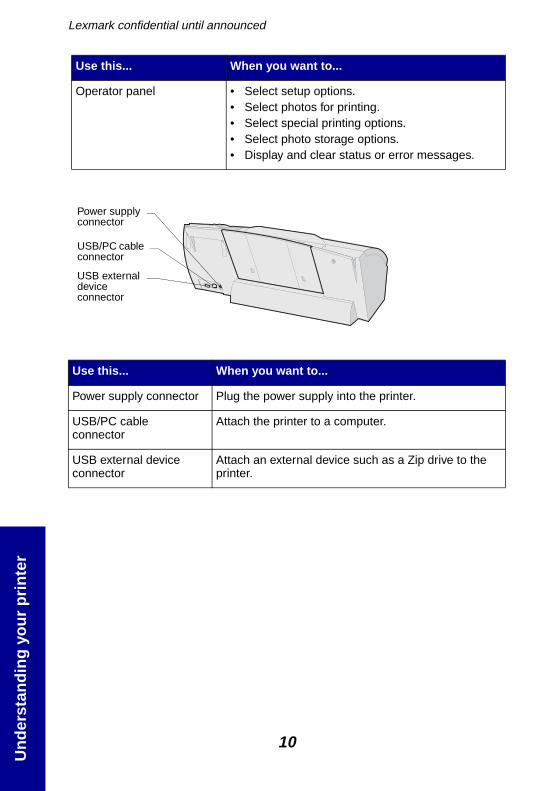
Use this... When you want to...
Power supply connector Plug the power supply into the printer.
USB/PC cableconnector
Attach the printer to a computer.
USB external deviceconnector
Attach an external device such as a Zip drive to theprinter.
Use this... When you want to...
Power supplyconnector
USB/PC cableconnector
USB externaldeviceconnector
Lexmark confidential until announced
11
Understanding
yourprinter
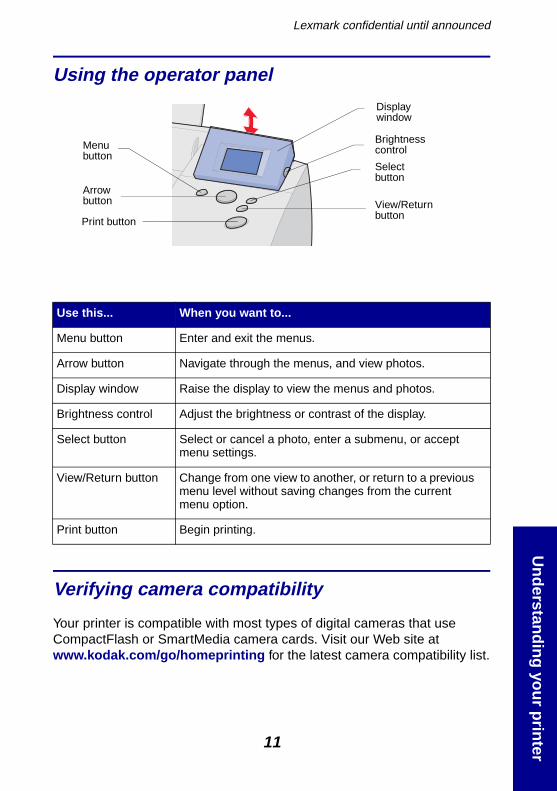
Using the operator panel
Verifying camera compatibility
Your printer is compatible with most types of digital cameras that useCompactFlash or SmartMedia camera cards. Visit our Web site atwww.kodak.com/go/homeprinting for the latest camera compatibility list.
Use this... When you want to...
Menu button Enter and exit the menus.
Arrow button Navigate through the menus, and view photos.
Display window Raise the display to view the menus and photos.
Brightness control Adjust the brightness or contrast of the display.
Select button Select or cancel a photo, enter a submenu, or acceptmenu settings.
View/Return button Change from one view to another, or return to a previousmenu level without saving changes from the currentmenu option.
Print button Begin printing.
Menubutton
Print button
View/Returnbutton
Selectbutton
Arrowbutton
Brightnesscontrol
Displaywindow
Lexmark confidential until announced
12
Und
erst
andi
ngyo
urpr
inte
r
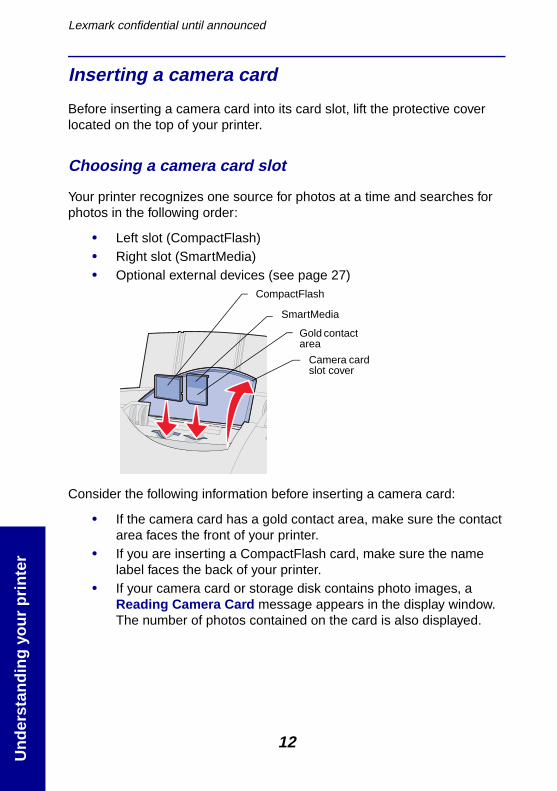
Inserting a camera card
Before inserting a camera card into its card slot, lift the protective coverlocated on the top of your printer.
Choosing a camera card slot
Your printer recognizes one source for photos at a time and searches forphotos in the following order:
• Left slot (CompactFlash)• Right slot (SmartMedia)• Optional external devices (see page 27)
Consider the following information before inserting a camera card:
• If the camera card has a gold contact area, make sure the contactarea faces the front of your printer.
• If you are inserting a CompactFlash card, make sure the namelabel faces the back of your printer.
• If your camera card or storage disk contains photo images, aReading Camera Card message appears in the display window.The number of photos contained on the card is also displayed.
SmartMedia
Gold contactarea
CompactFlash
Camera cardslot cover
Lexmark confidential until announced
13
Understanding
yourprinter
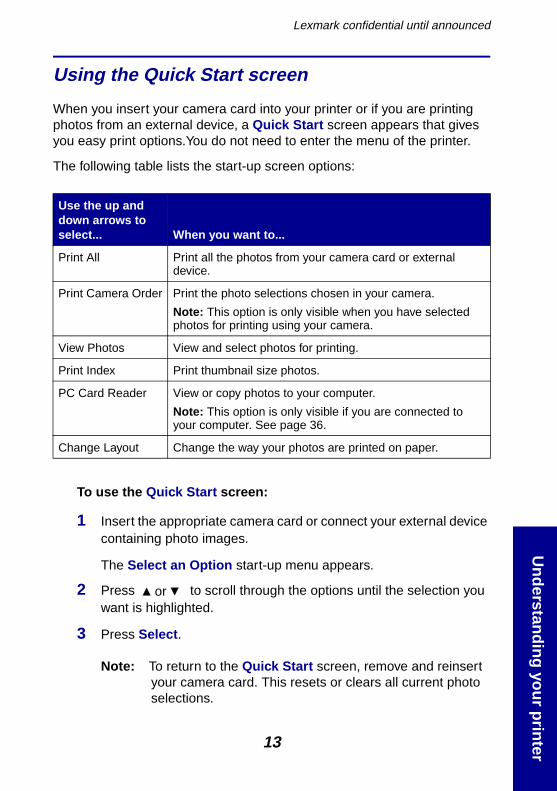
Using the Quick Start screen
When you insert your camera card into your printer or if you are printingphotos from an external device, a Quick Start screen appears that givesyou easy print options.You do not need to enter the menu of the printer.
The following table lists the start-up screen options:
To use the Quick Start screen:
1 Insert the appropriate camera card or connect your external devicecontaining photo images.
The Select an Option start-up menu appears.
2 Press to scroll through the options until the selection youwant is highlighted.
3 Press Select .
Note: To return to the Quick Start screen, remove and reinsertyour camera card. This resets or clears all current photoselections.
Use the up anddown arrows toselect... When you want to...
Print All Print all the photos from your camera card or externaldevice.
Print Camera Order Print the photo selections chosen in your camera.
Note: This option is only visible when you have selectedphotos for printing using your camera.
View Photos View and select photos for printing.
Print Index Print thumbnail size photos.
PC Card Reader View or copy photos to your computer.
Note: This option is only visible if you are connected toyour computer. See page 36.
Change Layout Change the way your photos are printed on paper.
or
Lexmark confidential until announced
14
Und
erst
andi
ngyo
urpr
inte
r
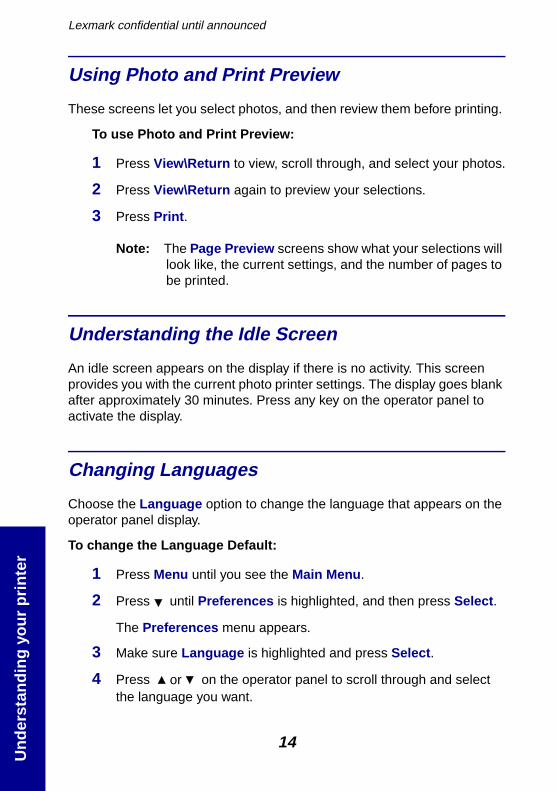
Using Photo and Print Preview
These screens let you select photos, and then review them before printing.
To use Photo and Print Preview:
1 Press View\Return to view, scroll through, and select your photos.
2 Press View\Return again to preview your selections.
3 Press Print .
Note: The Page Preview screens show what your selections willlook like, the current settings, and the number of pages tobe printed.
Understanding the Idle Screen
An idle screen appears on the display if there is no activity. This screenprovides you with the current photo printer settings. The display goes blankafter approximately 30 minutes. Press any key on the operator panel toactivate the display.
Changing Languages
Choose the Language option to change the language that appears on theoperator panel display.
To change the Language Default:
1 Press Menu until you see the Main Menu .
2 Press until Preferences is highlighted, and then press Select .
The Preferences menu appears.
3 Make sure Language is highlighted and press Select .
4 Press on the operator panel to scroll through and selectthe language you want.
or
Lexmark confidential until announced
15
3
Printing
photosw
ithoutacom
puter
Printing photos withouta computer
This chapter describes how to print and edit photos using the printermenus.
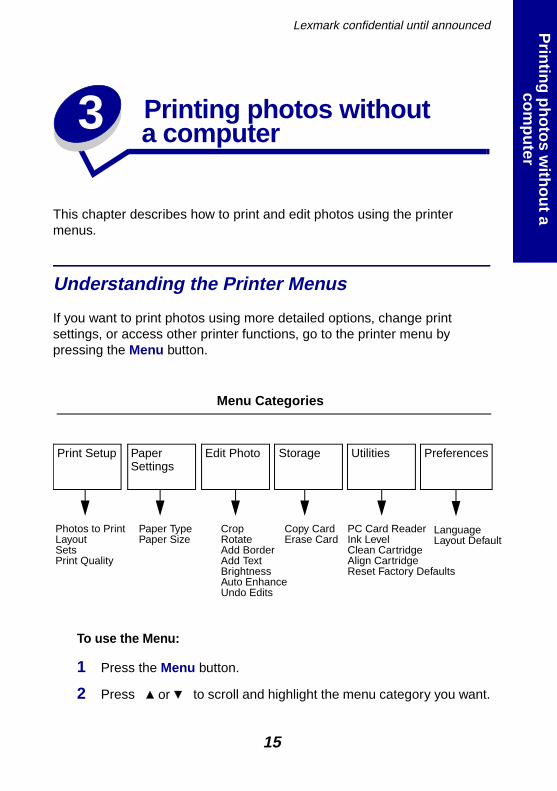
Understanding the Printer Menus
If you want to print photos using more detailed options, change printsettings, or access other printer functions, go to the printer menu bypressing the Menu button.
To use the Menu:
1 Press the Menu button.
2 Press to scroll and highlight the menu category you want.
Menu Categories
PreferencesUtilitiesPaperSettings
StorageEdit PhotoPrint Setup
Photos to PrintLayoutSetsPrint Quality
Paper TypePaper Size
CropRotateAdd BorderAdd TextBrightnessAuto EnhanceUndo Edits
Copy CardErase Card
PC Card ReaderInk LevelClean CartridgeAlign CartridgeReset Factory Defaults
LanguageLayout Default
or
Lexmark confidential until announced
16
Prin
ting
phot
osw
ithou
taco
mpu
ter
3 Press Select .
4 Press to navigate through the sub-menus and choosethe option you want.
5 Press Select .
Notes: The current setting is identified with a check mark next to it.Press View/Return to go back one menu level or you canpress Menu at anytime to return to Photo and PrintPreview .
The current settings for the highlighted category appear inthe bottom right corner of the display.
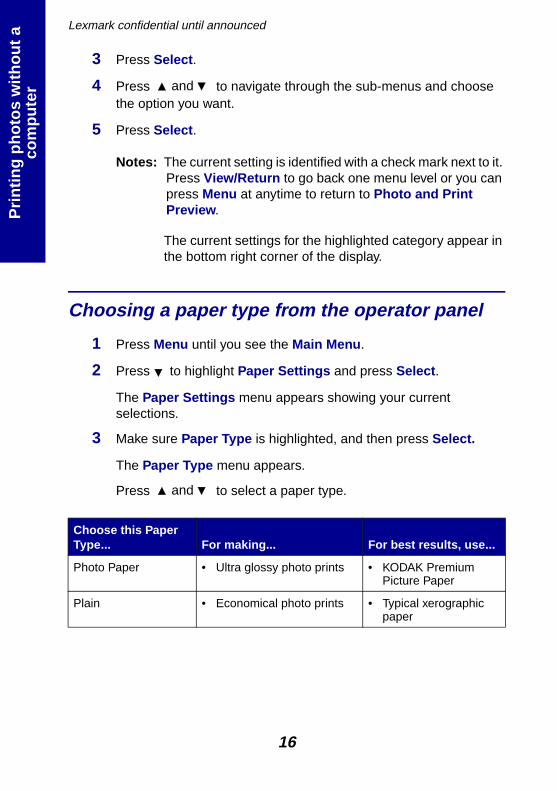
Choosing a paper type from the operator panel
1 Press Menu until you see the Main Menu .
2 Press to highlight Paper Settings and press Select .
The Paper Settings menu appears showing your currentselections.
3 Make sure Paper Type is highlighted, and then press Select.
The Paper Type menu appears.
Press to select a paper type.
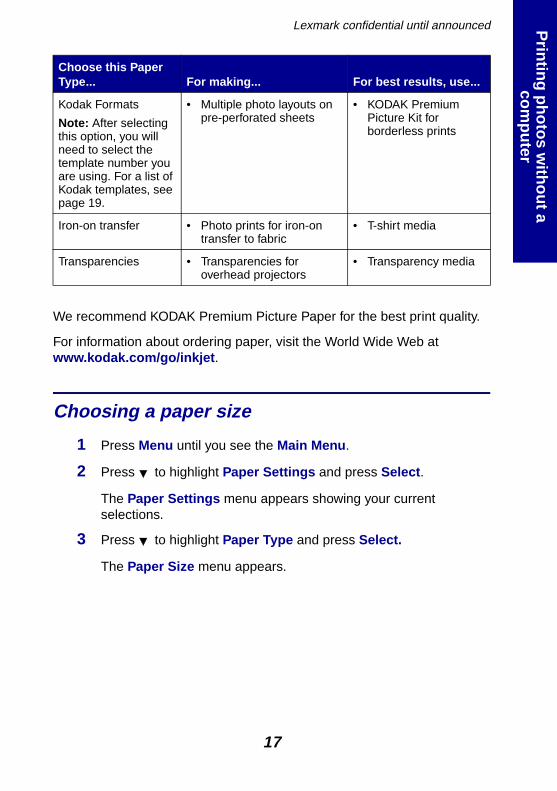
Choose this PaperType... For making... For best results, use...
Photo Paper • Ultra glossy photo prints • KODAK PremiumPicture Paper
Plain • Economical photo prints • Typical xerographicpaper
and
and
Lexmark confidential until announced
17
Printing
photosw
ithoutacom
puter
We recommend KODAK Premium Picture Paper for the best print quality.
For information about ordering paper, visit the World Wide Web atwww.kodak.com/go/inkjet .
Choosing a paper size
1 Press Menu until you see the Main Menu .
2 Press to highlight Paper Settings and press Select .
The Paper Settings menu appears showing your currentselections.
3 Press to highlight Paper Type and press Select.
The Paper Size menu appears.
Kodak Formats
Note: After selectingthis option, you willneed to select thetemplate number youare using. For a list ofKodak templates, seepage 19.
• Multiple photo layouts onpre-perforated sheets
• KODAK PremiumPicture Kit forborderless prints
Iron-on transfer • Photo prints for iron-ontransfer to fabric
• T-shirt media
Transparencies • Transparencies foroverhead projectors
• Transparency media
Choose this PaperType... For making... For best results, use...
Lexmark confidential until announced
18
Prin
ting
phot
osw
ithou
taco
mpu
ter
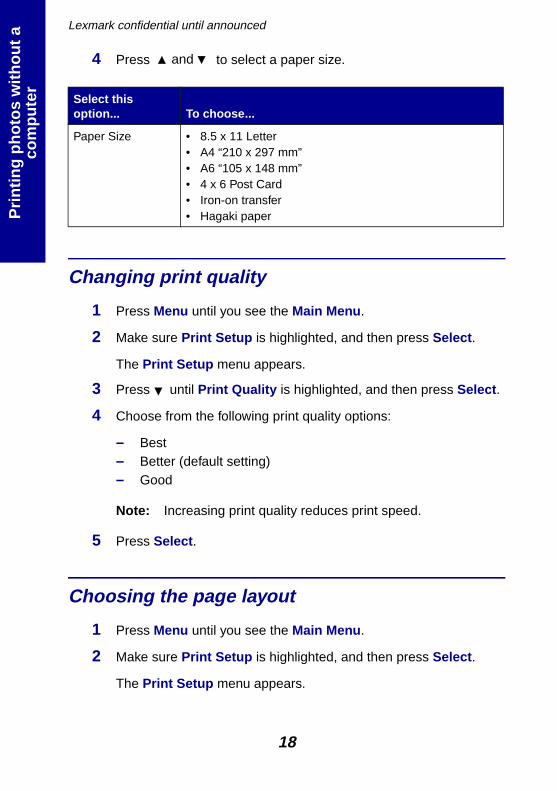
4 Press to select a paper size.
Changing print quality
1 Press Menu until you see the Main Menu .
2 Make sure Print Setup is highlighted, and then press Select .
The Print Setup menu appears.
3 Press until Print Quality is highlighted, and then press Select .
4 Choose from the following print quality options:
– Best– Better (default setting)– Good
Note: Increasing print quality reduces print speed.
5 Press Select .
Choosing the page layout
1 Press Menu until you see the Main Menu .
2 Make sure Print Setup is highlighted, and then press Select .
The Print Setup menu appears.
Select thisoption... To choose...
Paper Size • 8.5 x 11 Letter• A4 “210 x 297 mm”• A6 “105 x 148 mm”• 4 x 6 Post Card• Iron-on transfer• Hagaki paper
and
Lexmark confidential until announced
19
Printing
photosw
ithoutacom
puter
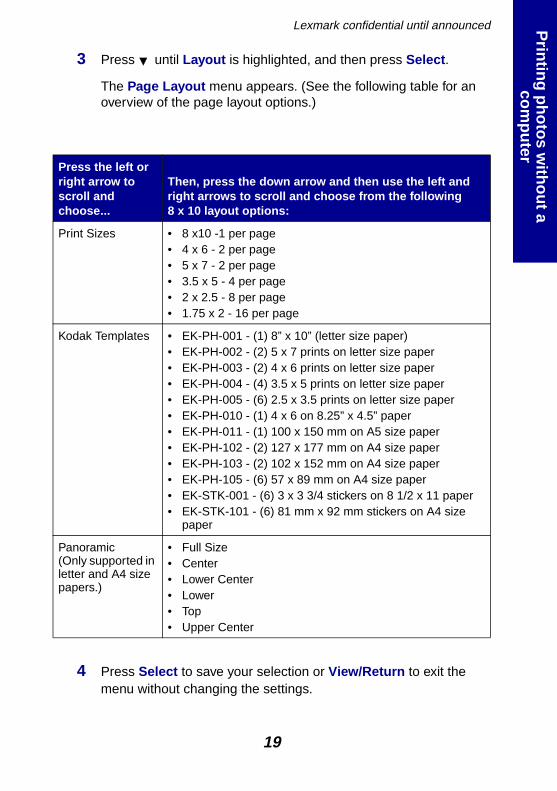
3 Press until Layout is highlighted, and then press Select .
The Page Layout menu appears. (See the following table for anoverview of the page layout options.)
4 Press Select to save your selection or View/Return to exit themenu without changing the settings.
Press the left orright arrow toscroll andchoose...
Then, press the down arrow and then use the left andright arrows to scroll and choose from the following8 x 10 layout options:
Print Sizes • 8 x10 -1 per page• 4 x 6 - 2 per page• 5 x 7 - 2 per page• 3.5 x 5 - 4 per page• 2 x 2.5 - 8 per page• 1.75 x 2 - 16 per page
Kodak Templates • EK-PH-001 - (1) 8” x 10” (letter size paper)• EK-PH-002 - (2) 5 x 7 prints on letter size paper• EK-PH-003 - (2) 4 x 6 prints on letter size paper• EK-PH-004 - (4) 3.5 x 5 prints on letter size paper• EK-PH-005 - (6) 2.5 x 3.5 prints on letter size paper• EK-PH-010 - (1) 4 x 6 on 8.25” x 4.5” paper• EK-PH-011 - (1) 100 x 150 mm on A5 size paper• EK-PH-102 - (2) 127 x 177 mm on A4 size paper• EK-PH-103 - (2) 102 x 152 mm on A4 size paper• EK-PH-105 - (6) 57 x 89 mm on A4 size paper• EK-STK-001 - (6) 3 x 3 3/4 stickers on 8 1/2 x 11 paper• EK-STK-101 - (6) 81 mm x 92 mm stickers on A4 size
paper
Panoramic(Only supported inletter and A4 sizepapers.)
• Full Size• Center• Lower Center• Lower• Top• Upper Center
Lexmark confidential until announced
20
Prin
ting
phot
osw
ithou
taco
mpu
ter
Notes: The panoramic, frame, and text options on your printer arenot available when you use Kodak Templates.
You can also use the Kodak Template menu settings withregular photo paper. Cut the photos to fit your frame tocreate standard size, borderless prints.
Using Layout Default
Use the Layout Default option to select a page layout and size that will actas your default setting. This setting remains until you clear or changedefaults, or override them in the Print Setup menu.
Note: The factory setting for this option is None.
To change the Layout Default:
1 Press Menu until you see the Main Menu .
2 Press until Preferences is highlighted and press Select .
The Preferences menu appears.
3 Press until Layout Default is highlighted, and then pressSelect .
The Layout Default menu appears.
4 Press to choose from Print Sizes , Kodak Format , orPanoramic .
5 Press then to scroll through and select the page layoutdefault setting you want, and then press Select .
Selecting photos to print
1 Insert the appropriate camera card.
2 Press to highlight View Photos .
3 Press View/Return until you see a full photo view.
or
or
Lexmark confidential until announced
21
Printing
photosw
ithoutacom
puter
4 Press to scroll through your photos.
5 Press Select for each photo you want to print.
6 Press to increase or decrease the number of copies foreach selected photo.
Note: A check mark appears in the lower left corner indicating thephoto is chosen. To remove the selection, press Selectagain.
7 Press View/Return and then to review the selections youhave chosen.
8 Press Print or Menu to select or change other print settings.
Using the Photos to Print option
1 Press Menu until you see the Main Menu .
2 Make sure Print Setup is highlighted, and then press Select .
The Print Setup menu appears.
3 Press until Photos to Print is highlighted, and then pressSelect .
The Photos to Print menu appears.
4 Press to choose from the following options:
– Selected Photos - Prints photos selected from the operatorpanel.
– Print Camera Order - Prints photos you selected on yourdigital camera.
– Print All X - Prints all photos.– Print Index - Prints small numbered photos with file names.
5 Press Select .
Printing starts immediately.
or
or
or
or
or
Lexmark confidential until announced
22
Prin
ting
phot
osw
ithou
taco
mpu
ter
Choosing the number of sets to print
Select Sets to print more than one copy of your photo grouping.
1 Press Menu until you see the Main Menu .
2 Make sure Print Setup is highlighted, and then press Select .
The Print Setup menu appears.
3 Press until Sets is highlighted, and then press Select .
4 Press to scroll and select the number of sets you want toprint.
5 Press Select .
Photo Editing Selections
To edit photos currently shown on the display, select:
• Crop• Rotate• Add Border• Add Text Caption• Modify Text• Change Brightness• Auto Enhance
Note: After you edit a photo, an icon appears in the lower rightcorner of the image.
Cropping photos
To crop or select specific areas of photos:
1 Press Menu until you see the Main Menu .
2 Press to highlight Edit, and then press Select .
or
Lexmark confidential until announced
23
Printing
photosw
ithoutacom
puter
The Edit menu appears.
3 Make sure Crop is highlighted, and then press Select.
4 Press or to move the crop window around thephoto.
5 Use arrows to position the crop box.
6 Press Select .
Note: To undo a previous crop, return to the Crop menu andpress Select . To redo a previous crop, return to the Cropmenu and use the arrows to reposition the crop box.
Rotating a photo
1 Press Menu until you see the Main Menu .
2 Press to highlight Edit, and then press Select .
The Edit menu appears.
3 Press to highlight Rotate, and then press Select .
The Rotate menu appears.
4 Press to scroll and select an angle, and then press Select .
Selecting a border for your photo
1 Press Menu until you see the Main Menu .
2 Press until Edit is highlighted, and then press Select .
The Edit menu appears.
3 Press until Add Border is highlighted, and then pressSelect .
The Add Border menu appears.
4 Press to scroll and choose a border selection.
5 Press Select.
and and
or
or
or
Lexmark confidential until announced
24
Prin
ting
phot
osw
ithou
taco
mpu
ter
Adding text to your photo
1 Press Menu until you see the Main Menu .
2 Press until Edit is highlighted, and then press Select .
The Edit menu appears.
3 Press until Add Text is highlighted, and then press Select .
The Add Text menu appears.
4 Press to scroll and choose a text selection.
5 Press Select .
Note: Use the “Modify Text ” option described in the followingsection to change the text selections.
Modifying text for your photo
1 Press Menu until you see the Main Menu .
2 Press until Edit is highlighted, and then press Select .
The Edit menu appears.
3 Press until Add Text is highlighted, and then pressSelect .
The Add Text menu appears.
4 Press to scroll and choose Modify Text .
The Modify Text menu appears.
5 Press to highlight and select the text you want to modify.
6 Press Select .
7 Press and then Select to choose each letter or symbol youwant.
Note: Press until Erase Last is highlighted, and then toerase characters, numbers, or symbols.
or
or
or
or
or
or
or
Lexmark confidential until announced
25
Printing
photosw
ithoutacom
puter
8 Press to highlight Space , and then use the to addspaces between text.
9 Press Done to save your text.
Notes: The letters and symbols selected appears in the text barlocated at the bottom of the menu screen.
To set the text back to it’s original factory settings, selectReset Text .
Brightness feature
To adjust the contrast of a photo, choose the Brightness feature from theoperator panel.
1 Press Menu until you see the Main Menu .
2 Press to highlight Edit , and then press Select .
The Edit menu appears.
3 Press to highlight Brightness , and then press Select.
4 Press to adjust the level of brightness for your photo, andthen press Select .
Auto Enhance
Use Auto Enhance to automatically improve the appearance or quality ofyour photos.
1 Press Menu until you see the Main Menu .
2 Press to highlight Edit , and then press Select .
The Edit menu appears.
3 Press to highlight Auto Enhance , and then press Select.
4 Press to choose from Off or On, and then press Select .
or
or
or
Lexmark confidential until announced
26
Prin
ting
phot
osw
ithou
taco
mpu
ter
Note: Changes are applied to prints but are not applied to thedisplay image.
Resetting Factory Defaults
Use Reset Factory Defaults to return to your printer’s original factorysettings.
1 Press Menu until you see the Main Menu .
2 Press until Utilities is highlighted, and then press Select .
The Utility menu appears.
3 Press until Reset Factory is highlighted, and then press Select .
The Reset Factory Defaults menu appears.
4 Press until Yes is highlighted, and then press Select .
Lexmark confidential until announcedU
singan
externalZip
drive
27
4 Using an external Zip drive
Connecting your external Zip drive
You can copy photos from your camera card directly to a Zip drive, which ispurchased separately. This lets you reuse your camera card and take morepictures. You can read photo images from these storage devices (with nocamera card inserted).
The following external storage device is supported with your printer:
Iomega Zip™ USB attached (100 and 250MB)
To attach a Zip drive directly to your printer, see the following instructions.
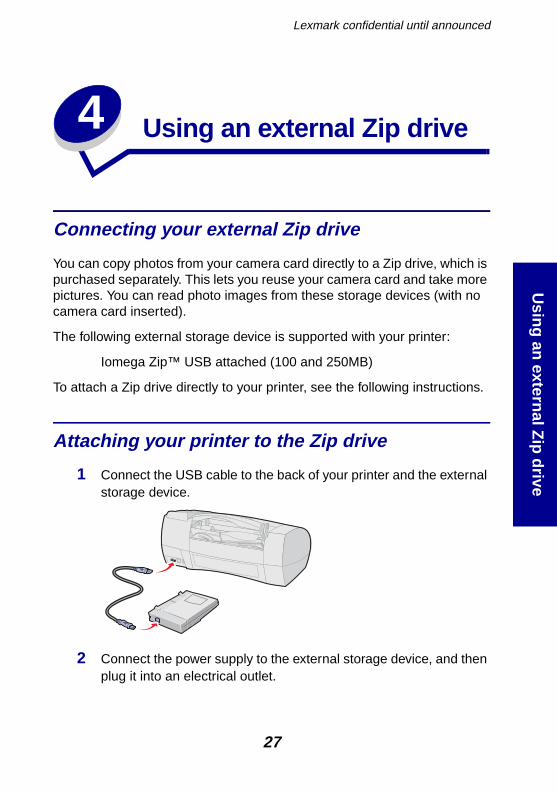
Attaching your printer to the Zip drive
1 Connect the USB cable to the back of your printer and the externalstorage device.
2 Connect the power supply to the external storage device, and thenplug it into an electrical outlet.
Lexmark confidential until announcedU
sing
anex
tern
alZ
ipdr
ive
28
Copying photos to your Zip drive
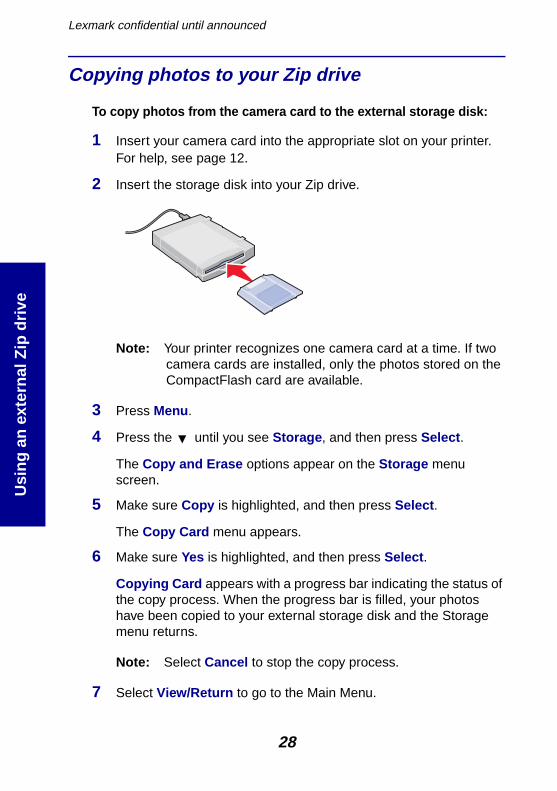
To copy photos from the camera card to the external storage disk:
1 Insert your camera card into the appropriate slot on your printer.For help, see page 12.
2 Insert the storage disk into your Zip drive.
Note: Your printer recognizes one camera card at a time. If twocamera cards are installed, only the photos stored on theCompactFlash card are available.
3 Press Menu .
4 Press the until you see Storage , and then press Select .
The Copy and Erase options appear on the Storage menuscreen.
5 Make sure Copy is highlighted, and then press Select .
The Copy Card menu appears.
6 Make sure Yes is highlighted, and then press Select .
Copying Card appears with a progress bar indicating the status ofthe copy process. When the progress bar is filled, your photoshave been copied to your external storage disk and the Storagemenu returns.
Note: Select Cancel to stop the copy process.
7 Select View/Return to go to the Main Menu.
Lexmark confidential until announcedU
singan
externalZip
drive
29
Erasing photos from your camera card
After you copy your photos to an external storage disk, you can erase thephotos from your camera card and reuse it.
1 Insert the appropriate camera card into your printer. For help, seepage 12.
2 Press Menu .
3 Press until you see Storage , and then press Select .
Two options, Copy Card and Erase Card appear on the Storagemenu screen.
4 Press to highlight Erase , and then press Select .
The Erase Card menu appears
5 Press to highlight Yes, and then press Select .
The Erase Card Are You Sure menu appears.
WARNING: This process erases all photos from your camera card.
6 Make sure Yes is highlighted and press Select .
Erasing Card appears with a progress bar indicating the status ofthe erasing process. When the progress bar is filled, your photoshave been erased from your camera card and the Storage menureturns.
Printing from your Zip disk
Remove all camera cards from your printer before printing from theexternal storage drive. The printer searches for images on the externalstorage disk only when no camera cards are installed.
Lexmark confidential until announcedU
sing
anex
tern
alZ
ipdr
ive
30
To print photos from your external storage disk:
1 Load paper against the right side of the sheet feeder. For help, seepage 3.
Note: For best print quality, use KODAK Premium Picture Paper.
2 Insert your storage disk into your Zip drive.
The Quick Start menu appears.
3 Select your print options, and then press Print .
Note: For the best print quality, remove each printed photo fromthe paper exit tray before the next one prints.
Lexmark confidential until announced
31
5
Using
yourprinter
with
acom
puter
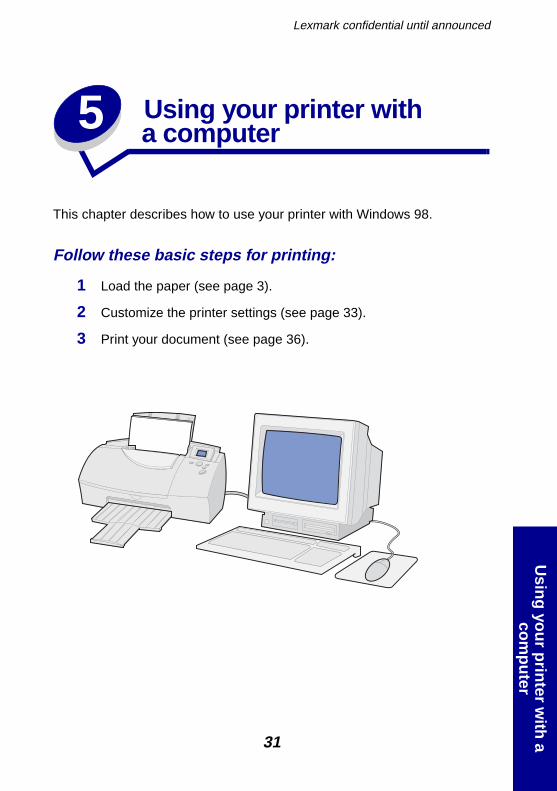
Using your printer witha computer
This chapter describes how to use your printer with Windows 98.
Follow these basic steps for printing:
1 Load the paper (see page 3).
2 Customize the printer settings (see page 33).
3 Print your document (see page 36).
Lexmark confidential until announced
32Usi
ngyo
urpr
inte
rw
itha
com
pute
r
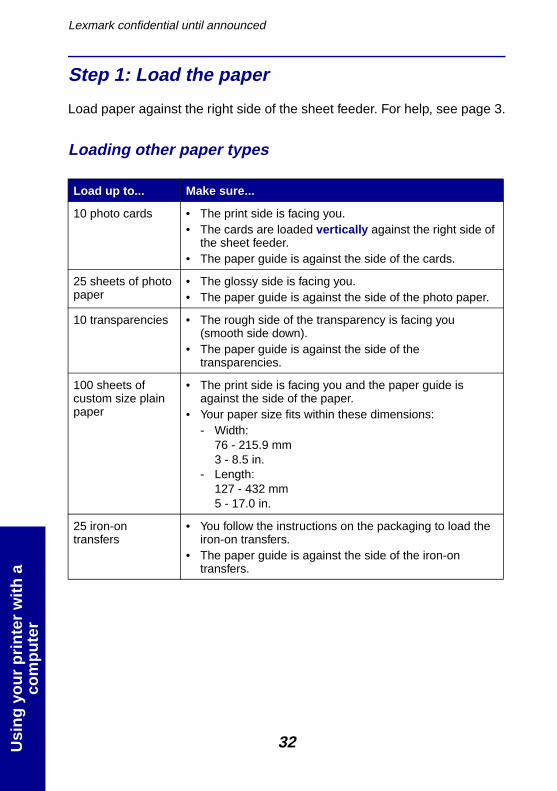
Step 1: Load the paper
Load paper against the right side of the sheet feeder. For help, see page 3.
Loading other paper types
Load up to... Make sure...
10 photo cards • The print side is facing you.• The cards are loaded vertically against the right side of
the sheet feeder.• The paper guide is against the side of the cards.
25 sheets of photopaper
• The glossy side is facing you.• The paper guide is against the side of the photo paper.
10 transparencies • The rough side of the transparency is facing you(smooth side down).
• The paper guide is against the side of thetransparencies.
100 sheets ofcustom size plainpaper
• The print side is facing you and the paper guide isagainst the side of the paper.
• Your paper size fits within these dimensions:- Width:
76 - 215.9 mm3 - 8.5 in.
- Length:127 - 432 mm5 - 17.0 in.
25 iron-ontransfers
• You follow the instructions on the packaging to load theiron-on transfers.
• The paper guide is against the side of the iron-ontransfers.
Lexmark confidential until announced
33
Using
yourprinter
with
acom
puter
Step 2: Customize the printer settings
Your printer software includes several applications that help you performprinting tasks easily. One of these applications is called PrinterProperties .
The Printer Properties application has three tabs: Job Finishing , Paper,and Document/Quality . Each tab contains settings related to theoperation of your printer and its software.
Opening Printer Properties from an application
You can open Printer Properties from almost any application. This letsyou change printer settings only for the document you are currentlyworking on in the application. To open Printer Properties from anapplication:
1 Open the application’s File menu.
2 Choose Print (or Printer ) Setup .
3 In the Printer Setup dialog box, click the Properties , Option , orSetup button (depending on the application).
4 Change settings as needed. For help, see page 34.
Opening Printer Properties from Windows
When you open Printer Properties from Windows, the settings youchange apply to all documents, unless you also change them from theapplication.
1 From the Start menu, select Settings , and then select Printers .
2 From the Printers folder, right-click the printer icon for your printer.
3 Select Properties from the sidebar menu.
Note: To help you identify Printer Properties and its associatedtabs and functions, see page 34.
Lexmark confidential until announced
34Usi
ngyo
urpr
inte
rw
itha
com
pute
r
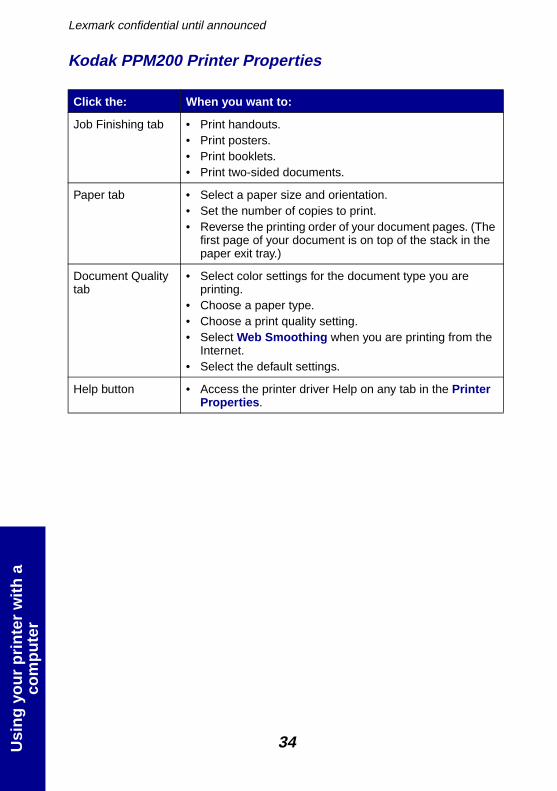
Kodak PPM200 Printer Properties
Click the: When you want to:
Job Finishing tab • Print handouts.• Print posters.• Print booklets.• Print two-sided documents.
Paper tab • Select a paper size and orientation.• Set the number of copies to print.• Reverse the printing order of your document pages. (The
first page of your document is on top of the stack in thepaper exit tray.)
Document Qualitytab
• Select color settings for the document type you areprinting.
• Choose a paper type.• Choose a print quality setting.• Select Web Smoothing when you are printing from the
Internet.• Select the default settings.
Help button • Access the printer driver Help on any tab in the PrinterProperties .
Lexmark confidential until announced
35
Using
yourprinter
with
acom
puter
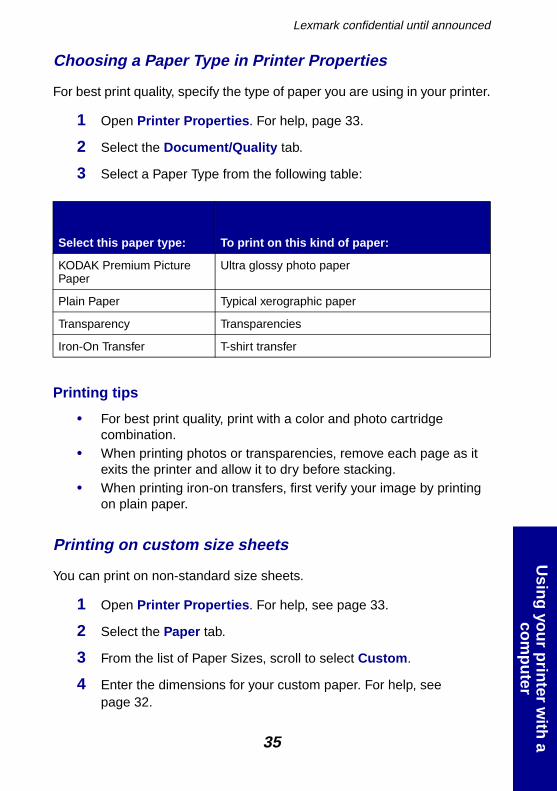
Choosing a Paper Type in Printer Properties
For best print quality, specify the type of paper you are using in your printer.
1 Open Printer Properties . For help, page 33.
2 Select the Document/Quality tab.
3 Select a Paper Type from the following table:
Printing tips
• For best print quality, print with a color and photo cartridgecombination.
• When printing photos or transparencies, remove each page as itexits the printer and allow it to dry before stacking.
• When printing iron-on transfers, first verify your image by printingon plain paper.
Printing on custom size sheets
You can print on non-standard size sheets.
1 Open Printer Properties . For help, see page 33.
2 Select the Paper tab.
3 From the list of Paper Sizes, scroll to select Custom .
4 Enter the dimensions for your custom paper. For help, seepage 32.
Select this paper type: To print on this kind of paper:
KODAK Premium PicturePaper
Ultra glossy photo paper
Plain Paper Typical xerographic paper
Transparency Transparencies
Iron-On Transfer T-shirt transfer

Lexmark confidential until announced
36Usi
ngyo
urpr
inte
rw
itha
com
pute
r
Step 3: Print your document
1 From your application’s File menu, click Print .
2 From the Print dialog box, click OK or Print (depending on theapplication).
Understanding the Card Reader
You can use your printer to load the pictures on your camera card directlyto your hard disk drive.
To use the card reader from the Start-up screen:
1 Insert your camera card into the appropriate camera card slot.
2 Press until PC Card Reader is highlighted, and then pressSelect .
The PC Card Reader Active screen appears.
To use the card reader from the Main Menu:
1 Press Menu until you see the Main Menu .
2 Press until Utilities is highlighted, and then press Select .
3 Make sure PC Card Reader is highlighted, and then press Select .
The PC Card Reader Active screen appears.
Notes: When you activate your card reader for the first time, yourcomputer software detects new hardware. Follow theinstructions on your computer screen for installation.
The card slots on the printer are visible as removabledrives on your computer until you exit the card readermode from the operator panel.
The printer cannot print while in PC Card Reader mode. Toexit PC Card Reader mode, press Select .
Lexmark confidential until announced
37
Using
yourprinter
with
acom
puter
KODAK Picture Page Software
To install the KODAK PPM200 printer software:
1 Place the CD into your computer’s CD-ROM drive.
2 Click Install KODAK Picture Page Software , and then follow theon-screen instructions.
3 After installation is complete, restart your computer.
To open KODAK’s Picture Page Software from the Start menu,click:
1 Programs
2 KODAK Picture Page Software
3 Start Control Center
4 Control Center icon in the system tray, located in the lower rightcorner of the Windows screen.
Note: All of the folders on your computer that contain picturesare displayed.
5 Select the Help/About tab , and then select HELP to learn how toview, edit, and print your pictures.

Lexmark confidential until announced
38Usi
ngyo
urpr
inte
rw
itha
com
pute
r
Lexmark confidential until announced
39
6
Printing
beyondthe
basics
Printing beyond the basics
You can use your printer to print:
• Both sides of a sheet of paper (on this page)• Handouts (see page 41)• Booklets (see page 42)• Posters (see page 44)
Printing on both sides of a sheet of paper
Your Kodak printer lets you print on both sides of a sheet of paper. Besidessaving paper, this feature is helpful when you want to print booklets ortablets.
Note: This feature does not work with all paper types. Be sure tocheck if your paper supports two-sided printing.
Step 1: Load the paper
Load paper against the right side of the sheet feeder. For help, see page 3.
Step 2: Customize Printer Properties for your two-sidedprint job
1 Open Printer Properties . For help, see page 33.
2 Select the page orientation and size:
a Click the Paper tab.
b Select the appropriate Paper Size .
Lexmark confidential until announced
40
Prin
ting
beyo
ndth
eba
sics c Select Portrait or Landscape orientation.
3 Customize the Printer Properties for two-sided printing:
a Click the Job Finishing tab.
b Select Two-sided printing .
c Select a binding edge .
Note: To print paper reloading instructions, select Printreloading instructions after the first side prints .
4 Click OK.
Step 3: Print your two-sided document
1 From your application’s File menu, select Print . Theodd-numbered pages print first.
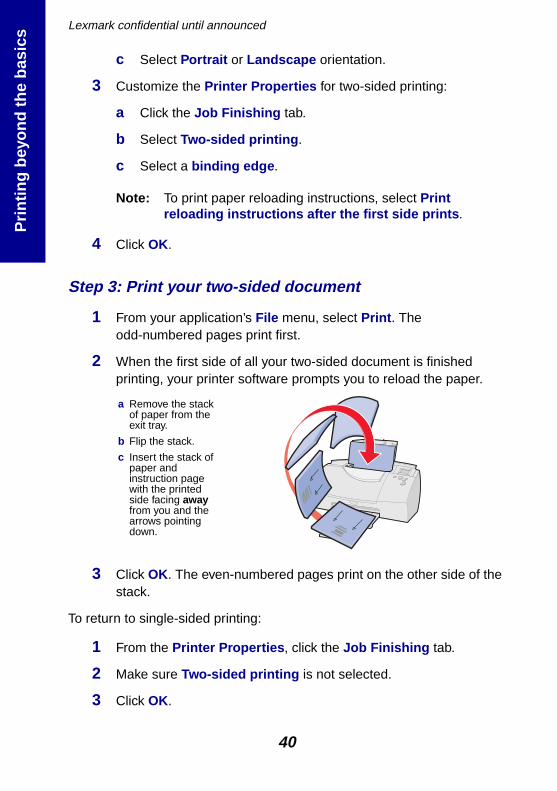
2 When the first side of all your two-sided document is finishedprinting, your printer software prompts you to reload the paper.
3 Click OK. The even-numbered pages print on the other side of thestack.
To return to single-sided printing:
1 From the Printer Properties , click the Job Finishing tab.
2 Make sure Two-sided printing is not selected.
3 Click OK.
a Remove the stackof paper from theexit tray.
b Flip the stack.
c Insert the stack ofpaper andinstruction pagewith the printedside facing awayfrom you and thearrows pointingdown.
Lexmark confidential until announced
41
Printing
beyondthe
basics
Printing handouts
You can conserve paper by printing handouts or multiple page images on asingle sheet of paper.
Step 1: Load the paper
Load paper against the right side of the sheet feeder. For help, see page 3.
Step 2: Customize Printer Properties for handouts
You can print your handouts on one side of the paper or on both sides.
1 Open Printer Properties . For help, see page 33.
2 Select the page orientation for the page images.
The page orientation you select in the Paper tab reflects theorientation of the page image and not the sheet of paper the pageimage prints on.
a Click the Paper tab.
b From the Orientation area, select Portrait or Landscape .
3 From the Paper Size area, select a paper size.
4 Click the Job Finishing tab and select the following options:
a Select Handout .
b Select the Number of Prints (page images) to print on asingle sheet.
c To print a representation of the paper edges for each pageimage, select Print Page Borders .
5 To print your handout on one side of the paper, click OK. To printyour handout on both sides of the paper:
a Select Two-sided printing .
Lexmark confidential until announced
42
Prin
ting
beyo
ndth
eba
sics b To print paper reloading instructions, select Print reloading
instructions after the first side prints .
c Click Long Edge Binding or Short Edge Binding .
d Click OK.
Step 3: Print your handouts
1 From your application’s File menu, select Print .
2 From the Print dialog box, click OK or Print (depending on theapplication).
– If you formatted your handouts to print on one side of eachpage, go to step 3.
– If you formatted your handouts for two-sided printing, continuewith printing the second side of your handouts.
3 When the first side of all your handouts is finished printing, yourprinter software prompts you to reload the paper.
Note: For help reloading and printing two-sided pages for yourbooklet, see page 40.
4 To return to normal printing:
a From the Job Finishing tab, select Normal .
b Click OK.
Printing booklets
You can print and bundle your document together to make a booklet.
Step 1: Load the paper
Load paper against the right side of the sheet feeder. For help, see page 3.
Lexmark confidential until announced
43
Printing
beyondthe
basics
Step 2: Customize Printer Properties for booklets
1 Select the correct paper size in your software application.
You can select from these paper sizes when printing booklets:
– Statement– Letter– A4– A5
2 Open the Printer Properties . For help, see page 33.
3 Click the Job Finishing tab.
4 Select Booklet .
5 To print paper reloading instructions, click Print reloadinginstructions after the first side prints .
6 Select the number of Sheets Per Bundle .
Note: A bundle is any number of sheets of paper folded together.When printing with a heavier paper stock, select a smallernumber of Sheets Per Bundle to allow for bindingconsiderations.
7 Click OK.
Step 3: Print and assemble your booklet
1 From your application’s File menu, select Print .
2 From the Print dialog box, click OK or Print (depending on theapplication).
3 When the first side of your booklet is finished printing, your printersoftware prompts you to reload the paper.
Note: For help reloading and printing two-sided pages for yourbooklet, see page 40.
4 Click OK. The even-numbered pages print on the other side.
Lexmark confidential until announced
44
Prin
ting
beyo
ndth
eba
sics 5 To return to normal printing:
a From the Job Finishing tab, select Normal .
b Click OK.
6 Assemble your booklet. For help, see the following section.
Building a booklet
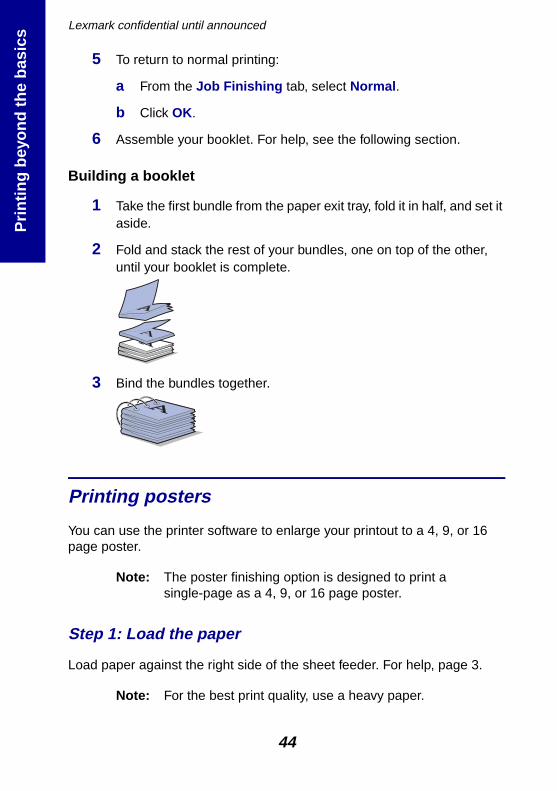
1 Take the first bundle from the paper exit tray, fold it in half, and set itaside.
2 Fold and stack the rest of your bundles, one on top of the other,until your booklet is complete.
3 Bind the bundles together.
Printing posters
You can use the printer software to enlarge your printout to a 4, 9, or 16page poster.
Note: The poster finishing option is designed to print asingle-page as a 4, 9, or 16 page poster.
Step 1: Load the paper
Load paper against the right side of the sheet feeder. For help, page 3.
Note: For the best print quality, use a heavy paper.
Lexmark confidential until announced
45
Printing
beyondthe
basics
Step 2: Customize Printer Properties for your poster
1 Open Printer Properties . For help, see page 33.
2 Click the Job Finishing tab.
3 Select Poster .
4 Select your poster size.
The number you select represents the number of pages that makeup the height and width of your poster. For example, if you select4 x 4, your printed poster is four pages high and four pages wide.
5 Select Show Crop Marks if you want to print markers that showyou where to easily trim (crop) the unprinted white space from theedges of the paper.
6 Click OK.
Step 3: Print and assemble your poster
1 From your application’s File menu, select Print .
2 From the Print dialog box, click OK or Print (depending on theapplication).
Note: If you need to reprint a specific page of your poster, seepage 46.
3 On each printed page, trim the white edges from two adjacentsides.
Lexmark confidential until announced
46
Prin
ting
beyo
ndth
eba
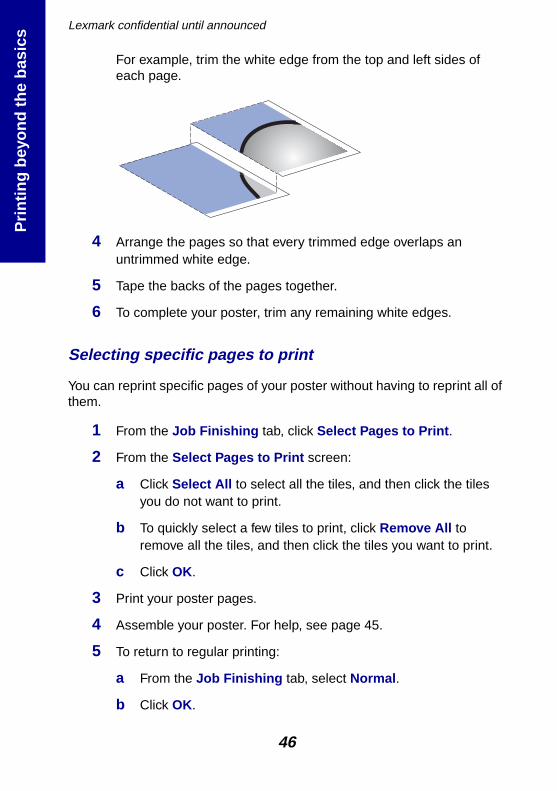
sics For example, trim the white edge from the top and left sides of
each page.
4 Arrange the pages so that every trimmed edge overlaps anuntrimmed white edge.
5 Tape the backs of the pages together.
6 To complete your poster, trim any remaining white edges.
Selecting specific pages to print
You can reprint specific pages of your poster without having to reprint all ofthem.
1 From the Job Finishing tab, click Select Pages to Print .
2 From the Select Pages to Print screen:
a Click Select All to select all the tiles, and then click the tilesyou do not want to print.
b To quickly select a few tiles to print, click Remove All toremove all the tiles, and then click the tiles you want to print.
c Click OK.
3 Print your poster pages.
4 Assemble your poster. For help, see page 45.
5 To return to regular printing:
a From the Job Finishing tab, select Normal .
b Click OK.
Lexmark confidential until announcedC
aringfor
yourcartridges
47
7 Caring for your cartridges
This chapter describes how to perform cartridge maintenance. You caninstall or replace cartridges, view ink levels, clean and align cartridgesusing your computer, or printer’s operator panel. If your printer isconnected to a computer, it may be more convenient to do theseoperations from your computer.
Using your computer for cartridge maintenance
To perform cartridge maintenance from your computer, you must accessthe Control Program .
To open the Control Program from the Start menu, click:
1 Programs
2 KODAK PPM200
3 KODAK PPM200 Control Program

Lexmark confidential until announcedC
arin
gfo
ryo
urca
rtrid
ges
48
KODAK PPM200 Control Program
Note: You can also access the Control Program by double-clicking the KODAK PPM200 icon on your desktop.
Installing or replacing print cartridges
1 Raise the front cover. The print cartridge carrier moves to theloading position unless the printer is busy.
Click the: When you want to:
Status tab • Monitor the status of your print job.• Cancel your print job.• Print a test page.• View your ink levels.
Options tab Enable/disable various printer software functions, such asSound Effects and Buffer Mode .
Cartridges tab • Install or replace print cartridges.• Clean the print nozzles.• Align print cartridges for best print quality.• View cartridge part numbers and order supplies directly
from Kodak’s Web site.
About tab Find the printer software version and copyright notice.
Help button Access the printer driver Help on any tab in the ControlProgram .
Print cartridgecarrier in theloading position
Frontcover
Lexmark confidential until announcedC
aringfor
yourcartridges
49
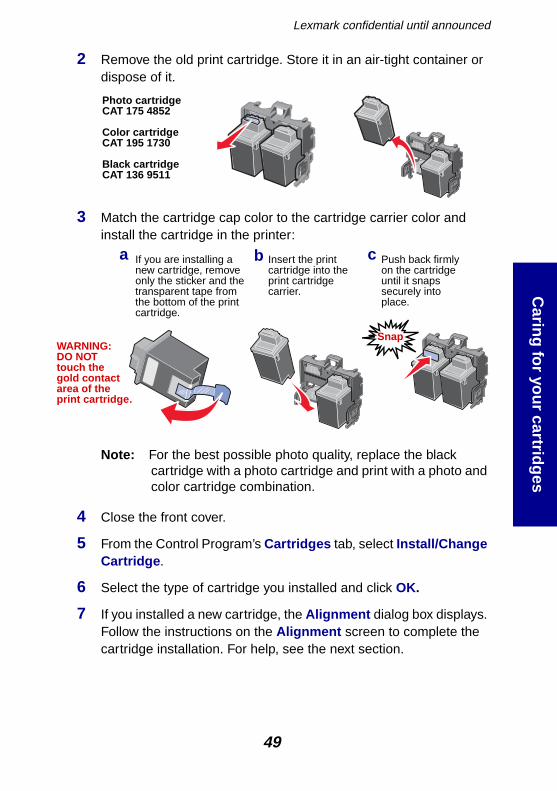
2 Remove the old print cartridge. Store it in an air-tight container ordispose of it.
3 Match the cartridge cap color to the cartridge carrier color andinstall the cartridge in the printer:
Note: For the best possible photo quality, replace the blackcartridge with a photo cartridge and print with a photo andcolor cartridge combination.
4 Close the front cover.
5 From the Control Program’s Cartridges tab, select Install/ChangeCartridge .
6 Select the type of cartridge you installed and click OK.
7 If you installed a new cartridge, the Alignment dialog box displays.Follow the instructions on the Alignment screen to complete thecartridge installation. For help, see the next section.
Photo cartridgeCAT 175 4852
Color cartridgeCAT 195 1730
Black cartridgeCAT 136 9511
Push back firmlyon the cartridgeuntil it snapssecurely intoplace.
Insert the printcartridge into theprint cartridgecarrier.
If you are installing anew cartridge, removeonly the sticker and thetransparent tape fromthe bottom of the printcartridge.
a b c
SnapWARNING:DO NOTtouch thegold contactarea of theprint cartridge.
Lexmark confidential until announcedC
arin
gfo
ryo
urca
rtrid
ges
50
Aligning print cartridges
If the print quality is not satisfactory, a simple cartridge alignment mayimprove print quality. If print quality is still not satisfactory after aligning theprint cartridges, you may need to clean the print nozzles.
1 Load plain paper in the printer. For help loading paper, see page 3.
2 From the Control Program’s Cartridges tab, select AlignCartridges .
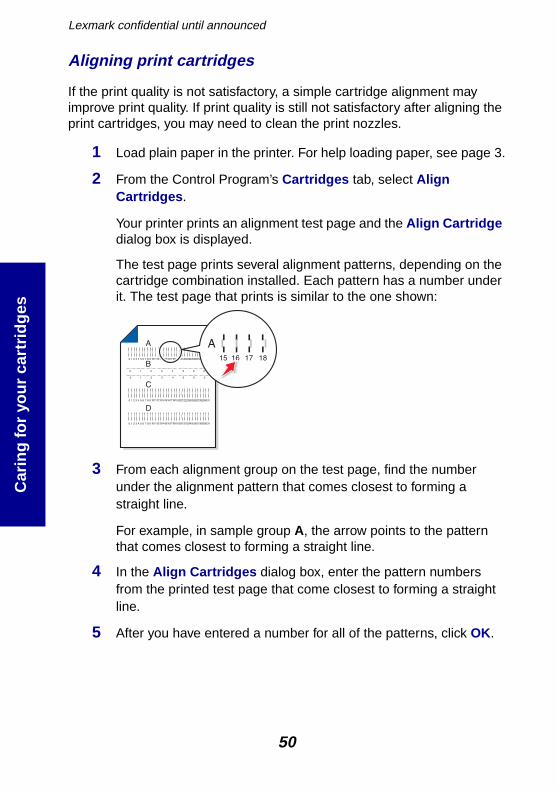
Your printer prints an alignment test page and the Align Cartridgedialog box is displayed.
The test page prints several alignment patterns, depending on thecartridge combination installed. Each pattern has a number underit. The test page that prints is similar to the one shown:
3 From each alignment group on the test page, find the numberunder the alignment pattern that comes closest to forming astraight line.
For example, in sample group A, the arrow points to the patternthat comes closest to forming a straight line.
4 In the Align Cartridges dialog box, enter the pattern numbersfrom the printed test page that come closest to forming a straightline.
5 After you have entered a number for all of the patterns, click OK.
Lexmark confidential until announcedC
aringfor
yourcartridges
51
Cleaning print nozzles
1 Load plain paper in the printer.
2 From the Control Program’s Cartridges tab, select Clean PrintNozzles .
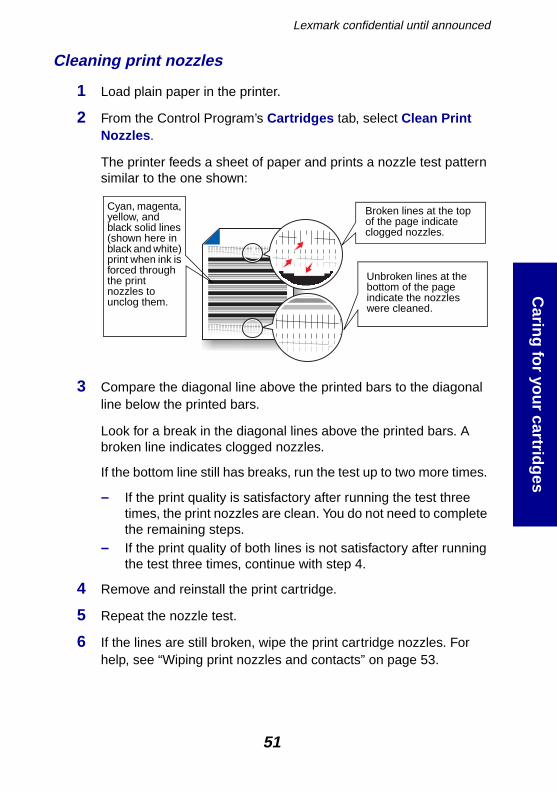
The printer feeds a sheet of paper and prints a nozzle test patternsimilar to the one shown:
3 Compare the diagonal line above the printed bars to the diagonalline below the printed bars.
Look for a break in the diagonal lines above the printed bars. Abroken line indicates clogged nozzles.
If the bottom line still has breaks, run the test up to two more times.
– If the print quality is satisfactory after running the test threetimes, the print nozzles are clean. You do not need to completethe remaining steps.
– If the print quality of both lines is not satisfactory after runningthe test three times, continue with step 4.
4 Remove and reinstall the print cartridge.
5 Repeat the nozzle test.
6 If the lines are still broken, wipe the print cartridge nozzles. Forhelp, see “Wiping print nozzles and contacts” on page 53.
Broken lines at the topof the page indicateclogged nozzles.
Unbroken lines at thebottom of the pageindicate the nozzleswere cleaned.
Cyan, magenta,yellow, andblack solid lines(shown here inblack and white)print when ink isforced throughthe printnozzles tounclog them.
Lexmark confidential until announcedC
arin
gfo
ryo
urca
rtrid
ges
52
Using your operator panel for cartridgemaintenance
Aligning the Print Cartridges
See page 4.
Cleaning print nozzles
1 Press Menu until you see the Main Menu .
2 Press until Utilities is highlighted, and then press Select .
The Utilities menu appears.
3 Press until Clean Cartridge is highlighted, and then pressSelect .
The Clean Cartridge menu appears.
4 Press until Yes is highlighted, and then press Select .
The Cleaning Cartridge menu appears with a progress barshowing the status of the cleaning process. When the progress baris complete, the Utilities menu returns.
Note: The printer feeds a sheet of paper and prints a nozzle testpattern similar to the one shown on page 51.
5 Follow steps 3 through 5 on page 51.
6 If the lines are still broken, wipe the print cartridge nozzles. Forhelp, see “Wiping print nozzles and contacts” on page 53.
7 Press Print or use the View/Return button to go to other menuoptions.
Viewing ink levels
1 Press Menu until you see the Main Menu .
Lexmark confidential until announcedC
aringfor
yourcartridges
53
2 Press until Utilities is highlighted, and then press Select.
The Utilities menu appears.
3 Make sure Ink Level is highlighted, and then press Select .
The Ink Level menu appears.
4 View the ink level.
5 Select Done when you are finished checking the ink level.
Cleaning and preserving print cartridges
Wiping print nozzles and contacts
If print quality does not improve after cleaning the print nozzles, there maybe dried ink on the print cartridge nozzles or the print cartridge contacts.
To wipe the print cartridge nozzles and contacts:
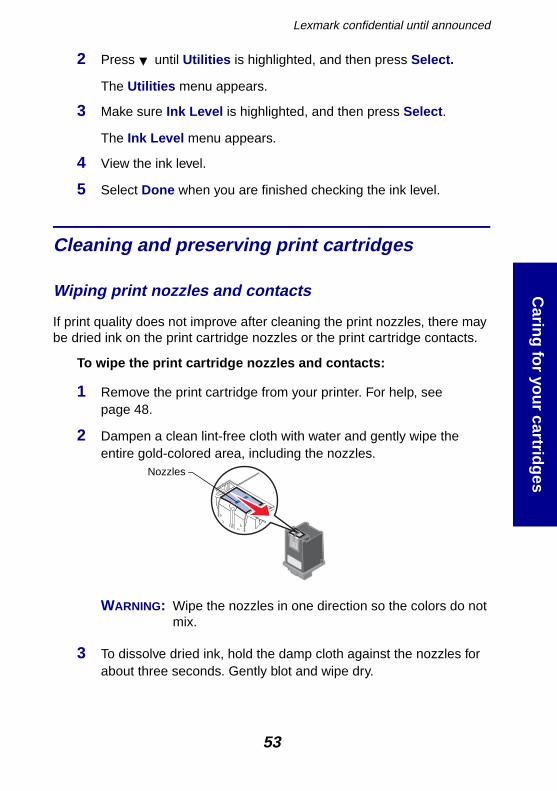
1 Remove the print cartridge from your printer. For help, seepage 48.
2 Dampen a clean lint-free cloth with water and gently wipe theentire gold-colored area, including the nozzles.
WARNING: Wipe the nozzles in one direction so the colors do notmix.
3 To dissolve dried ink, hold the damp cloth against the nozzles forabout three seconds. Gently blot and wipe dry.
Nozzles
Lexmark confidential until announcedC
arin
gfo
ryo
urca
rtrid
ges
54
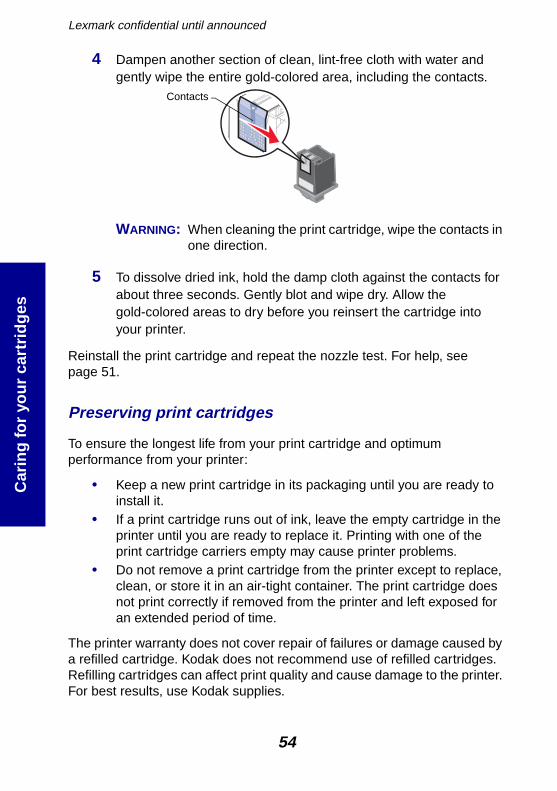
4 Dampen another section of clean, lint-free cloth with water andgently wipe the entire gold-colored area, including the contacts.
WARNING: When cleaning the print cartridge, wipe the contacts inone direction.
5 To dissolve dried ink, hold the damp cloth against the contacts forabout three seconds. Gently blot and wipe dry. Allow thegold-colored areas to dry before you reinsert the cartridge intoyour printer.
Reinstall the print cartridge and repeat the nozzle test. For help, seepage 51.
Preserving print cartridges
To ensure the longest life from your print cartridge and optimumperformance from your printer:
• Keep a new print cartridge in its packaging until you are ready toinstall it.
• If a print cartridge runs out of ink, leave the empty cartridge in theprinter until you are ready to replace it. Printing with one of theprint cartridge carriers empty may cause printer problems.
• Do not remove a print cartridge from the printer except to replace,clean, or store it in an air-tight container. The print cartridge doesnot print correctly if removed from the printer and left exposed foran extended period of time.
The printer warranty does not cover repair of failures or damage caused bya refilled cartridge. Kodak does not recommend use of refilled cartridges.Refilling cartridges can affect print quality and cause damage to the printer.For best results, use Kodak supplies.
Contacts
Lexmark confidential until announced
55
8
Troubleshooting
Troubleshooting
Understanding the operator panel errormessages
Cannot read Card
Check your camera card. The card may not have photos on it or it may bedamaged.
Carrier Stall
The cartridge carrier inside your printer has stalled. Unplug your printer,clear the paper jam, and then plug your printer back in. For help clearingpaper jams, see page 57.
Copy Failed Disk Full
Your external storage disk is full. Insert a new disk to store additionalphotos.
Copy Failed, Write Protected
The external storage disk you are using is write protected. You mustremove write protect from your disk before you copy photos.
Lexmark confidential until announced
56
Trou
bles
hoot
ing
Copy Failed No Disk
Your printer does not recognize your external storage drive. Check yourexternal storage drive cable connections to make sure they are secure.
Decode Error
Your printer can’t read your camera card. This is often caused by removingyour camera card from your camera before it has finished storing theimage. It can also be caused by photos that have been previouslyuploaded to a computer and modified.
Note: If the printer is connected to a computer, try viewing yourphotos from the card reader mode. For help using the cardreader, see page 36.
Erase Failed
The photos cannot be erased from your disk. Make sure your disk is notwrite protected.
Insert Paper, Press Print
The printer is out of paper. For help loading paper, see page 3.
Install Cartridge
Install a cartridge. For more information, see page 2.
Low Ink
Check your ink levels, it may be time to replace a cartridge. To check yourink levels from your computer, see page 48. To view your ink levels fromyour printer’s display, see page 52.
Lexmark confidential until announced
57
Troubleshooting
No PC is Connected
This error message appears when you choose the Card Reader optionfrom the operator panel and no computer is connected. Card Reader is afunction that interacts with your computer. For help, see “Understandingthe Card Reader” on page 36.
Paper Jam
Try removing the paper from the sheet feeder. If the paper is lodged too farinto the printer and can’t be removed:
1 Unplug your printer.
2 Pull firmly on the paper to remove it. If you cannot reach the paperbecause it is too far into the printer, raise the front cover and pullthe paper out.
3 Close the front cover.
4 Plug your printer into an electrical outlet.
Resend your document to print.
PC Printing in Progress
Wait until the print job from your computer is complete and then pressPrint on the operator panel to begin printing photos.
Printing problems without a computer
My printer will not read my camera card
• Remove your camera card for 15 seconds, and then reinsert.• There may not be any photos on your camera card.• Your camera card may not be supported by your printer.
Lexmark confidential until announced
58
Trou
bles
hoot
ing
The colors on my printed photos do not match the colorsdisplayed on my camera
• Your cartridge may be running out of ink and you may need toreplace your print cartridge. For help, see page 48.
• Check your paper. Photos can print with color variationsdepending upon the type of paper you have loaded in your printer.For the best print results, use KODAK Premium Picture Paper.
Printed pages have alternating bands of light and darkprint (intermittent printing)
Select Best print quality setting from your printer’s operator panel.For help, see page 18.
My photo prints, but there is too much white space on thepaper
• Make sure the paper size selected under PRINT OPTIONSmatches the paper size loaded in your printer. For help selectingthe correct paper size, see page 17.
• You may not have selected enough photos to print on one page.For help, see “Choosing the page layout” on page 18.
Printer prints very slowly
Select a lower print quality setting.
Note: If you are printing photos or your document containsgraphics, it may take longer to print than regular text.
Printing problems with your computer
When your printer has a problem, first make sure that:
• The power supply is plugged into the printer and a properlygrounded electrical outlet.
Lexmark confidential until announced
59
Troubleshooting
• The printer USB cable is securely attached to your computer andprinter.
Printer prints very slowly
• Close any open applications not in use.• Select a lower print quality setting.• Consider purchasing more memory, or increasing the virtual
memory for your computer.
Note: If you are printing photos or your document containsgraphics, it may take longer to print than regular text.
Printer is plugged in but doesn’t print, or you get a PrinterOffline message
Make sure:
• The printer is on and the paper is loaded correctly.• The USB cable is completely plugged into the printer.• The printer is set as the default printer.• The printer may be set up as card reader. For help, see page 36.• The print job is not being held or paused in the print queue. To
check the printer status:
1 From the Printers folder, double-click the KODAK PPM200 icon.
2 Click the Printer menu and make sure no check mark appearsnext to the Pause Printing option.
Print a test page (see page 5). If the test page prints, the printer isfunctioning properly. Check your application.
Lexmark confidential until announced
60
Trou
bles
hoot
ing
Test page does not print
Make sure:
• You have removed the tape from the cartridges. For help, seepage 2.
• Your print cartridges are properly installed. For help, see page 2.• The printer is set as the default printer.
Printed pages have alternating bands of light and darkprint (intermittent printing)
• Make sure Enable Buffer Mode is checked on the Options tab ofthe Control Program .
• Select the High 1200 x 1200 dpi Print Quality setting on theDocument/Quality tab of Printer Properties .
The printer settings I selected changed
When you change printer settings from your application, thesettings apply only to the specific document you opened with thatapplication. To make the settings apply to all documents, changethe settings from Windows. See page 33 for more information.
Transparencies or photos contain white lines
• From the Printer Properties , select the High 1200 x 1200 dpiPrint Quality setting.
• Your print nozzles may need cleaning. For help, see page 51.
General printing problems with or without yourcomputer
Printer ejects a blank page after appearing to print
Lexmark confidential until announced
61
Troubleshooting
Make sure:
• You have removed the sticker and transparent tape covering thegold area on the print cartridges. For help, see page 2.
• Your Kodak printer is set as the default printer on your computer.
Paper misfeeds or pulls multiple sheets through theprinter
Make sure:
• You are using a paper recommended for inkjet printers.• You do not force the paper down into the printer when you load it.• You do not load too much paper in the sheet feeder. Depending on
the thickness of your paper, the sheet feeder can hold up to 100sheets of plain paper or 25 sheets of KODAK’s Premium PicturePaper.
• The left paper guide does not cause the paper to bow in the sheetfeeder.
• The printer is on a flat, level surface.
Printer has a paper jam
See page 57.
Vertical straight lines are not smooth
To improve the print quality of vertical straight lines in tables, borders, andgraphs:
• Select a higher Print Quality setting. For help, see page 18 and34.
• Test the cartridge alignment. For help, see page 4 or 50.• Clean the print nozzles. For help, see page 51 or 52.
Lexmark confidential until announced
62
Trou
bles
hoot
ing
Print is too dark or smudged
Make sure:
• You let the ink dry before handling the paper.• The Paper Type setting in the Printer Properties or the printer’s
operator panel matches the paper type loaded in the printer.• The paper is straight and unwrinkled.• The print quality setting is appropriate for the paper type. If you are
printing on regular paper, select the Draft 300 x 600 dpi PrintQuality setting.
Note: If print quality still has not improved, you may need to cleanthe print nozzles. For help, see page 51 or 52.
Colors are not printing correctly
• An ink cartridge may be out of ink or low on ink. Check the ink levelgraphic on the Cartridges tab of your printer’s Control Programor in the printer’s operator panel menu.
• Use a different brand of paper. Every paper brand accepts inkdifferently and prints with slight color variations. For best printresults, use KODAK Premium Picture Paper .
• Your print cartridge may be low on ink. Check the ink level graphicon the Cartridges tab of your printer’s Control Program or in theprinter’s operator panel menu.
• Clean the print nozzles. For help, see page 51.
Glossy photo papers or transparencies stick together
• Remove each page as it exits the printer and allow it to dry beforestacking.
• Use a transparency or photo paper designed for an inkjet printer.
Lexmark confidential until announced
63
Troubleshooting
KODAK Customer Support Center
Prior to contacting Kodak, please have the following information availableso we may serve you faster. (Located on the back of the printer.)
Machine Type number
Serial number
Date purchased
Store where purchased
United States and Canada
1-877-774-6837
Or you may contact Kodak through our Website:www.kodak.com/go/homeprinting
Support Center Hours of Operation:
9 AM-9 PM Monday through Friday and12 PM-6 PM Saturday and Sunday (Eastern Time).

Lexmark confidential until announced
64
Trou
bles
hoot
ing
Lexmark confidential until announced
65
Appendix
Appendix
In this section, you can findinformation about:
• Installing printer software• Uninstalling printer
software• Warranty• Notices• Safety
Installing printersoftwareYou can obtain the printersoftware using the:
• Compact disc (CD-ROM)that came with yourprinter
• World Wide Web
If your printer software doesnot install properly, acommunications errormessage appears when youtry to print. You may need touninstall, and then reinstallthe printer software. For helpsee Uninstalling printersoftware. For help installingyour software, see page 6.
Using the World WideWebIf your computer does nothave a CD-ROM drive, youcan download the printersoftware from the World
Wide Web at http://www.kodak.com/go/ppm200.
1 At KODAK’s Web site,select the appropriatedriver for your operatingsystem.
2 Select Save to Disk .
3 Download according toyour operating systemrequirements.
Uninstallingprinter softwareIf your printer software doesnot install properly, or yourprinter is not installed to thecorrect port, you may needto uninstall, and thenreinstall the software.
To uninstall the printersoftware:
1 From the Start menu,select Programs .
2 Select KODAK PPM200.
3 Select KODAK PPM200Uninstall .
4 Follow the instructions onyour screen.
To reinstall the printersoftware, follow theappropriate set ofinstructions from “Installingprinter software.”
Statement ofLimited WarrantyLexmark International, Inc.,Lexington, KY
This warranty applies to theUnited States and Canada.For customers outside theU.S. and Canada, refer tothe country-specific warrantyinformation that came withyour printer.
KODAK Personal PictureMaker PPM200 by Lexmark
This Statement of LimitedWarranty applies to thisproduct if it was originallypurchased for your use, andnot for resale, from Lexmarkor a Lexmark remarketerincluding KODAK, referredto in this statement as“Remarketer.”
WarrantyLexmark warrants that thisproduct:
Lexmark confidential until announced
66
App
endi
x
• Is manufactured from newparts, or new andserviceable used parts,which perform like newparts,
• Is free from defects inmaterial andworkmanship,
• Conforms to Lexmark’sofficial publishedspecifications, and
• Is in good working order.
If this product does notfunction as warranted duringthe warranty period, contacta Remarketer or Lexmark forrepair without charge.
If you transfer this product toanother user, warrantyservice under the terms ofthis statement is available tothat user for the remainder ofthe warranty period. Youshould transfer proof oforiginal purchase and thisstatement to that user.
Warranty ServiceThe warranty period is 12months and starts on thedate of original purchase asshown on the purchasereceipt.
To obtain warranty serviceyou may be required topresent proof of originalpurchase. Warranty servicewill be provided at aLexmark designatedlocation.
When warranty serviceinvolves the exchange of aproduct or part, the itemreplaced becomes theproperty of the Remarketeror Lexmark. Thereplacement may be a newor repaired item. The
replacement item assumesthe remaining warrantyperiod of the originalproduct.
Replacement is not availableto you if the product youpresent for exchange isdefaced, altered, in need ofa repair not included inwarranty service, ordamaged beyond repair.Also, such product must befree of any legal obligation orrestrictions that prevent itsexchange.
Before you present thisproduct for warranty service,remove all programs, data,and removable storagemedia.
For further explanation ofyour warranty alternativesand the nearest Lexmarkauthorized servicer in yourarea, please call1-888-774-6837.
Free remote technicalsupport is provided for thisproduct throughout itswarranty period. Lexmarkoffers a variety of extendedwarranty programs thatinclude an extension oftechnical support. Forproducts no longer coveredby a Lexmark warranty,technical support may onlybe available for a fee.
Extent of WarrantyLexmark does not warrantuninterrupted or error-freeoperation of a product.
Warranty service does notinclude repair of failurescaused by:
• Modification orattachments
• Accidents or misuse• Unsuitable physical or
operating environment• Maintenance by anyone
other than Lexmark or aLexmark authorizedservicer
• Operation of a productbeyond the limit of its dutycycle
• Failure to have installed amaintenance kit asspecified (if applicable)
• Use of printing mediaoutside of Lexmark’spublished specifications
• Use of other thanKODAK’s inkjet cartridgesmanufactured byLexmark
• Use of other thanLexmark providedproduct or component
ALL EXPRESS ANDIMPLIED WARRANTIES,INCLUDING THE IMPLIEDWARRANTIES OFMERCHANTABILITY ANDFITNESS FOR APARTICULAR PURPOSE,ARE LIMITED INDURATION TO THEWARRANTY PERIOD. NOWARRANTIES, EXPRESSOR IMPLIED, WILL APPLYAFTER THIS PERIOD.
KODAK DISCLAIMS ALLWARRANTIES, EITHEREXPRESSED OR IMPLIED.
Limitation of LiabilityYour sole remedy under thisStatement of LimitedWarranty is set forth in thissection. For any claimconcerning performance ornonperformance of Lexmarkor a Remarketer for this

Lexmark confidential until announced
67
Appendix
product under this Statementof Limited Warranty, youmay recover actual damagesup to the limit set forth in thefollowing paragraph.
Lexmark's liability for actualdamages from any causewhatsoever will be limited tothe greater of 1) $5,000 or 2)the amount you paid for theproduct that caused thedamages. This limitation ofliability will not apply toclaims by you for bodilyinjury or damage to realproperty or tangible personalproperty for which Lexmarkis legally liable. IN NOEVENT WILL LEXMARKOR REMARKETER BELIABLE FOR ANY LOSTPROFITS, LOST SAVINGS,INDIRECT ORINCIDENTAL DAMAGES,OR OTHER ECONOMICCONSEQENTIALDAMAGES . This is trueeven if you advise Lexmarkor a Remarketer of thepossibility of such damages.Lexmark is not liable for anyclaim by you based on athird party claim.
This limitation of remediesalso applies to anydeveloper of materialssupplied to Lexmark.Lexmark’s and thedeveloper’s limitations ofremedies are not cumulative.Such developer is anintended beneficiary of thislimitation.
Additional RightsSome states do not allowlimitations on how long animplied warranty lasts, or do
not allow the exclusion orlimitation of incidental orconsequential damages. Ifsuch laws apply, thelimitations or exclusionscontained in this statementmay not apply to you.
This warranty gives youspecific legal rights. Youmay also have other rightswhich vary from state tostate.
Electronicemission notices
FederalCommunicationsCommission (FCC)ComplianceInformationStatementThe KODAK PersonalPicture Maker PPM200 byLexmark, Type 4103-P01has been tested and foundto comply with the limits for aClass B digital device,pursuant to Part 15 of theFCC Rules. Operation issubject to the following twoconditions: (1) this devicemay not cause harmfulinterference, and (2) thisdevice must accept anyinterference received,including interference thatmay cause undesiredoperation.
The FCC Class B limits aredesigned to providereasonable protectionagainst harmful interferencein a residential installation.This equipment generates,uses and can radiate radio
frequency energy and, if notinstalled and used inaccordance with theinstructions, may causeharmful interference to radiocommunications. However,there is no guarantee thatinterference will not occur ina particular installation. Ifthis equipment does causeharmful interference to radioor television reception, whichcan be determined byturning the equipment offand on, the user isencouraged to try to correctthe interference by one ormore of the followingmeasures:
• Reorient or relocate thereceiving antenna.
• Increase the separationbetween the equipmentand receiver.
• Connect the equipmentinto an outlet on a circuitdifferent from that towhich the receiver isconnected.
• Consult your point ofpurchase or servicerepresentative foradditional suggestions.
The manufacturer is notresponsible for any radio ortelevision interferencecaused by using other thanrecommended cables or byunauthorized changes ormodifications to thisequipment. Unauthorizedchanges or modificationscould void the user'sauthority to operate thisequipment.
To assure compliance withFCC regulations onelectromagnetic interferencefor a Class B computingdevice, use a properly

Lexmark confidential until announced
68
App
endi
x
shielded and grounded cablesuch as Lexmark partnumber 12A2405 for USBattach. Use of a substitutecable not properly shieldedand grounded may result ina violation of FCCregulations.
Any questions regarding thiscompliance informationstatement should be directedto:
Director of Lab OperationsLexmark International, Inc.740 West New Circle RoadLexington, KY 40550(859) 232-3000
Notices
Industry CanadaComplianceStatementThis Class B digitalapparatus meets allrequirements of theCanadianInterference-CausingEquipment Regulations.
Avis de conformitéaux normesd’Industrie CanadaCet appareil numérique de laclasse B respecte toutes lesexigences du Règlement surle matériel brouilleur duCanada.
Energy StarThe EPA ENERGY STARComputers program is apartnership effort with
computer manufacturers topromote the introduction ofenergy-efficient productsand to reduce air pollutioncaused by power generation.
Companies participating inthis program introducepersonal computers,printers, monitors, or faxmachines that power downwhen they are not beingused. This feature will cutthe energy used by up to 50percent. Lexmark is proud tobe a participant in thisprogram.
As an Energy Star Partner,Lexmark International, Inc.has determined that thisproduct meets the EnergyStar guidelines for energyefficiency.
Power SupplyinformationIf your power supply fails,replace it with the Lexmarkreplacement part.
Safetyinformation• If your product is NOT
marked with this symbol, it MUST be
connected to an electricaloutlet that is properlygrounded.
• The power supply mustbe connected to anelectrical outlet that isnear the product andeasily accessible.
• Refer service or repairs,other than thosedescribed in theoperating instructions, to
a professional serviceperson.
• This product is designed,tested and approved tomeet strict global safetystandards with the use ofspecific Lexmarkcomponents. The safetyfeatures of some partsmay not always beobvious. Lexmark is notresponsible for the use ofother replacement parts.
Lexmark confidential until announcedIndex
69
Index
Aaligning print cartridges
4, 50Arrow button
locating 11using 11
Auto Enhance 25
Bbanding 58, 60binding options
long edge 42short edge 42
bookletsbuilding 44bundling 44printing 42
borderless prints 20borders, adding 23brightness control
locating 11using 11
brightness feature 25buttons, operator panel
11
Ccable
connections 10USB 10
camera cardchoosing 12
cover 9erasing photos 29inserting 12slot, locating 12
camera compatibility,verifying 11
camera order, print 13,21
camera, compatibility list11
captions, adding 24card reader, PC 13, 36cartridges, print
aligning 4, 50cleaning 53gold contact area 2installing 2, 48preserving 54removing 48replacing 48
colors, wrong 58compatibility list, camera
11connecting
external device 10Power supply 10USB cable 6USB/PC 10
Control Program 48Copy Failed Disk Full 55Copy Failed Write
Protected 55copying photos 28cover, camera card 9
crop marks, selecting 45crop photos, using 22custom size paper,
loading 32customer support 63
DDecode Error 56defaults
factory, resetting 26layout, resetting 20
Display windowlocating 11using 11
downloaded printerdriver, installing 65
duplexing 39
Eelectronic emission
notices 67erasing photos 29error messages
Cannot read Card 55Carrier Stall 55Copy Failed Disk Full
55Copy Failed No Disk
56Copy Failed, Write
Protected 55Decode Error 56Erase Failed 56
Lexmark confidential until announcedIn
dex
70
Printer Offline 59exit tray
locating 9using 9
external device,connecting 10
external storage drive,connecting 27
Ffactory defaults, resetting
26FCC statement 67frames, adding to a photo
23front cover
locating 9using 9
Hhandouts, printing 41help, technical support
63
Iidle screen 14index, printing 13, 21Industry Canada
Compliance Statement68
installingprint cartridge 48printer software 6, 37,
65intermittent printing 58,
60iron-on transfers, loading
32
KKODAK Imaging
Software 7
Llanguages, changing 14layout
changing 13choosing 18default, using 20
loading paper 3long edge binding 42
Mmain menu
understanding 15using 15
Menu buttonslocating 11using 11
messages, errorCannot read Card 55Carrier Stall 55Copy Failed Disk Full
55Copy Failed No Disk
56Copy Failed, Write
Protected 55Decode Error 56Erase Failed 56Printer Offline 59
Nnotices
electronic emission 67FCC 67Industry Canada
ComplianceStatement 68
nozzles, printcleaning 51, 52wiping 53
n-up printingSee handouts 41
Ooperator panel
buttons 9error messages 55using 9
ordering replacement,power supply 68
Ppage layout, choosing 18paper
choosing 16loading 3size, choosing 17types 16
paper exit traylocating 3, 9using 3, 9
paper feederSee sheet feeder
paper guide 9paper support 9part number, USB cable
68PC card reader 13photo and print preview,
using 14photo paper, problems
62photos
adding frames 23adding text 24auto enhance 25brightness 25colors wrong 58copying to zip drive 28cropping 22editing 22erasing from the
camera card 29layout, changing 13layout, choosing 18modifying text 24rotating 23
Lexmark confidential until announcedIndex
71
selecting 20storing 28viewing 13
photos to print option,using 21
posterassembling 45printing 44selecting specific
pages 46power connection 10power supply 68
connecting 1ordering replacement
68print all photos 13Print button
locating 11using 11
print cartridgesaligning 4, 50contacts, cleaning 53gold contact area 2installing 2, 48preserving 54removing 48replacing 48
print nozzles 53cleaning 51, 52wiping 53
print qualitybanding 58, 60changing 18different colors 62missing colors 62smudged 62too dark 62
printer driverdownloading 65installing 65uninstalling 65
printer driver Help,accessing 34, 48
printer partslocating 9
using 9Printer Properties
customizing 33for booklets 43for poster 45for two-sided
printing 39opening
from an application33
from Windows 33tabs 33
printer softwareControl Program 47installing 6, 37Printer Properties 33uninstalling 65
printer, setting up 1printing
all photos 21booklets 42camera card order 21from zip drive 29handouts 41index 21on both sides of the
paper 39photos 15posters 44selected photos 21sets 22text on photos 24with a computer 31
printing problemscolor quality 62error messages 55intermittent 58, 60missing colors 62paper jam 57paper misfeeds 61with computer 58
printing, test page 5
Rrelease tab 9reloading instructions,
two-sided printing 40removing print cartridge
48
Ssafety information 68screen, idle 14Select button
locating 11using 11
select pages to print 46selected photos, printing
21sets, printing 22setting recommendations
poster 45two-sided printing 39
setting up, printer 1sheet feeder 9Sheets Per Bundle,
selecting 43short edge binding 42software applications,
Printer Properties 33software, printer
installing 6, 37uninstalling 65
specialty paperscustom size paper 32iron-on transfers 32transparencies 32
start-up screen, using 13storage device,
connecting 27storing photos 28supplies, ordering
power supply 68
Ttechnical support 63
Lexmark confidential until announcedIn
dex
72
test pagealignment 5, 50does not print 60nozzle test pattern 51,
52printing 5
textadding to a photo 24modifying 24
transparenciesloading 32problems 62
troubleshootingblank pages 60color quality 58, 62general 60missing colors 51, 62operator panel error
messages,understanding 60
paper sticks together62
printer settings 60printing problems 58problems, computer
58two-sided printing
reloading instructions40
two-sided printing, settingrecommendations 39
Uuninstalling printer
software 65USB cable
connecting 6part number 68
USB/PC connection 10
VView/Return button
locating 11using 11
view/return button, using11
WWarranty 65Web site, KODAK 11, 63
Zzip drive
connecting 10, 27copying to 28printing from 29storing photos 28using 28