Embed Size (px)
Citation preview

User
Manual
PARIS Hydrant Flow Test
Applications
System Support
(718) 595 - 3088
Version 2.0 11/15/21

Table of Contents
OVERVIEW
Software/Hardware Requirements
HOW TO ACCESS THE SYSTEM
Registration
Retrieving a lost password
MAIN MENU
SUBMITTING THE HYDRANT FLOW TEST APPLICATION
ENTERING PAYMENT INFORMATION
Electronic Checks
REVIEW PAYMENT DETAILS
PAYMENT CONFIRMATION
ENTERING CREDIT CARD INFORMATION
REVIEW PAYMENT DETAILS
PAYMENT CONFIRMATION
CANCELING PAYMENTS
RETURNED CHECKS
WITHDRAWING AN APPLICATION
ATTACHING A FILE
RETRIEVING THE FLOW TEST LETTER


Overview As part of the Department’s continuous efforts to streamline the permitting process for water and
sewer connections we are leveraging the use of technology to launch an online platform, which will
allow applicants to submit Hydrant Flow Test Applications (HFT) electronically.
Benefits of the system
There are many benefits to filing applications electronically. Applications can be created and filed on
any day of the week at any hour from almost anywhere. When an electronic application is submitted,
it is sent to a virtual queue for review by DEP staff. The status of the application is accessible at any
time by logging into your account. The system is very easy to learn and use. The system provides
instantaneous notice by e-mail whenever an application has been accepted and whenever the status
changes.
Software/Hardware Requirements
The current minimum requirements for filing electronically are: a computer with Internet access
(disable pop-up blockers), a printer, and Adobe Acrobat software, or similar (to convert documents
formatted by word processor to portable document format (PDF)).
An internet browser is a program that allows you to access pages on the World Wide Web. The
Permitting and Review Information System (PARIS) was developed specifically to take advantage of
the features available within Google Chrome and Microsoft Edge. Other browsers, such as FireFox
and Netscape, are not supported at this time. You can download the latest version of Chrome, free of
charge, at https://www.google.com/chrome.
Cookies
The user must have cookies enabled to use the system. The website uses session cookies and only
retains information until all user browsers are closed and the session is ended. The web site does not
write any data to the user’s hard drive. The exception to this is if a user selects to save a PDF of the
Hydrant Flow Test letter.
Pop-up Blockers
If you have a pop-up blocker installed, you will need to allow pop-ups from the web site. If you do
not have a pop-up blocker installed, you can skip to the next section.
To allow pop-ups from the web site using Google Chrome, follow these procedures:
1. Click the Chrome menu on the browser toolbar. Select Settings and then click Show
advanced settings.
2. In the Privacy section, click Site Settings and click Pop-ups and redirects. In the Pop-ups
section, select Allowed.

How to access the system The web address of the system is https://epermitsportal.azurewebsites.net/login
Registration
Go to NYC DEP PARIS (epermitsportal.azurewebsites.net). Click login in the top right corner of the
screen.
On the following page, the login fields will be shown. Below the “Sign In” button, there is a link to
“Sign Up Now”. Click the link to register an account.

When you are taken to the Sign Up screen:
1. Enter the email you want to use for the system.
2. Click “Send Verification Code”.
3. Check your email account for the email with the verification code. The email can take several
minutes to appear in your inbox.
4. Return to the Sign Up screen and enter the verification code from the email; click “Verify Code”.
**Please Note: You cannot finish creating the account until you have verified the code.
5. Enter the password you want to use for the system; password requirements. See Figure 3.

6. Pick the Display Name (can be your first name, company name, etc.)
7. Click “Create” to complete sign up.
8. You will be taken to the profile creation screen; fill out all fields with the information you want to
use for the account.

9. Email will be sent to your inbox (also check junk/spam boxes) to activate your account; click the
link provided in the email, “Activate Account”.
10. Click “Back to Home Page” and click “Login” in the top right.
11. Login using the credentials you just created.
12. You should be taken to a screen that asks if you are a licensed professional and provides a link to
the authentication form.
a. If you do not have a professional license, or prefer not to add it to the account, select “No”.
Your account is complete. *Please note: HFT (Hydrant Flow Test) requests do not require
a license.

b. If you have a professional license you want to add to the account, click “Yes” and then
“Continue”. Then follow the remaining steps.
13. Select License Type from the dropdown menu; enter license number and click “Search”.
14. License information should generate on the screen; if it is correct, click “Add” so the information
is added to your profile.
15. You should be taken to the homepage, and there will be message at the top stating that your
license information was successfully added.
16. Follow instructions below to make sure license is verified with DEP.
In order to register as professional, you must indicate yourself as a professional user on the account,
and a person must complete and submit an “Authentication Form” which must be signed and attested
by a NYS Notary Public.
Once completed, email the form to [email protected] and mail a hard copy to:
NYC Department of Environmental Protection
ATTN: Registrations (BWSO Office of Online Permitting)
59-17 Junction Blvd, 3rd Fl., Low-Rise
Flushing, NY 11373
The request will be checked for completeness and the identification of the professional will be verified.
Retrieving a lost password
To retrieve a lost password, click on the password recovery link, Forgot your password?

After entering the email address associated with account, click “Send Verification Code”.
You will receive an email with the verification code.
On the PARIS screen enter the verification code from the email, into the field provided and click Verify
Code.
Then, click Continue.
On the next screen, enter the new password twice in the fields provided, and click Continue.

Main Menu
The main menu screen contains information on all applications entered into the system by the user.
Applications shown as Draft have been started but not submitted to DEP; these applications can be
edited or deleted. Applications created and left in Draft for more than 30 days will automatically
expire. If your application expired, you can simply create a new request and submit, as needed.
Applications shown as Submitted are applications, which have been submitted to DEP. Once an
application has been submitted to DEP it cannot be edited.
Applications that are Approved, the test is complete and the approval letter is ready for download.
First-time Users will see a screen similar to the one below, with no current applications in the system.
To start a new application, click the plus sign on the top right of the request queue. A dropdown will
open with your request options.
Please Note: The options shown in the example are for a plumber’s account. Your options will vary
based on your profile type.

Submitting the Hydrant Flow Test Application To complete the Hydrant Flow Test Application fill out the Hydrant Flow Test section of the form.
Note, all fields in this section are required. Provide the Borough, House Number, Site Street, the
Specific Test Street, along with the Cross Streets and the Requested Flow Rate (GPM).
The information under Where the Flow Test Results Should be Sent will be populated based on
your profile information.
Please Note:
• Street fields should contain one street name only
• The street names should be written as they appear on maps/road signs
o Junction Blvd and Horace Harding Expwy should NOT be put in as Junction and
Horace Harding
• The general address should never be a range; it should be one building/site only
o If you want to use the same test results for 3 buildings in a row, for example, select
one building for the overall House Number field, and enter the range in the Alternative
Address field
• Cross streets must be different
o One cross street on the south or west side, and the other cross street on the north or
east side of the street the hydrant is located on.

Once the application has been completed, click Proceed to Payment to pay for the application and
submit it to DEP. The fee for the Hydrant Flow Test Application is $500.00. The system will display
the payment information window, select Pay Now to proceed with the payment.
*Note: To pay by electronic check, you will need your checking account and routing number. Credit
and debit card payments are charged a service fee of 2.00% of the payment amount. This fee is
nonrefundable. There is no additional fee for electronic checks.

After clicking Pay Now, you will be redirected to a secure third-party payment site.
1. Payment Amount: Shows the total payment amount and an itemized list of the charges.
2. Payment Step: Indicates where you are in the payment process. The active step is indicated by a
darker font color.
3. eCheck/Credit Card: Select the appropriate payment method tab: eCheck (personal or business
check) or Credit Card. *Note: Cashier’s checks and money orders are not accepted.

Entering Payment Information
Electronic Checks
1. Billing Information: Complete all of the required fields. NOTE: Do not include special characters
(such as #) in any of the fields.
2. Continue: Click after completing required fields to proceed to the Payment Review page.
3. Cancel Payment: Click if you want to cancel the payment.

After clicking on Continue, you will be taken to a new page to enter the eCheck information.

Click on Next. Clicking on Back/Exit will take you back to the previous page where you entered the
billing information.
Select the Account Type from the dropdown ( Personal or Business )

Next you will be taken to the Payment Information page where the Billing Address section is
displayed at the top. You can modify the information in this section, if needed. No special characters
are allowed. Special characters include a period (.) in the name field and a pound sign (#) in the
address field. Check Use Business Name to remove the first and last name fields and enter a business
name.
The Payment Details section is immediately under the billing address details. It contains the payment
amount information and any applicable fees.
Enter your account information in the Payment Method section.

1. Name on Account: Enter the name that is on the account. The name cannot contain special
characters.
2. Account Number: Enter your full Account Number.
3. Re-Type Account Number: Enter the Account Number again to verify it has been entered
correctly.
4. Routing Number: Enter the Routing Number of your account. A 9 digit number is required.
5. Account Type: Indicate if it is a Checking or Savings account.
Review Payment Details On the Payment Review page, review the statements, confirm all the information entered is correct
and click Pay Now to authorize payment.
After entering all necessary details, click on Next.

Payment Confirmation After processing the payment, you will be taken to the receipt page indicating that your payment has
been processed.
An auto-generated email will also be sent to the email address you provided during the payment
process with the payment amount and receipt number.
After the payment has been processed, close the payment tab on your browser.
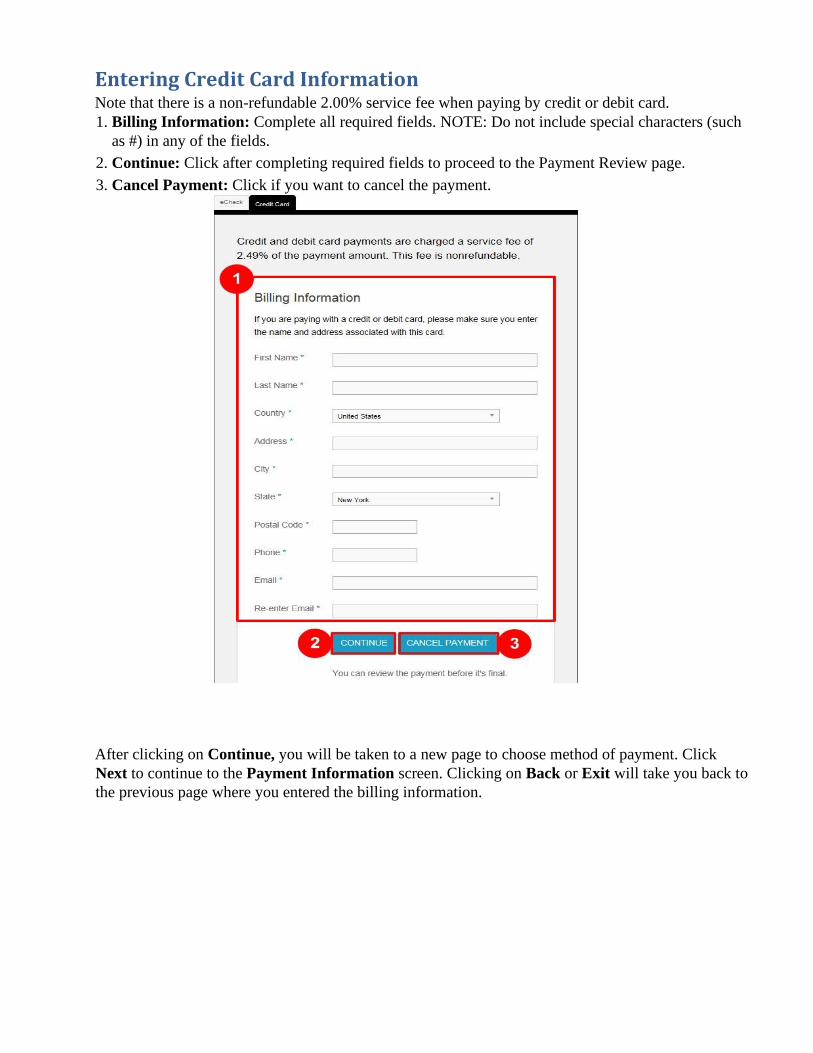
Entering Credit Card Information Note that there is a non-refundable 2.00% service fee when paying by credit or debit card.
1. Billing Information: Complete all required fields. NOTE: Do not include special characters (such
as #) in any of the fields.
2. Continue: Click after completing required fields to proceed to the Payment Review page.
3. Cancel Payment: Click if you want to cancel the payment.
After clicking on Continue, you will be taken to a new page to choose method of payment. Click
Next to continue to the Payment Information screen. Clicking on Back or Exit will take you back to
the previous page where you entered the billing information.

Next you will be taken to the Payment Information page where the Billing Address section is
displayed at the top. You can modify the information in this section, if needed. No special characters
are allowed. Special characters include a period (.) in the name field and a pound sign (#) in the
address field. Check Use Business Name to remove the first and last name fields and enter a business
name.
The Payment Details section is immediately under the billing address details. It contains the payment
amount information and the 2.00% convenience fee.

Enter you account information in the Payment Method section.
1. Name on Card: Enter the full name on the card.
2. Card Number: Enter the entire card number. (15 or 16 digits)
3. Expiration Date: Select the card expiration date from the month and year dropdowns.
4. Card Verification Value (CVV2): Enter the card security code.
After entering all necessary details, click on Next.
Review Payment Details On the Payment Review page, review the statements, confirm all the information entered is correct
and click Pay Now to authorize payment.

Payment Confirmation After processing the payment, you will be taken to the receipt page indicating that your payment has
been processed.
An auto-generated email will also be sent to the email address you provided during the payment
process with the payment amount and receipt number.

After the payment has been processed, close the payment tab on your browser.
Canceling Payments You can cancel a payment at several points in the payment process.
You can click on the Cancel Payment button on the first Payment Entry screen, located underneath
the Billing Information section.
Returned Checks When a check is returned by the payer’s bank, a $20 fee will be added to the original fee for each
check that is returned. Additionally, a hold will be placed on the Hydrant Flow Test application until

a valid payment is received (if you pay by eCheck again, it will take up to another five business days
to clear). DEP staff will not process the request until the payment is fully processed.
Withdrawing an application To withdraw a request that was submitted to DEP, open the respective application, provide the reason
why the application is being withdrawn and select Submit Cancellation.

Attaching a file To attach a document to your request, you must first Save the application. Click Save; once the
application has been saved the Files tab will appear at the top of the application page. Open the
tab and select Choose File and search the document to be attached to the application.
Retrieving the Flow Test Letter There are two ways to retrieve the HFT approval letter when the status is Approved.
1. Select the 3 dots under the Actions column of the approved test in the request queue. A
dropdown will appear with your action options. Select View Approval Letter PDF. The
PDF will then download.
2. Open the approved test and go to the Files tab. Under Uploaded Files, you will see a file
“View Approval Letter PDF”. You can double click this or select the cloud icon. The
PDF will then download.