Embed Size (px)
Citation preview

PTT Dispatch Console User Guide (v. 2.12)
Version 2.12

Version: 2.12
Page 2 of 42
1. INTRODUCTION AND KEY FEATURES ..................................... 5 1.1 Key Features: ...................................................................................................................... 5
2. GETTING STARTED ................................................................... 6 2.1 Prerequisites ....................................................................................................................... 6 2.2 How to Install the Dispatch Console ................................................................................... 7 2.3 Launching the PTT Dispatch Console ................................................................................ 8 2.4 Logout from PTT Dispatch Console .................................................................................... 8 2.5 Exit PTT Dispatch Console ................................................................................................. 8
3. GETTING TO KNOW THE PTT DISPATCH CONSOLE .............. 9 3.1 Navigation Areas ................................................................................................................. 9 3.2 Docking/Undocking ........................................................................................................... 10 3.3 Reset Layout ..................................................................................................................... 10 3.4 Searching .......................................................................................................................... 10
4. CONTACTS AND GROUPS ...................................................... 11 4.1 How to Add Contacts ........................................................................................................ 11 4.2 How to Navigate the Contacts Tab ................................................................................... 11 4.3 Groups Tab ....................................................................................................................... 12 4.4 My Local Groups Tab ........................................................................................................ 12
5. PTT CALLS ............................................................................... 13 5.1 Call Activity Window .......................................................................................................... 13 5.2 Making a PTT Call ............................................................................................................. 13
5.2.1 Group Call ......................................................................................................................... 13
5.2.2 Quick Group Call .............................................................................................................. 15
5.2.3 One-to-one ........................................................................................................................ 15
5.2.4 Broadcast Call .................................................................................................................. 15
5.2.5 Call from the Alerts window .............................................................................................. 17
5.2.6 Call from the Map ............................................................................................................. 17
5.2.7 Call from Call Logs ........................................................................................................... 18 5.3 Receiving Calls ................................................................................................................. 18 5.4 PTT Call Behavior While the Dispatch Console is in the Background .............................. 18 5.5 Rejoining a Group Call ...................................................................................................... 19
6. USING THE MAP ....................................................................... 20 6.1 Locating ............................................................................................................................. 20 6.2 Clear located fleet members on the map .......................................................................... 20 6.3 Fleet Member Information Window ................................................................................... 21 6.4 To select multiple fleet members: ..................................................................................... 21 6.5 Finding an address ............................................................................................................ 21 6.6 Auto tracking a fleet member ............................................................................................ 21

Version: 2.12
Page 3 of 42
7. RECORDING CALLS ................................................................ 22 7.1 Full Session Recording ..................................................................................................... 22 7.2 Manual Recording ............................................................................................................. 22 7.3 Playing Back Recorded Calls ............................................................................................ 23
8. ALERTS .................................................................................... 24 8.1 Instant Personal Alerts (IPA) ............................................................................................. 24
8.1.1 Sending an Alert ............................................................................................................... 24
8.1.2 Receiving an Alert............................................................................................................. 24
9. MONITORING GROUPS ........................................................... 25 9.1 Adding a Group to Monitored List ..................................................................................... 26 9.2 Removing a Group from Monitored List ............................................................................ 27 9.3 Actions on Monitored Group ............................................................................................. 27
10. TALKGROUP SCANNING ........................................................ 28 10.1 Adding Monitored Groups to Talkgroup Scan List ................................................................. 28 10.2 Enabling Talkgroup Scanning ................................................................................................ 29 10.3 Turning Talkgroup Scanning Off ............................................................................................ 29
11. USING THE MAP ....................................................................... 30 11.1 Locating single/multiple fleet member(s) .......................................................................... 30 11.2 Fleet Member Information Window ................................................................................... 31 11.3 Clear all located fleet members on the map ..................................................................... 31 11.4 Managing fleet members................................................................................................... 32
12 REAL-TIME PRESENCE ........................................................... 33 12.1 PTT Contact/Fleet Member’s Presence ............................................................................ 33 12.2 Your Presence .................................................................................................................. 33
13 USING ACCESSORIES ............................................................. 34 13.1 Notification Message on Connection ................................................................................ 34 13.2 Using Headset ................................................................................................................... 34 13.3 Using Footswitch ............................................................................................................... 35
14 SETTINGS ................................................................................. 36 14.1 Generic Settings ................................................................................................................ 36 14.1.1 Alert Settings ..................................................................................................................... 36 14.1.2 Backup/Archive Settings ................................................................................................... 36 14.1.3 Date/Time Format Settings ............................................................................................... 37 14.1.4 Recording Settings ............................................................................................................ 37 14.1.5 Application Settings ........................................................................................................... 37 14.1.6 GPS Expiry Settings .......................................................................................................... 37 14.1.7 Report Settings ................................................................................................................. 38

Version: 2.12
Page 4 of 42
14.1.8 Device Settings ................................................................................................................. 39 14.1.9 Tones ................................................................................................................................ 39 14.1.10 About ................................................................................................................................. 39 14.2 Map Settings ..................................................................................................................... 40
14.2.1 Map Color Settings ......................................................................................................... 40
14.2.2 On-Demand Location Settings ....................................................................................... 42

Version: 2.12
Page 5 of 42
1. Introduction and Key Features
The PTT Dispatch Console is a feature rich windows-based application that enables
organizations to effectively manage daily dispatch operations.
It provides PTT calling, location, alerts, and indicates presence through an intuitive user
interface. Dispatch Console allows a dispatcher to operate from a centralized corporate facility
and manage the activities for a set of mobile PTT users (also called fleet members) working in
the field. This enables an organization to effectively manage day to day dispatch operations and
rapidly respond to incidents, urgent situations, customer requests, facility events, and other
situations that require quick actions.
1.1 Key Features:
Contacts and Groups – You can establish a one-to-one call or send/receive Instant Personal
Alert (IPA) to a contact. A dispatch group allows one-to-many calls from you to fleet members.
Contacts and Groups are managed and pushed to the Dispatch Console by the Corporate
Administrator Tool (CAT) administrator (CA).
PTT Calling– Enables you to start or end a Push-to-talk (PTT) call, record a conversation, and
see the talker identity. The PTT Dispatch Console shows call activities during the call.
Monitored Groups– Allows you to monitor call activity on up to 16 Talkgroups, turn Talkgroup
Scanning on, join an existing active group call or initiate a new group call.
Alerts– Allows you to view Instant Personal Alerts (also known as IPA or call-me alerts) and
missed call alerts sent to the dispatcher by the fleet members and take action.
Map– Provides visual location information of the fleet members periodically or on-demand .
Dispatchers can also make PTT calls or send alerts to those fleet members directly from the
map.
Presence– View fleet member availability (i.e.“Available”, “Do Not Disturb”, and “Offline”)
Logs– Provides information about recent activity on the Dispatch Console including alerts, PTT
calls, and audio recordings of recorded calls.
Panel Undocking– Allows you to separate a section of the Dispatch Console for larger viewing
or for display on a different monitor.
Map Setting - Configure Map Color Settings and On-Demand Location Settings

Version: 2.12
Page 6 of 42
2. Getting Started
2.1 Prerequisites
The PTT Dispatch Console requires the following minimum system configuration:
1. Hardware Requirements:
Processor: Dual Core 2.1 GHz (minimum) Intel Core i5 or above
RAM (Memory): 4 GB (minimum)
Minimum required Hard Disk space: 1GB required for the installation (5GB or higher
is recommended depending on your storage needs)
Monitor: 20.1 inches or better flat panel LCD Monitor with a 1600 X 1200 resolution
setting (recommended).
A standard sound card supporting a headset and speaker
2+ Mbps Data Connectivity
Note: The disk space specified includes the space required for recording the call
conversation, storage of reports, and also for storage of backup files.
2. Operating System Requirements:
Windows 7 Professional Edition SP1 32-bit or 64-bit version
OR
Windows 8.0/8.1, Windows 8.0/8.1 Pro or Enterprise 32 bit or 64 bit version
OR
Windows 10 Pro or Enterprise 32 bit or 64 bit version
3. Software Requirements:
Internet Explorer (IE) 11 or Microsoft Edge 25 with File Download and Script options
enabled.
(DOT) .Net Framework 3.5 and above
Windows Media Player 10 and above
Version: 2.12
Page 7 of 42
4. Network Requirements
You must disable firewall services on your laptop/desktop before installing the
Dispatch Console.
Ports 443, 80 and 8080 must be open to both install and run Dispatch Console.
Dispatch Console does not support authenticated HTTP/SOCKS proxies to establish
a connection with the PTT server. The communication path between Dispatch
Console and the PTT server uses a TLS connection.
5. Mobile Device Requirements
Android and iOS smartphones with the latest version of PTT installed
Note: You will need administrative privileges to install Dispatch Console.
It’s recommended that PTT Dispatch Console is used over a dedicated PC.
2.2 How to Install the Dispatch Console
Step 1- Log in to the Corporate Administrator Tool (CAT), select the dispatcher profile and enter
in the dispatcher’s email address. Click “Generate Activation Code”, a window will ask the user
to send the download link and activation key. Click on “Send Mail” to confirm.
Step 2- Click the link provided in the activation e-mail to download the PTT Dispatch Console
pre-installer. This activation email also contains the activation key information for initializing the
PTT Dispatch Console.
Step 3- Double-click the PTT Dispatch Console pre-installer in the downloads folder once the
download is complete.
Step 4- Select the language for Installation Instructions and Dispatch Console and continue
following the on screen prompts.
Note: All the PTT Dispatch Console operations, such as installation, uninstallation, upgrade and restore need administrative privileges.
For Windows 7 Operating System, a dialog box appears as User Account Control according to the control settings, during the installation procedure. To continue with the installation process, click Yes.

Version: 2.12
Page 8 of 42
Please disable the VPN on your laptop/desktop before downloading the pre-installer, installing and launching the Dispatch Console
2.3 Launching the PTT Dispatch Console
Access the PTT Dispatch Console from the Windows Start Menu. You can find the application under Windows Start menu > All programs menu > PTT Dispatch Console menu > PTT Dispatch Console.
OR Double click the desktop shortcut icon on desktop.
Note: The first time you launch, you will be prompted to enter an activation key. The activation key is provided by your corporate administrator, usually through an automated email message. If you do not have a valid activation key, please check with your administrator.
2.4 Logout from PTT Dispatch Console
To dismiss the PTT Dispatch Console window, click the Logout button on the top right-hand
corner of the PTT Dispatch Console’s home page. The Logout button will close the application
window and log you out from the application.
2.5 Exit PTT Dispatch Console
To completely stop the PTT Dispatch Console, go to the Windows system tray at the bottom of
the screen and find the Dispatch Console icon (typically on the right-hand side of the Windows
task bar). Right click on the PTT Dispatch Console icon and click on “Exit”.
Version: 2.12
Page 9 of 42
3. Getting to know the PTT Dispatch Console
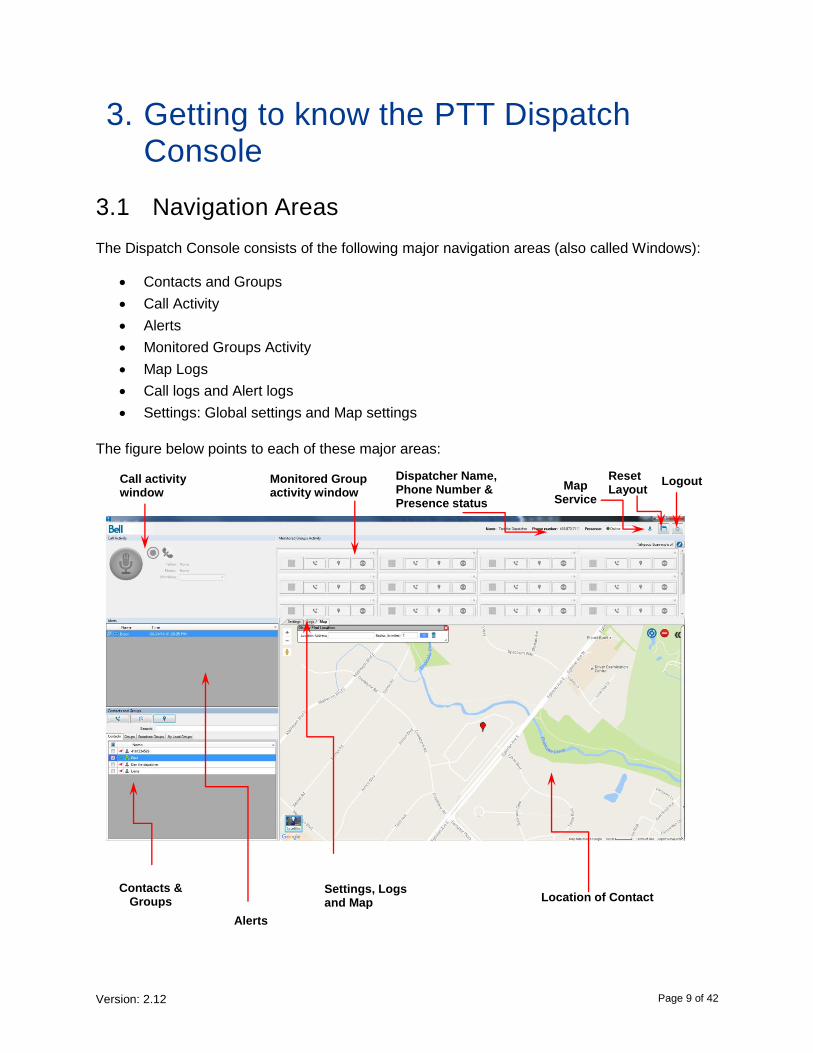
3.1 Navigation Areas
The Dispatch Console consists of the following major navigation areas (also called Windows):
Contacts and Groups
Call Activity
Alerts
Monitored Groups Activity
Map Logs
Call logs and Alert logs
Settings: Global settings and Map settings
The figure below points to each of these major areas:
Map Service
Reset Layout
Logout Dispatcher Name, Phone Number & Presence status
Monitored Group activity window
Call activity window
Contacts & Groups
Alerts
Settings, Logs and Map Location of Contact

Version: 2.12
Page 10 of 42
3.2 Docking/Undocking
Windows can be docked or undocked. When a window is docked, it is part of a larger window.
An undocked window can be moved around the screen or even dragged onto another display
monitor.
To undock a window, drag and drop or double click the title bar of the window to be undocked.
To dock a window back to its position, double click the title bar of the window.
3.3 Reset Layout
To reset the layout click the Reset Layout button located on the right side of the Dispatch
Console (as shown in the image above).
3.4 Searching
Contacts and Groups can be searched using the search bar on the Contacts and Groups
window. To search, select a tab (Contacts, Groups, or My Local Groups) and enter the fleet
member’s name or group’s name in the Search field. The list will be filtered to show matching
entries.
Note: You can also search logs for calls and alerts from the logs tab situated besides the Map tab.
Version: 2.12
Page 11 of 42
4. Contacts and Groups
The contacts and groups are added and pushed to the PTT Dispatch Console using the
Corporate Administrator Tool (CAT). Once configured by the corporate administrator, the
contacts and groups are shown on the Contacts and Groups Window.
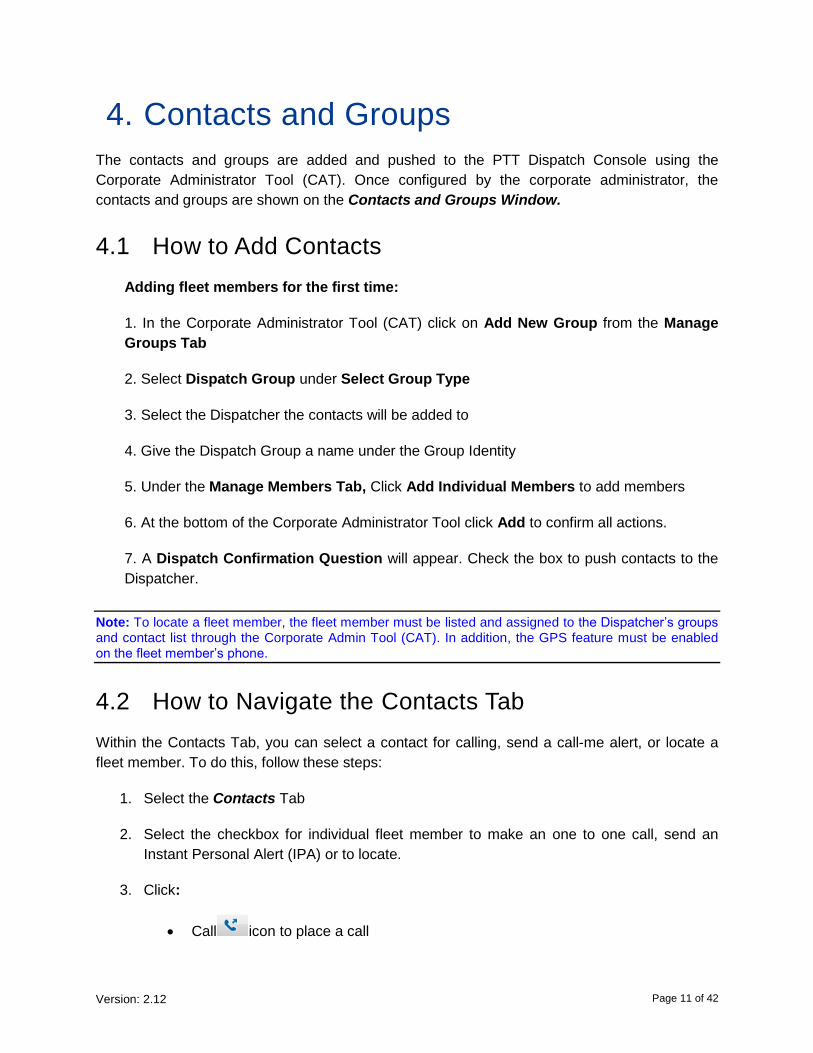
4.1 How to Add Contacts
Adding fleet members for the first time:
1. In the Corporate Administrator Tool (CAT) click on Add New Group from the Manage
Groups Tab
2. Select Dispatch Group under Select Group Type
3. Select the Dispatcher the contacts will be added to
4. Give the Dispatch Group a name under the Group Identity
5. Under the Manage Members Tab, Click Add Individual Members to add members
6. At the bottom of the Corporate Administrator Tool click Add to confirm all actions.
7. A Dispatch Confirmation Question will appear. Check the box to push contacts to the
Dispatcher.
Note: To locate a fleet member, the fleet member must be listed and assigned to the Dispatcher’s groups and contact list through the Corporate Admin Tool (CAT). In addition, the GPS feature must be enabled on the fleet member’s phone.
4.2 How to Navigate the Contacts Tab
Within the Contacts Tab, you can select a contact for calling, send a call-me alert, or locate a
fleet member. To do this, follow these steps:
1. Select the Contacts Tab
2. Select the checkbox for individual fleet member to make an one to one call, send an
Instant Personal Alert (IPA) or to locate.
3. Click:
Call icon to place a call

Version: 2.12
Page 12 of 42
OR
IPA icon to send an Instant Personal Alerts (IPA)
OR
Locate icon to locate the fleet member on the map
Note: Instant Personal Alerts (IPA) to a quick group is not allowed.
You can select multiple individual fleet members to perform a Quick Group call or locate at once
You can sort by name, GPS status, or presence status by clicking on the column label. By
default the contacts will be sorted by name.
4.3 Groups Tab
You can call or locate a group from the Groups Tab.
1. Select the Groups Tab, to display Groups Tab Window.
Note: Sending an Instant Personal Alert (IPA) to a group is not allowed.
4.4 My Local Groups Tab
With local groups, you can manage and communicate with your own personal groups. These personal groups are stored locally within the PTT Dispatch Console.
Note: Local groups are not managed by the corporate administrator.
Creating Local Groups:
To create a local group, follow these steps:
1. Select the fleet members from the Contacts Tab and right-click to create Local Group.
A My Local Group Window appear.
2. Enter the name of the local group in the Name field.
3. Click Save to save the new local group
OR
Cancel to abort.

Version: 2.12
Page 13 of 42
5. PTT Calls
5.1 Call Activity Window
When you select a contact or group from any window like Contacts and Groups, MAP info, MAP
Selection List, Alerts, Call and Alert Logs and click on the call button, the Call Activity
Window will change to "Call Ready" state. When a call ends the 'Call Activity' window will switch
back to 'Call Ready' state for the last dialed or received call.
5.2 Making a PTT Call
5.2.1 Group Call
To place a PTT group call:
1. Click on Groups Tab and select the Group Name from the Contacts and Groups
Window. To select the group, click the checkbox next to the group name.
2. Click icon to place a group call, you can see Call Ready screen at the Call activity
window, as shown below.
Version: 2.12
Page 14 of 42
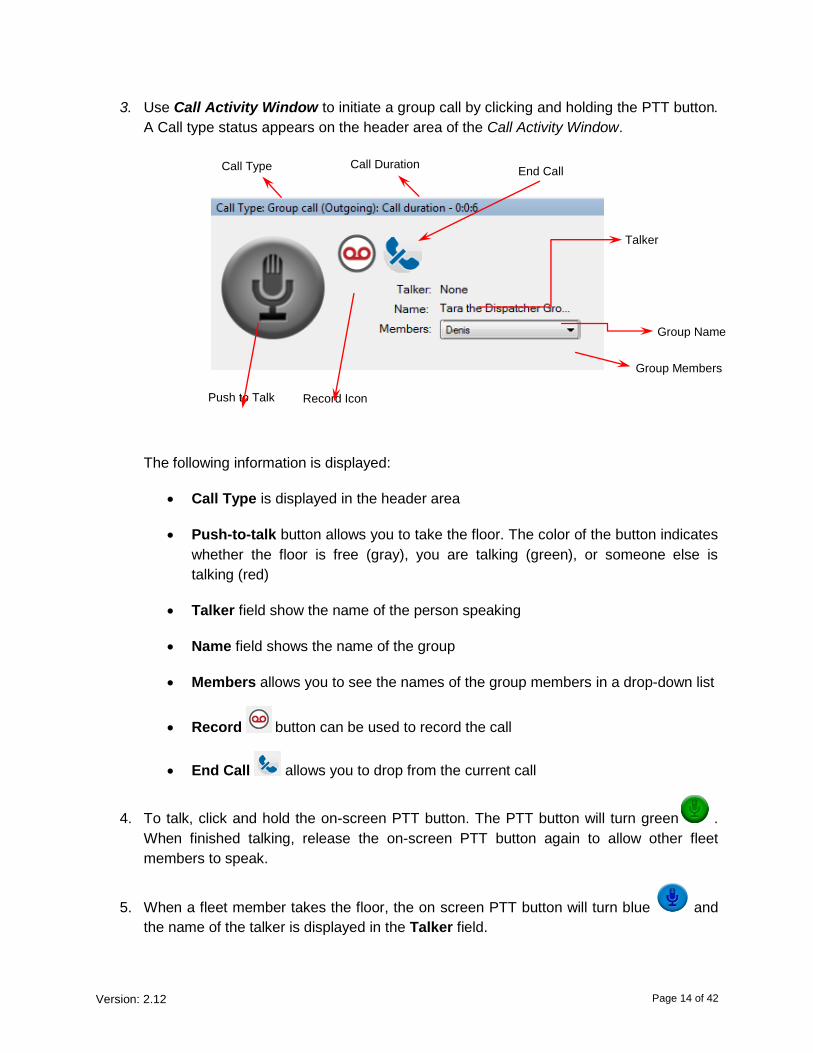
3. Use Call Activity Window to initiate a group call by clicking and holding the PTT button.
A Call type status appears on the header area of the Call Activity Window.
The following information is displayed:
Call Type is displayed in the header area
Push-to-talk button allows you to take the floor. The color of the button indicates
whether the floor is free (gray), you are talking (green), or someone else is
talking (red)
Talker field show the name of the person speaking
Name field shows the name of the group
Members allows you to see the names of the group members in a drop-down list
Record button can be used to record the call
End Call allows you to drop from the current call
4. To talk, click and hold the on-screen PTT button. The PTT button will turn green .
When finished talking, release the on-screen PTT button again to allow other fleet
members to speak.
5. When a fleet member takes the floor, the on screen PTT button will turn blue and
the name of the talker is displayed in the Talker field.
Talker
Group Name
Push to Talk Record Icon
Group Members
End Call Call Duration Call Type
Version: 2.12
Page 15 of 42
6. Click End Call to drop yourself from the call. The call will continue without you. The call will automatically end if no one takes the floor.
5.2.2 Quick Group Call
A Quick Group call is an ad hoc call consisting of selected fleet members. Quick Group calls are
generally special purpose groups that are used once. If you use a group often, you should have
the corporate administrator create the group for you, or create a My Local Group.
To place Quick Group call:
1. Click on Contacts Tab and select the desired fleet members from the Contacts and
Groups Window using the checkbox next to the fleet members’ names.
2. Click icon to place a Quick Group call, you can see Call Ready screen at the Call
activity window.
3. in Call Activity Window. The group name for a Quick Group call is shown as “None”.
Members list shows members of the Quick Group.
5.2.3 One-to-one
To place a PTT call to an individual fleet member, follow these steps:
1. Click the Contacts Tab and find the fleet member from the Contacts tab of the Contacts and Groups Window.
2. Select the checkbox next to the name of the fleet member.
3. Click icon to place a one-to-one call, you can see Call Ready screen at the Call activity window, as shown below.
4. A call starts and the same information is shown in the Call Activity Window as for a group call.
Note: The tones can be enable/disable to set the call tones refer to section Tones
5.2.4 Broadcast Call
Broadcast calling provides the ability for a dispatcher to make a one-way, high priority call to up to 499 subscribers. Since it’s a one-way group call, participants cannot talk back. Broadcast calls pre-empt any active ongoing calls that a PTT subscriber is on.

Version: 2.12
Page 16 of 42
Broadcast groups are created and administered by the CA through the CAT. Refer to the CAT User Guide 8.0 for more details on Broadcast group creation and management. Once a CA has assigned a Dispatcher to a Broadcast group, the Dispatcher should be able to see this group in the “Broadcast Groups” tab under the “Contacts and Groups” window in the Dispatch Console:
To place a Broadcast Call:
1. Select the checkbox next to the Broadcast Group name
2. Select the PTT call button
3. Select “Yes” when prompted:
4. Push the PTT call button to initiate the Broadcast Call:

Version: 2.12
Page 17 of 42
5. Select the End Call button when the Broadcast Call is complete.
5.2.5 Call from the Alerts window
To place a call from the Alerts Window:
1. Select and right-click on the alert on Alerts Window.
2. Click icon to place a call. The call is returned to the Alert’s originator.
5.2.6 Call from the Map
To place call from the Info Window on the map:
1. Click on the marker icon for the fleet member on the map to display the Info Window
2. Click icon to place a call.
To place a call from the Selection List Window on map:
1. Select the checkbox for the individual fleet members in the Selection List Window.
2. Click icon to place a call.
Version: 2.12
Page 18 of 42
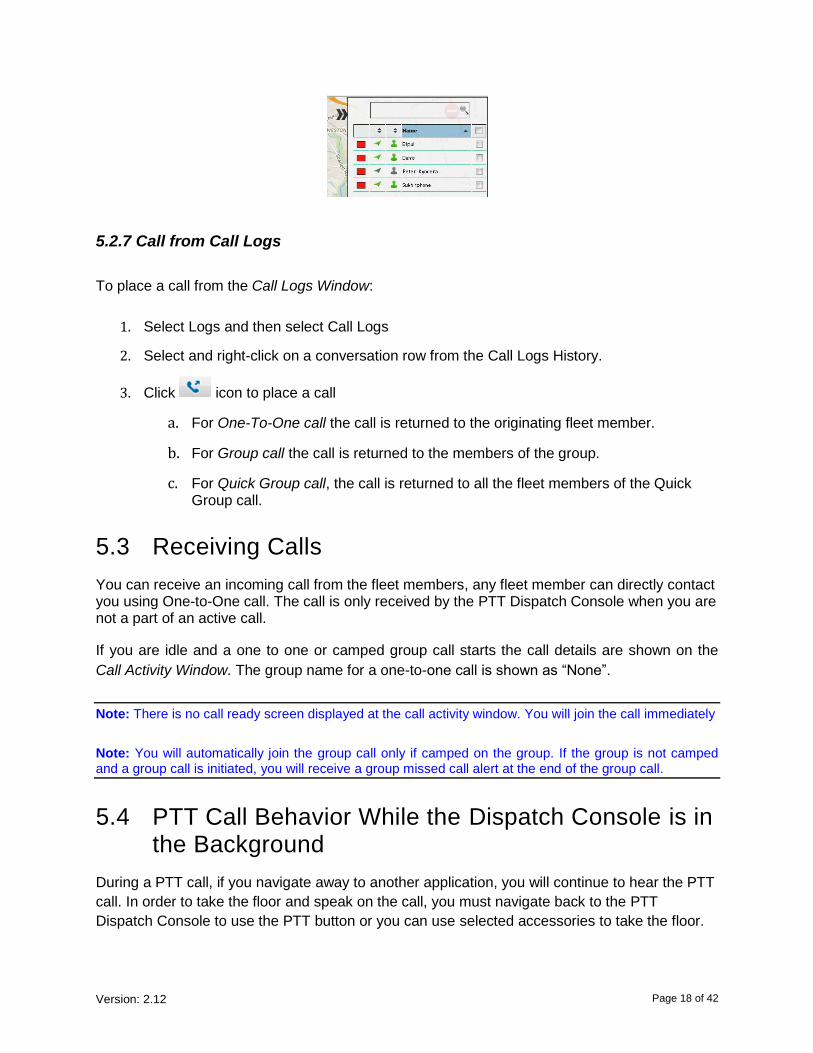
5.2.7 Call from Call Logs
To place a call from the Call Logs Window:
1. Select Logs and then select Call Logs
2. Select and right-click on a conversation row from the Call Logs History.
3. Click icon to place a call
a. For One-To-One call the call is returned to the originating fleet member.
b. For Group call the call is returned to the members of the group.
c. For Quick Group call, the call is returned to all the fleet members of the Quick Group call.
5.3 Receiving Calls
You can receive an incoming call from the fleet members, any fleet member can directly contact you using One-to-One call. The call is only received by the PTT Dispatch Console when you are not a part of an active call.
If you are idle and a one to one or camped group call starts the call details are shown on the
Call Activity Window. The group name for a one-to-one call is shown as “None”.
Note: There is no call ready screen displayed at the call activity window. You will join the call immediately
Note: You will automatically join the group call only if camped on the group. If the group is not camped and a group call is initiated, you will receive a group missed call alert at the end of the group call.
5.4 PTT Call Behavior While the Dispatch Console is in the Background
During a PTT call, if you navigate away to another application, you will continue to hear the PTT
call. In order to take the floor and speak on the call, you must navigate back to the PTT
Dispatch Console to use the PTT button or you can use selected accessories to take the floor.

Version: 2.12
Page 19 of 42
5.5 Rejoining a Group Call
If you drop from a group call e.g. using the End Call button, you can re-join the call by initiating a
call to that group. You can call the group from the call logs history, monitored groups or from the
Groups tab.
Note: If the call ended before you try to re-join, you will start a new call to that group.

Version: 2.12
Page 20 of 42
6. Using the Map
The PTT Dispatch Console uses the Google map service to display the location of fleet
members on a map.
Note: To locate a fleet member, the fleet member must be listed and assigned in the Dispatcher’s groups and contact list through the Corporate Admin Tool (CAT). In addition, the GPS feature must be enabled on the fleet member’s phone.
It is recommended that the mobile PTT devices being located are Android or iOS smartphones and running the latest PTT App.
6.1 Locating
Locating single/multiple fleet member(s)
1. Click Contacts Tab from Contacts and Groups Window.
2. Select contact(s) by clicking the checkbox next to the fleet member’s name.
3. Click the icon to locate the selected fleet member on the map. When the fleet
member(s) is located on the map, a marker is displayed at the fleet member’s location.
4. Click on the marker to view information for the fleet member(s).
Note: If location information is expired for the fleet member, then the fleet member will be located on the
map with icon..
The color of the push pin indicated on the map, depends on the color set for Individual contacts, contacts belonging to a single group and common contacts between groups in Map Color Settings.
6.2 Clear located fleet members on the map
To clear all the located fleet members on the map, click on icon provided at the top right corner of the map. To selectively clear the fleet members located on the map use selection list window. Select the fleet members by checking the check box on the selection list window.

Version: 2.12
Page 21 of 42
6.3 Fleet Member Information Window
Click on the marker icon located on map to display the fleet member information window.
6.4 To select multiple fleet members:
Press the Shift Key and holding the left or right mouse button, drag the mouse over the marker
icons. The Selection List Window will appear as shown below displaying the fleet members you
selected.
6.5 Finding an address
Mouse over on the map menu and click Find Location. This will display a Find Location Map
Window .
Note: To hide or display the find location window, mouse over on the map menu and select Find Location
option.
6.6 Auto tracking a fleet member
The Auto Tracking feature is available in Edit Map Setting. When enabled, the map zooms in
and out and centres itself automatically to make sure that all the located fleet members are
displayed on the map.
If this feature is disabled in the Edit Map Settings, you will have to scroll the map to find them
when they go out of the map coverage area or re-locate them to bring them in the view.
Note: Auto Track feature is disabled by default and needs to be enabled if required from Edit Map
Settings.

Version: 2.12
Page 22 of 42
7. Recording Calls
7.1 Full Session Recording
Full Session recording allows you to record each call you join. All the calls you are participate in will be recorded. In Full Session recording mode, the following behavior is observed for a call:
1. The recording status is indicated by the record icon on the Call Activity Window
2. When the call ends, the call recording is created and automatically stored in the call
history. When next call starts the call is automatically recorded and stored as new entry.
Note: Only those calls are recorded where you are the participant of the call.
7.2 Manual Recording
Manual recording allows recording whole or part of the call, by using start and stop record button whenever recording is desired.
1. Click the Record icon to start recording the call
2. Click the record icon again to stop recording. A recording entry is made in the call
logs.
Note: During a call if the recording setting is changed, it will be applicable from the next call.

Version: 2.12
Page 23 of 42
7.3 Playing Back Recorded Calls
Recorded calls are stored under Call Logs.
To view recorded calls
1. Click Logs>Call Logs. Refresh to view the latest information.
2. Select a recording from the Call Logs section, and click the Play button to play the
recorded files.

Version: 2.12
Page 24 of 42
8. Alerts
Alerts can be a request from a fleet member for a call or a notification that you missed an
incoming PTT call. Alerts are displayed in the Alerts Window. You can respond to an alert with
an action (locate, call, or send IPA). Alerts also have a status (Attended, Unattended, Parked, or
Complete). Alerts can be sorted by Sender’s name, Time, Type or Status by clicking on the
column label. By default, the Alerts will be sorted by Time. This section describes alerts.
8.1 Instant Personal Alerts (IPA)
An Instant Personal Alert (IPA) is a way for a fleet member to ask for a call back from you or vice versa. An IPA is especially useful if the fleet member you want to call has a presence status of Do Not Disturb.
8.1.1 Sending an Alert
1. Click on Contacts Tab from the Contacts and Groups Window and select a fleet
member using the checkbox next to the member’s name.
2. Click the IPA icon. When the IPA is sent, a message appears at the bottom right-
hand part of the screen with the status showing “Success” as shown below:
8.1.2 Receiving an Alert
Whenever an Instant Personal Alert is received, it will be shown in the Alerts Window with the
IPA icon next to the name of the sender. From this window, you can return a call.
Version: 2.12
Page 25 of 42
9. Monitoring Groups
The PTT Dispatch Console allows you to monitor up to sixteen groups via the Monitored Groups
Activity window. When monitoring, you will be able to see call activity on monitored groups and
optionally join a group call if active. This is helpful when you want to be aware of the call activity
on specific groups but not necessarily want to participate immediately.
The Monitored Groups Activity window also allows the dispatcher to enable Talkgroup
Scanning.
Note: Local groups cannot be monitored.

Version: 2.12
Page 26 of 42
9.1 Adding a Group to Monitored List
To add a group to monitored group list, follow these steps:
1. Click on the Groups Tab in the Contacts and Groups Window.
2. Find the group you want to monitor and select the group by clicking the checkbox next to the
name or by highlighting the group.
3. Drag and drop the group from Groups tab of Contacts and Groups window to the Monitored
Groups Activity Window. When group is successfully added, then the icons for Call, Close,
Camped off and Locate are enabled and the name of the monitored group is shown.
The following figure shows an example of the Monitored Groups Activity Window:
Call status
Indicator
Call Location Set Group Priority Remove Group

Version: 2.12
Page 27 of 42
9.2 Removing a Group from Monitored List
Click on the remove group icon to remove the monitored group from the Monitored Groups
Activity Window.
Note: You can remove a group from monitored list only if there is no call in progress for that group. A camped group cannot be removed.
Note: You can replace a group from monitored list only if there is no call in progress for that group
9.3 Actions on Monitored Group
Once the group is monitored, the call status indicator provides feedback on group call activity.
When a group call starts the call status indicator turns green and starts blinking,
also the monitored group area background turns grey indicating that you have not yet joined the
call. Once you join the call the background of the monitored group area turns green and the
blinking of the status indicator stops.
Joining an active group
If the call is already started, you can join the call by clicking the icon. The call status
indicator will turn and you will begin to hear the conversation. During the call use the Call Activity Window to make a PTT group call.
Note: When you try to join an ongoing active group call by clicking the icon, call ready screen is not displayed at the call activity window. Instead you readily join the group call, if the floor is available you will get the floor and lose the floor momentarily while a floor taken/busy tone is played. If the floor is not available you hear a bong tone indicating that the floor is unavailable and being used by a fleet member.
Placing call to a non active group
You can place a call to a Monitored Group not currently on a call by clicking on icon.
Locating group members from Monitored Groups
You can locate all the members of the monitored group on map by clicking on icon.
Version: 2.12
Page 28 of 42
10. Talkgroup Scanning
Replacing the Talkgroup Select or “Camping” functionality, Talkgroup Scanning enables a PTT
user or a Dispatcher to monitor (or scan) activity and communicate with a subset of up to 16
corporate groups. This subset of corporate groups is also known as a scan list. Scan lists are
usually maintained and pushed out to devices by a CA by the CAT, but Talkgroup scanning
management functionality is available from the handset as well.
When a call is active on a group within the scan list, the PTT user/Dispatcher automatically joins
that call and can participate. When the call ends, the PTT user joins the next active call in
progress from the scan list.
PTT users/Dispatchers can also set Priority levels to groups within the scan list. Priority Group
Scanning is a Talkgroup Scanning feature that allows you to designate up to 3 groups with
Priority levels 1 (highest) through Priority 3 (lowest):
Each priority group can only have one single group assigned to that priority
Calls on a higher priority group pre-empt calls on a lower priority group
Calls from any of the priority groups pre-empt non-priority calls in the monitored groups
list
10.1 Adding Monitored Groups to Talkgroup Scan List
Once you have at least one group in your monitored list (as described in section 9), each desired group must be added to the Talkgroup Scan list before Talkgroup Scanning can be enabled.
To add Monitored Groups to the Talkgroup Scan list, select the “Set Group Priority” button and pick one of four options presented: No Priority, Priority 1, Priority 2 or Priority 3. Once selected, the “Set Group Priority” icon will change depending on the option selected:
No Priority: Priority 1: Priority 2: Priority 3:
Version: 2.12
Page 29 of 42
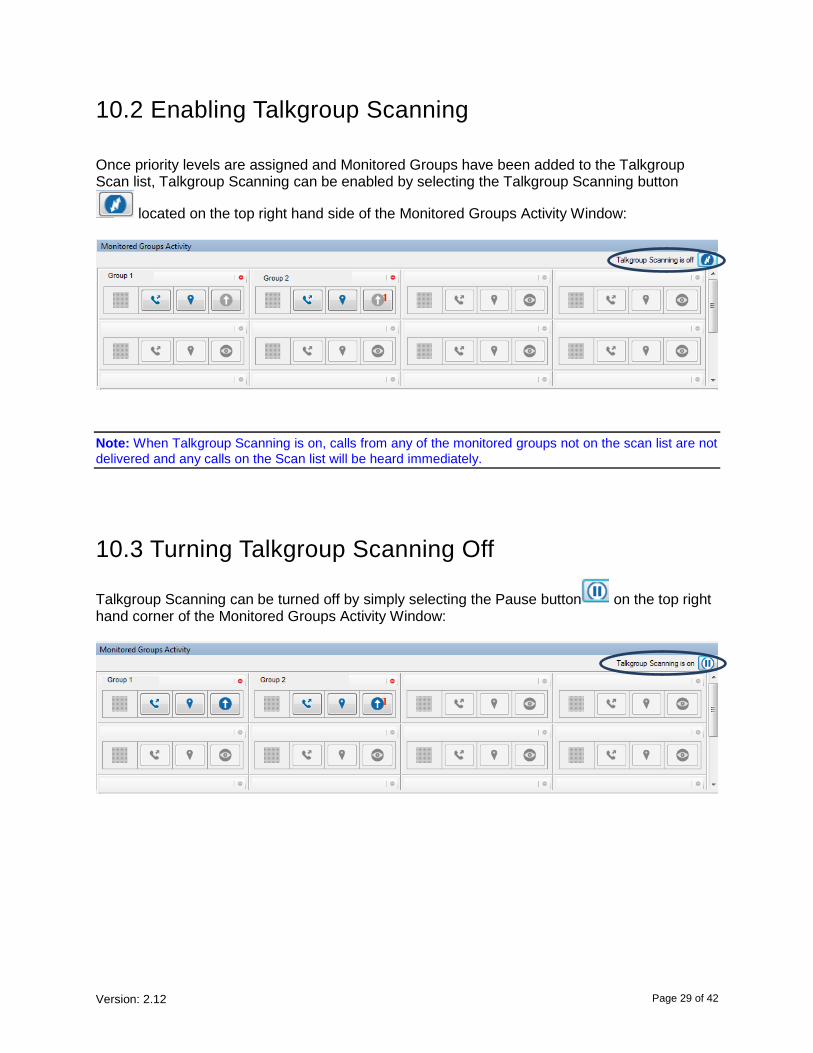
10.2 Enabling Talkgroup Scanning
Once priority levels are assigned and Monitored Groups have been added to the Talkgroup Scan list, Talkgroup Scanning can be enabled by selecting the Talkgroup Scanning button
located on the top right hand side of the Monitored Groups Activity Window:
Note: When Talkgroup Scanning is on, calls from any of the monitored groups not on the scan list are not
delivered and any calls on the Scan list will be heard immediately.
10.3 Turning Talkgroup Scanning Off
Talkgroup Scanning can be turned off by simply selecting the Pause button on the top right hand corner of the Monitored Groups Activity Window:
Version: 2.12
Page 30 of 42
11. Using the Map
The Dispatch Console uses the Google map service to display the location of fleet members on
a map.
Note: In order to locate a fleet member, the fleet member must be a member of one of the Dispatch groups assigned to the Dispatcher through the Corporate Admin Tool (CAT). In addition, the GPS feature must be enabled on the fleet member’s phone.
On first time login to the PTT Dispatch Console, no contacts will be located on the map. You have to locate contacts using the below steps. From the next login, you will see the last located contacts on the map.
11.1 Locating single/multiple fleet member(s)
1. Click on the Contacts Tab from the Contacts and Groups Window.
2. Select contact(s) by clicking the checkbox next to the fleet member’s name.
3. Click the icon to locate the selected fleet member on the map. When the fleet
member(s) is located on the map, a marker is displayed at the fleet member’s location.
4. Click on the marker to view information for the fleet member(s).
Note: If location information is expired for the fleet member, then the fleet member will be located on the
map with icon..
The color of the push pin indicated on the map, depends on the color set for Individual contacts, contacts belonging to a single group and common contacts between groups in Map Color Settings. For more details refer the section “Map Settings”
Note: In order to locate a group member, the member must be listed in the contacts list.

Version: 2.12
Page 31 of 42
11.2 Fleet Member Information Window
The Fleet Member Information Window appears when selecting a fleet member’s marker from the map. Dispatchers can obtain information such as the fleet member’s presence status, location and last location refresh time. Dispatchers can also make a direct PTT call to that fleet member, send an IPA and refresh fleet member’s location.
11.3 Clear all located fleet members on the map
To clear all the located fleet members on the map, click on icon provided at the top right corner of the map. To selectively clear the fleet members located on the map use selection list window.
Version: 2.12
Page 32 of 42
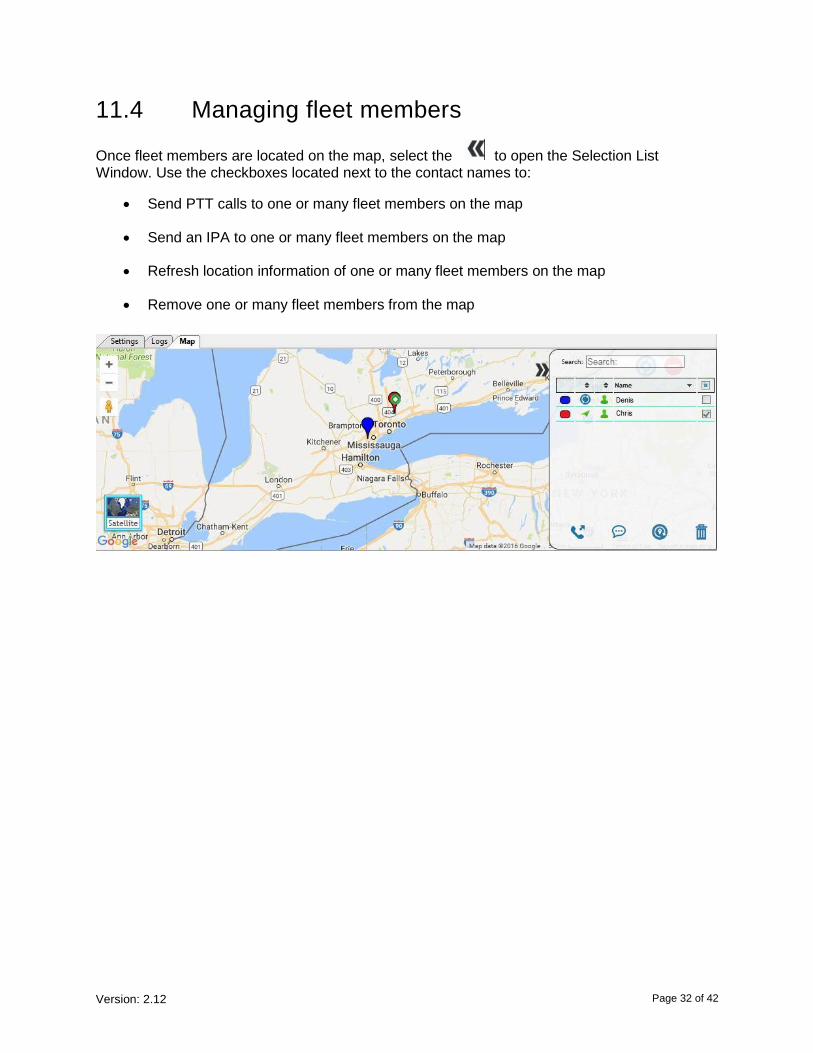
11.4 Managing fleet members
Once fleet members are located on the map, select the to open the Selection List Window. Use the checkboxes located next to the contact names to:
Send PTT calls to one or many fleet members on the map
Send an IPA to one or many fleet members on the map
Refresh location information of one or many fleet members on the map
Remove one or many fleet members from the map

Version: 2.12
Page 33 of 42
12 Real-Time Presence
Real-Time Presence allows you to quickly know whether the fleet member is available, busy
(DND), or offline. Only fleet members with presence as available receive PTT calls. The
Presence Indicator is displayed next to the name of each of your contact.
12.1 PTT Contact/Fleet Member’s Presence
Presence of a contact can be seen in the contacts list indicated by an icon next to contact’s
name.
Available: The PTT contact is logged into the PTT application and ready to receive PTT calls
and Instant Personal Alerts. It is shown with the Green presence icon.
Do Not Disturb (DND): The PTT contact is logged into the PTT application but does not want to
be disturbed with incoming PTT calls. It is shown with the Red presence icon.
You can still send an Instant Personal Alert to DND Contact.
Offline: The PTT contact is logged out from the PTT application and will not be able to receive
PTT calls and alerts. It is shown with a Gray presence icon.
12.2 Your Presence
Your presence is indicated on the PTT Dispatch Console screen as shown below.
Version: 2.12
Page 34 of 42
13 Using Accessories The Dispatch Console supports following audio devices and floor control devices.
1. Input Devices
a. External Microphone (1/8” jack)
b. Headset with PTT (USB)
c. Internal Microphone (supported by system hardware)
2. Output Devices
a. External Speakers (USB, 1/8” jack)
b. Headset with PTT (USB)
c. Internal Speakers (supported by system hardware)
13.1 Notification Message on Connection
The default device is set based on the order of plug-in. You can change audio input or output
device from Setting -> Devices.
Note: If you do not see the notification, enabled/disable the accessory setting from your PCControl
Panel hardware and SoundRecording tab.
Changes made to default audio Input / Output devices during call take effect after the current call ends.
13.2 Using Headset
You can use a headset plugged into your laptop/desktop to initiate PTT calls, floor control and
audio input/output.
Note: To control floor operations and call initiation process, the "Headset for PTT" needs to be selected in at least one of the audio input or audio output's preference under Devices tab under settings.
If any preferences of Audio (I/O) are changed during an ongoing call, they will be applicable from the next call.
When initiating a call from a PTT Headset follow the process below:
1. Select the contacts/Group/Local Group
2. Push the button on the Plantronics PTT Headset accessory/adapter to initiate a PTT call or
to perform the floor control operation. These devices, when connected are displayed under
Settings > Devices in the PTT Floor Control field.
Version: 2.12
Page 35 of 42
Note: - In Windows 7 Operating System to place a call or to perform floor control operation from this
device, select “Headset with PTT” from either audio input or audio output drop-down list when connected.
13.3 Using Footswitch
The PTT Dispatch Console supports Foot Pedal for PTT floor control. When placing a call with
this accessory connected:
1. Select the Contacts/Group/Local Group
2. Push the PTT Foot Pedal on the accessory to initiate a PTT call to perform the floor
control operation. These devices, when connected are displayed under Settings >
Devices in the PTT Floor Control field.
The PTT Dispatch Console dynamically recognizes these accessories when connected or
removed from the system hardware.
Version: 2.12
Page 36 of 42
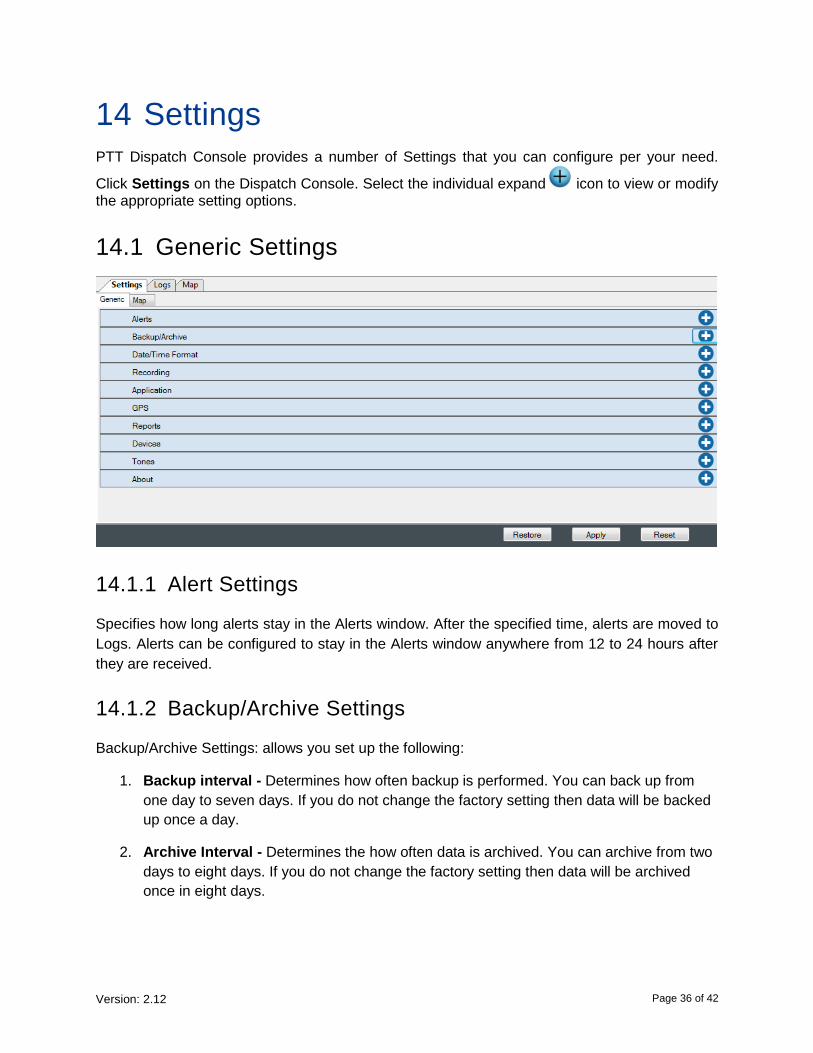
14 Settings PTT Dispatch Console provides a number of Settings that you can configure per your need.
Click Settings on the Dispatch Console. Select the individual expand icon to view or modify the appropriate setting options.
14.1 Generic Settings
14.1.1 Alert Settings
Specifies how long alerts stay in the Alerts window. After the specified time, alerts are moved to
Logs. Alerts can be configured to stay in the Alerts window anywhere from 12 to 24 hours after
they are received.
14.1.2 Backup/Archive Settings
Backup/Archive Settings: allows you set up the following:
1. Backup interval - Determines how often backup is performed. You can back up from
one day to seven days. If you do not change the factory setting then data will be backed
up once a day.
2. Archive Interval - Determines the how often data is archived. You can archive from two
days to eight days. If you do not change the factory setting then data will be archived
once in eight days.

Version: 2.12
Page 37 of 42
3. Backup/Archival - Determines at what time of the day the Backup / Archive process
starts (Min: 00:00 hours Max: 23:00 hours). If you do not change the factory setting then
data will be backed up/archived at midnight on the day of setting.
4. Backup Path - Sets the path on your PC where the Backup/Archived data is saved.
5. Backup Target Space - Specifies the max amount of space the application can use to
save Backup/Archived data. At minimum you need 5GB of space. If you do not change
the factory setting then max 5GB of space shall be used.
Note: Archival interval should be greater than or equal to backup interval.
14.1.3 Date/Time Format Settings
Using this setting, you can change how date and time is displayed on Dispatch Console. Supported Date formats are: MM/DD/YY and DD/MM/YY Supported Time formats are: HH:MM and HH:MM:SS
14.1.4 Recording Settings
Using this setting, you can change the call recording to either manual or full session. For more
information refer to sections Manual Recording and
Full Session RecordingError! Reference source not found..
14.1.5 Application Settings
Allows you to set up diagnostics options e.g., showing exceptions and enabling log backup. This
is helpful for bug fixes and products improvement. If another language is supported, it can be
changed from within this setting.
Click the Supported Feature Info link to show the list of features that are enabled / disabled for
ptt Dispatch Console UI. The enabled features are marked in Green and disabled features
are marked with the Red .
14.1.6 GPS Expiry Settings
GPS location of a fleet member is set to refresh automatically every 15 minutes by default. This
refresh time can be reconfigured to refresh at a minimum of 15 minutes, to a maximum of every
120 minutes. If there is no location update after this set time, fleet member’s location is marked
as expired.

Version: 2.12
Page 38 of 42
14.1.7 Report Settings
This setting allows you to set up the following:
Report Interval: reports can be generated and stored every day, every alternate day or three days once depending on the requirement.
Report format: The reports can be prepared in MS excel format.
Reporting Time of the day: The reporting can be chosen to be prepared within 24 hours during a specific time of the day.
Report path: The generated report is stored in a pre-specified path for future access to the reports.
You can generate reports in Excel format for specific instances (i.e. Alerts).
The columns in an Alerts report for example can provide information about:
The type of Alert (Instant Personal Alert/One To One Missed Call Alert)
Direction of Alert (Incoming/Outgoing)
Name of the person (to whom the Alert was sent/ from whom the Alert has been received)
Phone Number of the Alert (Sent/Received)
Status of the Alert (Attended/Unattended/Parked)
Time of the Alert sent/received
The columns in a Call report provides information about:
The type of Call (One To One Call/Group Call)
Direction of Call (Incoming/Outgoing)
Name of the person (calling/called)
Phone Number of calling/called fleet member/group
Duration of call in minutes
Time and Date of Call
The columns in a Location report provides information about:
Name of the fleet member
Version: 2.12
Page 39 of 42
Phone Number of fleet member
Presence status of the fleet member (Available/Offline)
Latitude of the location
Longitude of the location
Time and Date of Call
The columns in the Audit Information report provides information about:
Action Type
Description of the action
Time and Date of audit
User machine identity on which the PTT Dispatch Console is running
14.1.8 Device Settings
Device settings drop down provides the dispatcher information about the devices used for audio
input, output and PTT floor control.
14.1.9 Tones
This setting allows you to enable, disable and set call tones, alert tones and other tones.
Call Tones: Tones related to the call features
e.g: Floor Acquired, Floor Busy, Floor Free and Incoming Call tones.
Alert Tones: Tones related to the Alert features
e.g: Missed Call Alert and Instant Personal Alert tones.
Other Tones: Tones related to an operation/status notifications
e.g: Pop-up Notification tones (Success or Error).
14.1.10 About
About provides the dispatcher with the Dispatch Console version number, data version, and
map version. The End User License Agreement link is available here as well.

Version: 2.12
Page 40 of 42
14.2 Map Settings
The Map tab is located under the Settings tab.
14.2.1 Map Color Settings This section allows you to assign customized colors either for contacts and groups to be displayed on map. You can choose a color for a contact, groups and members belonging to multiple groups. If you wish, you can restore the colors back to default factory setting. The chosen color push pin for the selected contact will be displayed on the map when you locate a specific contact or group on the map.
To set color for contacts:
This setting allows you to choose a color that will be used when a contact is located on the map. To set a color follow the below steps:
1. Click on the Settings tab, and then click on Map Settings.
2. A Map Color Settings window will be displayed.
3. Click on the Default Contacts Color and then click on the drop down which is
displayed.
4. Select the new color, you wish to assign for a contact.
5. Click on Apply button at the bottom of the screen to Save the changes.
6. In the below screen shot selected contact’s location is shown with push pin
on the map.
Note: All the contacts are shown in same color on the map.

Version: 2.12
Page 41 of 42
To set default color for a group member:
This setting allows you to select a default color for group members when no color is chosen for a group member:
1. Click on the Settings tab, and then click on Map Settings.
2. A Map Color Settings window will be displayed.
3. Click on the Default Group Color and then click on the drop down which is
displayed.
4. Select the new color, you wish to assign for a group member.
5. Click on Apply button at the bottom of the screen to Save the changes.
6. When you locate a group member, the assigned color push pin will be appearing
on map.
To set color for a Common Member in multiple group:
This allows you to select a color for the fleet member who is part of more than one group.
1. Click on the Settings tab, and then click on Map Settings.
2. A Map Color Settings window will be displayed.
3. Click on the Default Common Member Color and then click on the drop down
which is displayed.
4. Select the new color, you wish to assign for a common member.
5. Click on Apply button at the bottom of the screen to Save the changes.
6. When you locate a group member, the assigned color push pin will be appearing
on map.
Note: If you attempt to set same color for both ‘Group’ and ‘Common Member’, you will get an error message and PTT Dispatch Console will not allow you to save the changes.

Version: 2.12
Page 42 of 42
To set color for a group:
This allows you to select a common color for all the fleet member in one group.
1. Click on the Settings tab, and then click on Map Settings.
2. A Map Color Settings window will be displayed.
3. Click on the Group list in Group Color settings and then click on the drop down
which is displayed.
4. Select the new color, you wish to assign for a Group.
5. Click on Apply button at the bottom of the screen to Save the changes.
6. When you locate a group member only belonging to this group, the assigned
color push pin will be appearing on map indicating the fleet members in this
Group.
Setting color to default contact color/default Group color for a group:
This setting allows you to change the color back to default contacts color or default group color for a group.
1. Click on the Settings tab, and then click on Map Settings.
2. A Map Color Settings window will be displayed.
3. Right click on any Group in Group Color settings to view the options “Set to
Default Group color” and “Set to default Contact Color” as shown in below
screens.
4. Select the option “Set to Default Group color” to change the assigned Group
color to that of Default Group Color.
Select the option “Set all to Default Contact color” to change color of all the Groups, Default groups color and Default common Member color to that of Default Contacts Color.
14.2.2 On-Demand Location Settings This section allows the dispatcher to set the interval of time that the dispatch console fetches location information of a fleet member. The interval of time is set to 5 minutes by default, but can be set at a minimum of 3 minutes to a maximum of 15 minutes. The dispatcher can also configure the duration of time the dispatch console will continue to fetch a specific fleet member’s location information after initially determining a member’s location. By default, duration is set to 1 hour, but can be set at a minimum of 30 minutes to a maximum of 24 hours.

![Stealth Force 8.0 SZ - mayagraphics.gr · [ Spider 8.1 Hydro HPi ] [ Spider 8.1 Multicam HPi ] [ Spider 8.1 Desert HPi ] ion mask™ επεξεργασία με νανοτεχνολογία](https://img.dokumen.tips/doc/110x75/5e0b1618b9afd121e77d5fd1/stealth-force-80-sz-spider-81-hydro-hpi-spider-81-multicam-hpi-spider.jpg)


![Windows 8.1 ストア アプリ first look for 8.0 developers! [ss]](https://img.dokumen.tips/doc/110x75/55518d18b4c90596028b555c/windows-81-first-look-for-80-developers-ss.jpg)


