Embed Size (px)
DESCRIPTION
how to train your norton
Citation preview
ClinicalKey User Guide Edition 2.0

ClinicalKey User Guide Edition 2.0
2
Table of Contents 1 Overview 3 1.1 Selecting the Best Internet Browser 3 1.2 Mobile Access 3 1.3 Registering Your Account 3 1.4 Logging into ClinicalKey 4 1.5 Logging Out of ClinicalKey 4 1.6 Username and Password 4 1.7 Navigating the ClinicalKey Home Page 5 2 Searching on ClinicalKey 6 2.1 Searching with AutoSuggest 6 2.2 Topic Pages 7 2.3 Navigating the Search Results Page 8 2.4 Viewing Search Results 8 2.5 Using Filters to Refine Search Results 9 2.6 Using Scoped Search to Refine Search Results 10 2.7 Search History 11 3 Reading Content on ClinicalKey 12 3.1 Selecting Content 12 3.2 Navigating the Content Reader 12 3.3 Saving Content 13 3.4 Earning CME Credit 14 3.5 Sharing ClinicalKey Handouts with Patients 14 3.6 Printing, Downloading, and Emailing Content from ClinicalKey 15 3.6 Citations 16 4 Creating Presentations from ClinicalKey 16 4.1 Using the Presentation Maker 16 4.2 Creating a Presentation for PowerPoint or Keynote 17 4.3 Citations 17 4.4 Permissions 17 5 Browsing in ClinicalKey 18 5.1 Browsing Books 19 5.2 Browsing Journals 20 5.3 Browsing Multimedia 21 6 Account Maintenance 22 6.1 Contacting Customer Support 22

ClinicalKey User Guide Edition 2.0
3
1 Overview ClinicalKey is a clinical search engine that supports the clinical decision requirements of physicians, medical librarians, CMO/CMIOs, and healthcare professionals. It is fast, complete, convenient, and trusted.
Fast: ClinicalKey answers questions quickly because it thinks like a clinician, recognizing relevant clinical concepts as you type and offering shortcuts to critical answers.
Complete: ClinicalKey is continuously updated, so it always offers the most complete and current collection of trusted content and multimedia across medical specialties.
Convenient: At the patient’s bedside or on the go, ClinicalKey makes it easy to discover, share and apply clinical content in new ways.
Trusted: Throughout their careers, healthcare professionals worldwide trust Elsevier’s content and technology to support better clinical decisions and improve patient outcomes.
1.1 Selecting the Best Internet Browser ClinicalKey is supported across all major browsers: Chrome (Desktop, iOS, Android), Internet Explorer 8+, Firefox, and Safari (Desktop for Mac & iOS App). Note: IE7 is also supported. Due to limitations within IE7, you may find aesthetic changes occur, however, you will have full functionality of ClinicalKey.
1.2 Mobile Access ClinicalKey is mobile optimized, meaning it will adapt to the screen of any mobile device or tablet. Use your device’s internet browser to visit www.ClinicalKey.com and access content on the go.
1.3 Registering Your Account You can register and use ClinicalKey as an Institutional User. After you register, you may personalize ClinicalKey by adding items to the Saved Content List, tracking Search History and using the Presentation Maker. To register your account:
1. In your institutional network or IP range, go to www.ClinicalKey.com. 2. In the upper right corner of the Home Page, click Register. The ClinicalKey registration page opens.

ClinicalKey User Guide Edition 2.0
4
1.4 Logging into ClinicalKey After you register, you can login to ClinicalKey. To login to ClinicalKey:
1. Go to www.ClinicalKey.com. 2. Enter your Username and Password. 3. Click Login. The Home Page opens.
Note: If you have ClinicalKey access through your institution, you must be connected to your institution’s network to login.
1.5 Logging Out of ClinicalKey ClinicalKey automatically logs you out after 30 minutes of inactivity. You can also logout manually. To logout of ClinicalKey:
In the upper right corner of the Home Page, click Logout.
1.6 Username and Password If you forgot your username, if the system does not recognize your email address, or if you are having any other problems accessing ClinicalKey, please contact customer support by clicking Help & Feedback at the bottom right of the ClinicalKey screen. To retrieve a forgotten password:
1. Go to www.ClinicalKey.com. 2. In the upper right corner of the Home Page, click Login. 3. Click Forgotten your Username or Password?
The Forgotten Username or Password page opens. 4. Enter your email address exactly as it is in your personal profile.
ClinicalKey will send you an email with a link to reset your password. To change your password:
1. Under your Account Menu, click Settings. 2. Select Change Password at the top of the page. 3. Fill in current password and then type in new password information. 4. Click Submit.

ClinicalKey User Guide Edition 2.0
5
1.7 Navigating the ClinicalKey Home Page After you login to ClinicalKey, you are at the Home Page. From the Home Page and all ClinicalKey screens, you can search and browse. You can also use the personal account drop-down menu to access your Saved Content, Presentations, Settings, and more. You can return to the Home Page from any ClinicalKey screen.
Browse Menu Account Menu From the drop-down menu, access: ● Saved Content ● Search History ● Presentations ● Settings ● Logout Search Bar and button Scoped Search From the drop-down menu you can filter your search by a specific content type
To return to the Home Page: Click the ClinicalKey icon in the upper left-hand corner of any screen.

ClinicalKey User Guide Edition 2.0
6
2 Searching on ClinicalKey It all starts with a simple search. The ClinicalKey Search Bar is always available, so you can easily search for content at any time. There are many search options available to help your narrow your search. You can further refine your search results using filters (see Using Filters to Refine Search Results).
Search Using When Full or partial words and phrases You know or have an idea of what you are searching for, such as migraines. Acronyms You know the acronym and do not want to enter the full term.
Example: Enter CHF and ClinicalKey displays results for congestive heart failure. Author’s name You know or have an idea of the author you are searching for. Book or journal title You know or have an idea of the book or journal title you are searching for. NLM standard abbreviated journal reference
You know the citation information for a journal, for example: Am J Cardiol. 2011 Dec 1;108(11):1614-9
2.1 Searching with AutoSuggest The Search Bar is always available, so you can search from any ClinicalKey screen. To search ClinicalKey using AutoSuggest:
1. In the Search Bar, enter the first few letters of your search word/words, or use a search method from the table above. As you enter your search criteria, ClinicalKey’s AutoSuggest feature automatically displays a list of relevant search terms, suggestions, books and journals, and authors. As you keep entering criteria, AutoSuggest continually refines the list of search terms.
2. Click the best match. The system will take you to the Search Results Page, which lists search results in order of clinical relevance.

ClinicalKey User Guide Edition 2.0
7
2.2 Topic Pages ClinicalKey offers over 1,400 disease Topic Pages covering epidemiology, risk factors, diagnosis, treatments and more, as well as links to specialty specific answers and related drugs. Search for one of ClinicalKey’s Topic Pages to jump to its page and get a high level overview, with the option to dive deeper into content when needed.
Link to show all search results Drop-down menus to view links for: Specialty Views Related Drugs Patient Education Latest Articles Related Guidelines Top sources tabs Quick links to go directly to content

ClinicalKey User Guide Edition 2.0
8
2.3 Navigating the Search Results Page Click to return to the Home Page Scoped Search: narrow search results from any page
Save, email, or print multiple selected results Filters to narrow your results by: Source Type Specialties Study Type Date Sort by: click to sort by Relevance or Date Multi-select option lets you select multiple results to save, email, or print
Save, email, and print icons display when hovering over an individual search result
Tip: Even if you make a typo in the Search Bar, when you press Enter, ClinicalKey predicts what you are searching for and suggests possible matches.
2.4 Viewing Search Results After you perform a search and narrow down your results, the Search Results Page shows the most clinically relevant results for your search. If you did not filter your search results, the default search results show all study types, all specialties, all source types and all publication dates.

ClinicalKey User Guide Edition 2.0
9
2.5 Using Filters to Refine Search Results After you perform a search, on the top of the Search Results Page you can refine your search results by Source Type, Specialty, Study Type and Date. The relevance and date Sort By options let you sort results according to your preference.
To refine your search results by Source Type: In the Source Type list click one or more source types in which you are interested.
The search results show only the selected source types.
ClinicalKey includes 12 types of content:
Books Images Procedures Consult Clinical Trials Full Text Articles Guidelines Drug Monographs MEDLINE Videos First Consult Patient Education The Clinics of North America
To refine your search by Specialty: The left panel includes the most relevant specialties for your search criteria.
In the Specialty list click the drop-down arrow, select one or more boxes next to the medical specialties in which you are interested. The search results show only content for the selected specialties.
To refine your search results by Study Type: In the Study Type list click one or more studies in which you are interested.
The search results show only the selected study types. ClinicalKey includes 4 types of study:
Systematic Reviews Randomized Control Trials Meta Analysis Narrative Review
To refine your search results by Date: In the Date list click one or more publication time frames in which you are interested.
The search results show only the selected date ranges.
Last 6 months Last 18 months Last 5 years Last 12 months Last 2 years
To remove a filter: Click the X next to the filters you wish remove.

ClinicalKey User Guide Edition 2.0
10
2.6 Using Scoped Search to Refine Search Results Use Scoped Search when you know the specific content type you would like to search. The search bar is available from any screen, so you can use Scoped Search at any time. To search using Scoped Search:
1. From the search bar, select the All drop-down menu. A list of searchable content types displays.
2. Select the content type you want to search and ClinicalKey displays the selected type.
3. Enter a term in the search box and run a search. ClinicalKey returns search results only for the selected content type.
4. Scoped Search can also be accessed from the book and journal Content Reader to narrow a search within a book, book chapter, journal, journal issue, or full text article.
ClinicalKey User Guide Edition 2.0
11
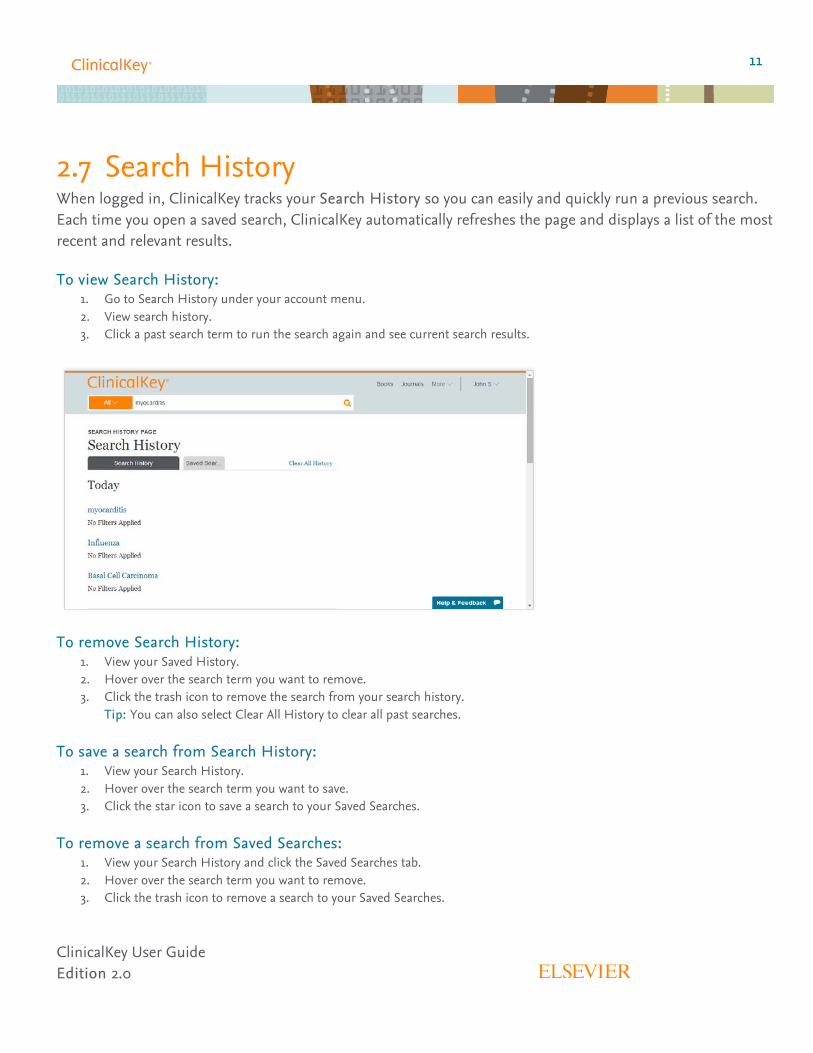
2.7 Search History When logged in, ClinicalKey tracks your Search History so you can easily and quickly run a previous search. Each time you open a saved search, ClinicalKey automatically refreshes the page and displays a list of the most recent and relevant results. To view Search History:
1. Go to Search History under your account menu. 2. View search history. 3. Click a past search term to run the search again and see current search results.
To remove Search History:
1. View your Saved History. 2. Hover over the search term you want to remove. 3. Click the trash icon to remove the search from your search history.
Tip: You can also select Clear All History to clear all past searches. To save a search from Search History:
1. View your Search History. 2. Hover over the search term you want to save. 3. Click the star icon to save a search to your Saved Searches.
To remove a search from Saved Searches:
1. View your Search History and click the Saved Searches tab. 2. Hover over the search term you want to remove. 3. Click the trash icon to remove a search to your Saved Searches.

ClinicalKey User Guide Edition 2.0
12
3 Reading Content on ClinicalKey After you select content on the Search Results Page, you can display and read it in the Content Reader. The Content Reader is the same for all content types.
3.1 Selecting Content To select content to read:
From the Search Results Page, click the title of your desired search result. The Content Reader opens to display the content.
3.2 Navigating the Content Reader
Outline drop-down menu: Click to navigate to a specific section
CME icon available for books, full-text articles, and First Consult content Save, Email, and Print icons for easy sharing and saving PDF icon available for most books and full-text articles with PDFs Content outline: Click to navigate to a specific section
To read material on the Content Reader: From the Content Outline along the left, click a topic to jump to that section in the content.
You can also use the Outline drop-down menu. Note: If the content does not have an outline, you can scroll to move through the material.

ClinicalKey User Guide Edition 2.0
13
3.3 Saving Content You can save content in ClinicalKey to the Saved Content list and then access it at a later time. Use Tags to categorize and organize content for quick access when you need it.
Tip: You can print and email selected content directly from the Save Content list. To save content:
1. From the Search Results Page, click the Save icon next to the content you want to save. Note: To select multiple pieces of content, click the multi-select box, choose the items you want to save, then click the Save icon. The tagging window opens.
2. Add tags by selecting a term from the Add Tag drop-down menu. Or create a new tag by clicking New Tag.
Click Done when you’re finished tagging. 3. Content is added to the Saved Content list.
Tip: You can also save any article from the Content Reader. To access content from the Saved Content list:
1. Click the Saved Content option under your account menu. The Saved Content page opens.
2. Click the title of the content you want to access. The content opens in the Content Reader. Tip: Clicking a tag(s) shows only the content with that tag. Clicking a tag again will deselect it.
To remove articles from the Saved Content List:
1. Click the Saved Content option under your account menu. The Saved Content page opens.
2. Hover over the article you want to remove. 3. Click the trash icon to remove the article. 4. A pop-up confirms the article has been removed.
Click the Undo button if you’d like to undo the action.

ClinicalKey User Guide Edition 2.0
14
3.4 Earning CME Credit ClinicalKey offers free CME credit provided by the Cleveland Clinic Center for Continuing Education. Users may earn 0.5 AMA PRA Category 1 Credit for each search conducted through ClinicalKey. To earn CME:
1. Perform a search in ClinicalKey to answer a clinical question. 2. Access full text articles, books, or First Consult content to find an answer. 3. Save the citations for completing the registration process. 4. Click the CME icon at the top of a full text article, book, or First Consult result. 5. A new window will open to the Cleveland Clinic Center for Continuing Education site. 6. Complete the form and submit to obtain AMA PRA Category 1 Credit.
Note: Users will need to be logged in and have an account with the Cleveland Clinic Center for Continuing Education to earn credits. To set up an account through the Cleveland Clinic, see the instructions on the CME page, accessed through the More drop-down menu.
3.5 Sharing ClinicalKey Handouts with Patients You may share Patient Education handouts with patients for personal, noncommercial use. You can share information by printing it and giving patients a hard copy or by downloading it as a PDF. ClinicalKey also lets you personalize Patient Education handouts and include comments. To customize Patient Education handouts:
1. Display the Patient Education handout you want to customize. 2. Click the Print button. 3. Add special instructions using the text box. Use the formatting tools to bold, italicize, or underline text. 4. Include contact information using the form available. Add additional contacts as necessary. 5. Adjust the text size by clicking the selection next to the small, medium, and large options.

ClinicalKey User Guide Edition 2.0
15
3.6 Printing, Downloading, and Emailing Content from ClinicalKey
You can print any content on ClinicalKey and download any material that has a PDF icon. You may print or download content from the site for your own personal, noncommercial use, provided you keep intact all copyright and other proprietary notices. You may not engage in systematic retrieval of content from the site to create or compile, directly or indirectly, a collection, compilation, database, or directory without prior written permission from Elsevier. To print content from the Content Reader:
1. Display the content you want to print in the Content Reader. 2. Click the print icon.
The Print Preview screen opens. Tip: Always use the ClinicalKey print icon to print your content. Other methods of printing can produce blank pages.
3. On the left, select printing options, such as range of pages and number of copies. 4. Click Print.
To download PDF content from the Content Reader: 1. To download a PDF there must be a PDF icon to the right of the title in the Search Results Page or in the Content Reader. 2. From the Search Results Page, click the title of the PDF content you want to download.
The content opens in the Content Reader. 3. Click the PDF icon to download the content.
Save the PDF using your browser. Tip: You can download content directly from the Search Results Page by clicking the PDF icon next to a title.
To email content from ClinicalKey:
1. Display the content you want to email in the Content Reader center panel. Click the email icon. An Email Citations window opens. Tip: You can print content directly from the Search Results Page by clicking the print icon next to a result.
2. Enter the recipient’s email address, and an optional message. ClinicalKey automatically attaches the selected content to the email.
3. Click Send. A message indicates your email was sent successfully.

ClinicalKey User Guide Edition 2.0
16
3.6 Citations You need to cite all articles and books from ClinicalKey according to the American Medical Association Manual of Style, 10th Edition (http://www.amamanualofstyle.com).
In citations for drug monographs, images, and patient education materials, include the copyright holder, the title of the material, a reference to ClinicalKey with the appropriate website address, and the date you viewed the material.
In citations for material original to First Consult, include the title of the material, the type of article, a reference to ClinicalKey with the appropriate website address, and the date you posted and viewed the material.
4 Creating Presentations from ClinicalKey You can use the Presentation Maker to share the latest medical and surgical information with colleagues and care teams by exporting text and images to PowerPoint. ClinicalKey lets you build, name and manage as many presentations as you’d like.
4.1 Using the Presentation Maker To add images to the Presentation Maker:
1. From the Search Results Page, click the Add to Presentation to the right of the images you want to add to the Presentation Maker. The Add to Presentation window opens. Tip: You can add multiple images at a time by turning on the Multi-Select option and selecting the check boxes to the right of the images you want to add. Then click the Add to Presentation icon at the top right of the Search Results Page.
2. Select the presentation you want to add images to, or click Create New Presentation to start a new presentation. 3. Click Save to add your images to the selected presentation.
You can also select Save and go to Presentations Page to go directly to the presentations page and view your content.
TM TM

ClinicalKey User Guide Edition 2.0
17
To view images in the Presentations: 1. Click the Presentations option under your account menu.
The Presentation Maker page opens. 2. View the images in each presentation by clicking the presentation name.
To remove images from the Presentations:
1. Click the Presentations option under your account menu. The Presentation Maker page opens.
2. View the images in each presentation by clicking the presentation name. 3. Click the image you want to remove.
The image preview window opens. 4. Click the trash icon to remove the image.
Click the Undo button if you’d like to undo the action.
4.2 Creating a Presentation for PowerPoint or Keynote You can share images from ClinicalKey by creating a PowerPoint or Keynote presentation with them. To create a PowerPoint or Keynote presentation with ClinicalKey images:
1. Add all the images you want for your presentation to the ClinicalKey Presentation Maker. 2. Open the Presentation Maker.
Select the preferred presentation under My Presentations. 3. Click the Export button. 4. ClinicalKey downloads the presentation file. 5. View your presentation in PowerPoint, Keynote, or other application that supports PowerPoint files.
4.3 Citations The Presentation Maker will automatically insert citations.
4.4 Permissions Authorized users of ClinicalKey have permission to use content from the site in presentations for noncommercial use. You must keep intact all copyright and other proprietary notices.
ClinicalKey User Guide Edition 2.0
18
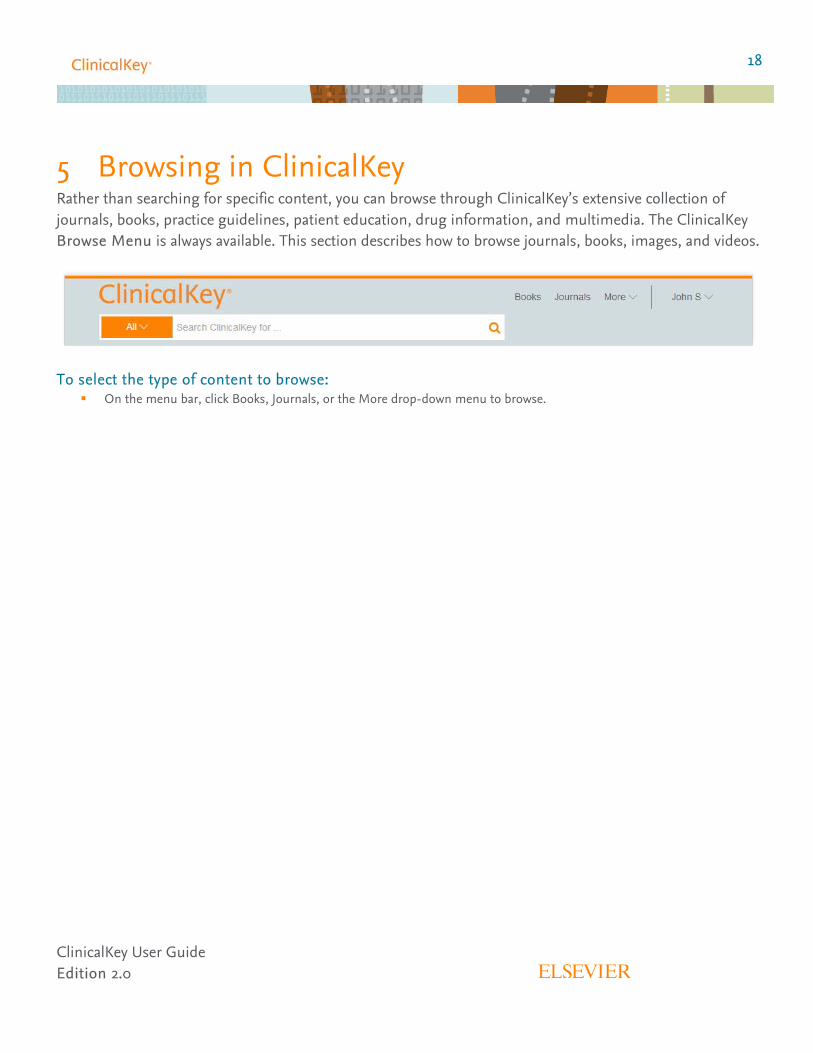
5 Browsing in ClinicalKey Rather than searching for specific content, you can browse through ClinicalKey’s extensive collection of journals, books, practice guidelines, patient education, drug information, and multimedia. The ClinicalKey Browse Menu is always available. This section describes how to browse journals, books, images, and videos.
To select the type of content to browse:
On the menu bar, click Books, Journals, or the More drop-down menu to browse.

ClinicalKey User Guide Edition 2.0
19
5.1 Browsing Books To browse books:
1. Click Books on the menu bar. The Browse Books screen opens with a complete list of books in ClinicalKey, in alphabetical order by name.
TTM
2. To narrow down the list of books, you can do the following: In the search box, type part or all of a book title. Filter by specialty using the Specialties drop-down menu.
3. Click a book title. The table of contents opens.
4. Click a chapter title. 5. Scroll through the chapter by clicking topics in the outline or using the scroll bar.

ClinicalKey User Guide Edition 2.0
20
5.2 Browsing Journals To browse journal articles:
1. Click Journals on the menu bar. The Browse Journals screen opens with a complete list of journals in ClinicalKey, in alphabetical order by name.
2. To narrow down the list of journals, you can do the following: In the search box, type part or all of a journal title. Filter by specialty using the Specialties drop-down menu.
3. Click a journal title. The journal volumes page opens, displaying the journal by year and volume number. Click a volume and a drop-down menu lists the issues within each volume.
4. Click an issue. The table of contents for that journal issue opens. Tip: For updates on a journal, click the RSS feed button to subscribe to an RSS feed of updates.
5. Click an article title. The article opens in the Content Reader.
6. Scroll through the article by clicking topics in the outline or using the scroll bar.

ClinicalKey User Guide Edition 2.0
21
5.3 Browsing Multimedia To browse images and videos:
1. Click Multimedia under the More drop-down menu. The Browse Multimedia screen opens.
2. To narrow down the list of images and videos, you can do the following: In the search box, type part or all of an image title. Filter by media type or specialty using the filter drop-down menus.
3. Click an image. An Image Preview screen opens with links to the image and citations. Click X in the upper right corner of the image preview to close it.
4. Click a video. A Video Preview screen opens where you can run the video, get links to the video, or citation information.

ClinicalKey User Guide Edition 2.0
22
6 Account Maintenance To view the ClinicalKey Privacy Policy, Registered User Agreement, and Terms and Conditions:
1. Click the following links: Privacy Policy, Registered User Agreement, and Terms and Conditions 2. Click the links in the footer bar of any ClinicalKey page.
6.1 Contacting Customer Support A link to customer support appears at the bottom left of every ClinicalKey screen. To contact Customer Support:
Click Contact Us at the bottom of the screen.
Customer Service for Individual Subscriptions e-mail: [email protected] telephone US toll-free: +1 (800) 401-9962 telephone Non US toll-free: +1 (314) 447-8200 telephone service hours: 7:30 am – 7 pm CDT (St. Louis office) Monday–Friday, excluding national holidays
Institutional Support – Americas (United States, Canada, Central America, and South America):
e-mail: [email protected] e-mail for Spanish customers: [email protected] telephone US toll-free: +1 (888) 615-4500 telephone Non toll-free: +1 (314) 447-8200 telephone service hours: 7:30 am – 7 pm CST (St. Louis office) Monday–Friday, excluding national holidays
Institutional Support - Europe, Middle East, and Africa:
e-mail: [email protected] e-mail for Spanish customers: [email protected] telephone: +31 (0) 20 485-3767 telephone service hours: 9 am - 6 pm GMT+1 (Amsterdam office) Monday – Friday, excluding national holidays
Institutional Support - Asia and Pacific: e-mail: [email protected] telephone: +65 6349 0222 telephone service hours: 9 am - 6 pm SST (Singapore office) Monday – Friday, excluding national holidays
Institutional Support - Japan: e-mail: [email protected] Web site: japan.elsevier.com telephone: +81 (3) 5561 5035 telephone service hours: 9:30 am - 5:30 pm JST (Tokyo office) Monday – Friday, excluding national holidays


![SAP HowTo Guide - Unlocking User SAPStar [User Guide]](https://img.dokumen.tips/doc/110x75/544ac849b1af9f7c4f8b4bd1/sap-howto-guide-unlocking-user-sapstar-user-guide.jpg)