Embed Size (px)
Citation preview
User Guide Master-Speed Controller
2
Thank you for purchasing a Hacker Electronic Speed Controller. This product was devel-oped in close co-operation with JETI and incorporates the latest technological develop-ments. You have got a very efficient Controller for brushless sensorless motors use. Our priority was reliability and simple Setup by transmitter use. In fact all parameters can be independently changed by using our Prog-Box (program-ming box). By using this device you will accede to the total programming possibilities of our new Controller-Line. Even if programming sequences of MASTER-Speed Controllers are particularly logical and therefore very easy, using and operating requires some knowledge and a few basic skills. Please read through these instructions sheets in its entirety before attempting to operate with these electronic devices. We strongly recommend getting particularly close attention to our safety instructions. We wish you joy and a lot of success with your new MASTER Speed Controller. Table of contents
Page
1. Safety and operating instructions 3 2. Limitation of liability 5 3. Product description 5 4. Connections and controls 6 4.1 MASTER-Flight /-F5 /-Acro /-Heli /-Navy Versions 6 4.2 MASTER-Car Versions 6 5. Initial Setup of MASTER-Speed Controllers 7 5.1 MASTER-Flight/-F5/-Acro -Versions 7 5.2 MASTER-Heli Versions 8 5.3 MASTER-Navy Versions 9 5.4 MASTER-Car Versions 10 6. Transmitter Setup of MASTER-Speed Controllers 11 6.1 Fundamental proceeding 11 6.2 Mode Setup 11 6.3 Timing Setup 13 6.4 Switch frequency settings 14 6.5 Current limitation settings of Car Controllers 15 7. MASTER-Speed Controller Setup by Prog-box 16 8. Declaration of conformity 17 9. Protection features 17 10. Warranty 17 A. Appendix 18 A-1 MASTER-Speed Controller: Technical Data 18 A-2 BE MASTER-Speed Controller: BEC-Capacities 19 A-3 MASTER-Prog-Box: Setup Features 20 A-4 MASTER-Prog-Box: Menu Features 21

MASTER-Line
3
1. Safety and operating instructions Building and operating of RC-models requires technical knowledge by careful and safety handling. Inaccurate assemblage as well as carelessness using can result in significant property and/or personal injuries. For these reasons build correctly, and care about the operating instructions, when mounting and operating a model with Speed Controllers. The CE sign guarantees the observance of legal rules for undisturbed operatings; how-ever it does not entitle you to a careless Controller use. MASTER-Speed Controllers are developed exclusively for RC model applications. Under any circumstances MASTER-Speed Controllers may not be used in any man-carrying aircrafts or any other man-carrying vehicles. MASTER-Speed Controllers are designed for exclusive operating with batteries. Never use Speed Controllers by connecting to a power supply, when motor breaks an over voltage by energy return appears, which could destroy the power supply and Speed Con-troller. Never connect Speed Controllers or other propulsion components directly to the 230 V / AC current. In any case keep your body and any other objects away from the path of a propeller or other spinning motor parts, which is connected to a power battery. Never lean over a running system. Care about that no parts can come in touch with spinning drive parts; they could be thrown into your face, and could also weaken propeller and drive, causing mechanical or electric failures. Protect yourselves against any dangers coming from pro-pellers and helicopter rotors. Keep anybody, especially small children, who can be hurt when the engine is running, at least 20 feet away. Protect the Speed Controller against any vibrations, dust, wet, hits or pressures. Check Speed Controller regularly on damages. Should the electronic device have become wet, only reuse it again after doing a longer drying phase and an exact examination! Also Speed Controller has to be completely checked after any model crash. Never use a damaged MASTER-Speed Controller. If you want to use it farther, send the device im-mediately to Hacker repair service. We defend any changes or modifications on the Speed Controller and his equipment. This is also considered for the battery connecting leads which have not to be extended. The battery wiring has to be as short as possible; they do not have to be longer than 15 cm. For these reasons a current measurement has to be done only with a pliers amme-ter. Any measurement with an inserted ammeter (resistance) can cause destruction of the Speed Controller. The lengths of the engine power wires are not critical that much, but they also should be as short as possible. Long wires should be twisted because of an otherwise possible receiving disturbance. Use device only by outside temperatures between -10°C up to +50°C. Therefore always provide for a good Speed Controller cooling. Speed Controller operations are only per-mitted in no electrostatic surroundings, where no loading can come true.

User Guide Master-Speed Controller
4
MASTER-Speed Controllers are not protected against polarity reversions; therefore you must be sure that polarity is correct when connecting the Speed Controller. If con-nection is wrong way round it would cause destruction of the device. If you want to re-verse the motor rotation, bench test the motor connections noting the rotation of the mo-tor. To change the rotation of the motor, simply swap any two motor wires connections or do it by programming. Never reverse battery connecting leads. Never connect power battery wires directly to the engine ones. This also can cause destruction of the device. Never separate the battery from the Speed Controller when motor is running. This can cause high current drains which can cause device destruction. Some Speed Controller BEC types are fitted out with a switch. ATTENTION: This switch does not disconnect, the power batteries, from the Speed Controller. A low residual current flows even if the switch position is OFF (AUS), this will cause deep under loading especially by Lion/LiPo-Cells applications! Therefore connect the batteries to the Speed Controller a few sec-onds before operating, and disconnect them immediately after the end of the run. Never connect a receiver battery in parallel when using a BEC device. This will cause destruction of the BEC unit! If you want to get a separate receiver battery by BEC type Speed Controller use, than disconnect and take out the red wire from the receiver-lead. The universal connecting system, used by us, can be dislocated easily. Use a knife blade to lift the retention tabs on the connector plug to remove the red wire.The free connector has to be insulated with a bit of electrical tape. Like this the BEC unit is out of service and a receiver battery can be connected without any danger. To know the permissible BEC load, which depends of the cells number of the battery pack and Speed Controller type, check on “BEC capacities list A-2” below! Attention digital Micro servos get a very high current drain, that means that the indicated number of Servos has, if necessary, to be decreased. Mount your radio equipment, especially the receiver with his antenna, as far as possible from Speed Controller, batteries and motor. Otherwise, high current magnetic fields could affect the receiving quality. Always do a range test with low speed running motor, to make sure the perfect receiving function of your model. For any connection you should use exclusively gold contact plugs and sockets which must be soldered perfectly to the wires. Never use strip connectors, crimp connectors or similar. For safety reasons always use identical products from the same manufacturer. This will minimize connection problems for example by battery changing. We recommend to use connectors, plugs and sockets from our accessories assortment. Connect Speed Controller lead into the throttle channel on your receiver. Don’t operate Speed Controller by a servo tester, because it could happened that motor will do some short starts in reason of some incorrect "throttle impulses". For this we strongly recom-mend, for any Speed Controller application an exclusive receiver use. We also recom-mend to only using receivers from relevant manufactories! MASTER Speed Controllers are equipped with some extensive protection devices, which can only protect when operating in a "normal" range. For example if you get a motor winding or a wire short cut or something similar, Speed Controller could be damaged or destroyed. This is why you always have to control, on perfect functioning, all wires and connectors. Also a blocking of a small motor, which is operated by a maladjusted very efficient Speed Controller, does not necessarily leads enough to switch off the current. Reason is that blocking current is not high enough, therefore always use motors with matched Speed Controllers.
MASTER-Line
5
MASTER-Speed Controllers are delivered with right setup for Hacker-Brushless motors. Airplane Speed Controllers are delivered with activated brake. You will find in these manual appropriated settings for other motors. Warning! High power motor systems can be very dangerous! High currents can heat wires and batteries, causing fires and burning skin. Follow the wiring directions carefully! Models equipped with high power motors can kill. Always fly at a sanctioned field. Never fly over or near spectators. Even though this Speed Controller is equipped with a safety arming program, you should still use caution when connecting the power battery. 2. Limitation of liability In that Hacker Motor GmbH has no control over the correct use, installation, application, as well as the Speed Controller maintenance, no liability shall be assumed nor accepted for any damages, losses or costs resulting from the use of the product. Any claims aris-ing from the operating, failure or malfunctioning etc. will be avoided. Hacker Motor GmbH assumes no liability for personal injury, property damage or consequential damages re-sulting from our delivery or our workmanship. As far as is legally admitted, with which legal arguments ever, the obligation to the compensation is limited to the invoice amount of the affected product. This does not apply, as far as we must avouch unrestrictedly af-ter compelling laws or for rough negligence. 3. Product description MASTER-Speed Controllers are highly developed electronic devices, especially for Hacker-Brushless motor use. Various, comfortable, setting possibilities as well as differ-ent operating modes make these Speed Controllers also compatible to other brushless motors. Their compact dimensions make this Speed Controller a good choice also for small models. Into all these different types, which are individually described below, you will found the correct Speed Controller for any purposed model application. Inside the MASTER-Speed Controller line there are some special types like for airplanes, helicopters, boats and car models. You will also find some contests "experts" like the one for Pylon racings F5D, F5F and F5B. You will find technical data for any Speed Controller type on data sheets below A-1 and A-2. All Speed Controllers could be settet up by transmitter as well as with our new Master Prog-Box. The programming range possibilities by transmitters are identical to our previ-ous MASTER-Speed Controller Line. By using the Prog-Box you will get the complete range of programming skills. Settings have to be programmed only one time. The Speed Controller stores Setup until the data wouldn’t be changed, even if you disconnect the battery. Setup can be changed only by a new programming sequence. You get an overview of total programming possibilities on added sheets below A-3 and A-4.
User Guide Master-Speed Controller
6
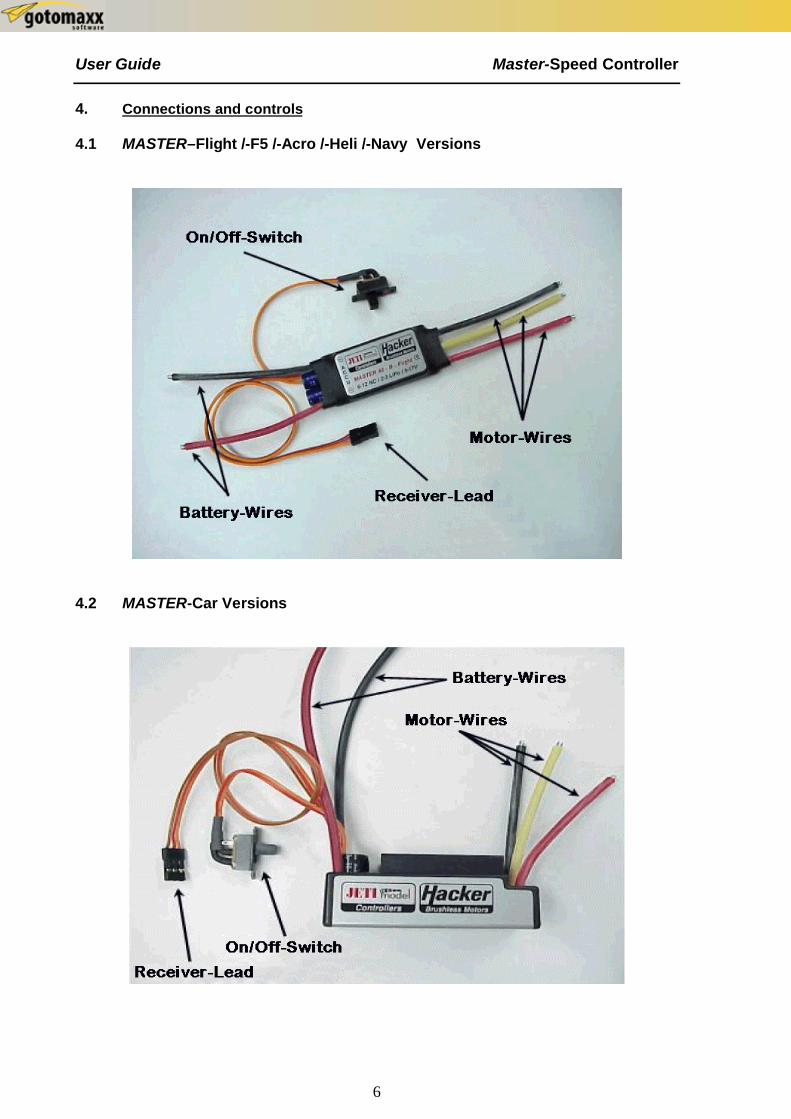
4. Connections and controls 4.1 MASTER–Flight /-F5 /-Acro /-Heli /-Navy Versions
4.2 MASTER-Car Versions

MASTER-Line
7
5. Initial Setup of MASTER-Speed Controllers The initial operations, for all Speed Controllers’ versions, are basically the same with very small differences. For a good overview we still described below the differences be-tween initial operations for the different model types like for airplane-, helicopter-, ship- and car-models. Basic conditions to start-up Speed Controller initial operations are that the motor is cor-rectly mount into the model and that Speed Controller has been connected properly. Please consider your motor operating instructions. Connect Speed Controller receiver lead to receiver throttle channel. Please check anytime the total system to prevent mal-functioning, which can cause destruction of the Speed Controller. 5.1 MASTER–Flight/-F5/-Acro Versions • Please care that your transmitter ATV adjustments, for both side of the Speed Con-
troller throttle stick or knob, are 100%. • When using Robbe/FUTABA transmitters, then your "throttle channel" has to be re-
versed! • Move throttle stick into motor stop position first then turn on transmitter. • Connect the power battery; avoid any repeating battery plug in and out. • Turn on receiver, when operating Speed Controllers with BEC-System then turn on
his switch. Both Controller MASTER 4B-Flight and MASTER 8B-Flight do not have switches, because of weight reasons. The turning on would be done by connecting the power battery.
• The motor will deliver a high tone signal (Beeping). After turning on, by activated brake, you will get only one "Beep”. You will get two “Beeps”, if brake has not been activated. Never move throttle stick/knob between turning on and the Beep(s). If the Beep sign does not sound, disconnect the power battery, then wait approx. 10 sec. and give it another try. After this, if "Beep" does not come, check following points be-low:
o Is Speed Controller receiver lead correctly connected to the receiver? o Does the throttle stick/knob be into motor "OFF" position?
o Is the power battery fully loaded and correctly connected? o Is receiver's power supply all right?
"Beeper" only sounds during the first turning on. If you turn off Speed Controller or re-ceiver battery, without disconnecting the power battery, then there would be no signal
(Beep) by switching on again. • After Beep sign Speed Controller is armed and ready to operate. The "full power"
setting would be programmed automatically. If you didn’t have change (except Mode) initial Setup, then Speed Controller will work with factory setup, which means brake is activated, timing 1 (8 kHz), as well as automatically Low-Voltage cutoff for NiCad-/NiMh cells. This Setup would be the optimal one for operating with Hacker Brush-less-Motors and is also recommended for 2-pole motors from other factories.

User Guide Master-Speed Controller
8
• 5.2 MASTER-Heli Versions Please care! All MASTER-Heli Speed Controllers could be programmed in two different modes. Mode 1 "standard" Speed Controller works in a normal way without brake (one "Beep" after turning on). This is Speed Controller’s factory setup. When using this mode then connect Speed Controller receiver-lead to receiver’s "throttle channel". In this case you need a transmitter setup with normal throttle curve. The motor spools up by soft start, run-up depend of helicopter can take up to 15 seconds. To deactivate soft start you have to pull back the throttle stick just a little bit and than to push it back up. Tip: To avoid soft start, during flight, you have to push (after motor has running up) throt-tle trimm lever forwards! Mode 2 "governor" Speed Controller works with an active Speed regulation (double Beep after turning on). If this mode would be used then connect Speed Controller receiver-lead to a receiver "channel" which has to be free of any mixing function. For this, use a trans-mitter free knob or slider channel. In contrast to the standard Mode, you couldn’t use the full range of speed, but only the meaningful range from 60-100% of full speed. If the low-est adjustable speed is still too high for a proper use, then change the pinion gear against a smaller one. Tip: For testing out a new balanced or adjusted rotor system you should use Mode1 (standard), so that you can start in a low Speed range! Before using Speed Controller for the very first time it is necessary to setup the needed Mode as well as the motor stop and full power positions. Therefore we described it be-low, and not in chapter “Mode Settings” (chapter 6.2). • Please care that your transmitter ATV adjustments, for both side of the Speed Con-
troller throttle stick or knob, are 100%. • When using Robbe/FUTABA transmitters, then your "throttle channel"! has to be re-
versed
• Move throttle stick into full power position first, then turn on transmitter. Now when switching on the Speed Controller, programming sequence will start, Speed Control-ler will remain disarmed (motor will not run).
• Connect the power battery; avoid any repeating battery plug in and out. • Turn on receiver, when operating Speed Controllers with BEC-System than turn on
his switch. • Controller does a four-tone sequence. • IMMEDIATLY after the first melody move "throttle stick" into motor stop position. • Speed Controller change Mode and signs it by a Beep(s) according to new Mode.
ATTENTION: from now on Speed Controller is armed; any "throttle stick" moving will make motor starting!
• Then disconnect power battery and turn off receiver. • This programming sequence, to change Speed Controller Mode, is repeatable any-
time you want. • This means that you must execute occurrence (described at the top) first time to get
the Speed Controller operate into mode 2 (governor). To get the Speed Controller back into mode 1 (standard), execute this occurrence a second time.
For other initial operations you can go forward as usual:
• Move throttle stick into motor Stop position first, then turn on transmitter. • Connect the power battery; avoid any repeating battery plug in and out.
MASTER-Line
9
• Switch on receiver, when operating Speed Controllers with BEC-System than use his switch.
• The motor will deliver a high tone signal (Beeping), which corresponds to operating mode.
• Speed Controller is ready after Beeping. If you didn’t have change (except Mode) initial Setup, then Speed Controller will work with factory setup, which means brake is activated with timing 1 (8 kHz). This Setup would be the optimal one for operat-ing with Hacker Brushless-Motors and is also recommended for 2-pole motors from other factories.
• Basically all MASTER-Heli Speed Controllers get a Low-Voltage regulation setup, which means Speed Controller reduce, depend on programmed tension, performance or Speed.
5.3 MASTER-Navy Versions Please care! MASTER-Navy Speed Controllers can be programmed to the special throttle setting need of "Pistol-Grip-Radios". For this it’s necessary to setup the Controller into the used transmitter. Therefore we described it below, and not in chapter “Mode Settings” (chapter 6.2).
• Please care that your transmitter ATV adjustments, of the Speed Controller throttle stick or knob, are 100% for both side.
• When using Robbe/FUTABA transmitters then your "throttle channel" has to be re-versed!
• Move throttle stick into full power position first, then turn on transmitter. Now when switching on the Speed Controller, programming sequence will start, motor will not run.
• Connect the power battery; avoid any repeating battery plug in and out. • Turn on receiver, when operating Speed Controllers with BEC-System than use his
switch. • The Speed Controller recognizes "full power" setting and signs it by a melody. • Move the throttle stick into motor “Stop” position. • Speed Controller recognizes this position and signs it by a Beep. • This programming is repeatable any time you want.
Settings would be stored, now Speed Controller knows the transmitter throttle settings. Disconnect power battery and switch off the receiving. For other initial operations you go forward as usual.
• Move throttle stick into motor Stop position first, then turn on transmitter. • Connect the power battery; avoid any repeating battery plug in and out. • Switch on receiver, when operating Speed Controllers with BEC-System, then use
his switch. • The motor will deliver two Beeps. • Speed Controller is ready after Beeping. If you didn’t have change (except Mode)
initial Setup, then Speed Controller will work with factory setup, which means brake is activated with timing 1 (8 kHz). This Setup would be the optimal one for operat-ing with Hacker Brushless-Motors and is also recommended for 2-pole motors from other factories.

User Guide Master-Speed Controller
10
5.4 MASTER-Car Versions • Please care that your transmitter ATV adjustments, of the Speed Controller throttle
stick or knob, are 100% for both side. • Move throttle stick into center position (motor Stop) first, then switch on transmitter. • Connect the power battery; avoid any repeating battery plug in and out. • Turn on receiver, when operating Speed Controllers with BEC-System, then turn on
his switch. • The motor will deliver a high tone signal (Beeping). After turning on, by activated
brake, you will get only one "Beep”. You will get two “Beeps”, if brake has not been activated. Never move throttle stick/knob between turning on and the Beep(s). If the Beep sign does not sound, disconnect the power battery, then wait approx. 10 sec. and give it another try. After this, if "Beep" does not comes check following points be-low:
o Is Speed Controller receiver lead correctly connected to the receiver? o Does the throttle stick/knob be into motor "OFF" position? o Is the power battery fully loaded and connected correctly? o Is receiver's power supply all right?
"Beeper" only sounds during the first turning on. If you turn off Controller or receiver battery, without disconnecting the power battery, then there would be no signal “Beep” by switching on again. • After Beep sign Speed Controller is armed and ready to operate. The "full power"
setting would be programmed automatically. If you didn’t have change (except Mode) initial Setup, then Speed Controller will work with factory setup, which means brake is activated, timing 1 (8 kHz), as well as automatically Low-Voltage cutoff for NiCad-/NiMh cells. This Setup would be the optimal one for operating with Hacker Brush-less-Motors and is also recommended for 2-pole motors from other factories.

MASTER-Line
11
6. Transmitter Setup of MASTER-Speed Controllers 6.1 Fundamental proceeding The initial setup of all our different Speed Controller versions is basically the same. Therefore we described below the programming occurrences for all Speed Controller versions. Make sure that for programming, the power battery (by non BEC Speed Controllers also the receiver battery) shows enough capacity. Also care, that your transmitter ATV ad-justments of Speed Controller throttle stick are 100% for both sides. By Multiplex trans-mitter use care, that the impulse system has an "UNI" setup. If using Robbe/FUTABA transmitters, you have to reverse the throttle channel Move throttle stick on full power position first, then turn on transmitter. Now, when switch-ing on Speed Controller, programming sequence will start. This will be indicated acousti-cally by one four-tone melody (in contrast to a "Simple or Double Beep by normal operat-ing). Besides, software guarantees, that motor does not start, even if the throttle stick would be in full power position. Each programmed setting would be motor signed by a melody. As the wished step sounds, move throttle stick into motor Stop position. The Speed Controller signs new mode setting by an associated sound signal and stores the constellation. Care about, that only one value can be programmed in a pass. For any new programming sequence (setting) the power battery has to be disconnected and re-connected. This programming is repeatable any time you want. 6.2 Mode Settings Any of our Speed Controller versions has two different operating modes. In the airplane one, MASTER-Flight/F5/Acro line, the brake can be activated. This mode is normally used with motor-gliders and folding propellers. For airplane models usually the braking mode is not desired. The factory delivery would be with activated brake. When turning on a MASTER-Flight/-F5/-Acro Speed Controller mode would be indicated by a melody (simply or double Beep), one Beep stands for brake mode and two Beeps for No brake. MASTER-Car Speed Controllers gets two different types of mode, one which has forward and brake, and an extended mode which get forward, brake and backwards. The factory delivery would be with forward and brake. When turning on a MASTER-Car Speed Con-troller mode would be indicated by a melody (simply or double Beep), one Beep stands for forward / brake mode and two Beeps for forward/brake/backwards. The mode of a Navy Speed Controller could not be changed by throttle stick. Navy Speed Controller can be set up by standard or on a Pistol-Grip-Radio (see chapter 5.3).

User Guide Master-Speed Controller
12
Mode setting procedure as follows: • Move throttle stick on full power position first, then turn on transmitter.
Now when switching on the Speed Controller, programming sequence will start, motor will not run.
• Connect the power battery; avoid any repeating battery plug in and out. • Switch on receiver, when operating Speed Controllers with BEC-
System, then use his switch. • Controller does, after approx. 5 sec., a four-tone melody, which
signs that programming sequence is ready. • IMMEDIATLY after the first melody move throttle stick into motor Stop
position. • Controller changes Mode and signs it by Beeping according to new
Mode. ATTENTION: From now on Speed Controller is armed and any throttle stick moving will make motor starting!
• This programming is repeatable any time you want; any time Speed Controller’s mode would be changed.
The settings would be stored, from now on Speed Controller works with programmed mode. Disconnect power battery and switch off the receiving. For other initial operations go forward as usual.
? / ??
Connect battery
Transmitter ON
Receiver ON

MASTER-Line
13
6.3 Timing settings All MASTER-Speed Controllers get four different, by transmitter programmable, timing adjustings (motor ignition advance). By this way all our Speed Controllers can be adapted to different motor types. A "motor ignition advance" is necessary, because by the inductance of motor coils is the current increase temporally delayed. The timing is indicated in degrees. This means how far before, the real moment, the coils current will be turned on. Sharpener the timing is (higher the number of degrees), the more shifts the max. efficiency to higher current operating. The optimal timing is determined by the dif-ferent motor types. Timing setting procedure as follows: • Move throttle stick on full power position first, then turn on transmitter.
Now when switching on the Speed Controller, programming sequence will start, motor will not run.
• Connect the power battery; avoid any repeating battery plug in and out.
• Switch on receiver, when operating Speed Controllers with BEC-System then use his switch.
• Controller does, after approx. 5 sec., a four-tone melody, which signs, that programming sequence is ready.
• After again waiting 5 sec., the different timing steps would be indi-cated by melodies. You will get five times one to four tones. Consider following system:
-Timing 1: five times one tone in a row -Timing 2: five times two tone in a row -Timing 3: five times three tone in a row -Timing 4: five times four tone in a row
While the wished step is indicated by the tone signal, move the "throttle stick" into motor stop position.
• Controller change Mode and signs it by tone signal according to new Mode. ATTENTION: From now on Controller is armed, and any "throttle stick" moving will make motor starting!
Timing settings would be stored, from now on Speed Controller works with programmed Timing. Disconnect power battery and switch off the receiving. For other settings go for-ward as usual. MASTER-Speed Controllers are factory programmed on Timing 1, which means to get a 2° "ignition advance" setting. This is the most efficient one for HACKER Brushless mo-tors. This setting is also recommended for 2-pole motors from other manufacturers. Tim-ing 2 corresponds to an 8° setting. Timing 2 is a sharpener one for 2-pole motors and brings the best results for 4-pole motors. Timing 3 has 15° of “ignition advance” it’s suit-able for 8-pole motors. Timing 4 has 30° of "ignition advance" and it fits to 10-and more pole motors. To get the most efficient timing for your motor, please check the used motor manual.
? or ??
Connect battery
Receiver ON
?? ?? ?? ?? ??
??? ??? ??? ??? ???
???? ???? ???? ???? ????
Transmitter ON

User Guide Master-Speed Controller
14
6.4 Switch frequency settings (40-A types), Low-Voltage cutoff (30-A types) and reverse (except Navy- and Car types) Brushless Speed Controller are working accordance with the PWM (Pulse With Modula-tion) switching rate principle. The switch frequency for this signal has to be a multiple one regarding to the commutation frequency. Frequencies of 8 kHz are generally considered as sufficient. Air coils motors need switch frequencies, because of their low inductance, up to 32 kHz. Starting from the MASTER 40 the switch frequency can be changed in three steps. This made our Speed Controllers universally useable. The optimal switch frequency depends of the motor construction. Switch frequency setting procedure as follows: • Move throttle stick on full power position first, then switch on transmit-
ter. Now when switching on the Speed Controller, programming se-quence will start, motor will not run.
• Connect the power battery; avoid any repeating battery plug in and out.
• Switch on receiver, when operating Speed Controllers with BEC-System, then use his switch.
• Controller does, after approx. 5 sec., a four-tone melody, which signs, that programming sequence is ready.
• After waiting again 5 sec. the different timing steps would be indicated by melodies. You will get five times one to four tones. Leave throttle stick in "full power" position and wait.
• Then the three different frequencies would be melody indicated. They are given by long and short Beeps. Consider following system:
-Frequency 1 (8KHz): long tones -Frequency 2 (16KHz): alternates long and short tones -Frequency 3 (32KHz): short tones -long, short, long Tone: reverse • While the wished switch frequency is indicated by tone signal, move
the throttle stick into motor Stop position. • Sped Controller recognizes new frequency setting and signs it by a
melody according to new Mode. ATTENTION: From now on Controller is armed, and any throttle stick moving will make motor starting!
Frequency settings would be stored, from now on Speed Controller works with pro-grammed frequency. Disconnect power battery and switch off the receiving. For other settings go forward as usual. MASTER-Speed Controllers are factory programmed on frequency 1, which means to get an 8 KHz setting. This is the most efficient one for HACKER Brushless motors. This setting is also recommended for 2-pole motors from other manufacturers. The second frequency corresponds to 16 KHz and the third to 32 KHz setting. To get the most efficient frequency for your motor, please check used motor manual. MASTER-Speed Controllers which switch currents up to 30 A (MASTER 4B-Flight to 30B-Flight as well as MASTER 8B-Heli as well as MASTER B-Car mini) purpose instead of a switch frequency a Low-Voltage cutoff. Like this you are also able to program these Speed Controllers by transmitter for Lithium Polymer cell applications. The setting method is completely identical to the switch frequency one. Besides, assigned to the acoustic signals are following Low-Voltage cutoff values/Options.
? or ??
Transmitter ON
Receiver ON
f.e. ? ? ? ? ?
? ? ? ? ?
?? ?? ?? ?? ??
? ? ? ? ?
Connect
battery

MASTER-Line
15
• Long tones: 33% of battery tension while connecting, at least with 4 V (for NiCd / NiMh).
• Long and short tones: cutoff with approx. 6.0 V (for 2 Lithium polymer cells). • Short tones: cutoff with approx. 9.0 V (for 3 Lithium polymer cells). • Long, short, long tone: reverse. 6.5 Current limitation setting of Car Speed Controllers MASTER-Car Speed Controllers get a four step programmable current limiter (20 A, 40 A, 60 A and without limitation). The limiter protect, while blocking the wheels, Speed Controller and motor. Current limiter programming procedure as follows: • Move throttle stick on full brake position first, then turn on transmitter.
Now when switching on the Speed Controller, programming sequence will start.
• Connect the power battery; avoid any repeating battery plug in and out.
• Switch on receiver, when operating Speed Controllers with BEC-System then use his switch.
• Speed Controller does, after approx. 5 sec., a melody, which signs, that programming sequence is ready.
• Then the four limiter Steps are systematically indicated by Beeps, by approx. 20 A -> current limitation one Beep, by approx. 40 A -> current limitation two Beeps, by approx. 60 A -> current limitation thee Beeps, no limitation -> are indicated by four Beeps.
• While the wished switch frequency signal sounds, move the "throttle stick" into motor Stop position.
• Speed Controller recognizes new setting and signs it by a melody ac-cording to new Mode. ATTENTION: From now on Speed Controller is armed, and any throttle stick moving will make motor starting!
Settings would be stored, from now on Speed Controller works with programmed current limitation. For other settings go forward as usual.
? or ??
Receiver ON
Connect battery
??
f.e. ???
???
????
Transmitter ON

User Guide Master-Speed Controller
16
7. MASTER-Speed Controller Setup by Prog-Box
All third generation MASTER-Speed Controllers can be programmed, in addition to the transmitter programming, by an independent Prog-Box (programming box). Herewith Speed Controller Setup can be programmed easily, see appendix A-3 (Setup features). How to connect the Prog-Box, please, check illustration below:
MASTER Prog-Box is not contained in Speed Controller supply.
Please check, how to use, on manual, which is added in the MASTER Prog-Box supply. 8. Declaration of conformity The described products are in compliance with the relevant and applicable EC guidelines for electromagnetic compatibility: 89/336/EWG 92/31/EWG 93/68/EWG

MASTER-Line
17
9. Protection features MASTER-Speed Controllers are fitted out with a couple of monitoring devices, which has to protect the Speed Controller as well as to care about the proper use of reception sig-nals. The protection functions guarantee the correct functioning of Speed Controller and motor in the whole Speed and current area. But they can't protect against inadmissible handling and operating conditions like for example short cuts or a polarity reverse of power battery. The Speed Controller protections switch the motor off if:
• Speed Controller gets overloaded when operating or if he reaches a temperature from110°C. However, this does not protect against short cuts.
• The battery tension gets down under the minimal operating voltage of the respec-tive type.
• The current drain, strongly distinguish in different phases (asymmetrical load). Speed Controllers do not get a current monitoring. The protection is only made by temperature monitoring
• If no valid receiver signal for more than 1 sec. Besides, Speed Controllers proc-essor checks the input after a logical mathematic procedure. As the correct im-pulses comes back again, motor would be restarted.
10. Warranty Any Speed Controllers wear during production through several tests. We lay a special priority into high quality products. Therefore we provide 24 months warranty to our Con-trollers. The warranty consists, during the guarantee time, in a free of charge repair service for proved material defects. We reserve device changing, if repair is impossible for eco-nomic reasons. As voucher for beginning and expiration of the warranty serves invoice issued by product acquisition. Possible repairs do not extend the warranty period. Incorrect application or operations, e.g., by polarity reverse, over voltage or wetness, avoid warranty claims. This is also considered for faults based on strong wear or excessive vibrations. Further claims, for example secondary damages, are expelled. The liability for losses by the device or its application is also expelled. Any shipping to Hacker Motor GmbH must be free of charge; unfree shipping will not be accepted. We can not take any responsibility for transport damages or loss of your ship-ment. For any warranty recover following conditions must be fulfilled: • Add invoice for Sped Controller purchase into the package • The Speed Controller has to be used in accordance with its operating instructions • The Speed Controller has to be used in accordance to the tensions and currents range indicated by the technical data • Add an indication which exactly describes the problem or defect.