Embed Size (px)
Citation preview
Copyright © 2002 VERITAS Software Corporation. All Rights Reserved. VERITAS, VERITAS Software, the VERITAS logo, and all other VERITAS product names and slogans are trademarks or registered trademarks of VERITAS Software Corporation in the US and/or other countries. Other product names and/or slogans mentioned herein may be trademarks or registered trademarks of their respective companies.
Classroom Session
WelcomeVERITAS Volume Manager
Basic Administration and Trouble shooting

VxVM (Veritas volume manager)
Describe standard terminology
• Diskgroup
• Volumes
• Plex
• Sub –Disk
List the common features of each supported RAID level
• Concatenation and spanning
• Striping (Raid – 0)
• Mirroring (Raid – 1)
• Striping Plus Mirroring (Mirrored Strip or Raid – 0+1)
• Mirroring Plus Striping (Striped – Mirror, Raid 1+0 or Raid – 10)
• Raid-5 (Striping with Parity)
At the end of this Session we familiar with

• Manageability
• Availability
• Performance
• Scalability
Benefits of VERITAS Volume Manager

Types of Objects
• Physical Storage Objects
• Logical or Virtual Objects

Physical Storage Objects

Logical or Virtual Objects

Disk Groups

VM Disks

Sub Disks

Plexes

Volumes

What is Volume Manger? Veritas Volume Manager (VxVM) is a storage management subsystem that allows you to manage physical disk as logical devices called Volumes.
VxVM operats as a subsystem between your operating system and your data management system, such as file system and database management system.
VxVM is layered on top of the OS interface services,and is dependent upon how the operating System accesses physical disks.
Through the support of RAID redundancy techniques, VxVM protects against disk and hardware failures, while providing the flexibility to extend the capabilities of existing hardware.
The basic method of disk organization is called Formatting.
Hard disk are formatted and information stored ,using 2 methods
•Physical storage layout
•Logical storage layout
VxVM uses logical storage layout method.

How Volume Manager Works?
With Volume Manager, you enable virtual data storage by bringing a disk under Volume Manager
control. To bring a disk under Volume Manager control means that Volume Manager creates virtual
objects and establishes logical connections between those objects and the underlying physical
objects, or disks.

VxVM Objects
VxVM uses two types of objects to handle storage management physical objects and virtual objects.
Physical objects – Physical Disk , controllers or other hardware with block and raw OS device interfaces that are used to store data.
Virtual objects – When one or more physical disks are brought under the control of VxVM, it creates virtual objects called Volumes on those physical disks.
Volume records and retrieve data from physical disk.
Volume are also composed of virtual objects (Plex and subdisks) that are used in changing the volume configuration
So volumes and their virtual components are called virtual objects or VxVM objects.

VxVM Objects Cont…
Volumes – is a virtual disk devices that appears to application,database, and file system like a physical disk device, but does not have the physical limitations of a physical disk device.
A volume may be created under the following constraints:
•The name of Volume can contain up to 31 character
•It can consist of 32 Plex ,each of which can have one or more subdisk
•Volumes must have at least one associated Plex that has a complete copy of data in the volume with at least one
associated subdisk
•All subdisk within a volume must belong to the same disk group
Plex – VxVM uses subdisks to build virtual objects called Plexes.A plex consists of one or more subdisks located on one
or more physical disks.
Plex can have 4096 subdisk.
Subdisk – A subdisk is a set of contiguous disk blocks. A blocks is a unit space on the disk. Each subdisk represents a
specific portion of a VM disk, which is mapped to a specific region of a physical disk.
Max 4096 subdisk can be created.

VxVM Objects Cont…
Volume
Plex
Subdisk

How Volume Manager Works?
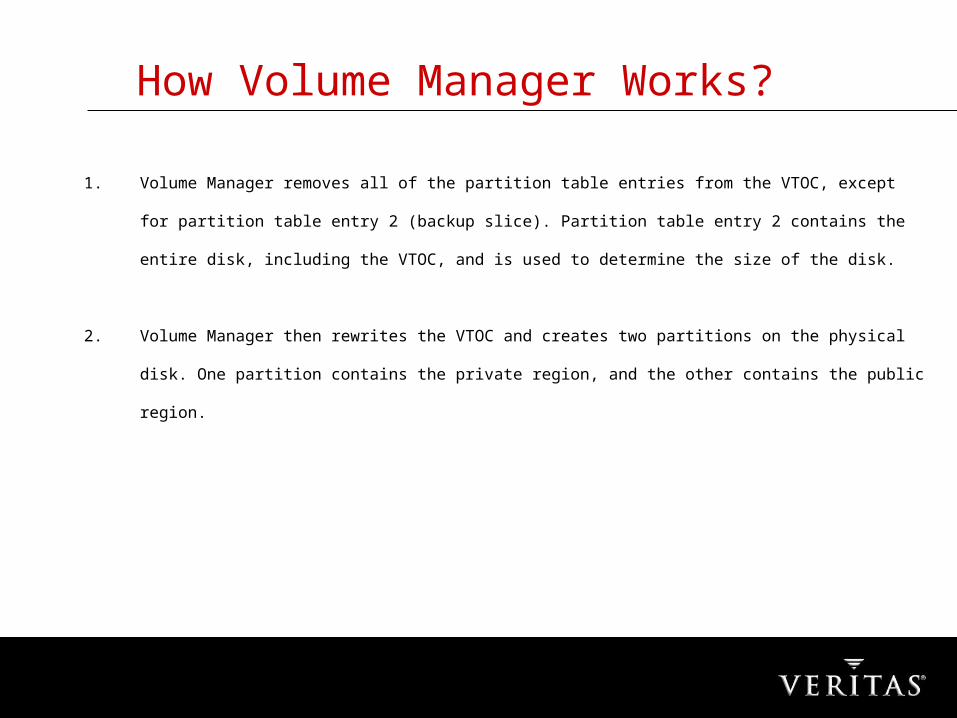
1. Volume Manager removes all of the partition table entries from the VTOC, except for partition table entry 2
(backup slice). Partition table entry 2 contains the entire disk, including the VTOC, and is used to determine
the size of the disk.
2. Volume Manager then rewrites the VTOC and creates two partitions on the physical disk. One partition
contains the private region, and the other contains the public region.
How Volume Manager Works?

• Private region: The private region stores information, such as disk headers, configuration copies, and kernel logs, that Volume Manager uses to manage virtual objects. The private region represents a small management overhead.The minimum size for the private region is 1024 sectors (512K) for disks with active configuration databases, but VxVM uses 2048 sectors (1024K) by default. This default value is rounded up to the next cylinder boundary.
• The maximum size for the private region is 524288 blocks (512K sectors).
• Partition Tags: VxVM sets the partition tags, the numeric values that describe the file system mounted on a partition, for the public and private regions:
• Tag 14 is always used for the public region of the disk. • Tag 15 is always used for the private region of the disk.
• If the disk has no partitions that are being placed under Volume Manager control, then Volume Manager creates the private region first, and the public region second, on the disk.
• Volume Manager updates the VTOC with information about the removal of the existing partitions and the addition of the new partitions during the initialization process.
How Volume Manager Works?

Summary of Virtual Object Relationships

Summary of Virtual Object Relationships…

Volume Layouts

Planning a First-Time VxVM Setup

Which disks do you want to place under Volume Manager control?

Do you want to use enclosure-based naming?

Do you want to exclude any disks from Volume Manager control?

Do you want to suppress dynamic multipathing on any disks?

When you place disks under Volume Manager control, do you want to preserve or eliminate data in existing file systems and partitions?

When you place disks under Volume Manager control, do you want to preserve or eliminate data in existing file systems and partitions?. . .
• When you place a disk under Volume Manager control, you can either preserve the data that exists on the physical disk (encapsulation) or eliminate all of the data on the physical disk (initialization).

• Saving the data on a disk brought under Volume Manager control is called disk encapsulation
• Contain the required minimum unpartitioned free space of 1024 sectors (512K) (By default, VxVM uses 2048 sectors (1024K).)
• Contain an s2 slice that represents the full disk( The s2 slice cannot contain a file system.)
Contain two free partition table entries
• The partitions are converted to subdisks that are used to create the volumes that replace the Solaris partitions.
Encapsulation

• Eliminating all of the data on a physical disk brought under Volume Manager
control is called disk initialization
Initialization
Note: Any disks that are encapsulated or initialized during installation are
placed in the disk group rootdg. If disks are left alone during installation, they can be placed under Volume Manager control later and assigned to disk
groups other than rootdg.

Do you want to place the system root disk under Volume Manager control?

• Existing /, /usr, and /var partitions are converted to volumes without removing the partitions.
• Other partitions are converted to volumes, and then partitions are removed.
• The existing swap area is converted to a volume. If there is insufficient space for the private region on the boot disk, Volume Manager takes sectors from the swap area of the disk, which makes the private region overlap the public region. The swap partition remains the same size, and the swap volume is resized to be smaller than the swap partition.
The /etc/system and /etc/vfstab files are modified.
Note: Volume Manager preserves a copy of the original VTOC of any disk
that is encapsulated in /etc/vx/reconfig.d/disks.d/cxtydz /vtoc, where cxtydz is the SCSI address of the disk.

Typical Initial VxVM Setup

• # vxlicense –c ;Adding a license a key
• # vxlicense –p ;Viewing installed license keys
VxVM Licensing

• VRTSvxvm ;Driver & Utilities
• VRTSlic ;Licensing
• VRTSvmdoc ;Documentation
• VRTSvmman ;Manual Pages
• VRTSvmdev ;Developer kit
• VRTSvmsa ;Storage Admin (GUI)
VxVM Standard Packages

• # pkgadd -d . VRTSlic
• # pkgadd -d . VRTSvxvm
• # pkgadd -d . VRTSvmsa
• # pkgadd -d . VRTSvmdoc
• # pkgadd -d . VRTSvmman
• # pkgadd -d . VRTSvmdev
Steps to Add VxVM Packages

• # vxinstall ;to configure VxVM after package installation
Steps to Add VxVM Packages

The vxinstall Process

The vxinstall Process…

• Volume Manager Storage Administrator (VMSA)
• Command Line Interface (CLI)
• Volume Manager Support Operations (vxdiskadm)
VxVM User Interfaces

• # tail -f /var/opt/vmsa/logs/command
Monitoring the Command Log

• /etc/vx/bin
• /usr/sbin
• /usr/lib/vxvm/bin
CLI Directories


Managing Disks

Placing a Disk Under Volume Manager Control

Placing a Disk Under Volume Manager Control…

Placing a Disk Under Volume Manager Control…

Commands…
• # vxdisksetup -i c1t0d0
• The -i option writes a disk header to the disk, making the disk directly usable

• # vxdg -g newdg adddisk newdg02=c2t0d0
Commands…

Commands…

Commands…

Commands…

Commands…

Commands…

• Evacuating a disk moves the contents of the volumes on a disk to another disk. The
contents of a disk can be evacuated only to disks in the same disk group that have
sufficient free space. You must evacuate a disk if you plan to remove the disk or if
you want to use the disk elsewhere
Evacuating a Disk

• # vxevac -g datadg datadg02 datadg03
Commands…

• If a disk is no longer needed in a disk group, you can remove the disk. After you
remove a disk from a disk group, the disk cannot be accessed. When removing a
disk from a disk group, you have two options:
• Move the disk to the free disk pool. With this option, the disk remains under Volume
Manager control.
• Send the disk back to an uninitialized state. With this option, the disk is no longer
under Volume Manager control.
• You cannot remove the last disk in a disk group. To remove the last disk in a disk
group, the disk group must be destroyed. The last disk in the rootdg disk group can
never be removed.
Removing a disk

• # vxdg -g newdg rmdisk newdg02
• vxdiskunsetup –C c1t0d0
Commands…

• # vxedit -g datadg rename datadg01 datadg03
Rename the disk

Managing Disk Group
• A disk group is created when you place at least one disk in the disk group. When you
add a disk to a disk group, a disk group entry is added to the private region header of
that disk. Because a disk can only have one disk group entry in its private region
header, one disk group does not "know about" other disk groups, and therefore disk
groups cannot share resources, such as disk drives, plexes, and volumes. A volume
with a plex can belong to only one disk group, and subdisks and plexes of a volume
must be stored in the same disk group.


• When you add a disk to a disk group, VxVM assigns the disk media name to the disk
and maps this name to the disk access record. In addition, the host name is also
recorded in the private region. This information is written to the private region of the
disk.


• Disk media name: A disk media name is the logical disk name assigned to a drive
by VxVM. VxVM uses this name to identify the disk for volume operations, such as
volume creation and mirroring.
• Disk access record: A disk access record is a record of how a disk maps to a
physical location and represents the UNIX path to the device. Disk access records
are dynamic and can be re-created when vxdctl enable is run.

• Once disks are placed under Volume Manager control, storage is managed in terms of
the logical configuration. File systems mount to logical volumes, not to physical
partitions. Logical names, such as /dev/vx/[r]dsk/diskgroup_name/volume, replace
physical locations, such as /dev/[r]dsk/c0t4d2s5

• Whenever the VxVM configuration daemon is started (or vxdctl enable is run), the
system reads the private region on every disk and establishes the connections
between disk access records and disk media names.

• The rootdg disk group is a special disk group that is created when you install VxVM
during the vxinstall process. VxVM requires that the rootdg disk group exist and that
it contain at least one disk. It is recommended that at least two disks are in the
rootdg disk group so that the VxVM configuration database can be maintained on at
least two disks. If you want your boot disk to be bootable under VxVM, then the boot
disk must be in the rootdg disk group.
The rootdg Disk Group


Disk Groups and High Availability

• # vxdg init newdg \ newdg01=c1t1d0s2
Creating Disk Group

• vxedit -g diskgroup set spare=on|off datadg02
Designating a Disk As a Hot-Relocation Spare

Making a Disk Group Unavailable

• # umount /filesystem1
• # umount /filesystem2
• # vxdg deport newdg

• # vxdg -n newerdg deport newdg
• # vxdg -h server1 deport newdg

Importing a Deported Disk Group

• # vxdg import newdg
• # vxdg -n newerdg import newdg
• # vxdg -f import newdg

Moving Disk Groups between Systems

Renaming a Disk Group

• # vxdg -n mktdg deport datadg• # vxdg import mktdg• # vxvol -g mktdg startall
(or)
• # vxdg deport datadg• # vxdg -n mktdg import datadg• # vxvol -g mktdg startall

• # vxdg destroy newdg
Destroying a Disk Group

Viewing Disk Group Information


Upgrading the Disk Group Version
# vxdg upgrade datadg

Selecting a Volume Layout

RAID - Redundant Array of Independent Disks
RAID is a method of combining several hard disk drives into one logical unit (two or more disks grouped together to appear
as a single device to the host system). RAID technology was developed to address the fault-tolerance and performance
limitations of conventional disk storage. It can offer fault tolerance and higher throughput levels than a single hard drive or
group of independent hard drives. While arrays were once considered complex and relatively specialized storage solutions,
today they are easy to use and essential for a broad spectrum of client/server applications.

VxVM Layouts
•Concatenation and spanning
•Striping (Raid – 0)
•Mirroring (Raid – 1)
•Striping Plus Mirroring (Mirrored Strip or Raid – 0+1)
•Mirroring Plus Striping (Striped – Mirror, Raid 1+0 or Raid – 10)
•Raid-5 (Striping with Parity)

Concatenation - RAID 0 Concatenation volume writes data to the first available component until it is full, then moves to the next available component
•Minimum number of drives: 2•Strengths: Highest performance. •Weaknesses: No data protection; One drive fails, all data is lost.
•Concatenation maps data in a linear manner
•Data is accessed in the first subdisk from beginning to end, data is then accessed in the remaining sub-disk available.
•Concatenated plex do not have to be physically contiguous and can belong to more then one VM disk.
Volume
Plex
Subdisk
ABC
DEF
ABCDEF

Striping - RAID 0
Data striping without redundancy (no protection)Minimum number of drives: 2Strengths: Highest performance. Weaknesses: No data protection; One drive fails, all data is lost.
•Striping (Raid 0) is useful if you need large amount of data written or read.
•Striping maps data so that the data is interleaved among two or more physical disks
•Data is allocated alternatively and evenly tp the subdisk of a striped plex
Volume
Plex
Subdisk Subdisk
ACE
BDF
ABCDEF
RAID Level 0

Concatenated Layout

• Removes size restrictions: Concatenation removes the restriction on size of storage devices imposed by physical disk size.
• Better utilization of free space: Concatenation enables better utilization of free space on disks by providing for the ordering of available discrete disk space on multiple disks into a single addressable volume.
• Simplified administration: Concatenation enables large file systems to be created and reduces overall system administration complexity
Concatenation: Advantages

• No protection against disk failure: Concatenation does not protect against disk failure. A single disk failure may result in the failure of the entire volume.
Concatenation: Disadvantages
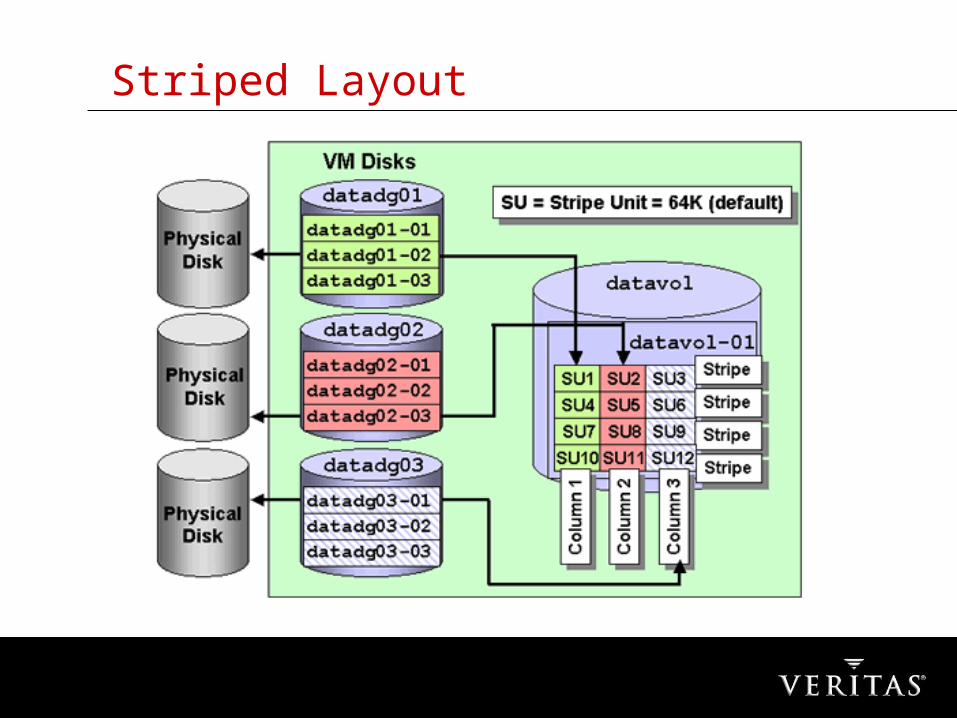
Striped Layout
• Parallel data transfer: Striping is useful if you need large amounts of data written to or read from the physical disks quickly by using parallel data transfer to multiple disks.
• Load balancing: Striping is also helpful in balancing the I/O load from multiuser applications across multiple disks.
• Improved performance: Improved performance is obtained by increasing the effective bandwidth of the I/O path to the data. This may be achieved by a single volume I/O operation spanning across a number of disks or by multiple concurrent volume I/O operations to more than one disk at the same time.
Striping: Advantages

• No redundancy: Striping alone offers no redundancy or recovery features.
• Disk failure: Striping a volume increases the chance that a disk failure will result in failure of that volume. For example, if you have three volumes striped across two disks, and one of the disks is used by two of the volumes, then if that one disk goes down, both volumes will go down.
Striping: Disadvantages

Mirrored Layout

• Improved reliability and availability: With concatenation or striping, failure of any one disk can make the entire plex unusable. With mirroring, data is protected against the failure of any one disk. Mirroring improves the reliability and availability of a striped or concatenated volume.
• Improved read performance: Reads benefit from having multiple places from which to read the data.
Mirroring: Advantages
• Requires more disk space: Mirroring requires twice as much disk space, which can be costly for large configurations. Each mirrored plex requires enough space for a complete copy of the volume's data.
• Slightly slower write performance: Writing to volumes is slightly slower, because multiple copies have to be written in parallel. The overall time the write operation takes is determined by the time needed to write to the slowest disk involved in the operation.
Mirroring: Disadvantages

RAID-5

• Redundancy through parity: With a RAID-5 volume layout, data can be re-created from remaining data and parity in case of disk failure.
• Requires less space than mirroring: RAID-5 stores parity information, rather than a complete copy of the data.
• Improved read performance: RAID-5 provides similar improvements in read performance as in a normal striped layout.
• Fast recovery through logging: RAID-5 logging minimizes recovery time in case of disk failure.
RAID-5: Advantages

• Slow write performance: The performance overhead for writes can be substantial, because a write can involve much more than simply writing to a data block. A write can involve reading the old data and parity, computing the new parity, and writing the new data and parity.
RAID-5: Disadvantages

• # vxassist -g datadg make datavol 10g
• # vxassist -g datadg make datavol layout=nostripe 10g
• # vxassist -g datadg make datavol 10g datadg02 datadg03
Creating a Concatenated Volume

• # vxassist -g acctdg make payvol 20m layout=stripe
• # vxassist -g acctdg make expvol 20m layout=stripe
ncol=3 stripeunit=64K acctdg01 acctdg02 acctdg03
Creating a Striped Volume

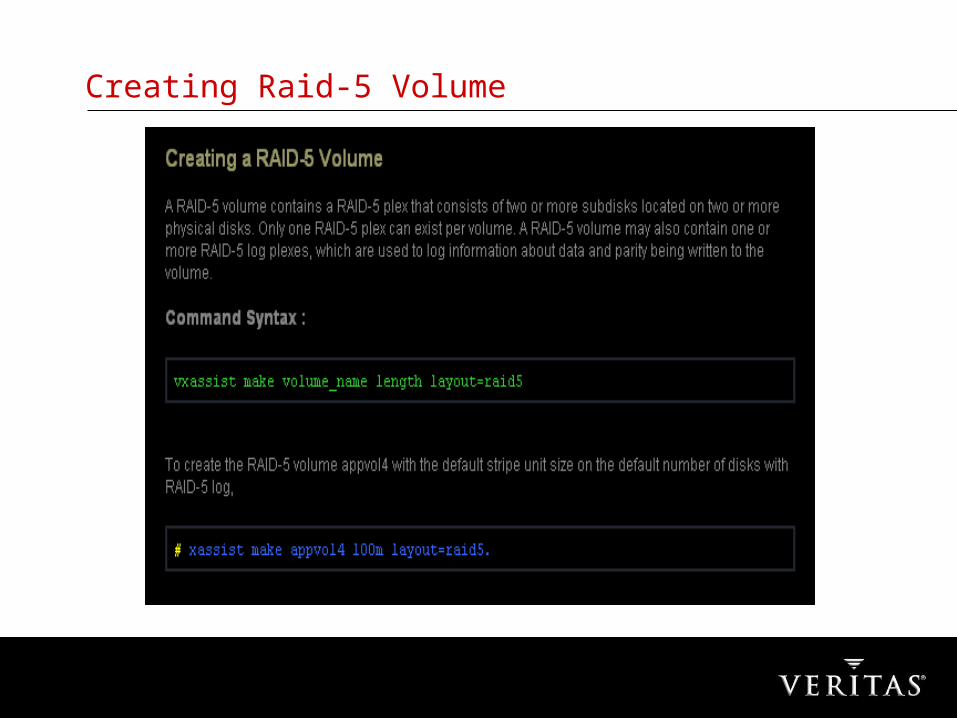
• # vxassist -g acctdg make expvol 20m layout=raid5
• # vxassist -g acctdg make expvol 20m layout=raid5 stripeunit=32K acctdg01 acctdg02 acctdg03 acctdg04
Creating a RAID-5 Volume

• # vxassist -g datadg make datavol 5g layout=mirror
• # vxassist -g datadg make datavol 5g layout=stripe,mirror
• # vxassist -g datadg -b make datavol 5glayout=stripe,mirror nmirror=3
Creating a Mirrored Volume

• # vxassist -g datadg maxsize
• # vxassist -g datadg maxsize layout=raid5
• vxassist -g datadg maxgrow datavol
Estimating Volume Size

• # vxprint –Aht• # vxprint –g rootdg• # vxprint –dt• # vxprint –st• # vxprint –pt• # vxprint -vt
Displaying Volume information

Removing a Volume

• # vxassist -g datadg remove volume datavol
• # vxedit –g datadg –rf rm datavol
Removing a Volume . . .

Adding Mirror

• # vxassist -g datadg mirror datavol
• # vxassist -g datadg mirror datavol datadg03
• vxmirror -g datadg -a
• # /etc/vx/bin/vxmirror -d yes
• # vxassist make nomirrorvol 20m nmirror=1
Adding Mirror . . .

• # vxassist -g datadg make datavol 10g layout=mirror nmirror=2 mirror=ctlr ctlr:c2 ctlr:c3
• # vxassist -g datadg make datavol 10g layout=mirror nmirror=2 mirror=enclr enclr:emc1 enclr:emc2
Mirroring across Controllers and Enclosures

Removing a Mirror

• # vxassist -g datadg remove mirror datavol datadg02
(or)
• # vxplex -g datadg dis datavol-02
• # vxedit -g datadg -rf rm \
datavol-02
Removing a Mirror

• # vxassist -g datadg make datavol 5g !datadg05
• # vxassist -g datadg make datavol 5g !ctlr:c2
• # vxassist -g datadg make datavol 5g ctlr:c1 !target:c1t5
• # vxassist -g datadg maxsize layout=raid5 nlog=2 !datadg07 !datadg08
Excluding Storage from Volume Creation

• # newfs dev/vx/rdsk/datadg/datavol
• # mount /dev/vx/dsk/datadg/datavol /data
Adding File System to a Volume

Volume Maintenance . . .

Volume Maintenance . . .

Managing Volume Tasks

• # vxtask -l list ;long format • # vxtask -h list ; hierarchically • # vxtask -p list ; paused state • # vxtask -r list ; running state• # vxtask -a list ; aborted state• # vxtask list convertop1
;specific task tag
Managing Volume Tasks

This is same as vxtask list command and addition to that we can use additional option like –w intervel
Monitoring a Task

• # vxtask pause 198
• # vxtask resume 198
• # vxtask abort 198
• # vxtask abort convertop1
Controlling the tasks
Disk Encapsulation

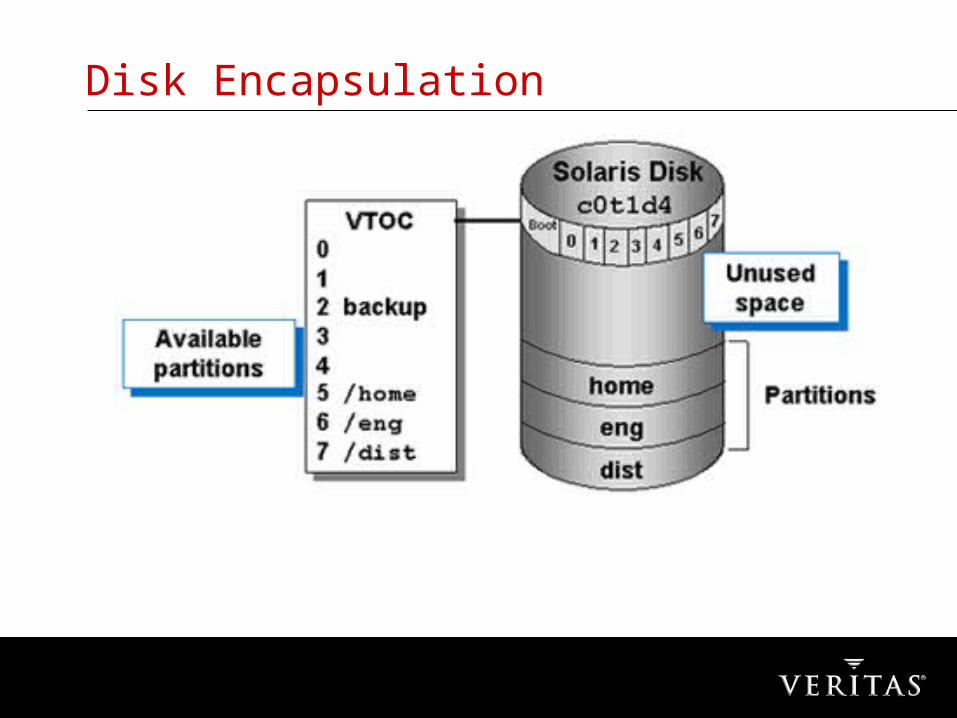
• On a Solaris system VxVM uses the volume table of contents (VTOC) to determine disk size (partition 2), then creates two partitions on the physical disk:
• One partition contains the private region. The private region stores VxVM information, such as disk headers, configuration copies, and kernel logs. Tag 15 is always associated with the private region. When a disk is encapsulated, tag 15 is always associated to a slice other than slice 3.
The other partition contains the public region. The public region is used for storage space allocation and is always associated with tag 14.

Root Disk Encapsulation

• At least two partition table entries must be available on the disk.
– One partition is used for the public region.– One partition is used for the private region.
• A minimum of 1024 sectors of unpartitioned free space, rounded up to the nearest cylinder boundary, must be available either at the beginning or at the end of the disk. VxVM uses 2048 sectors by default.
Data Disk Encapsulation Requirements
• Boot disk encapsulation has the same requirements as data disk encapsulation, with one important distinction: when encapsulating the root disk, the private region can be created from the swap area, which reduces the swap area by the size of the private region. The private region is created at the beginning of swap, and the swap partition begins one cylinder from its original location.
Boot Disk Encapsulation Requirements

Encapsulating Root

Select disk devices to encapsulate:[<pattern-list>,all,list,q,?] c0t0d0
Which disk group [<group>,list,q,?] (default: rootdg)
Encapsulate other disks? [y,n,q,?] (default: n) n

VTOC: Before Encapsulating Root Disk

VTOC: After Encapsulating Root Disk

• As part of the root encapsulation process, the /etc/system file is updated to include information that tells VxVM to boot up on the encapsulated volumes. The following two lines are added to the /etc/system file:
rootdev:/pseudo/vxio@0:0 set vxio:vol_rootdev_is_volume=1
VTOC: After Encapsulating Root Disk

/etc/vfstab: Before Root Encapsulation

/etc/vfstab: After Root Encapsulation

• The boot disk must be encapsulated by VxVM in order to be mirrored.
• To mirror the root disk, you must provide another disk with enough space to contain all of the root partitions (/, /usr, /var, /opt, and swap).
• You can only use disks in the rootdg disk group for the boot disk and alternate boot disks.
Mirroring the Root Disk
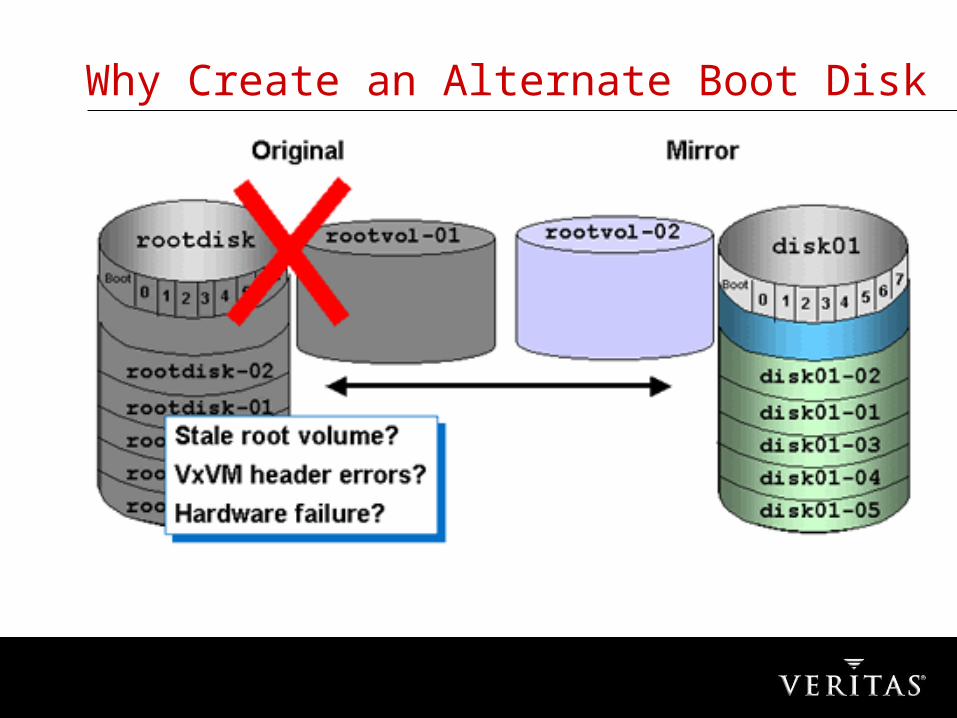
Why Create an Alternate Boot Disk

• # /etc/vx/bin/vxrootmir secrootmir
• # vxassist mirror homevol secrootmir
• # /etc/vx/bin/vxmirror rootdisk secrootmir

• # prtconf -vp | grep bootpath
• bootpath: '/sbus@3,0/SUNW,socal@d,10000/sf@0,0/ssd@w2100002037590098,0:a'

• # prtconf -vp | grep vx
vx-disk01: '/sbus@3,0/SUNW,socal@d,10000/sf@0,0/ssd@w21000020374fe71f,0:a'
• vx-rootdisk: '/sbus@3,0/SUNW,socal@d,10000/sf@0,0/ssd@w2100002037590098,0:a'

• # vxunroot• To convert the root, swap, usr, var, opt, and
home file systems back to being accessible directly through disk partitions instead of through volume devices, you use the vxunroot utility. Other changes that were made to ensure the booting of the system from the root volume are also removed so that the system boots with no dependency on VxVM.
Unencapsulating a Root Disk

• For vxunroot to work properly, the following conditions must be met:
• All but one plex of rootvol, swapvol, usr, var, opt, and home must be removed (using vxedit or vxplex).
• One disk in addition to the root disk must exist in rootdg.

To convert a root volume back to partitions:
• Ensure that the rootvol, swapvol, usr, and var volumes have only one associated plex each. The plex must be contiguous, nonstriped, nonspanned, and nonsparse.

• # vxprint -ht rootvol swapvol usr var
• # vxplex -o rm dis plex_name

• # /etc/vx/bin/vxunroot
• This command changes the volume entries in /etc/vfstab to the underlying disk partitions for the rootvol, swapvol, usr, and var volumes. The command also modifies /etc/system and prompts for a reboot so that disk partitions are mounted instead of volumes for the root, swap, usr, and var volumes.

VxVM Architecture

• VxVM is a device driver that is placed between the UNIX operating system and the SCSI device drivers. When VxVM is installed, UNIX invokes the VxVM device drivers instead of the SCSI device drivers. VxVM determines which SCSI drives are involved in the requested I/O and delivers the I/O request to those drives.

• vxconfigd• When a system is booted, the command vxdctl enable is
automatically executed to start the VxVM configuration daemon, vxconfigd. VxVM reads the /etc/vx/volboot file to determine disk ownership, then automatically imports rootdg and all other disk groups owned by this host.
• vxconfigd reads the kernel log to determine the state of VxVM objects. vxconfigd reads the configuration database on the disks, then uses the kernel log to update the state information of the VM objects.
VxVM Daemons

• vxiod• vxiod—VxVM I/O kernel threads provide extended I/O
operations without blocking calling processes. By default, 10 I/O threads are started at boot time, and at least one I/O thread must continue to run at all times.
VxVM Daemons…

• vxrelocd• vxrelocd is the hot relocation daemon that monitors
events that affect data redundancy. If redundancy failures are detected, vxrelocd automatically relocates affected data from mirrored or RAID-5 subdisks to spare disks or other free space within the disk group. vxrelocd also notifies the system administrator by e-mail of redundancy failures and relocation activities.
VxVM Daemons…

• The disk header contains the disk label, disk group information, host ID, and pointers to the private and public regions. You can display disk header information by using vxdisk list diskname.
• The configuration database contains VxVM object definitions. The size of the configuration database is approximately 70 percent of the private region.
• Kernel logs contain configuration changes, including information about log plex attachment, object creation, object deletion, object states, and flags.
V M Disks – Private Region

• A simple disk is a disk that is created dynamically in the kernel and has public and private regions that are contiguous inside a single partition.
• A sliced disk is a disk that has separate slices for the public and private regions.
• A NOPRIV disk is a disk that does not contain a private region
Types of VxVM Disks

• The VxVM configuration database stores all disk, volume, plex, and subdisk configuration records. The vxconfig device (/dev/vx/config) is the interface through which all changes to the volume driver state are performed. This device can only be opened by one process at a time, and the initial volume configuration is downloaded into the kernel through this device.
VxVM Configuration Database

• The configuration database is stored in the private region of a VxVM disk.
• The VxVM configuration is replicated within the disk group so that sufficient copies exist to protect against loss of the configuration in case of physical disk failure. VxVM attempts to store at least four copies for each disk group.

• To display the status of the configuration database for a disk group
• # vxdg list acctdg
Displaying Disk Group Configuration Data


• In the output, there are four disks that have configuration databases that are active (online), and there is one disk that does not have an active copy of the data (disabled).
• The size of the configuration database for a disk group is the size of the smallest private region in the disk group. In the example, permlen=2630.
• Log entries are on all disks that have databases. The log is used by the VxVM kernel to keep the state of the drives accurate, in case the database cannot be kept accurate (for example, if the configuration daemon is stopped).

• # vxdisk –g newdg list newdg01
Displaying Disk Configuration Data


• Term Description• Device Full UNIX device name of disk• devicetag Device name used by VxVM to reference the physical disk• type Method of placing disk under VxVM controlDefault is sliced.• hostid Name of system that manages the disk groupIf blank, no host is currently controlling this group• disk name VM disk media name and internal ID• group name Disk group name and internal ID• flags Settings that describe status and options for the disk• Pubpaths Paths for block and character device files of public region of disk• Privpaths Paths for block and character device files of private region of disk• version Version number of header format• iosize The size of I/O to private region• public, private slices Partition (slice) number, offset from beginning of partition, and length of partition• (public offset=0, private offset=1)• update time Date, time, and sequence number of last update to private region• headers Offset to two copies of the private region header• configs count Number of config database copies kept in the private region• logs count Number of kernel logs kept in the private region• Defined regions Location of configuration database(s) and kernel logs in the private regionBecause the
database or logs can be split, there could be multiple pieces. Therefore, the offset is the starting location within the private region where this piece of the database begins. Copy represents which copy of the database that this piece is a part of.
• Note: There are "multiple pieces" of the config database because one is READ-ONLY and the other is READ-WRITE. When you perform tasks in VxVM, only the RW piece's data changes. The other piece contains the control files for the config database.
• Multipathing information If dynamic multipathing is enabled and there are multiple paths to the disk, this item shows information about the paths and their status.

• The VxVM configuration daemon must be running in order for configuration changes to be made to the VxVM configuration database. If vxconfigd is not running, VxVM will operate properly, but configuration changes are not allowed.
How Does vxconfigd Work?

• Enabled
Enabled is the normal operating mode in which most configuration operations are allowed. Disk groups are imported, and VxVM begins to manage device nodes stored in /dev/vx/dsk and /dev/vx/rdsk.
vxconfigd Modes

• Disabled
In the disabled mode, most operations are not allowed. vxconfigd does not retain configuration information for the imported disk groups and does not maintain the volume and plex device directories. Certain failures, most commonly the loss of all disks or configuration copies in the rootdg disk group, will cause vxconfigd to enter the disabled state automatically.

• Booted
The booted mode is part of normal system startup, prior to checking the root file system. The booted mode imports the rootdg disk group and waits for a request to enter the enabled mode. Volume device node directories are not maintained, because it may not be possible to write to the root file system.

• vxconfigd is invoked by startup scripts during the boot procedure. To manage some aspects of vxconfigd, you can use the vxdctl utility.
The vxdctl Utility
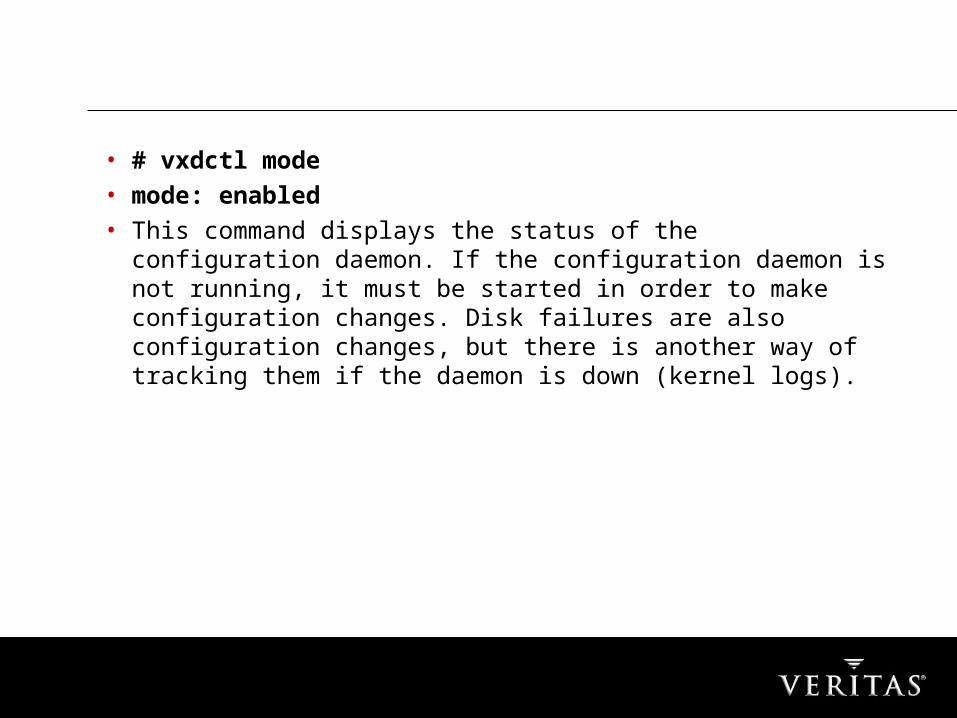
• # vxdctl mode• mode: enabled• This command displays the status of the configuration
daemon. If the configuration daemon is not running, it must be started in order to make configuration changes. Disk failures are also configuration changes, but there is another way of tracking them if the daemon is down (kernel logs).

• If vxconfigd is running, but not enabled, the following message is displayed:
• mode: disabled
• To enable the configuration daemon, you type:• # vxdctl enable

• mode: not-running
• # vxconfigd
• Once started, vxconfigd automatically becomes a background process.

• # vxdctl stop
• To send a kill -9 to vxconfigd:
• # vxdctl -k stop

• # vxdctl disable
• To prevent configuration changes from occurring, but to allow administrative commands to be used, you can disable the daemon

• # vxdctl license [init]
• To display the list of VxVM features which are currently available based on known licensing information
• This command checks /etc/vx/elm files in order to display currently licensed features
• By adding the init argument, you can request that vxconfigd reread any persistently stored license information. If licenses have expired, some features may become unavailable. If new licenses have been added, the features defined in those licenses become available.

• The /etc/vx/volboot file contains a host ID that is used by VxVM to establish ownership of physical disks. This host ID is used to ensure that two or more hosts that can access disks on a shared SCSI bus will not interfere with each other in their use of those disks. This host ID is important in the generation of unique ID strings that are used internally for stamping disks and disk groups.
The volboot File

• The volboot file also contains a list of disks to scan in search of the rootdg disk group. At least one disk in this list must be both readable and a part of the rootdg disk group, or VxVM will not be able to start up correctly.
• Never edit the volboot file manually. If you do so, its checksum will be invalidated.

• To view the decoded contents of the volboot file
• # vxdctl list

• If you change your host name in UNIX, you need to change your host ID in the volboot file. To change the host ID in the volboot file and on all disks in disk groups currently imported on the machine
• # vxdctl hostid hostid • # vxdctl enable
Changing the Host ID

• If some disks are inaccessible at the time of a hostid operation, it may be necessary to use the vxdisk clearimport operation to clear out the old host ID on those disks when they become reaccessible. Otherwise, you may not be able to re-add those disks to their disk groups.

• Caution: Be careful when using this command. If the system crashes before the hostid operation completes, some disk groups may not reimport automatically

• To re-create the volboot file because it was removed or invalidated
• # vxdctl init [hostid]
• If a hostid operand is specified, then this string is used; otherwise, a default host ID is used. The default host ID is the network node name for the host
Re-Creating the volboot File

Introduction to Recovery
• What Is Resynchronization ?

Minimizing the Impact of Resynchronization
• DRL - Dirty region logging for Mirror• Logging b – for RAID 5

How Does DRL Work?• DRL logically divides a volume into a set of consecutive
regions and keeps track of the regions to which writes occur. A log is maintained that contains a status bit representing each region of the volume. For any write operation to the volume, the regions being written are marked dirty in the log before the data is written.
• If a write causes a log region to become dirty when it was previously clean, the log is synchronously written to disk before the write operation can occur. On system restart, VxVM recovers only those regions of the volume that are marked as dirty in the dirty region log.
DRL

• RAID-5 volumes use RAID-5 logs to keep a copy of the data and parity currently being written.
• Without logging, data not involved in any active writes can be lost or silently corrupted if both a disk in a RAID-5 volume and the system fail.
• If this double-failure occurs, there is no way of knowing if the data being written to the data portions of the disks or the parity being written to the parity portions have actually been written.
RAID 5 Logging
• RAID-5 logging is used to prevent corruption of data during recovery by immediately recording changes to data and parity to a log area. The new data and parity are then written to disk.
• Logs are associated with a RAID-5 volume by being attached as log plexes. More than one log plex can exist for each RAID-5 volume, in which case the log areas are mirrored.

• Permanent disk failure:
Disk Failure

• When a disk is corrupted and no longer usable, the disk must be logically and physically removed, and then replaced with a new disk. With permanent disk failure, data on the disk is lost.
Example: VTOC is damaged.

• Temporary disk failure:

• Temporary disk failure: When communication to a disk is interrupted, but the disk is not damaged, the disk can be logically removed, then reattached as the replacement disk. With temporary (or intermittent) disk failure, data still exists on the disk.
Example: Power is disrupted.

• VxVM is designed to protect your system from the impact of disk failure through a feature called hot relocation. The hot-relocation feature of VxVM automatically detects disk failures and restores redundancy to failed VxVM objects by moving subdisks from failed disks to other disks.
Impact of Disk Failure

• Note: Hot relocation is only performed for redundant (mirrored or RAID-5) subdisks on a failed disk. Nonredundant subdisks on a failed disk are not relocated, but the system administrator is notified of the failure.


• When a partial disk failure occurs (that is, a failure affecting only some subdisks on a disk), redundant data on the failed portion of the disk is relocated. Existing volumes on the unaffected portions of the disk remain accessible. With partial disk failure, the disk is not removed from VxVM control and is labeled as FAILING, rather than as FAILED. Before removing a FAILING disk for replacement, you must evacuate any remaining volumes on the disk.
Partial Disk Failure

• The vxrelocd daemon starts during system startup and monitors VxVM for failures involving disks, plexes, or RAID-5 subdisks. When a failure occurs, vxrelocd triggers a hot-relocation attempt and notifies the system administrator, through e-mail, of failures and any relocation and recovery actions.
How Does Hot Relocation Work?

• The vxrelocd daemon is started from the S95vxvm-recover file. The argument to vxrelocd is the list of people to e-mail notice of a relocation (default is root). To disable vxrelocd, you can place a "#" in front of the line in the S95vxvm-recover file.
• The hot-relocation feature is enabled by default. No system administrator action is needed to start hot relocation when a failure occurs.

A successful hot-relocation process involves • Failure detection: Detecting the failure of a disk, plex, or RAID-5
subdisk
• Notification: Notifying the system administrator and other designated users and identifying the affected Volume Manager objects
• Relocation: Determining which subdisks can be relocated, finding space for those subdisks in the disk group, and relocating the subdisks (The system administrator is notified of the success or failure of these actions. Hot relocation does not guarantee the same layout of data or the same performance after relocation.)
• Recovery: Initiating recovery procedures, if necessary, to restore the volumes and data (Again, the system administrator is notified of the recovery attempt.)

A successful hot-relocation process involves

• vxedit -g datadg set spare=on datadg03
• vxedit -g datadg set spare=off datadg03
• vxedit -g datadg set nohotuse=on datadg04
• vxedit -g datadg set nohotuse=off datadg04
Setting Up Spare Disks

• # vxassist -g mydg -r maxsize layout=stripe ncolumns=3
• To include spare disks when determining how much space is available using the maxsize or maxgrow options, you add the -r flag in the vxassist command
Including Spare Disks in Space Availability

• A spare disk is not the same as a reserved disk. You can reserve a set of disks for special purposes, such as to avoid general use of a particularly slow or a particularly fast disk
• # vxedit set reserve=on datadg05
• # vxedit set reserve=off datadg05
Reserving Disks

• After you type this command, vxassist does not allocate space from the selected disk unless that disk is specifically mentioned on the vxassist command line.

• # vxassist make vol03 20g datadg05
• overrides the reservation and creates a 20-MB volume on datadg05. However, the command

• # vxassist make vol04 20g
does not use datadg05, even if there is no free space on any other disk.

• Replacing a failed or corrupted disk involves two main operations :
• 1. Disk replacement When a disk fails, you replace the corrupt disk with a new disk.
The disk used to replace the failed disk must be either an uninitialized disk or a disk in the free disk pool. The replacement disk cannot already be in a disk group. If you want to use a disk that exists in another disk group, then you must remove the disk from the disk group and place it back into the free disk pool before you can use it as the replacement disk.
Disk Replacement Tasks
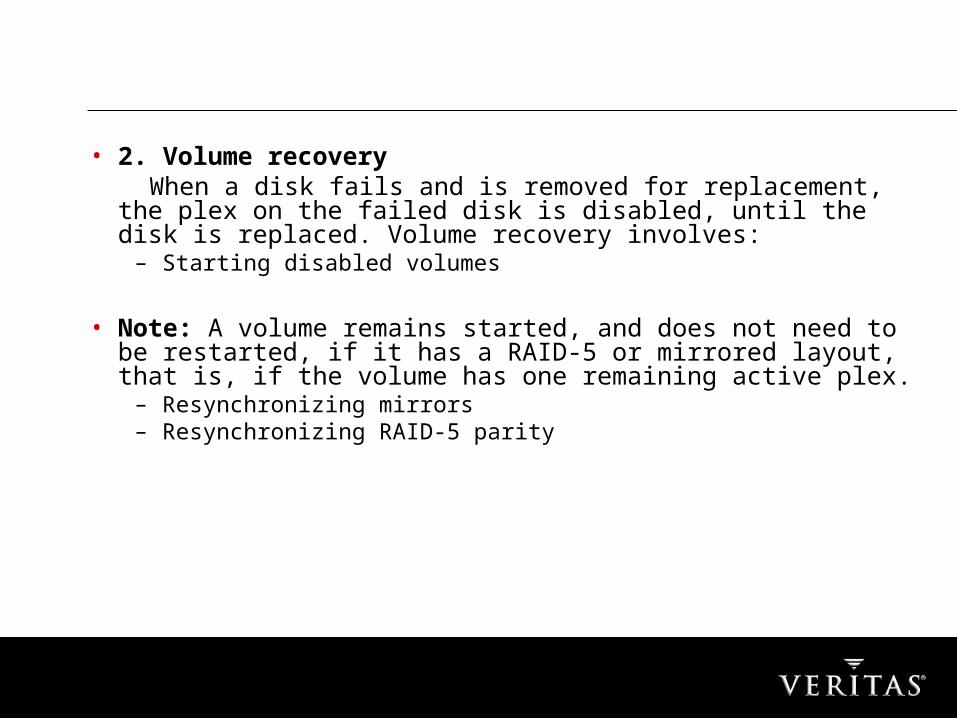
• 2. Volume recovery When a disk fails and is removed for replacement, the plex
on the failed disk is disabled, until the disk is replaced. Volume recovery involves:
– Starting disabled volumes
• Note: A volume remains started, and does not need to be restarted, if it has a RAID-5 or mirrored layout, that is, if the volume has one remaining active plex.
– Resynchronizing mirrors – Resynchronizing RAID-5 parity

• After successful recovery, the volume is available for use again. Redundant (mirrored or RAID-5) volumes can be recovered by VxVM. Nonredundant (unmirrored) volumes must be restored from backup.


• Before VxVM can use a new disk, you must ensure that Solaris recognizes the disk. When adding a new disk, follow these steps to ensure that the new disk is recognized:
Adding a New Disk

• 1.Connect the new disk. • 2. Get Solaris to recognize the disk: • # drvconfig• # disks • Note: In Solaris 7 and later, use devfsadm, a one-command • replacement for drvconfig and disks.• 3. Verify that Solaris recognizes the disk:• # prtvtoc /dev/dsk/device_name • 4. Get VxVM to recognize that a failed disk is now working
again: • # vxdctl enable • 5. Verify that VxVM recognizes the disk: • # vxdisk list• After Solaris and VxVM recognize the new disk, you can then
use the disk as a replacement disk.

Replace a failed disk

• Select a removed or failed disk [<disk>,list,q,?] datadg02
• The following devices are available as replacements:c1t0d0s2 c1t1d0s2
• Choose a device, or select "none" [<device>,none,q,?] (default: c1t0d0s2)

• After you confirm the operation, the following status message is displayed:
• Replacement of disk datadg02 in group datadg
with disk device c1t0d0s2 completed successfully.

• # vxdg -k -g datadg adddisk datadg01=c1t1d0s2
• The -k switch forces VxVM to take the disk media name of the failed disk and assign it to the new disk
• For example, if the failed disk datadg01 in the datadg disk group was removed, and you want to add the new device c1t1d0s2 as the replacement disk
Replacing a Disk: CLI

• Note: Exercise caution when using the -k option to vxdg. Attaching the wrong disk with the -k option can cause unpredictable results in VxVM

• The hot-relocation feature detects I/O failures in a subdisk, relocates the subdisk, and recovers the plex associated with the subdisk.
• VxVM also provides a utility that unrelocates a disk, that is, moves relocated subdisks back to their original disk. After hot relocation moves subdisks from a failed disk to other disks, you can return the relocated subdisks to their original disk locations after the original disk is repaired or replaced.
The vxunreloc Utility

• Unrelocation is performed using the vxunreloc utility, which restores the system to the same configuration that existed before a disk failure caused subdisks to be relocated.

• When a subdisk is hot-relocated, its original disk media name is stored in the orig_dm_name field of the subdisk record files. You can search this field to find all the subdisks that originated from a failed disk using the vxprint command
Viewing Relocated Subdisks

• For example, to display all the subdisks that were hot-relocated from datadg01 within the datadg disk group:
• # vxprint -g datadg -se `sd_orig_dmname="datadg01"'

Unrelocating a Disk: vxdiskadm

• The vxreattach utility reattaches disks to a disk group and retains the same media name. This command attempts to find the name of the drive in the private region and to match it to a disk media record that is missing a disk access record. This operation may be necessary if a disk has a transient failure, for example, if a drive is turned off and then back on, or if the Volume Manager starts with some disk drivers unloaded and unloadable.
Recovering a Volume

• vxreattach tries to find a disk in the same disk group with the same disk ID for the disks to be reattached. The reattach operation may fail even after finding the disk with the matching disk ID if the original cause (or some other cause) for the disk failure still exists.
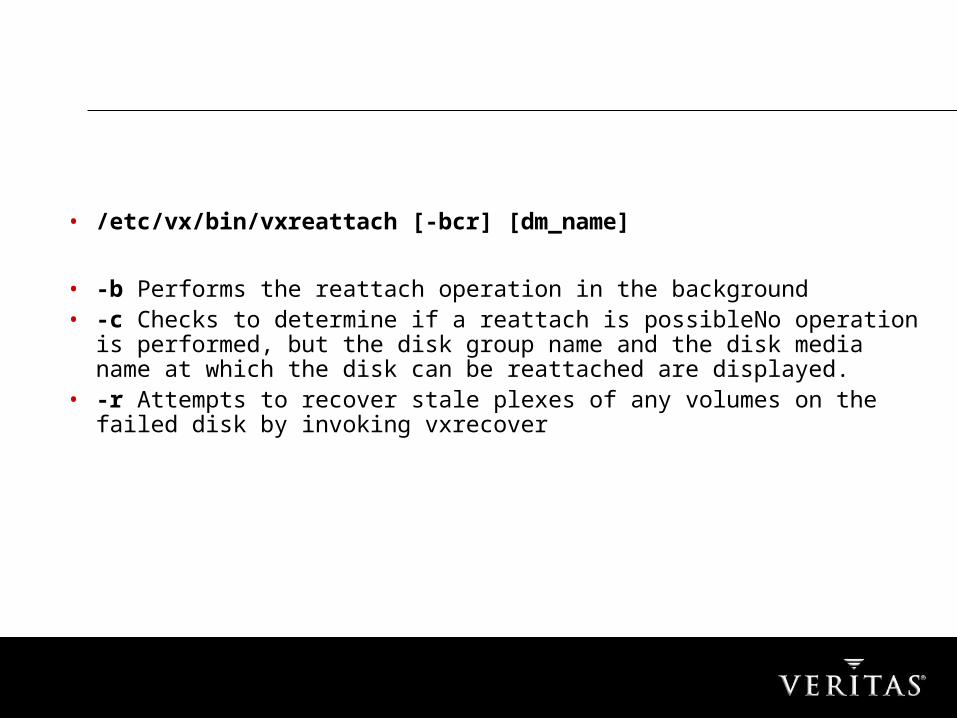
• /etc/vx/bin/vxreattach [-bcr] [dm_name]
• -b Performs the reattach operation in the background• -c Checks to determine if a reattach is possibleNo operation is
performed, but the disk group name and the disk media name at which the disk can be reattached are displayed.
• -r Attempts to recover stale plexes of any volumes on the failed disk by invoking vxrecover

• To perform volume recovery operations from the command line, you use the vxrecover command. The vxrecover program performs plex attach, RAID-5 subdisk recovery, and resynchronize operations for specified volumes (volume_name), or for volumes residing on specified disks (dm_name). You can run vxrecover any time to resynchronize mirrors.
The vxrecover Command

• Note: The vxrecover command will only work on a started volume. A started volume displays an ENABLED state in
vxprint -ht.

• Recovery operations are started in an order that prevents two concurrent operations from involving the same disk. Operations that involve unrelated disks will run in parallel.

• # vxrecover -bs -g datadg datadg01
• After replacing the failed disk datadg01 in the datadg disk group, and adding the new disk c1t1d0s2 in its place, you can attempt to recover the volumes.

• # vxrecover -b -g datadg datadg01
• To recover, in the background, any detached subdisks or plexes that resulted from replacement of the disk datadg01 in the datadg disk group

• # vxrecover -v -g datadg datadg01
• To monitor the operations during the recovery

• Precautionary Tasks
• To protect the VxVM configuration, you can perform two precautionary tasks:
• 1. Save a copy of the VxVM configuration using the vxprint command.
• 2. Save a copy of the /etc/system file.
Protecting VxVM Configuration

• You can also use the vxprint command to save the VxVM configuration to a file and later use that file to recover removed volumes. By saving the output of the vxprint command to a file, you can then use the vxmake command with the saved file to restore the configuration if needed.

• When saving the VxVM database configuration, you use the -m option. This option displays all information about each record in a format that is useful as input to the vxmake utility. To view the saved records, you can use the -D - option. This option reads a configuration from the standard input format.

Saving the Configuration Database
• # vxprint -g diskgroup -hmQqr > backup.DGname
(or)
• # vxprint -g diskgroup -hmvpsQqr > backup.DGname

• # vxprint -D - -rht < backup.DGname
Displaying a Saved Configuration

• # vxprint -D - -rhtmqQ lostvolume < backup.DGname > restoredvolume
• This command creates object definitions for a restored volume out of the object definitions in the lost volume
Recovering a Lost Volume

• To implement the object definitions of restoredvolume into a real volume
• # vxmake -g diskgroup -d restoredvolume

• To start the restored volume, and recover its plexes.
• # vxrecover -Es restoredvolume

Creating Volumes

Creating Concatenated Volume

Creating Striped Volume
Creating Raid-5 Volume

Removing Volumes

Extending Volume

Shrinking Volume

Question ….you well like to put

Hope now we all are familiar with Vxvm concept and ready for the Lab- Session

RAID 0 – Advantage & Disadvantage

Mirrored - RAID 1
•Disk mirroring•Minimum number of drives:2•Strengths: Very high performance; Very high data protection; Very minimal penalty on write performance.•Weaknesses: High redundancy cost overhead; Because all data is duplicated, twice the storage capacity is required.
Volume
Plex Plex
Subdisksubdisk
ABC
DEF
ABC
DEF
ABCDEF
RAID Level 1

RAID 1 – Advantage & Disadvantage

Mirrored Stripe - RAID 0+1
Combination of RAID 0 (data striping) and RAID 1 (mirroring).
•Minimum number of drives: 4•Strengths: Highest performance, highest data protection (can tolerate multiple drive failures). •Weaknesses: High redundancy cost overhead; Because all data is duplicated, twice the storage capacity is required; Requires minimum of four drives.
Volume
Plex Plex
Subdisk Subdisk Subdisk Subdisk
ABCDEF
ACE
BDF
ACE
BDF
Raid 1
Raid 0Striping
RAID Level 0+1
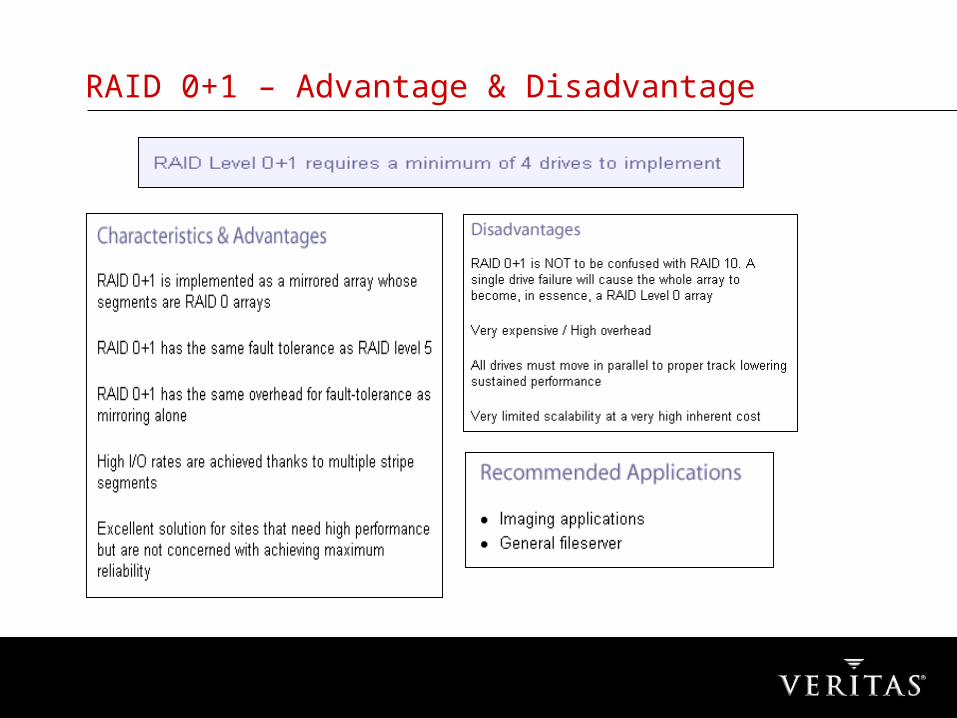
RAID 0+1 – Advantage & Disadvantage

Striped Mirror - Raid 1+0
Combination of RAID 0 (data striping) and RAID 1 (mirroring).
Note that RAID 10 is another name for RAID (0+1) or RAID 0/1Minimum number of drives: 4Strengths: Highest performance, highest data protection (can tolerate multiple drive failures). Weaknesses: High redundancy cost overhead; Because all data is duplicated, twice the storage capacity is required; Requires minimum of four drives.
Volume
Plex
Subdisk Subdisk
Layered Volume Layered Volume
Plex Plex Plex Plex
Sub Disk Sub Disk Sub Disk Sub Disk
AC
BD
AC
AC
AC
BD
AC
BD
BD
ABCD
Raid 0Striping
Raid 1
BD
RAID Level 1+0

RAID 1+0 – Advantage & Disadvantage

Parity
The concept behind RAID is relatively simple. The fundamental premise is to be able to recover data on-
line in the event of a disk failure by using a form of redundancy called parity. In its simplest form, parity is
an addition of all the drives used in an array. Recovery from a drive failure is achieved by reading the
remaining good data and checking it against parity data stored by the array. Parity is used by RAID
levels 2, 3, 4, and 5. RAID 1 does not use parity because all data is completely duplicated (mirrored).
RAID 0, used only to increase performance, offers no data redundancy at all.
A + B + C + D = PARITY 1 + 2 + 3 + 4 = 10 1 + 2 + X + 4 = 10 7 + X = 10 + X = 10 -7
--------- ----------X 3 MISSING RECOVEREDDATA DATA

Striping with Parity - Raid 5
Block-level data striping with distributed parity
Minimum number of drives: 3+1 log plex diskStrengths: Best cost/performance for transaction-oriented networks; Very high performance, very high data protection; Supports multiple simultaneous reads and writes; Can also be optimized for large, sequential requests. Weaknesses: Write performance is slower than RAID 0 or RAID 1.
Volume
Raid 5 plex Log Plex
Subdisk
SubdiskACP
SubdiskBPA
SubdiskPDB
ABCD
RAID Level 5

RAID 5 – Advantage & Disadvantage