Embed Size (px)
Citation preview

L
Universal StationXUser Guide
UX09-400


L
Universal StationX
Universal StationXUser Guide
UX09-4006/93
ii UXS User Guide 6/93
Copyright, Notices, and Trademarks
Printed in U.S.A. – © Copyright 1993 by Honeywell Inc.
Revision 01 – June 15, 1993
While this information is presented in good faith and believed to be accurate,Honeywell disclaims the implied warranties of merchantability and fitness for aparticular purpose and makes no express warranties except as may be stated in itswritten agreement with and for its customer.
In no event is Honeywell liable to anyone for any indirect, special or consequentialdamages. The information and specifications in this document are subject tochange without notice.
This document was prepared using Information Mapping® methodologies andformatting principles.
TDC 3000 is a trademark of Honeywell Inc.
Information Mapping is a trademark of Information Mapping Inc.
OSF, OSF/Motif, and Motif are trademarks of the Open Software Foundation, Inc.
TotalPlant is a trademark of Honeywell Inc.
Universal StationX is trademark of Honeywell Inc.
UNIX is a trademark of AT&T Technologies Inc.
Windows is a trademark of Microsoft Corporation.
HoneywellIndustrial Automation and Control
Automation College2820 West Kelton Lane
Phoenix, AZ 85023
(602) 789-5669

6/93 UXS User Guide iii
About This Publication
This publication is provided to aid operation of Universal StationX hardware/software.
Use this publication to operate the Universal StationX. If you are unfamiliar with the specific LANconfiguration to which the station is attached, your Local Area Network Administrator will beneeded to assist in initial operation.

iv UXS User Guide 6/93

6/93 UXS User Guide v
Table of Contents
SECTION 1 – UXS USER DOCUMENTATION.............................................................. 1
1.1 Overview.............................................................................................. 1
SECTION 2 – UXS CONCEPTS .................................................................................. 3
2.1 What is UxS .......................................................................................... 32.2 UXS Hardware....................................................................................... 5
SECTION 3 – WINDOW OPERATIONS........................................................................ 7
3.1 Window Manager .................................................................................. 73.2 Cursor Usage........................................................................................ 83.3 Altering Window Size ............................................................................ 93.4 Minimizing/Maximizing Windows........................................................... 103.5 Using the Window Menu...................................................................... 113.6 Repositioning Windows....................................................................... 123.7 Workspace Menu Access .................................................................... 133.8 Operator Workspace Menu.................................................................. 143.9 Supervisor Workspace Menu............................................................... 153.10 Engineer Workspace Menu ................................................................. 163.11 View-Only Workspace Menu................................................................ 183.12 Using the Touchscreen....................................................................... 19
SECTION 4 – UXS OPERATIONS............................................................................. 21
4.1 Power-On (Procedure)........................................................................ 214.2 Accessing UXS Co-Processor Functions.............................................. 224.3 Loading a Personality to the LCN Processor ......................................... 234.4 Printing from the UXS.......................................................................... 254.5 Failsafe Operation............................................................................... 264.6 X Window Operation............................................................................ 274.7 System Security.................................................................................. 284.8 Backup the Co-Processor Hard Drive.................................................... 304.9 Shut Down the UXS ............................................................................ 324.10 UXS Restrictions................................................................................. 334.11 Problem Reporting.............................................................................. 345.1 User Configuration Overview ............................................................... 355.2 X Host Authorization............................................................................ 365.3 Configure Native Window Behavior ...................................................... 395.4 Configure Keyboard Focus Policy........................................................ 405.5 Change User Password....................................................................... 41

vi UXS User Guide 6/93
Acronyms
AIA.......................................................................... Application Integration ArchitectureCIM ........................................................................ Computer Integrated ManufacturingIWSM ............................................................................. Industrial Work Space ManagerLCN ............................................................................................ Local Control NetworkLAN ................................................................................................ Local Area NetworkOSF.................................................................................... Open Systems FoundationOSI ............................................................................... Open Systems InterconnectionTDC ........................................................................................ Total Distributed ControlTPDG...................................................................... Turbo Peripheral Display GeneratorUCN...................................................................................... Universal Control NetworkUNPX......................................................................................... Universal Personality XUXS ........................................................................... Universal Station with ExtensionsWSI.............................................................................................. Workstation Interface

6/93 UXS User Guide vii
References
PublicationTitle
PublicationNumber
BinderTitle
BinderNumber
UxS User Guide UX09-400 UxS 2093
UxS System Administration Manual UX11-400 UxS 2093
A Beginners Guide to the X WindowSystem
98594-90002
Using the X11 Window System 98794-90001
HP-UX System Security 92453-90029
A Beginners Guide to HP-UX 98594-90006
HP-UX Concepts and Tutorials: TextEditors and Processors
97089-90022
A Beginner’s Guide to Text Editing 98594-90010
Quick Reference Card for vi Editor 98597-90000
HP-UX Concepts and Tutorials: Shellsand Miscellaneous Tools
97089-90062
A Beginner’s Guide to Using Shells 98594-90008
Laserjet III Printer User’s Manual
LaserJet 4 and 4M Printers User Manual C2001-90912

viii UXS User Guide 6/93
6/93 UXS User Guide 1
Section 1 – UxS User Documentation
1.1 Overview
Availabledocumentation
The user documentation for the Universal StationX product, is comprisedof the following manuals published by Honeywell and Hewlett Packard:
• UXS User Guide, UX09-400
• UXS System Administration Manual, UX11-400
• HP-UX System Security, 9253-90029
• Using the X11 Window System, 98794-90001
Procedures This publication covers specific procedures to perform many tasks whichinclude:
• Configuration of LCN window display behavior
• Adding/Deleting X host display access authorization
• Configuration of X Windows keyboard focus policy
• Performing routine backup
• Changing user passwords

2 UXS User Guide 6/93

6/93 UXS User Guide 3
Section 2 – UXS Concepts
2.1 What is UxS
Long term plan In today’s competitive environment, maintaining control of costs andquality is paramount. Many process industry companies are formulatinglong-range plans to meet these objectives. The broad direction is to achievelow cost operations through the integration of process control andinformation system technologies. Honeywell’s TDC (Total DistributedControl) system will be the foundation of the future CIM (ComputerIntegrated Manufacturing) system. This Honeywell system is calledTotalPlant.
To meet these challenges, it is important to provide an evolutionary path ofproducts, that preserve customer investments in hardware and training. TheUXS platform is the first step in implementing this long term strategy.
Definition of UXS An embedded open system environment provides support fordisplay/import of data generated on non-LCN platforms. ThisTDC 3000X/X Windows integrated platform enables software connectionsbetween the LAN (Local Area Network) and the LCN (Local ControlNetwork). UXS is the linking of open systems, X Windows, and Motif toproduce a visually integrated display of TotalPlant information.
The initial introduction/release of the UXS product provides visualintegration of plant information. Visual Integration provides the followingfeatures/benefits:
Features Benefits
Dual Operating System Support Power of TDC - flexibility of open systems
Window Management Management of multiple displays
Single LCN window - MotifEnvironment
Ability to resize or move LCN window
Client/Server X Windows Communication with non-TDC computersystems
Multiple LAN windows Simultaneous access to multiple non-TDCcomputer systems
Fail Safe Fall Back Ensures the “view to the valve”
System Security Limits access to authorized users
TDC system isolated from open system
Continued on next page
4 UXS User Guide 6/93
2.1 What is UXS, Continued
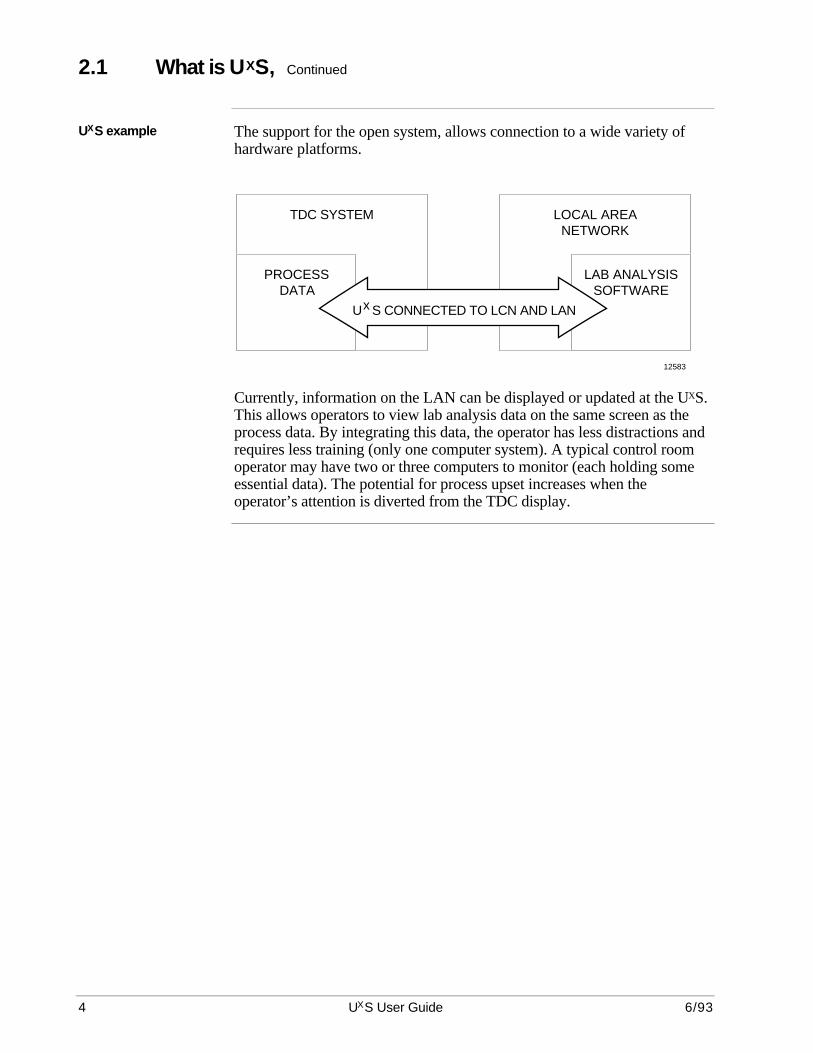
UXS example The support for the open system, allows connection to a wide variety ofhardware platforms.
TDC SYSTEM LOCAL AREA NETWORK
PROCESSDATA
LAB ANALYSISSOFTWARE
U S CONNECTED TO LCN AND LAN
12583
x
Currently, information on the LAN can be displayed or updated at the UXS.This allows operators to view lab analysis data on the same screen as theprocess data. By integrating this data, the operator has less distractions andrequires less training (only one computer system). A typical control roomoperator may have two or three computers to monitor (each holding someessential data). The potential for process upset increases when theoperator’s attention is diverted from the TDC display.
6/93 UXS User Guide 5
2.2 UXS Hardware
US - UXS migration The UXS is available in two basic forms: upgrade kits (for a standardUniversal Station), or as a complete station (with furniture). The upgradesare available in several versions to match your specific hardwareconfiguration.
Initial hardware The initial pre-release UXS deliveries are in a standard/current TDC 3000Universal Station furniture.
Components The UXS consists of a tightly integrated TDC 3000X Universal Station andan open system processor environment in a co-processor architecture. TheUXS contains the following components:
• Standard US furniture cabinet
• Standard 5 slot module
• New electronics package
• New monitor
• Hard drive and DAT (Digital Audio Tape) drive
New electronicspackage
The electronics package consists of:
• Standard K2LCN-8 board
• Workstation Interface board (WSI board)
• Turbo Peripheral Display Generator (TPDG board)
• I/O boards for each of the boards above
• 8 ampere power supply
New monitor A 1280 x 1024 monitor provides high resolution display.
New co-processormedia
A hard drive and a DAT (Digital Audio Tape) drive have been added tocontain these UXS files:• Open system filesystem
• X Window files
• TPDG download code
• UXS (UNPX) personality download code
This media is connected to the Open system co-processor and is notaccessible by the LCN filesystem.
Specific details For more specific hardware information, refer to UXS Service Manual.

6 UXS User Guide 6/93
6/93 UXS User Guide 7
Section 3 – Window Operations
3.1 Window Manager
X Window system The X Window system provides standards by which computers ofdissimilar types can exchange window displays. This allows computersystems to execute an application and send the display of that application toother computer systems which support the X Window graphical standard.This standard integrated the concept of a window manager. The windowmanager allows manipulation of the X Window displays.
Consistent look The UXS utilizes Motif Window Manager to provide a consistent look to allapplications displayed on the UXS. This software provides functions foropening, closing, moving, resizing, and indicating the active window. Ifyou have used Microsoft Windows you will immediately recognize thesimilarities.
The Window Manager attributes are preset, and cannot be changed. Laterversions will allow custom configuration of window attributes.
Functions provided The Motif Window Manager applies the window interface attributesindependent of the application running within a window. The windowinterface effects only the manner in which that window is displayed. It willprovide such elements as: title bars, scroll bars, resizing, control ofoverlapping windows, and the ability to iconify a window. These elementsallow manipulation of multiple windows, independent of their application orthe underlying computer platform/operating system executing theapplication. This allows one window interface to display all windowsappearing on the UXS screen.

8 UXS User Guide 6/93
3.2 Cursor Usage
Cursor types The Window Manager uses various cursor types to depict the type ofoperation being performed. The types are:
• pointing or or
• working
• moving
• resizing or or or or or or or

6/93 UXS User Guide 9
3.3 Altering Window Size
Changing window size Where you grab the window’s frame determines how the window will beresized. The dimensions (width x height) of the window being resized isdisplayed in the center of the screen. The measurement is in characters(across) and lines (down) for terminal windows; other types are measuredin pixels (dots on the screen).
NOTE: When resizing the LCN Native Window, it is necessary to clickthe bottom right corner of the window border to cause the LCNdisplay to resize. The LCN processing continues withoutproblem, but the display may be only partially visible.
Use the following to change the window size:
If you want to stretch or shrink thewindow . . .
Point to . . .
vertically from the . . .
top top of the frame, above the title bar
bottom bottom of the frame
horizontally from the . . .
right right side of the frame
left left side of the frame
diagonally from the . . .
bottom left corner frame’s lower left corner
top left frame’s upper left corner
top right frame’s upper right corner
bottom right frame’s lower right corner
10 UXS User Guide 6/93
3.4 Minimizing/Maximizing Windows
Minimize a window To reduce workspace clutter, you may change a window to an icon. Anicon is a graphical representation of the application executing in thatwindow. This reduction to an icon is called “minimizing” a window.Applications executing in a minimized window continue to execute until thetask is completed, or until they require user input.
There are several methods to minimize a window:
• Use the Minimize button on the windows title bar
• Use the Minimize selection from the Window Menu
A window which has been minimized (iconified) may be returned to thewindow form using several methods.
• Double-Click (click twice in rapid succession) the icon.
• Use the Maximize selection from the Window Menu
Telnet%
MINIMIZEBUTTON
Telnet
12584
Maximize a window Clicking on the Maximize button will enlarge the window to cover the entiremonitor. Clicking on the button a second time will return the window sizeto the original dimensions.
NOTE: When resizing the LCN Native Window, it is necessary to clickon the bottom right corner of the window border to cause the LCNdisplay to resize. The LCN processing continues withoutproblem, but the display may be only partially visible.
Telnet%
MAXIMIZEBUTTON
12585
6/93 UXS User Guide 11
3.5 Using the Window Menu
Window menu Each window has a window menu containing functions for controlling thewindow. To access the window menu, point to the menu target and thenpress and hold the select button. The menu is displayed as long as the selectbutton is held down. To select a menu item, drag the cursor down the listand release the select button when the appropriate item is highlighted.
Telnet%
MENUBUTTON
12586
To perform the following, select the appropriate menu item:
To do this . . . Select . . .
Restore a window from an icon or aftermaximizing.
Restore
Change the location of a window. Move
Change the size of a window. Size
Shrink the window to its iconrepresentation.
Minimize
Enlarge the window to cover the entireroot window.
Maximize
Send a window to the back or bottomof the window stack, the positionclosest to the root window.
Lower
Immediately close the window andmake it disappear.
Close

12 UXS User Guide 6/93
3.6 Repositioning Windows
Moving windows Windows can be positioned anywhere on the screen, with one exception.The Native LCN window is configured (for all users except engineer groupmembers) to inhibit its ability to be partially obscured or overlapped byother windows. This attribute can be configured and is covered insubsection 5.3, Configure Native Window Behavior.
To move a window, click and drag on the window’s title bar. Whilemoving, an outline of the window is shown for positioning purposes. Thewindow will move to this new location if the select button is released at thecurrent position.
Telnet%
TITLE BAR
12587
6/93 UXS User Guide 13
3.7 Workspace Menu Access
Workspace menu To reduce the user interaction with the open system environment, aworkspace menu (sometimes called the root menu) is included. This menuis accessed by holding down the select button within the workspace(outside all windows). You can select a menu item by dragging the pointerdown the menu list and releasing the select button when that item ishighlighted.
Operator Menu
X Menu >
Application Menu >
Engineer Menu
X Menu >
Application >
System Menu >12588
Hierarchical menus The menu uses hierarchical (nested) menu items indicated by an arrow tothe right of the item which has another level of menu. To access thesenested menus, hold the select button and scroll to the appropriate menu; thenested menu item will appear. Moving the cursor onto this new menu willallow selections to be made from this newly visible list of items.
Applications
Calculator
Datebook
Telnet
DECnet
Change Password
Operator Menu
X Menu >
Application Menu >
12589
Access levels The menu is preconfigured according to the access level, which is assignedby the system administrator. When a user is added to the co-processor, theiruser login name is associated to a group of users. This association providessecurity restrictions by displaying menus specific to that group’s accessauthorization.
The access levels are:
• Operator
• Supervisor
• Engineer
• View Only
14 UXS User Guide 6/93
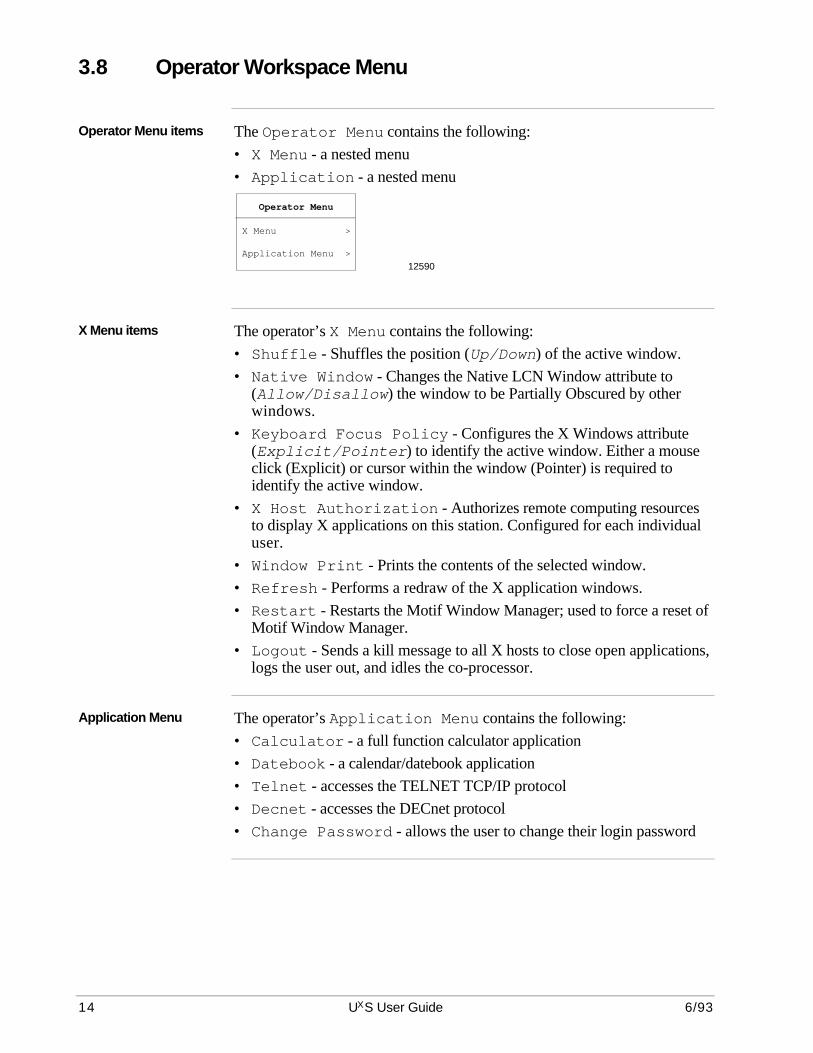
3.8 Operator Workspace Menu
Operator Menu items The Operator Menu contains the following:
• X Menu - a nested menu
• Application - a nested menu
Operator Menu
X Menu >
Application Menu >
12590
X Menu items The operator’s X Menu contains the following:
• Shuffle - Shuffles the position (Up/Down) of the active window.
• Native Window - Changes the Native LCN Window attribute to(Allow/Disallow) the window to be Partially Obscured by otherwindows.
• Keyboard Focus Policy - Configures the X Windows attribute(Explicit/Pointer) to identify the active window. Either a mouseclick (Explicit) or cursor within the window (Pointer) is required toidentify the active window.
• X Host Authorization - Authorizes remote computing resourcesto display X applications on this station. Configured for each individualuser.
• Window Print - Prints the contents of the selected window.
• Refresh - Performs a redraw of the X application windows.
• Restart - Restarts the Motif Window Manager; used to force a reset ofMotif Window Manager.
• Logout - Sends a kill message to all X hosts to close open applications,logs the user out, and idles the co-processor.
Application Menu The operator’s Application Menu contains the following:
• Calculator - a full function calculator application
• Datebook - a calendar/datebook application
• Telnet - accesses the TELNET TCP/IP protocol
• Decnet - accesses the DECnet protocol
• Change Password - allows the user to change their login password

6/93 UXS User Guide 15
3.9 Supervisor Workspace Menu
Supervisor Menu items The Supervisor Menu contains the following:
• X Menu - a nested menu
• Application - a nested menu
Supervisor Menu
X Menu >
Application Menu >
12591
X Menu items The supervisor’s X Menu contains the following:
• Shuffle - Shuffles the position (Up/Down) of the active window.
• Native Window - Changes the Native LCN Window attribute to(Allow/Disallow) the window to be Partially Obscured by otherwindows.
• Keyboard Focus Policy - Configures the X Windows attribute(Explicit/Pointer) to identify the active window. Either a mouseclick (Explicit) or cursor within the window (Pointer) is required toidentify the active window.
• X Host Authorization - Authorizes remote computing resourcesto display X applications on this station. Configured for each individualuser.
• Window Print - Prints the contents of the selected window.
• Refresh - Performs a redraw of the X application windows.
• Restart - Restarts the Motif Window Manager; used to force a reset ofMotif Window Manager.
• Logout - Sends a kill message to all X hosts to close open applications,logs the user out, and idles the co-processor.
Application Menu items The supervisor’s Application Menu contains the following:
• Calculator - a full function calculator application
• Datebook - a calendar/datebook application
• Telnet - accesses the TELNET TCP/IP protocol
• Decnet - accesses the DECnet protocol
• Change Password - allows the user to change their login password

16 UXS User Guide 6/93
3.10 Engineer Workspace Menu
Engineer Menu items The Engineer Menu contains the following:
• X Menu - a nested menu
• Application - a nested menu
• System Menu - a nested menu
Engineer Menu
X Menu >
Application >
System Menu >12592
X Menu items The engineer’s X Menu contains the following:
• Shuffle - Shuffles the position (Up/Down) of the active window.
• Native Window - Changes the Native LCN Window attribute to(Allow/Disallow) the window to be Partially Obscured by otherwindows.
• Keyboard Focus Policy - Configures the X Windows attribute(Explicit/Pointer) to identify the active window. Either a mouseclick (Explicit) or cursor within the window (Pointer) is required toidentify the active window.
• X Host Authorization - Authorizes remote computing resourcesto display X applications on this station. Configured for each individualuser.
• Window Print - Prints the contents of the selected window.
• Refresh - Performs a redraw of the X application windows.
• Restart - Restarts the Motif Window Manager; used to force a reset ofMotif Window Manager.
• Logout - Sends a kill message to all X hosts to close open applications,logs the user out, and idles the co-processor.
Application Menu items The engineer’s Application Menu contains the following:
• UNIX Load - a bar chart display of UNIX processor loading
• Calculator - a full function calculator application
• Datebook - a calendar/datebook application
Continued on next page

6/93 UXS User Guide 17
3.10 Engineer Workspace Menu, Continued
Application Menu items,continued
• Telnet - accesses the TELNET TCP/IP protocol
• Decnet - accesses the DECnet protocol
• Change Password - allows the user to change their login password
System Menu items The engineer’s System Commands menu contains the following:
• Configuration - a nested menu of configuration items
• Update Software - used to update co-processor software
• Add/Remove Users - a co-processor user registration application
• Backup/Restore - used to backup/restore the co-processor software
Configuration Menuitems
The engineer’s Configuration Menu contains the following:
• IWSM Configuration - shutdown WSI and Native Mode access
• System Configuration - used to configure the co-processor LANenvironment
• Set Time/Timezone - sets the co-processor time, date, and timezone
• Gated Daemon - Turns ON/OFF dynamic LAN routing
18 UXS User Guide 6/93
3.11 View-Only Workspace Menu
X Menu items The View-Only X Menu contains the following:
• Shuffle - Shuffles the position (Up/Down) of the active window.
• Native Window - Changes the Native LCN Window attribute to(Allow/Disallow) the window to be Partially Obscured by otherwindows.
• Keyboard Focus Policy - Configures the X Windows attribute(Explicit/Pointer) to identify the active window. Either a mouseclick (Explicit) or cursor within the window (Pointer) is required toidentify the active window.
• X Host Authorization - Authorizes remote computing resourcesto display X applications on this station. Configured for each individualuser.
• Window Print - Prints the contents of the selected window.
• Refresh - Performs a redraw of the X application windows.
• Restart - Restarts the Motif Window Manager; used to force a reset ofMotif Window Manager.
• Logout - Sends a kill message to all X hosts to close open applications,logs the user out, and idles the co-processor.

6/93 UXS User Guide 19
3.12 Using the Touchscreen
Display resolution The high resolution display required a change to touchscreen operation.Software is provided to zoom the screen display at 2 times original size.This zoom touchscreen aids in the selection of small targets.
Zoom touchscreen The touchscreen on the UXS is supplemented by software to aid in selectingsmall targets in high resolution display. On the initial touch a boundary iscreated approximately 3 inchs around the target area. This will show azoomed-in view of the screen around your finger. As you move yourfinger, the image moves one half the distance.
Zoom feature availability The zoom feature is only available when a user is logged into the co-processor environment. The software action is performed as part of the XWindow environment and does not effect operation of the application withinthe window.
Using zoom touch The proper method of using the zoom touchscreen is to place your finger on(or as close to) the desired target as possible. This is to reduce the amountof finger movement necessary allowing selection of targets close to thescreen border. It is important to watch the zoomed view, as the 2:1 ratio offinger to image movement is confusing at first.
Selecting with thetouchscreen
The touchscreen may be used to select targets in the LCN window bysimply touching the appropriate target.
All other X Window menu or target selections are made using the space barin conjunction with the touchscreen. To select a workspace menu item;touch the background (outside any windows) and press the space bar whilemoving your finger to select a menu item.
Sticky menus When using the touchscreen and space bar to select workspace menu items,you will notice they function as sticky menus (staying visible withoutholding down the mouse button) and allow use of the arrow keys tonavigate, return key to select, and ESCape key to cancel.

20 UXS User Guide 6/93

6/93 UXS User Guide 21
Section 4 – UXS Operations
4.1 Power-On (Procedure)
Apply power Apply power using the following steps:
Step Action
1 Open front access door to gain access to the circuit breaker.
2 Place the circuit breaker in the ON position.
3 Open the rear access door to gain access to the 5-slot module.
4 Apply power to the station, using the power switch on the 5-slotmodule face plate.
5 Observe the K2LCN board LEDs during the power on self-test. If noerrors are detected, the appropriate LCN node address is displayed.
6 If the appropriate LCN node address is displayed:Proceed with Step 7.
If another number is displayed:Record the error number for maintenance personnel to assist incorrecting the fault. Proceed with Step 9.
7 The Login banner should appear within 5 minutes.
8 If the Login banner does appear:Proceed to subsection 4.2, Accessing Co-Processor Functions.
If the Login banner has not appeared:Proceed with Step 14.
9 The Login banner should appear within 5 minutes.
10 If the banner does appear:Proceed to Step 11 to shut down the co-processor.
If the Login banner has not appeared:Proceed with Step 14.
11 Position the cursor in the Login box and typeusername <RETURN>
Note: The user must be authorized to shut down the WSI.
12 Position the cursor in the Password box and typepassword <RETURN>
Note: Replace password with your password.
13 Click the Shutdown WSI target.
14 Using the power switch located on the 5-slot module faceplate,remove power from the 5-slot module. Set the station circuit breakerto the OFF position. Contact maintenance to correct the error.

22 UXS User Guide 6/93
4.2 Accessing UXS Co-Processor Functions
Co-processor accessbanner
After power ON (3 to 5 minutes) the UXS will display a banner on the lowerportion of the screen.
This banner allows access to:
• X Windows environment (co-processor access)
• Shut down of the co-processor
• Universal Station Native Mode operation.
These items are user and password restricted to maintain security andrestrict access to the co-processor or LAN environment.
Using the accessbanner
Using the touchscreen:
Step Action
1 Touch the Login field.
2 Type your username <RETURN>
3 Type your password
4 To Login:Press <RETURN>
To Shut down the Co-processor:Touch the Shutdown WSI target and select it with the space bar.
To revert to Standard Universal Station Operation:Touch the Native Mode target and select it with the space bar.
Using the mouse or trackball:
Step Action
1 Select the Login field by placing the cursor over the field.
2 Type your username <RETURN>
3 Type your password
4 To Login:Press <RETURN>
To Shut down the Co-processor:Select the Shutdown WSI target.
To revert to Standard Universal Station Operation:Select the Native Mode target.

6/93 UXS User Guide 23
4.3 Loading a Personality to the LCN Processor
Capabilities The Universal Personality has been encapsulated in a “Windowsenvironment” to form the UNPX Personality stored on the co-processorhard drive. This integration enables the UXS to function as either a UXS or astandard TDC 3000 Universal Station.
The X Window capabilities are available only when functioning as a UXS.As a UXS, the presentation of all displays will be controlled by the XWindows/Motif Window Manager to provide the addition of such items as:title bar, zoom box, and scroll bars.
Hardware tests A fully operational UXS system can use the UNPX personality. Whenpower is applied, the system performs a series of internal self-tests. Thesetests check the presence and condition of both the TDC and co-processorhardware. The results determine the loading action available, when<Load> is pressed.
If test result is ... then loading action available is ...
TDC and co-processor hardware OK UNPX personality from hard drive orUNP, ENG, or OPR from HistoryModule
TDC hardware OK/co-processor testfailure
UNP, ENG, or OPR from HistoryModule or Removable Media
TDC and co-processor hardware failure No loading performed
Loading the personality The UXS may be loaded from several sources:• History Module• Removable Media (cartridge or floppy)• Internal co-processor hard drive
The UXS may be loaded from other consoles (UXS or US) on the LCN.However, the hardware tests will control the appropriate prompt. Forexample, failure of the co-processor will inhibit the load prompt fromdisplaying the appropriate choice (W).
The actual loading is achieved through the standard TDC loadingprocedures. However, when loading from the co-processor (W), only theUniversal Personality is available. NOTE: For UXS functionality the LCNprocessor must be loaded from the co-processor. The following personalitytypes are available from the History Module or Removable Media:
• OPR• ENG• UNP
Continued on next page

24 UXS User Guide 6/93
4.3 Loading a Personality to the LCN Processor, Continued
Load the LCNprocessor
Using the following, load the LCN processor:
Step Action
1 If the access banner is on the screen:Press <Load> on the operator keyboard.
If you are already logged in:Select the Native LCN Window, press <Load> on the operatorkeyboard.
2 At the prompt W, N, 1, 2, 3, 4, X type W <ENTER>
3 The load modules will be displayed as the LCN processor is loaded.
4 At the prompt NCF? type N <ENTER>
5 The station will complete the load process in 1 to 2 minutes.

6/93 UXS User Guide 25
4.4 Printing from the UXS
Two printers The UXS has two printer connections.
The standard LCN printer connection provided to print LCN displays andreports is configured as a standard Universal Station printer. This printer isfunctional whenever the station is in operation. The LCN printer can beconnected directly to a UXS or assigned from another station in the console(US or UXS). Standard Universal Station operating procedures apply to theprinting of reports, alarm summaries, configuration data, print displays,etc.
The co-processor has a printer connection provided to print window dumpsof X Window applications. This printer is available only when the user islogged into the co-processor, however printing will still continue afterlogging out. This printer will not print the various Universal Station Printerfunctions of alarm summaries, reports, etc. The co-processor printer can bedirectly attached to this UXS or shared across the LAN from another UXS.
Printing the LCNwindow
The LCN processor must be active to print. The user can be logged into theco-processor but it is not required to print LCN data.
To print the LCN window on the LCN printer, use the following:
Step Action
1 If logged into the co-processor:Select the LCN window.
2 Press the Print Display key.
Printing X Windows When the user is logged into the co-processor, the co-processor printer canbe used to print any window contents. To print to a shared printer, the co-processor of the UXS sharing the printer must be active (login bannerdisplayed or a user logged in).
To print any X Window on the co-processor printer, use the following:
Step Action
1 Select Window Print from the workspace menu.
Note: The cursor will change to a cross-hair pointer.
2 Position the cursor in the appropriate window to print.
3 Click the select button.
4 The printing of the display can take 5 to 10 minutes.

26 UXS User Guide 6/93
4.5 Failsafe Operation
Failsafe fall back The UXS is designed to be failsafe. Should an error occur in the co-processor, the UXS reverts to a standard TDC Universal Stationhardware/software configuration. If this should occur, the LCN display willrevert to full screen and the message Co-processor has failedto start, Call maintenance will be displayed in place of theLogin banner.
When functioning as a standard Universal Station, you will be unable toaccess LAN (Local Area Network) resident applications.
Native mode The UXS may be configured as a standard Universal Station by selectingNative Mode from the Login banner. To enter Native Mode the user mustbe authorized using the procedures covered in IWSM Configuration, UXSSystem Administration Manual..
Manual shutdown The co-processor can be shut down after power-on using theShutdown WSI target located on the login prompt. This action can also beperformed by logging out of the open system session and waiting for thelogin prompt to appear.
To invoke the failsafe condition:
• At the login prompt, enter your login name/password and select theShutdown WSI target.
Shutdown restriction To shut down the WSI, the user must be authorized using the procedurescovered in IWSM Configuration, UXS System Administration Manual.
Restarting aftershutdown
After the co-processor has been shutdown, a status message will appear inthe Login banner area. The message is:The co-processor is idle, select the box to reset.
There is a red box to the right of the status message. Using the mouse, clickon the box to reset the co-processor.

6/93 UXS User Guide 27
4.6 X Window Operation
Background The UXS is configured to launch the X Windows environment upon login.Once the system has initialized, the primary LCN display window appears.At this time you can start an X Windows session with LAN residentcomputing resources.
Pre-requisites The LAN computing resources must be configured to allow access from theUXS. In general terms, the following information is required by the LANhardware and/or application software:
• UXS internet address
• System name
• User name/password for its login
LAN access protocols To access LAN resident applications you will use one of thesecommunication protocols:
Protocol Accessed by . . . Access Level Required
DECNET DECNET from root menu Operator, Supervisor, Engineer
TELNET TCP/IP TELNET from root menu Operator, Supervisor, Engineer
Procedure LAN resident applications may not be Honeywell supplied; therefore, theseaccess procedures are general in nature.
Step Action
1 Login with the appropriate access capabilities.
2 Select the appropriate communication protocol from the X Menu.
NOTE: If you cannot determine the appropriate protocol, consultyour LAN administrator.
3 Place the cursor in the new communication window.
4 Type the commands provided by your LAN administrator.
5 The application is launched in this window.
NOTE: Follow the LAN administrators instructions on closing the application.
Keyboard mapping The operator and engineer keyboards are both active and can be used fortext entry.
When using xterm, the engineers keyboard mapping is altered to utilize thePF1 through PF17 keys. This alteration occurs only when the pointer is in avt340 window and enhances DEC VAX emulation.
28 UXS User Guide 6/93
4.7 System Security
TDC isolated The TDC operating system is isolated and inaccessible to the co-processor.This eliminates the possibility of misuse/tampering with the process controlsystem by unauthorized personnel who may gain access to the Local AreaNetwork.
System security is controlled through the configuration and login utilities.
Login A password controlled login utility protects against unauthorized UXSco-processor usage. This utility configures access dependent on the userlogin identification. The system customizes the workspace menu asappropriate to the access level of the user.
Access keylock versusco-processor login
This login utility performs a function similar to the Access Level Keylockon the standard Universal Station; however, the co-processor login isentirely independent from the keylock mechanism. System security may becompromised if the user leaves the immediate area without logging out ofthe co-processor environment.
It is suggested to remove the key and logout to ensure security. This willeliminate unauthorized access to the LCN system and the co-processor.
Security emphasis Users should be advised of the potential for security problems. A periodicreview of the system security, security procedures, and system users willhelp to raise awareness. Remind users that the password is their computersignature. Emphasize the importance of periodically changing thispassword.
Continued on next page

6/93 UXS User Guide 29
4.7 System Security, Continued
Co-processor access bygroup
The restrictions placed upon access levels are:
• Operator - able to configure their own environment, use telnet, and theoptional VT340 DECnet communications
• Supervisor - able to configure their own environment, use telnet, and theoptional VT340 DECnet communications
• Engineer - able to configure their own environment, use telnet, theoptional VT340 S/W, co-processor configuration (requires co-processorpassword), and perform periodic backups of the co-processor file system
• View Only - able to configure their own environment.
Note: User configurable items are: X Hosts, allowPartiallyObscured NativeWindow, and Keyboard Focus Policy.

30 UXS User Guide 6/93
4.8 Backup the Co-Processor Hard Drive
Required access level The procedures must be performed while logged in as “engineer,” and theco-processor password is not required.
Menu appearanceEngineer Menu
X Menu >
Application >
System Menu >System Commands
Configuration >
Update Software >
Add/Remove Users...
Backup/Restore... 12609
Backup co-processor Use the following procedure to backup the co-processor hard drive.NOTE: This procedure currently performs only full backups. The
contents of the DAT tape will be overwritten.
Step Action
1 Remove the appropriate tape from its protective case and gentlyinsert it into the tape drive. Press gently on the edge of the tapecartridge while inserting it into the unit until you feel the unit pull onthe tape. The unit will then load and position the tape. Whilepositioning is being performed, both indicator lamps on the front ofthe unit will flash. When the right lamp shows a solid green,positioning is complete and the tape unit is ready to use.
If you are unable to successfully insert the tape, gently remove thecartridge and reinsert it again. If you are still unsuccessful, contactyour Honeywell service representative for assistance.
1 Select Backup/Restore... from the workspace menu.
2 Select the BACKUP target.
3 To perform a backup of the entire UXS filesystem:
Select the System Backup: target.
To perform a backup of UXS user files only:
Select the User Backup: target.
Continued on next page
6/93 UXS User Guide 31
4.8 Backup the Co-Processor Hard Drive, Continued
Backup co-processor,continued
4 To perform a FULL backup of all files within the scope:
Select the FULL BACKUP target.
To perform an INCREMENTAL backup of all files within the scope:
This feature is not available at this time.
5 Select the START BACKUP target.
Note: The backup operation will take 3 to 20 minutes to complete. Ifany errors occur, your response to the prompts must betyped into the Input Commands field.
6 Upon completion, the following message is displayed:
fbackup: runtime: #### SecondsEnd of Execution
7 Select the Close target.
8 Select the Exit Xsam target.
Click OK at the message Do you really want to exit?

32 UXS User Guide 6/93
4.9 Shut Down the UXS
Background To prevent possible damage to the UNIX filesystem, the station must beshut down using a special sequence. The shutdown procedure must befollowed before power is removed from the station.
Failure to perform the proper shutdown procedure could result in damage tothe co-processor filesystem. The next time the station is powered up, it maytake up to 5 minutes to perform automatic repairs of the co-processorfilesystem. Use caution in cycling power on and off. If this is done while arepair is being made, the filesystem may be left in an unrepairable state.This would require reloading the filesystem backup from tape and possiblyrequire reformatting or replacement of the hard drive.
Procedure If you are currently logged into the UXS, use the following procedure:
Step Action
1 Select Logout from the root menu.
2 At the prompt Quit Mwm?, select the OK target.
3 When the login menu appears, enter your username and password.
4 Select SHUTDOWN WSI target.
5 Press the CONSOLE STATUS key.
6 Select the node number of the appropriate UXS.
7 Select the SHUTDOWN target.
8 Press ENTER to confirm the shutdown request.
Note: The message Co-processor is idle, select box toreset. will appear. Reset the co-processor by selecting the box.
If no user is logged into the UXS, use the following procedure:
Step Action
1 When login menu appears, enter your username and password.
2 Select the SHUTDOWN WSI target from the login menu.
3 Press the CONSOLE STATUS key.
4 Select the node number of the appropriate UXS.
5 Select the SHUTDOWN target.
6 Press ENTER to confirm the shutdown request.
Note: The message Co-processor is idle, select box toreset. will appear. Reset the co-processor by selecting the box.
6/93 UXS User Guide 33
4.10 UXS Restrictions
Shutdown procedure Because to the co-processor operating system is incorporated into the UXS,the station must be turned off using a special sequence. The shutdownprocedure must be followed any time power is to be removed from thestation.
Failure to perform the proper shutdown procedure could result in damage tothe co-processor filesystem. The next time the station is powered up it maytake 5 minutes to perform automatic repairs to the co-processor filesystem.Use caution in cycling power on and off. If this is done while a repair isbeing made, the filesystem may be left in a unrepairable state. This wouldrequire reloading the filesystem backup from tape, and possibly requirereformatting or replacement of the hard drive.
34 UXS User Guide 6/93
4.11 Problem Reporting
Service contacts If you encounter any problems please contact:
Honeywell IAC - Technical Assistance Center16404 North Black Canyon HighwayPhoenix, AZ 85023Phone (602) 863-5558Phone (800) 822-7672

6/93 UXS User Guide 35
Section 5 – Co-Processor User Environment Configuration
5.1 User Configuration Overview
Co-processorconfiguration
The major difference, when compared to a Universal Station, is the UXSsability to display non-TDC 3000 applications, generated by LAN (LocalArea Network - Ethernet) computing resources.
There are several attributes new to the UXS display, which are necessitatedby viewing in the X Windows environment:
• X Host Authorization—Controls remote access to the UXS display
• Native Window Behavior—Controls dominance of the LCN display
• Keyboard Focus Policy—Controls keyboard/mouse pointer interaction
Required information The following information is required for configuration:
• The hostnames of any remote computing resources which will open an Xdisplay on this station. This access is granted on a user by user basisusing subsection 5.2, X Host Authorization.

36 UXS User Guide 6/93
5.2 X Host Authorization
What is it? The X host authorization application grants X display permission to remotesystems on an individual-user basis. This allows other computer systems toopen a window on the users UXS display.
Required access level The procedures can be performed by any authorized user. Thisauthorization is granted/recorded on an individual-user basis.
Menu appearanceEngineer Menu
X Menu >
Application >
System Menu >
X Menu
Shuffle >
Native Window >
Keyboard Focus Policy >
X Host Authorization
Refresh
Restart...
Logout
12598
X Host toolX Host Authorization
Only the listed hosts are allowed access
Any host is allowed access
DISPLAY AREALISTS HOSTNAMES AUTHORIZED TO SENDAN X-WINDOW DISPLAY TO THIS STATION.
hostnamehostnamehostname
Add Delete Close
TEXT ENTRY AREA
12599
X host addresses To authorize remote systems to display X Window applications on the UXS,the hostname and TCP/IP address must be entered prior to this step, usingthe LAN information entry procedure.
Continued on next page

6/93 UXS User Guide 37
5.2 X Host Authorization, Continued
X host authorizationscope
The user can choose from two methods of granting access permission:
• Explicit host authorization—user must enter the hostnames of all systemsrequiring access
• Grant access to all hosts—user selects Any host is allowed access
Explicit hostauthorization
Use the following to authorize specific X hosts access:
Step Action
1 Select X Host Authorization from the workspace menu.
2 Type the co-processor password and <RETURN> at the prompt.
3 Select Only the listed hosts are allowed access target.
4 Click on the text entry area of the IWSM Configuration Tool.
5 Type information using this syntax:
hostnamehostnamehostnamehostnamehostname = replace with a valid hostname
Use of spaces is not allowed. The tool does nothing if there areinvalid characters in the text entry field.
6 Click on the Add target to authorize the remote host to display locally.
7 Repeat Steps 4 through 6 for each host requiring X host access.
8 To delete a host’s X display authorization privileges, click on thehostname to be deleted.
9 Click on the Delete target.
10 Repeat Steps 8 and 9 for all hosts to be Deleted.
11 Select the Close target.
Continued on next page

38 UXS User Guide 6/93
5.2 X Host Authorization, Continued
Allowing all X-hostsaccess
All LAN computing resources listed in the hosts file can be authorized todisplay X Window applications on this station using the followingprocedure.
Step Action
1 Select X Host Authorization from the workspace menu.
2 Type the co-processor password and <RETURN> at the prompt.
3 Select the Any host is allowed access target.
4 Select the Close target.
X Host Authorization
Only the listed hosts are allowed access
Any host is allowed access
DISPLAY AREALISTS HOSTNAMES AUTHORIZED TO SENDAN X-WINDOW DISPLAY TO THIS STATION.
hostnamehostnamehostname
Add Delete Close
TEXT ENTRY AREA
12600

6/93 UXS User Guide 39
5.3 Configure Native Window Behavior
Window dominance The dominance of the Native LCN Window is configurable on a user-by-user basis. The attribute allows the Native LCN Window to be partiallyobscured by another window.
The Native LCN Window behavior is initially configured to allow onlyengineering group members to partially obscure the LCN display.However, the individual users (all access levels) can set this attribute at theirdiscretion.
Menu appearanceOperator Menu
X Menu >
Application Menu >
X Menu
Shuffle >
Native Window >
Keyboard Focus Policy >
X Host Authorization
Refresh
Restart...
Logout
Native Window
Partially Obscured > Allow
Disallow
12601
Allow partial obscured Follow these steps to allow the LCN display to be partially obscured:
Step Action
1 Select Native Window - Partially Obscured - Allowfrom the workspace menu.
Note: The change will not take effect until the next login.
Disallow partialobscured
Follow these steps to prevent obscuring the LCN display:
Step Action
1 Select Native Window - Partially Obscured - Disallowfrom the workspace menu.
Note: The change will not take effect until the next login.

40 UXS User Guide 6/93
5.4 Configure Keyboard Focus Policy
Required access level The procedures must be performed while logged in as the user.
Menu appearance
X Menu
Shuffle >
Native Window >
Keyboard Focus Policy >
X Host Authorization
Refresh
Restart...
Logout
Operator Menu
X Menu >
Application Menu >
Explicit
Pointer
12602
Explicit vs. Pointer The keyboard focus policy allows two choices:
• Explicit focus—user must click on a window to make it active
• Pointer focus—user must point at the window to make it active
Note: Even small mouse movements may inactivate the windowwhen using pointer focus. This may cause keyboard entries tobe lost or directed to the wrong window.
Explicit focus Use the following to set the focus policy to explicit:
Step Action
1 Select Keyboard Focus Policy - Explicit from theworkspace menu.
Note: The change will not take effect until the next login.
Pointer focus Use the following to set the focus policy to pointer:
Step Action
1 Select Keyboard Focus Policy - Pointer from the workspacemenu.
Note: The change will not take effect until the next login.

6/93 UXS User Guide 41
5.5 Change User Password
Required access level The procedures must be performed while logged in as the user. The currentpassword is required.
Menu appearanceOperator Menu
X Menu >
Application >
System Menu >
Applications
Unix Load
Calculator
Datebook
Telnet
DECnet
Change Password12603
Change theuser password
Change the user password frequently to ensure security.
Step Action
1 Select Change Password from the workspace menu.
2 Type the old password and <RETURN> at the prompt.
Note: The new password must be at least 6 characters, containingat least two alpha characters and one numeric character.
3 Type a new password and <RETURN>.
4 Retype the new password and <RETURN> to confirm the entry.

42 UXS User Guide 6/93

Index
6/93 UXS User Guide 43
A
Access authorization 13
B
Backup co-processor 30
C, D
Changing window size 9Co-processor access banner 22Configuring LAN Computing Resources 27
E, F, G
Explicit focus 40
H, I, J
Hierarchical (nested) menu 13
K, L
Keyboard Focus Policy 35Keyboard mapping 27
M
Manual shutdown 26Minimized window 10Motif Window Manager 7
N, O
Native LCN Window 39Native mode 26Native Window Behavior 35
P, Q
Pointer focus 40Printing the LCN window 25Printing X Windows 25
R
Resizing the LCN Native Window 9Restarting after shutdown 26
S
Selecting with the touchscreen 19Shutdown procedure 32System security 28
T
TotalPlant 3
U
UNPX Personality 23
V
Visual integration 3
W
Window manager 7Window menu 11Workspace menu 13
X, Y
X Host Authorization 35, 36X Window 7xterm 27
Z
Zoom touchscreen 19

Index
44 UXS User Guide 6/93

READER COMMENTS
Honeywell IAC Automation College welcomes your comments and suggestions toimprove future editions of this and other publications.
You can communicate your thoughts to us by fax, mail, or toll-free telephone call. Wewould like to acknowledge your comments; please include your complet name andaddress
BY FAX: Use this form; and fax to us at (602) 313-4108
BY TELEPHONE: In the U.S.A. use our toll-free number 1*800-822-7673 (available inthe 48 contiguous states except Arizona; in Arizona dial 1-602-313-5558).
BY MAIL: Use this form; detach, fold, tape closed, and mail to us.
Title of Publication: UxS User Guide Issue Date: 6/93
Publication Number: UX09-400
Writer: R. Evans
COMMENTS: ___________________________________________________________
_______________________________________________________________________
_______________________________________________________________________
_______________________________________________________________________
_______________________________________________________________________
RECOMMENDATIONS:___________________________________________________
_______________________________________________________________________
_______________________________________________________________________
_______________________________________________________________________
_______________________________________________________________________
_______________________________________________________________________
NAME _______________________________________ DATE ____________________
TITLE _________________________________________________________________
COMPANY _____________________________________________________________
ADDRESS ______________________________________________________________
CITY ________________________ STATE ___________ ZIP ____________________
TELEPHONE _____________________ FAX _________________________________
(If returning by mail, please tape closed; Postal regulations prohibit use of staples.)
Automation CollegeIndustrial Automation and Control Honeywell Inc.2820 West Kelton LanePhoenix, Arizona 85023-3028
Communications concerning technical publications should be directed to:
FOLD FOLD
From: NO POSTAGENECESSARY
IF MAILEDIN THE USA
BUSINESS REPLY MAIL
POSTAGE WILL BE PAID BY ....
Industrial Automation and Control 2820 West Kelton LanePhoenix, Arizona 85023-3028
Attention: Manager, QualityC
ut A
long
Lin
e
FOLD FOLD
FIRST CLASS PERMIT NO. 4332 PHOENIX, ARIZONA
Honeywell


L
Industrial Automation and Control Helping You Control Your WorldHoneywell Inc.16404 North Black Canyon HighwayPhoenix, Arizona 85023-3028


![NanoGroup -skonsolidowany raport kwartalny za I Q 2018r. · 2019-02-20 · vw\f]qld gr pdufd urnx % uygurf]qh vnuyfrqh vnrqvrolgrzdqh nzduwdoqh vsudzr]gdqlh ilqdqvrzh *uxs\ .dslwdârzhm](https://img.dokumen.tips/doc/110x75/5e977a9d391fb35d677a1e19/nanogroup-skonsolidowany-raport-kwartalny-za-i-q-2018r-2019-02-20-vwfqld-gr.jpg)

![DSLWD RZHM 6DQWDQGHU %DQN 3ROVND 6 $ ]D URN · 6nrqvrolgrzdqh vsudzr]gdqlh ilqdqvrzh *uxs\ .dslwd rzhm 6dqwdqghu %dqn 3rovnd 6 $ ]d urn 6nrqvrolgrzdq\ udfkxqhn ]\vnµz l vwudw 6nrqvrolgrzdqh](https://img.dokumen.tips/doc/110x75/6014fbf54f91847cab7da1c8/dslwd-rzhm-6dqwdqghu-dqn-3rovnd-6-d-urn-6nrqvrolgrzdqh-vsudzrgdqlh-ilqdqvrzh.jpg)
![ZZZ UHGGRRU DXWLVP RUJ - The Ballroom Bowltheballroom.ca/docs/The Ballroom Bowl Food Menu.pdf · $ vhdvrqhg vluorlq sdww\ &dqdgldq fkhggdu vprnhg dssohzrrg edfrq gul]]ohg pdsoh v\uxs](https://img.dokumen.tips/doc/110x75/5aaf67867f8b9a25088d74b6/zzz-uhggrru-dxwlvp-ruj-the-ballroom-ballroom-bowl-food-menupdf-vhdvrqhg-vluorlq.jpg)


![Prezentacja Piotrkow marzec 2017 J.Sierak skrot · *uxs\ z\gdwnyz ur]zrmrz\fk *(1(58- &$ :](https://img.dokumen.tips/doc/110x75/6021d3680b647930c251c019/prezentacja-piotrkow-marzec-2017-jsierak-uxs-zgdwnyz-urzrmrzfk-158-.jpg)