Embed Size (px)
Citation preview
HP Unified Functional TestingSoftware Version: 12.02Windows ® operating systems
Tutorial
Document Release Date: December 2014Software Release Date: December 2014
Legal Notices
WarrantyThe only warranties for HP products and services are set forth in the express warranty statements accompanying such products and services. Nothingherein should be construed as constituting an additional warranty. HP shall not be liable for technical or editorial errors or omissions containedherein.
The information contained herein is subject to change without notice.
Restricted Rights LegendConfidential computer software. Valid license from HP required for possession, use or copying. Consistent with FAR 12.211 and 12.212, CommercialComputer Software, Computer Software Documentation, and Technical Data for Commercial Items are licensed to the U.S. Government undervendor's standard commercial license.
Copyright Notice© Copyright 1992 - 2014 Hewlett-Packard Development Company, L.P.
Trademark NoticesAdobe® and Acrobat® are trademarks of Adobe Systems Incorporated.
Google™ and Google Maps™ are trademarks of Google Inc
Intel® and Pentium® are trademarks of Intel Corporation in the U.S. and other countries.
Microsoft®,Windows®,Windows® XP, and Windows Vista ® are U.S. registered trademarks of Microsoft Corporation.
Oracle and Java are registered trademarks of Oracle and/or its affiliates.
Documentation UpdatesThe title page of this document contains the following identifying information:
l Software Version number, which indicates the software version.l Document Release Date, which changes each time the document is updated.l Software Release Date, which indicates the release date of this version of the software.
To check for recent updates or to verify that you are using the most recent edition of a document, go to:https://softwaresupport.hp.com/group/softwaresupport/search-result?keyword=.
This site requires an HP Passport account. If you do not have one, click the Create an account button on the HP Passport Sign in page.
Tutorial
HP Unified Functional Testing (12.02) Page 2
SupportVisit the HP Software Support Online web site at:https://softwaresupport.hp.com
This web site provides contact information and details about the products, services, and support that HP Software offers.
HP Software online support provides customer self-solve capabilities. It provides a fast and efficient way to access interactive technical support toolsneeded to manage your business. As a valued support customer, you can benefit by using the support web site to:
l Search for knowledge documents of interestl Submit and track support cases and enhancement requestsl Download software patchesl Manage support contractsl Look up HP support contactsl Review information about available servicesl Enter into discussions with other software customersl Research and register for software training
Most of the support areas require that you register as an HP Passport user and sign in. Many also require a support contract. To register for an HPPassport ID, go to:https://softwaresupport.hp.com and click Register.
To find more information about access levels, go to:https://softwaresupport.hp.com/web/softwaresupport/access-levels.
HP Software Solutions & Integrations and Best PracticesVisitHP Software Solutions Now athttps://h20230.www2.hp.com/sc/solutions/index.jsp to explore how the products in the HPSoftware catalog work together, exchange information, and solve business needs.
Visit the Cross Portfolio Best Practices Library athttps://hpln.hp.com/group/best-practices-hpsw to access a wide variety of bestpractice documents and materials.
Tutorial
HP Unified Functional Testing (12.02) Page 3

Contents
Welcome to the UFT Tutorial 8
UFT Guides and References 9
Additional Online Resources 12
Part 1: Introducing Unified Functional Testing 15
Benefits of Automated Testing 16
UFT's Testing Process 17
UFT Main Window 21
Part 2: Analyzing Your Application and Creating Tests 30
Getting to Know Your Application 31
Explore the Flight Reservation Application 33
Create a Solution for All Your Tests 36
Part 3: Creating and Running Automated GUI Tests 39
Lesson 1: Create a GUI Test and Actions 41
Lesson 2: Creating Object Repositories 46
UFT Test Object Recognition - Overview 47
Exercise 2a: Add Objects from Your Application 48
Exercise 2b: Create Object Repositories using Navigate and Learn 57
Lesson 3: Adding Steps to a Test 62
Adding Test Steps in a GUI Test - Overview 63
Exercise 3a: Add Steps to the Login Action in the Keyword View 64
Analyzing the Login Action in the Keyword View and the Editor 70
Exercise 3b: Add Steps to the FlightFinder Action by Recording 73
Exercise 3c: Add a Step to the Select Flight Action Using the Toolbox Pane 78
Exercise 3d: Add Steps to the Book Flight Action Using the Step Generator 81
Advanced Exercise 3e (Optional) - Add Steps Using the Editor 88
Tutorial
HP Unified Functional Testing (12.02) Page 4

Lesson 4: Running and Analyzing GUI Tests 95
Exercise 4a: Run a Test 96
Exercise 4b: Navigate the Run Results Viewer 99
Exercise 4c: Analyze the Run Results 100
Lesson 5: Parameterizing Steps and Objects 103
Parameterizing Tests, Actions, and Objects - Overview 104
Exercise 5a: Create a Test for Parameterization 105
Exercise 5b: Define Data Table Parameters 106
Exercise 5c: Add Parameter Values to a Data Table 112
Exercise 5d: Run a Parameterized Test 115
Lesson 6: Creating Checkpoints and Output Values 122
Understanding Checkpoint and Output Value Types 123
Exercise 6a: Create a Checkpoint Test 126
Exercise 6b: Check Object Values 128
Exercise 6c: Check Table Values 132
Exercise 6d: Check Text Values 139
Exercise 6e: Manage Checkpoints in the Object Repository 147
Exercise 6f: Run and Analyze a Test with Checkpoints 149
Exercise 6g: Create an Output Value Test 154
Exercise 6h: Add an Output Value Step 156
Lesson 7: Creating Functions and Function Libraries 169
Functions and Function Libraries - Overview 170
Exercise 7a: Create a Function 170
Exercise 7b: Associate a Function Library with Your Test 173
Exercise 7c: Perform a Check Using a Functions 175
Lesson 8: Using Insight in your Test 182
Insight Object Identification - Overview 183
Exercise 8a: Create a Test for Insight Objects 183
Exercise 8b: Add an Insight Object to the Object Repository 185
Exercise 8c: Use Insight Objects in a Test 188
Part 4: Creating and Running Automated API Tests 193
Lesson 1: Create an API Test 194
Tutorial
HP Unified Functional Testing (12.02) Page 5

Lesson 2: Create Simple API Test Steps 195
Lesson 3: Creating API Test Steps Using Standard Activities 201
UFT API Testing Standard Activities - Overview 202
Exercise 3a: Creating a Test with Standard Activities 203
Lesson 4: Parameterizing API Test Steps 209
Parameterizing API Test Steps - Overview 210
Exercise 4a: Parameterize a Test Step from a Data Source 211
Exercise 4b: Parameterize a Test Step from the Output of a Previous Step 223
Exercise 4c: Parameterize a Test with Multiple Sources Using a Custom Expression 227
Lesson 5: Running API Tests 236
Exercise 5a: Run a Test 237
Exercise 5b: Navigate the Run Results Viewer 238
Exercise 5c: Analyze the Run Results 240
Lesson 6: Creating and Running API Tests of Web Services 242
Exercise 6a: Create a Web Service Test 243
Exercise 6b: Import a Web Service 244
Exercise 6c: Build and Parameterize a Web Service Test 247
Exercise 6d: Run a Web Service Test 254
Lesson 7: Creating and Running API Tests of REST Services 258
Exercise 7a: Create a REST Service Test 259
Exercise 7b: Create a REST Service Structure 260
Exercise 7c: Create a Test Using REST Service Methods 266
Exercise 7d: Run a REST Service Test 270
Exercise 7e: Resolve a REST Service Conflict 272
Lesson 8: Creating and Running API Tests of Web Application Services (WADLs) 277
Exercise 8a: Create a Test for a Web Application Service 278
Exercise 8b: Import a Web Application Service Model 279
Exercise 8c: Edit the Web Application Service Methods 281
Exercise 8d: Build a Test with Web Application Service Methods 285
Exercise 8e: Run a Web Application Service Test 291
Part 5: Creating and Running GUI and API Tests in a Single Test 295
Lesson 1: Create a Test to Run GUI and API Tests Together 296
Tutorial
HP Unified Functional Testing (12.02) Page 6
Lesson 2: Call the API Test from a GUI Test 298
Lesson 3: Run a GUI Test that Calls an API Test 302
Where Do You Go From Here? 306
Send Us Feedback 310
Tutorial
HP Unified Functional Testing (12.02) Page 7

Welcome to the UFT TutorialThe UFT Tutorial is a self-paced guide that teaches you the basics of testing yourapplication with UFT. It will familiarize you with the process of creating and runningautomated GUI and API tests and analyzing the run results.
After completing the tutorial, you can apply the skills you have learned to testing yourown application.
Note: To learn more about creating and running GUI tests of your Web application,see the UFT Tutorial for GUI Testing of Web applications, available from the <UFTinstallation folder>\help folder.
Tutorial Audience and ScopeThis tutorial is intended for users who are new to UFT. No prior knowledge of UFT,QuickTest, or Service Test is required. A general understanding of testing concepts andfunctional testing processes may be helpful, but is not mandatory. UFT enables you tocreate GUI tests, API tests, business process tests, and composite tests containing GUIand API tests or calls to tests.
Note: This tutorial refers to file system paths that are relevant for Windows 7operating systems. The paths in other operating systems may be slightly different.
Using UFT with BPTIn addition to tests, UFT enables you to create keyword-driven, scripted, or APIbusiness components for use in business process tests, if you are connected to an ALMserver that supports BPT. The procedures described in this tutorial are designed forcreating GUI and API tests, but you can also apply the majority of these procedures tocreating keyword-driven components, scripted components, or API components. Formore details on business components and BPT, see the HP Unified Functional TestingUser Guide and the HP Business Process Testing User Guide.
Tutorial
HP Unified Functional Testing (12.02) Page 8
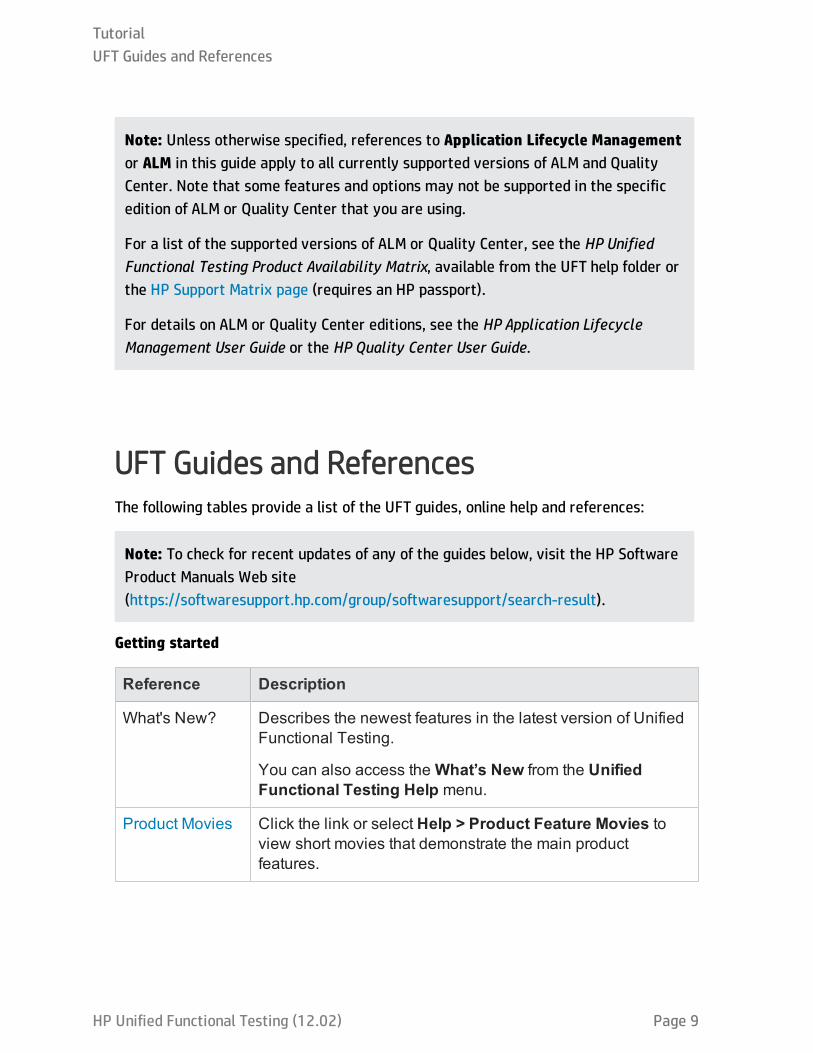
Note: Unless otherwise specified, references to Application Lifecycle Managementor ALM in this guide apply to all currently supported versions of ALM and QualityCenter. Note that some features and options may not be supported in the specificedition of ALM or Quality Center that you are using.
For a list of the supported versions of ALM or Quality Center, see the HP UnifiedFunctional Testing Product Availability Matrix, available from the UFT help folder orthe HP Support Matrix page (requires an HP passport).
For details on ALM or Quality Center editions, see the HP Application LifecycleManagement User Guide or the HP Quality Center User Guide.
UFT Guides and ReferencesThe following tables provide a list of the UFT guides, online help and references:
Note: To check for recent updates of any of the guides below, visit the HP SoftwareProduct Manuals Web site(https://softwaresupport.hp.com/group/softwaresupport/search-result).
Getting started
Reference Description
What's New? Describes the newest features in the latest version of UnifiedFunctional Testing.
You can also access theWhat’s New from the UnifiedFunctional Testing Help menu.
Product Movies Click the link or select Help > Product Feature Movies toview short movies that demonstrate the main productfeatures.
TutorialUFT Guides and References
HP Unified Functional Testing (12.02) Page 9
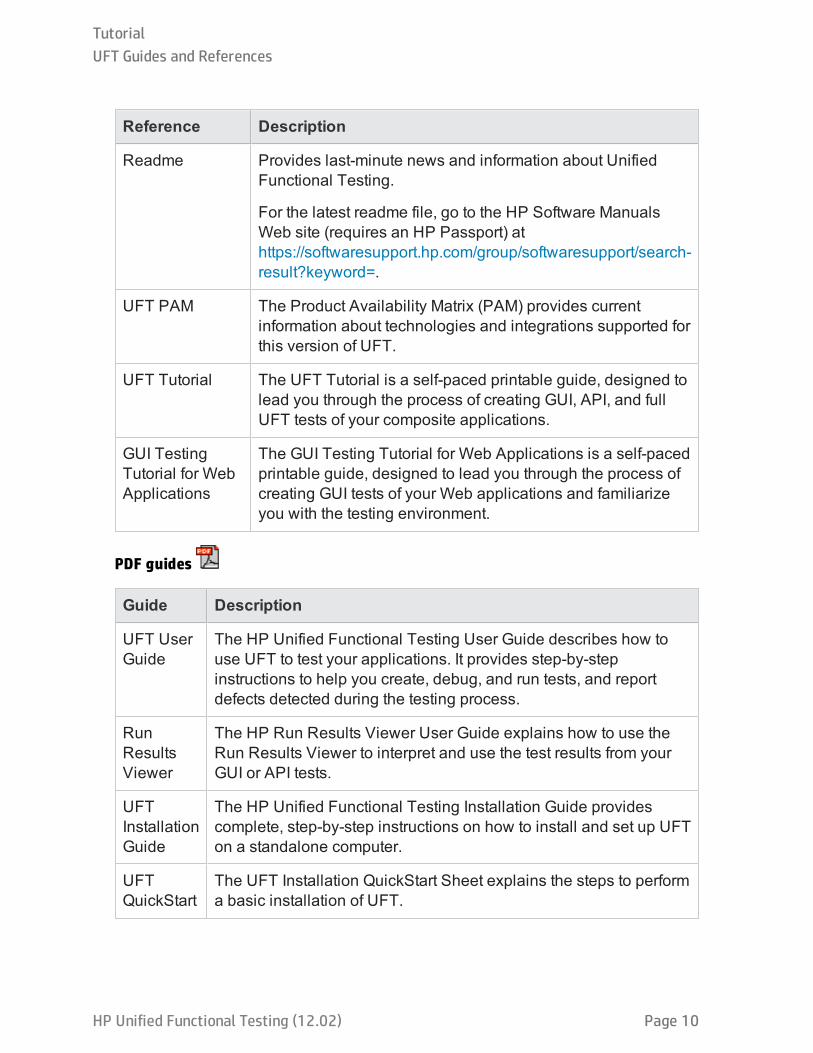
Reference Description
Readme Provides last-minute news and information about UnifiedFunctional Testing.
For the latest readme file, go to the HP Software ManualsWeb site (requires an HP Passport) athttps://softwaresupport.hp.com/group/softwaresupport/search-result?keyword=.
UFT PAM The Product Availability Matrix (PAM) provides currentinformation about technologies and integrations supported forthis version of UFT.
UFT Tutorial The UFT Tutorial is a self-paced printable guide, designed tolead you through the process of creating GUI, API, and fullUFT tests of your composite applications.
GUI TestingTutorial for WebApplications
The GUI Testing Tutorial for Web Applications is a self-pacedprintable guide, designed to lead you through the process ofcreating GUI tests of your Web applications and familiarizeyou with the testing environment.
PDF guides
Guide Description
UFT UserGuide
The HP Unified Functional Testing User Guide describes how touse UFT to test your applications. It provides step-by-stepinstructions to help you create, debug, and run tests, and reportdefects detected during the testing process.
RunResultsViewer
The HP Run Results Viewer User Guide explains how to use theRun Results Viewer to interpret and use the test results from yourGUI or API tests.
UFTInstallationGuide
The HP Unified Functional Testing Installation Guide providescomplete, step-by-step instructions on how to install and set up UFTon a standalone computer.
UFTQuickStart
The UFT Installation QuickStart Sheet explains the steps to performa basic installation of UFT.
TutorialUFT Guides and References
HP Unified Functional Testing (12.02) Page 10
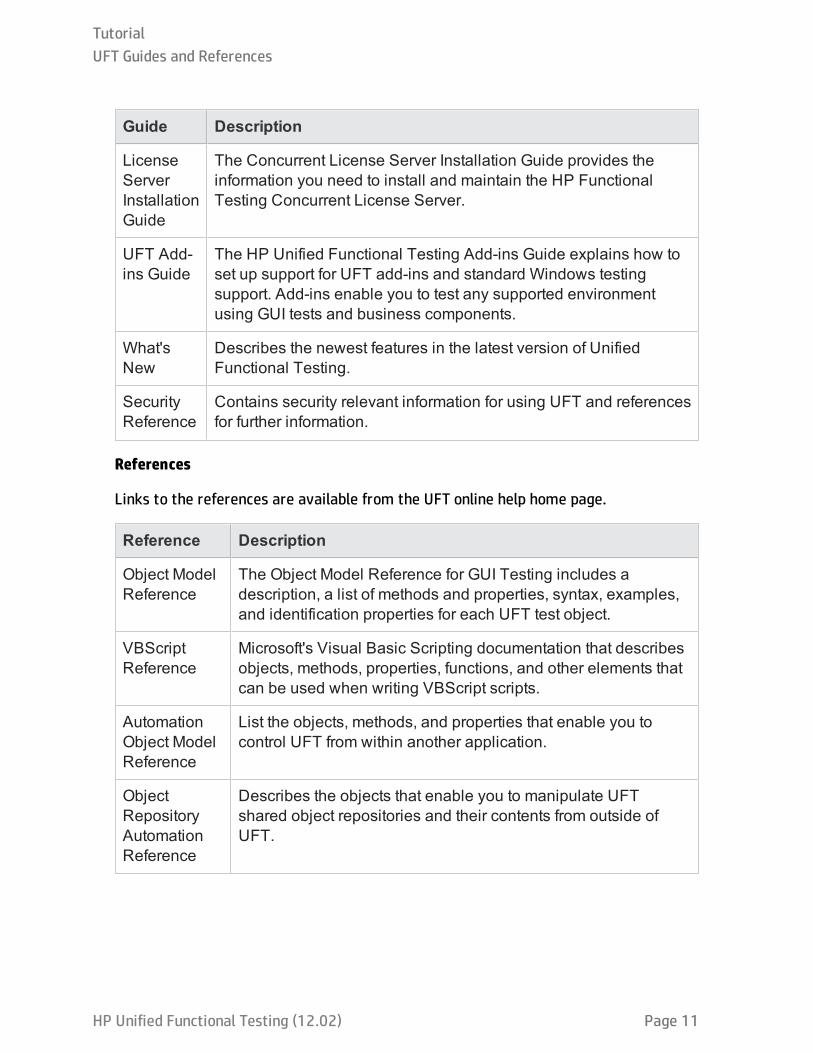
Guide Description
LicenseServerInstallationGuide
The Concurrent License Server Installation Guide provides theinformation you need to install and maintain the HP FunctionalTesting Concurrent License Server.
UFT Add-ins Guide
The HP Unified Functional Testing Add-ins Guide explains how toset up support for UFT add-ins and standard Windows testingsupport. Add-ins enable you to test any supported environmentusing GUI tests and business components.
What'sNew
Describes the newest features in the latest version of UnifiedFunctional Testing.
SecurityReference
Contains security relevant information for using UFT and referencesfor further information.
References
Links to the references are available from the UFT online help home page.
Reference Description
Object ModelReference
The Object Model Reference for GUI Testing includes adescription, a list of methods and properties, syntax, examples,and identification properties for each UFT test object.
VBScriptReference
Microsoft's Visual Basic Scripting documentation that describesobjects, methods, properties, functions, and other elements thatcan be used when writing VBScript scripts.
AutomationObject ModelReference
List the objects, methods, and properties that enable you tocontrol UFT from within another application.
ObjectRepositoryAutomationReference
Describes the objects that enable you to manipulate UFTshared object repositories and their contents from outside ofUFT.
TutorialUFT Guides and References
HP Unified Functional Testing (12.02) Page 11
Reference Description
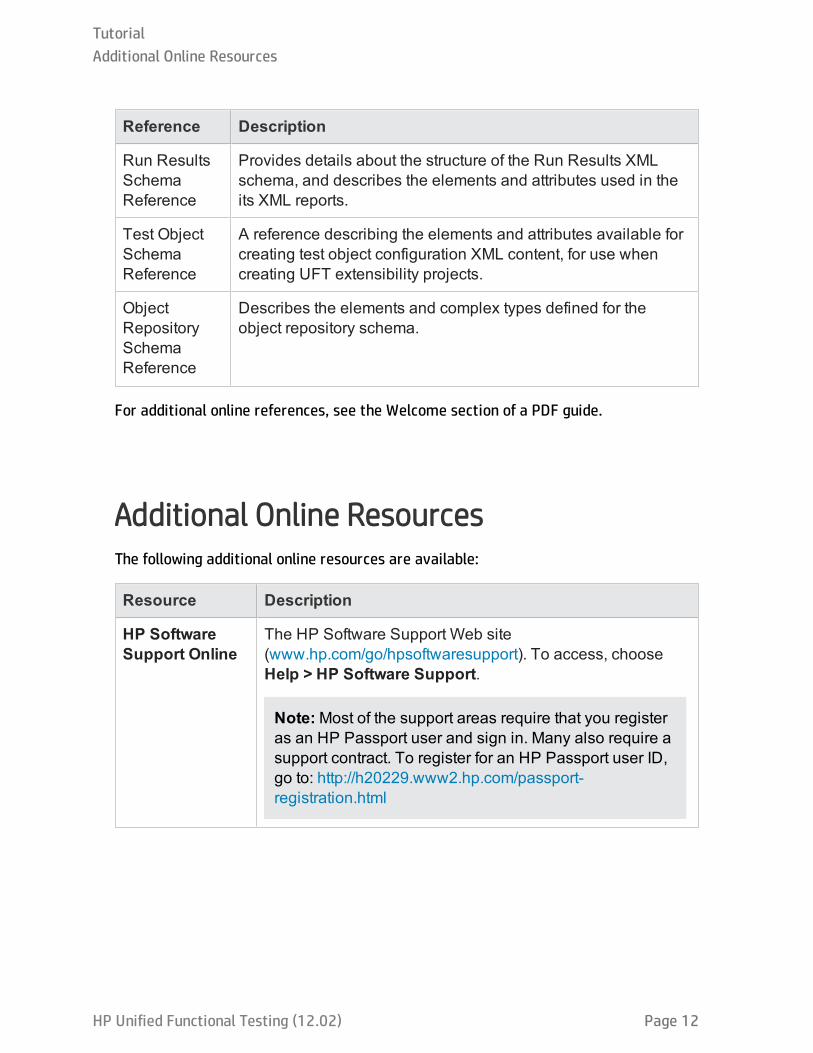
Run ResultsSchemaReference
Provides details about the structure of the Run Results XMLschema, and describes the elements and attributes used in theits XML reports.
Test ObjectSchemaReference
A reference describing the elements and attributes available forcreating test object configuration XML content, for use whencreating UFT extensibility projects.
ObjectRepositorySchemaReference
Describes the elements and complex types defined for theobject repository schema.
For additional online references, see the Welcome section of a PDF guide.
Additional Online ResourcesThe following additional online resources are available:
Resource Description
HP SoftwareSupport Online
The HP Software Support Web site(www.hp.com/go/hpsoftwaresupport). To access, chooseHelp > HP Software Support.
Note:Most of the support areas require that you registeras an HP Passport user and sign in. Many also require asupport contract. To register for an HP Passport user ID,go to: http://h20229.www2.hp.com/passport-registration.html
TutorialAdditional Online Resources
HP Unified Functional Testing (12.02) Page 12
Resource Description
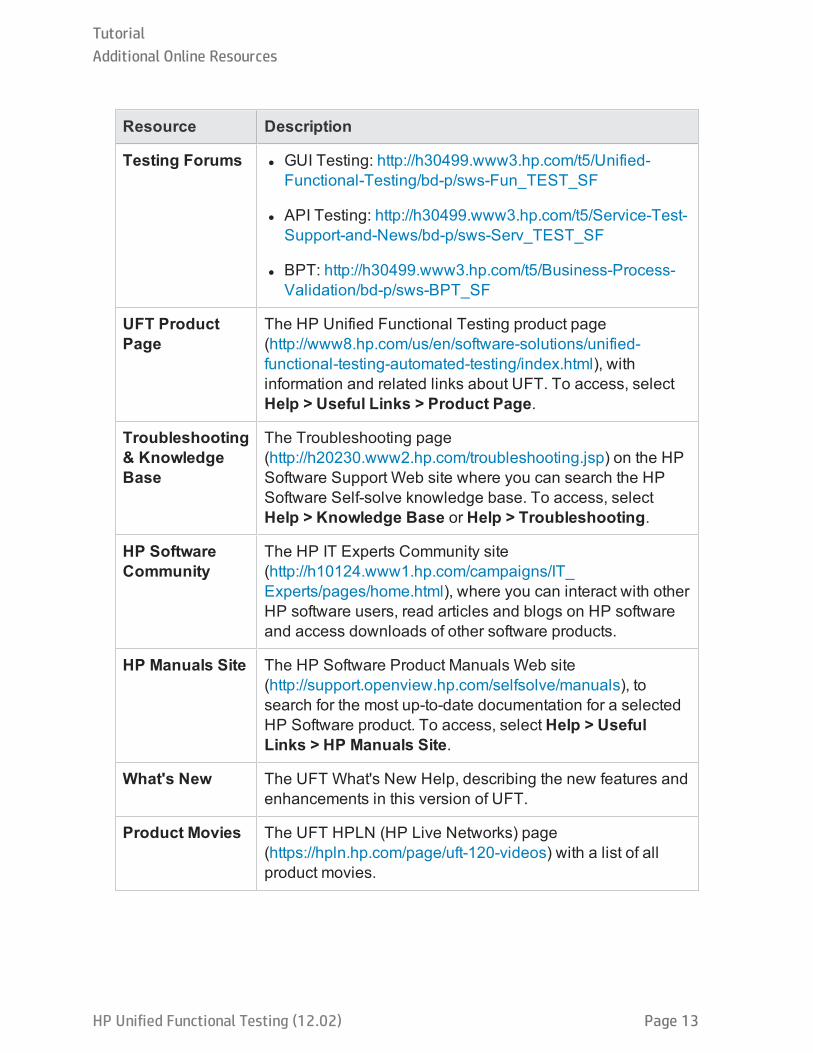
Testing Forums l GUI Testing: http://h30499.www3.hp.com/t5/Unified-Functional-Testing/bd-p/sws-Fun_TEST_SF
l API Testing: http://h30499.www3.hp.com/t5/Service-Test-Support-and-News/bd-p/sws-Serv_TEST_SF
l BPT: http://h30499.www3.hp.com/t5/Business-Process-Validation/bd-p/sws-BPT_SF
UFT ProductPage
The HP Unified Functional Testing product page(http://www8.hp.com/us/en/software-solutions/unified-functional-testing-automated-testing/index.html), withinformation and related links about UFT. To access, selectHelp > Useful Links > Product Page.
Troubleshooting& KnowledgeBase
The Troubleshooting page(http://h20230.www2.hp.com/troubleshooting.jsp) on the HPSoftware Support Web site where you can search the HPSoftware Self-solve knowledge base. To access, selectHelp > Knowledge Base or Help > Troubleshooting.
HP SoftwareCommunity
The HP IT Experts Community site(http://h10124.www1.hp.com/campaigns/IT_Experts/pages/home.html), where you can interact with otherHP software users, read articles and blogs on HP softwareand access downloads of other software products.
HP Manuals Site The HP Software Product Manuals Web site(http://support.openview.hp.com/selfsolve/manuals), tosearch for the most up-to-date documentation for a selectedHP Software product. To access, select Help > UsefulLinks > HP Manuals Site.
What's New The UFT What's New Help, describing the new features andenhancements in this version of UFT.
Product Movies The UFT HPLN (HP Live Networks) page(https://hpln.hp.com/page/uft-120-videos) with a list of allproduct movies.
TutorialAdditional Online Resources
HP Unified Functional Testing (12.02) Page 13
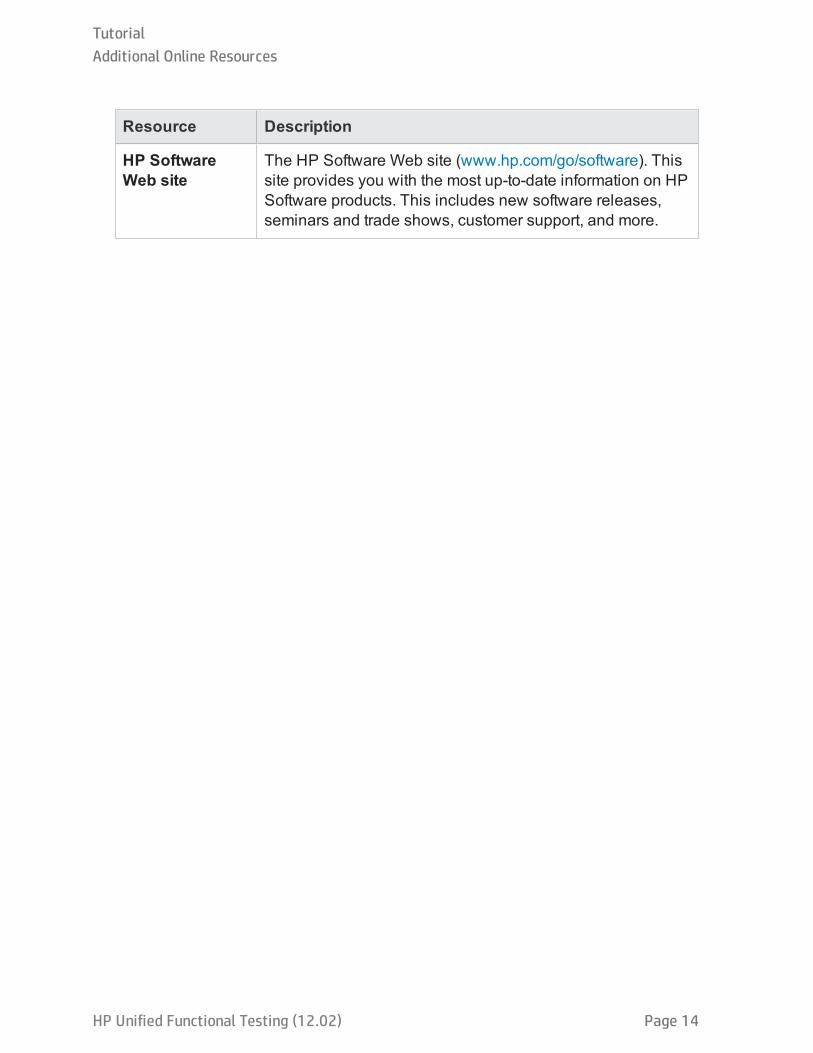
Resource Description
HP SoftwareWeb site
The HP Software Web site (www.hp.com/go/software). Thissite provides you with the most up-to-date information on HPSoftware products. This includes new software releases,seminars and trade shows, customer support, and more.
TutorialAdditional Online Resources
HP Unified Functional Testing (12.02) Page 14
HP Unified Functional Testing (12.02) Page 15
Part 1: Introducing Unified FunctionalTestingIn this lesson, you will get an overview of automated testing and UFT. You will also getstarted on preparing tests.
Note: It is recommended to work with an soft copy of this tutorial because thereare sections in which you will be asked to copy and paste test steps into UFT.However, keep in mind that in selected parts of this tutorial, UFT will be recordingyour operations or learning objects that you point to with the mouse. During suchsessions, you should refrain from switching focus to the PDF or Help window.
This section includes the following:
Benefits of Automated Testing 16
UFT's Testing Process 17
UFT Main Window 21

Benefits of Automated TestingIf you have ever tested applications or Web sites manually, you are aware of thedrawbacks of manual testing of these applications.
Manual testing is time-consuming and tedious, and requires a considerable investmentin human resources. Worst of all, time constraints often make it impossible to manuallytest every feature thoroughly before an application is released. This leaves youwondering if serious bugs have gone undetected.
Automated testing of the GUI and non-GUI (service) layers of your application by UFTaddresses the problems with manual testing by speeding up the testing process. Youcan create tests that check all aspects of your application or Web site, and then runthese tests each time your application or Web site changes. As a result, you create thetests once, and run them during each subsequent application change, without the needto update the test for each application update.
As UFT runs these tests, it emulates the human user actions by moving the cursor in anapplication or Web site, clicking objects in the application's GUI, entering keyboardinput, or running the application's API processes. However, unlike manual testing, UFTdoes this faster than any human user.
The benefits of automated testing are numerous:
Benefits of Automated Testing
Fast Automated tests are significantly faster than manual testsperformed by human users.
Reliable Automated tests perform precisely the same operations eachtime they are run, eliminating human error inherent in manualtests.
Repeatable You can test how your application or Web site reacts afterrepeated performance of the same operations.
HP Unified Functional Testing (12.02) Page 16
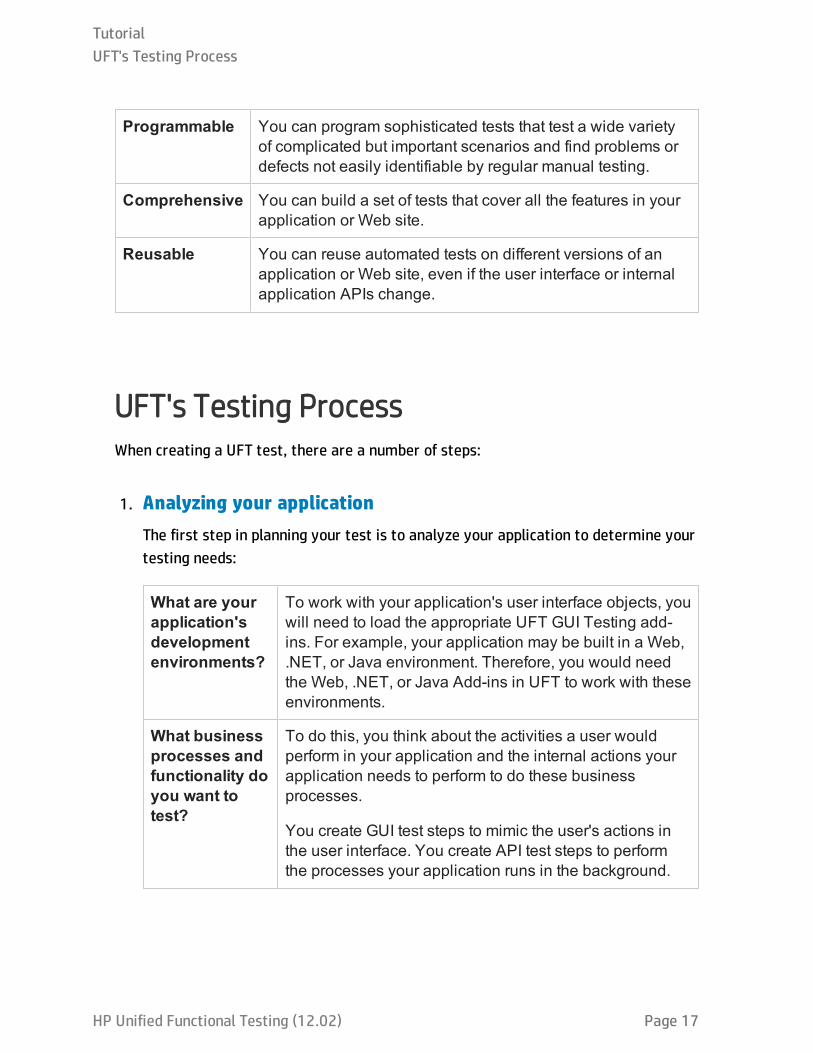
Programmable You can program sophisticated tests that test a wide varietyof complicated but important scenarios and find problems ordefects not easily identifiable by regular manual testing.
Comprehensive You can build a set of tests that cover all the features in yourapplication or Web site.
Reusable You can reuse automated tests on different versions of anapplication or Web site, even if the user interface or internalapplication APIs change.
UFT's Testing ProcessWhen creating a UFT test, there are a number of steps:
1. Analyzing your applicationThe first step in planning your test is to analyze your application to determine yourtesting needs:
What are yourapplication'sdevelopmentenvironments?
To work with your application's user interface objects, youwill need to load the appropriate UFT GUI Testing add-ins. For example, your application may be built in a Web,.NET, or Java environment. Therefore, you would needthe Web, .NET, or Java Add-ins in UFT to work with theseenvironments.
What businessprocesses andfunctionality doyou want totest?
To do this, you think about the activities a user wouldperform in your application and the internal actions yourapplication needs to perform to do these businessprocesses.
You create GUI test steps to mimic the user's actions inthe user interface. You create API test steps to performthe processes your application runs in the background.
TutorialUFT's Testing Process
HP Unified Functional Testing (12.02) Page 17

Does yourapplication usestandardapplicationactivities orcustom-designedservices?
Depending on what functions your application's API runs,you use the out-of-the-box activities provided with a UFTAPI test or import/create custom activities.
How can youbreak your testinto smalltestable units?
You should break the processes and functionality youwant to test into smaller tasks, so that you can create UFTactions in your GUI tests. These smaller and moremodular actions make your tests easier to read andfollow, and help ease maintenance in the long run.
Even at this stage, you can begin creating test skeletons and adding actions to GUItests.
2. Preparing the testing infrastructureBased on your testing needs, you must determine what resources are required andcreate these resources accordingly.
n For a GUI test, these resources include shared object repositories, whichcontain test objects that represent objects in your application, functionlibraries, which contain custom functions to use in a test, recovery scenariosthat instruct UFT how to respond when the application has problems,environmental variable files which contain definitions for common environmentvariables, or external data tables to use to parameterize test steps.
n For an API test, these resources include WSDL or WADL files describing theapplication service's methods, REST Services that you create to serve as aprototype or your application's REST process, external data sources,virtualization projects used with service calls, .NET assembilies referenced by atest step, or Java classes used in a test step. These resources must be importedor created in UFT.
TutorialUFT's Testing Process
HP Unified Functional Testing (12.02) Page 18
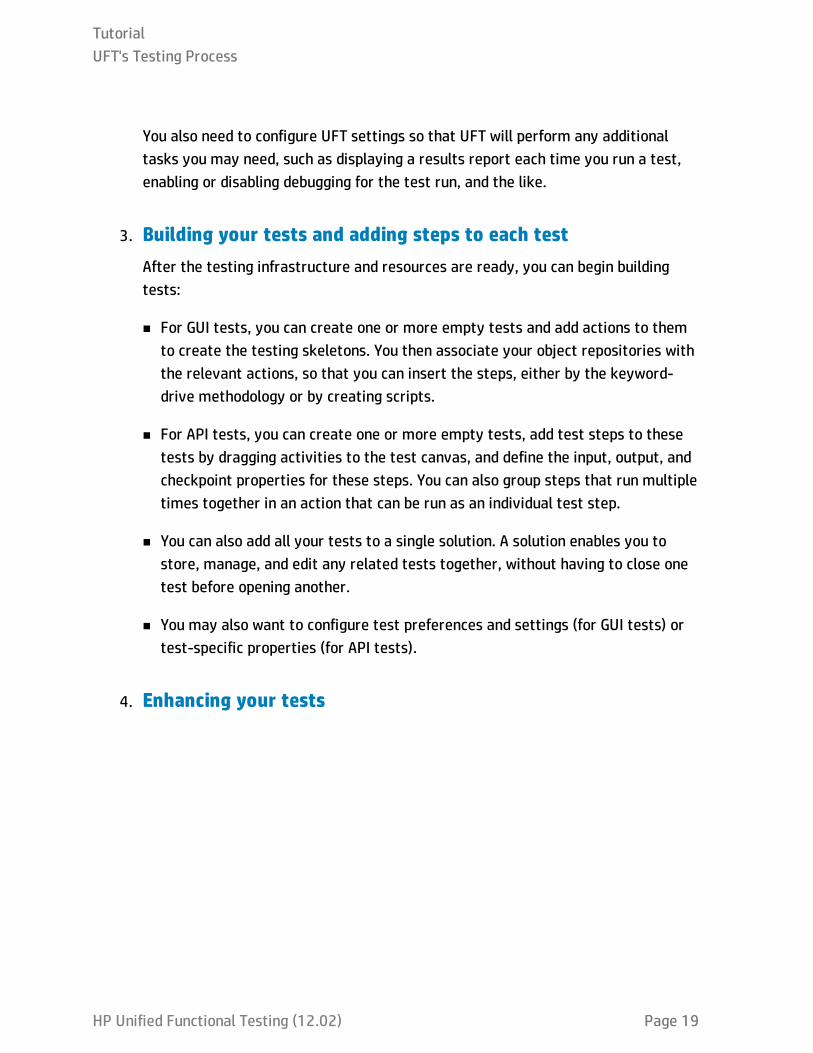
You also need to configure UFT settings so that UFT will perform any additionaltasks you may need, such as displaying a results report each time you run a test,enabling or disabling debugging for the test run, and the like.
3. Building your tests and adding steps to each testAfter the testing infrastructure and resources are ready, you can begin buildingtests:
n For GUI tests, you can create one or more empty tests and add actions to themto create the testing skeletons. You then associate your object repositories withthe relevant actions, so that you can insert the steps, either by the keyword-drive methodology or by creating scripts.
n For API tests, you can create one or more empty tests, add test steps to thesetests by dragging activities to the test canvas, and define the input, output, andcheckpoint properties for these steps. You can also group steps that run multipletimes together in an action that can be run as an individual test step.
n You can also add all your tests to a single solution. A solution enables you tostore, manage, and edit any related tests together, without having to close onetest before opening another.
n You may also want to configure test preferences and settings (for GUI tests) ortest-specific properties (for API tests).
4. Enhancing your tests
TutorialUFT's Testing Process
HP Unified Functional Testing (12.02) Page 19

You can enhance your tests in a number of ways:
ForGUItests...
n Insert checkpoints as test steps to check whether yourapplication is functioning correctly. For example, thesecheckpoints can check for the specific value of a page, individualtest object, or text string.
n You check how your application performs the same operationswith different values by parameterizing test step values withmutiple sets of data. You do this by replacing the test step's fixedvalues with parameters.
n You can add programming and conditional or loopstatements and other programming logic to your test usingVBscript.
ForAPItests...
n You can validate test step and individual properties of test stepsby selecting checkpoint properties and entering expectedvalues for the step properties.
n You can check how your application performs the sameprocesses with different values by parameterizing test stepproperties with multiple sets of data. You do this by replacingfixed values with parameters.
n You can add functionality to your test steps with custom codeactivities, event handlers, or custom activities created usingUFT's Activity Wizard.
5. Debugging, running, and analyzing your testYou can debug your test using UFT's debugging functionality to ensure that itoperates smoothly and without interruption. After the test is working correctly,you run it to check the behavior of your application. While running, UFT perfomseach step on the user interface of your application (while running a GUI test) orruns the application's API processes (while running an API test).
6. Reporting defectsIf you have access to an ALM server, you can report defects you discover to yourALM project. If not, you can manually report defects to your own defect database.
TutorialUFT's Testing Process
HP Unified Functional Testing (12.02) Page 20

UFT Main WindowBefore you begin working with UFT and creating your tests, you should familiarizeyourself with the main UFT window.
The image below shows the UFT window after you create a GUI test, with the test flowshown in the canvas, and with the toolbar, Solution Explorer, Data Pane, and Propertiespane displayed.
The image below shows the UFT window after you create an API test, with the test flowshown in the canvas, and with the toolbar, Toolbox pane, Data Pane, and Propertiespanes displayed.
TutorialUFT Main Window
HP Unified Functional Testing (12.02) Page 21

The main window displays a number of elements:
Testing DocumentsUFT displays open documents in the document pane (center of the UFT window). Youcan use the document tabs located just below the toolbar to navigate to opendocuments and bring them into focus.
The document pane can display the following types of files:
Tests Both GUI and API tests are displayed on their own tabs in thecanvas. A GUI test display shows the test flow, with separateitems for each action contained in the test. An API test displaysthe test flow of the various steps included in your tests.
BPT tests are displayed in a grid, listing the individualcomponents, groups, or flows contained in the test.
TutorialUFT Main Window
HP Unified Functional Testing (12.02) Page 22
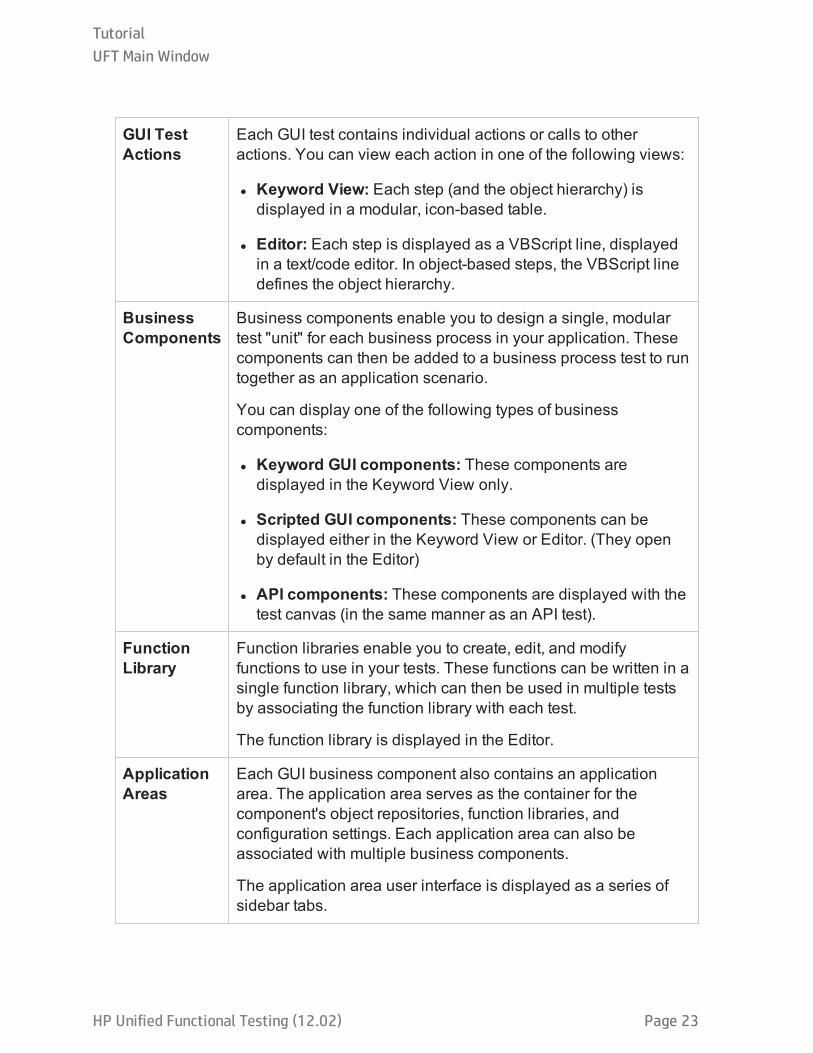
GUI TestActions
Each GUI test contains individual actions or calls to otheractions. You can view each action in one of the following views:
l Keyword View: Each step (and the object hierarchy) isdisplayed in a modular, icon-based table.
l Editor: Each step is displayed as a VBScript line, displayedin a text/code editor. In object-based steps, the VBScript linedefines the object hierarchy.
BusinessComponents
Business components enable you to design a single, modulartest "unit" for each business process in your application. Thesecomponents can then be added to a business process test to runtogether as an application scenario.
You can display one of the following types of businesscomponents:
l Keyword GUI components: These components aredisplayed in the Keyword View only.
l Scripted GUI components: These components can bedisplayed either in the Keyword View or Editor. (They openby default in the Editor)
l API components: These components are displayed with thetest canvas (in the same manner as an API test).
FunctionLibrary
Function libraries enable you to create, edit, and modifyfunctions to use in your tests. These functions can be written in asingle function library, which can then be used in multiple testsby associating the function library with each test.
The function library is displayed in the Editor.
ApplicationAreas
Each GUI business component also contains an applicationarea. The application area serves as the container for thecomponent's object repositories, function libraries, andconfiguration settings. Each application area can also beassociated with multiple business components.
The application area user interface is displayed as a series ofsidebar tabs.
TutorialUFT Main Window
HP Unified Functional Testing (12.02) Page 23
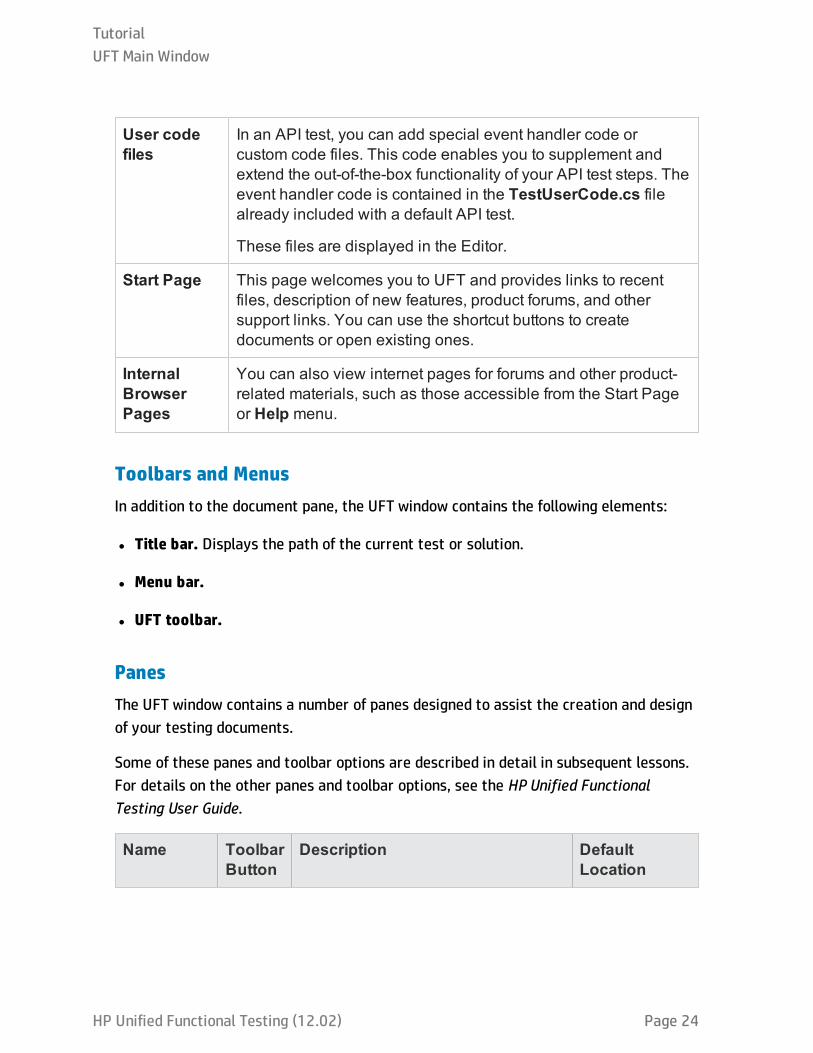
User codefiles
In an API test, you can add special event handler code orcustom code files. This code enables you to supplement andextend the out-of-the-box functionality of your API test steps. Theevent handler code is contained in the TestUserCode.cs filealready included with a default API test.
These files are displayed in the Editor.
Start Page This page welcomes you to UFT and provides links to recentfiles, description of new features, product forums, and othersupport links. You can use the shortcut buttons to createdocuments or open existing ones.
InternalBrowserPages
You can also view internet pages for forums and other product-related materials, such as those accessible from the Start Pageor Help menu.
Toolbars and MenusIn addition to the document pane, the UFT window contains the following elements:
l Title bar. Displays the path of the current test or solution.
l Menu bar.
l UFT toolbar.
PanesThe UFT window contains a number of panes designed to assist the creation and designof your testing documents.
Some of these panes and toolbar options are described in detail in subsequent lessons.For details on the other panes and toolbar options, see the HP Unified FunctionalTesting User Guide.
Name ToolbarButton
Description DefaultLocation
TutorialUFT Main Window
HP Unified Functional Testing (12.02) Page 24

SolutionExplorer
Displays all the tests, components,and application areas currently openor included in your solution, as wellas all the resources associated withyour current tests and components.Using the Solution Explorer, you canmanage these resources.
A tab on the leftside of the UFTwindow.
Toolbox l For GUI tests andcomponents: Displays all thekeywords available to your test,and enables you to drag and dropobjects, or calls to functions, fromthe Toolbox pane to your test.
l For API tests andcomponents: Displays all theactivities available to use in yourtest, and enables you to drag anddrop these activities on thecanvas.
A tab on the leftside of the UFTwindow.
Documentpane
N/A Displays all open documents. Eachdocument has a tab that you can clickto bring the document into focus.
An unlabeledpane in thecenter of theUFT window.Each documenttab is labeledwith thedocumentname.
Todisplay: Open atestingdocument.
TutorialUFT Main Window
HP Unified Functional Testing (12.02) Page 25
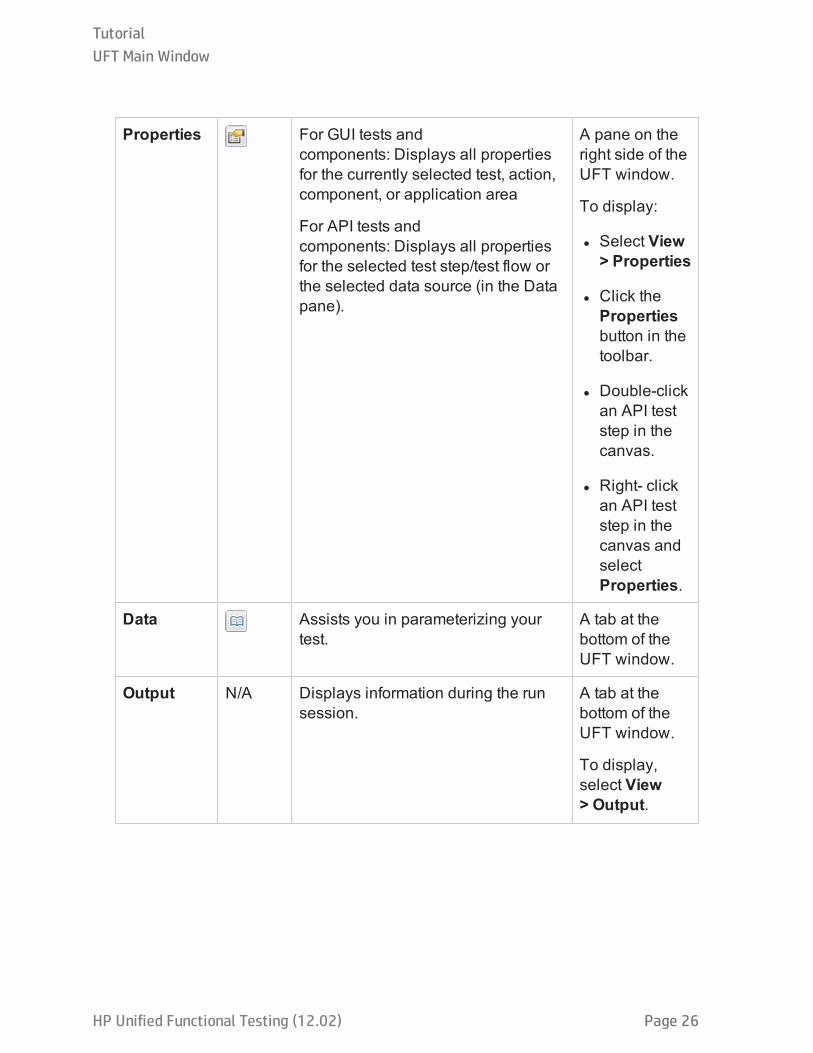
Properties For GUI tests andcomponents: Displays all propertiesfor the currently selected test, action,component, or application area
For API tests andcomponents: Displays all propertiesfor the selected test step/test flow orthe selected data source (in the Datapane).
A pane on theright side of theUFT window.
To display:
l Select View> Properties
l Click thePropertiesbutton in thetoolbar.
l Double-clickan API teststep in thecanvas.
l Right- clickan API teststep in thecanvas andselectProperties.
Data Assists you in parameterizing yourtest.
A tab at thebottom of theUFT window.
Output N/A Displays information during the runsession.
A tab at thebottom of theUFT window.
To display,select View> Output.
TutorialUFT Main Window
HP Unified Functional Testing (12.02) Page 26
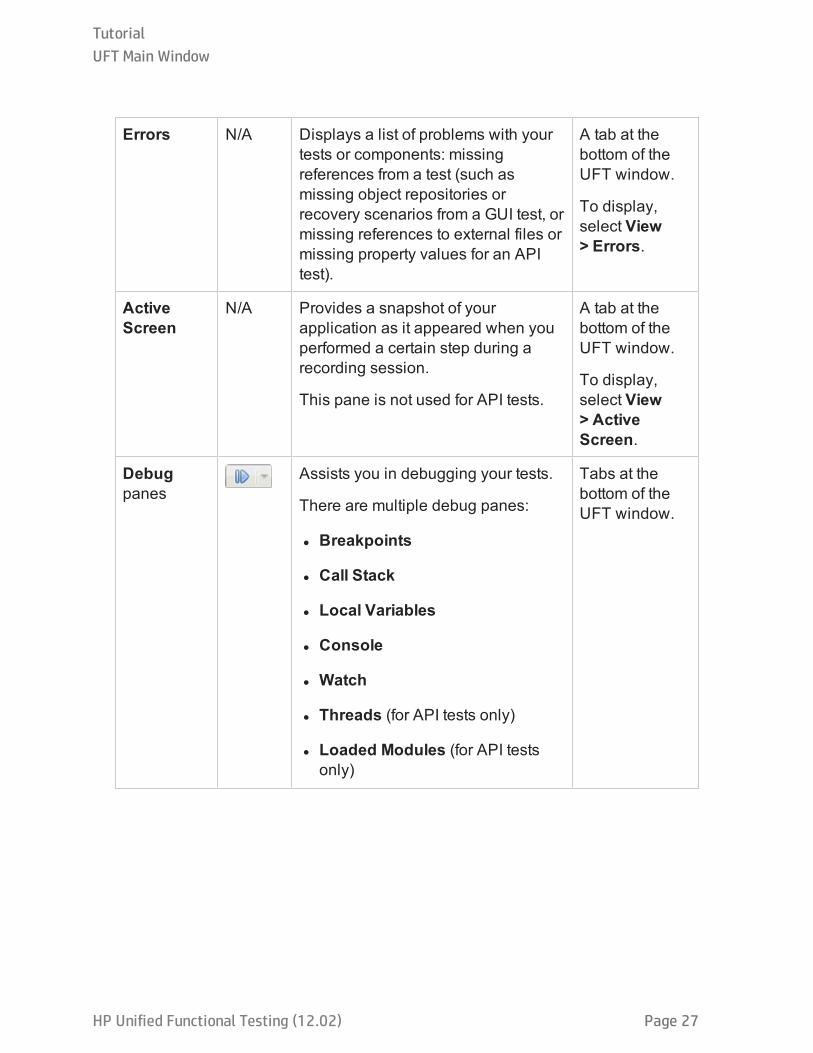
Errors N/A Displays a list of problems with yourtests or components: missingreferences from a test (such asmissing object repositories orrecovery scenarios from a GUI test, ormissing references to external files ormissing property values for an APItest).
A tab at thebottom of theUFT window.
To display,select View> Errors.
ActiveScreen
N/A Provides a snapshot of yourapplication as it appeared when youperformed a certain step during arecording session.
This pane is not used for API tests.
A tab at thebottom of theUFT window.
To display,select View> ActiveScreen.
Debugpanes
Assists you in debugging your tests.
There are multiple debug panes:
l Breakpoints
l Call Stack
l Local Variables
l Console
l Watch
l Threads (for API tests only)
l Loaded Modules (for API testsonly)
Tabs at thebottom of theUFT window.
TutorialUFT Main Window
HP Unified Functional Testing (12.02) Page 27

Tasks N/A Displays and enables you to managethe tasks defined for the current test.This pane also displays the TODOcomment steps of the test's actions,function libraries, or user code files.
A tab at thebottom of theUFT window.
To display,select View> Tasks.
SearchResults
N/A Displays all occurences of the searchcriteria you define in the Find dialogbox or using other Search menuitems.
A tab at thebottom of theUFT window.
To display:
l Select View> SerchResults.
l Perform asearch.
Bookmarks N/A Displays the list and location ofbookmarks contained in your testingdocuments.
A tab at thebottom of theUFT window.
To display,select View> Bookmarks.
TutorialUFT Main Window
HP Unified Functional Testing (12.02) Page 28

Run StepResults
N/A Displays the run results of a test runfor an individual API test step.
This pane is not used for GUI tests.
A tab at thebottom of theUFT window.
To display:
l Select View> RunResults.
l Run a stepby right-clicking anAPI test stepandselectingRun Step.
TutorialUFT Main Window
HP Unified Functional Testing (12.02) Page 29

HP Unified Functional Testing (12.02) Page 30
Part 2: Analyzing Your Application andCreating Tests"Introducing Unified Functional Testing" on page 15 gave you an overview of automatedtesting and UFT.
In this lesson, you will analyze an application to see what needs to be tested.
This section includes the following:
Getting to Know Your Application 31
Explore the Flight Reservation Application 33
Create a Solution for All Your Tests 36
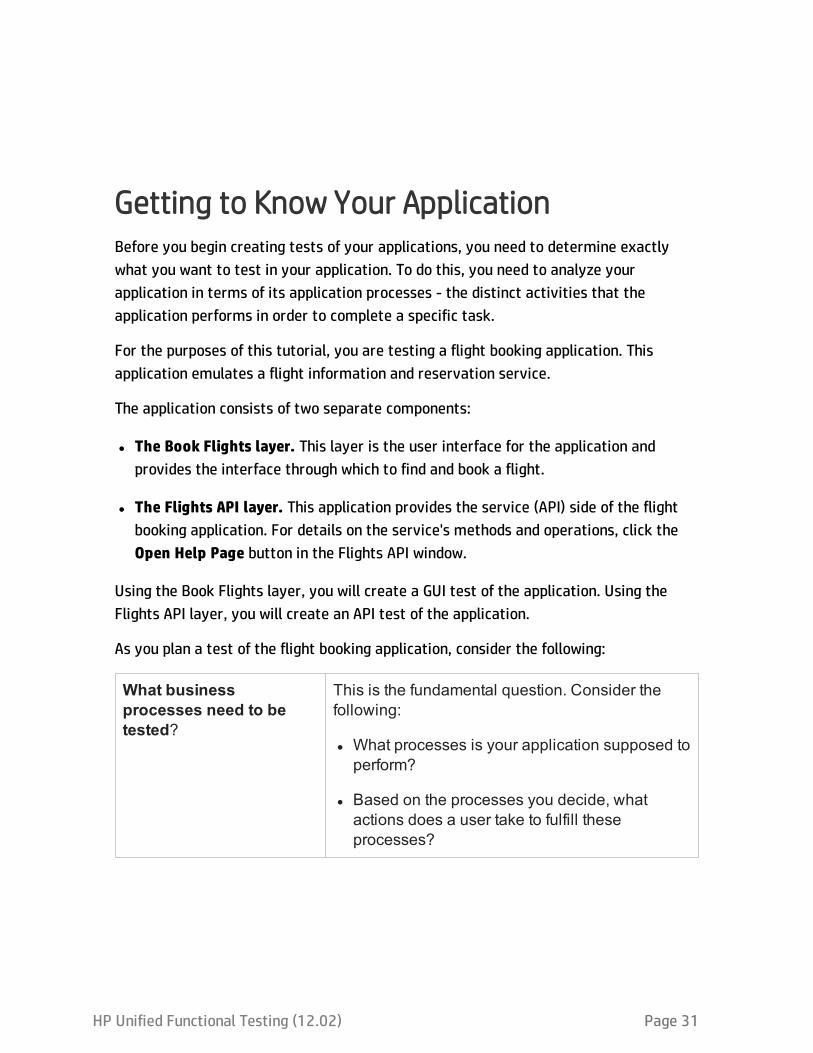
Getting to Know Your ApplicationBefore you begin creating tests of your applications, you need to determine exactlywhat you want to test in your application. To do this, you need to analyze yourapplication in terms of its application processes - the distinct activities that theapplication performs in order to complete a specific task.
For the purposes of this tutorial, you are testing a flight booking application. Thisapplication emulates a flight information and reservation service.
The application consists of two separate components:
l The Book Flights layer. This layer is the user interface for the application andprovides the interface through which to find and book a flight.
l The Flights API layer. This application provides the service (API) side of the flightbooking application. For details on the service's methods and operations, click theOpen Help Page button in the Flights API window.
Using the Book Flights layer, you will create a GUI test of the application. Using theFlights API layer, you will create an API test of the application.
As you plan a test of the flight booking application, consider the following:
What businessprocesses need to betested?
This is the fundamental question. Consider thefollowing:
l What processes is your application supposed toperform?
l Based on the processes you decide, whatactions does a user take to fulfill theseprocesses?
HP Unified Functional Testing (12.02) Page 31
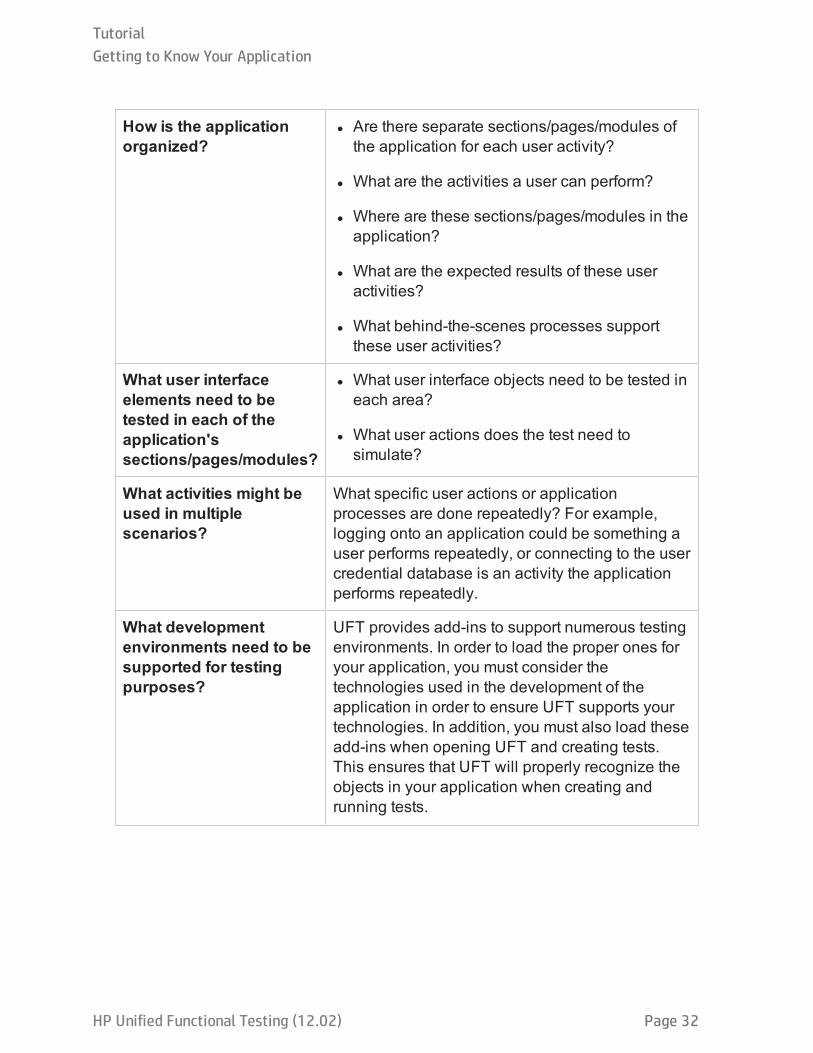
How is the applicationorganized?
l Are there separate sections/pages/modules ofthe application for each user activity?
l What are the activities a user can perform?
l Where are these sections/pages/modules in theapplication?
l What are the expected results of these useractivities?
l What behind-the-scenes processes supportthese user activities?
What user interfaceelements need to betested in each of theapplication'ssections/pages/modules?
l What user interface objects need to be tested ineach area?
l What user actions does the test need tosimulate?
What activities might beused in multiplescenarios?
What specific user actions or applicationprocesses are done repeatedly? For example,logging onto an application could be something auser performs repeatedly, or connecting to the usercredential database is an activity the applicationperforms repeatedly.
What developmentenvironments need to besupported for testingpurposes?
UFT provides add-ins to support numerous testingenvironments. In order to load the proper ones foryour application, you must consider thetechnologies used in the development of theapplication in order to ensure UFT supports yourtechnologies. In addition, you must also load theseadd-ins when opening UFT and creating tests.This ensures that UFT will properly recognize theobjects in your application when creating andrunning tests.
TutorialGetting to Know Your Application
HP Unified Functional Testing (12.02) Page 32
Explore the Flight Reservation ApplicationBefore you begin creating tests, you need to explore the sample application and seewhat user actions it has and what processes support the application flow.
As you navigate and use the application, consider the questions posed in the previouslesson. Use these questions to guide your thinking about how you could create a test ortests from the application.
1. Open the flight reservation application.Open both the Book Flights (GUI) layer and the Flights API (service) layer:
n The Book Flights layer is available at Start > All Programs > HP Software > HPUnified Functional Testing > Sample Applications > Flight GUI.
n The Flights API layer is available at Start > All Programs > HP Software > HPUnified Functional Testing > Sample Applications > Flight API.
For details on accessing UFT and UFT tools and files in Windows 8 and WindowsServer 2012, see "Accessing UFT in Windows 8 Operating Systems" on page 309.
2. Log in to the Book Flights application.In the Book Flights application start page, enter John for the user name and hp forthe password.
Note: The Flights API layer requires no login information.
TutorialExplore the Flight Reservation Application
HP Unified Functional Testing (12.02) Page 33

After logging in successfully, the application layer display should look like this:
Book Flights (GUI layer)
TutorialExplore the Flight Reservation Application
HP Unified Functional Testing (12.02) Page 34
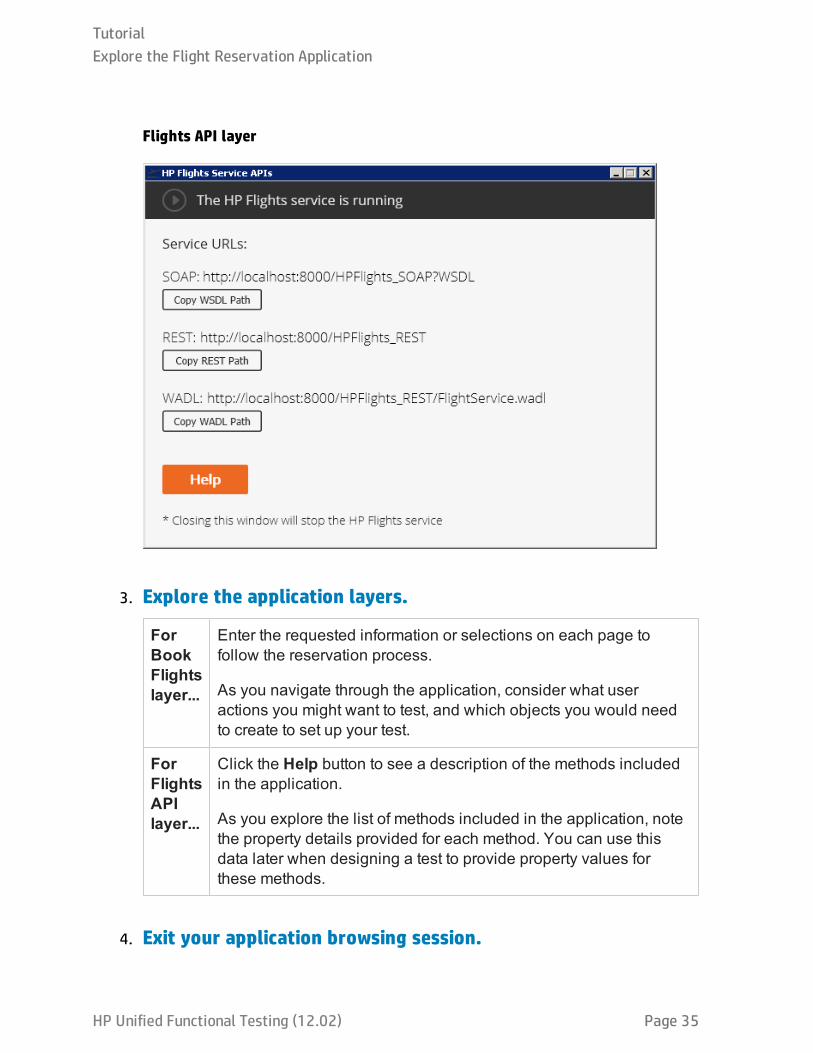
Flights API layer
3. Explore the application layers.
ForBookFlightslayer...
Enter the requested information or selections on each page tofollow the reservation process.
As you navigate through the application, consider what useractions you might want to test, and which objects you would needto create to set up your test.
ForFlightsAPIlayer...
Click the Help button to see a description of the methods includedin the application.
As you explore the list of methods included in the application, notethe property details provided for each method. You can use thisdata later when designing a test to provide property values forthese methods.
4. Exit your application browsing session.
TutorialExplore the Flight Reservation Application
HP Unified Functional Testing (12.02) Page 35
n For the Book Flights layer: After the flight reservation order details aredisplayed in the Order Details window, click New Search to return the applicationto the start.
n For Flights API layer: Minimize the Flights API window. Do not close thiswindow, as this will stop the service.
You are now ready to use these applications to create tests for each layer of theapplication. Continue with "Create a Solution for All Your Tests" below to create asolution for the tests you will use in the course of this tutorial.
Create a Solution for All Your TestsIn UFT, you can create a solution to serve as a container for your tests. Once a solutionis created, you can add any tests, business components, or application areas to thesolution.
Solutions enable you to group tests together in a convenient way. For example, you cancreate solutions containing all the tests of a particular application, or create solutionscontaining only the GUI or API tests of your application's parts.
You can add all types of UFT documents to a solution, and tests can be added tomultiple solutions.
In this exercise, you will create a new solution to hold the tests you will create in thecourse of this tutorial.
TutorialCreate a Solution for All Your Tests
HP Unified Functional Testing (12.02) Page 36
1. Start UFT.Do one of the following:
If UFT isnotcurrentlyopen
a. Open UFT.
o Double-click the UFT icon on your desktop or on the StartScreen (in Windows 8.x or Windows Server 2012).
o In Windows 7 or Windows Server 2008 R2, select Start> All Programs > HP Software > HP Unified FunctionalTesting.
b. In the Add-in Manager, confirm that only theWPF Add-in isselected. Clear all other add-ins.
c. Click OK to close the Add-in Manager and open UFT.
The UFT splash screen is displayed while UFT loads yourselected add-ins.
If UFT iscurrentlyopen
a. Select Help > About HP Unified Functional Testing tocheck which add-ins are loaded. The loaded add-ins aredisplayed with a checkbox next to their name in the Aboutdialog box.
b. If the .NET, WPF, and Web Add-ins are not loaded, you mustexit and restart UFT. When the Add-in Manager opens again,select these add-ins.
If the Add-in Manager does not open when starting UFT, afterUFT opens select Tools > Options. Then, in the StartupOptions pane (Tools > Options > General tab > StartupOptions node), select the Display Add-in Manager onstartup option.
2. Explore the Start Page.
TutorialCreate a Solution for All Your Tests
HP Unified Functional Testing (12.02) Page 37
The Start Page provides links to recent files, information about new features inUFT, as well as links to helpful support and community forums. In the top-rightcorner of the page, you can define the options for displaying and closing the StartPage while using UFT.
Note: If the Start Page is not displayed, you can display it by selecting View> Start Page.
3. Create a new solution.
a. In the toolbar, click the New down arrow and select New Solution.
b. Enter the details for the solution:
o Name: Flight Reservation Application
o Location: By default, all solutions and tests are saved atC:\%HOMEPATH%\My Documents\Unified Functional Testing. For thepurposes of this tutorial, you do not need to modify this path.
c. Click Create.
In the Solution Explorer pane, you can now see that the solution name isdisplayed at the top of the pane. Tests you add to this solution will be displayedas sub-nodes of this solution.
Note: If the Solution Explorer is hidden, click the Solution Explorer button
in the toolboar or select View > Solution Explorer to display it.
You can now begin creating GUI tests, as described in "Creating and Running AutomatedGUI Tests" on page 39 or API tests, as described in "Creating and Running AutomatedAPI Tests" on page 193.
TutorialCreate a Solution for All Your Tests
HP Unified Functional Testing (12.02) Page 38

HP Unified Functional Testing (12.02) Page 39
Part 3: Creating and Running AutomatedGUI TestsAfter analyzing your application and planning your testing goals, you create the tests ofthe application. A major part of this effort is creating tests of the user interface (GUI) ofyour application. Doing so ensures that the controls and objects in your applicationwork as designed.
Creating a GUI test involves a number of separate processes:
l Creating object repositories containing test objects for the objects in yourapplication
l Creating supplementary functions to use in your tests inside function libraries
l Adding steps to the test representing user actions in the application
l Creating checkpoints to validate specific objects in the application
l Parameterizing the test object values to see how the application reacts to differentinput values
l Running the test and analyzing the results of the test run
The following lessons will introduce and teach these processes in detail.
This section includes the following:
Lesson 1: Create a GUI Test and Actions 41
Lesson 2: Creating Object Repositories 46
Lesson 3: Adding Steps to a Test 62
Lesson 4: Running and Analyzing GUI Tests 95
Lesson 5: Parameterizing Steps and Objects 103
Lesson 6: Creating Checkpoints and Output Values 122
HP Unified Functional Testing (12.02) Page 40
Lesson 7: Creating Functions and Function Libraries 169
Lesson 8: Using Insight in your Test 182

Lesson 1: Create a GUI Test and ActionsBefore creating steps to test your application's GUI, you must first create a test andcreate the actions that provide the test structure.
Each UFT GUI test consists of calls to actions. Actions are units (within the test) thatdivide your test into logical sections. By dividing your tests into multiple actions, youcan design more modular, understandable, and efficient tests.
Your test can contain a number of different types of actions:
InternalandExternalActions
l An internal action is an action that is stored in the local test (alsoknow as a source test).
l An external action is a referenced call to an action that is storedin a different test.
Note: An external action called by a test is shown as aseparate node under the test node in the Solution Explorer.
For example, if you have an action that you want to use in multipletests, you would store the action as an internal action in one test andinsert calls to that action from other tests. In the other tests which callthe action, the action is available as an external action.
HP Unified Functional Testing (12.02) Page 41

Reusableactions
When you insert a call to a new action, it is reusable by default,enabling you to call the action from any test.
When you use reusable actions, you only need to update theexisting action stored with the original test. When you modify thatoriginal action, all tests containing calls to the action are updated.These reusable actions are read-only in the tests that call thereusable action.
Reusable actions can be useful if:
l You have a process that you may need to include in several tests,such as logging into your application.
l You may have a process that you need to insert several times inthe same test, such as entering user credential dialog boxes thatopen whenever a user tries to access a secure part of yourapplication.
If you want to prevent an action from being used in other tests, youcan make the action non-reusable.
Tip: If you plan to use the same or similar actions in many tests,you might consider creating a repository test to store yourreusable actions. Then, you can insert calls to these existingactions from other tests.
Copiedactions
You can also insert a copy of an action in a test if you want to modifythe action steps. When you copy the action, it becomes an internalaction of the test into which it is copied. These copies are not linkedto the source test, so any changes in the original action are notupdated in the copy.
You add actions to a test in the following ways:
l Calls to new actions. This inserts a new, empty action in your test. The action is aninternal action of the test containing it.
l Calls to a copy of an action. This inserts a copy of an existing action in your test.
l Calls to an existing action. This inserts a call to an existing action (an actionexternal to the current test).
TutorialLesson 1: Create a GUI Test and Actions
HP Unified Functional Testing (12.02) Page 42

1. Create a new test and add it to the solution.
a. In the UFT toolbar, click the Add button down arrow and select Add NewTest.
b. In the Add New Test to Solution dialog box, select GUI Test.
c. Enter the following details for your test:
o Name: Book Flights
o Location: By default, UFT saves documents at C:\%HOMEPATH%\MyDocuments\Unified Functional Testing. For this lesson, you do not need tomodify this path.
d. Click Add.
A blank test opens in the canvas, with one tab for the test flow (name BookFlights), and a blank action tab opens in the document pane (name Action 1).
This test is also displayed as a subnode of the Flight Reservation Applicationsolution node in the Solution Explorer pane.
2. Rename Action 1 so that it has a logical name.a. In the canvas, right-click the Action1 box and select Action Properties.
b. In the General tab of the Action Properties dialog box, rename Action1 to Loginand click OK.
c. In the warning that opens, click Yes.
The action block in the canvas should now be displayed with the name Login.
3. Create a new action named Flight Finder.a. Right-click anywhere in the canvas and select Call to New Action.
TutorialLesson 1: Create a GUI Test and Actions
HP Unified Functional Testing (12.02) Page 43
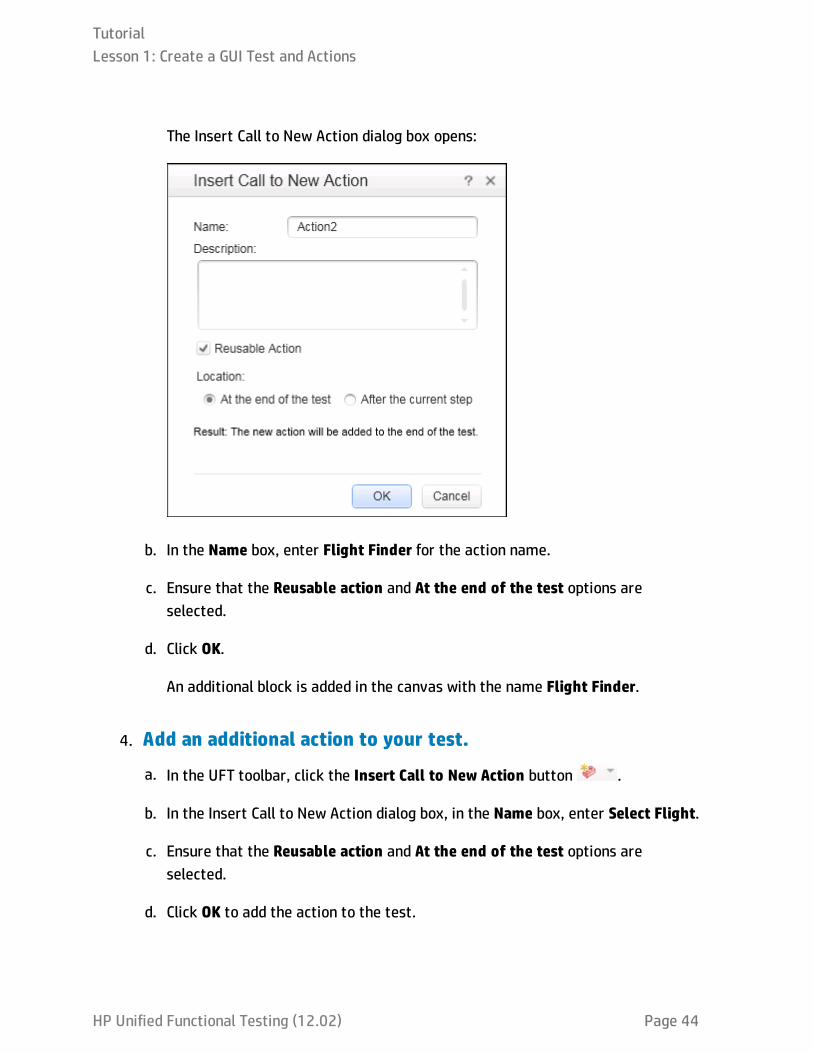
The Insert Call to New Action dialog box opens:
b. In the Name box, enter Flight Finder for the action name.
c. Ensure that the Reusable action and At the end of the test options areselected.
d. Click OK.
An additional block is added in the canvas with the name Flight Finder.
4. Add an additional action to your test.
a. In the UFT toolbar, click the Insert Call to New Action button .
b. In the Insert Call to New Action dialog box, in the Name box, enter Select Flight.
c. Ensure that the Reusable action and At the end of the test options areselected.
d. Click OK to add the action to the test.
TutorialLesson 1: Create a GUI Test and Actions
HP Unified Functional Testing (12.02) Page 44
Another block is added in the canvas with the name Select Flight.
5. Create a final action.Using either of the methods used above, add another action to your test namedFlight Confirmation.
Your test now contains all the actions necessary to test your application.
6. Save your test.
In the UFT toolbar, click the Save button .
You may have noticed that before you clicked Save, an asterisk (*) was displayed inthe Book Flights tab in the document pane and the Book Flights node in the SolutionExplorer. These asterisks are displayed to indicate that a document has unsavedcontent. When you save a test, all changes in action tabs are also saved.
7. Explore the test flow in the canvas.Click on the Book Flights tab in the canvas to view the entire test flow.
n You can zoom in or out on the test flow uing the mouse or the zom bar locatedabove the canvas.
n Once the test flow is zoomed to the maximum, and no longer fits the canvas, youcan also use the minimap in the bottom left corner of the canvas to navigatethrough the test flow.
If the minimap is not displayed, click the Minimap button above the canvasto display it. The minimap can be helpful if you have a test with many actions ornested actions.
Now that you have your test structure, you can begin creating object repositories forthe test. Continue to "Lesson 2: Creating Object Repositories" on the next page tocontinue.
TutorialLesson 1: Create a GUI Test and Actions
HP Unified Functional Testing (12.02) Page 45
Lesson 2: Creating Object RepositoriesThe basis of a GUI test is the collection of test objects used to test your application'suser interface. These test objects are learned by UFT and then stored in objectrepositories that are associated with your test.
Now that you have created a test and its test structure (by creating actions), you needto create the test objects to use in your tests. This lesson introduces the basic conceptsof test objects, run-time objects, and object repositories which are used in your tests.
This lesson includes the following:
UFT Test Object Recognition - Overview 47
Exercise 2a: Add Objects from Your Application 48
Exercise 2b: Create Object Repositories using Navigate and Learn 57
TutorialLesson 2: Creating Object Repositories
HP Unified Functional Testing (12.02) Page 46
UFT Test Object Recognition - OverviewWhen creating and running GUI tests, UFT uses test objects to recognize objects in yourapplication and then create test steps based on your application's objects. These testobjects are based on UFT's test object model.
The test object model is a large set of object types or classes that UFT uses torepresent the objects in your application. Each test object class has a list ofidentification properties that UFT can learn about the object, a sub-set of theseproperties that can uniquely identify objects of that class, and a set of relevantoperations that UFT can perform on the object.
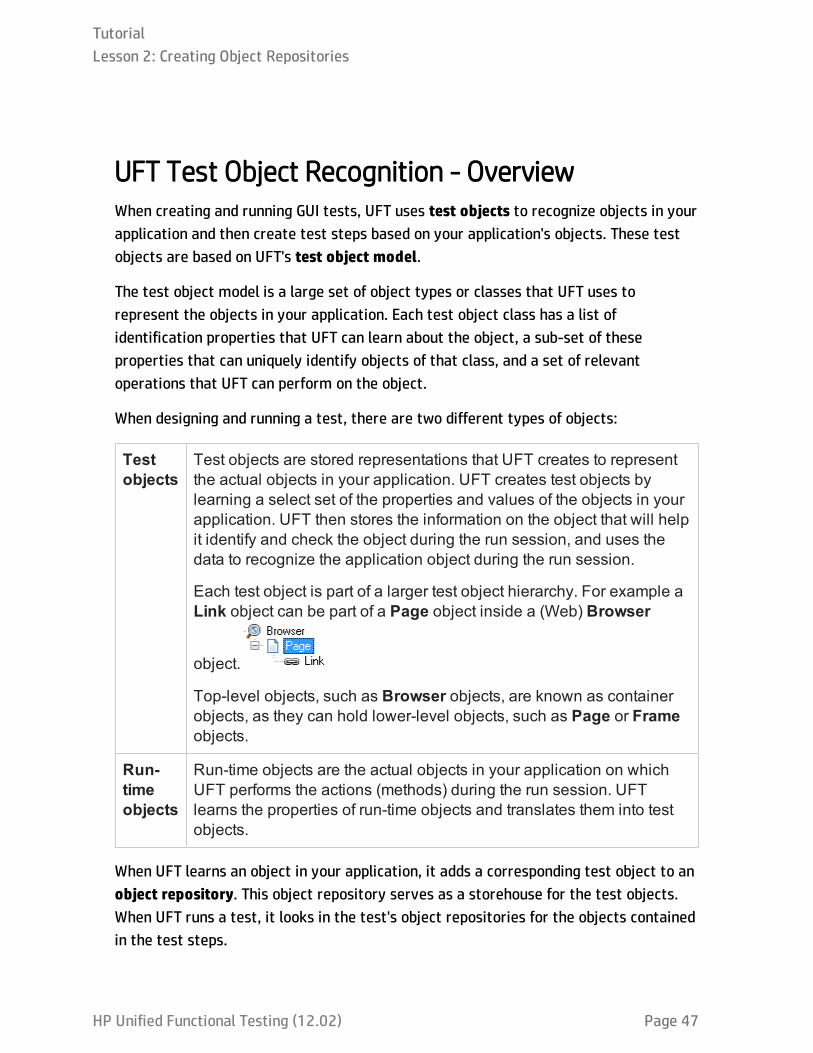
When designing and running a test, there are two different types of objects:
Testobjects
Test objects are stored representations that UFT creates to representthe actual objects in your application. UFT creates test objects bylearning a select set of the properties and values of the objects in yourapplication. UFT then stores the information on the object that will helpit identify and check the object during the run session, and uses thedata to recognize the application object during the run session.
Each test object is part of a larger test object hierarchy. For example aLink object can be part of a Page object inside a (Web) Browser
object.
Top-level objects, such as Browser objects, are known as containerobjects, as they can hold lower-level objects, such as Page or Frameobjects.
Run-timeobjects
Run-time objects are the actual objects in your application on whichUFT performs the actions (methods) during the run session. UFTlearns the properties of run-time objects and translates them into testobjects.
When UFT learns an object in your application, it adds a corresponding test object to anobject repository. This object repository serves as a storehouse for the test objects.When UFT runs a test, it looks in the test's object repositories for the objects containedin the test steps.
TutorialLesson 2: Creating Object Repositories
HP Unified Functional Testing (12.02) Page 47

When you add an object to an object repository, UFT:
l Identifies the UFT test object class that represents the learned object in yourapplication and creates an appropriate test object.
l Reads the current value of the object's properties in your application and stores thelist of identification properties and values with the test object.
l Chooses a unique name for the test object.
There are two different types of object repositories:
Sharedobjectrepositories
A shared object repositories is an object repository that existsindependently of an individual test. The test objects in a sharedobject repository can be used in multiple tests/actions. Thismakes this type of object repository the preferred repository typefor storing and maintaining your test objects as any updates youmake to a test object are then applied to all tests using thatshared object repository.
Localobjectrepositories
Local object repositories contain the test objects used in thecontext of a specific action. These type of object repositoriescannot be used with other actions. By default all actions have alocal object repository.
When you create an object repository, it is recommended to include only the testobjects you need for your testing purposes. This keeps the object repository relativelysmall and helps to simplify maintenance and object selection. Also, make sure that youprovide logical names so that others can easily select the correct objects when creatingor modifying tests.
Object repositories can also include checkpoint and output objects. Checkpoint objecttypes are covered in "Lesson 5: Parameterizing Steps and Objects" on page 103.
Exercise 2a: Add Objects from Your ApplicationIn "UFT Test Object Recognition - Overview" on the previous page, you learned aboutUFT's test object model and how UFT learns and stores objects.
TutorialLesson 2: Creating Object Repositories
HP Unified Functional Testing (12.02) Page 48
In this exercise, you will use UFT's object recognition capabilities to learn objects andcreate an object repository.
1. Start UFT and open the Book Flights test.a. If UFT is not open, open UFT, as described in "Create a Solution for All Your
Tests" on page 36.
b. On the Start Page, in the Recent tests/components area, click Book Flights.
The Book Flights test opens, displaying the Book Flights test (and its actions)you created in "Lesson 1: Create a GUI Test and Actions" on page 41.
2. Set the learn settings for UFT.a. Select Record > Record and Run Settings. The Record and Run Settings dialog
box opens.
b. In the Record and Run Settings dialog box, select the Windows Applicationstab.
c. In the Windows Applications tab, select the Record and run only on option.
TutorialLesson 2: Creating Object Repositories
HP Unified Functional Testing (12.02) Page 49

d. Under the Record and run only on option, select the checkboxes for theApplications opened by UFT and Applications specified below options:
e. In the Application details area, click the Add button .
f. In the Application details dialog box, enter the paths to the application and theworking folder for the application:
o Application: <UFT installation folder>\samples\FlightsApplication\FlightsGUI.exe
TutorialLesson 2: Creating Object Repositories
HP Unified Functional Testing (12.02) Page 50

o Working folder: <UFT installation folder>\samples\FlightsApplication
g. Select the Launch application option and click OK.
h. In the main Record and Run Settings dialog box, click OK. Later, when yourecord steps on the application or run a test for it, UFT will be able to work withthe application.
3. Open the flight reservation application.If it is not already open, open the flight reservation application.
Note: You can open the flight reservation application before or after openingUFT.
4. View the available properties and operations for some of theobjects in the flight reservation application.
a. In the toolbar, click the Object Spy button . The Object Spy dialog box opens:
TutorialLesson 2: Creating Object Repositories
HP Unified Functional Testing (12.02) Page 51
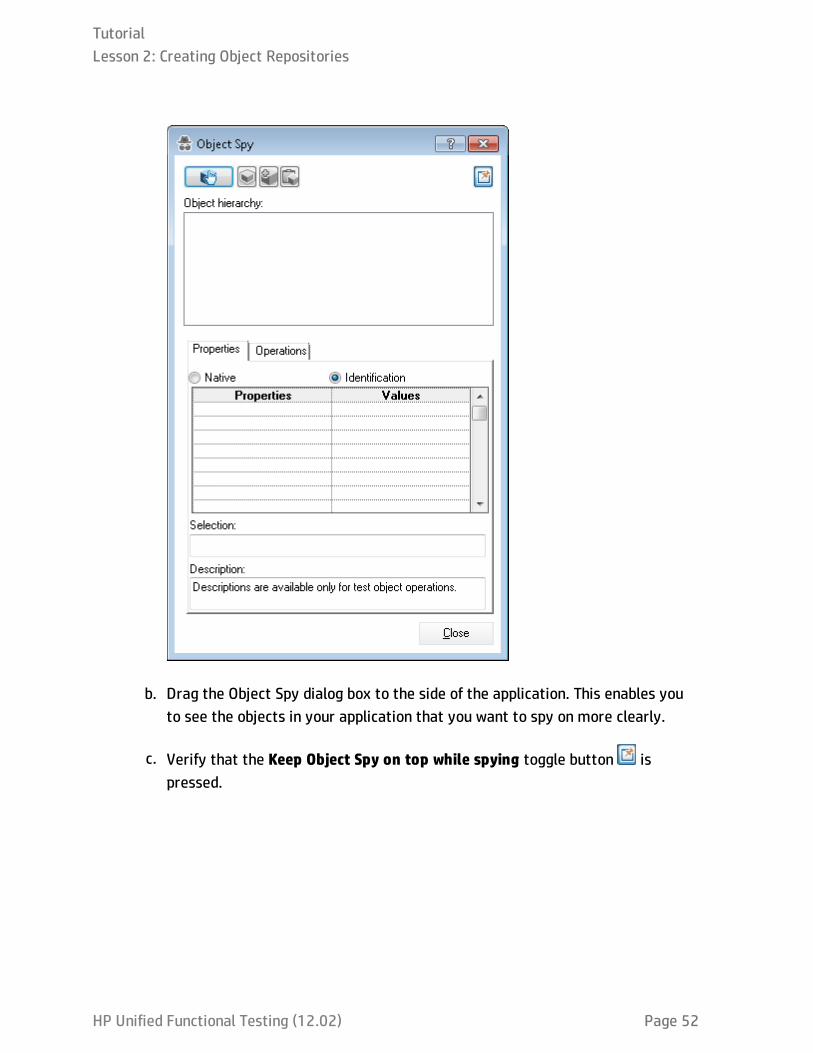
b. Drag the Object Spy dialog box to the side of the application. This enables youto see the objects in your application that you want to spy on more clearly.
c. Verify that the Keep Object Spy on top while spying toggle button ispressed.
TutorialLesson 2: Creating Object Repositories
HP Unified Functional Testing (12.02) Page 52
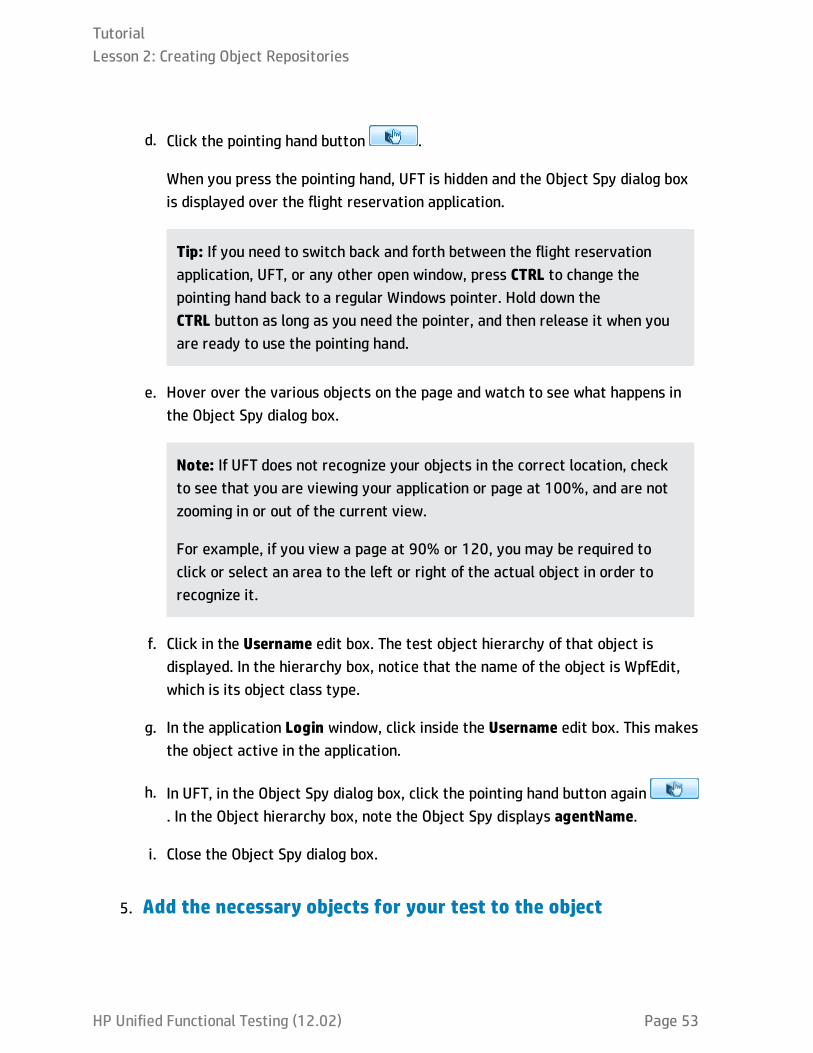
d. Click the pointing hand button .
When you press the pointing hand, UFT is hidden and the Object Spy dialog boxis displayed over the flight reservation application.
Tip: If you need to switch back and forth between the flight reservationapplication, UFT, or any other open window, press CTRL to change thepointing hand back to a regular Windows pointer. Hold down theCTRL button as long as you need the pointer, and then release it when youare ready to use the pointing hand.
e. Hover over the various objects on the page and watch to see what happens inthe Object Spy dialog box.
Note: If UFT does not recognize your objects in the correct location, checkto see that you are viewing your application or page at 100%, and are notzooming in or out of the current view.
For example, if you view a page at 90% or 120, you may be required toclick or select an area to the left or right of the actual object in order torecognize it.
f. Click in the Username edit box. The test object hierarchy of that object isdisplayed. In the hierarchy box, notice that the name of the object is WpfEdit,which is its object class type.
g. In the application Login window, click inside the Username edit box. This makesthe object active in the application.
h. In UFT, in the Object Spy dialog box, click the pointing hand button again. In the Object hierarchy box, note the Object Spy displays agentName.
i. Close the Object Spy dialog box.
5. Add the necessary objects for your test to the object
TutorialLesson 2: Creating Object Repositories
HP Unified Functional Testing (12.02) Page 53
repository.In this step, you take the "spy" process a step further and instruct UFT to learn onlythe objects that are needed for your test and add them to the object repository.
a. In the application Login window, click inside the Username edit box.
b. In UFT, select Resources > Object Repository Manager. The Object RepositoryManager window opens.
c. In the Object Repository Manager window, select Object > Add Objects. BothUFT and the Object Repository Manager are hidden.
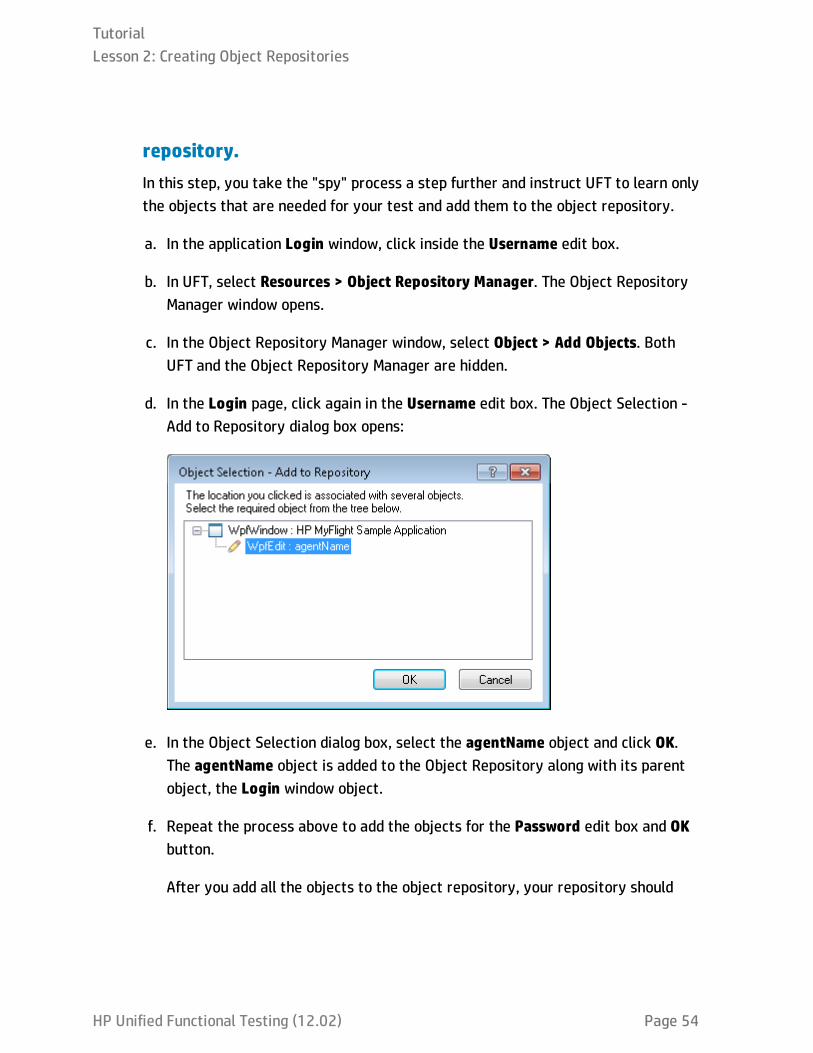
d. In the Login page, click again in the Username edit box. The Object Selection -Add to Repository dialog box opens:
e. In the Object Selection dialog box, select the agentName object and click OK.The agentName object is added to the Object Repository along with its parentobject, the Login window object.
f. Repeat the process above to add the objects for the Password edit box and OKbutton.
After you add all the objects to the object repository, your repository should
TutorialLesson 2: Creating Object Repositories
HP Unified Functional Testing (12.02) Page 54
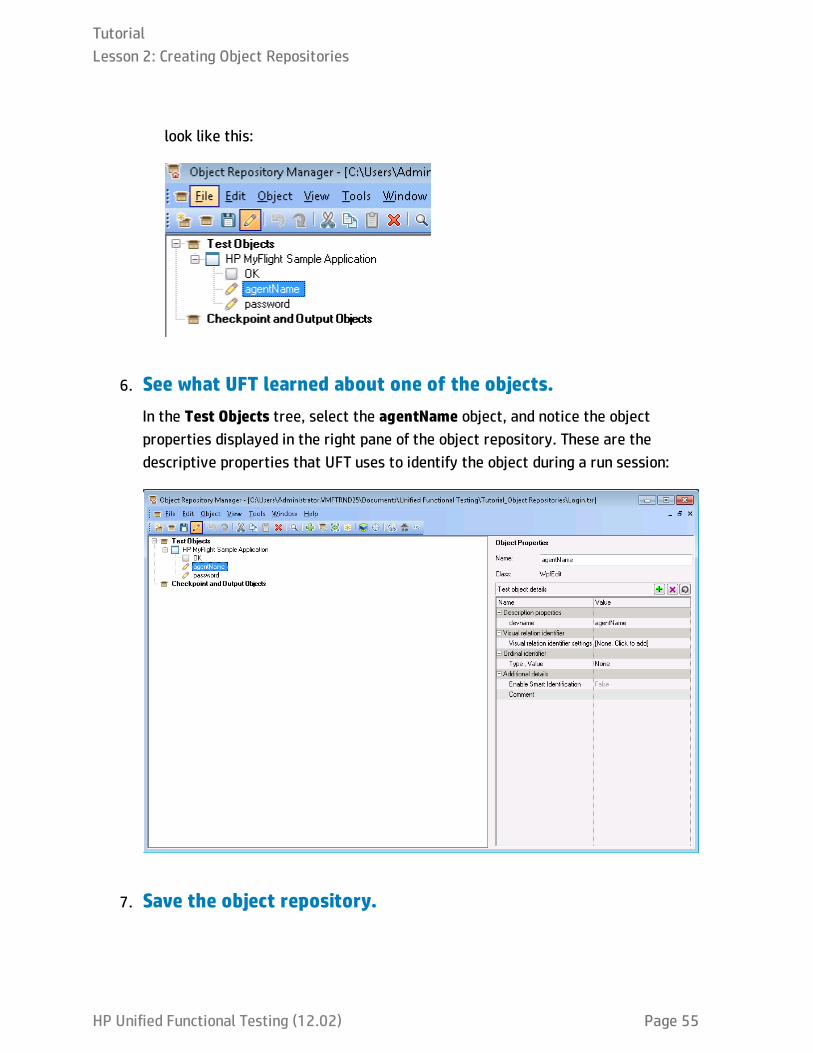
look like this:
6. See what UFT learned about one of the objects.In the Test Objects tree, select the agentName object, and notice the objectproperties displayed in the right pane of the object repository. These are thedescriptive properties that UFT uses to identify the object during a run session:
7. Save the object repository.
TutorialLesson 2: Creating Object Repositories
HP Unified Functional Testing (12.02) Page 55
a. In the Object Repository Manager window, click Save .
b. Browse to the folder where your solution and tests are saved, inC:\%HOMEPATH%\My Documents\Unified Functional Testing. In that folder,create a new folder named Tutorial_Object Repositories, and open it.
c. In the Tutorial_Object Repositories folder, save the object repository with thename Login and click OK.
Note: This step only saves the object repository. It is not connected with atest when you save it, even if you have a test open the UFT main window.
8. Associate the object repository with the Login action.Associating an object repository with an action enables you to then use any objectfrom that repository in any step in the associated action.
Note: The same object repository can be associated with multiple tests andactions.
a. Open the main UFT window.
b. In the main UFT window, open the Solution Explorer.
c. In the Solution Explorer, under the Book Flights node, expand the Login node.
d. Right-click the Login action and select Associate Repository with Action. TheOpen Shared Object Repository dialog box opens.
e. In the Open Shared Object Repository dialog box, navigate to the folder whereyou saved the object repository in the previous step and select the Login.tsrfile. Click Open.
f. In the dialog box that opens, click Yes.
The object repository is now associated with the Login action, and is displayedin the Solutoin Explorer as a child element of the action.
TutorialLesson 2: Creating Object Repositories
HP Unified Functional Testing (12.02) Page 56
9. Save your test.Select File > Save to save your test.
Now that you have taught UFT to recognize your appilcation's objects, created an objectrepository containing those objects, and associated the object repository with a test,you can create additional object repositories for the other areas of the application.Continue to "Exercise 2b: Create Object Repositories using Navigate and Learn"below to learn more.
Exercise 2b: Create Object Repositories usingNavigate and LearnIn "Exercise 2a: Add Objects from Your Application" on page 48, you learned how to useUFT to add objects in your application, create a shared object repository for the Loginpage of the flight reservation application, and associated this object repository with atest.
In this lesson, you will create a shared object repository for each of the remainingpages in the site. You will use the Navigate and Learn process, which enables you tolearn all the objects in a page or section of application at once.
Tip: It is recommended to always create a separate shared object repository foreach section/page of your application or Web site. This makes it easier to find thecorrect object when adding or modifying test steps or when performingmaintenance tasks.
For the purposes of this exercise, you will instruct UFT to learn all of the objects oneach page. At this point, you do not need to associate the object repositories withspecific actions.
1. Log in to the flight reservation application's Flight Finder page.a. If it is not already open, open the flight reservation application.
TutorialLesson 2: Creating Object Repositories
HP Unified Functional Testing (12.02) Page 57

b. In the Login page, enter the login credentials:
o Username: john
o Password: hp
c. Click OK. The Book Flight page opens.
2. Create a new shared object repository.a. If the Object Repository Manager is closed, open it by selecting Resources
> Object Repository Manager in UFT.
b. In the Object Repository Manager window, click New . A blank shared objectrepository opens.
3. Start the Navigate and Learn process by setting up the DefineObject Filter.In addition to adding objects individually as you did in the previous exercise, youcan learn and add all the objects in your application in one process using theNavigate and Learn mechanism.
a. In the Object Repository Manager window, select Object > Navigate and Learn.Both UFT and the Object Repository Manager are hidden.
b. In the Navigate and Learn toolbar, click the Define Object Filter button .The Define Object Filter dialog box opens.
TutorialLesson 2: Creating Object Repositories
HP Unified Functional Testing (12.02) Page 58
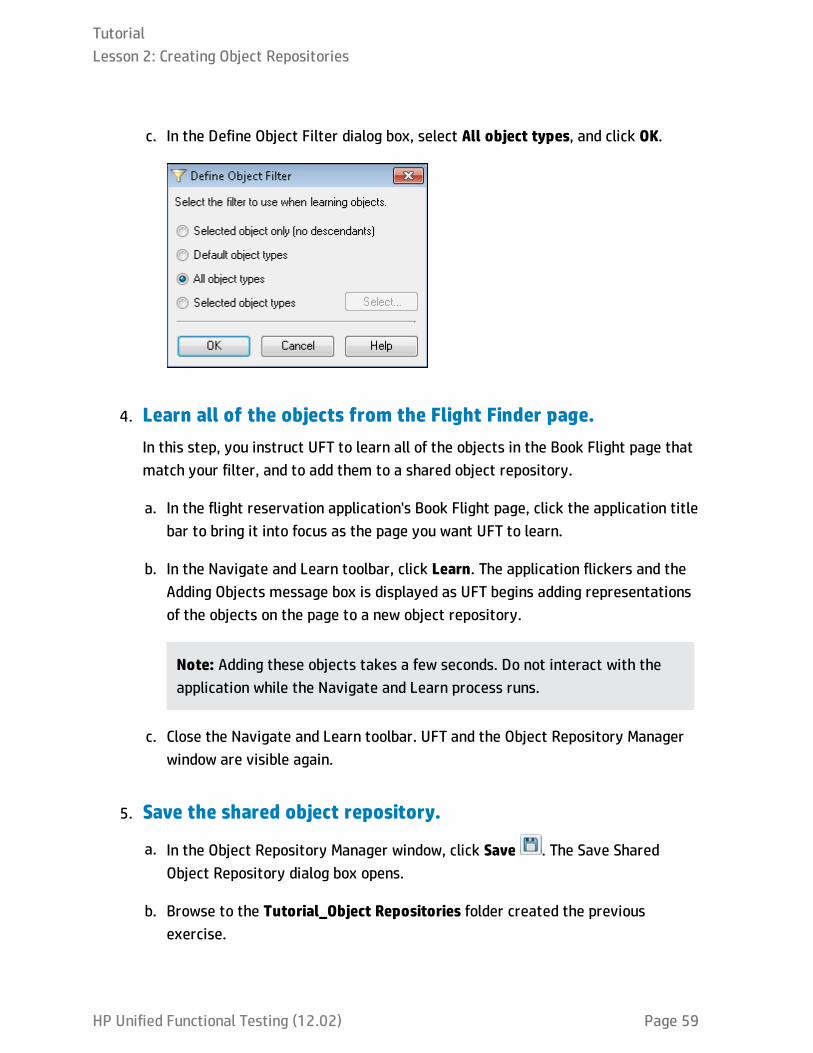
c. In the Define Object Filter dialog box, select All object types, and click OK.
4. Learn all of the objects from the Flight Finder page.In this step, you instruct UFT to learn all of the objects in the Book Flight page thatmatch your filter, and to add them to a shared object repository.
a. In the flight reservation application's Book Flight page, click the application titlebar to bring it into focus as the page you want UFT to learn.
b. In the Navigate and Learn toolbar, click Learn. The application flickers and theAdding Objects message box is displayed as UFT begins adding representationsof the objects on the page to a new object repository.
Note: Adding these objects takes a few seconds. Do not interact with theapplication while the Navigate and Learn process runs.
c. Close the Navigate and Learn toolbar. UFT and the Object Repository Managerwindow are visible again.
5. Save the shared object repository.
a. In the Object Repository Manager window, click Save . The Save SharedObject Repository dialog box opens.
b. Browse to the Tutorial_Object Repositories folder created the previousexercise.
TutorialLesson 2: Creating Object Repositories
HP Unified Functional Testing (12.02) Page 59
c. Name this object repository Flight Finder and click OK.
6. Create object repositories for the remaining application pages.a. Using the process described in the previous step, create new shared object
repositories for each of the following pages:
o Select Flight
o Flight Details
IMPORTANT: Make sure before learning the objects in the Flight Detailspage that you enter a string in the Passenger Name box. This activatesthe Order button and enables UFT to learn it properly. You will need thisbutton in other exercises.
b. Name the object repositories Select Flight and Flight Confirmation,respectively.
7. Associate the Flight Finder object repository with the FlightFinder action.a. Switch to the UFT window. If the Solution Explorer is not already open, open it
by clicking on the Solution Explorer tab in the bottom left corner of the UFTwindow.
b. In the Solution Explorer, in the Book Flights node, right-click the Flight Findernode and select Associate Repository with Action. The Open Shared ObjectRepository dialog box opens.
c. Browse to the Tutorial_ObjectRepositories folder.
d. In the Tutorial_ObjectRepositories folder, select the Flight Finder.tsr file andclick Open.
e. In the dialog box that opens, click Yes.
TutorialLesson 2: Creating Object Repositories
HP Unified Functional Testing (12.02) Page 60
The object repository is now associated with the Flight Finder action, and isdisplayed in the Solution Explorer as a child of that action.
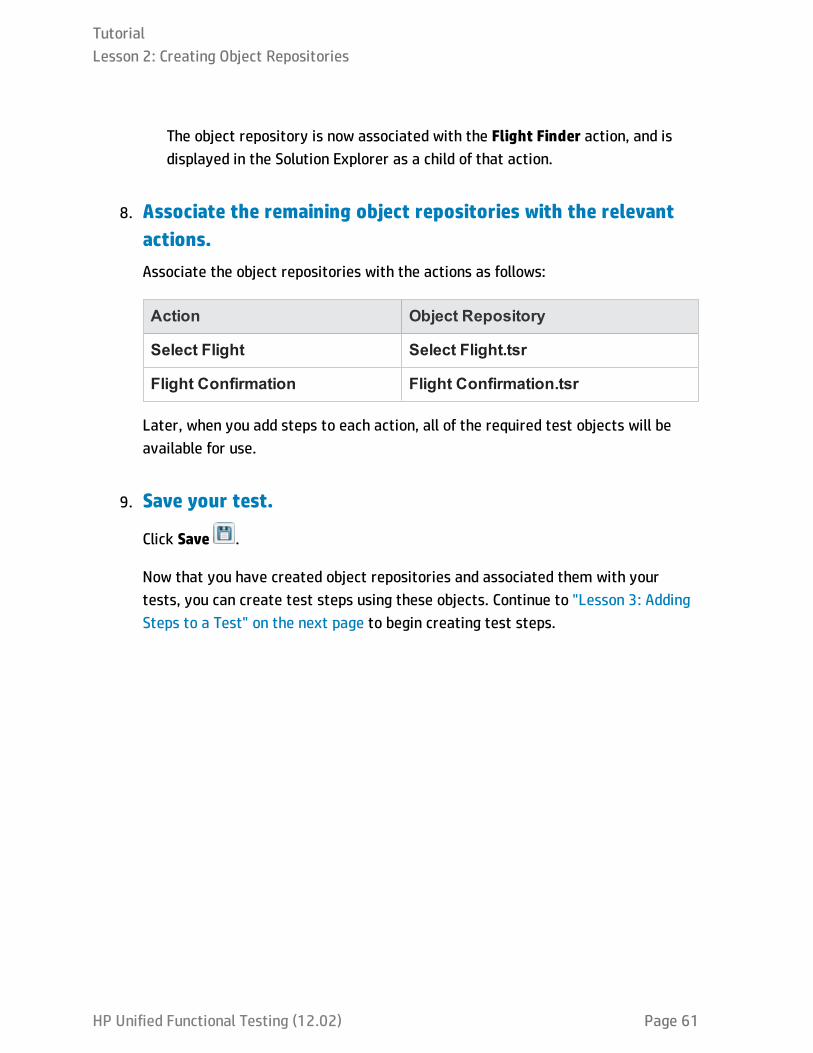
8. Associate the remaining object repositories with the relevantactions.Associate the object repositories with the actions as follows:
Action Object Repository
Select Flight Select Flight.tsr
Flight Confirmation Flight Confirmation.tsr
Later, when you add steps to each action, all of the required test objects will beavailable for use.
9. Save your test.
Click Save .
Now that you have created object repositories and associated them with yourtests, you can create test steps using these objects. Continue to "Lesson 3: AddingSteps to a Test" on the next page to begin creating test steps.
TutorialLesson 2: Creating Object Repositories
HP Unified Functional Testing (12.02) Page 61

Lesson 3: Adding Steps to a TestIn "Lesson 1: Create a GUI Test and Actions", you created a test and actions to provide astructure for the test of the flight reservation application. In "Lesson 2: Creating ObjectRepositories", you created object repositories with the test objects for the application.
In this lesson, you will learn the final mandatory step for creating tests of yourapplication. You will learn how to add test steps to your GUI tests that enable you torun an accurate test of user actions in the user interface.
This lesson includes the following:
Adding Test Steps in a GUI Test - Overview 63
Exercise 3a: Add Steps to the Login Action in the Keyword View 64
Exercise 3b: Add Steps to the FlightFinder Action by Recording 73
Exercise 3c: Add a Step to the Select Flight Action Using the Toolbox Pane 78
Exercise 3d: Add Steps to the Book Flight Action Using the Step Generator 81
Advanced Exercise 3e (Optional) - Add Steps Using the Editor 88
TutorialLesson 3: Adding Steps to a Test
HP Unified Functional Testing (12.02) Page 62
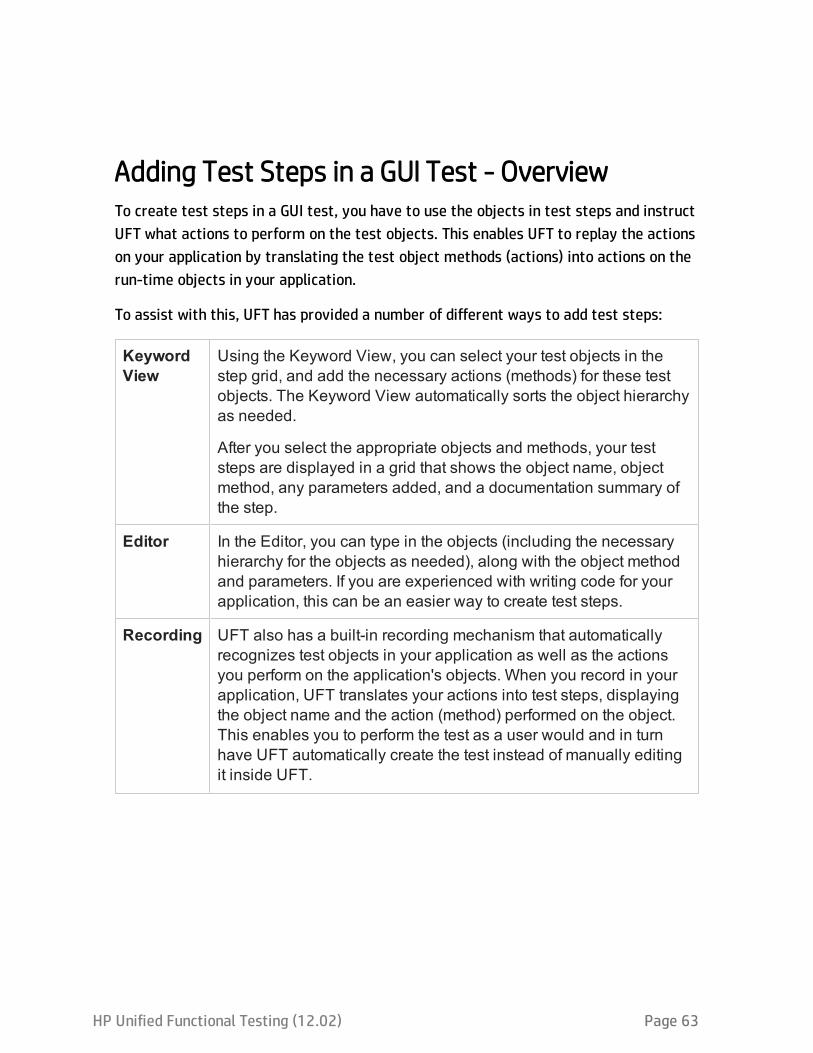
Adding Test Steps in a GUI Test - OverviewTo create test steps in a GUI test, you have to use the objects in test steps and instructUFT what actions to perform on the test objects. This enables UFT to replay the actionson your application by translating the test object methods (actions) into actions on therun-time objects in your application.
To assist with this, UFT has provided a number of different ways to add test steps:
KeywordView
Using the Keyword View, you can select your test objects in thestep grid, and add the necessary actions (methods) for these testobjects. The Keyword View automatically sorts the object hierarchyas needed.
After you select the appropriate objects and methods, your teststeps are displayed in a grid that shows the object name, objectmethod, any parameters added, and a documentation summary ofthe step.
Editor In the Editor, you can type in the objects (including the necessaryhierarchy for the objects as needed), along with the object methodand parameters. If you are experienced with writing code for yourapplication, this can be an easier way to create test steps.
Recording UFT also has a built-in recording mechanism that automaticallyrecognizes test objects in your application as well as the actionsyou perform on the application's objects. When you record in yourapplication, UFT translates your actions into test steps, displayingthe object name and the action (method) performed on the object.This enables you to perform the test as a user would and in turnhave UFT automatically create the test instead of manually editingit inside UFT.
HP Unified Functional Testing (12.02) Page 63
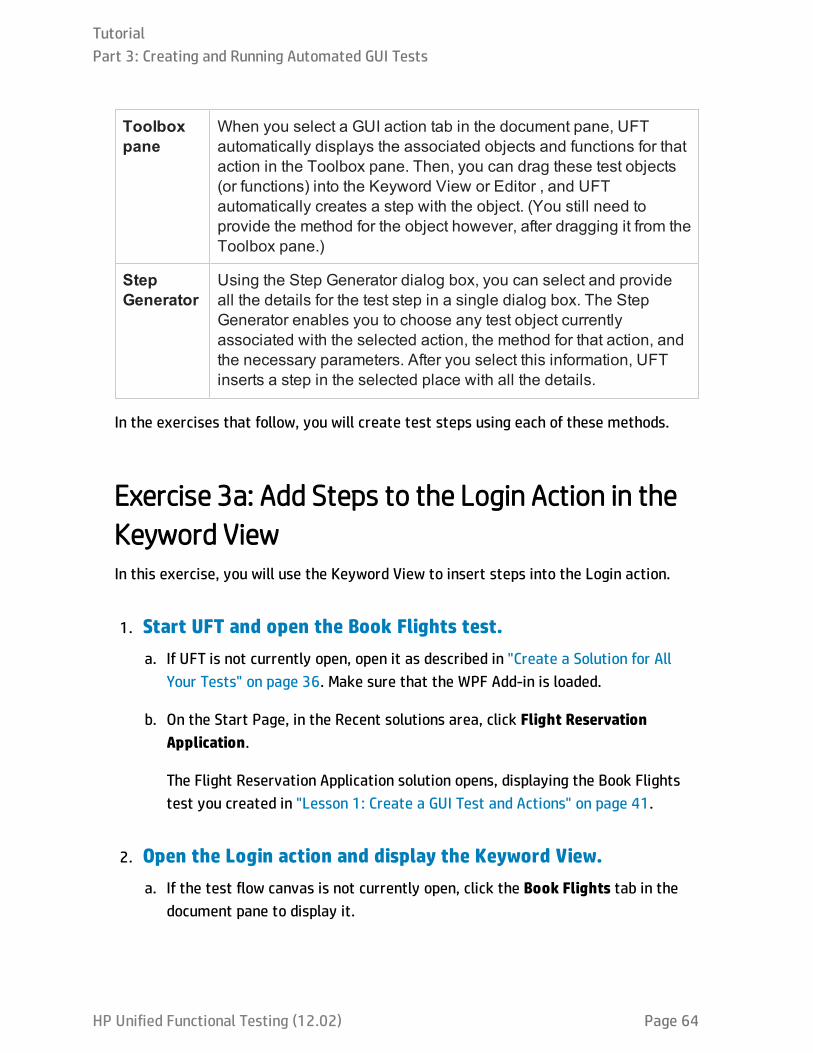
Toolboxpane
When you select a GUI action tab in the document pane, UFTautomatically displays the associated objects and functions for thataction in the Toolbox pane. Then, you can drag these test objects(or functions) into the Keyword View or Editor , and UFTautomatically creates a step with the object. (You still need toprovide the method for the object however, after dragging it from theToolbox pane.)
StepGenerator
Using the Step Generator dialog box, you can select and provideall the details for the test step in a single dialog box. The StepGenerator enables you to choose any test object currentlyassociated with the selected action, the method for that action, andthe necessary parameters. After you select this information, UFTinserts a step in the selected place with all the details.
In the exercises that follow, you will create test steps using each of these methods.
Exercise 3a: Add Steps to the Login Action in theKeyword ViewIn this exercise, you will use the Keyword View to insert steps into the Login action.
1. Start UFT and open the Book Flights test.a. If UFT is not currently open, open it as described in "Create a Solution for All
Your Tests" on page 36. Make sure that the WPF Add-in is loaded.
b. On the Start Page, in the Recent solutions area, click Flight ReservationApplication.
The Flight Reservation Application solution opens, displaying the Book Flightstest you created in "Lesson 1: Create a GUI Test and Actions" on page 41.
2. Open the Login action and display the Keyword View.a. If the test flow canvas is not currently open, click the Book Flights tab in the
document pane to display it.
TutorialPart 3: Creating and Running Automated GUI Tests
HP Unified Functional Testing (12.02) Page 64

b. In the canvas, double-click the Login action.
The Login action opens in a separate tab in the document pane.
c. If the Editor is displayed, in the toolbar, click the Keyword View button todisplay the Keyword View.
3. Add the first step to log in to the flight reservation application.a. In the Keyword View, click in the Item column, directly below the Login row.The
Item list dropdown list opens, displaying the top-level parent object in theassociated object repository, and instructing you to select an item.
In this step, the parent object is the Login window. Do not select this objectnow because you do not want to perform an operation on the main window. Youonly need to insert steps on the objects on which you want to performoperations.
b. Select Object from repository to open the Select Test Object dialog box.
TutorialPart 3: Creating and Running Automated GUI Tests
HP Unified Functional Testing (12.02) Page 65
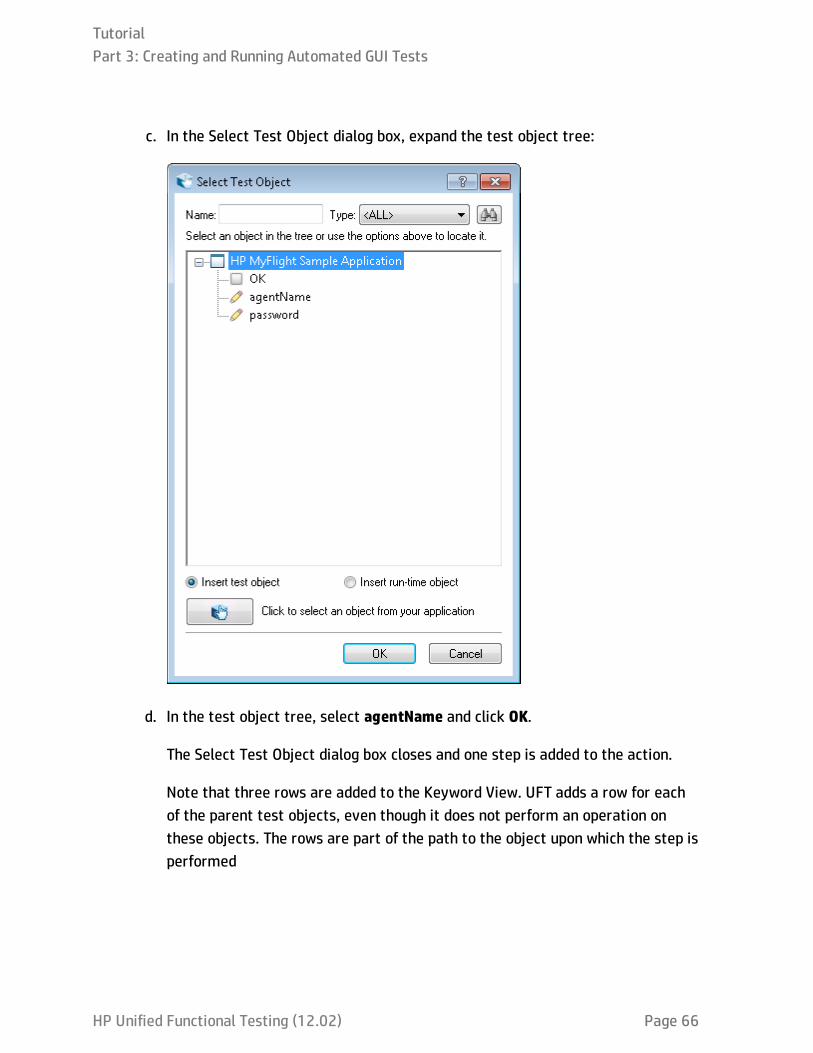
c. In the Select Test Object dialog box, expand the test object tree:
d. In the test object tree, select agentName and click OK.
The Select Test Object dialog box closes and one step is added to the action.
Note that three rows are added to the Keyword View. UFT adds a row for eachof the parent test objects, even though it does not perform an operation onthese objects. The rows are part of the path to the object upon which the step isperformed
TutorialPart 3: Creating and Running Automated GUI Tests
HP Unified Functional Testing (12.02) Page 66
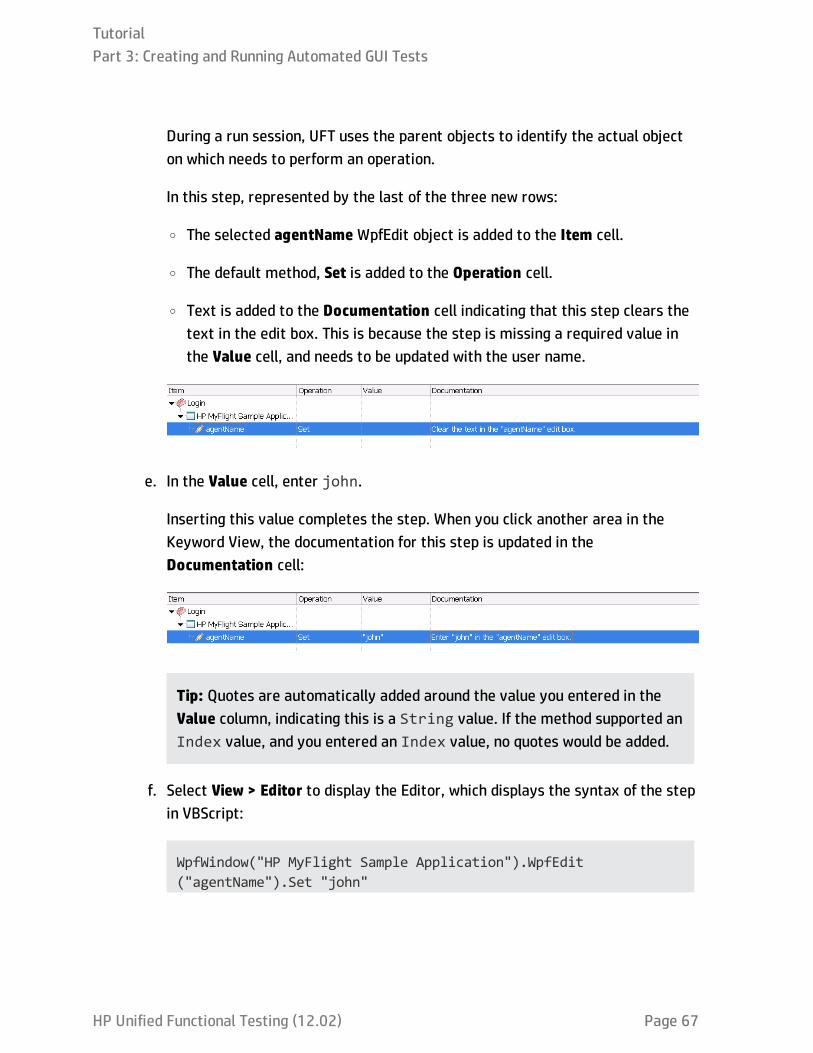
During a run session, UFT uses the parent objects to identify the actual objecton which needs to perform an operation.
In this step, represented by the last of the three new rows:
o The selected agentName WpfEdit object is added to the Item cell.
o The default method, Set is added to the Operation cell.
o Text is added to the Documentation cell indicating that this step clears thetext in the edit box. This is because the step is missing a required value inthe Value cell, and needs to be updated with the user name.
e. In the Value cell, enter john.
Inserting this value completes the step. When you click another area in theKeyword View, the documentation for this step is updated in theDocumentation cell:
Tip: Quotes are automatically added around the value you entered in theValue column, indicating this is a String value. If the method supported anIndex value, and you entered an Index value, no quotes would be added.
f. Select View > Editor to display the Editor, which displays the syntax of the stepin VBScript:
WpfWindow("HP MyFlight Sample Application").WpfEdit("agentName").Set "john"
TutorialPart 3: Creating and Running Automated GUI Tests
HP Unified Functional Testing (12.02) Page 67
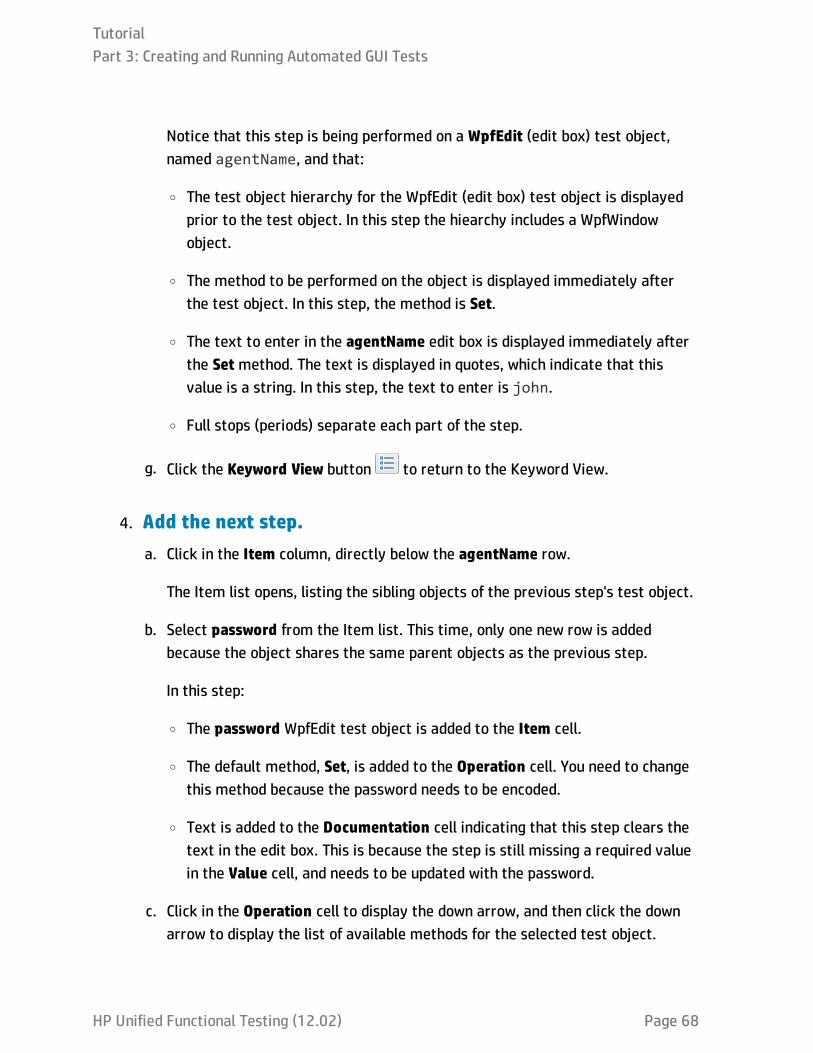
Notice that this step is being performed on a WpfEdit (edit box) test object,named agentName, and that:
o The test object hierarchy for the WpfEdit (edit box) test object is displayedprior to the test object. In this step the hiearchy includes a WpfWindowobject.
o The method to be performed on the object is displayed immediately afterthe test object. In this step, the method is Set.
o The text to enter in the agentName edit box is displayed immediately afterthe Setmethod. The text is displayed in quotes, which indicate that thisvalue is a string. In this step, the text to enter is john.
o Full stops (periods) separate each part of the step.
g. Click the Keyword View button to return to the Keyword View.
4. Add the next step.a. Click in the Item column, directly below the agentName row.
The Item list opens, listing the sibling objects of the previous step's test object.
b. Select password from the Item list. This time, only one new row is addedbecause the object shares the same parent objects as the previous step.
In this step:
o The password WpfEdit test object is added to the Item cell.
o The default method, Set, is added to the Operation cell. You need to changethis method because the password needs to be encoded.
o Text is added to the Documentation cell indicating that this step clears thetext in the edit box. This is because the step is still missing a required valuein the Value cell, and needs to be updated with the password.
c. Click in the Operation cell to display the down arrow, and then click the downarrow to display the list of available methods for the selected test object.
TutorialPart 3: Creating and Running Automated GUI Tests
HP Unified Functional Testing (12.02) Page 68
d. In the list of methods, select SetSecure. Thsi method enables the use ofencrypted text.
5. Generate an encoded password using the HP Password Encoderapplication.a. Select Start > All Programs> HP Software > HP > HP Unified Functional
Testing > Tools > Password Encoder or <UFT installationfolder>\bin\CryptonApp.exe.
b. In the Password Encoder, in the Password box, enter hp.
c. Click Generate. The Password Encoder encrypts the password and displays it inthe Encoded String box.
d. Click Copy.
e. In UFT, in the Login action, paste the encoded value in the Value cell for thepassword step.
In the Documentation column of this step, the updated documentation isdisplayed.
f. Close the Password Encoder dialog box.
If you ran your action at this point, UFT would automatically open the flightreservation application and inser the values you specified in the Username andPassword boxes.
6. Insert the last step in the Login action.a. Click the Item column below the last step to insert the next step.
The Item list opens, listing the sibling objects of the previous step's test object.
b. Select OK from the Item list.
This step instructs UFT to click OK after entering the Username and passwordfor the application.
TutorialPart 3: Creating and Running Automated GUI Tests
HP Unified Functional Testing (12.02) Page 69

7. Save your test.Select File > Save.
To learn more about the Keyword View and Editor, continue to "Analyzing the LoginAction in the Keyword View and the Editor" below.
To continue adding steps to your test, go to "Exercise 3b: Add Steps to the FlightFinderAction by Recording" on page 73.
Analyzing the Login Action in the Keyword View and theEditor
Now that you have created some test steps, let's look how these steps are displayed,both in the Keyword View and Editor:
Keyword ViewAfter you have added your steps, the Keyword View should look similar to this:
As you can see, the steps in your test are arranged in an icon-based grid which showsthe test step sequence as well as the object hierarchy. Each line in the Keyword Viewrepresents a different piece of information:
Line Description
Login is the action name.
All test steps contained in this actionwill be displayed as sub-nodes.
TutorialPart 3: Creating and Running Automated GUI Tests
HP Unified Functional Testing (12.02) Page 70

The Login window object is theparent object for the test objectscontained in this action.
All test objects contained in thefollowing steps are displayed as sub-nodes to this object.
agentName is the name of the editbox on which UFT performs theaction.
The Setmethod is the actionperformed on the agentName object.
UFT enters john as the text in the editbox.
password is the name of the edit boxon which UFT performs the action.
The SetSecure method is the actionperformed on thepasswordWatermakr object.
UFT enters the digit string as the textin the password edit box.
OK is the name of the button UFTclicks after the information is enteredin the agentName and password editboxes.
The Click method is the actionperformed on the button.
For each step in the Keyword View, there are a number of different elements:
Keyword ViewElement
Description
Item The item for the step (test object, utility object, function call, orstatement). This item is displayed in a hierarchical, icon-
TutorialPart 3: Creating and Running Automated GUI Tests
HP Unified Functional Testing (12.02) Page 71
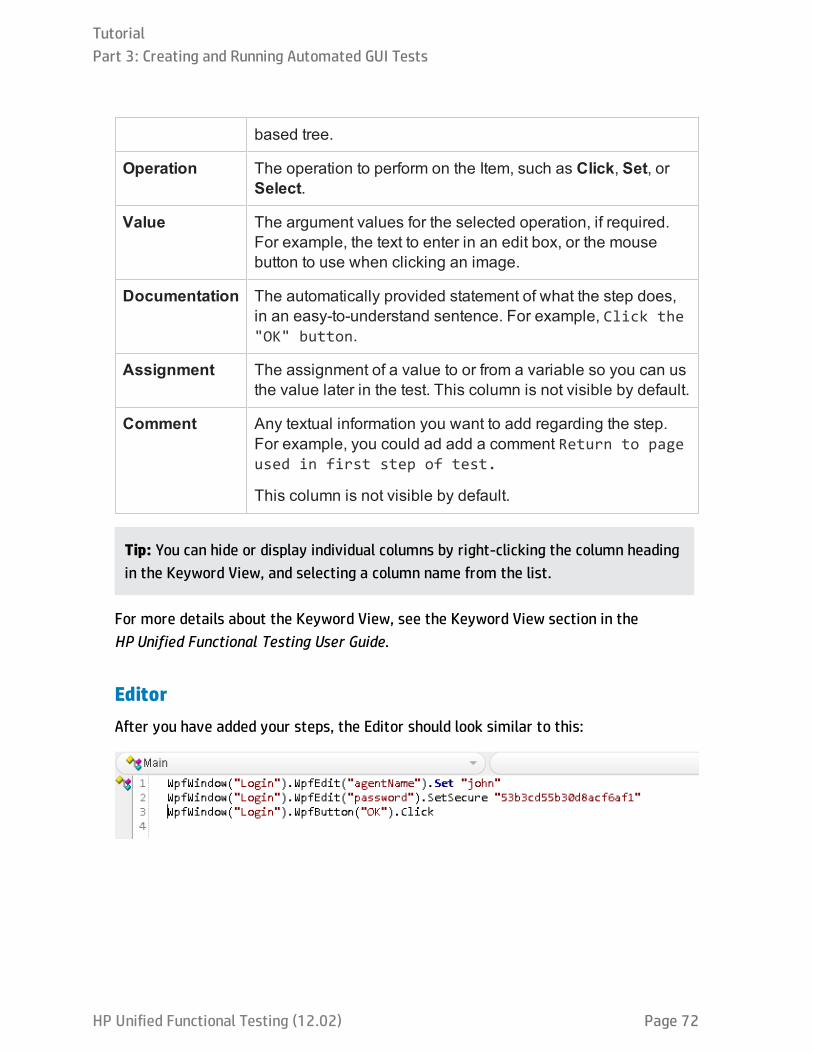
based tree.
Operation The operation to perform on the Item, such as Click, Set, orSelect.
Value The argument values for the selected operation, if required.For example, the text to enter in an edit box, or the mousebutton to use when clicking an image.
Documentation The automatically provided statement of what the step does,in an easy-to-understand sentence. For example, Click the"OK" button.
Assignment The assignment of a value to or from a variable so you can usthe value later in the test. This column is not visible by default.
Comment Any textual information you want to add regarding the step.For example, you could ad add a comment Return to pageused in first step of test.
This column is not visible by default.
Tip: You can hide or display individual columns by right-clicking the column headingin the Keyword View, and selecting a column name from the list.
For more details about the Keyword View, see the Keyword View section in theHP Unified Functional Testing User Guide.
EditorAfter you have added your steps, the Editor should look similar to this:
TutorialPart 3: Creating and Running Automated GUI Tests
HP Unified Functional Testing (12.02) Page 72
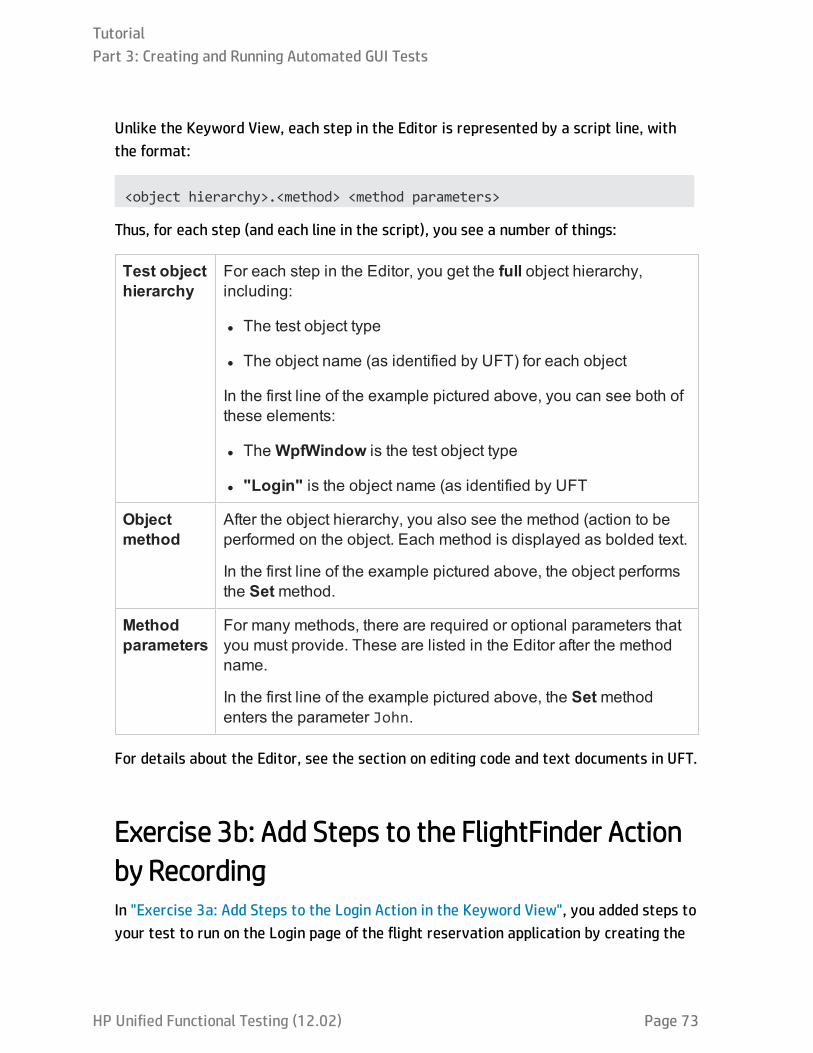
Unlike the Keyword View, each step in the Editor is represented by a script line, withthe format:
<object hierarchy>.<method> <method parameters>
Thus, for each step (and each line in the script), you see a number of things:
Test objecthierarchy
For each step in the Editor, you get the full object hierarchy,including:
l The test object type
l The object name (as identified by UFT) for each object
In the first line of the example pictured above, you can see both ofthese elements:
l TheWpfWindow is the test object type
l "Login" is the object name (as identified by UFT
Objectmethod
After the object hierarchy, you also see the method (action to beperformed on the object. Each method is displayed as bolded text.
In the first line of the example pictured above, the object performsthe Setmethod.
Methodparameters
For many methods, there are required or optional parameters thatyou must provide. These are listed in the Editor after the methodname.
In the first line of the example pictured above, the Setmethodenters the parameter John.
For details about the Editor, see the section on editing code and text documents in UFT.
Exercise 3b: Add Steps to the FlightFinder Actionby RecordingIn "Exercise 3a: Add Steps to the Login Action in the Keyword View", you added steps toyour test to run on the Login page of the flight reservation application by creating the
TutorialPart 3: Creating and Running Automated GUI Tests
HP Unified Functional Testing (12.02) Page 73
steps using the Keyword View.
In this exercise, you will record steps for the Flight Finder action you created for theFlight Finder page in the application. This action will use test objects contained in theFlight Finder shared object repository.
Tip: Before you begin your recording session, you may want to place the applicationwindow and this tutorial window side-by-side on your screen. This allows you toread the tutorial during recording.
1. Start UFT and open the Book Flights test.a. If UFT is not currently open, open UFT as described in "Create a Solution for All
Your Tests" on page 36. Make sure that the WPF add-in is loaded.
b. Select File > Open > Solution. The Open Solution dialog box opens.
c. In the Open Solution dialog box, navigate to the Flight ReservationApplication.ftsln file, located in C:\%HOMEPATH%\My Documents\UnifiedFunctional Testing, and click Open.
The Flight Reservation Application solution opens, displaying the Book Flightstest you created in "Lesson 1: Create a GUI Test and Actions" on page 41.
2. Open the Flight Finder action.a. If the test flow canvas is not currently open, click the Book Flights tab in the
document pane to display it.
b. In the canvas, double-click the Flight Finder action.
The Flight Finder action opens in a separate tab in the document pane.
3. Open the flight reservation application'sa. If it is not already open, open the flight reservation application, as described in
"Explore the Flight Reservation Application" on page 33.
The Login page of the flight reservation application opens.
TutorialPart 3: Creating and Running Automated GUI Tests
HP Unified Functional Testing (12.02) Page 74
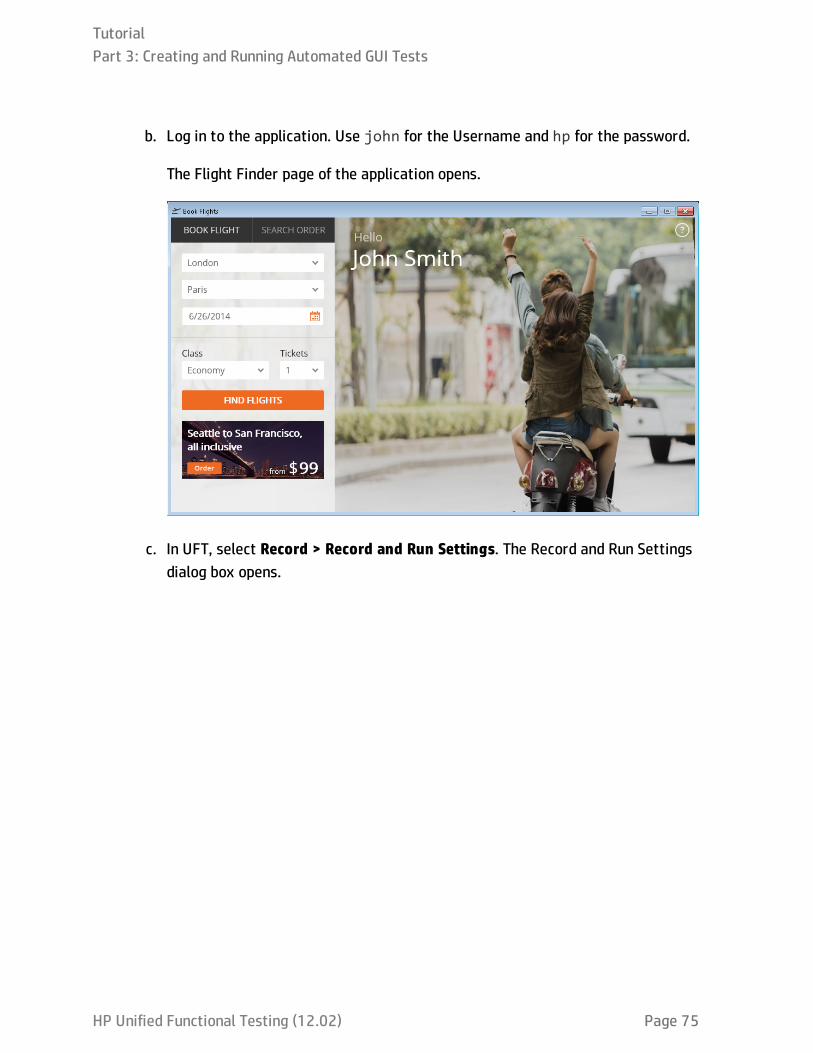
b. Log in to the application. Use john for the Username and hp for the password.
The Flight Finder page of the application opens.
c. In UFT, select Record > Record and Run Settings. The Record and Run Settingsdialog box opens.
TutorialPart 3: Creating and Running Automated GUI Tests
HP Unified Functional Testing (12.02) Page 75
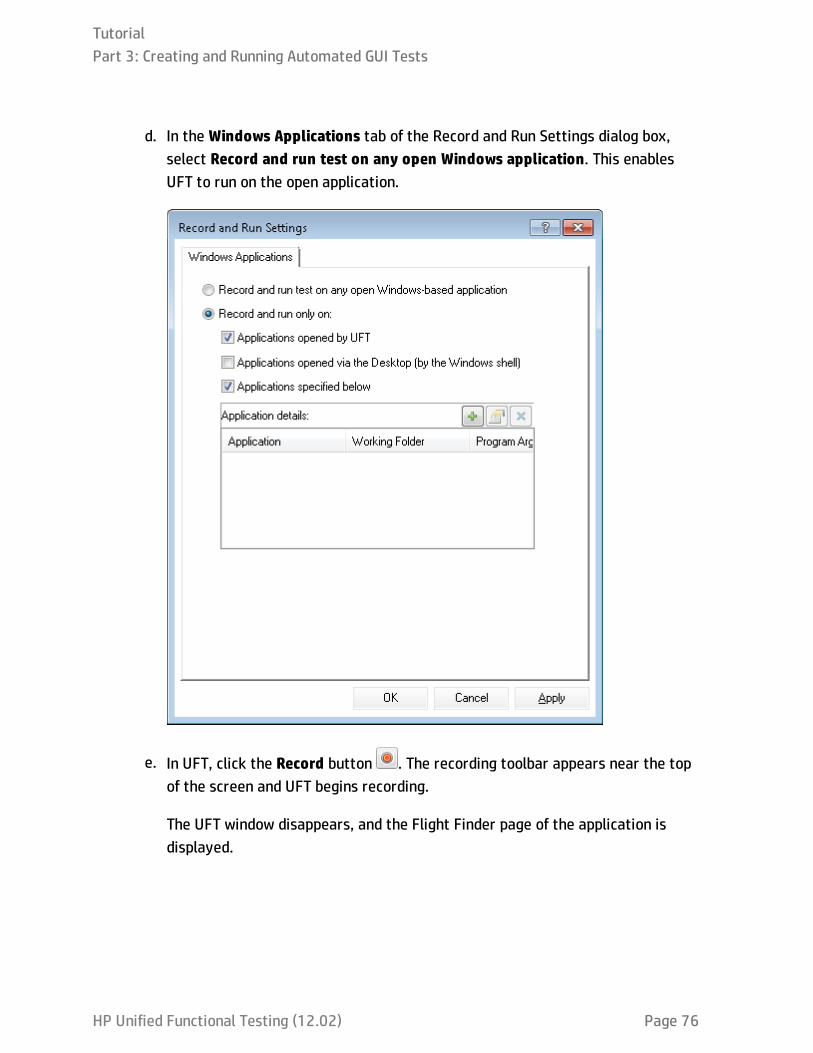
d. In the Windows Applications tab of the Record and Run Settings dialog box,select Record and run test on any open Windows application. This enablesUFT to run on the open application.
e. In UFT, click the Record button . The recording toolbar appears near the topof the screen and UFT begins recording.
The UFT window disappears, and the Flight Finder page of the application isdisplayed.
TutorialPart 3: Creating and Running Automated GUI Tests
HP Unified Functional Testing (12.02) Page 76
f. In the Flight Finder page, change the following selections by selecting from thedifferent items:
o From: Los Angeles
o To: Sydney
o Date: tomorrow's date
IMPORTANT: type the date into the edit box. Use the format M/D/YYYY.
o Class: Business
o Tickets: 2
Note: If you are performing this tutorial at the end of a month or year,select a different month or year while recording. UFT records an operationonly when you make a change in the application, so this ensures that thestep is recorded. If you accept a default value (or re-select the defaultvalue), UFT does not record an operation
g. After you make the selections, click FIND FLIGHTS to continue. The Select Flightpage opens.
h. On the Record Toolbar, click the Stop button to stop recording.
You have now reserved an imaginary ticket from Los Angeles to Sydney. UFTrecorded your actions in the application from the time you clicked the Recordbutton in UFT until the time you clicked Stop on the record toolbar.
4. Save your test.
Click Save .
Do not close the test, because you will continue to add steps to other actions. Continuewith "Exercise 3c: Add a Step to the Select Flight Action Using the Toolbox Pane" on thenext page to add additional steps to other actions.
TutorialPart 3: Creating and Running Automated GUI Tests
HP Unified Functional Testing (12.02) Page 77
Exercise 3c: Add a Step to the Select Flight ActionUsing the Toolbox PaneIn "Exercise 3b: Add Steps to the FlightFinder Action by Recording" on page 73, youadded steps to the Flight Finder action by using UFT's recording functionality. Thiscreated steps based on exactly the actions you performed in the flight reservationapplication's user interface.
In this exercise, you drag the relevant test objects into your action from the Toolboxpane.
Note: Toolbox pane items are listed according to the action in focus in thedocument pane. If a the test flow tab or a function library tab is in focus, or if youdo not have a test open at all, the Toolbox pane is empty.
1. Start UFT and open the Book Flights test.a. If UFT is not currently open, open UFT as described in "Create a Solution for All
Your Tests" on page 36.
b. Click the Open button down arrow , and select Open Solution. The OpenSolution dialog box opens
c. In the Open Solution dialog box, navigate to the Flight ReservationApplication.ftsln file, located in C:\%HOMEPATH%\My Documents\UnifiedFunctional Testing, and click Open.
The Flight Reservation Application solution opens, displaying the Book Flightstest you created in "Lesson 1: Create a GUI Test and Actions" on page 41.
2. Open the Select Flight action.In the Solution Explorer pane, double-click the Select Flight action.
The Select Flight action opens as a separate tab in the document pane.
TutorialPart 3: Creating and Running Automated GUI Tests
HP Unified Functional Testing (12.02) Page 78

3. Display the Toolbox pane.
In the UFT toolbar, click the Toolbox button . The Toolbox pane opens on theright side of the UFT window.
Note: The Toolbox pane displays the action's test objects and functionsregardless of whether the action is displayed in the Keyword View or Editor.
4. Select the flight to book from the grid.a. In the Toolbox Pane, expand the Test Objects tree.
b. .Locate and drag the flightsDataGrid object to the Keyword View or Editor(depending on which view is open).
Note: You may notice that this object repository has many more objectsthan the Login repository. This is because you did not delete extraneousobjects when creating this object repository.
The selected Table test object is added to the step, together with its defaultmethod, SelectCell.
o In the Keyword View, the Documentation cell is empty, because you havenot provided the required parameters for the method. Remember that thisstep is displayed on three rows in the Keyword View because the parent testobjects are part of the step.
o In the Editor, the step is displayed as follows:
WpfWindow("HP MyFlight Sample Application").WpfTable("flightsDataGrid").SelectCell
c. If the Keyword View is not open, select View > Keyword View to open it.
TutorialPart 3: Creating and Running Automated GUI Tests
HP Unified Functional Testing (12.02) Page 79
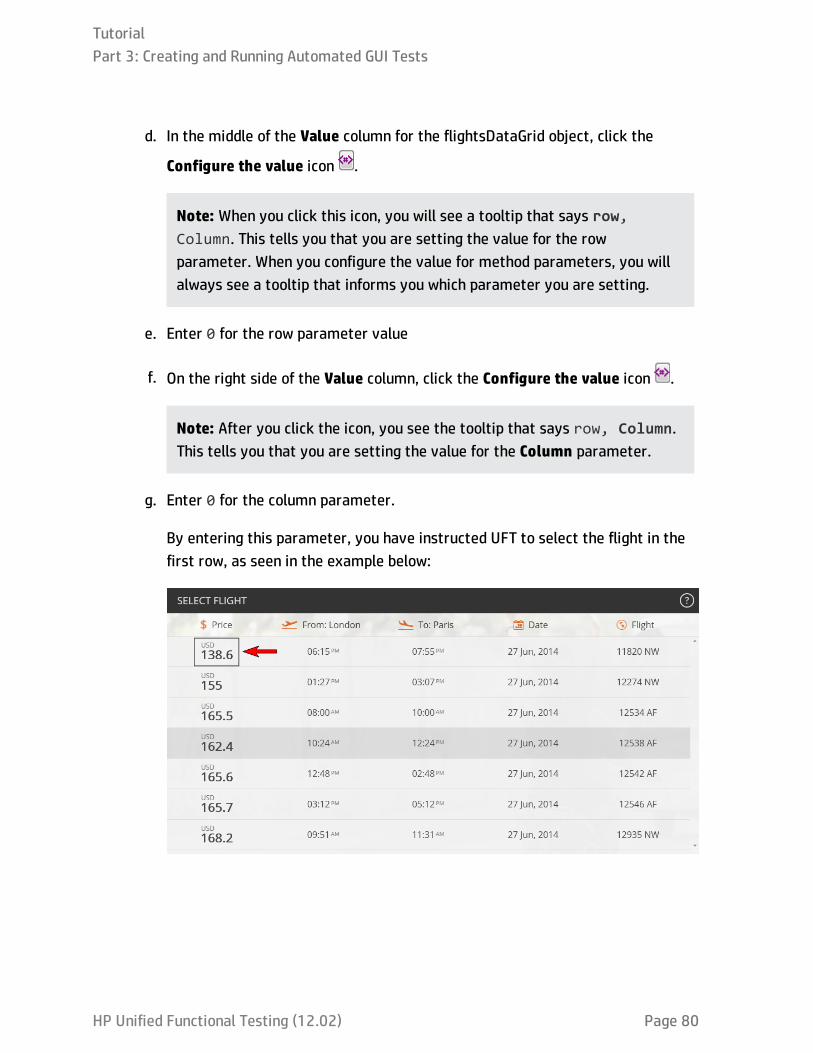
d. In the middle of the Value column for the flightsDataGrid object, click the
Configure the value icon .
Note: When you click this icon, you will see a tooltip that says row,Column. This tells you that you are setting the value for the rowparameter. When you configure the value for method parameters, you willalways see a tooltip that informs you which parameter you are setting.
e. Enter 0 for the row parameter value
f. On the right side of the Value column, click the Configure the value icon .
Note: After you click the icon, you see the tooltip that says row, Column.This tells you that you are setting the value for the Column parameter.
g. Enter 0 for the column parameter.
By entering this parameter, you have instructed UFT to select the flight in thefirst row, as seen in the example below:
TutorialPart 3: Creating and Running Automated GUI Tests
HP Unified Functional Testing (12.02) Page 80
After adding the method parameters, the step is updated in the Keyword Viewand Editor:
o The Value column in the Keyword View now shows "0","0" for the stepvalues.
o The Editor adds "0", "0" after the SelectCell method. Your statement in theeditor now looks like this:
WpfWindow("HP MyFlight Sample Application").WpfTable("flightsDataGrid").SelectCell "0", "0"
o The Documentation column now has a statement explaining the step'saction.
5. Save your test.Select File > Save.
Do not close the test, becuase you will still need to add steps to other actions. Continueto "Exercise 3d: Add Steps to the Book Flight Action Using the Step Generator" below toadd steps by using the Step Generator.
Exercise 3d: Add Steps to the Book Flight ActionUsing the Step GeneratorIn "Exercise 3c: Add a Step to the Select Flight Action Using the Toolbox Pane" onpage 78, you used the objects displayed in the Toolbox pane to created test steps.
In this lesson, you will use an additional way of creating test steps - the Step Generator.The Step Generator enables you to define an entire step in one dialog box, instead ofinserting different parts of a step in the various columns of the Keyword View.
TutorialPart 3: Creating and Running Automated GUI Tests
HP Unified Functional Testing (12.02) Page 81
1. Open the Flight Confirmation action.In the Solution Explorer, under the Book Flights node, double-click the FlightConfirmation action.
The Flight Confirmation action opens as a separate tab in the document pane
2. Add a step using the Step Generator.a. If the Keyword View is not already displayed, display it by selecting View
> Keyword View.
b. In the row below the Flight Confirmation row, click in the Item column. The stepselection drop down menu opens.
TutorialPart 3: Creating and Running Automated GUI Tests
HP Unified Functional Testing (12.02) Page 82

c. In the drop down list, click Step Generator. The Step Generator dialog boxopens.
d. In the Object drop-down, select "Book Flights".
e. Click the Select Object button . The Select Test Object dialog box opens.
TutorialPart 3: Creating and Running Automated GUI Tests
HP Unified Functional Testing (12.02) Page 83

f. In the Select Test Object dialog box, expand the Book Flights node:
g. Select the passengerName edit box , and click OK.
TutorialPart 3: Creating and Running Automated GUI Tests
HP Unified Functional Testing (12.02) Page 84

The Step Generator displays the default options for the passengerName object:
h. Define the arguments and values in the Step Generator just as you would in theKeyword View:
o In the Operation drop-down list, leave the Operation as Set. Note that whenyou select a test object in the Object drop-down list, the default operation isdisplayed. You can select other operations for this object as needed.However, in this exercise, the default operation is the correct one.
o In the Arguments table, click inside the Value column (like you would in theKeyword View), and enter a name of your choosing. Note that if argumentsare mandatory, a red asterisk is displayed next to the argument name.
TutorialPart 3: Creating and Running Automated GUI Tests
HP Unified Functional Testing (12.02) Page 85
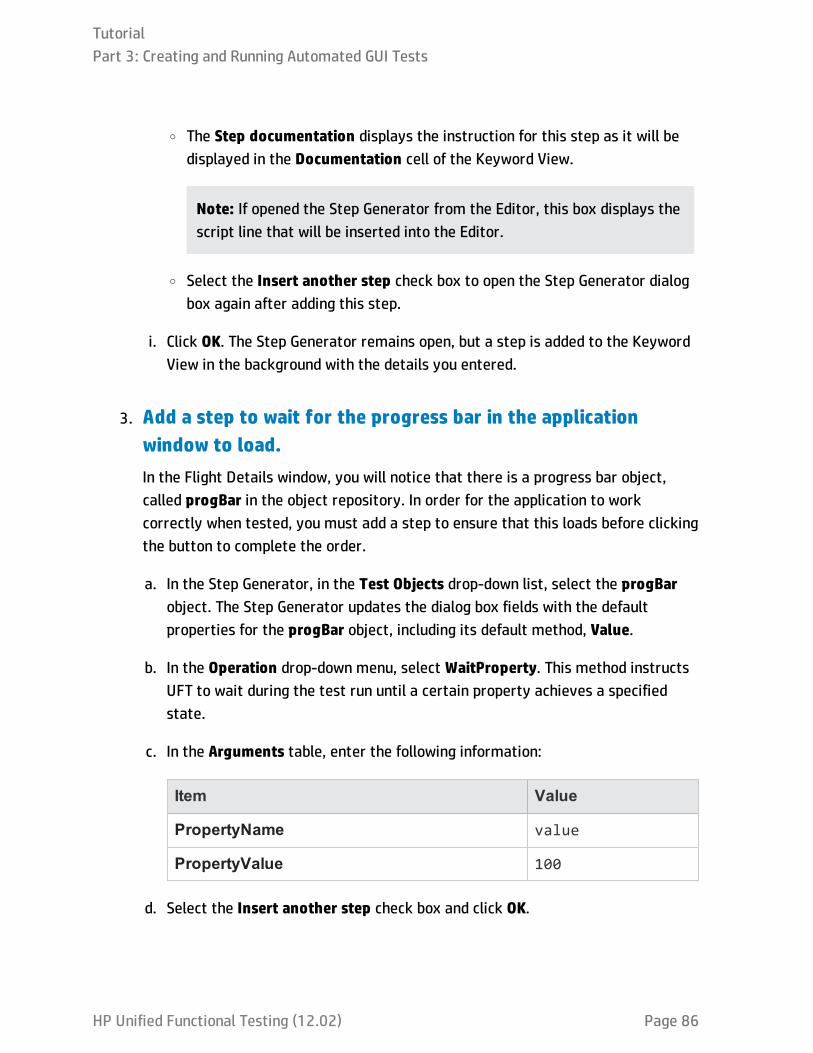
o The Step documentation displays the instruction for this step as it will bedisplayed in the Documentation cell of the Keyword View.
Note: If opened the Step Generator from the Editor, this box displays thescript line that will be inserted into the Editor.
o Select the Insert another step check box to open the Step Generator dialogbox again after adding this step.
i. Click OK. The Step Generator remains open, but a step is added to the KeywordView in the background with the details you entered.
3. Add a step to wait for the progress bar in the applicationwindow to load.In the Flight Details window, you will notice that there is a progress bar object,called progBar in the object repository. In order for the application to workcorrectly when tested, you must add a step to ensure that this loads before clickingthe button to complete the order.
a. In the Step Generator, in the Test Objects drop-down list, select the progBarobject. The Step Generator updates the dialog box fields with the defaultproperties for the progBar object, including its default method, Value.
b. In the Operation drop-down menu, select WaitProperty. This method instructsUFT to wait during the test run until a certain property achieves a specifiedstate.
c. In the Arguments table, enter the following information:
Item Value
PropertyName value
PropertyValue 100
d. Select the Insert another step check box and click OK.
TutorialPart 3: Creating and Running Automated GUI Tests
HP Unified Functional Testing (12.02) Page 86
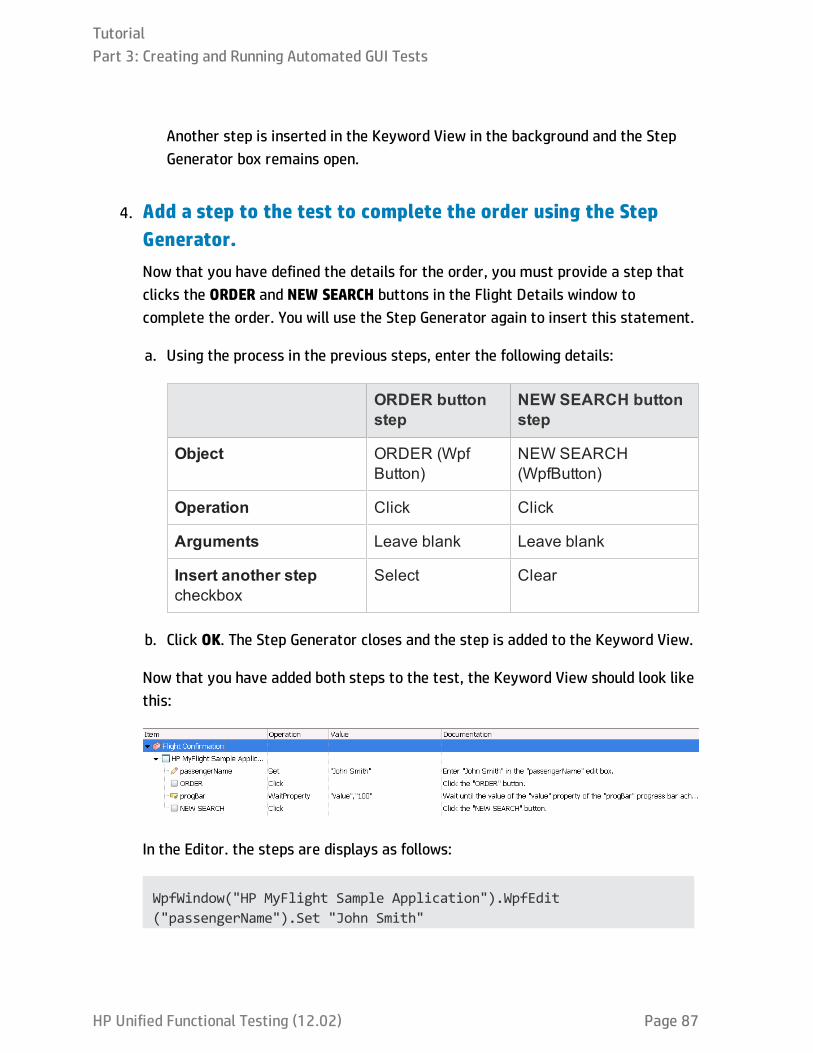
Another step is inserted in the Keyword View in the background and the StepGenerator box remains open.
4. Add a step to the test to complete the order using the StepGenerator.Now that you have defined the details for the order, you must provide a step thatclicks the ORDER and NEW SEARCH buttons in the Flight Details window tocomplete the order. You will use the Step Generator again to insert this statement.
a. Using the process in the previous steps, enter the following details:
ORDER buttonstep
NEW SEARCH buttonstep
Object ORDER (WpfButton)
NEW SEARCH (WpfButton)
Operation Click Click
Arguments Leave blank Leave blank
Insert another stepcheckbox
Select Clear
b. Click OK. The Step Generator closes and the step is added to the Keyword View.
Now that you have added both steps to the test, the Keyword View should look likethis:
In the Editor. the steps are displays as follows:
WpfWindow("HP MyFlight Sample Application").WpfEdit("passengerName").Set "John Smith"
TutorialPart 3: Creating and Running Automated GUI Tests
HP Unified Functional Testing (12.02) Page 87

WpfWindow("HP MyFlight Sample Application").WpfButton("ORDER").ClickWpfWindow("HP MyFlight Sample Application").WpfProgressBar("progBar").WaitProperty "value", "100"WpfWindow("HP MyFlight Sample Application").WpfButton("NEWSEARCH").Click
5. Save your test.
Click Save .
Now that you have created your first test, you can run it. Continue with "Lesson 4:Running and Analyzing GUI Tests" on page 95 to learn more about running tests.
If you would like an advanced lesson, continue to "Advanced Exercise 3e (Optional) - Add Steps Using the Editor" below to learn how to add steps in the Editor.
Advanced Exercise 3e (Optional) - Add StepsUsing the EditorIn addition to adding steps to your test through the Keyword View, the Toolbox pane, orthe Step Generator, you can also add steps directly into the Editor.
However, when adding steps through the Editor, you must have a greater knowledge ofboth your application and your test objects. In the Keyword View, Toolbox pane, andStep Generator, all the information for your test objects is provided in the dialog boxesby UFT. In the Editor, you must know a number of things:
l The full test object hierarchy for your objects
l The name of the test objects (as recorded in the Object Repository)
l The type of the test objects, i.e. WpfWindow, WpfButton, etc.
l The method to use
TutorialPart 3: Creating and Running Automated GUI Tests
HP Unified Functional Testing (12.02) Page 88

You use this information to create lines in the Editor. In this lesson, you will learn whereto find this information and how to enter it into the Editor to make test steps.
You will create statements in the Editor for an action which already has test steps.
1. Start UFT and open the Book Flights test.a. If UFT is not currently open, open UFT as described in "Create a Solution for All
Your Tests" on page 36. Make sure that the WPF add-in is loaded.
b. Select File > Open > Solution. The Open Solution dialog box opens.
c. In the Open Solution dialog box, navigate to the Flight ReservationApplication.ftsln file, located in C:\%HOMEPATH%\My Documents\UnifiedFunctional Testing, and click Open.
The Flight Reservation Application solution opens, displaying the Book Flightstest you created in "Lesson 1: Create a GUI Test and Actions" on page 41.
2. Open the Flight Confirmation action.In the Solution Explorer pane, double-click the Flight Confirmation action.
The Flight Confirmation action opens as a separate tab in the document pane. Donot delete the currently existing test steps in the action.
3. Learn the object details for the parent object.a. If it is not already open, open the Editor by selecting View > Editor.
Note that the already existing steps look like this:
WpfWindow("HP MyFlight Sample Application").WpfEdit("passengerName").Set "John Smith"WpfWindow("HP MyFlight Sample Application").WpfButton("ORDER").Click
For a description of each of the elements in these statements, see the Editorsection in "Analyzing the Login Action in the Keyword View and the Editor" onpage 70.
TutorialPart 3: Creating and Running Automated GUI Tests
HP Unified Functional Testing (12.02) Page 89
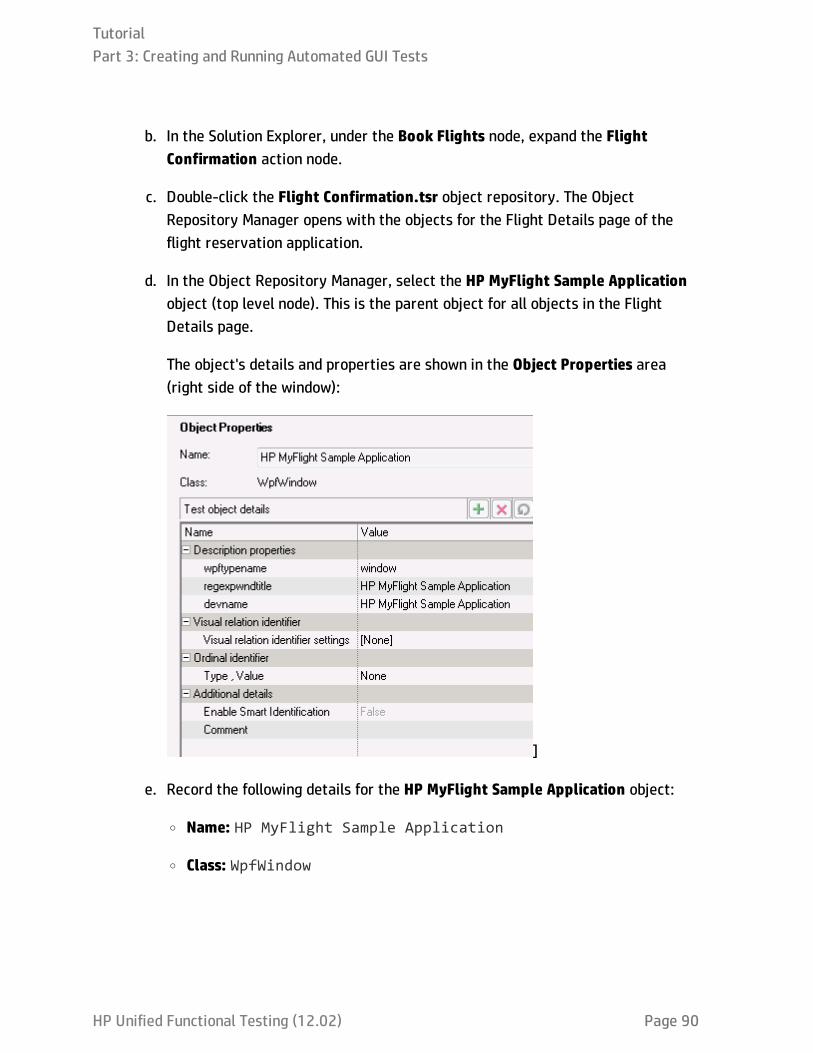
b. In the Solution Explorer, under the Book Flights node, expand the FlightConfirmation action node.
c. Double-click the Flight Confirmation.tsr object repository. The ObjectRepository Manager opens with the objects for the Flight Details page of theflight reservation application.
d. In the Object Repository Manager, select the HP MyFlight Sample Applicationobject (top level node). This is the parent object for all objects in the FlightDetails page.
The object's details and properties are shown in the Object Properties area(right side of the window):
]
e. Record the following details for the HP MyFlight Sample Application object:
o Name: HP MyFlight Sample Application
o Class: WpfWindow
TutorialPart 3: Creating and Running Automated GUI Tests
HP Unified Functional Testing (12.02) Page 90
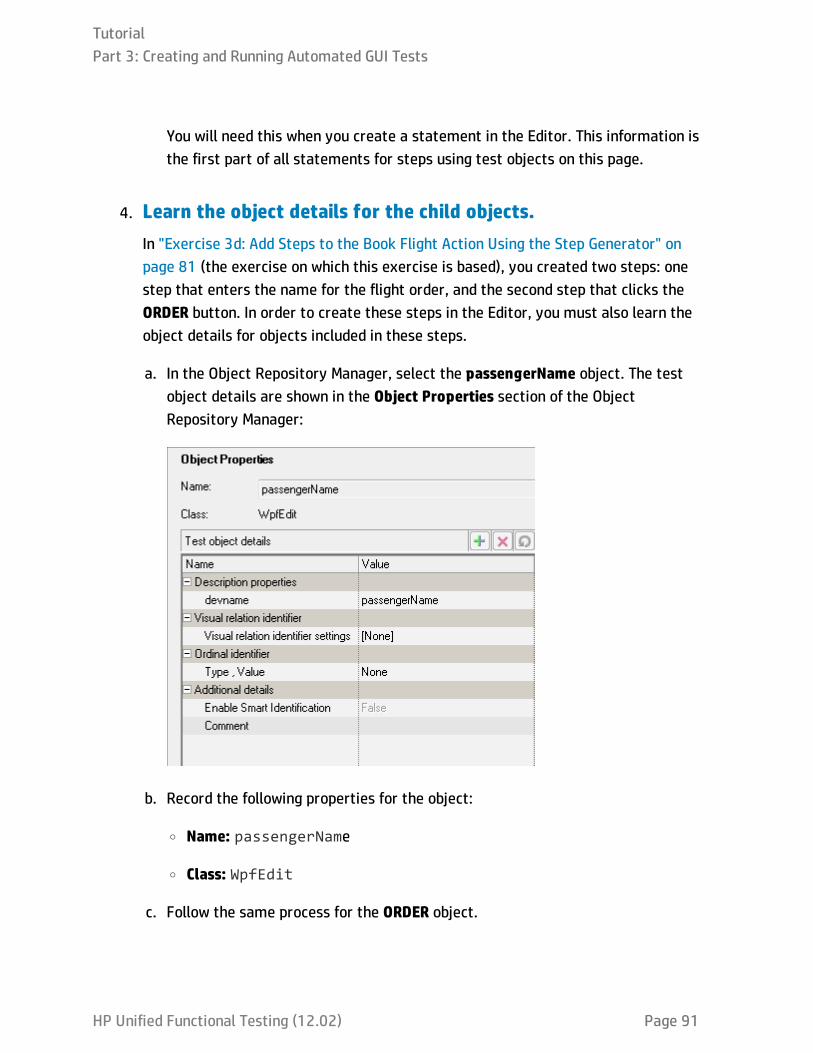
You will need this when you create a statement in the Editor. This information isthe first part of all statements for steps using test objects on this page.
4. Learn the object details for the child objects.In "Exercise 3d: Add Steps to the Book Flight Action Using the Step Generator" onpage 81 (the exercise on which this exercise is based), you created two steps: onestep that enters the name for the flight order, and the second step that clicks theORDER button. In order to create these steps in the Editor, you must also learn theobject details for objects included in these steps.
a. In the Object Repository Manager, select the passengerName object. The testobject details are shown in the Object Properties section of the ObjectRepository Manager:
b. Record the following properties for the object:
o Name: passengerName
o Class: WpfEdit
c. Follow the same process for the ORDER object.
TutorialPart 3: Creating and Running Automated GUI Tests
HP Unified Functional Testing (12.02) Page 91
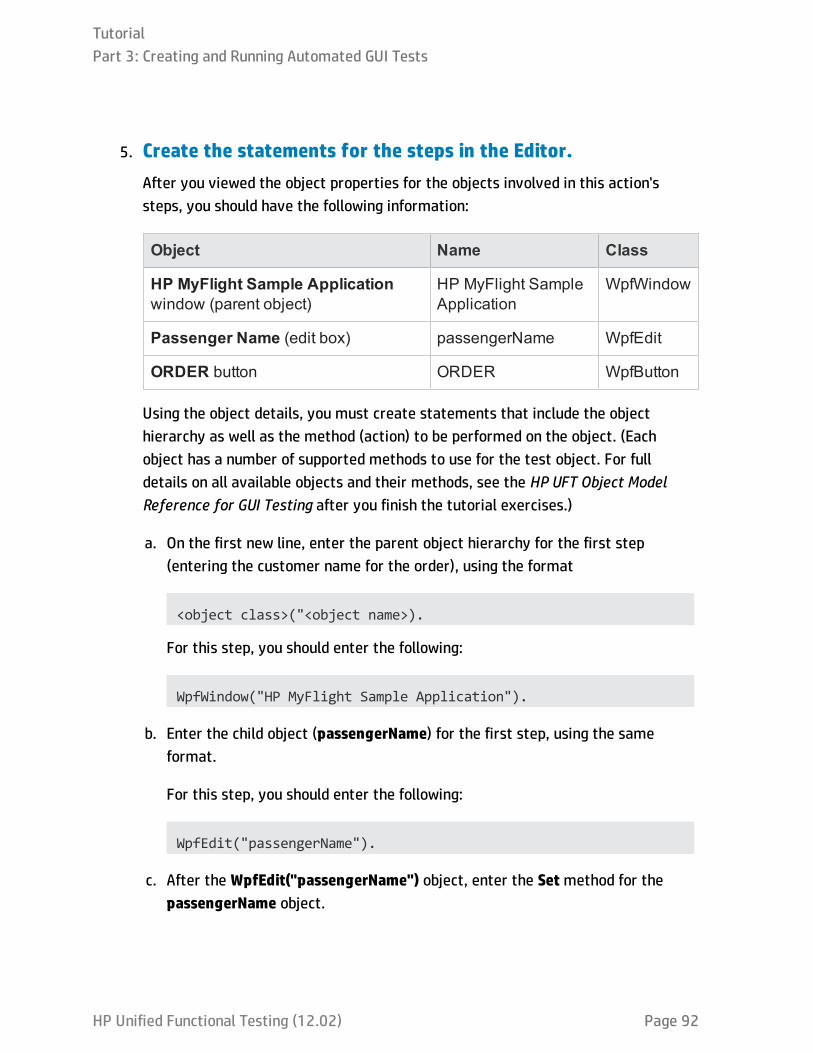
5. Create the statements for the steps in the Editor.After you viewed the object properties for the objects involved in this action'ssteps, you should have the following information:
Object Name Class
HP MyFlight Sample Applicationwindow (parent object)
HP MyFlight SampleApplication
WpfWindow
Passenger Name (edit box) passengerName WpfEdit
ORDER button ORDER WpfButton
Using the object details, you must create statements that include the objecthierarchy as well as the method (action) to be performed on the object. (Eachobject has a number of supported methods to use for the test object. For fulldetails on all available objects and their methods, see the HP UFT Object ModelReference for GUI Testing after you finish the tutorial exercises.)
a. On the first new line, enter the parent object hierarchy for the first step(entering the customer name for the order), using the format
<object class>("<object name>).
For this step, you should enter the following:
WpfWindow("HP MyFlight Sample Application").
b. Enter the child object (passengerName) for the first step, using the sameformat.
For this step, you should enter the following:
WpfEdit("passengerName").
c. After the WpfEdit("passengerName") object, enter the Setmethod for thepassengerName object.
TutorialPart 3: Creating and Running Automated GUI Tests
HP Unified Functional Testing (12.02) Page 92
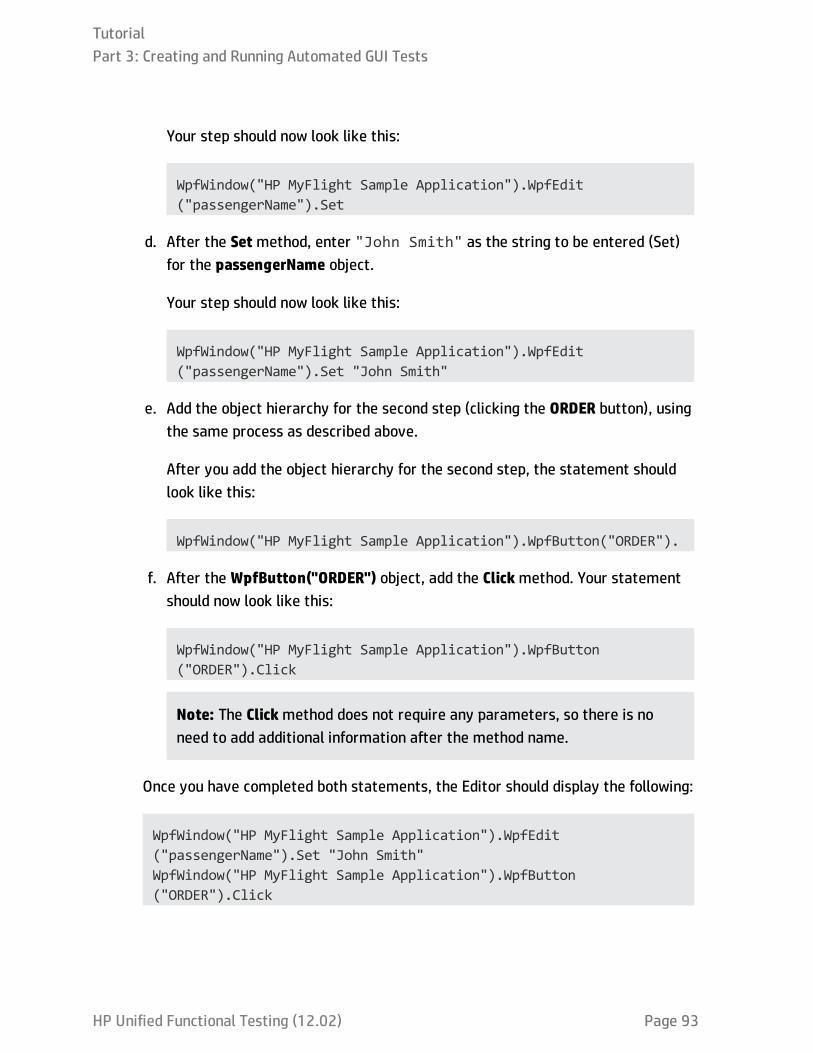
Your step should now look like this:
WpfWindow("HP MyFlight Sample Application").WpfEdit("passengerName").Set
d. After the Setmethod, enter "John Smith" as the string to be entered (Set)for the passengerName object.
Your step should now look like this:
WpfWindow("HP MyFlight Sample Application").WpfEdit("passengerName").Set "John Smith"
e. Add the object hierarchy for the second step (clicking the ORDER button), usingthe same process as described above.
After you add the object hierarchy for the second step, the statement shouldlook like this:
WpfWindow("HP MyFlight Sample Application").WpfButton("ORDER").
f. After the WpfButton("ORDER") object, add the Clickmethod. Your statementshould now look like this:
WpfWindow("HP MyFlight Sample Application").WpfButton("ORDER").Click
Note: The Clickmethod does not require any parameters, so there is noneed to add additional information after the method name.
Once you have completed both statements, the Editor should display the following:
WpfWindow("HP MyFlight Sample Application").WpfEdit("passengerName").Set "John Smith"WpfWindow("HP MyFlight Sample Application").WpfButton("ORDER").Click
TutorialPart 3: Creating and Running Automated GUI Tests
HP Unified Functional Testing (12.02) Page 93
6. Remove the extra lines.After you performed the previous steps, you added two extra lines to the action(for a total of four statements). Remove the last two statements from the action toensure that the test runs successfully.
7. Save the test.Select File > Save.
TutorialPart 3: Creating and Running Automated GUI Tests
HP Unified Functional Testing (12.02) Page 94
Lesson 4: Running and Analyzing GUI TestsIn "Lesson 3: Adding Steps to a Test" on page 62, you created multiple actions and teststeps in each action to test the flight reservation application. Now that the test iscomplete, you can run the test to see how the flight application performs.
In this lesson, you will learn how to run a test and view the run results.
This lesson includes the following:
Exercise 4a: Run a Test 96
Exercise 4b: Navigate the Run Results Viewer 99
Exercise 4c: Analyze the Run Results 100
HP Unified Functional Testing (12.02) Page 95
Exercise 4a: Run a TestIn "Lesson 3: Adding Steps to a Test" on page 62, you created a basic test that runsthrough the flight reservation application to book a flight.
In this exercise, you will learn how to run the test you just finished.
1. Start UFT and open the Book Flights test.a. If UFT is not currently open, open UFT as described in "Create a Solution for All
Your Tests" on page 36. Make sure the WPF Add-in is loaded.
b. Select File > Open > Solution. The Open Solution dialog box opens.
c. In the Open Solution dialog box, navigate to the Flight ReservationApplication.ftsln file, located in C:\%HOMEPATH%\My Documents\UnifiedFunctional Testing, and click Open.
The Flight Reservation Application solution opens in the Solution Explorer, andthe Book Flights test opens as a separate tab in the document pane.
2. Configure UFT to save all images to the run results.When you perform a test run, UFT gives you the option to save all images to thetest results.
a. Select Tools > Options > GUI Testing tab > Screen capture node. The ScreenCapture options pane opens.
b. In the Screen Capture options pane, select the Save still image captures toresults checkbox, and then select Always from the drop-down menu.
c. Click OK to close the Options dialog box.
3. Configure the Record and Run Settings for your test.In some cases, you may need UFT to open your application for you at the beginningof the test run. In these cases, you can set up the Record and Run Setting to enable
HP Unified Functional Testing (12.02) Page 96
this.
a. Select Record > Record and Run Settings. The Record and Run Settings dialogbox opens.
b. In the Windows Application tab of the Record and Run Settings dialog box, selectthe Record and run only on: option.
c. Under the Record and run only on option, select the Applications specifiedbelow option.
d. In the Application details area, click the Add button . The Application Detailsdialog box opens.
e. In the Application details dialog box, enter the application details:
Application C:\%HOMEPATH%\Unified FunctionalTesting\samples\FlightsApplication\FlightsGUI.exe
Workingfolder
C:\%HOMEPATH%\Unified FunctionalTesting\samples\Flights Application\
f. Click OK to close the Application Details dialog box.
g. In the Record and Run Settings dialog box, click Apply and then OK to enablethe settings and close the dialog box.
4. Start running your test.a. In the Solution Explorer, select the Book Flights test node.
b. In the toolbar, click the Run button . The Run Test dialog box opens.
TutorialLesson 4: Running and Analyzing GUI Tests
HP Unified Functional Testing (12.02) Page 97
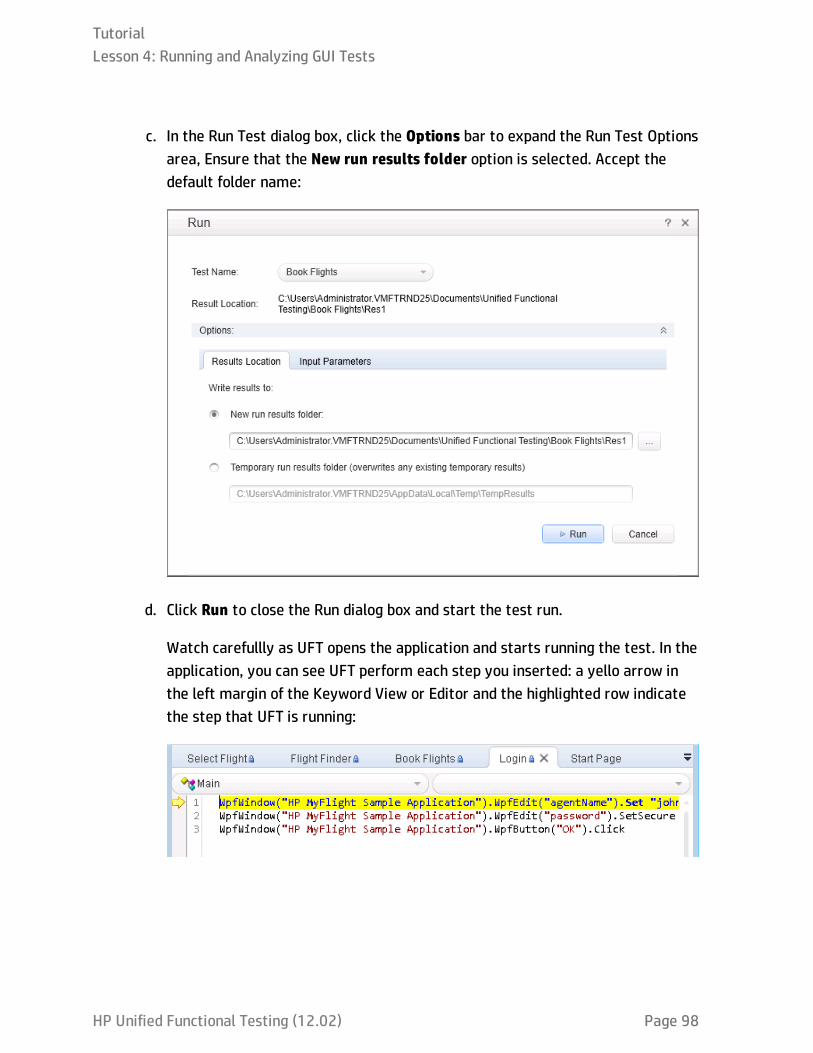
c. In the Run Test dialog box, click the Options bar to expand the Run Test Optionsarea, Ensure that the New run results folder option is selected. Accept thedefault folder name:
d. Click Run to close the Run dialog box and start the test run.
Watch carefullly as UFT opens the application and starts running the test. In theapplication, you can see UFT perform each step you inserted: a yello arrow inthe left margin of the Keyword View or Editor and the highlighted row indicatethe step that UFT is running:
TutorialLesson 4: Running and Analyzing GUI Tests
HP Unified Functional Testing (12.02) Page 98
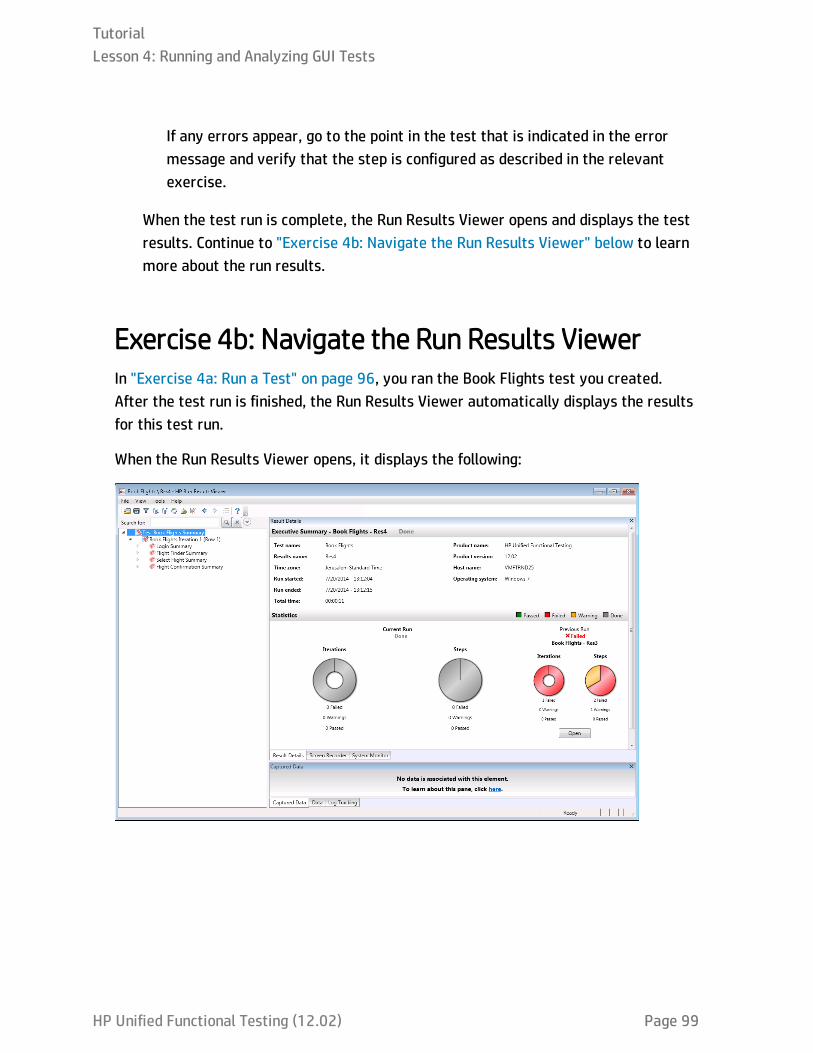
If any errors appear, go to the point in the test that is indicated in the errormessage and verify that the step is configured as described in the relevantexercise.
When the test run is complete, the Run Results Viewer opens and displays the testresults. Continue to "Exercise 4b: Navigate the Run Results Viewer" below to learnmore about the run results.
Exercise 4b: Navigate the Run Results ViewerIn "Exercise 4a: Run a Test" on page 96, you ran the Book Flights test you created.After the test run is finished, the Run Results Viewer automatically displays the resultsfor this test run.
When the Run Results Viewer opens, it displays the following:
TutorialLesson 4: Running and Analyzing GUI Tests
HP Unified Functional Testing (12.02) Page 99
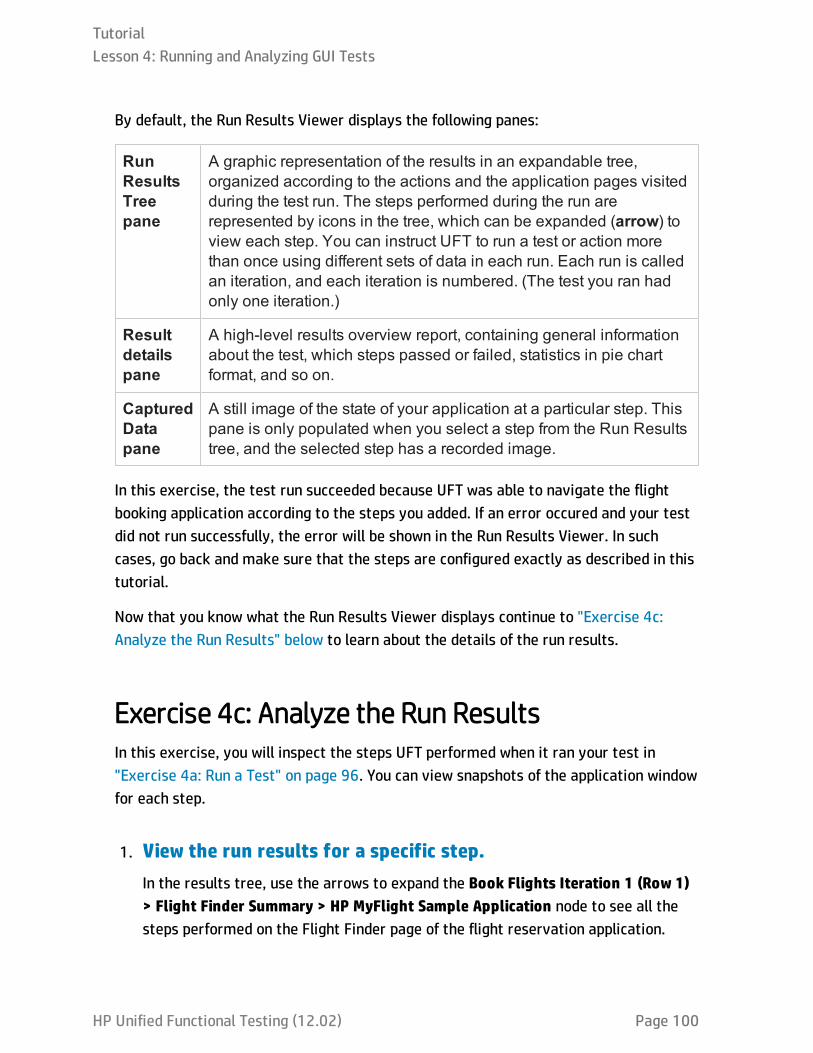
By default, the Run Results Viewer displays the following panes:
RunResultsTreepane
A graphic representation of the results in an expandable tree,organized according to the actions and the application pages visitedduring the test run. The steps performed during the run arerepresented by icons in the tree, which can be expanded (arrow) toview each step. You can instruct UFT to run a test or action morethan once using different sets of data in each run. Each run is calledan iteration, and each iteration is numbered. (The test you ran hadonly one iteration.)
Resultdetailspane
A high-level results overview report, containing general informationabout the test, which steps passed or failed, statistics in pie chartformat, and so on.
CapturedDatapane
A still image of the state of your application at a particular step. Thispane is only populated when you select a step from the Run Resultstree, and the selected step has a recorded image.
In this exercise, the test run succeeded because UFT was able to navigate the flightbooking application according to the steps you added. If an error occured and your testdid not run successfully, the error will be shown in the Run Results Viewer. In suchcases, go back and make sure that the steps are configured exactly as described in thistutorial.
Now that you know what the Run Results Viewer displays continue to "Exercise 4c:Analyze the Run Results" below to learn about the details of the run results.
Exercise 4c: Analyze the Run ResultsIn this exercise, you will inspect the steps UFT performed when it ran your test in"Exercise 4a: Run a Test" on page 96. You can view snapshots of the application windowfor each step.
1. View the run results for a specific step.In the results tree, use the arrows to expand the Book Flights Iteration 1 (Row 1)> Flight Finder Summary > HP MyFlight Sample Application node to see all thesteps performed on the Flight Finder page of the flight reservation application.
TutorialLesson 4: Running and Analyzing GUI Tests
HP Unified Functional Testing (12.02) Page 100

In the results tree, select the fromCity.Select step:
The Run Results Viewer now displays the following information:
n The Run Results Tree pane, with one step highlighted
n The Result Details pane, displaying details of the highlighted step
n The Captured Data pane, showing a screen capture of the application on whichthe step was performed..
When you click a page in the results tree, UFT displays the corresponding page inthe Captured Data pane. When you click a step (an operation performed on anobject) in the results tree, the corresponding object is highlighted in the CapturedData pane. In this case, the fromCity text box is highlighted.
2. Close the Run Results Viewer.Select File > Exit.
TutorialLesson 4: Running and Analyzing GUI Tests
HP Unified Functional Testing (12.02) Page 101
Now that you have set up and run your first test, you can continue to learn aboutdifferent ways of enhancing your tests. Select one of the following to learn more:
l "Lesson 5: Parameterizing Steps and Objects" on the next page
l "Lesson 6: Creating Checkpoints and Output Values" on page 122
l "Lesson 7: Creating Functions and Function Libraries" on page 169
l "Lesson 8: Using Insight in your Test" on page 182
TutorialLesson 4: Running and Analyzing GUI Tests
HP Unified Functional Testing (12.02) Page 102
Lesson 5: Parameterizing Steps and ObjectsIn "Lesson 3: Adding Steps to a Test" on page 62, you created test steps to check that aseries of steps performed on the flight reservation application ran smoothly. In "Lesson4: Running and Analyzing GUI Tests" on page 95, you ran the test, but only with a singleset of data. However, when you test your applications, you may want to see the sameoperations performed with multiple sets of data.
For example, you may want to run a test on your application using ten different sets ofdata. You can create ten separate tests, each with its own set of data, or you can addten sets of parameters to a single test. If you add the parameters, your test will run tentimes, each time using a different set of data.
In this lesson, you will add parameters to your test and run the test with multiple setsof data.
This lesson includes the following:
Parameterizing Tests, Actions, and Objects - Overview 104
Exercise 5a: Create a Test for Parameterization 105
Exercise 5b: Define Data Table Parameters 106
Exercise 5c: Add Parameter Values to a Data Table 112
Exercise 5d: Run a Parameterized Test 115
TutorialLesson 5: Parameterizing Steps and Objects
HP Unified Functional Testing (12.02) Page 103
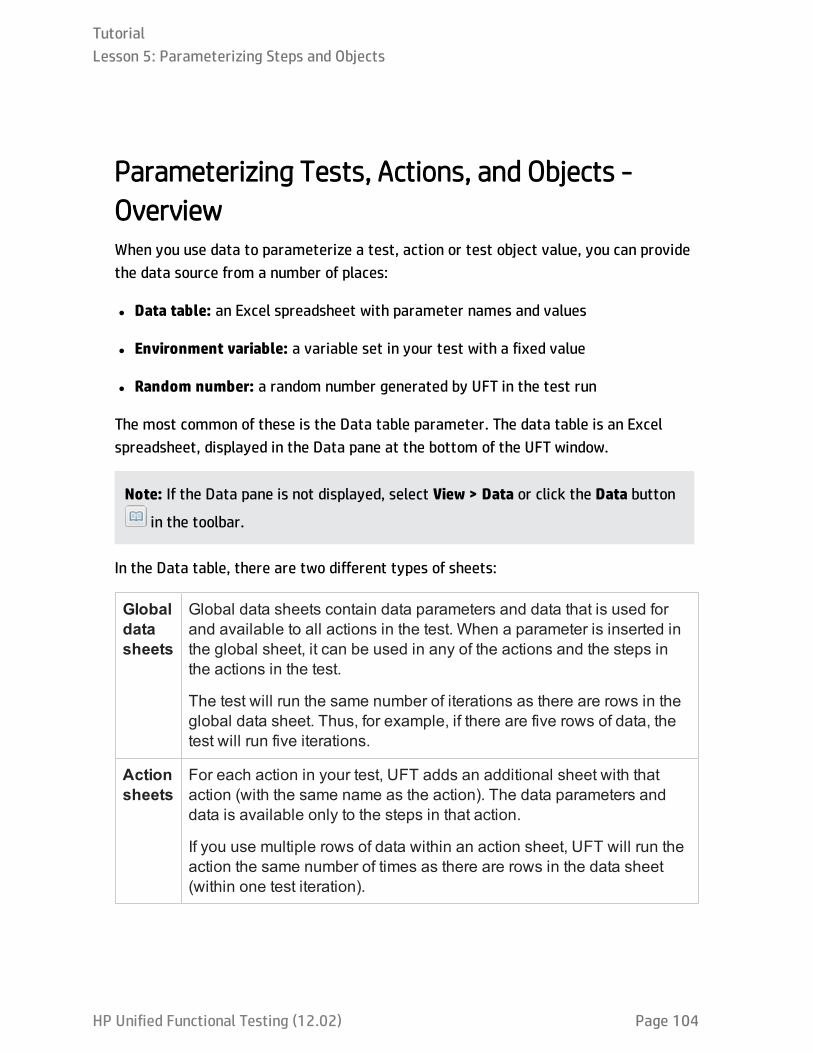
Parameterizing Tests, Actions, and Objects -OverviewWhen you use data to parameterize a test, action or test object value, you can providethe data source from a number of places:
l Data table: an Excel spreadsheet with parameter names and values
l Environment variable: a variable set in your test with a fixed value
l Random number: a random number generated by UFT in the test run
The most common of these is the Data table parameter. The data table is an Excelspreadsheet, displayed in the Data pane at the bottom of the UFT window.
Note: If the Data pane is not displayed, select View > Data or click the Data button
in the toolbar.
In the Data table, there are two different types of sheets:
Globaldatasheets
Global data sheets contain data parameters and data that is used forand available to all actions in the test. When a parameter is inserted inthe global sheet, it can be used in any of the actions and the steps inthe actions in the test.
The test will run the same number of iterations as there are rows in theglobal data sheet. Thus, for example, if there are five rows of data, thetest will run five iterations.
Actionsheets
For each action in your test, UFT adds an additional sheet with thataction (with the same name as the action). The data parameters anddata is available only to the steps in that action.
If you use multiple rows of data within an action sheet, UFT will run theaction the same number of times as there are rows in the data sheet (within one test iteration).
TutorialLesson 5: Parameterizing Steps and Objects
HP Unified Functional Testing (12.02) Page 104
In the course of this lesson, you will be using only data table parameters. For details onthe other types of parameters, see the section on parameterization in the HP UnifiedFunctional Testing User Guide
Exercise 5a: Create a Test for ParameterizationIn "Exercise 3b: Add Steps to the FlightFinder Action by Recording" on page 73, youreserved a flight from Los Angeles to Sydney. In those step, the Los Angeles and Sydneyvalues are constant values. This means that UFT uses Los Angeles and Sydney as thedeparture and arrival city each time it runs the test.
In this exercise, you will create a new test, in which you define the departure andarrival city as a parameter, so that you can use a different departure and arrival cityfor each test run.
1. Start UFT and open the Book Flights test.a. Open UFT as described in "Create a Solution for All Your Tests" on page 36.
Make sure that the WPF Add-in is loaded.
b. On the Start Page, in the Recent Solutions area, click Flight ReservationApplication.
The Flight Reservation Application solution opens, containing the Book Flightstest you created in "Lesson 1: Create a GUI Test and Actions" on page 41.
2. Save the Book Flights as Book Flights Parameter.a. In the Solution Explorer, select the Book Flights node.
b. Select File > Save As. In the Save Test As dialog box, browse toC:\%HOMEPATH%\My Documents\Unified Functional Testing and save thetest as Book Flights Parameter.
In the Solution Explorer, the Book Flights test is replaced by the new BookFlights Parameter test. The Book Flights test is still saved separately in the filesystem.
TutorialLesson 5: Parameterizing Steps and Objects
HP Unified Functional Testing (12.02) Page 105

3. Add the Book Flights test back to the solution.You can have all of your tests open at the same time if they are both referencedfrom the same solution. This enables you switch back and forth between them ifyou want to compare or edit the tests. You can only run a single test at a time.
a. Select File > Add > Existing Test.
b. In the Add Existing Test Dialog Box, browse to the C:\%HOMEPATH%\MyDocuments\Unified Functional Testing, and select the Book Flights test.
c. Click Add to add it to the solution.
The Book Flights test is again displayed in the Solution Explorer. Note that itappears above the Book Flights Parameter test you just created, as tests arelisted in alphabetical order.
Now that you have created the test for parameterization,continue with "Exercise5b: Define Data Table Parameters" below to create data table parameters in yourtest.
Exercise 5b: Define Data Table ParametersIn this lesson, you will the define the departure and arrival cities as parameters, so thatyou can use a different departure city for each test run.
1. Start UFT and open the Book Flights Parameter test, ifnecessary.a. Open UFT as described in "Create a Solution for All Your Tests" on page 36.
Make sure that the WPF Add-in is loaded.
b. Select File >Open > Solution. The Open Solution dialog box opens
c. Navigate to the Flight Reservation Application.ftsln file, located inC:\%HOMEPATH%\My Documents\Unified Functional Testing, and click Open.
TutorialLesson 5: Parameterizing Steps and Objects
HP Unified Functional Testing (12.02) Page 106

The Flight Reservation solution opens, including the Book Flights Parametertest you created in "Exercise 5a: Create a Test for Parameterization" onpage 105.
d. In the Solution Explorer, select the Book Flights Parameter node.
2. Make sure that the Data Pane is visible.If you do not see the Data pane at the bottom of the UFT window, select View> Data.
3. Open the Flight Finder action.a. In the canvas, double-click the Flight Finder action. The Flight Finder action is
displayed as a separate tab in the document pane.
b. If necessary, select View > Keyword View.
4. Select the text to parameterize.In the Keyword View, in the fromCity row, click the Value cell and then click the
parameterization button .
TutorialLesson 5: Parameterizing Steps and Objects
HP Unified Functional Testing (12.02) Page 107
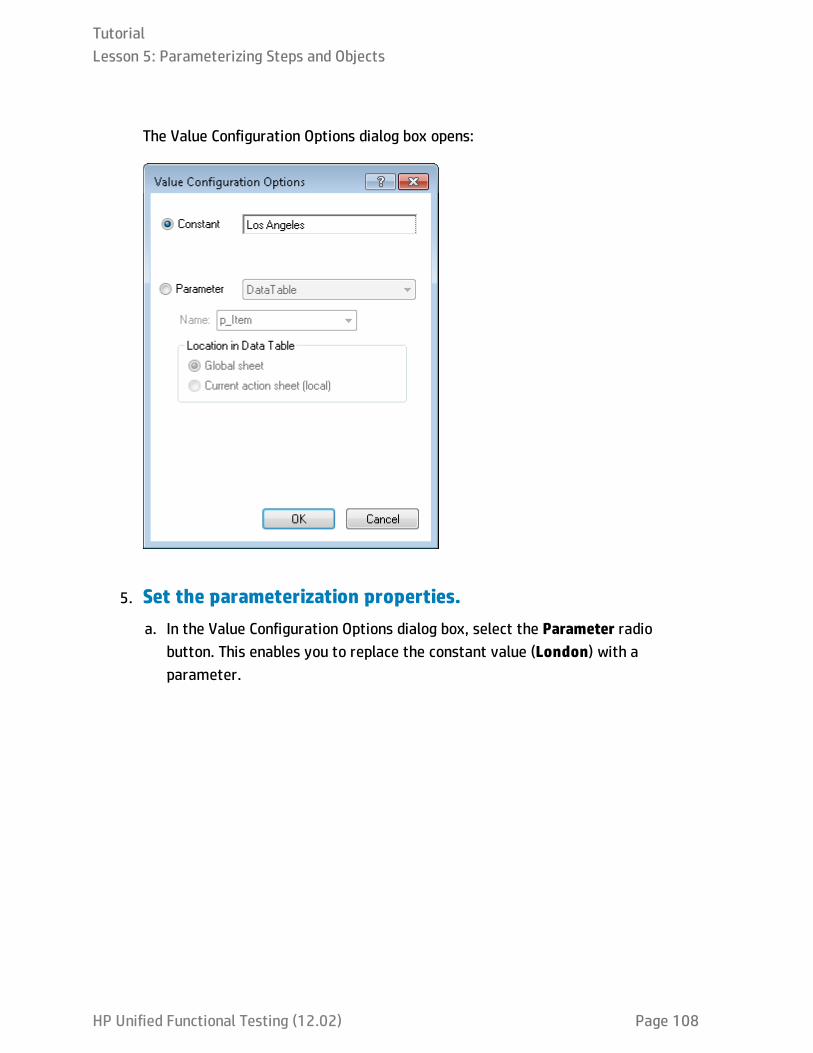
The Value Configuration Options dialog box opens:
5. Set the parameterization properties.a. In the Value Configuration Options dialog box, select the Parameter radio
button. This enables you to replace the constant value (London) with aparameter.
TutorialLesson 5: Parameterizing Steps and Objects
HP Unified Functional Testing (12.02) Page 108

b. Confirm that the DataTable option is selected from the Parameter drop-downmenu. This means that the value of the parameter will be taken from the UFTData pane. The Name box is enabled and displays p_Item:
c. Delete the p_Item parameter and enter fromCity.
d. Click OK to close the dialog box.
UFT adds the fromCity parameter to the Data pane as a new column and insertsLos Angeles (the previous constant value) in the first row in the column.
TutorialLesson 5: Parameterizing Steps and Objects
HP Unified Functional Testing (12.02) Page 109

Los Angeles will be the first of several departure cities that UFT will use duringtest runs of the application.
Note the change in the step's appearance in the Keyword View. Previously, thestep was displayed as fromCity Select Los Angeles. Now, when you clickthe Value cell, the following information is displayed, indicating that the valueis parameterized using a Data pane parameter called fromCity:
When you click another area in the Keyword View, the step is displayed as:
6. Add a data table parameter for the toCity step.
TutorialLesson 5: Parameterizing Steps and Objects
HP Unified Functional Testing (12.02) Page 110
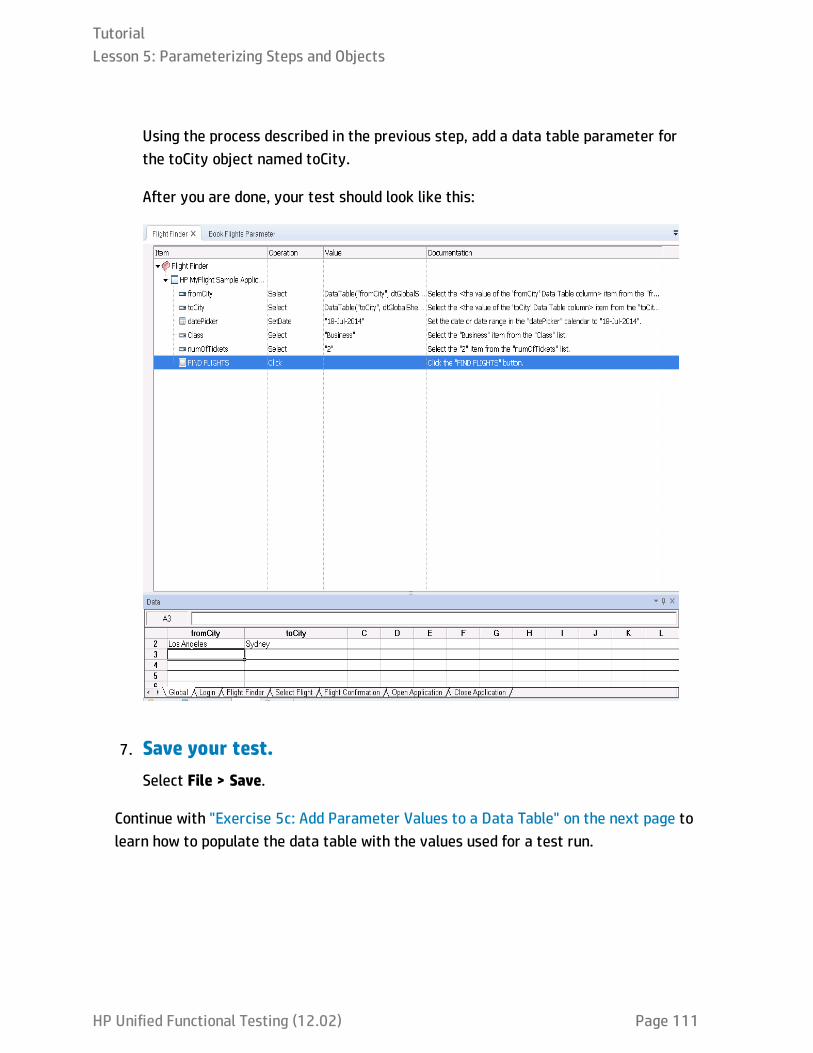
Using the process described in the previous step, add a data table parameter forthe toCity object named toCity.
After you are done, your test should look like this:
7. Save your test.Select File > Save.
Continue with "Exercise 5c: Add Parameter Values to a Data Table" on the next page tolearn how to populate the data table with the values used for a test run.
TutorialLesson 5: Parameterizing Steps and Objects
HP Unified Functional Testing (12.02) Page 111

Exercise 5c: Add Parameter Values to a DataTableAs you learned in "Exercise 5b: Define Data Table Parameters" on page 106, UFTdisplays parameter values in the Data pane. In this exercise, you will add anotherdeparture city (for the fromCity object) to the Data pane, so that UFT can test theapplication with this data.
1. Start UFT and open the Book Flights Parameter test, ifnecessary.a. Open UFT as described in "Create a Solution for All Your Tests" on page 36.
Make sure that the WPF Add-in is loaded.
b. Click the Open down arrow , and select Open Solution. The OpenSolution dialog box opens.
c. Navigate to the Flight Reservation Application.ftsln file, located inC:\%HOMEPATH%\My Documents\Unified Functional Testing, and click Open.
The Flight Reservation solution opens, including the Book Flights Parametertest you created in "Exercise 5a: Create a Test for Parameterization" onpage 105.
d. In the Solution Explorer, select the Book Flights Parameter node.
2. Open the Flight Finder action.In the Solution Explorer, double-click the Flight Finder action.
The Flight Finder action opens as a separate tab in the document pane.
3. Enter an additional cities in the fromCity column.
TutorialLesson 5: Parameterizing Steps and Objects
HP Unified Functional Testing (12.02) Page 112
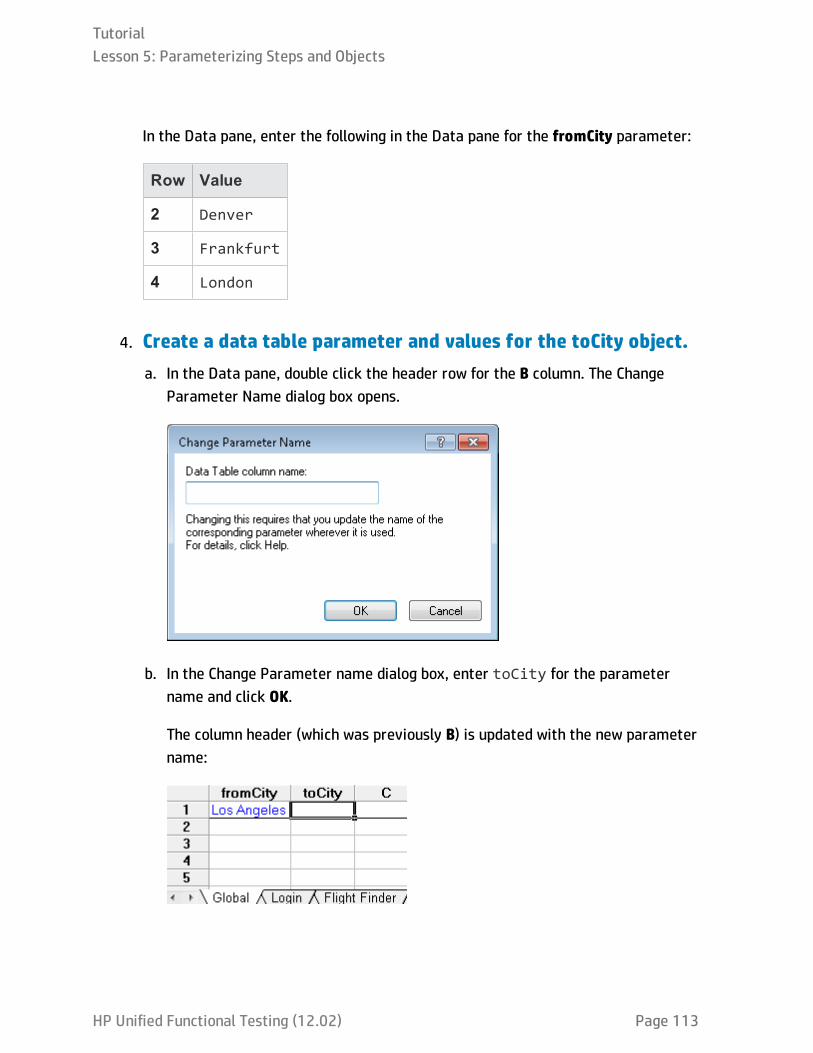
In the Data pane, enter the following in the Data pane for the fromCity parameter:
Row Value
2 Denver
3 Frankfurt
4 London
4. Create a data table parameter and values for the toCity object.a. In the Data pane, double click the header row for the B column. The Change
Parameter Name dialog box opens.
b. In the Change Parameter name dialog box, enter toCity for the parametername and click OK.
The column header (which was previously B) is updated with the new parametername:
TutorialLesson 5: Parameterizing Steps and Objects
HP Unified Functional Testing (12.02) Page 113
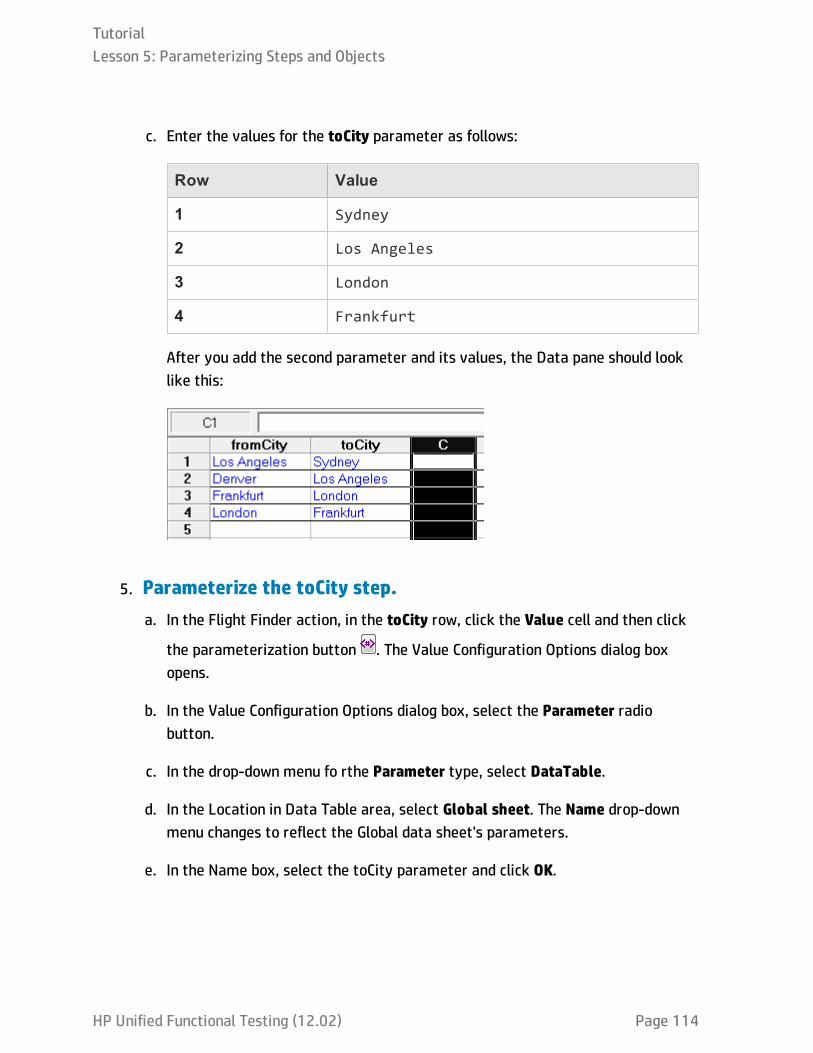
c. Enter the values for the toCity parameter as follows:
Row Value
1 Sydney
2 Los Angeles
3 London
4 Frankfurt
After you add the second parameter and its values, the Data pane should looklike this:
5. Parameterize the toCity step.a. In the Flight Finder action, in the toCity row, click the Value cell and then click
the parameterization button . The Value Configuration Options dialog boxopens.
b. In the Value Configuration Options dialog box, select the Parameter radiobutton.
c. In the drop-down menu fo rthe Parameter type, select DataTable.
d. In the Location in Data Table area, select Global sheet. The Name drop-downmenu changes to reflect the Global data sheet's parameters.
e. In the Name box, select the toCity parameter and click OK.
TutorialLesson 5: Parameterizing Steps and Objects
HP Unified Functional Testing (12.02) Page 114

In the Keyword View, the Value cell for the toCity object is updated to show theparameterization:
6. Save the test.
In the toolbar, click Save .
Now that you have added parameters and values, and linked your test steps with thesevalues, you are ready to run a parameterized test. Continue to "Exercise 5d: Run aParameterized Test" below
Exercise 5d: Run a Parameterized TestIn "Exercise 5b: Define Data Table Parameters" on page 106 and "Exercise 5c: AddParameter Values to a Data Table" on page 112, you created Data Table parametersfor the toCity and fromCity objects in the Flight Finder action. This enables you tosubstitute the constant object values with changing values from the test's data table.
However, if you were to run the test at this time, it would only run one time, with thedata from the first row of the Global data sheet. Since the purpose of parameterizationis to see how your application runs with different sets of data, you need to instruct UFTto run the test multiple times.
In this lesson, you will configure UFT and your test to ensure that the entire test runsmultiple times and uses the data in the test's Data table.
1. Start UFT and open the Book Flights Parameter test, ifnecessary.a. Open UFT as described in "Create a Solution for All Your Tests" on page 36.
Make sure that the WPF Add-in is loaded.
b. Click the Open down arrow , and select Open Solution. The OpenSolution dialog box opens.
TutorialLesson 5: Parameterizing Steps and Objects
HP Unified Functional Testing (12.02) Page 115

c. Navigate to the Flight Reservation Application.ftsln file, located inC:\%HOMEPATH%\My Documents\Unified Functional Testing, and click Open.
The Flight Reservation solution opens, including the Book Flights Parametertest you created in "Exercise 5a: Create a Test for Parameterization" onpage 105.
d. In the Solution Explorer, click the node for the Book Flights test. The test flowcanvas opens as a separate tab in the document pane.
2. Change the Record and Run Settings so that the flightreservation application does not open automatically.In the Book Flights test (the test from which this test was created), you configuredthe Run and Record Settings to automatically open the flight reservationapplication at the beginning of the test run. For the purposes of this test run, youwant UFT to open the application as part of a test step.
a. Select Record > Record and Run Settings. The Record and Run Settings dialogbox opens.
b. In the Windows Applications tab of the Record and Run Settings dialog box,select the Record and run test on any open Windows application option andclick Apply.
c. Click OK to close the dialog box.
3. Add additional actions for the open and close of theapplication.When you run a parameterized test, UFT runs the entire test multiple times,depending on the number of rows in your data table. However, in order to do this,we must add steps to open and close the application, in order for UFT to run theactions for each of the four application pages (Login, Flight Finder, Select Flight,and Flight Details/Confirmation.)
TutorialLesson 5: Parameterizing Steps and Objects
HP Unified Functional Testing (12.02) Page 116

a. In the document pane, select the Book Flights tab (with the test flow canvas).
b. In the toolbar, click the Insert Call to New Action button . The Insert Callto New Action dialog box opens.
c. In the Insert Call to New Action dialog box, name the new action OpenApplication. Leave all other settings and options with the default.
A new action block is added to the end of the test flow with the name OpenApplication.
d. In the Book Flights tab (with the test flow canvas), right-click the OpenApplication action and select Move Up. The Open Application action blockmoves up above the Flight Confirmation action.
e. Right-click and select Move Up until the Open Application block is the firstaction in the test.
Note: You can also drag and drop the action blocks in the test flow asneeded.
f. In the toolbar, click the Insert Call to New Action button again.
g. In the Insert Call to New Action dialog box, name the new action CloseApplication. Leave all other settings and options with the default.
TutorialLesson 5: Parameterizing Steps and Objects
HP Unified Functional Testing (12.02) Page 117
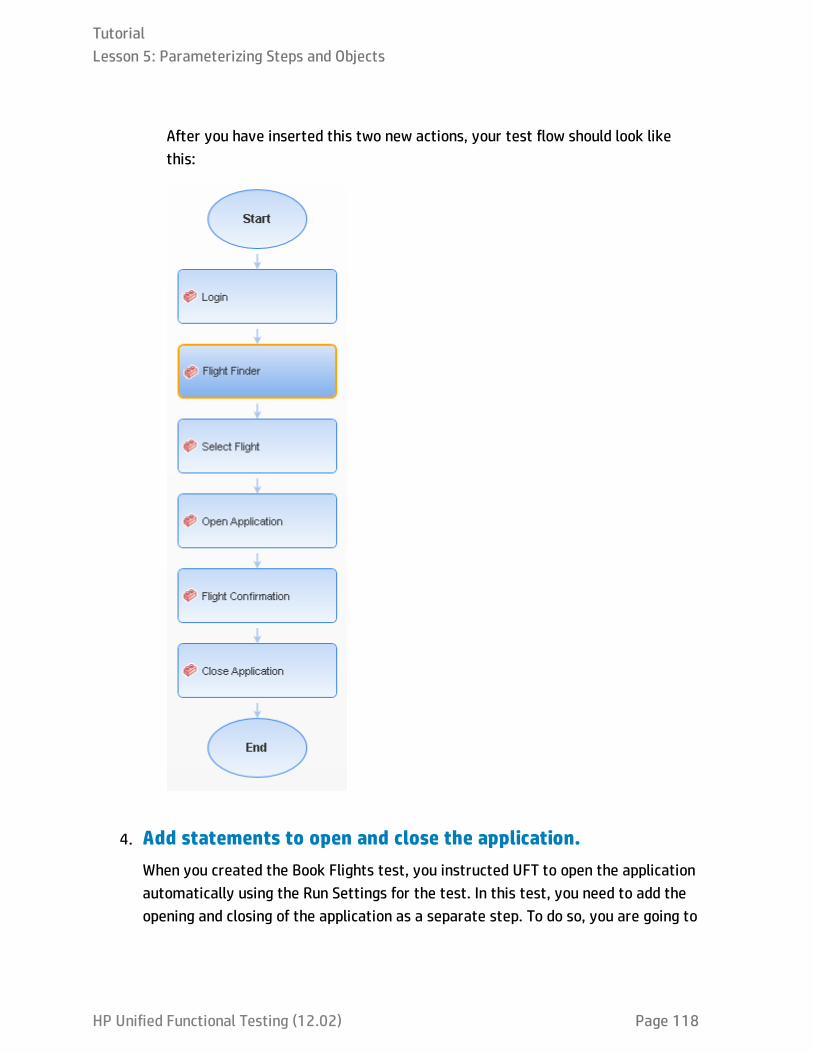
After you have inserted this two new actions, your test flow should look likethis:
4. Add statements to open and close the application.When you created the Book Flights test, you instructed UFT to open the applicationautomatically using the Run Settings for the test. In this test, you need to add theopening and closing of the application as a separate step. To do so, you are going to
TutorialLesson 5: Parameterizing Steps and Objects
HP Unified Functional Testing (12.02) Page 118
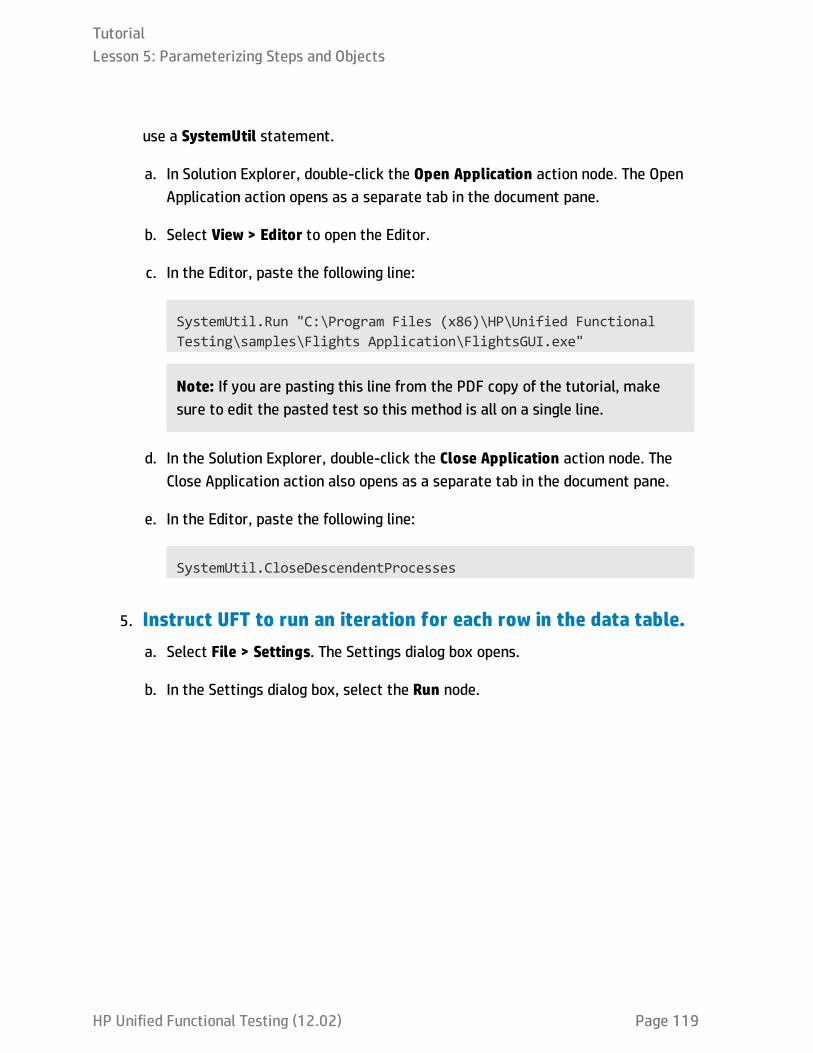
use a SystemUtil statement.
a. In Solution Explorer, double-click the Open Application action node. The OpenApplication action opens as a separate tab in the document pane.
b. Select View > Editor to open the Editor.
c. In the Editor, paste the following line:
SystemUtil.Run "C:\Program Files (x86)\HP\Unified FunctionalTesting\samples\Flights Application\FlightsGUI.exe"
Note: If you are pasting this line from the PDF copy of the tutorial, makesure to edit the pasted test so this method is all on a single line.
d. In the Solution Explorer, double-click the Close Application action node. TheClose Application action also opens as a separate tab in the document pane.
e. In the Editor, paste the following line:
SystemUtil.CloseDescendentProcesses
5. Instruct UFT to run an iteration for each row in the data table.a. Select File > Settings. The Settings dialog box opens.
b. In the Settings dialog box, select the Run node.
TutorialLesson 5: Parameterizing Steps and Objects
HP Unified Functional Testing (12.02) Page 119

c. In the Data Table iterations section, select the Run all rows option. Thisensures that UFT runs an iteration of the test for each row in the Global datasheet.
Now, when you run your test, UFT will run multiple iterations of the test,corresponding to the four rows in the Global data sheet.
6. Run the Book Flights Parameter test.
a. Click the Run button . The Run dialog box opens.
b. In the Run dialog box, in the Results Location tab, select New run resultsfolder and accept the default folder name.
c. Click OK. When the test run is completed, the Run Results Viewer opens.
7. Analyze the run results.
TutorialLesson 5: Parameterizing Steps and Objects
HP Unified Functional Testing (12.02) Page 120

In the Run Results Viewer, right-click the top node in the results tree and selectExpand All.
Note that the results display five different nodes for each iteration. Thiscorresponds to the mulitple rows of the Global data table:
If you expand the Flight Finder Summary nodes until you see the fromCity.Select ortoCity.Select steps, you will notice that the Details displayed in the Result Detailspane change to match the values in the Data table.
8. Close the Run Results Viewer.Select File > Exit.
Now that you have learned how to use data to parameterize your test, continue with"Lesson 6: Creating Checkpoints and Output Values" on the next page to learn how toenhance your tests with checkpoints and output values.
TutorialLesson 5: Parameterizing Steps and Objects
HP Unified Functional Testing (12.02) Page 121
Lesson 6: Creating Checkpoints and OutputValuesIn "Lesson 4: Running and Analyzing GUI Tests" on page 95, you ran a test that youcreated in previous lessons, to check that a series of steps performed on the flightreservation application ran smoothly and correctly.
After you create basic test steps, one of the enhancements you can make is to addcheckpoints and output values for your tests and test steps. Checkpoints verify thatexpected information is displayed in your application while a test is running. Outputvalues export a value to use in other places in the test as a parameter.
In this lesson, you will insert checkpoints and use a function to check the validity ofsome of the objects in the flight reservation application checkpoint.
This lesson includes the following:
Understanding Checkpoint and Output Value Types 123
Exercise 6a: Create a Checkpoint Test 126
Exercise 6b: Check Object Values 128
Exercise 6c: Check Table Values 132
Exercise 6d: Check Text Values 139
Exercise 6e: Manage Checkpoints in the Object Repository 147
Exercise 6f: Run and Analyze a Test with Checkpoints 149
Exercise 6g: Create an Output Value Test 154
Exercise 6h: Add an Output Value Step 156
TutorialLesson 6: Creating Checkpoints and Output Values
HP Unified Functional Testing (12.02) Page 122

Understanding Checkpoint and Output ValueTypesIn UFT, you can insert checkpoints to check to see that your application is runningcorrectly. These checkpoints run as a separate test step in the overall test flow. Youuse output values to take a value produced by a specific step or object and pass thisvalue to another step.
CheckpointsYou can check a variety of different application objects using checkpoints:
Object Type Description ofCheckpoint
Example of Use
Standard Checks the values of anobject's properties.
Check that a radio button isselected.
Image Checks the propertyvalue of an image.
You check an image byselecting the StandardCheckpoint option andthen selecting an imageobject.
Check that the image source file iscorrect.
Table Checks information in atable.
You check a table byselecting the StandardCheckpoint option andthen selecting a tableobject.
Check that the value in a table cell iscorrect.
TutorialLesson 6: Creating Checkpoints and Output Values
HP Unified Functional Testing (12.02) Page 123

Page Checks thecharacteristics of a Webpage.
You check a table byselecting the StandardCheckpoint option andthen selecting a Webpage in a browser.
Check how long a Web page takesto load or if a Web page containsbroken links.
Text Checks that a text stringis displayed in theappropriate place in anapplication.
Check whether the expected textstring is displayed in the expectedlocation in a test object.
Text Area Checks that a text stringis displayed within adefined area in aWindows-basedapplication.
Check that an area of a dialog boxincludes text that was entered inanother part of the application.
Bitmap Checks an area of anapplication after capturingit as a bitmap.
Check that a Web page (or anyportion of it) is displayed asexpected.
Database Checks the contents ofdatabases accessed byan application or Website.
Checks that the value in a databasequery is correct.
Accessibility Identifies areas of a Website to check for Section508 compliance.
Check if the images on a Web pageinclude ALT properties, required bythe W3C Web Content AccessibilityGuidelines.
File Content Checks the text in adocument generated oraccessed during a runsession.
Checks that the headers in adynamically-generated PDF displaythe regional corporate headquarterscontact information correctly.
TutorialLesson 6: Creating Checkpoints and Output Values
HP Unified Functional Testing (12.02) Page 124
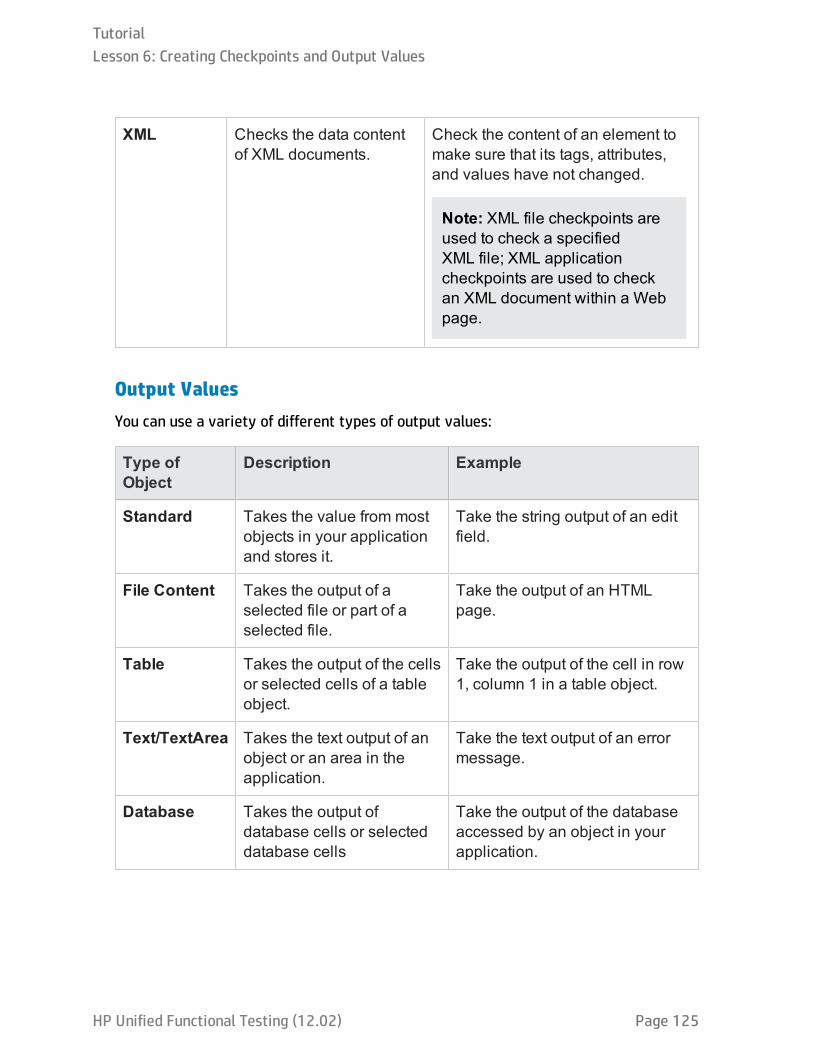
XML Checks the data contentof XML documents.
Check the content of an element tomake sure that its tags, attributes,and values have not changed.
Note: XML file checkpoints areused to check a specifiedXML file; XML applicationcheckpoints are used to checkan XML document within a Webpage.
Output ValuesYou can use a variety of different types of output values:
Type ofObject
Description Example
Standard Takes the value from mostobjects in your applicationand stores it.
Take the string output of an editfield.
File Content Takes the output of aselected file or part of aselected file.
Take the output of an HTMLpage.
Table Takes the output of the cellsor selected cells of a tableobject.
Take the output of the cell in row1, column 1 in a table object.
Text/TextArea Takes the text output of anobject or an area in theapplication.
Take the text output of an errormessage.
Database Takes the output ofdatabase cells or selecteddatabase cells
Take the output of the databaseaccessed by an object in yourapplication.
TutorialLesson 6: Creating Checkpoints and Output Values
HP Unified Functional Testing (12.02) Page 125

XML Takes the output ofelements included in anXML document.
Take the output of the<price> attribute in an XMLdefining prices for a product.
You can add most checkpoints and output values either while editing steps in theKeyword View or Editor or recording. The following exercises explain how to createsome of the checkpoints described above.
When UFT creates a checkpoint or output values, it assigns a name based oninformation inside the checkpoint or output value - the checked value, for example. Thecheckpoint or output value name remains unchanged, even if you modify theinformation on which it was based. Keep this in mind when looking for checkpoints oroutput values displayed in the Keyword View. Note also, that UFT may shorted thename displayed in the Keyword View.
For additional details on checkpoints and output values, see the HP Unified FunctionalTesting User Guide.
Continue with "Exercise 6a: Create a Checkpoint Test" below to create test in which touse checkpoints.
If you would like to add output values, continue to "Exercise 6g: Create an Output ValueTest" on page 154.
Exercise 6a: Create a Checkpoint TestIn this exercise, you will save the Book Flights test that you ran in "Lesson 4: Runningand Analyzing GUI Tests" on page 95 as a new test to create your checkpoints.
Note: Checkpoints do not need to be managed in separate tests. You are onlycreating a new test now for the sake of this tutorial. During your regular workingprocess, you can add checkpoints to any test.
1. Start UFT and open the Book Flights test.a. If UFT is not currently open, open it as described in "Create a Solution for All
Your Tests" on page 36. Make sure that the WPF Add-in is loaded.
TutorialLesson 6: Creating Checkpoints and Output Values
HP Unified Functional Testing (12.02) Page 126
b. Click the Open button down arrow , and select Open Solution. The OpenSolution dialog box opens.
c. Navigate to the Flight Reservation Application.ftsln file, located inC:\%HOMEPATH%\My Documents\Unified Functional Testing, and click Open.
The Flight Reservation Application solution opens, containing the Book Flightstest you created in "Lesson 1: Create a GUI Test and Actions" on page 41.
2. Save the test as Book Flights Checkpoint.a. In the Solution Explorer, right-click the Book Flights test node and select Save
As.
b. In the Save Test As dialog box, browse to the C:\%HOMEPATH%\MyDocuments\Unified Functional Testing directory, and save the test as BookFlight Checkpoint.
In the Solution Explorer, the Book Flights test is replaced with the Book FlightsCheckpoint test. The Book Flights test is still saved separately in the filesystem.
3. Add the Book Flights test back to the solution.You can have both the Book Flights and Book Flights Checkpoint tests open at thesame time if they are included in the same solution. This enables you to switchback and forth between them if you want to compare or edit the test.
Note: You can only run a single test at a time.
a. Select File > Add > Existing Test.
b. Navigate to the Book Flights test, located in C:\%HOMEPATH%\MyDocuments\Unified Functional Testing, and click Add.
The Book Flights test is added again to the Solution Explorer. Note that tests
TutorialLesson 6: Creating Checkpoints and Output Values
HP Unified Functional Testing (12.02) Page 127
are listed alphabetically in the Solution Explorer.
The solution is saved automatically.
Continue with "Exercise 6b: Check Object Values" below to begin insertingcheckpoints.
Exercise 6b: Check Object ValuesIn this exercise, you will add a standard checkpoint to the test you created in "Exercise6a: Create a Checkpoint Test" on page 126. This checkpoint verifies the value enteredfor the Passenger Name field in the Flight Details window.
Note: The flight reservation application must be open to the Flight Details pagebefore you can insert the checkpoint.
1. Start UFT and open the Book Flights Checkpoint test.a. If necessary, open UFT as described in "Create a Solution for All Your Tests" on
page 36. Make sure that the WPF Add-in is loaded.
b. On the Start Page, in the Recent Solutions area, click Flight ReservationApplication.
The Flight Reservation solution opens, including the Book Flights Parametertest you created in "Exercise 6a: Create a Checkpoint Test" on page 126.
c. In the Solution Explorer, double-click the Book Flights Checkpoint node.
The Book Flights Checkpoint test opens as a separate tab in the document pane.
2. Display the action in which you want to add a checkpoint.
TutorialLesson 6: Creating Checkpoints and Output Values
HP Unified Functional Testing (12.02) Page 128

In order to add a checkpoint that checks the property values of the PassengerName edit box, after the test automatically enters the passenger's name, you mustadd it to the appropriate action in the test.
In the canvas, double-click the Flight Confirmation action to open it.
3. Open the flight reservation application to the Flight Detailspage.a. Open the flight reservation application, as described in "Explore the Flight
Reservation Application" on page 33.
b. Enter the login information:
o Username: john
o Password: hp
c. Click OK. The Flight Finder page opens.
d. Enter the flight search details:
o Departure City: Los Angeles
o Arrival City: Sydney
o Date: tomorrow's date
o Class: Business
o Tickets: 2
e. Click the Find Flights button. The Select Flight page opens.
f. In the Select Flight page, select the first row and click Select Flight. The FlightDetails page opens.
4. Create a standard checkpoint.
a. If the Editor is displayed, click the Keyword View button to display the
TutorialLesson 6: Creating Checkpoints and Output Values
HP Unified Functional Testing (12.02) Page 129
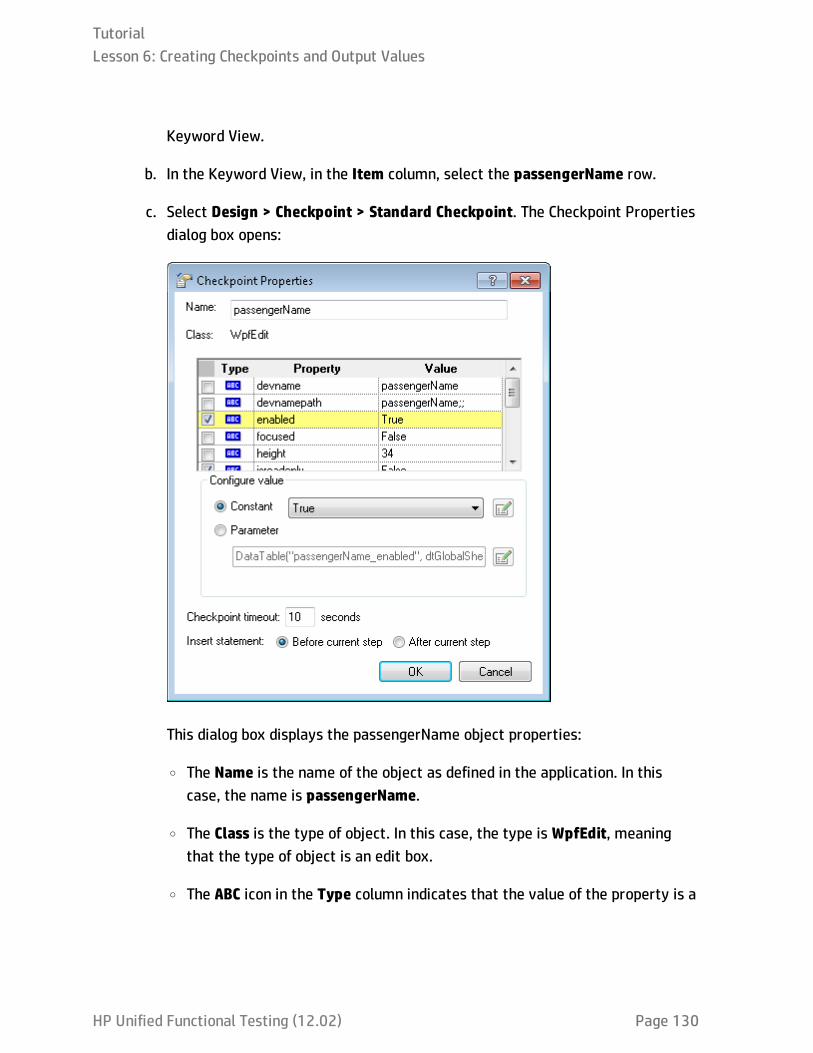
Keyword View.
b. In the Keyword View, in the Item column, select the passengerName row.
c. Select Design > Checkpoint > Standard Checkpoint. The Checkpoint Propertiesdialog box opens:
This dialog box displays the passengerName object properties:
o The Name is the name of the object as defined in the application. In thiscase, the name is passengerName.
o The Class is the type of object. In this case, the type is WpfEdit, meaningthat the type of object is an edit box.
o The ABC icon in the Type column indicates that the value of the property is a
TutorialLesson 6: Creating Checkpoints and Output Values
HP Unified Functional Testing (12.02) Page 130

constant.
When you insert a checkpoint, UFT recommends default property checks foreach object class:
Property Value Explanation
enabled True This checks whether the object is currentlyenabled.
isreadonly False This checks whether you can enterinformation into the edit box. Currently, theobject is set to allow entry of a text string.
text Nodefaultspecified
This checks the text that is entered in theobject. Currently the value is empty. Youneed to enter the same value that youspecified for the passengerName edit box inthe first step of this action.
d. In the Name box of the Checkpoint Properties dialog box, enter CheckName asthe new checkpoint name.
e. Scroll down in the object properties area and select the row containing theproperty name text. The row turns yellow to show that you have selected thisrow.
f. In the text property row, click in the Value column.
g. In the Configure value area below the object properties grid, click the Constantradio button.
h. In the Constant value edit box, enter John Smith. (This is the name of thevalue you entered in the Passenger Name box in the first step of the action.)Note that the object properties grid is also updated with this value.
i. In the Insert statement area at the bottom of the Checkpoint Properties dialogbox, select After current step. This insert the checkpoint after thepassengerName Set...step.
TutorialLesson 6: Creating Checkpoints and Output Values
HP Unified Functional Testing (12.02) Page 131
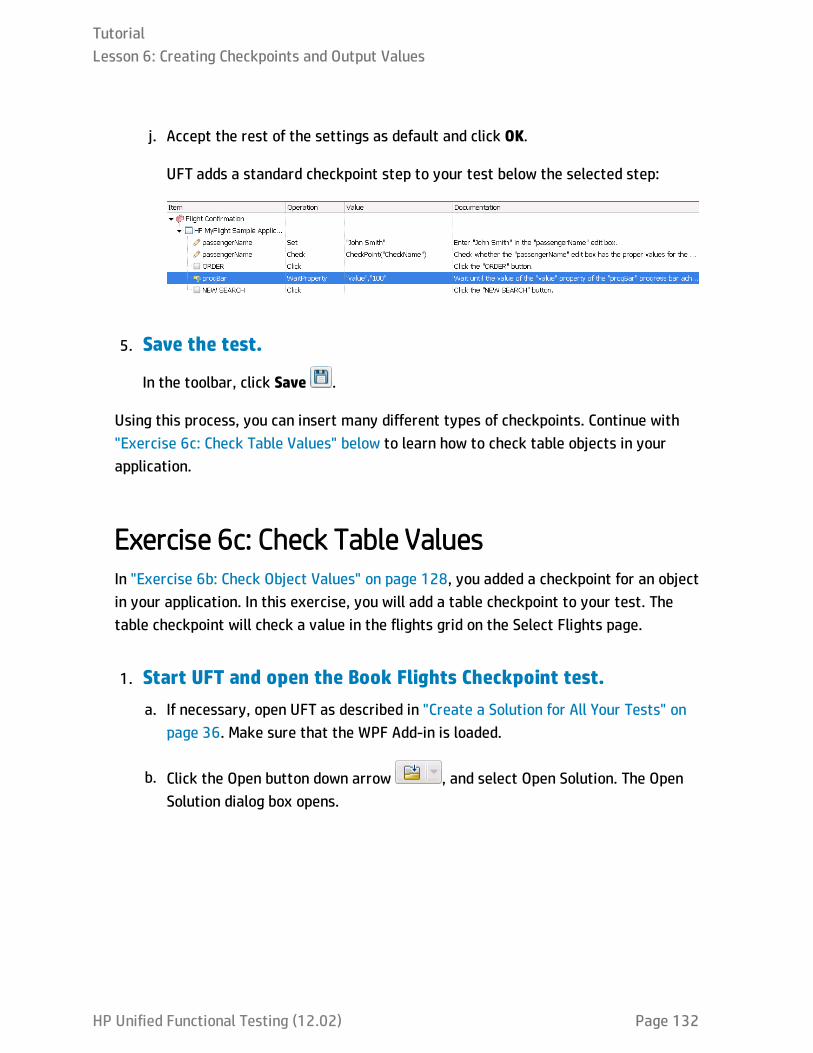
j. Accept the rest of the settings as default and click OK.
UFT adds a standard checkpoint step to your test below the selected step:
5. Save the test.
In the toolbar, click Save .
Using this process, you can insert many different types of checkpoints. Continue with"Exercise 6c: Check Table Values" below to learn how to check table objects in yourapplication.
Exercise 6c: Check Table ValuesIn "Exercise 6b: Check Object Values" on page 128, you added a checkpoint for an objectin your application. In this exercise, you will add a table checkpoint to your test. Thetable checkpoint will check a value in the flights grid on the Select Flights page.
1. Start UFT and open the Book Flights Checkpoint test.a. If necessary, open UFT as described in "Create a Solution for All Your Tests" on
page 36. Make sure that the WPF Add-in is loaded.
b. Click the Open button down arrow , and select Open Solution. The OpenSolution dialog box opens.
TutorialLesson 6: Creating Checkpoints and Output Values
HP Unified Functional Testing (12.02) Page 132

c. In the Open Solution dialog box, navigate to the Flight ReservationApplication.ftsln file, located in C:\%HOMEPATH%\My Documents\UnifiedFunctional Testing and click Open.
The Flight Reservation Application solution opens, including the Book FlightsParameter test you created in "Exercise 6a: Create a Checkpoint Test" onpage 126.
d. In the Solution Explorer, double-click the Book Flights Checkpoint node.
2. Locate the step where you want to add a table checkpoint.a. If the Select Flight action is not already open, in the Solution Explorer, double-
click the Select Flight action node. The action is displayed as a separate tab inthe document pane.
b. If the Editor is displayed, select View > Keyword View to show the KeywordView.
c. In the Keyword View, select the flightsDataGrid step (the step that selects theflight to book).
3. Open the flight reservation application to the Select Flightpage.a. Open the flight reservation application, as described in "Explore the Flight
Reservation Application" on page 33.
b. Enter the login information:
o Username: john
o Password: hp
c. Click OK. The Flight Finder page opens.
TutorialLesson 6: Creating Checkpoints and Output Values
HP Unified Functional Testing (12.02) Page 133

d. Enter the flight search details:
o Departure City: Los Angeles
o Arrival City: Sydney
o Date: tomorrow's date
o Class: Business
o Tickets: 2
e. Click the Find Flights button. The Select Flight page opens.
4. Configure UFT to record on the open application page.a. In UFT, select Record > Record and Run Settings. The Record and Run Settings
dialog box opens:
TutorialLesson 6: Creating Checkpoints and Output Values
HP Unified Functional Testing (12.02) Page 134

b. In the Windows Applications tab, select the Record and run test on any openWindows-based application option.
c. Click OK to close the dialog box.
5. Create a table checkpoint.
a. In the toolbar, click the Record button . UFT begins a recording session andthe main UFT window is hidden.
TutorialLesson 6: Creating Checkpoints and Output Values
HP Unified Functional Testing (12.02) Page 135
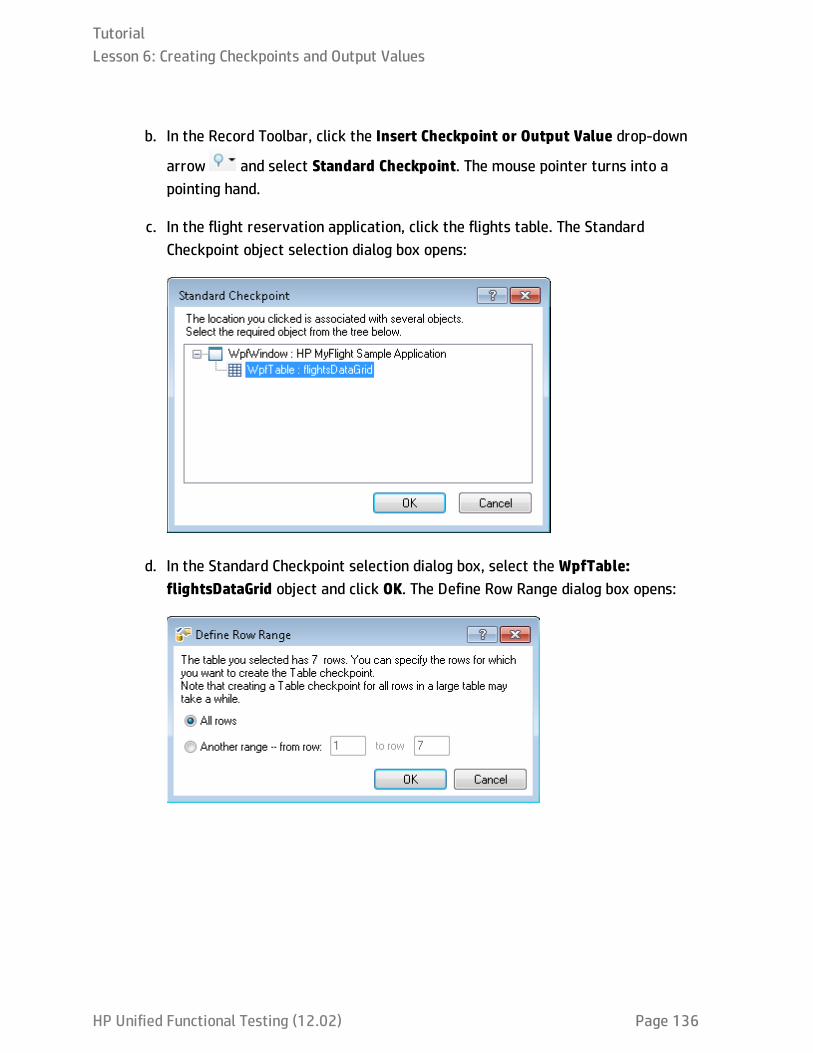
b. In the Record Toolbar, click the Insert Checkpoint or Output Value drop-down
arrow and select Standard Checkpoint. The mouse pointer turns into apointing hand.
c. In the flight reservation application, click the flights table. The StandardCheckpoint object selection dialog box opens:
d. In the Standard Checkpoint selection dialog box, select the WpfTable:flightsDataGrid object and click OK. The Define Row Range dialog box opens:
TutorialLesson 6: Creating Checkpoints and Output Values
HP Unified Functional Testing (12.02) Page 136
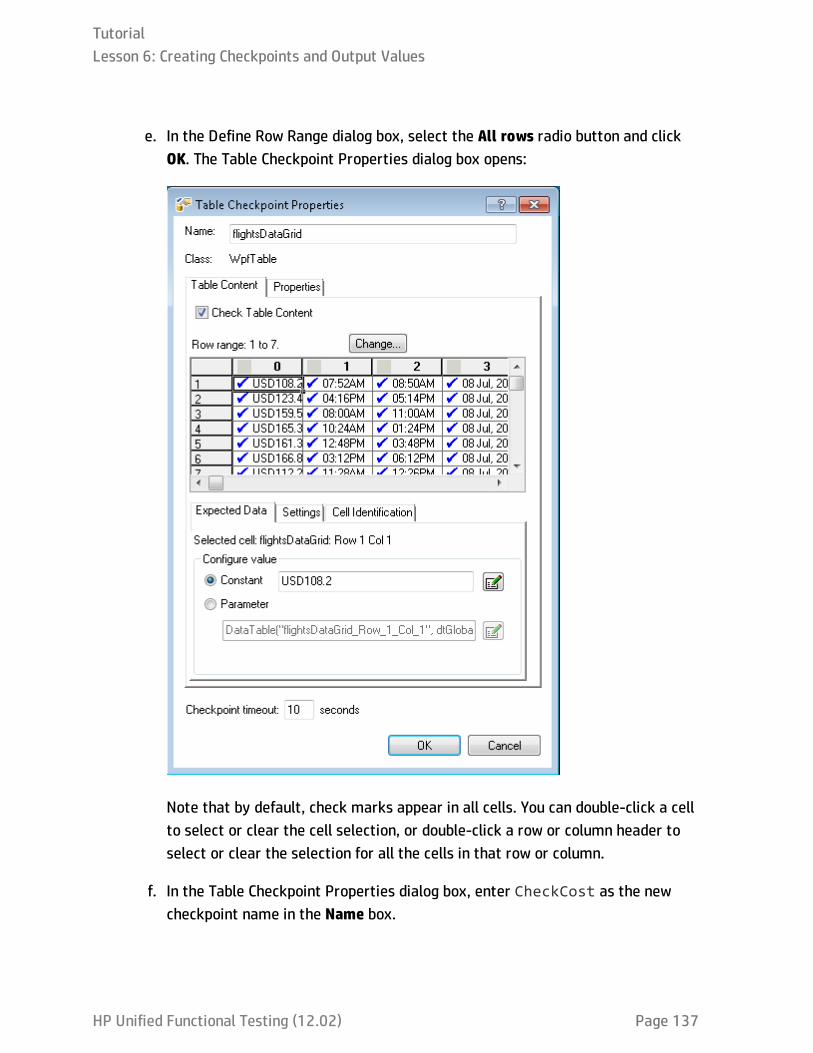
e. In the Define Row Range dialog box, select the All rows radio button and clickOK. The Table Checkpoint Properties dialog box opens:
Note that by default, check marks appear in all cells. You can double-click a cellto select or clear the cell selection, or double-click a row or column header toselect or clear the selection for all the cells in that row or column.
f. In the Table Checkpoint Properties dialog box, enter CheckCost as the newcheckpoint name in the Name box.
TutorialLesson 6: Creating Checkpoints and Output Values
HP Unified Functional Testing (12.02) Page 137
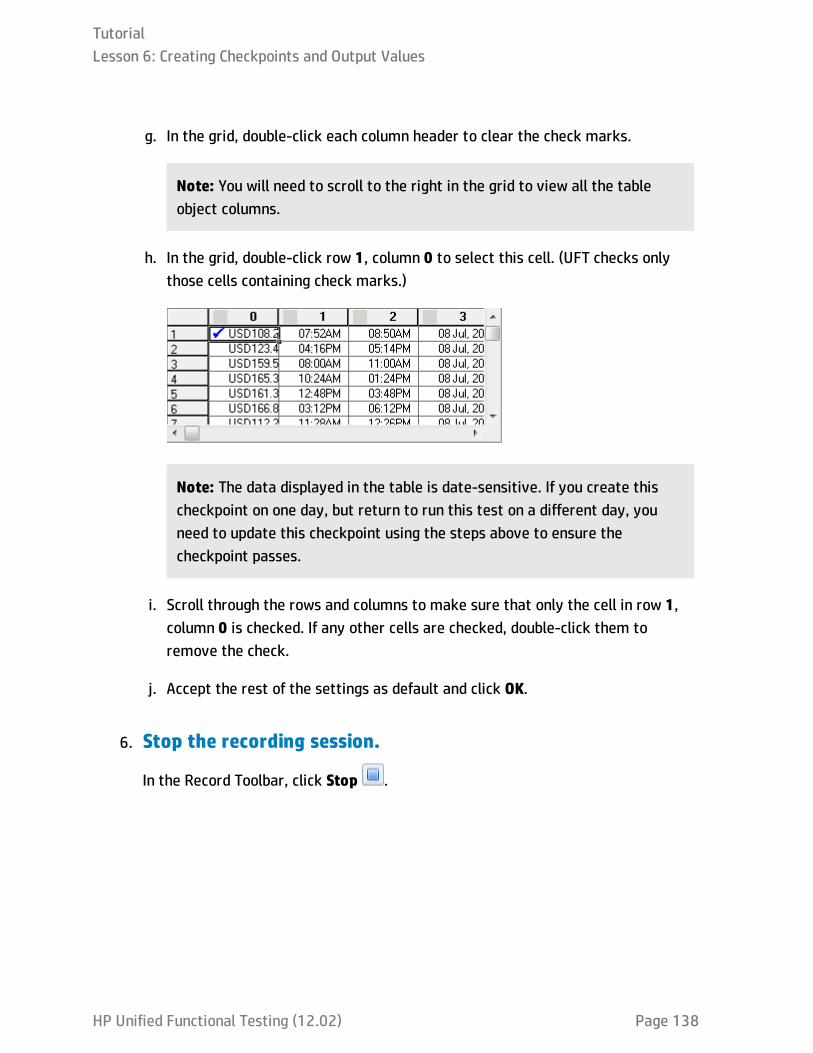
g. In the grid, double-click each column header to clear the check marks.
Note: You will need to scroll to the right in the grid to view all the tableobject columns.
h. In the grid, double-click row 1, column 0 to select this cell. (UFT checks onlythose cells containing check marks.)
Note: The data displayed in the table is date-sensitive. If you create thischeckpoint on one day, but return to run this test on a different day, youneed to update this checkpoint using the steps above to ensure thecheckpoint passes.
i. Scroll through the rows and columns to make sure that only the cell in row 1,column 0 is checked. If any other cells are checked, double-click them toremove the check.
j. Accept the rest of the settings as default and click OK.
6. Stop the recording session.
In the Record Toolbar, click Stop .
TutorialLesson 6: Creating Checkpoints and Output Values
HP Unified Functional Testing (12.02) Page 138

After you defined the table object's checkpoint properties, UFT added a tablecheckpoint step to your test. It is displayed in the Keyword View as a new stepunder the flightsDataGrid object step:
7. Save the test.
In the toolbar, click Save .
Now that you have added a checkpoint for a table object, continue to add checkpoints in"Exercise 6d: Check Text Values" below.
Exercise 6d: Check Text ValuesIn the previous exercises, you added checkpoints to a regular test object and a tableobject. In this object, you will add a text checkpoint to your test to check the text insidean object that appears at the end of the order process.
1. Start UFT and open the Book Flights Checkpoint test.a. If necessary, open UFT as described in "Create a Solution for All Your Tests" on
page 36. Make sure that the WPF Add-in is loaded.
b. On the Start Page, in the Recent Solutions area, click the Flight ReservationApplication solution.
The Flight Reservation Application solution opens, including the Book FlightsParameter test you created in "Exercise 6a: Create a Checkpoint Test" onpage 126.
c. In the Solution Explorer, double-click the Book Flights Checkpoint node.
The Book Flights Checkpoint test opens as a separate tab in the document pane.
TutorialLesson 6: Creating Checkpoints and Output Values
HP Unified Functional Testing (12.02) Page 139

2. Locate the step where you want to add a text checkpoint.a. In the Solution Explorer, double-click the Flight Confirmation action node. The
Flight Confirmation action opens as a separate tab in the document pane.
b. If the Editor is open, click the Keyword View button to display the KeywordView.
c. In the Keyword View, highlight the progBar step (in the next-to-last row, if youhave all of the steps fully expanded).
3. Open the flight reservation application to the Flight Detailspage.a. Open the flight reservation application, as described in "Explore the Flight
Reservation Application" on page 33.
b. Enter the login information:
o Username: john
o Password: hp
c. Click OK. The Flight Finder page opens.
d. Enter the flight search details:
o Departure City:Los Angeles
o Arrival City: Sydney
o Date: tomorrow's date
o Class: Business
o Tickets:2
e. Click the Find Flights button. The Select Flight page opens.
TutorialLesson 6: Creating Checkpoints and Output Values
HP Unified Functional Testing (12.02) Page 140

f. In the Select Flight page, select the first row and click Select Flight. The FlightDetails page opens.
g. In the Flight Details page, in the Passenger Name box, enter John Smith andclick ORDER.
A box is displayed in the middle of the window informing you of the completionof the order. Leave the application like this.
4. Configure UFT to record on the open application page.a. In UFT, select Record > Record and Run Settings. The Record and Run Settings
dialog box opens.
TutorialLesson 6: Creating Checkpoints and Output Values
HP Unified Functional Testing (12.02) Page 141
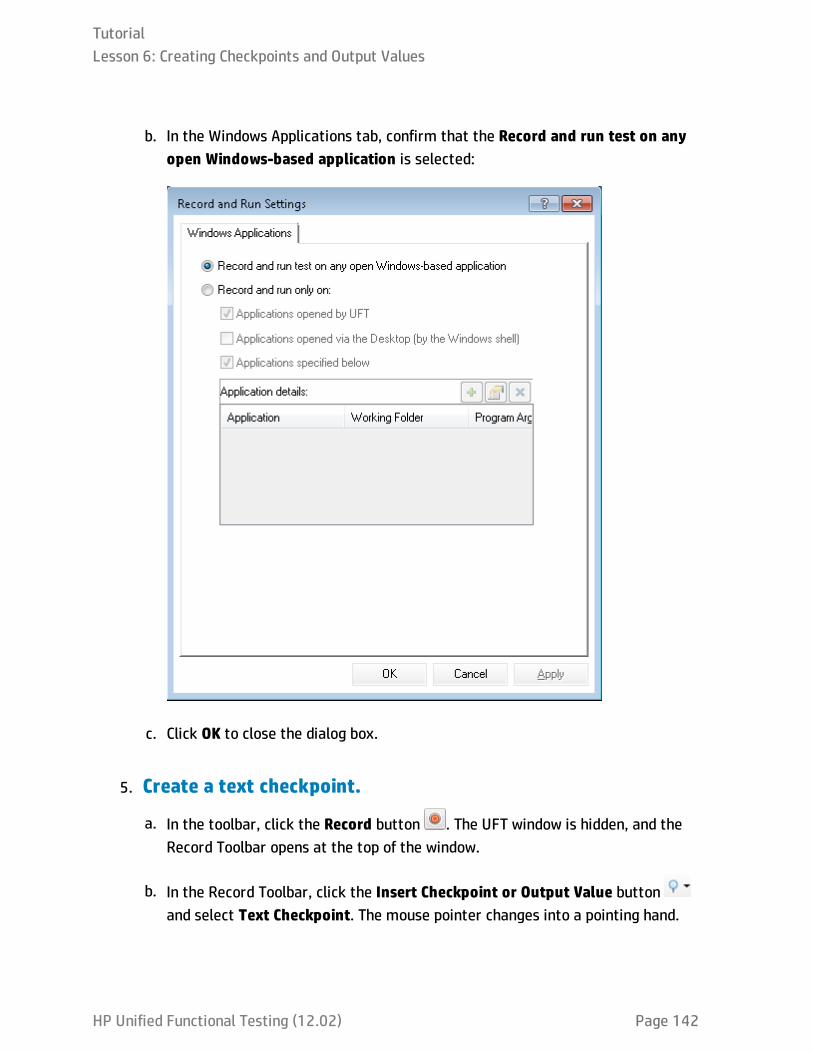
b. In the Windows Applications tab, confirm that the Record and run test on anyopen Windows-based application is selected:
c. Click OK to close the dialog box.
5. Create a text checkpoint.
a. In the toolbar, click the Record button . The UFT window is hidden, and theRecord Toolbar opens at the top of the window.
b. In the Record Toolbar, click the Insert Checkpoint or Output Value buttonand select Text Checkpoint. The mouse pointer changes into a pointing hand.
TutorialLesson 6: Creating Checkpoints and Output Values
HP Unified Functional Testing (12.02) Page 142
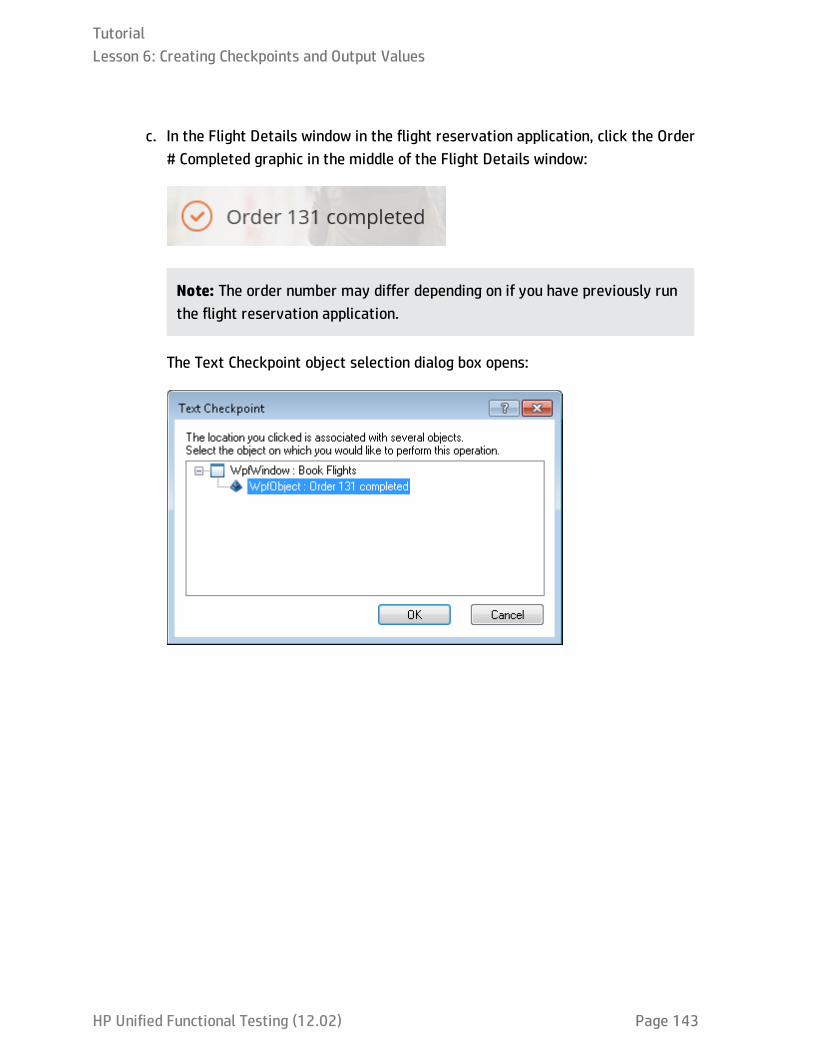
c. In the Flight Details window in the flight reservation application, click the Order# Completed graphic in the middle of the Flight Details window:
Note: The order number may differ depending on if you have previously runthe flight reservation application.
The Text Checkpoint object selection dialog box opens:
TutorialLesson 6: Creating Checkpoints and Output Values
HP Unified Functional Testing (12.02) Page 143

d. In the Text Checkpoint object selection dialog box, select the WpfObject: Order# Completed object and click OK. The Text Checkpoint Properties dialog boxopens:
e. In the Name box in the Text Checkpoint Properties dialog box, enterCheckOrderCompletedText as the new checkpoint name.
TutorialLesson 6: Creating Checkpoints and Output Values
HP Unified Functional Testing (12.02) Page 144
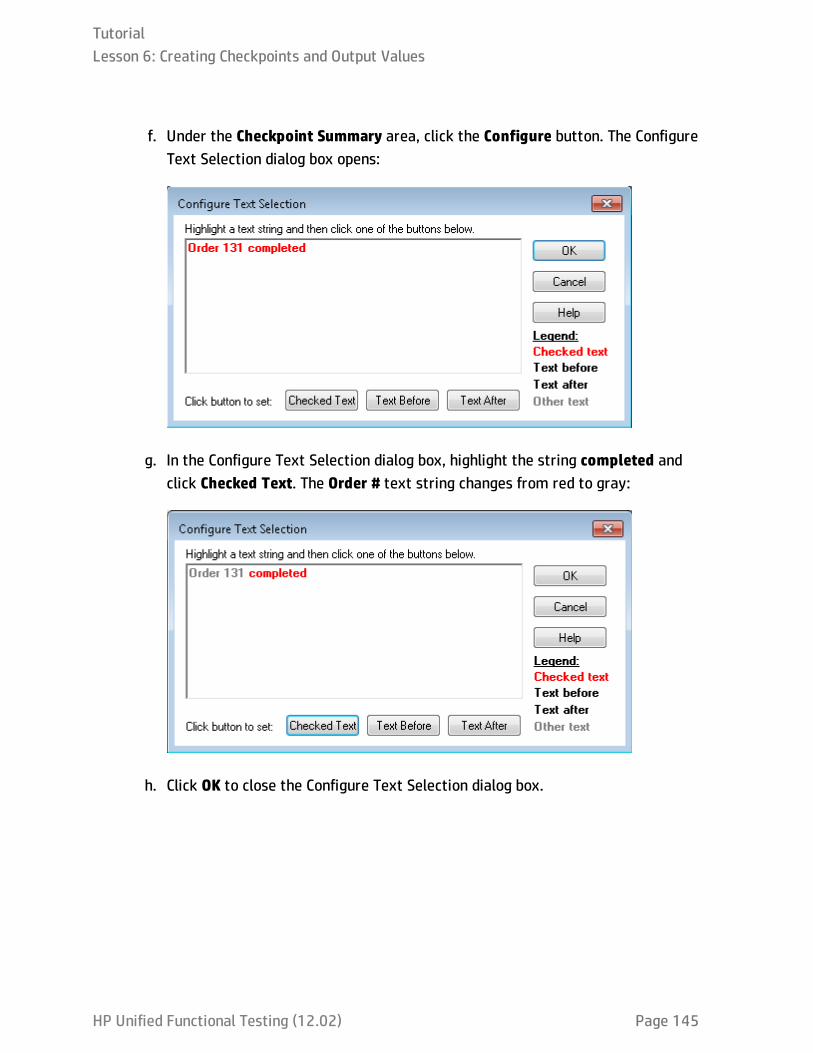
f. Under the Checkpoint Summary area, click the Configure button. The ConfigureText Selection dialog box opens:
g. In the Configure Text Selection dialog box, highlight the string completed andclick Checked Text. The Order # text string changes from red to gray:
h. Click OK to close the Configure Text Selection dialog box.
TutorialLesson 6: Creating Checkpoints and Output Values
HP Unified Functional Testing (12.02) Page 145
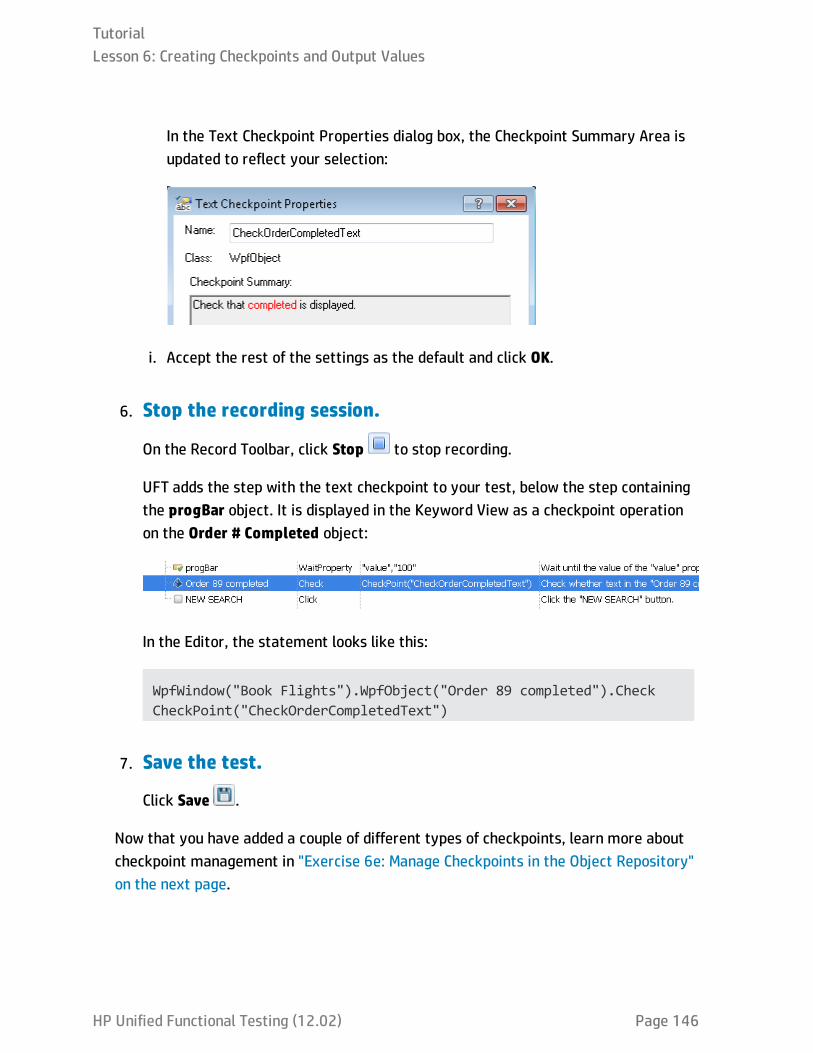
In the Text Checkpoint Properties dialog box, the Checkpoint Summary Area isupdated to reflect your selection:
i. Accept the rest of the settings as the default and click OK.
6. Stop the recording session.
On the Record Toolbar, click Stop to stop recording.
UFT adds the step with the text checkpoint to your test, below the step containingthe progBar object. It is displayed in the Keyword View as a checkpoint operationon the Order # Completed object:
In the Editor, the statement looks like this:
WpfWindow("Book Flights").WpfObject("Order 89 completed").CheckCheckPoint("CheckOrderCompletedText")
7. Save the test.
Click Save .
Now that you have added a couple of different types of checkpoints, learn more aboutcheckpoint management in "Exercise 6e: Manage Checkpoints in the Object Repository"on the next page.
TutorialLesson 6: Creating Checkpoints and Output Values
HP Unified Functional Testing (12.02) Page 146
Exercise 6e: Manage Checkpoints in the ObjectRepositoryIn the previous exercises, you added a number of different types of checkpoints in youractions. In addition to working with and viewing checkpoints in the context of a specificaction, you can also view them in the object repository and modify their properties.
By modifying them in an object repository, you can use the same checkpoint in morethan one location in your test. For example, if you want to verify that yourorganization's logo appears on every page of your application, you can create acheckpoint and insert it in different actions or places in the test.
For the purposes of this exercise, you will not be reusing checkpoints.
1. Start UFT and open the Book Flights Checkpoint test.a. If necessary, open UFT as described in "Create a Solution for All Your Tests" on
page 36. Make sure that the WPF Add-in is loaded.
b. Select File > Open > Solution. The Open Solution dialog box opens.
c. In the Open Solution dialog box, navigate to the Flight Reservation Applicationsolution, located in C:\%HOMEPATH%\My Documents\Unified FunctionalTesting, and click Open.
The Flight Reservation Application solution opens, including the Book FlightsParameter test you created in "Exercise 6a: Create a Checkpoint Test" onpage 126.
2. Open the Object Repository Window.a. In the Solution Explorer, double-click the Flight Confirmation action. The Flight
Confirmation action opens as a separate tab in the document pane.
b. In the toolbar, click the Object Repository button . The Object Repositorywindow opens, displaying a tree of all test objects and all checkpoint and output
TutorialLesson 6: Creating Checkpoints and Output Values
HP Unified Functional Testing (12.02) Page 147

objects in the current action.
The tree includes all local objects and all objects in any shared objectrepositories associated with the action:
3. Select an action to view its checkpoints.a. In the action drop-down menu directly above the object tree, select an action to
display its test objects, checkpoint objects, and output value objects.
b. Close the Object Repository window when you are done.
Note: For the purposes of this exercise, you do not need to modify anyobject or checkpoint properties.
You are now ready to run the test with your checkpoints. Continue with "Exercise 6f:Run and Analyze a Test with Checkpoints" on the next page to learn about running andviewing run results for a test containing checkpoints.
TutorialLesson 6: Creating Checkpoints and Output Values
HP Unified Functional Testing (12.02) Page 148
Exercise 6f: Run and Analyze a Test withCheckpointsNow that you have created a test using checkpoints, you should run the test to see howthe checkpoints perform. In this exercise, you will run the test and analyze thecheckpoint results.
1. Configure UFT to open the flight reservation application.a. In UFT, select Record > Record and Run Settings. The Record and Run Settings
dialog box opens.
TutorialLesson 6: Creating Checkpoints and Output Values
HP Unified Functional Testing (12.02) Page 149
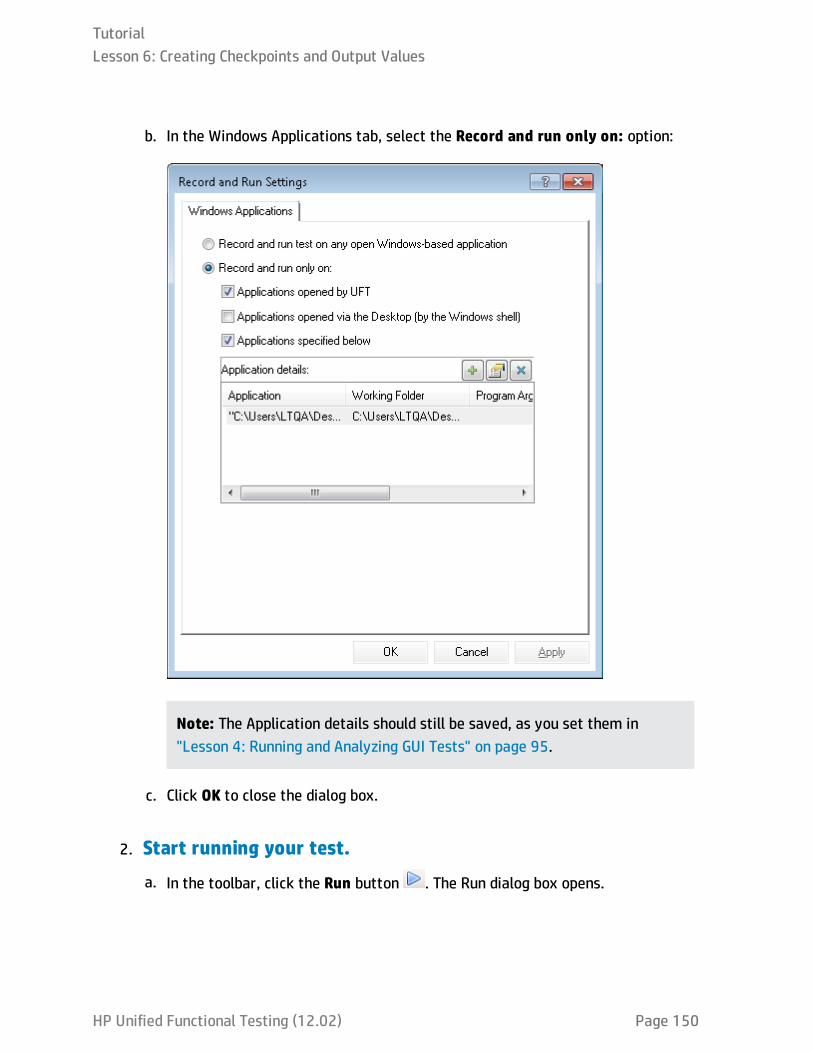
b. In the Windows Applications tab, select the Record and run only on: option:
Note: The Application details should still be saved, as you set them in"Lesson 4: Running and Analyzing GUI Tests" on page 95.
c. Click OK to close the dialog box.
2. Start running your test.
a. In the toolbar, click the Run button . The Run dialog box opens.
TutorialLesson 6: Creating Checkpoints and Output Values
HP Unified Functional Testing (12.02) Page 150
b. In the Results Location tab, ensure that the New run results folder is selected.Accept the default results folder name.
c. Click OK.
UFT opens the flight reservation application and performs the steps. At the endof the test run, the Run Results Viewer opens.
3. View the run results.When the run results are displayed in the Run Results Viewer, the run resultsshould be Passed, indicating that all the checkpoints passed. If one or more of thecheckpoints had failed, the test run is listed as Failed.
4. View the results of the standard checkpoint.a. In the results tree, expand the Flight Confirmation Summary node.
b. Under the Flight Confirmation Summary node, expand the passengerName nodeand select the checkpoint node.
TutorialLesson 6: Creating Checkpoints and Output Values
HP Unified Functional Testing (12.02) Page 151

The Results Details pane displays the details of the standard checkpoint,including the properties that were checked and their values. The checkpointpassed because the actual values of the object properites matched theexpected values:
5. View the results of the table checkpoint.a. In the results tree, expand the Select Flight Summary node.
b. In the Select Flight Summary node, expand the flightsDataGrid node twice.
c. Select the Checkpoint "CheckCost" node.
TutorialLesson 6: Creating Checkpoints and Output Values
HP Unified Functional Testing (12.02) Page 152
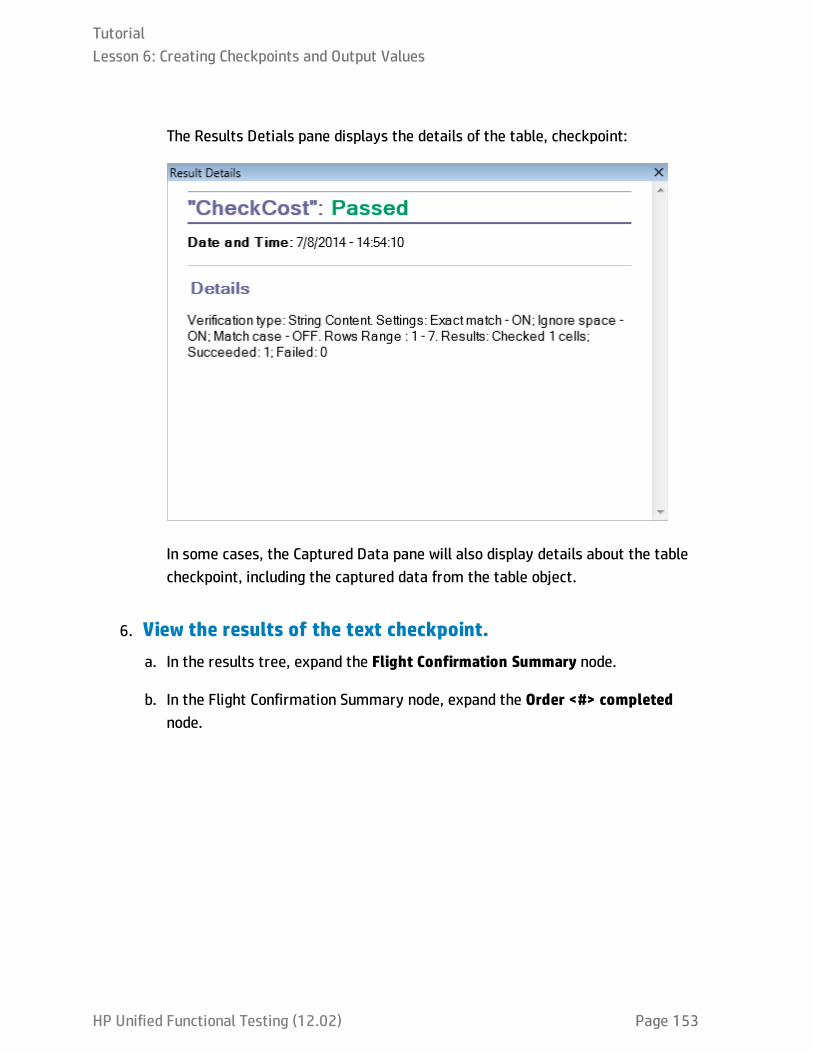
The Results Detials pane displays the details of the table, checkpoint:
In some cases, the Captured Data pane will also display details about the tablecheckpoint, including the captured data from the table object.
6. View the results of the text checkpoint.a. In the results tree, expand the Flight Confirmation Summary node.
b. In the Flight Confirmation Summary node, expand the Order <#> completednode.
TutorialLesson 6: Creating Checkpoints and Output Values
HP Unified Functional Testing (12.02) Page 153
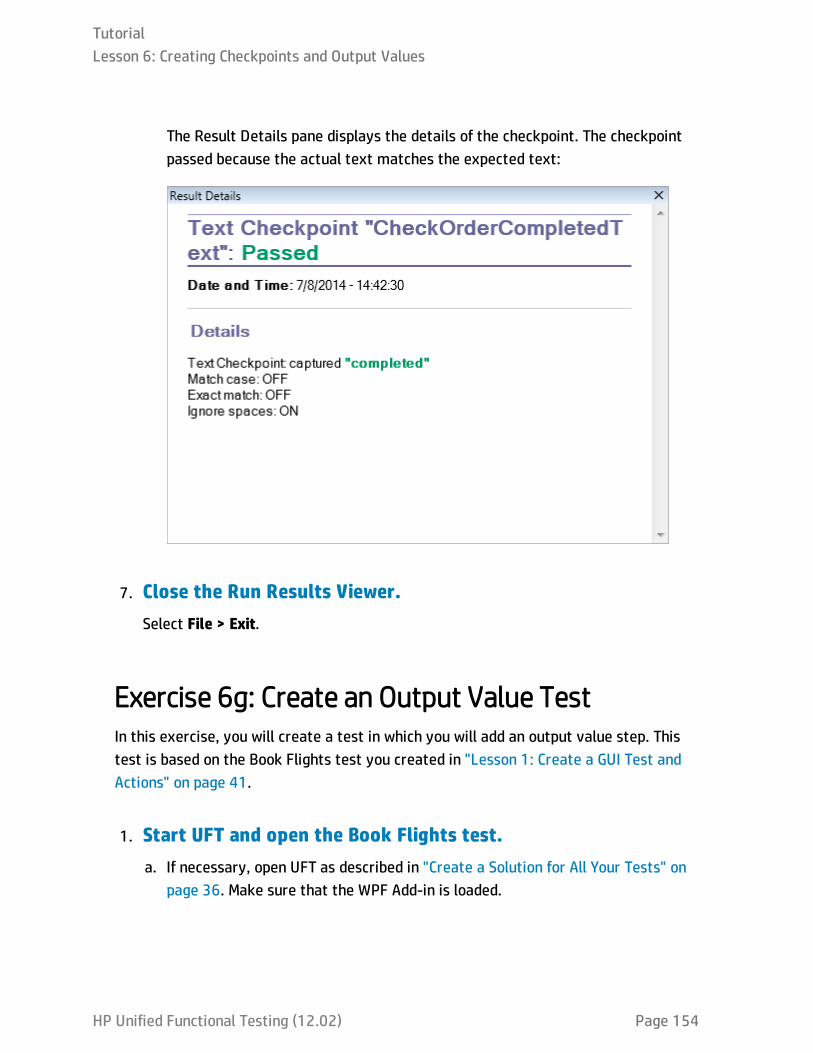
The Result Details pane displays the details of the checkpoint. The checkpointpassed because the actual text matches the expected text:
7. Close the Run Results Viewer.Select File > Exit.
Exercise 6g: Create an Output Value TestIn this exercise, you will create a test in which you will add an output value step. Thistest is based on the Book Flights test you created in "Lesson 1: Create a GUI Test andActions" on page 41.
1. Start UFT and open the Book Flights test.a. If necessary, open UFT as described in "Create a Solution for All Your Tests" on
page 36. Make sure that the WPF Add-in is loaded.
TutorialLesson 6: Creating Checkpoints and Output Values
HP Unified Functional Testing (12.02) Page 154
b. Click the Open button down arrow , and select Open Solution. The OpenSolution dialog box opens.
c. Navigate to the Flight Reservation Application.ftsln file, located inC:\%HOMEPATH%\My Documents\Unified Functional Testing, and click Open.
The Flight Reservation Application solution opens, containing the Book Flightstest you created in "Lesson 1: Create a GUI Test and Actions" on page 41.
2. Save the test as Book Flights Output Value.a. In the Solution Explorer, select the Book Flights test node, and then select File
> Save As.
b. In the Save Test As dialog box, browse to the C:\%HOMEPATH%\MyDocuments\Unified Functional Testing directory, and save the test as BookFlights Output Value.
In the Solution Explorer, the Book Flights test is replaced by the new BookFlights Output Value test. The original Book Flights test is still saved in the filesystem.
3. Add the Book Flights test back to the solution.You can have both the Book Flights and the Book Flights Output Value tests openat the same time if they are included in the same solution. This enables you toswitch back and forth between them if you want to compare or edit tests.
Note: You can only run a single test at a time.
a. Select File > Add > Existing Test.
b. In the Add Existing Test dialog box, navigate to the Book Flights test, stored inC:%\HOMEPATH%\My Documents\Unified Functional Testing, and click Add.
The Book Flights test is again displayed as a separate node in the SolutionExplorer.
TutorialLesson 6: Creating Checkpoints and Output Values
HP Unified Functional Testing (12.02) Page 155
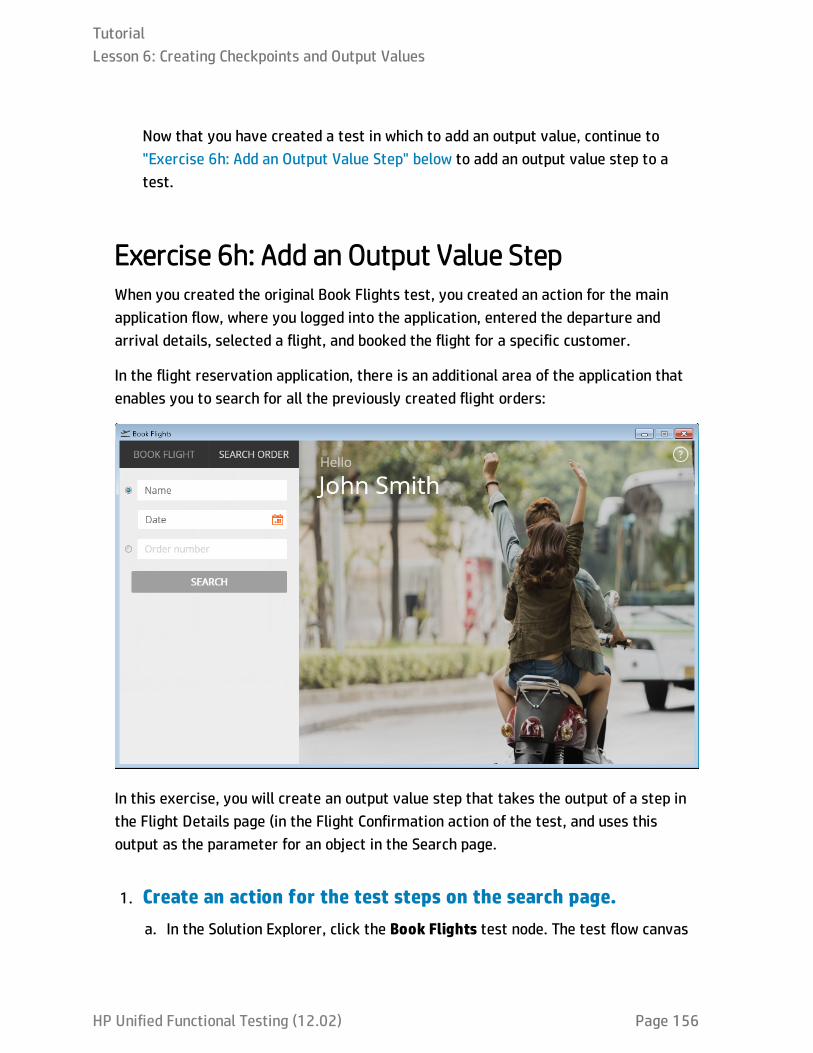
Now that you have created a test in which to add an output value, continue to"Exercise 6h: Add an Output Value Step" below to add an output value step to atest.
Exercise 6h: Add an Output Value StepWhen you created the original Book Flights test, you created an action for the mainapplication flow, where you logged into the application, entered the departure andarrival details, selected a flight, and booked the flight for a specific customer.
In the flight reservation application, there is an additional area of the application thatenables you to search for all the previously created flight orders:
In this exercise, you will create an output value step that takes the output of a step inthe Flight Details page (in the Flight Confirmation action of the test, and uses thisoutput as the parameter for an object in the Search page.
1. Create an action for the test steps on the search page.a. In the Solution Explorer, click the Book Flights test node. The test flow canvas
TutorialLesson 6: Creating Checkpoints and Output Values
HP Unified Functional Testing (12.02) Page 156
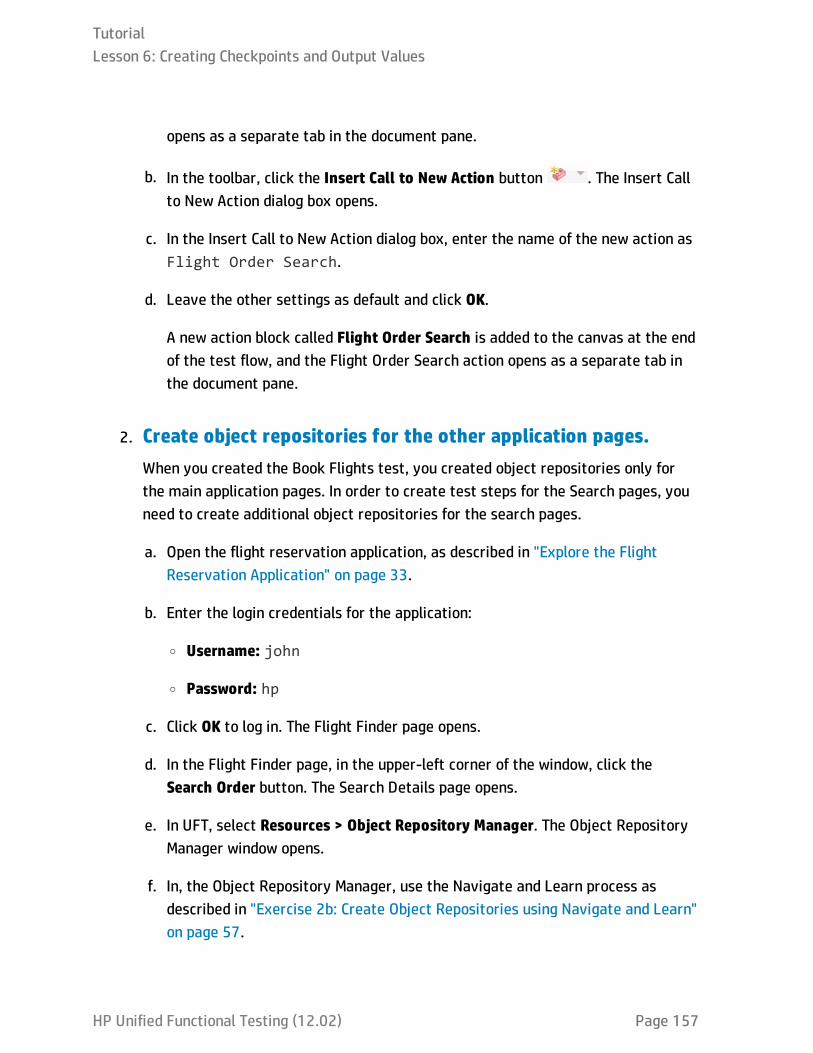
opens as a separate tab in the document pane.
b. In the toolbar, click the Insert Call to New Action button . The Insert Callto New Action dialog box opens.
c. In the Insert Call to New Action dialog box, enter the name of the new action asFlight Order Search.
d. Leave the other settings as default and click OK.
A new action block called Flight Order Search is added to the canvas at the endof the test flow, and the Flight Order Search action opens as a separate tab inthe document pane.
2. Create object repositories for the other application pages.When you created the Book Flights test, you created object repositories only forthe main application pages. In order to create test steps for the Search pages, youneed to create additional object repositories for the search pages.
a. Open the flight reservation application, as described in "Explore the FlightReservation Application" on page 33.
b. Enter the login credentials for the application:
o Username: john
o Password: hp
c. Click OK to log in. The Flight Finder page opens.
d. In the Flight Finder page, in the upper-left corner of the window, click theSearch Order button. The Search Details page opens.
e. In UFT, select Resources > Object Repository Manager. The Object RepositoryManager window opens.
f. In, the Object Repository Manager, use the Navigate and Learn process asdescribed in "Exercise 2b: Create Object Repositories using Navigate and Learn"on page 57.
TutorialLesson 6: Creating Checkpoints and Output Values
HP Unified Functional Testing (12.02) Page 157
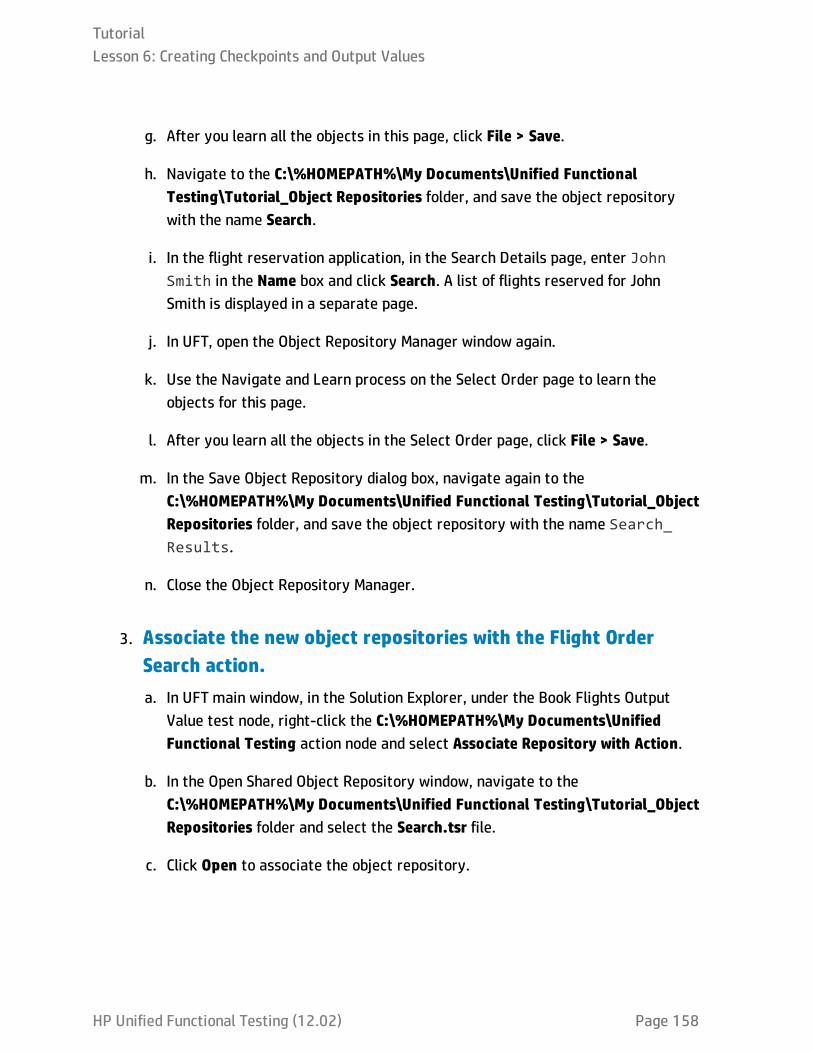
g. After you learn all the objects in this page, click File > Save.
h. Navigate to the C:\%HOMEPATH%\My Documents\Unified FunctionalTesting\Tutorial_Object Repositories folder, and save the object repositorywith the name Search.
i. In the flight reservation application, in the Search Details page, enter JohnSmith in the Name box and click Search. A list of flights reserved for JohnSmith is displayed in a separate page.
j. In UFT, open the Object Repository Manager window again.
k. Use the Navigate and Learn process on the Select Order page to learn theobjects for this page.
l. After you learn all the objects in the Select Order page, click File > Save.
m. In the Save Object Repository dialog box, navigate again to theC:\%HOMEPATH%\My Documents\Unified Functional Testing\Tutorial_ObjectRepositories folder, and save the object repository with the name Search_Results.
n. Close the Object Repository Manager.
3. Associate the new object repositories with the Flight OrderSearch action.a. In UFT main window, in the Solution Explorer, under the Book Flights Output
Value test node, right-click the C:\%HOMEPATH%\My Documents\UnifiedFunctional Testing action node and select Associate Repository with Action.
b. In the Open Shared Object Repository window, navigate to theC:\%HOMEPATH%\My Documents\Unified Functional Testing\Tutorial_ObjectRepositories folder and select the Search.tsr file.
c. Click Open to associate the object repository.
TutorialLesson 6: Creating Checkpoints and Output Values
HP Unified Functional Testing (12.02) Page 158

d. Repeat the process to associate the Search Results.tsr object repository (alsostored in the C:\%HOMEPATH%\My Documents\Unified FunctionalTesting\Tutorial_Object Repositories folder).
Both the Search.tsr and Search Results.tsr object repository files are displayedas sub-nodes of the Flight Order Search action.
4. Add steps to use the Search and Flight Orders pages.a. In the Solution Explorer, double-click the Flight Order Search action node. The
Flight Order Search action is displayed as a separate tab in the document pane.
b. If the Keyword View is displayed, select View > Editor to display the Editor.
c. In the Editor, paste the following lines:
WpfWindow("HP MyFlight Sample Application").WpfTabStrip("WpfTabStrip").Select "SEARCH ORDER"WpfWindow("HP MyFlight Sample Application").WpfEdit("byName").Set "John Smith"WpfWindow("HP MyFlight Sample Application").WpfButton("SEARCH").ClickWpfWindow("HP MyFlight Sample Application").WpfTable("ordersDataGrid").SelectCell 1, 1WpfWindow("HP MyFlight Sample Application").WpfButton("SELECTORDER").Click
5. Open the flight reservation application to the Flight Detailspage.a. In the Search Results page of the flight reservation application, click the
BACK button. The Search Details page is displayed.
b. In the Search Details page, in the upper left hand corner, click the Book Flightbutton. The Flight Finder page opens.
TutorialLesson 6: Creating Checkpoints and Output Values
HP Unified Functional Testing (12.02) Page 159
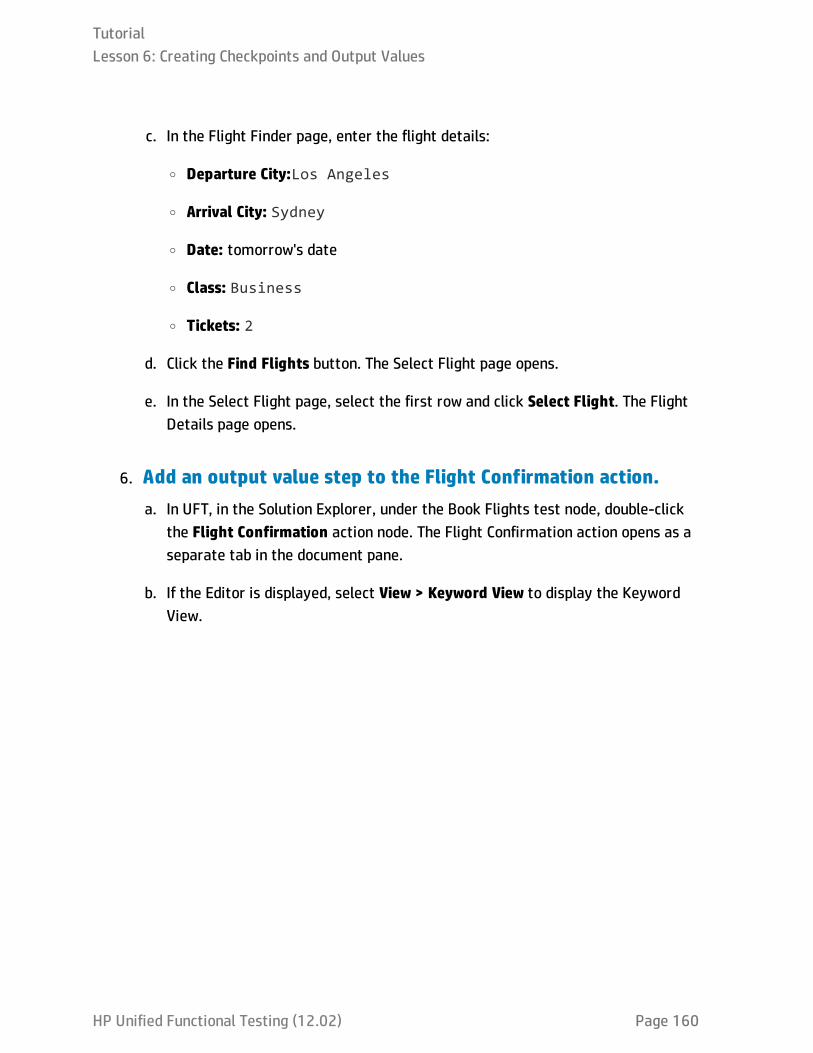
c. In the Flight Finder page, enter the flight details:
o Departure City:Los Angeles
o Arrival City: Sydney
o Date: tomorrow's date
o Class: Business
o Tickets: 2
d. Click the Find Flights button. The Select Flight page opens.
e. In the Select Flight page, select the first row and click Select Flight. The FlightDetails page opens.
6. Add an output value step to the Flight Confirmation action.a. In UFT, in the Solution Explorer, under the Book Flights test node, double-click
the Flight Confirmation action node. The Flight Confirmation action opens as aseparate tab in the document pane.
b. If the Editor is displayed, select View > Keyword View to display the KeywordView.
TutorialLesson 6: Creating Checkpoints and Output Values
HP Unified Functional Testing (12.02) Page 160

c. In the Keyword View, right-click the byName step and select Insert OutputValue. The Output Value Properties dialog box opens:
The dialog box displays the properties on which you are inserting the outputvalue:
o The Name is the name of the object as defined in the application, in this casebyName.
o The Class is the type of object, in this case WpfEdit, indicating that theobject is an edit box.
o The ABC icon in the Type column indicates that the value of the property is aconstant.
o The grid lists the object properties you can choose to output, including theProperty name and the Value of the object that can be sent as output.
TutorialLesson 6: Creating Checkpoints and Output Values
HP Unified Functional Testing (12.02) Page 161
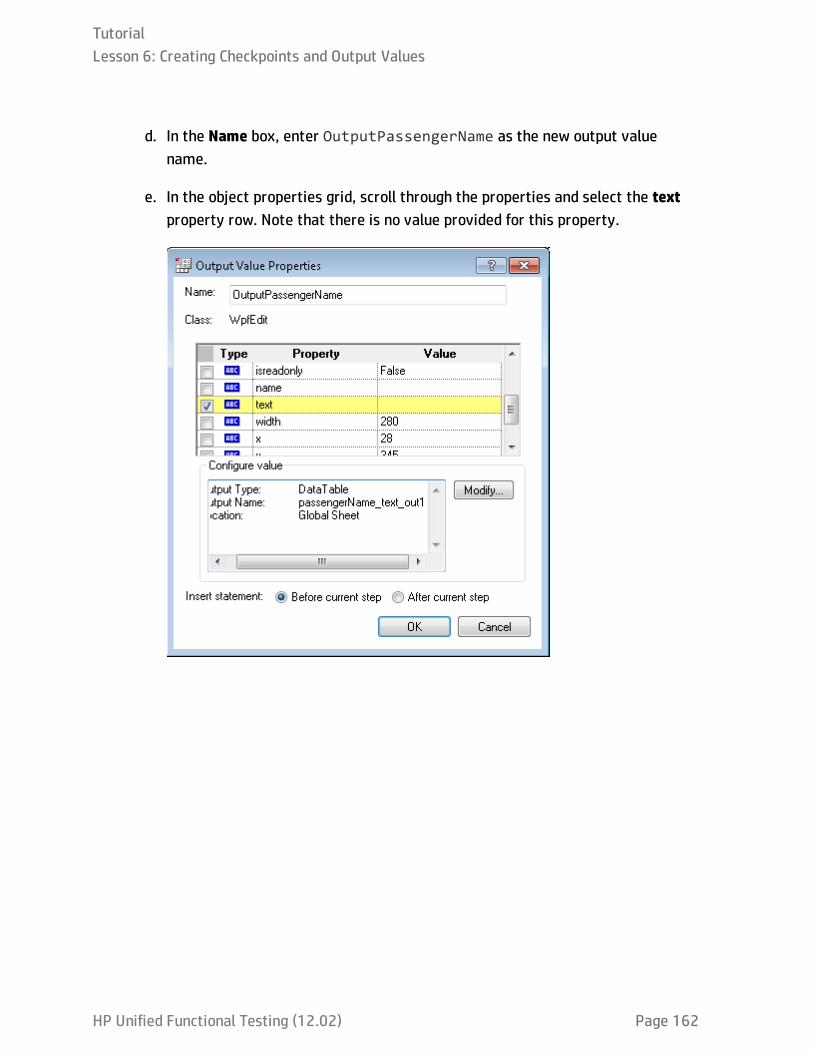
d. In the Name box, enter OutputPassengerName as the new output valuename.
e. In the object properties grid, scroll through the properties and select the textproperty row. Note that there is no value provided for this property.
TutorialLesson 6: Creating Checkpoints and Output Values
HP Unified Functional Testing (12.02) Page 162

f. Below the properties grid, click the Modify button. The Output Options dialogbox opens. (This dialog enables you to determine where to store the output ofthis test step.)
When you create an output value, you have the choice of places to store theoutput value:
o DataTable parameter
o Test/action parameter (if you have created one)
o Environment variable
o Component parameter (if you have created one)
For the purpose of this tutorial, we will save the output value in the Data Table.
g. In the Parameter type drop-down menu, select DataTable. UFT updates thefields of the dialog box, and suggests a default name for the parameter.
h. In the Name field, enter passengerName_text.
TutorialLesson 6: Creating Checkpoints and Output Values
HP Unified Functional Testing (12.02) Page 163

i. In the Location in Data Table area, ensure that the Global sheet is selected.This ensures that the output is saved in the Global data sheet, which makes thevalue accessible to other actions in the test.
j. Click OK to close the dialog box. UFT updates the value in the Output ValueProperties dialog box to reflect the DataTable parameter storage option:
k. In the Insert statement area, select the After current step option, and click OK.
UFT inserts a Output step immediately following the passengerName.Set step:
In the Editor, the steps look like this:
WpfWindow("Book Flights").WpfEdit("passengerName").Set "JohnSmith"WpfWindow("Book Flights").WpfEdit("passengerName").OutputCheckPoint("OutputPassengerName")WpfWindow("Book Flights").WpfButton("ORDER").ClickWpfWindow("Book Flights").WpfProgressBar("progBar").WaitProperty "value", "100"WpfWindow("Book Flights").WpfButton("NEW SEARCH").Click
TutorialLesson 6: Creating Checkpoints and Output Values
HP Unified Functional Testing (12.02) Page 164
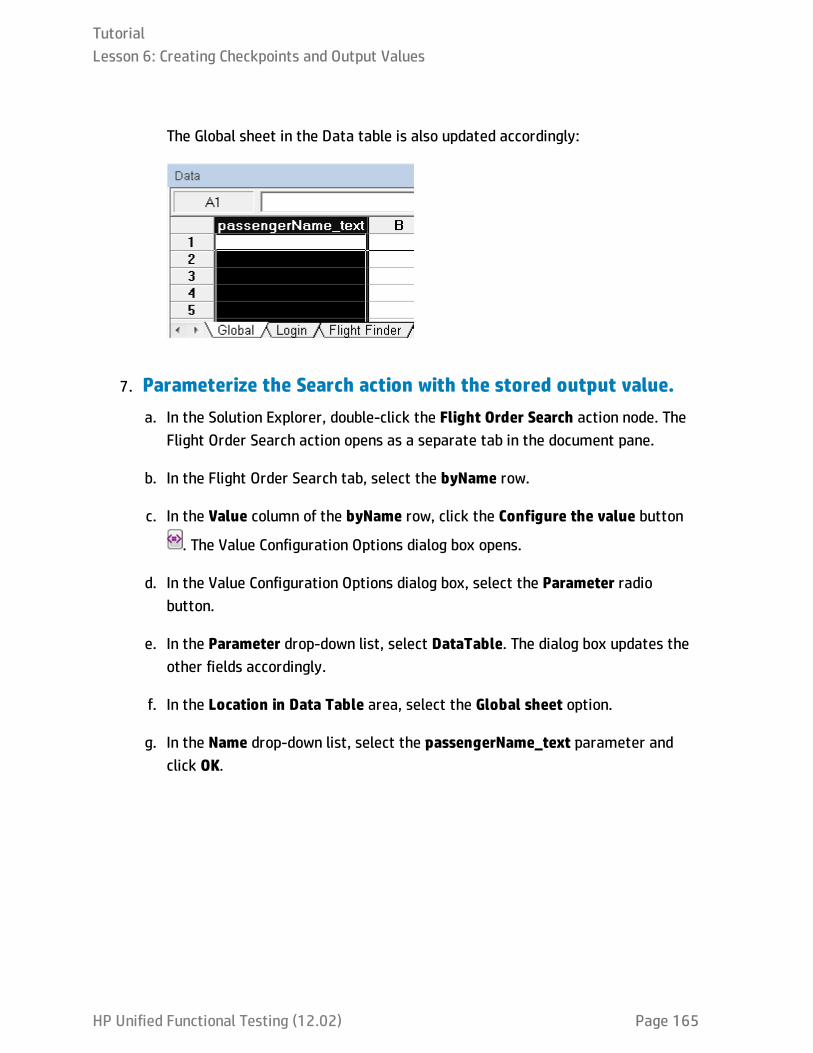
The Global sheet in the Data table is also updated accordingly:
7. Parameterize the Search action with the stored output value.a. In the Solution Explorer, double-click the Flight Order Search action node. The
Flight Order Search action opens as a separate tab in the document pane.
b. In the Flight Order Search tab, select the byName row.
c. In the Value column of the byName row, click the Configure the value button
. The Value Configuration Options dialog box opens.
d. In the Value Configuration Options dialog box, select the Parameter radiobutton.
e. In the Parameter drop-down list, select DataTable. The dialog box updates theother fields accordingly.
f. In the Location in Data Table area, select the Global sheet option.
g. In the Name drop-down list, select the passengerName_text parameter andclick OK.
TutorialLesson 6: Creating Checkpoints and Output Values
HP Unified Functional Testing (12.02) Page 165

UFT updates the byName row to reflect that the value is now provided by aData Table Parameter:
In the Editor, the statement looks like this:
WpfWindow("HP MyFlight Sample Application").WpfEdit("byName").Set DataTable("passengerName_text", dtGlobalSheet)
8. Save the test.
Click Save .
9. Run the test and view the run results.a. Select Record > Record and Run Settings. The Record and Run Settings dialog
box opens.
b. In the Windows Applications tab of the Record and Run Settings dialog box,select the Record and Run only on: option. The application details should besaved from previous test runs.
c. Click OK to save the settings and close the dialog box.
d. In the toolbar, click the Run button .
e. In the Results location tab, ensure that the New run results folder option isselected. Accept the default results folder name.
f. Click OK. When the test run is completed, the Run Results Viewer opens.
g. In the Results tree, expand the Flight Confirmation Summary node.
h. Under the Flight Confirmation Summary node, expand the passengerName node
TutorialLesson 6: Creating Checkpoints and Output Values
HP Unified Functional Testing (12.02) Page 166
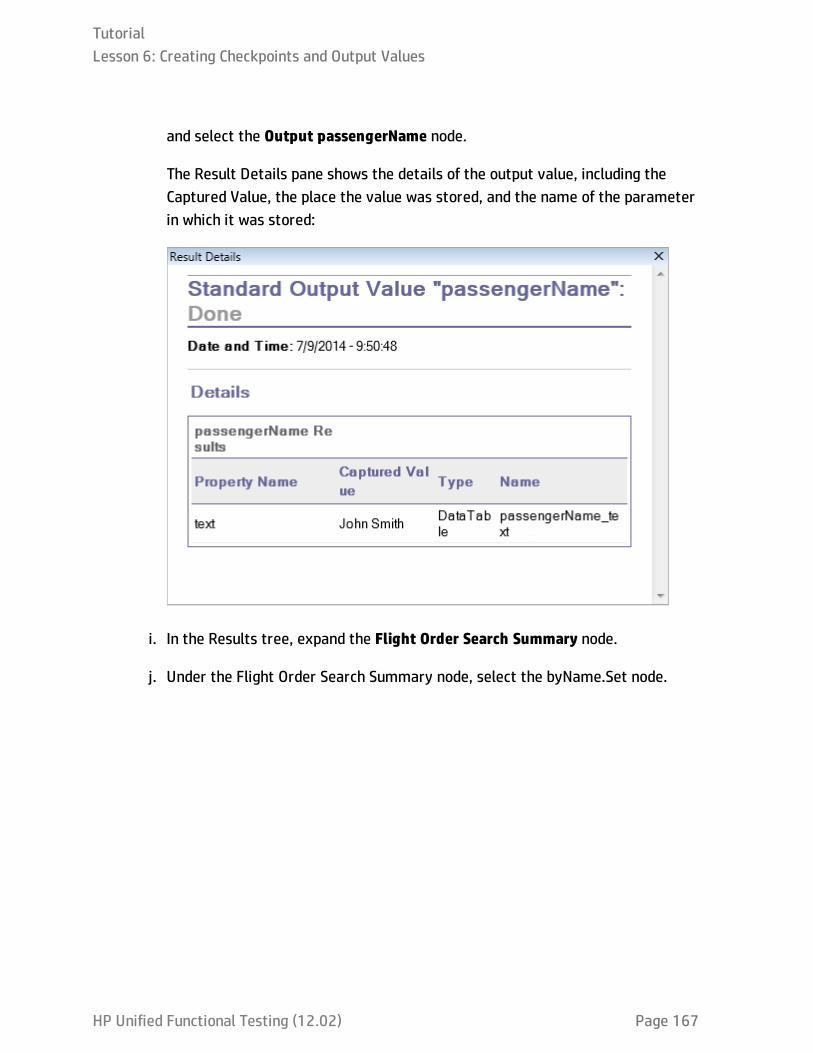
and select the Output passengerName node.
The Result Details pane shows the details of the output value, including theCaptured Value, the place the value was stored, and the name of the parameterin which it was stored:
i. In the Results tree, expand the Flight Order Search Summary node.
j. Under the Flight Order Search Summary node, select the byName.Set node.
TutorialLesson 6: Creating Checkpoints and Output Values
HP Unified Functional Testing (12.02) Page 167
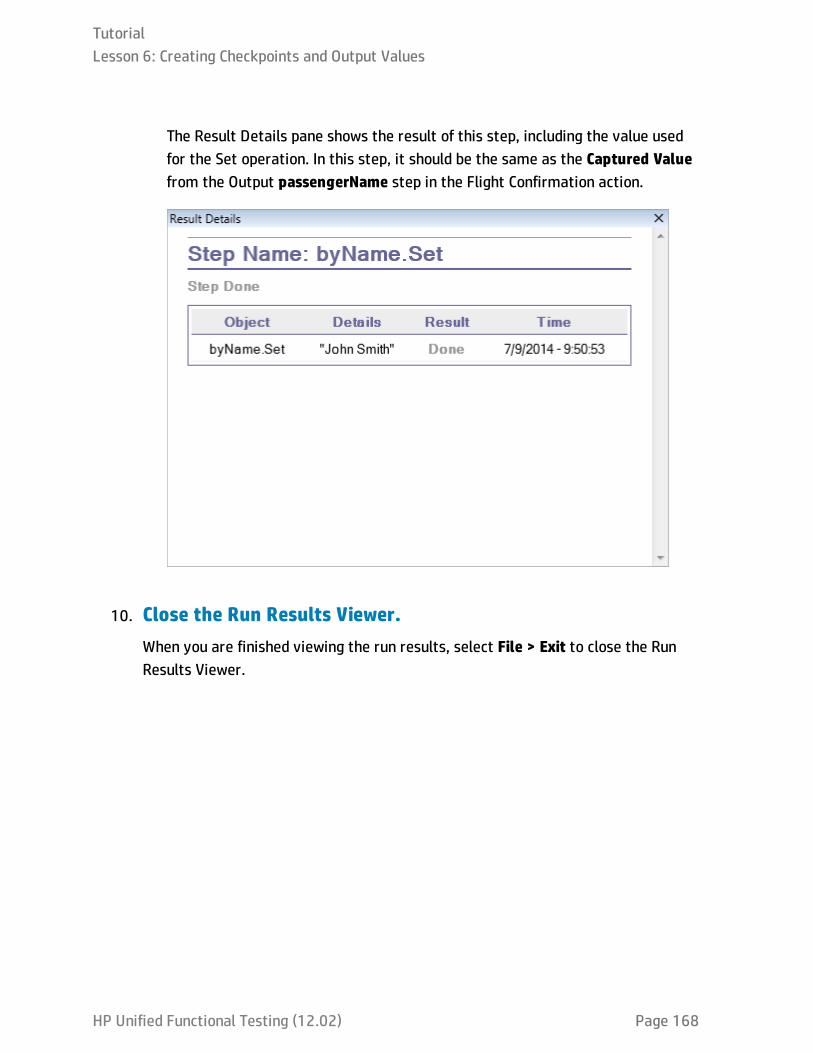
The Result Details pane shows the result of this step, including the value usedfor the Set operation. In this step, it should be the same as the Captured Valuefrom the Output passengerName step in the Flight Confirmation action.
10. Close the Run Results Viewer.When you are finished viewing the run results, select File > Exit to close the RunResults Viewer.
TutorialLesson 6: Creating Checkpoints and Output Values
HP Unified Functional Testing (12.02) Page 168

Lesson 7: Creating Functions and FunctionLibrariesUFT provides many built-in functions and methods that can satisfy many of your testingneeds. However, there may be times when you need to perform a specific task that isnot available by default for a particular test object class. In these cases, you can createa user-defined function for this task. You then save this function in a function library filewhich is associated with tests, and then insert the function call as a step whenever youneed to perform the task.
In "Lesson 2: Creating Object Repositories" on page 46, you created shared objectrepositories and associated them with the action in your test. In this lesson, you willuse a similar process by creating a function and a function library, and then associatingthe function library with your test. By associating this function library with your test,you can call any of the functions in the test.
This lesson includes the following:
Functions and Function Libraries - Overview 170
Exercise 7a: Create a Function 170
Exercise 7b: Associate a Function Library with Your Test 173
Exercise 7c: Perform a Check Using a Functions 175
TutorialLesson 7: Creating Functions and Function Libraries
HP Unified Functional Testing (12.02) Page 169

Functions and Function Libraries - OverviewIn UFT, you can create functions to perform special tasks not supported by UFT'sstandard classes and methods. A function is a set of coded steps that perform aparticular task for which no suitable method exists by default. You may want your testto include such a task, and even repeat this task several times. Therefore, you need thefunction to be easily accessible.
Once you create functions, you can store the functions in a function library. Thesefunction libraries serve as a repository for your user-defined functions. Each functionlibrary can be assigned to a test (or multiple tests), which enables the test to then callthe function as a test step.
In this lesson, you will create a function that checks the date format on a pagegenerated by the flight reservation application, and then add the function call to yourtest.
Exercise 7a: Create a FunctionIn this exercise, you will create a function that will be called from your test. Thisfunction checks whether the date is displayed in the proper format. The function alsochecks that the date is valid, for example, that the month does not exceed 12 or theday exceed 31.
1. Start UFT and open the Book Flights test.a. If UFT is not currently open, open UFT as described in "Create a Solution for All
Your Tests" on page 36. Make sure that the WPF Add-in is loaded.
b. Select File > Open > Solution. The Open Solution dialog box opens.
c. In the Open Solution dialog box, navigate to the Flight ReservationApplication.ftsln file, located in C:\%HOMEPATH%\My Documents\UnifiedFunctional Testing, and click Open.
TutorialLesson 7: Creating Functions and Function Libraries
HP Unified Functional Testing (12.02) Page 170
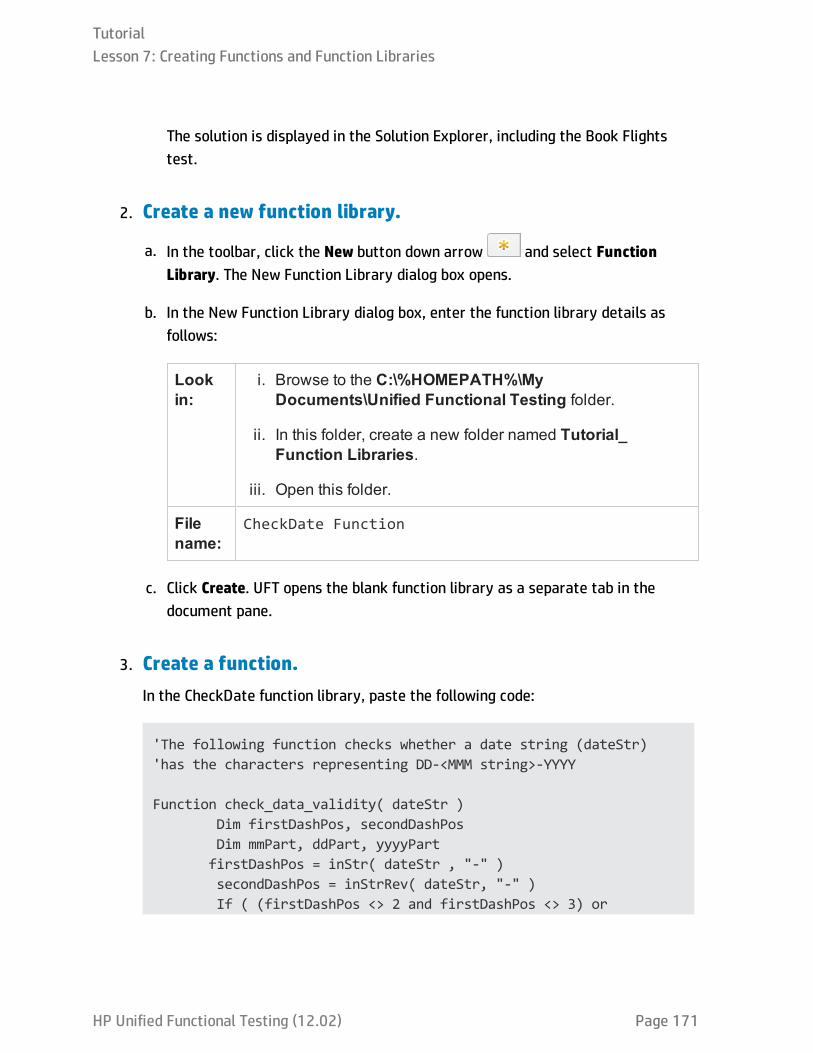
The solution is displayed in the Solution Explorer, including the Book Flightstest.
2. Create a new function library.
a. In the toolbar, click the New button down arrow and select FunctionLibrary. The New Function Library dialog box opens.
b. In the New Function Library dialog box, enter the function library details asfollows:
Lookin:
i. Browse to the C:\%HOMEPATH%\MyDocuments\Unified Functional Testing folder.
ii. In this folder, create a new folder named Tutorial_Function Libraries.
iii. Open this folder.
Filename:
CheckDate Function
c. Click Create. UFT opens the blank function library as a separate tab in thedocument pane.
3. Create a function.In the CheckDate function library, paste the following code:
'The following function checks whether a date string (dateStr)'has the characters representing DD-<MMM string>-YYYY
Function check_data_validity( dateStr )Dim firstDashPos, secondDashPosDim mmPart, ddPart, yyyyPartfirstDashPos = inStr( dateStr , "-" )secondDashPos = inStrRev( dateStr, "-" )If ( (firstDashPos <> 2 and firstDashPos <> 3) or
TutorialLesson 7: Creating Functions and Function Libraries
HP Unified Functional Testing (12.02) Page 171

(secondDashPos _ <> 6 and secondDashPos <> 7)) Thenreporter.ReportEvent micFail,"Format check", "Date
string is"&_"missing at least one dash ( - )."check_data_validity = False
Exit functionEnd If
if firstDashPos = 2 ThenddPart = mid( dateStr, 1, 1)
elseddPart = mid( dateStr, 1,2 )
End IfmmPart = mid( dateStr, firstDashPos+1, 3 )yyyyPart = mid( dateStr, secondDashPos +1 , 4 )
If inStr(mmPart, "Jan") and inStr(mmPart, "Feb") andinStr(mmPart, "Mar") and inStr(mmPart, "Apr") and inStr(mmPart,"May") and _ inStr(mmPart, "Jun") and inStr(mmPart, "Jul") andinStr(mmPart, "Aug") _ and inStr(mmPart, "Sep") and inStr(mmPart,"Oct") and inStr(mmPart, _ "Nov") and inStr(mmPart, "Dec") Then
reporter.ReportEvent micFail, "Format Check", "Themonth"& _ "value is invalid. It is not a valid month string."
check_data_validity = FalseExit function
End If
If ddPart > 31 Thenreporter.ReportEvent micFail, "Format Check", "The
date"& _"value is invalid. It exceeds 31."check_data_validity = FalseExit function
End If
If yyyyPart < 2013 Thenreporter.ReportEvent micFail, "Format Check", "The
year"& _"value is invalid. (Prior to this year.)"check_data_validity = False
Exit function
TutorialLesson 7: Creating Functions and Function Libraries
HP Unified Functional Testing (12.02) Page 172

End If
check_data_validity = True
End Function
4. Save the function library.
Click Save .
5. Close the function library.Select File > Close. The function library tab is closed and the test remains open.
Now that you have created the function, you need to associate it with your test in orderto use these functions in a test step. Continue with "Exercise 7b: Associate a FunctionLibrary with Your Test" below to see how to associate function libraries with your test.
Exercise 7b: Associate a Function Library withYour TestIn "Exercise 7a: Create a Function" on page 170, you created a function and a functionlibrary to run a date check on a test object. However, before you can use this functionin a test, you must associate the function library with a test.
In this exercise, you will associate the function library with your test.
1. Start UFT and open the Book Flights test.a. If UFT is not currently open, open UFT as described in "Create a Solution for All
Your Tests" on page 36. Make sure that the WPF Add-in is loaded.
b. Select File > Open > Solution. The Open Solution dialog box opens.
c. In the Open Solution dialog box, navigate to the Flight Reservation
TutorialLesson 7: Creating Functions and Function Libraries
HP Unified Functional Testing (12.02) Page 173

Application.ftsln file, located in C:\%HOMEPATH%\My Documents\UnifiedFunctional Testing, and click Open.
The solution is displayed in the Solution Explorer, including the Book Flightstest.
2. Associate the CheckDate Function.qfl with the Book Flightstest.a. If the Solution Explorer is not already open, in the toolbar, click the Solution
Explorer button .
b. In the Solution Explorer, right-click the Book Flights test node and select Add> Associate Function Library. The Open Function Library dialog box opens.
c. In the Open Function Library dialog box, navigate to the CheckDateFunction.qfl file, located in C:\%HOMEPATH%\Unified FunctionalTesting\Tutorial_Function Libraries, and click Open.
d. In the Automatic Relative Path Conversion dialog box, click Yes. (This convertsthe path to the function library into a relative path.
The function library is now associated with the Book Flights test, and isdisplayed in the Solution Explorer in the Function Libraries folder of the BookFlights test.
Note: Using a relative path keeps the path valid when you move folderscontaining tests and other files from one location to another, as long as thefolder hierarchy remains the same.
3. Save the test.
In the document pane, select the Book Flights canvas tab, and click Save .
Now that you have associated the function library with your test, you can use itsfunctions in test steps. Continue with "Exercise 7c: Perform a Check Using a Functions"on the next page to use the function in a test step.
TutorialLesson 7: Creating Functions and Function Libraries
HP Unified Functional Testing (12.02) Page 174
Exercise 7c: Perform a Check Using a FunctionsIn "Lesson 6: Creating Checkpoints and Output Values" on page 122, you created anumber of checkpoints to check objects in the flight reservation application.
In this exercise, instead of using the UFT user interface to create checkpoints, you willuse the function you created in "Exercise 7a: Create a Function" on page 170 to checkthe date format of a calendar object in the Flight Finder action.
1. Start UFT and open the Book Flights test.a. If UFT is not currently open, open UFT as described in "Create a Solution for All
Your Tests" on page 36. Make sure that the WPF Add-in is loaded.
b. Select File > Open > Solution. The Open Solution dialog box opens.
c. In the Open Solution dialog box, navigate to the Flight ReservationApplication.ftsln file, located in C:\%HOMEPATH%\My Documents\UnifiedFunctional Testing, and click Open.
The solution is displayed in the Solution Explorer, including the Book Flightstest.
2. Save the test as Book Flights Function.a. In the Solution Explorer, right-click the Book Flights node and select Save As.
The Save Test As dialog box opens.
b. In the Save Test As dialog ox, browse to the C:\%HOMEPATH%\MyDocuments\Unified Functional Testing folder.
c. Enter Book Flights Function as the test name.
In the Solution Explorer, the Book Flights test is replaced by the Book FlightsFunction test. The Book Flights test is still saved separately in the file system.
3. Add the Book Flights test back into the solution.
TutorialLesson 7: Creating Functions and Function Libraries
HP Unified Functional Testing (12.02) Page 175

You can have the Book Flights and Book Flights Function tests open at the sametime, if they are included in the same solution. This enables you to switch back andforth between them if you want to compare or edit the test.
Note: You can only run a single test at a time.
a. In the toolbar, click the Add button drop-down arrow , and select AddExisting Test. The Add Existing Test to Solution dialog box opens.
b. In the Add Existing Test to Solution dialog box, navigate to theC:\%HOMEPATH%\My Documents\Unified Functional Testing folder.
c. In the folder, select the Book Flights test, and click Open.
The Book Flights test node is again added to the Solution Explorer. Note thattests are organized alphabetically.
4. Display the Flight Finder page in the flight reservationapplication.a. Open the flight reservation application, as described in "Explore the Flight
Reservation Application" on page 33.
b. In the log in screen, enter the login user credentials:
o User name: john
o Password: hp
c. Click OK to sign in. The Flight Finder page opens.
5. Spy on the object properties for the checkpoint object.In this exercise, you are using a function to check the date format for a calendarobject. In order to do so, you must learn the properties of the object on which youwant to set the checkpoint.
TutorialLesson 7: Creating Functions and Function Libraries
HP Unified Functional Testing (12.02) Page 176
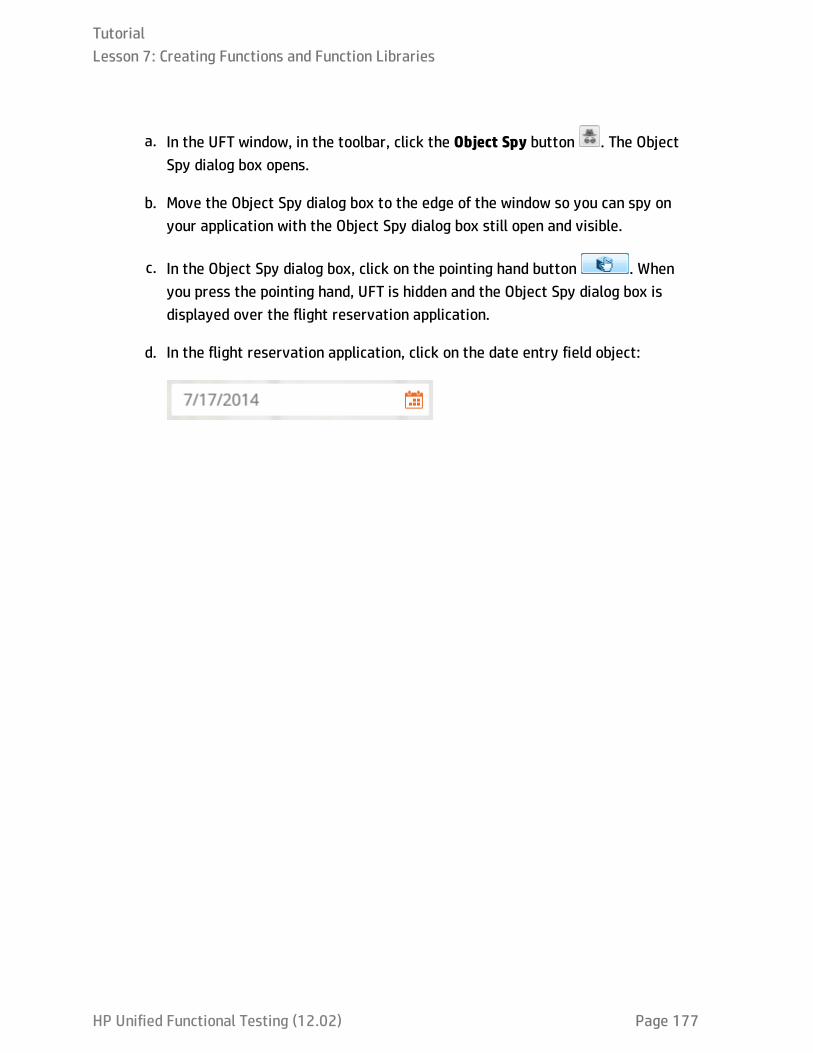
a. In the UFT window, in the toolbar, click the Object Spy button . The ObjectSpy dialog box opens.
b. Move the Object Spy dialog box to the edge of the window so you can spy onyour application with the Object Spy dialog box still open and visible.
c. In the Object Spy dialog box, click on the pointing hand button . Whenyou press the pointing hand, UFT is hidden and the Object Spy dialog box isdisplayed over the flight reservation application.
d. In the flight reservation application, click on the date entry field object:
TutorialLesson 7: Creating Functions and Function Libraries
HP Unified Functional Testing (12.02) Page 177

The Object Spy dialog displays the object properties:
e. In the properties grid (bottom of the dialog box), scroll through the propertiesuntil you find the property with the value of the date (in the format DD-MMM-YYYY). Note the name of this property, as you will need it for the function callstep inserted in your test later.
f. Click Close to close the Object Spy and return to your test.
6. Open the action for the function call.In the Solution Explorer, expand the Book Flights Function test node and double-
TutorialLesson 7: Creating Functions and Function Libraries
HP Unified Functional Testing (12.02) Page 178
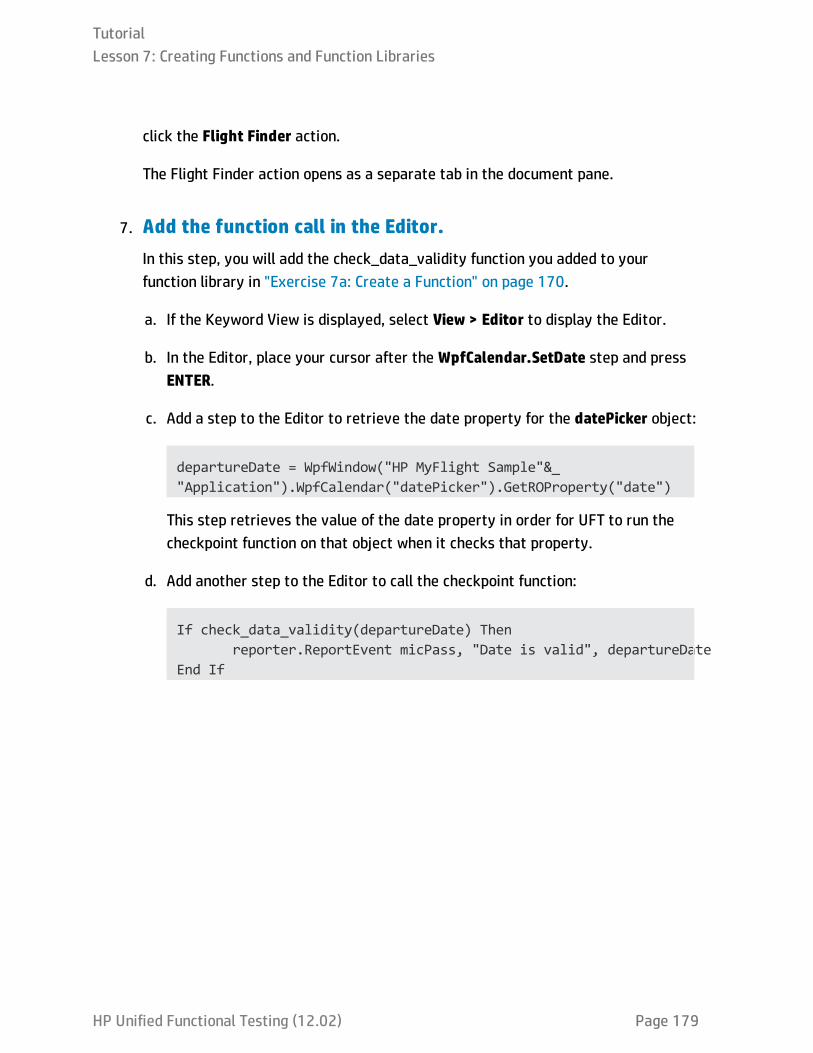
click the Flight Finder action.
The Flight Finder action opens as a separate tab in the document pane.
7. Add the function call in the Editor.In this step, you will add the check_data_validity function you added to yourfunction library in "Exercise 7a: Create a Function" on page 170.
a. If the Keyword View is displayed, select View > Editor to display the Editor.
b. In the Editor, place your cursor after the WpfCalendar.SetDate step and pressENTER.
c. Add a step to the Editor to retrieve the date property for the datePicker object:
departureDate = WpfWindow("HP MyFlight Sample"&_"Application").WpfCalendar("datePicker").GetROProperty("date")
This step retrieves the value of the date property in order for UFT to run thecheckpoint function on that object when it checks that property.
d. Add another step to the Editor to call the checkpoint function:
If check_data_validity(departureDate) Thenreporter.ReportEvent micPass, "Date is valid", departureDate
End If
TutorialLesson 7: Creating Functions and Function Libraries
HP Unified Functional Testing (12.02) Page 179
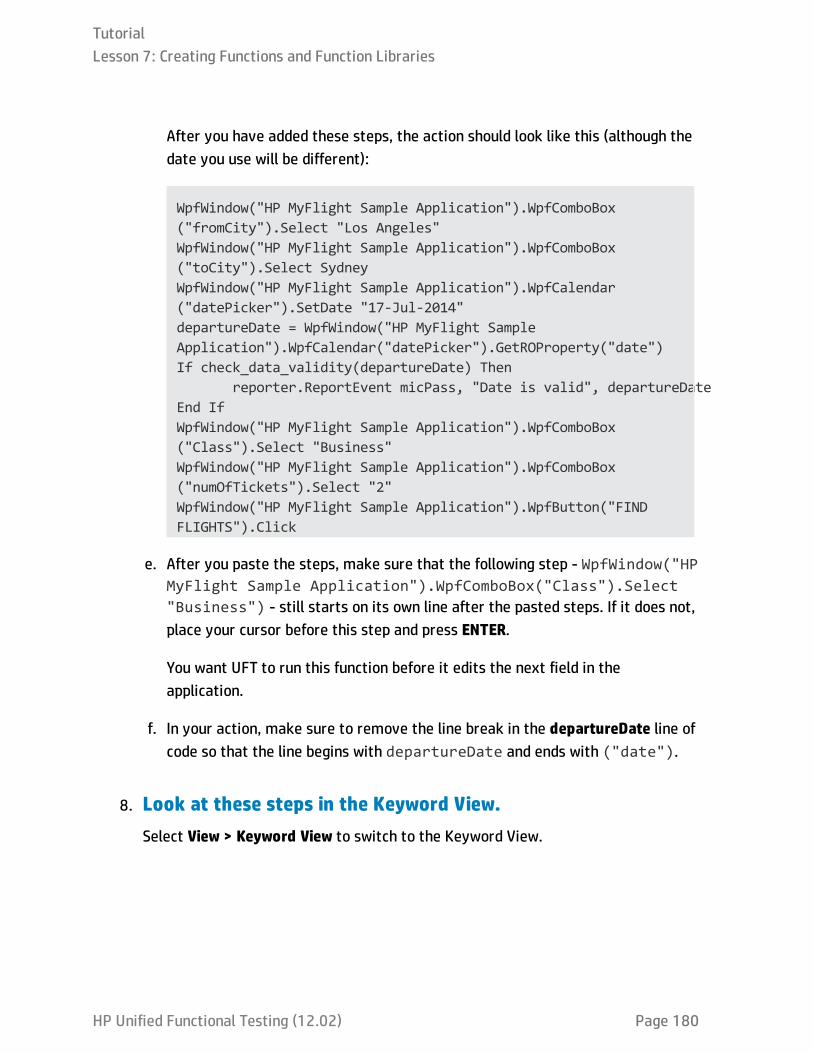
After you have added these steps, the action should look like this (although thedate you use will be different):
WpfWindow("HP MyFlight Sample Application").WpfComboBox("fromCity").Select "Los Angeles"WpfWindow("HP MyFlight Sample Application").WpfComboBox("toCity").Select SydneyWpfWindow("HP MyFlight Sample Application").WpfCalendar("datePicker").SetDate "17-Jul-2014"departureDate = WpfWindow("HP MyFlight SampleApplication").WpfCalendar("datePicker").GetROProperty("date")If check_data_validity(departureDate) Then
reporter.ReportEvent micPass, "Date is valid", departureDateEnd IfWpfWindow("HP MyFlight Sample Application").WpfComboBox("Class").Select "Business"WpfWindow("HP MyFlight Sample Application").WpfComboBox("numOfTickets").Select "2"WpfWindow("HP MyFlight Sample Application").WpfButton("FINDFLIGHTS").Click
e. After you paste the steps, make sure that the following step - WpfWindow("HPMyFlight Sample Application").WpfComboBox("Class").Select"Business") - still starts on its own line after the pasted steps. If it does not,place your cursor before this step and press ENTER.
You want UFT to run this function before it edits the next field in theapplication.
f. In your action, make sure to remove the line break in the departureDate line ofcode so that the line begins with departureDate and ends with ("date").
8. Look at these steps in the Keyword View.Select View > Keyword View to switch to the Keyword View.
TutorialLesson 7: Creating Functions and Function Libraries
HP Unified Functional Testing (12.02) Page 180
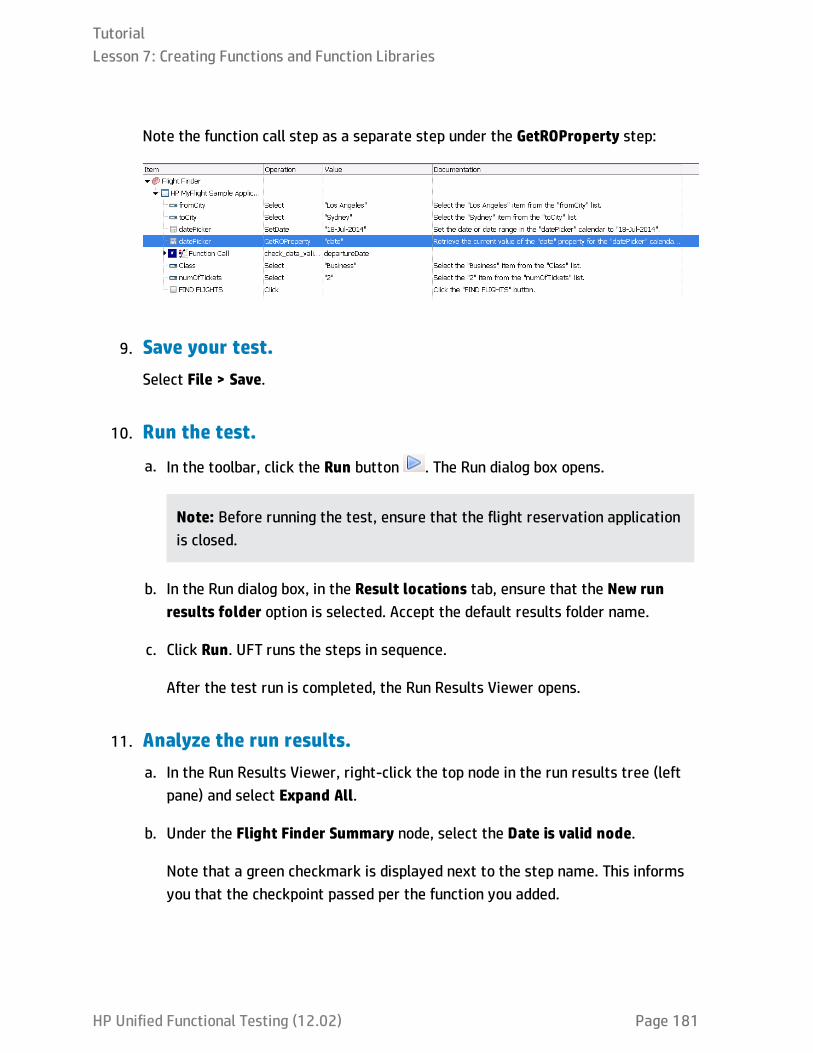
Note the function call step as a separate step under the GetROProperty step:
9. Save your test.Select File > Save.
10. Run the test.
a. In the toolbar, click the Run button . The Run dialog box opens.
Note: Before running the test, ensure that the flight reservation applicationis closed.
b. In the Run dialog box, in the Result locations tab, ensure that the New runresults folder option is selected. Accept the default results folder name.
c. Click Run. UFT runs the steps in sequence.
After the test run is completed, the Run Results Viewer opens.
11. Analyze the run results.a. In the Run Results Viewer, right-click the top node in the run results tree (left
pane) and select Expand All.
b. Under the Flight Finder Summary node, select the Date is valid node.
Note that a green checkmark is displayed next to the step name. This informsyou that the checkpoint passed per the function you added.
TutorialLesson 7: Creating Functions and Function Libraries
HP Unified Functional Testing (12.02) Page 181
Lesson 8: Using Insight in your TestSometimes, when you are creating your test and test objects, normal objectidentification does not help identify an object in your application for testing purposes.-Standard object identification relies on the object's properties, such as position in theapplication or browser window, time of appearance in the window, or a number of otherproperties - does not help identify an object in your application for testing purposes.
For situations where the regular object identification does not work correctly or doesnot suit your needs, UFT also has a image-based object recognition mechanism namedInsight. This mechanism enables you to identify objects by capturing a snapshot of theimage and using the captured image as the object during the test run.
In this lesson, you will be learning how to use Insight to identify objects and use theseobjects in your test.
This lesson includes the following:
Insight Object Identification - Overview 183
Exercise 8a: Create a Test for Insight Objects 183
Exercise 8b: Add an Insight Object to the Object Repository 185
Exercise 8c: Use Insight Objects in a Test 188
TutorialLesson 8: Using Insight in your Test
HP Unified Functional Testing (12.02) Page 182
Insight Object Identification - OverviewIn UFT, you can use Insight, which is an image-based identification ability, to recognizeobjects in your application. Insight identifies objects based on what they look like,instead of using the object properties which are part of the application/object design.Insight object identification is particularly useful if your application is designed with atechnology that UFT does not suppport or with an application running on a remotecomputer.
When you use Insight object identification, UFT stores an image of the object as part ofthe Insight test object it creates. Then, when running the test, UFT uses the image asthe main object property to identify the object in the application in run-time.
You can create Insight objects both in the object repository or when recording. In thislesson, you will be working only with adding Insight objects in the object repository.
Exercise 8a: Create a Test for Insight ObjectsIn this exercise, you create a test to add test steps using Insight objects. This test willbe saved separately from the solution containing the Book Flights test.
1. Start UFT.a. If UFT is not open, open it as described in "Create a Solution for All Your Tests"
on page 36. Make sure that the WPF Add-in is open.
b. In the toolbar, click the New button . The New Test dialog box opens.
c. In the New Test dialog box, select GUI Test.
d. Name the test Insight. Accept the default location.
Note: Do not enter a solution name for this test. This test is savedseparately from the solution used in the other lessons in this tutorial.
TutorialLesson 8: Using Insight in your Test
HP Unified Functional Testing (12.02) Page 183
e. Click Create to create the test.
The test opens in a separate tab in the document pane.
2. Associate the object repositories with your action.In this test, you will keep all the test steps in one action. However, you will needmultiple object repositories in order to have the appropriate test objects.
In this test, you will log in to the flight reservation application, then click a link in apromotional image to order a flight. As a result, you will need to include the objectrepositories for the Login page and the Flight Finder page of the application.
a. In the Solution Explorer, right-click the Action1 node and select AssociateRepository with Action. The Open Shared Object Repository dialog box opens.
b. In the Open Shared Object Repository dialog box, navigate to the Login.tsrobject repository file you created in "Lesson 2: Creating Object Repositories" onpage 46, located in C:\%HOMEPATH%\Unified Functional Testing\Tutorial_Object Repositories and click Open.
The Login.tsr object repository is displayed as a sub-node of the Action1 node.
c. Repeat the process described above to add the Flight Finder.tsr objectrepository file to Action1.
3. Save the test.
Click Save .
Now that you have created a test in which to work with Insight objects, continue to"Exercise 8b: Add an Insight Object to the Object Repository" on the next page to addthe Insight objects to your object repositories so they are available for your test steps.
TutorialLesson 8: Using Insight in your Test
HP Unified Functional Testing (12.02) Page 184

Exercise 8b: Add an Insight Object to the ObjectRepositoryIn "Exercise 8a: Create a Test for Insight Objects" on page 183, you created thestructure of the test you will use for your Insight objects. However, before you can addthese objects to a test, you must add them to an object repository. In this lesson, youwill learn how to use the Object Repository functionality to include Insight objects inyour tests.
1. Start UFT.a. If UFT is not open, open it as described in "Create a Solution for All Your Tests"
on page 36. Make sure that the WPF Add-in is open.
b. In the toolbar, click the Open drop-down arrow and select Open Test.The Open Test dialog box opens.
c. In the New Test dialog box, navigate to the Insight test, saved inC:%HOMEPATH%\Unified Functional Testing, and click Open.
The test opens in a separate tab in the document pane.
2. Create a new object repository.a. Select Resources > Object Repository Manager. The Object Repository
Manager dialog box opens.
b. In the Object Repository Manager window, select File > Save. The Save SharedObject Repository dialog box opens.
c. In the Save Shared Object Repository dialog box, navigate to the Tutorial_Object Repositories folder, located in C:%HOMEPATH%\Unified FunctionalTesting.
d. Name the object repository Insight and click Save.
TutorialLesson 8: Using Insight in your Test
HP Unified Functional Testing (12.02) Page 185

3. Open the flight reservation application to the Flight Finderpage.In the flight reservation application, you will notice that on the Flight Finder page,there is a changing object, displaying advertisement for special flights:
Because this image is changing periodically in the application, it is the type ofobject that you can test with Insight object recognition, as traditional objectrecognition relies on such things as position on the screen relative to other objects,ordinal identifiers, and the like. Furthermore, the Order button located inside theimage is not identifiable as a separate object. For example, if you use the ObjectSpy to identify the Order button, UFT cannot identify it.
a. Open the flight reservation application, as described in "Explore the FlightReservation Application" on page 33.
b. In the Login window, enter the user credentials:
o Username: john
o Password: hp
c. Click OK to log in to the application. The Flight Finder page opens.
4. Add the Insight object to the object repository.a. In the Object Repository Manager, in the toolbar, click the Add Insight Object
button . The Select Learn Mode dialog box opens:
TutorialLesson 8: Using Insight in your Test
HP Unified Functional Testing (12.02) Page 186

b. In the Select Learn Mode dialog box, click the Automatic button. UFT is hiddenfrom view and your application is displayed.
Note: Selecting the Automatic mode enables UFT to automatically selectthe region/object as the Insight object. If you were to select Manual, youcan specify the region/object to use as the Insight object.
c. In the flight reservation application, click on the Order button inside the flightpromotion image. The Add Insight Test Object dialog box opens:
TutorialLesson 8: Using Insight in your Test
HP Unified Functional Testing (12.02) Page 187

d. In the image editor (center of the dialog box), drag the object selection box sothat it includes the entire Order button:
e. In the Specify the location to click in the control option, select Center.
f. Click Save to add the object to the object repository.
The Insight object is added as a top-level object in the object repository:
g. In the Object Repository Manager, in the Object Properties pane (right side),rename the object from InsightObject to Promotion Order.
h. In the toolbar, click Save to change the object name and save the objectrepository.
Now that you have created the object repository containing the Insight images, you canuse these objects with your test. Continue to "Exercise 8c: Use Insight Objects in aTest" below to use the Insight objects in your test and run the test.
Exercise 8c: Use Insight Objects in a TestIn "Exercise 8b: Add an Insight Object to the Object Repository" on page 185, youcreated Insight objects for an object (image) in your application. In this exercise, youwill use these objects in a test and see how the test runs when using Insight objectidentification.
TutorialLesson 8: Using Insight in your Test
HP Unified Functional Testing (12.02) Page 188
1. Start UFT.a. If UFT is not open, open it as described in "Create a Solution for All Your Tests"
on page 36. Make sure that the WPF Add-in is open.
b. In the toolbar, click the Open drop-down arrow and select Open Test.The Open Test dialog box opens.
c. In the New Test dialog box, navigate to the Insight test, saved inC:%HOMEPATH%\Unified Functional Testing, and click Open.
The test opens in a separate tab in the document pane.
2. Associate the Insight object repository with your test.a. In the Solution Explorer, right-click the Action1 node and select Associate
Repository with Action. The Open Shared Object Repository dialog box opens.
b. In the Open Shared Object Repository dialog box, navigate to the Insight.tsrobject repository file, saved in C:\%HOMEPATH%\Unified FunctionalTesting\Tutorial_Object Repositories, and click Open.
The Insight.tsr file is now displayed as a sub-node of the Action1 node in theSolution Explorer and its objects are available for use in your tests.
c. Click Save to save the changes.
3. Add the login steps to the test.Add steps to your test to log in to the flight reservation application, as described in"Exercise 3a: Add Steps to the Login Action in the Keyword View" on page 64.
4. Add the Insight object to your test.a. In the Keyword View, below the OK button step, click in the Item column and
select Object from Repository from the drop-down list. The Select Test Objectdialog box opens.
TutorialLesson 8: Using Insight in your Test
HP Unified Functional Testing (12.02) Page 189
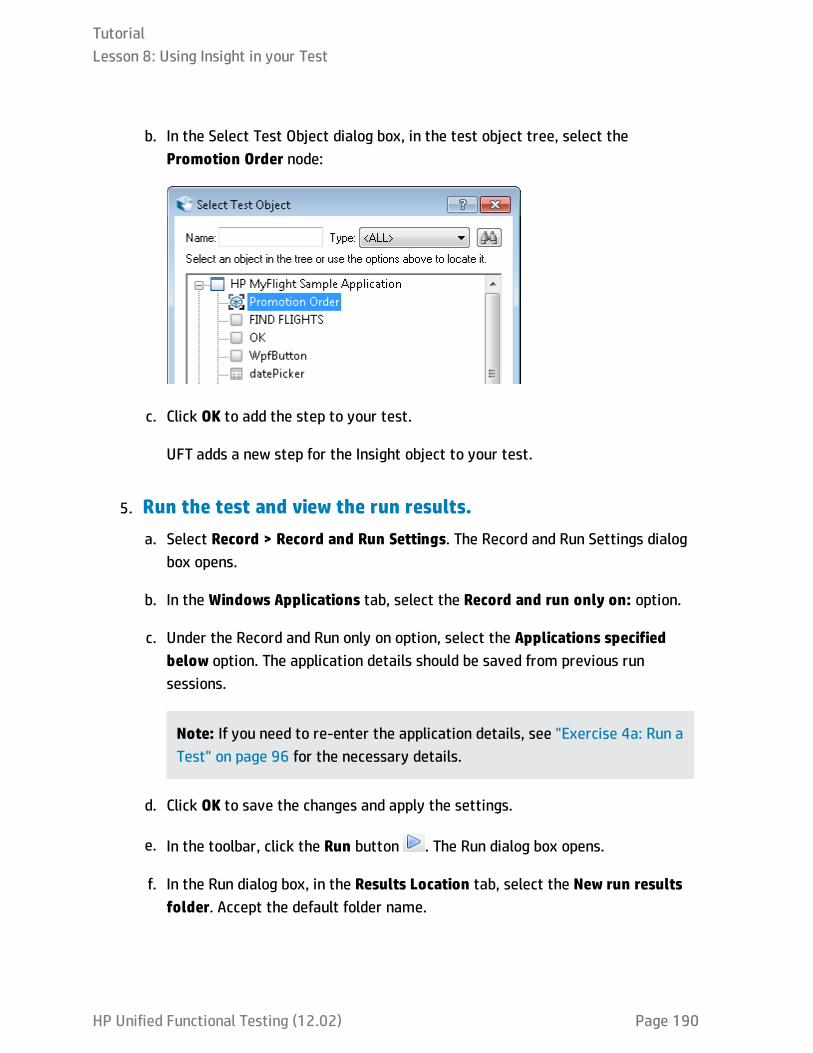
b. In the Select Test Object dialog box, in the test object tree, select thePromotion Order node:
c. Click OK to add the step to your test.
UFT adds a new step for the Insight object to your test.
5. Run the test and view the run results.a. Select Record > Record and Run Settings. The Record and Run Settings dialog
box opens.
b. In the Windows Applications tab, select the Record and run only on: option.
c. Under the Record and Run only on option, select the Applications specifiedbelow option. The application details should be saved from previous runsessions.
Note: If you need to re-enter the application details, see "Exercise 4a: Run aTest" on page 96 for the necessary details.
d. Click OK to save the changes and apply the settings.
e. In the toolbar, click the Run button . The Run dialog box opens.
f. In the Run dialog box, in the Results Location tab, select the New run resultsfolder. Accept the default folder name.
TutorialLesson 8: Using Insight in your Test
HP Unified Functional Testing (12.02) Page 190
g. Click Run to start the test run.
IMPORTANT: Make sure that the flight reservation application is closedbefore performing the test run.
UFT opens the flight reservation application and runs the test steps insequential order. When UFT runs the steps containing the Insight objects, ituses the Insight object identification mechanism to find the objects.
When the test run is complete, the Run Results Viewer opens.
h. In the Run Results Viewer, in the Run Results Tree pane (left pane), right-clickthe Test Insight Summary node and select Expand All.
i. In the run results tree, select the Promotion Order.Click node. The Run ResultsViewer updates the other panes with the result details.
j. In the lower part of the Run Results Viewer window, select the Captured Datatab to open the Captured Data pane.
TutorialLesson 8: Using Insight in your Test
HP Unified Functional Testing (12.02) Page 191

In this pane, you can see the object that UFT identified using Insight objectidentification during the test run:
TutorialLesson 8: Using Insight in your Test
HP Unified Functional Testing (12.02) Page 192

HP Unified Functional Testing (12.02) Page 193
Part 4: Creating and Running AutomatedAPI TestsIn addition to testing your application's user interface, you should also test the non-GUI(service) layers to ensure that the APIs that run your application are working properly.Using UFT, you can create automated API tests that do this for you.
When you create an API test, you create an overall test flow consisting of test stepswhich individually test the application's API processes. You provide the input andcheckpoint properties for these test steps, and UFT runs the test in your application.When the test run finishes, you can check the results to see how your application isfunctioning.
In this part, you will learn how to create API tests for a variety of different types ofapplications and services.
This section includes the following:
Lesson 1: Create an API Test 194
Lesson 2: Create Simple API Test Steps 195
Lesson 3: Creating API Test Steps Using Standard Activities 201
Lesson 4: Parameterizing API Test Steps 209
Lesson 5: Running API Tests 236
Lesson 6: Creating and Running API Tests of Web Services 242
Lesson 7: Creating and Running API Tests of REST Services 258
Lesson 8: Creating and Running API Tests of Web Application Services (WADLs) 277
Lesson 1: Create an API TestBefore creating the content of a test of your application's service layer, you must firstcreate a test and create the test structure.
1. In the UFT toolbar, click the New button down arrow and select New Test.
2. In the New Test dialog box, select API Test.
3. Enter the following details for your test:
Name: Basic
Location: By default, UFT saves documents at C:\%HOMEPATH%\MyDocuments\Unified Functional Testing. For this lesson, you do not need to modifythis path.
4. Click Create.
A blank test opens in the canvas with a tab for the test flow (named Basic). Insidethe test flow canvas is an empty test flow.
This test is also displayed as a subnode of the Untitled Solution node in theSolution Explorer pane. (This is the general solution name used when a test iscreated but not a named solution.)
You are now ready to begin designing API tests. Continue to "Lesson 2: Create SimpleAPI Test Steps" on the next page to learn how to create API test steps.
HP Unified Functional Testing (12.02) Page 194

Lesson 2: Create Simple API Test StepsIn UFT API tests, the process of creating tests is a visual one. Your test steps aredisplayed on a canvas which shows the entire master test flow.
Creating the actual test steps consists of two main parts:
1. Creating test steps by dragging the appropriate activities to the test flow in thecanvas.
The Toolbox pane contains all the activities you can use in your test. From the listof activities contained in the canvas, you can drag them to the canvas and addthem to the test flow in any place:
HP Unified Functional Testing (12.02) Page 195
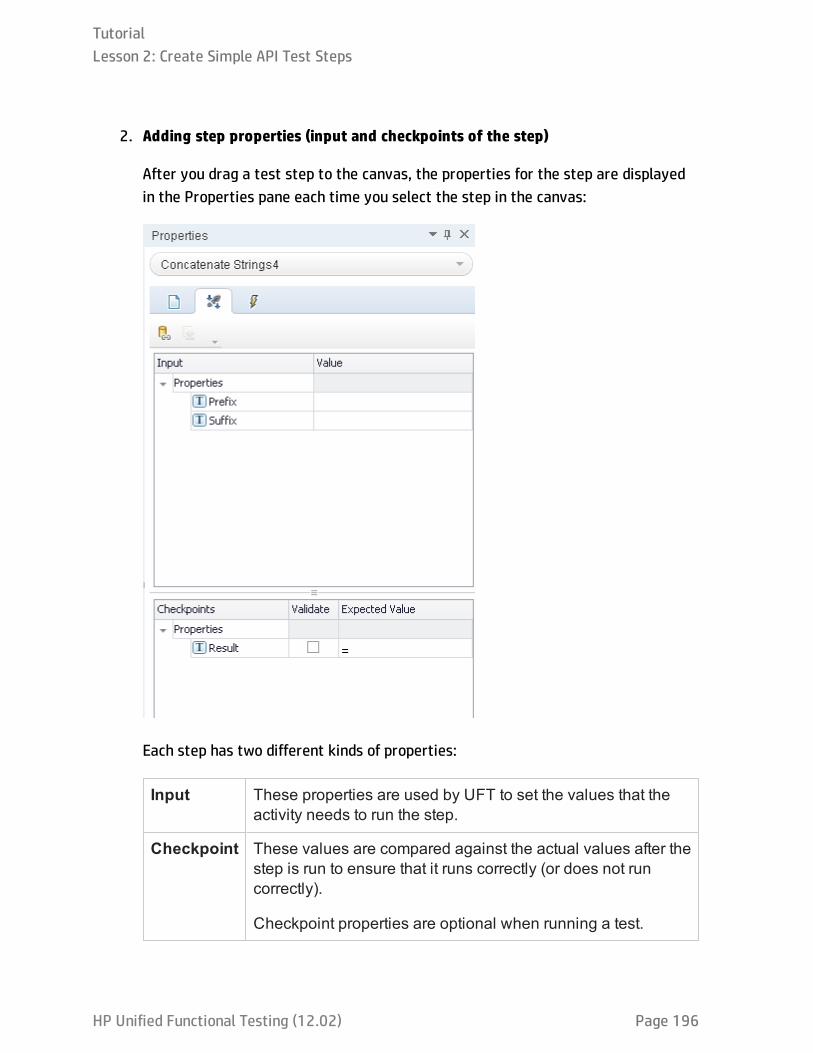
2. Adding step properties (input and checkpoints of the step)
After you drag a test step to the canvas, the properties for the step are displayedin the Properties pane each time you select the step in the canvas:
Each step has two different kinds of properties:
Input These properties are used by UFT to set the values that theactivity needs to run the step.
Checkpoint These values are compared against the actual values after thestep is run to ensure that it runs correctly (or does not runcorrectly).
Checkpoint properties are optional when running a test.
TutorialLesson 2: Create Simple API Test Steps
HP Unified Functional Testing (12.02) Page 196
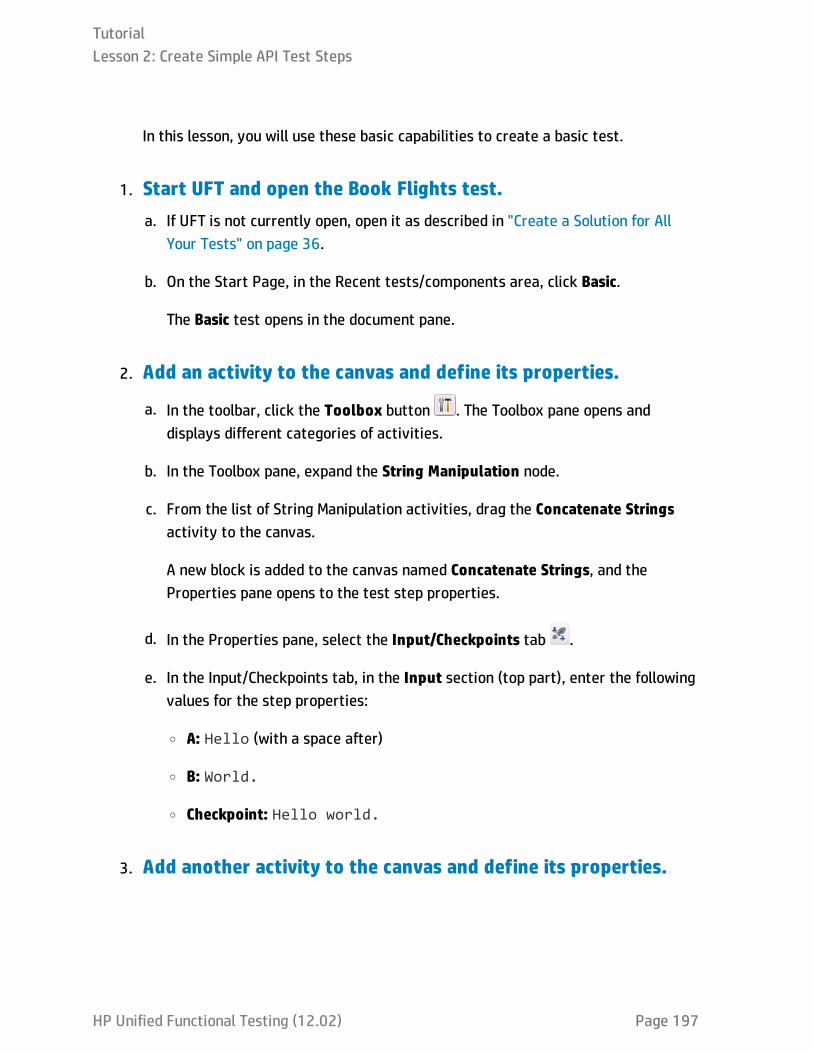
In this lesson, you will use these basic capabilities to create a basic test.
1. Start UFT and open the Book Flights test.a. If UFT is not currently open, open it as described in "Create a Solution for All
Your Tests" on page 36.
b. On the Start Page, in the Recent tests/components area, click Basic.
The Basic test opens in the document pane.
2. Add an activity to the canvas and define its properties.
a. In the toolbar, click the Toolbox button . The Toolbox pane opens anddisplays different categories of activities.
b. In the Toolbox pane, expand the String Manipulation node.
c. From the list of String Manipulation activities, drag the Concatenate Stringsactivity to the canvas.
A new block is added to the canvas named Concatenate Strings, and theProperties pane opens to the test step properties.
d. In the Properties pane, select the Input/Checkpoints tab .
e. In the Input/Checkpoints tab, in the Input section (top part), enter the followingvalues for the step properties:
o A: Hello (with a space after)
o B: World.
o Checkpoint: Hello world.
3. Add another activity to the canvas and define its properties.
TutorialLesson 2: Create Simple API Test Steps
HP Unified Functional Testing (12.02) Page 197

In addition to defining input and checkpoint properties, you can define otherproperties for the test step.
a. In the Toolbox pane, expand the String Manipulation node.
b. From the list of String Manipulation activities, double-click the Replace Stringactivity to add it to the canvas. The Input/Checkpoints tab opens in theProperties pane, displaying the input and checkpoint properties for the step.
c. In the Properties pane, open the General tab .
d. In the Name property row, change Replace String to Change Text andpress Enter. The name of the step in the canvas is changed to Change Text.
e. Open the Input/Checkpoints tab.
f. In the Input Checkpoints tab, enter the following values for the properties:
o Source string: Hello world.
o Search string: Hello
o Replace string: Goodbye
o Case-sensitive: False
4. Add checkpoint properties to the Change Text step.a. In the Checkpoints section of the Input/Checkpoints tab, in the Result row,
select the checkbox in the Validate column. This enables the checkpoint for thisstep
b. In the Expected value column, enter the expected result: Goodbye world.
5. Save the test.Select File > Save.
6. Run the test and view the results.
TutorialLesson 2: Create Simple API Test Steps
HP Unified Functional Testing (12.02) Page 198
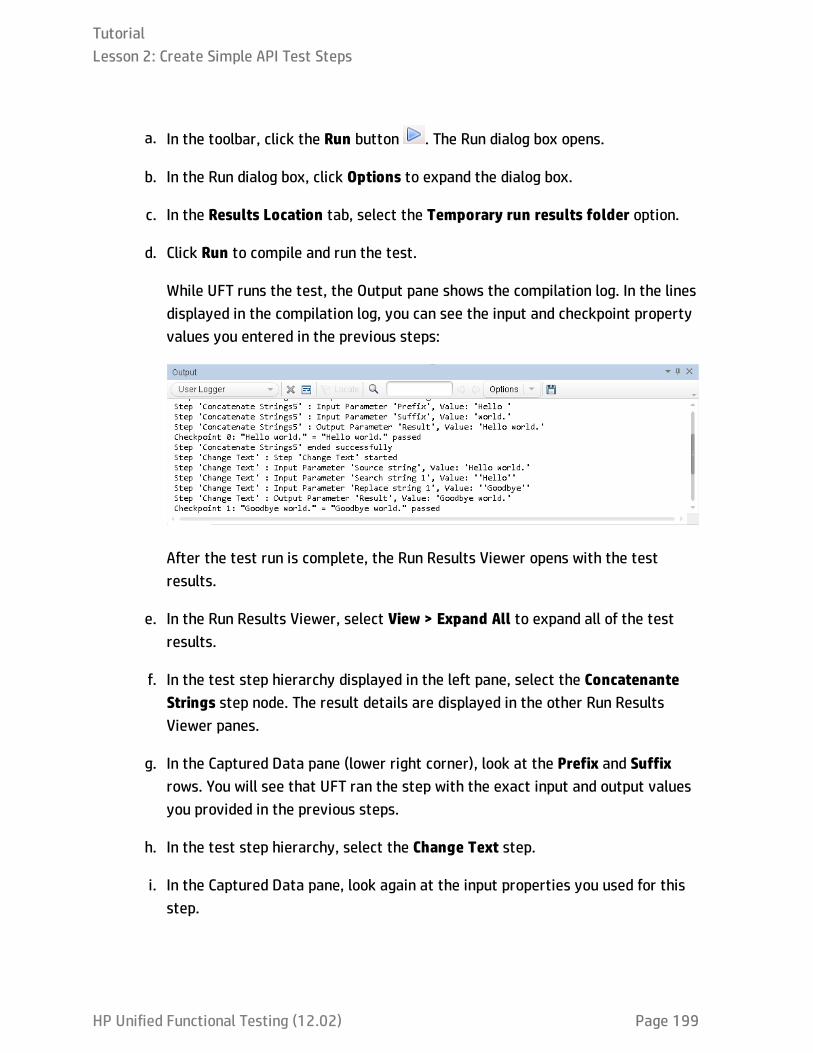
a. In the toolbar, click the Run button . The Run dialog box opens.
b. In the Run dialog box, click Options to expand the dialog box.
c. In the Results Location tab, select the Temporary run results folder option.
d. Click Run to compile and run the test.
While UFT runs the test, the Output pane shows the compilation log. In the linesdisplayed in the compilation log, you can see the input and checkpoint propertyvalues you entered in the previous steps:
After the test run is complete, the Run Results Viewer opens with the testresults.
e. In the Run Results Viewer, select View > Expand All to expand all of the testresults.
f. In the test step hierarchy displayed in the left pane, select the ConcatenanteStrings step node. The result details are displayed in the other Run ResultsViewer panes.
g. In the Captured Data pane (lower right corner), look at the Prefix and Suffixrows. You will see that UFT ran the step with the exact input and output valuesyou provided in the previous steps.
h. In the test step hierarchy, select the Change Text step.
i. In the Captured Data pane, look again at the input properties you used for thisstep.
TutorialLesson 2: Create Simple API Test Steps
HP Unified Functional Testing (12.02) Page 199
j. Under the Change Text node, select the Checkpoints node.
k. In the Captured Data pane, note the details for the test step run. Note that thatthe results show that the checkpoint passed (with a green checkmark) and theexpected string that you entered in the previous steps.
l. When you are finished reviewing the results, close the Run Results Viewer.
TutorialLesson 2: Create Simple API Test Steps
HP Unified Functional Testing (12.02) Page 200
Lesson 3: Creating API Test Steps UsingStandard ActivitiesWhen you create an API test, you are testing to see that the non-GUI (service) layer ofyour application works properly. The invisible processes that run your application canbe any number of things: calls to a database, calls to a Web service, opening a program,sending messages via the Web, and so forth.
To assist you in creating tests, UFT provides a number of standard API activities to usein designing test steps. In this lesson, you will use the standard activities to create abasic test.
This lesson includes the following:
UFT API Testing Standard Activities - Overview 202
Exercise 3a: Creating a Test with Standard Activities 203
TutorialLesson 3: Creating API Test Steps Using Standard Activities
HP Unified Functional Testing (12.02) Page 201

UFT API Testing Standard Activities - OverviewWhen you create an API test, there are a number of standard activities provided withall tests. These test common application processes, including:
l Flow Control activities, such as Wait, Break, and Condition step.
l String Manipulation activities, such as Concatenate Strings and Replace String
l File system activities for processes performed using the file system
l Database activities
l FTP activities
l Network activities, such as HTTP Request and SOAP Request
l JSON and XML activities for application processes that involve interacting with XMLor JSON strings/files
l Math and Date/Time activities
l Other Miscellaneous activities, including a Custom Code activity, Run Program andEnd Program activities, and a Report activity.
There are a number of technology-specific activities:
l A Call Java Class activity which tests Java processes used in your application
l JMS (Java Message Service) activities
l IBM Websphere MQ activities
l SAP activities to access an SAP iDOC or RFC stored on a SAP server
l Load Testing activities which help your test run (after a conversion to a LoadRunnerscript) with HP LoadRunner
TutorialLesson 3: Creating API Test Steps Using Standard Activities
HP Unified Functional Testing (12.02) Page 202

l HP Automated Testing Tools activities, which enable you to call a GUI test oraction, API test or action, or Virtual User Generator Script from UFT, QuickTestProfessional, Service Test, or LoadRunner as part of your test
There are a number of custom activities you can also import into your test, but thesetypes of activities will be discussed in detail in later lessons.
Exercise 3a: Creating a Test with StandardActivitiesIn "Lesson 2: Create Simple API Test Steps" on page 195, you familiarized yourself withthe UFT API testing user interface and learned how it is used to create and run teststeps.
In this lesson, you will use that knowledge to use standard activities to create a basicAPI test.
1. Create a new test.
a. In the toolbar, click the New button . The New Test dialog box opens
b. In the New Test Dialog Box, select API Test.
c. Enter the following details for your test:
o Name: Standard
o Location: C:\%HOMEPATH%\My Documents\Unified FunctionalTesting
d. Click Create.
A blank test opens in the canvas, with a blank test flow. The test is alsodisplayed as a sub-node of the Solution Untitled solution in the SolutionExplorer pane.
TutorialLesson 3: Creating API Test Steps Using Standard Activities
HP Unified Functional Testing (12.02) Page 203
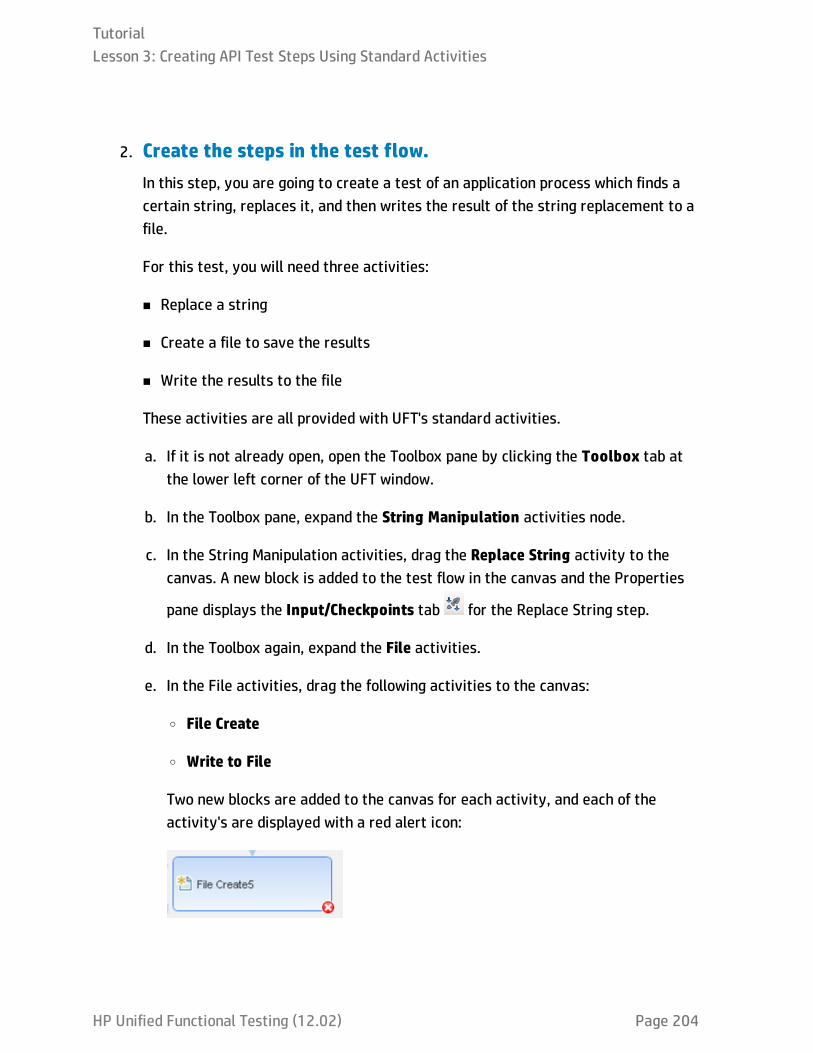
2. Create the steps in the test flow.In this step, you are going to create a test of an application process which finds acertain string, replaces it, and then writes the result of the string replacement to afile.
For this test, you will need three activities:
n Replace a string
n Create a file to save the results
n Write the results to the file
These activities are all provided with UFT's standard activities.
a. If it is not already open, open the Toolbox pane by clicking the Toolbox tab atthe lower left corner of the UFT window.
b. In the Toolbox pane, expand the String Manipulation activities node.
c. In the String Manipulation activities, drag the Replace String activity to thecanvas. A new block is added to the test flow in the canvas and the Properties
pane displays the Input/Checkpoints tab for the Replace String step.
d. In the Toolbox again, expand the File activities.
e. In the File activities, drag the following activities to the canvas:
o File Create
o Write to File
Two new blocks are added to the canvas for each activity, and each of theactivity's are displayed with a red alert icon:
TutorialLesson 3: Creating API Test Steps Using Standard Activities
HP Unified Functional Testing (12.02) Page 204

After you add the activities to the canvas, your test flow should look like this:
3. Enter the properties for the Replace String activity.a. In the canvas, select the Replace String activity. The Input/Checkpoints tab
in the Properties pane opens.
b. In the Input/Checkpoints tab, enter the input properties for the step:
o Source string: Hello world.
o Search string: Hello
o Replace string: Goodbye
Note: You do not need to use the checkpoint properties for this activity.
4. Enter the properties for the File Create step.
TutorialLesson 3: Creating API Test Steps Using Standard Activities
HP Unified Functional Testing (12.02) Page 205

This step will enable you to create a file on which to write the results of theReplace string operation from the previous step. You will create a file in a specifieddirectory to be used in the next steps.
a. In the canvas, select the File Create step. The Input/Checkpoints tab in theProperties pane opens.
b. In the file system, open the C:\%HOMEPATH%\My Documents\UnifiedFunctional Testing folder.
c. Inside the Unified Functional Testing folder mentioned in the previous step,create a folder named Tutorial_Files. You will use this folder to create the filein the next step.
d. In the Input/Checkpoints tab, enter the input properties for the step:
o Folder path: C:\%HOMEPATH%\My Documents\Unified FunctionalTesting\Tutorial_Files
Note: You can also enter this folder by pressing the Browse button andnavigating directly to the folder.
o File Name: Standard Test Result
o Overwrite: true
e. In the Checkpoints section of the Input/Checkpoints tab, in the Result row,select the checkbox in the Validate column. Leave the default value as it is.
This enables you to see if the file creation step was completed successfullyrunning the test and viewing the run results.
5. Enter the properties for the Write to File step.
TutorialLesson 3: Creating API Test Steps Using Standard Activities
HP Unified Functional Testing (12.02) Page 206
This step will write the string resulting from the Replace String step to the file youcreated in the Create File step.
a. In the canvas, select the Write to File step. The Input/Checkpoints tab in theProperties pane opens.
b. In the Input section of the Input/Checkpoints tab, enter the input properties forthe step:
o Content: Goodbye world.
o File path: You will use the file created in the previous step. You mustmanually enter the following: C:\%HOMEPATH%\My Documents\UnifiedFunctional Testing\Tutorial_Files\Standard Test Result
o Keep all other properties with the default.
c. In the Checkpoints section of the Input/Checkpoints tab, in the Result row,select the checkbox in the Validate column (Leave the default value as it is.)
This enables you to see if the write to file operation was completed successfullywhen running the test and viewing the run results.
6. Save the test.Select File > Save.
7. Run the test and view the run results.
a. In the toolbar, click the Run button . The Run dialog box opens.
b. In the Result Locations tab in the Run dialog box, ensure that the Termporaryrun results folder is still selected.
c. Click Run to compile and run the test.
After the test run is complete, the Run Results Viewer opens with the testresults.
TutorialLesson 3: Creating API Test Steps Using Standard Activities
HP Unified Functional Testing (12.02) Page 207
d. In the file system, open the C:\%HOMEPATH%\My Documents\UnifiedFunctional Testing\Tutorial_Files\Standard Test Result file.
In this file, you should see the string "Goodbye world" in the first line of thedocument. This shows that UFT ran the test steps on a real application, just asit would for any application, using the standard API activities provided with UFT.
Now that you have created a basic test of application processes using standardactivities, continue to "Lesson 4: Parameterizing API Test Steps" on the next pageto learn how to use data in your tests and parameterize test steps.
TutorialLesson 3: Creating API Test Steps Using Standard Activities
HP Unified Functional Testing (12.02) Page 208
Lesson 4: Parameterizing API Test StepsIn "Lesson 2: Create Simple API Test Steps" on page 195 and "Lesson 3: Creating APITest Steps Using Standard Activities" on page 201, you learned how to provide thevalues for API test steps by manually entering the required input and checkpointvalues.
However, you can also provide the input and checkpoint values from other sources:
l Data sources included with your test (including Excel files, XML, database datasources, or locally-created tables
l Output of previous steps
l A combination of all the above: manually entering the required data, data sources,and output of previous steps
Using these data sources to populate step input and output values enables you tomimic how your application works, as the input of an application process can come froma data source, the result of a previous application process and the like.
In this lesson, you will learn how to parameterize API test steps using differentmethods.
This lesson includes the following:
Parameterizing API Test Steps - Overview 210
Exercise 4a: Parameterize a Test Step from a Data Source 211
Exercise 4b: Parameterize a Test Step from the Output of a Previous Step 223
Exercise 4c: Parameterize a Test with Multiple Sources Using a CustomExpression 227
TutorialLesson 4: Parameterizing API Test Steps
HP Unified Functional Testing (12.02) Page 209
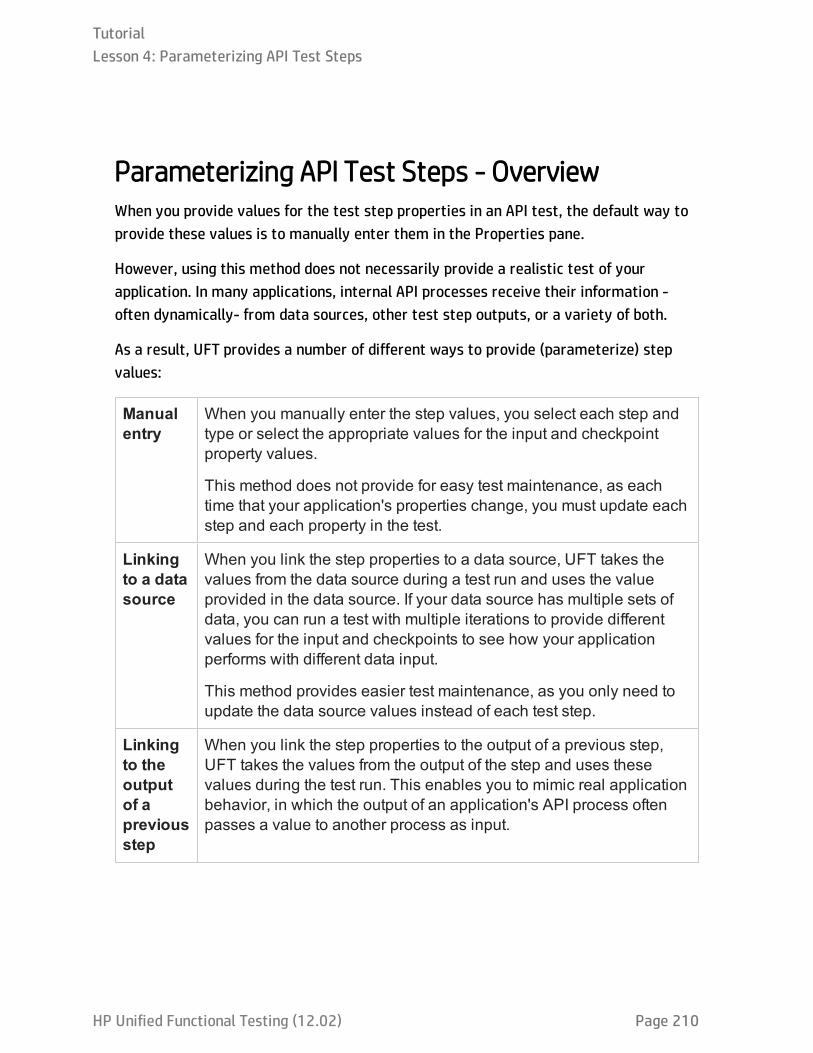
Parameterizing API Test Steps - OverviewWhen you provide values for the test step properties in an API test, the default way toprovide these values is to manually enter them in the Properties pane.
However, using this method does not necessarily provide a realistic test of yourapplication. In many applications, internal API processes receive their information -often dynamically- from data sources, other test step outputs, or a variety of both.
As a result, UFT provides a number of different ways to provide (parameterize) stepvalues:
Manualentry
When you manually enter the step values, you select each step andtype or select the appropriate values for the input and checkpointproperty values.
This method does not provide for easy test maintenance, as eachtime that your application's properties change, you must update eachstep and each property in the test.
Linkingto a datasource
When you link the step properties to a data source, UFT takes thevalues from the data source during a test run and uses the valueprovided in the data source. If your data source has multiple sets ofdata, you can run a test with multiple iterations to provide differentvalues for the input and checkpoints to see how your applicationperforms with different data input.
This method provides easier test maintenance, as you only need toupdate the data source values instead of each test step.
Linkingto theoutputof apreviousstep
When you link the step properties to the output of a previous step,UFT takes the values from the output of the step and uses thesevalues during the test run. This enables you to mimic real applicationbehavior, in which the output of an application's API process oftenpasses a value to another process as input.
TutorialLesson 4: Parameterizing API Test Steps
HP Unified Functional Testing (12.02) Page 210
Linkingtomultiplesources
If your application's input and checkpoints are provided from multiplesources - a static string, data, and output of other steps/processes,you can create custom expressions to perform this in your test. UFTthen provides the values using the custom expressions and uses thevalues during the test run.
Exercise 4a: Parameterize a Test Step from a DataSourceAs you saw in "Parameterizing API Test Steps - Overview" on the previous page, one ofthe ways you provide values to test steps is by linking the step property values to adata source. This enables you to run the test step with multiple different values,depending on the structure of the data source.
In your API test, you can add multiple different types of data sources:
l Excel sheets
l XML files or schemas
l Databases
l Locally-stored data tables
Each of these can be added to your test, which makes it available for all steps in thetest.
In this lesson, you will link test steps to a data source.
1. Start UFT and open the Standard test.a. If UFT is not currently open, open it as described in "Create a Solution for All
Your Tests" on page 36.
b. On the Start Page, in the Recent tests/components area, click Standard.
The Standard test you created in "Lesson 3: Creating API Test Steps UsingStandard Activities" on page 201 opens as a separate tab in the document
TutorialLesson 4: Parameterizing API Test Steps
HP Unified Functional Testing (12.02) Page 211
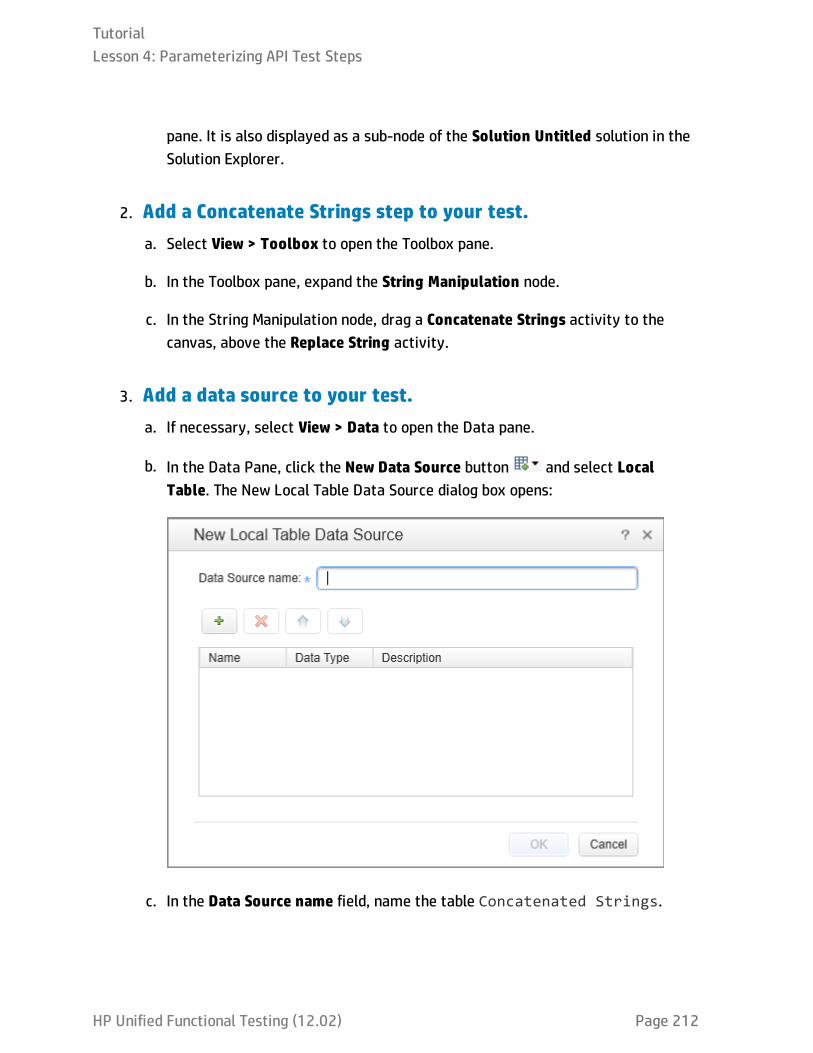
pane. It is also displayed as a sub-node of the Solution Untitled solution in theSolution Explorer.
2. Add a Concatenate Strings step to your test.a. Select View > Toolbox to open the Toolbox pane.
b. In the Toolbox pane, expand the String Manipulation node.
c. In the String Manipulation node, drag a Concatenate Strings activity to thecanvas, above the Replace String activity.
3. Add a data source to your test.a. If necessary, select View > Data to open the Data pane.
b. In the Data Pane, click the New Data Source button and select LocalTable. The New Local Table Data Source dialog box opens:
c. In the Data Source name field, name the table Concatenated Strings.
TutorialLesson 4: Parameterizing API Test Steps
HP Unified Functional Testing (12.02) Page 212
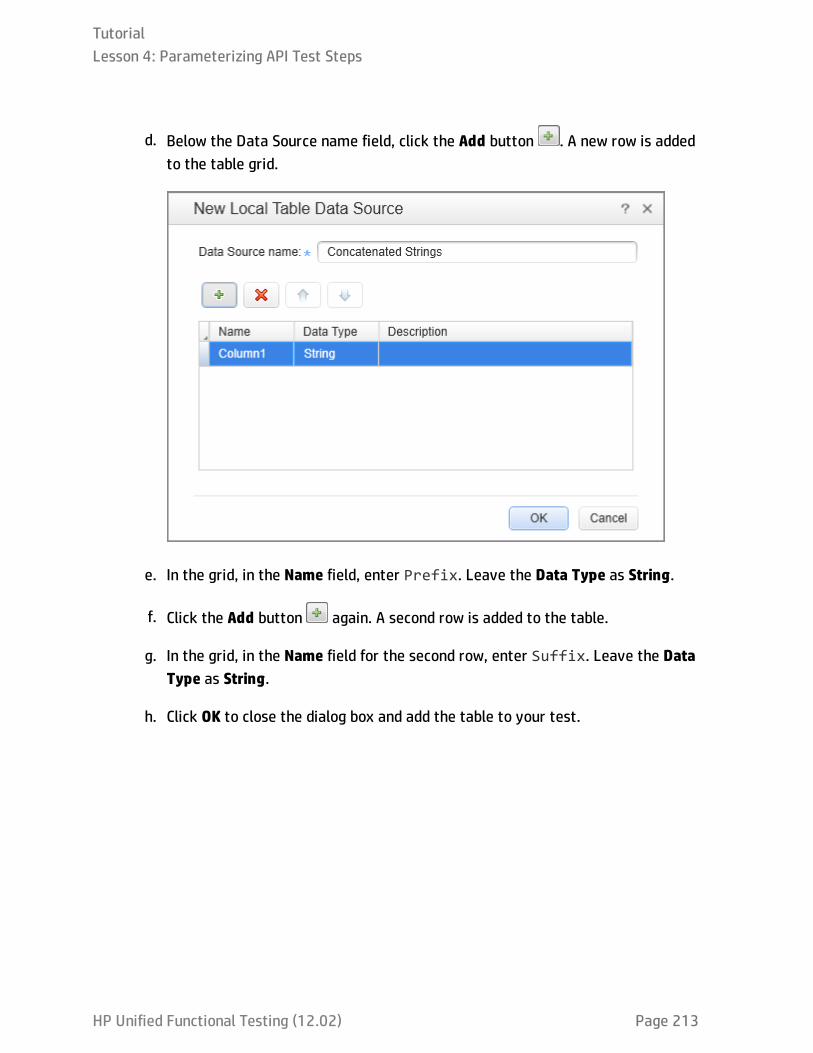
d. Below the Data Source name field, click the Add button . A new row is addedto the table grid.
e. In the grid, in the Name field, enter Prefix. Leave the Data Type as String.
f. Click the Add button again. A second row is added to the table.
g. In the grid, in the Name field for the second row, enter Suffix. Leave the DataType as String.
h. Click OK to close the dialog box and add the table to your test.
TutorialLesson 4: Parameterizing API Test Steps
HP Unified Functional Testing (12.02) Page 213

The table is added to your test, and is displayed in the Data pane as a sub-nodeof the Current Test data sources:
4. Add values to the data table.In order for your test steps to use values for test steps, you must also ensure thatthe data source has useable data. For a locally-created and stored table, you haveto add the data.
a. In the Data pane, under the Current Test node, select the Concatenated Stringsnode. The Data pane updates to show the data for the selected data source.(Right now, there is no data in the table.)
b. In the data grid, click in the Prefix column.
c. In the Prefix column, enter Hello. Make sure to leave a space after Hello.
d. Click in the Suffix column and enter World.
e. Enter additional rows:
Prefix Suffix
Welcome UFT.
I am running API tests.
Note: Make sure to enter a space after the string in the A column.
5. Connect the test steps to the data source.
TutorialLesson 4: Parameterizing API Test Steps
HP Unified Functional Testing (12.02) Page 214
In order to use the data source values when running the test, you need to link thetest step properties to the data source.
a. In the canvas, select the Concatenate Strings step. The Input/Checkpoints tab
opens in the Properties pane.
b. In the Input/Checkpoints tab, in the Input section, click in the Value cell for thePrefix property.
c. In the Value cell, click the Link to data source button . The Select LinkSource dialog box opens.
TutorialLesson 4: Parameterizing API Test Steps
HP Unified Functional Testing (12.02) Page 215

d. In the Select Link Source dialog box, select the Data source column radiobutton. A list of all the test's data sources is shown in the left side of the dialogbox:
TutorialLesson 4: Parameterizing API Test Steps
HP Unified Functional Testing (12.02) Page 216

e. In the Select a data source pane (left side), select the Concatenated Stringsnode. (This is the data source you created in the previous step.) A list of datasource parameters is displayed in the right pane:
f. In the Select data pane (right side), select the Prefix node and click OK.
The Value column in the Input/Checkpoints tab is updated with an expression toshow the link to the data source. If you hover over the Value column, theexpression is displayed:
{DataSource.Concatenated Strings.Prefix}
g. Repeat the process described above to link the Suffix property to the Suffixcolumn in the data table.
TutorialLesson 4: Parameterizing API Test Steps
HP Unified Functional Testing (12.02) Page 217
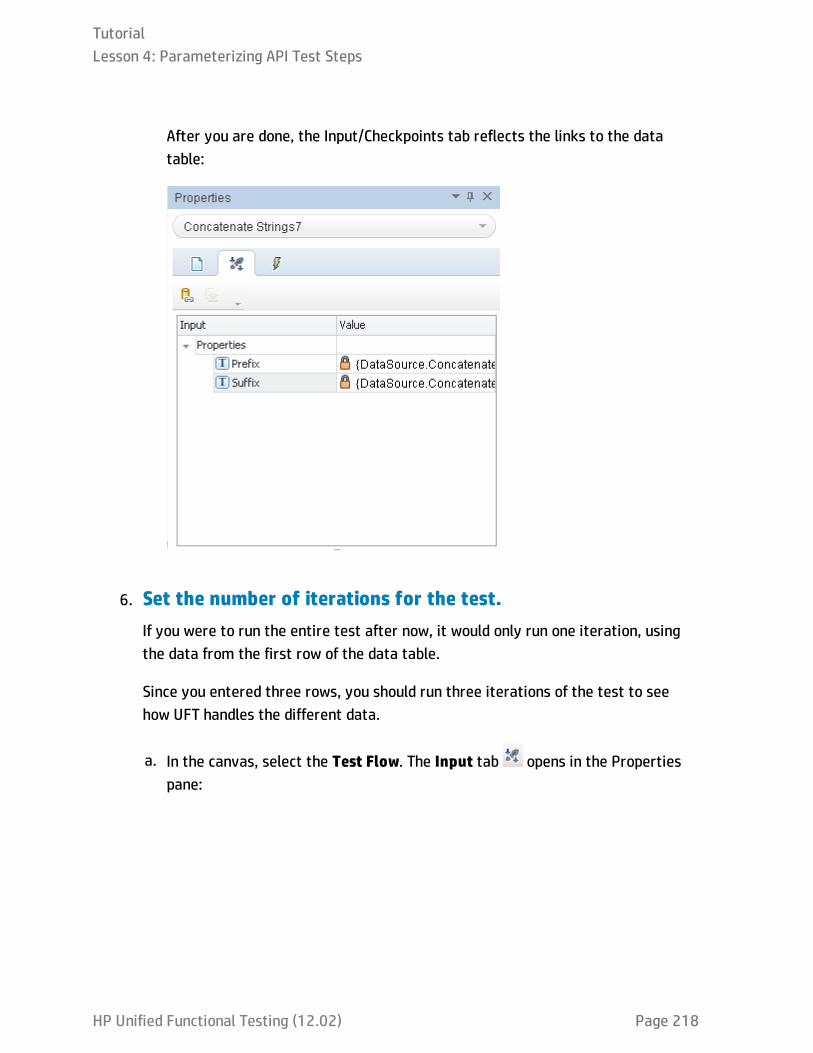
After you are done, the Input/Checkpoints tab reflects the links to the datatable:
6. Set the number of iterations for the test.If you were to run the entire test after now, it would only run one iteration, usingthe data from the first row of the data table.
Since you entered three rows, you should run three iterations of the test to seehow UFT handles the different data.
a. In the canvas, select the Test Flow. The Input tab opens in the Propertiespane:
TutorialLesson 4: Parameterizing API Test Steps
HP Unified Functional Testing (12.02) Page 218
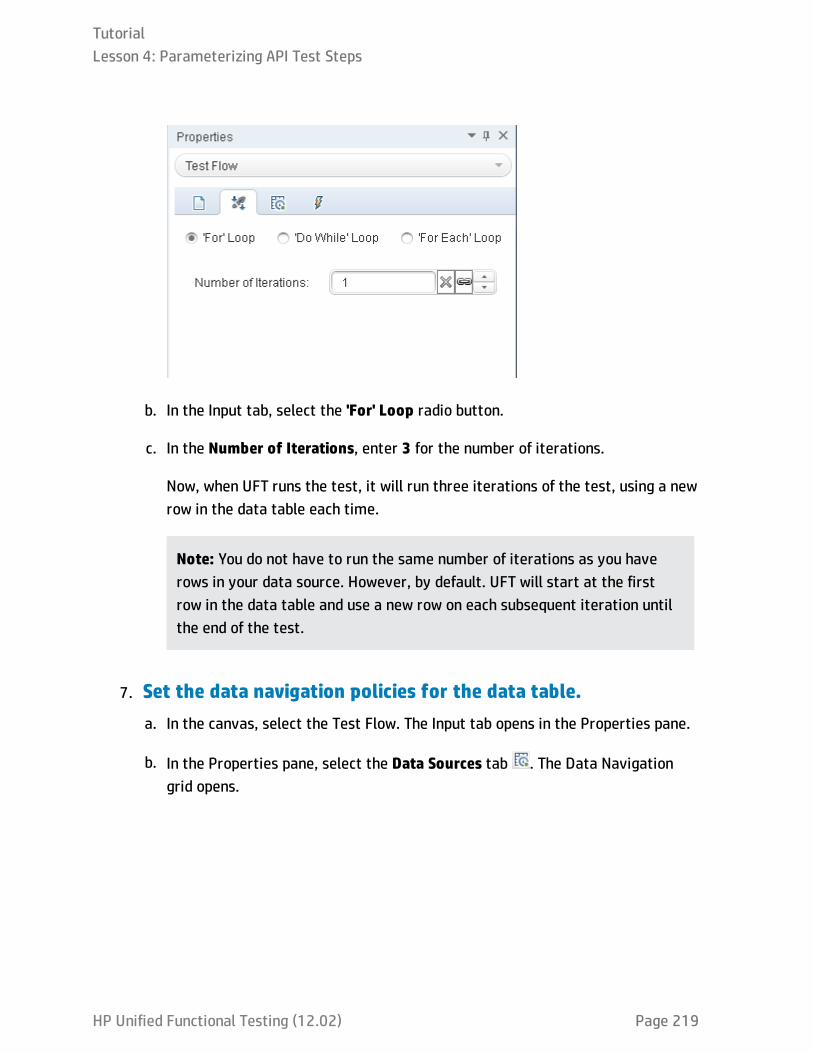
b. In the Input tab, select the 'For' Loop radio button.
c. In the Number of Iterations, enter 3 for the number of iterations.
Now, when UFT runs the test, it will run three iterations of the test, using a newrow in the data table each time.
Note: You do not have to run the same number of iterations as you haverows in your data source. However, by default. UFT will start at the firstrow in the data table and use a new row on each subsequent iteration untilthe end of the test.
7. Set the data navigation policies for the data table.a. In the canvas, select the Test Flow. The Input tab opens in the Properties pane.
b. In the Properties pane, select the Data Sources tab . The Data Navigationgrid opens.
TutorialLesson 4: Parameterizing API Test Steps
HP Unified Functional Testing (12.02) Page 219
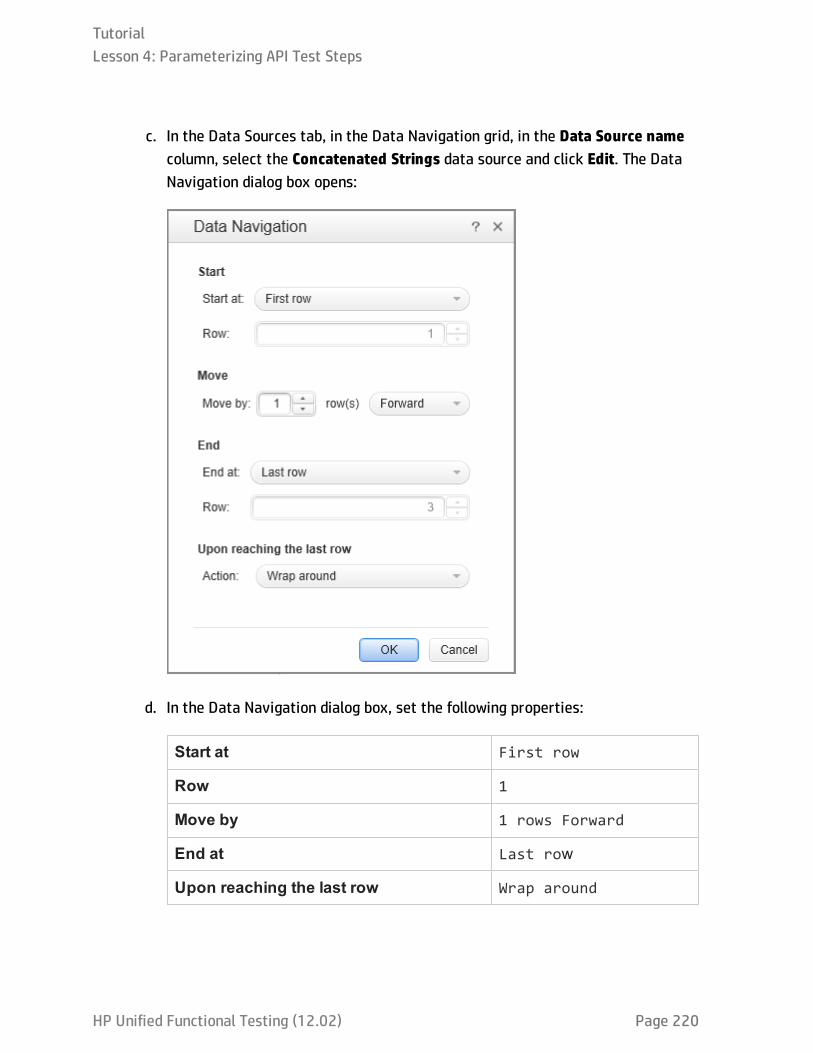
c. In the Data Sources tab, in the Data Navigation grid, in the Data Source namecolumn, select the Concatenated Strings data source and click Edit. The DataNavigation dialog box opens:
d. In the Data Navigation dialog box, set the following properties:
Start at First row
Row 1
Move by 1 rows Forward
End at Last row
Upon reaching the last row Wrap around
TutorialLesson 4: Parameterizing API Test Steps
HP Unified Functional Testing (12.02) Page 220
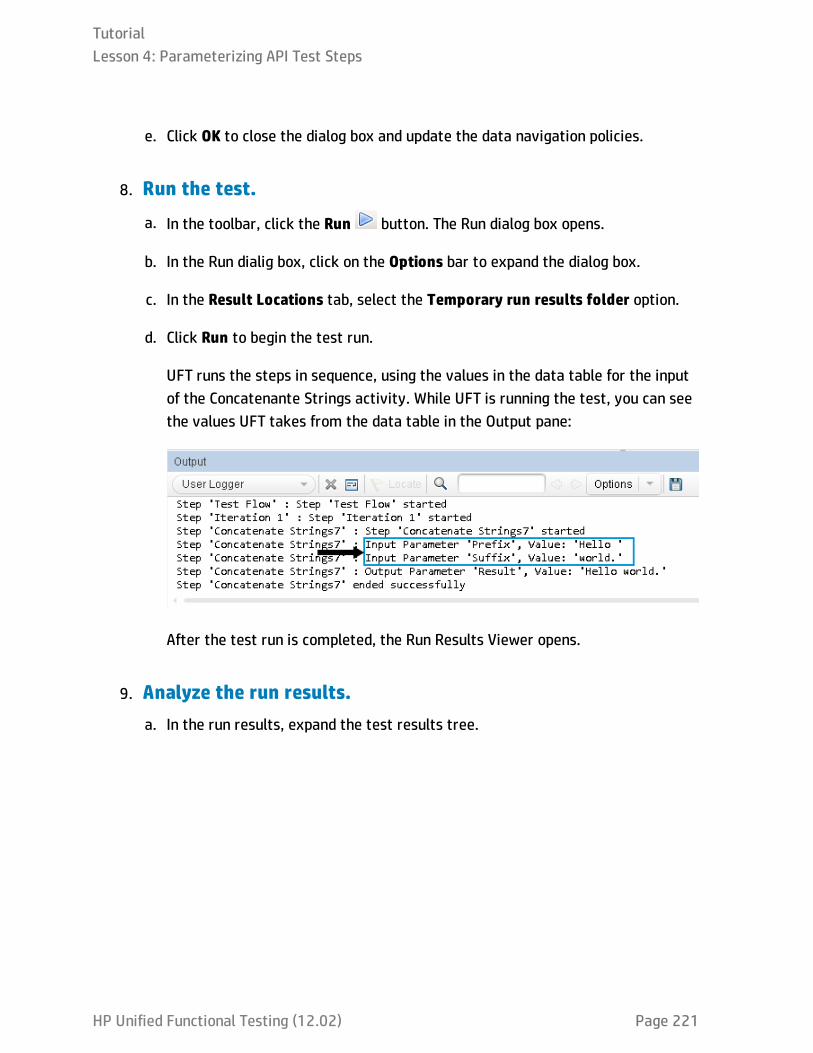
e. Click OK to close the dialog box and update the data navigation policies.
8. Run the test.
a. In the toolbar, click the Run button. The Run dialog box opens.
b. In the Run dialig box, click on the Options bar to expand the dialog box.
c. In the Result Locations tab, select the Temporary run results folder option.
d. Click Run to begin the test run.
UFT runs the steps in sequence, using the values in the data table for the inputof the Concatenante Strings activity. While UFT is running the test, you can seethe values UFT takes from the data table in the Output pane:
After the test run is completed, the Run Results Viewer opens.
9. Analyze the run results.a. In the run results, expand the test results tree.
TutorialLesson 4: Parameterizing API Test Steps
HP Unified Functional Testing (12.02) Page 221

Notice that there are three Summary nodes:
This corresponds to the three iterations you set earlier.
b. Expand the Iteration 1 node.
c. In the Iteration 1 node, select the Concatenate Strings node. The Run ResultsViewer updates the various panes with the relevant details.
d. With the Concatenate Strings node still selected, select the Captured Data panetab.
The Captured Data node shows the data used for the input values of theConcatenate Strings activity:
The values used match the first row in the data table.
TutorialLesson 4: Parameterizing API Test Steps
HP Unified Functional Testing (12.02) Page 222

e. Repeat this process for the Iteration 2 and Iteration 3 Concatenate Stringsactivities. You will see that the values displayed in the Captured Data panematch the second and third rows of the data table.
10. Save the test.Select File > Save.
Now that you have learned how to connect test steps to data sources, continue with"Exercise 4b: Parameterize a Test Step from the Output of a Previous Step" below tolearn how to link step properties with the output of a previous step.
Exercise 4b: Parameterize a Test Step from theOutput of a Previous StepIn "Exercise 4a: Parameterize a Test Step from a Data Source" on page 211, youlearned how to link the property values of a selected step to a data source.
However, in addition to providing the property values from data, you can also getproperty values from the output of previous steps. In this lesson, you will learn how tolink step values using previous step outputs.
1. Start UFT and open the Standard test.a. If UFT is not currently open, open it as described in "Create a Solution for All
Your Tests" on page 36.
b. On the Start Page, in the Recent tests/components area, click Standard.
The Standard test you created in "Lesson 3: Creating API Test Steps UsingStandard Activities" on page 201 opens as a separate tab in the documentpane. It is also displayed as a sub-node of the Solution Untitled solution in theSolution Explorer.
2. Link the properties of the Replace Strings step to the
TutorialLesson 4: Parameterizing API Test Steps
HP Unified Functional Testing (12.02) Page 223
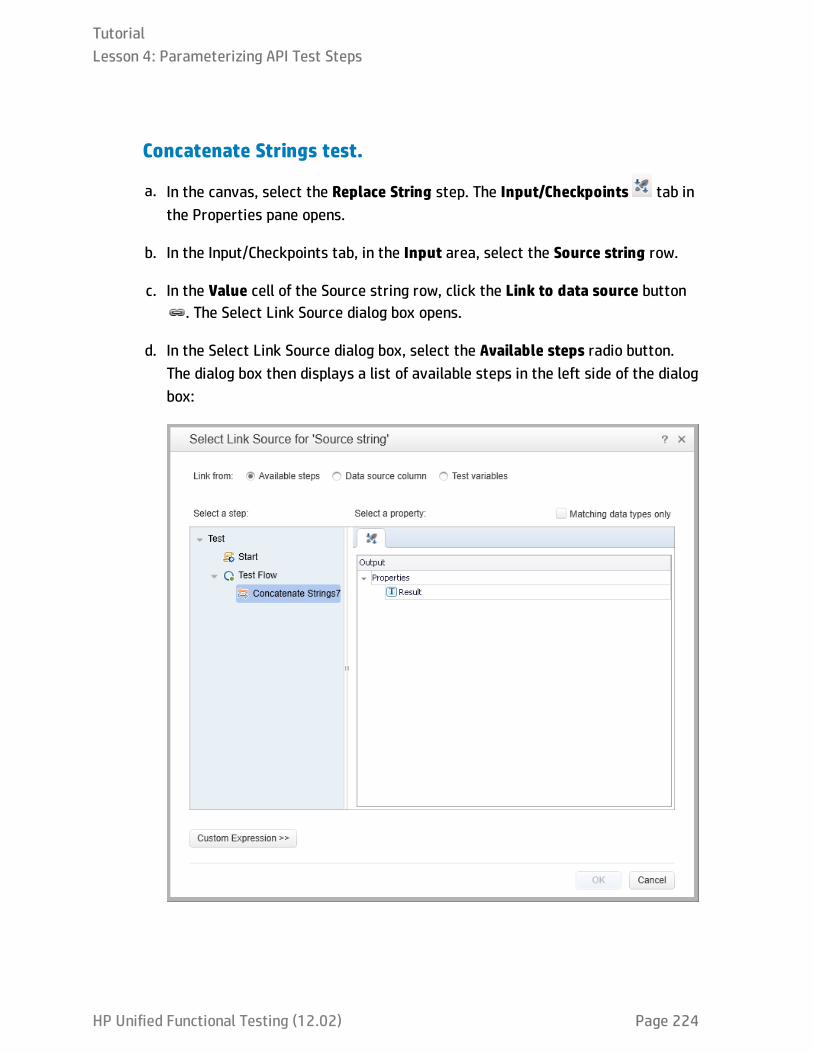
Concatenate Strings test.
a. In the canvas, select the Replace String step. The Input/Checkpoints tab inthe Properties pane opens.
b. In the Input/Checkpoints tab, in the Input area, select the Source string row.
c. In the Value cell of the Source string row, click the Link to data source button. The Select Link Source dialog box opens.
d. In the Select Link Source dialog box, select the Available steps radio button.The dialog box then displays a list of available steps in the left side of the dialogbox:
TutorialLesson 4: Parameterizing API Test Steps
HP Unified Functional Testing (12.02) Page 224
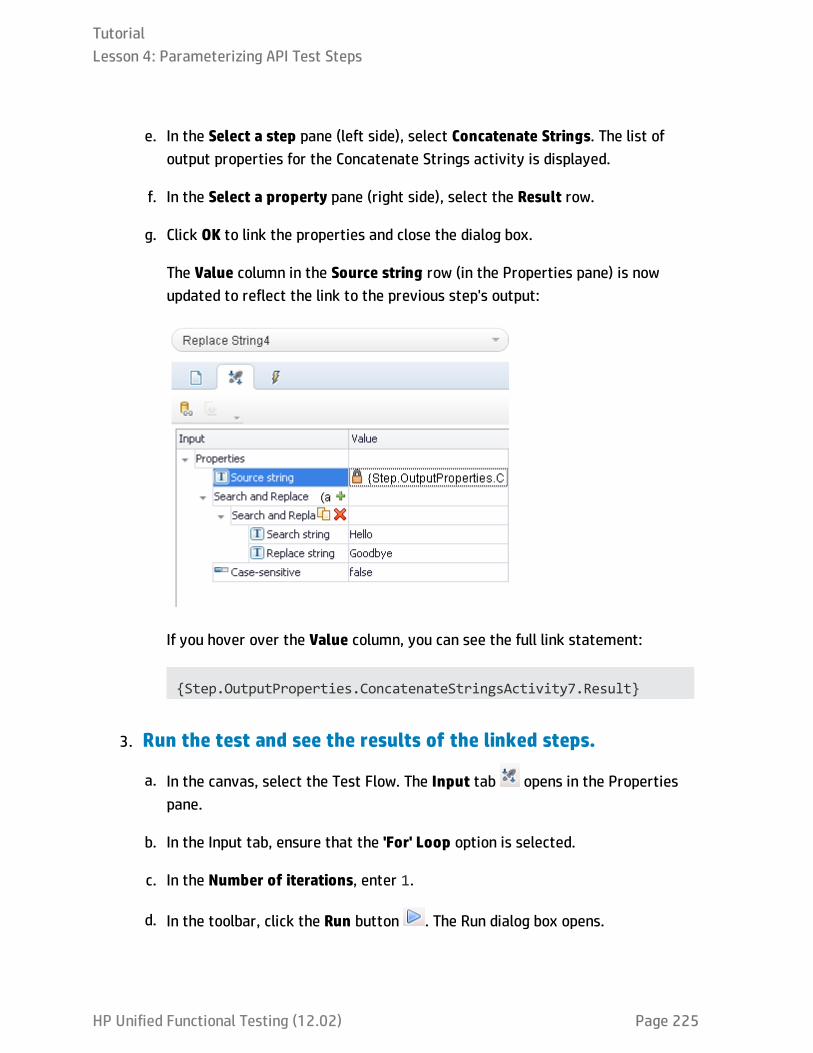
e. In the Select a step pane (left side), select Concatenate Strings. The list ofoutput properties for the Concatenate Strings activity is displayed.
f. In the Select a property pane (right side), select the Result row.
g. Click OK to link the properties and close the dialog box.
The Value column in the Source string row (in the Properties pane) is nowupdated to reflect the link to the previous step's output:
If you hover over the Value column, you can see the full link statement:
{Step.OutputProperties.ConcatenateStringsActivity7.Result}
3. Run the test and see the results of the linked steps.
a. In the canvas, select the Test Flow. The Input tab opens in the Propertiespane.
b. In the Input tab, ensure that the 'For' Loop option is selected.
c. In the Number of iterations, enter 1.
d. In the toolbar, click the Run button . The Run dialog box opens.
TutorialLesson 4: Parameterizing API Test Steps
HP Unified Functional Testing (12.02) Page 225

e. In the Run dialog box, in the Results Location tab, ensure that the Temporaryrun results folder option is selected.
f. Click Run to start the test run.
UFT runs the test steps, using the output of the Concatenate Strings step forthe input of the Replace string activity.
When the test run is finished, the Run Results Viewer opens.
g. In the run results, expand the results tree.
h. Under the Summary node, expand the nodes until the Replace String node isvisible.
i. Select the Replace String node. The Run Results Viewer displays the relevantinformation about the Replace String step.
j. Open the Captured Data pane. Note the source string used for this test run:
The source string is the output of the Concatenate Strings activity, as enteredin "Exercise 4a: Parameterize a Test Step from a Data Source" on page 211.
4. Save the test.Select File > Save.
TutorialLesson 4: Parameterizing API Test Steps
HP Unified Functional Testing (12.02) Page 226

Now that you have learned how to link test steps to each other, continue with "Exercise4c: Parameterize a Test with Multiple Sources Using a Custom Expression" below tolearn how to parameterize steps by using a combination of manually entering values,linking to a data source, and linking to the output of a previous step.
Exercise 4c: Parameterize a Test with MultipleSources Using a Custom ExpressionIn the previous exercises, you learned how link test step property values to a datasource or the output of a previous step.
However, there will be times where the step value comes from a variety ofplaces: entering a static value manually, a data source, and/or the output of a previousstep. In these cases, you can create a custom expression to link to multiple sources.
In this exercise, you will create a custom expression to write to a file the result of thestring replacement operation that uses data from the test's data table, manual entry ofa static text string, and the output of another test step.
1. Start UFT and open the Standard test.a. If UFT is not currently open, open it as described in "Create a Solution for All
Your Tests" on page 36.
b. On the Start Page, in the Recent tests/components area, click Standard.
The Standard test you created in "Lesson 3: Creating API Test Steps UsingStandard Activities" on page 201 opens as a separate tab in the documentpane. It is also displayed as a sub-node of the Solution Untitled solution in theSolution Explorer.
2. Link the input property for the Write to File test step.
TutorialLesson 4: Parameterizing API Test Steps
HP Unified Functional Testing (12.02) Page 227

In "Lesson 3: Creating API Test Steps Using Standard Activities" on page 201, youcreated a test with three activities:
n Replace String, where you took a string and replaced a part of it with anotherstring
n File Create, where you created a file to write the replaced string
n Write to File, where you wrote the replaced string
Note: You added the Concatenate Strings step in "Exercise 4a: Parameterize aTest Step from a Data Source" on page 211.
In this and the following steps, you will work with the Write to File activity.
a. In the canvas, select the Write to File step. The Input/Checkpoints tabopens in the Properties pane.
b. In the Input/Checkpoints tab, in the Input section, select the Content row.
c. In the Content row, in the Value column, click the Link to data source button.The Select Link Source dialog box opens.
3. Create the first part of the custom expression for the Contentproperty value from the data tablea. In the Select Link Source dialog box, select the Data source column option. The
Select Link Source dialog box displays a list of all the test's data sources:
TutorialLesson 4: Parameterizing API Test Steps
HP Unified Functional Testing (12.02) Page 228
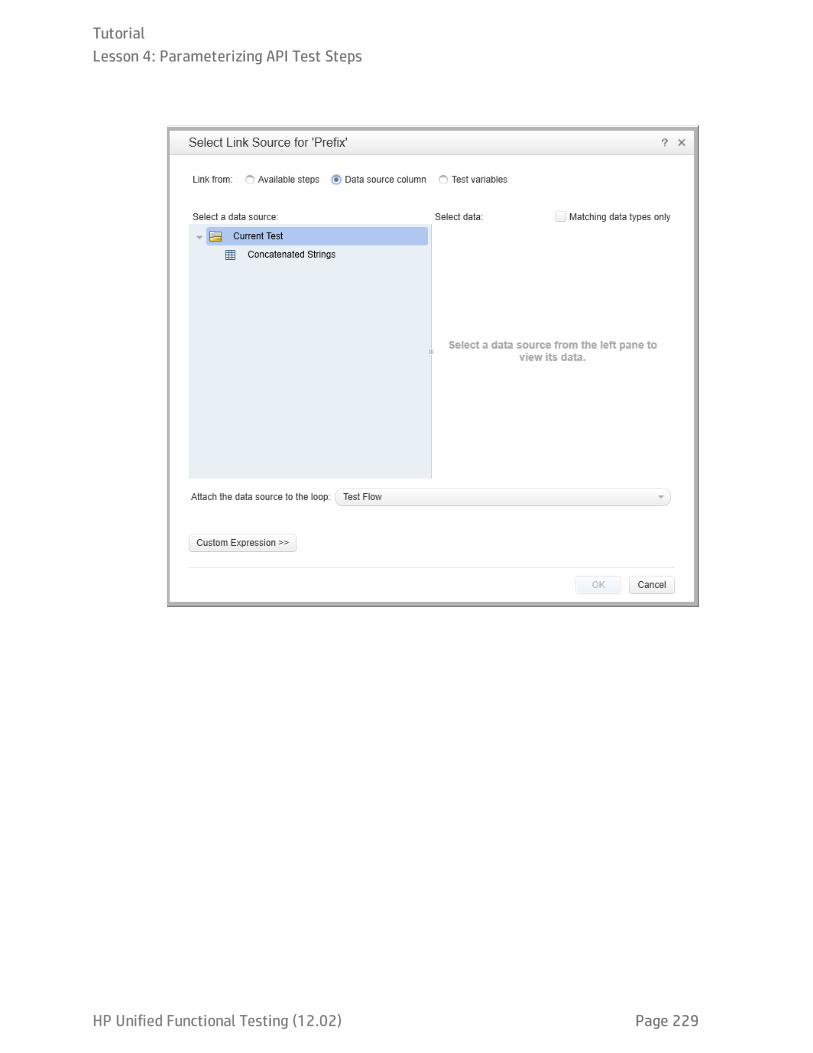
TutorialLesson 4: Parameterizing API Test Steps
HP Unified Functional Testing (12.02) Page 229

b. In the Select a data source pane (left side), select the Concatenated Stringsnode. The dialog box displays a list of data parameters in the ConcatenateStrings data table:
c. In the Select data pane (right side), select the Prefix node.
TutorialLesson 4: Parameterizing API Test Steps
HP Unified Functional Testing (12.02) Page 230
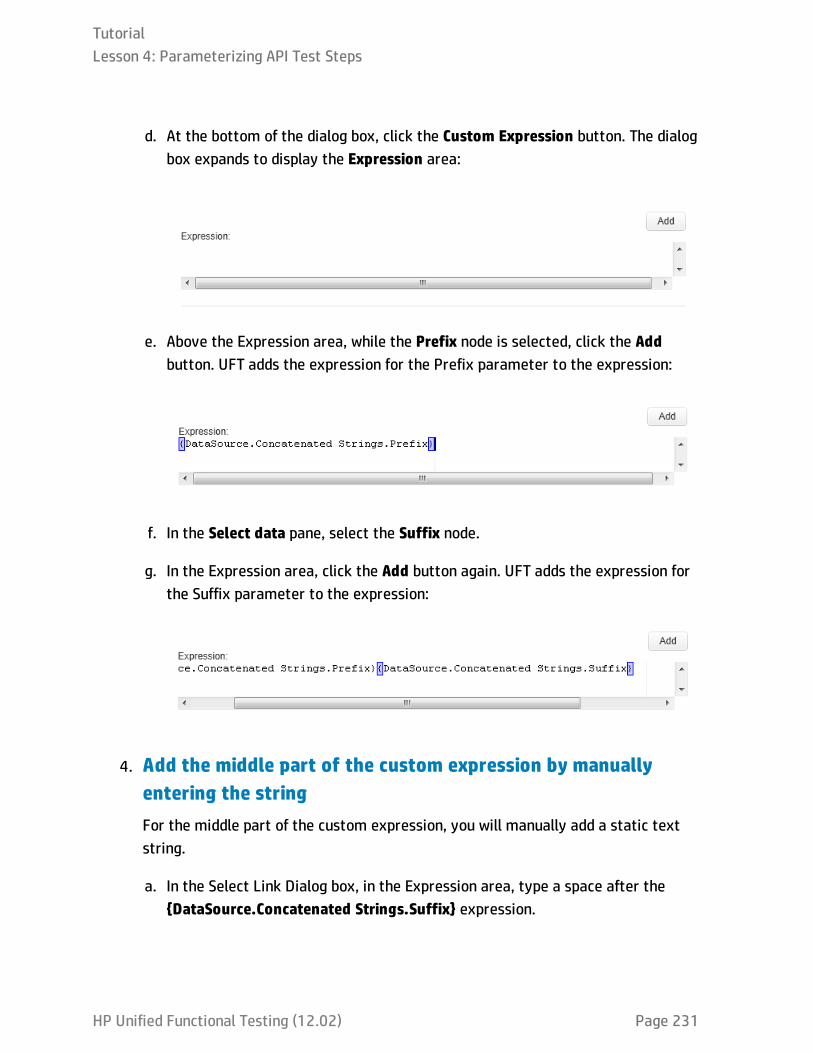
d. At the bottom of the dialog box, click the Custom Expression button. The dialogbox expands to display the Expression area:
e. Above the Expression area, while the Prefix node is selected, click the Addbutton. UFT adds the expression for the Prefix parameter to the expression:
f. In the Select data pane, select the Suffix node.
g. In the Expression area, click the Add button again. UFT adds the expression forthe Suffix parameter to the expression:
4. Add the middle part of the custom expression by manuallyentering the stringFor the middle part of the custom expression, you will manually add a static textstring.
a. In the Select Link Dialog box, in the Expression area, type a space after the{DataSource.Concatenated Strings.Suffix} expression.
TutorialLesson 4: Parameterizing API Test Steps
HP Unified Functional Testing (12.02) Page 231
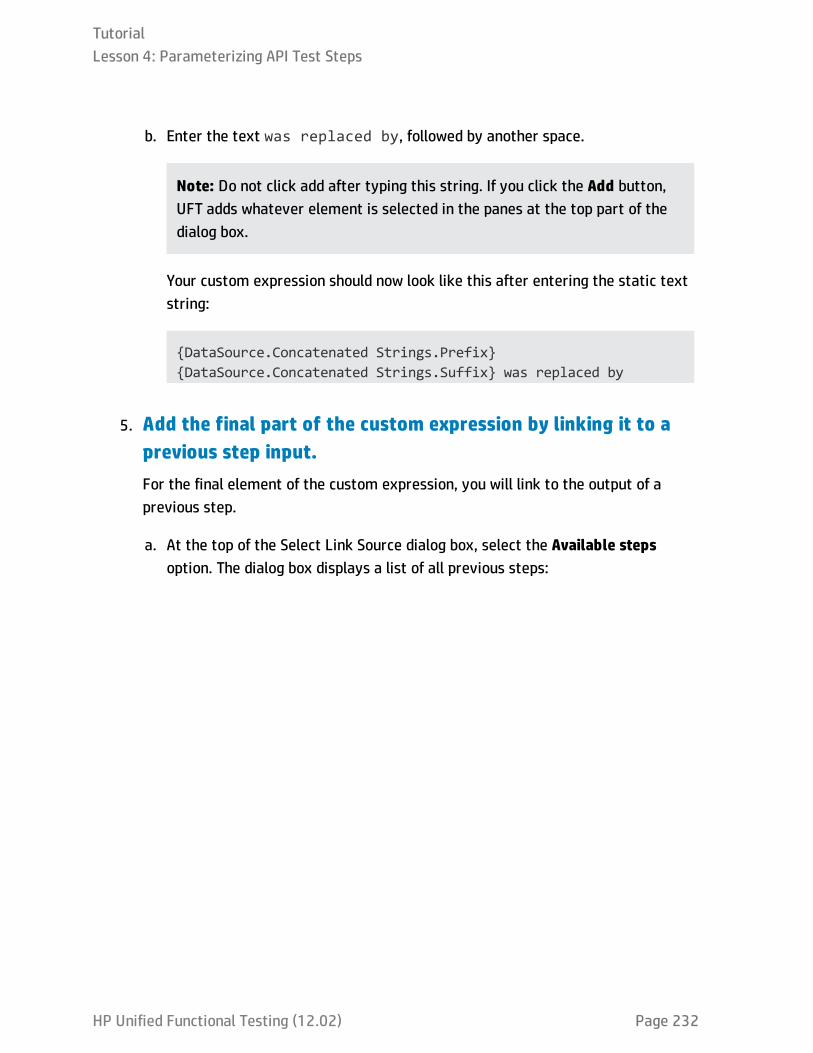
b. Enter the text was replaced by, followed by another space.
Note: Do not click add after typing this string. If you click the Add button,UFT adds whatever element is selected in the panes at the top part of thedialog box.
Your custom expression should now look like this after entering the static textstring:
{DataSource.Concatenated Strings.Prefix}{DataSource.Concatenated Strings.Suffix} was replaced by
5. Add the final part of the custom expression by linking it to aprevious step input.For the final element of the custom expression, you will link to the output of aprevious step.
a. At the top of the Select Link Source dialog box, select the Available stepsoption. The dialog box displays a list of all previous steps:
TutorialLesson 4: Parameterizing API Test Steps
HP Unified Functional Testing (12.02) Page 232
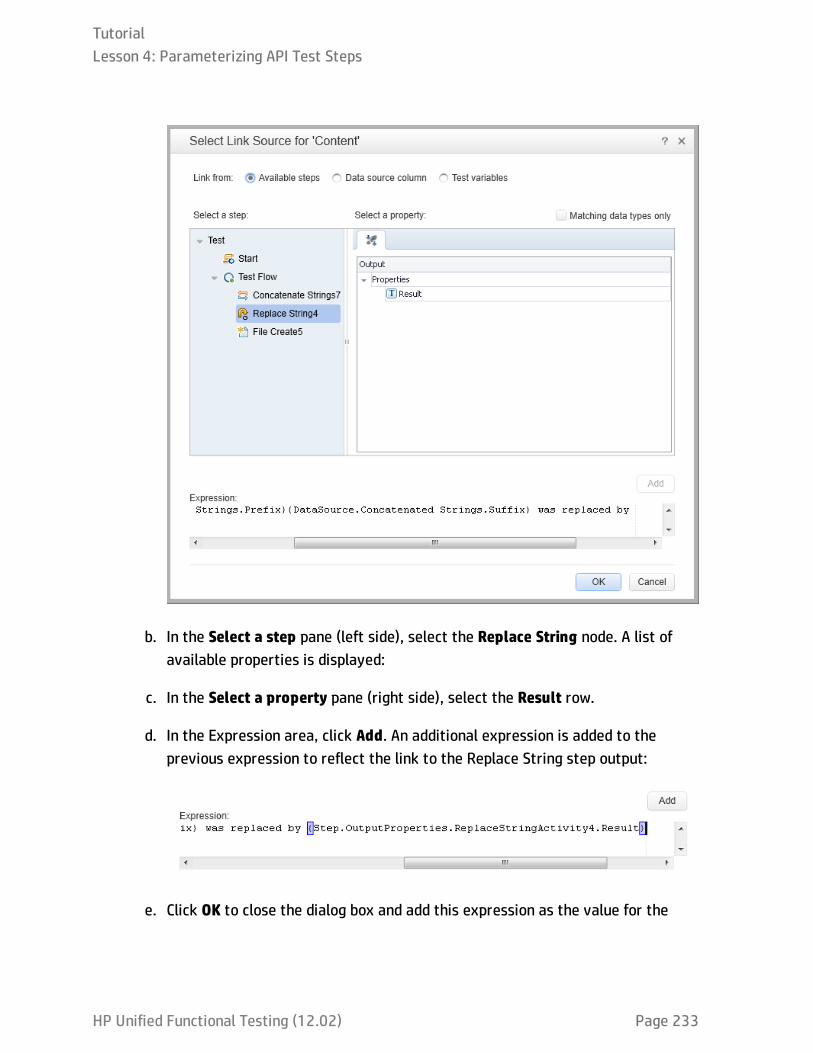
b. In the Select a step pane (left side), select the Replace String node. A list ofavailable properties is displayed:
c. In the Select a property pane (right side), select the Result row.
d. In the Expression area, click Add. An additional expression is added to theprevious expression to reflect the link to the Replace String step output:
e. Click OK to close the dialog box and add this expression as the value for the
TutorialLesson 4: Parameterizing API Test Steps
HP Unified Functional Testing (12.02) Page 233
Content property of the Write to File step.
The Value column for the Content property now displays the updatedexpression:
{DataSource.Concatenated Strings.Prefix}{DataSource.Concatenated Strings.Suffix} was replaced by{Step.OutputProperties.ReplaceStringActivity4.Result}
6. Set the number of iterations for the test run.
a. In the canvas, select the Test Flow. The Input tab opens in the Propertiespane.
b. In the Input tab, ensure that the 'For' Loop option is selected.
c. In the Number of iterations, enter 1.
7. Run the test and view the run results.
a. In the toolbar, click the Run button . The Run dialog box opens.
b. In the Run dialog box, in the Results Location tab, ensure that the Temporaryrun results option is selected.
c. Click Run to start the test run.
UFT runs the steps, taking the values for the Content property in the Write toFile step from the links you created in your custom expression.
When the test run is finished, the Run Results Viewer opens.
d. In the run results, expand the results tree.
e. Under the Summary node, expand the nodes until the Write to File node isvisible.
f. Select the Write to File node. The Run Results Viewer displays the relevantinformation about the step.
TutorialLesson 4: Parameterizing API Test Steps
HP Unified Functional Testing (12.02) Page 234

g. Open the Captured Data pane. Note the Content property value used for thistest run:
8. Save the test.
Click Save .
TutorialLesson 4: Parameterizing API Test Steps
HP Unified Functional Testing (12.02) Page 235
Lesson 5: Running API TestsIn "Exercise 3a: Creating a Test with Standard Activities" on page 203, you created abasic API test, using standard activities. Now that you have created this test, you canrun the test.
In this lesson, you will learn how to run a test and view the run results.
This lesson includes the following:
Exercise 5a: Run a Test 237
Exercise 5b: Navigate the Run Results Viewer 238
Exercise 5c: Analyze the Run Results 240
TutorialLesson 5: Running API Tests
HP Unified Functional Testing (12.02) Page 236
Exercise 5a: Run a TestIn "Exercise 3a: Creating a Test with Standard Activities" on page 203, you created atest using standard API testing activities. In "Lesson 4: Parameterizing API Test Steps"on page 209, you then parameterized the test, using a number of different methods.
In this lesson, you will learn how to prepare UFT to run the test and how to run your APItests.
1. Start UFT and open the Book Flights solution.a. Open UFT as described in "Create a Solution for All Your Tests" on page 36.
b. On the Start Page, in the Recent Tests area, click Flight ReservationApplication.
The Flight Reservation Application solution opens, containing the Book Flightstest you created in "Exercise 3a: Creating a Test with Standard Activities" onpage 203.
2. Set the run mode for the test.Before you run your test, you must instruct UFT how you want to run the test. Youcan run a test in Release mode, which runs the test quickly, or Debug mode, whichruns more slowly as UFT needs to load the debugging tools before the test run.
a. Select Tools > Options. The Options dialog opens.
b. In the Options dialog box, select the API Testing tab.
c. In the API Testing tab, select the General node.
d. In the General pane, select the Run test in debugging mode option.
3. Start running your test.
a. In the toolbar, click the Run button . The Run dialog box opens.
TutorialLesson 5: Running API Tests
HP Unified Functional Testing (12.02) Page 237

b. In the Run dialog box, click on the Options bar to expand the dialog box.
c. In the Options area, click the Results location tab. This enables you to specifywhere the test results are saved.
d. In the Results location, select the New run results folder option. Accept thedefault folder name.
e. Click Run to close the Run dialog box and start running the test.
As UFT runs the test, it provides a log of steps performed in the output pane,including the input and output parameters,and the result of any checkpointsrun:
Any errors that occur during the test run are reported as part of the log. Youcan return to the relevant step to fix these errors.
When the test run is complete, the Run Results Viewer opens with the run results.Continue to "Exercise 5b: Navigate the Run Results Viewer" below to learn more aboutthe run results.
Exercise 5b: Navigate the Run Results ViewerIn "Exercise 5a: Run a Test" on the previous page, you ran the Standard test youcreated. After the test run is finished, the Run Results Viewer automatically displaysthe results for this test run.
TutorialLesson 5: Running API Tests
HP Unified Functional Testing (12.02) Page 238
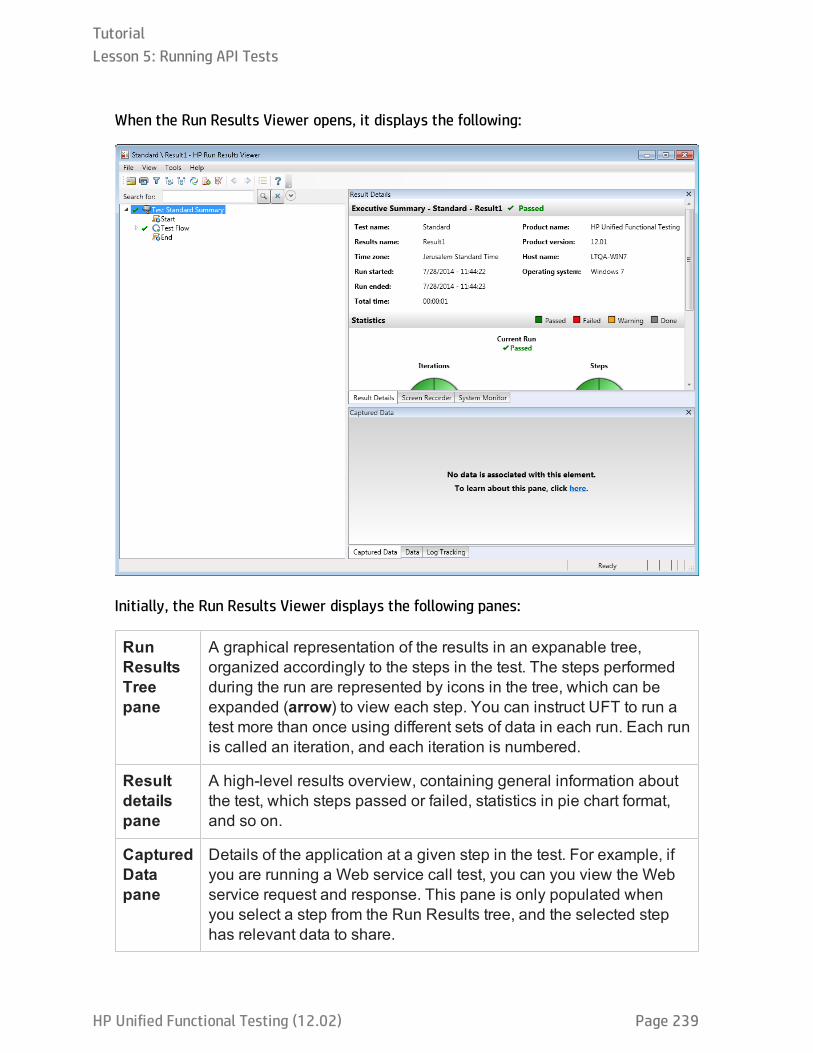
When the Run Results Viewer opens, it displays the following:
Initially, the Run Results Viewer displays the following panes:
RunResultsTreepane
A graphical representation of the results in an expanable tree,organized accordingly to the steps in the test. The steps performedduring the run are represented by icons in the tree, which can beexpanded (arrow) to view each step. You can instruct UFT to run atest more than once using different sets of data in each run. Each runis called an iteration, and each iteration is numbered.
Resultdetailspane
A high-level results overview, containing general information aboutthe test, which steps passed or failed, statistics in pie chart format,and so on.
CapturedDatapane
Details of the application at a given step in the test. For example, ifyou are running a Web service call test, you can you view the Webservice request and response. This pane is only populated whenyou select a step from the Run Results tree, and the selected stephas relevant data to share.
TutorialLesson 5: Running API Tests
HP Unified Functional Testing (12.02) Page 239
Note: The Test Flow pane is an additional pane in the Run Results Viewer. This paneis not open by default, but can be opened by selecting View > Test Flow.
Your test run succeeded because UFT was able to perform all the steps correctlyaccording to the steps you created and the properties you provided. If an error occuredand your test did not run successfully, the error is listed in the log in the Output pane.In such cases, go back and make sure that the steps are configured exactly as describedin this tutorial.
Now that you know what the Run Results Viewer displays continue to "Exercise5c: Analyze the Run Results" below to learn about the details of the run results.
Exercise 5c: Analyze the Run ResultsIn this exercise, you will inspect the steps UFT performed when running your test in"Exercise 5a: Run a Test" on page 237.
1. View the results for a specific step.a. In the results tree, use the arrows to expand the Test Flow > Summary
> Iteration 1 node to see all of the steps performed in this test.
TutorialLesson 5: Running API Tests
HP Unified Functional Testing (12.02) Page 240

b. Under the Iteration 1 node, select the Replace String node:
The Run Results Viewer now displays the following information:
o The Run Results Tree pane, with one step highlighted.
o The Result Details pane, displaying details of the highlighted step.
o The Captured Data pane, showing the details of the step, including input andoutput properties and the result of the step.
2. Close the Run Results Viewer.Select File > Exit.
TutorialLesson 5: Running API Tests
HP Unified Functional Testing (12.02) Page 241

Lesson 6: Creating and Running API Tests ofWeb ServicesIn "Lesson 3: Creating API Test Steps Using Standard Activities" on page 201, youlearned how to create a test using standard API activities.
However, there will also be times where standard activities do not match the processesyour application performs. In these cases, you will need to use custom activities thatyou import into UFT. One of the more widely used types of service activities are Webservices. In UFT, you import the service and its methods into UFT, which then makesthem available for use in your tests.
In this lesson, you will learn how to create a Web service test and run the test.
This lesson includes the following:
Exercise 6a: Create a Web Service Test 243
Exercise 6b: Import a Web Service 244
Exercise 6c: Build and Parameterize a Web Service Test 247
Exercise 6d: Run a Web Service Test 254
TutorialLesson 6: Creating and Running API Tests of Web Services
HP Unified Functional Testing (12.02) Page 242
Exercise 6a: Create a Web Service TestIn "Create a Solution for All Your Tests" on page 36, you created a solution for the flightreservation application tests. In "Creating and Running Automated GUI Tests" onpage 39, you created a variety of GUI tests that tested the performance of the flightreservation's user interface.
In this exercise, you will create the first of the API tests necessary to test the service(API) layer of the flight reservation application.
1. Start UFT and open the flight reservation application solution.a. Open UFT as described in "Create a Solution for All Your Tests" on page 36.
b. On the Start Page, in the Recent Solutions area, click Flight ReservationApplication.
The Flight Reservation Application solution opens, containing the Book Flightstest you created in "Lesson 1: Create a GUI Test and Actions" on page 41.
2. Add a new API test to the solution.
a. In the toolbar, select the Add drop-down arrow and select Add NewTest. The Add New Test dialog box opens.
b. In the Add New Test dialog box, select API Test.
c. In the Name field, name the test Book Flights Web Service.
d. In the Location field, click the Browse button and navigate to theC:\%HOMEPATH%\Unified Functional Testing folder.
e. Click Add to create the test and add it to the solution.
TutorialLesson 6: Creating and Running API Tests of Web Services
HP Unified Functional Testing (12.02) Page 243
The Book Flights Web Service test is added as a separate node in the FlightReservation Application solution and opens as a separate tab in the documentpane.
Note: The solution is saved automatically.
Now that you have created the test, you are ready to begin working with the Webservice and its methods. Continue to "Exercise 6b: Import a Web Service" below to learnhow to import the Web service into your test.
Exercise 6b: Import a Web ServiceBefore testing your Web service, you must import the service description and itsmethods into UFT. Typically, service descriptions are stored in a WSDL (Web ServiceDescription Language) file. This file defines the metadata for the service as well as theservice's operations/methods. UFT then reads this WSDL file and creates the service'smethods as activities in the Toolbox pane.
In this exercise, you will import the flight reservation application's service WSDL fileinto UFT.
1. Start the Flights API application.Start the HP Flights Service API application, as described in "Explore the FlightReservation Application" on page 33.
Note: Make sure that this application remains open when you are working withthe tutorial, as UFT must be able to access it when editing and running the test.
2. Import the WSDL file.a. In UFT, in the toolbar, press the Import WSDL button and select Import WSDL
from URL or UDDI. The Import WSDL from URL or UDDI dialog box opens.
Note: If you had a copy of your WSDL file saved locally or in an ALM project,
TutorialLesson 6: Creating and Running API Tests of Web Services
HP Unified Functional Testing (12.02) Page 244
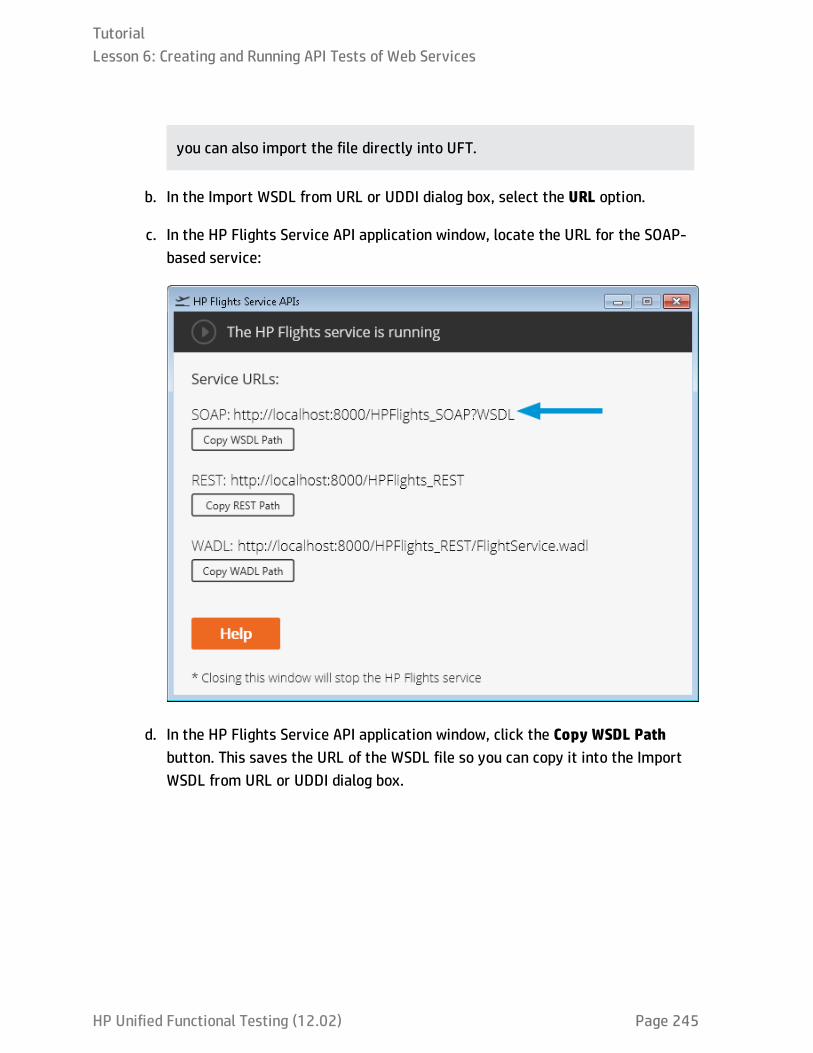
you can also import the file directly into UFT.
b. In the Import WSDL from URL or UDDI dialog box, select the URL option.
c. In the HP Flights Service API application window, locate the URL for the SOAP-based service:
d. In the HP Flights Service API application window, click the Copy WSDL Pathbutton. This saves the URL of the WSDL file so you can copy it into the ImportWSDL from URL or UDDI dialog box.
TutorialLesson 6: Creating and Running API Tests of Web Services
HP Unified Functional Testing (12.02) Page 245
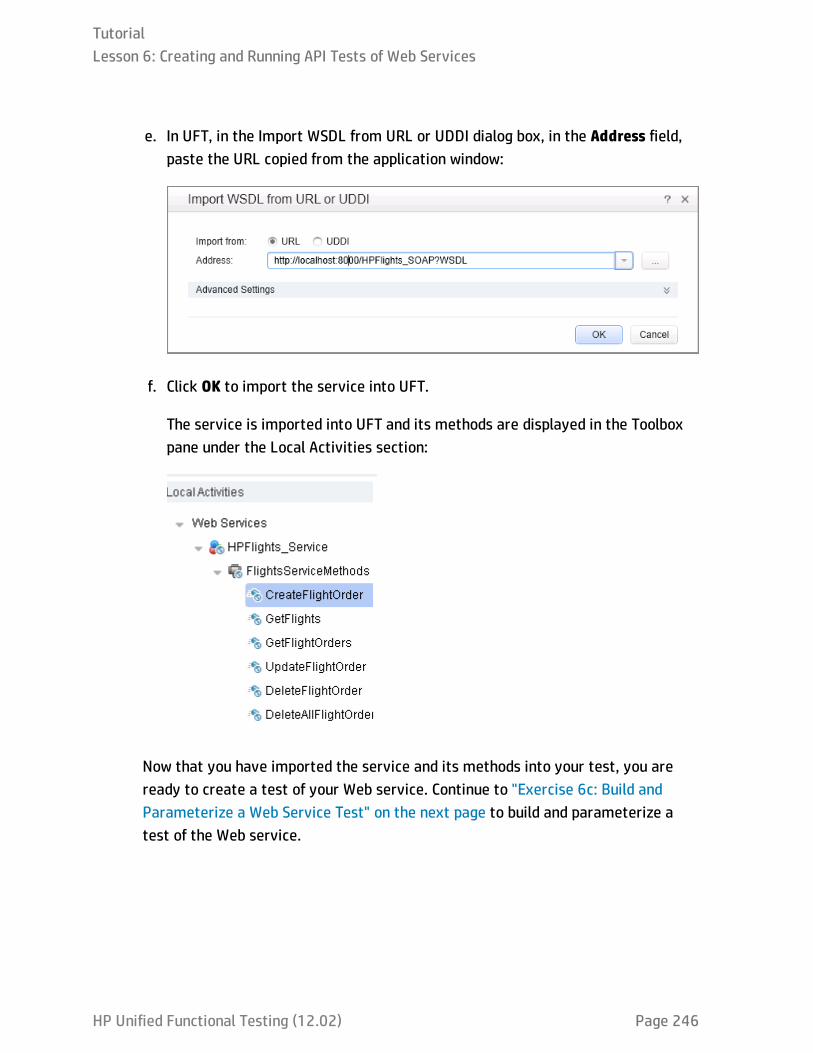
e. In UFT, in the Import WSDL from URL or UDDI dialog box, in the Address field,paste the URL copied from the application window:
f. Click OK to import the service into UFT.
The service is imported into UFT and its methods are displayed in the Toolboxpane under the Local Activities section:
Now that you have imported the service and its methods into your test, you areready to create a test of your Web service. Continue to "Exercise 6c: Build andParameterize a Web Service Test" on the next page to build and parameterize atest of the Web service.
TutorialLesson 6: Creating and Running API Tests of Web Services
HP Unified Functional Testing (12.02) Page 246
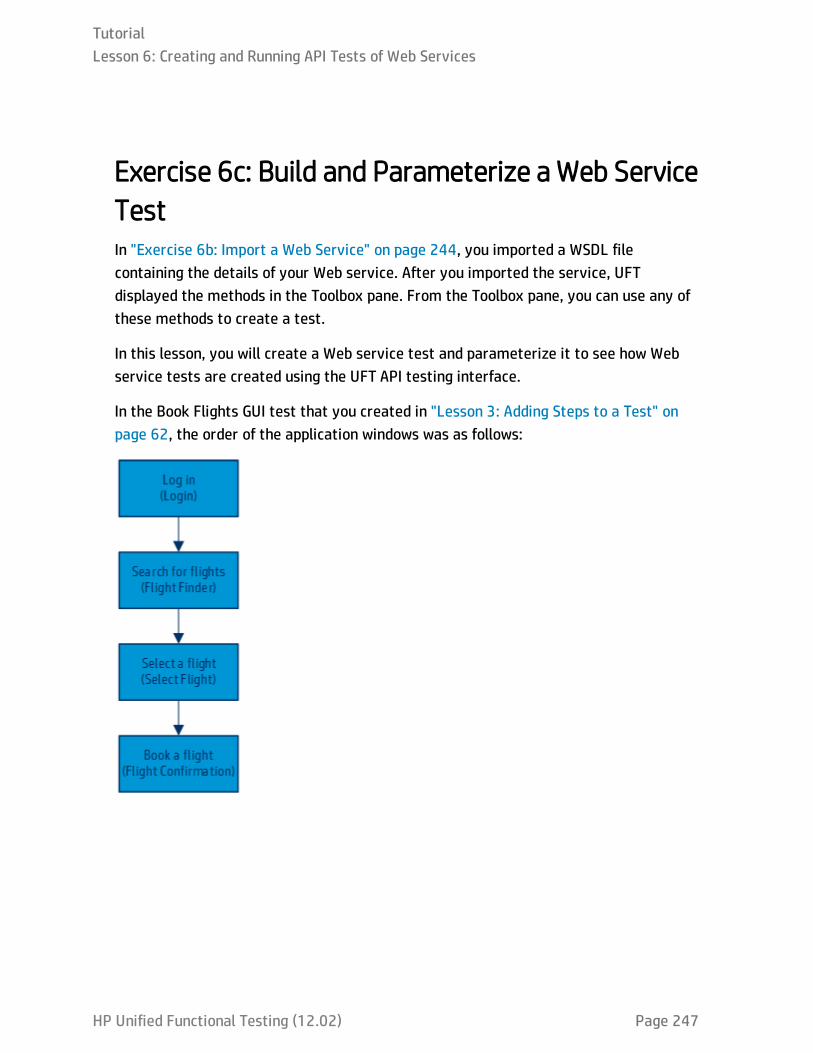
Exercise 6c: Build and Parameterize a Web ServiceTestIn "Exercise 6b: Import a Web Service" on page 244, you imported a WSDL filecontaining the details of your Web service. After you imported the service, UFTdisplayed the methods in the Toolbox pane. From the Toolbox pane, you can use any ofthese methods to create a test.
In this lesson, you will create a Web service test and parameterize it to see how Webservice tests are created using the UFT API testing interface.
In the Book Flights GUI test that you created in "Lesson 3: Adding Steps to a Test" onpage 62, the order of the application windows was as follows:
TutorialLesson 6: Creating and Running API Tests of Web Services
HP Unified Functional Testing (12.02) Page 247

When you create an API test of the same application, you want to make the stepsmatch the application's flow as closely as possible. In the list of methods imported fromthe WSDL file, you have the following:
l CreateFlightOrder
l GetFlights
l GetFlightOrders
l UpdateFlightOrder
l DeleteFlightOrder
l DeleteAllFlightOrders
In order to match the flow of the user interface, you need to create API test steps thatfind the flight, and then create a flight order based on the customer input.
In this exercise, you will create two test steps: GetFlights and CreateFlightOrder.
1. Create the test steps.a. In the Toolbox pane, in the Local Activities section, expand the Web Services
and then the HP_Flights Services and the FlightsServiceMethods nodes. TheToolbox pane displays the full list of available methods (six in all).
b. From the list of FlightsServiceMethods, drag the GetFlightsmethod to thecanvas.
A new step block is added to the canvas, called GetFlights. TheInput/Checkpoints tab opens in the Properties pane.
c. In the Toolbox pane, from the FlightsServiceMethods node again, drag theCreateFlightOrder method to the canvas.
2. Link the FlightNumber property of the CreateFlightOrder stepto the output of the GetFlights step.a. In the canvas, select the CreateFlightOrder step. The Input/Checkpoints tab
opens in the Properties pane.
TutorialLesson 6: Creating and Running API Tests of Web Services
HP Unified Functional Testing (12.02) Page 248

b. In the Input/Checkpoints tab, in the Input section, select the FlightNumberrow.
c. In the Value column of the FlightNumber row, click the Link to a data sourcebutton . The Select Link Source dialog box opens.
d. In the Select Link Source dialog box, select the Available steps option. TheSelect a step: pane (left side) is updated with a list of available steps.
e. In the Select a step: pane, select the GetFlights step. The Select a property:pane (right side) is updated with the step properties:
f. In the Select a property: pane, in the Input/Checkpoints tab , in the Outputsection, expand the GetFlightsResult node.
TutorialLesson 6: Creating and Running API Tests of Web Services
HP Unified Functional Testing (12.02) Page 249

g. Under the GetFlightsResult node, in the Flight (array) row, click the Add button
. A new output array is added to the output properties.
h. Under the Flight (array) row, expand the Flight[1] array. A list of all the outputproperties for the GetFlights step is displayed.
i. In the list of output properties, select the FlightNumber property and click OK.When prompted if you want to enclose the target step in a loop, select No.
UFT updates the Value column for the FlightNumber property to reflect the link:
3. Add a data source to use in your test.a. If necessary, select View > Data to display the Data pane.
b. In the Data pane, click the New Data source button and select Excel. TheNew Excel Data Source dialog box opens.
c. In the New Data Source dialog box, in the Excel file path field, click the Browsebutton.
d. In the Open dialog box, navigate to the application Excel file, saved in <UFTinstallation directory>\samples\Flights Application and click OK.
e. In the New Excel Data Source dialog box, name the file WS_Flights.
f. Select the Link to the Excel file in its original location option.
TutorialLesson 6: Creating and Running API Tests of Web Services
HP Unified Functional Testing (12.02) Page 250
g. Click OK to save the data source information and add the Excel data to yourtest.
4. Link the input properties of the test steps to the data source.
a. In the canvas, select the GetFlights step. The Input/Checkpoints tab opensin the Properties pane.
b. In the Input/Checkpoints tab, in the Input section, expand the FlightOrder node.
c. In the FlightOrder node, select the DepartureCity row.
d. In the Value column of the DepartureCity row, click the Link to a data sourcebutton . The Select Link Source dialog box opens.
e. In the Select Link Souce dialog box, select the Data source column option. Thelist of data sources (in this case just the Excel file) is displayed in the Select adata source pane (left side).
f. In the Select a data source pane, select the WS_Flights!Input node. The list ofall available data parameters (columns) is displayed in the Select data pane(right side).
TutorialLesson 6: Creating and Running API Tests of Web Services
HP Unified Functional Testing (12.02) Page 251

g. In the Select data pane, choose the DepartureCity column:
h. Click OK to link the property to this column in the data table.
UFT updates the Value column with a statement showing the link to the datasource.
i. Repeat the process above for the step's other properties:
o ArrivalCity
o FlightDate
TutorialLesson 6: Creating and Running API Tests of Web Services
HP Unified Functional Testing (12.02) Page 252
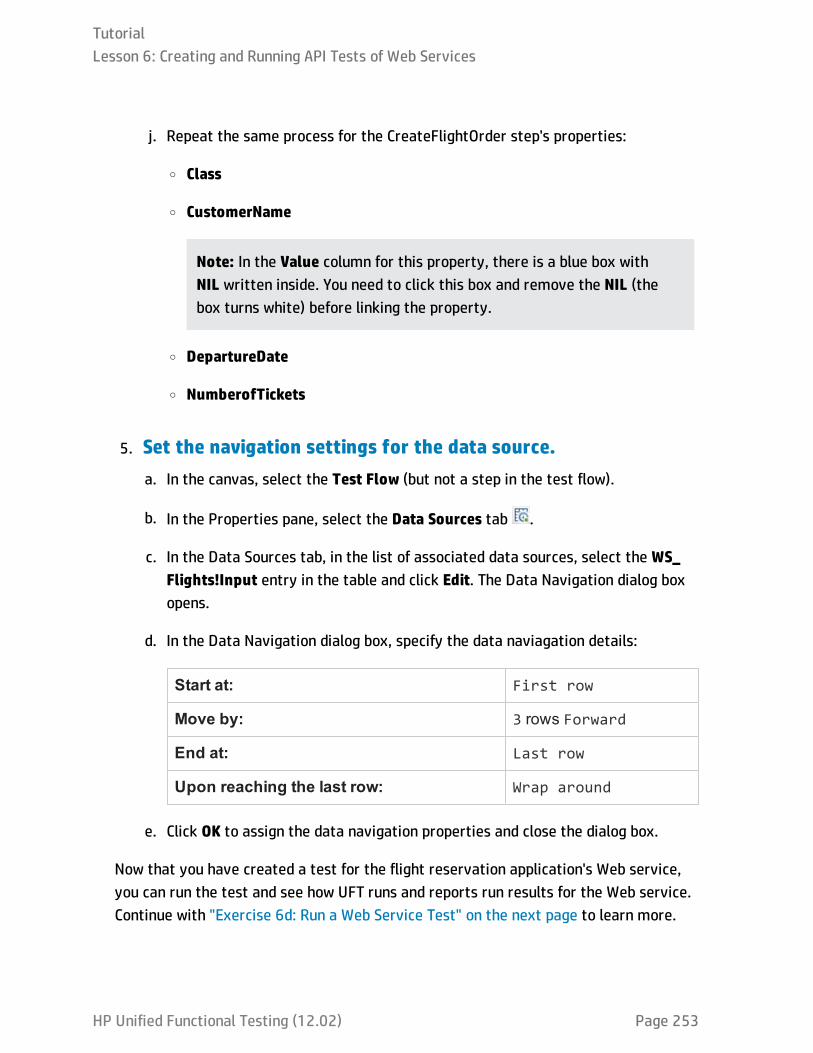
j. Repeat the same process for the CreateFlightOrder step's properties:
o Class
o CustomerName
Note: In the Value column for this property, there is a blue box withNIL written inside. You need to click this box and remove the NIL (thebox turns white) before linking the property.
o DepartureDate
o NumberofTickets
5. Set the navigation settings for the data source.a. In the canvas, select the Test Flow (but not a step in the test flow).
b. In the Properties pane, select the Data Sources tab .
c. In the Data Sources tab, in the list of associated data sources, select the WS_Flights!Input entry in the table and click Edit. The Data Navigation dialog boxopens.
d. In the Data Navigation dialog box, specify the data naviagation details:
Start at: First row
Move by: 3 rows Forward
End at: Last row
Upon reaching the last row: Wrap around
e. Click OK to assign the data navigation properties and close the dialog box.
Now that you have created a test for the flight reservation application's Web service,you can run the test and see how UFT runs and reports run results for the Web service.Continue with "Exercise 6d: Run a Web Service Test" on the next page to learn more.
TutorialLesson 6: Creating and Running API Tests of Web Services
HP Unified Functional Testing (12.02) Page 253
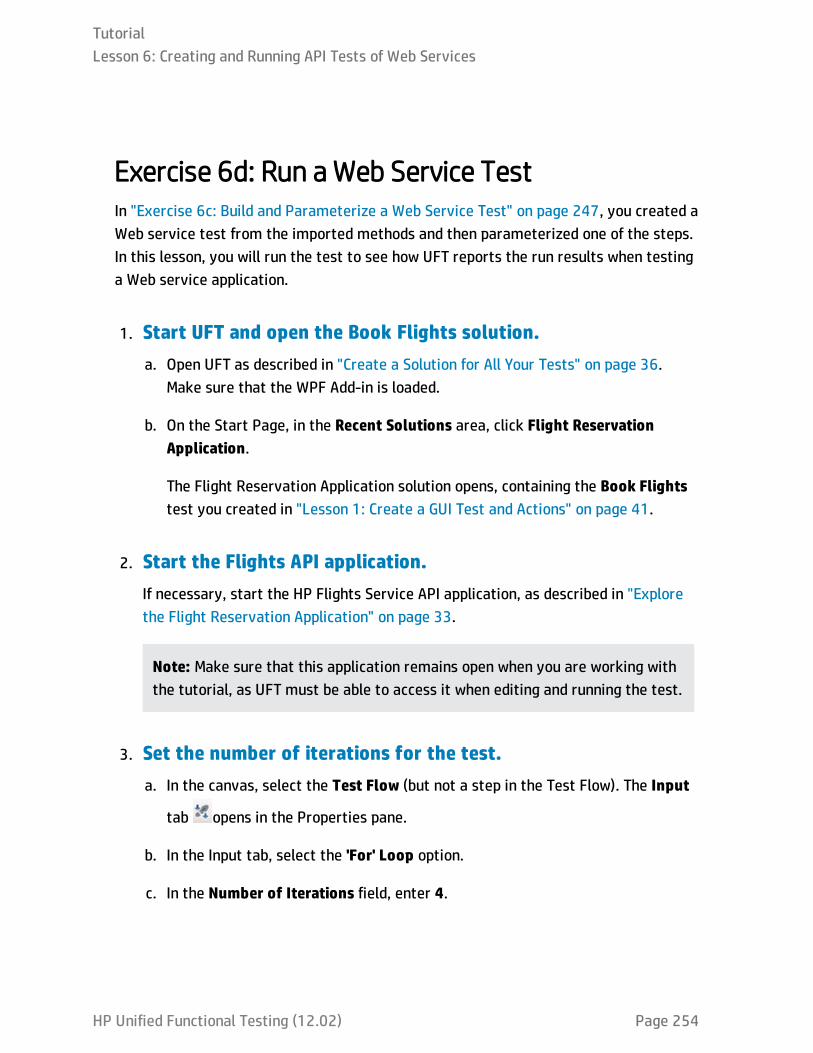
Exercise 6d: Run a Web Service TestIn "Exercise 6c: Build and Parameterize a Web Service Test" on page 247, you created aWeb service test from the imported methods and then parameterized one of the steps.In this lesson, you will run the test to see how UFT reports the run results when testinga Web service application.
1. Start UFT and open the Book Flights solution.a. Open UFT as described in "Create a Solution for All Your Tests" on page 36.
Make sure that the WPF Add-in is loaded.
b. On the Start Page, in the Recent Solutions area, click Flight ReservationApplication.
The Flight Reservation Application solution opens, containing the Book Flightstest you created in "Lesson 1: Create a GUI Test and Actions" on page 41.
2. Start the Flights API application.If necessary, start the HP Flights Service API application, as described in "Explorethe Flight Reservation Application" on page 33.
Note: Make sure that this application remains open when you are working withthe tutorial, as UFT must be able to access it when editing and running the test.
3. Set the number of iterations for the test.a. In the canvas, select the Test Flow (but not a step in the Test Flow). The Input
tab opens in the Properties pane.
b. In the Input tab, select the 'For' Loop option.
c. In the Number of Iterations field, enter 4.
TutorialLesson 6: Creating and Running API Tests of Web Services
HP Unified Functional Testing (12.02) Page 254
4. Run the test.
a. In the toolbar, click the Run button . The Run dialog box opens.
b. In the Result Locations tab in the Run dialog box, ensure that the Temporaryrun results folder is still selected.
c. Click Run to compile and run the test.
After the test run is complete, the Run Results Viewer opens with the testresults.
5. View the run results.a. In the Run Results Tree pane (left pane), right-click the Test Book Flights Web
Service Summary node and select Expand All.
b. In the results tree, under any of the nodes for the iterations (labeled with anIteration #), select the GetFlights node. The Run Results Viewer updates theother panes with the appropriate details for the step.
c. With the GetFlights node selected, click on the Captured Data tab.
TutorialLesson 6: Creating and Running API Tests of Web Services
HP Unified Functional Testing (12.02) Page 255
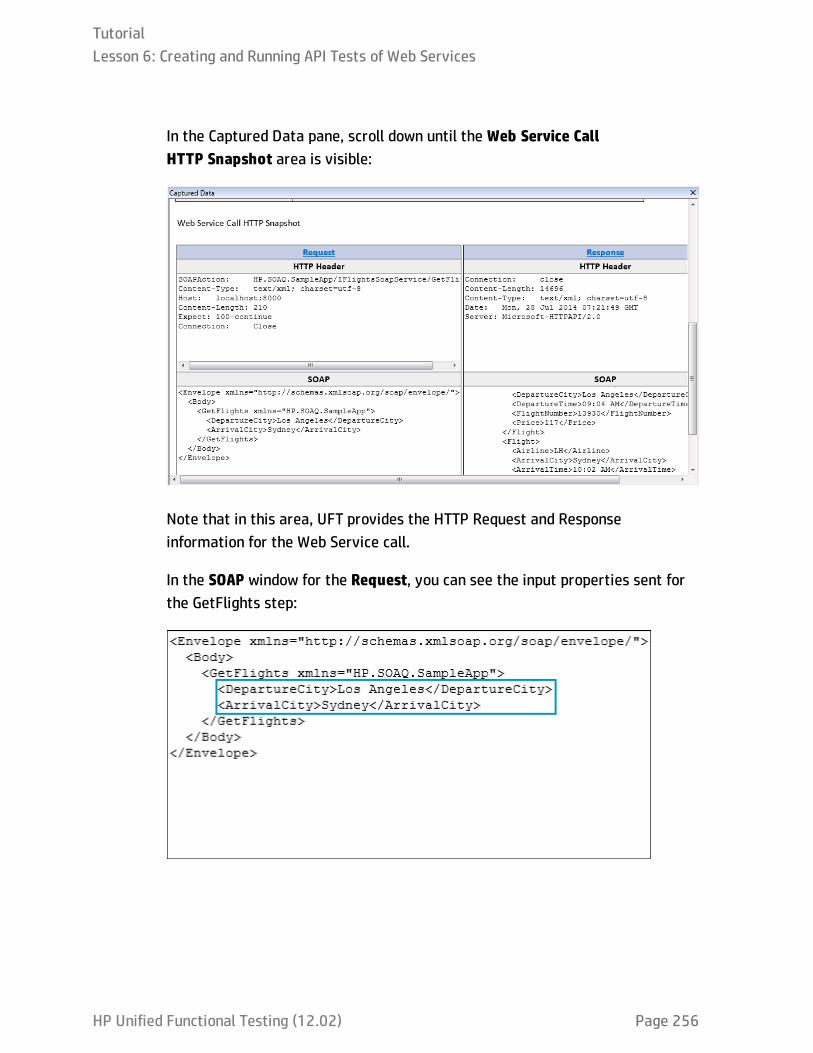
In the Captured Data pane, scroll down until the Web Service CallHTTP Snapshot area is visible:
Note that in this area, UFT provides the HTTP Request and Responseinformation for the Web Service call.
In the SOAP window for the Request, you can see the input properties sent forthe GetFlights step:
TutorialLesson 6: Creating and Running API Tests of Web Services
HP Unified Functional Testing (12.02) Page 256

Likewise, in the Response area, you can see the step's output properties:
d. Under the GetFlights node, select the Checkpoints node. The Run ResultsViewer updates the panes with the details for the checkpoint.
e. With the Checkpoints node selected, click on the Captured Data tab again. Thecheckpoint details are displayed.
In the Captured Data pane for a checkpoint, UFT displays the result (whetherthe checkpoint passed or failed, the actual and expected values, and the type ofcheckpoint:
6. Save the test.Select File > Save.
TutorialLesson 6: Creating and Running API Tests of Web Services
HP Unified Functional Testing (12.02) Page 257

Lesson 7: Creating and Running API Tests ofREST ServicesIn addition to testing Web services in UFT, you can use API testing to also test yourREST-based services or REST-based service layers of your application. You create aprototype model of the service in UFT, and then use the created methods to structureyour tests.
This lesson will teach you the basic steps in creating REST service prototype modelsand creating tests using these method models.
This lesson includes the following:
Exercise 7a: Create a REST Service Test 259
Exercise 7b: Create a REST Service Structure 260
Exercise 7c: Create a Test Using REST Service Methods 266
Exercise 7d: Run a REST Service Test 270
Exercise 7e: Resolve a REST Service Conflict 272
TutorialLesson 7: Creating and Running API Tests of REST Services
HP Unified Functional Testing (12.02) Page 258

Exercise 7a: Create a REST Service TestIn "Lesson 6: Creating and Running API Tests of Web Services" on page 242, you createda Web service test for the API side of the flight reservation application. In this exercise,you will add a test for the REST service component of the API side of the flightreservation application.
1. Start UFT and open the flight reservation application solution.a. Open UFT as described in "Create a Solution for All Your Tests" on page 36.
b. On the Start Page, in the Recent Solutions area, click Flight ReservationApplication.
The Flight Reservation Application solution opens.
2. Add a new API test to the solution.
a. In the toolbar, select the Add drop-down arrow and select Add NewTest. The Add New Test dialog box opens.
b. In the Add New Test dialog box, select API Test.
c. In the Name field, name the test Book Flights REST Service.
d. In the Location field, click the Browse button and navigate to theC:\%HOMEPATH%\Unified Functional Testing folder.
e. Click Add to create the test and add it to the solution.
The Book Flights REST Service test is added as a separate node in the FlightReservation Application solution and opens as a separate tab in the documentpane.
Note: The solution is saved automatically.
TutorialLesson 7: Creating and Running API Tests of REST Services
HP Unified Functional Testing (12.02) Page 259

Now that you have created the test, you are ready to begin working with theREST service model and its methods. Continue to "Exercise 7b: Create a REST ServiceStructure" below to learn how to create the REST service model in your test.
Exercise 7b: Create a REST Service StructureBefore you can use a REST Service activity in your tests, you must create a model ofthe necessary methods and their properties inside of UFT. UFT then takes theinformation for the service and methods and uses them as test steps to test the realservice's performance.
1. Start UFT and open the Book Flights solution.a. Open UFT as described in "Create a Solution for All Your Tests" on page 36.
b. On the Start Page, in the Recent Solutions area, click Flight ReservationApplication.
The Flight Reservation Application solution opens, containing the Book FlightsREST Service test you created in "Exercise 7a: Create a REST Service Test" onthe previous page.
2. Start the Flights API application.Make sure that the HP Flights Service APIs application is running, as described in"Explore the Flight Reservation Application" on page 33.
3. Open the REST Service method properties help document.In the HP Flights Service APIs window, click the HELP button. A browser windowopens with the method information.
4. Create a REST service model.a. In the toolbar, click the Add REST Service button. The Add REST Service dialog
box opens.
TutorialLesson 7: Creating and Running API Tests of REST Services
HP Unified Functional Testing (12.02) Page 260
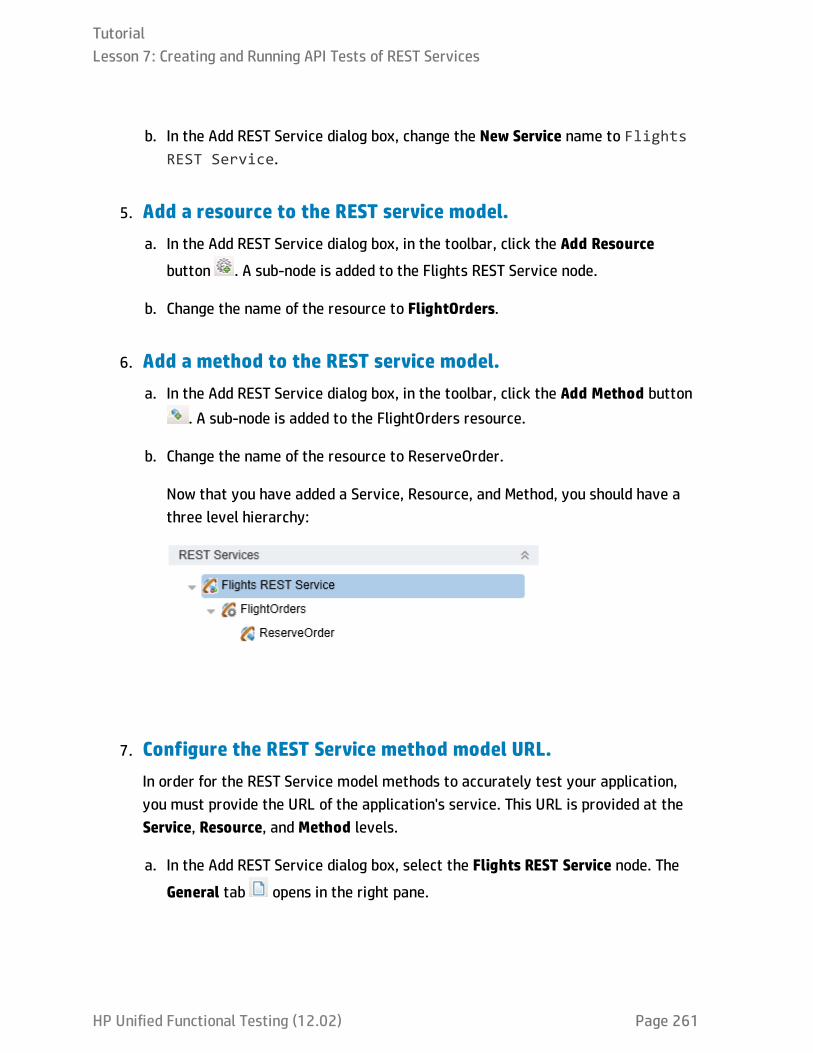
b. In the Add REST Service dialog box, change the New Service name to FlightsREST Service.
5. Add a resource to the REST service model.a. In the Add REST Service dialog box, in the toolbar, click the Add Resource
button . A sub-node is added to the Flights REST Service node.
b. Change the name of the resource to FlightOrders.
6. Add a method to the REST service model.a. In the Add REST Service dialog box, in the toolbar, click the Add Method button
. A sub-node is added to the FlightOrders resource.
b. Change the name of the resource to ReserveOrder.
Now that you have added a Service, Resource, and Method, you should have athree level hierarchy:
7. Configure the REST Service method model URL.In order for the REST Service model methods to accurately test your application,you must provide the URL of the application's service. This URL is provided at theService, Resource, and Method levels.
a. In the Add REST Service dialog box, select the Flights REST Service node. The
General tab opens in the right pane.
TutorialLesson 7: Creating and Running API Tests of REST Services
HP Unified Functional Testing (12.02) Page 261

b. In the General tab, in the Value column for the URL property, enterhttp://localhost:8000.
c. In the left pane, select the Flight Orders row. The General pane again opensin the right pane. Note that the URL you added in the General pane when theFlights REST Service was selected is displayed.
d. In the General tab, in the Value column for the Relative URL property, enterHPFlights_REST.
After you add this portion of the URL, UFT adds the Relative URL value to theURL value to make the concatenated URL:http://localhost:8000/HPFlights_REST.
e. In the left pane, select the ReserveOrder node. The General pane opens inthe right pane.
f. In the right pane, select the HTTP Input/Checkpoints tab .
g. In the Value column for the Relative URL property, enter /FlightOrders.
UFT concatenates this part of the URL with the URL passed from the FlightsREST Service and Flight Orders levels.
8. Configure the additional HTTP properties for the ReserveOrdersmethod model.a. In the Add REST Service dialog box, select the ReserveOrder node. The General
pane opens in the right pane.
b. In the right pane, select the HTTP Input/Checkpoints tab .
c. In the Value column for the HTTP method property, set the HTTP type to POST.
9. Add response information for the ReserveOrder method model.a. In the Add REST Service dialog box, select the ReserveOrder node. The General
tab opens in the right pane.
TutorialLesson 7: Creating and Running API Tests of REST Services
HP Unified Functional Testing (12.02) Page 262
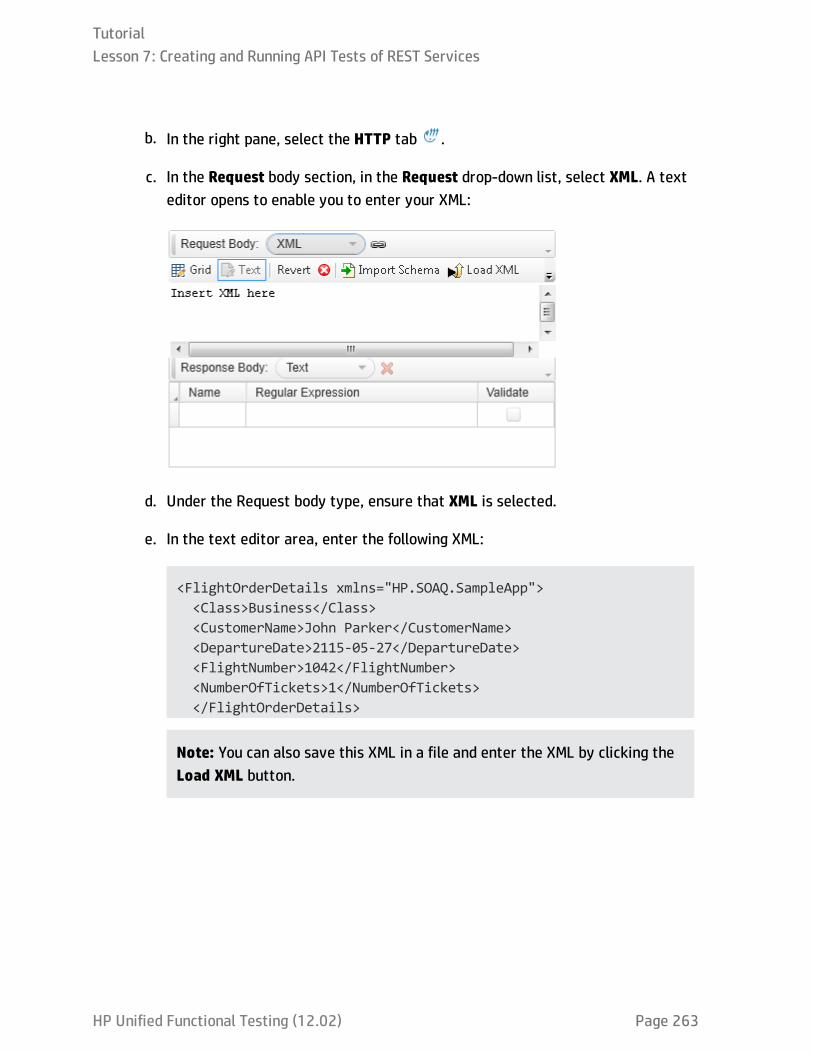
b. In the right pane, select the HTTP tab .
c. In the Request body section, in the Request drop-down list, select XML. A texteditor opens to enable you to enter your XML:
d. Under the Request body type, ensure that XML is selected.
e. In the text editor area, enter the following XML:
<FlightOrderDetails xmlns="HP.SOAQ.SampleApp"><Class>Business</Class><CustomerName>John Parker</CustomerName><DepartureDate>2115-05-27</DepartureDate><FlightNumber>1042</FlightNumber><NumberOfTickets>1</NumberOfTickets></FlightOrderDetails>
Note: You can also save this XML in a file and enter the XML by clicking theLoad XML button.
TutorialLesson 7: Creating and Running API Tests of REST Services
HP Unified Functional Testing (12.02) Page 263

If you click the Grid button, you can also see the properties you entered in theXML displayed in grid form:
f. In the right pane, select the HTTP Input/Checkpoints tab again.
g. In the Input section of the HTTP Input/Checkpoints tab, expand the RequestHeaders node, and then the Request Headers [1] node.
Note the settings for the response:
o Name: Content - Type
o Value: text/xml
10. Create output properties for the ReserveOrder method model.a. In the Add REST Service dialog box, select the ReserveOrder node. The General
tab opens in the right pane.
TutorialLesson 7: Creating and Running API Tests of REST Services
HP Unified Functional Testing (12.02) Page 264
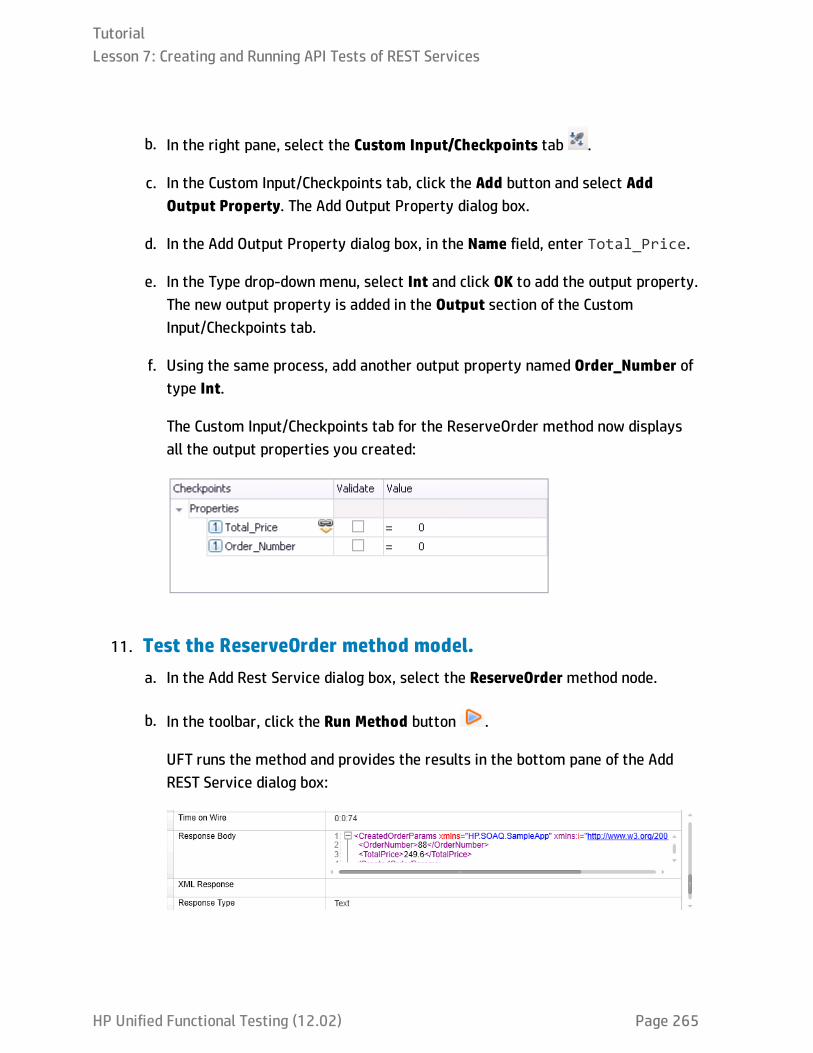
b. In the right pane, select the Custom Input/Checkpoints tab .
c. In the Custom Input/Checkpoints tab, click the Add button and select AddOutput Property. The Add Output Property dialog box.
d. In the Add Output Property dialog box, in the Name field, enter Total_Price.
e. In the Type drop-down menu, select Int and click OK to add the output property.The new output property is added in the Output section of the CustomInput/Checkpoints tab.
f. Using the same process, add another output property named Order_Number oftype Int.
The Custom Input/Checkpoints tab for the ReserveOrder method now displaysall the output properties you created:
11. Test the ReserveOrder method model.a. In the Add Rest Service dialog box, select the ReserveOrder method node.
b. In the toolbar, click the Run Method button .
UFT runs the method and provides the results in the bottom pane of the AddREST Service dialog box:
TutorialLesson 7: Creating and Running API Tests of REST Services
HP Unified Functional Testing (12.02) Page 265
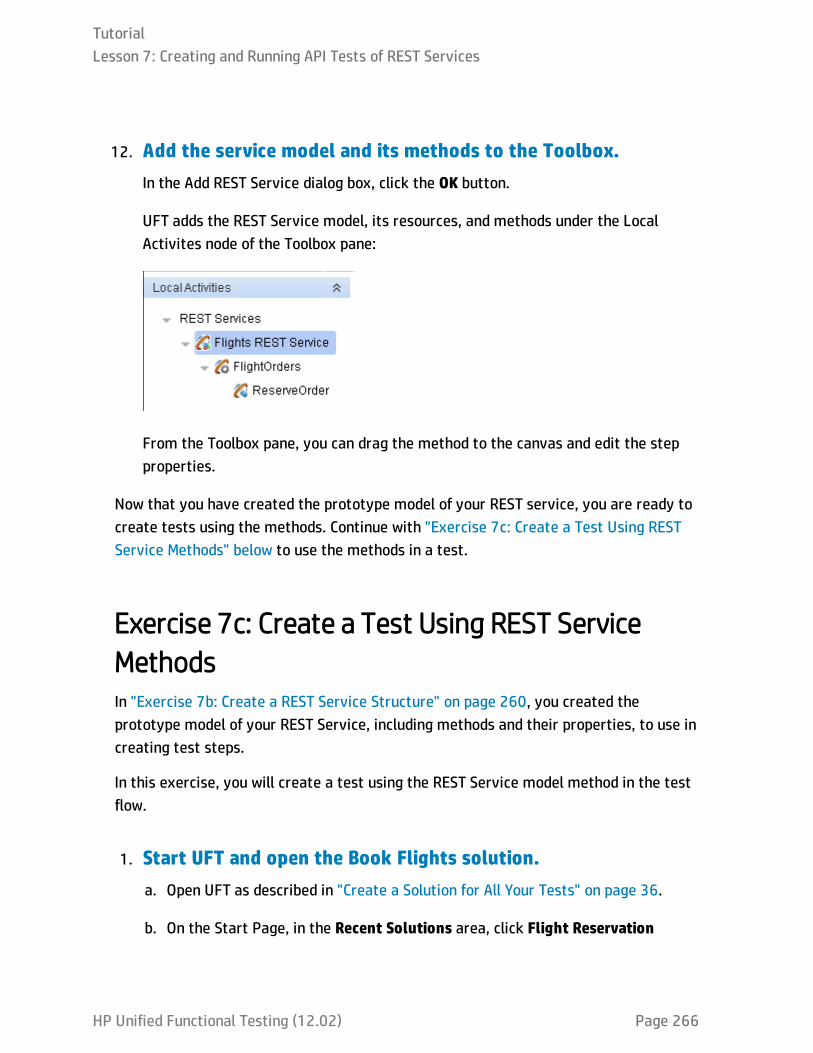
12. Add the service model and its methods to the Toolbox.In the Add REST Service dialog box, click the OK button.
UFT adds the REST Service model, its resources, and methods under the LocalActivites node of the Toolbox pane:
From the Toolbox pane, you can drag the method to the canvas and edit the stepproperties.
Now that you have created the prototype model of your REST service, you are ready tocreate tests using the methods. Continue with "Exercise 7c: Create a Test Using RESTService Methods" below to use the methods in a test.
Exercise 7c: Create a Test Using REST ServiceMethodsIn "Exercise 7b: Create a REST Service Structure" on page 260, you created theprototype model of your REST Service, including methods and their properties, to use increating test steps.
In this exercise, you will create a test using the REST Service model method in the testflow.
1. Start UFT and open the Book Flights solution.a. Open UFT as described in "Create a Solution for All Your Tests" on page 36.
b. On the Start Page, in the Recent Solutions area, click Flight Reservation
TutorialLesson 7: Creating and Running API Tests of REST Services
HP Unified Functional Testing (12.02) Page 266

Application.
The Flight Reservation Application solution opens, containing the Book FlightsREST Service test you created in "Exercise 7a: Create a REST Service Test" onpage 259.
2. Import a data source to use in your test.a. If necessary, select View > Data to display the Data pane.
b. In the Data pane, click the New Data source button and select Excel. TheNew Excel Data Source dialog box opens.
c. In the New Data Source dialog box, in the Excel file path field, click the Browsebutton.
d. In the Open dialog box, navigate to the application Excel file, saved in <UFTinstallation directory>\samples\Flights Application and click OK.
e. In the New Excel Data Source dialog box, name the file Flights_REST.
f. Select the Link to the Excel file in its original location option.
g. Click OK to save the data source information and add the Excel data to yourtest.
3. Create a step to test the ReserveOrder method.
a. In the toolbar, click the Toolbox button . The Toolbox pane opens.
b. In the Toolbox pane, in the Local Activities section, expand the nodes under theFlights REST Service node.
c. Under the Local Activities node, drag the ReserveOrder step to the canvas.
UFT adds a new block to the Test Flow, with the method name (ReserveOrder).
4. Link the method's HTTP Request properties to the data source.
TutorialLesson 7: Creating and Running API Tests of REST Services
HP Unified Functional Testing (12.02) Page 267

a. In the canvas, select the ReserveOrder step.
b. In the Properties pane, select the HTTP tab .
c. In the HTTP tab, in the Request section, click the Grid button.
d. In the Value column of the Class property, click the Link to a data sourcebutton . The Select Link Source dialog box opens.
e. In the Select Link Source dialog box, select the Data source column option. TheSelect a data source: pane (left pane) displays a list of all available datasources.
f. In the Select a data source pane, select the Flights_REST!Input node. TheSelect data: pane (right pane) displays a list of all data columns/parameters.
g. In the Select data: pane, select the Class node and click OK.
UFT updates the value of the Class property to reflect the link to the datasource:
h. Repeat the same process for the other HTTP Request properties:
o CustomerName
o DepartureDate
o FlightNumber
o NumberofTickets
TutorialLesson 7: Creating and Running API Tests of REST Services
HP Unified Functional Testing (12.02) Page 268
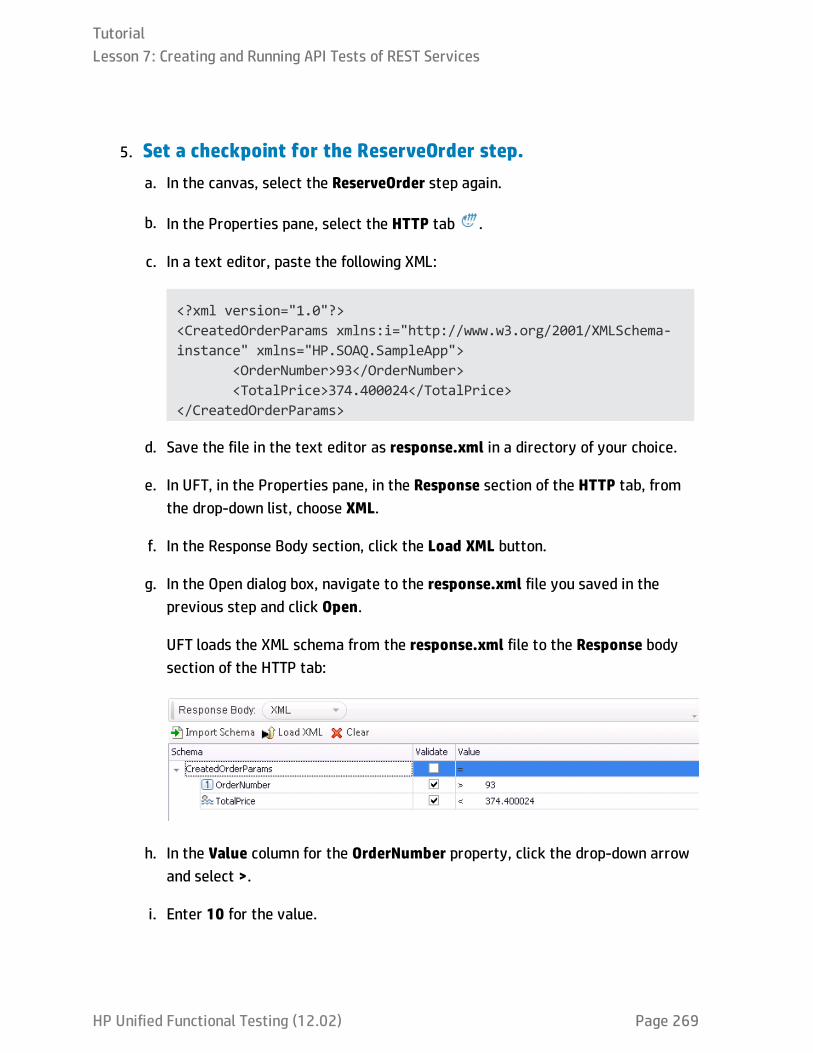
5. Set a checkpoint for the ReserveOrder step.a. In the canvas, select the ReserveOrder step again.
b. In the Properties pane, select the HTTP tab .
c. In a text editor, paste the following XML:
<?xml version="1.0"?><CreatedOrderParams xmlns:i="http://www.w3.org/2001/XMLSchema-instance" xmlns="HP.SOAQ.SampleApp">
<OrderNumber>93</OrderNumber><TotalPrice>374.400024</TotalPrice>
</CreatedOrderParams>
d. Save the file in the text editor as response.xml in a directory of your choice.
e. In UFT, in the Properties pane, in the Response section of the HTTP tab, fromthe drop-down list, choose XML.
f. In the Response Body section, click the Load XML button.
g. In the Open dialog box, navigate to the response.xml file you saved in theprevious step and click Open.
UFT loads the XML schema from the response.xml file to the Response bodysection of the HTTP tab:
h. In the Value column for the OrderNumber property, click the drop-down arrowand select >.
i. Enter 10 for the value.
TutorialLesson 7: Creating and Running API Tests of REST Services
HP Unified Functional Testing (12.02) Page 269
j. In the Value column for the TotalPrice property, repeat the same process andenter < and 500 for the value.
Now that you have created the test steps, and provided input and checkpointproperties, you are ready to run the test and view the run results. Continue with"Exercise 7d: Run a REST Service Test" below to learn more.
Exercise 7d: Run a REST Service TestIn "Exercise 7c: Create a Test Using REST Service Methods" on page 266, you created atest using the REST Service model methods. In this lesson, you will learn how to run thetest and how to view the run results.
1. Start UFT and open the Book Flights solution.a. Open UFT as described in "Create a Solution for All Your Tests" on page 36.
b. On the Start Page, in the Recent Solutions area, click Flight ReservationApplication.
The Flight Reservation Application solution opens, containing the Book FlightsREST Service test you created in "Exercise 7a: Create a REST Service Test" onpage 259.
2. Set the number of iterations for the test.Because your test has a data source with multiple rows, you must specify thenumber of iterations to run.
a. In the canvas, select the Test Flow. The Input tab opens in the Propertiespane.
b. In the Input tab, select the 'For' Loop option.
c. In the Number of Iterations field, enter 8.
TutorialLesson 7: Creating and Running API Tests of REST Services
HP Unified Functional Testing (12.02) Page 270
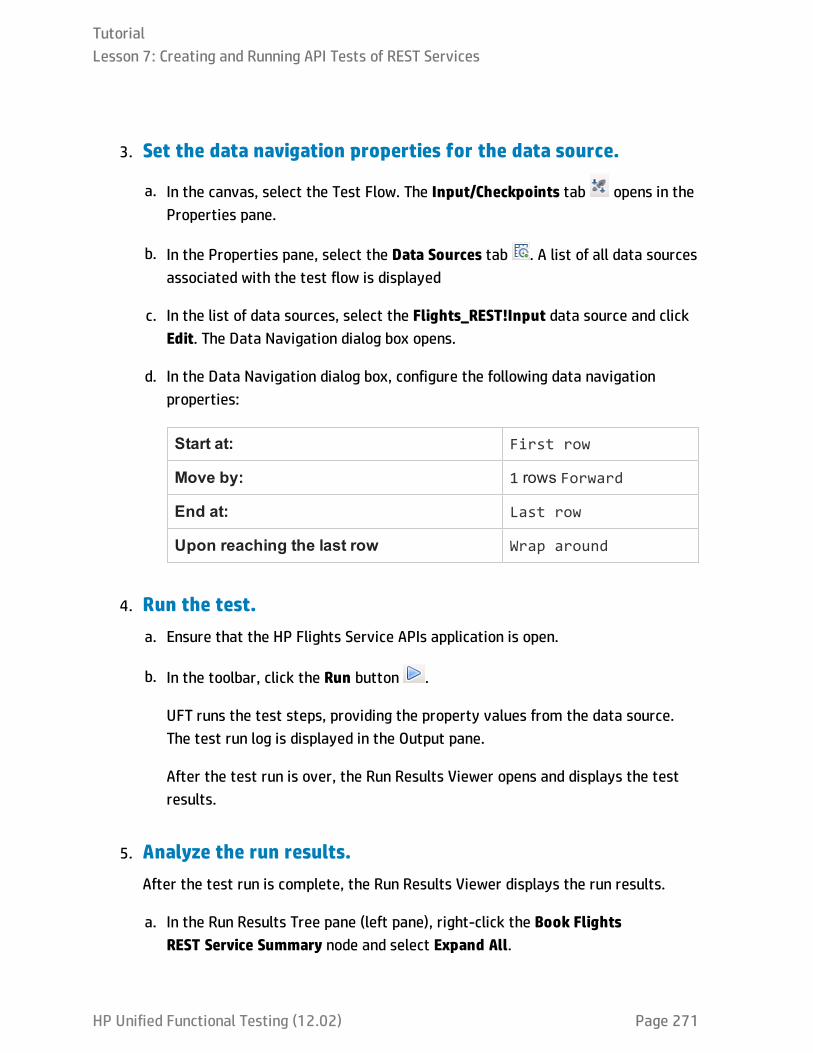
3. Set the data navigation properties for the data source.
a. In the canvas, select the Test Flow. The Input/Checkpoints tab opens in theProperties pane.
b. In the Properties pane, select the Data Sources tab . A list of all data sourcesassociated with the test flow is displayed
c. In the list of data sources, select the Flights_REST!Input data source and clickEdit. The Data Navigation dialog box opens.
d. In the Data Navigation dialog box, configure the following data navigationproperties:
Start at: First row
Move by: 1 rows Forward
End at: Last row
Upon reaching the last row Wrap around
4. Run the test.a. Ensure that the HP Flights Service APIs application is open.
b. In the toolbar, click the Run button .
UFT runs the test steps, providing the property values from the data source.The test run log is displayed in the Output pane.
After the test run is over, the Run Results Viewer opens and displays the testresults.
5. Analyze the run results.After the test run is complete, the Run Results Viewer displays the run results.
a. In the Run Results Tree pane (left pane), right-click the Book FlightsREST Service Summary node and select Expand All.
TutorialLesson 7: Creating and Running API Tests of REST Services
HP Unified Functional Testing (12.02) Page 271
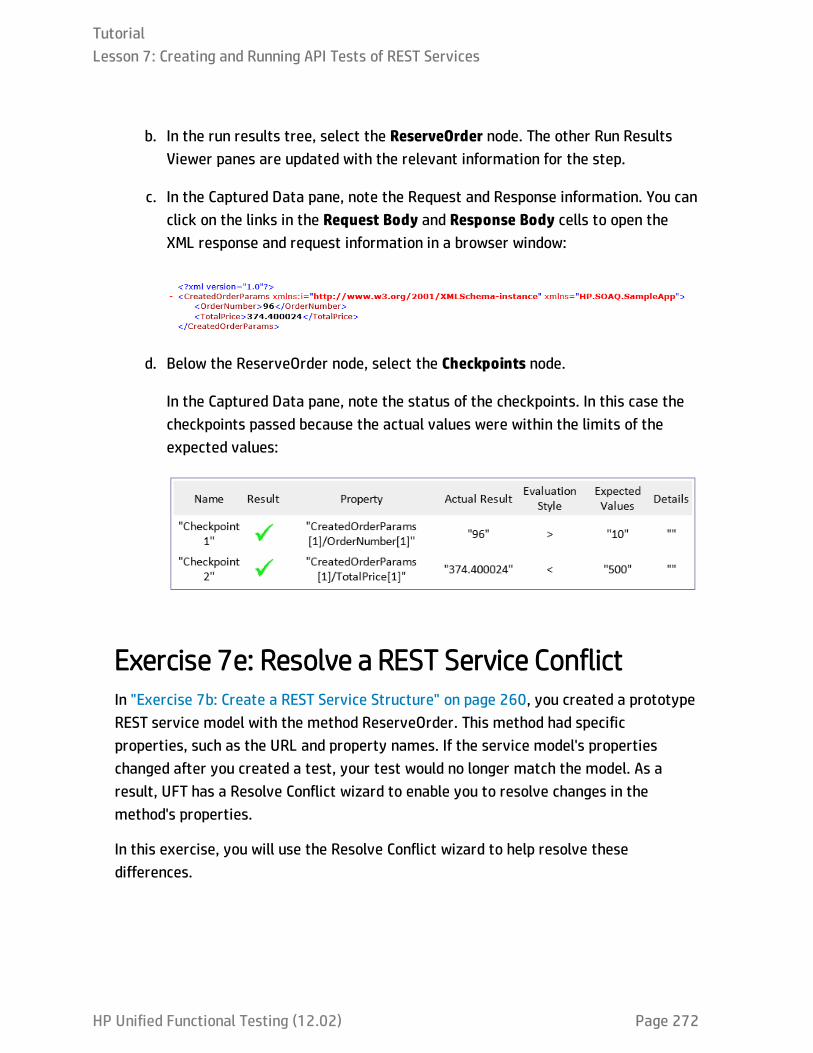
b. In the run results tree, select the ReserveOrder node. The other Run ResultsViewer panes are updated with the relevant information for the step.
c. In the Captured Data pane, note the Request and Response information. You canclick on the links in the Request Body and Response Body cells to open theXML response and request information in a browser window:
d. Below the ReserveOrder node, select the Checkpoints node.
In the Captured Data pane, note the status of the checkpoints. In this case thecheckpoints passed because the actual values were within the limits of theexpected values:
Exercise 7e: Resolve a REST Service ConflictIn "Exercise 7b: Create a REST Service Structure" on page 260, you created a prototypeREST service model with the method ReserveOrder. This method had specificproperties, such as the URL and property names. If the service model's propertieschanged after you created a test, your test would no longer match the model. As aresult, UFT has a Resolve Conflict wizard to enable you to resolve changes in themethod's properties.
In this exercise, you will use the Resolve Conflict wizard to help resolve thesedifferences.
TutorialLesson 7: Creating and Running API Tests of REST Services
HP Unified Functional Testing (12.02) Page 272
1. Start UFT and open the Book Flights solution.a. Open UFT as described in "Create a Solution for All Your Tests" on page 36.
b. On the Start Page, in the Recent Solutions area, click Flight ReservationApplication.
The Flight Reservation Application solution opens, containing the Book FlightsREST Service test you created in "Exercise 7a: Create a REST Service Test" onpage 259.
2. Edit the service model properties.
a. In the toolbar, click the Toolbox button .
b. In the Toolbox, in the Local Activities section, expand the nodes under the RESTServices node.
c. Right-click the Flights REST Service node and select Edit Service. The Edit RESTService dialog box opens.
d. In the Edit REST Service dialog box, select the ReserveOrder node. The General
tab opens in the right pane.
e. In the right pane, select the Custom Input/Checkpoints tab .
f. In the Custom Input/Checkpoints tab, in the Checkpoints section, select theTotal_Price property and click the Edit Property button . The Edit Propertydialog box opens.
g. In the Edit Property dialog box, change the name of the property toTotalPrice and click OK. The property name is modified in the Checkpointssection.
h. Repeat the same process to change the Order_Number property toOrderNumber.
i. In the Edit REST Service dialog box, click OK to save the changes to your
TutorialLesson 7: Creating and Running API Tests of REST Services
HP Unified Functional Testing (12.02) Page 273

service.
UFT saves the changes to the REST Service model. However, in theReserveOrder step in the canvas, an alert is displayed:
This indicates that there is a conflict between the service model and the step inthe test, that must be resolved.
3. Resolve the conflicts.a. In the canvas, click on the Alert icon. UFT displays a message: This step
should be resolved. Resolve step.
TutorialLesson 7: Creating and Running API Tests of REST Services
HP Unified Functional Testing (12.02) Page 274

b. Click on the alert text. The Resolve REST Methods wizard opens:
c. In the Select Steps screen (first screen), select the checkbox for theReserveOrder step and click Next. The Resolve Conflicts screen opens.
Note: When using this wizard, the Select Steps screen displays all the stepsin which there are conflicts. As a result, you can resolve multiple stepconflicts at once.
d. In the Resolve Conflicts screen, in the Output Properties section (bottom area),in the After changes box, select the Total_Price property (colored red):
TutorialLesson 7: Creating and Running API Tests of REST Services
HP Unified Functional Testing (12.02) Page 275

e. Click Remove.
f. Repeat the same process to remove the Order_Number property (also coloredred).
g. Click Next to continue. The Finish screen opens.
h. The Finish screen displays the status of the conflicts in your service model. Inthis case, there are no existing conflicts.
Click Finish to exit the wizard. UFT updates your test with the changes selectedin the Resolve REST Methods wizard. In this exercise, the output properties forthe ReserveOrder step are now updated in the Properties pane:
4. Save the test.Select File > Save.
TutorialLesson 7: Creating and Running API Tests of REST Services
HP Unified Functional Testing (12.02) Page 276
Lesson 8: Creating and Running API Tests ofWeb Application Services (WADLs)In "Lesson 3: Creating API Test Steps Using Standard Activities" on page 201, youlearned how to create a test using standard API activities.
However, there will also be times where standard activities do not match the processesyour application performs. In these cases, you will need to use custom activities thatyou import into UFT. One of the other types of service activities are Web applicationservices. In UFT, you import the service description and its methods into UFT, whichthen makes them available for use in your tests.
In this lesson, you will learn how to import and use a Web application servicedescription into UFT.
This lesson includes the following:
Exercise 8a: Create a Test for a Web Application Service 278
Exercise 8b: Import a Web Application Service Model 279
Exercise 8c: Edit the Web Application Service Methods 281
Exercise 8d: Build a Test with Web Application Service Methods 285
Exercise 8e: Run a Web Application Service Test 291
TutorialLesson 8: Creating and Running API Tests of Web Application Services (WADLs)
HP Unified Functional Testing (12.02) Page 277
Exercise 8a: Create a Test for a Web ApplicationServiceIn "Create a Solution for All Your Tests" on page 36, you created a solution for the flightreservation application, to which you added GUI tests of the application's user interface,and API tests of the application's Web services and REST services.
In this exercise, you will create a test for the Web Application service of the flightreservation application.
1. Start UFT and open the flight reservation application solution.a. Open UFT as described in "Create a Solution for All Your Tests" on page 36.
b. On the Start Page, in the Recent Solution area, click Flight ReservationApplication.
The Flight Reservation Application solution opens in the Solution Explorer.
2. Add a new API test to the solution.
a. In the toolbar, select the Add drop-down arrow and select New Test.
b. In the Add New Test dialog box, select API Test.
c. In the Name field, name the test Flights WADL.
d. In the Location field, click the Browse button and navigate to theC:\%HOMEPATH%\Unified Functional Testing folder.
e. Click Add to create the test and add it to the solution.
The Book Flights WADL test is added as a separate node in the FlightReservation Application solution and opens as a separate tab in the documentpane.
Note: The solution is saved automatically.
TutorialLesson 8: Creating and Running API Tests of Web Application Services (WADLs)
HP Unified Functional Testing (12.02) Page 278

Now that you have a created a test, you are ready to begin working with the WebApplication service model and its methods. Continue to "Exercise 8b: Import a WebApplication Service Model" below to learn how to import the service description intoUFT.
Exercise 8b: Import a Web Application ServiceModelBefore you test your Web Application service, you must import the service description(including its structure of the resources and its methods). Web Application servicedescriptions are stored in a WADL (Web Application Description Language) file. UFTreads this file, and then creates a hierarchy of service, resources, and methods (similarto a REST service hierarchy). Once you have imported the service description, you canuse the methods to create a test.
In this exercise, you will import the flight reservation application's service WADL fileinto UFT.
1. Start the Flights API application.Start the HP Flights Service API application, as described in "Explore the FlightReservation Application" on page 33.
Note: Make sure that this application remains open when you are working withthe tutorial, as UFT must be able to access it when editing and running the test.
2. Import the WADL file.a. In UFT, in the toolbar, click the ADD REST Service drop-down arrow and select
Import WADL from URL. The Import WADL from URL dialog box opens.
Note: If you have a copy of the WADL file saved locally, you can import theWADL file into UFT.
TutorialLesson 8: Creating and Running API Tests of Web Application Services (WADLs)
HP Unified Functional Testing (12.02) Page 279

b. In the HP Flights Service API application window, locate the URL for the WADLservice:
c. In the HP Flights Service API application window, click the Copy WADL Pathbutton. This saves the URL of the WADL file so you can copy it into the ImportWADL from URL dialog box.
d. In UFT, in the Import WADL from URL dialog box, in the Address field, paste theURL copied from the application window:
TutorialLesson 8: Creating and Running API Tests of Web Application Services (WADLs)
HP Unified Functional Testing (12.02) Page 280

e. Click OK to import the service description into UFT.
The service description is imported into UFT and its resources and methodshierarchy is displayed in the Toolbox pane in the Local Activities section:
Now that you have imported the service description and its methods into UFT, you areready to create a test using the methods. Continue to "Exercise 8c: Edit the WebApplication Service Methods" below to learn how to edit the service descriptionmethods in UFT.
Exercise 8c: Edit the Web Application ServiceMethodsIn "Exercise 8b: Import a Web Application Service Model" on page 279, you importedthe Web application service description and methods into UFT to create a hierarchy ofservices, resources, and methods.
TutorialLesson 8: Creating and Running API Tests of Web Application Services (WADLs)
HP Unified Functional Testing (12.02) Page 281

The WADL that you import contains a detailed description of the service's resourcesand methods, including the URL of the service and its methods, and parameters forvarious methods. Once you import the WADL file into UFT, you cannot change theseproperties.
However, you can add additional information to your service description, such asadditional parameters for the methods, and request and response information for themethods. This additional information is also saved as part of the service model and isused as the prototype information when you drag a method to the canvas.
In this lesson, you will learn how to edit the service model's properties in UFT. You willbe adding information to the GetFlights method and ReserveOrder methods, which youwill use in the next exercise to create a test.
1. Start UFT and open the flight reservation application solution.a. If necessary, open UFT as described in "Create a Solution for All Your Tests" on
page 36.
b. On the Start Page, in the Recent Solution area, click Flight ReservationApplication.
The Flight Reservation Application solution opens in the Solution Explorer,containing the Flights WADL test you created in "Exercise 8a: Create a Test fora Web Application Service" on page 278.
2. Open the Web Application service model description.When you edit a Web Application service description, you use the same dialog boxand tools that you use to create and edit a REST service model description.
In the Toolbox pane, under the Local Activities section, right click the Flight Servicenode and select Edit Service. The Edit REST Service dialog box opens.
3. Edit the response information for the GetFlights method.a. In the Edit REST Service dialog box, under the Flights node, select the
GetFlights node. The right pane is updated with the information for the method.
TutorialLesson 8: Creating and Running API Tests of Web Application Services (WADLs)
HP Unified Functional Testing (12.02) Page 282

b. In the right pane, select the HTTP tab .
c. In a text editor, copy the following XML:
<ArrayOfFlight xmlns="HP.SOAQ.SampleApp"xmlns:i="http://www.w3.org/2001/XMLSchema-instance"><Flight><Airlines>AA</Airlines><ArrivalCity>Denver</ArrivalCity><ArrivalTime>01:23 PM</ArrivalTime><DepartureCity>London</DepartureCity><DepartureTime>06:12 AM</DepartureTime><FlightNumber>20279</FlightNumber><Price>112.2</Price>
</Flight></ArrayOfFlight>
Note: In this case, you must leave values as part of the XML, as thisinstructs UFT on the type of value that each parameter must use.
d. Save the file as response.xml in a directory of your choice.
e. In UFT, in the Edit REST Service dialog box, with the GetFlights node selected, inthe HTTP tab, in the Response section, from the drop-down list, select XML
f. In the Response Body section, click the Load XML button. The Open dialog boxopens.
g. In the Open dialog box, navigate to the directory in which you saved theresponse.xml file and select the response.xml file.
h. Click Open to add the XML schema to the service description.
TutorialLesson 8: Creating and Running API Tests of Web Application Services (WADLs)
HP Unified Functional Testing (12.02) Page 283

UFT adds the response properties based on the XML in the Response grid:
4. Add request information for the ReserveOrders method.a. In the Edit REST Service dialog box, under the FlightOrders node, select the
ReserveOrder node. The right pane is updated with the information for theReserveOrder method.
b. In the right pane, select the HTTP tab .
c. In the HTTP tab, in the Request section, select XML from the Request Bodydrop-down list. The text editor opens with the message Insert XML here.
d. In the text entry area, paste the following XML:
<?xml version="1.0" encoding="utf-8"?><FlightOrderDetails xmlns="HP.SOAQ.SampleApp">
<Class>Business</Class><CustomerName>John Doe</CustomerName><DepartureDate>2012-12-12</DepartureDate><FlightNumber>1304</FlightNumber><NumberOfTickets>21</NumberOfTickets></FlightOrderDetails>
Note: In this case, you must leave values as part of the XML, as this
TutorialLesson 8: Creating and Running API Tests of Web Application Services (WADLs)
HP Unified Functional Testing (12.02) Page 284

instructs UFT on the type of value that each parameter must use.
If you click the Grid button, you can see the parameters for the XML requestdisplayed in the Properties grid:
e. Click OK to save the changes.
UFT saves the changes to the service model and updates the properties of themethods already imported in the Toolbox pane.
Now that you have edited your Web Application methods to included additionalinformation, you are ready to use them in a test. Continue to "Exercise 8d: Build a Testwith Web Application Service Methods" below to build a test using the methodsimported from your WADL.
Exercise 8d: Build a Test with Web ApplicationService MethodsIn "Exercise 8b: Import a Web Application Service Model" on page 279, you imported aWADL file that contained descriptions of the methods used in your Web Applicationservice. In "Exercise 8c: Edit the Web Application Service Methods" on page 281, you
TutorialLesson 8: Creating and Running API Tests of Web Application Services (WADLs)
HP Unified Functional Testing (12.02) Page 285
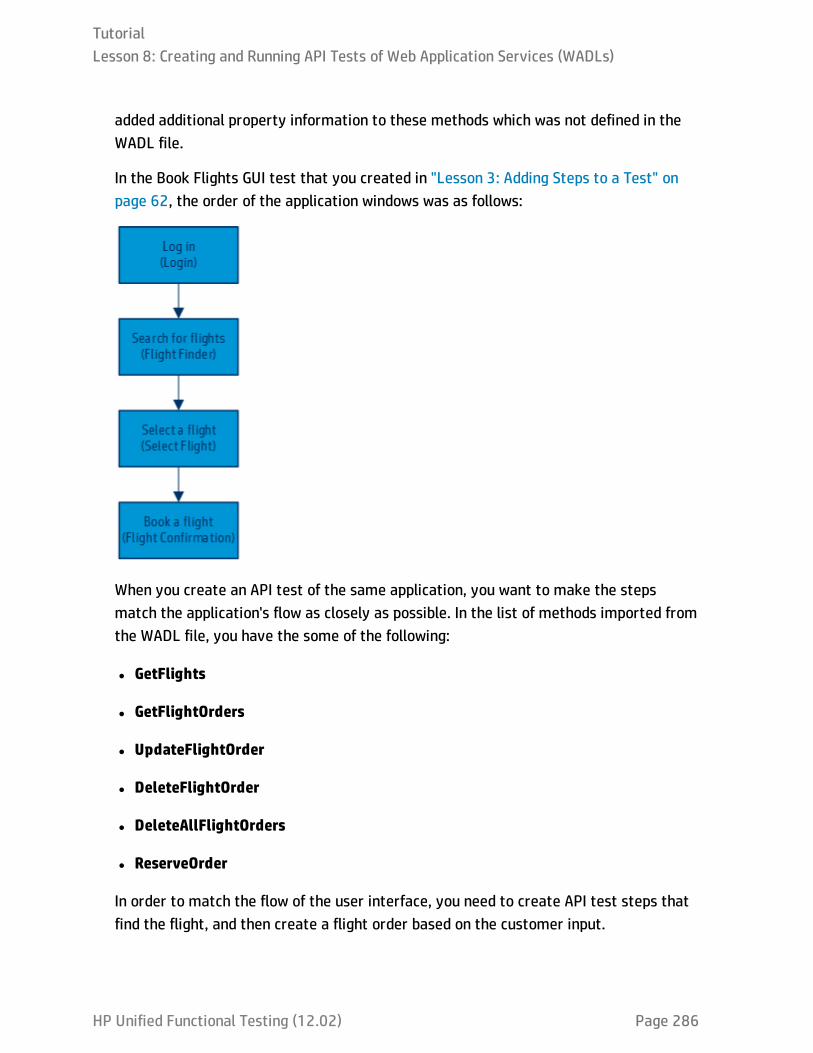
added additional property information to these methods which was not defined in theWADL file.
In the Book Flights GUI test that you created in "Lesson 3: Adding Steps to a Test" onpage 62, the order of the application windows was as follows:
When you create an API test of the same application, you want to make the stepsmatch the application's flow as closely as possible. In the list of methods imported fromthe WADL file, you have the some of the following:
l GetFlights
l GetFlightOrders
l UpdateFlightOrder
l DeleteFlightOrder
l DeleteAllFlightOrders
l ReserveOrder
In order to match the flow of the user interface, you need to create API test steps thatfind the flight, and then create a flight order based on the customer input.
TutorialLesson 8: Creating and Running API Tests of Web Application Services (WADLs)
HP Unified Functional Testing (12.02) Page 286

In this exercise, you will create two test steps: GetFlights and ReserveOrder.
1. Start UFT and open the flight reservation application solution.a. If necessary, open UFT as described in "Create a Solution for All Your Tests" on
page 36.
b. On the Start Page, in the Recent Solution area, click Flight ReservationApplication.
The Flight Reservation Application solution opens in the Solution Explorer,containing the Flights WADL test you created in "Exercise 8a: Create a Test fora Web Application Service" on page 278.
2. Create the test steps.a. In the Toolbox pane, in the Local Activities section, expand the Flights node
(located under the Flight Service and HPFlights_REST nodes).
b. Under the Flights node, drag a GetFlightsmethod to the canvas. UFT adds ablock in the Test Flow called GetFlights.
c. Under the FlightOrders node, drag a ReserveOrder node to the canvas. UFTadds another block in the Test Flow (under the GetFlights block) calledReserveOrder.
3. Link the FlightNumber property of the ReserveOrder step tothe output of the GetFlights step.
a. In the canvas, select the ReserveOrder step. The Input/Checkpoints tabopens in the Properties pane.
b. In the Properties pane, select the HTTP tab .
c. In the Request Body section of the HTTP tab, in the Value cell of theFlightNumber property, click the Link to data source button . The Select LinkSource dialog box opens.
TutorialLesson 8: Creating and Running API Tests of Web Application Services (WADLs)
HP Unified Functional Testing (12.02) Page 287
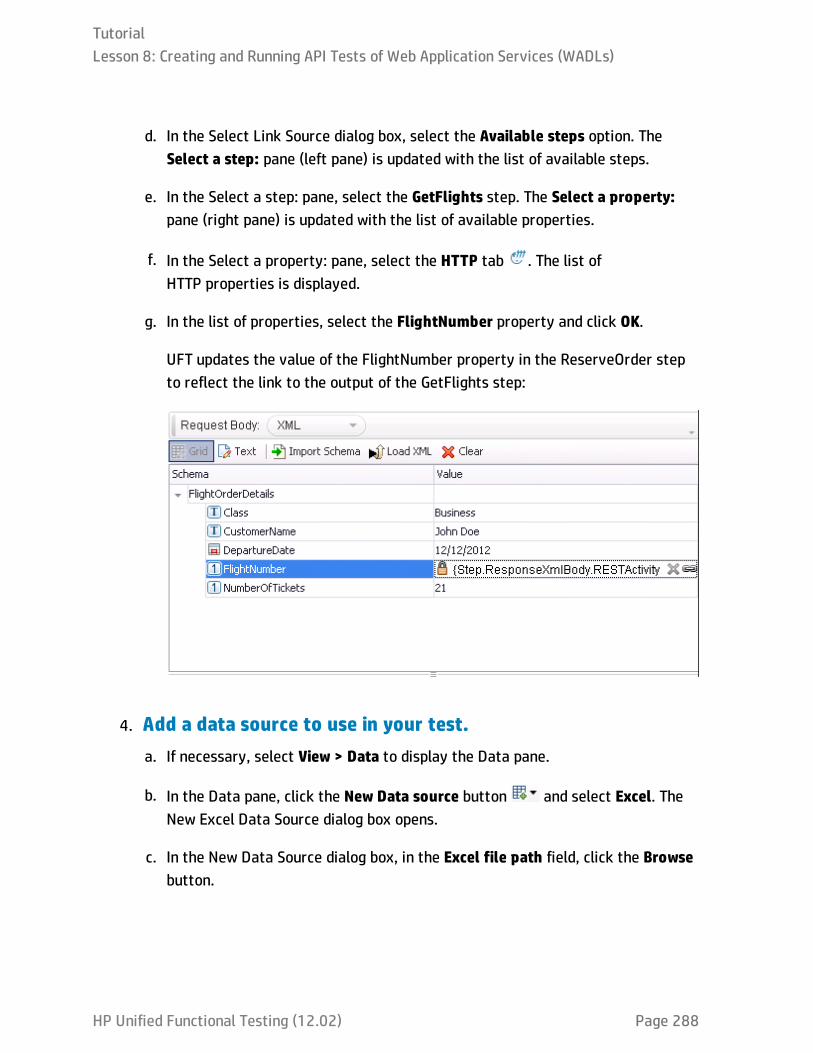
d. In the Select Link Source dialog box, select the Available steps option. TheSelect a step: pane (left pane) is updated with the list of available steps.
e. In the Select a step: pane, select the GetFlights step. The Select a property:pane (right pane) is updated with the list of available properties.
f. In the Select a property: pane, select the HTTP tab . The list ofHTTP properties is displayed.
g. In the list of properties, select the FlightNumber property and click OK.
UFT updates the value of the FlightNumber property in the ReserveOrder stepto reflect the link to the output of the GetFlights step:
4. Add a data source to use in your test.a. If necessary, select View > Data to display the Data pane.
b. In the Data pane, click the New Data source button and select Excel. TheNew Excel Data Source dialog box opens.
c. In the New Data Source dialog box, in the Excel file path field, click the Browsebutton.
TutorialLesson 8: Creating and Running API Tests of Web Application Services (WADLs)
HP Unified Functional Testing (12.02) Page 288

d. In the Open dialog box, navigate to the application Excel file, saved in <UFTinstallation directory>\samples\Flights Application and click OK.
e. In the New Excel Data Source dialog box, name the file WADL_Flights.
f. Select the Link to the Excel file in its original location option.
g. Click OK to save the data source information and add the Excel data to yourtest.
5. Link the input properties of the GetFlights step to the datasource.
a. In the canvas, select the GetFlights step. The Input/Checkpoints tab opensin the Properties pane.
b. In the Input/Checkpoints tab, in the Value cell of the DepartureCity property,click the Link to data source button . The Select Link Source dialog boxopens.
c. In the Select Link Source dialog box, select the Data source column option. TheSelect a data source: pane (left pane) displays a list of all the available datasources.
d. In the Select a data source: pane, select the WADL_Flights!Input node. TheSelect data: pane (right pane) displays a list of all available data parameters(columns).
e. In the Select data: pane, select the DepartureCity parameter and click OK. UFTupdates the Value column for the DepartureCity property in the Properties paneto reflect the link to the data source.
f. Repeat the same process to link the ArrivalCity and Date properties to the datasource.
TutorialLesson 8: Creating and Running API Tests of Web Application Services (WADLs)
HP Unified Functional Testing (12.02) Page 289

UFT displays the values of the GetFlights properties to display the link to thedata source:
6. Link the HTTP request properties for the ReserveOrder step tothe data source.
a. In the canvas, select the ReserveOrder step. The Input/Checkpoints tabopens in the Properties pane.
b. In the Properties pane, select the HTTP tab . The list of HTTP request andresponse properties is displayed.
c. In the Value cell for the Class property, click the Link to a data source button.. The Select Link Source dialog box opens.
d. In the Select Link Source dialog box, select the Data source column option. TheSelect a data source: (left pane) displays a list of all available data sources.
e. In the Select a data source: pane, select the WADL_Flights!Input node. TheSelect data: pane (right pane) displays a list of all available data parameters(columns).
f. In the Select data: pane, select the Class column and click OK. UFT updates thevalue of the Class property to reflect the link to the data source.
TutorialLesson 8: Creating and Running API Tests of Web Application Services (WADLs)
HP Unified Functional Testing (12.02) Page 290

g. Repeat the same process for the other HTTP Request properties:
o CustomerName
o DepartureDate
o NumberOfTickets
After you have linked all the properties (except the FlightNumber property) tothe data source, the Properties pane updates the values to reflect the link:
7. Save the test.
In the toolbar, click Save .
Now that you have created a test using the methods imported from your WADL file, youare ready to run the test and view the run results. Continue to "Exercise 8e: Run a WebApplication Service Test" below to run the test.
Exercise 8e: Run a Web Application Service TestIn "Exercise 8d: Build a Test with Web Application Service Methods" on page 285, youcreated a test using the methods for your Web Application service model that youimported and edited in previous exercises.
TutorialLesson 8: Creating and Running API Tests of Web Application Services (WADLs)
HP Unified Functional Testing (12.02) Page 291
In this exercise, you will run the test you created to see the results.
1. Start UFT and open the flight reservation application solution.a. If necessary, open UFT as described in "Create a Solution for All Your Tests" on
page 36.
b. On the Start Page, in the Recent Solution area, click Flight ReservationApplication.
The Flight Reservation Application solution opens in the Solution Explorer,containing the Flights WADL test you created in "Exercise 8a: Create a Test fora Web Application Service" on page 278.
2. Set the number of iterations for the test.
a. In the canvas, select the Test Flow. The Input tab opens in the Propertiespane.
b. In the Input pane, select the 'For' Loop option.
c. In the Number of iterations field, enter 8.
3. Set the data navigation properties for the data source.
a. In the canvas, select the Test Flow. The Input/Checkpoints tab opens in theProperties pane.
b. In the Properties pane, select the Data Sources tab . A list of all data sourcesassociated with the test flow is displayed
c. In the list of data sources, select the WADL_Flights!Input data source and clickEdit. The Data Navigation dialog box opens.
TutorialLesson 8: Creating and Running API Tests of Web Application Services (WADLs)
HP Unified Functional Testing (12.02) Page 292
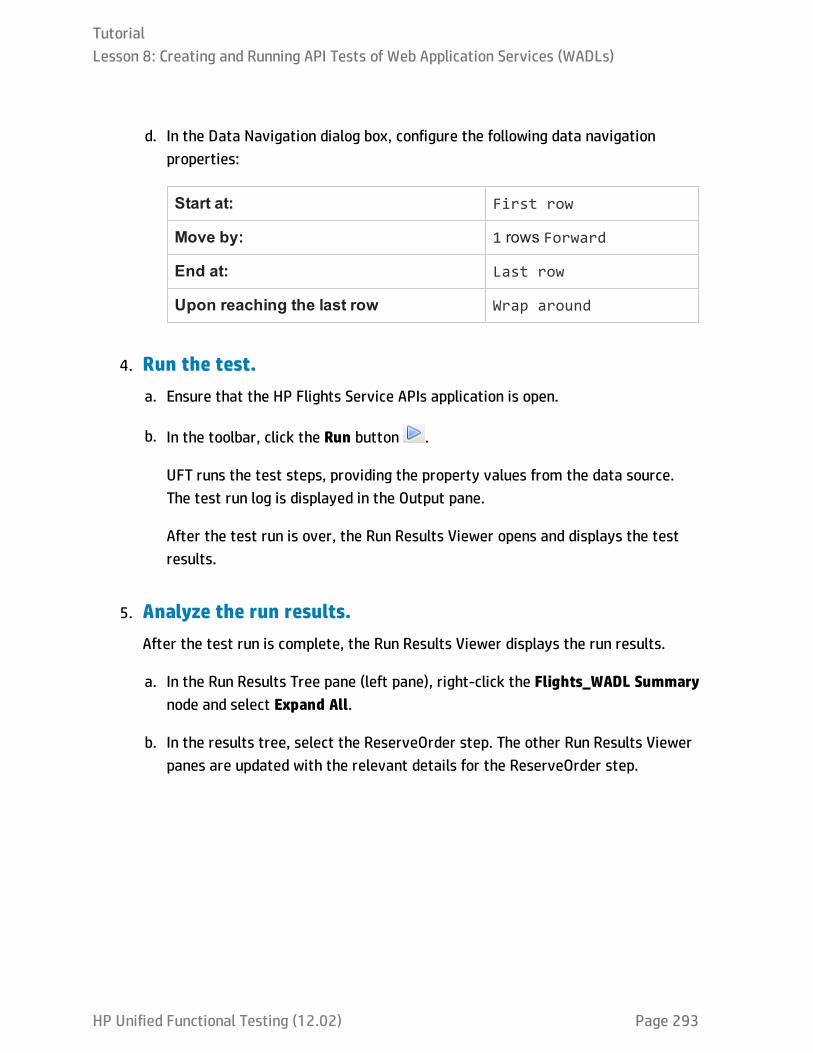
d. In the Data Navigation dialog box, configure the following data navigationproperties:
Start at: First row
Move by: 1 rows Forward
End at: Last row
Upon reaching the last row Wrap around
4. Run the test.a. Ensure that the HP Flights Service APIs application is open.
b. In the toolbar, click the Run button .
UFT runs the test steps, providing the property values from the data source.The test run log is displayed in the Output pane.
After the test run is over, the Run Results Viewer opens and displays the testresults.
5. Analyze the run results.After the test run is complete, the Run Results Viewer displays the run results.
a. In the Run Results Tree pane (left pane), right-click the Flights_WADL Summarynode and select Expand All.
b. In the results tree, select the ReserveOrder step. The other Run Results Viewerpanes are updated with the relevant details for the ReserveOrder step.
TutorialLesson 8: Creating and Running API Tests of Web Application Services (WADLs)
HP Unified Functional Testing (12.02) Page 293
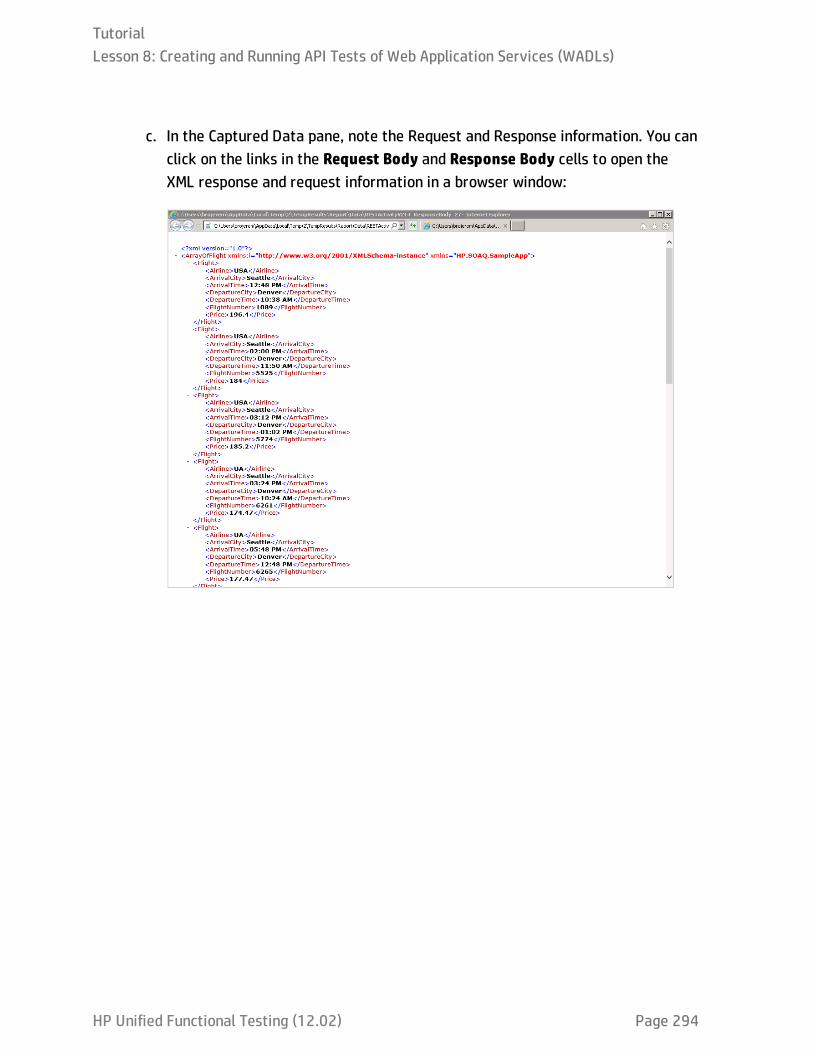
c. In the Captured Data pane, note the Request and Response information. You canclick on the links in the Request Body and Response Body cells to open theXML response and request information in a browser window:
TutorialLesson 8: Creating and Running API Tests of Web Application Services (WADLs)
HP Unified Functional Testing (12.02) Page 294

HP Unified Functional Testing (12.02) Page 295
Part 5: Creating and Running GUI and APITests in a Single TestNote: You must perform the tutorial lessons included in "Creating and RunningAutomated GUI Tests" on page 39 and "Creating and Running Automated API Tests"on page 193 before doing this part of the tutorial.
When you are testing your application, in order to perform a comprehensive test, youmust test both the user interface (the GUI) and the service layer (the API). One of thechallenges in doing this is maintaining and running separate tests for each part of yourapplication.
However, in UFT, although you still must create and maintain both GUI and API tests ofyour application, you can run unified tests which test both the GUI and the API of yourapplication in a single unified test run. You simply call an API test from a GUI test, andUFT runs both layers of the application within a single test run. Then, after the test runis complete, the run results display a unified view, reporting the performance of boththe GUI and API layers in a single report.
In this part, you will learn how to create and run tests which include both GUI and APItests in a single test run.
This section includes the following:
Lesson 1: Create a Test to Run GUI and API Tests Together 296
Lesson 2: Call the API Test from a GUI Test 298
Lesson 3: Run a GUI Test that Calls an API Test 302
Lesson 1: Create a Test to Run GUI and APITests TogetherIn this lesson, you will create a separate test in order to run a unified test with GUI andAPI tests together.
1. Start UFT and open the Book Flights test.a. Open UFT as described in "Create a Solution for All Your Tests" on page 36.
Make sure that the WPF Add-in is loaded.
b. On the Start Page, in the Recent Solutions area, click Flight ReservationApplication.
The Flight Reservation Application solution opens, containing the Book FlightsGUI tests you created in "Creating and Running Automated GUI Tests" onpage 39 and the API tests you created in "Creating and Running Automated APITests" on page 193.
2. Save the Book Flights test as Flight Reservation Application.a. In the Solution Explorer, right-click the Book Flights node and select Save As.
The Save As dialog box opens.
b. In the Save Test As dialog box, browse to C:\%HOMEPATH%\MyDocuments\Unified Functional Testing and save the test as FlightReservation Application.
In the Solution Explorer, the Book Flights test is replaced by the new FlightReservation Application test. The Book Flights test is still saved separately inthe file system.
3. Add the Book Flights test back into the solution.a. Select File > Add > Existing Test. The Add Test to Solution dialog box opens.
HP Unified Functional Testing (12.02) Page 296
b. In the Add Test to Solution dialog box, browse to the C:\%HOMEPATH%\MyDocuments\Unified Functional Testing directory, and select the Book Flightstest.
c. Click Add to return the Book Flights test to the solution.
The Book Flights test is again displayed in the Solution Explorer.
Now that you have a separate test for running GUI and API tests together, you areready to build the test to include both types of tests. Continue to "Lesson 2: Call the APITest from a GUI Test" on the next page to learn how to build the test to include bothtypes of tests.
TutorialLesson 1: Create a Test to Run GUI and API Tests Together
HP Unified Functional Testing (12.02) Page 297

Lesson 2: Call the API Test from a GUI TestIn order to run an API test from a GUI test, you must first call the API test. In thislesson, you will learn how to add calls to an API test from a GUI test in order to run bothtests in a single, unified test run.
1. Start UFT and open the Book Flights test.a. If necessary, open UFT as described in "Create a Solution for All Your Tests" on
page 36. Make sure that the WPF Add-in is loaded.
b. On the Start Page, in the Recent Solutions area, click Flight ReservationApplication.
The Flight Reservation Application solution opens, containing the FlightReservation Application test you created in "Lesson 1: Create a Test to Run GUIand API Tests Together" on page 296.
2. Create a new action for the API test call.When you call an API test, UFT runs the called API test in its entirety. You can putthe API test call as a separate step in an action, or as its own independent action.
a. In the toolbar, click the Call to New Action drop -down arrow and selectCall to New Action. The Insert Call to New Action dialog box opens.
b. In the Insert Call to New Action dialog box, name the action API Test Call.
c. Ensure that the At the end of the test option is selected. Keep the otheroptions as default.
d. Click OK to add the action to the test.
TutorialLesson 2: Call the API Test from a GUI Test
HP Unified Functional Testing (12.02) Page 298
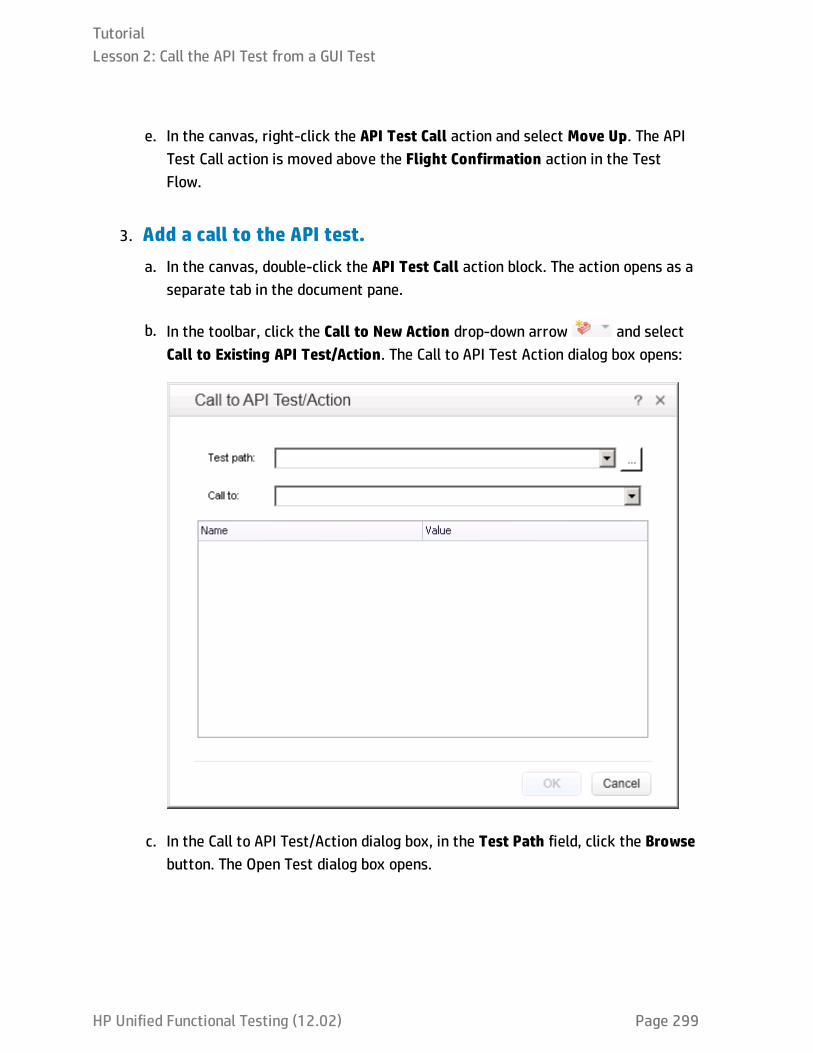
e. In the canvas, right-click the API Test Call action and select Move Up. The APITest Call action is moved above the Flight Confirmation action in the TestFlow.
3. Add a call to the API test.a. In the canvas, double-click the API Test Call action block. The action opens as a
separate tab in the document pane.
b. In the toolbar, click the Call to New Action drop-down arrow and selectCall to Existing API Test/Action. The Call to API Test Action dialog box opens:
c. In the Call to API Test/Action dialog box, in the Test Path field, click the Browsebutton. The Open Test dialog box opens.
TutorialLesson 2: Call the API Test from a GUI Test
HP Unified Functional Testing (12.02) Page 299

d. In the Open Test dialog box, navigate to the folder with the Flight ReservationApplication solution tests, stored at C:\%HOMEPATH%\Unified FunctionalTesting.
e. In this directory, select the Book Flights Web Service test and click Open. UFTadds the name of the test and its parameters to the Call to API Test/Actiondialog box:
Note: If your test had output parameters, you can use this dialog box tospecify the place in which to store the API test output parameter. In thiscase, the API test has no output parameters, so you will not perform thisstep.
f. Click OK to add the call as a step in your test.
TutorialLesson 2: Call the API Test from a GUI Test
HP Unified Functional Testing (12.02) Page 300

UFT adds a step for the API test call in the API Test Call action. In the editor, thestep is displayed as follows:
RunAPITest "Book Flights Web Service"
In the Keyword View, the step looks like this:
UFT also adds a visual indicator of the action call to the API Test Call action inthe canvas:
4. Save the test.Select File > Save.
Now that you have created the test step to call the API test, you are ready to run thetest. Continue to "Lesson 3: Run a GUI Test that Calls an API Test" on the next page torun the test and view the run results.
TutorialLesson 2: Call the API Test from a GUI Test
HP Unified Functional Testing (12.02) Page 301
Lesson 3: Run a GUI Test that Calls an APITestIn "Lesson 2: Call the API Test from a GUI Test" on page 298, you added a call to an APItest to an existing GUI test, which enables you to run unified tests of the flightreservation application in one test run.
In this lesson, you will run the test and see the results.
1. Start UFT and open the Book Flights test.a. If necessary, open UFT as described in "Create a Solution for All Your Tests" on
page 36. Make sure that the WPF Add-in is loaded.
b. On the Start Page, in the Recent Solutions area, click Flight ReservationApplication.
The Flight Reservation Application solution opens, containing the FlightReservation Application test you created in "Lesson 1: Create a Test to Run GUIand API Tests Together" on page 296.
2. Update the number of iterations for the Book Flights WebService test.Remember that when you created the Book Flights Web Service test, you ran thetest with multiple iterations. However, in the Flight Reservation Application test(which is calling the Book Flights Web Service test), there is only one iteration ofthe test. Therefore, you should modify the API test to run the same number ofiterations.
a. In the Solution Explorer, expand the nodes under the Book Flights Web Servicenode.
TutorialLesson 3: Run a GUI Test that Calls an API Test
HP Unified Functional Testing (12.02) Page 302

b. Under the Book Flights Web Service node, double-click the Flow node. The BookFlights Web Service Test Flow opens as a separate tab in the document pane.
c. In the canvas, select the Test Flow. The Input tab opens in the Propertiespane.
d. In the Input tab, in the Number of Iterations field, change the number to 1.
e. Select File > Save to save the modified settings.
3. Set the run settings for the Flight Reservation Application test.a. In the document pane, select the Flight Reservation Application tab.
If the Flight Reservation Application tab is closed, double-click on the FlightReservation Application node in the Solution Explorer to open it.
b. Select Record > Record and Run Settings. The Record and Run Settings dialogbox opens.
c. In the Windows Applications tab, ensure that the Record and run only on: andApplications specified below options are selected. The application detailsshould be saved from when you ran the original Book Flights test in "Lesson 4:Running and Analyzing GUI Tests" on page 95.
d. Click OK to close the dialog box.
4. Run the Flight Reservation Application test.a. Before running the test, ensure that the HP MyFlight Sample Application (the
user interface for the flight reservation application) window is closed.
b. Ensure that the HP Flights Service APIs window is open.
c. In the toolbar, click the Run button . The Run dialog box opens.
d. In the Run dialog box, in the Results location tab, select the New run resultsfolder option. Keep the default folder name.
TutorialLesson 3: Run a GUI Test that Calls an API Test
HP Unified Functional Testing (12.02) Page 303
e. Click Run to start the test run.
UFT opens the HP MyFlight Sample Application window and performs the stepson the application objects as created in the GUI test. When the test comes tothe API test call, the GUI test pauses and the API test comes into focus.
While the API test runs, you can view the progress of the API test run in theOutput pane.
Aft er the API test run is finished, the remainder of the GUI test runs.
When the complete test run is complete, the Run Results Viewer opens anddisplays the test results.
5. View the run results.In the Run Results Viewer, right click the Flight Reservation Application Summarynode and select Expand All. The Run Results Viewer expands all the nodes in theresults tree.
TutorialLesson 3: Run a GUI Test that Calls an API Test
HP Unified Functional Testing (12.02) Page 304
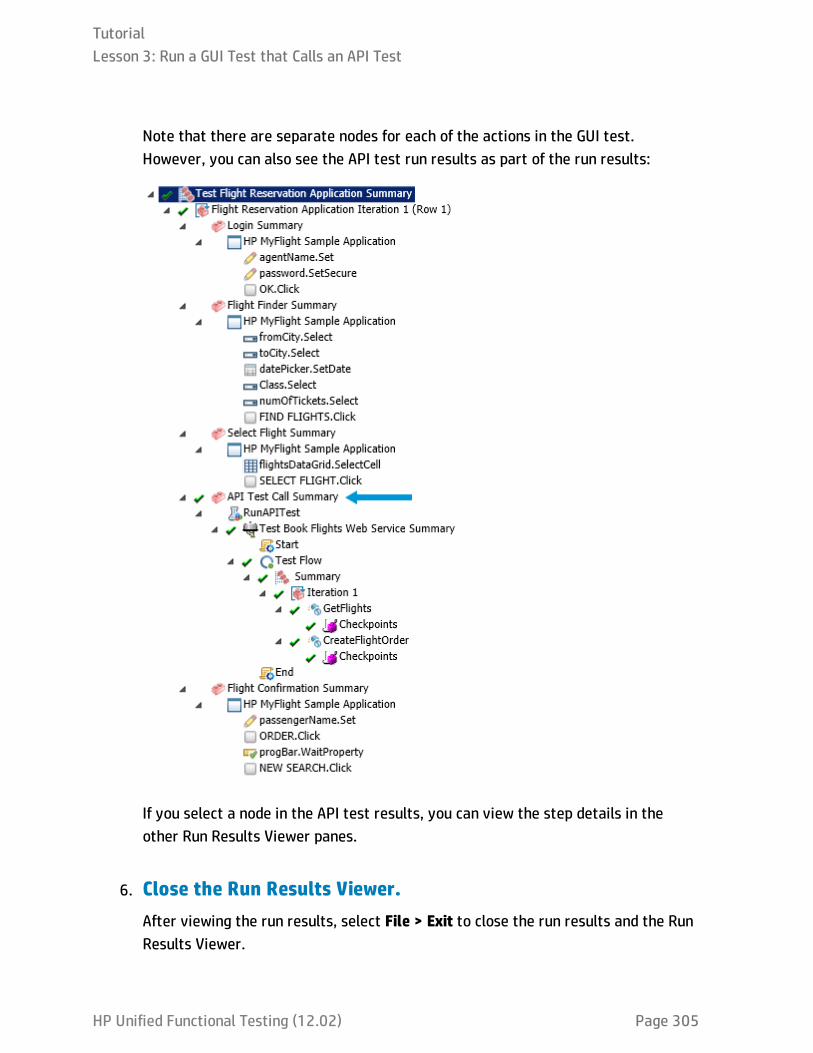
Note that there are separate nodes for each of the actions in the GUI test.However, you can also see the API test run results as part of the run results:
If you select a node in the API test results, you can view the step details in theother Run Results Viewer panes.
6. Close the Run Results Viewer.After viewing the run results, select File > Exit to close the run results and the RunResults Viewer.
TutorialLesson 3: Run a GUI Test that Calls an API Test
HP Unified Functional Testing (12.02) Page 305

Where Do You Go From Here?Now that you have learned how to use UFT, including creating automated GUI tests,automated API tests, and tests running both GUI and API tests, you are ready to useUFT to test your own application.
We suggest that you use the following procedure when testing your own application.
1. Analyze your application.
n Determine the development environment. This enables you to load the relevantUFT add-ins and provide support for the objects in your application.
n Determine the business processes that users will perform. Plan your tests andactions accordingly.
n Decide how to organize your test and which operations to include. Consider thegoals of the test, and confirm that your application and UFT are set to match theneeds of your test.
At this stage, you can begin creating the skeletal tests and actions to use whentesting your application.
HP Unified Functional Testing (12.02) Page 306

2. Prepare your testing infrastructure.
Decide how to store the objects in your test. You can store the objects for eachaction in its corresponding local object repository, or you can store the objects foreach action in one or more common (shared) object repositories. You can also usethe same shared object repository for multiple actions.
n If you are new to testing, you may want to use a local object repository foreach action. This is the default setting, and all objects are automatically addedto the local repository of each action.
n If you are familiar with testing, it is often most efficient to work with sharedobject repositories, which can be used for one or more actions. Objectinformation is kept in one central location, and when the objects in yourapplication change, you can update them in that one location for multipleactions, in multiple tests.
Although not discussed in this tutorial, you can also export test objects from a localobject repository to a shared object repository, and you can merge objectrepositories.
You may also want to create function libraries to enhance UFT functionality.
For details, see the HP Unified Functional Testing User Guide.
3. Build your test.
While you create your test steps, follow the steps you expect users to perform asthey navigate within your application.
4. Enhance your test.
n Add checkpoints to search for specific values of a page, object, text string, ortable cell.
n Replace fixed values in your test with parameter to check how your applicationperforms the same operations with multiple sets of data.
Tutorial
HP Unified Functional Testing (12.02) Page 307
You can further enhance your test with programming, conditional, and loopstatements, which add logic to your test. For details, see the HP Unified FunctionalTesting User Guide.
5. Debug your test.
Debug your test to check that it operates smoothly and without interruption. Fordetails, see the HP Unified Functional Testing User Guide.
6. Run your test.
Run your test on your application to check that the application functions asexpected.
7. Analyze the run results.
Examine the results of your test to pinpoint defects in your application. (Refer tothe appropriate sections of this tutorial to understand what to look for in the runresults for checkpoints or parameters.)
Tutorial
HP Unified Functional Testing (12.02) Page 308

Accessing UFT in Windows 8 OperatingSystemsNote: By default, the Start and Apps screens on Windows 8 are set to open InternetExplorer in Metro Mode. However, if User Account Control is turned off on yourcomputer, Windows 8 will not open Internet Explorer in Metro mode. Therefore, ifyou try to open an HTML shortcut from the Start or Apps screen, such as the UFTHelp or Readme file, an error will be displayed.
To solve this, you can change the default behavior of Internet Explorer so that itnever opens in Metro mode. In the Internet Properties dialog box > Programs tab,select Always in Internet Explorer on the desktop for the Choose how you openlinks option. For more details, see http://support.microsoft.com/kb/2736601 andhttp://blogs.msdn.com/b/ie/archive/2012/03/26/launch-options-for-internet-explorer-10-on-windows-8.aspx.
Tutorial
HP Unified Functional Testing (12.02) Page 309

Send Us FeedbackCan we make this Tutorial better?
Tell us how: [email protected]
HP Unified Functional Testing (12.02) Page 310