Embed Size (px)
Citation preview

Unified Communications – Desktop Client
Quick Reference Guide
Table of Contents
About MegaPath Unified Communications (UC) ................................................................................. 2
Download and Install the UC Client for Desktop.................................................................................. 2
Minimum Requirements .................................................................................................................. 3
Logging In ....................................................................................................................................... 3
Logging Out .................................................................................................................................... 3
The UC Desktop Client ....................................................................................................................... 4
Menu Options ..................................................................................................................................... 5
Softphone Tab ................................................................................................................................ 5
View Tab ......................................................................................................................................... 5
Contacts Tab .................................................................................................................................. 5
Help Tab ......................................................................................................................................... 5
Menu Shortcuts................................................................................................................................... 6
Adding Contacts ................................................................................................................................. 6
Mobile Numbers .............................................................................................................................. 6
Google Contacts ............................................................................................................................. 7
Making and Receiving Calls .............................................................................................................. 12
Incoming Calls .............................................................................................................................. 12
Making Calls ................................................................................................................................. 12
Managing an Established Call ....................................................................................................... 13
Call Transfer ................................................................................................................................. 13
Call Recording .............................................................................................................................. 13
Conference Calls .......................................................................................................................... 13
Pull a Call from Mobile .................................................................................................................. 14
Video Calls.................................................................................................................................... 14
Instant Messaging ............................................................................................................................. 14
SMS Texting ..................................................................................................................................... 15
Group Chat ....................................................................................................................................... 16
Broadcast IM .................................................................................................................................... 16
Screen Share .................................................................................................................................... 17
UC Desktop Client QRG
PAGE 2 of 18
About MegaPath Unified Communications (UC)
MegaPath UC is a powerful softphone client that supports Voice and Video Calling, Instant Messaging, SMS texting, Presence and Screen Share capabilities. The client is supported on mobile phones and tablets (Android and iOS) in addition to PC (Windows and Mac OS).
MegaPath UC features include
› Instant Messaging & Presence
› Voice Calling
› Video Calling
› Screen Share
› Call Recording
› SMS Texting
› Voice Manager access
Download and Install the UC Client for Desktop
These instructions are for first time download:
1. Visit the MegaPath Voice Learning Center at www.megapath.com/VLC. 2. Select “I have a MegaPath phone number” and enter your phone number. 3. Click on Software in the left navigation menu. 4. Click on the install link: “Install the Unified Communications Client for [Mac or PC].” Select the
appropriate link based on your operating system. 5. Click on the link on the next page to Download the file, and follow the system prompts for the
install.
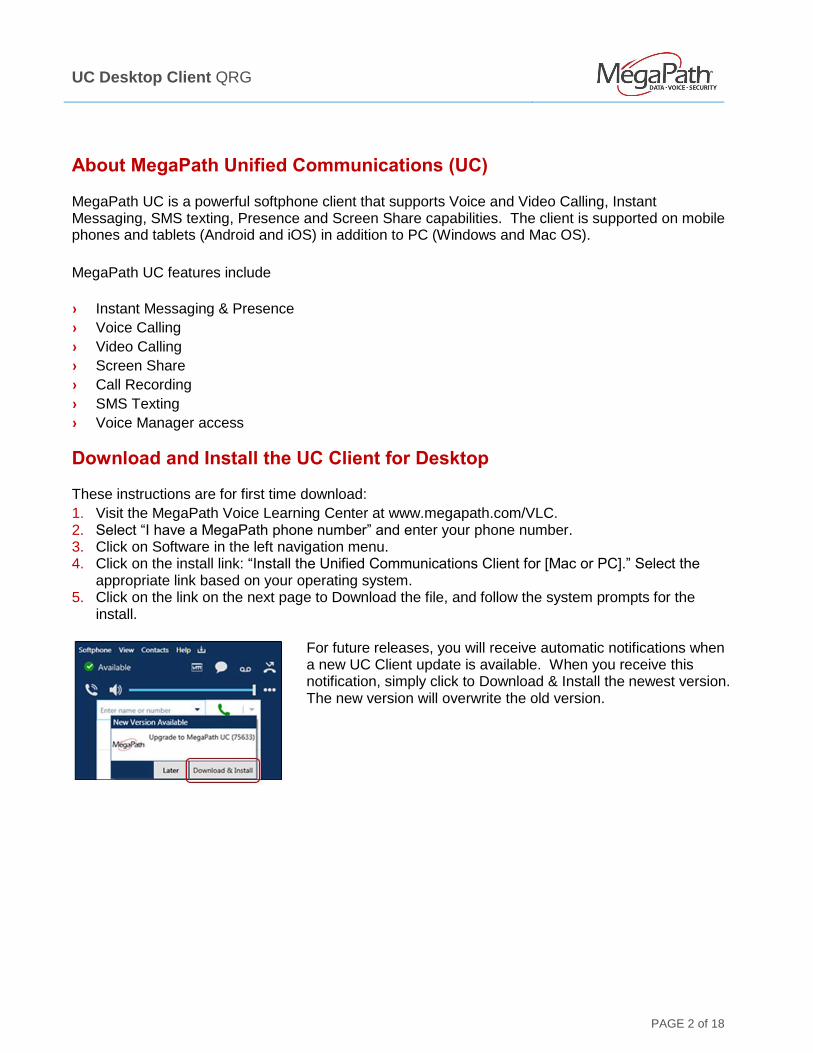
For future releases, you will receive automatic notifications when a new UC Client update is available. When you receive this notification, simply click to Download & Install the newest version. The new version will overwrite the old version.

UC Desktop Client QRG
PAGE 3 of 18
Minimum Requirements
Processor Minimum: Pentium 4® 2.4 GHz or equivalent
Optimal: Intel Core 2 Duo or equivalent, Video Card with DirectX 9.0c support
Memory Minimum: 1 GB RAM
Optimal: 2 GB RAM
Hard Disk Space 400 MB (Install/Upgrade, 200 MB operation)
Operating system Microsoft Windows Vista
Microsoft Windows 7
Microsoft Windows 8 (Desktop mode)
Microsoft Windows 8.1 (Desktop mode)
Mac OS X 10.8 or 10.9
Connection IP network connection (broadband, LAN, wireless); Constant Internet connection
Sound Card Full-duplex, 16-bit or use USB headset
Logging In
1. Obtain your initial login credentials from your company administrator, which will consist of your 10-digit phone number (no hyphens or spaces) @megapathvoice.com and your initial password.
2. You can select the option to remember your login information and log in automatically.
Notes: You will see the MP icon with your presence status in your system tray. You can be logged into the UC client on multiple devices at the same time.
Logging Out
To log out of UC, click Softphone, and then click Logout or Exit. Alternatively, you can press Ctrl + Q to exit the client. Logout logs you out of your account. Exit shuts down the client, and you will need to restart it.

UC Desktop Client QRG
PAGE 4 of 18
The UC Desktop Client
The following diagram provides a quick overview of the UC client features.
Tip: If you see and ellipsis icon (3 periods) where the Screen Share icon appears in the diagram above, expand your UC window (hover over the corner until the double-arrow appears and resize with your mouse).

UC Desktop Client QRG
PAGE 5 of 18
Menu Options
The Menu Bar includes a Softphone, View, Contacts and Help tab. In addition, you can manage your Presence status, initiate IM, listen to voicemails, view missed calls, change from speakerphone to headset mode, and adjust call volume.
Softphone Tab
› The Softphone menu includes the following selections:
› Preferences: Click to assign preferences for the Application, Alerts and Sounds, Privacy, Devices, Shortcut Keys and Calls
› Logout: Logs you out. Returns you to a log-in window.
› Exit (Ctrl + Q): Closes the program.
View Tab
› This tab controls which icons appear in your bottom menu. You can opt to show or hide the icons for your Contacts, Favorites, History, Screen Share and Directory.
› Within this tab, you may also open windows to view your Messages (IMs), Video, Chat Rooms (if you are a member of one), and your Workgroup (if you are a member of one).
Contacts Tab
› Manage your contacts here. Add groups, add contacts, import/export contacts, sort contacts, and show offline contacts and groups.
Help Tab
› The help menu contains troubleshooting tips for Devices, Audio, and more.

UC Desktop Client QRG
PAGE 6 of 18
Menu Shortcuts
Status: Most of the status indicators here are set by the user, with the exception is Idle, which is automatically set based on a period of time defined in your Preferences.
VM: Open your Voice Manager.
IM: Open your IM window.
Voicemail: Click-to-call into the voicemail system to listen to your voicemails.
Call History: Shows the number of missed calls. Click to see your call history.
Adding Contacts
Your business contacts have been preloaded by MegaPath. You can view, dial and IM your contacts by clicking the Directory icon.
There are several ways to create contacts:
1. Click the Contacts menu tab and select “Add Contact” or “Import Contacts…” If importing, you will be prompted to select the file type (.CSV, .VCF, or Outlook/Exchange)
2. Click the Directory icon, right click on a listing and select Add as Contact. 3. Within your Call History, right click on a call record and select Add as Contact. 4. From the Contacts page, click the add contact icon. 5. When a call is on hold, click the add contact icon.
Mobile Numbers
Adding mobile numbers to your contacts, and to your profile numbers, facilitates enterprise-wide communication; allowing for others to click-to-call to your mobile number and send/receive SMS texts.
To add a mobile number to a contact:
1. Click the contact and click Edit Profile
2. Select Mobile from the dropdown and enter the mobile number
To add a mobile number to your profile:
1. Click the VM icon to launch the Voice Manager and log in
2. Select Settings, then Advanced Configuration
3. Click the Profile tab and locate the Mobile number field
4. Enter your mobile number and click Save

UC Desktop Client QRG
PAGE 7 of 18
Google Contacts
To add your Google Contacts to your UC client, follow these three steps:
1. Export your Google contacts
2. Create a new CSV file for bulk import
3. Import the new CSV file into your UC client
To export your Google contacts:
› Sign in to Gmail › Click Gmail at the top-left corner of your Gmail page › Select Contacts › From the More dropdown menu, select Export
› Choose which contacts you would like to export › Select Google CSV format › Click Export

UC Desktop Client QRG
PAGE 8 of 18
Create New CSV File for Bulk Upload:
Once you have exported the Google CSV file, you will need to create a new CSV file using the desired headers (as shown in the Bulk Imports Table) before you can import the file into your UC client. After the desired headings have been added to the new CSV file, copy and paste the data from the Google CSV file into the appropriate columns in the new CSV file. Save the file. Once all of the data is copied, follow the instructions to import the CSV file into your UC client. Example CSV File and resulting contact page for Brian Andrews.

UC Desktop Client QRG
PAGE 9 of 18
Import the New CSV file Into Your UC Contacts:
› Select Contacts › Select Import Contacts › Select Comma-separated values (*.csv file) file format › Click Next › Browse to select the file › Click Next

UC Desktop Client QRG
PAGE 10 of 18
› Select Import Options as noted below on the Import Contacts page › Click Next › Once you see the success message, click Finish
When the above steps are completed, you will see the contacts listed in a Group called CSV; you can rename the group by right clicking on the group name, and selecting Rename Group.
To edit a Contact’s information, right click on the contact and select Edit Profile.

UC Desktop Client QRG
PAGE 11 of 18
Bulk Import Fields Table (for Google Contacts)

UC Desktop Client QRG
PAGE 12 of 18
Making and Receiving Calls
Incoming Calls
To receive incoming calls, UC must be running. When a call comes in, it appears in its own panel.
To answer the call, click the green phone icon.
To forward the incoming call, click the forward icon.
To reject the incoming call click the end call icon. The caller will receive a busy tone, and the call can go to voicemail.
If a second call comes in, you can click the answer icon to answer it. The first call automatically goes on hold.
If the incoming call is a video call the video icon is displayed. To answer with video click the video icon.
Making Calls
To make a voice phone call, use one of the methods in the table below. The outgoing call opens in its own call panel, below any other existing call panels. You will hear a ringing tone while UC attempts to make a connection.
› Using the keypad or computer keyboard: Enter the extension or phone number in “Enter name or number” field using the keypad or computer keyboard. As you type, a suggested contact (from your contact directory) may appear which you can choose by using the Up/Down key and the Tab key. UC makes a call as soon as you choose the suggestion. If you do not want to choose a suggestion, finish typing and click the Call button or press Enter.
› Within the Contacts or History list: Right-click an entry from the Contacts or History tab and choose Call. Alternatively, you can double-click the contact that either makes an audio phone call or starts an IM.
› Within the Contacts list: Hover over the contact to reveal “Call this contact” phone icon, and click it.
› Redial button: When the call entry field is empty, click the Call button to pull up your last attempted call. Or, click the down arrow in the call entry field and select a recent call.
› Message window: Click on the contact you wish to call in the left column. Click the More options icon (ellipsis) in the top menu of the Messages window and choose Call from the list.
Once you initiate a call you will see your status automatically change to On the phone.

UC Desktop Client QRG
PAGE 13 of 18
Managing an Established Call
After the call is established, additional options are displayed, including:
Mute microphone
Establish video call
Pause and resume
More options: Conference Call, Call Recording, Share my Screen
Call transfer
End call
Call Transfer
To transfer a call, click the Transfer icon and dial the number of the party you are transferring the call to. The caller is put on hold. Once you dial the number, the Transfer Now option is displayed.
To complete an attended transfer, click More transfer options by clicking the down arrow next to the transfer icon, and then click Call First. For an unattended transfer, click Transfer Now. To cancel a transfer, click the “X” icon.
Call Recording
To record a call once the call is established, click the More options icon and select Start Call Recording. You will see a red dot and the recording time. Click the box to end the recording.
When a call is recorded, the system will provide the Recording Name along with the location where the file is saved in .wav format.
Conference Calls
You can conference up to five people. To do so, establish a call with your first caller, then click the More options icon and then click Invite to Conference Call to place a call to the additional parties. The first caller is placed on hold.
Enter the name or number of the contact in the call entry field, or click the down button to display a list of numbers you have called before to select a number, and click Add. To cancel, press the “X” button.

UC Desktop Client QRG
PAGE 14 of 18
Pull a Call from Mobile
You can “pull” a call from your mobile UC client (iPhone, Android phone & tablet) to your desktop UC client. While on an active call on your UC mobile client, click the Softphone icon, and then select “Pull from Mobile” on your desktop UC client. This allows you to seamlessly continue your conversation while transitioning from out of the office to your desktop.
Video Calls
Once you have established a call, you can enable video. To do so, click the Start sending your video icon. The video call is established.
If you have a video camera, you can establish video even if you started your call with audio only. To start video click the video icon in the call panel. UC will work with most USB video cameras. If the other party starts video, your video panel will open automatically.
To stop sending video, click the Video icon again. You can pause and restart video by clicking the pause icon. To view manage the video’s aspect ratio or to view in full screen, hover over the video window and click the two-way arrow icon, or press F1.
Instant Messaging
When an Instant Messaging (IM) is received, the Messages window will display or a Call Alert will pop up, depending on your Preferences. You can start an IM session in multiple ways:
› From the Contacts tab: Right-click on the contact and choose Send Instant Message. The contact must have a softphone address. Or, click on the IM icon that appears to the right of the contact name.
› During an active phone call or conference call: If the person is in your Contacts, choose Send Instant Message from the call panel menu.
› From the Messages window: Click the New Conversation icon beside the Search field, and type a phone number or contact name.
UC Desktop Client QRG
PAGE 15 of 18
To review your IM activity:
› Click the Messages icon (see below)
› On the menu, click View > Messages
Tips:
› To insert a return in a message, press Shift + Enter or set your Messages Preferences to Create a new line when you press Enter.
› To manage your IM alert, go to Softphone > Preferences > Alerts & Sounds.
SMS Texting
SMS texting allows you to exchange SMS texts with your UC contacts once you have added their mobile number to their contact profile. (See Mobile Numbers for instructions on adding mobile numbers for your contacts.)
To initiate an SMS text conversation, click the SMS text icon next to the contact that you wish to send the SMS text.
To send an SMS text to a contact:
1. Hover your mouse over the contact
2. Click the SMS text icon (a conversation window opens)
3. Add additional recipients if desired
4. Enter the conversation
5. Click Send
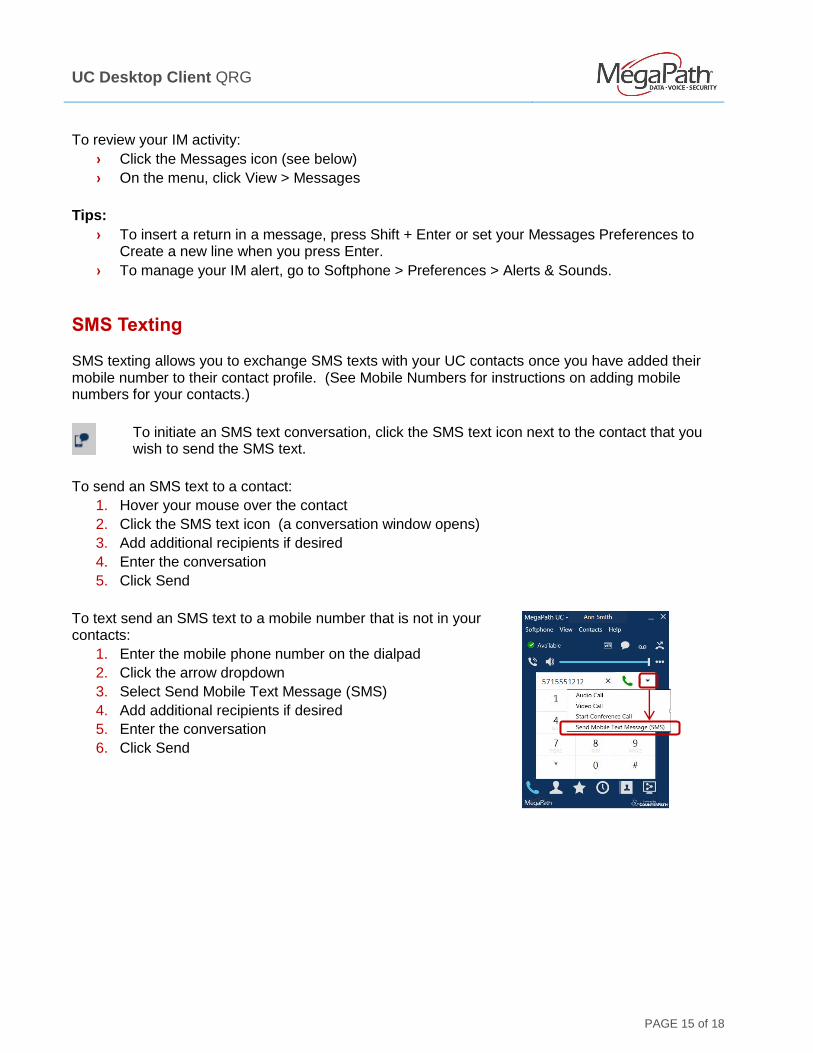
To text send an SMS text to a mobile number that is not in your contacts:
1. Enter the mobile phone number on the dialpad
2. Click the arrow dropdown
3. Select Send Mobile Text Message (SMS)
4. Add additional recipients if desired
5. Enter the conversation
6. Click Send

UC Desktop Client QRG
PAGE 16 of 18
Group Chat
Group chat allows you to exchange IMs with a group of people in the same session. All people must have XMPP accounts configured in order to participate in group chat. There is no limit to the number of participants in a group chat session.
With a group chat, all participants see the conversation. To send an IM to a group where only you see the responses, see Broadcast IM.
Starting a Group Chat 1. In the Contacts window, right-click on the desired contact and choose Start Group Chat. 2. In the new Message window, type the additional contacts where it says “Add recipients.”
3. Once all recipients have been added, type a message and click the Send Message icon. Once
the first message has been sent, you cannot add or remove participants
Manage Group Chat Within the Group Chat window, you can Call, Video Call, Send Files, and Share your Screen with the participants by clicking on their name in the top of the window. In addition, you can edit or block a contact.
Leaving a Group Chat
Exiting UC lets you leave all the active group chat sessions. The session continues with the remaining participants. Once you leave a group chat, you will not be able to rejoin the session. The thread in the Messages window becomes inactive (grayed out); you can read chat history, but cannot participate or download unread messages.
Note: Deleting a group chat session on the Messages window also lets you leave the session, but you will lose chat history.
Broadcast IM
You can send an IM to several people at one time. This is referred to as a Broadcast IM, which is NOT the same as a group chat. With a Broadcast IM, each recipient can reply to the IM, but only you will see these replies. Each response is displayed to you in a regular IM thread. You will then be in a regular IM with that one party. You can initiate a Broadcast IM in two ways:
1. Within the Contacts tab, use shift-click to select multiple contacts. Then, right-click on any of the selected contacts and select Broadcast IM from the dropdown menu. Type your message in the Compose Message field. OR
2. Within the Messages window, click on the New Conversation icon next to the Search field and, type in the name or phone number for your first contact in the Add recipients field. A list of options will appear and minimize as you type. Select your desired contact from the list and repeat for each participant.
UC Desktop Client QRG
PAGE 17 of 18
Screen Share
Screen Share allows you to share your screen with up to 100 people.
To initiate a Screen Share, click the Screen Share icon at the bottom of the main window. If you do not see this icon, expand the window until the icon is visible, or click More (ellipsis) icon at the bottom, and select Screen Share from the drop-down list.
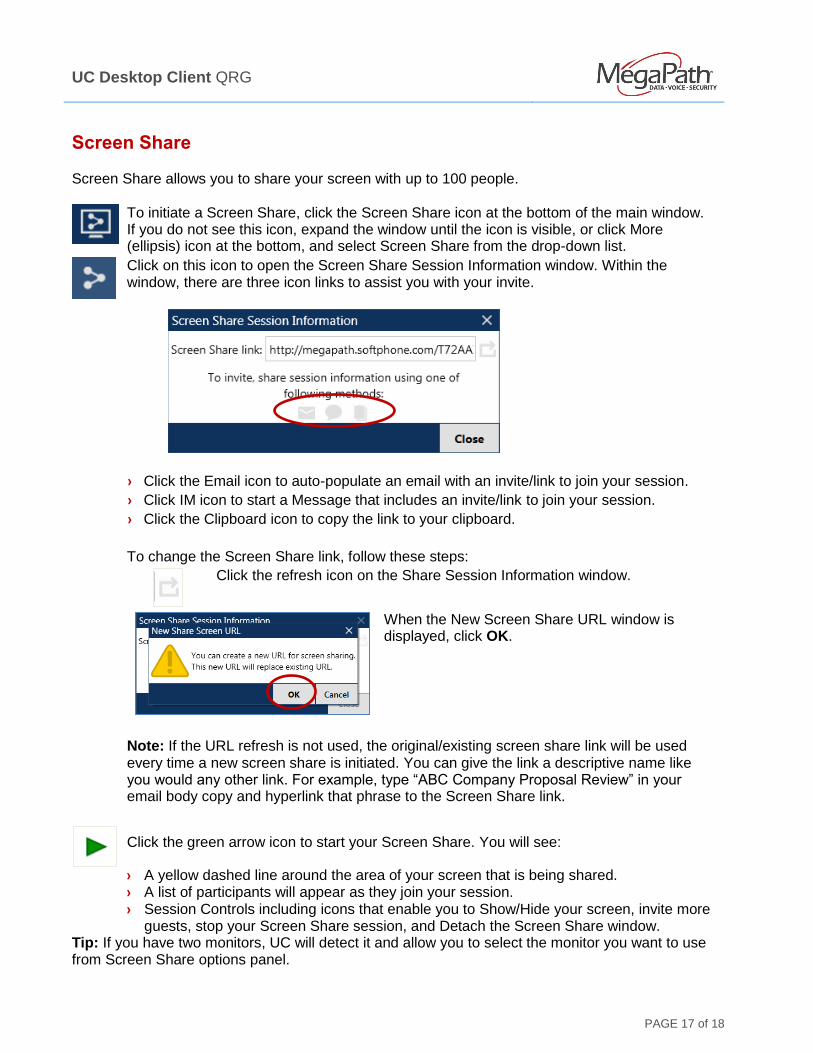
Click on this icon to open the Screen Share Session Information window. Within the window, there are three icon links to assist you with your invite.
› Click the Email icon to auto-populate an email with an invite/link to join your session.
› Click IM icon to start a Message that includes an invite/link to join your session.
› Click the Clipboard icon to copy the link to your clipboard.
To change the Screen Share link, follow these steps:
Click the refresh icon on the Share Session Information window.
When the New Screen Share URL window is displayed, click OK.
Note: If the URL refresh is not used, the original/existing screen share link will be used every time a new screen share is initiated. You can give the link a descriptive name like you would any other link. For example, type “ABC Company Proposal Review” in your email body copy and hyperlink that phrase to the Screen Share link.
Click the green arrow icon to start your Screen Share. You will see:
› A yellow dashed line around the area of your screen that is being shared. › A list of participants will appear as they join your session. › Session Controls including icons that enable you to Show/Hide your screen, invite more
guests, stop your Screen Share session, and Detach the Screen Share window. Tip: If you have two monitors, UC will detect it and allow you to select the monitor you want to use from Screen Share options panel.

UC Desktop Client QRG
PAGE 18 of 18
Note: Initiating a Screen Share is not currently available on Mac; however, Mac participants can join a screen share.
Inviting Participants from Contacts
You can also invite participants via your Contacts list. The contacts do not have to be UC users but they must have an address which can receive IMs, so either a softphone number or a SIP or XMPP IM address.
› To initiate a Screen Share from your Contacts list, right-click on a contact and select Share my Screen. This action will send the invite immediately.
› Click the Invite Guests icon to open an IM with the link. Type in the additional attendees and click the Send icon.
For more information on MegaPath UC, visit the Voice Learning Center www.megapath.com/VLC. Sign up for training at www.megapath.com/support/voice/content/training-unified-communications.